


ENGLISH 4
POLSKI 14
ROMÂNĂ 24
РУССКИЙ 34
ČESKY 45
MAGYAR 55
SLOVENSKY 65
УКРАЇНСЬКІЙ 75
HRVATSKI 85
EESTI 94
LATVISKI 103
LIETUVIŠKAI 113
SLOVENŠŚINA 123
HQ7850
3

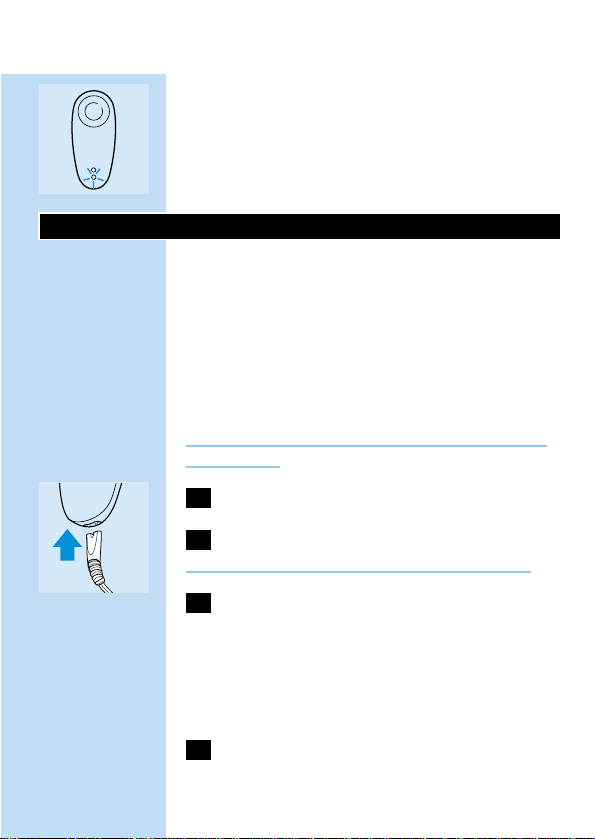
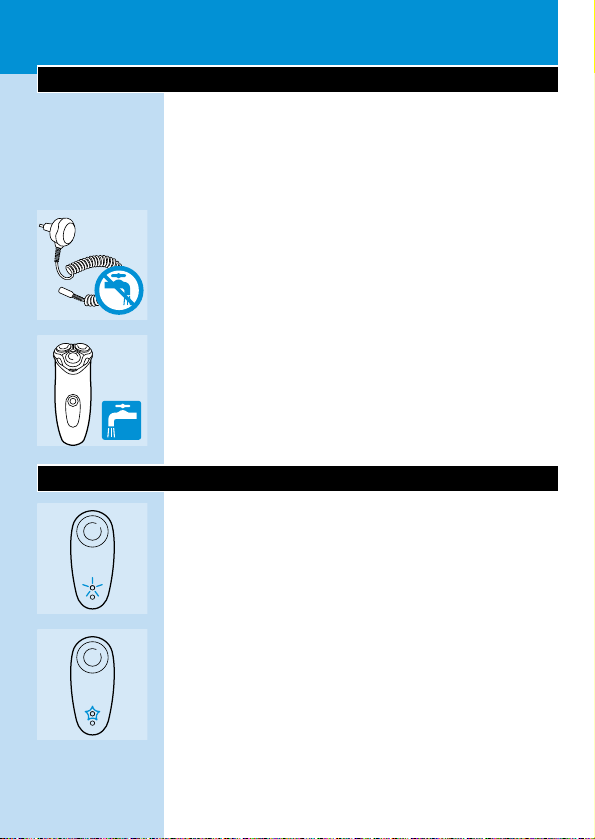
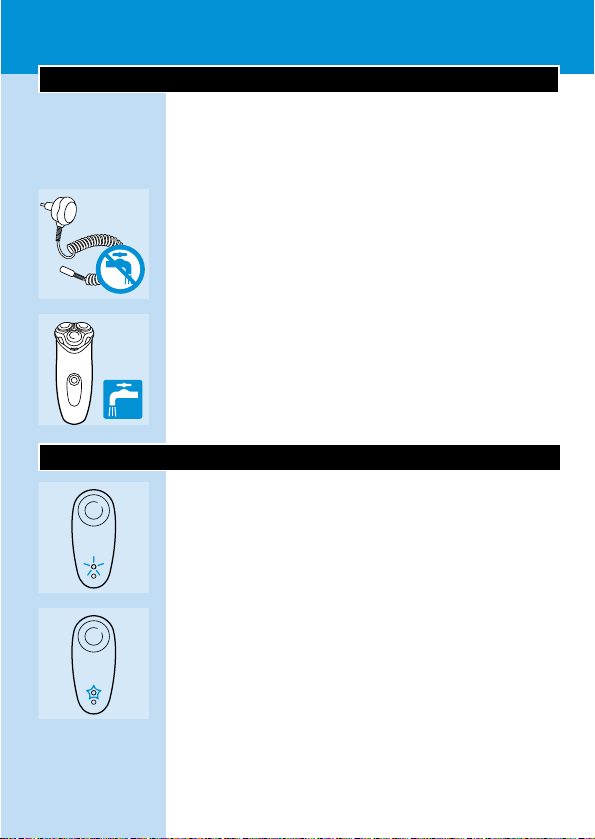
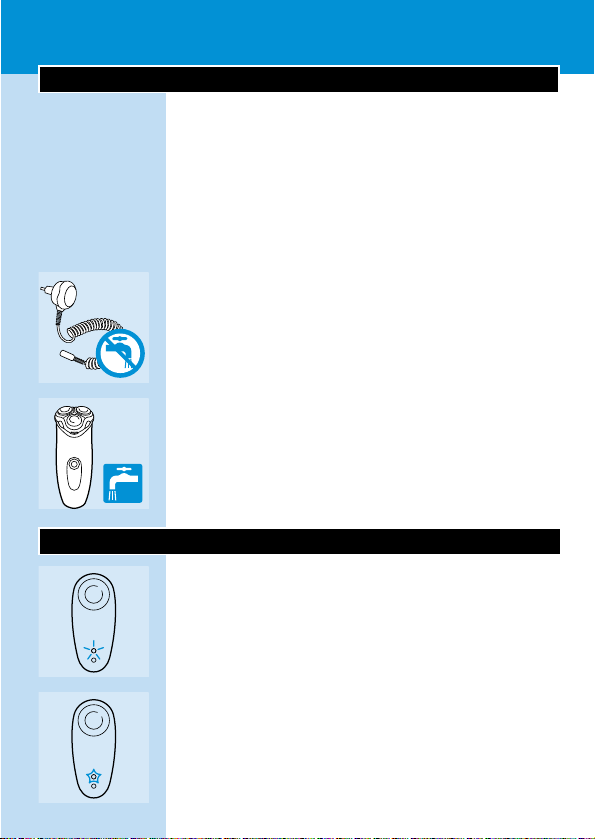
Warning
Please read these instructions before using the
appliance.
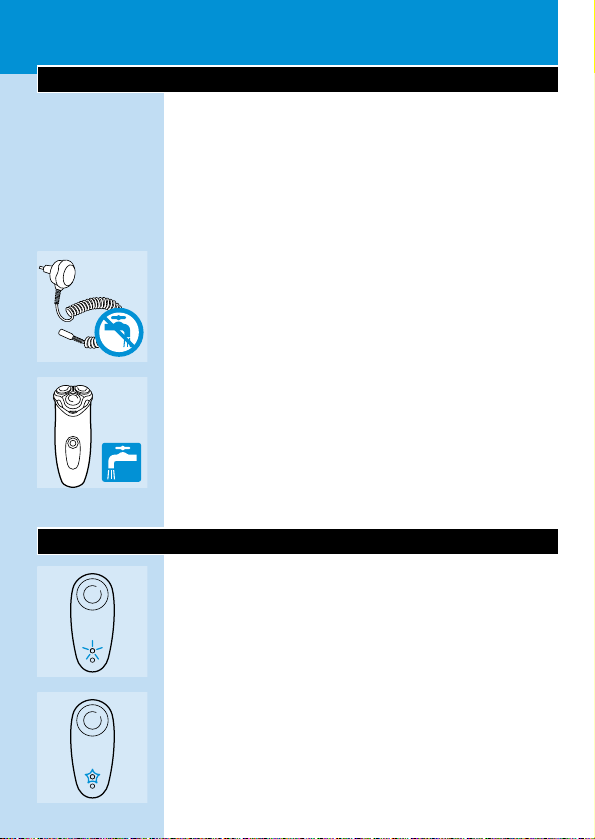
◗ Only use the HQ8000 powerplug supplied to
charge the appliance.
◗ The HQ8000 powerplug transforms
100-240 volts to 12 volts.Only use the
powerplug that comes with the appliance to
guarantee safe transformation.
C
◗ Make sure the HQ8000 powerplug does not
get wet.
C
◗ The shaver runs at a safe low voltage of
12 volts.It is watertight and can be cleaned
under the tap.Do not rinse with water hotter
than 80cC.
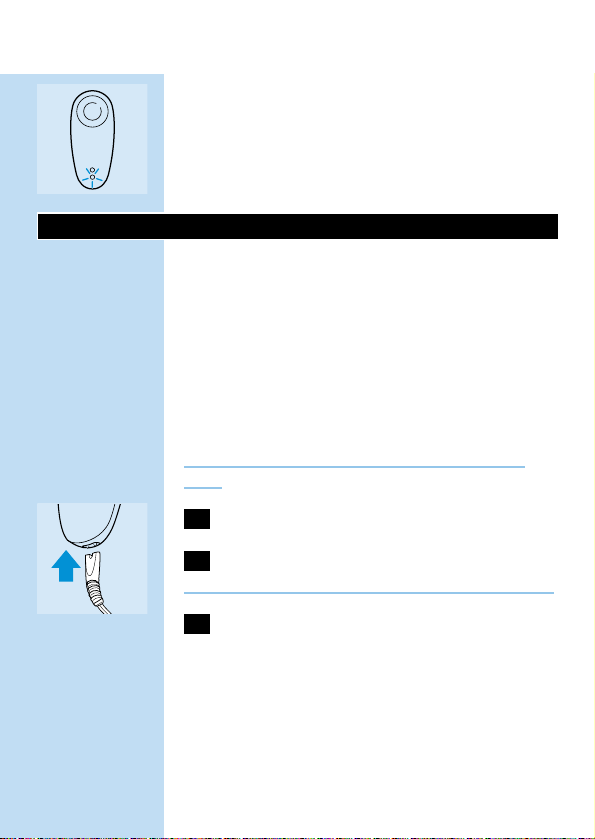
Charge indications
C
◗ Charging
As soon as you start charging the empty shaver,
the green pilot light will go on.
C
◗ Batteries fully charged
When the battery has been fully charged,the
green pilot light will start blinking.
A fully charged shaver has a cordless shaving time
of up to 70 minutes.
ENGLISH4
C
◗ Batteries running low
When the batteries are running low,the lower
pilot light turns red.When you have switched off
the shaver, the red light will blink for 4 seconds.
Charging
Recharge, store and use the appliance at a
temperature between 5cC and 35cC.
The powerplug is suitable for mains voltages
ranging from 100 to 240V.
You can also shave without charging by
connecting the shaver to the mains.The green
pilot light will go on during shaving.
Do not leave the shaver connected to the mains
continuously.
C
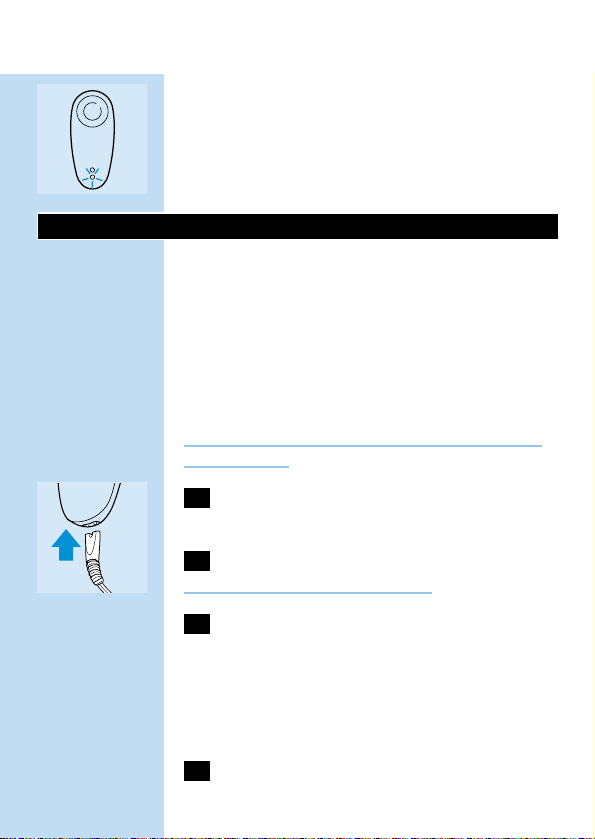
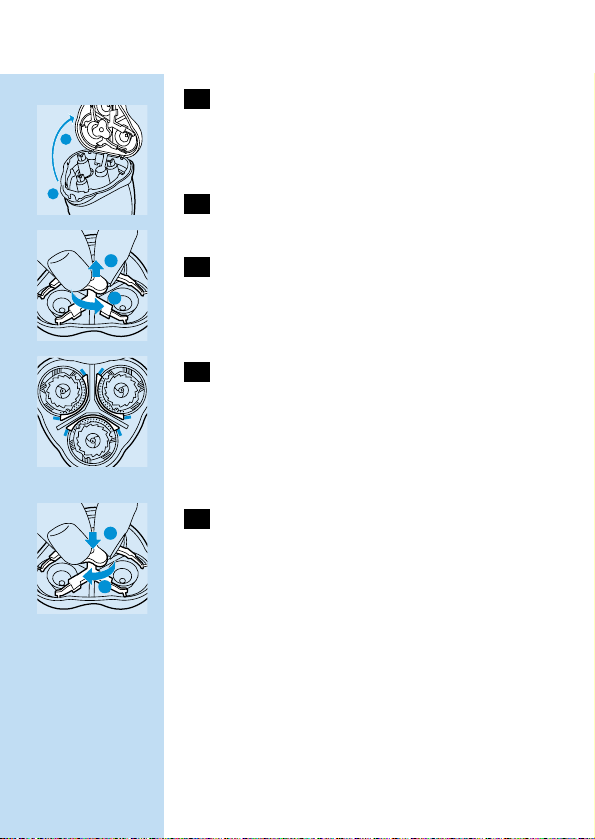
1 Put the appliance plug in the shaver.
2 Put the powerplug in the wall socket.
Do not recharge the shaver in a closed pouch.
3 When charging for the first time or after a
long period of disuse:leave the shaver to
charge continuously for 4 hours.
Charging normally takes approx.1 hour.
A fully charged shaver has a cordless shaving time
of up to 70 minutes.
4 Remove the powerplug from the socket
and pull the appliance plug out of the
ENGLISH 5

shaver when the batteries have been fully
charged.
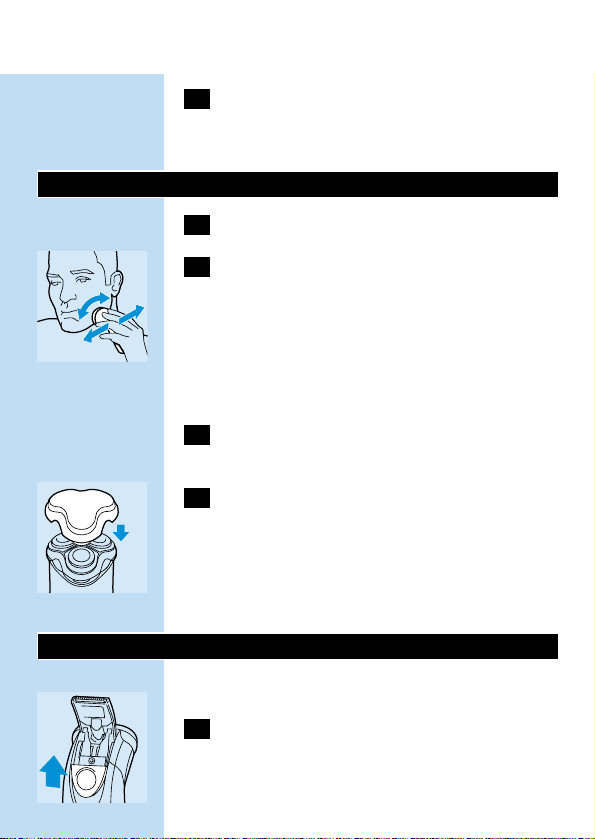
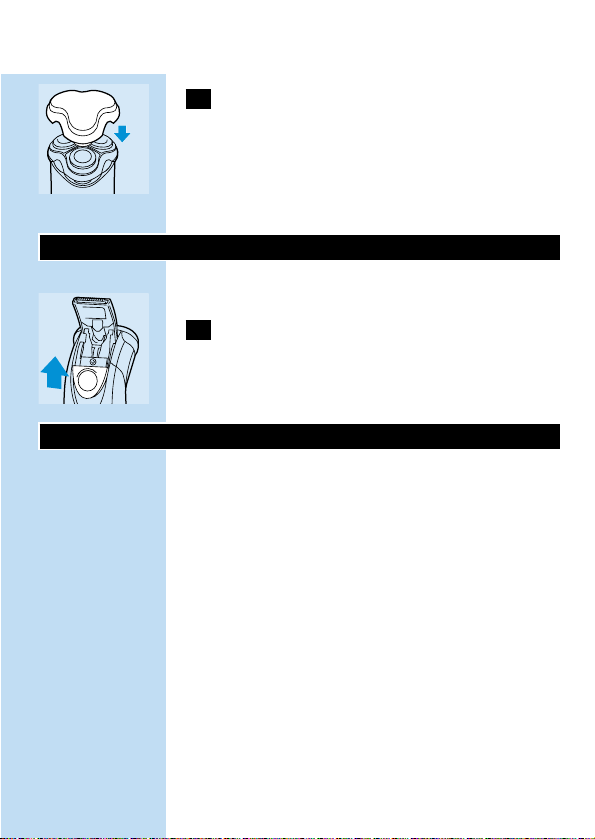
Shaving
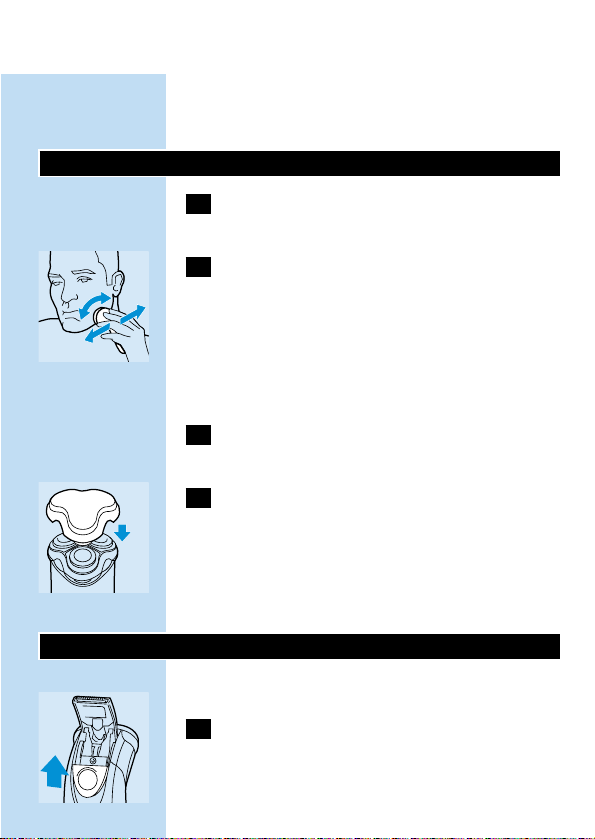
1 Switch the shaver on by pressing the on/off
button once.
C
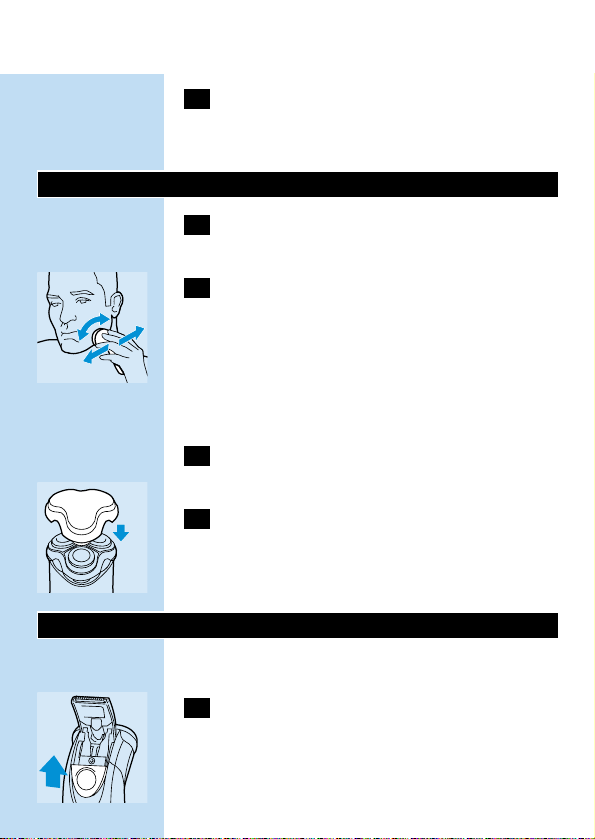
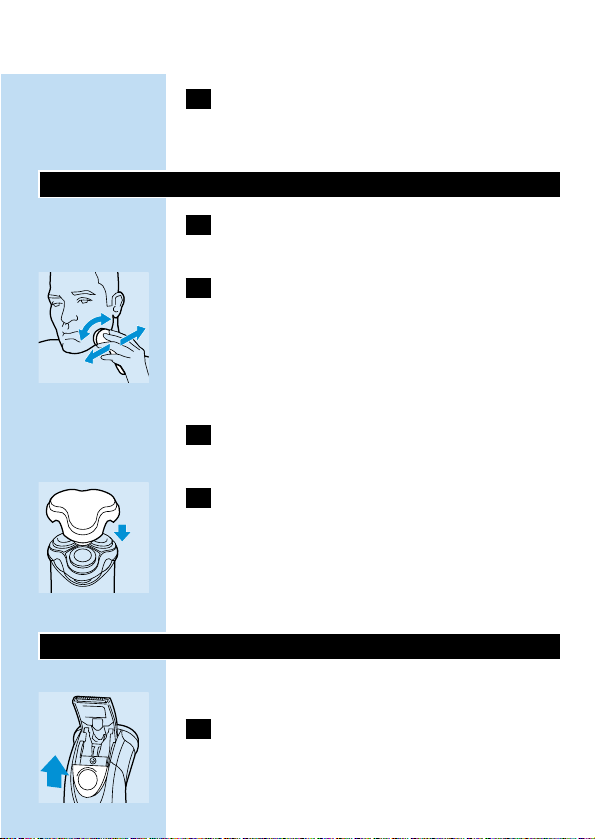
2 Move the shaving heads quickly over your
skin,making both straight and circular
movements.
Shaving on a dry face gives the best results.
Your skin may need 2 or 3 weeks to get
accustomed to the Philishave system.
3 Switch the shaver off by pressing the on/off
button once.
C
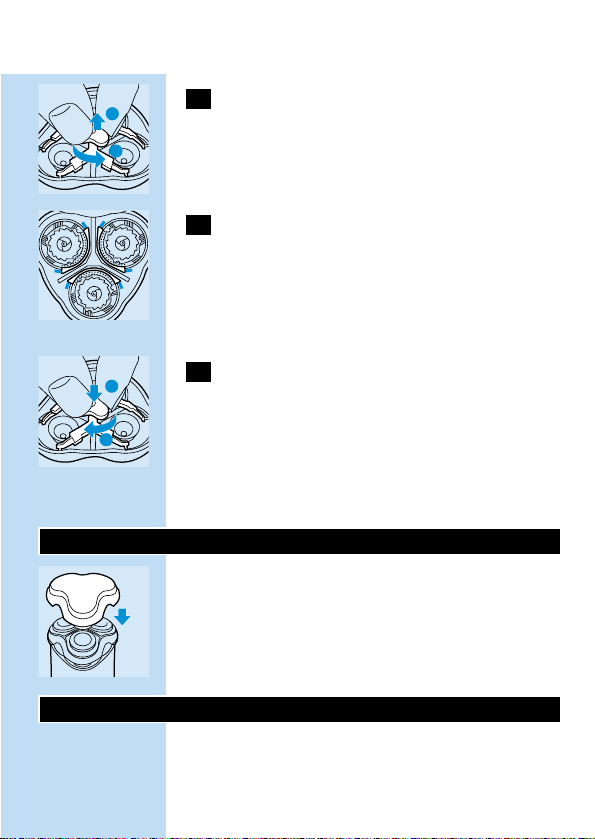
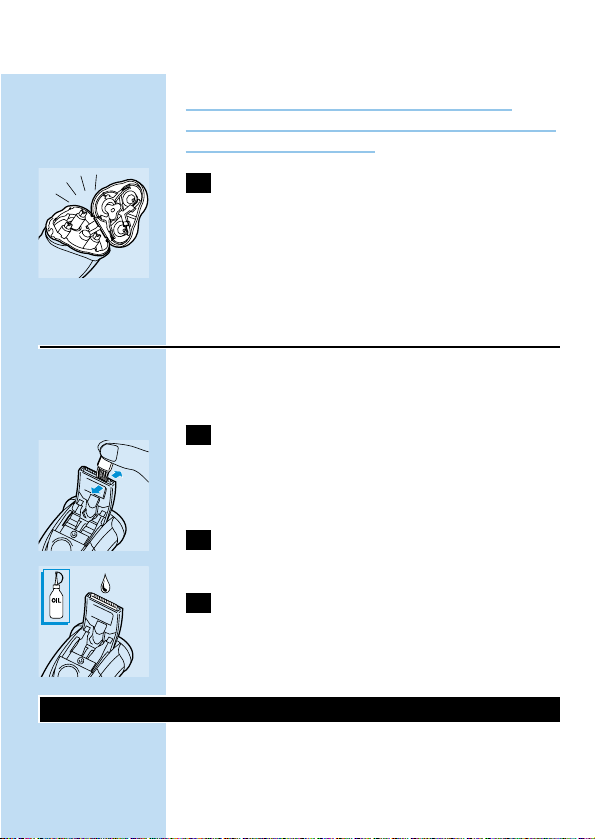
4 Put the protection cap on the shaver every
time you have used it,to prevent damage.
Replace the shaving heads (type HQ6 Quadra)
every 2 years for optimal shaving results.
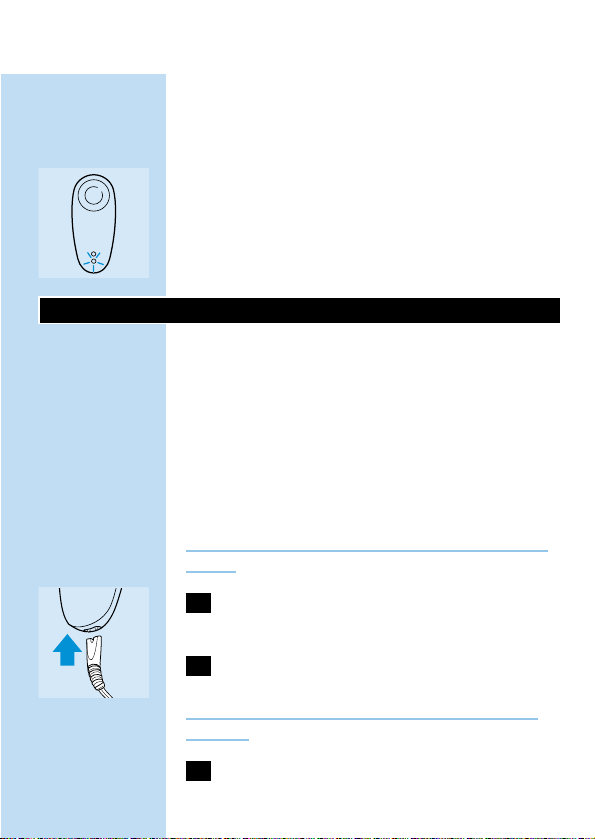
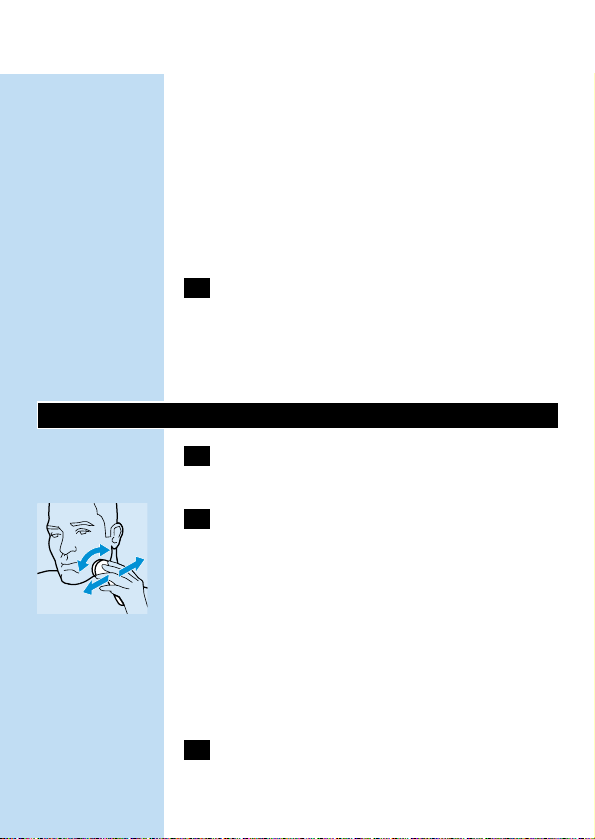
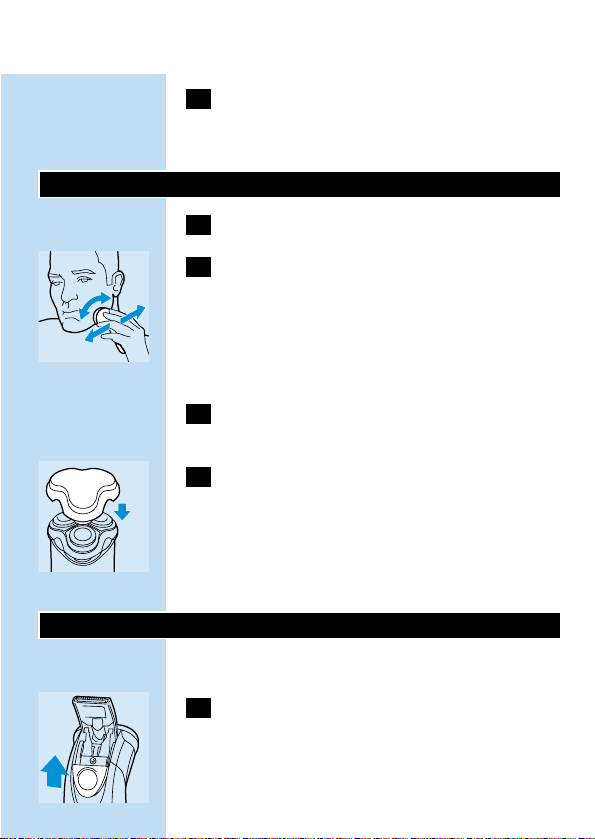
Trimming
For grooming sideburns and moustache.
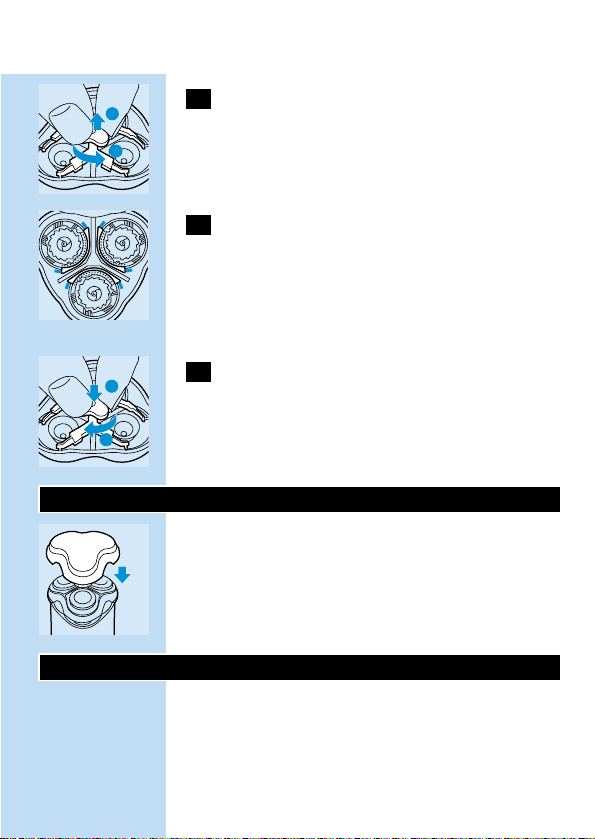
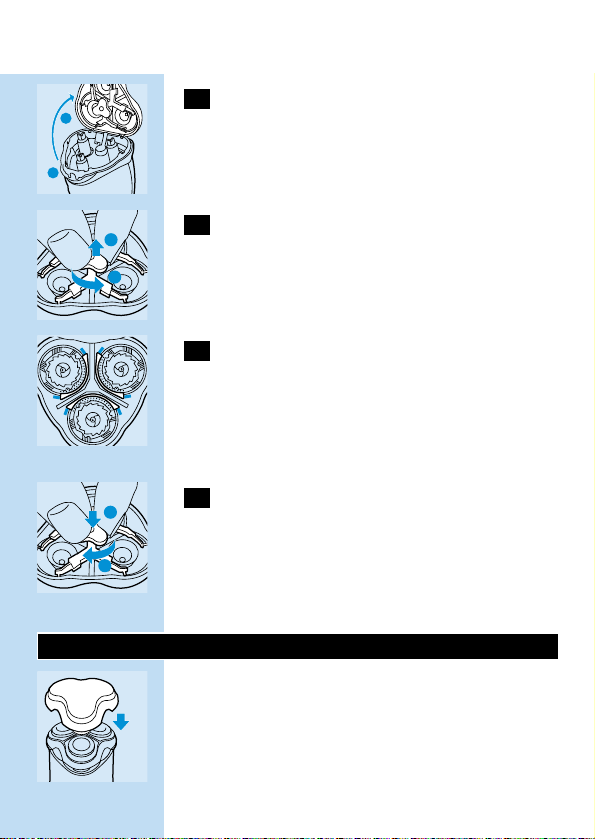
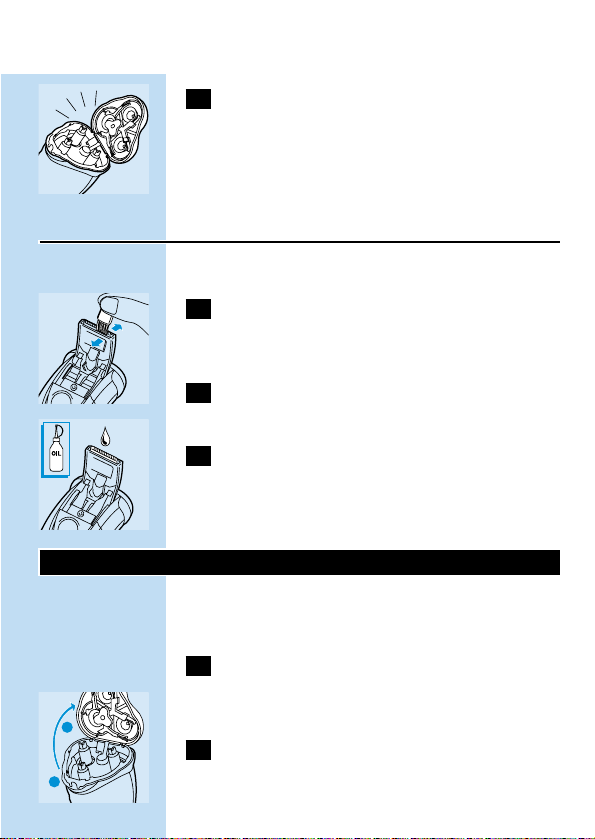
C
1 Open the trimmer by pushing the slide
upwards.
The trimmer can be activated while the motor is
running.
ENGLISH6

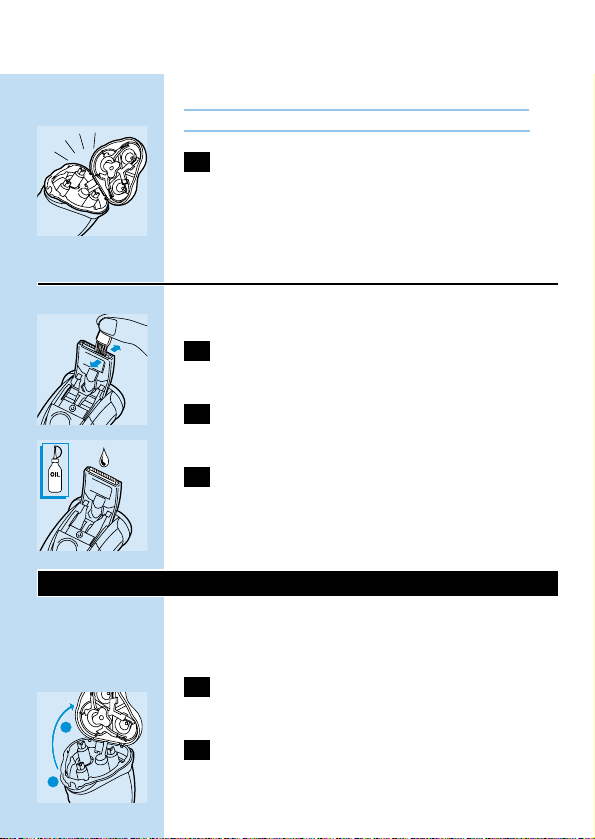
Cleaning
Regular cleaning guarantees better shaving
performance.
The easiest and most hygienic way to clean the
appliance is to rinse the shaving unit and the hair
chamber every day with hot water (60cC-80cC).
When you clean the appliance,it is not necessary
to take the shaving heads (cutters and guards)
apart.If you want to take them apart, be sure not
to mix up the cutters and guards, since grinding of
the cutters in the guards only guarantees optimal
performance for each matching set.If you
accidentally mix up the sets,it could take several
weeks before optimal shaving performance is
restored.
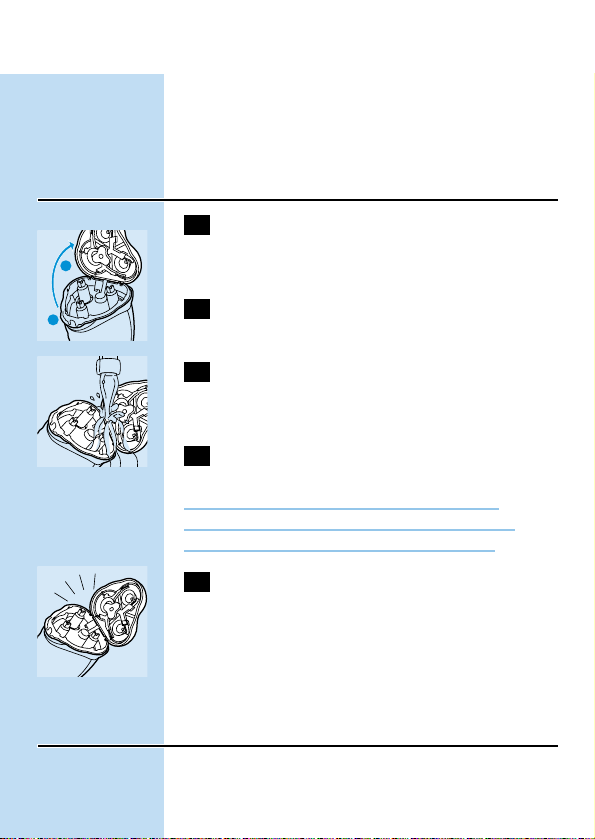
Every day:shaving unit and hair chamber
1 Switch the shaver off,remove the
powerplug from the wall socket and pull
the appliance plug out of the shaver.
C
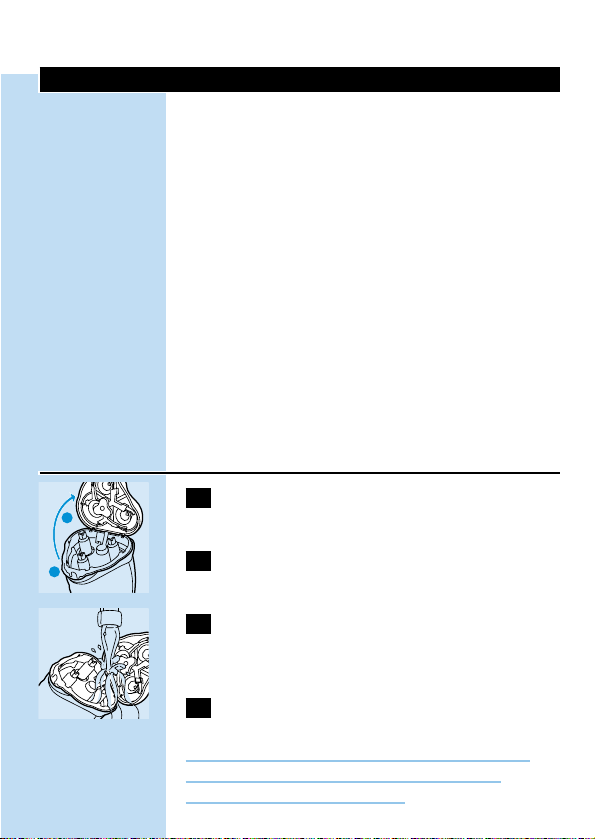
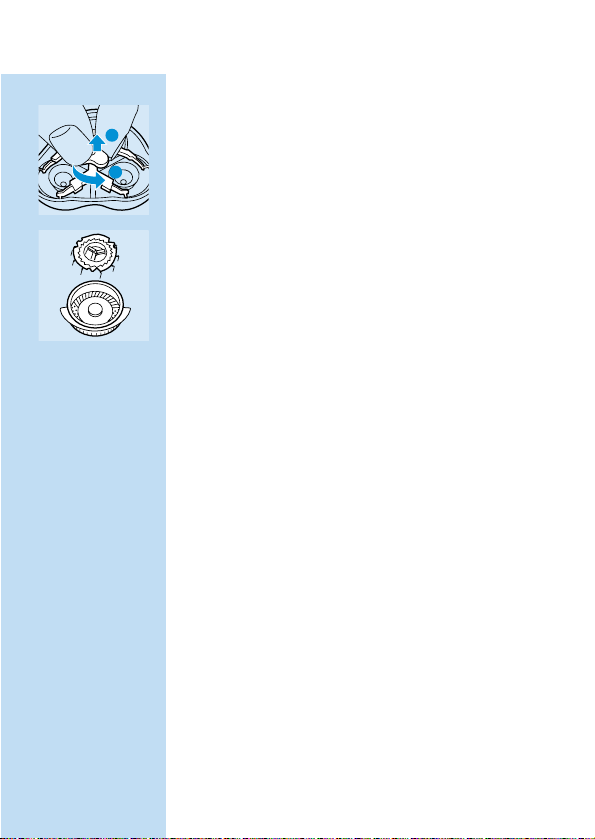
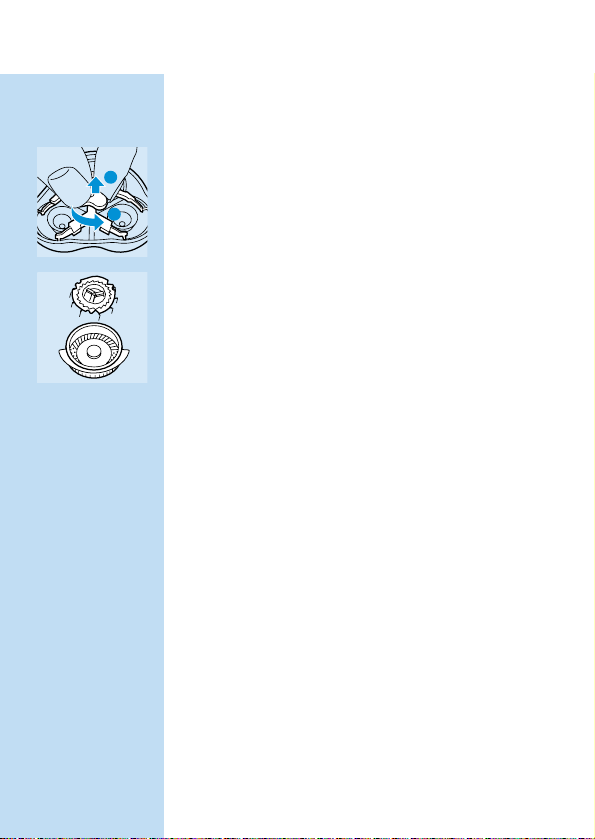
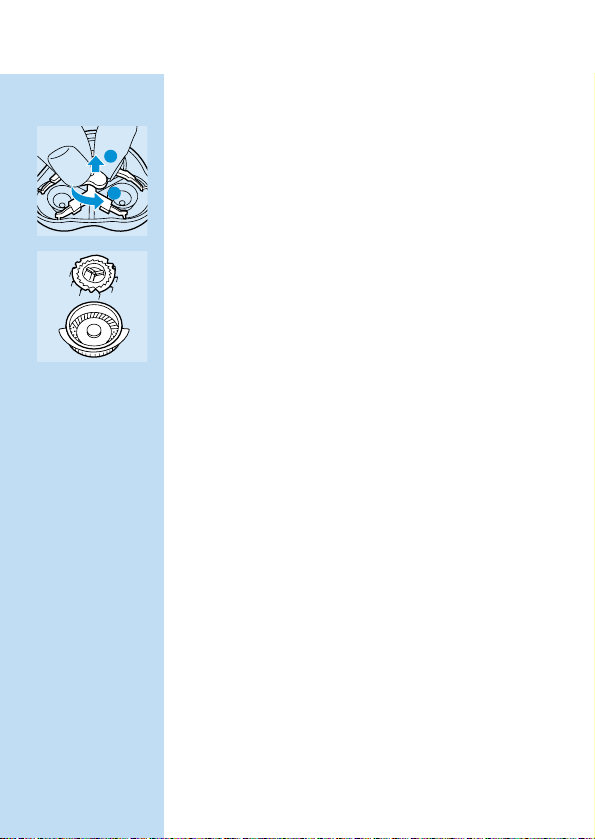
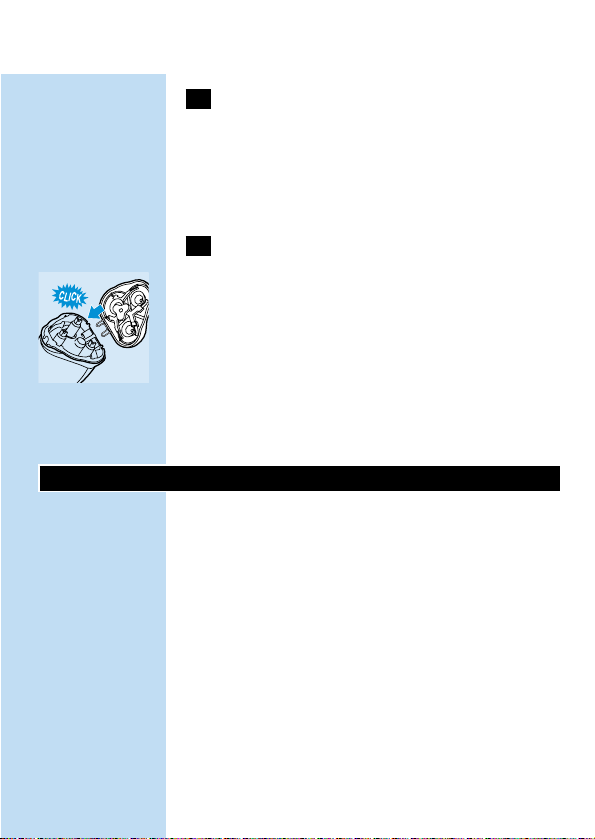
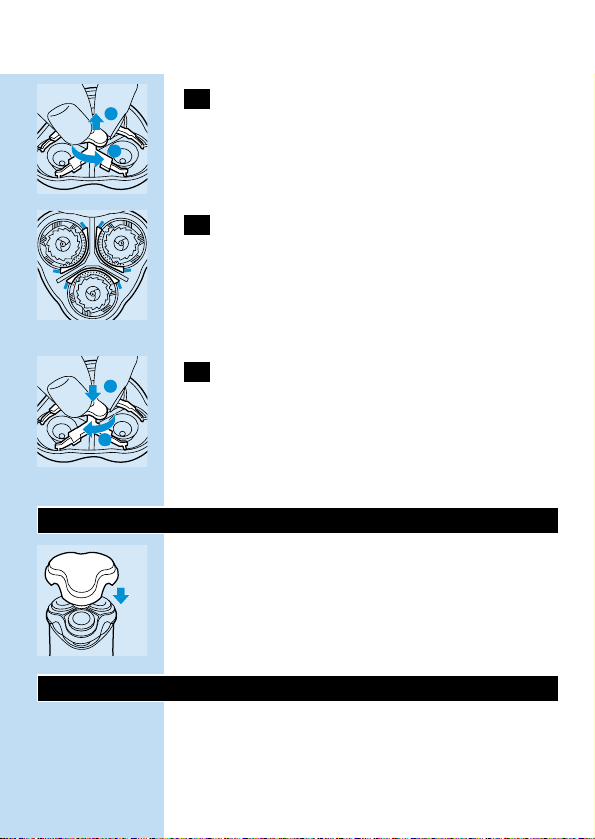
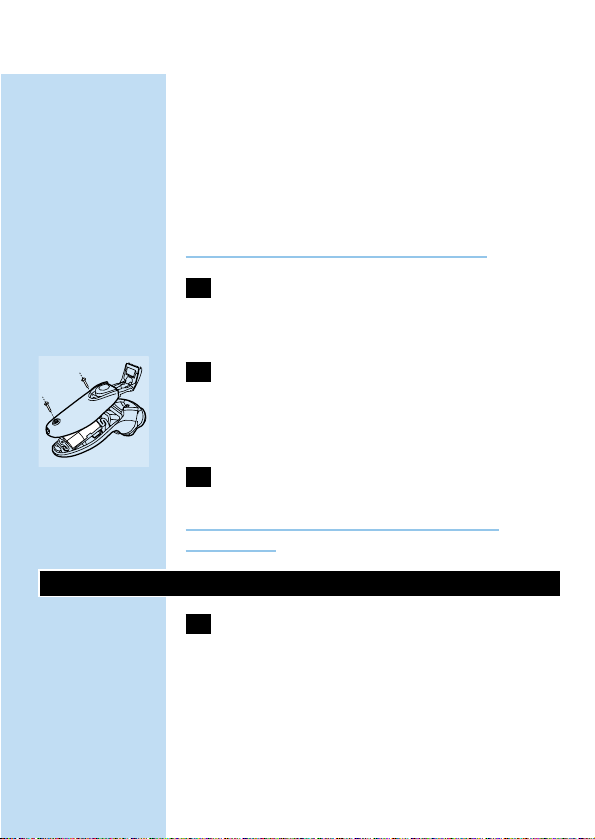
2 Press the release button (1) and open the
shaving unit (2).
C
3 Clean the shaving unit and the hair
chamber by rinsing them under a hot tap
(60cC-80cC) for some time.
4 Close the shaving unit and shake off excess
water.
Never dry the shaving unit with a towel or tissue
as this may damage the shaving heads.
ENGLISH 7
2
1

C
5 Open the shaving unit again and leave it
open to let the appliance dry completely.
You can also clean the hair chamber without
water by using the brush supplied.
Trimmer
Clean the trimmer every time you have used it.
1 Switch the shaver off,remove the
powerplug from the wall socket and pull
the appliance plug out of the shaver.
C
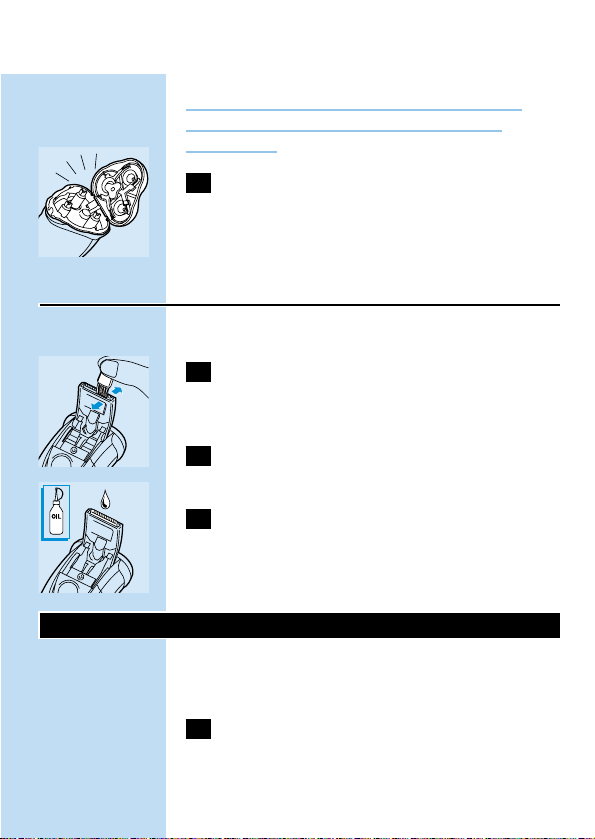
2 Clean the trimmer with the brush
supplied.
C
3 Lubricate the trimmer teeth with a drop
of sewing machine oil every six months.
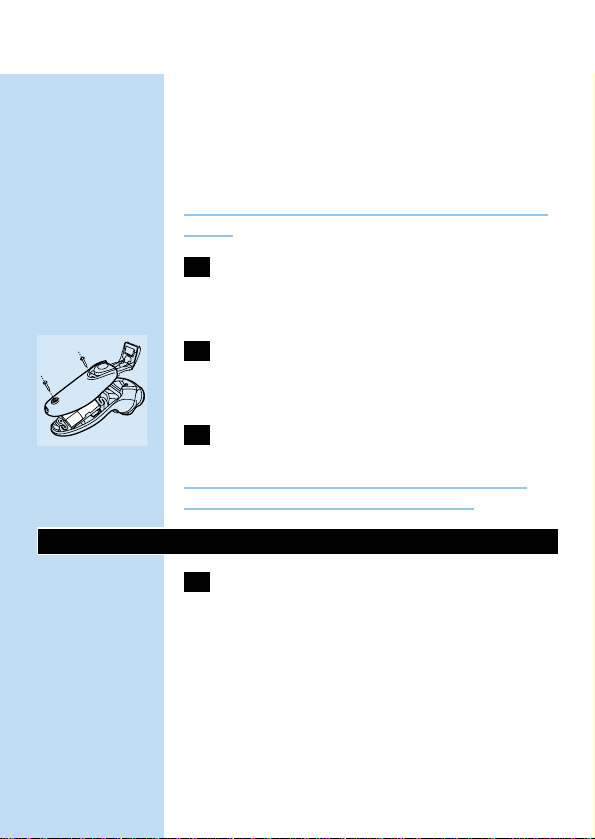
Replacing the shaving heads
Replace the shaving heads every two years for
optimal shaving results.
1 Switch the shaver off,remove the
powerplug from the socket and pull the
appliance plug out of the shaver.
C
2 Press the release button (1) to open the
shaving unit (2).
ENGLISH8
2
1
C
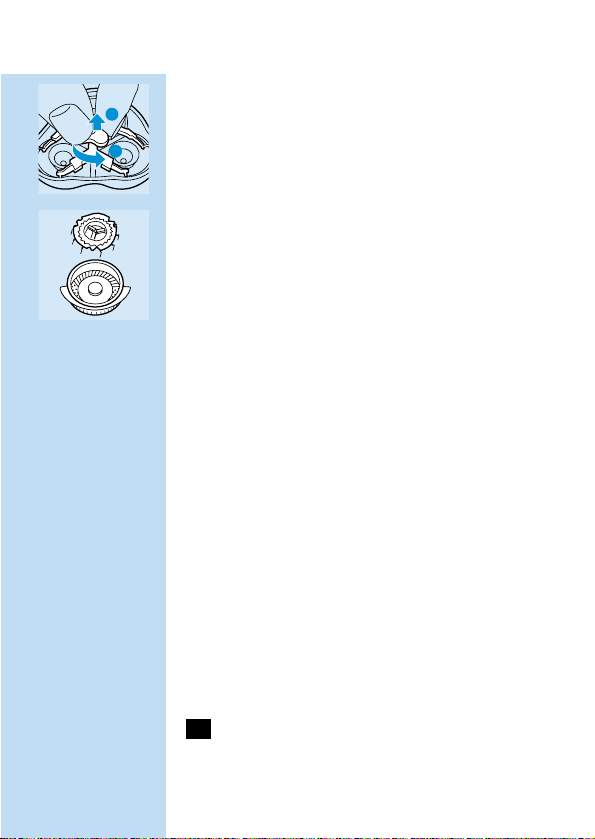
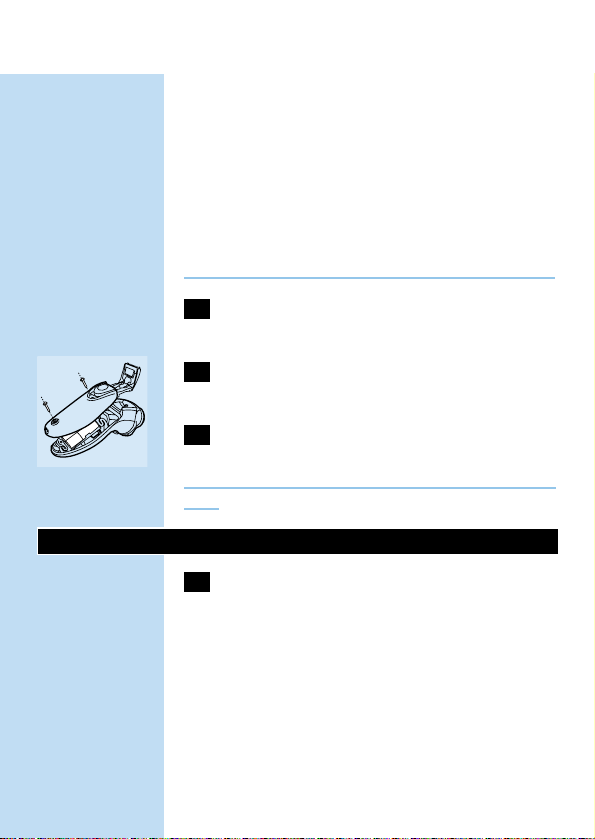
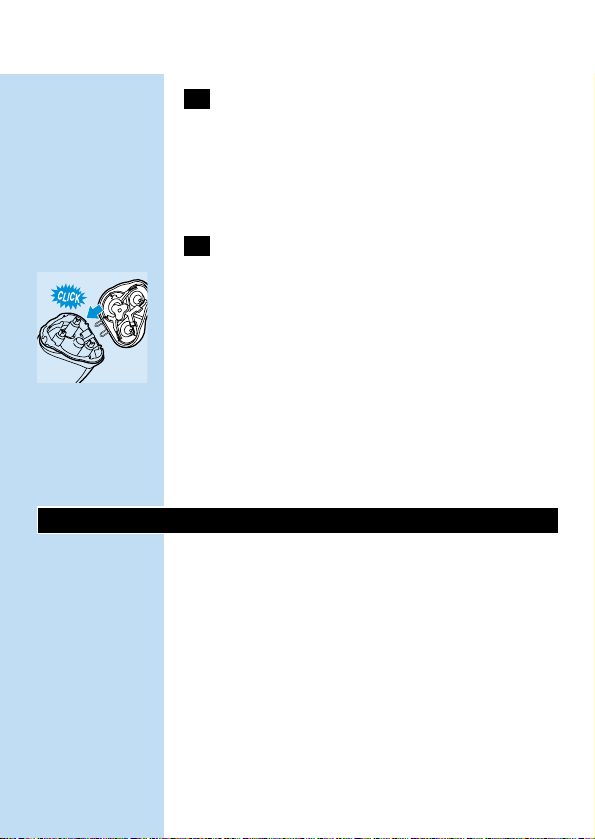
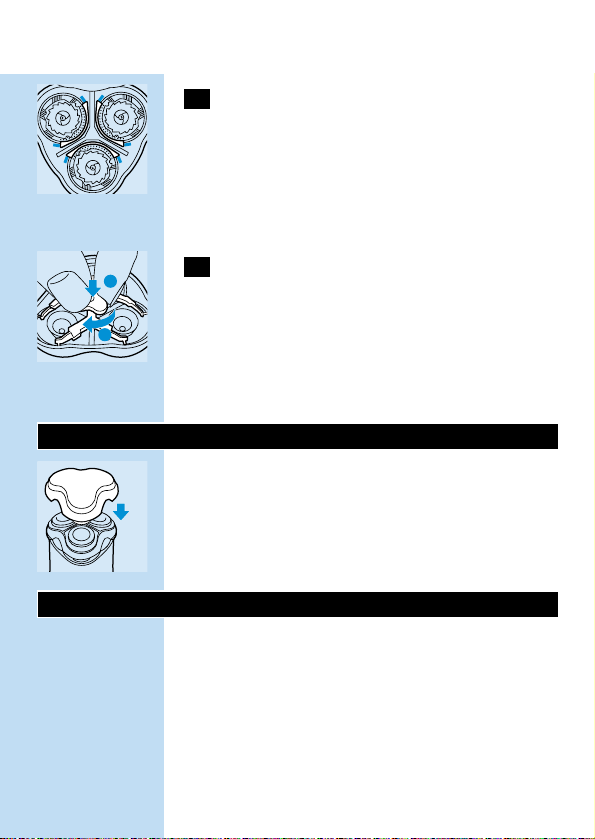
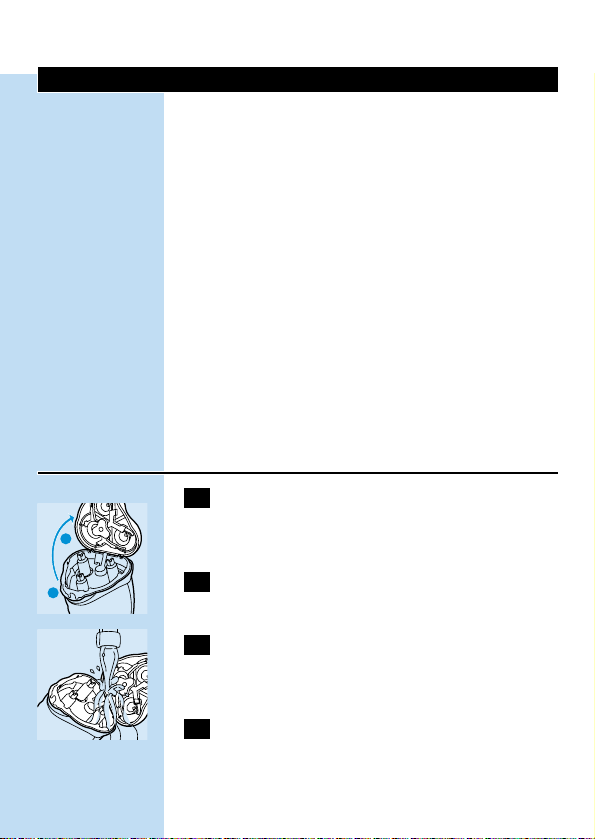
3 Turn the wheel anti-clockwise (1) and
remove the retaining frame (2).
C
4 Remove the shaving heads and place the
new ones in the shaving unit in such a way
that the parts with the small holes point
towards the centre of the shaving unit.
Make sure that the projections of the shaving
heads fit exactly into the recesses.
C
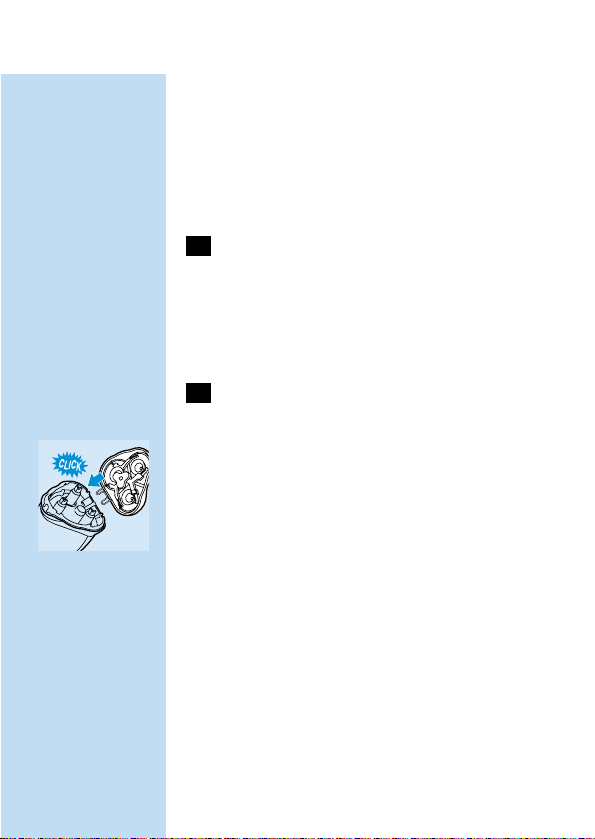
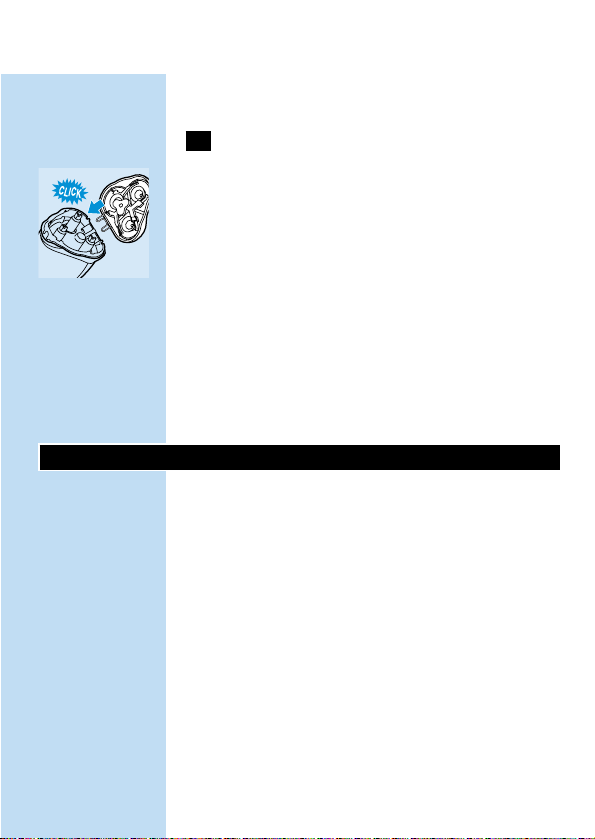
5 Reassemble the shaving unit by replacing
the retaining frame.Press the wheel (1)
and turn it clockwise (2).
Replace damaged or worn shaving heads with
Philishave HQ6 Quadra shaving heads only.
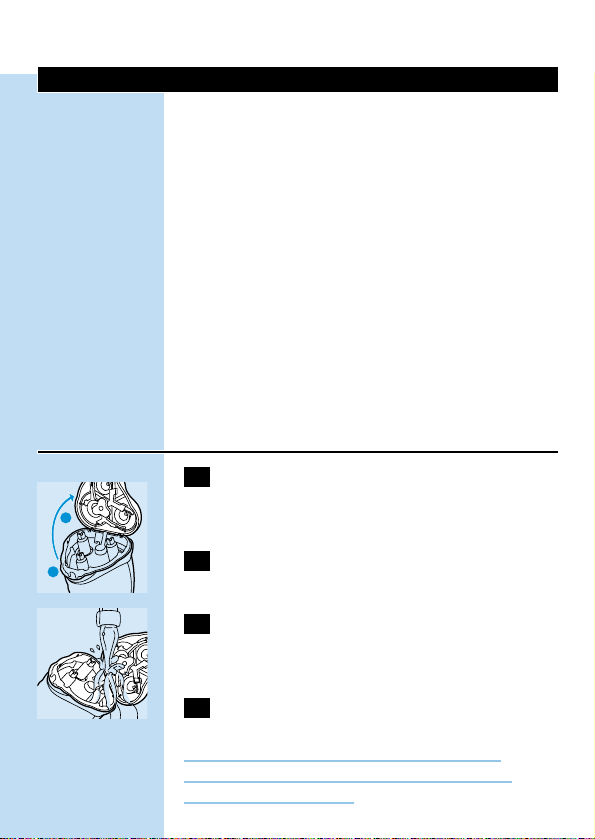
Storing
C
◗ Put the protection cap on the shaver to
prevent damage.
◗ The appliance can be stored in the pouch
supplied.
Disposal of batteries
The built-in rechargeable batteries contain
substances that may pollute the environment.
Remove the batteries when you discard the
shaver. Do not throw the batteries away with the
ENGLISH 9
2
1
1
2
normal household waste, but hand them in at an
official collection point.You can also take the
batteries to a Philips Service Centre,which will
dispose of them in an environmentally safe way.
Only remove the batteries if they are completely
empty.
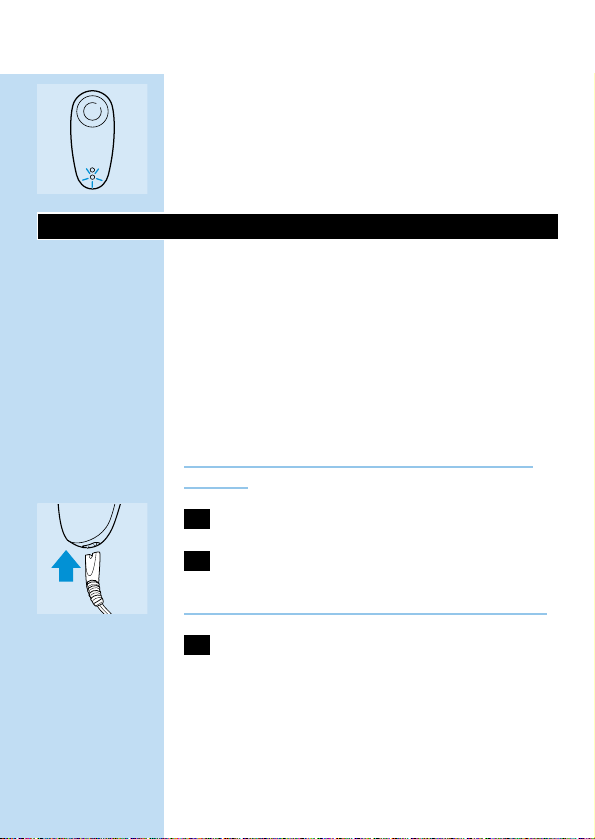
1 Remove the powerplug from the socket
and pull the appliance plug out of the
shaver.
C
2 Let the shaver run until it stops,open the
trimmer, undo the screws and open the
shaver.
3 Remove the batteries.
Do not connect the shaver to the mains again
after the batteries have been removed.
Troubleshooting
1 Reduced shaving performance.
B
Cause 1:the shaving heads are dirty.
B
The shaver has not been rinsed long enough or
the water used was not hot enough.
◗ Clean the shaver thoroughly before you
continue shaving (see 'Cleaning').
B
Cause 2:long hairs are obstructing the shaving
heads.
ENGLISH10
C
◗ Turn the wheel anti-clockwise (1) and remove
the retaining frame (2).
C
◗ Clean the cutters and guards.
Do not clean more than one cutter and guard at
a time, since they are all matching sets.If you
accidentally mix up the cutters and guards, it may
take several weeks before optimal shaving
performance is restored.
◗ Remove the hairs with the brush supplied.
◗ Put the retaining plate back onto the shaving
unit.
B
Cause 3:shaving heads are damaged or worn.
◗ Remove the retaining frame.
◗ Remove the old shaving heads from the
shaving unit and replace them with new ones
Damaged or worn shaving heads (cutters and
guards) must only be replaced with the original
Philishave HQ6 Quadra shaving heads.
◗ Put the retaining plate back onto the shaving
unit.
2 The shaver does not work when the
ON/OFF button is pressed.
B
Cause:the batteries are empty.
ENGLISH 11
2
1
◗ Recharge the batteries.
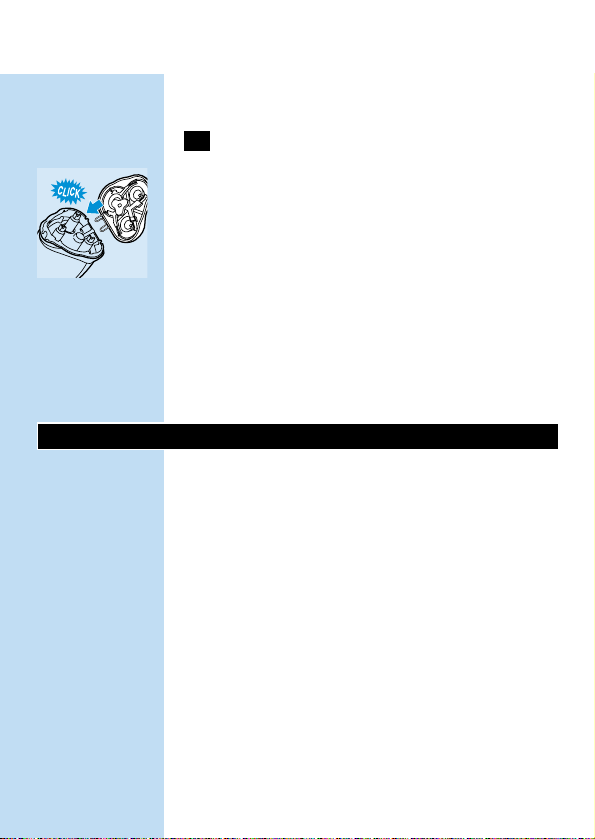
3 Shaving unit has come off shaver.
C
◗ If the shaving unit becomes detached from the
shaver,check whether the hinge spring is still
properly attached,i.e.has not come loose and
does not show any cracks or damage.If the
hinge spring is still properly attached,the
shaving unit can be easily put back on the
shaver again.However, if the hinge spring has
come loose,is cracked or damaged,please
contact your Philips dealer or the nearest
Philips service centre to avoid damage to your
shaver.
Accessories
- HQ6 Quadra Philishave Shaving Heads.
- HQ8000 powerplug.
- HQ100 Philishave Action Clean (shaving head
cleaner).
- HQ101 Philishave Action Clean Refill (shaving
head cleaning liquid).
- HQ110 Philishave Head Cleaner (shaving head
cleaning spray).
ENGLISH12

Information & service
If you need information or if you have a
problem,please visit the Philips Web site at
www.philips.com or contact the Philips Customer
Care Centre in your country (you will find its
phone number in the worldwide guarantee
leaflet).If there is no Customer Care Centre in
your country,turn to your local Philips dealer or
contact the Service Department of Philips
Domestic Appliances and Personal Care BV.
◗ Keep these instructions for use for future
reference.
ENGLISH 13

Ważne
Przed skorzystaniem z urządzenia zapoznaj się,
proszę, z niniejszą instrukcją.
◗ W celu ładowania golarki używaj wyłącznie
załączonej do urządzenia ładowarki HQ8000.
◗ Ładowarka redukuje napięcie ze 100-240 V do
12V.Aby zapewnić bezpieczeństwo używaj
jedynie ładowarki, która została załączona do
urządzenia.
C
◗ Upewnij się, czy ładowarka HQ8000 nie jest
narażona na zamoczenie.
C
◗ Golarka pracuje przy bezpiecznym niskim
napięciu 12V. Jest wodoszczelna i można ją
myć pod bieżącą wodą.Nie spłukuj jej jednak
wodą o temperaturze powyżej 80cC
Wskaźniki ładowania
C
◗ Ładowanie
Gdy urządzenie zaczyna się ładować zapala się
zielona lampka kontrolna.
C
◗ Akumulatory całkowicie naładowane
Gdy akumulatory są całkowicie nałądowane
zielona lampka zaczyna migać.
W pełni naładowana golarka gwarantuje do 70
minut beprzewodowej pracy.
POLSKI14

C
◗ Niski poziom naładowania akumulatorów
Kiedy akumulatory są bliskie rozładowania lampka
kontrolna zapala się na czerwono.Gdy wyłączysz
golarkę, czerwona lampka będzie jeszcze migać
przez 4 sekundy.
Ładowanie
Ładuj i przechowuj golarkę w temperaturze
pomiędzy 5c a 35cC.
Ładowarka ta jest dostosowana do zakresu
napięcia od 100 do 240 V.
Możesz także używać golarki bez ładowania,
podłączając ją bezpośrednio do sieci. Podczas
golenia zapali się zielona lampka kontrolna.
Nie zostawiaj golarki bez przerwy podłączonej do
sieci.
C
1 Włóż małą wtyczkę przewodu zasilającego
do golarki.
2 Podłącz ładowarkę do sieci.
Nie ładuj golarki w zamkniętej saszetce.
3 Jeśli ładujesz golarkę po raz pierwszy lub
po długim okresie nieużywania, podłącz
golarkę do ładowarki na 4 godziny.
Normalne ładowanie trwa ok. 1 godziny.
W pełni naładowana golarka gwarantuje do 70
minut beprzewodowej pracy.
POLSKI 15
4 Gdy akumulatory są całkowicie
naładowane, wyjmij wtyczkę z gniazda
sieciowego i odłącz urządzenie.
Golenie
1 Włącz golarkę, wciskając włącznik.
C
2 Przesuwaj głowice po skórze, wykonując
zarówno proste, jak i okrężne ruchy.
Najlepsze efekty golenia osiąga się na skórze
suchej.
Skóra Twojej twarzy potrzebuje pewnego czasu
(2-3 tygodni), by przyzwyczaić się do nowego
systemu golenia.
3 Wyłącz golarkę przez jednokrotne
wciśnięcie przycisku off/on.
C
4 Po każdym użyciu załóż na golarkę
ochronną osłonkę, zabezpieczającą golarkę
przed uszkodzeniem.
Wymieniaj głowice golące (typ HQ6 Quadra) co
dwa lata.W ten sposób zapewnisz sobie najlepsze
rezultaty golenia.
Trymer
Służy do przystrzygania wąsów i bokobrodów.
C
1 Otwórz trymer przesuwając suwak do
góry.
Trymer może być używany po uprzednim
włączeniu urządzenia.
POLSKI16

Czyszczenie
Regularne oczyszczanie golarki gwarantuje lepsze
efekty golenia.
Najprostszy i najbardziej higieniczny sposób
czyszczenia golarki to codzienne wypłukanie
części golącej i komory na ścięty zarost w ciepłej
wodzie (60cC-80cC).
Podczas czyszczenia golarki nie trzeba zdejmować
elementów golących (ostrzy i głowic). Jeśli je
wyjmiesz, zwróć szczególną uwagę, żeby nie
pomieszać ostrzy i głowic. Jest to bardzo ważne,
ponieważ dopasowanie ostrzy do głowic
zapewnia optymalną skuteczność działania
każdego z zestawów. Jeżeli przypadkowo ostrza i
głowice zostaną pomieszane, odzyskanie przez
golarkę dobrej jakości golenia może trwać nawet
kilka tygodni (dopasowanie się elementów).
Codziennie: część goląca i komora na ścięty
zarost
1 Wyłącz golarkę,wyjmij ładowarkę z
gniazdka ściennego oraz wtyczkę z golarki.
C
2 Wciśnij przycisk blokujący (1) i otwórz
część golącą (2).
C
3 Przez jakiś czas płucz element golący i
komorę na ścięty zarost w ciepłej,bieżącej
wodzie.
4 Zamknij część golącą i strząśnij pozostałą
wodę.
POLSKI 17
2
1
Nidy nie wycieraj części golącej ręcznikiem lub
chusteczką - możesz uszkodzić głowice golące.
C
5 Otwórz ponownie część golącą i pozostaw
ją tak do wyschnięcia.
Komorę na ścięty zarost można też czyścić na
sucho, używając specjalnej załączonej szczoteczki.
Trymer
Oczyszczaj trymer po każdym użyciu.
1 Wyłącz golarkę,wyjmij ładowarkę z
gniazdka ściennego oraz wtyczkę z golarki.
C
2 Trymer oczyść dołączoną do golarki
szczoteczką.
C
3 Co 6 miesięcy należy naoliwić ząbki
trymera kroplą oleju maszynowego.
Wymiana głowic
Aby zawsze osiągać najlepsze rezultaty, wymieniaj
głowice golące co dwa lata.
1 Wyłącz golarkę,wyjmij ładowarkę z
gniazda ściennego oraz wtyczkę z golarki.
C
2 Wciśnij przycisk blokujący (1) aby
otworzyć część golącą (2).
POLSKI18
2
1

C
3 Przekręć kółko w kierunku przeciwnym do
ruchu wskazówek zegara (1) i wyjmij
ramkę utrzymującą (2).
C
4 Wyjmij głowice golące i włóż nowe do
części golącej w taki sposób, by elementy z
okrągłymi otworami były skierowane do
środka części golącej.
Upewnij się, czy części wystające głowic pasują
dokładnie w zagłębienia.
C
5 Złóż z powrotem część golącą,zakładając
ponownie ramkę zabezpieczającą.Wciśnij
kółko (1) i przekręć je w kierunku
zgodnym z ruchem wskazówek zegara (2).
Zniszczone lub zużyte głowice golące należy
wymieniać wyłącznie na oryginalne głowice
Philishave HQ6 Quadra.
Przechowywanie
C
◗ Załóż na golarkę ochronną pokrywę, by
uniknąć uszkodzenia.
◗ Urządzenie może być przechowywane w
załączonym pokrowcu.
Usuwanie akumulatorów
Wbudowane akumulatory zawierają substancje,
które mogą zanieczyszczać środowisko.
POLSKI 19
2
1
1
2
Gdy wyrzucasz golarkę, wyjmij z niej akumulatory.
Nie wyrzucaj akumulatorów z innymi odpadkami
domowymi, ale zanieś je do specjalnego punktu
zbiórki. Możesz je także zanieść do punktu
serwisowego firmy Philips, gdzie zostaną one
wyrzucone w sposób zgodny z przepisami o
ochronie środowiska.
Wyrzucaj tylko zupełnie wyczerpane akumulatory.
1 Wyjmij wtyczkę ładowarki z gniazdka
ściennego i wtyczkę urządzenia z golarki.
C
2 Uruchom golarkę i poczekaj, aż przestanie
pracować, odkręć śrubki i otwórz golarkę.
3 Wyjmij akumulatory.
Po wyjęciu akumulatorów nie podłączaj golarki do
sieci.
Rozwiązywanie problemów
1 Zmniejszona wydajność golenia.
B
Przyczyna 1: głowice golące są zanieczyszczone.
B
Golarka nie była dostatecznie długo płukana lub
woda nie była wystarczająco ciepła.
◗ Wymyj starannie golarkę, zanim znowu
przystąpisz do golenia (patrz: "Czyszczenie")
B
Przyczyna 2: długie włoski blokują głowice golące.
POLSKI20

C
◗ Wyjmij ramkę zabezpieczającą.
C
◗ Wyczyść ostrza i głowice.
Nie myj jednorazowo więcej niż jednego ostrza i
jednej głowicy, ponieważ tworzą one dopasowane
zestawy. Jeśli przypadkowo pomieszasz ostrza i
głowice, potrwa kilka tygodni,zanim ponownie
przywrócisz optymalną skuteczność golenia.
◗ Usuń włoski załączoną do golarki szczoteczką.
◗ Załóż z powrotem blaszkę zabezpieczającą na
część golącą.
B
Przyczyna 3: głowice golące są uszkodzone lub
zużyte.
◗ Wyjmij ramkę zabezpieczającą.
◗ Wyjmij stare głowice z części golącej i zastąp
je nowymi
Uszkodzone lub zużyte głowice należy wymieniać
na oryginalne głowice Philishave HQ6 Quadra.
◗ Załóż z powrotem blaszkę zabezpieczającą na
część golącą.
2 Golarka nie działa, gdy wciśnięty jest
włącznik (przycisk ON/OFF).
B
Przyczyna: akumulator y są wyczerpane.
POLSKI 21
2
1

◗ Naładuj akumulatory.
3 Część goląca odłączyła się od golarki.
C
◗ Jeśli część goląca odłączyła się od golarki,
sprawdź czy sprężyna jest odpowiednio
zamontowana, na przykład czy nie poluzowała
się i czy nie widać na niej pęknięć lub
uszkodzeń. Jeśli sprężyna jest odpowiednio
zamocowana, część golącą można łatwo
ponownie założyć na golarkę. Jeśli jednak
sprężyna poluzowała się, jest pęknięta lub
uszkodzona, grozi uszkodzeniem całej golarki.
W takim przypadku powinieneś skontaktować
się ze swoim sprzedawcą lub najbliższym
punktem serwisowym firmy Phililps.
Akcesoria
- HQ6 Quadra Głowice golące Philishave
- HQ8000 Ładowarka
- HQ100 Philishave Action Clean (płyn do
czyszczenia głowicy golącej).
- HQ101 Philishave Action Clean Refill
(uzupełnienie/wkład płynu do czyszczenia
głowicy golącej).
- HQ110 Philishave Head Cleaner (spray do
czyszczenia głowicy golącej).
POLSKI22

Gwarancja i serwis
Jeśli potrzebujesz skorzystać z serwisu lub jeśli
masz jakiś problem, skontaktuj się z Działem
Obsługi Klienta (numer telefonu znajdziesz w
Karcie Gwarancyjnej lub też najbliższym punktem
serwisowym sprzętu AGD, autoryzowanym przez
firmę Philips (patrz: wykaz w Karcie
Gwarancyjnej).
◗ Niniejsza instrukcja obsługi może się okazać
przydatna w przyszłości.
POLSKI 23
Avertisment
Vă rugăm să citiţi aceste instrucţiuni înainte de
utilizarea aparatului.
◗ Nu folosiţi decât încărcătorul HQ8000
furnizat împreună cu aparatul.
◗ Încărcătorul HQ8000 transformă o tensiune
de 100-240 volţi în 12 volţi. Folosiţi doar
încărcătorul furnizat împreună cu aparatul
pentru o transformare în deplină siguranţă.
C
◗ Evitaţi contactul încărcătorului HQ8000 cu
apa.
C
◗ Aparatul de ras funcţionează la o temperatură
sigură de 12V. Este rezistent la apă şi poate fi
curăţat sub jetul de la robinet. Nu folosiţi apă
cu o temperatură mai mare de 80cC.
Indicaţii de încărcare
C
◗ Încărcare
Imediat ce începeţi să încărcaţi aparatul, becul
pilot verde se va aprinde.
C
◗ Acumulator complet încărcat
Când bateria este complet încărcată, becul pilot
verde începe să clipească.
Un aparat de ras complet încărcat oferă o
autonomie de funcţionare de până la 70 de
minute.
ROMÂNĂ24

C
◗ Acumulator descărcat
Când acumulatorul se descarcă, ledul inferior
devine roşu. Când opriţi aparatul de ras, ledul
roşu va clipi intermitent 4 secunde.
Încărcare
Reîncărcaţi şi păstraţi aparatul la o temperatură
cuprinsă între 5cC şi 35cC.
Acumulatorul este indicat pentru o tensiune între
100 şi 240 V.
Puteţi, de asemenea, să vă bărbieriţi fără să
încărcaţi în prealabil aparatul de ras, ci
conectându-l direct la priză. În timpul bărbieririi,
ledul verde se va aprinde.
Nu lăsaţi aparatul conectat la priză în permanenţă.
C
1 Introduceţi fişa în aparatul de bărbierit.
2 Puneţi încărcătorul în priza de perete.
Nu reîncărcaţi aparatul într-o borsetă închisă.
3 Când încărcaţi aparatul pentru prima oară
sau după o perioadă mai lungă de timp,
lăsaţi-l să se încarce timp de 4 ore.
În mod normal încărcarea durează 1 oră.
Un aparat de ras complet încărcat oferă o
autonomie de funcţionare de până la 70 de
minute.
ROMÂNĂ 25
4 Scoateţi cablul din priză şi scoateţi fişa din
aparat când bateriile sunt complet
încărcate.
Bărbierire
1 Porniţi aparatul apăsând o dată pe butonul
pornire/oprire.
C
2 Faceţi rapid mişcări drepte şi circulare cu
capetele de bărbierire pe suprafaţa pielii.
Bărbierirea pe o piele uscată asigură cele mai
bune rezultate.
Pielea dumneavoastră ar putea necesita 2-3
săptămâni până să se obişnuiască cu sistemul
Philishave.
3 Opriţi aparatul de ras apăsând butonul
pornire/oprire o dată.
C
4 Pentru a preveni deteriorarea aparatului,
puneţi întotdeauna capacul după utilizare.
Pentru rezultate optime, înlocuiţi capetele de
bărbierire (tipul HQ6 Quadra) o dată la 2 ani.
Dispozitiv de tăiere
Pentru îngrijirea perciunilor şi a mustăţii.
C
1 Deschideţi dispozitivul de tăiere împingând
în sus butonul culisant.
Dispozitivul de tăiere poate fi activat în timp ce
motorul funcţionează.
ROMÂNĂ26
Curăţare
O curăţare regulată asigură cele mai bune
rezultate de bărbierire.
Modul cel mai simplu şi mai igienic de a curăţa
aparatul este să clătiţi unitatea de radere şi
compartimentul de colectare a părului zilnic cu
apă fierbinte (60cC-80cC)
Când curăţaţi aparatul nu este necesar să scoateţi
capetele de bărbierire (cuţite şi site) din aparat.
Dacă doriţi să le scoateţi, aveţi grijă să nu
amestecaţi cuţitele şi sitele deoarece numai
potrivirea lor corectă garantează performanţe
optime pentru fiecare set. Dacă din greşeală le
amestecaţi, poate dura câteva săptămâni până ce
veţi obţine rezultatele anterioare.
În fiecare zi: unitatea de bărbierire şi
compartimentul pentru păr
1 Opriţi aparatul, scoateţi încărcătorul din
priză şi fişa din aparat.
C
2 Apăsaţi butonul de declanşare (1) şi
deschideţi unitatea de bărbierire (2).
C
3 Curăţaţi unitatea de bărbierire şi
compartimentul de colectare a părului
clătindu-le cu apă fierbinte de la robinet.
4 Închideţi unitatea de radere şi scuturaţi
excesul de apă.
Nu ştergeţi niciodată unitatea de radere cu un
prosop sau un şerveţel deoarece aţi putea
deteriora capetele de radere.
ROMÂNĂ 27
2
1

C
5 Deschideţi din nou unitatea de radere şi
lăsaţi-o deschisă pentru a se usca complet.
Puteţi curăţa compartimentul pentru păr fără apă
folosind peria furnizată.
Dispozitiv de tăiere
Curăţaţi dipozitivul de tăiere de fiecare dată când
îl folosiţi.
1 Opriţi aparatul, scoateţi încărcătorul din
priză şi fişa din aparat.
C
2 Curăţaţi dispozitivul de tăiere cu ajutorul
periuţei furnizate.
C
3 Ungeţi dinţii dispozitivului de tăiere cu
puţin ulei pentru maşina de cusut o dată la
şase luni.
Înlocuirea capetelor de bărbierire
Înlocuiţi capetele de bărbierire o dată la 2 ani
pentru rezultate optime.
1 Opriţi aparatul, scoateţi încărcătorul din
priză şi fişa din aparat.
C
2 Apăsaţi butonul de declanşare (1) şi
deschideţi unitatea de bărbierire (2).
ROMÂNĂ28
2
1
C
3 Răsuciţi rotiţa în sens invers acelor de
ceasornic (1) şi scoateţi cadrul de
susţinere (2).
C
4 Scoateţi capetele de bărbierire şi
poziţionaţi-le pe cele noi în unitatea de
bărbierire în aşa fel încât zona cu orificii să
fie îndreptată spre centrul unităţii.
Aveţi grijă să potriviţi corect capetele de bărbierie
în nişele corespunzătoare.
C
5 Asamblaţi unitatea de bărbierire
remontând cadrul de susţinere.Apăsaţi
rotiţa (1) şi răsuciţi-o în sensul acelor de
ceasornic (2).
Înlocuiţi capetele de bărbierire stricate sau tocite
doar cu capetele de bărbierire Philishave HQ6
Quadra.
Depozitare
C
◗ Acoperiţi aparatul de ras cu capacul de
protecţie pentru a preveni deteriorarea.
◗ Aparatul poate fi depozitat în husa furnizată.
Aruncarea acumulatorului
Acumulatorul reîncărcabil conţine substanţe ce
pot polua mediul.
ROMÂNĂ 29
2
1
1
2

Scoateţi acumulatorul când aruncaţi aparatul. Nu
aruncaţi acumulatorul în gunoiul menajer, ci la un
punct de colectare oficial. Puteţi să-l duceţi la un
centru service Philips care le va arunca în
conformitate cu normele privind protejarea
mediului înconjurător.
Scoateţi acumulatorul doar dacă este complet
descărcat.
1 Scoateţi încărcătorul din priză şi trageţi fişa
cablului de alimentare din aparat.
C
2 Lăsaţi aparatul de bărbierit să funcţioneze
până se opreşte, deschideţi dispozitivul de
tăiere, desfaceţi şuruburile şi aparatul.
3 Scoateţi acumulatorul.
Aparatul nu trebuie conectat la priză după ce aţi
scos acumulatorul.
Probleme ce pot apărea
1 Performanţe scăzute de bărbierire.
B
Cauza 1: capetele de bărbierire sunt murdare.
B
Aparatul de ras nu a fost clătit suficient de mult
timp sau apa folosită nu a fost suficient de
fierbinte.
◗ Curăţaţi bine aparatul înainte de a continua
bărbierirea (a se vedea capitolul "Curăţare").
ROMÂNĂ30
B
Cauza 2: fire lungi de păr blochează capetele de
bărbierire.
C
◗ Scoateţi cadrul de susţinere.
C
◗ Curăţaţi cuţitele şi sitele.
Lamele şi sitele de protecţie sunt pereche, de
aceea curăţaţi pe rând câte un set. Dacă
amestecaţi din greşeală lamele cu sitele, s-ar putea
să dureze câteva săptămâni până ce aparatul va
tăia din nou la performanţa optimă anterioară.
◗ Scoateţi firele de păr cu ajutorul periuţei
furnizate.
◗ Remontaţi cadrul de susţinere pe unitatea de
băbierire.
B
Cauza 3: capetele de bărbierire sunt deteriorate
sau uzate.
◗ Scoateţi cadrul de susţinere.
◗ Scoateţi capetele de bărbierire vechi din
unitatea de bărbierire şi înlocuiţi-le cu unele
noi.
Capetele de bărbierire deteriorate sau uzate
(lame şi site) trebuie înlocuite doar cu capete de
bărbierire originale Philishave HQ6 Quadra.
◗ Remontaţi cadrul de susţinere pe unitatea de
băbierire.
ROMÂNĂ 31
2
1
2 Aparatul de ras nu funcţionează când
butonul Pornire/Oprire este apăsat.
B
Cauza: acumulatorul este descărcat.
◗ Reîncărcaţi acumulatorul.
3 Unitatea de radere s-a desprins din aparat.
C
◗ Dacă unitatea de radere se desprinde din
aparat, verificaţi dacă arcul balamalei este încă
bine fixat sau dacă s-a desprins, rupt sau
îndoit. Dacă arcul balamalei este încă bine
prins, unitatea de radere poate fi uşor
remontată. Dar dacă arcul s-a desprins, este
rupt sau îndoit, vă rugăm să apelaţi la
furnizorul dumneavoastră sau la cel mai
apropiat centru service Philips pentru a evita
deteriorarea aparatului de ras.
Accesorii
- Capete de Bărbierire Philishave Quadra HQ6
- Încărcător HQ8000.
- HQ100 Philishave Action Clean (curăţător cap
de bărbierire).
- HQ101 Philishave Action Clean Refill (lichid de
curăţare pentru capul de bărbierire).
- Curăţător Cap de Bărbierire Philishave HQ110
(spray de curăţare cap de bărbierire).
ROMÂNĂ32

Informaţii şi service
Dacă aveţi nevoie de service sau informaţii, sau
dacă aveţi vreo problemă, vă rugăm să ne vizitaţi
la www.philips.com sau să contactaţi Biroul de
Relaţii Clienţi din ţara dumneavoastră (veţi găsi
numărul de telefon în garanţia internaţională).
Dacă în ţara dumneavoastră nu există un Birou de
Relaţii Clienţi adresaţi-vă furnizorului
dumneavoastră sau contactaţi Departamentul
Service Philips pentru Electrocasnice şi Produse
de Îngrijire Personală.
◗ Păstraţi aceste instrucţiuni pentru consultări
ulterioare.
ROMÂNĂ 33
Внимание
Прежде чем пользоваться прибором,
прочитайте настоящее руководство.
◗ Для зарядки электробритвы используйте
только зарядное устройство HQ8000,
входящее в комплект поставки.
◗ Блок питания HQ8000 преобразует сетевое
напряжение 100-240 В в напряжение
питания прибора 12 В. Для гарантии
безопасной работы прибора, используйте
только входящий в поставку блок питания.
C
◗ Следите за тем, чтобы зарядное устройство
HQ8000 не было влажным.
C
◗ Электробритва работает при низком
безопасном напряжении 12 вольт. Она
водонепроницаема, и ее можно промывать
водопроводной водой. Не промывайте
бритву водой, температура которой выше
80cC.
Индикация зарядки
C
◗ Зарядка
Когда вы начнете зарядку разряженной
аккумуляторной батареи электробритвы,
загорится зеленый индикатор.
C
◗ Аккумуляторные батареи полностью
заряжены.
Когда аккумуляторная батарея полностью
зарядилась, начинает мигать зеленый
индикатор.
РУССКИЙ34
Полностью заряженная бритва обеспечивает
время бритья без подключения к электросети
до 70 минут.
C
◗ Разрядка аккумуляторных батарей
При разрядке батарей нижний индикатор
загорается красным светом. После того как вы
выключите бритву, красный индикатор будет
мигать в течение 4 секунд.
Зарядка
Выполняйте зарядку и храните прибор при
температуре от 5cC до 35cC.
Сетевая вилка работает при напряжении сети
от 100 до 240 В.
Вы можете также бриться без зарядки
аккумуляторов, подключая электробритву
непосредственно к электросети. Во время
бритья будет гореть зеленый индикатор.
Не оставляйте бритву постоянно включенной
в сеть.
C
1 Вставьте штекер шнура сетевого
адаптера в электробритву.
2 Вставьте сетевую вилку в розетку
электросети.
Не подзаряжайте электробритву в закрытом
футляре.
3 Если вы заряжаете бритву в первый раз
или если вы долгое время не
РУССКИЙ 35
пользовались прибором, производите
зарядку бритвы в течение 4 часов
непрерывно.
Обычно для полной зарядки аккумуляторов
требуется приблизительно 1 час.
Полностью заряженная бритва обеспечивает
время бритья без подключения к электросети
до 70 минут.
4 Как только аккумуляторы будут
полностью заряжены,выньте вилку
сетевого адаптера из розетки и
отсоедините штекер шнура сетевого
адаптера от электробритвы.
Бритье
1 Включите бритву, нажав один раз кнопку
вкл./выкл.
C
2 Быстро перемещайте бритвенные
головки по коже, совершая
одновременно возвратнопоступательные и вращательные
движения.
Наилучшие результаты бритья достигаются в
том случае, когда ваша кожа сухая.
Вашей коже может потребоваться 2-3 недели
для того, чтобы привыкнуть к бритвенной
системе Philishave.
3 Выключите электробритву, нажав один
раз кнопку Вкл./Выкл.
РУССКИЙ36
C
4 Во избежание поломки, после
использования наденьте на бритву
защитную крышку.
Для получения оптимальных результатов
бритья каждые 2 года производите замену
бритвенных головок (модель HQ6 Quadra).
Подравниватель
Для подравнивания висков и ухода за усами.
C
1 Откройте подравниватель, передвинув
ползунковый переключатель вверх.
Подравнивателем можно пользоваться только
при включенном электродвигателе.
Очистка
Регулярная очистка гарантирует наилучшие
результаты бритья.
Наиболее простой и гигиеничный способ
очистки бритвы заключается в ежедневном
промывании бритвенного блока и камеры
волососборника горячей водой (60cС-80cС).
При очистке бритвы нет необходимости
отделять бритвенные головки (вращающиеся и
неподвижные ножи). Если вы все-таки хотите
их отделить, то будьте внимательны и не
перепутайте ножи разных пар, поскольку для
обеспечения оптимальных характеристик
бритья требуется притирка ножей друг к
другу. Если вы случайно перепутаете ножи, то
может потребоваться несколько недель для
РУССКИЙ 37
того, чтобы восстановить оптимальные
характеристики бритья.
Каждый день: бритвенный блок и камера
волососборника
1 Выключите бритву, выньте сетевую вилку
из розетки и отсоедините штекер шнура
сетевого адаптера от электробритвы.
C
2 Нажмите кнопку фиксатора (1) и
откройте бритвенный блок (2).
C
3 Очистите бритвенный блок и камеру
волососборника, промывая их под
горячей водопроводной водой.
4 Закройте бритвенный блок и стряхните
воду.
Запрещается сушить бритвенный блок с
помощью полотенца или салфетки, так как
можно повредить бритвенные головки.
C
5 Снова откройте бритвенный блок и
оставьте его открытым, чтобы дать
бритве полностью высохнуть.
Вы также можете очистить камеру
волососборника без воды, пользуясь
кисточкой, входящей в комплект поставки.
Подравниватель.
Очищайте подравниватель после каждого
использования.
РУССКИЙ38
2
1

1 Выключите бритву, выньте сетевую вилку
из розетки и отсоедините штекер шнура
сетевого адаптера от электробритвы.
C
2 Очищайте подравниватель с помощью
кисточки, входящей в комплект
поставки.
C
3 Смазывайте зубцы подравнивателя
каждые шесть месяцев каплей
машинного масла для швейных машин.
Замена бритвенных головок
Для достижения оптимальных результатов
бритья производите замену бритвенных
головок каждые два года.
1 Выключите бритву, выньте сетевую вилку
из розетки электросети и отсоедините
штекер шнура сетевого адаптера от
электробритвы.
C
2 Для того чтобы открыть бритвенный
блок (2) нажмите кнопку фиксатора (1).
C
3 Поверните колесико против часовой
стрелки (1) и снимите фиксирующую
рамку (2).
РУССКИЙ 39
2
1
2
1
C
4 Извлеките бритвенные головки из
бритвенного блока и установите новые
таким образом, чтобы боковые стороны
с мелкими отверстиями были
направлены в центр бритвенного блока.
Убедитесь, что выступы бритвенных головок
точно совпадают с соответствующими пазами.
C
5 Соберите бритвенный блок, установив
на место фиксирующую рамку.
Прижмите колесико (1) и поверните его
по часовой стрелке (2).
Заменяйте поврежденные или изношенные
бритвенные головки только бритвенными
головками Philishave HQ6 Quadra.
Хранение
C
◗ Во избежание повреждений наденьте на
электробритву защитный колпачок.
◗ Бритву можно хранить в футляре,
входящем в комплект поставки.
Утилизация аккумуляторов
Встроенная аккумуляторная батарея содержит
вещества, которые могут представлять
опасность для окружающей среды.
Извлеките аккумуляторы, если вы собираетесь
выбрасывать бритву. Не выкидывайте
аккумуляторы вместе с бытовым мусором, а
сдайте их в официальный пункт приема. Вы
РУССКИЙ40
1
2

также можете сдать аккумуляторы в сервисный
центр компании «Филипс», где они будут
утилизированы безопасным для окружающей
среды способом.
Перед удалением аккумуляторы должны быт
полностью разряжены.
1 Выньте сетевую вилку из розетки
электросети и отсоедините штекер
шнура сетевого адаптера от
электробритвы.
C
2 Оставьте электробритву во включенном
состоянии до остановки
электродвигателя, откройте
подравниватель, отверните винты и
откройте электробритву.
3 Извлеките аккумуляторы.
Не подключайте бритву к электросети после
извлечения из нее аккумуляторов.
Поиск и устранение неисправностей
1 Плохое качество бритья.
B
Причина 1: загрязнились бритвенные головки.
B
Бритва промывалась недостаточно долго
или недостаточно горячей водой.
РУССКИЙ 41
◗ Тщательно очистите электробритву,
прежде чем продолжать бритье (см. раздел
«Очистка»).
B
Причина 2: бритвенные головки забиты
длинными волосами.
C
◗ Снимите фиксирующую рамку.
C
◗ Очистите вращающиеся и неподвижные
ножи.
Не очищайте одновременно более одной
пары ножей, поскольку вращающийся и
неподвижный ножи каждой пары пригнаны
друг к другу. Если вы случайно перепутаете
ножи, то может потребоваться несколько
недель для того, чтобы восстановить
оптимальные характеристики бритья.
◗ Очистите бритвенные головки от волос,
пользуясь щеточкой, входящей в комплект
поставки.
◗ Установите фиксирующую рамку на
бритвенный блок.
B
Причина 3: бритвенные головки повреждены
или изношены.
◗ Снимите фиксирующую рамку.
◗ Извлеките из бритвенного блока старые
бритвенные головки и замените их новыми.
Заменяйте поврежденные или изношенные
РУССКИЙ42
2
1
бритвенные головки (вращающийся и
неподвижные ножи) только бритвенными
головками Philishave HQ6 Quadra.
◗ Установите фиксирующую рамку на
бритвенный блок.
2 При нажатии кнопки ON/OFF
электробритва не работает.
B
Причина: Разряжены аккумуляторы.
◗ Перезарядите аккумуляторы.
3 Произошло отсоединение бритвенного
блока от электробритвы.
C
◗ Если произошло отсоединение
бритвенного блока от электробритвы,
проверьте надежность крепления
пружинной петли, т.е. не ослабла ли
пружинная петля, нет ли на ней трещин или
иных повреждений. Если пружинная петля
закреплена надлежащим образом,
бритвенный блок может быть легко
установлен на место. Если же пружинная
петля ослабла или на ней имеются трещины
или повреждения, обратитесь в
представительство компании "Филипс" или
в ближайший сервисный центр компании
"Филипс" для устранения неисправности
вашего прибора.
РУССКИЙ 43

Принадлежности
- Бритвенные головки HQ6 Quadra Philishave.
- Блок питания HQ8000.
- Очиститель бритвенных головок HQ110
Philishave (очиститель бритвенных головок).
- Заполнитель HQ101 Philishave Action Clean
(жидкость для очистки бритвенных головок).
- Очиститель бритвенных головок HQ110
Philishave (спрей для очистки бритвенных
головок).
Информация и сервисное обслуживание
Если вам нужна помощь или информация или у
вас возникли проблемы, обратитесь к Webсайту компании "Филипс" по адресу
www.philips.com или в Службу по связям с
потребителями в вашей стране (номер
телефона вы найдете в гарантийном талоне).
Если в вашей стране нет Службы по связям с
потребителями, обращайтесь в торговую
организацию компании "Филипс" или в
Сервисный центр по обслуживанию бытовых
электроприборов компании "Филипс".
◗ Сохраните настоящее руководство по
эксплуатации в качестве справочного
материала.
РУССКИЙ44

Důležité
Před použitím přístroje přečtěte pozorně tento
návod.
◗ Pro nabíjení používejte výhradně nabíjecí
zástrčku HQ8000.
◗ Transformátorek v zástrčce přístroje
transformuje síťové napětí 100 až 240 V na
12 V. Pro připojení k síti používejte výhradně
tuto zástrčku, která byla s přístrojem dodána.
C
◗ Dbejte na to, aby nabíjecí zástrčka nepřišla do
styku s vodou.
C
◗ Přístroj je napájen bezpečným napětím 12 V. Je
vodotěsný a lze ho mýt pod tekoucí vodou.
Nepoužívejte však teplejší vodu než 80cC.
Indikace nabití
C
◗ Nabíjení
Jakmile je akumulátor téměř vybitý, rozsvítí se
zelená kontrolka.
C
◗ Akumulátory jsou plně nabity
Když je akumulátor plně nabitý, zelená kontrolka
začne blikat.
S plně nabitými akumulátory se lze holit až
70 minut.
ČESKY 45

C
◗ Akumulátory jsou již téměř vybity
Když jsou akumulátory již téměř vybity, dolní
kontrolka změní barvu na červenou. Po vypnutí
přístroje tato kontrolka asi 4 sekundy bliká.
Nabíjení
Nabíjejte a uchovávejte přístroj při teplotě okolí
mezi 5cC a 35cC.
Nabíječ je vhodný pro síťová napětí v rozmezí
100 až 240 V.
Můžete se též oholit bez nabíjení připojením
holicího přístroje do sítě. Během holení bude svítit
zelená kontrolka.
Přístroj však nenechávejte připojený do sítě trvale.
C
1 Zástrčku síťového přívodu zasuňte do
přístroje.
2 Síťovou zástrčku zasuňte do zásuvky.
Nenabíjejte akumulátory pokud je přístroj uzavřen
v pouzdru.
3 Pokud nabíjíte akumulátor přístroje
poprvé nebo po dlouhé přestávce,
doporučujeme nabíjet akumulátor asi
4 hodiny.
Akumulátory v běžném provozu nabíjejte asi
1 hodinu.
S plně nabitým akumulátorem se lze holit až
70 minut.
ČESKY46

4 Jakmile jsou akumulátory plně nabity,
vytáhněte zástrčku síťového přívodu ze
zásuvky a přívod odpojte též od přístroje.
Holení
1 Zapojte přístroj stisknutím tlačítka on/off.
C
2 Holicím přístrojem pohybujte po pokožce
rychle přímými i krouživými pohyby.
Pokud je pokožka suchá,dosáhnete při holení
nejlepších výsledků.
Pamatujte, že pokožka potřebuje 2 až 3 týdny na
to, aby si novému způsobu holení přivykla.
3 Holicí přístroj vypněte jedním stisknutím
tlačítka on/off.
C
4 Vždy po použití nasaďte na holicí přístroj
ochranný kryt, abyste předešli poškození
holicích hlav.
Holicí hlavy (typ HQ6 Quadra) vyměňte pro
zajištění nejlepších výsledků holení každé dva roky.
Zastřihovač
Zastřihovač slouží k úpravě kotlet nebo knírku.
C
1 Zastřihovač zapnete posunutím jeho
spínače směrem nahoru.
Zastřihovač lze zapojit i když je motor v chodu.
ČESKY 47
Čištění přístroje
Pravidelné čištění zajistí nejlepší výsledky při
holení.
Nejjednodušší a nejhygieničtější způsob čištění
přístroje je opláchnout každý den holicí jednotku
i komoru pro odstřižené vousy horkou vodou
(60cC-80cC).
Při čištění přístroje není nutné vyjímat holicí hlavy
(korunky a nožové věnce). Pokud byste je přesto
vyjmuli, nezapomeňte do každé korunky vložit
zpět ten nožový věnec, který v ní původně byl.
Nožové věnce jsou v korunkách zaběhnuty a
kdybyste je zaměnili, zhoršil by se výsledek holení
a trvalo by velmi dlouho než by se nožové věnce
v jiné korunce opět zaběhly.
Denně: holicí jednotka a komora pro
odstřižené vousy
1 Vypněte přístroj, vyjměte zástrčku nabíječe
ze zásuvky a vyjměte též zástrčku z
přístroje.
C
2 Stiskněte uvolňovací tlačítko (1) a otevřte
holicí jednotku (2).
C
3 Umyjte občas holicí jednotku a prostor
pro odstřižené vousy pod tekoucí horkou
vodou.
4 Holicí jednotku uzavřete a vytřepejte
přebytečnou vodu.
ČESKY48
2
1
Holicí jednotku nikdy nesušte ručníkem nebo
jinou tkaninou, vyvarujete se tak poškození
holicích hlav.
C
5 Opět otevřete holicí jednotku a nechte
přístroj v otevřeném stavu zcela uschnout.
Prostor pro odstřižené vousy můžete též vyčistit
bez použití vody přiloženým kartáčkem.
Zastřihovač
Zastřihovač vyčistěte po každém použití.
1 Vypněte přístroj, vyjměte zástrčku nabíječe
ze zásuvky a vyjměte též zástrčku z
přístroje.
C
2 Vyčistěte zastřihovač přiloženým
kartáčkem.
C
3 Na lišty zastřihovače kápněte každých šest
měsíců kapku oleje na šicí stroje.
Výměna holicích hlav
Pro optimální výsledky holení vyměňte holicí hlavy
každé dva roky.
1 Vypněte přístroj, vyjměte zástrčku nabíječe
ze zásuvky a vyjměte též zástrčku z
přístroje.
ČESKY 49
C
2 Stiskněte uvolňovací tlačítko (1) a otevřte
holicí jednotku (2).
C
3 Kolečko (1) otočte proti směru pohybu
hodinových ruček a odejměte zajišťovací
rámeček holicích hlav (2).
C
4 Vyjměte holicí hlavy a vložte na stejná
místa nové holicí hlavy tak,aby malé
otvory směřovaly do středu holicí
jednotky.
Přesvědčte se, že holicí hlavy přesně zapadly na
svá místa.
C
5 Sestavte holicí jednotku vložením
zajišťovacího rámečku. Stiskněte kolečko
(1) a otočte jím ve směru pohybu
hodinových ruček (2).
Poškozené nebo opotřebené holicí hlavy vyměňte
vždy jen za typy Philishave HQ6 Quadra.
Uchovávání
C
◗ Nasaďte na přístroj ochraný kryt abyste
předešli poškození holicích hlav.
◗ Holicí přístroj můžete uchovávat v přiloženém
váčku.
ČESKY50
2
1
2
1
1
2
Likvidace akumulátorů
Vestavěný akumulátory obsahuje substance, které,
po jeho rozpadu, mohou škodit životnímu
prostředí.
Pokud jednoho dne přístroj likvidujete, vyjměte z
něj akumulátory.Akumulátory nezahazujte do
běžného domovního odpadu, ale odevzdejte je
do sběrny, k tomu určené. Akumulátory můžete
též odevzdat v servisním středisku firmy Philips,
kde se již postarají o jejich optimální likvidaci.
Akumulátory vyjměte až když jsou zcela vybité.
1 Vytáhněte napáječ ze zásuvky a vysuňte
přívodní zástrčku z přístroje.
C
2 Ponechte motorek přístroje v chodu
dokud se nezastaví. Pak povolte šroubky a
přístroj otevřte.
3 Vyjměte akumulátory.
Když jste z přístroje vyjmuli akumulátory, nesmíte
ho již připojit do sítě!
Odstranění případných poruch
1 Zhoršené výsledky holení.
B
Příčina 1: holicí hlavy jsou zašpiněné.
B
Přístroj nebyl důkladně vyčištěn nebo voda při
čištění nebyla dostatečně horká.
ČESKY 51
◗ Před dalším holením přístroj důkladně
vyčistěte (viz odstavec "Čištění přístroje").
B
Příčina 2: holicí hlavy jsou blokovány dlouhými
vousy.
C
◗ Sejměte zajišťovací rámeček.
C
◗ Vyčistěte korunky a nožové věnce.
Čistěte vždy pouze jednu holicí hlavu (korunku a
nožový věnec) a vložte ji zpět do holicí jednotky
dříve, než vyjmete další holicí hlavu. Pokud byste
do některé korunky vložili jiný nožový věnec,
trvalo by týdny než by se nožový věnec v jiné
korunce zaběhl a v té době by výsledek holení
nebyl uspokojivý.
◗ Odstraňte odstřižené vousy přiloženým
kartáčkem.
◗ Vložte zpět zajišťovací rámeček.
B
Příčina 3: holicí hlavy jsou poškozeny nebo
opotřebeny.
◗ Sejměte zajišťovací rámeček.
◗ Vyjměte z holicí hlavice staré holicí hlavy a
nahraďte je novými.
Poškozené nebo opotřebené holicí hlavy musí být
nahraženy výhradně originálními hlavami Philips
HQ6 Quadra.
◗ Vložte zpět zajišťovací rámeček.
ČESKY52
2
1
2 Přístroj po stisknutí tlačítka ON/OFF
nepracuje.
B
Přičina: akumulátor y jsou vybité.
◗ Nabijte akumulátory.
3 Holicí jednotka vypadává z přístroje.
C
◗ V takovém případě zkontrolujte,zda závěsné
pružiny mají dostatečnou sílu udržet jednotku
na přístroji. Pokud jsou pružiny v pořádku, lze
holicí jednotku na přístroj znovu nasadit.
Pokud by ale jejich síla nestačila, nebo byly
jakkoli poškozené,kontaktujte servis firmy
Philips abyste zabránili případnému poškození
vašeho přístroje.
Příslušenství
- HQ6 holicí hlavy Philishave Quadra
- HQ8000 síťová zástrčka.
- HQ100 čistič holicích hlav Philishave Action
Clean.
- HQ101 čisticí kapalina pro holicí hlavy
Philishave Action Clean Refill.
- HQ110 čisticí sprej pro holicí hlavy Philishave
Head Cleaner.
ČESKY 53

Záruka a servis
Pokud byste potřebovali jakoukoli informaci nebo
měli jiný problém, zkuste nalézt potřebné
informace na internetové stránce
www.philips.com nebo kontaktujte Informační
středisko firmy Philips (Infolinka Philips), případně
se poraďte se svým dodavatelem.
◗ Tento návod uschovejte pro případné pozdější
nahlédnutí.
ČESKY54

Figyelem
Kérjük, hogy a készülék használata elott olvassa el
a használati útmutatót.
◗ Csak a készülékkel együtt szállított HQ8000
típusú adaptert használja a borotva töltéséhez.
◗ A HQ8000 adapter a 100-240 V feszültséget
12 V feszültségre alakítja át. Csak a készülékkel
szállított adaptert használja, hogy biztosítsa a
biztonságos töltést.
C
◗ Legyen óvatos, ne érje víz a HQ8000 típusú
adaptert.
C
◗ A borotva biztonságos 12 V kisfeszültséggel
működik.Vízhatlan és vízcsap alatt tisztítható.
Ne öblítse le 80cC-nál melegebb vízzel.
Töltéskijelzések
C
◗ Töltés
Amint elkezdi feltölteni a lemerült borotvát, a zöld
működést jelző lámpa világítani kezd.
C
◗ Az akkumulátorok teljesen feltöltődtek.
Az elem feltöltött állapotát a zöld működést jelző
lámpa villogása jelzi.
A teljesen feltöltött borotvát vezeték nélküli kb.
70 percig használhatja.
MAGYAR 55
C
◗ Az akkumulátorok lemerültek
Ha az akkumulátorok lemerültek, az alsó LED
piros lesz. Ha kikapcsolja a borotvát, a piros LED
4 másodpercig villog.
Töltés
Töltse fel a készüléket és tartsa 5cC és 35cC
közötti hőmérsékleten.
A töltő egység 100-240 V hálózati feszültséghez
alkalmazható.
Fel nem töltött borotvával is borotválkozhat, ha a
készüléket a fali konnektorhoz csatlakoztatja.A
zöld jelzőfény borotválkozás közben világítani fog.
Ne hagyja a borotvát folyamatosan a hálózathoz
csatlakoztatva.
C
1 Dugja a készülék csatlakozó dugóját a
borotvába.
2 Dugja az adaptert a fali konnektorba.
Ne töltse a borotvát zárt tokban.
3 Ha először tölti a borotvát, vagy hosszú
ideig nem használta: a borotvát 4 órán
keresztül folyamatosan töltse.
A normál töltés kb. 1 órát vesz igénybe.
A teljesen feltöltött borotvát vezeték nélküli kb.
70 percig használhatja.
4 Húzza ki az adaptert a fali konnektorból és
ha az akkumulátorok teljesen feltöltődtek,
MAGYAR56
húzza ki a csatlakozó dugót a készülékből
is.
Borotválkozás
1 Kapcsolja be a borotvát a be/kikapcsoló
gomb egyszeri megnyomásával.
C
2 Gyorsan mozgassa a borotvafejeket a
bőrén, egyenes és körkörös mozdulatokat
végezve.
A száraz bőrön történő borotválkozás biztosítja a
legjobb eredményt.
Bőrének 2-3 hétre van szüksége ahhoz, hogy a
Philishave rendszerhez hozzászokjon.
3 Kapcsolja ki a borotvát a be/kikapcsoló
gomb egyszeri megnyomásával.
C
4 A borotva minden használata után tegye rá
a védosapkát, hogy megvédje a
sérülésektol.
A legjobb borotválkozási eredmény érdekében
2 évente cserélje ki a borotvafejeket (típus: HQ6
Quadra).
Oldalszakáll vágó
Az oldalszakáll és a bajusz ápolásához.
C
1 Kapcsolja be az oldalszakáll vágót a
csúszókapcsoló felfelé nyomásával.
A oldalszakáll vágót a motor működése közben is
bekapcsolhatja.
MAGYAR 57

Tisztítás
A rendszeres tisztítás garantálja a legjobb
borotválkozási eredményt.
A legkönnyebb és leghigénikusabb módja a
tisztításnak, ha a készüléket és szőrkamrát minden
nap melegvizzel leöblíti (60cC-80cC).
Amikor tisztítja a készüléket, nem szükséges
levenni a borotva fejeket (vágókéseket, szitákat).
Ha azonban levette, figyeljen rá, hogy ne keverje
össze a késeket és a szitákat, mivel csak a
páronként, a szitával összecsiszolt késekkel legjobb
a borotválkozás eredménye. Ha véletlenül mégis
összekeverte őket, eltelhet néhány hét,amíg eléri
a legjobb borotválkozási eredményt.
Mindennapos használat: borotvaegység és
szőrkamra
1 Kapcsolja ki a borotvát, húzza ki az
adaptert a fali konnektorból és húzza ki a
töltő csatlakozó dugóját a borotvából.
C
2 Nyomja meg az (1) kioldógombot és nyissa
ki a borotvaegységet (2).
C
3 A borotvaegységet és a szőrkamrát úgy
tisztítsa, hogy melegvizes csap alatt öblítse
le néhányszor.
4 Zárja le a borotvaegységet és rázza ki a
felesleges vizet.
Sose szárítsa meg a borotvaegységet törülközővel
vagy papírzsebkendővel, mivel ezek megsérthetik
a borotvafejeket.
MAGYAR58
2
1

C
5 Nyissa ki ismét a borotvaegységet, és
hagyja hogy a készülék teljesen
megszáradjon.
A szőrgyűjtő kamrát ne vízzel, hanem a
készülékkel együtt szállított kefével tisztítsa.
Oldalszakáll vágó
Minden használat után tisztítsa meg a pajeszvágót.
1 Kapcsolja ki a borotvát, húzza ki az
adaptert a fali konnektorból és húzza ki a
töltő csatlakozó dugóját a borotvából.
C
2 A pajeszvágót a készülékkel együtt
szállított kefével tisztítsa meg.
C
3 Hat havonta olajozza meg az oldalszakáll
vágó fogait egy csepp varrógépolajjal.
A borotvafejek cseréje
A legjobb borotválkozási eredmény érdekében
két évente cserélje ki a borotvafejeket.
1 Kapcsolja ki a borotvát, húzza ki az
adaptert a fali konnektorból és húzza ki a
töltő csatlakozó dugóját a borotvából.
C
2 Nyomja meg az (1) kioldógombot és nyissa
ki a borotvaegységet (2).
MAGYAR 59
2
1
C
3 Forgassa a tengelyt az óramutató járásával
ellentétes irányba (1) és vegye ki a tartó
keretet (2).
C
4 Vegye ki a borotvafejeket és tegye be a
borotvába az újakat úgy, hogy a kis
lyukakkal ellátott részek a borotva közepe
felé mutassanak.
Vigyázzon, hogy a borotvafejek csapjai pontosan
illeszkedjenek a mélyedésekbe.
C
5 Szerelje össze a borotvaegységet a
tartókeret kicserélésével.Nyomja meg az
(1) kereket és fordítsa el jobbra (órajárás)
(2).
A sérült vagy tört borotvafejeket csak Philishave
HQ6 Quadra típusú borotvafejekre cserélje.
Tárolás
C
◗ Sérülések elkerülése végett tegye fel a
borotvára a védősapkát.
◗ A készüléket a hozzá mellékelt tokban tárolja.
Az akkumulátorok kiselejtezése
A beépített tölthető akkumulátorok olyan
anyagokat tartalmaznak, amik szennyezhetik a
környezetet.
MAGYAR60
2
1
1
2

Ha a borotvát kiselejtezi, vegye ki belőle az
akkumulátorokat.Az akkumulátorokat ne dobja a
közönséges háztartási szemétbe, hanem adja át
egy hivatalos gyűjtő helynek. Elviheti az
akkumulátorokat Philips szakszervizbe is, ami
környezetbarát módon fogja ezeket kiselejtezni.
Csak akkor vegye ki az akkumulátorokat,ha
teljesen lemerültek.
1 Húzza ki az adaptert a fali konnektorból és
húzza ki a készülék csatlakozó dugóját is a
borotvából.
C
2 Hagyja működni a borotvát, míg megáll,
nyissa ki az oldalszakáll vágót, csavarja ki a
csavarokat és nyissa ki a borotvát.
3 Vegye ki az akkumulátorokat.
Miután az akkumulátorokat kivette, ne
csatlakoztassa a borotvát a hálózathoz.
Hibaelhárítás
1 A borotválkozás nem megfelelő.
B
1. ok: a borotvafejek szennyezettek.
B
Nem öblítette le alaposan a borotvát vagy a víz
nem volt elég meleg.
◗ Mielőtt folytatná a borotválkozást, tisztítsa
meg alaposan a borotvát (lásd a 'Tisztítás' c.
részt).
MAGYAR 61

B
2. ok: hosszú szőrszálak eltömték a borotvafejeket.
C
◗ Vegye ki a tartókeretet.
C
◗ Tisztítsa meg a vágókéseket és a szitákat.
Egyszerre csak egy vágófejet és szitát tisztítson
meg, mert ezek egymáshoz tartoznak. Ha
véletlenül összekeveri a vágófejeket és a szitákat,
eltarthat néhány hétig, míg helyreáll az optimális
borotválkozási teljesítmény.
◗ A szőrt a tartozék kefével távolítsa el.
◗ Tegye vissza a tartókeretet a borotvaegységre.
B
3. ok: a borotvafejek sérültek vagy kopottak.
◗ Vegye ki a tartókeretet.
◗ Vegye ki a régi borotvafejeket a borotvából és
tegye be az újakat.
A sérült vagy kopott borotvafejeket (kések és
sziták) csak eredeti Philishave HQ6 Quadra
borotvafejekkel szabad cserélni.
◗ Tegye vissza a tartókeretet a borotvaegységre.
2 Ha az ON/OFF (be/kikapcsoló) gombot
megnyomta,a borotva nem működik.
B
Ok: az akkumulátorok kimerültek.
MAGYAR62
2
1
◗ Töltse fel az akkumulátorokat.
3 A borotvaegység leesik a borotváról.
C
◗ Ha a borotvaegységet leszerelte a borotváról,
ellenőrizze, hogy a záró rugó megfelelően a
készülékhez kapcsolódik, vagyis nem lazult-e
ki, és nem látható bármilyen törés vagy
sérülés. Ha a záró rugó megfelelően
kapcsolódik a készülékhez, akkor a
borotvaegység ismét könnyen
visszahelyezhető a borotvára.Ha a záró rugó
azonban meglazult, törött vagy megsérült,
kérem keresse fel Philips kereskedőjét vagy a
legközelebbi Philips szakszervizt, hogy
elkerülje a borotva megrongálását.
Tartozékok
- HQ6 Quadra Philishave borotva körkések.
- HQ8000 adapter.
- HQ100 Philishave Action Clean (borotvafej
tisztító).
- HQ101 Philishave Action Clean Refill
(borotvafej tisztító folyadék).
- HQ110 Philishave Head Cleaner (borotvafej
tisztító spray).
MAGYAR 63

Garancia és javítás
Javíttatás, tájékozódás vagy bármilyen probléma
esetén látogassa meg a www.philips.com Philips
Web-lapot,vagy lépjen érintkezésbe a helyi Philips
Vevőszolgálattal (a telefonszámot megtalálja a világ
minden részére kiterjedő garancialevélen). Ha
lakóhelyén nincs Vevőszolgálat, forduljon a helyi
Philips szaküzlethez vagy lépjen érintkezésbe a
Philips Háztartási Kisgépek és Szépségápolási
Termékek üzletág képviselőivel.
◗ A használati útmutatót őrizze meg későbbi
felhasználásra.
MAGYAR64
Výstraha
Pred použitím zariadenia si prečítajte tento návod.
◗ Na nabíjanie zariadenia používajte len dodaný
transformátor HQ8000.
◗ Transformátor HQ8000 mení napätie
100-240 voltov na 12 voltov. Používajte len
transformátor dodaný spolu so zariadením,
ktorý garantuje jeho bezpečné použitie.
C
◗ Dbajte, aby sa transformátor HQ8000
nedostal do styku s vodou.
C
◗ Prevádzka zariadenia je pri nízkom napätí
12 voltov. Holiaci strojček je vodotesný a
môžete ho umývať pod tečúcou vodou.
Neoplachujte ho vodou teplejšou ako 80cC.
Ukazovateľ nabíjania
C
◗ Nabíjanie
Akonáhle začnete nabíjať prázdny holiaci strojček,
zelené kontrolné svetlo sa rozsvieti.
C
◗ Nabité batérie
Keď je baterka kompletne nabitá, zelené
kontrolné svetlo začne blikať.
Plne nabitý holiaci strojček poskytuje až 70 minút
bezkáblového holenia.
SLOVENSKY 65
C
◗ Vybité batérie
Keď sa batérie vybijú, spodné kontrolné svetlo
zmení farbu na červenú. Po vypnutí holiaceho
strojčeka bude červené kontrolné svetlo blikať 4
sekundy.
Nabíjanie
Zariadenie nabíjajte a odkladajte pri teplote okolia
5cC a 35cC.
Zástrčka je určená pre sieťové napätie v rozpätí
od 100 do 240 V.
Holiť sa môžete aj bez toho, aby bola batéria
holiaceho strojčeka nabitá. Holiaci strojček
pripojte do siete, počas holenia bude svietiť
zelené kontrolné svetlo.
Prístroj nenechávajte nepretržite pripojený do
siete.
C
1 Koncovku zasuňte do holiaceho strojčeka.
2 Zástrčku pripojte siete.
Holiaci strojček nedobíjajte v zatvorenom púzdre.
3 Pri prvom nabíjaní, alebo po dlhšej dobe
nepoužívania: nechajte holiaci strojček
nabíjať nepretržite 4 hodiny.
Nabíjanie bežne trvá pribl.1 hodinu.
Plne nabitý holiaci strojček poskytuje až 70 minút
bezkáblového holenia.
SLOVENSKY66
4 Akonáhle sú baterky úplne nabité, odpojte
transformátor zo siete a jeho koncovku
odpojte z holiaceho strojčeka.
Holenie
1 Zapnite holiaci strojček stlačením vypínača.
C
2 Rýchlo pohybujte holiacimi hlavami po
pokožke,robte rovné aj krúživé pohyby.
Holením na suchej pokožke dosiahnete najlepšie
výsledky.
Vaša pokožka môže potrebovať 2-3 týždne, kým
si zvykne na holiaci systém Philishave.
3 Holiaci strojček vypnete jedným stlačením
hlavného vypínača ON/OFF.
C
4 Aby ste predišli poškodeniu,po každom
použití holiaci strojček zakryte ochranným
krytom.
Holiace hlavy vymieňajte raz za dva roky (typ
HQ6 Quadra), aby ste zachovali optimálny výkon
zariadenia.
Zastrihovanie
Pre zastrihovanie kotliet a fúzov.
C
1 Zapnite zastrihovač posunutím vypínača
smerom hore.
Zastrihovač môžete aktivovať aj počas chodu
motora.
SLOVENSKY 67
Čistenie
Pravidelné čistenie zabezpečuje lepšie výsledky
holenia.
Najjednoduchšií a hygienicky najvhodnejší spôsob
čistenia zariadenia je každodenné opláchnutie
holiacej jednotky a komory na chlpy horúcou
vodou (60cC-80cC).
Pri čistení zariadenia nie je potrebné dávať dole
holiace hlavy (rezače a zdvíhače).Ak ich chcete
vytiahnúť, dbajte, aby ste nepomiešali rezače so
zdvíhačmi, pretože ostrenie rezača v zdvíhači
zabezpečuje optimálny chod každej sady. Ak sady
omylom pomiešate môže trvať týždne, kým sa
opäť dosiahne optimálna kvalita holenia.
Každý deň: holiaca jednotka a komôrka na
chĺpky
1 Vypnite zariadenie, vytiahnite
transformátor zo zásuvky el. siete a druhú
koncovku vytiahnite z holiaceho strojčeka.
C
2 Stlačte tlačidlo (1) a otvorte holiacu
jednotku (2).
C
3 Vyčistite holiacu jednotku a komoru na
chĺpky tak, že ich raz za čas opláchnete
pod tečúcou horúcou vodou.
4 Uzatvorte holiacu jednotku a otraste z nej
prebytočnú vodu.
Holiacu jednotku nesmiete sušiť pomocou
uteráka ani inej tkaniny, pretože by ste mohli
poškodiť holiacu hlavu.
SLOVENSKY68
2
1
C
5 Holiacu jednotku znovu otvorte a nechajte
celé zariadenie úplne usušiť.
Komoru na chĺpky môžete vyčistiť aj bez vody,s
priloženou kefkou.
Zastrihovač
Zastrihovač vyčistite po každom použití.
1 Vypnite zariadenie, vytiahnite
transformátor zo zásuvky el. siete a druhú
koncovku vytiahnite z holiaceho strojčeka.
C
2 Zastrihovač očistite pomocou priloženej
kefky.
C
3 Každých šesť mesiacov namažte zúbky
zastrihovača kvapkou oleja na šijacie
stroje.
Výmena holiacich hláv
Holiace hlavy vymieňajte raz za dva roky na
udržanie optimálnych výkonov holenia .
1 Vypnite zariadenie, vytiahnite
transformátor zo zásuvky el. siete a druhú
koncovku vytiahnite z holiaceho strojčeka.
C
2 Stlačte tlačidlo (1) a otvorte holiacu
jednotku (2).
SLOVENSKY 69
2
1

C
3 Koliesko otočte proti smeru chodu
hodinových ručičiek (1) a vytiahnite
zachytávací rám (2).
C
4 Vytiahnite holiace hlavy a nové vložte do
holiacej jednotky tak, aby časti s malými
otvormi smerovali do stredu holiacej
jednotky.
Dbajte, aby výčnelky holiacich hláv zapadli presne
do zodpovedajúcich osadení.
C
5 Vráťte späť zachytávací rám a poskladajte
holiacu jednotku. Stlačte koliesko (1) a
otočte ním v smere pohybu hodinových
ručičiek (2).
Poškodené alebo opotrebované holiace hlavy
vymieňajte len za holiace hlavy Philishave HQ6
Quadra.
Odkladanie
C
◗ Aby ste zabránili poškodeniu,dajte na holiaci
strojček ochranný kryt.
◗ Zariadenie môžete odkladať do priloženého
puzdra.
Odstránenie batérií
Zabudované dobíjateľné batérie obsahujú látky,
ktoré by mohli znečistiť životné prostredie.
SLOVENSKY70
2
1
1
2
Batérie odstráňte spolu s opotrebovaným
zariadením. Neovyhadzujte ich do domového
odpadu, ale odneste ich do príslušnej zberne.
Môžete ich odniesť aj do servisného centra
Philips vo Vašej krajine, kde ich odstránia
spôsobom bezpečným pre životné prostredie.
Batérie odstráňte až keď sú úplne vybité.
1 Vytiahnite transformátor zo zásuvky el.
siete a druhú koncovku vytiahnite z
holiaceho strojčeka.
C
2 Nechajte strojček bežať dovtedy, kým sa
batérie nevybijú, otvorte zastrihovač,
demontujte skrutky a otvorte holiaci
strojček.
3 Vytiahnite batérie.
Po vytiahnutí batérií už zariadenie do siete
nepripájajte.
Odstraňovanie porúch
1 Znížený výkon holenia.
B
Príčina 1: holiace hlavy sú znečistené
B
Holiaci strojček nebol dostatočne opláchnutý
alebo opláchnutý pod dostatočne horúcou vodou.
◗ Holiaci strojček riadne vyčistite pretým ako
budete pokračovať v holení (viď "Čistenie").
SLOVENSKY 71

B
Príčina 2: dlhé chlpy zavadzajú holiacim hlavám.
C
◗ Vyberte zachytávací rám.
C
◗ Vyčistite rezače a zdvíhače.
Nečistite viac ako jeden rezač a zdvíhač naraz,
nakoľko predstavujú sadu.Ak ich omylom
pomiešate, môže trvať niekoľko týždňov,kým
opäť dosiahnú optimálny výkon.
◗ Chĺpky odstráňte priloženou kefou.
◗ Zachytávací rám vráťte naspäť na holiacu
jednotku.
B
Príčina 3: holiace hlavy sú poškodené, alebo
opotrebované.
◗ Vyberte zachytávací rám.
◗ Odstráňte staré holiace hlavy z holiacej
jednotky a nahraďte ich novými.
Poškodené alebo opotrebované holiace hlavy
(rezače a zdvíhače) môže byť nahradené len
originálnymi holiacimi hlavami Philishave HQ6
Quadra.
◗ Zachytávací rám vráťte naspäť na holiacu
jednotku.
2 Holiaci strojček nepracuje keď je zatlačený
spínač/vypínač.
SLOVENSKY72
2
1

B
Príčina: batérie sú vybité.
◗ Dobite batérie.
3 Holiaca jednotka je oddelená od holiaceho
strojčeka.
C
◗ Ak sa holiaca jednotka oddelí od zariadenia,
skontrolujte, či je upínacia pružina riadne
upevnená na svojom mieste, prípadne, či nie je
voľná, alebo na nej nie sú viditeľné známky
poškodenia.Ak je pružina stále riadne
upevnená, holiacu jednotku môžete ku
holiacenu strojčeku veľmi jednoducho pripojiť
späť.V prípade, že pružina je voľná, zlomená,
alebo inak poškodená, prosíme kontaktujte
predajcu výrobkov firmy Philips,alebo
najbližšie servisné centrum firmy Philips, aby
ste predišli poškodeniu holiaceho strojčeka.
Príslušenstvo
- Holiace hlavy HQ6 Quadra Philishave.
- Transformátor HQ8000.
- Systém HQ100 Philishave Action Clean na
čistenie holiacich hláv.
- Náhradná náplň HQ101 pre Philishave Action
Clean (kvapalina na čistenie holiacich hláv).
- Sprej na čistenie holiacich hláv HQ110
Philishave Head Cleaner.
SLOVENSKY 73

Informácie a služby
Ak potrebujete informáciu alebo máte problém,
prosíme Vás, aby ste sa oboznámili s webovou
stránkou Philips www.philips.com alebo sa obrátili
na zákaznícke centrum vo Vašej krajine (telefónne
čísla nájdete na celosvetovom záručnom liste).Ak
sa vo Vašej krajine nenachádza zákaznícke
centrum Philips, obráťte sa na Vášho miestneho
predajcu Philips alebo sa skontaktujte s oddelením
služieb divízie Domáce spotrebiče a osobná
starostlivosť.
◗ Tent návod si odložte na neskoršie použitie.
SLOVENSKY74
Увага
Будь-ласка, перечитайте цю інструкцію перед
тим, як використовувати пристрій.
◗ Використовуйте лише вилку-адаптер
електроживлення HQ8000, що
поставляється з електробритвою, щоб
заряджати цю електробритву.
◗ Блок живлення "HQ8000" трансформує
100-240 В у 12 В. Тільки використання
блоку живлення, що додається до
пристрою, гарантує безпечне перетворення
напруги.
C
◗ Слідкуйте, щоб перехідник HQ8000 не
намок.
C
◗ Бритва працює з безпечною низькою
напругою 12 В. Вона не пропускає воду, її
можна мити під краном. Не мийте пристрій
водою з температурою вище 80cC
Індикація зарядження
C
◗ Зарядження
Як тільки ви почнете заряджати розряджені
акумулятори електробритви, засвітиться зелена
сигнальна лампочка.
C
◗ Акумулятори заряджено повністю
Коли акумулятори заряджено повністю,
починає блимати зелена сигнальна лампочка.
Повністю зарядженою бритвою можна
голитися в сукупності до 70 хвилин.
УКРАЇНСЬКІЙ 75
C
◗ Акумулятори розряджено
Коли акумулятори розряджаються, нижня
лампа індикації починає світитися червоним.
Коли Ви вимикаєте бритву, червона лампа
блимає 4 секунди.
Зарядження
Перезаряджайте та зберігайте пристрій при
температурі від 5 cC до 35cC.
Силовий перехідник призначено для напруги
від 100 до 240 В.
Ви можете голитися також, не підзаряжаючи
бритву, а під'єднавши її до електроживлення.
Під час гоління зелений сигнальний індикатор
буде постійно горіти.
Не залишайте бритву постійно ввімкнутою у
розетку.
C
1 Вставте вилку приладу у електробритву.
2 Вставте вилку-адаптер до розетки
електромережі.
Не перезаряджайте бритву у закритому чохлі.
3 Якщо бритва заряджається вперше або
після тривалої перерви, то заряджати її
потрібно протягом 4 годин без перерви.
Зарядження займає приблизно 1 годину.
Повністю зарядженою бритвою можна
голитися в сукупності до 70 хвилин.
УКРАЇНСЬКІЙ76
4 Витягніть блок з розетки та шнур з
бритви, коли акумулятори повністю
зарядяться.
Гоління
1 Ввімкніть бритву, один раз натиснувши
на кнопку вмикання /вимикання.
C
2 Швидкими поступальними і круговими
рухами переміщуйте голівку для гоління
по шкірі.
Якість гоління буде найвищою, якщо шкіра суха.
Для звикання шкіри до бритви Philishave може
знадобитися 2 - 3 тижні.
3 Вимкніть бритву, натиснувши одного
разу на кнопку on/off (вкл/викл).
C
4 Надівайте захисний ковпачок на бритву
кожного разу після використання, щоб
запобігти пошкодженню.
Для досягнення оптимальних результатів
гоління голівки для гоління (типу HQ6 Quadra)
слід замінювати кожні два роки.
Тример
Для підрівнювання баків і вусів.
C
1 Підготуйте тример до роботи,
пересунувши движок вверх.
Тример можна привести в робочий стан тільки
при працюючому двигуні.
УКРАЇНСЬКІЙ 77

Чистка
Регулярне чищення гарантує кращу роботу
електробритви.
Найбільш простим та гігієнічно безпечним
способом почистити пристрій є полоскання
голівок для гоління та триммеру водою. (60cC80cC).
Для чистки бритви зніміть з неї бритвені
голівки (ножі і захист). Якщо ви бажаєте їх
розібрати, то зверніть увагу на те, щоб вони
завжди залишалися у парі, тому що лише у цій
парі вони можуть працювати оптимально.
Якщо ж цього правила не дотримуватися і
змішати у парі частини з різних пар, то до
відновлення оптимальних характеристик
гоління пройде декілька тижнів.
Кожного дня: голівки для гоління та
триммер
1 Вимкніть електробритву, вийміть вилку-
адаптер з розетки електромережі та
вийміть штекер приладу з
електробритви.
C
2 Натисніть кнопку розблокування (1) та
відкрийте блок гоління (2).
C
3 Чистіть блок для гоління та камеру для
збирання відрізаних волосків,
промиваючи їх під гарячою водою.
4 Закрийте блок для гоління та струсить
воду, що залишилися після промивання.
УКРАЇНСЬКІЙ78
2
1
Ніколи не протирайте голівки для гоління
полотенцем або якоюсь ганчіркою, бо це може
пошкодити леза бритви.
C
5 Відкрийте блок для гоління знову та
залиште їх відкритими, доки пристрій
повністю не висохне.
Камеру для збирання відрізаних волосків ви
можете почисти й без води - щіточкою, що
входить у комплект бритви.
Тример
Ножиці слід чистити кожного разу після їх
використання.
1 Вимкніть електробритву, вийміть вилку-
адаптер з розетки електромережі та
вийміть штекер приладу з
електробритви.
C
2 Пристрій слід чистити щiткой, яка
додається до нього при продажу.
C
3 Один раз на шість місяців змащуйте
зубці ножиць краплею машинного
мастила.
Заміна голівок для гоління
Для досягнення оптимальних результатів
гоління голівки для гоління слід замінювати
кожні два роки.
УКРАЇНСЬКІЙ 79
1 Вимкніть електробритву, вийміть вилку-
адаптер з розетки електромережі та
вийміть штекер приладу з
електробритви.
C
2 Натисніть кнопку розблокування (1) для
того, щоб відкрити блок гоління (2).
C
3 Поверніть коліщатко проти
годинникової стрілки (1) та зніміть
рамку-фіксатор (2).
C
4 Зніміть голівки з лезами та вставте нові у
блок для гоління так, щоб частини з
невеликими отворами були спрямовані
до центру блоку для гоління.
Виступи на голівках повинні попадати точно у
пази.
C
5 Зберіть блок гоління, встановивши
утримуючу рамку. Натисніть коліщатко
(1) та поверніть за годинниковою
стрілкою (2).
Замінюйте пошкоджені або зношені голівки для
гоління лише бритвеними голівками типу
Philishave HQ6 Quadra.
УКРАЇНСЬКІЙ80
2
1
2
1
1
2

Зберігання
C
◗ Надіньте захисний ковпачок на бритву, щоб
запобігти пошкодженню.
◗ Пристрій можна зберігати у футлярі, яка
додається до нього при продажу.
Як позбутися акумуляторів
Убудований акумулятор містить речовини, що
можуть забруднювати навколишнє середовище.
Перед тим, як викинути пристрій, що відслужив,
витягніть акумулятори. Не викидайте
акумулятори із звичайним побутовим сміттям віднесіть їх до спеціального приймального
пункту. Також ви можете віднести акумулятори
до сервісного центру Philips, де їх утилізують
небезпечно для оточуючого середовища.
Виймайте акумулятори тільки коли вони
повністю розряджені.
1 Витягніть блок живлення з розетки та
шнур - з пристрою.
C
2 Дайте бритві попрацювати до повної
зупинки, відкрийте тріммер, відкрутіть
гвинти та відкрийте бритву.
3 Витягнення акумуляторів.
Не підключайте бритву до розетки після того
як вийняли акумулятори.
УКРАЇНСЬКІЙ 81
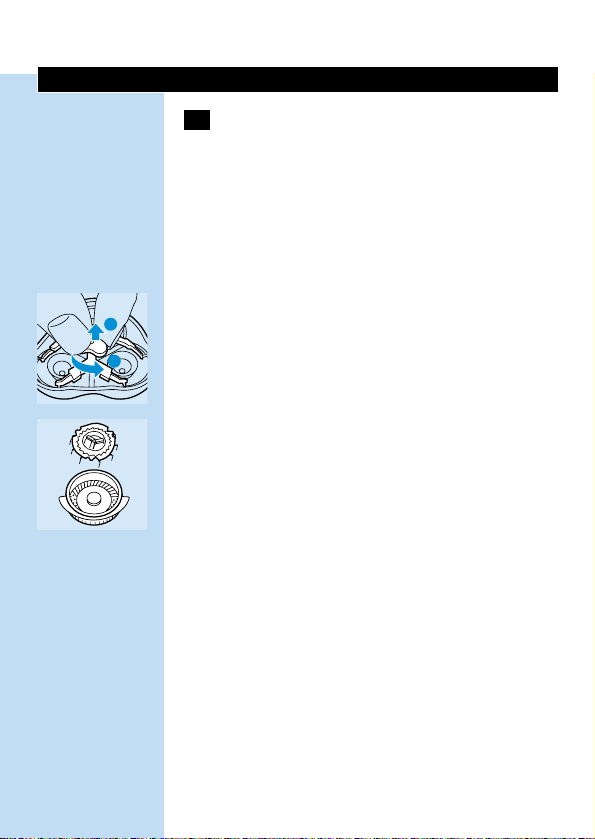
Пошук та усунення несправностей
1 Погіршене гоління.
B
Причина 1: голівки з лезами забруднено.
B
Бритву не мили достатньо довго, або вода
була недостатньо гарячою.
◗ Перед тим, як продовжувати гоління,
ретельно почистіть пристрій (див.
"Чищення").
B
Причина 2: довге волосся заважає голівкам з
лезами.
C
◗ Зніміть рамку-фіксатор.
C
◗ Почистіть ножі та захисні решітки.
Не чистіть одночасно більш ніж одно лезо та
захисну гратку, щоб не переплутати - кожну
пару підігнано одне до одного. Якщо ви
випадково переплутаєте лезо чи гратку, може
знадобитися декілька тижнів, щоб відновити
оптимальну ефективність гоління.
◗ Усуньте волосся за допомогою пензлика,
що додається.
◗ Встановіть фіксуючу скобу на блок для
гоління .
B
Причина 3: голівки з лезами пошкоджено, або
вони зносилися.
◗ Зніміть рамку-фіксатор.
УКРАЇНСЬКІЙ82
2
1
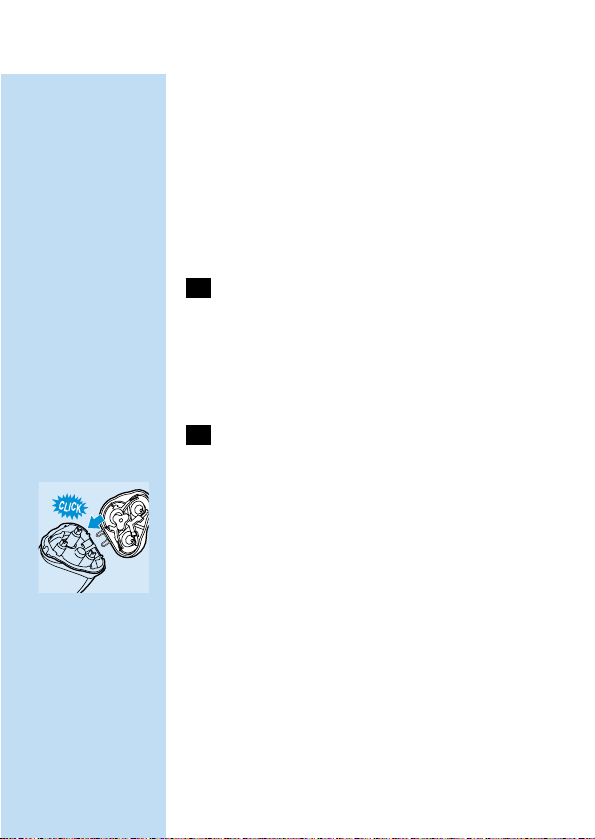
◗ Зніміть старі голівки з блоку для гоління та
замініть новими
Пошкоджені та зношені голівки (леза та
гратки) повинні замінятися оригінальними
голівками Philishave HQ6 Quadra.
◗ Встановіть фіксуючу скобу на блок для
гоління .
2 Бритва не працює з нажатою кнопкою
ON/OFF.
B
Причина: розряджені акумулятори
◗ Зарядіть акумулятори.
3 Якщо голівки для гоління відходять від
бритви.
C
◗ Якщо голівки для гоління відділяються від
бритви, перевірте, чи правильно закріплена
шарнірна пружина, тобто, не ослабла та не
має тріщин або якихось інших дефектів.
Якщо шарнірна пружина закріплена
правильно, голівки для гоління можна знову
легко закріпити на електробритві. Але, якщо
шарнірна пружина послаблена, має тріщини
або щє якись дефекти, звертайтесь, будь
ласка, до найближчого розповсюджувача
компанії "Philips" або до найближчого
сервісного центру компанії Philips аби
запобігнути поломки вашої електробритви.
УКРАЇНСЬКІЙ 83

Приладдя
- Насадки для гоління "HQ6 Quadra Philishave".
- Блок живлення "HQ8000".
- Пристрій для чищення насадок для гоління
"HQ100 Philishave Action Clean".
- Рідина для чищення насадок для гоління
"HQ101 Philishave Action Clean Refill".
- Розпилювач для чищення насадок для гоління
"HQ110 Philishave Head Cleaner".
Гарантія та сервіс
Якщо вам потрібне обслуговування або
інформація, або якщо у вас виникають
проблеми, можете відвідати web-сайт компанії
Philips за адресою www.philips.com або
зверніться до Центру обслуговування Philips у
вашій країні (номер телефону Центру можна
знайти в листівці міжнародної гарантії). Якщо
Центру обслуговування у вашій країні немає, то
зверніться до місцевого дилера компанії Philips
або до Відділу обслуговування компанії Philips
Domestic Appliances and Personal Care BV.
◗ Зберігайте цю інструкцію для подальшого
використання.
УКРАЇНСЬКІЙ84
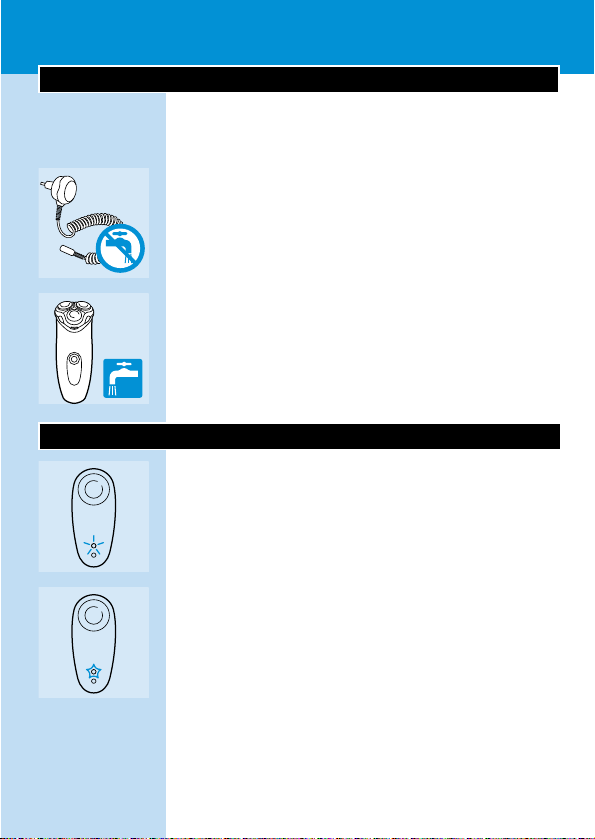
Važno
Prije uporabe aparata pročitajte upute.
◗ Za punjenje aparata koristite samo punjač
HQ8000.
◗ HQ8000 punjač pretvara 100-240 V u 12 V.
Koristite samo isporučeni punjač radi sigurne
pretvorbe napona.
C
◗ Pazite da se punjač HQ8000 ne smoči.
C
◗ Aparat radi na sigurnoj struji od 12 V.
Vodootporan je i može se prati ispod slavine.
Ne ispirite ga pod vodom toplijom od 80cC.
Indikatori punjenja
C
◗ Punjenje
Čim počnete sa punjenjem praznog aparata, pali
se zelena kontrolna žaruljica.
C
◗ Sasvim napunjene baterije
Kada se baterija napuni do kraja, počinje treptati
zelena kontrolna žaruljica.
S potpuno napunjenim aparatom moguće je
neprekidno brijanje do 70 minuta.
HRVATSKI 85

C
◗ Slabe baterije
Kad baterije oslabe, donja kontrolna žaruljica
svijetli crveno. Po isključenju aparata, crvena
žaruljica trepće 4 sekunde.
Punjenje
Aparat punite i pohranite na temperaturi izmeūu
5cC i 35cC.
Punjač je pogodan za rad pri naponima od
100 do 240 V.
Aparat možete koristiti i bez punjenja.
Jednostavno priključite brijač na mrežno napajanje.
Tijekom uporabe svijetli zelena kontrolna žaruljica.
Nemojte trajno ostaviti brijaći aparat priključen na
mrežno napajanje.
C
1 Utaknite priključak u brijaći aparat.
2 Utaknite kabel punjača u zidnu utičnicu.
Ne punite aparat u zatvorenoj vrećici.
3 Prvo punjenje ili nakon duljeg razdoblja
nekorištenja: ostavite aparat puniti
neprekidno 4 sata.
Punjenje normalno traje približno 1 sat.
S potpuno napunjenim aparatom moguće je
neprekidno brijanje do 70 minuta.
4 Po završetku punjenja odspojite punjač iz
aparata i zidne utičnice.
HRVATSKI86

Brijanje
1 Uključite aparat jednim pritiskom na tipku
za uključenje/isključenje.
C
2 Brzim, ravnim i kružnim pokretima
prelazite reznim glavama preko kože.
Najbolje rezultate daje brijanje suhe kože.
Vašoj koži biti će potrebno 2-3 tjedna da se
privikne na Philishave sustav.
3 Isključite aparat jednim pritiskom na tipku
za uključenje/isključenje.
C
4 Nakon svake uporabe na aparat stavite
zaštitni pokrov kako bi spriječili oštećenja.
Za optimalne rezultate, zamijenite brijaće glave
(tip HQ6 Quadra) svake 2 godine.
Podrezivač
Za podrezivanje zalizaka i brkova.
C
1 Otvorite podrezivač tako da pritisnete
klizač prema gore.
Podrezivač se može uključiti za vrijeme rada
motora.
Čišćenje
Redovitim čišćenjem postižu se bolji rezultati pri
brijanju.
Najlakši i najhigijenskiji način čišćenja aparata je
svakodnevno ispiranje brijaće jedinice i komorice
za dlačice vrućom vodom (60cC-80cC).
HRVATSKI 87

Pri čišćenju nije nužno rastavljati brijaće glave
(noževe i štitnike). Učinite li tako, pazite da ne
pomiješate noževe i štitnike jer njihovo
meūusobno trenje jamči optimalni rad. Ako ih
slučajno pomiješate, možda će biti potrebno
nekoliko tjedana prije ponovnog optimalnog rada
aparata.
Svaki dan: brijaća jedinica i komora za
dlačice
1 Isključite aparat, izvucite kabel punjača iz
zidne utičnice i aparata.
C
2 Pritisnite tipku za otpuštanje (1) i otvorite
brijaću jedinicu (2).
C
3 Brijaću jedinicu i komoru za dlačice
isperite pod vrućom vodom.
4 Zatvorite brijaću jedinicu i otresite
preostalu vodu.
Nikada ne sušite brijaću jedinicu frotirskim ili
papirnatim ručnikom jer to može oštetiti brijaće
glave.
C
5 Ponovo otvorite brijaću jedinicu i ostavite
je otvorenom kako bi se aparat u
potpunosti osušio.
Spremnik za dlačice možete očistiti i pomoću
isporučene četkice.
HRVATSKI88
2
1
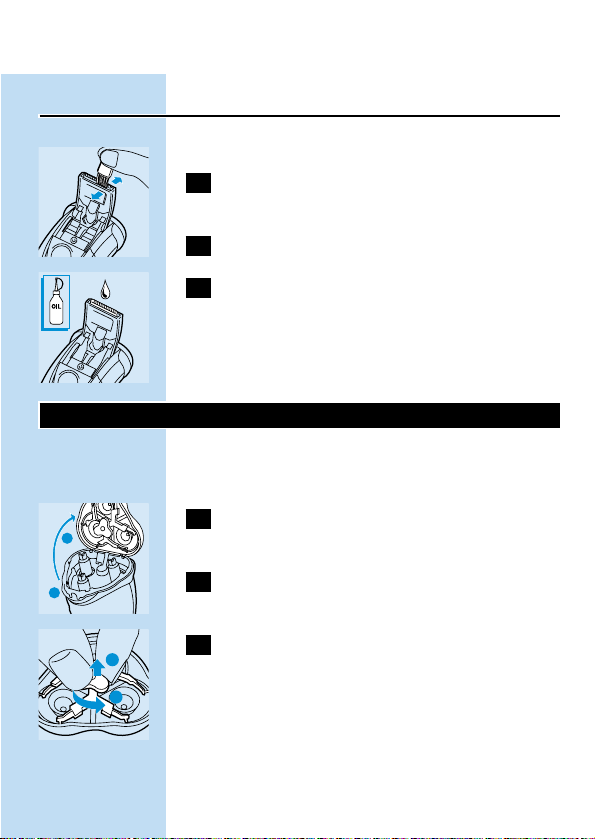
Podrezivač
Očistite podrezivač nakon svake uporabe.
1 Isključite aparat, izvucite kabel punjača iz
zidne utičnice i aparata.
C
2 Podrezivač čistite isporučenom četkicom.
C
3 Svakih šest mjeseci podmažite zupce
podrezivača jednom kapi ulja za šivaće
strojeve.
Zamjena brijaćih glava
Za optimalne rezultate, zamijenite brijaće glave
svake dvije godine.
1 Isključite aparat, izvucite mrežni kabel iz
utičnice i aparata.
C
2 Pritisnite tipku za otpuštanje (1) za
otvaranje brijaće jedinice (2).
C
3 Zakrenite kotačić ulijevo (1) i skinite
učvrsni okvir (2).
HRVATSKI 89
2
1
2
1
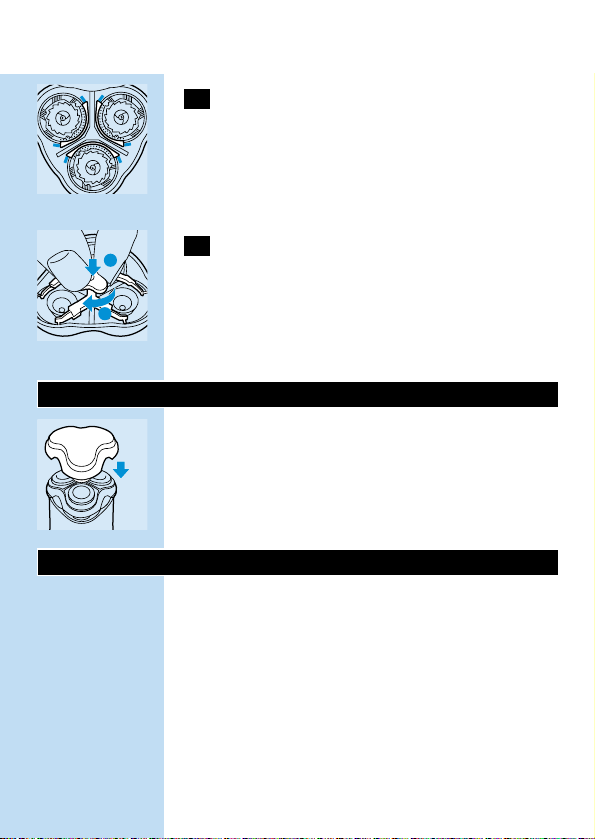
C
4 Skinite brijaće glave i stavite nove u brijaću
jedinicu tako da dijelovi s malim otvorima
budu usmjereni prema središtu brijaće
jedinice.
Pazite da zupci brijaćih glava točno pristaju u
utore.
C
5 Sastavite brijaću jedinicu vraćanjem
učvrsnog okvira na mjesto. Pritisnite
kotačić (1) i okrenite ga udesno (2).
Oštećene ili istrošene brijaće glave zamijenite
isključivo Philishave HQ6 Quadra brijaćim
glavama.
Pohranjivanje
C
◗ Kako bi spriječili oštećenja, vratite zaštitni
pokrov na aparat.
◗ Aparat možete spremiti u isporučenu vrećicu.
Odbacivanje baterija
Ugraūena akumulatorska baterija sadrži substance
koje mogu onečistiti okoliš.
Prije odbacivanja starog aparata izvadite baterije.
Ne bacajte baterije zajedno s kućnim otpadom,
već ih odnesite na za to namijenjeno odlagalište.
Takoūer ih možete odnijeti u Philips ovlašteni
servis gdje će biti odbačene na način siguran za
okoliš.
HRVATSKI90
1
2
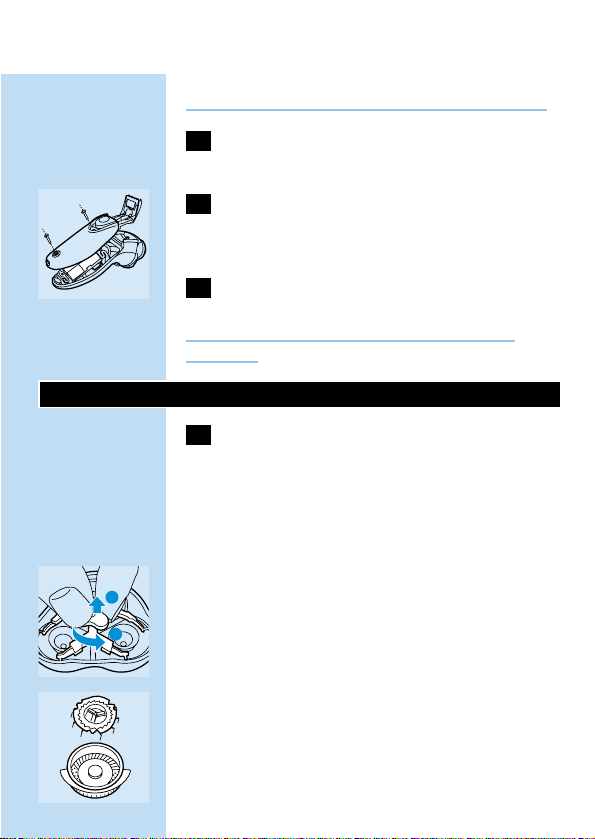
Baterije odbacujte samo kad su potpuno prazne.
1 Odspojite punjač iz aparata i zidne
utičnice.
C
2 Pustite aparat raditi dok se ne zaustavi,
otvorite podrezivač,odvrnite vijke i
otvorite aparat.
3 Izvadite baterije.
Nakon vaūenja baterija ne spajajte aparat na
napajanje.
U slučaju problema
1 Smanjena učinkovitost.
B
Uzrok 1: brijaće glave su zaprljane.
B
Niste ispirali aparat dovoljno dugo ili voda nije bila
dovoljno vruća.
◗ Prije nastavka brijanja temeljito očistite aparat
(pogledajte "Čišćenje").
B
Uzrok 2: dulje dlačice blokiraju brijaće glave.
C
◗ Skinite učvrsni okvir.
C
◗ Očistite noževe i štitnike.
Nemojte čistiti više od jednog noža i štitinika
odjednom jer su oni meūusobno usklaūeni.Ako ih
slučajno pomiješate možda će biti potrebno
HRVATSKI 91
2
1

nekoliko tjedana prije ponovnog optimalnog rada
aparata.
◗ Očetkajte dlačice isporučenom četkicom.
◗ Vratite učvrsnu pločicu natrag na brijaću
jedinicu.
B
Uzrok 3: brijaće glave su oštećene ili istrošene.
◗ Skinite učvrsni okvir.
◗ Skinite stare brijaće glave s brijaće jedinice i
zamijenite ih novima.
Oštećene ili istrošene brijaće glave (noževi i
štitnici) nužno je zamijeniti isključivo izvornim
Philishave HQ6 Quadra brijaćim glavama.
◗ Vratite učvrsnu pločicu natrag na brijaću
jedinicu.
2 Aparat ne radi kad pritisnete ON/OFF
tipku.
B
Uzrok: baterije su prazne.
◗ Napunite ih.
3 Brijaća jedinica se odvaja od aparata.
C
◗ Ako se brijaća jedinica odvoji od aparata,
provjerite je li spojna opruga još uvijek
učvršćena, odnosno nije li se olabavila, te je li
slomljena ili oštećena.Ako je spojna opruga na
svome mjestu, brijaću jedinicu je moguće lako
HRVATSKI92

vratiti na aparat. Ipak, ako je opruga labava ili
oštećena, molimo da se obratite najbližem
Philips prodavatelju ili ovlaštenom servisu.
Pribor
- HQ6 Quadra Philishave brijaće glave
- HQ8000 punjač
- HQ100 Philishave Action Clean sredstvo za
čišćenje brijaće glave.
- HQ101 Philishave Action Clean tekućina za
čišćenje brijaće glave.
- HQ110 Philishave Head Cleaner raspršivač za
čišćenje brijaće glave.
Informacije i servis
Ako Vam je potreban servis, informacija, ili naiūete
na problem, posjetite Philips web stranicu
www.philips.com ili se obratite Philips
predstavništvu u Vašoj zemlji (brojevi telefona se
nalaze u priloženom jamstvu). Ako u Vašoj zemlji
ne postoji takav ured, obratite se Philips
prodavatelju ili ovlaštenom servisu.
◗ Zadržite ovaj priručnik za buduću uporabu.
HRVATSKI 93

Tähtis
Lugege kasutusjuhend läbi enne, kui asute seadet
kasutama.
◗ Kasutage ainult kaasasolevat HQ8000 pistikut
seadme laadimiseks.
◗ HQ8000 toitejuhe muudab 100-240 voldise
voolu trafo abil 12 voldiseks.Turvalise
voolumuutmise tagamiseks kasutage ainult
seadmega kaasasolevat toitejuhet.
C
◗ Toitejuhe HQ8000 ei tohi märjaks saada.
C
◗ Pardel töötab voolutugevusel 12 volti.Ta on
veekindel ja seda on võimalik voolava veega
pesta. Ärge loputage veega, mis on palavam kui
80cC.
Laadimisnäidud
C
◗ Laadimine
Pärast tühja pardli ühendamist vooluvõrku süttib
roheline märgutuli.
C
◗ Akude täislaadimine
Kui aku on laetud, hakkab roheline tuli vilkuma.
Täislaetud pardel töötab kuni 70 minutit
EESTI94
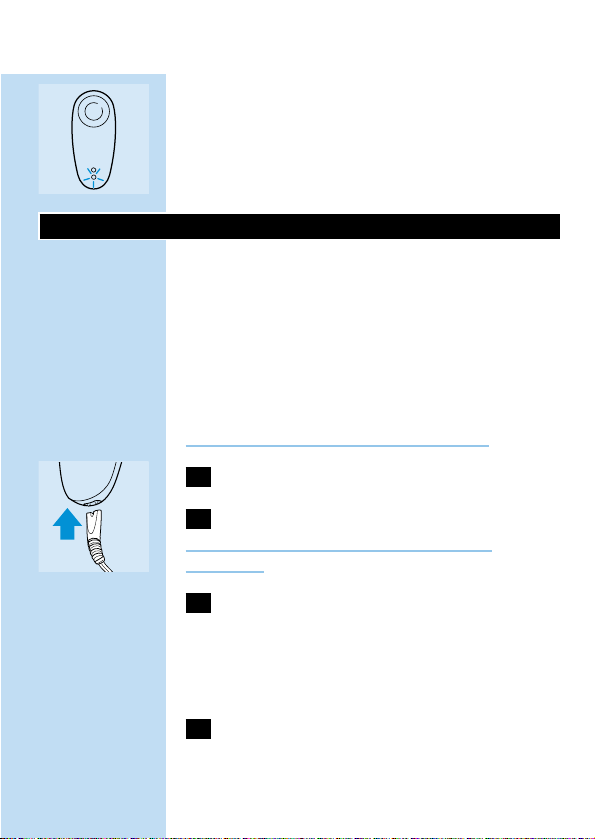
C
◗ Akud on tühjad
Akusid on vaja laadida, kui alumine märgutuli
muutub punaseks. Kui lülitate pardli välja, vilgub
punane märgutuli umbes 4 sekundit.
Laadimine
Laadige ja hoidke seadet temperatuuril 5c C kuni
35c C.
Kaasasolev toitejuhe on 100 kuni 240V pingega
vooluvõrgule.
Habet on võimalik ajada pardlit laadimata, kuid
voolutoitel.Toimingu käigus süttib roheline
signaallamp.
Ärge hoidke pardlit püsivalt vooluvõrgus.
C
1 Ühendage toitejuhtme pistik pardliga.
2 Ühendage võrgupistik pistikupessa.
Ärge laadige akusid, kui pardel on suletud
pardlikotis.
3 Enne esmakasutust või juhul kui pardlit ei
ole pikemat aega kasutatud, peab akusid
laadima umbes 4 tundi.
Tavaliselt võtab laadimine aega umbes 1 tunni.
Täislaetud pardel töötab kuni 70 minutit
4 Kui akud on laetud,võtke võrgupistik
pesast välja ja seadmepistik pardli küljest
lahti.
EESTI 95

Raseerimine
1 Lülitage pardel sisse vajutades ühe korra
ON/OFF lülitile.
C
2 Liigutage pardli pead mööda nahka nii
sirgete, kui ka ringikujuliste liigutustega.
Parima tulemuse saate siis, kui raseerite kuiva
nahka.
Teie nahal võib Philishave süsteemiga harjumiseks
kuluda 2-3 nädalat.
3 Vajutage sisse/välja nupule üks kord, et
pardlit välja lülitada.
C
4 Vigastuste vältimiseks pange kaitsekaas iga
kord pardlile pärast seadme kasutamist.
Parima habemeajamistulemuse saamiseks
vahetage lõikepead iga kahe aasta tagant uute
vastu (mudel HQ6 Quadra).
Piirel
Põskhabeme ja vuntside hooldamiseks.
C
1 Avage piirel,lükates plaadikest ülespoole.
Piirel hakkab tööle, kui mootor käib.
Puhastamine
Seadme regulaarne puhastamine tagab parema
raseerimistulemuse.
EESTI96

Kõige lihtsam ja hügieenilisem seadme
puhastamisviis on pardlipea loputamine iga nädal
kuuma veega (60c-80cC).
Pardli puhastamiseks ei ole vaja lõikepäid (lõiketeri
ja teravõresid) lahti võtta. Soovi korral tehke seda
ühe lõikepea kaupa, muidu võivad terad ja võred
segi minna. Iga tera on teritatud oma võre jaoks.
Kui terad ja võred omavahel segi lähevad, võib
kuluda mitu nädalat, enne kui reseerimiskvaliteet
taastub.
Iga päev: pardlipea ja karvakamber
1 Lülitage pardel välja, eemaldage võrgupistik
pistikupesast ja seadme toitepistik pardlist.
C
2 Vajutage vabastusnuppu (1) ja avage
pardlipea (2).
C
3 Peske pardlipea ja karvakamber voolava
kuuma vee all.
4 Sulgege pardlipea ja raputage vesi maha.
Ärge kunagi kasutage paberist käterätte või
salvrätikuid, sest need võivad rikkuda pardlipäid.
C
5 Avage pardlipea,jätke see avatuks ja laske
seadmel täielikult ära kuivada.
Võite karvakambrit puhastada ka veeta,kasutades
kaasasolevat harja.
EESTI 97
2
1
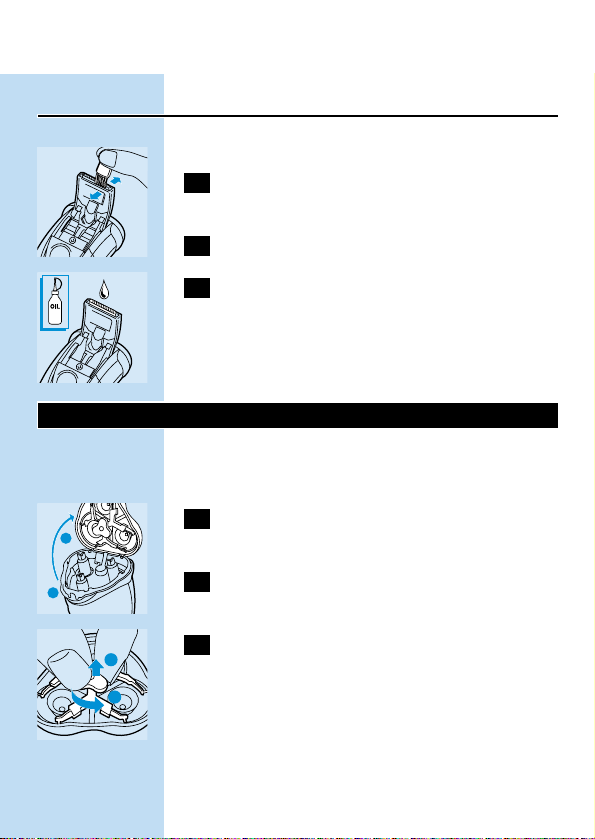
Piirel
Puhastage piirlit pärast iga kasutamist.
1 Lülitage pardel välja, eemaldage võrgupistik
pistikupesast ja seadme toitepistik pardlist.
C
2 Puhastage piirlit kaasasoleva harjaga.
C
3 Määrige piirli hambaid iga kuue kuu tagant
tilga õmblusmasinaõliga.
Lõikepeade vahetus
Parima habemeajamistulemuse tagamiseks
vahetage lõikepäid iga kahe aasta tagant.
1 Lülitage pardel välja, eemaldage võrgupistik
pistikupesast ja seadme toitepistik pardlist.
C
2 Vajutage vabastusnuppu (1),et avada
pardlipea (2).
C
3 Pöörake ratast vastupäeva (1) ja eemaldage
fikseerraam (2).
EESTI98
2
1
2
1
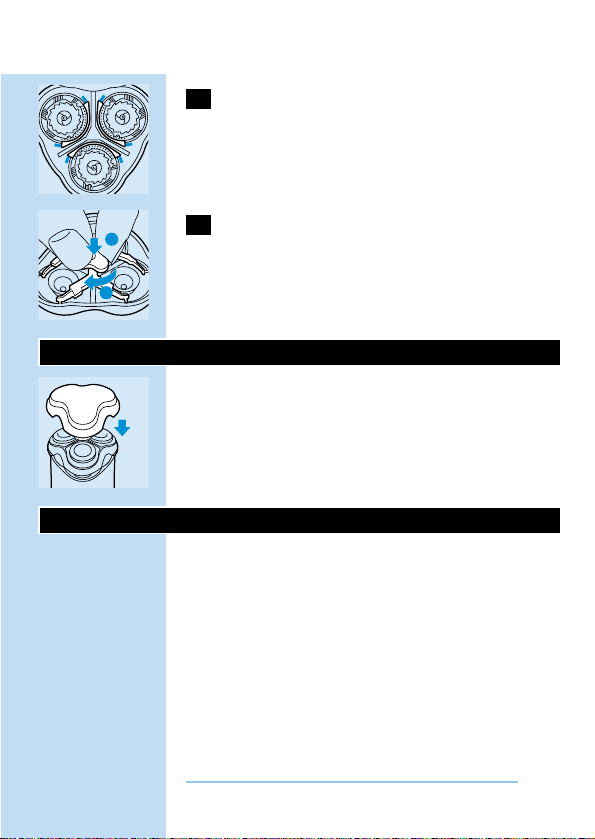
C
4 Eemaldage vanad lõikepead ja paigaldage
uued pardlipesasse nii, et väikeste
aukudega küljed jääksid pardlipea keskele.
Veenduge, et lõikepeade eendid fikseeruksid
korralikult õnarustesse.
C
5 Fikseerraami vahetades võtke lahti
pardlipea.Vajutage ratast (1) ja keerake
seda päripäeva (2).
Vahetage vigastatud või kulunud lõikepead
Philishave HQ6 Quadra vastu välja.
Hoidmine
C
◗ Vigastuste vältimiseks pange seadmele
kaitsekaas peale.
◗ Seadet võite hoida kaasasolevas kotis.
Akude eemaldamine
Sissemonteeritud aku sisaldab ümbritsevat
keskkonda saastavaid ained.
Eemaldage pardlist akud, kui olete otsustanud
seadme kasutusest kõrvaldada. Ärge viske akusid
muu olmeprahi hulka, vaid viige need
spetsiaalsesse kogumiskohta.Võite akud viia ka
Philipsi hoolduskeskusse, sealsed töötajad aitavad
teid meelsasti.
Eemaldage seadmest vaid täiesti tühjad akud.
EESTI 99
1
2
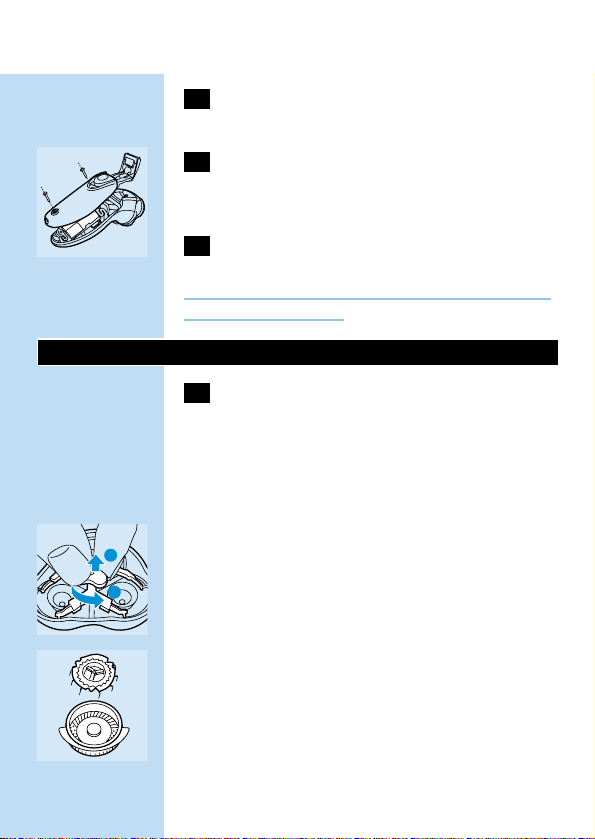
1 Eemaldage võrgupistik pistikupesast ja
toitepistik seadmest.
C
2 Laske pardlil töötada,kuni see peatub,
avage trimmer, keerake kruvid lahti ja avage
pardel.
3 Eemaldage akud.
Ärge ühendage pardlit vooluvõrku enne,kui akud
ei ole välja vahetatud.
Vead ja nende kõrvaldamine
1 Habemeajamine ei ole piisavalt efektiivne.
B
Põhjus 1: lõikepead on umbes.
B
Pardleid pole piisavalt kaua või piisavalt kuumas
vees pestud.
◗ Puhastage pardlit hoolikalt enne järgmist
kasutuskorda (Vt."Puhastamine").
B
Põhjus 2: pikad kar vad on ummistanud lõikpea.
C
◗ Eemaldage fikseerraam.
C
◗ Puhastage terad ja võred.
Puhastage korraga vaid üks lõiketera ja teravõre,
muidu võivad need omavahel segi minna. Kui
terad ja võred omavahel segi lähevad, võib kuluda
mitu nädalat, enne kui raseerimiskvaliteet taasub.
◗ Eemaldage karvad kaasasoleva harjaga.
EESTI100
2
1
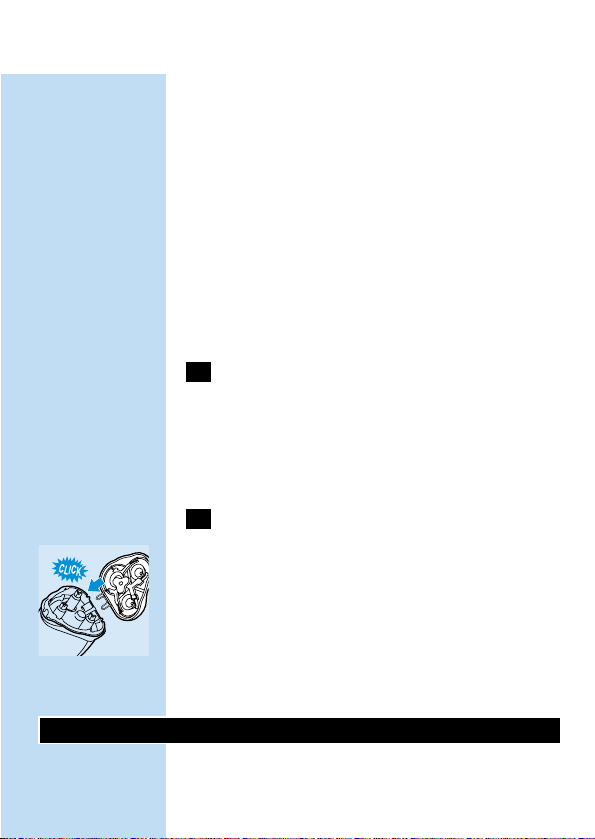
◗ Pange fikseerraam pardlipeasse tagasi.
B
Põhjus 3: lõikepead on vigastatud või kulunud.
◗ Eemaldage fikseerraam.
◗ Eemaldage pardlipeast vanad lõikepead ja
asendage uutega.
Vigastatud või kulunud lõikepäid (lõiketeri ja
teravõresid) tohib asendada ainult
originaallõikepeadega Philishave HQ6 Quadra.
◗ Pange fikseerraam pardlipeasse tagasi.
2 Pardel ei tööta, kui ON/OFF lüliti on alla
vajutatud.
B
Põhjus: akud on tühjad.
◗ Laadige akud täis.
3 Pardlipea on pardlilt maha tulnud.
C
◗ Kui pardlipea on pardlilt lahti tulnud,
kontrollige, kas hingevedru on korralikult
kohal, s.t. ei ole lahti tulnud, pragunenud või
katki läinud. Kui hingevedru on siiski paigal,
pange pardlipea tagasi pardlile. Häirete puhul
võtke ühendus tootemüüja või Philipsi
hooldekeskusega.
Lisaosad
- HQ6 Quadra Philishave pardlipead
- HQ8000 toitejuhe
EESTI 101
- HQ100 Philishave Action Clean (lõikepeade
puhasti)
- HQ101 Philishave Action Clean Refill
(lõikepeade puhastusvedelik)
- HQ110 Philishave Head Cleaner (pihustusaine
lõikepeade puhastamiseks)
Garantii & teenindus
Probleemide korral pöörduge Philips Web site
www.philips.com või võtke ühendus Philips
hoolduskeskusega oma riigis (aadressi ja
telefoninumbri leiate garantiilehelt). Kui Teie maal
ei ole Philpsi hoolduskeskust, pöörduge Philpsi
toodete levitaja poole või kontakteeruge Service
Department of Philips Domestic Appliances and
Personal Care BV.
◗ Hoidke juhendit alles ka edaspidiseks
kasutamiseks.
EESTI102
 Loading...