

Page 1

ENGLISH 4
FRANÇAIS 25
ESPAÑOL 47
PORTUGUÊS 70
110
129
HQ7760
3
á«Hô©dG
Page 2

Introduction
The shaver comes with two different kinds of
NIVEA FOR MEN cartridges: Extra Fresh Shaving
Gel for a fresh sensation during and after shaving
and Moisturising Shaving Lotion for sensitive skin.
This gives you the opportunity to tr y them out
and discover which one suits your skin type best.
Important
Read these instructions for use carefully before
using the appliance and save them for future
reference.
◗ Only use the powerplug and the charging
stand supplied.
◗ The powerplug transforms 100-240 volts to a
safe low voltage of less than 24 volts.
◗ The powerplug contains a transformer. Do
not cut off the powerplug to replace it with
another plug, as this will cause a hazardous
situation.
◗ Do not use a damaged powerplug or charging
stand.
◗ If the powerplug or charging stand is
damaged, always have it replaced by one of the
original type in order to avoid a hazard.
◗ Charge, store and use the appliance at a
temperature between 5cC and 35cC.
C
◗ Make sure the powerplug does not get wet.
◗ Never immerse the charging stand in water
nor rinse it under the tap.
◗ Do not leave the shaver in the plugged-in
charging stand for more than 24 hours.
ENGLISH4
Page 3
C
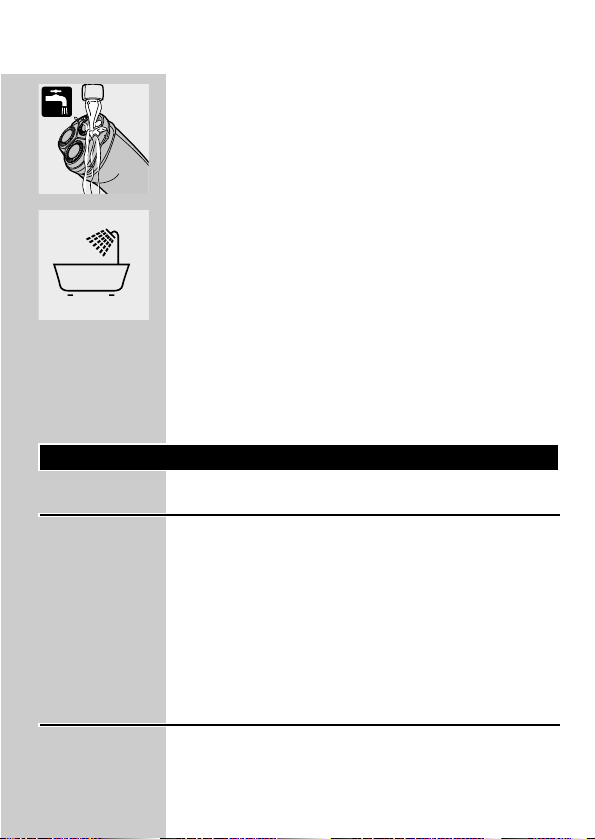
◗ The appliance is watertight and can be
cleaned under the tap.
Be careful with hot water. Always check if the
water is not too hot, to prevent your hands from
getting burnt.
C
◗ The appliance complies with the
internationally approved IEC safety regulations
and can be safely used in the bath or shower.
◗ Check if the gel and lotion supplied with the
appliance contain ingredients (see back of
cartridge) to which you are allergic before
you start using the appliance. Do not use the
gel and/or lotion if you are allergic to one or
more ingredients.
The display
Living Light Display
This model features the unique Living Light
display.This 3D colour LED display gives you all
the information you need with special 'living light'
effects.
◗ Remove any sticker or protective foil from
the Living Light Display.
Demonstration program
The appliance has a unique demonstration
program.
ENGLISH 5
Page 4

1 Press the on/off button for 7 seconds.
The demonstration will start automatically.
◗ When the demonstration starts, all indications
light up at the same time.Then all indications
of the shaver are shown separately for
3 seconds in the following order:
„ Charging/Battery full indication
Ê Shaving
± Shaving gel indication
 Cleaning reminder
Ê Shaving
± Shaving gel indication
„ Battery low indication
 Cleaning reminder/„ Battery low indication
ΠShaving head check indication
B
The whole demonstration program lasts approx.
1 minute (including intervals).
2 You can stop the demonstration by
pressing the on/off button.
Indications during use
All indications mentioned below are shown
during every shaving session and they are always
displayed in the same order, which makes it very
easy for you to maintain a regular shaving ritual
As a result, some symbols will light up even when
you have already taken the appropriate action.
ENGLISH6
Page 5
B
When you switch the appliance on, the shaving gel
indication blinks three times. If you have already
applied enough shaving gel or lotion, you can
ignore this indication.
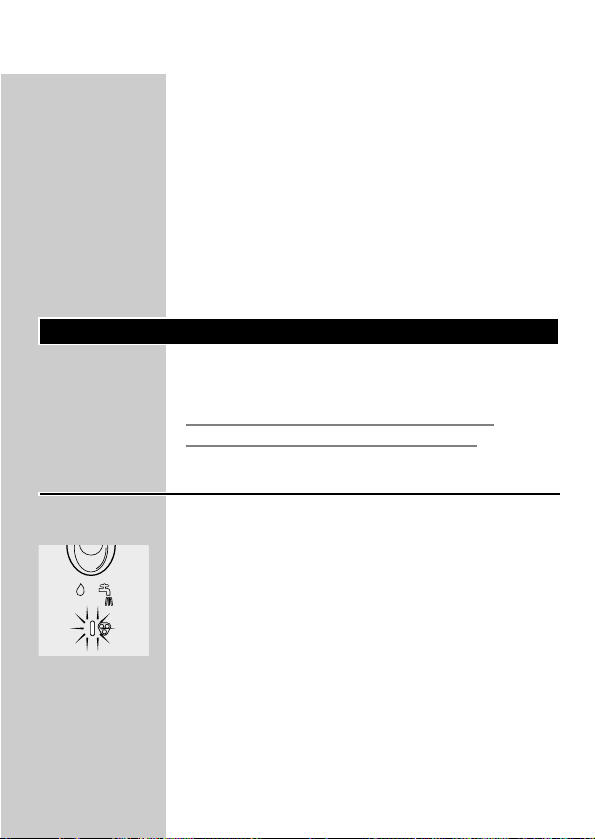
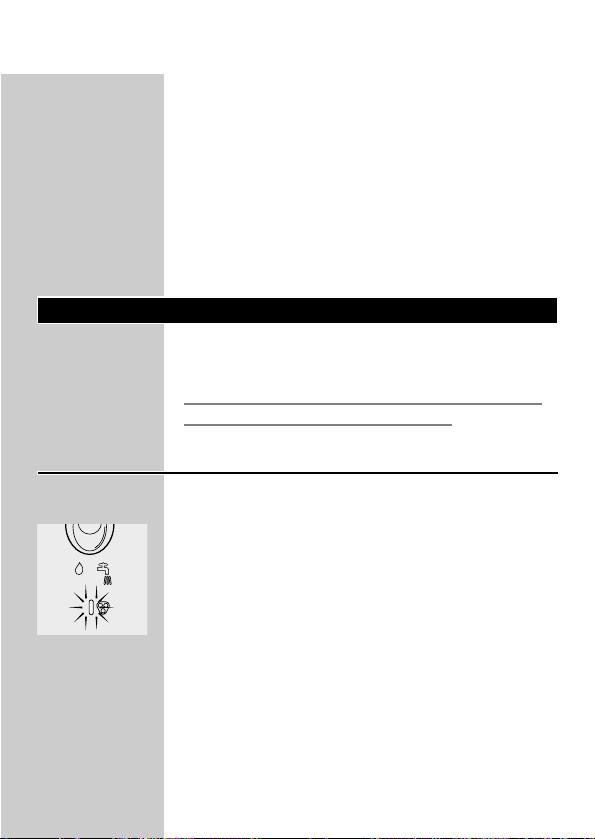
B
When you switch the appliance off, the cleaning
reminder is displayed.This cleaning reminder
consists of a green tap (lights up) and a green
water jet (blinks). If you have already cleaned the
shaver before switching it off, you can ignore the
cleaning reminder.
Charging
Charging takes approx. 8 hours.
Do not leave the shaver in the plugged-in
charging stand for more than 24 hours.
Charge indications
Battery running low
C
◗ When the battery is running low, the battery
light burns red during shaving.
◗ When you switch the shaver off while the
battery is nearly empty, the battery light blinks
red twice.This will happen four times with
brief pauses in between.
◗ When you start charging the shaver while
battery is running low, the battery light blinks
red for max. 3 minutes.
ENGLISH 7
Page 6
Battery fully charged
◗ During charging the battery light blinks green
until the battery is fully charged (approx. 8
hours).
◗ The battery light burns green continuously
when the battery is fully charged.
Charging the appliance
Charge the shaver before using it for the first time
and when the shaver indicates that the battery is
running low.
1 Insert the small plug into the charging
stand and put the powerplug in the wall
socket.
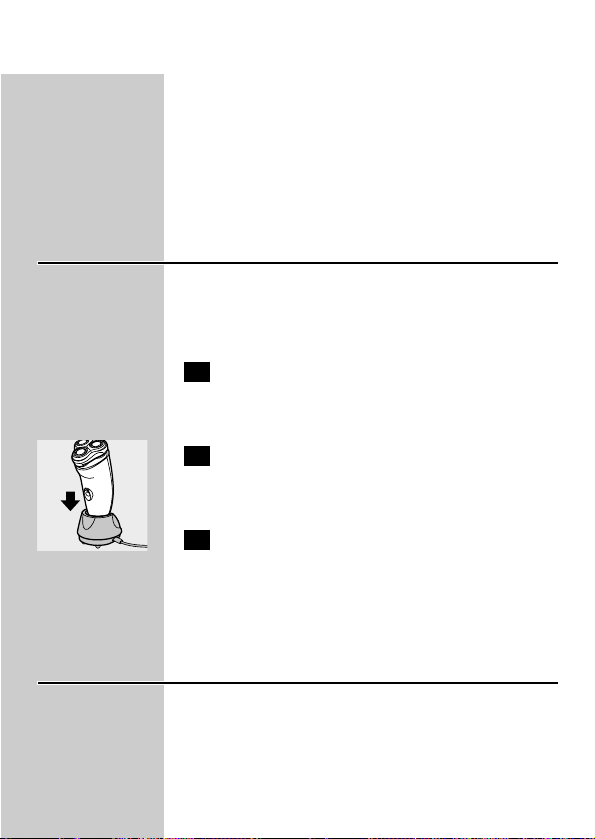
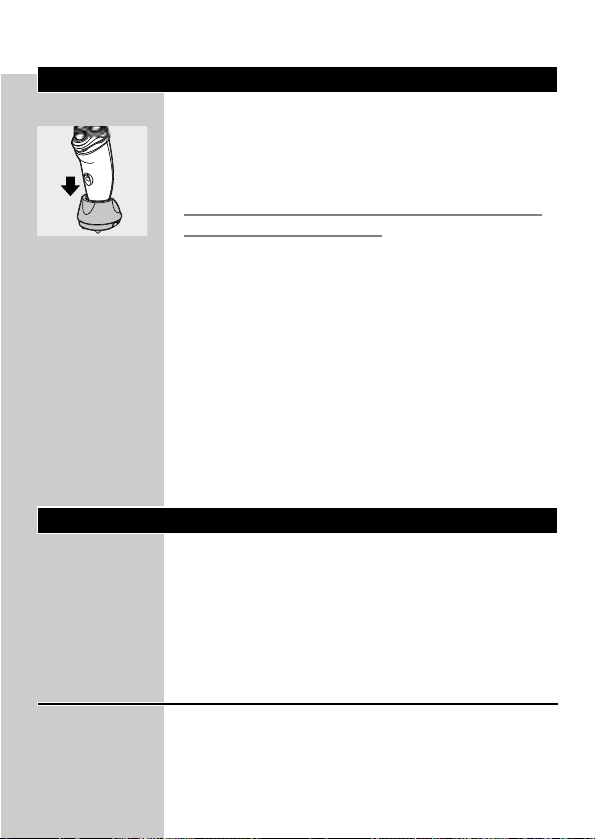
C
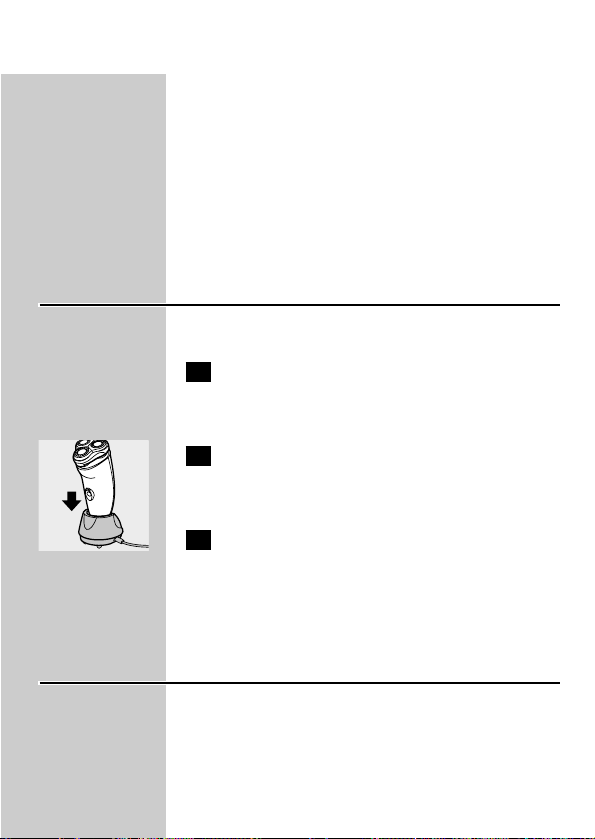
2 Place the shaver in the charging stand.
The shaver automatically switches off when it is
placed in the charging stand.
3 Remove the powerplug from the wall
socket and pull the small plug out of the
charging stand when the battery has been
fully charged.You can then leave the
appliance in the charging stand.
Cordless shaving time
A fully charged shaver has a cordless shaving time
of up to 55 minutes.
ENGLISH8
Page 7

Cartridges
Cartridges with NIVEA FOR MEN shaving
gel/lotion are available in boxes containing five
cartridges and one small plastic pump.
The NIVEA FOR MEN shaving gel/lotion in the
cartridges will keep for 32 months when stored
at temperatures between 0cC and +40cC.
Only use Philishave NIVEA FOR MEN Cool Skin
(HQ170 and HQ171) cartridges.
One Philishave NIVEA FOR MEN Cool Skin
cartridge contains enough gel/lotion for approx.
10 shaves.
For hygienic reasons, we advise you to insert a
new pump when you start using a new set of five
cartridges.
Do not throw the pump away when you replace
an empty cartridge.You will need it for all five
cartridges.
Remove the shaving gel/lotion cartridge from the
appliance when you are not going to use the
shaver for more than one week.
When you have run out of shaving gel/lotion
cartridges and you do not know where to buy
them, contact the Customer Care Centre in your
country (see 'Guarantee & service').
ENGLISH 9
Page 8
Inserting cartridges
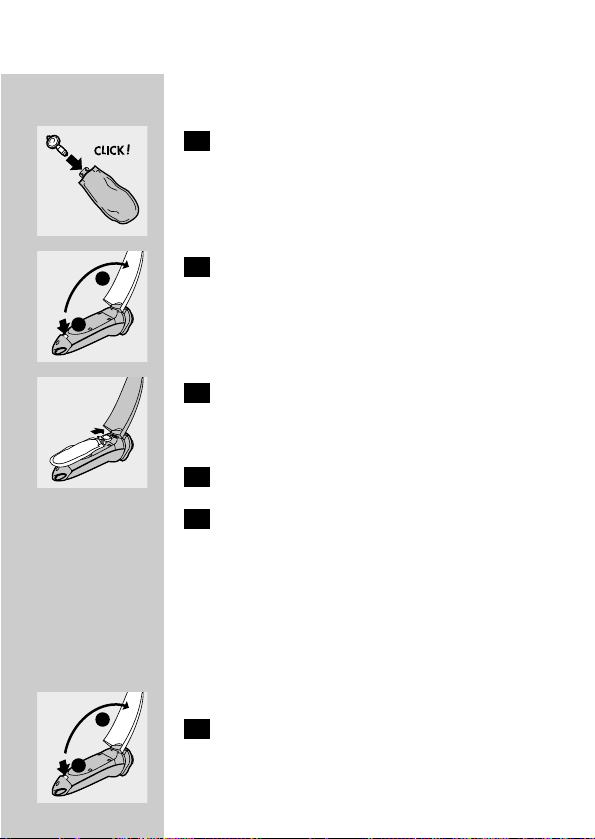
C
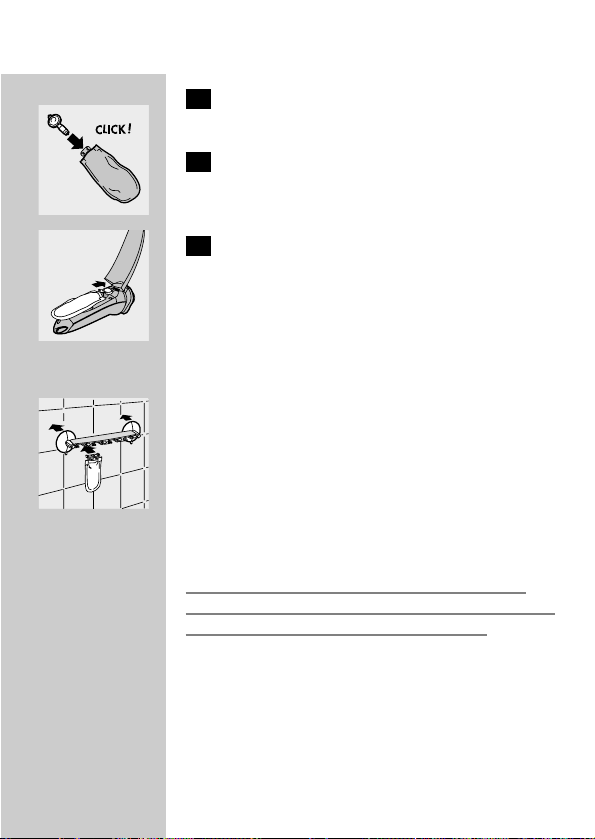
1 When you start using a new set of
cartridges, take the pump out of its bag
and push it into a cartridge until it locks
into position with a click.
C
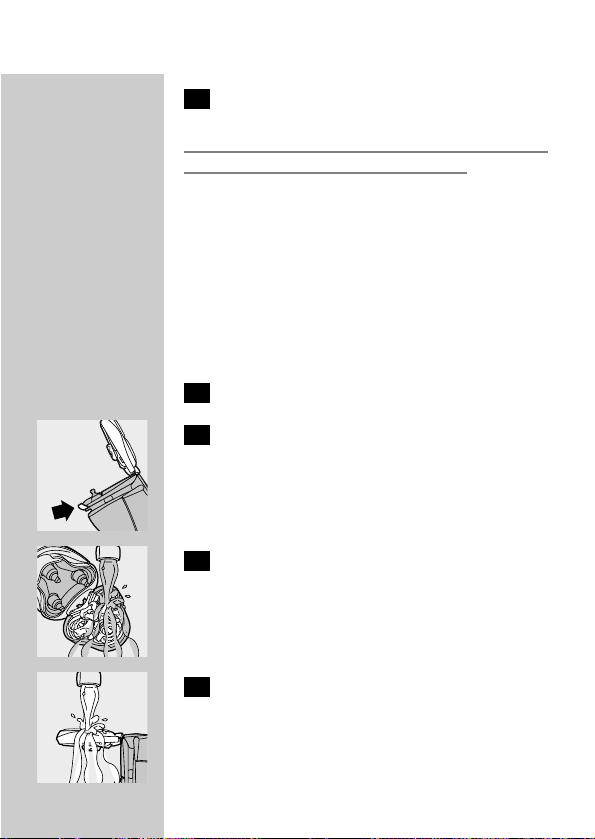
2 Press the release button and open the
cover of the cartridge compartment.
C
3 Slide the cartridge with the pump into the
shaver. It only fits properly if the white side
of the pump is pointing upwards.
4 Close the cover (you will hear a click).
5 Press the yellow pump button a few times
until the NIVEA FOR MEN shaving
gel/lotion appears.The shaver is now ready
for use.
Replacing cartridges
Do not throw the pump away when you replace
an empty cartridge.You will need it for the other
cartridges.
C
1 Press the release button and open the
cover of the cartridge compartment.
ENGLISH10
2
1
2
1
Page 9
2 Remove the empty cartridge and pull out
the pump.
C
3 Push the pump into a new cartridge until it
locks into position with a click.
C
4 Slide the cartridge with the pump into the
shaver. It only fits properly if the white side
of the pump is pointing upwards. Close the
cover.
Storing cartridges
C
◗ You can conveniently store the other
cartridges by attaching them to the wall
holder supplied.The holder has suction caps
which allow you to attach it to the wall easily.
In this way you always have the cartridges
close at hand, which is very convenient,
especially when you shave in the shower.
NB:The wall holder is only suitable for storing
cartridges. Never hang or place the shaver on the
wall holder. If you do, the shaver may fall!
ENGLISH 11
Page 10
Using the appliance
Shaving
Switching the shaver on
1 Switch the shaver on by pressing the on/off
button once.
The yellow teardrop-shaped shaving gel light ±
blinks 3 times to indicate that shaving gel/lotion
can be applied.
C
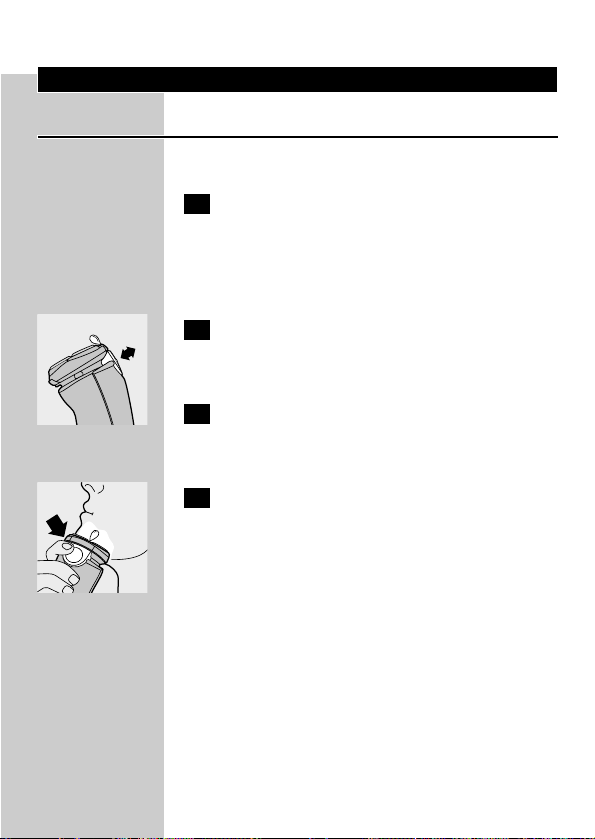
2 Press the yellow pump button to apply
NIVEA FOR MEN shaving gel/lotion to
your skin.
3 Move the shaving heads over your skin,
making both straight and circular
movements.
C
4 While shaving, press the pump button
frequently to apply more NIVEA FOR
MEN shaving gel/lotion so that the shaver
keeps gliding smoothly over your face.
Do not press the shaver too hard against your
skin while shaving. If you prefer, you can wet your
face before shaving.
◗ For the best shaving results,shaving gel/lotion
should be pumped up frequently.
◗ The shaver will not perform optimally when
used without shaving gel/lotion.
◗ Your skin may need 2 or 3 weeks to get
accustomed to the Philishave system.
ENGLISH12
Page 11

Switching the shaver off
1 Switch the shaver off by pressing the on/off
button once.
The cleaning reminder  (green tap symbol with
blinking water jet) lights up for 6 seconds to
indicate that the shaver should be cleaned.
2 Clean the shaver (see chapter 'Cleaning
and maintenance').
Rinse the shaver after each shave. Remove the
cartridge if you are not going to use the appliance
for more than one week.
C
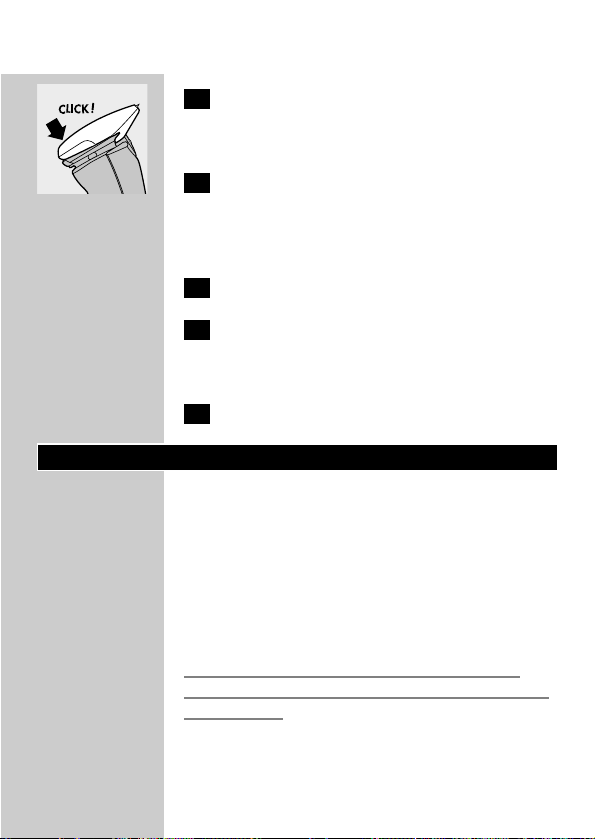
3 Put the protection cap on the shaver every
time you have used it, to prevent damage.
Trimming
For grooming sideburns and moustache.
Attaching the trimmer
1 Switch the shaver off.
Clean the shaver before you attach the trimmer
(see chapter 'Cleaning and maintenance').
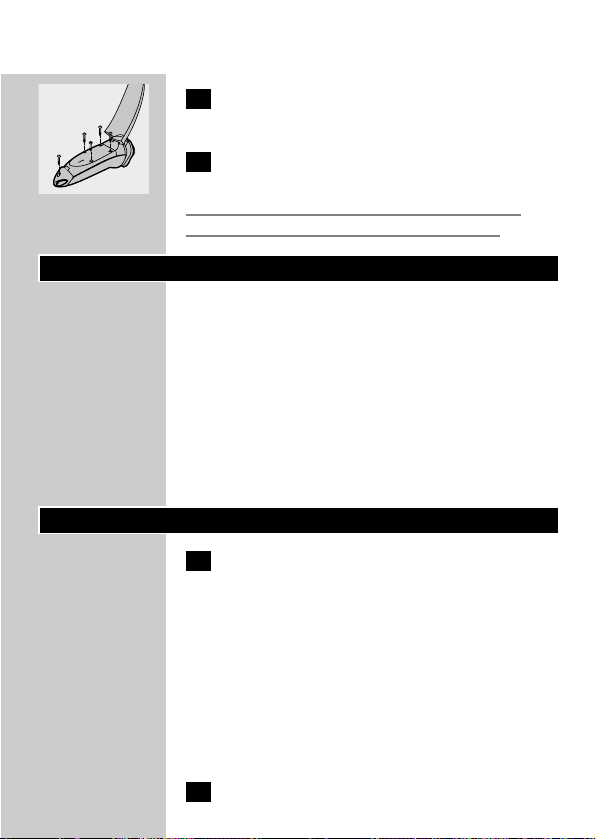
C
2 Press the release button (1) and pull the
shaving unit off the shaver (2).
C
3 Tilt the trimmer slightly backwards.
ENGLISH 13
2
1
Page 12
C
4 Fit the trimmer onto the shaver (you will
hear a click).The trimmer is now ready for
use.
5 Activate the trimmer by pressing the
on/off button once.
Removing the trimmer
1 Switch the shaver off.
2 Remove the trimmer by pressing the
release button again and pulling the
trimmer off the shaver.
3 Put the shaving unit back onto the shaver.
Cleaning and maintenance
Regular cleaning guarantees better shaving
performance.
To maintain optimal shaving performance and to
keep the shaver clean, you have to thoroughly
rinse the shaving unit and hair chamber with hot
water after every shave.
Be careful with hot water. Always check if the
water is not too hot, to prevent your hands from
getting burnt.
ENGLISH14
Page 13
Cleaning reminder
◗ When you have switched the shaver off, the
cleaning reminder  (green tap symbol with
blinking water jet) lights up for 6 seconds to
remind you that the shaver should be cleaned.
◗ If the red shaving unit symbol Œ and the
cleaning reminder  light up together, the
shaving heads have become so dirty or
damaged that they might cause the motor to
become blocked. If the shaving heads are dirty,
you have to clean them. If the shaving heads
are damaged, you have to replace them (see
chapter 'Replacement').
B
We advise you to avoid this situation by cleaning
the shaving heads regularly.
Cleaning
The shaver reminds you that it needs to be
cleaned by showing the cleaning reminder  after
every shaving session.
Shaving unit: Quick Clean after every
shave
1 Make sure the appliance is switched on.
2 Keep the shaving unit closed.
C
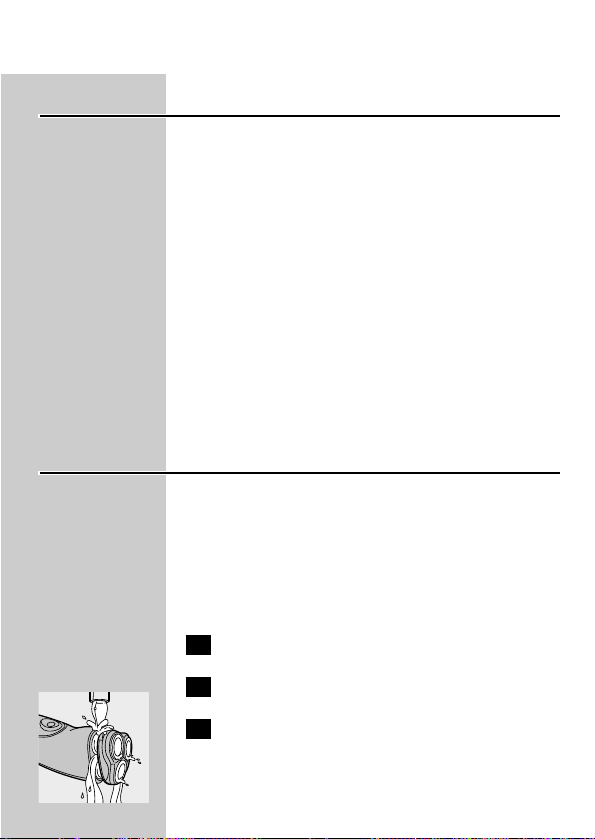
3 Rinse the shaving unit and the hair
chamber under a hot tap by letting the
water run through the openings below the
shaving unit for at least 30 seconds.
ENGLISH 15
Page 14
4 Shake off excess water.
Never dry the shaving unit with a towel or tissue
as this may damage the shaving heads.
Shaving unit and hair chamber:
every week
We advise you to clean the appliance thoroughly
at least once a week to maintain optimal shaving
performance.
You can also follow this procedure when the
shaving heads have to be cleaned.
1 Switch the shaver off.
C
2 Press the release button to open the
shaving unit.
C
3 Rinse the inside of the shaving unit.
C
4 Rinse the outside of the shaving unit.
ENGLISH16
2
Page 15
C
5 Rinse the hair chamber.
6 Make sure the inside of the shaving unit
and the hair chamber have been cleaned
properly.
7 Close the shaving unit and shake off excess
water.
8 Open the shaving unit again and leave it
open to let the appliance dry completely.
Charging stand
1 Unplug the charging stand.
2 Clean the charging stand with a moist
cloth.
Trimmer
1 Clean the outside of the trimmer with the
brush supplied after every use.
The trimmer can also be cleaned by rinsing it
under the tap.
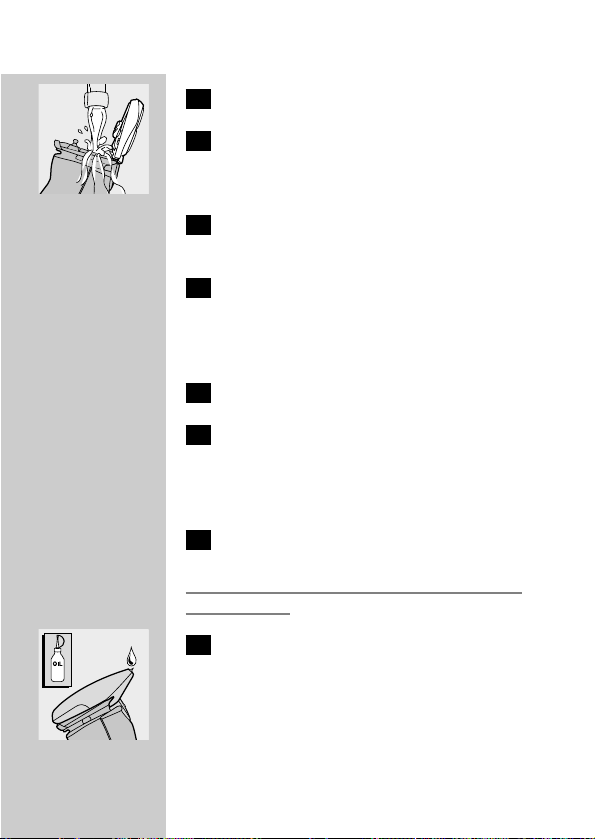
C
2 If the trimmer is used frequently, lubricate
the trimmer teeth with a drop of sewing
machine oil every six months.
ENGLISH 17
Page 16
Storage
Charging stand
C
◗ The shaver can be stored in the charging
stand, even when it is wet.
Always unplug the charging stand before storing
the wet or dry shaver in it.
Pouch
◗ The shaver can be stored in the pouch
supplied.There is also room for two NIVEA
FOR MEN Cool Skin cartridges.The pouch
will provide extra protection during travel.
Hanging cord
◗ The shaver can also be stored by hanging it
from the hanging cord supplied. Storing the
shaver by means of the hanging cord ensures
optimal drying conditions.
Replacement
Replace the shaving heads every two years for
optimal shaving results.
Replace damaged or worn shaving heads with
HQ177 Philishave Cool Skin shaving heads only.
Shaving head check indication
After two years of use the red shaving unit
symbol Πwill blink for 30 seconds during
7 shaves to indicate that you should check the
ENGLISH18
Page 17

condition of the shaving heads.This indication is
based on an average shaving time of 3 minutes
per shave.When the shaving head symbol blinks,
all other symbols and lights are out.When the
shaver is switched off, the shaving unit symbol
disappears.
When the red shaving unit symbol starts blinking,
you should check the shaving heads for possible
damage. If the shaving heads are damaged in any
way, they must be replaced in order to obtain
optimal shaving results.
Replacing the shaving heads
1 Switch the shaver off.
C
2 Press the release button to open the
shaving unit.
C
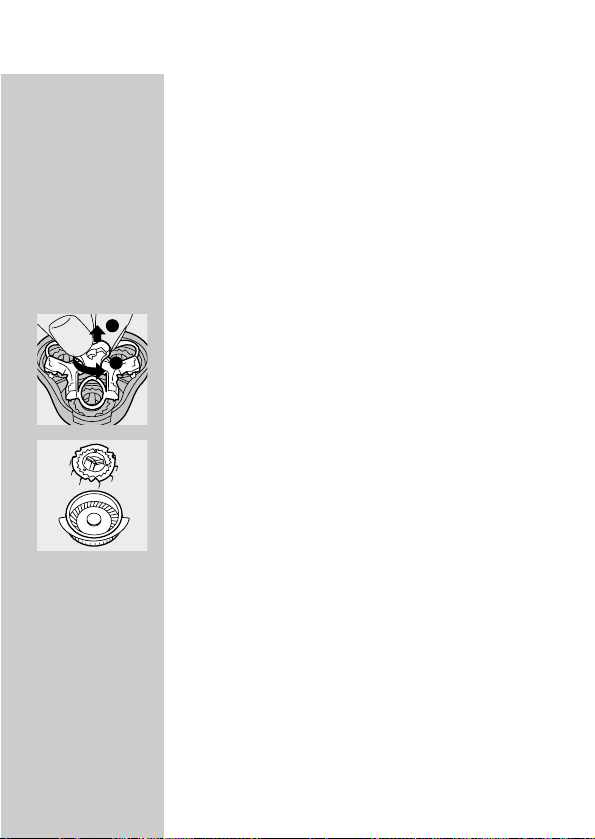
3 Turn the wheel anticlockwise (1) and
remove the retaining frame (2).
C
4 Remove the shaving heads and place new
ones in the shaving unit.
ENGLISH 19
2
1
Page 18

C
5 Put the retaining frame back into the
shaving unit, press the wheel (1) and turn it
clockwise (2).
Accessories
The following accessories are available:
- HQ800 powerplug.
- HQ177 Philishave Cool Skin shaving heads.
- HQ170 NIVEA FOR MEN Cool Skin
Moisturising Shaving Lotion.
- HQ171 NIVEA FOR MEN Cool Skin Extra
Fresh Shaving Gel.
Environment
The built-in rechargeable battery contains
substances that may pollute the environment.
Disposal of the battery
Remove the battery when you discard the
appliance. Do not throw the battery away with
the normal household waste, but hand it in at an
official collection point.You can also take the
appliance to a Philips service centre, which will
remove the battery for you and will dispose of it
in an environmentally safe way.
Only remove the battery if it is completely empty.
ENGLISH20
1
2
Page 19
C
1 Let the shaver run until it stops, undo the
screws and open the shaver.
2 Remove the battery.
Do not put the shaver back into the charging
stand after the battery has been removed.
Guarantee & service
If you need information or if you have a problem,
please visit the Philips website at www.philips.com
or contact the Philips Customer Care Centre in
your country (you will find its phone number in
the worldwide guarantee leaflet). If there is no
Customer Care Centre in your country, turn to
your local Philips dealer or contact the Service
Department of Philips Domestic Appliances and
Personal Care BV.
Troubleshooting
1 The shaving heads do not move smoothly
over the skin.
B
Cause: not enough shaving gel/lotion has been
applied.
◗ Press the pump button a few times until
sufficient NIVEA FOR MEN shaving gel/lotion
has been released to allow the shaving heads
to move smoothly over your face again.
2 Reduced shaving performance
ENGLISH 21
Page 20
B
Cause 1: the shaving heads are dirty.
The shaver has not been cleaned immediately
after use and/or has not been rinsed long enough
and/or the water used to rinse the shaver was
not hot enough.
◗ Clean the shaver thoroughly before you
continue shaving. See chapter 'Cleaning and
maintenance'.
B
Cause 2: long hairs are obstructing the shaving
heads.
◗ Press the release button to open the shaving
unit.
C
◗ Turn the wheel anticlockwise (1) and remove
the retaining frame (2).
C
◗ Clean the cutters and guards.
Do not clean more than one cutter and guard at
a time, since they are all matching sets. If you
accidentally mix up the cutters and guards, it may
take several weeks before optimal shaving
performance is restored.
◗ Remove the hairs with the brush supplied.
◗ Put the shaving heads back into the shaving
unit. Put the retaining frame back into the
shaving unit, press the wheel and turn it
clockwise.
◗ To prevent long hairs from obstructing the
shaving heads, remove the shaving heads once
ENGLISH22
2
1
Page 21

a month and clean them with the brush
supplied.
B
Cause 3: the shaving heads are damaged or worn.
◗ Replace the shaving heads. See chapter
'Replacement'.
3 The shaver does not work when the on/off
button is pressed.
B
Cause 1: the batter y is empty.
◗ Recharge the battery. See chapter 'Charging'.
B
Cause 2: dried-up shaving gel/lotion is blocking the
shaving heads.
◗ Clean the shaving heads thoroughly. See
chapter 'Cleaning and maintenance'.
B
Cause 3: the shaving heads are damaged.
◗ Replace the shaving heads. See chapter
'Replacement'.
4 The cover of the cartridge compartment
cannot be closed
B
Cause 1: the cartridge has not been inserted
correctly.
ENGLISH 23
Page 22

◗ Insert the cartridge correctly. It only fits
properly into the shaver if the white side of
the pump is pointing upwards.
B
Cause 2: the cartridge has not been pushed far
enough into the shaver.
◗ Press the cartridge until it is properly seated.
5 The NIVEA FOR MEN shaving gel/lotion
has changed colour or has turned watery.
B
Cause: the NIVEA FOR MEN shaving gel/lotion
has not been stored at the right temperature.
◗ Insert a new cartridge.
6 Skin irritation occurs
B
Cause 1: your skin has not yet become
accustomed to this shaving system.
◗ Allow 2-3 weeks for your skin to get
accustomed to this shaving system.
B
Cause 2: the shaving gel/lotion irritates your skin.
◗ Try the other type of NIVEA FOR MEN
cartridge.
◗ Wet your face before shaving with the shaving
gel/lotion.
If the irritation does not disappear within 24
hours, we advise you to stop using the shaving
gel/lotion.
ENGLISH24
Page 23

Introduction
Votre rasoir est livré avec 2 types différents de
cartouches NIVEA FOR MEN: un Gel à Raser
Extra Rafraîchissant pour une sensation de
fraîcheur pendant et après le rasage et une Lotion
à Raser Hydratante pour peau sensible. Cela vous
offre l'opportunité d'essayer et de choisir laquelle
convient le mieux à votre type de peau.
Important
Avant d'utiliser l'appareil, lisez les instructions cidessous et conservez ce mode d'emploi pour un
usage ultérieur.
◗ Utilisez exclusivement le chargeur et le
support de charge fourni.
◗ Le chargeur transforme le 100-240 V en une
tension de sécurité de 24 V.
◗ Le chargeur est doté d'un transformateur.
N'essayez pas de remplacer la fiche du
chargeur pour éviter tout accident.
◗ N'utilisez pas un chargeur ou un support de
charge endommagé.
◗ Si le chargeur ou le support de charge est
endommagé, remplacez-le toujours par un
d'origine pour éviter tout accident.
◗ Chargez, rangez et utilisez l'appareil à une
température comprise entre 5cC et 35cC.
C
◗ Evitez le contact du chargeur avec de l'eau.
◗ N'immergez jamais le support de charge dans
l'eau, ne le rincez pas non plus.
◗ Ne laissez pas le rasoir sur le support de
charge branché pendant plus de 24 heures.
FRANÇAIS 25
Page 24

C
◗ L'appareil est étanche et peut être nettoyé à
l'eau courante.
Faites attention que l'eau ne soit pas trop chaude
pour ne pas vous brûler.
C
◗ Cet appareil est conforme aux normes
internationales de sécurité IEC et peut être
utilisé sous la douche.
◗ Avant la première utilisation,vérifiez que le
gel ou la lotion fourni(e) avec l'appareil ne
contient pas des ingrédients (voir au dos de la
cartouche) qui puissent provoquer des
allergies. N'utilisez pas le gel et/ou la lotion si
vous êtes allergique à un ou plusieurs de ces
composants!
La fenêtre d'affichage
Affichage lumineux
Ce modèle comporte un affichage lumineux
spécial. L'afficheur 3D en couleur fournit toutes
les informations nécessaires en utilisant des effets
lumineux spéciaux.
◗ Retirez la feuille adhésive de l'affichage
lumineux.
Programme de démonstration
L'appareil a un programme spécial de
démonstration.
FRANÇAIS26
Page 25

1 Démonstration : Maintenez appuyé le
bouton marche/arrêt pendant 7 secondes.
La démonstration commence automatiquement.
◗ Au début de la démonstration, tous les
indicateurs lumineux s'allument en même
temps. Ensuite, ils sont affichés séparément
dans l'ordre suivant:
„ Indicateur de charge/accumulateurs
entièrement chargés
Ê Rasage
± Indicateur gel à raser
 Rappel de nettoyage
Ê Rasage
± Indicateur gel à raser
„ Accumulateurs déchargés
 Rappel de nettoyage/„ Accumulateurs
déchargés
Œ Vérification têtes de rasage
B
Le programme de démonstration dure environ
1 minute (y compris les intervalles).
2 Arrêtez la démonstration en appuyant sur
le bouton marche/arrêt.
Indications pendant utilisation
Tous les symboles mentionnés ci-dessous seront
affichés pendant chaque séance de rasage, dans le
même ordre.
Certains symboles seront affichés même si vous
avez accompli la tache indiquée.
FRANÇAIS 27
Page 26
B
Lors de la mise en marche de l'appareil, le
symbole pour le gel à raser clignote trois fois. Si
vous avez déjà appliqué une quantité suffisante
de gel ou lotion, vous pouvez ignorer ce symbole.
B
Lorsque vous arrêtez l'appareil, le rappel de
nettoyage sera affiché. Le symbole est représenté
par un robinet (qui s'allume) et des gouttes d'eau
(clignotantes). Si vous avez nettoyé le rasoir avant
de l'arrêter, ignorez ce rappel.
Charge
La charge dure environ 8 heures.
Ne laissez pas le rasoir sur le support de charge
branché pendant plus de 24 heures.
Indications de charge
Accumulateurs déchargés
C
◗ Si les accumulateurs sont presque déchargés,
le témoin de charge s'allumera en rouge et
clignotera pendant le rasage.
◗ Lorsque vous arrêtez le rasoir et les
accumulateurs sont presque déchargés, le
témoin de charge s'allume en rouge et
clignote deux fois. Ceci se passe quatre fois à
intervalles courts.
◗ Lorsque vous commencez à charger le rasoir
lorsque les accumulateurs sont déchargés, le
témoin de charge s'allume en rouge et
clignote pendant 3 minutes au maximum.
FRANÇAIS28
Page 27
Accumulateurs entièrement chargés
◗ Pendant la charge, le témoin de charge
s'allume en vert et clignote jusqu'à ce que les
accumulateurs soient complètement chargés
(environ 8 heures).
◗ Quand les accumulateurs sont complètement
chargés, le témoin de charge des
accumulateurs reste allumé en vert.
Charger l'appareil
Chargez le rasoir lors de la première utilisation.
1 Enfoncez la petite fiche dans le support de
charge et insérez la fiche du chargeur dans
la prise de courant.
C
2 Mettez le rasoir dans le support de charge.
Le rasoir s'arrête automatiquement lorsqu'il est
mis sur le support de charge.
3 Retirez le chargeur de la prise murale et la
petite fiche du support de charge lorsque
les accumulateurs sont complètement
chargés.Vous pouvez laisser le rasoir sur le
support de charge continuellement.
Autonomie de rasage
Un rasoir complètement chargé a une autonomie
de rasage de 55 minutes environ.
FRANÇAIS 29
Page 28

Cartouches
Les cartouches de gel/lotion à raser NIVEA FOR
MEN sont disponibles en paquets contenant cinq
cartouches et une pompe en plastique.
Valabilité du gel/lotion à raser NIVEA FOR MEN
des cartouches: 32 mois si conservé(e) à une
température comprise entre 0cC et +40cC.
Utilisez uniquement les cartouches Philishave
NIVEA FOR MEN Cool Skin (HQ170 et
HQ171).
Le gel/lotion d'une cartouche Philishave NIVEA
FOR MEN Cool Skin suffit pour environ 8/10
rasages.
Pour des raisons d'hygiène, il est conseillé de
changer la pompe à chaque nouveau paquet de
cartouches.
Ne jetez pas la pompe quand vous remplacez la
cartouche vide.Vous en aurez besoin pour les
cinq cartouches.
Retirez la cartouche de l'appareil si vous ne vous
en servez pas pendant une semaine ou plus.
Si vous êtes à court de car touches et que vous
ne savez pas où les acheter, contactez le Service
Consommateurs de votre pays (voir "Garantie et
service").
FRANÇAIS30
Page 29

Insérer les cartouches
C
1 Lorsque vous utilisez un nouveau paquet
de cartouches, ôtez la pompe et insérez-la
dans la cartouche jusqu'à ce que vous
entendiez un clic.
C
2 Appuyez sur le bouton de déverrouillage
et ouvrez le compartiment à cartouche.
C
3 Glissez la cartouche avec la pompe dans le
rasoir. Elle est fixée correctement si la
partie blanche de la pompe est dirigée vers
le haut.
4 Fermez le couvercle (clic).
5 Appuyez plusieurs fois sur le bouton jaune
de la pompe jusqu'à ce que le gel/lotion à
raser NIVEA FOR MEN apparaisse. Le
rasoir est prêt à l'emploi.
Remplacer les cartouches
Ne jetez pas la pompe quand vous remplacez la
cartouche vide.Vous en aurez besoin pour les
autres cartouches.
C
1 Appuyez sur le bouton de déverrouillage
et ouvrez le compartiment à cartouche.
FRANÇAIS 31
2
1
2
1
Page 30

2 Retirez la cartouche vide et ôtez la
pompe.
C
3 Insérez la pompe dans une nouvelle
cartouche jusqu'à ce que vous entendiez
un clic.
C
4 Glissez la cartouche avec la pompe dans le
rasoir. Elle est fixée correctement si la
partie blanche de la pompe est dirigée vers
le haut. Fermez le couvercle.
Ranger les cartouches
C
◗ Vous pouvez ranger les autres cartouches sur
le support mural fourni. Le support a des
ventouses qui vous permettent de le fixer
facilement à mur.Ainsi, vous aurez les
cartouches à portée de la main.
NB: Utilisez le suppor t mural uniquement pour le
rangement des cartouches. N'essayez pas de
placer le rasoir sur ce support car il peut tomber.
FRANÇAIS32
Page 31

Utilisation de l'appareil
Rasage
Mettre l'appareil en marche
1 Mettez le rasoir en marche en appuyant
sur le bouton marche/arrêt une fois.
Le témoin jaune pour le gel à raser ± clignote
3 fois pour indiquer que le gel/lotion à raser peut
être appliqué(e).
C
2 Appuyez sur le bouton jaune de la pompe
pour appliquer le gel/lotion NIVEA FOR
MEN.
3 Déplacez le rasoir sur la peau en
effectuant des mouvements rectilignes et
circulaires.
C
4 Pendant le rasage, appuyez souvent sur le
bouton de la pompe pour appliquer le
gel/lotion NIVEA FOR MEN et permettre
ainsi au rasoir de glisser sur votre peau.
N'appliquez pas une pression trop forte sur le
rasoir pendant le rasage. Si vous le souhaitez, vous
pouvez humidifier légèrement votre visage avant
de vous raser.
◗ Pour obtenir les meilleurs résultats, appuyez
souvent sur le bouton de la pompe pour
appliquer le gel/lotion.
◗ Toutefois le rasoir ne fonctionne pas de
manière optimale sans le gel/lotion à raser.
FRANÇAIS 33
Page 32

◗ Votre peau peut avoir besoin de 2-3 semaines
pour s'habituer au système Philishave.
Arrêter le rasoir
1 Arrêtez le rasoir en appuyant sur le
bouton marche/arrêt une fois.
Après avoir arrêté le rasoir, le rappel de nettoyage
 (symbole du robinet vert avec gouttes d'eau)
reste allumé pendant 6 secondes pour vous
indiquer que vous devez nettoyer le rasoir.
2 Nettoyez le rasoir (voir chapitre
"Nettoyage et entretien").
Rincez le rasoir après chaque emploi. Retirez la
cartouche si vous n'avez pas l'intention d'utiliser
l'appareil pendant plus d'une semaine.
C
3 Remettez le capot protecteur sur le rasoir
après chaque utilisation pour éviter tout
dommage.
Tondeuse
Pour tailler les favoris et la moustache.
Attacher la tondeuse
1 Arrêtez le rasoir.
Nettoyez le rasoir avant d'attacher la tondeuse
(voir chapitre "Nettoyage et entretien").
FRANÇAIS34
Page 33

C
2 Appuyez sur le bouton de déverrouillage
(1) et retirez l'unité de rasage du rasoir (2).
C
3 Inclinez légèrement la tondeuse vers le bas.
C
4 Fixez la tondeuse sur le rasoir (vous
entendrez un clic). La tondeuse est prête à
l'emploi.
5 Activez la tondeuse en appuyant sur le
bouton marche/arrêt une fois.
Retirer la tondeuse
1 Arrêtez le rasoir.
2 Retirez la tondeuse en appuyant sur le
bouton de déverrouillage.
3 Replacez l'unité de rasage sur le rasoir.
Nettoyage et entretien
Nettoyez régulièrement l'appareil pour obtenir de
meilleurs résultats de rasage.
FRANÇAIS 35
2
1
Page 34

Pour maintenir une performance optimale de
rasage, rincez l'unité de rasage et le
compartiment à poils sous l'eau chaude après
chaque emploi.
Faites attention que l'eau ne soit pas trop chaude
pour ne pas vous brûler.
Rappel de nettoyage
◗ Après avoir arrêté le rasoir, le rappel de
nettoyage  (symbole du robinet vert avec les
gouttes d'eau) reste allumé pendant 6
secondes pour vous rappeler que vous devez
nettoyer le rasoir.
◗ Si le symbole rouge de l'unité de rasage Œ et
le rappel de nettoyage  s'allument en même
temps, les têtes de rasage sont très sales ou
détériorées et elles peuvent arrêter le
moteur. Si les têtes sont sales, nettoyez-les. Si
elle sont détériorées, vous devez les
remplacer (voir chapitre "Remplacement").
B
Pour éviter cette situation, nettoyez les têtes de
rasage régulièrement.
Nettoyage
Après chaque séance de rasage, le rappel de
nettoyage  sera affiché pour vous indiquer que
vous devez nettoyer le rasoir.
FRANÇAIS36
Page 35

Unité de rasage: Nettoyage Rapide
après chaque rasage
1 Assurez-vous que l'appareil est mis en
marche.
2 N'ouvrez pas l'unité de rasage.
C
3 Rincez l'unité de rasage et le
compartiment à poils sous l'eau chaude.
4 Secouez un peu pour éliminer l'eau.
Ne séchez jamais l'unité de rasage à l'aide d'une
serviette, car cela pourrait endommager les têtes
de rasage.
Unité de rasage et compartiment à
poils: chaque semaine
Il est conseillé de nettoyer l'appareil à fond au
moins une fois par semaine pour obtenir les
meilleurs résultats.
Vous pouvez suivre la même procédure lorsque
vous nettoyez les têtes de rasage.
1 Arrêtez le rasoir.
C
2 Appuyez sur le bouton de blocage et ôtez
l'unité de rasage de l'appareil.
FRANÇAIS 37
Page 36

C
3 Rincez l'intérieur de l'unité de rasage.
C
4 Rincez l'extérieur de l'unité de rasage.
C
5 Rincez le compartiment à poils.
6 Assurez-vous que l'intérieur de l'unité de
rasage et le compartiment de récupération
des poils ont été nettoyés
minutieusement.
7 Fermez l'unité de rasage et secouez l'eau
du rasoir.
8 Ouvrez l'unité de rasage à nouveau et
laissez-la ouverte pour sécher l'appareil
complètement.
Support de charge
1 Débranchez le support de charge.
2 Nettoyez-le à l'aide d'un chiffon humide.
FRANÇAIS38
2
Page 37

Tondeuse
1 Nettoyez l'extérieur de la tondeuse avec la
brosse fournie.
Vous pouvez aussi la rincer à l'eau du robinet.
C
2 Si vous utilisez fréquemment la tondeuse,
lubrifiez la tondeuse à l'aide d'une
gouttelette d'huile pour machine à coudre
tous les six mois.
Rangement
Support de charge
C
◗ Vous pouvez ranger le rasoir sur le support
de charge, même s'il est humide.
Débranchez toujours le suppor t de charge avant
de ranger le rasoir.
Etui
◗ L'appareil peut être rangé dans l'étui fourni où
vous pouvez mettre également deux
cartouches NIVEA FOR MEN Cool Skin.
L'étui protégera votre appareil pendant les
voyages.
Cordon de suspension
◗ Vous pouvez ranger le rasoir à l'aide du
cordon spécial fourni pour un séchage plus
rapide.
FRANÇAIS 39
Page 38

Remplacement
Pour un résultat de rasage optimal, remplacez les
têtes de rasage tous les deux ans.
Remplacez les têtes endommagées ou usagées
exclusivement par des têtes Philishave Cool Skin
HQ177.
Vérification des têtes de rasage
Après deux ans d'utilisation le symbole rouge de
l'unité de rasage clignotera pendant 30 secondes
au cours de 7 rasages pour indiquer que vous
devez vérifier la condition des têtes de rasage.
L'estimation est basée sur une durée de rasage
moyenne de 3 minutes par séance. Lorsque le
symbole de la tête de rasage clignote, les autres
symboles et témoins sont éteints. Lorsque
l'appareil est arrêté, le symbole de l'unité de
rasage disparaît.
Lorsque le symbole rouge de l'unité de rasage
commence à clignoter, vous devrez vous assurer
que les têtes de rasage ne sont pas détériorées.
Sinon, elles doivent être remplacées pour obtenir
les meilleurs résultats.
Remplacement des têtes de rasage
1 Arrêtez le rasoir.
C
2 Appuyez sur le bouton de blocage et ôtez
l'unité de rasage de l'appareil.
FRANÇAIS40
Page 39

C
3 Faites tourner la molette dans le sens
contraires des aiguilles d'une montre (1) et
enlevez la plaque de fermeture (2).
C
4 Enlevez les têtes usagées et placez les
nouvelles têtes dans l'unité de rasage.
C
5 Remettez la plaque de fermeture sur
l'unité de rasage, pressez la molette (1) et
tournez-la dans le sens des aiguilles d'une
montre (2).
Accessoires
Les accessoires suivants sont disponibles:
- Chargeur HQ800
- Têtes de rasage Philishave Cool Skin HQ177.
- Lotion à raser hydratante NIVEA FOR MEN
Cool Skin HQ170.
- Gel à raser rafraîchissant et hydratant NIVEA
FOR MEN Cool Skin HQ171.
Environnement
Les accumulateurs rechargeables incorporés
contiennent des substances qui peuvent polluer
l'environnement.
FRANÇAIS 41
2
1
1
2
Page 40

Elimination des accumulateurs
Enlevez les accumulateurs lorsque vous mettez
l'appareil au rebut. Ne les jetez pas avec les
ordures ménagères, mais déposez-les à un endroit
prévu à cet effet par les pouvoirs publics.Vous
pouvez également porter l'appareil dans un
Centre Service Agréé Philips. Les accumulateurs y
seront traités dans le respect de l'environnement.
Eliminez les accumulateurs uniquement lorsqu'ils
sont entièrement vides.
C
1 Laissez l'appareil fonctionner jusqu'à l'arrêt
complet du moteur, ôtez les vis et ouvrez
l'appareil.
2 Retirez les accumulateurs.
Ne replacez pas le rasoir sur le support de charge
après avoir retiré les accumulateurs.
Garantie et service
Pour toute réparation/information, ou en cas de
problème, visitez notre website: www.philips.com.
Ou veuillez contacter le Service Consommateurs
Philips de votre pays (vous trouverez le numéro
de téléphone dans le dépliant sur la garantie
internationale). S'il n'y a aucun Service
Consommateurs Philips dans votre pays,
contactez votre distributeur ou le Service
Department de Philips Domestic Appliances and
Personal Care BV.
FRANÇAIS42
Page 41

Dépannage
1 Les têtes de rasage ont du mal à se
déplacer sur la peau.
B
Cause: vous n'avez pas appliqué assez de
gel/lotion.
◗ Appuyez sur le bouton de la pompe jusqu'à ce
qu'une quantité suffisante d'émulsion/gel à
raser NIVEA FOR MEN ait été appliquée
pour permettre aux têtes de rasage de se
déplacer aisément.
2 Les résultats de rasage se dégradent
B
Cause 1: Les têtes de rasage sont sales.
L'appareil n'a pas été rincé immédiatement après
le rasage et/ou il n'a pas été suffisamment rincé,
ou l'eau n'était pas suffisamment chaude.
◗ Nettoyez l'appareil à fond avant de continuer
le rasage.Voir chapitre "Nettoyage et
entretien".
B
Cause 2: Des poils longs sont emmêlés dans les
têtes de rasage.
◗ Appuyez sur le bouton de déverrouillage et
ôtez l'unité de rasage de l'appareil.
C
◗ Tournez la molette dans le sens inverse des
aiguilles d'une montre (1) et retirez la plaque
de fermeture (2).
FRANÇAIS 43
2
1
Page 42

C
◗ Nettoyez les couteaux et les grilles.
Ne nettoyez pas plus d'un couteau et une grille à
la fois, parce que ceux-ci sont affûtés par paires.
Si vous interver tissez par mégarde les couteaux
et les grilles, plusieurs semaines peuvent être
nécessaires avant que l'appareil rase à nouveau de
manière optimale.
◗ Enlevez les poils à l'aide de la brosse fournie.
◗ Remontez les têtes de rasage. Replacez la
plaque de fermeture sur l'unité de rasage,
pressez la molette et tournez-la dans le sens
des aiguilles d'une montre.
◗ Pour éviter que des poils longs s'emmêlent
dans les têtes de rasage, retirez l'unité de
rasage une fois par mois et nettoyez-la avec la
brosse fournie.
B
Cause 3: les têtes de rasage sont abîmées ou
usagées.
◗ Remplacez les têtes de rasage.Voir chapitre
"Remplacement".
3 Le rasoir ne fonctionne pas lorsque le
bouton marche/arrêt est pressé.
B
Cause 1: les accumulateurs sont vides.
◗ Rechargez le rasoir.Voir chapitre "Charge".
FRANÇAIS44
Page 43

B
Cause 2: le gel/lotion à raser sèche (sec) bloque
les têtes de rasage.
◗ Nettoyez à fond les têtes de rasage (voir
chapitre "Nettoyage et entretien").
B
Cause 3: les têtes de rasage sont endommagées.
◗ Remplacez les têtes de rasage.Voir chapitre
"Remplacement".
4 Le couvercle du compartiment à
cartouche ne se referme pas.
B
Cause 1: La cartouche n'a pas été insérée
correctement.
◗ Insérez la cartouche correctement; la partie
blanche doit être dirigée vers le haut.
B
Cause 2: La cartouche n'a pas été poussée
suffisamment dans le rasoir.
◗ Pressez la cartouche jusqu'à ce qu'elle soit
bien enfoncée.
5 Le gel/lotion à raser NIVEA FOR MEN a
changé de couleur ou est devenue
aqueuse.
B
Cause: Le gel/lotion à raser n'a pas été
conservé(e) à la bonne température.
◗ Insérez une autre cartouche.
FRANÇAIS 45
Page 44

6 Votre peau est irritée
B
Cause 1:Votre peau n'est pas encore habituée à
ce nouveau système de rasage.
◗ Vous pouvez avoir besoin de 2-3 semaines
pour vous habituer à ce système de rasage.
B
Cause 2: Le gel/lotion de rasage irrite votre peau.
◗ Essayez un autre type de cartouche NIVEA
FOR MEN.
◗ Essayez d'humidifier votre visage avant de
vous raser en utilisant le gel/lotion.
Si l'irritation ne disparaît pas sous 24 heures, il est
conseillé de ne plus utiliser le gel/lotion.
FRANÇAIS46
Page 45

Introducción
La afeitadora se suministra con dos tipos
diferentes de cartuchos NIVEA FOR MEN: un gel
extra refrescante para el afeitado que da
sensación de frescor durante y después del
afeitado, y una loción hidratante para el afeitado
para pieles sensibles. Así tendrá la opor tunidad de
probar ambos y descubrir cuál se adapta mejor a
su tipo de piel.
Importante
Lea atentamente estas instrucciones antes de usar
el aparato y consérvelas por si necesitara
consultarlas en el futuro.
◗ Use sólo la clavija adaptadora y el soporte de
carga que se suministran.
◗ La clavija adaptadora transforma la corriente
de 100-240 voltios en un voltaje más seguro e
inferior a los 24 voltios.
◗ La clavija adaptadora incorpora un
transformador. No quite la clavija adaptadora
para sustituirla por otro enchufe, ya que
podría producirse una situación de peligro.
◗ No utilice una clavija adaptadora dañada o un
soporte de carga dañado.
◗ Si la clavija adaptadora o el soporte de carga
estuvieran dañados, sustitúyalos siempre por
otra pieza original para evitar una situación de
peligro.
◗ Cargue, guarde y utilice el aparato a una
temperatura entre 5cC y 35cC.
ESPAÑOL 47
Page 46

C
◗ Asegúrese de que la clavija adaptadora no se
moje.
◗ No sumerja nunca el soporte de carga en
agua ni lo lave bajo el grifo.
◗ No deje enchufado el soporte de carga con la
afeitadora durante más de 24 horas.
C
◗ El aparato es hermético y puede limpiarse
bajo el grifo.
Tenga cuidado con el agua caliente. Compruebe
siempre que el agua no está demasiado caliente
para no quemarse las manos.
C
◗ El aparato cumple las normas de seguridad
IEC aprobadas internacionalmente y se puede
utilizar de manera segura en el baño o en la
ducha.
◗ Antes de comenzar a utilizar el aparato,
compruebe que ni el gel ni la loción que se
suministran con el aparato (consultar el dorso
del cartucho) contienen componentes a los
que sea alérgico. No utilice el gel ni la loción
si es alérgico a uno o más de sus
componentes.
La pantalla
Pantalla Living Light
Este modelo incorpora la exclusiva pantalla Living
Light. Esta pantalla a color y en 3D le
proporcionará toda la información que necesite
con efectos especiales luminosos.
ESPAÑOL48
Page 47

◗ Quite todas las pegatinas y láminas
protectoras de la pantalla.
Programa de demostración
El aparato tiene un exclusivo programa de
demostración.
1 Pulse el botón de marcha/parada (on/off)
durante 7 segundos.
La demostración comenzará automáticamente.
◗ Cuando comienza la demostración, todas las
indicaciones se iluminan a la vez. Después se
muestran todas las indicaciones de la
afeitadora por separado durante 3 segundos
en el siguiente orden:
„ Indicación de carga/batería llena
Ê Afeitado
± Gel para el afeitado
 Aviso de limpieza
Ê Afeitado
± Gel para el afeitado
„ Batería baja
 Aviso de limpieza / „ Batería baja
Œ Comprobación de los conjuntos cortantes
B
El programa de demostración completo dura
1 minuto aproximadamente (incluyendo los
intervalos).
2 Puede parar la demostración pulsando el
botón de marcha/parada (on/off)
ESPAÑOL 49
Page 48

Indicaciones durante el uso
Las indicaciones que se mencionan a continuación
aparecen en todas las sesiones de afeitado y
siempre en el mismo orden, lo que le facilita
seguir siempre el mismo ritual de afeitado.
Como resultado, se iluminarán algunos símbolos
incluso cuando ya haya realizado la acción
adecuada.
B
Cuando conecte el aparato, la indicación de gel
para el afeitado parpadeará tres veces. En caso
de que haya aplicado suficiente gel o loción, ignore
esta indicación.
B
Cuando desconecte el aparato, aparecerá el aviso
de limpieza, que consiste en un grifo en verde
(iluminado) y un chorro de agua en verde
(parpadea). Si ya ha limpiado la afeitadora antes
de desconectarla, no tenga en cuenta esta
indicación.
Cómo cargar el aparato
La carga dura aproximadamente 8 horas.
No deje enchufado el soporte de carga con la
afeitadora durante más de 24 horas.
ESPAÑOL50
Page 49

Indicaciones de carga
La batería se está agotando
C
◗ Cuando la batería se está agotando, se ilumina
en color rojo el piloto de la batería durante el
afeitado.
◗ Si desconecta la afeitadora cuando la batería
esté a punto de agotarse, el piloto de la
batería parpadeará en color rojo dos veces.
Esto sucederá cuatro veces con breves pausas
intercaladas.
◗ Si empieza a cargar la afeitadora cuando la
batería esté baja, el piloto de la batería
parpadeará en color rojo durante un 3
minutos como máximo.
Batería completamente cargada
◗ Durante la carga, el piloto de la batería
parpadea en color verde hasta que la batería
está completamente cargada (8 horas aprox.).
◗ El piloto de la batería está continuamente
iluminado en color verde si la batería está
completamente cargada.
Cómo cargar el aparato
Cargue la afeitadora antes de usarla por primera
vez o cuando el aparato indique que se está
agotando la batería.
1 Inserte la clavija pequeña en el soporte de
carga y enchufe la clavija adaptadora a una
toma de tierra.
ESPAÑOL 51
Page 50

C
2 Coloque la afeitadora en el soporte de
carga.
La afeitadora se desconecta automáticamente
cuando se coloca en el soporte de carga.
3 Quite la clavija del enchufe y saque la
clavija pequeña del soporte de carga
cuando la batería esté completamente
cargada. Entonces ya podrá dejar el
aparato en el soporte de carga.
Tiempo de afeitado sin cable.
Una afeitadora completamente cargada le
proporcionará un tiempo de afeitado sin cable de
hasta 55 minutos.
Cartuchos
Los cartuchos con gel o loción para el afeitado
NIVEA FOR MEN están disponibles en cajas que
contienen cinco cartuchos y una pequeña bomba
de plástico.
El gel o loción para el afeitado NIVEA FOR MEN
de los cartuchos se conservará en buenas
condiciones durante 32 meses si se guarda a
temperaturas entre 0cC y +40cC.
Utilice sólo cartuchos Philishave NIVEA FOR
MEN Cool Skin (modelos HQ170 y HQ171).
ESPAÑOL52
Page 51

Un cartucho Philishave NIVEA FOR MEN Cool
Skin contiene gel o loción suficiente para unos
10 afeitados.
Por razones higiénicas, le aconsejamos que inserte
una nueva bomba cuando empiece a usar un
nuevo conjunto de cinco cartuchos.
No tire la bomba cuando sustituya un cartucho
vacío. La necesitará para los otros cinco
cartuchos.
Quite del aparato el cartucho de gel o loción
para el afeitado cuando no vaya a usar la
afeitadora durante más de una semana.
Cuando se le acaben los cartuchos de gel o
loción para el afeitado y no sepa dónde
comprarlos, póngase en contacto con el Centro
de atención al cliente de su país (véase 'Garantía
y servicio').
Cómo insertar los cartuchos
C
1 Cuando comience a usar un paquete
nuevo de cartuchos, saque la bomba de su
bolsa e introdúzcala en el cartucho hasta
que se fije en su posición con un clic.
ESPAÑOL 53
Page 52

C
2 Pulse el botón de liberación y abra la tapa
del compartimento del cartucho.
C
3 Deslice el cartucho con la bomba en la
afeitadora. Sólo se acopla adecuadamente
si el lado blanco de la bomba está
orientado hacia arriba.
4 Cierre la cubierta (oirá un clic).
5 Presione el botón amarillo de la bomba
unas cuantas veces hasta que el gel o la
loción para el afeitado NIVEA FOR MEN
aparezca. La afeitadora está ahora lista para
usar.
Cómo sustituir los cartuchos
No tire la bomba cuando sustituya un cartucho
vacío. La necesitará para los otros car tuchos.
C
1 Pulse el botón de liberación y abra la tapa
del compartimento del cartucho.
2 Quite el cartucho vacío y saque la bomba.
C
3 Coloque la bomba en el cartucho nuevo y
empújela hasta que encaje en su posición
con un clic.
ESPAÑOL54
2
1
2
1
Page 53

C
4 Deslice el cartucho con la bomba en la
afeitadora. Sólo se acopla adecuadamente
si el lado blanco de la bomba está
orientado hacia arriba. Cierre la tapa.
Cómo guardar los cartuchos
C
◗ Puede guardar cómodamente los otros
cartuchos, fijándolos al soporte de pared que
se suministra. El soporte tiene ventosas que
permiten fijarlo fácilmente a la pared. De este
modo siempre tendrá los cartuchos a mano,
lo que resulta muy cómodo, sobre todo si se
afeita en la ducha.
Nota: El sopor te de pared sólo es adecuado para
guardar cartuchos. Nunca cuelgue o coloque la
afeitadora en el soporte de pared. Si lo hace, la
afeitadora se podría caer.
Cómo utilizar el aparato
Afeitado
Cómo conectar la afeitadora
1 Conecte la afeitadora presionando una vez
el botón de marcha/parada.
El símbolo con forma de gota ± parpadea 3 veces
en color amarillo para indicar que ya se puede
aplicar el gel o la loción.
ESPAÑOL 55
Page 54

C
2 Presione el botón amarillo de la bomba
para aplicar el gel o la loción para el
afeitado NIVEA FOR MEN sobre su piel.
3 Desplace los conjuntos cortantes sobre la
piel con movimientos rectos y circulares.
C
4 Mientras se afeita, presione
frecuentemente el botón de la bomba para
aplicar más gel o loción para el afeitado
NIVEA FOR MEN, de modo que la
afeitadora se deslice suavemente sobre su
cara.
Mientras se afeita no presione la afeitadora con
demasiada fuerza contra la piel. Si lo prefiere,
puede mojarse la cara primero.
◗ Para obtener mejores resultados, se debe
bombear frecuentemente gel o loción.
◗ La afeitadora no funcionará optimamente si la
utiliza sin gel o loción para el afeitado.
◗ Puede que su piel necesite de 2 a 3 semanas
para acostumbrarse al sistema de afeitado
Philishave.
Cómo desconectar la afeitadora
1 Presionando una vez más el botón de
marcha/parada, desconecte la afeitadora.
El aviso de limpieza  (símbolo de grifo verde
con chorro de agua parpadeando) se ilumina
durante 6 segundos para indicar que la afeitadora
se debe limpiar.
ESPAÑOL56
Page 55

2 Limpie la afeitadora (consulte el capítulo
'Limpieza y mantenimiento').
Limpie la afeitadora después de cada uso. Quite el
cartucho si no va a usar el aparato durante más
de una semana.
C
3 Después de usar la afeitadora, póngale
siempre la funda de protección para evitar
daños.
Cortapatillas
Para arreglar las patillas y el bigote.
Cómo colocar el cortapatillas
1 Desconecte la afeitadora.
Limpie la afeitadora antes de colocar el
cortapatillas (véase el capítulo 'Limpieza y
mantenimiento').
C
2 Presione el botón de liberación (1) y saque
la unidad afeitadora de la afeitadora (2).
C
3 Incline ligeramente el cortapatillas hacia
atrás.
C
4 Encaje el cortapatillas a la afeitadora (oirá
un clic).Ahora el cortapatillas ya está listo
para usar.
ESPAÑOL 57
2
1
Page 56

5 Active el cortapatillas pulsando una vez el
botón de marcha/parada (on/off).
Cómo quitar el cortapatillas
1 Desconecte la afeitadora.
2 Para quitar el cortapatillas, presione el
botón de liberación de nuevo y saque el
cortapatillas de la afeitadora.
3 Vuelva a colocar la unidad afeitadora en el
aparato.
Limpieza y mantenimiento
Una limpieza habitual garantiza un mejor
rendimiento en el afeitado.
Para mantener un rendimiento óptimo en el
afeitado y la afeitadora limpia, debe aclarar bien
con agua caliente la unidad afeitadora y la cámara
de recogida de pelo después de cada uso.
Tenga cuidado con el agua caliente. Compruebe
siempre que el agua no está demasiado caliente
para no quemarse las manos.
Aviso de limpieza
◗ Cuando desconecte la afeitadora, el aviso de
limpieza  (símbolo de grifo en verde con
chorro de agua parpadeando) se iluminará
ESPAÑOL58
Page 57

durante 6 segundos para recordarle que debe
limpiar la afeitadora.
◗ Si se iluminan a la vez el símbolo de la unidad
afeitadora en rojo Œ y el aviso de limpieza Â
es que los conjuntos cortantes están tan
sucios o dañados que pueden llegar a
bloquear el motor. Si los conjuntos cortantes
están sucios, límpielos. Si los conjuntos
cortantes están dañados, sustitúyalos
(consulte el capítulo 'Sustitución').
B
Le recomendamos que evite esta situación
limpiando los conjuntos cortantes regularmente.
Limpieza
Después de cada afeitado, el aparato le recuerda
que hay que limpiarlo mediante el aviso de
limpieza Â.
Unidad afeitadora: Quick Clean
después de cada afeitado
1 Asegúrese de que el aparato está
conectado.
2 Mantenga cerrada la unidad afeitadora.
C
3 Limpie la unidad afeitadora y la cámara de
recogida de pelo con agua caliente del
grifo, dejando que el agua corra por las
aberturas que se encuentran debajo de la
unidad afeitadora durante al menos
30 segundos.
ESPAÑOL 59
Page 58

4 Sacuda el exceso de agua.
No seque nunca la unidad afeitadora con una
toalla o un paño, ya que esto podría dañar los
conjuntos cortantes.
Unidad afeitadora y cámara de
recogida de pelo: todas las semanas
Le recomendamos que limpie a fondo el aparato
al menos una vez a la semana para mantener un
rendimiento óptimo.
También puede seguir este procedimiento cuando
tenga que limpiar los conjuntos cortantes.
1 Desconecte la afeitadora.
C
2 Presione el botón de liberación para abrir
la unidad afeitadora.
C
3 Limpie el interior de la unidad afeitadora.
C
4 Limpie el exterior de la unidad afeitadora.
ESPAÑOL60
2
Page 59

C
5 Limpie la cámara de recogida de pelo.
6 Asegúrese de que el interior de la unidad
afeitadora y la cámara de recogida del pelo
se han limpiado adecuadamente.
7 Cierre la unidad afeitadora y sacuda el
exceso de agua.
8 Vuelva a abrir la unidad afeitadora y déjela
abierta para que el aparato se seque
completamente.
Soporte de carga
1 Desenchufe el soporte de carga.
2 Limpie el soporte de carga con un paño
húmedo.
Cortapatillas
1 Después de cada uso, limpie el exterior del
cortapatillas con el cepillo que se
suministra.
También se puede limpiar el cortapatillas
aclarándolo bajo el grifo.
C
2 Si se usa frecuentemente el cortapatillas,
lubrique los dientes del cortapatillas con
una gota de aceite para máquinas de coser
cada seis meses.
ESPAÑOL 61
Page 60

Cómo guardar el aparato
Soporte de carga
C
◗ La afeitadora se puede guardar en el soporte
de carga, incluso si está mojada.
Desenchufe siempre el soporte de carga antes de
colocar la afeitadora, ya esté seca o húmeda.
Funda
◗ La afeitadora se puede guardar en la funda
que se suministra.También caben dos
cartuchos Cool Skin de NIVEA FOR MEN. La
funda protegerá el aparato durante los viajes.
Colgante
◗ Otra manera de guardar el aparato es
colgarlo del colgante que se suministra. Este
método garantiza un secado óptimo.
Sustitución
Para lograr un resultado óptimo en el afeitado,
sustituya los conjuntos cortantes cada dos años.
Sustituya los conjuntos cortantes dañados o
gastados sólo por conjuntos cortantes Philishave
Cool Skin HQ177.
Indicación de comprobación de los
conjuntos cortantes
A los dos años de usar la afeitadora, el símbolo
ESPAÑOL62
Page 61

rojo de la unidad afeitadora Œ parpadeará
durante 30 segundos durante 7 afeitados para
avisarle de que debe comprobar el estado de los
conjuntos cortantes. Esta indicación se basa en un
tiempo de afeitado medio de 3 minutos por
afeitado. Cuando parpadea el símbolo de los
conjuntos cortantes, el resto de símbolos y luces
están apagados. Cuando se desconecta la
afeitadora, el símbolo de la unidad afeitadora
desaparece.
Cuando el símbolo de la unidad afeitadora
comienza a parpadear en rojo, debe comprobar
los conjuntos cortantes por si hubiera algún daño.
Si los conjuntos cortantes estuvieran dañados,
deberá sustituirlos para obtener los mejores
resultados.
Sustitución de los conjuntos cortantes
1 Desconecte la afeitadora.
C
2 Presione el botón de liberación para abrir
la unidad afeitadora.
C
3 Gire la ruedecita en el sentido contrario a
las agujas del reloj (1) y quite el marco de
retención (2).
ESPAÑOL 63
2
1
Page 62

C
4 Saque los conjuntos cortantes y coloque
unos nuevos en la unidad afeitadora.
C
5 Coloque de nuevo el marco de retención
en la unidad afeitadora, presione la
ruedecita (1) y gírela en el sentido de las
agujas del reloj (2).
Accesorios
Están disponibles los siguientes accesorios:
- Clavija adaptadora HQ800.
- Conjuntos cor tantes Cool Skin de Philishave
HQ177.
- Loción hidratante para el afeitado Cool Skin de
NIVEA FOR MEN HQ170.
- Gel extra refrescante para el afeitado Cool Skin
de NIVEA FOR MEN HQ171.
Medio ambiente
La batería recargable incorporada contiene
sustancias que pueden contaminar el medio
ambiente.
Cómo deshacerse de la batería
Quite la batería cuando vaya a deshacerse del
aparato. No la tire a la basura normal del hogar y
ESPAÑOL64
1
2
Page 63

deposítela en un lugar de recogida oficial.También
puede llevarla a un Servicio de Asistencia Técnica
de Philips, donde se desharán de ella sin dañar el
medio ambiente.
Quite la batería sólo cuando esté completamente
descargada.
C
1 Deje que la afeitadora funcione hasta que
se pare. Luego afloje los tornillos y abra la
afeitadora.
2 Quite la batería.
No vuelva a colocar la afeitadora en el soporte
de carga después de haber sacado la batería.
Garantía y servicio
Si necesita información o tiene algún problema,
visite la página web de Philips en
www.philips.com, o póngase en contacto con el
Servicio Philips de Atención al Cliente de su país
(hallará el número de teléfono en el folleto de la
Garantía Mundial). Si en su país no hay Servicio
Philips de Atención al Cliente, diríjase a su
distribuidor local Philips o póngase en contacto
con el Service Department of Philips Domestic
Appliances and Personal Care BV.
Solución de problemas
1 Los conjuntos cortantes no se desplazan
fácilmente por la piel.
ESPAÑOL 65
Page 64

B
Causa: no se ha aplicado suficiente gel/loción para
el afeitado.
◗ Presione el botón de la bomba unas cuantas
veces hasta que se haya liberado suficiente
cantidad de gel o loción para el afeitado
NIVEA FOR MEN para permitir que los
conjuntos cortantes se vuelvan a deslizar
fácilmente por la cara.
2 Menor rendimiento en el afeitado
B
Causa 1: los conjuntos cortantes están sucios.
No se ha limpiado la afeitadora inmediatamente
después de utilizarla y/o no se ha aclarado
durante suficiente tiempo y/o el agua con la que
se limpió la afeitadora no estaba suficientemente
caliente.
◗ Limpie bien el aparato antes de seguir
afeitando. Consulte el capítulo 'Limpieza y
mantenimiento'.
B
Causa 2: hay pelos largos obstruyendo los
conjuntos cortantes.
◗ Presione el botón de liberación para abrir la
unidad afeitadora.
C
◗ Gire la ruedecita en el sentido contrario a las
agujas del reloj (1) y quite el marco de
retención (2).
ESPAÑOL66
2
1
Page 65

C
◗ Limpie las cuchillas y los protectores.
No limpie más de una cuchilla y un protector al
mismo tiempo, ya que forman conjuntos entre sí.
Si, accidentalmente, se intercambian las cuchillas y
los protectores, pueden ser necesarias varias
semanas para que se restablezcan los óptimos
resultados en el afeitado.
◗ Quite los pelos con el cepillo que se
suministra.
◗ Vuelva a colocar los conjuntos cortantes en la
unidad afeitadora.Vuelva a poner el marco de
retención en la unidad afeitadora, presione la
ruedecita y hágala girar en el sentido de las
agujas del reloj.
◗ Para evitar que los pelos largos obstruyan los
conjuntos cortantes, quite los conjuntos
cortantes una vez al mes y límpielos con el
cepillo que se suministra.
B
Causa 3: los conjuntos cortantes están gastados o
dañados.
◗ Sustituya los conjuntos cortantes. Consulte el
capítulo 'Sustitución'.
3 La afeitadora no funciona cuando se
aprieta el botón de marcha/parada.
B
Causa 1: la batería está descargada.
ESPAÑOL 67
Page 66

◗ Vuelva a cargar la batería. Consulte el capítulo
"Cómo cargar el aparato".
B
Causa 2: hay loción o gel seco y ha bloqueado los
conjuntos cortantes.
◗ Limpie a fondo los conjuntos cortantes
(consulte el capítulo 'Limpieza y
mantenimiento').
B
Causa 3: los conjuntos cortantes están dañados.
◗ Sustituya los conjuntos cortantes. Consulte el
capítulo 'Sustitución'.
4 La tapa del compartimento del cartucho
no puede cerrarse.
B
Causa 1: no se ha insertado el cartucho
correctamente.
◗ Inserte correctamente el cartucho. Sólo se
ajusta adecuadamente en la afeitadora si el
lado blanco de la bomba está orientado hacia
arriba.
B
Causa 2: el cartucho no ha entrado lo suficiente
en la afeitadora.
◗ Presione el cartucho hasta que esté bien
colocado.
ESPAÑOL68
Page 67

5 El gel o loción para el afeitado NIVEA FOR
MEN ha cambiado de color o se ha vuelto
acuoso.
B
Causa: el gel o loción para el afeitado NIVEA FOR
MEN no se ha guardado a la temperatura
correcta.
◗ Inserte un cartucho nuevo.
6 Se irrita la piel.
B
Causa 1: la piel no se ha acostumbrado todavía a
este sistema de afeitado.
◗ Deje transcurrir de dos a tres semanas para
que su piel se acostumbre a este sistema de
afeitado.
B
Causa 2: el gel o la loción para el afeitado irrita su
piel.
◗ Pruebe el otro tipo de cartucho de NIVEA
FOR MEN.
◗ Mójese la cara antes de afeitarse con el gel o
la loción para el afeitado
Si la irritación no desaparece en 24 horas, le
recomendamos que deje de utilizar el gel o la
loción para el afeitado.
ESPAÑOL 69
Page 68

Introdução
A máquina é fornecida com duas recargas
diferentes de NIVEA FOR MEN: Gel de Barbear
Extra Fresco para uma sensação de frescura
durante e depois da barba e Loção Hidratante
para a Barba especial para peles sensíveis.Terá,
assim, a opor tunidade de experimentar e
descobrir qual a que melhor se adequa ao seu
tipo de pele.
Importante
Antes da primeira utilização, por favor leia estas
instruções com atenção e guarde-as para uma
eventual consulta futura.
◗ Use apenas a ficha e o carregador fornecidos.
◗ A ficha transforma 100-240 volts numa
voltagem segura e inócua inferior a 24 volts.
◗ A ficha de ligação integra um transformador.
Não corte a ficha para a substituir por uma
outra, porque isso poderá provocar uma
situação de perigo para o utilizador.
◗ Não utilize a ficha ou o carregador se
estiverem estragados.
◗ Se a ficha de ligação ou o carregador
estiverem estragados, deverá sempre
proceder à sua substituição por uma peça de
origem para evitar a ocorrência de alguma
situação de perigo.
◗ Carregue, guarde e utilize a máquina numa
temperatura entre 5cC e 35cC.
C
◗ A ficha de ligação não deve ser molhada.
PORTUGUÊS70
Page 69

◗ Nunca mergulhe o carregador dentro de água
nem o enxague à torneira.
◗ Não deixe a máquina colocada sobre o
carregador ligado durante mais de 24 horas
seguidas.
C
◗ A máquina é estanque e pode ser lavada à
torneira.
Tenha cuidado com a água quente.Verifique
sempre se a água não está demasiado quente
para evitar queimar as mãos.
C
◗ A máquina satisfaz as regulações IEC
internacionalmente aprovadas sobre
segurança e pode ser usada no banho ou no
duche.
◗ Antes de se servir da máquina, verifique se o
gel e a loção que a acompanham contêm
ingredientes (veja o reverso da recarga) aos
quais possa ser alérgico. Não aplique o gel/a
loção se for alérgico a um ou mais dos seus
ingredientes.
Mostrador
Luzes Indicadoras
Este modelo apresenta um visor exclusivo 'Living
Light'. Este mostrador LED 3D a cores dá toda a
informação necessária através dos efeitos das suas
'luzes vivas'.
◗ Retire os autocolantes ou película protectora
do Visor 'Living Light'.
PORTUGUÊS 71
Page 70

Programa de demonstração
A máquina tem um programa de demonstração
exclusivo.
1 Prima o interruptor durante 7 segundos.
A demonstração começa automaticamente.
◗ Quando a demonstração arranca, todas as
luzes se acendem ao mesmo tempo. Em
seguida, as indicações da máquina vão sendo
mostradas separadamente durante 3 segundos,
pela seguinte ordem:
„ Indicação de Carga/Bateria cheia
Ê Barba
± Indicação de gel para a barba
 Lembrete de limpeza
Ê Barba
± Indicação de gel para a barba
„ Indicação de bateria fraca
 Lembrete de limpeza/„ Indicação de bateria
fraca
Œ Indicação para verificação das cabeças
B
O programa de demonstração completo demora
cerca de 1 minuto (incluindo intervalos).
2 A demonstração pode ser interrompida
premindo o interruptor.
Indicações durante a utilização
Todas as indicações mencionadas abaixo são
PORTUGUÊS72
Page 71

mostradas durante cada sessão de barbear e são
sempre visualizadas pela mesma sequência,
permitindo-lhe, assim, manter facilmente um ritual
regular quando faz a barba.
Deste modo, alguns símbolos acendem-se mesmo
que já tenha sido tomada a acção apropriada.
B
Quando se liga a máquina, a indicação do gel de
barbear pisca três vezes. Se já tiver aplicado gel
ou loção para a barba suficiente, pode ignorar
esta indicação.
B
Quando se desliga a máquina, o lembrete de
limpeza é apresentado. Este lembrete consiste
numa torneira verde (iluminada) e um jacto de
água verde (a piscar). Se já tiver limpo a máquina
antes de a desligar, pode ignorar esta indicação.
Carga
A carga demora aproximadamente 8 horas.
Se o carregador estiver ligado à corrente, não
deixe a máquina colocada sobre o mesmo
durante mais de 24 horas seguidas.
PORTUGUÊS 73
Page 72

Indicações de carga
Bateria fraca
C
◗ Quando a bateria começa a ficar fraca, a luz
do botão da bateria acende-se a encarnado
durante a barba.
◗ Quando se desliga a máquina e a bateria está
quase a ficar vazia, a luz da bateria pisca duas
vezes a encarnado. Isto ocorre quatro vezes
com breves intervalos.
◗ Quando se começa a carregar a máquina com
a bateria a trabalhar fraca, a luz da bateria
pisca a encarnado durante um máx. de 3
minutos.
Bateria completamente carregada
◗ Durante a carga, a luz da bateria pisca a verde
até que a bateria fique totalmente carregada
(aprox. 8 horas).
◗ As três luzes da bateria permanecem acesas a
verde quando a bateria está com carga total.
Carga da máquina
Carregue a máquina antes de se servir dela pela
primeira vez e quando receber a indicação de
que a bateria está a ficar fraca.
1 Introduza a ficha pequena no suporte de
carga e ligue a ficha na tomada eléctrica.
C
2 Coloque a máquina sobre o suporte de
carga.
PORTUGUÊS74
Page 73

A máquina desliga-se automaticamente quando é
colocada sobre o suporte de carga.
3 Quando a bateria ficar completamente
carregada, retire a ficha da tomada
eléctrica e puxe a ficha pequena para fora
do suporte de carga. Pode deixar a
máquina colocada sobre o suporte.
Barbear sem fio
Com carga total a máquina tem autonomia para
até 55 minutos.
Recargas
As recargas de gel/loção para a barba NIVEA
FOR MEN encontram-se à venda em embalagens
contendo cinco recargas e uma pequena bomba
em plástico.
As recargas de gel/loção para a barba NIVEA
FOR MEN conservam-se durante 32 meses
quando guardadas em temperaturas entre 0cC e
+40cC.
Use somente recargas Philishave NIVEA FOR
MEN Cool Skin (HQ170 e HQ171).
Uma recarga Philishave NIVEA FOR MEN Cool
Skin contém gel/loção suficiente para cerca de
10 barbas.
PORTUGUÊS 75
Page 74

Por razões higiénicas, aconselha-se que introduza
uma bomba nova quando encetar um novo
conjunto de cinco recargas.
Não deite a bomba fora quando for substituir
uma recarga vazia. Irá precisar dela para as outras
cinco recargas.
Retire a recarga de gel/loção para a barba da
máquina se não pretender usá-la durante uma
semana ou mais.
Quando já não tiver gel/loção para a barba e não
souber onde comprar, por favor contacte o
Centro de Informação ao Consumidor Philips do
seu país (vidé 'Garantia e Assistência').
Introdução das recargas
C
1 Quando começar a usar um novo
conjunto de recargas, retire a bomba para
fora da embalagem e empurre-a para
dentro da recarga até encaixar na sua
posição correcta (com um clique!).
C
2 Prima o botão para soltar e abrir a tampa
do compartimento das recargas.
PORTUGUÊS76
2
1
Page 75

C
3 Introduza a recarga com a bomba na
máquina.A recarga só entra bem se a
parte branca da bomba estiver virada para
cima.
4 Feche a tampa (ouve-se um clique).
5 Prima o botão amarelo da bomba umas
quantas vezes até aparecer o gel/a loção
para a barba NIVEA FOR MEN.A máquina
está pronta a usar.
Substituição das recargas
Não deite a bomba fora quando for substituir
uma recarga vazia. Irá precisar dela para as outras
recargas.
C
1 Prima o botão para soltar e abrir a tampa
do compartimento das recargas.
2 Retire a recarga vazia e puxe a bomba para
fora.
C
3 Empurre a bomba para dentro da nova
recarga até prender na posição correcta
com um clique.
C
4 Introduza a recarga com a bomba na
máquina. Só encaixará convenientemente
se a parte branca da bomba estiver virada
para cima. Feche a tampa.
PORTUGUÊS 77
2
1
Page 76

Conservação das recargas
C
◗ Pode guardar comodamente as outras
recargas no suporte de parede que é
fornecido. O suporte tem umas ventosas que
permitem prendê-lo facilmente na parede.
Desta forma, terá sempre as recargas à mão, o
que é muito conveniente sobretudo se fizer a
barba enquanto toma duche.
NOTA: O supor te de parede ser ve apenas para
guardar as recargas. Nunca pendure ou coloque a
máquina no suporte. Se o fizer, a máquina pode
cair!
Utilização
Fazer a barba
Ligar a máquina
1 Ligue a máquina pressionando uma vez o
botão On/Off (ligar/desligar).
A luz amarela ±, em forma de lágrima do gel para
a barba, pisca 3 vezes para indicar que pode
aplicar o gel/a loção.
C
2 Prima o botão amarelo da bomba para
aplicar o gel/a loção para a barba NIVEA
FOR MEN na pele.
3 Movimente as cabeças sobre a pele,
efectuando movimentos a direito e em
círculo.
PORTUGUÊS78
Page 77

C
4 Enquanto faz a barba, prima
frequentemente o botão da bomba para ir
aplicando mais gel/loção para a barba
NIVEA FOR MEN para que a máquina
deslize sempre suavemente sobre o rosto.
Não faça muita pressão da máquina contra a pele
enquanto se barbeia. Se preferir, pode molhar o
rosto antes de fazer a barba.
◗ Para obter sempre os melhores resultados, o
gel/a loção para a barba deve ser
bombeado(a) com frequência.
◗ A máquina não dará os mesmos resultados se
for usada sem o gel/a loção.
◗ A sua pele poderá demorar entre 2 a 3
semanas para se adaptar ao sistema de
barbear Philishave.
Desligar a máquina
1 Desligue a máquina premindo o
interruptor uma vez.
O lembrete de limpeza  (símbolo da torneira
verde com um jacto de água a piscar) acende-se
durante 6 segundos para indicar que a máquina
deve ser limpa.
2 Limpe a máquina (vidé capítulo 'Limpeza e
manutenção').
Passe a máquina por água após cada utilização.
Retire a recarga se não pretender servir-se da
máquina por uma semana ou mais.
PORTUGUÊS 79
Page 78

C
3 Depois de usar a máquina, coloque-lhe
sempre a tampa de protecção para evitar
qualquer dano.
Aparador
Para aparar as patilhas e o bigode.
Colocação do aparador
1 Desligue a máquina.
Antes de colocar o aparador limpe a máquina
(vidé capítulo 'Limpeza e manutenção').
C
2 Prima o botão (1) e puxe a unidade de
corte para fora da máquina (2).
C
3 Incline o aparador ligeiramente para trás.
C
4 Encaixe o aparador na máquina (ouve-se
um clique). O aparador está pronto a usar.
5 Active o aparador premindo o interruptor
uma vez.
PORTUGUÊS80
2
1
Page 79

Remoção do aparador
1 Desligue a máquina.
2 Retire o aparador fazendo novamente
pressão no botão e puxando-o para fora
da máquina.
3 Volte a colocar a unidade de corte na
máquina.
Limpeza e manutenção
Uma limpeza regular é garantia de melhores
resultados.
Para que a sua máquina tenha sempre um óptimo
desempenho e para se manter sempre limpa,
deverá enxaguar muito bem a unidade de corte e
a câmara de recolha dos pêlos com água quente
após cada utilização.
Tenha cuidado com a água quente.Verifique
sempre se a água não está demasiado quente
para evitar queimar as mãos.
Lembrete de limpeza
◗ Quando se desliga a máquina, o lembrete de
limpeza  (símbolo da torneira verde com um
jacto de água a piscar) acende-se durante 6
segundos para recordar que a máquina deve
ser limpa.
PORTUGUÊS 81
Page 80

◗ Se o símbolo Œ encarnado da unidade de
corte e o lembrete de limpeza  se
acenderem ao mesmo tempo, é sinal que as
cabeças já estão muito sujas ou estragadas e
isso poderá provocar o bloqueio do motor. Se
as cabeças estiverem sujas, terá de as limpar.
Se as cabeças estiverem estragadas, deverá
proceder à sua substituição (vidé capítulo
'Substituição').
B
Esta situação deverá ser evitada procedendo-se à
limpeza regular das cabeças da máquina.
Limpeza
A máquina avisa quando é necessário limpá-la,
apresentando o lembrete de limpeza  após cada
sessão de barbear.
Unidade de corte: Quick Clean, após
cada barba
1 Certifique-se que a máquina está ligada.
2 Mantenha a unidade de corte fechada.
C
3 Enxague a unidade de corte e a câmara de
recolha dos pêlos à torneira com água
quente, deixando a água correr através das
aberturas que se encontram sob a unidade
de corte durante pelo menos 30 segundos.
4 Sacuda o excesso de água.
PORTUGUÊS82
Page 81

Nunca seque a unidade de corte com uma toalha
ou qualquer tecido porque poderá danificar as
cabeças.
Unidade de corte e câmara de
recolha dos pêlos: todas as semanas
Aconselha-se a limpeza profunda da máquina
pelo menos uma vez por semana para manter
sempre as melhores condições de desempenho.
Também poderá seguir este procedimento
quando as cabeças tiverem de ser limpas.
1 Desligue a máquina.
C
2 Prima o botão para abrir a unidade de
corte.
C
3 Enxague o interior da unidade de corte.
C
4 Enxague o exterior da unidade de corte.
C
5 Enxague a câmara de recolha dos pêlos.
6 Verifique se o interior da unidade de corte
e da câmara de recolha dos pêlos ficaram
bem limpos.
PORTUGUÊS 83
2
Page 82

7 Feche a unidade de corte e sacuda o
excesso de água.
8 Volte a abrir a unidade de corte e deixe-a
aberta para que a máquina seque
completamente.
Suporte de carga
1 Desligue o suporte de carga da corrente.
2 Limpe o suporte de carga com um pano
húmido.
Aparador
1 Após cada utilização, limpe a parte
exterior do aparador com a escovinha
fornecida.
O aparador também pode ser enxaguado à
torneira.
C
2 Se o aparador for usado com frequência,
lubrifique os dentes do aparador todos os
seis meses com uma gota de óleo para
máquinas de costura.
PORTUGUÊS84
Page 83

Arrumação
Suporte de carga
C
◗ A máquina pode ser colocada no suporte de
carga mesmo que esteja molhada.
Contudo, o suporte de carga deve ser sempre
desligado da corrente antes de lhe colocar a
máquina molhada ou seca.
Bolsa
◗ A máquina pode ser guardada dentro da bolsa
que a acompanha.Também há espaço para
arrumar as duas recargas NIVEA FOR MEN
Cool Skin.A bolsa protege a máquina quando
viaja.
Cordão de suspensão
◗ A máquina também pode ficar pendurada pelo
cordão de suspensão. Esta forma de arrumar a
máquina permite que ela seque em condições
ideais.
Substituição
As cabeças de corte devem ser substituídas de
dois em dois anos para manter a eficácia da
máquina de barbear.
Substitua as cabeças estragadas ou gastas apenas
por cabeças HQ177 Philishave Cool Skin.
PORTUGUÊS 85
Page 84

Indicação de verificação das cabeças
Após dois anos de utilização, o símbolo
encarnado Œ da unidade de cor te piscará
durante 30 segundos e durante 7 barbas para
indicar que deverá verificar o estado das cabeças.
Esta indicação baseia-se no tempo médio de
3 minutos por barba. Quando o símbolo da
cabeça está a piscar, todos os outros símbolos e
luzes estão apagados. Quando se desliga a
máquina, o símbolo da unidade de cor te
desaparece.
Quando o símbolo encarnado da unidade de
corte começa a piscar, deverá verificar se as
cabeças estarão estragadas. Se as cabeças
estiverem estragadas de alguma forma, deverão
ser substituídas para continuar a obter sempre os
melhores resultados.
Substituição das cabeças
1 Desligue a máquina.
C
2 Prima o botão para abrir a unidade de
corte.
C
3 Rode o anel para a esquerda (1) e retire a
armação de retenção (2).
PORTUGUÊS86
2
1
Page 85

C
4 Retire as cabeças e coloque as cabeças
novas na unidade de corte.
C
5 Reponha a armação de retenção na
unidade de corte, pressione o anel (1) e
rode-o para a direita (2).
Acessórios
Poderá adquirir os seguintes acessórios:
- HQ800 Ficha de ligação
- HQ177 Cabeças Philishave Cool Skin
- HQ170 Loção de Barbear Hidratante NIVEA
FOR MEN Cool Skin
- HQ171 Gel de Barbear Extra Refrescante
NIVEA FOR MEN Cool Skin
Meio ambiente
A bateria recarregável integrada contém
substâncias que podem poluir o meio ambiente.
Remoção da bateria
Retire a bateria quando se desfizer da máquina.
Não deite a bateria fora junto com o lixo
doméstico normal. Coloque-a nos ecopontos
próprios para esse tipo de resíduos.Também
PORTUGUÊS 87
1
2
Page 86

poderá levar a máquina a um concessionário
autorizado pela Philips que se encarregará de
retirar a bateria e de se desfazer dela de forma a
respeitar o meio ambiente.
A bateria só deve ser retirada se estiver
totalmente vazia.
C
1 Deixe a máquina a trabalhar até parar,
desaperte os parafusos e abra a máquina
de barbear.
2 Retire a bateria.
Não volte a colocar a máquina sobre o suporte
de carga depois de ter retirado a bateria.
Garantia e assistência
Se necessitar de informações ou se tiver qualquer
problema, por favor visite o site da Philips em
www.philips.pt ou contacte o Centro de
Informação ao Consumidor Philips do seu país (o
número de telefone está indicado no folheto da
garantia mundial). Se não existir um Centro de
Informação ao Consumidor Philips no seu país,
dirija-se ao agente Philips local ou contacte o
Departamento de Service da Philips Domestic
Appliances and Personal Care BV.
Resolução de avarias
1 As cabeças não deslizam suavemente
sobre a pele.
PORTUGUÊS88
Page 87

B
Causa: não foi aplicado/a gel/loção para a barba
suficiente.
◗ Prima o botão da bomba várias vezes para
libertar gel/loção para a barba NIVEA FOR
MEN suficiente para que as cabeças da
máquina voltem a deslizar suavemente sobre
o seu rosto.
2 Eficácia reduzida no barbear
B
Causa 1: As cabeças estão sujas.
A máquina não foi limpa imediatamente após a
utilização e/ou não foi passada à torneira durante
tempo suficiente e/ou a água usada para a
enxaguar não estava bem quente.
◗ Lave muito bem a máquina antes de continuar
a barbear-se.Vidé capítulo 'Limpeza e
manutenção'.
B
Causa 2: há pêlos compridos a obstruir as
cabeças.
◗ Prima o botão para abrir a unidade de corte.
C
◗ Rode o anel para a esquerda (1) e retire a
armação de retenção (2).
C
◗ Limpe as lâminas e as guardas.
Não limpe mais do que uma lâmina e uma guarda
de cada vez, porque todas elas formam conjuntos.
Se, acidentalmente, misturar as lâminas e as
guardas, poderá levar várias semanas até
recuperar o óptimo rendimento da sua máquina
de barbear.
PORTUGUÊS 89
2
1
Page 88

◗ Retire os pêlos com a escova fornecida.
◗ Volte a colocar as cabeças na unidade de
corte. Reponha a armação na unidade de
corte, faça pressão no anel e rode-o para a
direita.
◗ Para evitar que os pêlos compridos obstruam
as cabeças, retire as cabeças uma vez por mês
e limpe-as com a escova fornecida.
B
Causa 3: as cabeças estão estragadas ou gastas.
◗ Substitua as cabeças.Vidé capítulo
'Substituição'.
3 A máquina não funciona quando se prime
o interruptor.
B
Causa 1: a bateria está vazia.
◗ Recarregue a bateria.Vidé capítulo 'Carga'.
B
Causa 2: há gel/loção para a barba seco(a) a
obstruir as cabeças.
◗ Limpe muito bem as cabeças.Vidé capítulo
'Limpeza e manutenção'.
B
Causa 3: as cabeças estão estragadas.
◗ Substitua as cabeças.Vidé capítulo
'Substituição'.
PORTUGUÊS90
Page 89

4 A tampa do compartimento das recargas
não se fecha.
B
Causa 1: a recarga não está bem colocada.
◗ Introduza a recarga correctamente. A recarga
está bem encaixada na máquina quando a
parte branca da bomba está virada para cima.
B
Causa 2: a recarga não foi bem empurrada para
dentro da máquina.
◗ Empurre a recarga até ficar bem encaixada.
5 O gel/a loção para a barba NIVEA FOR
MEN mudou de cor ou ficou aguada.
B
Causa: o gel/a loção para a barba NIVEA FOR
MEN não foi guardado/a na temperatura
adequada.
◗ Introduza uma nova recarga.
6 A pele fica irritada
B
Causa 1: a sua pele ainda não se adaptou a este
sistema de barbear.
◗ Deixe passar 2 a 3 semanas para que a sua
pele se acostume com este sistema de
barbear.
B
Causa 2: o gel/a loção para a barba irrita a sua
pele.
PORTUGUÊS 91
Page 90

◗ Experimente o outro tipo de recarga NIVEA
FOR MEN.
◗ Molhe o rosto antes de se barbear com o
gel/a loção.
Se a irritação não desaparecer no prazo de
24 horas, é aconselhável deixar de usar o gel/a
loção para a barba.
PORTUGUÊS92
Page 91

á«Hô©dG
C
.ábÓ◊G Ωɶf ™e ó©H ∂Jô°ûH º∏bCÉàJ ⁄ :1 ÖÑ°ùdG
æ¿CG ∂Jô°ûÑd íª°ùàd ™«HÉ°SCG 3 hCG ÚYƒÑ°SG IóŸ ábÓ◊G Ωɶf óîà°SG
.¬©e º∏bCÉàJ
C
.∂Jô°ûÑd ôJƒàdG ábÓ◊G πFÉ°S/πL ÖÑ°ùj :ÊÉãdG ÖÑ°ùdG
æ.∫ÉLô∏d É«Ø«f äGƒÑY øe ôNBG ´ƒf áHôéàH ºb
æ.ábÓ◊G πFÉ°S/πL ΩGóîà°SÉH ábÓ◊ÉH AóÑdG πÑb ∂Jô°ûH π«∏ÑàH ºb
í°üæf ,áYÉ°S øjô°ûY h á©HQCG ∫ÓN Iô°ûÑdG ôJƒJ äÉeÓY »ØàîJ ⁄ GPG
.ábÓ◊G πFÉ°S/πL ΩGóîà°SG øY ∞bƒàdÉH
93
Page 92

á«Hô©dG
C
.áZQÉa ájQÉ£ÑdG :∫hC’G ÖÑ°ùdG
æ.&«FÉHô¡µdG øë°ûdÉ" Iô≤a ¤G ô¶fG .ájQÉ£ÑdG øë°T IOÉYÉH ºb
C
.ábÓ◊G ¢ShDhQ ≥«©j ±É÷G ábÓ◊G πFÉ°S/πL ¿G :ÊÉãdG ÖÑ°ùdG
æ∞«¶æàdÉ" Iô≤a ¤G ô¶fG .Gó«L ábÓ◊G ¢ShDhQ ∞«¶æàH ºb
.<áfÉ«°üdGh
C
.áØdÉJ ábÓ◊G ¢ShDhQ :ådÉãdG ÖÑ°ùdG
æ.&dGóÑà°S’É" Iô≤a ¤G ô¶fG .ábÓ◊G ¢ShDhQ ∫óÑà°SG
4.äGƒÑ©dG ¿õfl AÉ£Z ∫ÉØbG øµÁ ’
C
.áë«ë°U á≤jô£H á°TƒWôÿG ∫ÉNOG ºàj ⁄ :1 ÖÑ°ùdG
æGPG í«ë°üdG É¡fɵe òNCÉJ ±ƒ°S .áë«ë°U á≤jô£H á°TƒWôÿG πNOCG
.≈∏YCG ¤G É¡éàe áî°†ŸG øe ¢†«HC’G º°ù≤dG ¿Éc
C
.ábÓ◊G ádBG πNGO É«aÉc É©aO á°TƒWôÿG ™aO ºàj ⁄ :2 ÖÑ°ùdG
æ.ΩɵMÉH É¡fɵe òNCÉJ ¿CG ¤G á°TƒWôÿG ™aOG
5¬àÑ«côJ ¿CG hCG ∫ÉLô∏d É«Ø«f ábÓ◊G πFÉ°S/πL ¿ƒd Ò¨J ó≤d
.GÒãc á∏FÉ°S âëÑ°UCG
C
áLQO ‘ ∫ÉLô∏d É«Ø«f ábÓ◊G πFÉ°S/πL øjõîJ ºàj ⁄ :ÖÑ°ùdG
.áë«ë°üdG IQGô◊G
æ.IójóL á°TƒWôN πNOCG
6Iô°ûÑdG ôJƒJ äÉeÓY äô¡X
94
Page 93

á«Hô©dG
æá«aÉc ᫪c êôîJ ¿CG ¤G äGôe ™°†H áî°†ŸG ìÉàØe ≈∏Y §¨°VG
ábÓ◊G ¢ShDhôd ≈æ°ùà«d ∫ÉLô∏d É«Ø«f ábÓ◊G πFÉ°S/πL øe
.∂¡Lh ≈∏Y áeƒ©æH ∑ôëàdG
2.RÉ¡é∏d á°†Øîæe á«dÉ©a
C
.áî°ùàe ábÓ◊G ¢ShDhQ :∫hC’G ÖÑ°ùdG
IóŸ ¬Ø£°T ºàj ⁄ hCG/h ΩGóîà°S’G ó©H GQƒa RÉ¡÷G ∞«¶æJ ºàj ⁄
.ájÉصdG ¬«a Éà ÉæNÉ°S øµj ⁄ ¬eGóîà°SG ” …òdG AÉŸG ¿CG hCG/h á«aÉc
æ¤G ô¶fG .ábÓ◊G á∏°UGƒe πÑb É≤«ªY ÉØ«¶æJ RÉ¡÷G ∞«¶æàH ºb
.<áfÉ«°üdGh ∞«¶æàdÉ" Iô≤a
C
.ábÓ◊G ¢ShDhQ πbô©J á∏jƒW äGÒ©°T :ÊÉãdG ÖÑ°ùdG
æ.∑ôÙG IóMh íàaG h π°üØdG ìÉàØe ≈∏Y §¨°VG
B
æâÑãŸG QÉW’G ´õfG h (1) áYÉ°ùdG ÜQÉ≤Y √ÉŒG ¢ùµ©H Ü’hódG QOCG
.(2)
B
æ.äGQÉW’G h äÉ°ü≤ŸG ∞¶f
.&dGóÑà°S’É" Iô≤a ¤G ô¶fG .ábÓ◊G ¢ShDhQ ∫óÑà°SG
æ.IOhõŸG IÉ°TôØdG ᣰSGƒH äGÒ©°ûdG ´õæH ºb
æIóMh ¤G »bGƒdG QÉW’G óYCG .ábÓ◊G IóMh ¤G ábÓ◊G ¢ShDhQ óYCG
.áYÉ°ùdG ÜQÉ≤Y √ÉŒÉH √ôjhóàH ºb h Ü’hódG ≈∏Y §¨°VG h ábÓ◊G
æ¢ShDhQ π°üaG ,ábÓ◊G ¢ShDhôd á∏jƒ£dG äGÒ©°ûdG ábÉYG Öæéàd
.IOhõŸG IÉ°TôØdG ᣰSGƒH º¡Ø«¶æàH ºbh ô¡°ûdG ‘ Iôe ábÓ◊G
C
.GóL áµ∏¡à°ùe hCG áØdÉJ ábÓ◊G ¢ShDhQ :ådÉãdG ÖÑ°ùdG
æ.&dGóÑà°S’É" Iô≤a ¤G ô¶fG .ábÓ◊G ¢ShDhQ ∫óÑà°SG
3.±É≤j’G/𫨰ûàdG ìÉàØe §¨°V ºàj ÉeóæY πª©J ’ ábÓ◊G ádBG
95
2
1
Page 94

á«Hô©dG
áÄ«ÑdG
.áÄ«ÑdG çƒ∏J ¿G øµÁ OGƒe ≈∏Y …ƒà– IOhõŸG äÉjQÉ£ÑdG ¿G
äÉjQÉ£ÑdG øe ¢ü∏îàdG
™e ájQÉ£ÑdG »eôH º≤J ’ .RÉ¡÷G øe ¢ü∏îàdG óæY ájQÉ£ÑdG ´õfG
∂æµÁ .᫪°SQ ΩÓà°SG á£≤f ¤G É¡ª«∏°ùàH ºb πH ájOÉ©dG ∫õæŸG äÉjÉØf
ÚØXƒŸG óMCG Ωƒ≤«°S å«M ¢ùÑ«∏«a áeóN õcôe ¤G RÉ¡÷G òNCG É°†jCG
.áÄ«Ñ∏d áæeBG á≤jô£H É¡æe ¢ü∏îàdG h ∂d ájQÉ£ÑdG ´õæH
.ÉeÉ“ áZQÉa âfÉc ∫ÉM ‘ §≤a ájQÉ£ÑdG ´õfG
B
1.ádB’G íàaG h »ZGÈdG ∂ØH ºb ,∞bƒàJ ¿CG ¤G πª©J ádB’G ´O
2.ájQÉ£ÑdG ´õfG
.ájQÉ£ÑdG ´õf ó©H GOó› øë°ûdG IóYÉb ≈∏Y ábÓ◊G ádBG ™°†J ’
áeóÿGh ¿Éª°†dG
¿GƒæY IQÉjR AÉLôdG ,á∏µ°ûe ∂jód âfÉc hCG äÉeƒ∏©e ájC’ âéàMG GPG
¢ùÑ«∏«a ácô°ûH ¢UÉÿG âfÎf’G
comphilips.www.π°üJG hCG
¿hóe ∞JÉ¡dG ºbQ óŒ ±ƒ°S) ∑ó∏H ‘ AÓª©dG áeóÿ ¢ùÑ«∏«a õcôÃ
,∑ó∏H ‘ AÓª©dG áeóÿ õcôe óLGƒàj ⁄ GPG .(»ŸÉ©dG ¿Éª°†dG Iô°ûf ‘
ácô°ûd ™HÉàdG áeóÿG õcôà π°üJG hCG ¢ùÑ«∏«a π«ch á©LGôe AÉLôdG
.á«°üî°ûdG ájÉæ©dG h á«dõæŸG äGhOCÓd ¢ùÑ«∏«a
πcÉ°ûŸG πM π«dO
1.áeƒ©æH Iô°ûÑdG ≈∏Y ∑ôëàJ ’ ábÓ◊G ¢ShDhQ
C
.ábÓ◊G πFÉ°S/πL øe á«aÉc ᫪c ≥«Ñ£J ºàj ⁄ :ÖÑ°ùdG
96
Page 95

á«Hô©dG
ábÓ◊G ¢ShDhQ πjóÑJ
1.RÉ¡÷G ∞«bƒàH ºb
B
2.ábÓ◊G IóMh íàØd ¥ÓW’G ìÉàØe ≈∏Y §¨°VG
B
3QÉW’G ´õfG h (1) áYÉ°ùdG ÜQÉ≤Y √ÉŒG ¢ùµ©H Ü’hódG QOCG
.(2) âÑãŸG
B
4‘ IójóL ábÓM ¢ShDhôH É¡dGóÑà°SÉH ºb h ábÓ◊G ¢ShDhQ ´õfG
.ábÓ◊G IóMh
B
5§¨°VG h ábÓ◊G IóMh ¤G GOó› âÑãŸG QÉW’G Ö«cÎH ºb
.(2) áYÉ°ùdG ÜQÉ≤Y √ÉŒÉH √QOCG h (1) Ü’hódG
äÉ≤ë∏ŸG
:á«dÉàdG äÉ≤ë∏ŸG ôaƒàJ
- AÉHô¡µdG ¢ùÑ≤e
HQ800.
- øµ°S ∫hƒc ∞«°û«∏«a ábÓM ¢ShDhQ
HQ177.
- øµ°S ∫hƒc ∫ÉLô∏d É«Ø«f ÖWôŸG ábÓ◊G πFÉ°S
HQ170.
- ‘É°VG ¢TÉ©àf’ øµ°S ∫hƒc ∫ÉLô∏d É«Ø«f ábÓ◊G πL
HQ171.
97
2
1
1
2
Page 96

á«Hô©dG
á«°Tɪ≤dG IƒÑ©dG
æIƒÑ©dG …ƒà– .IOhõŸG á«°Tɪ≤dG IƒÑ©dG ‘ ábÓ◊G ádBG øjõîJ øµÁ
∫hƒc ∫ÉLô∏d É«Ø«f øe ÚJƒÑY ™°Vƒd á«aÉc áMÉ°ùe ≈∏Y á«°Tɪ≤dG
.ôØ°ùdG ∫ÓN RÉ¡é∏d á«aÉ°VG ájɪM IƒÑ©dG √òg ôaƒJ .øµ°S
‹óàŸG ∂∏°ùdG
æ∂∏°ùdG ᣰSGƒH É¡≤«∏©J ∫ÓN øe ábÓ◊G ádBG øjõîJ É°†jCG øµÁ
É«dÉãe ÉaÉØL øª°†j á≤jô£dG √ò¡H RÉ¡÷G øjõîJ ¿G .OhõŸG ‹óàŸG
.RÉ¡é∏d
∫GóÑà°S’G
.ábÓ◊G èFÉàf π°†aCG ≈∏Y ∫ƒ°üë∏d Úàæ°S πc ábÓ◊G ¢ShDhQ ∫óÑà°SG
∫hƒc ∞«°û«∏«a ábÓM ¢ShDhôH áØdÉàdG ábÓ◊G ¢ShDhQ ∫GóÑà°SÉH ºb
øµ°S
HQ771.§≤a
ábÓ◊G ¢ShDhQ øe ócCÉàdG ô°TDƒe
ôªMC’G ábÓ◊G IóMh õeQ ¢†eƒ«°S ,RÉ¡÷G ΩGóîà°SG øe ÚeÉY ó©H
á©LGôe IQhô°†H Ò°TCÉà∏d ábÓM äÉ«∏ªY ™Ñ°S ∫ÓN á«fÉK ¿ƒKÓK IóŸ
ƒg ábÓM âbh ∫ó©e ≈∏Y ô°TDƒŸG Gòg óªà©j ,ábÓ◊G ¢ShDhQ ádÉM
,ábÓ◊G ¢ShDhQ õeQ A»°†j ÉeóæY .ábÓM á«∏ªY πµd ≥FÉbO çÓK
,πª©dG øY RÉ¡÷G ∞«bƒJ óæY .iôNC’G äGô°TDƒŸG ™«ªL A≈Ø£æà°S
.ábÓ◊G IóMh õeQ »Øàîj
ádÉM øe ócCÉàdG Öéj ,¢†«eƒdÉH ôªMC’G ábÓ◊G IóMh õeQ CGóÑj ÉeóæY
øe πµ°T …CÉH áØdÉJ Ó©a âfÉc GPG .áØdÉJ ¿ƒµJ ób å«M ábÓ◊G ¢ShDhQ
.ábÓ◊G èFÉàf π°†aCG ≈∏Y ∫ƒ°üë∏d É¡dGóÑà°SG Öéj ,∫ɵ°TC’G
98
Page 97

á«Hô©dG
B
5.ô©°ûdG ¿õfl ∞£°ûH ºb
6.Gó«L πNGódG øe ô©°ûdG ¿õfl h ábÓ◊G IóMh ∞«¶æJ øe ócCÉJ
7.óFGõdG AÉŸG É¡æY ÌfGh ábÓ◊G IóMh ≥∏ZCG
8RÉ¡÷G ∞éj ¿CG ¤G áMƒàØe É¡YO h GOó› ábÓ◊G IóMh íàaG
.ÉeÉ“
øë°ûdG IóYÉb
1.AÉHô¡µdG øY øë°ûdG IóYÉb π°üØH ºb
2.áÑWQ ¢Tɪb á©£b ᣰSGƒH øë°ûdG IóYÉb ∞«¶æàH ºb
Üò°ûŸG
1ó©H IOhõŸG IÉ°TôØdG ᣰSGƒH êQÉÿG øe Üò°ûŸG ∞«¶æàH ºb
.ΩGóîà°SG πc
.AÉŸG QƒÑæ°U â– ¬Ø£°T ∫ÓN øe É°†jCG Üò°ûŸG ∞«¶æJ øµÁ
B
2¿Éæ°SCG â«jõàH ºb ,∞ãµe πµ°ûH Üò°ûŸG Ωóîà°ùJ âæc GPG
.ô¡°TCG áà°S πc Iôe áWÉ«ÿG ádBG âjR øe á£≤æH Üò°ûŸG
øjõîàdG
øë°ûdG ∞bƒe
B
æá∏∏Ñe ¿ƒµJ ÉeóæY ≈àM øë°ûdG IóYÉb ‘ ábÓ◊G ádBG øjõîJ øµÁ
.AÉŸÉH
ábÓ◊G ádBG øjõîJ πÑb øë°ûdG IóYÉb øY »FÉHô¡µdG QÉ«àdG π°üaG ÉehO
.É¡«∏Y á∏∏ÑŸG hCG áaÉ÷G
99
Page 98

á«Hô©dG
B
3QƒÑæ°üdG AÉe â– ô©°ûdG ¿õfl h ábÓ◊G IóMh ∞£°ûH ºb
дЙлаШdG ∫УN шe …фŒ AЙŸG π©L ∫УN шe шNЙ°щdG
≈∏Y á«fÉK ¿ƒKÓK IóŸ ábÓ◊G IóMh πØ°SCG ‘ IóLGƒàŸG
.πbC’G
4.á°†FÉØdG AÉŸG øe ¢ü∏îà∏d RÉ¡÷G õ¡H ºb
∫P ¿ƒc á«bQh ΩQÉfi hCG áØ°ûæe ᣰSGƒH ábÓ◊G IóMh GóHCG ∞ØŒ ’
.ábÓ◊G ¢ShDhôd ∞∏J ÖÑ°ùj ¿CG øµÁ
´ƒÑ°SCG πc :ô©°ûdG ¿õflh ábÓ◊G IóMh
∫ƒ°üë∏d É«YƒÑ°SCG πbC’G ≈∏Y IóMGh Iôe Gó«L RÉ¡÷G ∞«¶æàH ∂ë°üæf
.ábÓ◊G èFÉàf π°†aCG ≈∏Y
.ábÓ◊G ¢ShDhQ ∞«¶æJ óæY äGOÉ°TQ’G √òg ´ÉÑJG É°†jCG ∂æµÁ
1.RÉ¡÷G ∞«bƒàH ºb
B
2.∑ôÙG IóMh íàaG h π°üØdG ìÉàØe ≈∏Y §¨°VG
B
3.πNGódG øe ábÓ◊G IóMh ∞£°ûH ºb
B
4.êQÉÿG øe ábÓ◊G IóMh ∞£°ûH ºb
100
2
Page 99

á«Hô©dG
áfÉ«°üdGh ∞«¶æàdG
.‹Éãe ábÓM AGOCG π°UGƒàŸG ∞«¶æàdG øª°†j
Öéj ,áØ«¶f ábÓ◊G ádBG AÉ≤H’h ∫É©a ábÓM AGOCG ≈∏Y ÉehO ∫ƒ°üë∏d
πc ó©H øNÉ°ùdG AÉŸÉH Gó«L ô©°ûdG ¿õflh ábÓ◊G IóMh ∞£°T ∂«∏Y
.ábÓM á«∏ªY
ÉæNÉ°S ¢ù«d AÉŸG ¿CÉH ócCÉJ ÉehO .øNÉ°ùdG AÉŸG ΩGóîà°SG óæY GQòM øc
GóL
.∂jój ¥ôM Öæéàd
∞«¶æàdG ôqcòe
æ ∞«¶æàdG ôcòe A»°†j ,RÉ¡÷G ∞«bƒJ óæYÂô°†NC’G QƒÑæ°üdG õeQ)
¿CÉH ∑Òcòàd ¿GƒK 6 IóŸ (¢†eƒJ »àdG á©aóæŸG AÉŸG õeQ ™e
.¬Ø«¶æJ Öéj RÉ¡÷G
æºMC’G ábÓ◊G IóMh õeQ Å«°VG GPGŒ∞«¶æàdG ôcòe õeQh‘
ɇ áØdÉJ hCG GóL áî°ùàe ábÓ◊G ¢ShDhQ âëÑ°UCG ó≤∏a ,óMGh ¿BG
Öéj ,áî°ùàe ábÓ◊G ¢ShDhQ âëÑ°UCG GPG .∑ôÙG ábÉYÉH ÖÑ°ùj
º¡dGóÑà°SG Öéj ,áØdÉJ ábÓ◊G ¢ShDhQ âëÑ°UCG GPG .É¡Ø«¶æJ ∂«∏Y
.(&dGóÑà°S’É" Iô≤a ¤G ô¶fG)
C
ábÓ◊G ¢ShDhQ ∞«¶æJ ∫ÓN øe ∞bƒŸG Gòg ÖæéàH ∂ë°üæfO
.ΩɶàfÉH
∞«¶æàdG
QÉ¡XG ∫ÓN øe ∞«¶æà∏d áLÉëH É¡fCÉH ∑ÒcòàH ábÓ◊G ádBG Ωƒ≤J
∞«¶æàdG ôcòeÂ.ábÓM á«∏ªY πc ó©H
ábÓM πc ó©H ™jô°S ∞«¶æJ :ábÓ◊G IóMh
1.¬∏«¨°ûJ ” RÉ¡÷G ¿ÉH ócCÉJ
2.ádƒØ≤e ábÓ◊G IóMh ´O
101
Page 100

á«Hô©dG
Öjò°ûàdG
.äÉÑæ°ûdGh ∞dGƒ°ùdG Öjò°ûàd
Üò°ûŸG π°Uh
1.RÉ¡÷G ∞«bƒàH ºb
h ∞«¶æàdÉ" Iô≤a ™LGQ) Üò°ûŸG π«°UƒJ πÑb ábÓ◊G ádBG ∞«¶æàH ºb
.(<áfÉ«°üdG
B
2øe ábÓ◊G IóMh Öë°SGh (1) ôjôëàdG ìÉàØe ≈∏Y §¨°VG
.(2) RÉ¡÷G
B
3.∞∏ÿG ¤G Ó«∏b Üò°ûŸG »æãH ºb
B
4íÑ°UCG .(∂«∏c 䃰U ™ª°ùà°S) RÉ¡÷G ‘ Üò°ûŸG Ö«cÎH ºb
.ΩGóîà°SÓd GõgÉL ¿B’G Üò°ûŸG
5ñÉàØe ≈∏Y §¨°†dG ∫ÓN øe Üò°ûŸG 𫨰ûàH ºb
.IóMGh Iôe ∞«bƒàdG/𫨰ûàdG
Üò°ûŸG ´õf
1.RÉ¡÷G ∞«bƒàH ºb
2Öë°S h ¥ÓW’G ìÉàØe ≈∏Y §¨°†dG ∫ÓN øe Üò°ûŸG ´õæH ºb
.ábÓ◊G ádBG øe Üò°ûŸG
3.ádB’G πNGO É¡fɵe ábÓ◊G IóMh ™°V
102
2
1
 Loading...