How it Works
Log In / Sign Up
Buy Points
How it Works
FAQ
Contact Us
Questions and Suggestions
Users
Philips
Loading...
H
HQ6855/16
2
HQ6855/33
HQ6857
3
HQ6857/16
HQ6859
3
HQ6859/16
3
HQ686
4
HQ686/02
5
HQ6863
2
HQ6863/16
HQ686/33
5
HQ6863/33
HQ6865
HQ6865/01
HQ6865A
HQ6867
HQ6867/01
2
HQ6867A
HQ6868
2
HQ6868/16
HQ686A
HQ6870
HQ6870/01
4
HQ6870/33
4
HQ6870A
HQ6871
HQ6871/01
3
HQ6871A
HQ6874
HQ6879
2
HQ6879/16
HQ6885
HQ6885/01
2
HQ6885A
HQ6886A
HQ6888
HQ6888A
HQ6889
HQ6889/01
HQ6889A
HQ6890
3
HQ6890/01
5
HQ6890/20
4
HQ6890/33
4
HQ6890A
HQ6893
3
HQ6893A
HQ6894
3
HQ6894/01
4
HQ6894A
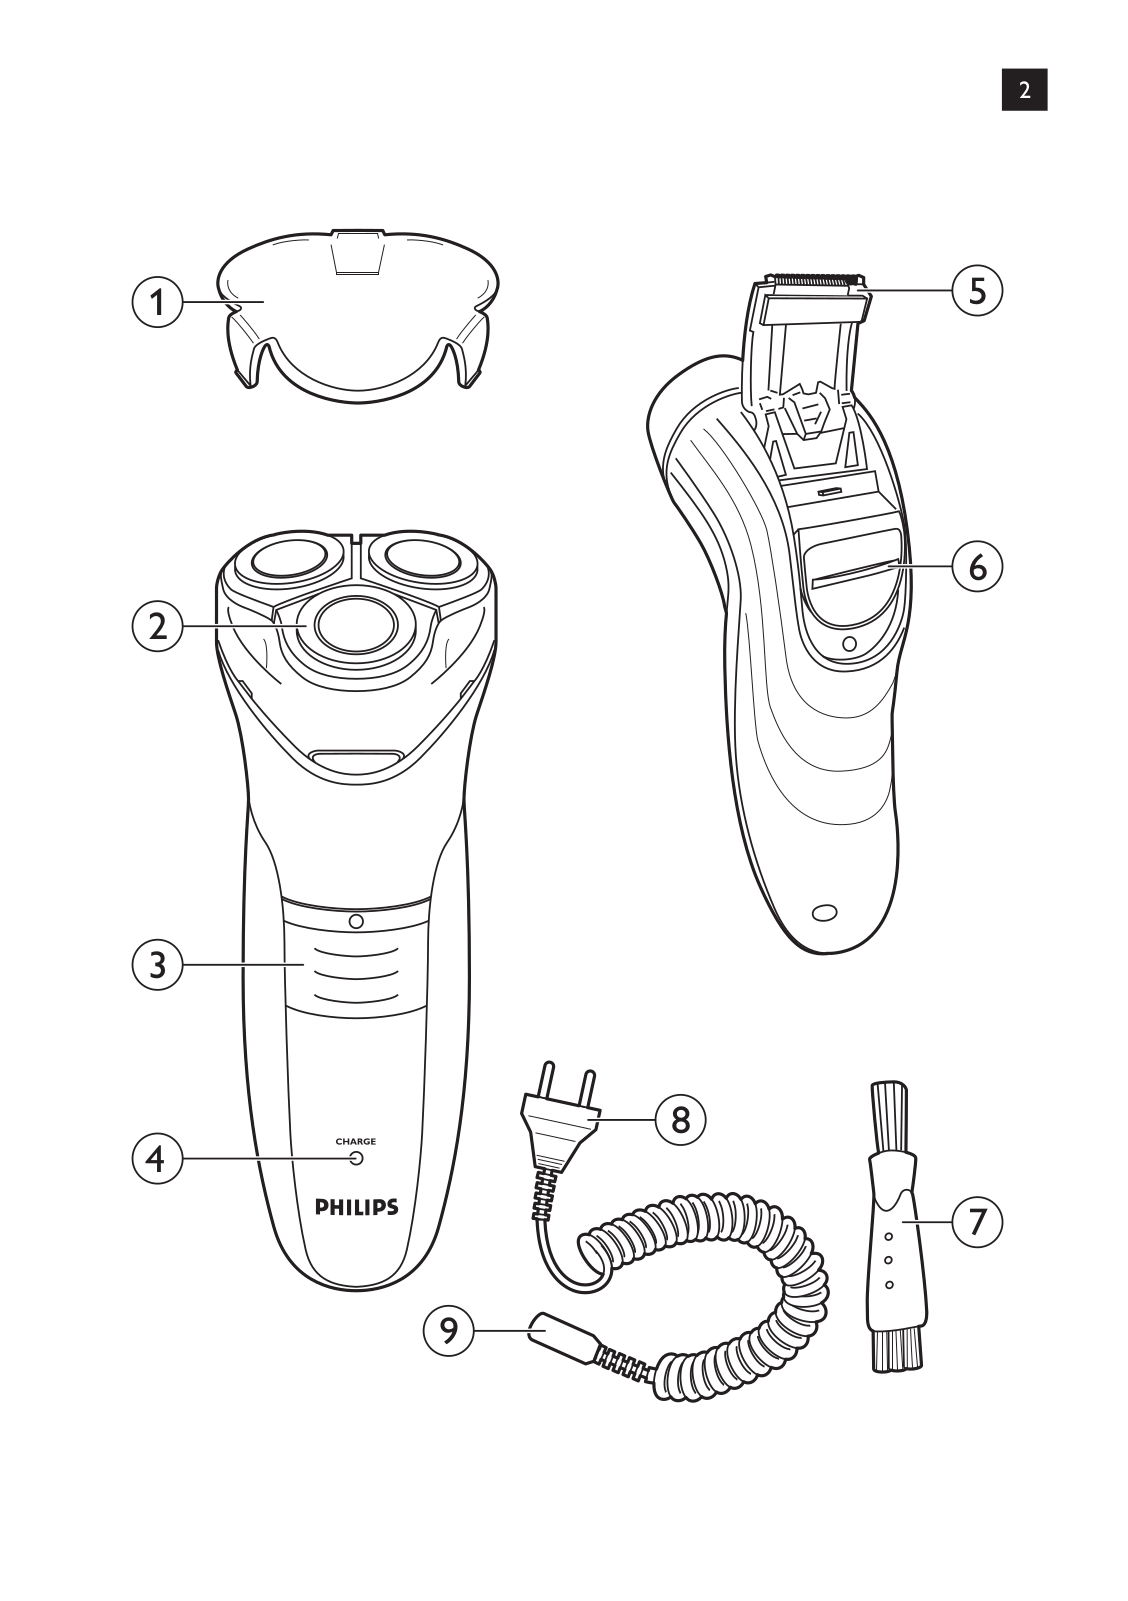
HQ6900
40
HQ6900/16
6
HQ6900/33
HQ6900 series
8
HQ6900 series User m
HQ6902/16
2
HQ6904/16
HQ6906
6
HQ6906/16
2
HQ6920
34
HQ6920-16
2
HQ6921/16
HQ6922
2
HQ6922/16
HQ6923
HQ6923/16
HQ6925
6
HQ6925/16
HQ6926
HQ6926/16
HQ6927
4
HQ6927/16
2
HQ6940
17
HQ6940/16
2
HQ6940/33
9
HQ6941/16
HQ6941/33
HQ6942
3
HQ6942/33
3
HQ6944/16
HQ6946
3
HQ6946/16
HQ6947/16
HQ6950
19
HQ6950/16
HQ6970
36
HQ6970/16
HQ6970/33
HQ6976
HQ6976/16
2
HQ6986
3
HQ6986/16
HQ6990/33
2
HQ6990/99
HQ6996
4
HQ6996/16
2
HQ6996/80
HQ6997
HQ6998
HQ7
Loading...
Loading...
Nothing found
HQ6900
BROCHURE
2 pgs
951.51 Kb
0
BROCHURE
2 pgs
899.39 Kb
0
BROCHURE
2 pgs
933.95 Kb
0
BROCHURE
2 pgs
908.4 Kb
0
BROCHURE
2 pgs
900.03 Kb
0
BROCHURE
2 pgs
280.87 Kb
0
BROCHURE
2 pgs
906.19 Kb
0
BROCHURE
2 pgs
288.71 Kb
0
BROCHURE
2 pgs
895.85 Kb
0
BROCHURE
2 pgs
920.8 Kb
0
BROCHURE
2 pgs
934.55 Kb
0
BROCHURE
2 pgs
907.46 Kb
0
BROCHURE
2 pgs
926.02 Kb
0
BROCHURE [es]
2 pgs
918.59 Kb
0
BROCHURE [et]
2 pgs
905.31 Kb
0
Quick Manual
4 pgs
852.64 Kb
0
User Manual
17 pgs
1.04 Mb
0
User Manual
2 pgs
282.72 Kb
0
User Manual
174 pgs
7.38 Mb
0
User Manual
7 pgs
741.7 Kb
0
User Manual
2 pgs
928.71 Kb
0
User Manual
2 pgs
926.1 Kb
0
User Manual
2 pgs
919.14 Kb
0
User Manual
2 pgs
931.9 Kb
0
User Manual
2 pgs
907.26 Kb
0
User Manual
2 pgs
919.85 Kb
0
User Manual
2 pgs
928.33 Kb
0
User Manual
7 pgs
477.54 Kb
0
User Manual
9 pgs
668.64 Kb
0
User Manual
11 pgs
1.08 Mb
0
User Manual
174 pgs
7.59 Mb
0
User Manual [de]
120 pgs
5.99 Mb
0
User Manual [et]
170 pgs
10.64 Mb
0
User Manual [fr]
9 pgs
644.58 Kb
0
User Manual [sk]
150 pgs
6.87 Mb
0
User Manual [tr]
2 pgs
968.34 Kb
0
User Manual [zh]
90 pgs
8.67 Mb
0
User notes [bg]
9 pgs
526.06 Kb
0
User notes [id]
9 pgs
1.04 Mb
0
User notes [zh]
9 pgs
501.48 Kb
0
Table of contents
Loading...
Philips HQ6900 User Manual [zh]
...
Philips User Manual [zh]
Download
Specifications and Main Features
Frequently Asked Questions
User Manual
Download
Loading...
+
63
hidden pages
Unhide
You need points to download manuals.
1 point = 1 manual.
You can buy points or you can get point for every manual you upload.
Buy points
Upload your manuals
 Loading...