


HQ6867,6865
3
ENGLISH 4
FRANÇAIS 13
ESPAÑOL 22
PORTUGUÊS 31
48
57
á«Hô©dG
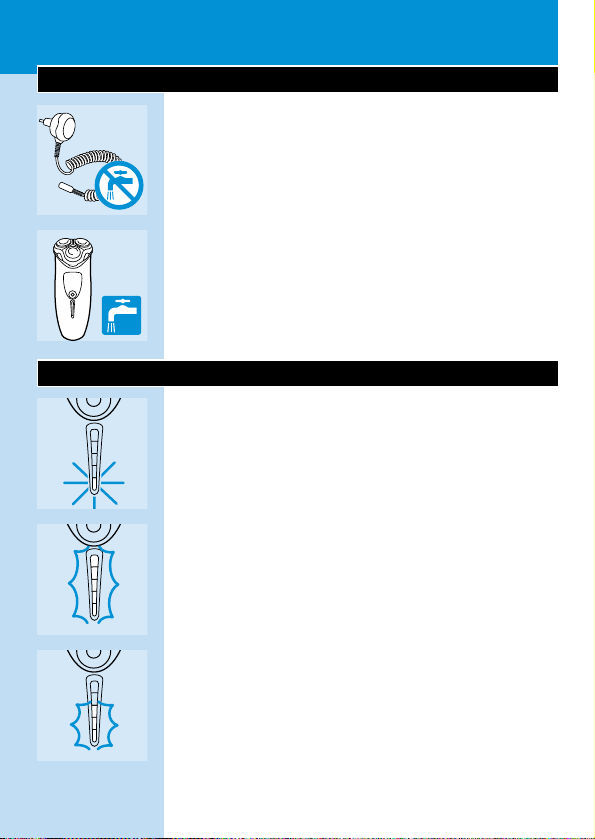
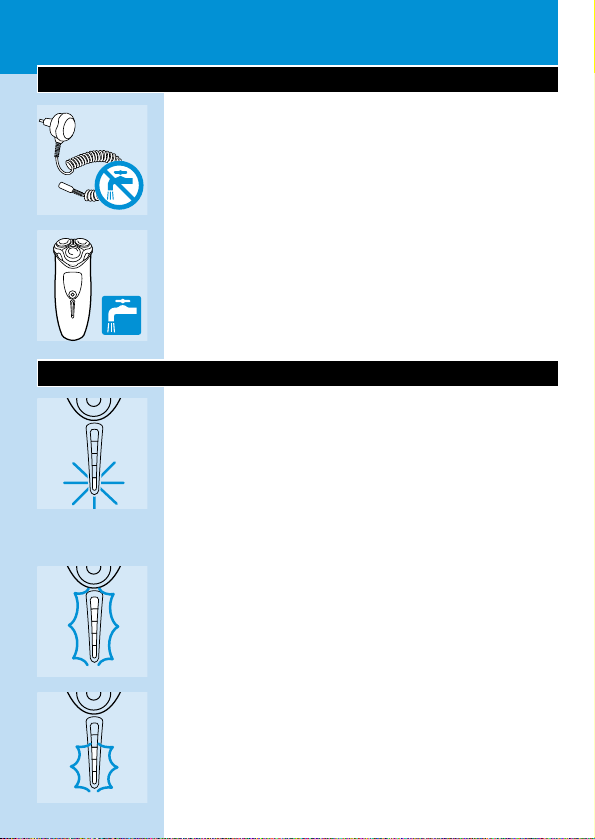
Important
◗ Only use the HQ8000/ 6000 powerplug
supplied to charge the appliance.
◗ The powerplug transforms 110-240 volts to
12 volts.
C
◗ Make sure the HQ8000/ 6000 powerplug
does not get wet.
C
◗ The shaver runs at a safe low voltage of
12 Volts.It is watertight and can be cleaned
under the tap.Do not rinse with water hotter
than 80cC.
Charge indications
C
◗ Charging
As soon as you start charging the empty shaver,
the red light lights up.When there is sufficient
power for 1 shave, the green light starts blinking.
As charging continues, more and more lights will
become green to indicate to what level the
batteries have been charged.
C
◗ Batteries fully charged
When the batteries have been fully charged,all
lights will become green.
C
◗ Remaining capacity
The number of lights indicate how much power
there is approx.left in the batteries: the more
lights are burning, the more power.A fully charged
shaver has cordless shaving time up to approx.
45 minutes.
ENGLISH4
◗ Batteries running low
When the batteries are running low,the lower
pilot light turns red.When you have switched off
the shaver,the red light will blink for 4 seconds.
Charging
Recharge and keep the appliance at a
temperature between 5cC and 35cC.
The powerplug is suitable for mains voltages
ranging from 110 to 240V.
You can also shave without charging by
connecting the shaver to the mains.
To extend the lifetime of the batteries,remove
the powerplug from the wall socket and pull the
appliance plug out of the shaver when the
batteries have been fully charged.
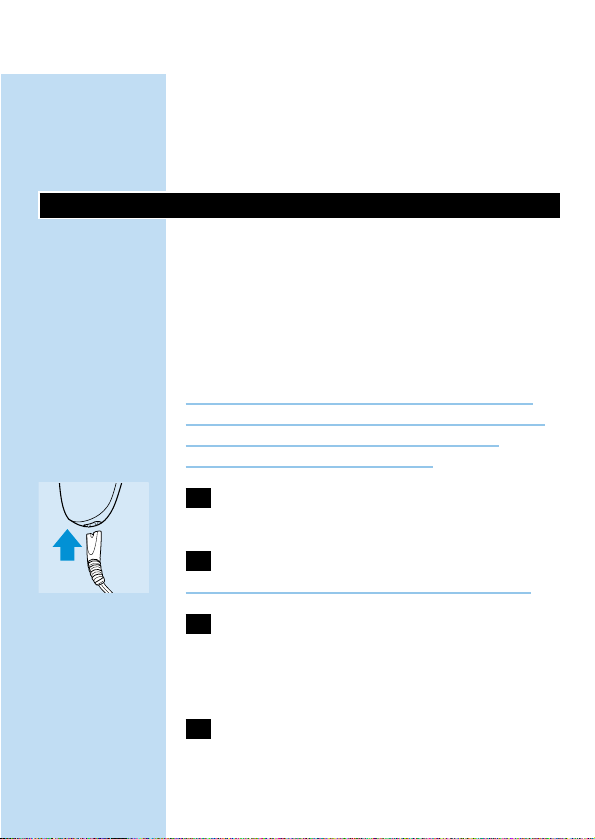
C
1 Insert the appliance plug into the shaver as
far as the line on the plug.
2 Put the powerplug in the wall socket.
Do not recharge the shaver in a closed pouch.
3 When charging for the first time or after a
long period of disuse:leave the shaver to
charge continuously for 4 hours.
Charging normally takes approx.1 hour.
4 Remove the powerplug from the socket
and pull the appliance plug out of the
shaver when the batteries have been fully
charged.
ENGLISH 5
With the special Philishave Car Cord (HQ6010),
you can also charge the appliance at 12 volts (e.g.
in a car).This cord is available from your Philishave
dealer.
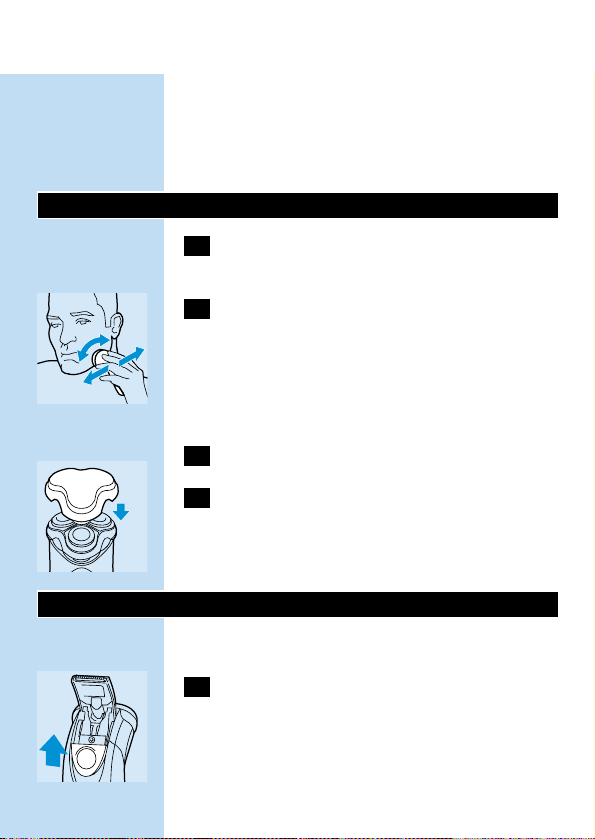
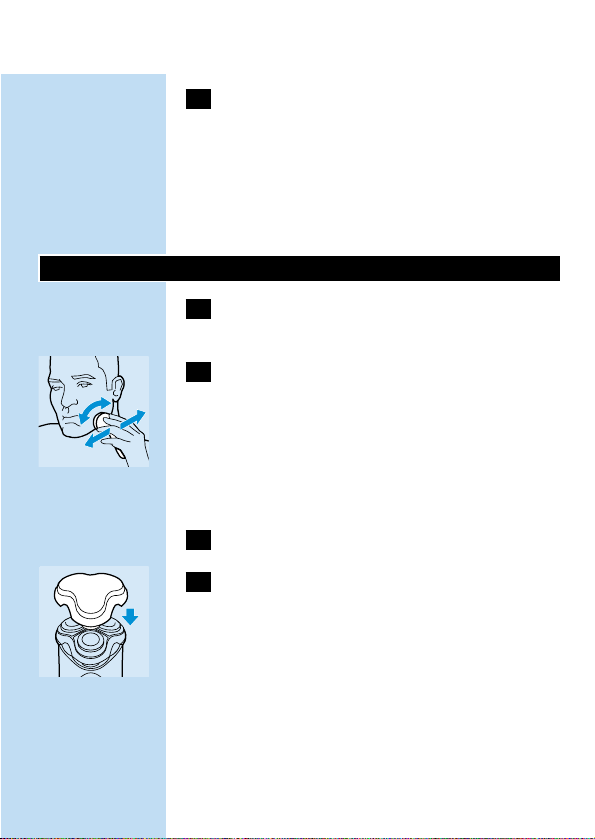
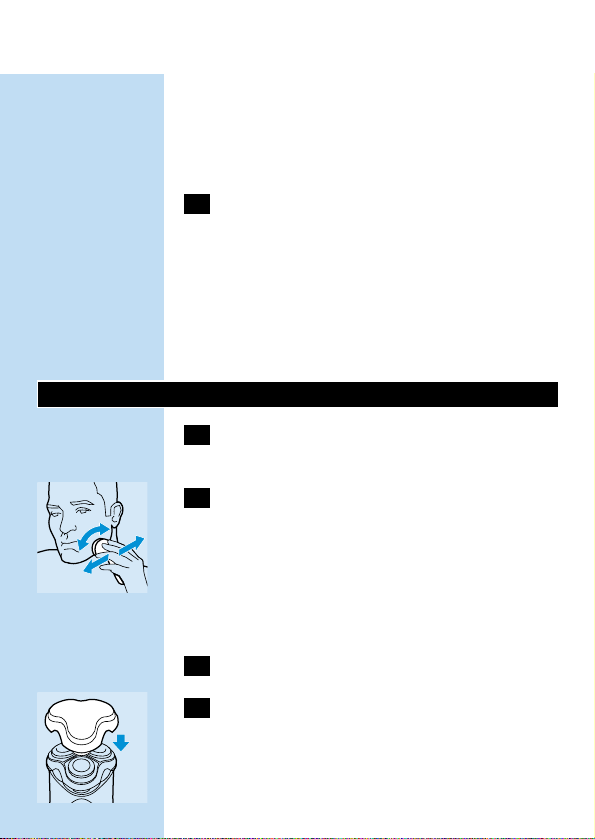
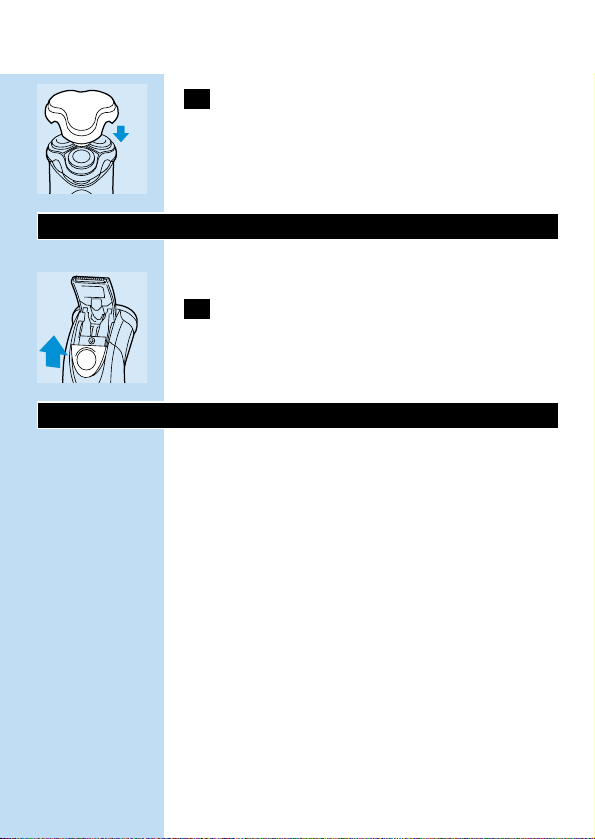
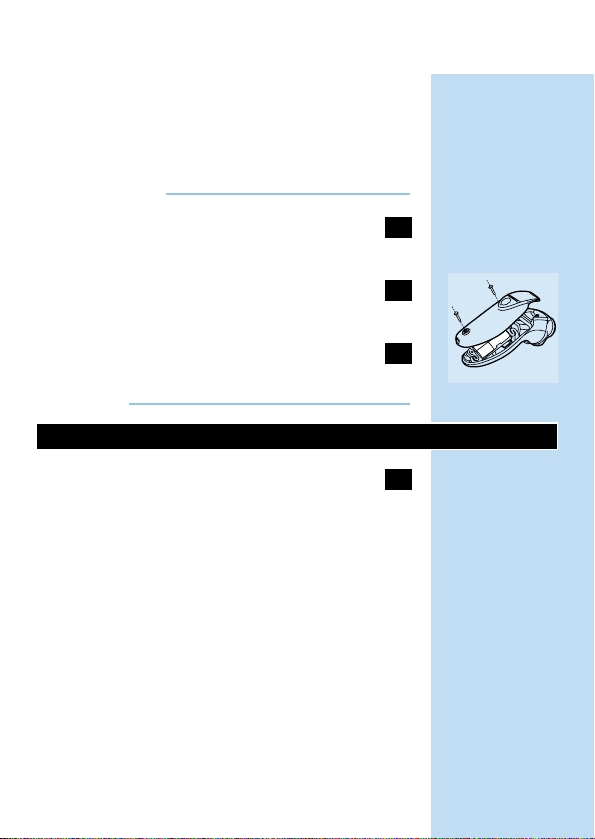
Shaving
1 Switch the appliance on by pressing the
on/off button once.
C
2 Move the shaving heads quickly over your
skin,making both straight and circular
movements.
Shaving on a dry face gives the best results.
Your skin may need 2 or 3 weeks to get
accustomed to the Philishave system.
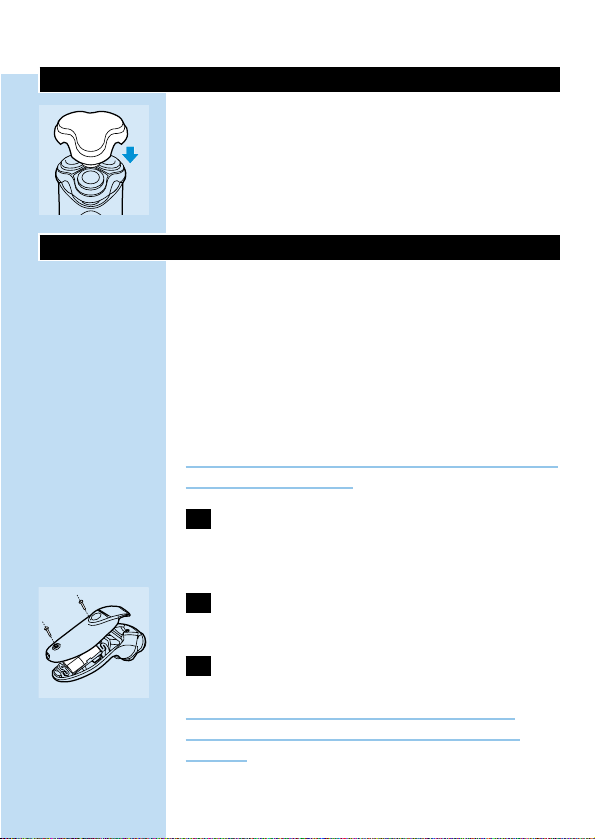
3 Switch the shaver off.
C
4 Put the protection cap on the shaver to
prevent damage.
Replace the shaving heads (type HQ6 Quadra
Action) every 2 years for optimal shaving results.
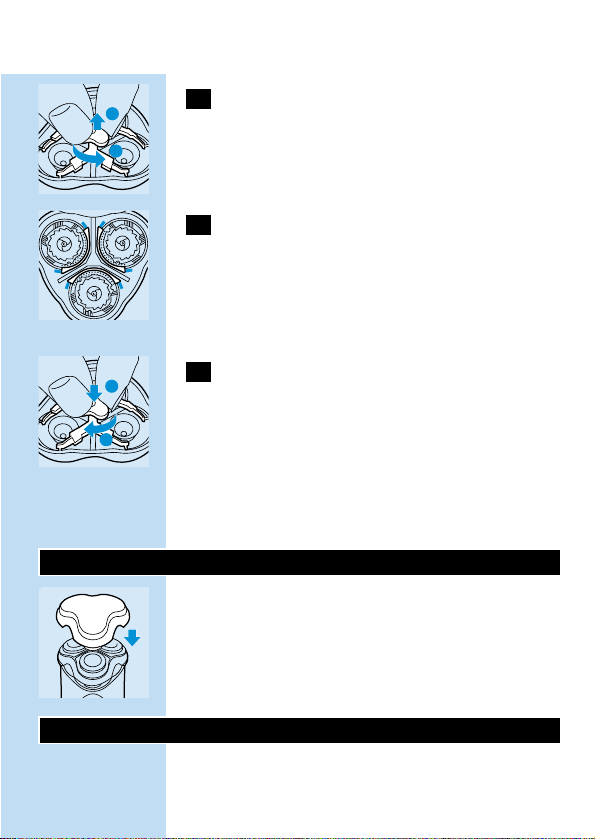
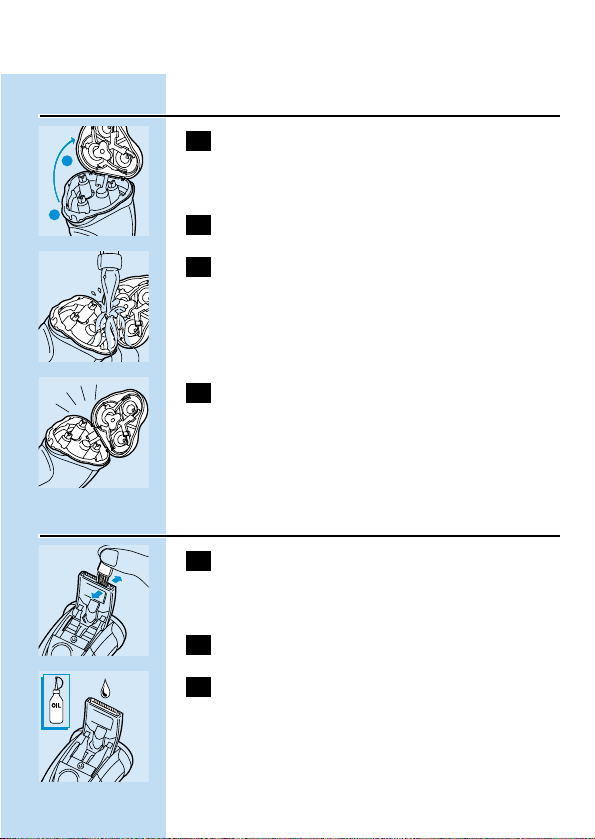
Trimming
For grooming sideburns and moustache.
C
1 Open the trimmer by pushing the slide
upwards.
The trimmer can be activated while the motor is
running.
ENGLISH6
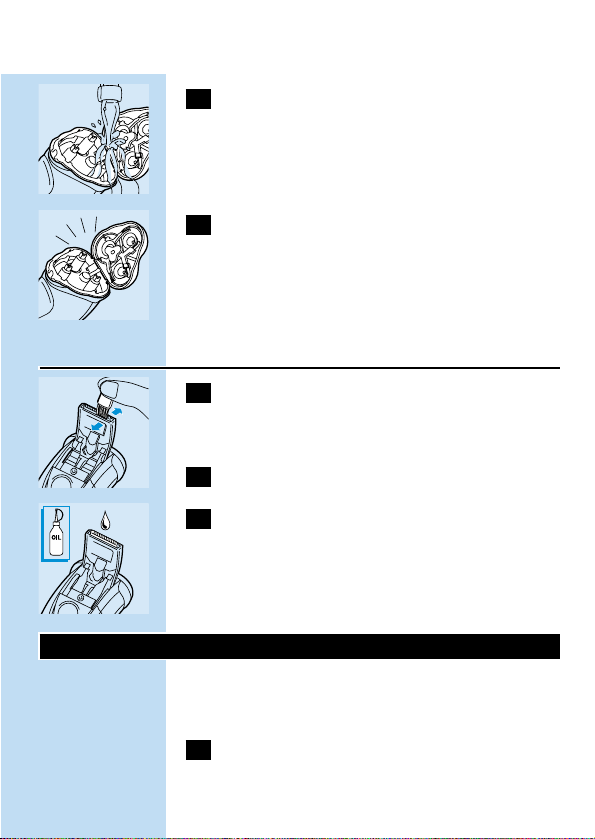
Cleaning
Regular cleaning guarantees better shaving
performance.
The easiest and most hygienic way to clean the
appliance is to rinse the shaving unit every week
with hot water (60cC-80cC).
When you clean the appliance,it is not necessary
to take the shaving heads (cutters and guards)
apart.If you want to take them apart, be sure not
to mix up the cutters and guards, since grinding of
the cutters in the guards only guarantees optimal
performance for each matching set.If you
accidentally mix up the sets,it could take several
weeks before optimal shaving performance is
restored.
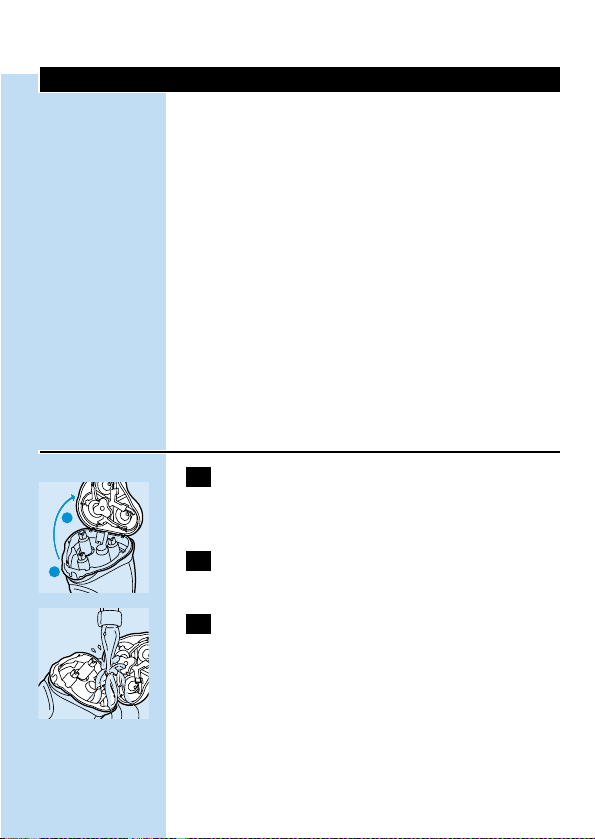
Every week:shaving unit
1 Switch the shaver off,remove the
powerplug from the wall socket and pull
the appliance plug out of the shaver.
C
2 Press the release button and open the
shaving unit.
C
3 Clean the shaving unit and the hair
chamber by rinsing them under a hot tap
for some time.
ENGLISH 7
2
1
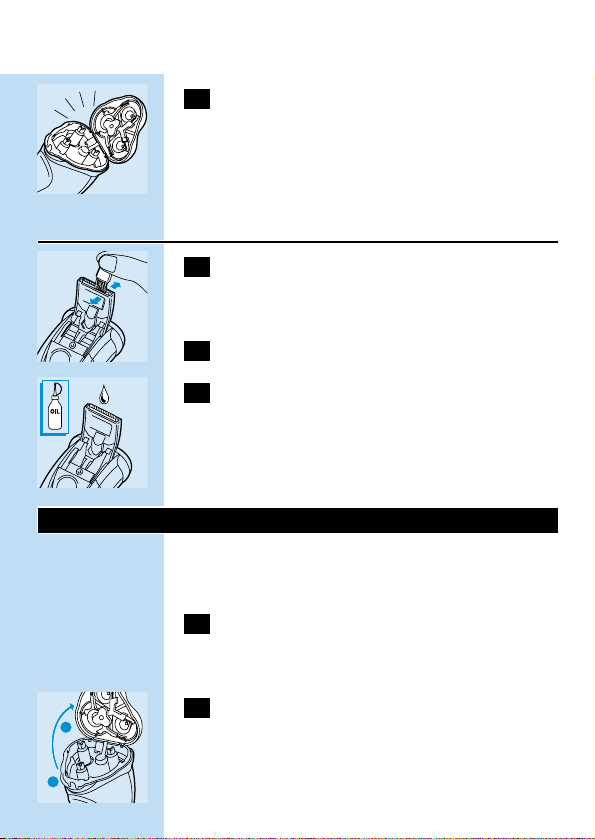
C
4 Leave the shaving unit open to let the
appliance dry completely.
You can also clean the hair chamber without
water by using the brush supplied.
Every six months:trimmer
1 Switch the shaver off,remove the
powerplug from the wall socket and pull
the appliance plug out of the shaver.
C
2 Clean the trimmer with the brush.
C
3 Lubricate the trimmer teeth with a drop
of sewing machine oil every six months.
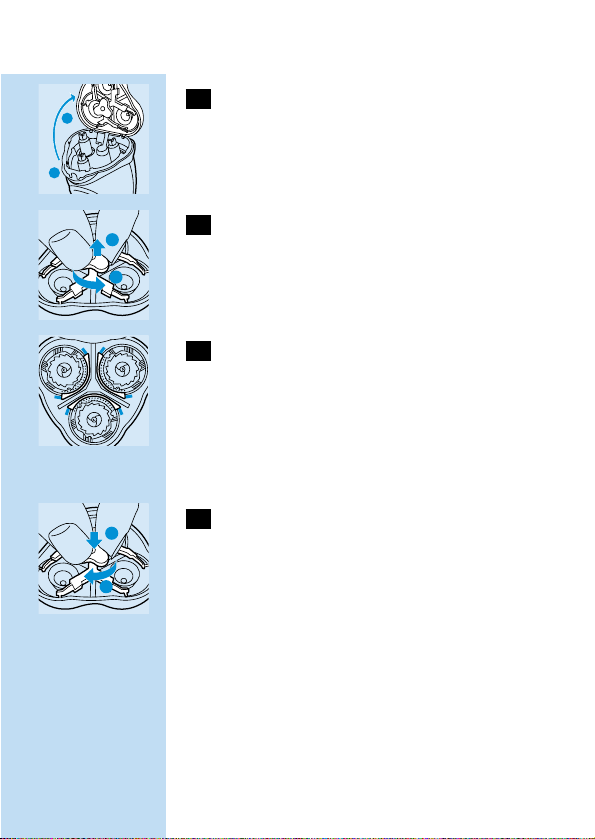
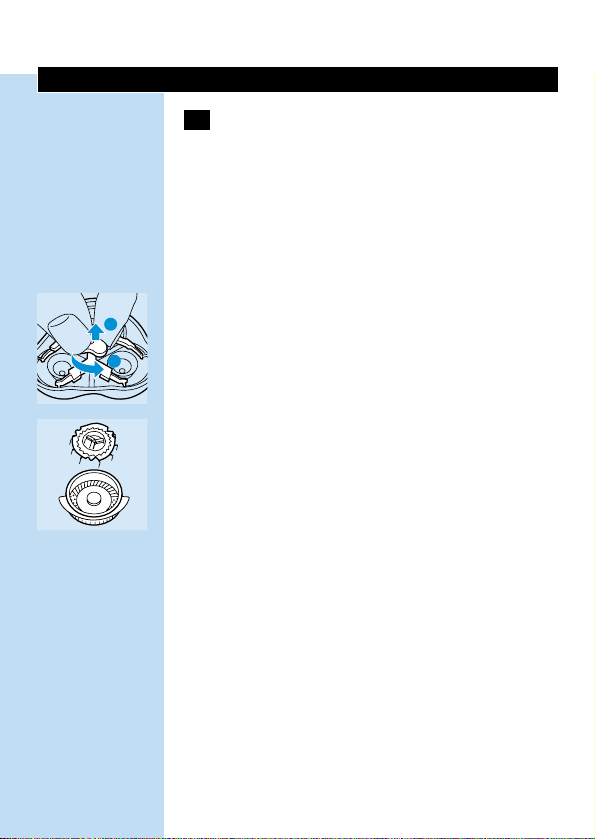
Replacing the shaving heads
Replace the shaving heads every two years for
optimal shaving results.
1 Switch the shaver off,remove the
powerplug from the socket and pull the
appliance plug out of the shaver.
C
2 Press the release button to open the
shaving unit.
ENGLISH8
2
1
C
3 Turn the wheel anti-clockwise and remove
the retaining frame.
C
4 Remove the shaving heads and place the
new ones in the shaving unit in such a way
that the parts with the small holes point
towards the centre of the shaving unit.
Make sure that the projections of the shaving
heads fit exactly into the recesses.
C
5 Reassemble the shaving unit by replacing
the retaining frame.Press the wheel and
turn it clockwise.
If the shaving heads have been properly inserted,
a shiny circle is visible on top of the shaving unit.
Replace damaged or worn shaving heads with
Philishave HQ6 Quadra Action shaving heads
only.
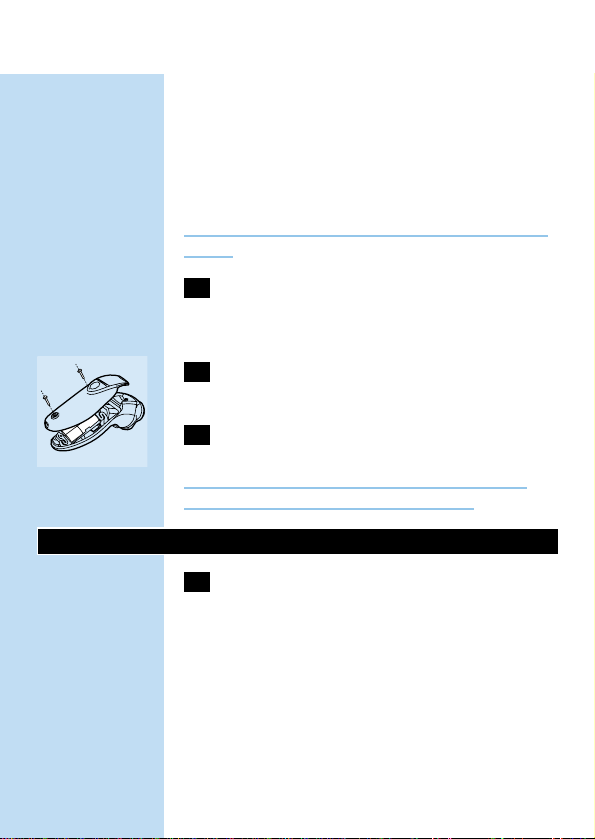
Storage
C
◗ Put the protective cap on the shaver to
prevent damage.
◗ Store the appliance in the luxury pouch.
Disposal of batteries
Remove the batteries when you discard the
ENGLISH 9
2
1
1
2
shaver.Do not throw the batteries away with the
normal household waste, but hand them in at an
official collection point.You can also take the
batteries to a Philips Service Centre,which will
dispose of them in an environmentally safe way.
Only remove the batteries if they are completely
empty.
1 Remove the powerplug from the socket
and pull the appliance plug out of the
shaver.
C
2 Let the shaver run until it stops,undo the
screws and open the shaver.
3 Remove the batteries.
Do not connect the shaver to the mains again
after the batteries have been removed.
Troubleshooting
1 Reduced shaving performance
B
Cause 1:the shaving heads are dirty.
B
The shaver has not been rinsed long enough or
the water used was not hot enough.
◗ Clean the shaver thoroughly before you
continue shaving (see 'Cleaning').
B
Cause 2:long hairs are obstructing the shaving
heads.
ENGLISH10

C
◗ Remove the retaining frame.
◗ Remove the hairs with the brush supplied.
C
◗ Clean the cutters and guards.
Do not clean more than one cutter and guard at
a time, since they are all matching sets.If you
accidentally mix up the cutters and guards, it may
take several weeks before optimal shaving
performance is restored.
◗ Put the retaining plate back onto the shaving
unit.
B
Cause 3:shaving heads are damaged or worn.
◗ Remove the retaining frame.
◗ Remove the old shaving heads from the
shaving unit and replace them with new ones
Damaged or worn shaving heads (cutters and
guards) must only be replaced with the original
Philishave HQ6 Quadra Action shaving heads.
◗ Put the retaining plate back onto the shaving
unit.
2 The shaver does not work when the
ON/OFF button is pressed
B
Cause:the batteries are empty.
◗ Recharge the batteries.
ENGLISH 11
2
1

Guarantee & service
If you need information or if you have a problem,
please visit the Philips Web site at
www.philips.com or contact the Philips Customer
Care Centre in your country (you will find its
phone number in the worldwide guarantee
leaflet).If there is no Customer Care Centre in
your country,turn to your local Philips dealer or
contact the Service Department of Philips
Domestic Appliances and Personal Care BV.
ENGLISH12

Important
◗ Utilisez exclusivement le chargeur HQ8000/
6000 fourni pour recharger l'appareil.
◗ La fiche d'alimentation transforme le 110-240 V
en 12 V.
C
◗ Veillez à ce que la fiche d'alimentation ne soit
pas exposée à l'humidité.
C
◗ Le rasoir fonctionne sous une tension de
sécurité de 12 V et est étanche à l'eau.Il peut
être nettoyé à l'eau courante.Ne le rincez pas
avec une eau de température supérieure à
80cC.
Indications de charge
C
◗ Charge
Dès que vous commencez à charger le rasoir
déchargé, la lampe rouge s'allume. Lorsque la
charge suffit pour un rasage, la lampe verte se
met à clignoter. Lorsque la charge se poursuit,de
plus en plus de lampes deviennent vertes pour
indiquer le niveau de charge atteint par les accus.
C
◗ Accumulateurs entièrement chargés
Lorsque les accus sont complètement chargés,
toutes les lampes deviennent vertes.
C
◗ Capacité restante
Le nombre de lampes indique la capacité restante
des accus:plus il y a de lampes allumées; plus la
charge est élevée. Un rasoir complêtement
chargé offre une autonomie de rasage sans fil
allant jusqu'à environ 45 minutes.
FRANÇAIS 13

◗ Accumulateurs déchargés
Si les accus sont déchargés, la lampe inférieure
devient rouge. Lorsque vous arrêtez le rasoir,la
lampe rouge clignote pendant environ 4
secondes.
Charge
Chargez et maintenez l'appareil à une
température comprise entre 5cC et 35cC.
Le chargeur convient pour les tensions entre
110 et 240 volts.
Vous pouvez également vous raser directement
sans charger préalablement l'appareil en
raccordant directement l'appareil à la tension du
réseau.
Pour prolonger la durabilité des accumulateurs
enlevez le chargeur de la prise de courant, et tirez
la fiche hors du rasoir.
C
1 Enfoncez la petite fiche jusqu'à la ligne
dans l'appareil.
2 Mettez le chargeur dans la prise de
courant.
Ne chargez jamais l'appareil dans un étui fermé.
3 Lorsque vous chargez l'appareil pour la
première fois,ou si l'appareil n'a pas été
utilisé pendant une longue période,
chargez-le pendant 4 heures au moins.
La charge normale est de 1 heure environ.
FRANÇAIS14
4 Lorsque le rasoir est complètement
rechargé,retirez d'abord la fiche de la
prise de courant puis celle du rasoir.
Avec le câble spécial Philishave Car Cord
(HQ6010),vous pouvez également charger
l'appareil sur 12~volts (p.ex. dans la voiture).Ce
câble est disponible chez votre revendeur Philips.
Rasage
1 Enclenchez l'appareil en faisant glisser le
bouton marche/arrêt vers le haut.
C
2 Déplacez rapidement les têtes de rasage
sur la peau en effectuant des mouvements
rectilignes et circulaires.
Les meilleurs résultats de rasage sont obtenus sur
peau sèche.
Votre peau peut avoir besoin de 2-3 semaines
pour s'habituer au système de coupe Philishave.
3 Arrêtez le rasoir.
C
4 Remettez le capot protecteur sur le rasoir
pour éviter tout dommage.
Remplacez les têtes de coupe tous les 2 ans (type
HQ6 Quadra Action) pour obtenir des résultats
de rasage optimaux.
FRANÇAIS 15

Tondeuse
Pour tailler les favoris et la moustache.
C
1 Dégagez la tondeuse en faisant glisser
l'interrupteur vers le haut.
La tondeuse peut être mise en service pendant
que le moteur fonctionne.
Nettoyage
Nettoyez régulièrement l'appareil pour obtenir de
meilleurs résultats de rasage.
Pour nettoyer l'appareil simplement et
hygiéniquement,rincez l'unité de coupe chaque
semaine sous l'eau la plus chaude possible (60c-
80cC).
Quand vous nettoyez l'appareil il n'est pas
nécessaire de démonter les têtes de rasage
(couteaux et grilles). Si vous désirez cependant le
faire, n'intervertissez pas les couteaux et les grilles
car elles sont affutées par paires.Si vous les
intervertissez,plusieurs semaines peuvent être
nécessaires avant de retrouver une qualité de
rasage optimale.
Toutes les semaines:unité de coupe
1 Arrêtez l'appareil,enlevez le chargeur de la
prise de courant,et tirez la fiche hors du
rasoir.
C
2 Appuyez sur le bouton de déverrouillage
et ouvrez l'unité de rasage.
FRANÇAIS16
2
1
C
3 Rincez l'unité de rasage sous l'eau la plus
chaude possible.
C
4 Laissez l'unité de rasage ouverte afin de
laisser l'appareil sécher complètement.
Vous pouvez également nettoyer le
compartiment à poils à l'aide de la brosse fournie
avec l'appareil.
Tous les six mois:tondeuse
1 Arrêtez l'appareil,enlevez le chargeur de la
prise de courant,et tirez la fiche hors du
rasoir.
C
2 Nettoyez la tondeuse avec la brosse.
C
3 Tous les six mois,lubrifiez la tondeuse à
l'aide d'une gouttelette d'huile pour
machine à coudre.
Remplacement des têtes de rasage
Pour un résultat de rasage optimal,remplacez les
têtes de rasage tous les deux ans.
1 Arrêtez l'appareil,enlevez le chargeur de la
prise de courant,et tirez la fiche hors du
rasoir.
FRANÇAIS 17

C
2 Appuyez sur le bouton de blocage et ôtez
l'unité de rasage de l'appareil.
C
3 Tournez la molette dans le sens inverse
des aiguilles d'une montre et retirez le
flasque support.
C
4 Enlevez les têtes de rasage et placez les
nouvelles têtes de rasage de telle façon
dans l'unité de rasage que les parties avec
les petits trous soient orientées vers le
milieu.
Veillez à ce que les petites ailettes qui dépassent
des têtes de rasage tombent exactement dans les
renfoncements.
C
5 Assemblez à nouveau l'unité de coupe en
pressant la molette et en la tournant dans
le sens des aiguilles d'une montre.
Si les têtes de coupe sont correctement placées,
un cercle brillant doit apparaître sur le dessus de
l'unité de coupe.
Remplacez les têtes de coupe endommagées ou
usées exclusivement par des têtes de coupe
Philishave HQ6 Quadra Action.
FRANÇAIS18
2
1
2
1
1
2

Rangement
C
◗ Employez le capot de protection pour éviter
les détériorations.
◗ Rangez l'appareil dans l'étui de luxe.
Elimination des accumulateurs
Enlevez les accumulateurs lorsque vous mettez
l'appareil au rebut.Ne les jetez pas avec les
ordures ménagères,mais déposez-les à un endroit
prévu à cet effet par les autorités publiques.Vous
pouvez également les déposer dans un Centre
Service Agéé Philips.Ils y seront traités dans le
respect de l'environnement.
Eliminez les accumulateurs uniquement lorsque
ceux-ci sont entièrement vides.
1 Enlevez le cordon d'alimentation de la
prise de courant et tirez la petite fiche
hors de l'appareil.
C
2 Laissez l'appareil fonctionner jusqu'au
moment où il s'arrête,défaites les vis et
ouvrez l'appareil.
3 Enlevez les accumulateurs.
L'appareil ne doit plus être raccordé au secteur
une fois les accumulateurs retirés.
FRANÇAIS 19

Dépannage
1 Les résultats de rasage se dégradent
B
Cause 1:les têtes de rasage sont sales.
B
L'appareil n'a pas été rincé ou pas suffisamment
longtemps.
◗ Nettoyez l'appareil à fond (voir "Nettoyage").
B
Cause 2:Des poils longs sont emmêlés dans les
têtes de rasage.
C
◗ Enlevez la plaque de fermeture.
◗ Enlevez les poils.
C
◗ Nettoyez les couteaux et les grilles.
Ne nettoyez pas plus d'un couteau et une grille à
la fois,parce que ceux-ci sont affûtés par paires. Si
vous intervertissez par mégarde les couteaux et
les grilles, plusieurs semaines peuvent être
nécessaires avant que l'appareil rase à nouveau de
manière optimale.
◗ Replacez la plaque de fermeture sur les têtes
de rasage.
B
Cause 3:les têtes de rasage sont abîmées ou
usées.
◗ Enlevez la plaque de fermeture.
◗ Enlevez les têtes de coupe de l'unité de coupe
et remplacez-les par des têtes de coupe
neuves.
Les têtes de coupe abîmées ou usées (couteaux
FRANÇAIS20
2
1

+ grilles) peuvent uniquement être remplacées
par des têtes de coupe Philishave d'origine
(type HQ6).
◗ Replacez la plaque de fermeture sur les têtes
de rasage.
2 Le rasoir ne fonctionne pas lorsque le
boutton marche/arrêt est pressé
B
Cause:les accumulateurs sont vides.
◗ Rechargez le rasoir.
Garantie et service
Pour toute réparation/information,ou en cas de
problème, visitez notre website:www.philips.com.
Ou veuillez contacter le Service Consommateurs
Philips de votre pays (vous trouverez le numéro
de téléphone dans le dépliant sur la garantie
internationale). S'il n'y a aucun Service
Consommateurs Philips dans votre pays,
contactez votre distributeur ou le Service
Department de Philips Domestic Appliances and
Personal Care BV.
FRANÇAIS 21
Importante
◗ Para cargar el aparato use sólo la clavija
adaptadora HQ8000/ 6000 que se suministra.
◗ La clavija adaptadora transforma los 110-240 V.
a 12 V.
C
◗ Asegúrese de que la clavija adaptadora
HQ8000/ 6000 no se moje.
C
◗ La afeitadora funciona con un bajo voltaje de
seguridad de 12 V. Es hermética y puede
limpiarse bajo el grifo.No la limpie con agua a
una temperatura superior a 80cC.
Indicaciones de carga
C
◗ Cómo cargar la afeitadora
Tan pronto como empiece a cargar la afeitadora
descargada, la lámpara piloto roja se encenderá.
Cuando haya suficiente carga para un afeitado,la
lámpara piloto verde empezará a parpadear.
Conforme continúe la carga, se irán poniendo
verdes más lámparas piloto para indicar hasta qué
nivel se han cargado las baterías.
C
◗ Baterías completamente cargadas
Cuando las baterías estén completamente
cargadas, todas las lámparas piloto se habrán
puesto verdes.
C
◗ Tiempo de afeitado disponible
El número de lámparas piloto indica
aproximadamente cuánta carga queda en las
baterías.A más lámparas piloto encendidas, más
ESPAÑOL22

carga. Una afeitadora completamente cargada
proporcionará un tiempo de afeitado sin cable de
hasta unos 45 minutos.
◗ Baterías casi descargadas
Cuando a las baterías les quede poca carga, la
lámpara piloto más baja se pondrá roja. Cuando
haya apagado la afeitadora,la lámpara piloto roja
parpadeará durante 4 segundos.
Carga
Recargue y guarde el aparato a una temperatura
entre 5cC y 35cC.
La clavija adaptadora es apropiada para voltajes
de red entre 110 y 240 V.
También puede afeitarse sin recargar la afeitadora,
enchufándola a la red eléctrica.
Para alargar la vida útil de las baterías, desenchufe
la clavija adaptadora de la red y quite la clavija de
la afeitadora una vez que las baterías se hayan
cargado completamente.
C
1 Enchufe la clavija correspondiente a la
afeitadora introduciéndola hasta la línea.
2 Enchufe la clavija adaptadora a la red.
No recargue la afeitadora dentro de su funda
cerrada.
3 Al cargar la afeitadora por primera vez,o
después de un largo período sin usarla,
ESPAÑOL 23
deje que la afeitadora se cargue durante
4 horas sin interrupción.
La afeitadora normalmente tarda 1 hora en
cargarse.
4 Una vez que la batería esté
completamente cargada,desenchufe la
clavija adaptadora de la toma de corriente
y saque la clavija de la afeitadora.
Con el cable especial Philishave Car Cord
(HQ6010) también puede recargar el aparato a
12 voltios (por ejemplo,en un coche). Puede
conseguir el cable en su distribuidor Philishave.
Afeitado
1 Ponga en marcha el aparato presionando
una vez el botón de encendido/apagado.
C
2 Desplace los conjuntos cortantes
rápidamente sobre la piel con
movimientos tanto rectos como circulares.
Los mejores resultados se obtienen afeitando
sobre la piel seca.
Puede que su piel necesite de 2 a 3 semanas para
acostumbrarse al sistema de afeitado Philishave.
3 Apague la afeitadora.
C
4 Coloque la tapa protectora en la
afeitadora para evitar que se deteriore.
Para unos resultados óptimos en el afeitado,
sustituya los conjuntos cortantes (tipo HQ6
Quadra Action) cada dos años.
ESPAÑOL24

Cortapatillas
Para arreglar las patillas y el bigote.
C
1 Abra el cortapatillas presionando el botón
deslizante hacia arriba.
El cortapatillas se puede activar con la afeitadora
en marcha.
Limpieza
Una limpieza regular garantiza el mejor resultado
en el afeitado.
La forma más fácil e higiénica de limpiar el
aparato es lavar cada semana la unidad afeitadora
con agua caliente (60-80 cC).
Cuando limpie el aparato no es necesario sacar
los conjuntos cortantes (cuchillas y protectores).
Si quiere sacarlos, asegúrese de no mezclar
protectores y cuchillas entre sí,ya que el afilado
de cada cuchilla en su protector garantiza el
funcionamiento óptimo sólo para cada conjunto
emparejado.Si accidentalmente mezcla los
conjuntos,pueden ser necesarias varias semanas
para que se restablezcan los optimos resultados
en el afeitado.
Cada semana:unidad afeitadora
1 Apague la afeitadora,desenchufe la clavija
adaptadora de la red y saque la clavija de la
afeitadora.
C
2 Presione el botón de liberación y abra la
unidad afeitadora.
ESPAÑOL 25
2
1

C
3 Limpie la unidad afeitadora y la cámara de
recogida del pelo enjuagándolas durante
algún tiempo bajo el agua caliente del grifo.
C
4 Deje abierta la unidad afeitadora para
permitir que el aparato se seque
completamente.
También puede limpiar la cámara de recogida del
pelo sin agua usando el cepillo que se suministra.
Cada seis meses:cortapatillas
1 Apague la afeitadora,desenchufe la clavija
adaptadora de la red y saque la clavija de la
afeitadora.
C
2 Limpie el cortapatillas con el cepillo.
C
3 Cada seis meses lubrifique los dientes del
cortapatillas con una gota de aceite de
máquina de coser.
Sustitución de los conjuntos cortantes
Para unos resultados óptimos en el afeitado,
sustituya los conjuntos cortantes cada dos años.
1 Apague la afeitadora,desenchufe la clavija
adaptadora de la red y saque la clavija de la
afeitadora.
ESPAÑOL26
C
2 Presione el botón de liberación para abrir
la unidad afeitadora.
C
3 Gire la ruedecita en sentido antihorario y
quite el marco de fijación.
C
4 Saque los conjuntos cortantes y coloque
los nuevos en la unidad afeitadora,de tal
forma que los lados con los agujeritos
estén orientados hacia el centro de la
unidad afeitadora.
Asegúrese de que los salientes de los conjuntos
cortantes encajen exactamente en las ranuras.
C
5 Colocando de nuevo el bastidor de
retención,vuelva a montar la unidad
afeitadora.Presione la ruedecita y hágala
girar en el sentido de las agujas del reloj.
Si los conjuntos cortantes han sido insertados
adecuadamente, un círculo brillante será visible en
la parte superior de la unidad afeitadora.
Sustituya los conjuntos cortantes deteriorados o
gastados sólo por conjuntos cortantes Philishave
HQ6 Quadra Action.
ESPAÑOL 27
2
1
2
1
1
2

Cómo guardar el aparato
C
◗ Para evitar deterioros,ponga la tapa
protectora en la afeitadora.
◗ Guarde el aparato en la bolsa de lujo.
Cómo deshacerse de las baterías
Quite las baterías cuando se deshaga de la
afeitadora.No tire las baterías junto con la basura
normal del hogar.Llévelas a un punto de recogida
oficial.También puede llevar la afeitadora a un
Servicio de Asistencia Técnica de Philips,donde se
desharán de las baterías de un modo seguro para
el medio ambiente.
Quite las baterías sólo si están completamente
descargadas.
1 Desenchufe la clavija adaptadora de la
toma de corriente y saque la clavija de la
afeitadora.
C
2 Deje que la afeitadora funcione hasta que
se pare,quite los tornillos y abra la
afeitadora.
3 Quite las baterías.
La afeitadora no debe volver a enchufarse a la red
después de haber quitado las baterías.
ESPAÑOL28

Solución de problemas
1 Menor rendimiento en el afeitado
B
Causa 1: los conjuntos cortantes están sucios.
B
La afeitadora no ha sido limpiada con agua
suficientemente caliente o durante un tiempo
suficiente.
◗ Limpie la afeitadora a fondo (ver "Limpieza")
antes de seguir afeitándose.
B
Causa 2: Hay pelos largos obstruyendo los
conjuntos cortantes.
C
◗ Quite el marco de sujeción.
◗ Quite los pelos con el cepillo que se
suministra.
C
◗ Limpie las cuchillas y los protectores.
No limpie más de una cuchilla y un protector al
mismo tiempo,ya que forman conjuntos entre sí.
Si,accidentalmente,se intercambian las cuchillas y
los protectores,pueden ser necesarias varias
semanas para que se restablezcan los óptimos
resultados en el afeitado.
◗ Vuelva a poner la placa de sujeción en la
unidad afeitadora.
B
Causa 3: Los conjuntos cortantes están gastados
o deteriorados
◗ Saque la placa de sujeción.
ESPAÑOL 29
2
1

◗ Saque los conjuntos cortantes viejos de la
unidad afeitadora y sustitúyalos por unos
nuevos.
¡Los conjuntos cortantes (cuchillas y protectores)
gastados o deteriorados sólo deben ser
sustituidos por conjuntos cortantes originales
Philishave HQ6 Quadra Action!
◗ Vuelva a poner la placa de sujeción en la
unidad afeitadora.
2 La afeitadora no funciona al presionar el
botón de encendido/apagado
B
Causa: las baterías están descargadas.
◗ Recargue las baterías.
Garantía y Servicio
Si necesita información o tiene algún problema,
visite la página Web de Philips en
www.philips.com,o contacte con el Servicio
Philips de Atención al Cliente de su país (hallará
su número de teléfono en el folleto de la
Garantía Mundial). Si en su país no hay Servicio
Philips de Atención al Cliente,diríjase a su
distribuidor local Philips o contacte con el Service
Department of Philips Domestic Appliances and
Personal Care BV.
ESPAÑOL30

Importante
◗ Para carregar a máquina use apenas a ficha
HQ8000/ 6000 fornecida.
◗ A ficha tem um transformador que converte
110-240 volts em 12 volts.
C
◗ Certifique-se de que a ficha HQ8000/ 6000
não entra em contacto com água nem fica
molhada.
C
◗ A máquina de barbear funciona com uma
tensão baixa e inócua de 12 volts.É de
construção estanque pelo que pode ser lavada
com água corrente.Não lavar com água
quente a uma temperatura superior a 80cC.
Indicações de carga
C
◗ Carga
Assim que começar a carregar a máquina de
barbear descarregada, a luz vermelha acender-seá.Quando existir energia suficiente que permita
utilizar a máquina uma vez,a luz verde começará
a piscar. À medida que continua o carregamento,
um número cada vez maior de luzes começa a
ficar verde para indicar até que nível é que as
baterias se encontram carregadas.
C
◗ Baterias completamente carregadas
Assim que as baterias se encontrarem
completamente carregadas, todas as luzes ficarão
verdes.
C
◗ Capacidade restante
O número de luzes indica a quantidade de
PORTUGUÊS 31

energia que ainda resta nas baterias: quanto mais
luzes estiverem acesas,maior será a energia
existente. Uma máquina com carga total tem uma
autonomia para cerca de 45 minutos de
funcionamento.
◗ Baterias fracas
Quando as baterias estão a ficar fracas, a luz
inferior fica vermelha.Quando se desliga a
máquina,a luz encarnada pisca durante
4 segundos.
Carga
Carregue e guarde a máquina numa temperatura
entre 5cC e 35cC.
A ficha de ligação é adequada para voltagens
entre 110 e 240V.
Poderá igualmente barbear-se sem carregar a
máquina,bastando que a ligue à corrente.
Para prolongar a vida das baterias, retire a ficha da
corrente e puxe a ficha de ligação para fora da
máquina quando as baterias estiverem com carga
total.
C
1 Introduza a ficha na máquina até ao nível
da linha marcada na ficha.
2 Ligue a ficha à tomada de corrente.
Não recarregue a máquina de barbear dentro da
bolsa fechada.
PORTUGUÊS32

3 Quando carregar a máquina pela primeira
vez ou após um prolongado período de
inactividade,deixe-a a carregar durante
4 horas sem interrupção.
A carga da máquina normalmente demora cerca
de 1 hora.
4 Desligue a ficha da tomada e retire a ficha
de ligação da máquina logo que as baterias
atingirem a sua carga total.
Com o cabo de alimentação especial Philishave
Car Cord (HQ6010) pode também proceder à
carga da máquina de barbear a partir de uma
alimentação de 12 volts (dentro de um
automóvel,por exemplo). Estes cabos são
acessórios disponíveis em qualquer distribuidor
Philips.
Utilização da máquina de barbear
1 Ligue a máquina pressionando uma vez o
botão On/Off (ligar/desligar).
C
2 Passe as cabeças de corte rapidamente
sobre a pele,efectuando movimentos
longitudinais e circulares.
Obterá melhores resultados se a pele estiver
seca.
A sua pele poderá demorar entre 2 a 3 semanas
a adaptar-se ao sistema de barbear Philishave.
3 Desligue a máquina.
PORTUGUÊS 33
C
4 Coloque a tampa de protecção na máquina
para evitar danos.
Substitua as cabeças de corte (tipo HQ6 Quadra
Action) de dois em dois anos para optimizar os
resultados.
Aparador
Para aparar as patilhas e o bigode.
C
1 Liberte o aparador empurrando o
comutador para cima.
O aparador poderá ser activado com o motor
em funcionamento.
Limpeza
Uma limpeza regular é garantia de melhores
resultados.
A forma mais fácil e higiénica de limpar a máquina
de barbear é lavando-a todas as semanas com
água quente (60c-80cC).
Quando proceder à limpeza da máquina,não é
necessário retirar as cabeças de corte (lâminas e
guardas).Se as quiser tirar, certifique-se que não
mistura as lâminas e as guardas umas com as
outras porque formam conjuntos e só funcionam
bem e dão bons resultados se estiverem em par.
Se, por acidente, misturar os pares, poderá levar
algumas semanas até voltar a obter o mesmo
rendimento e eficácia da sua máquina de barbear.
PORTUGUÊS34
Todas as semanas: unidade de barbear
1 Desligue a máquina,retire a ficha da
tomada eléctrica e puxe a ficha de ligação
para fora da máquina.
C
2 Prima o botão para abrir a máquina.
C
3 Lave a unidade de corte e a câmara de
recolha dos pêlos,mantendo sob um jacto
de água quente durante algum tempo.
C
4 Deixe o compartimento das cabeças
aberto até secar completamente.
O compartimento de recolha dos pêlos também
pode ser limpo a seco,utilizando para o efeito a
escova fornecida.
De seis em seis meses:aparador
1 Desligue a máquina,retire a ficha da
tomada eléctrica e puxe a ficha de ligação
para fora da máquina.
C
2 Limpe o aparador com a escova.
C
3 A cada seis meses,lubrifique os dentes do
aparador com uma gota de óleo para
máquinas de costura.
PORTUGUÊS 35
2
1

Substituição das cabeças
As cabeças de corte devem ser substituídas de
dois em dois anos para manter a eficácia da
máquina de barbear.
1 Desligue a máquina,retire a ficha da
tomada de corrente e puxe a ficha de
ligação para fora da máquina.
C
2 Prima o botão para abrir a unidade de
corte.
C
3 Rode o anel para a esquerda e retire a
armação.
C
4 Remova as cabeças de corte e coloque as
novas na máquina,de maneira que os lados
que têm os pequenos furos fiquem virados
para o centro da unidade de corte.
Certifique-se que as saliências existentes nas
cabeças encaixam perfeitamente nos seus
alojamentos.
C
5 Volte a montar a máquina de barbear,
premindo o anel e rodando-o para a
direita.
Se as novas cabeças estiverem bem colocadas,
torna-se visível um círculo brilhante no topo da
máquina de barbear.
Substitua as cabeças usadas ou estragadas
exclusivamente por cabeças Philishave HQ6
Quadra Action.
PORTUGUÊS36
2
1
2
1
1
2
Arrumação
C
◗ Coloque a tampa de protecção na máquina
para evitar danos.
◗ Guarde a máquina na sua requintada bolsa.
Remoção das baterias
Retire as baterias quando decidir deitar a máquina
fora. Não elimine as baterias juntamente com o
lixo doméstico normal. Deverá entregá-las num
posto de recolha oficial ou num Centro de
Assistência Técnica da Philips, que tratará de
eliminar as baterias de uma forma segura para o
ambiente.
Apenas retire as baterias caso estas se encontrem
completamente vazias.
1 Desligue a máquina,retirando a ficha da
tomada de corrente e puxando a ficha de
ligação para fora.
C
2 Deixe a máquina funcionar até parar,
desaperte os parafusos e abra-a.
3 Retire as baterias.
A máquina de barbear não deverá ser ligada
novamente à corrente depois de retiradas as
baterias.
PORTUGUÊS 37
Resolução de avarias
1 Eficácia reduzida no barbear
B
Causa 1:As cabeças estão sujas.
B
A máquina de barbear não tem sido lavada com
a frequência necessária ou não tem sido lavada
com água suficientemente quente.
◗ Lave cuidadosamente a máquina de barbear
antes de a utilizar novamente (ver "Limpeza").
B
Causa 2:há pêlos compridos a obstruir as
cabeças.
C
◗ Retire a armação.
◗ Remova os pêlos com a escova fornecida.
C
◗ Limpe as lâminas e as guardas.
Não limpe mais do que um conjunto
lâmina/guarda de cada vez já que constituem
pares.Se,por acaso,alterar os conjuntos
lâmina/guarda,a eficácia da máquina diminuirá e
só passadas algumas semanas voltará ao normal.
◗ Volte a colocar a armação na máquina.
B
Causa 3:cabeças de corte danificadas ou
desgastadas.
◗ Retire a armação.
◗ Retire as cabeças velhas da máquina e
substitua-as por novas.
As cabeças avariadas ou desgastadas (lâminas e
guardas) só devem ser substituídas por cabeças
originais Philishave HQ6 Quadra Action.
PORTUGUÊS38
2
1

◗ Volte a colocar a armação na máquina.
2 A máquina de barbear não funciona
quando se prime o botão ON/OFF.
B
Causa:as baterias estão vazias.
◗ Recarregue as baterias.
Informações e assistência
Se necessitar de informações ou se tiver qualquer
problema,por favor visite o site da Philips:
www.philips.com ou contacte o Centro de
Informação ao Consumidor Philips do seu país (o
número de telefone está indicado no folheto da
garantia mundial).Se não existir um Centro de
Informação ao Consumidor Philips no seu país,
dirija-se ao agente Philips local ou contacte o
Departamento de Service da Philips Domestic
Appliances and Personal Care BV.
PORTUGUÊS 39

40
á«Hô©dG
IQÉjR ∂æe ƒLôf á∏µ°ûe ájCG â¡LGh hCG áeóN ájCG ¤G âéàMG GPG
¿GƒæY â– âfÎf’G ≈∏Y ¢ùÑ«∏«a áëØ°Ucomphilips.www.hCG
∫ƒ°ü◊G ∂æµÁ ) ∑ó∏H ‘ øFÉHõdG áeóÿ ¢ùÑ«∏«a õcôà ∫É°üJ’G
∑Éæg øµj ⁄ GPG .(»ŸÉ©dG ¿Éª°†dG ≥ë∏e øe ∞JÉ¡dG ºbQ ≈∏Y
дЙйажe π«cƒH π°ьJEG ,¬«a ш£≤J …тdG у∏СdG ‘ шFЙHхdG бeуN хcфe
ájÉæ©dGh á«dõæŸG äGhOCÓd ¢ùÑ«∏«a áeóN õcôà π°üJEG hCG ¢ùÑ«∏«a
.á«°üî°ûdG
áeóÿGh ¿Éª°†dG

C
◗
◗
C
◗
◗
B
◗
◗
◗
B
◗
41
á«Hô©dG
.âÑãŸG QÉW’G ´õfG
.äGÒ©°ûdG ´õfG
.äGQÉW’Gh äGôØ°ûdG ∞¶f
≈àM óMGh âbh ‘ óMGh QÉWGh IóMGh IôØ°T øe ÌcG ∞¶æJ ’
.º¡Ñ«côJ IOÉYG óæY º¡fɵe áaô©e Ö©°üj’
≈∏Y ∫ƒ°ü◊G ≈æ°ùààd ™«HÉ°SG IóY ¥ô¨à°ùj ¿G øµÁ , ∂dP çóM GPG
.á«dÉãe ábÓM
.ábÓ◊G IóMh ‘ ¬fɵe ‘ âÑãŸG QÉW’G ™°V
.∫ɪ©à°SÓd á◊É°U ÒZ hG âØ∏J ábÓ◊G ¢ShDhQ :3 ÖÑ°ùdG
.âÑãŸG QÉW’G ´õfG
º¡dóÑà°SGh ábÓ◊G IóMh øe áÁó≤dG ábÓ◊G ¢ShDhQ ´õfG
.IójóL ¢ShDhôH
É¡dGóÑà°SG Öéj (äGQÉW’Gh äGôØ°ûdG ) áØdÉàdG ábÓ◊G ¢ShDhQ
∞«°û«∏«a á«∏°UG ábÓM ¢ShDhôHHQ6.ø°ûcCG GQOGƒc
.ábÓ◊G IóMh ‘ ¬fɵe âÑãŸG QÉW’G ™°V
.±É≤jE’G/𫨰ûàdG ìÉàØe ≈∏Y §¨°†dG óæY ádB’G πª©J ’
.á«dÉN äÉjQÉ£ÑdG :1 ÖÑ°ùdG
.äÉjQÉ£ÑdG øë°ûH ºb
2
2
1
C
B
◗
B
42
á«Hô©dG
πcÉ°ûŸG πM
.¢†Øîæe AGOÉH ábÓM
Iô°TÉÑe ád’G ∞«¶æJ ºàj ⁄ :áî°ùàe ábÓ◊G ¢ShDhQ :1 ÖÑ°ùdG
AÉŸG øµJ ⁄ hCG/h á«aÉc IóŸ É¡Ø£°T ºàj ⁄h ∫ɪ©à°S’G ó©H
.á«aÉc áfƒî°ùH
ábÓ◊G á∏ªµJ πÑb kGó«L ád’G π°ùZG
.(''∞«¶æàdG'' Iô≤a ¤G ô¶fG)
.ábÓ◊G ¢ShDhQ OGó°S ‘ ÖÑ°S πjƒ£dG ô©°ûdG :2 ÖÑ°ùdG
.ájOÉ©dG äÉjÉØædG ‘ äÉjQÉ£ÑdG »eôJ’
øjòdG ¢ùÑ«∏«a áeóN õcôŸ É¡ª«∏°ùJ ∂æµÁ
.áæeBGh á«Ä«H á≤jô£H É¡æe ¿ƒ°ü∏îàj
.kÉeÉ“ É¡ZGôa ádÉM ‘ äÉjQÉ£ÑdG ´õfG §≤a
øeh §FÉ◊G øe »FÉHô¡µdG ¢ùÑ≤ŸG ´õfG
.ádB’G
»ZGÈdG ∂ØH ºb ºK É¡ØbƒJ ájɨd πª©J ád’G ´O
.ád’G íàaGh
.äÉjQÉ£ÑdG ´õfG
.äÉjQÉ£ÑdG ´õf ó©H øë°ûdG IóYÉb ‘ ád’G ™°†J ’
1
2
3
1

C
C
C
C
◗
◗
43
á«Hô©dG
QÉW’G ´õfGh áYÉ°ùdG ÜQÉ≤Y √ÉŒG ¢ùµ©H Ü’hódG QOCG
.âÑãŸG
å«ëH ábÓ◊G IóMh ‘ Iójó÷G ™°Vh ábÓ◊G ¢ShDhQ ´õfG
§°Sh √ÉŒÉH Iô°TDƒe IÒ¨°üdG ܃≤ãdG äGP ™£≤dG ¿ƒµJ
.ábÓ◊G IóMh
§¨°†dG ∫ÓN øe ójóL øe ábÓ◊G IóMh ÖcQ
ÖcQ .áYÉ°ùdG ÜQÉ≤Y √ÉŒÉH ¬µjô–h Ü’hódG ≈∏Y
.âÑãŸG QÉW’G
∞«°û«∏«a ¢ShDhôH áØdÉàdG ábÓ◊G ¢ShDhQ ∫óÑà°SG
HQ6.§≤a ø°ûcCG GQOGƒc
.∞∏àdG Öæéàd ádB’G ≈∏Y »eÉ◊G AÉ£¨dG ™°V
.á¶aÉ◊G É¡àÑ«≤M ‘ ádB’G øjõîàH ºb
.ádB’G øe ¢ü∏îàdG óæY äÉjQÉ£ÑdG ´õfG
øjõîàdG
äÉjQÉ£ÑdG øe ¢ü∏îàdG
5
3
4
2
1
1
2

C
C
C
C
44
á«Hô©dG
.kÉ«∏c ádB’G ∞éàd áMƒàØe ábÓ◊G IóMh ´O
ᣰSGƒH AÉŸG ∫ɪ©à°SG ¿hóH ô©°ûdG ¿õfl ∞«¶æJ kÉ°†jCG ∂æµÁ
.IOhõŸG IÉ°TôØdG
Üò°ûŸG :ô¡°TCG áà°S πc
.ádB’G øeh §FÉ◊G øe ¢ùÑ≤ŸG ´õfGh ádB’G 𫨰ûJ ∞bhCG
.IÉ°TôØdG ᣰSGƒH Üò°ûŸG ∞¶f
áWÉ«ÿG äÉæ«cÉe âjR Iô£≤H Üò°ûŸG ¿Éæ°SCG º«ë°ûàH ºb
.ô¡°TCG áà°S πc
ábÓM èFÉàf ≈∏Y ∫ƒ°üë∏d Úàæ°S πc ábÓ◊G ¢ShDhQ ∫óÑà°SG
.ádÉ©a
øeh §FÉ◊G øe ¢ùÑ≤ŸG ´õfGh 𫨰ûàdG øY ádB’G ∞bhCG
.ábÓ◊G IóMh íàØd π°üØdG ìÉàØe ≈∏Y §¨°VG .ádB’G
QÉW’G ´õfGh áYÉ°ùdG ÜQÉ≤Y √ÉŒG ¢ùµ©H Ü’hódG QOCG
.âÑãŸG
ábÓ◊G ¢ShDhQ ∫GóÑà°SG
4
1
2
3
1
2
2
1

C
C
45
á«Hô©dG
.π°†aCG ábÓM AGOCG øª°†j π°UGƒàŸG ∞«¶æàdG
É¡Ø£°T ƒg ádB’G ∞«¶æàd á∏«°Sh π¡°SCGh ∞¶fCG
(ájƒÄe 80-60) ´ƒÑ°SCG πc øNÉ°ùdG AÉŸÉH
¢ShDhQ ´õ`æd …Qhô°V ¢ù«d ,ádB’G ∞«¶æJ óæY
¤G º¡YÉLQG øe ócCÉJ ∂dP äOQCG GPG .ábÓ◊G
ábÓM ≈∏Y ∫ƒ°üë∏d í«ë°üdG º¡`fɵe
.ádÉ©a
ábÓ◊G IóMh :´ƒÑ°SCG πc
.ádB’G øeh §FÉ◊G øe ¢ùÑ≤ŸG ´õfG .ádB’G 𫨰ûJ ∞bhCG
.ábÓ◊G IóMh íàaGh π°üØdG ìÉàØe ≈∏Y §¨°VG
AÉŸG â– º¡Ø£°ûH ô©°ûdG ¿õflh ábÓ◊G IóMh ∞¶f
.âbƒdG ¢†©Ñd øNÉ°ùdG
∞«¶æàdG
1
2
3
2
1

C
C
C
46
á«Hô©dG
) IQÉ«°ù∏d ∞«°û«∏«a ∂∏°S ᣰSGƒHHQ6010(øë°T kÉ°†jCG ∂æµÁ
π«ch iód ôaƒàe ∂∏°ùdG .IQÉ«°ùdG πNGO âdƒa 12 Iƒ≤H ádB’G
.∞«°û«∏«a
.äÉÑæ°ûdGh ∞dGƒ°ùdG Öjò¡àd
.≈∏YCÓd π°üØŸG ™aO ᣰSGƒH Üò°ûŸG íàaG
.∑ôÙG 𫨰ûJ á«∏ªY ∫ÓN Üò°ûŸG 𫨰ûJ øµÁ
±É≤j’G/𫨰ûàdG ìÉàØe ≈∏Y §¨°†dG ᣰSGƒH ádB’G π¨°T
.IóMGh Iôe
äÉcôëH ∂Jô°ûH ¥ƒa áYô°ùH ábÓ◊G ¢ShDhQ ∑ôM
.ájôFGOh ájRGƒàe
IóŸ êÉà– ∂Jô°ûH .áëLÉf èFÉàf »£©J ±ÉL ¬Lh ≈∏Y ábÓ◊G
.∞«°û«∏«a Ωɶf ™e º∏bCÉààd áKÓK hCG ÚYƒÑ°SCG
±É≤j’G/𫨰ûàdG ìÉàØe ≈∏Y §¨°†dG ᣰSGƒH ádB’G π¨°T
.IóMGh Iôe
.∞∏àdG Öæéàd ádB’G ≈∏Y »eÉ◊G AÉ£¨dG ≠°V
ø°ûcCG GQOGƒc RGôW) ábÓ◊G ¢ShDhQ ∫óÑà°SGHQ6Úàæ°S πc (
.ádÉ©a ábÓM èFÉàf ≈∏Y ∫ƒ°üë∏d
ábÓ◊G á«∏ªY
Öjò°ûàdG á«∏ªY
1
2
3
4
1

◗
C
47
á«Hô©dG
É¡àbÉW ᫪c π≤J »àdG äÉjQÉ£ÑdG
»∏Ø°ùdG Aƒ°†dG ¢†eƒj ,äÉjQÉ£ÑdG ‘ ábÉ£dG ¢VÉØîfG óæY
ôªMC’G Aƒ°†dG ¢†eƒ«°S ,ádB’G A≈Ø£J ÉeóæY .ôªMC’G ¿ƒ∏dÉH
.ÊGƒK 4 IóŸ
.ájƒÄe 35 h 5 ÚH IQGôM áLQóH áaôZ ‘ É¡YOh ádB’G øë°TG
240 h 110 ÚH ìhGÎj »FÉHô¡c QÉ«àd ºFÓe »FÉHô¡µdG ∂∏°ùdG
.âdƒa
∂∏°ùdG π«°UƒJ ᣰSGƒHh ,ádB’G øë°T ¿hO ábÓ◊G kÉ°†jCG ∂æµÁ
.QÉ«àdG ™e kIô°TÉÑe »FÉHô¡µdG
øeh §FÉ◊G øe »FÉHô¡µdG ¢ùÑ≤ŸG ´õfG ,äÉjQÉ£ÑdG ôªY ádÉWC’
.πeɵdÉH äÉjQÉ£ÑdG øë°T ΩÉ“G óæY ádB’G
.ádB’ÉH ¢ùÑ≤ŸG π°UhCG
.§FÉ◊ÉH ¢ùÑ≤ŸG π°UhCG
.á¶aÉ◊G É¡àÑ«≤M πNGO »gh ádB’G øë°ûJ ’
ΩóY øe á∏jƒW Ióe ó©H hCG Iôe ∫hC’ øë°ûdG óæY
.äÉYÉ°S 4 IóŸ øë°ûJ ádB’G ´O ,∫ɪ©à°S’G
.IóMGh áYÉ°S kIOÉY ¥ô¨à°ùJ øë°ûdG á«∏ªY
øë°T á«∏ªY ΩÉ“G óæY ádB’G øeh §FÉ◊G øe ¢ùÑ≤ŸG ´õfG
.πeɵdÉH äÉjQÉ£ÑdG
»FÉHô¡µdG øë°ûdG á«∏ªY
1
2
3
4

◗
◗
C
◗
C
◗
C
◗
C
◗
C
◗
48
á«Hô©dG
`H ¢UÉN »FÉHô¡c ∂∏°S πª©à°SG §≤aHQ8000/6000IóYÉbh
.ábÓ◊G ádBG øë°ûd IOhõŸG øë°ûdG
¤G âdƒa 240 - 110 ábÉW ∫ƒëj »FÉHô¡µdG ∂∏°ùdG
.âdƒa 12
»FÉHô¡µdG ∂∏°ùdG π∏ÑJ ΩóY øe ócÉJHQ8000/6000IóYÉbh
.AÉŸÉH øë°ûdG
É¡fG ,âdƒa 12 áæeBG á°†Øîæe ábÉW πªY ábÓ◊G ádBG πª©J
hP øNÉ°S AÉà ɡ∏°ù¨J ’ .AÉŸÉH É¡Ø«¶æJ øµÁh Aɪ∏d áehÉ≤e
.ájƒÄe 80 øe ÈcG IQGôM áLQO
øë°ûdG
.ôªMC’G ô°TDƒŸG Aƒ°†dG ¢†eƒj ,ádBÓd »FÉHô¡µdG øë°ûdÉH CGóÑJ ÉŸÉM
Aƒ°†dG CGóÑj ,IóMGh ábÓM á«∏ª©d á«aÉc ájQÉ£ÑdG ¿ƒµJ ÉeóæY
íÑ°üJ á∏°UGƒàŸG øë°ûdG á«∏ªY ∫ÓNh .Qƒ¡¶dÉH ô°†NC’G ô°TDƒŸG
‘ iƒà°ùŸG ¤G kIÒ°ûe ô°†NC’G ¿ƒ∏dG ¤G Ò°ûJ AGƒ°VC’G øe ójõŸG
.¬æë°T ” …òdG ájQÉ£ÑdG
πeɵdÉH áfƒë°ûe äÉjQÉ£H
AGƒ°VC’G ™«ªL íÑ°üJ ,πeɵdÉH áfƒë°ûe äÉjQÉ£ÑdG íÑ°üJ ÉeóæY
.AGô°†N
»≤ÑàŸG øë°ûdG
:äÉjQÉ£ÑdG ‘ kÉÑjô≤J á«≤ÑàŸG ábÉ£dG ᫪c ¤G Ò°ûj AGƒ°VC’G OóY
.ábÉ£dG äOGR ɪ∏c AGƒ°VC’G äOGR ɪ∏c
.á≤«bO 45 ‹Gƒ◊ ΩhóJ ábÓ◊ »ØµJ πeɵdÉH áfƒë°ûŸG ájQÉ£ÑdG
kGóL º¡e
»FÉHô¡µdG øë°ûdG äɪ«∏©J

49

50
C
◗
◗
B
◗
◗
◗
B
◗

51
C
B
B
◗
B
C
◗
◗
2
1

52
C
C
C
C
◗
◗
2
1
1
2

53
C
C
C
C
1
2

54
C
C
1
2

55
C
C
C

56
◗
C

57
◗
◗
C
◗
C
◗
C
◗
C
◗
C
◗
HQ8000/ 6000
HQ8000/ 6000

4222 001 87613
 Loading...