


ENGLISH 4
DEUTSCH 17
ČESKY 31
MAGYAR 44
HQ6763, HQ6762, HQ6761, HQ6760
3
Important
Read these instructions for use carefully before
using the appliance and save them for future
reference.
◗ Only use the HQ8000 powerplug and the
charging stand supplied to charge the shaver.
◗ The powerplug is suitable for mains voltages
ranging from 100 to 240 volts.
◗ The powerplug contains a transformer. Do
not cut off the powerplug to replace it with
another plug, as this will cause a hazardous
situation.
◗ The powerplug transforms 100-240 volts to
12 volts.
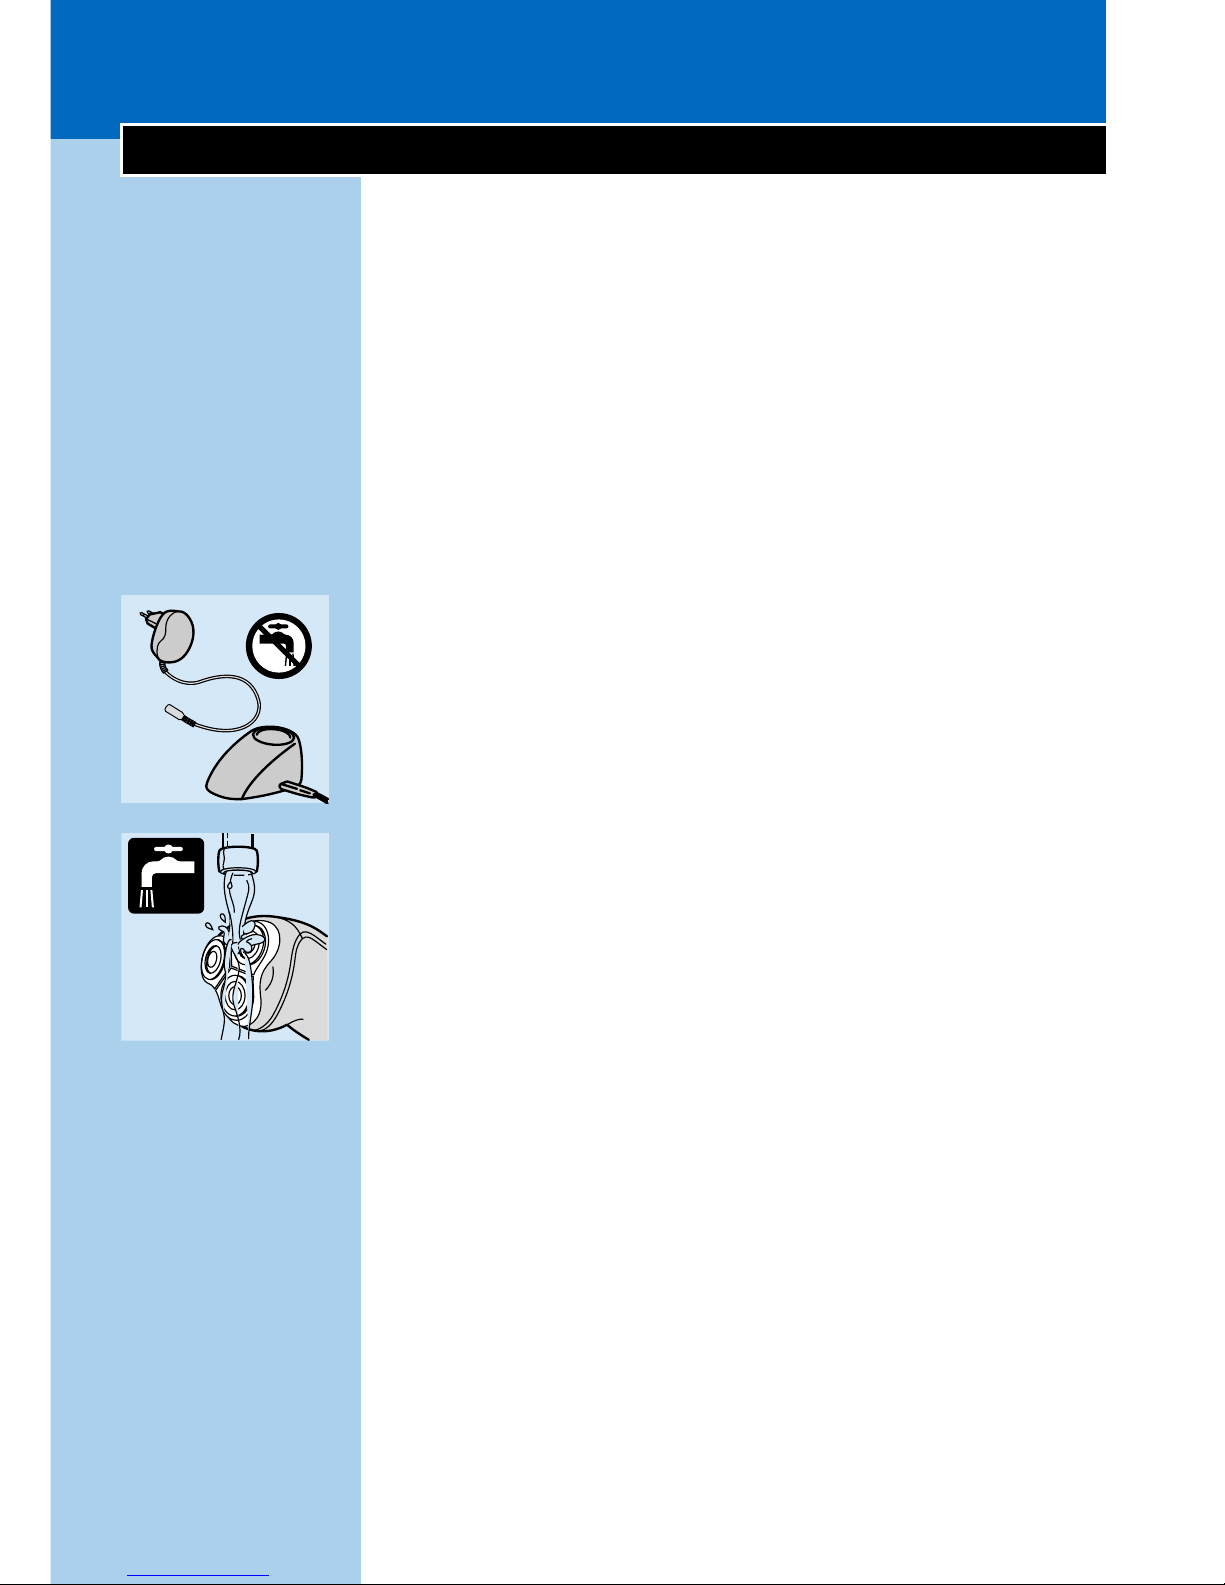
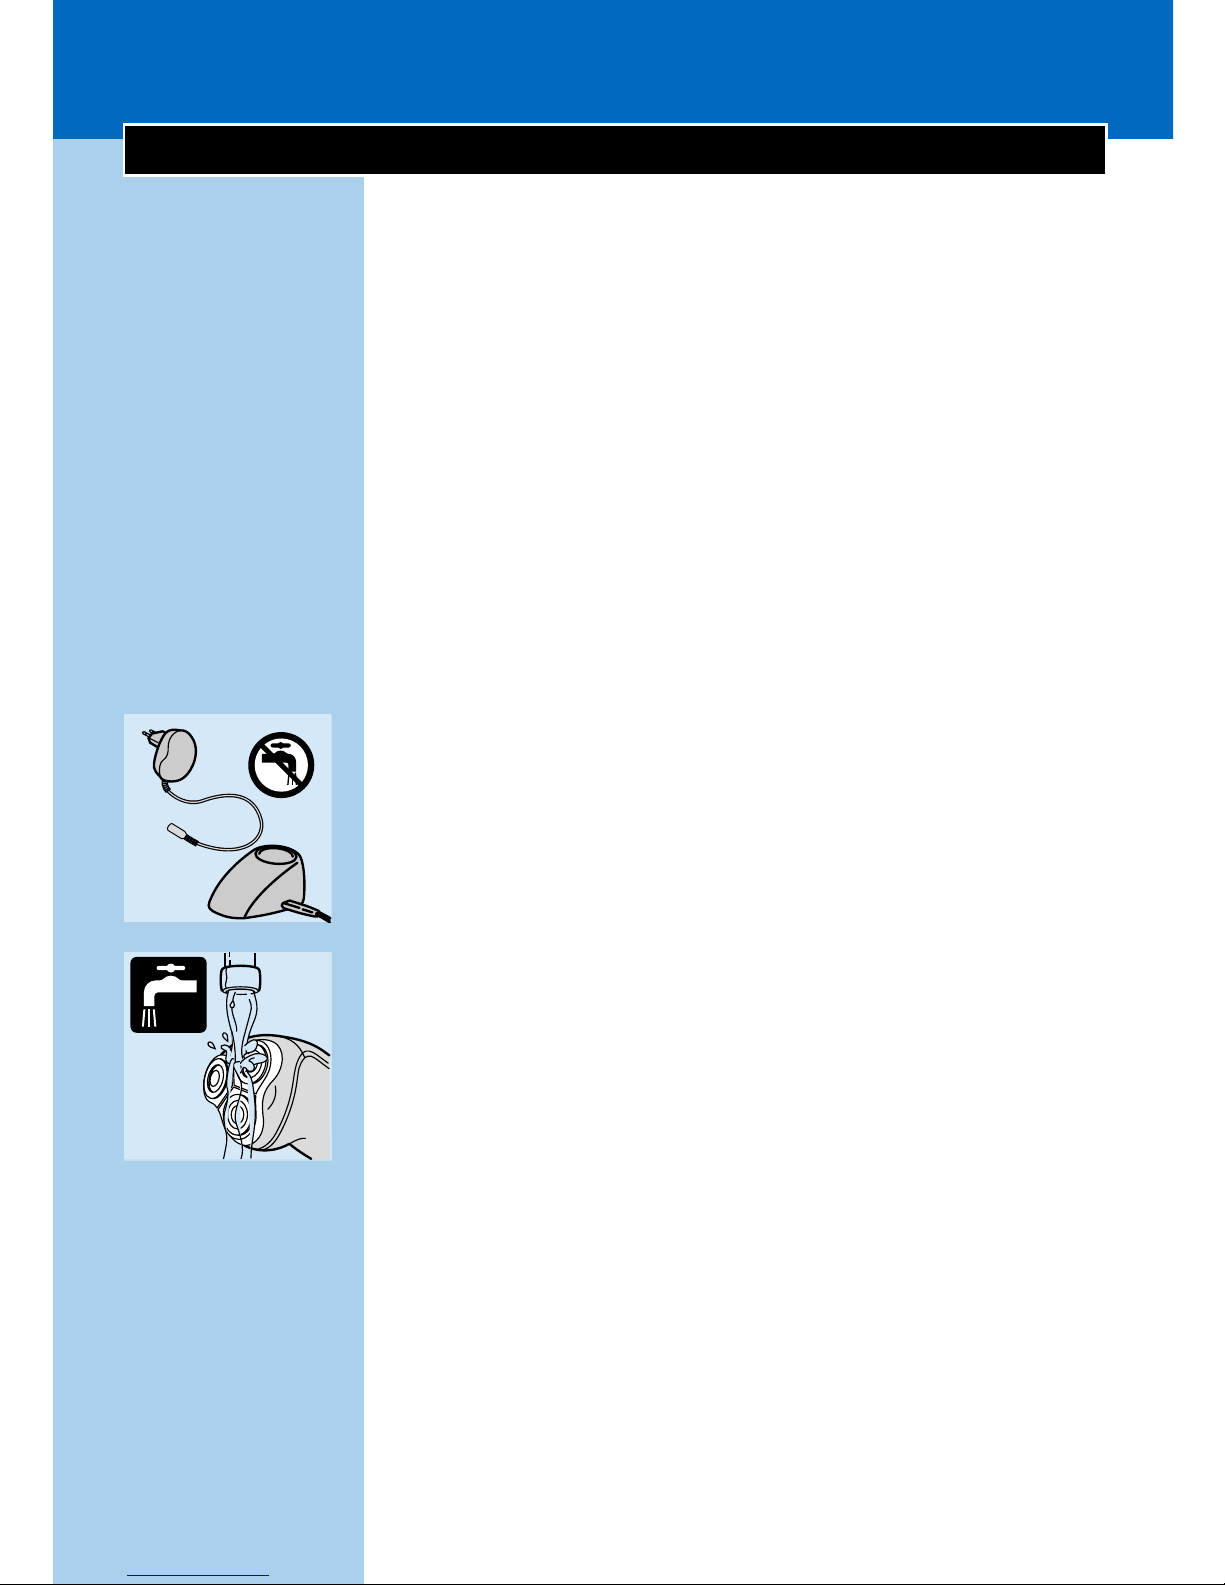
C
◗ Make sure the HQ8000 powerplug and the
charging stand do not get wet.
C
◗ The shaver runs at a safe low voltage of
12 volts. It is watertight and can be cleaned
under the tap. Do not rinse the shaver with
water hotter than 80cC.
◗ For the best shaving results, shaving emulsion
should be pumped up frequently.
◗ If the mains cord of this appliance is damaged,
it must always be replaced by Philips or a
service centre authorised by Philips in order
to avoid hazardous situations.
◗ Noise level:
- Shaver + shaving unit: Lc = 61-65 dB(A)
- Shaver + trimmer: Lc = 60-64 dB(A)
ENGLISH4

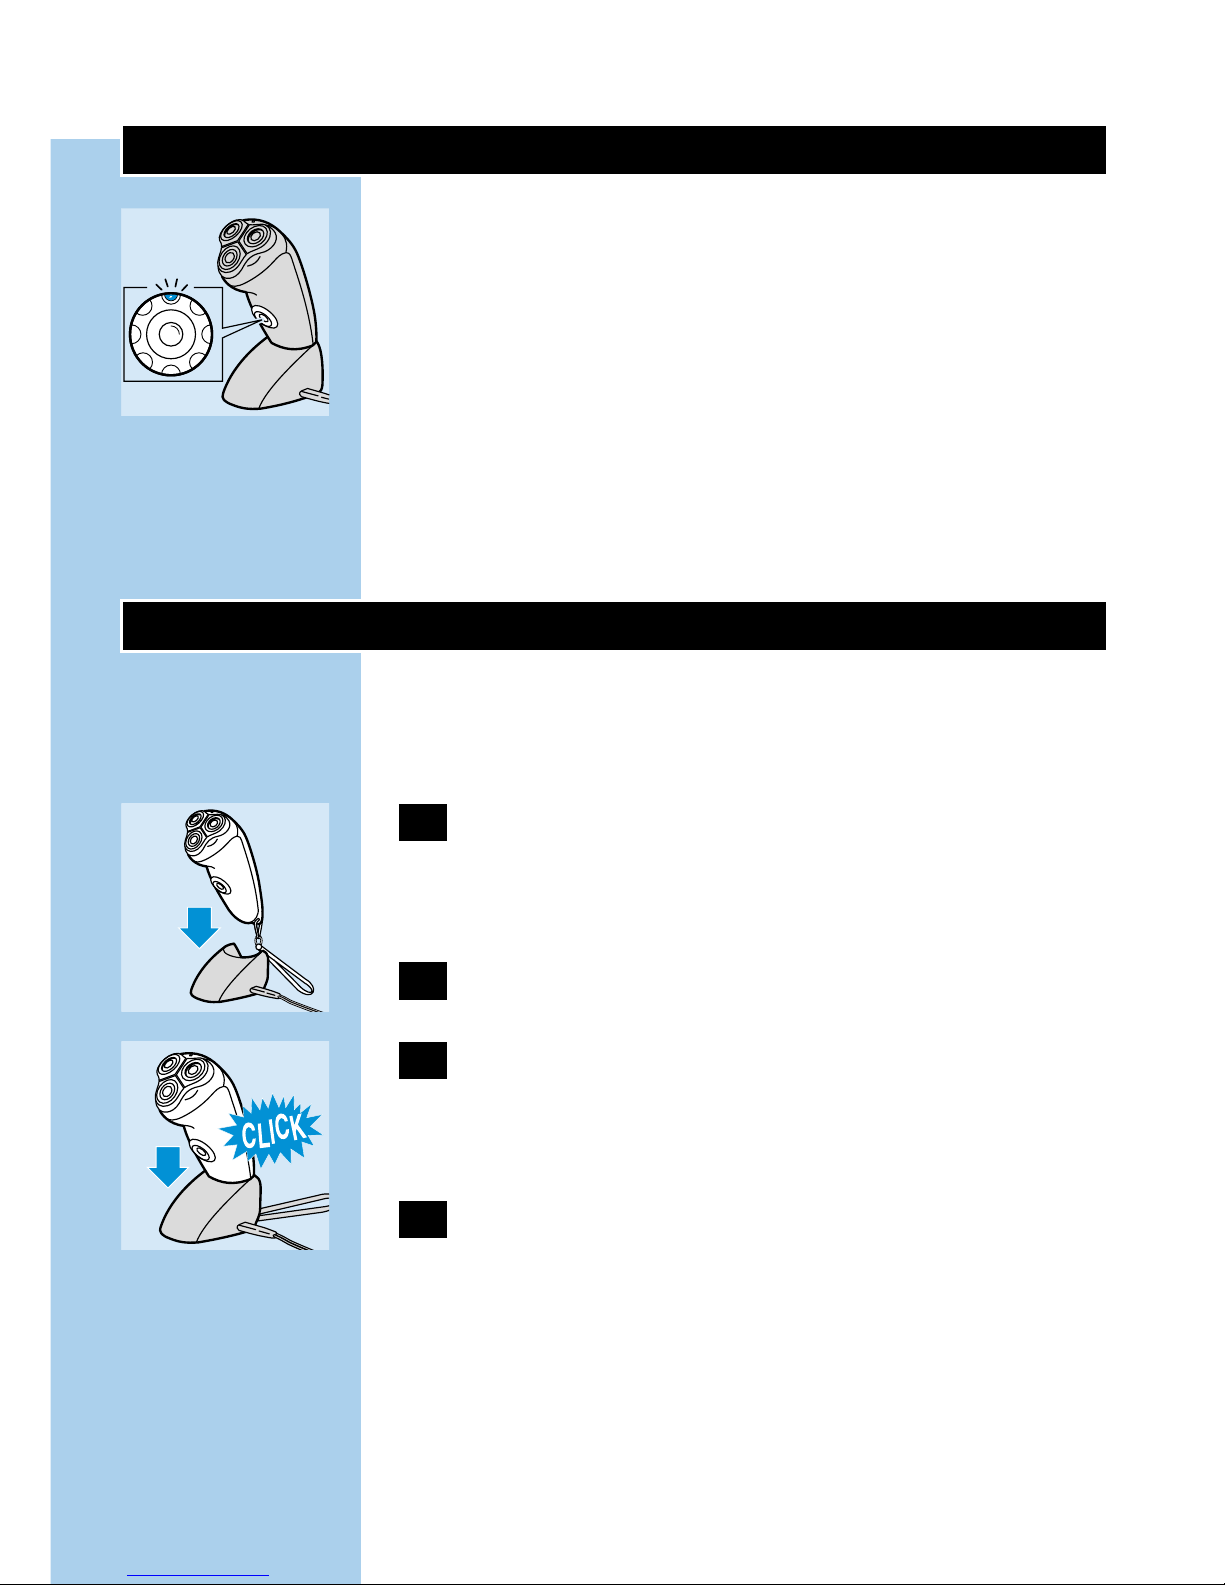
Charge indications
C
◗ As soon as you start charging the empty
shaver, the green pilot light goes on.
◗ When the batteries have been fully charged,
the green pilot light starts blinking.
◗ The red pilot light blinks when the batteries
are almost empty.
◗ When the batteries are almost empty, the red
pilot light blinks a few times after the shaver
has been switched off.
Charging
Recharge, store and use the appliance at a
temperature between 5cC and 35cC.
1 Insert the small plug into the charging
stand and put the powerplug in the wall
socket.
C
2 Place the shaver in the charging stand.
C
3 Press until you hear a click.
The shaver automatically switches off when
placed in the charging stand.
4 When charging for the first time or after a
long period of disuse: leave the shaver to
charge continuously for 4 hours.
Charging normally takes approx. 1 hour.
A fully charged shaver has a cordless shaving time
of up to approx. 55 minutes.
ENGLISH 5

Inserting cartridges
The cartridges with moisturising NIVEA FOR
MEN shaving emulsion are available in boxes
containing five cartridges and one small plastic
pump. Do not throw the pump away: you will
need it for all five cartridges!
Use only Philishave NIVEA FOR MEN Cool Skin
(HQ160 or HQ161) cartridges.
For hygienic reasons, we advise you to insert a
new pump when you start using a new set of five
cartridges.
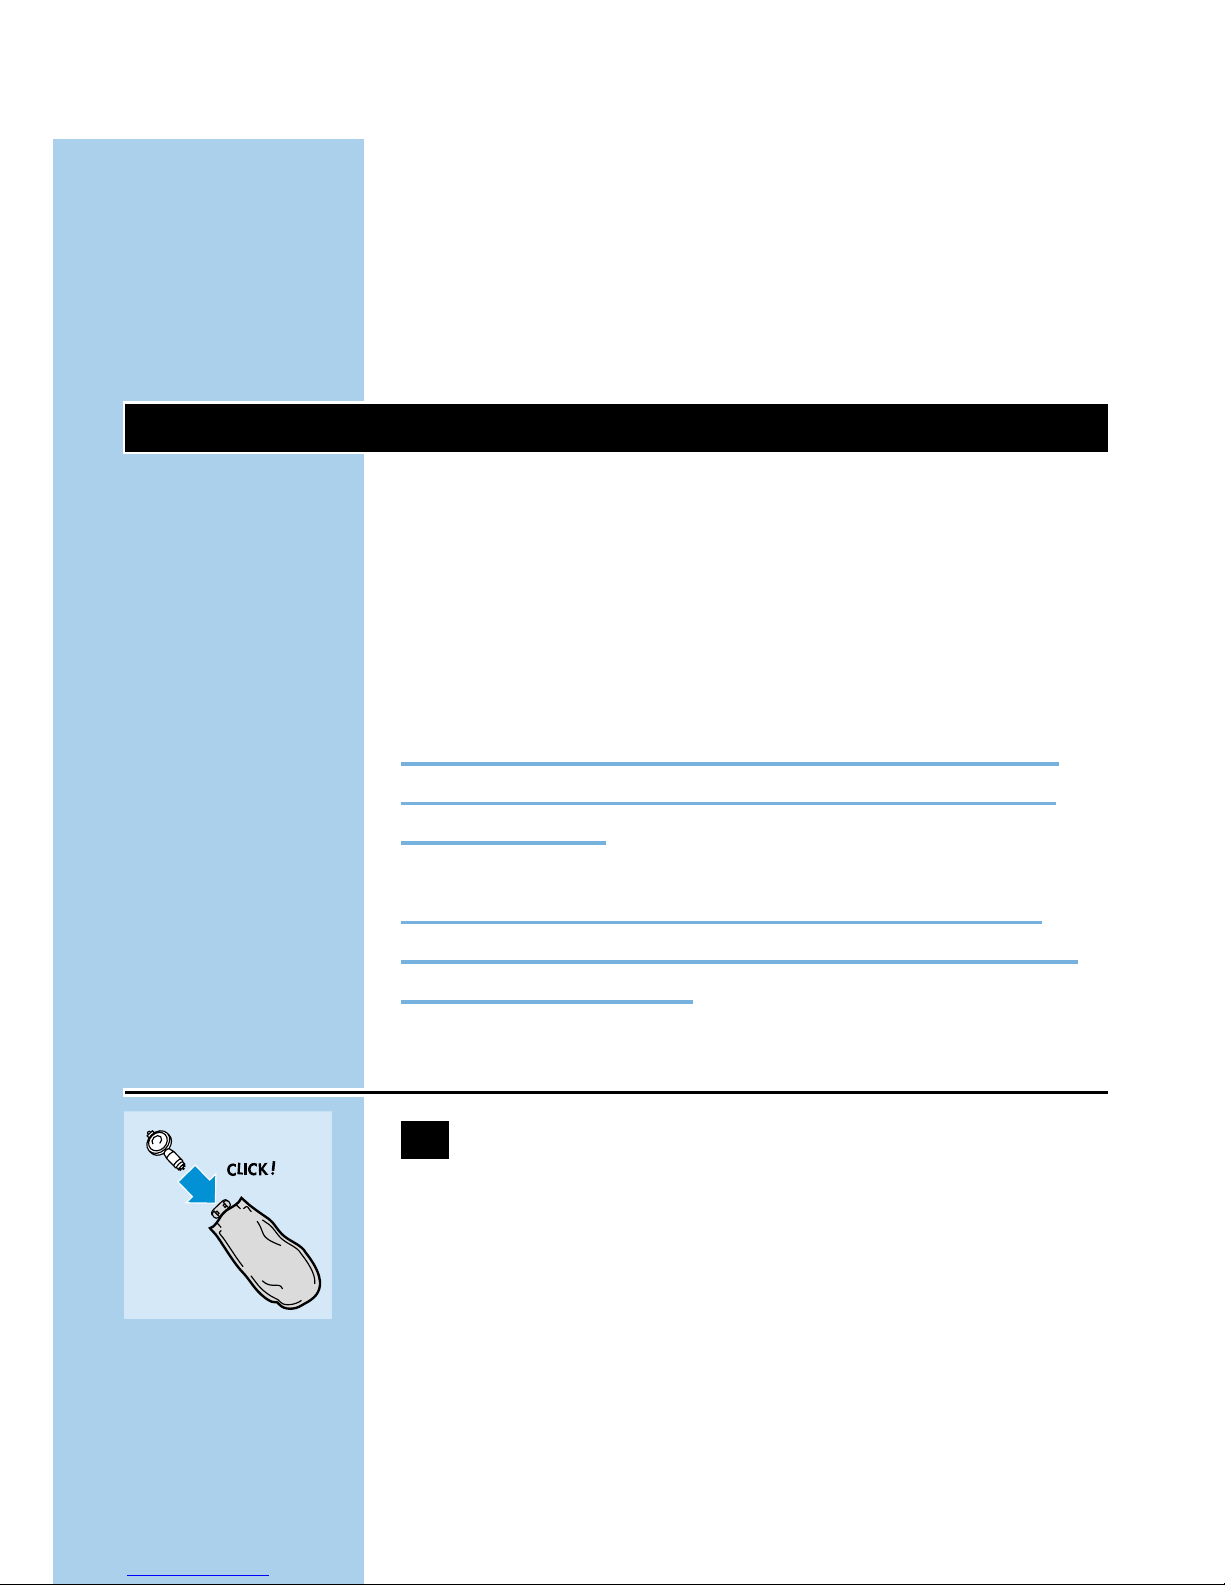
Inserting the first cartridge
C
1 Take one cartridge from the box.Take the
pump (supplied in the same box) out of its
bag and push it into the cartridge until it
locks into position with a click.
C
2 Move the release slide downwards and
open the cover of the cartridge
compartment.
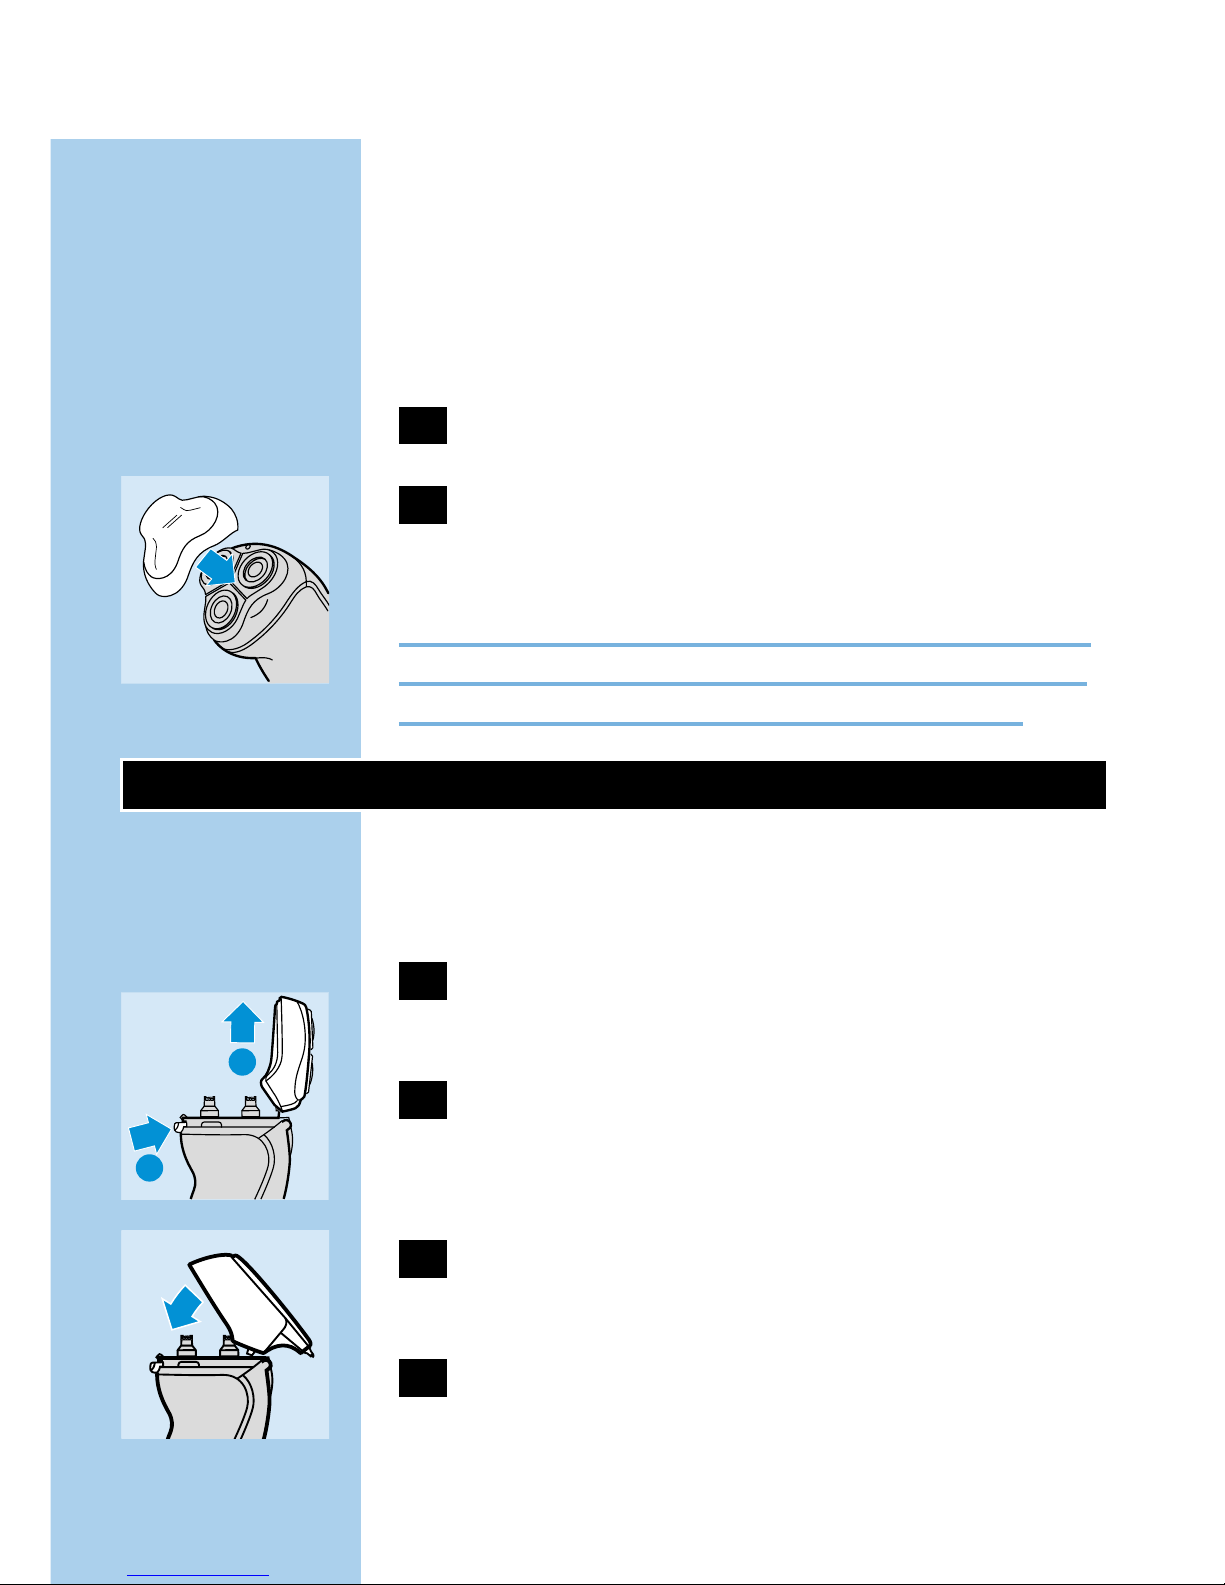
C
3 Slide the cartridge with the pump into the
shaver. It only fits properly if the white side
of the pump is pointing upwards. Close the
cover.
ENGLISH6
1
2
4 Press the yellow pump button a few times
until the NIVEA FOR MEN shaving
emulsion appears.The shaver is now ready
for use.
Do not throw the pump away when you replace
an empty cartridge.You will need it for the other
cartridges.
The NIVEA FOR MEN shaving emulsion in this
cartridge will keep when stored at temperatures
between 0cC and +40cC.
Shaving
1 Switch the shaver on by pressing the on/off
button once.
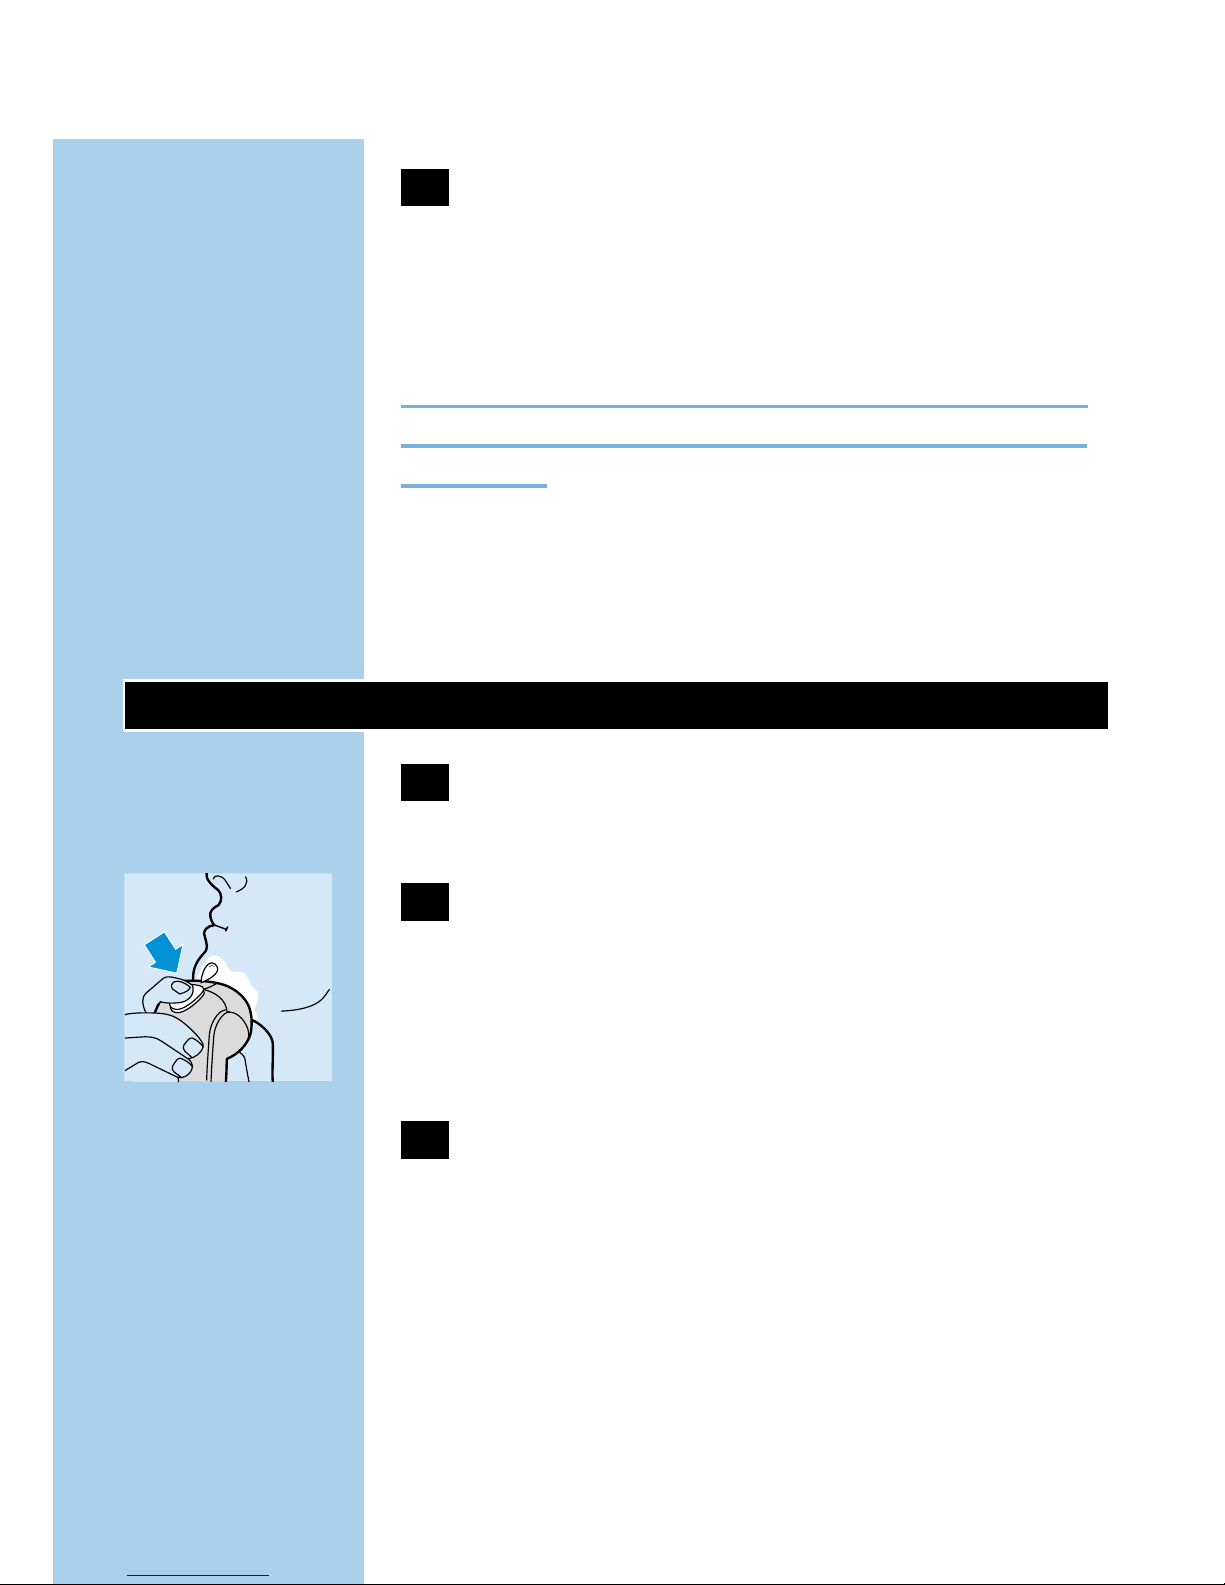
C
2 Press the yellow pump button to apply
NIVEA FOR MEN shaving emulsion to
your skin. Move the shaver over your skin,
making both straight and circular
movements.
3 While shaving, press the pump button
frequently to apply more NIVEA FOR
MEN shaving emulsion so that the shaver
keeps gliding smoothly over your face.
Do not press the shaver too hard against your
skin while shaving.
If you prefer, you can wet your face first.
ENGLISH 7
◗ When you have run out of shaving emulsion,
you can also use the shaver without it on a
dry face.
◗ Your skin may need 2-3 weeks to get
accustomed to the Philishave system.
4 Switch the shaver off.
C
5 Put the protection cap on the shaver every
time you have used it, to prevent damage.
Remove the cartridge and clean the shaver if you
are not going to use the appliance for more than
one week. Rinse the shaver after each shave.
Trimming
The shaver has a separate trimmer for grooming
sideburns and moustache.
1 Switch the shaver off.
Clean the shaver before you attach the trimmer.
C
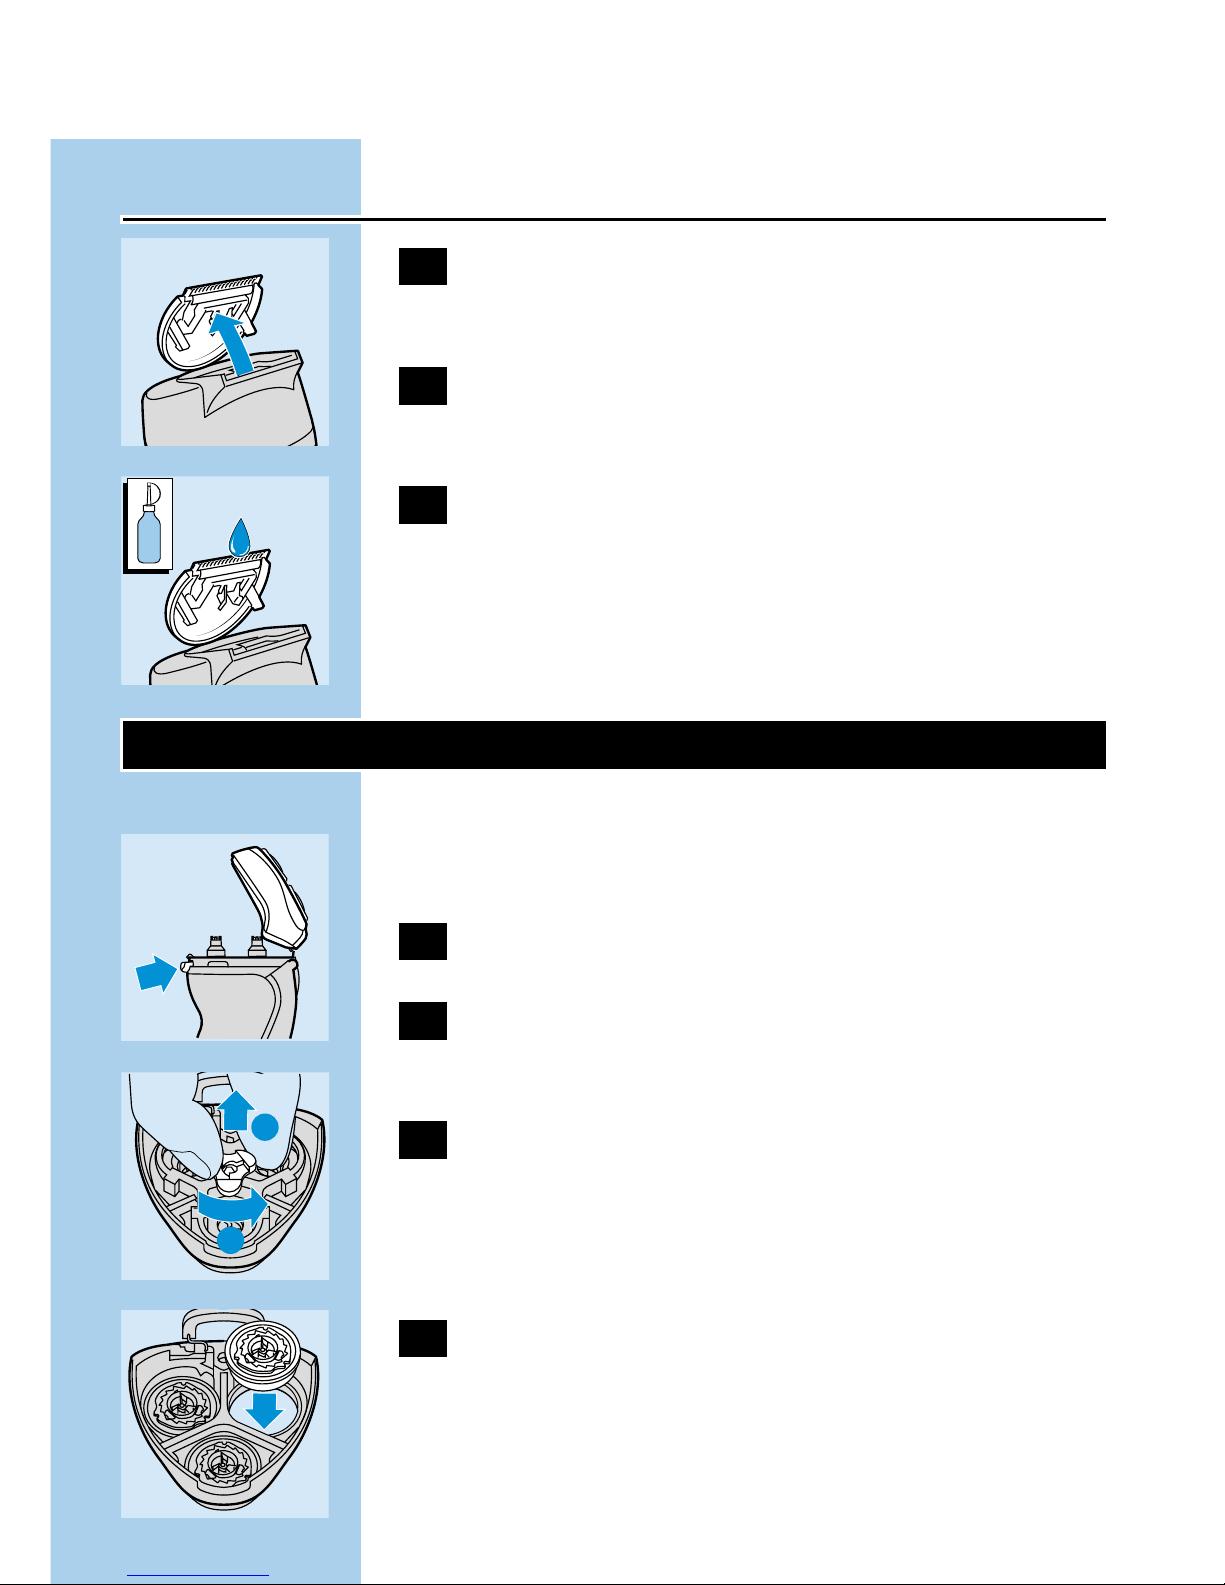
2 Press the release button to open the
shaving unit and pull the shaving unit off
the shaver.
C
3 Tilt the trimmer slightly backwards and fit
it onto the shaver.
4 Remove the trimmer by pressing the
release button again and pulling the
trimmer off the shaver.
ENGLISH8
2
1
Cleaning
Shaving unit
Rinse the shaving unit and the hair chamber with
hot water (60cC - 80cC) after every use.
1 Switch the shaver off.
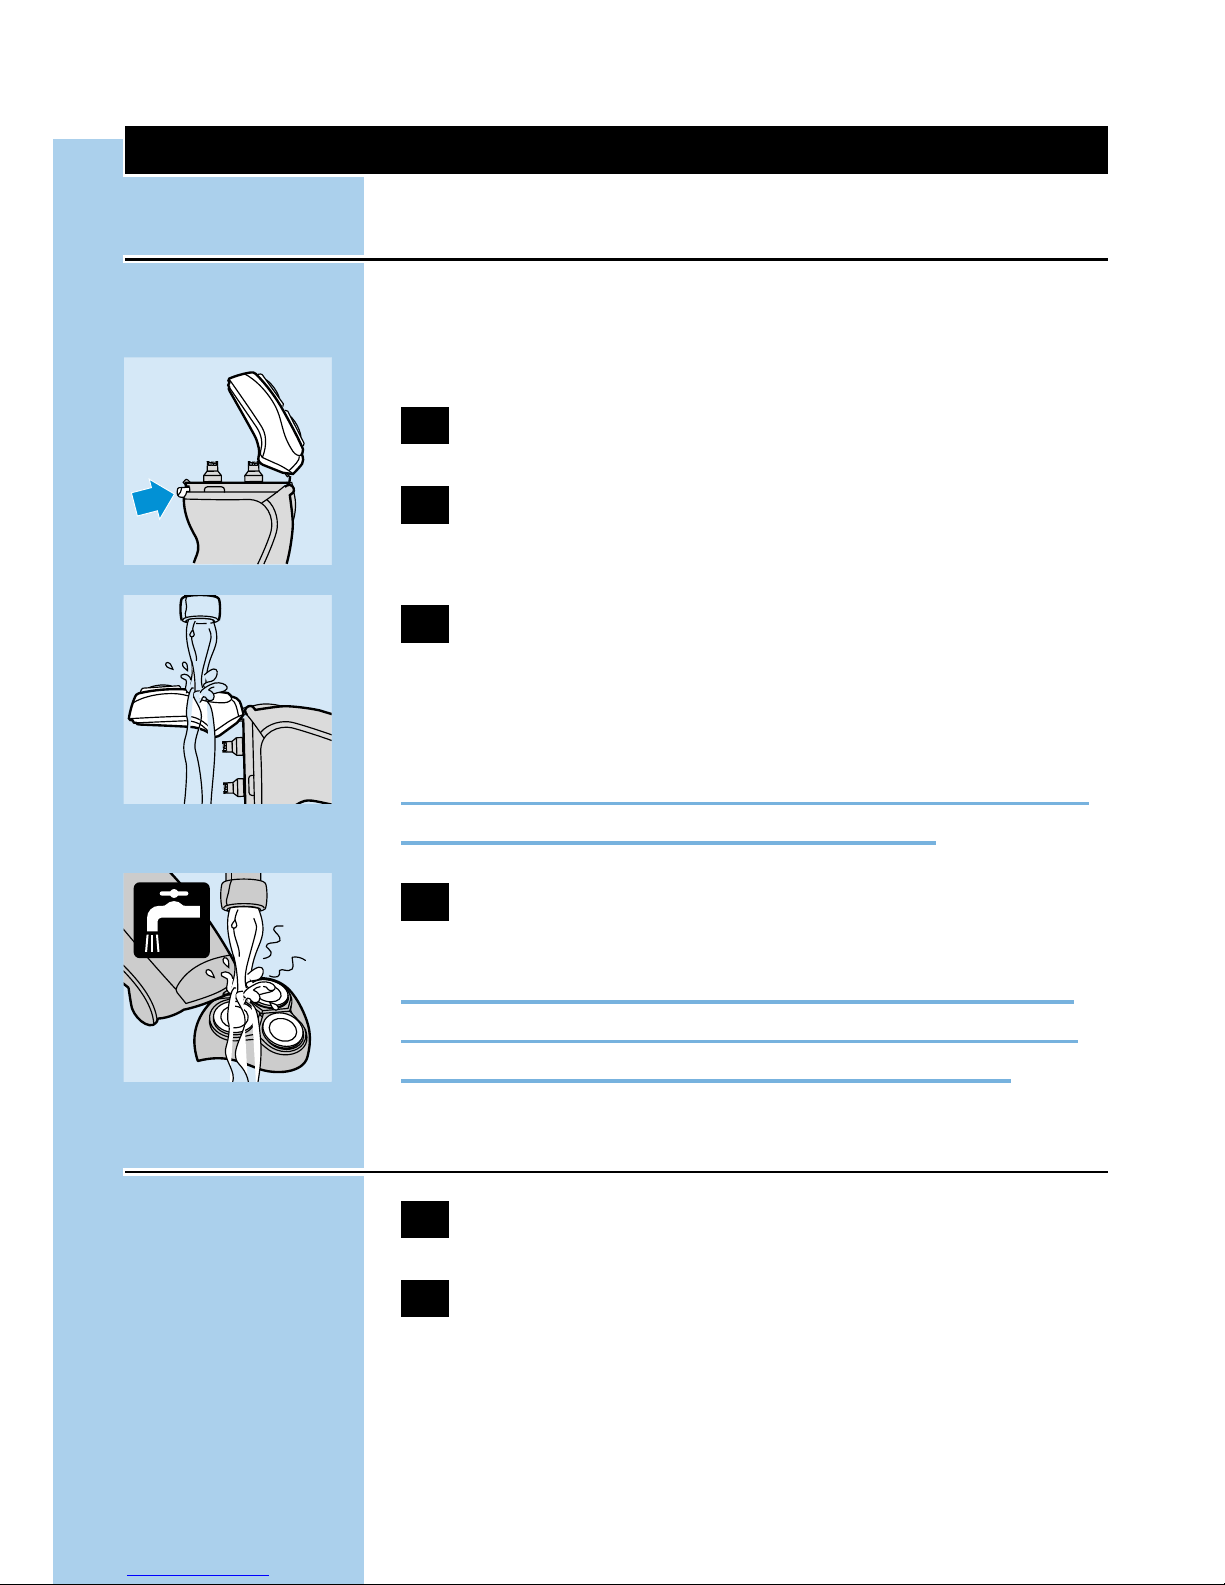
C
2 Press the release button to open the
shaving unit.
C
3 Clean the shaving unit and the hair
chamber by rinsing them under a hot tap
for some time.
Never dry the shaving unit with a towel or tissue
as this may damage the shaving heads.
C
4 Rinse the outside of the shaver.
Make sure the inside of the shaving unit and the
hair chamber have been cleaned properly. Close
the shaving unit and shake off excess water.
Charging stand
1 Unplug the charging stand.
2 Clean the charging stand with a moist
cloth.
ENGLISH 9
Trimmer
1 Clean the outside of the trimmer with the
brush supplied after every use.
C
2 Open the trimmer to clean it on the
inside.
C
3 Lubricate the trimmer teeth with a drop
of sewing machine oil every six months.
Replacing the shaving heads
Replace the shaving heads every two years for
optimal shaving results.
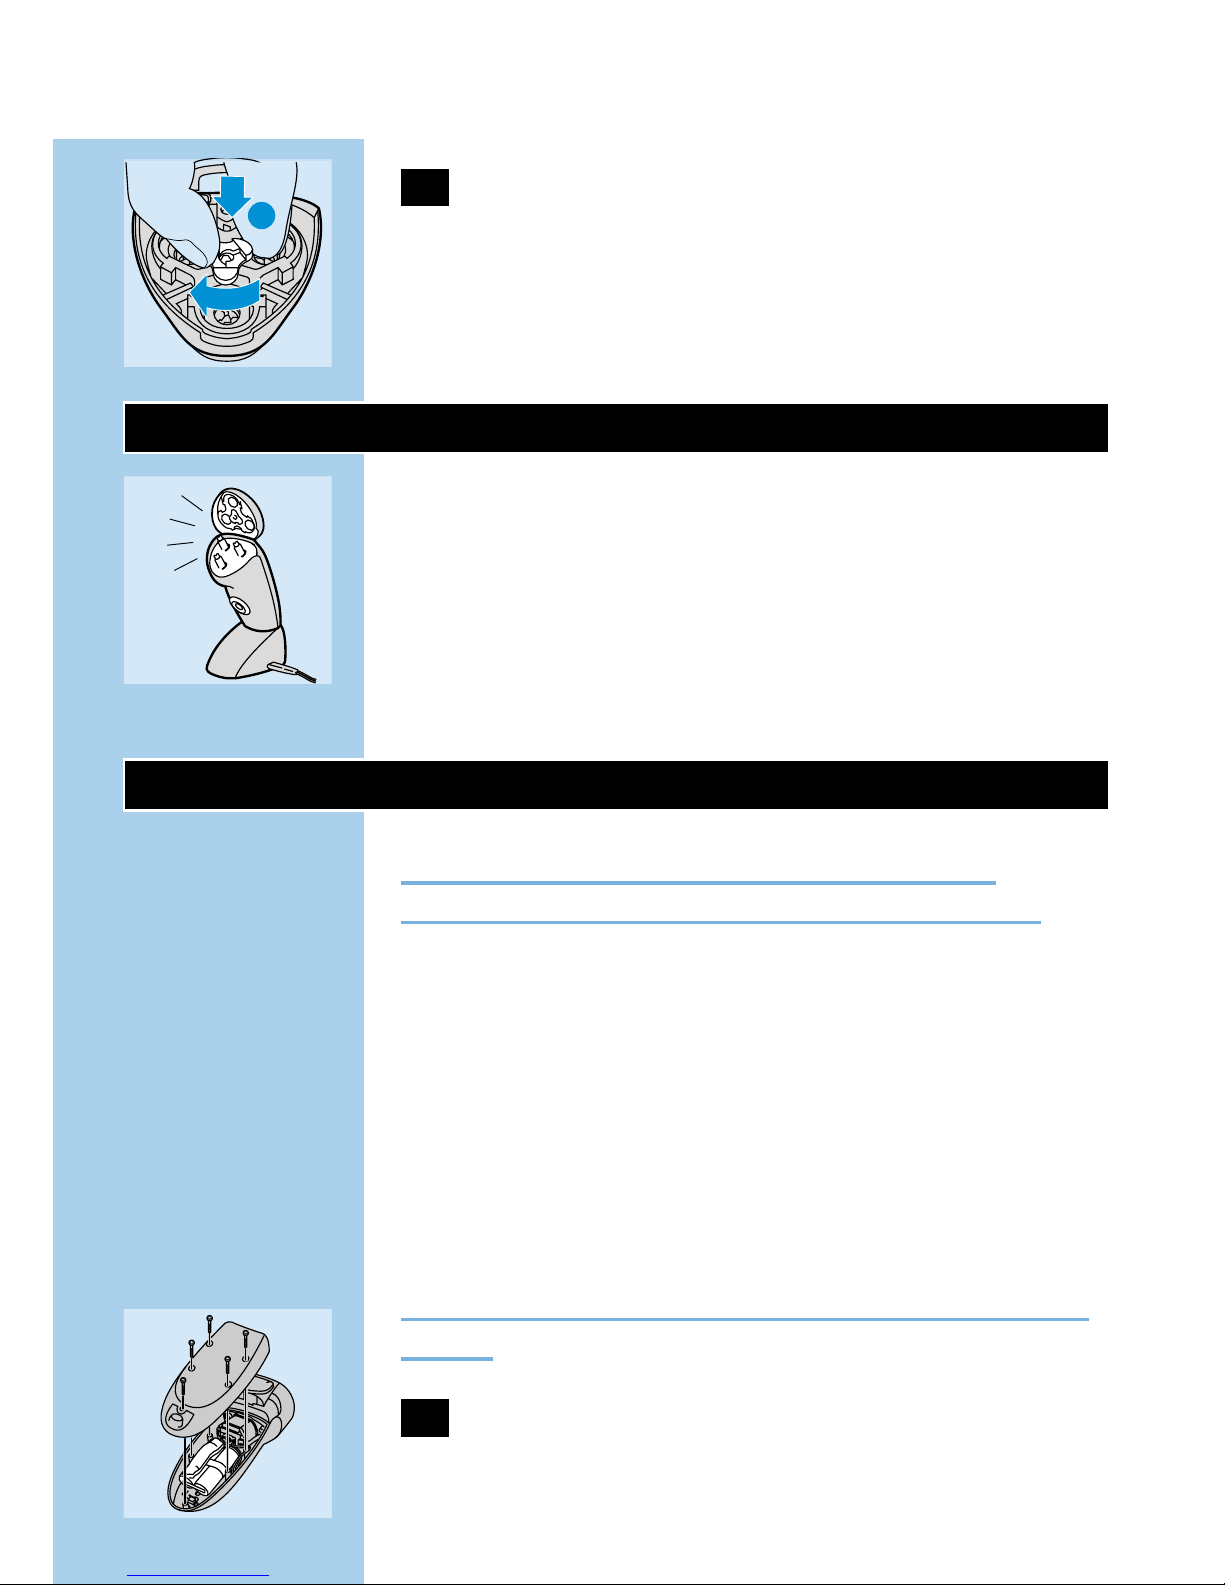
1 Switch the shaver off.
C
2 Press the release button to open the
shaving unit.
C
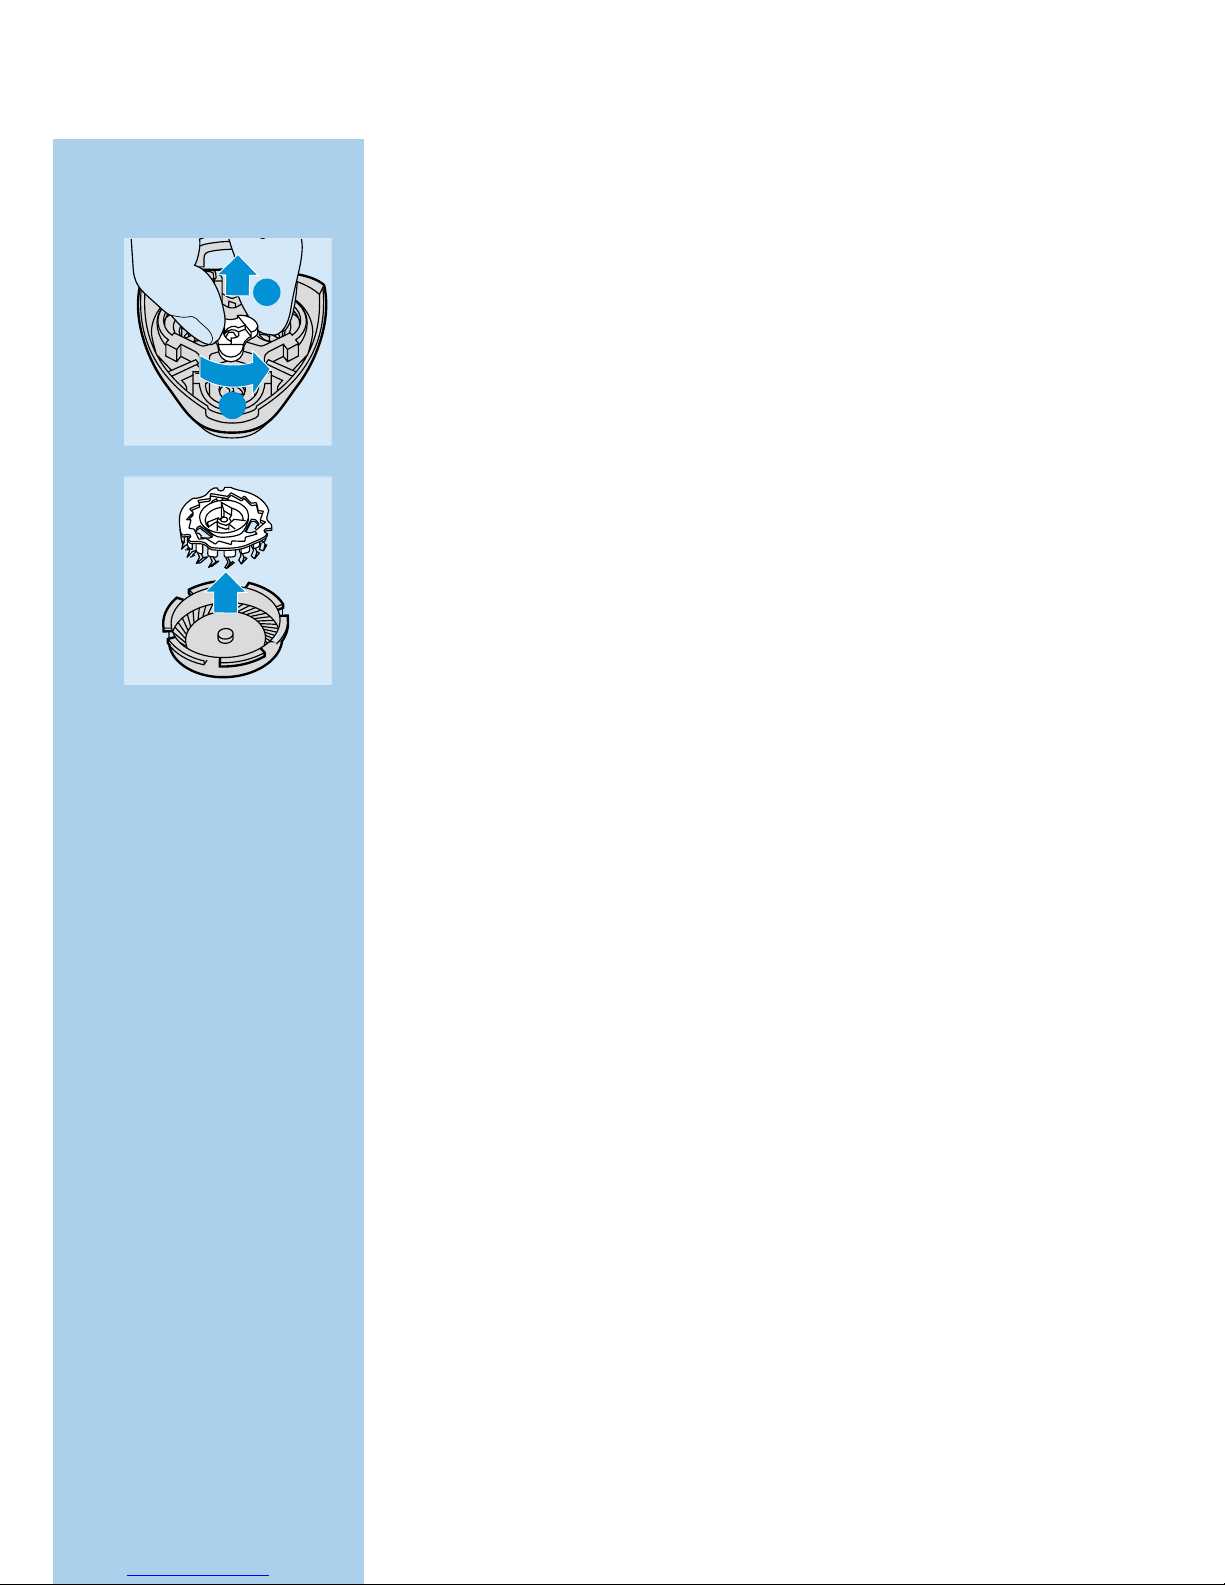
3 Turn the wheel anticlockwise and remove
the retaining frame.
C
4 Remove the shaving heads and place the
new ones in the shaving unit.
ENGLISH10
OIL
1
1
2
C
5 Put the retaining frame back into the
shaving unit, press the wheel and turn it
clockwise.
Replace damaged or worn shaving heads with
Philishave HQ167 Cool Skin shaving heads only.
Storage
C
◗ After cleaning, the wet shaver can be placed in
the charging stand.
◗ The appliance and the trimmer can be stored
in the pouch or cassette supplied.Whether
you have a pouch or a cassette depends on
your type of shaver.
Disposal of batteries
The built-in rechargeable batteries contain
substances that may pollute the environment.
Remove the batteries when you discard the
shaver. Do not throw the batteries away with the
normal household waste, but hand them in at an
official collection point.You can also take the
appliance to a Philips service centre, which will
remove them for you and will dispose of them in
an environmentally safe way.
Only remove the batteries if they are completely
empty.
C
1 Let the shaver run until it stops, undo the
screws and open the shaver.
ENGLISH 11
1
1

2 Remove the batteries.
Do not put the shaver back into the charging
stand after the batteries have been removed.
Tip
◗ The shaver comes with two different kinds of
shaving emulsion: an emulsion for sensitive
skin and a fresh gel.This gives you the
opportunity to try them out and discover
which one suits your skin type best.
Troubleshooting
1 The shaving heads do not move smoothly
over the skin.
B
Cause: not enough shaving emulsion has been
applied.
◗ Press the pump button a few times until a
sufficient amount of NIVEA FOR MEN shaving
emulsion has been released to allow the
shaving heads to move smoothly over your
face again.
2 Reduced shaving performance:
B
Cause 1: the shaving heads are dirty.The shaver
has not been cleaned immediately after use
and/or has not been rinsed long enough and/or
the water used to rinse the shaver was not hot
enough.
ENGLISH12
◗ Clean the shaver thoroughly before you
continue shaving (see 'Cleaning').
B
Cause 2: long hairs are obstructing the shaving
heads.
C
◗ Remove the retaining frame.
C
◗ Clean the cutters and guards.
Do not clean more than one cutter and guard at
a time, since they are all matching sets. If you
accidentally mix up the cutters and guards, it
could take several weeks before optimal shaving
performance is restored.
◗ Remove the hairs.
◗ Put the shaving heads back into the shaving
unit. Put the retaining frame back into the
shaving unit, press the wheel and turn it
clockwise.
B
Cause 3: the shaving heads are damaged or worn.
◗ Remove the retaining frame.
◗ Remove the old shaving heads from the
shaving unit and replace them with new ones.
Damaged or worn shaving heads (cutters and
guards) must only be replaced with the original
Philishave HQ167 Cool Skin shaving heads.
◗ Put the retaining frame back into the shaving
unit, press the wheel and turn it clockwise.
ENGLISH 13
1
1
2

3 Shaver does not work when the on/off
button is pressed:
B
Cause: the batteries are empty
◗ Recharge the batteries.
4 The cover of the cartridge compartment
cannot be closed.
B
Cause 1: the cartridge has not been inserted
correctly.
◗ Insert the cartridge correctly. It only fits
properly into the shaver if the white side of
the pump is pointing upwards.
B
Cause 2: the cartridge has not been pushed far
enough into the shaver.
◗ Press the cartridge until it is properly seated.
5 The NIVEA FOR MEN shaving emulsion
has changed colour or has turned watery.
B
Cause: the NIVEA FOR MEN shaving emulsion
has not been stored at the right temperature.
◗ Insert a new cartridge.
6 Skin irritation occurs.
B
Cause 1: your skin has not yet become
accustomed to this shaving system.
ENGLISH14

◗ Allow 2-3 weeks for your skin to get
accustomed to this shaving system.
B
Cause 2: the shaving emulsion irritates your skin.
◗ Try the other type of shaving emulsion.
◗ Wet your face before shaving with the shaving
emulsion.
If the irritation does not disappear within 24
hours, we advise you to stop using the shaving
emulsion and to contact your doctor.
7 In case of other problems:
◗ See 'Guarantee & service'
Accessories
The following accessories are available:
- HQ167 Philishave Cool Skin shaving heads.
- HQ160 NIVEA FOR MEN Cool Skin
moisturising shaving emulsion.
- HQ161 NIVEA FOR MEN Cool Skin
moisturising fresh shaving gel.
- HQ8000 powerplug.
- HQ100 Philishave Action Clean (shaving head
cleaner).
- HQ101 Philishave Action Clean refill (shaving
head cleaning liquid).
- HQ110 Philishave shaving head cleaner (shaving
head cleaning spray).
ENGLISH 15

Guarantee & service
If you need information or if you have a problem,
please visit the Philips Web site at
www.philips.com or contact the Philips Customer
Care Centre in your country (you will find its
phone number in the worldwide guarantee
leaflet). If there is no Customer Care Centre in
your country, turn to your local Philips dealer or
contact the Service Department of Philips
Domestic Appliances and Personal Care BV.
◗ Keep these instructions for future reference.
ENGLISH16
Wichtig
Lesen Sie diese Bedienungsanleitung vor der
ersten Benutzung des Geräts gründlich durch.
Bewahren Sie die Bedienungsanleitung zur
späteren Einsichtnahme auf.
◗ Verwenden Sie zum Laden des Rasierers nur
das mitgelieferte Netzteil HQ8000 sowie die
mitgelieferte Ladestation.
◗ Das Netzteil ist für Netzspannungen zwischen
100 und 240 Volt geeignet.
◗ Das Netzteil enthält einen Transformator.
Ersetzen Sie das Netzteil keinesfalls durch
einen anderen Stecker, da dies den Benutzer
gefährdet.
◗ Das Netzteil wandelt Netzspannungen von
100 bis 240 Volt in eine Betriebsspannung von
12 Volt um.
C
◗ Achten Sie darauf, dass das Netzteil und die
Ladestation nicht nass werden.
C
◗ Der Rasierer arbeitet mit einer ungefährlichen
Niedrigspannung von 12 Volt. Er ist
wasserdicht und kann unter fließendem
Wasser gereinigt werden. Spülen Sie den
Rasierer nicht mit Wasser ab, das heißer als
80c C ist.
◗ Pumpen Sie regelmäßig Rasieremulsion nach,
um optimale Resultate erzielen.
◗ Wenn das Netzkabel des Geräts beschädigt
ist, muss es von Philips oder einem Philips
Service Center ausgetauscht werden, um
Gefährdungen des Benutzers zu vermeiden.
DEUTSCH 17
Ladeanzeige
C
◗ Sobald Sie mit dem Aufladen der Akkus
beginnen, leuchtet die grüne Kontrolllampe.
◗ Sobald die Akkus vollständig geladen sind,
blinkt die grüne Kontrolllampe.
◗ Die rote Kontrolllampe blinkt, wenn die Akkus
fast leer sind.
◗ Sind die Akkus fast leer, blinkt die rote
Kontrolllampe noch einige Male, nachdem der
Rasierer ausgeschaltet wurde.
Aufladen
Laden, benutzen und lagern Sie das Gerät bei
Temperaturen zwischen5cC und 35cC.
1 Führen Sie den kleinen Stecker in die
Ladestation ein und stecken Sie das
Netzteil in die Steckdose.
C
2 Setzen Sie den Rasierer in die Ladestation.
C
3 Der Rasierer muss hörbar einrasten.
Der Rasierer schaltet sich automatisch aus, wenn
Sie ihn in die Ladestation stellen.
4 Beim erstmaligen Laden, und wenn der
Rasierer für einen längeren Zeitraum nicht
benutzt wurde, beträgt die Ladedauer 4
Stunden.
DEUTSCH18
Normalerweise ist der Akku nach ungefähr 1
Stunde aufgeladen.
Mit voll aufgeladenen Akkus können Sie sich ca.
55 Minuten kabelfrei rasieren.
Patronen einsetzen
NIVEA FOR MEN Rasieremulsion ist in
Packungen von 5 Kartuschen mit einer kleinen
Kunststoffpumpe erhältlich. Bewahren Sie die
Pumpe auf: Sie brauchen sie für jede der fünf
Kartuschen!
Verwenden Sie ausschließlich Philishave NIVEA
FOR MEN Cool Skin-Kartuschen (Typ HQ160
oder HQ161).
Verwenden Sie aus hygienischen Gründen die
neue Pumpe, wenn Sie eine neue Packung mit 5
Patronen anbrechen.
Die erste Patrone einsetzen
C
1 Nehmen Sie eine Kartusche aus der
Schachtel. Nehmen Sie die beiliegende
Kunststoffpumpe aus der Hülle und setzen
Sie sie bis zum Anschlag fest auf die
Kartusche, bis sie hörbar einrastet.
DEUTSCH 19

C
2 Drücken Sie den Freigaberiegel nach unten
und öffnen Sie den Deckel der
Patronenkammer.
C
3 Setzen Sie die Kartusche mit der Pumpe in
den Rasierer. Sie lässt sich nur einsetzen,
wenn die weiße Seite der Pumpe nach
oben zeigt. Schließen Sie den Deckel.
4 Drücken Sie einige Male die gelbe Taste, bis
etwas Rasieremulsion NIVEA FOR MEN
austritt. Das Gerät ist jetzt fertig für die
Rasur.
Werfen Sie die Pumpe nicht fort, wenn Sie eine
neue Kartusche einsetzen. Sie brauchen sie noch
für die anderen Kartuschen aus derselben
Packung.
Bewahren Sie die Kartuschen mit NIVEA FOR
MEN Rasieremulsion bei Temperaturen zwischen
0c C und +40c C auf.
Rasieren
1 Schalten Sie das Gerät ein, indem Sie den
Ein-/Ausschalter drücken.
C
2 Drücken Sie die gelbe Taste, um NIVEA
FOR MEN Rasieremulsion auf die Haut
aufzutragen. Bewegen Sie den Rasierer mit
DEUTSCH20
1
2

geraden und kreisförmigen Bewegungen
über die Haut.
3 Drücken Sie während des Rasierens
regelmäßig die gelbe Taste, um NIVEA FOR
MEN Rasieremulsion aufzutragen. Der
Rasierer gleitet dann mühelos über die
Haut.
Drücken Sie den Rasierer nicht zu stark auf die
Haut.
Sie können Ihre Haut vor dem Rasieren nach
Belieben anfeuchten.
◗ Sie können den Rasierer auch ohne die
Rasieremulsion zur Trockenrasur verwenden.
◗ Wenn Sie sich zum ersten Mal mit einem
Philishave Rasiersystem rasieren, benötigt Ihre
Haut 2 bis 3 Wochen, um sich an das neue
Rasiersystem zu gewöhnen.
4 Schalten Sie den Rasierer aus.
C
5 Setzen Sie die Schutzkappe nach jedem
Gebrauch auf die Schereinheit, um
Beschädigungen zu vermeiden.
Nehmen Sie die Kartusche heraus und reinigen
Sie den Rasierer, wenn Sie beabsichtigen, ihn
länger als eine Woche nicht zu verwenden. Spülen
Sie den Rasierer nach jedem Gebrauch ab.
DEUTSCH 21

Der Langhaarschneider
Das Gerät ist mit einem separaten
Langhaarschneider zum Trimmen von Koteletten
und Schnurrbart ausgestattet.
1 Schalten Sie das Gerät aus.
Reinigen Sie den Rasierer, bevor Sie den
Langhaarschneider aufsetzen.
C
2 Drücken Sie die Auslösetaste, um die
Schereinheit zu öffnen. Ziehen Sie die
Schereinheit vom Gerät ab.
C
3 Kippen Sie die Schereinheit etwas nach
hinten, und bringen Sie sie auf dem Gerät
an
4 Entfernen Sie den Langhaarschneider,
indem Sie erneut die Entriegelungstaste
drücken und ihn vom Rasierer abziehen.
Reinigung
Die Schereinheit reinigen
Spülen Sie die Rasiereinheit und die
Bartfangkammer unter heißem Wasser zwischen
60c C und 80c C ab.
1 Schalten Sie das Gerät aus.
C
2 Drücken Sie den Entriegelungsknopf, und
öffnen Sie die Rasiereinheit.
DEUTSCH22
2
1

C
3 Reinigen Sie die Rasiereinheit und die
Bartfangkammer, indem Sie sie eine Weile
unter heißem Wasser ausspülen.
Trocknen Sie die Rasiereinheit niemals mit einem
Tuch ab, denn das könnte die Rasierköpfe
beschädigen.
C
4 Spülen Sie das Gerät von außen ab.
Reinigen Sie die Innenseite der Schereinheit und
die Haarauffangkammer gründlich. Schließen Sie
die Schereinheit, und schütteln Sie überschüssiges
Wasser ab.
Ladestation
1 Ziehen Sie das Netzteil der Ladestation
aus der Steckdose.
2 Reinigen Sie die Ladestation mit einem
feuchten Tuch.
Der Langhaarschneider
1 Reinigen Sie die Außenseite des
Langhaarschneiders nach jedem Gebrauch
mit der beiligenden Bürste.
C
2 Öffnen Sie den Langhaarschneider, um ihn
von innen zu reinigen.
DEUTSCH 23

C
3 Ölen Sie die Zähne des
Langhaarschneiders alle sechs Monate mit
einem Tropfen Nähmaschinenöl.
Die Scherköpfe auswechseln
Ersetzen Sie die Scherköpfe alle zwei Jahre durch
neue, um weiterhin optimale Rasierergebnisse zu
erzielen.
1 Schalten Sie das Gerät aus.
C
2 Drücken Sie den Entriegelungsknopf, und
öffnen Sie die Rasiereinheit.
C
3 Drehen Sie das Rädchen gegen den
Uhrzeigersinn und nehmen Sie den
Scherkopfhalter heraus.
C
4 Nehmen Sie die Scherköpfe heraus, und
setzen Sie die neuen Scherköpfe in den
Scherkopfrahmen.
C
5 Bringen Sie den Scherkopfhalter in Position
und drehen Sie das Rädchen im
Uhrzeigersinn.
Ersetzen Sie abgenutzte oder beschädigte
Scherköpfe nur durch Philishave Cool Skin
Scherköpfe des Typs HQ167.
DEUTSCH24
OIL
1
1
2
1
1

Aufbewahrung
C
◗ Nach der Reinigung kann der Rasierer wieder
in die Ladestation gestellt werden.
◗ Das Gerät und der Langhaarschneider können
in der mitgelieferten Tasche bzw. im
mitgelieferten Etui (abhängig vom Modell)
aufbewahrt werden.
Umweltschutz
Die integrierten Akkus enthalten Substanzen, die
die Umwelt gefährden können.
Nehmen Sie die Akkus heraus, bevor Sie das
Gerät entsorgen. Batterien und Akkus gehören
nicht in den Hausmüll. Sie sind als Verbraucher
gesetzlich dazu verpflichtet, gebrauchte Batterien
und Akkus der Wiederverwertung zuzuführen.
Geben Sie sie bei den öffentlichen Sammelstellen
Ihrer Gemeinde oder bei einer Verkaufstelle für
entsprechende Geräte bzw. für Batterien und
Akkus ab. Sie können das Gerät auch dem Philips
Service Center zuführen. Wir kümmern uns dann
gern um eine ordnungsgemäße Entsorgung.
Nehmen Sie die Akkus erst aus dem Gerät
nachdem sie vollständig entleert wurden.
C
1 Lassen Sie den Rasierer laufen, bis der
Motor stoppt. Lösen Sie dann die
Schrauben und öffnen Sie den Rasierer.
2 Entnehmen Sie die Akkus.
DEUTSCH 25

Setzen Sie den Rasierer nicht mehr in das
Ladegerät, nachdem die Akkus entnommen sind.
Hinweis
◗ Der Rasierer wird mit zwei unterschiedlichen
Rasieremulsionen geliefert. Eine Emulsion ist
für empfindliche Haut geeignet, bei der
anderen handelt es sich um ein Frischegel. Sie
können beide testen und die für Ihren
Hauttyp besser geeignete Emulsion ermitteln.
Problemlösungen
1 Die Scherköpfe gleiten nicht sanft über die
Haut.
B
Ursache: Es wurde nicht genügend Rasieremulsion
aufgetragen.
◗ Drücken Sie einige Male die Taste der Pumpe,
bis genügend NIVEA FOR MEN
Rasieremulsion ausgetreten ist, damit die
Scherköpfe sanft über die Haut gleiten
können.
2 Geringer Rasiererfolg
B
Grund 1: Die Scherköpfe sind verschmutzt. Der
Rasierer wurde nicht sofort nach dem Rasieren
gereinigt und/oder nicht lange genug ausgespült
und/oder das zum Spülen verwendete Wasser war
nicht heiß genug.
DEUTSCH26

◗ Reinigen Sie den Rasierapparat gründlich,
bevor Sie die Rasur fortsetzen. - Vgl. den
Abschnitt "Reinigung".
B
Ursache 2: Lange Haare behindern die Rotation
der Scherköpfe.
C
◗ Nehmen Sie den Scherkopfhalter heraus.
C
◗ Reinigen Sie die Schermesser und die
Scherkörbe.
Reinigen Sie jeweils nur ein Schermesser mit dem
zugehörigen Scherkorb. Das Schermesser und der
jeweilige Scherkorb sind aufeinander
eingeschliffen.Werden sie versehentlich
vertauscht, kann es mehrere Wochen dauern, bis
die optimale Rasierleistung wieder hergestellt ist.
◗ Entfernen Sie die Haare.
◗ Setzen Sie die Scherköpfe wieder in die
Schereinheit. Bringen Sie den Scherkopfhalter
in Position und drehen Sie das Rädchen im
Uhrzeigersinn.
B
Ursache 3: Die Scherköpfe sind beschädigt oder
abgenutzt.
◗ Nehmen Sie den Scherkopfhalter heraus.
◗ Nehmen Sie die alten Scherköpfe aus der
Schereinheit heraus und ersetzen Sie sie
durch neue.
Verbrauchte oder beschädigte Scherköpfe
(Schermesser und Scherkorb) dürfen nur durch
DEUTSCH 27
1
1
2

die speziellen Philishave Cool Skin Scherköpfe
Type HQ167 ersetzt werden.
◗ Bringen Sie den Scherkopfhalter in Position
und drehen Sie das Rädchen im Uhrzeigersinn.
3 Der Rasierer reagiert nicht auf die
Betätigung des Ein-/Ausschalters
B
Ursache: Die Akkus sind leer.
◗ Laden Sie die Akkus.
4 Die Abdeckung der Kartuschenkammer
lässt sich nicht schließen.
B
Ursache 1: Die Kartusche ist nicht ordnungsgemäß
eingelegt worden.
◗ Legen Sie die Patrone richtig ein. Die weiße
Seite der Pumpe muss nach oben zeigen.
B
Ursache 2: Die Kartusche wurde nicht weit genug
eingeschoben.
◗ Drücken Sie die Kartusche hinein, bis sie fest
sitzt.
5 Die Rasieremulsion NIVEA FOR MEN hat
sich verfärbt oder ist wässrig geworden.
B
Ursache: Die Rasieremulsion ist nicht bei der
empfohlenen Temperatur aufbewahrt worden.
DEUTSCH28

◗ Setzen Sie eine neue Kartusche ein.
6 Es treten Hautreizungen auf.
B
Ursache 1: Ihre Haut hat sich noch nicht an das
Philishave Rasiersystem gewöhnt.
◗ Geben Sie Ihrer Haut 2 bis 3 Wochen Zeit,
um sich an das neue Rasiersystem zu
gewöhnen.
B
Ursache 2: Die Rasieremulsion reizt Ihre Haut.
◗ Verwenden Sie die andere Rasieremulsion.
◗ Feuchten Sie Ihre Haut vor der Rasur mit der
Rasieremulsion an.
Verschwindet die Reizung nicht innerhalb von 24
Stunden, verwenden Sie die Rasieremulsion nicht
mehr und setzen Sie sich mit Ihrem Arzt in
Verbindung.
7 Andere Probleme treten auf:
◗ Vgl. den Abschnitt "Garantie & Service".
Zubehör
Die folgenden Ersatz- und Zubehörteile sind
erhältlich:
- HQ167 Philishave Cool Skin Scherköpfe
- HQ160 NIVEA FOR MEN Cool Skin Feuchtigkeit spendende Rasieremulsion
DEUTSCH 29

- HQ161 NIVEA FOR MEN Cool Skin Feuchtigkeit spendendes Frischegel
- HQ8000 Netzteil
- HQ100 Philishave Action Clean
(Scherkopfreiniger)
- HQ101 Philishave Action Clean
Nachfüllpackung (ScherkopfReinigungsflüssigkeit)
- HQ110 Philishave Shaving Head Cleaner
(Reinigungsspray für Scherköpfe)
Garantie und Kundendienst
Wenden Sie sich mit Ihren Fragen,Wünschen und
Problemen bitte an das Philips Service Center in
Ihrem Lande. Sollte sich in Ihrem Lande kein
solches Center befinden, so wenden Sie sich bitte
an das Service Department von Philips Domestic
Appliances and Personal Care BV. Entnehmen Sie
die Telefonnummern bitte der beiliegenden
Garantieschrift. Besuchen Sie auch unsere
Homepage: www.philips.com.
◗ Bewahren Sie diese Gebrauchsanweisung zur
späteren Einsicht auf.
DEUTSCH30

Důležité
Následující návod pečlivě přečtěte a uschovejte jej
pro případná pozdější nahlédnutí.
◗ Vždy používejte napáječ HQ8000 a nabíjecí
podstavec, dodávaný s přístrojem.
◗ Přístroj je vhodný pro použití při síťovém
napětí 100 až 240 V.
◗ Síťová zástrčka obsahuje transformátor. Proto
ji nikdy nesmíte vyměnit za jinou zástrčku což
by mohlo způsobit vážnou poruchu.
◗ Nabíjecí zástrčka transformuje napětí sítě
(100 až 240 V) na napětí 12 V.
C
◗ Dbejte na to, aby nabíjecí zástrčka HQ8000 a
nabíjecí podstavec nenavlhly.
C
◗ Přístroj je napájen bezpečným napětím 12 V. Je
vodotěsný a lze ho mýt pod tekoucí vodou.
Nepoužívejte však teplejší vodu než 80cC.
◗ Pro nejlepší výsledky je vhodné čerpat holicí
emulzi na pleť častěji.
◗ Pokud by se jakkoli poškodil síťový přívod,
svěřte jeho výměnu pouze servisu firmy
Philips nebo jí autorizované opravně, aby tato
výměna byla realizována bezpečně.
◗ Hladina hluku:
- Přístroj + holicí jednotka: Lc = 61-65 dB(A)
- Přístroj + zastřihovačem: Lc = 60-64 dB(A)
ČESKY 31

Indikace nabití
C
◗ Jakmile začnete nabíjet vybité akumulátory,
rozsvítí se zelená kontrolka.
◗ Když jsou akumulátory plně nabity, zelená
kontrolka začne blikat.
◗ Pokud jsou akumulátory na hranici vybití,
upozorní na to blikající červená kontrolka.
◗ Pokud jsou akumulátory na hranici vybití,
červená kontrolka bude blikat ještě chvíli po
vypnutí přístroje.
Nabíjení
Nabíjejte a uchovávejte přístroj při teplotě okolí
mezi 5cC a 35cC.
1 Malou zástrčku zasuňte do zásuvky v
nabíjecím podstavci.
C
2 Přístroj vložte do nabíjecího podstavce.
C
3 Zasuňte ho až uslyšíte zaklapnutí.
Přístroj se po zasunutí do nabíjecího podstavce
automaticky vypne.
4 Pokud nabíjíte akumulátor přístroje
poprvé nebo po dlouhé přestávce,
doporučujeme nabíjet akumulátor asi 4
hodiny.
Akumulátory v běžném provozu nabíjejte asi 1
hodinu.
Přístroj s plně nabitým akumulátorem vydrží v
provozu asi 55 minut.
ČESKY32

Vkládací zásobníky
Zvlhčovací holicí emulzi NIVEA FOR MEN lze
dostat v balení po pěti zásobnících spolu s jedním
malým plastovým čerpadlem. Čerpadlo po prvním
použití nezahazujte, budete ho potřebovat pro
všech pět zásobníků.
Vždy používejte pouze zásobníky NIVEA FOR
MEN Cool Skin (HQ160 a HQ161).
Z hygienických důvodů doporučujeme použít
vždy po vypotřebování pěti zásobníků nové
čerpadlo.
Vložení prvního zásobníku
C
1 Z balení vyjměte jeden zásobník.Vyjměte
též příslušné čerpadlo a nasaďte ho na
zásobník. Přitlačte ho až slyšitelně
zaklapne.
C
2 Posunutím uzávěru směrem dolů otevřte
víčko prostoru pro zásobníky.
C
3 Zásobník s čerpadlem zasuňte do holicího
přístroje. Zásobník je správně zasunut jen
v tom případě, že bílá strana čerpadla
směřuje nahoru.Víčko uzavřete.
ČESKY 33
1
2

4 Několikrát stiskněte žluté tlačítko
čerpadla, až se objeví holicí emulze NIVEA
FOR MEN. Holicí přístroj je nyní připraven
k použití.
Čerpadlo po vypotřebování zásobníku
nezahazujte, budete ho potřebovat pro všech pět
zásobníků.
Holicí emulze NIVEA FOR MEN v tomto
zásobníku má být uchovávána při teplotě 0cC až
+40cC.
Holení
1 Zapojte přístroj stisknutím tlačítka on/off.
C
2 Stisknutím žĺutého tlačítka čerpadla budete
aplikovat emulzi NIVEA FOR MEN na
pokožku tváře. Pohybujte holicím
přístrojem po pokožce přímočarými i
krouživými pohyby.
3 Během holení stiskněte několikrát žluté
tlačítko čerpadla abyste přidali podle
potřeby více emulze a aby holicí hlavice
hladce klouzaly po vaší pokožce.
Při holení na přístroj nadměrně netlačte.
Pokud byste si přáli, můžete pleť před holením
mírně navlhčit.
◗ Jestliže byste holicí emulzi vyčerpali, můžete
se bez problémů holit i nasucho.
ČESKY34

◗ Pamatujte, že pokožka potřebuje 2 až 3 týdny
na to, aby si novému způsobu holení přivykla.
4 Přístroj vypněte.
C
5 Vždy po použití nasaďte na holicí přístroj
ochranný kryt, abyste předešli poškození
holicích hlav.
Pokud holicí přístroj nebudete používat déle než
jeden týden, vyjměte zásobník a přístroj vyčistěte
Po každém holení však přístroj opláchněte vodou.
Zastřihovač
Přístroj je vybaven samostatným zastřihovačem
pro úpravu licousů nebo kníru.
1 Přístroj vypněte.
Před nasazením zastřihovače přístroj vyčistěte.
C
2 Stisknutím uvolňovacího tlačítka otevřte
holicí jednotku a vysuňte ji z přístroje.
C
3 Nakloňte zastřihovač mírně dozadu a
upevněte ho na holicí přístroj.
4 Zastřihovač sejmete tak, že znovu
stisknete uvolňovací tlačítko a zastřihovač
stáhnete z přístroje.
ČESKY 35
2
1

Čištění
Holicí jednotka
Po každém použití opláchněte holicí jednotku a
komoru, do níž jsou zachycovány odstřižené
vousy, horkou vodou (60cC až 80cC).
1 Přístroj vypněte.
C
2 Stiskněte uvolňovací tlačítko a otevřte
holicí jednotku.
C
3 Umyjte občas holicí jednotku a prostor
pro odstřižené vousy tekoucí horkou
vodou.
Holicí jednotku nikdy nesušte ručníkem nebo
jinou tkaninou, vyvarujete se tak poškození
holicích hlav.
C
4 Opláchněte též vnější část přístroje.
Přesvědčte se, že jste holicí jednotku a prostor
pro odstřižené vousy umyli pečlivě. Uzavřete holicí
jednotku a vytřepte zbylou vodu.
Nabíjecí podstavec
1 Odpojte nabíjecí podstavec.
2 Nabíjecí podstavec otřete navlhčeným
hadříkem.
ČESKY36

Zastřihovač
1 Vnější část zastřihovače vyčistěte po
každém použití přiloženým kartáčkem.
C
2 Otevřte zastřihovač a vyčistěte ho též
uvnitř.
C
3 Na lišty zastřihovače kápněte každých šest
měsíců kapku oleje na šicí stroje.
Výměna holicích hlav
Pro optimální výsledky holení vyměňte holicí hlavy
každé dva roky.
1 Přístroj vypněte.
C
2 Stiskněte uvolňovací tlačítko a otevřte
holicí jednotku.
C
3 Otočte kolečkem proti směru pohybu
hodinových ruček a odejměte zajišťovací
rámeček.
C
4 Vyjměte holicí hlavy a vložte na jejich
místo nové hlavy.
ČESKY 37
OIL
1
1
2

C
5 Zajišťovací rámeček vložte zpět do
přístroje, stiskněte kolečko a otočte jím ve
směru pohybu hodinových ruček.
Opotřebené nebo poškozené holicí hlavy
nahražujte vždy jen hlavami Philishave HQ167
Cool Skin.
Uchovávání
C
◗ Po vyčištění můžete holicí přístroj vložit zpět
do nabíjecího podstavce i když je dosud vlhký.
◗ Přístroj a zastřihovač můžete uchovávat též ve
váčku nebo v kazetě, dodané s přístrojem.
Podle typu přístroje je dodáván buď váček
nebo kazeta.
Likvidace akumulátorů
Vestavěný akumulátory obsahuje substance, které
po jeho rozpadu, mohou škodit životnímu
prostředí.
Pokud jednoho dne přístroj likvidujete, vyjměte z
něj akumulátory.Akumulátory nezahazujte do
běžného domovního odpadu, ale odevzdejte je
do sběrny, k tomu určené. Akumulátory můžete
též odevzdat v servisním středisku firmy Philips,
kde se již postarají o jejich optimální likvidaci.
Akumulátory vyjměte až když jsou zcela vybité.
C
1 Motorek ponechte v chodu dokud se sám
nezastaví, pak povolte příslušné šroubky a
přístroj otevřte.
ČESKY38
1
1

2 Vyjměte akumulátory.
Holicí přístroj nesmíte vložit do nabíjecího
podstavce pokud z něho byly vyjmuty
akumulátory.
Upozornění
◗ Pro holicí přístroj přicházejí v úvahu dva
druhy holicí emulze: emulze pro citlivou pleť a
osvěžující želé.To vám poskytuje možnost
vyzkoušet, který druh se bude pro vaši pleť
lépe hodit.
Odstranění případných poruch
1 Holicí hlavy se nepohybují po pokožce
tváří dostatečně hladce.
B
Příčina: Aplikovali jste malé množství emulze.
◗ Stiskněte tlačítko čerpadla vícekrát až se na
pleť dostane větší množství emulze NIVEA
FOR MEN a holicí přístroj bude lépe klouzat.
2 Zhoršené výsledky holení:
B
Příčina 1: holicí hlavy jsou znečištěné. Holicí přístroj
nebyl vyčištěn ihned po ukončeném holení a/nebo
nebyl dostatečně opláchnut a/nebo voda, kterou
byl oplachován nebyla dostatečně horká.
◗ Před dalším holením přístroj důkladně
vyčistěte (viz odstavec "Čištění přístroje").
ČESKY 39

B
Příčina 2: holicí hlavy jsou blokovány dlouhými
vousy.
C
◗ Sejměte zajišťovací rámeček.
C
◗ Vyčistěte korunky a nožové věnce.
Vyčistěte vždy jen jednu korunku a její nožový
věnec. Pokud byste do korunky vložili věnec, který
v ní původně nebyl, trvalo by týdny, než by se jiný
věnec v korunce zaběhnul a holení by v té době
mohlo být neuspokojivé.
◗ Odstraňte vlasy.
◗ Vložte holicí hlavy zpět do holicí jednotky. Na
své místo vložte též zajišťovací rámeček,
stiskněte kolečko a otočte jím ve směru
pohybu hodinových ruček.
B
Příčina 3: holicí hlavy jsou opotřebeny nebo
poškozeny.
◗ Sejměte zajišťovací rámeček.
◗ Vyjměte staré holicí hlavy a nahraďte je
novými.
Opotřebené nebo poškozené holicí hlavy
(korunky a nožové věnce) musí být vždy
nahraženy výhradně originálními hlavami Philishave
HQ167 Cool Skin.
◗ Zajišťovací rámeček vložte zpět do přístroje,
stiskněte kolečko a otočte jím ve směru
pohybu hodinových ruček.
ČESKY40
1
1
2

3 Holicí přístroj po stisknutí tlačítka on/off
nepracuje:
B
Příčina: akumulátory jsou vybité.
◗ Nabijte akumulátory.
4 Víčko prostoru pro zásobník nelze uzavřít.
B
Příčina 1: zásobník nebyl vložen správně.
◗ Vložte zásobník správně. Bílá strana zásobníku
musí vždy směřovat nahoru.
B
Příčina 2: zásobník nebyl při vkládání do holicího
přístroje dostatečně přitlačen.
◗ Přitlačte zásobník až řádně dosedne.
5 Emulze NIVEA FOR MEN změnila svou
barvu nebo zvodnatěla.
B
Příčina: Emulze NIVEA FOR MEN nebyla
uchovávána při správné teplotě.
◗ Vložte nový zásobník.
6 Objevuje se podráždění pokožky.
B
Příčina 1: vaše pleť si na nový způsob holení
dosud nepřivykla.
◗ Ponechte pleti 2 až 3 týdny a to, aby se
novému způsobu holení přizpůsobila.
ČESKY 41

B
Příčina 2: holicí emulze dráždí vaši pleť.
◗ Vyzkoušejte jiný druh holicí emulze.
◗ Navlhčete vaši pleť před holením s holicí
emulzí.
Pokud podráždění nezmizí během 24 hodin,
doporučujeme vám přestat emulze používat a
konzultovat případ s vaším lékařem.
7 V případě jiných problémů:
◗ Viz "Záruka a servis"
Příslušenství
Lze zakoupit následující příslušenství:
- HQ167 holicí hlavy Philishave Cool Skin
- HQ160 NIVEA FOR MEN Cool Skin zvlhčující
holicí emulze.
- HQ161 NIVEA FOR MEN Cool Skin zvlhčující
a osvěžující želé.
- HQ8000 síťová zástrčka.
- HQ100 čistič holicích hlav Philishave Action
Clean.
- HQ101 čisticí kapalina pro holicí hlavy
Philishave Action Clean Refill.
- HQ110 čisticí sprej pro holicí hlavy Philishave
Head Cleaner.
Záruka a servis
Pokud byste potřebovali jakoukoli informaci nebo
ČESKY42

měli jiný problém, zkuste nalézt potřebné
informace na internetové stránce
www.philips.com nebo kontaktujte Informační
středisko firmy Philips, případně se poraďte se
svým dodavatelem.
◗ Tento návod uschovejte pro případná další
nahlédnutí.
ČESKY 43

Tudnivalók
A készūlék használatba vétele előtt olvassa el a
használati útmutatót. Õrizze meg az útmutatót
későbbi használatra.
◗ A töltéshez csak a borotvához mellékelt
HQ8000 tápegységet és töltőállványt
használja.
◗ A tápegység 100240 V-os hálózati feszūltségen
használható.
◗ A tápegység egy transzformátort tartalmaz.
Ne cserélje a tápegységet a kábel végén más
csatlakozódugóra, mert ez veszélyes lehet.
◗ A tápegység 12 V-os feszūltségre alakítja a
100240 V-os feszūltséget.
C
◗ Ügyeljen rá, hogy se a HQ8000 tápegység, se a
töltőállvány ne legyen nedves.
C
◗ A borotva 12 V-os kisfeszūltségen működik.
Vízhatlan és vízcsap alatt tisztítható. Ne
öblítse a készūléket 80cC-nál melegebb vízzel.
◗ A legjobb borotválkozási eredmény
eléréséhez gyakran kell borotválkozó emulziót
kipumpálnia.
◗ Ha megsérūl a készūlék hálózati
csatlakozókábele, azt kizárólag a Philips vagy
annak hivatalos szakszervize cserélheti ki,
nehogy veszélyes helyzet alakulhasson ki.
◗ Zajszint:
- Borotva + borotvafej: Lc = 61-65 dB(A)
- Borotva + pajeszvágó: Lc = 60-64 dB(A)
MAGYAR44

Töltéskijelzések
C
◗ Amint tölteni kezdi a lemerūlt borotvát,
kigyullad a zöld színű jelzőlámpa.
◗ Miután az akkumulátor teljesen feltöltődött, a
lámpa zölden villog.
◗ A lemerūlőben lévő akkumulátort pirosan
villogó lámpa jelzi.
◗ Lemerūlőben lévő akkumulátor esetén a
borotva kikapcsolása után a jelzőlámpa
néhányszor pirosan felvillan.
Töltés
A készūléket 5 és 35cC közötti hőmérsékleten
töltse, tárolja és használja.
1 Kösse a kis csatlakozót a töltőállványba, a
tápegységet pedig szúrja a hálózati aljzatba.
C
2 Helyezze a borotvát a töltőállványra.
C
3 Nyomja lefelé a készūléket, amíg egy
kattanást nem hall.
A borotva a töltőállványra helyezve
automatikusan kikapcsol.
4 Ha először tölti a borotvát, vagy hosszú
ideig nem használta: a borotvát 4 órán
keresztūl folyamatosan töltse.
A normál töltés kb. 1 órát vesz igénybe.
A teljesen feltöltött borotvával vezeték nélkūl kb.
55 percet lehet borotválkozni.
MAGYAR 45

Patronok betöltése
A NIVEA FOR MEN hidratáló borotvakrém öt
krémmel töltött patront és egy kis műanyag
szivattyút tartalmazó kiszerelésben kapható.A
szivattyúra mind az öt patronhoz szūksége lesz,
ezért ne dobja el!
Csak Philishave NIVEA FOR MEN Cool Skin
(HQ160 és HQ161) patronokat használjon.
Higiéniai okokból javasoljuk, hogy tegyen be új
szivattyút, valahányszor elkezd egy patront
használni egy öt darabos készletből.
Az első patron behelyezése
C
1 Vegyen elő egy patront a dobozból.Vegye
ki a szivattyút a zacskójából (ugyanebben a
dobozban találja), és a patronba nyomva
kattintsa a helyére.
C
2 Mozgassa nyitócsúszkát lefelé és nyissa ki a
patrontartó fedelét.
C
3 Tolja a szivattyúval felszerelt patront a
borotvába.A patron csak akkor illeszkedik
megfelelően, ha a szivattyú fehér oldala
felfelé néz. Hajtsa le a fedelet.
MAGYAR46
1
2

4 Nyomja meg néhányszor a sárga
szivattyúgombot, hogy kijöjjön egy kevés
NIVEA FOR MEN borotvakrém.A borotva
ezzel készen áll a használatra.
A kiūrūlt patron cseréjekor a szivattyút ne dobja
el, mivel a többi patronhoz is szūksége lesz rá.
A NIVEA FOR MEN borotvakrémmel töltött
patronokat 0 és +40cC közötti hőmérsékleten
tárolja.
Borotválkozás
1 Kapcsolja be a borotvát a be/kikapcsoló
gomb egyszer történő megnyomásával.
C
2 A sárga szivattyúgombot megnyomva
vigyen a bőrére NIVEA FOR MEN
borotvakrémet.A borotvát egyenes és
körkörös mozdulatokat végezve mozgassa
bőrén.
3 A borotva akkor csúszik simán az arcán, ha
gyakran nyomja meg a szivattyúgombot,
tehát ha elegendő NIVEA FOR MEN
borotvakrémet használ.
Borotválkozás közben ne nyomja a borotvát túl
erősen a bőrére.
Ha előnyösnek találja, előbb nedvesítse be bőrét.
◗ Ha elfogy a borotvakrém, a készūlék a nélkūl
is használható, száraz arcon.
MAGYAR 47

◗ Bőrének 2-3 hétre van szūksége ahhoz, hogy a
Philishave rendszerhez hozzászokjon.
4 Kapcsolja ki a készūléket.
C
5 Használat után mindig tegye fel a
készūlékre a védősapkát, hogy megvédje a
sérūléstől.
Ha több mint egy hétig nem fogja használni a
készūléket, akkor vegye ki a patront, és tisztítsa ki a
borotvát. Borotválkozás után mindig öblítse le a
készūléket.
Pajeszvágó
A borotvának kūlön vágóéle (trimmere) van
pajesz és bajusz igazításához.
1 Kapcsolja ki a készūléket.
A pajeszvágó felerősítése előtt tisztítsa ki a
készūléket.
C
2 Nyissa ki a borotvaegységet a kioldógomb
megnyomásával, és húzza ki a
borotvaegységet a készūlékből.
C
3 Billentse a trimmert kissé hátra és illessze
be a borotvába.
4 Távolítsa el a trimmert a kioldógomg újbóli
megnyomásával, majd húzza ki a trimmert
a borotvából.
MAGYAR48
2
1

Tisztítás
Borotvafej
Öblítse le a borotvát és a hajkamrát (60cC 80cC) meleg vízzel minden használat után.
1 Kapcsolja ki a készūléket.
C
2 Nyomja meg a kioldó gombot a
borotvaegység nyitásához.
C
3 A borotva készūléket és a szőrkamrát úgy
tisztítsa, hogy melegvizes csap alatt öblítse
le néhányszor.
Soha ne szárítsa meg a borotvaegységet
törūlközővel vagy papírzsebkendővel, mivel ezek
megsérthetik a borotvafejeket.
C
4 Öblítse le a borotva kūlső részét.
Győződjön meg róla, hogy teljesen kitisztította a
borotvaegység belsejét és a szőrgyűjtő kamrát
Zárja le a borotvaegységet, és rázza ki a felesleges
vizet.
Töltőegység
1 Húzza ki a töltőegység dugóját a
konnektorból.
2 Tisztítsa le a töltőegységet nedves ruhával.
MAGYAR 49

Pajeszvágó
1 A mellékelt kefével tisztítsa le minden
használat után a pajeszvágó kūlsejét.
C
2 Nyissa ki a pajeszvágót a belső részek
tisztításához.
C
3 Hat havonta olajozza meg a pajeszvágó
fogait egy csepp varrógépolajjal.
A borotvafejek cseréje
Az optimális borotválás érdekében kétévente
cserélje ki a borotvafejeket.
1 Kapcsolja ki a készūléket.
C
2 Nyomja meg a kioldó gombot a
borotvaegység nyitásához.
C
3 Forgassa a tengelyt az óramutató járásával
ellenkező irányba és vegye ki a
tartókeretet.
C
4 Távolítsa el a borotvafejeket és tegye be az
újakat a borotva egységbe.
MAGYAR50
OIL
1
1
2

C
5 Tegye vissza a tartókeretet a
borotvaegységbe, nyomja meg a tengelyt,
és fordítsa el az óramutató járásával
megegyező irányban.
A hibás vagy kopott borotvafejeket csak Philishave
HQ167 Cool Skin borotvafejekkel cserélje.
Tárolás
C
◗ Tisztítás után a nedves borotvát ráhelyezheti a
töltőállványra.
◗ A készūlék és a pajeszvágó a mellékelt
utazótokban vagy tartódobozban tárolható.A
készūlék típusától fūgg, hogy utazótok vagy
tartódoboz tartozik-e hozzá.
Az akkumulátor kiselejtezése
A beépített újratölthető akkumulátor olyan
anyagokat tartalmaz, melyek szennyezhetik a
környezetet.
Ha kiselejtezi a készūléket, vegye ki belőle az
akkumulátort. Ezt ne dobja a normál háztartási
hulladékba, hanem juttassa el egy hivatalos
gyűjtőhelyre. Egy Philips szakszervizbe is elviheti a
készūléket, ahol eltávolítják belőle az
akkumulátort, és gondoskodnak annak
környezetbarát kiselejtezéséről.
Csak akkor vegye ki az akkumulátort, ha az
teljesen lemerūlt.
MAGYAR 51
1
1

C
1 Hagyja leállásig működni a készūléket, majd
lazítsa meg a csavarokat, és nyissa ki a
borotvát.
2 Vegye ki az akkumulátort.
Az akkumulátor eltávolítása után már ne tegye
vissza a borotvát a töltőállványra.
Javaslat
◗ A borotvához kétféle borotvakrémet is kap:
egy érzékeny bőrre való krémet és egy
frissítőzselét. Így mindkettőt kipróbálva
megállapíthatja, melyik felel meg jobban a
bőrének.
Hibaelhárítás
1 Nem csúsznak simán a bőrén a
borotvafejek.
B
Ok: Nem használ elegendő borotvakrémet.
◗ A szivattyúgombot néhányszor megnyomva
vigyen az arcára annyi NIVEA FOR MEN
borotvakrémet, hogy a borotvafejek ismét
simán csússzanak a bőrén.
2 Csökkent borotválkozási sebességet:
B
1. ok: a borotvafej piszkos. Nem tisztította meg a
borotvát közvetlenūl használat után és/vagy nem
MAGYAR52

öblítette elég hosszú ideig és/vagy a borotva
öblítéséhez használat víz nem volt elég meleg.
◗ Mielőtt folytatná a borotválkozást, tisztítsa
meg alaposan a borotvát (lásd a Tisztításcímű
részt).
B
2. ok: A hosszú szőrszálak eltömték a
borotvafejeket.
C
◗ Vegye ki a tartókeretet.
C
◗ Tisztítsa meg a vágókéseket és a szitákat.
Egyszerre csak egy vágókést és szitát tisztítson,
mert összecsiszolták azokat. Ha véletlenūl
összekeveri a vágókéseket és szitákat, eltelhet
néhány hét, mielőtt eléri az optimális
borotválkozási eredményt.
◗ Távolítsa el a szőrszálakat.
◗ Illessze vissza a borotvaegységbe a
borotvafejeket.Tegye vissza a tartókeretet a
borotvaegységbe, nyomja meg a tengelyt, és
fordítsa el az óramutató járásával megegyező
irányban.
B
3. ok: Sérūltek vagy kopottak a borotvafejek.
◗ Vegye ki a tartókeretet.
◗ Vegye ki az elhasználódott borotvafejeket a
borotvaegységből és cserélje ki őket újakra.
A sérūlt vagy kopott borotvafejet (vágó- és
tartórész) csak eredeti Philishave HQ167 Cool
Skin borotvafejjel szabad kicserélni.
MAGYAR 53
1
1
2

◗ Tegye vissza a tartókeretet a
borotvaegységbe, nyomja meg a tengelyt, és
fordítsa el az óramutató járásával megegyező
irányban.
3 A borotva nem működik, ha a be/ki
gombot megnyomja.
B
Ok: az elemek kimerūltek.
◗ Töltse fel az akkumulátorokat.
4 Nem lehet bezárni a patrontartó fedelét.
B
1. ok: Rosszul van behelyezve a patron.
◗ Megfelelően tegye be a patront. Ez csak akkor
illeszkedik jól a borotvába, ha a szivattyú fehér
oldala felfelé mutat.
B
2. ok: A patron nincs elég mélyen betolva a
borotvába.
◗ Tolja beljebb a patront, hogy megfelelően a
helyére illeszkedjen.
5 Megváltozott a NIVEA FOR MEN
borotvakrém színe, vagy vizenyőssé vált a
krém.
B
Ok: Nem megfelelő hőmérsékleten tárolta a
NIVEA FOR MEN borotvakrémet.
◗ Helyezzen be új patront.
MAGYAR54

6 Bőre érzékennyé vált.
B
1. ok: Bőre még nem szokott hozzá ehhez a
borotvarendszerhez.
◗ 2-3 hétig tarthat, míg bőre hozzászokik a
borotvarendszerhez.
B
2. ok: A borotvakrém ingerli bőrét.
◗ Próbálja ki a másik borotválkozó emulzió
fajtát.
◗ Borotválkozás előtt nedvesítse meg bőrét a
borotválkozó emulzióval.
Ha a bőringerlő hatás 24 órán belūl sem szűnik
meg, javasoljuk, hogy hagyjon fel a borotvakrém
használatával, és forduljon orvoshoz.
7 Egyéb hiba esetén:
◗ Lásd a ĒJótállás és szervizcímű részt.
Tartozékok
A következő tartozékok vásárolhatók a
készūlékhez:
- HQ167 Philishave Cool Skin borotvafejek
- HQ160 NIVEA FOR MEN Cool Skin hidratáló
borotvakrém
- HQ161 NIVEA FOR MEN Cool Skin hidratálóhűsítő borotválkozózselé
- HQ8000 tápegység
MAGYAR 55

- HQ100 Philishave Action Clean (borotvafejtisztító)
- HQ101 Philishave Action Clean Refill
(borotvafej-tisztító folyadék)
- HQ110 Philishave Shaving Head Cleaner
(borotvafej-tisztító spray)
Garancia és javítás
Javítás, tájékozódás vagy probléma esetén
látogassa meg a www.philips.com Philips Web
lapot, vagy lépjen érintkezésbe a helyi Philips
Vevőszolgálattal (a telefonszámot megtalálja a világ
minden részére kiterjedő garancialevélen). Ha
lakóhelyén nincs Vevőszolgálat, forduljon a helyi
Philips szakūzlethez vagy lépjen érintkezésbe a
Philips Háztartási kisgépek és Szépségápolási
termékek ūzletága képviselőivel.
◗ A használati útmutatót orizze meg késobbi
használtra.
MAGYAR56

57

58
4222 002 40685
 Loading...