

Page 1

ENGLISH 4
POLSKI 14
ROMÂNĂ 24
РУССКИЙ 34
ČESKY 45
MAGYAR 55
SLOVENSKY 65
УКРАЇНСЬКІЙ 75
HRVATSKI 86
EESTI 95
LATVISKI 104
LIETUVIŠKAI 114
SLOVENŠČINA 123
БЪЛГАРСКИ 133
SRPSKI 144
HQ663,662
3
Page 2

Important
Read these instructions for use carefully before
using the appliance and save them for future
reference.
◗ Only use the HQ600 powerplug supplied to
charge and use the appliance.
◗ The powerplug transforms 220-240 volts to a
safe low voltage of less than 24 volts.Only the
powerplug supplied guarantees safe
transformation.
◗ The powerplug contains a transformer.Do
not cut off the powerplug to replace it with
another plug,as this will cause a hazardous
situation.
C
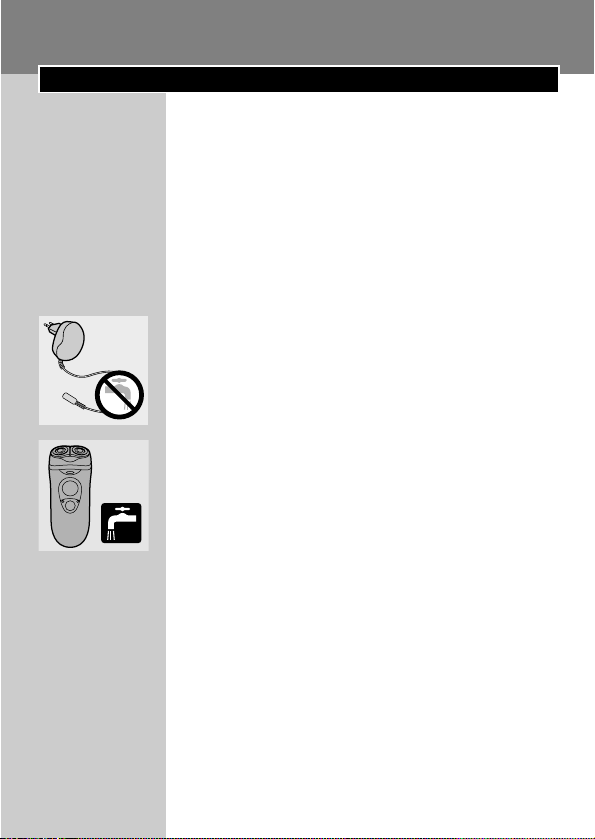
◗ Make sure the H600 powerplug and the cord
do not get wet.
C
◗ The appliance complies with the
internationally approved IEC safety regulations
and can be safely cleaned under the tap.
Be careful with hot water.Always check if the
water is not too hot,to prevent your hands from
getting burnt.
◗ Noise level:Lc= 61 dB [A]
ENGLISH4
Page 3

Charging
Charge indications
C
◗ As soon as you start charging the empty
shaver,the green pilot light goes on.
◗ When the battery has been fully charged,the
green pilot light starts blinking.
Charging the appliance
Do not recharge the shaver in a closed pouch.
Recharge, store and use the appliance at a
temperature between 5cC and 35cC.
You cannot use the shaver when it is charging,
because the appliance does not work while the
battery is being charged.
When charging for the first time or after a long
period of disuse: leave the shaver to charge
continuously for 12 hours.Charging normally
takes approx.8 hours.
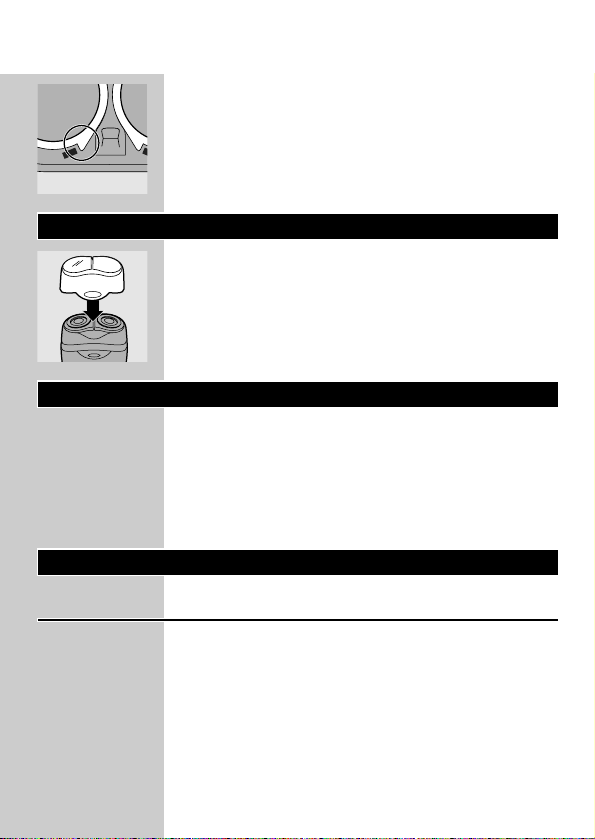
C
1 Put the appliance plug in the shaver.
2 Put the powerplug in the wall socket.
3 To extend the lifetime of the battery,
remove the powerplug from the wall
socket and pull the appliance plug out of
the shaver when the battery has been fully
charged.
ENGLISH 5
Page 4

◗ Cordless shaving time
A fully charged shaver has a cordless shaving time
of up to 30 minutes.
Using the appliance
Shaving
1 Remove the appliance plug from the shaver
before you start shaving.
2 Switch the shaver on by pressing the on/off
button once.
C
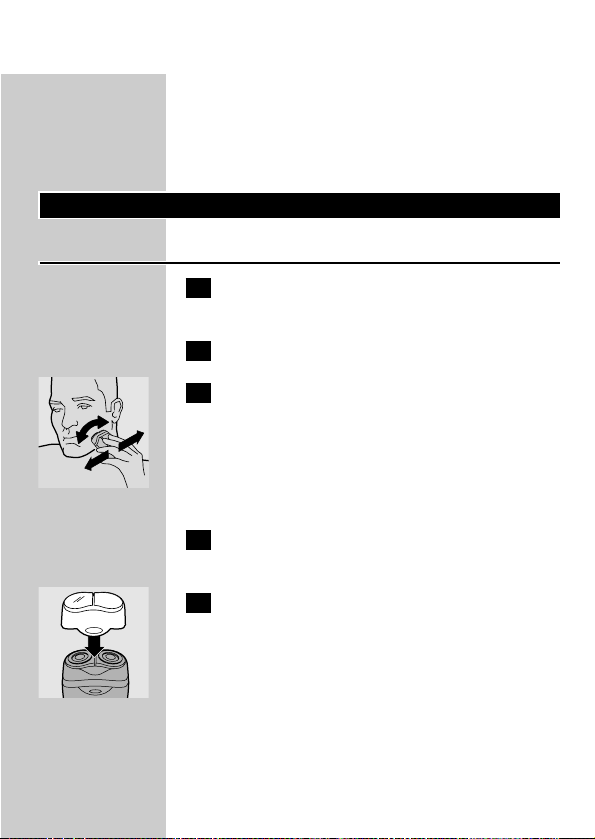
3 Move the shaving heads quickly over your
skin,making both straight and circular
movements.
Shaving on a dry face gives the best results.
Your skin may need 2 or 3 weeks to get
accustomed to the Philishave system.
4 Switch the shaver off by pressing the on/off
button once.
C
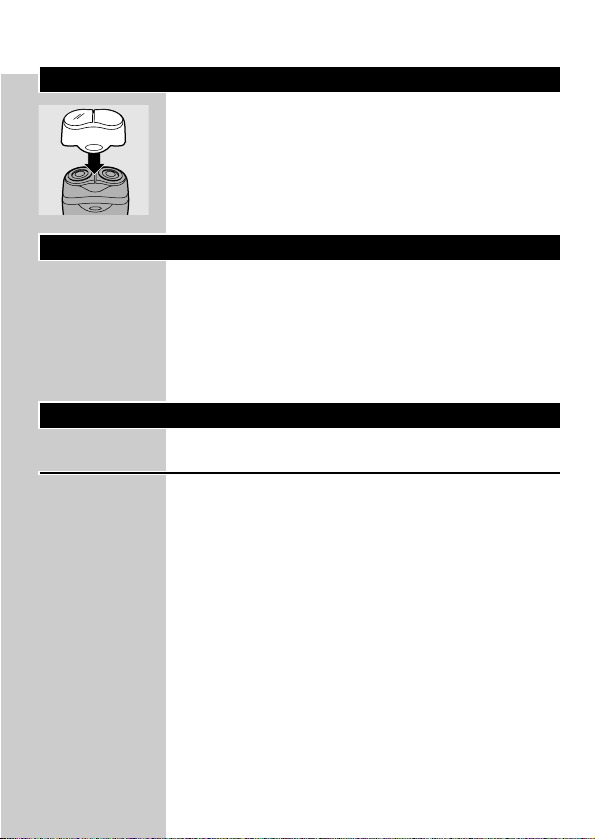
5 Put the protection cap on the shaver every
time you have used it,to prevent damage.
Trimming
For grooming sideburns and moustache.
C
1 Open the trimmer by pushing the slide
upwards.
ENGLISH6
Page 5
2 The trimmer can be activated while the
motor is running.
Cleaning and maintenance
Regular cleaning guarantees better shaving
performance.
Be careful with hot water.Always check if the
water is not too hot,to prevent your hands from
getting burnt.
Shaving unit
When you clean the appliance,it is not necessary
to take the shaving heads (cutters and guards)
apart.If you want to take them apart,be sure not
to mix up the cutters and guards, since grinding of
the cutters in the guards only guarantees optimal
performance for each matching set.If you
accidentally mix up the sets,it could take several
weeks before optimal shaving performance is
restored.
The easiest and most hygienic way to clean the
appliance is to rinse the shaving unit and the hair
chamber with hot water every time you have
used the appliance.
1 Switch the shaver off,remove the
powerplug from the wall socket and pull
the appliance plug out of the shaver.
ENGLISH 7
Page 6

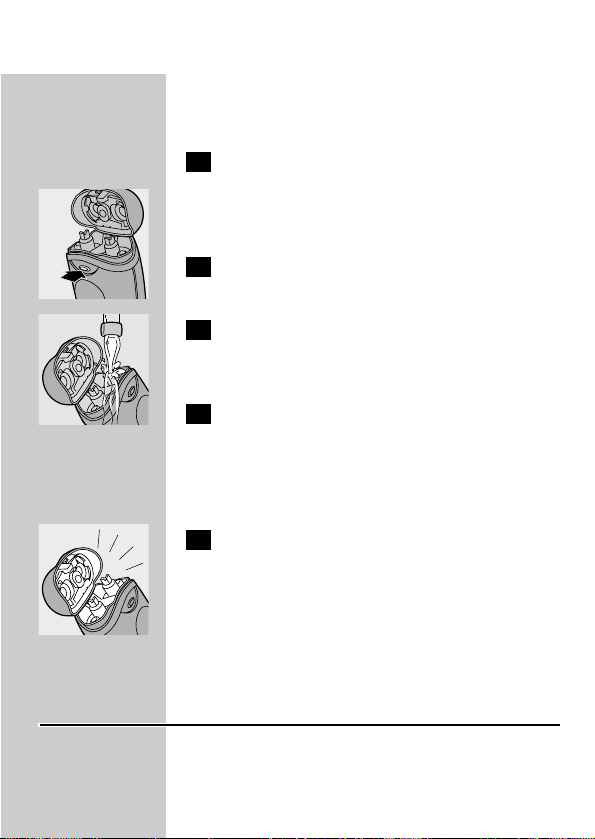
C
2 Press the release button to open the
shaving unit.
C
3 Clean the shaving unit and the hair
chamber by rinsing them under a hot tap
for some time.
4 Close the shaving unit and shake off excess
water.
Never dry the shaving unit with a towel or tissue
as this may damage the shaving heads.
C
1 Open the shaving unit again and leave it
open to let the appliance dry completely.
◗ You can also clean the hair chamber without
water by using the brush supplied.
Trimmer
Clean the trimmer every time you have used it.
1 Switch the shaver off,remove the
powerplug from the wall socket and pull
the appliance plug out of the shaver.
C
2 Clean the trimmer with the brush.
ENGLISH8
Page 7

C
3 Lubricate the trimmer teeth with a drop
of sewing machine oil every six months.
Replacement
Replace the shaving heads (type HQ6 Quadra)
every 2 years for optimal shaving results.
1 Switch the shaver off,remove the
powerplug from the wall socket and pull
the appliance plug out of the shaver.
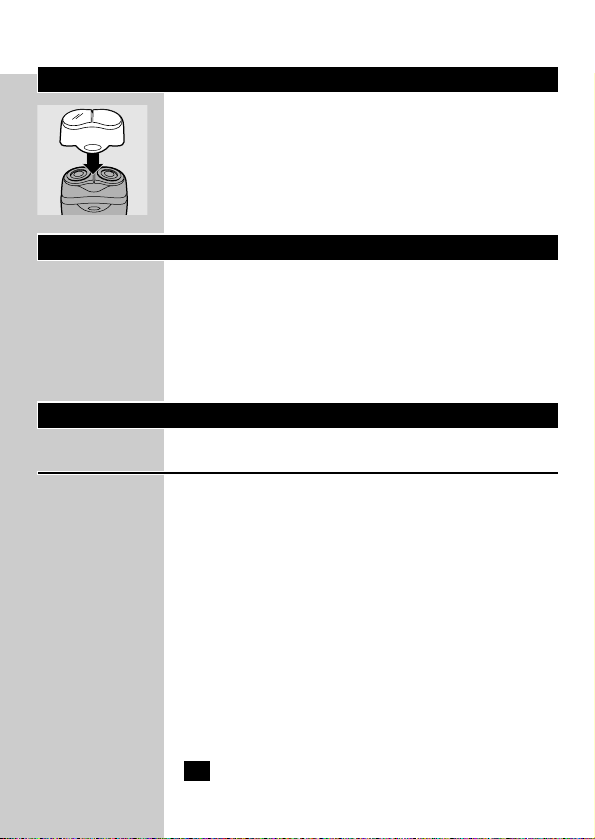
C
2 Press the release button to open the
shaving unit.
C
3 Turn the wheel anticlockwise (1) and
remove the retaining frame (2).
C
4 Remove the shaving heads and place new
ones in the shaving unit in such a way that
the projections fit exactly into the
recesses in the shaving unit.
5 Put the retaining frame back into the
shaving unit,press the wheel and turn it
clockwise.
6 Close the shaving unit.
ENGLISH 9
OIL
2
1
Page 8
C
◗ If the shaving heads have been properly
inserted,the shiny parts are pointing inwards
and towards each other.
Storage
C
◗ Put the protection cap on the shaver to
prevent damage.
◗ Store the appliance in the luxury pouch.
Accessories
The following accessories are available:
- HQ8000 powerplug.
- HQ6 Philishave Quadra shaving heads.
- HQ110 Philishave shaving head cleaner
(shaving head cleaning spray).
Environment
Disposal of the battery
The built-in rechargeable battery contains
substances that may pollute the environment.
Remove the battery when you discard the
appliance. Do not throw the battery away with
the normal household waste, but hand it in at an
official collection point.You can also take the
appliance to a Philips service centre,which will
ENGLISH10
Page 9

remove the battery for you and will dispose of it
in an environmentally safe way.
Only remove the battery if it is completely empty.
1 Remove the powerplug from the wall
socket and pull the appliance plug out of
the shaver.
C
2 Let the shaver run until it stops,undo the
screws and open the shaver.
3 Remove the battery.
Do not connect the shaver to the mains again
after the battery has been removed.
Guarantee & service
If you need information or if you have a problem,
please visit the Philips Web site at
www.philips.com or contact the Philips Customer
Care Centre in your country (you will find its
phone number in the worldwide guarantee
leaflet).If there is no Customer Care Centre in
your country,turn to your local Philips dealer or
contact the Service Department of Philips
Domestic Appliances and Personal Care BV.
ENGLISH 11
Page 10

Troubleshooting
1 Reduced shaving performance
B
Cause 1:the shaving heads are dirty.The shaver
has not been rinsed long enough or the water
used was not hot enough.
◗ Clean the shaver thoroughly before you
continue shaving (see 'Cleaning and
maintenance').
B
Cause 2:long hairs are obstructing the shaving
heads.
C
◗ Remove the retaining frame from the shaving
unit by turning the wheel anticlockwise.
◗ Remove the shaving heads from the shaving
unit.
C
◗ Remove the hairs from the cutters and guards
with the brush supplied.
Do not clean more than one cutter and guard at
a time, since they are all matching sets.If you
accidentally mix up the cutters and guards, it
could take several weeks before optimal shaving
performance is restored.
◗ Put the shaving heads back into the shaving
unit.Put the retaining frame back into the
shaving unit,press the wheel and turn it
clockwise.
B
Cause 3:shaving heads are damaged or worn.
◗ Remove the retaining frame.
ENGLISH12
2
Page 11

◗ Remove the old shaving heads from the
shaving unit and replace them with new ones.
Damaged or worn shaving heads (cutters and
guards) may only be replaced with original HQ6
Philishave Quadra shaving heads.
◗ Put the retaining frame back into the shaving
unit,press the wheel and turn it clockwise.
2 The shaver does not work when the on/off
button is pressed.
B
Cause:the shaver is connected to the mains.
◗ Disconnect the shaver from the mains.
B
Cause:the battery is empty.
◗ Recharge the battery.
ENGLISH 13
Page 12

Ważne
Przed pierwszym użyciem urządzenia zapoznaj się
dokładnie z instrukcją jego obsługi i zachowaj ją na
przyszłość, do ewentualnej konsultacji.
◗ Korzystaj wyłącznie z dołączonego do
urządzenia zasilacza HQ600, który służy do
jego ładowania i obsługi.
◗ Zasilacz przekształca napięcie 220-240 V na
bezpieczne niskie napięcie niższe niż 24 V.
Wyłącznie on gwarantuje bezpieczne
przekształcenie napięcia.
◗ Wtyczka zasilacza zawiera transformator.
Odcięcie wtyczki celem wymiany jej na nową
może spowodować niebezpieczeństwo.
C
◗ Upewnij się, że zasilacz HQ600 nie miał
kontaktu z wodą.
C
◗ Niniejsze urządzenie spełnia międzynarodowe,
zatwierdzone normy bezpieczeństwa IEC i
można je myć pod kranem.
Postępuj ostrożnie z gorącą wodą. Zawsze
sprawdzaj, czy jej temperatura jest odpowiednia
dla kontaktu z rękami.
◗ Poziom hałasu: Lc= 61 dB [A]
POLSKI14
Page 13

Ładowanie
Wskaźniki ładowania
C
◗ W momencie rozpoczęcia ładowania
rozładowanej golarki zaświeci się zielona
lampka kontrolna.
◗ Gdy akumulatory zostały całkowicie
naładowane, zaczyna migotać zielona lampka
kontrolna.
Ładowanie urządzenia
Nie ładuj golarki w zamkniętej saszetce.
Ładuj i przechowuj golarkę w temperaturze
pomiędzy 5c a 35cC.
Podczas ładowania golarka nie działa, czyli nie
można jej w tym czasie używać.
Zanim zaczniesz korzystać z golarki, lub jeśli przez
długi okres czasu nie była ona używana, musisz ją
ładować przez 12 godzin. Normalne ładowanie
zajmie około 8 godzin.
C
1 Włóż małą wtyczkę przewodu zasilającego
do golarki.
2 Podłącz zasilacz do sieci.
POLSKI 15
Page 14

3 Aby wydłużyć trwałość akumulatorów,
wyjmij wtyczkę z gniazdka ściennego i
małąwtyczkę z urządzenia, gdy akumulator
będzie w pełni naładowany.
◗ Czas bezprzewodowej pracy
Całkowicie naładowana golarka pozwala na 30
minut golenia.
Korzystanie z urządzenia
Golenie
1 Przed rozpoczęciem golenia wyjmij
wtyczkę z golarki.
2 Włącz golarkę, wciskając włącznik.
C
3 Przesuwaj głowice po skórze, wykonując
zarówno proste, jak i okrężne ruchy.
Najlepsze efekty golenia osiąga się na skórze
suchej.
Skóra Twojej twarzy potrzebuje pewnego czasu
(2-3 tygodni), by przyzwyczaić się do nowego
systemu golenia.
4 Wyłącz golarkę przez jednokrotne
wciśnięcie przycisku off/on.
C
5 Po każdym użyciu załóż na golarkę
ochronną osłonkę, zabezpieczającą głowice
golące przed uszkodzeniem mechanicznym.
POLSKI16
Page 15

Trymer
Służy do przystrzygania wąsów i bokobrodów.
C
1 Otwórz trymer przesuwając suwak do
góry.
2 Trymer może być używany po uprzednim
włączeniu urządzenia.
Czyszczenie i konserwacja
Regularne oczyszczanie golarki gwarantuje lepsze
efekty golenia.
Postępuj ostrożnie z gorącą wodą. Zawsze
sprawdzaj, czy jej temperatura jest odpowiednia
dla kontaktu z rękami.
Moduł golący
Podczas czyszczenia golarki nie trzeba zdejmować
części golących ( nożyków i osłonek). Jeśli je
wyjmiesz zwróć szczególną uwagę, żeby nie
pomieszać nożyków i osłonek. Jest to bardzo
ważne, ponieważ dopasowanie nożyków do
osłonek zapewnia optymalną skuteczność
działania każdego z zestawów. Jeżeli przypadkowo
osłonki i nożyki zostaną pomieszane, odzyskanie
przez golarkę dobrej jakości golenia może trwać
nawet kilka tygodni.
Najprostszym i najbardziej higienicznym
sposobem czyszczenia urządzenia jest opłukanie
POLSKI 17
Page 16

gorącą wodą modułu golącego i komory na ścięte
włosy - po każdym użyciu golarki.
1 Wyłącz golarkę,wyjmij ładowarkę z
gniazdka ściennego oraz wtyczkę z golarki.
C
2 Wciśnij przycisk blokujący, aby otworzyć
element golący.
C
3 Przez jakiś czas płucz element golący i
komorę na ścięty zarost pod gorącą
bieżącą wodą.
4 Zamknij część golącą i strząśnij pozostałą
wodę.
Nidy nie wycieraj części golącej ręcznikiem lub
chusteczką - możesz uszkodzić głowice golące.
C
1 Otwórz ponownie część golącą i pozostaw
ją tak do wyschnięcia.
◗ Komorę na ścięty zarost można też czyścić na
sucho, używając specjalnej załączonej
szczoteczki.
Trymer
Oczyszczaj trymer po każdym użyciu.
1 Wyłącz golarkę,wyjmij ładowarkę z
gniazdka ściennego oraz wtyczkę z golarki.
C
2 Wyczyść trymer szczoteczką.
POLSKI18
Page 17

C
3 Co 6 miesięcy należy naoliwić ząbki
trymera kroplą oleju maszynowego.
Wymiana
Wymieniaj głowice golące (typ HQ6 Quadra) co
dwa lata. W ten sposób zapewnisz sobie najlepsze
rezultaty golenia.
1 Wyłącz golarkę,wyjmij ładowarkę z
gniazdka ściennego oraz wtyczkę z golarki.
C
2 Wciśnij przycisk blokujący, aby otworzyć
element golący.
C
3 Obróć kółkiem w kierunku przeciwnym
do ruchu wskazówek zegara (1) i wyjmij
obsadę (2).
C
4 Zdejmij głowice golące i załóż do modułu
golącego nowe głowice golące w taki
sposób, aby występy dokładnie
dopasowywały się do zagłębień w module
golącym.
5 Załóż ponownie obsadę na moduł golący,
wciśnij kółko i obróć nim w kierunku
zgodnym z kierunkiem wskazówek zegara.
6 Zamknij część golącą.
POLSKI 19
OIL
2
1
Page 18

C
◗ Jeśli głowice golące zostały założone
poprawnie, wypolerowane części w położeniu
wewnętrznym bezpośrednio sąsiadują ze sobą.
Przechowywanie
C
◗ Załóż na golarkę ochronną pokrywę, by
uniknąć uszkodzenia.
◗ Przechowuj urządzenie w saszetce.
Akcesoria
Dostępne są następujące akcesoria:
- HQ8000 Ładowarka
- Głowice golące HQ6 Philishave Quadra.
Ochrona środowiska
Usuwanie akumulatora
Wbudowany akumulator zawiera substancje
które mogą zanieczyścić środowisko.
Przed wyrzuceniem wyeksploatowanego urządzenia
wyjmij z niego akumulator. Nie wyrzucaj
akumulatora z odpadami gospodarstwa domowego,
lecz oddaj go do oficjalnego punktu skupu. Możesz
również zwrócić się z urządzeniem do serwisu
Philipsa, gdzie personel pomoże ci wyjąć baterię i
pozbyć się jej w sposób przyjazny dla środowiska.
POLSKI20
Page 19

Wyrzucaj akumulatory tylko wtedy,gdy są
kompletnie wykorzystane.
1 Wyjmij wtyczkę z gniazdka sieciowego i
odłącz małą wtyczkę od golarki.
C
2 Uruchom golarkę i poczekaj, aż przestanie
pracować, odkręć śrubki i otwórz golarkę.
3 Wyjmij akumulator
Po wyjęciu akumulatora nie podłączaj golarki do
sieci.
Gwarancja i serwis
Jeśli potrzebne Ci są informacje lub napotykasz
jakiś problem, skontaktuj się z Biurem Obsługi
Klienta (numer telefonu znajdziesz w Karcie
Gwarancyjnej), lub też z najbliższym punktem
serwisowym sprzętu AGD, autoryzowanym przez
firmę Philips. Możesz też odwiedzić naszą stronę
internetową www.philips.pl.
Rozwiązywanie problemów
1 Zmniejszona wydajność golenia
B
Przyczyna 1: zabrudzone są głowice golące.
Golarka nie była wystarczająco długo płukana lub
użyta woda nie była dostatecznie gorąca.
POLSKI 21
Page 20

◗ Przed przystąpieniem do golenia oczyść
gruntownie golarkę (patrz: "Czyszczenie i
konserwacja").
B
Przyczyna 2: długie włoski blokują głowice golące.
C
◗ Zdejmij obsadę z modułu golącego,obracając
kółkiem w kierunku przeciwnym do ruchu
wskazówek zegara.
◗ Zdejmij głowice golące z modułu golącego.
C
◗ Za pomocą dołączonej szczoteczki oczyść z
włosów nożyki i osłonki.
Nie oczyszczaj więcej niż jedną osłonkę i jeden
nożyk jednocześnie, ponieważ są to zestawy
dopasowane do siebie. Jeśli przypadkowo
pomieszasz osłonki i nożyki, może upłynąć nawet
kilka tygodni, zanim ponownie osiągniesz
optymalną jakość golenia.
◗ Ponownie załóż głowice golące na moduł
golący. Następnie załóż obsadę na moduł
golący, wciśnij kółko i obróć nim w kierunku
zgodnym z kierunkiem ruchu wskazówek
zegara.
B
Przyczyna 3: głowice golące są uszkodzone lub
zużyte.
◗ Wyjmij ramkę zabezpieczającą.
◗ Wyjmij stare głowice golące z części golącej i
zastąp je nowymi.
Uszkodzone lub zużyte głowice golące (nożyki i
osłonki) można wymienić jedynie na oryginalne
głowice golące HQ6 Philishave Quadra.
POLSKI22
2
Page 21

◗ Następnie załóż obsadę na moduł golący,
wciśnij kółko i obróć nim w kierunku
zgodnym z kierunkiem ruchu wskazówek
zegara.
2 Golarka nie działa, gdy wciśnięty jest
przycisk on/off.
B
Przyczyna: Golarka jest podłączona do sieci.
◗ Wyłącz golarkę z sieci.
B
Przyczyna: akumulator jest wyładowany.
◗ Naładuj akumulator.
POLSKI 23
Page 22
Important
Citiţi aceste instrucţiuni cu atenţie înainte de
utilizarea aparatului şi păstraţi-le pentru consultări
ulterioare.
◗ Nu folosiţi decât încărcătorul HQ600 furnizat
împreună cu aparatul.
◗ Încărcătorul transformă o tensiune de 220-
240 volţi într-o tensiune sigură de mai puţin
de 24 volţi. Folosiţi doar încărcătorul furnizat
pentru o transformare în deplină siguranţă.
◗ Încărcătorul este dotat cu un transformator.
Nu încercaţi să înlocuiţi fişa de conectare
pentru a evita provocarea unor accidente.
C
◗ Evitaţi contactul încărcătorului HQ600 cu apa.
C
◗ Aparatul corespunde normelor de securitate
internaţionale IEC şi poate fi curăţat sub jet
de apă.
Aveţi grijă ca apa să nu fie foarte fierbinte pentru
a nu vă arde.
◗ Nivel de zgomot: Lc = 61 dB [A]
Încărcare
Indicaţii de încărcare
C
◗ Imediat ce începeţi să încărcaţi aparatul, ledul
verde se va aprinde.
◗ Când acumulatorul este complet încărcat,
ledul verde începe să clipească intermitent.
ROMÂNĂ24
Page 23

Încărcarea aparatului
Nu încărcaţi aparatul în etui.
Reîncărcaţi şi păstraţi aparatul la o temperatură
cuprinsă între 5cC şi 35cC.
Aparatul nu funcţionează în timp ce se încarcă.
Acest lucru înseamnă că nu veţi putea folosi
aparatul în timp ce se reîncarcă.
Când încărcaţi aparatul pentru prima oară sau
după o perioadă mai lungă de timp, lăsaţi-l să se
încarce timp de 12 ore. În mod normal, încărcarea
durează 8 ore.
C
1 Introduceţi fişa în aparatul de bărbierit.
2 Puneţi încărcătorul în priza de perete.
3 Pentru a prelungi durata de funcţionare a
acumulatorului, scoateţi încărcătorul din
priză, apoi scoateţi fişa cablului de
alimentare din aparat după încărcarea
completă a acestuia.
◗ Perioadă de funcţionare fără cablu
Un aparat cu o baterie complet încărcată are o
periodă de funcţionare fără cablu de până la 30
de minute.
ROMÂNĂ 25
Page 24

Utilizarea aparatului
Bărbierire
1 Înainte de a începe să vă bărbieriţi scoateţi
ştecherul din aparatul de ras.
2 Porniţi aparatul apăsând o dată pe butonul
pornire/oprire.
C
3 Faceţi rapid mişcări drepte şi circulare cu
capetele de bărbierire pe suprafaţa pielii.
Bărbierirea pe o piele uscată asigură cele mai
bune rezultate.
Pielea dumneavoastră ar putea necesita 2-3
săptămâni până să se obişnuiască cu sistemul
Philishave.
4 Opriţi aparatul de ras apăsând butonul
pornire/oprire o dată.
C
5 Pentru a preveni deteriorarea aparatului,
puneţi întotdeauna capacul după utilizare.
Dispozitiv de tăiere
Pentru îngrijirea perciunilor şi a mustăţii.
C
1 Deschideţi dispozitivul de tăiere împingând
în sus butonul culisant.
2 Dispozitivul de tăiere poate fi activat în
timp ce motorul funcţionează.
ROMÂNĂ26
Page 25

Curăţare şi întreţinere
O curăţare regulată asigură cele mai bune
rezultate de bărbierire.
Aveţi grijă ca apa să nu fie foarte fierbinte pentru
a nu vă arde.
Unitatea de bărbierire
Când curăţaţi aparatul nu este necesar să scoateţi
capetele de bărbierire (cuţite şi dispozitive de
siguranţă) din aparat. Dacă doriţi să le scoateţi,
aveţi grijă să nu amestecaţi cuţitele şi dispozitivele
de siguranţă deoarece numai potrivirea lor
corectă garantează performanţe optime pentru
fiecare set. Dacă din greşeală le amestecaţi poate
dura câteva săptămâni până ce veţi obţine
rezultatele anterioare.
Modul cel mai simplu şi mai igienic de a curăţa
aparatul este să clătiţi unitatea de bărbierire şi
compartimentul de colectare a părului cu apă
fierbinte după fiecare utilizare.
1 Opriţi aparatul, scoateţi încărcătorul din
priză şi mufa din aparat.
C
2 Apăsaţi butonul de decuplare pentru a
deschide unitatea de bărbierire.
C
3 Curăţaţi unitatea de bărbierire şi
compartimentul de colectarea a părului
clătindu-le cu apă fierbinte de la robinet.
ROMÂNĂ 27
Page 26

4 Închideţi unitatea de radere şi scuturaţi
excesul de apă.
Nu ştergeţi niciodată unitatea de radere cu un
prosop sau un şerveţel deoarece aţi putea
deteriora capetele de radere.
C
1 Deschideţi din nou unitatea de radere şi
lăsaţi-o deschisă pentru a se usca complet.
◗ Puteţi curăţa compartimentul pentru păr fără
apă folosind peria furnizată.
Dispozitiv de tăiere
Curăţaţi dispozitivul de tăiere de fiecare dată când
îl folosiţi.
1 Opriţi aparatul, scoateţi încărcătorul din
priză şi mufa din aparat.
C
2 Curăţaţi dispozitivul pentru tuns barba cu
o periuţă.
C
3 Ungeţi dinţii dispozitivului de tăiere cu
puţin ulei pentru maşina de cusut o dată la
şase luni.
Înlocuire
Pentru rezultate optime, înlocuiţi capetele de
bărbierire (tipul HQ6 Quadra) o dată la 2 ani.
ROMÂNĂ28
OIL
Page 27

1 Opriţi aparatul, scoateţi încărcătorul din
priză şi mufa din aparat.
C
2 Apăsaţi butonul de decuplare pentru a
deschide unitatea de bărbierire.
C
3 Răsuciţi rotiţa în sens invers acelor de
ceasornic (1) şi scoateţi cadrul de
susţinere (2).
C
4 Scoateţi capetele de bărbierire şi
poziţionaţi-le pe cele noi în unitatea de
bărbierire fixându-le corect în nişele
corespunzătoare.
5 Repoziţionaţi cadrul de susţinere în
unitatea de bărbierire.Apăsaţi rotiţa şi
răsuciţi-o în sensul acelor de ceasornic.
6 Închideţi unitatea de bărbierire.
C
◗ În cazul în care capetele de bărbierire sunt
introduse corect,părţile care lucesc sunt
îndreptate înăuntru şi una spre cealaltă.
ROMÂNĂ 29
2
1
Page 28
Depozitare
C
◗ Acoperiţi aparatul de ras cu capacul de
protecţie pentru a preveni deteriorarea.
◗ Depozitaţi aparatul în borseta de lux.
Accesorii
Următoarele accesorii sunt disponibile:
- Încărcător HQ8000.
- Capete de bărbierire Philishave Quadra HQ6.
- Curăţător Cap de Bărbierire Philishave HQ110
(spray de curăţare cap de bărbierire).
Protejarea mediului
Aruncarea acumulatorului
Acumulatorul încorporat reîncărcabil conţine
substanţe care pot polua mediul înconjurător.
Scoateţi acumulatorul când aruncaţi aparatul. Nu
aruncaţi acumulatorul în gunoiul menajer, ci
predaţi-l la un punct de colectare oficial. Îl puteţi,
de asemenea, duce la un centru service Philips,
unde va fi scos şi depozitat în conformitate cu
normele privind protejarea mediului.
Scoateţi acumulatorul doar dacă este complet
descărcat.
1 Scoateţi încărcătorul din priză şi fişa din
aparat.
ROMÂNĂ30
Page 29

C
2 Lăsaţi aparatul să funcţioneze până ce se
opreşte, desfaceţi şuruburile şi deschideţi-l.
3 Scoateţi acumulatorul.
Nu conectaţi aparatul de ras la priză după ce aţi
scos acumulatorul.
Garanţie şi service
Pentru informaţii suplimentare sau în cazul altor
probleme, vă rugăm să vizitaţi site-ul Philips
www.philips.com sau să contactaţi
Departamentul Clienţi din ţara dumneavoastră
(veţi găsi numărul de telefon în garanţia
internaţională). Dacă în ţara dumneavoastră nu
există un astfel de departament, contactaţi
furnizorul dumneavoastră Philips sau
Departamentul Service pentru Aparate
Electrocasnice şi Produse de Îngrijire Personală
Philips.
Depanare
1 Performanţe scăzute de bărbierire
B
Cauza 1: capetele de bărbierire sunt murdare.
Aparatul de ras nu a fost clătit suficient de mult
timp sau apa folosită nu a fost suficient de
fierbinte.
◗ Curăţaţi bine aparatul înainte de a continua
bărbierirea (a se vedea capitolul "Curăţare şi
întreţinere").
ROMÂNĂ 31
Page 30

B
Cauza 2: fire lungi de păr blochează capetele de
bărbierire.
C
◗ Scoateţi cadrul de susţinere răsucind în sensul
acelor de ceasornic.
◗ Scoateţi capetele de bărbierire.
C
◗ Îndepărtaţi firele de păr de pe cuţite şi site cu
ajutorul periuţei furnizate.
Curăţaţi cuţitele şi dispozitivele de protecţie pe
rând deoarece ele sunt în set. Dacă din greşeală
amestecaţi cuţitele şi dispozitivele de siguranţă,
poate dura câteva săptămâni până ce veţi obţine
performanţa anterioară.
◗ Puneţi capetele de bărbierire în unitatea de
bărbierire. Introduceţi cadrul în unitatea,
apăsaţi rotiţa şi răsuciţi în sensul acelor de
ceasornic.
B
Cauza 3: capetele de bărbierire sunt deteriorate
sau uzate.
◗ Scoateţi cadrul de susţinere.
◗ Scoateţi capetele de bărbierire vechi din
unitatea de bărbierire şi înlocuiţi-le cu unele
noi.
Înlocuiţi capetele de bărbierire deteriorate sau
uzate (cuţite şi site) doar cu capetele de
bărbierire HQ6 Philishave Quadra.
◗ Introduceţi cadrul în unitatea de bărbierire,
apăsaţi rotiţa şi răsuciţi în sensul acelor de
ceasornic.
ROMÂNĂ32
2
Page 31

2 Aparatul de bărbierit nu funcţionează dacă
butonul pornire/oprire este apăsat.
B
Cauza: Aparatul este conectat la priză.
◗ Deconectaţi aparatul din priză.
B
Cauza: acumulatorul este descărcat.
◗ Reîncărcaţi acumulatorul.
ROMÂNĂ 33
Page 32

Внимание
Прежде чем начать пользоваться прибором,
внимательно ознакомьтесь с настоящим
руководством и сохраните его в качестве
справочного материала.
◗ Для зарядки и эксплуатации электробритвы
используйте только блок питания HQ600,
входящий в комплект поставки.
◗ Блок питания преобразует сетевое
напряжение 220-240 В в напряжение
питания прибора 24 В. Для гарантии
безопасной работы прибора, используйте
только входящий в комплект поставки блок
питания.
◗ Вилка шнура электропитания содержит
адаптер. Не производите замену
оригинальной вилки на какую-либо другую.
Это может привести к опасным
последствиям.
C
◗ Убедитесь, что блок питания HQ600 и
сетевой шнур сухие.
C
◗ Электробритва соответствует принятому
международному стандарту по технике
безопасности IEC(МЕЖДУНАРОДНОЙ
ЭЛЕКТРОТЕХНИЧЕСКОЙ КОМИССИИ),
и ее можно промывать водопроводной
водой.
Будьте осторожны с горячей водой. Всегда
проверяйте, не слишком ли горяча вода, чтобы
уберечь ваши руки от получения ожога.
◗ Уровень шума Lc= 61 дБ [A]
РУССКИЙ34
Page 33

Зарядка
Индикация зарядки
C
◗ Когда вы начнете зарядку разряженной
аккумуляторной батареи электробритвы,
загорится зеленый светодиод.
◗ Когда аккумуляторная батарея полностью
зарядится, начнет мигать зеленый
индикатор.
Зарядка аккумуляторов
электробритвы
Не подзаряжайте электробритву в закрытом
футляре.
Выполняйте зарядку и храните прибор при
температуре от 5cC до 35cC.
Во время зарядки аккумуляторной батареи
бритва не работает. Это значит, что вы не
можете пользоваться бритвой во время
зарядки батареи.
Если вы заряжаете бритву в первый раз или
если вы долгое время не пользовались
прибором, производите зарядку бритвы в
течение 12 часов непрерывно. Обычно для
полной зарядки аккумуляторов требуется
приблизительно 8 часов.
C
1 Вставьте штекер шнура сетевого
адаптера в электробритву.
РУССКИЙ 35
Page 34

2 Вставьте сетевую вилку в розетку
электросети.
3 Для того, чтобы продлить срок службы
аккумуляторной батареи, вынимайте
вилку из розетки электросети, а также
отсоединяйте шнур от бритвы, когда
батарея полностью заряжена.
◗ Время бритья без подключения к
электросети
Полностью заряженная бритва обеспечивает
время автономного бритья до 30 мин.
Как пользоваться прибором
Бритье
1 Перед началом бритья выньте штекер из
гнезда на электробритве.
2 Включите бритву, нажав на кнопку
Вкл./Выкл.
C
3 Быстро перемещайте бритвенные
головки по коже, совершая
одновременно возвратнопоступательные и вращательные
движения.
Наилучшие результаты бритья достигаются в
том случае, когда ваша кожа сухая.
Вашей коже может потребоваться 2-3 недели
для того, чтобы привыкнуть к бритвенной
системе Philishave.
РУССКИЙ36
Page 35

4 Выключите электробритву, нажав один
раз кнопку Вкл./Выкл.
C
5 Во избежание поломки, после
использования наденьте на бритву
защитную крышку.
Подравниватель.
Для подравнивания висков и ухода за усами.
C
1 Откройте подравниватель,передвинув
ползунковый переключатель вверх.
2 Подравнивателем можно пользоваться
только при включенном
электродвигателе.
Очистка и уход
Регулярная очистка гарантирует наилучшие
результаты бритья.
Будьте осторожны с горячей водой. Все
проверяйте, не слишком ли горяча вода, что
уберечь ваши руки от получения ожога.
Бритвенный блок
При очистке бритвы нет необходимости
отделять бритвенные головки (вращающиеся и
неподвижные ножи). Если вы все-таки хотите
их отделить, то будьте внимательны и не
РУССКИЙ 37
Page 36

перепутайте ножи разных пар, поскольку для
обеспечения оптимальных характеристик
бритья требуется притирка ножей друг к
другу. Если Вы случайно перепутаете ножи, то
может потребоваться несколько недель для
того, чтобы восстановить оптимальные
характеристики бритья.
Наиболее простой и гигиеничный способ
очистки электробритвы заключается в
промывании бритвенного блока и камеры
волососборника горячей водой после каждого
пользования бритвой.
1 Выключите бритву, выньте сетевую вилку
из розетки и отсоедините штекер шнура
сетевого адаптера от электробритвы.
C
2 Откройте бритвенный блок, нажав
кнопку фиксатора.
C
3 Очистите бритвенный блок и камеру
волососборника, промывая их под
горячей водопроводной водой.
4 Закройте бритвенный блок и стряхните
воду.
Запрещается сушить бритвенный блок с
помощью полотенца или салфетки, так как
можно повредить бритвенные головки.
C
1 Снова откройте бритвенный блок и
оставьте его открытым, чтобы дать
бритве полностью высохнуть.
РУССКИЙ38
Page 37

◗ Вы также можете очистить камеру
волососборника без воды, пользуясь
кисточкой,входящей в комплект поставки.
Подравниватель.
Очищайте подравниватель после каждого
использования.
1 Выключите бритву, выньте сетевую вилку
из розетки и отсоедините штекер шнура
сетевого адаптера от электробритвы.
C
2 Очистите подравниватель с помощью
кисточки.
C
3 Смазывайте зубцы подравнивателя
каждые шесть месяцев каплей
машинного масла для швейных машин.
Замена бритвенных головок
Для получения оптимальных результатов
бритья каждые 2 года производите замену
бритвенных головок (модель HQ6 Quadra).
1 Выключите бритву, выньте сетевую вилку
из розетки и отсоедините штекер шнура
сетевого адаптера от электробритвы.
C
2 Откройте бритвенный блок, нажав
кнопку фиксатора.
РУССКИЙ 39
OIL
Page 38

C
3 Поверните колесико против часовой
стрелки (1) и снимите фиксирующую
рамку (2).
C
4 Извлеките бритвенные головки из
бритвенного блока и установите новые
таким образом, чтобы их выступы точно
встали в углубления в бритвенном блоке.
5 Установите фиксирующую рамку в
бритвенный блок, нажмите на колесико
и поверните его по часовой стрелке.
6 Закройте бритвенный блок.
C
◗ Если бритвенные головки установлены
правильно, их блестящие части направлены
внутрь и друг к другу.
Хранение
C
◗ Во избежание повреждений наденьте на
электробритву защитный колпачок.
◗ Храните бритву в роскошном футляре.
Принадлежности
В продаже имеются следующие
принадлежности:
- Блок питания HQ8000.
РУССКИЙ40
2
1
Page 39

- Бритвенные головки HQ6 Philishave Quadra
- Очиститель бритвенных головок HQ110
Philishave (спрей для очистки бритвенных
головок).
Забота об окружающей среде
Утилизация аккумуляторной батареи
Встроенная аккумуляторная батарея содержит
вещества, которые могут представлят
опасность для окружающей среды.
Прежде чем выбросить электробритву, выньте
из нее батарею. Не выбрасывайте батарею
вместе с бытовым мусором, а сдайте ее в
официальный пункт приема. Вы также можете
сдать прибор в сервисный центр компании
«Филипс», персонал которого выполнит для
вас работу по удалению батарей и их
безопасной утилизации.
Перед удалением батарея должна быт
полностью разряжена.
1 Выньте вилку сетевого адаптера из
розетки сети электропитания и
отсоедините штекер его шнура от
электробритвы.
C
2 Оставьте электробритву во включенном
состоянии до остановки
электродвигателя, отверните винты и
откройте электробритву.
РУССКИЙ 41
Page 40

3 Извлеките аккумуляторную батарею.
Не включайте бритву в сеть после того, как
аккумуляторная батарея была извлечена.
Информация и сервисное
обслуживание.
По поводу дополнительной информации или в
случае возникновения каких-либо проблем
обращайтесь на Web-сайт компании «Филипс»
по адресу www.philips.com или в центр
компании «Филипс» по обслуживанию
потребителей в вашей стране (вы найдете его
номер телефона на международном
гарантийном талоне). Если подобный центр в
вашей стране отсутствует, обратитесь в вашу
местную торговую организацию компании
«Филипс» или сервисное отделение компании
Philips Domestic Appliances and Personal Care
BV.
Поиск и устранение неисправностей
1 Плохое качество бритья
B
Причина 1: загрязнились бритвенные головки.
Бритва промывалась недостаточно долго
или недостаточно горячей водой.
◗ Тщательно очистите электробритву,
прежде чем продолжать бритье (см.раздел
«Очистка и уход»).
РУССКИЙ42
Page 41

B
Причина 2: бритвенные головки забиты
длинными волосами.
C
◗ Снимите с бритвенного блока
фиксирующую рамку, повернув колесико
против часовой стрелки.
◗ Извлеките бритвенные головки из
бритвенного блока.
C
◗ Очистите вращающиеся и неподвижные
ножи бритвенных головок от волос с
помощью щеточки.
Не очищайте одновременно более одной
пары ножей, поскольку вращающиеся и
неподвижные ножи каждой пары пригнаны
друг к другу. Если ножи разных пар
перепутаны, то может потребоваться
несколько недель для того, чтобы
восстановить оптимальное качество бритья.
◗ Установите бритвенные головки в
бритвенный блок. Установите
фиксирующую рамкув бритвенный блок,
нажмите на колесико и поверните его по
часовой стрелке.
B
Причина 3: бритвенные головки повреждены
или изношены.
◗ Снимите фиксирующую рамку.
◗ Снимите с бритвенного блока старые
бритвенные головки и замените их новыми.
РУССКИЙ 43
2
Page 42

Заменяйте поврежденные или изношенные
бритвенные головки (вращающиеся и
неподвижные ножи) только бритвенными
головками HQ6 PhilishaveQuadra.
◗ Установите фиксирующую рамкув
бритвенный блок, нажмите на колесико и
поверните его по часовой стрелке.
2 При нажатии кнопки вкл./выкл.
электробритва не работает.
B
Причина: Бритва подсоединена к
электросети.
◗ Отключите бритву от электросети.
B
Причина: батарея разряжена.
◗ Зарядите аккумуляторную батарею.
РУССКИЙ44
Page 43

Důležité
Následující návod pečlivě přečtěte a uschovejte jej
pro případná pozdější nahlédnutí.
◗ Pro práci s přístrojem i nabíjení jeho
akumulátoru používejte výhradně
transformátorovou zástrčku HQ600.
◗ Transformátorová zástrčka mění napětí 220 až
240 V na napětí menší než 24 V. Pouze tato
zástrčka zaručuje bezpečný provoz.
◗ Síťová zástrčka obsahuje transformátor. Proto
ji nikdy nesmíte vyměnit za jinou zástrčku což
by mohlo způsobit vážnou poruchu.
C
◗ Dbejte na to, aby zástrčka HQ600 ani její
přívod nikdy nenavlhly.
C
◗ Přístroj odpovídá mezinárodně schváleným
bezpečnostním předpisům IEC a může být bez
obav čištěn pod tekoucí vodou.
Buďte opatrní při použití horké vody.Vždy
předem zkontrolujte, zda není voda nadměrně
horká, abyste si neopařili prsty.
◗ Hladina hluku: Lc = 61 dB (A).
Nabíjení akumulátoru
Indikace nabití
C
◗ Jakmile začnete nabíjet vybitý akumulátor,
rozsvítí se zelená kontrolka.
◗ Když je akumulátor plně nabitý, zelená
kontrolka začne blikat.
ČESKY 45
Page 44

Nabíjení akumulátorů
Nenabíjejte akumulátor pokud je přístroj uložen v
obalu.
Nabíjejte a uchovávejte přístroj při teplotě okolí
mezi 5cC a 35cC.
Holicí přístroj není během nabíjení schopen
funkce. Proto ho v průběhu nabíjení nepoužívejte.
Pokud akumulátor přístroje nabíjíte poprvé nebo
po delší době, kdy přístroj nepoužíváte, nabíjejte
jej bez přerušení 12 hodin. Běžné nabíjení pak
trvá přibližně 8 hodin.
C
1 Zástrčku síťového přívodu zasuňte do
přístroje.
2 Síťovou zástrčku zasuňte do zásuvky.
3 Abyste prodloužili životnost akumulátoru,
vytáhněte po jeho plném nabití síťovou
zástrčku ze zásuvky a vytáhněte též
zástrčku z holicího přístroje.
◗ Doba holení bez sítě
S plně nabitým akumulátorem může být přístroj v
provozu po dobu asi 30 minut.
ČESKY46
Page 45

Použití přístroje
Holení
1 Před holením nezapomeňte vytáhnout
síťovou zástrčku přístroje ze zásuvky.
2 Zapojte přístroj stisknutím tlačítka on/off.
C
3 Holicím přístrojem pohybujte po pokožce
rychle přímými i krouživými pohyby.
Pokud je pokožka suchá,dosáhnete při holení
nejlepších výsledků.
Pamatujte, že pokožka potřebuje 2 až 3 týdny na
to, aby si novému způsobu holení přivykla.
4 Holicí přístroj vypněte jedním stisknutím
tlačítka on/off.
C
5 Vždy po použití nasaďte na holicí přístroj
ochranný kryt, abyste předešli poškození
holicích hlav.
Zastřihovač
Zastřihovač slouží k úpravě kotlet nebo knírku.
C
1 Zastřihovač zapnete posunutím jeho
spínače směrem nahoru.
2 Zastřihovač lze zapojit i když je motor v
chodu.
ČESKY 47
Page 46

Čištění a údržba
Pravidelné čištění zajistí nejlepší výsledky při
holení.
Buďte opatrní při použití horké vody.Vždy
předem zkontrolujte, zda není voda nadměrně
horká, abyste si neopařili prsty.
Holicí jednotka
Při čištění přístroje není nutné vyjímat holicí hlavy
(korunky a nožové věnce). Pokud byste je přesto
vyjmuli, nezapomeňte do každé korunky vložit
zpět ten nožový věnec, který v ní původně byl.
Nožové věnce jsou v korunkách zaběhnuty a
kdybyste je zaměnili, zhoršil by se výsledek holení
a trvalo by velmi dlouho než by se nožové věnce
v jiné korunce opět zaběhly.
Nejsnažším a nejhygieničtějším čištěním je
opláchnout holicí jednotku a komoru pro
odstřižené vousy horkou vodou po každém
použití přístroje.
1 Vypněte přístroj, vyjměte zástrčku nabíječe
ze zásuvky a vyjměte též zástrčku z
přístroje.
C
2 Stiskněte uvolňovací tlačítko a otevřte
holicí jednotku.
ČESKY48
Page 47

C
3 Umyjte občas holicí jednotku a prostor
pro odstřižené vousy tekoucí horkou
vodou.
4 Holicí jednotku uzavřete a vytřepejte
přebytečnou vodu.
Holicí jednotku nikdy nesušte ručníkem nebo
jinou tkaninou, vyvarujete se tak poškození
holicích hlav.
C
1 Opět otevřete holicí jednotku a nechte
přístroj v otevřeném stavu zcela uschnout.
◗ Prostor pro odstřižené vousy můžete též
vyčistit bez použití vody přiloženým
kartáčkem.
Zastřihovač
Zastřihovač vyčistěte po každém použití.
1 Vypněte přístroj, vyjměte zástrčku nabíječe
ze zásuvky a vyjměte též zástrčku z
přístroje.
C
2 Vyčistěte zastřihovač kartáčkem.
C
3 Na lišty zastřihovače kápněte každých šest
měsíců kapku oleje na šicí stroje.
ČESKY 49
OIL
Page 48

Výměna dílů
Holicí hlavy (typ HQ6 Quadra) vyměňte pro
zajištění nejlepších výsledků holení každé dva roky.
1 Vypněte přístroj, vyjměte zástrčku nabíječe
ze zásuvky a vyjměte též zástrčku z
přístroje.
C
2 Stiskněte uvolňovací tlačítko a otevřte
holicí jednotku.
C
3 Otočte kolečkem proti směru pohybu
hodinových ruček (1) a sejměte zajišťovací
rámeček (2).
C
4 Vyjměte holicí hlavy a na jejich místo
vložte nové holicí hlavy tak,aby jejich
výstupky přesně zapadly do výřezů v holicí
jednotce.
5 Zajišťovací rámeček vložte zpět do
přístroje, stiskněte kolečko a otočte jím ve
směru pohybu hodinových ruček.
6 Holicí jednotku uzavřete.
C
◗ Pokud byly holicí hlavy řádně vloženy, lesklé
části holicích hlav směřují proti sobě.
ČESKY50
2
1
Page 49
Uchovávání
C
◗ Nasaďte na přístroj ochraný kryt abyste
předešli poškození holicích hlav.
◗ Přístroj uchovávejte v luxusním pouzdru.
Příslušenství
Lze zakoupit následující příslušenství:
- HQ8000 síťová zástrčka.
- HQ6 Holicí hlavy Philishave Quadra
- HQ110 čisticí sprej pro holicí hlavy Philishave
Head Cleaner.
Ochrana životního prostředí
Likvidace akumulátoru
Vestavěný akumulátor obsahuje substance, které
po jeho rozpadu, mohou škodit životnímu
prostředí.
Když vám jednoho dne přístroj doslouží, vyjměte
nejprve jeho akumulátor. Akumulátor nezahazujte
do běžného domovního odpadu, ale odevzdejte
ho ve sběrně k tomu určené. Můžete ho též
odevzdat v servisním středisku firmy Philips,kde
se již postarají o jeho optimální likvidaci.
Akumulátor vyjměte jen když je ve zcela vybitém
stavu.
ČESKY 51
Page 50

1 Vypněte přístroj, vytáhněte zástrčku
síťového přívodu ze zásuvky a přívod
odpojte též od přístroje.
C
2 Motorek ponechte v chodu dokud se sám
nezastaví: pak povolte příslušné šroubky a
přístroj otevřete.
3 Vyjměte akumulátor.
Jakmile jste z přístroje vyjmuli akumulátor, nesmíte
ho již nikdy připojit k síti.
Záruka & servis
Pokud byste potřebovali jakoukoli informaci nebo
měli nějaký problém, nahlédněte na internetovou
stránku www.philips.com.Můžete se též spojit s
Informačním střediskem firmy Philips, jehož
adresu, telefonní číslo i další možnosti
kontaktování najdete na letáčku s celosvětovou
zárukou.
Odstranění případných poruch
1 Zhoršené výsledky holení
B
Příčina 1: holicí hlavy jsou špinavé. Přístroj nebyl
dostatečně vyčištěn nebo voda nebyla dostatečně
teplá.
◗ Přístroj důkladně vyčistěte dříve, než budete v
holení pokračovat (viz "Čištění a údržba").
ČESKY52
Page 51

B
Příčina 2: holicí hlavy jsou blokovány dlouhými
vousy.
C
◗ Vyjměte zajišťovací rámeček z holicí jednotky
po otočení kolečka proti směru pohybu
hodinových ruček.
◗ Vyjměte holicí hlavy z holicí jednotky.
C
◗ Přiloženým kartáčkem vyčistěte nože a
korunky.
Vyčistěte vždy jen jednu korunku a její nožový
věnec. Pokud byste do korunky vložili věnec, který
v ní původně nebyl, trvalo by týdny, než by se jiný
věnec v korunce zaběhnul a holení by v té době
mohlo být neuspokojivé.
◗ Vložte holicí hlavy zpět do holicí jednotky. Na
své místo vložte též zajišťovací rámeček,
stiskněte kolečko a otočte jím ve směru
pohybu hodinových ruček.
B
Příčina 3: holicí hlavy jsou poškozeny nebo
opotřebeny.
◗ Sejměte zajišťovací rámeček.
◗ Vyjměte staré holicí hlavy a nahraďte je
novými.
Poškozené nebo opotřebené hlavy (nože a
korunky) smějí být nahrazeny výhradně
originálními holicími hlavami HQ6 Philishave
Quadra.
◗ Zajišťovací rámeček vložte zpět do přístroje,
stiskněte kolečko a otočte jím ve směru
pohybu hodinových ruček.
ČESKY 53
2
Page 52

2 Holicí přístroj nepracuje, když je spínač
on/off stisknut.
B
Příčina: Přístroj je připojen k síti.
◗ Odpojte přístroj od sítě.
B
Příčina: Akumulátor je vybitý.
◗ Akumulátor nabijte.
ČESKY54
Page 53

Tudnivalók
A készülék használata előtt olvassa el a használati
útmutatót. Őrizze meg az útmutatót későbbi
használatra.
◗ A készülék töltéséhez és használatához csak a
mellékelt HQ600 hálózati adaptert használja.
◗ A hálózati adapter a 220-240 Volt váltakozó
feszültséget legfeljebb 24 Volt, biztonságos
alacsony feszültségre alakítja át.Csak a
tartozék hálózati adapter biztosítja a
biztonságos transzformálást.
◗ A hálózati adapter transzformátort tartalmaz.
Ne vágja le a csatlakozó vezetéket a hálózati
adapterről és ne csatlakoztassa a borotvát
másik hálózati adapterhez, mert ez veszélyes
lehet.
C
◗ Vigyázzon, hogy a HQ600 hálózati adapter és
a csatlakozó kábel ne legyen nedves.
C
◗ A készülék megfelel a nemzetközi jóváhagyott
IEC biztonsági előírásoknak és biztonságosan
tisztítható vízcsap alatt.
Óvatosan bánjon a meleg vízzel. Mindig
ellenőrizze, hogy a víz ne legyen túl forró, nehogy
leforázza a kezeit.
◗ Zajszint: Lc=61 dB [A]
MAGYAR 55
Page 54

Töltés
Töltés kijelzések
C
◗ Amint tölteni kezdi a lemerült borotvát,világít
a zöld színű jelző LED.
◗ Az akkumulátor teljes feltöltése után villogni
kezd a zöld jelző LED.
A készülék feltöltése
Ne töltse a borotvát a zárt táskában.
A készüléket 5cC és 35cC közötti hőmérsékleten
töltse és tárolja.
A borotva nem működik töltés közben. Ez azt
jelenti, hogy a készüléket töltés közben nem tudja
használni.
Ha először vagy hosszabb használaton kívüli idő
után tölti fel a készüléket:hagyja töltődni a
borotvát folyamatosan, 12 óra hosszat. A szokásos
töltési idő kb. 8 óra.
C
1 Dugja a készülék csatlakozó dugóját a
borotvába.
2 Dugja a hálózati adaptert a fali
konnektorba.
3 Az akkumulátor élettartamának
növeléséhez húzza ki a hálózati adapter
csatlakozó dugóját a fali konnektorból és a
MAGYAR56
Page 55

borotvából, miután az akkumulátort
teljesen feltöltötte.
◗ Vezeték nélküli borotválkozási idő
A teljesen feltöltött borotvával max. 30 percig
lehet vezeték nélkül borotválkozni.
A készülék használata
Borotválkozás
1 Húzza ki a készülékből a csatlakozó dugót
mielőtt borotválkozni kezd.
2 Kapcsolja be a borotvát a be-/kikapcsoló
gomb egyszer történő megnyomásával.
C
3 Gyorsan mozgassa a borotvafejeket a
bőrén, egyenes és körkörös mozdulatokat
végezve.
A száraz bőrön történő borotválkozás biztosítja a
legjobb eredményt.
Bőrének 2-3 hétre lehet szüksége ahhoz, hogy a
Philishave rendszerhez hozzászokjon.
4 Kapcsolja ki a borotvát a be-/kikapcsoló
gomb egyszeri megnyomásával.
C
5 Használat után mindig tegye fel a
készülékre a védősapkát, hogy megvédje a
sérüléstől.
MAGYAR 57
Page 56

Pajeszvágó
Az oldalszakáll és a bajusz ápolásához.
C
1 Kapcsolja be a pajeszvágót a
csúszókapcsoló felfelé nyomásával.
2 A pajeszvágót a készülék működése
közben is bekapcsolhatja.
Tisztítás
A rendszeres tisztítás biztosítja a legjobb
borotválkozási eredményt.
Óvatósan bánjon a meleg vízzel. Mindig
ellenőrizze, hogy a víz ne legyen túl forró, nehogy
leforázza a kezeit.
Borotva egység
Amikor tisztítja a készüléket nem szükséges
levenni a borotva fejeket (vágókéseket, szitákat).
Ha azonban levette, figyeljen rá, hogy ne keverje
össze a késeket és a szitákat mivel csak a
páronként, a szitával összecsiszolt késekkel legjobb
a borotválkozás eredménye. Ha véletlenül mégis
összekeverte őket, eltelhet néhány hét,amíg eléri
az optimális borotválkozási eredményt.
A készülék tisztításának legegyszerűbb és
leghigiénikusabb módja az, hogy a borotva
készüléket és a szőrkamrát a készülék minden
használata után forró vízzel kiöblíti.
MAGYAR58
Page 57

1 Kapcsolja ki a borotvát, húzza ki a hálózati
adaptert a fali konnektorból és húzza ki a
hálózati adapter csatlakozó dugóját a
borotvából.
C
2 Nyomja meg a kioldó gombot a
borotvaegység nyitásához.
C
3 A borotva készüléket és a szőrkamrát
melegvizes csap alatt öblítse le néhányszor.
4 Zárja vissza a borotvaegységet és rázza ki
a felesleges vizet.
Soha ne szárítsa meg a borotvaegységet
törülközővel vagy papírzsebkendővel, mivel ezek
megsérthetik a borotvafejeket.
C
1 Nyissa ki ismét a borotvaegységet, és
hagyja hogy a készülék teljesen
megszáradjon.
◗ A szőrkamrát ne vízzel, hanem a készülékkel
együtt szállított kefe segítségével tisztítsa ki.
Pajeszvágó
Minden használat után tisztítsa meg a pajeszvágót.
1 Kapcsolja ki a borotvát, húzza ki a hálózati
adaptert a fali konnektorból és húzza ki a
hálózati adapter csatlakozó dugóját a
borotvából.
C
2 A pajeszvágót kefével tisztítsa meg.
MAGYAR 59
Page 58

C
3 Hat havonta olajozza meg a pajeszvágó
fogait egy csepp varrógépolajjal.
Borotvafejek cseréje
A legjobb borotválkozási eredmény érdekében 2
évente cserélje ki a borotvafejeket (típus: HQ6
Quadra).
1 Kapcsolja ki a borotvát, húzza ki a hálózati
adaptert a fali konnektorból és húzza ki a
hálózati adapter csatlakozó dugóját a
borotvából.
C
2 Nyomja meg a kioldó gombot a
borotvaegység nyitásához.
C
3 Forgassa a tengelyt az óramutató járásával
ellenkező irányba (1) és vegye ki a
tartókeretet (2).
C
4 Emelje ki a borotvafejeket és tegyen a
borotvába újakat úgy, hogy a csapok
pontosan illeszkedjenek a borotva készülék
mélyedéseibe.
5 Tegye vissza a tartókeretet a
borotvaegységbe, nyomja meg a tengelyt,
és fordítsa el az óramutató járásával
egyező irányba.
MAGYAR60
OIL
2
1
Page 59

6 Zárja le a borotvaegységet.
C
◗ Ha a borotvafejeket megfelelően helyezte be,
a fényes részek befelé mutatnak a többi
résszel szemben.
Tárolás
C
◗ Tegye fel a borotvára a védősapkát, hogy az
óvja a sérüléstől.
◗ A készüléket az utazó tokban tárolja.
Tartozékok
A következő tartozékok vásárolhatók a
készülékhez:
- HQ8000 hálózati adapter.
- HQ6 Philishave Quadra borotvafejek.
- HQ110 Philishave Shaving Head Cleaner
(borotvafej-tisztító spray)
Környezetvédelem
Az akkumulátor kiselejtezése
A beépített tölthető akkumulátor olyan anyagokat
tartalmaz, amelyek szennyezik a környezetet.
A készülék selejtezése előtt vegye ki az
akkumulátort. Az akkumulátort ne dobja a
háztartási szemétbe, hanem adja át a hivatalos
MAGYAR 61
Page 60

gyűjtőhelyen. Beviheti a készüléket Philips
szakszervizbe is, ahol kiveszik az akkumulátort és
környezetvédelmi szempontból biztonságos
módon selejtezik ki.
Csak teljesen üres állapotban távolítsa el az
akkumulátort.
1 Kapcsolja ki a készüléket,húzza ki a
hálózati adaptert a fali konnektorból és
húzza ki a készülék csatlakozó dugóját a
borotvából.
C
2 Hagyja leállásig működni a borotvát, majd
vegye ki a csavarokat és nyissa fel a
borotvát.
3 Távolítsa el az akkumulátort.
Ne csatlakoztassa a borotvát a fali konnektorhoz
ha az akkumulátort kivette a készülékből.
Garancia és javítás
Ha valamilyen információra van szüksége, vagy
valamilyen probléma merült fel,akkor látogasson
el a Philips honlapjára (www.philips.com), vagy
forduljon országa Philips vevőszolgálatához (a
telefonszámot megtalálja a világ minden részére
kiterjedő garancialevélen). Ha lakóhelyén nincs
vevőszolgálat, forduljon a Philips helyi
szaküzletéhez vagy a Philips háztartási kisgépek és
szépségápolási termékek üzletágának
vevőszolgálatához.
MAGYAR62
Page 61

Hibaelhárítás
1 Gyengén borotvál a készülék.
B
1. ok: a borotvafejek piszkosak. A borotvát nem
öblítette ki elég hosszú ideig vagy a használt víz
nem volt elég forró.
◗ Mielőtt folytatná a borotválkozást, tisztítsa
meg alaposan a borotvát (lásd a "Tisztítás" c.
részt)
B
2. ok:A hosszú szőrszálak eltömték a
borotvafejeket.
C
◗ Vegye ki a borotvából a tartókeretet úgy, hogy
a tengelyt az óra járásával ellenkező irányba
forgatja.
◗ Vegye ki a borotva készülékből a
borotvafejeket.
C
◗ A mellékelt kefével távolítsa el a szőrszálakat a
vágókésekről és a szitákról.
Egyszerre csak egy vágókést és szitát tisztítson,
mert azokat összecsiszolták. Ha véletlenül
összekeveri a vágókéseket és szitákat, eltelhet
néhány hét, mielőtt eléri az optimális
borotválkozási eredményt.
◗ Illessze vissza a borotvaegységbe a
borotvafejeket.Tegye vissza a tartókeretet a
borotvaegységbe, nyomja meg a tengelyt, és
fordítsa el az óramutató járásával egyező
irányba.
B
3. ok:A borotvafejek sérültek vagy kopottak.
MAGYAR 63
2
Page 62

◗ Vegye ki a tartókeretet.
◗ Vegye ki az elhasználódott borotvafejeket a
borotvaegységből és cserélje ki őket újakra.
A sérült vagy kopott borotvafejeket (vágókések és
sziták) csak eredeti HQ6 Philishave Quadra
borotvafejekre cserélje.
◗ Tegye vissza a tartókeretet a
borotvaegységbe, nyomja meg a tengelyt, és
fordítsa el az óramutató járásával megegyező
irányba.
2 Ha megnyomja a be-/kikapcsoló gombot,a
borotva nem működik.
B
1. ok:A borotvát a hálózati adapterhez
csatlakoztatta.
◗ Húzza ki a hálózati adaptert a fali
konnektorból és a csatlakozó dugót a
készülékből.
B
2. ok:Az akkumulátor lemerült.
◗ Töltse fel az akkumulátort.
MAGYAR64
Page 63
Dôležité upozornenie
Pred použitím zariadenie si pozorne prečítajte
nasledujúce pokyny a návod si odložte na
neskoršie použitie.
◗ Na nabíjanie zariadenia a na holenie používajte
len dodaný adaptér HQ600.
◗ Adaptér HQ600 mení napätie 220-240 voltov
na bezpečné napätie 24 voltov. Len dodaný
adaptér garantuje bezpečnú transformáciu
vysokého napätia.
◗ Súčasťou adaptéra je transformátor.
Neoddeľte adaptér, aby ste ho nahradili iným
typom zástrčky, lebo spôsobíte nebezpečnú
situáciu.
C
◗ Dbajte, aby sa adaptér HQ600 ani kábel
nedostali do styku s vodou.
C
◗ Zariadenie vyhovuje bezpečnostným
predpisom IEC a môžete ho bezpečne čistiť
pod tečúcou vodou.
Dajte pozor na horúcu vodu. Skontrolujte, či voda
nie je horúca, aby ste si nepopálili ruky.
◗ Deklarovaná hodnota emisie hluku tohto
spotrebiča je 61 dB(A), čo predstavuje hladinu
A akustického výkonu vzhľadom na
referenčný akustický výkon 1 pW.
SLOVENSKY 65
Page 64

Nabíjanie
Ukazovateľ nabíjania
C
◗ Po pripojení zariadenia s vybitou batériou do
siete sa rozsvieti zelené kontrolné svetlo.
◗ Keď je batéria úplne nabitá,začne blikať
zelené kontrolné svetlo.
Nabíjanie zariadenia
Zariadenie nenabíjajte v uzatvorenom púzdre.
Zariadenie nabíjajte a odkladajte pri teplote okolia
5cC a 35cC.
Počas nabíjania sa nemôžete holiť, pretože počas
dobíjania batérie zariadenie nepracuje.
Pri prvom nabíjaní, alebo po dlhšej dobe bez
použitia: nechajte holiaci strojček nabíjať
nepretržite 12 hodín. Nabíjanie bežne trvá
približne 8 hodín.
C
1 Koncovku pripojte do otvoru v holiacom
strojčeku.
2 Adaptér pripojte do siete.
3 Aby ste predĺžili životnosť batérie,
akonáhle sú batérie úplne nabité, odpojte
adaptér zo siete a jeho koncovku odpojte
z holiaceho strojčeka.
SLOVENSKY66
Page 65
◗ Holenie bez pripojenia do siete
Holiaci strojček s plne nabitými batériami
umožňuje až 30 minút holenia bez potreby
pripojiť zariadenie do siete.
Použitie zariadenia
Holenie
1 Pred holením odpojte koncovku adaptéra z
otvoru v holiacom strojčeku.
2 Stlačením vypínača zapnite holiaci strojček.
C
3 Rýchlo pohybujte holiacimi hlavami po
pokožke,robte rovné aj krúživé pohyby.
Holením na suchej pokožke dosiahnete najlepšie
výsledky.
Môže trvať 2-3 týždne, kým si Vaša pokožka
zvykne na holiaci systém Philishave.
4 Holiaci strojček vypnete jedným stlačením
hlavného vypínača ON/OFF.
C
5 Aby ste predišli poškodeniu,po každom
použití nasaďte na holiaci strojček
ochranný kryt.
SLOVENSKY 67
Page 66

Zastrihovač
Na strihanie bokombrady a fúzov.
C
1 Otvorte zastrihovač posunutím vypínača
smerom nahor.
2 Zastrihovač môžete aktivovať aj počas
chodu motora.
Čistenie a údržba
Pravidelné čistenie zabezpečuje lepšie výsledky
holenia.
Dajte pozor na horúcu vodu. Skontrolujte, či voda
nie je horúca, aby ste si nepopálili ruky.
Holiaca jednotka
Pri čistení zariadenia nie je potrebné odpojiť
holiace hlavy (rezače a zdvíhače). Ak ich chcete
odpojiť, dbajte, aby ste nepomiešali rezače so
zdvíhačmi, pretože ostrenie rezača vo zdvíhači
zabezpečuje optimálny chod každej sady.Ak sady
omylom pomiešate môže trvať týždne, kým sa
opäť dosiahne optimálna kvalita holenia.
Najjednoduchšií a hygienicky najvhodnejší spôsob
čistenia zariadenia je opláchnutie holiacej jednotky
a komory na chlpy horúcou vodou po každom
použití holiaceho strojčeka.
SLOVENSKY68
Page 67

1 Vypnite zariadenie, adaptér odpojte zo
siete a koncovku kábla odpojte z holiaceho
strojčeka.
C
2 Stlačte uvoľňovacie tlačidlo na otvorenie
holiacej jednotky.
C
3 Holiacu jednotku a komoru na chĺpky
očistite opláchnutím pod prúdom horúcej
vody.
4 Uzatvorte holiacu jednotku a otraste z nej
prebytočnú vodu.
Holiacu jednotku nesmiete sušiť pomocou
uteráka ani inej tkaniny, pretože by ste mohli
poškodiť holiacu hlavu.
C
1 Holiacu jednotku znovu otvorte a nechajte
celé zariadenie úplne usušiť.
◗ Komôrku na chĺpky môžete očistiť aj bez
použitia vody pomocou dodanej kefky.
Zastrihovač
Zastrihovač vyčistite po každom použití.
1 Vypnite zariadenie, adaptér odpojte zo
siete a koncovku kábla odpojte z holiaceho
strojčeka.
C
2 Zastrihovač vyčistite kefkou.
SLOVENSKY 69
Page 68

C
3 Každých šesť mesiacov namažte zúbky
zastrihovača kvapkou oleja na šijacie
stroje.
Výmena
Holiace hlavy vymieňajte raz za dva roky (typ
HQ6 Quadra), aby ste zachovali optimálny výkon
zariadenia.
1 Vypnite zariadenie, adaptér odpojte zo
siete a koncovku kábla odpojte z holiaceho
strojčeka.
C
2 Stlačte uvoľňovacie tlačidlo na otvorenie
holiacej jednotky.
C
3 Koliesko otočte proti smeru chodu
hodinových ručičiek (1) a vytiahnite
zachytávací rám (2).
C
4 Vo vnútri holiacej jednotky vymeňte
opotrebované holiace hlavy za nové tak,
aby ich výstupky smerovali priamo do
vybraní v holiacej jednotky.
5 Zachytávací rám vložte späť do holiacej
jednotky, stlačte koliesko a otočte ním v
smere pohybu hodinových ručičiek.
6 Zatvorte holiacu jednotku.
SLOVENSKY70
OIL
2
1
Page 69

C
◗ Ak boli holiace hlavy riadne vložené, lesklé
časti smerujú dnu a smerom k sebe.
Odkladanie
C
◗ Aby ste zabránili poškodeniu,dajte na holiaci
strojček ochranný kryt.
◗ Zariadenie odkladajte do jeho luxusného
púzdra.
Príslušenstvo
K dispozícii máte nasledujúce príslušenstvo:
- Adaptér HQ600.
- Holiace hlavy HQ6 Philishave Quadra.
- Sprej na čistenie holiacich hláv HQ110
Philishave Head Cleaner.
Životné prostredie
Odstránenie batérie
Zabudovaná dobíjateľná batéria obsahuje zložky
ktoré môžu znečistiť životné prostredie.
Pred zneškodnením zariadenia vyberte batériu.
Neodhadzujte ju spolu s bežným odpadom, ale
zaneste ju na miesto oficiálneho zberu. Zariadenie
tiež môžete zaniesť do servisného centra
SLOVENSKY 71
Page 70

spoločnosti Philips, kde z neho vyberú batériu
aodstránia ju spôsobom, ktorý neohrozuje životné
prostredie.
Batériu odstráňte až keď je úplne vybitá.
1 Odpojte adaptér zo siete a kábel z otvoru
v holiacom strojčeku.
C
2 Zariadenie nechajte v činnosti kým
nezastane, odskrutkujte skrutky a otvorte
holiaci strojček.
3 Vyberte batériu.
Akonáhle vyberiete batériu, holiaci strojček už
nepripájajte do siete.
Záruka a servis
Ak potrebujete informácie, alebo máte problém,
prosíme Vás, aby ste navštívili www stránku
spoločnosti Philips - www.philips.com,alebo sa
obrátili na Centrum služieb zákazníkom
spoločnosti Philips vo Vašej krajine (telefónne číslo
Centra nájdete v priloženom celosvetovo
platnom záručnom liste).Ak sa vo Vašej krajine
toto Centrum nenachádza, obráťte sa na
miestneho predajcu výrobkov Philips, alebo
kontaktujte Oddelenie služieb Philips - divízia
domáce spotrebiče a osobná starostlivosť.
SLOVENSKY72
Page 71

Odstraňovanie porúch
1 Znížený výkon holenia
B
Príčina 1: holiace hlavy sú znečistené. Holiaci
strojček ste riadne neopláchli, alebo ste ho opláchli
pod vodou, ktorá nemala dostatočnú teplotu.
◗ Skôr, ako budete pokračovať v holení, riadne
vyčistite holiaci strojček (viď "Čistenie a
údržba").
B
Príčina 2: dlhé chlpy zavadzajú holiacim hlavám.
C
◗ Otočte kolieskom proti smeru pohybu
hodinových ručičiek a vyberte zachytávací rám
z holiacej jednotky.
◗ Vyberte holiace hlavy z holiacej jednotky.
C
◗ Pomocou dodanej kefky odstráňte chĺpky z
rezačov a zdvíhačov.
Nečistite viac ako jeden rezač a zdvíhač naraz,
nakoľko predstavujú sadu.Ak ich omylom
pomiešate, môže trvať niekoľko týždňov,kým
opäť dosiahnú optimálny výkon.
◗ Holiace hlavy vložte späť do holiacej jednotky.
Zachytávací rám vložte späť do holiacej
jednotky, stlačte koliesko a otočte ním v
smere pohybu hodinových ručičiek.
B
Príčina 3: holiace hlavy sú poškodené, alebo
opotrebované.
◗ Vyberte zachytávací rám.
SLOVENSKY 73
2
Page 72

◗ Odstráňte staré holiace hlavy z holiacej
jednotky a nahraďte ich novými.
Poškodené alebo opotrebované holiace hlavy
(rezače a zdvíhače) vymeňte jedine za originálne
holiace hlavy Philishave HQ6 Quadra.
◗ Zachytávací rám vložte späť do holiacej
jednotky, stlačte koliesko a otočte ním v
smere pohybu hodinových ručičiek.
2 Po stlačení vypínača holiaci strojček
nepracuje.
B
Príčina: Holiaci strojček je pripojený do siete.
◗ Holiaci strojček odpojte zo siete.
B
Príčina: vybitá batéria.
◗ Nabite batériu.
SLOVENSKY74
Page 73

Увага
Прочитайте цю інструкцію уважно перед
використанням пристрою та зберігайте для
подальшого використання.
◗ Для підзарядки та експлуатації цього
пристрою застосовуйте блок живлення
HQ600, що додається.
◗ Блок живлення перетворює напругу 220-
240 В у безпечну низьку напругу менше 24
В. Тільки блок живлення, що додається,
гарантує безпечне перетворення.
◗ У блоку живлення знаходиться
трансформатор.Не від'єднуйте блок
живлення для заміни іншим, оскільки це
може спричинити небезпечну ситуацію.
C
◗ Переконайтеся, що блок живлення HQ600
та пристрій не намокають.
C
◗ Пристрій відповідає міжнародним
нормативним актам із безпеки IEC, і його
можна безпечно мити під краном.
Будьте обережні з гарячою водою. Завжди
перевіряйте, чи не надто гаряча вода, щоб не
допустити опіків рук.
◗ Рівень шуму: Lc= 61 dB [A]
УКРАЇНСЬКІЙ 75
Page 74

Заряджання
Індикація зарядження
C
◗ Як тільки ви починаєте заряджати бритву,
загорається зелена лампа.
◗ Коли акумулятор повністю зарядився,
починає миготіти зелена контрольна
лампочка.
Підзарядка пристрою
Не заряджайте бритву у закритому пакунку
Перезаряджайте та зберігайте пристрій при
температурі від 5 cC до 35cC.
Під час зарядження батареї бритва не працює,
тобто ви не зможете нею скористатися для
гоління.
При підзарядці уперши або після тривалого
періоду невикористання: залиште бритву
заряджатися протягом 12 годин Підзарядка
зазвичай триває близько 8 години.
C
1 Вставте вилку приладу у електробритву.
2 Вставте вилку-адаптер до розетки
електромережі.
3 Щоб подовжити термін служби
акумулятора,виймайте вилку з розетки
УКРАЇНСЬКІЙ76
Page 75

та від'єднуйте шнур від бритви після
повної зарядки акумулятора.
◗ Час гоління без шнура
Повністю заряджений акумулятор
електробритви забезпечує вам до 30 хвилин
гоління без електромережі.
Використання пристрою
Гоління.
1 Перед початком гоління витягніть вилку
приладу з бритви.
2 Ввімкніть бритву, один раз натиснувши
на кнопку вмикання /вимикання.
C
3 Швидкими поступальними і коловими
рухами переміщуйте голівку для гоління
по шкірі.
Якість гоління буде найвищою, якщо шкіра суха.
Для звикання шкіри до бритви Philishave може
знадобитися 2 - 3 тижні.
4 Вимкніть бритву, натиснувши одного
разу на кнопку on/off (вкл/викл).
C
5 Надівайте захисний ковпачок на бритву
кожного разу після використання, щоб
запобігти пошкодженню.
УКРАЇНСЬКІЙ 77
Page 76

Тример
Для підрівнювання баків і вусів.
C
1 Підготуйте тример до роботи,
пересунувши движок вверх.
2 Тример можна привести в робочий стан
тільки при працюючому двигуні.
Чищення та догляд
Регулярне чищення гарантує кращу роботу
електробритви.
Будьте обережні з гарячою водою. Завжди
перевіряйте, чи не надто гаряча вода, щоб не
допустити опіків рук.
Блок для гоління.
Для чистки бритви зніміть з неї бритвені
голівки (ножі і захист). Якщо ви бажаєте їх
розібрати, то зверніть увагу на те, щоб вони
завжди залишалися у парі, тому що лише у цій
парі вони можуть працювати оптимально.
Якщо ж цього правила не дотримуватися і
змішати у парі частини з різних пар, то до
відновлення оптимальних характеристик
гоління пройде декілька тижнів.
Найпростіший та самий гігієнічний спосіб
чищення - це промивання бритвеного блоку та
УКРАЇНСЬКІЙ78
Page 77
камери для волосся під краном гарячої води
кожного разу після використання пристрою.
1 Вимкніть електробритву, вийміть вилку-
адаптер з розетки електромережі та
вийміть штекер приладу з
електробритви.
C
2 Натисніть кнопку замка і відкрийте блок
для гоління.
C
3 Чистіть блок гоління та камеру для
збирання відрізаних волосків,
промиваючи їх під гарячою водою.
4 Закрийте блок для гоління та струсить
воду, що залишилися після промивання.
Ніколи не протирайте голівки для голінн
полотенцем або якоюсь ганчіркою, бо це може
пошкодити леза бритви.
C
1 Відкрийте блок для гоління знову та
залиште їх відкритими, доки пристрій
повністю не висохне.
◗ Камеру для волосків ви можете почистити
й без води - щіточкою,що входить у
комплект бритви.
Тример
Ножиці слід чистити кожного разу після їх
використання.
УКРАЇНСЬКІЙ 79
Page 78

1 Вимкніть електробритву, вийміть вилку-
адаптер з розетки електромережі та
вийміть штекер приладу з
електробритви.
C
2 Почистіть тример щіточкою.
C
3 Один раз на шість місяців змащуйте
зубці ножиць краплею машинного
мастила.
Заміна
Для досягнення оптимальних результатів
гоління голівки для гоління (типу HQ6 Quadra)
слід замінювати кожні два роки.
1 Вимкніть електробритву, вийміть вилку-
адаптер з розетки електромережі та
вийміть штекер приладу з
електробритви.
C
2 Натисніть кнопку замка і відкрийте блок
для гоління.
C
3 Поверніть коліщатко (1) проти
годинникової стрілки та зніміть
утримуючу рамку (2).
УКРАЇНСЬКІЙ80
OIL
2
1
Page 79

C
4 Зніміть бритвені головки та встановіть
нові у бритвений блок так, щоб виступи
точно потрапили у пази у бритвеному
блоці.
5 Встановіть утримуючу рамку на
бритвений блок, натисніть коліщатко та
поверніть його за годинниковою
стрілкою.
6 Закрийте бритвений блок.
C
◗ Якщо бритвені голівки вставлено
правильно, то блискучі елементи обернено
всередину та в напрямку одна до одної.
Зберігання
C
◗ Надіньте захисний ковпачок на бритву, щоб
запобігти пошкодженню.
◗ Зберігайте пристрій у чохлі.
Приладдя
Існує таке приладдя:
- Блок живлення "HQ8000".
- Головки для гоління "HQ6 Philishave Quadra".
- Розпилювач для чищення насадок для гоління
"HQ110 Philishave Head Cleaner".
УКРАЇНСЬКІЙ 81
Page 80

Захист оточуючого середовища
Заміна акумулятора
Вмонтований акумулятор містить речовини, що
можуть забруднювати довкілля.
Виймайте батарею, коли Ви викидаєте
пристрій. Не викидайте акумулятор зі
звичайним побутовим сміттям, доставляйте
його до офіційного прийомного пункту. Ви
також можете віднести пристрій до сервісного
центру "Philips", де витягнуть акумулятор та
ліквідують його безпечним для середовища
чином.
Позбавлятися слід лише від повніст
розрядженого акумулятора.
1 Витягніть вилку шнура живлення з
розетки електромережі, а вилку приладу
з електробритви.
C
2 Дайте бритві попрацювати, поки вона
зупиниться, викрутіть гвинти і відкрийте
бритву.
3 Як позбавлятися від акумулятора.
Не підключайте бритву до мережі після того
як акумулятор було вийнято.
УКРАЇНСЬКІЙ82
Page 81

Гарантія та сервіс
Якщо Вам потрібна інформація або у Вас
виникли проблеми з приладом, будь ласка,
завітайте до веб-сайту фірми Philips (aдреса в
Інтернеті: www.philips.com) або зв'яжіться з
найближчим центром Philips по
обслуговуванню клієнтів Philips Customer Care
Centreу Вашій країні (Ви можете знайти його
номер телефону у єдиному гарантійному
талоні, дійсному в усьому світі). Якщо у Вашій
країні немає центру Philips по обслуговуванню
клієнтів Philips Customer Care Centre,
зверніться до Вашого місцевого торгового
представникафірми Philips або зв'яжіться з
департаментом обслуговування Service
Department відділення Philips Domestic
Appliances and Personal CareBV.
Пошук та усунення несправностей
1 Погіршене гоління
B
Причина 1: бритвені головки забруднені.
Бритву довго не промивали, або промивали
недостатньо гарячою водою.
◗ Чистіть бритву ретельно перед
продовженням гоління (див."Чищення та
догляд").
B
Причина 2: довге волосся заважає голівкам з
лезами.
УКРАЇНСЬКІЙ 83
Page 82

C
◗ Зніміть утримуючу рамку з бритвеного
блоку, повернувши коліщатко проти
годинникової стрілки.
◗ Зніміть бритвені головки з бритвеного
блоку.
C
◗ Витрусіть волосся з ножів та запобіжних
≠раток щіткою, що додається.
Не чистіть більше за один ніж та одну сітку за
один раз, оскільки вони підогнані одне до
одного. Якщо ви випадково переплутаєте сітки
та ножі, то для відновлення оптимальних
характеристик гоління може знадобитися
кілька тижнів.
◗ Встановіть бритвені головки на бритвений
блок. Встановіть утримуючу рамку на
бритвений блок, натисніть коліщатко та
поверніть його за годинниковою стрілкою.
B
Причина 3: головки з лезами пошкоджено, або
вони зносилися.
◗ Зніміть рамку-фіксатор.
◗ Вийміть старі бритвені голівки з бритвеного
блоку та замініть їх новими.
Пошкоджені чи зношені бритвені голівки (ножі
та ≠ратки) можна заміняти тільки
оригінальними голівками HQ6 Philishave
Quadra.
◗ Встановіть утримуючу рамку на бритвений
блок, натисніть коліщатко та поверніть його
за годинниковою стрілкою.
УКРАЇНСЬКІЙ84
2
Page 83

2 Бритва не працює, коли кнопку
вмк./вимк. натиснуто.
B
Причина: Електробритва підключена до
мережі.
◗ Від'єднайте електробритву від мережі.
B
Причина: акумулятор розряджений.
◗ Знову зарядіть батарею.
УКРАЇНСЬКІЙ 85
Page 84

Važno
Pažljivo pročitajte ovu uputu prije uporabe
aparata te ju sačuvajte za kasniju uporabu.
◗ Koristite iskljucivo ispravljač HQ600 koji
dolazi u pakiranju s aparatom.
◗ Ispravljač transformira napon od 220-240V u
sigurni napon od 24V. jedino isporučeni
ispravljač jamči ispravan rad.
◗ Punjač sadrži transformator. Nemojte odrezati
utikač punjača i zamijeniti ga drugim utikačem,
jer ćete time izazvati opasnost.
C
◗ Nikada ne dozvolite da se ispravljač smoči.
C
◗ Aparat je proizvedeb u skladu s
medjunarodnim IEC sigurnosnim normama i
može se sigurno čistiti i prati pod vodom.
Budite oprezni s vrućom vodom, pazite da ne
opečete ruke.
◗ Razina buke: Lc = 77 dB(A)
Punjenje
Indikacije punjenja
C
◗ Odmah po početku punjenja praznog aparata
zelena žaruljica počinje svijetliti.
◗ Kada se baterije napune do kraja, zelena
kontrolna lampica počinje "blinkati".
HRVATSKI86
Page 85

Punjenje aparata
Nemojte puniti brijaći aparat u zatvorenoj torbici.
Aparat punite i pohranite na temperaturi između
5cC i 35cC.
Tijekom punjenja nije moguće koristiti aparat.
Ako punite batriju prvi puta ili nakon dugog
vremen nekoristenja: punite aparata neprekidno
12 sati. Normalno punjenje traje cca 8 sati.
C
1 Utaknite priključak u brijaći aparat.
2 Utaknite kabel punjača u zidnu utičnicu.
3 Za dulji radni vijek baterije, po završetku
punjenja izvucite utikač iz zidne utičnice i
aparata.
◗ Vrijeme brijanja
Sasvim napunjenim aparatom moguće se brijati
do 30 minuta bez uključenja u mrežno napajanje.
Uporaba aparata
Brijanje
1 Prije brijanja izvucite utikač iz aparata.
2 Uključite aparat jednim pritiskom na tipku
za uključenje/isključenje.
HRVATSKI 87
Page 86

C
3 Brzim, ravnim i kružnim pokretima
prelazite brijaćim glavama preko kože.
Najbolje rezultate daje brijanje suhe kože.
Koži će biti potrebno 2-3 tjedna da se privikne na
Philishave sustav.
4 Isključite aparat jednim pritiskom na tipku
za uključenje/isključenje.
C
5 Nakon svake uporabe na aparat stavite
zaštitni pokrov kako bi spriječili oštećenja.
Podrezivač
Za podrezivanje zalizaka i brkova.
C
1 Otvorite podrezivač tako da pritisnete
klizač prema gore.
2 Podrezivač se može uključiti za vrijeme
rada motora.
Čišćenje i održavanje
Redovitim čišćenjem postižu se bolji rezultati pri
brijanju.
Budite oprezni s vrućom vodom, pazite da ne
opečete ruke.
Brijaća glava
Pri čišćenju nije nužno rastavljati brijaće glave
(noževe i štitnike). Učinite li tako, pazite da ne
HRVATSKI88
Page 87

pomiješate noževe i štitnike jer njihovo
međusobno trenje jamči optimalni rad. Ako ih
slučajno pomiješate, možda će biti potrebno
nekoliko tjedana prije ponovnog optimalnog rada
aparata.
Najlakši i najhigijenskii način za čišćenjeaparata je
da isperete brijaću glavu i spremište za dlačice
ispod mlaza vruće vode nakon svakog korištenja.
1 Isključite aparat, izvucite kabel punjača iz
zidne utičnice i aparata.
C
2 Pritisnite tipku za otpuštanje za otvaranje
brijaće jedinice.
C
3 Brijaću jedinicu i komoru za dlačice
isperite pod vrućom vodom.
4 Zatvorite brijaću jedinicu i otresite
preostalu vodu.
Nikada ne sušite brijaću jedinicu frotirskim ili
papirnatim ručnikom jer to može oštetiti brijaće
glave.
C
1 Ponovo otvorite brijaću jedinicu i ostavite
je otvorenom kako bi se aparat u
potpunosti osušio.
◗ Spremnik za dlačice možete očistiti i pomoću
isporučene četkice.
HRVATSKI 89
Page 88

Podrezivač
Očistite podrezivač nakon svake uporabe.
1 Isključite aparat, izvucite kabel punjača iz
zidne utičnice i aparata.
C
2 Očistite podrezivač četkicom.
C
3 Svakih šest mjeseci podmažite zupce
podrezivača jednom kapi ulja za šivaće
strojeve.
Zamjena brijaćih glava
Za optimalne rezultate, zamijenite brijaće glave
(tip HQ6 Quadra) svake 2 godine.
1 Isključite aparat, izvucite kabel punjača iz
zidne utičnice i aparata.
C
2 Pritisnite tipku za otpuštanje za otvaranje
brijaće jedinice.
C
3 Okrenite kotačić u smjeru obrnutim od
kazaljke na satu (1) te izvadite pričvrsni
okvir(2).
HRVATSKI90
OIL
2
1
Page 89

C
4 UKlonite brijaće glave te stavite nove na
taj način da ih postavite točno u ležište,
kako su i stare glave brijaće glave bile
postavljene.
5 Stavite nazad pričvrsni okvir, pritisnite
kotačić te ga okrenite u smjeru kazaljke na
satu.
6 Zatvorite brijaću jedinicu.
C
◗ Ako brijaće glave nisu ispravno uložene, sjajni
dijelovi će biti okrenuti jedni prema drugima.
Pohranjivanje
C
◗ Kako bi spriječili oštećenja, vratite zaštitni
pokrov na aparat.
◗ Spremite aparat u vrećicu.
Pribor
Raspoloživ je sljedeći dodatni pribor:
- HQ8000 punjač.
- HQ6 Philishave Quadra brijaće glave.
- HQ110 Philishave Head Cleaner raspršivač za
čišćenje brijaće glave.
HRVATSKI 91
Page 90

Napomene o zaštiti okoliša
Odbacivanje baterije
Ugrađena akumulatorska baterija sadrži substance
koje mogu onečistiti okoliš.
Izvadite baterije prilikom odlaganja brijaćeg
aparata. Baterije ne odlažite zajedno s normalnim
kućnim smećem, odnesite ih na sluzbeno
propisano mjesto za prikupljanje takvog otpada.
Takodjer mozete odnijeti aparat u ovlasteni Philips
servis kako bi Vam osoblje izvadilo baterije te ih
odložilo na propisani deponij.
Izvadite bateriju samo ako je potpuno prazna.
1 Izvucite mrežni kabel iz zidne utičnice i
priključak sa brijaćeg aparata.
C
2 Ostavite brijaći aparat uključen dok se ne
zaustavi, odvijte vijke i otvorite brijaći
aparat.
3 Izvadite bateriju.
Nakon vađenja baterije nemojte priključivati
aparat na napajanje.
Jamstvo i servis
Ako su Vam potrebne određene informacije ili
ako imate problem, posjetite Philipsove Web
stranice na www.philips.com ili kontaktirajte
HRVATSKI92
Page 91

Philipsov korisnički centar u svojoj zemlji
(telefonski broj ćete naći na globalnom
jamstvenom listu). Ako u Vašoj zamlji ne postoji
korisnički centar, obratite se lokalnom dobavljaču
Philipsovih proizvoda ili kontaktirajte servis
Philipsovih kućanskih aparata i aparata za osobnu
njegu (Service Depar tment of Philips Domestic
Appliances and Personal Care BV).
U slučaju problema
1 Smanjena učinkovitost
B
Uzrok 1: brijaće glave su prljave. Aparat nije bio
ispiran vrućom vodom neko vrijeme ili nije ispiran
dovoljno.
◗ Očistite brijaće glave i pokušajte s brijanjem
ponovo.
B
Uzrok 2: dulje dlačice blokiraju brijaće glave.
C
◗ Izvadite pričvrsni okvir s brijaće jedinice tako
da ga okrenete u smjeru obrnutim od kazaljke
na satu.
◗ Izvadite brijaće glave iz brijaće jedinice.
C
◗ Očistite dlake iz mrežica i nožića priloženom
četkicom.
Noževe i štitnike čistite pojedinačno, budući da su
međusobno usklađeni. Pomiješate li ih slučajno,
možda će biti potrebno nekoliko tjedana za
povratak na optimalni rad aparata.
HRVATSKI 93
2
Page 92

◗ Vratite brijaće glava netrag u brijaću jedinicu.
Stavite pričvrsni okvir, pritisnite ga i okrenite u
smjeru kazaljke na satu.
B
Uzrok 3: brijaće glave su oštećene ili istrošene.
◗ Skinite učvrsni okvir.
◗ Odvojite stare brijaće glave s brijaće jedinice i
zamijenite ih novima.
Oštećene i/ili istrošene brijaće glave se mogu
zamijeniti jedino s originalnim Philips HQ6
Philishave Quadra brijaćim glavama.
◗ Vratite brijaće glava netrag u brijaću jedinicu.
Stavite pričvrsni okvir, pritisnite ga i okrenite u
smjeru kazaljke na satu.
2 Aparat ne radi kada je pritisnuto dugme
ON/Off.
B
Uzrok: Aparat je priključen na mrežu.
◗ Odspojite aparat iz mreže.
B
Uzrok: baterija je prazna.
◗ Napunite bateriju.
HRVATSKI94
Page 93

Tähtis
Enne seadme ühendamist vooluvõrku kontrollige,
kas adapterile märgitud pinge vastab kohalikule
võrgupingele.
◗ Kasutage ainult kaasasolevat HQ600 pistikut
seadme laadimiseks ja tööks.
◗ Toitepistik muundab 220-240 voldise voolu
turvaliseks voolutugevuseks, mis on madalam
kui 24 volti.Ainult kaasasolev toitepistik tagab
ohutu voolumuundamise.
◗ Pistikul on voolumuundur. Ärge lõigake seda
ära, et asendada teise pistikuga, see võib
põhjustada ohtlikke olukordi.
C
◗ Toitepistik HQ600 ja -juhe ei tohi märjaks
saada.
C
◗ Seade on varustatud rahvusvaheliselt
tunnustatud IEC turvaregulatsiooniga ja seda
võib pesta voolava vee all.
Olge ettevaatlik kuuma veega. Kontrollige alati, et
vesi ei oleks liiga tuline ja ei tekitaks kätele
põletushaavu.
◗ Müra tase: Lc = 61 dB [A]
Laadimine
Laadimisindikaator
C
◗ Kohe,kui alustate tühja pardli laadimist, sütib
roheline märgutuli.
◗ Kui aku in laetud,hakkab roheline märgutuli
vilkuma.
EESTI 95
Page 94

Seadme laadimine
Võtke pardel laadimise ajaks vutlarist välja.
Laadige ja hoidke seadet temperatuuril 5cC kuni
35cC.
Laadimise ajal pardel ei tööta. See tähendab, et
seadet ei või kasutada laadimise ajal.
Esmakordselt kasutades või pärast pikaajalist
jõudeseisu: jätke pardel laadima 12 tunniks.
Tavaliselt võtab laadimine aega 8 tundi.
C
1 Ühendage toitejuhtme pistik pardliga.
2 Ühendage võrgupistik pistikupessa.
3 Akude eluea pikendamiseks eemaldage
pistik seina pistikupesast ja toitejuhe
pardlist, kui akud on täis laetud
◗ Vooluvõrgutoiteta raseerimisaeg
Täislaetud aku võimaldab ajada habet ilma
toitejuhtmeta umbes 30 minutit.
Seadme kasutamine
Raseerimine
1 Enne raseerimist eemaldage toitejuhe
seadmest.
2 Lülitage pardel sisse vajutades ühe korra
ON/OFF lülitile.
EESTI96
Page 95

C
3 Liigutage pardli pead mööda nahka nii
sirgete, kui ka ringikujuliste liigutustega.
Parima tulemuse saate siis, kui raseerite kuiva
nahka.
Teie nahal võib Philishave süsteemiga harjumiseks
kuluda 2-3 nädalat.
4 Vajutage sisse/välja nupule üks kord, et
pardlit välja lülitada.
C
5 Vigastuste vältimiseks pange kaitsekaas iga
kord pardlile pärast seadme kasutamist.
Piirel
Põskhabeme ja vuntside hooldamiseks.
C
1 Avage piirel,lükates plaadikest ülespoole.
2 Piirel hakkab tööle, kui mootor käib.
Puhastamine ja hooldamine
Seadme regulaarne puhastamine tagab parema
raseerimistulemuse.
Olge ettevaatlik kuuma veega. Kontrollige alati, et
vesi ei oleks liiga tuline ja ei tekitaks kätele
põletushaavu.
EESTI 97
Page 96

Pardlipea
Pardli puhastamiseks ei ole vaja lõikepäid
(lõiketerija teravõresid) lahti võtta. Soovi korral
tehke seda ühe lõikepea kaupa, muidu võivad
terad ja võred segi minna. Iga tera on teritatud
oma võre jaoks. Kui terad ja võred omavahel segi
lähevad, võib kuluda mitu nädalat, enne kui
reseerimiskvaliteet taastub.
Lihtsam ja hügieenilisem seadme puhastamisviis
on loputada pardlipead ja karvakambrit tulise
veega pärast iga kasutuskorda.
1 Lülitage pardel välja, eemaldage võrgupistik
pistikupesast ja seadme toitepistik pardlist.
C
2 Eemaldage pardlipea pardlist vajutades
vabastusnuppu.
C
3 Peske pardlipea ja karvakamber voolava
kuuma vee all.
4 Sulgege pardlipea ja raputage vesi maha.
Ärge kunagi kasutage paberist käterätte või
salvrätikuid, sest need võivad rikkuda pardlipäid.
C
1 Avage pardlipea,jätke see avatuks ja laske
seadmel täielikult ära kuivada.
◗ Võite karvakambrit puhastada ka veeta,
kasutades kaasasolevat harja.
EESTI98
Page 97

Piirel
Puhastage piirlit pärast iga kasutamist.
1 Lülitage pardel välja, eemaldage võrgupistik
pistikupesast ja seadme toitepistik pardlist.
C
2 Puhastage piirel kaasasoleva harjaga.
C
3 Määrige piirli hambaid iga kuue kuu tagant
tilga õmblusmasinaõliga.
Lõikepea vahetamine
Parima habemeajamistulemuse saamiseks
vahetage lõikepead iga kahe aasta tagant uute
vastu (mudel HQ6 Quadra).
1 Lülitage pardel välja, eemaldage võrgupistik
pistikupesast ja seadme toitepistik pardlist.
C
2 Eemaldage pardlipea pardlist vajutades
vabastusnuppu.
C
3 Keerake ratast vastupäeva (1) ja eemaldage
tugiraam (2).
EESTI 99
OIL
2
1
Page 98

C
4 Eemaldage lõiketerad ja paigaldage
pardlipeasse uued nii, et väljaulatuvad osad
oleks asetatud täpselt lõikepea
õnarustesse.
5 Pange fikseerraam tagasi pardlipeasse,
vajutage ratast ja keerake päripäeva.
6 Sulgege pardlipea.
C
◗ Kui pardlipead on õigesti paigaldatud,on
pardlipeal nähtav läikiv ring.
Hoidmine
C
◗ Vigastuste vältimiseks pange seadmele
kaitsekaas peale.
◗ Hoidke seadet kaasasolevas kotis.
Lisaosad
On võimalikud järgnevad lisaosad:
- HQ8000 toitejuhe.
- HQ6 Philishave Quadra lõikepead.
- HQ110 Philishave Head Cleaner
(pihustusaine lõikepeade puhastamiseks).
EESTI100
Page 99

Keskkonnakaitse
Akude eemaldamine
Sissemonteeritud taaslaetav aku sisaldab
keskkonnale kahjulikke aineid.
Eemaldage akud, kui otsustate pardli ära visata.
Ärge pange akusid tavalise olmeprügi hulka, vaid
viige nad ametlikku kogumispunkti.Võite seadme
viia ka Philipsi teeninduskeskusse, kus akud
hävitatakse keskkonnasõbralikul moel.
Eemaldage seadmest vaid täiesti tühi aku.
1 Eemaldage võrgupistik pistikupesast ja
toitepistik seadmest.
C
2 Laske pardlil mootori seiskumiseni
töötada. Keerake kruvid lahti ja avage
seejärel pardel.
3 Eemaldage aku.
Kui olete akud välja võtnud, ärge pardlit enam
vooluvõrku lülitage.
Garantii & teenindus
Kui Te vajate teenuseid või informatsiooni või teil
on tekkinud probleeme, külastage Philips internetlehte www.philips.com või võtke ühendus Philipsi
hoolduskeskusega oma riigis (telefoninumbrid
leiate garantiitalongilt). Kui Teie riigis ei ole
EESTI 101
Page 100

hoolduskeskust, pöörduge oma Philipsi toodete
müüja poole või võtke ühendus Philipsi
koduseadmete Teeninduskeskusega.
Vead ja nende kõrvaldamine
1 Habemeajamine ei ole piisavalt efektiivne
B
Põhjus 1: lõikepead on umbes. Pardlit pole küllalt
kaua või piisavalt kuumas vees pestud.
◗ Enne raseerimise jätkamist puhastage pardlit
põhjalikult (vt ÍPuhastamine ja hooldamineÍ).
B
Põhjus 2: pikad karvad on ummistanud lõikpea.
C
◗ Eemaldage fikseerraam ratast vastupäeva
pöörates.
◗ Eemaldage lõikepead pardlipeast.
C
◗ Eemaldage karvad lõiketerade ja juhtkammi
vahelt kaasasoleva harjaga.
Puhastage korraga vaid ühe lõikepea tera ja võre.
Muidu võivad lõikepead ja terad segi minna. Kui
terad ja võred omavahel segi lähevad, võib kuluda
mitu nädalat, enne kui raseerimiskvaliteet taastub.
◗ Pange lõiketerad tagasi seadmesse. Pange
fikseerraam tagasi pardlipea sisse, vajutage
rattale ja keerake päripäeva.
B
Põhjus 3: lõikepead on vigastatud või kulunud.
◗ Eemaldage fikseerraam.
EESTI102
2
 Loading...