


ENGLISH 4
FRANÇAIS 12
ESPAÑOL 20
PORTUGUÊS 28
42
50
HQ6445, HQ6415, HQ6405
á«Hô©dGá«Hô©dG
Warning
Please read these instructions before using the
appliance.
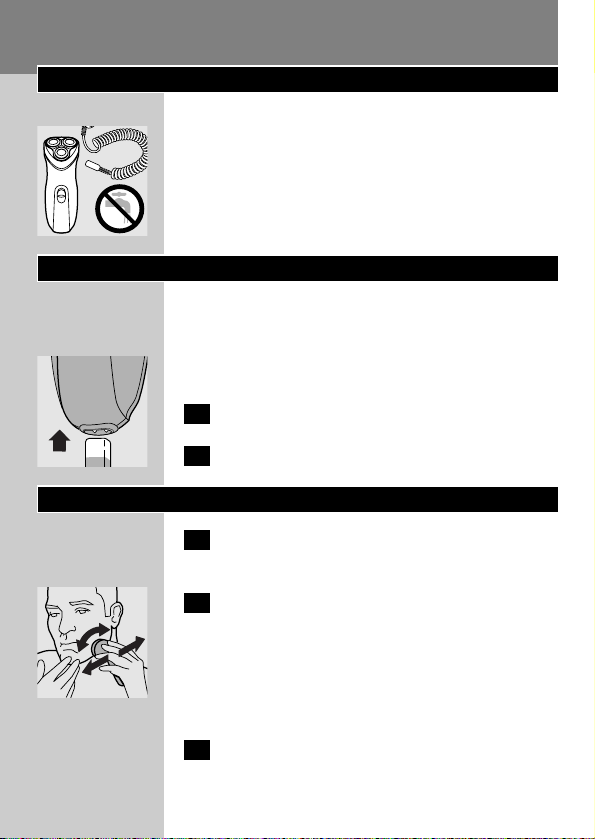
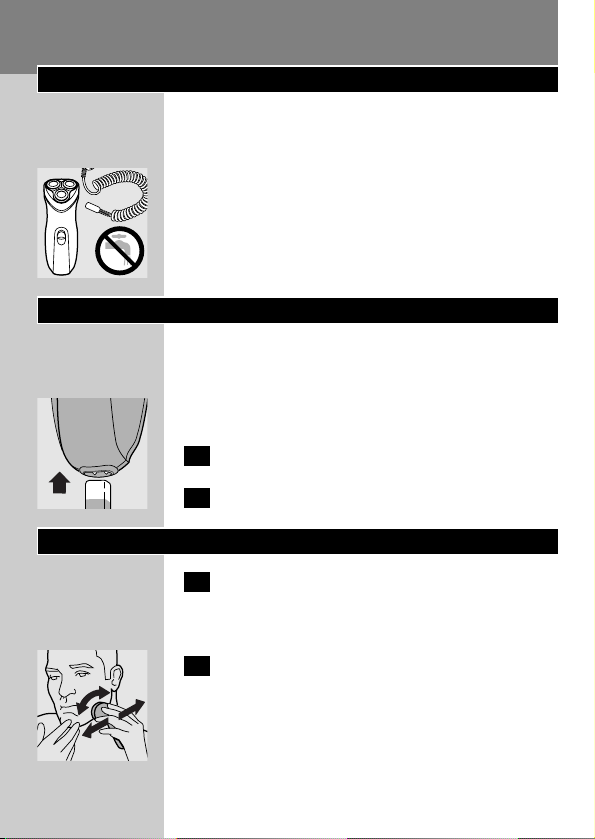
◗ Only use the cord supplied.
C
◗ Make sure the appliance and the cord do not
get wet.
Connecting
Store and use the appliance at a temperature
between 5cC and 35cC.
The appliance is suitable for mains voltages
ranging from 100 to 240V.
C
1 Put the appliance plug in the shaver.
2 Put the cord in the wall socket.
Shaving
1 Switch the shaver on by sliding the on/off
button upwards (1).
C
2 Move the shaving heads quickly over your
skin, making both straight and circular
movements.
Shaving on a dry face gives the best results.
Your skin may need 2 or 3 weeks to get
accustomed to the Philips system.
3 Switch the shaver off (0).
ENGLISH4
C
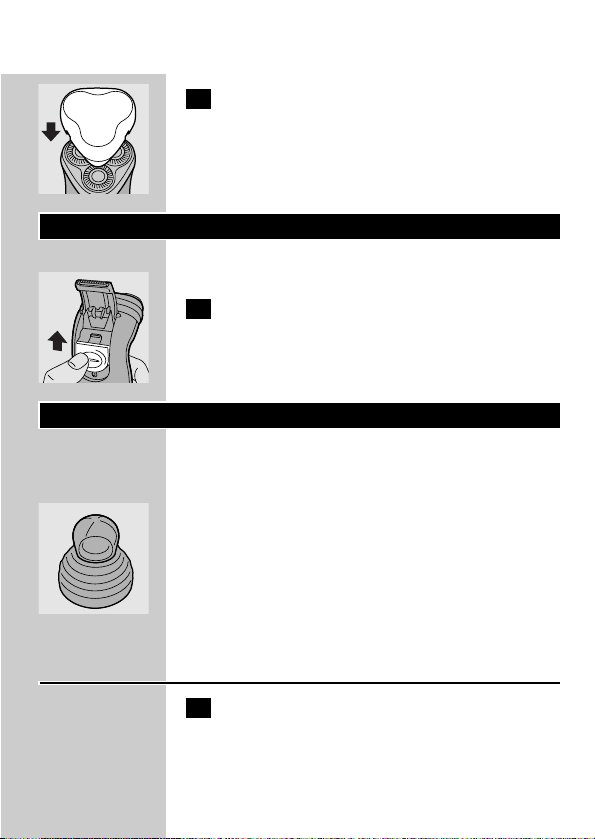
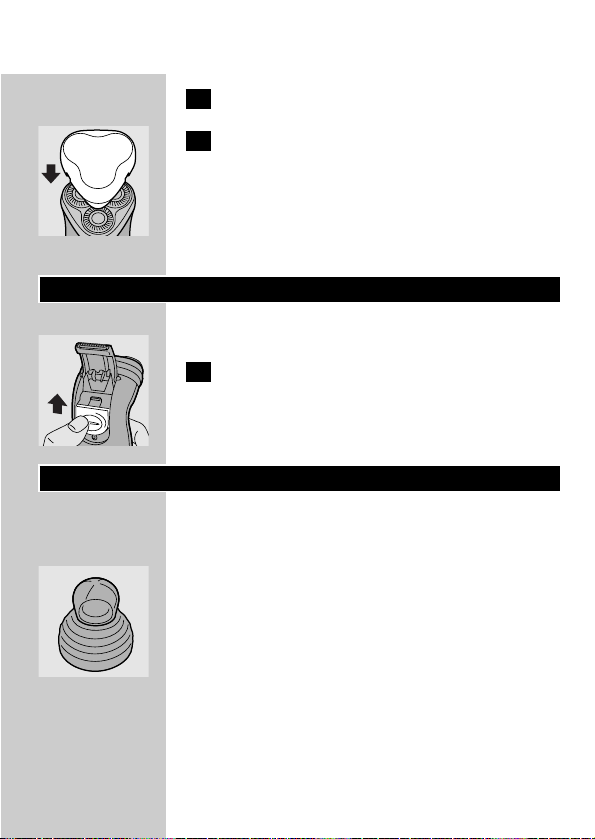
4 Put the protection cap on the shaver every
time you have used it, to prevent damage.
Replace the shaving heads (type HQ55) every
2 years for optimal shaving results.
Trimming
For grooming sideburns and moustache.
C
1 Open the trimmer by pushing the slide
upwards.
The trimmer can be activated while the motor is
running.
Cleaning
Regular cleaning guarantees better shaving
performance.
C
◗ For easy and optimal cleaning, the Philips
Action Clean (shaving head cleaner, type
HQ100) is available.Ask your Philips dealer
for information.
You can also clean the shaver in the following way:
Every week: shaving unit
1 Switch the shaver off (0), remove the cord
from the wall socket and pull the appliance
plug out of the shaver.
ENGLISH 5
C
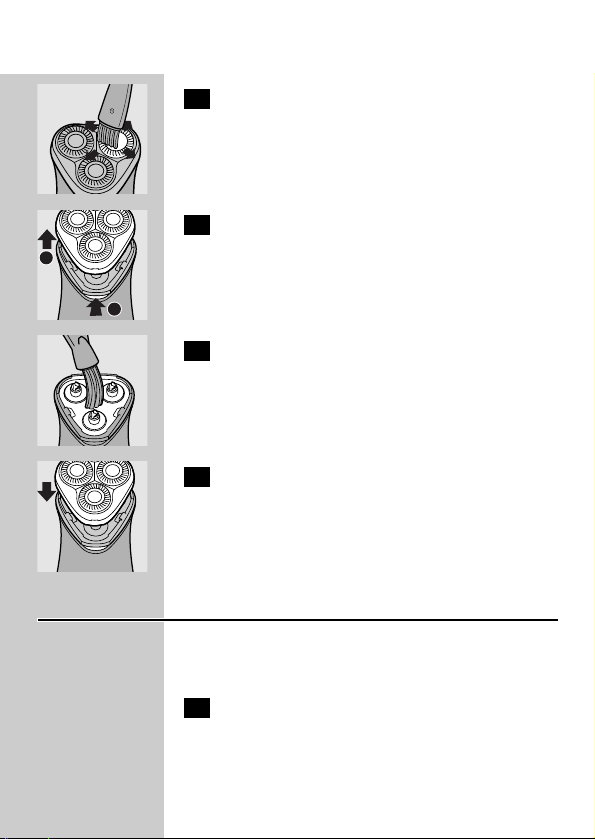
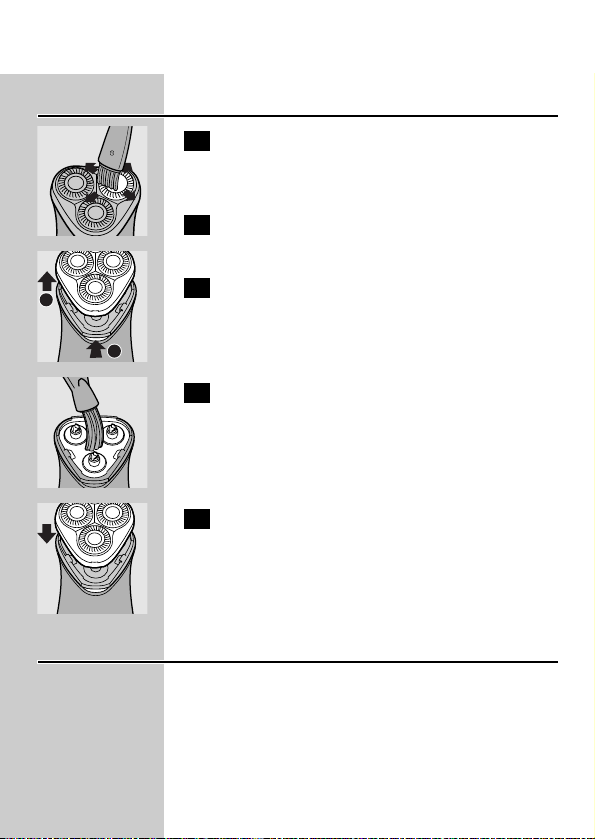
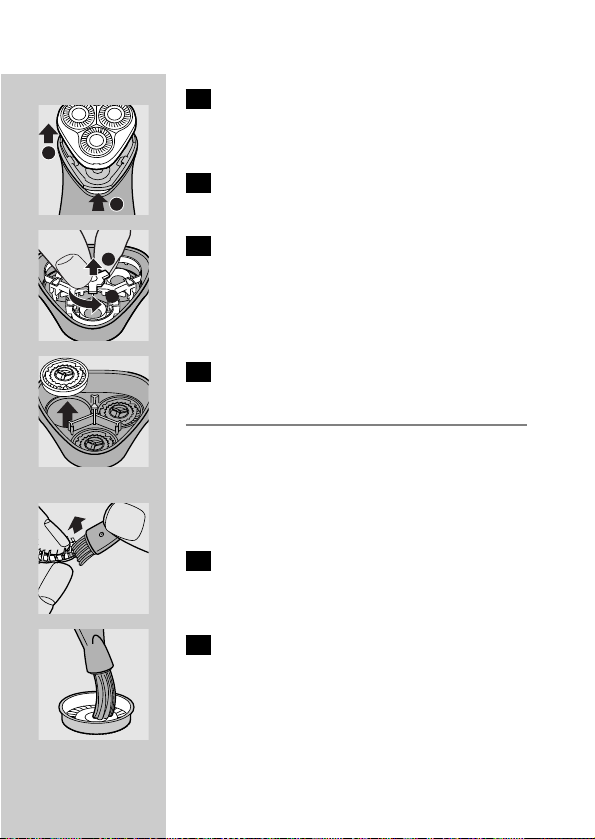
2 Clean the top of the appliance first, using
the brush supplied.
C
3 Press the release button and remove the
shaving unit.
C
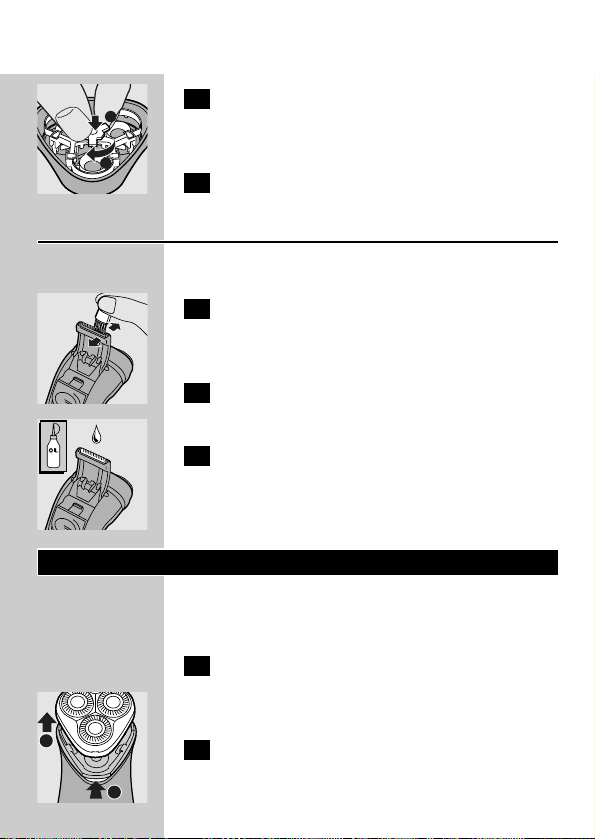
4 Clean the inside of the shaving unit and the
hair chamber with the brush.
C
5 Put the shaving unit back onto the shaver.
Every two months: shaving heads
Replace the shaving heads (type HQ55) every
2 years for optimal shaving results.
1 Switch the shaver off (0), remove the cord
from the wall socket and pull the appliance
plug out of the shaver.
ENGLISH6
2
1
C
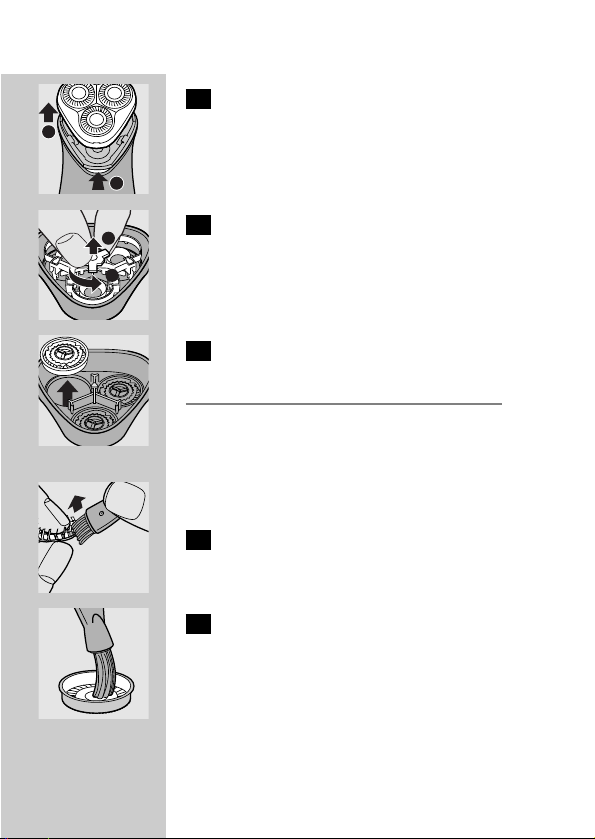
2 Press the release button and remove the
shaving unit.
C
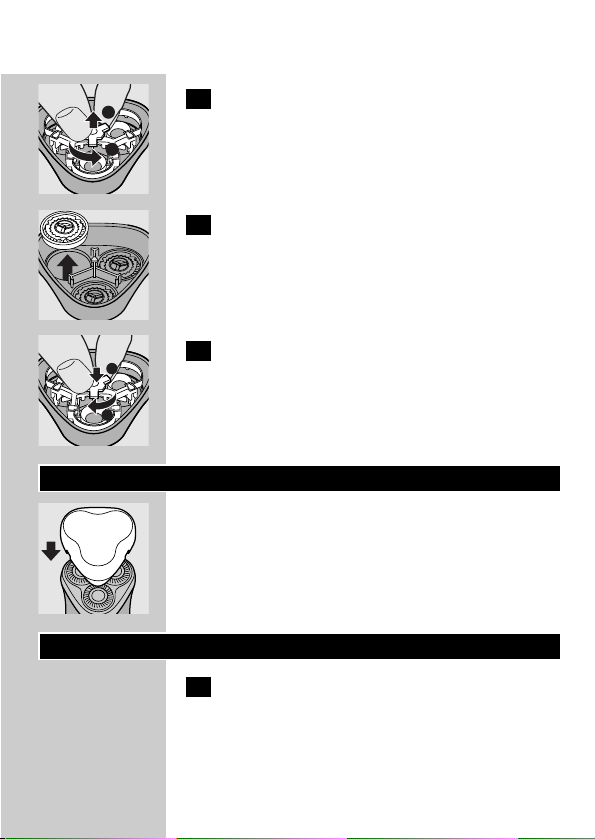
3 Turn the wheel anticlockwise and remove
the retaining frame.
C
4 Remove and clean the shaving heads
(cutters and guards) one by one.
Do not mix up the cutters and the guards.
This is essential since each cutter has been
ground with its corresponding guard for optimal
performance. If you accidentally mix the sets up, it
could take several weeks before optimal shaving
performance is restored.
C
5 Clean the cutter with the short-bristled
side of the brush.
Brush carefully in the direction of the arrow.
C
6 Brush the guard.
You can also clean the shaving unit with a
degreasing liquid (e.g. alcohol). If you do, lubricate
the central point of the guards with a drop of
sewing machine oil after cleaning.This prevents
wear of the shaving heads.
ENGLISH 7
2
1
2
1

C
7 Reassemble the shaving unit: turn the
wheel clockwise.
8 Put the shaving unit back onto the shaver.
Trimmer
Clean the trimmer every time you have used it.
1 Switch the shaver off (0), remove the cord
from the wall socket and pull the appliance
plug out of the shaver.
C
2 Clean the trimmer with the brush
supplied.
C
3 Lubricate the trimmer teeth with a drop
of sewing machine oil every six months.
Replacing the shaving heads
Replace the shaving heads every two years for
optimal shaving results.
1 Switch the shaver off (1), remove the cord
from the wall socket and pull the appliance
plug out of the shaver.
C
2 Press the release button and remove the
shaving unit.
ENGLISH8
1
2
2
1
C
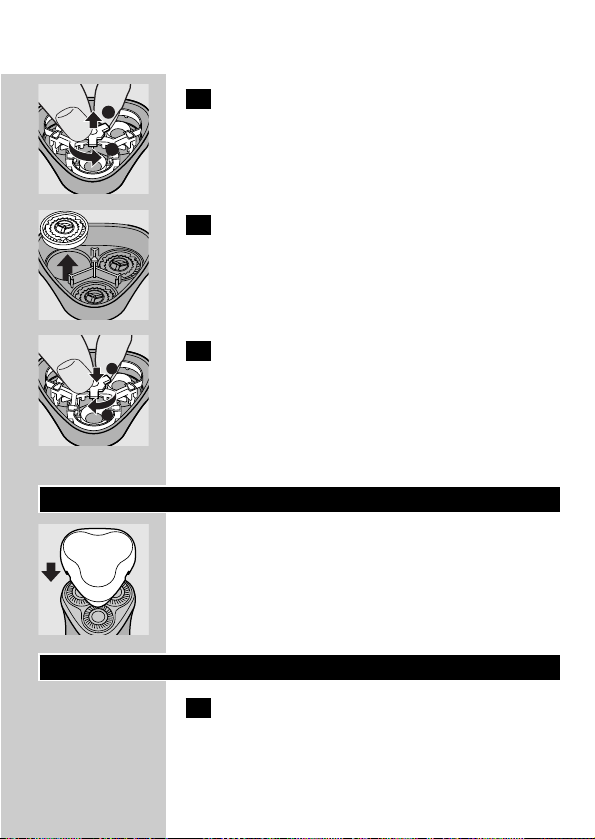
3 Turn the wheel anti-clockwise and remove
the retaining frame.
C
4 Remove the shaving heads and place the
new ones in the shaving unit.
C
5 Reassemble the shaving unit: turn the
wheel clockwise.
Replace damaged or worn shaving heads with
Philips HQ55 shaving heads only.
Storing
C
◗ Put the protection cap on the shaver to
prevent damage.
◗ The appliance can be stored in the pouch
supplied.
Troubleshooting
1 Reduced shaving performance
B
Cause 1: the shaving heads are dirty.
B
The shaver has not been cleaned well enough or
has not been cleaned for a longer period.
ENGLISH 9
2
1
1
2

◗ Clean the shaver thoroughly before you
continue shaving (see 'Cleaning').
B
Cause 2: long hairs are obstructing the shaving
heads.
C
◗ Remove the retaining frame.
C
◗ Clean the cutters and guards.
Do not clean more than one cutter and guard at
a time, since they are all matching sets. If you
accidentally mix up the cutters and guards, it may
take several weeks before optimal shaving
performance is restored.
◗ Remove the hairs with the brush supplied.
◗ Put the retaining plate back onto the shaving
unit.
B
Cause 3: shaving heads are damaged or worn. See
'Replacing the shaving heads'.
Replacing the shaving heads every 2 years
prevents wear of the shaving heads.
2 The shaver does not work when the
ON/OFF button is pushed upwards (1).
B
Cause: the shaver is not connected to the mains.
ENGLISH10
1
2

Accessories
The following accessories are available for your
shaver:
- HQ55 Philips Shaving Heads.
- HQ100 Philips Action Clean (shaving head
cleaner).
- HQ101 Philips Action Refill (shaving head
cleaning liquid).
- HQ110 Philips Head Cleaner (shaving head
cleaning spray).
Information & service
If you need information or if you have a problem,
please visit the Philips Web site at
www.philips.com or contact the Philips Customer
Care Centre in your country (you will find its
phone number in the worldwide guarantee
leaflet). If there is no Customer Care Centre in
your country, turn to your local Philips dealer or
contact the Service Depar tment of Philips
Domestic Appliances and Personal Care BV.
◗ Keep these instructions for use for future
reference.
ENGLISH 11
Avertissement
Avant d'utiliser l'appareil, veuillez lire ces
instructions.
◗ Utilisez exclusivement le cordon
d'alimentation fourni avec l'appareil.
C
◗ Veillez à ce que l'appareil et le cordon
d'alimentation ne soient pas exposés à
l'humidité.
Raccordement
Chargez et utilisez l'appareil à une température
comprise entre 5cC et 35cC.
Ce rasoir fonctionne sur une tension secteur de
100 à 240~volts.
C
1 Enfoncez la fiche dans le rasoir.
2 Branchez l'appareil.
Rasage
1 Mettez l'appareil en marche en faisant
glisser le bouton marche/arrêt vers le haut
(1).
C
2 Déplacez rapidement les têtes de rasage
sur la peau en effectuant des mouvements
rectilignes et circulaires.
Les meilleurs résultats de rasage sont obtenus sur
peau sèche.
Votre peau peut avoir besoin de 2-3 semaines
pour s'habituer au système Philips.
FRANÇAIS12
3 Arrêtez le rasoir (0).
C
4 Remettez le capot protecteur sur le rasoir
après chaque utilisation pour éviter tout
dommage.
Remplacez les têtes de rasage (type HQ55) tous
les 2 ans pour obtenir des résultats de rasage
optimaux.
Tondeuse
Pour tailler les favoris et la moustache.
C
1 Dégagez la tondeuse en faisant glisser
l'interrupteur vers le haut.
La tondeuse peut être mise en service pendant
que le moteur fonctionne.
Nettoyage
Nettoyez régulièrement l'appareil pour obtenir de
meilleurs résultats de rasage.
C
◗ Pour un nettoyage facile et rapide des têtes,
vous pouvez utiliser L'Action Clean de Philips
(type HQ100). Disponible auprès de votre
revendeur ou Centre Service Agréé Philips.
Vous pouvez nettoyer le rasoir de la manière
suivante:
FRANÇAIS 13
Toutes les semaines: unité de rasage
1 Arrêtez l'appareil (0), enlevez le cordon de
la prise de courant, et tirez la fiche hors du
rasoir.
C
2 Nettoyez le dessus de l'appareil avec la
brosse fournie.
C
3 Appuyez sur le bouton de déverrouillage
et enlevez l'unité de rasage.
C
4 Nettoyez l'unité de rasage et le
compartiment à poils avec la brosse.
C
5 Replacez l'unité de rasage sur le rasoir.
Tous les deux mois:Têtes de rasage
Remplacez les têtes de rasage (type HQ55) tous
les 2 ans pour obtenir des résultats de rasage
optimaux.
FRANÇAIS14
2
1
1 Arrêtez l'appareil (0), enlevez le cordon de
la prise de courant, et tirez la fiche hors du
rasoir.
C
2 Appuyez sur le bouton de déverrouillage
et enlevez l'unité de rasage.
C
3 Faites tourner la molette dans le sens
contraire des aiguilles d'une montre et
enlevez la plaque de fermeture.
C
4 Enlevez et nettoyez les têtes de rasage
(couteaux et grilles) une à une.
N'interver tissez pas les couteaux et les grilles.
Les couteaux et les grilles sont affûtés par paire
ce qui leur assure des performances optimales. Si
vous les interver tissez accidentellement, plusieurs
semaines peuvent être nécessaires avant que
l'appareil rase à nouveau de manière optimale.
C
5 Nettoyez les couteaux avec le côté à poils
courts de la brosse.
Brossez avec précaution dans le sens de la flèche.
C
6 Brossez la grille.
Si nécessaire, vous pouvez nettoyer l'unité de
rasage avec un liquide dégraissant (p. ex. alcool).
N'oubliez pas de lubrifier le point central des
grilles avec une goutte d'huile pour machine à
coudre après le nettoyage.
FRANÇAIS 15
2
1
2
1
C
7 Remontez l'unité de rasage: tournez la
molette dans le sens des aiguilles d'une
montre.
8 Replacez l'unité de rasage sur le rasoir.
Tondeuse
Nettoyez la tondeuse après chaque utilisation.
1 Arrêtez l'appareil (0), enlevez le cordon de
la prise de courant, et tirez la fiche hors du
rasoir.
C
2 Nettoyez la tondeuse à l'aide de la brosse
fournie.
C
3 Tous les six mois, lubrifiez la tondeuse à
l'aide d'une gouttelette d'huile pour
machine à coudre.
Remplacement des têtes de rasage
Pour un résultat de rasage optimal, remplacez les
têtes de rasage tous les deux ans.
1 Arrêtez l'appareil (0), enlevez le cordon de
la prise de courant, et tirez la fiche hors du
rasoir.
C
2 Appuyez sur le bouton de déverrouillage
et enlevez l'unité de rasage.
FRANÇAIS16
1
2
2
1
C
3 Tournez la molette dans le sens inverse
des aiguilles d'une montre et retirez la
plaque de fermeture.
C
4 Enlevez les têtes usagées et placez les
nouvelles têtes dans l'unité de rasage.
C
5 Remontez l'unité de rasage: tournez la
molette dans le sens des aiguilles d'une
montre.
Remplacez les têtes endommagées ou usagées
exclusivement par des têtes Philips HQ55.
Rangement
C
◗ Employez le capot de protection pour éviter
les détériorations.
◗ L'appareil peut être rangé dans l'étui fourni.
Dépannage
1 Les résultats de rasage se dégradent
B
Cause 1: les têtes de rasage sont sales.
B
Le rasoir n'a pas été nettoyé suffisamment ou il
n'a pas été nettoyé depuis longtemps.
FRANÇAIS 17
2
1
1
2

◗ Nettoyez l'appareil à fond (voir "Nettoyage").
B
Cause 2: Des poils longs sont emmêlés dans les
têtes de rasage.
C
◗ Enlevez la plaque de fermeture.
C
◗ Nettoyez les couteaux et les grilles.
Ne nettoyez pas plus d'un couteau et une grille à
la fois, parce que ceux-ci sont affûtés par paires. Si
vous interver tissez par mégarde les couteaux et
les grilles, plusieurs semaines peuvent être
nécessaires avant que l'appareil rase à nouveau de
manière optimale.
◗ Enlevez les poils.
◗ Replacez la plaque de fermeture sur les têtes
de rasage.
B
Cause 3: les têtes de rasage sont abîmées ou
usées. Voir 'Remplacement des têtes de rasage'.
Afin d'éviter toute détérioration, nous vous
conseillons de remplacer les têtes de rasage tous
les 2 ans.
2 Le rasoir ne fonctionne pas lorsque le
bouton marche/arrêt est en haut (1).
B
Cause: le rasoir n'est pas branché.
FRANÇAIS18
1
2

Accessoires
Les accessoires suivants sont disponibles pour
votre rasoir:
- Têtes de rasage Philips HQ55.
- Philips Action Clean HQ100 (nettoyeur de la
tête de rasage)
- Philips Action Refill HQ101 (produit liquide de
nettoyage de la tête de rasage).
- Nettoyeur de la tête de rasage Philips HQ110
(spray de nettoyage de la tête de rasage).
Information et service
Pour toute réparation/information, ou en cas de
problème, visitez notre website: www.philips.com.
Ou veuillez contacter le Service Consommateurs
Philips de votre pays (vous trouverez le numéro
de téléphone dans le dépliant sur la garantie
internationale). S'il n'y a aucun Service
Consommateurs Philips dans votre pays,
contactez votre distributeur ou le Service
Department de Philips Domestic Appliances and
Personal Care BV.
◗ Conservez ce mode d'emploi pour un usage
ultérieur.
FRANÇAIS 19

Importante
Por favor, lea estas instrucciones antes de usar el
aparato.
◗ Emplee únicamente el cable que se suministra.
C
◗ Asegúrese de que el aparato y el cable no se
mojen.
Cómo enchufar la afeitadora
Guarde y utilice el aparato a una temperatura
entre 5cC y 35cC.
El aparato es apto para una gama de voltajes de
red entre 100V y 240V.
C
1 Ponga la clavija del aparato en la afeitadora
2 Enchufe el aparato.
Afeitado
1 Para encender la afeitadora, suba el botón
de encendido/apagado (1).
C
2 Desplace los conjuntos cortantes
rápidamente sobre la piel con
movimientos tanto rectos como circulares.
Los mejores resultados se obtienen afeitando
sobre la piel seca.
Puede que su piel necesite de 2 a 3 semanas para
acostumbrarse al sistema de afeitado Philips.
3 Apague la afeitadora (0).
ESPAÑOL20

C
4 Después de usar la afeitadora, póngale
siempre la funda de protección para evitar
daños.
Cambie los conjuntos cortantes (modelo HQ55)
cada dos años para obtener mejores resultados.
Cortapatillas
Para arreglar las patillas y el bigote.
C
1 Abra el cortapatillas presionando el botón
deslizante hacia arriba.
El cortapatillas se puede activar con la afeitadora
en marcha.
Limpieza
Una limpieza regular garantiza el mejor resultado
en el afeitado.
C
◗ Para una limpieza fácil y óptima está
disponible Philips Action Clean (limpiador de
conjuntos cortantes, modelo HQ100). Para
más información, consulte a su vendedor o
distribuidor Philips.
También puede limpiar la afeitadora de la
siguiente forma:
Cada semana: Unidad afeitadora
1 Apague la afeitadora (0), desenchufe el
aparato y retire la clavija del mismo.
ESPAÑOL 21

C
2 Limpie primero la parte superior del
aparato con el cepillo que se suministra.
C
3 Presione el botón de liberación y saque la
unidad afeitadora.
C
4 Limpie el interior de la unidad de afeitado
y la cámara de recogida del pelo con el
cepillo.
C
5 Vuelva a colocar la unidad de afeitado en la
afeitadora.
Cada dos meses: conjuntos cortantes
Cambie los conjuntos cortantes (modelo HQ55)
cada dos años para obtener mejores resultados.
1 Apague la afeitadora (0), desenchufe el
aparato y retire la clavija del mismo.
C
2 Presione el botón de liberación y saque la
unidad afeitadora.
ESPAÑOL22
2
1
2
1

C
3 Gire la rueda en sentido contrario al de las
agujas del reloj y saque el bastidor de
retención.
C
4 Saque y limpie los conjuntos cortantes
(cuchillas y protectores) uno a uno.
No mezcle las cuchillas y protectores entre sí.
Esto es esencial, ya que cada cuchilla ha sido
afilada con su protector correspondiente para
asegurar un resultado óptimo. Si, accidentalmente,
se mezclaran entre sí protectores y cuchillas,
podrían ser necesarias varias semanas hasta que
se volviera a alcanzar de nuevo el nivel óptimo de
afeitado.
C
5 Limpie la cuchilla con el lado de cerdas
cortas del cepillo.
Cepille con cuidado siguiendo la dirección de la
flecha.
C
6 Cepille el protector.
Si es necesario, puede limpiar la unidad de
afeitado con un líquido desengrasante (p. ej.
alcohol). Si lo hace, recuerde lubricar el punto
central de los protectores con una gota de aceite
para máquinas de coser después de realizar la
limpieza. Esto previene el desgaste de los
conjuntos cortantes.
C
7 Monte de nuevo la unidad de afeitado: gire
la rueda en el sentido de las agujas del
reloj.
ESPAÑOL 23
2
1
1
2

8 Vuelva a colocar la unidad de afeitado en la
afeitadora.
Cortapatillas
Limpie el cortapatillas cada vez que lo use.
1 Apague la afeitadora (0), desenchufe el
aparato y retire la clavija del mismo.
C
2 Limpie el cortapatillas con el cepillo que se
suministra.
C
3 Cada seis meses lubrique los dientes del
cortapatillas con una gota de aceite de
máquina de coser.
Sustitución de los conjuntos cortantes
Para obtener un resultado óptimo en el afeitado,
sustituya los conjuntos cortantes cada dos años.
1 Apague la afeitadora (0), desenchufe el
aparato y retire la clavija del mismo.
C
2 Presione el botón de liberación y saque la
unidad afeitadora.
C
3 Gire la rueda en el sentido contrario a las
agujas del reloj y quite el bastidor de
retención.
ESPAÑOL24
2
1
2
1

C
4 Quite los conjuntos cortantes y coloque
los nuevos en la unidad afeitadora.
C
5 Monte de nuevo la unidad de afeitado: gire
la rueda en el sentido de las agujas del
reloj.
Cambie los conjuntos cortantes dañados o
gastados sólo por otros conjuntos de Philips
HQ55.
Cómo guardar el aparato
C
◗ Para evitar deterioros, ponga la tapa
protectora en la afeitadora.
◗ El aparato puede guardarse en la bolsa que se
incluye.
Solución de problemas
1 Menor rendimiento en el afeitado
B
Causa 1: los conjuntos cortantes están sucios.
B
No ha limpiado la afeitadora suficientemente bien
o no ha sido limpiada durante un largo periodo de
tiempo.
◗ Limpie la afeitadora a fondo (véase
"Limpieza") antes de seguir afeitándose.
ESPAÑOL 25
1
2

B
Causa 2: hay pelos largos obstruyendo los
conjuntos cortantes.
C
◗ Saque el bastidor de retención.
C
◗ Limpie las cuchillas y los protectores.
No limpie más de una cuchilla y un protector al
mismo tiempo, ya que forman conjuntos entre sí.
Si, accidentalmente, se mezclan las cuchillas y los
protectores, pueden ser necesarias varias semanas
para que se restablezcan los óptimos resultados
en el afeitado.
◗ Quite los pelos con el cepillo que se
suministra.
◗ Vuelva a poner el bastidor de retención en la
unidad afeitadora.
B
Causa 3: los conjuntos cortantes están gastados o
deteriorados. Consulte "Sustitución de los conjuntos
cortantes"
Sustituir los conjuntos cortantes cada 2 años
previene el deterioro de éstos.
2 La afeitadora no funciona cuando sube el
botón de encendido/apagado (1).
B
Causa: la afeitadora no está conectada a la red.
ESPAÑOL26
1
2

Accesorios
Están disponibles los siguientes accesorios:
- Conjuntos cortantes Philips HQ55.
- Philips Action Clean HQ100 (para limpiar los
conjuntos cortantes)
- Recambio Philips Action HQ101 (líquido
limpiador de los conjuntos cortantes).
- Limpiador Philips HQ110 (spray limpiador de
los conjuntos cortantes).
Garantía y Servicio
Si necesita información o tiene algún problema,
visite la página Web de Philips en
www.philips.com, o póngase en contacto con el
Servicio Philips de Atención al Cliente de su país
(hallará su número de teléfono en el folleto de la
Garantía Mundial). Si en su país no hay Servicio
Philips de Atención al Cliente, diríjase a su
distribuidor local Philips o póngase en contacto
con el Service Depar tment of Philips Domestic
Appliances and Personal Care BV.
◗ Conserve este manual de instrucciones por si
necesita consultarlo en el futuro.
ESPAÑOL 27

Importante
Por favor, leia estas instruções antes de usar o
aparelho.
◗ Utilize apenas com o cabo de alimentação
fornecido.
C
◗ Não molhe a máquina nem o cabo de
alimentação.
Ligação
Guarde a máquina numa temperatura entre 5cC
e 35cC.
A máquina é própria para correntes eléctricas de
100 a 240V.
C
1 Introduza a ficha do aparelho na máquina
de barbear.
2 Ligue a ficha à tomada eléctrica.
Utilização da máquina
1 Ligue a máquina, empurrando o comutador
'on/off' (ligar/desligar) para cima (1).
C
2 Passe as cabeças de corte rapidamente
sobre a pele, efectuando movimentos a
direito e em círculo.
Obterá melhores resultados se a pele estiver
seca.
A sua pele poderá demorar entre 2 a 3 semanas
a adaptar-se ao sistema de barbear Philips.
PORTUGUÊS28

3 Desligue a máquina (0).
C
4 Depois de usar a máquina, coloque-lhe
sempre a tampa de protecção para evitar
qualquer dano.
Substitua as cabeças (tipo HQ55) de 2 em 2 anos
para obter sempre os melhores resultados.
Aparador
Para aparar as patilhas e o bigode.
C
1 Liberte o aparador empurrando o
comutador para cima.
O aparador poderá ser activado com o motor
em funcionamento.
Limpeza
Uma limpeza regular é garantia de melhores
resultados.
C
◗ Para uma limpeza mais simples e eficaz,
adquira o Philips Action Clean (líquido de
limpeza das cabeças, tipo HQ100). Informe-se
num agente ou num distribuidor Philips.
Também pode limpar a máquina da seguinte
maneira:
PORTUGUÊS 29

Todas as semanas: unidade de barbear
1 Desligue a máquina (0), retire a ficha da
tomada eléctrica e puxe a ficha de ligação
para fora da máquina.
C
2 Limpe primeiro a parte superior da
máquina com a escova fornecida.
C
3 Pressione o botão de desengate e abra a
unidade de corte.
C
4 Limpe a unidade de corte e a câmara de
recolha dos pêlos com a escova.
C
5 Volte a colocar a unidade de corte na
máquina.
A cada dois meses: cabeças
Substitua as cabeças (tipo HQ55) de 2 em 2 anos
para obter sempre os melhores resultados.
1 Desligue a máquina (0), retire a ficha da
tomada eléctrica e puxe a ficha de ligação
para fora da máquina.
PORTUGUÊS30
2
1

C
2 Pressione o botão de desengate e abra a
unidade de corte.
C
3 Rode o anel para a esquerda e retire a
armação de suporte.
C
4 Retire e limpe as cabeças de corte (lâmina
e guarda), uma a uma.
Não misture as lâminas e as guardas.
Tenha cuidado para que isto não aconteça,
porque as lâminas e as guardas formam um
conjunto que garante um rendimento adequado.
Se misturar acidentalmente os pares, poderá levar
várias semanas até voltar a obter um barbear
apurado com óptimos resultados.
C
5 Limpe as lâminas utilizando para o efeito
as cerdas mais curtas da escova.
Escove as lâminas cuidadosamente na direcção da
seta.
C
6 Escove a guarda.
Se for necessário, poderá limpar a unidade de
corte com um pouco de líquido desengordurante
(álcool, por exemplo). Não se esqueça de
lubrificar o ponto central das guardas com uma
gota de óleo para máquinas de costura depois de
PORTUGUÊS 31
2
1
2
1

terminada a limpeza. Isto evitará o desgaste das
cabeças.
C
7 Volte a montar a unidade de corte: rode o
anel para a direita.
8 Volte a colocar a unidade de corte na
máquina.
Aparador
Limpe o aparador sempre que o utilizar.
1 Desligue a máquina (0), retire a ficha da
tomada eléctrica e puxe a ficha de ligação
para fora da máquina.
C
2 Limpe o aparador com a escova fornecida.
C
3 A cada seis meses, lubrifique os dentes do
aparador com uma gota de óleo para
máquinas de costura.
Substituição das cabeças
As cabeças de corte devem ser substituídas de
dois em dois anos para manter a eficácia da
máquina de barbear.
1 Desligue a máquina (0), retire a ficha da
tomada eléctrica e puxe a ficha de ligação
para fora da máquina.
PORTUGUÊS32
1
2

C
2 Pressione o botão de desengate e abra a
unidade de corte.
C
3 Rode o anel para a esquerda e retire a
armação.
C
4 Retire as cabeças e coloque as cabeças
novas na unidade de corte.
C
5 Volte a montar a unidade de corte: rode o
anel para a direita.
Substitua as cabeças estragadas ou gastas apenas
por cabeças Philips HQ55.
Arrumação
C
◗ Coloque a tampa de protecção na máquina
para evitar danos.
◗ A máquina pode ser guardada na bolsa
fornecida.
PORTUGUÊS 33
2
1
2
1
1
2

Resolução de avarias
1 Eficácia reduzida no barbear
B
Causa 1: As cabeças estão sujas.
B
A máquina não ficou bem limpa ou já não é
limpa há bastante tempo.
◗ Limpe cuidadosamente a máquina de barbear
antes de a utilizar novamente (ver "Limpeza").
B
Causa 2: há pêlos compridos a obstruir as cabeças.
C
◗ Retire a armação.
C
◗ Limpe as lâminas e as guardas.
Não limpe mais do que um conjunto
lâmina/guarda de cada vez já que constituem
pares. Se, por acaso, alterar os conjuntos
lâmina/guarda, a eficácia da máquina diminuirá e
só passadas algumas semanas voltará ao normal.
◗ Remova os pêlos com a escova fornecida.
◗ Volte a colocar a armação na máquina.
B
Causa 3: as cabeças estão estragadas ou gastas.
Vidé 'Substituição das cabeças'.
A substituição das cabeças de 2 em 2 anos
previne o seu desgaste.
2 A máquina não funciona com o botão
'ON/OFF' (ligar/desligar) para cima (1).
B
Causa: a máquina não está ligada à corrente.
PORTUGUÊS34
1
2

Acessórios
Poderá adquirir os seguintes acessórios para a sua
máquina:
- HQ55 Cabeças Philips.
- Philips Action Clean HQ100 (líquido de
limpeza das cabeças).
- HQ101 Recarga Philips Action (líquido de
limpeza das cabeças).
- HQ110 Philips Head Cleaner (spray para
limpeza das cabeças).
Informações e assistência
Se necessitar de informações ou se tiver qualquer
problema, por favor visite o site da Philips:
www.philips.com ou contacte o Centro de
Informação ao Consumidor Philips do seu país (o
número de telefone está indicado no folheto da
garantia mundial). Se não existir um Centro de
Informação ao Consumidor Philips no seu país,
dirija-se ao agente Philips local ou contacte o
Departamento de Service da Philips Domestic
Appliances and Personal Care BV.
◗ Guarde estas instruções para uma eventual
consulta futura.
PORTUGUÊS 35

á«Hô©dGá«Hô©dG
äÉ≤ë∏ŸGäÉ≤ë∏ŸG
:∂H á°UÉÿG ábÓ◊G ádB’ á«dÉàdG äÉ≤ë∏ŸG ôaƒàJ:∂H á°UÉÿG ábÓ◊G ádB’ á«dÉàdG äÉ≤ë∏ŸG ôaƒàJ
-- ábÓM ¢ShDhQ ábÓM ¢ShDhQPhilipsPhilipsHQ55HQ55..
-- ábÓ◊G ¢ShDhQ ∞«¶æJ IGOCG ábÓ◊G ¢ShDhQ ∞«¶æJ IGOCGPhilipsPhilips Ú∏c ø°ûcCG Ú∏c ø°ûcCGHQ100HQ100..
-- ábÓ◊G ¢ShDhQ ∞«¶æJ πFÉ°S ábÓ◊G ¢ShDhQ ∞«¶æJ πFÉ°SPhilipsPhilips π«ØjQ ø°ûcCG π«ØjQ ø°ûcCGHQ101HQ101..
-- ábÓM ¢ShDhôd ∞¶æe ñÉîH ábÓM ¢ShDhôd ∞¶æe ñÉîHPhilipsPhilipsHQ110HQ110..
áeóÿG h äÉeƒ∏©ŸGáeóÿG h äÉeƒ∏©ŸG
¿GƒæY IQÉjR AÉLôdG ,á∏µ°ûe ∂jód âfÉc hCG äÉeƒ∏©e ájC’ âéàMG GPG¿GƒæY IQÉjR AÉLôdG ,á∏µ°ûe ∂jód âfÉc hCG äÉeƒ∏©e ájC’ âéàMG GPG
¢ùÑ«∏«a ácô°ûH ¢UÉÿG âfÎf’G ¢ùÑ«∏«a ácô°ûH ¢UÉÿG âfÎf’Gcomcomphilips.philips. www. www.π°üJG hCGπ°üJG hCG
¿hóe ∞JÉ¡dG ºbQ óŒ ±ƒ°S) ∑ó∏H ‘ AÓª©dG áeóÿ ¢ùÑ«∏«a õcôÿhóe ∞JÉ¡dG ºbQ óŒ ±ƒ°S) ∑ó∏H ‘ AÓª©dG áeóÿ ¢ùÑ«∏«a õcôÃ
,∑ó∏H ‘ AÓª©dG áeóÿ õcôe óLGƒàj ⁄ GPG .(»ŸÉ©dG ¿Éª°†dG Iô°ûf ‘,∑ó∏H ‘ AÓª©dG áeóÿ õcôe óLGƒàj ⁄ GPG .(»ŸÉ©dG ¿Éª°†dG Iô°ûf ‘
ácô°ûd ™HÉàdG áeóÿG õcôà π°üJG hCG ¢ùÑ«∏«a π«ch á©LGôe AÉLôdGácô°ûd ™HÉàdG áeóÿG õcôà π°üJG hCG ¢ùÑ«∏«a π«ch á©LGôe AÉLôdG
.á«°üî°ûdG ájÉæ©dG h á«dõæŸG äGhOCÓd ¢ùÑ«∏«a.á«°üî°ûdG ájÉæ©dG h á«dõæŸG äGhOCÓd ¢ùÑ«∏«a
ææ.dÖ≤à°ùŸG ‘ É¡eGóîà°S’ äGOÉ°TQ’G √ò¡H ßØàMG.dÖ≤à°ùŸG ‘ É¡eGóîà°S’ äGOÉ°TQ’G √ò¡H ßØàMG
36

á«Hô©dGá«Hô©dG
πcÉ°ûŸG πMπcÉ°ûŸG πM
11.¢†Øîæe ábÓM AGOCG.¢†Øîæe ábÓM AGOCG
CC
.ábÓ◊G ¢ShDhQ ñÉ°ùJG :∫hC’G ÖÑ°ùdG.ábÓ◊G ¢ShDhQ ñÉ°ùJG :∫hC’G ÖÑ°ùdG
CC
.á∏jƒW IÎa òæe É¡Ø«¶æJ ºàj ⁄ hCG Gó«L ábÓ◊G ádBG ∞«¶æJ ºàj ⁄.á∏jƒW IÎa òæe É¡Ø«¶æJ ºàj ⁄ hCG Gó«L ábÓ◊G ádBG ∞«¶æJ ºàj ⁄
ææ.(∞«¶æàdG Iô≤a ™LGQ) ábÓ◊G ΩÉ“G πÑb ÓeÉ°T ÉØ«¶æJ ádB’G ∞¶f.(∞«¶æàdG Iô≤a ™LGQ) ábÓ◊G ΩÉ“G πÑb ÓeÉ°T ÉØ«¶æJ ádB’G ∞¶f
CC
.ábÓ◊G ¢ShDhQ ≥«©J á∏jƒW äGÒ©°T :ÊÉãdG ÖÑ°ùdG.ábÓ◊G ¢ShDhQ ≥«©J á∏jƒW äGÒ©°T :ÊÉãdG ÖÑ°ùdG
BB
ææ.âÑãŸG QÉW’G ´õfG.âÑãŸG QÉW’G ´õfG
BB
ææ.äGQÉW’G h äÉ°ü≤ŸG ∞¶f.äGQÉW’G h äÉ°ü≤ŸG ∞¶f
ÚH âLõe GPG .óMGh ¿BG ‘ óMGh QÉWG h óMGh ¢ü≤e øe ÌcCG ∞¶æJ ’ÚH âLõe GPG .óMGh ¿BG ‘ óMGh QÉWG h óMGh ¢ü≤e øe ÌcCG ∞¶æJ ’
∫ƒ°ü◊G IOÉY’ ™«HÉ°SCG IóY ôeC’G Ö∏£à«°S ,AÉ£ÿG ≥jô£H äÉYƒªÛG∫ƒ°ü◊G IOÉY’ ™«HÉ°SCG IóY ôeC’G Ö∏£à«°S ,AÉ£ÿG ≥jô£H äÉYƒªÛG
.‹Éãe ábÓM AGOCG ≈∏Y.‹Éãe ábÓM AGOCG ≈∏Y
ææ.IOhõŸG IÉ°TôØdG ᣰSGƒH äGÒ©°ûdG ´õfG.IOhõŸG IÉ°TôØdG ᣰSGƒH äGÒ©°ûdG ´õfG
ææ.ábÓ◊G IóMh πNGO GOó› âÑãŸG QÉW’G ÖcQ.ábÓ◊G IóMh πNGO GOó› âÑãŸG QÉW’G ÖcQ
CC
¢ShDhQ ∫GóÑà°SG Iô≤a ¤G ô¶fG .áØdÉJ ábÓ◊G ¢ShDhQ :ådÉãdG ÖÑ°ùdG¢ShDhQ ∫GóÑà°SG Iô≤a ¤G ô¶fG .áØdÉJ ábÓ◊G ¢ShDhQ :ådÉãdG ÖÑ°ùdG
.ábÓ◊G.ábÓ◊G
.ábÓ◊G ¢ShDhQ ∞∏J Öæéj Úàæ°S πc ábÓ◊G ¢ShDhQ ∫GóÑà°SG ¿G.ábÓ◊G ¢ShDhQ ∞∏J Öæéj Úàæ°S πc ábÓ◊G ¢ShDhQ ∫GóÑà°SG ¿G
22»ÑfÉ÷G ±É≤j’G/𫨰ûàdG ìÉàØe ∂jô– óæY πª©j ’ RÉ¡÷G»ÑfÉ÷G ±É≤j’G/𫨰ûàdG ìÉàØe ∂jô– óæY πª©j ’ RÉ¡÷G
) ≈∏YC’G √ÉŒÉH) ≈∏YC’G √ÉŒÉH11.(.(
CC
.QTÉÑŸG QÉ«àdÉH á∏°üàe â°ù«d ádB’G :ÖÑ°ùdG.QTÉÑŸG QÉ«àdÉH á∏°üàe â°ù«d ádB’G :ÖÑ°ùdG
1
2
37

ábÓ◊G ¢ShDhQ ∫GóÑà°SGábÓ◊G ¢ShDhQ ∫GóÑà°SG
.ábÓ◊G èFÉàf π°†aCG ≈∏Y ∫ƒ°üë∏d Úàæ°S πc ábÓ◊G ¢ShDhQ ∫óÑà°SG.ábÓ◊G èFÉàf π°†aCG ≈∏Y ∫ƒ°üë∏d Úàæ°S πc ábÓ◊G ¢ShDhQ ∫óÑà°SG
11) ábÓ◊G ádBG 𫨰ûJ ∞bhCG) ábÓ◊G ádBG 𫨰ûJ ∞bhCG11¢ùHÉb øe »FÉHô¡µdG ∂∏°ùdG ´õfG ,(¢ùHÉb øe »FÉHô¡µdG ∂∏°ùdG ´õfG ,(
.ábÓ◊G ádBG øe »FÉHô¡µdG ¢ùÑ≤ŸG π°üaGh §FÉ◊G.ábÓ◊G ádBG øe »FÉHô¡µdG ¢ùÑ≤ŸG π°üaGh §FÉ◊G
BB
22.ábÓ◊G IóMh ´õfG h π°üØdG ìÉàØe §¨°VG.ábÓ◊G IóMh ´õfG h π°üØdG ìÉàØe §¨°VG
BB
33.âÑãŸG QÉW’G ´õfG h áYÉ°ùdG ÜQÉ≤Y √ÉŒG ¢ùµ©H Ü’hódG QOCG.âÑãŸG QÉW’G ´õfG h áYÉ°ùdG ÜQÉ≤Y √ÉŒG ¢ùµ©H Ü’hódG QOCG
BB
44IóMh πNGO IójóL ¢ShDhôH É¡dóÑà°SG h ábÓ◊G ¢ShDhQ ´õfGIóMh πNGO IójóL ¢ShDhôH É¡dóÑà°SG h ábÓ◊G ¢ShDhQ ´õfG
.ábÓ◊G.ábÓ◊G
BB
55ÜQÉ≤Y √ÉŒÉH Ü’hódG QOCG :ójóL øe ábÓ◊G IóMh ÖcQÜQÉ≤Y √ÉŒÉH Ü’hódG QOCG :ójóL øe ábÓ◊G IóMh ÖcQ
.áYÉ°ùdG.áYÉ°ùdG
RGôW øe §≤a IójóL ábÓM ¢ShDhôH áØ∏àŸG ábÓ◊G ¢ShDhQ ∫óÑà°SGRGôW øe §≤a IójóL ábÓM ¢ShDhôH áØ∏àŸG ábÓ◊G ¢ShDhQ ∫óÑà°SG
PhilipsPhilipsHQ55HQ55
øjõîàdGøjõîàdG
BB
ææ.∞∏àdG Öæéàd ádB’G ≈∏Y »bGƒdG AÉ£¨dG ™°V.∞∏àdG Öæéàd ádB’G ≈∏Y »bGƒdG AÉ£¨dG ™°V
ææ.IOhõŸG á¶aÉ◊G áÑ«≤◊G πNGO RÉ¡÷G øjõîJ øµÁ.IOhõŸG á¶aÉ◊G áÑ«≤◊G πNGO RÉ¡÷G øjõîJ øµÁ
á«Hô©dGá«Hô©dG38
2
1
2
1
1
2

BB
55.IÉ°TôØ∏d áªYÉædG äGÒ©°ûdG hP ÖfÉ÷G ᣰSGƒH ¢ü≤ŸG ∞¶f.IÉ°TôØ∏d áªYÉædG äGÒ©°ûdG hP ÖfÉ÷G ᣰSGƒH ¢ü≤ŸG ∞¶f
.º¡°ùdG √ÉŒÉH ¢UôëH IÉ°TôØdÉH ∞¶f.º¡°ùdG √ÉŒÉH ¢UôëH IÉ°TôØdÉH ∞¶f
BB
66.IÉ°TôØdÉH QÉW’G ∞¶f.IÉ°TôØdÉH QÉW’G ∞¶f
GPG .∫ƒëµdG πãe ºë°û∏d πjõe πFÉ°ùH ábÓ◊G IóMh ∞«¶æJ É°†jCG ∂æµÁGPG .∫ƒëµdG πãe ºë°û∏d πjõe πFÉ°ùH ábÓ◊G IóMh ∞«¶æJ É°†jCG ∂æµÁ
ádBG âjR Iô£b ᣰSGƒH QÉWÓd ájõcôŸG á£≤ædG º«ë°ûàH ºb ,∂dòH âªbádBG âjR Iô£b ᣰSGƒH QÉWÓd ájõcôŸG á£≤ædG º«ë°ûàH ºb ,∂dòH âªb
.ábÓ◊G ¢ShDhQ ∞∏J Öæéj ∂dP .∞«¶æàdG ó©H áWÉ«ÿG.ábÓ◊G ¢ShDhQ ∞∏J Öæéj ∂dP .∞«¶æàdG ó©H áWÉ«ÿG
BB
77ÜQÉ≤Y √ÉŒÉH Ü’hódG QOCG :ójóL øe ábÓ◊G IóMh ÖcQÜQÉ≤Y √ÉŒÉH Ü’hódG QOCG :ójóL øe ábÓ◊G IóMh ÖcQ
.áYÉ°ùdG.áYÉ°ùdG
88.ádB’G πNGO É¡fɵe ábÓ◊G IóMh ™°V.ádB’G πNGO É¡fɵe ábÓ◊G IóMh ™°V
Üò°ûŸGÜò°ûŸG
.É¡«a ¬eóîà°ùJ Iôe πc ó©H Üò°ûŸG ∞«¶æàH ºb.É¡«a ¬eóîà°ùJ Iôe πc ó©H Üò°ûŸG ∞«¶æàH ºb
11) ábÓ◊G ádBG 𫨰ûJ ∞bhCG) ábÓ◊G ádBG 𫨰ûJ ∞bhCG00¢ùHÉb øe »FÉHô¡µdG ∂∏°ùdG ´õfG ,(¢ùHÉb øe »FÉHô¡µdG ∂∏°ùdG ´õfG ,(
.ábÓ◊G ádBG øe »FÉHô¡µdG ¢ùÑ≤ŸG π°üaGh §FÉ◊G.ábÓ◊G ádBG øe »FÉHô¡µdG ¢ùÑ≤ŸG π°üaGh §FÉ◊G
BB
22.IOhõŸG IÉ°TôØdG ᣰSGƒH Üò°ûŸG ∞¶f.IOhõŸG IÉ°TôØdG ᣰSGƒH Üò°ûŸG ∞¶f
BB
33πc áWÉ«ÿG ádBG âjR Iô£b ᣰSGƒH Üò°ûŸG ¿Éæ°SCG º«ë°ûàH ºbπc áWÉ«ÿG ádBG âjR Iô£b ᣰSGƒH Üò°ûŸG ¿Éæ°SCG º«ë°ûàH ºb
.ô¡°TCG áà°S.ô¡°TCG áà°S
á«Hô©dGá«Hô©dG 39
1
2

BB
44ᣰSGƒH ô©°ûdG ¿õfl h πNGódG øe ábÓ◊G IóMh ∞¶fᣰSGƒH ô©°ûdG ¿õfl h πNGódG øe ábÓ◊G IóMh ∞¶f
.IÉ°TôØdG.IÉ°TôØdG
BB
55.ádB’G πNGO É¡fɵe ábÓ◊G IóMh ™°V.ádB’G πNGO É¡fɵe ábÓ◊G IóMh ™°V
.ábÓ◊G ¢ShDhQ :øjô¡°T πc.ábÓ◊G ¢ShDhQ :øjô¡°T πc
èFÉàf π°†aCG ≈∏Y ∫ƒ°üë∏d Úàæ°S πc RGôW ábÓ◊G ¢ShDhQ ∫óÑà°SGèFÉàf π°†aCG ≈∏Y ∫ƒ°üë∏d Úàæ°S πc RGôW ábÓ◊G ¢ShDhQ ∫óÑà°SG
.ábÓ◊G.ábÓ◊GHQ55HQ55
11) ábÓ◊G ádBG 𫨰ûJ ∞bhCG) ábÓ◊G ádBG 𫨰ûJ ∞bhCG00¢ùHÉb øe »FÉHô¡µdG ∂∏°ùdG ´õfG ,(¢ùHÉb øe »FÉHô¡µdG ∂∏°ùdG ´õfG ,(
.ábÓ◊G ádBG øe »FÉHô¡µdG ¢ùÑ≤ŸG π°üaGh §FÉ◊G.ábÓ◊G ádBG øe »FÉHô¡µdG ¢ùÑ≤ŸG π°üaGh §FÉ◊G
BB
22.ábÓ◊G IóMh ´õfG h π°üØdG ìÉàØe §¨°VG.ábÓ◊G IóMh ´õfG h π°üØdG ìÉàØe §¨°VG
BB
33.âÑãŸG QÉW’G ´õfG h áYÉ°ùdG ÜQÉ≤Y √ÉŒG ¢ùµ©H Ü’hódG QOCG.âÑãŸG QÉW’G ´õfG h áYÉ°ùdG ÜQÉ≤Y √ÉŒG ¢ùµ©H Ü’hódG QOCG
BB
44(äGQÉW’G h äÉ°ü≤ŸG ™e) º¡Ø«¶æàH ºb h ábÓ◊G ¢ShDhQ ´õfG(äGQÉW’G h äÉ°ü≤ŸG ™e) º¡Ø«¶æàH ºb h ábÓ◊G ¢ShDhQ ´õfG
.iôNC’G ƒ∏J IóMGh.iôNC’G ƒ∏J IóMGh
.äGQÉW’G h äÉ°ü≤ŸG ÚH êõ“ ’.äGQÉW’G h äÉ°ü≤ŸG ÚH êõ“ ’
πLCG øe ¢UÉÿG √QÉWG Ö°SÉæ«d ¬ª«ª°üJ ” ¢ü≤e πc ¿C’ GóL º¡e ∂dPπLCG øe ¢UÉÿG √QÉWG Ö°SÉæ«d ¬ª«ª°üJ ” ¢ü≤e πc ¿C’ GóL º¡e ∂dP
ôeC’G Ö∏£à«°S ,AÉ£ÿG ≥jô£H äÉYƒªÛG ÚH âLõe GPG .‹Éãe AGOCGôeC’G Ö∏£à«°S ,AÉ£ÿG ≥jô£H äÉYƒªÛG ÚH âLõe GPG .‹Éãe AGOCG
.»dÉãe ábÓM AGOCG ≈∏Y ∫ƒ°ü◊G IOÉY’ ™«HÉ°SCG IóY.»dÉãe ábÓM AGOCG ≈∏Y ∫ƒ°ü◊G IOÉY’ ™«HÉ°SCG IóY
á«Hô©dGá«Hô©dG40
2
1
2
1

Öjò°ûàdGÖjò°ûàdG
.Öæ°ûdG h ∞dGƒ°ùdG Öjò°ûàd.Öæ°ûdG h ∞dGƒ°ùdG Öjò°ûàd
BB
11√ÉŒÉH »ÑfÉ÷G ìÉàØŸG ≈∏Y §¨°†dG ∫ÓN øe Üò°ûŸG íàaG√ÉŒÉH »ÑfÉ÷G ìÉàØŸG ≈∏Y §¨°†dG ∫ÓN øe Üò°ûŸG íàaG
.≈∏YC’G.≈∏YC’G
.ádB’G ∑ôfi 𫨰ûJ ∫ÉN Üò°ûŸG 𫨰ûJ øµÁ.ádB’G ∑ôfi 𫨰ûJ ∫ÉN Üò°ûŸG 𫨰ûJ øµÁ
∞«¶æàdG∞«¶æàdG
.‹Éãe ábÓM AGOCG π°UGƒàŸG ∞«¶æàdG øª°†j.‹Éãe ábÓM AGOCG π°UGƒàŸG ∞«¶æàdG øª°†j
BB
ææ ábÓ◊G ¢ShDhQ ∞«¶æJ IGOCG ôaƒàJ ,∫É©a h π¡°S ∞«¶æàd ábÓ◊G ¢ShDhQ ∞«¶æJ IGOCG ôaƒàJ ,∫É©a h π¡°S ∞«¶æàdPhilipsPhilips
RGôW) Ú∏c ø°ûcCG RGôW) Ú∏c ø°ûcCGHQ100HQ100π«ch øe äÉeƒ∏©ŸG øY ô°ùØà°SG .(π«ch øe äÉeƒ∏©ŸG øY ô°ùØà°SG .(
PhilipsPhilips..
:á«dÉàdG á≤jô£dÉH ádB’G ∞«¶æJ É°†jCG ∂æµÁ:á«dÉàdG á≤jô£dÉH ádB’G ∞«¶æJ É°†jCG ∂æµÁ
.ábÓ◊G IóMh :´ƒÑ°SCG πc.ábÓ◊G IóMh :´ƒÑ°SCG πc
11) ábÓ◊G ádBG 𫨰ûJ ∞bhCG) ábÓ◊G ádBG 𫨰ûJ ∞bhCG00¢ùHÉb øe »FÉHô¡µdG ∂∏°ùdG ´õfG ,(¢ùHÉb øe »FÉHô¡µdG ∂∏°ùdG ´õfG ,(
.ábÓ◊G ádBG øe »FÉHô¡µdG ¢ùÑ≤ŸG π°üaGh §FÉ◊G.ábÓ◊G ádBG øe »FÉHô¡µdG ¢ùÑ≤ŸG π°üaGh §FÉ◊G
BB
22.IOhõŸG IÉ°TôØdG ΩGóîà°SÉH ’hCG RÉ¡÷G øe …ƒ∏©dG º°ù≤dG ∞¶f.IOhõŸG IÉ°TôØdG ΩGóîà°SÉH ’hCG RÉ¡÷G øe …ƒ∏©dG º°ù≤dG ∞¶f
BB
33.IbÓ◊G IóMh ´õfG h π°üØdG ìÉàØe §¨°VG.IbÓ◊G IóMh ´õfG h π°üØdG ìÉàØe §¨°VG
á«Hô©dGá«Hô©dG 41
2
1

¬«ÑæJ¬«ÑæJ
.RÉ¡÷G ΩGóîà°SG πÑb äGOÉ°TQ’G √òg IAGôb AÉLôdG.RÉ¡÷G ΩGóîà°SG πÑb äGOÉ°TQ’G √òg IAGôb AÉLôdG
ææ.RÉ¡÷G ™e OhõŸG »FÉHô¡µdG ∂∏°ùdG §≤a Ωóîà°SG.RÉ¡÷G ™e OhõŸG »FÉHô¡µdG ∂∏°ùdG §≤a Ωóîà°SG
BB
ææ.AÉŸÉH ¿ÓàÑj ’ »FÉHô¡µdG ∂∏°ùdG h RÉ¡÷G ¿CÉH ócCÉJ.AÉŸÉH ¿ÓàÑj ’ »FÉHô¡µdG ∂∏°ùdG h RÉ¡÷G ¿CÉH ócCÉJ
π«°UƒàdGπ«°UƒàdG
ÚH ìhGÎJ IQGôM áLQO ‘ ¬eóîà°SGh RÉ¡÷G ¿õN ÚH ìhGÎJ IQGôM áLQO ‘ ¬eóîà°SGh RÉ¡÷G ¿õN55 h h3535áLQOáLQO
.ájƒÄe.ájƒÄe
ÚH ìhGÎj »FÉHô¡c QÉ«àd ºFÓe RÉ¡÷G ÚH ìhGÎj »FÉHô¡c QÉ«àd ºFÓe RÉ¡÷G100100 h h240240.âdƒa.âdƒa
BB
11.ádB’G ‘ RÉ¡÷G ¢ùÑ≤e ™°V.ádB’G ‘ RÉ¡÷G ¢ùÑ≤e ™°V
22.§FÉ◊G ¢ùHÉb ‘ »FÉHô¡µdG ∂∏°ùdG ™°V.§FÉ◊G ¢ùHÉb ‘ »FÉHô¡µdG ∂∏°ùdG ™°V
ábÓ◊GábÓ◊G
11ìÉàØe ≈∏Y §¨°†dG ∫ÓN øe ádB’G 𫨰ûàH ºbìÉàØe ≈∏Y §¨°†dG ∫ÓN øe ádB’G 𫨰ûàH ºb
) ≈∏YC’G √ÉŒÉH ±É≤j’G/𫨰ûàdG) ≈∏YC’G √ÉŒÉH ±É≤j’G/𫨰ûàdG11.(.(
BB
22äÉcôM ∫ÓN øe ∂Jô°ûH ≈∏Y áYô°ùH ábÓ◊G ¢ShDhQ ∑ôMäÉcôM ∫ÓN øe ∂Jô°ûH ≈∏Y áYô°ùH ábÓ◊G ¢ShDhQ ∑ôM
.᪫≤à°ùe h á«fGQhO.᪫≤à°ùe h á«fGQhO
.èFÉàædG π°†aCG ±ÉL ¬Lh ≈∏Y ábÓ◊G ôaƒJ.èFÉàædG π°†aCG ±ÉL ¬Lh ≈∏Y ábÓ◊G ôaƒJ
Ωɶf ™e º∏bCÉààd áKÓK hCG ÚYƒÑ°SCG ¤G ∂Jô°ûH êÉà– ±ƒ°S Ωɶf ™e º∏bCÉààd áKÓK hCG ÚYƒÑ°SCG ¤G ∂Jô°ûH êÉà– ±ƒ°SPhilipsPhilips..
33) ádB’G 𫨰ûJ ∞bhCG) ádB’G 𫨰ûJ ∞bhCG00.(.(
BB
44.∞∏àdG Öæéàd ΩGóîà°SG πc ó©H ádB’G ≈∏Y »bGƒdG AÉ£¨dG ™°V.∞∏àdG Öæéàd ΩGóîà°SG πc ó©H ádB’G ≈∏Y »bGƒdG AÉ£¨dG ™°V
èFÉàf π°†aCG ≈∏Y ∫ƒ°üë∏d Úàæ°S πc RGôW ábÓ◊G ¢ShDhQ ∫óÑà°SGèFÉàf π°†aCG ≈∏Y ∫ƒ°üë∏d Úàæ°S πc RGôW ábÓ◊G ¢ShDhQ ∫óÑà°SG
.ábÓ◊G.ábÓ◊GHQ55HQ55
á«Hô©dGá«Hô©dG42

43

44
2
2
1

45
3
4
5
1
2
1
1
2

46
7
8
1
2
3
1
2
1
2
2
1

47
6
5
4
3
2
2
1
2
1

48
1
5
4
3
2
2
1
2
1

49
4
1
1

50
1
2
1
2
3
4222 002 42073
 Loading...