

Page 1

ENGLISH 4
FRANÇAIS 12
ESPAÑOL 20
PORTUGUÊS 29
43
50
HQ642
3
áá««HHôô©©ddGG
Page 2

Important
Read these instructions for use carefully before
using the appliance and save them for future
reference.
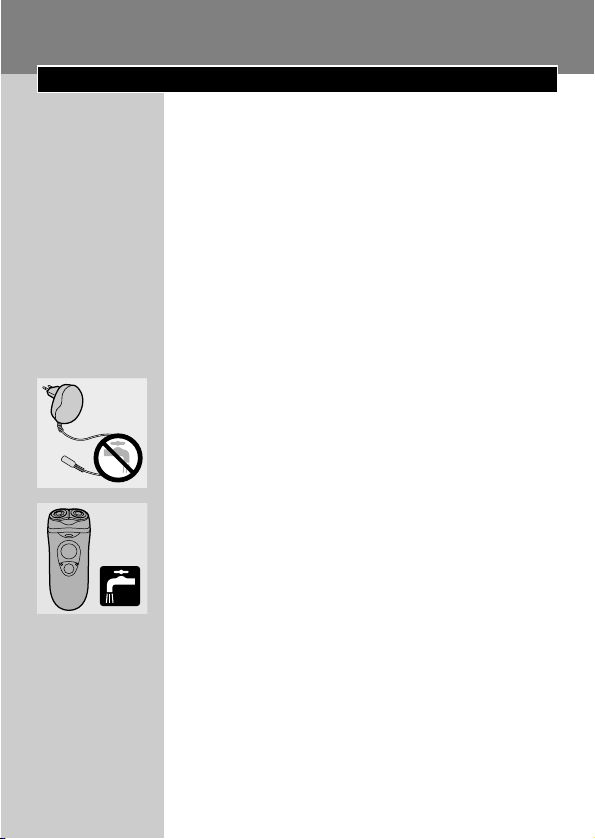
◗ Only use the powerplug supplied to connect
the appliance to the mains.
◗ If the powerplug is damaged, always have it
replaced by one of the original type in order
to avoid a hazard.
◗ The powerplug transforms 220-240 volts to a
safe low voltage of less than 24 volts. Only the
powerplug supplied guarantees safe
transformation.
◗ The powerplug contains a transformer. Do
not cut off the powerplug to replace it with
another plug, as this will cause a hazardous
situation.
C
◗ Make sure the powerplug does not get wet.
C
◗ The appliance complies with the
internationally approved IEC safety regulations
and can be safely cleaned under the tap.
Be careful with hot water. Always check if the
water is not too hot, to prevent your hands from
getting burnt.
ENGLISH4
Page 3

Using the appliance
Shaving
C
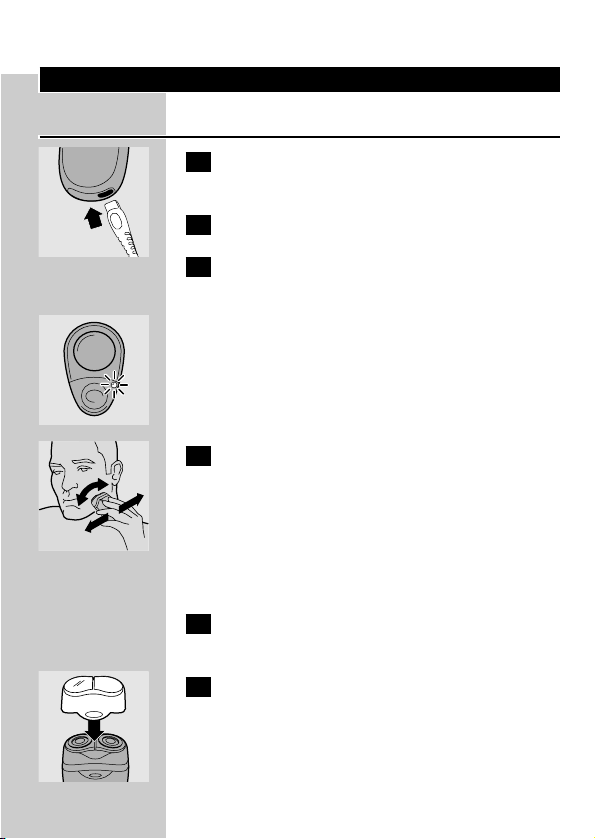
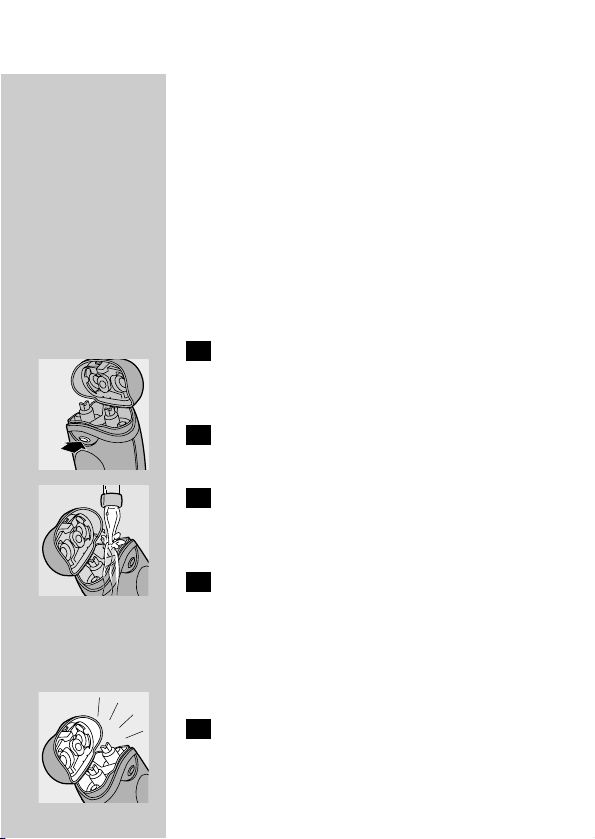
1 Put the appliance plug in the shaver.
2 Put the powerplug in the wall socket.
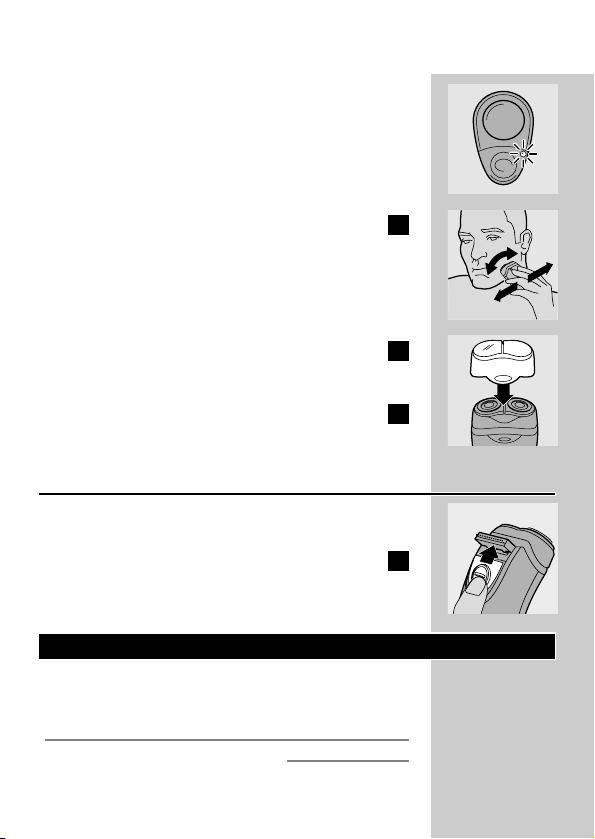
3 Switch the shaver on by pressing the on/off
button once.
C
◗ The green pilot light goes on.
C
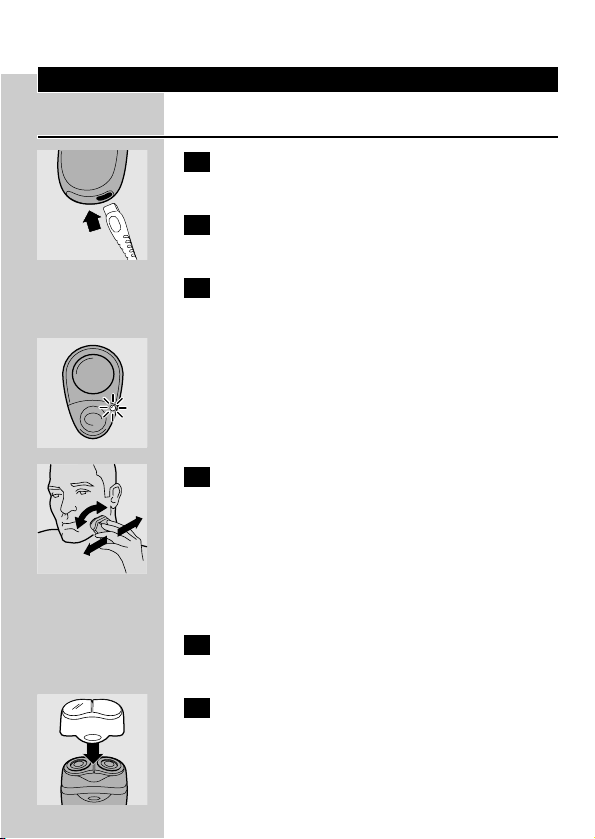
4 Move the shaving heads quickly over your
skin, making both straight and circular
movements.
Shaving on a dry face gives the best results.
Your skin may need 2 or 3 weeks to get
accustomed to the Philishave system.
5 Switch the shaver off by pressing the on/off
button once.
C
6 Put the protection cap on the shaver every
time you have used it, to prevent damage.
ENGLISH 5
Page 4

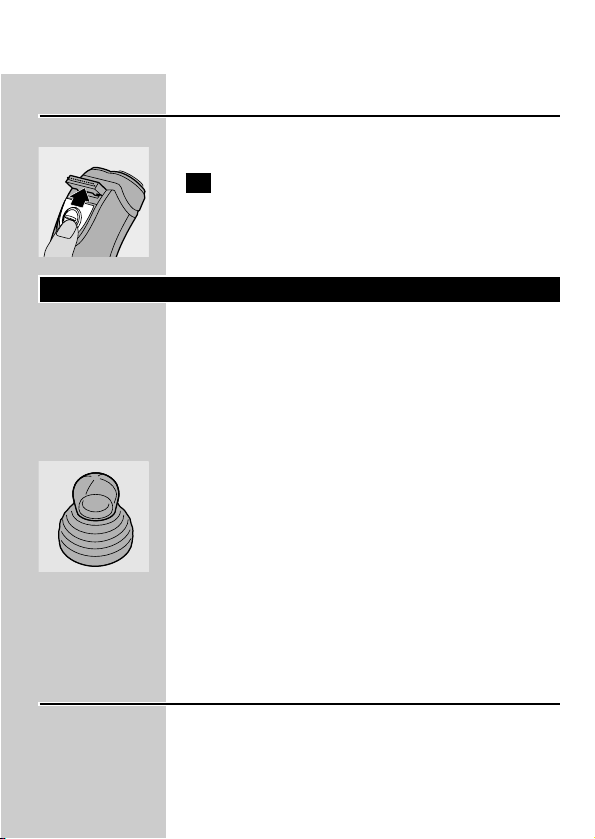
Trimming
For grooming sideburns and moustache.
C
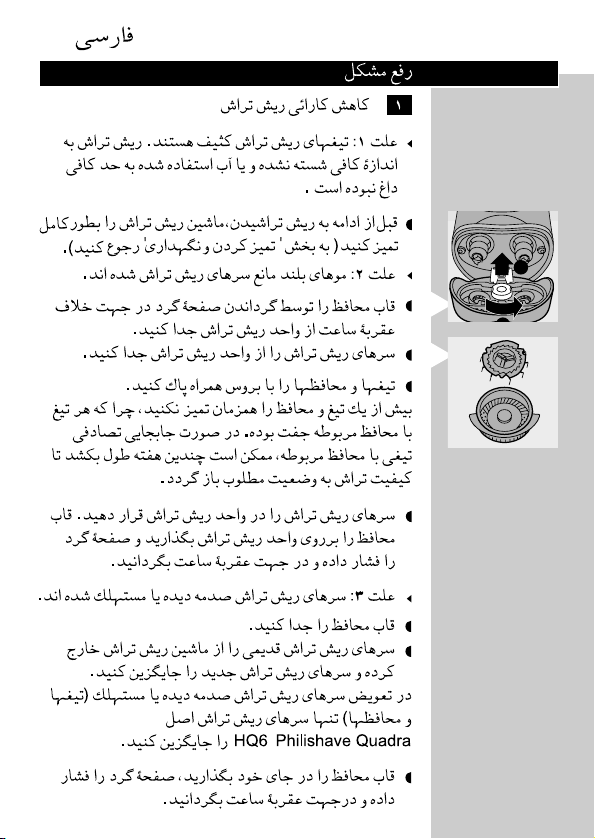
1 Open the trimmer by pushing the slide
upwards.
The trimmer can be activated while the motor is
running.
Cleaning and maintenance
Regular cleaning guarantees better shaving
performance.
Be careful with hot water. Always check if the
water is not too hot, to prevent your hands from
getting burnt.
C
◗ For easy and optimal cleaning, the Philishave
Action Clean (shaving head cleaner, type
HQ100) is available.Ask your Philishave dealer
for information.
B
The Philishave Action Clean may not be available
in all countries. Contact the Customer Care Centre
in your country about the availability of this
accessory.
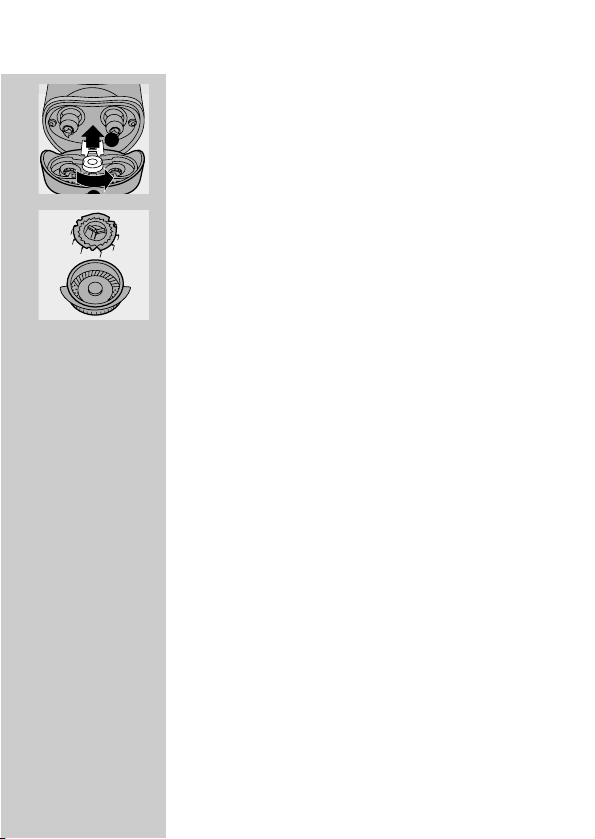
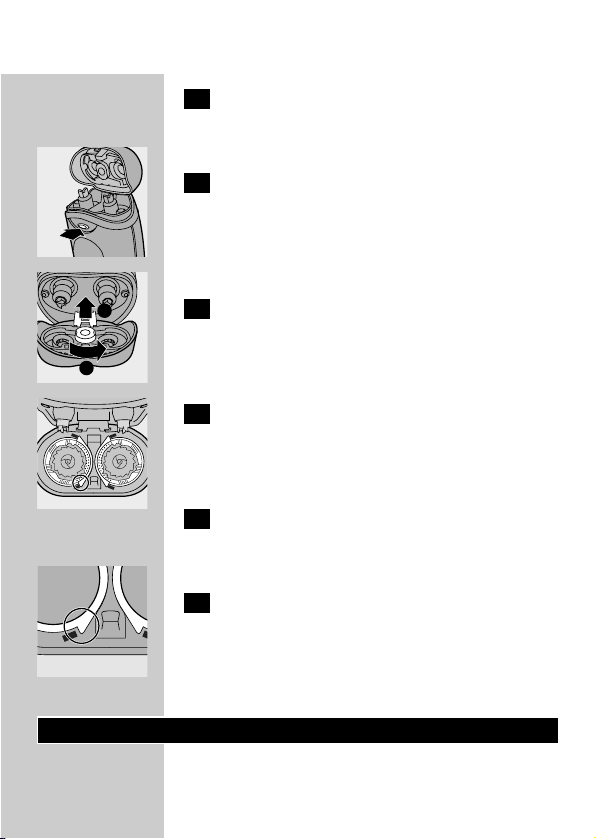
Shaving unit
When you clean the appliance, it is not necessary
to take the shaving heads (cutters and guards)
apart. If you want to take them apart, be sure not
to mix up the cutters and guards, since grinding of
ENGLISH6
Page 5

the cutters in the guards only guarantees optimal
performance for each matching set. If you
accidentally mix up the sets, it could take several
weeks before optimal shaving performance is
restored.
The easiest and most hygienic way to clean the
appliance is to rinse the shaving unit and the hair
chamber with hot water every time you have
used the appliance.
1 Switch the shaver off, remove the
powerplug from the wall socket and pull
the appliance plug out of the shaver.
C
2 Press the release button to open the
shaving unit.
C
3 Clean the shaving unit and the hair
chamber by rinsing them under a hot tap
for some time.
4 Close the shaving unit and shake off excess
water.
Never dry the shaving unit with a towel or tissue
as this may damage the shaving heads.
C
5 Open the shaving unit again and leave it
open to let the appliance dry completely.
◗ You can also clean the hair chamber without
water by using the brush supplied.
ENGLISH 7
Page 6

Trimmer
Clean the trimmer every time you have used it.
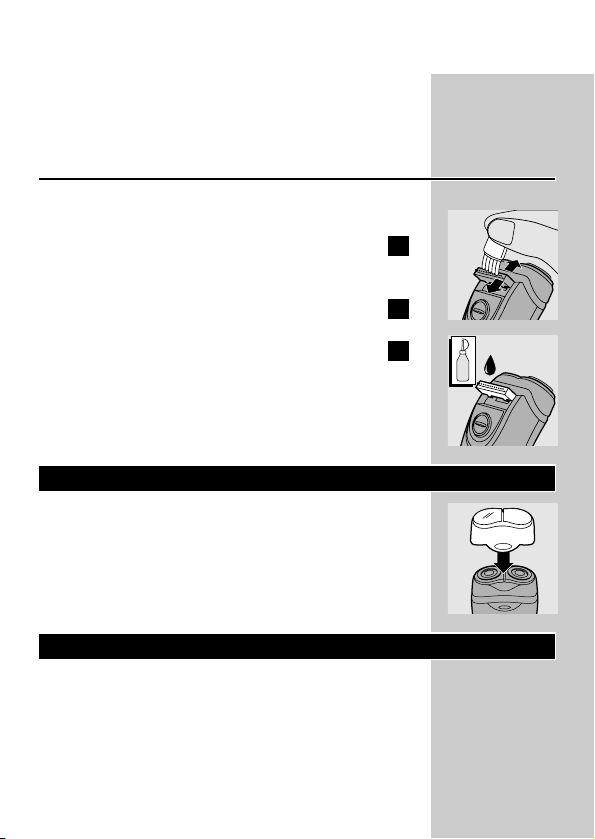
1 Switch the shaver off, remove the
powerplug from the wall socket and pull
the appliance plug out of the shaver.
C
2 Clean the trimmer with the brush
supplied.
C
3 Lubricate the trimmer teeth with a drop
of sewing machine oil every six months.
Storage
C
◗ Put the protection cap on the shaver to
prevent damage.
◗ Store the shaver in the pouch.
Replacement
Replace the shaving heads every 2 years for
optimal shaving results.
Replace damaged or worn shaving heads with
HQ6 Philishave Quadra shaving heads only.
ENGLISH8
OIL
Page 7

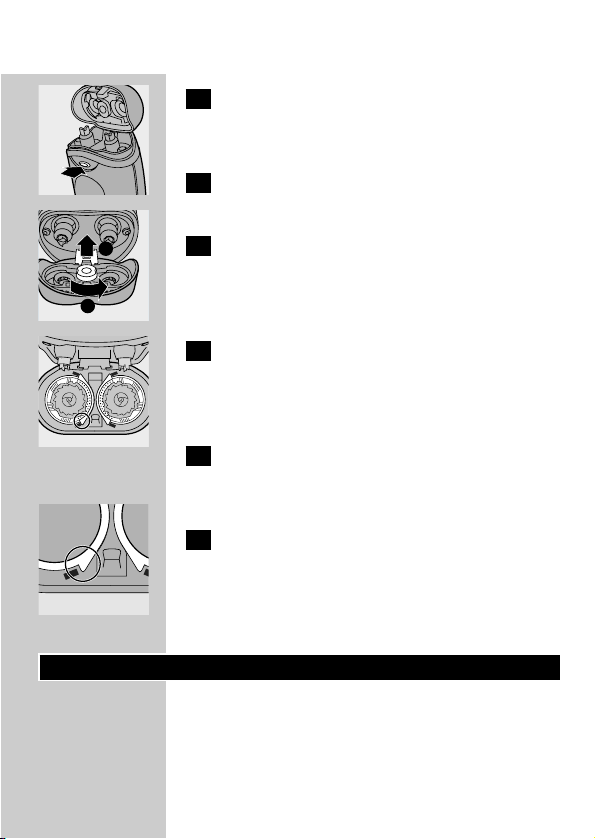
1 Switch the shaver off, remove the
powerplug from the wall socket and pull
the appliance plug out of the shaver.
C
2 Press the release button to open the
shaving unit.
C
3 Turn the wheel anticlockwise (1) and
remove the retaining frame (2).
C
4 Remove the shaving heads and place new
ones in the shaving unit in such a way that
the projections fit exactly into the
recesses in the shaving unit.
5 Put the retaining frame back into the
shaving unit, press the wheel and turn it
clockwise.
6 Close the shaving unit.
C
◗ If the shaving heads have been properly
inserted, the shiny parts are pointing inwards
and towards each other.
Accessories
The following accessories are available:
- HQ8000 powerplug.
- HQ6 Philishave Quadra shaving heads.
ENGLISH 9
2
1
Page 8

- HQ100 Philishave Action Clean
(shaving head cleaner).
- HQ101 Philishave Action Clean refill
(shaving head cleaning liquid).
- HQ110 Philishave shaving head cleaner
(shaving head cleaning spray).
Guarantee & service
If you need information or if you have a problem,
please visit the Philips Web site at www.philips.com
or contact the Philips Customer Care Centre in
your country (you will find its phone number in
the worldwide guarantee leaflet). If there is no
Customer Care Centre in your country, turn to
your local Philips dealer or contact the Service
Department of Philips Domestic Appliances and
Personal Care BV.
Troubleshooting
1 Reduced shaving performance
B
Cause 1: the shaving heads are dirty.The shaver
has not been rinsed long enough or the water
used was not hot enough.
◗ Clean the shaver thoroughly before you
continue shaving (See chapter 'Cleaning and
maintenance').
B
Cause 2: long hairs are obstructing the shaving
heads.
ENGLISH10
Page 9

C
◗ Remove the retaining frame from the shaving
unit by turning the wheel anticlockwise.
◗ Remove the shaving heads from the shaving
unit.
C
◗ Remove the hairs from the cutters and the
guards with the brush supplied.
Do not clean more than one cutter and guard at
a time, since they are all matching sets. If you
accidentally mix up the cutters and guards, it
could take several weeks before optimal shaving
performance is restored.
◗ Put the shaving heads back into the shaving
unit. Put the retaining frame back into the
shaving unit, press the wheel and turn it
clockwise.
B
Cause 3: the shaving heads are damaged or worn.
◗ Remove the retaining frame.
◗ Remove the old shaving heads from the
shaving unit and replace them with new ones.
Damaged or worn shaving heads (cutters and
guards) may only be replaced with original HQ6
Philishave Quadra shaving heads.
◗ Put the retaining frame back into the shaving
unit, press the wheel and turn it clockwise.
ENGLISH 11
2
Page 10

Important
Avant d'utiliser l'appareil, lisez les instructions cidessous et conservez ce mode d'emploi pour un
usage ultérieur.
◗ Utilisez exclusivement le chargeur fourni pour
connecter l'appareil.
◗ Lorsque le chargeur est endommagé,
remplacez-le par un chargeur d'origine pour
éviter tout accident.
◗ Le chargeur transforme le 220-240 V en une
tension de sécurité de 24 V. Seul le chargeur
fourni garantit votre sécurité.
◗ Le chargeur est doté d'un transformateur.
N'essayez pas de remplacer la fiche du
chargeur pour éviter tout accident.
C
◗ Evitez le contact du chargeur avec de l'eau.
C
◗ Ce rasoir est conforme aux normes
internationales IEC et il peut être nettoyé en
toute sécurité à l'eau.
Faites attention que l'eau ne soit pas trop chaude
pour ne pas vous brûler.
Utilisation de l'appareil
Rasage
C
1 Enfoncez la fiche dans le rasoir.
2 Mettez le chargeur dans la prise de
courant.
FRANÇAIS12
Page 11

3 Mettez le rasoir en marche en appuyant
sur le bouton marche/arrêt une fois.
C
◗ Le témoin vert s'allume.
C
4 Déplacez rapidement les têtes de rasage
sur la peau en effectuant des mouvements
rectilignes et circulaires.
Les meilleurs résultats de rasage sont obtenus sur
peau sèche.
Votre peau peut avoir besoin de 2-3 semaines
pour s'habituer au système Philishave.
5 Arrêtez le rasoir en appuyant sur le
bouton marche/arrêt une fois.
C
6 Remettez le capot protecteur sur le rasoir
après chaque utilisation pour éviter tout
dommage.
Tondeuse
Pour tailler les favoris et la moustache.
C
1 Dégagez la tondeuse en faisant glisser
l'interrupteur vers le haut.
La tondeuse peut être mise en service pendant
que le moteur fonctionne.
FRANÇAIS 13
Page 12

Nettoyage et entretien
Nettoyez régulièrement l'appareil pour obtenir de
meilleurs résultats de rasage.
Faites attention que l'eau ne soit pas trop chaude
pour ne pas vous brûler.
C
◗ Pour un nettoyage facile et rapide des têtes,
vous pouvez utiliser L'Action Clean de
Philishave (type HQ100). Disponible auprès de
votre revendeur ou Centre Service Agréé
Philips.
B
Il est possible que l'Action Clean de Philishave ne
soit pas disponible dans tous les pays. Pour plus
d'informations, contactez le Service
Consommateurs Philips de votre pays.
Unité de rasage
Quand vous nettoyez l'appareil il n'est pas
nécessaire de démonter les têtes de rasage
(couteaux et grilles). Si vous désirez cependant le
faire, n'intervertissez pas les couteaux et les grilles
car elles sont affûtées par paires. Si vous les
intervertissez, plusieurs semaines peuvent être
nécessaires avant de retrouver une qualité de
rasage optimale.
Pour nettoyer l'appareil simplement et d'une
façon hygiénique, rincez l'unité de rasage et le
compartiment à poils sous l'eau la plus chaude
possible après chaque emploi.
FRANÇAIS14
Page 13

1 Arrêtez l'appareil, enlevez le chargeur de la
prise de courant, et tirez la fiche hors du
rasoir.
C
2 Appuyez sur le bouton de blocage et ôtez
l'unité de rasage de l'appareil.
C
3 Rincez l'unité de rasage et le
compartiment des poils sous l'eau la plus
chaude possible.
4 Fermez l'unité de rasage et secouez l'eau
du rasoir.
Ne séchez jamais l'unité de rasage à l'aide d'une
serviette, car cela pourrait endommager les têtes
de rasage.
C
5 Ouvrez l'unité de rasage à nouveau et
laissez-la ouverte pour sécher l'appareil
complètement.
◗ Vous pouvez également nettoyer le
compartiment à poils à l'aide de la brosse
fournie avec l'appareil.
Tondeuse
Nettoyez la tondeuse après chaque utilisation.
1 Arrêtez l'appareil, enlevez le chargeur de la
prise de courant, et tirez la fiche hors du
rasoir.
FRANÇAIS 15
Page 14

C
2 Nettoyez la tondeuse à l'aide de la brosse
fournie.
C
3 Tous les six mois, lubrifiez la tondeuse à
l'aide d'une gouttelette d'huile pour
machine à coudre.
Rangement
C
◗ Employez le capot de protection pour éviter
les détériorations.
◗ Rangez le rasoir dans l'étui.
Remplacement
Pour un résultat de rasage optimal, remplacez les
têtes de rasage tous les deux ans.
Remplacez les têtes de rasage endommagées ou
usagées exclusivement par des têtes de rasage
Philishave HQ6 Quadra.
1 Arrêtez l'appareil, enlevez le chargeur de la
prise de courant, et tirez la fiche hors du
rasoir.
FRANÇAIS16
OIL
Page 15

C
2 Appuyez sur le bouton de déblocage et
ôtez l'unité de rasage de l'appareil.
C
3 Tournez la molette dans le sens inverse
des aiguilles d'une montre (1) et retirez la
plaque de fermeture (2).
C
4 Enlevez les têtes de rasage et placez les
nouvelles têtes de rasage de telle façon
que les petites ailettes qui dépassent des
têtes de rasage tombent exactement dans
les renfoncements.
5 Remontez la plaque de fermeture sur
l'unité de rasage, pressez la molette et
tournez-la dans le sens des aiguilles d'une
montre.
6 Fermez l'unité de rasage.
C
◗ Si les têtes de rasage sont correctement
positionnées, un cercle brillant doit apparaître
sur le dessus.
Accessoires
Les accessoires suivants sont disponibles:
- Chargeur HQ8000.
- Têtes de rasage Philishave Quadra HQ6.
FRANÇAIS 17
2
1
Page 16

- Philishave Action Clean HQ100 (nettoyeur de
têtes de rasage)
- Philishave Action Clean Recharge HQ101
(produit liquide de nettoyage pour HQ100).
- Philishave Spray HQ110 (spray de nettoyage de
tête de rasage).
Garantie et service
Pour toute réparation/information, ou en cas de
problème, visitez notre website: www.philips.com.
Ou veuillez contacter le Service Consommateurs
Philips de votre pays (vous trouverez le numéro
de téléphone dans le dépliant sur la garantie
internationale). S'il n'y a aucun Service
Consommateurs Philips dans votre pays,
contactez votre distributeur ou le Service
Department de Philips Domestic Appliances and
Personal Care BV.
Dépannage
1 Les résultats de rasage se dégradent
B
Cause 1: Les têtes de rasage sont sales. L'appareil
n'a pas été rincé suffisamment longtemps ou
l'eau n'était pas assez chaude.
◗ Nettoyez l'appareil à fond avant de continuer
le rasage (voir "Nettoyage et entretien").
B
Cause 2: Des poils longs sont emmêlés dans les
têtes de rasage.
FRANÇAIS18
Page 17
C
◗ Enlevez la plaque de fermeture.
◗ Retirez les têtes de rasage de l'unité de
rasage.
C
◗ Enlevez les poils des couteaux et des grilles à
l'aide de la brosse fournie.
Ne nettoyez pas plus d'un couteau et une grille à
la fois, car ceux-ci sont affûtés par paires. Si vous
intervertissez par mégarde les couteaux et les
grilles, plusieurs semaines peuvent être
nécessaires avant que l'appareil rase à nouveau de
manière optimale.
◗ Remontez les têtes de rasage sur l'unité.
Replacez la plaque de fermeture sur l'unité de
rasage, pressez la molette et tournez-la dans
le sens des aiguilles d'une montre.
B
Cause 3: les têtes de rasage sont abîmées ou usées.
◗ Enlevez la plaque de fermeture.
◗ Enlevez les têtes de rasage de l'unité de rasage
et remplacez-les par des têtes de rasage
neuves.
Les têtes de rasage abîmées ou usagées
(couteaux et grilles) doivent être remplacées
uniquement par des têtes de rasage d'origine
Philishave Quadra HQ6.
◗ Remontez la plaque de fermeture sur l'unité
de rasage, pressez la molette et tournez-la
dans le sens des aiguilles d'une montre.
FRANÇAIS 19
2
Page 18
Importante
Lea atentamente estas instrucciones antes de usar
el aparato y consérvelas por si necesitara
consultarlas en el futuro.
◗ Only use the powerplug supplied to connect
the appliance to the mains.
◗ If the powerplug is damaged, always have it
replaced by one of the original type in order
to avoid a hazard.
◗ The powerplug transforms 220-240 volts to a
safe low voltage of less than 24 volts. Only the
powerplug supplied guarantees safe
transformation.
◗ La clavija adaptadora incorpora un
transformador. No quite la clavija adaptadora
para sustituirla por otro enchufe, ya que
podría producirse una situación de peligro.
C
◗ Asegúrese de que la clavija adaptadora no se
moje.
C
◗ El aparato cumple los requisitos de seguridad
IEC aprobados internacionalmente y se puede
limpiar bajo el grifo.
Tenga cuidado con el agua caliente. Compruebe
siempre que el agua no está demasiado caliente
para no quemarse las manos.
20 ESPAÑOL
Page 19
Cómo utilizar el aparato
Afeitado
C
1 Inserte la clavija correspondiente en la
afeitadora.
2 Enchufe la clavija adaptadora a la red.
3 Conecte la afeitadora presionando una vez
el botón de marcha/parada.
C
◗ La lámpara piloto verde se encenderá
C
4 Desplace los conjuntos cortantes
rápidamente sobre la piel con
movimientos rectos y circulares.
Los mejores resultados se obtienen afeitando
sobre la piel seca.
Puede que su piel necesite de 2 a 3 semanas para
acostumbrarse al sistema de afeitado Philishave.
5 Presionando una vez más el botón de
marcha/parada, desconecte la afeitadora.
C
6 Después de usar la afeitadora, póngale
siempre la funda de protección para evitar
daños.
21ESPAÑOL
Page 20
22
Cortapatillas
Para arreglar las patillas y el bigote.
C
1 Abra el cortapatillas presionando el botón
deslizante hacia arriba.
El cortapatillas se puede activar con la afeitadora
en marcha.
Limpieza y mantenimiento
Una limpieza regular garantiza el mejor resultado
en el afeitado.
Tenga cuidado con el agua caliente. Compruebe
siempre que el agua no está demasiado caliente
para no quemarse las manos.
C
◗ Para una limpieza fácil y óptima está
disponible Philishave Action Clean (limpiador
de conjuntos cortantes, modelo HQ100). Para
más información, consulte con su vendedor o
distribuidor Philips.
B
The Philishave Action Clean may not be available
in all countries. Contact the Customer Care Centre
in your country about the availability of this
accessory.
Unidad de afeitado
Cuando limpie el aparato no es necesario sacar
los conjuntos cortantes (cuchillas y protectores).
Si quiere sacarlos, asegúrese de no mezclar
protectores y cuchillas entre sí, ya que el afilado
ESPAÑOL
Page 21
23
de cada cuchilla en su protector garantiza el
funcionamiento óptimo sólo para cada conjunto
emparejado. Si accidentalmente mezcla los
conjuntos, pueden ser necesarias varias semanas
para que se restablezcan los optimos resultados
en el afeitado.
La forma más fácil y más higiénica de limpiar el
aparato es enjuagar la unidad afeitadora y la
cámara de recogida de pelo con agua caliente
cada vez que utilice el aparato.
1 Desconecte la afeitadora, desenchufe la
clavija adaptadora de la red y saque la
clavija de la afeitadora.
C
2 Presione el botón de liberación para abrir
la unidad afeitadora.
C
3 Clean the shaving unit and the hair
chamber by rinsing them under a hot tap
for some time.
4 Cierre la unidad afeitadora y sacuda el
exceso de agua.
No seque nunca la unidad afeitadora con una
toalla o un paño, ya que ello podría dañar los
conjuntos cortantes.
C
5 Vuelva a abrir la unidad afeitadora y déjela
abierta para permitir que el aparato se
seque completamente.
ESPAÑOL
Page 22
24
◗ También puede limpiar la cámara de recogida
del pelo sin agua usando el cepillo que se
suministra.
Cortapatillas
Limpie el cortapatillas cada vez que lo use.
1 Desconecte la afeitadora, desenchufe la
clavija adaptadora de la red y saque la
clavija de la afeitadora.
C
2 Limpie el cortapatillas con el cepillo que se
suministra.
C
3 Cada seis meses lubrique los dientes del
cortapatillas con una gota de aceite de
máquina de coser.
Cómo guardar el aparato
C
◗ Para evitar deterioros, ponga la tapa
protectora en la afeitadora.
◗ Guarde la afeitadora en la bolsa.
Sustitución
Para lograr un resultado óptimo en el afeitado,
sustituya los conjuntos cortantes cada dos años.
Replace damaged or worn shaving heads with
HQ6 Philishave Quadra shaving heads only.
ESPAÑOL
OIL
Page 23
25
1 Apague la afeitadora, desenchufe la clavija
adaptadora de la red y saque la clavija de la
afeitadora.
C
2 Presione el botón de liberación para abrir
la unidad afeitadora.
C
3 Gire la ruedecita en el sentido contrario a
las agujas del reloj (1) y quite el marco de
retención (2).
C
4 Remove the shaving heads and place new
ones in the shaving unit in such a way that
the projections fit exactly into the
recesses in the shaving unit.
5 Vuelva a colocar el marco de retención en
la unidad afeitadora. Presione la ruedecita
y gírela en el sentido de las agujas del reloj.
6 Cierre la unidad afeitadora.
C
◗ Si los conjuntos cortantes han sido colocados
correctamente, las partes brillantes estarán
mirando hacia el interior y una hacia la otra.
Accesorios
Están disponibles los siguientes accesorios:
- Clavija adaptadora HQ8000.
- Conjuntos cortantes HQ6 Philishave Quadra
- Philishave Action Clean HQ100
(para limpiar los conjuntos cortantes).
ESPAÑOL
2
1
Page 24

26
- Recambio Philishave Action Clean HQ101
(líquido limpiador de los conjuntos cortantes).
- Limpiador Philishave HQ110
(spray limpiador de los conjuntos cortantes).
Garantía y servicio
Si necesita información o tiene algún problema,
visite la página web de Philips en www.philips.com,
o póngase en contacto con el Servicio Philips de
Atención al Cliente de su país (hallará el número
de teléfono en el folleto de la Garantía Mundial).
Si en su país no hay Servicio Philips de Atención
al Cliente, diríjase a su distribuidor local Philips o
póngase en contacto con el Service Department
of Philips Domestic Appliances and Personal
Care BV.
Solución de problemas
1 Menor rendimiento en el afeitado
B
Causa 1: los conjuntos cortantes están sucios. La
afeitadora no se ha limpiado durante suficiente
tiempo y/o el agua utilizada para limpiarla no
estaba lo suficientemente caliente.
◗ Clean the shaver thoroughly before you
continue shaving (See chapter 'Cleaning and
maintenance').
B
Causa 2: hay pelos largos obstruyendo los
conjuntos cortantes.
ESPAÑOL
Page 25

27
C
◗ Saque el marco de retención de la unidad
afeitadora girando la ruedecita en sentido
contrario a las agujas del reloj.
◗ Remove the shaving heads from the shaving
unit.
C
◗ Remove the hairs from the cutters and the
guards with the brush supplied.
No limpie más de una cuchilla y un protector al
mismo tiempo, ya que forman conjuntos entre sí.
Si, accidentalmente, se intercambian las cuchillas y
los protectores, pueden ser necesarias varias
semanas para que se restablezcan los óptimos
resultados en el afeitado.
◗ Vuelva a colocar los conjuntos cortantes en la
unidad afeitadora.Vuelva a poner el marco de
retención en la unidad afeitadora, presione la
ruedecita y hágala girar en el sentido de las
agujas del reloj.
B
Causa 3: los conjuntos cortantes están gastados o
dañados
◗ Saque el marco de retención.
◗ Saque los conjuntos cortantes viejos de la
unidad afeitadora y sustitúyalos por unos
nuevos.
Los conjuntos cortantes (cuchillas y protectores)
gastados o dañados sólo deben ser sustituidos
por conjuntos cortantes originales Philishave
HQ6 Quadra.
ESPAÑOL
2
Page 26

28
◗ Vuelva a colocar el marco de retención en la
unidad afeitadora. Presione la ruedecita y
gírela en el sentido de las agujas del reloj.
ESPAÑOL
Page 27

Importante
Antes da primeira utilização, por favor leia estas
instruções com atenção e guarde-as para uma
eventual consulta futura.
◗ Use somente a ficha fornecida para ligar o
aparelho à corrente.
◗ Se a ficha estiver estragada, só deverá ser
substituída por uma peça de origem para se
evitarem situações gravosas para o utilizador.
◗ A ficha transforma 220-240 volts numa
voltagem baixa e inócua inferior a 24 volts.
Apenas a ficha fornecida garante uma
utilização em total segurança.
◗ A ficha de ligação integra um transformador.
Não corte a ficha para a substituir por uma
outra, porque isso poderá provocar uma
situação grave.
C
◗ A ficha de ligação não deve ser molhada.
C
◗ A máquina está conforme as regulamentações
de segurança IEC aprovadas
internacionalmente e pode ser lavada à
torneira com total segurança.
Tenha cuidado com a água quente.Verifique
sempre se a água não está demasiado quente
para evitar queimar as mãos.
29PORTUGUÊS
Page 28
Utilização
Utilização da máquina
C
1 Introduza a ficha de ligação na máquina de
barbear.
2 Ligue o cabo de alimentação à tomada
eléctrica.
3 Ligue a máquina pressionando uma vez o
botão On/Off (ligar/desligar).
C
◗ A luz verde acende-se.
C
4 Passe as cabeças de corte rapidamente
sobre a pele, efectuando movimentos a
direito e em círculo.
Obterá melhores resultados se a pele estiver
seca.
A sua pele poderá demorar entre 2 a 3 semanas
a adaptar-se ao sistema de barbear Philishave.
5 Desligue a máquina premindo o botão
'on/off' uma vez.
C
6 Depois de usar a máquina, coloque-lhe
sempre a tampa de protecção para evitar
qualquer dano.
30 PORTUGUÊS
Page 29
31
Aparador
Para aparar as patilhas e o bigode.
C
1 Liberte o aparador empurrando o
comutador para cima.
O aparador poderá ser activado com o motor
em funcionamento.
Limpeza e manutenção
Uma limpeza regular é garantia de melhores
resultados.
Tenha cuidado com a água quente.Verifique
sempre se a água não está demasiado quente
para evitar queimar as mãos.
C
◗ Para uma limpeza mais simples e eficaz,
adquira o Philishave Action Clean (líquido de
limpeza das cabeças, tipo HQ100). Informe-se
num agente ou num distribuidor Philishave.
B
O Philishave Action Clean poderá não se encontrar
disponível em todos os países. Contacte o Centro
de Informação ao Consumidor do seu país para
se informar sobre a disponibilidade deste
acessório.
Unidade de corte
Quando proceder à limpeza da máquina, não é
necessário retirar as cabeças de cor te (lâminas e
guardas). Se as quiser tirar, certifique-se que não
PORTUGUÊS
Page 30

32
mistura as lâminas e as guardas umas com as
outras porque formam conjuntos e só funcionam
bem e dão bons resultados se estiverem em par.
Se, por acidente, misturar os pares, poderá levar
algumas semanas até voltar a obter o mesmo
rendimento e eficácia da sua máquina de barbear.
A maneira mais simples e mais higiénica de limpar
a máquina é enxaguando a unidade de corte e a
câmara de recolha dos pêlos com água quente
sempre que se servir dela.
1 Desligue a máquina, retire o cabo de
alimentação da tomada eléctrica e puxe a
ficha de ligação para fora da máquina.
C
2 Prima o botão para abrir a unidade de
corte.
C
3 Lave a unidade de corte e a câmara de
recolha dos pêlos à torneira com água
quente.
4 Feche a unidade de corte e sacuda o
excesso de água.
Nunca seque a unidade de corte com uma toalha
ou qualquer tecido porque poderá danificar as
cabeças.
C
5 Abra novamente a unidade de corte e
deixe-a aberta para permitir que a
máquina seque completamente.
PORTUGUÊS
Page 31

33
◗ A câmara de recolha dos pêlos também pode
ser limpa a seco, utilizando para o efeito a
escova fornecida.
Aparador
Limpe o aparador sempre que o utilizar.
1 Desligue a máquina, retire o cabo de
alimentação da tomada eléctrica e puxe a
ficha de ligação para fora da máquina.
C
2 Limpe o aparador com a escova fornecida.
C
3 A cada seis meses, lubrifique os dentes do
aparador com uma gota de óleo para
máquinas de costura.
Arrumação
C
◗ Coloque a tampa de protecção na máquina
para evitar danos.
◗ Guarde a máquina dentro da bolsa.
Substituição
Substitua as cabeças de 2 em 2 anos para obter
sempre os melhores resultados.
Substitua as cabeças estragadas ou gastas apenas
por cabeças HQ6 Philishave Quadra.
PORTUGUÊS
OIL
Page 32
34
1 Desligue a máquina, retire a ficha da
tomada de corrente e puxe a ficha de
ligação para fora da máquina.
C
2 Prima o botão para abrir a unidade de
corte.
C
3 Rode o anel para a esquerda (1) e retire a
armação de retenção (2).
C
4 Retire as cabeças e coloque as cabeças
novas na unidade de corte de maneira que
as projecções encaixem exactamente nas
reentrâncias da unidade de corte.
5 Volte a colocar a armação na unidade de
corte, faça pressão sobre o anel e rode-o
para a direita.
6 Feche a unidade de corte.
C
◗ Se as cabeças tiverem ficado bem colocadas,
as peças brilhantes estarão viradas para
dentro e voltadas umas para as outras.
Acessórios
Poderá adquirir os seguintes acessórios:
- Ficha de ligação HQ8000.
PORTUGUÊS
2
1
Page 33

35
- HQ6 Cabeças Philishave Quadra.
- HQ100 Philishave Action Clean
(líquido de limpeza das cabeças)
- HQ101 Recarga Philishave Action Clean
(líquido de limpeza das cabeças)
- HQ110 Philishave Head Cleaner
(spray para limpeza das cabeças)
Garantia e assistência
Se necessitar de informações ou se tiver qualquer
problema, por favor visite o site da Philips:
www.philips.pt ou contacte o Centro de
Informação ao Consumidor Philips do seu país (o
número de telefone está indicado no folheto da
garantia mundial). Se não existir um Centro de
Informação ao Consumidor Philips no seu país,
dirija-se ao agente Philips local ou contacte o
Departamento de Service da Philips Domestic
Appliances and Personal Care BV.
Resolução de avarias
1 Eficácia reduzida no barbear
B
Causa 1: as cabeças estão sujas. A máquina não
foi enxaguada o tempo suficiente ou a água
utilizada não estava suficientemente quente.
◗ Lave a máquina muito bem antes de continuar
a barbear-se (vidé capítulo 'Limpeza e
manutenção').
PORTUGUÊS
Page 34

36
B
Causa 2: há pêlos compridos a obstruir as
cabeças.
C
◗ Retire a armação.
◗ Retire as cabeças para fora da unidade de
corte.
C
◗ Com a escovinha fornecida, remova os pêlos
existentes nas lâminas e nas guardas.
Não limpar mais que um conjunto lâmina/guarda
de cada vez porque formam pares. Se, por acaso,
alterar os conjuntos lâmina/guarda, a eficácia da
máquina diminuirá e só passadas algumas semanas
voltará ao normal.
◗ Volte a colocar as cabeças na máquina.
Reponha a armação na unidade de corte, faça
pressão no anel e rode-o para a direita.
B
Causa 3: as cabeças estão estragadas ou gastas.
◗ Retire a armação.
◗ Retire as cabeças velhas da máquina e
substitua-as por novas.
As cabeças estragadas ou gastas (lâminas e
guardas) só deverão ser substituídas por cabeças
de origem HQ6 Philishave Quadra.
◗ Volte a colocar a armação na unidade de
corte, faça pressão sobre o anel e rode-o para
a direita.
PORTUGUÊS
2
Page 35

37á«Hô©dG
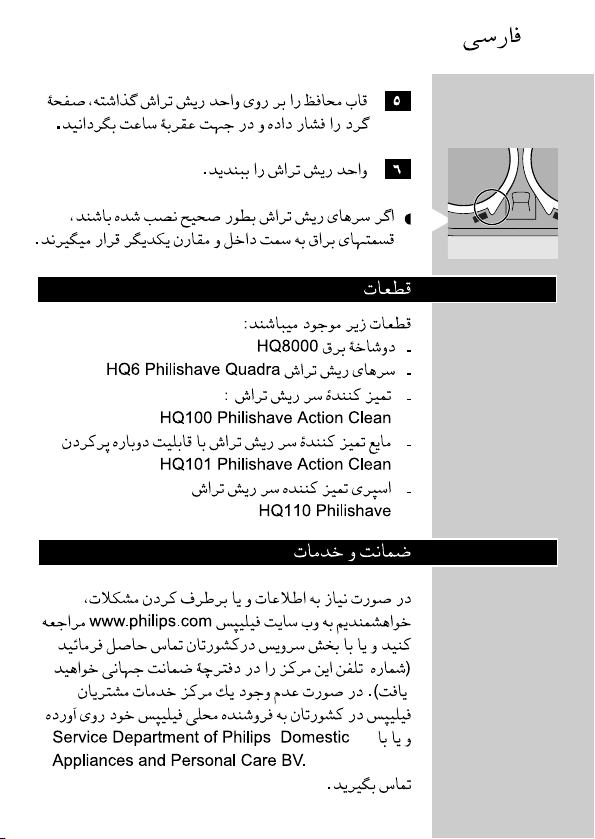
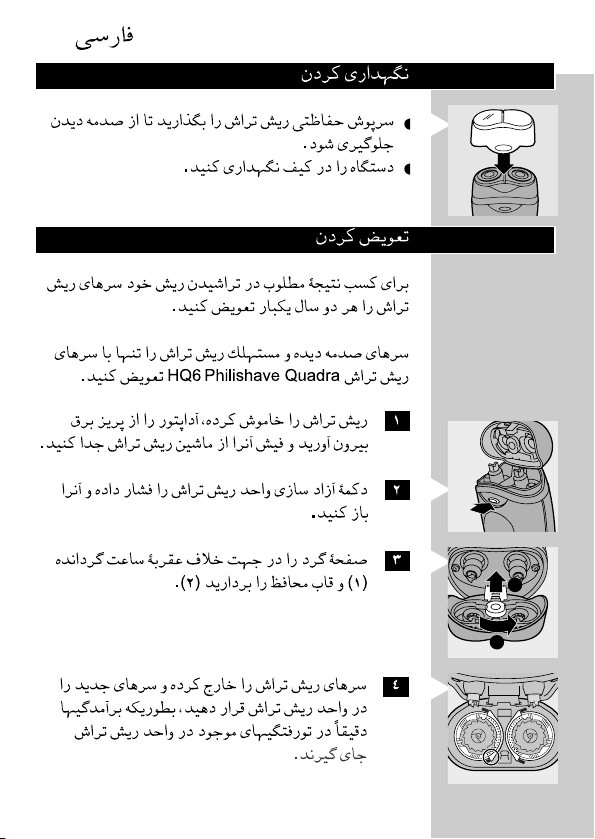
æ¢ShDhôH É¡dóÑà°SG h ábÓ◊G IóMh øe áÁó≤dG ábÓ◊G ¢ShDhQ ´õfG
.IójóL
’G (äGQÉW’G h äÉ°ü≤ŸG) áØdÉàdG ábÓ◊G ¢ShDhQ ∫GóÑà°SG øµÁ ’
GQOGƒc ∞«°û«∏«a á«∏°UCG ábÓM ¢ShDhôH
HQ6.
æ√QOCG h Ü’hódG §¨°VG h ábÓ◊G IóMh ‘ GOó› âÑãŸG QÉW’G ™°V
.áYÉ°ùdG ÜQÉ≤Y √ÉŒÉH
Page 36

38 á«Hô©dG
áeóîdGh ¿Éª°†dG
¿GƒæY IQÉjR AÉLôdG ,á∏µ°ûe ∂jód âfÉc hCG äÉeƒ∏©e ájC’ âéàMG GPG
¢ùÑ«∏«a ácô°ûH ¢UÉîdG âfôàf’G
comphilps.www.õcôªH π°üJG hCG
»a ¿hóe ∞JÉ¡dG ºbQ óéJ ±ƒ°S) ∑ó∏H »a AÓª©dG áeóîd ¢ùÑ«∏«a
,∑ó∏H »a AÓª©dG áeóîd õcôe óLGƒàj ºd GPG .(»ªdÉ©dG ¿Éª°†dG Iô°ûf
ácô°ûd ™HÉàdG áeóîdG õcôªH π°üJG hCG ¢ùÑ«∏«a π«ch á©LGôe AÉLôdG
.á«°üî°ûdG ájÉæ©dG h á«dõæªdG äGhOCÓd ¢ùÑ«∏«a
πcÉ°ûªdG πM
1.¢†Øîæe ábÓM AGOCG
C
Ióªd ábÓëdG ádBG ∞£°T ºàj ºd .áî°ùàe ábÓëdG ¢ShDhQ :∫hC’G ÖÑ°ùdG
.ájÉصdG ¬«a ɪH áæNÉ°S øµJ ºd áeóîà°ùªdG AɪdG ¿CG hCG á«aÉc
æIô≤a ™LGQ) ábÓëdÉH QGôªà°S’G πÑb Gó«L ábÓëdG ádBG ∞«¶æàH ºb
.(<áfÉ«°üdG h ∞«¶æàdÉ"
C
.ábÓëdG ¢ShDhQ ≥«©J á∏jƒW äGô«©°T :»fÉãdG ÖÑ°ùdG
B
æÜ’hódG ôjhóJ ∫ÓN øe ábÓëdG IóMh øe âÑãªdG QÉW’G ´õfG
.áYÉ°ùdG √ÉéJG ¢ùµ©H
æ.ábÓëdG IóMh øe ábÓëdG ¢ShDhQ ´õfG
B
æ.IOhõªdG IÉ°TôØdG ᣰSGƒH äGQÉW’G h äÉ°ü≤ªdG øe ô©°ûdG ´õfG
ø«H âLõe GPG .óMGh ¿BG »a óMGh QÉWG h óMGh ¢ü≤e øe ôãcCG ∞¶æJ ’
IOÉY’ ™«HÉ°SCG IóY ôeC’G Ö∏£à«°S ,AÉ£îdG ≥jô£H äÉYƒªéªdG
.»dÉãe ábÓM AGOCG ≈∏Y ∫ƒ°üëdG
æIóMh ≈dG âÑãªdG QÉW’G óYCG .ábÓëdG IóMh ≈dG ábÓëdG ¢ShDhQ óYCG
.áYÉ°ùdG ÜQÉ≤Y √ÉéJÉH √QOCG h Ü’hódG ≈∏Y §¨°VG h ábÓëdG
C
.GóL áµ∏¡à°ùe hCG áØdÉJ ábÓëdG ¢ShDhQ :ådÉãdG ÖÑ°ùdG
æ.âÑãªdG QÉW’G ´õfG
2
Page 37
39á«Hô©dG
1øe h §FÉ◊G øe »FÉHô¡µdG ¢ùÑ≤ŸG ´õfG h ádB’G 𫨰ûJ ∞bhCG
.ádB’G
B
2.ábÓ◊G IóMh íàØd ¥ÓW’G ìÉàØe ≈∏Y §¨°VG
B
3QÉW’G ´õfG h (1) áYÉ°ùdG ÜQÉ≤Y √ÉŒG ¢ùµ©H Ü’hódG QOCG
.(2) âÑãŸG
B
4IóMh ‘ IójóL ábÓM ¢ShDhQ ™°V h ábÓ◊G ¢ShDhQ ´õfG
≥WÉæŸG ‘ ÉeÉ“ IRQÉÑdG ≥WÉæŸG Ö«côJ ºàj å«ëH ábÓ◊G
.ábÓ◊G IóMh ‘ É¡d á°ü°üıG h áaƒÛG
5h Ü’hódG §¨°VG h ábÓ◊G IóMh ‘ GOó› âÑãŸG QÉW’G ™°V
.áYÉ°ùdG ÜQÉ≤Y √ÉŒÉH √QOCG
6.ábÓ◊G IóMh ≥∏ZCG
B
濃µJ ¿CG Öéj ,í«ë°üdG πµ°ûdÉH ábÓ◊G ¢ShDhQ ∫ÉNOG ” GPG
.É°†jCG ¢†©ÑdG É¡°†©H √ÉŒÉH h πNGódG ¤G á¡éàe á©eÓdG AGõLC’G
äÉ≤ë∏ŸG
:á«dÉàdG äÉ≤ë∏ŸG ôaƒàJ
- AÉHô¡µdG ¢ùÑ≤e
HQ8000.
- GQOGƒc ∞«°û«∏«a ábÓM ¢ShDhQ
HQ6.
- Ú∏c ø°ûcCG ∞«°û«∏«a ábÓ◊G ¢ShDhQ ∞«¶æJ IGOCG
HQ100.
- Ú∏c ø°ûcCG ∞«°û«∏«a ábÓ◊G ¢ShDhQ ∞«¶æJ πFÉ°S
HQ101.
-0 ∞«°û«∏«a ábÓ◊G ¢ShDhQ ∞«¶æJ ñÉîH
HQ110.
2
1
Page 38
40 á«Hô©dG
æ∫ÓN øe AÉŸG ΩGóîà°SG ¿hO ô©°ûdG ¿GõN ∞«¶æJ É°†jCG ∂æµÁ
.IOhõŸG IÉ°TôØdG ΩGóîà°SG
Üò°ûŸG
.É¡«a ¬eóîà°ùJ Iôe πc ó©H Üò°ûŸG ∞«¶æàH ºb
1øe h §FÉ◊G øe »FÉHô¡µdG ¢ùÑ≤ŸG ´õfG h ádB’G 𫨰ûJ ∞bhCG
.ádB’G
B
2.IOhõŸG IÉ°TôØdG ᣰSGƒH Üò°ûŸG ∞¶f
B
3πc áWÉ«ÿG ádBG âjR Iô£b ᣰSGƒH Üò°ûŸG ¿Éæ°SCG º«ë°ûàH ºb
.ô¡°TCG áà°S
øjõîàdG
B
æ.∞∏àdG Öæéàd ádB’G ≈∏Y »bGƒdG AÉ£¨dG ™°V
æ.∂dòd á°UÉÿG áÑ«≤◊G ‘ ábÓ◊G ádBG øjõîàH ºb
∫GóÑà°S’G
.ábÓ◊G èFÉàf π°†aCG ≈∏Y ∫ƒ°üë∏d Úàæ°S πc ábÓ◊G ¢ShDhQ ∫óÑà°SG
GQOGƒc ∞«°û«∏«a ábÓM ¢ShDhôH áØdÉàdG ábÓ◊G ¢ShDhQ ∫GóÑà°SÉH ºb
HQ6.§≤a
OIL
Page 39

41á«Hô©dG
B
æ∞«°û«∏«a ábÓ◊G ¢ShDhQ ∞«¶æJ IGOCG ôaƒàJ ,∫É©a h π¡°S ∞«¶æàd
RGôW) Ú∏c ø°ûcCG
HQ100π«ch øe äÉeƒ∏©ŸG øY ô°ùØà°SG .(
.∞«°û«∏«a
C
∫É°üJ’G AÉLôdG .OÓÑdG πc ‘ Ú∏c ø°ûcCG ∞«°û«∏«a ôaƒàj ’ ób
.≥ë∏ŸG Gòg ôaƒJ øe ócCÉà∏d ∑ó∏H ‘ øFÉHõdG áeóN õcôÃ
ábÓ◊G IóMh
øY ábÓ◊G ¢ShDhQ π°üØJ ¿CG IQhô°†dÉH ¢ù«d ,RÉ¡÷G ∞«¶æJ óæY
øe ócCÉJ ,∂dP äOQCG GPG .äGQÉW’Gh äÉ°ü≤ŸG É¡«a Éà ¢†©ÑdG É¡°†©H
¢UÉÿG √QÉWG ¬d ¢ü≤e πc ¿ƒc äGQÉW’G h äÉ°ü≤ŸG ÚH êõŸG ΩóY
IóY ¤G êÉà– ¿CG øµÁ º¡Lõà âªb GPG .ádBÓd ∫É©a AGOCG øª°†j ɇ
.ójóL øe ádÉ©a ábÓM ≈∏Y π°ü– ¿CG πÑb ™«HÉ°SCG
IóMh ∞£°T ∫ÓN øe »g RÉ¡÷G ∞«¶æàd á≤jôW ∞¶fCG h π¡°SCG ¿G
ΩGóîà°SG É¡«a ºàj Iôe πc ‘ øNÉ°ùdG AÉŸÉH ô©°ûdG ¿GõN h ábÓ◊G
.RÉ¡÷G
1øe h §FÉ◊G øe »FÉHô¡µdG ¢ùÑ≤ŸG ´õfG h ádB’G 𫨰ûJ ∞bhCG
.ádB’G
B
2.∑ôÙG IóMh íàaG h π°üØdG ìÉàØe ≈∏Y §¨°VG
B
3º¡Ø£°T ∫ÓN øe ô©°ûdG ¿GõN h ábÓ◊G IóMh ∞«¶æàH ºb
.âbƒdG ¢†©Ñd øNÉ°ùdG AÉŸG QƒÑæ°U â–
4.óFGõdG AÉŸG É¡æY ÌfG h ábÓ◊G IóMh ≥∏ZCG
∫P ¿ƒc á«bQh ΩQÉfi hCG áØ°ûæe ᣰSGƒH ábÓ◊G IóMh GóHCG ∞ØŒ ’
.ábÓ◊G ¢ShDhôd ∞∏J ÖÑ°ùj ¿CG øµÁ
B
5RÉ¡÷G ∞éj ¿CG ¤G áMƒàØe É¡YO h GOó› ábÓ◊G IóMh íàaG
.ÉeÉ“
Page 40
42 á«Hô©dG
B
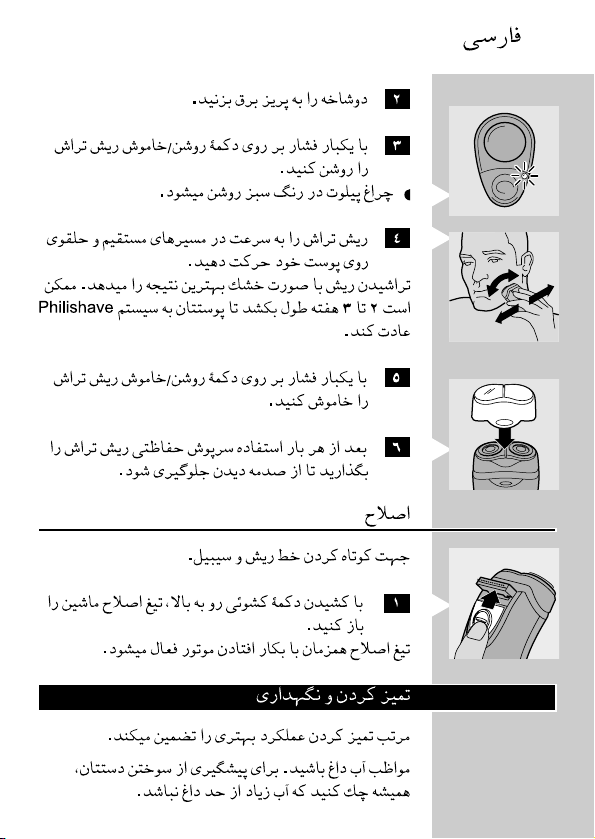
æ.ô°†NC’G »Fƒ°†dG ô°TDƒŸG A»°†j
B
4äÉcôM ´ÉÑJÉH ∂Jô°ûH ≈∏Y áYô°ùH ábÓ◊G ¢ShDhQ Qôe
.É°†jCG ájôFGO h ᪫≤à°ùe
.èFÉàædG π°†aCG íæ“ áaÉL Iô°ûH ≈∏Y ábÓ◊G ¿G
Ωɶf ≈∏Y Oƒ©à∏d ™«HÉ°SCG áKÓK ¤G ÚYƒÑ°SCG ÚH Ée ∂Jô°ûH êÉà– ób
.∞«°û«∏«a ádBG
5ìÉàØe ≈∏Y §¨°†dG ∫ÓN øe ádB’G 𫨰ûJ ∞bhCG
.IóMGh Iôe ±É≤j’G/𫨰ûàdG
B
6.∞∏àdG Öæéàd ΩGóîà°SG πc ó©H ádB’G ≈∏Y »bGƒdG AÉ£¨dG ™°V
Öjò°ûàdG
.Öæ°ûdG h ∞dGƒ°ùdG Öjò°ûàd
B
1√ÉŒÉH »ÑfÉ÷G ìÉàØŸG ≈∏Y §¨°†dG ∫ÓN øe Üò°ûŸG íàaG
.≈∏YC’G
.ádB’G ∑ôfi 𫨰ûJ ∫ÉN Üò°ûŸG 𫨰ûJ øµÁ
áfÉ«°üdG h ∞«¶æàdG
.‹Éãe ábÓM AGOCG π°UGƒàŸG ∞«¶æàdG øª°†j
ÉæNÉ°S ¢ù«d AÉŸG ¿CÉH ócCÉJ ÉehO .øNÉ°ùdG AÉŸG ΩGóîà°SG óæY GQòM øc
.∂jój ¥ôM Öæéàd GóL
Page 41
á«Hô©dG
GóL º¡e
RÉ¡÷G ΩGóîà°SG πÑb Gó«L √òg ∫ɪ©à°S’G äGOÉ°TQG IAGôb AÉLôdG
.πÑ≤à°ùŸG ‘ ™Lôªc É¡H ®ÉØàM’Gh
æ¤G RÉ¡÷G π«°Uƒàd RÉ¡÷G ™e OhõŸG AÉHô¡µdG ¢ùÑ≤e Ωóîà°SG §≤a
.ô°TÉÑŸG QÉ«àdG
æôNBG »FÉHô¡c ¢ùÑ≤à ÉehO ¬dóÑà°SG ,ÉØdÉJ AÉHô¡µdG ¢ùÑ≤e ¿Éc GPG
.IÒ£N ∞bGƒe Öæéàd »∏°UCG
梆Øîæe QÉ«J ¤G âdƒa 022 - 042 πjƒëàH AÉHô¡µdG ¢ùÑ≤e Ωƒ≤j
OhõŸG AÉHô¡µdG ¢ùÑ≤e §≤a .âdƒa 42 øe πbCG ≈∏Y …ƒàëj øeBG
.ÉæeBG Ójƒ– øª°†j
æAÉHô¡µdG ¢ùÑ≤e ™£≤H º≤J ’ .∫qƒfi ≈∏Y AÉHô¡µdG ¢ùÑ≤e …ƒàëj
.GÒ£N ÉØbƒe ÖÑ°ùj ób Gòg ¿CG å«M ôNBÉH ¬dGóÑà°S’
B
æAÉHô¡µdG ¢ùÑ≤e πàÑj ’ ¿CÉH ócCÉJ
B
æøµÁ h áeÓ°ù∏d á«ŸÉ©dG ÚfGƒ≤dG h ÒjÉ©ŸG ™e RÉ¡÷G ≥HÉ£àj
.AÉŸG QƒÑæ°U â– ¬Ø«¶æJ
ÉæNÉ°S ¢ù«d AÉŸG ¿CÉH ócCÉJ ÉehO .øNÉ°ùdG AÉŸG ΩGóîà°SG óæY GQòM øc
.∂jój ¥ôM Öæéàd GóL
RÉ¡÷G ΩGóîà°SG
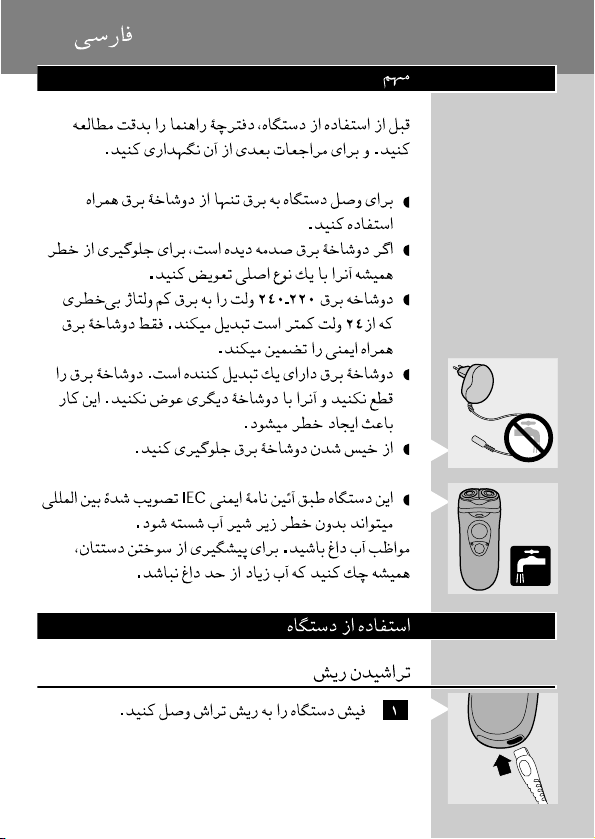
ábÓ◊G
B
1.ádB’G ‘ RÉ¡÷G ¢ùÑ≤e ™°V
2.§FÉ◊G ¢ùHÉb ‘ AÉHô¡µdG ¢ùÑ≤e π°UhCG
3ìÉàØe ≈∏Y IóMGh Iôe §¨°†dG ∫ÓN øe ádB’G 𫨰ûàH ºb
.∞«bƒàdG/𫨰ûàdG
43
Page 42
44
2
Page 43
45
Page 44
46
2
1
Page 45
47
OIL
Page 46
484950
Page 47
Page 48
4222 001 89993
 Loading...