


ENGLISH 4
POLSKI 14
ROMÂNĂ 24
РУССКИЙ 34
ČESKY 46
MAGYAR 56
SLOVENSKY 66
УКРАЇНСЬКА 76
HRVATSKI 86
EESTI 96
LATVISKI 106
LIETUVIŠKAI 116
SLOVENŠČINA 126
БЪЛГАРСКИ 136
SRPSKI 147
HQ5813,HQ5812

Important
Read these instructions for use carefully before
using the appliance and save them for future
reference.
◗ Only use the mains cord supplied.
◗ Do not use a damaged mains cord.
◗ If the mains cord is damaged, always have it
replaced by one of the original type in order
to avoid a hazard.
◗ The appliance is equipped with an automatic
voltage selector and is suitable for mains
voltages ranging from 100 to 240 volts.
◗ Charge, store and use the appliance at a
temperature between 5cC and 35cC.
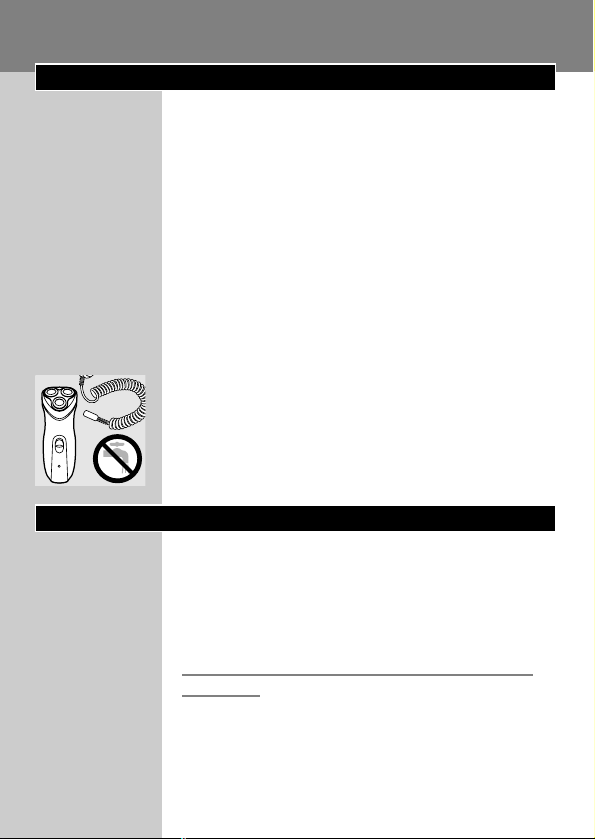
◗ Do not recharge the shaver in a closed pouch.
C
◗ Keep the appliance and the mains cord dry.
◗ Noise level: Lc= 62 dB [A]
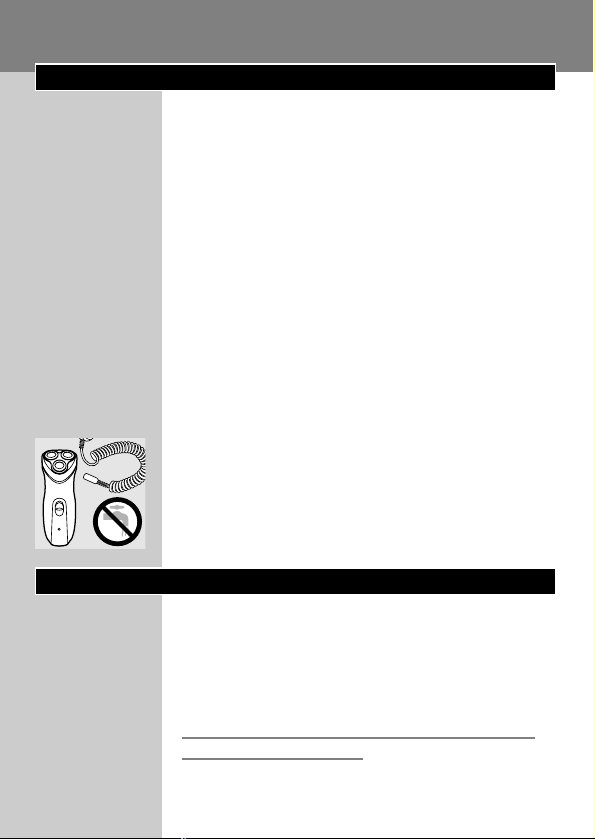
Charging
Make sure the appliance is switched off before
you start charging it.
Charging takes approx. 8 hours.
You can also shave without charging by
connecting the shaver to the mains.
Do not leave the appliance connected to the
mains for more than 24 hours.
ENGLISH4
Charge indications
Charging
C
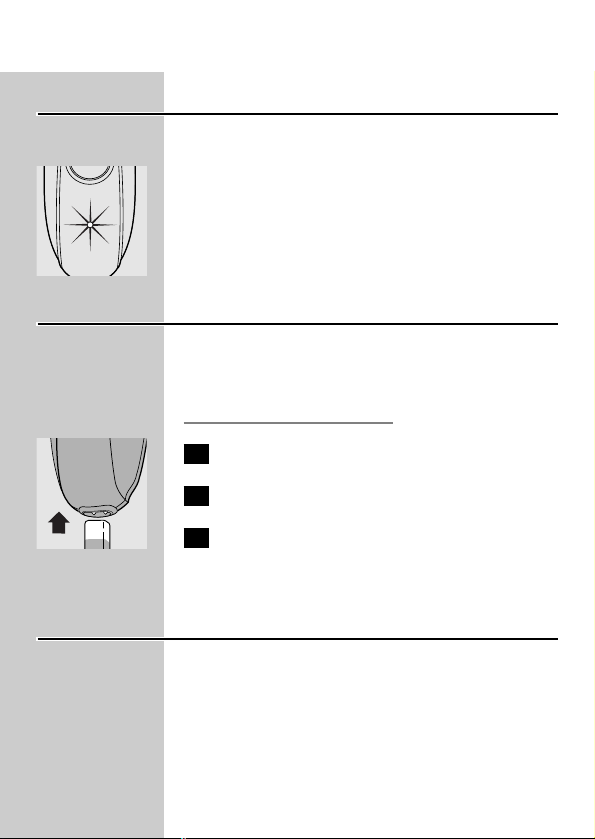
◗ As soon as you start charging the empty
shaver, the green pilot light goes on.
Charging the appliance
Charge the appliance when the motor stops or
starts running slower.
Do not recharge the shaver in a closed pouch.
C
1 Put the appliance plug in the shaver.
2 Put the mains plug in the wall socket.
3 Remove the mains plug from the socket
and pull the appliance plug out of the
shaver when the battery has been fully
charged.
Cordless shaving time
A fully charged shaver has a cordless shaving time
of up to 30 minutes.
ENGLISH 5
CHARGE
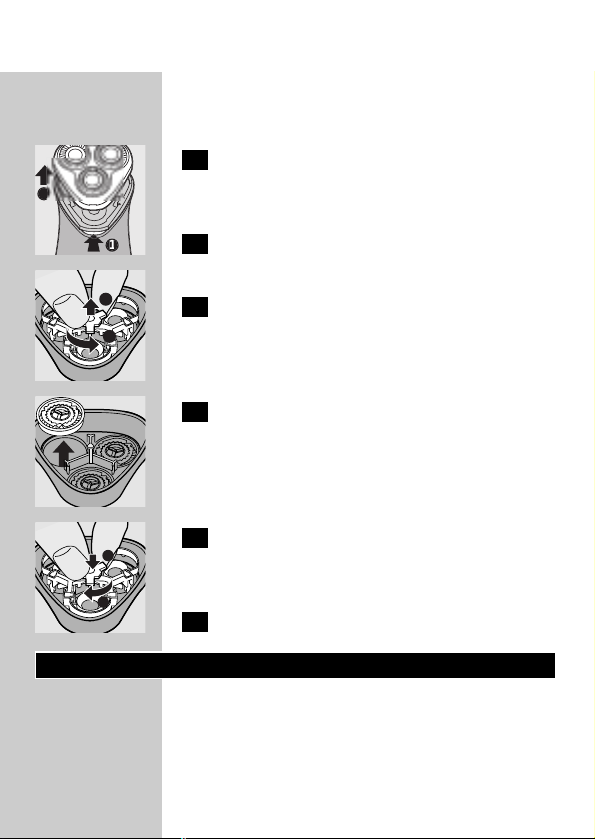
Using the appliance
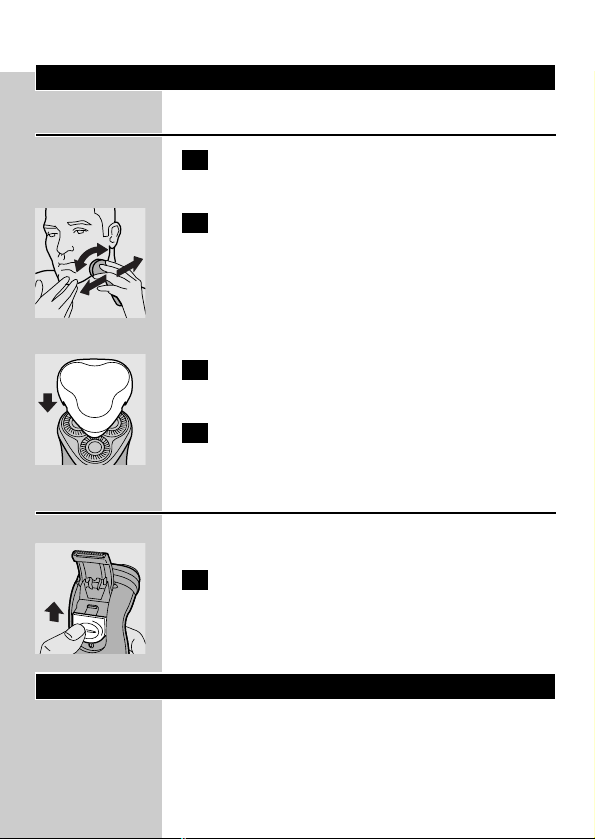
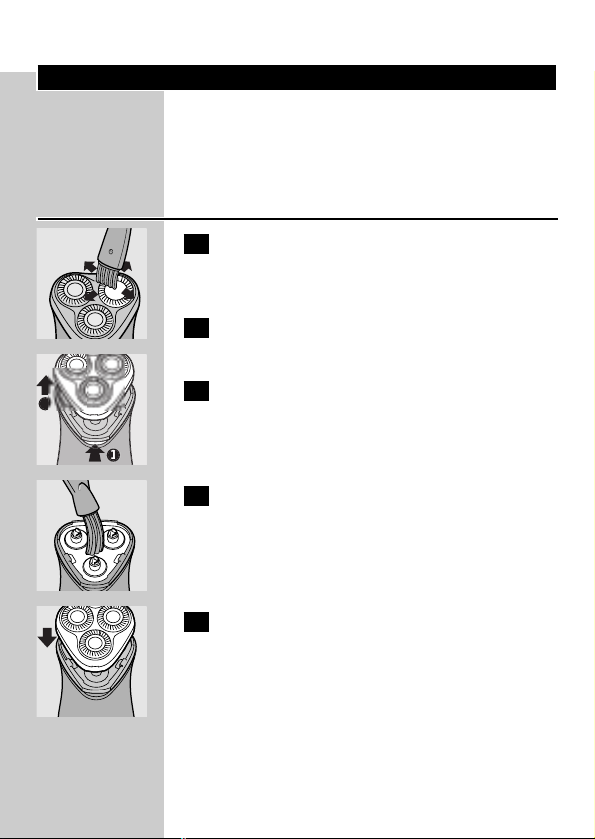
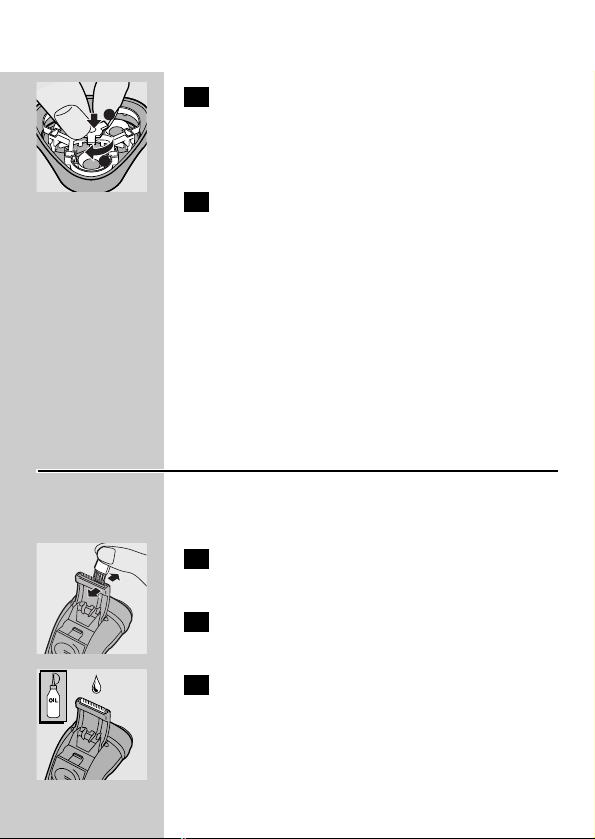
Shaving
1 Switch the shaver on by pushing the on/off
slide to position I.
C
2 Move the shaving heads quickly over your
skin, making both straight and circular
movements.
Shaving on a dry face gives the best results.
Your skin may need 2 or 3 weeks to get
accustomed to the Philips system.
3 Switch the shaver off by pushing the on/off
slide to position 0.
C
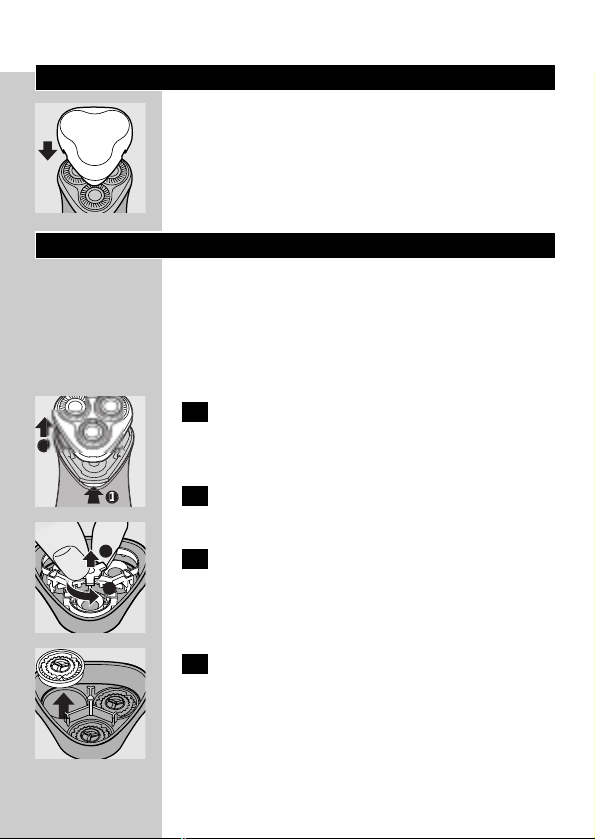
4 Put the protection cap on the shaver every
time you have used it, to prevent damage.
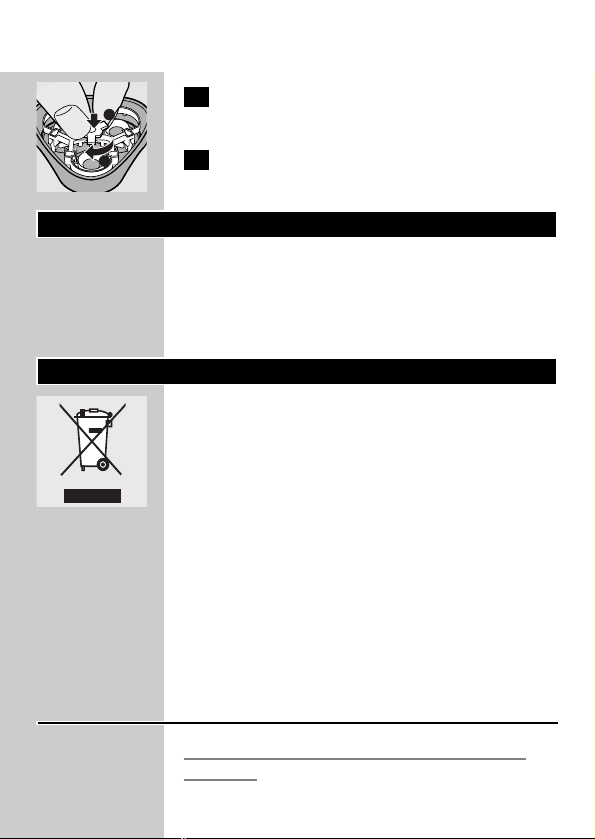
Trimming
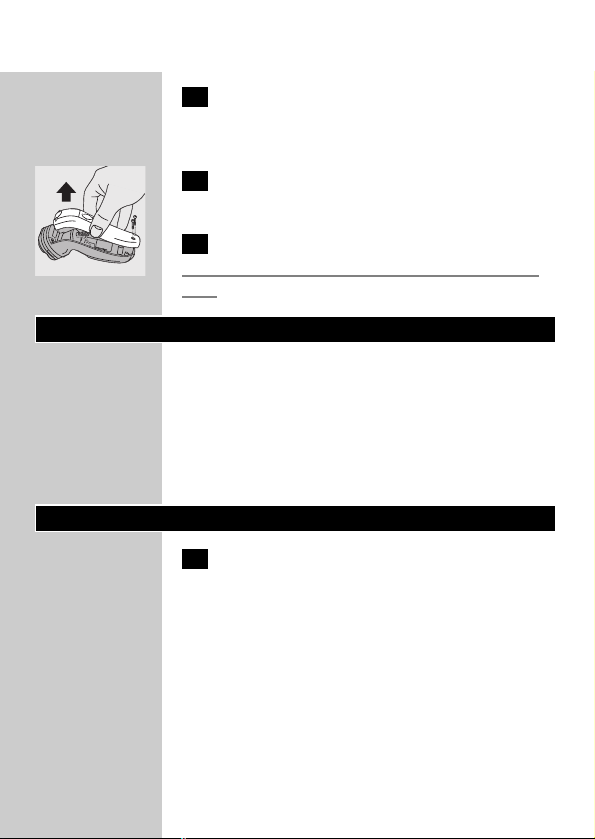
For grooming sideburns and moustache.
C
1 Open the trimmer by pushing the slide
upwards.
The trimmer can be activated while the motor is
running.
Cleaning and maintenance
Regular cleaning guarantees better shaving
performance.
ENGLISH6
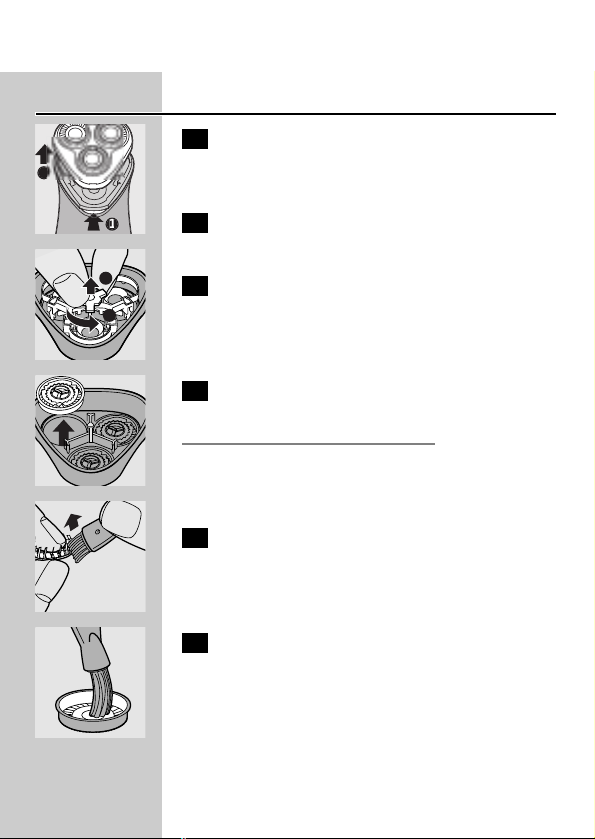
Every day: shaving unit and hair chamber
1 Switch the shaver off, remove the mains
plug from the wall socket and pull the
appliance plug out of the shaver.
C
2 Clean the top of the appliance first, using
the brush supplied.
C
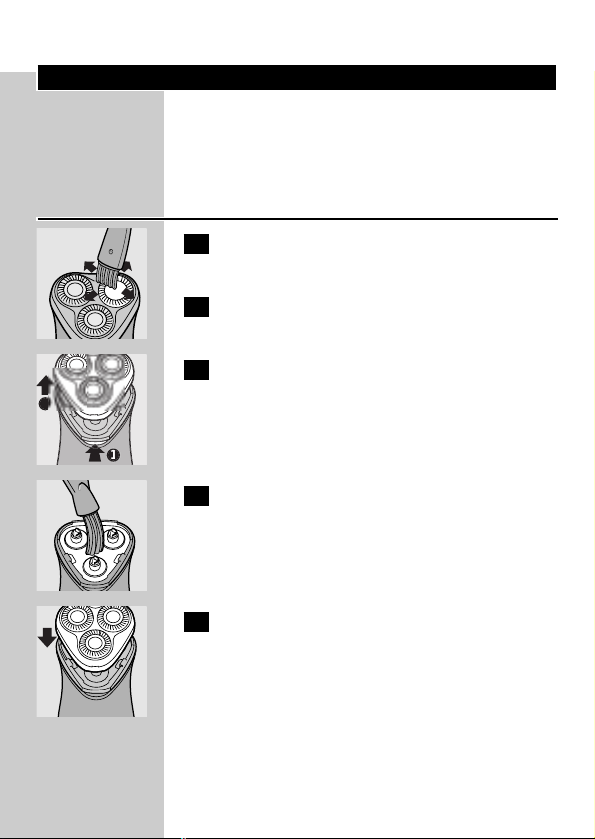
3 Press the release button (1) and remove
the shaving unit (2).
C
4 Clean the inside of the shaving unit and the
hair chamber with the brush.
C
5 Put the shaving unit back onto the shaver.
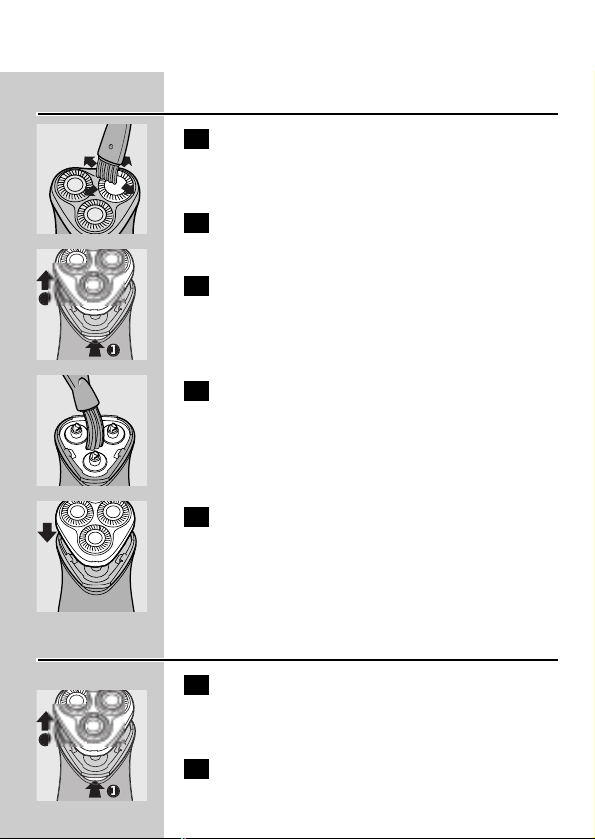
Every two months: shaving heads
1 Switch the shaver off, remove the mains
plug from the wall socket and pull the
appliance plug out of the shaver.
C
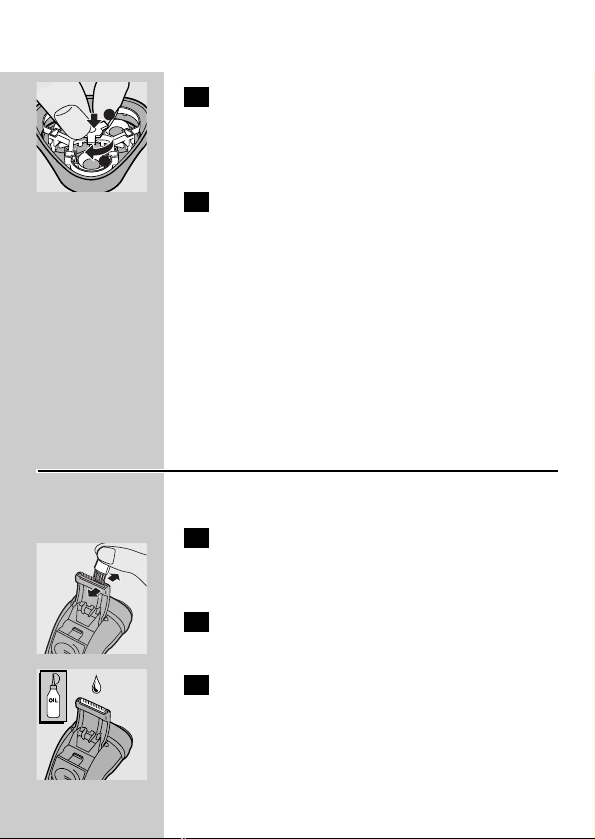
2 Press the release button (1) and remove
the shaving unit (2).
ENGLISH 7

C
3 Turn the wheel anticlockwise (1) and
remove the retaining frame (2).
C
4 Remove and clean the shaving heads
(cutters and guards) one by one.
Do not mix up the cutters and the guards.
This is essential since each cutter has been
ground with its corresponding guard for optimal
performance. If you accidentally mix the sets up, it
could take several weeks before optimal shaving
performance is restored.
C
5 Clean the cutter with the short-bristled
side of the brush.
Brush carefully in the direction of the arrow.
C
6 Brush the guard.
C
7 Put the shaving heads back into the shaving
unit. Put the retaining frame back into the
shaving unit (1) and turn the wheel
clockwise (2).
8 Put the shaving unit back onto the shaver.
B
For extra thorough cleaning, clean the shaving
heads by putting them in a degreasing liquid (e.g.
alcohol) every six months.To remove the shaving
ENGLISH8
2
1
1
2
heads, follow steps 1 to 4 described above. After
cleaning, lubricate the central point on the inside
of the guards with a drop of sewing machine oil to
prevent wear of the shaving heads.
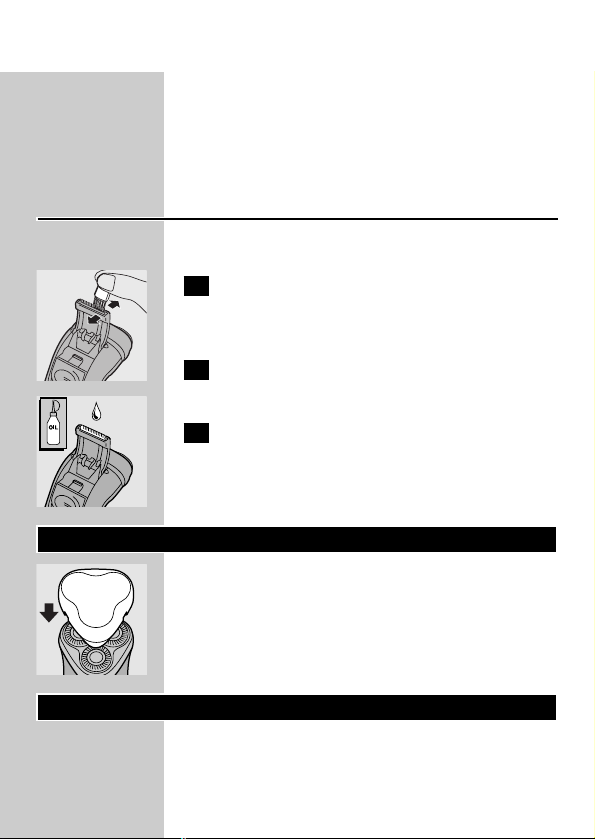
Trimmer
Clean the trimmer every time you have used it.
1 Switch the shaver off, remove the mains
plug from the wall socket and pull the
appliance plug out of the shaver.
C
2 Clean the trimmer with the brush
supplied.
C
3 Lubricate the trimmer teeth with a drop
of sewing machine oil every six months.
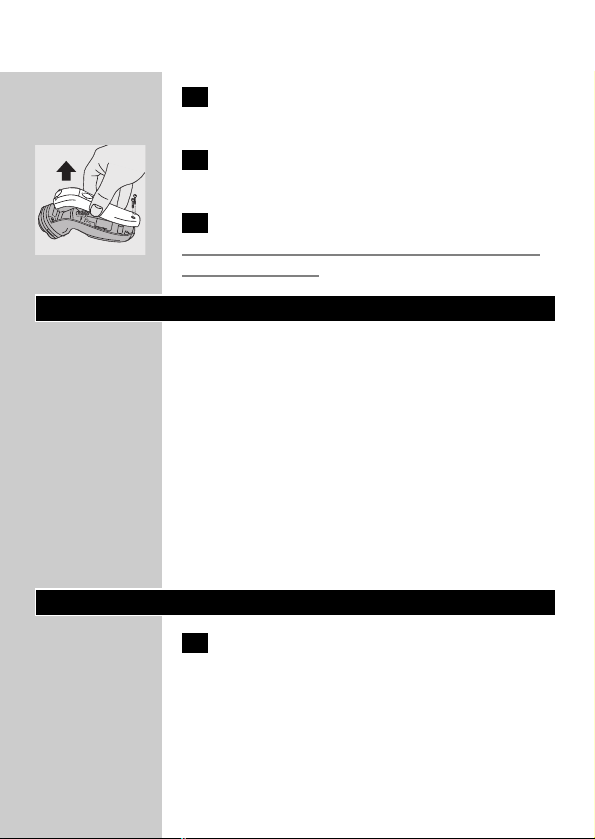
Storage
C
◗ Put the protection cap on the shaver to
prevent damage.
◗ The appliance can be stored in the pouch
supplied.
Replacement
Replace the shaving heads every two years for
optimal shaving results.
ENGLISH 9
Replace damaged or worn shaving heads with
HQ4« Philips shaving heads only.
1 Switch the shaver off, remove the mains
plug from the wall socket and pull the
appliance plug out of the shaver.
C
2 Press the release button (1) and remove
the shaving unit (2).
C
3 Turn the wheel anticlockwise (1) and
remove the retaining frame (2).
C
4 Remove the shaving heads and place new
ones in the shaving unit.
C
5 Put the retaining frame back into the
shaving unit (1) and turn the wheel
clockwise (2).
6 Put the shaving unit back onto the shaver.
Accessories
The following accessories are available:
- HQ4« Philips shaving heads.
- HQ110 Philips shaving head cleaner (shaving
head cleaning spray).
ENGLISH10
2
1
1
2
Environment
C
◗ Do not throw the appliance away with the
normal household waste at the end of its life,
but hand it in at an official collection point for
recycling. By doing this you will help to
preserve the environment.
◗ The built-in rechargeable battery contains
substances that may pollute the environment.
Always remove the battery before discarding
the appliance or handing it in at an official
collection point. Dispose of the battery at an
official collection point for batteries. If you
have trouble removing the battery, you can
also take the appliance to a Philips service
centre, which will remove the battery for you
and will dispose of it in an environmentally
safe way.
Disposal of the battery
Only remove the battery if it is completely empty.
1 Remove the mains plug from the wall
socket and pull the appliance plug out of
the shaver.
C
2 Let the shaver run until it stops, undo the
screws and open the shaver.
3 Remove the battery.
Do not connect the shaver to the mains again
after the battery has been removed.
ENGLISH 11
Guarantee & service
If you need information or if you have a
problem, please visit the Philips Web site at
www.philips.com or contact the Philips Customer
Care Centre in your country (you will find its
phone number in the worldwide guarantee
leaflet). If there is no Customer Care Centre in
your country, turn to your local Philips dealer or
contact the Service Depar tment of Philips
Domestic Appliances and Personal Care BV.
Troubleshooting
1 Reduced shaving performance
B
Cause 1: the shaving heads are dirty.
B
The shaver has not been cleaned well enough or
has not been cleaned for a long time.
◗ Clean the shaver thoroughly before you
continue shaving. See chapter 'Cleaning and
maintenance'.
B
Cause 2: long hairs are obstructing the shaving
heads.
◗ Clean the cutters and guards with the brush
supplied. See chapter 'Cleaning and
maintenance', section 'Every two months:
shaving heads'.
B
Cause 3: the shaving heads are damaged or worn.
◗ Replace the shaving heads. See chapter
'Replacement'.
ENGLISH12

2 The shaver does not work when the on/off
slide is pushed to position I.
B
Cause 1: the battery is empty.
◗ Recharge the battery. See chapter 'Charging'.
B
Cause 2: the appliance is not connected to the
mains.
◗ Put the mains plug in the wall socket.
ENGLISH 13
Ważne
Przeczytaj instrukcję zanim zaczniesz używać
golarkę i zachowaj ja w przyszłości na wszelki
wypadek.
◗ Używaj wyłącznie przewodu zasilającego, w
który zostało wyposażone urządzenie.
◗ Nie używaj uszkodzonego przewodu
zasilającego.
◗ Jeśli uszkodzony jest przewód zasilający,
wówczas dla zapewnienia bezpieczeństwa
należy zastąpić go wyłącznie przewodem
oryginalnym.
◗ Urządzenie dysponuje automatycznym
przełącznikiem napięcia i przystosowane jest
do napięcia zasilania od 100 V do 240 V.
◗ Ładuj, przechowuj i używaj urządzenie w
temperaturze pomiędzy 5cC a 35cC.
◗ Nie ładuj golarki w zamkniętej saszetce.
C
◗ Utrzymuj urządzenie i przewód zasilający w
stanie suchym.
◗ Poziom hałasu: Lc= 62 dB [A]
Ładowanie
Przed rozpoczęciem ładowania należy sprawdzić,
czy urządzenie jest wyłączone.
Pełne ładowanie zajmie około 8 godzin.
Możesz także używać golarki bez ładowania,
podłączając ją bezpośrednio do sieci.
Nie zostawiaj urządzenia podłączonego do sieci
na dłużej, niż 24 godziny.
POLSKI14

Wskaźnik naładowania akumulatora
Ładowanie
C
◗ W momencie rozpoczęcia ładowania
rozładowanej golarki zaświeci się zielona
lampka kontrolna.
Ładowanie akumulatora
Gdy urządzenie zacznie pracować wolniej lub
zatrzyma się, należy je naładować.
Nie ładuj golarki w zamkniętej saszetce.
C
1 Włóż małą wtyczkę przewodu zasilającego
do golarki.
2 Wetknij wtyczkę do gniazdka ściennego.
3 Gdy akumulator jest całkowicie
naładowany wyjmij wtyczkę z gniazdka
sieciowego i odłącz urządzenie.
Czas bezprzewodowej pracy
Całkowicie naładowana golarka pozwala na
30 minut golenia.
POLSKI 15
CHARGE

Sposób używania
Golenie
1 Włącz golarkę, przesuwając przełącznik
on/off do pozycji I.
C
2 Przesuwaj głowice po skórze, wykonując
zarówno proste, jak i okrężne ruchy.
Najlepsze efekty golenia osiąga się na skórze
suchej.
Skóra Twojej twarzy potrzebuje pewnego czasu
(2-3 tygodni), by przyzwyczaić się do nowego
systemu golenia.
3 Wyłącz urządzenie, przesuwając
przełącznik on/off do pozycji 0.
C
4 Po każdym użyciu załóż na golarkę
ochronną osłonkę, zabezpieczającą głowice
golące przed uszkodzeniem mechanicznym.
Trymer
Do kształtowania bokobrodów i wąsów.
C
1 Otwórz trymer przesuwając suwak do
góry.
Trymer może być używany po uprzednim
włączeniu urządzenia.
POLSKI16
Czyszczenie i konserwacja
Regularne oczyszczanie golarki gwarantuje lepsze
efekty golenia.
Codziennie: część goląca i komora na ścięty
zarost
1 Wyłącz golarkę,wyjmij wtyczkę zasilania z
gniazdka ściennego oraz wyjmij małą
wtyczkę z golarki.
C
2 Najpierw oczyść górną część urządzenia
przy pomocy załączonej szczoteczki.
C
3 Wciśnij przycisk zwalniający (1) i wyjmij
moduł golący (2).
C
4 Oczyść szczoteczką moduł golący oraz
komorę na włosy.
C
5 Ponownie zamontuj moduł golący na
golarce.
POLSKI 17
Trymer
1 Wyłącz golarkę,wyjmij wtyczkę zasilania z
gniazdka ściennego oraz wyjmij małą
wtyczkę z golarki.
C
2 Wciśnij przycisk zwalniający (1) i wyjmij
moduł golący (2).
C
3 Obróć kółkiem w kierunku przeciwnym
do ruchu wskazówek zegara (1) i wyjmij
obsadę (2).
C
4 Wyjmij i oczyść głowice golące (nożyki i
osłonki) pojedynczo.
Nie pomieszaj nożyków i osłonek.
Tylko dokładne dopasowanie nożyków do
osłonek zapewnia optymalną skuteczność
działania każdego z zestawów.
C
5 Oczyść nożyk tą stroną szczoteczki, która
jest zakończona krótszym włosiem.
Ostrożnie oczyszczaj w kierunku wskazanym
przez strzałkę.
C
6 Oczyść osłonkę.
POLSKI18
2
1
C
7 Ponownie załóż głowice golące na moduł
golący. Następnie załóż obsadę na moduł
golący (1) i obróć kółkiem w kierunku
zgodnym z ruchem wskazówek zegara (2).
8 Ponownie zamontuj moduł golący na
golarce.
B
Aby wykonać dodatkowe kompletne czyszczenie
głowic, wkładaj je co sześć miesięcy do płynu
usuwającego tłuszcz (np. spirytusu). Aby zdjąć
głowice golące, postępuj zgodnie z wymienionymi
wyżej czterema krokami. Po zakończeniu
czyszczenia nasmaruj środkowy punkt wnętrza
osłonek kroplą oleju maszynowego, co zapobiegnie
zużywaniu się głowic golących.
Trymer
Oczyszczaj trymer po każdym użyciu.
1 Wyłącz golarkę,wyjmij wtyczkę zasilania z
gniazdka ściennego oraz wyjmij małą
wtyczkę z golarki.
C
2 Trymer oczyść dołączoną do golarki
szczoteczką.
C
3 Co 6 miesięcy należy naoliwić ząbki
trymera kroplą oleju maszynowego.
POLSKI 19
1
2
Przechowywanie
C
◗ Załóż na golarkę ochronną pokrywę, by
uniknąć uszkodzenia.
◗ Urządzenie może być przechowywane w
załączonym pokrowcu.
Wymiana
Aby zapewnić optymalne funkcjonowanie
urządzenia, co dwa lata wymieniaj głowice golące.
Uszkodzone lub zużyte głowice golące wymieniaj
jedynie na oryginalne głowice golące HQ4«.
1 Wyłącz golarkę,wyjmij wtyczkę zasilania z
gniazdka ściennego oraz wyjmij małą
wtyczkę z golarki.
C
2 Wciśnij przycisk zwalniający (1) i wyjmij
moduł golący (2).
C
3 Obróć kółkiem w kierunku przeciwnym
do ruchu wskazówek zegara (1) i wyjmij
obsadę (2).
C
4 Zdejmij głowice golące z modułu golącego
i załóż nowe.
POLSKI20
2
1

C
5 Następnie załóż obsadę na moduł golący
(1) i obróć kółkiem w kierunku zgodnym z
ruchem wskazówek zegara (2).
6 Ponownie zamontuj moduł golący na
golarce.
Akcesoria
Poniższe akcesoria są dostępne:
- Głowice golące HQ4« Philips.
Dbamy o nasze środowisko naturalne
C
◗ Nie wyrzucaj urządzenia po jego zużyciu wraz
z resztą odpadków, urżądzenie powinno
zostać oddane do punktu surowców
wtórnych.To prosty sposób dbania o nasze
naturalne środowisko.
◗ Wbudowany akumulator zawiera substancje,
które mogą zanieczyszczać środowisko
naturalne. Zawsze usuwaj akumulator przed
wyrzuceniem urządzenia.Akumulator
powinien zostać oddany do punktu surowców
wtórnych.W przypadku problemów z
usunięciem akumulatora nalezy zwrócić sie do
serwisu Philipsa, tam możesz pozostawić
wyeksploatowane urządzenie do utylizacji.
Usuwanie akumulatora
Wyrzucaj akumulatory tylko wtedy,gdy są
kompletnie wykorzystane.
POLSKI 21
1
2
1 Wyjmij wtyczkę zasilania z gniazdka
ściennego oraz wyjmij małą wtyczkę z
golarki.
C
2 Uruchom golarkę i poczekaj, aż przestanie
pracować, odkręć śrubki i otwórz golarkę.
3 Wyjmij akumulator
Po wyjęciu akumulatora nie podłączaj golarki do
sieci.
Gwarancja i serwis
Jeśli potrzebne Ci są informacje lub napotykasz
jakiś problem, skontaktuj się z Biurem Obsługi
Klienta (numer telefonu znajdziesz w Karcie
Gwarancyjnej), lub też z najbliższym punktem
serwisowym sprzętu AGD, autoryzowanym przez
firmę Philips.
Rozwiązywanie problemów
1 Zmniejszona wydajność golenia
B
Przyczyna 1: głowice golące są zanieczyszczone.
B
Golarka nie była zbyt starannie czyszczona lub nie
była czyszczona przez długi okres czasu.
◗ Zanim przystąpisz do golenia, dokładnie
oczyść golarkę. Patrz: rozdział "Czyszczenie i
konserwacja".
B
Przyczyna 2: długie włoski blokują głowice golące.
POLSKI22

◗ Za pomocą dołączonej szczoteczki oczyść
nożyki i osłonki. Patrz: rozdział "Czyszczenie i
konserwacja", punkt "Co dwa miesiące:
głowice golące".
B
Przyczyna 3: głowice golące są zużyte lub
uszkodzone.
◗ Wymień głowice golące. Patrz: rozdział
"Wymiana".
2 Golarka nie działa, gdy przełącznik on/off
przesunięty jest do pozycji I.
B
Przyczyna 1: rozładowany jest akumulator.
◗ Naładuj akumulator. Patrz:rozdział
"Ładowanie".
B
Przyczyna 2: Golarka nie jest podłączona do sieci.
◗ Wetknij wtyczkę do gniazdka ściennego.
POLSKI 23
Important
Citiţi aceste instrucţiuni cu atenţie înainte de
utilizarea aparatului şi păstraţi-le pentru consultări
ulterioare.
◗ Folosiţi doar cablul furnizat.
◗ Nu folosiţi un cablu deteriorat.
◗ În cazul în care cablul se deteriorează,
înlocuiţi-l întotdeauna cu unul original pentru
a evita orice accident.
◗ Acest aparat este dotat cu un selector
automat de tensiune, potrivit pentru tensiuni
între 100 şi 240 V.
◗ Încărcaţi, depozitaţi şi utilizaţi aparatul la o
temperatură între 5cC şi 35cC.
◗ Nu încărcaţi aparatul în etui.
C
◗ Feriţi aparatul şi cablul de alimentare de
contactul cu apa.
◗ Nivel de zgomot: Lc = 62 dB [A]
Încărcare
Înainte de a începe încărcarea, aparatul trebuie să
fie oprit.
În mod normal, încărcarea durează 8 ore.
Puteţi folosi aparatul fără să-l încărcaţi,
conectându-l la priză.
Nu lăsaţi aparatul conectat la priză mai mult de
24 de ore.
ROMÂNĂ24
Indicaţii de încărcare
Încărcare
C
◗ Imediat ce începeţi să încărcaţi aparatul, ledul
verde se va aprinde.
Încărcarea aparatului
Încărcaţi aparatul când se opreşte motorul sau
funcţionează mai lent.
Nu încărcaţi aparatul în etui.
C
1 Introduceţi fişa în aparatul de bărbierit.
2 Introduceţi ştecherul în priză.
3 Când bateria este complet încărcată,
scoateţi cablul din priză şi mufa cablului din
aparat.
Perioadă de funcţionare fără cablu
Un aparat cu un acumulator complet încărcat
asigură o perioadă de funcţionare fără cablu de
până la 30 de minute.
ROMÂNĂ 25
CHARGE

Utilizarea aparatului
Bărbierire
1 Porniţi aparatul culisând butonul
pornire/oprire pe poziţia I.
C
2 Faceţi rapid mişcări drepte şi circulare cu
capetele de bărbierire pe suprafaţa pielii.
Bărbierirea pe o piele uscată asigură cele mai
bune rezultate.
Pielea dumneavoastră ar putea necesita 2-3
săptămâni până să se obişnuiască cu sistemul
Philips.
3 Opriţi aparatul de bărbierit împingând
butonul pornire/oprire pe poziţie 0.
C
4 Puneţi capacul de protecţie pe aparat după
utilizare pentru a evita deteriorarea
acestuia.
Dispozitiv de tundere
Pentru îngrijirea perciunilor şi a mustăţii.
C
1 Deschideţi dispozitivul de tundere
împingând în sus butonul culisant.
Dispozitivul de tundere poate fi activat în timp ce
motorul funcţionează.
ROMÂNĂ26
Curăţare şi întreţinere
O curăţare regulată asigură cele mai bune
rezultate de bărbierire.
În fiecare zi: unitatea de bărbierire şi
compartimentul pentru păr
1 Opriţi aparatul de ras, scoateţi ştecherul
din priză şi fişa din mufa aparatului.
C
2 Curăţaţi mai întâi partea superioară a
aparatului cu periuţa furnizată.
C
3 Apăsaţi butonul de declanşare (1) şi
scoateţi unitatea de bărbierire (2).
C
4 Curăţaţi interiorul unităţii de bărbierire şi
compartimentul pentru păr cu periuţa
furnizată.
C
5 Introduceţi unitatea de bărbierire înapoi în
aparat.
ROMÂNĂ 27

Dispozitiv de tundere
1 Opriţi aparatul de ras, scoateţi ştecherul
din priză şi fişa din mufa aparatului.
C
2 Apăsaţi butonul de declanşare (1) şi
scoateţi unitatea de bărbierire (2).
C
3 Răsuciţi rotiţa în sens invers acelor de
ceasornic (1) şi scoateţi cadrul de
susţinere (2).
C
4 Scoateţi şi curăţaţi capetele de bărbierire
(cuţite şi site de protecţie) unul câte unul.
Nu amestecaţi cuţitele şi sitele de protecţie.
Pentru a obţine cele mai bune rezultate, acest
lucru este esenţial având în vedere faptul că
fiecare cuţit este dotat cu propria sită de
protecţie. Ar putea dura câteva săptămâni până să
ajungeţi din nou la rezultatele optime anterioare.
C
5 Curăţaţi cuţitele cu perii scurţi ai periuţei.
Periaţi uşor în direcţia săgeţii.
C
6 Periaţi sita de protecţie.
ROMÂNĂ28
2
1
C
7 Remontaţi capetele de bărbierire pe
unitate. Puneţi la loc cadrul de susţinere pe
unitate (1) şi răsuciţi în sensul acelor de
ceasornic (2).
8 Introduceţi unitatea de bărbierire înapoi în
aparat.
B
Puteţi curăţa temeinic capetele de bărbierire
folosind un lichid degresant (de ex. alcool) o dată
la şase luni. Pentru scoaterea capetelor de
bărbierire, urmaţi etapele 1-4 descrise mai sus.
După curăţare, ungeţi punctul central din interiorul
sitelor de protecţie cu o picătură de ulei pentru
maşina de cusut pentru a preveni uzarea
capetelor de bărbierire.
Dispozitiv de tundere
Curăţaţi dispozitivul de tundere de fiecare dată
când îl folosiţi.
1 Opriţi aparatul de ras, scoateţi ştecherul
din priză şi fişa din mufa aparatului.
C
2 Curăţaţi dispozitivul de tundere cu
ajutorul periuţei furnizate.
C
3 Ungeţi dinţii dispozitivului de tundere cu
puţin ulei pentru maşina de cusut o dată la
şase luni.
ROMÂNĂ 29
1
2

Depozitare
C
◗ Acoperiţi aparatul de ras cu capacul de
protecţie pentru a preveni deteriorarea.
◗ Aparatul poate fi depozitat în husa furnizată.
Înlocuire
Înlocuiţi capetele de bărbierire o dată la doi ani
pentru rezultate optime.
Înlocuiţi capetele de bărbierire uzate sau
deteriorate doar cu capete de bărbierire Philips
HQ4«.
1 Opriţi aparatul de ras, scoateţi ştecherul
din priză şi fişa din mufa aparatului.
C
2 Apăsaţi butonul de declanşare (1) şi
scoateţi unitatea de bărbierire (2).
C
3 Răsuciţi rotiţa în sens invers acelor de
ceasornic (1) şi scoateţi cadrul de
susţinere (2).
C
4 Scoateţi capetele de bărbierire şi
poziţionaţi-le pe cele noi în unitatea de
bărbierire.
ROMÂNĂ30
2
1
C
5 Puneţi la loc cadrul de susţinere (1) şi
răsuciţi în sensul acelor de ceasornic (2).
6 Introduceţi unitatea de bărbierire înapoi în
aparat.
Accesorii
Următoarele accesorii sunt disponibile:
- Capete de bărbierire Philips HQ4«.
- Curăţător cap de bărbierire Philips HQ110
(spray de curăţare cap de bărbierire).
Protejarea mediului
C
◗ Nu aruncaţi aparatul în gunoiul menajer la
sfârşitul duratei de funcţionare, ci duceţi-l la
un punct de colectare autorizat pentru
reciclare. În acest fel, veţi ajuta la protejarea
mediului înconjurător.
◗ Acumulatorul reîncărcabil conţine substanţe
ce pot polua mediul. Scoateţi acumulatorul
când aruncaţi aparatul. Nu aruncaţi
acumulatorul în gunoiul menajer, ci predaţi-l la
un punct de colectare oficial. Îl puteţi duce de
asemenea la un centru service Philips, unde va
fi scos şi depozitat în conformitate cu
normele privind protejarea mediului.
Aruncarea acumulatorului
Scoateţi acumulatorul doar dacă este complet
descărcat.
ROMÂNĂ 31
1
2
1 Scoateţi ştecherul din priză şi trageţi fişa
din aparatul de ras.
C
2 Lăsaţi aparatul să funcţioneze până ce se
opreşte, desfaceţi şuruburile şi deschideţi-l.
3 Scoateţi acumulatorul.
Nu conectaţi aparatul de ras la priză după ce aţi
scos acumulatorul.
Garanţie şi service
Pentru informaţii suplimentare sau în cazul altor
probleme, vă rugăm să vizitaţi site-ul Philips
www.philips.com sau să contactaţi
Departamentul Clienţi din ţara dumneavoastră
(veţi găsi numărul de telefon în garanţia
internaţională).
Dacă în ţara dumneavoastră nu există un astfel de
departament, contactaţi furnizorul dumneavoastră
Philips sau Departamentul Service pentru
Aparate Electrocasnice şi Produse de Îngrijire
Personală Philips.
Depanare
1 Performanţe scăzute de bărbierire
B
Cauza 1: capetele de bărbierire sunt murdare.
B
Aparatul de ras nu a fost clătit suficient de bine
sau suficient de mult timp.
◗ Curăţaţi bine aparatul înainte de a continua
bărbierirea.A se vedea capitolul "Curăţare şi
întreţinere".
ROMÂNĂ32

B
Cauza 2: fire lungi de păr blochează capetele de
bărbierire.
◗ Curăţaţi lamele şi sitele de protecţie cu
periuţa furnizată. Consultaţi capitolul
"Curăţare", secţiunea "O dată la două luni:
capete de bărbierire".
B
Cauza 3: capetele de bărbierire sunt deteriorate
sau uzate.
◗ Înlocuiţi capetele de bărbierire.A se vedea
capitolul "Înlocuire".
2 Aparatul de bărbierit nu funcţionează când
butonul pornire/oprire este culisat pe
poziţia I.
B
Cauza 1: acumulatorul este descărcat.
◗ Reîncărcaţi acumulatorul. Consultaţi capitolul
"Încărcare".
B
Cauza 2: aparatul nu este conectat la priză.
◗ Introduceţi ştecherul în priză.
ROMÂNĂ 33

Внимание
Прежде чем начать пользоваться прибором,
внимательно ознакомьтесь с настоящим
руководством и сохраните его в качестве
справочного материала.
◗ Пользуйтесь только шнуром питания,
входящим в комплект поставки.
◗ Запрещается использовать поврежденный
сетевой шнур.
◗ При повреждении сетевого шнура всегда
заменяйте его оригинальным сетевым
шнуром, чтобы обеспечить безопасную
эксплуатацию прибора.
◗ Прибор снабжен устройством
автоматической адаптации к напряжению
электросети и предназначен для
напряжения электросети от 100 до 240
вольт.
◗ Заряжайте, храните и используйте прибор
при температуре 5cC до 35cC.
◗ Не подзаряжайте электробритву в
закрытом футляре.
C
◗ Бритва и сетевой шнур должны храниться
сухими.
◗ Уровень шума: Lc= 62 дБ [A]
Зарядка
Перед тем как зарядить прибор, убедитесь,
что он выключен.
Зарядка аккумулятора занимает
приблизительно 8 часов.
РУССКИЙ34

Вы можете также бриться без зарядки
аккумуляторов, подключая электробритву
непосредственно к электросети.
Не оставляйте прибор подключенным к
электросети более, чем на 24 часа.
Индикация зарядки
Зарядка
C
◗ Когда вы начнете зарядку разряженной
аккумуляторной батареи электробритвы,
загорится зеленый светодиод.
Зарядка аккумуляторов электробритвы
Производите зарядку прибора тогда, когда
мотор остановился или работает в
замедленном темпе.
Не подзаряжайте электробритву в закрытом
футляре.
C
1 Вставьте штекер шнура сетевого
адаптера в электробритву.
2 Вставьте вилку шнура питания в розетку
электросети.
РУССКИЙ 35
CHARGE

3 Как только аккумулятор будет
полностью заряжен,выньте вилку
сетевого адаптера из розетки и
отсоедините штекер шнура сетевого
адаптера от электробритвы.
Время бритья без подключения к
электросети
Полностью заряженная бритва обеспечивает
время автономного бритья до 30 мин.
Бритье
Бритье
1 Включите бритву, сдвинув ползунковый
переключатель «вкл./выкл.» в
положение "I".
C
2 Быстро перемещайте бритвенные
головки по коже, совершая
одновременно возвратнопоступательные и вращательные
движения.
Наилучшие результаты бритья достигаются в
том случае, когда ваша кожа сухая.
Вашей коже может потребоваться 2-3 недели
для того, чтобы привыкнуть к бритвенной
системе Philips.
3 Выключите электробритву, сдвинув
ползунковый переключатель в
положение 0.
РУССКИЙ36

C
4 Во избежание поломки, после
использования наденьте на бритву
защитную крышку.
Подравниватель.
Для подравнивания висков и ухода за усами.
C
1 Откройте подравниватель, передвинув
ползунковый переключатель вверх.
Подравнивателем можно пользоваться только
при включенном электродвигателе.
Очистка и уход
Регулярная очистка гарантирует наилучшие
результаты бритья.
Каждый день: бритвенный блок и камера
волососборника
1 Выключите электробритву, выньте
сетевую вилку из розетки электросети и
отсоедините штекер сетевого адаптера
от электробритвы.
C
2 Сначала очистите верхнюю часть
электробритвы, используя прилагаемую
кисточку.
РУССКИЙ 37

C
3 Нажмите кнопку защелки (1) и снимите
бритвенный блок (2).
C
4 При помощи кисточки очистите
изнутри бритвенный блок и камеру
волососборника.
C
5 Вставьте бритвенный блок обратно в
электробритву.
Подравниватель
1 Выключите электробритву, выньте
сетевую вилку из розетки электросети и
отсоедините штекер сетевого адаптера
от электробритвы.
C
2 Нажмите кнопку защелки (1) и снимите
бритвенный блок (2).
C
3 Поверните колесико против часовой
стрелки (1) и снимите фиксирующую
рамку (2).
РУССКИЙ38
2
1

C
4 Снимите и очистите бритвенные
головки (отдельно вращающиеся и
неподвижные ножи).
Не перепутайте вращающиеся и неподвижные
ножи.
Это важно, поскольку вращающийся и
неподвижный ножи каждой головки подогнаны
друг к другу, что гарантирует оптимальные
рабочие характеристики каждой пары ножей.
Если вы случайно перепутали комплекты
ножей, то может потребоваться несколько
недель для того, чтобы восстановить
оптимальные характеристики бритья.
C
5 Очистите вращающийся нож с
помощью кисточки. Используйте
сторону кисточки с короткой щетиной.
Осторожно производите очистку кисточкой в
направлении, указанном стрелкой.
C
6 Очистите неподвижный нож при
помощи кисточки.
C
7 Установите бритвенные головки в
бритвенный блок. Установите
фиксирующую рамку в бритвенный блок
(1) и поверните колесико по часовой
стрелке (2).
8 Вставьте бритвенный блок обратно в
электробритву.
B
Для особенно тщательной очистки раз в
шесть месяцев помещайте бритвенные
РУССКИЙ 39
1
2

головки в обезжиривающую жидкость
(например, спирт). Для того чтобы вынуть
бритвенные головки, следуйте пунктам 1 - 4,
как указано выше. После очистки смажьте
центральную часть неподвижных ножей
каплей машинного масла для швейных машин
для предотвращения износа бритвенных
головок.
Подравниватель
Очищайте подравниватель после каждого
использования.
1 Выключите электробритву, выньте
сетевую вилку из розетки электросети и
отсоедините штекер сетевого адаптера
от электробритвы.
C
2 Очищайте подравниватель с помощью
кисточки, входящей в комплект
поставки.
C
3 Смазывайте зубцы подравнивателя
каждые шесть месяцев каплей
машинного масла для швейных машин.
Хранение
C
◗ Во избежание повреждений наденьте на
электробритву защитный колпачок.
◗ Бритву можно хранить в футляре,
входящем в комплект поставки.
РУССКИЙ40

Замена бритвенных головок
Для достижения оптимальных результатов
бритья производите замену бритвенных
головок каждые два года.
Изношенные или поврежденные бритвенные
головки следует заменять только
оригинальными бритвенными головками HQ4«
Philips.
1 Выключите электробритву, выньте
сетевую вилку из розетки электросети и
отсоедините штекер сетевого адаптера
от электробритвы.
C
2 Нажмите кнопку защелки (1) и снимите
бритвенный блок (2).
C
3 Поверните колесико против часовой
стрелки (1) и снимите фиксирующую
рамку (2).
C
4 Выньте бритвенные головки и вставьте
новые бритвенные головки в
бритвенный блок.
C
5 Установите фиксирующую рамку в
бритвенный блок (1) и поверните
колесико по часовой стрелке (2).
РУССКИЙ 41
2
1
1
2

6 Вставьте бритвенный блок обратно в
электробритву.
Принадлежности
В продаже имеются следующие
принадлежности:
- Бритвенные головки HQ4« Philips.
- Очиститель бритвенных головок HQ110
Philips (спрей для очистки бритвенных
головок).
Защита окружающей среды
C
◗ По окончании срока службы не
выбрасывайте прибор вместе с обычными
бытовыми отходами, а сдавайте в
специальные пункты приема. Поступая так
вы способствуете делу сохранения
окружающей среды.
◗ Встроенная аккумуляторная батарея
содержат вещества,которые могут
представлять опасность для окружающей
среды. Прежде чем выбросить бритву или
сдать ее в приемный пункт утильсырья,
всегда вынимайте из нее батарею. Отнесите
батарею в официальный пункт приема. Если
вам сложно самостоятельно извлечь
батарею, вы можете отнести бритву в
сервисный центр компании «Филипс», где
вам извлекут батарею и утилизируют ее
безопасным для окружающей среды
образом.
РУССКИЙ42

Утилизация аккумуляторной батареи
Перед удалением батарея должна быт
полностью разряжена.
1 Выньте вилку сетевого шнура из розетки
сети электропитания и отсоедините
штекер шнура от электробритвы.
C
2 Оставьте электробритву во включенном
состоянии до остановки
электродвигателя, отверните винты и
откройте электробритву.
3 Извлеките аккумуляторную батарею.
Не включайте бритву в сеть после того, как
аккумуляторная батарея была извлечена.
Информация и сервисное обслуживание
По поводу дополнительной информации или в
случае возникновения каких-либо проблем
обращайтесь на Web-сайт компании «Филипс»
по адресу www.philips.com или в центр
компании «Филипс» по обслуживанию
потребителей в вашей стране (вы найдете его
номер телефона на международном
гарантийном талоне). Если подобный центр в
вашей стране отсутствует, обратитесь в вашу
местную торговую организацию компании
«Филипс» или сервисное отделение компании
Philips Domestic Appliancesand Personal Care BV.
РУССКИЙ 43

Поиск и устранение неисправностей
1 Плохое качество бритья
B
Причина 1: загрязнились бритвенные головки.
B
Электробритва не была очищена
достаточно хорошо или давно не чистилась.
◗ Перед тем как продолжить бритье,
тщательно очистите электробритву. См.
раздел «Очистка и уход».
B
Причина 2: бритвенные головки забиты
длинными волосами.
◗ Очистите вращающиеся и неподвижные
ножи щеточкой,входящей в комплект
поставки прибора. См. раздел «Очистка и
уход», секция «Каждые два месяца:
бритвенные головки».
B
Причина 3: бритвенные головки повреждены
или изношены.
◗ Замените бреющие головки. См. раздел
«Замена».
2 При переводе ползункового
переключателя «вкл./выкл.» в положение
"I" электробритва не работает.
B
Причина 1:аккумуляторная батарея
разряжена.
◗ Зарядите батарею. См. раздел "Зарядка"
РУССКИЙ44

B
Причина 2: прибор не подключен к
электросети.
◗ Вставьте сетевую вилку в розетку
электросети
РУССКИЙ 45

Důležité
Následující návod pečlivě přečtěte a uschovejte jej
pro případná pozdější nahlédnutí.
◗ Používejte vždy pouze dodaný přívodní kabel.
◗ Nepoužívejte poškozený síťový přívod.
◗ Pokud by byl síťový přívod poškozen, svěřte
jeho výměnu výhradně servisu firmy Philips,
abyste zabránili případné nebezpečné situaci.
◗ Přístroj se automaticky přizpůsobí napájecímu
napětí v rozmezí 100 až 240 V.
◗ Akumulátory přístroje nabíjejte a přístroj
používejte při teplotě mezi 5cC a 35cC.
◗ Nenabíjejte akumulátory pokud je přístroj
uložen v obalu.
C
◗ Přístroj a napájecí kabel chraňte před vlhkostí.
◗ Hladina hluku: Lc = 62 dB (A).
Nabíjení akumulátorů
Než začnete akumulátory nabíjet, přesvědčte se,
že je přístroj vypnut.
Nabíjení trvá běžně asi 8 hodin.
Můžete se samozřejmě též oholit i při vybitých
akumulátorech tak, že přístroj připojíte do sítě.
Nenechávejte ale přístroj připojený k síti déle než
24 hodin.
ČESKY46

Indikace nabití
Nabíjení akumulátorů
C
◗ Jakmile začnete nabíjet vybité akumulátory,
rozsvítí se zelená kontrolka.
Nabíjení akumulátorů
Nabijte akumulátory přístroje, když se jeho
motorek zastaví nebo když se otáčky motorku
zpomalí.
Nenabíjejte akumulátory pokud je přístroj uložen
v obalu.
C
1 Zástrčku síťového přívodu zasuňte do
přístroje.
2 Síťovou zástrčku zapojte do elektrické
síťové zásuvky.
3 Po úplném nabití akumulátoru vytáhněte
zástrčku ze síťové zásuvky i zástrčku z
přístroje.
Doba holení bez sítě
S plně nabitým akumulátorem může být přístroj v
provozu při běžném užívání po dobu asi 30 minut.
ČESKY 47
CHARGE

Holení
Holení
1 Zapněte holicí strojek posunutím vypínače
on/off do polohy I.
C
2 Rychle pohybujte holicími hlavami po
pokožce, provádějte přitom přímé i
krouživé pohyby.
Pokud je pokožka suchá,dosáhnete při holení
nejlepších výsledků.
Pamatujte, že pokožka potřebuje 2 až 3 týdny na
to, aby si přivykla novému způsobu holení.
3 Holicí strojek vypněte posunutím vypínače
on/off do polohy 0.
C
4 Vždy po použití nasaďte na holicí přístroj
ochranný kryt, abyste předešli poškození
holicích hlav.
Zastřihovač
Zastřihovač slouží k úpravě kotlet nebo knírku.
C
1 Zastřihovač zapnete posunutím jeho
spínače směrem nahoru.
Zastřihovač lze aktivovat,i když je motor v chodu.
ČESKY48

Čištění a údržba
Pravidelné čištění zajistí nejlepší výsledky při
holení.
Denně: holicí jednotka a komora pro
odstřižené vousy
1 Vypněte holicí strojek, odpojte síťový
kabel ze zásuvky a rovněž odpojte napájecí
kabel od přístroje.
C
2 Přiloženým kartáčkem vyčistěte nejdříve
čelo přístroje.
C
3 Stiskněte uvolňovací tlačítko (1) a
odejměte holicí jednotku (2).
C
4 Vnitřek holicí hlavice a komoru,v níž
zůstávají odstřižené vousy, vyčistěte rovněž
kartáčkem.
C
5 Holicí jednotku nasaďte zpět na přístroj.
ČESKY 49

Zastřihovač
1 Vypněte holicí strojek, odpojte síťový
kabel ze zásuvky a rovněž odpojte napájecí
kabel od přístroje.
C
2 Stiskněte uvolňovací tlačítko (1) a
odejměte holicí jednotku (2).
C
3 Otočte kolečkem proti směru pohybu
hodinových ručiček (1) a vyjměte
zajišťovací rámeček (2).
C
4 Vyjímejte holicí hlavy jednu po druhé
(nožový věnec a korunku).
Nezaměňte vzájemně nožový věnec a korunku.
Dbejte proto na to, abyste do každé korunky
vložili vždy zpět ten nožový věnec, který v ní
původně byl. Jinak by trvalo týdny než by se
nožový věnec v jiné korunce zaběhl a holení by v
té době nemuselo být uspokojující.
C
5 Nožový věnec vyčistěte kratší částí
kartáčku.
Čistěte opatrně a vždy jen ve směru šipky.
C
6 Vyčistěte korunku.
ČESKY50
2
1

C
7 Vložte holicí hlavy zpět do holicí jednotky.
Vložte přídržný rámeček zpět do holicí
jednotky (1) a otočte kolečko ve směru
hodinových ručiček (2).
8 Holicí jednotku nasaďte zpět na přístroj.
B
Pro velmi důkladné vyčištění můžete každých šest
měsíců vložit holicí hlavy do odmašťovací kapaliny
(např. alkoholu). Holicí hlavy vyjměte podle výše
uvedených kroků 1 až 4. Po vyčištění namažte
středový bod uvnitř korunky kapkou oleje na šicí
stroje, aby nedocházelo k nadměrnému
opotřebování holicích hlav.
Zastřihovač
Zastřihovač vyčistěte po každém použití.
1 Vypněte holicí strojek, odpojte síťový
kabel ze zásuvky a rovněž odpojte napájecí
kabel od přístroje.
C
2 Zastřihovač čistěte přiloženým kartáčkem.
C
3 Na lišty zastřihovače kápněte každých šest
měsíců kapku oleje na šicí stroje.
ČESKY 51
1
2

Uchovávání
C
◗ Nasaďte na přístroj ochraný kryt, abyste
předešli poškození holicích hlav.
◗ Holicí přístroj můžete uchovávat v přiloženém
váčku.
Výměna dílů
Pro optimální výsledky holení vyměňte holicí hlavy
každé dva roky.
Opotřebené nebo poškozené holicí hlavy
vyměňte vždy jen za hlavy Philips HQ4«.
1 Vypněte holicí strojek, odpojte síťový
kabel ze zásuvky a rovněž odpojte napájecí
kabel od přístroje.
C
2 Stiskněte uvolňovací tlačítko (1) a
odejměte holicí jednotku (2).
C
3 Otočte kolečkem proti směru pohybu
hodinových ruček (1) a odejměte
zajišťovací rámeček (2).
C
4 Vyjměte holicí hlavy a do holicí jednotky
vložte nové hlavy.
ČESKY52
2
1

C
5 Vložte zajišťovací rámeček zpět do holicí
jednotky (1) a otočte kolečkem ve směru
hodinových ručiček (2).
6 Holicí jednotku nasaďte zpět na přístroj.
Příslušenství
Lze zakoupit následující příslušenství:
- HQ4« holicí hlavy Philips.
- HQ110 čisticí sprej na holicí hlavy ( prodává se
pouze v některých zemích ).
Ochrana životního prostředí
C
◗ Až přístroj doslouží, nevyhazujte jej do
běžného domovního odpadu, ale odevzdejte
jej na oficiálním sběrném místě za účelem
recyklace. Přispějete tím k ochraně životního
prostředí.
◗ Vestavěný nabíjecí akumulátor obsahuje látky,
které mohou škodit životnímu prostředí. Před
likvidací přístroje nebo jeho odevzdáním na
oficiálním sběrném místě nejprve akumulátor
vyjměte.Akumulátor odevzdejte na oficiálním
sběrném místě pro staré baterie. Pokud máte
problémy s vyjmutím akumulátoru, můžete
přístroj odnést do servisního střediska Philips,
kde se již postarají o vyjmutí akumulátoru a
jeho bezpečnou likvidaci.
ČESKY 53
1
2

Likvidace akumulátoru
Akumulátory vyjměte jen když jsou ve zcela
vybitém stavu.
1 Vypněte přístroj, vytáhněte síťovou
zástrčku ze zásuvky a odpojte napájecí
konektor od přístroje.
C
2 Motorek ponechte v chodu, dokud se sám
nezastaví, pak povolte příslušné šroubky a
přístroj otevřte.
3 Vyjměte akumulátor.
Jakmile jste z přístroje vyjmuli akumulátor, nesmíte
ho již nikdy připojit k síti.
Záruka & servis
Pokud byste potřebovali jakoukoli informaci nebo
měli nějaký problém, podívejte se na internetovou
stránku www.philips.com,případně kontaktujte
Informační středisko firmy Philips, jehož telefonní
číslo naleznete na letáčku s celosvětovou zárukou.
Pokud není Informační středisko ve vaší blízkosti,
můžete kontaktovat místního dodavatele výrobků
Philips nebo Service Depar tment of Philips
Domestic Appliances and Personal Care BV.
Odstranění případných poruch
1 Zhoršené výsledky holení
B
Příčina 1: holicí hlavy jsou zašpiněné.
ČESKY54

B
Přístroj nebyl dostatečně vyčištěn nebo nebyl čištěn
dostatečně dlouho.
◗ Než budete pokračovat v holení, přístroj
důkladně vyčistěte (viz odstavec "Čištění a
údržba").
B
Příčina 2: holicí hlavy jsou blokovány dlouhými
vousy.
◗ Pomocí přibaleného kartáčku vyčistěte
nožové věnce a korunky.Viz kapitolu "Čištění
a údržba", část "Každé dva měsíce: holicí
hlavy".
B
Příčina 3: holicí hlavy jsou opotřebeny nebo
poškozeny.
◗ Vyměňte holicí hlavy (viz odstavec "Výměna
dílů").
2 Holicí strojek nepracuje, je-li vypínač
on/off v poloze I.
B
Příčina 1: akumulátor je vybitý.
◗ Nabijte akumulátor.Viz odstavec "Nabíjení
akumulátoru".
B
Příčina 2: přístroj není připojen k síti.
◗ Zapojte síťovou zástrčku do elektrické
zásuvky.
ČESKY 55

Tudnivalók
A készülék használata előtt olvassa el a használati
útmutatót. Őrizze meg az útmutatót későbbi
használatra.
◗ Csak a készülékkel együtt szállított hálózati
csatlakozó kábelt használja.
◗ Ne használjon sérült hálózati csatlakozó
kábelt.
◗ Ha a hálózati csatlakozó kábel megsérül,
veszély elkerülése végett mindig eredeti
típussal cseréltesse ki.
◗ A készülék automatikus hálózati feszültség
választóval van ellátva és alkalmas
100-240 Volt között hálózati feszültségű
csatlakoztatáshoz.
◗ A készüléket 5cC és 35cC közötti
hőmérsékleten töltse, tárolja és használja.
◗ Ne töltse a borotvát zárt táskában.
C
◗ Tartsa a készüléket és a vezetéket szározon.
◗ Zajszint: Lc=62 dB (A)
Töltés
Mielőtt elkezdi a töltést ellenőrizze, hogy a
készülék ki legyen kapcsolva.
A töltés időtartama kb. 8 óra.
Töltés nélkül is borotválkozhat, ha a készüléket a
hálózathoz csatlakoztatja.
Ne hagyja a borotvát a hálózathoz csatlakoztatva
24 óránál hosszabb ideig.
MAGYAR56

Töltés jelzések
Töltés
C
◗ Amint tölteni kezdi a lemerült borotvát,világit
a zöld színű jelző LED.
A készülék feltöltése
Ha a készülék megáll vagy lassabban indul, töltse
fel a készüléket.
Ne töltse a borotvát zárt táskában.
C
1 Csatlakoztassa a hálózati adapter
csatlakozó dugóját a borotvába.
2 Csatlakoztassa a hálózati csatlakozó dugót
a fali konnektorba.
3 Az akkumulátor teljes feltöltése után húzza
ki a hálózati csatlakozódugót az aljzatból és
a készülék csatlakozódugóját a borotvából.
Hálózati csatlakozó kábel nélküli
borotválkozási idő
A teljesen feltöltött borotvával max. 30 percig
lehet csatlakozó kábel nélkül borotválkozni.
MAGYAR 57
CHARGE

Borotválkozás
Borotválkozás
1 A be-/kikapcsoló gomb I pozícióba
csúsztatásával kapcsolja be a borotvát.
C
2 Gyorsan mozgassa a borotvafejeket a
bőrén, egyenes és körkörös mozdulatokat
végezve.
Borotválkozáskor legjobb, ha száraz a bőre.
Bőrének 2-3 hétre is szüksége lehet ahhoz, hogy a
Philips rendszerhez hozzászokjon.
3 Kapcsolja ki a borotvát úgy, hogy a be-
/kikapcsoló gombot a 0 pozícióra tolja.
C
4 Használat után mindig tegye fel a
készülékre a védősapkát, hogy megvédje a
sérüléstől.
Pajeszvágó
Az oldalszakáll és a bajusz ápolásához.
C
1 Kapcsolja be a pajeszvágót a kapcsoló
felfelé nyomásával.
A pajeszvágót a borotva működése közben is
bekapcsolhatja.
Tisztítás és karbantartás
A rendszeres tisztítás garantálja a legjobb
borotválkozási eredményt.
MAGYAR58

Minden nap: borotvaegység és szőrgyűjtő
kamra
1 Kapcsolja ki a készüléket,húzza ki a
hálózati csatlakozó kábelt a fali
konnektorból és húzza ki a csatlakozó
dugót a borotvából.
C
2 Először a készülék tetejét tisztítsa meg a
tartozék kefe segítségével.
C
3 Nyomja meg a kioldó gombot (1) és
távolítsa el a bortovaegységet (2).
C
4 Tisztítsa ki a borotvaegység belsejét és a
szőrgyűjtő kamrát a kefével.
C
5 Tegye vissza a borotvaegységet a
borotvába.
Pajeszvágó
1 Kapcsolja ki a készüléket,húzza ki a
hálózati csatlakozó kábelt a fali
konnektorból és húzza ki a csatlakozó
dugót a borotvából.
MAGYAR 59

C
2 Nyomja meg a kioldó gombot (1) és
távolítsa el a bortovaegységet (2).
C
3 Forgassa a tengelyt az óramutató járásával
ellenkező irányba (1) és vegye ki a
tartókeretet (2).
C
4 Vegye ki és tisztítsa meg egyenként a
körkéseket és a szitákat.
Ne keverje össze a körkéseket és szitákat.
Az optimális működés érdekében minden körkést
a szitához csiszoltak. Ha véletlenül felcseréli őket,
beletelik néhány hétbe, míg ismét optimális
borotválkozási teljesítményt ér el.
C
5 Tisztítsa meg a körkéseket a kefe
rövidszőrű oldalával.
A nyíllal jelzett irányban óvatosan tisztítsa a
kefével.
C
6 Kefélje le a szitákat.
MAGYAR60
2
1

C
7 Helyezze vissza a borotvafejeket a
borotvaegységre.Tegye a tartókeretet a
helyére, a borotvaegységbe (1) és rögzítse
a kerék, óramutató járásával megegyező
irányba történő elforgatásával (2).
8 Tegye vissza a borotvaegységet a
borotvába.
B
A tökéletesebb tisztítás érdekében tegye a
borotvafejeket zsírtalanító folyadékba (pl: alkohol)
hat havonta. A borotvafejek eltávolításához
kövesse a 1-4 pontokban foglaltakat.Tisztítás után
kenyje be a sziták középponti részt egy csepp
varrógépolajjal hogy a felek ne kopjanak.
Pajeszvágó
Minden használat után tisztítsa meg a pajeszvágót.
1 Kapcsolja ki a készüléket,húzza ki a
hálózati csatlakozó kábelt a fali
konnektorból és húzza ki a csatlakozó
dugót a borotvából.
C
2 A pajeszvágót a készülékhez mellékelt
kefével tisztítsa meg.
C
3 Hat havonta olajozza meg a pajeszvágó
fogait egy csepp varrógép olajjal.
MAGYAR 61
1
2

Tárolás
C
◗ Tegye fel a borotvára a védősapkát, hogy az
óvja a sérüléstől.
◗ A készüléket a hozzá mellékelt tokban tárolja.
Borotvafejek cseréje
Az optimális borotválás érdekében kétévente
cserélje ki a borotvafejeket.
A sérült vagy kopott borotvafejeket csak HQ4«
Philips borotvafejekre cserélje le.
1 Kapcsolja ki a borotvát, húzza ki a hálózati
dugót a fali konnektorból és húzza ki a
vezetéket a borotvából.
C
2 Nyomja meg a kioldó gombot (1) és
távolítsa el a bortovaegységet (2).
C
3 Forgassa a tengelyt az óramutató járásával
ellenkező irányba (1) és vegye ki a
tartókeretet (2).
C
4 Vegye ki a borotvafejeket és helyezze be az
újakat a borotvaegységbe.
MAGYAR62
2
1

C
5 Tegye a tartókeretet a helyére, a
borotvaegységbe (1) és rögzítse a kerék
óramutató járásával megegyező irányba
történő elforgatásával (2).
6 Tegye vissza a borotva egységet a
borotvába.
Tartozékok
A következő tartozékok vásárolhatók a
készülékhez:
- HQ4« Philips borotvafejek.
- HQ110 Philips Shaving Head Cleaner
(borotvafej-tisztító spray)
Környezetvédelem
C
◗ Kérjük, hogy a használhatatlanná vált
készüléket ne dobja a háztartási
hulladékgyűjtőbe, hanem hivatalos
hulladékújrahasznosítási gyűjtőhelyeken adja
le. Ezzel Ön hozzájárul a környezetünk
megóvásához.
◗ A készülékbe épített akkumulátor a
környezetre szennyező anyagokat
tartalmazhat. Mindig vegye ki az elemet/
akkumulátort a készülékből mielőtt
leselejtezné vagy leadná hivatalos, kijelőlt
gyűjtőponton.Az elemeket/ akkumulátorokat
mindig hivatalalos, kijelőlt gyűjtőpontokon adja
le. Ha problémája lenne az akkumulátor
eltávolításával, kérjük keresse fel a Philips
MAGYAR 63
1
2

szervizek egyikét, ahol kiveszik a készülékből
az akkumulátort és gondoskodnak
környezetbarát módon történő
leselejtezéséről.
Az akkumulátor kiselejtezése
Csak a teljesen lemerült akkumulátort távolítsa el.
1 Kapcsolja ki a készüléket,húzza ki a
hálózati csatlakozó dugót a fali
konnektorból és húzza ki a készülék
csatlakozó dugóját a borotvából is.
C
2 Hagyja megállásig működni a készüléket,
majd lazítsa meg a csavarokat,és nyissa ki a
borotvát.
3 Vegye ki az akkumulátort.
Ne csatlakoztassa a borotvát a fali konnektorhoz
ha az akkumulátort kivette a készülékből.
Garancia és javítás
Ha valamilyen információra van szüksége, vagy
valamilyen probléma merült fel,akkor látogasson
el a Philips honlapjára (www.philips.com), vagy
forduljon országa Philips vevőszolgálatához (a
telefonszámot megtalálja a világ minden részére
kiterjedő garancialevélen). Ha lakóhelyén nincs
vevőszolgálat, forduljon a Philips helyi
szaküzletéhez vagy a Philips háztartási kisgépek és
szépségápolási termékek üzletágának
vevőszolgálatához.
MAGYAR64

Hibaelhárítás
1 Gyengén borotvál a készülék.
B
1. ok: szennyezettek a borotvafejek.
B
Nem tisztította ki alaposan a borotvát vagy már
régóta egyáltalán nem tisztította ki.
◗ Alaposan tisztítsa meg a borotvát, mielőtt
folytatná a borotválkozást. Lásd még a
"Tisztítás és karbantartás" c. részt.
B
2. ok: a hosszú szőrszálak eltömték a
borotvafejeket.
◗ Tisztítsa meg a késeket és szitákat a mellékelt
kefével.Kövesse a "Tisztítás és karbantartás"
c. fejezet, "Kéthavonta: borotvafejek" c. részét.
B
3. ok: sérültek vagy kopottak a borotvafejek.
◗ Cserélje ki a borotvafejeket.Lásd a "Csere" c.
részt.
2 A borotva nem működik pedig a be-
/kikapcsoló az I pozícióban áll.
B
1. ok: lemerült az akkumulátor.
◗ Töltse fel az akkumulátort. Lásd a "Töltés" c.
részt.
B
2. ok: a borotva nem csatlakozik a hálózati
adapteren keresztül a fali konnektorhoz.
◗ Csatlakoztassa a vezetéket a fali konnektorba.
MAGYAR 65

Dôležité upozornenie
Pred použitím zariadenia si pozorne prečítajte
tento návod na použitie.
◗ Používajte jedine dodaný kábel.
◗ Ak je kábel poškodený, zariadenie
nepoužívajte.
◗ Poškodený kábel vždy vymeňte za originálny,
aby ste predišli nebezpečenstvu.
◗ Zariadenie sa automaticky prispôsobí napätiu
v sieti v rozsahu 100 až 240 voltov.
◗ Zariadenie nabíjajte, odkladajte a používajte
pri teplote 5 až 35°C.
◗ Zariadenie nenabíjajte v zatvorenom puzdre.
C
◗ Holiaci strojček a kábel udržiavajte v suchu.
◗ Deklarovaná hodnota emisie hluku tohto
spotrebiča je 62 dB(A), čo predstavuje hladinu
A akustického výkonu vzhľadom na
referenčný akustický výkon 1 pW.
Nabíjanie
Predtým, ako začnete s nabíjaním, vypnite
zariadenie.
Nabíjanie trvá približne 8 hodín.
Môžete sa holiť aj bez nabitej batérie, stačí
pripojiť zariadenie do siete.
Zariadenie nenabíjajte dlhšie ako 24 hodín.
SLOVENSKY66

Indikácia nabíjania
Nabíjanie
C
◗ Po pripojení zariadenia s vybitou batériou do
siete sa rozsvieti zelené kontrolné svetlo.
Nabíjanie batérie
Zariadenie nabíjajte keď sa motor zastaví, alebo
začne pracovať pomalšie.
Zariadenie nenabíjajte v zatvorenom puzdre.
C
1 Koncovku zasuňte do holiaceho strojčeka.
2 Kábel pripojte do siete.
3 Po nabití batérie odpojte adaptér zo siete
a tiež z holiaceho strojčeka.
Holenie bez pripojenia do siete
Holiaci strojček s plne nabitou batériou umožňuje
až 30 minút holenia bez potreby pripojenia do
siete.
SLOVENSKY 67
CHARGE

Použitie holiaceho strojčeka
Holenie
1 Holiaci strojček zapnete posunutím
vypínača do polohy I.
C
2 Rýchlo pohybujte holiacimi hlavami po
pokožke,robte rovné aj krúživé pohyby.
Holením suchej pokožky dosiahnete najlepšie
výsledky.
Môže trvať 2-3 týždne, kým si Vaša pokožka
zvykne na holiaci systém Philips.
3 Holiaci strojček vypnete posunutím
vypínača do polohy 0.
C
4 Aby ste predišli prípadnému poškodeniu
holiaceho strojčeka, po každom použití
nasaďte na holiace hlavy ochranný kryt.
Zastrihávanie
Na úpravu bokombrady a fúzov.
C
1 Zastrihovač zapnete tak, že posuniete
vypínač nahor.
Zastrihovač môžete aktivovať aj počas chodu
motora.
Čistenie a údržba
Pravidelné čistenie zabezpečuje lepšie výsledky
holenia.
SLOVENSKY68

Každý deň: holiaca jednotka a komôrka na
chĺpky
1 Vypnite holiaci strojček, odpojte kábel zo
siete a tiež zo strojčeka.
C
2 Najprv očistite povrch zariadenia
pomocou priloženej kefky.
C
3 Stlačte uvoľňovacie tlačidlo (1) a
demontujte holiacu jednotku (2).
C
4 Kefkou vyčistite vnútro holiacej jednotky a
komoru na fúzy.
C
5 Holiacu jednotku vráťte naspäť na holiaci
strojček.
Každé dva mesiace: holiace hlavy
1 Vypnite holiaci strojček, odpojte kábel zo
siete a tiež zo strojčeka.
C
2 Stlačte uvoľňovacie tlačidlo (1) a
demontujte holiacu jednotku (2).
SLOVENSKY 69

C
3 Kolieskom otočte proti smeru pohybu
hodinových ručičiek (1) a vyberte prítlačný
rám (2).
C
4 Po jednej vyberte a očistite holiace hlavy
(rezače a zdvíhače).
Nepomiešajte rezače a zdvíhače.
Jednotlivé rezače sú ostrené príslušnými
zdvíhačmi, aby ste dosiahli optimálne výsledky
holenia.Ak omylom pomiešate jednotlivé dvojice,
môže trvať týždne kým znovu dosiahnete
optimálnu kvalitu holenia.
C
5 Rezač očistite krátkymi štetinkami kefky.
Opatrne ho čistite v smere šípky.
C
6 Očistite zdvíhač.
C
7 Holiace hlavy vráťte späť do holiacej
jednotky. Prítlačný rám vložte späť do
holiacej jednotky (1) a otočte kolieskom v
smere pohybu hodinových ručičiek (2).
8 Holiacu jednotku vráťte naspäť na holiaci
strojček.
B
Pri zvlášť dôkladnom čistení, holiace hlavy každých
šesť mesiacov ponorte do odmasťujúcej kvapaliny
SLOVENSKY70
2
1
1
2

(napr. alkoholu). Pri demontáži holiacich hláv
postupujte podľa vyššie uvedených krokov 1 až 4.
Po čistení namažte stredový bod na strane
zdvíhačov kvapkou oleja na šijacie stroje, aby ste
predišli opotrebovaniu holiacich hláv.
Zastrihovač
Zastrihovač očistite po každom použití.
1 Vypnite holiaci strojček, odpojte kábel zo
siete a tiež zo strojčeka.
C
2 Zastrihovač očistite pomocou priloženej
kefky.
C
3 Každých šesť mesiacov namažte zúbky
zastrihovača kvapkou oleja na šijacie
stroje.
Odkladanie
C
◗ Aby ste zabránili poškodeniu,dajte na holiaci
strojček ochranný kryt.
◗ Zariadenie môžete odkladať do priloženého
puzdra.
Výmena
Aby ste dosiahli optimálne výsledky holenia,
vymeňte raz za dva roky holiace hlavy.
SLOVENSKY 71

Poškodené alebo opotrebované holiace hlavy
nahraďte jedine holiacimi hlavami Philips HQ4«.
1 Vypnite holiaci strojček, odpojte kábel zo
siete a tiež zo strojčeka.
C
2 Stlačte uvoľňovacie tlačidlo (1) a
demontujte holiacu jednotku (2).
C
3 Koliesko otočte proti smeru pohybu
hodinových ručičiek (1) a vyberte prítlačný
rám (2).
C
4 Vo vnútri holiacej jednotky vymeňte
opotrebované holiace hlavy za nové.
C
5 Prítlačný rám vložte späť do holiacej
jednotky (1) a otočte kolieskom v smere
pohybu hodinových ručičiek (2).
6 Holiacu jednotku nasaďte späť na strojček.
Príslušenstvo
V predajnej sieti je možné zakúpiť nasledujúce
príslušenstvo:
- Holiace hlavy Philips HQ4«.
- Sprej na čistenie holiacich hláv HQ110 Philips
Head Cleaner.
SLOVENSKY72
2
1
1
2

Životné prostredie
C
◗ Keď sa skončí životnosť zariadenia,
neodhadzujte ho spolu s bežným odpadom,
ale zaneste ho na miesto oficiálneho zberu
kvôli recyklovaniu. Pomôžete tak zachovať
životné prostredie.
◗ Zabudovaná dobíjateľná batéria obsahuje
látky, ktoré môžu znečistiť životné prostredie.
Preto ju zo strojčeka vyberte skôr, ako ho
odstránite, alebo zanesiete na miesto
oficiálneho zberu. Batérie odneste do zberne
batérií.Ak nedokážete batériu zo zariadenia
vybrať, môžete strojček zaniesť do servisného
centra Philips, kde za Vás batériu odstránia
spôsobom bezpečným pre životné prostredie.
Odstránenie batérie
Batériu odstráňte len ak je úplne vybitá.
1 Odpojte kábel zo siete a tiež z holiaceho
strojčeka.
C
2 Holiaci strojček nechajte bežať, kým
nezastane, odskrutkujte skrutky a otvorte
ho.
3 Vyberte batériu.
Akonáhle vyberiete batériu, holiaci strojček už
nepripájajte do siete.
SLOVENSKY 73

Záruka a servis
Ak potrebujete informácie, alebo máte problém,
prosíme Vás, aby ste navštívili www stránku
spoločnosti Philips - www.philips.com,alebo sa
obrátili na Centrum služieb zákazníkom
spoločnosti Philips vo Vašej krajine (telefónne číslo
Centra nájdete v priloženom celosvetovo
platnom záručnom liste). Ak sa vo Vašej krajine
toto Centrum nenachádza, obráťte sa na
miestneho predajcu výrobkov Philips, alebo
kontaktujte Oddelenie služieb Philips - divízia
domáce spotrebiče a osobná starostlivosť.
Riešenie problémov
1 Znížená účinnosť holenia
B
Príčina 1: holiace hlavy sú znečistené.
B
Holiaci strojček ste riadne neočistili, alebo ste ho
už dlhší čas nečistili.
◗ Riadne očistite holiaci strojček a až potom
pokračujte v holení (viď kapitola "Čistenie a
údržba").
B
Príčina 2: dlhé chlpy zavadzajú holiacim hlavám.
◗ Rezače a zdvíhače očistite dodanou kefkou.
Viď kapitola "Čistenie a údržba", časť "Každé
dva týždne: holiace hlavy".
B
Príčina 3: holiace hlavy sú poškodené, alebo
opotrebované.
SLOVENSKY74

◗ Vymeňte holiace hlavy (viď kapitola
"Výmena").
2 Po zapnutí vypínača do polohy I, strojček
nepracuje.
B
Príčina 1: batéria je vybitá.
◗ Dobite batériu (viď kapitola "Nabíjanie").
B
Príčina 2: holiaci strojček nie je pripojený do siete.
◗ Kábel pripojte do siete.
SLOVENSKY 75

Важлива інформація
Прочитайте цю інструкцію уважно перед
використанням пристрою та зберігайте для
подальшого використання.
◗ Користуйтесь лише шнуром живлення, який
входить у комплект поставки.
◗ Не використовуйте пошкоджений шнур.
◗ Якщо шнур пошкоджено, його обов'язково
треба замінити оригінальним блоком
живленням, щоб уникнути небезпеки.
◗ Пристрій оснащено автоматичним
селектором напруги, що підходить для
напруги в діапазоні від 100 до 240 В.
◗ Заряджайте, використовуйте та зберігайте
пристрій при температурі між 5cC та 35cC.
◗ Не заряджайте бритву у закритому пакунку
C
◗ Тримайте пристрій та шнур сухими.
◗ Рівень шуму: Lc= 62 dB [A]
Заряджання
Переконайтеся, що пристрій вимкнено, перед
тим, як заряджати його.
Підзарядка триває близько 8 годин.
Ви можете також голитися без
перезарядження батарей, увімкнувши бритву
безпосередньо у мережу живлення.
Не залишайте пристрій приєднаним до мереж
більші ніж на 24 години.
УКРАЇНСЬКА76

Індикація підзарядки
Заряджання
C
◗ Як тільки ви починаєте заряджати бритву,
загорається зелена лампа.
Підзарядка пристрою
Заряджайте пристрій, коли двигун припинить
працювати або працюватиме повільніше.
Не заряджайте бритву у закритому пакунку
C
1 Вставте вилку приладу у електробритву.
2 Вставте штепсель у розетку.
3 Коли акумулятор повністю зарядився,
витягніть вилку з стінної розетки та
від'єднайте від електробритви
з'єднувальний штекер.
Час гоління без шнура
Повністю заряджений акумулятор
електробритви забезпечує вам до 30 хвилин
гоління без електромережі.
УКРАЇНСЬКА 77
CHARGE

Використання пристрою
Гоління.
1 Увімкніть пристрій, пересунувши
повзунок "вмк/вимк" у положення І.
C
2 Швидкими поступальними і коловими
рухами переміщуйте голівку для гоління
по шкірі.
Якість гоління буде найвищою, якщо шкіра суха.
Для звикання шкіри до бритви Philips може
знадобитися 2 - 3 тижні.
3 Вимкніть пристрій, пересунувши
повзунок "вмк./вимк." у положення (0).
C
4 Надівайте захисний ковпачок на бритву
кожного разу після використання, щоб
запобігти пошкодженню.
Підстригання
Для підстригання бакенбардів та вусів.
C
1 Підготуйте тример до роботи,
пересунувши движок вверх.
Тример можна привести в робочий стан тільки
при працюючому двигуні.
Чищення й догляд
Регулярне чищення гарантує кращу роботу
електробритви.
УКРАЇНСЬКА78

Кожного дня: голівки для гоління та
триммер
1 Вимкніть бритву, витягніть штепсель із
розетки та витягніть штекер із бритви.
C
2 За допомогою щітки, яка входить до
комплекту, почистіть спочатку верх
приладу.
C
3 Натисніть кнопку розблокування (1) та
зніміть бритвений блок (2).
C
4 Почистіть щіткою внутрішню частину
приладу і камеру для збирання зрізаного
волосся.
C
5 Поставте блок для гоління знову на
бритву.
Тример
1 Вимкніть бритву, витягніть штепсель із
розетки та витягніть штекер із бритви.
C
2 Натисніть кнопку розблокування (1) та
зніміть бритвений блок (2).
УКРАЇНСЬКА 79

C
3 Прокрутіть механізм проти
годинникової стрілки і зніміть фіксуючу
рамку.
C
4 Одна за одною зніміть і почистіть
голівки для гоління (ножі і сітки).
Не міняйте місцями ножі і сітки.
Це важливо, тому що кожний ніж притертий
до своєї сітки. Якщо ви випадково
переплутаєте пари ніж-сітка, то до відновлення
оптимальної якості гоління може пройти
декілька тижнів.
C
5 Почистіть ножі щіткою з короткою
щетиною.
Чистити щіткою слід обережно, робіть рухи у
напрямку стрілки.
C
6 Почистіть сітку щіткою.
C
7 Встановіть бритвені головки на
бритвений блок.Встановіть утримуючу
рамку на бритвений блок (1) та
поверніть коліщатко за годинниковою
стрілкою (2).
8 Поставте блок для гоління знову на
бритву.
УКРАЇНСЬКА80
2
1
1
2

B
Для більш ретельного чищення чистіть
бритвені головки, покладаючи їх у знежирюючу
рідину (наприклад, спирт) кожні шість місяців.
Щоб зняти бритвені головки, виконайте
кроки 1 - 4, описані нижче.Після чищення
змастіть центральну точку з внутрішньої
частини захисної решітки краплею мастила
для швейних машинок, щоб запобігти зносу
бритвених головок.
Тример
Тример слід чистити кожного разу після його
використання.
1 Вимкніть бритву, витягніть штепсель із
розетки та витягніть штекер із бритви.
C
2 Пристрій слід чистити щiткой, яка
додається до нього при продажу.
C
3 Один раз на шість місяців змащуйте
зубці ножиць краплею машинного
мастила.
Зберігання
C
◗ Надіньте захисний ковпачок на бритву, щоб
запобігти пошкодженню.
◗ Пристрій можна зберігати у футлярі, яка
додається до нього при продажу.
УКРАЇНСЬКА 81

Заміна
Для досягнення оптимальних результатів
гоління голівки для гоління слід замінювати
кожні два роки.
Заміняйте пошкоджені чи зношені насадки
тільки насадками "HQ4« Philips ".
1 Вимкніть бритву, витягніть штепсель із
розетки та витягніть штекер із бритви.
C
2 Натисніть кнопку розблокування (1) та
зніміть бритвений блок (2).
C
3 Поверніть коліщатко (1) проти
годинникової стрілки та зніміть
утримуючу рамку (2).
C
4 Зніміть бритвені головки та встановіть
нові у бритвений блок.
C
5 Встановіть утримуючу рамку на
бритвений блок (1) та поверніть
коліщатко за годинниковою
стрілкою (2).
6 Вставте бритвений блок назад у бритву.
УКРАЇНСЬКА82
2
1
1
2

Приладдя
Доступне таке приладдя:
- Насадки для гоління HQ4« Philips.
- Розпилювач для чищення голівок для гоління
"HQ110 Philips Head Cleaner".
Захист оточуючого середовища
C
◗ Не викидайте пристрій зі звичайним
побутовим сміттям, доставляйте його після
того, як сплине термін використання, до
офіційного приймального пункту для
переробки. Цим ви допоможете зберегти
довкілля.
◗ Вбудований акумулятор містить речовини,
що можуть забруднювати довкілля. Завжди
витягуйте акумулятор перед тим, як
позбутися пристрою або передати його до
офіційного приймального пункту. Віднесіть
акумулятор до офіційного приймального
пункту акумуляторів. Якщо у вас виникли
складнощі з витягненням акумулятора, ви
також можете віднести пристрій до
сервісного центру «Філіпс», де з пристрою
витягнуть акумулятор та ліквідують його
безпечним для довкілля чином.
Утилізація акумулятора
Витягуйте акумулятор тільки тоді, коли з
повністю вичерпано.
УКРАЇНСЬКА 83

1 Витягніть вилку шнура живлення з
розетки електромережі, а вилку приладу
з електробритви.
C
2 Дайте бритві попрацювати, поки вона
зупиниться, викрутіть гвинти і відкрийте
бритву.
3 Витягніть батарею.
Не підключайте бритву до мережі після того
як акумулятор було вийнято.
Гарантія та обслуговування
Якщо Вам потрібна інформація або у Вас
виникли проблеми з приладом, будь ласка,
завітайте до веб-сайту фірми Philips (aдреса в
Інтернеті: www.philips.com) або зв'яжіться з
найближчим центром Philips по
обслуговуванню клієнтів Philips Customer Care
Centreу Вашій країні (Ви можете знайти його
номер телефону у єдиному гарантійному
талоні, дійсному в усьому світі). Якщо у Вашій
країні немає центру Philips по обслуговуванню
клієнтів Philips Customer Care Centre,
зверніться до Вашого місцевого торгового
представникафірми Philips або зв'яжіться з
департаментом обслуговування Service
Department відділення Philips Domestic
Appliances and Personal CareBV.
УКРАЇНСЬКА84

Пошук та усунення несправностей
1 Погіршене гоління
B
Причина 1: голівки з лезами забруднено.
B
Бритву недостатньо почищено або взагалі не
чищено протягом довгого часу.
◗ Ретельно почистіть бритву перед тим, як
продовжувати гоління.Див.главу "Чищення
та догляд".
B
Причина 2: довге волосся заважає голівкам з
лезами.
◗ Почистіть леза та ≠ратки щіткою, що
додається.Див. главу "Чищення та догляд",
розділ "Кожні два місяці:бритвені головки".
B
Причина 3:бритвені головки пошкоджені або
зношені.
◗ Замініть бритвені головки.Див. розділ
„Заміна.
2 Бритва не працює, коли повзунок
"вмк/вимк" встановлено у положення І.
B
Причина 1:акумулятор розряджений.
◗ Перезарядіть акумулятор.Див.розділ
„Підзарядка.
B
Причина 2:пристрій не приєднано до мережі.
◗ Вставте штепсель у розетку.
УКРАЇНСЬКА 85

Važno
Pažljivo pročitajte ovu uputu prije uporabe
aparata te ju sačuvajte za kasniju uporabu.
◗ Koristite samo pripadni mrežni kabel.
◗ Nikada ne korisite oštećeni mrežni kabel.
◗ Ako se mrežni kabel ošteti ili uništi,zamijenite
ga uvijek s originalnim tipom kako bi izbjegli
potencijalno opasne situacije.
◗ Aparat je opremljen s automatskim
selektorom voltaže te je pogodan za napone
od 100 do 240V.
◗ Aparat punite, koristite i spremajte na
temperaturi izmedju 5cC i 35cC.
◗ Nemojte puniti brijaći aparat u zatvorenoj
torbici.
C
◗ Čuvajte aparat i mrežni akbel suhim.
◗ Razina buke: Lc= 62 dB[A]
Punjenje
Provjerite da li je aparat isključen prije početka
punjenja.
Punjenje traje cca. 8 sati.
Brijati se možete i bez punjenja baterija tako da
priključite brijaći aparat na struju.
Ne ostavljajte aparat uključen u el. mrežu duže od
24 sata.
HRVATSKI86

Indikacije punjenja
Punjenje
C
◗ Odmah po početku punjenja praznog aparata
zelena žaruljica počinje svijetliti.
Punjenje aparata
Aparat punite kada motor stane ili kada započne
raditi usporeno.
Nemojte puniti brijaći aparat u zatvorenoj torbici.
C
1 Uključite priključak u brijaći aparat.
2 Utaknite mrežni kabel u utičnicu.
3 Kada je baterija potpuno napunjena
izvadite mrežni kabel iz zidne utičnice i iz
brijaćeg aparata.
Vrijeme brijanja
Sasvim napunjenim aparatom moguće se brijati
do 30 minuta bez uključenja u mrežno napajanje.
HRVATSKI 87
CHARGE

Brijanje
Brijanje
1 Uključite brijač stavljanjem On/Off klizača
u poziciju I.
C
2 Brzim, ravnim i kružnim pokretima
prelazite brijaćim glavama preko kože.
Najbolje rezultate daje brijanje suhe kože.
Koži će biti potrebno 2-3 tjedna da se privikne na
Philips sustav.
3 Isključite aparat pomakom On/Off
dugmeta u poziciji 0.
C
4 Nakon svake uporabe na aparat stavite
zaštitni pokrov kako bi spriječili oštećenja.
Podrezivač
Za podrezivanje zalizaka i brkova.
C
1 Otvorite podrezivač tako da pritisnete
klizač prema gore.
Podrezivač se može uključiti za vrijeme rada
motora.
Čišćenje i održavanje
Redovitim čišćenjem postižu se bolji rezultati pri
brijanju.
HRVATSKI88

Svaki dan: brijaća jedinica i komora za
dlačice
1 Isključite aparat, izvucite mrežni kabel iz
utičnice te izvuccite kabel iz aparata.
C
2 Pomoću isporučene četkice najprije
očistite gornji dio brijaće glave.
C
3 Pritisnite dugme (1) te odvojite brijaću
jedinicu.
C
4 Četkicom očistite unutrašnjost brijaće
glave.
C
5 Vratite brijaću glavu na brijaći aparat.
Podrezivač
1 Isključite aparat, izvucite mrežni kabel iz
utičnice te izvuccite kabel iz aparata.
C
2 Pritisnite dugme (1) te odvojite brijaću
jedinicu.
HRVATSKI 89

C
3 Zakrenite kotačić u lijevo i skinite učvrsni
okvir.
C
4 Skinite i očistite jednu po jednu reznu
glavu (rezače i štitnik).
Nemojte pomiješati rezače i štitnike.
Ovo je jako važno jer je svaki rezač usklađen sa
svojim štitnikom kako bi se postiglo optimalno
brijanje.
C
5 Četkicom očistite rezač kratkodlakim
dijelom četkice.
Pažljivo četkajte u smjeru strelice.
C
6 Četkicom očistite štitnik.
C
7 Vratite brijaće glave nazad u brijaću
jedinicu. Stavite pričvrsni okvir natraga na
brijaću jedinicu (1) i okrenite kotačić u
smjeru kazaljke na satu (2).
8 Vratite brijaću glavu na brijaći aparat.
B
Za extra čišćenje brijaćih glava, stavite ih u neko
otapalo, npr. alkohol, svakih 6 mjeseci. Kako bi
izvadili brijaće glave, slijedite korake 1-4 opisane
HRVATSKI90
2
1
1
2

gore. Nakon čišćenja, podmažite glave kapljicom
strojnog ulja.
Podrezivač
Očistite podrezivač nakon svake uporabe.
1 Isključite aparat, izvucite mrežni kabel iz
utičnice te izvuccite kabel iz aparata.
C
2 Podrezivač čistite isporučenom četkicom.
C
3 Svakih šest mjeseci podmažite zupce
podrezivača jednom kapi ulja za šivaće
strojeve.
Pohranjivanje
C
◗ Kako bi spriječili oštećenja, vratite zaštitni
pokrov na aparat.
◗ Aparat možete spremiti u isporučenu vrećicu.
Zamjena brijaćih glava
Za optimalne rezultate, zamijenite brijaće glave
svake dvije godine.
Zamijenite istrošene brijaće noževe s HQ4«
Philips noževima.
HRVATSKI 91

1 Isključite aparat, izvucite mrežni kabel iz
utičnice te izvuccite kabel iz aparata.
C
2 Pritisnite dugme (1) te odvojite brijaću
jedinicu.
C
3 Zakrenite kotačić u lijevo i skinite učvrsni
okvir.
C
4 Izvadite rezne glave te stavite nove na
njihovo mjesto.
C
5 Vratite pričvrsni okvir natrag na brijaću
jedinicu (1) i zaokrenite kotačić u smjeru
kazaljke na satu (2).
6 Vratite brijaću glavu na brijaći aparat.
Pribor
Raspoloživ je sljedeći dodatni pribor:
- HQ4« Philips brijaće glave.
- HQ110 Philips Head Cleaner raspršivač za
čišćenje brijaće glave.
HRVATSKI92
2
1
1
2

Napomene o zaštiti okoliša
C
◗ Aparat ne odbacujte zajedno s ostalim kućnim
smećem, već ga odložite na za to predviđena
prikupljališta. Na taj način pridonosite zaštiti
okoliša.
◗ Ugrađene baterije sadržavaju supstance koje
mogu onečistiti okoliš. Uvijek izvadite baterije
prije odbacivanja aparata te ih odložite na za
to predviđena odlagališta.
Odbacivanje baterije
Izvadite bateriju samo ako je potpuno prazna.
1 Izvucite mrežni kabel iz zidne utičnice i
priključak sa brijaćeg aparata.
C
2 Ostavite aparat uključenim dok se ne
zaustavi, odvijte vijke i otvorite brijaći
aparat.
3 Izvadite bateriju.
Nakon vađenja baterije nemojte priključivati
aparat na napajanje.
Jamstvo i servis
Ako su Vam potrebne određene informacije ili
ako imate problem, posjetite Philipsove Web
stranice na www.philips.com ili kontaktirajte
Philipsov korisnički centar u svojoj zemlji
(telefonski broj ćete naći na globalnom
jamstvenom listu).Ako u Vašoj zamlji ne postoji
HRVATSKI 93

korisnički centar, obratite se lokalnom dobavljaču
Philipsovih proizvoda ili kontaktirajte servis
Philipsovih kućanskih aparata i aparata za osobnu
njegu (Service Depar tment of Philips Domestic
Appliances and Personal Care BV).
U slučaju problema
1 Smanjena učinkovitost
B
Uzrok 1: brijaće glave su prljave.
B
Aparat nije dobri očišćen ili nije čišćen duže
vrijeme.
◗ Očistite aparat temeljito prije nogo nastavite s
brijanjem.Vidi poglavlje " Čišćenje i
održavanje"
B
Uzrok 2: dulje dlačice blokiraju brijaće glave.
◗ Očistite nožiće i vodilice s isporučenom
četkicom.Vidi poglavlje 'Čišćenje i
održaavanje.', sekcija 'Svaka dva mjeseca:
brijaće glave'.
B
Uzrok 3: brijaće glave su oštećene ili istrošene
◗ Zamjenite brijaće glave.Vidi poglavlje
"Zamjena"
2 Aparat ne radi kada je On/Off klizač
pomaknut na poziciju I.
B
Uzrok 1: Baterija je prazna
HRVATSKI94

◗ Napunite bateriju.Vidi "Punjenje"
B
Uzrok 2: Aparat nije priključen na el. struju.
◗ Umetnite mrežni kabel u zidnu utičnicu.
HRVATSKI 95

Tähtis
Enne seadme ühendamist vooluvõrku kontrollige,
kas adapterile märgitud pinge vastab kohalikule
võrgupingele.
◗ Kasutage ainult kaasasolevat toitejuhet.
◗ Ärge kasutage vigastatud toitejuhet.
◗ Kui toitejuhe on vigastatud,vahetage see alati
originaaljuhtme vastu vältimaks ohtlikke
olukordi.
◗ Seade on varustatud automaatse
voolumuunduriga ja on kasutatav
voolutugevusega 100 kuni 240 volti.
◗ Laadige, hoidke ja kasutage seadet
temperatuurilvahemikus 5cC ja 35cC.
◗ Võtke pardel laadimise ajaks vutlarist välja.
C
◗ Hoidke seadet ja toitejuhet veest eemal.
◗ Müra tase: Lc = 62 dB [A]
Laadimine
Kontrollige, et seade oleks väljalülitatud enne kui
hakkate seadet laadima.
Laadimine kestab ligi 8 tundi.
Te võite raseerida ka laadimata pardliga, kui
ühendate selle võrguga.
Ärge jätke seadet vooluvõrku ühendatuks üle 24
tunni.
EESTI96

Laadimise märgutuled
Laadimine
C
◗ Kohe,kui alustate tühja pardli laadimist, sütib
roheline märgutuli.
Seadme laadimine
Laadige seadet, kui mootor seiskub või hakkab
aeglasemalt tööle.
Võtke pardel laadimise ajaks vutlarist välja.
C
1 Ühendage toitejuhtme pistik pardliga.
2 Pange pistik pistikupessa.
3 Akude kasutusea pikendamiseks eemaldage
toitepistik pistikupesast ja tõmmake
seadmepistik aku laadimisajaks pardlist
välja.
Voolutoiteta raseerimisaeg
Täislaetud aku võimaldab ajada habet ilma
toitejuhtmeta umbes 30 minutit.
EESTI 97
CHARGE

Seadme kasutamine
Raseerimine
1 Lükake liuglüliti asendisse I ja lülitage seade
sisse.
C
2 Liigutage pardli pead mööda nahka nii
sirgete, kui ka ringikujuliste liigutustega.
Parima tulemuse saate siis, kui raseerite kuiva
nahka.
Teie nahal võib Philips süsteemiga harjumiseks
kuluda 2-3 nädalat.
3 Lülitage pardel välja, lükates sisse/välja lüliti
asendisse 0.
C
4 Vigastuste vältimiseks pange pardlile pärast
iga kasutuskorda kaitsekaas peale.
Piiramine
Põskhabeme ja vuntside piiramine.
C
1 Avage piirel,lükates plaadikest ülespoole.
Piirel hakkab tööle, kui mootor käib.
Puhastamine ja hooldus
Seadme regulaarne puhastamine tagab parema
raseerimistulemuse.
EESTI98

Iga päev: pardlipea ja karvakamber
1 Lülitage pardel välja, eemaldage pistik
pistikupesast ja tõmmake seadmepistik
pardlist välja.
C
2 Puhastage kaasapandud harjaga kõigepealt
seadme ots.
C
3 Vajutage vabastusnuppu (1) ja eemaldage
pardlipea (2).
C
4 Harjake pardlipead ja karvakambrit
seestpoolt.
C
5 Pange pardlipea pardlile tagasi.
Piirel
1 Lülitage pardel välja, eemaldage pistik
pistikupesast ja tõmmake seadmepistik
pardlist välja.
C
2 Vajutage vabastusnuppu (1) ja eemaldage
pardlipea (2).
EESTI 99

C
3 Keerake ratast vastupäeva (1) ja eemaldage
tugiraam (2).
C
4 Puhastamiseks eemaldage vaid üks lõikepea
(lõiketera ja teravõre) korraga.
Ärge ajage terade ja kaitsete komplekte segamini.
Optimaalse raseerimistulemuse tagamiseks on
tähtis, et iga tera toetub oma vastavale kaitsele.
Kui Te ajate komplektid juhuslikult segamini, võib
kuluda mitu nädalat, kuni saavutate taas
optimaalse raseerimistulemuse.
C
5 Harjake tera ettevaatlikult harja lühemate
harjastega poolega.
Harjake ettevaatlikult noole suunas.
C
6 Harjake kaitset.
C
7 Pange pardlipead pardlile tagasi. Pange
tugiraam tagasi lõikepeasse (1) ja keerake
ratast päripäeva (2).
8 Pange pardlipea pardlile tagasi.
B
Süvapuhastamiseks pange pardlipead iga kuue
kuu tagant rasva lahustavasse vedelikku (nt
alkohol). Pardlipeade eemaldamiseks järgige
allpoolkirjeldatud 1. kuni 4. toimingut. Pärast
EESTI100
2
1
1
2

puhastamist määrige kaitsete keskosa sisepinda
tilga masinaõliga, et vältida pardlipeade kulumist.
Piirel
Puhastage piirlit pärast iga kasutamist.
1 Lülitage pardel välja, eemaldage pistik
pistikupesast ja tõmmake seadmepistik
pardlist välja.
C
2 Puhastage piirlit kaasasoleva harjaga.
C
3 Määrige piirli hambaid iga kuue kuu tagant
tilga õmblusmasinaõliga.
Hoidmine
C
◗ Vigastuste vältimiseks pange seadmele
kaitsekaas peale.
◗ Seadet võite hoida kaasasolevas kotis.
Vahetamine
Parima habemeajamistulemuse tagamiseks
vahetage lõikepäid iga kahe aasta tagant.
Vahetage vigastatud või kulunud lõikepead ainult
HQ4« Philips lõikepeade vastu.
EESTI 101

1 Lülitage pardel välja, eemaldage pistik
pistikupesast ja tõmmake seadmepistik
pardlist välja.
C
2 Vajutage vabastusnuppu (1) ja eemaldage
pardlipea (2).
C
3 Keerake ratast vastupäeva (1) ja eemaldage
tugiraam (2).
C
4 Eemaldage lõikepead ja asendage uutega.
C
5 Pange fikseerraam tagasi pardlipeasse (1) ja
keerake ratast päripäeva (2).
6 Pange pardlipea tagasi pardlisse.
Lisavarustus
On võimalik järgmine lisavarustus:
- HQ4« Philips lõikepead,
- HQ110 Philips Head Cleaner (pihustusaine
lõikepeade puhastamiseks),
EESTI102
2
1
1
2
 Loading...