


ENGLISH 4
13
HQ422, HQ420
Important
Read these instructions for use carefully before
using the appliance and save them for future
reference.
◗ Store and use the appliance at a temperature
between 5cC and 35cC.
C
◗ Keep the appliance dry.
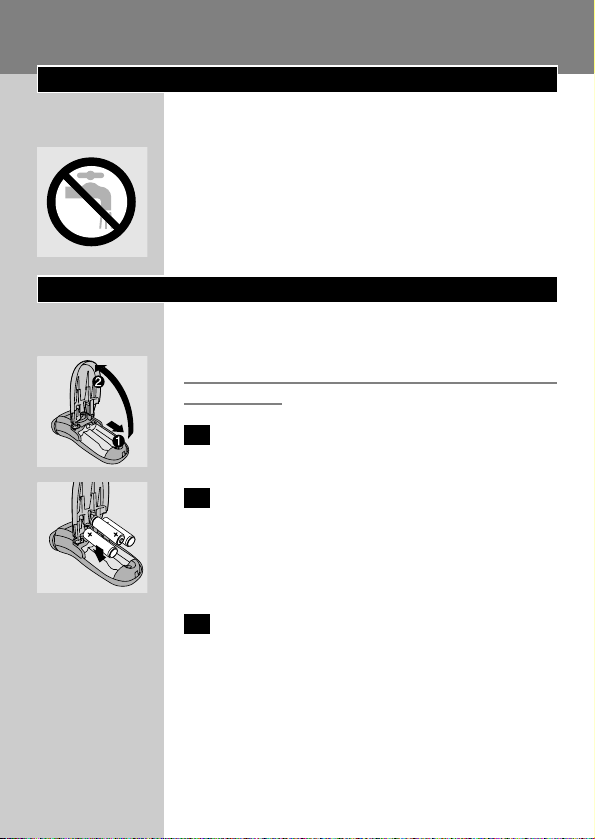
Inserting batteries
The appliance runs on three R6 AA 1.5-volt
batteries. Preferably use Philips alkaline batteries.
Make sure that your hands are dry when inser ting
the batteries.
C
1 Slide the lid of the battery compartment
backwards (1) and open it (2).
C
2 Put three batteries in the battery
compartment.
Make sure the + and - indications on the
batteries match the indications in the battery
compartment.
3 Push the lid of the battery compartment
down onto the appliance and slide it
upwards to close it.
◗ To avoid damage due to battery leakage:
- do not expose the appliance to temperatures
higher than 35cC;
- remove the batteries if the appliance is not
going to be used for a month or more;
ENGLISH4

- do not leave empty batteries in the appliance.
Shaving time
Three new batteries offer a shaving time of
60 minutes.
Using the appliance
Shaving
C
1 Switch the appliance on by pressing the
switch lock (1) and pushing the on/off slide
upwards (2).
B
The switch lock prevents accidental switching on of
the appliance.
C
2 Move the shaving heads quickly over your
skin, making both straight and circular
movements.
Shaving on a dry face gives the best results.
Your skin may need 2 or 3 weeks to get
accustomed to the Philips shaving system.
3 Switch the shaver off by pushing the on/off
slide downwards.
C
4 Put the protection cap on the shaver every
time you have used it, to prevent damage.
ENGLISH 5
Trimming (HQ422 only)
For grooming sideburns and moustache.
C
1 Open the trimmer by pushing the slide
upwards.
The trimmer can be activated while the motor is
running.
Cleaning and maintenance
Regular cleaning guarantees better shaving
performance.
C
◗ For easy and optimal cleaning, the Philips
Action Clean (shaving head cleaner, type
HQ100) is available.Ask your Philips dealer
for information.
B
The Philips Action Clean may not be available in
all countries. Contact the Customer Care Centre in
your country about the availability of this
accessory.
You can also clean the shaver in the following
way:
Every week: shaving unit and hair chamber
1 Switch the shaver off.
C
2 Clean the top of the appliance first, using
the brush supplied.
ENGLISH6

C
3 Press the release button (1) and remove
the shaving unit (2).
C
4 Clean the inside of the shaving unit and the
hair chamber with the brush.
C
5 Put the shaving unit back onto the shaver.
Every two months: shaving heads
1 Switch the shaver off.
C
2 Press the release button (1) and remove
the shaving unit (2).
C
3 Remove the retaining frame by pushing the
sides of the central spring towards each
other (1) and lifting the retaining frame out
of the shaving unit (2).
ENGLISH 7
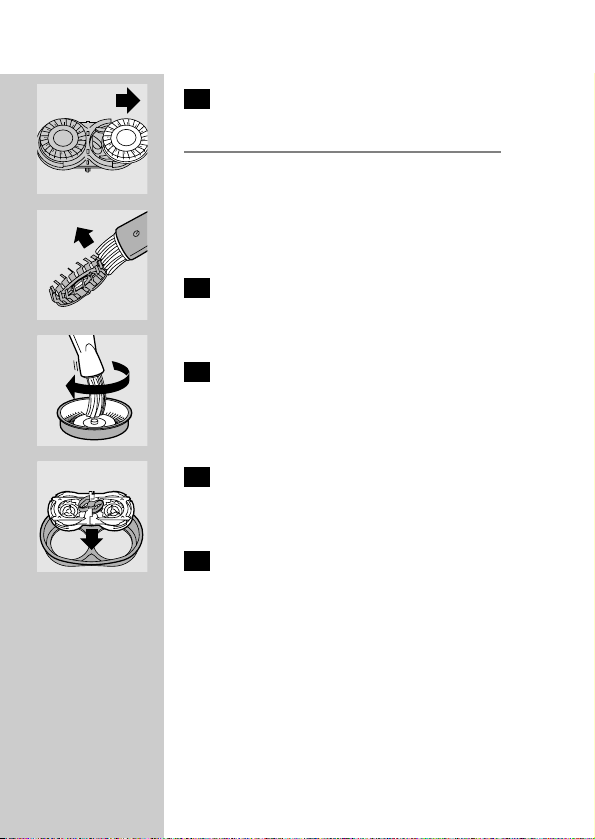
C
4 Slide the shaving heads out of the retaining
frame and clean them one by one.
Do not mix up the cutters and the guards.
This is essential since each cutter has been
ground with its corresponding guard for optimal
performance. If you accidentally mix the sets up, it
could take several weeks before optimal shaving
performance is restored.
C
5 Clean the cutter with the short-bristled
side of the brush.
Brush carefully in the direction of the arrow.
C
6 Brush the guard.
C
7 Slide the shaving heads back into the
retaining frame and put the retaining frame
back into the shaving unit.
8 Put the shaving unit back onto the shaver.
For extra thorough cleaning, clean the shaving
heads by putting them in a degreasing liquid (e.g.
alcohol) every six months.To remove the shaving
heads, follow steps 1 to 4 described above. After
cleaning, lubricate the central point on the inside
of the guards with a drop of sewing machine oil
to prevent wear of the shaving heads.
ENGLISH8
Trimmer (HQ422 only)
Clean the trimmer every time you have used it.
1 Switch the shaver off.
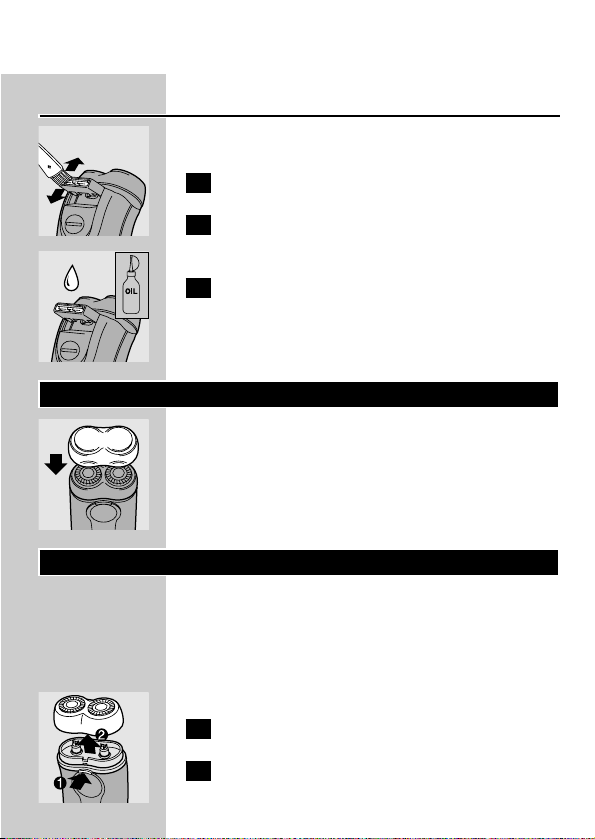
C
2 Clean the trimmer with the brush
supplied.
C
3 Lubricate the trimmer teeth with a drop
of sewing machine oil every six months.
Storage
C
◗ Put the protection cap on the shaver to
prevent damage.
◗ HQ422 only:
The appliance can be stored in the pouch
supplied.
Replacement
Replace the shaving heads every two years for
optimal shaving results.
Replace damaged or worn shaving heads with
HQ4« Philips shaving heads only.
1 Switch the shaver off.
C
2 Press the release button (1) and remove
the shaving unit (2).
ENGLISH 9

C
3 Remove the retaining frame by pushing the
sides of the central spring towards each
other (1) and lifting the retaining frame out
of the shaving unit (2).
C
4 Slide the shaving heads out of the retaining
frame.
C
5 Slide new shaving heads into the retaining
frame.
C
6 Put the retaining frame back into the
shaving unit.
7 Put the shaving unit back onto the shaver.
Accessories
The following accessories are available:
- HQ4« Philips shaving heads.
- HQ100 Philips Action Clean
(shaving head cleaner).
- HQ101 Philips Action Clean refill
(shaving head cleaning liquid).
- HQ110 Philips shaving head cleaner
(shaving head cleaning spray).
ENGLISH10

Environment
Batteries contain substances that may pollute the
environment.
Do not throw batteries away with the normal
household waste, but hand them in at an official
collection point.
Guarantee & service
If you need information or if you have a problem,
please visit the Philips website at www.philips.com
or contact the Philips Customer Care Centre in
your country (you will find its phone number in
the worldwide guarantee leaflet). If there is no
Customer Care Centre in your country, turn to
your local Philips dealer or contact the Service
Department of Philips Domestic Appliances and
Personal Care BV.
Troubleshooting
1 Reduced shaving performance
B
Cause 1: the shaving heads are dirty.
B
The shaver has not been cleaned well enough or
has not been cleaned for a long time.
◗ Clean the shaver thoroughly before you
continue shaving. See chapter 'Cleaning and
maintenance'.
B
Cause 2: long hairs are obstructing the shaving
heads.
ENGLISH 11

◗ Clean the cutters and guards with the brush
supplied. See chapter 'Cleaning and
maintenance', section 'Every two months:
shaving heads'.
B
Cause 3: the shaving heads are damaged or worn.
Replace the shaving heads. See chapter
'Replacement'.
2 The shaver does not work when the on/off
slide is pushed upwards.
B
Cause 1: the batteries are empty
◗ Replace the batteries. See chapter 'Inserting
batteries'.
ENGLISH12

◗
c c
C
◗
C
1
C
2
3
◗
13

14
C
1
B
C
2
3
C
4
C
1

C
◗
B
1
C
2
C
3
C
4
15

16
C
5
1
C
2
C
3
C
4
C
5

17
C
6
C
7
8
1
C
2
C
3

C
◗
◗
«
1
C
2
C
3
C
4
18

19
C
5
C
6
7
«

20
1
B
B
◗
B
◗
B
2
B
◗

21

22
4222 002 42313
 Loading...