


HP8350/00
2

3
D
F
G
B
C
E
A
1

4

HP8350/00
ENGLISH 6
DEUTSCH 13
ESPAÑOL 21
FRANÇAIS 28
ITALIANO 36
NEDERLANDS 44
PORTUGUÊS 51

6
Introduction
Congratulations on your purchase and welcome to Philips! To fully benet
from the support that Philips offers, register your product at www.philips.
com/welcome.
The new Philips SalonStraight XL straightener provides great results in
less time. The professional styling temperature combined with ceramiccoated plates give you perfect long-lasting straight results.
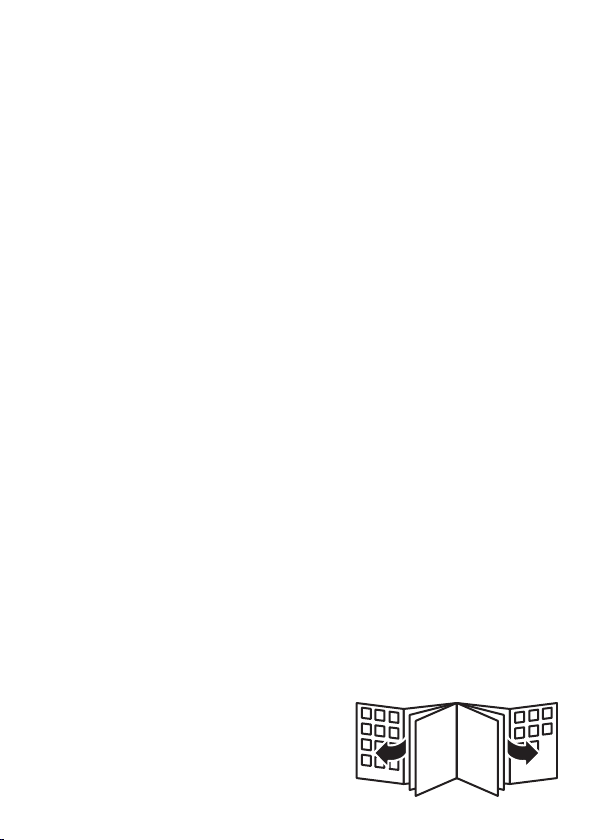
General description (Fig. 1)
A Ceramic-coated plates
B + button to increase the temperature setting
C - button to decrease the temperature setting
D On/off slide switch
E Locking slide
F Hanging loop
G Digital LCD display with temperature setting, ‘READY’ indication and
automatic shut-off indication
Heat-resistant pouch (not shown)
Important
Read this user manual carefully before you use the appliance and save it
for future reference.
Warning
Do not use this appliance near water. Do not use this appliance near
bathtubs, showers, basins or other vessels containing water (Fig. 2).
When you use the appliance in a bathroom, unplug it after use. The
proximity of water presents a risk, even when the appliance is
switched off.
Check if the voltage indicated on the appliance corresponds to the
local mains voltage before you connect the appliance.
Check the condition of the mains cord regularly. Do not use the
appliance if the plug, the mains cord or the appliance itself is damaged.
-
-
-
-
-
ENGLISH

If the mains cord is damaged, you must have it replaced by Philips, a
service centre authorised by Philips or similarly qualied persons in
order to avoid a hazard.
This appliance is not intended for use by persons (including children)
with reduced physical, sensory or mental capabilities, or lack of
experience and knowledge, unless they have been given supervision
or instruction concerning use of the appliance by a person
responsible for their safety.
Children should be supervised to ensure that they do not play with
the appliance.
Keep the appliance away from non-heat-resistant surfaces and never
cover the appliance with anything (e.g. a towel or clothing) when it is
hot.
Keep the appliance away from ammable items.
Never leave the appliance unattended when it is plugged in.
Caution
For additional protection, we advise you to install a residual current
device (RCD) in the electrical circuit that supplies the bathroom. This
RCD must have a rated residual operating current not higher than
30mA. Ask your installer for advice.
The straightening plates and the plastic parts near the plates reach a
high temperature quickly. Prevent the hot surfaces of the appliance
from coming into contact with your skin.
The maximum temperature occurs just after heating up. The actual
temperature during use may be lower.
Always unplug the appliance after use.
For safety reasons, the straightener automatically switches off after
having been on for 1 hour.
Wait until the appliance has cooled down before you store it.
Always switch off the appliance before you put it down, even if it is
only for a moment.
Do not leave the plates in your hair for more than a few seconds at a
time, as this may cause damage to your hair.
Do not wind the mains cord round the appliance.
Only use the appliance on dry hair.
Do not use the appliance on articial hair.
-
-
-
-
-
-
-
-
-
-
-
-
-
-
-
-
-
ENGLISH 7

Do not use the appliance for any other purpose than described in
this manual.
Keep the straightening plates clean and free of dust, dirt and styling
products such as mousse, spray and gel, for a perfect straightening
result.
The plates have a nano-diamond ceramic coating. This coating slowly
wears away over time. This does not affect the performance of the
appliance.
If you use the appliance on colour-treated hair, the straightening plates
may stain.
Never use any accessories or parts from other manufacturers or that
Philips does not specically recommend. If you use such accessories
or parts, your guarantee becomes invalid.
Electromagnetic elds (EMF)
This Philips appliance complies with all standards regarding
electromagnetic elds (EMF). If handled properly and according to the
instructions in this user manual, the appliance is safe to use based on
scientic evidence available today.
Using the appliance
Straighteners are powerful styling tools and must always be used with
care. As with all straighteners that reach salon-high temperatures, do not
use the appliance frequently to avoid damage to the hair.
If you use the straightener incorrectly or at a wrong temperature setting,
you could overheat your hair or even burn it. Always make sure you
select a temperature setting that is suitable for your hair type.
Note: Make sure your hair is completely dry before you straighten it.
Straightening
1 Put the plug in the wall socket.
2 Lock the straightening plates if you want the straightening plates to
heat up more quickly (Fig. 3).
To lock the straightening plates, press the plates together and push the
locking slide downwards.
-
-
-
-
-
ENGLISH8

3 Set the on/off slide switch to ‘I’ to switch on the appliance (Fig. 4).
The default temperature setting of 120 appears on the display. As
soon as the appliance has heated up to this setting, the word
‘READY’ appears on the display (Fig. 5).
Never leave the appliance unattended when it is plugged in. Always put
the appliance on a heat-resistant surface when it is heating up and
when it is hot.
For safety reasons, the straightener automatically switches off after
having been on for 1 hour.
4 Select a temperature setting (120 to 220) that is suitable for your
hair type.
Always select a low setting when you use the straightener for the rst
time.
For coarse, curly or hard-to-straighten hair, select a medium to high
setting (170 and up).
For ne, medium-textured or softly waved hair, select a medium to
low setting (160 and below).
Note: Take extra care with pale, blonde, bleached or colour-treated hair, since
it is susceptible to damage at high temperatures.
5 Use the + and - buttons to set the appropriate temperature
setting. (Fig. 6)
The display shows the selected temperature setting.
When the appliance has heated up to the selected setting, the word
‘READY’ appears on the display.
The bars on the display show the remaining usage time of the
appliance. The total usage time is 60 minutes. Every ten minutes,
one of the six bars disappears. After 60 minutes, the appliance
switches off automatically.
6 Comb or brush your hair so that it is disentangled and
smooth. (Fig. 7)
7 Use a comb to divide the hair into sections. Do not put too much
hair in one section.
,
-
-
-
,
,
,
ENGLISH 9
Note: It is better to section off the crown area and to straighten the hair
underneath rst. Then straighten the top area.
8 If the straightening plates are locked, push the locking slide upwards
to unlock them (Fig. 8).
9 Take a section that is not wider than 5cm. Place it between the
straightening plates and press the handles of the appliance rmly
together.
10 Slide the straightener down the length of the hair in 5 seconds,
from root to hair end, without stopping to prevent
overheating (Fig. 9).
Tip: If you want to create icks, straighten the lock and turn the
straightener a half-circle inwards (or outwards) when you get to the end of
the lock. Hold the straightener in this position for 2 to 3 seconds and then
release the lock (Fig. 10).
11 Repeat this process after 20 seconds until you have achieved the
desired look.
12 Let your hair cool down. Do not comb or brush it before it has
cooled down, as this would ruin the hairstyle you have just created.
Cleaning
Never immerse the appliance in water or any other liquid, nor rinse it
under the tap.
1 Switch off the appliance and unplug it.
2 Let the appliance cool down completely on a heat-resistant surface.
3 Clean the appliance with a damp cloth.
Note: Make sure the appliance is completely dry before you use or store it.
Storage
Never wind the mains cord round the appliance.
1 Switch off the appliance and unplug it.
ENGLISH10

2 Let the appliance cool down on a heat-resistant surface.
3 Press the straightening plates together and push the locking slide
downwards to lock the plates (Fig. 3).
4 Store the appliance in a safe and dry place. You can also store the
appliance by hanging it from its hanging loop.
Environment
Do not throw away the appliance with the normal household waste
at the end of its life, but hand it in at an ofcial collection point for
recycling. By doing this, you help to preserve the
environment (Fig. 11).
Guarantee & service
If you need service or information or if you have a problem, please visit
the Philips website at www.philips.com or contact the Philips Consumer
Care Centre in your country (you nd its phone number in the
worldwide guarantee leaet). If there is no Consumer Care Centre in
your country, go to your local Philips dealer.
Troubleshooting
This chapter summarises the most common problems you could
encounter with the appliance. If you are unable to solve the problem with
the information below, contact the Philips Consumer Care Centre in your
country.
Problem Possible cause Solution
The
appliance
does not
work.
There is a power
failure or the socket
to which the
appliance is
connected is not live.
Check if the power supply
works. If it does, plug in another
appliance to check whether the
socket is live.
-
ENGLISH 11

Problem Possible cause Solution
You have not
switched on the
appliance.
Set the on/off slide switch to ‘I’
to switch on the appliance.
The
appliance overheated
and switched itself
off.
Unplug the appliance and let it
cool down for a few minutes.
Then set the on/off slide switch
to ‘I’ to switch on the appliance
again.
The mains cord is
damaged
If the mains cord is damaged,
you must have it replaced by
Philips, a service centre
authorised by Philips or similarly
qualied persons in order to
avoid a hazard.
The appliance is not
suitable for the
voltage to which it is
connected.
Make sure that the voltage
indicated on the appliance
corresponds to the local mains
voltage.
ENGLISH12

13
Einführung
Herzlichen Glückwunsch zu Ihrem Kauf und willkommen bei Philips! Um
den Support von Philips optimal nutzen zu können, registrieren Sie Ihr
Produkt bitte unter www.philips.com/welcome.
Mit dem neuen Philips SalonStraight XL Haarglätter erzielen Sie in
kürzester Zeit hervorragende Ergebnisse. Die professionelle
Stylingtemperatur in Kombination mit keramikbeschichteten Platten sorgt
für ein perfektes, lang anhaltendes, glattes Styling.
Allgemeine Beschreibung (Abb. 1)
A Platten mit Keramikbeschichtung
B + Taste zur Erhöhung der Temperatur
C - Taste zur Reduzierung der Temperatur
D Ein-/Ausschalter
E Verriegelungsschalter
F Aufhängeöse
G Digitales LCD-Display mit Temperatureinstellung, “READY”-Anzeige
und Abschaltautomatik-Anzeige
Hitzebeständige Tasche (nicht abgebildet)
Wichtig
Lesen Sie diese Bedienungsanleitung vor dem Gebrauch des Geräts
aufmerksam durch, und bewahren Sie sie für eine spätere Verwendung
auf.
Warnhinweis
Verwenden Sie dieses Gerät niemals in der Nähe von Wasser.
Verwenden Sie dieses Gerät niemals in der Nähe von Badewannen,
Duschen, Becken oder Behältern mit Wasser (Abb. 2).
Wenn Sie das Gerät in einem Bad verwenden, trennen Sie es nach
dem Gebrauch von der Stromversorgung. Die Nähe zum Wasser
stellt ein Risiko dar, sogar wenn das Gerät abgeschaltet ist.
Prüfen Sie, bevor Sie das Gerät in Betrieb nehmen, ob die
Spannungsangabe auf dem Gerät mit der örtlichen Netzspannung
übereinstimmt.
-
-
-
-
DEUTSCH

Überprüfen Sie das Netzkabel regelmäßig auf Unversehrtheit.
Verwenden Sie das Gerät keinesfalls, wenn der Netzstecker, das
Netzkabel oder das Gerät selbst defekt ist.
Ist das Netzkabel defekt, darf es nur von einem Philips Service-Center
oder einer von Philips autorisierten Werkstatt durch ein Original-
Ersatzkabel ausgetauscht werden, um Gefährdungen zu vermeiden.
Dieses Gerät ist für Benutzer (einschl. Kinder) mit eingeschränkten
physischen, sensorischen oder psychischen Fähigkeiten bzw. ohne
jegliche Erfahrung oder Vorwissen nur dann geeignet, wenn eine
angemessene Aufsicht oder ausführliche Anleitung zur Benutzung des
Geräts durch eine verantwortliche Person sichergestellt ist.
Achten Sie darauf, dass Kinder nicht mit dem Gerät spielen.
Halten Sie das Gerät fern von nicht hitzebeständigen Oberächen
und bedecken Sie es nicht (z. B. mit einem Handtuch), solange es heiß
ist.
Halten Sie das Gerät fern von leicht entzündbaren Gegenständen.
Lassen Sie das angeschlossene Gerät niemals unbeaufsichtigt.
Achtung
Der Einbau einer Fehlerstromschutzeinrichtung in dem Stromkreis,
der das Badezimmer versorgt, bietet zusätzlichen Schutz. Dieses
Gerät muss über einen Nennauslösestrom von maximal 30 mA
verfügen. Lassen Sie sich von Ihrem Elektroinstallateur beraten.
Die Glätterplatten und Kunststoffteile um die Platten werden sehr
schnell sehr heiß. Vermeiden Sie daher direkten Hautkontakt mit den
heißen Flächen.
Die Höchsttemperatur wird direkt nach dem Aufheizen erreicht. Die
tatsächliche Temperatur während des Gebrauchs kann aber niedriger
sein.
Ziehen Sie nach jedem Gebrauch den Netzstecker aus der Steckdose.
Aus Sicherheitsgründen schaltet sich der Haarglätter nach 1 Stunde
automatisch aus.
Lassen Sie das Gerät abkühlen, bevor Sie es wegräumen.
Schalten Sie das Gerät immer aus, auch wenn Sie es nur für einen
Augenblick aus der Hand legen.
Lassen Sie die Platten nicht länger als ein paar Sekunden im Haar, da
Ihr Haar andernfalls geschädigt werden kann.
-
-
-
-
-
-
-
-
-
-
-
-
-
-
-
DEUTSCH14

Wickeln Sie das Netzkabel nicht um das Gerät.
Verwenden Sie das Gerät nur bei trockenem Haar.
Verwenden Sie das Gerät nicht zum Trocknen von Kunsthaar.
Verwenden Sie das Gerät nie für andere als in dieser
Bedienungsanleitung beschriebene Zwecke.
Halten Sie die Glätterplatten sauber und frei von Staub, Schmutz
sowie Schaumfestiger, Styling-Spray oder Gel, um eine perfektes
Glättungsergebnis zu erzielen.
Die Platten haben eine Nano-Diamant-Beschichtung, die sich im Laufe
der Zeit langsam abnutzt. Dies beeinträchtigt jedoch nicht die
Funktion des Geräts.
Bei Anwendung in getöntem oder gefärbtem Haar können sich die
Glätterplatten verfärben.
Verwenden Sie keine Zubehörteile anderer Hersteller oder solche,
die von Philips nicht ausdrücklich empfohlen werden. Falls Sie
derartiges Zubehör benutzen, erlischt die Garantie.
Elektromagnetische Felder
Dieses Philips Gerät erfüllt sämtliche Normen bezüglich
elektromagnetischer Felder (EMF). Nach aktuellen wissenschaftlichen
Erkenntnissen ist das Gerät sicher im Gebrauch, sofern es ordnungsgemäß
und entsprechend den Anweisungen in dieser Bedienungsanleitung
gehandhabt wird.
Das Gerät benutzen
Haarglätter sind leistungsstarke Stylinggeräte und sollten stets mit Vorsicht
verwendet werden. Wie für alle Haarglätter, die hohe Temperaturen
erreichen, gilt auch für dieses Gerät: Benutzen Sie es nicht zu häug, um
Haarschäden zu vermeiden.
Wenn Sie den Haarglätter unsachgemäß oder bei zu hohen
Temperaturen verwenden, kann Ihr Haar austrocknen oder sogar
verbrennen. Wählen Sie eine Temperatur aus, die Ihrem Haartyp
entspricht.
Hinweis: Achten Sie darauf, dass Ihr Haar vollständig trocken ist, bevor Sie es
glätten.
-
-
-
-
-
-
-
-
DEUTSCH 15
Glätten
1 Stecken Sie den Stecker in die Steckdose.
2 Um die Aufheizzeit zu verkürzen, drücken Sie die Glätterplatten
zusammen, und schieben Sie den Verriegelungsschalter nach
unten (Abb. 3).
Um die Glätterplatten zu verriegeln, drücken Sie die Platten zusammen,
und schieben Sie den Verriegelungsschalter nach unten.
3 Stellen Sie den Ein-/Ausschalter auf die Position “I”, um das Gerät
einzuschalten (Abb. 4).
Die Standard-Temperatureinstellung von 120 wird auf dem Display
angezeigt. Sobald das Gerät auf diese Temperatur aufgeheizt ist,
wird das Wort ‚READY‘ im Display angezeigt (Abb. 5).
Lassen Sie das angeschlossene Gerät niemals unbeaufsichtigt. Legen Sie
das Gerät während es aufheizt oder solange es heiß ist nur auf
hitzebeständige Oberächen.
Aus Sicherheitsgründen schaltet sich der Haarglätter nach 1 Stunde
automatisch aus.
4 Wählen Sie eine Temperatur (120 bis 220 °C), die Ihrem Haartyp
entspricht:
Wählen Sie beim ersten Gebrauch des Haarglätters immer eine
niedrige Temperatureinstellung.
Wählen Sie für sehr dickes, lockiges und schwer zu glättendes Haar
eine mittlere bis hohe Temperatureinstellung (170 °C oder höher).
Wählen Sie für feines, normales oder leicht welliges Haar eine
mittlere bis niedrige Temperatur (160 °C oder niedriger).
Hinweis: Seien Sie besonders vorsichtig bei hellem, blondem, gebleichtem oder
coloriertem Haar, da dies leichter durch hohe Temperaturen beschädigt wird.
5 Stellen Sie mit den Tasten “+” und “-” die entsprechende
Temperatur ein. (Abb. 6)
Im Display wird die gewählte Temperatureinstellung angezeigt.
Sobald das Gerät auf die gewählte Temperatur aufgeheizt ist, wird
das Wort ‚READY‘ im Display angezeigt.
,
-
-
-
,
,
DEUTSCH16

Die Balken im Display zeigen die verbleibende Anwendungszeit an.
Die Gesamt-Anwendungsdauer beträgt 60 Minuten. Alle zehn
Minuten wird einer der sechs Balken ausgeblendet. Nach
60 Minuten schaltet sich das Gerät automatisch aus.
6 Kämmen oder bürsten Sie Ihr Haar, damit es glatt und locker
fällt. (Abb. 7)
7 Teilen Sie Ihr Haar mit einem Kamm in Strähnen. Erfassen Sie dabei
nicht zu viel Haar in einer Strähne.
Hinweis: Am besten teilen Sie zuerst das Haar oben auf dem Kopf ab und
glätten das Haar darunter. Glätten Sie anschließend die oberen Haarpartien.
8 Sind die Glätterplatten verriegelt, schieben Sie den
Verriegelungsschalter nach oben, um die Verriegelung
aufzuheben (Abb. 8).
9 Nehmen Sie eine höchstens 5 cm breite Haarsträhne, legen Sie sie
zwischen die Platten, und drücken Sie die Griffe fest zusammen.
10 Führen Sie das Gerät innerhalb von 5 Sekunden ohne
Unterbrechung vom Ansatz bis zu den Spitzen, um das Haar vor
Überhitzung zu schützen (Abb. 9).
Tipp: Wenn Sie eine Innen- oder Außenrolle stylen möchten, ziehen Sie die
Strähne glatt, und drehen Sie den Haarglätter in einem Halbkreis nach innen
(oder außen), wenn Sie am Ende der Strähne angekommen sind. Halten Sie
den Haarglätter 2 bis 3 Sekunden in dieser Position, bevor Sie ihn
absetzen (Abb. 10).
11 Wiederholen Sie diesen Vorgang nach 20 Sekunden, bis Sie das
gewünschte Ergebnis erzielt haben.
12 Lassen Sie Ihr Haar abkühlen, bevor Sie es kämmen oder bürsten,
um den soeben erzielten Effekt zu erhalten.
Reinigung
Tauchen Sie das Gerät niemals in Wasser oder andere Flüssigkeiten;
spülen Sie es auch nicht unter ießendem Wasser ab.
,
DEUTSCH 17
1 Schalten Sie das Gerät aus, und ziehen Sie den Netzstecker aus der
Steckdose.
2 Lassen Sie das Gerät auf einer hitzebeständigen Unterlage
vollständig abkühlen.
3 Reinigen Sie das Gerät mit einem feuchten Tuch.
Hinweis: Achten Sie darauf, dass das Gerät vollständig trocken ist, bevor Sie es
benutzen oder verstauen.
Aufbewahrung
Wickeln Sie das Netzkabel nicht um das Gerät.
1 Schalten Sie das Gerät aus, und ziehen Sie den Netzstecker aus der
Steckdose.
2 Lassen Sie das Gerät auf einer hitzebeständigen Unterlage abkühlen.
3 Drücken Sie die Glätterplatten zusammen, und drücken Sie den
Verriegelungsschalter nach unten, um die Platten zu
verriegeln (Abb. 3).
4 Bewahren Sie das Gerät an einem sicheren und trockenen Ort auf.
Sie können das Gerät an der Aufhängeöse aufhängen.
Umweltschutz
Werfen Sie das Gerät am Ende der Lebensdauer nicht in den
normalen Hausmüll. Bringen Sie es zum Recycling zu einer ofziellen
Sammelstelle. Auf diese Weise tragen Sie zum Umweltschutz
bei (Abb. 11).
Garantie und Kundendienst
Benötigen Sie weitere Informationen oder treten Probleme auf, besuchen
Sie bitte die Philips Website (www.philips.com), oder setzen Sie sich mit
einem Philips Service-Center in Ihrem Land in Verbindung
(Telefonnummer siehe Garantieschrift). Sollte es in Ihrem Land kein
Service-Center geben, wenden Sie sich bitte an Ihren Philips Händler.
-
DEUTSCH18

Fehlerbehebung
In diesem Kapitel sind die häugsten Probleme aufgeführt, die beim
Gebrauch Ihres Geräts auftreten können. Sollten Sie ein Problem mithilfe
der nachstehenden Informationen nicht beheben können, wenden Sie
sich bitte an das Philips Service Center in Ihrem Land.
Problem Mögliche Ursache Lösung
Das Gerät
funktioniert
nicht.
Möglicherweise liegt
ein Stromausfall vor
oder die Steckdose,
mit der das Gerät
verbunden ist, führt
keinen Strom.
Überprüfen Sie, ob die
Stromversorgung funktioniert.
Falls dies der Fall ist, schließen Sie
ein anderes Gerät an die
Steckdose an, um zu ermitteln, ob
diese Strom führt.
Sie haben das Gerät
nicht eingeschaltet.
Stellen Sie den Ein-/Ausschalter
auf die Position “I”, um das Gerät
einzuschalten.
Möglicherweise hat
sich das Gerät
wegen Überhitzung
automatisch
ausgeschaltet.
Ziehen Sie den Netzstecker aus
der Steckdose, und lassen Sie das
Gerät einige Minuten abkühlen.
Stellen Sie dann den Ein-/
Ausschalter auf die Position “I”,
um das Gerät wieder
einzuschalten.
Das Netzkabel ist
beschädigt.
Ist das Netzkabel defekt, darf es
nur von einem Philips ServiceCenter oder einer von Philips
autorisierten Werkstatt durch ein
Original-Ersatzkabel ausgetauscht
werden, um Gefährdungen zu
vermeiden.
DEUTSCH 19

Problem Mögliche Ursache Lösung
Möglicherweise ist
das Gerät für die
verfügbare
Netzspannung nicht
geeignet.
Prüfen Sie, ob die
Spannungsangabe auf dem Gerät
mit der örtlichen Netzspannung
übereinstimmt.
DEUTSCH20

21
Introducción
Enhorabuena por la compra de este producto y bienvenido a Philips. Para
sacar el mayor partido de la asistencia que Philips le ofrece, registre su
producto en www.philips.com/welcome.
La nueva plancha para el pelo SalonStraight XL de Philips proporciona
excelentes resultados en menos tiempo. La temperatura de moldeado
profesional, combinada con las placas con revestimiento de cerámica
proporcionan un alisado perfecto y duradero.
Descripción general (g. 1)
A Placas con revestimiento cerámico
B Botón + para aumentar la temperatura
C Botón - para disminuir la temperatura
D Botón de encendido/apagado
E Botón de bloqueo
F Anilla para colgar
G Display LCD digital con ajuste de temperatura, indicador ‘READY’
(listo) e indicador de apagado automático
Funda resistente al calor (no se muestra)
Importante
Antes de usar el aparato, lea atentamente este manual de usuario y
consérvelo por si necesitara consultarlo en el futuro.
Advertencia
No utilice este aparato cerca del agua ni cerca de bañeras, duchas,
cubetas u otros recipientes que contengan agua (g. 2).
Si utiliza el aparato en el cuarto de baño, desenchúfelo después de
usarlo. La proximidad de agua representa un riesgo, aunque el
aparato esté apagado.
Antes de enchufar el aparato, compruebe si el voltaje indicado en el
mismo se corresponde con el voltaje de red local.
Compruebe el estado del cable de alimentación con regularidad. No
utilice el aparato si la clavija, el cable de alimentación o el propio
aparato están dañados.
-
-
-
-
-
ESPAÑOL

Si el cable de alimentación está dañado, debe ser sustituido por
Philips o por un centro de servicio autorizado por Philips, con el n
de evitar situaciones de peligro.
Este aparato no debe ser usado por personas (adultos o niños) con
su capacidad física, psíquica o sensorial reducida, ni por quienes no
tengan los conocimientos y la experiencia necesarios, a menos que
sean supervisados o instruidos acerca del uso del aparato por una
persona responsable de su seguridad.
Asegúrese de que los niños no jueguen con este aparato.
Mantenga el aparato lejos de supercies no resistentes al calor y
nunca cubra el aparato (por ejemplo, con una toalla o ropa) mientras
esté caliente.
Mantenga el aparato lejos de objetos inamables.
No deje nunca el aparato desatendido cuando esté enchufado.
Precaución
Como protección adicional, aconsejamos que instale en el circuito
que suministre electricidad al cuarto de baño un dispositivo de
corriente residual (RCD) con una corriente residual de
funcionamiento que no exceda los 30 mA. Consulte a su electricista.
Las placas alisadoras y las piezas de plástico cercanas a las placas se
calientan mucho rápidamente. Evite que las supercies calientes del
aparato entren en contacto directo con su piel.
La máxima temperatura se alcanza justo después del proceso de
calentamiento. La temperatura real durante el uso puede bajar.
Desenchufe siempre el aparato después de usarlo.
Por motivos de seguridad, la plancha se desconecta automáticamente
tras una hora de funcionamiento.
Espere a que se enfríe el aparato antes de guardarlo.
Apague siempre el aparato cuando lo deje en algún sitio, aunque sólo
sea por un momento.
No deje las placas en contacto con el cabello más de unos pocos
segundos cada vez, ya que podrían dañarlo.
No enrolle el cable de alimentación alrededor del aparato.
Utilice el aparato sólo sobre el pelo seco.
No utilice el aparato sobre cabello articial.
-
-
-
-
-
-
-
-
-
-
-
-
-
-
-
-
-
ESPAÑOL22

No utilice este aparato para otros nes distintos a los descritos en
este manual.
Para conseguir un alisado perfecto, mantenga las placas alisadoras
limpias y sin polvo, suciedad, ni productos de peluquería como
espuma, laca o gel.
Las placas tienen un revestimiento cerámico de diamantes diminutos.
Este revestimiento se desgasta lentamente con el tiempo, aunque
esto no inuye en el rendimiento del aparato.
Si se utiliza el aparato sobre cabello teñido, las placas alisadoras
pueden mancharse.
No utilice nunca accesorios o piezas de otros fabricantes o que no
hayan sido especícamente recomendados por Philips. La garantía
queda anulada si utiliza tales piezas o accesorios.
Campos electromagnéticos (CEM)
Este aparato Philips cumple todos los estándares sobre campos
electromagnéticos (CEM). Si se utiliza correctamente y de acuerdo con
las instrucciones de este manual, el aparato se puede usar de forma
segura según los conocimientos cientícos disponibles hoy en día.
Uso del aparato
Las planchas para el pelo son herramientas potentes y deben utilizarse
con precaución. Al igual que con todas las planchas que alcanzan altas
temperaturas como en la peluquería, no utilice este aparato con
frecuencia para evitar dañar el cabello.
Si utiliza la plancha de forma incorrecta, podría calentar en exceso el
cabello o incluso quemarlo. Asegúrese siempre de seleccionar una
temperatura adecuada para su tipo de cabello.
Nota: Asegúrese de tener el pelo seco antes de plancharlo.
Alisado
1 Enchufe el aparato a la red.
2 Bloquee las placas alisadoras para que se calienten más
rápido (g. 3).
-
-
-
-
-
ESPAÑOL 23

Para bloquear las placas alisadoras, júntelas y deslice el botón de bloqueo
hacia abajo.
3 Para encender el aparato, coloque el interruptor de encendido/
apagado en la posición ‘I’ (g. 4).
La temperatura predeterminada de 120 aparece en el display. En
cuanto el aparato se calienta y alcanza esta temperatura, la palabra
“READY” (LISTO) aparece en el display (g. 5).
No deje nunca el aparato desatendido cuando esté enchufado. Cuando
el aparato se esté calentando o esté caliente, colóquelo siempre sobre
una supercie resistente al calor.
Por motivos de seguridad, la plancha se desconecta automáticamente
tras una hora de funcionamiento.
4 Seleccione una posición de temperatura (de 120 a 220) que sea
adecuada para su tipo de cabello.
Seleccione siempre una posición de temperatura baja cuando use la
plancha por primera vez.
Para cabello grueso, rizado o difícil de alisar, seleccione una posición
de media a alta (170 o más).
Para cabello no, de textura media o ligeramente ondulado,
seleccione una posición de media a baja (160 o menos).
Nota: Tenga especial cuidado con el cabello claro, rubio, decolorado o teñido,
ya que se puede dañar con temperaturas altas.
5 Utilice los botones + y - para ajustar la temperatura
adecuada. (g. 6)
El display muestra la temperatura seleccionada.
Cuando el aparato ha alcanzado la temperatura seleccionada, la
palabra “READY” (listo) aparece en el display.
Las barras del display muestran el tiempo restante de utilización del
aparato. El tiempo total de utilización es de 60 minutos. Cada diez
minutos una de las seis barras desaparece. Transcurridos los
60 minutos, el aparato se apaga automáticamente.
6 Peine o cepille el cabello para desenredarlo y dejarlo suave. (g. 7)
,
-
-
-
,
,
,
ESPAÑOL24

7 Utilice un peine para dividir el cabello en mechones. No ponga
demasiado cabello en un mechón.
Nota: es mejor separar la parte de la coronilla y alisar primero el cabello de
la parte inferior. A continuación, alise la parte superior.
8 Si las placas alisadoras están bloqueadas, deslice el botón de
bloqueo hacia arriba para desbloquearlas (g. 8).
9 Tome un mechón que no sea más ancho de 5 cm. Colóquelo entre
las placas alisadoras y junte rmemente los mangos del aparato.
10 Deslice la plancha a lo largo del pelo durante 5 segundos, desde la
raíz a las puntas, sin detenerse para evitar que se caliente en
exceso (g. 9).
Consejo: Si desea dar forma a las puntas del cabello, alise el mechón y gire la
plancha media vuelta hacia dentro (o hacia fuera) cuando llegue a la punta
del mechón. Mantenga la plancha en esa posición durante 2 ó 3 segundos y
luego suelte el mechón (g. 10).
11 Repita este proceso después de 20 segundos hasta conseguir el
aspecto deseado.
12 Deje que el cabello se enfríe. No lo peine ni lo cepille hasta que se
haya enfriado, ya que de lo contrario estropearía el peinado que
acaba de crear.
Limpieza
No sumerja nunca el aparato en agua u otros líquidos, ni lo enjuague
bajo el grifo.
1 Apague el aparato y desenchúfelo.
2 Deje enfriar totalmente el aparato sobre una supercie resistente
al calor.
3 Limpie el aparato con un paño húmedo.
Nota: Asegúrese de que el aparato esté completamente seco antes de
utilizarlo o guardarlo.
ESPAÑOL 25

Almacenamiento
No enrolle nunca el cable alrededor del aparato.
1 Apague el aparato y desenchúfelo.
2 Deje enfriar el aparato sobre una supercie resistente al calor.
3 Junte las placas alisadoras y deslice el botón de bloqueo hacia abajo
para bloquearlas (g. 3).
4 Guarde el aparato en un lugar seco y seguro. También puede
guardar el aparato colgándolo por la anilla.
Medio ambiente
Al nal de su vida útil, no tire el aparato junto con la basura normal
del hogar. Llévelo a un punto de recogida ocial para su reciclado. De
esta manera ayudará a conservar el medio ambiente (g. 11).
Garantía y servicio
Si necesita información o si tiene algún problema, visite la página Web de
Philips en www.philips.com, o póngase en contacto con el Servicio de
Atención al Cliente de Philips en su país (hallará el número de teléfono
en el folleto de la garantía mundial). Si no hay Servicio de Atención al
Cliente de Philips en su país, diríjase a su distribuidor local Philips.
Guía de resolución de problemas
En este capítulo se resumen los problemas más frecuentes que pueden
surgir. Si no puede resolver el problema con la siguiente información,
póngase en contacto con el Servicio de Atención al Cliente de Philips de
su país.
-
ESPAÑOL26

Problema Posible causa Solución
El aparato
no funciona.
Hay un fallo en el
suministro de energía
o la toma de
corriente a la que se
ha conectado el
aparato no está
activa.
Compruebe si la toma de
corriente funciona. Si es así,
enchufe otro aparato para
comprobar que la toma está
activa.
No ha encendido el
aparato.
Para encender el aparato,
coloque el interruptor de
encendido/apagado en la
posición ‘I’.
El aparato se ha
calentado en exceso
y se ha apagado
automáticamente.
Desenchufe el aparato y deje
que se enfríe durante unos
minutos. Para volver a encender
el aparato, coloque el
interruptor de encendido/
apagado en la posición ‘I’.
El cable de
alimentación está
dañado
Si el cable de alimentación está
dañado, debe ser sustituido por
Philips o por un centro de
servicio autorizado por Philips,
con el n de evitar situaciones
de peligro.
El aparato no es
adecuado para el
voltaje de la red a la
que se ha conectado.
Compruebe que el voltaje
indicado en el aparato se
corresponde con el voltaje de
red local.
ESPAÑOL 27

28
Introduction
Félicitations pour votre achat et bienvenue dans l’univers Philips ! Pour
proter pleinement de l’assistance Philips, enregistrez votre produit sur le
site à l’adresse suivante : www.philips.com/welcome.
Le nouveau lisseur SalonStraight XL de Philips offre des résultats
exceptionnels en un temps record. Grâce à sa température optimale et à
ses plaques en céramique, vous obtiendrez un lissage longue durée de
qualité professionnelle.
Description générale (g. 1)
A Plaques en céramique
B Bouton + pour augmenter la température
C Bouton - pour diminuer la température
D Bouton marche/arrêt
E Verrouillage des plaques
F Anneau de suspension
G Écran LCD numérique avec réglage de température, indicateur
« READY » et indicateur d’arrêt automatique
Trousse thermo-résistante (non illustrée)
Important
Lisez attentivement ce mode d’emploi avant d’utiliser l’appareil et
conservez-le pour un usage ultérieur.
Avertissement
Tenez l’appareil à l’écar t de l’eau. Ne l’utilisez pas près d’une
baignoire, d’une douche, d’un lavabo ni de tout autre récipient
contenant de l’eau (g. 2).
Si vous utilisez l’appareil dans la salle de bain, débranchez-le après
usage car la proximité de l’eau peut présenter un risque pour
l’utilisateur même si l’appareil est éteint.
Avant de brancher l’appareil, vériez que la tension indiquée sur
l’appareil correspond à la tension secteur locale.
-
-
-
-
FRANÇAIS

Vériez régulièrement le cordon d’alimentation. N’utilisez jamais
l’appareil si la che, le cordon d’alimentation ou l’appareil lui-même
est endommagé.
Si le cordon d’alimentation est endommagé, il doit être remplacé
par Philips, un Centre Service Agréé Philips ou un technicien qualié
an d’éviter tout accident.
Cet appareil n’est pas destiné à être utilisé par des personnes
(notamment des enfants) dont les capacités physiques, sensorielles ou
intellectuelles sont réduites, ou par des personnes manquant
d’expérience ou de connaissances, à moins que celles-ci ne soient
sous surveillance ou qu’elles n’aient reçu des instructions quant à
l’utilisation de l’appareil par une personne responsable de leur
sécurité.
Veillez à ce que les enfants ne puissent pas jouer avec l’appareil.
Ne posez pas l’appareil sur des surfaces sensibles à la chaleur et ne le
couvrez jamais (par exemple, d’une serviette ou d’un vêtement)
lorsqu’il est chaud.
Ne laissez pas l’appareil à proximité d’objets inammables.
Ne laissez jamais l’appareil branché sans surveillance.
Attention
Pour plus de sécurité, il est conseillé de brancher l’appareil sur une
prise de courant protégée par un disjoncteur différentiel de 30 mA
dans la salle de bains. Demandez conseil à votre électricien.
Les plaques lissantes et les éléments en plastique environnants sont
portés rapidement à haute température. Évitez tout contact entre les
surfaces chaudes et votre peau.
La température maximale est atteinte juste après l’opération de
chauffe. La température effective peut diminuer au cours de
l’utilisation.
Débranchez toujours l’appareil après utilisation.
Par mesure de sécurité, le lisseur s’éteint automatiquement au bout
d’une heure.
Attendez que l’appareil ait refroidi avant de le ranger.
Éteignez toujours l’appareil avant de le poser, même pour un court
instant.
-
-
-
-
-
-
-
-
-
-
-
-
-
-
FRANÇAIS 29

Ne laissez pas les plaques plus de quelques secondes consécutives
sur vos cheveux, vous risqueriez de les abîmer.
N’enroulez pas le cordon d’alimentation autour de l’appareil.
Utilisez l’appareil uniquement sur cheveux secs.
N’utilisez pas l’appareil sur cheveux articiels.
N’utilisez pas l’appareil dans un autre but que celui qui est indiqué
dans ce manuel.
Pour obtenir un lissage parfait, les plaques lissantes doivent être
propres et ne comporter aucune trace de poussières, de saletés ou
de produits coiffants tels que mousse, spray et gel.
Le revêtement en céramique nano-diamant des plaques présente une
usure normale au l du temps. Cela n’a aucune incidence sur les
performances de l’appareil.
Si vous utilisez l’appareil sur cheveux colorés, il est possible que les
plaques lissantes se tachent.
N’utilisez jamais d’accessoires, ni de pièces d’autres fabricants ou qui
n’ont pas été spéciquement recommandés par Philips. Votre garantie
ne sera pas valable en cas d’utilisation de tels accessoires ou pièces.
Champs électromagnétiques (CEM)
Cet appareil Philips est conforme à toutes les normes relatives aux
champs électromagnétiques (CEM). Il répond aux règles de sécurité
établies sur la base des connaissances scientiques actuelles s’il est
manipulé correctement et conformément aux instructions de ce mode
d’emploi.
Utilisation de l’appareil
La brosse lissante est un appareil puissant et doit dès lors s’utiliser avec
précaution. Comme tout appareil professionnel atteignant des
températures élevées, il est conseillé de ne pas l’employer trop souvent
pour éviter d’abîmer le cheveu.
Si vous utilisez le lisseur de manière inadaptée ou si vous sélectionnez
une température incorrecte, vous risquez de surchauffer le cheveu, voire
de le brûler. Veillez à toujours sélectionner une température adaptée à
votre type de cheveu.
-
-
-
-
-
-
-
-
-
FRANÇAIS30

Remarque : Assurez-vous que vos cheveux sont bien secs avant de les lisser.
Lissage
1 Branchez le cordon d’alimentation sur la prise secteur.
2 Verrouillez les plaques lissantes si vous souhaitez qu’elles chauffent
plus rapidement (g. 3).
Pour verrouiller les plaques lissantes, pressez-les l’une contre l’autre et
faites coulisser le verrou vers le bas.
3 Positionnez le bouton coulissant marche/arrêt sur la position « I »
pour allumer l’appareil (g. 4).
Le réglage de température par défaut (120) apparaît sur l’écran.
Dès que l’appareil atteint cette température, le mot « READY »
(Prêt) apparaît sur l’écran (g. 5).
Ne laissez jamais l’appareil branché sans surveillance. Posez-le toujours
sur une surface résistante à la chaleur lorsqu’il chauffe ou est à
température.
Par mesure de sécurité, le lisseur s’éteint automatiquement au bout
d’une heure.
4 Choisissez une température (120 à 220 °C) adaptée à votre type
de cheveu.
Sélectionnez toujours le réglage minimum lors de la première
utilisation du lisseur.
Pour les cheveux drus, bouclés ou rebelles, sélectionnez une
température moyenne à élevée (supérieure à 170 °C).
Pour les cheveux ns, de texture moyenne ou légèrement ondulés,
sélectionnez une température moyenne à basse (inférieure à 160 °C).
Remarque : Soyez prudent si vous avez des cheveux clairs, blonds, colorés ou
décolorés car une température élevée peut les abîmer.
5 Utilisez les boutons + et - pour régler la température
appropriée. (g. 6)
L’écran indique la température sélectionnée.
Dès que l’appareil atteint la température demandée, le mot
« READY » (Prêt) apparaît sur l’écran.
,
-
-
-
,
,
FRANÇAIS 31

Les barres qui s’afchent à l’écran indiquent le temps d’utilisation
restant. La durée totale d’utilisation est de 60 minutes, soit
six barres. Une barre disparaît toutes les 10 minutes. Après
60 minutes, l’appareil s’éteint automatiquement.
6 Démêlez vos cheveux au peigne ou à la brosse. (g. 7)
7 Divisez-les en mèches à l’aide d’un peigne. Ne faites pas de mèches
trop épaisses.
Remarque : Commencez par lisser les mèches de la nuque et des côtés, puis
remontez vers le sommet du crâne.
8 Si les plaques lissantes sont verrouillées, faites coulisser le verrou
vers le haut pour les déverrouiller (g. 8).
9 Prenez une mèche de maximum 5 cm de large. Placez-la entre les
plaques lissantes et pressez fermement les poignées de l’appareil
l’une contre l’autre.
10 Faites glisser l’appareil en 5 secondes sur toute la longueur du
cheveu, de la racine à la pointe. N’arrêtez pas votre mouvement
pour éviter de surchauffer les cheveux (g. 9).
Conseil : Pour lisser vos cheveux en mèches, faites un demi-cercle vers
l’intérieur (ou l’extérieur) lorsque vous arrivez vers les pointes. Maintenez le
lisseur dans cette position pendant 2 à 3 secondes, puis relâchez-le (g. 10).
11 Répétez ce geste après 20 secondes jusqu’à ce que vous obteniez
l’effet désiré.
12 Laissez vos cheveux refroidir. Évitez de les peigner ou de les
brosser lorsqu’ils sont chauds ; vous risqueriez de vous décoiffer.
,
FRANÇAIS32

Nettoyage
Ne plongez jamais l’appareil dans l’eau, ni dans d’autres liquides et ne le
rincez pas sous le robinet.
1 Arrêtez l’appareil et débranchez-le.
2 Laissez l’appareil refroidir complètement sur une surface résistante
à la chaleur.
3 Nettoyez l’appareil avec un chiffon humide.
Remarque : Assurez-vous que l’appareil est complètement sec avant de
l’utiliser ou de le ranger.
Rangement
N’enroulez pas le cordon d’alimentation autour de l’appareil.
1 Arrêtez l’appareil et débranchez-le.
2 Laissez l’appareil refroidir sur une surface résistante à la chaleur.
3 Pressez les plaques lissantes l’une contre l’autre et faites coulisser
le verrou vers le bas pour verrouiller les plaques (g. 3).
4 Placez l’appareil dans un endroit sûr et sec. Vous pouvez aussi
ranger l’appareil en l’accrochant par son anneau de suspension.
Environnement
Lorsqu’il ne fonctionnera plus, ne jetez pas l’appareil avec les ordures
ménagères, mais déposez-le à un endroit assigné à cet effet, où il
pourra être recyclé. Vous contribuerez ainsi à la protection de
l’environnement (g. 11).
-
FRANÇAIS 33

Garantie et service
Si vous souhaitez obtenir des informations supplémentaires ou faire
réparer l’appareil, ou si vous rencontrez un problème, rendez-vous sur le
site Web de Philips à l’adresse www.philips.com ou contactez le
Service Consommateurs Philips de votre pays (vous trouverez le numéro
de téléphone correspondant sur le dépliant de garantie internationale).
S’il n’existe pas de Service Consommateurs Philips dans votre pays,
renseignez-vous auprès de votre revendeur Philips local.
Dépannage
Cette rubrique présente les problèmes les plus courants que vous
pouvez rencontrer avec l’appareil. Si vous ne parvenez pas à résoudre un
problème à l’aide des informations ci-dessous, contactez le
Service Consommateurs Philips de votre pays.
Problème Cause possible Solution
L’appareil ne
fonctionne
pas.
L’alimentation électrique
ne fonctionne peut-être
pas ou la prise sur
laquelle l’appareil est
branché n’est peut-être
pas alimentée.
Vériez si l’alimentation
électrique fonctionne en
branchant un autre appareil
sur la prise.
Vous n’avez pas allumé
l’appareil.
Positionnez le bouton
marche/arrêt sur la position
« I » pour allumer l’appareil.
L’appareil était en
surchauffe et s’est arrêté
automatiquement.
Débranchez l’appareil et
laissez-le refroidir pendant
quelques minutes. Puis,
positionnez le bouton
marche/arrêt sur « I » pour
rallumer l’appareil.
FRANÇAIS34

Problème Cause possible Solution
Le cordon d’alimentation
est endommagé.
Si le cordon d’alimentation
est endommagé, il doit être
remplacé par Philips, un
Centre Service Agréé Philips
ou un technicien qualié an
d’éviter tout accident.
La tension nominale de
l’appareil ne correspond
peut-être pas à la tension
secteur.
Assurez-vous que la tension
indiquée sur l’appareil
correspond bien à la tension
secteur locale.
FRANÇAIS 35

36
Introduzione
Congratulazioni per l’acquisto e benvenuti in Philips! Per trarre il massimo
vantaggio dall’assistenza Philips, registrate il vostro prodotto su www.
philips.com/welcome.
La nuova piastra per capelli Philips SalonStraight XL consente di ottenere
risultati ottimali in meno tempo. La temperatura professionale insieme alle
piastre in ceramica vi permette di ottenere capelli lisci e perfetti più a
lungo.
Descrizione generale (g. 1)
A Piastre rivestite di ceramica
B Pulsante “+” per aumentare la temperatura
C Pulsante “-” per diminuire la temperatura
D Interruttore on/off
E Blocco a scorrimento
F Gancio
G Display LCD digitale con impostazione della temperatura, indicazione
“READY” e spia di spegnimento automatico
Custodia termoresistente (non in gura)
Importante
Prima di utilizzare l’apparecchio, leggete attentamente il presente manuale
e conservatelo per eventuali riferimenti futuri.
Avvertenza
Non utilizzate l’apparecchio vicino all’acqua. Non utilizzatelo vicino a
vasche da bagno, docce, lavelli o altri recipienti che contengano
acqua (g. 2).
Quando utilizzate l’apparecchio in bagno, scollegatelo dopo l’uso. La
vicinanza dell’acqua rappresenta un rischio anche quando
l’apparecchio è spento.
Prima di collegare l’apparecchio, vericate che la tensione riportata
sulla spina corrisponda alla tensione disponibile.
-
-
-
-
ITALIANO

Vericate periodicamente le condizioni del cavo di alimentazione.
Non utilizzate l’apparecchio nel caso in cui la spina, il cavo di
alimentazione o l’apparecchio stesso siano danneggiati.
Nel caso in cui il cavo di alimentazione fosse danneggiato, dovrà
essere sostituito presso i centri autorizzati Philips, i rivenditori
specializzati oppure da personale debitamente qualicato, per evitare
situazioni pericolose.
L’apparecchio non è destinato a persone (inclusi bambini) con
capacità mentali, siche o sensoriali ridotte, fatti salvi i casi in cui tali
persone abbiano ricevuto assistenza o formazione per l’uso
dell’apparecchio da una persona responsabile della loro sicurezza.
Adottate le dovute precauzioni per evitare che i bambini giochino
con l’apparecchio.
Tenete l’apparecchio lontano dalle superci termosensibili e non
copritelo, ad esempio con asciugamani o indumenti, se ancora caldo.
Tenete l’apparecchio lontano da oggetti o prodotti inammabili.
Non lasciate mai incustodito l’apparecchio mentre è collegato alla
presa di corrente.
Attenzione
Per una maggiore protezione, vi consigliamo di installare sull’impianto
elettrico del bagno un dispositivo di corrente residua (RCD) non
superiore a 30 mA. Per ulteriori suggerimenti, rivolgetevi
all’installatore di ducia.
Le piastre e le parti in plastica in prossimità delle piastre raggiungono
velocemente temperature elevate. Evitate il contatto delle superci
surriscaldate con la pelle.
La temperatura massima viene raggiunta al termine del riscaldamento.
La temperatura effettiva durante l’utilizzo potrebbe essere inferiore.
Scollegate sempre il cavo di alimentazione dopo l’uso.
Per motivi di sicurezza, la piastra per capelli si spegne
automaticamente dopo essere rimasta accesa per un’ora.
Lasciate raffreddare l’apparecchio prima di riporlo.
Spegnete sempre l’apparecchio prima di appoggiarlo, anche se solo
per un istante.
-
-
-
-
-
-
-
-
-
-
-
-
-
-
ITALIANO 37

Utilizzate le piastre per pochi secondi alla volta per evitare di
danneggiare i capelli.
Non avvolgete il cavo di alimentazione attorno all’apparecchio.
Usate l’apparecchio esclusivamente sui capelli asciutti.
Non usate l’apparecchio sui capelli articiali.
Non usate l’apparecchio per scopi diversi da quelli descritti nel
presente manuale.
Fate in modo che le piastre siano sempre pulite e prive di polvere,
sporcizia e residui di prodotti per lo styling come mousse, spray e gel
in modo da ottenere risultati ottimali.
Le piastre sono dotate di un rivestimento in ceramica Nano-
Diamond che si consuma lentamente con il passare del tempo:
questo fenomeno non compromette in alcun modo le prestazioni
dell’apparecchio.
Se utilizzate l’apparecchio per lo styling di capelli trattati con tinture,
le piastre potrebbero macchiarsi.
Non usate mai accessori o parti di altri produttori o non
specicatamente consigliati da Philips. Nel caso in cui utilizziate detti
accessori o parti, la garanzia decade.
Campi elettromagnetici (EMF)
Questo apparecchio Philips è conforme a tutti gli standard relativi ai
campi elettromagnetici (EMF). Se utilizzato in modo
appropriato seguendo le istruzioni contenute nel presente manuale
utente, l’apparecchio consente un utilizzo sicuro come confermato dai
risultati scientici attualmente disponibili.
Modalità d’uso dell’apparecchio
Le piastre per capelli sono strumenti molto potenti e devono essere
utilizzate con la massima cautela. Come per tutte le piastre per capelli in
grado di raggiungere temperature molto elevate, non utilizzare
frequentemente l’apparecchio per evitare di danneggiare i capelli.
Se utilizzate la piastra in modo errato o alla temperatura sbagliata,
potreste surriscaldare i capelli o addirittura bruciarli. Selezionate sempre
una temperatura adatta al vostro tipo di capelli.
-
-
-
-
-
-
-
-
-
ITALIANO38

Nota Assicuratevi che i vostri capelli siano completamente asciutti prima di
lisciarli.
Stiratura
1 Inserite la spina nella presa di corrente a muro.
2 Per riscaldare le piastre più rapidamente, unitele e bloccatele in
posizione (g. 3).
Per bloccarle, unitele e spostate il blocco a scorrimento verso il basso.
3 Per accendere l’apparecchio, impostate l’interruttore on/off su
“I” (g. 4).
Sul display compare l’impostazione di fabbrica: 120. Quando
l’apparecchio raggiunge questa temperatura, compare la parola
“READY” sul display (g. 5).
Non lasciate l’apparecchio incustodito se collegato alla presa di
corrente. Posizionate sempre l’apparecchio su una supercie
termoresistente quando la piastra è in fase di riscaldamento o è ancora
calda.
Per motivi di sicurezza, la piastra per capelli si spegne automaticamente
dopo essere rimasta accesa per un’ora.
4 Selezionate un’impostazione della temperatura (da 120° a 220°)
adatta al vostro tipo di capelli.
Quando utilizzate la piastra per la prima volta, selezionate una
temperatura bassa.
Per capelli ribelli, molto ricci e difcili da stirare, selezionare una
temperatura medio-alta (170 °C o superiore).
Per capelli delicati, sottili o leggermente ondulati, selezionate una
temperatura medio-bassa (160°C o inferiore).
Nota Prestate particolare attenzione nel caso di capelli biondi, decolorati o
trattati, in quanto potrebbero essere particolarmente delicati e rovinarsi con
le alte temperature.
5 Utilizzate i pulsanti + e - per impostare la temperatura
appropriata. (g. 6)
Sul display viene selezionata la temperatura selezionata.
,
-
-
-
,
ITALIANO 39

Una volta che la piastra ha raggiunto la temperatura selezionata, sul
display viene visualizzato il messaggio “READY”.
Le barre sul display indicano il tempo ancora disponibile per usare
l’apparecchio. Il tempo complessivo è di 60 minuti. Ogni dieci
minuti, dal display scompare una delle sei barre. Scaduti i 60 minuti,
l’apparecchio si spegne automaticamente.
6 Pettinate o spazzolate i capelli per eliminare eventuali nodi. (g. 7)
7 Utilizzate un pettine per dividere i capelli in ciocche sottili.
Nota è meglio sollevare le ciocche superiori e stirare per prima cosa i capelli
sottostanti, per poi passare alle ciocche che stanno sopra.
8 Se le piastre sono bloccate, spostate il blocco a scorrimento verso
l’alto (g. 8).
9 Prendete una ciocca di 5 cm di larghezza, posizionatela tra le
piastre e premete energicamente le impugnature dell’apparecchio.
10 Fate scorrere la piastra per 5 secondi per tutta la lunghezza dei
capelli, dalle radici alle punte, senza fermarvi per evitare di
surriscaldare le ciocche (g. 9).
Consiglio Se desiderate arricciare le punte, allungate la ciocca e girate la
piastra di mezzo giro verso l’interno (o verso l’esterno) no alla ne della
ciocca stessa. Lasciate la piastra per 2-3 secondi, quindi lasciate la
ciocca (g. 10).
11 Ripetete questa procedura dopo 20 secondi no a ottenere il
risultato desiderato.
12 Lasciate raffreddare le ciocche. Attendete che i capelli si siano
raffreddati prima di pettinarli o spazzolarli per non rovinare la
pettinatura creata.
,
,
ITALIANO40

Pulizia
Non immergete l’apparecchio nell’acqua o in altri liquidi e non
risciacquatelo sotto l’acqua corrente.
1 Spegnete l’apparecchio e staccate la spina.
2 Lasciate raffreddare completamente l’apparecchio su una supercie
termoresistente.
3 Pulite l’apparecchio con un panno umido.
Nota Assicuratevi che l’apparecchio sia completamente asciutto prima di
utilizzarlo o riporlo.
Conservazione
non avvolgete il cavo di alimentazione attorno all’apparecchio.
1 Spegnete l’apparecchio e staccate la spina.
2 Lasciate raffreddare l’apparecchio su una supercie termoresistente.
3 Unite le piastre e premete il blocco a scorrimento verso il basso
per bloccarle (g. 3).
4 Riponete l’apparecchio in un posto sicuro e asciutto. Potete anche
riporlo appendendolo all’apposito gancio.
Tutela dell’ambiente
Per contribuire alla tutela dell’ambiente, non smaltite
l’apparecchio insieme ai riuti domestici ma consegnatelo a un centro
di raccolta ufciale (g. 11).
Garanzia e assistenza
Per assistenza o informazioni e in caso di problemi, visitate il sito Web
Philips all’indirizzo www.philips.com oppure contattate il Centro
Assistenza Clienti Philips del vostro paese (per conoscere il numero di
telefono consultate l’opuscolo della garanzia). Se nel vostro paese non
esiste un Centro Assistenza Clienti, rivolgetevi al vostro rivenditore Philips.
-
ITALIANO 41

Risoluzione dei guasti
In questo capitolo vengono riportati i problemi più ricorrenti legati all’uso
dell’apparecchio. Se non riuscite a risolvere i problemi con le
informazioni seguenti, vi preghiamo di contattare il Centro Assistenza
Clienti Philips del vostro Paese.
Problema Possibile causa Soluzione
L’apparecchio
non funziona.
È presente una
problema di
alimentazione
oppure la presa
alla quale è
collegato
l’apparecchio non
funziona.
Controllate che l’alimentazione
funzioni correttamente. In tal caso,
collegate un altro apparecchio alla
presa per vericare che sia
alimentata.
L’apparecchio non
è stato acceso.
Per accendere l’apparecchio,
impostate l’interruttore on/off su
“I”.
L’apparecchio
potrebbe essersi
surriscaldato e
quindi potrebbe
essersi spento
automaticamente.
Togliete la spina dalla presa e
lasciate raffreddare l’apparecchio
per alcuni minuti. Successivamente
riaccendete l’apparecchio,
impostando l’interruttore on/off
su “I”.
Il cavo di
alimentazione è
danneggiato.
Nel caso in cui il cavo di
alimentazione fosse danneggiato,
dovrà essere sostituito presso i
centri autorizzati Philips, i
rivenditori specializzati oppure da
personale debitamente qualicato,
per evitare situazioni pericolose.
ITALIANO42

Problema Possibile causa Soluzione
L’apparecchio non
è adatto per il
tipo di tensione a
cui è stato
collegato.
Vericate che la tensione indicata
sull’apparecchio corrisponda a
quella della tensione locale.
ITALIANO 43

44
Inleiding
Gefeliciteerd met uw aankoop en welkom bij Philips! Als u volledig wilt
proteren van de ondersteuning die Philips biedt, registreer uw product
dan op www.philips.com/welcome.
De nieuwe Philips SalonStraight XL-straightener zorgt in een mum van
tijd voor fantastische resultaten. De combinatie van de professionele
stylingtemperatuur en de platen met keramische laag zorgt voor een
langdurig steil kapsel.
Algemene beschrijving (g. 1)
A Platen met keramische laag
B + knop om temperatuurstand te verhogen
C - knop om temperatuurstand te verlagen
D Aan/uitknop
E Vergrendelschuif
F Ophangoog
G Digitaal LCD-display met temperatuurstand, ‘Klaar voor gebruik’-
aanduiding (‘READY’) en aanduiding voor automatische uitschakeling
Hittebestendig etui (niet afgebeeld)
Belangrijk
Lees deze gebruiksaanwijzing zorgvuldig door voordat u het apparaat gaat
gebruiken. Bewaar de gebruiksaanwijzing om deze indien nodig te kunnen
raadplegen.
Waarschuwing
Gebruik dit apparaat niet in de buurt van water. Gebruik dit apparaat
niet in de buurt van een bad, douche, waterbak of andere houders
met water (g. 2).
Als u het apparaat in de badkamer gebruikt, haal de stekker dan na
gebruik altijd uit het stopcontact. De nabijheid van water kan gevaar
opleveren, zelfs als het apparaat is uitgeschakeld.
Controleer of het voltage aangegeven op het apparaat overeenkomt
met de plaatselijke netspanning voordat u het apparaat aansluit.
-
-
-
-
NEDERLANDS

Controleer regelmatig of het netsnoer niet beschadigd is. Gebruik het
apparaat niet indien de stekker, het netsnoer of het apparaat zelf
beschadigd is.
Indien het netsnoer beschadigd is, moet u het laten vervangen door
Philips, een door Philips geautoriseerd servicecentrum of personen
met vergelijkbare kwalicaties om gevaar te voorkomen.
Dit apparaat is niet bedoeld voor gebruik door personen (waaronder
kinderen) met verminderde lichamelijke, zintuiglijke of geestelijke
vermogens, of die gebrek aan ervaring of kennis hebben, tenzij
iemand die verantwoordelijk is voor hun veiligheid toezicht op hen
houdt of hen heeft uitgelegd hoe het apparaat dient te worden
gebruikt.
Houd toezicht op kinderen om te voorkomen dat ze met het
apparaat gaan spelen.
Houd het apparaat uit de buurt van oppervlakken die niet
hittebestendig zijn en dek het apparaat nooit af als het heet is (bijv.
met een handdoek of kleding).
Houd het apparaat uit de buurt van brandbare voorwerpen.
Laat het apparaat nooit onbeheerd achter als het op netspanning is
aangesloten.
Let op
Voor extra veiligheid adviseren we u een aardlekschakelaar te
installeren in de elektrische groep die de badkamer van stroom
voorziet. Deze aardlekschakelaar dient een waarde te hebben die niet
hoger is dan 30 mA. Raadpleeg uw installateur.
De ontkrulplaten en de kunststof delen nabij deze platen worden snel
zeer heet. Voorkom dat de hete oppervlakken van het apparaat in
contact komen met uw huid.
De maximumtemperatuur wordt direct na het opwarmen bereikt.
Tijdens het gebruik kan de temperatuur lager liggen.
Haal na gebruik altijd de stekker uit het stopcontact.
Om veiligheidsredenen schakelt het apparaat automatisch uit nadat
het 1 uur ingeschakeld is geweest.
Wacht met opbergen tot het apparaat is afgekoeld.
Schakel het apparaat uit voordat u het neerlegt, al is het maar voor
even.
-
-
-
-
-
-
-
-
-
-
-
-
-
-
NEDERLANDS 45

Houd de platen per keer nooit langer dan enkele seconden in uw
haar, omdat uw haar anders beschadigd kan raken.
Wikkel het netsnoer niet om het apparaat.
Gebruik het apparaat alleen op droog haar.
Gebruik het apparaat niet op kunsthaar.
Gebruik het apparaat niet voor andere doeleinden dan beschreven in
deze gebruiksaanwijzing.
Houd de ontkrulplaten voor perfecte ontkrulresultaten schoon en vrij
van stof, vuil en stylingproducten zoals mousse, haarlak en gel.
De platen hebben een nanodiamanten keramische laag. In de loop
der tijd slijt deze laag langzaam weg. Dit heeft geen invloed op de
prestaties van het apparaat.
Bij gebruik op gekleurd haar kunnen de ontkrulplaten verkleuren.
Gebruik geen accessoires of onderdelen van andere fabrikanten of
die niet speciek door Philips worden aanbevolen. Als u dergelijke
accessoires of onderdelen gebruikt, vervalt de garantie.
Elektromagnetische velden (EMV)
Dit Philips-apparaat voldoet aan alle richtlijnen met betrekking tot
elektromagnetische velden (EMV). Mits het apparaat op de juiste wijze
en volgens de instructies in deze gebruiksaanwijzing wordt gebruikt, is het
veilig te gebruiken volgens het nu beschikbare wetenschappelijke bewijs.
Het apparaat gebruiken
Straighteners zijn krachtige stylingapparaten en moeten daarom altijd
voorzichtig worden gebruikt. Zoals bij andere straighteners die, net als bij
de kapper, hoge temperaturen bereiken, geldt ook voor dit apparaat dat u
het niet te vaak mag gebruiken om schade aan uw haar te voorkomen.
Gebruikt u de straightener niet op de voorgeschreven manier of kiest u
niet de juiste temperatuur, dan kan dit oververhitting of zelfs verbranding
van het haar tot gevolg hebben. Zorg ervoor dat u altijd een temperatuur
kiest die bij uw haartype past.
Opmerking: Zorg ervoor dat uw haar helemaal droog is voordat u het gaat
ontkrullen.
-
-
-
-
-
-
-
-
-
NEDERLANDS46

Ontkrullen
1 Steek de stekker in het stopcontact.
2 Vergrendel de ontkrulplaten als u wilt dat de ontkrulplaten sneller
opwarmen (g. 3).
Om de ontkrulplaten te vergrendelen, drukt u de platen op elkaar en
duwt u de vergrendelschuif omlaag.
3 Zet de aan/uitknop op ‘I’ om het apparaat in te schakelen (g. 4).
De standaardtemperatuurstand 120 verschijnt op het display. Zodra
het apparaat is opgewarmd, verschijnt het woord ‘READY’ op het
display (g. 5).
Laat het apparaat nooit onbeheerd achter wanneer de stekker in het
stopcontact zit. Plaats het apparaat altijd op een hittebestendig
oppervlak wanneer het apparaat aan het opwarmen is en wanneer het
heet is.
Om veiligheidsredenen schakelt het apparaat automatisch uit nadat het
1 uur ingeschakeld is geweest.
4 Kies een temperatuurstand (120 t/m 220) die bij uw haartype past.
Kies altijd een lage temperatuurstand wanneer u de straightener voor
het eerst gebruikt.
Kies een gemiddelde tot hoge stand (170 of hoger) voor stug,
krullend of moeilijk te ontkrullen haar.
Kies een gemiddelde tot lage stand (160 of lager) voor jn, licht
krullend of golvend haar.
Opmerking: Wees extra voorzichtig met lichtgetint, blond, gebleekt of geverfd
haar, aangezien deze haartypen bij hoge temperaturen gevoelig zijn voor
beschadiging.
5 Gebruik de + en - knoppen om de gewenste temperatuurstand in
te stellen. (g. 6)
Op het display verschijnt de geselecteerde temperatuurstand.
Als het apparaat de gekozen temperatuur heeft bereikt, verschijnt
het woord ‘READY’ op het display.
,
-
-
-
,
,
NEDERLANDS 47

De balkjes op het display tonen de resterende gebruikstijd van de
sessie. De totale gebruikstijd per sessie is 60 minuten. Na iedere
tien minuten verdwijnt een van de zes balkjes. Na 60 minuten
schakelt het apparaat automatisch uit.
6 Kam of borstel uw haar om het te ontwarren en soepel en glad te
maken. (g. 7)
7 Verdeel het haar met een kam in lokken. Maak de lokken niet te dik.
Opmerking: U kunt het beste het haar op de kruin vastzetten en eerst het
onderliggende haar ontkrullen. Ontkrul daarna het bovenste deel.
8 Als de ontkrulplaten zijn vergrendeld, duwt u de vergrendelschuif
omhoog om de platen te ontgrendelen (g. 8).
9 Pak een lok van maximaal 5 cm breed. Plaats de lok tussen de
ontkrulplaten en knijp de handgrepen van het apparaat stevig
samen.
10 Begin bij de wortel en trek de straightener in 5 seconden langs de
lok naar beneden. Houd de straightener nergens stil, om
oververhitting van het haar te voorkomen (g. 9).
Tip Als u slagen in uw haar wilt maken, ontkrul dan de haarlok en draai de
straightener bij het einde van de haarlok een halve slag naar binnen (of naar
buiten). Houd de straightener 2 tot 3 seconden in deze positie en laat de
haarlok vervolgens los (g. 10).
11 Herhaal dit proces na 20 seconden totdat u het gewenste resultaat
hebt bereikt.
12 Laat uw haar afkoelen. Kam of borstel het haar niet voordat het
afgekoeld is, omdat u hierdoor het gecreëerde kapsel zou bederven.
Schoonmaken
Dompel het apparaat nooit in water of een andere vloeistof en spoel
het ook niet af onder de kraan.
1 Schakel het apparaat uit en haal de stekker uit het stopcontact.
,
NEDERLANDS48

2 Laat het apparaat volledig afkoelen op een hittebestendig oppervlak.
3 Maak het apparaat schoon met een vochtige doek.
Opmerking: Zorg ervoor dat het apparaat helemaal droog is voordat u het
gebruikt of opbergt.
Opbergen
Wikkel het netsnoer nooit om het apparaat.
1 Schakel het apparaat uit en haal de stekker uit het stopcontact.
2 Laat het apparaat afkoelen op een hittebestendig oppervlak.
3 Druk de ontkrulplaten op elkaar en duw de vergrendelschuif
omlaag om de platen te vergrendelen (g. 3).
4 Berg het apparaat op een veilige en droge plaats op. U kunt het
apparaat ook opbergen door het aan het ophangoog op te hangen.
Milieu
Gooi het apparaat aan het einde van zijn levensduur niet weg met
het normale huisvuil, maar lever het in op een door de overheid
aangewezen inzamelpunt om het te laten recyclen. Op die manier
levert u een bijdrage aan een schonere leefomgeving (g. 11).
Garantie & service
Als u service of informatie nodig hebt of als u een probleem hebt, bezoek
dan de Philips-website (www.philips.nl), of neem contact op met het
Philips Consumer Care Centre in uw land (u vindt het telefoonnummer
in het ‘worldwide guarantee’-vouwblad). Als er geen Consumer Care
Centre in uw land is, ga dan naar uw Philips-dealer.
Problemen oplossen
Dit hoofdstuk behandelt in het kort de problemen die u tegen kunt
komen tijdens het gebruik van het apparaat. Als u er niet in slaagt het
-
NEDERLANDS 49

probleem op te lossen met behulp van de onderstaande informatie,
neem dan contact op met het Consumer Care Centre in uw land.
Probleem Mogelijke oorzaak Oplossing
Het
apparaat
werkt niet.
Er is een
stroomstoring of
het stopcontact
waarop het
apparaat is
aangesloten werkt
niet.
Controleer of de
stroomvoorziening naar behoren
werkt. Als dit het geval is, sluit dan
een ander apparaat aan om te
controleren of het stopcontact
het doet.
Het apparaat is niet
ingeschakeld.
Zet de aan/uitknop op ‘I’ om het
apparaat in te schakelen.
Het apparaat is
oververhit geraakt
en heeft zichzelf
uitgeschakeld.
Haal de stekker uit het
stopcontact en laat het apparaat
een paar minuten afkoelen. Zet
de aan/uitknop vervolgens op ‘I’
om het apparaat weer in te
schakelen.
Het netsnoer is
beschadigd.
Indien het netsnoer beschadigd is,
moet u het laten vervangen door
Philips, een door Philips
geautoriseerd servicecentrum of
personen met vergelijkbare
kwalicaties om gevaar te
voorkomen.
Het apparaat is niet
geschikt voor de
netspanning waarop
het is aangesloten.
Controleer of het voltage
aangegeven op het apparaat
overeenkomt met de plaatselijke
netspanning.
NEDERLANDS50

51
Introdução
Parabéns pela sua compra e bem-vindo à Philips! Para tirar todo o
partido da assistência fornecida pela Philips, registe o seu produto em
www.philips.com/welcome.
O novo alisador Philips SalonStraight XL proporciona excelentes
resultados em menos tempo. A temperatura de penteados prossionais
combinada com as placas revestidas a cerâmica oferecem resultados
duradouros.
Descrição geral (g. 1)
A Placas com revestimento cerâmico
B Botão + para aumentar a temperatura seleccionada
C Botão - para diminuir a temperatura seleccionada
D Interruptor ligar/desligar
E Bloqueio deslizante
F Argola de suspensão
G Visor LCD digital com regulador de temperatura, indicação “READY”
(pronto) e indicação de desligar automático
Bolsa resistente ao calor (não ilustrada)
Importante
Leia cuidadosamente este manual do utilizador antes de utilizar o
aparelho e guarde-o para consultas futuras.
Aviso
Não utilize este aparelho perto de água. Não utilize este aparelho
perto de banheiras, chuveiros, lavatórios ou outros recipientes que
contenham água (g. 2).
Quando utilizar o aparelho numa casa-de-banho, desligue-o da
corrente eléctrica após a utilização. A proximidade de água
representa um risco, mesmo quando o aparelho está desligado.
Verique se a voltagem indicada no aparelho corresponde à voltagem
eléctrica local antes de o ligar.
-
-
-
-
PORTUGUÊS

Verique regularmente o estado do o de alimentação. Não utilize o
aparelho se a cha, o o de alimentação ou o próprio aparelho
estiverem danicados.
Se o o estiver danicado, deve ser sempre substituído pela Philips,
por um centro de assistência autorizado da Philips ou por pessoal
devidamente qualicado para se evitarem situações de perigo.
Este aparelho não se destina a ser utilizado por pessoas (incluindo
crianças) com capacidades físicas, sensoriais ou mentais reduzidas, ou
com falta de experiência e conhecimentos, salvo se tiverem recebido
supervisão ou instruções sobre o uso do aparelho por alguém
responsável pela sua segurança.
As crianças devem ser supervisionadas para garantir que não brincam
com o aparelho.
Mantenha o aparelho afastado de superfícies que não sejam
resistentes ao calor e nunca cubra o aparelho (por exemplo, uma
toalha ou roupa) quando estiver quente.
Mantenha o aparelho afastado de produtos inamáveis.
Nunca deixe o aparelho sem vigilância quando está ligado à corrente.
Cuidado
Para maior segurança, aconselhamos a instalação de um dispositivo
de corrente residual (disjuntor) no circuito eléctrico que abastece a
casa de banho. Este disjuntor deve ter uma corrente residual nominal
não superior a 30 mA. Aconselhe-se com o seu electricista.
As placas de alisamento e as peças plásticas junto das placas atingem
temperaturas elevadas rapidamente. Evite o contacto entre a
superfície quente do aparelho e a sua pele.
A temperatura máxima é atingida pouco depois do aquecimento. A
temperatura real durante a utilização pode ser mais reduzida.
Desligue sempre da corrente após cada utilização.
Por razões de segurança, o alisador desliga-se automaticamente, após
estar ligado durante 1 hora.
Aguarde que o aparelho arrefeça antes de o guardar.
Desligue sempre o aparelho antes de o pousar, mesmo que seja
apenas por breves instantes.
Não deixe as placas no cabelo durante mais do que alguns segundos
de cada vez, para evitar que o seu cabelo se estrague.
-
-
-
-
-
-
-
-
-
-
-
-
-
-
-
PORTUGUÊS52

Não enrole o o de alimentação à volta do aparelho.
Utilize apenas o aparelho sobre cabelos secos.
Não utilize o aparelho sobre cabelo articial.
Não utilize o aparelho para outro m que não o descrito neste
manual.
Mantenha as placas de alisamento limpas e sem poeiras, sujidade e
produtos para o cabelo, como espuma, spray e gel, para obter
resultados perfeitos.
As placas possuem um revestimento cerâmico de nanodiamente. Este
revestimento desgasta-se lentamente com o passar do tempo, o que
não afecta o desempenho do aparelho.
Se o aparelho for utilizado em cabelos pintados, as placas de
alisamento podem car manchadas.
Nunca utilize quaisquer acessórios ou peças de outros fabricantes ou
que a Philips não tenha especicamente recomendado. Se utilizar tais
acessórios ou peças, a garantia será considerada inválida.
Campos electromagnéticos (EMF)
Este aparelho Philips cumpre com todas as normas correspondentes a
campos electromagnéticos (EMF). Se manuseado correctamente e de
acordo com as instruções fornecidas neste manual do utilizador, o
aparelho pode ser utilizado em segurança com base em provas cientícas
disponíveis actualmente.
Utilizar o aparelho
Os alisadores são ferramentas de pentear potentes e devem ser sempre
utilizados com cuidado. Como todos os alisadores que atingem
temperaturas elevadas, não deve usar este aparelho com muita
frequência para evitar danicar o cabelo.
Se utilizar o alisador de forma incorrecta ou a uma temperatura errada,
pode sobreaquecer o seu cabelo ou até queimá-lo. Certique-se sempre
de que seleccionou uma temperatura adequada para o seu tipo de
cabelo.
Nota: Certique-se de que o seu cabelo está completamente seco antes de o
alisar.
-
-
-
-
-
-
-
-
PORTUGUÊS 53

Alisar
1 Ligue a cha à tomada eléctrica.
2 Feche as placas alisadoras se pretender que aqueçam mais
rapidamente (g. 3).
Para fechar as placas alisadoras, una-as e empurre o bloquei deslizante
para baixo.
3 Regule o botão ligar/desligar para “I” para ligar o aparelho (g. 4).
A temperatura predenida (120 graus) aparece no visor. Assim que
o aparelho atingir essa temperatura, aparece no visor a palavra
“READY” (g. 5).
Nunca deixe o aparelho sem vigilância enquanto está ligado à corrente.
Nunca coloque o aparelho numa superfície que não seja resistente ao
calor, enquanto está a aquecer ou enquanto estiver quente.
Por razões de segurança, o alisador desliga-se automaticamente, após
estar ligado durante 1 hora.
4 Seleccione uma temperatura (120 a 220) adequada ao seu tipo de
cabelo.
Seleccione sempre um nível de temperatura baixo quando utilizar o
alisador pela primeira vez.
Para cabelo grosso, encaracolado ou difícil de alisar, seleccione uma
posição média-alta (170 e superior).
Para cabelo no, de textura intermédia ou ligeiramente ondulado,
seleccione uma posição média-baixa (160 e inferior).
Nota: Tenha um cuidado especial com cabelo esbranquiçado, loiro,
descolorado ou pintado, pois pode danicar-se a temperaturas elevadas.
5 Utilize os botões + e - para denir a temperatura adequada. (g. 6)
O visor mostra a temperatura seleccionada.
Quando o aparelho tiver aquecido até à posição seleccionada, a
palavra “READY” surge no visor.
As barras do visor mostram o tempo que resta de utilização do
aparelho. O tempo de utilização total é de 60 minutos. De dez em
dez minutos uma das seis barras desaparece. Passados 60 minutos,
o aparelho desliga-se automaticamente.
,
-
-
-
,
,
,
PORTUGUÊS54

6 Penteie ou escove o cabelo para o desembaraçar e amaciar. (g. 7)
7 Utilize um pente para dividir o cabelo em madeixas. Não faça
madeixas muito grossas.
Nota: É melhor deixar o alto da cabeça para o m, começar a alisar o cabelo
por baixo e depois alisar o alto da cabeça.
8 Se as placas alisadoras estiverem fechadas, empurre o bloqueio
deslizante para cima para abri-las (g. 8).
9 Não faça madeixas com mais de 5 cm de largura. Coloque a
madeixa entre as placas de alisamento e aperte rmemente as
pegas do aparelho.
10 Faça deslizar o alisador através do comprimento do cabelo em 5
segundos, da raiz até às pontas, sem parar para evitar o
sobreaquecimento (g. 9).
Sugestão: Se deseja criar palas, alise a madeixa de cabelo e rode o alisador
meia volta para dentro (ou para fora) quando chegar à ponta da madeixa.
Segure o alisador durante 2 a 3 segundos e, depois, solte a madeixa (g. 10).
11 Repita este processo passados 20 segundos até obter o efeito
desejado.
12 Deixe o cabelo arrefecer. Não penteie nem escove o cabelo antes
de ter arrefecido para não estragar o efeito que acabou de dar ao
cabelo.
Limpeza
Nunca mergulhe o aparelho em água ou noutro líquido, nem o enxagúe
à torneira.
1 Pare a máquina e desligue-a da corrente.
2 Deixe o aparelho arrefecer por completo sobre uma superfície
resistente ao calor.
3 Limpe o aparelho com um pano húmido.
PORTUGUÊS 55

Nota: Certique-se de que o aparelho está seco antes de o utilizar ou
guardar.
Arrumação
Nunca enrole o o de alimentação à volta do aparelho.
1 Desligue o aparelho e retire a cha da corrente.
2 Deixe o aparelho arrefecer por completo sobre uma superfície
resistente ao calor.
3 Una as placas alisadoras e empurre o bloqueio deslizante para
baixo para fechá-las (g. 3).
4 Guarde o aparelho num local seco e seguro. Também pode guardar
o aparelho pendurando-o pela argola adequada.
Meio ambiente
Não deite fora o aparelho junto com o lixo doméstico normal no
nal da sua vida útil; entregue-o num ponto de recolha ocial para
reciclagem. Ao fazê-lo ajuda a preservar o ambiente (g. 11).
Garantia e assistência
Se necessitar de reparações, informações ou se tiver problemas, visite o
Web site da Philips em www.philips.pt ou contacte o Centro de
Assistência ao Consumidor local (pode encontrar o número de telefone
no folheto de garantia mundial). Se não existir um Centro de Assistência
no seu país, dirija-se ao seu representante Philips local.
Resolução de problemas
Este capítulo resume alguns dos problemas mais comuns que pode
encontrar no aparelho. Se não conseguir resolver o problema através das
indicações dadas a seguir, contacte o Centro de Atendimento ao Cliente
Philips no seu país.
-
PORTUGUÊS56

Problema Causa provável Solução
O aparelho
não
funciona.
Ocorreu uma
falha de corrente
ou a tomada à
qual está ligado o
aparelho não
tem corrente.
Verique se a fonte de
alimentação funciona. Se funcionar,
ligue outro aparelho para vericar se
a tomada tem corrente.
Não ligou o
aparelho.
Regule o botão ligar/desligar para “I”
para ligar o aparelho.
O aparelho
aqueceu
demasiado e
desligou-se.
Desligue o aparelho e permita que
arrefeça durante alguns minutos. Em
seguida, regule o interruptor de ligar/
desligar para a posição ‘I’ para ligar
novamente o aparelho.
O o de
alimentação está
danicado.
Se o o estiver danicado, deve ser
sempre substituído pela Philips, por
um centro de assistência autorizado
da Philips ou por pessoal
devidamente qualicado para se
evitarem situações de perigo.
O aparelho não
é indicado para a
voltagem à qual
está ligado.
Certique-se de que a voltagem
indicada no aparelho corresponde à
voltagem eléctrica local.
PORTUGUÊS 57

58
2 3 4 5
6
7 8 9
10 11

59

4222.002.7391.1www.philips.com
u
 Loading...