

Philips HP6490 User Manual [fi]
Satinelle Massage Premium
HP6490

2
33
A
B
C
E
F
D
G
H
I
J
K
1

4

ENGLISH 6
DANSK 15
DEUTSCH 24
SUOMI 35
FRANÇAIS 44
ITALIANO 54
NEDERLANDS 64
NORSK 74
SVENSKA 83
HP6490

6
ENGLISH
Introduction
With your new Satinelle MASSAGE PREMIUM you can remove
unwanted hairs quickly, easily and effectively. The combination of
the ceramic epilating system with the new active massaging system
constitutes a revolution in epilation. Thanks to the natural numbing effect
of massaging, the new Satinelle MASSAGE PREMIUM makes epilation
more comfortable and less painful than ever. The result is a silky-smooth
skin and a hair growth reduction of up to 50%, assuming you use the
appliance regularly (every 4 weeks).
The rapidly rotating epilating discs catch even the shortest hairs (down to
0.5 millimetre!) and pull them out by the roots. As a result, your skin stays
smooth for up to four weeks and regrowth is soft and downy.
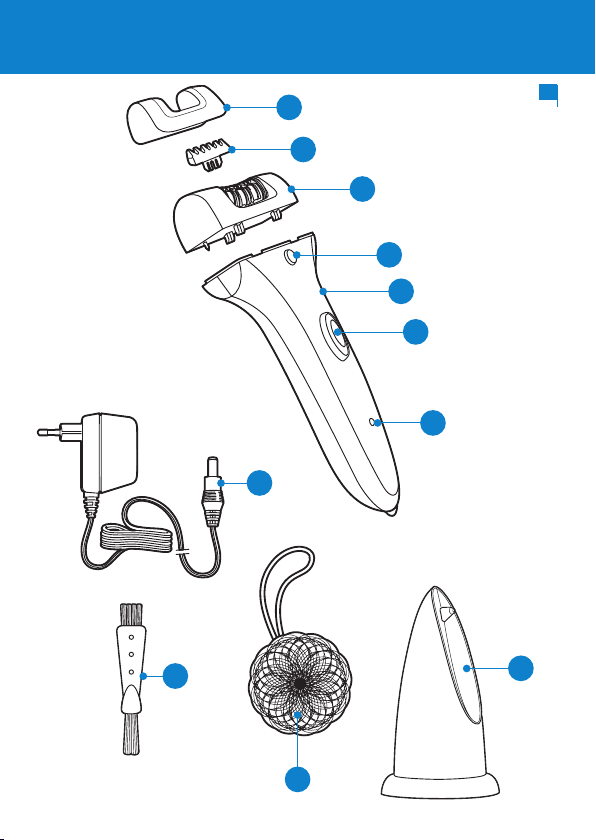
General description (Fig. 1)
A Sensitive area cap
B Massaging element
C Epilating head
D Release button
E Appliance
F On/off button
G Charging light
H Adapter
I Cleaning brush
J Exfoliating body puff
K Stand
Important
Read this user manual carefully before you use the appliance and save it
for future reference.
Check if the voltage indicated on the adapter corresponds to the
,
local mains voltage before you connect the appliance.
Only use the appliance in combination with the adapter supplied.
,
Do not use the appliance if the adapter or the appliance itself is
,
damaged.

ENGLISH 7
If the adapter is damaged, always have it replaced with one of the
,
original type in order to avoid a hazard.
The adapter contains a transformer. Do not cut off the adapter to
,
replace it with another plug, as this causes a hazardous situation.
Keep the appliance and the adapter dry.
,
Keep the appliance out of the reach of children.
,
Do not expose the appliance to temperatures lower than 5°C or
,
higher than 35°C.
To prevent damage and injuries, keep the running appliance away
,
from your scalp hair, eyebrows, eyelashes, clothes, threads, cords,
brushes etc.
The appliance contains two NiMH rechargeable batteries that may
,
harm the environment if not disposed of properly.
Do not use the appliance on irritated skin or skin with varicose
,
veins, rashes, spots, moles (with hairs) or wounds without
consulting your doctor rst. People with a reduced immune
response or people who suffer from diabetes mellitus, Raynaud’s
disease or immunodeciency should contact their doctor rst.
Electromagnetic elds
This Philips appliance complies with all standards regarding
electromagnetic elds (EMF). If handled properly and according to
the instructions in this user manual, the appliance is safe to use based on
scientic evidence available today.
Charging
You can run the appliance directly from the mains or you can use it
without the cord when the batteries have been charged.
Charge the batteries at least 16 hours before you use the appliance for a
cordless operating time of up to 20 minutes.
Do not charge the appliance for more than 24 hours.
1 Make sure the appliance is switched off while charging.
2 Insert the appliance plug into the bottom of the appliance and put
the adapter in the wall socket.

ENGLISH8
The charging light goes on and stays on to indicate that the
,
appliance is charging.
The charging light does not go out or change colour when the
appliance is fully charged.
3 For more convenient charging, you can put the appliance in
the stand (‘click’) (Fig. 2).
Optimising the lifetime of the batteries
After you have charged the appliance for the rst time, do not
recharge it between epilating sessions. Continue to use it and only
recharge it when the batteries are (almost) empty.
Discharge the batteries completely twice a year by letting the motor
run until it stops.
Do not keep the appliance plugged into a wall socket all the time.
If the appliance has not been used for a long time, it must be
recharged for 16 hours.
Using the appliance
General information about epilation
,
Epilation is easier just after a bath or shower. Make sure your skin
is completely dry when you start to epilate.
When you use the appliance for the rst time, we advise you to try
,
it out on an area with only light hair growth. This helps you get
accustomed to the epilation process.
For optimal epilating results, the hairs should not be longer than 10
,
millimetres (Fig. 3)
To epilate longer hairs: (Fig. 3)
,
shorten the hairs to a maximum length of 10mm with a trimmer. In
this case, you can start to epilate right away.
shave the hairs completely. In this case you can start to epilate after a
few days (the hairs must be at least 0.5mm long).
Your skin may become a little red and irritated the rst few times
,
you use the epilator. This phenomenon is absolutely normal
and quickly disappears. As you use the appliance more often, your

ENGLISH 9
skin gets used to epilation, skin irritation decreases and
regrowth becomes thinner and softer. If the irritation has not
disappeared within three days, we advise you to consult a doctor.
We advise you to epilate before you go to bed at night, as
,
this allows any skin irritation that may develop to diminish
overnight.
Corded use
Do not run the appliance from the mains when the batteries are fully
charged.
1 To run the appliance from the mains, switch off the appliance and
connect it to the mains. Wait a few seconds before you switch on
the appliance.
Epilating the legs
Make sure your skin is clean, entirely dry and free from grease. Do not
use any cream before you start to epilate.
1 Select the desired speed to switch on the appliance (Fig. 4).
Select speed I for areas with little hair growth and for areas where bones
are located directly beneath the skin, such as knees and ankles.
Select speed II for larger areas with stronger hair growth.
2 Stretch your skin with your free hand to make the hairs stand
upright.
3 Place the appliance perpendicularly onto the skin with the epilating
head pointing forward. Move the appliance against the direction of
hair growth at a moderate speed. (Fig. 5)
Make sure both the epilating discs and the massaging element are in
proper contact with the skin.
Press the appliance lightly onto the skin.
If you are not completely satised with the epilation result, try
,
moving the epilator more slowly over your skin.

ENGLISH10
Epilating the underarms and bikini line
Your epilator comes with a sensitive area cap that reduces the number of
active epilating discs and stretches the skin during epilation. This makes
the appliance ideal for epilating the more delicate areas of the body, such
as the underarms and bikini line.
Tip: You get the best results when the hairs are not too long.
1 Put the sensitive area cap on the epilating head (Fig. 6).
The sensitive area cap can only be tted onto the appliance in one way.
2 Switch on the appliance. (Fig. 7)
We advise you to select speed II.
3 Stretch the skin with your free hand.
4 Place the appliance perpendicularly onto your skin, with the on/off
slide pointing in the direction in which you are going to move the
appliance (Fig. 5).
5 Move the appliance slowly over the skin, against the direction of
the hair growth (Fig. 5).
Epilate your bikini line as shown in the gure (Fig. 8).
-
Epilate your underarms as shown in the gure (Fig. 9).
-
For a cool sensation, you can dab the area you have just epilated with
a cloth soaked in cold water.
6 Remove the sensitive area cap from the epilator after use (Fig. 10).
Using the exfoliating body puff
Use the exfoliating body puff in the shower.
Regular massages with the puff may help to prevent ingrown hairs.
Do not use the puff immediately before or after epilation.
Cleaning and maintenance
Never rinse the adapter or the appliance itself with water.
Do not use any corrosive detergents, scouring pads or cloths, petrol,
acetone etc. to clean the appliance.

ENGLISH 11
1 Make sure the appliance is switched off and unplugged.
Cleaning the epilating head
Clean the epilating head after every use.
1 Make sure the appliance is switched off and unplugged.
2 Remove the epilating head (Fig. 11).
Press the release button (1) and move the epilating head in the direction
of the arrow (2).
3 Remove the massaging element (Fig. 12).
4 Clean the epilating head, including the epilating discs and the plastic
housing (Fig. 13).
5 You can also rinse the epilating head (not the appliance!) under the
tap to clean it more thoroughly (Fig. 14).
Never try to detach the epilating discs from the epilating head.
6 Reattach the massaging element to the epilating head. Then place
the epilating head on the appliance and press it until it snaps home
(‘click’) (Fig. 15).
The epilating head only ts onto the appliance in one way.
Storage
Store the appliance and the accessories in the pouch.
1
2 You can also store the appliance in the stand (Fig. 2).
Environment
Do not throw away the appliance with the normal household waste
-
at the end of its life, but hand it in at an ofcial collection point for
recycling. By doing this, you help to preserve the
environment (Fig. 16).
The built-in rechargeable batteries contain substances that may
pollute the environment. Always remove the batteries before you
discard and hand in the appliance at an ofcial collection point.
Dispose of the batteries at an ofcial collection point for batteries. If

ENGLISH12
you have trouble removing the batteries, you can also take the
appliance to a Philips service centre. The staff of this centre will
remove the batteries for you and will dispose of them in an
environmentally safe way.
1 Remove the adapter from the wall socket and let the appliance run
until the batteries are empty.
2 Remove the epilating head (Fig. 11).
3 Hold the appliance in your hand and insert a screwdriver into the
opening in the bottom of the epilator (1). Then move the
screwdriver upwards (2) to open the housing (Fig. 17).
4 Pull the two housings halves apart with your thumbs until the snap
connections break (Fig. 18).
5 Remove all components (motor unit and the printed circuit board
unit) from the housing halves.
6 Insert a screwdriver between the plastic battery holder and the
batteries (Fig. 19).
7 Remove the batteries from the plastic battery holder and the
printed circuit board (Fig. 20).
Do not try to reassemble the appliance in order to run it from the
mains. This is dangerous (Fig. 3).
Guarantee & service
If you need information or if you have a problem, please visit the Philips
website at www.philips.com or contact the Philips Customer Care
Centre in your country (you nd its phone number in the worldwide
guarantee leaet). If there is no Customer Care Centre in your country,
go to your local Philips dealer or contact the Service Department of
Philips Domestic Appliances and Personal Care BV.

Troubleshooting
Problem Possible cause Solution
Reduced
epilating
performance.
The appliance
does not
work.
You moved the
epilator in the
wrong direction.
You placed the
epilating head on
the skin at the
wrong angle.
The epilating head
did not touch the
skin.
You moistened
your skin with
water or a cream
or other skincare
product prior to
epilation.
The sensitive area
cap was on the
appliance when you
epilated your legs.
The appliance has
been moved over
the skin too fast.
The batteries are
empty.
Move the appliance against the
direction of hair growth.
Make sure you place the
appliance perpendicularly onto
the skin.
Make sure both the epilating
head and the skin cooler are in
proper contact with your skin
during epilation.
Make sure your skin is entirely
dry and free from grease.
Do not put any cream, body
milk or other skincare product
on your skin before you start to
epilate.
Only use the sensitive area cap
to epilate your underarms and
bikini line.
Move the appliance over the
skin at a moderate speed.
Charge the batteries.
ENGLISH 13

ENGLISH14
Problem Possible cause Solution
Skin irritation
occurs.
It is not
possible to
remove the
epilating head.
The socket to
which the appliance
is connected is not
live.
The appliance is not
switched on.
You did not attach
the epilating
head correctly.
You used the
epilator for the rst
time or after a long
period of disuse.
You have applied
too much pressure
to the appliance
You did not move
the epilating head
in the right
direction.
Make sure the socket you use is
live. If you use a socket in a
bathroom cabinet, you may
need to switch on the light to
activate the socket.
Switch on the appliance.
Place the epilating head on the
appliance and press it onto the
appliance until it snaps home
(‘click’).
Some skin irritation may occur
the rst few times you use the
appliance. This is absolutely
normal and usually disappears
quickly. For tips to reduce skin
irritation, see the rst section of
chapter ‘Using the appliance’.
Also make sure you keep the
epilating head clean.
Do not use any pressure when
moving the appliance over skin
Press the release button and
move the epilating head in the
direction of the arrow (g. 11)
to remove it.

DANSK
Introduktion
Med din nye Satinelle MASSAGE PREMIUM kan du hurtigt og effektivt
fjerne uønsket hårvækst. Kombinationen af det keramiske epileringssystem
med det nye aktive massagesystem udgør en revolution inden for
epilering. Takket være massagens naturligt bedøvende effekt, bliver
epilering med den nye Satinelle MASSAGE PREMIUM mere behagelig og
mindre smertefuld end nogensinde. Resultatet er silkeblød hud og op til
50% nedsat hårvækst, forudsat at du anvender apparatet regelmæssigt
(hver 4. uge).
De hurtigt roterende pincetskiver fanger selv de korteste hår (ned til
0,5 mm!) og trækker dem ud med rod. Huden forbliver glat og blød i op
til 4 uger, og den nye hårvækst er blød og dunet.
Generel beskrivelse (g. 1)
15
A Præcisionskappe til sensitive områder
B Massageelement
C Epilatorhoved
D Udløserknap
E Apparat
F On/Off-knap
G Opladeindikator med lys
H Adapter
I Rensebørste
J ”Body Puff”-eksfolieringssvamp
K Stander
Vigtigt
Læs denne brugsvejledning omhyggeligt igennem, inden apparatet tages i
brug, og gem den til eventuelt senere brug.
Før der sluttes strøm til apparatet, kontrolleres det, om
,
spændingsangivelsen på adapteren svarer til den lokale netspænding.
Brug kun apparatet sammen med den medfølgende adapter.
,
Brug ikke apparatet, hvis adapteren eller selve apparatet er
,
beskadiget.

DANSK16
Hvis adapteren beskadiges, skal den altid udskiftes med en original
,
adapter af samme type for at undgå enhver risiko.
Adapteren indeholder en transformer. Adapteren må ikke klippes af
,
og udskiftes med et andet stik, da dette kan være meget risikabelt.
Både apparat og adapter skal holdes tørre.
,
Hold apparatet uden for børns rækkevidde.
,
Udsæt ikke apparatet for temperaturer under 5°C eller over 35°C.
,
For at undgå skader og uheld, skal apparatet altid holdes i sikker
,
afstand fra hovedhår, øjenbryn, øjenvipper, tøj, snore, ledninger,
børster o.lign., når det er tændt.
Apparatet indeholder to genopladelige NiMH-batterier, som kan
,
være skadelige for miljøet, hvis de ikke bortskaffes på korrekt vis.
Brug aldrig apparatet på irriteret hud eller på hud med åreknuder,
,
udslæt, hudafskrabninger, lipenser, (behårede) modermærker eller
sår uden først at rådføre dig med lægen. Spørg ligeledes lægen til
råds, hvis du har nedsat immunforsvar eller lider af sukkersyge eller
Raynauds syndrom.
Elektromagnetiske felter
Dette Philips-apparat overholder alle standarder for elektromagnetiske
felter (EMF). Ved korrekt anvendelse i overensstemmelse med
instruktionerne i denne brugsvejleding, er apparatet sikkert at anvende,
ifølge den videnskabelige viden, der er tilgængelig i dag.
Opladning
Apparatet kan både anvendes via lysnettet eller uden ledning, når
batterierne er opladede.
Batterierne skal oplades i mindst 16 timer, hvilket giver en ledningsfri
brugstid på op til 20 minutter.
Oplad aldrig apparatet i mere end 24 timer i træk.
1 Apparatet skal være slukket under opladning.
2 Sæt apparatstikket i kontakten i bunden af apparatet, og slut
adapteren til lysnettet.
Opladeindikatoren lyser for at vise, at apparatet oplades.
,

DANSK 17
Opladeindikatoren slukker ikke og skifter ikke farve, når apparatet er
fuldt opladet.
3 Sæt apparatet i standeren (“klik”) for mere praktisk
opladning (g. 2).
Sådan forlænges batteriets levetid
Efter opladning af apparatet første gang skal det ikke genoplades, hver
-
gang det har været i brug. Fortsæt blot med at anvende apparatet, og
vent med at genoplade det, til batterierne er (næsten) tomme.
Aad batteriet helt et par gange om året ved at lade motoren køre,
til den stopper af sig selv.
Lad ikke apparatet være konstant tilsluttet lysnettet.
-
Hvis apparatet ikke har været brugt i en længere periode, skal det
genoplades i 16 timer.
Sådan bruges apparatet
Generel information om epilering
Det er lettest at bruge epilatoren lige efter et kar- eller brusebad,
,
men huden skal være helt tør, inden du starter.
Første gang apparatet bruges, anbefales det at begynde et sted med
,
let hårvækst. På denne måde vænner du dig gradvist til epileringen.
For at opnå det bedste epileringsresultat må hårene ikke være
,
længere end 10 mm (g. 3)
Epilering af længere hår: (g. 3)
,
Afkort hårene til maks. 10 mm med en trimmer. Herefter kan du
-
påbegynde epileringen.
Barbér hårene helt af. Herefter kan du påbegynde epilering efter et
-
par dage (hårene skal mindst være 0,5 mm lange).
Huden bliver måske lidt rød og irriteret de første par gange
,
epilatoren anvendes. Dette er helt normalt og vil hurtigt forsvinde.
Efterhånden som huden vænner sig til behandlingen, bliver den
mindre irriteret og hårene, der gror ud igen, vil være blødere og
tyndere. Hvis en eventuel hudirritation ikke er forsvundet efter
3 dage, bør du kontakte lægen.

DANSK18
Vi anbefaler, at du bruger epilatoren, før du går i seng om aftenen,
,
så eventuel hudirritation har tid til at dæmpes i løbet af natten.
Brug med ledning
Brug ikke apparatet via lysnettet, når batterierne er fuldt opladet.
1 Hvis apparatet skal bruges med netledningen, skal det slukkes og
tilsluttes stikkontakten. Vent et par sekunder, før du tænder
apparatet.
Epilering af ben
Sørg for at huden er ren, helt tør og fri for fedtstoffer. Undlad at bruge
nogen former for creme umiddelbart før epilering.
1 Tænd apparatet ved at vælge den ønskede hastighed (g. 4).
Vælg hastighed I til områder med let hårvækst og områder, hvor der er
knogler lige under huden, f.eks. knæ og ankler.
Vælg hastighed II til større områder med kraftigere hårvækst.
2 Stræk huden ud med den frie hånd, så hårene rejser sig.
3 Placér apparatet vinkelret på huden med epilatorhovedet pegende
fremad. Bevæg apparatet mod hårenes vækstretning i et moderat
tempo. (g. 5)
Sørg for, at både pincetskiver og massageelement har fuld kontakt med
huden.
Tryk apparatet let mod huden.
Hvis du ikke er helt tilfreds med resultatet, så prøv at bevæge
,
epilatoren lidt langsommere over huden.
Epilering af armhuler og bikinilinje
Epilatoren leveres med en præcisionskappe til følsomme områder, som
reducerer antallet af aktive pincetskiver og samtidig strækker huden under
epileringen. Det gør apparatet velegnet til epilering af de mere følsomme
kropszoner, såsom armhuler og bikinilinjen.
Tips: Du opnår det bedste resultat, når hårene ikke er for lange.

DANSK 19
1 Sæt præcisionskappen til følsomme områder på
epileringshovedet (g. 6).
Præcisionskappen kan kun sættes på apparatet på én måde.
2 Tænd for apparatet. (g. 7)
Vi anbefaler, at du vælger hastighed II.
3 Stræk huden med din frie hånd.
4 Placér apparatet vinkelret på huden, mens on/off-skydeknappen
peger i den retning, du vil bevæge apparatet (g. 5).
5 Bevæg apparatet langsomt hen over huden, i modsat retning af
hårets vækstretning (g. 5).
Epilér bikinilinjen som vist på illustrationen (g. 8).
-
Epilér armhulerne som vist på illustrationen (g. 9).
-
For at afkøle det epilerede område kan du duppe det med en kold,
-
våd klud.
6 Fjern præcisionskappen efter brug (g. 10).
”Body-Puff”
Brug eksfolieringssvampen i brusebadet.
Regelmæssig massage med eksfolieringssvampen er en god hjælp til at
undgå indgroede hår. Bør dog ikke anvendes umiddelbart før eller efter
epilering.
Rengøring og vedligeholdelse
Adapteren og selve apparatet må aldrig rengøres med vand.
Brug aldrig ætsende rengøringsmidler, skuremidler, ståluldssvampe,
benzin, acetone eller lignende til rengøring af apparatet.
1 Sørg for, at apparatet er slukket, og stikket er taget ud af
stikkontakten.
Rengøring af epilatorhovedet
Rengør epileringshovedet, hver gang det har været brugt.

DANSK20
1 Sørg for, at apparatet er slukket, og stikket er taget ud af
stikkontakten.
2 Tag epilatorhovedet af (g. 11).
Tryk på udløserknappen (1) og træk epilatorhovedet i pilens retning (2).
3 Fjern massageelementet (g. 12).
4 Rengør epilatorhovedet inklusive pincetskiverne og
plastikkabinettet (g. 13).
5 Du kan også skylle epilatorhovedet (ikke apparatet!) under
vandhanen for at rengøre det grundigt (g. 14).
Prøv aldrig at fjerne pincetskiverne fra epilatorhovedet.
6 Fastgør massageelementet på epilatorhovedet igen. Anbring
derefter epilatorhovedet på apparatet, og tryk på det, indtil det
klikker på plads (g. 15).
Epilatorhovedet kan kun påsættes på én måde.
Opbevaring
Opbevar epilator og tilbehør i posen.
1
2 Du kan også opbevare apparatet i standeren (g. 2).
Miljøhensyn
Apparatet må ikke smides ud sammen med det almindelige
-
husholdningsaffald, når det til sin tid kasseres. Aevér det i stedet på
en kommunal genbrugsstation. På den måde er du med til at beskytte
miljøet (g. 16).
De indbyggede genopladelige batterier indeholder stoffer, der kan
-
forurene miljøet. Fjern altid batterierne, før du kasserer apparatet og
aeverer det på en genbrugsstation. Aevér batterierne på et ofcielt
indsamlingssted for brugte batterier. Kan du ikke få batterierne ud, kan
du aevere apparatet til Philips, som vil sørge for at tage batterierne
ud og bortskaffe dem på en miljømæssig forsvarlig måde.
1 Tag adapteren ud af stikkontakten, og lad apparatet køre, indtil
batterierne er opbrugt.

DANSK 21
2 Tag epilatorhovedet af (g. 11).
3 Hold apparatet i hånden, og sæt en skruetrækker ind i åbningen i
bunden af epilatoren (1). Før skruetrækkeren opad (2) for at åbne
kabinettet (g. 17).
4 Træk apparatets to dele fra hinanden med tommelngrene til “snap-
on”-tappene brækker af (g. 18).
5 Tag alle komponenterne ud (motorenhed og printkort med
batterier) af de to halvdele.
6 Indsæt en skruetrækker mellem plastbatteriholderen og
batterierne (g. 19).
7 Fjern batterierne fra plastbatteriholderen og printkortet (g. 20).
Du må ikke forsøge at samle apparatet igen for at bruge det med
netledningen. Dette er farligt (g. 3).
Reklamationsret og service
For alle yderligere oplysninger eller ved eventuelle problemer med
apparatet henvises til Philips’ hjemmeside på adressen www.philips.com
eller det lokale Philips Kundecenter (telefonnumre ndes i vedlagte
“World-Wide Guarantee” folder). Hvis der ikke ndes et kundecenter i
dit land, bedes du venligst kontakte din lokale Philips-forhandler eller
Serviceafdelingen i Philips Domestic Appliances and Personal Care BV.
Fejlnding
Problem Mulig årsag Løsning
Nedsat
epileringsevne.
Du har bevæget
epilatoren i den
forkerte retning.
Bevæg altid apparatet imod
hårenes vækstretning.

DANSK22
Problem Mulig årsag Løsning
Apparatet
fungerer ikke.
Du har placeret
epilatorhovedet
mod huden i en
forkert vinkel.
Epilatorhovedet
var ikke i berøring
med huden.
Du havde fugtet
huden med vand,
creme eller et
andet
hudplejeprodukt
før epileringen.
Præcisionskappen
til følsomme
områder sad på,
da du epilerede
benene.
Du har bevæget
apparatet for
hurtigt hen over
huden.
Batterierne er
brugt op.
Der er ikke strøm
i kontakten.
Sørg for at placere apparatet
vinkelret mod huden.
Sørg for, at epilatorhoved og
iselement har fuld kontakt med
huden under epilering.
Sørg for at huden er
fuldstændig tør og fedtfri.
Du må ikke smøre huden med
fugtighedscreme eller noget
andet hudplejeprodukt, før du
begynder epileringen.
Anvend kun præcisionkappen
til epilering af armhuler og
bikinilinje.
Bevæg apparatet henover
huden ved en moderat
hastighed.
Oplad batterierne.
Sørg for, at der er strøm i
kontakten. Anvender du en
integreret stikkontakt i et
badeværelsesskab/kabinet, skal
lyset på badeværelset ofte
tændes for at aktivere denne.

Problem Mulig årsag Løsning
Der opstår
hudirritation.
Epilatorhovedet
kan ikke tages af.
Der er ikke tændt
for apparatet.
Epilatorhovedet
var ikke sat rigtigt
på.
Det er første gang
du benytter
epilatoren, eller du
har holdt en
længere pause.
Du har trykket
apparatet for
hårdt mod huden
Du trak
epilatorhovedet i
den forkerte
retning.
Tænd for apparatet.
Sæt epilatorhovedet på
apparatet og tryk, indtil det
klikker på plads.
Der kan opstå hudirritation de
første par gange du bruger
apparatet. Dette er fuldstændigt
normalt og ophører
sædvanligvis hurtigt. Læs første
del af afsnittet “Brug af
apparatet” for at få et par gode
råd om nedsat hudirritation.
Sørg også for at holde
epilatorhovedet rent.
Undlad at trykke for hårdt, når
du fører apparatet hen over
huden
Tryk på udløserknappen, og
træk epilatorhovedet i pilens
retning (g. 11) for at tage det
af.
DANSK 23

24
DEUTSCH
Einführung
Mit Ihrem neuen Epiliergerät Satinelle MASSAGE PREMIUM werden
lästige Haare schnell, einfach und gründlich entfernt. Die Kombination des
neuen Keramik-Pinzettensystems mit dem aktiven Massagesystem stellt
eine wahre Revolution auf dem Gebiet der Epilation dar. Die
schmerzlindernde Wirkung von Massage macht das Epilieren mit dem
neuen Satinelle MASSAGE PREMIUM angenehmer und schmerzfreier
denn je. Das Ergebnis ist seidenglatte Haut. Bei regelmäßiger Anwendung
(alle 4 Wochen) reduziert sich der Haarwuchs um bis zu 50 %.
Die schnell rotierenden Pinzetten erfassen selbst die kürzesten Härchen
von nur einem halben Millimeter Länge und entfernen sie an der Wurzel.
Anschließend bleibt Ihre Haut bis zu 4 Wochen glatt. Die
nachwachsenden Härchen sind weich und fein.
Allgemeine Beschreibung (Abb. 1)
A Aufsatz für empndliche Körperzonen
B Massage-Element
C Epilierkopf
D Entriegelungstaste
E Das Gerät
F Ein-/Ausschalter
G Ladeanzeige
H Adapter
I Reinigungsbürste
J Körperpeeling-Pegeschwamm
K Ladestation
Wichtig
Lesen Sie diese Bedienungsanleitung vor dem Gebrauch des Geräts
aufmerksam durch und bewahren Sie sie für eine spätere Verwendung auf.
Überprüfen Sie vor dem ersten Gebrauch, ob die Spannungsangabe
,
auf dem Adapter mit der örtlichen Netzspannung übereinstimmt.
Benutzen Sie das Gerät nur mit dem mitgelieferten Adapter.
,
Benutzen Sie das Gerät nicht, wenn der Adapter oder das Gerät
,
selbst beschädigt oder defekt ist.

DEUTSCH 25
Wenn der Adapter defekt oder beschädigt ist, darf er nur durch ein
,
Original-Ersatzteil ausgetauscht werden, um Gefährdungen zu
vermeiden.
Der Adapter enthält einen Transformator. Ersetzen Sie den Adapter
,
keinesfalls durch einen anderen Stecker, da dies den Benutzer
gefährden würde.
Gerät und Adapter dürfen nicht mit Flüssigkeiten in Berührung
,
kommen.
Halten Sie das Gerät außerhalb der Reichweite von Kindern.
,
Setzen Sie das Gerät keinen Temperaturen unter 5 °C oder über
,
35 °C aus.
Halten Sie das eingeschaltete Gerät fern von Kopfhaar, Wimpern
,
und Augenbrauen, sowie von Kleidung, Borsten, Fäden und Drähten,
um Verletzungen und Beschädigungen zu vermeiden.
Das Gerät enthält zwei Nickel-Kadmium-Akkus, die
,
vorschriftsmäßig entsorgt werden müssen, um Umweltschäden zu
vermeiden.
Bei Hautreizungen, Krampfadern, Ausschlag, Pickeln, (behaarten)
,
Muttermalen oder Wunden sollte das Gerät nicht verwendet
werden, ohne vorher einen Arzt zu konsultieren. Gleiches gilt bei
Patienten mit geschwächter Immunabwehr, Diabetes, dem RaynaudSyndrom oder einer Immunschwächekrankheit. In diesen Fällen
sollten Sie unbedingt zunächst ein Arzt konsultieren.
Elektromagnetische Felder
Dieses Philips Gerät erfüllt sämtliche Normen bezüglich
elektromagnetischer Felder (EMF). Nach aktuellen wissenschaftlichen
Erkenntnissen ist das Gerät sicher im Gebrauch, sofern es ordnungsgemäß
und entsprechend den Anweisungen in dieser Bedienungsanleitung
gehandhabt wird.
Laden
Sie können das Gerät direkt am Netz betreiben oder bei vollständig
geladenen Akkus ohne Kabel benutzen.
Laden Sie die Akkus zunächst mindestens 16 Stunden lang auf, um das
Gerät für max. 20 Minuten schnurlos benutzen zu können.

DEUTSCH26
Laden Sie das Gerät nicht länger als 24 Stunden.
1 Achten Sie darauf, dass das Gerät während des Auadens
ausgeschaltet ist.
2 Führen Sie den Gerätestecker in die Buchse im Gerät, und stecken
Sie den Adapter in eine Steckdose.
Die Ladeanzeige leuchtet dauerhaft und zeigt an, dass das Gerät
,
aufgeladen wird.
Die Ladeanzeige schaltet sich nicht aus bzw. ändert nicht ihre Farbe,
wenn das Gerät vollständig aufgeladen ist.
3 Stellen Sie das Gerät zum Laden einfach in die Ladestation (Sie
hören ein Klicken) (Abb. 2).
Die Lebensdauer der Akkus optimieren
Laden Sie das Gerät vor der ersten Benutzung vollständig auf. Laden
-
Sie es aber nicht nach jedem Gebrauch neu auf. Verwenden Sie es so
lange, bis die Akkus (fast) leer sind.
Entladen Sie die Akkus zweimal pro Jahr vollständig, indem Sie das
Gerät so lange laufen lassen, bis es zum Stillstand kommt.
Lassen Sie das Gerät nicht ständig an der Steckdose angeschlossen.
Wenn das Gerät längere Zeit nicht verwendet wurde, muss es erneut
16 Stunden lang aufgeladen werden.
Das Gerät benutzen
Allgemeine Hinweise zum Epilieren
Das Epilieren ist nach einem Dusch- oder Vollbad am leichtesten.
,
Achten Sie darauf, dass Ihre Haut vor der Anwendung vollständig
trocken ist.
Wenn Sie das Gerät zum ersten Mal benutzen, empehlt es sich, es
,
zunächst an einer Stelle mit geringer Behaarung auszuprobieren,
damit Sie sich an das Epilieren gewöhnen.
Für optimale Ergebnisse beim Epilieren sollten die Haare nicht
,
länger als 10 mm sein (Abb. 3).
Zum Epilieren längerer Haare: (Abb. 3)
,

DEUTSCH 27
schneiden Sie das Haar mit einem Langhaarschneider auf eine Länge
-
von max. 10 mm vor. Anschließend können Sie mit dem Epilieren
beginnen.
rasieren Sie die Haare vollständig. Nach ein paar Tagen können Sie mit
dem Epilieren beginnen (die Haare müssen mindestens 0,5 mm lang
sein).
Nach den ersten Anwendungen kann Ihre Haut möglicherweise mit
,
Rötungen oder Reizungen reagieren. Dies ist völlig normal und
sollte sich bald legen, sobald Sie sich an das Epilieren gewöhnt
haben und die nachwachsenden Haare feiner und weicher werden.
Sollte die Hautirritation nicht innerhalb von 3 Tagen wieder
abklingen, konsultieren Sie Ihren Arzt.
Wir empfehlen das Epilieren vor dem Schlafengehen. So kann eine
,
möglicherweise auftretende Hautreizung über Nacht abklingen.
Netzbetrieb
Betreiben Sie das Gerät bei voll aufgeladenen Akkus nicht am
Stromnetz.
1 Um das Gerät am Netz zu betreiben, schalten Sie das Gerät aus
und schließen es am Stromnetz an. Warten Sie einen Moment,
bevor Sie das Gerät wieder einschalten.
Beine epilieren
Ihre Haut sollte sauber, fettfrei und absolut trocken sein, wenn Sie das
Gerät benutzen. Verwenden Sie vor dem Epilieren keine Cremes.
1 Wählen Sie zum Einschalten des Geräts die gewünschte
Geschwindigkeit (Abb. 4).
Wählen Sie die normale Geschwindigkeit I für Hautpartien mit geringer
Behaarung und für Hautpartien über Knochen, z. B. Knie und Knöchel.
Wählen Sie Geschwindigkeitsstufe II für größere Hautpartien mit
stärkerer Behaarung.
2 Straffen Sie die Haut mit Ihrer freien Hand, damit sich die Haare
aufrichten.

DEUTSCH28
3 Setzen Sie das Gerät senkrecht auf die Haut, und achten Sie darauf,
dass der Epilierkopf nach vorne zeigt. Führen Sie das Gerät langsam
gegen die Haarwuchsrichtung. (Abb. 5)
Achten Sie darauf, dass die Pinzetten und das Massage-Element Kontakt
zur Haut haben.
Drücken Sie das Gerät leicht auf die Haut.
Wenn Sie mit dem Ergebnis der Epilation nicht zufrieden sind,
,
führen Sie das Epiliergerät etwas langsamer über Ihre Haut.
Achselhöhlen und Bikinizone epilieren
Ihr Epiliergerät ist mit einem Aufsatz für empndliche Körperzonen
ausgestattet, der die Anzahl der aktiven Epilierpinzetten verringert und die
Haut während der Epilation strafft. Mit diesem Aufsatz eignet sich das
Gerät perfekt zum Epilieren besonders sensibler Hautpartien, wie
Achselhöhlen und Bikinizone.
Tipp: Die besten Ergebnisse erzielen Sie, wenn die Haare nicht zu lang sind.
1 Setzen Sie den Aufsatz für empndliche Körperzonen auf den
Epilierkopf (Abb. 6).
Der Aufsatz für empndliche Körperzonen lässt sich nur in einer Richtung
auf das Gerät setzen.
2 Schalten Sie das Gerät ein. (Abb. 7)
Wir empfehlen Geschwindigkeitsstufe II.
3 Straffen Sie Ihre Haut mit der freien Hand.
4 Setzen Sie das Gerät senkrecht auf die Haut, wobei der Ein-/
Ausschalter in die Richtung zeigt, in der Sie das Gerät
bewegen (Abb. 5).
5 Führen Sie das Gerät langsam gegen die Haarwuchsrichtung über
die Haut (Abb. 5).
Epilieren Sie die Bikinizone wie in der Abbildung dargestellt (Abb. 8).
-
Epilieren Sie die Achselhöhle wie in der Abbildung dargestellt (Abb. 9).
-
Zur Kühlung der Haut können Sie die gerade epilierte Hautpartie mit
einem in kaltem Wasser getränkten Tuch abtupfen.

DEUTSCH 29
6 Entfernen Sie nach der Anwendung den Aufsatz für empndliche
Körperzonen vom Epiliergerät (Abb. 10).
Den Körperpeeling-Pegeschwamm verwenden
Verwenden Sie den Körperpeeling-Pegeschwamm während des
Duschens.
Regelmäßige Massagen mit einem Luffa-Schwamm können verhindern,
dass Härchen in die Haut einwachsen. Verwenden Sie aber den LuffaSchwamm nicht unmittelbar vor oder nach dem Epilieren.
Reinigung und Wartung
Spülen Sie den Adapter und das Gerät selbst niemals mit Wasser ab.
Verwenden Sie zum Reinigen des Geräts keine scharfen Wasch-, Spül-
oder Scheuermittel bzw. Scheuerschwämme, auch keine Lösungsmittel
wie Alkohol, Azeton, Benzin usw.
1 Überprüfen Sie, ob das Gerät tatsächlich ausgeschaltet und von der
Steckdose getrennt ist.
Den Epilierkopf reinigen
Der Epilierkopf sollte nach jeder Verwendung gereinigt werden.
1 Überprüfen Sie, ob das Gerät tatsächlich ausgeschaltet und von der
Steckdose getrennt ist.
2 Nehmen Sie den Epilierkopf vom Gerät ab (Abb. 11).
Drücken Sie auf die Entriegelungstaste (1), und schieben Sie den
Epilierkopf in Pfeilrichtung (2).
3 Entfernen Sie das Massage-Element (Abb. 12).
4 Reinigen Sie den Epilierkopf, einschließlich Pinzetten und
Kunststoffgehäuse (Abb. 13).
5 Der Epilierkopf (nicht das Gerät!) kann auch durch vorsichtiges
Spülen unter ießendem Wasser noch gründlicher gereinigt
werden (Abb. 14).
Versuchen Sie nicht, die Epilierpinzetten vom Epilierkopf abzunehmen.
 Loading...