

Page 1
HP6342, HP6341
A
1
B
E
C
2 3 4
5
6 7
F
2
1 1
G
8 9 10
D
H
11 12 13
14 15 16
17 18 19
20 21 22
OIL
Page 2
ENGLISH
2
4203.000.6698.1
Introduction
Congratulations on your purchase and welcome to
Philips! To fully benet from the support that Philips offers,
register your product at www.philips.com/welcome.
With your new Philips Ladyshave you can quickly, easily
and comfortably remove unwanted body hair. You can use
the Ladyshave either dry or wet. If you shave while taking
a bath or shower, we advise you to use soap or shaving
foam for the most comfortable shave. After use, you can
clean the Ladyshave under the tap or with the cleaning
brush for extra hygiene.
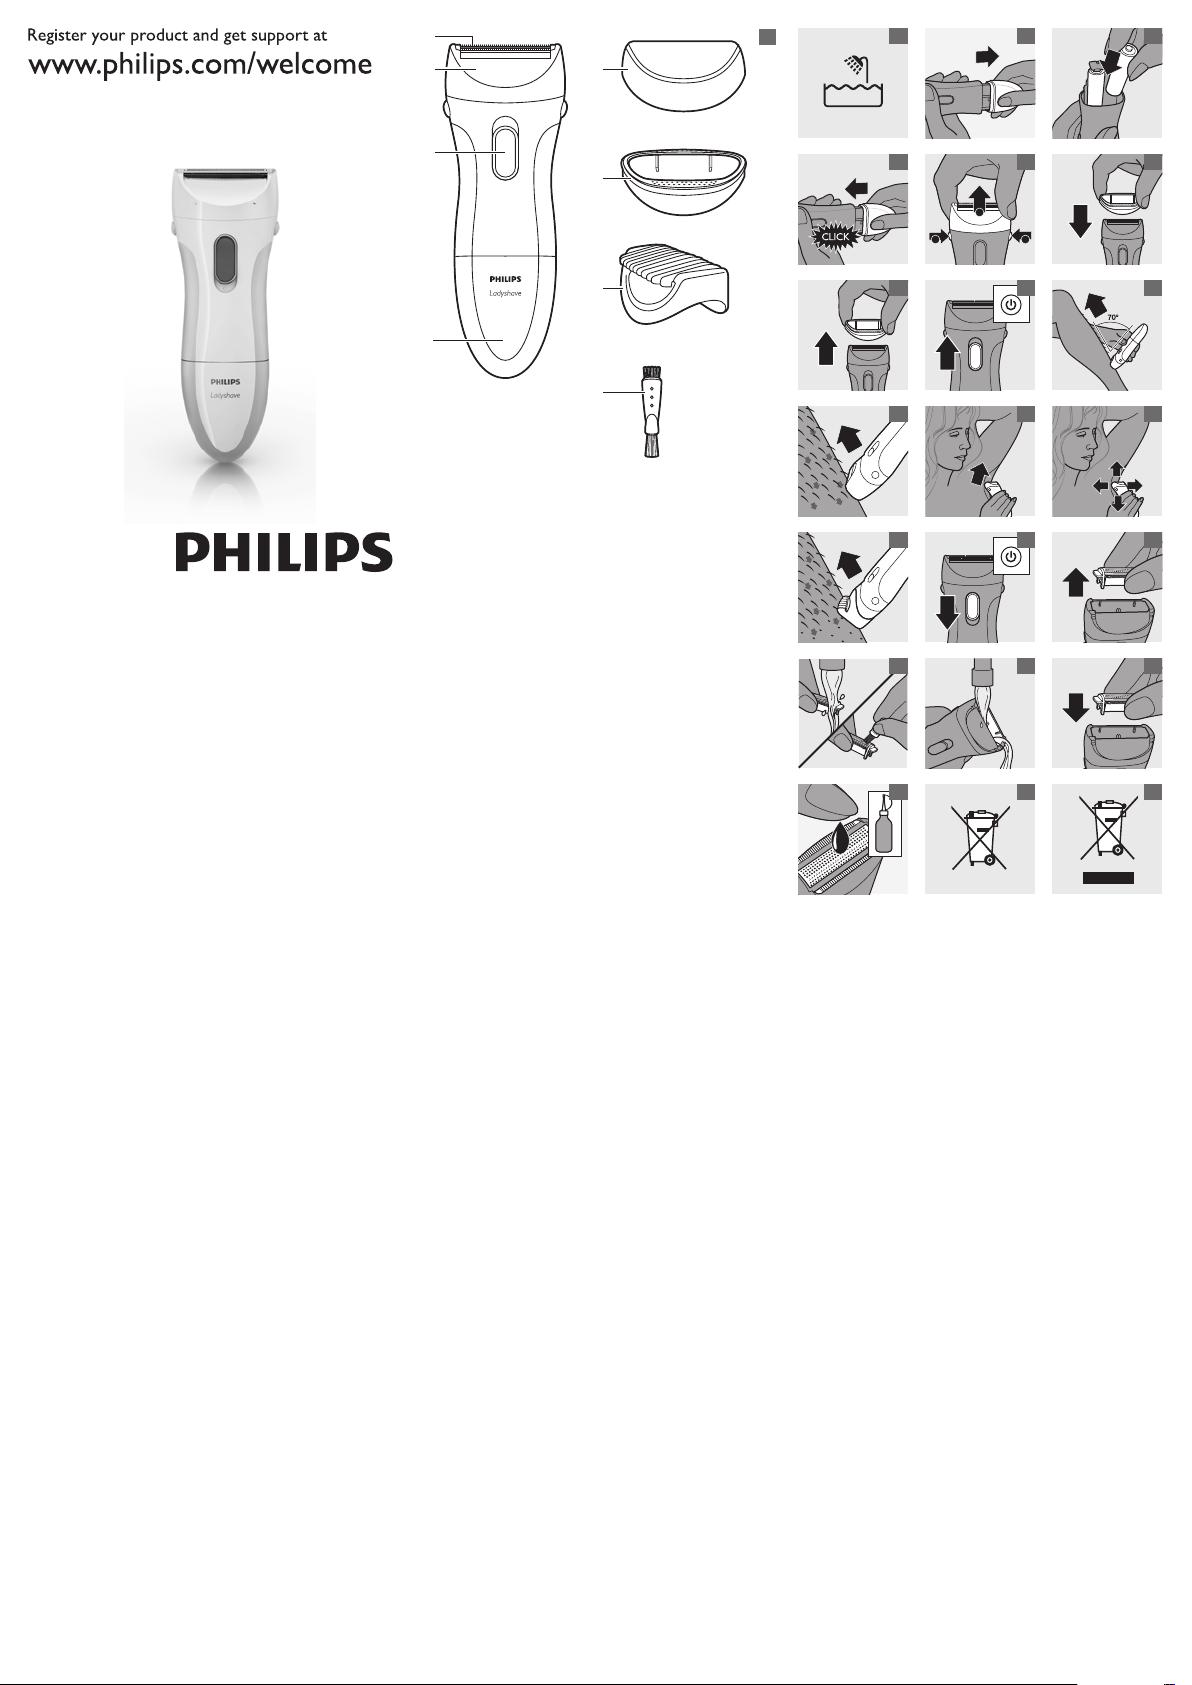
General description (Fig. 1)
A Shaving unit with shaving foil and pre-trimmer
B Shaving head
C On/off slide
D Battery compar tment cover
E Protection cap
F Efciency cap (HP6342 only)
G 3mm trimming comb (HP6342 only)
H Cleaning brush
Not shown: Pouch (HP6342 only)
Important
Read this user manual carefully before you use the
appliance and save it for future reference.
Warning
- This appliance is not intended for use by persons
(including children) with reduced physical, sensory
or mental capabilities, or lack of experience and
knowledge, unless they have been given supervision
or instruction concerning use of the appliance by a
person responsible for their safety.
- Children should be supervised to ensure that they
do not play with the appliance.
Caution
- Make sure your hands and the appliance are dry
when you insert the batteries.
- Do not clean the Ladyshave with water above
shower temperature (max. 35°C).
- Be careful with hot water. Always check if the water
is not too hot, to prevent your hands from getting
burnt.
- Use and store the appliance at a temperature
between 15°C and 35°C.
- Do not use the appliance, the shaving unit, the
efciency cap (HP6342 only) or the trimming comb
(HP6342 only) if it is damaged or broken, as this may
cause injury.
- Never use any accessories or parts from other
manufacturers or that Philips does not specically
recommend. If you use such accessories or par ts,
your guarantee becomes invalid.
- Do not expose the Ladyshave to direct sunlight.
- This appliance is only intended to be used by
women to shave and trim their body hair. It is not
intended for shaving or trimming scalp hair or for
any other purpose.
General
- The appliance can be safely used in the bath or
shower and cleaned under the tap (Fig. 2).
- To keep the Ladyshave watertight:
1 Make sure that the rubber sealing ring of the battery
holder stays clean and undamaged.
2 Apply some vaseline to the rubber sealing ring from
time to time.
Electromagnetic eld (EMF)
- This Philips appliance complies with all standards
regarding electromagnetic elds (EMF). If handled
properly and according to the instructions in this
user manual, the appliance is safe to use based on
scientic evidence available today.
Preparing for use
The Ladyshave runs on two AA 1.5 volt alkaline batteries.
We advise you to use Philips LR6 PowerLife batteries.
They supply sufcient energy for approx. 40 minutes of
shaving.
Note: Make sure that your hands are dry when you
insert the batteries.
To avoid damage due to battery leakage:
- Do not expose the appliance to direct sunlight.
- Do not expose the appliance to temperatures higher
than 35°C.
- Remove the batteries if you are not going to use the
appliance for a month or more.
- Do not leave empty batteries in the appliance.
Inserting batteries
1 To remove the battery compartment cover, pull it
off the appliance (Fig. 3).
2 Put the batteries in the battery holder (Fig. 4).
Note: Make sure that the + and - poles of the batteries
point in the right direction.
3 Push the battery compartment cover back onto the
appliance (‘click’) (Fig. 5).
Attaching/detaching the shaving head
1 To detach the shaving head, press the release
buttons on both sides of the appliance (1) and
pull the shaving head (2) (Fig. 6).
2 To attach the shaving head push it onto the
appliance.
Note: Do not exert pressure on the shaving foil to avoid
damage.
Attaching/detaching attachments
HP6342 comes with the protection cap, the efciency
cap and the trimming comb. HP6340 comes with the
protection cap. All attachments can be attached and
detached in the same way.
1 To attach a cap or comb, carefully push it onto
the appliance. Make sure the recess of the comb is
aligned with the front of the appliance (Fig. 7).
2 To detach a cap or comb, carefully pull it off the
appliance (Fig. 8).
Note: Do not hold the comb by its teeth when you pull it.
Using the appliance
The Ladyshave is suitable for:
- Shaving the underarms
- Shaving the legs
- Shaving the bikini line
- Trimming the bikini line (HP6342 only)
Use on wet skin
You can use the Ladyshave on wet skin, while you have a
bath or shower. To achieve the best result, lather your skin
with soap or shaving cream beforehand.
Use on dry skin
If you prefer to use the Ladyshave dry, make sure that
your skin is clean and completely dry.
Note: in principle, there is no difference in using
the appliance on wet skin and using it on dry skin. You can
simply choose which method you like best.
Note: Do not apply alcohol based-lotions to the skin directly
before or after shaving. If you want, you can apply some
talcum powder.
Note: Do not press the shaving head too hard onto the skin,
as this has a negative effect on shaving performance and
may cause some skin irritation.
Shaving
Legs and bikini line
1 Press the on/off slide upwards to switch on the
appliance (Fig. 9).
2 Hold the appliance at an angle of approximately 70°.
Make sure that the shaving foil and pre-trimmer are
fully in contact with your skin (Fig. 10).
3 Stretch the skin with your free hand to make the
hairs stand upright.
4 Move the appliance gently over the skin against the
direction of hair growth (Fig. 11).
Underarms
1 When you shave the underarm area, place one arm
behind your head to stretch the skin (Fig. 12).
2 Move the Ladyshave gently over the skin. To achieve
the best result, move the Ladyshave up and down
and from left to right (Fig. 13).
Efciency cap (HP6342 only)
If you are new to shaving, you can use the efciency
cap to help you place the Ladyshave on the skin at the
optimum angle. When the efciency cap is placed at on
the skin, the shaving foil and trimmer are fully in contact
with the skin. This helps to get perfect results.
Trimming (HP6342 only)
If the hair you want to shave is longer than 10mm, pre-
trim the hair with the trimming comb to a length of 3mm
for an optimal shaving performance.
1 Attach the trimming comb onto the appliance.
2 Press the on/off slide upwards to switch on the
appliance (Fig. 9).
3 Move the appliance against the direction of hair
growth. Make sure that the surface of the comb is
in full contact with the skin at all times (Fig. 14).
Note: You will achieve the best result if you trim under dry
conditions.
Cleaning and maintenance
Regular cleaning and proper maintenance ensure optimal
results and guarantee a long life for the appliance.
Clean the Ladyshave after each use.
Do not clean, rinse or immerse the Ladyshave in water
if the cover of the battery holder is not closed properly.
Never use scouring pads, abrasive cleaning agents or
aggressive liquids such as petrol or acetone to clean the
appliance.
1 Switch off the appliance (Fig. 15).
2 Detach the shaving head from the appliance (see
chapter ‘preparing for use’).
3 Remove the shaving unit from the shaving
head (Fig. 16).
Note: Do not exert too much pressure on the shaving foil to
avoid damage.
4 To clean the shaving head and shaving unit,
rinse them under the tap or use the cleaning
brush (Fig. 17).
Note: Do not clean the appliance with water above shower
temperature.
5 Rinse the hairs off the appliance (Fig. 18).
6 Make sure the appliance is completely dry before
you reattach the shaving unit (Fig. 19).
Maintenance
1 Lubricate the shaving foil with a drop of sewing
machine oil twice a year (Fig. 20).
2 Apply some vaseline to the rubber sealing ring from
time to time to keep the Ladyshave watertight.
Storage
1 Put the protection cap on the appliance.
Note: The protection cap prevents the shaving head from
becoming damaged.
2 HP6342 only: Store the appliance and accessories in
the pouch supplied.
Replacement
If you use the Ladyshave more than once a week, we
advise you to replace the shaving unit after one or two
years or when it is damaged.
The shaving unit, the cover of the battery compar tment,
the cleaning brush, the caps and the comb can be
replaced. If you need to replace one or more parts, go to
your Philips dealer or an authorised Philips service centre.
Environment
- Non-rechargeable batteries contain substances
that may pollute the environment. Do not throw
away non-rechargeable batteries with the normal
household waste, but dispose of them at an ofcial
collection point for batteries. Always remove the
non-rechargeable batteries before you discard
Page 3

and hand in the appliance at an ofcial collection
3
4203.000.6698.1
point (Fig. 21).
- Do not throw away the appliance with the normal
household waste at the end of its life, but hand it in
at an ofcial collection point for recycling. By doing
this, you help to preserve the environment (Fig. 22).
Guarantee and service
If you need service or information or if you have a
problem, please visit the Philips website at www.philips.
com or contact the Philips Consumer Care Centre
in your country (you nd its phone number in the
worldwide guarantee leaet). If there is no Consumer
Care Centre in your country, go to your local Philips
dealer.
Troubleshooting
This chapter summarises the most common problems
you could encounter with the appliance. If you are unable
to solve the problem with the information below, contact
the Consumer Care Centre in your country.
Problem Cause Solution
The appliance is
not performing
as well as it
should.
The shaving unit
is dirty.
Remove the
shaving unit and
clean it under
the tap or with
the cleaning
brush. Remove
any hairs that
might be stuck
under the
trimmer.
Problem Cause Solution
The appliance
fell into the
water while
the battery
compartment
was open.
Let the
appliance
dry. Do not
reattach
the battery
comportment
cover until the
inside of the
appliance is
completely dry.
The appliance
runs too slowly
(and produces
an odd sound).
More skin
irritation than
usual.
The appliance
does not work.
You put the
appliance on the
skin at a wrong
angle.
The batteries are
nearly empty.
The shaving unit
is dirty.
The shaving unit
needs to be
lubricated.
The shaving foil
is damaged or
worn.
The batteries are
empty.
You have
not placed
the batteries in
the battery
compartment
correctly.
Make sure
that you put
the appliance
on the skin
at an angle
of 70° (see
chapter ‘Using
the appliance’,
section
‘Shaving’).
Replace the
batteries.
Clean the
shaving unit.
Lubricate the
shaving unit
with a few
drops of sewing
machine oil.
Replace the
shaving unit.
Replace the
batteries.
Put the
batteries in the
compartment
in accordance
with the + and
- indications
in the
compartment.
You have
not attached
the battery
compartment
cover properly.
Push the
battery
compartment
cover onto
the appliance
(‘click’).
Page 4

简体中文
4
4203.000.6698.1
简介
感谢您的惠顾,欢迎光临飞利浦!为了您能充分
享受飞利浦提供的支持,请在 www.philips.com/
welcome 上注册您的产品。
借助全新飞利浦 Ladyshave 干湿美容剃毛
器,您可以快速、便捷而舒适地除去多余的体
毛。Ladyshave 干湿美容剃毛器可以干湿两用。如
果您在沐浴或淋浴时剃毛,建议您使用肥皂或剃毛
乳液,以获得更舒适的剃毛体验。使用后,您可以
在水龙头下清洗 Ladyshave 干湿美容剃毛器,或者
使用清洁刷进行清洁,使用更加卫生。
一般说明 (图 1)
A 带剃毛刀网和预修剪器的剃毛刀头部件
B 剃毛刀头
C 开/关滑钮
D 电池仓盖
E 保护盖
F 轮廓增效盖(仅限于 HP6342)
G 3 毫米修剪梳(仅限于 HP6342)
H 清洁刷
未显示:精美软袋(仅限于 HP6342)
注意事项
使用本产品之前,请仔细阅读本使用说明书,并妥
善保管以备日后参考。
警告
- 本产品不得由肢体不健全、感觉或精神上有障碍
或缺乏相关经验和知识的人(包括儿童)使用,
除非有负责他们安全的人对他们使用本产品进
行监督或指导。
- 应照看好儿童,确保他们不玩耍该产品。
注意
- 确保您在安装电池时双手和产品都是干的。
- 不要用超过沐浴温度的热水(最高 35°C)清
洁 Ladyshave 干湿美容剃毛器。
- 使用热水时一定要小心。切记先检查水温是否太
高,以防烫手。
- 必须在 15 摄氏度至 35 摄氏度之间的温度下使
用和存放本产品。
- 如果产品损坏或破损,则不要使用产品、剃毛
刀头部件、轮廓增效盖(仅限于 HP6342)或
修剪梳(仅限于 HP6342),否则可能造成人
身伤害。
- 切勿使用其它制造商生产的或未经飞利浦特别推
荐的附件或部件。如果您使用了此类附件或部
件,则本产品的保修将会失效。
- 切勿将 Ladyshave 干湿美容剃毛器直接曝晒于
阳光下。
- 本产品仅供女士剃毛和修剪体毛使用。不得用于
剃或剪头发或用于其他目的。
概述
- 本产品可以在沐浴或淋浴时安全使用,并可在水
龙头下清洁。 (图 2)
- 要保持 Ladyshave 干湿美容剃毛器的防水性
能。
1 确保电池舱的橡胶密封环清洁且完好无损。
2 时常在橡胶密封环上涂抹一些凡士林。
电磁场 (EMF)
- 本飞利浦产品符合关于电磁场 (EMF) 的所有相
关标准。据目前的科学证明,如果正确使用并
按照本用户手册中的说明进行操作,本产品是
安全的。
使用准备
Ladyshave 干湿美容剃毛器使用两节 AA 1.5 伏电
池。建议您使用飞利浦 LR6 PowerLife 电池,它们
能提供大约 40 分钟剃毛所需的电量。
注意: 装入电池之前,双手要保持干燥。
为了防止因电池泄漏而引起的损坏:
- 切勿将产品直接曝晒于阳光下。
- 切勿将产品暴露在温度高于 35°C 的环境中。
- 如果一个月或一个月以上不使用本产品,则将
电池取出。
- 切勿将耗尽的电池留在产品中。
插入电池
1 要取下电池仓盖,只需将其抽离产品。 (图 3)
2 把电池装入电池盒内。 (图 4)
注意: 确保电池的 + 和 - 极方向正确。
3 将电池仓盖按回产品上(可听到“咔哒”一声)
。 (图 5)
安装/拆卸剃毛刀头
1 要拆卸剃毛刀头,请按产品两侧的释放钮 (1),
然后将剃毛刀头抽离 (2)。 (图 6)
2 要连接剃毛刀头,请将其推到产品上。
注意: 不要用力按压剃毛刀网,以免将其损坏。
连接/拆卸附件
HP6342 配备保护盖、轮廓增效盖和修剪
梳。HP6340 只有保护盖。所有附件均可通过相同
的方法连接和拆卸。
1 要连接保护盖或修剪梳,请小心将其按到产品
上。确保修剪梳的凹槽与产品的正面齐平。 (
图 7)
2 要拆卸保护盖或修剪梳,请小心将其从产品抽
离。 (图 8)
注意: 抽离修剪梳时,不要抓握其梳齿。
使用本产品
Ladyshave 干湿美容剃毛器适用于:
- 在腋下剃毛
- 在腿部剃毛
- 在比基尼线处剃毛
- 修剪比基尼线(仅限于 HP6342)
在湿润的皮肤上使用
您可以在沐浴或淋浴的时候在湿润的皮肤上使用
Ladyshave 干湿美容剃毛器。为了获得最佳的效
果,请先在皮肤上涂上肥皂或剃毛乳液。
在干燥的皮肤上使用
如果喜欢在皮肤干燥时使用 Ladyshave 干湿美容剃
毛器,则必须确保皮肤清洁且完全干透。
注意: 原则上,在干燥的皮肤上使用本产品和在湿
润的皮肤上使用没什么两样。您只需选择自己感觉
最好的方法。
注意: 剃毛前后,不要直接在皮肤上使用酒精类润
肤液。如果有需要,可适当涂抹一些爽身粉。
注意: 在皮肤上按压剃毛刀头不要太过用力,因
为这样会对剃毛效果产生负面影响并可能造成皮肤
刺激。
剃毛
腿部和比基尼线
1 向上推动开/关滑钮以接通产品电源。 (图 9)
2 握住产品,使其与身体的角度大约成 70°。确
保剃毛刀网和预修剪器与您的皮肤完全接触。 (
图 10)
3 用另外一只空着的手来伸展您的皮肤使毛发向上
直立。
4 将产品逆着毛发生长的方向在皮肤上轻轻移
动。 (图 11)
腋下
1 在腋下剃毛时,请将一只手臂放在头后以伸展皮
肤。 (图 12)
2 在皮肤上轻轻移动 Ladyshave 干湿美容剃毛
器。为了获得最佳的效果,请上下左右移动
Ladyshave 干湿美容剃毛器。 (图 13)
轮廓增效盖(仅限于 HP6342)
如果您刚开始剃毛,则可使用轮廓增效盖来帮助您
优化 Ladyshave 干湿美容剃毛器在皮肤上放置的
角度。当轮廓增效盖在皮肤上平放时,剃毛刀网和
修剪器便可与皮肤完全接触。这可帮助您获得完美
的效果。
修剪(仅限于 HP6342)
如果您要剃的毛发长于 10 毫米,则可以使用修剪
梳将毛发预先修剪成 3 毫米的长度,以获得更佳的
剃毛效果。
1 将修剪梳安装到本产品上。
2 向上推动开/关滑钮以接通产品电源。 (图 9)
3 以逆着毛发生长的方向移动产品。确保修剪梳的
表面始终与皮肤完全接触。 (图 14)
注意: 在干燥的条件下修剪效果最佳。
清洁和保养
经常清洁和正确保养可确保产品效果最佳,并可延
长其使用寿命。
每次使用后都要清洁 Ladyshave 干湿美容剃毛器。
如果电池舱盖没有正确关闭,请不要清洁、冲洗或
将 Ladyshave 干湿美容剃毛器浸入水中。
不要使用钢丝绒、研磨性清洁剂或腐蚀性液体(例
如汽油或丙酮)来清洁产品。
1 关闭产品。 (图 15)
2 从产品卸下剃毛刀头(见“准备使用”一章)。
3 取下剃毛刀头上的剃毛刀头部件。 (图 16)
注意: 按压剃毛刀网时不要太过用力,以免损坏。
4 要清洁剃毛刀头和剃毛刀头部件,请在水龙头下
冲洗或使用清洁刷。 (图 17)
注意: 不要使用超过沐浴温度的水清洁产品。
5 冲掉产品上的毛发。 (图 18)
6 先确保产品已完全干燥,然后再重新装上剃毛
刀头部件。 (图 19)
维护
1 用缝纫机油润滑剃毛刀网,每年两次。 (图 20)
2 不时在橡胶密封圈上涂一些凡士林,以确保
Ladyshave 干湿美容剃毛器防水。
存储
1 将保护盖放到产品上。
注意: 保护盖可防止剃毛刀头被损坏。
2 仅限于 HP6342:使用随附的精美软袋存放产品
和附件。
更换
如果您每周使用 Ladyshave 干湿美容剃毛器不只一
次,建议您一到两年更换一次剃毛刀头部件,或在
其损坏时进行更换。
剃毛刀头部件、电池仓盖、清洁刷、保护盖和修剪
梳均可更换。如果需更换一个或多个部件,请前往
飞利浦经销商或授权的飞利浦服务中心处。
环保
- 一次性电池包含可能污染环境的物质。不要将一
次性电池和普通生活垃圾一同丢弃,而应交给官
方指定的回收中心处理。丢弃前,一定要将一
次性电池取出,再将本产品送到官方指定的回收
中心。 (图 21)
- 弃置产品时,请不要将其与一般生活垃圾堆放在
一起;应将其交给官方指定的回收点。这样做有
利于环保。 (图 22)
保修和服务
如果您需要服务或信息,或者有任何疑问,请访问
飞利浦网站:www.philips.com。您也可与您所在地
的飞利浦客户服务中心联系(可从全球保修卡中找
到其电话号码)。如果您的所在地没有飞利浦顾客
服务中心,则可以与当地的飞利浦经销商联系。
故障种类和处理方法
本章归纳了使用本产品时最可能遇到的问题。如果
您无法根据下面的信息解决问题,请与贵国(地
区)的飞利浦客户服务中心联系。
问题 原因 解决方法
产品无法
正常运
转。
产品运转
速度太慢
(并发出
奇怪的声
音)。
剃毛刀头部
件脏了。
您将产品以
错误的角度
放在了皮肤
上。
电池电量几
乎耗尽。
拆下剃毛刀头部件并在
水龙头下或使用清洁刷
进行清洁。清除可能卡
住修剪器的毛发。
确保产品放在皮肤上
时,与皮肤呈 70° 角
(见“使用产品”一章
的“剃毛”部分)。
更换电池。
Page 5

问题 原因 解决方法
5
4203.000.6698.1
剃毛刀头部
件脏了。
清洁剃毛刀头部件。
皮肤过敏
现象比
平时严
重。
产品不能
工作。
电池仓打
开时,产
品掉到水
中。
剃毛刀头部
件需要润
滑。
剃毛刀网已
损坏或磨
损。
电池已耗
尽。
您没有在电
池仓中正确
放置电池。
您没有正确
安装电池仓
盖。
用少量缝纫机油润滑剃
毛刀头部件。
更换剃毛刀头附件。
更换电池。
按照电池仓中的 + 和
- 指示将电池装到电池
仓中。
将电池仓盖按到产品上
(可听到“咔哒”一
声)。
晾干产品。在产品完全
干燥之前,请勿重新安
装电池仓盖。
Page 6

繁體中文
6
4203.000.6698.1
簡介
恭喜您購買本產品並歡迎加入飛利浦!請於 www.
philips.com/welcome 註冊您的產品,以善用飛利浦
提供的支援。
以您全新的飛利浦 Ladyshave 除毛刀迅速、舒適、
輕鬆地除去多餘體毛。Ladyshave 除毛刀可乾濕兩
用。如果要在淋浴或泡澡時使用,我們建議您使用
肥皂或除毛膏,以獲得最舒適的除毛體驗。使用以
後,您可以清水或搭配清潔刷清洗 Ladyshave 除毛
刀,常保除毛刀的衛生清潔。
一般說明 (圖 1)
A 附刀網和修整刀頭的除毛刀組
B 除毛刀頭
C On/Off 開關
D 電池槽蓋
E 保護蓋
F 高效能保護蓋 (限 HP6342)
G 3 公釐修剪梳 (限 HP6342)
H 清潔刷
未顯示:收納袋 (限 HP6342)
重要事項
在使用本產品前,請先仔細閱讀本使用手冊,並保
留說明以供日後參考。
警示
- 基於安全考慮,在缺乏監督及適當指示之下,本
產品不適用於孩童及任何身體、知覺、或心理功
能障礙者,或缺乏使用經驗及知識者。
- 請勿讓孩童使用本產品或當成玩具。
警告
- 安裝電池時,請確定您的雙手及本產品都處於
乾燥狀態。
- 請勿以高於淋浴溫度 (最高 35°C) 的水溫清洗
Ladyshave 除毛刀。
- 請小心使用熱水。隨時檢查熱水是否太燙,以
避免手部燙傷。
- 請於 15°C 到 35°C 間使用並存放本產品。
- 如果產品、除毛刀組、高效能保護蓋 (限
HP6342) 或修剪梳 (限 HP6342) 損壞或破損,
請勿繼續使用,否則可能導致受傷。
- 請勿使用其他製造商的任何配件或零件,或非飛
利浦建議之配件或零件。如果您使用此類配件或
零件,保修即會失效。
- 請勿將 Ladyshave 除毛刀直接曝曬在陽光下。
- 本產品僅供女性用來刮除和修剪體毛。不適合用
於修剪頭髮,或是用於任何其他用途。
一般
- 泡澡或淋浴時可安全使用本產品,並以清水清洗
本產品。 (圖 2)
- 為確保 Ladyshave 除毛刀的防水特性:
1 請確保電池固定座橡皮環的清潔且無損壞。
2 定期在橡皮環上塗抹凡士林。
電磁場 (EMF)
- 本飛利浦產品符合電磁波 (Electromagnetic
field,EMF) 所有相關標準。若正確處理及依照
本使用手冊之說明進行操作,根據現有之科學文
獻來看,使用本產品並無安全顧慮。
使用前準備
Ladyshave 除毛刀使用兩個 AA 1.5 伏特鹼性電池,
我們強烈建議您使用飛利浦 LR6 PowerLife 電池,
電量充足可持續除毛約 40 分鐘。
注意: 裝入電池時請保持雙手乾燥。
為避免電池漏電造成損壞:
- 請勿將本產品直接曝曬在陽光下。
- 請勿讓產品暴露於超過攝氏 35°C 的高溫。
- 如果將有一個月以上的時間不使用本產品,請
將電池取出。
- 請勿將電力耗盡的電池留置在此產品中。
裝入電池
1 要打開電池槽蓋,請將其從產品上拔下。 (圖 3)
2 將電池放入電池固定座中。 (圖 4)
注意: 請確定電池的正 (+) 負 (-) 極放置無誤。
3 將電池槽蓋蓋回產品上 (會聽見「喀噠」一聲)
。 (圖 5)
連接/拆離除毛刀頭
1 若要拆離除毛刀頭,按下產品 (1) 兩旁的釋放紐
並拉出除毛刀頭 (2)。 (圖 6)
2 若要連接除毛刀頭,請將該刀頭壓入產品。
注意: 請勿施壓在除毛刀刀網上,以免受傷。
連接/拆離配件
HP6342 隨附保護蓋、高效能保護蓋和修剪
梳。HP6340 隨附保護蓋。所有配件均可以同樣方
式安裝和拆卸。
1 要裝上護蓋或修剪梳,請小心將它推到產品上。
確定修剪梳的凹陷處對準產品正面。 (圖 7)
2 要拆卸護蓋或修剪梳,請小心從產品拔下。 (
圖 8)
注意: 拔下時,請勿拉扯修剪梳的梳齒部分。
使用此產品
Ladyshave 除毛刀適合用於:
- 刮除腋毛
- 刮除腿毛
- 刮除比基尼線的毛髮
- 修剪比基尼線 (限 HP6342)
使用在濕皮膚上
在淋浴或泡澡時,您可以在濕皮膚上使用
Ladyshave 除毛刀。要達到最佳結果,請先在皮膚
上塗上肥皂或除毛乳液。
使用在乾皮膚上
如果您較喜歡在皮膚乾燥時使用 Ladyshave 除毛
刀,請確定您的皮膚處於清潔且完全乾燥的狀態。
注意: 原則上,使用方式與在濕皮膚上的使用方式
相同。您可以選擇您最喜歡的方式。
注意: 刮毛前後,請勿直接在皮膚上塗抹含酒精的
乳液。可視需要灑上一些爽身粉。
注意: 請勿太大力壓除毛刀頭,這樣可能造成除毛
的反效果,並可能導致刺激皮膚現象。
除毛
腿部及比基尼線
1 將 On/Off 開關往上推,即可開啟產品電源。 (
圖 9)
2 以 70° 角方式握住產品。確定刀網和修整刀頭
完全接觸到您的皮膚。 (圖 10)
3 用空出來的另一隻手撐開皮膚,使毛髮向上豎
立。
4 逆著毛髮生長方向,在皮膚上輕輕移動本產
品。 (圖 11)
腋下
1 進行除腋毛時,請將手臂高舉過頭,使皮膚繃
緊。 (圖 12)
2 在皮膚上輕輕移動 Ladyshave 除毛刀。要達到
最佳效果,請上下左右移動 Ladyshave 除毛
刀。 (圖 13)
高效能保護蓋 (限 HP6342)
如果您沒有除毛經驗,您可以使用高效能保護蓋幫
助您將 Ladyshave 除毛刀在皮膚上調整至最佳角
度。當高效能保護蓋完全平放在皮膚上時,刀網和
修整刀頭會完全與皮膚貼合。這有助於獲得完美的
除毛結果。
修剪 (限 HP6342)
如果毛髮長於 10 公釐,請先用修剪梳將毛髮修剪至
3 公釐的長度,以獲得最佳除毛結果。
1 將修剪梳安裝到產品上。
2 將 On/Off 開關往上推,即可開啟產品電源。 (
圖 9)
3 逆著毛髮生長方向移動產品。確定修剪梳表面始
終與皮膚完全貼合。 (圖 14)
注意: 如果在乾皮膚上進行修剪,將能達到最佳除
毛結果。
清潔與維護
定期清潔並適當保養,可確保本產品的最佳除毛效
果,並能延長使用壽命。
每次使用之後,請清洗 Ladyshave 除毛刀。
如果電池固定座蓋子沒有正確緊閉,請勿清潔、沖
洗或將 Ladyshave 除毛刀浸泡在水中。
絕對不可使用鋼絲絨、磨蝕性的清潔劑或侵蝕性的
液體 (例如汽油或丙酮) 清潔本產品。
1 關閉產品。 (圖 15)
2 從產品拆下除毛刀頭 (參閱「使用前準備」單元)
。
3 從除毛刀組拆下除毛刀網。 (圖 16)
注意: 請勿大力施壓在刀網上,以免受傷。
4 要清洗除毛刀頭和除毛刀組,請以清水或搭配清
潔刷清洗。 (圖 17)
注意: 請勿以高於淋浴溫度的水溫清洗本產品。
5 將附著在本產品的毛髮沖掉。 (圖 18)
6 在您重新裝上除毛刀組之前,請確定產品已完
全風乾。 (圖 19)
保養
1 每年兩次,用一滴縫紉機油來潤滑刀網。 (
圖 20)
2 不時在橡膠密封環上塗上一些凡士林,使
Ladyshave 除毛刀能夠防水。
收納
1 把保護蓋裝回產品上。
注意: 保護蓋可避免除毛刀頭受損。
2 限 HP6342:將產品和配件儲存在提供的收納袋
中。
更換
如果您一個星期使用 Ladyshave 除毛刀一次以上,
我們建議您每一或兩年或於損壞時,更換除毛刀
組。
除毛刀組、電池槽蓋、清潔刷、護蓋和修剪梳均可
更換。如果您必須更換一個或多個零件,請洽飛利
浦經銷商或飛利浦授權服務中心。
環境保護
- 非充電式電池內含可能會污染環境的物質,請勿
與一般家庭廢棄物一併丟棄,而應送至政府指定
的電池回收點進行回收。若要丟棄本產品,請務
必將非充電式電池取出後,再將產品送至政府指
定的回收點進行回收。 (圖 21)
- 本產品使用壽命結束時請勿與一般家庭廢棄物一
併丟棄。請將該產品放置於政府指定的回收站,
此舉能為環保盡一份心力。 (圖 22)
保固與服務
若您需要相關服務或資訊,或是有任何問題,請瀏
覽飛利浦網站,網址為 www.philips.com,或聯絡
當地的飛利浦顧客服務中心 (電話號碼可參閱全球保
證書)。若您當地沒有顧客服務中心,請洽詢當地的
飛利浦經銷商。
故障排除
本單元概述您使用本產品時最常遇到的問題。如果
您無法利用以下資訊解決您遇到的問題,請聯絡您
所在國家/地區的客戶服務中心。
問題 原因 解決方法
產品無法
運作,或
運作失
常。
產品運作
緩慢 (並發
出怪聲)。
除毛刀組髒污。取下除毛刀組,並以
產品放在皮
膚上的角度
不正確。
電池電量即
將耗盡。
除毛刀組髒污。清洗除毛刀組。
除毛刀組需
要潤滑。
清水或搭配清潔刷清
洗。移除任何卡在修
整刀下的毛髮。
請確實將您的除毛刀
以 70° 角放在皮膚
上 (請參閱「使用此
產品」單元中的「除
毛」一節)。
更換電池。
滴幾滴縫紉機油以潤
滑除毛刀組。
Page 7

問題 原因 解決方法
7
4203.000.6698.1
比平常更
強烈的皮
膚刺激
感。
刀網損壞或
磨損。
請更換除毛刀組。
本產品無
法運作。
產品掉入
水中時,
電池槽是
開啟的。
電池電量耗盡。更換電池。
您沒有將電
池正確放
入電池槽
中。
您沒有正確
地裝回電池
槽蓋。
按照電池槽中標示的 +
和 - 極位置,將電池放
入電池槽中。
將電池槽蓋蓋回產品
上 (會聽見「喀噠」
一聲)。
讓產品風乾。在產品
內部完全風乾之前,
請勿重新蓋上電池槽
蓋。
Page 8

한국어
8
4203.000.6698.1
소개
필립스 제품을 구입해 주셔서 감사합니다!
필립스가 드리는 지원 혜택을 받으실 수 있도록
www.philips.co.kr에서 제품을 등록하십시오.
새로운 필립스 여성 면도기로 원치 않는 체모를
빠르고 쉽고 편안하게 면도할 수 있습니다. 여성
면도기는 마른 피부나 젖은 피부 모두에 사용할
수 있습니다. 목욕 또는 샤워 도중에 면도하는
경우 비누나 쉐이빙 폼을 사용하면 가장 편안하게
면도할 수 있습니다. 사용 후에는 제품을 수돗물에
씻어 내거나 보다 더 나은 위생을 위해서 세척용
브러시로 세척할 수 있습니다.
각 부의 명칭 (그림 1)
A 쉐이빙 포일 및 프리 트리머가 있는 쉐이빙
유닛
B 쉐이빙 헤드
C 전원 스위치
D 배터리함 덮개
E 보호 뚜껑
F 효과 캡(HP6342만 해당)
G 3mm 트리밍 빗(HP6342만 해당)
H 세척용 브러시
그림 표시 안 됨: 파우치(HP6342만 해당)
중요 사항
본 제품을 사용하기 전에 이 사용 설명서를
주의 깊게 읽고 나중에 참조할 수 있도록 잘
보관하십시오.
경고
- 신체적인 감각 및 정신적인 능력이 떨어지거나
경험과 지식이 풍부하지 않은 성인 및 어린이는
혼자 제품을 사용하지 말고 제품 사용과
관련하여 안전에 책임 질 수 있도록 지시사항을
충분히 숙지한 사람의 도움을 받으십시오.
- 어린이가 제품을 가지고 놀지 못하도록 지도해
주십시오.
주의
- 배터리를 삽입할 때에는 반드시 제품과 손이
마른 상태인지 확인하십시오.
- 샤워 시에 사용하는 물의 온도보다 뜨거운
물에서 여성 면도기를 세척하지 마십시오(최대
35도).
- 뜨거운 물을 사용하는 경우 주의하십시오.
화상을 입지 않도록 물이 너무 뜨겁지 않은지
항상 확인하십시오.
- 제품은 15°C - 35°C 사이의 온도에서 사용
및 보관하는 것이 적합합니다.
- 쉐이빙 유닛, 효과 캡(HP6342만 해당) 또는
트리밍 빗(HP6342만 해당)이 손상되었거나
고장난 경우 상처를 입을 수 있으므로 제품을
사용하지 마십시오.
- 다른 제조업체에서 만들었거나 필립스에서
권장하지 않은 제품 액세서리 또는 부품은 절대
사용하지 마십시오. 이러한 액세서리나 부품을
사용했을 경우에는 품질 보증이 무효화됩니다.
- 레이디쉐이브를 직사광선에 노출시키지
마십시오.
- 이 제품은 여성의 체모만 면도하고 다듬을 수
있는 면도기로서 두발 면도 또는 이외의 용도로
사용해서는 안 됩니다.
일반
- 제품은 목욕 또는 샤워 중에 안전하게 사용할
수 있고 수돗물로 세척할 수 있습니다 (그림 2).
- 여성 면도기의 방수 상태를 유지하려면:
1 배터리함의 고무 봉합 링을 깨끗하고 손상되지
않도록 관리하십시오.
2 가끔씩 고무 봉합 링에 바셀린을 바르십시오.
EMF(전자기장)
- 이 필립스 제품은 EMF(전자기장)와 관련된
모든 기준을 준수합니다. 이 사용 설명서의
지침에 따라 적절하게 취급할 경우 이 제품은
안전하게 사용할 수 있으며 이는 현재까지의
과학적 증거에 근거하고 있습니다.
사용 전 준비
이 여성 면도기는 2개의 AA 1.5V 알카라인
배터리로 작동되며, 필립스 LR6 파워라이프
배터리(국가에 따라 판매되지 않을 수 있음)
를 사용하는 것이 좋습니다. 이 배터리는 약 40
분 동안 면도기를 충분히 사용할 수 있는 전원을
공급합니다.
참고: 배터리를 삽입할 때에는 손이 젖은
상태여서는 안됩니다.
배터리 누액에 의한 손상 방지:
- 제품을 직사광선에 노출시키지 마십시오.
- 제품을 35°C 이상의 고온에 노출시키지
마십시오.
- 한 달 이상 제품을 사용하지 않을 경우에는
배터리를 꺼낸 후 보관하십시오.
- 수명이 다 된 배터리를 제품에 넣은 상태로
두지 마십시오.
배터리 삽입
1 배터리함 덮개를 분리하려면 제품에서 당겨
빼내십시오 (그림 3).
2 배터리를 배터리함에 끼우십시오 (그림 4).
참고: 배터리의 극성(+/-)에 맞게 끼우십시오.
3 배터리함 덮개를 다시 제품에 밀어 넣으십시오
(‘딸깍’ 소리가 남) (그림 5).
쉐이빙 헤드 탈착/부착
1 쉐이빙 헤드를 분리하려면 제품 양쪽의 열림
버튼을 동시에 누르고(1) and 쉐이빙 헤드를
잡아당기십시오(2) (그림 6).
2 쉐이빙 헤드를 부착하려면 제품에 대고
누르십시오.
참고: 손상 방지를 위해 쉐이빙 포일에는 무리한
힘을 가하지 마십시오.
액세서리 부착/탈착
HP6342는 보호 캡, 효과 캡 및 트리밍 빗과 함께
제공되며 HP6340은 보호 캡과 함께 제공됩니다.
모든 액세서리는 같은 방법으로 부착 및 분리할 수
있습니다.
1 캡이나 빗을 부착하려면 제품에 위에 놓고
조심스럽게 누르십시오. 빗의 홈이 제품
앞부분과 맞물려 있는지 확인하십시오 (
그림 7).
2 캡이나 빗을 분리하려면 제품에서 조심스럽게
당겨 빼내십시오 (그림 8).
참고: 빗을 빼낼 때 빗의 날을 잡아 당기지
마십시오.
제품 사용
여성 면도기의 적합한 용도:
- 겨드랑이 면도
- 다리 면도
- 비키니 라인 면도
- 비키니 라인 다듬기(HP6342만 해당)
젖은 피부 상태에서 사용
여성 제모기는 목욕 또는 샤워 중과 같은 젖은
피부 상태에서 사용할 수 있습니다. 최적의 효과를
얻으려면 면도 전에 비누 또는 면도 크림을 바르고
거품을 내십시오.
마른 피부 상태에서 사용
마른 피부 상태에서 여성 면도기를 사용하는 것을
선호하시는 경우, 피부가 깨끗하고 완전히 마른
상태인지 확인하십시오.
참고: 일반적으로 젖은 피부에서 사용하는 것과
마른 피부에서 사용하는 것의 차이는 없으므로
자신이 원하는 방법을 선택할 수 있습니다.
참고: 면도 직전 또는 직후에는 피부에 알코올
성분이 함유된 스킨로션을 바르지 마십시오.
원하시는 경우, 파우더는 발라도 됩니다.
참고: 쉐이빙 헤드를 피부에 대고 너무 세게 누르지
마십시오. 이는 면도 성능에 좋지 않은 영향을
끼치며 피부 자극의 원인이 될 수 있습니다.
면도
다리 및 비키니 라인
1 전원 슬라이드를 위로 눌러 제품을 켜십시오 (
그림 9).
2 제품을 약 70° 기울인 상태로 잡으십시오.
쉐이빙 포일과 프리 트리머가 피부에 완전히
밀착되어 있는지 확인하십시오 (그림 10).
3 다른 한 손으로 피부를 팽팽하게 당겨서 체모가
위를 향하도록 만듭니다.
4 체모가 자라는 반대 방향으로 트리머를
부드럽게 미십시오 (그림 11).
겨드랑이
1 겨드랑이 부분을 면도할 경우, 한 쪽 팔을
머리 뒤로 넘겨 피부를 팽팽하게 만드십시오 (
그림 12).
2 여성 면도기를 피부 위에서 부드럽게
움직이십시오. 최적의 효과를 얻으려면 여성
면도기를 위에서 아래로, 왼쪽에서 오른쪽으로
움직이십시오 (그림 13).
효과 캡(HP6342만 해당)
면도를 처음 하는 경우 효과 캡을 사용하면 여성
면도기를 최적의 각도로 피부에 댈 수 있습니다.
효과 캡이 피부에 평평하게 놓였을 때 쉐이빙
포일과 트리머가 완전히 피부에 밀착되며, 이는
완벽한 면도 효과를 가져올 수 있습니다.
트리머 사용법(HP6342만 해당)
면도하려는 체모가 10mm 이상인 경우 최적의
면도 성능을 유지하려면 트리밍 빗으로 체모를
3mm까지 미리 다듬으십시오.
1 트리밍 빗을 제품에 부착하십시오.
2 전원 슬라이드를 위로 눌러 제품을 켜십시오 (
그림 9).
3 체모가 자라는 반대 방향으로 제품을
움직이고, 빗의 표면이 항상 피부에 완전히
밀착되어 있는지 확인하십시오 (그림 14).
참고: 건조한 상태에서 트리밍하면 최상의 효과를
얻을 수 있습니다.
세척 및 유지관리
제품의 성능을 최상으로 유지하고 오래 사용하려면
정기적인 세척과 적절한 유지관리가 필요합니다.
사용 후에는 항상 제품을 세척하십시오.
배터리함의 덮개가 제대로 닫히지 않은 경우
제품을 세척하거나, 헹구거나, 물에 담그지
마십시오.
제품을 세척할 때 수세미, 연마성 세제나 휘발유,
아세톤과 같은 강력 세제를 사용하지 마십시오.
1 제품 전원을 끄십시오 (그림 15).
2 제품에서 쉐이빙 헤드를 분리하십시오(‘사용
전 준비’란 참조).
3 쉐이빙 헤드에서 쉐이빙 유닛을
분리하십시오 (그림 16).
참고: 손상 방지를 위해 쉐이빙 포일에는 무리한
힘을 가하지 마십시오.
4 쉐이빙 헤드와 쉐이빙 유닛을 세척하려면
수돗물에 헹구거나 세척용 브러시를
사용하십시오 (그림 17).
참고: 샤워 시 사용하는 물의 온도보다 뜨거운
물에서 제품을 세척하지 마십시오.
5 제품에 남아 있는 체모를 헹구십시오 (
그림 18).
6 쉐이빙 유닛을 다시 부착하기 전에 제품이
완전히 말랐는지 확인하십시오 (그림 19).
유지관리
1 쉐이빙 포일에 1년에 2번 재봉틀용 기름 한
방울 정도 발라 주십시오 (그림 20).
2 여성 면도기의 방수 상태를 유지하려면 가끔씩
고무 봉합 링에 바셀린을 바르십시오.
저장
1 제품에 보호 캡을 씌우십시오.
참고: 보호 캡은 쉐이빙 헤드가 손상되는 것을
방지합니다.
2 HP6342만 해당: 제품과 액세서리를 제공된
파우치에 넣어 보관하십시오.
교체
여성 면도기를 일주일에 두 번 이상 사용하는
경우에는 쉐이빙 유닛을 1 - 2년에 한 번
교체하거나 손상 시 바로 교체하는 것이 좋습니다.
쉐이빙 유닛, 배터리함 덮개, 세척용 브러시, 캡
및 빗은 교체할 수 있습니다. 하나 이상의 부품을
Page 9

교체하려면 필립스 대리점이나 필립스 서비스
9
4203.000.6698.1
센터로 문의하십시오.
환경
- 비충전식 배터리는 환경 오염 물질을 포함하고
있습니다. 비충전식 배터리는 일반 가정용
쓰레기와 함께 버리지 마시고 지정된 배터리
분리 수거함에 버리십시오. 제품을 버리기 전에
항상 배터리를 분리하여 지정된 수거함에 버려
주십시오 (그림 21).
- 수명이 다 된 제품은 일반 가정용 쓰레기와
함께 버리지 마시고 지정된 재활용 수거
장소에 버리십시오. 이런 방법으로 환경 보호에
동참하실 수 있습니다 (그림 22).
품질 보증 및 서비스
보다 자세한 정보가 필요하시거나, 사용상의
문제가 있을 경우에는 필립스전자 홈페이지
(www.philips.co.kr)를 방문하시거나 필립스 고객
상담실로 문의하십시오. 전국 서비스센터 안내는
제품 보증서를 참조하십시오. *(주)필립스전자:
(02)709-1200 *고객 상담실: (080)600-6600(
수신자부담)
문제 해결
이 장은 제품을 사용하면서 가장 일반적으로
경험하게 되는 문제와 그 해결 방법을 제시합니다.
발생한 문제를 아래 정보로 해결할 수 없는
경우에는 필립스 고객 상담실로 문의하십시오.
문제점 원인 해결책
제품이 제대로
작동하지 않습니다.
쉐이빙 유닛이
지저분합니다.
쉐이빙 유닛을 분리하고 수돗물이나 세척용 브러시로
세척하십시오. 트리머 밑에 끼어 있을 수 있는 체모를
모두 제거하십시오.
제품이 너무
느리게 작동합니다
(그리고 이상한
소리가 납니다).
평상 시보다 피부
자극이 심합니다.
제품이 작동하지
않습니다.
배터리함이 열려
있는 상태에서
제품을 물에
빠뜨렸습니다.
제품을 잘못된 각도로
피부에 대고 있습니다.
배터리가 거의
방전되었습니다.
쉐이빙 유닛이
지저분합니다.
쉐이빙 유닛에 윤활유를
발라야 합니다.
쉐이빙 포일이 손상되거나
마모되었습니다.
배터리가 방전되었습니다. 배터리를 교체하십시오.
배터리를 배터리함에
올바르게 끼우지
않았습니다.
배터리함 덮개를 제대로
끼우지 않았습니다.
제품이 피부에 70° 각도로 놓여 있는지 확인하십시오
(‘제품 사용’란의 ‘면도’ 부분 참조).
배터리를 교체하십시오.
쉐이빙 유닛을 세척하십시오.
쉐이빙 유닛에 재봉틀용 기름을 몇 방울 발라 주십시오.
쉐이빙 유닛을 교체하십시오.
배터리를 배터리함에 표시된 극성(+/-)에 맞게
끼우십시오.
배터리함 덮개를 제품에 밀어 넣으십시오(‘딸깍’
소리가 남).
제품을 건조시키십시오. 제품 내부가 완전히 마를 때까지
배터리함 덮개를 다시 끼우지 마십시오.
 Loading...