

Page 1
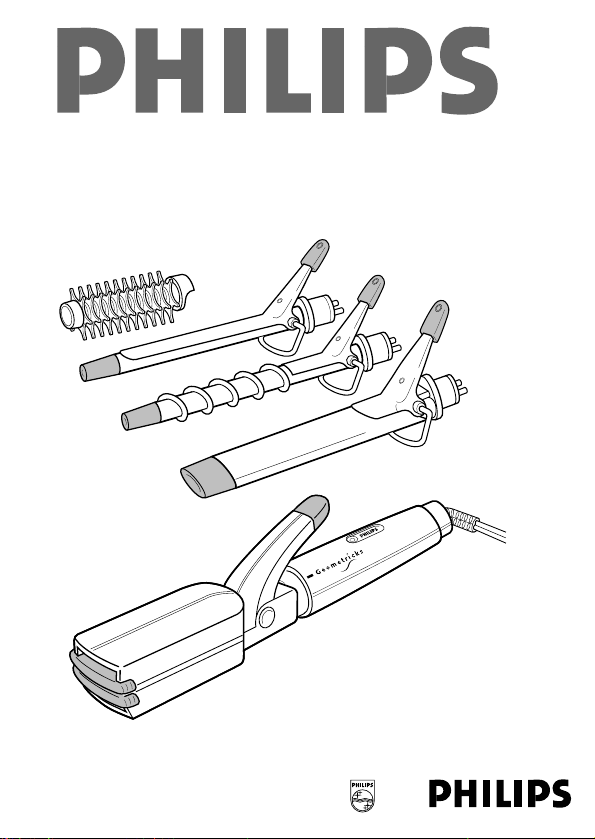
HP 4490/94/96
Page 2

2
English Page 6
• Keep pages 4, 5, 50 and 51 open when reading these operating instructions.
Français Page 10
• Pour le mode d'emploi: dépliez les pages 4, 5, 50 et 51.
Deutsch Seite 13
• Schlagen Sie beim Lesen der Gebrauchsanweisung
Seiten 4, 5, 50 und 51 auf.
Nederlands Pagina 16
• Sla bij het lezen van de gebruiksaanwijzing de pagina's 4, 5, 50 en 51 op.
Italiano Pagina 19
• Prima di usare l'apparecchio, aprite le pagine 4, 5, 50 e 51
e leggeteattentamente le istruzioni per l'uso.
Español Página 22
• Desplegar las páginas 4, 5, 50 y 51 al leer las instrucciones de manejo.
Português Página 25
• Durante a leitura do modo de emprêgo, desdobre e
verifique as pág. 4, 5, 50 e 51.
Dansk Side 28
• Hold side 4, 5, 50 og 51 opslået mens De læser brugsanvisningen.
Norsk Side 31
• Slå opp på side 4, 5, 50 og 51 før De leser videre.
Svenska Sid 34
• Ha sidan 4, 5, 50 och 51 utvikt när ni läser bruksanvisningen.
Suomi Sivu 37
• Pidä sivut 4, 5, 50 ja 51 auki samalla kun luet käyttöohjetta.
Türkçe Sayfa 40
• Kullanım kılavuzunu okuduπunuzda 3., 4., 50. ve 51. sayfaları açınız.
Page 3
3
Fitting a plug
Connections - Applicable to U.K. only
Important
The wires in this mains lead are coloured in accordance with the
following code:
BLUE - NEUTRAL
BROWN - LIVE
As the colours of the wires in the mains lead of this appliance may not
correspond with the markings identifying the terminals in your plug,
proceed as follows:
The wire which is coloured BLUE must be connected to the terminal
which is marked with a letter "N" or coloured BLACK.
The wire which is coloured BROWN must be connected to the
terminal which is marked with the letter "L" or coloured RED.
DO NOT CONNECT either of these wires to the earth terminal in the
plug which is marked with the letter “E” or by the earth symbol E or
coloured GREEN, or GREEN AND YELLOW.
Note: If the terminals of the plug are unmarked or if you are in
any doubt consult a qualified electrician.
If a 13 Amp. 3-pin plug is fitted, it must be an "approved" plug,
conforming to BS 1363-1986.
Page 4
4
M
H
N
K
1
4
5
Page 5
G
F
B
A
E
O
I
L
D
C
J
5
Page 6
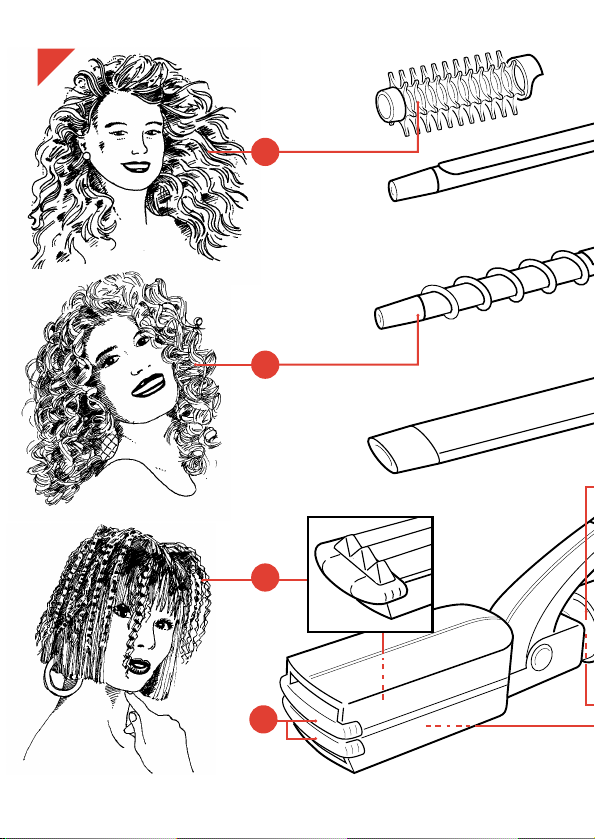
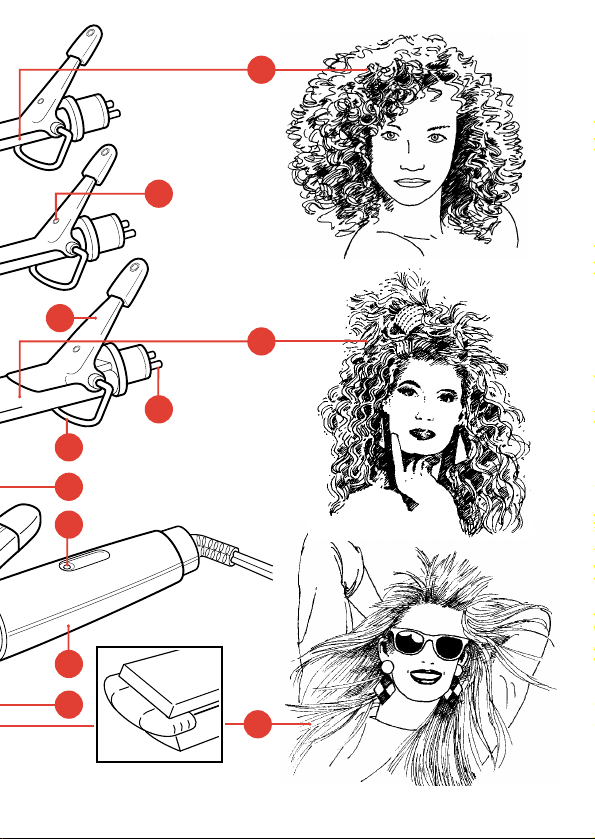
General description (fig. 1)
A Handle
B "On"-light
C Clamping ring
D Connect point
E Contact pins
F Heel rest (turn backwards before use)
G Clip
H Styling attachment "Spirals" (for corkscrew curls) (HP 4494/96)
I Styling attachment "Zig Zags" (for Z-shaped curls) (HP 4494/96)
J Styling attachment "Crimper/Straightener" (HP 4496)
K Inset plates for "Crimper/Straightener" (HP 4496):
"Crimping plate" (ribbed side: for waves)
"Straightener" (flat side: for straight hair)
L Styling attachment "Curls" (for evenly rounded curls) (HP 4494/96)
M Styling attachment "Brush" (for brushing/untangling and creating
large rolls) (HP 4494/96)
N Cool tips
O Ready dot
6
English
Important
• The styling attachments and the inset plates of the "Crimper/
Straightener " will become hot during use. Prevent contact
with the skin. Do not allow the mains cord to touch any hot
parts.
• Never immerse the appliance in water. You may clean it with a
damp cloth, but first remove the plug from the wall socket.
• Washing your hair or using the "Flat plate" of the Crimper/
Straightener attachment will remove the waves and curls.
Page 7

Making the "Geometricks" MultiStyler ready for use
How to change the styling attachments (fig. 2-6)
• When changing styling attachments during use only touch the plastic
parts. The metal parts are hot!
- To release the styling attachment, turn the clamping ring (C) in the
direction of the arrow (fig. 2).
- Pull the styling attachment from the handle (fig. 3).
- When mounting the required styling attachment, ensure that the
heel rest (F) is at the underside (fig. 4).
- Insert the styling attachment firmly into the main unit (fig. 5).
- Secure by turning the clamping ring (fig. 6).
How to change the Crimper/Straightener inset plates (fig. 7-10)
• Ribbed side: for waves
• Flat side: for straight hair
- Open the Crimper/Straightener by pressing the handle downwards
(fig. 7).
- Take the plate by the cool tips (N) at the front side.
- Pull the plate out of the Crimper/Straightener (fig. 8).
- Turn the plate (fig. 9).
- Insert the plate into the Crimper/Straightener. Ensure that the
protrusions at the sides enter the runners correctly (fig. 10).
Heating up (fig. 11-12)
- Insert the mains plug into the wall socket. The "On"-light (B) will come on
and the styling attachment will heat up (fig. 11).
- When the "Ready"-dot (O) on the styling attachment becomes dark the
appliance is ready for use (fig. 12).
How to use
• Before styling, comb or brush the hair so that it is completely untangled
and smooth.
• Always ensure good contact between hair and styling attachment or
Crimper. For that reason, do not attempt to style thick tresses of hair and
do not double-wind the hair when using the styling attachments.
• You need only 5 - 10 seconds to make a curl or wave.
A setting lotion may be applied after washing the hair.
7
Page 8

Styling attachments (fig. 13 - 18)
• Always style small tresses of hair (2 - 3 cm or 1 inch thick).
• For good results, wind a tress around the styling attachment in a spiral
form. The full length of the tress will then be in contact with the hot rod.
• Fix the end of the tress with the clip and wind the hair around the rod
towards the head.
After 5 - 10 seconds open the clip and remove the barrel from the hair.
- With "Spirals" wind the tress following the spiral profile on the styling
attachment.
- With "Curls" wind the hair in straight.
- With the "Brush" a clip is not required as the teeth grip the hair.
• Important: Always ensure that the hair ends are wrapped smoothly
around the barrel of the attachment: this will avoid bent ends.
• You can divide the curls with your fingers to add volume. Especially with
Spirals this will give you a stunning hairstyle.
"Crimper/Straightener" (fig. 19 - 21)
• Take tresses of hair of max. 5 - 6 cm or 2 inches thick.
• The clip enables you to open and close the Crimper/Straightener, so that
you can style a tress of hair section by section.
• Always start crimping or straightening close to the head. Then
successively treat the lower sections.
• You may press the two parts of the Crimper/Straightener together by
using your fingers. (Do not touch the plates!)
• Keep the hair in the Crimper/Straightener for 5-10 seconds. Then open
the Crimper/Straightener to treat the next section of the same tress.
Ensure that there is an overlap!
After use
- After use remove the mains plug from the wall socket.
- Place the appliance with the stand downwards on a safe place and allow
it to cool down.
Replacing the mains cord
If the mains cord of this appliance is damaged, it must only be replaced by
Philips or their service representative, as special tools and/or parts are
required.
8
Page 9

For U.K. only:
This appliance is supplied with a non-rewirable 13 Amp. plug. The plug
must never be used without the fuse cover being in place.
If a replacement fuse cover is required, it must be of the same type or
colour as the coloured insert around the fuse cover.
Replacement fuse covers are available from Electrical Retailers or direct
from Philips, tel. 081 - 689 - 2166, ext. 8014.
Replacement 3 Amp. fuses must be BSI or ASTA BS 1362 approved.
Important safety information
If the non-rewirable plug is not suitable for the socket outlets in your home,
it can be removed and replaced by a plug of the correct type.
The non-rewirable plug must be cut from the mains cord, the fuse
removed, and the plug safely discarded to prevent further use.
The removed plug can be hazardous if inserted into a live mains socket.
Fitting a plug: please refer to page 3
9
Page 10

Description générale (fig. 1)
A Appareil
B Témoin lumineux
C Bague de fixation de l'accessoire
D Point de fixation de l'accessoire
E Fiches de contact
F Support de sécurité
G Pince à cheveux
H Accessoire amovible "Spirales" (pour anglaises) (HP 4494/96)
I Accessoire amovible "Zig-Zags" (pour des cheveux crantés)
(HP 4494/96)
J "Crimper" (pour gaufrer et défriser les cheveux) (HP 4496)
K Plaques réversibles du "Crimper": (HP 4496)
Plaque à gaufrer (côté ondulé pour de fines ondulations)
Plaque à lisser (côté lisse, pour défriser les cheveux)
L Accessoire amovible "boucles" (pour des boucles rondes)
(HP 4494/96)
M Accessoire "brosse" (pour brosser, démêler ou donner du gonflant à
la coiffure) (HP 4494/96)
N Pince (isolée thermiquement)
O Indicateur de température
10
Français
Important
• Les différents accessoires de l'appareil et les plaques
réversibles du "Crimper" deviennent très chauds pendant
l'utilisation: évitez tout contact avec la peau. Assurez-vous
que le fil ne soit jamais en contact avec les parties chaudes de
l'appareil.
• Ne plongez jamais l'appareil dans l'eau. Vous pouvez le
nettoyer avec un chiffon humide après l'avoir débranché et
seulement lorsqu'il est complètement refroidi.
• Vous pouvez éliminer toutes ondulations ou bouclés des
cheveux à l'aide d'un schampooing ou en utilisant le côté lisse
du Crimper.
Page 11

Mise en service
Remplacement des accessoires (fig. 2 - 6)
- Lorsque vous changez les accessoires pendant l'utilisation ne touchez
uniquement que les parties en matière plastique. Les parties métalliques
peuvent être brûlantes.
- Pour retirer un accessoire, tournez la bague de fixation (C) dans le sens
de la flèche.
- Retirez l'accessoire en tirant dessus.
- Avant d'introduire l'accessoire de votre choix, assurez-vous que le
support de sécurité (F) soit dirigé vers le bas (fig.4).
- Emboîtez l'accessoire dans l'appareil (fig.5).
- Verrouillez en tournant la bague de fixation (fig.6).
Changement des plaques réversibles du Crimper (fig. 7-10):
• Côté ondulé: pour de fines ondulations
• Côté lisse: pour défriser les cheveux
- Pour ouvrir le Crimper, appuyer avec le pouce sur le levier de la poignée
(fig.7).
- Prenez la plaque sur le devant avec les pinces isolées (N).
- Retirez la plaque du Crimper en tirant vers vous (fig. 8).
- Retournez la plaque (fig. 9).
- Remettez la plaque. Assurez vous que les nervures sur les côtés soient
bien placées dans les rainures (fig. 10).
Mise à température (fig. 11-12)
- Branchez l'appareil. Le témoin lumineux (B) est maintenant allumé et
l'accessoire que vous avez introduit chauffe (fig. 11).
- Lorsque l'indicateur de température (O), placé sur l'accessoire prend
une couleur foncée, l'appareil est prêt à l'utilisation (fig. 12)
Utilisation
• Avant de vous servir de l'appareil, assurez-vous que vos cheveux soient
parfaitement secs et démêlés.
• Prenez des mèches de cheveux pas trop épaisses
• Assurez-vous du parfait contact entre les cheveux et les différents
accessoires. Pour cette raison ne vous attendez pas à un résultat
spectaculaire si vous prenez des mèches de cheveux trop épaisses ou
si vous enroulez plusieurs fois les mèches sur les accessoires.
- Que vos cheveux soient secs ou humides (mais jamais mouillés), le
"Géométricks" Philips peut vous aider à créer et à conserver longtemps
des cheveux bouclés ou ondulés.
11
Page 12

- Après avoir lavé les cheveux vous pouvez utiliser une lotion capillaire.
- Pour fixer une boucle ou une anglaise 5 à 10 seconde suffisent avec
"Géométricks".
- Vous pouvez vaporiser un peu de laque sur chaque mèche avant
d'utiliser l'accessoire ou après afin de fixer la coiffure durablement.
Accessoires (fig. 13-18)
• N'utilisez que de petites mèches de 2-3 cm de long.
• Enroulez toute la longueur de la mèche sur la spirale chauffante.
- Coincez l'extrémité de la mèche sous le clip puis faites rouler l'appareil
vers la base des cheveux.
- Avec l'accessoire "Spirale" si vous désirez des anglaises .
- Avec l'accessoire "Boucles" si vous désirez des boucles (enroulez les
cheveux droits).
- Avec l'accessoire "Brosse" le clip n'est pas indispensable à son
utilisation.
• Important:
Faites attention à ne pas "casser" la pointe des cheveux sur les
accessoires.
• Vous pouvez séparer et donner du volume à vos boucles en passant vos
doigts dans les cheveux.
"CRIMPER" (fig. 19-21)
• Formez une mèche de 5-6 cm de long.
• Le levier du Crimper permet d'ouvrir et fermer les plaques et de mettre
en forme ainsi vos cheveux mèche/mèche.
• Commencez toujours par le sommet du crane puis vers la base et le cou.
• Pressez éventuellement les 2 parties du "Crimper" l'une contre l'autre
(sans toucher aux plaques).
• Laissez la mèche 5-10 seconde dans le Crimper avant de procéder de la
même façon avec la mèche suivante.
Après utilisation
- Débranchez l'appareil.
- Laissez refroidir l'appareil en lieu sur, le support de sécurité dirigé vers
le bas.
Remplacement du cordon électrique
Si le cordon secteur de votre appareil est endommagé, il doit
impérativement être remplacé par un réparateur indépendant agréé
Philips car des équipements et des composants spécifiques sont exigés.
12
Page 13
Allgemeine Beschreibung (Abb. 1)
A Grundgerät
B Kontrollampe
C Klemmring
D Anschlußstück
E Kontaktstifte
F Ablagebügel (vor Gebrauch ausklappen)
G Haarclip
H "Spiral"-Einsatz, für Korkenzieherlocken (HP 4494/96)
I "Zick-Zack"-Einsatz, für z-förmige Locken (HP 4494/96)
J "Crimper"-Einsatz, zum Ondulieren (HP 4496)
K Austauschbare Platten für den "Crimper" (HP 4496)
Ondulierplatte, gewellte Seite, für kleine Wellen
Flache Platte, glatte Seite, für glattes Haar
L "Curls"-Einsatz, für runde Locken (HP 4494/96)
M "Brush"-Einsatz, zum Bürsten und Auskämmen großer Locken
(HP 4494/96)
N Wärmeisolierter Griff, ständig kühl
O Temperaturanzeige
13
Deutsch
Wichtig
• Die Frisiereinsätze und die austauschbaren Platten des
"Crimpers" werden bei Gebrauch heiß. Vermeiden Sie Kontakt
mit der Haut. Achten Sie darauf, daß das Kabel nicht mit
heißen Teilen in Berührung kommt.
• Tauchen Sie das Gerät niemals in Wasser. Sie können es mit
einem feuchten Tuch reinigen, doch ziehen Sie zuvor den
Stecker aus der Steckdose.
• Durch eine Haarwäsche oder durch den Gebrauch der "flachen
Platte" gehen Locken und Wellen verloren.
Page 14

Vorbereitung zum Gebrauch
Auswechseln der Einsätze (Abb. 2 bis 6)
• Fassen Sie beim Auswechseln der Einsätze nur die Teile aus Kunststoff
an. Die Metallteile sind heiß!
• Drehen Sie den Klemmring (C) in Pfeilrichtung, bevor Sie den Einsatz
herausnehmen (Abb. 2).
• Ziehen Sie den Einsatz aus dem Grundgerät (Abb. 3).
• Achten Sie beim Anbringen des gewünschten Einsatzes darauf, daß sich
der Ablagebügel (F) unten befindet (Abb. 4).
• Stecken Sie den Einsatz fest in das Grundgerät (Abb. 5).
• Drehen Sie den Klemmring wieder fest (Abb. 6).
Auswechseln der "Crimper"-Einsätze (Abb. 7 bis 10)
• Gewellte Seite für Wellen.
• Glatte Seite für glattes Haar.
- Öffnen Sie den "Crimper", indem Sie den Handgriff herabdrücken (Abb. 7).
- Fassen Sie die Platte vorn an den isolierten Griffen (N).
- Ziehen Sie die Platte aus dem "Crimper" (Abb. 8).
- Drehen Sie die Platte um (Abb. 9).
- Stecken Sie die Platte wieder in den "Crimper" (Abb. 10). Achten Sie
darauf, daß die beiden seitlichen Leisten genau in die Nuten gleiten.
Anheizen (Abb. 11 und 12)
- Stecken Sie den Stecker in die Steckdose. Die Kontrollampe (B) leuchtet
auf, und das Gerät wird warm (Abb. 11).
- Wenn die Temperaturanzeige (O) auf dem Einsatz dunkel wird
(Abb. 12), ist das Gerät zur Anwendung bereit.
Die Anwendung des Geräts
• Kämmen und/oder bürsten Sie Ihr Haar vor dem Stylen gründlich aus, so
daß es glatt und geschmeidig ist.
• Achten Sie darauf, daß Ihr Haar stets guten Kontakt zu den Platten des
"Crimper" hat. Nehmen Sie nicht zu dicke Strähnen, und wickeln Sie das
Haar nie doppelt um die Frisier-Einsätze.
• Mit dem Philips "Geometricks" MultiStyler können Sie sowohl trockenes
wie feuchtes (niemals aber nasses Haar!) in dauerhafte Wellen oder
Locken legen. Hierzu reichen 5 bis 10 Sekunden.
Nach dem Waschen können Sie einen Haarfestiger benutzen.
Sie können auch, um ein schnelles und gutes Resultat zu erzielen, auf
jede Haarsträhne Haarspray auftragen. Machen Sie das nach jedem
einzelnen Auskämmen, kurz bevor Sie das Gerät benutzen.
14
Page 15

Die Frisiereinsätze (Abb. 13 bis 18)
• Nehmen Sie immer nur kleine Strähnen von max. 2 bis 3 cm.
• Ein dauerhaftes Ergebnis erzielen Sie, wenn Sie die Strähnen
spiralförmig nebeneinander aufwickeln. So kommt die ganze Länge des
Haares mit dem aufgeheizten Stab in Berührung.
• Befestigen Sie die Haarspitzen mit dem Haarclip und wickeln Sie das
Haar bis zum Haaransatz hin um den Stab. Öffnen Sie den Haarclip
nach 5 bis 10 Sekunden, und wickeln Sie das Haar ab.
• Mit dem "Spiral"-Einsatz wickeln Sie das Haar, indem Sie dem Profil auf
dem Stab folgen.
• Mit dem "Curls"-Einsatz können Sie das Haar auch glatt aufwickeln.
• Bei dem "Brush"-Einsatz erfassen die Borsten das Haar, Sie brauchen
den Haarclip dabei also nicht.
• Wichtig: Achten Sie darauf, daß die Haarspitzen immer komplett um den
Stab gewickelt werden. So vermeiden Sie, daß die Haarspitzen abstehen.
• Ihre Frisur fällt fülliger, wenn Sie Ihr Haar mit Ihren Fingern auflockern.
Das ist besonders vorteilhaft bei Korkenzieherlocken.
"Crimper" (Abb. 19 bis 21)
• Nehmen Sie immer nur kleine Strähnen von max. 2 bis 3 cm.
Mit dem Haarclip können Sie den "Crimper" öffnen und schließen, und
so Strähne um Strähne bearbeiten.
• Beginnen Sie immer in der Nähe des Haaransatzes, und arbeiten Sie
auf die Haarspitzen zu.
• Sie können die beiden Teile des "Crimper" mit den Fingern zusammendrücken; aber geben Sie acht, daß Sie keine heißen Teile berühren!
• Lassen Sie Ihr Haar für 5 bis 10 Sekunden im "Crimper", und stylen Sie
danach den nächsten Abschnitt der Strähne. Achten Sie darauf, daß
sich die gestylte Stelle mit der vorherigen überlappt.
Nach Gebrauch
- Ziehen Sie den Stecker aus der Steckdose.
- Stellen Sie das Gerät auf den ausgeklappten Ablagebügel (F) zum
Abkühlen an einen sicheren Platz.
Auswechseln des Netzanschlußkabels
Wenn das Netzanschlußkabel defekt oder beschädigt ist, muß es ersetzt
werden durch eine von Philips autorisierte Werkstatt, da für die Reparatur
Spezial-Werkzeuge und/oder spezielle Teile benötigt werden.
15
Page 16

Algemene beschrijving (fig. 1)
A Apparaat
B Controlelampje
C Klemring
D Aansluitpunt
E Contactpennen
F Steuntje (naar achteren zetten vóór gebruik)
G Haarklem
H Opzetstuk "Spirals" (voor pijpekrullen) (HP 4494/96)
I Opzetstuk "Zig Zags" (voor Z-vormige krullen) (HP 4494/96)
J Opzetstuk "Crimper" (HP 4496)
K Inzetplaten van "Crimper" (HP 4496):
"Crimping plate" (geribbelde zijde: voor kleine golfjes)
"Flat plate" (vlakke zijde: voor glad haar)
L Opzetstuk "Curls" (voor ronde krullen) (HP 4494/96)
M Opzetstuk "Brush" (voor uitborstelen/ontwarren en het maken van
grote golven) (HP 4494/96)
N Koudgreepjes
O Temperatuurstip
16
Nederlands
Belangrijk
• De opzetstukken en de inzetplaten van de "Crimper" worden
heet tijdens het gebruik. Vermijd contact met de huid. Zorg
ervoor dat het snoer niet de hete delen raakt.
• Dompel het apparaat nooit in water. U kunt het schoonmaken
met een vochtige doek, nadat u de stekker uit het stopcontact
hebt genomen.
• Door het haar te wassen of met behulp van de "Flat plate" van
het Crimper opzetstuk kunt u de krullen en golven weer uit het
haar verwijderen.
Page 17

Hoe maakt u de "Geometricks" klaar voor gebruik?
Opzetstukken verwisselen (fig. 2-6)
• Wanneer u tijdens het gebruik opzetstukken verwisselt, raak dan alleen
de kunststof delen aan. De metalen delen zijn heet!
- Om een opzetstuk los te maken, draait u de klemring (C) in de richting
van de pijl (fig. 2).
- Trek het opzetstuk van het apparaat af (fig. 3).
- Wanneer u het nu gewenste opzetstuk aanbrengt, let er dan op dat het
steuntje (F) zich aan de onderzijde bevindt (fig. 4).
- Steek het opzetstuk stevig vast in het apparaat (fig. 5).
- Draai de klemring vast (fig. 6).
Inzetplaten van Crimper omdraaien (fig. 7-10)
• Geribbelde zijde: voor kleine golfjes
• Gladde zijde: voor sluik haar
- Open de Crimper door de hendel omlaag te drukken (fig. 7).
- Pak de plaat vast bij de koudgreepjes (N) aan de voorzijde.
- Trek de plaat uit de Crimper (fig. 8).
- Draai de plaat (fig. 9).
- Steek de plaat in de Crimper. Zorg ervoor dat de nokjes aan de zijkanten
goed in het glijprofiel komen (fig. 10).
Opwarmen (fig. 11-12)
- Steek de stekker in het stopcontact. Het controlelampje (B) gaat nu
branden en het opzetstuk wordt opgewarmd (fig. 11).
- Als de temperatuurstip (O) op het opzetstuk een donkere kleur krijgt, is
het apparaat klaar voor gebruik (fig. 12).
Gebruik
• Voordat u het haar in model brengt, kamt of borstelt u het goed zodat het
geheel ontward en glad is.
• Zorg ervoor dat het haar goed in contact komt met het opzetstuk of de
Crimper. Probeer niet te dikke haarstrengen te modelleren en wikkel het
haar niet dubbel om een opzetstuk.
• Zowel met droog als enigszins vochtig haar (niet nat!) helpt de Philips
"Geometricks" MultiStyler u krullen en golven in het haar te maken, die
lang hun vorm zullen behouden. Voor het maken van een krul of golf
heeft u slechts 5 - 10 seconden nodig.
Na het wassen van het haar kunt u een haarversteviger gebruiken.
Voor snel modelleren met een goed resultaat kunt u een geschikte
haarspray aanbrengen op elke haarstreng. Doe dat nadat u de streng
hebt gekamd, en direkt voordat u deze gaat modelleren.
17
Page 18

Opzetstukken (fig. 13 - 18)
• Modelleer altijd dunne haarstrengen van max. 2 - 3 cm.
• Voor een stevig resultaat wikkelt u de haarstreng spiraalvormig rond het
opzetstuk. Het haar komt dan overal goed in contact met de warme
staaf.
• Zet het uiteind van de haarstreng vast met behulp van de klem en wikkel
naar het hoofd toe.
Na 5 - 10 seconden opent u de klem en haalt u de staaf uit het haar.
- Bij "Spirals" wikkelt u de streng volgens het spiraalvormige profiel van
het opzetstuk.
- Bij "Curls" kunt u het haar ook recht opwikkelen.
- Bij "Brush" is de klem niet nodig, omdat de tanden van de borstel de
haren op hun plaats houden.
• Belangrijk: Zorg er altijd voor dat de uiteinden van het haar strak om de
staaf van het opzetstuk zijn gewikkeld. Dit voorkomt dat de uiteinden
worden geknikt.
• U kunt de krullen met de vingers splitsen, waardoor het kapsel
volumineus wordt. Vooral bij Spirals (pijpekrullen) levert dit een
verrassend resultaat.
"Crimper" (fig. 19 - 21)
• Modelleer altijd haarstrengen van max. 2 - 3 cm.
• Met de klem kunt u de Crimper openen en sluiten, zodat u een
haarstreng deel voor deel kunt modelleren.
• Begin met modelleren altijd dicht bij het hoofd. Behandel daarna
achtereenvolgens de gedeelten verder van het hoofd af.
• Druk desgewenst met de vingers de beide delen van de Crimper naar
elkaar toe. (Raak niet de platen aan!)
• Houd het haar gedurende 5 tot 10 seconden in de Crimper. Open dan de
Crimper om het volgende gedeelte van dezelfde haarstreng te
behandelen. Zorg voor een overlapping!
Na gebruik
- Haal de stekker uit het stopcontact.
- Zet het apparaat met het steuntje naar beneden op een veilige plaats om
het te laten afkoelen.
Snoer vervangen
Indien het snoer van dit apparaat is beschadigd, dient het uitsluitend te
worden vervangen door een door Philips daartoe aangewezen reparateur,
omdat voor de reparatie speciale gereedschappen en/of onderdelen
vereist zijn.
18
Page 19

Descrizione dell'apparecchio (fig. 1)
A Unità principale
B Lampada-spia
C Anello di bloccaggio
D Presa
E Perni di contatto
F Supporto
G Fermo per capelli
H Ferro a spirale (per riccioli a cavatappo) (HP 4494/96).
I Ferro per zig-zag (per un effetto angolare) (HP 4494/96).
J Accessorio per piastre (HP 4496)
K Piastre (HP 4496):
lato ondulato: per piega frisée
lato liscio: per stirare i capelli
L Ferro arricciacapelli (HP 4494/96)
M Spazzola (per spazzolare o creare grossi riccioli) (HP 4494/96).
N Impugnature isolate
O Indicatore della temperatura
19
Italiano
Importante
• Le parti metalliche degli accessori modellatori diventano molto
calde durante l'uso. Evitate il contatto diretto.
Fate in modo che il cavo di alimentazione non venga a
contatto con le parti riscaldate.
• Non immergete mai l'apparecchio nell'acqua. Potete invece
pulirlo con un panno umido; prima però togliete sempre la
spina dalla presa di alimentazione.
• Lavando i capelli, o usando la piastra dalla parte liscia, la
piega ottenuta con l'apparecchio sparirà.
Page 20

Preparazione all'uso
Per cambiare gli accessori modellatori (fig. 2-6):
• Se durante la piega desiderate cambiare accessorio toccate solamente
le parti in plastica. Le parti metalliche dell'apparecchio scottano!
- Per sganciare l'accessorio dall'unità principale, girate l'anello di
bloccaggio (C) in direzione della freccia (fig. 2).
- Estraetelo dall'unità principale (fig. 3).
- Quando montate l'accessorio modellatore che avete scelto, controllate
che il supporto (F) si trovi nel lato inferiore (fig. 4).
- Inseritelo nell'unità principale (fig. 5).
- Agganciate l'anello di bloccaggio ruotandolo nel senso indicato dalla
freccia (fig. 6).
Per cambiare le piastre (fig. 7-10)
• lato ondulato: per la piega frisée
• lato liscio: per stirare i capelli
- Aprite le piastre premendo sull'impugnatura (fig. 7).
- Estraetele agendo sulle impugnature isolate (N) (fig. 8).
- Girate le piastre (fig. 9).
- Reinseritele controllando che le parti sporgenti ai lati entrino
correttamente nelle guide (fig. 10).
Riscaldamento (fig. 11-12)
- Inserite la spina nella presa di alimentazione. La lampada-spia (B) si
accenderà e l'accessorio modellatore si riscalderà (fig. 11).
- Quando l'indicatore della temperatura (O) posto sul ferro diventerà
scuro, l'apparecchio sarà pronto per l'uso (fig. 12).
Funzionamento
• Prima di iniziare a mettere in piega i capelli, pettinateli o spazzolateli a
lungo.
• I capelli e le parti riscaldate degli accessori devono essere ben a
contatto tra di loro. Di conseguenza, non mettete in piega grosse
ciocche di capelli e fate attenzione a non fare sovrapposizioni.
• Geometricks vi aiuterà a creare riccioli ed acconciature che durano a
lungo sia con i capelli asciutti sia umidi (mai bagnati!). Per ciascuna
onda o ricciolo occorrono solamente 5-10 secondi.
Dopo aver lavato i capelli potete applicare una spuma modellante.
Per ottenere risultati rapidi ed una maggiore durata, potete applicare un
po' di lacca ad ogni ciocca di capelli appena prima della messa in piega.
20
Page 21

Ferri modellatori (fig. 13 -18)
• Prendete una piccola ciocca di capelli di 2-3 cm al massimo.
• Per ottenere dei risultati duraturi, avvolgete a spirale una ciocca di
capelli attorno al ferro. Tutta la lunghezza della ciocca di capelli sarà
così in contatto con il ferro caldo.
• Fissate la punta della ciocca con il fermo ed avvolgete i capelli attorno al
ferro. Dopo 5-10 secondi aprite il fermo e togliete il ferro.
- Con il ferro a spirale: avvolgete la ciocca seguendo la forma a spirale del
ferro.
- Con il ferro arricciacapelli avvolgete i capelli normalmente.
- Con la spazzola non occorre il fermo, i capelli vengono presi dai denti.
• Importante: Controllate che la punta dei capelli sia sempre avvolta
attorno al ferro in modo uniforme: ciò per evitare di piegarle.
• Per dare volume ai capelli, dividete con le mani i riccioli. Con il ferro a
spirale questa operazione vi darà un'acconciatura veramente speciale.
Piastre (fig. 19-21)
• Prendete una ciocca di capelli di 5-6 cm al massimo.
• L'impugnatura vi consente di aprire e chiudere le piastre, in questo modo
potete mettere in piega una ciocca di capelli per volta.
• Con le piastre, iniziate sempre dall'attaccatura dei capelli. Poi continuate
verso la punta.
• Volendo, potete fare pressione con le dita sulla parte esterna delle
piastre. (Non toccate l'interno!).
• Trattenete i capelli nelle piastre per 5-10 secondi e poi apritele per
mettere in piega, con lo stesso procedimento, tutta la lunghezza della
ciocca di capelli. Fate attenzione a non fare sovrapposizioni!
Dopo l'uso
- Dopo l'uso, togliete sempre la spina dalla presa di alimentazione.
- Riponete in un posto sicuro l'apparecchio, con il supporto rivolto verso il
basso, e lasciatelo raffreddare.
Sostituzione del cavo di alimentazione
Se il cavo di alimentazione di questo apparecchio si dovesse rovinare,
occorrerà farlo sostituire da un centro assistenza autorizzato perchè
occorrono strumenti e ricambi speciali.
21
Page 22

Descripción general (fig. 1)
A Unidad principal
B Lámpara piloto
C Anillo de sujeción
D Enchufe
E Patillas de contacto
F Soporte (échese hacia atrás antes de usar el aparato)
G Pinza
H Pieza moldeadora "Espirales" (para tirabuzones) (HP 4494/96)
I Pieza moldeadora "Zigzags" (para rizado redondeado)
(HP 4494/96)
J Pieza moldeadora "Rizado" (HP 4496)
K Placas de inserción para "Rizado" (HP 4496):
"Placa de rizado" (cara ondulada: para ondas)
"Placa plana" (cara plana: para alisar)
L Pieza moldeadora "Tirabuzones" (para tirabuzones redondeados
uniformemente) (HP 4494/96)
M Pieza moldeadora "Cepillo" (para cepillado, desenredado y formar
grandes ondas) (HP 4494/96)
N Mangos aislados
O Punto de temperatura
22
Español
Importante
• Las piezas del moldeador se calientan durante su empleo.
Impidan pues que entren en contacto con la piel. No dejen que
el cordón de red toque en partes calientes.
• No sumerjan nunca el aparato en agua. Podrán limpiarlo con
un paño húmedo. Antes de ello, saquen la clavija de la toma
de corriente.
• El lavado del pelo o el empleo de la "Placa lisa" del moldeador
eliminará las ondas y los rizos.
Page 23

Para poner a punto el MultiStyler
Como cambiar las piezas moldeadoras (figs. 2-6)
• Cuando cambien estas piezas estando caliente el aparato, toquen solo
las partes de plástico: ¡las metálicas están calientes!
- Para soltar las piezas, hagan girar el anillo de sujeción (C) en la
dirección de la flecha (fig. 2).
- Saquen la pieza moldeadora de la unidad principal (fig. 3).
- Al montar la pieza moldeadora que necesiten, cerciórense de que el
soporte (F) quede en la parte inferior (fig. 4).
- Empujen la pieza con firmeza en la unidad principal (fig. 5).
- Asegúrenla haciendo girar el anillo de sujeción (fig. 6).
Como cambiar las piezas para rizado (figs. 7 a 10)
• Cara ondulada: para ondas
• Cara plana: para alisar
- Abran el aparato apretando hacia abajo el mango (fig. 7).
- Cojan la placa por las partes aisladas (N) en la parte frontal.
- Saquen la placa del rizador (fig. 8).
- Hagan girar la placa (fig. 9).
- Introduzcan la placa en el rizador, cerciorándose de que las partes sobresalientes de los lados entren en las ranuras correctamente (fig. 10).
Calentamiento (figs. 11-12)
- Inserten la clavija de red en el enchufe. El piloto (B) se
iluminará y la pieza del moldeador se calentará (fig. 11).
- Cuando el punto de temperatura (O) en el accesorio se oscurezca
el moldeador está listo para usar (fig. 12).
Como usarlo
• Antes de proceder al moldeado, péinense el pelo, para que esté
completamente desenredado y suave.
• Cerciórense siempre de hacer buen contacto entre el pelo y la placa
moldeadora o la rizadora. Por eso, no intenten moldear mechones
gruesos de pelo, ni dupliquen el rizado cuando usen las placas.
• Tanto con pelo seco como húmedo (¡pero nunca mojado!) el MultiStyler
de Philips les ayudará a conseguir ondas y rizos duraderos. Para ello
solo necesitan de 5 a 10 segundos.
Después de haberse lavado el pelo podrán usar una loción fijadora.
Para conseguir unos resultados rápidos y una textura fina, podrán
aplicarse un spray adecuado en cada mecha peinada de pelo
inmediatamente antes de proceder a su moldeado.
23
Page 24

Las piezas moldeadoras (figs. 13 a 18)
• Trabajen siempre con mechas pequeñas, de un máximo de 2 a 3 cm.
• Para conseguir resultados más firmes, envuelvan una mecha en la pieza
moldeadora, en espiral. El pelo debe estar en contacto con la varilla
caliente en toda su longitud.
• Sujeten el extremo fijo de la mecha con la pinza y envuelvan el pelo en
la varilla yendo hacia la cabeza.
Al cabo de 5 a 10 segundos, abran la pinza y saquen la varilla del pelo.
- Con "Espirales": envuelvan la mecha siguiendo el perfil en espiral de la
pieza.
- Con "Tirabuzones": envuelvan el pelo en línea recta.
- Con el "Cepillo": no se necesita pinza para que los dientes cojan el pelo.
• Importante. Cerciórense siempre de que los extremos del pelo quedan
envueltos con suavidad alrededor de la varilla. De ese modo se evitarán
extremos doblados.
• Podrán dividir los tirabuzones con los dedos para agregarles volumen.
Sobre todo con "Espirales", esto le proporcionará a su cabello un
moldeado asombroso.
"Pinza" (figs. 19 a 21)
• Formen mechas de un máximo de 5 a 6 cm.
• La pinza les permitirá abrir y cerrar el rizador, de modo que puedan
moldear una mecha de pelo por secciones.
• Empiecen a moldear lo más cerca posible de la cabeza, tratando a
continuación las partes más alejadas.
Podrán apretar las dos partes del rizador con los dedos. (¡No toquen las
placas!)
• Mantengan el pelo en el rizador entre 5 y 10 segundos. Abran después
el aparato y pasen a tratar la siguiente sección de la misma mecha,
procurando no superponer secciones ya tratadas.
Después de usarlo
- Tras haber usado el aparato, extraigan la clavija de la toma de corriente.
- Pongan el aparato en su soporte, colocándolo hacia abajo, en un lugar
seguro, y dejen que se enfríe.
Para sustituir el cordón de red
Si el cable de red se averiase, llévelo a reparar a un taller de servicio
autorizado, designado por la organización Philips, ya que se necesitan
herramientas y piezas especiales para repararlo.
24
Page 25

Descrição geral (fig. 1)
A Unidade principal
B Lâmpada piloto
C Anel de fixação
D Tomada
E Pinos de contacto
F Base (rode para trás antes de usar)
G Grampo
H Peça "Espirais" (para caracóis em espiral) (HP 4494/96)
I Peça "Zig Zags" (para caracóis em canudos) (HP 4494/96)
J Peça "Frisador" (HP 4496)
K Placas interiores do "Frisador" (HP 4496):
"Placa de frisar" (lado ondulado: para ondas)
"Placa lisa" (lado plano: para cabelo liso)
L Peça "Caracóis" (para caracóis uniformemente enrolados)
(HP 4494/96)
M Peça "Escova" (para escovar/desemaranhar e fazer rolos grandes)
(HP 4494/96)
N Pinças isoladas
O Ponto de temperatura
25
Português
Importante
• As peças do aparelho e as placas interiores do "Frisador"
ficarão quentes durante a utilização. Evite por isso o contacto
com a pele. Não deixe que o cabo de ligação toque em
qualquer das peças quentes.
• Nunca mergulhe o aparelho em água. Pode limpá-lo com um
pano humedecido. Retire primeiro a ficha da tomada da
parede.
• A lavagem do seu cabelo ou a utilização da "Flat plate" (placa
lisa) do Frisador desfarão as ondas e os caracóis.
Page 26

Preparação do MultiStyler
Como mudar as peças (fig. 2-6)
• Quando mudar as peças durante o funcionamento, toque somente nas
partes de plástico. As partes de metal estarão quentes!
- Para soltar as peças, rode o anel de fixação (C) na direcção da seta
(fig. 2).
- Retire a peça do aparelho (fig. 3).
- Ao montar o acessório pretendido, verifique se a base (F) está por baixo
(fig. 4).
- Introduza firmemente a peça no aparelho (fig. 5).
- Prenda-a rodando o anel de fixação (fig. 6).
Como mudar as placas interiores do Frisador (fig. 7-10)
• Lado ondulado: para ondas.
• Lado liso: para cabelo liso.
- Abra o Frisador carregando para baixo na pega (fig. 7).
- Pegue na placa pelas pegas isoladas (N) do lado da frente.
- Puxe a placa para fora do Frisador (fig. 8).
- Rode a placa (fig. 9).
- Introduza a placa no Frisador. Verifique se as saliências dos lados
entram correctamente nos entalhes (fig. 10).
Aquecimento (fig. 11-12)
- Introduza a ficha na tomada da parede. A lâmpada piloto (B) acende-se
e a peça começa a aquecer (fig. 11).
- Quando o ponto de temperatura (O) na peça escurecer, o aparelho
estará pronto a usar (fig. 12)
Como usar
• Antes de modelar, pentear ou escovar o cabelo deverá estar
desemaranhado e macio.
• Verifique sempre se existe bom contacto entre o cabelo e a peça do
Frisador. Por esta razão, não tente modelar tranças grossas de cabelo
nem enrolar grandes caracóis quando usar as peças do aparelho.
• Tanto com cabelo seco como húmido (nunca molhado!), o
"Geometricks" MultiStyler da Philips ajudá-la-à a fazer longos e duráveis
caracóis e ondas. Para fazer um rolo de ondas apenas precisará de 5 10 segundos.
Depois de lavar o cabelo poderá usar uma loção de assentamento.
Para resultados mais rápidos e com textura fina, poderá aplicar um
vaporizador adequado em cada trança de cabelo, imediatamente antes
de modelar.
26
Page 27

Peças (fig. 13 - 18)
• Faça sempre tranças pequenas de 2 - 3 cm no máximo.
• Para melhores resultados, enrole uma trança em espiral à volta da peça.
A totalidade do comprimento da trança deverá ficar em contacto com a
haste quente.
• Prenda a ponta da trança com o grampo e enrole o cabelo à volta da
haste na direcção da cabeça.
Depois de 5 - 10 segundos abra o grampo e tire o cilindro do cabelo.
- Para "Espirais": enrole a trança em espiral ao longo da peça.
- Para "Caracóis": enrole o cabelo a direito.
- Para "Escova" não é necessário o grampo porque os dentes da escova
agarram o cabelo.
• Importante: Verifique sempre se as pontas dos cabelos ficam enroladas
uniformemente à volta do cilindro da peça: isto evitará pontas
recurvadas.
• Poderá dividir os caracóis com os seus dedos para aumentar o volume.
Especialmente com Espirais dar-lhe-à um aspecto magnífico.
"Frisador" (fig. 19 - 21)
• Faça tranças de 5 - 6 cm no máximo.
• O grampo permite-lhe abrir e fechar o Frisador, de maneira a modelar
as tranças de cabelo por partes. Comece sempre a frisar junto à
cabeça. Depois passe a arranjar sucessivamente as secções inferiores.
• Pode carregar ao mesmo tempo com os seus dedos em ambas as
partes do Frisador. (Não toque nas placas!).
• Mantenha o cabelo no Frisador de Cabelo durante 5 - 10 segundos.
Abra depois o Frisador de Cabelo para arranjar a secção seguinte da
mesma trança. Verifique se há alguma sobreposição!
Depois de usar
- Depois de usar retire a ficha da tomada da parede.
- Coloque o aparelho com a base por baixo num local seguro e deixe-o
arrefecer.
Substituição do fio eléctrico
Se o cabo de alimentação deste aparelho se encontrar danificado, deverá
ser somente substituido numa oficina designada pelo fabricante, porque
são necessárias ferramentas e/ou componentes especiais.
27
Page 28

Generel beskrivelse (fig. 1)
A Hoveddel
B Kontrollampe
C Klemmering
D Fatning
E Kontaktben
F Støtte (drejes tilbage før brug)
G Klemme
H Krølletilbehør "Spiral" (til proptrækkerkrøller) (HP 4494/96)
I Krølletilbehør "Zigzag" (til z-formede krøller) (HP 4494/96)
J Krølletilbehør "Crepejern" (HP 4496)
K Indskudsplader til "crepejernet" (HP 4496):
"Crepe plade" (den rillede side: til bølger)
"Flad plade" (den flade side: til glat hår)
L Krølletilbehør "Krøller" (til ensartede runde krøller) (HP 4494/96)
M Krølletilbehør "Børste" (til at børste/rede ud og forme store krøller)
(HP 4494/96)
N Isolerede håndtag
O Temperaturindikator
28
Dansk
Vigtigt
• Krølletilbehøret og pladerne til "crepejernet" bliver varme
under brug. Undgå berøring med huden. Ledningen må ikke
komme i berøring med nogen af de varme dele.
• Apparatet må aldrig nedsænkes i vand. Det kan rengøres med
en fugtig klud. Tag stikket ud af stikkontakten før rengøring.
• Krøller og bølger forsvinder ved hårvask, eller hvis
crepejernets "flade plade" benyttes.
Page 29

Sådan gøres MultiStyleren klar til brug
Sådan skiftes stylerens tilbehør (fig. 2-6)
• Skiftes tilbehøret under hårsætningen, må man kun røre ved plastic
delene. Metal delene bliver meget varme!
- Klemmeringen (C) drejes i pilens retning (fig. 2), når tilbehøret skal tages
af.
- Tilbehøret trækkes fri af hoveddelen (fig. 3).
- Når det ønskede tilbehør påsættes, skal støtten (F) vende nedad (fig. 4).
- Tilbehøret skubbes godt ind i hoveddelen (fig. 5).
- Tilbehøret fastgøres med klemmeringen (fig. 6).
Sådan skiftes crepe pladerne (fig. 7-10)
• Den rillede side: til bølger
• Den flade side: til glat hår
- Crepejernet åbnes ved at trykke håndtaget nedad (fig. 7).
- Pladen holdes i de isolerede håndtag (N) foran.
- Pladen trækkes ud af crepejernet (fig. 8).
- Pladen vendes (fig. 9).
- Pladen skydes ind i crepejernet. Kontroller at kantfremspringene i
pladens sider glider rigtigt ind i rillerne (fig. 10).
Opvarmning (fig. 11-12)
- Stikket sættes i stikkontakten. Kontrollampen (B) tænder, og
krølletilbehøret opvarmes (fig. 11).
- Når temperaturindikatoren (O) på tilbehøret bliver mørk, er apparatet klar
til brug (fig. 12).
Sådan anvendes apparatet
• Håret redes eller børstes helt glat før formningen.
• Sørg altid for at håret har god kontakt med krølletilbehøret eller
crepejernet. Derfor bør man ikke forsøge at forme for store hårlokker ad
gangen, og håret må ikke rulles dobbelt omkring tilbehøret.
• Philips "Geometricks" MultiStyler kan anvendes både i tørt og let fugtigt
hår (aldrig i vådt hår!), og giver krøller og bølger, der holder længe. Det
tager kun 5-10 sekunder at forme en krølle eller bølge.
Man kan benytte en setting lotion efter hårvask.
For at opnå et hurtigt og mere holdbart resultat kan man anvende en
dertil egnet hårspray til hver enkelt hårlok lige før formningen.
29
Page 30

Krølletilbehør (fig. 13-18)
• Krøl altid små hårlokker på maks. 2-3 cm.
• Et holdbart resultat opnås ved at rulle en hårlok som en spiral rundt om
krølletilbehøret. På den måde kommer hele hårlokken i kontakt med den
varme krøllestang.
• Spidsen af hårlokken fastgøres med klemmen, hvorefter håret rulles
omkring stangen ind imod hovedbunden.
Efter 5-10 sekunder åbnes klemmen, og stangen tages ud af håret.
- Med "Spiral" rulles hårlokken op langs spiralens profil på krølletilbehøret.
- Med "Krøller" rulles håret lige op.
- Med "Børste" behøver man ikke klemmen, da børsten holder håret fast.
• Vigtigt: Sørg altid for at hårspidserne er rullet glat omkring stangen, så
undgår man, at hårspidserne får forkerte knæk.
• Man kan skille krøllerne med fingrene, så håret får mere fylde. Det vil
give en flot frisure, især når man har anvendt "Spiral".
"Crepejern" (fig. 19-21)
• Crep hårlokker der er maks. 5-6 cm.
• Crepejernet åbnes og lukkes med klemmen, og således kan man creppe
en hårlok ad flere gange.
• Start altid med at creppe hårlokken fra hovedbunden, hvorefter man
gradvis arbejder sig ned ad hårlokken.
• Crepejernets to dele kan klemmes sammen med fingrene. (Rør ikke ved
pladerne!)
• Håret holdes i crepejernet i 5-10 sekunder. Derefter åbnes crepejernet,
og den næste del af hårlokken behandles. Sørge for at de behandlede
dele af hårlokken overlapper hinanden.
Efter brug
- Stikket tages ud af stikkontakten efter brug.
- Apparatet placeres med støtten nedad på et sikkert sted, hvor det skal
have tid til at afkøle.
Udskiftning af netledning
Hvis netledningen til dette apparat er beskadiget skal den udskiftes af
Philips Service A/S, da der skal anvendes specialværktøj og/eller dele i
forbindelse med udskiftningen.
30
Page 31

Beskrivelse (fig. 1)
A Hovedenhet
B Indikatorlampe
C Festering
D Kontakt
E Kontaktpinner
F Stativ (snu bakover før bruk)
G Klype
H Frisertilbehør "Spiraler" (for korketrekker-krøller) (HP 4494/96)
I Frisertilbehør "Sik-sak" (for formete krøller) (HP 4494/96)
J Frisertilbehør "Crepetang" (HP 4496)
K Innleggsplater for "creping" (HP 4496)
"Crepe-plate" (riflet side: for bølger)
"Flat plate" (flat side: for rett hår)
L Frisertilbehør "Krøller" (for runde krøller) (HP 4494/96)
M Frisertilbehør "Børste" (for børsting/utretting og store ruller)
(HP 4494/96)
N Isolert håndtak
O Temperaturmerke
31
Norsk
Viktig
• Frisertilbehøret og platene på creperen vil bli varmt under
bruk. Unngå kontakt med huden. La ikke nettledningen komme
i kontakt med de varme delene.
• Dypp aldri apparatet i vann. De kan rengjøre det med en fuktig
klut. Trekk alltid først støpselet ut av stikkontakten.
• Vasking av håret eller bruk av "Flat plate" på creperen, vil ta
bort bølger og krøller.
Page 32

Før bruk:
Bytting av frontstykker (fig. 2-6)
- Ved bytte av frisertilbehør under bruk, berør kun plastdelene.
Metalldelene er varme.
- For å frigjøre frontstykket, dreies festeringen (C) (fig. 2).
- Trekk frontstykket rett av hovedenheten (fig. 3).
- Ved montering av det ønskede frontstykket, pass da på at stativet (F) er
på undersiden (fig. 4).
- Sett frontstykket rett inn på hovedenheten (fig. 5). Sikres ved å vri
festeringen (fig. 6).
Skifting av crepe innleggsplater (fig. 7-10)
• Riflet side: for små bølger.
• Flat side: for rett hår.
- Åpne creperen ved å presse håndtaket nedover (fig. 7).
- Ta platen med det isolerte håndtaket (N) i fronten.
- Trekk platen ut av creperen (fig. 8).
- Snu platen (fig. 9).
- Sett platen i creperen. Vær sikker på at fremspringene på sidene går
riktig inn i sporene (fig. 10).
Oppvarming (fig. 11-12)
- Sett støpselet i stikkontakten. Indikatorlampen (B) vil lyse og frontstykket
vil bli varmet (fig. 11).
- Når temperaturmerket (O) på frontstykket blir mørkt, er apparatet ferdig
til bruk (fig. 12).
Bruk
• Gre eller børst håret før frisering slik at det er glatt og helt uten floker.
• Pass på at det er god kontakt mellom håret og frisertilbehør eller creper.
Det anbefales derfor å ikke forme for store mengder hår på en gang og
heller ikke tvinne håret ved bruk av frisertilbehøret.
• Både for tørt og fuktig hår (aldri vått!) vil Philips "Geometricks"
Multistyler hjelpe Dem med å forme varige krøller og bølger. Å forme en
krøll eller bølge tar bare 5-10 sek.
Etter hårvask kan De bruke leggevann. For å oppnå et hurtig resultat og
en fin frisyre, kan De benytte en passende hårspray på hver hårlokk rett
før håret formes.
32
Page 33

Frisertilbehør (fig. 13-18)
• Form alltid små lokker maks 2-3 cm.
• For å oppnå et fast resultat, tvinn en hårlokk rundt frisertilbehøret i
spiralform. Hele hårlokken vil således komme i kontakt med
varmetangen.
• Fest enden på hårlokken med klypen og tvinn håret rundt tangen mot
hodet. Etter 5-10 sek. åpnes klypen og tangen fjernes fra håret.
- Tvinn hårlokken med "Spiralen" slik at håret følger spiralen på
frontstykket.
- Med "Krøller" tvinnes håret stramt.
- Med "Børste" er det ikke nødvendig å bruke klypen, da tennene griper
håret.
• Viktig: Påse alltid at hårendene vikles godt rundt tangen - dette for å
hindre bøyde tupper.
• De kan fordele krøllene med fingrene for å få det fyldigere. Spesielt med
"Spiralen" vil dette gi en flott frisyre.
"Creper" (fig. 19-21)
• Form krøller på maks 5-6 cm.
• Ved hjelp av klypen åpnes og lukkes creperen, slik at De kan forme en
hårlengde bit for bit.
• Begynn alltid crepingen inntil hodebunnen. Deretter behandles håret
sukessivt utover hårlengden. De kan presse de to delen til creperen
sammen med fingrene. (Berør ikke platene). La håret være i hårcreperen
5-10 sek. Deretter åpnes creperen for å behandle neste hårlengde. Pass
på at det er en overlapping.
Etter bruk
Etter bruk tas støpselet ut av stikkontakten. Plasser apparatet med
stativet nedover på en sikker plass, og la det avkjøles.
Skifte av nettledning
Hvis nettledningen på dette apparatet blir skadet, må den skiftes hos en
serviceavdeling utnevnt av leverandør, da spesialverktøj og/eller deler er
påkrevet.
33
Page 34

Apparatens delar, fig 1
A Skaft.
B Signallampa.
C Låsring.
D Anslutning till tillsatserna.
E Kontaktpinnar.
F Stöd. Vik undan det när du skall använda apparaten.
G Klämma.
H Tillsats "Spiral" för korkskruvslockar (HP 4494/96).
I Tillsats "Sicksacktång" för sicksackformade lockar (HP 4494/96).
J Tillsats "Krustång" (HP 4496).
K Utbytbara plattor till krustången (HP 4496) med:
Räfflad sida för krusning och
slät sida för att göra håret rakt.
L Tillsats "Locktång" för "vanliga" runda lockar (HP 4494/96)
M Tillsats "Borste" för borstning och formning av stora lockar
(HP 4494/96).
N Värmeisolerande grepp.
O Färgfläck för temperaturindikering.
34
Svenska
Viktigt
• De utbytbara tillsatserna, spiralen, sicksacktången,
triangeltången och plattorna på krustången blir heta vid
användning. Du kan bränna dig om du tar i dem.
• Drag ut stickproppen ur vägguttaget före rengöring.
• Doppa aldrig apparaten i vatten. Den kan torkas av med en
fuktig väl urvriden trasa.
• När håret tvättas försvinner läggningen du gjort med
apparaten.
Läs först hela bruksanvisningen. Spara den. Spara köpbevis och kvitto.
Page 35

Så här byter du tillsatser
• Se upp så att du inte bränner dig. Apparatens metalldelar kan vara heta.
Tag endast i plastdelarna.
- För att kunna lossa den tillsats, som sitter på, vrid låsringen (C) i pilens
riktning, fig 2.
- Dra tillsatsen rakt ut från skaftet, fig 3.
- Den nya tillsatsen skall sättas på så att stödet (F) kommer neråt, fig 4.
- Stick in tillsatsen i skaftets främre del och tryck in den ordentligt, fig 5.
- Lås genom att vrida tillbaka låsringen (C), fig 6.
Så här vänder du krustångens plattor, fig 7-10
• Räfflade sidorna mot varandra för krusning.
• Släta sidorna mot varandra för att göra håret rakt.
- Öppna krustången, fig 7.
- Ta tag i de värmeisolerande greppen (N) och drag plattorna rakt ut,
fig 8.
- Vänd på plattorna till önskat läge.
- Sätt tillbaka plattorna. Kontrollera att de passar i spåren på sidorna,
fig 10.
Uppvärmning, fig 11 och 12
- Sätt i stickproppen i ett vägguttag. Signallampan (B) tänds och
apparaten börjar bli varm, fig 11.
- När färgfläcken (O) blir mörk är apparaten färdig att användas, fig 12.
Användning
• Innan du börjar bör du kamma och borsta ut håret ordentligt.
• Håret måste få god kontakt med det tillbehör du använder resp med
krustångens plattor. Bearbeta därför inte tjocka hårlänkar och linda inte
upp håret i dubbla lager.
• Du får bra och varaktigt resultat med torrt eller lätt fuktigt men inte vått
hår. Låt värmen verka 5 - 10 sekunder.
Använd gärna hårläggningsvätska efter att du tvättat håret.
Du får lättare ett bra resultat om du sprayar hårlänken med en lämplig
hårspray omedelbart innan du formar den.
"Spiraler", "Sicksack" och "Trianglar", fig 13-18
• Arbeta med 2 - 3 cm breda hårlänkar.
• Linda upp hårlänken så att den får god kontakt med den heta staven, om
möjligt i hela sin längd.
• Kläm fast yttersta änden av hårlänken i klämman och linda den runt
35
Page 36

staven in mot huvudet. Efter 5 - 10 sekunder, öppna klämman och drag
ut staven ur hårlänken.
- För spirallockar, linda hårlänken runt staven på tillsatsen (H) utefter
spiralen.
- För lockar linda hårlänken rakare på tillsatsens stav.
- Borsten greppar håret med sina tänderna och gör att någon klämma inte
behövs.
• Det är viktigt att hårtopparna lindas in utan att de viks.
• När du är färdig kan du försiktigt forma håret med fingrarna eller med
t ex skaftet på en kam.
Krustången, fig 19-21
• Arbeta med 5 - 6 cm breda hårlänkar.
• Börja krusningen längst in vid huvudet och flytta sedan krustången bit för
bit utåt med litet överlapp, så att du får ett jämnt resultat utefter hela
hårlänken.
• Du kan få bättre resultat om du trycker ihop tången med fingrarna, men
tryck inte på själva plattorna, de är heta så att du kan bränna dig.
• Håll håret 5 - 10 sekunder mellan plattorna innan du öppnar
krustången.
När du är färdig
- Ta ur stickproppen ur vägguttaget.
- Placera apparaten på en säker plats med stödet neråt och låt den kallna.
Byte av nättsladd
Om sladden på denna apparat skadas måste den bytas av Philips eller av
deras serviceombud, eftersom specialverktyg krävs.
36
Page 37

Laitteen osat (kuva 1)
A Runko
B Merkkivalo
C Kiristysrengas
D Vastake
E Kytkentänastat
F Tukijalka (käännä taaksepäin ennen käyttöä)
G Pihti
H "Spiraali"-kiharrusosa (korkkiruuvikiharat) (HP 4494/96)
I "Siksak"-kiharrusosa (z-malliset kiharat) (HP 4494/96)
J "Kreppaus"-kiharrusosa (HP 4496)
K Kreppausosan vaihtolevyt (HP 4496):
"Kreppauslevy" (aaltopuoli: laineita)
"Tasainen levy" (sileä puoli: suorat hiukset)
L "Kihara"-kiharrusosa (tasaisen pyöreät kiharat) (HP 4494/96)
M "Harja"-kiharrusosa (harjaus/selvittäminen ja loivat kiharat)
(HP 4494/96)
N Eristetyt kahvat
O Merkkitäplä
37
Suomi
Tärkeää
• Laitteen kiharrusosat ja kreppauslevyt kuumenevat. Varo
etteivät ne kosketa ihoa. Liitosjohto ei saa koskettaa mitään
kuumaa osaa.
• Älä upota laitetta veteen. Käytä puhdistukseen kosteaa liinaa.
Irrota ensin pistotulppa pistorasiasta.
• Hiusten pesu tai sileiden kreppauslevyjen käyttö poistaa
kreppikihartimella tehdyt laineet ja kiharat.
• Ennen kuin yhdistät laitteen pistorasiaan, tarkista, että laitteen
arvokilven jännite- ja taajuusmerkintä vastaavat paikallista
verkkojännitettä ja -taajuutta.
• Älä käytä laitetta kylvyssä, suihkussa, suihkun läheisyydessä
tai ulkona sateessa.
• Jos laite on pudonnut veteen, irrota ensin pistotulppa
pistorasiasta, ennen kuin nostat laitteen vedestä.
• Tarkistuta veteen pudonnut laite huollossa ennen käyttöönottoa.
• Älä anna lasten käyttää laitetta ilman valvontaa.
Page 38

Käyttöönotto
Kiharrusosan vaihto (kuvat 2-6)
• Kun vaihdat kiharrusosan kesken kihartamisen, koske vain muoviosiin.
Metalliosat ovat kuumat!
- Irrota kiharrusosa kiertämällä kiristysrengasta (C) nuolen suuntaan
(kuva 2).
- Vedä kiharrusosa irti rungosta (kuva 3).
- Kun kiinnität kiharrusosan, varmista että tukijalka (F) on alapuolella
(kuva 4).
- Työnnä kiharrusosa kunnolla runkoon (kuva 5).
- Kiinnitä kiertämällä kiristysrengasta (kuva 6).
Kreppauslevyjen vaihto (kuvat 7-10)
• Aaltopuoli: laineita
• Sileä puoli: suorat hiukset
- Avaa kreppikiharrin painamalla kahvaa alaspäin (kuva 7).
- Tartu levyn etupuolella oleviin eristettyihin kahvoihin (N).
- Vedä levy pois kreppikihartimesta (kuva 8).
- Käännä levy (kuva 9).
- Työnnä levy kreppikihartimeen. Varmista, että sivuilla olevat ulokkeet
asettuvat ohjausuriin oikein (kuva 10).
Kuumentaminen (kuvat 11-12)
- Työnnä pistotulppa pistorasiaan. Merkkivalo (B) syttyy ja kiharrusosa
alkaa kuumentua (kuva 11).
- Kun kiharrusosan merkkitäplä (O) muuttuu tummaksi, laite on valmis
käyttöön (kuva 12).
Käyttö
• Kampaa tai harjaa hiukset täysin selviksi ja sileiksi ennen kihartamista.
• Hiusten tulee koskettaa kunnolla kiharrusosaa tai kreppauslevyjä.
Tämän takia ei kannata yrittää kihartaa paksuja hiustupsuja tai kiertää
hiuksia moninkerroin kiharrinosan ympärille.
• Philips "Geometricks" -kihartimilla voi kihartaa sekä kuivia että kosteita
(ei koskaan märkiä!) hiuksia. Yhden kiharan tai laineen tekemiseen
kuuluu vain 5 - 10 sekuntia.
Vastapestyihin hiuksiin voi käyttää kampausnestettä.
Lopputulosta voidaan parantaa suihkuttamalla jokaiselle kiharalle
hiuslakkaa juuri ennen aukikampausta.
38
Page 39

Kiharrusosat (kuvat 13 - 18)
• Kiharra aina pieni hiustupsu (leveys 2-3 cm) kerralla.
• Kierrä hiustupsu spiraaliksi kiharrusosan ympärille. Silloin hiustupsu
koskettaa koko pituudeltaan kuumaa kiharrusosaa.
- Aseta hiustupsun pää pihdin väliin ja kierrä laitetta niin että hiukset
kiertyvät kiharrusosan ympäri.
- Avaa pihti 5 - 10 sekunnin kuluttua ja vedä kiharrusosa pois hiuksista.
- Spiraalikiharrin: kierrä hiukset seuraten kiharrusosan spiraalimuotoa.
- Kiharakiharrin: kierrä hiukset suoraan.
- Harjakiharrin ei tarvitse pihtiä, sillä harjakset pitävät hiukset paikallaan.
• Tärkeää: Kierrä hiuslatvat aina sileästi kiharrusosan ympärille: näin
hiuslatvat eivät taitu.
• Hajota kiharat sormin ilmavaksi kampaukseksi. Varsinkin spiraalikiharoilla saat upean kampauksen.
"Kreppaus" (kuvat 19 - 21)
• Kiharra aina pieni hiustupsu (leveys 5-6 cm) kerralla.
• Kreppauskiharrin voidaan avata ja sulkea kahvasta, joten voit kihartaa
hiustupsun osa kerralla.
• Aloita läheltä päälakea. Siirry sitten vähitellen alaspäin.
• Halutessasi voit puristaa kiharrusosan puolia sormilla vastakkain. (Älä
koske levyihin!)
• Pidä hiukset kihartimessa 5-10 sekuntia. Avaa sen jälkeen kiharrin ja
kiharra seuraava osa samasta hiustupsusta. Katso, että kiharat menevät
hieman päällekkäin!
Käytön jälkeen
- Irrota käytön jälkeen pistotulppa pistorasiasta.
- Aseta laite tukijalka alaspäin jäähtymään turvalliseen paikkaan.
Liitäntäjohdon vaihto
Jos tämän laitteen verkkoliitäntäjohto vaurioituu, on johto vaihdatettava
valmistajan valtuuttamassa huoltoliikkeessä tarvittavien erikoistyökalujen
ja/tai -osien takia.
Oikeus muutoksiin varataan.
39
Page 40

Genel Aç›klamalar (flekil 1)
A fiekillendirici
B Aç›k lambas›
C Aparatlar› takma/ç›karma halkas›
D Ba¤lant› noktalar›
E Ba¤lant› soketleri
F Dayanak aya¤› (kullanmadan önce ters yöne do¤ru aç›n›z)
G Mafla
H Saçta Spiral fleklinde dalgalar yaratan aparat (HP 4494/96)
I Saçta Zig zag yaratan aparat (HP 4494/96)
J Düzlefltirme/Tost aparat› (HP 4496)
K Düzlefltirme/Tost plakalar› (HP 4496)
Düzlefltirme Plakalar› (yüzeyi düz taraf)
Tost Plakalar› (yüzeyi dalgal› taraf)
L K›v›rma maflas› (biçimli bukleler yaratmak için) (HP 4494/96)
M fiekillendirme f›rças› (saç› taramak, saç› açmak, iri bukleler
sa¤lamakiçin) (HP 4494/96)
N Plastik, so¤uk uç k›s›mlar
O Kullan›ma haz›r iflareti
40
Türkçe
Önemli
• fiekillendirme aparatlar› ve düzlefltirme/tost plakas› kullan›m
s›ras›nda s›cak olacakt›r.
Bu nedenle kullan›m s›ras›nda ç›plak deri ile temas etmesini
engelleyiniz. Elektrik kablosunun cihaz›n ›s›nan k›s›mlar›na de¤mesine izin vermeyiniz.
• Cihaz› asla do¤rudan suyun içine sokmay›n›z.Temizlemek
istedi¤inizde cihaz›n fiflinin prizden çekilmifl oldu¤undan emin
olduktan sonra nemli bir bez ile siliniz.
• Cihaz ile saç›n›za verece¤iniz flekiller, saç›n›z› y›kad›¤›n›zda ya
da düzlefltirme aparat› kullan›ld›¤›nda kaybolacakt›r.
Page 41

Geometricks Multi fiekillendirici yi kullan›ma haz›rlamak
fiekillendirme aparatlar›n›n tak›lmas›/ç›kar›lmas› (fig. 2-6)
• Cihaz s›cak iken, flekillendirme aparatlar›n› de¤ifltirmek isterseniz
sadece plastik k›s›mlara dokununuz. Metal k›s›mlar s›cakt›r.
- Cihaza tak›l› bulunan bir flekillendirme aparat›n› ç›kartmak için önce
aparat takma/ç›karma halkas›n› (C) ok yönünde çeviriniz. (fig. 2)
- Daha sonra flekillendirme aparat›n› flekillendiriciden çekerek ç›kar›n›z.
(fig. 3)
- Gerekli olan flekillendirme aparat›n› takarken, dayanak aya¤›n›n (F)
afla¤›ya bakacak flekilde takt›¤›n›zdan emin olun. (fig. 4)
- fiekillendirme aparat›n› dikkatlice, flekillendirici üzerinde yer alan sokete
tak›n›z (fig. 5).
- fiekillendirme aparat›n› tesbit etmek için, takma/ç›karma halkas›n› bu
kez ters yönde çeviriniz (fig. 6).
Düzlefltirme/Tost plakalar›n›n tak›lmas›/ç›kart›lmas› (fig. 7-10)
• Düzlefltirme Plakalar› (yüzeyi düz taraf)
• Tost Plakalar› (yüzeyi dalgal› taraf)
- Düzlefltirme/Tost plakalar›n›n içine konulaca¤› aparat› açma/kapama
koluna bast›rarak aç›n›z. (fig. 7)
- Ç›kartmak istedi¤iniz plakay› (s›cak olaca¤›ndan) plastik uç k›sm›ndan
(N) tutun ve çekerek aparattan ç›kart›n›z. (fig. 8)
- Ç›kartt›¤›n›z plakan›n di¤er yüzünü çeviriniz. (fig. 9)
- Plakay› tekrar aparat›n içine sokun ve plakan›n iki yan›nda yer alan
ç›k›nt›lar›n yuvalar›na tam olarak oturdu¤undan emin olunuz. (fig. 10)
Cihaz› ›s›tmak (fig. 11-12)
- Cihaz›n fiflini pirize tak›n›z. Cihaz›n üzerindeki Aç›k ›fl›¤› (B) yanacak ve
cihaz ›s›nmaya bafllayacakt›r. (fig. 11)
- Cihaz ›s›nd›kça, cihaz›n üzerinde yer alan Kullan›ma haz›r iflaretinin
(O) rengi de¤iflecektir. Renk koyulaflt›¤› zaman cihaz kullan›ma haz›r
demektir. (fig. 12)
Nas›l Kullancaks›n›z
• fiekillendirmeye bafllamadan önce saç›n›z› bir f›rça ya da tarak yard›m›
ile aç›n›z. Saç›n kar›fl›k olmad›¤›ndan ve düzgün oldu¤undan emin
olunuz.
• Daima saç›n›z ile flekillendirme aparatlar›n›n yüzeylerinin/plakalar›n
birbirlerine iyi temas etti¤inden emin olunuz. Bu nedenle saç›n›z› kal›n
tutamlar halinde flekillendirmeyiniz ve saç› aparata çift kat sarmay›n›z.
41
Page 42

• 5-10 saniye, saça k›v›rc›k flekil kazand›rmak veya dalga yaratmak için
yeterlidir. ‹sterseniz saç›n›z› y›kad›ktan sonra flekillendirmede yard›mc›
olmas› için uygun bir kozmetik ürün kullanabilirsiniz.
fiekillendirme Aparatlar› (fig. 13-18)
• Saç›n›z› daima ince tutamlar halinde flekillendirin (2-3 cm. kal›nl›¤›nda)
• ‹yi bir sonuç için saç›n›z› flekillendirici aparat›n üzerine spiral flekilde
sar›n›z. Böylece saç›n tamam›n›n s›cak yüzeylere temas› sa¤lanabilir.
• Saç tutam›n›, ucunu bir toka yard›m› ile sabitledikten sonra (kafan›za
do¤ru ilerleyecek flekilde) flekillendiriciye sar›n›z ve bekleyiniz.
• 5-10 saniye sonra tokay› aç›n›z ve saç›n›z› flekillendiriciden ay›r›n›z.
• Spiral flekil sa¤lamak için, saç› ilgili aparata (namlu k›sm›n›n yüzeyine
uygun olarak) spiral flekilde sar›n›z.
• Bukle yaratmak için saç› ilgili aparata düz flekilde, gererek sar›n›z.
• K›v›rma f›rças›n› kullan›rken, tutam›n ucunu bir toka ise sabitlemenize
gerek olmayacakt›r, çünkü f›rça saç›n›z› tutacakt›r.
• Önemli: Saç uçlar›n›n flekillendirme aparat›na düzgün sar›ld›¤›ndan emin
olunuz. Bu k›vr›k uç oluflmas›n› engelleyecektir.
• Yaratt›¤›n›z bukleleri, tutamlar› parmaklar›n›zla ay›rarak çoaltabilir ve
saç›n hacim kazanmas›n› sa¤layabilirsiniz. Özellike spiral biçimli
flekillendirilmifl buklelerde bu uygulama çarp›c› bir
görünüm sa¤layacakt›r.
Düzlefltirme/Tost Aparat› (fig. 19-21)
• Saç›n›z› maksimum 5-6 cm. kal›nl›¤›nda tutamlar halinde flekillendiriniz.
• Açma/Kapama kolu sayesinde Düzlefltirme/Tost aparat›n› bir mafla gibi
aç›p kapayabilirsiniz. Böylelikle saç›n›z› bölge bölge flekillendirebilirsiniz.
• Saça flekil vermeye daima kafan›za yak›n k›s›mlar›ndan bafllay›n›z ve uç
k›s›mlar›na do¤ru bölge bölge ilerleyiniz.
• ‹sterseniz plakalar›n saç›n›za temas›n› daha artt›rmak için, aparat›
parma›n›z ile iki taraf›ndan s›k›flt›rabilirsiniz. (Kesinlikle s›cak plakalara
elleriniz ile dokunmay›n)
• Saç›n›z› plakalar›n aras›nda 5-10 saniye kadar tutun. Daha sonra
açma/kapama kolunu
kullanarak aparat›n a¤z›n› aç›n›z ve saç›n›z› plakalar›n aras›ndan
ç›kart›n›z.
• Ayn› tutam üzerinde bir sonraki k›sm› flekillendirmek üzere, o k›sm›
plakalar›n aras›na yerlefltiriniz, açma/kapama kolunu b›rakarak aparat›n
a¤z›n› tekrar kapat›n›z. Bu flekilde tutam üzerinde uca do¤ru bölge bölge
ilerleyiniz. Birbirini uyumlu takip eden bölgeler olmas›na dikkat ediniz.
42
Page 43

Kullan›m Sonras›
- Cihaz› kullanmay› tamamlad›¤›n›zda elektrik fiflini pirizden çekiniz.
- Cihaz›n dayanak aya¤›n› aç›n›z ve cihaz› emniyetli bir yerde, so¤umas›
için bekletiniz. Cihaz›n s›cak k›s›mlar›n›n, so¤umas› için koydu¤unuz
zemine ›s› yoluyla zarar vermesini önlemek için dayanak aya¤›n›n
üzerinde durdu¤undan ve s›cak k›s›mlar›n hiçbir yere demedi¤inden
emin olun.
Cihaz›n Elektrik Kablosunun De¤ifltirilmesi
E¤er cihaz›n elektrik kablosu zaman içinde hasar görecek olursa, bu
kabloyu mutlaka bir Philips yetkili servisinde de¤ifltiriniz.
43
Page 44

44
7
8 10
12
2
6
3 4
5
9
11 13
Page 45

45
18
14 15
20
19
21
16
17
Page 46

4222 000 64795
;
 Loading...