

Page 1
Instructions for use
English 4
Mode d'emploi
Français 30
Bedienungsanleitung
Deutsch 56
Gebruiksaanwijzing
Nederlands 82
Instrucciones de manejo
Español 108
Manual de utilização
Português 134
Instruzioni per l'uso
Italiano 160
Bruksanvisning
Svenska 186
HP1500
HP1500
0912HP_EU 09-12-2003 12:12 Pagina 1
Page 2
3
0912HP_EU 09-12-2003 12:12 Pagina 2
Page 3

2
☎
Helpline (www.p4c.philips.com)
België/Belgien/Belgique
32-2-525.81.11
Danmark
45 33 29 33 33
Deutschland
49-40-28990
España
34-91-4042200
France
33 1 47 28 10 00
30-1-4894911
Ireland
353-1-764 0000
Italia
39.039.203.1
Nederland
0900-8406
Norge
47-22-748 000
Österreich
43-1-601 01
Portugal
+351-21-416 33 33
Schweiz/ Suisse/ Svizzera
41-1-48 82 211
Suomi
358-9-615 800
Sverige
468 598 520 00
UK (United Kingdom)
44-208-689 2166
‘Dolby’,‘Pro Logic’ and the double-D symbol
are trademarks of Dolby Laboratories.
‘DTS’ and ‘DTS Virtual’ are trademarks of
Digital Theater Systems, Inc .
0912HP_EU 09-12-2003 12:12 Pagina 3
Page 4

ENGLISH4
Index
4 Introduction
5 System configuration
6 Dolby Headphone
7 Advanced technologies used in HP 1500
10 Digital audio formats
10 Important information
11 Benefits of latest sound processing technology
11 Kit contents
12 Functional overview
15 Installation
15 Audio connections
26 Basic operation
27 Problem solving
28 Maintenance
28 Technical specifications
29 European Regulations
Introduction
SBC HP1500
Congratulations! You have just bought a most sophisticated digital
headphone system.
This system uses state of the art digital technology, offering you the freedom
of enjoying your favourite music or movies in the purest digital quality.
Even silent passages in classical music and plain silence in between
two music tracks are reproduced as pure silence.
0912HP_EU 09-12-2003 12:12 Pagina 4
Page 5

This system has been designed to faithfully reproduce the kind of
multi-channel surround sound experience that you normally can enjoy with
a conventional multi-channel speaker set-up.The latest digital signal
processing technology is being used to ensure that you can indulge yourself
in an overwhelming private home entertainment experience.
And all this at the volume level that you personally prefer without running
the risk of disturbing the neighbours or the family!
To ensure you get the best performance from your digital headphone
system please read this manual carefully.
System configuration
The HP 1500 system consists of a digital base station and a pure
Hifi headphone.The base station contains a digital signal processor offering
you a real 5.1-channel surround sound experience through the personal
comfort of your headphone.
The base station can decode Dolby Pro Logic II signals as well as
Dolby Digital and DTS signals.The Dolby Headphone technology will
ensure that these signals are converted to audio signals that can be handled
by the headphone whilst still maintaining the directional information as in
the original signals.
The base station has an analogue stereo input as well as a digital electrical
coaxial S/PDIF input.The digital input allows you to enjoy your favourite
DVD movies in full surround sound through Dolby Pro Logic II,
Dolby Digital or DTS. And the analogue input brings your collection of
VCR tapes back to life in full Dolby Pro Logic II surround sound.
The pure Hifi headphone that comes with the HP1500 system will provide
you with pure audio quality that is second to none.
Power
Supply
Audio Processing
User
Interface
Control
Block Diagram
HP1500 Basestation
Basestation Audio Processing
IN
SEL
HP
AMP
DD
DTS
LPCM
DAI
ADC
DIG
ANA
DPLII DH DAC DBE
ENGLISH 5
0912HP_EU 09-12-2003 12:12 Pagina 5
Page 6

ENGLISH6
Dolby Headphone
A brief introduction
Dolby Digital and DTS provide discrete left and right surround channels,
for more precise localization of sound and a more convincing, realistic
ambience. Discrete means that each channel contains its own particular
audio information and plays a unique role in creating a realistic surround
sound experience.
Up until now all this was reserved to speaker set-ups, but thanks to
Dolby Headphone, the ultimate experience in home theatre surround with
five (left, right, centre, rear-left and rear-right) discrete channels of digital
sound quality is now also available to headphones.
Dolby Headphone is a revolutionary signal processing system that works
not only with multi channel audio but also with conventional stereo signals.
In case of multi channel audio signals, Dolby Headphone technology will
process these signals in such a way that you will experience the sound
through your headphone as if it were coming from an actual five speaker
home entertainment set-up. And even when listening to conventional stereo
signals, Dolby Headphone will give you a much more natural and less
fatiguing listening experience, equivalent to a good two-speaker playback
system in a room with good acoustics.
Dolby Headphone technology can model the sound of a playback system in
up to three different listening environments, based on acoustic
measurements of real rooms:
• DH1 is a small, well-damped room appropriate for both movies and
music-only recordings.
• DH2 is a more acoustically live room particularly suited to music
listening, but also great for movies.
• DH3 is a larger room, more like a concert hall or movie theatre.
You can easily switch between these room modes and select whichever one
suits the particular program material and your own preferences.
0912HP_EU 09-12-2003 12:12 Pagina 6
Page 7

Advanced technologies used in HP 1500
The HP1500 makes use of several advanced technologies.
Principle of determining the direction of sound
People can determine the localization of sounds through the perception of
differences in intensity – so called Interaural Intensity Difference (IID) – and
through time differences – so called Interaural Time Difference (ITD).
IID is about the fact of sounds being louder as they are closer to the ear
and being louder in case they have a non-obstructed path to the ear.
ITD is about the fact that in most cases sounds will arrive earlier in time at
one ear than at the other.
In fact it is the environment itself that greatly impacts the sound before it
reaches our ears. Reflections and absorption all will influence the sense of
distance and direction we associate with a sound.
Combining IID and ITD will allow the brain to determine the direction of
sounds only in a rough way. It is in through the combination of IID and ITD
and the way sounds are filtered because of the structure of the pinna
– the outer ear – that allows to brain to accurately localise sounds.
• Depending on how a sound wave hits the pinna, it will be emphasized
or suppressed.
• Depending on how a sound wave hits the pinna, reflections within the
pinna are created, altering the phase relationship within the spectrum of
the sound wave.
• And also: higher frequencies are more affected by the pinna than lower
frequencies.That’s why our brain can easily locate higher frequencies,
rather than lower frequencies.
ENGLISH 7
0912HP_EU 09-12-2003 12:12 Pagina 7
Page 8

ENGLISH8
If we wish to reproduce all those effects through an audio system, than we
need to take IID, ITD, pinna effects, room impulse response, etc. into
account.That is where Head-Related Transfer Functions (HRTF) come into
play.
An HRTF is a mathematical equation that describes how a sound is effected
when travelling from its source to our ears.
There are several ways to synthesise an HRTF. The most common way to
measure an HRTF makes use of placing tiny microphones in a listener’s ears.
Every person has its unique HRTF. However, we can identify crucial parts in
an HRTF that are responsible for localization of sound as if this sound
would be radiated by a typical home cinema speaker set-up.
When these parts are synthesized in an optimal way, a typical 5 speaker setup listening experience is created.
HRTFs are implemented in real-time Digital Signal Processors (DSP) and
will then be applied to audio signals in order to reproduce "spatial" cues, i.e.
create a sense of directionality.
It is through these techniques that Philips is able to bring you a home
cinema experience through a headphone that is as real as when you would
be listening to an actual 5.1 speaker set-up.
0912HP_EU 09-12-2003 12:12 Pagina 8
Page 9

Automatic Audio Signal Routing
The Automatic Audio Signal Routing (AASR) feature of the HP 1500
basestation allows for audio sources to be connected to its audio inputs and
at the same time it can pass those same audio signals on to – for example –
your Home Cinema receiver. This allows for permanent audio connections
to be made without the need for swapping cables.Whether you want to
listen to your headphone or your existing speaker set-up, it no longer
involves tiresome swapping of cables: the choice is yours at the flick of a
switch.
Intelligent user interface
After a digital analysis of the audio input signal the display will indicate which
sound processing features can be activated. No more frustrating pressing of
all buttons. Just read the display and select out of the active sound menus.
Headphone construction
The headphone’s semi-open construction will benefit the transparency of
the sound.This will make you experience your favourite tracks under even
more realistic conditions.
Neodymium magnets
Neodymium is the strongest magnet material available, which optimises the
behaviour of the speaker coil for increased sound pressure levels and a
more powerful bass response. All this at the lowest possible levels of
distortion.
ENGLISH 9
0912HP_EU 09-12-2003 12:12 Pagina 9
Page 10

ENGLISH10
Digital audio formats
The device will recognize the following digital input signals:
– Stereo LPCM with sample frequencies 44.1 kHz and 48kHz
– Dolby® Digital (AC-3), up to 5.1 channels
– DTS®, up to 5.1 channels
In case an invalid digital signal is detected - for example a digital MP3 data
stream - the ‘DIGITAL’ indication LED will be illuminated in red.
In case a valid digital signal is detected - for example a digital DTS data
stream - the ‘DIGITAL’ indication LED will be illuminated in green.
TO ENSURE YOU GET THE BEST PERFORMANCE FROM YOUR
DIGITAL HEADPHONE SYSTEM:
PLEASE READ THIS MANUAL CAREFULLY.
Important information
• Please read the following instructions carefully, and retain this booklet for
future reference.All the safety and operating instructions should be read
before using the digital headphone system.
• Check if the voltage indicated on the type plate (located at the bottom of
the set) corresponds to the local mains voltage before connecting to the
mains power supply.
• Remove the batteries from the headphone’s battery compartment and
from the base station’s charging compartment and disconnect the power
cable from the mains if the system is not in use for a long period.
•Prevent fire or shock hazard: do not expose this equipment to humidity,
rain, sand or excessive heat caused by heating equipment or direct
sunlight.
0912HP_EU 09-12-2003 12:12 Pagina 10
Page 11

Safety precautions
• Do not use this product in damp places or close to water.
• Do not expose this product to extreme heat.
• Do not open this product.
In the event of technical difficulties take it to your Philips retailer.
• Do not cover this product.
• Inadequately protected or sensitive electronic equipment may be affected
by the use of this product.This interference may lead to damage to either
equipment. Please check whether or not surrounding equipment may be
affected by this product before you start using it.
Benefits of latest digital sound processing
technology
Dolby Digital and DTS
Dolby Digital and DTS allow you to listen to DVD movies or concerts in
full surround sound.
Dolby Headphone
In case of multi channel audio signals, Dolby Headphone technology
will make you hear the sound through your headphone as if it is coming
from five speakers. In case of a stereo signal, Dolby Headphone will give you
a much more natural and less fatiguing listening experience, equivalent to a
good two-speaker playback system in a room with good acoustics.
Kit contents
This headphone system consists of the following accessories:
–1 x SBC AH 1000 base station
–1 x SBC HP 1000 pure Hifi headphone (incl. accessories)
–1 x AC mains cable
–1 x RCA stereo audio cable (2 m)
–1 x coaxial S/PDIF digital audio cable (2 m)
–1 x headphone stereo audio extension cable (4 m)
ENGLISH 11
0912HP_EU 09-12-2003 12:12 Pagina 11
Page 12

ENGLISH12
Functional overview Product illustrations on inside flap
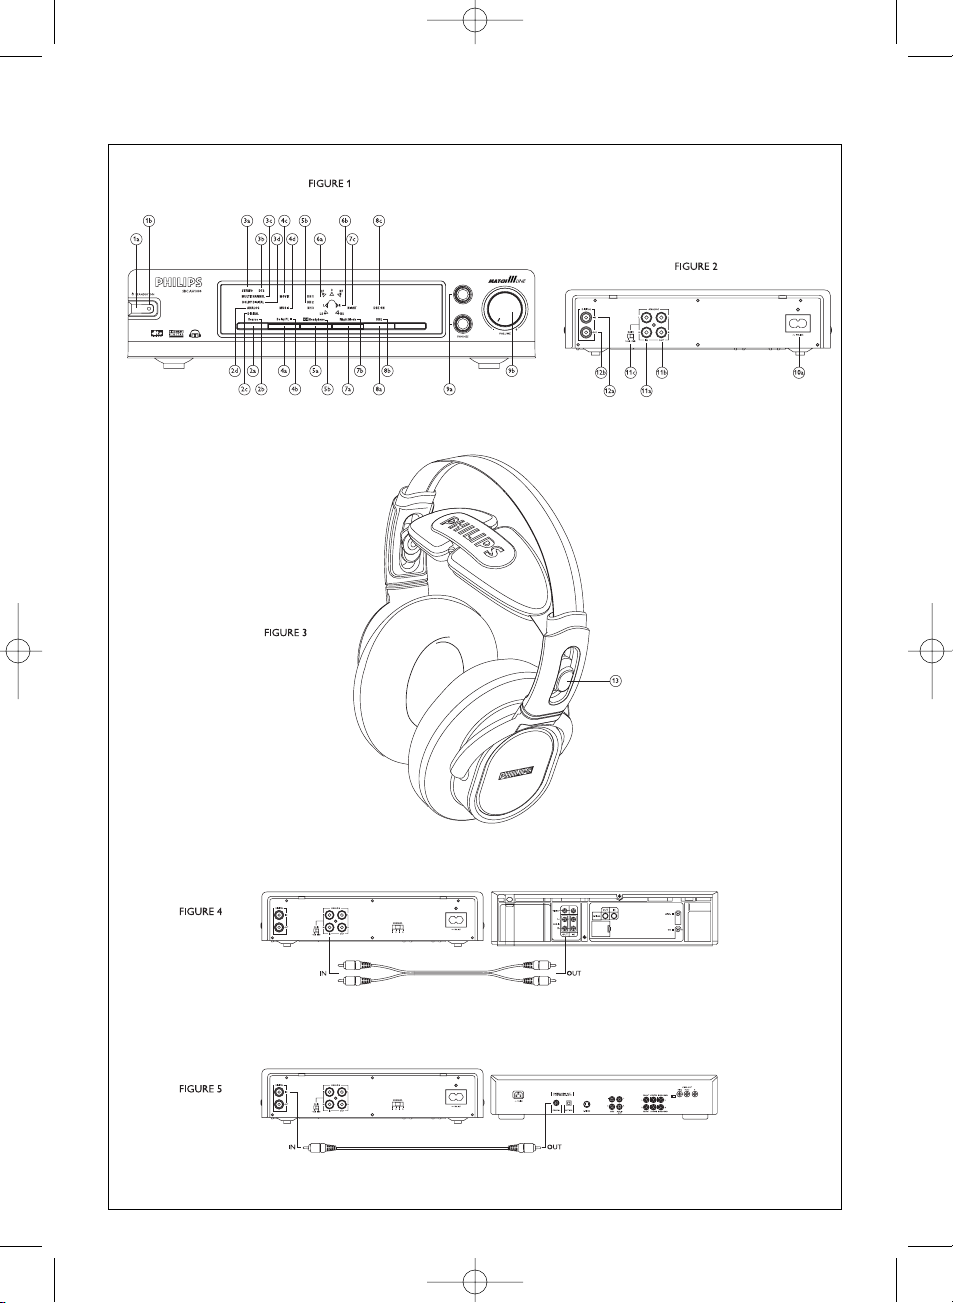
Base station front panel (figure 1)
1Power section
a) power on/standby and demo mode button
By holding the 'STANDBY-ON' button for 1.5 seconds or
longer, the demo mode can be activated:
– Pink noise is used to simulate the position of the 5 virtual
speakers in the headphone.
– The corresponding speaker indicator in the output section
of the display will go on indicating which speaker is being
simulated.
The demo mode can be deactivated by pressing any control
button on the base station.
b) STANDBY-ON’ dual-color LED
– Red = base station in standby mode
– Green = base station in active mode
2 Source select section
a) button to toggle between the analogue and digital coaxial inputs
b) ‘Source’ menu yellow LED
c) ‘ANALOG’ indication green LED
d) ‘DIGITAL’ indication illuminated by dual colour LED:
– Red = input signal is locked, but invalid
(for instance 96 kHz) or unlocked (no signal)
– Green = input signal is locked and valid (signal accepted)
3 The input signal detection section
a) ‘STEREO’ indicator green LED (activated in case of detection of
digital stereo signal or selection of analogue input source)
b) ‘DTS’ indicator green LED
(activated in case of detection of DTS signal)
c) ‘MULTICHANNEL’ indicator green LED
(activated in case of detection of multi-channel audio)
d) ‘DOLBY DIGITAL’ indicator green LED
(activated in case of detection of Dolby Digital signal)
0912HP_EU 09-12-2003 12:12 Pagina 12
Page 13

4 Dolby Pro Logic II section
a) button to activate Dolby Pro Logic II and to toggle between ‘MUSIC’
and ‘MOVIE’ mode.
– the preferred mode depends on the nature of the audio
input signal:
– In case of a digital audio signal: the preferred mode will
automatically be selected first in case Dolby Pro Logic II is
activated. By pressing the Dolby Pro Logic II button again
the other (non-preferred) mode will be selected.
– In case of an analogue audio signal: the mode, which was
selected in previous listening sessions, will be activated first.
By pressing the Dolby Pro Logic II button again the other
mode will be selected.
b) ‘Dolby Pro Logic II’ menu field yellow LED:
lights up whenever Dolby Pro Logic II is possible (also when Dolby
Pro Logic II is not selected but actually possible, the yellow LED will
remain to be on)
– ‘MOVIE’ indicator green LED
(in case of movie mode selection)
– ‘MUSIC’ indicator green LED
(in case of music mode selection)
5 Dolby Headphone (DH) section
a) button to toggle between the three DH room modes and bypass
mode
b) ‘Dolby Headphone’ menu field yellow LED: lights up whenever DH is
possible
– ‘DH1’ indicator green: Small Room mode
– ‘DH2’ indicator green LED: Large Room mode
– ‘DH3’ indicator green LED: Cinema mode
– ‘DH’ LEDs off: bypass mode
6 Output display section
a) 5 virtual multi-channel , , , and indicators green LEDs:
light up whenever DH is activated
b) Stereo indicator green LED: lights up whenever DH is
de-activated and "ordinary" stereo is being reproduced
ENGLISH 13
0912HP_EU 09-12-2003 12:12 Pagina 13
Page 14

7 Night mode section
a) button to activate Night mode
– Night mode will reduce the dynamics of the audio signal.This will
result in both the loudest and the most silent audio signals becoming
clearly audible, even at lower volume levels.
– The audio signals on a DVD movie disc have large dynamics, i.e. the
difference in loudness between the loudest and most silent signal can
be very large. In order to hear both the loudest and most silent signal
you normally would have to turn up to volume of the headphone.
In case however you would prefer to listen at lower volume levels, it
could result in the most silent signals becoming difficult to hear: by
making use of the night mode this can be resolved.
b) ‘Night Mode’ menu field yellow LED:
lights up whenever Night mode is possible
c) ‘NIGHT’ indicator green LED:
lights up whenever Night mode is activated
8 Dynamic Bass Boost section
a) button to toggle the DBB function
b) ‘DBB’ menu field illuminated by yellow LED
c) ‘DBB’ indicator green LED: lights up whenever DBB is active
9 Headphone output section
a) 2 x 6.3mm headphone jack sockets
b) rotary volume control
Base station rear panel (figure 2)
10 Power connector
a) AC connector for AC mains cable
11 Analogue Input/Output connectors
a) stereo input (L/R)
b) stereo output (L/R) providing AASR function
c) 2-position slide-switch to select the analogue input-GAIN
(+6dB/0dB):
– set to +6dB in case of weak audio input signals
– set to 0 dB in case of distorted audio input signals
12 Digital Input/Output connectors
a) coax input (S/P DIF)
b) coax output (S/P DIF) providing AASR function
ENGLISH14
0912HP_EU 09-12-2003 12:12 Pagina 14
Page 15

Headphone (figure 3)
13 Flexifit™ headband
a) adjust the comfort level of the inner headband to your personal
preference by simply pushing the adjustment button.
Installation
Base station power supply
1 Make sure the base station’s rated voltage corresponds to the mains
socket voltage.
2 Connect the AC mains cable to the AC mains socket at the rear of the
base station.
Always disconnect the mains cable if the base station is not to be used for a
long period of time.
3 In order to disconnect the basestation from the AC mains power, the AC
mains cable needs to be unplugged from the AC mains power wall socket.
The AC mains power wall socket should be easily accessible in normal
operating conditions.
Audio connections
OPTION 1:ANALOGUE STEREO SOURCE:
Connecting the digital base station to an analogue
stereo source (stereo TV, stereo VCR, (S)VCD player,
tape recorder, etc.)
Base station
1 Connect one side of the RCA stereo audio cable (included) to the line
output of the audio source and the other side to the analogue input of
the base station.
Make sure the red RCA plug (right channel) is connected to the red
connector (right channel) of the audio source.
The white RCA plug (left channel) must be connected to the white
connector (left channel) of the audio source.
2 Next take the RCA cable that most likely came supplied with your
analogue audio source. Connect one side of this second RCA stereo
audio cable (not included) to the line input of your amplifier or home
cinema receiver and the other side to the analogue output of the base
station.
ENGLISH 15
0912HP_EU 09-12-2003 12:12 Pagina 15
Page 16

When connecting your audio equipment in this way, you will be able to benefit
from the Automatic Audio Signal Routing (AASR) feature. As long as the base
station is powered – even in stand-by mode – the audio signal from the audio
source will be made available not only to the digital base station but it will be
routed through to the rest of your home entertainment set-up.Without the need
for swapping cables you can decide whether you wish to enjoy the audio
through your headphones or through for example the speakers of your home
entertainment system.
3 Check if the red RCA plug (right channel) is connected to the right
channel (red) of the audio source.
The white RCA plug (left channel) must be connected to the white
connector (left channel) of the audio source.
4 Power on your audio source: switch on your audio source, i.e. stereo TV,
stereo VCR, (S)VCD player, tape recorder, etc.
5 Output adjustment of your audio source: in case the line output of your
audio source has an adjustable output level, adjust the line output level of
the audio source to the highest acceptable undistorted level.
Note: In case of certain TVs, the line output level can only be
adjusted through the TV’s on screen menu.
6 Power on the base station: switch on the digital base station.
The power indication LED of the base station will change from red to
green.
7 Sensitivity switch: if your audio source’s output signal is relatively weak,
the sensitivity switch at the back of the digital base station should be
changed from 0dB to +6dB.This will provide the necessary additional
amplification to the audio input signal prior to processing.
If this results in a distorted signal, then set the switch back to 0dB.
8 Source select: select the analogue input on the base station by pressing
the ‘Source’ button.
9 Input signal detection: once a stereo audio signal is detected the input
signal indicator ’STEREO’ will be illuminated.
Note: In case of multilingual NICAM transmissions, you should select
the appropriate language in your TV’s menu. In that case the
audio signal will no longer be stereo but only mono and the
effect of for example Dolby Pro Logic II or Dolby Headphone
will very be limited.
ENGLISH16
0912HP_EU 09-12-2003 12:12 Pagina 16
Page 17

10 Dolby Pro Logic II: the ‘Dolby Pro Logic II’ menu field indicator will be
illuminated in yellow indicating that Dolby Pro Logic II is possible.
Press the Dolby Pro Logic II button to activate Dolby Pro Logic II.
Pressing this button repeatedly will allow you to toggle between ‘MUSIC’
and ‘MOVIE’ mode and bypass mode (= MUSIC and MOVIE LED are both
off). In case of an analogue audio signal: the mode, which was selected in
previous listening sessions, will be activated first. By pressing the Dolby Pro
Logic II button again the other mode will be selected.
11 Dolby Headphone: Dolby Headphone will automatically be activated as
soon as Dolby Pro Logic II is activated. Pressing the ‘Dolby Headphone’
button repeatedly will allow you to toggle between the different DH
rooms and the by-pass mode (= DH1, DH2, DH3 are both off).
By-passing Dolby Headphone processing will also de-activate Dolby Pro
Logic II.
The following table will illustrate the different combinations of Dolby Pro
Logic II and Dolby Headphone and the resulting indication in the display of
the base station.
For example:
– when DPL II is on (in Music or Movie mode) Dolby Headphone will
automatically be activated: all green virtual multi-channel indicators
(, , ,,) will light up;
– when DPLII is off but Dolby Headphone is still activated, the green
indicator lights up, indicating Dolby Headphone stereo sound reproduction;
– when Dolby Headphone is bypassed (resulting in Dolby Pro Logic II
automatically being bypassed too), the green stereo indicator lights up,
indicating normal stereo sound reproduction.
ANALOG STEREO AUDIO INPUT
Dolby Headphone offDolby Headphone on
Dolby Pro Logic II
will automatically
be switched off
Dolby Pro Logic II on
Dolby Pro Logic II off
ENGLISH 17
0912HP_EU 09-12-2003 12:12 Pagina 17
Page 18

12 Night mode: this option is not available in case of analogue audio signals.
The ‘Night Mode’ menu field indicator is off: NIGHT’ mode cannot be
activated.
13 DBB: the Dynamic Bass Boost function is only applicable to headphones
connected to the 6.3 mm headphone outputs.
14 Volume control: the Volume control function is only applicable to
headphones connected to the 6.3 mm headphone outputs.
Headphone
1 HP1000 headphone jack: connect the headphone jack to one of the
headphone outputs on the base station.
You can connect up to 2 headphones simultaneously.
2 Headphone stereo audio extension cable (4 m): you can connect the
extension cable in between one of the base station’s headphone outputs
and the HP1000 headphone.
3 Flexifit™ headband: adjust the comfort level of the inner headband to your
personal preference by simply pushing the adjustment button.
ENGLISH18
0912HP_EU 09-12-2003 12:12 Pagina 18
Page 19

OPTION 2: DIGITAL STEREO OR MULTI
CHANNEL SOURCE:
Connecting the digital base station to a digital
stereo source (CD player with S/PDIF output, etc.)
or a digital multichannel source (DVD player with
S/PDIF output, etc.)
Base station
1 Connect one side of the S/PDIF digital audio cable (included) to the
S/PDIF output of the audio source and the other side to the S/PDIF input
of the base station.
2 Next take the S/PDIF cable that most likely came supplied with your
digital audio source. Connect one side of this 2nd S/PDIF digital audio
cable (not included) to the S/PDIF input of your amplifier or home
cinema receiver and the other side to the S/PDIF output of the base
station.
When connecting your audio equipment in this way, you will be able to benefit
from the Automatic Audio Signal Routing (AASR) feature. As long as the base
station is powered – even in stand-by mode – the audio signal from the audio
source will be made available not only to the digital base station but it will be
routed through to the rest of your home entertainment set-up.Without the need
for swapping cables you can decide whether you wish to enjoy the audio
through your headphones or through for example the speakers of your home
entertainment system.
3 Check if the red RCA plug (right channel) is connected to the right
channel (red) of the audio source.
4 Power on your audio source: switch on your audio source, i.e.
DVD player with S/PDIF output, CD player with S/PDIF output, etc.
ENGLISH 19
0912HP_EU 09-12-2003 12:12 Pagina 19
Page 20

IMPORTANT!
• In case of connecting an audio CD player to the HP1500 base
station making use of the CD player’s digital outputs: do not up
sample the Audio CD digital output signal higher than 44.1 kHz.
• When connecting a DVD player to the HP1500 base station: do
not up sample the DVD digital output signal higher than 48 kHz.
5 Power on the base station: switch on the digital base station.
The power indication LED of the base station will change from red to
green.
6 Source select: select the digital input on the base station by pressing the
‘Source’ button.
The digital indicator will light up in GREEN. In case of an invalid digital signal
(for example a digital MP3 data stream) the digital indicator will be RED
blinking.
The device will recognize the following digital input signals:
– Stereo LPCM with sample frequencies 44.1 kHz and 48kHz
– Dolby® Digital (AC-3), up to 5.1 channels
– DTS®, up to 5.1 channels
7 Input signal detection: after the input signal has been analyzed, its nature
will automatically be indicated on the display of the base station.
– Stereo: will light up in case of a digital stereo signal
(for example when playing a CD in a CD/DVD player,
or when playing a VCD in a DVD player)
– Multichannel: will light up in case of a digital multichannel signal
(for example when playing a DVD in a DVD player.
The following multichannel streams can be decoded:
– DTS: the DTS indicator will light up in GREEN.
– Dolby Digital: the Dolby Digital indicator will light up in GREEN
ENGLISH20
0912HP_EU 09-12-2003 12:12 Pagina 20
Page 21

8 Dolby Pro Logic II: the ‘Dolby Pro Logic II’ menu field indicator will be
illuminated in yellow in case of a digital stereo signal.
In case of a digital multichannel signal, Dolby Pro Logic II will not be
illuminated (since it is not a valid option for such signals).
Press the Dolby Pro Logic II button to activate Dolby Pro Logic II.
Pressing this button repeatedly will allow you to toggle between ‘MUSIC’
and ‘MOVIE’ mode and bypass mode (= MUSIC and MOVIE LED are both
off). In case of an digital stereo audio signal: the mode, which was selected in
previous listening sessions, will be activated first. By pressing the Dolby Pro
Logic II button again the other mode will be selected.
9 Dolby Digital or DTS: in case of digital multichannel signals, the base station
will automatically detect whether the signal is Dolby Digital encoded or
DTS encoded. In any of these cases Dolby Headphone will be activated
automatically.
10 Dolby Headphone: Pressing the ‘Dolby Headphone’ button repeatedly will
allow you to toggle between the different DH rooms and the by-pass
mode (= DH1, DH2, DH3 are both off).
By-passing Dolby Headphone processing is not possible in case of
multichannel Digital audio signals.
ENGLISH 21
0912HP_EU 09-12-2003 12:12 Pagina 21
Page 22

The following tables will illustrate the different combinations of Dolby Pro
Logic II, Dolby Digital, DTS and Dolby Headphone and the resulting
indication in the display of the base station depending on the nature of the
digital audio input signal (i.e. stereo or multichannel).
For example:
– when Dolby Pro Logic II is on (in Music or Movie mode) Dolby Headphone will
automatically be activated: all green virtual multi-channel indicators
(, , ,,) will light up;
– when Dolby Pro Logic II is off but Dolby Headphone is still activated,
the green indicator lights up, indicating Dolby Headphone stereo sound
reproduction;
– when Dolby Headphone is bypassed (resulting in Dolby Pro Logic II
automatically being bypassed too), the green stereo indicator lights up,
indicating normal stereo sound reproduction.
For example:
– when Dolby Digital is on then Dolby Headphone will automatically be
activated: all green virtual multi-channel indicators ( , , , , ) will
light up;
– switching off Dolby Headphone in case of a Dolby Digital multichannel signal
is not possible.
– similar for DTS multichannel signals.
DIGITAL MULTICHANNEL AUDIO INPUT
Dolby Headphone offDolby Headphone on
Impossible
Impossible
Dolby Digital on
DTS on
DIGITAL STEREO AUDIO INPUT
Dolby Headphone offDolby Headphone on
Dolby Pro Logic II
will automatically be
switched off
Dolby Pro Logic II on
Dolby Pro Logic II off
ENGLISH22
0912HP_EU 09-12-2003 12:12 Pagina 22
Page 23

11 Night mode: this option is only available in case of digital stereo or digital
multichannel audio signals.When the ‘Night Mode’ menu field indicator is on,
‘NIGHT’ mode can be activated.
12 DBB: the Dynamic Bass Boost function is only applicable to headphones
connected to the 6.3 mm headphone outputs.
13 Volume control: the Volume control function is only applicable to
headphones connected to the 6.3 mm headphone outputs.
Headphone
1 HP1000 headphone jack: connect the headphone jack to one of the
headphone outputs on the base station.
You can connect up to 2 headphones simultaneously.
2 Headphone stereo audio extension cable (4 m): you can connect the
extension cable in between one of the base station’s headphone outputs
and the HP1000 headphone.
3 Flexifit™ headband: adjust the comfort level of the inner headband to your
personal preference by simply pushing the adjustment button.
ENGLISH 23
0912HP_EU 09-12-2003 12:12 Pagina 23
Page 24

OPTION 3: SACD PLAYER:
Connecting the digital transmitter to a
Philips SACD player
Philips SACD players come with a multitude of audio output connectors.
Some of the Philips SACD players can even function as a DVD video player.
The following will explain the different possibilities of connecting your Philips
SACD player to the HP1500 base station.
Using the electrical coaxial digital S/PDIF output of
your SACD player
1 Connect to the HP1500 base station’s digital S/PDIF input.
– Follow instructions as per OPTION 2.
– This option only allows you to listen to audio CDs
(not Super Audio CDs) through your HP1500 base station.
IMPORTANT!
• When playing Super Audio CDs you should not use the digital
electrical S/PDIF output of your SACD player when connecting it
to the HP1500 base station.
• The digital electrical S/PDIF output will ONLY be able to output
audio CD signals and not Super Audio CD signals.
• As per the SACD standard SACD audio is not available on digital
electrical S/PDIF output.
2 Using the analogue 5.1 output of your SACD player:
– In case you wish to make use of the analogue audio outputs of your
SACD player when connecting your SACD player to your HP1500 base
station, we recommend you select the "stereo" mode or "Dolby Pro
Logic" mode through your SACD player’s menu.
– For more details on the different menu options of your SACD player:
please refer to its instruction manual.
ENGLISH24
0912HP_EU 09-12-2003 12:12 Pagina 24
Page 25

3 Upsampling:
– Some SACD players allow for audio CDs to be upsampled from
44.1 kHz/16 bit to various higher sampling rates.
– When connecting your SACD player to the HP1500 base station
through the digital coaxial S/PDIF connector, you should not upsample
the audio signal.
– The HP1500 base station will recognize the following digital input signals:
– Stereo LPCM with sample frequencies 44.1 kHz and 48kHz
– Dolby® Digital (AC-3), up to 5.1 channels
– DTS®, up to 5.1 channels
IMPORTANT!
• In case of connecting a Super Audio CD player to the HP1500
base station making use of the SACD player’s digital outputs: do
not upsample the Super Audio CD digital output signal higher than
44.1 kHz.
• When connecting a DVD player to the HP1500 base station: do
not upsample the DVD digital output signal higher than 48 kHz.
In case an invalid digital signal is detected - for example a digital MP3 data
stream - the ‘DIGITAL’ indication LED in the HP1500 display window will be
illuminated in red. In case a valid digital signal is detected - for example a
digital DTS data stream - the ‘DIGITAL’ indication LED will be illuminated in
green.
ENGLISH 25
0912HP_EU 09-12-2003 12:12 Pagina 25
Page 26

Basic operation
When the base station is connected to a:
- analogue line output of an analogue stereo source
(stereo TV, stereo VCR, (S)VCD player, tape
recorder, etc.)
- digital electrical coaxial S/PDIF output of a stereo
source (CD player with S/PDIF output, etc.) or a
multichannel source (DVD player with S/PDIF
output, etc.)
1 Switch on your audio source.
2 Switch on the HP1500 base station: the power indicator will change from
red to green.
3 Select the input source you wish to listen to (analogue or digital):
– In case of analogue input source: you can select Dolby Prologic II;
activation of Dolby Headphone is optional.
– In case of digital input source: Dolby Digital or DTS will be activated
automatically, together with Dolby Headphone.
4 In case you activate Dolby Headphone you can toggle between the
3 modes and bypass mode.
5 In case you want to listen to a corded headphone:
–You can connect up to 2 corded headphones to the base station.
– Adjust the volume on the base station: this will have no effect on the
headphone.
– Adjust the bass as desired by pressing the DBE button on the base
station: this will have no effect on the headphone.
ENGLISH26
0912HP_EU 09-12-2003 12:12 Pagina 26
Page 27

Problem solving
If a fault occurs, first check the points listed below. If you are unable to
remedy a problem by following these hints, contact the helpline
(see ‘Need help?’) or consult your dealer.
Never try to open the set yourself as this will void the guarantee.
First, check all cables to ensure that they are connected correctly.
Problem Solution
No sound • Check if the mains cable is fully inserted into the AC outlet and that its
connector is properly inserted into the AC input connector located at
the rear of the base station.
• Check if the audio source is switched on and tuned to a channel with
audio.
• In case of an audio source with adjustable output level: adjust the output
level of the audio source to a higher and non-distorted level.
•Volume on base station or headphone is set too low.
Adjust the volume on the base station/headphone to a higher level.
• The audio signal from your SACD player is upsampled. Lower the
sampling rate through the SACD player’s menu to 44.1 kHz
• The audio signal from your DVD player is upsampled: lower the PCM
sampling rate through the DVD player’s menu to 48 kHz.
•Invalid digital audio signal: the ‘DIGITAL’ indication LED in the HP1500
display window will be illuminated in red. Change the digital audio signal
(for exampling: by changing from MP3 to audio CD) or switch to the
analogue input signal of the HP1500 base station.
• Check whether the audio output connector of your audio source is
connected to the correct audio input connector of the HP1500 base
station.
Distorted sound • In case of an audio source with adjustable output level: adjust the output
level of the audio source to a higher and non-distorted level.
•Volume on base station or headphone is set too high.Adjust the volume
on the base station/headphone to a lower level.
• Check whether the output connector of your audio source is connected
to the correct audio input connector of the HP1500 base station.
ENGLISH 27
0912HP_EU 09-12-2003 12:12 Pagina 27
Page 28

Maintenance
• If the headphone will not be used for a longer time, please remove the
batteries to prevent leakage and corrosion.
• Hearing Safety! Continuous use at a high volume may permanently
damage your hearing.
• Do not leave the headphone near heat sources. Do not expose to
direct sunlight, excessive dust, moisture, rain or any kind of mechanical
shock.
• Do not use alcohol, thinner or petroleum-based substances to clean the
headphone or transmitter. Use a slightly dampened chamois cloth to
clean the housing.
• Do not use cleaning agents containing alcohol, spirits, ammonia or
abrasives as these may harm the housing.
Technical specifications*
Input sensitivity: 500 mVrms (1 kHz sine wave)
Power supply – base station: SBC HP 1500/00 & /05
230 VAC 50Hz
Signal/Noise ratio: 85 dB typical
(1 kHz sine wave, A-weighted)
HP 1000 Headphone
Distortion: 0.8% THP typical
Sensitivity: 106 dB
Frequency range: 40 – 40,000 Hz
Impedance: 32 Ohm
Headphone cable: 4.0 m (12 ft) LC OFC
Max. power input: 1500 mW
*) All specifications are subject to change without prior notice.
ENGLISH28
0912HP_EU 09-12-2003 12:12 Pagina 28
Page 29

Hereby, Philips Consumer Electronics, B.U. Peripherals & Accessories,
declares that this digital headphone system (HP1500) is in compliance with
the essential requirements and other relevant provisions
of Directive 89/336/ECC.
European Regulations
This product has been designed, tested and manufactured according the
European EMC directive 89/336/ECC.
The EMC equipment category class 2 has been used for compliance
demonstration to these directives.
Following this Directive, this product can be brought into service in the
following states:
SBC HP 1500/00
SBC HP 1500/05
ENGLISH 29
B ✔ DK ✔ E ✔ GR ✔ F ✔
IRL ✘ I ✔ L ✔ NL ✔ A ✔
P ✔ SU ✔ S ✔ UK ✘ N ✔
D ✔ CH ✔
B ✘ DK ✘ E ✘ GR ✘ F ✘
IRL ✔ I ✘ L ✘ NL ✘ A ✘
P ✘ SU ✘ S ✘ UK ✔ N ✘
D ✘ CH ✘
0912HP_EU 09-12-2003 12:12 Pagina 29
Page 30

www.philips.com
This document is printed on chlorine free produced paper
Data subject to change without notice
Printed in China
0912HP_EU 09-12-2003 12:12 Pagina 212
 Loading...