

Page 1
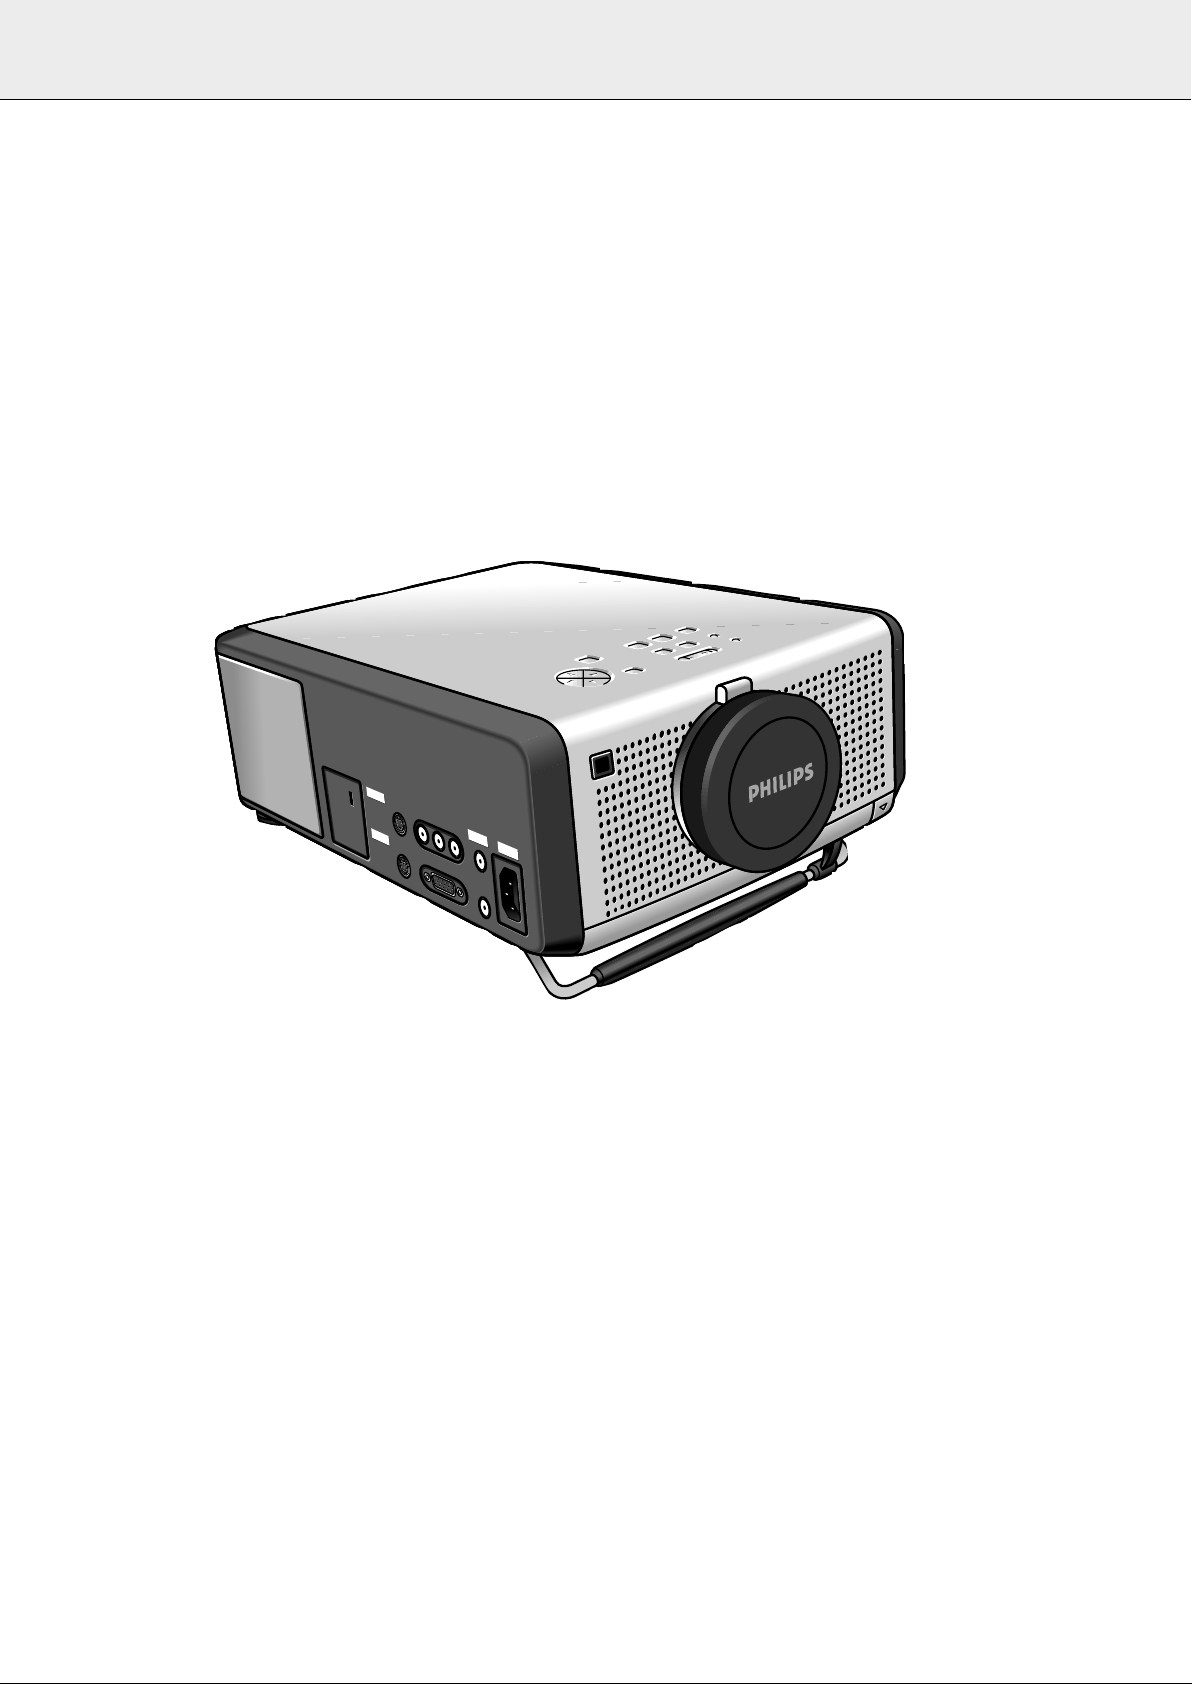
Philips Multimedia projector
Mouse
Data in
S-Video in
Video in
Audio
out
Audio
in
L
R
Mouse
Data in
S-Video in
Video in
Audio
out
Audio
in
L
R
Power
Data
Audio
Video
OK
Menu
Data
Lamp
Mute
AVMute
RC
Volume
Standby
Video
On/Off
OK
Menu
Data
Lamp
Mute
AVMute
RC
Volume
Standby
Video
On/Off
Hopper 10 series
English
Page 2

IMPORTANT NOTE FOR USERS IN THE U.S.A.
The responsible party of this multi media projector is
the following:
Philips Consumer Electronics Company
One Philips Drive
Knoxville, TN 37914
Telephone 1888 873 4672
2
Page 3

6
4
2
Standby
Standby
Lamp RC
Lamp RC
Mute Volume
Mute Volume
Data
Data
AV Mute
AV Mute
Video
Video
Menu OK
Menu OK
9
5
8
7
3
0
!
@
1
Video
Data
S-Video in
S-Video in
Mouse
Mouse
Video in
Video in
L
L
Audio
Audio
Data in
Data in
Standby
On/Off
Standby
On/Off
Data
Data
Video
Video
Menu
Menu
R
R
Audio
Power
out
out
Audio
Audio
in
in
OK
OK
AVMute
AVMute
Mute
Mute
Lamp
Lamp
Volume
Volume
RC
RC
%
^#
&$
fig. 1
*
1
3
2
6
8
4
5
Menu
Menu
Volume
Volume
Standby AV-Mute
Standby AV-Mute
y
y
On/off
On/Off
Mute
Mute
c
c
Video
Video
V
V
Data
Data
D
D
(
7
4
Data
d
S-Video in Video in Audio
S-Video in Video in Audio
Mouse
Mouse Data in
f
LR
LR
Data in
AudioVideo
Audio
Audio
ge
out
out
Power
in
in
fig. 2 fig. 3
a
b
c
h
3
Page 4

1. INTRODUCTION 2. THINGS YOU SHOULD KNOW
TABLE OF CONTENTS
English
1. INTRODUCTION .................................................................4
2. THINGS YOU SHOULD KNOW ........................................4
3. IMPORTANT SAFEGUARDS .............................................5
4. PROJECTOR FEATURES....................................................6
5. FUNCTIONAL OVERVIEW.................................................7
Controls ...............................................................................7
Connections.........................................................................7
6. SET UP.............................................................................8-9
Positioning the projector and screen...................................8
Mains supply .......................................................................8
Adjusting the focus and size of the image..........................8
Adjusting the vertical and horizontal angle of the projector 8
Moving the projector ...........................................................9
Inserting the batteries in the remote control ......................9
7. INSTALLATION .......................................................... 10-13
Video/computer cables and adaptor ..................................10
Connecting to a computer.................................................11
Connecting to video equipment ........................................12
Connecting to audio equipment ........................................13
8. OPERATION................................................................ 13-18
Preparation....................................................................13-14
Picture control ..............................................................14-15
Audio control .....................................................................16
Personal Preferences ...................................................16-17
Other settings...............................................................17-18
9. ADDITIONAL INFORMATION.................................... 18-20
Installing the remote control software ..............................18
Maintenance .................................................................18-20
10. TROUBLESHOOTING.......................................................21
ILLUSTRATIONS ................................................................3
INTRODUCTION
Congratulations on your purchase of one of the most
sophisticated and reliable products on the market today. We
are sure that, used properly, it will bring you years of
enjoyment. You will want to keep this manual handy, as it is a
convenient source of information about your projector. For your
own protection and prolonged operation of your projector,
please read the ‘Important Safeguards’ section before use.
This equipment has been tested to comply with the limits for a
class B digital device in accordance with Part 15 of the FCC
Rules as well as the European CE marking.
Operation is subject to the following two conditions:
1. This device may not cause harmful interference, and
2. This device must accept any interference received, including
interference that may cause undesired operation.
These limits are designed to provide reasonable protection
against harmful interference when the equipment is operated
in a commercial environment.
This equipment generates, uses, and can radiate radio
frequency energy and, if not installed and used in accordance
with the user’s guide, may cause harmful interference to radio
communications.
Operation of this equipment in a residential area is likely to
cause harmful interference in which case the user will be
required to correct the interference at his own expense.
If this equipment does cause harmful interference to radio or
television reception, which can be determined by turning the
equipment off and on, the user is encouraged to try to correct
the interference by one or more of the following measures:
– Reorientate or relocate the receiving antenna.
– Increase the distance between the equipment and receiver.
– Connect the equipment into an outlet on a circuit different
from that to which the receiver is connected.
– Consult the dealer or an experienced radio/TV technician for
help.
To assure continued compliance, use only the provided
grounded power supply cord and shielded interface cables
when connecting this device to a computer. Also, any
unauthorized changes or modifications to this equipment could
void the user’s authority to operate this device.
SAVE ENERGY! To save energy, please put the projector in the
STANDBY position if you are not going to use the projector for
more than 15 minutes.
Note:
FCC Warning:
Note:
PACKAGING CONTENTS
Please confirm that the following items are packed in the
projector box. They are provided to help you use or set up your
projector.
– Projector
– 3 LR 6/AA/1,5 V Batteries
– Mains lead
– VGA Cable
– Video/Audio RCA Cable
– Scart/RCA Audio Video adaptor
– Mouse Cable 8-pin mini Din to RS232
– Mouse Cable 8-pin mini Din to ADB
– CD-ROM & Quick Reference Guide
– Remote control
– Portable soft bag.
4
Page 5

3. IMPORTANT SAFEGUARDS
CAUTION: Please read all of these instructions before you operate your projector. Save these instructions for
S
Electrical energy can perform many useful functions.
This projector has been engineered and manufactured to meet applicable safety standards. IMPROPER USE CAN RESULT IN
POTENTIAL ELECTRICAL SHOCK OR FIRE HAZARDS. In order not to defeat the safeguards incorporated into this projector,
observe the following basic rules for its installation, use and servicing.
1.
Unplug the projector from the wall outlet before cleaning or
lamp replacement.
2.
Do not use liquid cleaners or aerosol cleaners. Use a soft
dry cloth to clean the projector unit. If the unit is very dirty,
wet a cloth with neutral detergent, squeeze it tight, wipe
the unit with it, and finish by wiping with a dry cloth.
Do not use a chemical duster or polisher-cleaner because it
can adversely affect the unit and peel the paint.
3.
Do not use attachments not recommended by PHILIPS, as
they may cause hazards.
4.
Do not use the projector near water- for example, near a
bathtub, washbowl, kitchen sink, or laundry tub, in a wet
basement, near a swimming pool, etc. Never spill liquid
into the projector.
5.
Do not place the projector on an unstable cart, stand, or
table. The projector may fall, which may cause serious
injury to a child or an adult and/or serious damage to the
unit. Use only with a cart or stand recommended by its
manufacturer as being suitable for use with a projector.
6.
Ceiling, wall or shelf mounting should be done with a
mounting kit approved by the manufacturer for use with a
projector and should follow the manufacturer’s instructions.
7.
Projector equipment and cart combinations should be
moved with care. Quick stops, excessive force, and uneven
surfaces may cause the equipment and cart combination to
overturn.
8.
Slots and openings in the sides and bottom of the cabinet
are provided for ventilation. To ensure reliable operation of
the projector and to protect it from overheating, these
openings must not be blocked or covered. These openings
should never be covered with cloth or other material. The
bottom opening should not be blocked by placing the
projector on a bed, sofa, rug, or other similar surface. The
projector should not be placed near or over a radiator or
heating vent. The projector should not be placed in a builtin installation such as a bookcase unless proper ventilation
is provided.
9.
The projector should be operated only from the type of
power source indicated on the side of the projector or in
the specifications and with the appropriate mains lead. If
you are not sure of the type of power supplied to your
business or the right type of mains lead, consult your
projector dealer or local power company.
10.
Do not allow anything to rest on the power cord. Do not
place the projector where the cord will be walked on.
11.
Follow all warnings and instructions marked on the
projector.
12.
As a safety feature, this projector is equipped with mains
lead with a 3-pin grounded plug (for USA-versions only) or a
2-pin grounded plug (for European versions only). The 3pin/2-pin grounded plug will fit only into a grounding type
power outlet. If the plug does not fit, use an adaptor that is
properly grounded or have an electrician install a grounded
type outlet. Do not attempt to modify this AC plug.
future reference.
13.
For added protection of the projector during a lightning
storm, or when it is left unattended or not in use for long
periods of time, unplug it from the wall outlet and
disconnect any cable systems. This will prevent damage to
the projector due to lightning and power-line surges.
14.
Do not overload wall outlets and extension cords with too
many products, because this can cause a fire or electric
shock.
15.
Never push objects of any kind into the projector through
cabinet slots as they may touch dangerous voltage points
or short cut parts, which could result in a fire or electric
shock.
16.
Do not attempt to service the projector yourself other than
maintenance issues presented in chapter ‘Maintenance’.
Opening or removing covers may expose you to dangerous
voltage or other hazards. Refer all servicing to qualified
service personnel.
17.
Unplug the projector from the wall outlet and refer
servicing to qualified service personnel under the following
conditions:
A. When the power cord or plug is damaged or frayed.
B. If liquid has been spilled into the projector.
C. If the projector has been exposed to rain or water.
D. If the projector does not operate normally when you
follow the operating instructions. Adjust only those
controls that are covered by the operating instructions;
improper adjustment of other controls may cause
damage and will often require extensive work by a
qualified technician to restore the projector to normal
operation.
E. If the projector has been dropped or the cabinet has
been damaged.
F. When the projector exhibits a distinct change in
performance – (this indicates a need for service).
18.
Upon completion of any service or repairs to the projector,
ask the service technician to perform a routine safety check
to check that the projector is in safe operating condition.
19.
When replacement parts are required, be sure the service
technician has used replacement parts specified by the
manufacturer that have the same characteristics as the
original parts. Unauthorized substitutions may result in fire,
electric shock, or other hazards.
20.
It is recommended to clean the air filter after every 100
lamp hours. The projector may become too hot if the filter
is not cleaned when required.
21.
If the lens becomes dirty or smudged, clean it with a clean,
dampened cloth. Never touch the lens with your fingers.
22.
Do not look directly into the aperture and lens while
operating the projector as this may damage your eyes.
English
5
Page 6

4. PROJECTOR FEATURES
English
1. Fully compatible with PC and MAC
The Philips Limesco solution enables perfect interfacing
with all sorts of PC and MAC standards.
Optimum picture quality is guaranteed in all modes.
The projector will adapt automatically to the proper data
source.
Signals from PC and MAC compatible computers will be
accepted without additional hardware.
2. High reliability and excellent brightness
The Philips UHP lamp guarantees long life, excellent
brightness over the lamp’s lifetime and excellent colour
reproduction. Furthermore, the projector has an excellent
uniformity of brightness over the whole screen.
3. Excellent video quality
The Philips line doubling technology ensures excellent
video quality.
The projector accepts the input signal of all major video
formats, including PAL, SECAM, NTSC and the higher
quality S-Video signals. The projector will recognize these
standards and adapt to them automatically.
5. Stereo Audio Output
Line output for connecting external audio equipment.
6. Adjustable Screen Capability
The diagonal picture size of the display can be set from 21"
(0.53 m) to 262" (6.6 m).
7. Ceiling Mount and Rear Screen projection
The projector is equipped with a full mirror scan conversion
function (‘vertical/horizontal mirror’), which allows the
image to be reversed for ceiling mount as well as for rear
projection applications.
8. Compact and lightweight
Completely portable, you can give attractive presentations
at any location by connecting the projector to a notebook,
video source etc.
4. Very easy to install and operate
The OSD (On Screen Display: information screens and
menus) in 6 languages provides you with additional
information to help you make the right choices about
installation and operation, and to perform the correct
actions.
The standard OSD language is English. In addition you can
select French, Spanish, German, Italian and Portuguese.
The sensor of the ergonomic, wireless Remote Control
allows you to operate both your computer as well as your
projector from almost anywhere in the room. The trackball
on the remote control and the directional shuttle on the
projector function as Cursor Control and are used to
manipulate the mouse cursor on the connected computer
as long as the menu is not active. When the menu is active
the Cursor Control controls the menu cursor.
The remote and local keyboard provides direct access
buttons for those functions that are most often used during
presentations:
Source selection buttons
With the VIDEO and DATA buttons you can directly select
the required source: S-video, video or Data.
Standby/On/Off
Switches the projector in the Power Standby mode.
Mute
Mutes the sound of the projector (or an externally
connected sound amplifier).
A/V (Audio/Video) Mute
Blanks out the screen and mutes the sound of the
projector (or an externally connected sound amplifier).
– VOLUME +
For adjusting the volume.
Further functions which can be addressed via the menu
are:
PP-save
This feature allows you to save sound and picture settings
as a Personal Preference.
PP-recall
This feature allows you to recall the saved sound and
picture settings (Personal Preference) as well as the factory
presets.
White point
Using the ‘white point’ feature you can change the overall
picture impression from warm white to cool white.
6
Page 7

5. FUNCTIONAL OVERVIEW See illustrations on page 3
CONTROLS
(fig. 1 and 2)
On projector and remote control
1 Cursor Control
For manipulating the mouse cursor on the connected computer
as long as the menu is not active. When the menu is active the
Cursor Control controls the menu cursor. The cursor control, by
means of the local keyboard, works with up/down and left/right
button operation.
Notes:
– The Cursor Control only functions when the Mouse socket
of the projector is connected to the serial port of a PC or
the ADB terminal of an Apple Macintosh computer.
– Installation of dedicated RC mouse driver software on the
computer used is necessary.
– A cursor control requires the presence of data signal.
– The computer in use needs to be reset before the projector
is detected.
2 MENU
For activating and deactivating the menu.
3 OK (projector) and – / –– (remote control)
For action confirmation in the menu when the menu is on
screen.
When the menu is not on screen the – / ––buttons on the
remote control function as the Left and Right mouse buttons of
your PC.
4 Source selection buttons
VIDEO – For selecting the video signal or S-video signal as the
current projection source.
The button toggles between video and S-video signal.
DATA – For selecting the DATA signal as the current projection
source.
5 MUTE
For muting the sound of the projector (or an externally
connected sound amplifier).
6 STANDBY/ON/OFF
For switching the projector in the power standby mode.
7 A(audio)/V(video)-MUTE
For muting the sound of the projector (or an externally
connected sound amplifier) and for muting the picture.
8 – VOLUME +
For adjusting the volume.
On projector only
9 Indicators
Lamp indicator
– Flashes green when the lamp is starting up.
– Lights up green when the lamp is on.
– Flashes orange when the remaining lamp life is less than 100
hours.
– Lights up orange when the lamp life is expired.
– Lights up red when
• the temperature, measured in the set, is too high, or
• lamp start has failed.
Remote Control indicator
Flashes green when the remote control is operated and the
projector responds to this operation.
0 ZOOM ring
For adjusting the size of the projected image.
% Dust filter
^ Lens cap
& HEIGHT/LEVEL adjuster
For adjusting the vertical angle of the projector.
On remote control only
* On/off button
For switching the remote control on and off.
Note: The remote control will always use some power, even
when not in use. Therefore always switch off the remote
control after use.
( Light button
For switching on the button illumination
The back-light will switch off automatically after 5 seconds.
CONNECTIONS
(fig. 3)
Data source connections
a MOUSE
In-/output socket for connecting to the serial port of a PC or the
ADB terminal of an Apple Macintosh computer.
b DATA IN
Input socket for connecting to the DATA OUT terminal of a
computer.
c AUDIO IN
Input socket for connection to the AUDIO OUT socket of a
computer.
g AUDIO OUT (audio output connection)
Output socket for connecting to the Line Input sockets of an
amplifier or stereo system.
Video source connections
d S-VIDEO IN
Input socket for connecting to the S-VIDEO OUT socket of a SVHS video recorder, a VCR, Laser Disc player, video camera or
TV with AV output socket.
e VIDEO IN
Input socket for connecting to the VIDEO OUT socket of a
video recorder, Laser Disc player, video camera or TV with AV
output socket (PAL, NTSC, SECAM).
f AUDIO IN L/R
Input sockets for connection to the AUDIO OUT sockets of a
video recorder (S-VHS, PAL, NTSC, SECAM).
g AUDIO OUT (audio output connection)
Output socket for connecting to the Line Input sockets of an
amplifier or stereo system.
Other connections
h POWER
For connecting the projector to the mains.
English
! FOCUS ring
For adjusting the focus of the projected image.
@ Horizontal adjusters
For adjusting or correcting a possible oblique displayed picture.
# Lock slit
For inserting an optional locking device (Kensington lock).
$ IR sensor
Receive the signals from the remote control.
7
Page 8
Mouse
Data in
S-Video in
Video in
Audio
out
Audio
in
L
R
Mouse
Data in
S-Video in
Video in
Audio
out
Audio
in
L
R
Power
Data
Audio
Video
OK
Menu
D
ata
Lam
p
M
u
t
e
AVMute
RC
Volume
Stan
d
by
Vi
de
o
On/
O
ff
OK
Menu
Data
Lam
p
M
u
t
e
A
VM
u
t
e
RC
V
o
lume
S
t
andby
Video
O
n/Of
f
Focus ring
Zoom ring
Mouse
Data in
S-Video in
Video in
Audio
in
Audio
out
L
R
Mouse
Data in
S-Video in
Video in
Audio
in
Audio
out
L
R
Power
Data
Audio
Video
OK
Menu
Data
Lamp
Mute
AVMute
RC
Volume
Standby
Video
On/Off
OK
Menu
Data
Lamp
Mute
AVMute
RC
Volume
Standby
Video
On/Off
Mouse Data in
S-Video in Video in Audio
out
Audio
in
LR
Mouse Data in
S-Video in Video in Audio
out
Audio
in
LR
Power
Data
AudioVideo
6. SET UP
POSITIONING THE PROJECTOR AND SCREEN
English
• Place the projector on a stable, level surface, out of direct
sunlight and away from sources of excessive dust, dirt, heat,
water, moisture, vibration and strong magnetic fields.
Face the projector at right angles towards the screen for the
best picture results. To determine the distance for the
desired size, please refer to the Projection Assistant, a
calculation programme included on the CD-ROM.
• The screen should be positioned so that it is not directly
touched by sunlight or artificial light, as this will wash out the
colours of the picture, making it hard to see.
• The projector can be used for both front projection, rear
projection and ceiling projection applications. As default
factory setting, the projector has been set up for front
projection. You can change to rear or ceiling projection via
the OSD menu. See ‘Rear screen projection’ and ‘Upsidedown (ceiling) projection’ under ‘Other settings’ for further
instructions.
• Choose a screen size suitable for the number of viewers and
the size of the room.
• Picture quality is best when you sit directly in front of the
projector screen.
ADJUSTING THE FOCUS AND SIZE OF THE IMAGE
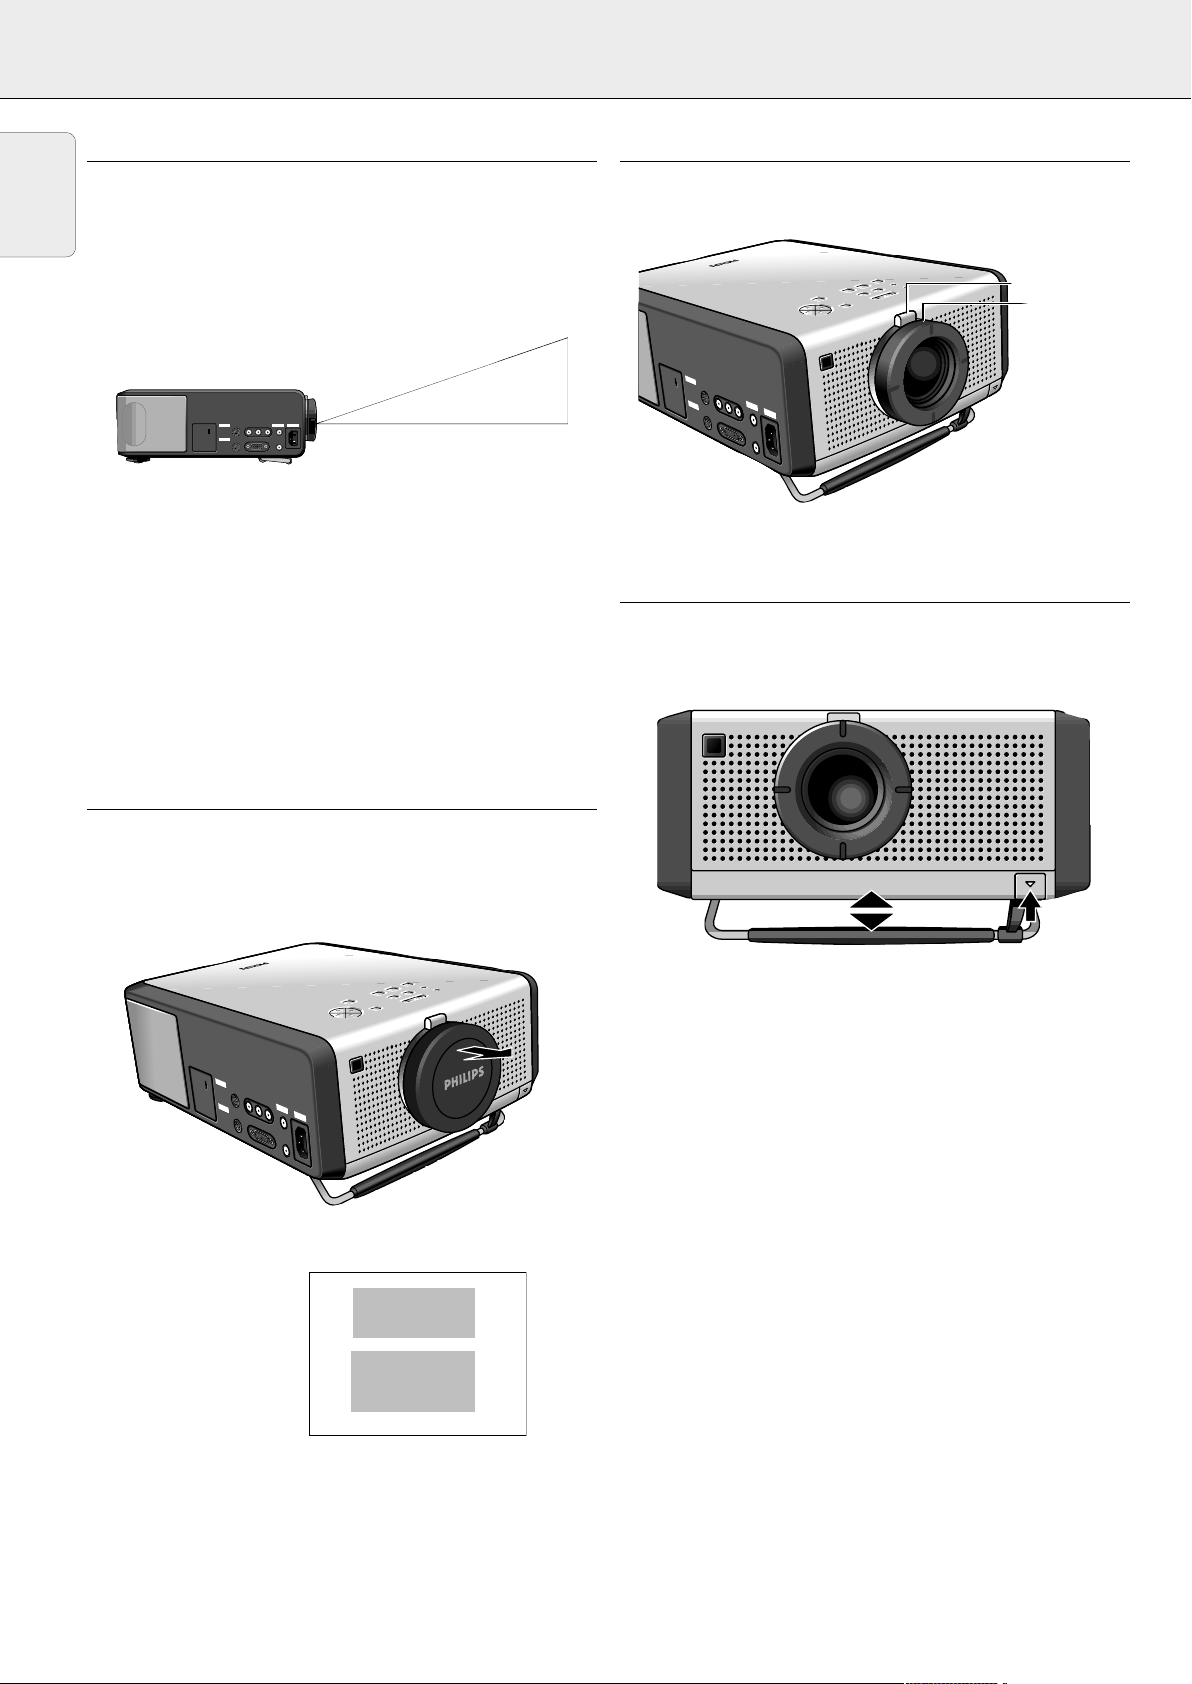
• Use the ZOOM ring to adjust the size of the image.
• Use the FOCUS ring to adjust the focus of the image.
ADJUSTING THE VERTICAL AND HORIZONTAL ANGLE OF THE PROJECTOR
Vertical angle
• Use the Height/Level Adjuster to adjust the vertical angle of the
projector as specified under ‘Positioning the projector and
screen’.
MAINS SUPPLY
1.
Insert the mains lead into the projectors POWER socket and
connect it to the wall socket.
Note: The standby indicator lights up red, the projector is
now in the Power/Standby mode.
2.
Remove the lens cap.
3.
Press the STANDBY ON/OFF button to switch on the
projector.
– The lamp indicator
flashes green and the
start-up screen appears
PHILIPS
for 5 seconds.
– When the projection
lamp is on, the lamp
indicator lights up
Multimedia
Projectors
green.
– The start-up position of
the projector depends on when the projector has been
switched off before. The factory default position is
Power/Standby.
4.
To switch off the mains supply completely, pull the mains
plug out of the wall socket.
Note: Before disconnecting the mains lead, make sure that
8
the cooling fan has stopped (about 3 minutes after the
projector has been switched to Power Standby).
To Raise: press the adjuster carefully and lift to raise the
projector.
To Lower: press the adjuster carefully again to lower the
projector.
• Use the FOCUS Ring and ZOOM Ring to readjust the focus and
size of the image.
Page 9
Horizontal angle (horizon)
Push
Mouse
Data in
S-Video in
Video in
Audio
in
Audio
out
L
R
Mouse
Data in
S-Video in
Video in
Audio
in
Audio
out
L
R
Power
Data
Audio
Video
OK
Menu
Data
Lamp
Mute
AVMute
RC
Volume
Standby
Video
On/Off
OK
Menu
Data
Lamp
Mute
AVMute
RC
Volume
Standby
Video
On/Off
Mouse
Data in
S-Video in
Video in
Audio
out
Audio
in
L
R
Mouse
Data in
S-Video in
Video in
Audio
out
Audio
in
L
R
Power
Data
Audio
Video
OK
Me
n
u
Data
Lamp
Mute
AVMute
RC
Volume
Standby
Video
On/
Of
f
OK
Menu
Data
Lamp
Mute
AVMute
RC
Volume
Standby
Video
On/
Off
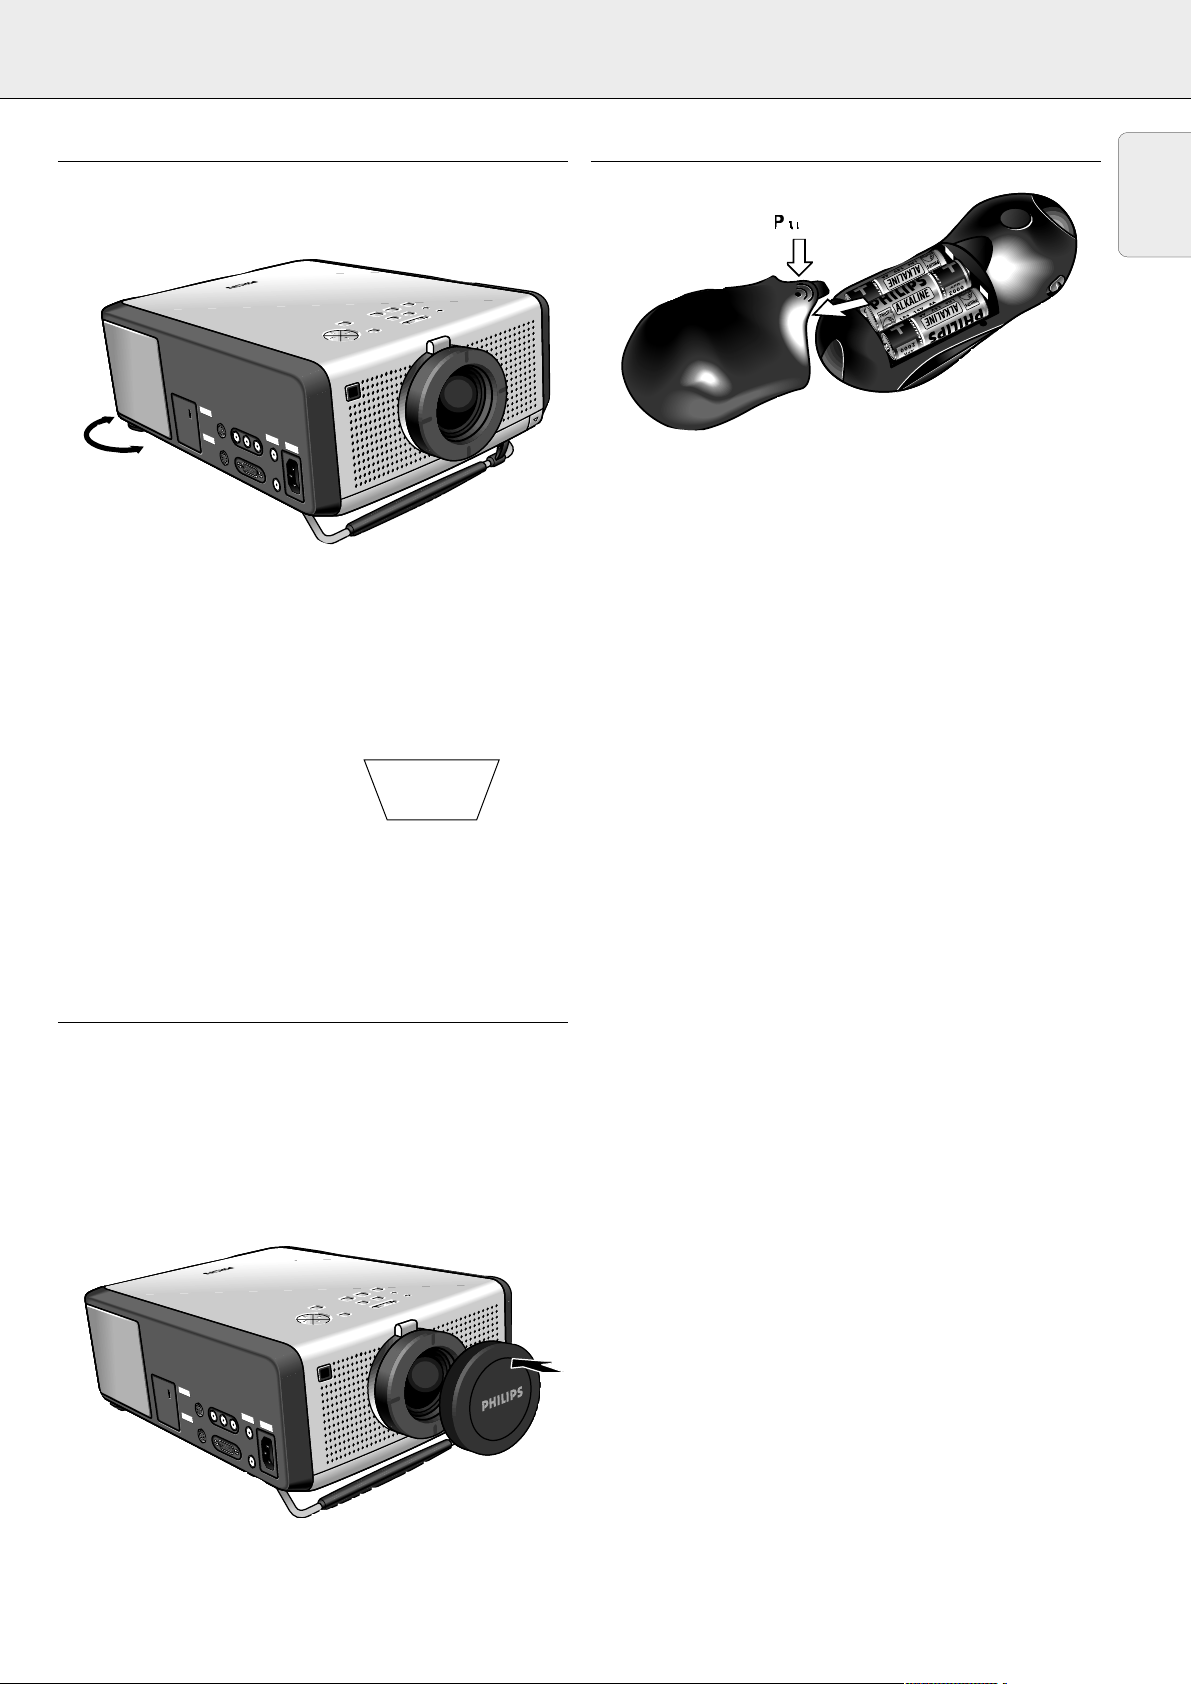
• Adjust or correct a possible oblique displayed picture by turning
the horizontal adjusters to the desired position.
6. SET UP
INSERTING THE BATTERIES IN THE REMOTE CONTROL
1.
Push and slide the lid in the direction of the arrow.
2.
Install three ‘AA’ batteries as indicated inside the battery
compartment.
3.
Replace the lid and snap into place.
English
Up: turn the adjuster(s) to the left.
Down: turn the adjuster(s) to the right.
• Use the FOCUS Ring and ZOOM Ring to readjust the focus and
size of the image.
Notes:
– When adjustments are not properly made, the picture may
become distorted, depending on the relative positions of the
projector and the screen.
– If the projector and the screen
are not properly placed, the
picture will be distorted,
producing a keystone image as
shown at right.
Keystoned Image
CAUTION!
When all required adjustments have been made, switch off the
projector before making any other connections (see
‘Installation’).
MOVING THE PROJECTOR
1.
Press the STANDBY/ON/OFF button to switch off the
projector. The standby indicator lights up red.
2.
Wait until the cooling fan has stopped (about 3 minutes
after the projector has been switched off) and disconnect
the mains lead and all other cables.
3.
Make sure the lens is turned back in to prevent damage to
the lens.
4.
Put the lens cap back in place to prevent dust, dirt or other
contamination from harming or damaging the front of the
projector lens when moving the projector.
Caution: Do not mix old and new batteries (also never mix
alkaline and manganese batteries).
Note: The maximum range of the remote control is
20 m (± 65 feet).
Note: Never place the projector on the side where the
connections are located.
9
Page 10
7. INSTALLATION Video/computer cables and adaptor
VIDEO/COMPUTER CABLES AND ADAPTOR
English
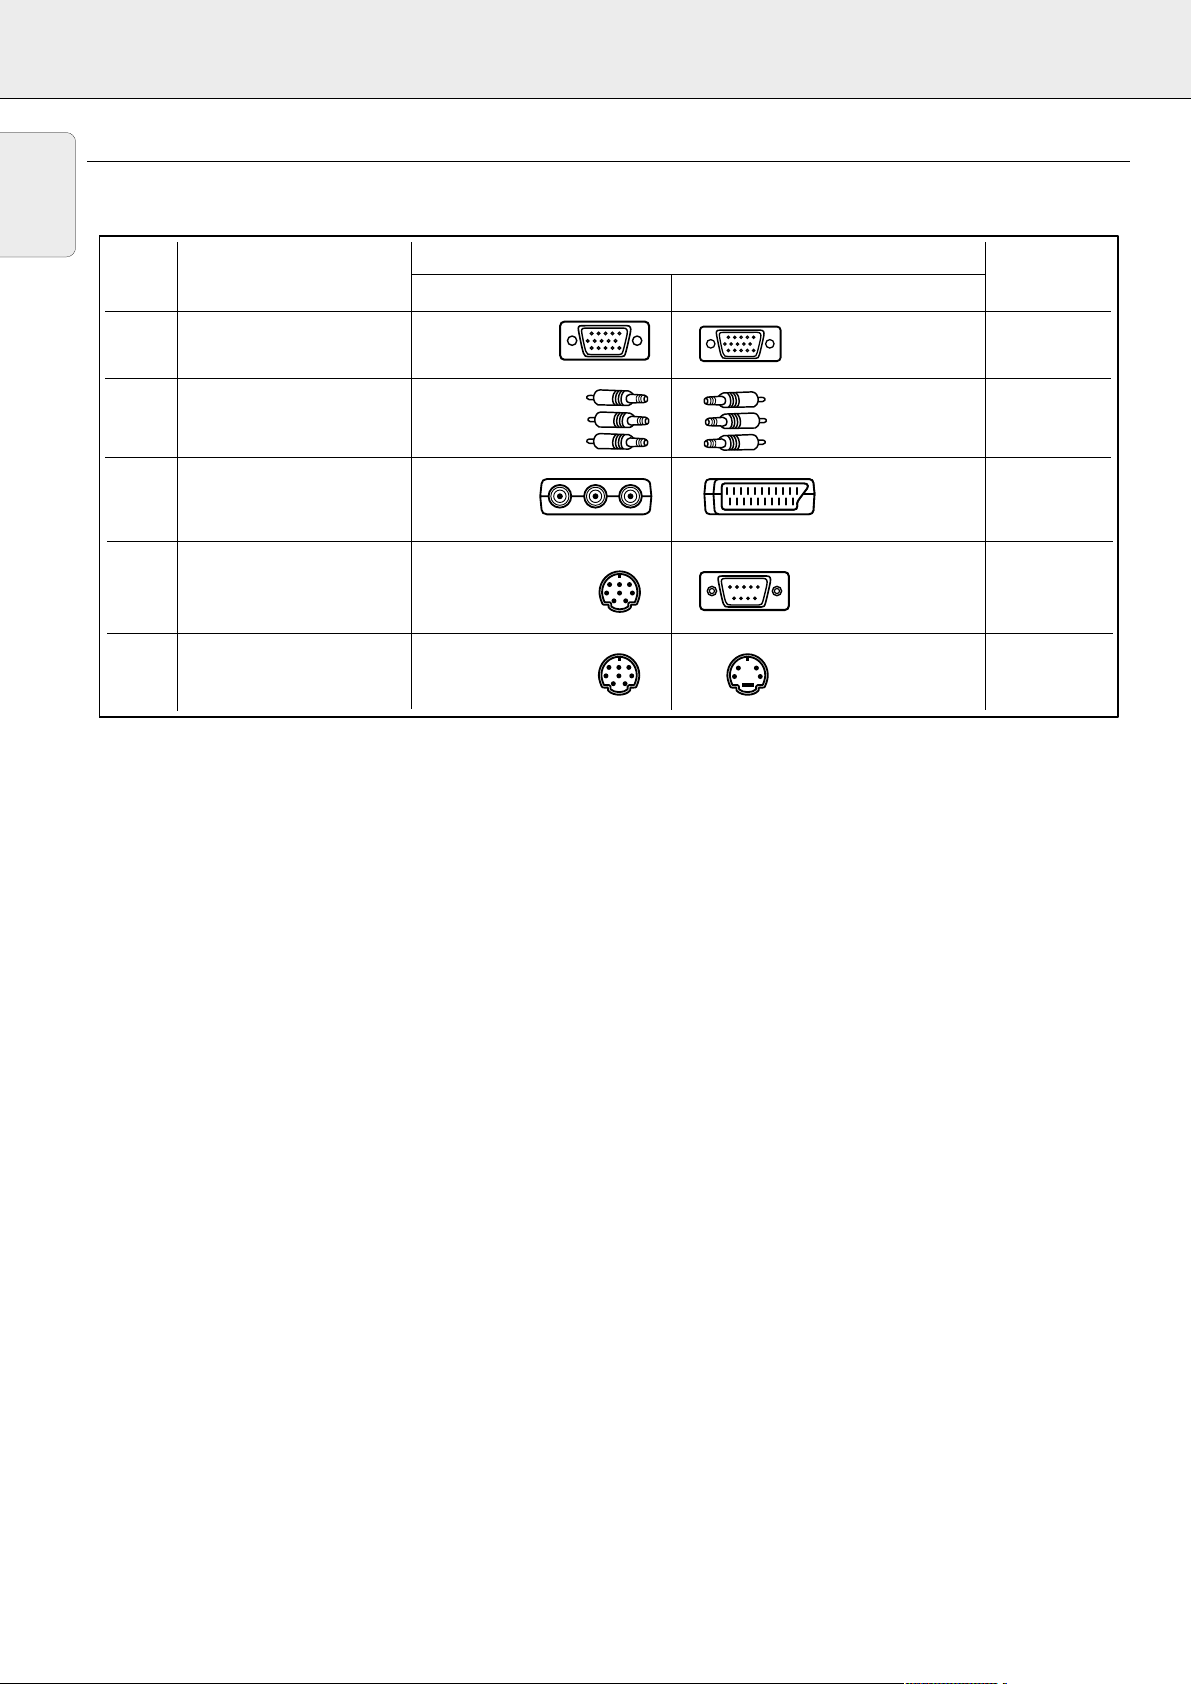
These accessories are supplied for connecting the projector to computer/AV equipment. The numbers in the left-hand column
correspond with the numbers in the connection diagrams on the following pages.
No.
1
2
3
4
8-mini Din to RS232
5
Optional cables and adaptor:
CABLE/ADAPTOR
VGA Cable
Video/Audio
Stereo RCA Cable
Scart/RCA-AV
Adaptor
Mouse cable
Mouse cable
8-mini Din to ADB
CONNECTIONS
D-Sub M
15P (male)
RCA pin
(male) x 3
Mini Din
8P (male)
Mini Din
8P (male)
– Audio cable for PC/MAC computers
– S-video cable
– Audio RCA cable
– Programmable VGA/MAC adaptor
LENGTH
Computer/AV products sideProjector side
D-Sub M
15P (male)
RCA pin
(male) x 3
D-Sub M
9P (female)
Mini Din
4P (male)
2.0 m
2.0 m
- -
2.0 m
2.0 m
10
Page 11
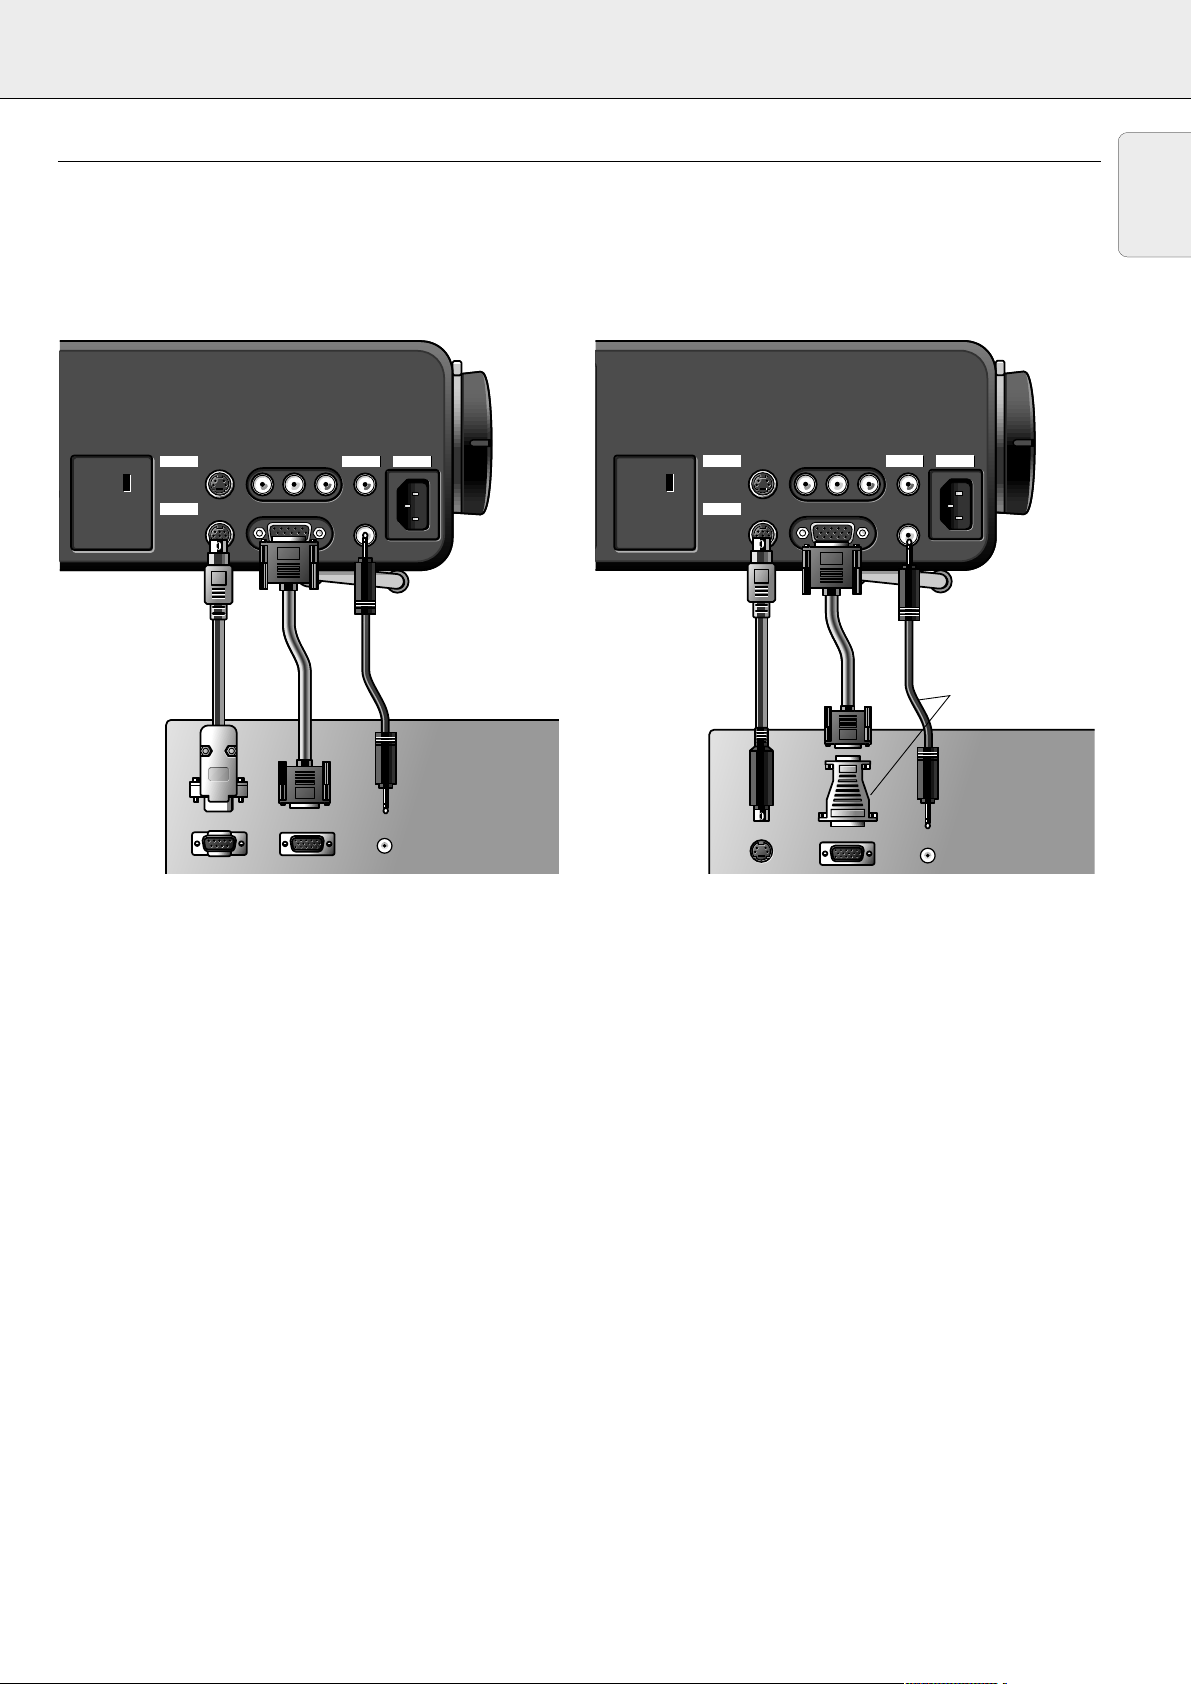
7. INSTALLATION Connecting to a computer
CONNECTING TO A COMPUTER
General
–
Caution: Always switch off the projector before making any connections!
– The data input is suitable for both Apple Macintosh computers (Power Book and Power Mac) as well as for IBM compatible PCs.
– The data output of IBM compatible PCs can be connected directly to the projector using standard data cables.
– Apple Macintosh computers may need a conversion plug (optional) added to the standard data cable.
– The figures in brackets
– The characters in brackets
PC (Desk Top/Lap Top)
(1)
correspond to the figures in the diagram on page 10.
(a)
correspond to the characters in
fig. 2
on page 3.
MACINTOSH (Desk Top/Power Book/Power Mac)
English
ctor
S-Video in Video in Audio
S-Video in Video in Audio
Data
Mouse Data in
Mouse Data in
LR
LR
Power
AudioVideo
out
out
Audio
Audio
in
in
Projector
4 Optional
1
PC
Mouse
Mouse
1.
Connect the DATA OUT terminal of the computer to the DATA
IN terminal
(b)
of the projector and secure the plugs by
Data out
Data out
Audio out
Audio out
tightening the thumb screws.
For this, use the VGA cable
2.
Connect the serial port of the computer to the MOUSE terminal
(a)
of the projector.
For this, use the mouse cable
(1)
supplied.
(4)
supplied.
– You can now manipulate the mouse cursor on the computer
and on the screen, using Cursor Control.
3.
If you wish to use audio, connect the AUDIO OUT socket of the
computer to the AUDIO IN socket
(c)
of the projector.
For this, use an optional audio cable.
Notes:
– If the mouse cursor does not react when moving the track ball
on the remote control:
• check that the Remote Control indicator on the projector
flashes green when you move the trackball.
–
If it does not: Check that you have switched on the remote
control. If you have, check that the batteries are installed
properly and/or replace the batteries.
–
If it does: Install the proper remote control software on your
computer as described in the chapter ‘Additional information’.
If the mouse cursor does not react when moving the directional
shuttle on the projector:
• Install the proper remote control software on your computer
as described in the chapter ‘Additional information’.
– For computers with a PS2 mouse port:
The projector does not support the PS2 mouse protocol. To
operate the mouse function:
• connect the projector to the serial port of the computer as
indicated above.
• Install the proper remote control software on your computer
as described in the chapter ‘Additional information’.
Sometimes your computer will require that the serial port is
enabled separately. Please check the documentation of your
computer for details.
jector
S-Video in Video in Audio
S-Video in Video in Audio
Data
Mouse Data in
Mouse Data in
LR
LR
Power
AudioVideo
out
out
Audio
Audio
in
in
Projector
Projector
5
1
Optional
Mac
Mouse
Mouse
1.
Connect the DATA OUT terminal of the computer to the DATA
IN terminal
(b)
of the projector and secure the plugs by
Data out
Data out
Audio out
Audio out
tightening the thumb screws.
For this, use the VGA cable
2.
Connect the ADB port of the computer to the MOUSE terminal
(a)
of the projector.
For this, use the mouse cable
(1)
supplied.
(5)
supplied.
– You can now manipulate the mouse cursor on the computer
and on the screen, using Cursor Control.
3.
If you wish to use audio, connect the AUDIO OUT socket of the
computer to the AUDIO IN socket
(c)
of the projector.
For this, use an optional audio cable.
Notes:
– For older versions of Apple Macintosh computers an optional
VGA/MAC adaptor may be needed. In this case:
• Connect the optional VGA/MAC adaptor to the DATA OUT
terminal of the computer and secure the plugs by tightening
the thumb screws.
•
Select the required resolution for your monitor in the
diagram on the back of the adaptor and adjust the
dipswitches accordingly.
• Plug the VGA cable (1) supplied into both the adaptor and
the DATA IN terminal (b) of the projector and secure the
plugs by tightening the thumb screws.
• Proceed with step 2. (see above).
– If he mouse cursor does not react when moving the track ball
on the remote control:
• Check that the Remote Control indicator on the projector
flashes green when you move the trackball.
–
If not: Check that you have switched on the remote control.
If you have, check if the batteries are installed properly
and/or replace the batteries.
11
Page 12
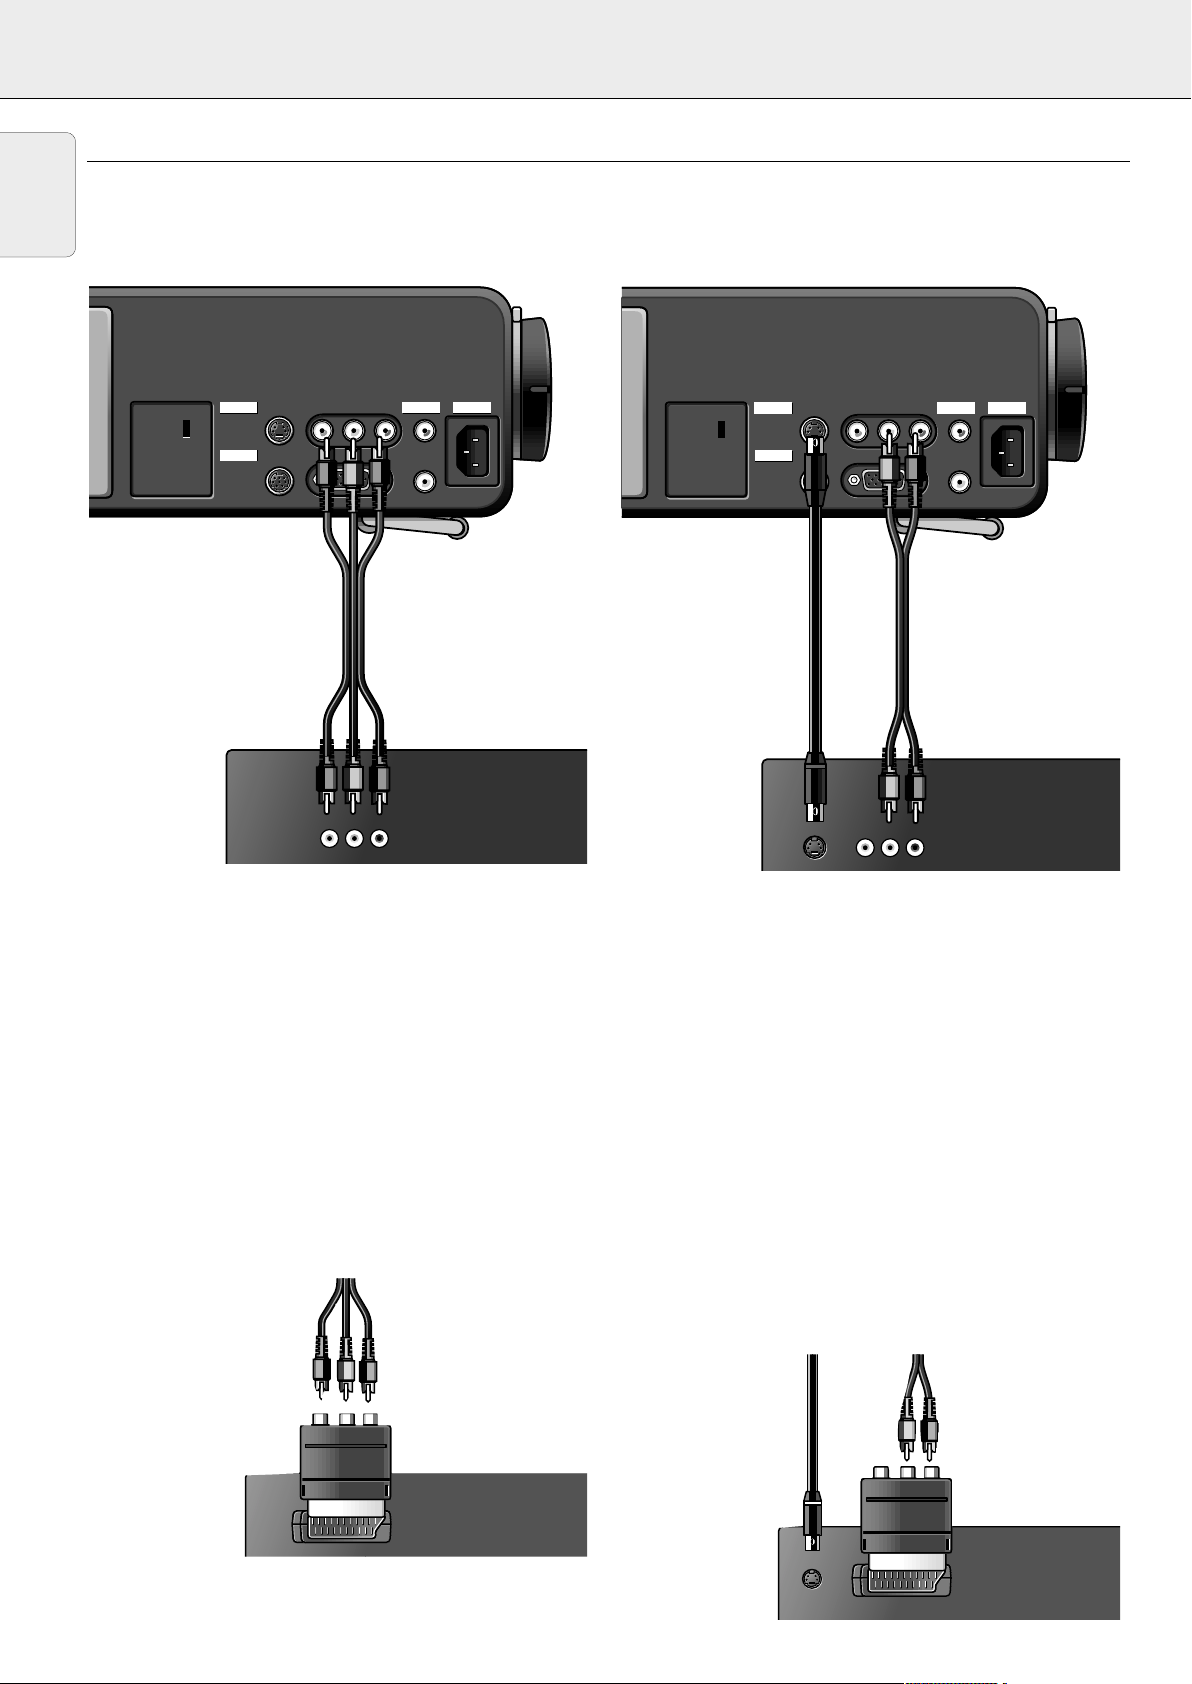
VCR
S-Video
VCR
7. INSTALLATION Connecting to video equipment
CONNECTING TO VIDEO EQUIPMENT
English
General
– The figures in brackets
– The characters in brackets
–
Caution: Always switch off the projector before making any connections.
PAL, NTSC, SECAM
(1)
correspond to the figures in the diagram on page 10.
(a)
correspond to characters in
fig. 2
on page 3.
S-VHS
rojector
S-Video in Video in Audio
S-Video in Video in Audio
Data
Mouse Data in
Mouse Data in
LR
LR
Power
AudioVideo
out
out
Audio
Audio
in
in
Projector
2
L Audio R
Video
L Audio R
Video
out
out
out
VCR
1.
Connect the VIDEO OUT socket of a VCR, Laser Disc
player, video camera or TV to the VIDEO IN socket
out
(e)
of
the projector.
For this, use the video/audio connection cable
2.
Connect the AUDIO OUT L/R sockets of the VCR, Laser
(2)
supplied.
Disc player, video camera or TV to the AUDIO L/R sockets
(f)
of the projector.
For this, use video/audio connection cable
(2)
supplied.
Insert the white plug into the L socket and the red plug into
the R socket.
In case your VCR, Laser Disc player, video camera or TV is
equipped with a Scart connector:
1.
Connect the Scart/RCA Audio Video adaptor
(3)
supplied to
the Scart connector of the VCR, Laser Disc player, video
camera or TV.
2.
Plug the video/audio connection cable
the adaptor and the VIDEO IN
(f)
of the projector.
(e)
(2)
supplied into both
and AUDIO L/R sockets
Projector
S-Video in Video in Audio
S-Video in Video in Audio
Data
Mouse Data in
Mouse Data in
LR
LR
Power
AudioVideo
out
out
Audio
Audio
in
in
Projector
Optional
S-Video
Video
S-Video
Video
out
VCR
1.
Connect the S-VIDEO OUT socket of a S-VHS video
out
L Audio R
L Audio R
out
out
Optional
recorder, Laser Disc player, video camera or TV to the
S-VIDEO IN socket
For this use an
2.
Connect the AUDIO OUT L/R sockets of the S-VHS video
(d)
of the projector.
(optional)
S-video connection cable
.
recorder, Laser Disc player, video camera or TV to the
AUDIO L/R sockets
For this, use an
(f)
of the projector.
(optional)
audio connection cable.
Insert the white plug into the L socket and the red plug into
the R socket.
In case your VCR, Laser Disc player, video camera or TV is
equipped with a Scart connector:
1.
Connect the Scart/RCA Audio Video adaptor
(3)
supplied to
the Scart connector of the VCR, Laser Disc player, video
camera or TV.
2.
Plug an
(optional)
audio connection cable or the video/audio
connection cable supplied into both the adaptor and the
AUDIO L/R sockets
(f)
of the projector.
Insert the white plug into the L socket and the red plug into
the R socket.
3.
Plug an
the S-VIDEO in socket
(optional)
S-Video connection cable into the VCR and
(d)
of the projector.
12
Page 13
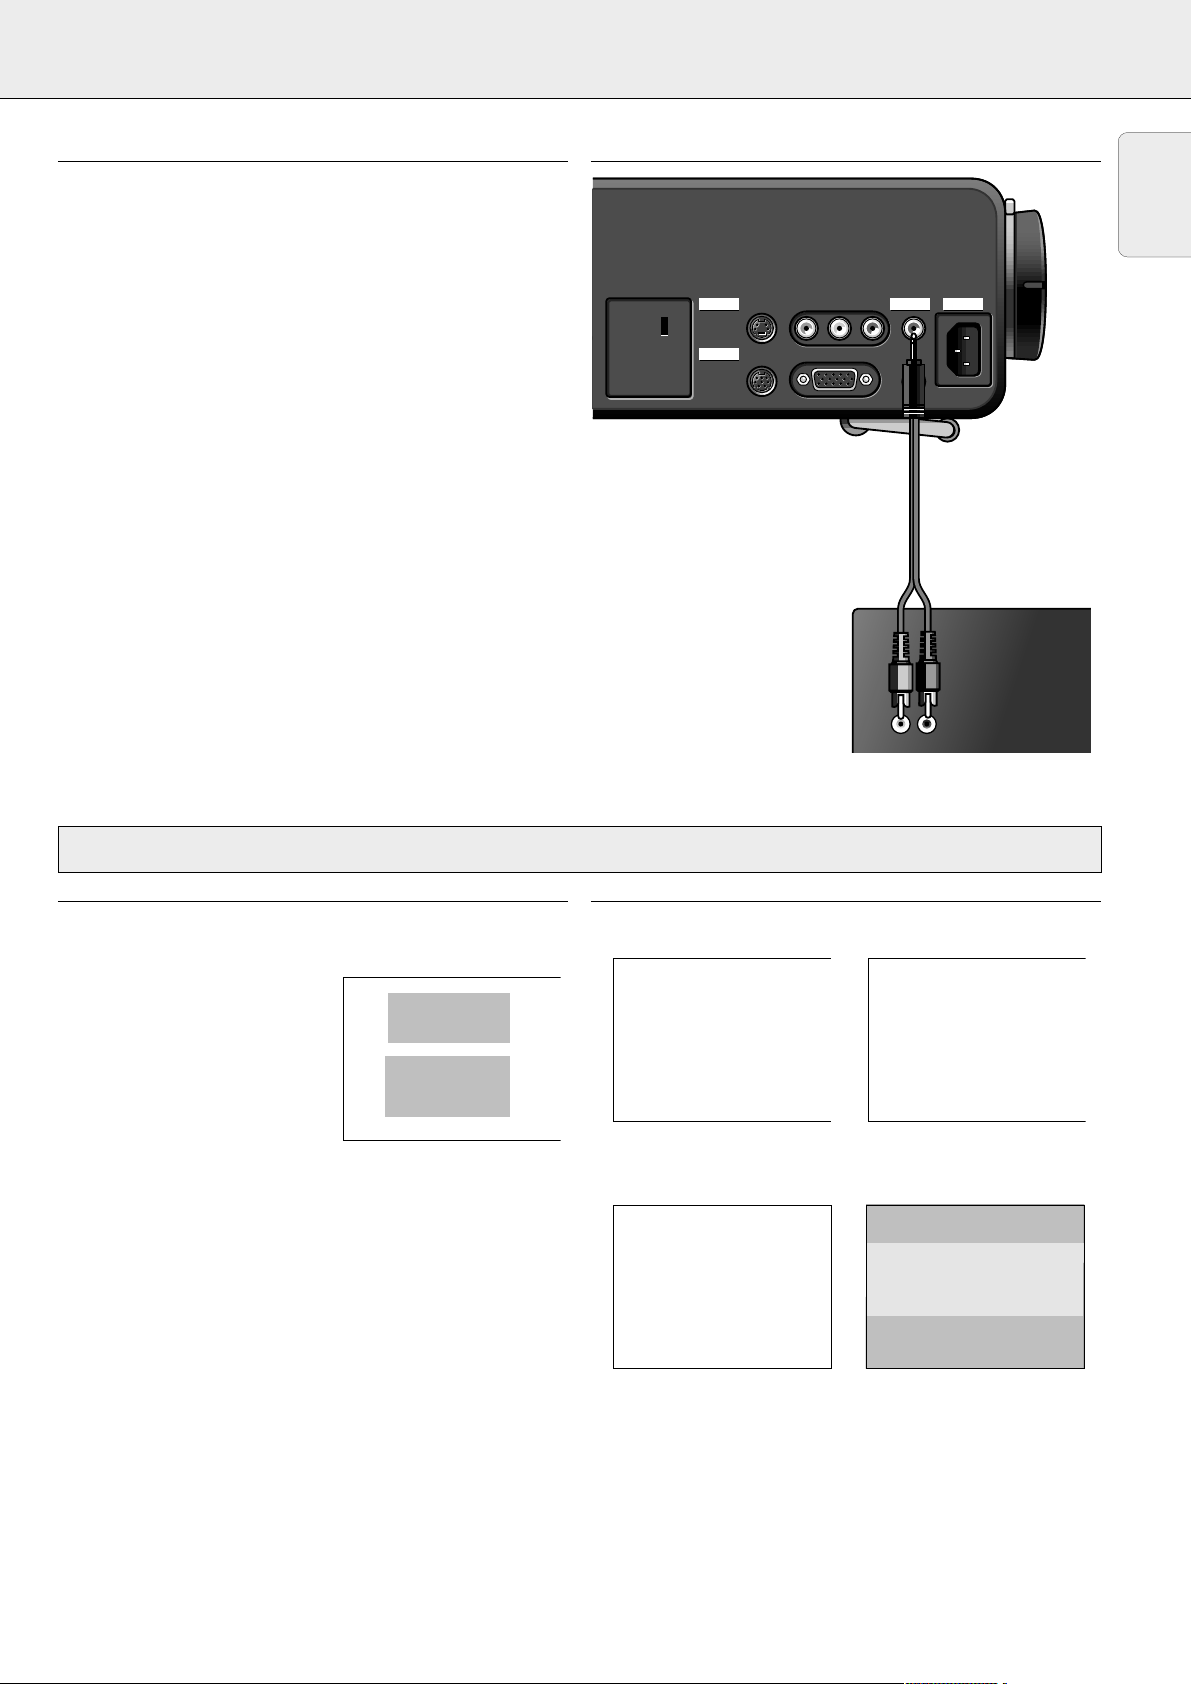
7. INSTALLATION Connecting to audio equipment
e
CONNECTING TO AUDIO EQUIPMENT
General
– The figures in brackets
diagram on page 10.
The characters in brackets
fig. 2
–
on page 3.
Caution: Always switch off the projector before making any
connections.
• Connect the AUDIO IN L/R sockets of an amplifier or stereo
system to the AUDIO OUT socket
For this, use an
(optional)
Insert the white plug into the L socket and the red plug into
the R socket.
Note: When the projector is connected to an external audio
amplifier, you cannot control the volume via the
projector or the remote control. However, the sound
can still be muted via the projector or the remote
control.
(1)
correspond to the figures in the
(a)
correspond to characters in
(g)
of the projector.
audio connection cable.
ctor
S-Video in Video in Audio
S-Video in Video in Audio
Data
Mouse Data in
Mouse Data in
Projector
Projector
LR
LR
AudioVideo
Audio
Audio
in
in
out
out
Power
Optional
English
8. OPERATION Preparation
PREPARATION
General
1.
Press the STANDBY/ON/OFF button to switch on the
projector.
– The lamp indicator flashes
green and the start up screen
appears for 5 seconds.
–
When operation time reaches
3901 hours, the message
‘WARNING: Lamplife expires in
99 hours’ will be displayed on the
screen when switching the
projector on.
For this refer to the chapter ‘Lamp’ under ‘Additional
information’.
– When the lamp is on, the lamp indicator lights up green.
2.
Set the ON/OFF switch of the remote control to ON in order
to switch on the remote control.
Note: Always switch off the remote control after use.
3.
If required, press the light button of the remote control.
– When this button is pressed the button illumination is
switched on for 5 seconds. Every time one of the buttons is
pressed within these 5 seconds, the illumination time is
extended (by a further 5 seconds).
4.
Select the required source (Video, S-Video or Data) by
pressing the corresponding source selection button.
Note: The source selection button VIDEO toggles between
Video and S-video.
5.
Switch on the computer or start video playback.
PHILIPS
Multimedia
Projectors
Amplifier
L Audio R
L Audio R
in
in
– The following messages may appear on the screen when
selecting a source:
S-Video
Video
S-Video selected as source. Video selected as source.
Data
PHILIPS
No input signal detected
Please check the
connections
Multimedia Projectors
Data selected as source. No input signal.
13
Page 14
8. OPERATION Preparation/Picture control
English
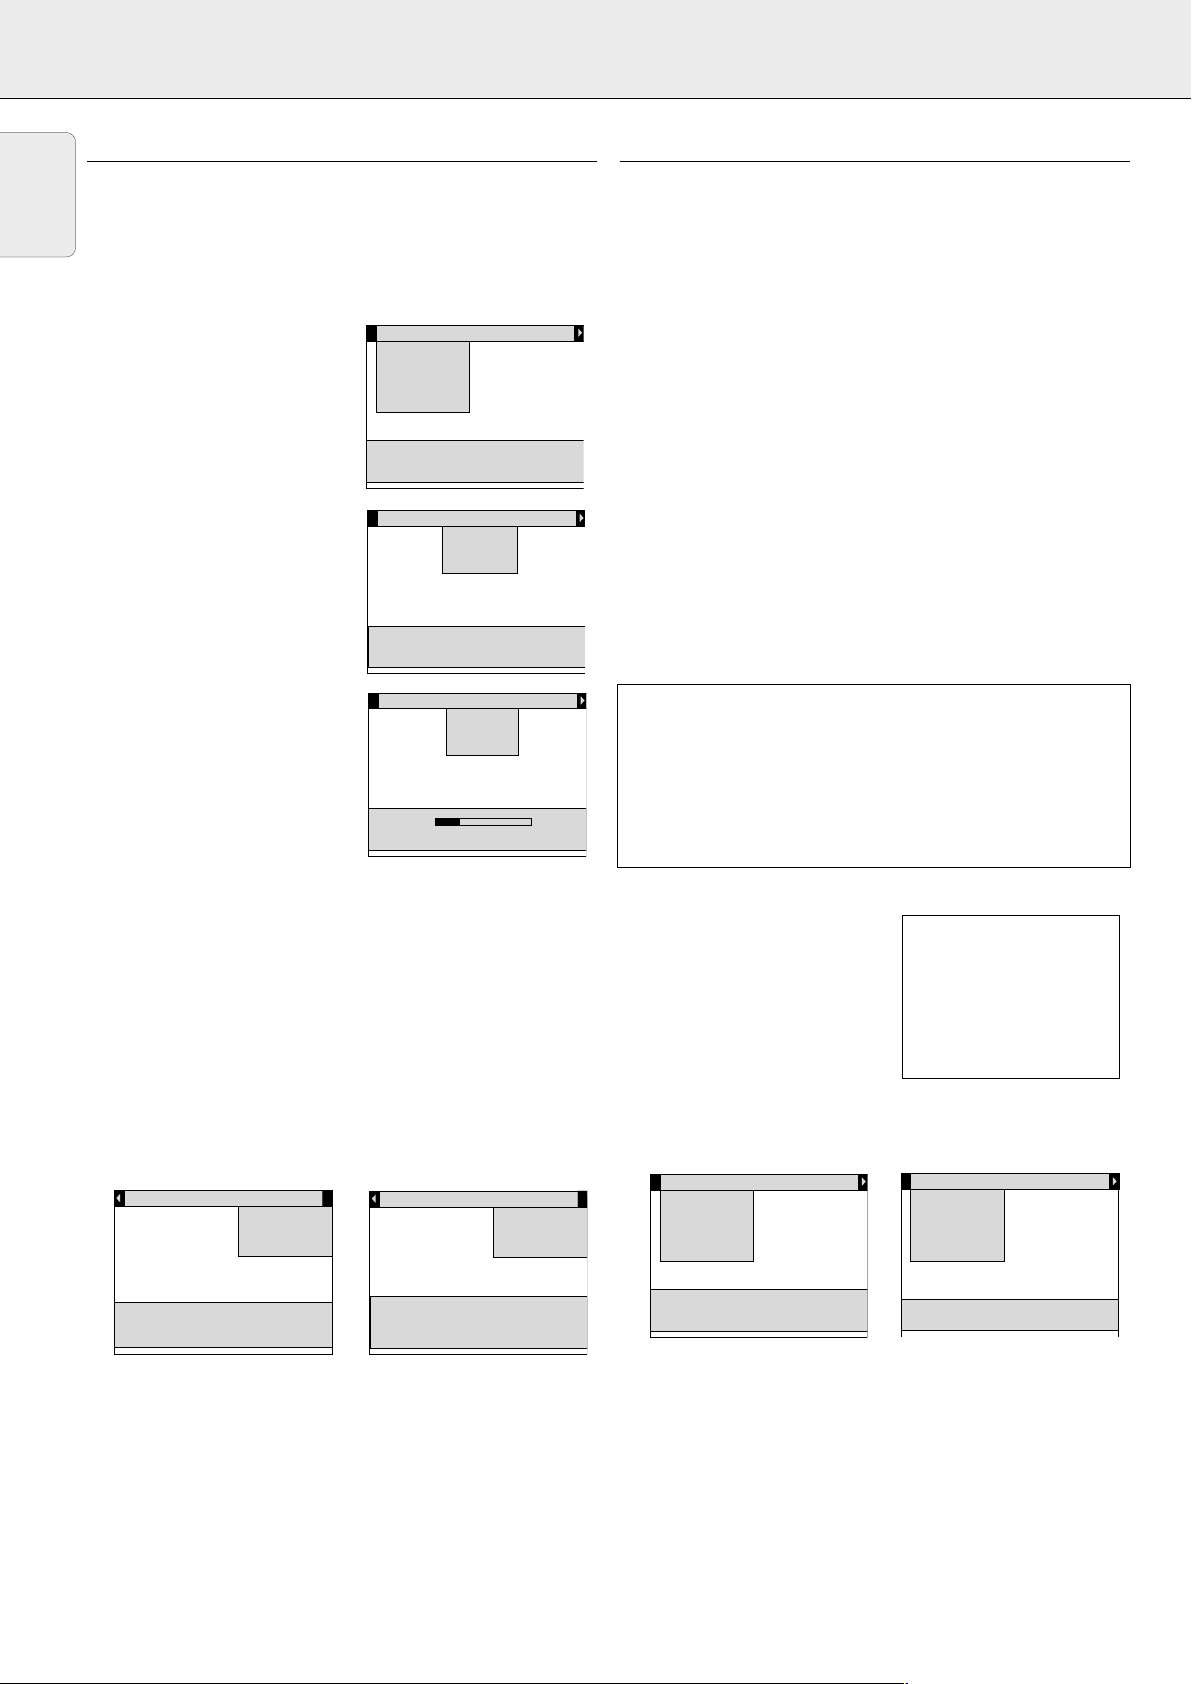
On Screen Display menu - General explanation
All video and data adjustments and settings (except A/V Mute)
are done via On Screen Displays and with help of the following
controls:
MENU, OK (–/––) and Cursor Control on the projector or the
remote control.
1.
Press MENU.
– The menu bar appears on the
screen.
The first item is highlighted
and its sub menu is shown.
2.
Use
Cursor Control
to move
the cursor to any other item in
Display
Shift
Hor. size
Phase
Brightness
Contrast
White point
Use cursor control to select
Press OK or — to invoke item
Press MENU to exit menu
Display
the menu bar.
– When the cursor is moved to
1 or 2, the menu bar will scroll
to the left or the right.
Use cursor control to select
Press OK or — to invoke item
Press MENU to exit menu
3.
Select the sub menu item to
Display
be adjusted using Cursor
Control.
4.
Press OK (–/––) to activate
the item.
5.
Adjust the selected item in the
action window at the bottom
of the screen, using Cursor
Control.
6.
Press OK (–/––) to confirm and store the adjustment.
7.
Select the next item to be adjusted in the sub menu and
Use cursor control to adjust
Press OK or — to accept
adjust as described above.
8.
Pressing MENU will also confirm and store the adjustment.
In this case the On Screen Display will be closed.
Audio Source
Audio
Volume
Bass
Treble
Mute
Audio
Volume
Bass
Treble
Mute
–+
Source
Source
PICTURE CONTROL
– The projector’s picture is set to standard specifications at the
factory. However, you can adjust the image to suit your own
preferences by using the VIDEO or DATA ADJUST feature.
The projector will store the last used settings for every
source. So when you switch from one source to another,
the settings of the source switched from will be stored and
the settings of the source switched to will be recalled.
When the projector is switched off and on again the
settings for the selected source will be recalled again.
– Three memory modes allow you to adjust and save up to
three sets of settings (see ‘Personal Preferences’).
Data display adjustments
For data signal input, the following adjustments can be made:
– shift - adjusts the computer image in horizontal and vertical
direction to centre it on the screen;
– horizontal size - adjusts the computer image in a horizontal
direction to make the image completely fill the screen;
– phase - when connecting the projector to your PC for the first
time, be sure to adjust the phase control for optimal readability
of the projected text;
– brightness - adjusts the black level to the room brightness;
– contrast - adjusts the overall contrast intensity;
– white point - adjusts the overall picture impression from
warm white to cool white.
Tip for Windows users:
To adjust horizontal size and phase correctly:
1.
Select ‘Start’ and then ‘Shut down’.
2.
Adjust the projectors horizontal size control, so that no
vertical bars are visible.
3.
Now adjust the projectors phase control for optimal
readability.
4.
Press ‘No’ in the Windows shutdown screen to cancel the
shutdown action.
1.
Press DATA to select data input.
– DATA appears on the screen.
Data
Language selection
The projector can display menus in one of six different
languages.
1.
Press MENU.
– The menu bar appears on the screen.
2.
Use
Cursor Control
to select
MISC(ellaneous) in the menu
bar.
3.
Use
Cursor Control
to select
LANGUAGE from the sub
menu.
Source P.Pref.
Use cursor control to select
Press OK or — to invoke item
Press MENU to exit menu
4.
Press OK (–/––) to activate the LANGUAGE item.
5.
Use Cursor Control to select the required language in the
Misc.
Lamp life
Language
Hor. mirror
Ver. mirror
Source P.Pref.
English Deutsch Français
Español Português Italiano
Use cursor control to select
Press OK or — to accept
Misc.
Lamp life
Language
Hor. mirror
Ver. mirror
action window.
6.
Press OK (–/––) to confirm and store the selected
language.
7.
If required, select the next item to be adjusted or press
MENU to exit.
2.
Press MENU.
– The menu bar appears on the screen; DISPLAY is
highlighted and its sub menu is shown.
3.
Use Cursor Control to select the item to be adjusted.
Display
Shift
Hor. size
Phase
Brightness
Contrast
White point
Use cursor control to select
Press OK or — to invoke item
Press MENU to exit menu
4.
Press OK (–/––) to activate the selected item.
5.
Use Cursor Control to make the required adjustment in the
Audio Source
Display
Shift
Hor.size
Phase
Brightness
Contrast
White point
Use cursor control to adjust
Press OK or — to accept
Audio Source
action window.
6.
Press OK (–/––) to confirm and store the adjustment.
7.
If required, select the next item to be adjusted or press
MENU to exit.
14
Page 15
8. OPERATION Picture control
– When you have selected the menu mode, you cannot use
Notes:
the source selection buttons on the projector or on the
remote control to select another input. You can only change
to another input via the SOURCE menu.
– A(audio)/V(video)-mute can
A/V mute
only be selected with the A/V
MUTE button on the projector
or on the remote control.
A/V mute then appears on the
screen.
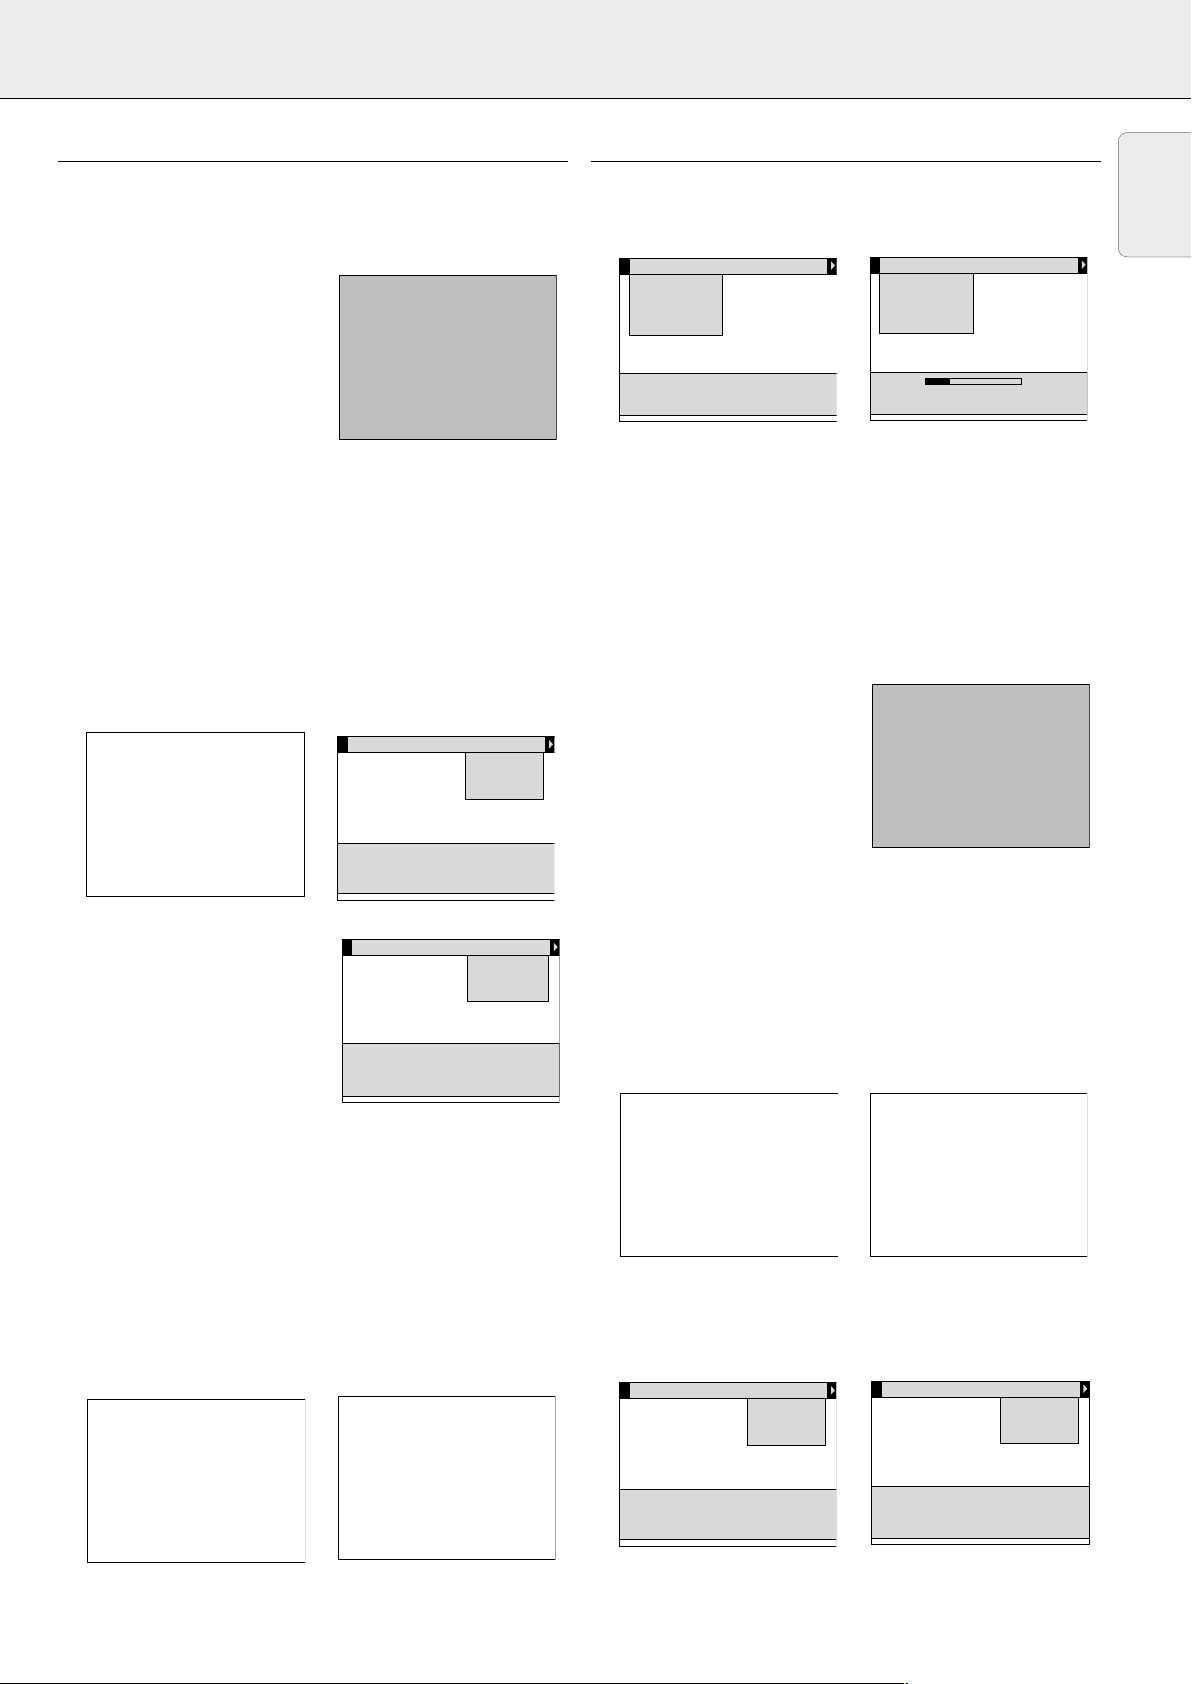
Data mode selection
When set to AUTO, the projector can automatically identify the
signal type of the connected computer. However, if the signal does
not match the known computer signal standards, automatic
identification can be overruled. The required data mode can then be
selected as described below:
1.
Select Data.
– Data appears on the screen.
2.
Press MENU.
– The menu bar appears on the screen.
3.
Use Cursor Control to select SOURCE in the menu bar.
– DATA is highlighted.
Data
Display
Audio
Source
Data
√
Video
S-Video
Auto start
2.
Press MENU.
– The menu bar appears on the screen; DISPLAY is highlighted
and its sub menu is shown.
3.
Use Cursor Control to select the item to be adjusted.
Display
Brightness
Contrast
Saturation
Hue
White point
Use cursor control to select
Press OK or — to invoke item
Press MENU to exit menu
4.
Press
5.
Use Cursor Control to make the required adjustment in the
Audio Source
OK (–/––)
to activate the selected item.
Display
Brightness
Contrast
Saturation
Hue
White point
Cool Warm
Use cursor control to adjust
Press OK or — to accept
Audio Source
action window.
6.
Press
OK (–/––)
7.
If required, select the next item to be adjusted or press MENU
to confirm and store the adjustment.
to exit.
Notes:
– When you have selected the menu mode, you cannot use the
source selection buttons on the projector or on the remote
control to select another input. You can only change to another
input via the SOURCE menu.
– A(audio)/V(video)-mute can
A/V mute
only be selected with the A/V
MUTE button on the projector or
on the remote control.
A/V mute then appears on the
screen.
English
√:currently selected source
Use cursor control to select
Press OK or — to invoke item
Press MENU to exit menu
4.
Press
5.
Use Cursor Control to select
the required data mode in the
action window.
6.
Press
OK (–/––)
OK (–/––)
to activate the DATA item.
Display
to confirm and
Audio
Source
Data
√
Video
S-Video
Auto start
store the adjustment.
7.
If required, select another item
you wish to adjust or press
MENU to exit.
AUTO VGA400 VGA
SVGA XGA
Use cursor control to select
Press OK or — to accept
Video display adjustments
For video signal input, the following adjustments can be made:
– brightness - adjusts the black level to the room brightness;
– contrast - adjusts the overall contrast intensity;
– saturation - adjusts the colour saturation of the projected
image;
– hue
(only for NTSC)
- adjusts the tint of the projected image;
– white point - adjusts the overall picture impression from warm
white to cool white.
1.
Press VIDEO to select video signal or S-video signal as the
current projection source.
The button toggles between video and S-video signal.
– VIDEO or S-VIDEO appears on the screen.
Video
S-Video
Video system selection
The Projector is equipped with full NTSC, PAL and SECAM video
support. When set to AUTO, the broadcast format is automatically
switched according to the video standard connected. If you
experience poor colour however, you may have to set to NTSC,
PAL, or SECAM as described below.
1.
Press VIDEO to select video signal or S-video signal as the
current projection source.
The button toggles between video and S-video signal.
– VIDEO or S-VIDEO appears on the screen.
2.
Press MENU.
Video
S-Video
– The menu bar appears on the screen.
3.
Use Cursor Control to select SOURCE in the menu bar.
4.
Use Cursor Control to select VIDEO or S-VIDEO from the sub
menu.
Source
Display
Audio
Source
Data
√
Video
S-Video
Auto start
Display
Audio
Data
Video
√
S-Video
Auto start
√:currently selected source
Use cursor control to select
Press OK or — to invoke item
Press MENU to exit menu
Press
OK (–/––)
5.
AUTO PALBG PALM PALN NTSCM
NTSC443 SECAM50 SECAM60
Use cursor control to select
Press OK or — to accept
to activate the VIDEO or S-VIDEO item.
15
Page 16
8. OPERATION Picture control/Audio control/Personal Preferences
English
6.
Use Cursor Control to select the required video system in the
action window: AUTO, PAL, SECAM or NTSC.
7.
Press
OK (–/––)
system.
8.
If required, select another item you wish to adjust or press
MENU to exit.
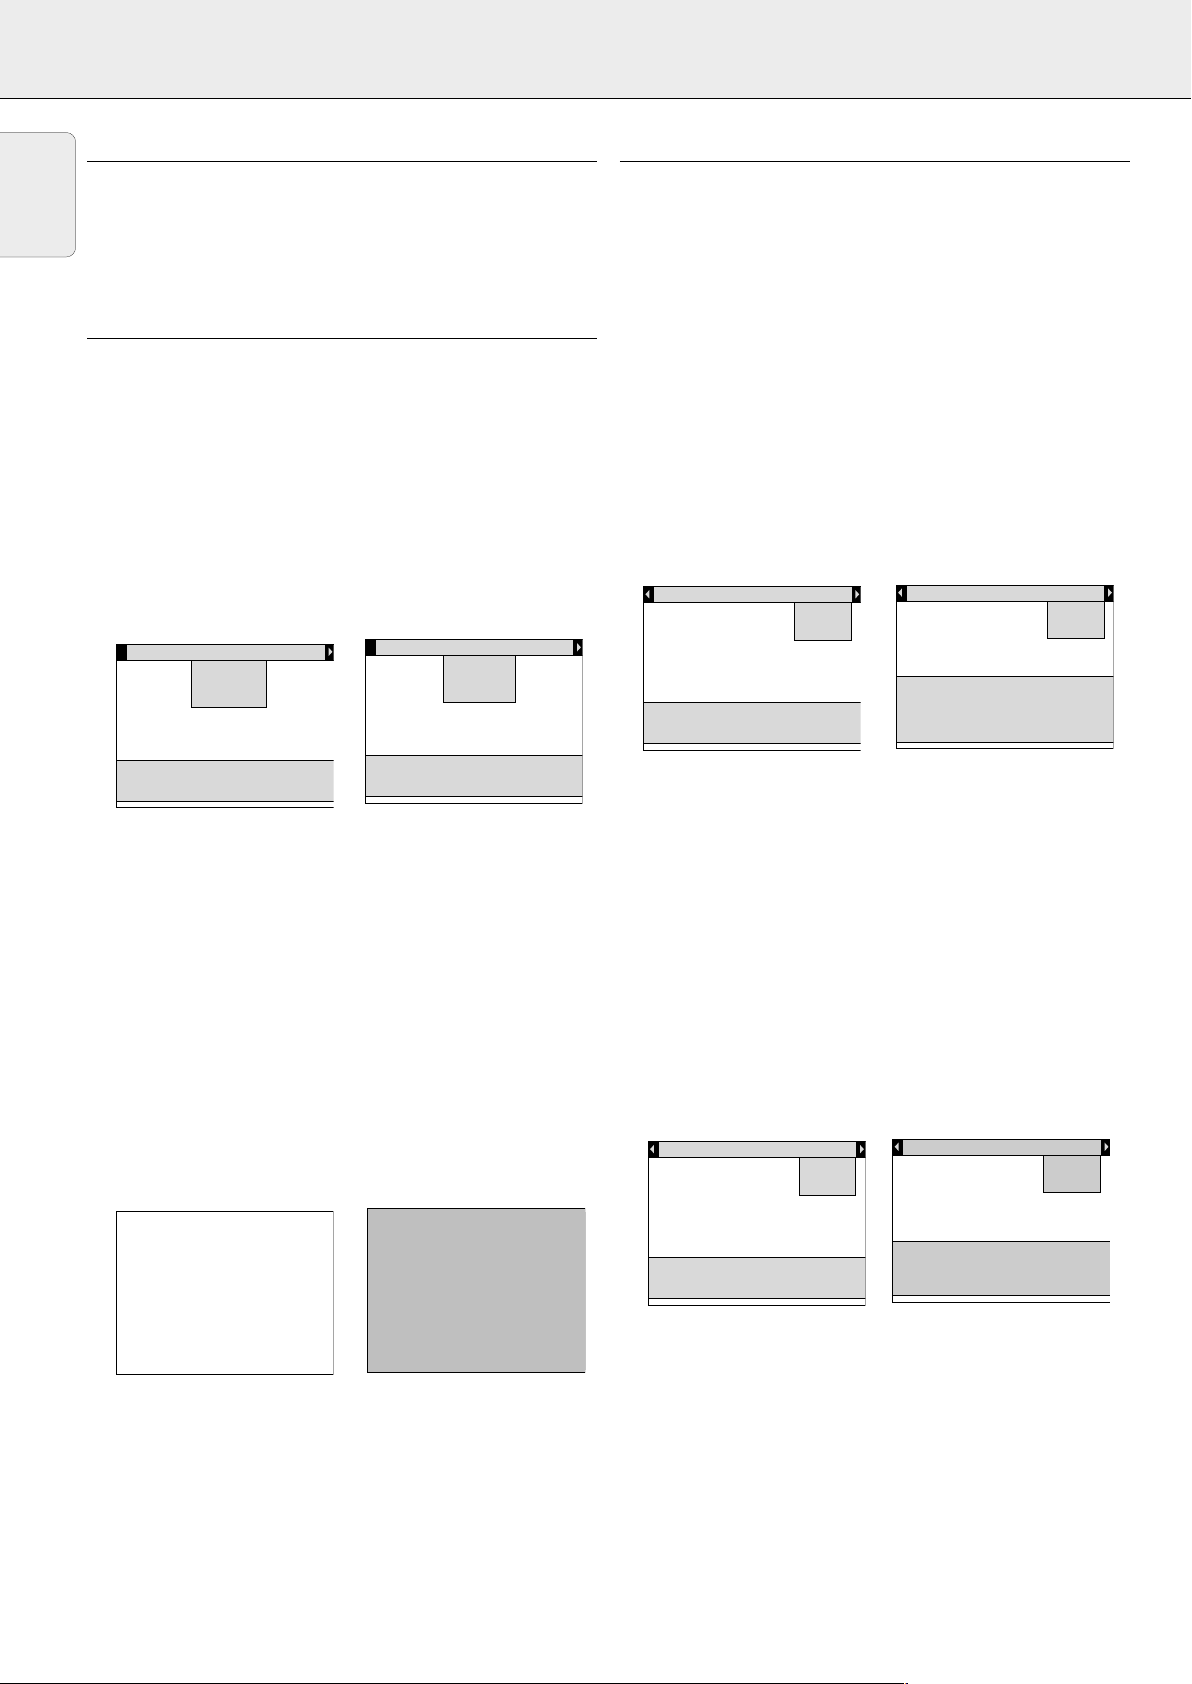
AUDIO CONTROL
The projector’s sound is set to standard specifications at the
factory. However, you can adjust the sound to suit your own
preferences by using the SOUND CONTROL feature.
The following adjustments can be made:
– volume – adjusts the sound level;
– bass – adjusts the bass tones;
– treble – adjusts the high tones;
– mute – mutes the sound of the projector (or an externally
connected loudspeaker);
1.
Select the required input (Video, S-Video or Data).
2.
Press MENU.
– The menu bar appears on the screen.
3.
Use Cursor Control to select AUDIO in the menu bar.
4.
Use Cursor Control to select the item to be adjusted.
Display
Use cursor control to select
Press OK or — to invoke item
Press MENU to exit menu
5.
Press OK (–/––) to activate the selected item.
6.
Use Cursor Control to make the required adjustment in the
action window.
7.
Press OK (–/––) to confirm and store the adjustment.
8.
If required, select the next item to be adjusted or press
MENU to exit.
– The volume can also be adjusted with the – VOLUME +
buttons on the projector or on the remote control.
– When the projector is connected to an amplifier or stereo
system, the volume must be adjusted on the amplifier or
stereo system.
– Mute can also be selected with the MUTE button on the
projector or on the remote control.
Mute then appears on the screen.
– A(audio)/V(ideo)-mute can only be selected with the A/V
MUTE button on the projector or on the remote control.
A/V mute then appears on the screen.
to confirm and store the selected video
Audio
Volume
Bass
Treble
Mute
Source
Display
√
Use cursor control to select
Press OK or — to accept
On Off
Notes:
Mute
Audio
Volume
Bass
Treble
Mute
Source
A/V mute
PERSONAL PREFERENCES
You can store up to three sets of settings. These settings can
be called up at any time so you can use different sets of
settings for different sources.
The following settings can be stored:
– vertical mirror – audio volume
– bass – horizontal mirror
– treble – brightness
– white point – contrast
– hue – saturation
– AV source (Data/Video/S-Video)
Storing Personal Preferences
1.
Select the required input (Video, S-Video or Data).
2.
Make the required adjustments, as described under ‘Picture
Control’ and ‘Audio Control’.
3.
Press MENU.
– The menu bar appears on the screen.
4.
Use Cursor Control to select P. PREF (Personal Preferences)
in the menu bar.
5.
Use Cursor Control to select STORE from the submenu.
Audio Source
Use cursor control to select
Press OK or — to invoke item
Press MENU to exit menu
6.
Press OK (–/––) to activate the STORE item.
7.
Use
Cursor Control
P.Pref.
Recall
Store
Reset
to select P. PREF 1, 2 or 3 in the action
Audio Source
P.Pref-1 P.Pref-2 P.pref-3
Use cursor control to select
Press OK or — to accept
Quit
P.Pref.
Recall
Store
Reset
window.
Note: If you select Quit, you will exit the action window and
your settings will not be stored in the P. Pref.
memory
8.
Press OK (–/––) to confirm and store the Personal
Preferences.
9.
If required, select another item you wish to adjust or press
MENU to exit.
Calling up Personal Preferences
1.
Select the required input (Video, S-Video, Data).
2.
Press MENU.
– The menu bar appears on the screen.
3.
Use Cursor Control to select P. Pref (Personal Preferences)
in the menu bar.
4.
Use Cursor Control to select RECALL from the submenu.
Audio Source
Use cursor control to select
Press OK or — to invoke item
Press MENU to exit menu
P.Pref.
Recall
Store
Reset
Audio Source
P.Pref-1 P.Pref-2 P.pref-3
Use cursor control to select
Press OK or — to accept
Quit
P.Pref.
Recall
Store
Reset
16
5.
Press OK (–/––) to activate the RECALL item.
6.
Use Cursor Control to select the required Personal
Preference (P. Pref 1, 2 or 3) in the action window.
Note: If you select Quit, you will exit the action window and
your settings will not be stored in the P. Pref.
memory.
7.
Press OK (–/––) to confirm and store the selection.
8.
If required, select another item you wish to adjust or press
MENU to exit.
Page 17
8. OPERATION Personal Preferences/Other settings
SCREEN
SCREEN
OTHER SETTINGS
Changing Personal Preferences
1.
Select the required input (Video, S-Video, Data).
2.
Make the new adjustments, as described under ‘Picture
Control’ and ‘Audio Control’.
3.
Press MENU.
– The menu bar appears on the screen.
4.
Use Cursor Control to select P(ersonal) PREf(erences) in the
menu bar.
5.
Use Cursor Control to select STORE from the submenu.
Audio Source
Use cursor control to select
Press OK or — to invoke item
Press MENU to exit menu
P.Pref.
Recall
Store
Reset
Audio Source
P.Pref-1 P.Pref-2 P.pref-3
Use cursor control to select
Press OK or — to accept
Quit
P.Pref.
Recall
Store
Reset
Default source selection
The Auto start command gives you the opportunity to define
the input source with which your projector will start up.
For instance:
if you select Video as your default (Auto start)
source, the projector will select Video as the source when the
projector is switched on.
Note: The factory set default for Auto start is Data.
1.
Press MENU.
– The menu bar appears on the screen.
2.
Use Cursor Control to select SOURCE in the menu bar.
3.
Use Cursor Control to select AUTO START from the sub
menu.
Source
Display
Audio
Source
Data
√
Video
S-Video
Auto start
Display
Audio
Data
Video
S-Video
√
Auto start
English
6.
Press OK (–/––) to activate the STORE item.
7.
Use Cursor Control to select P. PREF 1, 2 or 3 in the action
window.
Note: If you select Quit, you will exit the action window and
your settings will not be stored in the P. Pref.
memory
8.
Press OK (–/––) to confirm and store the new Personal
Preferences.
9.
If required, select another item you wish to adjust or press
MENU to exit.
Resetting to the factory set default settings
1.
Select the required input (Video, S-video, Data).
2.
Press MENU.
– The menu bar appears on the screen.
3.
Use Cursor Control to select P. PREF (Personal Preferences)
in the menu bar.
4.
Use Cursor Control to select RESET from the submenu.
Audio Source
Use cursor control to select
Press OK or — to invoke item
Press MENU to exit menu
5.
Press OK (–/––) to activate the RESET item.
6.
Use Cursor Control to select RESET if you wish to reset
P.Pref.
Recall
Store
Reset
Audio Source
Reset Quit
Use cursor control to select
Press OK or — to accept
P.Pref.
Recall
Store
Reset
your Personal Preferences for the selected source to the
factory set default settings.
7.
Press OK (–/––) to confirm and store the factory set
default settings.
8.
If required, select another item you wish to adjust or press
MENU to exit.
If you wish to keep the old settings after all:
1.
Use
Cursor Control
QUIT in the action window.
2.
Press OK (–/––) to confirm.
3.
If required, select another item
to select
Audio Source
P.Pref.
Recall
Store
Reset
you wish to adjust or press
MENU to exit.
Reset Quit
Use cursor control to select
Press OK or — to accept
√:currently selected source
Use cursor control to select
Press OK or — to invoke item
Press MENU to exit menu
4.
Press OK (–/––) to activate the AUTO START item.
5.
Use Cursor Control to select the required default source in
Video S-Video Data
Use cursor control to select
Press OK or — to accept
the action window (Data, Video or S-Video).
6.
Press OK (–/––) to confirm and store the default source.
7.
If required, select another item you wish to adjust or press
MENU to exit.
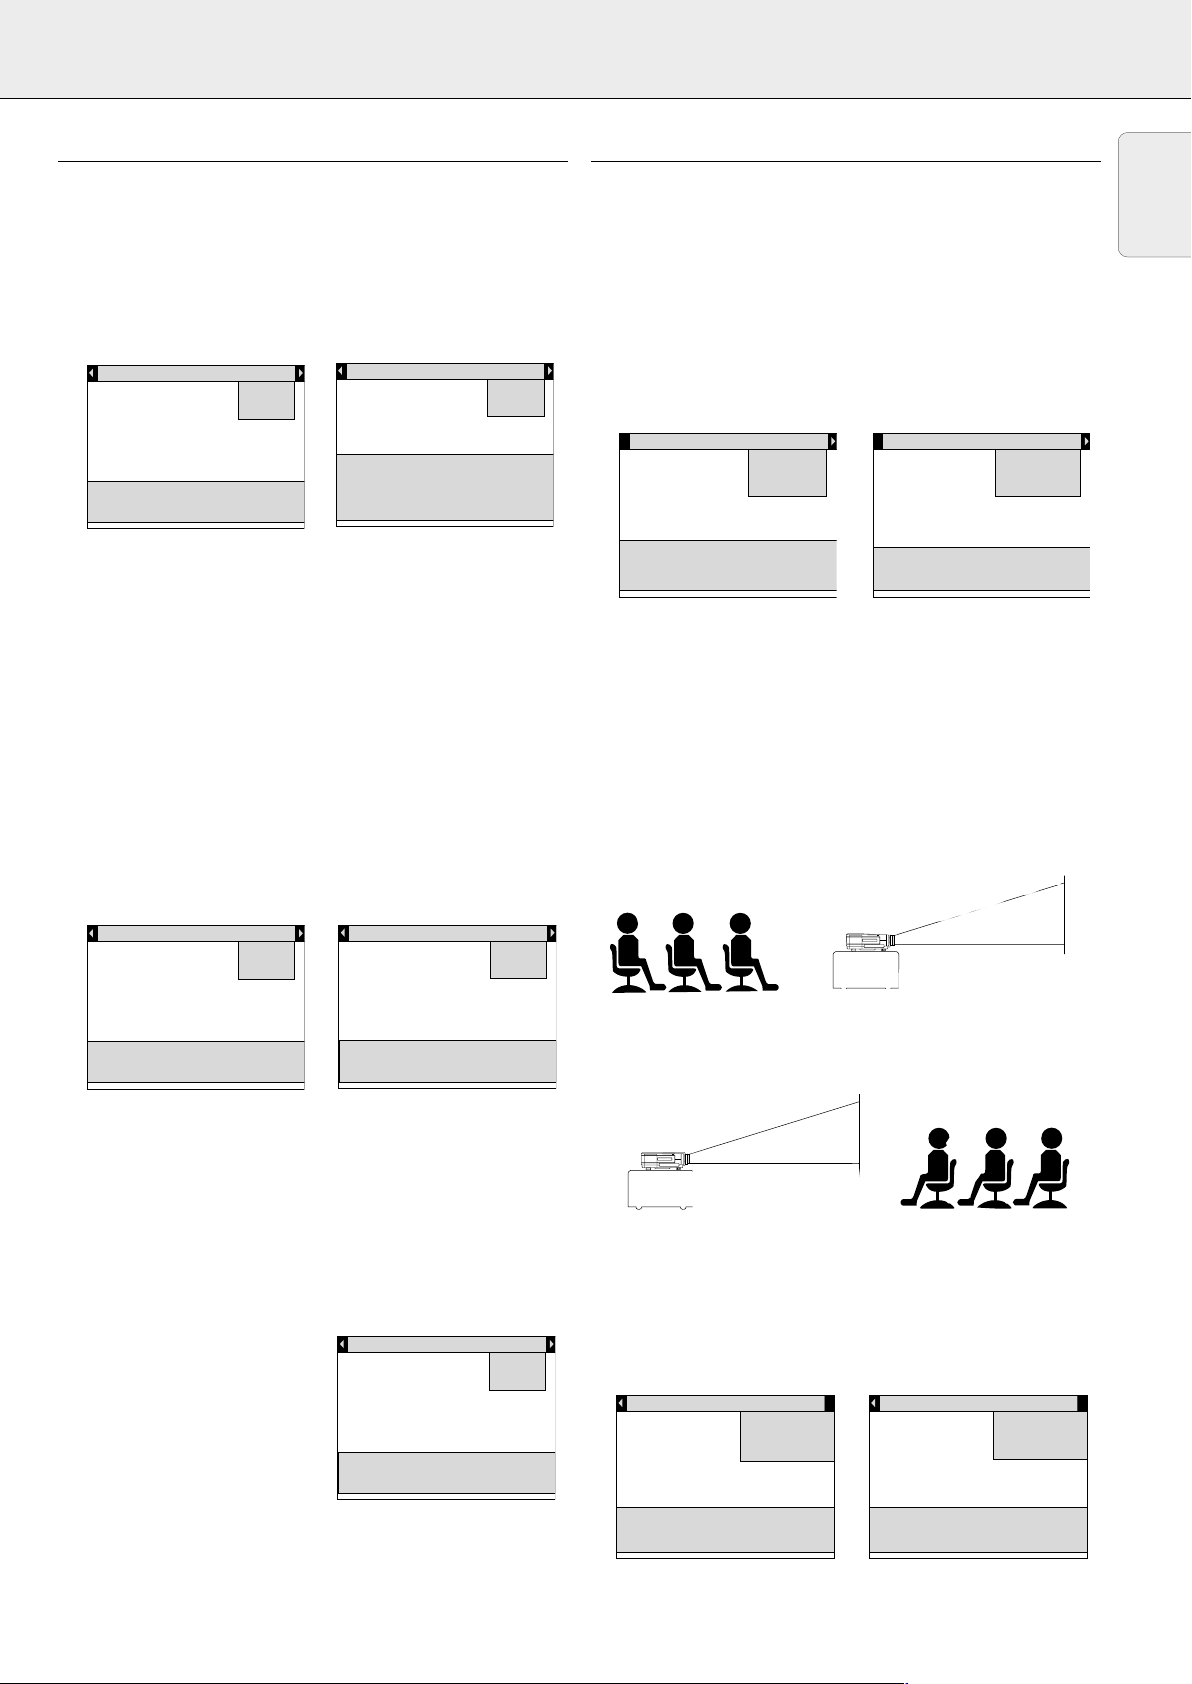
Rear screen projection
The image can be flipped to a horizontal mirror image of the
input signal for rear screen projection.
Front projection
Rear projection
1.
Press MENU.
– The menu bar appears on the screen.
2.
Use cursor control to select MISC(ellaneous) in the menu
bar.
3.
Use Cursor Control to select HOR.(horizontal) MIRROR from
the sub menu.
Source P.Pref.
Use cursor control to select
Press OK or — to invoke item
Press MENU to exit menu
Misc.
Lamp life
Language
Hor. mirror
Ver. mirror
Source P.Pref.
Front Rear
Use cursor control to select
Press OK or — to invoke item
Misc.
Lamp life
Language
Hor. mirror
Ver. mirror
17
Page 18
Misc.
Lamp life
Language
Hor. mirror
Ver. mirror
Source P.Pref.
Use cursor control to select
Press OK or — to invoke item
Table-top Ceiling
SCREEN
SCREEN
8. OPERATION Other settings
English
4.
Press OK (–/––) to activate the HOR. MIRROR item.
5.
Use Cursor Control to select REAR in the action window.
6.
Press OK (–/––) to confirm and store the selection.
7.
If required, select another item you wish to adjust or press
MENU to exit.
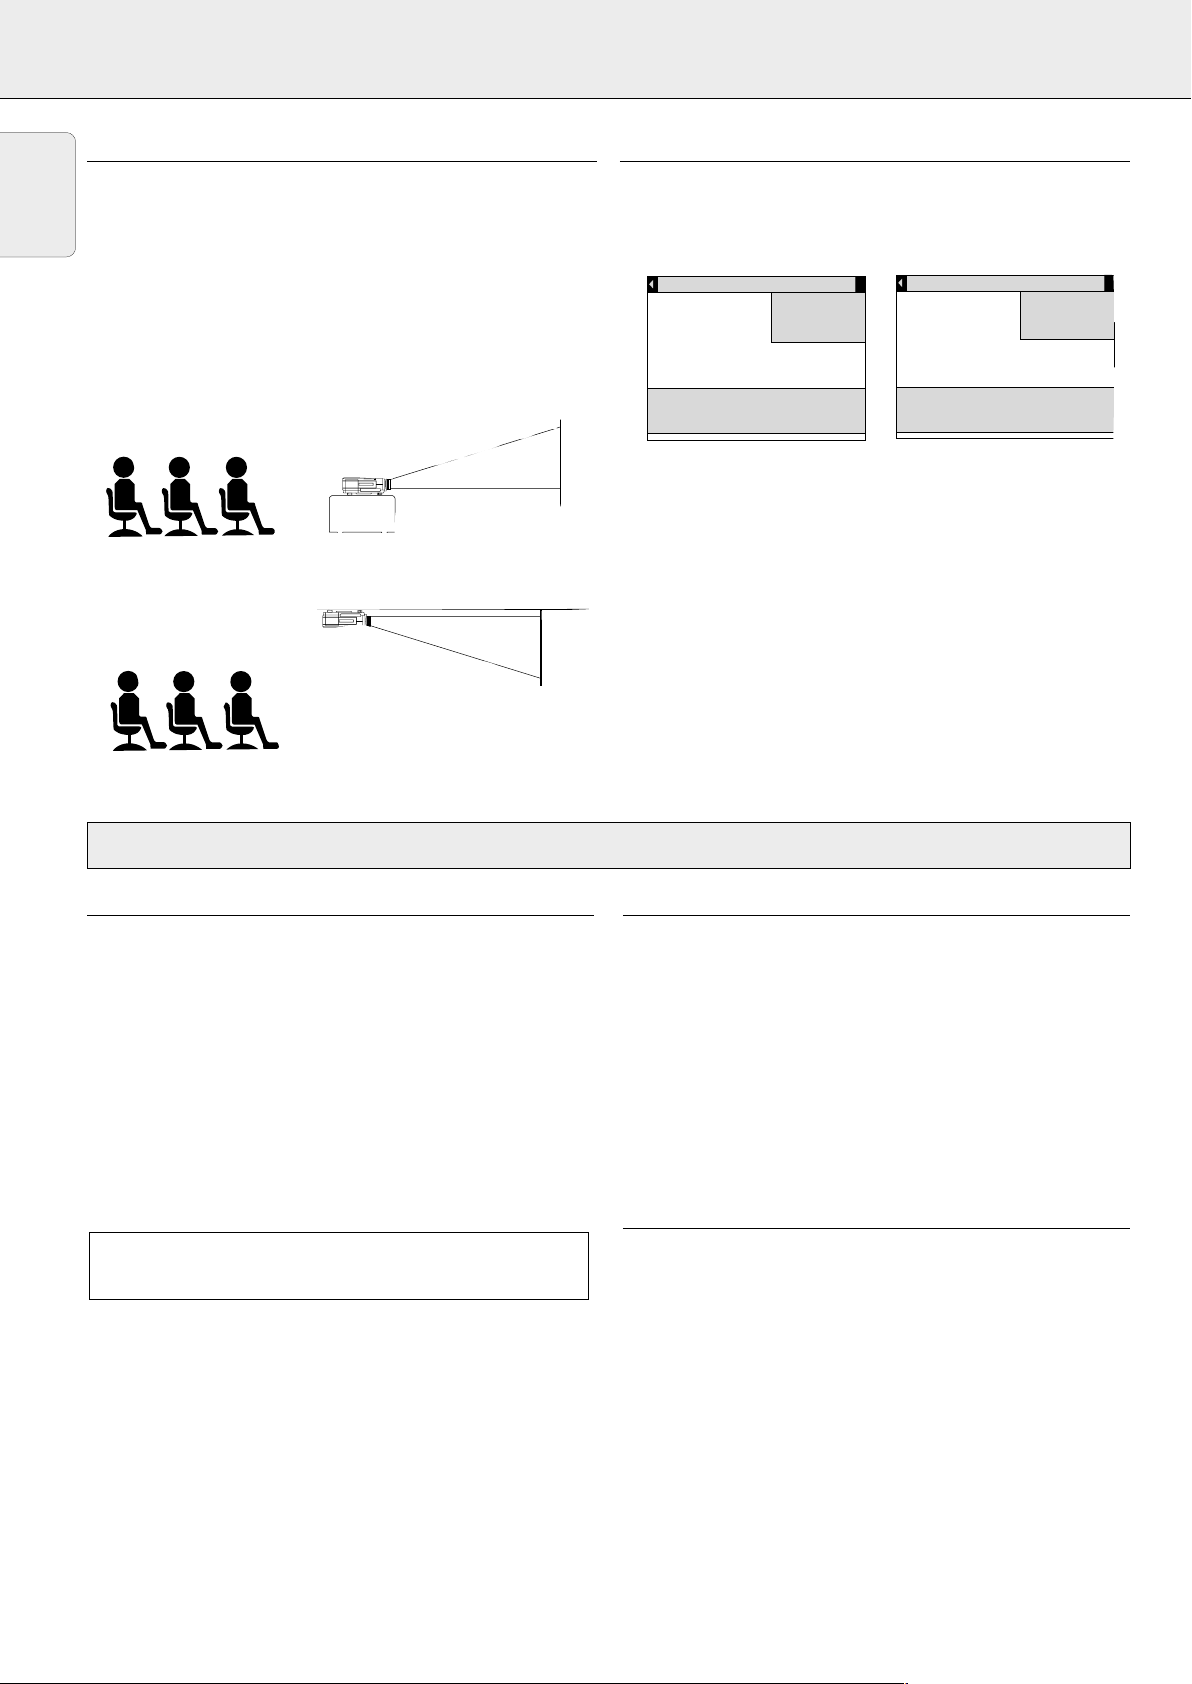
Upside-down (ceiling) projection
The projector is equipped with an upside-down scan function
(vertical mirror), which allows the image to be flipped when the
projector is mounted upside down to the ceiling.
Table-top projection
1.
Press MENU.
– The menu bar appears on the screen.
2.
Use Cursor Control to select MISC(ellaneous) in the menu bar.
3.
Use Cursor Control to select VER.(vertical) MIRROR from the
sub menu.
Source P.Pref.
Use cursor control to select
Press OK or — to invoke item
Press MENU to exit menu
4.
Press OK (–/––) to activate the VER. MIRROR item.
5.
Use Cursor Control to select CEILING in the action window.
6.
Press OK (–/––) to confirm and store the selection.
7.
If required, select another item you wish to adjust or press
Misc.
Lamp life
Language
Hor. mirror
Ver. mirror
MENU to exit.
9. ADDITIONAL INFORMATION
INSTALLING THE REMOTE CONTROL SOFTWARE
This chapter describes how to install and use your pointing device
software. Installation is only necessary if the mouse cursor cannot
be manipulated by the remote control Cursor Control, after making
all necessary connections.
For Macintosh users:
1.
2.
For PC users:
1.
2.
Please continue with the following instructions, if this is the
first time that you use the Remote control mouse function
with your PC.
For Windows users:
1.
2.
3.
– A dialog box appears, asking to install a new hardware driver for
4.
– You should now be able to control your PC mouse via the
Ceiling projection
Turn off your computer and connect the supplied remote mouse
cable (ADB) between the projector and the ADB port
Switch-on your computer; you can immediately operate your
mouse via the Remote Control
Turn off your PC and connect the supplied remote mouse cable
(RS232) between the computer and the projector
Switch-on your PC; you can now operate your mouse via the
remote control;
if not, please continue:
Double click on the remote control software file
(ex. m83setup.exe)
Follow installation instructions.
Re-boot your computer.
a Logitech serial mouse.
Select the Windows default driver (click OK).
remote control.
Remote control software/Maintenance
CLEANING
CAUTION: Switch off and disconnect the projector before
1.
When the cabinet is dusty, clean it by gently wiping with a soft
cloth.
2.
A chamois leather slightly moistened with water is sufficient for
cleaning the housing.
3.
Do not use cleaning agents as they may harm the housing.
Always keep the lens clean
1.
When the lens is dirty or dusty, first blow the dust off and then
gently wipe with a soft brush or lens cleaning paper.
Never touch the lens with your fingers.
2.
The lens is likely to become mouldy if left dirty.
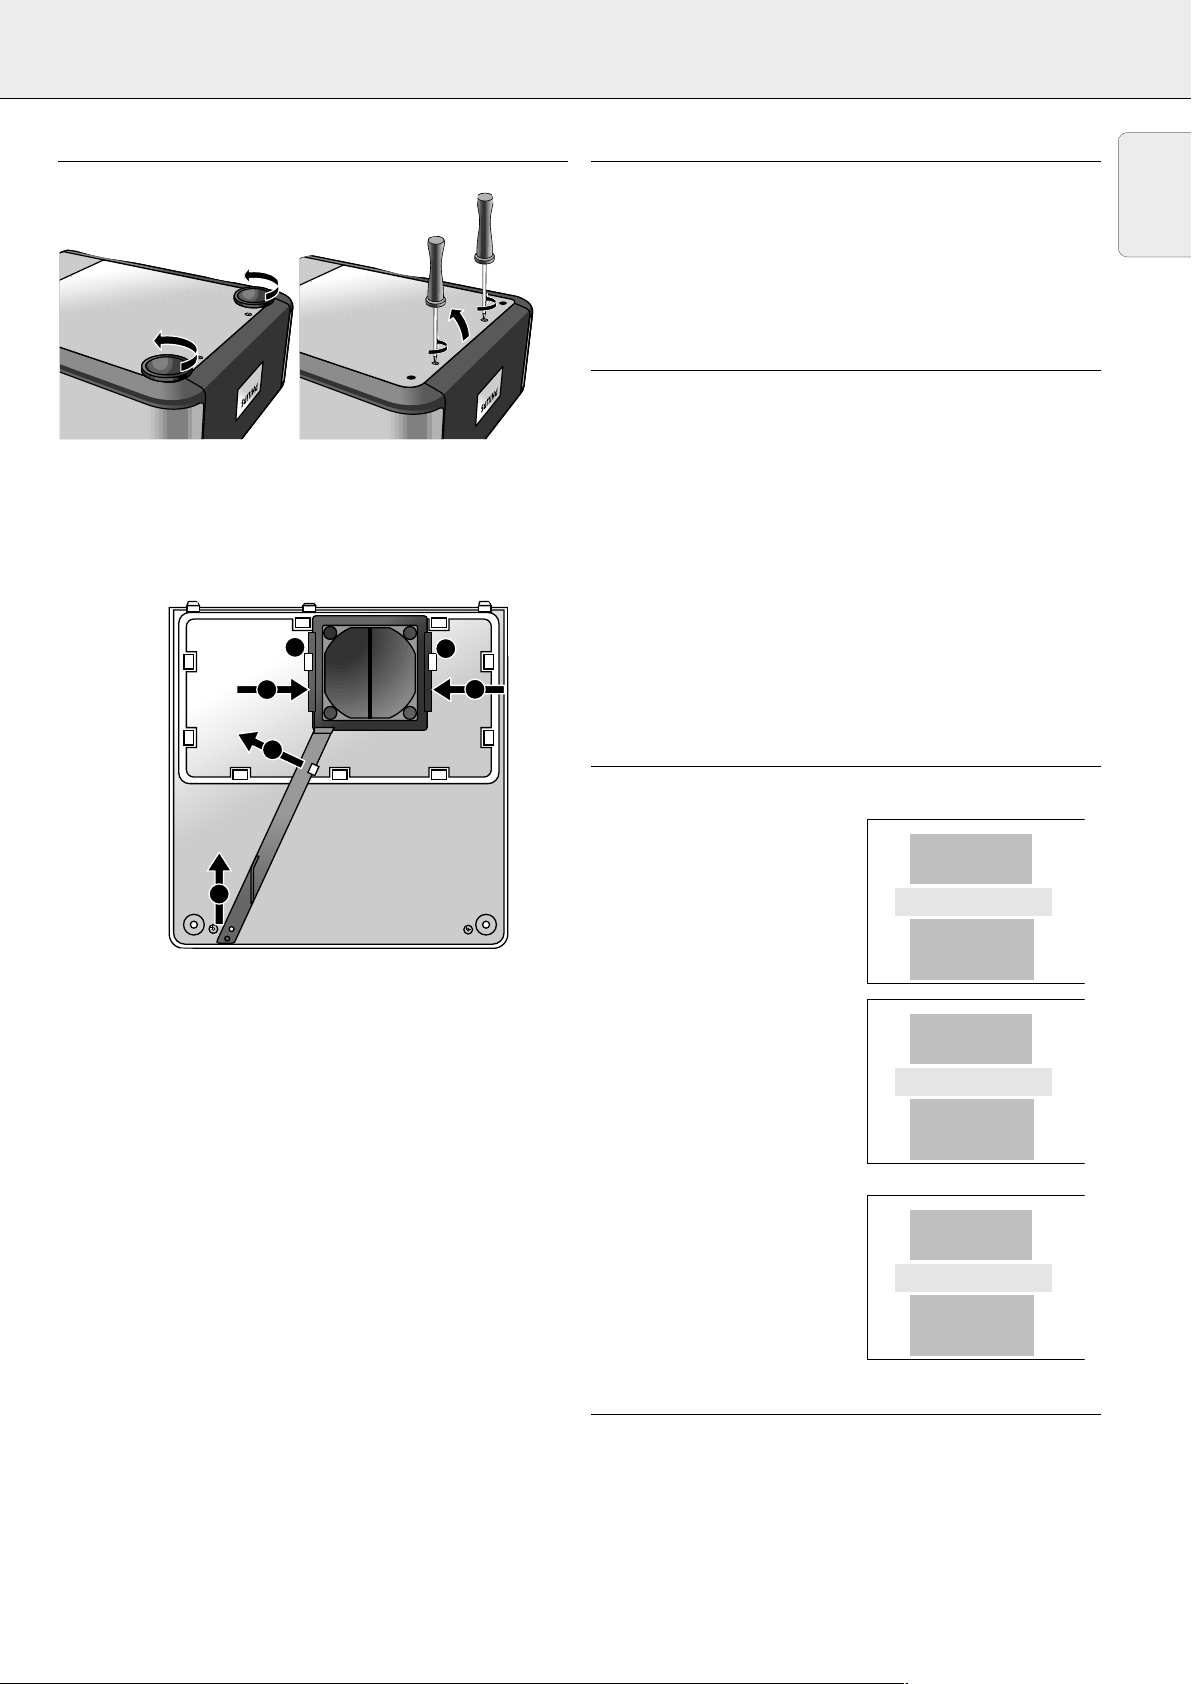
CLEANING THE DUST FILTER
1.
– The standby indicator lights up red.
2.
3.
4.
5.
cleaning.
Press the STANDBY ON/OFF button to switch off the
projector.
Wait until the cooling fan has stopped (about 3 minutes
after the projector has been switched off) and disconnect
the mains lead and all other cables.
Turn the projector over.
Never place the projector on the
side where the connections are located!
Unscrew and remove both horizontal adjusters.
Unscrew the screws at the bottom of the cover and
remove the cover.
18
Page 19
9. ADDITIONAL INFORMATION
c
a
a
d
b
b
Hopper SV10
Hopper SV10
Hopper SV10
Hopper SV10
Maintenance
6.
Remove the filter from its compartment.
•
Press both sides of the filter
the clips
•
Move the handle to the left
•
Remove the handle from the catch and lift upwards
•
Carefully lift the filter out of its compartment.
7.
While firmly holding the filter, gently remove any accumulated
(b).
(a)
until it comes loose from
(c).
dust with a vacuum cleaner.
8.
Replace the filter:
•
Press both sides of the filter
(a)
and place it back into its
compartment.
• Loosen the sides of the filter so it will fall back in position
under the clips
•
Position the handle under the clip
•
Slide the handle over the catch and click it back in
position
(b).
(c).
(d).
(d).
– We advise you to clean the filter every 100 hours.
Notes:
– Operating the projector with a torn or damaged filter may cause
damage to the projector.
– When the filter is damaged replace it with a filter of the same
type (12 nc: 4822 480 10229).
– The projector power cannot be switched on again unless the
filter holder is installed correctly.
MAINTENANCE OF YOUR REMOTE CONTROL
Your trackball on the remote control is very durable and will provide
years of use. It has a self-cleaning ball-cage that helps prevent dust
and lint built-up around the ball. If the screen cursor jumps or
moves abnormally, we recommend that you clean the trackball
manually.
To clean your trackball
1.
Turn the retainer ring counter-clockwise to remove the ball.
2.
Wipe the ball with a clean, lint-free cloth.
3.
Blow carefully into the ball cage to dislodge dust and lint.
4.
Look or a built-up of dirt on the rubber rollers inside the ball
cage. This build-up usually appears as a stripe running around
the middle of the roller.
5.
If dirty, clean the rollers using a cotton swab moistened lightly
with isopropyl (rubbing) alcohol. After cleaning, make sure the
rollers are still centered in their channels.
6.
Make sure that fluff from the swab is not left on the rollers.
7.
Replace the ball and retainer ring.
LAMP
– The projector lamp has a operating life of approximately 4000
hours.
When operation time reaches
3901 hours, the message
‘WARNING: Lamplife expires in
99 hours’ will be displayed on the
screen when switching the
projector on.
PHILIPS
WARNING: lamplife
expires in 99 hours
Multimedia
Projectors
– Then, each time the projector
is switched on, the lamp
indicator flashes orange and
the lamplife remaining will be
displayed for 10 seconds.
PHILIPS
WARNING: lamplife
expires in 90 hours
Multimedia
Projectors
English
9.
Replace the cover and tighten both the screws and the
horizontal adjusters.
– When the lamplife is expired,
the lampindicator lights up
orange and the message
‘WARNING: lamplife is expired’
is displayed on the screen.
PHILIPS
WARNING: lamplife
is expired
Multimedia
Projectors
LAMP REPLACEMENT
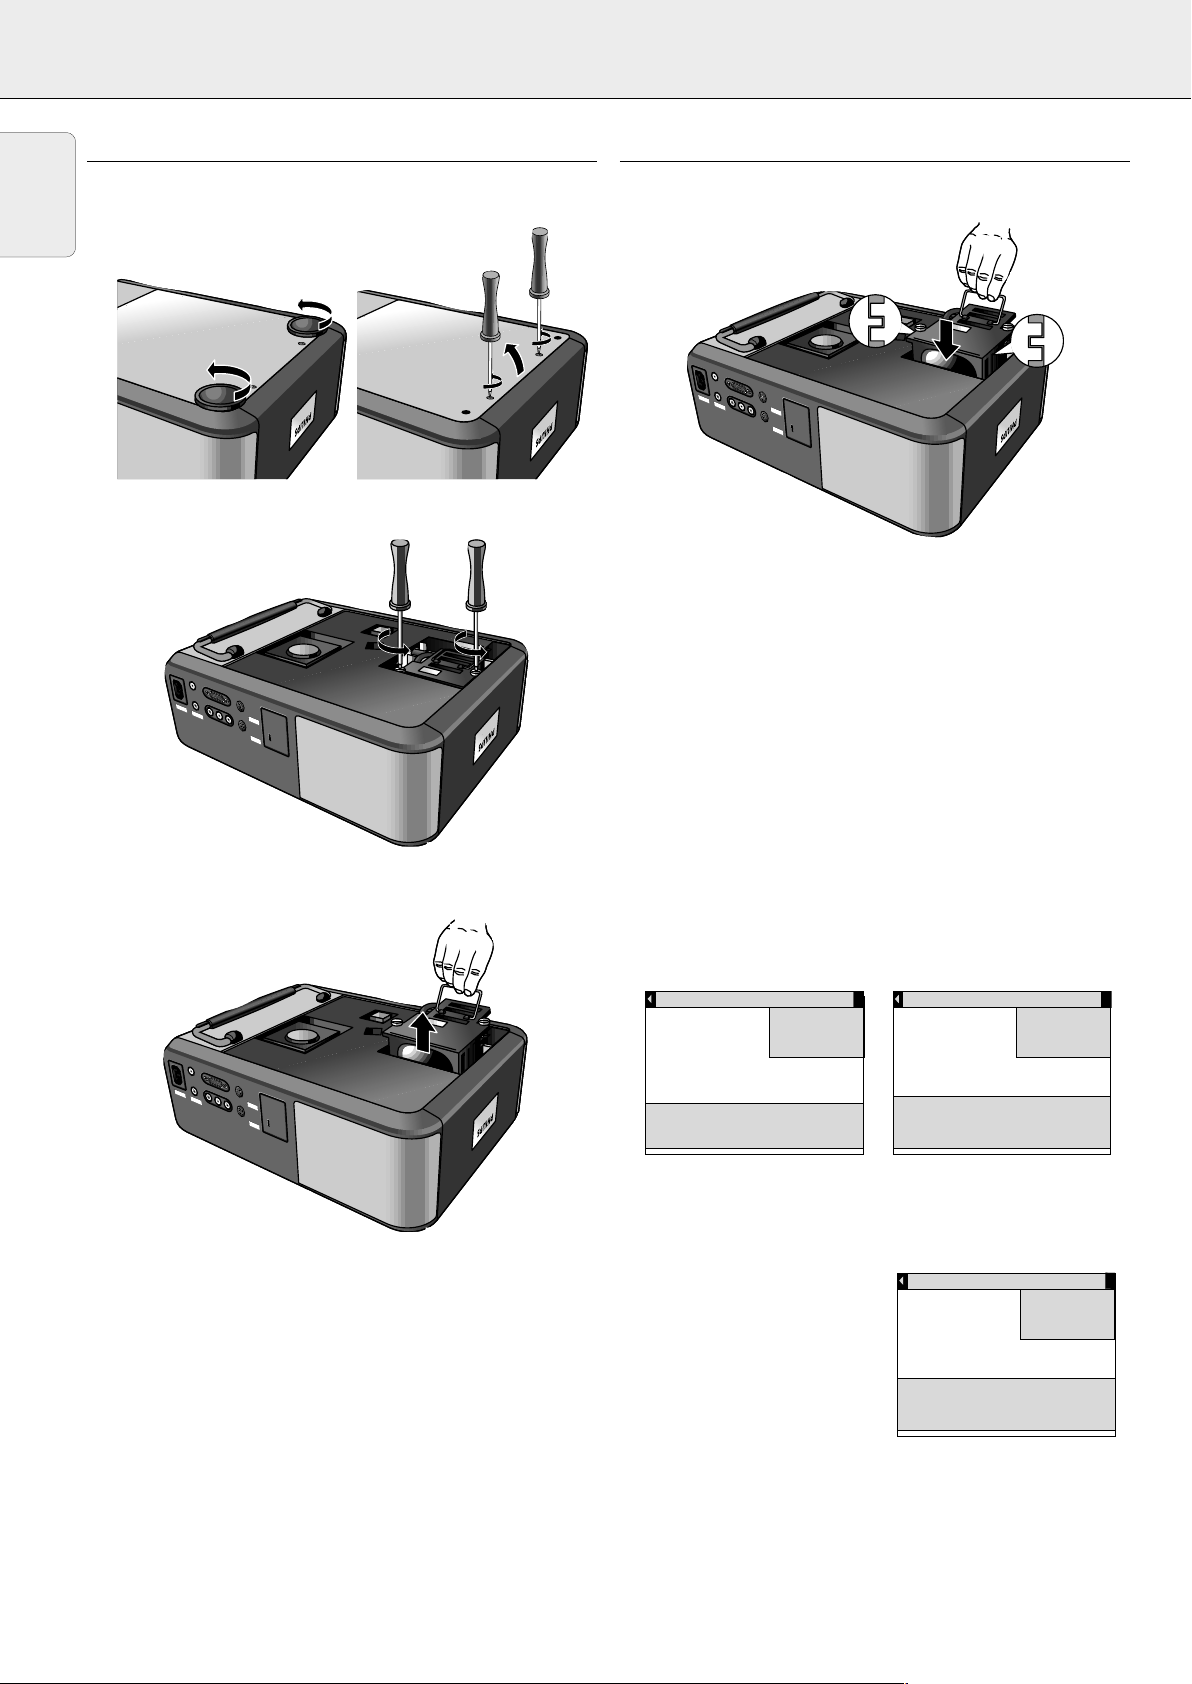
1.
Press the STANDBY/ON/OFF button to switch off the
projector.
– The standby indicator lights up red.
2.
Wait 5 minutes for the lamp to cool down and the cooling
fan to stop and disconnect the mains lead and all other
cables.
3.
Turn the projector over.
Never place the projector on the
side where the connections are located!
4.
Unscrew and remove both horizontal adjusters.
19
Page 20
Hopper SV10
Hopper SV10
Mouse
Data in
S-Video in
Video in
Audio
in
Audio
out
LR
Mouse
Data in
S-Video in
Video in
Audio
in
Audio
out
L
R
Power
Data
Audio
Video
Hopper SV10
Hopper SV10
Mouse
Data in
S-Video in
Video in Audio
in
Audio
out
LR
Mouse
Data in
S-Video in
Video in
Audio
in
Audio
out
L
R
Power
Data
Audio
Video
Hopper SV10
Hopper SV10
Mouse
Data in
S-Video in
Video in Audio
in
Audio
out
LR
Mouse
Data in
S-Video in
Video in
Audio
in
Audio
out
L
R
Power
Data
Audio
Video
Hopper SV10
Hopper SV10
Hopper SV10
Hopper SV10
9. ADDITIONAL INFORMATION Maintenance
English
5.
Unscrew the screws at the bottom of the cover and
remove the cover.
6.
Read the caution and warning labels on the lamp cover.
7.
Unscrew the lamp holder.
10.
Place the lamp holder in the guiding slots and insert into
the lamp compartment.
11.
Tighten the screws.
12.
Replace the cover and tighten both the screws and the
horizontal adjusters.
13.
Plug the projector back in by inserting the mains lead in the
POWER socket.
14.
Press the STANDBY/ON/OFF button to switch on the
projector.
15.
Reset the lamp life time (see ‘Resetting the lamplife time’).
16.
Properly dispose of the old lamp.
8.
Grasp the lamp holder handle and carefully pull the lamp
holder out of the projector.
Caution: Be very careful. The lamp holder may still be too
hot to touch.
Keep lamp holder opening to your right.
Do not
touch lamp
or point lamp holder opening at anyone.
Warning: The lamp may be hot. Be careful when handling.
Caution: A high-pressure lamp may break if handled
improperly.
Note: When replacing the lamp, always use the same type
of lamp (LCA 3107/00, 12NC: 8670 931 07009).
Resetting the lamplife time
1.
Press MENU.
– The menu bar appears on the screen.
2.
Use cursor control to select
MISC(ellaneous) in the menu
bar.
3.
LAMP LIFE is highlighted.
Source P.Pref.
Use cursor control to select
Press OK or — to invoke item
Press MENU to exit menu
4.
Press OK (–/––) to activate the LAMP LIFE item.
5.
Use cursor control to select RESET in the action window.
Misc.
Lamp life
Language
Hor. mirror
Ver. mirror
Source P.Pref.
378 hours used
Reset Quit
Use cursor control to select
Press OK or — to accept
Misc.
Lamp life
Language
Hor. mirror
Ver. mirror
Note: If you select Quit, you will exit the action window and
the lamp life time will not be reset.
6.
Press OK (–/––) to confirm.
– A new action window
will appear
7.
Use cursor control to select
YES or NO in the action
Source P.Pref.
Misc.
Lamp life
Language
Hor. mirror
Ver. mirror
window and press OK
(–/––)to confirm.
8.
If required, select another
item you wish to adjust or
Reconfirm
Yes No
Use cursor control to select
Press OK or — to accept
press MENU to exit.
9.
Carefully remove the new lamp housing from its package.
Do not
touch lamp or point lamp housing opening at
anyone.
break.
Do not
drop, as the impact may cause the lamp to
20
Page 21

10. TROUBLESHOOTING
If you are unable to remedy a problem by following these hints, consult your dealer or service organisation.
If a fault occurs, first check the points listed below before taking the projector for repair.
WARNING
Under no circumstances should you try to repair the projector yourself as this could invalidate the warranty.
PROBLEM
– POSSIBLE CAUSE
• SOLUTION
Image is not displayed
– Mains lead is not correctly connected.
• Correctly connect mains lead.
– The filter holder is not installed correctly or is damaged.
• Install the filter holder correctly (see ‘Cleaning the dust filter’
under Additional Information’).
– Lamp holder cover is not closed correctly or the lamp holder
is damaged.
• Close the cover correctly (see ‘Lamp replacement’ under
Additional Information’).
– Signal cable not correctly connected.
• Connect signal cable correctly.
– The projector is in OFF position.
• Press STANDBY/ON/OFF button to to switch on the
projector ON.
Lamp ceased to operate or does not light up at all
(indicator lights up red)
– Lamp is still hot while the projector attempts to restart the lamp.
• Do not switch the set off; it will restart the lamp automatically
within a few seconds.
– Lamp circuit failure or worn-out lamp.
• Take the projector to your nearest Service Centre.
• Replace lamp (see ‘Maintenance’).
– Internal temperature of the projector is too high.
• Wait a few minutes and check to see if the air outlets are
blocked.
Lamp indicator blinks orange
– Lamp life is almost expired (less then 100 hours to go).
• See lamp life counter on start up screen for details.
English
Image does not match up with the projected screen
– Horizontal or vertical shift or horizontal size are not adjusted
correctly.
• Adjust horizontal or vertical shift or horizontal size (See ‘Data
adjustments’ under ‘Picture Control’).
Picture rolls
– Signal cable is not correctly connected.
• Connect signal cable correctly.
No sound
– Audio cable is not correctly connected.
• Connect audio cable correctly.
– Volume is not adjusted.
• Adjust volume.
– Mute or A/V-mute is active.
• Cancel mute or A/V-mute.
The projector does not react to commands from the
remote control
– Remote control is not switched on.
• Switch on the remote control.
– Distance is too great.
• Reduce distance.
– Batteries are exhausted.
• Replace batteries (see ‘Inserting the batteries in the remote
control’).
– IR sensor is obstructed.
• Remove obstacle.
– Proper mouse software has not been installed on your
computer.
• Install proper mouse software.
Lamp indicator lights up orange
– Lamp life is expired.
Poor colour
– Wrong video system has been selected.
• Select the correct video system (see ‘Video system
selection’ under ‘Picture Control’).
• Adjust brightness, contrast, saturation or hue (see ‘Video
adjustments’ under ‘Picture Control’).
Image is blurred
– Image is not focused.
• Adjust focus ring.
– Distance between projector and screen is not correct.
• Adjust the distance between the projector and the screen.
– Signal cable is not correctly connected.
• Connect signal cable correctly.
21
 Loading...