

Philips Lifeline, GoSafe, HomeSafe Instructions For Use Manual
Philips Lifeline
Medical Alert Service
Includes: GoSafe Mobile System and HomeSafe System
Instructions for use

2
Contents
Philips Lifeline Service ...............................4
Welcome to Philips Lifeline
Setting up your Lifeline Service
Responders and People to Notify
Calling for help inside your home
Signal Range
Battery information
Equipment service
Contact Philips Lifeline or your representative
HomeSafe System and GoSafe Mobile System
Communicators – General Information
................13
Safety information regarding the Home Communicator
Cleaning
Backup battery
Landline Communicator (7000L)
.....................16
Description
Safety information
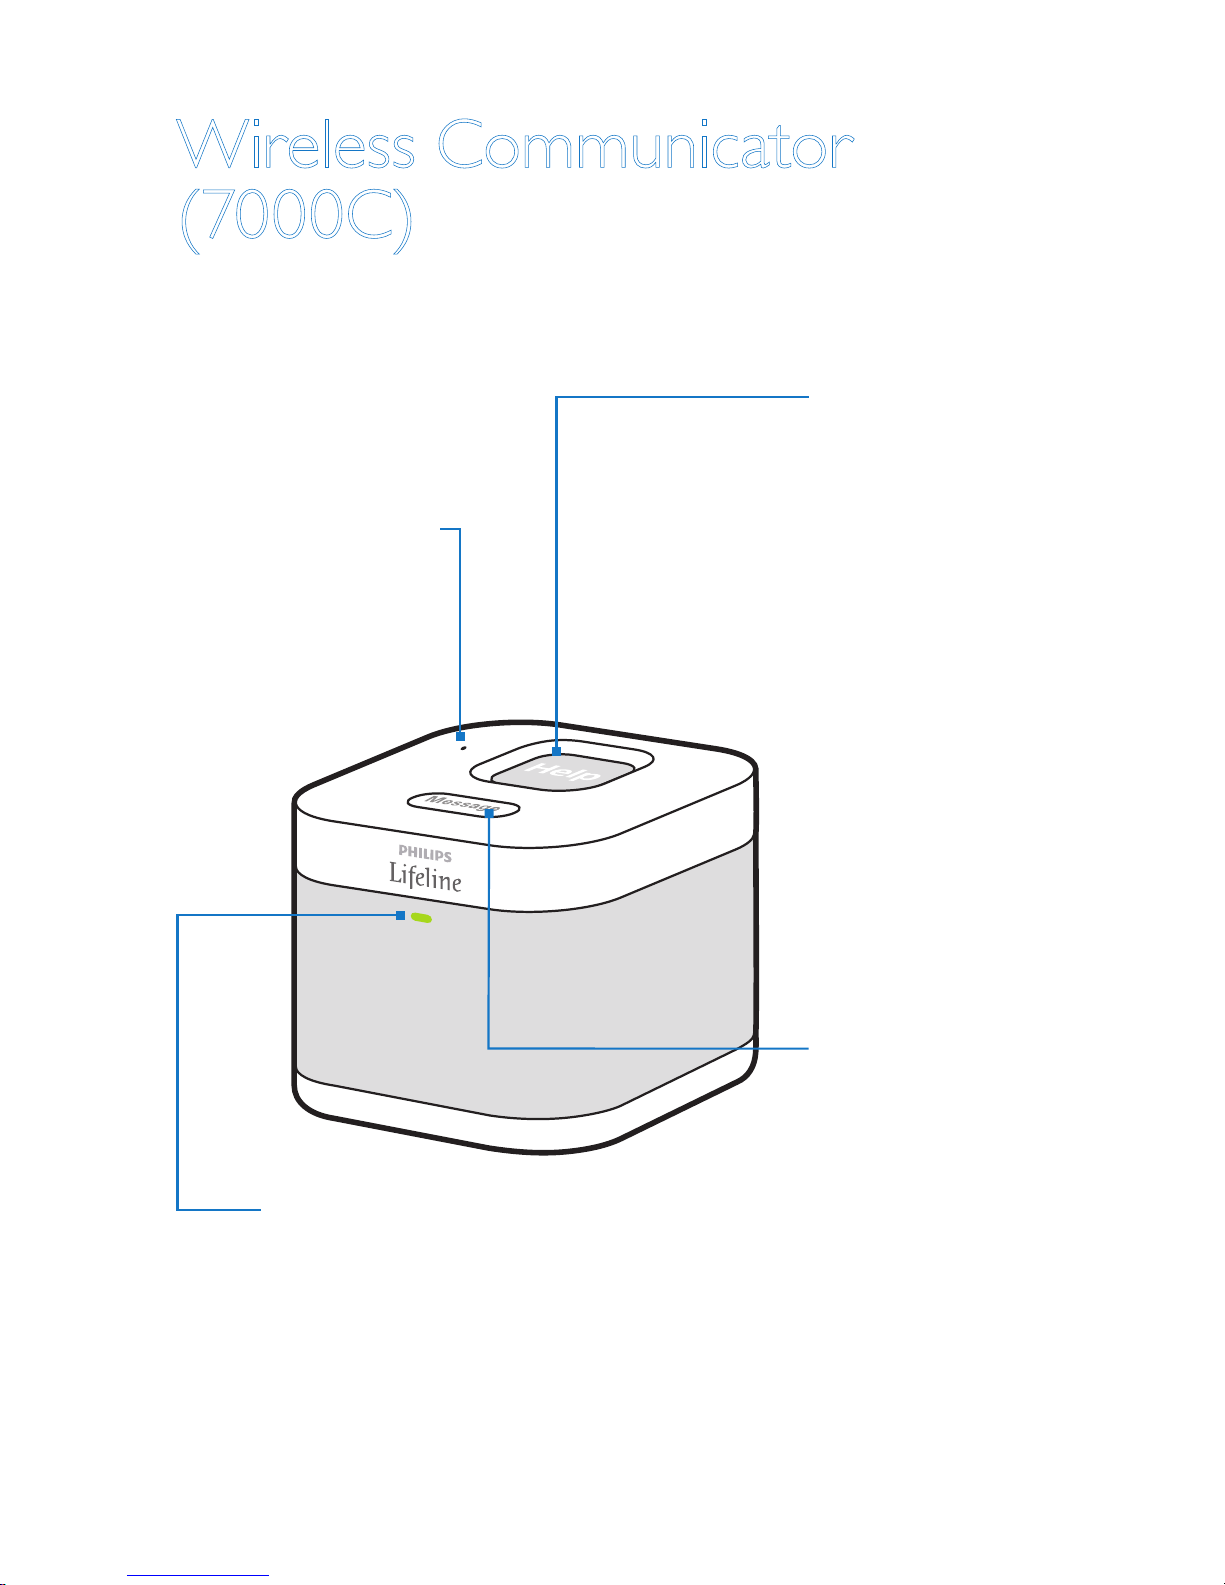
Wireless Communicator (7000C) .....................19
Description
Safety information
HomeSafe System and GoSafe Mobile System
Help Buttons – General Information ..................22
Compatible Home Communicators
Setting up a replacement Help Button
Cleaning

3
.26
..............29
.33
HomeSafe Personal Help Buttons
(7000PHB or 7000PHW) ...........................
Using the wristband
Adjusting the neck cord
Battery
Recommended usage
HomeSafe AutoAlert Button (7000AHB)
Battery
Recommended usage
GoSafe Mobile Button
(7000MHB/7100MHB) ..............................
Charging the battery
Sleep mode
Recommended usage
Safety and Regulatory Compliance ....................41
IEC regulations
System classification
Radio specifications
FCC Notice to Users
Compliance
Intended Use
Compatibility
Risks and Benefits
Training
Safety
Maintenance
Communicator Alarms
GoSafe Mobile Help Button Alarms
Alarm Descriptions / Summary Tables
Technical Specifications

4
Philips Lifeline Service
Welcome to Philips Lifeline
Thank you for choosing the Philips Lifeline Medical Alert Service.
Please refer to the Quick Setup Guide provided for instructions on
setting up your equipment. These Instructions for Use will provide you
with information about your equipment and the Lifeline Medical Alert
Service. Please read the manual and Quick Setup Guide carefully, and
note the Warnings and Cautions. If you have questions, call Lifeline at any
time. Please save this manual in case you need to refer to it later.
Please pay special attention to all the instructions provided in the
Warning and Caution sections.
A Warning alerts you to a potential serious outcome, adverse event or
safety hazard. Failure to observe a warning may result in death or serious
injury to the user or patient.
A Caution alerts you to where special care is necessary for the safe and
effective use of the product. Failure to observe a caution may result in
minor or moderate personal injury or damage to the product or other
property, and possibly in a remote risk of more serious injury, and/or
cause environmental pollution.
These Instructions for Use and the Quick Setup Guide describe the most
extensive configuration of the product, with the maximum number of
options and accessories. Not every function described may be available
on your product.

5
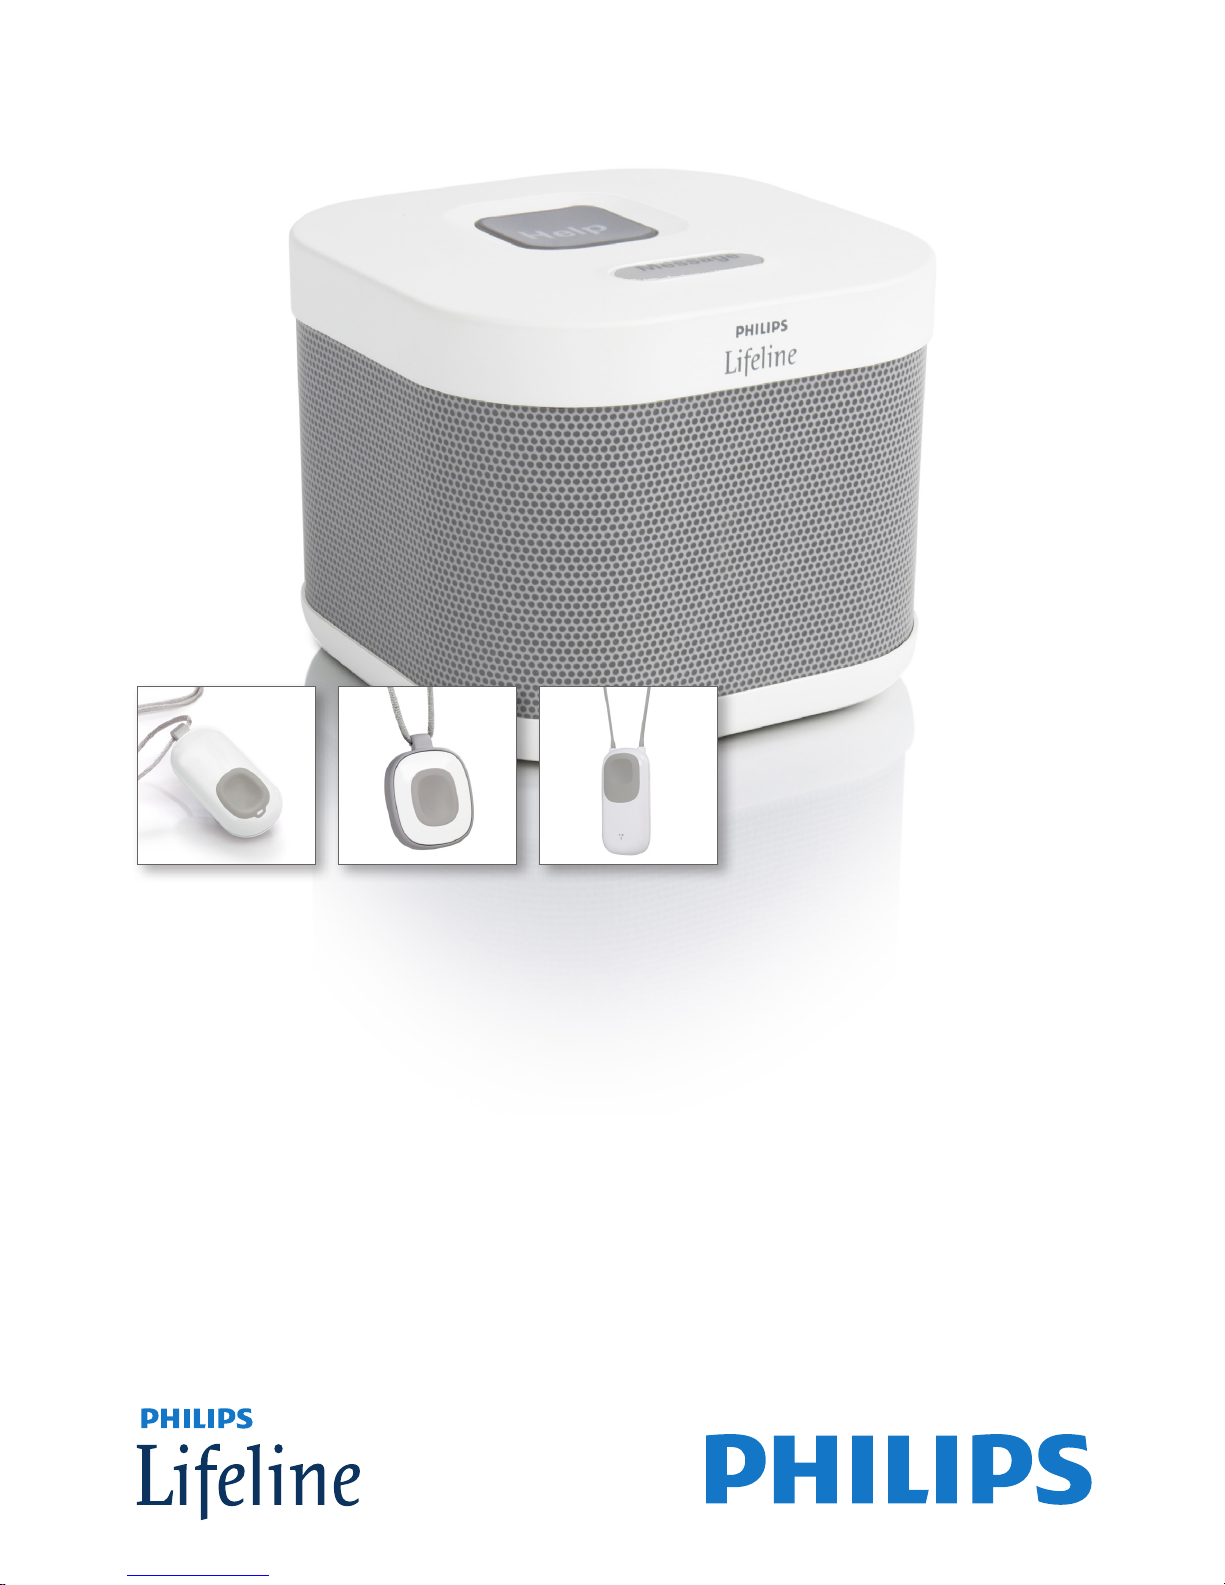
This manual covers the following:
Landline Communicator (7000L)
A Communicator that connects to Lifeline using your home’s existing
landline telephone service. Landline telephone service is required.
Wireless Communicator (7000C)
A Communicator that connects to Lifeline using the AT&T wireless
network; no phone line is required. Wireless service is provided as part
of your Lifeline Service; no additional wireless equipment is needed.
6
HomeSafe
Personal
Help Button
(7000PHB and
7000PHW)
HomeSafe
AutoAlert
Button
(7000AHB)
GoSafe
Mobile Button
(7000MHB/
7100MHB)
Works within
the range of your
Communicator
Works outside* your
home
Can be worn around
neck as a pendant
Can be worn on a
wristband
Can detect falls** in
your home
Can detect falls**
outside* your home
Has a built-in speaker
and microphone
* When access to the AT&T wireless network is available.
** The HomeSafe AutoAlert Button and GoSafe Mobile Button provide an extra layer of protection
by placing a Help Call if a fall is detected and you can’t push the Button. Not all falls can be
detected. If you need help, press your Help Button.

7
Setting up your Lifeline Service
Before you can use your system, your Communicator must be properly
set up, and the coverage range of your Help Button must be determined.
Please see the Quick Setup Guide for instructions on how to set up your
system and test the coverage range of your Help Button. If you have any
questions, please contact Philips Lifeline or your representative.
Responders and People to Notify
What is a “Responder”?
As a Lifeline subscriber, you should have designated people who have
agreed to be “Responders.” These are people whom Lifeline should call
in an emergency, when appropriate. Examples include: neighbors, friends,
relatives, your current nursing aide, etc.
Choosing a Responder
It is best to choose a Responder who:
• Has a key to your home or knows where one is located (perhaps in
a key lockbox)
• Could come to help you at different times of the day or night
• Lives or works within 10 minutes of where you live
• Has a phone, preferably a cell phone
• Ideally has a driver’s license and access to a vehicle
If you are using the GoSafe System, choose a Responder who can also:
• Drive to your location, whether you are at home or away from home,
and provide help if needed

8
Information Lifeline needs about Responders
Please ensure that Lifeline has the following information about each
person acting as a Responder:
• Name
• Phone numbers – home, work and cell phone
• Whether or not the Responder has a key to your home
It’s very important that you keep your Responders and their contact
information up to date. Remember to contact Lifeline if one of your
Responders is no longer able to assist you or if they get a new
telephone number.
Please contact Lifeline for any questions about selecting or being a
Responder.
Who are “People to Notify”?
If you call for help, Lifeline will contact the “People to Notify” to let
them know that you received assistance. “People to Notify” will not be
contacted to help you, unless they are also on your list of “Responders.”
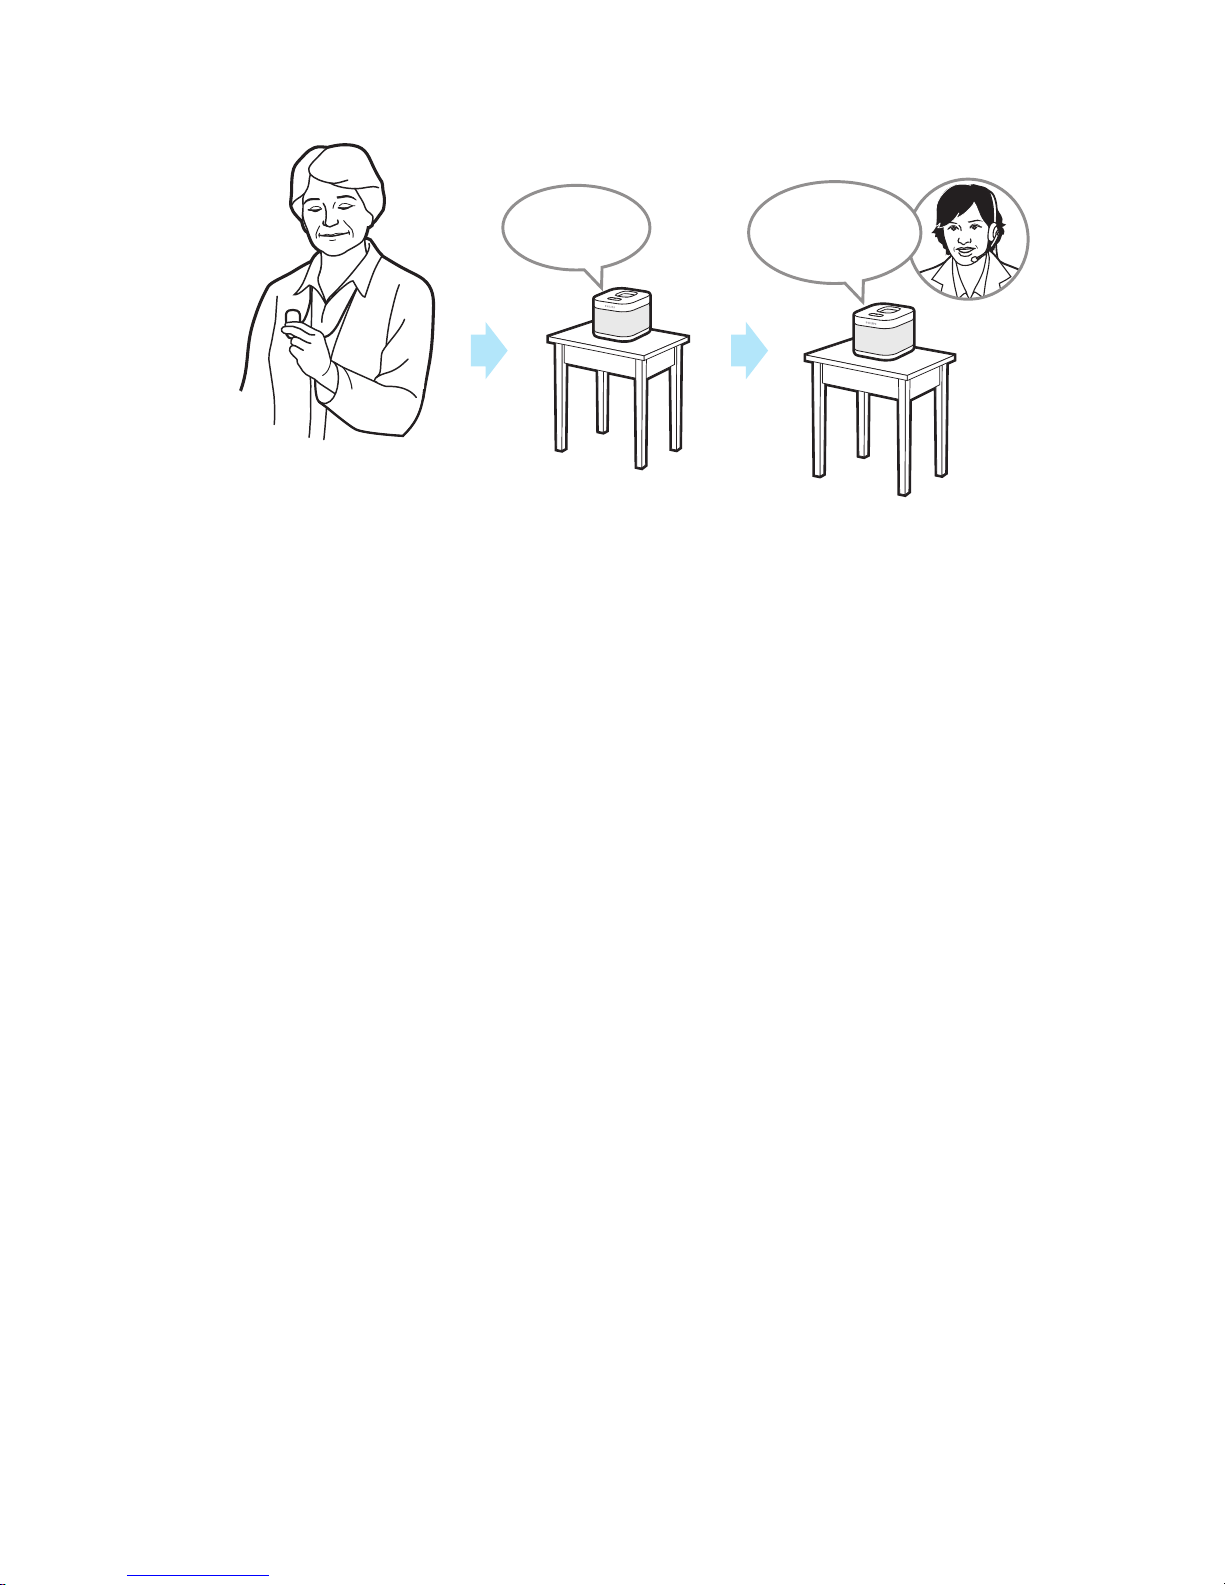
Calling for help inside your home
1. Press the Help Button that you wear or the gray Help button on the
top of your Home Communicator. You can press either button, but
you do not need to press both. The Home Communicator will beep
and dial the Lifeline Response Center.
Note: The Response Center is available 24 hours a day, 365 days a year.
A trained Personal Response Associate is always available to assist you.
9
Help call in
progress.
Please wait.
Hello, Mrs. Smith.
Do you need help?
2. The Home Communicator calls the Response Center. When it dials
the Response Center, the Home Communicator will repeatedly say:
“Your Help Call is in progress; please wait.” Once it connects with the
Response Center, it will say: “Your call has been connected; Lifeline will
be right with you.”
3. The Response Center will answer the call. A Response Associate
will speak to you through the Home Communicator’s built-in speaker
and hear you through the Home Communicator’s highly sensitive
microphone. He/she will ask if you need help. If you do not need help,
just tell the Response Associate that help is not needed.
Note: If you cannot speak or be heard, the Response Associate will try
calling you back. If you cannot answer or if the Response Associate cannot
hear you, Lifeline will contact your Responders or emergency services.
4. The Response Center will assess the situation. If help is needed,
the Response Associate will contact your list of Responders (i.e., a
caregiver, neighbor, loved one) or emergency services in accordance
with your request.

10
5. Once your Responder or the emergency service arrives, they should
press your Help Button to let Lifeline know that help has arrived. The
Response Associate will contact the household to confirm that you
received the help that you needed.
6. Once Lifeline confirms that you have been assisted, a Response
Associate will contact the “People to Notify” you’ve designated,
letting them know you needed and received help.
Note: If you accidentally press your Help Button, a Response Associate
will respond to your call and ask if you need help. Just tell them that it
was pressed accidentally and that you do not need assistance. Don’t be
concerned that you are bothering Lifeline; we just want to be sure that
you are alright.
Signal Range
Caution
Please see the Quick Setup Guide located in the box for instructions on
how to set up your system and test the range of your Help Button. The
Communicator must be properly set up, and the coverage area of the
Help Button must be tested prior to use. The Help Button is a radio
frequency (RF) device that transmits a signal to a compatible Lifeline
Communicator.
Your Help Button and Home Communicator provide coverage inside
your home and may provide coverage in the area immediately outside (in
the yard, etc.). If you live in an apartment building or condominium, you
may have coverage in areas immediately outside your apartment (e.g., the
hallway, stairway, or another floor of the building). A Signal Range Test is
required to determine which areas are covered. Be sure to thoroughly
test the coverage range of the system in all areas of your home.

11
The signal range may be affected by environmental factors, including
building materials, large masses covering the Help Button (i.e. a person
falling on top of it) and submersion in liquid.
A Signal Range Test will determine your coverage range, which is the
distance you can move away from your Home Communicator and still
call for help. If you press your Help Button outside of your apartment,
but still within the range of the Home Communicator, help will be sent to
the location of the Home Communicator (i.e., your apartment).
Note: If you have the GoSafe Mobile Button you can call for help outside
the range of your Home Communicator when the AT&T Wireless
network is available. Help will be sent to your location. Please refer to
page 35 for further information.
Signal Range Test
You should conduct a Signal Range Test during installation, and if you
move your Home Communicator to a different location in your home.
1. Make sure that your Home Communicator is ON and that you have
your Help Button in hand.
2. PRESS and HOLD DOWN the Message button. The Home
Communicator will beep and announce: “Continue to hold the
Message button for AutoLearn. When you are ready for Range Test,
please release the Message button.”
3. Release the Message button. The Home Communicator will announce:
“Please press the flashing orange Message button after you have
completed the range test. Begin Signal Range Test.”
4. Press your Help Button. The Home Communicator will beep and play
a voice message and the light on your Help Button will flash green to
indicate that the Home Communicator has received the signal.

12
5. Move to other parts of your home and press your Help Button again.
Listen for the beep and check to see if the green light is flashing.
6. Once you have tested different locations in your home and
immediately outside your home, return to the Home Communicator
and press the flashing orange Message button.
Battery information
All Philips Lifeline equipment contains batteries that can only be replaced
by Philips Lifeline in the factory. The equipment will automatically send a
signal to Lifeline when the battery needs to be replaced. Philips Lifeline
will contact you directly to make arrangements for a replacement.
Equipment service
Every Home Communicator and Help Button is manufactured to high
quality standards. Philips Lifeline equipment can only be factory-serviced
by Philips Lifeline. The HomeSafe/GoSafe devices perform periodic
diagnostic self-tests to verify their functionality. If you ever experience
issues with your equipment, or if it becomes damaged, please contact
Philips Lifeline or your representative.
Contact Philips Lifeline or your representative
• If you would like to transfer your service to a new or second home.
• If your Responder or People to Notify list needs to be updated. It
is important that your list is up to date with the correct people and
telephone numbers.
• If someone else in your home needs to use the Lifeline Service. More
than one person living in the same household can have the service.
13
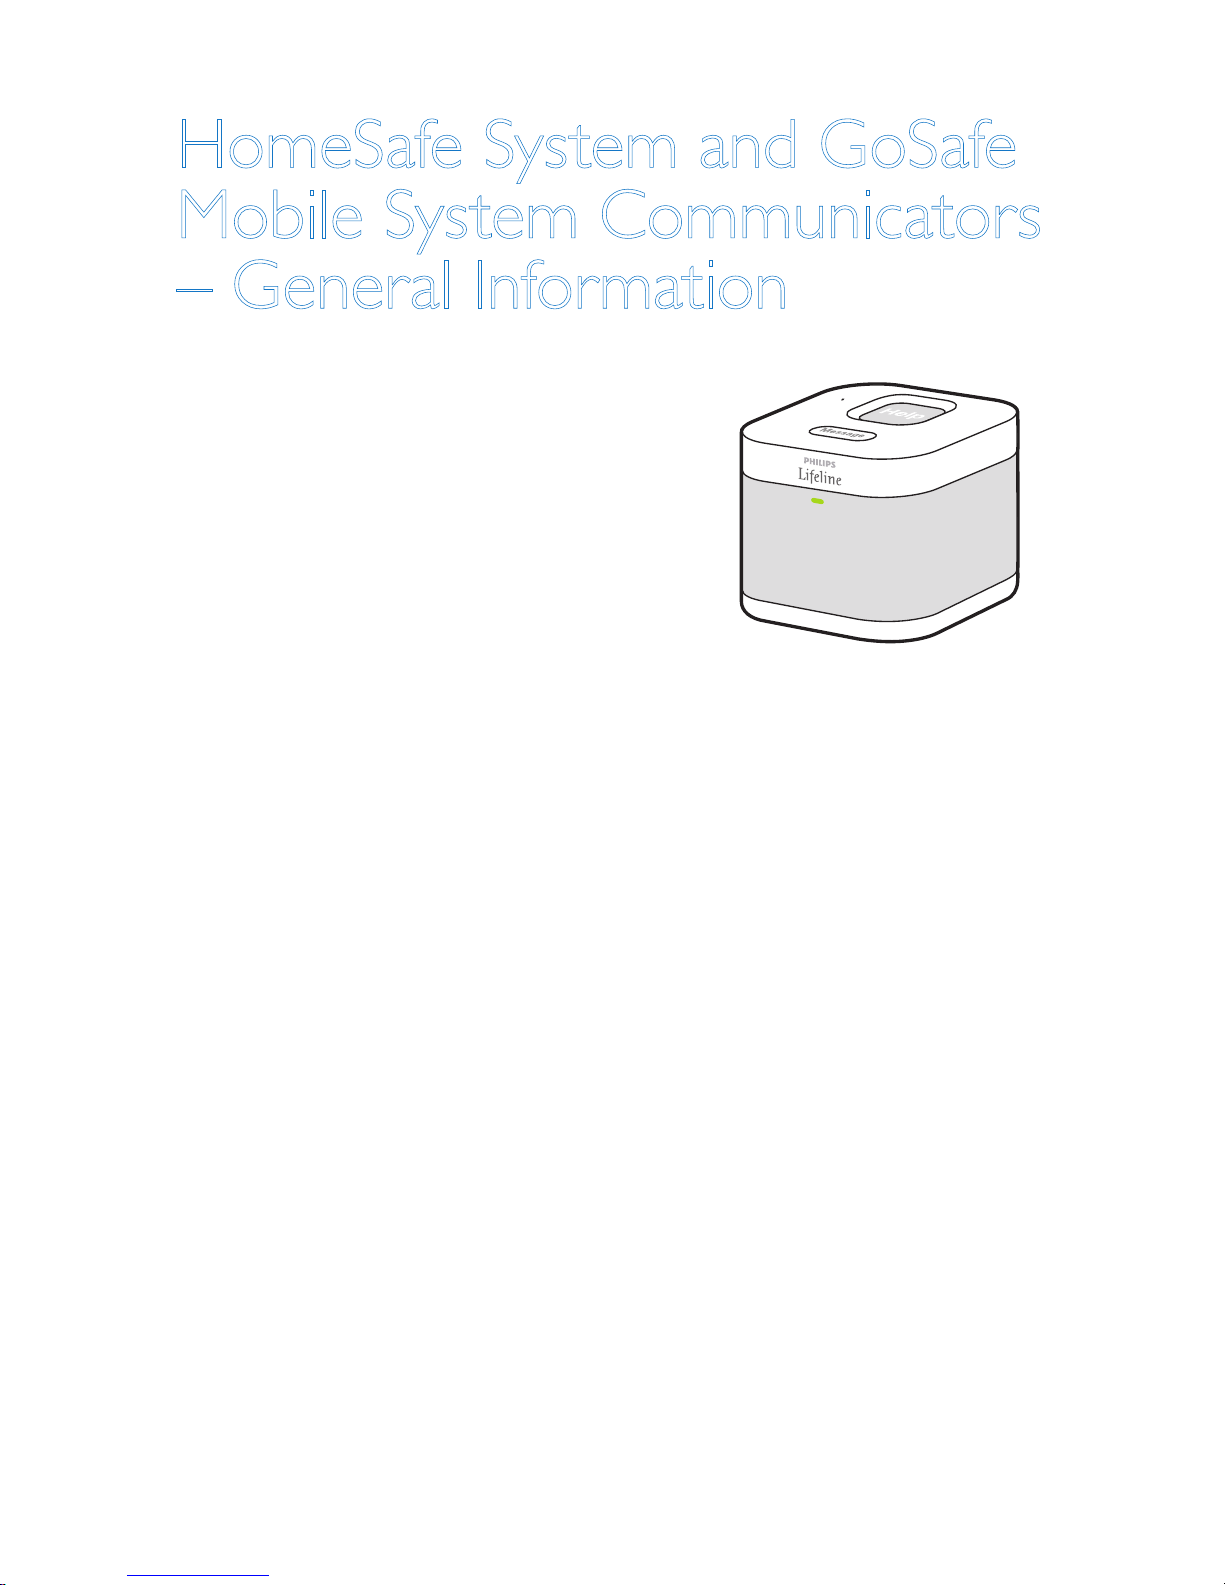
HomeSafe System and GoSafe
Mobile System Communicators
– General Information
Safety information regarding the
Home Communicator
1. The Home Communicator must be
placed in an indoor living area. Please
keep in mind that sunlight may make it
difficult to see the status lights.
2. Make sure that you do not plug your Home Communicator into a
power outlet that is controlled by a wall switch because someone
could accidentally turn off the wall switch and shut off the power to
your Home Communicator.
3. Do not place anything on top of the Home Communicator. The Help
button and the Message button must always be visible and accessible.
4. The Home Communicator contains a speaker and microphone. Take
care not to block these, since doing so will make it difficult for you to
communicate with Lifeline.
5. Make sure your Home Communicator is away from any clutter or
any object that might block its ability to receive a signal from the Help
Button. The Home Communicator should not be placed on or near
your refrigerator or any type of metal cabinet or bookcase, since this
may limit the overall range of the system.
6. To reduce the risk of electrical shock or fire, do not place the Home
Communicator in or near water or other liquids.

14
7. Never carry the Home Communicator by the cord or yank on the
cord to disconnect the plug from a power outlet. Instead, grasp the
plug and pull to disconnect. Periodically inspect electrical cords and
cables for damage or signs of wear.
Cleaning
Keep the Home Communicator free of dust by wiping it with a soft
cotton cloth. If additional cleaning is required, follow the steps below:
1. Move the power switch on the back of the Home Communicator to
the OFF position and unplug the power cord from the power outlet.
If you have the Landline Communicator, unplug the telephone cord
from the wall jack.
Warning
Always unplug the Communicator from the power outlet before cleaning
to prevent electric shocks.
Note: You cannot call for help while the Home Communicator is off.
Accordingly, you may wish to have a family member or caregiver present
while you are cleaning your Home Communicator.
2. Slightly dampen a soft cloth with a mild soap and water and gently
wipe the surfaces clean. Do not use detergent or abrasive cleaners
on your Home Communicator.
3. Reconnect the power cord to the power outlet. If you have the
Landline Communicator, reconnect the telephone cord to the wall
jack, and then move the power switch on the back of the Home
Communicator to the ON position.
4. Test your system by pressing your Help Button. Tell the Response
Associate that you are just testing your equipment after cleaning it
and no help is needed.

15
Caution
Never allow water or other liquids to enter the product, since these may
cause electrical short-circuits or metal corrosion. Do not spray water or
cleaners directly on your Home Communicator. Excessive moisture could
get inside the Home Communicator and cause damage.
Backup battery
Your Home Communicator uses a factory-installed battery for back up.
If you lose power, the backup battery begins to work automatically. The
Communicator will send an alarm to the Lifeline Response Center to
indicate that the Communicator is using its backup battery. The backup
battery can last for up to 30 hours, depending on the battery age and
environmental conditions.
If your Communicator battery needs to be replaced, a silent signal will
be sent to Lifeline, and Lifeline or your representative will contact you
to arrange for a replacement.

16
Landline Communicator
(7000L)
Description
Help button
• Press to send a Help
Call to the Response
Center
• Flashes red while a
Help Call is
connecting and after
Lifeline has contacted
your Repsonders or
emergency services
• Steady red when
a Help Call is
connected
Message button
• Used during the
setup process
• When the button
is flashing orange,
press to hear a status
message
Microphone
• Used to talk
to Lifeline
Green status light
• Steady green when the
Communicator is ON. Flashes
green when the Communicator
is running on backup battery
(AC power loss).

17
Volume control
Controls the volume
of the speaker on the
Communicator
Green phone jack
Used to connect the
Communicator to your
household phone jack
Blue phone jack
Allows you to connect
a telephone to the
Communicator (optional)
Power switch
Used to turn the
Communicator ON or
OFF. The Communicator
must be ON for your
Lifeline service to work.

18
Safety information
1. If you have multiple phones in your home, and any of them are
left off the hook, the Home Communicator will not be able to
place a Help Call. This problem can be addressed by plugging the
Home Communicator phone cord into an RJ31X/CA38A type jack,
sometimes referred to as a “line seizure jack”, on your main phone line.
Contact your phone company for further assistance with this option.
If (and only if) there is only one phone jack in your home, there is
an RJ31X jack in the Home Communicator that is designed to seize
the line if installed properly. Please refer to the Customer Premises
Equipment and Wiring diagram on page 44 in the Safety and Regulatory
Compliance section.
2. This product cannot be used on party lines/shared service lines.
3. If you have DSL Internet service, you will need to install a DSL filter
between your phone jack and the Home Communicator. Contact your
phone company to obtain a DSL filter or purchase one from a local
electronics store.
Warning
Using telephone services provided via the internet, broadband, VoIP, or
any other nontraditional telephone service presents additional risks for
non-transmission of signals from the Equipment, and the Equipment may
not operate as intended. Contact Lifeline if you have questions in this
regard. If your landline phone service is deemed not compatible with
the 7000L, a 7000C Wireless Communicator may possibly be used to
provide Lifeline service.
19
Wireless Communicator
(7000C)
Description
Help button
• Press to send a Help
Call to the Response
Center
• Flashes red while a
Help Call is
connecting and after
Lifeline has contacted
your Repsonders or
emergency services
• Steady red when
a Help Call is
connected
Message button
• Used during the
setup process
• When the button
is flashing orange,
press to hear a status
message
Microphone
• Used to talk
to Lifeline
Green status light
• Steady green when the
Communicator is ON. Flashes
green when the Communicator
is running on backup battery
(AC power loss).
20
Volume control
Controls the volume
of the speaker on the
Communicator
Signal strength
Indicates the strength
of the wireless signal
*
Power switch
Used to turn the
Communicator ON or OFF.
The power switch must be
ON at all times for your
Lifeline service to work.
* Signal strength may vary

21
Safety information
The Wireless Communicator (7000C) uses the AT&T wireless network
to communicate with the Lifeline Response Center.
1. The strength of the wireless signal may be stronger in some areas of
your home than others. When you set up your Home Communicator,
look at the signal strength indicator on the back of the Home
Communicator. The number of green bars that are glowing indicate the
signal strength; the more bars you see, the stronger the signal. Place
your Home Communicator in a location where you spend the majority
of your time, and the signal strength indicator shows two or more bars.
2. If the AT&T wireless network experiences an outage or the Home
Communicator loses its signal, the Message button on top of the
Home Communicator will flash and it will not be able to send a
Help Call to Lifeline. If you press your Button and the AT&T wireless
network is not available, you will hear a message saying: “Your call
cannot be connected. There is no signal strength. Move your Home
Communicator to a different location.” Try moving the Home
Communicator to a different location in your home. Once the signal
is restored, you will hear a message saying: “Connection has been
restored.” Your Help Call will then be dialed.
22
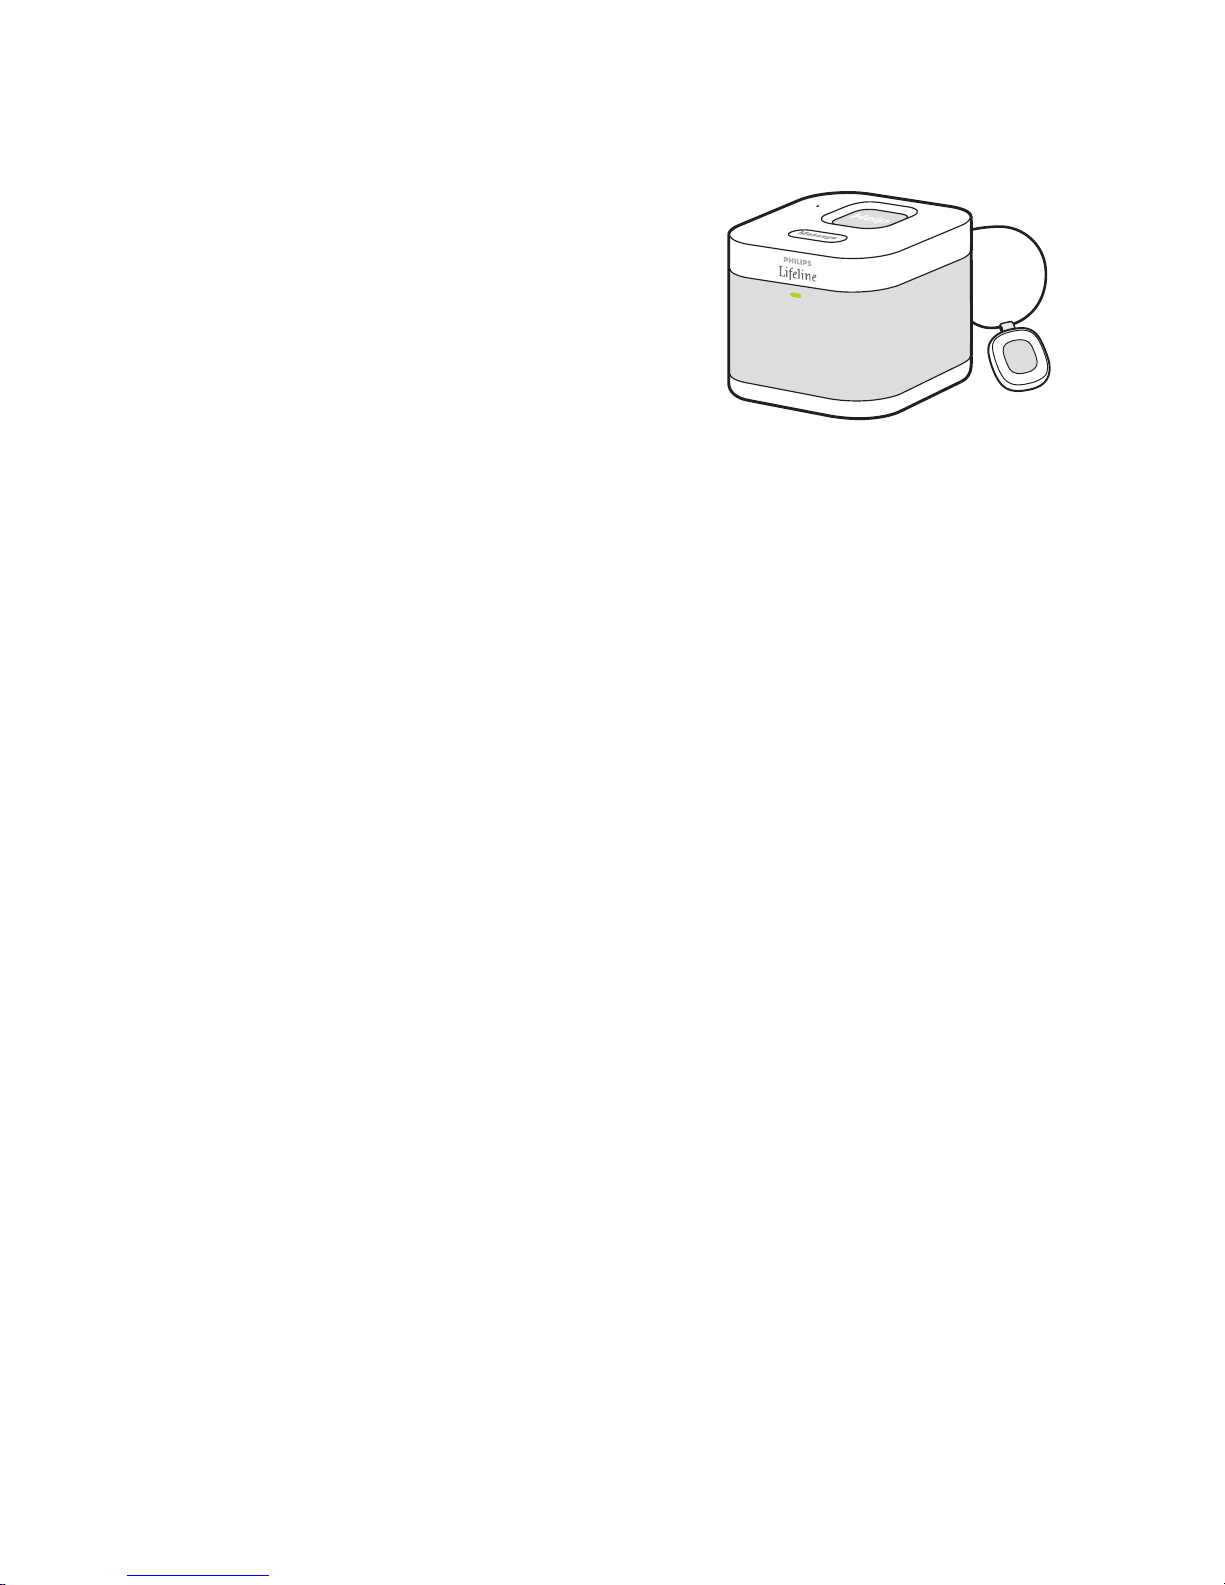
HomeSafe System and GoSafe
Mobile System Help Buttons –
General Information
The information in this section applies to all types of wearable Help
Buttons.
Compatible Home Communicators
The HomeSafe Personal Help Button, the HomeSafe AutoAlert Button,
and the GoSafe Mobile Button are compatible only with the following
Philips Lifeline Home Communicators:
• Landline Communicator (7000L)
• Wireless Communicator (7000C)
Setting up a replacement Help Button
If you receive a replacement Help Button, you will need to set it up to
work with your Home Communicator. You’ll need to be within arm’s
reach of the Home Communicator to set up your replacement Help
Button.
If more than one Help Button is used in your home, gather them all for
this process. You will need to reprogram all of them, even if you are only
replacing one of them.
1. Make sure that your Home Communicator is ON and that you have
your replacement Help Button in hand.
23
2. PRESS and HOLD DOWN the
Message button on the Home
Communicator. The Home
Communicator will beep and
announce: “Continue to hold the
Message button for AutoLearn. When
you are ready for Range Test, please
release the Message button.”
Do not release the Message button until you get to Step 4.
3. Continue to hold down the Message button on your Home
Communicator. With your other hand, press the wearable Help Button.
You will hear a long beep and a voice message saying: “Your Lifeline Help
Button is now auto-learned and ready to use.” The Communicator will
also announce the four large digits that appear on the back of your Help
Button. This will indicate that the Help Button is working with the Home
Communicator. If the AutoLearn process fails, please contact Philips
Lifeline or your representative.
4. Repeat step 3 to reprogram all the other Help Buttons in your home.
Then, release the Message button on the Home Communicator. The
Home Communicator will announce: “Please press the flashing Message
button after you have completed the range test. Begin Signal Range
Tes t .”
5. Press your Help Button. The Home Communicator will beep and the
light on your Help Button will flash green to indicate that the Home
Communicator has received the signal.
6. Move to other parts of your home and press your Help Button again.
Listen for the beep and check to see if the green light on the Button
is flashing.

24
7. Once you have tested different locations in your home and
immediately outside your home, return to the Home Communicator
and press the flashing orange Message button.
Cleaning
Your Help Button is waterproof (IPX7, 1 meter for 30 minutes), so you
can submerge it in warm water for easy cleaning.
1. Wash your wrist strap or adjustable neck cord with a mild liquid
dishwashing detergent.
2. Wash the Help Button under warm running water. You may also
gently wipe it with an isopropyl (rubbing) alcohol wipe or a cotton pad
moistened with alcohol. However, do not soak it in alcohol.
3. Blot excess moisture with a towel and allow the Help Button to finish
air-drying while you’re wearing it.
Note: If you accidentally push your Help Button during cleaning, please
simply tell the Personal Response Associate that you accidentally pressed
the Button.
Warnings
• Any cord worn around the neck can pose a strangulation risk, including
the possibility of death and serious injuries. This may be of more
concern to wearers in wheelchairs, using walkers, using beds with guard
rails, or who might encounter other protruding objects upon which the
cord can become tangled.
• Philips Lifeline neck cords contain a special fuse (see
image on right) designed to break away under certain
conditions to reduce the remote risk of strangulation.
If this fuse breaks apart, contact Philips Lifeline or your
representative for a replacement, as the fuse cannot
be repaired or re-used.
8235
2000148235-YYYYMMDD
FCC: BDZ7000AHB
IC: 655C-7000AH B
Model: 7000AHB

25
• Do not use any neck cord other than the one provided by Philips
Lifeline or your representative. Other neck cords may not provide the
feature to break apart therefore increasing the risk of strangulation.
• Do not tie a knot in your neck cord since this may prevent the break
away feature from working properly.
• There are no user-serviceable parts inside the Help Button. Do not
attempt to open or modify the device.
• The Help Button contains a lithium battery that must be disposed of
properly. Do not discard the Help Button in the trash or expose it to
flames or intense heat.
• The Help Button is not suitable for use in the presence of flammable
mixtures.
• Do not put your Help Button through the dishwasher, clothes washer
or dryer. Please be sure to remove your Help Button from articles of
clothing that are being dry-cleaned.
• Excessive heat may damage your Help Button. Do not leave your Help
Button on the dashboard of your car or on a windowsill that receives
direct sunlight. Likewise, do not wear your Help Button into a hot tub
or sauna. Normal bathing and showering temperatures WILL NOT
damage your Help Button.
Caution
• Your Help Button may interfere with certain medical equipment, such
as magnetic resonance imaging (MRI), X-ray machines, as well as metal
detectors.
 Loading...