

Page 1
Always there to help you
Question?
Contact
Philips
Question?
Contact
Philips
Register your product and get support at
www.philips.com/welcome
HMP8100
User manual
Page 2

Page 3

Contents
1 Trademark notice 5
2 Safety and notice 6
Safety 6
Compliance 6
Care of the environment 7
Notice 8
Written Offer 8
Warranty 8
3 Get started 10
Place 10
Install 11
Connect to your HDTV 11
Switch on or off 12
First-time setup 13
Set up the screen display 13
Set up the network 14
Use the remote control 19
Install batteries into the remote control 20
Calibrate the remote control 20
Navigate 21
Zoom in or out 24
Increase or decrease the volume 25
1EN
Page 4

Use the remote control as a game console (for some games) 25
4 Basics 27
Home screen 27
Find apps 27
Text entry 29
Select input methods 29
Enter text 30
Customize the Home screen 31
Add app icons and widgets 31
Delete items 32
Relocate items 32
5 Play 33
Play from online services 33
Install apps 33
Manage apps 34
Play movies from a mass storage device 35
Play media from a PC or NAS device (DLNA) 36
6 Use the device in corporate networks 37
Install secure credentials 37
Set up your Microsoft Exchange account 38
Add VPN 38
7 Settings 40
WIRELESS & NETWORKS 40
2 EN
Page 5

Wi-Fi 40
Ethernet 41
DEVICE 41
Sound 41
Display 41
Storage 42
Apps 42
PERSONAL 42
Security 42
Language & input 43
reset 44
ACCOUNTS 44
Add account 44
SYSTEM 44
Date & time 44
About MediaBox 45
System updates 45
Status and information about the device 46
8 Updatethermware 47
Update the rmware through the SD card 47
9 Troubleshooting 48
Model No. & SN 48
No picture 48
USB content cannot be read 48
HMP8100 does not respond to the pressing of keys 48
3EN
Page 6

The remote control cannot respond quickly to the pressing of keys 49
The new remote control does not work with the player 49
The rmware updating is not complete after a long time 49
HMP8100 hangs during rmware updating 50
10Specication 51
4 EN
Page 7

1 Trademark notice
®
The terms HDMI and HDMI High-Denition Multimedia Interface, and the HDMI
Logo are trademarks or registered trademar ks of HDMI Licensing LLC in the
United States and other countries.
Manufactured under license from Dolby Laboratories.
Dolby and the double-D symbol are trademarks of Dolby Laboratories.
Manufactured under license under U.S. Patent Nos: 5,956,674; 5,974,380; 6,487,535
& other U.S. and worldwide patents issued & pending. DTS, the Symbol, & DTS
and the Symbol together are registered trademarks & DTS 2.0+Digital Out is a
trademark of DTS, Inc. Product includes software. © DTS, Inc. All Rights Reserved.
Real RMVB logo is a trademark or a registered trademar k of RealNetworks, Inc.
5EN
Page 8

2 Safety and notice
Read and understand all instructions before you use this product. If damage is
caused by failure to follow the instructions, the warranty does not apply.
Safety
• Only use attachments/accessories specied by the manufacturer.
• Use only power supplies listed in the user manual.
• The product shall not be exposed to dripping or splashing.
• Do not place any sources of danger on the product (e.g. liquid lled objects,
lighted candles).
• Batteries (battery pack or batteries installed) shall not be exposed to
excessive heat such as sunshine, re or the like.
• Danger of explosion if battery is incorrectly replaced. Replace only with the
same or equivalent type.
ModicationoftheproductcouldresultinhazardousradiationofEMCor
other unsafe operation.
Warning
• Never remove the casing of this product.
• Never lubricate any part of this product.
• Never place this product on other electrical equipment.
• Keep this product away from direct sunlight, naked ames or heat.
• Ensure that you always have easy access to the power cord, plug or adaptor to disconnect the
product from the power.
Compliance
Class II equipment symbol:
6 EN
Page 9
CLASS II apparatus with double insulation, and no protective earth provided.
Note
• The type plate is located on the bottom of the product.
Care of the environment
Environmental information
All unnecessary packaging has been omitted. We have tried to make the packaging
easy to separate into three materials: cardboard (box), polystyrene foam (buffer)
and polyethylene (bags, protective foam sheet.)
Your system consists of materials which can be recycled and reused if
disassembled by a specialized company. Please observe the local regulations
regarding the disposal of packaging materials, and old equipment.
Your product is designed and manufactured with high quality materials and
components, which can be recycled and reused.
Please inform yourself about the local separate collection system for electrical and
electronic products.
Please act according to your local rules and do not dispose of your old products
with your normal household waste. Correct disposal of your old product helps
to prevent potential negative consequences for the environment and human
health.Please inform yourself about the local rules on separate collection of
batteries because correct disposal helps to prevent negative consequences for the
environmental and human health.
7EN
Page 10

Notice
Written Offer
WOOX Innovations hereby offers to deliver, upon request, a copy of the complete
corresponding source code for the copyrighted open source software packages
used in this product for which such offer is requested by the respective licenses.
This offer is valid up to three years after product purchase. To obtain source code,
please contact open.source@woox.com. If you prefer not to use email or if you do
not receive conrmation receipt within a week after mailing to this email address,
please write to Open Source Team, 6/F, Philips Electronics Building, 5 Science Park
East Avenue, Hong Kong Science Park, Shatin, New Territories, Hong Kong. If you
do not receive timely conrmation of your letter, please email to the email address
above.
This product is partly based on Open Source software. The license text and
acknowledgment can be retrieved from the device under > About Mediabox
> Legal information.
Specications are subject to change without notice. Philips and the Philips’ Shield
Emblem are registered trademarks of Koninklijke Philips N.V. and are used by
WOOX Innovations Limited under license from Koninklijke Philips N.V.. WOOX
Innovations reserves the right to change products at any time without being
obliged to adjust earlier supplies accordingly.
Warranty
• Never attempt to repair the product, this could lead to the risk of injury,
damage to the product and will void your warranty.
• Use the product and accessories only as intended by the manufacturer. The
caution sign printed on the back of the product indicates risk of electric
shock.
• Never remove the cover of the product. Always contact Customer Support
for service or repairs.
8 EN
Page 11

• Any operation expressly prohibited in this manual, or any adjustments and
assembly procedures not recommended or authorized in this manual shall
void the warranty.
9EN
Page 12
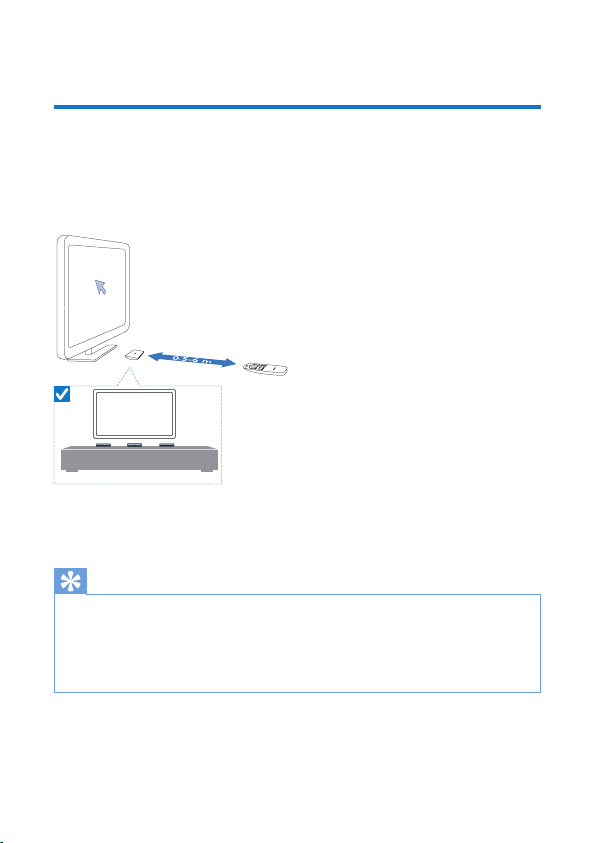
3 Get started
Place
HMP8100 works with the supplied uWand remote control. For good navigation
and interaction experience, do the following:
1 Place HMP8100 as shown:
TV
BestGood Good
2 If necessary, reduce the distance and angle between HMP8100 and the
remote control.
Tip
• The remote control is using an absolute pointing mechanism which aims at giving an intuitive and
predictable experience and enabling faster interaction with the user interface of the player. The
cursor always shows on the expected screen position for each angular orientation, even returning
from out of the screen. There is no calibr ation needed as a reference point is always broadcast
at the hidden transmitter of the player and therefore the player should be placed in a visible area
close to the TV for the best pointing experience.
10 EN
Page 13
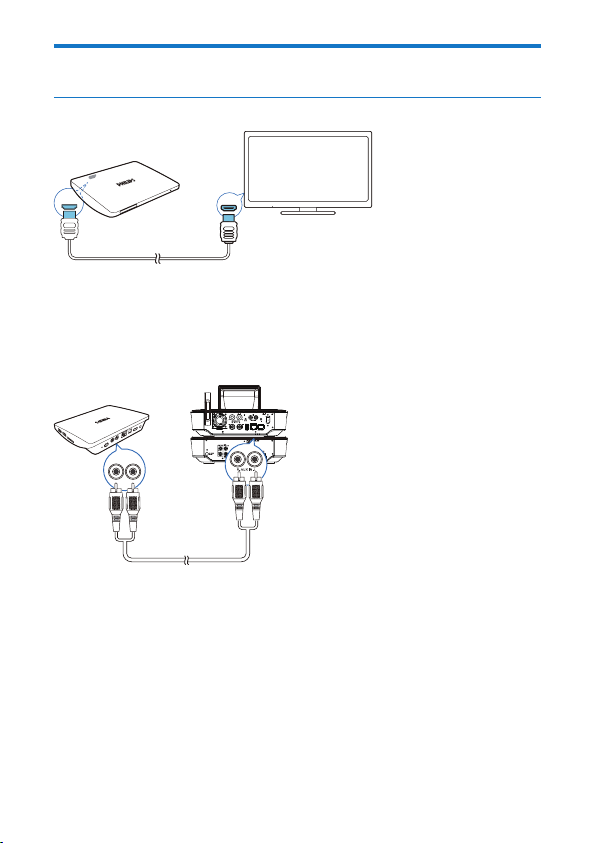
Install
Connect to your HDTV
HDMI INHDMI IN
• Through an HDMI cable, connect HMP8100 to a high-denition TV (HDTV).
Connect to an external audio system
For high quality audio, you can connect HMP8100 to your sophisticated audio
system.
ThroughR AUDIO L:
LR
• Use audio cables to connect HMP8100 to the audio input connectors on
your audio system.
• Make sure that the plugs and sockets match in color.
Through OPTICAL:
11EN
Page 14
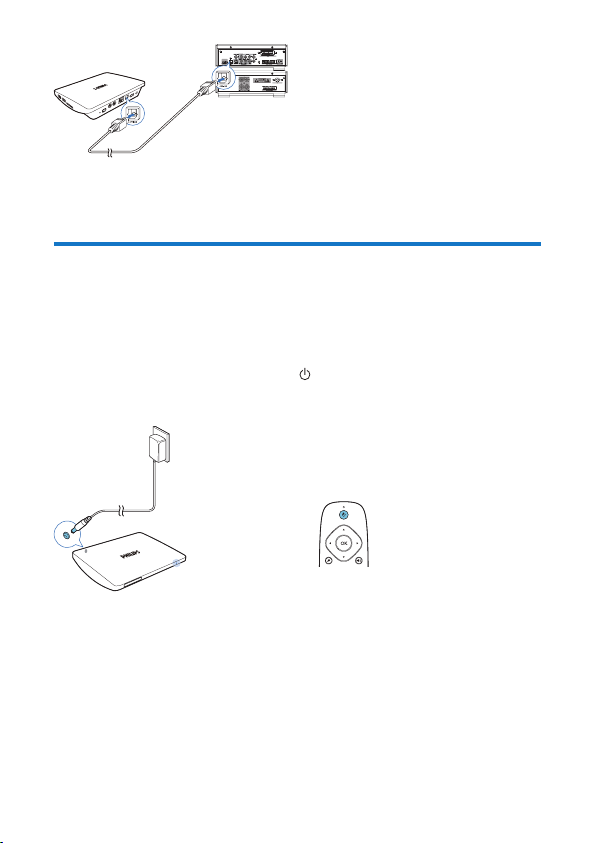
• Use a ber optical cable to connect the OPTICAL or SPDIF input
connector on your audio system.
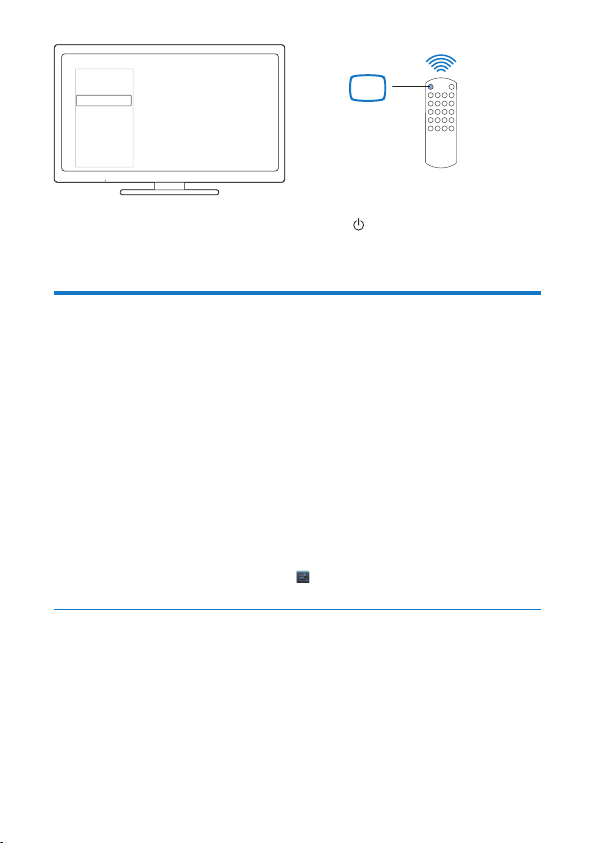
Switch on or off
1 To switch on HMP8100,
a Connect HMP8100 to power.
b On the remote control, press to switch on.
» The power indicator lights up green.
2 On the TV, switch to the input source of HMP8100:
• On the remote control of your TV, use the source button to select the
input channel of HMP8100.
12 EN
Page 15
AV
HDMI 1
HDMI 2
HDMI 3
Side HDMI
Side AV
SOURCE
TV
3 To switch HMP8100 to standby mode, press again on the remote control.
» The power indicator lights up red.
First-time setup
The rst time you use HMP8100, do the following setup:
• Select the menu language on HMP8100;
• Set up the screen display on your TV;
• Connect HMP8100 to your home network through an Ethernet cable
or Wi-Fi.
• Log in to your Google account.
Follow onscreen instructions to select your options:
1 Click the option button to show the list of options.
2 Select your option.
3 Click Next to move to the next step.
To change your setup options later,
• From the Home screen, go to Settings.
Set up the screen display
• In Output mode, select the video resolution that your TV supports.
13EN
Page 16

• In Display position, adjust the edges of the screen display. Follow the
onscreen instructions to make and save the adjustment.
Set up the network
Connect HMP8100 to a router (Access Point) through an Ethernet cable or
through Wi-Fi. You can connect HMP8100 to the network that is built around the
router.
To connect to the Internet, make sure that the router connects to the Internet
directly and no dial-up is required on the computer.
To skip the Ethernet or Wi-Fi setup screen, click Next.
14 EN
Page 17
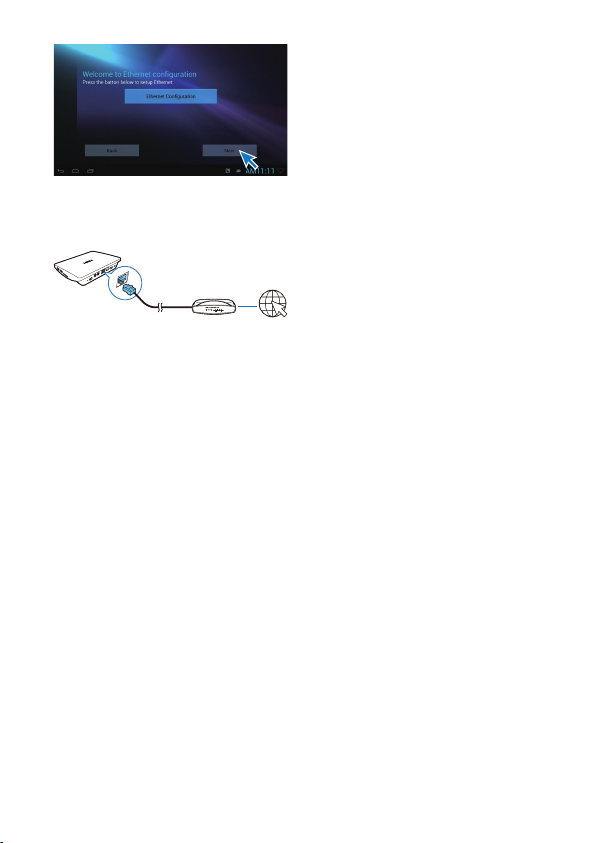
Connect through an Ethernet cable
1 Use an Ethernet cable to connect HMP8100 to the router.
2 On HMP8100, click EthernetConguration. Select ON to switch on the
Ethernet connection.
» A pop-up screen is displayed for you to set up the network connection
through the Ethernet cable.
15EN
Page 18

To use an IP address that the router assigns automatically,
• Select DHCP.
» HMP8100 star ts to acquire an IP address.
Tip
• If the DHCP (Dynamic Host Congur ation Protocol) is unavailable or disabled on the router,
manually enter the IP address of the player.
To enter the IP address of the player manually,
1 Get the IP address of the router.
• Consult the user manual of the router ; or
• To check for the settings of the router, enter the IP address (for
example, 192.168.1.1) in the web browser (for example, Internet
Explorer) of the computer. Get the information in the setup page.
2 On HMP8100, select Static IP. Assign the IP address manually.
16 EN
Page 19

• On the player, enter an IP address that allows the player to be in the
same subnet as the router.
For example, if the router has
IP address: 192.168.1.1, Subnet mask: 255.255.255.000;
Then, enter the following on the player:
IP address: 192.168.1.XX (where XX denotes a number), Subnet mask:
Connect through Wi-Fi
255.255.255.000.
WWW
1 On HMP8100, click Wi-FiConguration.
2 Select Wi-Fi settings.
3 Select the option to switch on the Wi-Fi function.
» You see a list of Wi-Fi networks in range.
17EN
Page 20

4 Connect HMP8100 to a network:
a In the list of Wi-Fi networks, select an option.
b On the pop-up screen, enter the password to the network.
» is displayed in the status bar when the Wi-Fi connection is
completed successfully.
» Next time you switch on HMP8100, HMP8100 connects to the
previously connected network automatically.
18 EN
Page 21

Note
• If MAC address ltering is enabled on your router, add the MAC address of HMP8100 to the list of
devices that are allowed to join the network. To nd the Wi-Fi MAC address, go to Settings >
About MediaBox > Status on the Home screen.
• To refresh the list of networks, select > Scan at the upper-right corner of the screen.
• If you have disabled SSID broadcasting or hidden the Service Set Identier (SSID) of the router,
manually enter the SSID or public name for the network. Go to Settings > Wi-Fi. On the top
bar, select .
• If the DHCP (Dynamic Host Congur ation Protocol) is unavailable or disabled on the router,
manually enter the IP address of HMP8100.
Use the remote control
Switch HMP8100 on or to standby mode
• Press
Navigate between screens or through options
• Return to the Home screen
, , ,
• Scroll through options
OK
• Conrm the option
• Back one level
View options menu
19EN
Page 22

• Press
Control the play
• Star t, pause, or resume the play
• Stop the play
/
• Select the previous or next le
Install batteries into the remote control
a Open the battery compartment.
b Insert two AAA batteries (1,100 mA) with correct polarity (+/-) as
indicated.
c Close the battery compartment.
Calibrate the remote control
With the supplied uWand remote control, you can navigate and select on
HMP8100 as you do with a mouse on a computer.
1 Make sure that you have placed HMP8100 properly (see 'Place' on page 10).
2 Go to Setupwizard.
3 Follow the onscreen instruction to calibrate your remote control.
20 EN
Page 23

Tip
• If the Game mode is available on your TV, select the mode to reduce the picture processing time
and allow the cursor to move more smoothly.
• To pair a new uWand remote control with HMP8100 , refer to "Troubleshooting" (see
'Troubleshooting' on page 48).
• You can also use a wireless mouse with HMP8100.
Navigate
Navigate on the screen
Navigate and select
1 To navigate to an item, point the remote control at HMP8100, and move the
remote control as needed.
» The cursor moves as you move the remote control.
2 To select the item, press OK.
Swipe
21EN
Page 24

1 Place the cursor in an empty space.
2 Press and hold OK.
» The status LED ashes.
3 Swipe left/ right, or up/ down.
» You can switch between pages, or scroll through the list of options.
Drag
1 Select an item.
2 Press and hold OK to drag the item as needed.
Scroll through options
22 EN
Page 25

1 To scroll through options, press .
» The cursor changes to 4-way navigation buttons.
2 Press repeatedly to navigate to your option.
• For fast scrolling, press and hold .
3 To select the item, press OK.
23EN
Page 26

Zoom in or out
1 Enter the Zoom mode:
• Press and hold .
» The status LED ashes.
» The zoom icon is displayed.
2 Zoom in or out:
• Swipe up or down.
3 Exit the Zoom mode:
• Release .
24 EN
Page 27

Increase or decrease the volume
1 Enter the Volume mode:
• Press and hold .
» The status LED ashes.
» The volume bar is displayed, indicating current volume level.
2 Increase or decrease the volume:
• Swipe left or right.
3 Exit the Volume mode:
• Release .
Use the remote control as a game console (for some games)
In some games, you can use the remote control as a game console.
25EN
Page 28

3 sec.
1 Enter the Game mode:
• Press and hold for more than three seconds.
» The status LED lights up red.
» The layout of the navigation buttons changes from vertical to
horizontal.
» and are disabled.
2 Exit the Game mode:
• Press and hold for more than three seconds.
» The status LED switches off.
26 EN
Page 29

4 Basics
Home screen
b
a
a Apps
• List all apps.
Widget
• List the shor tcuts to apps.
b Google Search
• : Use the quick search box to search on HMP8100 or the Web.
c Navigation buttons
• : Return to the Home screen.
• : Go back one level or exit.
• : Display recent applications that you have accessed.
• : (for some apps): View the options menu.
d Notications,time,setupstatus
• Select to check the details and select setup options.
Find apps
Navigate on the Home screen to nd an app:
• Select Apps to open the list of apps.
dc
27EN
Page 30
To switch between pages, press and hold OK on the remote control,
and swipe left/ right.
• To scroll through the apps, you can also press on the remote
control.
• To switch to the apps you have accessed recently, select .
Tip
• On HMP8100, you can install apps from the Play Store or other sources.
/
Play Store/ :
• Download different apps, games, and others.
MoviePlayer:
• Play media from the storage devices that you have connected to
HMP8100, including USB storage devices and SD/SDHC cards.
Movie Center:
• Play media from a PC that runs the DLNA media ser ver software.
Gallery:
• View pictures and videos on HMP8100.
/
Play Music/Music:
• Play music on HMP8100.
Settings:
• Customize the settings of HMP8100.
ES File Explorer:
• Browse the les/ folders on the device, install apps, and manage les.
Browser:
• Browse Web pages.
Email:
• Set up your email account on HMP8100.
28 EN
Page 31

Calculator
YouTube:
• Online video ser vice of Google
/
/ : News portal
Text entry
With the onscreen keyboard, you can enter text in multiple languages.
Select input methods
1 Select your input methods as needed:
a On the Home screen, press .
b On the pop-up screen, select System settings > Language & input.
c Select your input methods:
Android keyboard: for multiple languages other than Chinese
Baidu input: for Chinese input through handwriting recognition, stroke,
and Pinyin, and English input
Google Pinyin: for Chinese input through Pinyin, and English input
29EN
Page 32

Wallpaper
Manage apps
System settings
System settings
Language & input
2 To switch between text input methods during text entry:
• Click at the base of the screen.
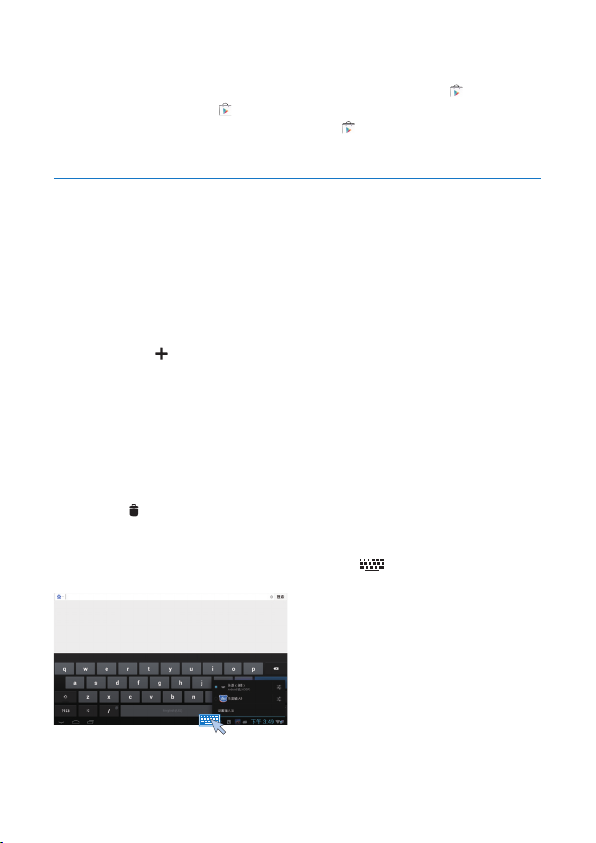
Enter text
• On the onscreen keyboard, use the remote control to select keys.
• For handwriting recognition, press and hold OK on the remote control to
drag the cursor and enter a character.
30 EN
Page 33

To delete the entry before the cursor,
• Select .
To move to the next line,
• Select .
CustomizetheHomescreen
To access functions quickly from the Home screen, you can rearrange the items.
Add app icons and widgets
1 On the Homes screen, swipe left/ right to select a page.
• Make sure that the page isn't lled.
2 Select Apps/ Widget to open the list of app icons and widgets.
3 Select and hold an icon or widget until the page is displayed.
» The icon or widget is added to the selected page.
31EN
Page 34

Delete items
1 Select and hold an item to unlock.
2 Drag the item to .
Relocate items
1 Select and hold an item to unlock.
2 Drag the item to a space on a page.
3 Release the item.
» The item moves to the space.
32 EN
Page 35

5 Play
On the HDTV, enjoy media play from
• the online ser vices;
• a mass storage device, including a USB mass storage device, or an SD/
SDHC card;
• a DLNA-compliant device on your home network, such as a PC or
Network Attached Storage (NAS) device.
Play from online services
Connect HMP8100 to the Internet. You can enjoy online services on the HDTV.
Install apps
On HMP8100, you can install apps from
• (Play Store) over the Internet; or
• other sources, such as
other online sources,
the internal storage of HMP8100, and
the USB storage device and SD/ SDHC card that you have mounted
Play Store
1 Log in to or create your Google account to access Google services.
onto HMP8100.
To add a Google account, do the following:
a Go to (Play Store). Tap > Accounts.
33EN
Page 36

b Select Add account.
c Follow onscreen instructions to add an account.
2 Search for apps as needed.
• Tap for keyword search.
3 Download the app:
• Tap the app. Conrm as needed.
» When the downloading is complete, installation starts automatically.
» Check the status bar to nd the status. If necessary, tap the icon to
start installation as prompted.
Tip
• To manage your accounts, go to Settings > ACCOUNTS. Tap an account to select your options.
Other sources
Allow the installation from unknown sources
• Go to Settings > Security. Switch on Unknown sources.
Download/ transfer the apps
• To download the apps from online sources, follow the onscreen
instructions;
• To transfer the apps from a PC, save the apps to an SD/ SDHC card.
Start installation
Then, mount the memory card onto HMP8100.
• The downloaded apps start installation automatically. Or, start
installation as prompted.
• To nd the apps on HMP8100 or the SD/ SDHC card, go to ES File
Explorer. Find the app and select the option to start installation.
Manage apps
You can manage apps on HMP8100 and the SD/ SDHC card, for example, install/
uninstall apps, stop running apps, or select other options.
1 On the Home screen, press on the remote control.
» The options menu is displayed.
2 Select Manage apps.
34 EN
Page 37

Wallpaper
Manage apps
Manage apps
Play movies from a mass storage device
Through the HDTV, play movies from a mass storage device that you connect to
HMP8100. The mass storage device can be:
• a USB mass storage device,
• an SD/ SDHC card.
1
2
System settings
1
2
HDMI
HDMI
1 Connect your mass storage device to HMP8100:
• For a USB mass storage device, connect to on HMP8100.
• Inser t an SD/ SDHC card to the SDHC slot.
2 Go to MoviePlayer. Then, select or .
3 Select a le to start play.
35EN
Page 38

Play media from a PC or NAS device (DLNA)
1 Make sure that you have connected HMP8100 PC to the same network as
the PC or Network Attached Storage (NAS) device.
• Make sure that the UPnP (Universal Play and Plug) function is enabled
on the router.
2 On the PC, launch the software of DLNA media server. Enable the media
sharing function.
3 On HMP8100 , select Media Center > Media Player.
• Find media les on the PC or NAS device.
4 Use the remote control to search for and play media les on HMP8100.
36 EN
Page 39

6 Use the device in corporate
networks
You can use HMP8100 in corporate networks. Install the secure credentials or
security certicates before you access corporate networks.
The access to corporate network may allow you to set up your Microsoft
Exchange account and add VPN on the device. With the Microsoft Exchange
account, you can access your exchange mailbox at work.
Install secure credentials
Ask your network administrator for secure credentials or security cer ticates.
To install the secure credentials,
1 Make sure that you transfer the les of secure credentials from a PC to the
SD/ SDHC card that you have mounted onto the device.
Note
• On HMP8100, make sure that the secure credentials are saved to the root directory of the SD/
SDHC card, instead of under a folder.
2 Install the secure credentials:
a Go to Settings > Security > Install from SD card.
b Selecttheletostartinstallation.
c Set the password and name for the credentials as prompted.
To apply the secure credentials,
1 In Settings, select Security > Trusted credentials.
2 Make sure that the credential is selected.
» On HMP8100, you allow the apps to use the secure credentials.
37EN
Page 40

Set up your Microsoft Exchange account
1 Go to Email.
2 Set up your email account:
• Enter the information about your account, and select Exchange as the
account type.
• If you have set up other email accounts, select > Settings on the
screen of mail list. Select Add account.
3 Follow the onscreen instructions to complete the setup.
• For the ser ver address, enter the web address for your Outlook web
access, for example, owa.company name.com or mail. company name.
com/owa.
• For other setup information, such as domain name, user name, check
with your system administrator.
Note
• The device can wor k with Microsft Exchange 2003 and 2007.
Add VPN
Virtual private network (VPN) allows you to connect to private networks through
secure access.
Sometimes, you need VPN access to connect to corporate networks.
To add VPN on the device
1 Ask your network administrator for the conguration information.
2 From the Home screen, go to Settings > WIRELESS & NETWORKS >
More > VPN.
3 Congure the VPN as prompted.
4 Install the secure credentials as needed.
To connect to the VPN,
1 Make sure that you have connected HMP8100 to the Internet.
38 EN
Page 41

2 Go to Settings > WIRELESS & NETWORKS > More.
» A list of VPNs is displayed.
3 Select the VPN to start connection.
39EN
Page 42

7 Settings
To select your settings,
1 At the base of the screen, click an icon of setup status. On the pop-up
screen, select .
• Alternatively, go to Settings from the Home screen; or
• On the Home screen, press on the remote control. Select System
settings from the options menu.
2 Use the remote control to select options.
WIRELESS & NETWORKS
Wi-Fi
In WIRELESS & NETWORKS > Wi-Fi, select your Wi-Fi settings on the device (see
'Set up the network' on page 14).
Network notication
Switch on Networknotication. At the base of the screen, is displayed when
an open Wi-Fi network is available.
1 In Wi-Fi, select ON to switch on.
2 At the top bar, select > Advanced > Networknotication.
Portable hotspot
HMP8100 can work as a Wi-Fi hotspot. Through HMP8100, you can have your
wireless devices connected to the Internet.
To connect to the Internet through HMP8100,
40 EN
Page 43

1 Connect HMP8100 to the Internet.
2 In Portable hotspot, select the checkbox to switch on Portable Wi-Fi
hotspot.
3 Go to Set up Wi-Fi hotspot to check and edit the network name (SSID)
and password.
4 On your wireless devices, search for and connect to HMP8100.
Ethernet
In WIRELESS & NETWORKS > Ethernet, select the settings for network setup
through an Ethernet cable (see 'Set up the network' on page 14).
DEVICE
Sound
In Sound, select sound settings for HMP8100.
Volume
• Select the volume level for media and notications.
Click sounds
• Select your click sounds on the screen.
Digital audio output
• If you use TV speakers for audio output, select PCM.
• If you use external amplier for decoding, select SPDIF passthrough or
Equalizer
HDMI passthrough.
• Select your equalizer options for the sound output.
• The function may not be supported by some apps that you install on
HMP8100.
Display
In Display, select your display settings:
Wallpaper
• Set the wallpaper of the device.
41EN
Page 44

Application request to change orientation
• Allow you to select whether to change the orientation of the display.
Sleep
• After the selected time duration, the screen switches off automatically.
Output mode
• Select the video resolution that your TV supports. See your TV manual
HDMI auto output mode
Display position
Fontsize
for details.
• Allow the output resolution to match the best resolution of your TV
automatically.
• Position the screen display as needed.
• Select font size for the onscreen display.
Storage
In Storage, learn the space information about the internal memory on your
HMP8100.
Apps
In Apps, manage the apps on HMP8100 and the SD/SDHC card. You can install/
uninstall applications, or select other options.
PERSONAL
Security
Device administrators
Apps in corporate networks require the rights of device administrator, such as the
email under your Microsoft Exchange account.
Before you uninstall such an application, disable the rights of device administrator.
• In Device administrators, select an app.
» The rights of device administrator are disabled.
42 EN
Page 45
» You cannot sync data for the application.
Unknown sources
On HMP8100, you can install applications that you download from (Play Store),
or from sources other than .
• For the apps from sources other than , select Unknown sources to
allow installation on HMP8100.
Language & input
Language
In Language, select the language for the onscreen instructions of HMP8100.
Personal dictionaries
In Personal dictionaries, add or remove words or phrases to/ from the user
dictionary. You can customize the word suggestions that are displayed on the popup screen during your text entry on the Android keyboard.
To add a word or phrase,
• Select to add a word or phrase.
To edit a word or phrase,
1 Select the word or phrase.
» A pop-up screen is displayed.
2 Edit the word or phrase.
To remove a word or phrase,
1 Select the word or phrase.
2 Select .
Keyboard & Input methods
In KEYBOARD & INPUT METHODS, select your input methods. To switch
between text input methods during text entry, click at the base of the screen.
Mouse/ Trackpad
43EN
Page 46

On HMP8100, you can install a wireless mouse. The wireless mouse can work as
the remote control.
In Pointer speed, set the speed for the pointer of the mouse.
uWand remote control
On your TV screen, calibrate the cursor of your uWand remote control.
reset
In reset > Factory data reset, you can erase all the data that you have stored on
the internal memory of HMP8100.
ACCOUNTS
In ACCOUNTS, add, remove, or manage an account.
Add account
• Select Add account to add an account.
• Select an account to manage the account, for example, remove the
account or select sync options.
SYSTEM
Date & time
Automatic setting
Over the Internet, you can sync the date and time on HMP8100 from the
network.
To switch on the automatic clock setting,
1 In Date & time, switch on Automatic date & time.
» If the function is enabled, the tick box is selected.
2 In Selecttimezone, select your current time zone.
3 In Use 24-hour format and Select date format, select your options for time
and date display.
44 EN
Page 47

Manual setting
1 In Date & time, switch off Automatic date & time.
» If the function is disabled, the tick box is deselected.
2 Select the date, time, and time zone in Set date, Set time, and Settimezone.
About MediaBox
In About MediaBox, learn the status and information about your HMP8100.
System updates
In System updates, check for the system updates of HMP8100. Make sure that you
have connected HMP8100 to the Internet.
Register your HMP8100 to access the rmware upgrades.
Register
1 Make sure that you have connected HMP8100 to the Internet.
2 To register HMP8100 with www.philips.com/welcome,
a Select System updates > Register.
b Enter your valid email address.
» You receive an email message from ConsumerCare@Philips.com.
c Use the Web page link in the email to complete registration.
To check registration information
You can check whether you have registered your HMP8100, whether you have
completed the registration, and what account you have used for registration.
• Select Register > Registration information.
To unregisterHMP8100
To use another email address as your account with www.philips.com/welcome, you
can unregister HMP8100.
1 Select Register > Unregister.
2 Conrm as prompted.
Upgrade
1 Make sure that you have connected HMP8100 to the Internet.
45EN
Page 48

2 Select System updates > Upgrade.
» The device starts to check for the rmware update.
» The rmware information is displayed.
3 Follow the onscreen instructions to download the rmware update to your
device.
» When the message "An update.zip is detected from your Device
Storage. Do you want to have this update?" is displayed, the
downloading is complete.
4 Select the option to start upgrading.
Note
• Dur ing the upgrading process, keep from operating HMP8100.
• Keep HMP8100 powered on before the rmware update is complete.
Status and information about the device
• In Status,IP address: Display the IP address that is assigned to HMP8100
when the device is connected a Wi-Fi network.
• Wi-Fi MAC address: Display the unique identier that is assigned to the
network adapter of HMP8100. If MAC address ltering is enabled on
your router, add the MAC address of HMP8100 to the list of devices
that are allowed to join the network.
• Serial number: Find the serial number of your HMP8100.
Legal information: Legal information for HMP8100
Model number: Model no. of the device
Android version:Firmware version of the Android platform that the deviceis
running on
Build number: Software version of HMP8100
46 EN
Page 49

8 Update the firmware
On HMP8100, you can update the rmware through Philips online services over
the Internet.
Connect HMP8100 to the Internet. You can receive notications about rmware
updates. Check notications at the base of the screen.
Alternatively, go to Settings > About Mediabox > Systemupdates to check for
rmware updates (see 'System updates' on page 45).
UpdatethermwarethroughtheSDcard
1 Remove the power plug from HMP8100.
2 On your computer, do the following:
a Go to www.philips.com/supporttondthelatestrmware.
b Search for your model and click on Software and drivers.
c Downloadandthen,unzipthermwareupdateles.
d SavetheunzippedlestotherootdirectoryofanSDcard.
3 On HMP8100, do the following:
a Mount the SD card.
b Connect HMP8100 to power.
» The rmware updating star ts automatically.
47EN
Page 50

9 Troubleshooting
Model No. & SN
If you contact Philips, you will be asked for the model and serial number of this
player. The model number and serial number are at the bottom of this player.
Write the numbers here:
Model No. __________________________
Serial No. ___________________________
No picture
• Refer to the TV user manual for how to select the correct video input
channel.
USB content cannot be read
• The format of this USB storage device is not supported.
• The supported memor y size is 1TB maximum.
• Make sure that this player supports these les. (Refer to "Specications" >
"Playable media").
HMP8100 does not respond to the pressing of keys
• Use the tip of a ball pen to press the RESET hole at the back of HMP8100.
48 EN
Page 51

RESET
The remote control cannot respond quickly to the pressing of keys
• Make sure that batteries have enough power. Insert two AAA batteries
(1,100 mA) into the remote control (see 'Install batteries into the remote
control' on page 20).
The new remote control does not work with the player
• For the remote control that is by-packed with HMP8100,the pairing
has been completed in the factory. To use a new remote control with
HMP8100,press and to complete the pairing between the remote
control and HMP8100.
Thermwareupdatingisnotcompleteafteralong
time
• If you update the rmware over the online service, it may take a long time
to download the rmware update les from the server. To save your time,
update the rmware through the SD card (see 'Update the rmware
through the SD card' on page 47).
49EN
Page 52

HMP8100hangsduringrmwareupdating
• If power is disconnected during rmware updating, HMP8100 hangs.
• Do the following to restart the rmware updating:
1 Remove the power plug from HMP8100.
2 On your computer, do the following:
a Go to www.philips.com/supporttondthelatestrmware.
b Search for your model and click on "Software and drivers".
c Downloadandthen,unzipthermwareupdatele.
d SavetheunzippedlestotherootdirectoryofanSDcard.
3 On HMP8100, do the following:
a Mount the SD card.
b Connect HMP8100 to power.
» The rmware updating star ts automatically.
50 EN
Page 53

10 Specification
Note
• Specication and design are subject to change without notice .
AC power adapter
• Philips ASSA36E-050250
Input: 100-240 V~ 50/60 Hz, 0.6 A
USB connector
Supported formats:
HDD & USB support
Video
Audio
Main Unit
Output: DC 5.0 V, 2.5 A
• Output: DC 5 V, 500 mA
• Video: MPEG 1/2/4(MPEG 4 Part 2), H.263, H.264/AVC, RealVideo
(RV30, RV40 codec), RMVB/RM/RV, VP8, VC-1, 3GP,AVI, MKV, MP4/M4V,
MPG/MPEG, TS, DAT
• Audio: Dolby digital, DTS, AAC/M4A, AMR-NB, AMR-WB, FLAC, HE-
AAC V1, V2, MIDI, MP3, OGG Vorbis, PCM (WAV audio les), ADPCM
(Advanced Differential PCM), LPCM (Linear PCM), OGG .mid/.xmf/.
mxmf/.rtttl/.r tx/.ota/.imy, RA, WAV
• Picture: BMP, JPEG, JPEG Progressive,PNG, TIFF, WEBP
• MP3 ID3 tag
• Compatibility: Hi-Speed USB (2.0)
• NTFS, FAT32, FAT16
• USB MSC suppor t
• HDMI output: 480i, 480p, 576i, 576p, 720p, 720p/24, 1080i, 1080p,
1080p/24
• HDMI output
• Optical output
• Analog stereo output
• Signal to noise ratio (1 kHz): > 90 dB (A-weighted)
• Dynamic Range (1 kHz): > 80 dB (A-weighted)
• Frequency response: +/-0.2 dB
51EN
Page 54

• Dimensions (L x W x H): 191.8 x 148.2 x 35.6 mm
• Net Weight: 0.265 Kg
52 EN
Page 55

Page 56

Specicationsaresubjecttochangewithoutnotice
2014 © WOOX Innovations Limited. All rights reserved.
Philips and the Philips’ Shield Emblem are registered
trademarksofKoninklijkePhilipsN.V.andareused
by WOOX Innovations Limited under license from
KoninklijkePhilipsN.V.
HMP8100_98_UM_V2.0
wk1443.3
 Loading...