

Philips HearLink 7020, HL 7020 BTE SP, HEB7021, HearLink 3020, HL 3020 BTE SP User Manual
...
HearLink
BTE SP, BTE UP
HearLink
Behind-the-Ear
Hearing Aids
Behind-the-Ear
Hearing Aids
BTE SP, BTE UP
User Guide
1


Model overview
This booklet is valid for the following hearing aid
family and models:
HearLink BTE SP (Super Power)
HearLink 7020 – HL 7020 BTE SP
GTIN: (01)05714464003051
(HEB7021)
HearLink 3020 – HL 3020 BTE SP
GTIN: (01)05714464003068
(HEB3021)
HearLink BTE UP (Ultra Power)
HearLink 7020 – HL 7020 BTE UP
GTIN: (01)05714464003051
(HEB7022)
HearLink 3020 – HL 3020 BTE UP
GTIN: (01)05714464003068
(HEB3022)
Battery size
BTE SP: 13
BTE UP: 675
The LED light is used to help caregivers, parents
and teachers to operate the hearing aid and to
give instructions on relevant functions and modes
(see relevant information throughout the booklet).
3

Introduction to this booklet
This booklet shows you how to use and maintain
your new hearing aid. Please read the booklet
carefully including the warning section. This will
help you to get the most out of your new hearing
aid.
Your hearing care professional has adjusted
the hearing aid to meet your needs. If you have
further questions, please contact your hearing
care professional.
The illustrations shown in this booklet are in
most cases the BTE SP, due to the fact that both
hearing aid models are handled the same way.
More information is available on
hearingsolutions.philips.com
For your convenience, this booklet contains a
navigation bar to help you easily navigate through
the dierent sections.
Your hearing aid
Start-up
Handling
Options
Warnings
More info
Settings
Warranty
4

Intended use
The hearing aid is intended to amplify and
transmit sound to the ear, and thereby
compensate for impaired hearing within
moderate-to-severe to profound hearing loss.
The hearing aid is intended to be used by adults,
children and infants.
Important notice
The hearing aid amplication is uniquely
adjusted and optimized to your hearing
capabilities during the hearing aid tting
performed by your hearing care professional.
5

Table of contents
Your hearing aid
Identify your hearing aid 9
Your hearing aid − What it is, what it does 10
Identify left and right hearing aid 11
Battery (size 13 or 675) 12
MultiTool for handling batteries and cleaning 13
Start-up
Turn the hearing aid ON and OFF 14
When to replace a battery 15
Replace the battery 16
Handling
Put on the hearing aid 18
Caring for your hearing aid 19
Flight mode 22
Options
Optional features and accessories 23
Change volume 24
Change program 25
Mute the hearing aid 26
Using hearing aid with iPhone and iPad 27
6

Pair with iPhone 28
Wireless accessories 31
Other options 32
Tamper-resistant battery drawer 34
Warnings
General warnings 36
More info
Troubleshooting guide 44
Water & dust resistance (IP68) 46
Conditions of use 47
Technical information 48
Settings
Your individual hearing aid settings 54
Your settings at a glance 57
Warranty
Warranty 58
7

8
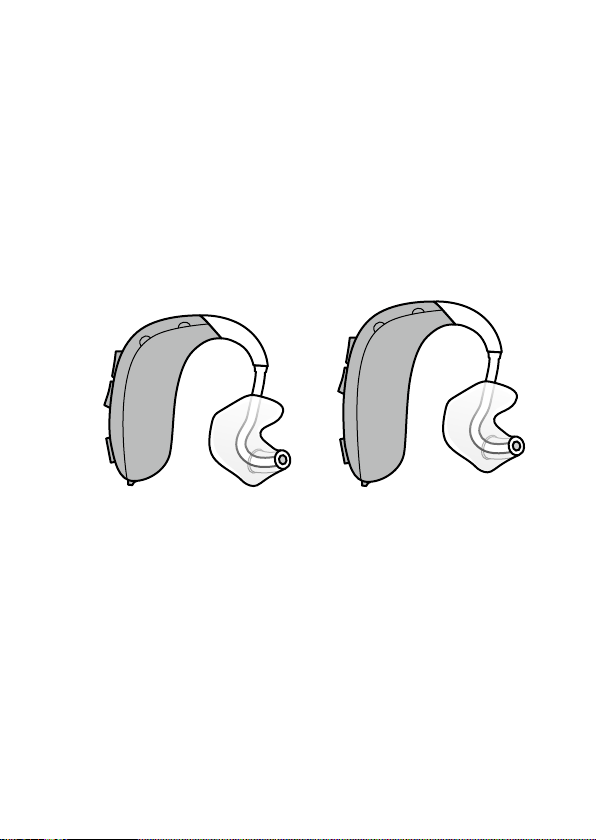
Identify your hearing aid
This booklet covers both BTE SP and BTE UP.
BTE SP with earhook
and mold
BTE UP with earhook and
mold
Your hearing aid
9
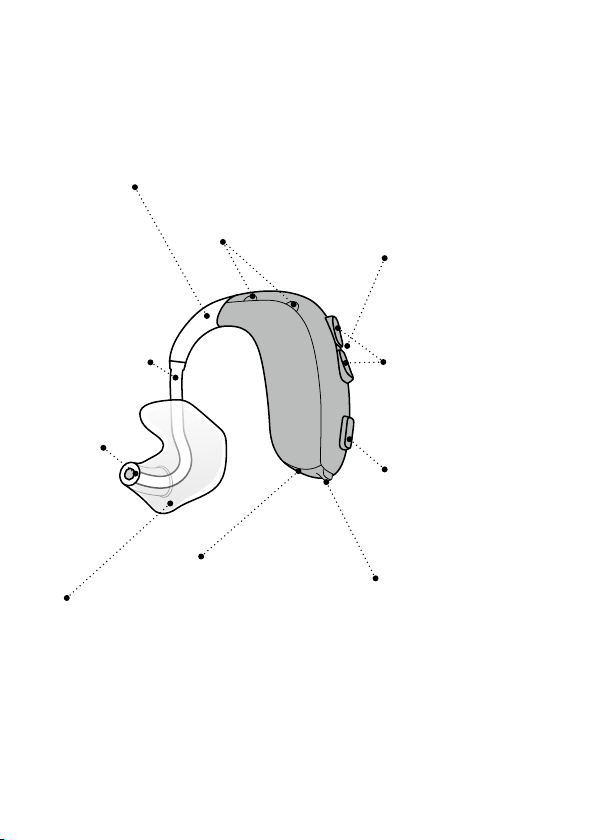
Your hearing aid − What it is, what it does
Earhook
Tube
Brings sound
into the ear
Sound out
Mold
Holds the
hearing aid
in the ear
Microphone openings
Sound in
Battery drawer
Direct Audio Input
(with an optional
DAI/FM adapter)
Contains the
battery and
functions as an on/
o switch
LED (optional)
Program,
volume and
battery status
Double Program
Button
Change volume
and mute
Program Button
Change
programs and
ight mode
Nail grip
Open the
battery drawer
Your hearing aid
10
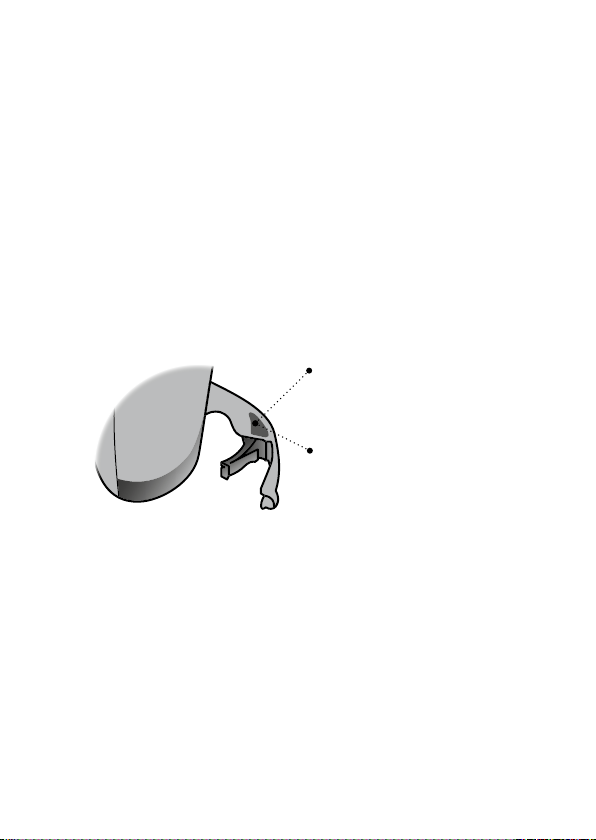
Identify left and right hearing aid
It is important to distinguish between the left
and the right hearing aid as they might be
programmed dierently. You can nd left/right
color indicators in the battery drawer. Indicators
may also be found on the molds.
Only BTE SP battery drawer is shown in this
booklet.
A BLUE indicator marks the
LEFT hearing aid
A RED indicator marks the
RIGHT hearing aid
Your hearing aid
11
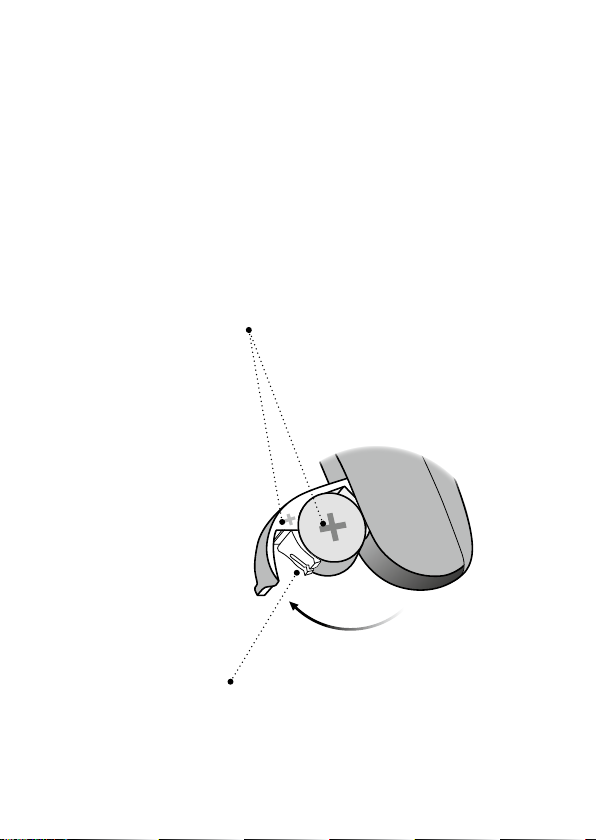
Battery (size 13 or 675)
Your hearing aid is a miniature electronic device
that runs on special batteries. To activate the
hearing aid, you must insert a new battery in
the battery drawer. See how in the “Replace the
battery” section.
Make sure the
plus is visible
Pull out to open
Battery drawer
Your hearing aid
12

MultiTool for handling batteries and cleaning
The MultiTool contains a magnet which makes it
easier to replace the battery in the hearing aid. It
also contains a brush and a wire loop for cleaning
and removing ear wax from your mold. If you need
a new MultiTool, please contact your hearing care
professional.
Magnet
Brush
Important notice
The MultiTool has a built-in magnet. Keep the
MultiTool at least 30 cm (12 in) away from credit
cards and other magnetically sensitive devices.
Wire loop
Your hearing aid
13
Turn the hearing aid ON and OFF
The battery drawer is used to switch the hearing
aid on and o. To save battery life, make sure
your hearing aid is switched o when you are not
wearing it.
If you wish to return to the standard settings
of the hearing aid, simply open and close the
battery drawer (quick reset).
Turn ON
Close the battery drawer
with the battery in place.
Pairing mode
To pair your hearing aid with a wireless accessory,
you must open and close the battery drawer. The
hearing aid will remain in pairing mode for three
minutes.
Optional LED
Two long green blinks indicate that the hearing
aid is turned on.
Start-up
14
Turn OFF
Open the battery drawer.

When to replace a battery
When it is time to replace the battery, you will
hear three beeps repeated at moderate intervals
until the battery runs out.
Three beeps*
= The battery is
running low
Four beeps
= The battery has
run out
Battery tip
To make sure the hearing aid is always working,
bring spare batteries with you, or replace the
battery before you leave home.
Optional LED
Red blinks, continuously repeated, indicate that
the battery is low.
*
Bluetooth® will be shut down and it will not be possible to use
wireless accessories.
The batteries need to be replaced more often if you are
streaming audio or music to your hearing aid.
Start-up
15

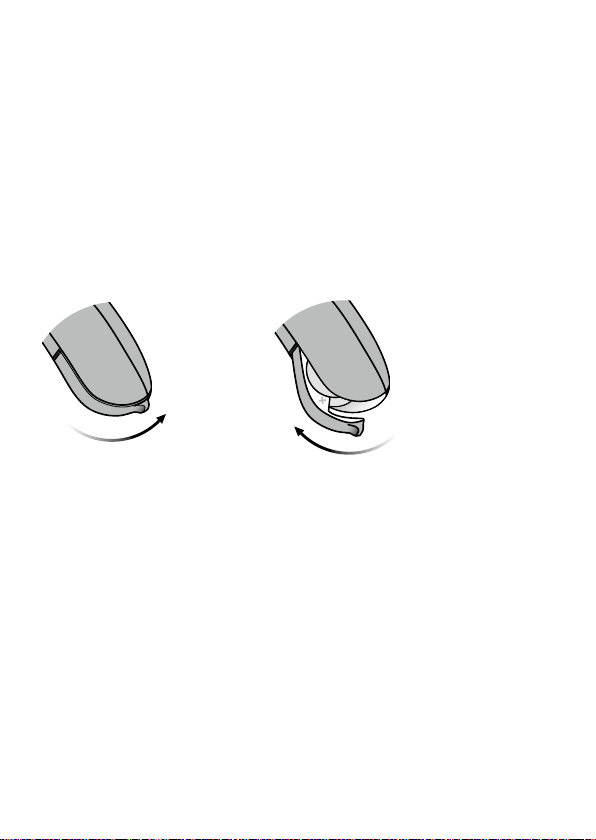
Replace the battery
1. Remove
Fully open the battery drawer.
Remove the battery.
2. Uncover
Remove the sticky label from the +
side of the new battery.
Tip:
Wait two minutes so that the
battery can draw air, to ensure
optimal function.
3. Insert
Insert the new battery into the
battery drawer with the
+ side facing upwards.
Start-up
16
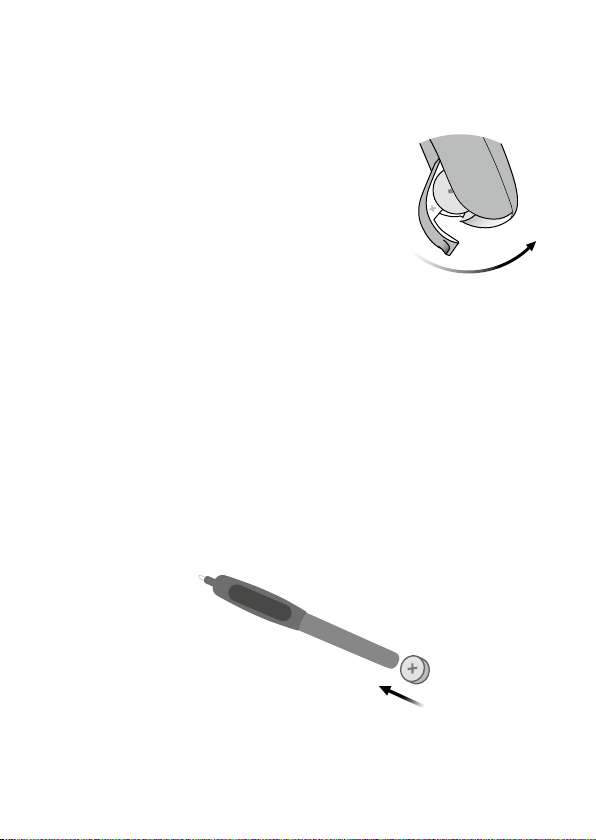
4. Close
Close the battery drawer. The
hearing aid may play a jingle
through the mold. Hold the
mold close to your ear to hear
the jingle.
Tip
The MultiTool can be used for battery change.
Use the magnetic end to remove and insert batteries.
The MultiTool is provided by your hearing care
professional.
Start-up
17
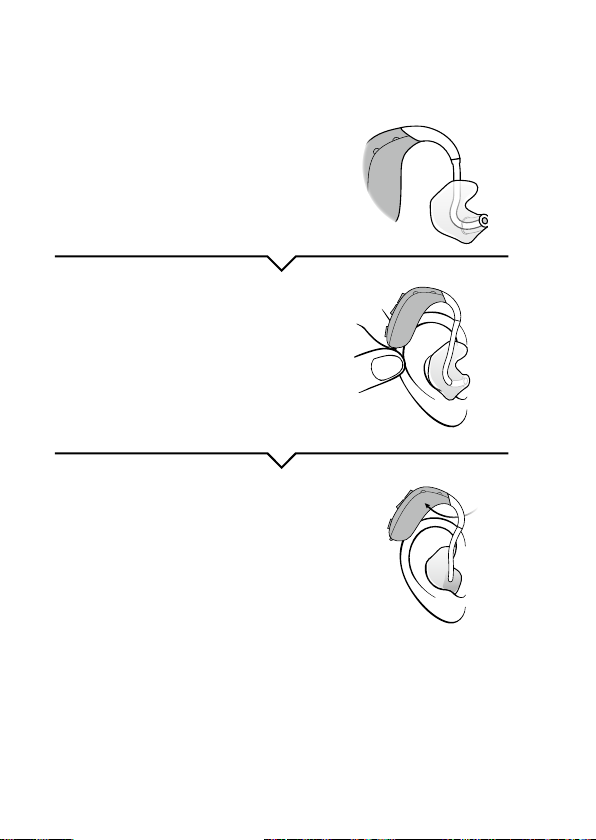
Put on the hearing aid
The mold is customized for you
and ts your ear shape. The molds
are unique to the left or the right
ear.
Step 1
Gently pull your ear outwards and
press the mold in the direction of
the ear canal, twisting it slightly.
Step 2
Place the hearing aid behind your
ear.
18
Handling
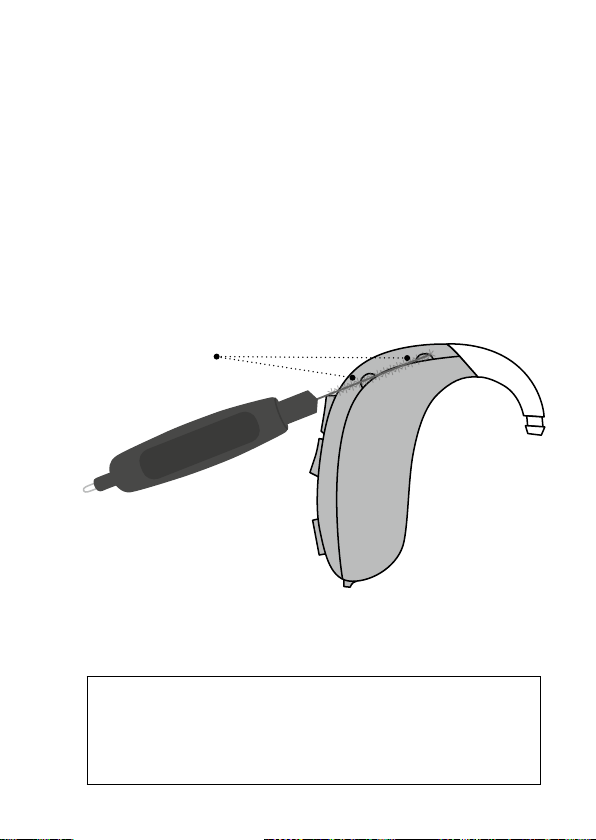
Caring for your hearing aid
When handling your hearing aid, hold it over a
soft surface to avoid damage if you drop it.
Clean the microphone openings
Carefully brush away debris from the openings
using a clean brush. Gently brush the surface
and make sure the brush is not pressed into the
openings.
Microphone
openings
Important notice
Use a soft, dry cloth to clean the hearing aid. It
must never be washed or immersed in water or
other liquids.
Handling
19
 Loading...