

Page 1

Toaster HL5885
Page 2

Page 3

ENGLISH 4
DEUTSCH 12
FRANÇAIS 21
HL5885
3
Page 4

Important
◗ Read these directions for use carefully before
using the appliance and save them for future
reference.
◗ Use the appliance only for its intended
purpose as described in this manual.
◗ Check if the voltage indicated on the bottom
of the appliance corresponds to the mains
voltage in your home before you connect the
appliance.
◗ Connect the appliance to an earthed wall
socket.
◗ Position the appliance in such a way that:
- the mains cord does not hang over the edge
of the table or worktop;
- it is standing on a flat surface with sufficient
free space around it;
- it is out of the reach of children
◗ Never operate the appliance on a non-heat-
resistant or flammable surface.
◗ Do not place the appliance on or near a hot
ring of a gas cooker,a hot element of an
electric cooker or a heated oven.
◗ Bread may burn.Do not use the toaster near
or below curtains or other combustible
materials.
◗ Make sure that the mains cord is not too
close to and particularly not in contact with
the hot surface of the appliance.
◗ Do not use foods with coatings or fillings that
may start to drip when heated up.
Accumulation of food particles or juices in the
toaster can cause an unhealthy situation and
can lead to malfunctioning and even burning
of the appliance.
ENGLISH4
Page 5

◗ Do not insert foil-covered or oversized foods
into the toaster.
◗ Never let the appliance operate unattended.
◗ Avoid touching the slots of the toaster,as
they become very hot.
◗ Do not put you fingers in the slots of the
toaster.
◗ Unplug the appliance immediately after use.
◗ Always clean the appliance after use.Unplug
the appliance and let it cool down before you
start cleaning it.
◗ Never immerse the toaster in water.You can
clean it by wiping it with a moist cloth.
◗ Prevent water or other liquids from running
into the appliance.
◗ Clean out accumulated crumbs frequently to
avoid the risk of fire or malfunctioning of the
toaster.
◗ Never insert sharp or abrasive objects into
the slots,as this will cause damage.
◗ Do not use the appliance if the mains cord is
damaged or after the appliance has been
dropped or damaged in any way.If damage is
suspected,the appliance is to be examined by
Philips or by a service centre authorised by
Philips,as special tools and/or parts are
required.
◗ Do not use accessories that are not
recommended by the manufacturer.
Before you start using the appliance
1 Remove any stickers and wipe the body of
the toaster with a moist cloth.
ENGLISH 5
Page 6
2 Make sure that the toasting lever is in
raised position when you put the plug in
the wall socket.
3 Let the toaster complete the first toasting
cycle without slices of bread in it at the
highest toasting setting to preheat the new
elements and to burn away any dust that
may have accumulated in the toaster
during storage.Let the toasting cycle take
place in a ventilated room to prevent any
unpleasant smells produced by appliance
from accumulating in the room.
Using the appliance
C
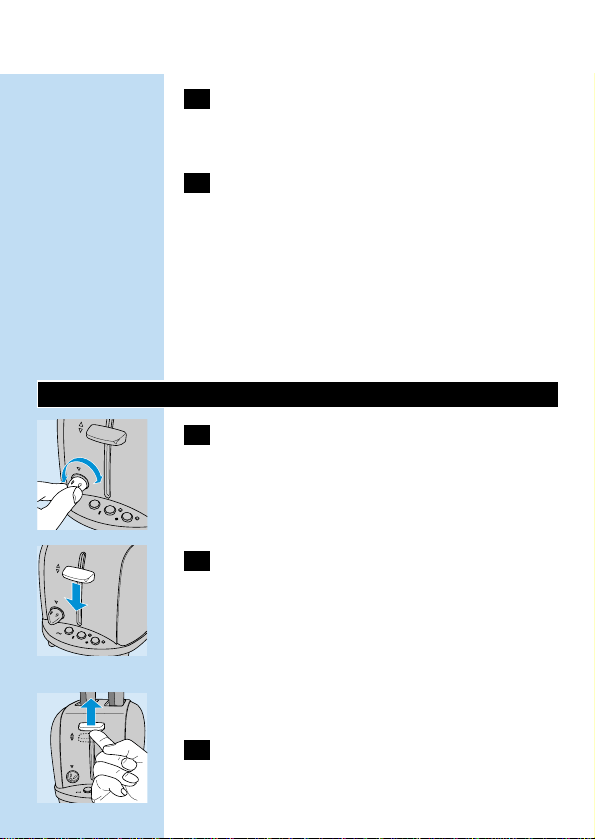
1 Select the desired browning setting (1-7)
by means of the Electronic Browning
Control.The required setting depends on
the thickness and moisture content of the
bread.
C
2 After having selected the desired browning
setting,place the bread in the slots and
press the toasting lever down until it locks.
NB:the toasting lever will not lock in downward
position when the Electronic Browning Control is
in position 'O' (OFF).This will prevent the
appliance from being accidentally switched on if
children should pull at the lever.
C
3 When the bread has reached the selected
browning degree,the slices will pop up
automatically and are ready for removal
ENGLISH6
3
4
2
1
STOP
3
4
2
1
Page 7

from the slots.If the slices are difficult to
remove safely,you can lift the Safety-Lift
toasting lever a little further.This will raise
the bread carriage another 16 mm to
allow you to safely remove small pieces of
toast.
4 If the toast gets stuck in the slots,the
automatic safety cut-out will switch the
heating elements off after the bread has
reached the desired browning degree.
Unplug the appliance and wait until the toaster
has cooled down before removing slices that have
got stuck in the toaster.
5 Remove the plug from the wall socket.
C
6 Let the appliance cool down,roll up the
mains cord and store the appliance.
DO NOT WRAP THE MAINS CORD AROUND
THE BODY OF THE APPLIANCE DURING OR
AFTER USE.
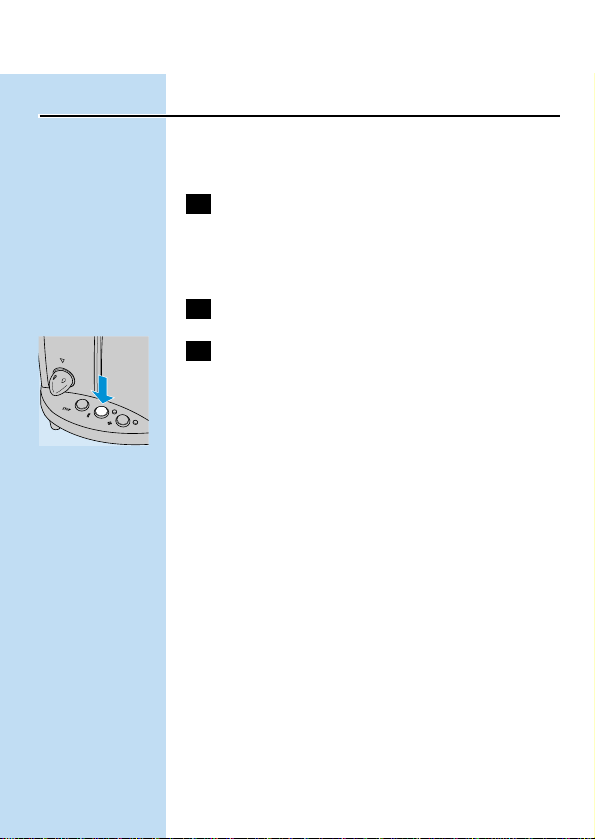
Cancel button
C
1 When the toasting cycle has been
completed,the bread carriage will be
raised.If you wish to interrupt the toasting
process,simply press the Cancel button.
ENGLISH 7
3
4
2
1
Page 8

Defrost button
The Defrost function allows you to defrost and
toast slices of bread in one go.This results in a
slightly longer toasting cycle.
1 Insert one or more slices of bread into the
toaster. Make sure that the slices do not
overlap and that the bread carriage is in
raised position.
2 Set the browning control to the desired
position:
- Setting 1-2:for toasting frozen slices of bread
and thinner frozen items such as pancakes.
- Setting 3-4:for toasting frozen pastries, frozen
waffles,(thin) French bread and frozen bagels.
- Setting 5-6:thicker frozen items such as bagels,
hand-cut bread and thick French bread.
3 Press the toasting lever down until it locks.
C
4 Press the Defrost button
When the defrosting and toasting cycle has been
completed,the toaster will raise the bread.If you
wish to interrupt the defrosting and toasting
process before it is finished,simply press the
Cancel button.
Unplug the appliance after use.
ENGLISH8
3
4
2
1
Page 9
Reheat button
The Reheat function allows you to reheat bread
without browning it.
1 Insert one or more slices of bread into the
toaster. Make sure that the slices do not
overlap and that the bread carriage is in
raised position.
2 Press the toasting lever down until it locks.
C
3 Press the Reheat button.
When the Reheat cycle has been completed,the
toaster will raise the bread. If you wish to
interrupt the reheat cycle before it is finished,
simply press the Cancel button.
- Tips:
- In order to achieve a uniform browning result,
we advise you to wait at least 30 seconds
between toasting cycles to allow the browning
control to automatically reset itself.
- Stale bread toasts more rapidly than fresh
bread.When toasting stale bread,select a lower
browning setting than you would normally use.
- When toasting two slices,it is recommended to
use slices that are the same size and that are
equally fresh.
- When toasting a single slice of bread,set the
browning control to a lower setting than you
would normally use.The toaster will heat the
entire toasting chamber, even when you have
ENGLISH 9
3
4
2
1
Page 10

inserted only a single slice.By selecting a lower
browning setting,you will prevent the slice from
being overtoasted.
Cleaning
Switch the toaster off,remove the plug from the
wall socket and let the toaster cool down before
you start cleaning it.
Wipe the outside of the toaster with a moist
cloth and dry it with another cloth or a paper
towel.
DO NOT USE ABRASIVES TO CLEAN THE
TOASTER.
To avoid damage to the heating elements,do not
use any pointed or sharp objects to clean the
inside of the toaster.
C
1 Crumbs will accumulate in the crumb tray
and could catch fire if the crumb tray is
not emptied periodically.When the toaster
has cooled down completely, tap the sides
of the toaster lightly to dislodge any
crumbs caught in the toasting chamber and
pull out the crumb tray.
Empty the tray and push it back into the toaster.
DO NOT HOLD THE APPLIANCE UPSIDE
DOWN T O REMOVE THE CRUMBS.
ENGLISH10
Page 11

Information & service
If you need information or if you have a problem,
please visit the Philips Web site at
www.philips.com or contact the Philips Customer
Care Centre in your country (you will find its
phone number in the worldwide guarantee
leaflet).If there is no Customer Care Centre in
your country,turn to your local Philips dealer or
contact the Service Department of Philips
Domestic Appliances and Personal Care BV.
ENGLISH 11
Page 12

Wichtig
◗ Lesen Sie diese Gebrauchsanweisung
sorgfältig durch,und sehen Sie sich dabei die
Abbildungen an,bevor Sie das Gerät zum
ersten Mal benutzen.
◗ Verwenden Sie das Gerät ausschließlich zu
dem in dieser Gebrauchsanweisung
beschriebenen Zweck.
◗ Prüfen Sie,bevor Sie das Gerät anschließen,
ob die Spannungsangabe auf der Unterseite
des Geräts mit der örtlichen Netzspannung
übereinstimmt.
◗ Schließen Sie das Gerät nur an eine
Schukosteckdose an.
◗ Stellen Sie das Gerät so auf,dass:
- das Netzkabel nicht über die Arbeitsfläche
hinabhängt;
- auf einer ebenen Fläche,von genügend
freiem Raum umgeben;
- außer Reichweite von Kindern steht.
◗ Betreiben Sie das Gerät niemals auf einer
Fläche,die Feuer fangen könnte oder nicht
hitzebeständig ist.
◗ Stellen Sie das Gerät niemals auf oder neben
den heißen Brenner eines Gaskochers oder
eine Herdplatte.
◗ Brot kann in Brand geraten.Verwenden Sie
das Gerät deshalb nicht unter Vorhängen oder
anderem brennbaren Material.
◗ Achten Sie darauf,dass das Netzkabel die
heißen Flächen Geräts nicht berührt oder
ihnen zu nahe kommt.
◗ Geben Sie keine bestrichenen oder gefüllten
Nahrungsmittel in das Gerät,die beim
DEUTSCH12
Page 13

Erhitzen schmelzen und tropfen könnten.
Ansammlungen von Nahrungsmittelresten im
Toaster können die Gesundheit und die
Funktion des Geräts beeinträchtigen und
unter Umständen in Brand geraten.
◗ Füllen Sie das Gerät nicht mit
Nahrungsmitteln in Folien oder mit
übergroßen oder zu dicken Scheiben.
◗ Lassen Sie das eingeschaltete Gerät niemals
unbeaufsichtigt.
◗ Berühren Sie niemals die Schlitze des Toasters;
sie werden sehr heiß.
◗ Stecken Sie niemals Ihre Finger in einen
Schlitz des Toasters; auch wenn er außer
Betrieb ist!
◗ Ziehen Sie unmittelbar nach Gebrauch den
Netzstecker aus der Steckdose.
◗ Reinigen Sie das Gerät nach jedem Gebrauch.
Ziehen Sie zuvor den Netzstecker aus der
Steckdose und lassen Sie das Gerät abkühlen.
◗ Tauchen Sie das Gerät niemals in Wasser. Sie
können die Außenwände mit einem feuchten
Tuch abwischen,auf das Sie bei Bedarf etwas
Spülmittel aufgetragen haben.
◗ Achten Sie drauf,dass kein Wasser oder
andere Flüssigkeiten in das Gerät gelangen
können.
◗ Entfernen Sie regelmäßig die angesammelten
Brotkrümel,um zu vermeiden,dass sie in
Brand geraten oder die Funktion des Geräts
beeinträchtigen.
◗ Führen Sie niemals scharfe oder kratzende
Gegenstände in das Gerät ein;das könnte
Schäden verursachen.
DEUTSCH 13
Page 14

◗ Wenn das Netzkabel defekt oder beschädigt
ist,wenn das Gerät hingefallen oder auf
andere Weise beschädigt sein könnte,darf es
nicht mehr benutzt werden.Das Gerät ist
dann von einer durch Philips autorisierten
Werkstatt zu überprüfen, da für eine
Reparatur Spezial-Werkzeug und/oder
spezielle Teile benötigt werden.
◗ Verwenden Sie in Verbindung mit diesem
Gerät keine zusätzlichen Teile und Aufsätze,
die nicht ausdrücklich von Philips empfohlen
sind.
Vor dem ersten Gebrauch
1 Entfernen Sie alle Aufkleber,und wischen
Sie die Außenwände des Toasters mit
einem feuchten Tuch sauber.
2 Achten Sie darauf,dass sich der
Schiebeschalter in der obersten Position
befindet,wenn Sie den Netzstecker in die
Steckdose stecken.
3 Stellen Sie vor dem ersten Gebrauch den
Bräunungsregler auf die höchste Position
und schalten Sie das Gerät am
Schiebeschalter ein,ohne Brotscheiben
einzulegen.Auf diese Weise werden die
Heizelemente aufgeheizt,und alle
Staubpartikel verbrannt,die sich
möglicherweise bei der Lagerung im Gerät
angesammelt haben.
DEUTSCH14
Page 15

Suchen Sie hierzu einen gut gelüfteten
Raum auf,damit sich gfs. keine
unangenehmen Gerüche verbreiten.
Der Gebrauch des Geräts
C
1 Stellen Sie den Bräunungsregler auf den
gewünschten Bräunungsgrad ( 1 bis 7).Die
erforderliche Einstellung ist von der Dicke
der Scheibe und ihrem Feuchtigkeitsgehalt
abhängig.
C
2 Geben Sie dann das Brot in die Schlitze
des Toasters, und drücken Sie den
Schiebeschalter hinunter bis er einrastet.
Hinweis:Der Schiebeschalter rastet nicht ein,
wenn der Bräunungsregler auf der Position 0
steht.Durch diese Maßnahme wird verhindert,
dass das Gerät zum Beispiel durch Kinder
unbeabsichtigt eingeschaltet wird.
C
3 Wenn der Toast fertig ist,springt der
Toastträger hoch,und das Gerät wird
ausgeschaltet.Bei Bedarf kann der
Schiebeschalter weiter angehoben werden.
Der Toastträger wird dabei um zusätzliche
16 mm angehoben,und kleine Scheiben
lassen sich dann leicht und sicher
entnehmen.
4 Wenn sich der Toast in den Schlitzen
verfängt,wird das Gerät automatisch
ausgeschaltet,sobald der eingestellte
Bräunungsgrad erreicht ist.
DEUTSCH 15
3
4
2
1
STOP
3
4
2
1
Page 16

Ziehen Sie den Netzstecker aus der Steckdose,
und warten Sie,bis das Gerät ausreichend
abgekühlt ist,bevor Sie die eingeklemmten
Scheiben entfernen.
5 Ziehen Sie den Netzstecker aus der
Steckdose.
C
6 Lassen Sie das Gerät abkühlen,rollen Sie
das Netzkabel auf,und stellen Sie das
Gerät fort.
Rollen Sie das Netzkabel niemals rund um das
Gerät,wenn der Toaster in Betrieb oder wenn er
nach Gebrauch noch heiss ist.
Unterbrechertaste
C
1 Nach Ablauf des Toastvorgangs springt der
Toastträger in die obere Position zurück.
Drücken Sie die Unterbrechertaste,wenn
Sie den Toastvorgang vorzeitig beenden
wollen.
Entfrostertaste
Mit Hilfe der Entfrostertaste lassen sich
eingefrorene Brotscheiben in einem Arbeitsgang
toasten.Der Toastvorgang dauert dann etwas
länger.
DEUTSCH16
3
4
2
1
Page 17

1 Geben Sie eine oder mehrere Scheiben
Brot in den Toaster.Achten Sie darauf,dass
sich die Scheiben nicht überlappen und
derToastträger sich in der oberen Position
befindet.
2 Stellen Sie den Bräunungsschalter auf die
gewünschte Position:
- Position 1 und 2 für eingefrorene Brotscheiben
sowie dünneres Toastgut, z.B.dünne
Pfannkuchen.
- Position 3 und 4 für eingefrorene Kuchen,
Waffeln,Baguette-Scheiben, aufgeschnittene
Brötchen usw.
- Position 5 und 6 für dickere Scheiben.
3 Drücken Sie den Schiebeschalter hinunter
bis er einrastet.
C
4 Drücken Sie die Entfrostertaste.
Nach Ablauf des verlängerten Toastvorgangs
springt der Toastträger in die obere Position
zurück.Drücken Sie die Unterbrechertaste, wenn
Sie den Vorgang vorzeitig beenden wollen.
Ziehen Sie nach Gebrauch den Netzstecker aus
der Steckdose.
Aufwärmtaste
Mit Hilfe der Aufwärmtaste können Sie Brot
aufwärmen, ohne es zu bräunen.
DEUTSCH 17
3
4
2
1
Page 18

1 Geben Sie eine oder mehrere Scheiben
Brot in den Toaster.Achten Sie darauf,dass
sich die Scheiben nicht überlappen und
derToastträger sich in der oberen Position
befindet.
2 Drücken Sie den Schiebeschalter hinunter
bis er einrastet.
C
3 Drücken Sie dann die Aufwärmtaste.
Nach Ablauf des Aufwärmvorgangs springt der
Toastträger in die obere Position zurück.Drücken
Sie die Unterbrechertaste,wenn Sie den Vorgang
vorzeitig beenden wollen.
- Hinweise:
- Wenn Sie weiteres Toastgut bräunen wollen, so
empfehlen wir Ihnen,30 Sekunden zu warten,
bis sich die automatische Bräunungskontrolle
zurückgestellt hat.
- Abgelagertes Brot bräunt schneller als frisches
Brot.Wählen Sie darum,wenn Sie abgelagertes
Brot bräunen wollen,eine niedrigere Position
als bei frischem Brot.
- Wenn Sie zwei Scheiben zugleich toasten
wollen,so empfehlen wir Ihnen, Scheiben
gleicher Dicke und gleichen Frischegrads zu
verwenden.
- Wenn Sie eine einzelne Scheibe toasten wollen,
so stellen Sie den Bräunungsschalter auf eine
niedrigere Position.
DEUTSCH18
3
4
2
1
Page 19

Das Gerät heizt die gesamte Toastkammer auf,
auch wenn Sie nur eine Scheibe hineingeben.
Durch die Wahl einer niedrigeren Position
vermeiden Sie eine zu starke Bräunung.
Reinigung
Schalten Sie das Gerät aus,ziehen Sie den Stecker
aus der Steckdose und lassen Sie das Gerät
abkühlen,bevor Sie mit der Reinigung beginnen.
Wischen Sie die Außenwände mit einem feuchten
Tuch ab, auf das Sie bei Bedarf ein wenig
Spülmittel auftragen können.Trocknen Sie das
Gerät mit Haushaltspapier oder einem
Papiertaschentuch ab.
VERWENDEN SIE ZUM REINIGEN KEINE
SCHEUERMITTEL.
Führen Sie keine scharfen oder spitzen
Gegenstände in den Toaster ein, damit die
Heizelemente nicht beschädigt werden.
C
1 Brotkrümel werden in der
Krümelschublade aufgefangen.Leeren Sie
die Krümelschublade regelmäßig,damit die
Krümel nicht in Brand geraten.Stoßen Sie
die Seiten des Geräts,nachdem es
abgekühlt ist,leicht auf eine Unterlage, um
Krümel die sich in der Toastkammer
verfangen haben zu lösen,und nehmen Sie
dann die Krümelschublade zum Entleeren
heraus.
DEUTSCH 19
Page 20

Setzen Sie die gesäuberte Krümelschublade in das
Gerät zurück.
HALTEN SIE DAS GERÄT NIEMALS KOPFÜBER
UM DIE KRÜMEL ZU ENFERNEN.
Garantie und Service
Weitere Informationen erhalten Sie im Internet
unter www.philips.com.Wenden Sie sich mit Ihren
Problemen,Fragen und Wünschen gegebenenfalls
an das Philips Service Center in Ihrem Lande.Ist
in Ihrem Land kein Philips Service Center
vorhanden,so wenden Sie sich an das Service
Department von Philips Domestic Appliances and
Personal Care B.V.Die Telefonnummern
entnehmen Sie bitte der beiliegenden
Garantieschrift.
DEUTSCH20
Page 21

Important
◗ Lisez attentivement le mode d'emploi en
regardant les illustrations avant d'utiliser
l'appareil.
◗ Le grille-pain est destiné à un usage
domestique uniquement comme il est décrit
dans ce mode d'emploi.
◗ Avant de brancher l'appareil,vérifiez que la
tension indiquée au dos du l'appareil
correspond à la tension du réseau.
◗ Branchez l'appareil sur une prise murale
équipée d'une mise à la terre.
◗ Placez l'appareil de telle manière que:
- le cordon d'alimentation ne pende pas du
plan de travail;
- l'appareil soit placé sur une surface plate,
stable et avec suffisamment d'espace autour;
- hors de portée des enfants.
◗ L'appareil doit être utilisé sur une surface
résistante à la chaleur.
◗ Ne placez pas l'appareil sur ou près d'un
brûleur à gaz,près d'une plaque chauffante de
cuisinière ou près d'un four.
◗ Attention:Le pain peut brûler.N'utilisez donc
jamais le grille-pain près ou au-dessous de
rideaux ou autres matériaux combustibles.
◗ Assurez-vous que le cordon d'alimentation
n'est pas près ou en contact avec les parties
chauffantes de l'appareil.
◗ N'utilisez pas de la nourriture avec son
emballage ou qui contient du liquide ou du jus
qui pourrait s'écouller en chauffant.
L'accumulation des miettes ou de jus dans le
grille-pain peut provoquer une situation
FRANÇAIS 21
Page 22

dangereuse ou des dommages,voire même
brûler.
◗ N'introduisez pas de la nourriture avec du
papier en aluminium ou des quantités de
nourriture trop grandes .
◗ Ne laissez jamais l'appareil sans surveillance
pendant l'utilisation.
◗ Eviter de toucher les fentes car elles
deviennnent très chaudes.
◗ N'introduisez pas vos doigts dans les fentes
du grille-pain.
◗ Débranchez l'appareil immédiatement après
utilisation.
◗ Nettoyez toujours l'appareil après chaque
utilisation.Débranchez l'appareil et laissez-le
refroidir avant de commencer à le nettoyer.
◗ N'immergez jamais le grille-pain dans l'eau.
Essuyez-le avec un chiffon humide.
◗ Evitez tout contact de l'appareil avec de l'eau
ou tout autre liquide.
◗ Retirez toujours les miettes pour éviter tout
risque de défaillance ou qu'elles ne
s'enflamment.
◗ N'insérez jamais d'objets aigus ou abrasifs
dans les fentes car cela pourrait causer des
dommages irréversibles.
◗ N'utilisez pas l'appareil si le cordon
d'alimentation ou le grille-pain lui-même ont
été endommagés.Consultez votre revendeur
ou un Centre Service Agréé Philips, car des
outils spéciaux et/ou des composants sont
nécessaires.
◗ N'utilisez pas des accessoires qui ne sont pas
recommandés par le fabricant.
FRANÇAIS22
Page 23

Avant de commencer l'utilisation de
l'appareil
1 Retirez tout autocollant et essuyez le
corps de l'appareil avec un chiffon humide.
2 Assurez-vous que le levier est en position
levée quand vous insérez la fiche dans la
prise de courant.
3 Laissez l'appareil terminer le premier cycle
de grillage sans introduire des tranches de
pain,sur le niveau le plus élevé de grillage
et permettre ainsi de brûler la poussière
accumulée dans le grille-pain pendant le
stockage.L'appareil doit être utilisé dans
un local aéré pour éviter les accumulations
d'odeurs ou de fumée.
Mode d'emploi
C
1 Sélectionnez la position de grillage
souhaitée (1-7) à l'aide de la Fontion
Electronique de Brunissage.Le réglage
nécessaire dépend de l'épaisseur et de
l'humidité du contenu du pain.
C
2 Après avoir sélectionné le niveau de
brunissage souhaité, introduisez la tranche
de pain dans les fentes et abaissez le levier
jusqu'au verrouillage.
NB:le levier ne se verrouille pas si la Fontion
Electronique de Brunissage est en position "O"
(Arrêt). Ainsi l'appareil ne peut pas être mis en
marche accidentellement par les enfants.
FRANÇAIS 23
3
4
2
1
STOP
3
4
2
1
Page 24

C
3 Lorsque les tranches de pain sont prêtes,
elles remontent automatiquement et alors
vous pouvez les retirer. Si nécessaire,vous
pouvez faire remonter légèrement le levier
Safety-Lift.Le chariot remonte de 16 mm
en plus et peut faciliter le retrait des
petites tranches de pain.
4 Si une tranche reste coincée entre les
fentes,l'appareil coupe automatiquement
le fonctionnement des résistances
chauffantes quand le pain atteint le niveau
de brunissage souhaité.
Débranchez l'appareil et attendez qu'il refroidisse
avant de retirer délicatement les tranches de pain
coinçées dans le grille-pain.
5 Débranchez l'appareil.
C
6 Laissez l'appareil refroidir,enroulez le
cordon d'alimentation et rangez l'appareil.
N'ENROULEZ PAS LE CORDON
D'ALIMENTATION AUTOUR DU CORPS DE
L'APPAREIL PENDANT OU APRES USAGE.
Bouton Stop
C
1 Lorsque le cycle de grillage est terminé,le
chariot porte-pain remontera.Si vous
voulez interrompre le cycle de grillage,
appuyez sur le bouton Stop.
FRANÇAIS24
3
4
2
1
Page 25

Bouton Décongélation
La fonction Décongélation vous permet de
décongéler et de griller des tranches de pains en
une seule fois.Le cycle de grillage sera ainsi plus
long.
1 Insérez une ou deux tranches de pain dans
le grille-pain.Assurez-vous que les tranches
ne se recouvrent pas et que le chariot
porte-pain soit en position élevée.
2 Sélectionnez la position de grillage
souhaitée:
- Réglage 1-2:pour griller des tranches de pain
congélées et des tartines minces congelées.
- Réglage 3-4:pour griller des petits pains
congélés,gaufres congelées, baguette et
croissants congéles.
- Réglages 5-6:pour des aliments congelés plus
épais comme les croissants épais,du pain de
campagne coupé à la main.
3 Abaissez le levier jusqu'au verrouillage.
C
4 Appuyez sur le bouton Décongélation
Lorsque le cycle de décongélation et de grillage
est terminé, le pain remonte automatiquement.
Vous pouvez interrompre le cycle de
décongélation et grillage en appuyant sur le
bouton Stop.
Débranchez l'appareil après utilisation.
FRANÇAIS 25
3
4
2
1
Page 26

Bouton rechauffage
La fonction Rechauffage vous permet de
rechauffer le pain sans le dorer.
1 Insérez une ou deux tranches de pain dans
le grille-pain.Assurez-vous que les tranches
ne se recouvrent pas et que le chariot
porte-pain soit en position élevée.
2 Abaissez le levier jusqu'au verrouillage.
C
3 Appuyez sur le bouton Rechauffage.
Lorsque le cycle de rechauffage est terminé, le
pain remonte automatiquement du grille-pain.
Vous pouvez interrompre le cycle de rechauffage
en appuyant sur le bouton Stop.
- Conseils:
- Pour obtenir des résultats de brunissage
uniformes, il est conseillé d'attendre au moins
30 secondes entre deux cycles de grillage.
- Le pain rassis grille plus rapidement que le pain
frais. Quand vous grillez du pain rassis,
sélectionnez un niveau de brunissage inférieur à
celui que vous utiliseriez normalement.
- Quand vous grillez deux tranches de pain, il est
recommandé d'utiliser des tranches de la
même dimension et fraîcheur.
- Quand vous grillez une seule tranche de pain,
réglez le bouton de brunissage sur une position
inférieure à celle que vous utiliseriez
normalement. Le grille-pain rechauffe la
FRANÇAIS26
3
4
2
1
Page 27

chambre entière du grille-pain, même si vous
avez introduit une seule tranche. En
sélectionnant un niveau de brunissage inférieur,
vous éviterez que la tranche soit brûlée.
Nettoyage
Arrêtez l'appareil, retirez la fiche de la prise
murale et laissez le grille-pain refroidir avant de
commencer de le nettoyer.
Essuyez l'extérieur du grille-pain avec un chiffon
humide et séchez-le avec un autre chiffon ou
tissu.
N'UTILISEZ PAS D' ABRASIFS POUR
NETTOYER LE GRILLE-PAIN.
N'utilisez pas des objets aigus ou pointus pour
nettoyer l'intérieur de l'appareil et pour éviter
d'endommager les élements chauffants.
C
1 Les miettes s'accumulent dans le tirroir
ramasse-miettes et peuvent s'enflammer si
vous ne videz pas périodiquement le tiroir.
Laissez le grille-pain refroidir et puis
secouez-le légèrement pour retirer toutes
les miettes coinçées dans la chambre de
grillage.
Videz le tirroir ramasse-miettes et remettez-le
dans l'appareil.
FRANÇAIS 27
Page 28

NE RETOURNEZ PAS L'APPAREIL POUR
RETIRER LES MIETTES.
Information et service
Pour plus d'informations,visitez notre Philips Web
site :www.philips.com ou veuillez contacter le
Service Consommateurs Philips de votre pays
(vous trouverez le numéro de téléphone dans le
dépliant sur la garantie internationale). S'il n'y a
aucun Service Consommateurs Philips dans votre
pays,contactez votre distributeur ou le Service
Department of Philips Domestic Appliances and
Personal Care BV.
FRANÇAIS28
Page 29

Page 30

Page 31

Page 32

u
www.philips.com
4222 001 93721
 Loading...