

Page 1
HL3844/N Expresso de Luxe
HL3854 Expresso Profesional
Page 2

English Page 6
• Keep pages 4, 5, 22 and 23 open
when reading these operating instructions.
Italiano Pagina 10
• Prima di usare l’apparecchio, aprite
le pagine 4, 5, 22 e 23 e leggete
attentamente le istruzioni per l’uso.
Español Página 14
• Desplegar las páginas 4, 5, 22 y 23
al leer las instrucciones de manejo.
Português Página 18
• Durante a leitura do modo de
emprêgo, desdobre e verifique a
pág. 4 e as pág. 5, 22 e 23.
2
Page 3

3
Page 4

4
8
7
6
5
4
3
2
1
GROSSEFINE
A
B
C
D
E
F
G
H
M
N
P
U
T
1
O
V
J
K
L
R
I
Q
S
Page 5
5
OSSE
2
3
8
7
GROSSE
4
6
7
8
7
6
5
4
3
2
1
GROSSEFINE
8
F
G
9
10
11
12
13
14
5
15
16
Page 6

Important
• Read the instructions in conjunction with
the illustrations (pages 4, 5, 22 and 23)
before using the appliance.
• Check that the voltage rating at the
bottom of the appliance corresponds
to your mains voltage.
• The appliance should be connected to
an earthed mains socket by means of an
earthed plug.
• Never immerse the appliance in water.
• Unplug the appliance before cleaning.
• If the mains cord of this appliance is
damaged, it must only be replaced by
Philips or their service representative, as
special tools and/or parts are required.
• Bleed-off air before using the appliance
for the first time to guarantee proper
pump functioning. Please refer to the
sections “Before using for the first
time and not using for a while” and
“Refreshing water in the boiler”.
English
• Inside the Espresso machine water is
heated up. This water will expand and
as a result some drops may leak from
the steam pipe and/or the water outlet
opening. This is quite normal. Do not
forget to move the steam pipe backwards
into a position over the grid if you do not
wish to use it.
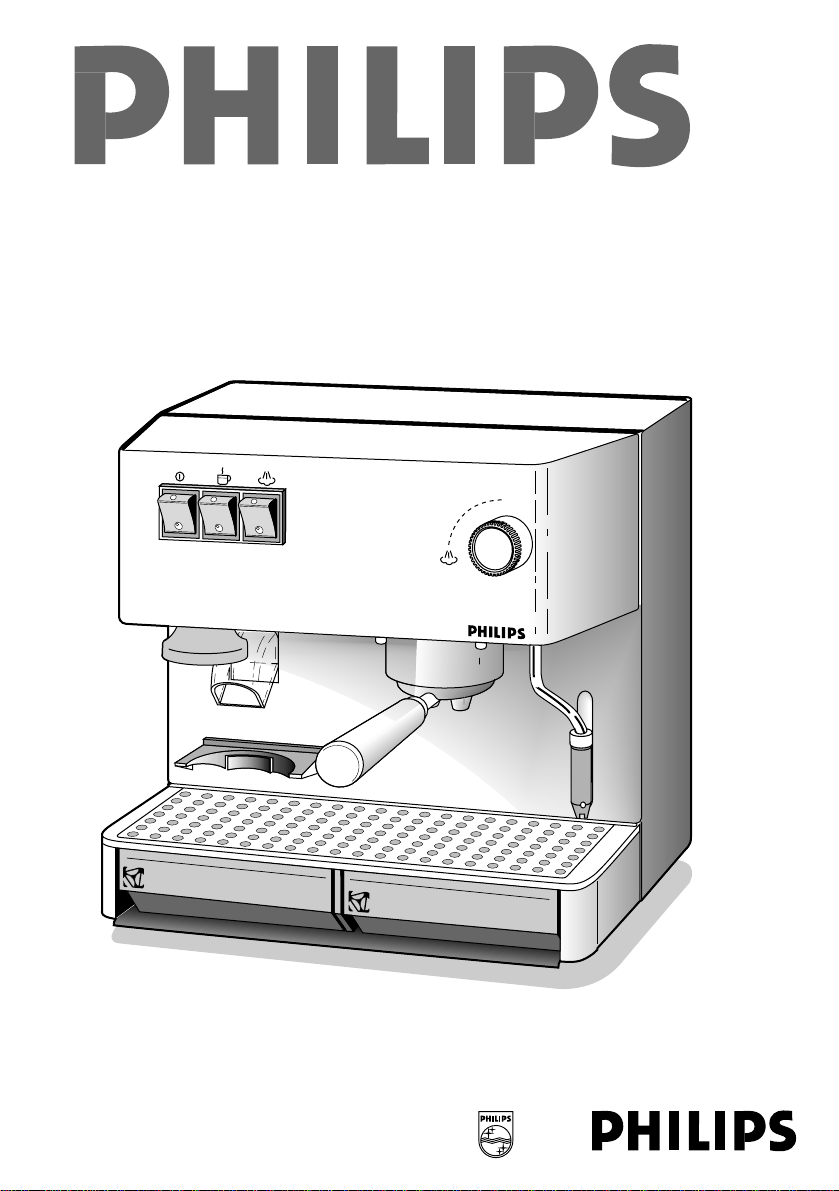
N Filter holder attachment - water outlet
opening
O Filter
For 1 cup: filled up to the indentation
For 2 cups: filled to the top
P Filter holder
Q Steam pipe with “Cappuccino Extra”
R Tamper for ground coffee
S Grid (removable)
T Drip basin (removable)
U Container for used ground coffee (removable)
V “Cremacaffé” valve
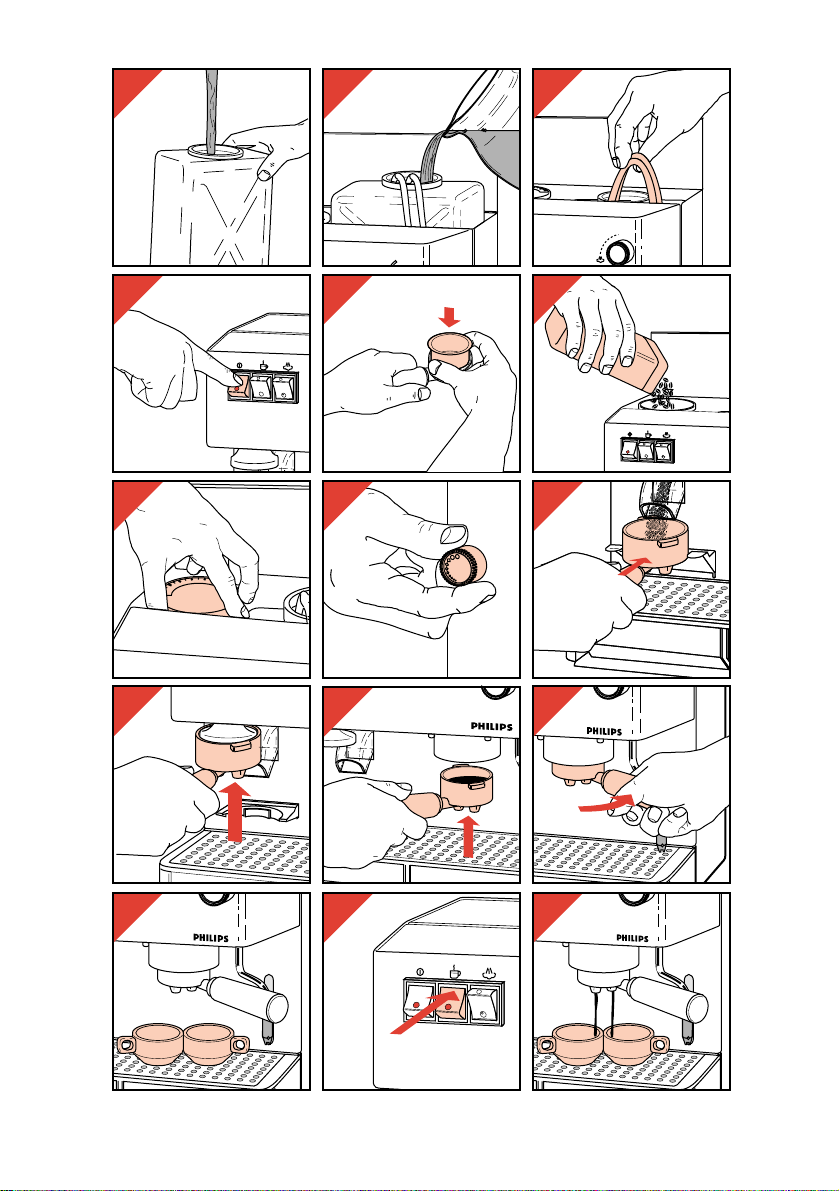
Before using for the first time and not using
for a while
- Wash the removable water tank,the coffee filter
and the filter holder in hot soapy water. Rinse
with clean water.
- Fill the water tank (figs. 2 and 3).
Be careful to insert the two tubes (fig. 4).
Refreshing water in the boiler
The appliance has a boiler which contains
about 200 ml water. When the appliance is
new or when it has not been used for a while
(more than three days) it is advised to refresh
the water in the boiler before brewing coffee:
- refresh the water in the water tank.
Be careful to insert the two tubes;
- place a small jug (200ml min.) under the steam
pipe;
- open the steam pipe by turning the steam
control knob anti-clockwise;
- switch on the appliance (On/Off) (J);
- switch on the pump k;
- when you have filled the jug, switch off the
pump k and close the steam control knob
(clockwise).
Then the appliance is ready for further use.
Espresso
Espresso is made by pumping hot water
rapidly and at a high pressure through
ground Espresso type coffee.
This tasty Espresso is best served in
special small-sized cups (50 ml).
• Your Espresso coffee will be at optimum
(hot!) temperature, if the filter holder is
screwed into place while the machine is
heating up.
• You can pre-heat your cups by rinsing
them with hot tap water.
General description (fig. 1, page 4)
A Cover (removable)
B Water tank (removable)
C Tubes for water
D Window of water tank
E Lid of coffee mill with granularity
indication:
∂∂
= coarse
∂ = fine
F Coffee mill
G Coffee mill granularity control rotary knob
H Spout for ground coffee
I Push button of coffee mill
J Main On/Off switch with pilot light
K Pump switch k with pilot light
L Steam switch s with pilot light
M Steam control (rotary knob)
6
Page 7

7
the steam pipe. The froth, together with a little
milk, is added to the Espresso.
The steam pipe of your Espresso machine is
equipped with a handy accessory, named
“Cappuccino Extra”. This will help you to
make an excellent milk froth for Cappuccino,
simply and effectively.
• First prepare the milk froth, then the
Espresso.
• Use the wider special “Cappuccino” cups
(approx. 70 ml) for the same quantity of
coffee!
• BEFORE USING THE STEAM PIPE, ALWAYS
TAKE THE FILTER HOLDER OFF.
- Switch on main On/Off switch (J) (fig. 18).
The pilot light will now come on.
- Fill a milk jug about half full with cold milk.
- Set the steam switch s (L) to position “on”.
As soon as all three pilot lights illuminate,
the appliance is ready for making steam.
- You can swing the steam pipe (Q) to bring it
into the most suitable position (fig. 19).
- Keep the jug under the steam pipe.
Please note: the air outlet holes of the
accessory should remain under the milk
level (fig. 20).
- Open the steam control (M) by turning anti-
clockwise (fig. 21). At the first moment the
steam condensates into water and some drops
will come out of the steam pipe. You can collect
these drops into the drip basin (T). Afterwards
steam will come out of the steam pipe, making
the milk bubble (fig. 22).
Using the steam control (M) you can adjust
the steam output.
- When the milk froth has been formed, you
can close the steam control (fig. 23).
- Set the steam switch s (L) to position
“off” (fig. 24).
- Then remove the milk jug.
- Move the steam pipe backwards into
position over the grid.
After use
- Switch off by setting the main On/Off switch (J)
to position “off”.
- Slide the container for used ground coffee (U)
out (fig. 25).
- Unscrew the filter holder (fig. 26).
- Tap the filter holder to remove the ground
coffee out of the filter (fig. 27).
- Ensure that there is enough fresh cold water
in the tank.
- Switch on by setting the main On/Off switch (J)
to position “on”. The pilot light comes on.
The appliance is now heating-up (fig. 5).
- Insert the filter (O) into the filter holder (P)
(fig. 6).
If you use ground Espresso coffee, scoop
ground coffee into the filter. Preferably use a
special espresso coffee. Never fill the coffee mill
with ground coffee.
If you use Espresso coffee beans:
- Take the lid (E) from the coffee mill (F). Fill the
coffee mill with Espresso coffee beans (fig. 7).
- Replace the lid (fig. 8). Please note the
correct position. The indications on the lid
correspond with the set granularity (“fineness”)
- If required, set the coffee granularity by turning
the lateral control knob (G) (fig. 9):
∂∂
= coarse, ∂ = fine (please also refer
to “Tips”).
- Push the filter holder against the on/off switch
of the coffee mill (I) (fig. 10). The coffee mill
starts operating and the ground coffee flows
into the filter.
- As soon as there is enough ground coffee in
the filter (for 1 cup filled up to the coffee filter
indentation; for 2 cups to the top), withdraw
the filter holder. Then the coffee mill stops
automatically.
- Press the coffee down using the tamper (R)
(fig. 11).
- If necessary, clean traces of coffee off the edge
of the filter.
- Position the filter holder (fig. 12) and screw in
from left to right (fig. 13).
- Place 1 or 2 Espresso cup(s) (approx. 50 ml)
under the spouts of the filter holder (fig. 14).
- As soon as the pilot light of pump switch k (K)
comes on, you can turn the switch “on” (fig.15).
Hot water will then be pumped through the
ground coffee and after a few seconds the
Espresso coffee will start flowing into the
cup(s) (fig. 16).
- Set pump switch k (K) to position “O” as
soon as there is enough Espresso in the
cup(s) (fig. 17).
- Serve and savour your Espresso right away!
Cappuccino
“Cappuccino” is the Italian name for Espresso
with a little milk and a layer of milk froth.
The froth is made of cold milk in a jug using
Page 8

- Finish cleaning with a damp cloth (fig. 34).
- Push the outer pipe back into place. Push
firmly to ensure that it fits well at the top
(fig. 35).
Descaling
Descale your Espresso machine regularly.
With normal household use the following rule
applies:
• hardness up to 18° DH - two or three times a
year;
• hardness over 18° DH - four or five times a
year.
Your water supply company can inform you about
the hardness of your water.
- Operate the appliance twice as indicated in
section “Making Espresso”.
However, now use ordinary vinegar to half fill
the water tank and do not fill the filter with
ground coffee.
- To remove any scale that has set in the inside
of the steam pipe, let the appliance produce
vinegar steam for some time.
- To remove all remainders of vinegar and scale,
operate the appliance twice with fresh cold
water in the same manner.
Then clean all removable items.
If the appliance is cleaned and descaled regulary
as indicated in the instructions for use, it will
probably not be necessary to carry out the
following cleaning & descaling procedures.
However, if the performance of the espresso
machine should decline and non of the indicated
measurements (such as bleeding off air!) helps,
some extra cleaning/descaling may be required.
• For very effective descaling first follow the
instructions in section “Descaling” of the
instructions for use. However, interrupt the
descaling procedure once or twice after
pumping and steaming hot vinegar and let the
vinegar act on the scale for at least half an
hour. Then continue the procedure.
• If no more (or too little) hot water comes out
of the outlet opening: clean/descale the
perforated outlet plate.
Switch off and unplug the appliance and let it
cool down. With the help of a screwdriver or
coin unscrew the outlet plate (fig. 36, 37) and
also the valve system will come out. Clean with
a firm brush. To descale, leave the plate and
the valve immersed in ordinary vinegar for min.
15 minutes. Use a brush to remove loose scale
remainders. Rinse with clean water.
Tips
“Wonderful tasty and aromatic Espresso…
and preferably with such a nice brown crest
on top… How do you get that?”
• Use exclusively fresh real Espresso-coffee.
- Try out a number of types of Espresso and find
out which suits your taste best.
• Store the coffee in an air-tight and lightproof
container in a cool and dry environment.
- In special cases please follow the instructions
of the manufacturer of the coffee.
• If ground Espresso is used: from time to time
shake the coffee container. The finer grains
tend to drain to the bottom of the container and
remain there. By shaking from time to time you
maintain even granularity.
• Genuine Espresso-coffee is granulated
properly: Espresso is ground a little more finely
than “fast filter” type coffee used for coffee
makers. When the coffee has been ground
too coarsely, and also when the ground coffee
has not been pressed down sufficiently, the
Espresso will not be tasty and aromatic.
The hot water will be pumped through the
ground coffee too quickly.
On the other hand, when the coffee has been
ground too finely, or pressed down too firmly,
it will take longer for the cup(s) to fill.
The Espresso may become rather bitter in such
a case.
• Use authentic Espresso cups (50 ml), which
you fill between half and three-quarters: that
will give you the right quantity of Espresso.
Cleaning
- Wash the filter, the filter holder, the water tank,
the “Cremacaffé” valve, the drip-basin and grid
regularly.
The drip-basin and grid can be removed as
illustrated in fig. 28 - 30.
- Regularly clean the location for filter holder
connection (N) removing any stuck grains
of coffee.
- Regularly clean the water outlet opening,
removing any stuck grains of coffee.
Always clean the “Cappuccino Extra”
accessory of the steam pipe after making
Cappuccino:
- Remove the outside pipe by pulling in the
direction of the arrow (fig. 31).
- Rinse the outside pipe under the tap (fig. 32).
- Let some steam escape to clean the inner
section (fig. 33).
8
Page 9

9
The pump is too noisy.
- There is no water in the water tank.
Refill with water.
- The water tank is not placed correctly.
The machine does not produce Espresso.
- There is no water in the water tank or the
water tank is not placed correctly.
- The coffee has been ground too finely and/or
has been tapped down too much.
- The water outlet opening is clogged.
- The machine needs descaling.
Water leaks from the water outlet opening
and/or the steam pipe.
- The water inside the appliance expands when
being heated up. This is quite normal. Swing
the steam pipe into a position over the grid.
- If excessive leaking occurs: descale or
clean the valve.
The “crema” crest on the Espresso is too
thin or isn’t there altogether.
- The coffee has not been tapped down firmly
enough.
- There was not enough coffee in the filter.
- The machine was not heated-up sufficiently.
(Had the pilot light gone out?)
- The coffee had been ground too coarsely.
- The “Cremacaffé” valve is not in the filter.
The “crema” is too dark and/or the coffee
has a burning taste.
- The machine was too heated-up. (Was the
steam button still in “on” (down) position?)
- The coffee has been ground too finely.
- The coffee has been tapped down too much.
If the appliance does not function as required
If your Espresso machine does not operate as expected you may, in most cases, find the cause and
cure below. Also refer to the corresponding sections in these instructions for use!
Page 10

Importante
• Leggete queste istruzioni attentamente
osservando le istruzioni (pagine 4, 5, 22
e 23) prima di usare l’apparecchio.
• Prima di collegare l’apparecchio,
verificate che la tensione indicata sulla
parte inferiore dell’apparecchio
corrisponda a quella della rete locale.
• L’apparecchio deve essere collegato ad
una presa con messa a terra mediante
spina con connettore di terra.
• Non immergete l’apparecchio in acqua
• Togliete la spina dell’apparecchio dalla
presa di corrente prima di procedere
alla pulizia.
• Nel caso in cui il cavo di alimentazione
dovesse rovinarsi, dovrà essere
sostituito solo presso un centro di
assistenza Philips, dal momento che
potrebbero essere necessari utensili
e/o pezzi speciali.
10
Italiano
• All’interno dell’apparecchio, l’acqua,
riscaldandosi, può aumentare di volume
e quindi fuoriuscire dal beccuccio del
vapore e/o dall’apertura di scarico.
Questo è del tutto normale. Quando non
usate l’apparecchio, non dimenticate di
spostare sempre all’indietro il beccuccio
del vapore, in modo che si trovi sopra la
griglia.
N Alloggiamento portafiltro (uscita acqua)
O Filtro
Per 1 tazza: riempite fino alla tacca di
indicazione
Per 2 tazze: riempite fino all’orlo
P Portafiltro
Q Beccuccio del vapore e acqua calda
con “Cappuccino Extra”
R Pressino
S Griglia asportabile
T Cassetto raccogli-gocce (asportabile)
U Cassetto per caffè macinato usato
(asportabile)
V Valvola “Cremacaffé”
Prima dell’uso
- Lavate il serbatoio d’acqua asportabile, e il
portafiltro con acqua saponata tiepida.
Riscacquate con acqua corrente.
- Riempite il serbatoio d’acqua (fig. 2 e 3).
Ricordatevi di inserire i due tubi (fig. 4).
Cambio dell’acqua nella caldaia
L’apparecchio è dotato di una caldaia che
contiene circa 200 cc di acqua. Quando utilizzate
l’apparecchio per la prima volta o quando non lo
usate da un po’ di tempo (da più di 3 giorni), è
consigliabile cambiare l’acqua nella caldaia prima
di preparare il caffè:
- cambiate l’acqua contenuta nel serbatoio.
Ricordatevi di inserire i due tubi.
- Mettete una brocca di almeno 200 cc sotto il
beccuccio del vapore.
- Aprite il beccuccio del vapore girando la
manopola di selezione del vapore (M) in senso
antiorario.
- Accendete l’apparecchio (J).
- Accendete la pompa k (K).
- Una volta riempita la brocca, spegnete la
pompa k (K) e girate in senso orario la
manopola di selezione del vapore (M).
A questo punto l’apparecchio è pronto per il
funzionamento.
Espresso
• Il caffè espresso viene preparato facendo
scorrere rapidamente dell’acqua bollente
sotto pressione attraverso il caffè macinato.
• Il caffè espresso raggiungerà la temperatura
ottimale solo se il portafiltro si trova già
inserito quando state facendo riscaldare la
macchina.
• Potete pre-riscaldare le tazzine risciacquandole sotto l’acqua bollente del beccuccio Q.
Descrizione generale (fig. 1 pag. 4)
A Coperchio (asportabile)
B Serbatoio acqua (asportabile)
C Tubi per l’acqua
D Finestra serbatoio acqua
E Coperchio del macinacaffè con indicazione
del grado di macinatura:
∂∂
= normale
∂ = fine
F Macinacaffè
G Manopola rotante di controllo del grado di
macinatura del macinacaffè
H Beccuccio per uscita caffè macinato
I Pulsante acceso/spento macinacaffè
J Interruttore acceso/spento principale con
spia
K Interruttore pompa k con spia
L Interruttore vapore F con spia
M Manopola di selezione del vapore
Page 11

da caffè è dotato di uno speciale accessorio
chiamato “Cappucino Extra”. In questo modo
potrete preparare un ottimo cappuccino ricco
di schiuma in modo semplice e rapido.
• Per prima cosa preparate la schiuma e poi il
caffè espresso.
• Usate le apposite tazze da cappuccino
mettendo la stessa quantità di caffè che
utilizzate per l’espresso.
• PRIMA DI UTILIZZARE IL BECCUCCIO DEL
VAPORE, TOGLIETE SEMPRE IL
PORTAFILTRO.
- Accendete l’apparecchio premendo l’interruttore
Acceso/Spento (J) (fig. 18). La spia si
accenderà.
- Riempite a metà un bricco di latte .
- Premete l’interruttore vapore su acceso F (L).
Appena le tre spie degli interruttori (J.K.L.) si
illumineranno, l’apparecchio sarà pronto a
produrre vapore.
- Potete muovere il beccuccio del vapore (Q) per
sistemarlo nella posizione più adatta (fig. 19).
- Mettete il bricco sotto il beccuccio del vapore.
Nota: le aperture di aerazione dell’accessorio
devono rimanere sotto il livello del latte (fig. 20).
- Aprite la manopola di selezione del vapore girandola in senso antiorario (fig. 21). Dapprima il
vapore si condensa formando una piccola
quantità d’acqua da raccogliere a parte o nell’
apposita vaschetta (T). Dopodiché il vapore
uscirà dal beccuccio, facendo ribollire il latte
(fig. 22). Usando la manopola di selezione del
vapore (M), potete regolare la quantità di
vapore.
- Appena avrete ottenuto schiuma sufficiente,
potete bloccare la manopola di selezione del
vapore (fig. 23).
- Mettete l’interruttore vapore F (L) su “spento”
(fig. 24).
- Togliete il bricco del latte.
- Rimettete il beccuccio del vapore nella
posizione originaria sopra la griglia.
Dopo l’uso
- Spegnete premendo l’interruttore principale
Acceso/Spento (J) su “spento”.
- Estraete il cassetto per il caffè macinato usato
(U) (fig. 25).
- Sganciate ruotando da destra verso sinistra, il
portafiltro (fig. 26).
- Battete leggermente il portafiltro sull’apposita
gomma per togliere il caffè macinato dal filtro
(fig. 27).
11
- Assicuratevi che ci sia acqua a sufficienza nel
serbatoio.
- Accendete l’apparecchio spostando l’interruttore
Acceso/Spento (J) sulla posizione “on”. La spia
si accende per indicare che l’apparecchio si sta
riscaldando (fig. 5).
- Inserite il filtro (O) nel portafiltro (P) (fig. 6).
Se usate caffè già macinato per espresso,
mettetelo direttamente nel filtro. Vi consigliamo di
usare una miscela speciale per espresso. Non
riempite mai il macinacaffè con caffè già macinato.
Se usate il caffè espresso in grani:
- togliete il coperchio (E) dal macinacaffè (F).
Riempite il contenitore (G) (fig. 7).
- Rimettete il coperchio (fig. 8) rispettando
l’apposito riferimento. Le scritte sul coperchio
indicano il grado di macinatura scelto
(“finezza”).
- Se necessario, regolate la macinatura ruotando
la manopola laterale (G) (fig. 9):
∂∂
= normale, ∂ = fine (vedete anche la
sezione “consigli”).
- Spingete il portafiltro contro l’interruttore del
macinacaffè (I) (fig. 10). Il macinacaffè si mette
in funzione e lascia scendere il caffè macinato
nel filtro.
- Appena avete riempito il filtro con una quantità
sufficiente di caffè macinato (per 1 tazza fino
alla tacca di indicazione; per 2 tazze fino
all’orlo), togliete il portafiltro. A questo punto, il
macinacaffè si ferma automaticamante.
- Premete il caffè con il pressino (R) (fig.11).
Se necessario, pulite il bordo del filtro.
Posizionate il portafiltro (fig. 12) e agganciatelo
ruotandolo da sinistra a destra (fig. 13).
- Posizionate la/le tazza/e sotto l’apposita
apertura del portafiltro (fig. 14).
- Appena si accende la spia dell’interruttore
pompa k (K), lo potete mettere in posizione
“on” (fig. 15). L’acqua bollente passerà
attraverso il caffè macinato e, dopo pochi
secondi, l’espresso inizierà a scendere dentro
la/le tazza/e (fig. 16).
- Quando il livello del caffè nella/e tazza/e ha
raggiunto la quantità voluta, spostate
l’interruttore pompa k sulla posizione “O”
(fig. 17).
- Servite l’espresso e gustatelo caldo e fragrante!
Cappuccino
“Cappucino” è il nome italiano di un caffè
espresso a cui è stato aggiunto del latte e uno
strato di schiuma di latte.
Il beccuccio del vapore della vostra macchina
Page 12

- Rimettete a posto il beccuccio esterno.
Spingete con forza per assicurarvi che sia ben
fissato in alto (fig. 35).
Disincrostazione/decalcificazione
Disincrostate/Decalcificate periodicamente la
vostra macchina per espresso. Con normale
acqua potabile, attenetevi alle seguenti norme:
• nel caso di acqua dolce - durezza fino a
18° DH - due o tre volte all’anno.
• nel caso di acqua dura - durezza superiore ai
18° DH - quattro o cinque volte all’anno.
L’ente che eroga l’acqua potabile potrà indicarvi la
durezza dell’acqua di casa.
• Fate funzionare l’apparecchio due volte
seguendo le indicazioni contenute nel paragrafo
“Espresso” ma utilizzate aceto comune
(1/2 litro) per riempire il serbatoio e non
mettete caffè nel filtro.
- Per togliere eventuali incrostazioni, fate
fuoriuscire il vapore di aceto per alcuni
secondi/minuti.
- Per togliere eventuali residui di aceto e di
incrostazioni, fate funzionare l’apparecchio due
volte con acqua pura nello stesso modo. Alla
fine pulite tutte le parti che possono essere
rimosse.
Se l’apparecchio viene pulito regolarmente
seguendo le istruzioni qui sopra riportate, è assai
probabile che non sia necessario ricorrere alle
operazioni di seguito riportate. In ogni caso, se la
macchina per espresso non dovesse più offrire le
stesse prestazioni di prima e le normali misure da
intraprendere non fossero più sufficienti, è bene
adottare qualche provvedimento extra.
• Per una disincrostazione efficace seguite le
istruzioni riportate al paragrafo
Disincrostazione/ Decalcificazione, ma
sospendete le operazioni un paio di volte dopo
aver fatto uscire un po’ di aceto. Lasciate agire
l’aceto per circa mezz’ora e poi completate
l’operazione.
• Se esce poca acqua dall’apertura:
pulite/disincrostate la griglia.
Spegnete l’apparecchio e staccate la spina
dalla presa di corrente. Lasciate raffreddare.
Svitate la griglia dell’apertura (fig. 36, 37) con
un cacciavite o una moneta, così facendo,
uscirà anche la valvola. Pulite con uno
spazzolino. Per togliere le incrostazioni, lasciate
la griglia a bagno in aceto comune per 15 min.
poi rimuovete le incrostazioni e risciacquate
abbondantemente con acqua corrente.
12
Consigli
“Un delizioso e aromatico caffè espresso …
e preferibilmente con una gustosa cremina …
Come prepararlo?”
• Usate esclusivamente caffè per espresso.
- Provate ad assaggiare diverse miscele di caffè
per trovare quella che soddisfa maggiormente il
vostro palato.
• Conservate il caffè in un contenitore a tenuta
d’aria e di luce e in un ambiente fresco ed
asciutto.
- Per miscele speciali, seguite le istruzioni fornite
dal produttore del caffè.
• In caso usiate il caffè macinato, ogni tanto
agitate il contenitore. I grani più piccoli tendono
a depositarsi e a rimanere sul fondo del
contenitore. Agitatelo quindi ogni tanto per
ottenere una distribuzione uniforme.
• Il vero caffè per espresso richiede una
macinatura particolare: la miscela risulta infatti
più fine rispetto al normale caffè utilizzato con le
macchine comuni. Se il caffè viene macinato
troppo grosso, l’espresso non potrà sprigionare
il caratteristico aroma e il gusto risulterà diverso
in quanto l’acqua passerà attraverso la miscela
troppo rapidamente. D’altra parte, se il caffè
risulta macinato troppo finemente, occorrerà più
tempo per riempire la/le tazza/e. In questo caso,
l’espresso risulta troppo amaro.
• Usate le apposite tazzine per espresso, che
riempirete fra metà e i tre quarti. In questo
modo otterrete la giusta dose di caffè espresso.
Pulizia
- Lavate periodicamente il filtro, il portafiltro, il
serbatoio dell’acqua, il raccogli-gocce, la griglia
e la valvola “Cremacaffé”.
Il raccogli-gocce e la griglia possono essere tolti
come illustrato nelle figg. 28 - 30.
- Pulite periodicamente l’alloggiamento del portafiltro (N), togliendo eventuali residui di caffè.
- Pulite periodicamente la doccia di uscita
dell’acqua eliminando eventuali residui di caffè.
Pulite sempre l’accessorio “Cappucino Extra”
del beccuccio di vapore dopo aver preparato il
cappuccino:
- togliete il beccuccio esterno tirando in direzione
della freccia (fig. 31).
- Risciacquate il beccuccio esterno sotto il
rubinetto (fig. 32).
- Fate fuoriuscire del vapore per pulire la parte
interna (fig. 33).
- Pulite con un panno umido (fig. 34).
Page 13

13
L’apparecchio non funziona come dovrebbe ?
Nel caso in cui l’apparecchio non funzionasse come dovrebbe, potete trovare la causa consultando le
istruzioni qui di seguito riportate.
La pompa fa troppo rumore:
- non c’è acqua nel serbatoio. Riportate a
livello.
- Il serbatoio non è posizionato in modo
corretto.
La macchina non fa l’espresso:
- non c’è acqua nel serbatoio oppure il
serbatoio non è stato posizionato in modo
corretto.
- Il caffè è stato macinato troppo finemente
e/o è stato pressato troppo.
- L’apertura di uscita acqua è otturata.
- L’apparecchio deve essere disincrostato.
Cola acqua dall’apertura di uscita acqua e/o
dal beccuccio del vapore:
- L’acqua si espande quando viene riscaldata:
è un fenomeno del tutto normale.
Spostate il beccuccio del vapore sopra la
griglia raccogli-gocce.
- Se l’acqua che cola è eccessiva,
disincrostate e pulite la valvola.
La crema dell’espresso è troppo poca o
inesistente:
- Il caffè non è stato pressato a sufficienza.
- Non è stato messo abbastanza caffè nel
filtro.
- La macchina non si è riscaldata a sufficienza
(si era spenta la spia ?)
- Il caffè è stato macinato troppo
grossolanamente.
- La valvola “Cremacaffé” non è stata
posizionato sul filtro.
La crema è troppo scura e/o il caffè ha un
sapore eccessivamente tostato:
- La macchina è stata riscaldata troppo
(l’interruttore di “vapore” era ancora in
posizione di “acceso” ?).
- Il caffè è stato macinato troppo finemente.
- Il caffè è stato pressato in modo eccessivo.
Page 14

Descripción general (fig. 1, pág. 4)
A Tapa (desmontable)
B Depósito para el agua (desmontable)
C Tubos para el agua
D Ventana del depósito para el agua
E Tapa del molinillo de café con indicación
de la granulación :
∂∂
= Grueso
∂ = Fino
F Molinillo del café
G Mando giratorio para regulación de la
granulación del molinillo de café
H Salida del café molido
I Pulsador Paro/Marcha del molinillo del café
J Interruptor general Paro/Marcha con
lámpara piloto
• El agua se calienta dentro de la Cafetera
Espresso. Esta agua se expansiona y,
por ello, pueden caer algunas gotas a
través del tubo de vapor y/o la abertura
de salida del agua. Esto es completamente normal. Si no desean usar el tubo
de vapor, no olviden volver a colocarlo en
una posición que quede sobre la rejilla.
14
Importante
• Lean estas instrucciones conjuntamente
con las ilustraciones (págs. 4, 5, 22 y 23)
antes de usar el aparato.
• Comprueben que el voltaje indicado en
el fondo del aparato se corresponde con
el de su hogar.
• El aparato debe ser conectado a una
base de enchufe con tomas de masa,
mediante una clavija con toma de tierra.
• No sumerjan nunca el aparato en agua.
• Desenchufen el aparato antes de
limpiarlo.
• Si el cable de red de este aparato se
deteriora, solo puede ser reemplazado
por Philips o por un Servicio de Asistencia Técnica Philips ya que se requieren
herramientas y/o piezas especiales.
• Para garantizar el adecuado funcionamiento de la bomba, purguen el aire
antes de usar el aparato por primera vez.
Lean atentamente las secciones “Antes
de usar el aparato por primera vez” y
“Renovación del agua del hervidor” de
las instrucciones de manejo.
Español
K Interruptor de la bomba k con lámpara piloto
L Interruptor del vapor F con lámpara piloto
M Control del vapor (mando giratorio)
N Lugar donde se coloca el soporte del filtro
Abertura de salida del agua
O Filtro
Para 1 taza : Llenar hasta la marca
Para 2 tazas : Llenar hasta arriba
P Soporte del filtro
Q Tubo de vapor con el dispositivo
“Cappucino Extra”
R Pisón para el café molido
S Rejilla (desmontable)
T Cubeta para el goteo (desmontable)
U Depósito para el café molido ya usado
(desmontable)
V Válvula para “Café con Crema Extra”
Antes de usar el aparato por vez primera y
después de no usarlo durante cierto tiempo
- Laven el desmontable depósito para el agua, el
filtro del café y el soporte del filtro con agua
jabonosa caliente. Aclárenlos con agua limpia.
- Llenen el depósito para el agua (figs. 2 y 3).
Asegúrense de insertar los 2 tubos (fig. 4).
Renovación del agua del hervidor
El aparato está provisto de un hervidor que
contiene unos 200 ml de agua. Cuando el aparato
sea nuevo o cuando no haya sido usado durante
cierto tiempo (más de 3 días) es aconsejable renovar el agua del hervidor antes de elaborar café:
- Renueven el agua del depósito para el agua.
Asegúrense de insertar los 2 tubos.
- Coloquen una pequeña jarra (de 200 ml como
mínimo) bajo el tubo de vapor.
- Abran el tubo de vapor, girando el mando de
control del vapo en sentido antihorario.
- Pongan en marcha el aparato
(Off/On = Paro/Marcha) (J).
- Pongan en marcha la bomba k .
- Cuando se haya llenado la jarra, paren la bomba
k y cierren el mando de control del vapor,
girando en sentido horario.
El aparato estará entonces listo para futuros usos.
Café Espresso
El café Espresso se logra bombeando
rápidamente agua caliente y a alta presión, a
través de café molido del tipo Espresso.
El mejor modo de servir su sabroso café
espresso es en tacitas especiales de pequeño
tamaño (50 ml).
Page 15

• Su café Espresso estará a una óptima
temperatura (! Caliente !) si el soporte del
filtro está colocado (girando) en su lugar
mientras la Cafetera se calienta.
• Pueden precalentar sus tazas enjuagándolas
con agua caliente del grifo.
- Asegúrense de que haya suficiente agua fría en
el depósito.
- Pongan en marcha el aparato colocando el
interruptor principal Paro/ Marcha (J) en la
posición Marcha (On). La lámpara piloto se
encenderá. El aparato está ahora calentándose
(fig. 5).
- Inserten el filtro (O) en el portafiltro (P)(fig. 6).
Si usan café espresso molido : Pongan, con
una cuchara, café molido en el filtro. Usen,
preferiblemente, un café Espresso especial.
No llenen nunca el molinillo de café con café
molido.
Si usan café espresso en grano :
- Quiten la tapa (E) del molinillo de café (F).
Llenen el molinillo de café con café Espresso
en grano (fig 7).
- Vuelvan a colocar la tapa (fig. 8) y comprueben
la correcta posición. Las indicaciones sobre la
tapa se corresponden con la granulación fijada
(finura).
- Si es necesario, gradúen la granulación del
café haciendo girar el mando lateral de
control (G) (fig. 9) :
∂∂
= grueso, ∂ = fino (Vean también el
capítulo “Consejos”).
- Con el soporte del filtro, presionen contra el
interruptor Paro/Marcha del molinillo de café (I)
(fig. 10). El molinillo de café empezará a
funcionar y el café molido caerá en el filtro.
- Tan pronto como haya suficiente café molido en
el filtro (Para 1 taza, hasta la marca del filtro del
café, para 2 tazas hasta arriba) retiren el
soporte del filtro. El molinillo de café se parará
automáticamente.
- Presionen el café, usando el pisón (R) (fig. 11).
- Si es necesario, eliminen los restos de café del
borde del filtro.
- Coloquen el soporte del filtro (fig. 12) en su
lugar y háganlo girar de izquierda a derecha
(fig. 13).
- Coloquen 1 ó 2 taza(s) Espresso (de
aproximadamente 50 ml) bajo las salidas del
soporte del filtro (fig. 14).
- Tan pronto como la lámpara piloto del
interruptor de la bomba k (K) se encienda,
pueden hacer girar el interruptor a la posición
Marcha (On) (fig. 15).
El agua caliente será entonces bombeada a
través del café molido y, después de unos
pocos segundos, el café Espresso empezará a
fluir a la(s) taza(s) (fig. 16).
- Retornen el interruptor de la bomba k (K) a la
posición “O” tan pronto como haya suficiente
café Espresso en la(s) taza(s)(fig. 17).
- ¡ Sirvan y saboreen inmediatamente su café
Espresso !
Cappuccino
“Cappuccino” es el nombre que dan los
italianos al café Espresso con un poco de
leche y una capa de espuma de leche.
La espuma se obtiene en una jarra con leche
fría y usando el tubo de vapor. La espuma,
conjuntamente con un poco de leche, se
añade al café Espresso.
El tubo de vapor de su Cafetera Espresso está
equipado con un dispositivo manual llamado
“Cappuccino Extra”, que les ayudará a
obtener, fácil y efectivamente, una excelente
espuma de leche para el “Cappuccino”.
• Preparen primero la espuma de leche y, a
continuación, el café Espresso.
•¡ Usen las tazas especiales, más anchas,
para “Cappuccino” (de unos 70 ml) para la
misma cantidad de café !
• ANTES DE USAR EL TUBO DE VAPOR,
QUITEN SIEMPRE EL SOPORTE DEL
FILTRO.
- Conecten el interruptor principal Paro/Marcha
(J) (fig. 18) La lámpara piloto se encenderá.
- Llenen una jarra para leche con leche fría hasta
la mitad.
- Coloquen el interruptor del vapor F (L) en la
posición Marcha (On). Tan pronto como las 3
lámparas piloto se iluminen, el aparato estará
listo para producir vapor.
- Pueden hacer girar el tubo de vapor (Q) para
colocarlo en la posición más adecuada (fig. 19).
- Mantengan la jarra bajo el tubo de vapor.
Nota : Los agujeros de salida del aire del
accesorio deben permanecer bajo el nivel de la
leche (fig. 20).
- Abran el control de vapor (M) girando en
sentido antihorario (fig. 21). Al principio, el
vapor se condensará y algunas gotas de agua
saldrán del tubo de vapor. Esas gotas pueden
recogerlas en la cubeta para el goteo (T).
Después de esto, el vapor empezará a salir
por el tubo de vapor, haciendo burbujear la
leche (fig. 22).
Usando el control de vapor (M), pueden ajustar
la salida de vapor.
15
Page 16

• Usen auténticas tazas para café Espresso
(50 ml), llenándolas entre su mitad y sus tres
cuartas partes, obteniendo así la correcta
cantidad de café Espresso.
Limpieza
- Laven regularmente el filtro, el soporte para el
filtro, el depósito para el agua, la válvula para
“Café con Crema Extra”, la cubeta para el goteo
y la rejilla.
La cubeta para el goteo y la rejilla pueden
desmontarse, tal como está indicado en las
figs. 28 - 30.
- Limpien regularmente el lugar (N) donde se
coloca el soporte del filtro, eliminando cualquier
gránulo de café adherido.
- Limpien regularmente la abertura de salida del
agua, eliminando cualquier gránulo de café
adherido.
Después de hacer “Cappuccino” limpien
siempre el dispositivo “Cappucino Extra” del
tubo de vapor :
- Quiten el tubo exterior, estirando en la dirección
de la flecha (fig. 31).
- Laven el tubo exterior bajo el grifo (fig. 32).
- Dejen que salga un poco de vapor para limpiar
la sección interior (fig. 33).
- Terminen la limpieza con un paño húmedo
(fig. 34).
- Vuelvan a colocar el tubo exterior en su lugar,
presionando firmemente para asegurarse de
que queda bien fijado en la parte superior
(fig. 35).
Descalcificación
Descalcifiquen regularmente su Cafetera
Espresso.
Con un empleo casero normal, apliquen las
siguientes reglas :
• Dureza hasta 18 ºDH : Dos o tres veces al año.
• Dureza mayor de 18 ºDH : Cuatro o cinco
veces al año.
Su compañía suministradora de agua podrá
informarles acerca de la dureza de su agua.
- Pongan en marcha la Cafetera dos veces, tal
como está indicado en la sección “Café
Espresso”, pero usando vinagre ordinario para
llenar el depósito del agua hasta la mitad y sin
llenar el filtro con café molido.
- Para eliminar cualquier calcificación que haya
podido crearse en el interior del tubo de vapor,
dejen que la Cafetera produzca vapor de vinagre
durante un rato.
- Cuando se haya formado la espuma de leche,
pueden cerrar el control de vapor (fig. 23).
- Coloquen el interruptor del vapor s (L) en la
posición Paro (Off) (fig. 24).
- Quiten entonces la jarra de leche.
- Vuelvan a colocar el tubo de vapor en la
posición sobre la rejilla.
Después del uso
- Desconecten el aparato poniendo el interruptor
principal Paro/ Marcha (J) en la posición
Paro (Off).
- Deslicen hacia afuera el depósito para el café
molido ya usado (U) (fig. 25).
- Quiten (girando) el soporte del filtro (fig. 26).
- Golpeen ligeramente el soporte del filtro para
eliminar el café molido del filtro (fig. 27).
Consejos
“Excelente, sabroso y aromático café
Espresso. y, preferiblemente, recubierto con
una tan agradable y morena “crema” …
¿Como pueden obtenerlo?”
• Usen exclusivamente auténtico y fresco café
Espresso.
- Prueben varios tipos de café Espresso, hasta
encontrar el que mejor se adapte a sus gustos
personales.
• Guarden el café en recipientes herméticos y
opacos y en un lugar fresco y seco.
- En casos especiales, sigan las instrucciones del
fabricante del café.
• Si usan café Espresso molido : De vez en
cuando, sacudan el recipiente del café.
Los granos más finos tienden a caer al fondo
del recipiente y a permanecer allí.
Sacudiéndolo de vez en cuando, mantendrán
una granulación uniforme.
• El genuino café Espresso está adecuadamente
granulado.
Se muele un poco más fino que el tipo “filtro
rápido” usado en las cafeteras. Cuando el café
ha sido molido demasiado grueso, y también
cuando el café molido no ha sido presionado
suficientemente, el café Espresso no resultará
tan sabroso y aromático, ya que el agua
caliente será bombeada con demasiada
rapidez a través del café molido.
Al contrario, cuando el café ha sido molido
demasiado finamente o presionado demasiado
firmemente, tardará más en llenar la(s) taza(s)
y, en tal caso, el café Espresso puede volverse
demasiado amargo.
16
Page 17

17
Si el aparato no funciona como es requerido
Si su Cafetera Espresso no funciona como era de esperar, pueden, en la mayoría de los casos,
encontrar la causa y la solución en lo que se indica a continuación. ¡ Consulten también las
correspondientes secciones de estas instrucciones de uso !
La bomba es demasiado ruidosa
- No hay agua en el depósito para el agua.
Rellénenlo con agua.
- El depósito para el agua no está
correctamente colocado.
La Cafetera no produce café Espresso
- No hay agua en el depósito para el agua o el
depósito para el agua no está colocado
correctamente.
- El café ha sido molido demasiado finamente
y/o ha sido demasiado presionado.
- La abertura de salida de agua está obstruida.
- La Cafetera necesita descalcificación.
Pérdidas de agua por la abertura de
salida de agua y/o tubo de vapor
- Como es normal, el agua se expande dentro
de la cafetera al ser calentada. Hagan girar
el tubo de vapor hasta una posición que
quede sobre la rejilla.
- Si las pérdidas de agua son excesivas,
descalcifiquen o limpien la válvula.
La capa de “CREMA” sobre el café
Espresso es demasiado fina o no existe
- El café no ha sido presionado con suficiente
firmeza
- No hay suficiente café en el filtro.
- La Cafetera no se ha calentado
suficientemente. (¿ Se ha apagado la
lámpara piloto ?)
- El café ha sido molido demasiado grueso.
- La válvula para”Café con Crema Extra” no está
colocada en el filtro.
La capa de “CREMA” es demasiado
oscura y/o tiene un sabor a quemado
- La Cafetera se ha calentado excesivamente.
(¿ Está todavía el botón del vapor en la
posición baja (Marcha = On) ?)
- El café ha sido molido demasiado finamente.
- El café ha sido demasiado presionado.
- Para eliminar todos los restos de vinagre y de
calcificaciones hagan funcionar, dos veces y del
mismo modo, la Cafetera con agua fresca y
limpiando, después, todas las piezas
desmontables
Si el aparato es limpiado y descalcificado
regularmente, tal como se indica en las
instrucciones de uso, probablemente no será
necesario llevar a cabo los siguientes
procedimientos de limpieza y descalcificación.
No obstante, si disminuyera la aptitud para el uso
de la Cafetera Espresso y ninguna de las medidas
indicadas (¡ Tales como el purgado del aire !) lo
remedia, puede necesitarse alguna limpieza /
descalcificación extra.
• Para una muy eficaz descalcificación, sigan
primero las instrucciones indicadas en la
sección "Descalcificación" de las instrucciones
de uso. No obstante, interrumpan el proceso de
descalcificación, una o dos veces, después de
bombear y vaporizar vinagre caliente y dejen
que, al menos durante media hora, el vinagre
actúe sobre el calcio. Después de ello,
continúen el procedimiento.
• Si el agua caliente no sale (o sale demasiado
poca) por la abertura de salida,
limpien/descalcifiquen la perforada placa de
salida.
Desconecten y desenchufen el aparato y
déjenlo enfriar.
Con la ayuda de un destornillador o una
moneda, desenrosquen la placa de salida
(figs. 36 y 37) con lo que podrán, además,
extraer el sistema de válvula. Limpien con un
cepillo duro.
Para descalcificarlas, pongan la placa y la
válvula sumergidas en vinagre ordinario durante
al menos 15 minutos. Usen un cepillo para
eliminar los restos sueltos de calcio. Aclaren
con agua limpia.
Page 18

Importante
• Leia as instruções, acompanhando as
ilustrações (das págs. 4, 5, 22 e 23), antes
de se servir da máquina pela primeira
vez.
• Certifique-se que a voltagem indicada na
base da máquina corresponde à corrente
do local onde vai utilizá-la.
• A máquina deve ser ligada a uma tomada
com terra e a ficha também deverá ter
terra.
• Nunca mergulhe a máquina dentro de
água.
• Antes de proceder à sua limpeza,
desligue a máquina da corrente.
• Se o cabo de alimentação se danificar, a
sua substituição só deverá ser efectuada
pela Philips ou por um seu
concessionário, uma vez que poderão
ser necessárias ferramentas e/ou peças
especiais.
• Antes da primeira utilização, retire todo o
ar da bomba para garantir o seu perfeito
funcio namento. Consulte os capítulos
“Antes de se servir da máquina pela
primeira vez ou após um período
prolongado de inactividade” e
“Renovação da água na caldeira”.
Português
• A água aquece no interior da Máquina
de Café Espresso. A água a ferver
poderá provocar a formação de gotas
que sairão através do tubo de vapor e/ou
pela abertura de saída da água. Trata-se
de um processo perfeitamente normal.
Se não pretender usar o tubo de vapor,
não se esqueça de o voltar a recolher
sobre a grelha.
H Saída do café em pó
I Interruptor do moinho de café
J Comutador para ligar/desligar
com lâmpada piloto
K Interruptor da bomba k com lâmpada piloto
L Interruptor do vapor s com lâmpada piloto
M Controlo do vapor (botão rotativo)
N Acessório porta-filtros - abertura de saída
da água
O Filtro
Para 1 chávena: cheio até à marca
Para 2 chávenas: cheio até acima
P Porta-filtros
Q Tubo de vapor com “Cappuccino Extra”
R Pressor para o café moído
S Grelha (desmontável)
T Gaveta de recolha dos pingos
(desmontável)
U Depósito para o café usado (desmontável)
V Valvula “Cremacaffé”
Antes de se servir da máquina pela primeira
vez ou após um período prolongado de
inactividade
- Lave o reservatório da água, o filtro de café e o
suporte do filtro em água quente com um pouco
de detergente. Enxague muito bem com água
limpa.
- Encha o reservatório com água fria (figs. 2 e 3).
Coloque os dois tubos com cuidado (fig. 4).
Renovação da água na caldeira
A caldeira da máquina leva cerca de 200 ml de
água. Quando a máquina é nova ou quando não é
utilizada durante algum tempo (mais de três dias),
aconselha-se a renovação da água da caldeira
antes de fazer café:
- mude a água do reservatório. Tome atenção à
correcta introdução dos dois tubos.
- coloque um jarro (capacidade mín. de 200 ml)
debaixo do tubo de vapor.
- abra o vapor, rodando o botão para a esquerda.
- ponha a máquina em funcionamento (on/off)(J).
- ligue a bomba k.
- logo que o jarro ficar cheio, desligue a bomba
k e feche o botão do vapor (rodando para a
direita).
A máquina está pronta a funcionar.
Café Espresso
O café Espresso obtém-se pela passagem
rápida da água quente, sob pressão, através
do pó de café tipo Espresso.
Descrição geral (fig. 1, pág. 4)
A Tampa (desmontável)
B Reservatório para a água (desmontável)
C Tubos para a água
D Janela do reservatório para a água
E Tampa do moinho de café com indicador
do tipo de moagem:
∂∂
= moagem normal
∂ = moagem fina
F Moinho de café
G Botão rotativo de controlo do grau de
moagem do moinho de café
18
Page 19

“Cappuccino”
“Cappuccino” é o nome italiano para um café
Espresso servido com um pouco de leite e
coberto com uma camada de espuma de leite.
O creme é preparado com leite frio aquecido
num recipiente com o tubo de vapor.
A espuma e o leite depositam-se sobre
o café Espresso.
O tubo de vapor da sua máquina está
equipado com um acessório muito prático,
chamado “Cappuccino Extra”. Este acessório
é um precioso auxiliar na preparação, de
forma simples e eficaz, dum excelente creme
de leite espumoso para o seu Cappuccino.
• Comece por preparar o creme de leite.
Em seguida, prepare o café Espresso.
• Utilize a mesma quantidade de café mas
chávenas mais largas, próprias para
Cappuccino (70 ml).
• ANTES DE SE SERVIR DO TUBO DE
VAPOR, DEVERÁ RETIRAR SEMPRE O
SUPORTE DO FILTRO.
- Coloque a máquina em posição de
funcionamento, ligando o interruptor (J)
(fig. 18). A lâmpada piloto acende-se.
- Deite leite frio num recipiente, até meio.
- Coloque o botão de vapor s (L) na posição
“on”. Logo que as 3 lâmpadas piloto se acende
rem, a máquina estará pronta para produzir
vapor.
- Rode o tubo do vapor (Q) para o colocar na
posição mais adequada (fig. 19).
- Mantenha o recipiente sob o tubo do vapor.
Nota: os orifícios de saída do ar devem ficar
abaixo do nível do leite (fig. 20).
- Abra o interruptor de controlo do vapor (M),
rodando para a esquerda (fig. 21). A princípio
o vapor condensa-se na água e poderão
sair alguns pingos do tubo de vapor.
Esse gotejamento é recolhido na gaveta (T).
Em seguida, o vapor produzido pelo tubo
começa a emulsionar o leite (fig. 22).
A saída de vapor pode ser regulada através do
controlo de vapor (M).
- Logo que o creme de leite começar a
formar-se, feche o interruptor de controlo do
vapor (fig. 23).
- Volte a colocar o interruptor do vapor F (L) na
posição de desligado “off” (fig. 24).
- Retire o recipiente com o leite.
- Volte a colocar o tubo de vapor na sua posição
sobre a grelha.
O café Espresso serve-se em chávenas
pequenas próprias (50 ml).
• O seu café Espresso ficará à temperatura
certa (quente!) se o porta-filtros for
colocado correctamente na máquina durante
o aquecimento da água.
• As chávenas podem ser previamente
aquecidas, passando-as por água quente.
- Verifique se o reservatório contém água
suficiente.
- Ligue a máquina no botão “on/off” (J). A
lâmpada piloto acende-se. A água da caldeira
começa a aquecer (fig. 5).
- Coloque o filtro (O) no porta-filtros (P) (fig. 6).
Se utilizar café Espresso já moído, comprima-o
bem no filtro. Utilize café especial Espresso.
Nunca coloque café já moído dentro do moinho.
Se utilizar café Espresso em grão:
- Retire a tampa (E) do moinho (F). Encha o
moinho com os grãos de café Espresso (fig. 7).
- Volte a colocar a tampa (fig. 8). Atenção à
posição correcta. As indicações na tampa
correspondem ao tipo de moagem pretendido.
- Se necessário, regule o grau de moagem do
café rodando o botão lateral (G) (fig. 9):
∂∂
= normal, ∂ = fino (favor consultar a
secção “Sugestões”).
- Empurre o porta-filtros contra o botão de
ligar/desligar do moinho (I) (fig. 10). O moinho
começa a trabalhar e o café começa a passar
para o filtro.
- Logo que haja pó de café suficiente no
filtro (para 1 chávena: cheio até à marca;
para 2 chávenas: cheio até acima), retire o
suporte do filtro. O moinho de café parará
automaticamente.
- Comprima o café no filtro, carregando com o
pressor (R) (fig. 11).
- Se necessário, retire os restos de café que
ficarem no rebordo do filtro.
- Coloque o porta-filtros (fig. 12) e aperte-o da
esquerda para a direita (fig. 13).
- Coloque 1 ou 2 chávenas Espresso (50 ml) por
baixo dos bicos do porta-filtros (fig. 14).
- Logo que a lâmpada piloto do interruptor da
bomba k (K) se acender, poderá carregar no
botão de funcionamento (fig. 15). A água
quente é bombeada sobre o café moído e o
líquido produzido começa a passar para as
chávenas (fig. 16).
- Coloque o interruptor da bomba k (K) na
posição de desligado (“O”), logo que tiver café
suficiente nas chávenas (fig. 17).
- Sirva de imediato e saboreie o seu café
Espresso!
19
Page 20

A gaveta e a grelha podem ser retiradas
conforme se indica nas figs. 28-30.
- Limpe regularmente o encaixe do porta-filtros
(N) para retirar os restos de café.
- Limpe regularmente a abertura de saída da
água, retirando qualquer resíduo de café.
Depois de ter feito um “Cappuccino”, limpe
sempre o acessório “Cappuccino Extra” do
tubo de vapor:
- Retire o tubo exterior, puxando no sentido da
seta (fig. 31).
- Enxague o tubo exterior à torneira, em água
corrente (fig. 32).
- Deixe sair um pouco de vapor para limpar o
interior do tubo (fig. 33).
- Termine, passando um pano húmido (fig. 34).
- Volte a colocar o tubo exterior no lugar,
empurrando com força para ficar bem firme
(fig. 35).
Descalcificação
Descalcifique a sua máquina Espresso
regularmente.
Para uma utilização normal, aplique as seguintes
regras:
• 2 a 3 vezes por ano se a dureza da água for
até aos 18º DH
• 4 a 5 vezes por ano se a dureza da água for
superior a 18º DH.
A Companhia das Águas da sua zona poderá
informar sobre o grau de dureza da água.
- Ponha a máquina a trabalhar duas vezes,
conforme indicado no capítulo “Café Espresso”.
Utilize vinagre branco normal em vez de água
para encher o reservatório e não coloque café
no filtro.
- Para remover o calcário que se possa ter
formado no interior do tubo de vapor, ponha a
máquina a funcionar com vinagre durante
algum tempo.
- Ponha a máquina a trabalhar duas vezes com
água limpa para eliminar por completo todos os
resíduos de vinagre e de calcário.
Lave todas as peças desmontáveis.
Se a máquina for limpa e descalcificada
regularmente, conforme se indica nos passos
anteriores, não será necessário proceder a
nenhuma limpeza ou descalcificação mais
profundas. Contudo, se o rendimento da máquina
de café “Espresso” baixar e nenhuma das acções
indicadas resultar (como retirar todo o ar da
máquina!), deverá tornar-se necessário proceder
a uma limpeza/descalcificação mais elaboradas.
Após a utilização
- Desligue a máquina, colocando o interruptor
na posição “off” (J).
- Retire a gaveta do café moído já usado (U)
(fig. 25).
- Retire o porta-filtros (fig. 26).
- Bata o filtro sobre a gaveta para lhe retirar o
café (fig. 27).
Sugestões
“Um delicioso e aromático café Espresso … de
preferência, com uma agradável espuma por
cima … Como fazer?”
• Utilize unicamente café Espresso especial.
- Experimente vários tipos de café Espresso até
encontrar o que melhor serve o seu gosto
pessoal.
• Guarde sempre o café numa caixa bem
fechada, em local fresco e seco, ao abrigo da
luz e da humidade.
- Siga as recomendações do fornecedor
indicadas na embalagem do café.
• Se utilizar café Espresso em pó: de tempos a
tempos deverá agitar o recipiente onde guarda
o café. Os grãos mais finos têm tendência a
comprimir-se no fundo da caixa do café.
Ao agitar a caixa o café mantém-se numa
mistura homogénea.
• A moagem Espresso mais adequada para esta
máquina é uma moagem um pouco mais fina
que a usada para as máquinas com filtro de
papel. Se o pó de café estiver muito grosso ou
se o café não for bem comprimido no filtro, o
seu Espresso não ficará tão gostoso nem tão
aromático. A água quente bombeada passará
muito rapidamente através da mistura de café.
Por outro lado, se a moagem for muito fina ou
se o café for demasiado comprimido no filtro,
o processo é mais lento e o café é coado mais
lentamente para as chávenas.
Além disso, o café poderá ficar um pouco
amargo.
• Sirva o café Espresso em chávenas próprias
(50 ml), enchendo-as até metade ou a três
quartos de altura. Esta é a medida certa para
saborear um óptimo café Espresso.
Limpeza
- Lave regularmente o filtro, o porta-filtros, o
reservatório da água, a válvula “Cremacaffé”, a
gaveta de recolha de pingos e a grelha.
20
Page 21

21
Se a máquina não funcionar bem
Se a sua máquina Espresso não funcionar como gostaria, isso pode dever-se, na maioria dos casos,
a uma das causas apresentadas em seguida. Consulte, também, as secções correspondentes neste
Manual de Instruções!
A bomba faz muito barulho.
- O reservatório não tem água. Encha o
reservatório com água.
- O reservatório da água não está bem
colocado.
A máquina não faz café Espresso.
- O reservatório não tem água ou, então,
não está colocado correctamente.
- O café foi moído demasiado fino e/ou foi
demasiado comprimido no filtro.
- A abertura para saída da água está
obstruída.
- A máquina precisa de ser descalcificada.
Pinga água pela abertura de saída e/ou
pelo tubo de vapor.
- A água no interior da máquina expande-se
por acção do calor. É perfeitamente normal.
Rode o tubo do vapor para o deixar sobre a
grelha.
- Se pingar muita água: descalcifique ou
limpe a válvula.
O café Espresso saiu com um “creme”
muito fino ou, então, sem nenhum creme.
- O café não foi devidamente comprimido
no filtro.
- O filtro não tinha café suficiente.
- A máquina não aqueceu o suficiente.
(A lâmpada piloto já se tinha apagado?)
- O café ficou moído de forma muito grosseira.
- A válvula para “Café com Crema Extra” não
esta colocada no filtro.
O “creme” do café Espresso ficou muito
escuro e/ou o café tem um sabor amargo.
- A máquina aqueceu demasiado.
(O botão do vapor ainda estava ligado
(posição “on” - para baixo?)
- O café foi moído demasiado fino.
- O café ficou demasiado comprimido
no filtro.
• Se não sair (ou sair muito pouca)
água quente pela abertura de saída:
limpe/descalcifique a parte perfurada
da abertura.
Desligue a máquina, retire a ficha da tomada e
deixe arrefecer. Com o auxílio duma chave de
parafusos ou duma moeda, retire a placa da
abertura de saída (figs. 36, 37) para fazer sair
a válvula do sistema. Limpe, com a ajuda
duma escova rija. Para descalcificar, deixe a
placa e a válvula mergulhadas em vinagre
durante 15 minutos. Escove-os bem para
retirar todos os resíduos e enxague com
água limpa.
• Para uma descalcificação mais profunda,
comece por seguir as instruções dadas no
capítulo “Descalcificação” deste manual.
Porém, deverá interromper o processo de
descalcificação uma ou duas vezes após o
vinagre quente começar a ser bombeado e
evaporado e deixar o vinagre a actuar durante,
pelo menos, uma meia hora. Em seguida,
retome a operação.
Page 22

22
20
21
22
25
27
28
29
19
17 18
24
23
30
26
31
Page 23

23
34
32
33
36
37
35
Page 24

24
Page 25

252627
Page 26

Page 27

Page 28

4222 001 91563www.philips.comu
 Loading...