

Page 1
SILK
ZIJDE
SETA
SOIE
SEIDE
SEDA
NYLON
NYLON
NYLON
NYLON
NYLON
NILON
WOOL
WOL
LANA
LAINE
WOLLE
LANA
COTTON
KATOEN
COTONE
COTON
B.WOLLE
ALGODON
LINEN
LINNEN
LINO
LIN
LEINEN
HILO
MAX
MIN
MAX
Supervapor 40
Page 2

2
English Page 4
• Keep page 3 open when reading these
operating instructions.
Français Page 9
• Pour le mode d'emploi: dépliez la page 37.
Deutsch Seite 14
• Schlagen Sie beim Lesen der Gebrauchsanweisung Seite 3 auf.
Nederlands Pagina 19
• Sla bij het lezen van de gebruiksaanwijzing
pagina 3 op.
Italiano Pagina 24
• Prima di usare l'apparecchio, aprite la
pagina 3e leggete attentamente le
istruzioni per l'uso.
Español Página 29
• Desplegar la página 3 al leer las
instrucciones de manejo.
Page 3
3
1
D
GIK
J
M
F
H
L
E
O
L
A
E
N
N
A
O
T
L
O
A
N
I
N
O
C
E
T
S
E
O
T
S
C
O
A
I
E
O
N
N
I
I
L
L
MAX
MIN
N
Y
L
O
N
NYLON
NYLON
NYLON
NYLON
NYLON
MAX
LINEN
COTTON
LINNEN
WOOL
LINO
KATOEN
SILK
LIN
WOL
COTONE
ZIJDE
LANA
LEINEN
COTON
SETA
LAINE
HILO
B.WOLLE
SOIE
WOLLE
ALGODON
SEIDE
LANA
SEDA
NILON
N
C
B
A
Page 4

4
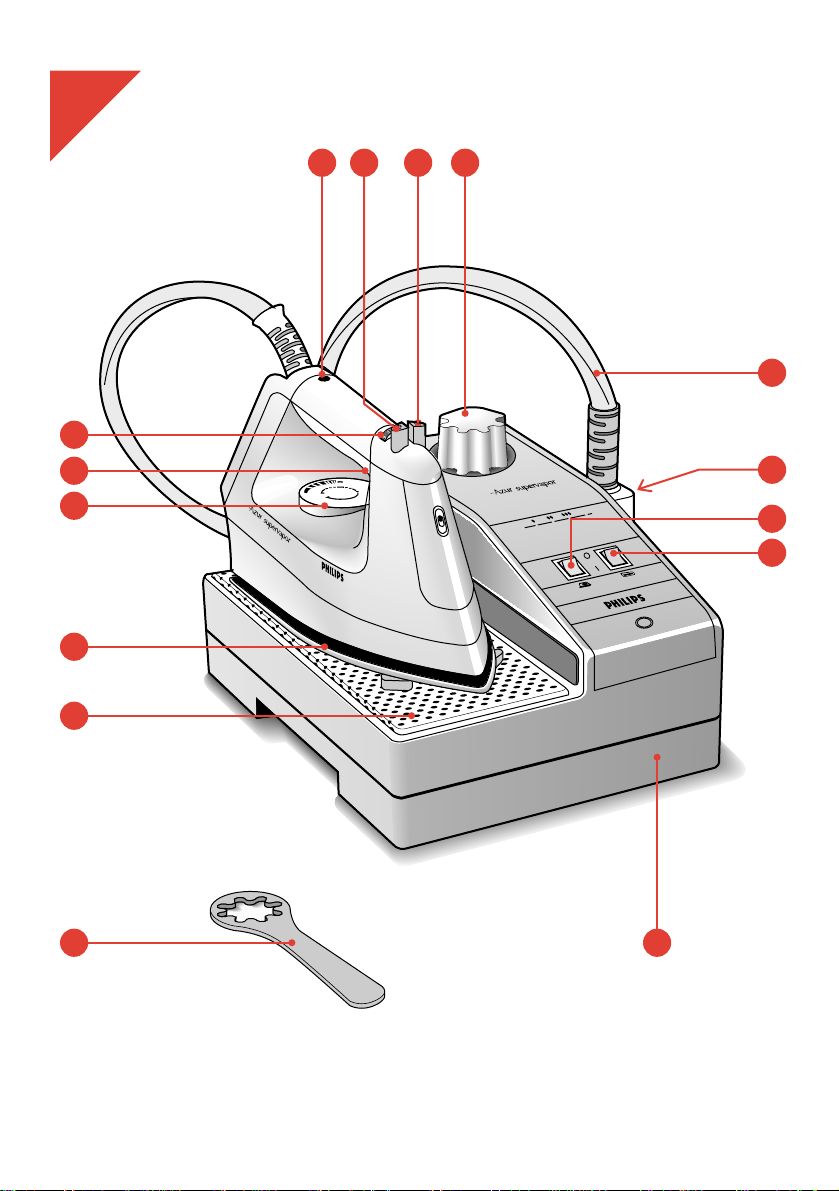
General description (fig. 1)
A Steam tank
B Switch "Steam tank On/Off" with built-in
pilot light "Heating-up". (The pilot light goes
out when the appliance is ready for steamironing.)
C Switch "Iron On/Off" with built-in pilot light
D Filling opening with screw cap
E Iron stand (removable)
F Steam activator (press-in for steam ironing)
G Pilot light "Iron heating-up"
H Temperature dial (rotate)
I Steam control (rotate)
J "Jet of Steam" button (press)
K "Shot of Steam" button (press)
L Soleplate
M Supply hose with ball swivel for maximum
ironing convenience
N Mains cord
O Ring spanner for unscrewing the cap
Ironing temperature
- Always check first if a label with ironing
instructions is attached to the article to be
ironed. Follow these ironing instructions in
all cases.
- If ironing instructions are missing but you know
the kind of fabric, then see the table for
recommended ironing temperatures.
- After the pilot light (G) has gone out and come
on again you can start ironing.
• During ironing the pilot light will come on from
time to time. When this happens, the soleplate
is being heated-up to the required temperature
again. You can continue ironing.
• The table is valid for the fibre materials only.
If some kind of finish has been applied (gloss,
wrinkle, relief etc.), the textile can best be
ironed at a lower temperature.
• First sort out the fabrics according to ironing
temperature: wool with wool, cotton with cotton,
etc.
The iron heats up quicker than it cools down.
Therefore, start ironing the articles requiring the
lowest temperature such as those made of
synthetic fibres. Then progress to the higher
temperatures.
• If the article is made of a mixture of different
fibres, you must always select the lowest ironing
temperature of the composition of those fibres.
(E.g. an article consisting of "60% polyester and
40% cotton" should be ironed at the
temperature indicated for polyester (1) and
without steam.)
If you do not know what kind(s) of fabric(s) the
English
Important
• Please read these instructions for use
carefully in conjunction with the
illustrations before using the appliance.
• Check if the voltage rating on the
typeplate (under the steam tank)
corresponds to the mains voltage in
your home.
• Never unscrew the cap of the steam tank
while the appliance is connected to the
mains wall socket.
• Before using the first time remove any
sticker or protective foil from the
soleplate. Clean the soleplate with a soft
cloth.
• Only connect the appliance to a mains
earthed wall socket.
• Never use the appliance if damaged in
any way.
• Fully unwind the mains cord and supply
hose before starting to iron.
• Always unplug the iron and place it on
the stand when leaving, even when only
for a short while.
• Always place the iron on the iron stand.
Do not place the hot iron on the steam
tank, the supply hose or the mains cord.
The cordset should not be allowed to
touch the soleplate when it is hot.
• Fill the steam tank from a beaker with a
spout to avoid spillage.
• Never fill the steam tank with vinegar,
descaling agents or other chemicals.
• Never immerse the iron or the steam
tank in water.
• Some parts of the iron have been slightly
greased and as a result the iron might
slightly smoke when switched on for the
first time. After a short while, however,
this will cease.
• Take care that children cannot touch the
iron when hot and that they cannot pull
the mains cord or supply hose.
• Always place the steam tank on a stable
ironing board or table.
Page 5
5
article has been made of, find a spot which will
be invisible when wearing or using the article to
try out the ironing temperature. (Always start at
a low temperature and increase to one which
gives the required results.)
• Pure woollen fabrics (100% wool) may be
pressed with the iron set to a steam position.
It is recommended to apply shot-of-steam and
use a dry pressing cloth.
When steam-ironing woollen fabrics, shining of
the fabric may occur. This can be prevented by
turning the article inside out and ironing the
inside.
• Velvet and other textures which rapidly acquire
shiny spots should be ironed in one direction
only (with the nap), applying only light pressure.
Always keep the iron moving.
• Iron the reverse side of synthetic materials and
silk to prevent shining spots. When ironing
coloured silk, it is not advisable to use steam as
this may cause stains.
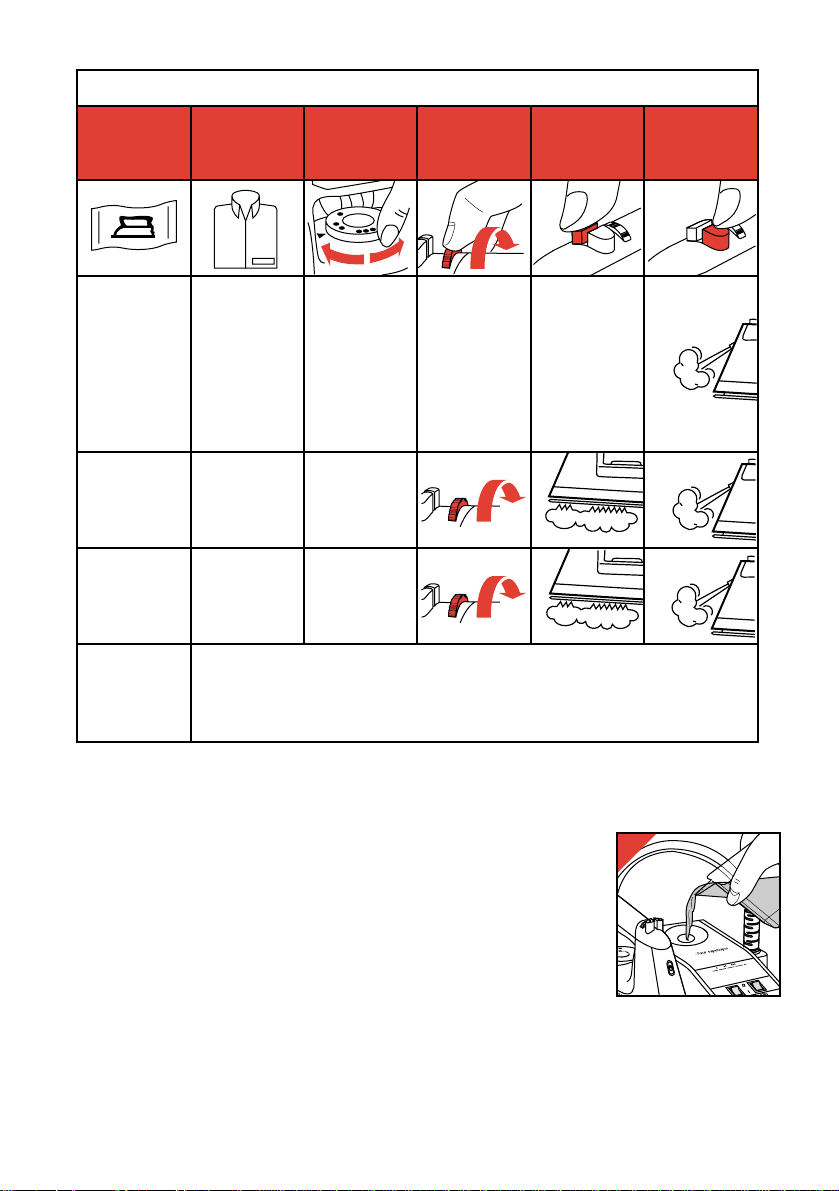
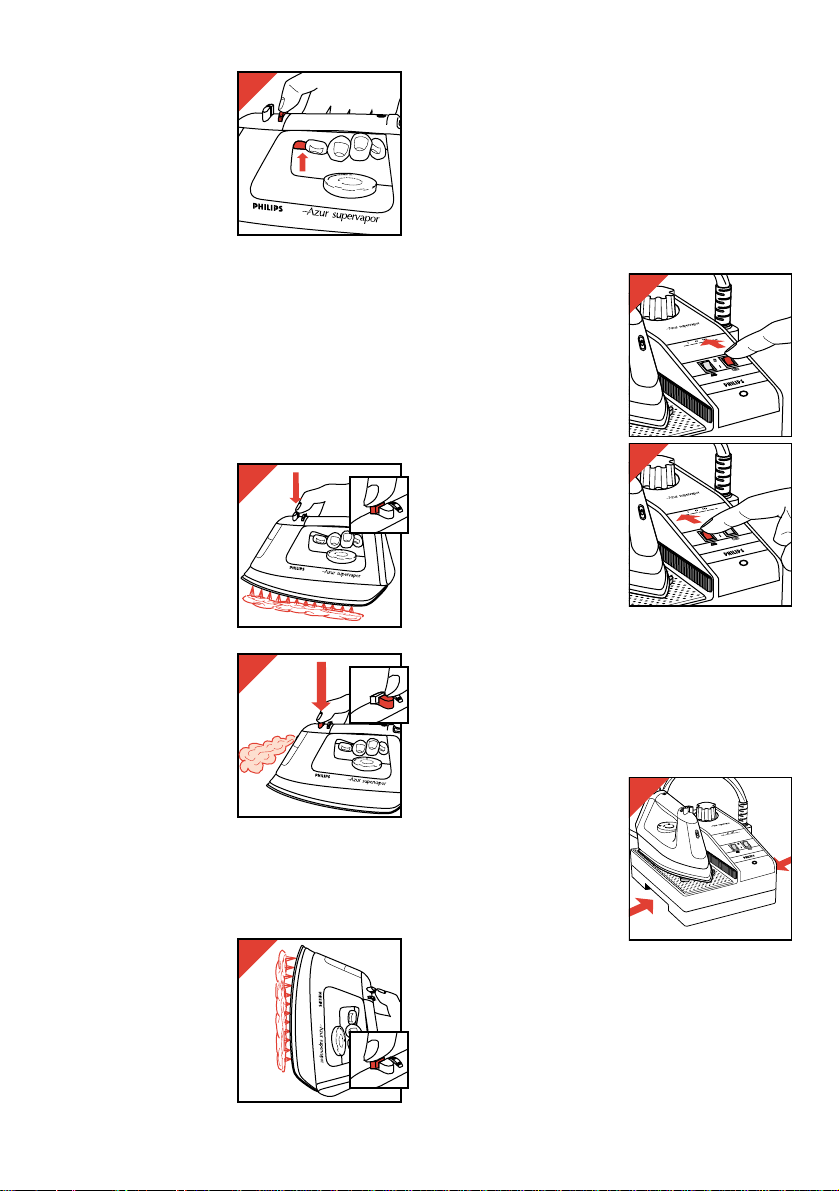
Filling with water (for steam-ironing, shot-of-
steam and steam-spray)
- Position the steam
tank on a stable flat
surface and unscrew
the cap of the steam
tank (D) by turning
anti-clockwise.
- Fill the steam tank
with water
(max. 0.9 litre)
(fig. 2).
• You can use
tapwater. However, if the water is very hard
(hardness higher than 17 °DH / 21
1
⁄4 °Clarke), it
is advisable to use distilled water.
• Never use vinegar, descaling agents or other
chemicals.
–
Table
Label with
ironing
instructions
Kind of
textile
Temperature
dial
Steamironing
B
Synthetic
e.g. acetate,
acrylic,
viscose,
polyamide,
polyester.
Silk
MIN
|
|
1
|
|
A
–
C
Wool
|
2
A
D
Cotton
Linen
|
3
MAX
Z
Please note: This article cannot be ironed!
Shot of
steam
Jet of steam
MIN
MIN
MAX
MAX
2
L
A
N
A
L
A
I
N
E
S
E
T
S
O
A
I
E
IN
N
Y
L
O
N
NYLON
NYLON
NYLON
MAX
LINEN
COTTON
LINNEN
WOOL
LINO
KATOEN
SILK
LIN
WOL
COTONE
ZIJDE
LANA
LEINEN
COTON
SETA
LAINE
HILO
B.WOLLE
SOIE
WOLLE
ALGODON
NYLON
SEIDE
LANA
NYLON
SEDA
NILON
Page 6
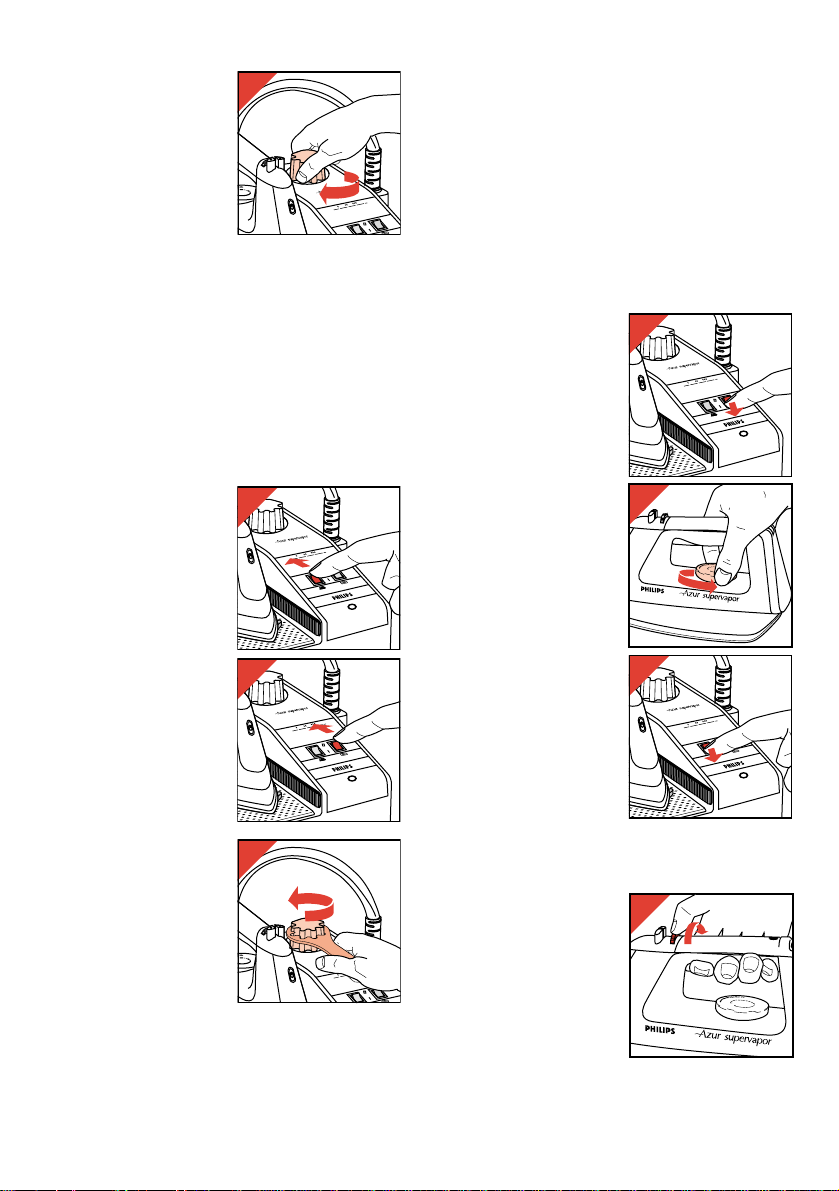
6
- Close the steam tank
by turning the screw
cap clockwise by hand
until tight (fig. 3).
If you begin ironing
- Fill the steam tank before inserting the mains
plug into the wall socket.
While ironing
Caution: If heated-up, the steam tank will be
under pressure.
Only refill if the steam tank is empty (i.e. when
no more steam comes from the soleplate during
steam-ironing).
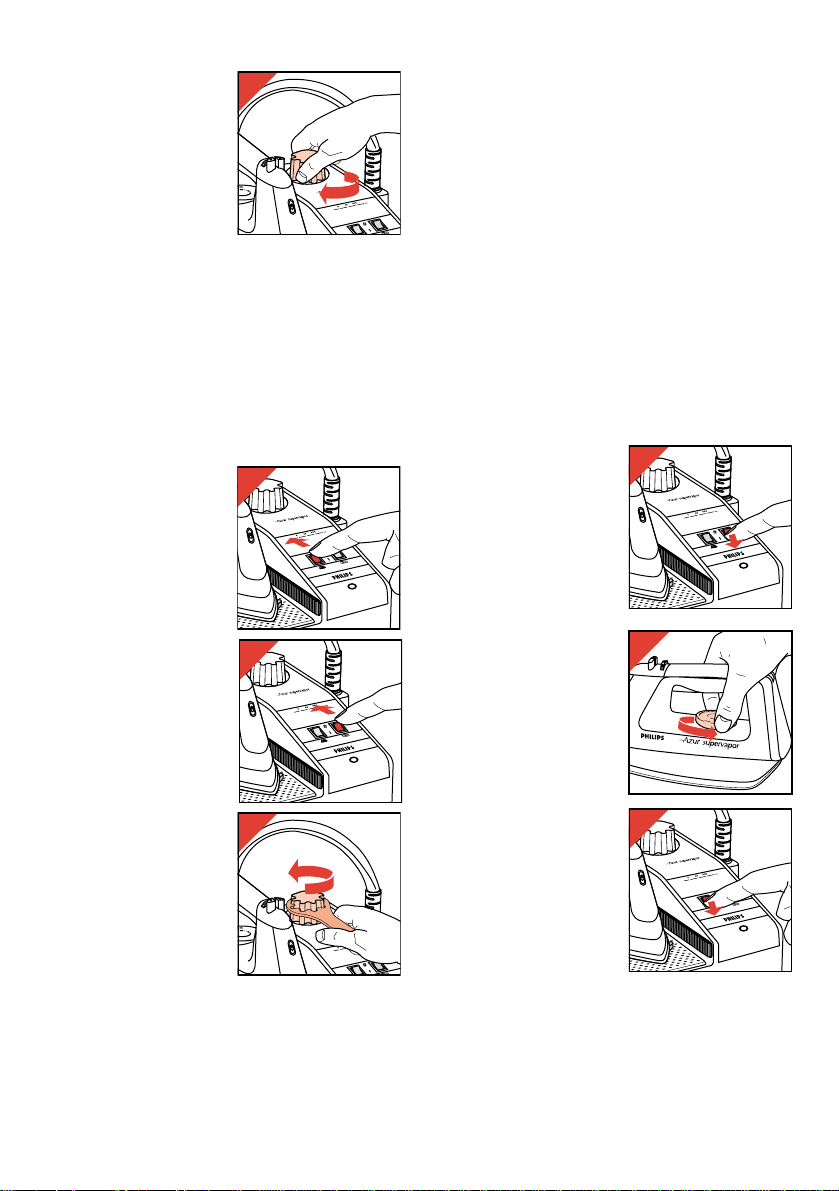
- Switch the iron off by
setting switch (C) to
position O (fig. 4).
- Switch the steam tank
off by setting
switch (B) to position O
(fig. 5).
- Remove the mains
plug from the wall
socket.
- Using the spanner,
carefully unscrew the
cap of the steam tank
(anti-clockwise) until
you can hear steam
escaping (fig. 6).
Wait for the hissing
sound to stop.
This high-pitched sound is completely normal
and is not dangerous.
- Carefully unscrew the cap of the steam tank
further, until you hear the hissing sound again.
Wait again until the sound stops. Proceed in the
same manner until the cap is unscrewed.
- Wait for a few minutes. Then slowly pour
water into the filling opening (D) (fig. 2).
- Close the steam tank by turning the screw cap
manually (clockwise) until tight (fig. 3).
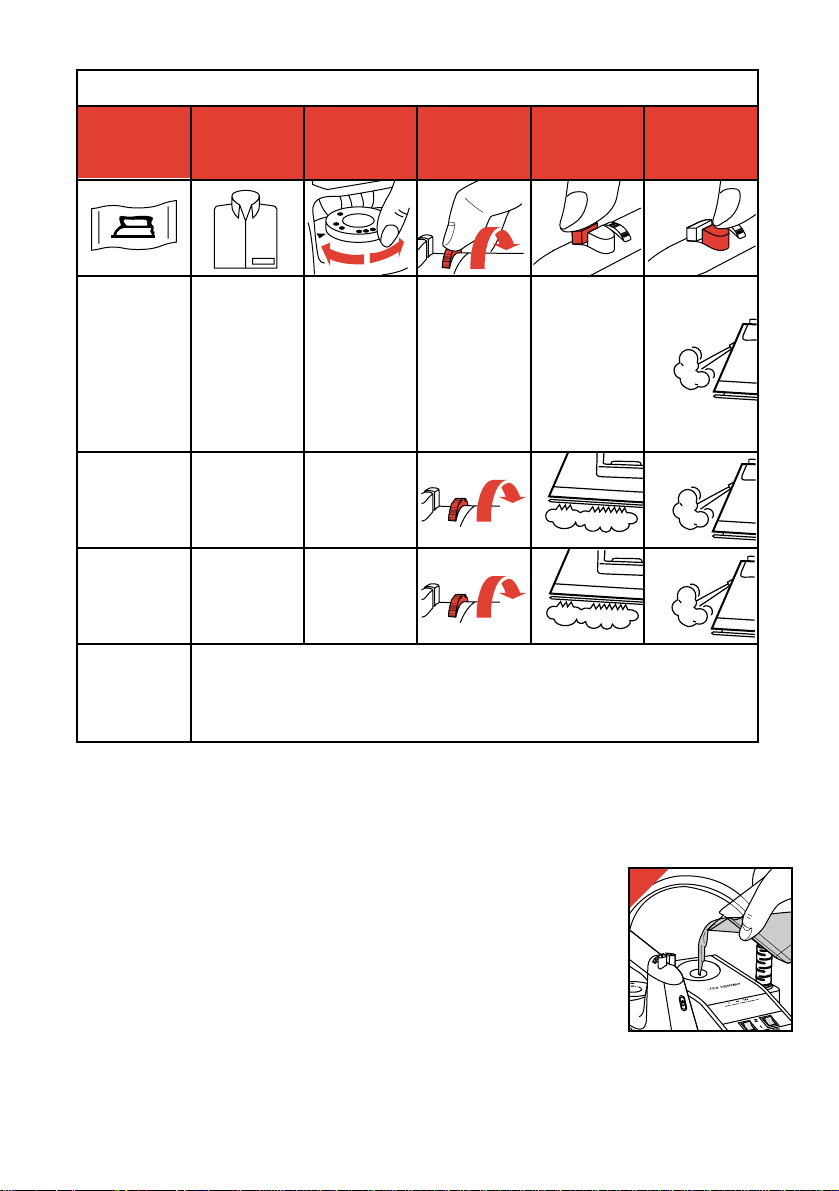
Steam-ironing
• As indicated on the temperature dial (H) and
the table, steam-ironing is only possible at
higher ironing temperatures, so set the dial to
2 or 3.
- Insert the mains plug
into a wall socket.
- Set switch "Steam
tank On/Off" (B) to
position |. The pilot
light in the switch will
come on (fig. 7).
• The iron heats up
faster than the steam
tank. Hence you can
switch on the iron a
few minutes later than
the steam tank.
- Select the required
ironing temperature
with the temperature
dial (H) (fig. 8).
- Set switch
"Iron On/Off" (C) to
position |. The pilot
light in the switch as
well as pilot light (G)
will come on (fig. 9)
- After a few minutes,
pilot light (G) will go
out. This indicates that
the soleplate has
reached the set
temperature.
- When pilot light (B) goes out, this indicates that
the steam tank is heated up and that steam is
ready. You can now start steam ironing.
- To select the required
steam output rotate
the steam control (I)
clockwise (fig. 10).
The further the control
is rotated clockwise,
the more steam is
produced.
3
L
A
N
A
L
A
I
N
E
S
E
T
S
O
A
I
E
IN
N
Y
L
O
N
MAX
LINEN
COTTON
LINNEN
WOOL
LINO
KATOEN
SILK
LIN
WOL
COTONE
NYLON
ZIJDE
LANA
LEINEN
COTON
NYLON
SETA
LAINE
HILO
B.WOLLE
NYLON
SOIE
WOLLE
ALGODON
NYLON
SEIDE
LANA
NYLON
SEDA
NILON
4
MAX
LINEN
COTTON
LINNEN
WOOL
LINO
KATOEN
SILK
LIN
WOL
COTONE
NYLON
ZIJDE
LANA
LEINEN
COTON
NYLON
SETA
LAINE
HILO
B.WOLLE
NYLON
SOIE
WOLLE
ALGODON
NYLON
SEIDE
LANA
NYLON
SEDA
NILON
5
MAX
LINEN
COTTON
LINNEN
WOOL
LINO
KATOEN
SILK
LIN
WOL
COTONE
NYLON
ZIJDE
LANA
LEINEN
COTON
NYLON
SETA
LAINE
HILO
B.WOLLE
NYLON
SOIE
WOLLE
ALGODON
NYLON
SEIDE
LANA
NYLON
SEDA
IN
NILON
6
L
A
N
A
L
A
I
N
E
S
E
T
S
O
A
I
E
N
Y
L
O
N
MAX
LINEN
COTTON
LINNEN
WOOL
LINO
KATOEN
SILK
LIN
WOL
COTONE
NYLON
ZIJDE
LANA
LEINEN
COTON
NYLON
SETA
LAINE
HILO
B.WOLLE
NYLON
SOIE
WOLLE
ALGODON
NYLON
SEIDE
LANA
NYLON
SEDA
NILON
7
MAX
LINEN
COTTON
LINNEN
WOOL
LINO
KATOEN
SILK
LIN
WOL
COTONE
NYLON
ZIJDE
LANA
LEINEN
COTON
NYLON
SETA
LAINE
HILO
B.WOLLE
NYLON
SOIE
WOLLE
ALGODON
NYLON
SEIDE
LANA
NYLON
SEDA
NILON
8
E
N
O
T
L
A
O
N
C
A
N
O
L
T
A
O
I
N
C
E
S
O
E
S
T
O
N
I
A
N
I
I
L
E
L
M
AX
MIN
N
Y
L
O
N
9
MAX
LINEN
COTTON
LINNEN
WOOL
LINO
KATOEN
SILK
LIN
WOL
COTONE
NYLON
ZIJDE
LANA
LEINEN
COTON
NYLON
SETA
LAINE
HILO
B.WOLLE
NYLON
SOIE
WOLLE
ALGODON
NYLON
SEIDE
LANA
NYLON
SEDA
NILON
10
E
N
O
T
L
A
O
N
C
A
N
O
L
T
A
O
I
N
C
E
S
O
E
S
T
O
N
I
A
N
I
I
L
E
L
MAX
MIN
N
Y
L
O
N
Page 7
7
- While steam-ironing
keep the steam
activator (F) pressed-in
(fig. 11).
• During steam-ironing
the two pilot lights (B)
and (G) will come on
from time to time.
When this happens,
either the iron or the
steam tank is being heated-up to the required
temperature. You can continue ironing.
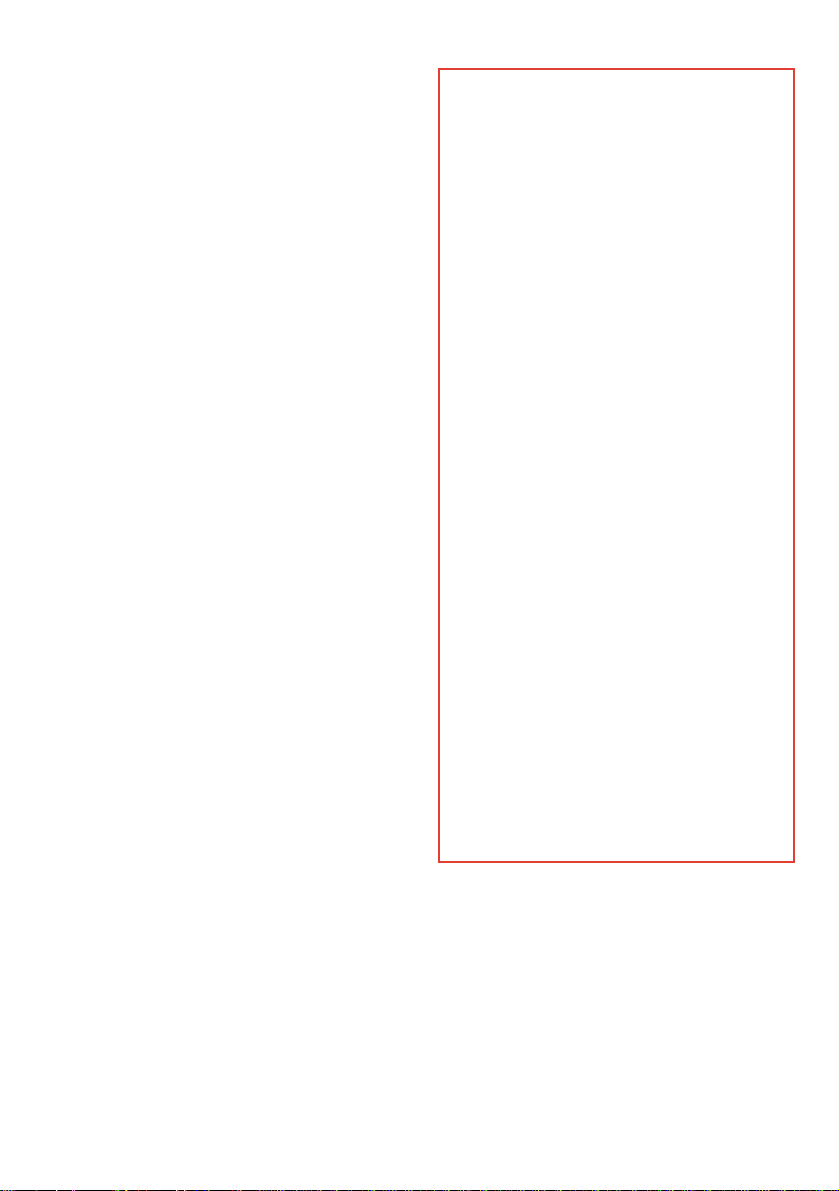
"Shot-of-steam"
• Applying "shot-of-steam" (i.e. high steam output
coming from a limited number of holes in the
soleplate) can help remove stubborn wrinkles
over a large area. This is possible during dryironing as well as steam-ironing.
- Always set the
temperature dial (H) to
the steam range
(2 or 3).
Otherwise the
soleplate is not hot
enough so that water
may drip from it.
- Press button (K)
(fig. 12).
"Jet of steam"
• Applying "jet of steam"
can help remove
stubborn wrinkles.
This is possible during
dry-ironing as well as
steam-ironing.
- Press button (J)
(fig. 13).
• It is not necessary to set the temperature
dial (H) to the steam range for "jet of steam".
Steaming in a vertical
position
Hanging curtains and
clothing (jackets,
woman's suits, coats)
can be steamed by
holding the iron in a
vertical position (fig. 14).
"Jet of steam" and
"Shot-of-steam" can be
applied as well in a vertical position.
Dry-ironing
• For ironing without steam, set the steam
control (I) to position O or do not press-in the
steam activator (F).
• You may switch off the steam tank by setting
switch (B) to Off-position (O) if you do not
intend to use "shot-of-steam" and/or "jet of
steam".
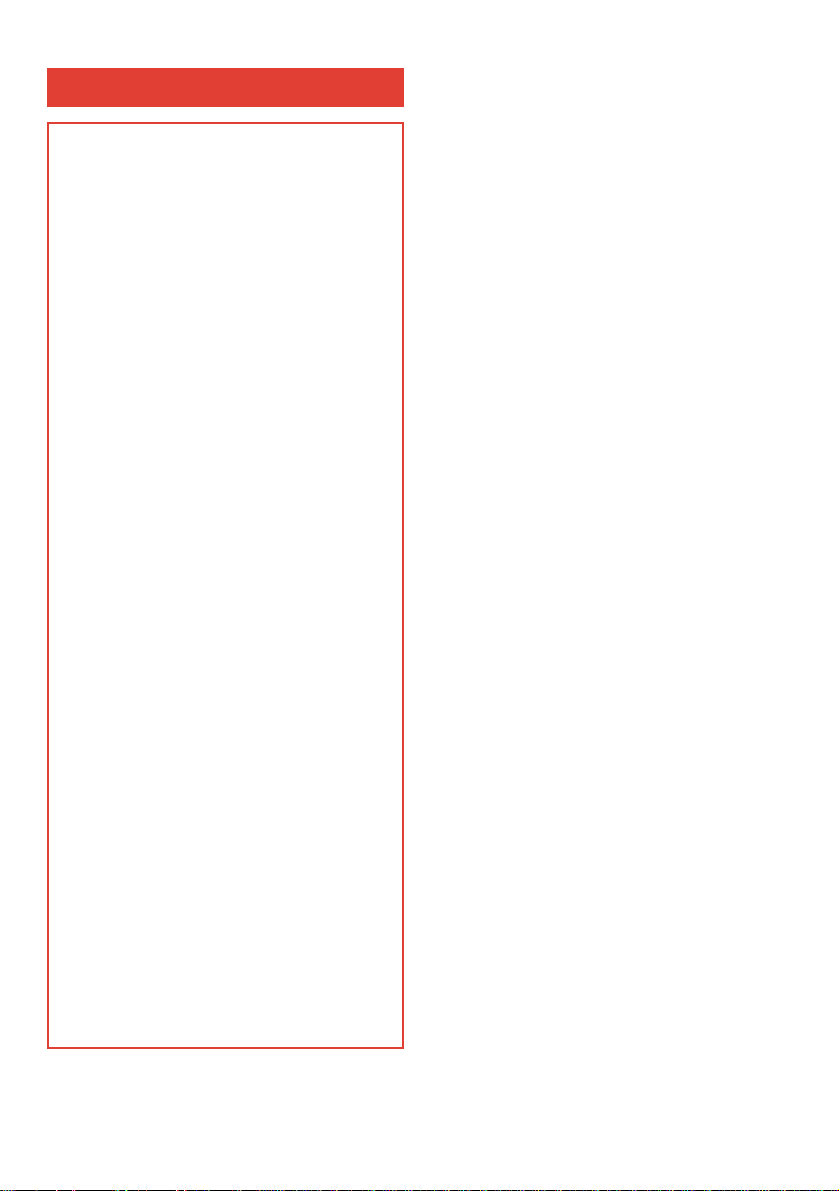
When finished ironing
- Switch off the steam
tank and the iron
(fig. 15, 16).
- Remove the mains
plug from the wall
socket.
- Place the iron on the
stand and let it cool
down.
• It is not necessary to
pour the remainder of
the water out of the
steam tank.
Cleaning
- Before cleaning remove the mains plug from
the wall socket and allow the iron to cool down
sufficiently.
- The appliance can be cleaned with a damp
cloth.
Storage
- For transport there are
handgrips on either
side of the steam tank
(fig. 17).
- Regularly check if the
mains cord and the
supply hose are still in
a good and safe condition.
11
O
N
I
L
E
N
O
T
L
A
O
N
C
A
N
O
L
T
A
O
I
N
C
E
S
E
S
T
O
A
N
I
I
E
L
M
AX
MIN
N
Y
L
O
N
15
12
E
N
O
T
L
A
O
N
C
A
N
O
L
T
A
O
I
N
C
E
S
O
E
S
T
O
N
I
A
N
I
I
L
E
L
MAX
MIN
N
Y
L
O
N
13
E
N
O
T
L
A
O
N
C
A
N
O
L
T
A
O
I
N
C
E
S
O
E
S
T
O
N
I
A
N
I
I
L
E
L
MAX
MIN
N
Y
L
O
N
14
I
N
L
O
N
I
L
C
O
C
T
O
M
O
T
N
AX
O
E
MIN
N
L
L
A
A
I
N
N
E
A
S
O
I
S
E
N
E
T
O
A
L
Y
N
MAX
LINEN
COTTON
LINNEN
WOOL
LINO
KATOEN
SILK
LIN
WOL
COTONE
NYLON
ZIJDE
LANA
LEINEN
COTON
NYLON
SETA
LAINE
HILO
B.WOLLE
NYLON
SOIE
WOLLE
ALGODON
NYLON
SEIDE
LANA
NYLON
SEDA
NILON
16
MAX
LINEN
COTTON
LINNEN
WOOL
LINO
KATOEN
SILK
LIN
WOL
COTONE
NYLON
ZIJDE
LANA
LEINEN
COTON
NYLON
SETA
LAINE
HILO
B.WOLLE
NYLON
SOIE
WOLLE
ALGODON
NYLON
SEIDE
LANA
NYLON
SEDA
NILON
17
L
A
E
N
N
A
O
T
L
O
A
N
I
N
O
C
E
T
S
E
O
T
S
C
O
A
I
E
O
N
N
I
I
L
L
M
A
X
MIN
N
Y
L
O
N
MAX
LINEN
COTTON
LINNEN
WOOL
LINO
KATOEN
SILK
LIN
WOL
COTONE
NYLON
ZIJDE
LANA
LEINEN
COTON
NYLON
SETA
LAINE
HILO
B.WOLLE
NYLON
SOIE
WOLLE
ALGODON
NYLON
SEIDE
LANA
NYLON
SEDA
NILON
Page 8
8
Guarantee and service
This product is guaranteed by Philips for a period
of one year after the date of purchase against
defects due to faulty workmanship or materials.
The guarantee covers both piece parts and
labour.
Service under guarantee is only provided upon
presentation of reasonable evidence
(e.g. completed guarantee card or purchase
receipt) that the date of the claim is within the
guarantee period.
The guarantee is not valid if the defect is due to
accidental damage, misuse or neglect and in case
of alterations or repair carried out by unauthorised
persons.
Service (during and after guarantee) is available
in all countries where the product is officially
distributed by Philips.
In countries where Philips do not distribute the
product, the local Philips service organisation will
also provide service although there may be a
delay if the required spare parts are not readily
available.
In the event of difficulty please contact:
Philips Domestic Appliances and Personal Care B.V.
Service Department,
P.O. Box 225,
9700 AE Groningen,
The Netherlands.
Fax: +31.50.138016.
For United Kingdom:
(These statements do not affect a consumer's
statutory rights.)
Should service be required please apply to the
dealer in the U.K. from whom the product was
purchased or to a Philips Authorised Service
Dealer.
For the address of your nearest
Authorised Service Dealer simply contact our
Consumer Help Desk,
Telephone No. 081-689-2166 Ext. 8014.
This product is manufactured to comply with the
radio interference requirements of the
Council Directive 87/308/EEC.
For U.K. only:
IMPORTANT
Wiring Instructions
WARNING - THIS APPLIANCE MUST BE
EARTHED
The wires in this mains lead are coloured in
accordance with the following code:
GREEN AND YELLOW - EARTH
BLUE - NEUTRAL
BROWN - LIVE
As the colours of the wires in the mains lead of
this appliance may not correspond with the
coloured markings identifying the terminals in
your plug, proceed as follows:
The wire which is coloured GREEN AND
YELLOW must be connected to the terminal
which is marked with the letter "E" or by the
earth symbol E or coloured GREEN or
GREEN AND YELLOW.
The wire which is coloured BLUE must be
connected to the terminal which is marked with
a letter "N" or coloured BLACK.
The wire which is coloured BROWN must be
connected to the terminal which is marked with
the letter "L" or coloured RED.
Note: If the terminals of the plug are
unmarked or if you are in any doubt
consult a qualified electrician.
If a 13 amp. plug is used this must be fitted
with a 13 amp. fuse.
Page 9
9
Description générale (fig. 1)
A Chaudière
B Interrupteur “chaudière marche/arrêt” avec
témoin lumineux. (Le témoin s’éteint lorsque
la pression chaudière est atteinte.)
C Interrupteur “fer marche/arrêt” avec
témoin lumineux
D Bouchon de chaudière avec soupape de
sécurité
E Repose-fer (amovible)
F Bouton de commande vapeur
G Témoin lumineux “chauffage du fer”
H Bouton de commande thermostat (rotatif)
I Bouton de réglage vapeur (rotatif)
J Bouton “spray vapeur” (poussoir)
K Bouton “jet de vapeur” (poussoir)
L Semelle
M Guide-cordon articulé
N Cordon d’alimentation
O Clé de desserrage du bouchon
uniquement
Température de repassage
- Vérifiez toujours au préalable les instructions de
repassage qui sont cousues sur les vêtements.
Dans tous les cas, suivez ces instructions
de repassage.
- Si les instructions de repassage manquent,
mais que vous connaissez le type de textile,
suivez les indications du tableau ci-après.
- Vous pouvez commencer à repasser après que
le témoin lumineux (G) se soit éteint et rallumé
à nouveau.
• Le témoin lumineux s’allumera et s’éteindra de
temps en temps pendant le repassage.
• Le tableau est valable pour tous les tissus.
Les textiles sur lesquels des finitions spéciales
ont été appliquées peuvent être légèrement
repassés à une température inférieure.
• Triez le linge avant de repasser: laine avec
laine, coton avec coton, etc...
Le fer chauffe plus vite qu’il ne refroidit. De ce
fait, commencez à repasser le linge nécessitant
la température la plus basse, tels que les
synthétiques. Puis continuez à des
températures plus élevées.
• Si la composition des tissus est faite de
plusieurs sortes de textiles, réglez le thermostat
pour celui qui nécessite la température la plus
basse (ex: un article composé de “60% polyester et 40% coton”, réglez le thermostat à la
température indiquée pour polyester (1) et sans
vapeur).
• Si vous ne connaissez pas la composition des
tissus, trouvez un endroit invisible de l’extérieur
Français
Important
• Lisez attentivement ce mode d’emploi en
même temps que les illustrations avant
d’utiliser l’appareil.
• Assurez-vous que la tension indiquée
sur la plaque signalétique (à la partie
inférieure de la chaudière) correspond à
celle de votre logement.
• Ne dévissez jamais le bouchon de la
chaudière si l’appareil est connecté au
secteur.
• Avant la première mise en service du fer,
retirez tout sticker ou feuille de
protection de la semelle et essuyez-la
avec un chiffon doux.
• Branchez uniquement l’appareil sur une
prise équipée de terre.
• N’utilisez pas votre fer si une de ses
parties est endommagée.
• Déroulez complètement le cordon et
mettez en place le cordon de liaison
avant de commencer à repasser.
• Débranchez toujours votre fer et placezle sur le socle repose-fer quand vous
vous absentez, même momentanément.
• Ne posez pas le fer chaud sur la
chaudière, sur le cordon de liaison ou
sur le cordon d’alimentation secteur.
• Remplissez la chaudière à l’aide d’un
gobelet à bec verseur pour éviter toute
éclaboussure.
• Ne mettez jamais de vinaigre ou d’autres
agents adoucissants dans la chaudière.
• N’immergez jamais le fer ou la chaudière
dans l’eau.
• Certaines parties du fer ont été un peu
graissées. De ce fait, le fer peut dégager
de la fumée lors de la première mise en
service. Au bout de quelque temps, cette
fumée, qui est sans aucun danger,
disparaîtra.
• Tenez le fer chaud ainsi que le cordon
d’alimentation et le flexible hors de
portée des enfants.
• Placez toujours votre fer et sa chaudière
sur une table ou planche à repasser
stable.
Page 10
10
(l’intérieur par exemple) et essayez de repasser
en commençant par une température basse.
• Les tissus en pure laine (100% laine) peuvent
être repassés à la vapeur. Il est préférable de
régler le fer sur jet de vapeur et d’utiliser une
pattemouille sèche.
Pour éviter le lustrage de tissus en laine
pendant le repassage, repassez-les sur
l’envers.
• Les velours et autres textiles qui risquent de se
lustrer rapidement seront repassés dans une
seule direction (dans le sens des fibres) sans
appuyer sur le fer toujours en mouvement.
• Repassez le côté intérieur des textiles
synthétiques et de la soie pour éviter leur
lustrage. N’utilisez pas le vaporisateur qui peut
faire des tâches.
Remplissage en eau (pour repassage à la
vapeur, jet de vapeur et spray vapeur)
- Placez votre fer et son bloc chaudière sur une
surface stable et dévissez le bouchon de la
chaudière (D).
- Remplissez la
chaudière avec de
l’eau (max. 0,9 l)
(fig. 2).
• Vous pouvez utiliser
de l’eau du robinet.
Utilisez cependant de
l’eau déminéralisée si
l’eau du robinet est
très dure (dureté de
l’eau supérieure à 30° TH). Pour la France,
utilisez de l’eau déminéralisée uniquement.
• N’utilisez jamais de vinaigre ou d’agent anticalcaire chimique.
–
Table
Etiquette
avec instructions de
repassage
Type de
textile
Thermostat Réglage
vapeur
B
Synthétiques
acétate,
acrylique,
viscose,
polyamide,
polyester.
Soie
MIN
|
|
1
|
|
A
–
C Laine
|
2
A
D
Coton
Lin
|
3
MAX
Z
Attention : Ne pas repasser cet article.
“Spray
vapeur”
“Jet vapeur”
MIN
MIN
MAX
MAX
2
L
A
N
A
L
A
I
N
E
S
E
T
S
O
A
I
E
IN
N
Y
L
O
N
MAX
LINEN
COTTON
LINNEN
WOOL
LINO
KATOEN
SILK
LIN
WOL
COTONE
NYLON
ZIJDE
LANA
LEINEN
COTON
NYLON
SETA
LAINE
HILO
B.WOLLE
NYLON
SOIE
WOLLE
ALGODON
NYLON
SEIDE
LANA
NYLON
SEDA
NILON
Page 11
11
• N’ajoutez jamais à
l’eau des produits
odorisants (lavande,
parfums, etc...).
- Revissez le bouchon
de la chaudière à la
main et sans forcer
(fig. 3).
Si vous commencez à repasser
- Remplissez toujours la chaudière avant de
brancher la prise de courant.
Pendant le repassage
Attention: lorsque l’appareil chauffe, la
chaudière est sous pression.
Vérifiez donc qu’il n’y a plus de vapeur à la
sortie du fer avant de remplir la chaudière.
- Mettez l'interrupteur
fer (C) sur la position
arrêt O (fig. 4).
- Mettez l'interrupteur
chaudière (B) sur la
position arrêt O (fig. 5).
- Débranchez la fiche
de la prise de courant.
- Dévissez le bouchon
chaudière à l’aide de
la clé si nécessaire
(fig. 6).
Si un peu de vapeur
sort par le bouchon
lors du dévissage,
attendez que cela
cesse puis continuez l’opération.
Le sifflement qui se produit est toutefois normal
et sans danger pour l’utilisateur.
- Retirez le bouchon (D) et attendez quelques
instants avant de remplir lentement le réservoir
(fig. 2).
- Refermez la chaudière en vissant doucement le
bouchon jusqu’à buter, sans serrer
excessivement ni utiliser la clé (fig. 3).
Attention - Ne serrez pas fortement, la dilatation
de l’ensemble assurant l’étanchéité avec le
joint.
Si vous serrez trop fort, il vous sera difficile
d’ouvrir pour remplir de nouveau le réservoir
lorsqu’il sera chaud. Si au cours de la montée
en température une petite fuite de vapeur se
produisait, resserrez légèrement.
Repassage à la vapeur
• Comme indiqué sur le bouton thermostat (H) et
dans le tableau, vous ne pouvez repasser à la
vapeur qu’à des températures élevées, aussi
réglez le bouton (H) sur 2 ou 3.
- Branchez l’appareil.
- Positionnez
“l’interrupteur
chaudière” (B) sur
marche (position I).
Le témoin lumineux de
l’interrupteur s’allume
(fig. 7).
• Le fer chauffe plus vite
que la chaudière. De
ce fait, vous pouvez
mettre en marche le
fer quelques minutes
plus tard que la
chaudière.
- Sélectionnez la
température de
repassage avec le
bouton (H) (fig. 8).
- Positionnez
“l’interrupteur fer” (C)
sur marche (position I).
Le témoin lumineux de
l’interrupteur (G)
s’allume (fig. 9).
- Au bout de quelques
minutes, ce témoin
lumineux s’éteint. La
semelle est à bonne
température.
- Lorsque la pression
vapeur est atteinte, le témoin lumineux (B)
s’éteint également. Vous pouvez commencer à
repasser.
3
L
A
N
A
L
A
I
N
E
S
E
T
S
O
A
I
E
IN
N
Y
L
O
N
MAX
LINEN
COTTON
LINNEN
WOOL
LINO
KATOEN
SILK
WOL
COTONE
NYLON
ZIJDE
LANA
COTON
NYLON
SETA
LAINE
B.WOLLE
NYLON
SOIE
WOLLE
ALGODON
NYLON
SEIDE
LANA
NYLON
SEDA
NILON
4
MAX
LINEN
COTTON
LINNEN
WOOL
LINO
KATOEN
SILK
LIN
WOL
COTONE
NYLON
ZIJDE
LANA
LEINEN
COTON
NYLON
SETA
LAINE
HILO
B.WOLLE
NYLON
SOIE
WOLLE
ALGODON
NYLON
SEIDE
LANA
NYLON
SEDA
NILON
5
MAX
LINEN
COTTON
LINNEN
WOOL
LINO
KATOEN
SILK
LIN
WOL
COTONE
NYLON
ZIJDE
LANA
LEINEN
COTON
NYLON
SETA
LAINE
HILO
B.WOLLE
NYLON
SOIE
WOLLE
ALGODON
NYLON
SEIDE
LANA
NYLON
SEDA
NILON
6
L
A
N
A
L
A
I
N
E
S
E
T
S
O
A
I
E
IN
N
Y
L
O
N
MAX
LINEN
COTTON
LINNEN
WOOL
LINO
KATOEN
SILK
WOL
COTONE
NYLON
ZIJDE
LANA
COTON
NYLON
SETA
LAINE
B.WOLLE
NYLON
SOIE
WOLLE
ALGODON
NYLON
SEIDE
LANA
NYLON
SEDA
NILON
LIN
LEINEN
HILO
7
MAX
LINEN
COTTON
LINNEN
WOOL
LINO
KATOEN
SILK
LIN
WOL
COTONE
NYLON
ZIJDE
LANA
LEINEN
COTON
NYLON
SETA
LAINE
HILO
B.WOLLE
NYLON
SOIE
WOLLE
ALGODON
NYLON
SEIDE
LANA
NYLON
SEDA
NILON
8
E
N
O
T
L
A
O
N
C
A
N
O
L
T
A
O
I
N
C
E
S
O
E
S
T
O
N
I
A
N
I
I
L
E
L
MAX
MIN
N
Y
L
O
N
9
MAX
LINEN
COTTON
LINNEN
WOOL
LINO
KATOEN
SILK
LIN
WOL
COTONE
NYLON
ZIJDE
LANA
LEINEN
COTON
NYLON
SETA
LAINE
HILO
B.WOLLE
NYLON
SOIE
WOLLE
ALGODON
NYLON
SEIDE
LANA
NYLON
SEDA
NILON
LIN
LEINEN
HILO
Page 12

12
- Pour choisir le débit
vapeur, tournez le
bouton réglage
vapeur (I) (fig. 10).
Plus vous tournerez ce
bouton, plus la
production de vapeur
sera importante.
- Conservez le bouton
vapeur (F) enfoncé
durant le repassage à
la vapeur (fig. 11).
• Pendant le repassage,
les 2 témoins (B)
et (G) peuvent
s’éteindre et se
rallumer de temps à
autre. Ceci est normal
et ne nuit pas au repassage.
“`Jet vapeur”
• Produire une “super vapeur instantanée” peut
être utile pour éliminer des plis rebelles. (Le
surplus de vapeur n’est diffusé que sur un
nombre plus limité de trous sous la semelle.)
Cette opération est possible aussi bien pendant
le repassage à sec que pendant le repassage à
la vapeur.
- Réglez toujours le bouton de température (H)
sur 2 ou 3
selon la vapeur
souhaitée. En effet,
si la température de
la semelle n’est pas
assez élevée, de
l’eau peut couler de
celle-ci.
- Pressez le bouton
(K) (fig. 12).
“
Spray vapeur”
• L’utilisation du spray vapeur peut être utile pour
éliminer des plis rebelles. Cette opération est
possible aussi bien pendant le repassage à sec
que pendant le
repassage à la
vapeur.
- Pressez le
bouton (J) (fig. 13).
• Il n’est pas
nécessaire de régler
le bouton de
température (H).
Repassage en
position verticale
Vous pouvez repasser
des rideaux suspendus et
des vêtements (vestes,
tailleurs, manteaux) en
tenant le fer en position
verticale (fig. 14).
Vous pouvez également
utiliser dans cette
position le jet de vapeur
ou bien le spray vapeur.
Repassage à sec
• Pour le repassage à sec (c’est-à-dire
repassage sans vapeur) n’enfoncez pas le
bouton de commande vapeur (F).
• Vous pouvez éteindre la chaudière en
positionnant l’interrupteur (B) sur O si vous
n’utilisez plus le repassage à la vapeur ou le
spray vapeur.
10
E
N
O
T
L
A
O
N
C
A
N
O
L
T
A
O
I
N
C
E
S
O
E
S
T
O
N
I
A
N
I
I
L
E
L
M
AX
MIN
N
Y
L
O
N
11
E
N
O
T
L
A
O
N
C
A
N
O
L
T
A
O
I
N
C
E
S
O
E
S
T
O
N
I
A
N
I
I
L
E
L
M
A
X
MIN
N
Y
L
O
N
12
E
N
O
T
L
A
O
N
C
A
N
O
L
T
A
O
I
N
C
E
S
O
E
S
T
O
N
I
A
N
I
I
L
E
L
MAX
MIN
N
Y
L
O
N
13
E
N
O
T
L
A
O
N
C
A
N
O
L
T
A
O
I
N
C
E
S
O
E
S
T
O
N
I
A
N
I
I
L
E
L
M
AX
MIN
N
Y
L
O
N
14
I
N
L
O
N
I
L
C
O
C
T
O
MAX
O
T
N
O
E
M
N
I
N
L
L
A
A
I
N
N
E
A
S
O
I
S
E
N
E
T
O
A
L
Y
N
Page 13

13
Après le repassage
- Arrêtez la chaudière et
le fer (fig. 15, 16).
- Débranchez l’appareil.
- Placez le fer sur la
plaque repose-fer et
laissez-le refroidir.
• Il n’est pas nécessaire
de vider l’eau restant
dans la chaudière
après chaque
utilisation.
Il n’est toutefois pas
souhaitable que l’eau
stagne trop longtemps
dans la chaudière. En
cas de non-utilisation
prolongée, il est donc
conseillé de vaporiser
toute l’eau contenue
dans la chaudière et
d’ôter le bouchon ou ne revisser celui-ci que
partiellement.
Nettoyage
- Avant de nettoyer l’appareil, débranchez la
fiche de la prise et attendez qu’il soit
suffisamment refroidi.
- La semelle, le corps du fer et la chaudière
peuvent alors être nettoyés avec un chiffon
humide.
Rangement
- Pour le transport,
utilisez les poignées
de chaque côté
(fig. 17).
- Vérifiez régulièrement
que les cordons
d’alimentation et de
liaison soient en bon
état.
Garantie et service
Philips Appareils Domestiques garantit le
fonctionnement de ses appareils conformément
aux prescriptions de leur mode d'emploi.
En cas de défaillance de l'appareil, Philips assure
gratuitement, à travers son réseau de réparateurs
agréés (liste dans le minitel 3615 Philips), sa
réparation pendant un an, à compter de la date
de vente. Le service est effectué sous garantie
uniquement sur présentation d'un justificatif
(par ex. carte de garantie dûment complétée ou
facture d'achat) et la date d'intervention doit se
situer dans la période de garantie.
La garantie ne couvre pas les défaillances dues à
une cause accidentelle, à un mauvais usage ou
une négligence et en cas de modifications ou
réparations effectuées par des personnes non
qualifiées. En aucun cas, cette garantie ne peut
donner droit à des dommages et intérêts.
Les frais de port retour des interventions
effectuées par le réseau de
Réparateurs Indépendants Agréés Philips A.D
sont pris en charge par Philips A.D sur
présentation des justificatifs correspondants.
Philips assure la garantie et le service aprèsvente dans tous les pays dans lesquels le produit
est officiellement vendu et distribué. Dans les
pays où Philips ne distribue pas le produit,
l'organisation locale pourra effectuer le service
bien qu'il y ait un délai si les pièces ne sont pas
immédiatement disponibles.
En cas de difficulté, contactez:
Philips Domestic Appliances and
Personal Care B.V.
Service Department,
P.O. Box 225,
9700 AE Groningen,
The Netherlands.
Fax: +31.50.138016.
Le consommateur bénéficie en tout état de cause
des conditions des articles 1641 et suivants du
code civil relatifs à la garantie légale.
(Pour la France)
Pour tous renseignements complémentaires, nous
vous conseillons de vous adresser à:
SERVICE SA
Service CONSOMMATEURS PHILIPS
APPAREILS DOMESTIQUES
Rue des Vieilles Vignes - B.P 49
Croissy-Beaubourg
77423 Marne-la-Vallée Cedex 2
Tel. (1) 64.80.54.54
Ce produit répond aux exigences de la
Directive Communautaire antiparasitage
87/308/CEE.
15
MAX
LINEN
COTTON
LINNEN
WOOL
KATOEN
SILK
WOL
COTONE
NYLON
ZIJDE
LANA
COTON
NYLON
SETA
LAINE
B.WOLLE
NYLON
SOIE
WOLLE
ALGODON
NYLON
SEIDE
LANA
NYLON
SEDA
NILON
16
MAX
LINEN
COTTON
LINNEN
WOOL
KATOEN
SILK
WOL
COTONE
NYLON
ZIJDE
LANA
COTON
NYLON
SETA
LAINE
B.WOLLE
NYLON
SOIE
WOLLE
ALGODON
NYLON
SEIDE
LANA
NYLON
SEDA
NILON
LINO
LIN
LEINEN
HILO
LINO
LIN
LEINEN
HILO
17
L
A
E
N
N
A
O
T
L
O
A
N
I
N
O
C
E
T
S
E
O
T
S
C
O
A
I
E
O
N
N
I
I
L
L
M
AX
MIN
N
Y
L
O
N
MAX
LINEN
COTTON
LINNEN
WOOL
LINO
KATOEN
SILK
LIN
WOL
COTONE
NYLON
ZIJDE
LANA
LEINEN
COTON
NYLON
SETA
LAINE
HILO
B.WOLLE
NYLON
SOIE
WOLLE
ALGODON
NYLON
SEIDE
LANA
NYLON
SEDA
NILON
Page 14

Allgemeine Beschreibung (Abb. 1)
A Dampftank
B Ein-/Ausschalter für Dampftank mit
eingebauter Kontrollampe “Dampf wird
erhitzt”. Die Kontrollampe erlischt, sobald
das Gerät zum Dampfbügeln bereit ist.
C Ein-/Ausschalter für das Bügeleisen, mit
eingebauter Kontrollampe
D Einfüllöffnung mit Schraubdeckel
E Abstellfläche, ausklappbar und abnehmbar
F Drucktaste für die Dampfzufuhr
G Kontrollampe “Bügeleisen wird aufgeheizt”
H Temperaturregler, Drehschalter
I Dampfregler, Drehschalter
J Dampfstrahltaste, Druckschalter
K Dampfstoßtaste, Druckschalter
L Bügelsohle
M Verbindungsschlauch mit schwenkbarem
Anschluß zu bequemerem Bügeln
N Netzkabel
O Schraubschlüssel zum Öffnen des
Schraubdeckels
Bügeltemperatur
- Prüfen Sie zuerst immer, ob das zu bügelnde
Wäschestück ein Etikett mit
Bügelvorschriften enthält. Befolgen Sie
diese Bügelvorschriften in jedem Falle.
- Wenn die Bügelvorschrift fehlt und Sie aber die
Textilart kennen, so schauen Sie in der Tabelle
mit den empfohlenen Bügeltemperaturen nach.
- Sie können mit dem Bügeln beginnen, sobald
die Kontrollampe (G) erst aus- und dann wieder
angegangen ist.
• Während des Bügelns geht diese Kontrollampe
von Zeit zu Zeit an und wieder aus. Dann wird
die Bügelsohle wieder auf die erforderliche
Temperatur aufgeheizt. Sie können dabei
weiterbügeln.
• Die Tabelle gilt nur für die dort aufgeführten
Materialien ohne Appretur. Chemisch
behandeltes Material (Glanz, Relief, knitterfrei
usw.) ist bei niedrigerer Temperatur als
angegeben zu bügeln.
• Sortieren Sie zuvor das Bügelgut nach der
erforderlichen Bügeltemperatur: Wolle zu Wolle,
Baumwolle zu Baumwolle usw.
Das Bügeleisen ist schneller aufgeheizt als
abgekühlt. Beginnen Sie darum mit den
Textilien, die nur eine niedrige Temperatur
vertragen, z.B. mit den Synthetics. Bügeln Sie
danach mit höheren Temperaturen weiter.
• Bei Mischgeweben müssen Sie stets die
Temperatur für die Faser einstellen, welche die
niedrigste Temperatur verlangt. Ein Wäscheteil
Deutsch
Wichtig
• Lesen Sie diese Gebrauchsanweisung
sorgfältig durch, und sehen Sie sich
dabei die Abbildungen an, bevor Sie das
Gerät zum ersten Mal benutzen.
• Prüfen Sie vor Inbetriebnahme, ob die
Spannungsangabe auf dem Typenschild
auf der Unterseite des Dampftanks mit der
örtlichen Netzspannung übereinstimmt.
• Schließen Sie das Gerät nur an eine
Schutzkontakt-Steckdose an.
• Öffnen Sie niemals den Deckel des
Dampftanks, während der Stecker in der
Steckdose steckt.
• Entfernen Sie vor dem ersten Gebrauch
alle Aufkleber und die Schutzfolie von
der Bügelsohle. Reinigen Sie die
Bügelsohle mit einem weichen Tuch.
• Einige Teile des Bügeleisens sind leicht
eingefettet und können beim ersten
Gebrauch etwas Rauch entwickeln. Das
geht nach kurzer Zeit vorüber.
• Benutzen Sie das Gerät niemals, wenn es
in irgend einer Hinsicht beschädigt ist.
• Wickeln Sie das Netzkabel und den
Verbindungsschlauch vollständig ab,
bevor Sie mit dem Bügeln beginnen.
• Ziehen Sie den Stecker aus der Steckdose und stellen Sie das Bügeleisen auf
die Abstellfläche, wenn Sie den Raum
verlassen oder das Bügeln, und sei es
nur für kurze Zeit, unterbrechen.
• Stellen Sie das Bügeleisen immer auf der
Abstellfläche ab. Stellen Sie das heiße
Bügeleisen nicht auf den Dampftank und
nicht auf den Verbindungsschlauch
oder auf das Netzkabel, sie dürfen nicht
mit der heißen Bügelsohle in Berührung
kommen.
• Füllen Sie den Dampftank mit Hilfe eines
Meßbechers mit Ausguß, damit kein
Wasser vorbeiläuft.
• Füllen Sie niemals Essig, ein
Entkalkungsmittel oder andere
Chemikalien in den Dampftank.
• Tauchen Sie das Bügeleisen oder den
Dampftank niemals in Wasser.
• Achten Sie darauf, daß Kinder nicht die
heiße Bügelsohle berühren und das
Netzkabel oder den Verbindungsschlauch nicht herabreißen können.
• Stellen Sie den Dampftank immer auf ein
feststehendes Bügelbrett oder auf einen
Tisch.
14
Page 15

15
aus 60% Polyester und 40% Baumwolle z.B.
muß ohne Dampf bei der Einstellung (•) für
Polyester ohne Dampf gebügelt werden.
Wenn Sie nicht wissen, woraus das zu
bügelnde Teil besteht, so suchen Sie eine
Stelle, die bei normalem Gebrauch nicht
sichtbar ist, und probieren Sie dort, welche
Bügeltemperatur angemessen ist. Beginnen Sie
immer mit der niedrigsten Temperaturstufe, bis
das beste Resultat erreicht wird.
• Rein wollene Textilien (100% Wolle) können mit
einer Dampfeinstellung gebügelt werden. Am
besten bügeln Sie mit Dampfstoß und
verwenden ein trockenes Bügeltuch.
Es kann vorkommen, daß die Oberfläche von
Wollsachen nach dem Bügeln glänzt. Das läßt
sich vermeiden, indem Sie das Teil von links,
von der Rückseite, bügeln.
• Samt und andere Gewebe, die beim Bügeln
rasch glänzende Stellen annehmen, sollten Sie
nur in eine Richtung (“mit dem Strich”) und
ohne Druck bügeln.
Halten Sie das Bügeleisen dabei ständig in
Bewegung.
• Bügeln Sie Synthetics und Seide stets von
links, um glänzende Stellen zu vermeiden.
Beim Bügeln gefärbter Seide ist von der
Dampfanwendung abzuraten, weil sonst
Flecken entstehen können.
–
Tabelle
Bügelvorschrift
Textilart Temperatur-
einstellung
Dampfbügeln
B
Synthetics
z.B. Acetat,
Acryl,
Viskose,
Polyamid,
Polyester
Seide
MIN
|
|
1
|
|
A
–
C Wolle
|
2
A
D
Baumwolle
Leinen
|
3
MAX
Z
Dampfstoß Dampfstrahl
Wichtig: Dieses Teil darf nicht gebügelt werden!
MIN
MIN
MAX
MAX
Page 16

16
Mit Wasser füllen zum Dampfbügeln,
Dampfstrahl und Dampfstoß
• Ziehen Sie ggf. zuerst den Stecker aus der
Steckdose.
- Stellen Sie den Dampftank auf eine feste und
ebene Fläche, und schrauben Sie den
Schraubdeckel (D) ab, indem Sie ihn gegen
den Uhrzeigersinn drehen.
- Füllen Sie den
Dampftank mit
maximal 0,9 Liter
Wasser (Abb. 2).
• Sie können
Leitungswasser
verwenden.
• Verwenden Sie
niemals Essig,
Entkalkungsmittel oder
andere Chemikalien.
- Drehen Sie den
Schraubdeckel im
Uhrzeigersinn, bis er
völlig schließt (Abb. 3).
- Stecken Sie erst
danach den Stecker
wieder in die
Steckdose.
Nachfüllen während des Bügelns
Vorsicht: Der heiße Dampftank steht unter
Druck!
Füllen Sie nur dann Wasser nach, wenn der
Dampftank völlig leer ist. Es darf beim
Dampfbügeln kein Dampf mehr aus der
Bügelsohle kommen.
- Schalten Sie das
Bügeleisen aus, indem
Sie den Ein-/Ausschalter (C) auf O
stellen (Abb. 4).
- Schalten Sie den
Dampftank aus, indem
Sie den Ein-/Ausschalter (B) auf O
stellen (Abb. 5).
- Ziehen Sie den
Stecker aus der
Steckdose.
- Lockern Sie den
Schraubdeckel mit
Hilfe des Schraubschlüssels (O)
vorsichtig durch
Drehen gegen den
Uhrzeigersinn, bis Sie
hören, daß Restdampf
entweicht (Abb. 6).
Warten Sie, bis das
Zischen völlig aufgehört hat. Dieses Geräusch
ist völlig normal und gefahrlos.
- Lockern Sie nun vorsichtig den Schraubdeckel
weiter, bis Sie wieder ein zischendes Geräusch
vernehmen. Machen Sie so weiter, bis kein
Zischen mehr zu vernehmen ist, und schrauben
Sie den Schraubdeckel ab.
- Warten Sie jetzt einige Minuten!
Gießen Sie dann langsam Wasser durch die
Einfüllöffnung (D) (Abb. 2).
- Schließen Sie den Dampftank durch Drehen im
Uhrzeigersinn mit dem Schraubdeckel, bis er
dicht sitzt (Abb. 3).
Dampfbügeln
• Dem Temperaturregler (H) und der Tabelle ist
zu entnehmen, daß Dampfbügeln nur bei
höheren Temperaturen möglich ist: Stellen Sie
also den Temperaturregler (H) auf •• oder •••.
- Stecken Sie den Netzstecker in die Steckdose.
- Stellen Sie den
Ein-/Ausschalter (B)
des Dampftanks auf
Position I. Die
Kontrollampe leuchtet
auf (Abb. 7).
• Das Bügeleisen wird
schneller heiß als der
Dampftank. Sie
können das
Bügeleisen darum
einige Minuten später
einschalten als den
Dampftank.
- Stellen Sie den
Temperaturregler (H)
auf die gewünschte
Temperatur (Abb. 8).
2
L
A
N
A
L
A
I
N
E
S
E
T
S
O
A
I
E
IN
N
Y
L
O
N
MAX
LINEN
COTTON
LINNEN
WOOL
LINO
KATOEN
SILK
WOL
COTONE
NYLON
ZIJDE
LANA
COTON
NYLON
SETA
LAINE
B.WOLLE
NYLON
SOIE
WOLLE
ALGODON
NYLON
SEIDE
LANA
NYLON
SEDA
NILON
3
L
A
N
A
L
A
I
N
E
S
E
T
S
O
A
I
E
IN
N
Y
L
O
N
MAX
LINEN
COTTON
LINNEN
WOOL
LINO
KATOEN
SILK
WOL
COTONE
NYLON
ZIJDE
LANA
COTON
NYLON
SETA
LAINE
B.WOLLE
NYLON
SOIE
WOLLE
ALGODON
NYLON
SEIDE
LANA
NYLON
SEDA
NILON
4
5
MAX
LINEN
COTTON
LINNEN
WOOL
LINO
KATOEN
SILK
LIN
WOL
COTONE
NYLON
ZIJDE
LANA
LEINEN
COTON
NYLON
SETA
LAINE
HILO
B.WOLLE
NYLON
SOIE
WOLLE
ALGODON
NYLON
SEIDE
LANA
NYLON
SEDA
NILON
MAX
LINEN
COTTON
LINNEN
WOOL
LINO
KATOEN
SILK
LIN
WOL
COTONE
NYLON
ZIJDE
LANA
LEINEN
COTON
NYLON
SETA
LAINE
HILO
B.WOLLE
NYLON
SOIE
WOLLE
ALGODON
NYLON
SEIDE
LANA
NYLON
SEDA
NILON
6
L
A
N
A
L
A
I
N
E
S
E
T
S
O
A
I
E
IN
N
Y
L
O
N
MAX
LINEN
COTTON
LINNEN
WOOL
LINO
KATOEN
SILK
LIN
WOL
COTONE
NYLON
ZIJDE
LANA
LEINEN
COTON
NYLON
SETA
LAINE
HILO
B.WOLLE
NYLON
SOIE
WOLLE
ALGODON
NYLON
SEIDE
LANA
NYLON
SEDA
NILON
LIN
LEINEN
HILO
LIN
LEINEN
HILO
7
MAX
LINEN
COTTON
LINNEN
WOOL
LINO
KATOEN
SILK
LIN
WOL
COTONE
NYLON
ZIJDE
LANA
LEINEN
COTON
NYLON
SETA
LAINE
HILO
B.WOLLE
NYLON
SOIE
WOLLE
ALGODON
NYLON
SEIDE
LANA
NYLON
SEDA
NILON
8
E
N
O
T
L
A
O
N
C
A
N
O
L
T
A
O
I
N
C
E
S
O
E
S
T
O
N
I
A
N
I
I
L
E
L
MAX
MIN
N
Y
L
O
N
Page 17

- Stellen Sie den
Ein-/Ausschalter (C)
des Bügeleisens auf
Position I. Die
Kontrollampe in
diesem Schalter und
die Kontrollampe (G)
leuchten auf (Abb. 9).
- Nach einigen Minuten
erlischt die Kontrollampe (G). Damit ist die eingestellte
Bügeltemperatur erreicht.
- Danach erlischt die Kontrollampe (B), und der
Dampftank ist aufgeheizt. Sie können jetzt
dampfbügeln.
- Die Dampfzufuhr läßt
sich mit dem
Dampfregler (I)
einstellen. Je weiter
Sie diesen Regler im
Uhrzeigersinn
aufdrehen, um so
mehr Dampf wird
zugeführt (Abb. 10).
- Halten Sie während
des Dampfbügelns die
Drucktaste (F)
gedrückt (Abb. 11).
• Während des
Dampfbügelns gehen
die Kontrollampen (B)
und (G) von Zeit zu
Zeit wieder an. Dann
wird das Bügeleisen
oder das Wasser im Dampftank wieder auf die
eingestellte Temperatur aufgeheizt. Sie können
währenddessen weiterbügeln.
Dampfstoß
• Durch einige Löcher in der Bügelsohle kann ein
Dampfstoß abgegeben werden. Das ist
nützlich, wenn auf einer größeren Fläche
hartnäckige Falten auszubügeln sind. Das ist
sowohl während des Dampbügelns wie beim
Trockenbügeln möglich.
- Stellen Sie den Temperaturregler (H) stets auf
den “Dampfbereich”, also auf •• oder •••, sonst
wird die Bügelsohle
nicht heiß genug, und
es kann aus ihr
Wasser austreten.
- Drücken Sie die
Dampfstoßtaste (K)
(Abb. 12).
Dampfstrahl
• Ein Dampfstrahl ist angebracht, wenn einzelne
hartnäckige Falten auszubügeln sind. Das ist
sowohl während des
Dampfbügelns wie
beim Trockenbügeln
möglich.
- Drücken Sie die
Dampfstrahltaste (J)
(Abb. 13).
- Der Dampfstrahl kann
bei jeder
Bügeltemperatur
eingesetzt werden.
In senkrechter Haltung Aufdämpfen
Vorhänge oder
Kleidungsstücke (Jacken,
Mäntel, Kleider) können
hängend mit aufrecht
gehaltenem Bügeleisen
aufgedämpft werden
(Abb. 14).
Sie können dabei sowohl
den Dampfstrahl wie den
Dampfstoß anwenden.
Trockenbügeln
• Wenn Sie ohne Dampf bügeln wollen, stellen
Sie den Dampfregler (I) auf Position O oder
drücken Sie die Drucktaste (F) für die
Dampfzufuhr nicht.
• Sie können dabei den Dampftank ausschalten,
indem Sie den Ein-/Ausschalter auf O stellen,
wenn Sie weder den Dampfstrahl noch den
Dampfstoß anwenden wollen.
Nach dem Bügeln
- Schalten Sie den Dampftank und das
Bügeleisen aus (Abb. 15 u. 16).
17
9
MAX
LINEN
COTTON
LINNEN
WOOL
LINO
KATOEN
SILK
LIN
WOL
COTONE
NYLON
ZIJDE
LANA
LEINEN
COTON
NYLON
SETA
LAINE
HILO
B.WOLLE
NYLON
SOIE
WOLLE
ALGODON
NYLON
SEIDE
LANA
NYLON
SEDA
NILON
10
E
N
O
T
L
A
O
N
C
A
N
O
L
T
A
O
I
N
C
E
S
O
E
S
T
O
N
I
A
N
I
I
L
E
L
M
A
X
MIN
N
Y
L
O
N
11
E
N
O
T
L
A
O
N
C
A
N
O
L
T
A
O
I
N
C
E
S
O
E
S
T
O
N
I
A
N
I
I
L
E
L
MAX
MIN
N
Y
L
O
N
12
E
N
O
T
L
A
O
N
C
A
N
O
L
T
A
O
I
N
C
E
S
O
E
S
T
O
N
I
A
N
I
I
L
E
L
MAX
MIN
N
Y
L
O
N
13
E
N
O
T
L
A
O
N
C
A
N
O
L
T
A
O
I
N
C
E
S
O
E
S
T
O
N
I
A
N
I
I
L
E
L
MAX
IN
M
N
Y
L
O
N
14
I
N
L
O
N
I
L
C
O
C
T
O
MAX
O
T
N
O
E
M
N
IN
L
L
A
A
I
N
N
E
A
S
O
I
S
E
N
E
T
O
A
L
Y
N
15
MAX
LINEN
COTTON
LINNEN
WOOL
LINO
KATOEN
SILK
LIN
WOL
COTONE
NYLON
ZIJDE
LANA
LEINEN
COTON
NYLON
SETA
LAINE
HILO
B.WOLLE
NYLON
SOIE
WOLLE
ALGODON
NYLON
SEIDE
LANA
NYLON
SEDA
NILON
16
MAX
LINEN
COTTON
LINNEN
WOOL
LINO
KATOEN
SILK
LIN
WOL
COTONE
NYLON
ZIJDE
LANA
LEINEN
COTON
NYLON
SETA
LAINE
HILO
B.WOLLE
NYLON
SOIE
WOLLE
ALGODON
NYLON
SEIDE
LANA
NYLON
SEDA
NILON
Page 18

18
- Ziehen Sie den Stecker aus der Steckdose.
- Stellen Sie das Bügeleisen auf die Abstellfläche
und lassen Sie es abkühlen.
• Sie brauchen das restliche Wasser nicht aus
dem Dampftank zu entfernen.
Reinigung
- Ziehen Sie vor dem Reinigen den Netzstecker
aus der Steckdose und lassen Sie das
Bügeleisen ausreichend abkühlen.
- Das Gerät kann mit einem feuchten Tuch
abgewischt werden.
Aufbewahrung
• Auf beiden Seiten des
Dampftanks sind Griffe
zum Transport des
Geräts angebracht
(Abb. 17).
- Prüfen Sie
regelmäßig, ob das
Netzkabel und die
Verbindungsschläuche
in gutem Zustand sind.
Garantie
Philips übernimmt für dieses Gerät eine Garantie
für die Dauer eines Jahres ab Verkaufsdatum.
Diese Garantie gilt für Material- und
Fabrikationsfehler und schließt sowohl die
Ersatzteile wie die Arbeitsleistung ein.
Die Garantieleistung setzt voraus, daß ein
ausreichender Beleg, z.B. die ausgefüllte
Garantiekarte oder eine ordentliche Kaufquittung,
vorgelegt wird und der Garantieanspruch
innerhalb der Garantiefrist erhoben wird. Die
Garantie verfällt, wenn das Gerät beschädigt,
nicht sachgemäß benutzt oder gewartet wurde
oder unbefugte Eingriffe vorgenommen wurden.
Der Service während und nach der Garantiezeit
ist in allen Ländern verfügbar, in denen das
gekaufte Philips-Produkt offiziell vertrieben wird.
In den Ländern, in denen Philips dieses Produkt
nicht vertreibt, übernimmt die örtliche PhilipsOrganisation trotzdem den Service; jedoch ist
dann ein Zeitverzug möglich, wenn die
erforderlichen Ersatzteile nicht sofort verfügbar
sind.
In Zweifelsfällen wenden Sie sich bitte an:
(für Deutschland)
-ARRIVOPhilips GmbH, Elektro-Hausgeräte-Service
Essener Straße 91, 2000 Hamburg 62
oder
-ARRIVO BerlinPhilips GmbH, Elektro-Hausgeräte-Service
Allee der Kosmonauten 35, O-1140 BerlinMarzahn
oder an
Philips Domestic Appliances and
Personal Care B.V.
Service Department
PO Box 225,
9700 AE Groningen
The Netherlands
Fax: +31.50.138016
Dieses Produkt entspricht den Funkentstörvorschriften der Richtlinie des Rates 87/308/EWG.
17
L
A
E
N
N
A
O
T
L
O
A
N
I
N
O
C
E
T
S
E
O
T
S
C
O
A
I
E
O
N
N
I
I
L
L
MA
X
MIN
N
Y
L
O
N
MAX
LINEN
COTTON
LINNEN
WOOL
LINO
KATOEN
SILK
LIN
WOL
COTONE
NYLON
ZIJDE
LANA
LEINEN
COTON
NYLON
SETA
LAINE
HILO
B.WOLLE
NYLON
SOIE
WOLLE
ALGODON
NYLON
SEIDE
LANA
NYLON
SEDA
NILON
Page 19

19
Algemene beschrijving (fig. 1)
A Stoomtank
B Schakelaar "Stoomtank Aan/Uit" met
ingebouwd controlelampje "Opwarmen".
(Het controlelampje gaat uit als het apparaat
gereed is voor stoomstrijken.)
C Schakelaar "Strijkijzer Aan/Uit"met
ingebouwd controlelampje
D Vulopening met draaidop
E Houder voor strijkijzer
(uitklapbaar/afneembaar)
F Drukknop stoomtoevoer (indrukken voor
stoomstrijken)
G Controlelampje "Strijkijzer warmt op"
H Temperatuurregelaar (draaien)
I Stoomregelaar (draaien)
J Stoomstraal knop (indrukken)
K Stoomstoot knop (indrukken)
L Zoolplaat
M Verbindingsslang met kogelgewricht-
aansluiting voor maximaal strijkgemak
N Aansluitsnoer
O Ringsleutel voor losdraaien van de draaidop.
Strijktemperatuur
- Kijk altijd eerst of er een etiket met
strijkvoorschrift op het stuk textiel is genaaid.
Volg in alle gevallen de aanwijzingen van
het strijkvoorschrift op.
- Als het strijkvoorschrift ontbreekt maar u wel
weet welke soort textiel het betreft, zie dan de
tabel voor de aanbevolen strijktemperaturen.
- Als het controlelampje (G) eerst is uitgegaan en
daarna weer is gaan branden, kunt u beginnen
met strijken.
• Tijdens het strijken zal het controlelampje van
tijd tot tijd even gaan branden. De zoolplaat
wordt dan weer op de juiste temperatuur
gebracht. U kunt intussen doorgaan met
strijken.
• De tabel geldt slechts voor de vezelmaterialen.
Als het textiel een bepaalde "finish" heeft
gekregen (glans, kreuk, structuur, reliëf), dan
kunt u beter op een wat lagere temperatuur
strijken.
• Sorteer het strijkgoed vooraf, rekening houdend
met de strijktemperatuur.
Het strijkijzer warmt snel op, maar koelt
langzamer af. Daarom kunt u het beste
beginnen met de synthetische stoffen
(kunststoffen), die op de laagste temperatuur
gestreken moeten worden. Daarna strijkt u de
stoffen waarvoor u een wat hogere
strijktemperatuur nodig hebt, enzovoorts.
Nederlands
Belangrijk
• Lees de gebruiksaanwijzing en bekijk
alle plaatjes goed voordat u het apparaat
in gebruik neemt.
• Controleer of de aanduiding van het
voltage (aan de onderzijde van de
stoomtank) overeenkomt met de
netspanning in uw woning.
• Draai de dop van de stoomtank nooit los
terwijl de stekker in het stopcontact is.
• Verwijder vóórdat u gaat strijken een
eventueel op de zoolplaat aangebrachte
sticker of beschermfolie. Wrijf de
zoolplaat even schoon met een zachte
doek.
• Sluit het apparaat alleen aan op een
geaard stopcontact.
• Gebruik het apparaat nooit als er iets
stuk aan is.
• Wikkel het aansluitsnoer en de
verbindingsslang geheel af, voordat u
met strijken begint.
• Wanneer u weg moet tijdens het strijken
- zelfs als het maar voor eventjes is haal dan de stekker uit het stopcontact
en zet het strijkijzer op de houder.
• Zet het strijkijzer altijd op de houder. Zet
het hete ijzer nooit op de stoomtank, het
aansluitsnoer of de verbindingsslang.
Voorkom dat de zoolplaat, wanneer deze
heet is, het aansluitsnoer raakt.
• Vul de stoomtank met een beker met
schenktuit om morsen te voorkomen.
• Doe geen azijn, ontkalkingsmiddelen of
andere chemicaliën in de stoomtank.
• Dompel het strijkijzer of de stoomtank
nooit in water.
• Enkele onderdelen van het strijkijzer zijn
licht ingevet. Daardoor kan er wat rook
van het strijkijzer komen als u het voor
de eerste keer gebruikt. Na korte tijd
houdt dit (onschuldige) verschijnsel
vanzelf op.
• Zorg ervoor dat kinderen niet aan het
hete strijkijzer kunnen komen, en dat zij
niet aan de snoeren kunnen trekken.
• Zet de stoomtank altijd op een stabiele
strijkplank of tafel.
Page 20

20
• Wanneer het textiel uit verschillende
vezelsoorten bestaat, kies dan altijd de
temperatuur die geldt voor de gevoeligste stof
van deze samenstelling. (Bijvoorbeeld: als een
stuk textiel bestaat uit "60% polyester en
40% katoen", kies dan de temperatuur voor
polyester (1) en gebruik dan dus ook geen
stoom.)
Als u niet weet uit welke vezelsoorten het textiel
bestaat, zoek dan een plek op die niet zichtbaar
zal zijn als u het artikel draagt of gebruikt en
probeer daar uit welke temperatuur geschikt is.
(Begin dan bij een tamelijk lage temperatuur en
voer de warmte op tot het gewenste resultaat
wordt bereikt.)
• Zuiver wollen stoffen (100% wol) kunt u persen
met stoom. Gebruik dan bij voorkeur
"stoomstoot" en een droge perslap.
Bij het strijken van wollen stoffen met stoom
kunnen glimmende plekken ontstaan. Dit kunt u
voorkomen door het kledingstuk binnenstebuiten te keren en de binnenzijde te strijken.
• Fluweel en andere weefsels die snel
glimplekken vertonen, strijkt u altijd in één
richting (met de vleug mee) en zonder drukken.
Zorg dat het strijkijzer steeds in beweging blijft.
• Synthetische stoffen en zijde strijkt u bij
voorkeur aan de binnenzijde om glimplekken te
voorkomen. Wanneer u gekleurde zijde strijkt,
is het niet aan te raden stoom te gebruiken: dit
kan vlekken veroorzaken.
–
Tabel
Etiket met
strijkvoorschrift
Soort
textiel
Temperatuurkiezer
Stoomstrijken
B
Synthetisch
b.v. acetaat,
acryl,
viscose,
polyamide,
polyester
Zijde
MIN
|
|
1
|
|
A
–
C
Wol
AA
2
A
D
Katoen
Linnen
|
3
MAX
Z
Let op:
Dit artikel kan niet gestreken worden!
Stoomstoot
Stoomstraal
MIN
MIN
MAX
MAX
Page 21

21
Vullen met water (voor strijken met stoom,
stoomstoot en stoomsproeien)
• Zet de stoomtank op
een stevig oppervlak
en draai de dop van
de vulopening los
(linksom).
Doe water in de
stoomtank
(max. 0,9 liter) (fig. 2).
• U kunt gewoon
kraanwater gebruiken.
Het wordt echter aanbevolen gedistilleerd water
te gebruiken als het water erg hard is
(waterhardheid boven
17 °DH).
• Gebruik nooit azijn,
ontkalkingsmiddel of
andere chemicaliën.
- Sluit de stoomtank
door de de dop met de
hand vast te draaien
(rechtsom) (fig. 3).
Bij het begin van een
strijkbeurt
- Vul de stoomtank voordat u de stekker in het
stopcontact steekt.
Tijdens een strijkbeurt
Pas op: de stoomtank staat onder druk
wanneer deze heet is.
Vul de stoomtank alleen wanneer deze geheel
leeg is. Dit is het geval
wanneer er tijdens het
stoomstrijken geen
stoom meer wordt
afgegeven.
- Schakel het strijkijzer
uit door schakelaar (C)
in stand O ("Uit") te
zetten (fig. 4).
- Schakel de stoomtank
uit door schakelaar (B)
in stand O ("Uit") te
zetten (fig. 5).
- Neem de stekker uit
het stopcontact.
- Draai met behulp van
de ringsleutel (O) de
dop van de stoomtank
voorzichtig wat los
(linksom), totdat u
stoom hoort
ontsnappen (fig. 6).
Wacht totdat het
sissende geluid
ophoudt.
- Het geluid is een
normaal verschijnsel
en niet gevaarlijk.
- Draai de dop
voorzichtig wat verder
los, totdat u opnieuw het sissende geluid hoort.
Wacht dan weer tot het ophoudt. Ga zo door
totdat de dop los is.
- Wacht enkele minuten. Giet dan langzaam
water in de vulopening (D) (fig. 2).
- Sluit de stoomtank door de dop met de hand
vast te draaien (fig. 3).
Strijken met stoom
• Zoals u aan de temperatuurregelaar (H) en de
tabel kunt zien, is strijken met stoom alleen
mogelijk bij hogere strijktemperaturen.
Zet dus de temperatuurregelaar op 2 of 3
- Steek de stekker in het stopcontact.
- Zet schakelaar
"Stoomtank Aan/Uit"
(B) in stand | ("Aan").
Het controlelampje in
de schakelaar gaat
dan branden (fig.7).
• Het strijkijzer warmt
sneller op dan de
stoomtank: vandaar
dat u het strijkijzer
enkele minuten later
kunt inschakelen.
- Stel de gewenste
strijktemperatuur in
met behulp van de
temperatuurregelaar
(H) (fig. 8).
- Zet schakelaar
"Strijkijzer Aan/Uit" (C)
in stand | ("Aan"). Het
controlelampje in de
schakelaar gaat dan
branden, evenals
controlelampje (G)
(fig. 9).
- Na een paar minuten
gaat controlelampje
(G) uit.
2
L
A
N
A
L
A
I
N
E
S
E
T
S
O
A
I
E
IN
N
Y
L
O
N
MAX
LINEN
COTTON
LINNEN
WOOL
LINO
KATOEN
SILK
LIN
WOL
COTONE
NYLON
ZIJDE
LANA
LEINEN
COTON
NYLON
SETA
LAINE
HILO
B.WOLLE
NYLON
SOIE
WOLLE
ALGODON
NYLON
SEIDE
LANA
NYLON
SEDA
NILON
3
L
A
N
A
L
A
I
N
E
S
E
T
S
O
A
I
E
IN
N
Y
L
O
N
MAX
LINEN
COTTON
LINNEN
WOOL
LINO
KATOEN
SILK
LIN
WOL
COTONE
NYLON
ZIJDE
LANA
LEINEN
COTON
NYLON
SETA
LAINE
HILO
B.WOLLE
NYLON
SOIE
WOLLE
ALGODON
NYLON
SEIDE
LANA
NYLON
SEDA
NILON
4
MAX
LINEN
COTTON
LINNEN
WOOL
LINO
KATOEN
SILK
LIN
WOL
COTONE
NYLON
ZIJDE
LANA
LEINEN
COTON
NYLON
SETA
LAINE
HILO
B.WOLLE
NYLON
SOIE
WOLLE
ALGODON
NYLON
SEIDE
LANA
NYLON
SEDA
NILON
5
MAX
LINEN
COTTON
LINNEN
WOOL
LINO
KATOEN
SILK
LIN
WOL
COTONE
NYLON
ZIJDE
LANA
LEINEN
COTON
NYLON
SETA
LAINE
HILO
B.WOLLE
NYLON
SOIE
WOLLE
ALGODON
NYLON
SEIDE
LANA
NYLON
SEDA
NILON
6
L
A
N
A
L
A
I
N
E
S
E
T
S
O
A
I
E
IN
N
Y
L
O
N
MAX
LINEN
COTTON
LINNEN
WOOL
LINO
KATOEN
SILK
LIN
WOL
COTONE
NYLON
ZIJDE
LANA
LEINEN
COTON
NYLON
SETA
LAINE
HILO
B.WOLLE
NYLON
SOIE
WOLLE
ALGODON
NYLON
SEIDE
LANA
NYLON
SEDA
NILON
7
MAX
LINEN
COTTON
LINNEN
WOOL
LINO
KATOEN
SILK
LIN
WOL
COTONE
NYLON
ZIJDE
LANA
LEINEN
COTON
NYLON
SETA
LAINE
HILO
B.WOLLE
NYLON
SOIE
WOLLE
ALGODON
NYLON
SEIDE
LANA
NYLON
SEDA
NILON
8
E
N
O
T
L
A
O
N
C
A
N
O
L
T
A
O
I
N
C
E
S
O
E
S
T
O
N
I
A
N
I
I
L
E
L
MAX
MIN
N
Y
L
O
N
9
MAX
LINEN
COTTON
LINNEN
WOOL
LINO
KATOEN
SILK
LIN
WOL
COTONE
NYLON
ZIJDE
LANA
LEINEN
COTON
NYLON
SETA
LAINE
HILO
B.WOLLE
NYLON
SOIE
WOLLE
ALGODON
NYLON
SEIDE
LANA
NYLON
SEDA
NILON
Page 22

22
Dit betekent, dat de zoolplaat de ingestelde
temperatuur heeft bereikt.
- Als controlelampje (B) uit gaat, betekent dit dat
de stoomtank is opgewarmd en dat de stoom
klaar is. U kunt nu beginnen met stoomstrijken.
- Om de hoeveelheid
stoom te regelen,
draait u de stoomregelaar (I) naar rechts
(fig. 10). Naarmate u
de regelaar verder
naar rechts draait,
produceert het
apparaat meer stoom.
- Tijdens het
stoomstrijken houdt u
bovendien knop
stoomtoevoer (F)
ingedrukt (fig. 11).
• Tijdens het
stoomstrijken gaan de
lampjes (B) en (G) nu
en dan branden. Het
strijkijzer of de
stoomtank wordt dan
weer op de juiste temperatuur gebracht. U kunt
intussen doorgaan met stoomstrijken.
"Stoomstoot"
• Het toedienen van een "stoomstoot" (d.w.z.
krachtige stoomafgifte uit een beperkt aantal
gaatjes in de zoolplaat) kan van nut zijn bij het
wegstrijken van hardnekkige valse plooien over
een groot gebied. Dit is zowel tijdens
droogstrijken als tijdens strijken met stoom
mogelijk.
- Zet de temperatuurregelaar (H) altijd in het
"stoomgebied"
(2 of 3): anders
is de zoolplaat niet
heet genoeg en kan
er water uit
druppelen.
- Druk knop (K) in
(fig. 12).
"Stoomstraal"
• Het gebruik van de "stoomstraal" kan van nut
zijn bij het wegstrijken van hardnekkige valse
plooien.
Dit is zowel tijdens droogstrijken als tijdens
strijken met stoom
mogelijk.
- Druk knop (J) in
(fig. 13).
- Het is voor
stoomsproeien niet
nodig de temperatuurregelaar (H) in
het "stoomgebied"
te zetten.
Verticaal stomen
U kunt opgehangen
gordijnen en kleding
(colberts,
mantelpakjes, jassen)
stomen, door het
strijkijzer verticaal te
houden (fig. 14).
U kunt hierbij zowel "stoomstoot" als "stoomstraal"
toepassen.
Droogstrijken
• Voor droogstrijken (= strijken zonder stoom) zet
u de stoomregelaar (I) in stand O of drukt u niet
de knop voor stoomtoevoer (F) in.
• Als u "stoomstoot" en/of "stoomstraal" niet wilt
gebruiken, kunt de stoomtank uitschakelen door
schakelaar (B) in stand "Uit" (O ) te zetten.
Na het strijken
- Schakel de stoomtank en het strijkijzer uit
10
E
N
O
T
L
A
O
N
C
A
N
O
L
T
A
O
I
N
C
E
S
O
E
S
T
O
N
I
A
N
I
I
L
E
L
M
AX
MIN
N
Y
L
O
N
11
E
N
O
T
L
A
O
N
C
A
N
O
L
T
A
O
I
N
C
E
S
O
E
S
T
O
N
I
A
N
I
I
L
E
L
MAX
MIN
N
Y
L
O
N
12
E
N
O
T
L
A
O
N
C
A
N
O
L
T
A
O
I
N
C
E
S
O
E
S
T
O
N
I
A
N
I
I
L
E
L
MAX
MIN
N
Y
L
O
N
13
E
N
O
T
L
A
O
N
C
A
N
O
L
T
A
O
I
N
C
E
S
O
E
S
T
O
N
I
A
N
I
I
L
E
L
MA
X
IN
M
N
Y
L
O
N
14
I
N
L
O
N
I
L
C
O
C
T
O
MA
O
T
N
O
X
E
MIN
N
L
L
A
A
I
N
N
E
A
S
O
I
S
E
N
E
T
O
A
L
Y
N
15
MAX
LINEN
COTTON
LINNEN
WOOL
LINO
KATOEN
SILK
LIN
WOL
COTONE
NYLON
ZIJDE
LANA
LEINEN
COTON
NYLON
SETA
LAINE
HILO
B.WOLLE
NYLON
SOIE
WOLLE
ALGODON
NYLON
SEIDE
LANA
NYLON
SEDA
NILON
16
MAX
LINEN
COTTON
LINNEN
WOOL
LINO
KATOEN
SILK
LIN
WOL
COTONE
NYLON
ZIJDE
LANA
LEINEN
COTON
NYLON
SETA
LAINE
HILO
B.WOLLE
NYLON
SOIE
WOLLE
ALGODON
NYLON
SEIDE
LANA
NYLON
SEDA
NILON
Page 23

23
(fig. 15, 16).
- Neem de stekker uit het stopcontact.
- Zet het strijkijzer op de houder en laat het
afkoelen.
• Het is niet nodig het overgebleven water uit de
stoomtank te gieten.
Schoonmaken
- Neem vóór het schoonmaken de stekker uit het
stopcontact en laat het strijkijzer voldoende
afkoelen.
- U kunt het apparaat schoonmaken met een
vochtige doek.
Opbergen
- Aan de zijkanten zijn
handgrepen
aangebracht voor het
optillen en verplaatsen
(fig. 17).
- Controleer regelmatig
of het snoer en de
verbindingsslang nog
in goede en veilige
conditie zijn.
Garantie en service
Dit produkt wordt door Philips gedurende één jaar
na de datum van aankoop gegarandeerd tegen
gebreken als gevolg van materiaal- en
fabricagefouten. De garantie omvat zowel
onderdelen als arbeidsloon.
Reparatie wordt alleen onder garantie uitgevoerd
indien overtuigend wordt aangetoond
(bijvoorbeeld door middel van een ingevulde
garantiekaart of aankoopbon) dat de dag waarop
de klacht is ingediend binnen de garantieperiode
valt.
De garantie vervalt indien het defect is ontstaan
door schade als gevolg van een ongeluk, onjuist
gebruik, verwaarlozing, of indien er ingrepen aan
zijn verricht of reparatie is uitgevoerd door daartoe
niet bevoegde personen.
Service (tijdens en na de garantieperiode) kan
worden verkregen in alle landen waar het produkt
officieel door Philips wordt gedistribueerd.
Ook in landen waar het produkt niet door Philips
wordt gedistribueerd, zal de plaatselijke Philips
organisatie service verlenen.
Er zal echter enige vertraging kunnen optreden
wanneer de juiste reserve-onderdelen niet direct
beschikbaar zijn.
In geval van moeilijkheden verzoeken wij u
contact op te nemen met:
Philips Domestic Appliances and
Personal Care B.V.
Service Afdeling,
Postbus 225,
9700 AE Groningen,
Nederland.
Fax: 050.138016.
Dit produkt is gefabriceerd in overeenstemming
met de radiostoringsvoorschriften van de
geldende EEG-Richtlijn.
17
L
A
E
N
N
A
O
T
L
O
A
N
I
N
O
C
E
T
S
E
O
T
S
C
O
A
I
E
O
N
N
I
I
L
L
M
AX
MIN
N
Y
L
O
N
MAX
LINEN
COTTON
LINNEN
WOOL
LINO
KATOEN
SILK
LIN
WOL
COTONE
NYLON
ZIJDE
LANA
LEINEN
COTON
NYLON
SETA
LAINE
HILO
B.WOLLE
NYLON
SOIE
WOLLE
ALGODON
NYLON
SEIDE
LANA
NYLON
SEDA
NILON
Page 24

24
Descrizione generale (fig. 1)
A Caldaia
B Interruttore "Caldaia acceso/spento" con
spia incorporata per il riscaldamento (la spia
si spegne automaticamente quando il ferro è
pronto per stirare).
C Interruttore "Ferro acceso/spento" con spia
incorporata
D Apertura con tappo a vite
E Griglia appoggiaferro (asportabile)
F Pulsante per attivare la fuoriuscita di
vapore (premerlo per la stiratura a vapore)
G Spia “ferro da stiro accesso”
H Manopola del termostato (girevole)
I Regolatore del vapore (girevole)
J Pulsante “Getto di vapore” (premere)
K Pulsante “Colpo di vapore” (premere)
L Piastra del ferro
M Tubo flessibile con giunto attacco per una
maggior facilità di stiratura
N Cavo di alimentazione
O Chiave per svitare il tappo.
Temperatura di stiratura
- Per prima cosa controllate se il capo da stirare
è provvisto dell’apposita etichetta con le
istruzioni per la stiratura ed attenetevi in ogni
caso ai consigli riportati.
- In mancanza delle istruzioni per la stiratura ma
conoscendo il tipo di tessuto, potete fare
riferimento alle temperature consigliate nella
tabella allegata.
- Potete iniziare a stirare quando la spia (G) si
spegne per poi riaccendersi subito.
• Nel corso della stiratura, la spia può tornare ad
accendersi di tanto in tanto: questo significa
che la piastra è stata riportata alla temperatura
desiderata e che quindi potete continuare a
stirare.
• La tabella è valida solo per le fibre tessili. In
caso di applicazioni (lustrini, crespature, parti in
rilievo ecc.) vi consigliamo di utilizzare
temperature più basse.
• Dividete per prima cosa i capi da stirare in base
alle diverse temperature di stiratura: lana con
lana, cotone con cotone ecc.
Il ferro impiega meno tempo a riscaldarsi che a
raffreddarsi e quindi vi consigliamo di iniziare a
stirare i capi che richiedono le temperature più
basse, come i capi in fibra sintetica. Passate
poi progressivamente alle temperature più alte.
• Se il capo è composto da tessuti diversi,
scegliete sempre la temperatura più bassa
(es.: un capo composto per il 60% da poliestere
e per il 40% da cotone, dovrà essere stirato alla
Italiano
Importante
• Prima di usare l’apparecchio, leggete
con attenzione le istruzioni e osservate
le figure.
• Prima di collegare l’apparecchio alla rete
di alimentazione, controllate che la
tensione indicata sotto la caldaia
corrisponda a quella della rete locale.
• Non svitate mai il tappo della caldaia
mentre l’apparecchio è collegato alla
rete di alimentazione.
• Prima di usare il ferro per la prima volta,
togliete qualsiasi adesivo o carta
protettiva dalla piastra e pulitela
accuratamente con un panno morbido.
• Collegate il ferro soltanto ad una presa
provvista di messa a terra.
• Non usate l’apparecchio nel caso
risultasse danneggiato in qualsiasi
modo.
• Srotolate completamente il cavo di
alimentazione e il tubo flessibile prima di
iniziare a stirare.
• Togliete sempre la spina dalla presa e
appoggiate il ferro sull’apposito
supporto quando dovete allontanarvi
anche solo per un attimo.
• Appoggiate sempre il ferro sull’apposito
supporto. Non appoggiate mai il ferro
caldo sulla caldaia, sul tubo flessibile o
sul cavo di alimentazione. I cavi non
devono mai toccare la piastra quando è
calda.
• Riempite la caldaia utilizzando un
recipiente dotato di beccuccio per
evitare di rovesciare l’acqua.
• Non riempite mai la caldaia con aceto,
prodotti disincrostanti o altri agenti
chimici.
• Non immergete mai il ferro o la caldaia in
acqua.
• Alcune parti del ferro sono state
lubrificate e quindi il ferro potrebbe
leggermente emettere un pò di fumo
quando viene acceso per la prima volta.
Il fenomeno scomparirà (naturalmente)
nel giro di poco tempo.
• Tenete i bambini lontani dal ferro caldo e
fate in modo che non possano tirare il
cavo di alimentazione o il tubo flessibile.
• Appoggiate sempre la caldaia sull’asse
da stiro o su un tavolo ben saldi.
Page 25

25
temperatura indicata per il poliestere (1) e
senza vapore.
Se non conoscete la composizione del tessuto,
effettuate una prova su un angolo nascosto del
capo per stabilire la giusta temperatura (iniziate
da quella più bassa e aumentatela
gradatamente fino a raggiungere quella che
fornisce i risultati desiderati).
• I capi in pura lana 100% possono essere stirati
con il ferro in posizione vapore.
Vi consigliamo di usare rapidi colpi di vapore e
un panno asciutto.
• Stirando a vapore i capi in lana, il tessuto
potrebbe risultare lucido: per evitare questo
inconveniente, stirate il capo al rovescio.
• Il velluto e gli altri tessuti che tendono a
diventare lucidi rapidamente devono essere
stirati in una sola direzione (nel senso del pelo),
esercitando una leggerissima pressione.
Non tenete mai fermo il ferro sullo stesso punto.
• Per evitare tracce di lucido, stirate al rovescio i
capi in materiale sintetico e in seta. Nel caso di
seta colorata, non usate il vapore per evitare di
provocare eventuali macchie.
Riempimento con acqua (per la stiratura a
vapore, i colpi e lo spruzzo il getto di vapore)
- Appoggiate la caldaia su una superficie stabile
e svitate il tappo (D)
utilizzando l’apposita
chiave e girando in
senso antiorario.
- Riempite d’acqua la
caldaia (max. 0,9 l)
(fig. 2).
• Potete usare normale
acqua del rubinetto.
Nel caso tuttavia
–
Tabella
Etichetta con
istruzioni per
la stiratura
Tipo di
tessuto:
Temperatura Stiratura a
vapore
B
Fibre
sintetiche
es. acetato,
acrilico,
viscosa,
poliammide,
poliestere.
Seta
MIN
|
|
1
|
|
A
–
C
Lana
|
2
A
D
Cotone
Lino
|
3
MAX
Z
Colpo di
vapore
Getto di
vapore
Avvertenza: questo capo non può essere stirato!
MAX
MIN
MAX
MIN
2
L
A
N
A
L
A
I
N
E
S
E
T
S
O
A
I
E
IN
N
Y
L
O
N
MAX
LINEN
COTTON
LINNEN
WOOL
LINO
KATOEN
SILK
LIN
WOL
COTONE
NYLON
ZIJDE
LANA
LEINEN
COTON
NYLON
SETA
LAINE
HILO
B.WOLLE
NYLON
SOIE
WOLLE
ALGODON
NYLON
SEIDE
LANA
NYLON
SEDA
NILON
Page 26

26
l’acqua fosse troppo dura (durezza superiore a
17° DH), vi consigliamo di usare acqua
distillata.
• Non usate mai aceto, prodotti disincrostanti o
agenti chimici.
• Chiudete la caldaia
riavvitando bene a
mano il tappo in senso
orario (fig. 3). Non
usate la chiave perchè
non è necessario ad
un serraggio troppo
forzato potrebbe
creare delle difficoltà
nell’apertura.
Prima di iniziare a stirare
- Riempite la caldaia prima di inserire la spina
nella presa di corrente.
Durante la stiratura
Attenzione: se riscaldata, la caldaia è sotto
pressione.
Riempitela nuovamente solo quando è vuota
(es. quando non esce più vapore durante la
stiratura).
- Spegnete il ferro
mettendo l’interruttore
(C) in posizione O
(fig. 4).
- Spegnete la caldaia
mettendo l’interruttore
(D) in posizione O
(fig. 5).
- Togliete la spina dalla
presa di corrente.
- Svitate con cautela il
tappo in senso
antiorario, utilizzando
l’apposita chiave fino a
quando inizierà a
fuoriuscire il vapore
(fig. 6).
Aspettate che cessi il fischio del vapore.
Questo rumore è assolutamente normale e non
è pericoloso.
- Svitate ulteriormente il tappo fino a quando
sentirete di nuovo il fischio del vapore.
Aspettate nuovamente che cessi il fischio.
Procedete in questo modo fino a svitare
completamente il tappo.
- Aspettate qualche minuto, poi versate
lentamente l’acqua nell’apposita apertura (D)
(fig. 2).
- Richiudete la caldaia avvitando il tappo
manualmente (in senso orario) (fig. 3).
Stiratura a vapore
• Come indicato sulla manopola del termostato
(H) e nella tabella, la stiratura a vapore è
possibile solo con le temperature più alte,
quindi impostate la
temperatura 2 o
3.
- Inserite la spina nella
presa di corrente.
- Mettete l’interruttore
"Caldaia
acceso/spento" (B) in
posizione I. Si accenderà la spia (fig. 7).
• Il ferro si riscalda più
rapidamente rispetto al
vapore, quindi potete
accendere il ferro
qualche minuto dopo
rispetto alla caldaia.
- Selezionate la
temperatura
desiderata mediante il
termostato (H) (fig. 8).
- Mettete l’interruttore
"Ferro acceso/spento"
(C) in posizione I. Si
accenderà la spia
dell’interruttore come
pure la spia (G)
(fig. 9).
- Dopo pochi minuti, la
spia (G) si spegnerà,
per indicare che la
piastra ha raggiunto la temperatura desiderata.
- Lo spegnimento della spia (B) sta ad indicare
che la caldaia è in pressione e che il vapore è
pronto. A questo punto potete iniziare a stirare.
3
L
A
N
A
L
A
I
N
E
S
E
T
S
O
A
I
E
IN
N
Y
L
O
N
MAX
LINEN
COTTON
LINNEN
WOOL
LINO
KATOEN
SILK
WOL
COTONE
NYLON
ZIJDE
LANA
COTON
NYLON
SETA
LAINE
B.WOLLE
NYLON
SOIE
WOLLE
ALGODON
NYLON
SEIDE
LANA
NYLON
SEDA
NILON
4
MAX
LINEN
COTTON
LINNEN
WOOL
LINO
KATOEN
SILK
LIN
WOL
COTONE
NYLON
ZIJDE
LANA
LEINEN
COTON
NYLON
SETA
LAINE
HILO
B.WOLLE
NYLON
SOIE
WOLLE
ALGODON
NYLON
SEIDE
LANA
NYLON
SEDA
NILON
5
MAX
LINEN
COTTON
LINNEN
WOOL
LINO
KATOEN
SILK
LIN
WOL
COTONE
NYLON
ZIJDE
LANA
LEINEN
COTON
NYLON
SETA
LAINE
HILO
B.WOLLE
NYLON
SOIE
WOLLE
ALGODON
NYLON
SEIDE
LANA
NYLON
SEDA
L
A
L
A
IN
NILON
6
N
A
I
N
E
S
E
T
S
O
A
I
E
N
Y
L
O
N
MAX
LINEN
COTTON
LINNEN
WOOL
LINO
KATOEN
SILK
WOL
COTONE
NYLON
ZIJDE
LANA
COTON
NYLON
SETA
LAINE
B.WOLLE
NYLON
SOIE
WOLLE
ALGODON
NYLON
SEIDE
LANA
NYLON
SEDA
NILON
LIN
LEINEN
HILO
7
MAX
LINEN
COTTON
LINNEN
WOOL
LINO
KATOEN
SILK
LIN
WOL
COTONE
NYLON
ZIJDE
LANA
LEINEN
COTON
NYLON
SETA
LAINE
HILO
B.WOLLE
NYLON
SOIE
WOLLE
ALGODON
NYLON
SEIDE
LANA
NYLON
SEDA
NILON
8
E
N
O
T
L
A
O
N
C
A
N
O
L
T
A
O
I
N
C
E
S
O
E
S
T
O
N
I
A
N
I
I
L
E
L
MAX
MIN
N
Y
L
O
N
9
MAX
LINEN
COTTON
LINNEN
WOOL
LINO
KATOEN
SILK
LIN
WOL
COTONE
NYLON
ZIJDE
LANA
LEINEN
COTON
NYLON
SETA
LAINE
HILO
B.WOLLE
NYLON
SOIE
WOLLE
ALGODON
NYLON
SEIDE
LANA
NYLON
SEDA
NILON
LIN
LEINEN
HILO
Page 27

27
- Per regolare la
quantità del vapore,
girate il regolatore del
vapore (I) verso
destra. Quando più si
gira il regolatora verso
destra, tanto più
vapore si produce.
- Durante la stiratura a
vapore, tenete
premuto il pulsante
attivatore di vapore (F)
(fig. 11).
• Durante la stiratura le
due spie (B) e (G) si
accenderanno di tanto
in tanto. Questo
significa che il ferro o
la caldaia hanno
raggiunto la
temperatura desiderata, quindi potete
continuare a stirare.
Il colpo di vapore
• Il colpo di vapore (ad es. il vapore che esce da
un numero limitato di fori della piastra) può
aiutare ad eliminare le pieghe più ribelli su una
specifica zona di tessuto. Questo è possibile
durante la stiratura a vapore o a secco.
- Ruotate la manopola del termostato (H) in
modo da selezionare una delle temperature
previste per la stiratura a vapore (2 o 3)
altrimenti la piastra
non è sufficientemente
calda e l’acqua rischia
di fuoriuscire dai fori.
- Premete il pulsante
(K) (fig. 12).
Getto di vapore
• Il getto di vapore può aiutare ad eliminare le
pieghe più difficili.
Questo è possibile
durante la stiratura a
vapore o a secco.
- Premete il pulsante
(J) (fig. 13).
• Non è necessario
selezionare la
temperatura per il
getto di vapore.
Stiratura in posizione verticale
Con le tende e gli abiti
appesi (giacche, abiti
da donna, cappotti) è
possibile usare il getto
di vapore tenendo il
ferro in posizione
verticale (fig. 14).
E' possibile utilizzare il
colpo o il getto di
vapore anche in
posizione verticale.
Stiratura a secco
• Per stirare senza vapore, mettete il regolatore
del vapore (I) in posizione O oppure non
premete il pulsante attivatore di vapore (F).
• Potete anche spegnere la caldaia mettendo
l’interruttore (B) in posizione O se non volete
utilizzare il colpo o il getto di vapore.
Al termine della stiratura
- Spegnete la caldaia e il ferro (fig. 15, 16).
- Togliete la spina dalla presa di corrente.
- Mettete il ferro sul supporto e lasciatelo
raffreddare.
• Non è necessario togliere dalla caldaia l’acqua
rimasta.
Pulizia
- Prima di pulire il ferro, togliete la spina dalla
presa di corrente e aspettate che l’apparecchio
sia freddo.
- Il ferro può essere pulito con un panno umido.
10
11
14
E
N
O
T
L
A
O
N
C
A
N
O
L
T
A
O
I
N
C
E
S
O
E
S
T
O
N
I
A
N
I
I
L
E
L
M
AX
MIN
N
Y
L
O
N
I
N
L
O
N
I
L
C
O
C
T
O
M
O
T
N
A
O
X
E
M
N
IN
L
L
A
A
I
N
N
E
A
S
O
I
S
E
N
E
T
O
A
L
Y
N
E
N
O
T
L
A
O
N
C
A
N
O
L
T
A
O
I
N
C
E
S
O
E
S
T
O
N
I
A
N
I
I
L
E
L
MAX
MIN
N
Y
L
O
N
12
E
N
O
T
L
A
O
N
C
A
N
O
L
T
A
O
I
N
C
E
S
O
E
S
T
O
N
I
A
N
I
I
L
E
L
M
A
X
MIN
N
Y
L
O
N
13
E
N
O
T
L
A
O
N
C
A
N
O
L
T
A
O
I
N
C
E
S
O
E
S
T
O
N
I
A
N
I
I
L
E
L
MAX
MIN
N
Y
L
O
N
15
MAX
LINEN
COTTON
LINNEN
WOOL
LINO
KATOEN
SILK
LIN
WOL
COTONE
NYLON
ZIJDE
LANA
LEINEN
COTON
NYLON
SETA
LAINE
HILO
B.WOLLE
NYLON
SOIE
WOLLE
ALGODON
NYLON
SEIDE
LANA
NYLON
SEDA
NILON
16
MAX
LINEN
COTTON
LINNEN
WOOL
LINO
KATOEN
SILK
LIN
WOL
COTONE
NYLON
ZIJDE
LANA
LEINEN
COTON
NYLON
SETA
LAINE
HILO
B.WOLLE
NYLON
SOIE
WOLLE
ALGODON
NYLON
SEIDE
LANA
NYLON
SEDA
NILON
Page 28

28
Come riporlo
- La caldaia è dotata di
due impugnature per
permettere il trasporto
dell’apparecchio
(fig. 17).
- Controllate
periodicamente le
condizioni del cavo di
alimentazione e del tubo flessibile.
Garanzia e Servizio Assistenza
Philips garantisce questo apparecchio per
un anno dalla data dell'acquisto contro i difetti di
fabbricazione e dei materiali impiegati.
La garanzia copre sia le parti di ricambio sia la
mano d'opera.
L'assistenza per gli apparecchi in garanzia si
ottiene solamente presentando la prova d'acquisto
dell'apparecchio (p.e. la garanzia debitamente
compilata, oppure lo scontrino fiscale) che
comprovano che la richiesta avviene durante il
periodo di garanzia.
La garanzia non viene riconosciuta per danni
provocati accidentalmente, per uso improprio o
negligenza ed in caso di modifiche o riparazioni
effettuate da persone non autorizzate.
E' possibile ottenere l'assistenza in tutti i Paesi
dove l'apparecchio è ufficialmente distribuito da
Philips (sia durante il periodo di garanzia, sia
quando tale periodo è scaduto).
Nei Paesi dove Philips non distribuisce
l'apparecchio il locale Servizio Assistenza Philips
fornirà l'assistenza anche se potrebbero esserci
dei ritardi nel caso alcune parti di ricambio non
fossero disponibili in loco.
In caso di difficoltà, vogliate contattare :
Servizio Consumatori PHILIPS ITALIA
Linea Verde: 1678-20026
oppure:
Philips Domestic Appliances and
Personal Care B.V.
Service Department
P.O. Box 225
9700 AE Groningen
The Netherlands
Fax: + 31.50.138016
Questo apparecchio è conforme al
D.M. 13.4.1989 (Direttiva CEE/87/308) sulla
soppressione dei radiodisturbi.
17
L
A
E
N
N
A
O
T
L
O
A
N
I
N
O
C
E
T
S
E
O
T
S
C
O
A
I
E
O
N
N
I
I
L
L
M
AX
MIN
N
Y
L
O
N
MAX
N
E
LIN
COTTON
LINNEN
WOOL
LINO
KATOEN
SILK
ONE
LIN
T
WOL
O
C
NYLON
ZIJDE
NA
LA
LEINEN
COTON
NYLON
SETA
LLE
LAINE
HILO
WO
B.
NYLON
ON
SOIE
WOLLE
ALGOD
NYLON
SEIDE
LANA
NYLON
SEDA
NILON
Page 29

29
Descripción general (fig. 1)
A Depósito de vapor
B Conmutador paro/marcha del depósito de
vapor, con luz piloto “Calentándose”
incorporado. (Esta luz piloto se apaga cuando
el aparato ya está listo para poder planchar
con vapor.)
C Interruptor de la plancha con luz piloto
incorporada
D Abertura de llenado con tapa atornillable
E Soporte para la plancha (amovible)
F Activador de vapor (apretar para planchar
con vapor)
G Luz piloto “plancha calentándose”
H Cuadrante de temperatura (giratorio)
I Control de vapor (giratorio)
J Botón “chorro de vapor” (apretar)
K Botón “rociado de vapor” (apretar)
L Suela
M Manguera de alimentación con conexión
giratoria a bola para una mayor comodidad
N Cordón de red
O Llave anular para desenroscar la tapa
Temperatura de planchado
- Comprueben siempre si la prenda que van a
planchar tiene alguna etiqueta con
instrucciones de planchado. Sigan esas
instrucciones en todos los casos.
- Si no hay tal etiqueta, pero conocen la clase de
tejido de que se trate, usen la tabla para ajustar
las temperaturas de planchado.
- Una vez que la luz piloto (G) se haya apagado
y vuelto a encender, podrán empezar a
planchar.
• Durante el planchado, la luz piloto se
encenderá y apagará de vez en cuando.
Durante esos instantes la suela se va
calentando a la temperatura ajustada. Pueden
seguir planchando tranquilamente.
• La tabla sólo es válida para las fibras indicadas
y no es aplicable a ninguno de los acabados,
brillos, etc.
Los tejidos a los que se les haya aplicado algún
tipo de acabado (brillo, arrugas, relieve, etc.)
pueden plancharse mejor en temperaturas
inferiores.
• Seleccionen primero las telas de acuerdo con
la temperatura de planchado: lana con lana,
algodón con algodón, etc.
La plancha se calienta con mayor rapidez que
se enfría. Por eso conviene empezar a planchar
los artículos que necesiten la temperatura más
baja, como son los fabricados con fibras
sintéticas, para ir aumentando después.
Español
Importante
• Lean atentamente estas instrucciones
observando al mismo tiempo las
ilustraciones, antes de usar el aparato
por primera vez.
• Comprueben que la tensión indicada en
la placa de tipo (bajo el tanque de vapor)
corresponde a la existente en su hogar.
• No desenrosquen nunca la tapa del
depósito de vapor estando conectado el
aparato a la red.
• Antes de usar la plancha por primera vez
despeguen todos los adhesivos y
pegatinas que lleve, incluida la lámina
protectora de la suela. Limpien ésta con
un paño húmedo.
• Conecten el aparato únicamente a tomas
de corriente provistas de toma de tierra.
• No empleen nunca el aparato si está
dañado de alguna manera.
• Desenrollen todo el cordón de red y la
manguera de alimentación antes de
empezar a planchar.
• Desenchufen siempre la plancha y
pónganla en su soporte cuando hayan
de ausentarse, aunque sólo sea por un
momento.
• Pongan siempre la plancha en el soporte
de hierro. No la coloquen, estando
caliente, sobre el depósito de vapor, la
manguera o el cordón. Este último no
deberá tocar en la suela cuando ésta se
encuentre caliente.
• Llenen el depósito de vapor con una
jarra provista de pico, para evitar
salpicaduras.
• No llenen el depósito con vinagre,
agentes descalcificadores ni otros
productos químicos similares.
• No sumerjan nunca la plancha ni el
depósito de vapor en agua.
• Algunas partes de la plancha están
ligeramente engrasadas y, como
consecuencia, humearán un poco al
calentarla por primera vez, aunque
durará poco. No es nada peligroso.
• Procuren que los niños no puedan tocar
la plancha estando caliente ni tirar del
cordón de alimentación o de la
manguera.
• Pongan siempre el depósito de vapor en
una superficie plana (tabla de planchar o
mesa).
Page 30

30
• Si la tela consta de varias clases de fibras, se
seleccionará siempre la mínima temperatura de
planchado correspondiente a la composición de
esas fibras. (Por ejemplo, un artículo formado
por un 60% de poliéster y un 40% de algodón
deberá plancharse con la temperatura indicada
para la primera de las fibras (1) y sin vapor.)
Si ignoran la composición de las telas, busquen
un lugar que resulte invisible al vestir la prenda
y prueben allí cuál es la temperatura más
apropiada. (Empiecen con la más baja y suban
hasta que dé mejores resultados.)
• Los tejidos hechos de lana pura (100% lana)
pueden plancharse con la plancha en posición
de vapor. Lo más conveniente es usar chorro
de vapor y poner una tela seca intermedia.
Al planchar telas de lana con vapor puede
aparecer brillo en ellas, lo cual puede evitarse
planchándolas por el revés.
• Los terciopelos y otras telas similares, que
adquieren rápidamente puntos brillantes,
deberán plancharse en una sola dirección (con
una tela interpuesta) y aplicándoles una presión
muy ligera.
Conserven la plancha siempre en movimiento.
• Planchen los materiales sintéticos y la seda por
el revés para evitar puntos brillantes. No usen
vapor, que podría ocasionar manchas.
Para llenarla de agua (para planchar al vapor,
chorro de vapor y rociado de vapor)
- Pongan el depósito de vapor en una superficie
plana y estable, y desenrosquen la tapa del
depósito (D), haciéndola girar a izquierdas.
–
Tabla
Etiqueta con
instrucciones
de planchado
Clase de
tejido
Mando de
temperatura
Planchado
con vapor
B
Sintéticos
p. ej. acetato
acrílicos
viscosa
poliamida
poliéster
seda
MIN
|
|
1
|
|
A
–
C
lana
|
2
A
D
algodón
lino
|
3
MAX
Z
Rociado de
vapor
Chorro de
vapor
Cuidado: ¡Este artículo no se puede planchar!
MAX
MIN
MAX
MIN
Page 31

31
- Llenen el depósito con
agua (máx. 0,9 litros)
(fig. 2).
• Pueden usar agua del
grifo. Si esta agua es
muy dura (más de
17 °DH), conviene que
usen sólo agua
destilada.
• No utilicen vinagre,
agentes descalcificantes ni otros
productos químicos.
- Cierren el depósito del
vapor haciendo girar
manualmente la tapa a
derechas hasta que
quede bien apretada
(fig. 3).
Si empiezan a planchar
- Llenen primero el depósito, antes de enchufar
la clavija en la toma de corriente.
Mientras planchan
¡Cuidado!: Si se ha calentado, el depósito de
vapor estará sometido a presión.
Rellénenlo únicamente si está vacío (es decir,
cuando ya no salga vapor por la suela durante el
planchado).
- Apaguen la plancha
llevando el interruptor
(C) a la posición O
(fig. 4).
- Apaguen el depósito
llevando el interruptor
(B) a la posición O
(fig. 5).
- Saquen la clavija de la
toma de corriente.
- Con la llave que se
entrega con el
aparato, desenrosquen poco a poco la
tapa del depósito de
vapor (a izquierdas)
hasta que oigan que
se escapa vapor
(fig. 6).
Esperen a que cese el silbido del escape.
Este tono alto del escape es del todo normal y
no peligroso.
- Desenrosquen con cuidado la tapa del depósito
de vapor un poco más, hasta que vuelvan a oír
el siseo del vapor.
Esperen a que termine y sigan de este modo
hasta que la tapa quede completamente
desenroscada.
- Esperen unos minutos. Después, poco a poco,
echen agua por la abertura de llenado (D)
(fig. 2).
- Cierren el depósito de vapor haciendo girar la
tapa a derechas, con la mano, hasta que quede
bien apretada (fig. 3).
Planchado con vapor
• Como se indica en el cuadrante (H) de
temperatura y en la tabla, el planchado con
vapor sólo puede hacerse en las más altas
temperaturas de planchado, por lo que habrá
que poner el cuadrante en 2 o 3.
- Enchufen la clavija en una toma de corriente.
- Pongan el conmutador
paro/marcha del
depósito de vapor (B)
en la posición I. La luz
piloto del conmutador
se iluminará (fig. 7).
• La plancha se calienta
más deprisa que el
depósito de vapor. Por
eso, conviene que
enciendan aquélla
unos minutos antes
que éste.
- Elijan la temperatura
de planchado más
idónea con el
cuadrante (H) (fig. 8).
2
L
A
N
A
L
A
I
N
E
S
E
T
S
O
A
I
E
IN
N
Y
L
O
N
MAX
LINEN
COTTON
LINNEN
WOOL
LINO
KATOEN
SILK
LIN
WOL
COTONE
NYLON
ZIJDE
LANA
LEINEN
COTON
NYLON
SETA
LAINE
HILO
B.WOLLE
NYLON
SOIE
WOLLE
ALGODON
NYLON
SEIDE
LANA
NYLON
SEDA
NILON
3
L
A
N
A
L
A
I
N
E
S
E
T
S
O
A
I
E
IN
N
Y
L
O
N
MAX
LINEN
COTTON
LINNEN
WOOL
LINO
KATOEN
SILK
LIN
WOL
COTONE
NYLON
ZIJDE
LANA
LEINEN
COTON
NYLON
SETA
LAINE
HILO
B.WOLLE
NYLON
SOIE
WOLLE
ALGODON
NYLON
SEIDE
LANA
NYLON
SEDA
NILON
4
MAX
LINEN
COTTON
LINNEN
WOOL
LINO
KATOEN
SILK
LIN
WOL
COTONE
NYLON
ZIJDE
LANA
LEINEN
COTON
NYLON
SETA
LAINE
HILO
B.WOLLE
NYLON
SOIE
WOLLE
ALGODON
NYLON
SEIDE
LANA
NYLON
SEDA
NILON
5
MAX
LINEN
COTTON
LINNEN
WOOL
LINO
KATOEN
SILK
LIN
WOL
COTONE
NYLON
ZIJDE
LANA
LEINEN
COTON
NYLON
SETA
LAINE
HILO
B.WOLLE
NYLON
SOIE
WOLLE
ALGODON
NYLON
SEIDE
LANA
NYLON
SEDA
NILON
6
L
A
N
A
L
A
I
N
E
S
E
T
S
O
A
I
E
IN
N
Y
L
O
N
MAX
LINEN
COTTON
LINNEN
WOOL
LINO
KATOEN
SILK
LIN
WOL
COTONE
NYLON
ZIJDE
LANA
LEINEN
COTON
NYLON
SETA
LAINE
HILO
B.WOLLE
NYLON
SOIE
WOLLE
ALGODON
NYLON
SEIDE
LANA
NYLON
SEDA
NILON
7
MAX
LINEN
COTTON
LINNEN
WOOL
LINO
KATOEN
SILK
LIN
WOL
COTONE
NYLON
ZIJDE
LANA
LEINEN
COTON
NYLON
SETA
LAINE
HILO
B.WOLLE
NYLON
SOIE
WOLLE
ALGODON
NYLON
SEIDE
LANA
NYLON
SEDA
NILON
8
E
N
O
T
L
A
O
N
C
A
N
O
L
T
A
O
I
N
C
E
S
O
E
S
T
O
N
I
A
N
I
I
L
E
L
MAX
MIN
N
Y
L
O
N
Page 32

32
- Lleven el interruptor
de la plancha (C) a la
posición I. La luz piloto
de éste se iluminará lo
mismo que la (G)
(fig. 9).
- Transcurridos unos
minutos, la luz
piloto (G) se extinguirá,
lo que indica que la
suela ha alcanzado la temperatura ajustada.
- Cuando la luz piloto (B) se apague, indicará
con ello que el depósito de vapor ya está
caliente y que el vapor se encuentra listo. Ya
pueden empezar a planchar.
- Para elegir la salida de
vapor que deseen,
hagan girar el control
de vapor (I) a
derechas (fig. 10).
Cuanto más a
derechas lleven el
mando, más vapor se
producirá.
- Mientras planchen con
vapor, mantengan
apretado el activador
de vapor (F) (fig. 11).
• Durante el planchado
con vapor, las dos
luces piloto (B) y (G)
se iluminarán de vez
en cuando. En esos
momentos, bien la
plancha, bien el depósito, se están calentando
a la temperatura fijada. Pueden seguir
planchando sin más.
“Rociado de vapor”
• La aplicación de un “rociado de vapor”, es
decir, una salida de vapor por una cantidad
limitada de orificios de la suela, puede ayudar a
suprimir arrugas rebeldes en zonas grandes.
Esto puede conseguirse lo mismo planchando
con vapor como sin él.
- Ajusten siempre el mando de temperatura (H)
al margen de vapor
2 o 3. De lo
contrario, la suela no
estará lo
suficientemente
caliente y saldrá
agua por ella.
- Aprieten el botón (K)
(fig. 12).
“Chorro de vapor”
• La aplicación del
“chorro de
vapor”ayudará a
eliminar arrugas
rebeldes, tanto
planchando con
vapor como si se
hace sin él.
- Aprieten el botón (J)
(fig. 13).
• No hace falta poner
el mando de temperatura (H) en el margen de
vapor para conseguir el “chorro de vapor”.
Planchado en posición vertical
Las cortinas y trajes
colgados (chaquetas,
faldas o abrigos)
pueden plancharse
manteniendo la
plancha en posición
vertical (fig. 14).
Planchado en seco
• Para planchar en seco, lleven el control de
vapor (I) a la posición O o no aprieten el
activador de vapor (F).
• Podrán desactivar el depósito de vapor
llevando el interruptor (B) a la posición O, si no
tienen intención de utilizar “rociado de vapor” ni
“chorro de vapor”.
Cuando terminen de planchar
- Apaguen el depósito de vapor y la plancha
(figs. 15 y 16).
- Saquen la clavija de la toma de corriente.
- Pongan la plancha en el soporte y dejen que se
enfríe.
• No hace falta que vacien el agua que quede en
el depósito de vapor.
9
MAX
LINEN
COTTON
LINNEN
WOOL
LINO
KATOEN
SILK
LIN
WOL
COTONE
NYLON
ZIJDE
LANA
LEINEN
COTON
NYLON
SETA
LAINE
HILO
B.WOLLE
NYLON
SOIE
WOLLE
ALGODON
NYLON
SEIDE
LANA
NYLON
SEDA
NILON
10
E
N
O
T
L
A
O
N
C
A
N
O
L
T
A
O
I
N
C
E
O
N
I
N
I
L
L
MAX
MIN
11
E
N
O
T
L
A
O
N
C
A
N
O
L
T
A
O
I
N
C
E
O
N
I
N
I
L
L
MAX
MIN
13
E
N
O
T
L
A
O
N
C
A
N
O
L
T
A
O
I
N
C
E
S
O
E
S
T
O
N
I
A
N
I
I
L
E
L
MA
X
N
I
M
N
Y
L
O
N
S
E
S
T
O
A
I
E
N
Y
L
O
N
14
I
N
L
O
N
I
L
C
O
C
T
O
M
O
T
N
A
O
X
E
MIN
N
L
L
A
A
I
N
N
E
A
S
O
I
S
E
N
E
T
O
A
L
Y
N
S
E
S
T
O
A
I
E
N
Y
L
O
N
12
E
N
O
T
L
A
O
N
C
A
N
O
L
T
A
O
I
N
C
E
S
O
E
S
T
O
N
I
A
N
I
I
L
E
L
MAX
MIN
N
Y
L
O
N
15
MAX
LINEN
COTTON
LINNEN
WOOL
LINO
KATOEN
SILK
LIN
WOL
COTONE
NYLON
ZIJDE
LANA
LEINEN
COTON
NYLON
SETA
LAINE
HILO
B.WOLLE
NYLON
SOIE
WOLLE
ALGODON
NYLON
SEIDE
LANA
NYLON
SEDA
NILON
16
MAX
LINEN
COTTON
LINNEN
WOOL
LINO
KATOEN
SILK
LIN
WOL
COTONE
NYLON
ZIJDE
LANA
LEINEN
COTON
NYLON
SETA
LAINE
B.WOLLE
NYLON
SOIE
WOLLE
ALGODON
NYLON
SEIDE
LANA
NYLON
SEDA
NILON
HILO
Page 33

33
Limpieza
- Antes de limpiar la plancha, desenchúfenla de
la red y dejen que se enfríe lo suficiente.
- Pueden limpiarla con un paño húmedo.
Almacenamiento
- Para su transporte hay
dos asas, una a cada
lado del depósito de
vapor (fig. 17).
Comprueben con
regularidad si el cordón
de red y la manguera de
alimentación están en
buenas condiciones.
Garantía y Servicio (para España)
PHILIPS IBERICA S.A.E.
c / Martinez Villergas, 2
28027 Madrid ESPAÑA
Garantiza este producto durante 1 año a partir de
la fecha de adquisición y contra defectos debidos
a una imperfecta fabricación o a los materiales.
Esta garantía cubre tanto las piezas de recambio
como la mano de obra.
Las reparaciones que pudieran producirse
durante el período de vigencia de la presente
garantía, se efectuarán solo si se presenta una
razonable evidencia (por ejemplo, mediante la
presente garantía, debidamente cumplimentada,
o la factura de compra) de que la fecha de la
queja está dentro del período de garantía.
Esta garantía no tendrá validez si el defecto es
debido a un deterioro accidental, un uso
inadecuado o un mal trato y en el caso de
modificaciones o reparaciones llevadas a cabo
por personal no autorizado.
El servicio (durante y después de la garantía) está
disponible en todos los países donde el producto
es oficialmente distribuido por Philips.
En países donde Philips no distribuya el producto,
la organización local de Servicio Philips dará
también el servicio necesario, aunque puede
producirse una demora si los adecuados
recambios no están fácilmente disponibles.
En todo caso, el titular de la garantía tiene todos
los derechos mínimos reconocidos por la Ley.
Para cualquier consulta posterior, por favor,
diríjase a:
DEPARTAMENTO DE SERVICIO DE ATENCION
AL CLIENTE
c/ Bernardino Obregón, 26
28012 Madrid
España
Teléfono n°: (91) 530 07 77
Facsimil n°: (91) 467 89 25
Si Vd. vive en un país donde el aparato no es
oficialmente distribuido y la organización local de
servicio Philips no puede ayudarle, por favor,
contacte con:
Philips Domestic Appliances and
Personal Care B.V.
Service Department,
P.O. Box 225,
9700 AE Groningen,
The Netherlands.
Teléfono n°: +3150 19 91 11
Facsimil n°: +3150 13 8016.
GARANTIA N° .............................................
TITULAR DE EL/LA COMPRADOR(A),
LA GARANTIA: D./Dña..................................
.............................................
DOMICILIO: .............................................
.............................................
OBJETO DE
LA GARANTIA: .............................................
(modelo, tipo y .............................................
número de serie) .............................................
FECHA DE VENTA:.............................................
SELLO DEL VENDEDOR
SUPRESION DE RADIO/TV INTERFERENCIAS
Este aparato cumple con las exigencias de la
Directiva Comunitaria 87/308-CEE.
17
L
A
E
N
N
A
O
T
L
O
A
N
I
N
O
C
E
T
S
E
O
T
S
C
O
A
I
E
O
N
N
I
I
L
L
MAX
IN
M
N
Y
L
O
N
MAX
LINEN
COTTON
LINNEN
WOOL
LINO
KATOEN
SILK
LIN
WOL
COTONE
NYLON
ZIJDE
LANA
LEINEN
COTON
NYLON
SETA
LAINE
HILO
B.WOLLE
NYLON
SOIE
WOLLE
ALGODON
NYLON
SEIDE
LANA
NYLON
SEDA
NILON
Page 34

4222 001 73091;
 Loading...