

Page 1
HI 984/HI 985
Page 2

English Page 4
• Keep page 3 open when reading these
operating instructions.
Français Page 8
• Pour le mode d'emploi: dépliez la page 3.
Deutsch Seite 12
• Schlagen Sie beim Lesen der
Gebrauchsanweisung Seite 3 auf.
Nederlands Pagina 16
• Sla bij het lezen van de gebruiksaanwijzing
pagina 3 op.
Italiano Pagina 20
• Prima di usare l'apparecchio, aprite la pagina 3
e leggete attentamente le istruzioni per l'uso.
Español Página 24
• Desplegar la página 3 al leer las instrucciones
de manejo.
Português Página 28
• Mantenha a página 3 desdobrada enquanto
estiver a ler as instruções.
2
Page 3

FILLING OPENING
WITH SCREW CAP
A B ND C OE L
F
HG I J
K
M
1
Page 4
4
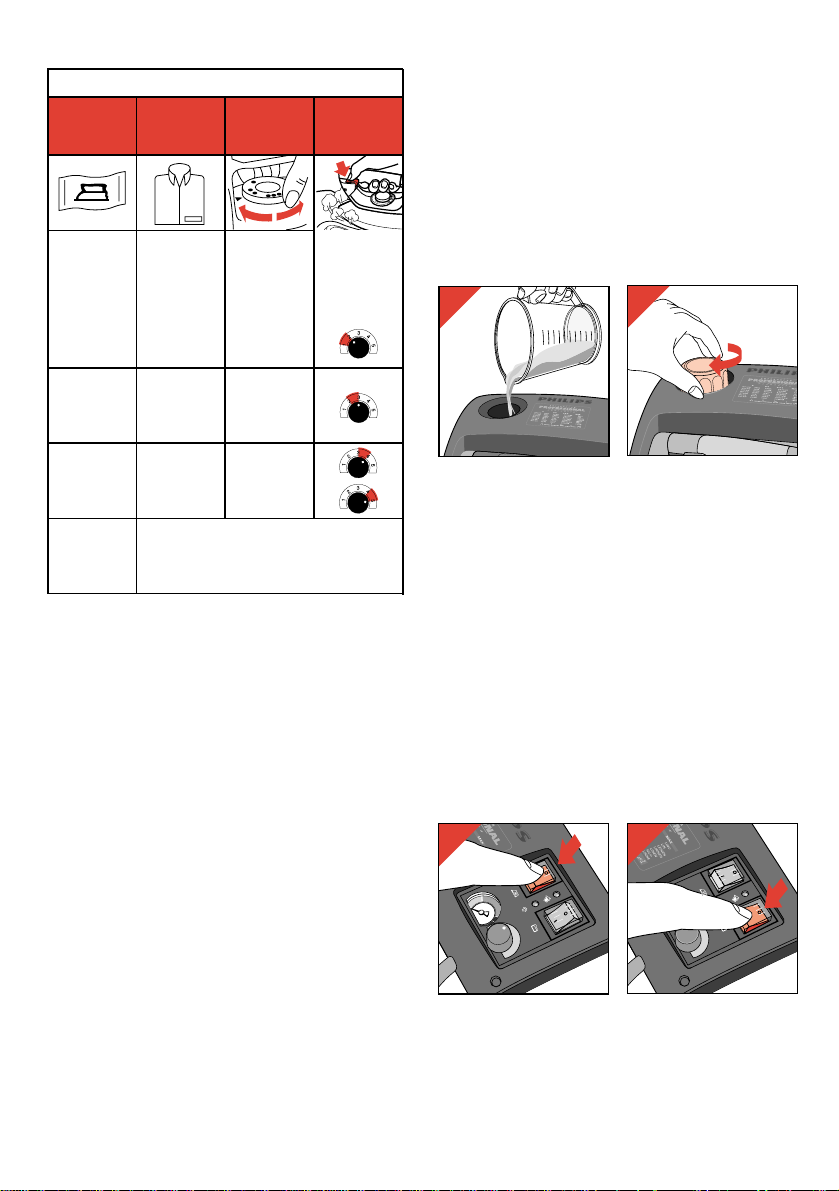
General description (fig. 1)
A Steam tank
B Switch "Steam tank on/off" ≤ with
integrated pilot light
C Pilot light "Steam tank heating up" U
(The pilot light goes out when the appliance
is ready for steam-ironing.)
D Switch "Iron on/off" ≥ with integrated
pilot light
E Filling opening with screw cap
F Iron stand (removable)
G Steam activator (press-in for steam
ironing)
H Pilot light "Iron heating up"
I Temperature dial (rotate)
J Soleplate
K Supply hose
L Mains cord
M Manometer (to verify steam pressure)
Needle in the green area: sufficient steam
pressure
N Steam control (rotate)
position 1: minimum steam output
position 5: maximum steam output
O Pilot light “Refill steam tank” *
The water tank needs to be refilled when
this pilot light comes on.
Important
• Please read these instructions for use carefully in conjunction with the illustrations
before using the appliance.
• Never use the appliance if damaged in any way. Regularly check if the mains cord
and the supply hose are still in a good and safe condition.
If the mains cord of this appliance is damaged, it must only be replaced by Philips or
their service representative, as special tools and/or parts are required.
• Check if the voltage rating on the typeplate (under the steam tank) corresponds to
the mains voltage in your home.
• Only connect the appliance to an earthed mains wall socket.
• Never immerse the iron or the steam tank in water.
• Never fill the steam tank with perfumes, vinegar, descaling agents or other
chemicals.
• Take care that children cannot touch the iron when hot and that they cannot pull
the mains cord or supply hose.
• When leaving the iron, even for a short while, always remove the mains plug from
the wall socket and place the iron on the stand.
• Always place the steam tank on a stable flat surface.
• Always place the iron on the iron stand. Do not place the hot iron on the steam
tank, the supply hose or the mains cord. The cordset should not be allowed to
touch the soleplate when it is hot.
English
Ironing temperature
- Always check first if a label with ironing
instructions is attached to the article to be
ironed. Follow these ironing instructions
in all cases.
- If ironing instructions are missing but you
know the kind of fabric, then see the table for
recommended ironing temperatures.
- After the pilot light "Iron heating up" (H) has
gone out and come on again you can start
ironing.
• During ironing the pilot light will come on
from time to time. When this happens, the
soleplate is being heated-up to the required
temperature again. You can continue ironing.
• The table is valid for the fibre materials only.
If some kind of finish has been applied (gloss,
wrinkle, relief etc.), the textile can best be
ironed at a lower temperature.
• First sort out the fabrics according to ironing
temperature: wool with wool, cotton with
cotton, etc.
The iron heats up quicker than it cools down.
Therefore, start ironing the articles requiring
the lowest temperature such as those made of
synthetic fibres. Then progress to the higher
temperatures.
• If the article is made of a mixture of different
fibres, you must always select the lowest
Page 5
ironing coloured silk, it is not advisable to use
steam as this may cause stains.
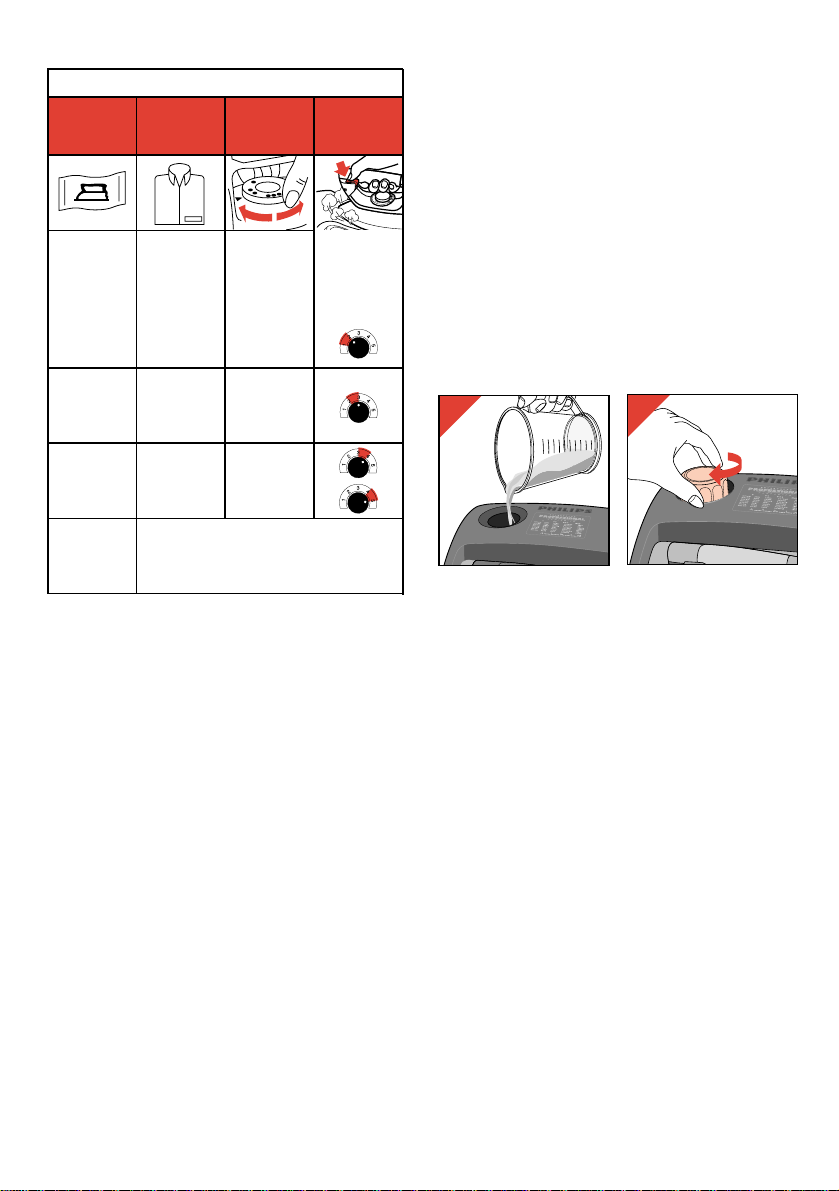
Filling with water (for steam-ironing)
- Position the steam tank on a stable flat surface
and unscrew the cap of the steam tank (E) by
turning anti-clockwise.
- Fill the steam tank with water (max. 1 litre)
(fig. 2).
• You can use tapwater. However, if the water is
very hard (hardness higher than 17 °DH /
211⁄4 °Clarke), it is advisable to use distilled
water.
• Never use vinegar, descaling agents or other
chemicals.
- Close the steam tank by turning the screw cap
clockwise by hand until tight (fig. 3).
If you begin ironing
- Fill the steam tank before inserting the mains
plug into the wall socket.
While ironing
Caution: If heated-up, the steam tank will
be under pressure.
Only refill if the steam tank is empty (i.e.
when pilot light “Refill steam tank ” * (O)
comes on.
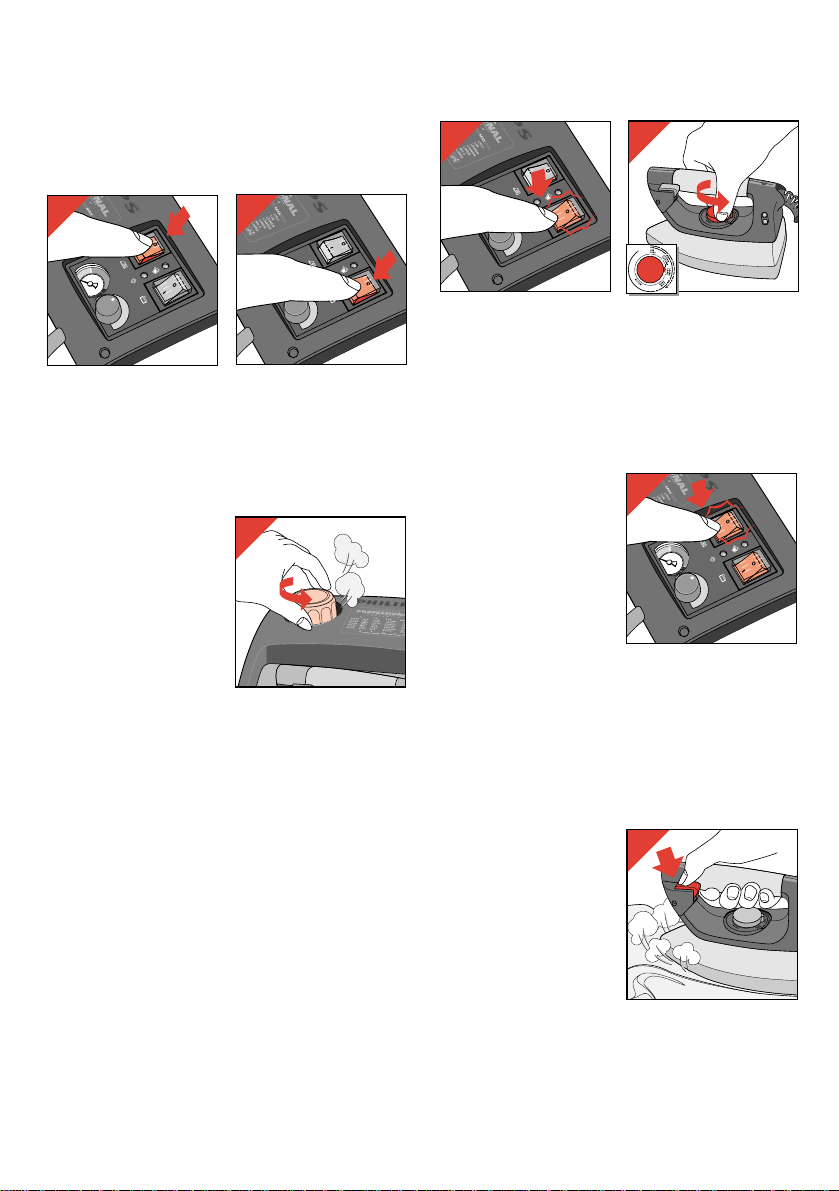
- Switch the iron off by setting switch “Iron
on/off” ≥(D) to position O (fig. 4).
- Switch the steam tank off by setting switch
“Steam tank on/off” ≤ (B) to position O
(fig. 5).
ironing temperature of the composition of
those fibres.
(E.g. an article consisting of "60% polyester
and 40% cotton" should be ironed at the
temperature indicated for polyester (1) and
without steam.)
If you do not know what kind(s) of fabric(s)
the article has been made of, find a spot which
will be invisible when wearing or using the
article to try out the ironing temperature.
(Always start at a low temperature and
increase to one which gives the required
results.)
• Pure woollen fabrics (100% wool) may be
pressed with the iron set to a steam position.
It is recommended to apply shot-of-steam and
use a dry pressing cloth.
When steam-ironing woollen fabrics, shining
of the fabric may occur. This can be prevented
by turning the article inside out and ironing
the inside.
• Velvet and other textures which rapidly
acquire shiny spots should be ironed in one
direction only (with the nap), applying only
light pressure.
Always keep the iron moving.
• Iron the reverse side of synthetic materials
and silk to prevent shining spots. When
Steam
ironing
B
Synthetic
e.g. acetate,
acrylic,
viscose,
polyamide,
polyester.
Silk
MIN
|
|
1
|
|
A
C
Wool
|
2
A
D
Cotton
Linen
|
3
MAX
Z Please note: This article cannot be
ironed!
Table
Label with
ironing
instructions
Kind of
textile
Temperature
dial
5
_
2
1
3
FILLING OPENING
WITH SCREW CAP
4
2
1
3
4
5
5
2
1
3
4
5
Page 6
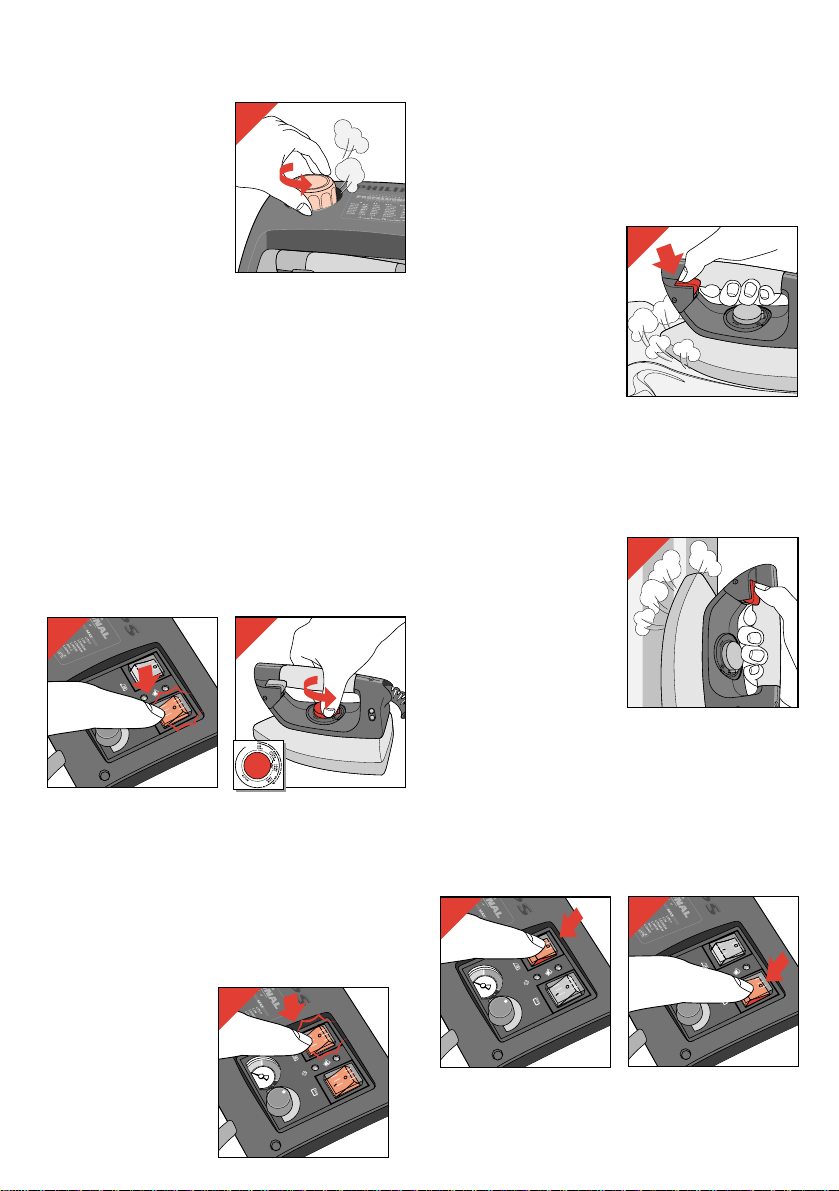
- After a few minutes, pilot light “Iron heating
up” (H) will go out. This indicates that the
soleplate has reached the set temperature.
- When pilot light “Steam tank heating up U
(C) goes out and the manometer (M) needle
is in the green section, the steam tank is
heated up and steam is ready.
You can now start steam ironing.
- While steam-ironing
keep the steam
activator (G)
pressed-in (fig. 10).
• During steam-ironing
the two pilot lights
(C) and (H) will
come on from time
to time.
When this happens,
either the iron or
the steam tank is being heated-up to the
required temperature. You can continue
ironing.
Steaming in a vertical position
Hanging curtains and
clothing (jackets,
woman's suits, coats)
can be steamed by
holding the iron in a
vertical position
(fig. 11).
Dry-ironing
• For ironing without steam, do not press-in the
steam activator (G).
• You may switch off the steam tank by setting
switch "Steam tank on/off" ≤ (B) to
position O.
When finished ironing
- Switch off the steam tank and the iron
(fig. 12, 13).
- Remove the mains plug from the wall socket.
- Carefully unscrew the
cap of the steam tank
(anti-clockwise) until
you can hear steam
escaping (fig. 6).
Wait for the hissing
sound to stop.
This high-pitched
sound is completely
normal and is not
dangerous.
- Carefully unscrew the cap of the steam tank
further, until you hear the hissing sound again.
Wait again until the sound stops. Proceed in
the same manner until the cap is unscrewed.
- Wait for a few minutes. Then slowly pour
water into the filling opening (E) (fig. 2).
- Close the steam tank by turning the screw cap
manually (clockwise) until tight (fig. 3).
Steam-ironing
• As indicated on the temperature dial (I) and
the table, steam-ironing is only possible at
higher ironing temperatures, so set the dial to
2 or 3 .
- Insert the mains plug into a wall socket.
- Set switch "Steam tank on/off" ≤ (B) to
position |. The pilot light in the switch as well
as pilot light “Steam tank heating up U (C) will
come on (fig. 7).
• The iron heats up faster than the steam tank.
Hence you can switch on the iron a few
minutes later than the steam tank.
- Select the required ironing temperature with
the temperature dial (I) (fig. 8).
- Set switch "Iron
on/off" ≥(D) to
position |.
The pilot light in
the switch as well
as pilot light “Iron
heating up” (H)
will come on
(fig. 9)
6
6
FILLING OPENING
WITH SCREW CAP
10
7
2
1
3
4
5
8
9
2
1
3
4
5
11
12
2
1
3
4
5
13
2
1
3
4
5
Page 7
- Remove the mains plug from the wall socket.
- Place the iron on the stand and let it cool
down.
• It is not necessary to pour the remainder of
the water out of the steam tank.
Cleaning
- Before cleaning remove the mains plug from
the wall socket and allow the iron to cool
down sufficiently.
- The appliance can be cleaned with a damp
cloth.
Storage
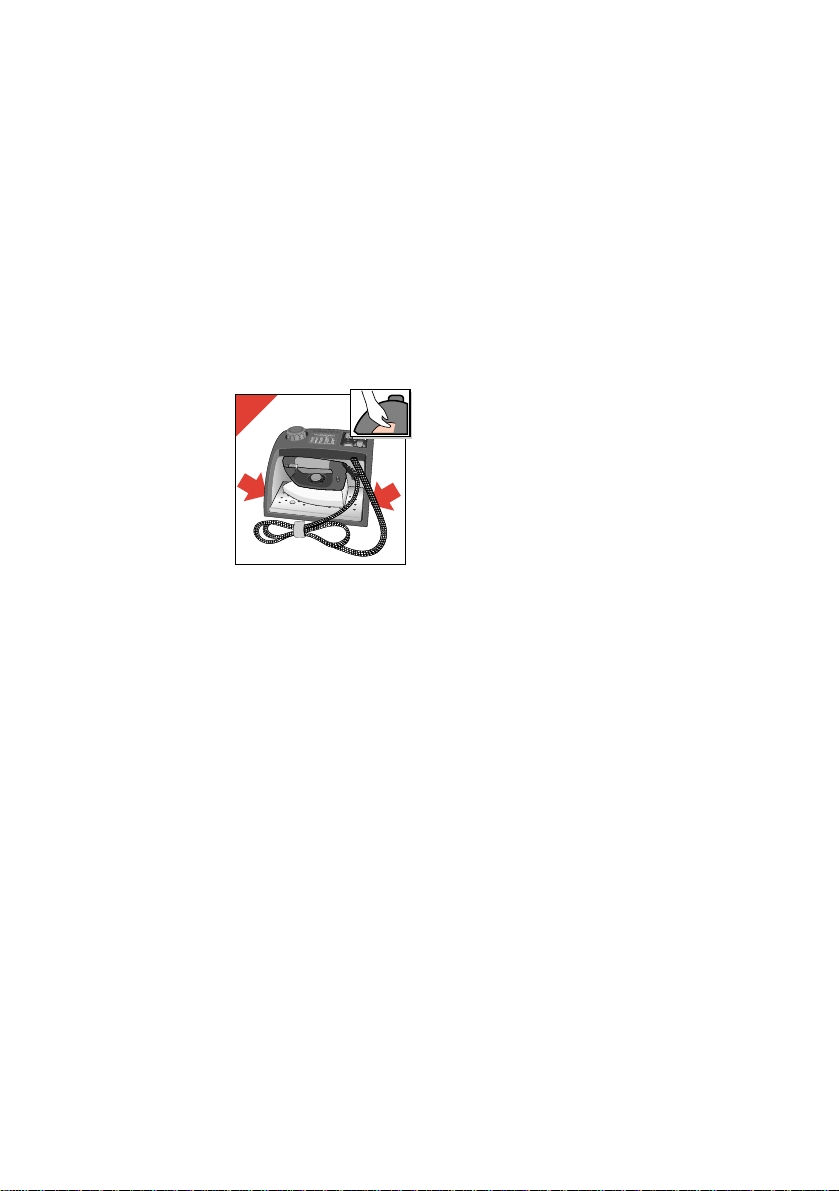
- For transport there
are handgrips on
either side of the
steam tank (fig. 14).
• Regularly check if the
mains cord and the
supply hose are still in
a good and safe
condition.
7
14
FILLING OPENING
WITH SCREW CAP
Page 8

8
Description générale (fig. 1)
A Chaudière
B Interrupteur “Chaudière
marche/arrêt” ≤ avec témoin
lumineux
C Témoin lumineux “Chaudière chauffe”
U (Le témoin lumineux s’éteint quand
l’appareil est prêt pour le repassage à la
vapeur.)
D Interrupteur “Fer marche/arrêt” ≥
avec témoin lumineux
E Ouverture de remplissage et bouchon
de chaudière
F Repose-fer (détachable)
G Bouton commande vapeur (pressez
pour repassage à la vapeur)
H Témoin lumineux “Fer chauffe”
I Bouton de commande thermostat
J Semelle
K Cordon d’alimentation vapeur
L Cordon secteur
M Manomètre (pour vérifier la pression
vapeur)
Aiguille dans la surface verte: pression
vapeur suffisante
N Commande vapeur
position 1: vapeur minimum
position 5: vapeur maximum
Important
• Lisez attentivement ce mode d’emploi en même temps que les illustrations avant
toute utilisation de l’appareil.
• N’utilisez jamais l’appareil si une de ses parties est endommagée. Assurez- vous
régulièrment que le cordon secteur et le cordon d’alimentation vapeur sont encore
dans de bonnes conditions de sécurité.
Si le cordon secteur de cet appareil est endommagé, il doit être remplacé
uniquement par Philips ou un Centre Service Agréé, car des outils spéciaux sont
nécessaires.
• Assurez-vous que la tension indiquée sur la plaque signalétique (sous la chaudière)
correspond à la tension du secteur de votre logement.
• Branchez uniquement l’appareil à une prise équipée de terre.
• N’immergez jamais le fer ou la chaudière dans l’eau.
• Ne remplissez jamais le réservoir avec du parfum, vinaigre, agents adoucissants ou
tout autre produit chimique.
• Faites attention que les enfants ne puissent pas toucher le fer quand il est chaud et
qu’ils ne puissent pas tirer le cordon secteur ou cordon d’alimentation vapeur.
• Quand vous vous absentez, même pour un court instant, retirez toujours la fiche de
la prise de courant et placez le fer sur le socle repose-fer.
• Placez toujours la chaudière sur une surface stable.
• Placez toujours le fer sur le repose-fer. Ne placez jamais le fer chaud sur la
chaudière, le cordon d’alimentation vapeur ou le cordon secteur.
Français
O Témoin lumineux “Remplissage
chaudière” *
Le réservoir d’eau a besoin d’être rempli
quand ce témoin lumineux s’allume .
Température de repassage
- Vérifiez toujours si une étiquette avec les
instructions de repassage est jointe à l’article à
repasser. Suivez ces instructions de
repassage dans tous les cas.
- Si les instructions de repassage sont
manquantes mais que vous connaissez le type
de textile, reportez-vous au tableau de
repassage .
- Ensuite le témoin lumineux “Fer chauffe” (H)
s’éteint et se rallume à nouveau vous pouvez
commencer le repassage.
• Pendant le repassage le témoin lumineux
s’allume de temps en temps. Cela arrive quand
la semelle chauffe à la température désirée.
Vous pouvez continuer le repassage.
• Le tableau est valable pour les tissus
mentionnés seulement.
Si des finitions spéciales doivent ètre
appliquées (lustrage, plis rebelles etc.), le
textile peut être repassé à une température
plus basse.
Page 9
dans une seule direction seulement (dans le
sens des fibres), en appliquant une légère
pression.
Gardez toujours le fer en mouvement.
• Repassez à l’envers les tissus syntétiques et la
soie afin d’éviter des taches brillantes.
Lorsque vous repassez de la soie colorée, il
n’est pas souhaitable d’utiliser la vapeur car
ceci peut provoquer des taches.
Remplissez avec de l’eau (pour le repassage à
la vapeur)
- Placez la chaudière sur une surface stable et
dévissez le bouchon de la chaudière (E) en
tournant dans le sens inverse des aiguilles
d’une montre.
- Remplissez la chaudière avec de l’eau (max. 1
litre) (fig. 2).
• Vous pouvez utiliser de l’eau du robinet.
Cependant, si l’eau est très dure (dureté
supérieure à 30°TH la compagnie des eaux de
votre région vous renseignera sur le degré de
dureté de votre eau), il est préférable
d’utiliser de l’eau déminéralisée.
• N’utilisez jamais de vinaigre, agents
adoucissants ou autres produits chimiques.
- Fermez la chaudière en tournant le bouchon
dans le sens des aiguilles d’une montre à la
main jusqu’à buter (fig. 3).
Si vous commencez le repassage
- Remplissez la chaudière avant d’insérer la fiche
dans la prise de courant.
• Tout d’abord triez le linge avant de repasser :
laine avec laine, coton avec coton, etc.
Le fer chauffe plus rapidement qu’il ne
refroidit. Donc, commencez le repassage des
articles nécessitant la plus basse température
tels que les fibres synthétiques. Puis continuez
avec les températures plus élevées.
• Si l’article se compose d’un mélange de
différentes fibres, vous devez choisir toujours
la température de repassage la plus basse en
fonction de la composition de ces fibres.
(Exemple: un article composé de “60%
polyester et 40% coton” doit être repassé à la
température indiquée pour polyester (1) et
sans vapeur.)
Si vous ne connaissez pas la composition du
tissu, trouvez un endroit invisible de
l’extérieur pour déterminer la température de
repassage. (Commencez toujours à une faible
température et augmentez-la jusqu’à
obtention du résultat désiré.)
• Les tissus en pure laine (100% laine) peuvent
ètre repassés avec le fer sur une position
vapeur. Il est recommandé d’utiliser le jet de
vapeur et une pattemouille sèche.
Les velours et autres tissus synthétiques qui
lustrent rapidement doivent être repassés
Commande
vapeur
B
Synthétiques
acétate,
acrylique,
viscose,
polyamide,
polyester.
Soie
MIN
|
|
1
|
|
A
C
Laine
|
2
A
D
Coton
Lin
|
3
MAX
Z Attention: Ne pas repasser cet article.
Tableau
Etiquette avec
instructions
de repassage
Type de
textile
Thermostat
9
_
2
1
3
FILLING OPENING
WITH SCREW CAP
Page 10
Placez le thermostat sur 2 ou 3 .
- Insérez la fiche dans une prise de courant.
- Mettez l’interrupteur “Chaudière” ≤ (B)
sur la position marche |. Le témoin lumineux
de l’interrupteur ainsi que le témoin lumineux
“Chaudière chauffe” U (C) s’allument (fig. 7).
- Le fer chauffe plus vite que la chaudière aussi
vous pouvez attendre quelques minutes avant
de l’allumer.
- Sélectionnez la température de repassage
désirée (I) (fig. 8).
- Placez l’interrupteur
“Fer” ≥(D) sur la
position marche |.
Le témoin lumineux
dans l’interrupteur
ainsi que le témoin
lumineux “Fer
chauffe” (H)
s’allument (fig. 9)
- Après quelques
minutes, le témoin
lumineux “Fer chauffe” (H) s’éteint . Ceci vous
indique que la semelle est à la température
désirée.
- Quand le témoin lumineux “Chaudière
chauffe” U (C) s’eteint et l’ aiguille du
manomètre (M) est dans la partie verte, la
vapeur est prête.
Vous pouvez maintenant commencer le
repassage à la vapeur.
- Pendant le repassage
maintenez le bouton
commande vapeur
(G) pressé (fig. 10).
• Pendant le repassage
à la vapeur les deux
témoins lumineux
(C) et (H) s’allument
de temps en temps.
Vous pouvez
continuer le
repassage.
10
Pendant le repassage
Précaution: Si l’appareil chauffe, la
chaudière est sous pression.
Remplissez la chaudière seulement si elle est
vide (ex. quand le témoin lumineux “Remplissage
chaudière ”
* (O) s’allume.
- Mettez le fer sur arrêt en plaçant
l’interrupteur “Fer”≥ (D) sur la position
“arrêt” O (fig. 4).
- Mettez la chaudière sur arrêt en plaçant
l’interrupteur “Chaudière” ≤ (B) sur la
position O (fig. 5).
- Enlevez la fiche de la prise de courant.
- Dévissez soigneusement le bouchon de
la chaudière (dans le
sens inverse des
aiguilles d’une
montre) jusqu’à ce
que vous entendiez la
vapeur s’échapper
(fig. 6).
Attendez à nouveau
que le sifflement
s’arrête.
Ce sifflement est parfaitement normal et n’est
pas dangereux.
- Dévissez soigneusement le bouchon de la
chaudière jusqu’à ce que vous entendiez le
sifflement de nouveau. Attendez à nouveau
que le sifflement s’arrête. Procédez de la
même manière jusqu’à ce que le bouchon soit
dévissé complètement.
- Attendez quelques minutes avant de
verser lentement l’eau dans l’ouverture de
remplissage (E) (fig. 2).
- Fermez la chaudière en tournant le bouchon
de chaudière, manuellement (dans le sens des
aiguilles d’une montre) jusqu’à buter (fig. 3).
Repassage à la vapeur
• Comme indiquée sur le bouton de commande
thermostat (I) et le tableau de repassage, le
repassage à la vapeur est seulement possible à
haute température.
7
8
4
2
1
3
4
5
5
2
1
3
4
5
6
FILLING OPENING
WITH SCREW CAP
2
1
3
4
5
9
2
1
3
4
5
10
Page 11
Rangement
- Pour le transport il
y a des poignées de
chaque côté de la
chaudière (fig. 14).
• Assurez-vous
régulièrement que
le cordon secteur
et le cordon
d’alimentation
vapeur sont
encore dans de bonnes conditions de sécurité.
Repassage en position verticale
Rideaux et
vêtements suspendus
(jaquettes, tailleurs,
manteaux) peuvent
être repassés en
tenant le fer en
position verticale
(fig. 11).
Repassage à sec
• Pour repasser sans vapeur, ne pressez pas le
bouton commande vapeur (G).
• Vous pouvez arrêter la chaudière en mettant
l’interrupteur “Chaudière” ≤ (B) sur la
position arrêt O.
Quand le repassage est fini :
- Placez l’interrupteur chaudière et fer sur
arrêt (fig. 12, 13).
- Enlevez la fiche de la prise de courant.
- Placez le fer sur le socle repose-fer et laissez
le refroidir.
• Il n’est pas nécessaire de vider l’eau restante
contenue dans la chaudiere.
Nettoyage
- Enlevez la fiche de la prise de courant et
laissez le fer refroidir suffisamment.
- L’appareil peut être nettoyé avec un chiffon
humide.
11
11
12
2
1
3
4
5
13
2
1
3
4
5
14
PENING
FILLING O
WITH SCREW CAP
Page 12

12
Allgemeine Beschreibung (Abb. 1)
A Dampftank
B Ein-/Ausschalter für Dampftank ≤ mit
eingebauter Kontrollampe
C Kontrollampe “Dampf wird erhitzt” U,
erlischt, wenn das Gerät zum Dampfbügeln
betriebsbereit ist.
D Ein-/Ausschalter für das Bügeleisen ≥
mit eingebauter Kontrollampe
E Einfüllöffnung mit Schraubdeckel
F Abstellfläche für das Bügeleisen,
abnehmbar
G Drucktaste für die Dampfzufuhr
H Kontrollampe “Bügeleisen wird
aufgeheizt”
I Temperaturregler, Drehschalter
J Bügelsohle
K Verbindungsschlauch
L Netzkabel
M Manometer zum Messen des
Dampfdrucks.
Nadel im grünen Bereich = Genügend
Dampfdruck vorhanden.
N Dampfregler, Drehschalter
Position 1: Minimale Dampfzufuhr
Position 2: Maximale Dampfzufuhr
WICHTIG
• Lesen Sie diese Gebrauchsanweisung sorgfältig durch, und sehen
Sie sich dabei die Abbildungen an, bevor Sie das Gerät zum ersten Mal benutzen.
• Verwenden Sie das Gerät niemals, wenn es in irgendeiner Hinsicht defekt oder
beschädigt ist. Prüfen Sie regelmäßig, ob das Netzkabel und der
Verbindungsschlauch unversehrt sind.
Wenn das Netzkabel defekt oder beschädigt ist, muß es von einer durch Philips
autorisierten Werkstatt ersetzt werden, da für die Reparatur Spezial-Werkzeug
und/oder spezielle Teile benötigt werden.
• Prüfen Sie, bevor Sie das Gerät in Betrieb nehmen, ob die Spannungsangabe auf
dem Typenschild unter dem Dampftank mit der örtlichen Netzspannung
übereinstimmt.
• Schließen Sie das Gerät nur an eine Schuko-Steckdose an.
• Tauchen Sie das Bügeleisen oder den Dampftank niemals in Wasser.
• Füllen Sie niemals Duftstoffe, Essig, Entkalker oder andere Chemikalien in den
Dampftank.
• Geben Sie acht, daß Kinder die heiße Bügelsohle nicht berühren und das Gerät
nicht am Netzkabel hinabziehen können.
• Stellen Sie das Bügeleisen stets auf die Abstellfläche und ziehen Sie den
Netzstecker, wenn Sie das Bügeln unterbrechen, und sei es auch nur für kurze Zeit.
• Stellen Sie den Dampftank stets auf eine feste, ebene Fläche.
• Stellen Sie das Bügeleisen nur auf der Abstellfläche ab. Achten Sie darauf, daß das
heiße Eisen niemals den Dampftank, das Netzkabel oder den Verbindungsschlauch
berührt.
Deutsch
O Kontrollampe “Dampftank nachfüllen”
* Wenn diese Kontrollampe aufleuchtet,
muß der Dampftank nachgefüllt werden.
Bügeltemperatur
- Prüfen Sie stets, ob eine Bügelvorschrift in
das Kleidungsstück eingenäht ist. Befolgen
Sie diese Bügelvorschriften in allen
Fällen.
- Wenn Bügelvorschriften fehlen, Sie aber die
Textilart kennen, so schauen Sie in der Tabelle
nach.
- Nachdem die Kontrollampe “Bügeleisen wird
aufgeheizt” (H) aus- und wieder angegangen
ist, können Sie mit dem Bügeln beginnen.
• Während des Bügelns leuchtet die
Kontrollampe von Zeit zu Zeit wieder auf. Sie
zeigt an, daß die Bügelsohle wieder auf die
erforderliche Temperatur aufgeheizt wird. Sie
können dabei unbedenklich weiterbügeln.
• Die Tabelle gilt nur für die dort aufgeführten
Materialien. Chemisch behandeltes Material
(Glanz, Relief, knitterfrei usw.) ist bei
niedrigerer Temperatur zu bügeln.
• Sortieren Sie das Bügelgut zuvor immer nach
Page 13

• Samt und andere Gewebe, die nach dem
Bügeln rasch glänzende Stellen annehmen,
sollten nur in eine Richtung (“mit dem Strich”)
und unter nur leichtem Druck gebügelt
werden. Halten Sie das Bügeleisen dabei stets
in Bewegung.
• Bügeln Sie Synthetics und Seide stets von
links, um glänzende Stellen zu vermeiden.
Verwenden Sie kein Bügelspray, es könnte
Flecken verursachen.
Wasser einfüllen zum Dampfbügeln ...
- Stellen Sie den Dampftank auf eine feste,
ebene Fläche, und schrauben Sie den Deckel
(E) gegen den Uhrzeigersinn ab.
- Füllen Sie den Dampftank mit maximal 1 Liter
Wasser (Abb. 2).
• Sie können stets normales Leitungswasser
verwenden. Ist das Wasser aber härter als 17°
dH, so empfiehlt sich die Verwendung von
destilliertem Wasser.
• Verwenden Sie niemals Essig, Entkalker oder
andere Chemikalien.
- Schließen Sie den Dampftank, indem Sie den
Deckel durch Drehen im Uhrzeigersinn
wieder fest aufsetzen (Abb. 3).
... vor dem Bügeln
- Füllen Sie zuerst den Dampftank, und stecken
Sie erst dann den Stecker in die Steckdose.
der erforderlichen Temperatur: Wolle zu
Wolle, Baumwolle zu Baumwolle usw.
Das Bügeleisen ist schneller aufgeheizt als
abgekühlt. Beginnen Sie darum mit Textilien,
die nur eine niedrige Temperatur vertragen,
also ggf. mit Synthetics. Gehen Sie dann zu
höheren Temperaturen über.
• Bei Mischgeweben wählen Sie stets die
Temperaturstufe für die Faser, welche die
niedrigste Temperatur erfordert. Ein
Wäschestück aus 60% Polyester und 40%
Baumwolle muß also bei Einstellung (•) für
Polyester und ohne Dampf gebügelt werden.
• Wenn Sie nicht wissen, woraus das zu
bügelnde Teil besteht, so suchen Sie eine
Stelle, die bei normaler Verwendung nicht
sichtbar wird, und prüfen Sie dort, mit der
niedrigsten Temperatur beginnend, welche
Temperaturstufe angemessen ist.
• Textilien aus reiner Wolle (100 % Wolle)
können mit einer Dampfeinstellung gebügelt
werden. Es empfiehlt sich, mit einem
trockenen Bügeltuch zu arbeiten und den
Dampfstoß anzuwenden.
Es kann vorkommen, daß die Oberfläche von
Wollsachen nach dem Bügeln glänzt. Das läßt
sich vermeiden, indem Sie das Teil von links,
auf der Rückseite bügeln.
Dampfbügeln
B
Synthetics
z.B. Acetat,
Acryl,
Viskose,
Polyamid,
Polyester
Seide
MIN
|
|
1
|
|
A
C
Wolle
|
2
A
D
Baumwolle
Leinen
|
3
MAX
Z Wichtig: Dieses Teil darf
nicht gebügelt werden!
Tabelle
Bügelvorschrift
Textilart
Temperatureinstellung
13
_
2
1
3
FILLING OPENING
WITH SCREW CAP
Page 14

- Stecken Sie den Stecker in die Steckdose.
- Stellen Sie den Ein-/Ausschalter für den
Dampftank (B) ≤ auf Position I. Die Kontrollampe im Schalter und die Kontrollampe
“Dampf wird erhitzt” (C) U leuchten auf (Abb.
7).
• Das Bügeleisen ist schneller heiß als das
Wasser im Dampftank. Sie können also das
Bügeleisen einige Minuten später einschalten
als den Dampftank.
- Stellen Sie am Temperaturregler (I) die zum
Bügeln erforderliche Temperatur ein (Abb. 8).
- Stellen Sie den Ein-/
Ausschalter für das
Bügeleisen (D) ≥
auf Position I. Die
Kontrollampe im
Schalter und die
Kontrollampe
“Bügeleisen wird
aufgeheizt” (H)
leuchten auf (Abb. 9).
- Nach einigen Minuten
erlischt die Kontrollampe “Bügeleisen wird
aufgeheizt” (H). Die Bügelsohle hat dann die
erforderliche Temperatur erreicht.
- Wenn die Kontrollampe “Dampf wird erhitzt”
(C) U erloschen ist, ist das Wasser im
Dampftank aufgeheizt und Dampf steht zum
Bügeln zur Verfügung. Sie können jetzt mit
dem Dampfbügeln beginnen.
- Halten Sie
während des
Dampfbügelns die
Drucktaste für die
Dampfzufuhr (G)
gedrückt (Abb.
10).
• Während des
Dampfbügelns
gehen die beiden
Kontrollampen (C)
und (H) von Zeit zu Zeit an und aus. Das zeigt
an, daß entweder der Dampftank oder das
Bügeleisen nachgeheizt werden. Sie können
unterdessen weiterbügeln.
14
... während des Bügelns
Vorsicht: Beim Aufheizen steht der
Dampftank unter Druck. Füllen Sie erst
dann Wasser nach, wenn der Dampftank
leer ist, wenn also die Kontrollampe
* (O)
“Dampftank nachfüllen” aufleuchtet.
- Stellen Sie den Ein-/Ausschalter ≥(D) auf O
(Abb. 4).
- Schalten Sie den Dampftank aus, indem Sie
den Ein-/Ausschalter ≤ (B) auf Position O
stellen (Abb. 5).
- Ziehen Sie den Netzstecker aus der
Steckdose.
- Drehen Sie vorsichtig
den Schraubdeckel
der Einfüllöffnung
gegen den
Uhrzeigersinn, bis Sie
hören, daß Dampf
entweicht (Abb. 6).
Warten Sie, bis es
aufgehört hat, zu
zischen.
Dieser Ton ist völlig
normal und kein
Grund zur Beunruhigung.
- Schrauben Sie den Deckel jetzt vorsichtig
weiter auf, bis Sie das Zischen erneut hören.
Warten Sie wieder, bis es aufgehört hat zu
zischen, und fahren Sie in der gleichen Weise
fort, bis Sie den Deckel ganz abschrauben
können.
- Warten Sie einige Minuten. Gießen Sie
dann langsam frisches Wasser durch die
Einfüllöffnung (E) (Abb. 2).
- Schließen Sie den Dampftank, indem Sie den
Deckel aufsetzen und im Uhrzeigersinn fest
zudrehen (Abb. 3).
Dampfbügeln
• Dem Temperaturregler (I) und der Tabelle ist
zu entnehmen, daß Dampfbügeln nur bei
höheren Temperaturen möglich ist. Stellen Sie
also den Temperaturregler auf •• oder •••.
4
5
7
2
1
3
4
5
8
2
1
3
4
5
2
1
3
4
5
6
FILLING OPENING
WITH SCREW CAP
9
2
1
3
4
5
10
Page 15

Aufbewahrung
- An beiden Seiten des
Dampftanks sind
Griffe angebracht, an
denen Sie das Gerät
leicht transportieren
können (Abb. 14).
• Prüfen Sie
regelmäßig, ob das
Netzkabel und der
Verbindungschlauch
in gebrauchssicherem Zustand sind.
In senkrechter Haltung aufdämpfen
Vorhänge und
Kleidungsstücke (Jacken,
Kleider, Mäntel) können
hängend mit senkrecht
gehaltenem Bügeleisen
aufgedämpft werden
(Abb. 11).
Trockenbügeln
• Wollen Sie ohne Dampf bügeln, so drücken
Sie die Drucktaste für die Dampfzufuhr (G)
nicht.
• Beim Trockenbügeln können Sie auch den Ein/ Ausschalter (B) ≤ auf die Position O stellen,
um den Dampftank abzuschalten.
Nach dem Bügeln
- Schalten Sie den Dampftank und das
Bügeleisen aus (Abb. 12 und 13).
- Ziehen Sie den Stecker aus der Steckdose.
- Stellen Sie das Bügeleisen auf die Abstellfläche,
und lassen Sie es abkühlen.
• Sie können das restliche Wasser bis zum
nächsten Bügeln im Dampftank lassen.
Reinigen
- Ziehen Sie vor der Reinigung den Stecker aus
der Steckdose und lassen Sie das Gerät
ausreichend abkühlen.
- Sie können das Gerät mit einem
angefeuchteten Tuch abwischen.
15
11
12
2
1
3
4
5
13
2
1
3
4
5
14
FILLING OPENING
WITH SCREW CAP
Page 16

16
Algemene beschrijving (fig. 1)
A Stoomtank
B Schakelaar "Stoomtank aan/uit" ≤
met ingebouwd controlelampje.
C Controlelampje "Stoomtank warmt
op" U (Het controlelampje gaat uit als het
apparaat gereed is voor stoomstrijken.)
D Schakelaar "Strijkijzer aan/uit" ≥ met
ingebouwd controlelampje
E Vulopening met draaidop
F Houder voor strijkijzer (afneembaar)
G Drukknop stoomtoevoer (indrukken
voor stoomstrijken)
H Controlelampje "Strijkijzer warmt op"
I Temperatuurregelaar (draaien)
J Zoolplaat
K Verbindingsslang
L Aansluitsnoer
M Manometer (controleren van stoomdruk)
Naald in het groene gebied: voldoende
stoomdruk
N Stoomregelaar (draaien)
stand 1: minimum stoomafgifte
stand 5: maximum stoomafgifte
O Controlelampje “Stoomtank vullen”
* Vul de stoomtank wanneer dit lampje gaat
branden.
Belangrijk
• Lees de gebruiksaanwijzing en bekijk alle plaatjes goed voordat u het apparaat in
gebruik neemt.
• Gebruik het apparaat nooit als er iets stuk aan is. Controleer regelmatig of het
snoer en de verbindingsslang nog in goede conditie zijn.
• Indien het snoer van dit apparaat is beschadigd, dient het uitsluitend te worden
vervangen door een door Philips daartoe aangewezen reparateur, omdat voor de
reparatie speciale gereedschappen en/of onderdelen vereist zijn.
• Controleer of de aanduiding van het voltage (aan de onderzijde van de stoomtank)
overeenkomt met de netspanning in uw woning.
• Sluit het apparaat alleen aan op een geaard stopcontact.
• Dompel het strijkijzer of de stoomtank nooit in water.
• Doe geen odeur, azijn, ontkalkingsmiddelen of andere chemicaliën in de stoomtank.
• Zorg ervoor dat kinderen niet aan het hete strijkijzer kunnen komen, en dat zij niet
aan de snoeren kunnen trekken.
• Wanneer u weg moet tijdens het strijken - zelfs als het maar voor eventjes is - haal
dan de stekker uit het stopcontact en zet het strijkijzer op de wegzetplaat.
• Zet de stoomtank altijd op een stabiele strijkplank of tafel.
• Zet het strijkijzer altijd op de wegzetplaat. Zet het hete ijzer nooit op de
stoomtank, het aansluitsnoer of de verbindingsslang. Voorkom dat de zoolplaat,
wanneer deze heet is, het aansluitsnoer raakt.
Nederlands
Strijktemperatuur
- Kijk altijd eerst of er een etiket met
strijkvoorschrift op het stuk textiel is
genaaid. Volg in alle gevallen de
aanwijzingen van het strijkvoorschrift
op.
- Als het strijkvoorschrift ontbreekt maar u wel
weet welke soort textiel het betreft, zie dan
de tabel voor de aanbevolen
strijktemperaturen.
- Als het controlelampje "Strijkijzer warmt op"
(G) eerst is uitgegaan en daarna weer is gaan
branden, kunt u beginnen met strijken.
• Sorteer het strijkgoed vooraf, rekening
houdend met de strijktemperatuur.
Het strijkijzer warmt snel op, maar koelt
langzamer af. Daarom kunt u het beste
beginnen met de synthetische stoffen
(kunststoffen), die op de laagste temperatuur
gestreken moeten worden. Daarna strijkt u de
stoffen waarvoor u een wat hogere
strijktemperatuur nodig hebt, enzovoorts.
• Wanneer het textiel uit verschillende
vezelsoorten bestaat, kies dan altijd de
temperatuur die geldt voor de gevoeligste stof
van deze samenstelling. (Bijvoorbeeld: als een
stuk textiel bestaat uit "60% polyester en
40% katoen", kies dan de temperatuur voor
polyester (1) en gebruik dan dus ook geen
stoom.)
Page 17

Vullen met water (voor strijken met
stoom)
- Zet de stoomtank op een stevig oppervlak en
draai de dop van de vulopening (E) los
(linksom).
- Doe water in de stoomtank (max. 1 liter)
(fig. 2).
• U kunt gewoon kraanwater gebruiken.
Het wordt echter aanbevolen gedistilleerd
water te gebruiken als het water erg hard is
(waterhardheid boven 17 °DH).
• Gebruik nooit azijn, ontkalkingsmiddel of
andere chemicaliën.
- Sluit de stoomtank door de de dop met de
hand vast te draaien (rechtsom) (fig. 3).
Bij het begin van een strijkbeurt
- Vul de stoomtank voordat u de stekker in het
stopcontact steekt.
Tijdens een strijkbeurt
Pas op: de stoomtank staat onder druk
wanneer deze heet is.
Vul de stoomtank alleen wanneer deze
geheel leeg is. Dit is het geval wanneer
controlelampje “Stoomtank vullen” * (O)
gaat branden.
- Schakel het strijkijzer uit door schakelaar
"Strijkijzer aan/uit" ≥ (D) in stand O te
zetten (fig. 4).
- Schakel de stoomtank uit door schakelaar
"Stoomtank aan/uit" ≤ (B) in stand O te
zetten (fig. 5).
Als u niet weet uit welke vezelsoorten het
textiel bestaat, zoek dan een plek op die niet
zichtbaar zal zijn als u het artikel draagt of
gebruikt en probeer daar uit welke
temperatuur geschikt is. (Begin dan bij een
tamelijk lage temperatuur en voer de warmte
op tot het gewenste resultaat wordt bereikt.)
• Zuiver wollen stoffen (100% wol) kunt u
persen met stoom.
Gebruik dan bij voorkeur "stoomstoot" en
een droge perslap.
Bij het strijken van wollen stoffen met stoom
kunnen glimmende plekken ontstaan. Dit kunt
u voorkomen door het kledingstuk binnenstebuiten te keren en de binnenzijde te strijken.
• Fluweel en andere weefsels die snel
glimplekken vertonen, strijkt u altijd in één
richting (met de vleug mee) en zonder
drukken.
Zorg dat het strijkijzer steeds in beweging
blijft.
• Synthetische stoffen en zijde strijkt u bij
voorkeur aan de binnenzijde om glimplekken
te voorkomen. Wanneer u gekleurde zijde
strijkt, is het niet aan te raden stoom te
gebruiken: dit kan vlekken veroorzaken.
Stoomstrijken
B
Synthetisch
b.v. acetaat,
acryl,
viscose,
polyamide,
polyester
Zijde
MIN
|
|
1
|
|
A
C
Wol
|
2
A
D
Katoen
Linnen
|
3
MAX
Z
Let op:
Dit artikel kan niet gestreken
worden!
Tabel
Etiket met
strijkvoorschrift
Soort
textiel
Temperatuurkiezer
17
_
2
1
3
FILLING OPENING
WITH SCREW CAP
4
2
1
3
4
5
5
2
1
3
4
5
Page 18

- Zet schakelaar
"Strijk-ijzer aan/uit"
≥(D) in stand | .
Het controlelampje
in de schakelaar gaat
dan branden, evenals
controlelampje
“Strijkijzer warmt
op” (H) (fig. 9).
- Na een paar minuten
gaat controlelampje
"Strijkijzer warmt op" (H) uit.
Dit betekent, dat de zoolplaat de ingestelde
temperatuur heeft bereikt.
- Als controlelampje "Stoomtank warmt op" U
(C) uit gaat en de naald van de manometer
(M) in het groene gebied staat, is de
stoomtank opgewarmd en is de stoom klaar
voor gebruik.
U kunt nu beginnen met stoomstrijken.
- Tijdens het
stoomstrijken houdt
u de knop voor
stoomtoevoer (G)
ingedrukt (fig. 10).
• Tijdens het
stoomstrijken gaan
de controlelampjes
(C) en (H) nu en dan
branden. Het
strijkijzer of de
stoomtank wordt dan weer op de juiste
temperatuur gebracht. U kunt intussen
doorgaan met stoomstrijken.
Verticaal stomen
U kunt opgehangen
gordijnen en kleding
(colberts, mantelpakjes,
jassen) stomen, door
het strijkijzer verticaal
te houden (fig. 11).
Droogstrijken
• Voor droogstrijken (= strijken zonder stoom)
drukt u de knop voor stoomtoevoer (G) niet
in.
• Desgewenst schakelt u de stoomtank uit door
schakelaar "Stoomtank aan/uit" ≤ (B) in stand
O te zetten.
18
- Neem de stekker uit het stopcontact.
- Draai de dop van de
stoomtank
voorzichtig wat los
(linksom), totdat u
stoom hoort
ontsnappen (fig. 6).
Wacht totdat het
sissende geluid
ophoudt.
- Het geluid is een
normaal verschijnsel
en niet gevaarlijk.
- Draai de dop voorzichtig wat verder los,
totdat u opnieuw het sissende geluid hoort.
Wacht dan weer tot het ophoudt. Ga zo door
totdat de dop los is.
- Wacht enkele minuten. Giet dan langzaam
water in de vulopening (E) (fig. 2).
- Sluit de stoomtank door de dop met de hand
vast te draaien (fig. 3).
Strijken met stoom
• Zoals u aan de temperatuurregelaar (H) en de
tabel kunt zien, is strijken met stoom alleen
mogelijk bij hogere strijktemperaturen.
Zet dus de temperatuurregelaar op
2 of
3
- Steek de stekker in het stopcontact.
- Zet schakelaar "Stoomtank aan/uit" ≤ (B) in
stand | . Het controlelampje in de schakelaar
gaat dan branden (fig. 7).
• Het strijkijzer warmt sneller op dan de
stoomtank: vandaar dat u het strijkijzer enkele
minuten later kunt inschakelen.
- Stel de gewenste strijktemperatuur in met
behulp van de temperatuurregelaar (I) (fig. 8).
6
FILLING OPENING
WITH SCREW CAP
7
8
9
2
1
3
4
5
10
2
1
3
4
5
11
Page 19

Na het strijken
- Schakel de stoomtank en het strijkijzer uit
(fig. 12, 13).
- Neem de stekker uit het stopcontact.
- Zet het strijkijzer op de houder en laat het
afkoelen.
• Het is niet nodig het overgebleven water uit
de stoomtank te gieten.
Schoonmaken
- Neem vóór het schoonmaken de stekker uit
het stopcontact en laat het strijkijzer
voldoende afkoelen.
- U kunt het apparaat schoonmaken met een
vochtige doek.
Opbergen
- Aan de zijkanten van
de stoomtank zijn
handgrepen
aangebracht voor het
optillen en
verplaatsen (fig. 14).
• Controleer
regelmatig of het
snoer en de
verbindingsslang nog
in goede en veilige conditie zijn.
19
12
2
1
3
4
5
13
2
1
3
4
5
14
FILLING OPENING
WITH SCREW CAP
Page 20

20
Descrizione generale (fig. 1)
A Caldaia
B Interruttore “Caldaia accesa/spenta”
≤ con luce spia incorporata
C Luce spia “Riscaldamento caldaia” U.
(La spia si spegne quando l’apparecchio è
pronto per la stiratura a vapore)
D Interruttore “Ferro acceso/spento ≥
con luce spia incorporata
E Bocchettone per il riempimento
d’acqua con tappo a vite
F Appoggia-ferro (asportabile)
G Attivatore vapore (premere per la
stiratura a vapore)
H Luce spia “Riscaldamento ferro”
I Manopola del termostato (ruotare)
J Piastra
K Cavo di collegamento
L Cavo di alimentazione
M Manometro (per verificare la pressione del
vapore)
Indice sulla zona verde: pressione del vapore
sufficiente
N Regolatore del vapore (da ruotare)
posizione 1: uscita vapore minima
posizione 2: uscita vapore massima
Importante
• Prima di usare l’apparecchio leggete attentamente le istruzioni d’uso guardando le
figure relative.
• Non usate mai un apparecchio danneggiato. Controllate regolarmente che il cavo di
alimentazione e il cavo di collegamento fra ferro e caldaia siano sempre in buone
condizioni.
Se il cavo di alimentazione dell’apparecchio è danneggiato, deve essere sostituito
solo da un Centro Assistenza Autorizzato Philips perché occorrono attrezzi e parti
di ricambio speciali.
• Controllate che la tensione di rete indicata sulla targhetta (posta sotto la caldaia)
corrisponda a quella della rete locale.
• Collegate l’apparecchio solo ad una presa dotata di terra.
• Non immergete mai il ferro o la caldaia nell’acqua.
• Non aggiungete mai all’acqua della caldaia profumi, aceto o prodotti disincrostanti
o chimici.
• Tenete i bambini lontani dal ferro caldo e fate in modo che non possano tirare il
cavo di alimentazione o il cavo di collegamento fra caldaia e ferro.
• Se smettete di stirare anche per breve tempo, staccate sempre la spina dalla presa
di corrente e appoggiate il ferro sul suo supporto.
• Appoggiate sempre la caldaia su una superficie piana e stabile.
• Appoggiate sempre il ferro sul suo supporto. Non appoggiate il ferro caldo sulla
caldaia, sul cavo di collegamento o sul cavo di alimentazione. Durante la stiratura il
cavo di alimentazione non deve mai toccare la piastra calda.
Italiano
O Luce spia “Riempimento caldaia” *
Quando questa luce spia si accende è ora di
riempire d’acqua la caldaia.
Temperatura di stiratura
- Controllate prima se il capo da stirare è
provvisto dell’etichetta con le indicazioni
di stiratura.
Attenetevi sempre alle istruzioni
riportate sull’etichetta.
- Se mancano le istruzioni per la stiratura ma
conoscete il tipo di tessuto, potete far
riferimento alle temperature consigliate nella
tabella.
- Potete cominciare a stirare quando la spia (H)
“riscaldamento ferro” si è spenta una prima
volta e si è riaccesa.
• Durante la stiratura la spia si accenderà di
tanto in tanto per mantenere la piastra alla
temperatura occorrente. Potete comunque
continuare a stirare.
• La tabella si riferisce a tessuti senza particolari
trattamenti. Nel caso di tessuti con finiture
(come lustrini, pieghettature, rilievi, ecc.), vi
consigliamo di usare temperature più basse.
Page 21

inconveniente, stirate il capo al rovescio.
• Il velluto o gli altri tessuti che prendono
facilmente il lucido devono essere stirati in
una sola direzione (nel senso del pelo)
esercitando solo una pressione leggera e
muovendo continuamente il ferro.
• Per evitare che prendano il lucido stirate al
rovescio anche i capi in materiale sintetico e in
seta. Nella stiratura della seta stampata è
meglio non usare il vapore per evitare
macchie.
Riempimento con acqua (per la stiratura a
vapore)
- Appoggiate la caldaia su un piano stabile e
svitate il tappo (E) del serbatoio ruotandolo in
senso antiorario.
- Riempite il serbatoio di acqua (max 1 litro)
(fig.2).
• Potete usare acqua del rubinetto. Tuttavia, se
questa acqua fosse molto dura (durezza
maggiore di 17° DH / 21 ° Clarke), è meglio
usare acqua distillata.
• Non usate mai aceto, decalcificanti o altri
prodotti chimici.
- Richiudete il serbatoio della caldaia avvitando
a mano il tappo in senso orario finché si
blocca (fig. 3).
Inizio della stiratura
- Prima di inserire la spina nella presa di
corrente riempite d’acqua la caldaia.
Durante la stiratura
Attenzione: Dopo l’accensione la caldaia
va in pressione.
Riempitela solo quando è vuota (cioè
quando la spia “Riempimento caldaia” * (O) si
accende.
• Suddividete prima i capi da stirare in base alle
diverse temperature di stiratura: lana con lana,
cotone con cotone, ecc.
• Il ferro impiega meno tempo a riscaldarsi che
a raffreddarsi e quindi vi consigliamo di iniziare
a stirare i capi che richiedono la temperatura
più bassa, come quelli in fibre sintetiche. Poi
passate ai capi che richiedono temperature più
alte.
• Se il tessuto è composto da fibre diverse,
regolate il ferro sulla temperatura della fibra
che richiede la temperatura più bassa. (es. un
capo composto da “60% poliestere e 40%
cotone”, dovrà essere stirato alla temperatura
indicata per il poliestere 1 e senza vapore).
Se non conoscete la composizione del
tessuto, per stabilire la temperatura giusta,
fate una prova su un angolo del capo non
visibile quando indossato. (Iniziate sempre da
una temperatura bassa e aumentate
gradualmente la temperatura finché ottenete il
risultato desiderato).
• I capi in pura lana (100% lana) possono essere
stirati a vapore. Si consiglia di usare un telo
asciutto e il colpo di vapore.
I capi in lana stirati a vapore potrebbero
prendere il lucido. Per evitare questo
Vapore
B
Fibre
sintetiche
es. acetato,
acrilico,
viscosa,
poliammide,
poliestere.
Seta
MIN
|
|
1
|
|
A
C
Lana
|
2
A
D
Cotone
Lino
|
3
MAX
Z Avvertenza: questo capo non
può essere stirato
Tablella
Etichetta
con
istruzioni per
la stiratura
Tipo de
tessuto
Temperatura
21
_
2
3
1
FILLING OPENING
WITH SCREW CAP
Page 22

“riscaldamento caldaia” U (C) si
accenderanno (fig. 7).
• Siccome il ferro si scalda più rapidamente
dell’acqua nella caldaia potete accenderlo
qualche minuto dopo.
- Scegliete la temperatura di stiratura richiesta
con la manopola del termostato (I) (fig. 8).
- Portate l’interruttore
del ferro ≥ (D)
nella posizione I. La
spia nell’interruttore
e la spia
“riscaldamento
ferro” (H) si
accenderanno
(fig. 9).
- Dopo alcuni minuti la
spia “riscaldamento
ferro” (H) si spegnerà. La piastra ha raggiunto
la temperatura selezionata.
- Quando la spia “riscaldamento caldaia” U (C)
si spegne e l’indice del manometro (M) si
trova nella zona verde, vuol dire che la caldaia
è calda e il vapore è pronto e potete iniziare la
stiratura a vapore.
- Quando stirate a
vapore tenete
premuto il tasto
attivazione vapore
(G) (fig. 10).
- Durante la stiratura a
vapore le due spie
(C) e (H) si
accenderanno e
spegneranno di tanto
in tanto. Ciò vuol
dire che sia la caldaia che il ferro vengono
riscaldati alla temperatura necessaria. Potete
comunque continuare a stirare regolarmente.
Vapore in posizione verticale
Tenedo il ferro in
posizione verticale è
possibile indirizzare il
getto di vapore su
tende o capi di
vestiario appesi
(giacche, vestiti, ecc.)
(fig. 11).
22
- Spegnete il ferro portando l’interruttore del
ferro
≥(D) nella posizione[O (fig. 4).
- Spegnete la caldaia portando l’interruttore
della caldaia ≤(B) nella posizione O (fig. 5).
- Staccate la spina dalla presa di corrente.
- Svitate lentamente il
tappo del serbatoio
(in senso antiorario)
finché sentite sfuggire
il vapore residuo
(fig. 6).
Lasciate finire il
fischio del vapore. Si
tratta di una
operazione normale
senza alcun pericolo.
- Svitate ancora un po’ il tappo finché sentite
ancora il fischio.
Aspettate che finisca e ripete l’operazione
finché il tappo è completamente svitato.
- Attendete qualche minuto. Quindi versate
l’acqua attraverso il bocchettone della caldaia
(E) (fig. 2).
- Chiudete la caldaia avvitando a mano il tappo
(in senso orario) finché si blocca (fig. 3).
Stiratura a vapore
• Come indicato sulla manopola del termostato
(I) e nella tabella, la stiratura a vapore è
possibile solo con le temperature più alte;
portate quindi la manopola su 2 o su 3 :
- Inserite la spina in una presa di corrente.
- Portate l’interruttore della caldaia ≤ (B) nella
posizione I. La spia nell’interruttore e la spia
4
2
1
3
4
5
5
2
1
3
4
5
6
FILLING OPENING
WITH SCREW CAP
7
2
1
3
4
5
8
9
2
1
3
4
5
10
11
Page 23

Stiratura a secco
• Per stirare senza vapore, non premete il tasto
di attivazione del vapore (G).
• Spegnete la caldaia portando l’interruttore
della caldaia ≤ (B) nella posizione O.
Al termine della stiratura
- Spegnete la caldaia e il ferro (figg. 12 e 13).
- Staccate la spina dalla presa di corrente.
- Appoggiate il ferro sul suo appoggia-ferro e
lasciatelo raffreddare.
• Non è necessario vuotare l’acqua rimasta nella
caldaia.
Pulizia
- Prima di pulire il ferro staccate la spina dalla
presa di corrente e lasciatelo raffreddare.
- L’apparecchio può essere pulito con un panno
umido.
Come riporlo
- Per trasportare
l’apparecchio usate le
maniglie che si
trovano ai due lati
della caldaia (fig. 14).
• Controllate
regolarmente che il
cavo di alimentazione
e il cavo di
collegamento siano
sempre in buone condizioni.
23
12
2
1
3
4
5
13
2
1
3
4
5
14
FILLING OPENING
WITH SCREW CAP
Page 24

Descripción general (fig. 1)
A Depósito de vapor.
B Interruptor “Paro / Marcha del
depósito de vapor” ≤ con lámpara piloto
incorporada.
C Lámpara piloto “Calentamiento del
depósito de vapor” U (La lámpara piloto
se apaga cuando el aparato está listo para
planchar con vapor).
D Interruptor “Paro / Marcha de la
plancha” ≥ con lámpara piloto
incorporada.
E Abertura de llenado con tapa roscada.
F Soporte para la plancha (desmontable).
G Activador del vapor (Presionar para
planchar con vapor).
H Lámpara piloto “Plancha
calentándose”.
I Mando de la temperatura (giratorio).
J Suela.
K Manguera de alimentación.
L Cable de red.
M Manómetro (para comprobar la presión
del vapor).
Aguja en la zona verde = Suficiente
presión de vapor.
N Control del vapor (giratorio).
Posición 1 : Mínima salida de vapor
Posición 5 : Máxima salida de vapor
Importante
• Antes de usar el aparato, lean cuidadosamente estas instrucciones observando, al
mismo tiempo, las ilustraciones.
• No usen nunca el aparato si tiene cualquier tipo de deterioro. Comprueben
regularmente que el cable de red y la manguera de alimentación todavía estén bien
y sean seguros. Si el cable de red de este aparato está deteriorado, solo debe ser
reemplazado por Philips o por su servicio oficial, ya que se requieren piezas y / o
herramientas especiales.
• Comprueben si el voltaje indicado en la placa de características (bajo el depósito de
vapor) se corresponde con el de su hogar.
• Enchufen el aparato solo a un enchufe mural con toma de tierra.
• No sumerjan nunca la plancha o el depósito de vapor en agua.
• No llenen nunca el depósito del agua con perfumes, vinagre, agentes
desincrustantes u otros productos químicos.
• Cuiden de que los niños no puedan tocar la plancha cuando esté caliente y de que
no puedan tirar del cable de red o de la manguera de alimentación.
• Cuando dejen sola la plancha, aunque sea por corto tiempo, desenchufen siempre la
clavija del enchufe mural y coloquen la plancha sobre el soporte.
• Coloquen siempre el depósito de vapor sobre una superficie plana y estable.
• Coloquen siempre la plancha sobre su soporte. No coloquen la plancha caliente
sobre el depósito de vapor, la manguera de alimentación o el cable de red. Eviten
que el cable de red toque la suela de la plancha cuando ésta esté caliente.
Español
24
O Lámpara piloto “Relleno del depósito
de vapor” *
El depósito de vapor necesita ser rellenado
cuando esta lámpara piloto se enciende.
Temperatura de planchado
- Primero comprueben siempre si el tejido a ser
planchado lleva una etiqueta con instrucciones
de planchado.
Sigan esas instrucciones en todos los casos.
- Si no hay instrucciones de planchado pero
saben el tipo de tejido, consulten la tabla para
las temperaturas de planchado recomendadas
.
- Después de que la lámpara piloto “Plancha
calentándose” (H) se haya apagado y
encendido de nuevo, pueden empezar a
planchar.
• Durante el planchado, la lámpara piloto se
encenderá periódicamente. Cuando esto
sucede, la suela está siendo calentada de
nuevo a la temperatura fijada. Pueden
continuar planchando.
• La tabla solo es valida para materiales de fibra.
Si se ha aplicado algún tipo de acabado (brillo,
arrugas, relieve, etc.), el tejido puede ser
planchado mejor con una temperatura
inferior.
Page 25

chorro de vapor y usar un paño seco
interpuesto.
Al planchar con vapor los tejidos de lana
pueden aparecer brillos en ellos. Ello puede
evitarse girando la prenda hacia dentro y
planchándola por el revés.
• El terciopelo y otros tejidos que adquieran
puntos brillantes con rapidez, deben
plancharlos solo en una dirección (la del pelo),
aplicando una presión ligera y sin dejar de
mover la plancha.
• Para evitar puntos brillantes, planchen por el
revés la seda y los materiales sintéticos.
• Cuando planchen seda de colores no es
aconsejable usar vapor ya que puede
ocasionar manchas.
Llenado con agua (para planchar con vapor)
- Coloquen el depósito de vapor sobre una
superficie plana y estable y desenrosquen la
tapa del depósito de vapor (E) haciéndola
girar en sentido antihorario.
- Llenen el depósito de vapor con agua
(Máximo 1 litro) (fig. 2).
• Pueden usar agua del grifo. Sin embargo, si el
agua es muy dura (dureza superior a 17 ºDH)
es aconsejable usar agua destilada.
• No usen nunca vinagre, agentes desincrustantes u otros productos químicos.
- Cierren el depósito de vapor haciendo girar la
tapa roscada, en sentido horario y a mano,
hasta que quede apretada (fig. 3).
Al empezar a planchar
- Llenen el depósito de vapor antes de enchufar
la clavija en el enchufe mural.
Durante el planchado
- Advertencias :
• Si se ha calentado, el depósito de vapor
está bajo presión.
• Vuelvan a llenar el depósito de vapor solo
cuando esté vacío (por ejemplo, cuando la
lámpara piloto “Relleno del depósito de
vapor” * se encienda).
• Seleccionen primero las telas de acuerdo con
la temperatura de planchado : lana con lana,
algodón con algodón, etc.
La plancha se calienta con mayor rapidez que
se enfría. Por ello, conviene empezar a
planchar los artículos que necesiten la
temperatura más baja como son los fabricados
con fibras sintéticas e ir pasando a
temperaturas superiores.
• Si el artículo está hecho con una mezcla de
fibras diferentes, siempre deben seleccionar la
más baja temperatura de planchado
correspondiente a la composición de esas
fibras. (Por ejemplo, un artículo formado por
un 60 % de poliester y un 40 % de algodón
deberá plancharse con la temperatura indicada
para el poliester (1) y sin vapor).
Si no saben de que tipo(s) de fibra (s) está
compuesto el artículo, busquen un lugar que
sea invisible cuando se lleve o use el artículo
para hallar la temperatura de planchado.
(Empiecen siempre con una temperatura baja
y vayan aumentándola hasta encontrar una
que dé los resultados deseados).
• Los tejidos de pura lana (100 % lana) pueden
plancharlos con la plancha ajustada a una
posición de vapor. Es recomendable aplicar el
Planchado
con vapor
B
Sintéticos
p. ej. acetato
acrílicos
viscosa
poliamida
poliéster
seda
MIN
|
|
1
|
|
A
C
lana
|
2
A
D
algodon
Lino
|
3
MAX
Z Cuidado: ¡Este artículo no se
puede planchar!
Tabla
Etiqueta con
instrucciones
de planchado
Clase de
tejido
Mando de
temperatura
25
_
2
1
3
FILLING OPENING
WITH SCREW CAP
Page 26

- Ajusten el interruptor “Paro / Marcha del
depósito de vapor” ≤ a la posición I. La
lámpara piloto del interruptor así como la
lámpara piloto “Calentamiento del depósito
de vapor” U se encenderán (fig. 7).
• La plancha se calienta más rápidamente que el
depósito de vapor y, en consecuencia, pueden
conectar la plancha unos minutos más tarde
que el depósito de vapor.
- Con el mando de la temperatura (I)(fig. 8)
seleccionen la temperatura de planchado
requerida.
- Ajusten el
interruptor “Paro /
Marcha de la
plancha” ≥(D) a la
posición I.
Se encenderán tanto
la lámpara piloto del
interruptor como la
del “Calentamiento
de la plancha” (H)
(fig. 9).
- Después de unos pocos minutos, la lámpara
piloto “Calentamiento de la plancha” (H) se
apagará.
Esto indica que la suela ha alcanzado la
temperatura fijada.
- Cuando la lámpara piloto “Calentamiento del
depósito de vapor” U (C) se apaga y la aguja
del manómetro (M) está en la zona verde, el
depósito de vapor está caliente y el vapor está
listo.
Pueden empezar a planchar.
- Mientras planchen
con vapor,
mantengan
presionado el
activador del vapor
(G)(fig. 10).
• Durante el planchado
con vapor, las dos
lámparas piloto (C) y
(H) se encenderán
periódicamente.
Cuando eso sucede, ya sea la plancha o el
26
- Desconecten la plancha colocando el
interruptor “Paro / Marcha de la plancha”
≥
(D) en la posición O (fig. 4).
- Desconecten el depósito de vapor colocando
el interruptor “Paro / Marcha del depósito de
vapor” ≤ en la posición O (fig. 5).
- Desenchufen la clavija del enchufe mural.
- Desenrosquen,
cuidadosamente y en
sentido antihorario, la
tapa del depósito de
vapor hasta que oigan
escapes de vapor
(fig. 6).
Esperen a que pare el
sonido silbante.
Este sonido de alto
tono es completamente normal y no peligroso.
- Desenrosquen, de nuevo y cuidadosamente, la
tapa del depósito de vapor hasta que otra vez
oigan el sonido silbante. Esperen a que cese
el sonido. Vayan procediendo del mismo
modo hasta que la tapa esté desenroscada.
- Esperen durante unos minutos y viertan
lentamente el agua en la abertura de llenado
(E) (fig. 2).
- Cierren el depósito de vapor haciendo girar,
en sentido horario y a mano, la tapa roscada
hasta que quede apretada (fig. 3).
Planchado con vapor
• Como está indicado en el mando de la
temperatura (I) y en la tabla, el planchado con
vapor solo es posible con las más altas
temperaturas de planchado y, por ello, ajusten
el mando en la posición 2 o 3 .
- Enchufen la clavija en un enchufe mural.
4
5
7
8
2
1
3
4
5
2
1
3
4
5
6
FILLING OPENING
WITH SCREW CAP
2
1
3
4
5
9
2
1
3
4
5
10
Page 27

Almacenamiento
- Para el transporte
hay empuñaduras a
cada lado del
depósito de vapor
(fig. 14).
• Comprueben
regularmente que el
cable de red y la
manguera de
alimentación todavía
estén bien y sean seguros.
depósito de vapor se están calentando a la
temperatura requerida. Pueden continuar
planchando.
Planchado en posición vertical
Cortinas colgantes y
ropas (Chaquetas, ropas
femeninas, americanas)
pueden plancharse
sosteniendo la plancha
en posición vertical
(fig. 11).
Planchado en seco
• Para planchar sin vapor no presionen el
activador del vapor (G).
• Pueden desconectar el depósito de vapor
llevando el interruptor “Paro / Mar cha del
depósito de vapor” ≤ (B) a la posición O.
Cuando hayan acabado de planchar
- Desconecten el depósito de vapor y la plancha
(figs. 12 y 13).
- Desenchufen la clavija del enchufe mural.
- Coloquen la plancha sobre el soporte y
déjenla enfriar.
• No es necesario eliminar el resto de agua del
depósito de vapor.
Limpieza
- Antes de limpiar la plancha, quiten la clavija
del enchufe mural y dejen que se enfríe
suficientemente.
- El aparato puede limpiarse con un paño
húmedo.
27
11
14
G OPENING
FILLIN
WITH SCREW CAP
12
2
1
3
4
5
13
2
1
3
4
5
Page 28

28
Descrição geral (fig. 1)
A Reservatório do vapor
B Botão ‘on/off’ (ligar/desligar) ≤ o
reservatório do vapor com lâmpada piloto
integrada
C Lâmpada piloto ‘Reservatório do
vapor em aquecimento’ U (A lâmpada
apaga-se quando o ferro fica pronto para
passar com vapor)
D Botão ‘on/off’ (ligar/desligar) ≥ o ferro
com lâmpada piloto integrada
E Abertura de enchimento com tampa de
enroscar
F Suporte para o ferro (desmontável)
G Botão activador do vapor (carregar para
passar com vapor)
H Lâmpada piloto ‘Ferro em
aquecimento’
I Botão da temperatura (rotativo)
J Base do ferro
K Mangueira de abastecimento
L Cabo de alimentação
M Manómetro (para verificar a pressão do
vapor) Agulha na zona verde: pressão
suficiente
Importante
• Antes de utilizar o ferro, leia atentamente estas instruções e consulte as ilustrações
fornecidas.
• Não se sirva do aparelho se ele apresentar qualquer tipo de avaria. Verifique
regularmente se o cabo de alimentação e a mangueira de abastecimento estão em
boas condições e se oferecem segurança.
Se o cabo de alimentação estiver danificado, só deverá ser substituído pela Philips
ou por um Concessionário Philips Autorizado, uma vez que a reparação requer a
utilização de peças e/ou ferramentas especiais.
• Verifique se a voltagem indicada na placa de características (na base do
reservatório do vapor) corresponde à corrente eléctrica da sua casa.
• O ferro só deverá ser ligado a uma tomada com terra.
• Nunca mergulhe o ferro ou o reservatório do vapor dentro de água.
• Não deite perfume, vinagre, agentes descalcificantes ou outros produtos químicos
no reservatório do vapor.
• Tome as precauções necessárias para evitar que as crianças toquem no ferro
enquanto quente ou puxem inadvertidamente pelo fio ou pela mangueira de
abastecimento.
• Se deixar o ferro sem vigilância, mesmo que seja por muito pouco tempo, desligue
sempre a ficha da corrente e coloque o ferro sobre o respectivo suporte.
• Coloque sempre o reservatório do vapor sobre uma superfície plana e estável.
• Coloque sempre o ferro sobre o respectivo suporte. Não coloque o ferro quente
sobre o reservatório do vapor, a mangueira de abastecimento ou o cabo de
alimentação. Certifique-se que o cabo de alimentação não fica em contacto com a
base quente do ferro.
Português
N Controlo do vapor (rotativo)
Posição 1: vapor mínimo
Posição 5: vapor máximo
O Lâmpada piloto ‘Reabastecer
reservatório do vapor’*
Quando a lâmpada acede, o reservatório
precisa de ser reabastecido.
Temperatura
- Comece por verificar se a peça que vai passar
tem alguma etiqueta com instruções. Siga
sempre as instruções da etiqueta sobre
o modo como deve passar a peça de
roupa.
- Se a peça de roupa não tiver etiqueta com
instruções, mas se conhecer o tipo de tecido
de que a peça é feita, consulte a tabela para
ver qual a temperatura mais aconselhada.
- Quando a lâmpada piloto ‘Ferro em
aquecimento’ (H) se apagar e voltar a acender,
poderá começar o trabalho.
• Enquanto está a passar a roupa, a lâmpada
piloto acender-se-á de tempos a tempos.
Quando isso acontece, é sinal de que a base
Page 29

gradualmente até obter o resultado
pretendido).
• Os tecidos de lã (100% lã) podem ser
passados com vapor. Recomenda-se a
aplicação de um jacto de vapor e a utilização
de um pano. Quando se passa tecidos de lã
com vapor, o tecido poderá ganhar um pouco
de brilho. Essa situação não ocorrerá se
passar o tecido pelo avesso.
• Veludo e outros tecidos que tendam a ganhar
manchas, deverão ser passados apenas numa
direcção (a favor do pêlo), fazendo apenas
uma ligeira pressão.
O ferro deverá estar sempre em movimento.
• Os materiais sintéticos e os tecidos de seda
devem ser passados pelo avesso para evitar
manchar o tecido. Se passar seda com corres,
evite o vapor para não deixar manchas.
Enchimento do reservatório com água
(para passar com vapor)
- Coloque o reservatório do vapor sobre uma
superfície plana e estável e desenrosque a
tampa (E), rodando-a para a esquerda.
- Encha o reservatório com água (Máximo 1
litro) (fig. 2).
• Poderá usar água da torneira. Se a água for
muito dura (superior a 17º DH), aconselha-se
a utilização de água mineral ou destilada
• Não deite vinagre, agentes descalcificantes ou
outros produtos químicos no reservatório da
água.
- Feche o reservatório, rodando a tampa com
força para a direita para ficar bem apertada
(fig. 3).
Quando for passar
- Encha o reservatório do vapor antes de ligar
a ficha na tomada de corrente.
do ferro está a aquecer para atingir a
temperatura necessária. Pode continuar o seu
trabalho.
• A tabela é válida apenas para tecidos simples.
Se a peça a engomar tiver algum tratamento
(lustro, pregas, relevo, etc.), será melhor
passá-la a uma temperatura mais baixa.
• Escolha primeiro os tecidos de acordo com a
temperatura: junte lã com lã, algodão com
algodão, etc.O ferro aquece mais rapidamente
do que arrefece. Por conseguinte, comece a
passar as peças que precisem de temperaturas
mais baixas, como é o caso dos tecidos
sintéticos. Prossiga com os tecidos que
requerem uma temperatura mais elevada.
• Se a peça for constituída por uma mistura de
fibras diferentes, deverá seleccionar sempre a
temperatura mais baixa da composição dessas
fibras. (Se, por exemplo, uma peça for
constituída por 60% de poliester e 40% de
algodão, deverá ser passada a uma
temperatura indicada para poliester (1) e sem
vapor). Se desconhecer o(s) tipo(s) de
material(is) de que a peça é feita, experimente
primeiro num sítio que não fique à vista para
se certificar da temperatura mais adequada.
(Comece sempre por uma temperatura
relativamente baixa e vá aumentando
Controlo
Vapor
B
Tecidos
sintéticos
como
acetato,
acrílico,
viscose,
poliamide,
poliester
Seda
MIN
|
|
1
|
|
A
C
Lã
|
2
A
D
Algodão
Linho
|
3
MAX
Z
Atenção: o símbolo Z na etiqueta
significa que a peça não pode ser
passada a ferro.
Tabela
Etiqueta do
tecido
Tipo de
tecido
Controlo
Temperatura
29
_
2
3
1
FILLING OPENING
WITH SCREW CAP
Page 30

lâmpada piloto do botão bem como a lâmpada
piloto ‘Reservatório do vapor em
aquecimento’ U (C) acendem-se (fig. 7).
• O ferro aquece mais depressa do que o
reservatório do vapor. Por isso, pode ligar o
ferro uns minutos depois de ligar o
reservatório.
- Seleccione a temperatura adequada, rodando
o botão (I) (fig. 8).
- Coloque o botão
‘Ligar/desligar o
ferro’ ≥(D) na
posição I.
A lâmpada piloto do
botão, bem como a
lâmpada piloto
‘Ferro em
aquecimento’ (H)
acende-se (fig. 9).
- • Passados alguns minutos, a lâmpada piloto
‘Ferro em aquecimento’ (H) apagar-se-á. A
base do ferro atingiu a temperatura
seleccionada.
- Quando a lâmpada piloto ‘Reservatório do
vapor em aquecimento’ U (C) se apagar e a
agulha do manómetro (M) estiver na secção
verde, o reservatório do vapor já estará
quente e o vapor estará pronto.
Poderá, então, começar a passar.
- Enquanto estiver a
passar com vapor,
mantenha premido o
activador do vapor
(G) (fig. 10).
• Quando se está a
passar com vapor, as
duas lâmpadas piloto
(C) e (H) acendemse de tempos a
tempos. Se isso
acontecer, significa que o ferro ou o
reservatório do vapor estão em aquecimento
para a temperatura necessária. Pode continuar
o trabalho.
30
Enquanto estiver a passar
Atenção: Quando quente, o reservatório
do vapor estará sob pressão.
Só deverá pr oceder ao seu
reabastecimento quando o reservatório
estiver vazio (isto é, quando a lâmpada piloto
‘Reabastecer reservatório do vapor’
* (O) se
acender.
- Desligue o ferro, colocando o botão ‘on/off’
≥(D) na posição O (fig. 4).
- Desligue o reservatório do vapor, colocando
o botão ‘Ligar/desligar o reservatório do
vapor’ ≤ (B) na posição O (fig. 5).
- Retire a ficha da tomada de corrente.
- Desenrosque a tampa
do reservatório do
vapor com cuidado
(para a esquerda) até
se ouvir o vapor a
sair (fig. 6). Espere
que este silvo páre.
Este som estridente é
perfeitamente normal
e não é perigoso.
- Continue a
desenroscar a tampa do reservatório do
vapor com cuidado até voltar a ouvir o
mesmo som sibilante. Volte a aguardar que o
som páre. Prossiga com esta operação até que
a tampa fique totalmente desenroscada.
- Espere uns minutos. Deite a água,
lentamente, através da abertura de
enchimento (E) (fig. 2).
- Feche o reservatório do vapor, rodando a
tampa com a mão (para a direita) até ficar
bem apertada (fig. 3).
Passar com vapor
• Conforme indicado no botão da temperatura
(I) e na tabela, só é possível passar com vapor
nas temperaturas mais elevadas. Por isso, rode
o botão para 2 ou 3 .
- Ligue a ficha à tomada de corrente.
- Coloque o botão ‘Ligar/desligar o
reservatório do vapor’ ≤ (B) na posição I. A
4
5
7
2
1
3
4
5
8
2
1
3
4
5
2
1
3
4
5
6
FILLING OPENING
WITH SCREW CAP
9
2
1
3
4
5
10
Page 31

Arrumação
- As pegas existentes
de cada um dos lados
do reservatório do
vapor servem para
facilitar o transporte
(fig. 14).
• Verifique
regularmente se o
cabo de alimentação
e a mangueira de
abastecimento estão em boas condições e
segurança.
Passar a vapor com o ferro na vertical
Os cortinados e a
roupa pendurada em
cabides (casacos, fatos,
sobretudos) podem ser
passados a vapor com o
ferro na vertical (fig.11).
Passar a seco (sem
vapor)
• Para passar sem vapor, não carregue no
activador de vapor (G).
• Poderá desligar o reservatório do vapor,
colocando o botão ‘Ligar/desligar reservatório
do vapor’ ≤ (B) na posição O.
Quando terminar
- Desligue o reservatório do vapor e o ferro
(fig. 12, 13).
- Desligue o ferro da corrente.
- Assente o ferro sobre o suporte e deixe-o
arrefecer.
• Não é necessário retirar a água que tiver
sobejado no reservatório do vapor.
Limpeza
- Retire a ficha da tomada de corrente e deixe
o ferro arrefecer o suficiente antes de
proceder à sua limpeza.
- O ferro pode ser limpo com um pano húmido.
31
11
12
2
1
3
4
5
13
2
1
3
4
5
14
FILLING OPENING
WITH SCREW CAP
Page 32

32
Page 33

33
Page 34

4222 001 76703
u
 Loading...