

HI 980/HI 981

2
English Page 4
• Keep page 3 open when reading these
operating instructions.
Français Page 8
• Pour le mode d'emploi: dépliez la page 3.
Deutsch Seite 12
• Schlagen Sie beim Lesen der
Gebrauchsanweisung Seite 3 auf.
Nederlands Pagina 16
• Sla bij het lezen van de gebruiksaanwijzing
pagina 3 op.
Italiano Pagina 20
• Prima di usare l'apparecchio, aprite la pagina 3
e leggete attentamente le istruzioni per l'uso.
Español Página 24
• Desplegar la página 3 al leer las instrucciones
de manejo.
FILLING OPENING
WITH SCREW CAP
1
A BD CE L
F HG I J K

4
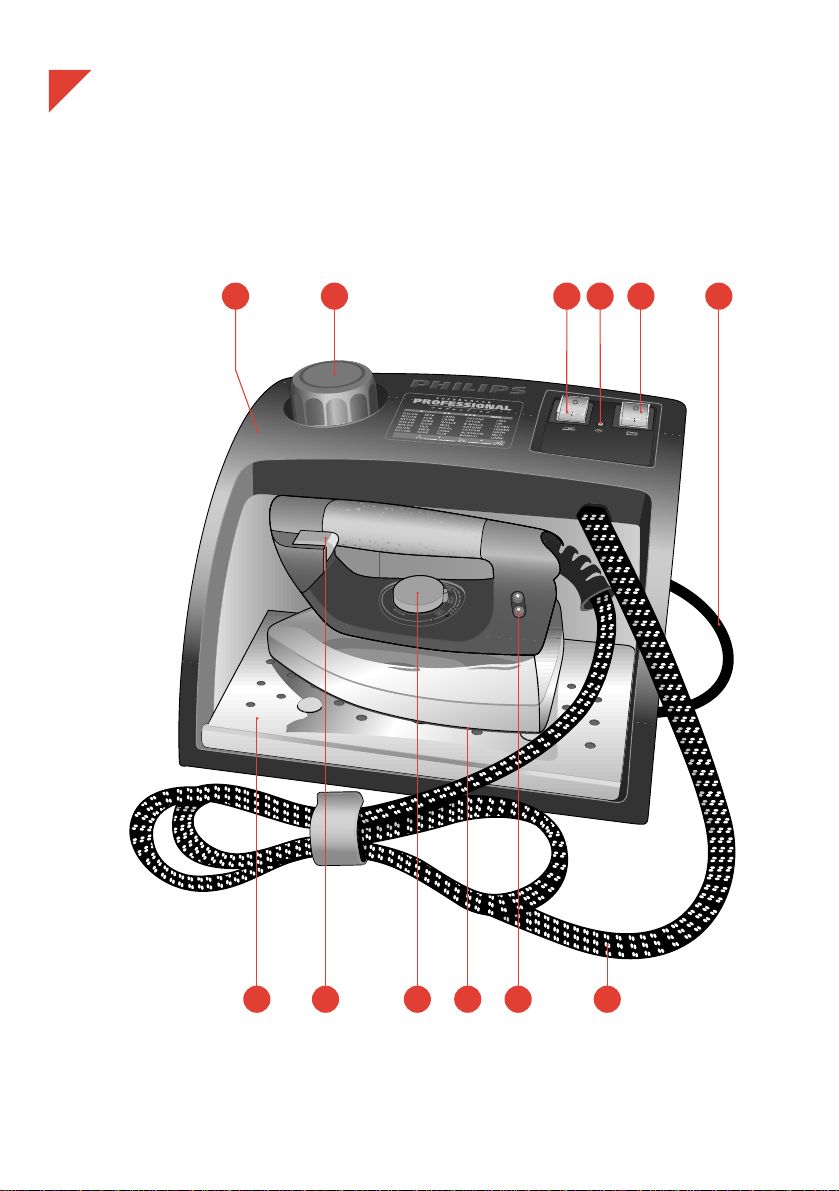
General description (fig. 1)
A Steam tank
B Switch "Steam tank on/off" ≤ with
integrated pilot light
C Pilot light "Steam tank heating up" U
(The pilot light goes out when the appliance is
ready for steam-ironing.)
D Switch "Iron on/off" ≥ with integrated
pilot light
E Filling opening with screw cap
F Iron stand (removable)
G Steam activator (press-in for steam ironing)
H Pilot light "Iron heating up"
I Temperature dial (rotate)
J Soleplate
K Supply hose
L Mains cord
Ironing temperature
- Always check first if a label with ironing
instructions is attached to the article to be
ironed. Follow these ironing instructions in
all cases.
- If ironing instructions are missing but you know
the kind of fabric, then see the table for
recommended ironing temperatures.
- After the pilot light "Iron heating up" (H) has
gone out and come on again you can start
ironing.
• During ironing the pilot light will come on from
time to time. When this happens, the soleplate
is being heated-up to the required temperature
again. You can continue ironing.
• The table is valid for the fibre materials only.
If some kind of finish has been applied (gloss,
wrinkle, relief etc.), the textile can best be
ironed at a lower temperature.
• First sort out the fabrics according to ironing
temperature: wool with wool, cotton with cotton,
etc.
The iron heats up quicker than it cools down.
Therefore, start ironing the articles requiring the
lowest temperature such as those made of
synthetic fibres. Then progress to the higher
temperatures.
• If the article is made of a mixture of different
fibres, you must always select the lowest
ironing temperature of the composition of those
fibres.
(E.g. an article consisting of "60% polyester and
40% cotton" should be ironed at the
temperature indicated for polyester (1) and
without steam.)
If you do not know what kind(s) of fabric(s) the
article has been made of, find a spot which will
be invisible when wearing or using the article to
try out the ironing temperature. (Always start at
a low temperature and increase to one which
gives the required results.)
Important
• Please read these instructions for use carefully in conjunction with the illustrations before
using the appliance.
• Never use the appliance if damaged in any way. Regularly check if the mains cord and the
supply hose are still in a good and safe condition.
If the mains cord of this appliance is damaged, it must only be replaced by Philips or their
service representative, as special tools and/or parts are required.
• Check if the voltage rating on the typeplate (under the steam tank) corresponds to the mains
voltage in your home.
• Only connect the appliance to an earthed mains wall socket.
• Never immerse the iron or the steam tank in water.
• Never fill the steam tank with perfumes, vinegar, descaling agents or other chemicals.
• Take care that children cannot touch the iron when hot and that they cannot pull the mains
cord or supply hose.
• When leaving the iron, even for a short while, always remove the mains plug from the wall
socket and place the iron on the stand.
• Always place the steam tank on a stable flat surface.
• Always place the iron on the iron stand. Do not place the hot iron on the steam tank, the
supply hose or the mains cord. The cordset should not be allowed to touch the soleplate
when it is hot.
English
• Pure woollen fabrics (100% wool) may be
pressed with the iron set to a steam position. It
is recommended to apply shot-of-steam and
use a dry pressing cloth.
When steam-ironing woollen fabrics, shining of
the fabric may occur. This can be prevented by
turning the article inside out and ironing the
inside.
• Velvet and other textures which rapidly acquire
shiny spots should be ironed in one direction
only (with the nap), applying only light pressure.
Always keep the iron moving.
• Iron the reverse side of synthetic materials and
silk to prevent shining spots. When ironing
coloured silk, it is not advisable to use steam as
this may cause stains.
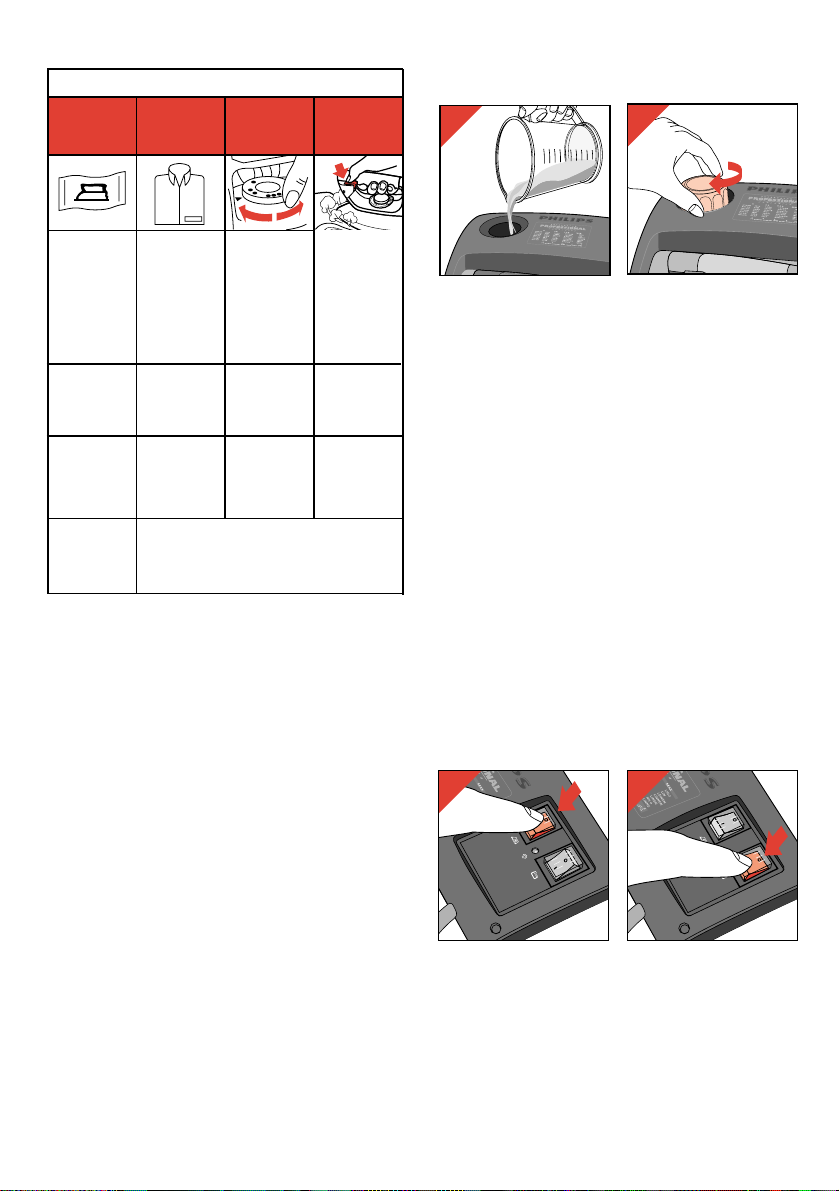
Filling with water (for steam-ironing)
- Position the steam tank on a stable flat surface
and unscrew the cap of the steam tank (E) by
turning anti-clockwise.
- Fill the steam tank with water (max. 1 litre)
(fig. 2).
• You can use tapwater. However, if the water is
very hard (hardness higher than 17 °DH /
211⁄4 °Clarke), it is advisable to use distilled
water.
• Never use vinegar, descaling agents or other
chemicals.
- Close the steam tank by turning the screw cap
clockwise by hand until tight (fig. 3).
If you begin ironing
- Fill the steam tank before inserting the mains
plug into the wall socket.
While ironing
Caution: If heated-up, the steam tank will be
under pressure.
Only refill if the steam tank is empty (i.e. when
no more steam comes from the soleplate during
steam-ironing).
- Switch the iron off by setting switch “Iron on/off”
≥(D) to position O (fig. 4).
- Switch the steam tank off by setting switch
“Steam tank on/off” ≤ (B) to position O
(fig. 5).
Steam
ironing
B
Synthetic
e.g. acetate,
acrylic,
viscose,
polyamide,
polyester.
Silk
MIN
|
|
1
|
|
A
C
Wool
|
2
A
D
Cotton
Linen
|
3
MAX
Z Please note: This article cannot be
ironed!
Table
Label with
ironing
instructions
Kind of
textile
Temperature
dial
5
_
N
N
N
N
2
1
3
FILLING OPENING
WITH SCREW CAP
4 5
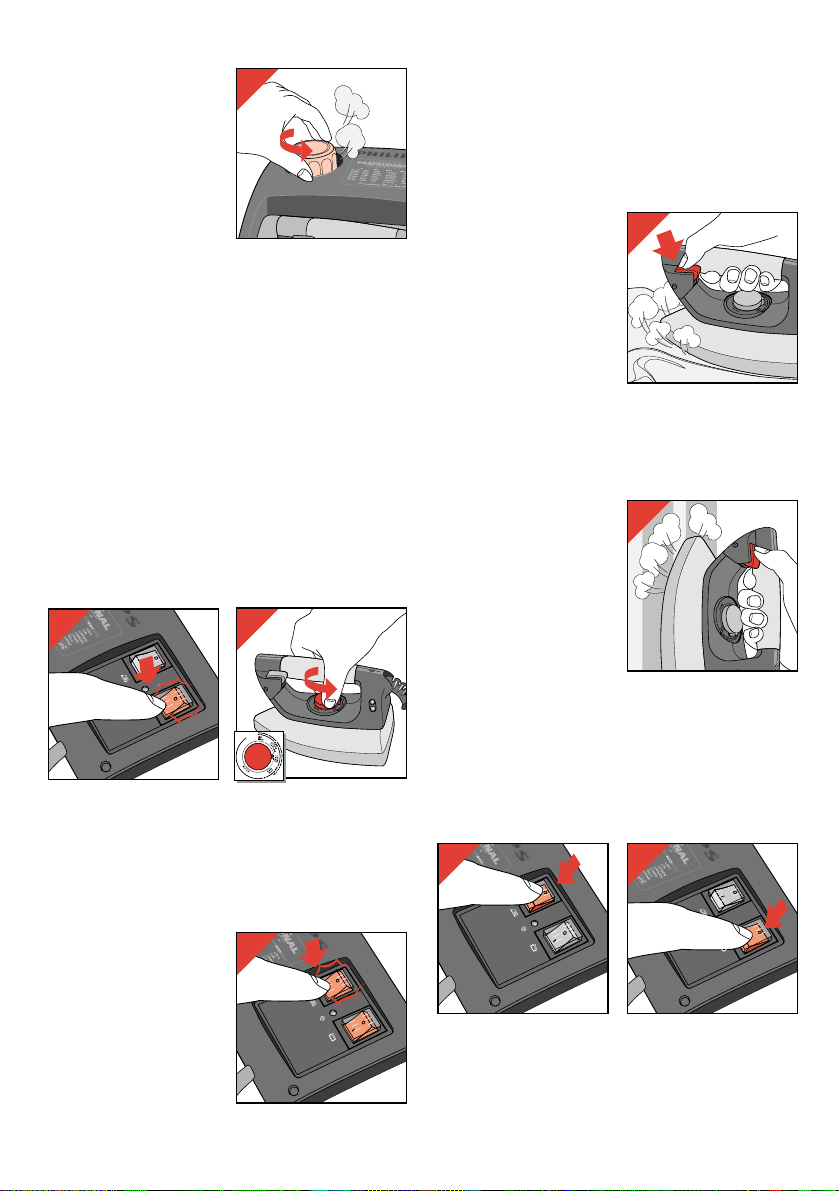
6
- Remove the mains
plug from the wall
socket.
- Carefully unscrew the
cap of the steam tank
(anti-clockwise) until
you can hear steam
escaping (fig. 6).
Wait for the hissing
sound to stop.
This high-pitched sound is completely normal
and is not dangerous.
- Carefully unscrew the cap of the steam tank
further, until you hear the hissing sound again.
Wait again until the sound stops. Proceed in the
same manner until the cap is unscrewed.
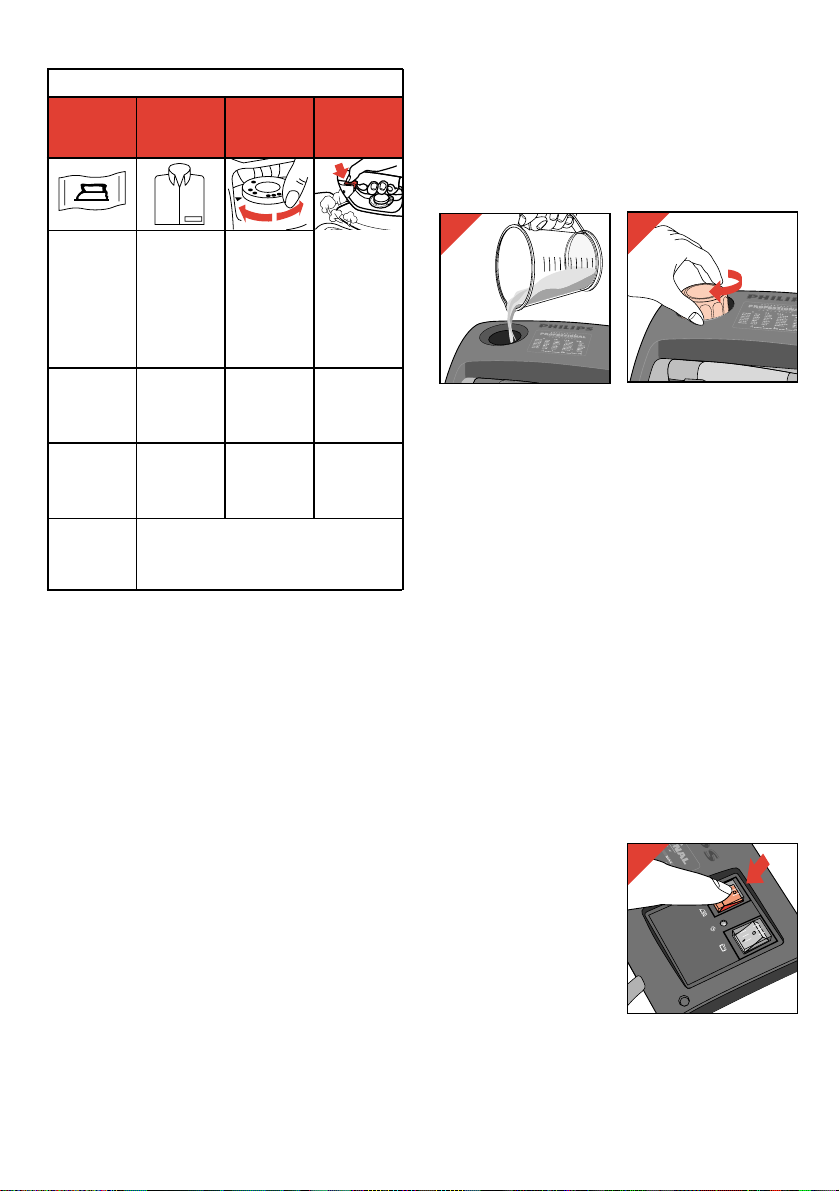
- Wait for a few minutes. Then slowly pour
water into the filling opening (E) (fig. 2).
- Close the steam tank by turning the screw cap
manually (clockwise) until tight (fig. 3).
Steam-ironing
• As indicated on the temperature dial (I) and the
table, steam-ironing is only possible at higher
ironing temperatures, so set the dial to 2 or
3 .
- Insert the mains plug into a wall socket.
- Set switch "Steam tank on/off" ≤ (B) to
position |. The pilot light in the switch as well as
pilot light “Steam tank heating up U (C) will
come on (fig. 7).
• The iron heats up faster than the steam tank.
Hence you can switch on the iron a few minutes
later than the steam tank.
- Select the required
ironing temperature
with the temperature
dial (I) (fig. 8).
- Set switch "Iron
on/off" ≥(D) to
position |.
The pilot light in the
switch as well as
pilot light “Iron
heating up” (H) will
come on (fig. 9)
- After a few minutes, pilot light “Iron heating up”
(H) will go out. This indicates that the soleplate
has reached the set temperature.
- When pilot light “Steam tank heating up U (C)
goes out, this indicates that the steam tank is
heated up and that steam is ready.
You can now start steam ironing.
- While steam-ironing
keep the steam
activator (G) pressedin (fig. 10).
• During steam-ironing
the two pilot lights (C)
and (H) will come on
from time to time.
When this happens,
either the iron or the
steam tank is being heated-up to the required
temperature. You can continue ironing.
Steaming in a vertical position
Hanging curtains and
clothing (jackets,
woman's suits, coats)
can be steamed by
holding the iron in a
vertical position (fig. 11).
Dry-ironing
• For ironing without steam, do not press-in the
steam activator (G).
• You may switch off the steam tank by setting
switch "Steam tank on/off" ≤ (B) to
position O.
When finished ironing
- Switch off the steam tank and the iron
(fig. 12, 13).
- Remove the mains plug from the wall socket.
- Place the iron on the stand and let it cool down.
• It is not necessary to pour the remainder of the
water out of the steam tank.
6
FILLING OPENING
WITH SCREW CAP
10
7
8
9
11
12 13
7
Cleaning
- Before cleaning remove the mains plug from
the wall socket and allow the iron to cool down
sufficiently.
- The appliance can be cleaned with a damp
cloth.
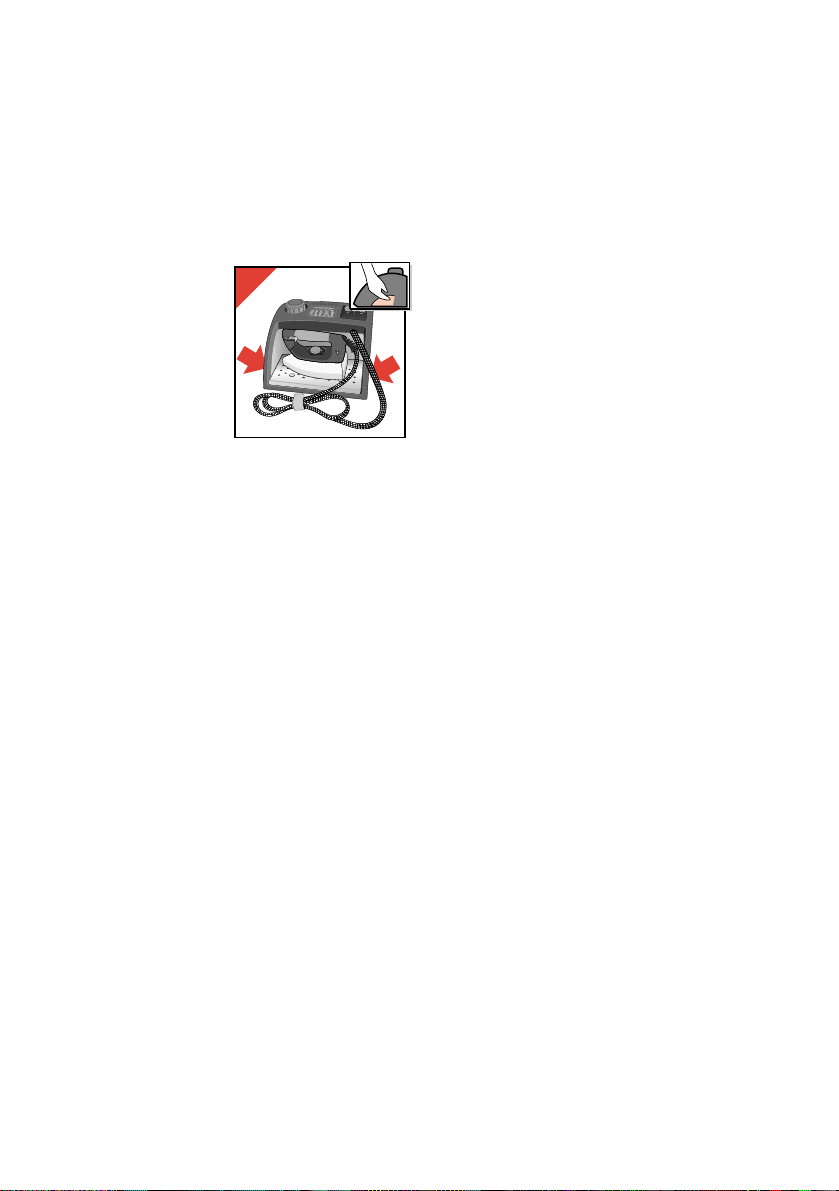
Storage
- For transport there
are handgrips on
either side of the
steam tank (fig. 14).
• Regularly check if the
mains cord and the
supply hose are still in
a good and safe
condition.
For U.K. only:
Fitting a different plug
This appliance is fitted with a BS 1363 13 Amp.
plug.
Should you need to replace the plug, connect the
wires as follows:
Always fit the same value of fuse as that originally
supplied with your appliance.
Only use BS 1362 approved fuses.
As a guide only: Appliances under 700 W can
have a 3 Amp. fuse (red) and all others should
have a 13 Amp. fuse (brown).
Green/yellow wire to the Earth terminal (E) of
the new plug.
Brown wire to the Live (L) terminal of the new
plug.
Blue wire to the Neutral (N) terminal of the new
plug.When disposing of an old plug (particularly
the moulded type which has been cut from the
mains cord) always remove the fuse as the plug
could be dangerous if ever inserted in a live
socket.
14
FILLING OPENING
WITH SCREW CAP

8
Description générale (fig. 1)
A Chaudière
B Interrupteur “Chaudière” marche/arrêt ≤
avec témoin lumineux
C Témoin lumineux “Chaudière chauffe” U
(Le témoin lumineux s'éteint quand l'appareil
est prêt pour le repassage à la vapeur.)
D Interrupteur “Fer” marche/arrêt ≥ avec
témoin lumineux
E Ouverture de remplissage et bouchon de
chaudière
F Repose fer (détachable)
G Bouton commande vapeur (pressez pour
repassage à la vapeur)
H Témoin lumineux “Fer chauffe”
I Bouton de commande thermostat
J Semelle
K Cordon d'alimentation vapeur
L Cordon secteur
Température de repassage
- Vérifiez toujours si une étiquette avec les
instructions de repassage est jointe à l'article
à repasser. Suivez ces instructions de
repassage dans tous les cas.
- Si les instructions de repassage sont
manquantes mais que vous connaissez le type
de textile, reportez-vous au tableau de
repassage .
- Ensuite le témoin lumineux "Fer chauffe" (H)
s'éteint et se rallume à nouveau vous pouvez
commencez le repassage.
• Pendant le repassage le témoin lumineux
s'allume de temps en temps. Cela arrive quand
la semelle chauffe à la température désirée.
Vous pouvez continuer le repassage.
• Le tableau est valable pour les tissus
mentionnés seulement.
Si des finitions spéciales doivent ètre
appliquées (lustrage, plis rebelles etc.), le
textile peut être repassé à une température
plus basse.
• Tout d'abord triez le linge avant de repasser:
laine avec laine, coton avec coton, etc.
Le fer chauffe plus rapidement qu'il ne refroidit.
Donc, commencez le repassage des articles
nécessitant la plus basse température tels que
les fibres synthétiques. Puis continuez avec les
températures plus élevées.
• Si l'article se compose d'un mélange de
différentes fibres, vous devez choisir toujours la
température de repassage la plus basse en
fonction de la composition de ces fibres.
Important
• Lisez attentivement ce mode d'emploi en même temps que les illustrations avant toute
utilisation de l'appareil.
Transport: Utilisez les poignées situées de part et d'autre de la chaudière (fig. 14).
• N'utilisez jamais l'appareil si une de ses parties est endommagée. Assurez-vous
régulièrement que le cordon secteur et le cordon d'alimentation vapeur sont encore dans de
bonnes conditions de sécurité.
Si le cordon secteur de cet appareil est endommagé, il doit être remplacé uniquement par
Philips ou un Centre Service Agréé, car des outils spéciaux sont nécessaires.
• Assurez-vous que la tension indiquée sur la plaque signalétique (sous la chaudiere)
correspond à la tension du secteur de votre logement.
• Branchez uniquement l’appareil à une prise équipée de terre.
• N’immergez jamais le fer ou la chaudière dans l'eau.
• Ne remplissez jamais le réservoir avec du parfum, vinaigre, agents adoucissants ou tout
autre produit chimique.
• Faites attention que les enfants ne puissent pas toucher le fer quand il est chaud et qu'ils ne
puissent pars tirer le cordon secteur ou cordon d'alimentation vapeur.
• Quand vous vous absentez, même pour un court instant, retirez toujours la fiche de la prise
de courant et placez le fer sur le socle repose-fer.
• Plaçez toujours la chaudière sur une surface stable.
• Placez toujours le fer sur le repose-fer. Ne placez jamais le fer chaud sur la chaudière, le
cordon d'alimentation vapeur ou le cordon secteur.
Français
(Exemple: un article composé de "60%
polyester et 40% coton" doit être repassé à la
température indiquée pour polyester (1) et sans
vapeur.)
Si vous ne connaissez pas la composition du
tissu, trouvez un endroit invisible de l'extérieur
pour déterminer la température de repassage.
(Commencez toujours à une faible température
et augmentez-la jusqu'à obtention du résultat
désiré.)
• Les tissus en pure laine (100% laine) peuvent
être repassés avec le fer sur une position
vapeur. Il est recommandé d'utiliser le jet de
vapeur et une pattemouille sèche.
Les velours et autres tissus synthétiques qui
lustrent rapidement doivent être repassés dans
une seule direction seulement (dans le sens
des fibres), en appliquant une légère pression.
Gardez toujours le fer en mouvement.
• Repassez à l'envers les tissus syntétiques et la
soie afin d'éviter des taches brillantes. Lorsque
vous repassez de la soie colorée, il n'est pas
souhaitable d'utiliser la vapeur car ceci peut
provoquer des taches.
Remplissez avec de l'eau (pour le repassage à
la vapeur)
- Placez la chaudiere sur une surface stable et
dévissez le bouchon de la chaudière (E) en
tournant dans le sens inverse des aiguilles
d'une montre.
- Remplissez la chaudière avec de l'eau
(max. 1 litre) (fig. 2).
• Vous pouvez utiliser de l'eau du robinet.
Cependant, si l'eau est très dure (dureté
supérieure à 30°TH la compagnie des eaux de
votre région vous renseignera sur le degré de
dureté de votre eau), il est préférable d'utiliser
de l'eau déminéralisée.
• N'utilisez jamais de vinaigre, agents
adoucissants ou autres produits chimiques.
- Fermez la chaudière en tournant le bouchon
dans le sens des aiguilles d'une montre à la
main jusqu'à buter (fig. 3).
Si vous commencez le repassage
- Remplissez la chaudière avant d'insérer la fiche
dans la prise de courant.
Pendant le repassage
Précaution: Si l'appareil chauffe, la chaudière
est sous pression.
Remplissez la
chaudière seulement
si elle est vide
- Mettez le fer sur arrêt
en plaçant
l'interrupteur “Fer” sur
arrêt ≥ (D) sur la
position O (fig. 4).
Commande
vapeur
B
Synthétiques
acétate,
acrylique,
viscose,
polyamide,
polyester.
Soie
MIN
|
|
1
|
|
A
C
Laine
|
2
A
D
Coton
Lin
|
3
MAX
Z Attention: Ne pas repasser cet article.
Tableau
Etiquette avec
instructions
de repassage
Type de
textile
Thermostat
9
_
N
N
N
N
2
1
3
FILLING OPENING
WITH SCREW CAP
4
 Loading...