

Page 1
HI838, 835
Azur Excel Plus 'Aquazur'
Page 2

2
English Page 4
• Keep page 3 open when reading these
operating instructions.
Deutsch Seite 12
• Schlagen Sie beim Lesen der
Gebrauchsanweisung Seite 3 auf.
Dansk Side 20
• Hold side 3 opslået mens De læser
brugsanvisningen.
Norsk Side 28
• Slå opp på side 3 før De leser videre.
Svenska Sid 36
• Ha sidan 3 utvikt när ni läser
bruksanvisningen.
Suomi Sivu 44
• Pidä sivu 3 auki samalla kun luet käyttöohjetta.
Page 3

3
1
E
J
J
M
M
K
K
O
Q
P
G
HC I RADBF
L
I
N
O
1
2
CALC CLEAN
4
H
G
F
B
D
2
Page 4

Important
Read these instructions for use carefully before using the appliance and save them for future reference.
• Check if the voltage indicated on the type plate corresponds to the local mains voltage
before you connect the appliance.
• Only connect the appliance to an earthed wall socket.
• Do not use the appliance if the plug, the cord, the supply hose or the appliance itself shows
visible damage, or if the appliance has been dropped or is leaking.
• Check the cord and the supply hose regularly for possible damage.
• If the mains cord or the supply hose is damaged, it must be replaced by Philips, a service
centre authorised by Philips or similarly qualified persons in order to avoid a hazard.
• Never leave the appliance unattended when it is connected to the mains.
• Never immerse the iron or the steam tank in water.
• Keep the appliance out of the reach of children.
• The iron stand and the soleplate of the iron can become extremely hot and may cause burns
if touched. If you want to move the steam tank, do not touch the stand.
• Do not allow the mains cord and supply hose to come into contact with the soleplate when it
is hot.
• When you have finished ironing, when you clean the appliance, when you fill or empty the
water tank and also when you leave the iron even for a short while: set the steam control to
position O, put the iron on its heel and remove the mains plug from the wall socket.
• Only use this iron with the stand supplied.
• Always place and use the iron and the steam tank on a stable, level and horizontal surface.
Do not put the steam tank on the soft part of the ironing board.
• Do not put perfume, vinegar, starch, descaling agents, ironing aids or other chemicals in the
water tank.
• This appliance is intended for household use only.
English
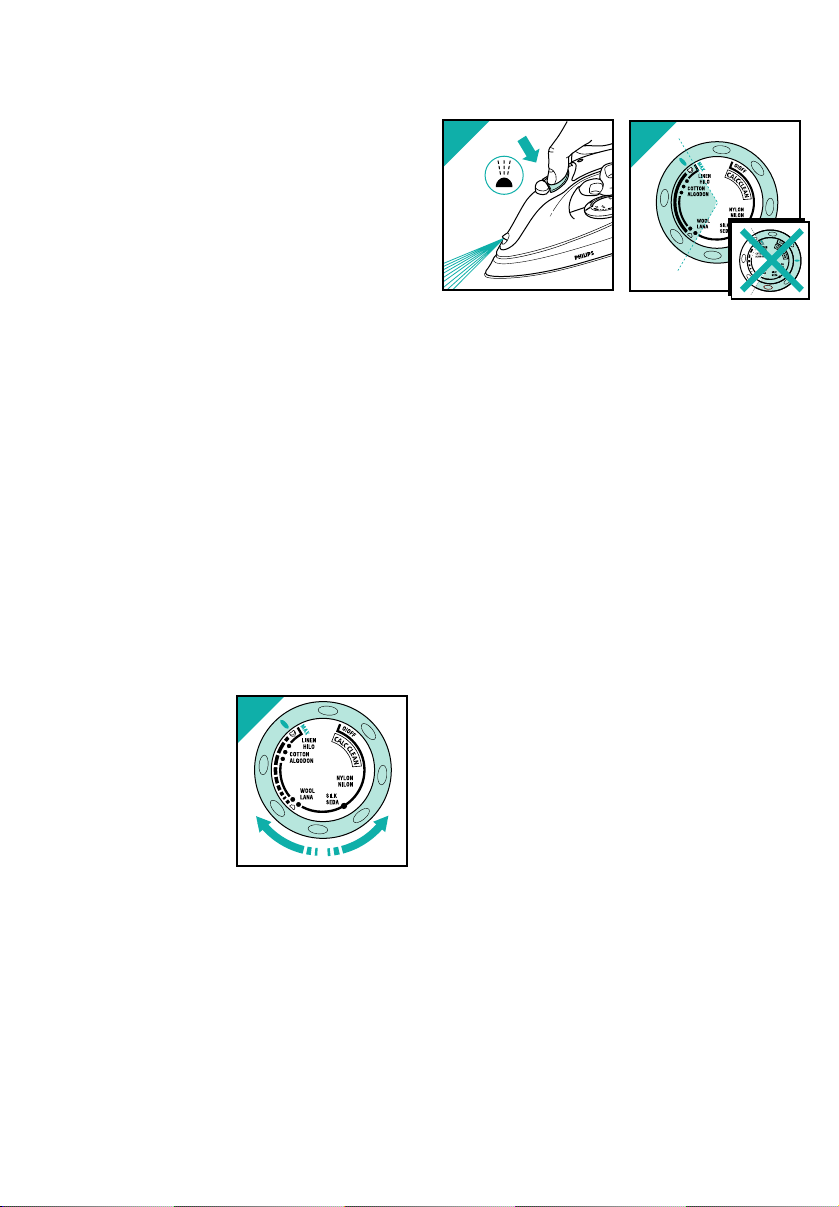
General description (fig. 1)
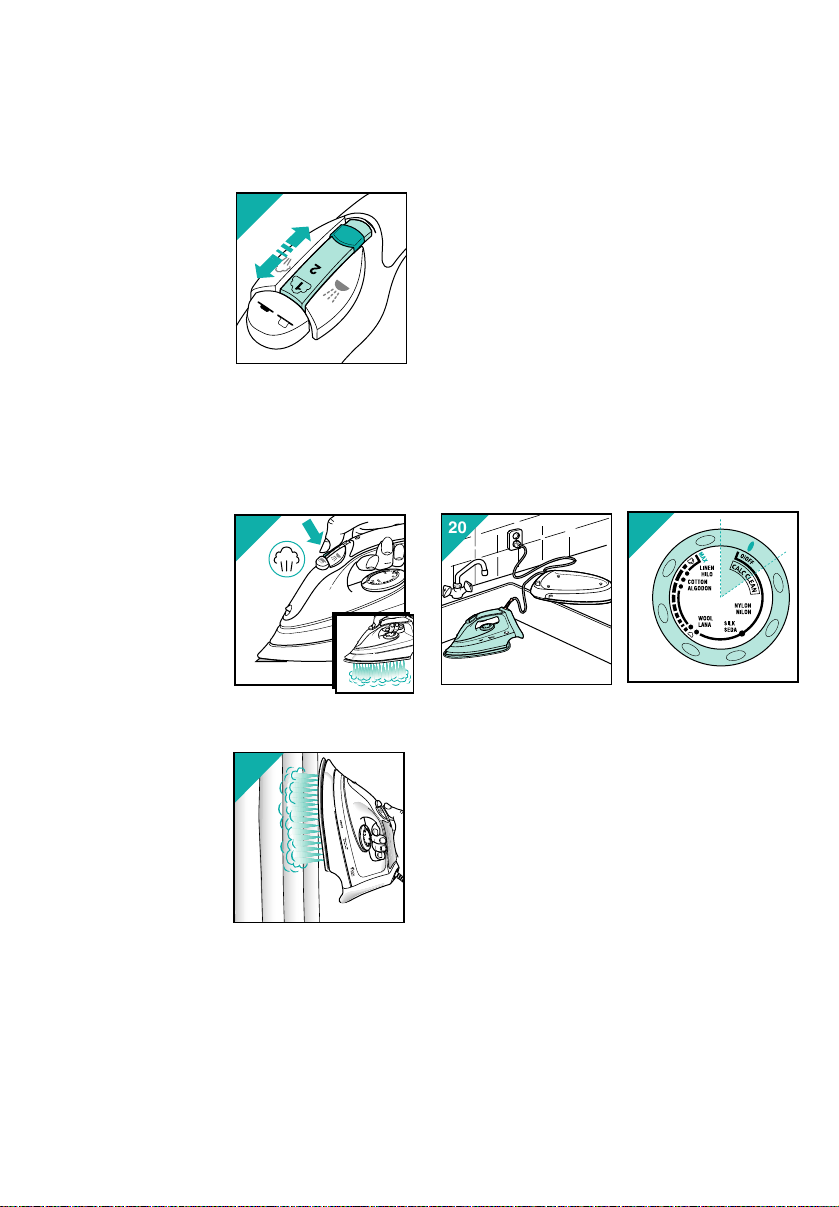
A Temperature control (rotate dial)
B Steam control (slide)
1 = minimum steam output
4 = maximum steam output
C Steam trigger (push)
D Spray button T (push)
E Spray nozzle
F Shot-of-steam button 9 (push)
G Calc cleaning eU (push)
H Temperature pilot light
I “Soft touch” handgrip
J Anti-calc cassette
K Cassette release button (push)
L Watertank (iron stand)
M Water filling hole
N Rubber mat
O Hanger
P Internal reservoir
Q Power cord
R Connecting cord / Supply hose
4
Page 5

5
Using the Philips Aquazur HI838, 835 for the
first time
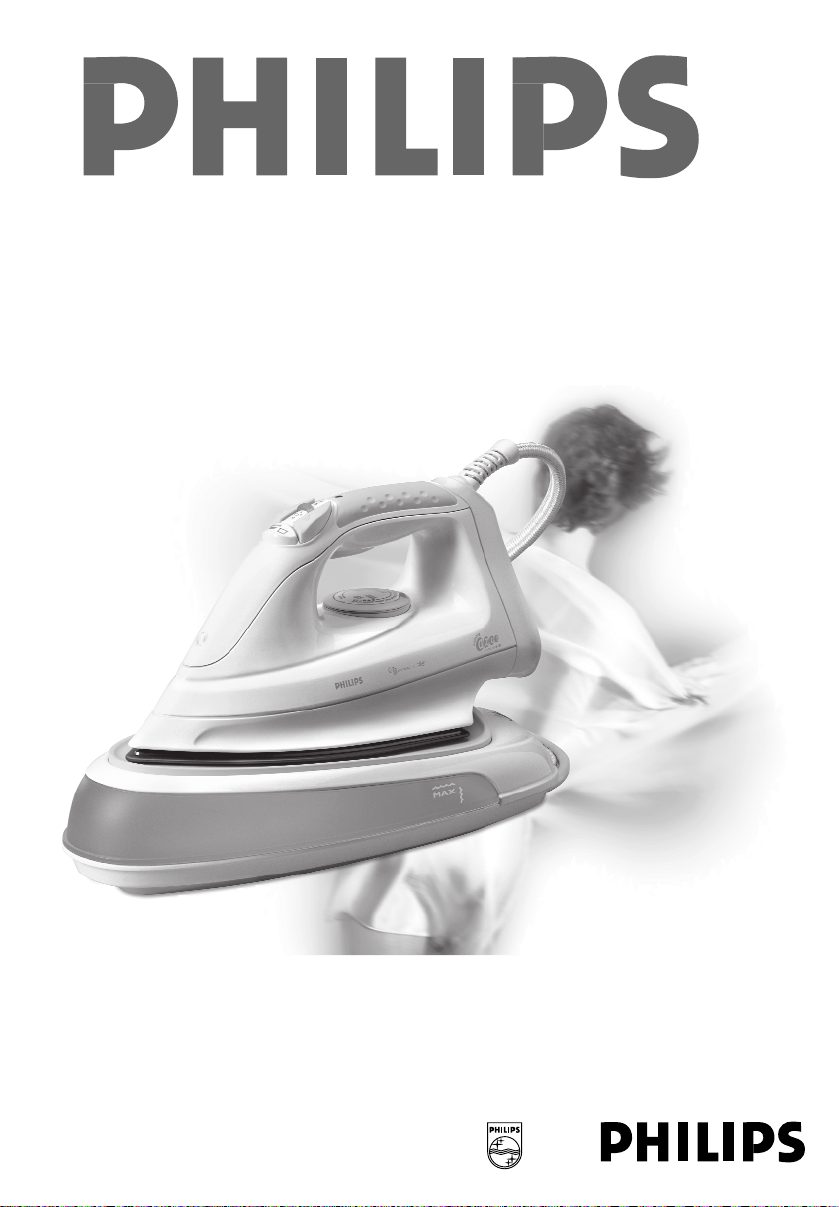
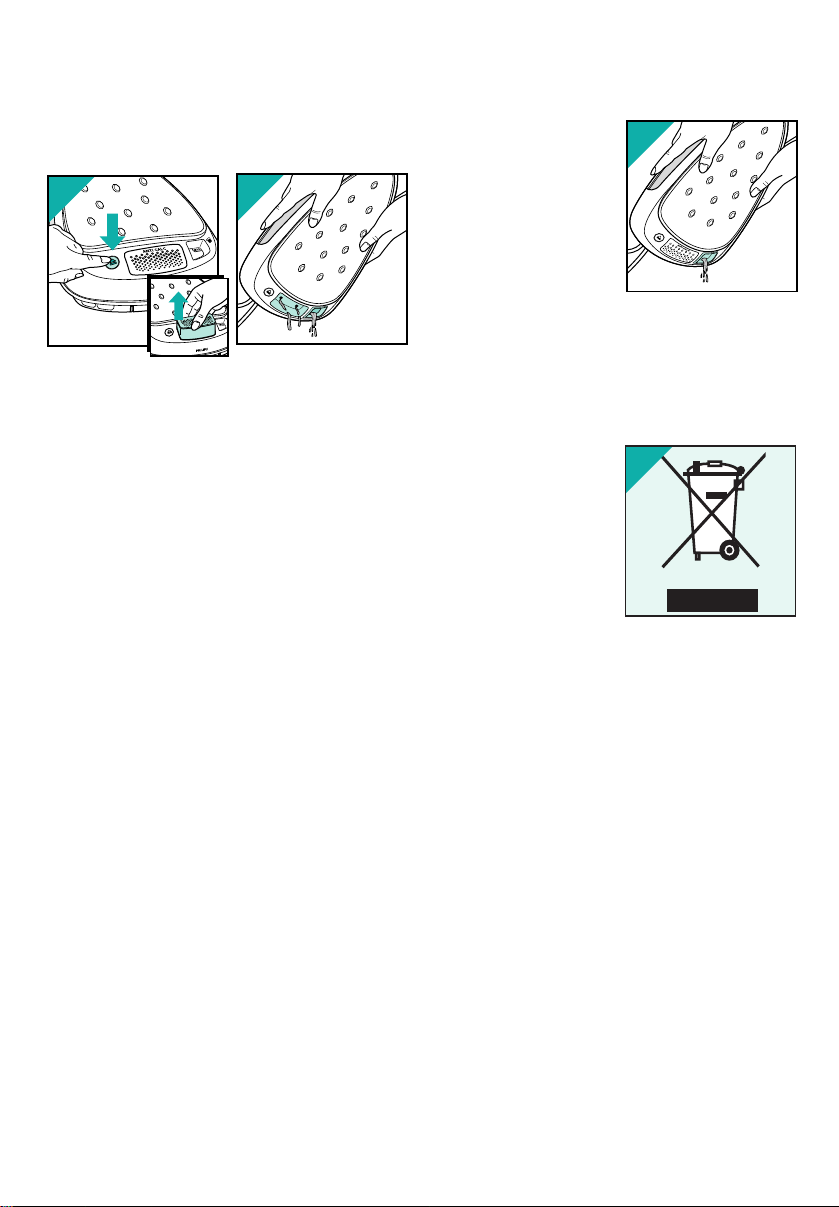
• Remove the anti-calc cassette (J) from the
stand, by pushing the cassette release button
(K). Write the date (year/month/day) on the
sticker on the cassette. Insert the cassette into
the stand (fig. 2).
• Fill the watertank with normal tapwater (using a
jar/bottle) up to the MAX mark (fig.3).
• Plug in the power cord (Q).
• Set temperature dial (A) to MAX (fig. 4).
• Set steam control slider (B) to position 4 (fig. 5).
2
4
5
CALC CLEAN
4
3
F
Instructions
on label
Fabric Tempera-
ture
control
Steam
control
B
Synthetic
fibres, e.g.
acryl, viscose,
polyamide
(nylon),
polyester
Silk
MIN
|
|
1
|
|
|
|
2
|
||
3
MAX
C Wool
D Cotton
Linen
Z
Please note that Z on the label means:
“This article cannot be ironed!”
Shot of
steam
Spray
Table
X
F
F
T
T
T
1
2-4
Do not
activate
steam trigger
C.
3
.
X
A
M
4
3
2
N
A
E
L
C
F
L
E
S
N
A
E
L
C
F
L
E
S
4
3
3
N
A
E
L
C
F
L
E
S
Page 6
• The temperature pilot
light (H) will light up.
• When the pilot lamp
goes off, push the
steam trigger (C)
under the handle
continuously (fig. 6).
Steam comes on after
about 2 minutes.
• Iron with steam on a
piece of cloth/towel for 1 or 2 minutes. Then
you can proceed to iron your clothings.
• Read this manual first, for guide on
temperature and steam settings.
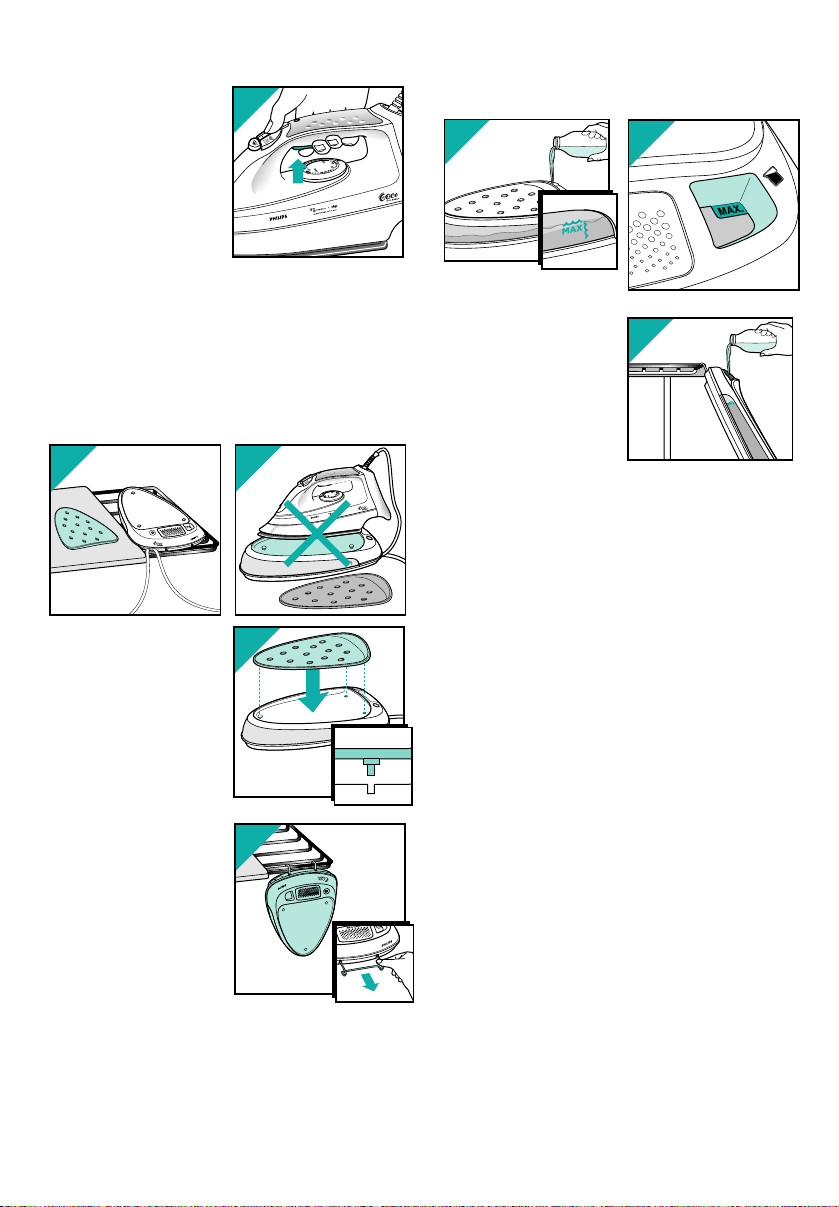
How to use the rubber mat (N) and hanger (O)
• The iron stand (watertank) is equipped with a
rubber mat (N).
The rubber mat can be detached and laid flat
on the ironing board,
to rest the iron during
ironing (fig. 7).
• Never rest a hot iron
on the plastic
watertank! (fig. 8).
To rest the iron on the
stand, always attach
the rubber mat to the
stand (fig. 9).
• The stand can be hung on the metal rod of
most ironing boards. To hang the stand, pull
out the metal hanger (O)
(fig. 10). Before hanging the stand, remove the
rubber mat and place
it on the ironing board
for easy resting the
iron.
• Do not place the
rubber mat (N) on a
table or any other
surface which may be
damaged by heat.
Filling the watertank (for steam-ironing and
spraying)
• Fill the watertank with normal tap water before
using for the first time.
• If the watertank is in a
horizontal position, fill
the water to the MAX
level indicated on the
side (fig. 11) or in the
filling hole (fig. 12).
• If the watertank is in a
vertical position, fill
only to the MAX level
on the side (fig. 13).
• For refilling, also use
tapwater. (See: Water hardness)
• Remove the mains plug from the wall socket
before filling the iron.
Do not activate steam trigger (C).
• You may empty the remaining water in the
watertank before storing it.
Ironing temperature
• Always check first to see whether a label with
ironing instructions is attached to the article to
be ironed. (See table)
Follow these ironing instructions in all cases.
• If ironing instructions are missing, but you do
know the kind of fabric, then see the table.
• The table is valid for the materials only and is
not applicable to any applied finish, gloss etc.
Textile to which some kind of finish has been
applied (gloss, wrinkle, relief etc.) can best be
ironed at lower temperatures.
• Sort the laundry out according to ironing
temperature first: wool with wool, cotton with
cotton, etc.
• The iron heats up quicker than it cools down.
Therefore, start ironing the articles requiring
the lowest temperature such as those made of
synthetic fibres.
• If the fabric consists of various kinds of fibres,
you must always select the lowest ironing
temperature of the composition of those fibres.
(For example: an article consisting of “60%
6
6
11
12
7
8
9
10
.
X
A
M
MAX.
13
Page 7
Spraying T
• You can spray at any temperature by pushing
on the spray button T (D) (fig. 15).
• An electrical pump in the iron stand supplies the
small internal reservoir (P) with spraywater.
• Ensure that there is enough water in the
watertank.
• When the internal reservoir (P) is empty, after
intensive spraying, pull the steam trigger (C) for
about one minute to refill it. Refilling is complete
when you see/hear steam coming out from the
steam vents on the iron sole.
• Filling and refilling of the internal reservoir must
be executed at a temperature setting between
2 and MAX. It’s not possible to fill the
reservoir at a temperature setting below 2
(fig. 16).
Steam-ironing
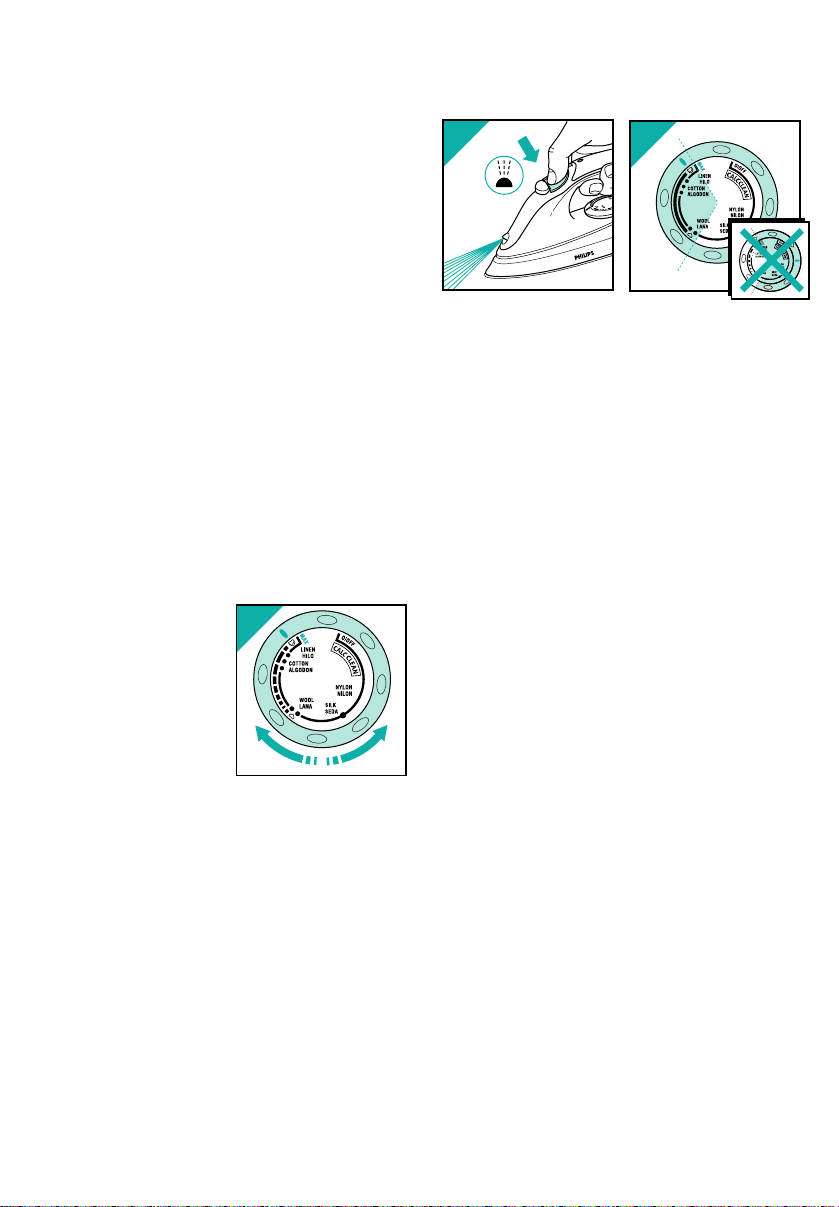
• As indicated on the temperature control (A) and
the table, steam-ironing is only possible at
higher ironing temperatures:
2 for moderate steam
3 for maximum steam.
• With conventional steam irons, water may leak
from the soleplate if a too low temperature has
been selected. This will cause stains.
However,the Philips Aquazur HI838, 835
features "Drip Stop" Steam Shut-off: the iron
will automatically stop steaming at too low
temperatures, to avoid the forming of drops,
which could leave stains on textile.
When Drip Stop is activated, you can hear
"Click". Set the temperature control (A) to the
advised position. Steaming will recommence as
soon as the appropriate temperature has been
reached.
• Ensure that there is enough water in the
watertank.
- Put the iron on its rubber mat on the watertank.
- Set the temperature control (A) at the required
position within the “steam area” (11 to MAX).
- Insert the mains plug into the wall socket.
- After the amber temperature pilot light (H) first
has gone out and has come on again, you can
start ironing.
polyester and 40% cotton” should be ironed at
the temperature indicated for polyester (1) and
without steam.)
If you do not know what kind(s) of fabric(s) the
article has been made of, find a spot which will
be invisible when wearing or using the article.
Try out the ironing temperature which is most
suitable there. (Start at a relatively low
temperature.)
• Pure woollen fabrics (100% wool) may be
pressed with the iron set to a steam position.
Preferably set the steam control to maximum
position and use a dry pressing cloth.
When steam-ironing woollen fabrics, shining of
the fabric may occur. This can be prevented by
turning the article inside out and ironing the
reverse side.
• Velvet and other textures which rapidly acquire
shiny spots should be ironed in one direction
only (with the nap) applying light pressure.
Always keep the iron moving.
• Iron the reverse side of synthetic materials and
silk to prevent shining spots. Do not use the
spray button to prevent stains.
Setting the temperature
- Stand the iron on its
rubber mat on the
watertank.
- Set the temperature
control (A) to the
correct ironing
temperature as
indicated in the ironing
instructions or in the
table (fig. 14).
- Insert the mains plug
into the wall socket.
- After the amber temperature pilot light (H) first
has gone out and has come on again, you may
start ironing.
• The amber pilot light will come on from time to
time during ironing.
• If you set the temperature control to a lower
setting after ironing at a high temperature, do
not begin again before the amber pilot light has
come on and gone out again.
7
14
15
16
Page 8
- Slide the steam control
(B) to the required
position (fig. 17).
• Just before the
watertank is emptied,
there normally is a
burst of steam and
possibly some minor
spitting. This is a
normal phenomenon,
related to the electrical pump.
Shot-of-Steam 9
By pushing button 9 (F)
a powerful "shot" of
steam is emitted from the
soleplate (fig. 18).
This can be very useful,
for example when
removing stubborn
creases.
The “shot-of-steam”
facility can be used only
while ironing with high
ironing temperatures (positions ranging from
2 to MAX) at an interval of
5 seconds.
Steaming in a vertical position
“Shot-of-steam” can also
be applied when holding
the iron in a vertical
position (fig. 19).
This is useful for
removing creases from
hanging clothes,
curtains, etc.
The "shot-of-steam”
facility can be used only
while ironing with high
ironing temperatures (positions ranging from 2
to MAX) at an interval of 5 seconds.
This iron is not suitable for continuous steaming
(except “shot-of-steam) in vertical position.
Ironing without steam
For ironing without steam, proceed as described
for steam-ironing. However, d not activate steam
trigger (C).
Calc cleaning eU
• Calc cleaning works in conjunction with anticalc.
- Calc cleaning allows to clean the steam
chamber from residual particles (dirt, sand,
etc.).
• For the best performances of the Philips
Aquazur it is important to apply calc cleaning
regularly. In case of normal usage
(2 hours/week), calc clean should be applied
once every month. In case of frequent usage
(average 4 hours/week), calc clean should be
applied once every two weeks.
- Bring the iron and watertank to the kitchen sink
(fig. 20).
- Fill the watertank (L) with water (to about half
tank).
- Plug in the power cord.
- Set the Temperature control (A) to position
'CALC CLEAN' (fig. 21). Set steam slider (B) to
position 4.
- If necessary, use the rubber mat to rest the iron
on the kitchen sink.
- Hold the iron horizontally over the sink.
- Push the 'CALC CLEAN' button eU (G) (fig.
22).
Water will now be ejected from the holes in the
soleplate. Impurities and scale (if any) are
washed away with it.
- Move the iron forwards and backwards while
this happens (fig. 23).
- Release the Calc-clean button eU to stop
the calc-clean process. Repeat the calc-clean
8
17
4
3
N
CLEA
LC
CA
18
19
20
21
22
CALC CLEAN
23
Page 9
9
process until the water
reservoir (P) is empty.
The water flow will
cease.
- Reheat the iron to dry
up excess water.
- Move the iron over a
(preferably) old piece
of cloth (fig. 24).
This is to ensure that the
soleplate will be dry during storage.
- Unplug the power cord and let the iron cool
down before you store it.
Anti-calc cassette
The Philips Aquazur has a disposable anti-calc
cassette to filter the water. The anti-calc content
of the cassette will be saturated after some time.
Then, the anti-calc cassette should be replaced
by a new one. How often the cassette should be
replaced, depends on the water hardness and the
frequency of iron usage. The table below give you
a general guide on when you should change the
cassette.
Hardness of the water
In a few seconds you can test the hardness of the
tap water yourself, using the test-strip inserted in
these instructions.
1. Take a glass of tap water.
2. Put the test-strip in the tap water for 1 or 2
seconds.
3. Take the strip out and let it dry for about
1 minute.
4. Read the results below.
5. In the water hardness table you can see when
the anti-calc cassette is to be replaced by a
new one.
The test strip has four green coloured squares. As
the strips are put into water, one or more squares
may become pink coloured. The more squares
become pink, the harder the water (i.e. the more
calcium the water contains). This test needs only
to be done once. Mark the test result in the table
for future reference.
Waterhardness table
This table gives a general guide on when you should change the anticalc cassette.
Waterhardness
pink coloured
squares on test low moderate hard very hard
strip 0-1 2 3 4
normal usage no need change every change every change every
(2 hours/week) to change 12 months 6 months 4 months
intensive usage no need change every change every change every
(4 hours/week) to change 6 months 3 months 2 months
■ ■ ■ ■
■■■ ■
■■■■
■ ■ ■ ■
24
Page 10
10
How to change the cassette
- Purchase a replacement cassette
(type HD 1900) from your dealer or the nearest
Philips service centre.
- Push the cassette release button (K) and take
out the cassette (fig. 25).
- Empty the water from the watertank and
cassette housing (fig. 26).
- Write the date on the new cassette and insert it
into the iron stand.
- Fill the watertank with water.
- Set steam control in position 4 and temperature
control to 3.
- Push steam trigger for about one minute. The
new cassette is now filled with water.
- You can resume ironing.
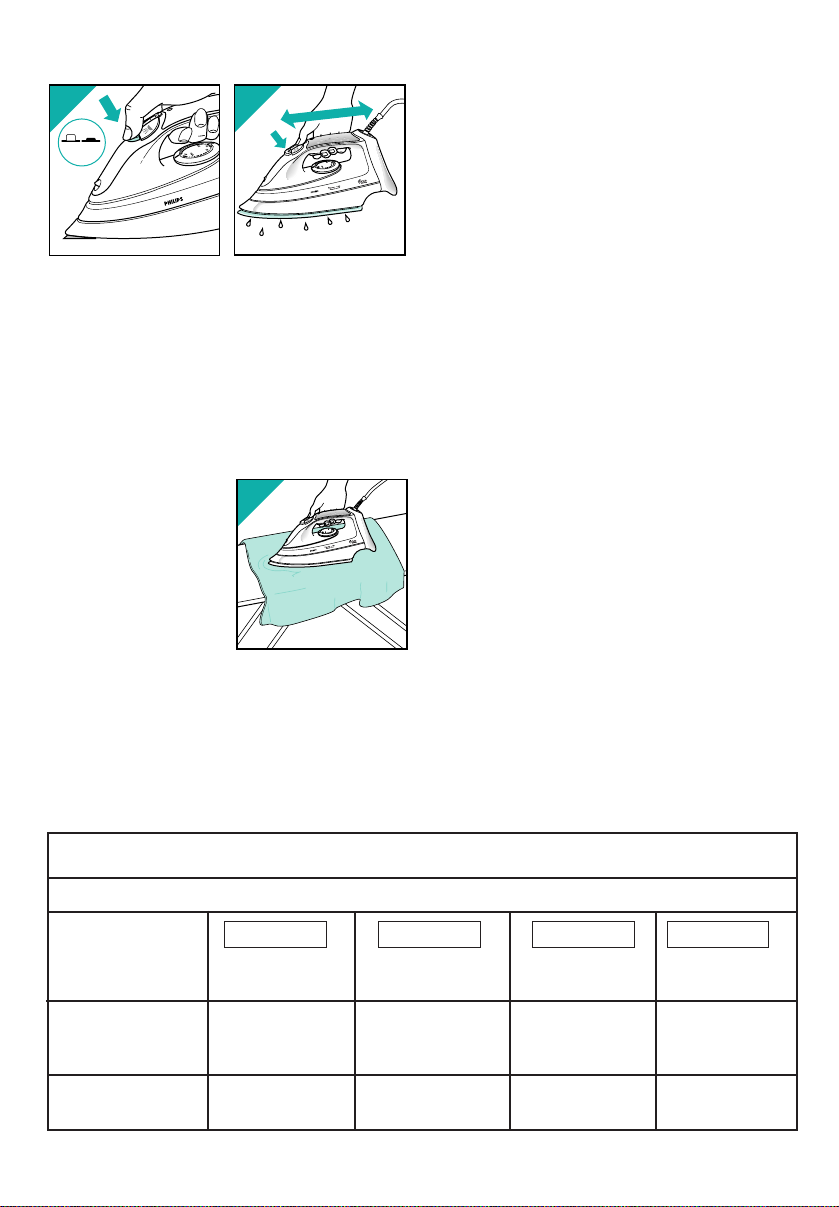
Cleaning
- Before cleaning remove the mains plug from
the wall socket and allow the iron to cool down
sufficiently.
- Scale and other deposit can be wiped off the
soleplate with a damp cloth and some nonscratching (fluid) abrasive.
• Keep the soleplate smooth: avoid hard
contact with metal objects.
- The upper part of the appliance can be cleaned
with a damp cloth.
- From time to time clean the inside of the
watertank by filling it with water and shaking.
Then pour the water back out.
Storage
- Remove the mains
plug from the wall
socket.
- Pour any remaining
water out of the
watertank (fig. 27).
- Set the steam control
to position 4.
- Put the iron on the
rubber mat on its
stand and let it cool down sufficiently before you
store it.
- Regularly check if the mains cord is still in a
good and safe condition.
Environment
• Do not throw the
appliance away with
the normal household
waste at the end of its
life, but hand it in at an
official collection point
for recycling. By doing
this you will help to
preserve the
environment (fig. 28).
Products bought in Canada
For guarantee conditions on products bought in
Canada see separate purchase card.
25
26
27
28
Page 11

11
Assistance guide
Problem
After switching on for the first time,
some smoke comes from the iron.
The iron does not steam and you hear
a loud noise from the stand.
There is no
water spray.
There is no
‘Shot-of-steam’.
Likely cause
This is normal.
Some parts of the iron have been
greased lightly in the factory.
The water level is too low,
the anti-calc cassette is not properly
inserted and/or the temperature is
less than 2.
The internal water
reservoir (P) is empty.
The internal water
reservoir (P) is empty.
What to do?
Nothing.
After a short while
this phenomenon will stop.
Fill the watertank to the
MAX indication, insert the
anti-calc cassette by
pushing it, and/or select a
higher temperature with the
temperature dial (A).
Fill the watertank to the
MAX indication, set
temperature to 3 and
push steam trigger (C) until
steam comes out of the
sole.
Fill the watertank to the
MAX indication, Set
temperature to 3 and
push steam trigger (C) until
steam comes out of the
sole.
Page 12

WICHTIG
Lesen Sie diese Bedienungsanleitung vor dem ersten Gebrauch des Geräts sorgfältig durch und
bewahren Sie sie zur späteren Einsichtnahme auf.
•Überprüfen Sie, ob die auf dem Typenschild angegebene Betriebsspannung mit der
örtlichen Netzspannung übereinstimmt, bevor Sie das Gerät anschließen.
• Verwenden Sie das Gerät ausschließlich an einer Schukosteckdose.
• Benutzen Sie das Gerät nicht, wenn Schäden am Stecker, am Kabel, am
Verbindungsschlauch oder am Gerät selbst erkennbar sind, oder wenn das Gerät herunter
gefallen oder undicht ist.
•Überprüfen Sie das Netzkabel und den Verbindungsschlauch regelmäßig auf
Unversehrtheit.
• Wenn das Netzkabel oder der Verbindungsschlauch defekt oder beschädigt ist, darf es/er
nur von einem Philips Service-Center oder einer von Philips autorisierten Werkstatt durch
ein Original-Ersatzteil ausgetauscht werden, um Gefährdungen zu vermeiden.
• Lassen Sie das Gerät nicht unbeaufsichtigt, solange es am Stromnetz angeschlossen ist.
• Tauchen Sie das Bügeleisen und den Boiler niemals in Wasser.
• Halten Sie das Gerät außer Reichweite von Kindern.
• Die Abstellfläche und die Bügelsohle können sehr heiß werden und bei Berührung
Brandwunden verursachen. Berühren Sie keinesfalls die Abstellfläche, wenn Sie den Boiler
bewegen.
• Lassen Sie das Netzkabel und den Verbindungsschlauch nicht in Berührung mit der heißen
Bügelsohle kommen.
• Wenn Sie das Bügeln beenden, das Gerät reinigen, den Wasserbehälter füllen oder leeren
oder den Raum nur kurz verlassen, stellen Sie stets den Dampfregler auf Position 0, stellen
Sie das Bügeleisen aufrecht und ziehen Sie den Netzstecker aus der Steckdose.
• Benutzen Sie dieses Bügeleisen nur mit der dazugehörigen Ladestation.
• Platzieren und benutzen Sie das Bügeleisen und den Boiler stets auf einer stabilen, ebenen
und waagerechten Unterlage. Stellen Sie den Boiler nicht auf die weiche, gepolsterte Fläche
des Bügelbretts.
• Geben Sie niemals Parfüm, Essig, Stärke, Entkalker, Bügelhilfen oder andere Chemikalien in
den Wasserbehälter.
• Dieses Gerät ist nur für den Gebrauch im Haushalt bestimmt.
Deutsch
Allgemeine Beschreibung (Abb. 1)
A Temperaturregler, Drehschalter
B Dampfregler, Schiebeschalter
1 = minimale Dampfabgabe
4 = maximale Dampfabgabe
C Dampfzufuhr, Drucktaste
D Sprühtaste, Drucktaste T
E Sprühdüse
F Dampfstoßtaste 9
G Entkalkung eU
H Kontrollampe für Temperatur
I Soft-Touch-Griff
J Antikalk-Kassette
K Entriegelung der Antikalk-Kassette
L Wassertank
M Einfüllöffnung
N Gummimatte
O Aufhängung
P Wasserbehälter
Q Netzkabel
R Verbindungsschlauch
12F13
Page 13
Vorbereitung zum ersten Gebrauch
• Drücken Sie die Entriegelung (K), und nehmen
Sie die Antikalk-Kassette (J) von der
Basisstation ab. Schreiben Sie das Datum auf
den Aufkleber an der Kassette. Setzen Sie die
Kassette wieder ein (Abb. 2).
• Füllen Sie den Wassertank mit Hilfe eines
Gefäßes bis zur Markierung MAX mit Wasser
(Abb. 3).
• Stecken Sie das Netzkabel (Q) in die
Steckdose.
• Stellen Sie den Temperaturregler (A) auf MAX
(Abb. 4).
• Schieben Sie den Dampfregler (B) auf Position
4 (Abb. 5).
• Die Kontrollampe (H) leuchtet auf.
2
Bügelvor-
schrift
Textilart Temperatur-
einstellung
Dampf-
bügeln
B
Synthetics
z.B. Acryl,
Acetat
Viskose,
Polyamid
(Nylon)
Polyester
Seide
MIN
|
|
1
|
|
|
|
2
|
||
3
MAX
C Wolle
D Baumwolle
Leinen
Z
Vorsicht: Diese Teile dürfen nicht gebügelt werden!
Dampfstoß
Dampfstrahl
Tabelle
X
F
F
T
T
T
1
2-4
4
5
CALC CLEAN
4
3
Drücken Sie
die
Dampftaste
nicht ein (C).
3
.
X
A
M
4
3
2
N
A
E
L
C
F
L
E
S
N
A
E
L
C
F
L
E
S
4
3
3
N
A
E
L
C
F
L
E
S
Page 14
• Wenn die
Kontrollampe
erloschen ist, drücken
Sie die TurboDampftaste (C) unter
dem Griff (Abb. 6), und
halten Sie gedrückt,
bis nach ca. 2 Minuten
Dampf austritt.
• Bügeln Sie 1 bis 2
Minuten ein gebrauchtes Stück Stoff.
• Lesen Sie diese Anleitung zum Einstellen
von Temperatur und Dampfzufuhr. Danach
können mit dem Bügeln von Wäsche oder
Kleidung beginnen.
Gebrauch der Gummimatte (N) und der
Aufhängung (O)
• Auf der Basisstation
mit dem Wassertank
befindet sich eine
Gummimatte (N).
Diese Gummimatte
kann zu Ihrer
Bequemlichkeit
abgenommen und
während des Bügelns
flach auf ein Bügelbrett
gelegt werden
(Abb. 7).
• Stellen Sie das heiße
Bügeleisen niemals
direkt auf die
Basisstation (Abb. 8)!
Bringen Sie zuvor
immer die
Gummimatte an
(Abb. 9).
• Die Basisstation kann auch an den Metallbügel
des Bügelbretts aufgehängt werden. Ziehen Sie
zuvor die Aufhängung (O) aus der Basisstation
(Abb. 10); nehmen Sie die Gummimatte ab,
und legen Sie sie auf das Bügelbrett.
• Legen Sie diese Gummimatte niemals auf eine
hitzeempfindliche Unterlage.
Wassertank füllen
• Füllen Sie das
Bügeleisen vor dem
ersten Gebrauch mit
normalem
Leitungswasser.
• Steht die Basisstation
waagerecht, so füllen
Sie den Wassertank
bis zur Markierung
MAX an der Seite
(Abb. 11) oder in der
Einfüllöffnung (Abb. 12).
• Steht oder hängt die Basisstation senkrecht, so
füllen Sie den Wassertank nur bis zur
Markierung MAX an der Seite (Abb. 13).
• Verwenden Sie zum Nachfüllen ebenfalls
Leitungswasser. Vgl. die Tabelle
"Wasserhärte".
• Ziehen Sie vor dem Füllen des Wassertanks
stets den Netzstecker aus der Steckdose.
Drücken Sie die Dampftaste nicht ein (C).
• Sie können den Wassertank leeren, bevor Sie
das Gerät fortstellen.
Bügeltemperatur
• Prüfen Sie stets, ob eine Bügelvorschrift in das
Kleidungsstück eingenäht ist. Vgl. die Tabelle.
Befolgen Sie diese Bügelvorschriften in allen
Fällen.
• Wenn eine Bügelvorschrift fehlt, Sie aber die
Textilart kennen, so schauen Sie in der Tabelle
nach.
• Die Tabelle gilt nur für die dort aufgeführten
Materialien. Chemisch behandeltes Material
(z.B. Glanz, Relief, knitterfrei usw.) ist bei einer
niedrigeren Temperatur zu bügeln.
• Sortieren Sie das Bügelgut zuvor immer nach
der erforderlichen Temperatur: Wolle zu Wolle,
Baumwolle zu Baumwolle usw.
Das Bügeleisen ist schneller aufgeheizt als
abgekühlt. Beginnen Sie darum mit Textilien,
die nur eine niedrige Temperatur vertragen,
also ggf. mit Synthetics.
• Bei Mischgeweben wählen Sie stets die
14
6
7
8
9
10
.
X
A
M
MAX.
11
12
13
Page 15
Bügelgut einsprühen T
• Das Bügelgut kann bei gefülltem
Wasserbehälter jederzeit durch mehrfaches
Drücken der Sprühtaste T (D) angefeuchtet
werden (Abb. 15).
• Das Wasser zum Sprühen kommt aus dem
Wasserbehälter (P) im Bügeleisen. Es wird
durch eine elektrische Pumpe in der
Basisstation bereitgestellt.
• Vergewissern Sie sich, daß genug Wasser im
Wassertank (L) ist.
• Wenn der Wasserbehälter (P) nach längerem
Gebrauch leer ist, so drücken Sie die
Dampftaste (C) etwa eine Minute lang, um den
Wasserbehälter wieder zu füllen. Der Vorgang
ist beendet, wenn Dampf aus der Bügelsohle
austritt.
• Der Wasserbehälter muß bei einer
Temperatureinstellung zwischen 2 und MAX
gefüllt bzw. nachgefüllt werden. Bei einer
Temperatureinstellung unter 2 ist das nicht
möglich (Abb. 16).
Dampfbügeln
• Der Temperaturregler (A) und die Tabelle
zeigen, daß Dampfbügeln nur bei höheren
Bügeltemperaturen möglich ist:
2 bei normaler Dampfabgabe,
3 MAX bei maximaler Dampfabgabe.
• Ihr Aquazur HI838, 835 verfügt über das
“Tropf-Stop”-System:
Bei zu niedriger Temperatur wird die
Dampfzufuhr mit einem "Klick" automatisch
ausgeschaltet, so daß kein Wasser aus der
Bügelsohle austreten und Flecken auf Ihrer
Wäsche hinterlassen kann.
Stellen Sie dann am Temperaturregler (A) die
empfohlene Bügeltemperatur ein. Hat die
Bügelsohle die eingestellte Temperatur erreicht,
steht wieder Dampf zur Verfügung.
• Achten Sie darauf, daß genügend Wasser im
Wassertank ist.
- Stellen Sie das Bügeleisen auf die Gummimatte
auf der Basisstation.
15
Temperaturstufe für die Faser, welche die
niedrigste Temperatur erfordert. Ein
Wäschestück aus 60% Polyester und 40%
Baumwolle muß also bei Einstellung (1) für
Polyester und ohne Dampf gebügelt werden.
• Wenn Sie nicht wissen, woraus das zu
bügelnde Teil besteht, so suchen Sie eine
Stelle, die bei normaler Verwendung nicht
sichtbar wird, und prüfen Sie dort, mit der
niedrigsten Temperatur beginnend, welche
Temperaturstufe angemessen ist.
• Textilien aus reiner Wolle (100 % Wolle)
können mit einer Dampfeinstellung gebügelt
werden. Es empfiehlt sich, mit einem trockenen
Bügeltuch zu arbeiten und den Dampfregler auf
die höchste Position zu stellen.
Es kann vorkommen, daß die Oberfläche von
Wollsachen nach dem Bügeln glänzt. Das läßt
sich vermeiden, indem Sie das Teil von links,
auf der Rückseite bügeln.
• Samt und andere Gewebe, die beim Bügeln
rasch glänzende Stellen annehmen, sollten nur
in eine Richtung ("mit dem Strich") und unter
nur leichtem Druck gebügelt werden. Halten Sie
das Bügeleisen dabei stets in Bewegung.
• Bügeln Sie Synthetics und Seide stets von
links, um glänzende Stellen zu vermeiden.
Verwenden Sie kein Bügelspray, es könnte
Flecken verursachen.
Einstellen der Temperatur
- Stellen Sie das
Bügeleisen auf die
Gummimatte.
- Stellen Sie den
Temperaturregler (A)
auf die laut
Bügelvorschrift oder
Tabelle erforderliche
Temperatur (Abb. 14).
- Stecken Sie den
Stecker in die
Steckdose.
- Wenn die gelbe Kontrollampe (H) einmal ausund dann wieder angegangen ist, können Sie
mit dem Bügeln beginnen.
• Während des Bügelns geht die gelbe
Kontrollampe von Zeit zu Zeit an und wieder
aus.
• Wollen Sie mit einer niedrigeren Temperatur
weiterbügeln, so stellen Sie die neue
Temperatur ein, und warten Sie, bis die gelbe
Kontrollampe (H) einmal an- und wieder
ausgegangen ist.
14
15
16
Page 16
- Stellen Sie den Temperaturregler (A) auf die
erforderliche Temperatur im Dampfbereich,
also 2 bis MAX.
- Stecken Sie den Stecker in die Steckdose.
- Nachdem die gelbe Kontrollampe (H) einmal
aus- und wieder
angegangen ist,
können Sie mit dem
Bügeln fortfahren.
- Stellen Sie den
Dampfregler (B) auf
die erforderliche
Position (Abb. 17).
• Kurz bevor der
Wassertank völlig leer
ist, wird von der
Wasserpumpe durch die Bügelsohle ein
Dampfstoß mit einigen kleinen Wasserspritzern
abgegeben. Das ist kein Grund zur
Beunruhigung.
Dampfstoß 9
Wenn Sie die
Dampfstoßtaste 9 (F)
drücken, stößt die
Bügelsohle intensiv
Dampf aus (Abb. 18).
Auf diese Weise lassen
sich Falten leicht
entfernen.
Der Dampfstoß kann nur
bei Temperaturen im
Dampfbereich, also T bis MAX, alle 5 Sekunden
angewendet werden.
Mit senkrecht
gehaltenem Eisen
aufdämpfen.
Der Dampfstoß kann
auch bei senkrecht
gehaltenem Bügeleisen
angewendet werden
(Abb. 19).
Damit lassen sich
Falten z.B. aus
Vorhängen und hängenden Kleidungsstücken
wirksam entfernen.
Der Dampfstoß kann nur bei Temperaturen im
Dampfbereich, also 2 bis MAX, alle 5 Sekunden
angewendet werden.
Hinweis: Dieses Bügeleisen ist nicht zu
kontinuierlichem Aufdämpfen geeignet.
Trockenbügeln
Wenn Sie ohne Dampf bügeln wollen, so
verfahren Sie wie oben beschrieben, lassen aber
drücken Sie die Dampftaste nicht ein (C).
Entkalkung eU
• Die Entkalkung wirkt in Verbindung mit der AntiKalk-Kassette.
- Durch die Kalkreinigung werden Ablagerungen
(Schmutz, Sand usw.) in der Dampfkammer
beseitigt.
• Es ist wichtig, Ihr Philips Aquazur HI838, 835
regelmäßig zu entkalken, um seine optimale
Leistung zu erhalten. Bei normaler Verwendung
des Bügeleisens von ca. 2 Stunden pro Woche
ist Calc Clean monatlich einmal anzuwenden.
Bei häufigerer Verwendung von durchschnittlich
4 Stunden pro Woche ist Calc Clean alle 14
Tage anzuwenden.
• Stellen Sie das Bügeleisen und den
Wassertank in die Spüle (Abb. 20)..
-Füllen Sie den Wassertank (L) etwa halb voll
mit Wasser.
- Stecken Sie den Stecker in die Steckdose.
- Stellen Sie den Temperaturregler (A) auf
Position "CALC CLEAN" (Abb. 21) und den
Dampfregler (B) auf Position 4.
- Stellen Sie, falls erforderlich, das Bügeleisen im
Spülbecken auf die Gummimatte.
-Drücken Sie die Selbstreinigungstaste "CALC
CLEAN" eU (G) (Abb. 22).
- Jetzt tritt Wasser aus den Löchern in der
Bügelsohle aus. Eventuell vorhandene
Kalkreste und Verunreinigungen werden damit
heraus gespült.
- Bewegen Sie gleichzeitig das Bügeleisen vor
und zurück (Abb. 23).
- Lassen Sie die Selbstreinigungstaste eU (G)
wieder los, um den Vorgang abzubrechen.
16
17
4
3
EAN
ALC CL
C
18
19
20
21
Page 17
17
Es kommt kein Wasser mehr aus der Bügelsohle.
- Heizen Sie das Bügeleisen wieder auf, damit
überschüssiges Wasser verdampft.
-Führen Sie das Bügeleisen über ein
gebrauchtes Stück Stoff (Abb. 24).
Dadurch bleibt die Bügelsohle während der
Aufbewahrung des Geräts trocken.
- Ziehen Sie den Stecker aus der Steckdose, und
lassen Sie das Bügeleisen abkühlen, bevor Sie
es fortstellen.
Antikalk-Kassette
Das Philips Aquazur ist
mit einer
auswechselbaren
Antikalk-Kassette
ausgestattet, die das
Wasser filtert. Nach
Ablauf einer gewissen
Zeit läßt die Wirkung
nach. Die Kassette muß schließlich ausgetauscht
werden. Die folgende Tabelle gibt einen Hinweis
darauf, wann die Kassette, abhängig von der
Härte des Wassers und der Häufigkeit der
Verwendung, auszutauschen ist.
Die Wasserhärte
In kürzester Zeit haben Sie selbst die Härte des
von Ihnen verwendeten Wassers bestimmt.
1. Füllen Sie ein Glas mit dem von Ihnen
verwendeten Leitungswasser.
2. Halten Sie den Teststreifen 1 oder 2 Sekunden
in das Wasser.
3. Nehmen Sie ihn heraus, und bewegen Sie ihn 1
Minute hin und her.
4. Vergleichen Sie das Resultat mit der Tabelle
der Wasserhärte.
Die Wasserhärte entspricht der Anzahl der
verfärbten Quadrate auf dem Teststreifen.
5. Lesen Sie in der Tabelle "Wasserhärte" ab,
nach welcher Zeit Sie die Antikalk-Kassette
auswechseln müssen.
Auf dem Teststreifen befinden sich vier grüne
Quadrate. Wenn Sie den Teststreifen ins Wasser
halten, verfärben sich einer oder mehrere
Quadrate rosa. Je mehr Quadrate sich verfärben,
um so härter ist das Wasser. Die Härte hängt vom
Kalziumgehalt des Wassers ab.
Dieser Test braucht nur einmal durchgeführt zu
werden. Das Testergebnis in die nachstehende
Tabelle eintragen.
Tabelle Wasserhärte Die Tabelle "Wasserhärte" gibt Ihnen einen allgemeinen Hinweis, wann die Antikalk-Kassette
auszutauschen ist. Gehen Sie wie folgt vor:
Wasserhärte
Rosa verfärbte
Quadrate auf dem weich mäßig hart hart sehr hart
Teststreifen 0 ... 1 2 3 4
Normaler Gebrauch Kein Austausch Austausch alle Austausch alle Austausch alle
ca. 2 Std. nötig 12 Monate 6 Monate 4 Monate
pro Woche
Häufiger Gebrauch Kein Austausch Austausch alle Austausch alle Austausch alle
ca. 4 Std. pro Woche nötig 6 Monate 3 Monate 2 Monate
■ ■ ■ ■ ■■■ ■ ■■■■ ■ ■ ■ ■
22
CALC CLEAN
23
24
Page 18

18
Die Kassette auswechseln
- Kaufen Sie eine Ersatz-Kassette
Type HD 1900 bei Ihrem Händler oder einem
Philips Service Center.
-Drücken Sie die Entriegelung (K) und nehmen
Sie die gebrauchte Kassette heraus (Abb. 25).
- Leeren Sie den Wassertank und die
Kassettenhalterung (Abb. 26).
- Schreiben Sie das Datum auf die neue
Kassette, und setzen Sie sie in die Basisstation
ein.
-Füllen Sie den Wassertank wieder.
- Stellen Sie den Dampfregler auf Position 4 und
den Temperaturregler auf 3.
-Drücken Sie ca. eine Minute lang die
Dampftaste (C). Die neue Kassette ist dann mit
Wasser gefüllt.
- Sie können jetzt wieder bügeln.
Reinigung
- Ziehen Sie vor jeder Reinigung den Stecker
aus der Steckdose, und lassen Sie das Gerät
ausreichend abkühlen.
- Kalkreste und Verunreinigungen lassen sich
mit einem weichen Tuch und ein wenig
Spülmittel von der Bügelsohle abwischen.
Halten Sie die Bügelsohle unversehrt.
Vermeiden Sie, daß sie mit Gegenständen
aus Metall in Berührung kommt.
- Der obere Teil des Bügeleisens läßt sich mit
einem feuchten Tuch abwischen, auf das Sie
bei Bedarf ein wenig Spülmittel auftragen
können.
-Füllen Sie von Zeit zu Zeit den Wassertank mit
klarem Wasser, und schütteln Sie ihn. Gießen
Sie dann das Wasser aus.
Aufbewahrung
- Ziehen Sie den
Netzstecker aus der
Steckdose.
- Gießen Sie evtl. im
Wassertank
verbliebenes Wasser
aus (Abb. 27).
- Stellen Sie den
Dampfregler (B) auf
Position 4.
- Stellen Sie das Bügeleisen zurück auf die
Gummimatte auf der Basisstation, und lassen
Sie es abkühlen.
-Prüfen Sie regelmäßig den Zustand des
Netzkabels und des Verbindungsschlauchs.
Umweltschutz
• Geben Sie das Gerät
am Ende der
Lebensdauer nicht in
den normalen
Hausmüll. Bringen Sie
es zum Recycling zu
einer offiziellen
Sammelstelle. Auf
diese Weise helfen
Sie die Umwelt zu
schonen (Abb. 28).
25
26
27
28
Page 19

19
Häufig gestellte Fragen
Problem
Beim Einschalten zum ersten
Gebrauch kommt Rauch aus dem
Bügeleisen.
Das Bügeleisen gibt keinen Dampf von
sich, und ein lautes Geräusch kommt
aus der Basisstation.
Wasser kann nicht gesprüht werden.
Kein Dampfstoß möglich.
Mögliche Ursache
Keine Sorge! Einige Teile sind in der
Fabrik leicht eingefettet worden.
Es ist zu wenig Wasser verfügbar.
Die Antikalk-Kassette ist nicht richtig
eingesetzt.
Und/oder der Temperaturregler
steht auf einer Position unter 2.
Der Wasserbehälter (P) ist leer.
Der Wasserbehälter (P) ist leer.
Abhilfe
Die Erscheinung geht nach
kurzer Zeit von selbst
vorbei.
Füllen Sie den Wassertank
bis zur Markierung MAX.
Setzen Sie die AntikalkKassette fest ein.
Und/oder wählen Sie am
Temperaturregler (A) eine
höhere Position.
Füllen Sie den Wassertank
bis zur Markierung MAX,
stellen Sie den
Temperaturregler auf 3,
drücken Sie die
Dampftaste, bis Dampf aus
der Bügelsohle kommt.
Füllen Sie den Wassertank
bis zur Markierung MAX,
stellen Sie den
Temperaturregler auf 3,
drücken Sie die
Dampftaste, bis Dampf aus
der Bügelsohle kommt.
Page 20

Vigtigt
Af hensyn til sikkerheden anbefales det at læse denne betjeningsvejledning grundigt igennem og se
på illustrationerne, før apparatet tages i brug første gang.
• Inden apparatet tages i brug første gang, kontrolleres det, at spændingsangivelsen på
typeskiltet svarer til den lokale netspænding.
• Apparatet må kun sluttes til en stikkontakt med jordforbindelse.
• Brug ikke apparatet, hvis stik, netledning, dampslange eller selve apparatet viser synlige
tegn på beskadigelse, hvis apparatet har været tabt på gulvet, eller hvis det er utæt.
• Efterse jævnligt netledning og dampslange for tegn på skader.
• Hvis netledningen eller dampslangen beskadiges, må de kun udskiftes af Philips, et
autoriseret Philips-serviceværksted eller af en tilsvarende kvalificeret fagmand for at undgå
enhver risiko.
• Apparatet skal altid være under opsyn, når det er tilsluttet strøm.
• Strygejern og damptank må aldrig kommes ned i vand.
• Hold apparatet uden for børns rækkevidde.
• Strygejernets stander og strygesål kan blive utroligt varme og forårsage brandsår ved
berøring. Pas derfor på ikke at komme til at berøre standeren, når damptanken flyttes.
• Netledning og dampslange må ikke komme i berøring med den varme strygesål.
• Når du er færdig med at stryge, rengør apparatet, fylder vand i eller tømmer vandtanken, og
når du forlader strygejernet - selv for et kort øjeblik - skal dampvælgeren altid sættes i
stilling O, strygejernet stilles på højkant, og stikket tages ud af stikkontakten.
• Anvend kun strygejernet sammen med den medfølgende holder.
• Strygejern og damptank skal altid placeres og anvendes på et stabilt, plant og vandret
underlag. Sæt aldrig damptanken på den bløde del af strygebrættet.
• Kom aldrig parfume, eddike, stivelse, afkalkningsmiddel eller andre former for kemikalier i
vandtanken.
• Dette apparat er udelukkende beregnet til husholdningsbrug.
Dansk
General beskrivelse (fig. 1).
A Temperaturvælger (drejelig)
B Dampmængde-knap (skydeknap)
1 = minimum damp
4 = maximum damp
B Damp-knap (skub)
D Spray-knap T (tryk)
E Sprayåbning
F Dampskudsknap 9 (tryk)
G Calc Cleaning (Afkalkning) eU (tryk)
H Kontrollampe for temperatur
I "Soft Touch" håndtag
J Antikalk-kassette
K Udløserknap for kassette (tryk)
L Vandtank (strygejernsstativ)
M Åbning til påfyldning af vand
N Gummimåtte
O Opbevaringsbøjle
P Indvendig vandbeholder
Q Netledning
R Mellemledning/dampslange
20F21
Page 21

Når Philips Aquazur HI838, 835 tages i brug
første gang:
• Tag antikalk-kassetten (J) ud af stativet ved at
trykke på kassettens udløserknap (K). Skriv
dato (år/måned/dag) på kassettens etikette.
Sæt kassetten tilbage i stativet (fig. 2).
• Fyld vand i vandtanken til MAX-markeringen
(brug en kande eller flaske) (fig. 3).
• Sæt netledningen(Q) i en stikkontakt og tænd.
• Sæt temperaturvælgeren (A) på MAX (fig. 4).
• Sæt skydeknappen for dampmængde (B) i
stilling 4 (fig. 5).
2
Strygean-
visning i tøjet
Materiale Temperatur-
indstilling
Damp-
indstilling
B
Syntetiske
stoffer, f.eks.
akryl, viscose,
polyamid
(nylon),
polyester
Silke
MIN
|
|
1
|
|
|
|
2
|
||
3
MAX
C Uld
D
Bomuld
Linned
Z
Bemærk: Denne mærkning Z betyder
"Tåler IKKE strygning!"
Dampskud Spray
Strygetabel
X
F
F
T
T
T
1
2-4
4
5
CALC CLEAN
4
3
Aktiver dog
ikke Damp-
udløseren
(C).
3
.
X
A
M
4
3
2
N
A
E
L
C
F
L
E
S
N
A
E
L
C
F
L
E
S
4
3
N
A
E
L
3
C
F
L
E
S
Page 22

• Den lille kontrollampe
(H) lyser.
• Når kontrollampen
slukker, trykkes på
damp-knappen (C)
indvendigt i håndtaget
(hold knappen
indtrykket) (fig. 6).
Efter ca. 2 minutter
kommer der damp ud
af strygesålen.
• Stryg et stykke klæde/håndklæde med damp i 1
til 2 minutter. Herefter er strygejernet klar til brug.
• Se vejledningen i denne brugsanvisning
vedr. strygetemperaturer og dampindstilling.
Sådan bruges gummimåtten (N) og
opbevaringsbøjlen (O).
• Strygejernsstativet
(vandtanken) er
forsynet med en
gummimåtte (N), der
kan tages af og
lægges på
strygebrættet, så
strygejernet nemt kan
stilles til side under
strygningen (fig. 7).
• Stil aldrig strygejernet
direkte på stativets
plastikoverdel! (fig. 8).
Læg altid først måtten
på (fig. 9).
• Stativet kan eventuelt
hænges på
strygebrættets
metalkurv, når
metalbøjlen (O)
vippes ud (fig. 10). Før
stativet hænges op,
tages gummimåtten af
og lægges på strygebrættet, så strygejernet kan
stilles til side under strygningen.
• Læg ikke gummimåtten på et bord eller anden
overflade, som ikke er varmebestandig.
Vandpåfyldning (til dampstrygning og
spraying/fugtning)
• Første gang
strygejernet tages i
brug, fyldes det med
almindeligt postevand.
• Hvis vandtanken
holdes vandret, fyldes
der vand i op til MAXmarkeringen på siden
af tanken (fig. 11) eller
i påfyldningsåbningen
(fig. 12).
• Hvis vandtanken holdes lodret, fyldes der kun
vand i til MAX-markeringen på siden af tanken
(fig. 13).
• Ved efterfølgende påfyldninger kan De også
anvende almindeligt postevand (se afsnittet
"Vandets hårdhed").
• Tag altid stikket ud af stikkontakten før
vandpåfyldning.
Aktiver dog ikke damp-udløseren (C).
• Overskydende vand kan hældes ud af
vandtanken, før strygejernet stilles væk efter
brug.
Strygetemperatur
• Kontrollér altid først, om der er en
strygeanvisning i det tøj, der skal stryges.
(Se tabellen).
Følg under alle omstændigheder en sådan
anvisning.
• Hvis der ingen mærkning er i tøjet, men De
kender tekstilarten, kan De følge den viste
tabel.
• Tabellen er kun gældende for de nævnte
tekstiler og tager ikke højde for eventuelle
efterbehandlinger af tøjet som f.eks. glans eller
lign.
Det anbefales altid at stryge specialbehandlede
stoffer (glans, rynker, tryk etc.) ved en lav
temperatur.
22
6
7
8
9
10
.
X
A
M
MAX.
11
12
13
Page 23

Spraying (fugtning) T.
• Ved at trykke på spray-knappen T (D) kan man
fugte tøjet uanset temperaturindstillingen
(fig. 15).
• Vandet til spraying kommer fra en lille indvendig
vandbeholder (P).
Vandet pumpes ud af en pumpe i
strygejernsstativet.
• Sørg for, at der er tilstrækkeligt med vand i
vandtanken.
• Hvis den lille indvendige vandbeholder (P) løber
tør under kraftig brug af spray-knappen, trykkes
blot på damp-knappen (C) i ca. 1 minut for at
fylde den op igen. Beholderen er fyldt op, når
man ser/hører damp komme ud af hullerne i
strygesålen.
• Ved påfyldning og genopfyldning af den
indvendige vandbeholder skal
temperaturvælgeren stå mellem 2 og MAX.
Det er ikke muligt at fylde vand i beholderen,
hvis temperaturvælgeren står lavere end 2
fig. 16).
Dampstrygning
• Som vist på temperaturvælgeren (A) og i
tabellen, kan dampstrygning kun finde sted ved
højere temperaturer:
2 for moderat (normal) damp,
3 for maximal (kraftig) damp.
• Philips Aquazur strygejernet har en indbygget
"dryp-stop" funktion, der automatisk "afbryder"
dampproduktionen ved for lave temperaturer.
Derved undgår man, at der drypper vand ud fra
strygesålen, som kan give pletter og skjolder på
tøjet. Når det sker, høres der et "klik". Sæt da
temperaturvælgeren (A) i den anbefalede
stilling. Dampstrygning vil igen være mulig, så
snart den nødvendige temperatur er nået.
• Sørg for, at der er tilstrækkeligt med vand i
vandtanken.
- Stil strygejernet på vandtankens gummimåtte.
-Sæt temperaturvælgeren (A) i den nødvendige
stilling indenfor "dampområdet" (2 til MAX).
-Sæt netstikket i en stikkontakt og tænd den.
23
• Sortér tøjet efter strygetemperatur, inden
strygningen påbegyndes. Uld sammen med uld,
bomuld sammen med bomuld o.s.v.
• Strygejernet varmes hurtigere op, end det
afkøles, så start med det tøj, der kræver den
laveste temperatur, f.eks. syntetiske tekstiler.
• Hvis tøjet består af blandingstekstiler, vælges
temperaturen for det tekstil, der har den laveste
strygetemperatur (f.eks. skal et tekstil, der
består af "60% polyester og 40% bomuld"
stryges ved den temperatur, der er angivet for
polyester (1) og uden damp).
Hvis De ikke ved, hvilket materiale tøjet er lavet
af, vælges et sted på tøjet, der ikke ses, når det
bæres eller bruges. Prøv at finde frem til den
bedst egnede strygetemperatur (begynd med
en relativ lav temperatur).
• Ren uld (100%) kan stryges med strygejernet
sat i dampstilling. Det anbefales at sætte
dampvælgeren til maximum damp og bruge et
tørt strygeklæde.
Ved dampstrygning af ren uld kan tøjet komme
til at skinne. Dette undgås bedst ved at stryge
det på vrangen.
• Fløjl og andre tekstiler, der let bliver blanke,
stryges hele tiden i samme retning (med luven)
og med let tryk. Hold hele tiden strygejernet i
bevægelse.
• Syntetiske stoffer og silke stryges på vrangen
for at undgå blanke pletter. Undlad at bruge
spray-knappen, da det kan give skjolder på
tøjet.
Temperaturindstilling
- Stil strygejernet på
vandtankens
gummimåtte.
- Indstil
temperaturvælgeren
(A) til den korrekte
strygetemperatur som
angivet i
strygeanvisningen
eller i tabellen (fig. 14).
-Sæt netstikket i stikkontakten og tænd.
-Når den gule kontrollampe (H) er slukket og
tændt igen, kan strygningen påbegyndes.
• Under strygningen vil den gule kontrollampe
tænde og slukke med jævne mellemrum.
• Hvis De efter at have strøget med en høj
temperatur sætter temperaturvælgeren til et
lavere niveau, skal De vente med at stryge igen
til kontrollampen har tændt og slukker igen.
15
16
14
Page 24

- Strygningen kan
påbegyndes, når den
gule kontrollampe (H)
har slukket og tænder
igen.
-Sæt skydeknappen til
dampmængde (B) i
den ønskede stilling
(fig. 17).
• Lige inden vandtanken
løber tør for vand, kommer der normalt lidt
damp og sprøjt. Dette skyldes den elektriske
pumpe og er helt normalt.
Dampskud 9
Ved tryk på 9 knappen
(E) kommer et kraftigt
"dampskud" ud af
strygesålen (fig. 18).
Dette er specielt
velegnet til at glatte
ekstra besværlige folder
ud.
"Dampskud" kan kun
frembringes med
intervaller på 5 sekunder,
og når strygejernet har en høj temperatur (mellem
2 og MAX).
Dampning i lodret stilling
Der kan også frembringes "dampskud", når
strygejernet holdes
lodret (fig. 19). Dette er
specielt praktisk, når
man glatter tøj der
hænger på bøjle,
gardiner o.lign.
"Dampskud" kan kun
frembringes med
intervaller på 5
sekunder, og når
strygejernet har en høj
temperatur (mellem 2 og MAX).
I lodret stilling er strygejernet kun egnet til
dampskud - ikke konstant dampning.
Tørstrygning
Tørstrygning, d.v.s. uden damp, foretages på
nøjagtig samme måde som beskrevet for
dampstrygning bortset fra, at aktiver dog ikke
damp-udløseren (C).
Calc Cleaning (Afkalkning) eU
• Calc cleaning og anti-calc funktionen
understøtter hinanden.
- Calc cleaning-funktionen sikrer, at
dampkammeret renses for eventuelle
restpartikler (snavs, sand osv.).
• For at opnå de bedste resultater med Philips
Aquazur er det vigtigt, at man udfører
regelmæssig calc cleaning. Ved normal brug
(2 timer om ugen) bør calc cleaning foretages
1 gang om måneden. Ved oftere brug (4 timer
om ugen), bør calc cleaning foretages 1 gang
hver 14. dag.
- Tag strygejern og vandtank med hen til
køkkenvasken (fig. 20).
- Fyld vandtanken (L) med vand (ca. halvt op).
-Sæt stikket i stikkontakten (og tænd).
-Sæt temperaturkontrollen (A) i stilling 'CALC
CLEAN' (fig. 21). Sæt damvælgeren (B) i
stilling 4.
- Lad eventuelt strygejernet hvile på
gummimåtten.
- Tryk på 'CALC CLEAN' knappen eU(G)
(fig. 22).
- Vandet sprøjtes nu ud gennem hullerne i
strygesålen. Urenheder og eventuelle
kalkpartikler vaskes med ud.
- Bevæg strygejernet lidt frem og tilbage imens
(fig. 23).
- Slip Calc-clean knappen eU (G) for at
stoppe processen. Gentag calc-clean
processen til vandtanken (P) er tom.
24
17
ALC CLEAN
C
4
3
18
19
20
21
22
CALC CLEAN
23
Page 25

25
Vandet holder op med at
løbe.
- Varm strygejernet op
igen for, så
overskydende vand
fordamper.
- Bevæg strygejernet
hen over et (gammelt)
stykke stof (fig. 24).
Dette sikrer, at strygesålen er tør under
opbevaring.
- Tag stikket ud af stikkontakten og lad
strygejernet afkøle, inden det stilles væk efter
brug.
Antikalk-kasette
Philips Aquazur har en udskiftelig antikalkkasette, der filtrerer vandet. Indholdet i kasetten
bliver med tiden mættet, og når dette indtræffer,
skal kasetten udskiftes. Hvor tit den skal udskiftes
afhænger dels af vandets hårdhedsgrad og dels
af, hvor meget strygejernet anvendes. Se de
generelle retningslinier i tabellen nedenfor.
Vandets hårdhedsgrad
Man kan hurtigt selv teste vandets hårdhedsgrad
ved hjælp af “vandtesteren” (den lille strip vedlagt
i brugsanvisningen).
1. Tag et glas vand.
2. Hold strippen nede i vandet i 1-2 sekunder.
3. Tag strippen op og bevæg den frem og tilbage i
1 minut.
4. Aflæs herefter resultatet nedenfor.
5. Vandhårdheds-tabellen angiver, hvornår
antikalk-kasetten skal udskiftes.
“Vandtesteren” har 4 grønne felter. Når stippen
kommes i vand vil en eller flere af disse felter
blive lyserøde. Desto flere felter, der skifter farve
til lyserød, desto hårdere er vandet (d.v.s.
indholdet af Cadmium i vandet er højere).
Denne test behøver kun at udføres 1 gang. Skriv
resultatet ned i tabellen til eventuel senere brug.
Vandhårdheds-tabel
Denne tabel angiver generelle retningslinier for, hvornår antikalk-kasetten bør udskiftes.
Vandets hårdhed
Lyserøde felter på
“vand-testeren” blødt moderat hårdt meget hårdt
(strippen) 0-1 2 3 4
normal brug behøver udskiftes udskiftes udskiftes
(2 timer om ugen) ikke hver 12. hver 6. hver 4.
udskiftes måned måned måned
intensiv brug behøver udskiftes udskiftes udskiftes
(4 timer om ugen) ikke hver 6. hver 3. hver 2.
udskiftes måned måned måned
■ ■ ■ ■
■■■ ■
■■■■
■ ■ ■ ■
24
Page 26

26
Sådan udskiftes antikalk-kasetten
- Nye antikalk-kasetter (type HD 1900) fås hos
Deres forhandler.
- Skub kasettens udløserknap (K) frem og tag
kasetten ud (fig. 25).
-Hæld vandet ud af vandtanken og kasette-
rummet (fig. 26).
- Skriv dato på den ny kasette og sæt den ind på
plads.
- Fyld vand i vandtanken.
-Sæt dampmængde-knappen i stilling 4 og
temperaturvælgeren på 3.
- Skub dampskuds-knappen frem i ca. 1 minut.
Den ny kasette er nu fyldt med vand.
- Strygningen kan påbegyndes/genoptages.
Rengøring
-Før strygejernet rengøres, skal stikket være
taget ud af stikkontakten og strygejernet være
tilstrækkeligt afkølet.
- Kalk og andre belægninger på strygesålen kan
tørres af med en fugtig klud og lidt ikkeridsende, flydende rengøringsmiddel.
• Hold strygesålen ren og glat: Undgå kontakt
med metalgenstande.
- Den øverste del af strygejernet kan rengøres
med en fugtig klud.
- Fra tid til anden kan vandtanken rengøres
indvendigt ved at fylde den med vand og ryste
strygejernet. Derefter hældes vandet ud igen.
Opbevaring.
- Tag stikket ud af
stikkontakten.
-Hæld eventuelt
resterende vand ud af
vandtanken (fig. 27).
-Sæt dampvælgeren i
stilling 4.
- Stil strygejernet på
gummimåtten i stativet
og lad det afkøle helt,
før det stilles væk.
- Kontrollér med regelmæssige mellemrum, at
netledningen ikke er beskadiget.
Miljøbeskyttelse
• Smid ikke apparatet
ud sammen med det
almindelige
husholdningsaffald,
når det til sin tid
kasseres. Indlevér det
istedet på det
kommunale
indsamlingssted for
genbrugsmaterialer.
Derved er du med til
at beskytte miljøet (fig. 28).
27
25
26
28
Page 27

27
Vejledning i.f.m. problemer med
strygejernet
Problem
Strygejernet ryger lidt første gang der
sluttes strøm til.
Der kommer ingen damp, og der
høres en høj lyd fra stativet.
Der kommer ingen vand til spray
Der kommer ingen “damp-skud”
Mulig årsag
Dette er helt normalt, da visse dele
er smurt med lidt olie fra fabrikken.
Der er for lidt vand i vandtanken,
eller antikalk-kasetten er ikke sat
rigtigt ind på plads og/eller
temperaturvælgeren er indstillet
lavere end 2
Den indvendige
vandbeholder (P) er tom.
Den indvendige
vandbeholder (P) er tom.
Hvad skal der gøres ?
Intet.
Røgen holder op efter et
kort øjeblik.
Fyld vandtanken op til
MAX-markeringen, skub
antikalk-kasetten ind på
plads, og/eller drej
temperaturvælgeren (A) til
en højere temperatur.
Fyld vandtanken op til
MAX-markeringen, sæt
temperaturvælgeren på
3 og skub dampknappen (C) frem, til der
kommer damp ud fra
strygesålen.
Fyld vandtanken op til
MAX-markeringen, sæt
temperaturen på 3 og
skub damp-knappen (C)
frem, til der kommer damp
ud fra strygesålen.
Page 28

Viktig
Av sikkerhetshensyn bør du lese denne bruksanvisningen nøye og se på illustrasjonene før du
begynner å bruke apparatet.
• Kontroller at spenningen som er angitt på merkeplaten, er den samme som nettspenningen
før du kobler apparatet til strøm.
• Apparatet skal bare kobles til jordet stikkontakt.
• Ikke bruk apparatet hvis støpselet, ledningen, tilførselsslangen eller selve apparatet har
synlig skade, eller hvis apparatet har blitt mistet i gulvet eller det lekker.
• Kontroller ledningen og tilførselsslangen regelmessig for skade.
• Hvis nettledningen eller tilførselsslangen blir skadet, må den bare skiftes ut av Philips, et
serviceverksted autorisert av Philips eller liknende kvalifisert personell. Dette for å unngå
fare.
• La aldri apparatet være uten tilsyn når det er koblet til strøm.
• Strykejernet og damptanken må aldri senkes ned i vann.
• Hold apparatet utenfor barns rekkevidde.
• Sokkelen og strykesålen kan bli svært varme og forårsake brannsår ved berøring. Hvis du
vil flytte damptanken, må du ikke ta i sokkelen.
• Nettledningen og tilførselsslangen må ikke komme i berøring med den varme strykesålen.
• Når du er ferdig med å stryke, når du rengjør apparatet, når du fyller eller tømmer
vannbeholderen, og også når du forlater strykejernet et kort øyeblikk: Still dampkontrollen
på O, sett strykejernet i oppreist stilling, og dra ut støpselet fra stikkontakten.
• Strykejernet skal bare brukes sammen med den medfølgende sokkelen.
• Strykejernet og damptanken skal settes og brukes på et stabilt, jevnt og vannrett underlag.
Ikke sett damptanken på den myke delen av strykebrettet.
• Ikke tilsett parfyme, eddik, stivelse, avkalkingsmiddel, strykespray eller andre kjemikalier i
vannbeholderen.
• Dette apparatet er bare beregnet på husholdningsbruk.
Norsk
Generell beskrivelse (fig. 1)
A Termostatknapp (roterende)
B Dampkontroll (skyvbar)
1 = Minimum damp
4 = Maksimum damp
C Dampavtrekker (trykk)
D Dynkeknapp T (trykk)
E Dynkedyse
F Dampskudd-knapp 9 (trykk)
G Kalkrensing eU (trykk)
H Temperaturindikator
I "Soft touch" håndtak
J Antikalk kassett
K Utløserknapp for kassett (trykk)
L Vannbeholder (strykestativ)
M Påfyllingsåpning
N Gummimatte
O Hengekrok
p Vannreservoir
Q Nettledning
R Tilførselsledning
28F29
Page 29

Klargjøring av Philips Aquazur HI838, 835 før
første gangs bruk
• Fjern antikalk kassetten (J) fra stativet ved å
trykke på utløserknappen (K). Skriv datoen
(dag, måned og år) på merkelappen på
kassetten. Sett kassetten tilbake i stativet
(fig. 2).
• Fyll vannbeholderen med vann (bruk en liten
mugge/flaske) opp til MAX merket (fig. 3).
• Koble til nettledningen (Q).
• Sett termostatknappen (A) til MAX (fig. 4).
• Sett dampkontrollknappen (B) til posisjon 4
(fig. 5).
2
Merkelapp
med stryke-
instruksjon
Fiber-
materiale
Termostat-
knapp
Damp-
kontroll
B
Syntetisk
f.eks.
acryl,
viscose,
polyamid,
(nylon)
polyester
Silke
MIN
|
|
1
|
|
|
|
2
|
||
3
MAX
C Ull
D Bomull
Lin
Z
Merk: Dette merket Z betyr må ikke strykes!
Superdamp Dynk
Tabell
X
F
F
T
T
T
1
2-4
4
5
CALC CLEAN
4
3
Ikke aktiver
Damputløser
(C).
3
.
X
A
M
4
3
2
N
A
E
L
C
F
L
E
S
N
A
E
L
C
F
L
E
S
4
3
3
N
A
E
L
C
F
L
E
S
Page 30

• Den lille
indikatorlampen (H) vil
begynne å lyse.
• Når indikatorlampen
slokker, trykk og hold
inne dampavtrekker
(C) under håndtaket
(fig. 6). Damp vil
begynne å komme ut
etter ca. 2 minutter.
• Stryk på et stykke tøy eller håndkle i 1-2
minutter, deretter kan De begynne strykingen.
• Les denne bruksanvisningen for å få
retningslinjer for bruk av temperatur og
dampinnstillinger.
Hvordan bruke gummimatten (N) og
hengekroken (O)
• Strykejernstativet
(vannbeholderen) er
utstyrt med en
gummimatte (N).
Denne gummimatten
kan lett tas av og
legges på
strykebrettet for å
kunne la strykejernet
hvile på denne under
strykingen (fig. 7).
• Sett aldri strykejernet
på plasttoppen av
stativet (fig. 8). For å
sette strykejernet på
stativet, bruk alltid den
medfølgende
gummimatten (fig. 9).
• Stativet kan henges
på metallstangen på
de fleste strykebrett.
For å henge stativet, trekk ut metallkroken (O)
(fig. 10). Før stativet henges opp, fjern
gummimatten og legg den på strykebrettet.
• Legg ikke gummimatten (N) på bord eller andre
flater som ikke er varmebestandige.
Påfylling av vann (for dampstryking og dynking)
• Fyll vannbeholderen
med vanlig vann fra
springen før første
gangs bruk.
• Hvis vannbeholderen
står plassert
horisontalt fyll vann til
MAX merket på siden
(fig. 11) eller i
påfyllingsåpningen
(fig. 12).
• Hvis vannbeholderen står plassert i vertikal
posisjon, fyll bare til MAX merket på siden
(fig. 13).
• Ved etterfylling kan De også bruke vann rett fra
springen. Hvis vannet er meget hardt (se
vannets hardhet).
• Trekk støpselet ut av stikkontakten før jernet
fylles. Ikke aktiver damputløser (C).
• Resterende vann kan helles ut før jernet settes
bort.
Temperaturinnstilling
• Undersøk alltid først merkelappen som er
festet på plagget som skal strykes om det står
noen instruks om stryking. (Se tabell).
I alle tilfelle følg disse strykeinstruksjonene.
• Hvis det ikke finnes noen instruks om stryking,
men De vet hva slags stoff det er, kan tabellen
være til hjelp.
• Tabellen omhandler kun grunnmateriale og
ikke eventuelle overflatebehandlinger. Tekstiler
som er overflatebehandlet (glanset, rynket etc.)
bør strykes på en noe lavere temperatur.
• Sorter først tøyet etter stryketemperaturen: ull
med ull, bomull med bomull etc.
• Jernet oppvarmes fortere enn det avkjøles.
Begynn med å stryke det som skal ha lavest
temperatur først, slik som syntetiske stoffer og
fortsett med høyere temperaturer etter hvert.
30
6
7
8
9
10
.
X
A
M
MAX.
11
12
13
Page 31

Dynking T
• De kan dynke tøyet ved alle stryketemperaturer
ved å trykke på dynkeknappen T (D) (fig. 15).
• Vannet til dynking kommer fra et lite internt
reservoir (P).
Dette reservoiret fylles med en elektrisk pumpe
i stativet.
• Forsikre Dem om at det er tilsrekkelig vann i
vannbeholderen.
• Når det interne reservoiret (P) er tomt etter mye
dynking, hold dampavtrekkeren ( C ) inne i ca.
ett minutt for å fylle det igjen. Påfyllingen er klar
når De ser/hører vann/damp komme ut av
dampåpningene i sålen.
• Påfylling av det interne reservoiret må gjøres
ved temperaturer mellom 2 og MAX. Det er
ikke mulig å gjøre denne påfyllingen på
temperaturer under 2 (fig. 16).
Dampstryking
• Som vist på termostatknappen (A) og tabellen
er dampstryking bare mulig ved høyere
temperaturer:
2 for moderat damp og
3 for maksimum damp.
• Philips Aquazur HI838, 835 har "Dryppstopp"
dampavstenging: Strykejernet vil automatisk
stoppe dampingen ved for lave temperaturer.
Dette for å hindre at det dannes dråper som
kan lage flekker på tekstilene. Når
dryppstoppen er aktivert kan De høre et "klikk".
Sett termostaten (A) til anbefalt posisjon og
dampingen vil igjen begynne så snart
tilstrekkelig temperatur er oppnådd.
• Forsikre Dem om at det er tilstrekkelig vann i
beholderen.
- Sett strykejernet på gummimatten på
vannbeholderen.
- Sett termostaten (A) til ønsket posisjon innenfor
dampområdet (2 til MAX).
- Sett støpselet i stikkontakten.
31
• Hvis stoffet inneholder forskjellige fibre, må De
alltid velge den laveste innstillingen for denne
kombinasjonen (f.eks. et plagg inneholder:
60 % polyester og 40 % bomull skal dette
strykes med temperaturen indikert for polyester
(1) og uten damp).
Hvis De ikke vet hva slags stoff(er) det er, finn
en liten bit som ikke er synlig og prøv hvilken
temperatur som er best. (Start alltid med en lav
temperatur og øk til de ønskede resultater
oppnås).
• Rene ullprodukter (100 % ull) kan strykes med
jernet i dampstilling. Det anbefales å sette
dampkontrollen til MAX posisjon og bruke et
tørt presseklede.
Ved dampstryking av ullprodukter, kan De
unngå å få blankt stoff hvis De damper på
vrangen.
• Fløyel og andre stoffer som lett blir blanke, bør
strykes kun i en retning (med hårene) med et
lett press. Hold jernet i bevegelse hele tiden.
• Stryk på vrangen av syntetiske materialer og
silke for å hindre blanke flekker. Bruk ikke
dynkeknappen for å hindre at det blir flekker.
Temperaturinnstilling
- Sett strykejernet på
gummimatten på
vannbeholderen.
- Sett termostatknappen
(A) til riktig stryketemperatur som vist i
strykeinstruksjonene
eller tabellen (fig. 14).
- Sett støpselet i
stikkontakten.
- Etter at den gule indikatorlampen (H) har
slokket og begynt å lyse igjen kan De begynne
strykingen.
• Den gule indikatorlampen vil begynne å lyse
med jevne mellomrom under strykingen.
• Hvis De setter termostatknappen til en lavere
innstilling etter å ha strøket med høyere
temperatur, begynn ikke strykingen igjen før
den gule indikatorlampen har begynt å lyse og
slokket igjen.
14
15
16
Page 32

- Etter at den gule
indikatorlampen (H)
først har slokket og
begynt å lyse igjen kan
De begynne
strykingen.
- Skyv dampkontrollen
(B) til ønsket posisjon
(fig. 17).
• Rett før vannbeholderen er tom vil det normalt komme ut
noe ekstra damp og litt mindre spruting. Dette
er et normalt fenomen relatert til den elektriske
pumpen.
Dampskudd 9
Ved å trykke på knappen
9 (F) vil en høy mengde
damp komme ut fra sålen
(fig. 18). Dette kan være
til hjelp ved å fjerne
gjenstridige rynker.
Dampskudd kan bare
brukes ved høy
stryketempertur (posisjon fra 2 til MAX) og med
5 sekunders intervaller.
Damping i vertikal posisjon
Dampskudd kan også brukes når jernet holdes i
vertikal posisjon (fig. 19). Dette kan være til hjelp
for å fjerne rynker fra
hengende klær,
gardiner etc.
Dampskudd kan bare
brukes ved høy
stryketemperatur
(posisjon fra 2 til
MAX) og med
5 sekunders intervaller.
Dette strykejernet er
ikke anvendelig til
kontinuerlig damping (utenom dampskudd i
vertikal posisjon).
Tørrstryking
For stryking uten damp, gjør som beskrevet
under dampstryking, likevel ikke aktiver
damputløser (C).
Kalkrensing eU
• Kalkrensing virker i samband med anti-kalk.
- Kalkrensing muliggjør rengjøring av
restpartikler (skitt, sand, etc) i dampkammeret.
• For beste resultat med Philips Aquazur er det
viktig å foreta kalkrensing regelmessig. Ved
normal bruk (2 timer per uke) bør kalkrensing
foretas hver måned. Ved hyppig bruk
(gjennomsnittlig 4 timer per uke) bør
kalkrensing foretas hver annen uke.
- Ta med Dem dampjernet og vanntanken til
vasken på kjøkkenet (fig. 20).
- Fyll vanntanken (L) med vann (omtrent halv
tank).
- Sett støpslet i stikkontakten.
- Sett temperaturkontrollen (A) til posisjon 'CALC
CLEAN' (fig. 21). Sett skyveknappen for damp
(B) til posisjon 3.
- Hvis nødvendig, bruk gummimatten til å hvile
dampjernet på kjøkkenvasken.
- Trykk på 'CALC CLEAN'-knappen eU (G)
(fig. 22).
- Vann vil nå komme ut støtvis fra hullene i
strykesålen. Urenheter og kalk (dersom dette
finnes) blir vasket ut samtidig.
- Beveg dampjernet forover og bakover mens
dette pågår (fig. 23).
-Løs ut Calc-clean-knappen eU (G) for å
stoppe kalkrensingprosessen. Gjenta
kalkrensingprosessen inntil vannbeholderen
(P) er tom.
32
17
4
3
N
CLEA
LC
CA
18
19
20
21
22
CALC CLEAN
23
Page 33

33
Vannstrømmen vil
opphøre.
- Varm opp dampjernet
igjen for å tørke opp
overflødig vann.
- Beveg dampjernet
over et (fortrinnsvis)
gammelt tøystykke
(fig. 24).
Dette gjøres for å
forsikre seg om at strykesålen vil være tørr under
oppbevaring.
- Trekk støpslet ut av stikkontakten og la
dampjernet kjøle seg ned før De setter det til
oppbevaring.
Antikalk kassett
Philips Aquazur har en antikalk kassett for
filtrering av vannet. Innholdet i antikalk kassetten
vil etter en tid bli mettet. Når dette skjer må
antikalk kassetten erstattes med en ny kassett.
Hvor ofte kassetten må byttes avhenger av
vannets hardhet og hvor mye jernet blir brukt.
Tabellen nedenfor gir generelle retningslinjer for
når kassetten bør byttes.
Vannets hardhet
I løpet av noen få sekunder kan De teste vannet i
springen selv. Bruk teststripen som følger med
denne bruksanvisningen.
1. Fyll et glass med vann fra springen.
2. Sett teststripen i vannet i 1-2 sekunder.
3. Ta ut teststripen og beveg den frem og tilbake
i ett minutt.
4. Les av resultatet nedenfor.
5. I tabellen "Vannets hardhet" kan De se hvor
ofte antikalk kassetten bør byttes med en ny.
Teststripen har fire grønnfargede firkanter. Etter
at stripen har vært i vann, kan en eller flere
firkanter bli rosa. Desto flere firkanter som blir
rosa, desto hardere er vannet (med andre ord
desto mer kalsiuminnhold i vannet).
Denne testen er det bare behov for å gjøre en
gang. Merk av testresultatene i tabellen for
senere bruk.
Tabell for vannets hardhet
Denne tabellen gir generelle retningslinjer for når kassetten bør byttes.
Vannets hardhet
Rosa farge på
firkantene til Lav Medium Hard Meget hard
teststripen 0-1 2 3 4
Normal bruk Ikke behov Bytte hver Bytte hver Bytte hver
(2 timer/uke) å bytte 12. mnd. 6. mnd. 4. mnd.
Intensiv bruk Ikke behov Bytte hver Bytte hver Bytte hver
(4 timer/uke) å bytte 6. mnd. 3. mnd. 2. mnd.
■ ■ ■ ■
■■■ ■
■■■■
■ ■ ■ ■
24
Page 34

34
Hvordan bytte kassett
-Kjøp en erstatningskassett (type HD 1900) fra
Deres forhandler eller nærmeste Philips
service senter.
- Trykk på utløserknappen (K) til kassetten og ta
den ut (fig. 25).
-Tøm ut vann fra vannbeholderen og
kassetthuset (fig. 26).
- Skriv dato på den nye kassetten og sett den
tilbake på plass i stativet.
- Fyll vannbeholderen med vann.
- Sett dampkontrollen til posisjon 4 og
termostatknappen til 3.
- Trykk på dampavtrekkeren i ett minutt. Den nye
kassetten er nå fylt med vann.
- De kan fortsette strykingen.
Rengjøring
-Før rengjøring trekk ut støpselet fra
stikkontakten og la strykejernet avkjøles
tilstrekkelig.
- Kalk og andre forurensninger kan fjernes med
en fuktig klut og noe ikke skurende (flytende)
vaskemiddel.
• Hold sålen glatt: Unngå hard kontakt med
metallgjenstander.
- Den øvre delen av apparatet kan rengjøres
med en fuktig klut.
- Rengjør av og til innsiden av vannbeholderen
ved å fylle den med vann og riste den. Hell
deretter vannet ut.
Oppbevaring
- Trekk støpselet ut av
stikkontakten.
- Hell ut eventuelt
resterende vann fra
vannbeholderen
(fig. 27).
- Sett dampkontrollen til
posisjon 4.
- Sett strykejernet på
gummimatten på
stativet og la det avkjøles tilstrekkelig før det
settes bort.
- Kontroller regelmessig om nettledningen er hel
og sikker.
Miljø
• Ikke kast apparatet
sammen med vanlig
husholdningaavfall
når produktets levetid
er over, men lever det
på et anvist
oppsamlingssted for
resirkulering. Ved å
gjøre dette, vil du
hjelpe til å verne
miljøet (fig. 28).
25
26
27
28
Page 35

35
Assistanse
Problem
Etter at apparatet er slått på for første
gang kommer det røyk fra strykejernet.
Jernet lager ikke damp og De hører
høyt bråk fra stativet.
Det er ikke vann til dynking.
Det er ikke dampskudd.
Mulig årsak
Dette er normalt. Noen av jernets
deler har fått et lag fett i fabrikken.
Vannivået er for lavt.
Antikalk kassetten er ikke satt riktig
på plass og/eller temperaturen er
mindre enn 2.
Det interne vannreservoiret (P) er
tomt.
Det interne vannreservoiret (P) er
tomt.
Mulig løsning
Ingen ting. Dette fenom vil
gi seg etter en kort stund.
Fyll vannbeholderen til
MAX merket. Sett antikalk
kassetten på plass ved å
trykke på den og/eller velg
en høyere temperatur med
termostatknappen (A).
Fyll vannbeholderen til
MAX merket. Sett
temperaturen til 3.
Trykk inn dampavtrekkeren
(C ) til damp kommer ut av
sålen.
Fyll vannbeholderen til
MAX merket. Sett
temperaturen til 3.
Trykk inn dampavtrekkeren
(C ) til damp kommer ut av
sålen.
Page 36

Viktigt
Läs instruktionerna noggrant innan du börjar använda strykjärnet och spara dem som referens.
• Innan du ansluter apparaten kontrollerar du att den spänning som anges på apparaten
överensstämmer med nätspänningen i ditt hem.
• Använd endast ett jordat vägguttag.
• Använd inte apparaten om stickkontakten, nätsladden, tillförselslangen eller apparaten själv
har synliga skador eller om apparaten har tappats eller läcker.
• Kontrollera nätsladden och tillförselslangen regelbundet för att se om de är skadade.
• Om nätsladden eller tillförselslangen är skadad måste den bytas ut av Philips, ett av Philips
auktoriserat serviceombud eller liknande kvalificerade personer för att undvika olycksrisk.
• Lämna aldrig apparaten obevakad när den är ansluten till elnätet.
• Sänk aldrig ner strykjärnet eller ångbehållaren i vatten.
• Förvara apparaten utom räckhåll för barn.
• Hållaren och stryksulan kan bli väldigt varma och kan orsaka brännskador vid beröring.
Vidrör inte hållaren när du ska flytta på ångbehållaren.
• Låt inte nätsladden eller tillförselslangen komma i kontakt med stryksulan när den är varm.
• När du är färdig med strykningen, när du gör ren strykjärnet, när du fyller på vatten och
också när du lämnar strykjärnet för en kort stund ska du vrida ångvredet till läge 0, ställa
järnet på sin häl och ta ut stickkontakten ur väggkontakten.
• Använd endast strykjärnet med det medföljande stället.
• Ställ alltid och använd strykjärnet och ångbehållaren på en stabil, jämn och horisontell yta.
Ställ inte ångbehållaren på den mjuka delen av strykbrädan.
• Häll inte parfym, vinäger, stärkelse, avkalkningsmedel, strykningshjälpmedel eller andra
kemikalier i vattentanken.
• Den här apparaten är endast avsedd för hushållsbruk.
Svenska
Ångstrykjärnets delar, fig 1
A Termostatratt (för inställning av rätt
stryktemperatur)
B Ångreglage (för inställning av ångmängden)
1 = minimal ånga
4 = maximal ånga
C Ångknapp (tryck)
D Sprayknapp T (tryck)
E Spraymunstycke
F Ångpuffknapp 9 (tryck)
G Kalkrengöring eU (tryck)
H Signallampa för temperatur
I "Soft touch" greppvänligt handtag
J Antikalk-kassett
K Lossningsknapp för kassetten (tryck)
L Vattentank (stativ för strykjärnet)
M Påfyllningsöppning
N Gummimatta/avställningsplatta
O Hängare
P Vattenbehållare
Q Nätsladd
R Försörjningskabel/slang
36F37
Page 37

När du skall använda Philips Aquazur HI838,
835 för första gången
• Innan du tar strykjärnet i bruk, avlägsna
eventuella skyddsfolier och etiketter på
stryksulan. Torka ren stryksulan med en mjuk
trasa.
• Tag loss antikalk-kassetten (J) från stativet
genom att trycka på lossningsknappen (K).
Skriv datum (år/månad/dag) på kassettens
etikett. Sätt tillbaka kassetten i stativet, fig 2.
• Fyll vattentanken med vatten (använd en
tillbringare eller flaska) upp till MAXmarkeringen, fig 4.
• Sätt nätsladdens stickpropp (Q) i vägguttaget.
• Vrid termostatratten (A) till MAX, fig 4.
• Skjut ångreglaget (B) till läge 4, fig 5.
2
Tvätt/
strykråd
Material Termostat-
rattens läge
Ångstrykning
B
Syntet
t ex:
acetat, akryl,
viskos (rayon)
polyamid
(nylon),
polyester
Siden
MIN
|
|
1
|
|
|
|
2
|
||
3
MAX
C Ylle
D
Bomull
Linne
Z
Observera denna märkning Z betyder att:
Detta plagg skall inte strykas.
Ångpuff Ångstråle
Tabell
X
F
F
T
T
T
1
2-4
4
5
CALC CLEAN
4
3
Tryck inte in
ångknappen
(C).
3
.
X
A
M
4
3
2
N
A
E
L
C
F
L
E
S
N
A
E
L
C
F
L
E
S
4
3
N
A
E
L
C
F
L
E
S
3
Page 38

• Signallampan för
temperatur (H) tänds.
• När signallampan
slocknar trycker du in
ångknappen (C) under
handtaget och håller
den intryckt, fig 6.
Ånga kommer efter
cirka två minuter.
• Provstryk med ånga i
ett par minuter på en tygbit du inte är så rädd
om. Sedan kan du börja stryka klädesplaggen.
• Läs vidare i bruksanvisningen för
inställning av temperatur och ånga.
Så här använder du gummimattan/
avställningsplattan (N) och hängaren (O)
• Stativet med
vattentanken är
försedd med en
gummimatta (N) som
kan tas loss och
läggas på strykbrädan
för att du enkelt skall
kunna ställa ifrån dig
strykjärnet under
strykningen, fig 7.
• Ställ aldrig det varma
strykjärnet på stativets
överdel som är av
plast, fig 8. Lägg alltid
gummimattan på
stativet innan du
ställer strykjärnet på
stativet, fig 9.
• Stativet kan hängas
upp på det metallgaller
som finns på flertalet
strykbrädor i handeln. Drag ut metallhängaren
(O), fig 10. Tag bort gummimattan och lägg
den på strykbrädan innan du hänger stativet på
strykbrädans metallgaller, så att du enkelt och
bekvämt kan ställa ifrån dig strykjärnet.
• Lägg aldrig gummimattan (N) på ett bord eller
någon annan yta som inte är värmetålig.
Påfyllning av vatten för ångstrykning och
spray
• Innan du använder
strykjärnet skall
vattentanken fyllas
med vanligt
kranvatten.
• Om vattentanken står i
horisontalläge skall du
fylla med vatten upp till
MAX-nivån markerat
på sidan, fig 11, eller i
påfyllningsöppningen, fig 12.
• Om vattentanken är i vertikalläge skall du
endast fylla med vatten upp till markeringen
MAX på sidan, fig 13.
• Du kan även i fortsättningen fylla med vanligt
kranvatten, men läs mer om vattenkvaliteten
under rubriken "Vattnets hårdhet".
• Drag ut stickproppen ur vägguttaget innan du
börjar fylla vattentanken. Tryck inte
ångknappen (C).
• Häll ut kvarvarande vatten ur vattentanken när
du slutat stryka.
Stryktemperaturen
• Se efter om det finns tvätt- och strykråd i det
plagg du skall stryka. Se tabell.
Följ alltid dessa råd.
• Finns det inga instruktioner i plagget, men du
vet vilken slags textil det är frågan om, kan du
ställa in rätt temperatur med hjälp av tabellen
nedan.
• Tabellen gäller för vanliga tyger utan speciell
ytstruktur. Tyger med exempelvis plissering
eller appretur bör i allmänhet strykas med lägre
temperatur.
• Sortera plaggen med avseende på
stryktemperatur innan du börjar stryka: ylle med
ylle, bomull med bomull och så vidare.
• Strykjärnet värms upp fortare än det svalnar.
Börja därför med att stryka de plagg som
kräver den lägsta temperaturen och övergå
sedan till högre och högre temperatur.
38
6
7
8
9
10
.
X
A
M
11
12
13
MAX.
Page 39

Spray T
• Du kan spraya vid vilken inställd temperatur
som helst. Tryck på sprayknappen T (D), fig 15.
• Vattnet för sprayning kommer från den lilla
vattenbehållaren (P). Den får vatten med hjälp
av en elektrisk pump i stativet.
• Det måste finnas tillräckligt med vatten i
behållaren för att man skall kunna spraya.
• När vattenbehållaren (P) är tom, exempelvis då
du använt mycket spray, fyller du den genom
att trycka in ångknappen (C) i cirka en minut.
Återfyllningen är klar när du ser/hör ånga
komma ut ur ånghålen i stryksulan.
• Fyllning och återfyllning av vattenbehållaren
kan endast ske då termostatratten står mellan
markeringarna 2 och MAX. Det går inte att
fylla behållaren om termostatratten står i ett
läge lägre än 2, fig 16.
Ångstrykning
• Av märkningen på termostatratten (A) samt av
tabellen framgår det att ångstrykning endast
är möjlig om temperaturen är tillräcklig hög:
2 för normal ånga.
3 maximal ånga.
• Med ett vanligt ångstrykjärn kan vatten läcka ut
från stryksulan om den inte är tillräckligt varm.
Detta kan förorsaka fläckar.
Ditt nya Philips strykjärn Aquazur HI838, 835
har en finess "Dropp stopp". Droppstoppet
fungerar på så sätt att om temperaturen blir för
låg på stryksulan så upphör ångtillförseln. När
detta inträffar kan du höra ett "klick" i
strykjärnet. Vrid upp termostatratten (A) till
rekommenderat läge. Ångstrykningen kan
fortsätta så snart rätt temperatur uppnåtts.
• Kontrollera att det finns tillräckligt med vatten i
vattentanken.
-Ställ strykjärnet på gummimattan.
-Ställ termostatratten (A) i rätt läge inom
ångsektorn, alltså mellan 2 och MAX.
-Sätt stickproppen i vägguttaget.
39
•Är plagget gjort av ett tyg, som består av flera
olika sorters fibrer, t ex bomull och polyester,
så kallade blandtyger, måste alltid
temperaturen ställas in för det material som
kräver lägst temperatur. I nämnda exempel
väljer man alltså temperaturen för polyester 1
och ingen ånga.
Om du inte vet av vilket material tyget består,
måste du prova dig fram. Sök ett dolt ställe i
plagget och prova först med låg temperatur och
sedan med högre och högre tills du hittar den
bästa.
• Helylletyger (100% ull) kan vanligen strykas
med strykjärnet i ångläge.
Välj maximal ånga och torr pressduk.
När man ångstryker ylletyger kan de bli blanka.
Det kan undvikas om man vänder ut och in på
plagget och stryker på avigsidan.
• Sammet och andra tyger som har lätt för att få
blanka fläckar skall strykas i en och samma
riktning, med luggen och med lätt tryck.
Strykjärnet måste alltid hållas i rörelse.
• Siden och syntetmaterial har också lätt för att
bli blanka och skall strykas på tygets avigsida.
För att undvika fläckar bör du inte använda
spray på silke och andra ömtåliga tyger.
Inställning av stryktemperaturen
-Ställ strykjärnet på
gummimattan.
- Vrid termostatratten
(A) till rätt läge enligt
tvätt- och strykråden i
plaggen eller enligt
tabellen, fig 14.
-Sätt stickproppen i
vägguttaget.
-När den
bärnstensfärgade signallampan (H) för
temperatur slocknat och åter tänts kan du börja
stryka.
• Medan du stryker kommer den
bärnstensfärgade signallampan att upprepade
gånger tändas och släckas, vilket är normalt.
• Om du ställer termostatratten till en lägre
temperatur, när en högre varit inställd, måste
du vänta tills den bärnstensfärgade
signallampan först tänts och sedan slocknat
igen.
15
16
14
Page 40

-Vänta tills den
bärnstensfärgade
signallampan (H) för
temperatur slocknat
och åter tänts. Nu kan
du starta strykningen.
- Skjut ångreglaget (B) i
önskat läge, fig 17.
• Precis innan
vattentanken är helt
tömd blir det oftast en ångstöt och kanske
också lite vattenstänk. Det är en normal
företeelse som hänför sig till den elektriska
pumpen.
Ångpuff 9
Genom att trycka på
knappen ångpuff 9 (E)
kommer en kraftig
ångpuff genom
stryksulan, fig 18.
Detta är mycket effektivt
när man vill avlägsna
svåra skrynklor.
Ångpuffen kan endast
användas vid hög
temperatur då
termostatratten står mellan 2 och MAX och inte
längre tid än fem sekunder.
Strykning i vertikalt läge
"Ångpuff" kan också
åstadkommas när man
håller strykjärnet i
vertikalt läge, fig 19.
Detta är till exempel
användbart för att
avlägsna skrynklor på
hängande kläder eller
gardiner.
Ångpuffen kan endast
användas vid hög temperatur då termostatratten
står mellan 2 och MAX och inte längre tid än
fem sekunder.
Strykjärnet kan inte användas för strykning
(förutom ångpuff) i vertikalt läge.
Stryking uten damp, se ångstryking, emellertid
tryck inte ångknappen (C).
Kalkrengöring eU
• Kalkrengöring sker i samband med avkalkning
- Vid kalkrengöringen avlägsnar man
föroreningar som fastnat på insidan av
ångvattenbehållaren (smuts, sand m.m.)
• För att Philips Aquazur ska fungera på bästa
sätt är det viktigt att avkalka den regelbundet.
Vid normal användning (2 timmar per vecka)
ska den avkalkas en gång i månaden. Om den
används mer än så (i genomsnitt 4 timmar per
vecka), ska den avkalkas varannan vecka.
- Ta strykjärnet och vattentanken till disksbänken
(figur 20).
- Fyll vattentanken (L) med vatten (ungefär halva
tanken).
-Sätt in stickkontaken i eluttaget.
-Ställ termostatratten (A) i läget 'CACL CLEAN'
(figur 21). Ställ ångreglaget (B) i läge 3.
-Ställ strykjärnet på sin gummimatta på
diskbänken om det behövs.
- Tryck på knappen 'CALC CLEAN' eU (G)
(figur 22).
- Vatten rinner nu ut genom hålen i strykjärnets
sula. Smuts och avlagringar (som eventuellt
finns där) sköljs ut med vattnet.
-Rör järnet fram och tillbaka under tiden (figur
23).
-Släpp upp knappen för kalkrengöring eU (G)
för att avsluta rengöringen. Upprepa processen
tills vattentanken (P) är tom.
Vattnet i tanken har pyst ut.överblivet vatten
försvinner.
-Värm upp järnet igen för att torka ut
återstående vatten.
40
17
4
3
N
LEA
C
CALC
18
19
20
21
22
CALC CLEAN
23
Page 41

41
- Stryk med järnet över
ett tygstycke som du
inte är rädd om (figur
24.)
Det gör du för att järnets
sula ska vara helt torr
när järnet förvaras.
- Ta ut stickkontakten
och låt järnet svalna
innan du ställer undan
det.
Antikalk-kassett
Philips Aquazur är försedd med en engångs
antikalk-kassett som filtrerar vattnet. Kassettens
antikalk-del blir efter en tid ineffektiv, beroende på
vattnets hårdhet och hur ofta du använder
strykjärnet.
Tabellen här intill ger en allmän hänvisning om
när du bör byta ut kassetten.
Vattnets hårdhet
På några sekunder kan du med hjälp av
provremsan som är bifogad bruksanvisningen få
svar på hur hårt ditt vatten har.
1. Häll upp ett glas vatten.
2. Håll provremsan i vattnet under en till två
sekunder.
3. Tag upp provremsan och rör den lite i ungefär
en minut.
4. Läs av resultatet här nedan.
5. I tabellen över vattnets hårdhet kan du se när
antikalk-kassetten bör bytas till en ny.
Testremsan har fyra gröna fyrkanter. När remsan
doppas i vatten kommer en eller flera av
fyrkanterna att färgas rosa. Ju fler fyrkanter som
färgas rosa desto hårdare är vattnet (det innebär
att vattnet innehåller mer kalcium). Denna test
behöver endast göras en gång (under
förutsättning att du inte använder strykjärnet på
mer än en ort) notera resultatet i tabellen för
framtida referens.
Tabell vattnets hårdhet
Denna tabell är en allmän guide över när du bör byta antikalk-kassetten.
Vattnets hårdhet
antal rosa rutor mjukt normalt hårt mycket hårt
på remsan 0 - 1 2 2 4
normal strykning behöver ej byt var byt var byt var
(2 timmar/vecka) bytas 12 månad 6 månad 4 månad
intensiv strykning behöver ej byt var byt var byt var
(4 timmar/vecka) bytas 6 månad 3 månad 2 månad
■ ■ ■ ■
■■■ ■
■■■■
■ ■ ■ ■
24
Page 42

42
Så här byter du kassett
-Köp en kassett (typ HD 1900) hos din handlare
eller från ett av Philips serviceombud.
- Tryck på kassettens lossningsknapp (K) och
tag ut kassetten, fig 25.
-Töm ut vattnet från vattentanken och
kassetthuset, fig 26.
- Skriv upp datum på den nya kassetten och sätt
in den i stativet.
- Fyll vattentanken med vatten.
-Ställ ångreglaget i läge 4 och termostatratten
till 3.
- Tryck på ångknappen i ungefär en minut. Den
nya kassetten är nu fylld med vatten.
- Du kan fortsätta att stryka.
Rengöring
- Drag först ut stickproppen ur vägguttaget och
låt strykjärnet kallna.
- Beläggningar på stryksulan kan i allmänhet
avlägsnas med en trasa fuktad med vatten och
något diskmedel som inte repar.
• Håll stryksulan slät. Skrapa aldrig med
hårda metallföremål såsom verktyg eller
knivar.
- Strykjärnets överdel kan torkas av med en
fuktig och väl urvriden trasa.
- Emellanåt bör vattentanken sköljas ur. Fyll den
med vatten, skaka strykjärnet och häll därefter
ut vattnet.
Förvaring
- Dra ut stickproppen ur
vägguttaget.
-Häll ut eventuellt
kvarvarande vatten ur
vattentanken, fig 27.
- Skjut ångreglaget i
läge 4.
-Ställ sedan strykjärnet
på gummimattan i
stativet och låt det
kallna innan du ställer undan det till förvaring.
- Kontrollera regelbundet att nätsladden inte är
sliten.
Miljö
• När apparatens
livslängd är slut ska
du inte slänga den
med de vanliga
hushållssoporna utan
lämna in den på en
offentlig
återvinningsstation.
Om du gör det hjälper
du till att skydda miljön
fig 28.
25
26
27
28
Page 43

43
Felsökningsguide
Om detta inträffar
När strykjärnet kopplas på för första
gången kommer det rök från järnet.
Strykjärnet ger ingen ånga och du hör
ett kraftigt brus från stativet.
Det går inte att spraya.
Det blir ingen ångpuff.
Trolig orsak
Detta är normalt och ofarligt. Vissa
delar är lätt insmorda från fabriken.
Vattennivån är för låg, antikalkkassetten sitter inte rätt och/eller
temperaturen är lägre än 2.
Vattenbehållaren (P) är tom.
Vattenbehållaren (P) är tom.
Åtgärd
Ingen alls. Efter en stund
upphör röken.
Fyll vattentanken till
indikeringen MAX, tryck in
antikalk-kassetten
ordentligt och/eller välj
högre temperatur med
termostatratten (A).
Fyll vattentanken till
indikeringen MAX, vrid
termostatratten till 3
och tryck in ångknappen
(C) tills det kommer ut
ånga i stryksulan.
Fyll vattentanken till
indikeringen MAX, vrid
termostatratten till 3
och tryck in ångknappen
(C) tills det kommer ut
ånga i stryksulan.
Page 44

Tärkeää
Lue nämä ohjeet huolellisesti, ennen kuin alat käyttää laitetta. Säästä käyttöohje vastaisen varalle.
• Tarkasta, että laitteen arvokilven jännitemerkintä vastaa paikallista verkkojännitettä, ennen
kuin liität laitteen pistorasiaan.
• Liitä laite mielellään maadoitettuun pistorasiaan.
•Älä käytä laitetta, jos sen pistotulpassa, liitosjohdossa, höyryletkussa tai itse laitteessa on
näkyviä vaurioita tai jos laite on vaurioitunut pudotessaan tai se vuotaa.
• Tarkasta liitosjohdon ja höyryletkun kunto säännöllisesti.
• Jos verkkoliitosjohto tai höyryletku on vaurioitunut, se on vaaratilanteiden välttämiseksi
vaihdatettava Philips Kodinkoneiden valtuuttamassa huoltoliikkeessä tai muuten
ammattitaitoisella henkilöllä.
• Laitetta ei saa koskaan jättää ilman valvontaa silloin kun se on liitetty sähköverkkoon.
•Älä upota höyryrautaa tai höyrysäiliötä veteen. Jos laite on pudonnut veteen, irrota ensin
pistotulppa pistorasiasta, ennen kuin nostat laitteen vedestä. Tarkastuta veteen pudonnut
laite huollossa ennen käyttöönottoa.
• Pidä laite poissa lasten ulottuvilta.
• Laskualusta ja höyryraudan pohja tulevat hyvin kuumiksi ja voivat koskettaessa aiheuttaa
palovamman. Jos haluat siirtää höyrysäiliötä, älä koske laskualustaan.
• Pidä huoli, ettei höyryraudan kuuma pohja kosketa liitosjohtoa tai höyryletkua.
• Aseta höyrynvalitsin asentoon O, aseta höyryrauta pystyasentoon ja irrota pistotulppa
pistorasiasta aina, kun lopetat silittämisen, kun puhdistat laitetta, kun täytät tai tyhjennät
vesisäiliötä tai kun hetkeksikin poistut höyryraudan luota.
• Käytä höyryrautaa vain sen mukana toimitetun laskualustan kanssa.
• Aseta höyryrauta ja höyrysäiliö aina tukevalle, tasaiselle ja vaakasuoralle pinnalle ja käytä
tukevaa, tasaista ja vaakasuoraa alustaa silittäessäsi. Älä aseta höyrysäiliötä silityslaudan
pehmeän osan päälle.
•Älä laita vesisäiliöön hajusteita, etikkaa, kalkinpoistoaineita tai muitakaan kemikaaleja.
• Tämä laite on tarkoitettu vain kotikäyttöön.
Suomi
Laitteen osat (kuva 1)
A Lämpötilanvalitsin (käännettävä)
B Höyrynvalitsin (liukukytkin)
1 = vähiten höyryä
4 = eniten höyryä
C Höyrysalpa (painettava)
D Suihkutuspainike T (painettava)
E Suihkutussuutin
F Höyrysuihkauspainike 9 (painettava)
G Calc-cleaning-järjestelmä eU
(painettava)
H Lämpötilan merkkivalo
I Pehmeä kädensija
J Kalkinpoistokasetti
K Kasetinirrotuspainike (painettava)
L Vesisäiliö (höyryraudan teline)
M Täyttöaukko
N Kumimatto
O Ripustin
P Sisäsäiliö
Q Liitosjohto
R Välijohto ja vesiletku
44
Page 45

Älä käytä
höyryhappacia
(C)
.
F
45
Käyttöönotto
• Poista kalkinpoistokasetti (J) telineestä
painamalla irrotuspainiketta (K). Kirjoita
päivämäärä (vuosi/kuukausi/päivä) kasetin
tarraan. Työnnä kasetti takaisin telineeseen
(kuva 2).
• Täytä vesisäiliö vedellä (käytä apuna kannua
tai pulloa) MAX-merkkiin asti (kuva 3).
• Yhdistä liitosjohto (Q).
• Aseta lämpötilanvalitsin (A) asentoon MAX
(kuva 4).
• Aseta höyrynvalitsin (B) asentoon 3 (kuva 5).
2
Silitys-
ohje
Tekstiili Lämpötilan-
valitsin
Höyryn-
valitsin
B
Tekokuidut,
esim. akryyli,
asetaatti,
polyamidi
(nailon),
polyesteri,
viskoosi.
Silkki
MIN
|
|
1
|
|
|
|
2
|
||
3
MAX
C Villa
D Puuvilla
Pellava
Z
Huom. Merkki Z tarkoittaa:
“Tätä vaatetta ei voi silittää!”
Höyry-
suihkaus
Suihkutus
Taulukko
X
F
F
T
T
T
1
2-4
4
5
CALC CLEAN
4
3
3
.
X
A
M
4
3
2
N
A
E
L
C
F
L
E
S
4
3
N
A
E
L
C
F
L
E
S
3
N
A
E
L
C
F
L
E
S
Page 46

• Merkkivalo (H) syttyy.
• Kun merkkivalo on
sammunut, purista
jatkuvasti kädensijan
alla olevaa
höyrysalpaa (C)
(kuva 6). Höyryä alkaa
tulla noin 2 minuutissa.
• Silitä höyryn kanssa
ensin jotain kankaan
palaa 1 tai 2 minuuttia. Sen jälkeen voi alkaa
silittää vaatteita.
• Lue tästä käyttöohjeesta tarkemmat ohjeet
lämpötiloista ja höyryasetuksista.
Kumimaton (N) ja ripustimen (O) käyttö
• Höyryraudan
telineeseen
(vesisäiliö) kuuluu
kumimatto (N).
Kumimatto voidaan
irrottaa ja asettaa
silityslaudalle, johon
höyryrauta on helppo
asettaa silityksen
aikana (kuva 7).
•Älä koskaan laita
kuumaa rautaa
telineen muovipinnalle
(kuva 8)! Laita
kumimatto aina
telineeseen, ennen
kuin asetat raudan
sen päälle (kuva 9).
• Teline voidaan myös
ripustaa useimmissa
silityslaudoissa
olevaan
metallitelineeseen.
Jos haluat ripustaa telineen, vedä metallinen
ripustin (O) esiin (kuva 10). Irrota kumimatto ja
aseta se silityslaudalle ennen telineen
ripustamista.
•Älä laita kumimattoa (N) pöydälle tai muulle
alustalle, joka ei kestä kuumaa.
Vesisäiliön täyttö (höyrysilitystä ja
suihkutusta varten)
• Täytä vesisäiliö
vesijohtovedellä ennen
ensimmäistä
käyttökertaa.
• Jos vesisäiliö on
vaaka-asennossa,
täytä sivussa (kuva 11)
tai täyttöaukossa
(kuva 12) näkyvään
MAX-merkkiin asti.
• Jos vesisäiliö on pystyasennossa, täytä vain
sivussa näkyvään MAX-merkkiin asti (kuva 13).
• Voit käyttää vesijohtovettä myös uudelleen
täyttämiseen. (Katso: Veden kovuus.)
• Irrota pistotulppa pistorasiasta ennen
vesisäiliön täyttämistä.
Älä käytä höyryhappacia (C).
• Voit tyhjentää vesisäiliön ennen säilytykseen
laittamista.
Silityslämpötila
• Tarkista aina ensin, onko silitettävässä
vaatekappaleessa silitysohjetta. (Katso
taulukkoa.)
Noudata aina tätä silitysohjetta.
• Jos silitysohjetta ei ole, mutta tunnet tekstiilin
laadun, katso silloin taulukosta.
• Taulukko koskee varsinaista
valmistusmateriaalia eikä mahdollisesti
käytettyä pintakäsittelyä, kiiltoa yms.
Materiaalit, joihin on käytetty jotain
pintakäsittelyä (kiiltoa, rypistystä,
kohokuviointia yms.), on paras silittää käyttäen
hieman alempaa lämpötilaa.
• Lajittele vaatteet ensin silityslämpötilan
mukaan: villaiset yhteen, puuvillaiset yhteen
jne.
• Höyryrauta kuumenee nopeammin kuin se
jäähtyy. Silittäminen kannattaa sen tähden
aloittaa alinta lämpötilaa vaativista vaatteista,
esim. tekokuituisista.
46
6
7
8
9
10
.
X
A
M
11
12
13
MAX.
Page 47

Suihkutus T
• Voit käyttää suihkutusta kaikissa lämpötiloissa
painamalla suihkutuspainiketta T (D) (kuva 15).
• Suihkutusvesi tulee pienestä sisäsäiliöstä (P).
Vesi tulee telineessä olevan pienen
sähköpumpun avulla.
• Pidä huoli, että säiliössä on tarpeeksi vettä.
• Kun sisäsäiliö (P) on tyhjä runsaan
suihkutuksen jälkeen, täytä se puristamalla
höyrysalpaa (C) noin yhden minuutin ajan.
Säiliö on täynnä, kun höyryä alkaa tulla raudan
pohjassa olevista aukoista.
• Sisäsäiliön voi täyttää vain lämpötilanvalitsimen
asentojen 2 ja MAX välillä. Sitä ei voi täyttää
lämpötila-asetuksen 2 alapuolella (kuva 16).
Höyrysilitys
• Lämpötilanvalitsimen (A) merkeistä ja
taulukosta näkyy, että höyrysilitys on
mahdollista vain korkeammissa lämpötiloissa:
2 normaali höyry
3 maksimi höyry.
• Philips Aquasur HI838, 835 -höyryraudassa on
"Drip Stop"-järjestelmä: Höyryn tulo katkeaa
automaattisesti, jos lämpötila on liian matala,
ettei muodostuvista pisaroista jää läikkiä
vaatteisiin. Kun näin tapahtuu, kuulet
"napsahduksen". Aseta lämpötilanvalitsin (A)
suositeltuun asentoon. Höyryä alkaa tulla, heti
kun sopiva lämpötila on saavutettu.
• Vesisäiliössä tulee olla riittävästi vettä.
- Aseta höyryrauta kumimatolle vesisäiliön
päälle.
- Aseta lämpötilanvalitsin (A) "höyryalueella"
haluamaasi asentoon (2 - MAX).
-Työnnä pistotulppa pistorasiaan.
47
• Jos vaatteissa on käytetty erilaisia materiaaleja,
on lämpötila valittava alinta lämpötilaa vaativan
materiaalin mukaan.
(Esim. vaate, joka sisältää "60 % polyesteriä ja
40 % puuvillaa", on silitettävä polyesterin
lämpötilan mukaan (1) ja ilman höyryä.)
Ellet tunne vaatekappaleen materiaalia, kokeile
silitystä varovasti jostain sellaisesta kohdasta,
joka ei näy. (Aloita matalasta lämpötilasta.)
• Villavaatteet (100 % villaa) voidaan silittää
höyryasennolla. Valitse mieluiten korkein
höyryasento ja käytä kuivaa silitysliinaa.
Villa alkaa silitettäessä helposti kiiltää. Vaate
kannattaa kääntää nurinpäin ja silittää nurjalta
puolelta.
• Sametti ja muut helposti kiiltävät materiaalit
kannattaa silittää vain yhteen suuntaan ja vain
kevyesti painaen.
Pidä höyryrauta koko ajan liikkeessä.
• Silitä tekokuidut ja silkki nurjalta puolelta,
etteivät ne ala kiiltää. Älä käytä suihkutusta,
ettei niihin jää läikkiä.
Lämpötilan valinta
- Aseta höyryrauta
kumimaton päälle
telineeseen.
- Aseta
lämpötilanvalitsin (A)
oikeaan asentoon
silitysohjeen tai
taulukon mukaan
(kuva 14.)
-Työnnä pistotulppa
pistorasiaan.
- Voit aloittaa silittämisen, kun keltainen
merkkivalo (H) on sammunut ja syttynyt
uudelleen.
• Keltainen merkkivalo (H) syttyy ja sammuu aina
välillä silittämisen aikana.
• Jos asetat valitsimen alemmalle lämpötilalle
silitettyäsi ensin korkeammalla lämpötilalla, älä
ala silittää ennen kuin keltainen merkkivalo (H)
on syttynyt ja sammunut uudelleen.
14
15
16
Page 48

- Voit aloittaa
silittämisen, kun
keltainen merkkivalo
(H) on ensin
sammunut ja syttynyt
uudelleen.
- Aseta höyrynvalitsin
(B) haluamaasi
asentoon (kuva 17).
• Juuri ennen kuin
vesisäiliö tyhjenee, höyryraudasta voi
purskahtaa höyryä ja roiskeita. Tämä on
normaalia ja johtuu sähköpumpusta.
Höyrysuihkaus 9
Kun painat painiketta 9
(F), höyryraudan
pohjasta tulee runsaasti
höyryä (kuva 18).
Tätä voidaan käyttää
poistamaan itsepäiset
laskokset.
Höyrysuihkausta
voidaan käyttää vain
silitettäessä korkealla
lämpötilalla (asennot 2
- MAX) ja 5 sekunnin välein.
Höyryttäminen pystyasennossa
Höyrysuihkausta voi
käyttää myös raudan
ollessa pystyasennossa
(kuva 19). Tällä tavalla
voidaan suoristaa esim.
verhoja.
Höyrysuihkausta
voidaan käyttää vain
silitettäessä korkealla
lämpötilalla (asennot 2
- MAX) ja 5 sekunnin
välein.
Tämä höyryrauta ei sovellu jatkuvaan
höyryttämiseen (ei koske höyrysuihkausta)
pystyasennossa.
Silittäminen ilman höyryä
Silittäminen ilman höyryä tapahtuu muuten samalla
tavalla kuin höyrysilitys, mutta älä käytä
höyryhappacia (C).
Calc-cleaning-järjestelmä eU
• Calc-cleaning-järjestelmä toimii anti-calckasetin kanssa.
- Calc cleaning puhdistaa höyrykammion
hiukkasjäämistä (pöly, hiekka yms.).
• On tärkeää käyttää calc-cleaning-järjestelmää
säännöllisesti, jotta Philips Aquazur :n toimii
moitteettomasti. Normaalissa käytössä
(silitysaika 2 tuntia viikossa), calc-cleaningpuhdistus tulisi tehdä kerran kuukaudessa. Jos
höyryrautaa käytetään enemmän (keskimäärin
4 tuntia viikossa), puhdistus tulisi tehdä kahden
viikon välein.
- Nosta höyryrauta ja vesisäiliö tiskipöydälle
(kuva 20).
- Kaada vesisäiliöön (L) vettä (noin puolilleen).
-Työnnä pistotulppa pistorasiaan.
- Aseta lämpötilanvalitsin (A) asentoon 'CALC
CLEAN' (kuva 21). Aseta höyrynvalitsin (B)
asentoon 4.
- Aseta höyryrauta tiskipöydälle tarvittaessa
kumimaton päälle.
- Paina 'CALC CLEAN'-painiketta eU (G)
(kuva 22).
- Vettä alkaa nyt tulla pohjan rei'istä.
Epäpuhtaudet ja kalkki (jos sitä on)
huuhtoutuvat pois.
- Liikuta höyryrautaa samaan aikaan
edestakaisin (kuva 23).
- Vapauta Calc-clean-painike eU (G), kun
lopetat puhdistuksen. Toista toimenpide niin
monta kertaa, kunnes vesisäiliö (P) on tyhjä.
48
17
AN
LE
ALC C
C
4
3
20
21
18
19
22
CALC CLEAN
23
Page 49

49
Veden tulo lakkaa.
- Kuumenna höyryrauta
uudelleen, niin että se
kuivuu.
- Liikuta höyryrautaa
(mielellään) vanhan
kangaspalan päällä
(kuva 24).
Näin varmistetaan, että
pohja on säilytyksen
aikana kuiva.
- Irrota liitosjohto pistorasiasta ja anna
höyryraudan jäähtyä ennen säilytykseen
laittamista.
Kalkinpoistokasetti
Philips Aquazur -höyryraudassa on veden
suodattamiseen kertakäyttöinen
kalkinpoistokasetti. Kasetin kalkinpoistoteho
laskee aikaa myöten. Tällöin kasetti on
vaihdettava uuteen. Vaihtotiheys riippuu veden
kovuudesta ja raudan käytöstä. Alla oleva
taulukosta näkyy, miten usein kasetti keskimäärin
tulisi vaihtaa.
Veden kovuus
Voit itse muutamassa sekunnissa tarkistaa
vesijohtoveden kovuuden käyttämällä tämän
käyttöohjeen mukana olevaa testiliuskaa.
1. Ota lasiin vesijohtovettä.
2. Laita testiliuska veteen 1 tai 2 sekunniksi.
3. Ota liuska ylös ja heiluttele sitä noin 1
minuutti.
4. Katso tulos alla olevasta luettelosta.
5. Vedenkovuustaulukosta näet miten usein
kalkinpoistokasetti tulisi vaihtaa.
Testiliuskassa on neljä vihreää neliötä. Kun liuska
laitetaan veteen, yksi tai useampi neliö muuttuu
vaaleanpunaiseksi. Mitä useampi neliö muuttuu
vaaleanpunaiseksi, sitä kovempaa vesi on (eli
sitä enemmän vedessä on kalkkia). Tämä koe
tarvitsee tehdä vain kerran. Merkitse tulos
taulukkoon vastaisen varalle.
Vedenkovuustaulukko
Tämä taulukko antaa yleisohjeen siitä, miten usein kalkinpoistosuodatin tulisi vaihtaa.
Veden kovuus
testiliuskassa
vaaleanpunaisia pehmeä keskikova kova hyvin kova
neliöitä 0-1 2 3 4
normaalikäyttö ei tarvitse vaihda 12 vaihda 6 vaihda 4
(2 h/vko) vaihtaa kuukauden välein kuukauden välein kuukauden välein
runsas käyttö ei tarvitse vaihda 6 vaihda 3 vaihda 2
(4 h/vko) vaihtaa kuukauden välein kuukauden välein kuukauden välein
■ ■ ■ ■
■■■ ■
■■■■
■ ■ ■ ■
24
Page 50

50
Kasetin vaihto
- Hanki varakasetti (tuotenumero HD 1900)
Philips-myyjältä tai Philips Kodinkoneiden
valtuuttamasta huoltoliikkeestä.
- Paina kasetinirrotuspainiketta (K) ja ota vanha
kasetti pois (kuva 25).
- Kaada vesi pois vesisäiliöstä ja kasetista
(kuva 26).
- Merkitse päivämäärä uuteen kasettiin ja työnnä
se paikalleen telineeseen.
-Täytä vesisäiliö vedellä.
- Aseta höyrynvalitsin asentoon 4 ja
lämpötilanvalitsin asentoon 3.
- Paina höyrysalpaa noin yhden minuutin ajan.
Uusi kasetti on nyt täynnä vettä.
- Voit aloittaa silittämisen.
Puhdistus
- Irrota pistotulppa pistorasiasta ja anna
höyryraudan jäähtyä ennen puhdistusta.
- Pohjaan tarttunut kalkki tai lika voidaan poistaa
kostealla liinalla ja naarmuttamattomalla
(nestemäisellä) puhdistusaineella.
• Varo pohjan naarmuuntumista: pohja ei
saisi koskettaa metallia.
-Höyryraudan vaippa voidaan pyyhkiä kostealla
liinalla.
- Puhdista vesisäiliö silloin tällöin täyttämällä
vesisäiliö vedellä ja ravistelemalla
voimakkaasti. Kaada sitten vesi pois.
Säilytys
- Irrota pistotulppa
pistorasiasta.
- Kaada vesisäiliöön
jäänyt vesi pois
(kuva 27).
- Aseta höyrynvalitsin
asentoon 4.
- Aseta höyryrauta
kumimatolle pystyyn ja
anna jäähtyä ennen
säilytykseen laittamista.
- Tarkista liitosjohdon kunto säännöllisesti.
Ympäristöasiaa
•Älä hävitä loppuun
käytettyä laitetta
tavallisen
kotitalousjätteen
mukana, vaan toimita
se asianmukaiseen
keräyspisteeseen.
Näin autat
suojelemaan
ympäristöä (kuva 28).
25
26
27
28
Page 51

51
Tarkistusluettelo
Ongelma
Käynnistettyäsi laitteen ensimmäisen
kerran raudasta alkaa tulla käryä.
Höyryä ei tule ja telineestä kuuluu
kovaa ääntä.
Vesisuihkua ei tule.
Höyrysuihkausta ei tule.
Mahdollinen syy
Tämä on normaali ilmiö. Raudan
jotkut osat on öljytty tehtaalla.
Vettä on liian vähän,
kalkinpoistokasetti on laitettu
huonosti ja/tai lämpötila on alempi
kuin 2.
Sisäsäiliö (P) on tyhjä.
Sisäsäiliö (P) on tyhjä.
Mitä tehdä
Ei mitään. Ilmiö häviää
jonkin ajan kuluttua.
Täytä vesisäiliö MAXmerkkiin asti, paina
kalkinpoistokasetti kunnolla
paikalleen ja/tai valitse
korkeampi lämpötila
valitsimella (K).
Täytä vesisäiliö MAXmerkkiin asti, valitse
lämpötila 3 ja paina
höyrysalpaa (C), kunnes
pohjasta alkaa tulla höyryä.
Täytä vesisäiliö MAXmerkkiin asti, valitse
lämpötila 3 ja paina
höyrysalpaa (C), kunnes
pohjasta alkaa tulla höyryä.
Page 52

52
Page 53

53
Page 54

4239 000 44465
u
www.philips.com
 Loading...