

Philips HI575, HI571, HI570 User Manual [fi]
Azur Cordless
HI575, HI571, HI570

234


ENGLISH 6
DEUTSCH 17
NORSK 29
SVENSKA 40
SUOMI 51
DANSK 62
HI575, HI571, HI570

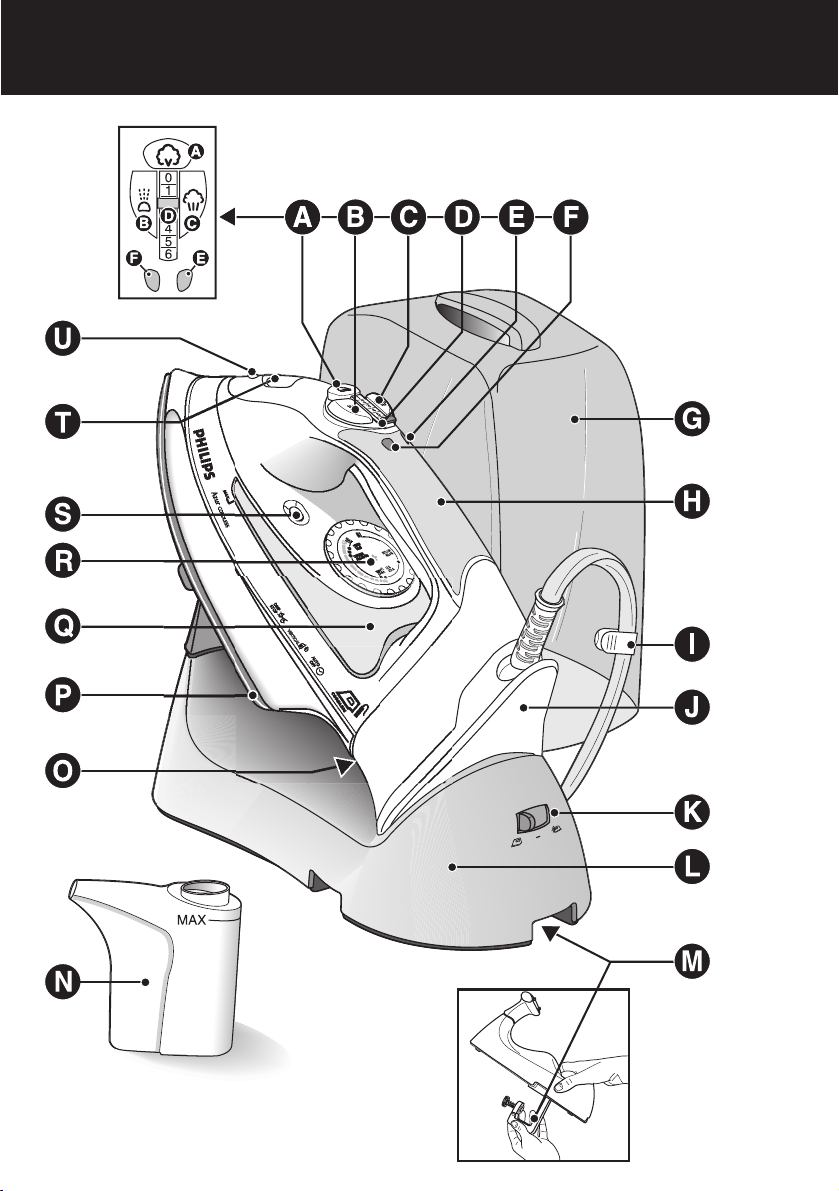
General description (fig. 1)
A Turbo steam button 0 (HI575 only)
B Spray button T
C Shot-of-steam button 9
D Steam control
0 = no steam
1 = minimum steam
6 = maximum steam
E Auto shut-off light (HI575 only)
F Temperature light
G Carry case (HI575/571 only)
H Soft-touch handgrip (HI575 only)
I Cord clip
J Power unit
K Mode switch
∫ = cordless ironing
π = storage position
ª = corded ironing
L Stand
M Stand clamp
N Filling cup
O Typeplate
P Soleplate
Q Water level window
R Temperature dial
S Calc-Clean button for cleaning/descaling
T Filling opening with cap
U Spray nozzle
Important
Read these instructions for use carefully before using the appliance and
save them for future reference.
◗ Check if the voltage indicated on the type plate corresponds to
the local mains voltage before you connect the appliance.
◗ Only connect the appliance to an earthed wall socket.
◗ Do not use the appliance if the plug, the cord or the appliance
itself shows visible damage, or if the appliance has been dropped
or is leaking.
◗ Check the cord regularly for possible damage.
◗ If the mains cord is damaged, it must be replaced by Philips, a
service centre authorised by Philips or similarly qualified persons
in order to avoid a hazard.
◗ Never leave the appliance unattended when it is connected to the
mains.
◗ Never immerse the iron and the stand,if provided, in water.
◗ Keep the appliance out of the reach of children.
◗ The soleplate of the iron can become extremely hot and may
cause burns if touched.
ENGLISH6
◗ Do not allow the cord to come into contact with the soleplate
when it is hot.
◗ When you have finished ironing, when you clean the appliance,
when you fill or empty the water tank and also when you leave
the iron even for a short while:set the steam control to position
O,put the iron on its heel and remove the mains plug from the
wall socket.
◗ Only use this iron with the stand supplied.
◗ Always place and use the iron and the stand, if provided, on a
stable, level and horizontal surface.
◗ Do not put perfume, vinegar, starch,descaling agents, ironing aids
or other chemicals in the water tank.
◗ This appliance is intended for household use only.
Before first use
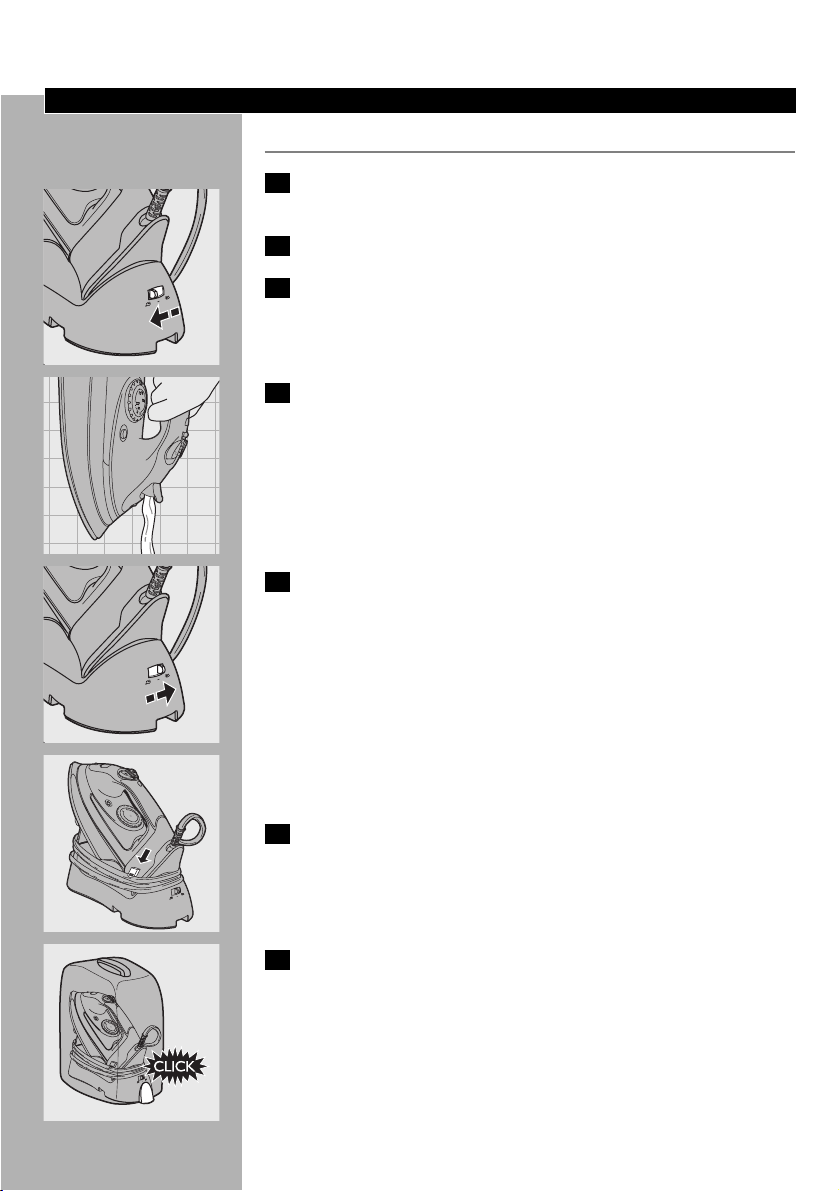
C
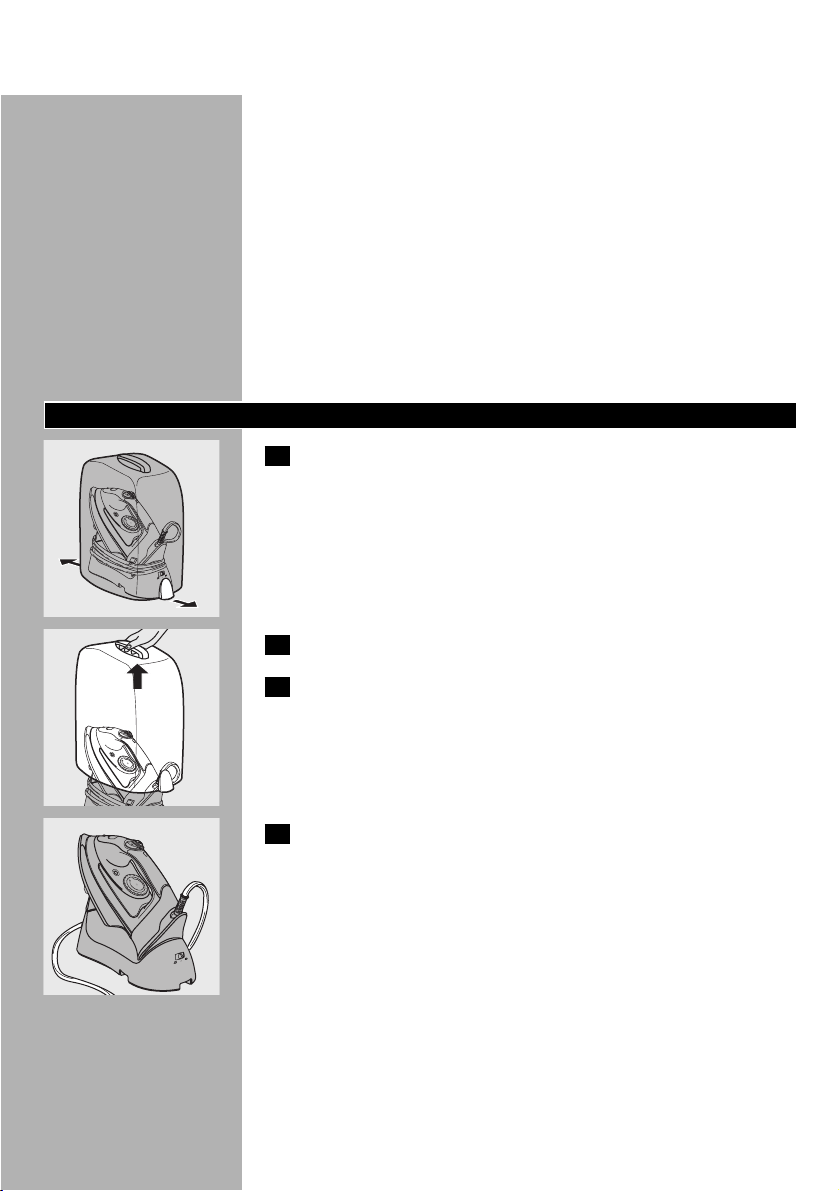
1 Release the carry case (HI575/571 only).
C
2 Remove the carry case (HI575/571 only).
3 Remove any sticker or protective foil from the soleplate and
clean the soleplate with a soft cloth.
C
4 Fully unwind the mains cord.
ENGLISH 7
N
I
M
M
A
X
N
E
N
I
L
O
L
I
H
N
O
L
Y
N
N
N
O
T
O
T
L
N
I
O
O
N
C
D
O
G
L
A
K
L
I
S
L
O
A
D
O
E
W
S
A
N
A
L
N
I
M
M
A
X
N
E
N
I
L
O
L
I
H
N
O
L
Y
N
N
N
O
T
T
LO
N
I
O
O
N
C
D
O
G
L
A
K
L
I
S
L
O
A
D
O
E
W
S
A
N
A
L
N
I
M
M
A
X
N
E
N
I
L
O
IL
H
N
O
L
Y
N
N
N
O
T
O
T
L
N
I
O
O
N
C
D
O
LG
A
K
L
I
S
L
O
A
D
O
E
W
S
A
N
A
L

Preparing for use
Fastening the stand clamp
C
1 Fold out the clamp on the bottom of the stand and fix the
stand clamp to the ironing board or to another stable surface,
such as a tabletop.
The rubber feet on the bottom prevent the stand from slipping.
◗ You can also place the stand on the ironing board without using
the clamp.The clamp can then remain folded in.
Do not place the stand close to the table edge, as the stand could
accidentally be knocked over.
Filling the water tank
1 Remove the mains plug from the wall socket.
2 Set the steam control to 0 (no steam).
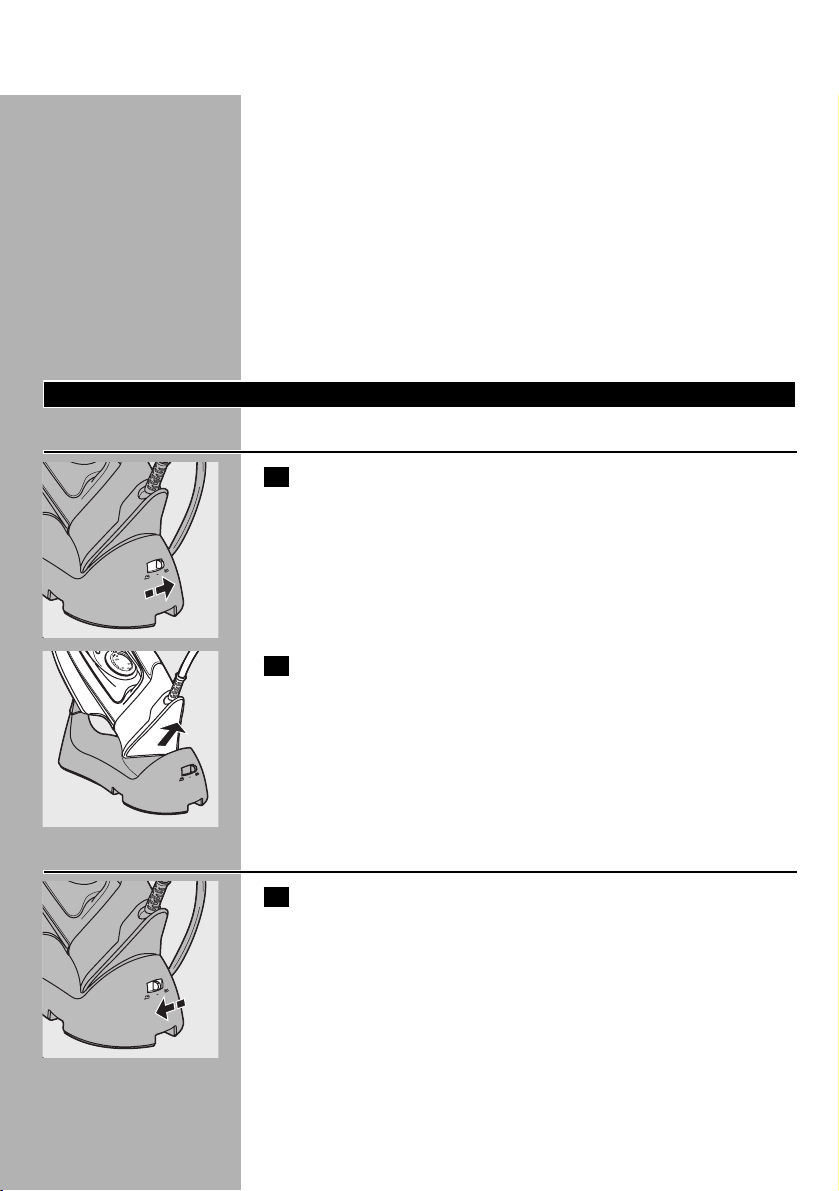
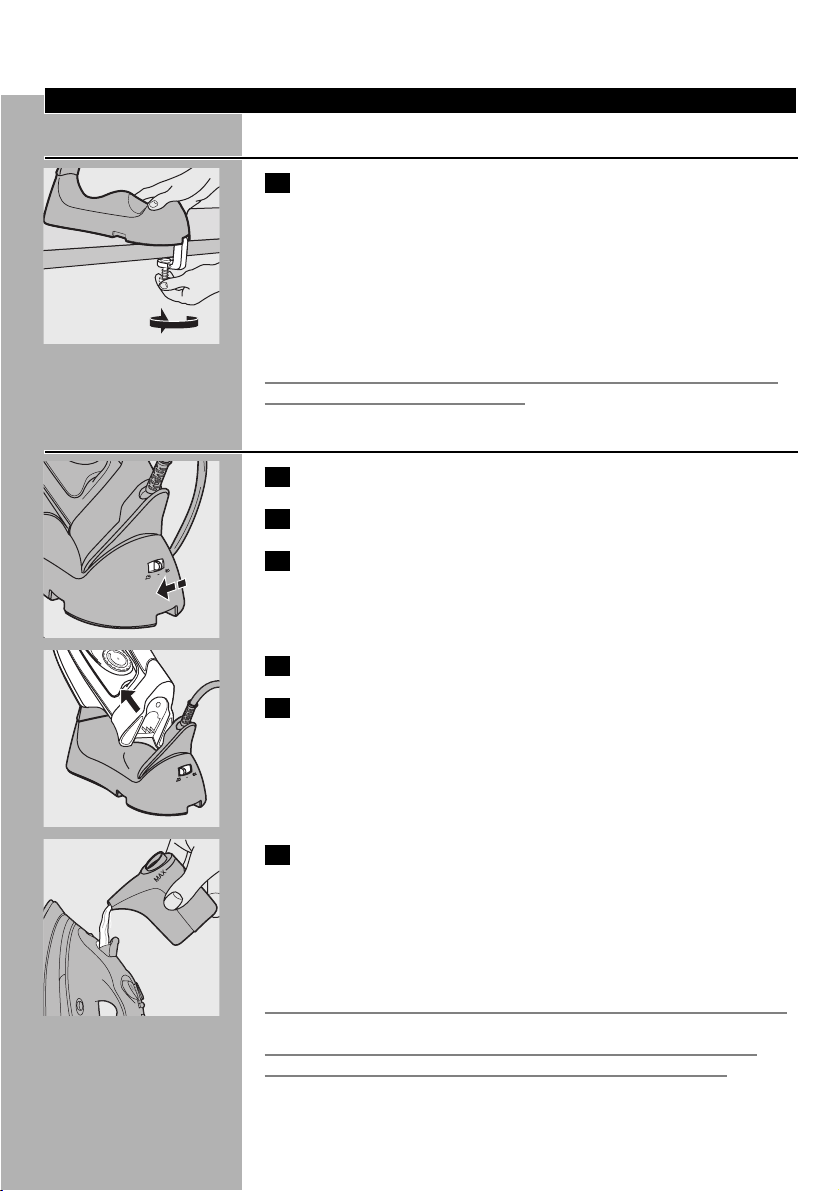
C
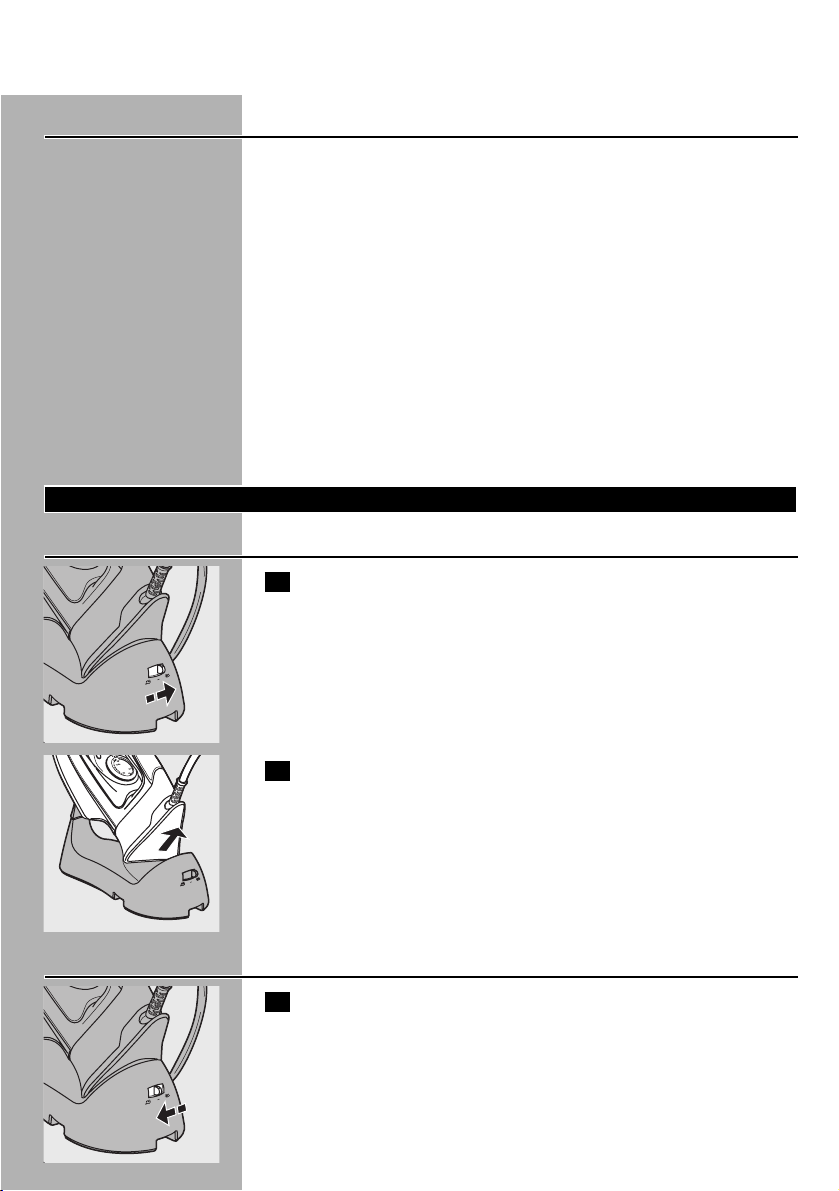
3 Set the mode switch to ∫ (cordless ironing).
C
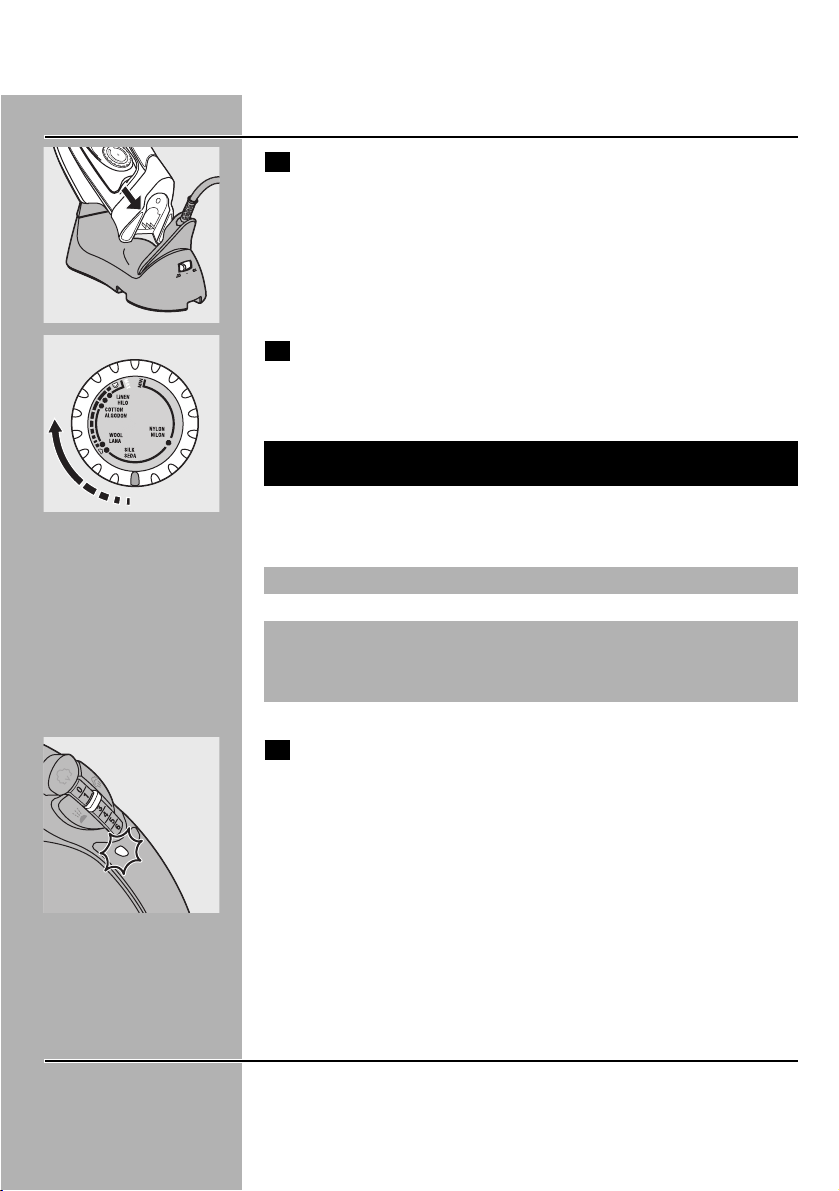
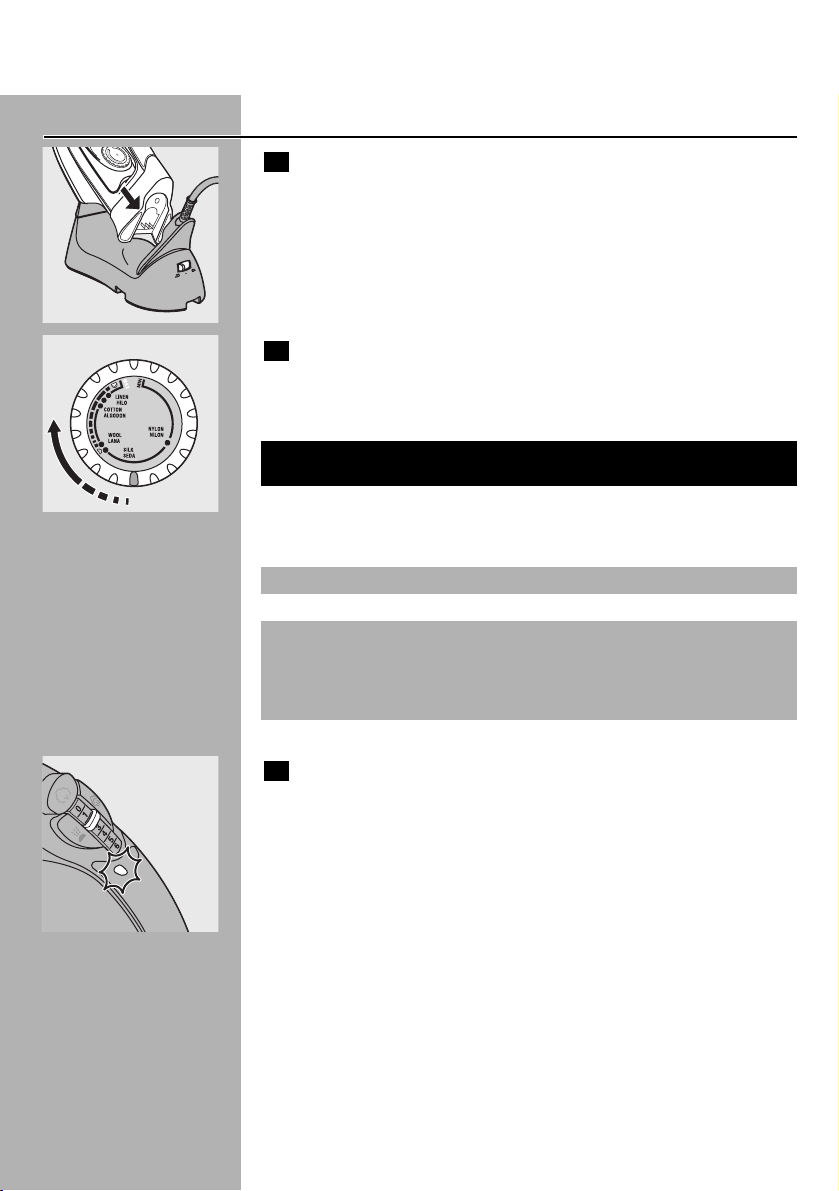
4 Take the iron from the stand.
5 Place the iron on its heel and open the cap of the filling
opening.
C
6 Use the filling cup to pour water into the water tank and close
the cap of the filling opening afterwards.
If the tap water in your area is very hard, we advise you to mix it with
an equal amount of distilled water or to use distilled water only.
Do not fill the water tank beyond the MAX indication.
Do not put perfume, vinegar, starch, descaling agents, ironing aids or
other chemicals in the water tank.
ENGLISH8
N
I
M
M
A
X
N
E
N
I
L
O
L
HI
N
O
L
N
NY
N
O
T
O
T
L
N
I
O
O
N
C
D
O
G
L
A
K
L
I
S
OL
A
D
O
E
W
S
A
N
A
L
Setting the temperature
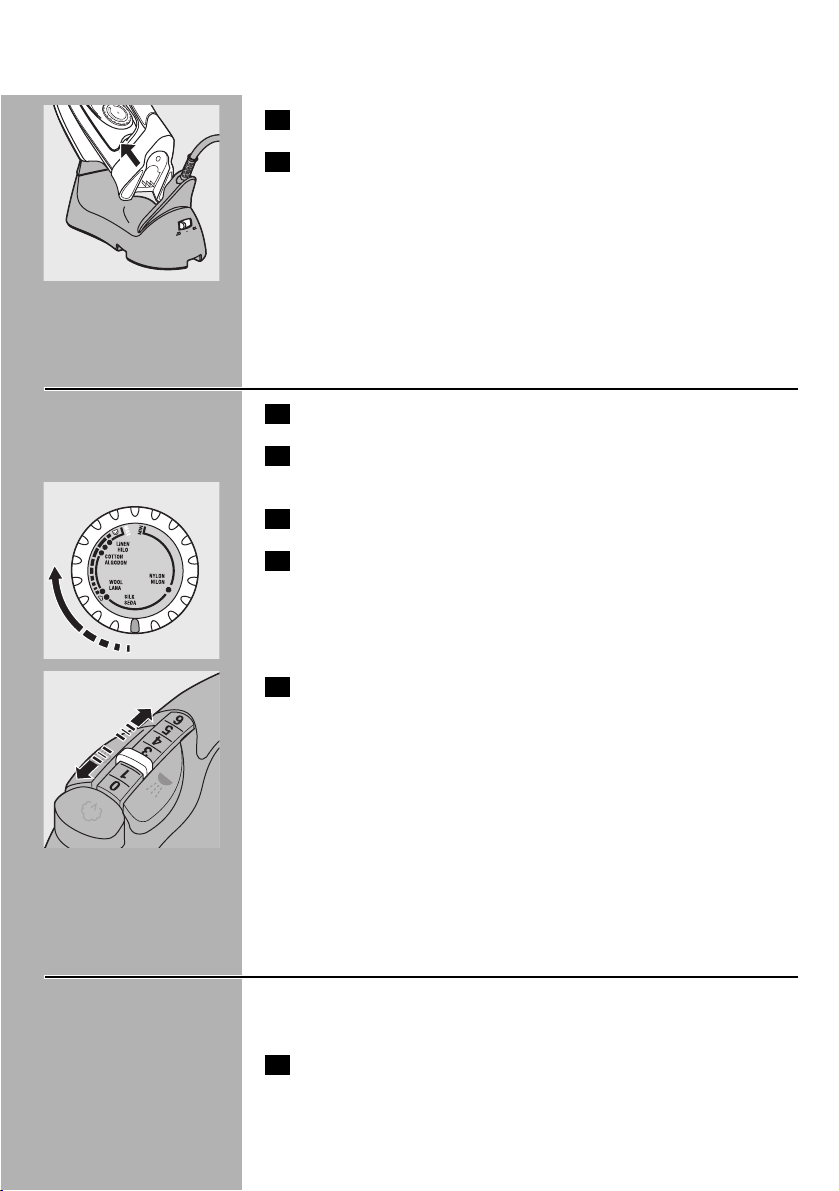
C
1 Put the iron on the iron stand.
C
2 Set the required ironing temperature by turning the
temperature dial to the appropriate position (see section 'Tips'
for extra information).
Check the laundry care label for the required ironing temperature:
C
3 Put the mains plug in an earthed wall socket.The temperature
light goes on to indicate that the iron is heating up.
◗ The iron is hot enough when the temperature light goes out.
◗ During ironing the temperature light goes on from time to time.
This indicates that the iron is heating up to the right temperature.
◗ If you have been ironing at a high temperature and subsequently
set the temperature dial to a lower setting,wait until the
temperature light goes on again before you continue ironing.This
will prevent damage to your fabrics.
◗ Some parts of the iron have been lightly greased.This may cause
the iron to give off some smoke when you switch it on for the
first time.After a short while, however, this will cease.
Tips
- If the fabric consists of various kinds of fibres, always select the
temperature required by the most delicate fibre, i.e. the lowest
temperature. For example: if an article consists of 60% polyester and
ENGLISH 9
N
Steam setting
0 (see 'Ironing
without steam')
1-2
3-6
Temperature
setting
1
2
3 to MAX
Type of fabric
Synthetic fabrics (e.g.
acetate, acrylic,
viscose, polyamide,
polyester) and silk
Wool
Cotton, linen
Please note that Z
on the label means
that the article cannot
be ironed.
Symbol on laundry
care label
B
C
D
Z
I
M
M
A
X
N
E
N
I
L
O
L
HI
N
O
L
N
NY
N
O
T
O
T
L
N
I
O
O
N
C
D
O
G
L
A
K
L
I
S
OL
A
D
O
E
W
S
A
N
A
L
40% cotton, it should be ironed at the temperature indicated for
polyester (2) and without steam.
- If you do not know what kind or kinds of fabric an article is made of,
determine the right ironing temperature by ironing a part that will
not be visible when you wear or use the article.
- Silk, woollen and synthetic materials: iron the reverse side of the
fabric to prevent shiny patches.
- Velvet and other fabrics that tend to acquire shiny patches should be
ironed in one direction only (along with the nap) while applying very
little pressure.
- Start ironing the articles that require the lowest ironing temperature,
such as those made of synthetic fibres.
Using the appliance
Corded ironing
C
1 Set the mode switch to position ª (corded ironing).
C
2 Take the iron from the stand.
◗ When you stop ironing for a while, you can put the iron on the
stand or on its heel.
Cordless ironing
C
1 Set the mode switch to position ∫ (cordless ironing).
ENGLISH10
C
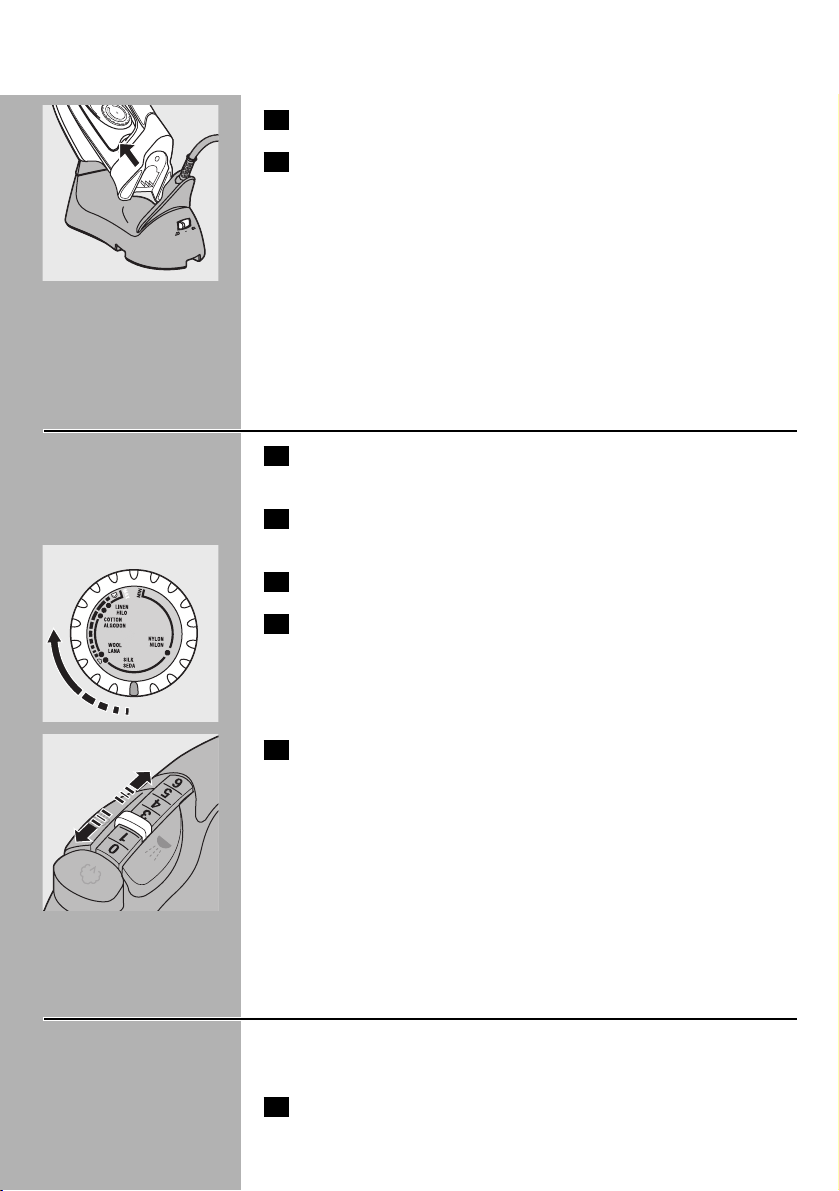
2 Take the iron from the stand.
3 HI575 only: put the iron back on the stand when the
temperature light starts blinking.This indicates that the iron
has cooled down below the set temperature.
◗ When you stop ironing for a while, always put the iron on the
stand to allow it to heat up again.
◗ When you use the shot-of-steam or turbo-steam function, the
iron may cool down rather quickly.We advise you to iron in
corded mode when using these functions.
Steam ironing
1 Make sure that there is enough water in the water tank.
2 Select the recommended ironing temperature (see section
'Setting the temperature').
3 Put the iron on the stand.
C
4 Put the mains plug in the wall socket.
The iron starts heating up.
◗ As soon as the water in the water tank is hot enough for steam
ironing, the temperature light goes out.
C
5 Set the steam control to the required position to start steam
ironing.
◗ Steam ironing is only possible at higher ironing temperatures
(temperature settings 2 to MAX).
◗ Select the recommended steam setting:
B
1 - 2 for moderate steam (temperature settings 2)
B
3 - 6 for maximum steam (temperature settings 3 to MAX)
◗ During steam ironing the temperature light goes on from time to
time.This indicates that the iron is heating up to the set
temperature.
Ironing without steam
◗ To iron without steam,proceed as described for steam ironing but
set the steam control to position 0 (no steam).
1 Select the recommended ironing temperature (see section
'Setting the temperature').
ENGLISH 11
N
I
M
M
A
X
N
E
N
I
L
O
L
HI
N
O
L
N
NY
N
O
T
O
T
L
N
I
O
O
N
C
D
O
G
L
A
K
L
I
S
OL
A
D
O
E
W
S
A
N
A
L
Features
Spray function
You can use the spray function to remove stubborn creases at any
temperature.
◗ Make sure that there is enough water in the water tank.
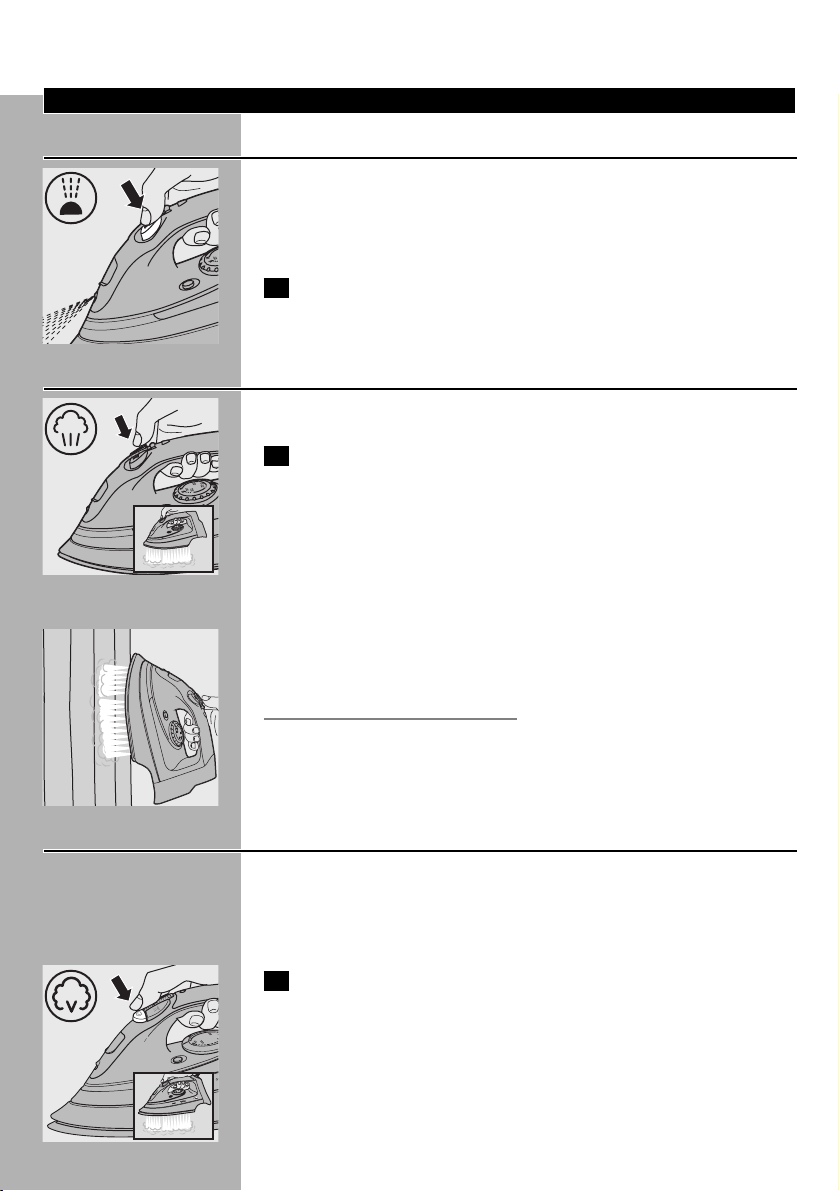
C
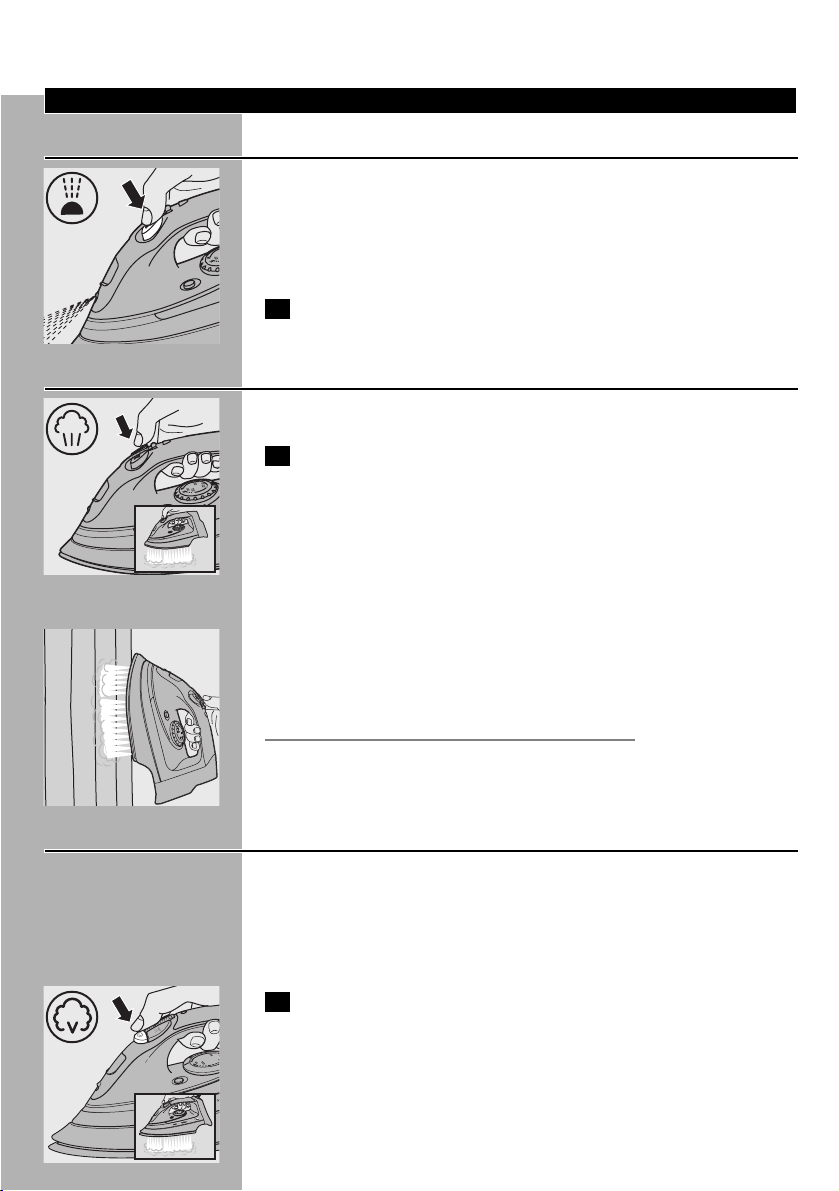
1 Press the spray button several times to moisten the article to
be ironed.
Shot of steam
A powerful shot of steam helps remove stubborn creases.
C
1 Press and hold the shot-of-steam button for a few seconds.
Then release the button.
◗ The shot-of-steam function can only be used at temperature
settings between 2 and MAX.
Vertical shot of steam
C
◗ The shot-of-steam function can also be used when you hold the
iron in vertical position.
This is useful for removing creases from hanging clothes, curtains etc.
Never direct the steam at people.
Turbo steam (HI575 only)
The turbo-steam function helps remove difficult creases.
◗ The turbo-steam function can only be used at temperature
settings between 3 and MAX.
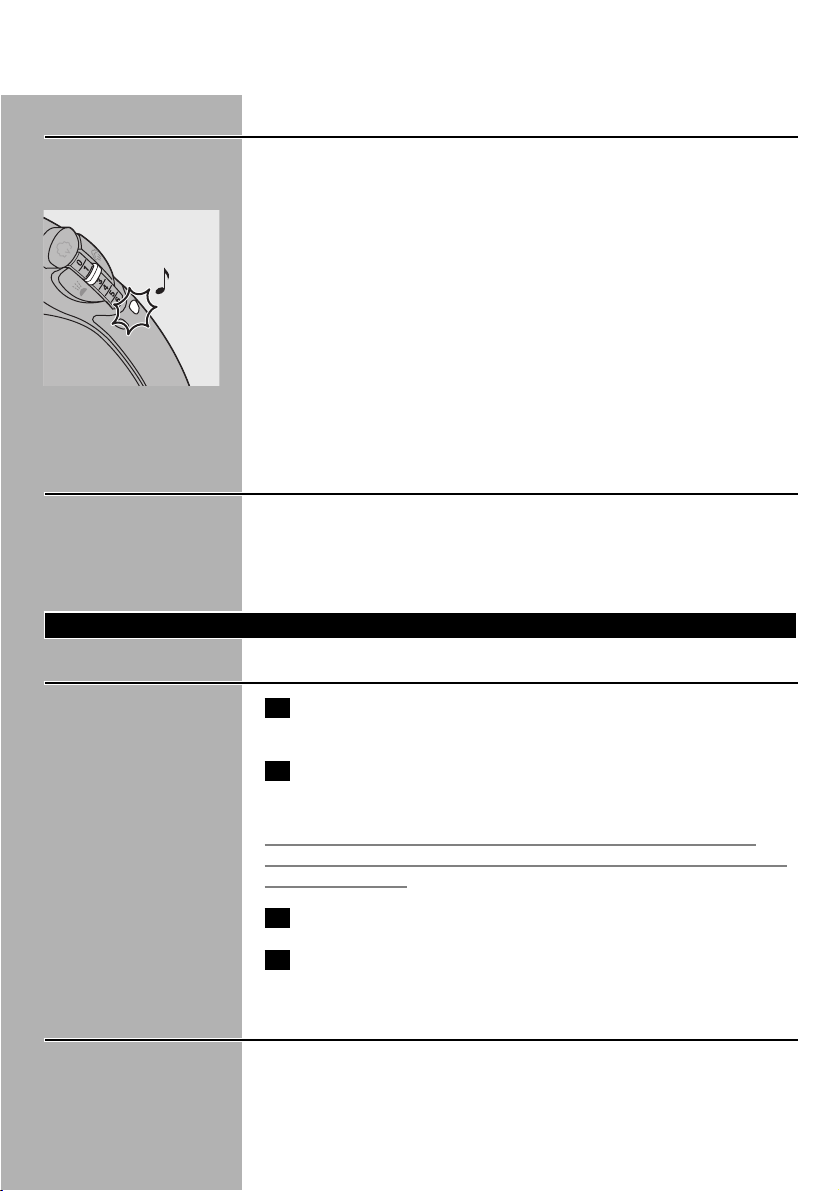
C
1 Press and hold the turbo-steam button for a few seconds.Then
release the button.
Do not keep the button pressed for more than 10 seconds.Wait at
least one minute before using the turbo-steam function again to let the
iron heat up again.The iron is hot enough when the temperature light
goes out.
ENGLISH12
Electronic safety shut-off function (HI575 only)
The electronic safety shut-off function automatically switches the iron
off if it has not been moved for a while.
C
◗ To indicate that the heating element has been switched off,the
auto-off light will start blinking and you will hear an audible signal.
- In horizontal position, this will happen after 30 seconds.
- In vertical position, this will happen after 8 minutes.
◗ To let the iron heat up again:
- Pick up the iron or move it slightly.
- The auto-off light goes out and the audible signal stops.
- Put the iron back on its stand.The iron will heat up again.
- When the temperature light has gone on and goes out again, the
iron is ready for use.
Drip stop
This iron is equipped with a drip-stop function to prevent water
dripping out of the soleplate: the iron automatically stops producing
steam when the temperature is too low.When this happens you may
hear a click.
Cleaning and maintenance
After ironing
1 Remove the mains plug from the wall socket and let the iron
cool down.
2 Wipe scale and any other deposits off the soleplate with a
damp cloth and a non-abrasive (liquid) cleaning agent.
To keep the soleplate smooth, you should avoid hard contact with
metal objects. Never use a scouring pad, vinegar or other chemicals to
clean the soleplate.
3 Clean the upper part of the iron with a damp cloth.
4 Regularly rinse the water tank with water. Empty the water
tank after cleaning.
Calc-Clean function
Use the Calc-Clean function once every two weeks to remove scale
and impurities from the soleplate. If the water in your area is very hard
(i.e. when flakes come out of the soleplate during ironing), you should
use the Calc-Clean function more frequently.
ENGLISH 13

1 Set the steam control to position 0.
2 Open the cap of the filling opening and fill the water tank up to
the maximum level.Then close the cap again.
Do not pour vinegar or other descaling agents into the water tank.
3 Put the iron on its stand.
4 Set the temperature dial to MAX.
5 Put the mains plug in the wall socket.
C
6 Set the mode switch to position ∫ (cordless).
C
7 Wait until the temperature light goes out and then remove the
iron from the stand.
C
8 Hold the iron over the sink,press and hold the Calc-Clean
button and gently shake the iron to and fro.
Steam and boiling water will come out of the soleplate. Scale (if any)
will be flushed out.
9 Release the Calc-Clean button after one minute or when the
water tank is empty.
10 Repeat the Calc-Clean process if the water coming out of the
iron still contains a lot of scale particles.
After the Calc-Clean process
1 Put the iron back on the stand to let the soleplate dry.
2 Unplug the iron when the light has gone out.
3 Move the iron gently over a piece of used cloth to remove any
water stains that may have formed on the soleplate.
4 Let the iron cool down before you store it.
ENGLISH14
Storage
Make sure the iron has cooled down sufficiently before you put it away.
1 Remove the mains plug from the wall socket and let the iron
cool down.
2 Set the steam control to position 0 (no steam).
C
3 Set the mode switch to position ∫ (cordless).
C
4 Empty the water tank.
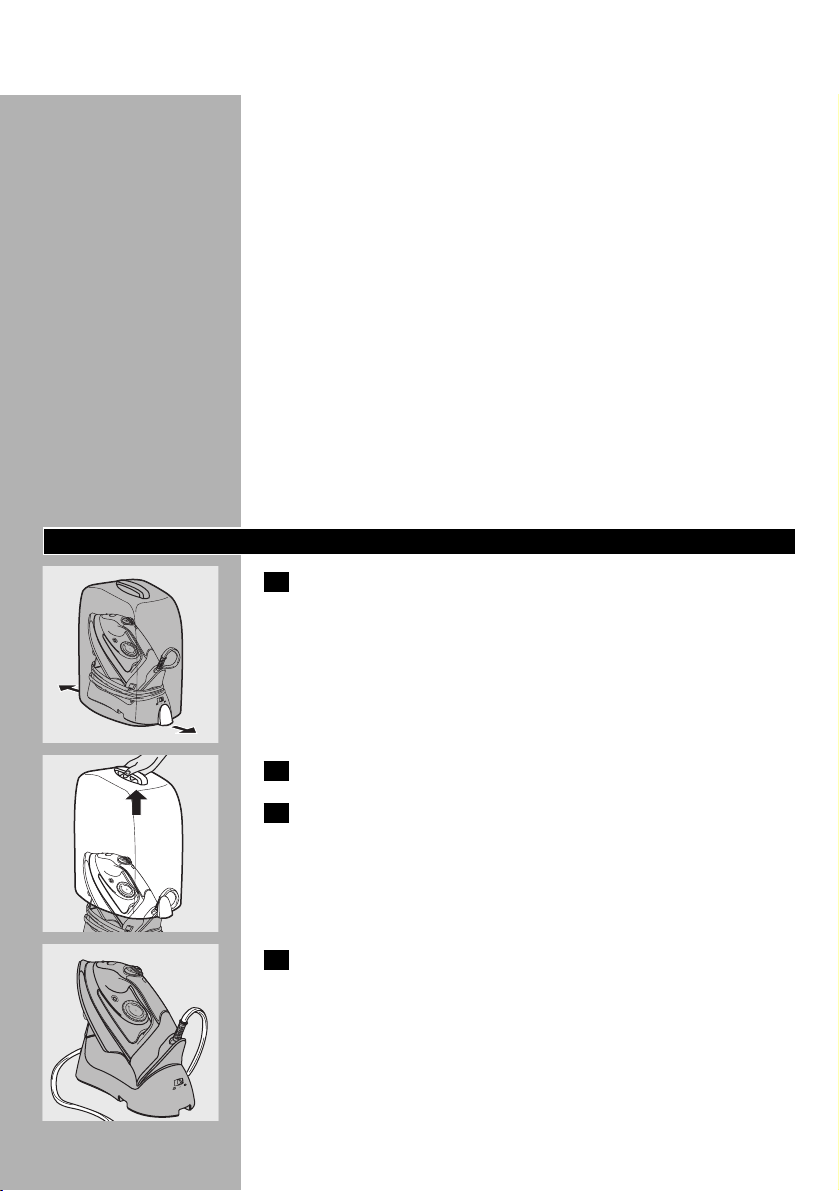
C
5 Put the iron on the stand and set the mode switch to the
storage position (-).
The iron, the power unit and the stand are then locked together.
C
◗ You can wind the cord round the stand and fix the end of the
cord with the cord clip.
6 Place the carry case over the stand (HI575/571 only).
C
7 Press on the case to lock it onto the stand ('click') (HI575/571
only).
ENGLISH 15
N
I
M
M
A
X
N
E
N
I
L
O
L
I
H
N
O
L
N
NY
N
O
T
T
LO
N
I
O
O
N
C
D
O
G
L
A
K
L
I
S
L
O
A
D
O
E
W
S
A
N
A
L
N
I
M
M
A
X
N
E
N
I
L
O
L
I
H
N
O
L
Y
N
N
N
O
T
O
T
L
N
I
O
O
N
C
D
O
G
L
A
K
L
I
S
L
O
A
D
O
E
W
S
A
N
A
L
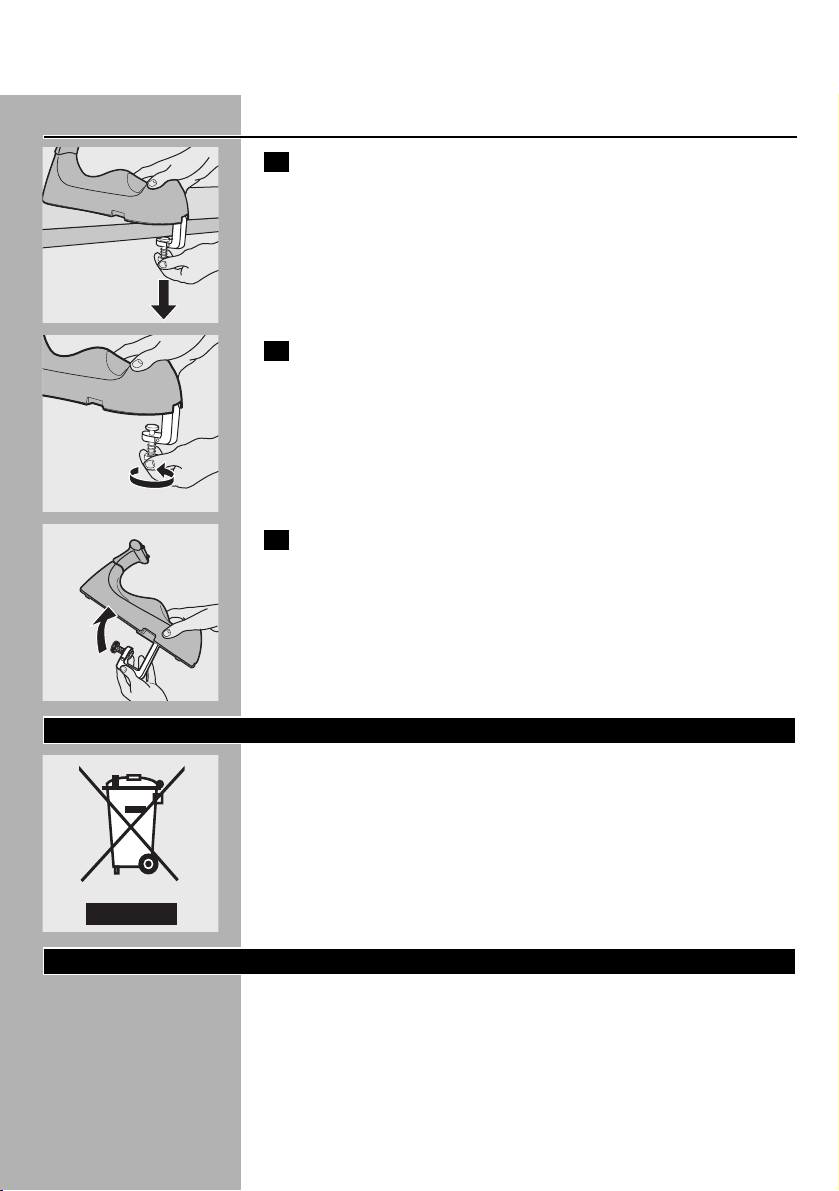
Storing the stand clamp
C
1 Unlock the stand clamp.
C
2 Screw in the fixing screw completely.
C
3 Fold the stand clamp into the stand.
Environment
C
◗ Do not throw the appliance away with the normal household
waste at the end of its life, but hand it in at an official collection
point for recycling. By doing this you will help to preserve the
environment.
Guarantee & service
If you need information or if you have a problem, please visit the Philips
website at www.philips.com or contact the Philips Customer Care
Centre in your country (you will find its phone number in the
worldwide guarantee leaflet). If there is no Customer Care Centre in
your country, turn to your local Philips dealer or contact the Service
Department of Philips Domestic Appliances and Personal Care BV.
ENGLISH16

DEUTSCH 17
Übersicht (Abb.1)
- A Turbodampf-Taste 0 (nur HI575)
- B Sprühtaste T
- C Dampfstoßtaste 9
- D Dampfregler
0 = kein Dampf
1 = wenig Dampf
6 = maximaler Dampf
- E Kontrollanzeige für Abschaltautomatik (nur HI575)
- F Temperaturkontrollanzeige
- G Aufbewahrungskoffer (nur HI575/571)
- H Soft-Touch-Handgriff (nur HI575)
- I Kabelclip
- J Stromelement
- K Wahlschalter
∫ = schnurlos bügeln
π = Aufbewahrung
ª = Bügeln mit Netzkabel
- L Ladestation
- M Klemme (Ladestation)
- N Einfüllbecher
- O Typenschild
- P Bügelsohle
- Q Sichtfenster (Wasserstand)
- R Temperaturregler
- S Calc-Clean-Taste zum Reinigen/Entkalken
- T Einfüllöffnung mit Klappe
- U Spraydüse
Wichtig
Lesen Sie diese Bedienungsanleitung vor dem ersten Gebrauch des
Geräts sorgfältig durch, und bewahren Sie sie für eine spätere
Verwendung auf.
◗ Prüfen Sie vor Inbetriebnahme des Geräts, ob die auf dem
Typenschild angegebene Betriebsspannung mit der örtlichen
Netzspannung übereinstimmt.
◗ Schließen Sie das Gerät nur an eine geerdete Steckdose an.
◗ Verwenden Sie das Gerät nicht, wenn der Netzstecker,das
Netzkabel oder das Gerät selbst beschädigt ist oder das Gerät
heruntergefallen ist bzw.leckt.
◗ Überprüfen Sie das Netzkabel regelmäßig auf mögliche
Beschädigungen.
◗ Wenn das Netzkabel defekt oder beschädigt ist, darf es nur von
einem Philips Service-Center oder einer von Philips autorisierten
Werkstatt durch ein Original-Ersatzkabel ausgetauscht werden,
um Gefährdungen zu vermeiden.
◗ Lassen Sie das eingeschaltete Gerät niemals unbeaufsichtigt.
◗ Tauchen Sie das Bügeleisen und die Ladestation nicht in Wasser.
DEUTSCH18
◗ Halten Sie das Gerät außerhalb der Reichweite von Kindern.
◗ Achten Sie beim Bügeln darauf, dass Sie die heiße Bügelsohle nicht
berühren.
◗ Achten Sie darauf, dass das Netzkabel nicht mit der heißen
Bügelsohle in Kontakt kommt.
◗ Wenn Sie das Bügeln beenden, das Gerät reinigen, den
Wasserbehälter füllen oder leeren oder den Raum nur kurz
verlassen, stellen Sie stets den Dampfregler auf Position 0, stellen
Sie das Bügeleisen aufrecht und ziehen Sie den Netzstecker aus
der Steckdose.
◗ Benutzen Sie das Bügeleisen nur mit der mitgelieferten
Ladestation.
◗ Verwenden Sie das Bügeleisen und die Ladestation(sofern
mitgeliefert) auf einer stabilen, ebenen und waagerechten
Unterlage.
◗ Geben Sie weder Duftstoffe, Essig,Wäschesteife,
Entkalkungsmittel, Bügelzusätze noch andere Chemikalien in den
Wasserbehälter.
◗ Dieses Gerät ist nur für den Gebrauch im Haushalt bestimmt.
Vor dem ersten Gebrauch
C
1 Nur HI575/571: Entriegeln Sie den Koffer.
C
2 Nur HI575/571: Nehmen Sie den Koffer ab.
3 Entfernen Sie Schutzfolie bzw.Aufkleber von der Bügelsohle,
und reinigen Sie die Bügelsohle mit einem weichen Tuch.
C
4 Wickeln Sie das Netzkabel vollständig ab.
N
I
M
M
A
X
N
E
N
I
L
O
L
I
H
N
O
L
Y
N
N
N
O
T
O
T
L
N
I
O
O
N
C
D
O
G
L
A
K
L
I
S
L
O
A
D
O
E
W
S
A
N
A
L
N
I
M
M
A
X
N
E
N
I
L
O
L
I
H
N
O
L
Y
N
N
N
O
T
T
LO
N
I
O
O
N
C
D
O
G
L
A
K
L
I
S
L
O
A
D
O
E
W
S
A
N
A
L
N
I
M
M
A
X
N
E
N
I
L
O
IL
H
N
O
L
Y
N
N
N
O
T
O
T
L
N
I
O
O
N
C
D
O
LG
A
LK
I
S
L
O
A
D
O
E
W
S
A
N
A
L
DEUTSCH 19
Für den Gebrauch vorbereiten
Die Klemme der Ladestation befestigen
C
1 Klappen Sie die Klemme unten an der Ladestation aus und
befestigen Sie sie am Bügelbrett oder einer anderen stabilen
Arbeitsfläche.
Die Gummifüße verhindern das Abrutschen der Ladestation.
◗ Sie können die Ladestation auch auf den Bügeltisch stellen, ohne
die Klemme anzubringen. In diesem Fall kann die Klemme
eingeklappt bleiben.
Stellen Sie die Ladestation nicht zu nahe an den Tischrand; sie könnte
versehentlich umgestoßen werden.
Den Wasserbehälter füllen
1 Trennen Sie den Netzstecker von der Steckdose.
2 Stellen Sie den Dampfregler auf "0" (kein Dampf)
C
3 Stellen Sie den Wahlschalter auf ∫ (schnurlos bügeln).
C
4 Nehmen Sie das Bügeleisen von der Ladestation.
5 Stellen Sie das Bügeleisen senkrecht, und öffnen Sie die Klappe
der Einfüllöffnung.
C
6 Füllen Sie mit dem Becher Wasser in den Behälter,und
schließen Sie anschließend die Klappe der Einfüllöffnung.
Wenn das Leitungswasser in Ihrer Gegend sehr hart ist, empfiehlt es
sich, Leitungswasser und destilliertes Wasser zu gleichen Teilen oder
ausschließlich destilliertes Wasser zu verwenden.
Füllen Sie den Wasserbehälter nicht über die Markierung MAX hinaus.
Geben Sie weder Duftstoffe, Essig,Wäschesteife, Entkalkungsmittel
Bügelzusätze noch andere Chemikalien in den Wasserbehälter.
N
I
M
M
A
X
N
E
N
I
L
O
L
HI
N
O
L
N
NY
N
O
T
O
T
L
N
I
O
O
N
C
D
O
G
L
A
K
L
I
S
OL
A
D
O
E
W
S
A
N
A
L
DEUTSCH20
Die Temperatur einstellen
C
1 Stellen Sie das Bügeleisen auf die Ladestation.
C
2 Stellen Sie den Temperaturregler auf die gewünschte
Temperatur (siehe "Tipps" für zusätzliche Hinweise).
Prüfen Sie das Etikett im Wäsche-/Kleidungsstück auf die erforderliche
Bügeltemperatur:
C
3 Stecken Sie den Netzstecker in eine geerdete Steckdose. Die
Temperaturkontrollanzeige leuchtet und signalisiert, dass sich
das Bügeleisen aufheizt.
◗ Wenn die Lampe erlischt, hat das Bügeleisen die eingestellte
Temperatur erreicht.
◗ Die Temperaturkontrollanzeige leuchtet während des Betriebs
gelegentlich auf und zeigt an, dass das Gerät auf die erforderliche
Temperatur aufgeheizt wird.
◗ Wenn Sie bei hoher Temperatur gebügelt haben und anschließend
eine niedrigere Temperatur einstellen,sollten Sie warten, bis die
Kontrollanzeige wieder leuchtet, bevor Sie mit dem Bügeln
fortfahren. So vermeiden Sie Schäden an den Textilien.
◗ Einige Teile des Bügeleisens sind leicht eingefettet und können
beim ersten Gebrauch etwas Rauch abgeben. Nach kurzer Zeit
tritt dies nicht mehr auf.
N
Dampfeinstellung
"0" (siehe
"Trockenbügeln")
1 - 2
3 - 6
Temperatureinstellung
1
2
3 bis MAX
Gewebeart
Synthetikfasern (z. B.
Azetat,Acryl,Viskose,
Polyamid,Polyester)
und Seide
Wolle
Baumwolle, Leinen
Das Symbol Z auf
dem Etikett bedeutet,
dass das Wäsche/Kleidungsstück nicht
gebügelt werden darf.
Symbol auf dem
Pflegeetikett
B
C
D
Z
I
M
M
A
X
N
E
N
I
L
O
L
HI
N
O
L
N
NY
N
O
T
O
T
L
N
I
O
O
N
C
D
O
G
L
A
K
L
I
S
OL
A
D
O
E
W
S
A
N
A
L
DEUTSCH 21
Tipps
- Wenn sich das Gewebe aus verschiedenen Fasern zusammensetzt,
sollten Sie stets die Temperatureinstellung für das empfindlichste
Gewebe wählen, also die niedrigste Temperatur. Besteht das Gewebe
z. B. aus 60 % Polyester und 40 % Baumwolle, sollten Sie es bei der
Temperatur für Polyester (2) und ohne Dampf bügeln.
- Wenn Sie nicht wissen,um welche Art von Gewebe es sich handelt,
ermitteln Sie die richtige Temperatur durch Bügeln einer Stelle, die
normalerweise nicht sichtbar ist.
- Seide,Wolle und Synthetikfasern: Bügeln Sie den Stoff von links, um
glänzende Stellen zu vermeiden.
- Samt und andere Stoffe, die leicht glänzende Stellen bekommen,
sollten nur in eine Richtung (mit dem Fadenlauf) und nur mit sehr
leichtem Druck gebügelt werden.
- Beginnen Sie stets mit den Textilien, die eine niedrige
Temperatureinstellung erfordern, etwa mit synthetischen Stoffen.
Das Gerät verwenden
Mit Netzkabel bügeln
C
1 Stellen Sie den Wahlschalter auf Position ª (Bügeln mit
Netzkabel).
C
2 Nehmen Sie das Bügeleisen von der Ladestation.
◗ Wenn Sie das Bügeln für eine Weile unterbrechen, können Sie das
Bügeleisen auf die Ladestation oder aufrecht stellen.
Schnurlos bügeln
C
1 Stellen Sie den Wahlschalter auf Position ∫ (schnurlos
bügeln).
DEUTSCH22
C
2 Nehmen Sie das Bügeleisen von der Ladestation.
3 Nur HI575: Stellen Sie das Bügeleisen auf die Ladestation
zurück, sobald die Kontrollanzeige blinkt. Die Anzeige zeigt an,
dass das Bügeleisen unter die eingestellte Temperatur abgekühlt
ist.
◗ Wenn Sie das Bügeln für eine Weile unterbrechen, sollten Sie das
Bügeleisen stets auf die Ladestation stellen, damit es wieder
aufheizen kann.
◗ Wenn Sie die Dampfstoß- oder Turbodampf-Funktion aktivieren,
kühlt das Bügeleisen relativ schnell ab. Bei Anwendung dieser
Funktionen empfiehlt es sich, im Netzbetrieb zu bügeln.
Dampfbügeln
1 Überprüfen Sie, ob sich genügend Wasser im Wasserbehälter
befindet.
2 Wählen Sie die empfohlene Bügeltemperatur (siehe "Die
Bügeltemperatur einstellen").
3 Stellen Sie das Bügeleisen auf die Ladestation.
C
4 Verbinden Sie den Netzstecker mit einer Steckdose.
Das Bügeleisen heizt sich auf.
◗ Sobald das Wasser im Wasserbehälter heiß genug zum
Dampfbügeln ist, erlischt die Kontrollanzeige.
C
5 Stellen Sie den Dampfregler auf die erforderliche Stufe.
◗ Dampfbügeln ist nur bei höheren Temperaturen möglich (zwischen
2 und MAX).
◗ Wählen Sie die empfohlene Dampfeinstellung:
B
1 bis 2: mäßiger Dampf (Temperatureinstellung 2)
B
3 bis 6: starker Dampf (Temperatureinstellung 3 bis MAX)
◗ Während des Dampfbügelns leuchtet die Kontrollanzeige von Zeit
zu Zeit und erlischt wieder. Dadurch wird signalisiert,dass das
Bügeleisen auf die eingestellte Temperatur aufgeheizt wird.
Trockenbügeln
◗ Beim Trockenbügeln verfahren Sie auf dieselbe Weise wie beim
Dampfbügeln - jedoch mit dem Dampfregler auf "0" (kein Dampf).
1 Wählen Sie die empfohlene Bügeltemperatur (siehe "Die
Bügeltemperatur einstellen").
N
I
M
M
A
X
N
E
N
I
L
O
L
HI
N
O
L
N
NY
N
O
T
O
T
L
N
I
O
O
N
C
D
O
G
L
A
K
L
I
S
OL
A
D
O
E
W
S
A
N
A
L
DEUTSCH 23
Produktmerkmale
Die Sprühfunktion
Die Sprühfunktion steht bei jeder Temperatur zur Verfügung und eignet
sich zur Beseitigung hartnäckiger Falten.
◗ Überprüfen Sie, ob sich genügend Wasser im Wasserbehälter
befindet.
C
1 Betätigen Sie die Sprühtaste mehrmals, um das Wäsche-
/Kleidungsstück anzufeuchten.
Der Dampfstoß
Ein kräftiger Dampfstoß hilft, hartnäckige Falten zu beseitigen.
C
1 Halten Sie die Dampfstoßtaste einige Sekunden lang gedrückt.
Lassen Sie sie dann wieder los.
◗ Die Dampfstoßfunktion kann nur bei Temperaturen zwischen 2
und MAX aktiviert werden.
Vertikaler Dampfstoß
C
◗ Die Dampfstoßfunktion kann auch bei senkrecht gehaltenem
Bügeleisen genutzt werden.
Diese Funktion eignet sich besonders zum Glätten hängender
Kleidungsstücke und Textilien wie Gardinen,Vorhänge usw.
Richten Sie den Dampfstoß niemals auf Personen!
Turbodampf (nur HI575)
Ein besonders kräftiger Dampfstoß hilft, hartnäckige Falten zu
beseitigen.
◗ Die Turbodampf-Funktion kann nur bei Temperaturen zwischen
3 und MAX genutzt werden.
C
1 Halten Sie die Turbodampf-Taste einige Sekunden lang
gedrückt, und lassen Sie sie dann wieder los.
Halten Sie die Taste nicht länger als 10 Sekunden gedrückt.Warten Sie
mindestens 1 Minute, bevor Sie die Turbodampf-Funktion erneut
betätigen, damit das Bügeleisen wieder aufheizen kann.Wenn die
Kontrollanzeige erlischt, ist das Bügeleisen heiß genug.
 Loading...