

Page 1
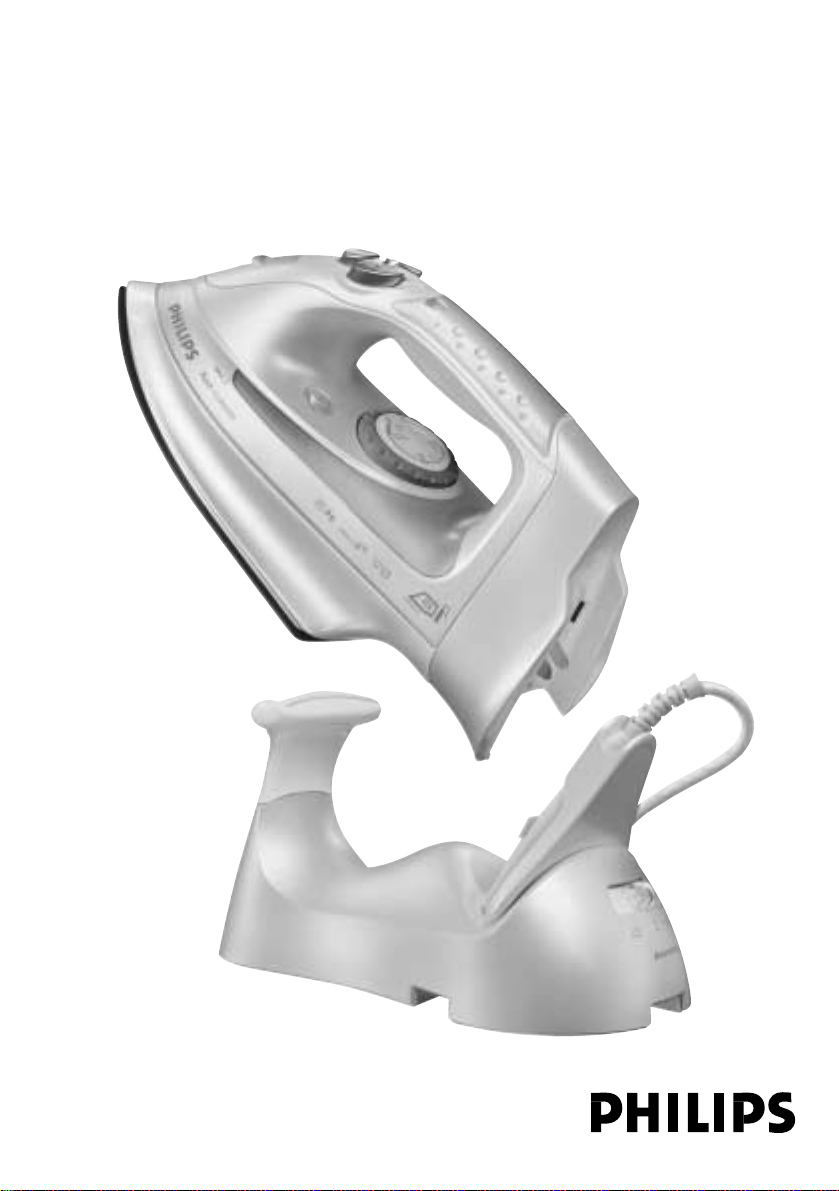
Azur Cordless
HI575, HI571, HI570
Page 2
234
Page 3
Page 4

Page 5
ENGLISH 6
УКРАЇНСЬКА 17
HRVATSKI 29
EESTI 40
LATVIEŠU 51
SLOVENŠČINA 62
БЪЛГАРСКИ 73
SRPSKI 85
96
HI575, HI571, HI570
Page 6
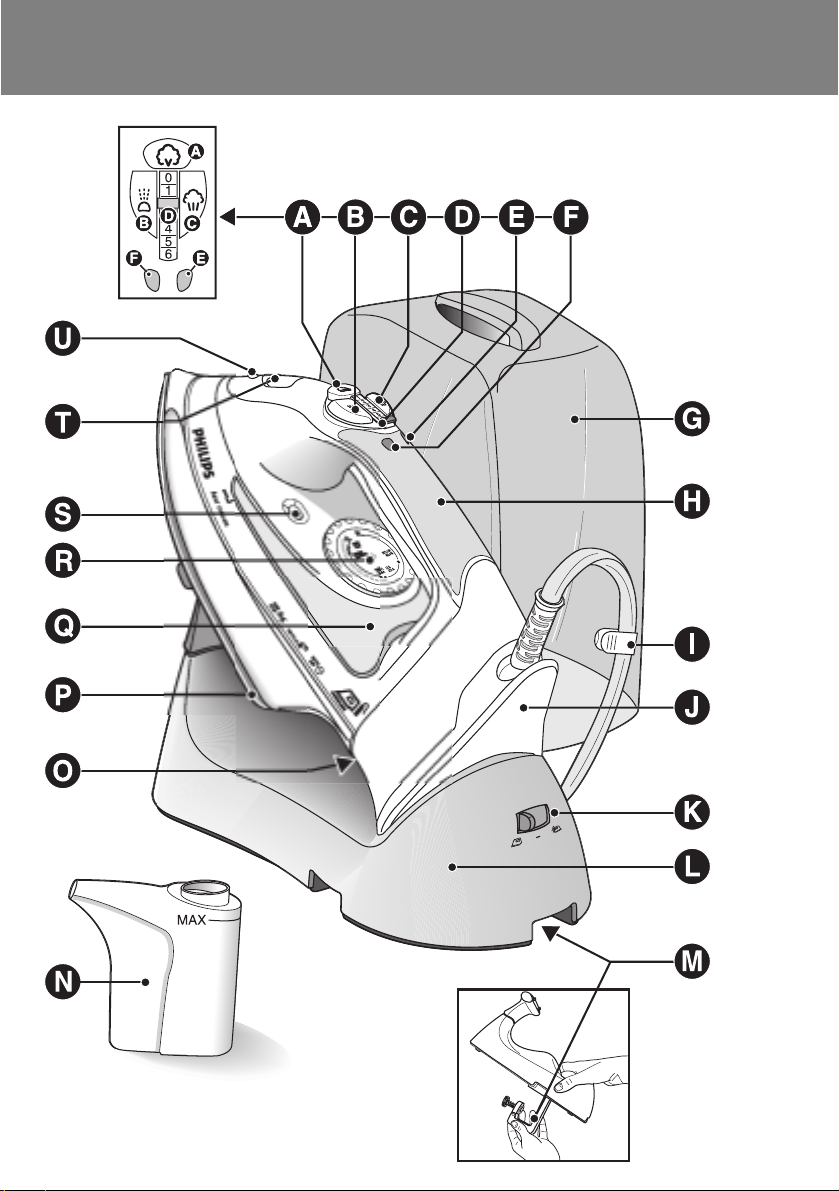
General description (fig. 1)
A Turbo steam button 0 (HI575 only)
B Spray button T
C Shot-of-steam button 9
D Steam control
0= no steam
1= minimum steam
6= maximum steam
E Auto shut-off light (HI575 only)
F Temperature light
G Carry case (HI575/571 only)
H Soft-touch handgrip (HI575 only)
I Cord clip
J Power unit
K Mode switch
∫ = cordless ironing
π = storage position
ª = corded ironing
L Stand
M Stand clamp
N Filling cup
O Typeplate
P Soleplate
Q Water level window
R Temperature dial
S Calc-Clean button for cleaning/descaling
T Filling opening with cap
U Spray nozzle
Important
Read these instructions for use carefully before using the appliance and
save them for future reference.
◗ Check if the voltage indicated on the type plate corresponds to
the local mains voltage before you connect the appliance.
◗ Only connect the appliance to an earthed wall socket.
◗ Do not use the appliance if the plug, the cord or the appliance
itself shows visible damage, or if the appliance has been dropped
or is leaking.
◗ Check the cord regularly for possible damage.
◗ If the mains cord is damaged, it must be replaced by Philips, a
service centre authorised by Philips or similarly qualified persons
in order to avoid a hazard.
◗ Never leave the appliance unattended when it is connected to the
mains.
◗ Never immerse the iron and the stand, if provided, in water.
◗ Keep the appliance out of the reach of children.
◗ The soleplate of the iron can become extremely hot and may
cause burns if touched.
ENGLISH6
Page 7
◗ Do not allow the cord to come into contact with the soleplate
when it is hot.
◗ When you have finished ironing, when you clean the appliance,
when you fill or empty the water tank and also when you leave
the iron even for a short while: set the steam control to position
O, put the iron on its heel and remove the mains plug from the
wall socket.
◗ Only use this iron with the stand supplied.
◗ Always place and use the iron and the stand, if provided, on a
stable, level and horizontal surface.
◗ Do not put perfume, vinegar, starch, descaling agents, ironing aids
or other chemicals in the water tank.
◗ This appliance is intended for household use only.
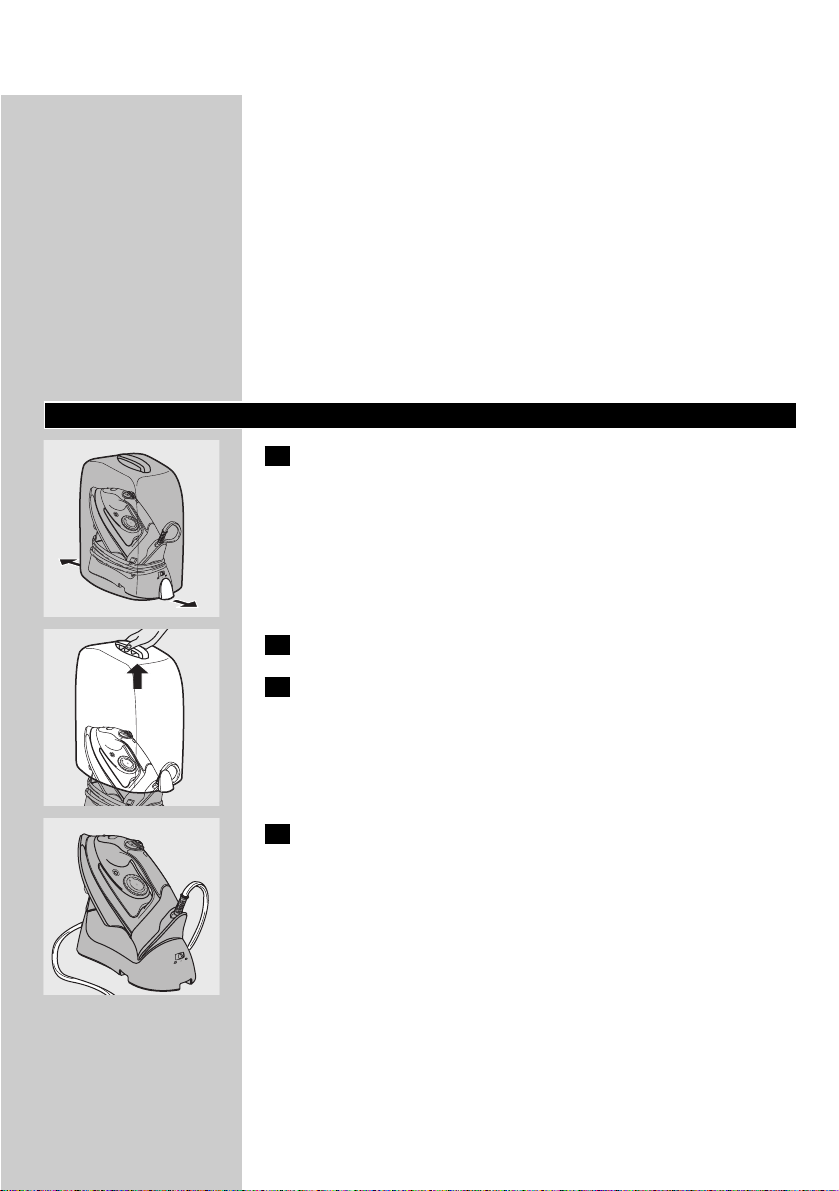
Before first use
C
1 Release the carry case (HI575/571 only).
C
2 Remove the carry case (HI575/571 only).
3 Remove any sticker or protective foil from the soleplate and
clean the soleplate with a soft cloth.
C
4 Fully unwind the mains cord.
ENGLISH 7
MIN
M
A
X
N
E
N
I
L
O
L
I
H
N
O
L
Y
N
N
N
O
T
O
T
L
N
I
O
O
N
C
D
O
G
L
A
K
L
I
S
L
O
A
D
O
E
W
S
A
N
A
L
MIN
M
A
X
N
E
N
I
L
O
L
I
H
N
O
L
Y
N
N
N
O
T
T
LO
N
I
O
O
N
C
D
O
G
L
A
K
L
I
S
L
O
A
D
O
E
W
S
A
N
A
L
N
I
M
M
A
X
N
E
N
I
L
O
IL
H
N
O
L
Y
N
N
N
O
T
O
T
L
N
I
O
O
N
C
D
O
LG
A
K
L
I
S
L
O
A
D
O
E
W
S
A
N
A
L
Page 8
Preparing for use
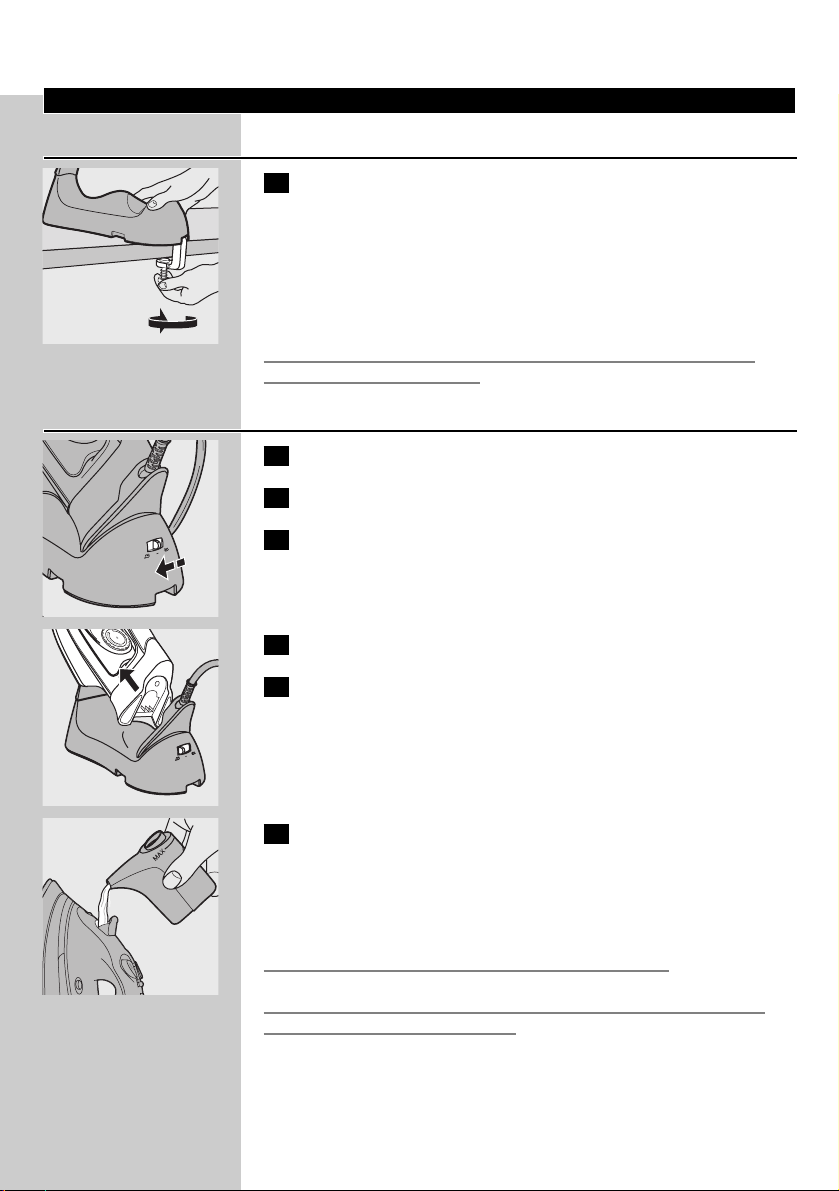
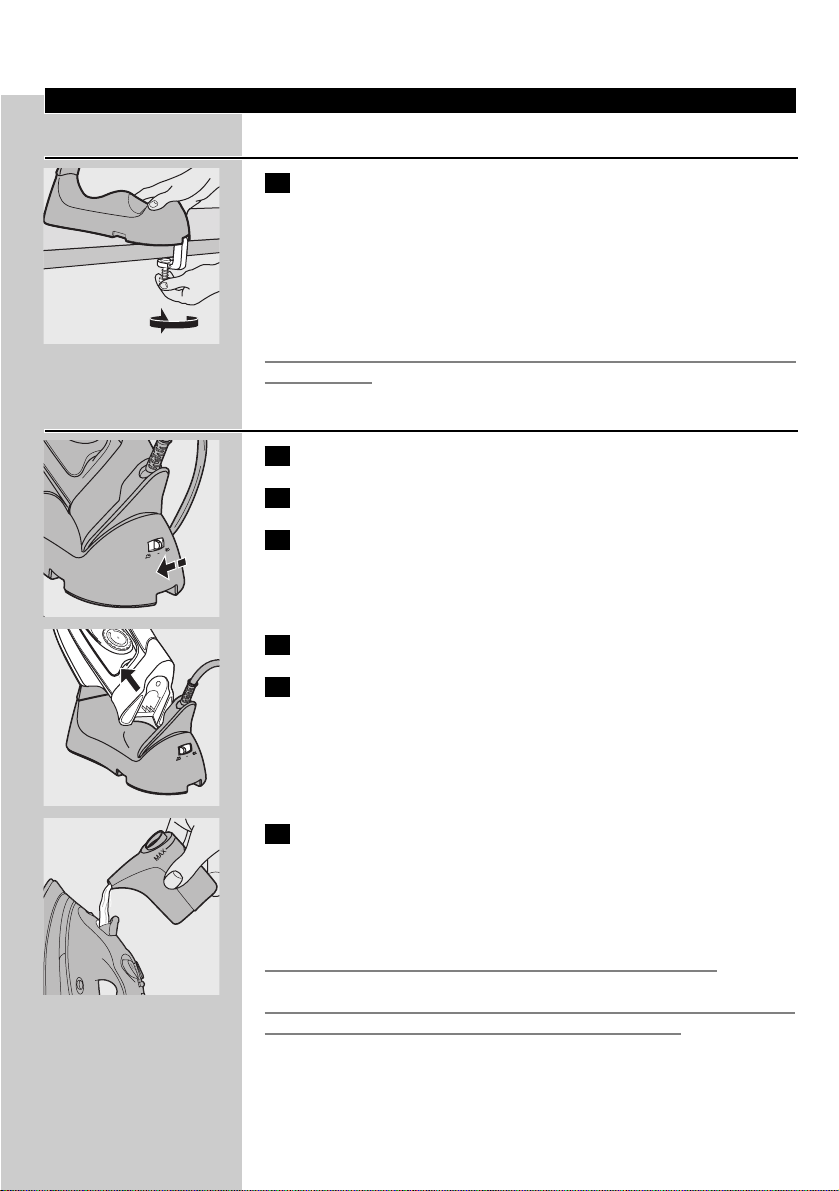
Fastening the stand clamp
C
1 Fold out the clamp on the bottom of the stand and fix the
stand clamp to the ironing board or to another stable surface,
such as a tabletop.
The rubber feet on the bottom prevent the stand from slipping.
◗ You can also place the stand on the ironing board without using
the clamp.The clamp can then remain folded in.
Do not place the stand close to the table edge, as the stand could
accidentally be knocked over.
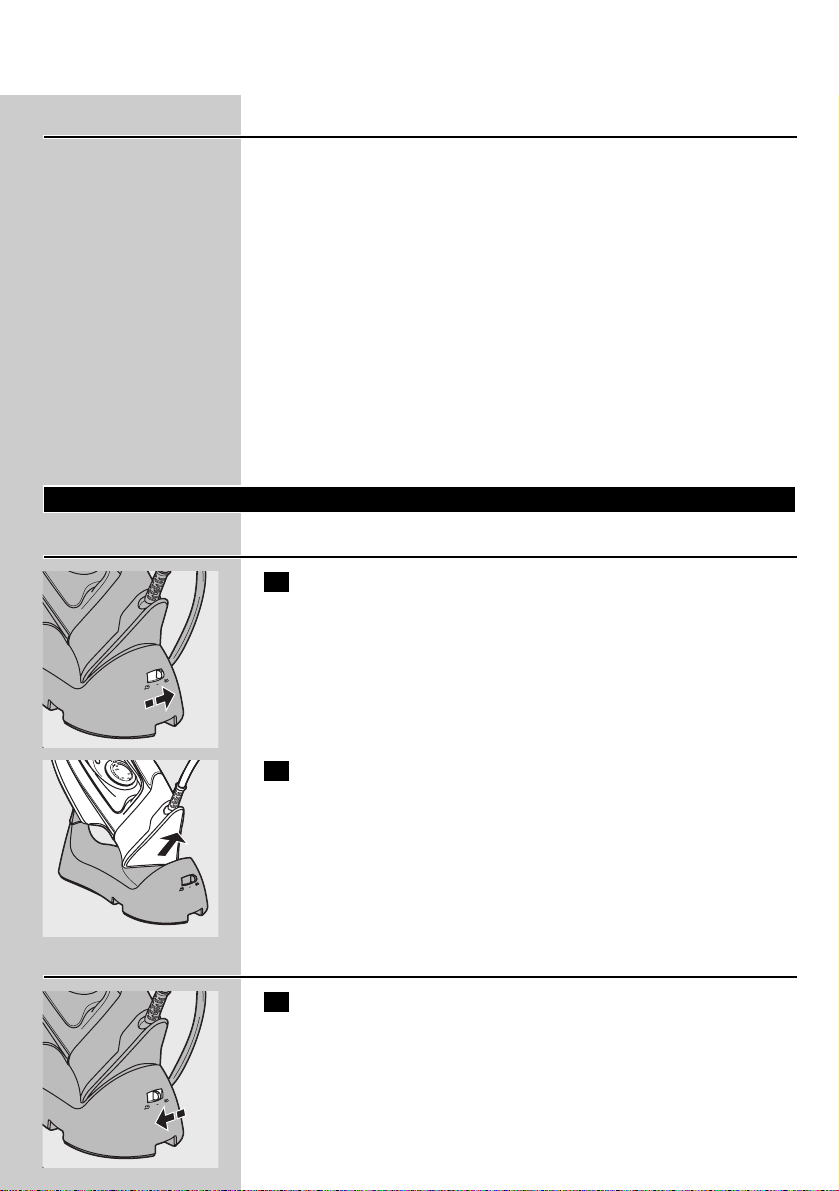
Filling the water tank
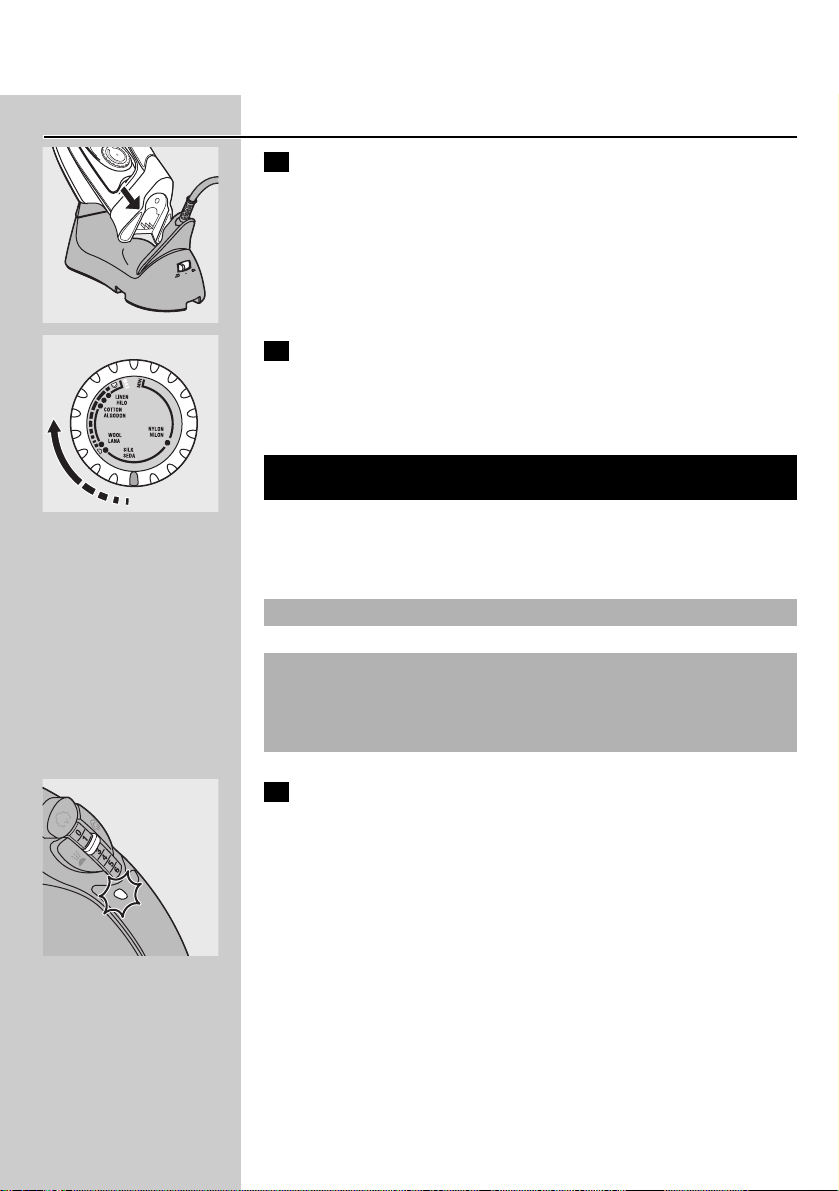
1 Remove the mains plug from the wall socket.
2 Set the steam control to 0 (no steam).
C
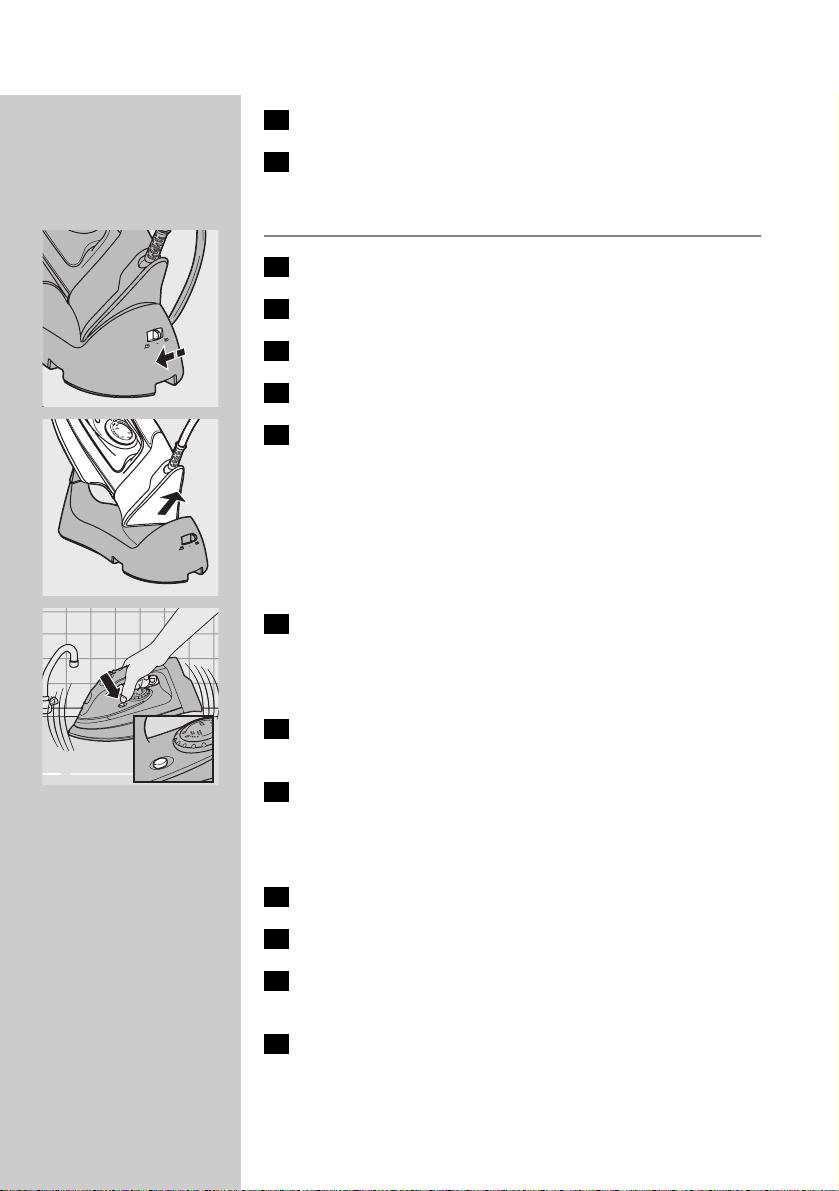
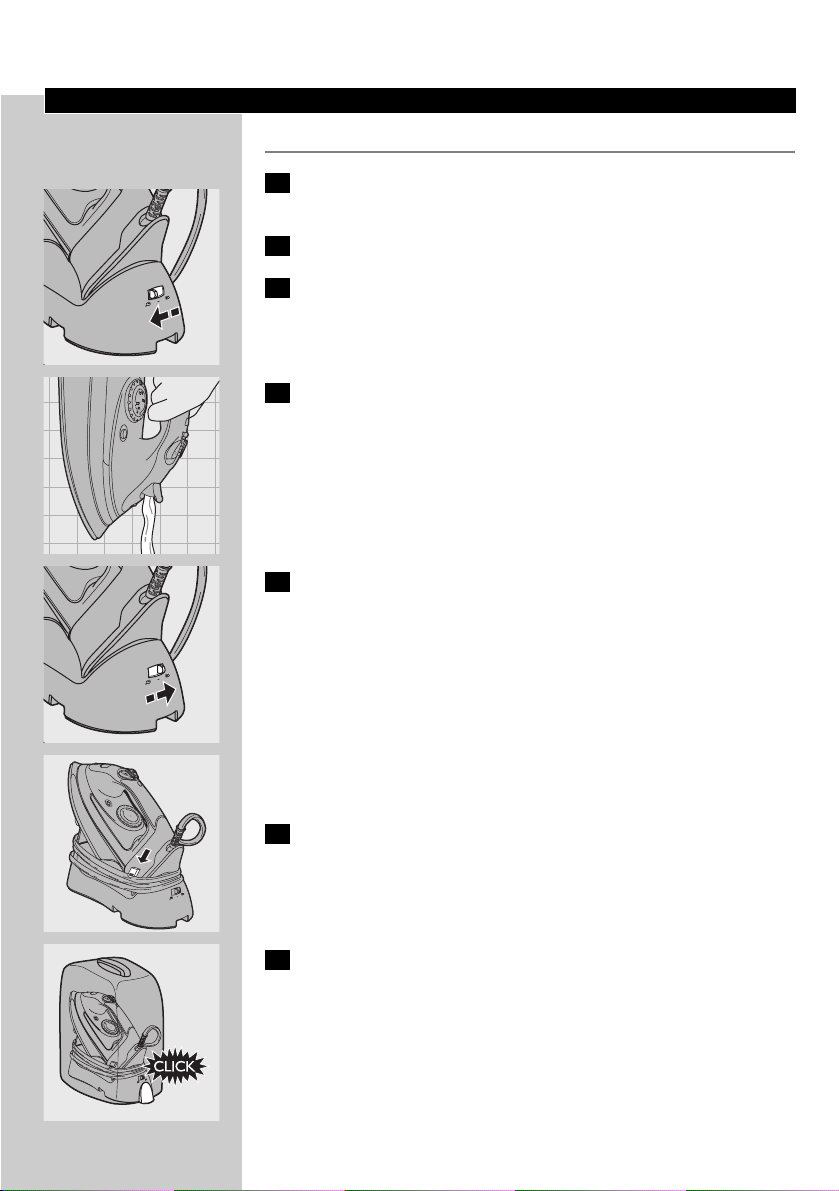
3 Set the mode switch to ∫ (cordless ironing).
C
4 Take the iron from the stand.
5 Place the iron on its heel and open the cap of the filling
opening.
C
6 Use the filling cup to pour water into the water tank and close
the cap of the filling opening afterwards.
If the tap water in your area is very hard, we advise you to mix it with
an equal amount of distilled water or to use distilled water only.
Do not fill the water tank beyond the MAX indication.
Do not put perfume, vinegar, starch, descaling agents, ironing aids or
other chemicals in the water tank.
ENGLISH8
N
I
M
M
A
X
N
E
N
I
L
O
L
HI
N
O
L
N
NY
N
O
T
O
T
L
N
I
O
O
N
C
D
O
G
L
A
K
L
I
S
OL
A
D
O
E
W
S
A
N
A
L
Page 9
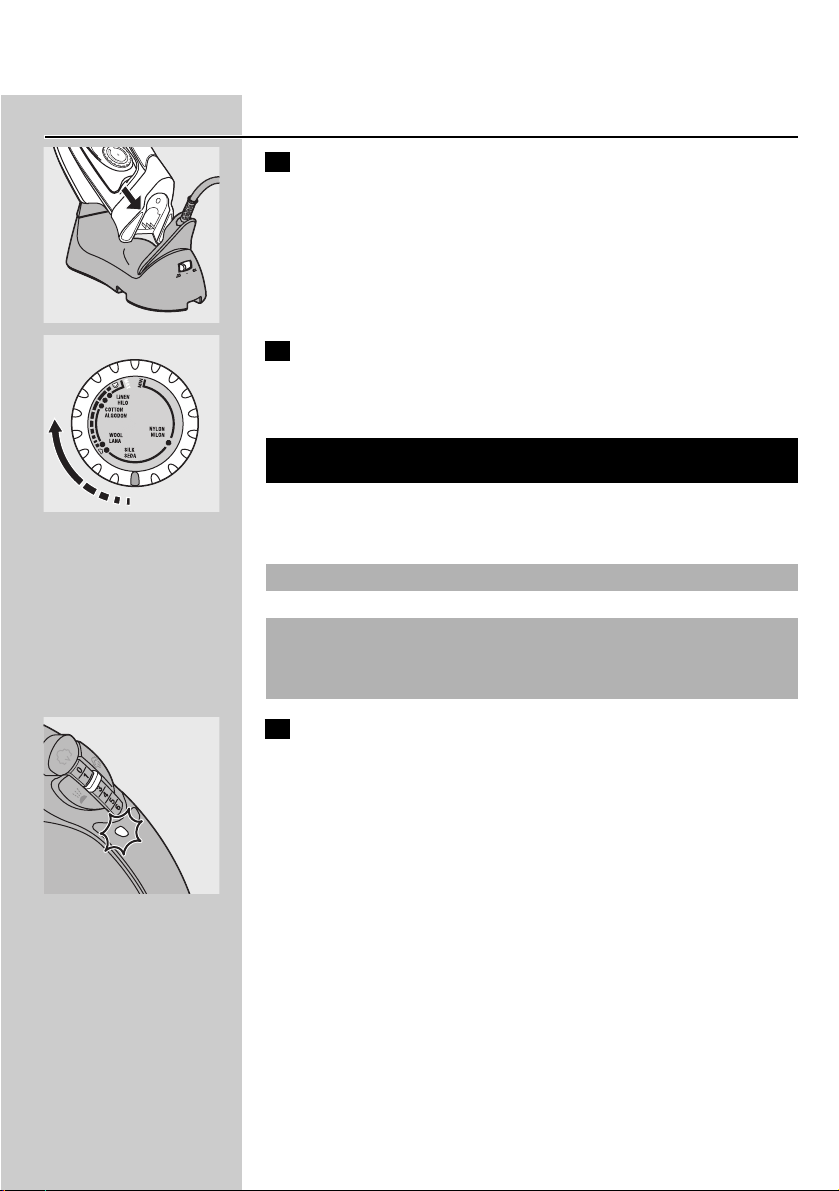
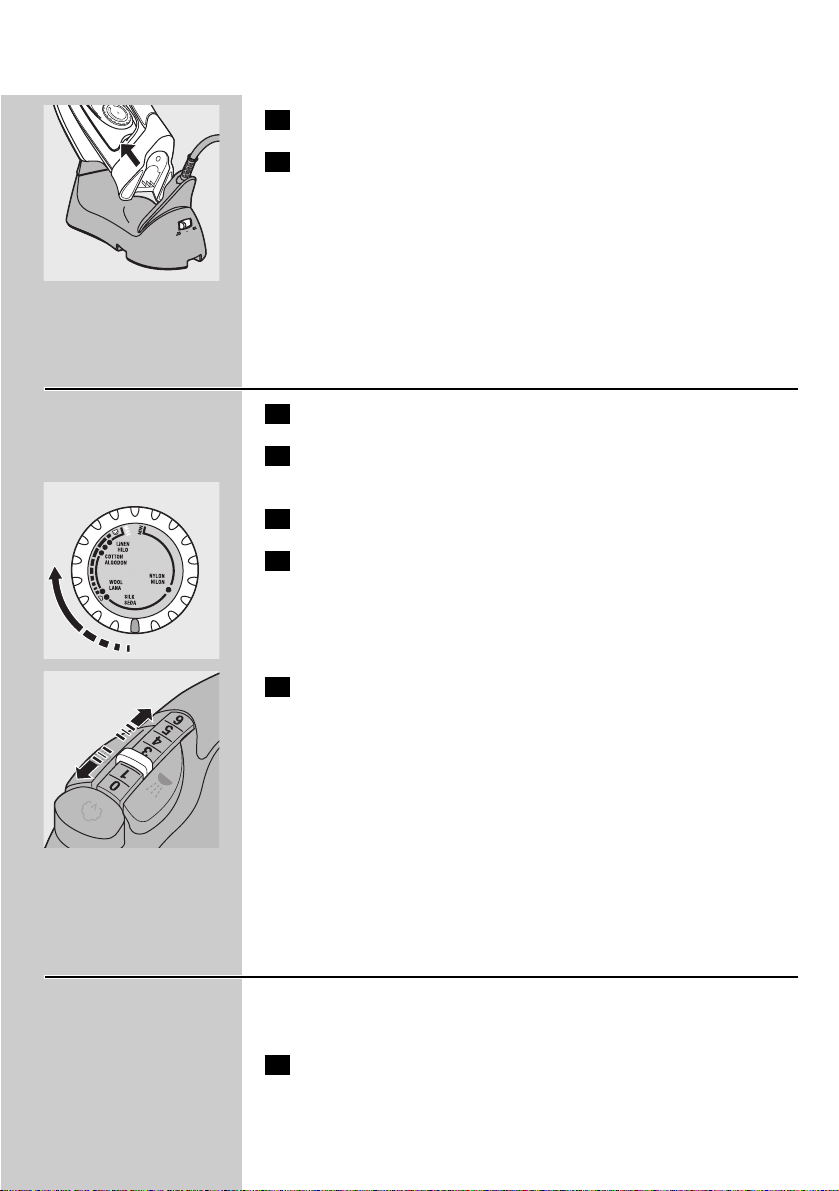
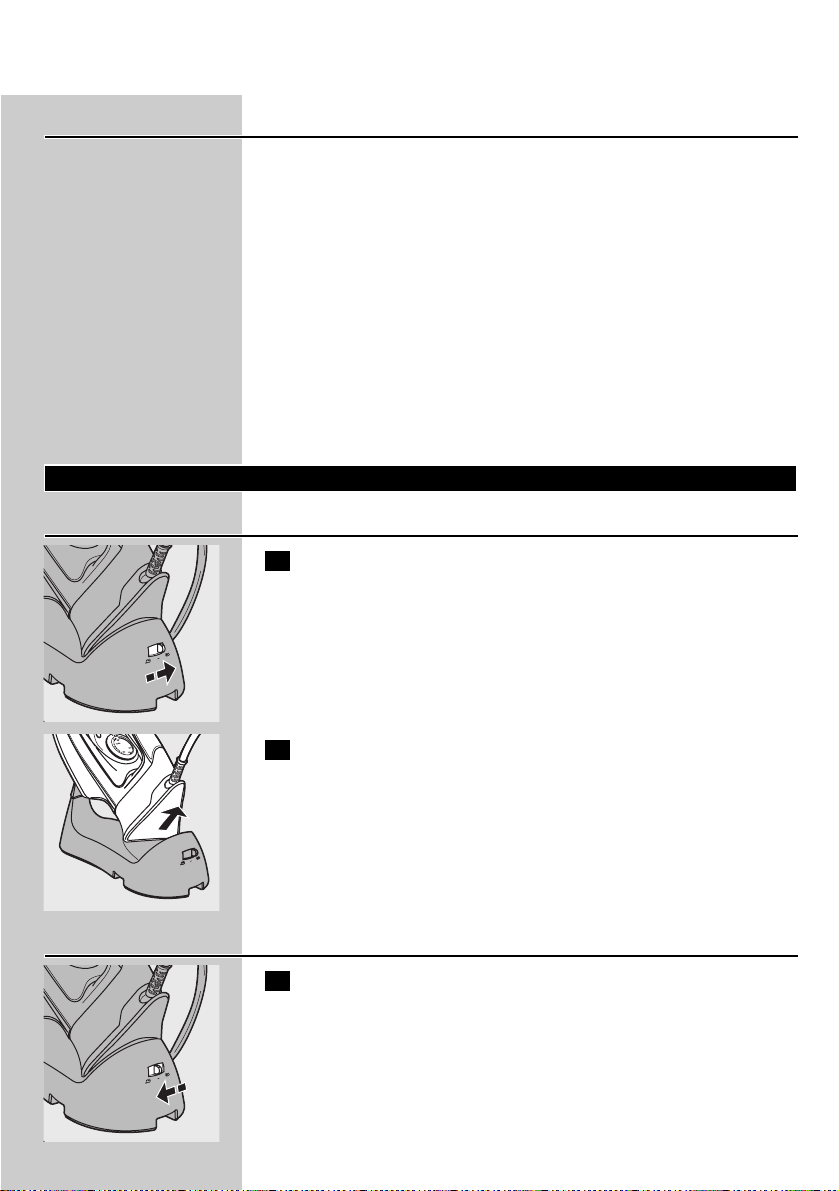
Setting the temperature
C
1 Put the iron on the iron stand.
C
2 Set the required ironing temperature by turning the
temperature dial to the appropriate position (see section 'Tips'
for extra information).
Check the laundry care label for the required ironing temperature:
C
3 Put the mains plug in an earthed wall socket.The temperature
light goes on to indicate that the iron is heating up.
◗ The iron is hot enough when the temperature light goes out.
◗ During ironing the temperature light goes on from time to time.
This indicates that the iron is heating up to the right temperature.
◗ If you have been ironing at a high temperature and subsequently
set the temperature dial to a lower setting, wait until the
temperature light goes on again before you continue ironing.This
will prevent damage to your fabrics.
◗ Some parts of the iron have been lightly greased.This may cause
the iron to give off some smoke when you switch it on for the
first time.After a short while, however, this will cease.
ENGLISH 9
N
Steam setting
0 (see 'Ironing
without steam')
1-2
3-6
Temperature
setting
1
2
3 to MAX
Type of fabric
Synthetic fabrics (e.g.
acetate, acrylic,
viscose, polyamide,
polyester) and silk
Wool
Cotton, linen
Please note that Z
on the label means
that the article cannot
be ironed.
Symbol on
laundry care label
B
C
D
Z
I
M
M
A
X
N
E
N
I
L
O
L
HI
N
O
L
N
NY
N
O
T
O
T
L
N
I
O
O
N
C
D
O
G
L
A
K
L
I
S
OL
A
D
O
E
W
S
A
N
A
L
Page 10
Tips
- If the fabric consists of various kinds of fibres, always select the
temperature required by the most delicate fibre, i.e. the lowest
temperature. For example: if an article consists of 60% polyester and
40% cotton, it should be ironed at the temperature indicated for
polyester (2) and without steam.
- If you do not know what kind or kinds of fabric an article is made of,
determine the right ironing temperature by ironing a part that will
not be visible when you wear or use the article.
- Silk, woollen and synthetic materials: iron the reverse side of the
fabric to prevent shiny patches.
- Velvet and other fabrics that tend to acquire shiny patches should be
ironed in one direction only (along with the nap) while applying very
little pressure.
- Start ironing the articles that require the lowest ironing temperature,
such as those made of synthetic fibres.
Using the appliance
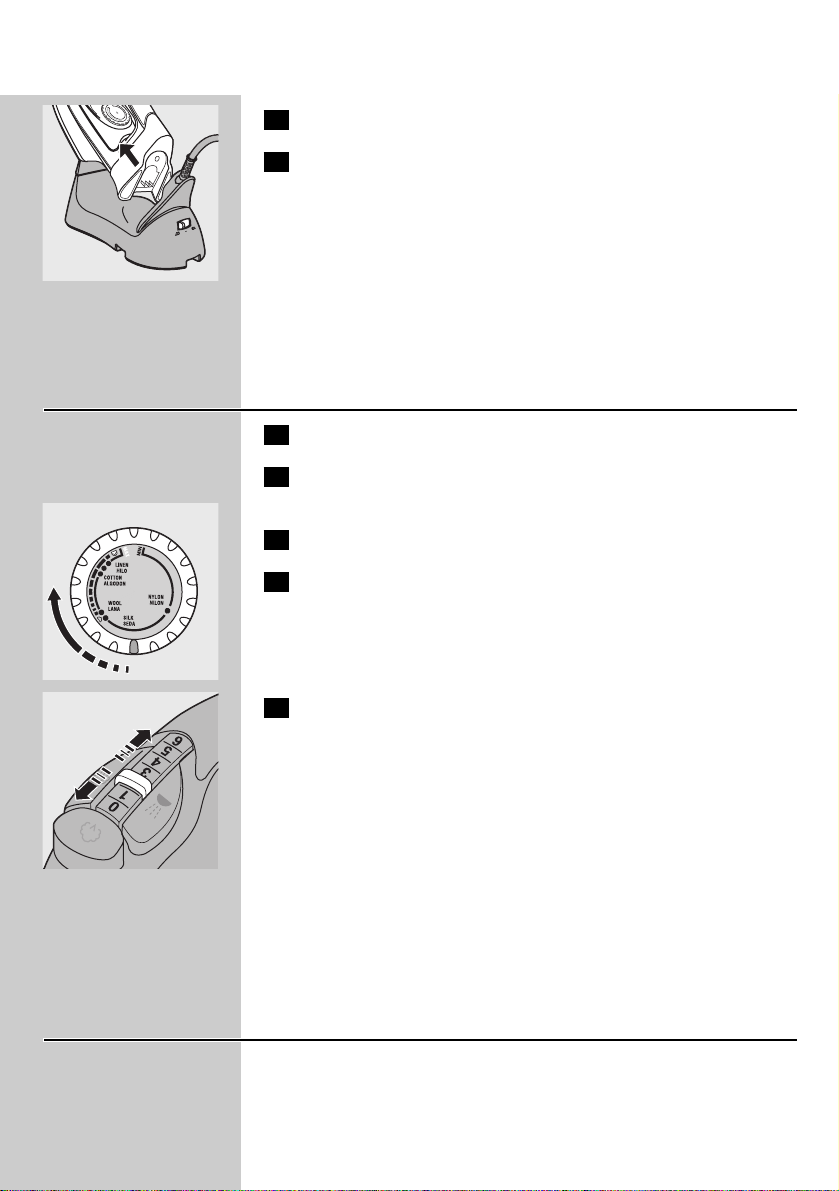
Corded ironing
C
1 Set the mode switch to position ª (corded ironing).
C
2 Take the iron from the stand.
◗ When you stop ironing for a while, you can put the iron on the
stand or on its heel.
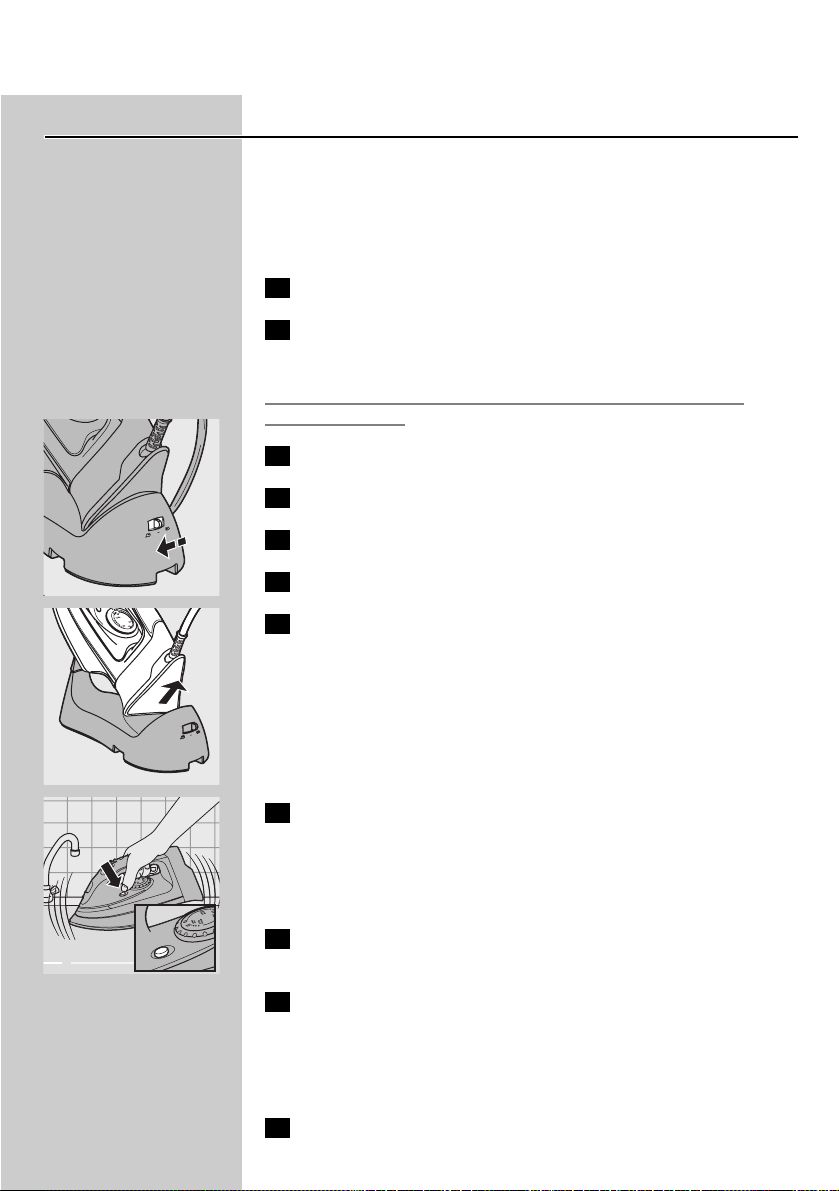
Cordless ironing
C
1 Set the mode switch to position ∫ (cordless ironing).
ENGLISH10
Page 11
C
2 Take the iron from the stand.
3 HI575 only: put the iron back on the stand when the
temperature light starts blinking.This indicates that the iron
has cooled down below the set temperature.
◗ When you stop ironing for a while, always put the iron on the
stand to allow it to heat up again.
◗ When you use the shot-of-steam or turbo-steam function, the
iron may cool down rather quickly.We advise you to iron in
corded mode when using these functions.
Steam ironing
1 Make sure that there is enough water in the water tank.
2 Select the recommended ironing temperature (see section
'Setting the temperature').
3 Put the iron on the stand.
C
4 Put the mains plug in the wall socket.
The iron starts heating up.
◗ As soon as the water in the water tank is hot enough for steam
ironing, the temperature light goes out.
C
5 Set the steam control to the required position to start steam
ironing.
◗ Steam ironing is only possible at higher ironing temperatures
(temperature settings 2 to MAX).
◗ Select the recommended steam setting:
B
1 - 2 for moderate steam (temperature settings 2)
B
3 - 6 for maximum steam (temperature settings 3 to MAX)
◗ During steam ironing the temperature light goes on from time to
time.This indicates that the iron is heating up to the set
temperature.
Ironing without steam
◗ To iron without steam, proceed as described for steam ironing but
set the steam control to position 0 (no steam).
1 Select the recommended ironing temperature (see section
'Setting the temperature').
ENGLISH 11
N
I
M
M
A
X
N
E
N
I
L
O
L
HI
N
O
L
N
NY
N
O
T
O
T
L
N
I
O
O
N
C
D
O
G
L
A
K
L
I
S
OL
A
D
O
E
W
S
A
N
A
L
Page 12
Features
Spray function
You can use the spray function to remove stubborn creases at any
temperature.
◗ Make sure that there is enough water in the water tank.
C
1 Press the spray button several times to moisten the article to
be ironed.
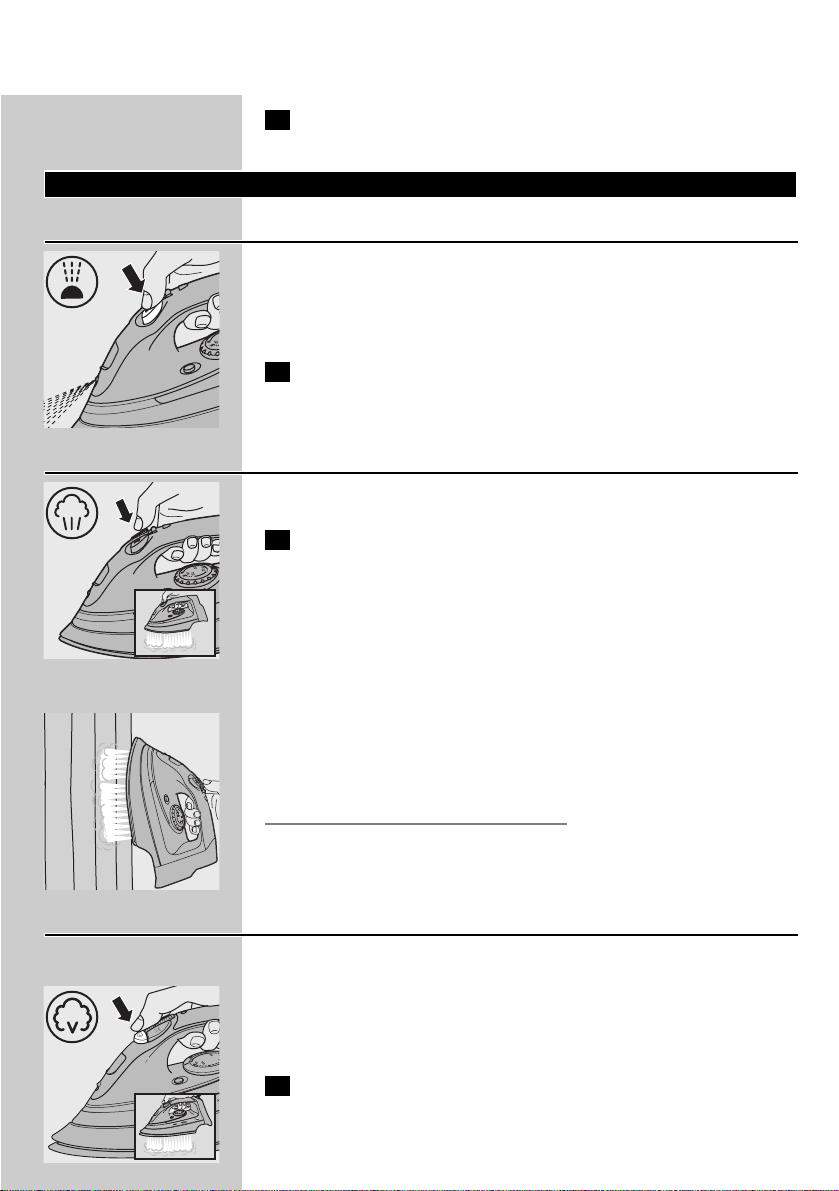
Shot of steam
A powerful shot of steam helps remove stubborn creases.
C
1 Press and hold the shot-of-steam button for a few seconds.
Then release the button.
◗ The shot-of-steam function can only be used at temperature
settings between 2 and MAX.
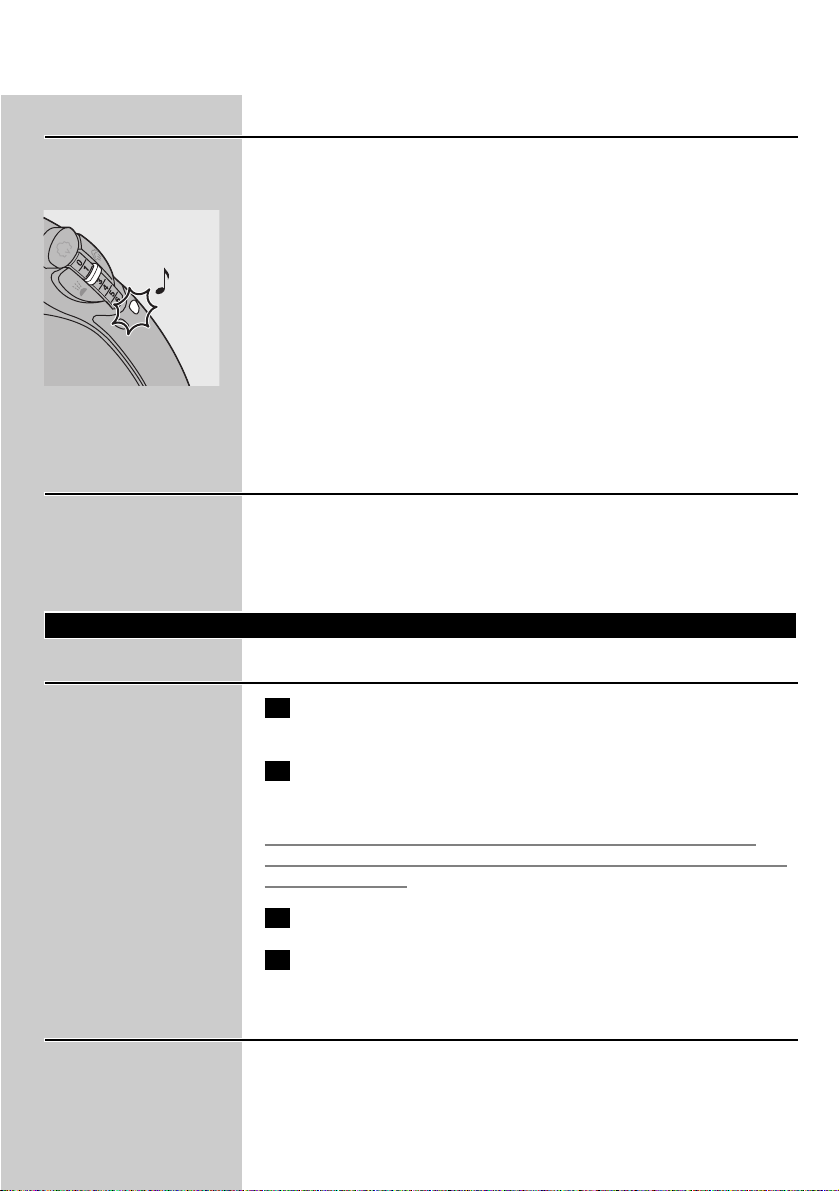
Vertical shot of steam
C
◗ The shot-of-steam function can also be used when you hold the
iron in vertical position.
This is useful for removing creases from hanging clothes, curtains etc.
Never direct the steam at people.
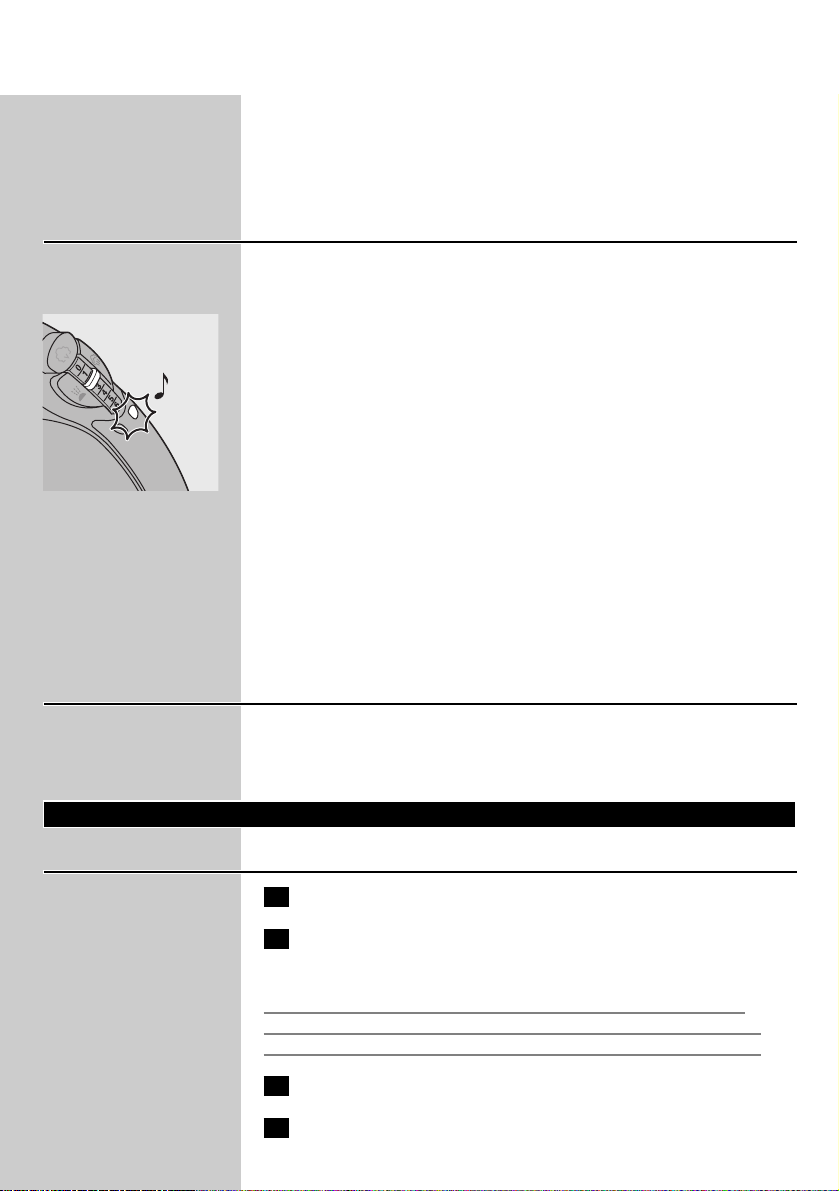
Turbo steam (HI575 only)
The turbo-steam function helps remove difficult creases.
◗ The turbo-steam function can only be used at temperature
settings between 3 and MAX.
C
1 Press and hold the turbo-steam button for a few seconds.Then
release the button.
Do not keep the button pressed for more than 10 seconds.Wait at
least one minute before using the turbo-steam function again to let the
iron heat up again.The iron is hot enough when the temperature light
goes out.
ENGLISH12
Page 13
Electronic safety shut-off function (HI575 only)
The electronic safety shut-off function automatically switches the iron
off if it has not been moved for a while.
C
◗ To indicate that the heating element has been switched off, the
auto-off light will start blinking and you will hear an audible signal.
- In horizontal position, this will happen after 30 seconds.
- In vertical position, this will happen after 8 minutes.
◗ To let the iron heat up again:
- Pick up the iron or move it slightly.
- The auto-off light goes out and the audible signal stops.
- Put the iron back on its stand.The iron will heat up again.
- When the temperature light has gone on and goes out again, the
iron is ready for use.
Drip stop
This iron is equipped with a drip-stop function to prevent water
dripping out of the soleplate: the iron automatically stops producing
steam when the temperature is too low.When this happens you may
hear a click.
Cleaning and maintenance
After ironing
1 Remove the mains plug from the wall socket and let the iron
cool down.
2 Wipe scale and any other deposits off the soleplate with a
damp cloth and a non-abrasive (liquid) cleaning agent.
To keep the soleplate smooth, you should avoid hard contact with
metal objects. Never use a scouring pad, vinegar or other chemicals to
clean the soleplate.
3 Clean the upper part of the iron with a damp cloth.
4 Regularly rinse the water tank with water. Empty the water
tank after cleaning.
Calc-Clean function
Use the Calc-Clean function once every two weeks to remove scale
and impurities from the soleplate. If the water in your area is very hard
(i.e. when flakes come out of the soleplate during ironing), you should
use the Calc-Clean function more frequently.
ENGLISH 13
Page 14
1 Set the steam control to position 0.
2 Open the cap of the filling opening and fill the water tank up to
the maximum level.Then close the cap again.
Do not pour vinegar or other descaling agents into the water tank.
3 Put the iron on its stand.
4 Set the temperature dial to MAX.
5 Put the mains plug in the wall socket.
C
6 Set the mode switch to position ∫ (cordless).
C
7 Wait until the temperature light goes out and then remove the
iron from the stand.
C
8 Hold the iron over the sink, press and hold the Calc-Clean
button and gently shake the iron to and fro.
Steam and boiling water will come out of the soleplate. Scale (if any)
will be flushed out.
9 Release the Calc-Clean button after one minute or when the
water tank is empty.
10 Repeat the Calc-Clean process if the water coming out of the
iron still contains a lot of scale particles.
After the Calc-Clean process
1 Put the iron back on the stand to let the soleplate dry.
2 Unplug the iron when the light has gone out.
3 Move the iron gently over a piece of used cloth to remove any
water stains that may have formed on the soleplate.
4 Let the iron cool down before you store it.
ENGLISH14
Page 15
Storage
Make sure the iron has cooled down sufficiently before you put it away.
1 Remove the mains plug from the wall socket and let the iron
cool down.
2 Set the steam control to position 0 (no steam).
C
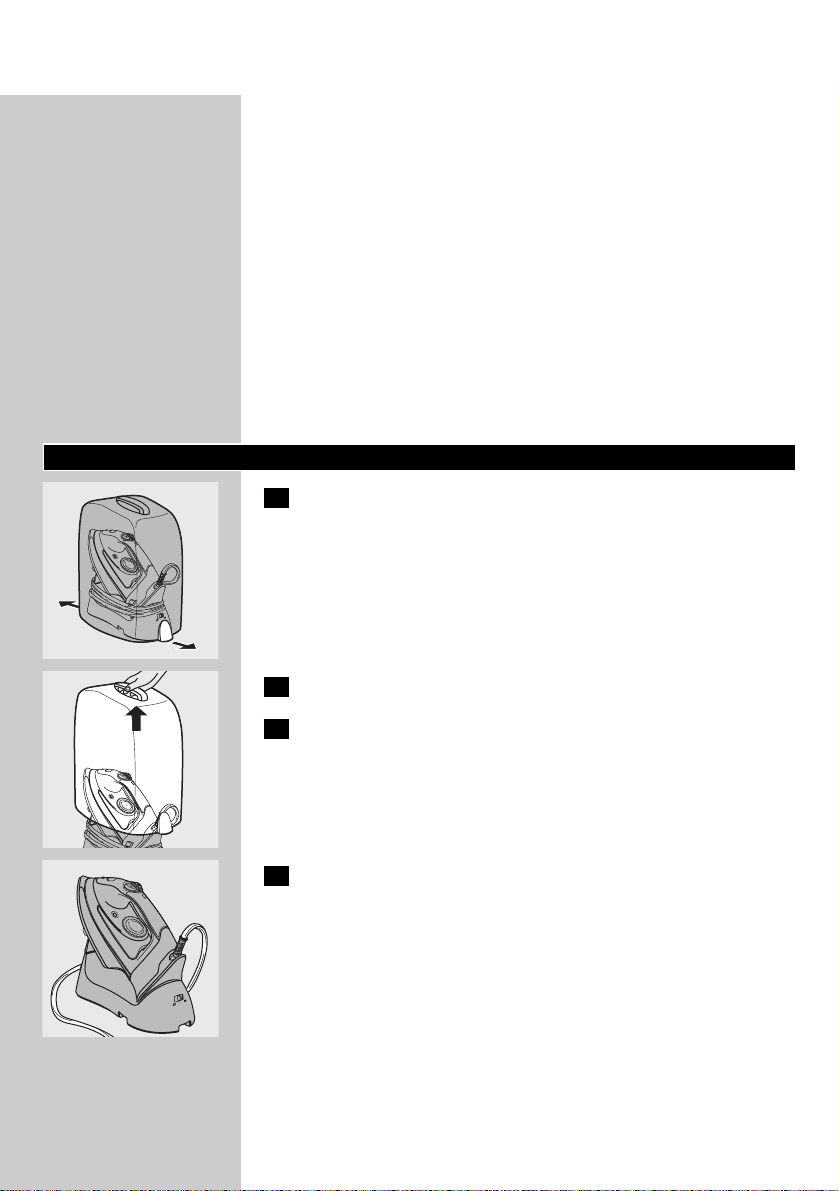
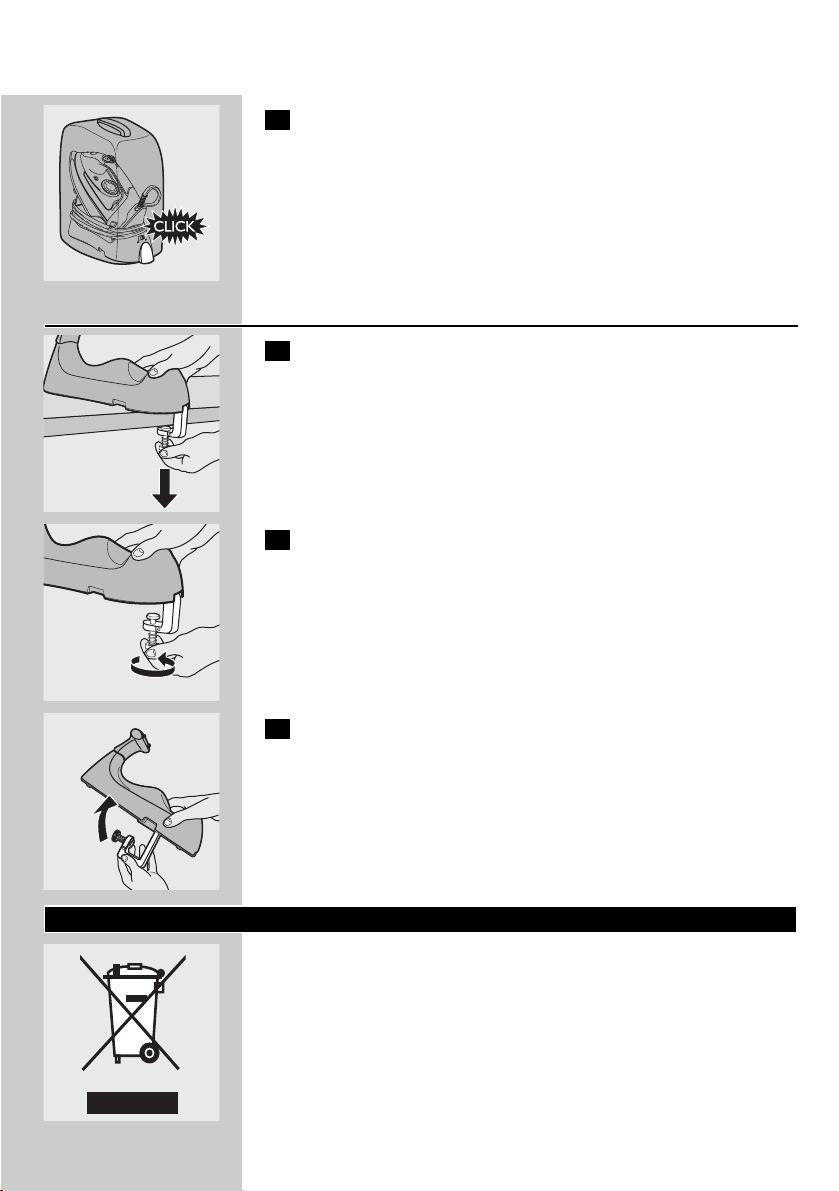
3 Set the mode switch to position ∫ (cordless).
C
4 Empty the water tank.
C
5 Put the iron on the stand and set the mode switch to the
storage position (-).
The iron, the power unit and the stand are then locked together.
C
◗ You can wind the cord round the stand and fix the end of the
cord with the cord clip.
6 Place the carry case over the stand (HI575/571 only).
C
7 Press on the case to lock it onto the stand ('click') (HI575/571
only).
ENGLISH 15
MIN
MA
X
N
E
N
I
L
O
L
I
H
N
O
L
N
NY
N
O
T
T
LO
N
I
O
O
N
C
D
O
G
L
A
K
L
I
S
L
O
A
D
O
E
W
S
A
N
A
L
MIN
M
A
X
N
E
N
I
L
O
L
I
H
N
O
L
Y
N
N
N
O
T
O
T
L
N
I
O
O
N
C
D
O
G
L
A
K
L
I
S
L
O
A
D
O
E
W
S
A
N
A
L
Page 16
Storing the stand clamp
C
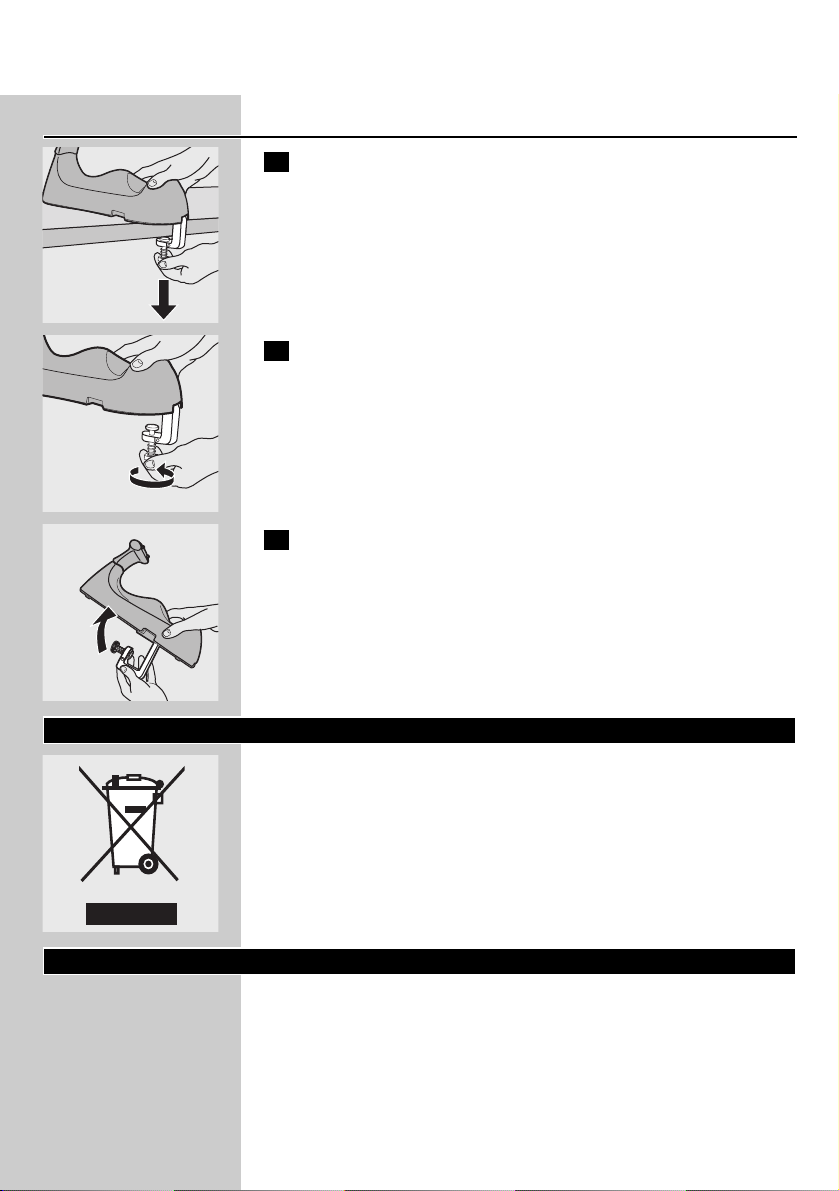
1 Unlock the stand clamp.
C
2 Screw in the fixing screw completely.
C
3 Fold the stand clamp into the stand.
Environment
C
◗ Do not throw the appliance away with the normal household
waste at the end of its life, but hand it in at an official collection
point for recycling. By doing this you will help to preserve the
environment.
Guarantee & service
If you need information or if you have a problem, please visit the Philips
website at www.philips.com or contact the Philips Customer Care
Centre in your country (you will find its phone number in the
worldwide guarantee leaflet). If there is no Customer Care Centre in
your country, turn to your local Philips dealer or contact the Service
Department of Philips Domestic Appliances and Personal Care BV.
ENGLISH16
Page 17

Загальний опис (мал. 1)
A Кнопка турбо-подачі пари 0 (лише модель HI575)
B Кнопка розпилювача T
C Кнопка викиду пари 9
D Регулятор пари
0= без пари
1= мінімальний вихід пари
6= максимальний вихід пари
E Індикатор автоматичного вимкнення (лише модель HI575)
F Індикатор температури
G Чохол (лише моделі HI575/571)
H М'яка ручка (лише модель HI575)
I Затискач для шнура
J Блок живлення
K Перемикач режиму
∫ = прасування без шнура
π = положення зберігання
ª = прасування зі шнуром
L Підставка
M Затискач підставки
N Склянка для наливання води
O Табличка
P Підошва
Q Покажчик рівня води
R Регулятор температури
S Кнопка Calc-Clean для чищення та видалення накипу
T Отвір для води із кришкою
U Носик розпилювача
Важлива інформація
Уважно прочитайте ці інструкції перед тим, як використовувати
пристрій, та зберігайте їх для подальшого використання.
◗ Перед тим, як приєднувати пристрій до мережі, перевірте, чи
збігається напруга, вказана на таблиці з даними, із напругою у
мережі.
◗ Підключайте пристрій лише до заземленої розетки.
◗ Не використовуйте пристрій, якщо на штекері, шнурі або
самому пристрої помітні пошкодження,або якщо пристрій
упав або протікає.
◗ Регулярно перевіряйте, чи не пошкоджений шнур.
◗ Якщо шнур пошкоджений, його можна замінити у сервісному
центрі Philips або кваліфікованими особами для запобігання
небезпеки.
◗ Ніколи не залишайте пристрій без нагляду,коли він
приєднаний до мережі.
◗ Ніколи не занурюйте праску і підставку, якщо така входить в
комплект, у воду.
◗ Зберігайте пристрій подалі від дітей.
УКРАЇНСЬКА 17
Page 18
18
◗ Температура підошви праски може бути дуже високою і
спричинити опіки.
◗ Не допускайте, щоб шнур живлення торкався гарячої підошви.
◗ Після прасування, під час чищення пристрою, наповнення або
спорожнення резервуару для води,а також якщо Ви навіть
ненадовго залишаєте праску: встановлюйте регулятор пари у
положення O, кладіть праску на п'яту та витягайте штепсель з
розетки.
◗ Використовуйте праску лише з підставкою, що додається.
◗ Завжди ставте і використовуйте праску і підставку,якщо така
входить у комплект, на стійкій, рівній горизонтальній поверхні.
◗ Не заливайте у резервуар для води парфуми, оцет, крохмаль,
засоби проти накипу, засоби для прасування чи інші хімікати.
◗ Цей пристрій призначений виключно для побутового
використання.
Перед першим використанням
C
1 Розблокуйте чохол (лише моделі HI575/571)
C
2 Зніміть чохол (лише моделі HI575/571)
3 Зніміть усі наклейки та захисну плівку з підошви та
почистіть її м'якою ганчіркою.
C
4 Повністю розмотайте шнур.
УКРАЇНСЬКА
MIN
M
A
X
N
E
N
I
L
O
L
I
H
N
O
L
Y
N
N
N
O
T
O
T
L
N
I
O
O
N
C
D
O
G
L
A
K
L
I
S
L
O
A
D
O
E
W
S
A
N
A
L
MIN
M
A
X
N
E
N
I
L
O
L
I
H
N
O
L
Y
N
N
N
O
T
T
LO
N
I
O
O
N
C
D
O
G
L
A
K
L
I
S
L
O
A
D
O
E
W
S
A
N
A
L
N
I
M
M
A
X
N
E
N
I
L
O
IL
H
N
O
L
Y
N
N
N
O
T
O
T
L
N
I
O
O
N
C
D
O
LG
A
LK
I
S
L
O
A
D
O
E
W
S
A
N
A
L
Page 19
Підготовка до використання
Закріплення підставки за допомогою затискача
C
1 Розкладіть затискач на нижній частині підставки, прикріпіть
його до прасувальної дошки або іншої стійкої поверхні,
наприклад, до столу.
Гумові ніжки на дні запобігають ковзанню підставки.
◗ Підставку можна також поставити на прасувальну дошку без
затискача. Тоді затискач можна залишати складеним.
Не ставте підставку близько до краю стола, щоб вона випадково не
перекинулася.
Наповнення резервуару для води
1 Витягніть штепсель із розетки.
2 Налаштуйте в положення 0 (= без пари).
C
3 Встановіть перемикач режиму на ∫ (прасування без
шнура).
C
4 Зніміть праску з підставки.
5 Поставте праску на п'яту і відкрийте кришку отвору для
води.
C
6 За допомогою спеціальної склянки наповніть резервуар
водою і закрийте отвір кришкою.
Якщо вода дуже жорстка, радимо розбавляти її рівною кількістю
фільтрованої води або використовувати лише фільтровану воду.
Не наповнюйте резервуар для води вище позначки MAX.
Не заливайте у резервуар для води парфуми, оцет, крохмаль, засоби
проти накипу, засоби для прасування чи інші хімікати.
19УКРАЇНСЬКА
N
I
M
M
A
X
N
E
N
I
L
O
L
HI
N
O
L
N
NY
N
O
T
O
T
L
N
I
O
O
N
C
D
O
G
L
A
K
L
I
S
OL
A
D
O
E
W
S
A
N
A
L
Page 20
20
Налаштування температури
C
1 Поставте праску на підставку.
C
2 Встановіть необхідне значення температури прасування,
повертаючи регулятор до відповідного положення
(додаткову інформацію див. у розділі "Поради").
Перевірте значення допустимої температури прасування одежі на
етикетці:
C
3 Вставте штепсель у розетку із заземленням. Засвічується
індикатор температури, показуючи, що праска нагрівається.
◗ Коли індикатор температури згасає, це означає, що праска
достатньо гаряча.
◗ Під час прасування індикатор температури час від часу
засвічується. Отже,праска нагрівається до потрібної
температури.
◗ Якщо Ви прасували за високої температури, а потім встановили
регулятор у положення нижчої температури, перед тим, як
продовжувати прасування,зачекайте, поки індикатор
температури не засвітиться знову. Це дозволить запобігти
пошкодженню тканини.
◗ Деякі частини праски були трохи змащені. Тому під час
першого увімкнення з праски може вийти дим. Це незабаром
припиниться.
УКРАЇНСЬКА
N
Налаштування
пари
0 (див. розділ
"Прасування без
пари")
1-2
3-6
Налаштування
температури
1
2
3 до MAX
Тип тканини
Синтетичні тканини
(наприклад, ацетат,
акрил, віскоза,
поліамід, поліефір) і
шовк
Вовна
Бавовна, льон
Зверніть увагу, що
символ Z на
етикетці означає, що
цей одяг не можна
прасувати.
Символ на
етикетці одягу
B
C
D
Z
I
M
M
A
X
N
E
N
I
L
O
L
HI
N
O
L
N
NY
N
O
T
O
T
L
N
I
O
O
N
C
D
O
G
L
A
K
L
I
S
OL
A
D
O
E
W
S
A
N
A
L
Page 21
21
Поради
- Якщо одежа складається з різних типів тканини, завжди
вибирайте температуру, необхідну для найделікатнішої тканини,
тобто найнижчу температуру. Наприклад: якщо тканина містить
60% поліестера та 40% бавовни, прасуйте за температури,
вказаної для поліестера (2), і без пари.
- Якщо невідомо, до якого типу або типів відноситься тканина
виробу, визначте відповідну температуру, попрасувавши шматок
тканини, якого не видно під час носіння одягу.
- Шовк, вовна та синтетика: для запобігання появи лиску на
тканині, прасуйте зі зворотної сторони тканини.
- Вельвет та іншу тканину, схильну до лиску, необхідно прасувати
лише в одному напрямку (за ворсом), несильно притискаючи.
- Починайте прасувати вироби, які потребують найнижчої
температури, наприклад, вироби з синтетичних тканин.
Застосування пристрою
Прасування зі шнуром
C
1 Встановіть перемикач режиму на ª (прасування зі
шнуром).
C
2 Зніміть праску з підставки.
◗ Припинивши на якийсь час прасувати, праску можна поставити
на підставку або на п'яту.
Прасування без шнура
C
1 Встановіть перемикач режиму на ∫ (прасування без
шнура).
УКРАЇНСЬКА
Page 22
22
C
2 Зніміть праску з підставки.
3 Лише модель HI575: коли індикатор температури почне
мигати, поставте праску знову на підставку. Це показує, що
праска охолонула нижче встановленої температури.
◗ Припинивши на якийсь час прасувати, завжди ставте праску на
підставку,щоб вона знову нагрілася.
◗ Під час використання функцій викиду пари або турбо-
відпарювання, праска може досить швидко охолонути.
Використовуючи ці функції, рекомендується прасувати у
режимі зі шнуром.
Прасування з відпарюванням
1 Перевірте, чи у резервуарі достатньо води.
2 Виберіть рекомендовану температуру прасування (див.
розділ "Налаштування температури").
3 Поставте праску на підставку.
C
4 Вставте штепсель у розетку.
Праска починає нагріватися.
◗ Як тільки вода у резервуарі достатньо нагріється, індикатор
температури згасне.
C
5 Встановіть регулятор пари у відповідне положення, щоб
почати прасувати з відпарюванням.
◗ Прасування з відпарюванням можливе лише за вищої
температури (налаштування температури від 2 до MAX).
◗ Виберіть рекомендоване налаштування пари:
B
1-2 - для помірної обробки парою (налаштування температури
2)
B
3-6 - для максимальної обробки парою (налаштування
температури від 3 до MAX)
◗ Під час прасування з відпарюванням індикатор температури
час від часу засвічується. Це означає, що праска нагрівається і
підтримує встановлену температуру.
Прасування без пари
◗ Для прасування без пари виконуйте кроки, описані для
прасування з відпарюванням, але встановіть регулятор пари в
положення 0 (без пари).
УКРАЇНСЬКА
N
MI
M
A
X
N
E
N
I
L
O
L
HI
N
O
L
N
NY
N
O
T
O
T
L
N
I
O
O
N
C
D
O
G
L
A
K
L
I
S
OL
A
D
O
E
W
S
A
N
A
L
Page 23
23
1 Виберіть рекомендовану температуру прасування (див.
розділ "Налаштування температури").
Характеристики
Функція розпилення
Функцію розпилення можна використовувати за будь-якої
температури для прасування складних складок.
◗ Перевірте, чи у резервуарі достатньо води.
C
1 Натисніть кнопку розпилення декілька разів, щоб
зволожити тканину.
Викид пари
Потужний струмінь пари допоможе розпрасувати складні складки.
C
1 Натисніть та кілька секунд тримайте кнопку викиду пари.
Потім відпустіть кнопку.
◗ Функцію подачі струменя пари можна використовувати лише з
налаштуваннями температури між 2 та MAX.
Вертикальний викид пари
C
◗ Функцію викиду пари можна використовувати також,
тримаючи праску в вертикальному положенні.
Це згодиться для розпрасування складок на підвішеному одязі,
занавісках тощо.
Ніколи не спрямовуйте пару на людей.
Турбо-відпарювання (лише модель HI575)
Функція турбо-відпарювання допомагає розпрасувати важкі
складки.
◗ Функцію турбо-відпарювання можна використовувати лише за
температури між 3 і MAX.
C
1 Натисніть та кілька секунд тримайте кнопку турбо-
відпарювання. Потім відпустіть кнопку.
Не тримайте кнопку більше 10 секунд. Перед повторним
УКРАЇНСЬКА
Page 24
24
використанням функції турбо-відпарювання зачекайте щонайменше
хвилину, щоб дати прасці знову нагрітися. Праска достатньо гаряча,
коли індикатор температури згасає.
Система безпечного електронного вимкнення (лише
модель HI575)
Система безпечного електронного вимкнення автоматично
вимикає праску, якщо її не рухали протягом певного періоду часу.
C
◗ Під час автоматичного відключення нагрівального елементу
почне блимати індикатор автоматичного вимкнення, і
прозвучить звуковий сигнал.
- Якщо праска знаходиться у горизонтальному положенні, вона
вимкнеться через 30 секунд.
- Якщо праска знаходиться у вертикальному положенні, вона
вимкнеться через 8 секунд.
◗ Щоб праска знову нагрілася:
- підніміть її або ледь порухайте.
- Індикатор автоматичного вимкнення згасне, і звуковий сигнал
вимкнеться.
- Поставте праску назад на підставку. Праска починає нагріватися
знову.
- Коли індикатор температури загориться і згасне, праскою можна
прасувати.
Система запобігання протіканню води
Праску обладнано функцією запобігання витіканню води з підошви:
за надто низької температури праска автоматично припиняє
подачу пари. Коли це відбувається, чути клацання.
Чищення та догляд
Після прасування
1 Витягніть штепсель із розетки і дайте прасці охолонути.
2 Зітріть накип чи інші відкладення з підошви вологою
тканиною з неабразивним (рідким) засобом для чищення.
Щоб підошва залишалася гладкою, захищайте її від контакту з
металевими предметами. Ніколи не використовуйте шліфувальн
подушечки, оцет чи інші хімічні речовини для чищення підошви.
3 Чистіть верхню частину праски вологою ганчіркою.
4 Регулярно промивайте резервуар для води. Після чищення
спорожніть резервуар для води.
УКРАЇНСЬКА
Page 25
25
Функція Calc-Clean
Для видалення накипу та інших забруднень з підошви
використовуйте функцію видалення накипу Calc-Clean двічі на
місяць. Якщо вода дуже жорстка (тобто коли під час прасування з
підошви виходять частки накипу), цю функцію необхідно
використовувати частіше.
1 Налаштуйте регулятор пари у положення 0.
2 Відкрийте кришку отвору для води і наповніть резервуар
водою до максимального рівня. Потім закрийте кришку.
Не заливайте в резервуар для води оцет та інші речовини дл
видалення накипу.
3 Поставте праску на підставку.
4 Встановіть регулятор температури у положення MAX.
5 Вставте штепсель у розетку.
C
6 Встановіть перемикач режиму на ∫ (без шнура).
C
7 Зачекайте, поки не згасне індикатор температури, і зніміть
праску з підставки.
C
8 Тримаючи праску над раковиною, натисніть і потримайте
кнопку Calc-Clean, і повільно порухайте праскою впередназад.
З підошви разом з парою тектиме гаряча вода. При цьому буде
вимиватися накип (якщо він є).
9 Відпустіть кнопку Calc-Clean через хвилину або коли
резервуар для води буде порожній.
10 Повторіть процедуру видалення накипу Calc-Clean, якщо
вода, що витікає з праски, містить багато частинок накипу.
Після використання функції видалення накипу CalcClean
1 Поставте праску на підставку, щоб дати підошві висохнути.
УКРАЇНСЬКА
Page 26

26
2 Витягніть штепсель із розетки, коли індикатор згасне.
3 Повільно ведіть праскою по шматку ганчірки, щоб видалити
плями, які можуть утворитися на підошві.
4 Перед зберіганням дайте прасці охолонути.
Зберігання
Перед тим, як ставити праску на зберігання, перевірте, чи праск
достатньо охолонула.
1 Витягніть штепсель із розетки і дайте прасці охолонути.
2 Встановіть регулятор пари у положення 0 (без пари).
C
3 Встановіть перемикач режиму на ∫ (без шнура).
C
4 Спорожніть резервуар для води.
C
5 Поставте праску на підставку і встановіть регулятор режиму
у положення зберігання (-).
Праска, блок живлення і підставка фіксуються одне з одним.
C
◗ Шнур можна намотати навколо підставки, а його кінець
зафіксувати за допомогою затискача.
6 Встановіть чохол на підставку (лише моделі HI575/571)
УКРАЇНСЬКА
IN
M
M
AX
N
E
N
I
L
O
L
I
H
N
O
L
N
NY
N
O
T
T
LO
N
I
O
O
N
C
D
O
G
L
A
K
L
I
S
L
O
A
D
O
E
W
S
A
N
A
L
Page 27
27
C
7 Натисніть на чохол, щоб зафіксувати його на підставці до
клацання (лише моделі HI575/571).
Зберігання затискача підставки
C
1 Від'єднайте затискач підставки.
C
2 Повністю закрутіть фіксуючий гвинт.
C
3 Складіть затискач у підставку.
Навколишнє середовище
C
◗ Не викидайте пристрій разом із звичайними побутовими
відходами, а здавайте його в офіційний пункт прийому для
повторної переробки. Таким чином Ви допоможете захистити
довкілля.
УКРАЇНСЬКА
IN
M
M
A
X
N
E
N
I
L
O
L
I
H
N
O
L
Y
N
N
N
O
T
O
T
L
N
I
O
O
N
C
D
O
G
L
A
K
L
I
S
L
O
A
D
O
E
W
S
A
N
A
L
Page 28

Гарантія та обслуговування
Якщо Вам необхідна інформація або у Вас виникла проблема,
відвідайте веб-сторінку компанії Philips www.philips.com, або
зверніться до Центру обслуговування клієнтів компанії Philips у
Вашій країні (телефон можна знайти на гарантійному талоні). Якщо
у Вашій країні немає Центру обслуговування клієнтів, зверніться до
місцевого дилера або у відділ технічного обслуговування компанії
Philips Domestic Appliаnces аnd Personаl Cаre BV.
28 УКРАЇНСЬКА
Page 29
Opći opis (slika 1)
A Gumb za turbo paru 0 ( samo HI575)
B Gumb raspršivača T
C Gumb za mlaz pare 9
D Kontrola pare
0= bez pare
1= najmanje pare
6= najviše pare
E Indikator automatskog isključivanja (samo HI575)
F Indikator temperature
G Kutija za nošenje (samo HI575/571)
H Meka ručka (samo HI575)
I Kopča za učvršćivanje kabela
J Jedinica za napajanje
K Prekidač za odabir načina rada
∫ = glačanje bez priključivanja kabela
π = položaj za odlaganje
ª = glačanje uz priključen kabel
L Postolje
M Spojnica za postolje
N Posudica za punjenje
O Pločica s oznakom
P Površina za glačanje
Q Prozor za provjeravanje razine vode
R Regulator temperature
S Gumb za čišćenje/uklanjanje kamenca
T Otvor za punjenje s poklopcem
U Mlaznica za raspršivanje
Važno
Prije korištenja aparata pažljivo pročitajte ove upute za uporabu i
spremite ih za buduće potrebe.
◗ Prije priključivanja aparata provjerite odgovara li mrežni napon
naveden na naljepnici s podacima naponu lokalne mreže.
◗ Priključite aparat samo u uzemljenu zidnu utičnicu.
◗ Nemojte koristiti aparat ako su na utikaču, kabelu ili samom
aparatu vidljiva oštećenja, ako je aparat pao na pod ili ako iz njega
curi voda.
◗ Redovito provjeravajte je li kabel oštećen.
◗ Ako se kabel za napajanje ošteti, mora ga zamijeniti tvrtka Philips,
ovlašteni Philips servisni centar ili kvalificirana osoba kako bi se
izbjegle potencijalno opasne situacije.
◗ Nikada ne ostavljajte aparat bez nadzora kada je spojen na
mrežno napajanje.
◗ Nikada ne uranjajte u vodu glačalo i postolje, ako je isporučeno.
◗ Aparat držite izvan dohvata djece.
◗ Površina za glačanje se može jako zagrijati i uzrokovati opekotine
ako se dodiruje.
HRVATSKI 29
Page 30

◗ Pazite da kabel ne dođe u dodir s površinom za glačanje kada je
površina vruća.
◗ Nakon glačanja, tijekom čišćenja aparata,punjenja ili pražnjenja
spremišta za vodu i kad nakratko ostavljate glačalo bez nadzora:
postavite kontrolu pare na položaj O,postavite glačalo u uspravni
položaj i izvucite kabel za napajanje iz zidne utičnice.
◗ Ovo glačalo koristite isključivo s isporučenim postoljem.
◗ Uvijek koristite i stavljajte glačalo i postolje, ako je isporučeno, na
stabilnu, ravnu i vodoravnu površinu.
◗ Nemojte stavljati parfem, ocat, izbjeljivač, sredstva protiv kamenca,
sredstva za olakšavanje glačanja ili neka druga kemijska sredstva u
spremište za vodu.
◗ Ovaj aparat je namijenjen isključivo uporabi u kućanstvu.
Prije prve uporabe
C
1 Otvorite kutiju za nošenje (samo HI575/571).
C
2 Odvojite kutiju za nošenje (samo HI575/571).
3 Uklonite sve naljepnice i zaštitne folije s površine za glačanje te
je očistite mekom tkaninom.
C
4 Potpuno odmotajte kabel za napajanje.
HRVATSKI30
IN
M
M
A
X
N
E
N
I
L
O
L
I
H
N
O
L
Y
N
N
N
O
T
O
T
L
N
I
O
O
N
C
D
O
G
L
A
K
L
I
S
L
O
A
D
O
E
W
S
A
N
A
L
MIN
M
A
X
N
E
N
I
L
O
L
I
H
N
O
L
Y
N
N
N
O
T
T
LO
N
I
O
O
N
C
D
O
G
L
A
K
L
I
S
L
O
A
D
O
E
W
S
A
N
A
L
N
I
M
M
A
X
N
E
N
I
L
O
IL
H
N
O
L
Y
N
N
N
O
T
O
T
L
N
I
O
O
N
C
D
O
LG
A
LK
I
S
L
O
A
D
O
E
W
S
A
N
A
L
Page 31

Priprema za uporabu
Pričvršćivanje spojnice za postolje
C
1 Rasklopite spojnicu na dnu postolja i pričvrstite je na dasku za
glačanje ili neku drugu stabilnu površinu, kao što je površina
stola.
Gumena podloga na dnu sprječava proklizavanje postolja.
◗ Postolje možete postaviti na dasku za glačanje i bez spojnice, koja
u tom slučaju ostaje sklopljena.
Nemojte stavljati postolje preblizu rubu stola jer biste ga mogli slučajno
srušiti.
Punjenje spremišta za vodu
1 Izvucite kabel za napajanje iz zidne utičnice.
2 Postavite kontrolu pare na 0 (=bez pare).
C
3 Postavite prekidač načina rada na ∫ (glačanje bez
priključivanja kabela).
C
4 Uzmite glačalo s postolja.
5 Stavite glačalo u uspravan položaj i otvorite poklopac otvora za
punjenje.
C
6 Pomoću posudice za punjenje ulijte vodu u spremište,a zatim
zatvorite poklopac otvora za punjenje.
Ako je voda u vašem području vrlo tvrda, savjetujemo da je pomiješate
s jednakom količinom destilirane vode ili koristite samo destiliranu
vodu.
Nemojte puniti spremište za vodu iznad oznake MAX.
Nemojte stavljati parfem, ocat, izbjeljivač, sredstva protiv kamenca
sredstva za olakšavanje glačanja ili neka druga kemijska sredstva u
spremište za vodu.
HRVATSKI 31
N
I
M
M
A
X
N
E
N
I
L
O
L
HI
N
O
L
N
NY
N
O
T
O
T
L
N
I
O
O
N
C
D
O
G
L
A
K
L
I
S
OL
A
D
O
E
W
S
A
N
A
L
Page 32

Postavljanje temperature
C
1 Stavite glačalo na postolje.
C
2 Postavite željenu temperaturu glačanja okretanjem regulatora
temperature u odgovarajući položaj (dodatne informacije
potražite u odjeljku "Savjeti").
Dozvoljenu temperaturu glačanja pronađite na ušivenoj markici:
C
3 Priključite utikač u uzemljenu zidnu utičnicu. Indikator
temperature se uključuje označavajući zagrijavanje glačala.
◗ Glačalo je dovoljno zagrijano kad se indikator temperature
isključi.
◗ Indikator temperature se povremeno uključuje i isključuje tijekom
glačanja, što znači da se glačalo zagrijava na određenu
temperaturu.
◗ Ako ste glačali pri visokoj temperaturi, a zatim postavili regulator
temperature na nižu postavku,pričekajte da se indikator
temperature ponovno uključi prije no što nastavite glačati.Time
ćete spriječiti oštećenja tkanine.
◗ Neki dijelovi glačala su malo podmazani.To može izazvati pojavu
dima prilikom prvog uključivanja glačala. Međutim, to će prestati
nakon nekog vremena.
HRVATSKI32
N
Postavka pare
0 (pogledajte
"Glačanje bez
pare")
1-2
3-6
Postavka
temperature
1
2
3 do MAX
Vrsta tkanine
Sintetika (acetat,
akril, viskoza,
poliamid, poliester) i
svila
Vuna
Pamuk, lan
Oznaka Z na
markici znači da se
odjevni predmet ne
smije glačati.
Simbol na ušivenoj
markici odjevnih
predmeta
B
C
D
Z
I
M
M
A
X
N
E
N
I
L
O
L
HI
N
O
L
N
NY
N
O
T
O
T
L
N
I
O
O
N
C
D
O
G
L
A
K
L
I
S
OL
A
D
O
E
W
S
A
N
A
L
Page 33

Savjeti
- Ako se tkanina sastoji od različitih vrsta vlakana, uvijek odaberite
temperaturu za najosjetljivije materijale, tj. najnižu temperaturu. Na
primjer: ako se tkanina sastoji od 60% poliestera i 40% pamuka, treba
se glačati pri odgovarajućoj temperaturi za poliester (2) i bez pare.
- Ako ne znate od kojeg materijala je odjevni predmet koji glačate,
isprobajte temperaturu glačanja na komadiću tkanine koji se ne vidi
prilikom nošenja.
- Svila, vuna i sintetički materijali: glačajte s naličja tkanine kako biste
izbjegli sjajne mrlje.
- Baršun i drugi materijali na kojima se mogu stvoriti sjajni tragovi
trebaju se glačati u samo jednom smjeru uz lagan pritisak.
- Glačanje započnite s materijalima koji zahtijevaju najniže temperature
glačanja, kao što je sintetika.
Korištenje aparata
Glačanje uz priključen kabel
C
1 Postavite prekidač za odabir načina rada u položaj ª (glačanje
uz priključen kabel).
C
2 Uzmite glačalo s postolja.
◗ Ako privremeno prekinete glačanje, glačalo možete odložiti na
postolje ili u uspravan položaj.
Glačanje bez priključivanja kabela
C
1 Postavite prekidač za odabir načina rada u položaj ∫ (glačanje
bez priključivanja kabela).
HRVATSKI 33
Page 34

C
2 Uzmite glačalo s postolja.
3 Samo HI575: kad indikator temperature počne treperiti, vratite
glačalo na postolje.To znači da se temperatura glačala spustila
ispod postavljene temperature.
◗ Kad privremeno prekinete glačanje, uvijek vratite glačalo na
postolje kako bi se ponovno zagrijalo.
◗ Kada koristite funkciju mlaza pare ili turbo pare, glačalo se može
brzo ohladiti. Savjetujemo vam da prilikom korištenja ovih funkcija
glačate uz priključen kabel za napajanje.
Glačanje s parom
1 Provjerite ima li u spremištu dovoljno vode.
2 Odaberite preporučenu temperaturu glačanja (pogledajte
odjeljak "Postavljanje temperature").
3 Stavite glačalo na postolje.
C
4 Priključite utikač u zidnu utičnicu.
Glačalo se počinje zagrijavati.
◗ Ako razina vode u spremištu nije dovoljna za glačanje, indikator
temperature se isključuje.
C
5 Postavite kontrolu pare na odgovarajući položaj za početak
glačanja s parom.
◗ Glačanje s parom je moguće samo pri višim temperaturama
glačanja (postavke temperature od 2 do MAX).
◗ Odaberite preporučenu postavku pare:
B
1 - 2 za umjerenu količinu pare (postavke temperature 2)
B
3 - 6 za najvišu količinu pare (postavke temperature 3 do MAX)
◗ Tijekom glačanja s parom indikator temperature se povremeno
uključuje, što znači da se glačalo zagrijava na postavljenu
temperaturu.
Glačanje bez pare
◗ Za glačanje bez pare slijedite upute za glačanje s parom, ali
postavite kontrolu pare na položaj 0 (bez pare).
1 Odaberite preporučenu temperaturu glačanja (pogledajte
odjeljak "Postavljanje temperature").
HRVATSKI34
N
MI
M
A
X
N
E
N
I
L
O
L
HI
N
O
L
N
NY
N
O
T
O
T
L
N
I
O
O
N
C
D
O
G
L
A
K
L
I
S
OL
A
D
O
E
W
S
A
N
A
L
Page 35

Značajke
Funkcija raspršivanja
Funkciju raspršivanja možete koristiti za uklanjanje nabora pri bilo kojoj
temperaturi.
◗ Provjerite ima li u spremištu dovoljno vode.
C
1 Pritisnite gumb za raspršivanje nekoliko puta kako biste navlažili
tkaninu koju glačate.
Mlaz pare
Snažan mlaz pare pomaže u glačanju nabora koji se teško glačaju.
C
1 Pritisnite i nekoliko sekundi držite gumb za mlaz pare, a zatim
ga otpustite.
◗ Funkcija mlaza pare se može koristiti isključivo pri postavkama
temperature između 2 i MAX.
Okomiti mlaz pare
C
◗ Mlaz pare se može koristiti i kada je glačalo u okomitom položaju.
To je korisno za uklanjanje nabora na izvješenoj odjeći, zavjesama itd.
Mlaz nikada nemojte usmjeravati prema ljudima.
Turbo para (samo HI575)
Ova funkcija pomaže kod uklanjanja nabora koji se teško glačaju.
◗ Funkcija za turbo paru se može koristiti isključivo pri postavkama
temperature između 3 i MAX.
C
1 Pritisnite i nekoliko sekundi držite gumb za turbo paru,a zatim
ga otpustite.
Nemojte držati gumb pritisnutim duže od 10 sekundi. Pričekajte
najmanje jednu minutu prije ponovnog korištenja funkcije za turbo paru
kako biste pustili glačalo da se ponovno zagrije. Kad se indikator
temperature isključi, glačalo je dovoljno zagrijano.
HRVATSKI 35
Page 36

Elektroničko automatsko isključivanje (samo HI575)
Elektroničko sigurnosno automatsko isključivanje isključuje glačalo ako
dulje vrijeme nije bilo pomaknuto.
C
◗ Indikator automatskog isključivanja počinje treperiti i čuje se
zvučni signal, što znači da je grijaći element isključen.
- U vodoravnom položaju to će se dogoditi nakon 30 sekundi.
- U okomitom položaju, to će se dogoditi nakon 8 minuta.
◗ Ako želite da se glačalo opet zagrije:
- podignite glačalo ili ga lagano pomaknite.
- Indikator automatskog isključivanja se isključuje i zvučni signal se
prekida.
- Vratite glačalo na postolje. Glačalo će se ponovno zagrijati.
- Kad se indikator temperature uključi i ponovno isključi, glačalo je
spremno za uporabu.
Funkcija zaustavljanja kapanja
Glačalo je opremljeno funkcijom za zaustavljanje kapanja koja sprječava
kapanje iz površine za glačanje: glačalo automatski prestaje proizvoditi
paru kad je temperatura preniska. Kad se to dogodi, možda ćete čuti
zvučni signal.
Čišćenje i održavanje
Nakon glačanja
1 Isključite utikač iz zidne utičnice i ostavite glačalo da se ohladi.
2 Obrišite kamenac ili bilo koju drugu nečistoću s površine za
glačanje vlažnom tkaninom i neabrazivnim (tekućim) sredstvom
za čišćenje.
Površina za glačanje uvijek treba biti glatka i zato izbjegavajte kontakt
površine za glačanje s metalnim predmetima. Nikada nemojte koristiti
spužvicu za ribanje, ocat ili druge kemikalije za čišćenje površine za
glačanje.
3 Očistite gornji dio glačala vlažnom tkaninom.
4 Redovito ispirite spremište za vodu.Ispraznite spremište za
vodu nakon čišćenja.
Funkcija Calc Clean
Koristite ovu funkciju jednom svaka dva tjedna kako biste uklonili
kamenac i druge nečistoće s površine za glačanje. Ako je voda u vašem
HRVATSKI36
Page 37

području vrlo tvrda (odnosno, ako tijekom glačanja iz površine za
glačanje izlaze djelići kamenca), ovu je funkciju potrebno koristiti češće.
1 Postavite kontrolu pare u položaj 0.
2 Otvorite poklopac otvora za punjenje i napunite spremište za
vodu do najviše razine, a zatim ponovno zatvorite poklopac.
U spremište za vodu ne ulijevajte ocat ili druga sredstva za uklanjanje
kamenca.
3 Stavite glačalo na postolje.
4 Postavite regulator temperature na MAX.
5 Priključite utikač u zidnu utičnicu.
C
6 Postavite prekidač za odabir načina rada u položaj ∫ (bez
priključivanja kabela).
C
7 Pričekajte da se indikator temperature isključi, a zatim uzmite
glačalo s postolja.
C
8 Držite glačalo iznad sudopera, pritisnite i držite gumb za
čišćenje od kamenca i blago tresite glačalo.
Iz površine za glačanje izlaze para i kipuća voda. Kamenac (ako ga ima)
se ispire.
9 Otpustite gumb za čišćenje kamenca nakon jedne minute ili kad
je spremište za vodu prazno.
10 Ponovite cijeli proces čišćenja kamenca ako voda koja curi iz
glačala još uvijek sadrži dosta kamenca.
Nakon postupka Calc-Clean
1 Vratite glačalo na postolje kako bi se površina za glačanje
osušila.
2 Kad se indikator isključi, isključite glačalo iz napajanja.
3 Lagano glačajte komad tkanine kako bi ste s površine za
glačanje uklonili moguće mrlje.
4 Ostavite glačalo da se potpuno ohladi prije odlaganja.
HRVATSKI 37
Page 38

Spremanje
Prije odlaganja glačala provjerite je li se dovoljno ohladilo.
1 Isključite utikač iz zidne utičnice i ostavite glačalo da se ohladi.
2 Postavite kontrolu pare na položaj 0 (=bez pare).
C
3 Postavite prekidač za odabir načina rada u položaj ∫ (bez
priključivanja kabela).
C
4 Ispraznite spremište za vodu.
C
5 Vratite glačalo na postolje i postavite prekidač za odabir načina
rada u položaj za odlaganje (-).
Glačalo, jedinica za napajanje i postolje su sada spojeni.
C
◗ Kabel možete omotati oko postolja i njegov kraj pričvrstiti
kopčom.
6 Stavite kutiju za nošenje preko postolja (samo HI575/571).
C
7 Pritisnite kutiju kako biste je pričvrstili na postolje ("klik")
(samo HI575/571).
HRVATSKI38
IN
M
MAX
N
E
N
I
L
O
L
I
H
N
O
L
N
NY
N
O
T
T
LO
N
I
O
O
N
C
D
O
G
L
A
K
L
I
S
L
O
A
D
O
E
W
S
A
N
A
L
MIN
M
A
X
N
E
N
I
L
O
L
I
H
N
O
L
Y
N
N
N
O
T
O
T
L
N
I
O
O
N
C
D
O
G
L
A
K
L
I
S
L
O
A
D
O
E
W
S
A
N
A
L
Page 39

Odlaganje spojnice za postolje
C
1 Otključajte spojnicu za postolje.
C
2 Potpuno zavrnite vijak za pričvršćivanje.
C
3 Sklopite spojnicu na postolje.
Zaštita okoliša
C
◗ Uređaj koji se više ne može koristiti nemojte odlagati s
uobičajenim otpadom iz kućanstva nego ga odnesite u predviđeno
odlagalište na recikliranje.Time ćete pridonijeti očuvanju okoliša.
Jamstvo i servis
Ako vam je potrebna informacija ili imate problem s nekim od uređaja,
posjetite web-stranicu www.philips.com ili kontaktirajte Philips centar
za korisnike u svojoj državi (broj se nalazi u jamstvenom listu).Ako u
vašoj državi ne postoji centar za korisnike, obratite se lokalnom
prodavaču Philips proizvoda ili servisnom odjelu Philips Domestic
Appliances and Personal Care BV.
HRVATSKI 39
Page 40

Seadme osad (joon 1)
A Turbo aurunupp 0 (ainult HI575)
B Piserdusnupp T
C Aurupahvaku nupp 9
D Aururegulaator
0= auruta
1= minimaalne aur
6= maksimaalne aur
E Automaatne väljalülitamise märgutuli (ainult HI575)
F Temperatuuri märgutuli
G Kandekott (ainult HI575/571)
H Pehme käepide (ainult HI575)
I Juhtmeklamber
J Toiteseade
K Režiimilüliti
∫ = juhtmeta triikimine
π = hoiustusasend
ª = juhtmega triikimine
L Alus
M Aluse kinnitusklamber
N Täitenõu
O Nimiandmete silt
P Triikraua tald
Q Veetaseme näidik
R Temperatuuri ketasregulaator
S Katlakivi puhastus- või eemaldusnupp
T Kattega täiteava
U Piserdusava
Tähelepanu!
Enne seadme kasutamist lugege kasutusjuhend hoolikalt läbi ja hoidke
alles edaspidiseks.
◗ Enne seadme sisselülitamist kontrollige, kas seadme andmesildile
märgitud pinge vastab kohalikule toitepingele.
◗ Ühendage seade ainult maandatud pistikupessa.
◗ Ärge kasutage seadet, kui pistikul,toitejuhtmel või seadmel endal
on nähtavaid kahjustusi või kui seade on maha pillatud või lekib.
◗ Kontrollige juhet korrapäraselt, et leida võimalikke vigastusi.
◗ Kui toitejuhe on vigastatud, tuleb see uue vastu vahetada Philipsi,
Philipsi volitatud hooldekeskuses või lihtsalt vastavalt
kvalifitseeritud isiku poolt, et vältida ohtlikke olukordi.
◗ Ärge jätke elektrivõrku ühendatud seadet järelvalveta.
◗ Ärge kastke triikrauda või laadimisalust, kui see on varustuses
olemas, vette.
◗ Hoidke seade laste käeulatusest eemal.
◗ Triikraua tald võib minna väga kuumaks ja puudutamisel tekitada
põletusi.
◗ Ärge laske juhtmel minna vastu tulist triikrauatalda.
EESTI40
Page 41

41
◗ Kui olete lõpetanud triikimise või puhastate seadet, kui täidate või
tühjendate veenõu või peate triikraua juurest korraks ära minema,
siis keerake aururegulaator asendisse "O", pange triikraud kannale
seisma ja eemaldage pistik pistikupesast.
◗ Kasutage triikrauda ainult koos kaasasoleva alusega.
◗ Alati asetage ja kasutage triikrauda ning alust, kui on
standardvarustuses, kindlal, tasasel ja horisontaalsel pinnal.
◗ Ärge täitke veepaaki lõhnaõli, äädika, tärgeldamise,
katlakivieemaldamise ega mingite teiste keemiliste vahenditega.
◗ Seade on mõeldud kasutamiseks ainult koduses majapidamises.
Enne esmakasutust
C
1 Tehke kandekott lahti (ainult HI575/571).
C
2 Eemaldage kandekott (ainult HI575/571).
3 Eemaldage tallalt kõik kleebised või kaitsekile ja puhastage tald
pehme lapiga.
C
4 Kerige toitejuhe täielikult lahti.
EESTI
MIN
M
A
X
N
E
N
I
L
O
L
I
H
N
O
L
Y
N
N
N
O
T
O
T
L
N
I
O
O
N
C
D
O
G
L
A
K
L
I
S
L
O
A
D
O
E
W
S
A
N
A
L
MIN
M
A
X
N
E
N
I
L
O
L
I
H
N
O
L
Y
N
N
N
O
T
T
LO
N
I
O
O
N
C
D
O
G
L
A
K
L
I
S
L
O
A
D
O
E
W
S
A
N
A
L
N
I
M
M
A
X
N
E
N
I
L
O
IL
H
N
O
L
Y
N
N
N
O
T
O
T
L
N
I
O
O
N
C
D
O
LG
A
K
L
I
S
L
O
A
D
O
E
W
S
A
N
A
L
Page 42

Ettevalmistus kasutamiseks
Aluse kinnitusklambri kinnitamine
C
1 Tõmmake kinnitusklamber aluse alt välja ja keerake
triikimislaua või mõne muu stabiilse pinna külge, nagu nt laua
külge.
Kummist jalased väldivad aluse libisemist.
◗ Aluse võite paigaldada triikimislauale ka kinnitusklambrit
kasutamata. Sel juhul tuleb klamber jätta oma kohale aluse all.
Ärge paigaldage alust liiga laua ääre lähedale, sest võite aluse juhuslikult
ümber lükata.
Veepaagi täitmine
1 Võtke võrgupistik seinakontaktist välja.
2 Pange aururegulaator asendisse „0” (auruta).
C
3 Pange režiimilüliti asendisse ∫ (juhtmeta triikimine).
C
4 Võtke triikraud aluselt.
5 Pange triikraud kannale seisma ja avage täiteava kate.
C
6 Kasutage veenõud paagi täitmiseks ja sulgege pärast veega
täitmist veepaagi kate.
Kui kraanivesi on teie asukoha piirkonnas liiga kare, soovitame seda
segada võrdse koguse destilleeritud veega või kasutada ainult
destilleeritud vett.
Ärge kunagi täitke veepaaki üle MAX-tähise.
Ärge täitke veepaaki lõhnaõli, äädika, tärgeldamise, katlakivieemaldamise
ega mingite teiste keemiliste vahenditega.
42 EESTI
N
I
M
M
A
X
N
E
N
I
L
O
L
HI
N
O
L
N
NY
N
O
T
O
T
L
N
I
O
O
N
C
D
O
G
L
A
K
L
I
S
OL
A
D
O
E
W
S
A
N
A
L
Page 43

43
Temperatuuri reguleerimine
C
1 Pange triikraud alusele.
C
2 Valige temperatuuri ketasregulaatoriga vajalik
triikimistemperatuur (täiendava teabe saamiseks vt pt
„Nõuanded”).
Kontrollige pesulipikult esemete triikimistemperatuure:
C
3 Pange toitepistik maandatud seinakontakti.Temperatuuri
märgutuli sütib ja näitab, et triikraud soojeneb.
◗ Kui temperatuuri märgutuli kustub, on triikraud piisavalt tuline.
◗ Aeg-ajalt temperatuuri märgutuli sütib ning kustub. See tähendab,
et triikraud soojeneb õige temperatuurini.
◗ Kui olete triikinud kõrgel temperatuuril ja hiljem reguleerite
triikraua madalamale temperatuurile, oodake enne triikimise
jätkamist, kuni temperatuuri märgutuli sütib uuesti. Nii väldite
triigitavate kangaste rikkumist.
◗ Mõned triikraua osad on veidi õlitatud. See põhjustab esmakordsel
sisselülitamisel vähest suitsemist. Siiski, see nähtus kaob peagi.
EESTI
N
Auru seadistus
0 (vt
„Kuivtriikimine”)
1–2
3–6
Temperatuuri
seadistus
1
2
3 kuni MAX
Kanga tüüp
Sünteetilised kangad
(nt atsetaat, akrüül,
viskoos, polüamiid,
polüester) ja siid
Vill
Puuvill, lina
Palun pidage silmas,
et märk Z sildil
tähistab eset, mida ei
tohi triikida.
Pesulalipikul olev
sümbol
B
C
D
Z
I
M
M
A
X
N
E
N
I
L
O
L
HI
N
O
L
N
NY
N
O
T
O
T
L
N
I
O
O
N
C
D
O
G
L
A
K
L
I
S
OL
A
D
O
E
W
S
A
N
A
L
Page 44

44
Näpunäiteid
- Kui kangas koosneb erinevatest kiududest, valige triikimiseks
temperatuur,mis sobib kõige õrnemate kiudude triikimiseks, s.o
madalaim temperatuur.Nt kui ese sisaldab 60% polüestrit ja 40%
puuvilla, siis tuleb temperatuur seadistada madalamat temperatuuri
nõudva polüesterkiu (2) järgi, ja triikida ilma auruta.
- Kui te ei tea, millisest või millistest materjalidest on ese valmistatud,
triikige õige triikimistemperatuuri määramiseks kohta, mida eseme
kandmisel või kasutamisel pole näha.
- Siidist, villasest ja sünteetilisest kiust kangaid triikige pahemalt poolt, et
vältida läikivate laikude tekkimist.
- Sametit ja teisi kergesti läikima hakkavaid kangaid tuleb triikida ainult
ühes suunas (piki kiu suunda) ja väga õrnalt vajutades.
- Triikimist alustage neist esemeist, mis nõuavad madalamat
triikimistemperatuuri, nagu näiteks sünteetilisest kiust tehtud esemetest.
Seadme kasutamine
Juhtmega triikimine
C
1 Pange režiimilüliti asendisse ª (juhtmega triikimine).
C
2 Võtke triikraud aluselt.
◗ Kui katkestate korraks triikimise,võite triikraua panna alusele või
kannale seisma.
Juhtmeta triikimine
C
1 Pange lüliti asendisse ∫ (juhtmeta triikimine).
EESTI
Page 45

45
C
2 Võtke triikraud aluselt.
3 Ainult mudel HI575 – kui temperatuuri märgutuli hakkab
vilkuma, siis pange triikraud alusele tagasi. See annab märku, et
triikraua temperatuur on langenud nõutust madalamale.
◗ Kui katkestate korraks triikimise,pange triikraud alati alusele
uuesti soojenema.
◗ Kui kasutate aurupahvaku või turboaurufunktsiooni, võib triikraud
jahtuda tunduvalt kiiremini. Soovitame neid funktsioone kasutades
triikida juhtmega toite režiimis.
Auruga triikimine
1 Kontrollige, kas veepaagis on küllaldaselt vett.
2 Valige soovitatud triikimistemperatuur (vt pt „Temperatuuri
reguleerimine”).
3 Pange triikraud alusele.
C
4 Sisestage pistik seinakontakti.
Triikraud hakkab soojenema.
◗ Niipea kui vesi on veepaagis aurtriikimiseks piisavalt tuliseks
saanud, kustub temperatuuri märgutuli.
C
5 Pange aurtriikimisega alustamiseks aururegulaator nõutud
asendisse.
◗ Aurtriikimine on võimalik ainult kõrgematel
triikimistemperatuuridel (temperatuuriseadistused 2 kuni
MAX).
◗ Valige vajalik auruseadistus:
B
1 – 2 keskmise auru jaoks (temperatuuri seadistus 2)
B
3 – 6 maksimaalse auru jaoks (temperatuuri seadistus 3 kuni
MAX)
◗ Aurtriikimise käigus temperatuuri märgutuli aeg-ajalt sütib ja
kustub. See näitab,et triikraud hoiab seadistatud temperatuuri.
Kuivtriikimine
◗ Auruta triikimiseks jätkake triikimist nagu oli kirjeldatud
aurtriikimise korral, kuid pange aururegulaator 0 asendisse
(auruta).
1 Valige soovitatud triikimistemperatuur (vt pt „Temperatuuri
reguleerimine”).
EESTI
N
I
M
M
A
X
N
E
N
I
L
O
L
HI
N
O
L
N
NY
N
O
T
O
T
L
N
I
O
O
N
C
D
O
G
L
A
K
L
I
S
OL
A
D
O
E
W
S
A
N
A
L
Page 46

Omadused
Piserdusfunktsioon
Piserdusfunktsiooni võib kasutada raskete kortsude kõrvaldamiseks igal
temperatuuril.
◗ Kontrollige, kas veepaagis on küllaldaselt vett.
C
1 Triigitava toote niisutamiseks vajutage mitmel korral
piserdusnupule.
Aurudoos
Tugeva aurujoa doosi abil saab kõrvaldada raskesti eemaldatavaid
kortse.
C
1 Vajutage ja hoidke aurupahvaku nuppu mõni sekund all. Seejärel
vabastage nupp.
◗ Aurujoa funktsiooni saab kasutada ainult siis, kui temperatuur on
pandud vahemikku 2 kuni MAX.
Vertikaalne aurujuga
C
◗ Aurujoa funktsiooni võite kasutada ka püstiasendis triikrauaga.
Seda saab kasutada kortsude eemaldamiseks rippuvatelt riietelt,
kardinatelt jms.
Ärge kunagi suunake aurujuga inimeste poole.
Turboaur (ainult HI575)
Turbo-auru funktsioon aitab siluda raskesti eemaldatavaid kortse.
◗ Kasutage turbo-auru funktsiooni ainult siis, kui
temperatuuriseadistus on vahemikus 3 kuni MAX.
C
1 Vajutage ja hoidke turboauru nuppu paar sekundit all. Seejärel
vabastage nupp.
Ärge hoidke nuppu allavajutatuna pikemalt kui 10 sekundit. Oodake
vähemalt 1 minut, enne kui kasutate turbo-auru funktsiooni uuesti, et
triikraud saaks vahepeal uuesti piisavalt kuumaks.Triikraud on piisavalt
kuum, kui temperatuuri märgutuli kustub.
46 EESTI
Page 47

47
Elektrooniline väljalülitav ohutuskaitse (ainult HI575)
Elektrooniline väljalülitav ohutuskaitse lülitab triikraua automaatselt välja,
kui seda ei ole mõni aeg liigutatud.
C
◗ Sellest, et soojuselement on välja lülitatud,teatab automaatne
väljalülitamise märgutuli ja kuulete ka helisignaali.
- Kui triikraud on horisontaalses asendis, toimub see pärast 30
sekundit.
- Kui triikraud on püstasendis, toimub see pärast 8 minutit.
◗ Et triikraud hakkaks jälle kuumenema,
- tõstke triikrauda või liigutage seda natuke.
- Automaatne väljalülitamise märgutuli kustub ja helisignaal katkeb.
- Pange triikraud alusele tagasi.Triikraud hakkab jälle soojenema.
- Kui temperatuuri märgutuli sütib ja kustub uuesti, on triikraud
kasutamiseks valmis.
Tilgalukusti
Sellel triikraual on tallast vee tilkumist ärahoidev funktsioon – kui
temperatuur muutub liiga madalaks, siis katkeb auru teke automaatselt.
Funktsiooni rakendumisel kuulete klõpsatust.
Puhastamine ja hooldus
Pärast triikimist
1 Eemaldage pistik pistikupesast ja laske triikraual maha jahtuda.
2 Pühkige niiske lapi ja mitteabrasiivse (vedela) puhastusvahendiga
tallalt katlakivi ja muu mustuse jäägid.
Selleks, et tald oleks sile, vältige selle kriimustamist metallesemetega
Ärge kunagi kasutage küürimiskäsnu, äädikat ega teisi kemikaale triikraua
talla puhastamiseks.
3 Puhastage seadme ülemine osa niiske lapiga.
4 Loputage paaki korrapäraselt veega.Pärast puhastamist valage
vesi paagist ära.
Katlakivi eemaldamisfunktsioon
Eemaldage iga kahe nädala tagant katlakivi ja muud lisandid tallalt
katlakivi funktsiooni kasutades. Kui teie asukoha vesi on väga kare (nt
triikimise ajal eraldub tallast valgeid helbeid), peaksite katlakivi
eemaldamise funktsiooni sagedamini kasutama.
1 Pange aururegulaator asendisse O.
EESTI
Page 48

48
2 Avage veepaagi ava kate ja valage sinna maksimaaltaseme
tähiseni vett. Seejärel sulgege kate uuesti.
Ärge valage veepaaki äädikat ega teisi katlakivi eemaldamise vahendeid.
3 Pange triikraud alusele.
4 Seadke temperatuuri ketasregulaator MAX asendisse.
5 Sisestage pistik seinakontakti.
C
6 Seadke režiimilüliti asendisse ∫ (juhtmeta režiim).
C
7 Oodake, kuni temperatuuri märgutuli kustub ja seejärel võtke
triikraud aluselt ära.
C
8 Hoidke triikrauda valamu kohal,vajutage ja hoidke katlakivi
eemaldamise nuppu all ning liigutage triikrauda edasi-tagasi.
Tallast väljub aur ja keev vesi. Katlakivi (kui seda on) uhutakse välja.
9 Laske katlakivi eemaldamise nupp minuti pärast lahti või siis,kui
veepaak on tühjaks saanud.
10 Korrake katlakivi eemaldamise toimingut, kui triikrauast väljuv
vesi sisaldab endiselt rohkesti helbeid.
Pärast katlakivi eemaldamist
1 Pange triikraud alusele tagasi ja laske tallal kuivada.
2 Eemaldage pistik seinakontaktist, kui märgutuli on kustunud.
3 Triikige tallale jäänud veejääkide eemaldamiseks õrnalt mõnda
kasutatud riideeset.
4 Laske triikraual enne hoiule panemist maha jahtuda.
Hoidmine
Enne triikraua hoiustamist veenduge, et see on piisavalt jahtunud.
1 Eemaldage pistik pistikupesast ja laske triikraual maha jahtuda.
2 Pange aururegulaator asendisse 0 (auruta).
EESTI
Page 49

49
C
3 Seadke režiimilüliti asendisse ∫ (juhtmeta režiim).
C
4 Tühjendage veepaak.
C
5 Pange triikraud alusele ja seadke režiimilüliti hoiustamise
asendisse (-).
Nüüd on triikraud, toiteseade ja alus lukustatud.
C
◗ Toitejuhtme võite kerida ümber aluse ja juhtmeotsa kinnitada
klambriga.
6 Pange alus kandekotti (ainult HI575/571).
C
7 Vajutage kandekotile, et see lukustuks alusele (kuulete
klõpsatust, ainult mudelid HI575/571).
EESTI
MIN
MAX
N
E
N
I
L
O
L
I
H
N
O
L
N
NY
N
O
T
T
LO
N
I
O
O
N
C
D
O
G
L
A
K
L
I
S
L
O
A
D
O
E
W
S
A
N
A
L
MIN
M
A
X
N
E
N
I
L
O
L
I
H
N
O
L
Y
N
N
N
O
T
O
T
L
N
I
O
O
N
C
D
O
G
L
A
K
L
I
S
L
O
A
D
O
E
W
S
A
N
A
L
Page 50

50
Aluse kinnitusklambri hoidmine
C
1 Vabastage aluse kinnitusklamber lukustusest.
C
2 Keerake kinnituskruvi täielikult sisse.
C
3 Lükake kinnitusklamber aluse sisse.
Keskkonnakaitse
C
◗ Kasutuskõlbmatut seadet ei tohi olmeprügi hulka visata. Seade
tuleb ametlikku kogumispunkti viia. See on vajalik keskkonna
säästmiseks.
Garantii ja hooldus
Infopäringud ja küsimused on võimalik esitada Philipsi veebisaidi
www.philips.com kaudu või kohalikku Philipsi hoolduskeskusse
pöördudes (telefoninumbri leiate garantiilehelt). Kui teie riigis ei ole
hoolduskeskust, pöörduge Philips toodete kohaliku müüja poole või
võtke ühendus Philips kodumasinate teeninduskeskusega.
EESTI
Page 51

Vispārējs apraksts (1. zīm.)
A Pastiprinātas tvaika padeves poga 0 (tikai HI575)
B Smidzināšanas taustiņš T
C Tvaika strūklas padeves poga 9
D Tvaika vadība
0= bez tvaika
1= minimāla tvaika padeve
6= maksimāla tvaika padeve
E Automātiskās izslēgšanās lampiņa (tikai HI575)
F Temperatūras lampiņa
G Soma pārnēsāšanai (tikai HI575/571)
H Neslīdošs rokturis (tikai HI575)
I Elektrības vada skava
J Barošanas bloks
K Režīmu pārslēgs
∫ = bezvada gludināšana
π = uzglabāšanas stāvoklis
ª = gludināšana, izmantojot elektrības vadu
L Statīvs
M Statīva skava
N Uzpildes trauks
O Modeļa plāksne
P Gludināšanas virsma
Q Ūdens līmeņa norāde
R Temperatūras regulators
S Calc-clean poga tīrīšanai/katlakmens notīrīšanai
T Uzpildes atvere ar vāciņu
U Smidzināšanas sprausla
Svarīgi
Pirms ierīces lietošanas uzmanīgi izlasiet šo lietošanas pamācību un
saglabājiet to, lai vajadzības gadījumā varētu ieskatīties tajā arī turpmāk.
◗ Pirms pieslēgšanas elektrotīklam pārbaudiet, vai uz ierīces modeļa
plāksnītes norādītais spriegums atbilst jūsu vietējā elektrotīkla
spriegumam.
◗ Pievienojiet ierīci tikai iezemētai elektrotīkla sienas
kontaktrozetei.
◗ Nelietojiet ierīci, ja tās elektrības vadam,kontaktdakšai vai pašai
ierīcei ir redzami bojājumi, kā arī, ja ierīce ir kritusi zemē vai tai ir
sūce.
◗ Regulāri pārbaudiet, vai elektrības vadam nav kādi bojājumi.
◗ Ja elektrības vads ir bojāts, tas jānomaina autorizētā Philips servisa
centrā, lai izvairītos no bīstamām situācijām.
◗ Nekad neatstājiet ierīci bez uzraudzības, kad tā ir pieslēgta
elektrotīklam.
◗ Gludekli un paliktni, ja tāds ir gludekļa komplektā, nekad nelieciet
ūdenī.
◗ Glabājiet ierīci bērniem nepieejamā vietā.
LATVIEŠU 51
Page 52

◗ Gludekļa darba virsma var kļūt ārkārtīgi karsta, un pieskaršanās tai
var izsaukt apdegumus.
◗ Raugieties, lai elektrības vads nesaskaras ar gludekļa darba virsmu,
kamēr tā ir karsta.
◗ Pēc gludināšanas, tīrot ierīci, piepildot vai iztukšojot ūdens tvertni
un arī kaut uz pavisam īsu brīdi atstājot gludekli bez uzraudzības:
iestatiet tvaika padevi stāvoklī O, novietojiet gludekli vertikāli un
izvelciet elektrības vada spraudni no sienas kontaktligzdas.
◗ Lietojiet šo gludekli tikai kopā ar tā komplektā esošo paliktni.
◗ Gludekli un paliktni, ja tāds ir gludekļa komplektā, vienmēr
novietojiet un lietojiet uz stabilas, līdzenas un horizontālas virsmas.
◗ Nelejiet ūdens tvertnē smaržas, etiķi,cieti, katlakmens attīrīšanas
līdzekļus, gludināšanas šķidrumus vai citas ķīmiskas vielas.
◗ Ierīce ir paredzēta tikai mājas lietošanai.
Pirms pirmās lietošanas
C
1 Atveriet somu pārnēsāšanai (tikai HI575/571).
C
2 Noņemiet somu pārnēsāšanai (tikai HI575/571).
3 Noņemiet no gludināšanas virsmas jebkuras uzlīmes vai
aizsargmateriālus un noslaukiet to ar mīkstu drānu.
C
4 Pilnīgi atritiniet elektrības vadu.
LATVIEŠU52
MIN
M
A
X
N
E
N
I
L
O
L
I
H
N
O
L
Y
N
N
N
O
T
O
T
L
N
I
O
O
N
C
D
O
G
L
A
K
L
I
S
L
O
A
D
O
E
W
S
A
N
A
L
MIN
M
A
X
N
E
N
I
L
O
L
I
H
N
O
L
Y
N
N
N
O
T
T
LO
N
I
O
O
N
C
D
O
G
L
A
K
L
I
S
L
O
A
D
O
E
W
S
A
N
A
L
N
I
M
M
A
X
N
E
N
I
L
O
IL
H
N
O
L
Y
N
N
N
O
T
O
T
L
N
I
O
O
N
C
D
O
LG
A
K
L
I
S
L
O
A
D
O
E
W
S
A
N
A
L
Page 53

Sagatavošana lietošanai
Statīva skavas nostiprināšana
C
1 Atlieciet skavu statīva apakšdaļā un piestipriniet to
gludināmajam dēlim vai citai stabilai virsmai, piemēram, galda
virsmai.
Apakšdaļas gumijas pārklājums novērš statīva slīdēšanu.
◗ Statīvu var novietot arī uz gludināmā dēļa, neizmantojot skavu.
Tādā gadījumā skavu var atstāt neatliektu.
Nenovietojiet statīvu tuvu galda malai, jo statīvu var nejauši apgāzt.
Ūdens tvertnes piepildīšana
1 Atvienojiet gludekli no elektrotīkla.
2 Noregulējiet tvaika vadību 0 stāvoklī (bez tvaika).
C
3 Noregulējiet režīmu pārslēgu ∫ stāvoklī (bezvada
gludināšana).
C
4 Noņemiet gludekli no statīva.
5 Novietojiet gludekli vertikāli un atveriet uzpildes atveres
vāciņu.
C
6 Ar uzpildes trauku ielejiet ūdens tvertnē ūdeni un pēc tam
aizveriet uzpildes atveres vāciņu.
Ja apvidū, kur dzīvojat, ūdens ir ļoti ciets, ieteicams sajaukt to ar tādu
pašu daudzumu destilēta ūdens vai izmantot tikai destilētu ūdeni.
Nepārsniedziet maksimālā līmeņa iezīmi MAX.
Nelejiet ūdens tvertnē smaržas, etiķi, cieti, katlakmens attīrīšanas
līdzekļus, gludināšanas šķidrumus vai citas ķīmiskas vielas.
LATVIEŠU 53
N
I
M
M
A
X
N
E
N
I
L
O
L
HI
N
O
L
N
NY
N
O
T
O
T
L
N
I
O
O
N
C
D
O
G
L
A
K
L
I
S
OL
A
D
O
E
W
S
A
N
A
L
Page 54

Temperatūras noregulēšana
C
1 Novietojiet gludekli uz statīva.
C
2 Noregulējiet vajadzīgo gludināšanas temperatūru, pagriežot
temperatūras regulatoru atbilstošajā stāvoklī (papildu
informāciju skatiet sadaļā 'Padomi').
Pārbaudiet apģērba kopšanas etiķeti, lai izvēlētos atbilstošo gludināšanas
temperatūru:
C
3 Iespraudiet elektrības vada kontaktdakšu iezemētā
kontaktligzdā. Iedegas temperatūras lampiņa, kas norāda,ka
gludeklis uzkarst.
◗ Gludekli ir pietiekami uzkarsis, kad lampiņa nodziest.
◗ Gludināšanas laikā temperatūras lampiņa periodiski iedegas.Tas
norāda, ka gludeklis uzkarst līdz vajadzīgajai temperatūrai.
◗ Ja gludināt augstā temperatūrā un pēc tam pagriežat temperatūras
regulatoru zemākā stāvoklī,pagaidiet, līdz temperatūras lampiņa
vēlreiz iedegas, pirms turpināt gludināšanu.Tādējādi netiks bojāts
audums.
◗ Dažas gludekļa detaļas ir nedaudz ieeļļotas.Tādēļ, pirmo reizi
ieslēdzot gludekli, tas var nedaudz kūpēt.Taču pēc kāda laika tā
vairs nenotiks.
LATVIEŠU54
N
Tvaika padeves
režīms
0 (skatiet
'Gludināšana
bez tvaika')
1-2
3-6
Temperatūras
režīms
1
2
3 līdz MAX
Auduma veids
Sintētiski audumi
(piemēram,
acetātšķiedras, akrils,
viskoze, poliamīds,
poliesters) un zīds
Vilna
Kokvilna, lins
Lūdzu, ņemiet vērā,ka
Z uz etiķetes nozīmē,
ka šo apģērbu nedrīkst
gludināt.
Simbols uz apģērba
etiķetes
B
C
D
Z
I
M
M
A
X
N
E
N
I
L
O
L
HI
N
O
L
N
NY
N
O
T
O
T
L
N
I
O
O
N
C
D
O
G
L
A
K
L
I
S
OL
A
D
O
E
W
S
A
N
A
L
Page 55

Padomi
- Ja apģērba sastāvā ir dažādu veidu šķiedras, vienmēr noregulējiet
temperatūru, kāda nepieciešama vissmalkākajām šķiedrām, t. i.,
viszemāko temperatūru. Piemēram, ja apģērba sastāvā ir 60%
poliestera un 40% kokvilnas, tas jāgludina temperatūrā, kāda norādīta
poliesteram (2), un bez tvaika padeves.
- Ja nezināt, no kāda auduma apģērbs izgatavots, noskaidrojiet pareizo
gludināšanas temperatūru, pagludinot apģērbu vietā, kas valkājot nav
redzama.
- Lai nerastos spīdīgi plankumi, zīda, vilnas un sintētisko audumu
apģērbiem gludiniet otru pusi.
- Samts un citi audumi, kam mēdz rasties spīdīgi plankumi, jāgludina
tikai vienā virzienā (plūksnojuma virzienā), to piespiežot pavisam
nedaudz.
- Vispirms gludiniet tos apģērbus, kam piemērota viszemākā
gludināšanas temperatūra, piemēram, sintētisko šķiedru izstrādājumus.
Ierīces lietošana
Gludināšana, izmantojot elektrības vadu
C
1 Noregulējiet režīmu pārslēgu ª stāvoklī (gludināšana,
izmantojot elektrības vadu).
C
2 Noņemiet gludekli no statīva.
◗ Ja uz brīdi pārtraucat gludināšanu, varat novietot gludekli uz statīva
vai vertikāli.
Bezvada gludināšana
C
1 Noregulējiet režīmu pārslēgu ∫ stāvoklī (bezvada
gludināšana).
LATVIEŠU 55
Page 56

C
2 Noņemiet gludekli no statīva.
3 Tikai H1I575: Kad temperatūras lampiņa sāk mirgot,novietojiet
gludekli atpakaļ uz statīva.Tas rāda, ka gludeklis atdziest līdz
uzstādītai temperatūrai.
◗ Ja uz brīdi pārtraucat gludināšanu, vienmēr novietojiet gludekli uz
statīva, lai tas atkal uzkarstu.
◗ Ja izmantojat tvaika strūklu vai pastiprinātu tvaika padevi, gludeklis
var atdzist diezgan ātri. Ja izmantojat šīs funkcijas, ieteicams
gludināt, izmantojot elektrības vadu.
Gludināšana ar tvaiku
1 Pārliecinieties, vai tvertnē ir pietiekami daudz ūdens.
2 Noregulējiet ieteicamo gludināšanas temperatūru (skatiet
sadaļu 'Temperatūras noregulēšana').
3 Novietojiet gludekli uz statīva.
C
4 Iespraudiet elektrības vada kontaktdakšu sienas kontaktligzdā.
Gludeklis sāk uzkarst.
◗ Tiklīdz ūdens tvertnē ir uzkarsis pietiekami, lai varētu gludināt ar
tvaiku, temperatūras lampiņa nodziest.
C
5 Noregulējiet tvaika vadību vajadzīgajā stāvoklī,lai sāktu
gludināšanu ar tvaiku.
◗ Gludināšana ar tvaiku ir iespējama, tikai noregulējot augstu
gludināšanas temperatūru (temperatūras režīmi no 2 līdz MAX).
◗ Noregulējiet ieteicamo tvaika režīmu:
B
1 - 2 vidēji spēcīgam tvaikam (temperatūras režīms 2)
B
3 - 6 maksimālam tvaikam (temperatūras režīmi no 3 līdz MAX)
◗ Gludinot ar tvaiku, temperatūras lampiņa periodiski iedegas.Tas
norāda, ka gludeklis uzkarst līdz noregulētajai temperatūrai.
Gludināšana bez tvaika
◗ Lai gludinātu bez tvaika padeves, rīkojieties tāpat,kā gludinot ar
tvaika padevi, bet noregulējiet tvaika padeves slēdzi 0 stāvoklī (bez
tvaika).
1 Noregulējiet ieteicamo gludināšanas temperatūru (skatiet
sadaļu 'Temperatūras noregulēšana').
LATVIEŠU56
N
MI
M
A
X
N
E
N
I
L
O
L
HI
N
O
L
N
NY
N
O
T
O
T
L
N
I
O
O
N
C
D
O
G
L
A
K
L
I
S
OL
A
D
O
E
W
S
A
N
A
L
Page 57

Funkcijas
Smidzināšanas funkcija
Varat izmantot smidzināšanas funkciju, lai jebkurā temperatūrā
izgludinātu grūti gludināmas apģērba krokas.
◗ Pārliecinieties, vai tvertnē ir pietiekami daudz ūdens.
C
1 Piespiediet smidzināšanas taustiņu vairākas reizes, lai
samitrinātu gludināmo apģērbu.
Tvaika strūkla
Spēcīgas tvaika strūklas padeve palīdz izgludināt grūti gludināmas
apģērba krokas.
C
1 Piespiediet tvaika strūklas padeves taustiņu un dažas sekundes
turiet to piespiestu. Pēc tam atlaidiet taustiņu.
◗ Tvaika strūklas funkciju ir iespējama, ja temperatūras regulators ir
uzstādīts no 2 līdz MAX.
Vertikāla tvaika strūkla
C
◗ Tvaika strūklas funkciju iespējams izmantot arī turot gludekli
vertikāli.
Tas palīdz izgludināt krokas no pakarinātiem apģērbiem, aizkariem u. c.
Nekad nevērsiet tvaika plūsmu pret cilvēkiem.
Pastiprināta tvaika padeve (tikai HI575)
Pastiprināta tvaika padeve palīdz izgludināt grūti gludināmas krokas.
◗ Pastiprinātu tvaika padevi var izmantot tikai tad, ja temperatūra ir
noregulēta no 3 līdz MAX.
C
1 Piespiediet pastiprinātas tvaika padeves pogu un dažas sekundes
turiet to piespiestu. Pēc tam atlaidiet pogu.
Neturiet pogu piespiestu ilgāk par 10 sekundēm. Pagaidiet vismaz vienu
minūti, pirms vēlreiz izmantojat pastiprinātu tvaika padevi, lai gludeklis
atkal uzkarstu. Gludeklis ir pietiekami uzkarsis, kad nodziest
temperatūras lampiņa.
LATVIEŠU 57
Page 58

Elektroniskā drošības izslēgšanās funkcija (tikai HI575)
Elektroniskā drošības izslēgšanās funkcija automātiski izslēdz gludekli, ja
tas kādu laiku nav kustināts.
C
◗ Lai norādītu, ka sildīšanas elements ir izslēgts,sāk mirgot
automātiskās izslēgšanās lampiņa un atskan skaņas signāls.
- Ja gludeklis atrodas horizontālā stāvoklī, tas notiek pēc 30 sekundēm.
- Ja gludeklis atrodas vertikālā stāvoklī, tas notiek pēc 8 minūtēm.
◗ Lai gludeklis atkal uzkarstu:
- Paceliet gludekli vai viegli to pakustiniet.
- Automātiskās izslēgšanās lampiņa nodziest, un skaņas signāls vairs
neatskan.
- Novietojiet gludekli atpakaļ uz statīva. Gludeklis atkal uzkarsīs.
- Gludeklis ir gatavs lietošanai, kad temperatūras lampiņa ir iedegusies
un vēlreiz nodzisusi.
Pilēšanas apture
Šis gludeklis ir aprīkots ar pilientaptures funkciju, lai novērstu ūdens
pilēšanu no gludināšanas virsmas: gludeklis automātiski aptur tvaika
izdalīšanu, kad temperatūra ir pārāk zema. Kad tas notiek, var atskanēt
klikšķis.
Tīrīšana un kopšana
Pēc gludināšanas
1 Izvelciet elektrības kontaktdakšu no sienas kontaktligzdas un
ļaujiet gludeklim atdzist.
2 Ar mitru drānu un neskrāpējošu (šķidru) tīrīšanas līdzekli
notīriet katlakmeni un citas nogulsnes no gludināšanas virsmas.
Lai uzturētu gludināšanas virsmu gludu, nepieskarieties gludeklim ar
metāla priekšmetiem. Gludināšanas virsmas tīrīšanai nekad nelietojiet
skrāpjus, etiķi vai citas ķīmiskas vielas.
3 Noslaukiet gludekļa augšdaļu ar mitru drānu.
4 Regulāri izskalojiet ūdens tvertni ar ūdeni. Pēc tīrīšanas
iztukšojiet ūdens tvertni.
"Calc-Clean" funkcija
Izmantojiet Calc-Clean funkciju reizi divās nedēļās, lai notīrītu katlakmeni
un netīrumus no gludināšanas virsmas. Ja apvidū, kur dzīvojat, ūdens ir
ļoti ciets (piemēram, ja gludināšanas laikā no gludināšanas virsmas
atdalās plēksnes), Calc-Clean funkcija jāizmanto biežāk.
LATVIEŠU58
Page 59

1 Pagrieziet tvaika vadību pozīcijā 0.
2 Atveriet uzpildes atveres vāciņu un piepildiet ūdens tvertni līdz
maksimālā līmeņa iezīmei. Pēc tam aizveriet vāciņu.
Nelejiet ūdens tvertnē etiķi vai citu katlakmens tīrīšanas ķīmisko līdzekli.
3 Novietojiet gludekli uz statīva.
4 Pagrieziet temperatūras regulatoru pret MAX iezīmi.
5 Iespraudiet elektrības vada kontaktdakšu sienas kontaktligzdā.
C
6 Noregulējiet režīmu pārslēgu ∫ stāvoklī (bezvada).
C
7 Pagaidiet, līdz temperatūras lampiņa nodziest, un pēc tam
noņemiet gludekli no statīva.
C
8 Turiet gludekli virs izlietnes, piespiediet un turiet piespiestu
Calc-Clean pogu un viegli pašūpojiet gludekli šurpu turpu.
No gludināšanas virsmas plūdīs tvaiks un verdošs ūdens. Katlakmens
(ja tāds ir) tiks izskalots.
9 Atlaidiet Calc-Clean pogu pēc vienas minūtes vai tad, kad ūdens
tvertne ir tukša.
10 Atkārtojiet Calc-Clean darbības, ja no gludekļa plūstošais ūdens
joprojām satur daudz katlakmens daļiņu.
Pēc "Calc-Clean" procesa
1 Novietojiet gludekli uz statīva un ļaujiet gludināšanas virsmai
nožūt.
2 Kad lampiņa nodziest, atvienojiet gludekli no elektrotīkla.
3 Nedaudz pagludiniet lietotas drānas gabalu, lai notīrītu ūdens
plankumus, ja tādi radušies uz gludināšanas virsmas.
4 Ļaujiet gludeklim atdzist, pirms novietojat to glabāšanā.
LATVIEŠU 59
Page 60

Uzglabāšana
Pirms novietojat gludekli glabāšanā, pārliecinieties, vai tas ir pietiekami
atdzisis.
1 Izvelciet elektrības kontaktdakšu no sienas kontaktligzdas un
ļaujiet gludeklim atdzist.
2 Noregulējiet tvaika padeves slēdzi 0 stāvoklī (bez tvaika).
C
3 Noregulējiet režīmu pārslēgu ∫ stāvoklī (bezvada).
C
4 Iztukšojiet ūdens tvertni.
C
5 Novietojiet gludekli uz statīva un noregulējiet režīmu pārslēgu
uzglabāšanas stāvoklī (-).
Tādējādi gludeklis, barošanas bloks un statīvs ir saslēgti kopā.
C
◗ Varat aptīt elektrības vadu ap statīvu un pēc tam nostiprināt
elektrības vada galu ar elektrības vada skavu.
6 Novietojiet somu pārnēsāšanai uz statīva (tikai HI575/571).
C
7 Piespiediet somu, lai nostiprinātu to uz statīva (atskan klikšķis)
(tika HI575/571).
LATVIEŠU60
IN
M
MA
X
N
E
N
I
L
O
L
I
H
N
O
L
N
NY
N
O
T
T
LO
N
I
O
O
N
C
D
O
G
L
A
K
L
I
S
L
O
A
D
O
E
W
S
A
N
A
L
MIN
M
A
X
N
E
N
I
L
O
L
I
H
N
O
L
Y
N
N
N
O
T
O
T
L
N
I
O
O
N
C
D
O
G
L
A
K
L
I
S
L
O
A
D
O
E
W
S
A
N
A
L
Page 61

Statīva skavas uzglabāšana.
C
1 Atveriet statīva skavu.
C
2 Pilnīgi ieskrūvējiet nostiprinošo skrūvi.
C
3 Ielokiet statīva skavu statīvā.
Vides aizsardzība
C
◗ Kad ierīce ir beigusi kalpot, neizmetiet to kopā ar sadzīves
atkritumiem, bet nododiet to oficiālā savākšanas punktā
pārstrādei.Tādā veidā jūs palīdzēsit pasargāt vidi.
Garantija un apkalpošana
Ja nepieciešama palīdzība vai informācija, lūdzu,izmantojiet Philips
tīmekļa vietni www.philips.com vai sazinieties ar Philips Pakalpojumu
centru savā valstī (tā tālruņa numurs atrodams pasaules garantijas
brošūrā). Ja jūsu valstī nav Philips Pakalpojumu centra, lūdziet palīdzību
Philips preču tirgotājiem vai Philips Mājturības un personīgās higiēnas
ierīču nodaļas pakalpojumu dienestam.
LATVIEŠU 61
Page 62

Splošni opis (sl. 1)
A Gumb za turbo izpust pare 0 (samo HI575)
B Gumb za pršenje T
C Gumb za sunkoviti izpust pare 9
D Parni regulator
0= brez pare
1= najmanj pare
6= največ pare
E Lučka za samodejni izklop (samo HI575)
F Lučka temperaturnega regulatorja
G Prenosna kaseta (samo HI575/571)
H Mehki ročaj (samo HI575)
I Sponka za kabel
J Napajalna enota
K Stikalo za izbiro načina
∫ = brezžično likanje
π = položaj za shranjevanje
ª = likanje s priklopom na električno omrežje
L Stojalo
M Objemka za stojalo
N Posodica za polnjenje
O Tipska ploščica
P Likalna plošča
Q Okence nivoja vode
R Temperaturni regulator
S Gumb za čiščenje/odstranjevanje apnenca
T Odprtina za polnjenje s pokrovčkom
U Odprtina za pršenje
Pomembno
Pred uporabo aparata natančno preberite ta navodila za uporabo in jih
shranite za poznejšo uporabo.
◗ Pred priključitvijo aparata preverite, ali na omrežnem vtikaču
označena napetost ustreza napetosti lokalnega električnega
omrežja.
◗ Aparat priključite le na ozemljeno vtičnico.
◗ Aparata ne uporabljajte, če so vtikač, kabel ali aparat poškodovani,
če vam je aparat padel po tleh ali če spušča.
◗ Omrežni kabel redno pregledujte zaradi morebitnih poškodb.
◗ Poškodovani omrežni kabel sme zamenjati le podjetje Philips,
Philipsov pooblaščeni servis ali ustrezno usposobljeno osebje.
◗ Na električno omrežje priklopljenega aparata nikoli ne puščajte
brez nadzora.
◗ Likalnika in stojala (če je priloženo) nikoli ne potapljajte v vodo.
◗ Aparat hranite izven dosega otrok.
◗ Likalna plošča se lahko zelo segreje in vam ob dotiku povzroči
opekline.
◗ Kabel ne sme priti v stik z vročo likalno ploščo.
SLOVENŠČINA62
Page 63

63
◗ Ko zaključite z likanjem, med čiščenjem aparata,polnjenjem ali
praznjenjem zbiralnika za vodo in tudi, če pustite likalnik krajši čas
brez nadzora: parni regulator nastavite na položaj O,likalnik
postavite v pokončni položaj in izvlecite omrežni vtikač iz
omrežne vtičnice.
◗ Likalnik uporabljajte le s priloženim stojalom.
◗ Likalnik in stojalo (če je priloženo) vedno postavite na stabilno in
vodoravno podlago.
◗ V vodni rezervoar ne vlivajte parfuma, kisa, škroba, odstranjevalcev
apnenca, dodatkov za likanje in drugih kemikalij.
◗ Aparat je namenjen izključno uporabi v gospodinjstvu.
Pred prvo uporabo
C
1 Ločite prenosno kaseto (samo HI575/571).
C
2 Odstranite prenosno kaseto (samo HI575/571).
3 Z likalne plošče odstranite vse nalepke oziroma zaščitno folijo
in jo očistite z mehko krpo.
C
4 Omrežni kabel v celoti odvijte.
SLOVENŠČINA
MIN
M
A
X
N
E
N
I
L
O
L
I
H
N
O
L
Y
N
N
N
O
T
O
T
L
N
I
O
O
N
C
D
O
G
L
A
K
L
I
S
L
O
A
D
O
E
W
S
A
N
A
L
MIN
M
A
X
N
E
N
I
L
O
L
I
H
N
O
L
Y
N
N
N
O
T
T
LO
N
I
O
O
N
C
D
O
G
L
A
K
L
I
S
L
O
A
D
O
E
W
S
A
N
A
L
N
I
M
M
A
X
N
E
N
I
L
O
IL
H
N
O
L
Y
N
N
N
O
T
O
T
L
N
I
O
O
N
C
D
O
LG
A
K
L
I
S
L
O
A
D
O
E
W
S
A
N
A
L
Page 64

Priprava pred uporabo
Pritrditev objemke za stojalo
C
1 Razprite objemko na dnu stojala in jo pritrdite na likalno desko
ali drugo stabilno podlago,kot je miza.
Gumijasta podloga na dnu preprečuje drsenje stojala.
◗ Stojalo lahko postavite na likalno desko tudi brez objemke.
Objemka lahko zato ostane zložena v stojalu.
Stojala ne postavljajte blizu roba mize, saj se lahko nehote prevrne.
Polnjenje zbiralnika za vodo
1 Izvlecite vtikač omrežnega kabla iz omrežne vtičnice.
2 Parni regulator nastavite na 0 (brez pare).
C
3 Stikalo za izbiro načina nastavite na ∫ (brezžično likanje).
C
4 Likalnik vzemite s stojala.
5 Likalnik postavite pokonci in odprite pokrovček odprtine za
polnjenje.
C
6 S posodico za polnjenje nalijte vodo v zbiralnik za vodo in nato
s pokrovčkom zaprite odprtino za polnjenje.
Če je voda zelo trda, vam svetujemo uporabo čiste destilirane vode ali
mešanje navadne vode z destilirano v enakem razmerju.
Zbiralnika za vodo ne polnite preko oznake MAX.
V vodni rezervoar ne vlivajte parfuma, kisa, škroba, odstranjevalcev
apnenca, dodatkov za likanje in drugih kemikalij.
64 SLOVENŠČINA
N
I
M
M
A
X
N
E
N
I
L
O
L
HI
N
O
L
N
NY
N
O
T
O
T
L
N
I
O
O
N
C
D
O
G
L
A
K
L
I
S
OL
A
D
O
E
W
S
A
N
A
L
Page 65

65
Nastavljanje temperature
C
1 Likalnik postavite na stojalo.
C
2 Ustrezno temperaturo likanja nastavite tako, da temperaturni
regulator obrnete na ustrezni položaj (za dodatne informacije
si oglejte razdelek "Nasveti" ).
Na etiketi oblačila preverite pravilno temperaturo likanja:
C
3 Omrežni vtikač vstavite v ozemljeno omrežno vtičnico. Lučka
temperaturnega regulatorja se vklopi, kar pomeni, da se likalnik
segreva.
◗ Likalnik je dovolj vroč, ko se lučka temperaturnega regulatorja
izklopi.
◗ Med likanjem se lučka temperaturnega regulatorja občasno vklopi.
To pomeni, da se likalnik segreva do ustrezne temperature.
◗ Če ste likali pri visoki temperaturi in nato temperaturni regulator
nastavili na nižjo nastavitev, počakajte z likanjem toliko časa, da se
temperaturna lučka začne ponovno vklopi. S tem preprečite
poškodovanje tkanin.
◗ Nekateri deli likalnika so rahlo namaščeni.To lahko povzroči, da se
pri prvem vklopu likalnika iz njega pokadi, vendar to traja le krajši
čas.
SLOVENŠČINA
N
Nastavitev pare
0 (oglejte si "Likanje
brez pare")
1-2
3-6
Nastavitev
temperature
1
2
3 do MAX
Vrsta tkanine
Sintetične tkanine
(npr. acetat, akril,
viskoza, poliamid,
poliester) in svila
Volna
Bombaž, posteljnina
ZnakZ na etiketi
pomeni, da se
oblačila ne sme likati.
Simbol na etiketi
oblačila
B
C
D
Z
I
M
M
A
X
N
E
N
I
L
O
L
HI
N
O
L
N
NY
N
O
T
O
T
L
N
I
O
O
N
C
D
O
G
L
A
K
L
I
S
OL
A
D
O
E
W
S
A
N
A
L
Page 66

66
Nasveti
- Če tkanina vsebuje različne vrste vlaken, izberite temperaturo, ki je
primerna za najbolj občutljiva vlakna, torej najnižjo temperaturo. Če
je npr. tkanina sestavljena iz 60 % poliestra in 40 % bombaža, jo likajte
pri temperaturi, označeni za poliester (2) in brez pare.
- Če ne veste, iz kakšnega materiala je artikel, določite ustrezno
temperaturo z likanjem tistega dela artikla, ki med nošenjem oz.
uporabo ne bo viden.
- Svila, volneni in sintetični materiali: likajte notranjo stran tkanine, da
preprečite nastanek svetlečih lis.
- Žamet in ostale tkanine, na katerih se rade pojavijo svetleče lise,
likajte samo v eno smer (vzdolž kosmatih delov) z zelo malo pritiska.
- Začnite z likanjem artiklov, ki zahtevajo najnižjo temperaturo likanja,
kot so tisti, narejeni iz sintetičnih vlaken.
Uporaba aparata
Likanje s priklopom na električno omrežje
C
1 Stikalo za izbiro načina nastavite na položaj ª (likanje s
priklopom na električno omrežje).
C
2 Likalnik vzemite s stojala.
◗ Ko za nekaj časa prenehate z likanjem, lahko likalnik postavite na
stojalo ali pokonci.
Brezžično likanje
C
1 Stikalo za izbiro načina nastavite na položaj ∫ (brezžično
likanje).
SLOVENŠČINA
Page 67

67
C
2 Likalnik vzemite s stojala.
3 Samo HI575: ko začne lučka temperaturnega regulatorja
utripati, likalnik postavite nazaj na stojalo.To pomeni, da se je
likalnik ohladil pod nastavljeno temperaturo.
◗ Ko za nekaj časa prenehate z likanjem, likalnik postavite nazaj na
stojalo, da se lahko ponovno segreje.
◗ Ko uporabljate funkciji sunkovitega ali turbo izpusta pare,se lahko
likalnik hitro ohladi. Pri uporabi teh funkcij priporočamo likanje s
priklopom na električno omrežje.
Likanje s paro
1 V zbiralniku za vodo naj bo dovolj vode.
2 Izberite priporočeno temperaturo likanja (oglejte si razdelek
"Nastavljanje temperature").
3 Likalnik postavite na stojalo.
C
4 Vstavite omrežni vtikač v omrežno vtičnico.
Likalnik se začne segrevati.
◗ Ko je voda v zbiralniku dovolj vroča za likanje s paro, se lučka
temperaturnega regulatorja izklopi.
C
5 Parni regulator nastavite na zahtevani položaj za začetek likanja
s paro.
◗ Likanje s paro deluje samo pri višjih temperaturah likanja
(nastavitve temperature 2 do MAX).
◗ Izberite priporočeno nastavitev za paro:
B
1-2 za zmerno paro (nastavitve temperature 2)
B
3-6 za največ pare (nastavitve temperature 3 do MAX)
◗ Med likanjem s paro se lučka temperaturnega regulatorja občasno
vklopi.To pomeni, da se likalnik segreva do nastavljene
temperature.
Likanje brez pare
◗ Za likanje brez pare ravnajte, kot je opisano za likanje s paro, le da
parni regulator nastavite na položaj 0 (brez pare).
1 Izberite priporočeno temperaturo likanja (oglejte si razdelek
"Nastavljanje temperature").
SLOVENŠČINA
N
I
M
M
A
X
N
E
N
I
L
O
L
HI
N
O
L
N
NY
N
O
T
O
T
L
N
I
O
O
N
C
D
O
G
L
A
K
L
I
S
OL
A
D
O
E
W
S
A
N
A
L
Page 68

Funkcije
Funkcija pršenja
Funkcijo pršenja lahko uporabite za odstranitev trdovratnih gub pri
katerikoli temperaturi.
◗ V zbiralniku za vodo naj bo dovolj vode.
C
1 Večkrat pritisnite gumb za pršenje, da pred likanjem navlažite
blago.
Sunkovit izpust pare
Sunkoviti izpust pare pomaga zgladiti trdovratne gube.
C
1 Pritisnite in nekaj sekund držite gumb za sunkoviti izpust pare.
Nato gumb sprostite.
◗ Funkcija sunkovitega izpusta pare deluje le pri nastavitvah
temperature med 2 in MAX.
Navpični sunkoviti izpust pare
C
◗ Sunkoviti izpust pare lahko uporabite tudi, ko likalnik držite v
navpičnem položaju.
To je uporabno zlasti pri likanju visečih oblek, zaves itd.
Pare nikoli ne usmerjajte proti ljudem.
Turbo izpust pare (samo HI575)
Funkcija turbo izpusta pare pomaga zgladiti težavne gube.
◗ Funkcija turbo izpusta pare deluje samo pri nastavitvah
temperature med 3 in MAX.
C
1 Pritisnite in nekaj sekund držite gumb za turbo izpust pare.
Nato ga sprostite.
Gumba ne držite pritisnjenega dlje kot 10 sekund. Pred ponovno
uporabo funkcije za turbo izpust pare počakajte vsaj minuto, da se
likalnik ponovno segreje. Likalnik je dovolj vroč, ko se lučka
temperaturnega regulatorja izklopi.
68 SLOVENŠČINA
Page 69

69
Funkcija elektronskega varnostnega izklopa (samo HI575)
Funkcija elektronskega varnostnega izklopa samodejno izklopi likalnik, če
ga nekaj časa ne premaknete.
C
◗ Izklop grelnega elementa označujeta utripanje lučke samodejnega
izklopa in zvočni signal.
- Če je likalnik v vodoravnem položaju, se to zgodi po 30 sekundah.
- Če je likalnik v navpičnem položaju, se to zgodi po 8 minutah.
◗ Da likalnik ponovno segrejete:
- Primite likalnik ali ga rahlo premaknite.
- Lučka samodejnega izklopa se izklopi in zvočni signal se prekine.
- Likalnik postavite nazaj na stojalo. Likalnik se bo ponovno segrel.
- Ko se lučka temperaturnega regulatorja vklopi in ponovno izklopi, je
likalnik pripravljen za uporabo.
Preprečevanje kapljanja
Likalnik je opremljen s funkcijo zaščite pred kapljanjem za preprečitev
kapljanja vode iz likalne plošče; likalnik samodejno ustavi oddajanje pare,
ko je temperatura prenizka. Ko se to zgodi, lahko zaslišite klik.
Čiščenje in vzdrževanje
Po likanju
1 Izvlecite vtikač iz omrežne vtičnice in počakajte, da se likalnik
ohladi.
2 Z vlažno krpo in blagim (tekočim) čistilom z likalne plošče
obrišite apnenec in ostale usedline.
Da ohranite likalno ploščo gladko, se izogibajte kontaktov s kovinskimi
predmeti. Za čiščenje likalne plošče nikoli ne uporabljajte žičnatih gobic
kisa ali kemikalij.
3 Zgornji del aparata očistite z vlažno krpo.
4 Zbiralnik za vodo redno spirajte s čisto vodo. Po čiščenju ga
vedno izpraznite.
Funkcija za odstranjevanje apnenca
Funkcijo Calc-Clean uporabite enkrat na dva tedna, da z likalne plošče
odstranite apnenec in nečistočo. Če je voda na vašem območju zelo
trda (če med likanjem iz likalne plošče prihajajo drobci vodnih usedlin),
uporabljajte funkcijo Calc-Clean pogosteje.
1 Nastavite parni regulator na položaj 0.
SLOVENŠČINA
Page 70

70
2 Odprite pokrovček odprtine za polnjenje in napolnite zbiralnik
za vodo do oznake za najvišjo raven. Nato pokrovček ponovno
zaprite.
V zbiralnik za vodo ne vlivajte vinskega kisa ali kakršnegakoli drugega
sredstva za odstranjevanje apnenca.
3 Likalnik postavite na stojalo.
4 Temperaturni regulator nastavite na MAX.
5 Vstavite omrežni vtikač v omrežno vtičnico.
C
6 Stikalo za izbiro načina nastavite na položaj ∫ (brezžično
likanje).
C
7 Počakajte, da se lučka temperaturnega regulatorja izklopi,in
nato likalnik vzemite s stojala.
C
8 Pridržite likalnik nad odtokom, pridržite gumb za čiščenje
apnenca in likalnik nežno stresajte sem ter tja.
Para in vrela voda se odvajata iz likalne plošče. Apnenec (če je
prisoten) bo odplaknilo ven.
9 Po minuti oziroma ko je zbiralnik za vodo prazen, sprostite
gumb za čiščenje apnenca.
10 Proces čiščenja apnenca ponovite, če voda iz likalnika še vedno
vsebuje veliko apnenčevih delcev.
Po postopku odstranjevanja apnenca
1 Likalnik postavite nazaj na stojalo,da se likalna plošča posuši.
2 Ko se lučka izklopi,likalnik izključite iz električnega omrežja.
3 Z likalnikom nekajkrat potegnite preko stare krpe in z likalne
plošče odstranite morebitne vodne madeže, ki so se na njej
nabrali.
4 Preden likalnik shranite počakajte, da se ohladi.
SLOVENŠČINA
Page 71

Shranjevanje
Preden likalnik pospravite, se mora dovolj ohladiti.
1 Izvlecite vtikač iz omrežne vtičnice in počakajte, da se likalnik
ohladi.
2 Parni regulator nastavite na položaj 0 (brez pare).
C
3 Stikalo za izbiro načina nastavite na položaj ∫ (brezžično
likanje).
C
4 Izpraznite zbiralnik za vodo.
C
5 Likalnik postavite na stojalo in stikalo za izbiro načina nastavite
na položaj za shranjevanje (-).
Likalnik, napajalna enota in stojalo so zaklenjeni skupaj.
C
◗ Kabel lahko ovijete okoli stojala in ga na koncu pritrdite s sponko.
6 Preko stojala namestite prenosno kaseto (samo HI575/571).
C
7 Pritisnite na kaseto, da se zaklene na stojalu ("klik") (samo
HI575/571).
71SLOVENŠČINA
IN
M
MAX
N
E
N
I
L
O
L
I
H
N
O
L
N
NY
N
O
T
T
LO
N
I
O
O
N
C
D
O
G
L
A
K
L
I
S
L
O
A
D
O
E
W
S
A
N
A
L
MIN
M
A
X
N
E
N
I
L
O
L
I
H
N
O
L
Y
N
N
N
O
T
O
T
L
N
I
O
O
N
C
D
O
G
L
A
K
L
I
S
L
O
A
D
O
E
W
S
A
N
A
L
Page 72

72
Shranjevanje objemke za stojalo
C
1 Odklenite objemke za stojalo.
C
2 Vijak privijte do konca.
C
3 Objemko za stojalo zložite v stojalo.
Okolje
C
◗ Aparata po preteku življenjske dobe ne odvrzite skupaj z
običajnimi gospodinjskimi odpadki, odložite ga na uradnem
zbirnem mestu za recikliranje. S tem boste pripomogli k ohranitvi
okolja.
Garancija in servis
Za informacije ali v primeru težav obiščite Philipsovo spletno stran na
naslovu www.philips.com oziroma se obrnite na Philipsov center za
pomoč uporabnikom v vaši državi (telefonsko številko najdete v
mednarodnem garancijskem listu). Če v vaši državi takšnega centra ni,
se obrnite na lokalnega Philipsovega prodajalca ali Philipsov oddelek za
male gospodinjske aparate in aparate za osebno nego.
SLOVENŠČINA
Page 73

Общо описание (фиг. 1)
A Бутон за силно пускане на пара ("Турбо") 0 (само за HI575)
B Бутон за пръскане T
C Бутон за парен удар 9
D Регулатор на парата
0= без пара
1= минимална пара
6= максимална пара
E Светлинен индикатор за автоматично изключване (само HI575)
F Светлинен температурен индикатор
G Чанта за носене (само HI575/571)
H Мека дръжка (само за HI575)
I Щипка за кабела
J Захранващ блок
K Режимен превключвател
∫ = гладене с изключен щепсел
π = положение за прибиране
ª = гладене със захранване от ел. мрежа
L Стойка
M Стяга на подложката
N Чашка за пълнене
O Табелка
P Гладеща повърхност
Q Нивопоказател (прозорче)
R Температурен регулатор
S Бутон Calc-Clean за почистване/премахване на накип
T Отвор за наливане, с капачка
U Дюза за пръскане
Важно
Преди да използвате уреда, прочетете внимателно това
ръководство за експлоатация и го запазете за справка в бъдеще.
◗ Преди да включите уреда в контакта, проверете дали
напрежението, отбелязано на типа на уреда, отговаря на
напрежението на местната електрическа мрежа.
◗ Включвайте уреда само в заземен мрежов контакт.
◗ Не използвайте уреда, ако щепселът, кабелът или самият уред
имат видими повреди, както и ако уредът е падал или тече.
◗ Проверявайте редовно за евентуални повреди на кабела.
◗ За предотвратяване на опасност при повреда в захранващия
кабел, той трябва да бъде сменен от Philips, оторизиран от
Philips сервиз или квалифициран техник.
◗ Никога не оставяйте уреда без наблюдение, когато е включен
в контакт.
◗ Никога не потапяйте ютията и поставката (ако е приложена
такава) във вода.
◗ Дръжте уреда извън обсега на деца.
БЪЛГАРСКИ 73
Page 74

◗ Гладещата плоча на ютията може да се нагорещи много и да
причини изгаряне при докосване.
◗ Не допускайте кабела да се допира до гладещата плоча,
когато е гореща.
◗ Когато сте свършили с гладенето, когато почиствате уреда,
когато пълните или изпразвате резервоара за вода, а също така
когато оставяте ютията дори за момент: поставете регулатора
на парата в положение О, поставете ютията върху петата й и
изключете щепсела от контакта.
◗ Използвайте тази ютия само с приложената в комплекта
поставка.
◗ Винаги поставяйте и използвайте ютията и поставката (ако е
приложена такава) върху хоризонтална, равна и стабилна
повърхност.
◗ Не сипвайте във водния резервоар парфюм, оцет, кола,
препарати за отстраняване на накип, помощни препарати за
гладене или други химикали.
◗ Този уред е предназначен само за домашна употреба.
Преди първата употреба
C
1 Отворете куфарчето (само за HI575/571).
C
2 Махнете куфарчето (само за HI575/571).
3 Махнете всякакви лепенки или защитно фолио от гладещата
повърхност и я почистете с мека кърпа.
C
4 Развийте докрай захранващия кабел.
БЪЛГАРСКИ74
IN
M
M
A
X
N
E
N
I
L
O
L
I
H
N
O
L
Y
N
N
N
O
T
O
T
L
N
I
O
O
N
C
D
O
G
L
A
K
L
I
S
L
O
A
D
O
E
W
S
A
N
A
L
MIN
M
A
X
N
E
N
I
L
O
L
I
H
N
O
L
Y
N
N
N
O
T
T
LO
N
I
O
O
N
C
D
O
G
L
A
K
L
I
S
L
O
A
D
O
E
W
S
A
N
A
L
N
I
M
M
AX
N
E
N
I
L
O
IL
H
N
O
L
Y
N
N
N
O
T
O
T
L
N
I
O
O
N
C
D
O
LG
A
LK
I
S
L
O
A
D
O
E
W
S
A
N
A
L
Page 75

Подготовка за употреба
Закрепване на стягата за подложката
C
1 Разгънете стягата отдолу на подложката и закрепете стягата
към дъската за гладене или към друга стабилна повърхност,
например плот на маса.
Гумените стъпала отдолу предпазват подложката от приплъзване.
◗ Можете също да сложите подложката върху дъската за
гладене, без да използвате стягата. Тогава стягата може да
остане сгъната.
Не слагайте подложката близо до ръба на масата, тъй като може
случайно да бъде съборена.
Наливане на вода в резервоара
1 Изключете щепсела от контакта.
2 Нагласете регулатора на парата на 0 (без пара).
C
3 Сложете режимния превключвател на ∫ (гладене с
изключен щепсел).
C
4 Вдигнете ютията от подложката.
5 Сложете ютията на пета и отворете капачката на отвора за
наливане.
C
6 Използвайте чашката за пълнене, за да налеете вода в
резервоара, след което затворете отвора с капачката.
Ако чешмяната вода във вашия район е много твърда,
препоръчваме ви да я смесите с равно количество дестилирана
вода или да използвате само дестилирана вода.
Не пълнете водния резервоар над знака MAX.
Не сипвайте във водния резервоар парфюм, оцет, кола, препарати
за отстраняване на накип, помощни препарати за гладене или
други химикали.
БЪЛГАРСКИ 75
N
I
M
M
A
X
N
E
N
I
L
O
L
HI
N
O
L
N
NY
N
O
T
O
T
L
N
I
O
O
N
C
D
O
G
L
A
K
L
I
S
OL
A
D
O
E
W
S
A
N
A
L
Page 76

Настройка на температурата
C
1 Сложете ютията върху подложката.
C
2 Нагласете препоръчваната температура на гладене чрез
завъртане на температурния регулатор в съответното
положение (вж. раздел "Полезни съвети" за повече
информация).
Проверете етикета за пране на дрехата за препоръчваната
температура на гладене:
C
3 Включете щепсела в заземен контакт. Температурният
индикатор светва, за да покаже, че ютията се нагрява.
◗ Ютията е достатъчно нагрята, когато изгасне температурният
индикатор.
◗ По време на гладене температурният индикатор светва от
време на време. Това показва, че ютията се нагрява до
зададената температура.
◗ Ако сте гладили при висока температура и след това нагласите
температурния регулатор на по-ниска стойност, изчакайте
температурният индикатор да светне отново, преди да
продължите гладенето. Това ще предотврати повреждане на
гладения плат.
◗ Някои части от ютията са леко смазани. Това може да причини
изпускане на малко дим от ютията, когато я включите за първи
път. Не след дълго това ще престане.
БЪЛГАРСКИ76
N
Парна настройка
0 (вж. "Гладене
без пара")
1-2
3-6
Температурна
настройка
1
2
3 до MAX
Тип плат
Синтетични тъкани
(напр. ацетат,
полиакрил, вискоза,
полиамид,
полиестер) и
коприна
Вълна
Памук, лен
Обърнете
внимание, че Z на
етикета означава, че
изделието не може
да се глади.
Символ на
етикета за пране
B
C
D
Z
I
M
M
A
X
N
E
N
I
L
O
L
HI
N
O
L
N
NY
N
O
T
O
T
L
N
I
O
O
N
C
D
O
G
L
A
K
L
I
S
OL
A
D
O
E
W
S
A
N
A
L
Page 77

Полезни съвети
- Ако платът се състои от различни видове нишки, винаги
избирайте температурата, препоръчвана за най-деликатното
влакно, т. е. най-ниската температура. Например: ако някое
изделие е направено от 60% полиестер и 40% памук, то трябва
да се глади при посочената за полиестер температура (2) и
без пара.
- Ако не знаете от какъв вид или видове тъкани е изделието,
определете правилната температура за гладене чрез изглаждане
на някаква част, която няма да се вижда, като носите или
използвате изделието.
- Коприна, вълна и синтетика: гладете от обратната страна на
плата, за да не се образуват лъскави участъци.
- Кадифето и други платове, които лесно образуват лъскави петна,
трябва да се гладят само в една посока (по посока на мъха) с
прилагане на много лек натиск.
- Започнете гладенето с изделия, които изискват най-ниската
температура на гладене, например такива от синтетични влакна.
Използване на уреда
Гладене със захранване от ел. мрежа
C
1 Сложете режимния превключвател в положение ª
(гладене със захранване от ел. мрежа).
C
2 Вдигнете ютията от подложката.
◗ Когато спрете да гладите за малко, можете да сложите ютията
върху подложката или на пета.
БЪЛГАРСКИ 77
Page 78

Гладене с изключен щепсел
C
1 Поставете режимния превключвател в положение ∫
(гладене с изключен щепсел).
C
2 Вдигнете ютията от подложката.
3 Само за HI575: Сложете ютията обратно върху подложката,
когато започне да мига светлинният температурен
индикатор. Това показва, че ютията се е охладила под
зададената температура.
◗ Когато спирате да гладите за малко, винаги слагайте ютията
върху подложката, за да може тя да се нагрее отново.
◗ Когато използвате функциите "парен удар" или "турбо",
ютията може да се охлади доста бързо. Препоръчваме ви да
гладите със захранване от ел. мрежа, когато използвате тези
функции.
Гладене с пара
1 Проверете дали има достатъчно вода в резервоара.
2 Задайте препоръчваната температура на гладене (вж. раздел
"Настройка на температурата").
3 Сложете ютията върху подложката.
C
4 Включете щепсела на захранващия кабел в контакта.
Ютията започва да се нагрява.
◗ Когато водата в резервоара се нагрее достатъчно за парно
гладене, светлинният температурен индикатор угасва.
C
5 Нагласете парния регулатор в необходимото положение, за
да започнете парното гладене.
◗ Парното гладене е възможно само при по-високи температури
на гладене (температурни настройки 2 до MAX).
◗ Изберете препоръчваната настройка на парата:
B
1 - 2 за умерено подаване на пара (температурни настройки
2)
B
3 - 6 за максимално подаване на пара (температурни настройки
3 до MAX)
БЪЛГАРСКИ78
N
I
M
M
A
X
N
E
N
I
L
O
L
HI
N
O
L
N
NY
N
O
T
O
T
L
N
I
O
O
N
C
D
O
G
L
A
K
L
I
S
L
O
A
D
O
E
W
S
A
N
A
L
Page 79

◗ По време на гладене с пара температурният индикатор светва
от време на време. Това показва, че ютията се нагрява до
зададената температура.
Гладене без пара
◗ За да гладите без пара, действайте съгласно описаното за
гладене с пара, но нагласете парния регулатор в положение 0
(без пара).
1 Задайте препоръчваната температура на гладене (вж. раздел
"Настройка на температурата").
Отличителни характеристики
Пръскане
Можете да използвате функцията за пръскане за премахване на
упорити гънки при всякаква температура.
◗ Проверете дали има достатъчно вода в резервоара.
C
1 Натиснете няколко пъти бутона за пръскане, за да
навлажните гладения артикул.
Парен удар
Силната насочена парна струя помага за премахване на упорити
гънки.
C
1 Натиснете и задръжте натиснат за няколко секунди бутона
за парен удар. След това отпуснете бутона.
◗ Функцията парен удар може да се използва само при
температурни настройки между 2 и MAX.
Вертикален парен удар
C
◗ Функцията парен удар може да се използва и когато държите
ютията във вертикално положение.
Това помага за премахване на гънки от окачени дрехи, пердета и т.
н.
Никога не насочвайте парата към хора.
БЪЛГАРСКИ 79
Page 80

Силно пускане на пара (турбо) (само за HI575)
Функцията за силно пускане на пара помага за отстраняване на
най-трудните гънки.
◗ Функцията "Турбо" може да се използва само при
температурни настройки между 3 и MAX.
C
1 Натиснете и задръжте натиснат бутона "Турбо" за няколко
секунди. След това го отпуснете.
Не дръжте бутона натиснат повече от 10 секунди. Изчакайте поне
една минута, преди да използвате отново функцията "Турбо", за да
дадете възможност на ютията да се нагрее отново. Ютията е
достатъчно гореща, когато изгасне температурният индикатор.
Електронно предпазно изключване (само HI575)
Тази функция служи за автоматично изключване на ютията, когато
тя не е била местена известно време.
C
◗ За да покаже, че нагревателният елемент е изключен, ще
започне да мига светлинният индикатор за автоматично
изключване и ще чуете звуков сигнал.
- В хоризонтално положение това ще стане след 30 секунди.
- Във вертикално положение това ще стане след 8 минути.
◗ За да дадете възможност на ютията да се нагрее отново:
- Вдигнете ютията или леко я помръднете.
- Светлинният индикатор за автоматично изключване изгасва и
звуковият сигнал спира.
- Сложете ютията обратно на подложката й. Ютията ще започне
отново да се нагрява.
- Когато температурният индикатор светне и след това отново
изгасне, ютията е готова за употреба.
Спиране на капенето
Тази ютия е снабдена с функция за спиране на капенето, която
предотвратява прокапването от гладещата повърхност: ютията
автоматично спира да отделя пара, когато температурата е
прекалено ниска. Когато това стане, може да чуете щракване.
БЪЛГАРСКИ80
Page 81

Почистване и поддръжка
След гладене
1 Извадете щепсела от контакта и оставете ютията да
изстине.
2 Избършете накипа и други отлагания от гладещата
повърхност с мокра кърпа и неабразивен (течен) миещ
препарат.
За да запазите гладещата плоча гладка, трябва да избягвате гру
допир до метални предмети. Никога не използвайте тел, оцет или
други химикали за почистване на гладещата плоча.
3 Почиствайте горната част на ютията с влажна кърпа.
4 Изплаквайте редовно с вода водния резервоар. Изпразвайте
резервоара след почистване.
Функция за почистване на накип
Използвайте функцията Calc-Clean веднъж на всеки две седмици за
отстраняване на накип и замърсявания от гладещата повърхност.
Ако водата във вашия район е много твърда (т. е. ако по време на
гладене от гладещата плоча излизат люспи), трябва да използвате
функцията Calc-Clean по-често.
1 Нагласете регулатора на парата в положение 0.
2 Отворете капачката на отвора за наливане и напълнете
водния резервоар до максималното ниво. След това отново
затворете капачката.
Не наливайте оцет или други антикалциращи препарати
резервоара за вода.
3 Сложете ютията върху подложката.
4 Нагласете температурния регулатор на MAX.
5 Включете щепсела на захранващия кабел в контакта.
C
6 Нагласете режимния превключвател в положение ∫
(с изключен щепсел).
БЪЛГАРСКИ 81
Page 82

C
7 Изчакайте да изгасне температурният индикатор и след
това вдигнете ютията от подложката.
C
8 Дръжте ютията над мивката, натиснете и задръжте бутона
на функцията за почистване на накип (Calc-Clean) и леко
разклатете ютията напред-назад.
От гладещата плоча ще излязат пара и вряла вода. Така ще се
отмият варовиковите отлагания (ако ги има).
9 Отпуснете бутона Calc-Clean след една минута или когато
се изпразни водният резервоар.
10 Повторете процеса за премахване на накип, ако в
излизащата от ютията вода все още има много частици
накип.
След процеса на почистване на накип
1 Сложете ютията обратно върху подложката, за да оставите
гладещата повърхност да изсъхне.
2 Изключете щепсела на ютията от контакта, когато
светлинният индикатор угасне.
3 След това прекарайте леко ютията над старо парче плат, за
да отстраните евентуални петна от водата, образувани по
гладещата плоча.
4 Оставете ютията да изстине, преди да я приберете.
Съхранение
Уверете се, че ютията е изстинала достатъчно, преди
приберете.
1 Извадете щепсела от контакта и оставете ютията да
изстине.
2 Нагласете парния регулатор в положение 0 (без пара).
C
3 Нагласете режимния превключвател в положение ∫ (с
изключен щепсел).
БЪЛГАРСКИ82
Page 83

C
4 Изпразнете водния резервоар.
C
5 Сложете ютията върху подложката и нагласете режимния
превключвател в положение за прибиране (-).
Сега ютията, захранващият блок и подложката са закопчани
заедно.
C
◗ Можете да навиете кабела около подложката и да захванете
края на кабела със щипката за тази цел.
6 Сложете чантата за носене върху подложката (само за
HI575/571).
C
7 Натиснете чантата, за да я заключите върху подложката (със
щракване) (само за HI575/571).
Прибиране на стягата на подложката
C
1 Освободете стягата на подложката.
БЪЛГАРСКИ 83
N
MI
M
AX
N
E
N
I
L
O
L
I
H
N
O
L
N
NY
N
O
T
T
LO
N
I
O
O
N
C
D
O
G
L
A
K
L
I
S
L
O
A
D
O
E
W
S
A
N
A
L
MIN
M
A
X
N
E
N
I
L
O
L
I
H
N
O
L
Y
N
N
N
O
T
O
T
L
N
I
O
O
N
C
D
O
G
L
A
K
L
I
S
L
O
A
D
O
E
W
S
A
N
A
L
Page 84

C
2 Завийте докрай фиксиращия винт.
C
3 Сгънете стягата в подложката.
Опазване на околната среда
C
◗ След края на срока на експлоатация на уреда не го
изхвърляйте заедно с нормалните битови отпадъци, а го
предайте в официален пункт за събиране, където да бъде
рециклиран. По този начин вие помагате за опазването на
околната среда.
Гаранция и сервизно обслужване
Ако се нуждаете от информация или имате проблем, посетете
Интернет сайта на Philips на адрес www.philips.com или се
обърнете към Центъра за обслужване на клиенти на Philips във
вашата страна (телефонния му номер можете да намерите в
международната гаранционна карта). Ако във вашата страна няма
Център за обслужване на клиенти, обърнете се към местния
търговец на уреди на Philips или се свържете с Отдела за сервизно
обслужване на битови уреди на Philips [Service Department of
Philips Domestic Appliances and Personal Care BV].
БЪЛГАРСКИ84
Page 85

Opšti izgled (slika 1)
A Dugme za turbo paru 0 (samoHI575)
B Dugme za raspršivanje T
C Dugme za mlaz pare 9
D Kontrola pare
0= bez pare
1= minimalna količina pare
6= maksimalna količina pare
E Lampica automatskog isključivanja (samo HI575)
F Indikator temperature
G Kutija za nošenje (samo HI575/571)
H Meka drška (samo HI575)
I Štipaljka za pričvršćivanje kabla
J Jedinica za napajanje
K Prekidač za biranje režima rada
∫ = bežično peglanje
π = položaj za odlaganje
ª = peglanje uz mrežno napajanje
L Postolje
M Stezaljka na postolju
N Posuda za punjenje
O Tipska pločica
P Ploča za peglanje
Q Prozor za proveravanje nivoa vode
R Regulator temperature
S Dugme za čišćenje/otklanjanje kamenca
T Otvor za punjenje sa poklopcem
U Mlaznica za raspršivanje
Važno
Pre upotrebe aparata pažljivo pročitajte ovo uputstvo i sačuvajte ga za
buduće potrebe.
◗ Pre nego što uključite aparat, proverite da li napon naveden na
tipskoj pločici odgovara naponu lokalne električne mreže.
◗ Uređaj priključujte samo u uzemljenu zidnu utičnicu.
◗ Aparat nemojte koristiti ako na utikaču, kablu ili samom aparatu
primetite vidljiva oštećenja, odnosno ako vam je aparat pao ili iz
njega curi voda.
◗ Redovno proveravajte da li na kablu ima oštećenja.
◗ Da bi se izbegao rizik, glavni kabl u slučaju oštećenja treba da
zameni kompanija Philips, tj. servisni centar ovlašćen od strane
kompanije Philips ili osoba sa odgovarajućim kvalifikacijama.
◗ Aparat nikada ne ostavljajte bez nadzora dok je priključen na
električnu mrežu.
◗ Peglu i postolje, ako ste ih dobili u kompletu, nikada ne uranjajte u
vodu.
◗ Aparat čuvajte van domašaja dece.
SRPSKI 85
Page 86

86
◗ Grejna ploča pegle može da postane veoma vrela i da izazove
opekotine ako je dodirnete.
◗ Nemojte da dozvolite da kabl dođe u dodir sa grejnom pločom
dok je ona vrela.
◗ Kada ste gotovi sa peglanjem, kada čistite aparat, kada punite ili
praznite posudu za vodu i kada peglu ostavljate makar i na kratko:
kontrolu pare podesite na položaj O, postavite peglu u uspravan
položaj i izvucite utikač iz zidne utičnice.
◗ Peglu koristite samo sa isporučenim postoljem.
◗ Peglu i postolje, ako ste ih dobili u kompletu, uvek postavljajte i
koristite na stabilnoj, ravnoj i horizontalnoj površini.
◗ U posudu za vodu nemojte da stavljate parfem, sirće, štirak,
sredstva za čišćenje kamenca, aditive za peglanje i druge
hemikalije.
◗ Aparat je namenjen isključivo upotrebi u domaćinstvu.
Pre prve upotrebe
C
1 Otvorite kutiju za nošenje (samo HI575/571).
C
2 Odvojite kutiju za nošenje (samo HI575/571).
3 Uklonite sve nalepnice i zaštitne folije sa ploče i očistite je
mekom tkaninom.
C
4 Do kraja odmotajte kabl za napajanje.
SRPSKI
MIN
M
A
X
N
E
N
I
L
O
L
I
H
N
O
L
Y
N
N
N
O
T
O
T
L
N
I
O
O
N
C
D
O
G
L
A
K
L
I
S
L
O
A
D
O
E
W
S
A
N
A
L
MIN
M
A
X
N
E
N
I
L
O
L
I
H
N
O
L
Y
N
N
N
O
T
T
LO
N
I
O
O
N
C
D
O
G
L
A
K
L
I
S
L
O
A
D
O
E
W
S
A
N
A
L
N
I
M
M
A
X
N
E
N
I
L
O
IL
H
N
O
L
Y
N
N
N
O
T
O
T
L
N
I
O
O
N
C
D
O
LG
A
LK
I
S
L
O
A
D
O
E
W
S
A
N
A
L
Page 87

Pre upotrebe
Pričvršćivanje stezaljke postolja
C
1 Rasklopite stezaljku sa donje strane postolja i pričvrstite je na
dasku za peglanje ili na neku drugu stabilnu površinu, kao što je
površina stola.
Gumene nožice na donjoj strani sprečavaju proklizavanje postolja.
◗ Postolje možete postaviti na dasku za peglanje bez upotrebe
stezaljke. U tom slučaju,stezaljka može da ostane sklopljena.
Nemojte da stavljate postolje blizu ivice stola, jer biste slučajno mogli
da ga oborite.
Punjenje posude za vodu
1 Izvucite utikač iz zidne utičnice.
2 Kontrolu pare podesite na 0 (bez pare).
C
3 Podesite prekidač za biranje režima rada na ∫ (bežično
peglanje).
C
4 Uzmite peglu sa postolja.
5 Postavite peglu uspravno i otvorite poklopac otvora za
punjenje.
C
6 Upotrebite posudu za punjenje da biste dosuli vodu u
rezervoar, nakon toga zatvorite otvor za punjenje.
Ako je voda u vašem području izrazito tvrda, savetujemo da je u
jednakoj količini pomešate sa destilovanom vodom ili upotrebite samo
destilovanu vodu.
Nemojte puniti posudu za vodu iznad oznake MAX.
U posudu za vodu nemojte da stavljate parfem, sirće, štirak, sredstva za
čišćenje kamenca, aditive za peglanje i druge hemikalije.
87SRPSKI
N
I
M
M
A
X
N
E
N
I
L
O
L
HI
N
O
L
N
NY
N
O
T
O
T
L
N
I
O
O
N
C
D
O
G
L
A
K
L
I
S
OL
A
D
O
E
W
S
A
N
A
L
Page 88

88
Podešavanje temperature
C
1 Stavite peglu na postolje.
C
2 Podesite potrebnu temperaturu peglanja postavljanjem
regulatora temperature u odgovarajući položaj (za dodatne
informacije pogledajte poglavlje "Saveti").
Na etiketi proverite potrebnu temperaturu peglanja:
C
3 Gurnite utikač u uzemljenu utičnicu na zidu. Indikator
temperature se uključuje, što znači da se pegla zagreva.
◗ Kada se indikator temperature isključi, pegla je dovoljno vrela.
◗ Tokom peglanja indikator temperature se uključuje s vremena na
vreme.To pokazuje da se pegla zagreva do prave temperature.
◗ Ako ste peglali na visokoj temperaturi i zatim podesili regulator
temperature na nižu vrednost,sačekajte da se indikator
temperature ponovo uključi pre nego što nastavite peglanje.Tako
ćete sprečiti oštećenje tkanine.
◗ Neki delovi pegle su blago podmazani.To može izazvati
pojavljivanje dima kada peglu uključite prvi put. Posle nekog
vremena ovo će prestati.
Saveti
- Ako se tkanina sastoji od različitih vrsta vlakana, uvek izaberite
temperaturu koju zahteva najosetljivija tkanina, tj. najnižu
temperaturu. Na primer: ako se proizvod sastoji od 60% poliestera i
40% pamuka, treba ga peglati na temperaturi koja je navedena za
poliester (2), bez pare.
SRPSKI
N
Postavka pare
0 (pogledajte
"Peglanje bez pare")
1-2
3-6
Postavka
temperature
1
2
3 do MAX
Vrsta tkanine
Sintetika (npr. acetat,
akril, viskoza,poliamid,
poliester) i svila
Vuna
Pamuk, laneno platno
Imajte u vidu da Z
na etiketi znači da se
predmet ne može
peglati.
Simbol na etiketi
rublja
B
C
D
Z
I
M
M
A
X
N
E
N
I
L
O
L
HI
N
O
L
N
NY
N
O
T
O
T
L
N
I
O
O
N
C
D
O
G
L
A
K
L
I
S
OL
A
D
O
E
W
S
A
N
A
L
Page 89

89
- Ako ne znate o kojoj tkanini se radi, utvrdite odgovarajuću
temperaturu peglanjem dela koji neće biti vidljiv prilikom nošenja ili
korišćenja tkanine.
- Svila, vuneni i sintetički materijali: peglajte naličje tkanine da biste
izbegli sjajne tragove.
- Somot i druge tkanine na kojima mogu da ostanu sjajni tragovi treba
peglati samo u jednom pravcu (niz dlačice), uz veoma slab pritisak.
- Počnite da peglate predmete koji zahtevaju najnižu temperaturu
peglanja, kao što su oni od sintetičkih vlakana.
Upotreba aparata
Peglanje uz mrežno napajanje
C
1 Podesite prekidač za biranje režima rada na položaj ª
(peglanje uz mrežno napajanje).
C
2 Uzmite peglu sa postolja.
◗ Kada za kratko prestanete da peglate, peglu možete staviti na
postolje ili je postaviti uspravno.
Bežično peglanje
C
1 Podesite prekidač za biranje režima rada na položaj ∫
(bežično peglanje).
SRPSKI
Page 90

90
C
2 Uzmite peglu sa postolja.
3 Samo HI575: vratite peglu na postolje kada indikator
temperature počne da treperi.To pokazuje da se pegla ohladila
na vrednost ispod podešene temperature.
◗ Kada na kratko prestanete da peglate, peglu uvek stavite na
postolje da bi se ponovo zagrejala.
◗ Kada koristite funkciju mlaza pare ili turbo pare, pegla može
veoma brzo da se ohladi. Savetujemo vam da peglate sa
priključenim kablom kada koristite ove funkcije.
Peglanje sa parom
1 Pazite da u posudi za vodu bude dovoljno vode.
2 Izaberite preporučenu temperaturu peglanja (pogledajte
odeljak "Podešavanje temperature").
3 Stavite peglu na postolje.
C
4 Uključite kabl za napajanje u utičnicu.
Pegla počinje da se zagreva.
◗ Čim voda u rezervoaru bude dovoljno zagrejana za peglanje sa
parom, indikator temperature će se isključiti.
C
5 Podesite kontrolu pare u potreban položaj da biste počeli sa
peglanjem sa parom.
◗ Peglanje sa parom je moguće samo na višim temperaturama
peglanja (vrednosti temperature 2 do MAX).
◗ Izaberite preporučenu postavku temperature:
B
1 - 2 za umerenu količinu pare (postavke temperature 2)
B
3 - 6 za maksimalnu količinu pare (postavke temperature 3 do
MAX)
◗ Tokom peglanja indikator temperature se uključuje povremeno.To
pokazuje da se pegla zagreva do odgovarajuće temperature.
Peglanje bez pare
◗ Da biste peglali bez pare, postupite kao kod peglanja sa parom, ali
podesite kontrolu pare u položaj 0 (bez pare).
1 Izaberite preporučenu temperaturu peglanja (pogledajte
odeljak "Podešavanje temperature").
SRPSKI
N
MI
M
A
X
N
E
N
I
L
O
L
HI
N
O
L
N
NY
N
O
T
O
T
L
N
I
O
O
N
C
D
O
G
L
A
K
L
I
S
OL
A
D
O
E
W
S
A
N
A
L
Page 91

Karakteristike
Funkcija raspršivanja
Funkciju raspršivanja možete da koristite da biste uklonili tvrdokorne
nabore na bilo kojoj temperaturi.
◗ Pazite da u posudi za vodu bude dovoljno vode.
C
1 Pritisnite dugme za raspršivanje nekoliko puta da biste navlažili
artikal koji treba da se pegla.
Mlaz pare
Snažan "mlaz" pare pomaže kod uklanjanja većih nabora.
C
1 Pritisnite i držite dugme za mlaz pare nekoliko sekundi, a zatim
ga otpustite.
◗ Funkcija mlaza pare može da se koristi samo na postavkama
temperature između 2 i MAX.
Vertikalni mlaz pare
C
◗ Funkciju "mlaz pare" možete da koristite i kada peglu držite u
vertikalnom položaju.
To je korisno kod uklanjanja nabora odeće koja visi, zavesa itd.
Nemojte da upravljate mlaz prema ljudima.
Turbo para (samo HI575)
Funkcija turbo pare pomaže da se uklone teški nabori.
◗ Funkcija turbo pare može da se koristi samo pri postavkama
temperature između 3 i MAX.
C
1 Pritisnite i držite dugme za turbo paru nekoliko sekundi,a
zatim ga otpustite.
Nemojte držati dugme pritisnutim duže od 10 sekundi. Da biste pustili
peglu da se ponovo zagreje, sačekajte najmanje jedan minut pre nego
što ponovo upotrebite funkciju turbo pare. Kada se indikator
temperature isključi, pegla je dovoljno zagrejana.
91SRPSKI
Page 92

92
Funkcija bezbednosnog elektronskog isključivanja (samo
HI575)
Funkcija bezbednosnog elektronskog isključivanja automatski isključuje
peglu ako je neko vreme ne pomerite.
C
◗ Lampica automatskog isključivanja počeće da treperi i začuće se
zvučni signal koji vas obaveštava da je elemenat za grejanje
isključen.
- U horizontalnom položaju to će se desiti posle 30 sekundi.
- U vertikalnom položaju to će se desiti posle 8 minuta.
◗ Da bi se pegla ponovo zagrejala:
- Podignite peglu ili je malo pomerite.
- Lampica automatskog isključivanja će se ugasiti i zvučni signal
prestaje.
- Vratite peglu na postolje. Ona će se ponovo zagrejati.
- Kada se indikator temperature uključi i ponovo isključi, pegla je
spremna za upotrebu.
Funkcija za zaustavljanje kapljanja
Pegla je opremljena funkcijom za zaustavljanje kapljanja da bi se sprečilo
da voda curi iz grejne ploče; pegla automatski prestaje da proizvodi
paru kada je temperatura previše niska. Kada se to desi, možete čuti
"klik".
Čišćenje i održavanje
Nakon peglanja
1 Isključite utikač iz utičnice i ostavite peglu da se ohladi.
2 Vlažnom krpom i neabrazivnim (tečnim) deterdžentom obrišite
kamenac i druge naslage sa grejne ploče.
Da bi grejna ploča ostala glatka, treba da izbegavate kontakt sa
metalnim predmetima. Za čišćenje grejne ploče nemojte da koristite
žicu za ribanje, sirće ili druge hemikalije.
3 Gornji deo pegle čistite vlažnom tkaninom.
4 Redovno ispirajte posudu za vodu. Nakon čišćenja posudu za
vodu ispraznite.
Funkcija Calc-Clean
Koristite Calc-Clean funkciju svake dve nedelje da biste uklonili
kamenac i nečistoće sa grejne ploče. Ako je voda u vašem području
SRPSKI
Page 93

93
izrazito tvrda (tj. kada ljuspice izlaze iz grejne ploče u toku peglanja),
Calc-Clean funkciju treba da koristite češće.
1 Podesite kontrolu pare na položaj 0.
2 Otvorite poklopac otvora za punjenje i napunite rezervoar za
vodu do maksimalnog nivoa.Zatim ponovo zatvorite poklopac.
U posudu za vodu nemojte da sipate sirće ni druga sredstva za
uklanjanje kamenca.
3 Stavite peglu na postolje.
4 Podesite regulator temperature na MAX.
5 Uključite kabl za napajanje u utičnicu.
C
6 Podesite prekidač za biranje režima rada na položaj ∫
(bežično).
C
7 Sačekajte da se indikator temperature isključi i zatim uklonite
peglu sa postolja.
C
8 Držite peglu iznad odvoda, pritisnite i držite dugme Calc-Clean
i nežno protresite peglu napred-nazad.
Para i ključala voda će izaći kroz grejnu ploču. Kamenac (ako ga ima) će
biti izbačen.
9 Otpustite dugme Calc-Clean posle jednog minuta ili kada se
isprazni rezervoar za vodu.
10 Ponovite Calc-Clean postupak ako voda koja izlazi iz pegle još
uvek sadrži velik broj komadića kamenca.
Posle Calc-Clean procesa
1 Vratite peglu na postolje i ostavite grejnu ploču da se osuši.
2 Isključite peglu iz struje kada se indikator temperature isključi.
3 Pažljivo pređite peglom preko komada stare tkanine da biste
uklonili sve vodene mrlje koje mogu da nastanu na grejnoj
ploči.
4 Ostavite peglu da se ohladi pre nego što je odložite.
SRPSKI
Page 94

Odlaganje
Proverite da li se pegla dovoljno ohladila pre nego što je odložite.
1 Isključite utikač iz utičnice i ostavite peglu da se ohladi.
2 Podesite kontrolu pare u položaj 0 (bez pare).
C
3 Podesite prekidač za biranje režima rada na položaj ∫
(bežično).
C
4 Ispraznite posudu za vodu.
C
5 Stavite peglu na postolje i podesite prekidač za režim rada u
položaj za odlaganje (-).
Pegla, jedinica napajanja i postolje se zatim blokiraju.
C
◗ Možete da namotate kabl oko postolja i pričvrstite kraj kabla
posebnom hvataljkom.
6 Postavite kutiju za nošenje preko postolja (samo HI575/571).
C
7 Pritisnite kutiju da bi se ona zakačila na postolje ("klik") (samo
HI575/571).
94 SRPSKI
IN
M
MAX
N
E
N
I
L
O
L
I
H
N
O
L
N
NY
N
O
T
T
LO
N
I
O
O
N
C
D
O
G
L
A
K
L
I
S
L
O
A
D
O
E
W
S
A
N
A
L
MIN
M
A
X
N
E
N
I
L
O
L
I
H
N
O
L
Y
N
N
N
O
T
O
T
L
N
I
O
O
N
C
D
O
G
L
A
K
L
I
S
L
O
A
D
O
E
W
S
A
N
A
L
Page 95

95
Odlaganje stezaljke postolja
C
1 Otvorite stezaljku postolja.
C
2 Potpuno zategnite vijak za pričvršćivanje.
C
3 Savijte stezaljku u postolje.
Zaštita okoline
C
◗ Uređaj koji se više ne može upotrebljavati nemojte da odlažete u
kućanski otpad, već ga odložite na reciklažnom dvorištu.Tako ćete
doprineti zaštiti okoline.
Garancija i servis
Ako su vam potrebne informacije ili imate neki problem, posetite
Philips web-stranicu na adresi www.philips.com ili se obratite Philips
korisničkoj podršci u svojoj zemlji (broj telefona pronaći ćete na
međunarodnom garantnom listu). Ako u vašoj zemlji ne postoji
predstavništvo,obratite se ovlašćenom prodavcu ili servisnom odeljenju
Philips Domestic Appliances and Personal Care BV.
SRPSKI
Page 96

96
Page 97

97
MIN
M
A
X
N
E
N
I
L
O
L
I
H
N
O
L
Y
N
N
N
O
T
O
T
L
N
I
O
O
N
C
D
O
G
L
A
K
L
I
S
L
O
A
D
O
E
W
S
A
N
A
L
MIN
M
A
X
N
E
N
I
L
O
L
I
H
N
O
L
Y
N
N
N
O
T
T
LO
N
I
O
O
N
C
D
O
G
L
A
K
L
I
S
L
O
A
D
O
E
W
S
A
N
A
L
N
I
M
M
A
X
N
E
N
I
L
O
IL
H
N
O
L
Y
N
N
N
O
T
O
T
L
N
I
O
O
N
C
D
O
LG
A
LK
I
S
L
O
A
D
O
E
W
S
A
N
A
L
Page 98

98
N
I
M
M
A
X
N
E
N
I
L
O
L
HI
N
O
L
N
NY
N
O
T
O
T
L
N
I
O
O
N
C
D
O
G
L
A
K
L
I
S
OL
A
D
O
E
W
S
A
N
A
L
Page 99

99
N
I
M
M
A
X
N
E
N
I
L
O
L
HI
N
O
L
N
NY
N
O
T
O
T
L
N
I
O
O
N
C
D
O
G
L
A
K
L
I
S
OL
A
D
O
E
W
S
A
N
A
L
Page 100

100
 Loading...