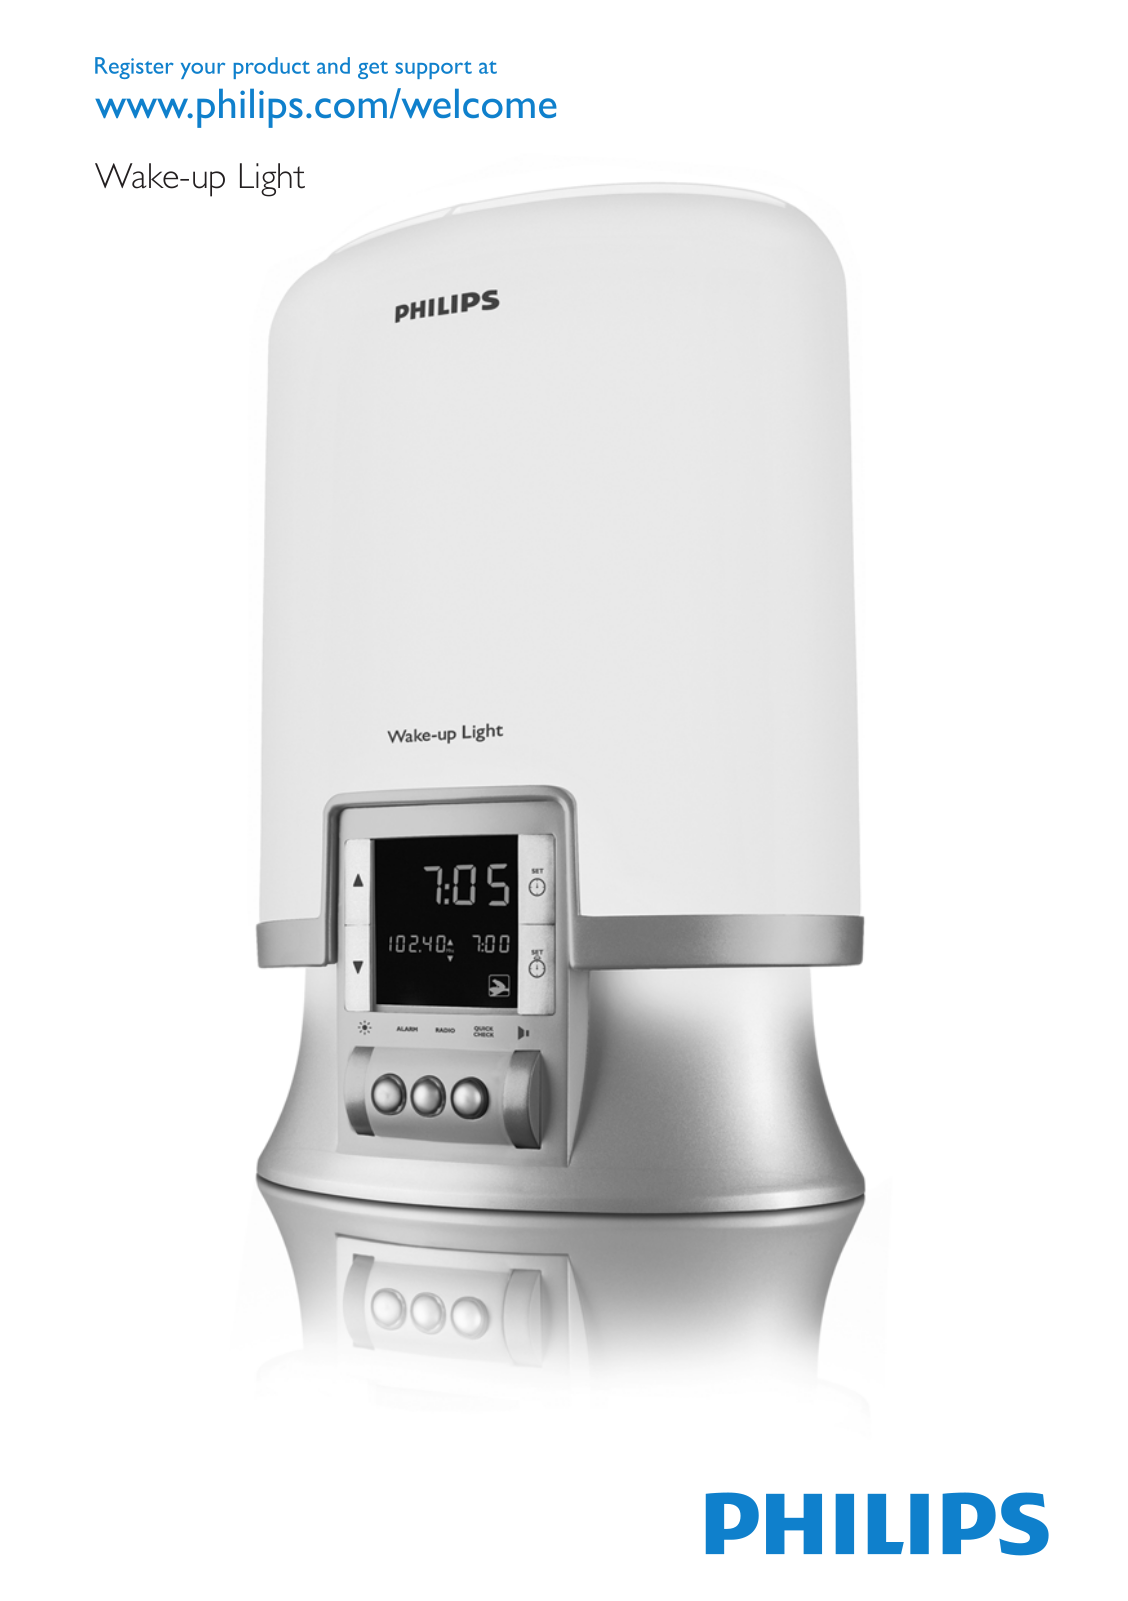
PHILIPS HF3451, HF3461 User Manual [fr]

PHILIPS HF3451, HF3461 User Manual

Wake-up Light

1

English 6

Français 16

Nederlands 26

HF3462/10, HF3462/20, HF3461, HF3451

English

Introduction

Congratulations on your purchase and welcome to Philips!To fully benefit from the support that

Philips offers, register your product at www.philips.com/welcome.

This appliance helps you wake up feeling fitter and more energetic. It creates a summer dawn experience that makes awakening and getting up easier.The light intensity slowly increases to the chosen level during 30 minutes. Light in the morning increases the production of the cortisol hormone that makes you feel more energetic when you wake up.You can have the appliance wake you up by light only or by light and sound.The appliance can also be used as a reading lamp.

Light and the biological clock

Exposure to light regulates the biological clock that controls the body’s circadian rhythms.The melatonin level rises in the evening, preparing our body for sleep and lowering the core body temperature.The light in the morning stimulates the secretion of the hormone cortisol, which makes us awake and alert. Optimally, the circadian rhythms are in sync with our sleep-wake rhythm. Disturbed sleep and circadian rhythms can severely impact our health, performance and productivity.

In autumn and winter, when the days are shorter and darker, many people experience tiredness and need more sleep. Lack of energy and trouble to get up in the morning are common symptoms of the winter blues. Other symptoms may be unexpected mood changes, concentration problems and a craving for food rich in fattening carbohydrates. Some people may even develop a serious depression (seasonal affective disorder or SAD), which disappears when spring comes.

The effects of dawn simulation

The Philips Wake-up Light gently prepares your body for waking up during the last half hour of sleep. In the early morning hours our eyes are more sensitive to light than when we are awake.

During that period the relatively low light levels of a simulated natural sunrise elevate the cortisol level shortly after awakening. Clinical studies have shown that regular use of a dawn simulator can alleviate even the severest symptoms of the winter blues, improving productivity and concentration.

In addition, people who use the Wake-up Light wake up more easily, have a better overall mood in the morning and feel more energetic.With the Philips Wake-up Light, you can set the light level that corresponds to your light sensitivity for optimum dawn simulation.

For more information about the health benefits, see www.philips.com, search word “Wake-up Light”.

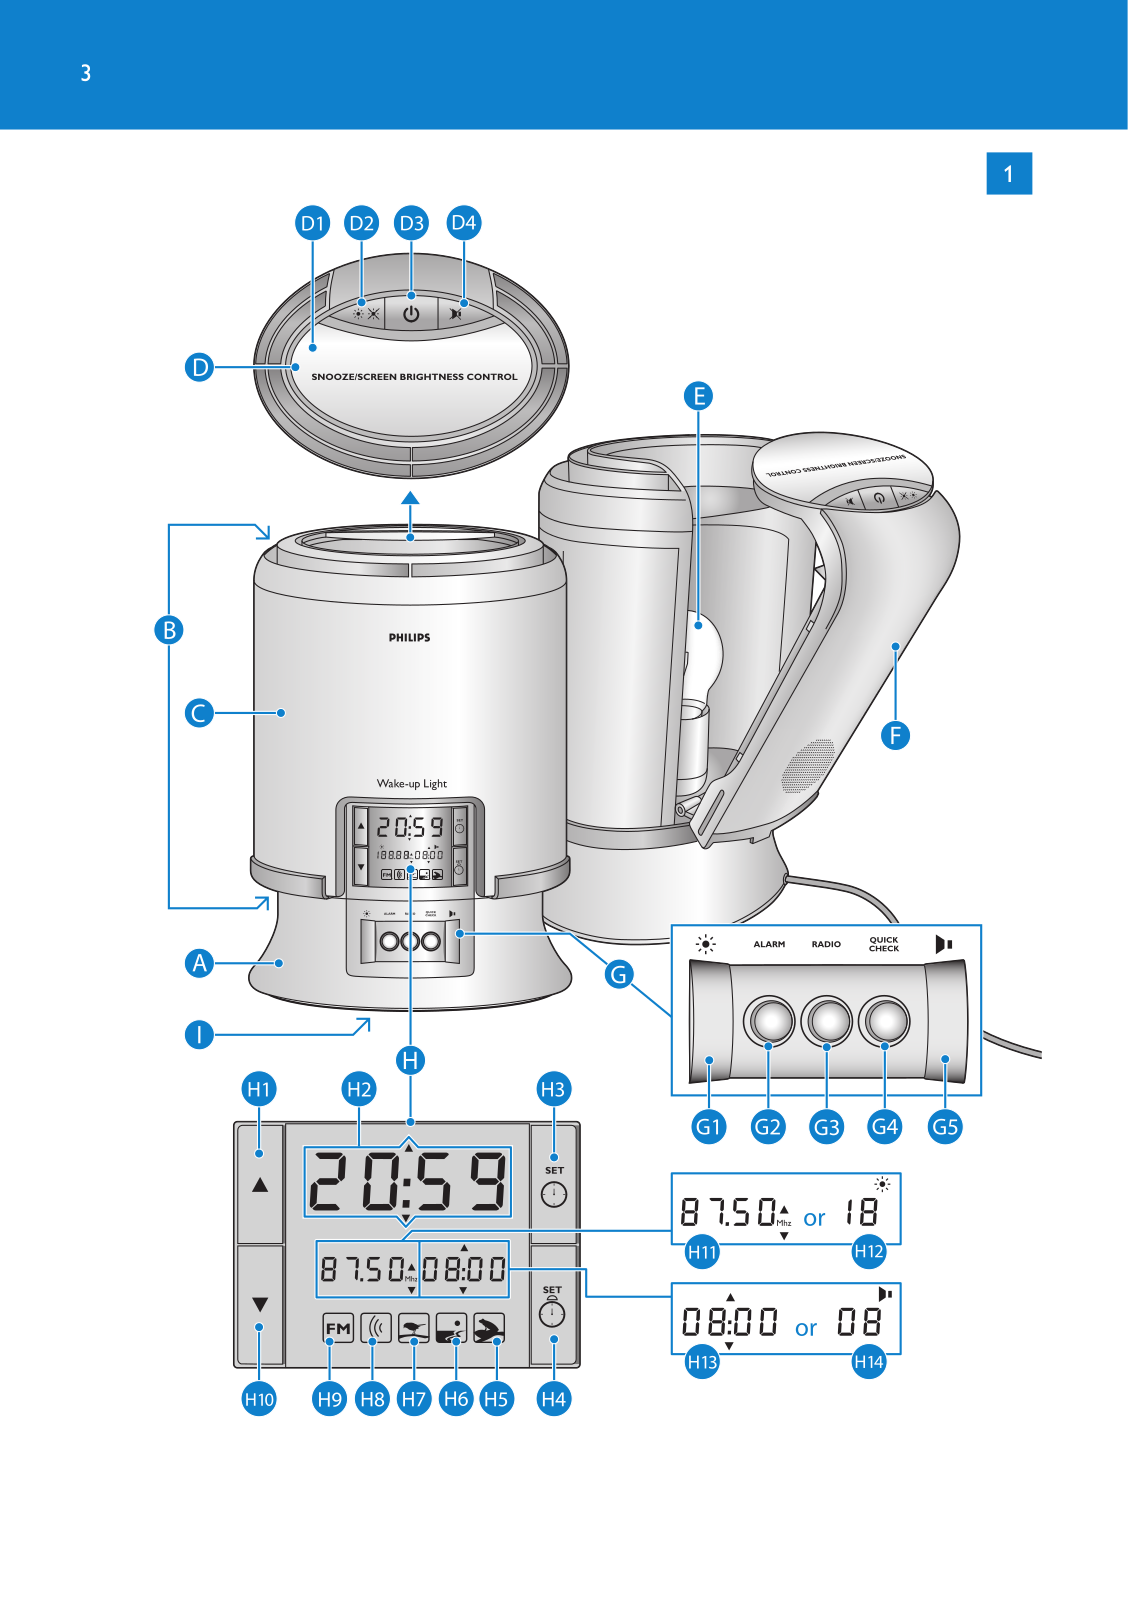
General description (Fig. 1)

ABase

BVents

CLamp housing

DTop control panel

1 SNOOZE/SCREEN BRIGHTNESS CONTROL button

2@& button (light on/off)

33 button (light and sound on/off)

4# button (sound off)

E100W lamp (HF3462/HF3461) or 75W lamp (HF3451)

FLamp replacement hatch

GBottom control panel

1@ wheel (turn to set the light intensity)

2ALARM button

3 RADIO button (HF3462/HF3461 only)

4QUICK CHECK button

5 $ wheel (turn to set volume) H Display section

1% button

2Time indication

English

3( button (to set clock time)

4* button (to set alarm time)

5 Natural pond sound symbol (HF3462/HF3461 only)

6 Natural sea sound symbol (HF3462/HF3461 only)

7 Natural forest sound symbol

8Gentle beep symbol

9 Radio symbol (HF3462/HF3461 only)

10^ button

11Radio frequency indication (HF3462/HF3461 only)

12Light level indication (visible when light level is adjusted)

13Alarm time indication

14Sound level indication (visible when sound level is adjusted) I Reset button

Note:The HF3462/20 and the HF3462/10 are technically the same and only differ in colour. For this reason, these two versions will simply be called HF3462 in this user manual.

Important

-Read this user manual carefully before you use the appliance and save it for future reference.

- This appliance is double insulated according to Class II (Fig. 2).

-This appliance meets the requirements of the European Medical Device Directive MDD

2007/47/EC.

Danger

-Water and electricity are a dangerous combination. Do not use this appliance in wet surroundings (e.g. in the bathroom or near a shower or swimming pool).

-Do not let water run into the appliance or spill water onto the appliance.

Warning

-Check if the voltage indicated on the appliance corresponds to the local mains voltage before you connect the appliance.

-The appliance is suitable for mains voltages of 230V.

-If the mains cord is damaged, you must have it replaced by Philips, a service centre authorised by Philips or similarly qualified persons in order to avoid a hazard.

-This appliance is not intended for use by persons (including children) with reduced physical, sensory or mental capabilities, or lack of experience and knowledge, unless they have been given supervision or instruction concerning use of the appliance by a person responsible for their safety.

-Children should be supervised to ensure that they do not play with the appliance.

-Regularly remove dust from the inside of the appliance with a dry cloth, as accumulated dust close to a powerful lamp presents a potential fire hazard. See chapter ‘Cleaning and maintenance’ for more details.

Caution

-Do not subject the appliance to heavy shocks.

-Place the appliance on a stable, level surface and make sure there is at least 15cm free space around it and 40cm above it to prevent overheating. (Fig. 3)

-Do not use the appliance at room temperatures lower than 10°C or higher than 35°C.

-Make sure the vents in the base and on top of the appliance remain open during use.

- Let the appliance cool down for approx. 15 minutes before you clean or store it.

-Never use the appliance when the lamp housing is damaged, broken or missing.

- If you wake up too early or with a headache, reduce the light level.

-Consult your doctor before you start using the Philips Wake-up Light if you have suffered from or are suffering from a serious depression.

English

-Do not use this appliance as a means to reduce your hours of sleep.The purpose of this

appliance is to help you wake up more easily. It does not diminish your need for sleep.

-Always replace the lamp with a Philips 75W E27 SOFTONE softwhite 230VT55 (HF3451) or a

Philips 100W E27 SOFTONE softwhite 230VT55 lamp (HF3462/HF3461).

-The appliance has no on/off switch.To disconnect the appliance from the mains, remove the plug from the wall socket.

-This appliance is only intended for household use, including similar use like in hotels.

General

-The appliance has been fitted with an automatic protection against overheating. If the appliance is insufficiently cooled (e.g. because the vents are covered), the appliance switches off automatically. Remove the cause of overheating, unplug the appliance and let it cool down for approx. 20 minutes.Then switch the appliance back on by plugging it in again.

-We advise you to set the light intensity for waking up to a setting between 9 and 20 (for the

HF3451 with 75W lamp) or between 7 and 15 (for the HF3462/HF3461 with 100W lamp).

These settings correspond to light intensity levels of 100 to 300 lux.The correct setting depends on your light sensitivity and will have to be determined by yourself. It is possible to select a higher or lower setting. See chapter ‘Using the appliance’ for more details. If light level 20 of the HF3451 is not high enough, we advise you to move the appliance closer to the bed.

-If you share a bedroom with someone else, this person may unintentionally wake up from the light of the appliance, even though this person is further removed from the appliance.This phenomenon is the result of differences in light sensitivity between people.

-If you start having trouble waking up again, this is possibly due to a decrease in the lamp’s light output that occurs after some time. In that case, you can increase the light level or replace the lamp.

-If the appliance is used in an industrial area and/or near a power station, it may occur that, under certain circumstances, the lamp goes off after it has come on.This does not have an adverse or harmful effect on the safe functioning of the appliance the next time it is used.

Electromagnetic fields (EMF)

This Philips appliance complies with all standards regarding electromagnetic fields (EMF). If handled properly and according to the instructions in this user manual, the appliance is safe to use based on scientific evidence available today.

Preparing for use

Installation

1Before first use,open the hatch in the back of the appliance (see chapter‘Replacement’) and screw the lamp into the lamp holder.

2Place the appliance at 40-50cm from your head,for example on a bedside table (Fig.4).

3Put the plug in the wall socket.

,The time on the display starts flashing and arrows appear above and below the time to indicate that the clock time has to be set (Fig.5).

Note: If the display does not light up after you have plugged in the appliance, press the reset button on the bottom of the appliance.

Setting the clock time

1Use the ^ and the % buttons to set the time.

2Hold the button down longer to put the time forward or backward more quickly.

English

Note:After you have set the time for the first time,you have to press the‘set time’button before you can adjust the time again.The time on the display starts flashing and arrows appear above and below the time to indicate that the clock time can be set.

3 When you have set the correct time,press the‘set time’ button to confirm the time (Fig.6).

,The time on the display stops flashing and the arrows disappear.

Note:If you do not confirm the time,the flashing stops and the arrows disappear after 10 seconds.This indicates that the time has been set.

The appliance is now ready for use.

Using the appliance

Setting the alarm

When you set the alarm, you choose the light intensity level, the type of sound and the sound level. The alarm is set when the light ring round the ALARM button burns.The light intensity slowly increases to the chosen level during the last 30 minutes before the set alarm time.The sound slowly increases in 90 seconds to the chosen level after the set alarm time.

Setting the alarm time

1Press the alarm time button ( *) to set the alarm. (Fig.7)

,The alarm time starts flashing and two arrows appear above and below the alarm time (Fig. 8).

2Use the % and the ^ buttons to set the alarm time,i.e.the time at which you wish to get up. (Fig.9)

3Press the button longer to put the time forward or backward more quickly.

4Press the alarm time button ( *) again to confirm the alarm time. (Fig. 7)

,The arrows disappear and the alarm time stops flashing.

Note:If you do not confirm the alarm time,the flashing stops after 10 seconds.This means that the alarm time has been set.

Setting the sound and the sound level

1Press theALARM button (Fig.10).

,The light ring round theALARM button goes on (Fig.11).

,The first sound symbol (radio symbol for HF3462/HF3461 and gentle beep symbol for HF3451) flashes for 3 seconds and the sound can be heard.

2Press theALARM button again if you want to select another wake-up sound.When you have found the sound you want to use, do not press theALARM button again (Fig.10).

,After 3 seconds,the symbol of the sound selected stops flashing to indicate that it has been selected.

,The alarm has been set and continues to work until you switch off the alarm function.When you do this,the sound symbol disappears from the display and the light ring round the ALARM button goes out.See also section‘Switching the alarm on or off’.

3Turn the volume control wheel $ to set the sound level. (Fig.12)

,The $ appears on the display. (Fig.13)

4If you want no sound at wake-up time,select level 0.

Setting the light intensity level

1Use the light adjustment wheel @ to set the light intensity level. (Fig.14)

,The @ appears on the display.

10 English

Tip:We advise a light intensity between 9 and 20 (for the HF3451 with 75W lamp) or between 7 and 15 (for the HF3462/HF3461 with 100W lamp) for the alarm function. Set the light intensity to your own preference by trying out the alarm function at different light intensity levels.

2If you do not want the light to go on at wake-up time, select light intensity level 0.

Quick alarm check

1Press the QUICK CHECK button to start an accelerated wake-up alarm test (Fig.15).

,The light ring round the QUICK CHECK button goes on (Fig. 16).

,During the first 50 seconds of the test,you see a rapid increase of the light intensity to the selected level.During the last 40 seconds,you hear the selected sound gradually increase to the selected level.

2Press the QUICK CHECK button again to stop the test (Fig.15).

,The light ring round the QUICK CHECK button goes out.

Note:The appliance continues to run the accelerated wake-up alarm test until you press the QUICK CHECK button.

Switching the alarm on or off

The light ring round the ALARM button burns when the alarm is on. At the set time, the wake-up sound is played and the lamp has reached the selected light intensity level.

1Press the 3 button to switch off the light and the wake-up sound. (Fig.17)

,The light ring round theALARM button continues to burn.The alarm function is still active and the wake-up alarm will go off at the set time and with the set sound and light intensity the next day (Fig. 11).


Press the # button if you want to switch off the sound when the alarm goes off.

(Fig.18)

2


Press the @& button if you want to switch off the lamp when the alarm goes off.

(Fig.19)

3

4If you want to switch off the alarm function altogether,press theALARM button one or more times until there is no sound symbol on the display and the light ring round the ALARM button goes out.

Snoozing

1Press the SNOOZE/SCREEN BRIGHTNESS CONTROL button to switch off the sound for 9 minutes when the alarm has gone off (Fig. 20).

The lamp continues to burn at the selected intensity level. After 9 minutes, the wake-up sound is automatically played again.

2 Press the SNOOZE/SCREEN BRIGHTNESS CONTROL button longer to dim the light.

Note:You can only do this once.After you release the button, it functions as SCREEN BRIGHTNESS CONTROL button again.

Note:You can only use the snooze function within 15 minutes after the alarm starts to go off.After those 15 minutes, the button no longer functions as SNOOZE button and only functions as

SCREEN BRIGHTNESS CONTROL button.

Adjusting the light intensity during the wake-up phase

1 Turn the light adjustment wheel @ to select a higher or lower light intensity. (Fig.14)

The lamp burns at the selected intensity during the rest of the wake-up phase.

Adjusting the brightness of the display

1Press the SNOOZE/SCREEN BRIGHTNESS CONTROL button to adjust the brightness of the display (Fig. 20).

English 11

Press the button again to set the brightness to another level.There are three levels.

Note:This button cannot be used to adjust the display brightness when the alarm goes off and during snoozing.

3 button

1When the alarm goes off at the set wake-up time, press the 3 button to switch off the wake-up alarm light and sound.

Note:The alarm function remains active and the light ring round the alarm button continues to burn.

2When you have switched on the reading lamp and/or the radio,press the 3 button to switch off the reading lamp and/or the radio.

When you press the 3 button again, only the light goes on.

Note:When the alarm function is active, pressing the 3 button does not affect the alarm settings.

Reading lamp

1Press the @& button to switch the lamp on or off. (Fig.19)

2Turn the light adjustment wheel @ upwards or downwards to increase or decrease the light intensity level. (Fig. 14)

,The light level indication on the display @ shows the light intensity level (00 to 20). (Fig.21)

Tip:We advise you to set the light intensity to 20 (maximum level) for reading. If this light level is not strong enough, switch on an extra lamp.

Do not forget to set the light intensity level back to the wake-up level!

Radio (HF3462/HF3461 only)

1Press the RADIO button to switch on the radio (Fig. 22).

,The light ring round the button goes on (Fig.23).

2Use the % and the ^ buttons to select the frequency of your favourite station. (Fig.24)

You can choose FM stations.

3You can use the external antenna for better reception.Insert the external antenna into the antenna socket next to symbol ò on the back of the appliance.

4Press the RADIO button to switch off the radio (Fig. 22).

Power failure

To make sure the alarm goes off at the set time after a short power failure, the appliance has been provided with a backup system.This system has a self-charging battery that does not have to be replaced.The system remembers the time for a few minutes.

,After a long power failure,the display shows an incorrect clock time and the alarm time is 00.00.Set the correct clock time (see chapter ‘Preparing for use’) and the correct alarm time (see chapter‘Using the appliance’) (Fig. 5).

Reset

1If the appliance does not respond well,remove the plug from the wall socket and then reinsert it.If this does not help,press the reset button on the bottom of the appliance to reset the display to the factory default settings (Fig.25).

Cleaning and maintenance

Always unplug the appliance and let it cool down for approx.15 minutes before you start cleaning it.

12 English

Never use scouring pads,abrasive cleaning agents or aggressive liquids such as petrol or acetone to clean the appliance.

Regularly remove dust from the inside of the appliance with a dry cloth, as accumulated dust close to a powerful lamp presents a potential fire hazard.

1Clean the outside of the appliance with a damp cloth.

2Clean the inside of the appliance with a dry cloth.

,Open the lamp replacement hatch by first pushing the rib at the bottom inwards and then upwards with some force (Fig.26).

,Tilt the lamp replacement hatch outwards as far as it goes (Fig.27).

,Do not let water run into the appliance or spill water onto the appliance (Fig. 28).

Replacement

Except for the lamp, the appliance does not contain any serviceable parts.

The lamp has to be replaced when it stops burning or when the light output decreases (also see chapter ‘Important’).You must replace the lamp with a Philips 75W E27 SOFTONE softwhite 230V T55 (HF3451) or a Philips 100W E27 SOFTONE softwhite 230VT55 lamp (HF3462/HF3461).Only this lamp provides the correct light intensity.

Replacing the lamp

1Unplug the appliance.

2Let the appliance cool down for approx. 15 minutes.

3Open the lamp replacement hatch by first pushing the rib at the bottom inwards and then upwards with some force (Fig.26).

4Tilt the lamp replacement hatch outwards as far as it goes (Fig.27).

5 Remove the old lamp from the lamp holder (Fig. 29).

6Screw a new lamp in the lamp holder.

Environment

-Do not throw away the appliance with the normal household waste at the end of its life, but hand it in at an official collection point for recycling. By doing this, you help to preserve the environment (Fig. 30).

Guarantee and service

If you need service or information or if you have a problem, please visit the Philips website at www.philips.com or contact the Philips Customer Care Centre in your country (you find its phone number in the worldwide guarantee leaflet). If there is no Customer Care Centre in your country, go to your local Philips dealer or contact the Service Department of Philips Consumer Lifestyle BV.

Guarantee restrictions

The international guarantee does not cover the lamp.

Loading...
+ 28 hidden pages