

Philips miniRITE T R, HearLink 9010 MNR T R, HL 9010 MNR T R, HER9012, HearLink 7010 MNR T R User Manual
...Page 1

HearLink
miniRITE T R
HearLink
Receiver
in-the-Ear
Hearing Aids
Receiver
in-the-Ear
Hearing Aids
miniRITE T R
User Guide
Page 2

Page 3

Model overview
This booklet is valid for the following hearing
aid families and models:
HearLink 9010 MNR T R – HL 9010 MNR T R
(HER9012)
GTIN: 05714464002818
HearLink 7010 MNR T R – HL 7010 MNR T R
(HER7012)
GTIN: 05714464002801
HearLink 5010 MNR T R – HL 5010 MNR T R
(HEB5012)
GTIN: 05714464002795
The following acoustic options are available
for the above families:
60-Speaker
85-Speaker
100-Speaker (power aid)
100-Speaker with Power Mold (power aid)
105-Speaker with Power Mold (power aid)
Page 4
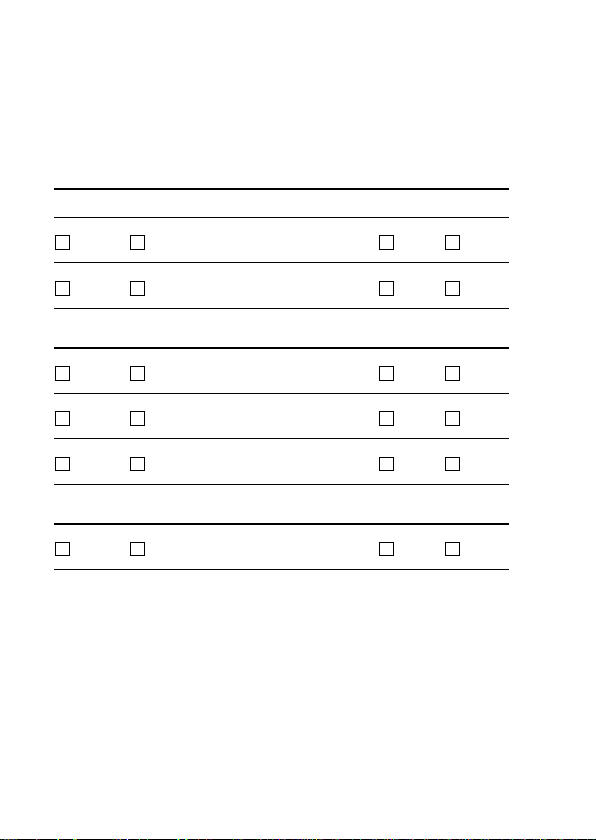
Your individual hearing aid
settings
Settings overview for your hearing aid
Left Right
Yes No
Yes No
On O
On O
On O
On O
Volume Control
Program Button
Volume Control indicators
Beeps at min/max
volume
Clicks when
changing volume
Beeps at preferred
volume
Battery indicators
Low battery warning
Yes No
Yes No
On O
On O
On O
On O
Page 5
Warranty certicate
Name of owner:
Hearing care professional:
Hearing care professional address:
Hearing care professional phone:
Purchase date:
Warranty period:
Model right:
Model left:
Month:
Serial no.:
Serial no.:
Page 6

International warranty
Your hearing aid is covered by an international
limited warranty issued by the manufacturer for
a period of 24 months from the date of delivery.
This limited warranty covers manufacturing and
material defects in the hearing aid itself, but
not in accessories such as batteries, tubing,
speakers, earpieces and lters, etc. Problems
arising from improper/incorrect handling
or care, excessive use, accidents, repairs
made by an unauthorized party, exposure to
corrosive conditions, physical changes in your
ear, damage due to foreign objects entering
the device or incorrect adjustments are NOT
covered by the limited warranty and may void
it. The above warranty does not aect any legal
rights that you might have under applicable
national legislation governing sale of consumer
goods. Your hearing care professional may have
issued a warranty that goes beyond the clauses
of this limited warranty. Please consult him/her
for further information.
If you need service
Take your hearing aid to your hearing care
professional, who may be able to sort out minor
problems and adjustments immediately.
Page 7

Introduction to this booklet
This booklet shows you how to use and
maintain your new hearing aid. Please read
the booklet carefully including the warning
sections. This will help you to get the most out
of your new hearing aid.
Your hearing care professional has adjusted
the hearing aid to meet your needs. If you
have further questions, please contact your
hearing care professional.
More information is available on
www.hearingsolutions.philips.com.
Page 8

Intended use
The hearing aid is intended to amplify and
transmit sound to the ear and thereby
compensate for impaired hearing within mild
to moderate to profound hearing loss. This
hearing aid is intended to be used by adults
and children older than 36 months.
Important notice
The hearing aid amplication is uniquely
adjusted and optimized to your hearing
capabilities during the hearing aid
tting performed by your hearing care
professional.
Page 9

In short
Charging
Charge the hearing aid every night.
The LED on the hearing aid will turn red when
the hearing aid is charging and green when
fully charged.
It takes 3 hours to fully charge the hearing aid.
ON/O FF
· The hearing aid turns ON when you remove it
from the charger.
· The hearing aid turns OFF when you place it
in the charger.
Always leave the charger connected to a
power supply when the hearing aid is seated
in the charging port. Unplugging the charger
will make the hearing aid turn on and start
using the battery.
Page 10
Table of contents
Identify your hearing aid, speaker,
and earpiece 13
Your hearing aid −What it is and does 16
Charger − What it is and does 17
Preparing the charger 18
Charging the hearing aids 19
Charging time 20
Battery performance 21
Turn hearing aid ON/OFF using charger 22
Turn hearing aid ON/OFF using Program
Button 23
Low battery indication 24
Identify left and right hearing aid 25
Put on the hearing aid 26
Cleaning 27
Replacing standard earpieces 29
ProWax miniFit lter 30
Replace ProWax miniFit lter 31
Page 11
Clean customized earpieces 32
Replace ProWax lter 33
Store the hearing aid 34
Flight mode 35
Optional features and accessories 36
Change volume (optional) 37
Change program (optional) 38
Mute the hearing aid (optional) 40
Put hearing aid in pairing mode 41
Using hearing aid with iPhone, iPad,
or iPod touch 42
Pairing hearing aid with iPhone 43
Re-connect your hearing aids to your
iPhone, iPad, or iPod touch 46
Wireless accessories (optional) 47
Other options (optional) 48
Sound and LED indications 49
General warnings 52
Troubleshooting guide 62
Page 12

Water & dust resistance 66
Conditions of use 67
Mobile phone 68
Technical information 70
Technical data 75
Page 13
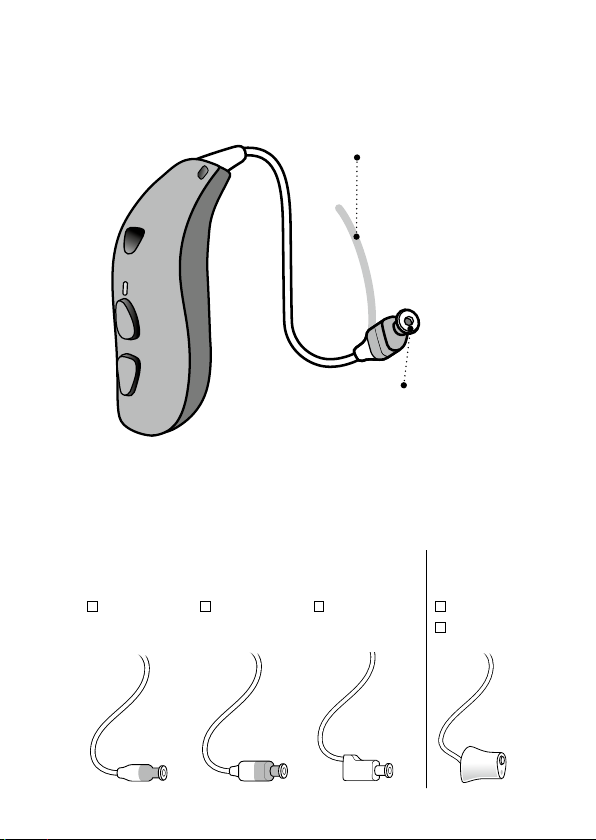
Identify your hearing aid,
speaker, and earpiece
Ear grip
(optional)
Speaker
(60-Speaker shown)
Speakers
miniRITE T R hearing aid comes with ve
dierent speakers:
Standard
speakers
60-Speaker 85-Speaker 100-Speaker 100-Speaker
Power Mold
speakers
105-Speaker
13
Page 14
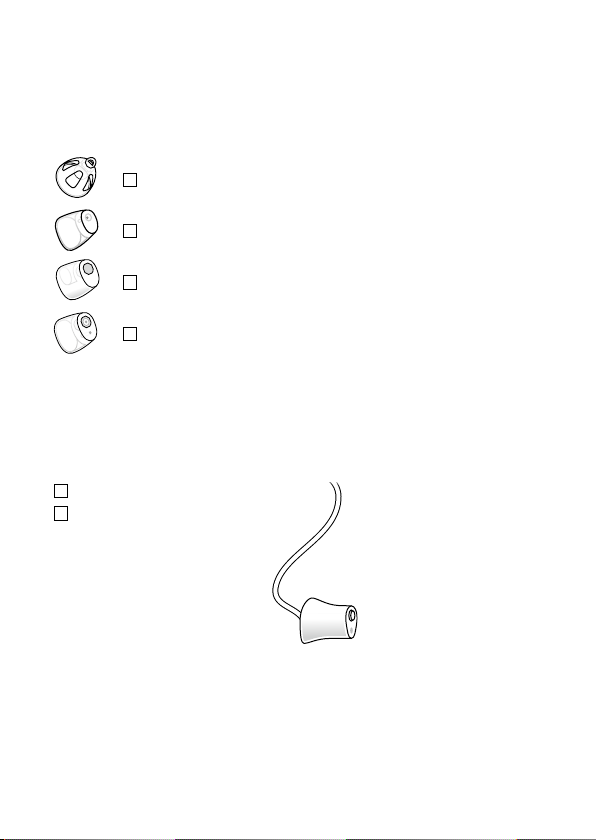
Earpieces
The speaker uses one of the following
earpieces:
Dome (Open Dome shown)*
Grip Tip*
VarioTherm® Micro Mold or Lite Tip
Micro Mold or Lite Tip
Power Mold speakers
100-Speaker
105-Speaker
* Please see details for replacing the dome or
Grip Tip in sec tion: “Replace dome or Grip Tip”.
Va r ioThe rm® is a registered trademark of Dreve.
14
Page 15
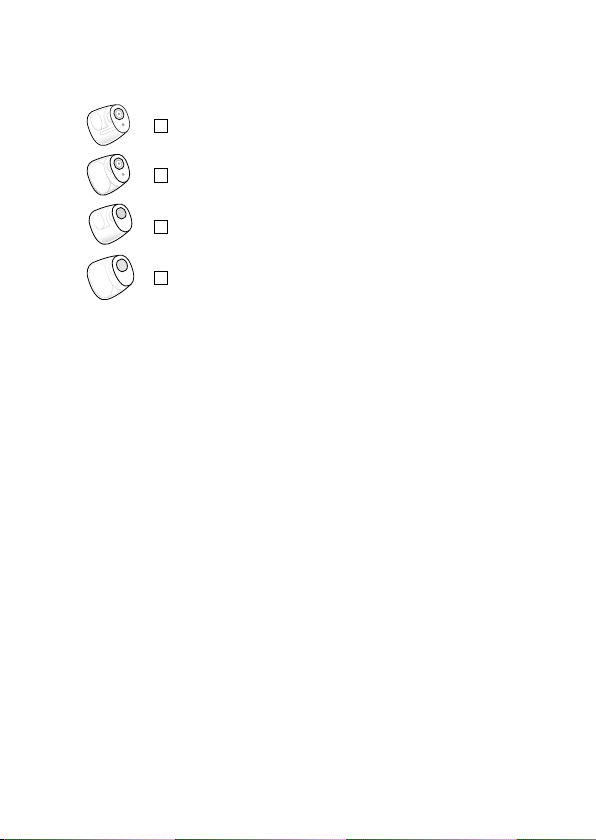
Customized earpieces
Micro Mold
Lite Tip
VarioTherm® Micro Mold
VarioTherm® Lite Tip
Va r ioThe rm® is a registered trademark of Dreve.
15
Page 16
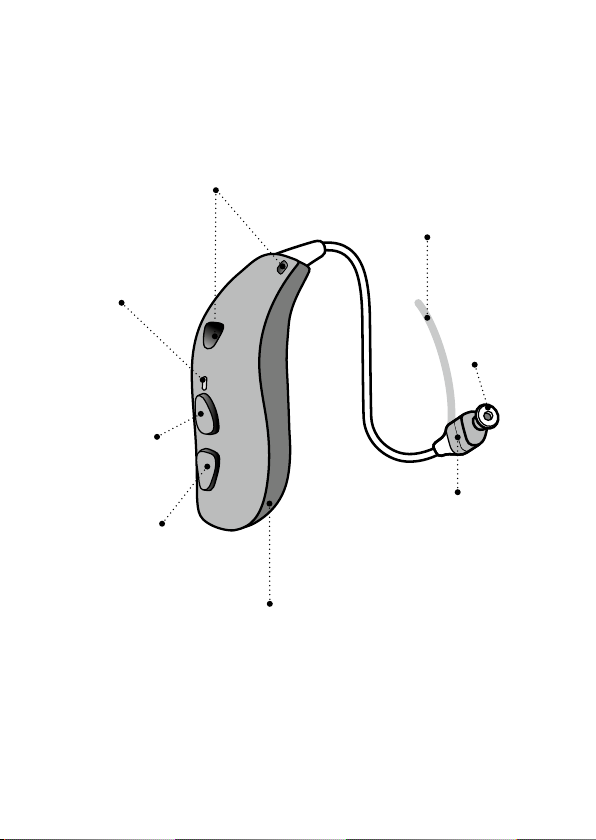
Your hearing aid −
What it is and does
Microphones
Sound in
LED light
Charging, ON,
OFF, ight
mode status
Program
Button
Upper part:
Volume up,
program
change.
Lower part:
ON, OFF, ight
mode, volume
down, program
change
Rechargeable battery
Only replaced by
the hearing care
professional
Ear grip
Holds the speaker
in place (optional)
Wax lter
Protect
the speaker
from wax
Speaker
Sound out
16
Page 17
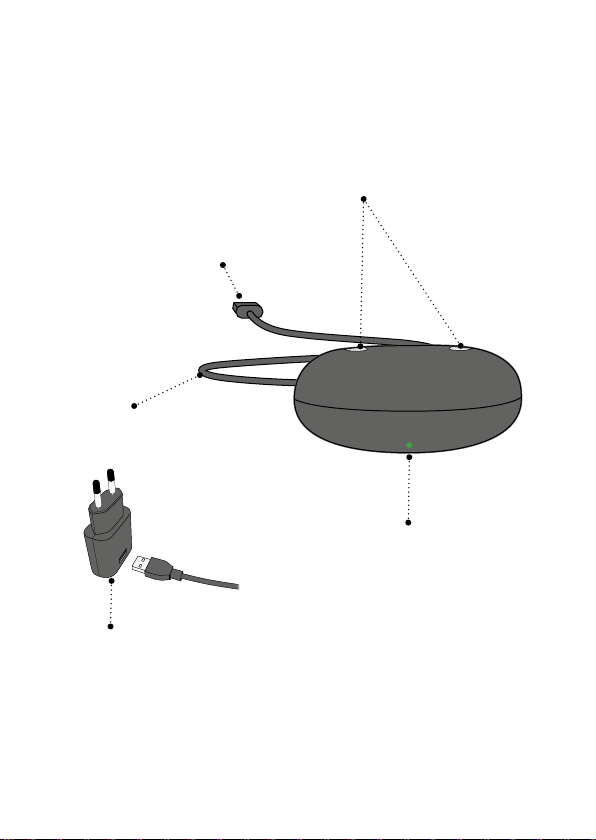
Start up
Charger − What it is and does
Charging ports
For hear ing aids when
charging
USB connector
Insert in power plug or
other power sources
Power cable
Supply power
LED light
Status indicator for
charger ON/OFF
Power plug*
For power socket
* Power plug will vary from countr y to country
17
Page 18
Start up
Start up
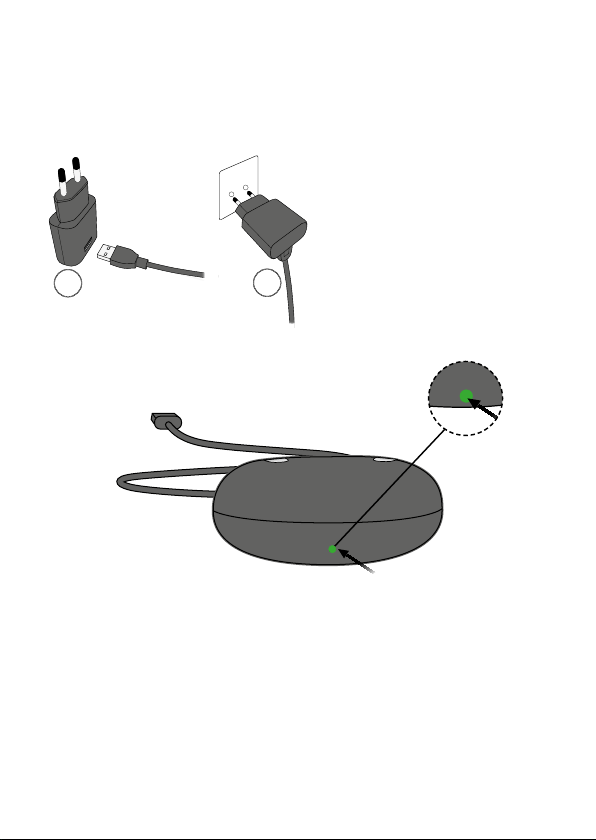
Preparing the charger
Connect to power source
1. Insert the USB
connector into
the power plug.
2. Insert the power
plug into a
1
Charger is on
2
power socket.
The charger
will turn on
automatically.
When the charger is connected to power,
the green LED turns on.
18
Page 19
Charging the hearing aids
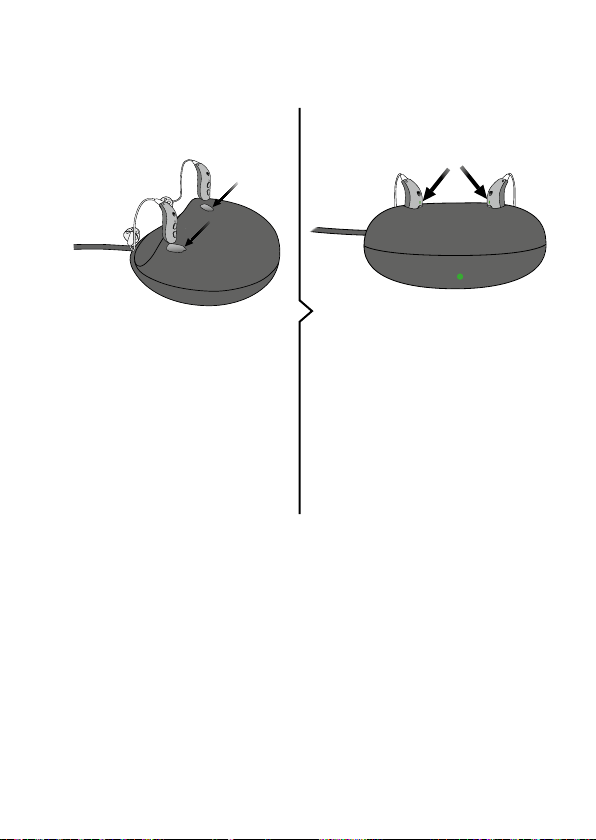
Place hearing aids
in charger
Place the hear ing aids
in the charging ports as
shown in the picture.
Charger
The LEDs on the hearing aids
will turn on when the hearing
aids are correctly placed in the
charger.
Hearing aid LED charging
status:
Red light = Charging
Green light = Fully charged
19
Page 20

Charging time
Fully charge your hearing aid at least 3 hours
before rst time use.
Charge your hearing aid every night. That
ensures that you will start your day with a fully
charged hearing aid.
Charging time can vary depending on the
remaining capacity of the battery. If your
hearing aid is completely drained, the normal
charging time is:
3 hours = Fully charged
1 hour = 50 % charged
0.5 hours = 25 % charged
The charging process will automatically stop
when the battery is fully charged. Leave
the hearing aid in the charger when you do
not use it. Remember to keep the charger
connected to a power source.
Note that charging time may vary between the
left and the right hearing aid.
20
Page 21

Battery performance
The daily battery performance varies
depending on your individual use and hearing
aid settings.
Streaming sound from a TV, mobile phone
or AudioClip can inuence daily battery
performance.
If your hearing aid runs out of battery, place it
in the charger for a recharge. Additional usage
time cannot be achieved by trying to restart
the hearing aid.
For the best charging conditions, the room
temperature should be between +5 °C to
+35 °C.
If you experience that your hearing aid does
not perform for a full day, it might be time
to have the battery replaced. Contact your
hearing care professional.
21
Page 22

Turn hearing aid ON/OFF
using charger
Your hearing aid automatically turns ON when
removed from the charger.
The hearing aid LED turns green after
6 seconds, conrming that it is ready for use.
You may hear a start-up jingle.
Your hearing aid automatically turns OFF
when placed in the charger and starts
charging. The LED turns red.
Important notice
Always leave the charger connected to a
power source when the hearing aid is seated
in the charging port. Unplugging the charger
will make the hearing aid turn on and start
using the battery.
22
Page 23
Turn hearing aid ON/OFF
using Program Button
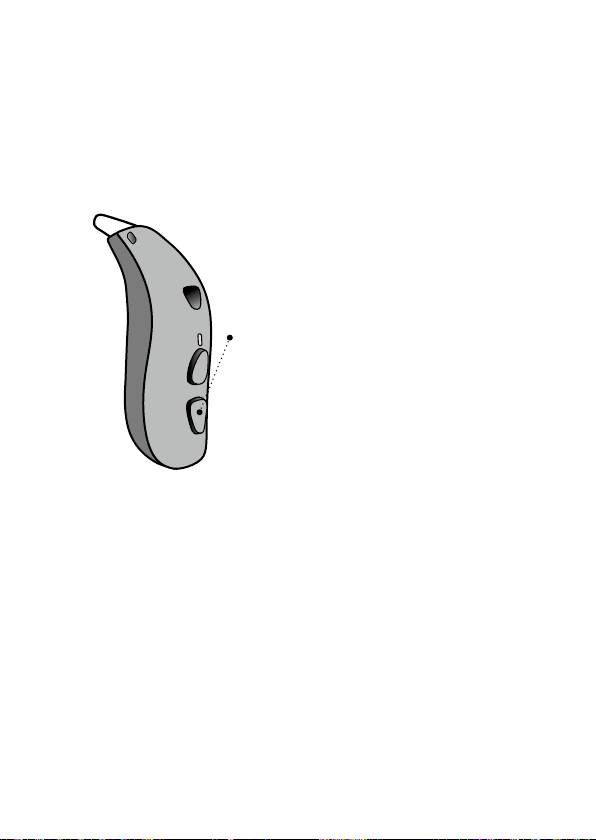
The hearing aid can be turned ON and OFF
using the Program Button.
ON:
Press and hold the lower part of
the button for approx. 2 seconds.
Release the button and wait until
the hearing aid LED turns GREEN.
The hearing aid is now turned ON.
You may hear a short start-up
jingle.
OFF:
Press and hold the lower part of
the button for approx. 3 seconds
until the hearing aid LED turns
RED and the hearing aid plays 4
descending tones. Release the
Program Button and the hearing
aid is turned OFF.
See overview “Sound and LED indications”.
23
Page 24
Low battery indication
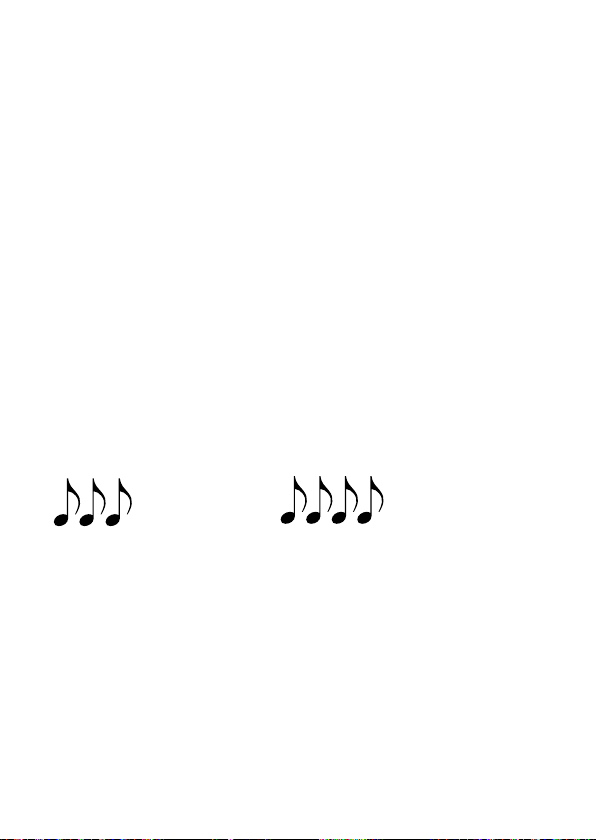
When the battery is running low, you will
hear 3 short beeps. This will leave you
approximately 2 hours before the hearing aid
stops working. The beeps will be repeated
every 30 minutes. Just before the battery runs
out you will hear 4 descending tones.
If you are streaming audio to your hearing
aid (e.g., from TV or mobile phone), you have
approximately 1 hour before the hearing aid
stops working, when you hear the 3 short
beeps.
Stopping streaming will prolong the battery
performance.
Three beeps
The battery is
running low
Four beeps
The battery
has run out
Optional LED
The LED blinks red and continuously repeats
to indicate that the battery is low.
24
Page 25
Identify left and right hearing
aid
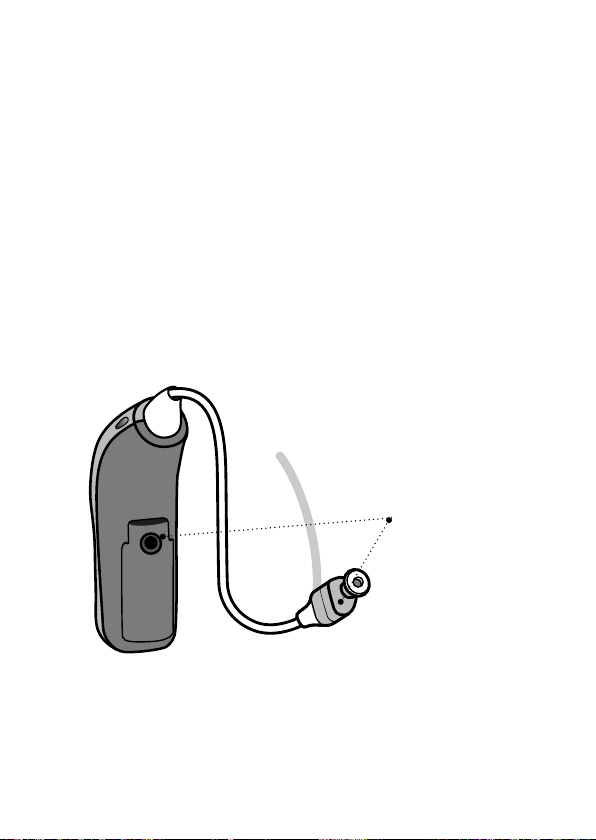
It is important to distinguish between the left
and the right hearing aid, as they might be
programmed dierently.
You can nd left/right color indicators on the
hearing aid itself and on 60- and 85-Speakers
as shown. Indicators (either L or R) can also be
found on 100-Speakers and some earpieces.
A RED indicator
marks the RIGHT
hearing aid
A BLUE indicator
marks the LEFT
hearing aid
25
Page 26
Put on the hearing aid
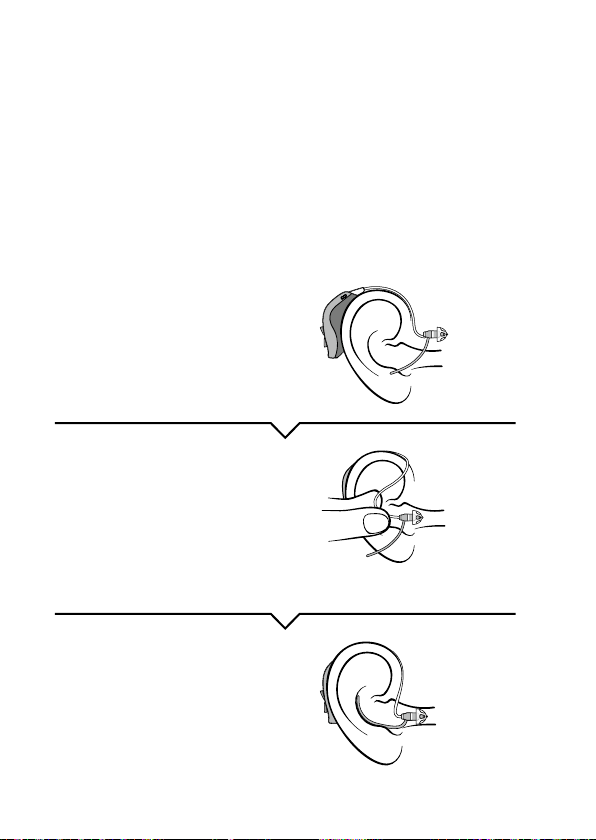
The speaker brings the sound into your ear.
The speaker should always be used with an
earpiece attached. Use only parts designed
for your hearing aid.
If the speaker has an ear grip, place it in the
ear so it follows the contour of the ear
(see step 3).
Step 1
Place the hearing aid
behind your ear.
Step 2
Hold the bend of the
speaker wire between your
thumb and index nger.
The earpiece should point
towards the ear canal
opening.
Step 3
Gently push the earpiece
into your ear canal until
the speaker wire sits close
against the side of your
head.
26
Page 27
Cleaning
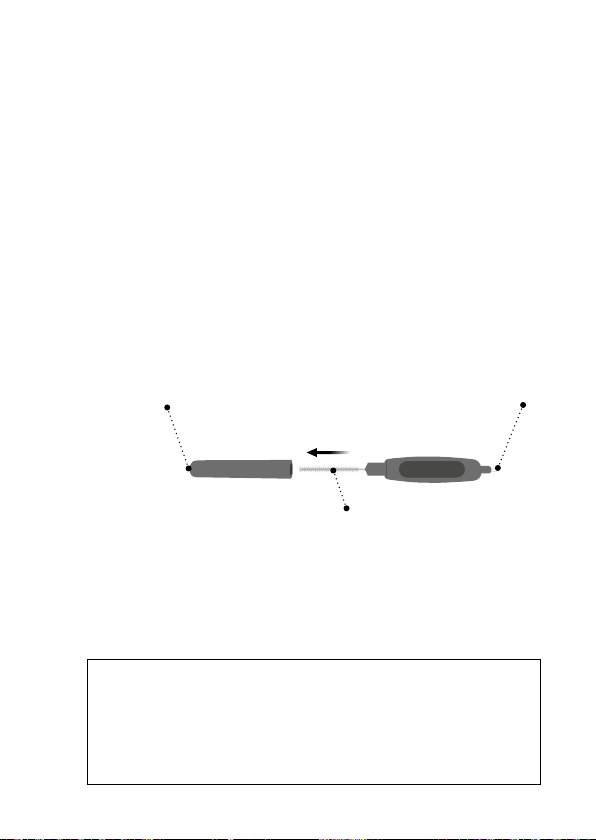
The MultiTool contains a brush and a wire
loop for cleaning and removing ear wax from
your earpiece. If you need a new MultiTool,
please contact your hearing care professional.
Magnet
Brush
Important notice
The MultiTool has a built-in magnet.
Keep the MultiTool at least 30 cm away from
credit cards and other magnetically sensitive
devices.
Wire loop
27
Page 28
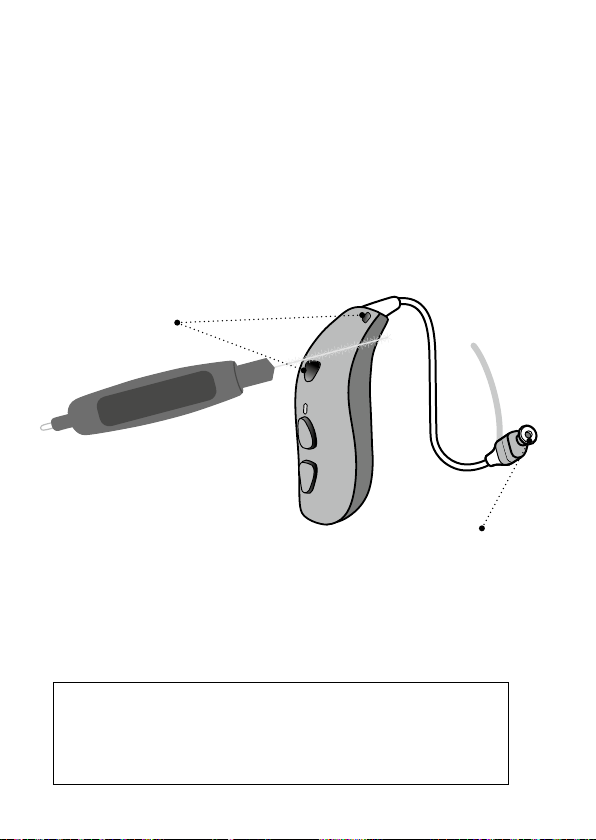
When handling your hearing aid, hold it over a
soft surface to avoid damage if you drop it.
Clean the microphone openings
Carefully brush away debris from the openings
using a clean brush. Gently brush the surface
and make sure the brush is clean and that it is
not pressed into the openings.
Microphone
openings
Wax lter
Important notice
Use a soft, dry cloth to clean the hearing aid.
It must never be washed or immersed in
water or other liquids.
28
Page 29
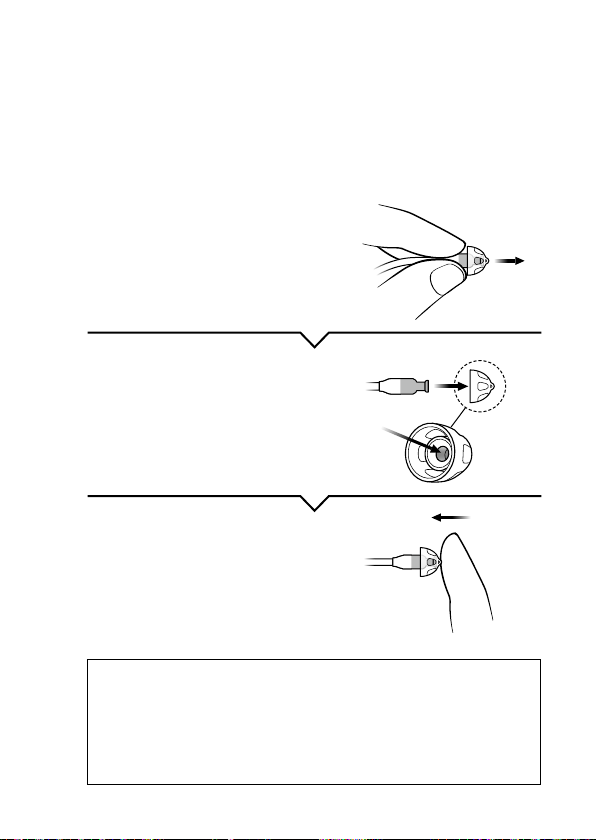
Replacing standard earpieces
The standard earpiece (dome and Grip Tip)
should not be cleaned. If the earpiece is lled
with wax, replace it with a new one. Grip Tip
needs to be replaced at least once a month.
Step 1
Hold on to the end of the
speaker and then pull o
the earpiece.
Step 2
Insert the speaker exactly
into the middle of the
earpiece to obtain a rm
attachment.
Step 3
Push rmly to ensure that
the earpiece is fastened
securely.
Important notice
If the earpiece is not on the speaker when
removed from the ear, the earpiece may still
be in the ear canal. Consult your hearing care
professional for further instructions.
29
Page 30

ProWax miniFit lter
The speaker has a white wax lter attached
to the end where the earpiece is attached.
The wax lter will help prevent wax and
debris from damaging the speaker. If the lter
becomes clogged, please replace the wax lter
(see section “Replace ProWax miniFit lter”) or
contact your hearing care professional.
Remove the earpiece from the speaker before
replacing the wax lter.
Important notice
Always use the same type of wax lter as
was originally supplied with the hearing
aid. If you are in any doubt about the use
or replacement of wax lters, contact your
hearing care professional.
30
Page 31
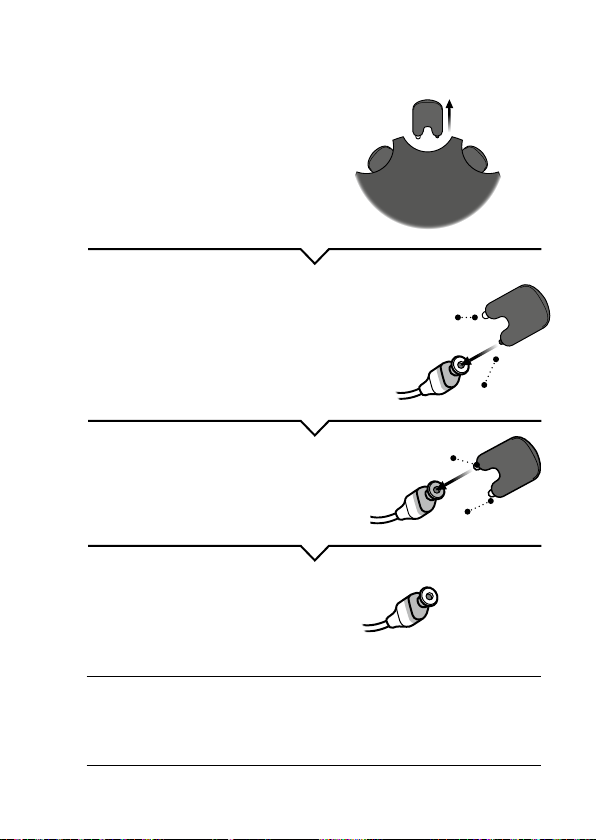
Replace ProWax miniFit lter
1. To ol
Remove the tool from the
shell. The tool has two pins,
one empty for removal and
one with the new wa x lter.
2. Remove
Push the empty pin into the
wax lter in the speaker and
pull it out.
New lter
Empty pin
3. Insert
Insert the new wax lter using
the other pin, remove the tool
and throw it out.
4. Final
The speaker should look
as shown when you have
replaced the wax lter.
New lter
Old lter
If you use a mold or LiteTip, a hearing care
professional must replace the wax lter in the
speaker.
31
Page 32
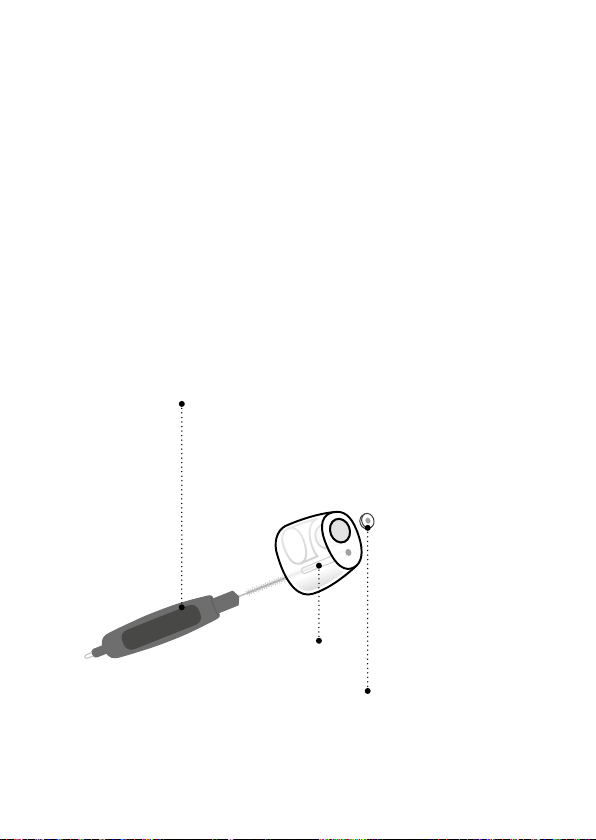
Clean customized earpieces
The earpiece should be cleaned regularly.
The earpiece contains a wax lter*. The lter
keeps wax and debris from damaging the
speaker. Replace the lter when clogged or
when the hearing aid does not sound normal.
Alternatively, contact your hearing care
professional.
Always use the wax lter delivered by your
hearing care professional.
The vent is cleaned by pressing the
brush through the hole, twisting it
slightly.
Vent
ProWax lter
* VarioTherm Micro Mold and LiteTip do not have a wax
lter.
32
Page 33
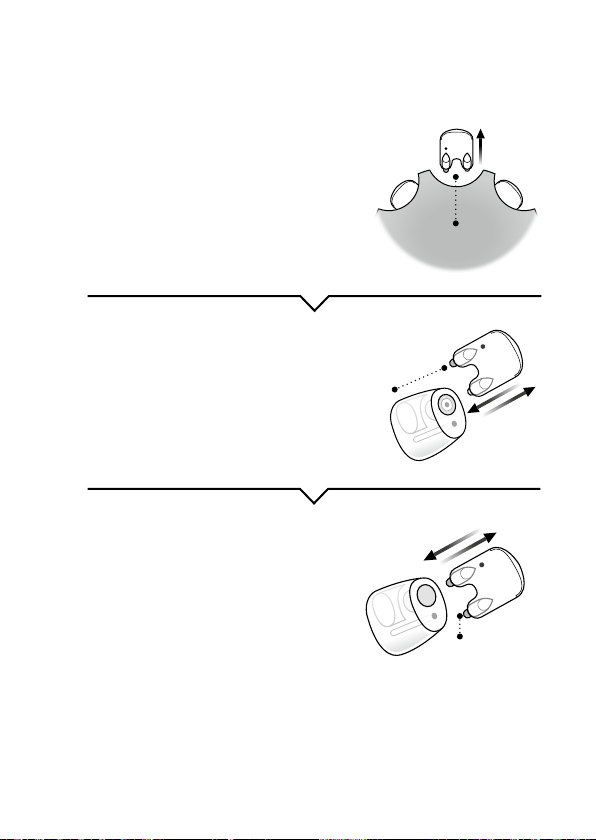
Replace ProWax lter
1. To o l
Remove the tool from
the shell. The tool has
two pins, one empty
for removal and one
with the new wax lter.
2. Remove
Push the empty pin
into the wax lter in
the mold and pull it
out.
3. Insert
Insert the new wax
lter using the other
pin, remove the tool,
and throw it out.
New
lter
New
lter
Old lter
33
Page 34

Store the hearing aid
The charger is the optimal storage for the
hearing aid. Anytime your hearing aid is not in
use, place it in the charger for charging. This
will ensure your hearing aid is always charged.
To ensure the longest life of the rechargeable
battery in the hearing aid, do not expose it
to excess heat. For example, do not leave the
hearing aid in the sun in a window or in a car,
even if the hearing aid is in the charger.
Long term storage (weeks, months)
Before storing the hearing aid for a longer
period (more than 14 days) fully charge the
hearing aid. Then turn the hearing aid o. This
way the battery can be charged again.
It is necessary to fully charge the hearing aid
every 6 months to protect the rechargeable
battery. If a stored hearing aid is not
charged within a 6-month time frame, the
rechargeable battery will need to be replaced.
Important notice
Always leave the charger connected to a
power source when the hearing aid is seated
in the charging port. Unplugging the charger
will make the hearing aid turn on and start
using the battery.
34
Page 35
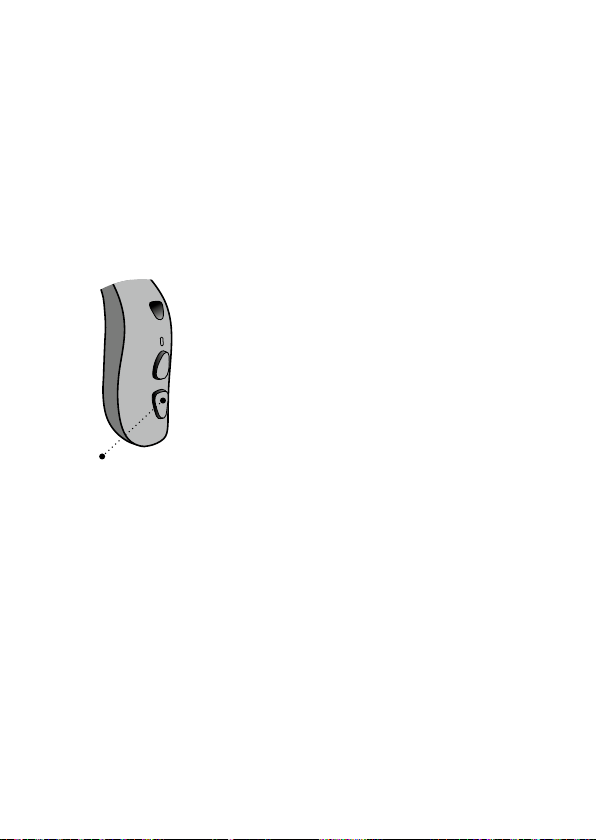
Flight mode
When boarding an airplane or entering an
area where it is prohibited to radiate radio
signals, e.g., during ight, ight mode must be
activated. It is only necessary to activate ight
mode on one hearing aid. When ight mode
is activated, only Bluetooth
hearing aid will still be working.
Beep:
The hearing aid plays
4 descending tones
followed by 4 tones to
indicate that ight mode is
activated or deactivated.
LED ight mode activated:
To activate and
deact ivate ight
mode press and
hold the Program
Button (lower part)
for 7 seconds.
A long red blink followed
by green, red, red. The
LED will blink green, red,
red a few times. This
conrms that ight mode
is activated.
LED ight mode deactivated: The LED will turn
steady red for a few seconds, until the hearing
aid returns to its normal operating mode.
®
is turned o. The
Pressing the button on one hearing aid will
activate ight mode on both hearing aids.
See over view “Sound and LED indicat ions”.
35
Page 36
Optional features and
accessories
The features and accessories described on
the following pages are optional. Please
contact your hearing care professional to nd
out how your hearing aid is programmed. If
you experience dicult listening situations,
a special program may be helpful. These
are programmed by your hearing care
professional.
Write down hearing situations where you may
need help.
36
Page 37
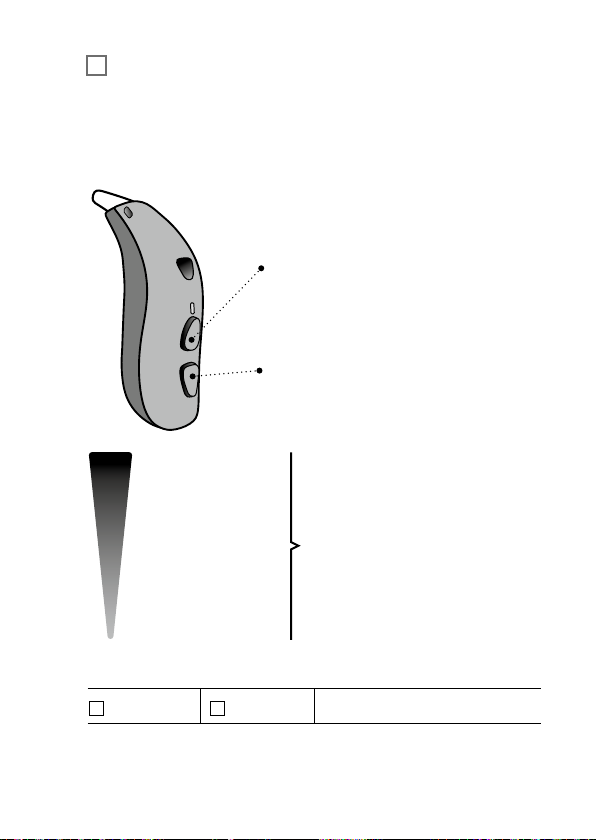
Change volume (optional)
The Program Button allows you to adjust the
volume. You will hear a beep when you turn
the volume up or down.
Give a short press to the
button to increase the volume
Give a short press to the
button to decrease the volume
Maximum
Start-up level
Minimum
You will hear 2 beeps at
the start-up level.
You will hear 3 beeps at
Maximum and Minimum.
Volume Change
Left Right
To be lled out by the hearing care
professional.
37
Page 38
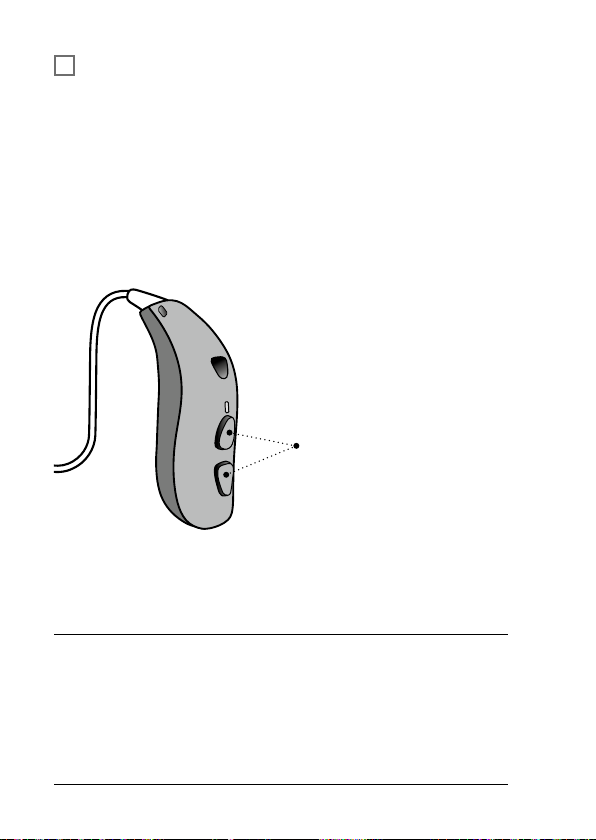
Change program (optional)
Your hearing aid can have up to 4 dierent
programs. These are programmed by your
hearing care professional.
Press up or down
to change between
programs
You can change continuously between
programs both up and down in the program
order. For example, if you want to go from
program 1 to 4, you can press the down button
once instead of pressing the up button 3
times.
38
Page 39
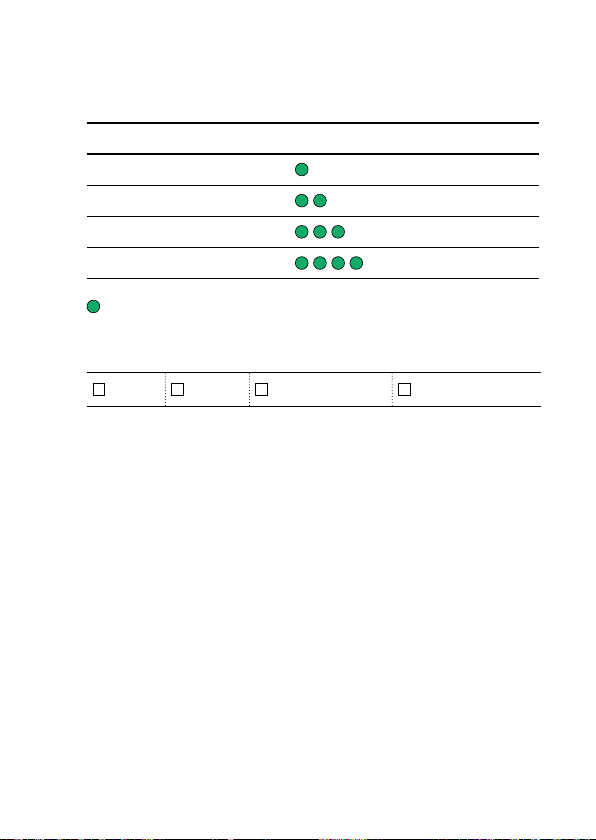
To be lled out by the hearing care
professional
Program Activation sound When to use
Program 1 1 tone
Program 2 2 tones
Program 3 3 tones
Program 4 4 tones
Green, short blink
Program change:
Left Right Short press Medium press
39
Page 40

Mute the hearing aid
(optional)
Use the mute function if you need to silence
the hearing aid while wearing it.
Your hearing aid can be muted by using one of
the following optional devices:
· Philips HearLink app
· AudioClip
· Remote Control
The LED might blink red and green, depending
on how your hearing care professional has
congured your hearing aid.
How to unmute your hearing aid
The hearing aid can be unmuted using one of
the optional devices or by applying a short
press to any of the buttons on the hearing aid.
Important notice
Do not use the mute function as an o
switch, as the hearing aid still draws current
from the battery in this mode.
40
Page 41

Put hearing aid in pairing
mode
To pair your hearing aid with a wireless
accessory (e.g. TV Adapter, AudioClip,
smartphone, etc.), your hearing aid must be in
pairing mode. To activate pairing mode, switch
the hearing aid OFF and ON as described on
pages 22 and 23.
The hearing aid will remain in pairing mode for
180 seconds.
41
Page 42

Using hearing aid with iPhone,
iPad, or iPod touch
Your hearing aid is a Made for iPhone® hearing
aid and allows for direct communication and
control with an iPhone®, iPad®, or iPod® touch.
For assistance in pairing and using these
products with your hearing aid, please contact
your hearing care professional or visit our
support site at:
www.hearingsolutions.philips.com.
For information on compatibility, please visit
www.hearingsolutions.philips.com/compatibility.
“Made for iPod”, “Made for iPhone”, and “Made for
iPad” mean that an electronic accessory has been
designed to connect specically to iPod, iPhone,
or iPad, respectively, and has been certied by the
developer to meet Apple performance standards.
Apple is not responsible for the operation of
this device or its compliance with safety and
regulatory standards. Please note that the use of
this accessory with iPod, iPhone, or iPad may aect
wireless performance.
Stream audio with Android™ devices through
the Philips AudioClip.
42
Page 43
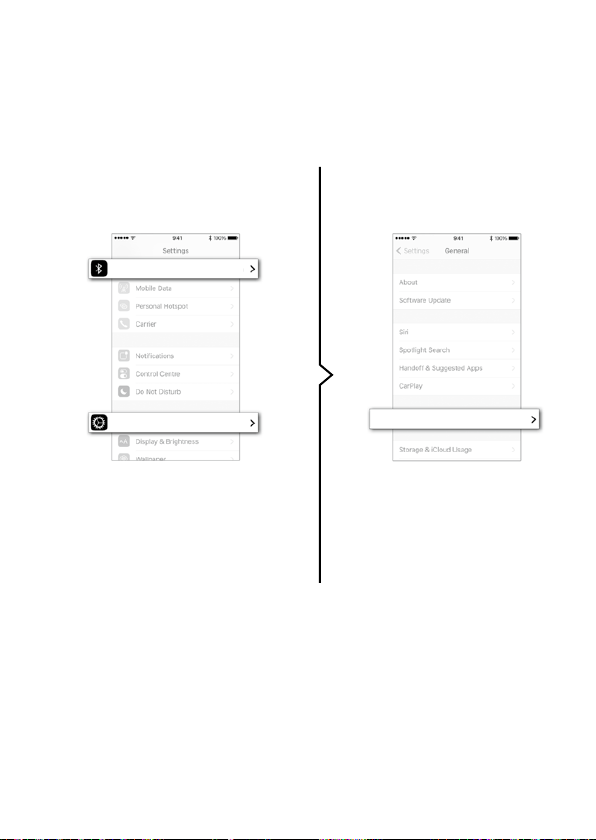
Pairing hearing aid with
iPhone
1. Settings
Bluetooth
General
On
Open your iPhone
and go to “Settings”.
Make sure Bluetooth
is on. Then choose
“General”.
2. General
Accessibility
On the “General”
screen, choose
®
“Accessibility”.
43
Page 44
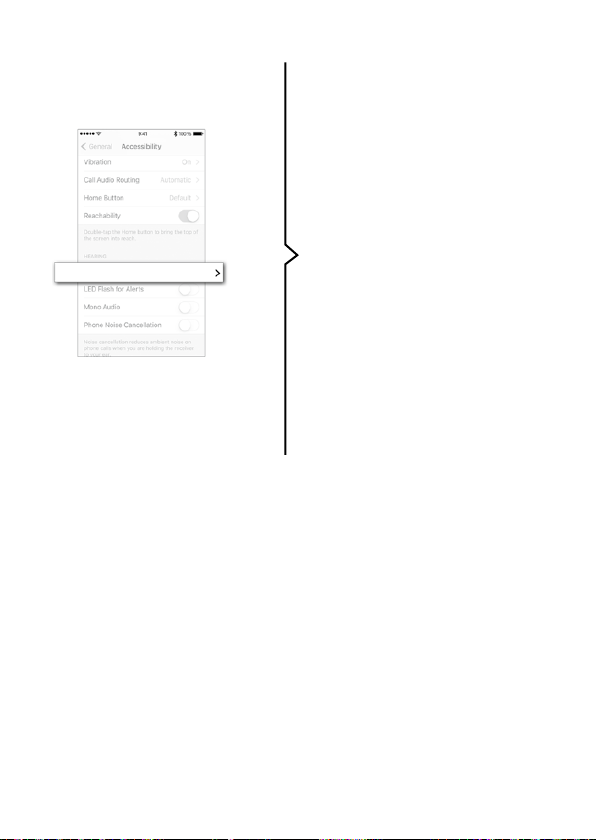
3. Accessibility
MFi Hearing Devices
On the “Accessibility”
screen, choose
“MFi Hearing
Dev ices”.
4. Prepare
Pairing must occur
within 3 minutes
after the hearing
aid is turned on.
To restart the
hearing aid, place it
in the charger and
remove it again, or
use the Program
Button (see section:
Turn ON/OFF using
Program Button).
This will put the
hearing aid into
pairing mode.
44
Page 45
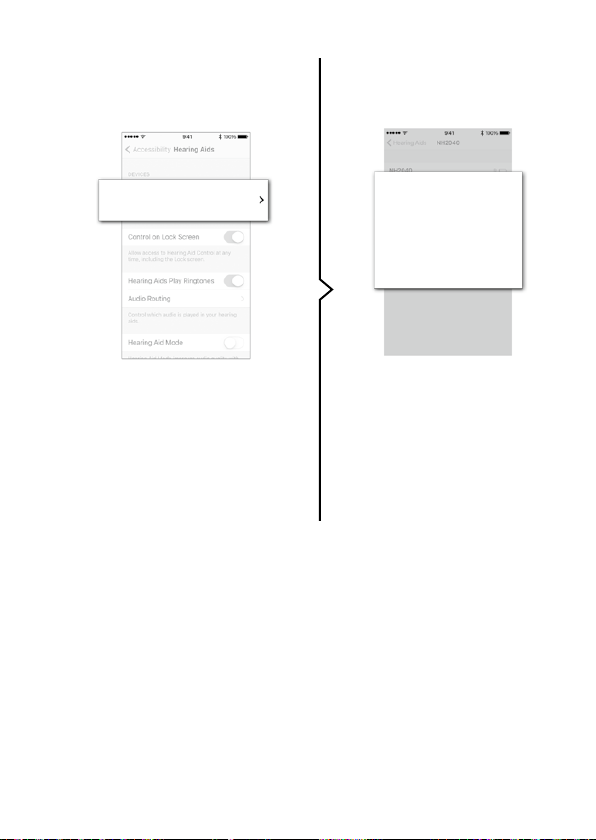
5. Select
6. Conrm pairing
Philip
HearLink 9010
Your iPhone will
detect the hearing aid
for pairing. Detected
devices will appear
in your iPhone list.
Choose your hearing
aid.
Bluetooth Pairing
Request
“Philip” would like to
pair with your iPhone
Cancel Pair
Conrm pairing.
If you have two
hearing aids,
pairing
conrmation
is needed for
each hearing aid.
45
Page 46

Re-connect your hearing aids
to your iPhone, iPad, or iPod
touch
When you turn o your hearing aids or iPhone,
iPad, or iPod touch, these will no longer be
connected. To connect them again, restart
your hearing aids (see pages 22 and 23).
The hearing aids will then automatically
reconnect to your iPhone, iPad, or iPod touch.
Use of the Made for Apple badge means that
an accessory has been designed to connect
specically to the Apple product(s) identied in the
badge, and has been certied by the developer to
meet Apple performance standards. Apple is not
responsible for the operation of this device or its
compliance with safety and regulatory standards.
Please note that use of this Accessory with iPod,
iPhone, or iPad may aect wireless performance.
Apple, the Apple logo, iPhone, iPad, and iPod
touch are trademarks of Apple Inc., registered in
the U.S. and other countries.
46
Page 47

Wireless accessories
(optional)
As an enhancement to your wireless hearing
aid, a range of wireless accessories are
available. They can enable you to hear and
communicate better in a lot of everyday
situations.
AudioClip
When this device is paired with your mobile
phone, you can use the hearing aids like stereo
headphones. AudioClip can also function as a
remote microphone and remote control.
TV Adapter
TV Adapter is a wireless transmitter of sound from
TV and electronic audio devices. The TV Adapter
streams sound directly to your hearing aid.
Remote Control
Remote Control oers the ability to change
programs, adjust volume or mute your hear ing aid.
Philips HearLink app
The app oers an intuitive and discreet way to
control your hearing aids with iPhone, iPad, iPod
touch, and Android devices.
For more information, please contact your
hearing care professional or visit:
www.hearingsolutions.philips.com
47
Page 48
Other options (optional)
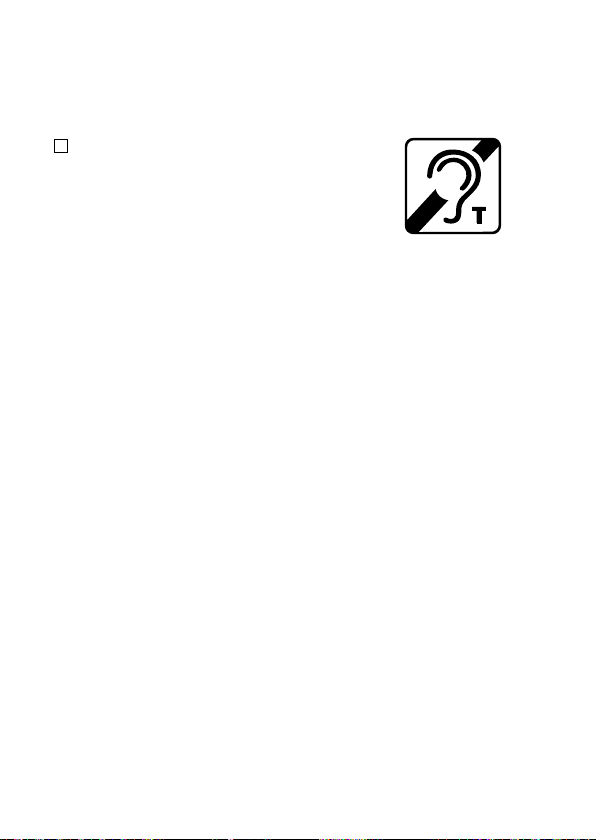
Telecoil
Telecoil helps you hear better
when using a telephone with a
built-in loop or when you are in
buildings with teleloop systems
such as theaters, churches, or
lecture rooms. This symbol or a
similar sign is shown wherever a
teleloop has been installed.
For more information, please contact your
hearing care professional.
48
Page 49

Sound and LED indications
Dierent sound and light indications help to
show the hearing aid status. The dierent
settings are listed on the following pages.
Your hearing care professional can set
sound and LED indications to match your
preferences.
For charger LED indication, see Charger User
Guide.
49
Page 50
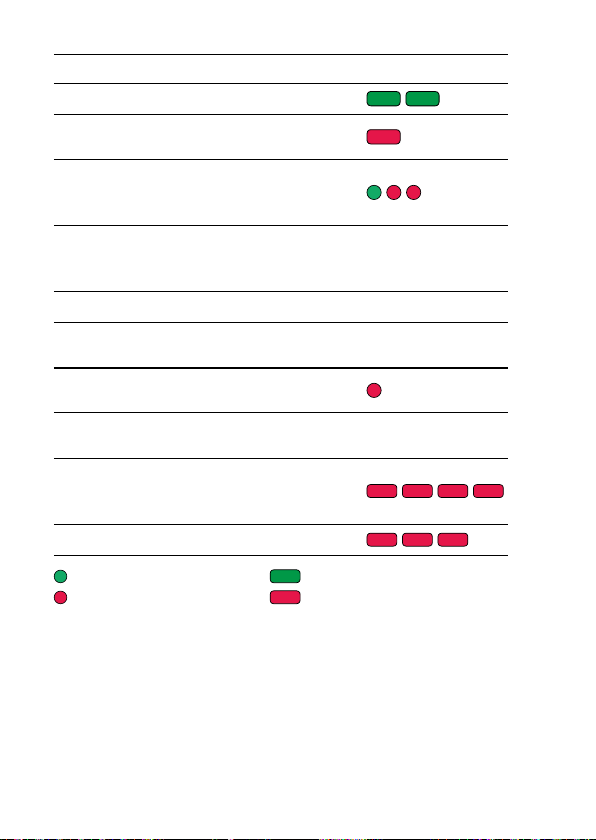
Status Indicators Sound LED
Start-up Start-up jingl e
Shutdown
Flight mode
activation
Flight mode
deactivation
4 descending
tones
Shutdown tones
followed by 4
tones
Shutdown tones
followed by 4
tones
–
Warning
Indicators
Battery low
indication
Battery end
of life
Microphone
serv ice
check needed
System error –
Green, short blink Green, long blink
Red, short blink Red, long blink
50
Sound LED
3 beeps
4 descending
tones
8 beeps
–
Page 51
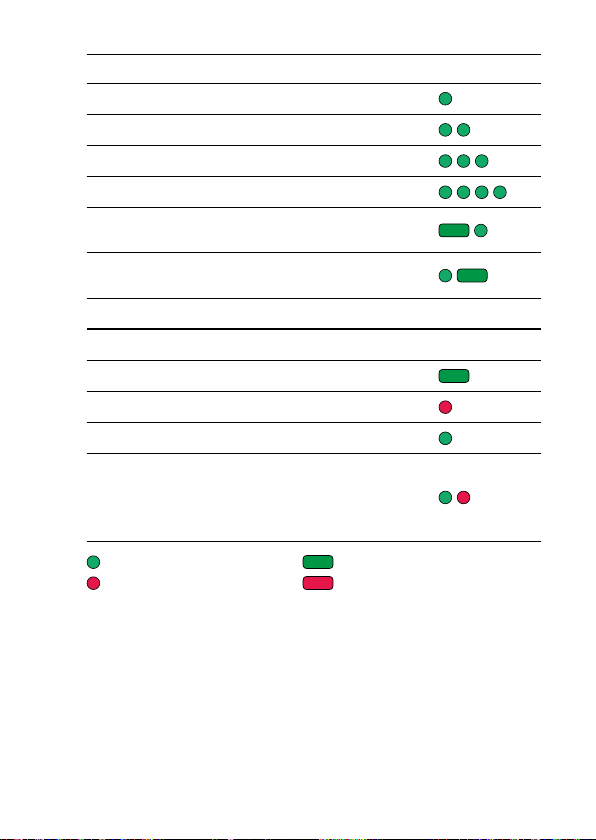
Program Indicators Sound LED
Program 1 1 tone
Program 2 2 tones
Program 3 3 tones
Program 4 4 tones
TV Adapter program
Remote Mic program
Volume Indicators Sound LED
Preferred volume 2 beeps
Min/max volume 3 beeps
Volume change 1 click
Mute activated with
Philips HearLink app,
AudioClip, or Remote
Control
Green, short blink Green, long blink
Red, short blink Red, long blink
2 ascending
tones
2 descending
tones
–
51
Page 52

General warnings
You should familiarize yourself fully with the
following general warnings before using your
hearing aid for your personal safety and to
ensure correct use.
Please note that a hearing aid will not restore
normal hearing and will not prevent or
improve a hearing impairment resulting from
organic conditions. Furthermore, note that in
most cases, infrequent use of a hearing aid
does not permit a user to attain full benet
from it.
Consult your hearing care professional if you
experience unexpected operations or events
with your hearing aid.
This hearing aid is supported by a nonremovable rechargeable lithium-ion battery
cell. Please ensure that you charge the
hearing aid and familiarize yourself with the
safety and handling information related to
rechargeable hearing aids.
Do not try to get access to the battery
inserted in the hearing aid. The battery
must only be replaced by your hearing care
professional.
52
Page 53

Only charge the hearing aid with a Philips
charger. Other chargers risk destroying the
hearing aid and battery.
If a battery or hearing aid is swallowed,
see a doctor immediately. Contact the
National Poison Center at 1-800-222-1222 or
National Battery Ingestion Hotline at 202-625-
3333.
Usage of hearing aids
· Hearing aids should be used only as
directed and adjusted by your hearing care
professional. Misuse can result in sudden and
permanent hearing loss.
· Never allow others to wear your hearing aid,
as incorrect usage could cause permanent
damage to their hearing.
Choking hazards & risk of swallowing small
parts
· Hearing aids and their parts should be kept
out of reach of children and anyone who might
swallow these items or otherwise cause injury
to themselves.
53
Page 54

General warnings
Fatality hazards and risk of swallowing lithiumion
batteries or placing them in the ear or nose
· Never swallow lithium-ion batteries nor
place them in the ear or the nose as this may
lead to serious injury or death in as little as
2 hours. This can be due to chemical burn,
which can cause permanent damage to the
nose or ear or potentially lead to perforation
of the inner organs. If a lithium-ion battery is
swallowed or placed in the ear or nose, see a
doctor immediately. Keep the batteries in the
original package until use. Dispose of used
batteries immediately.
Rechargeable battery
· Do not attempt to open the hearing aid, as it
may damage the battery.
· Never attempt to replace the battery. If
battery replacement is needed, please
return your device to the supplier. The
service guarantee is void if there are signs of
tampering.
· The safety of recharging batteries using a
USB connector is determined by the external
signal source. When connected to external
equipment plugged into a wall outlet, this
equipment must comply with IEC-62368 (or
IEC-60065, IEC- 60950 until June 20, 2019) or
equivalent safety standards.
54
Page 55

Dysfunction
· Be aware of the possibility that your hearing
aid may stop working without notice. Keep
this in mind when you depend on warning
sounds (e.g. when you are in trac). The
hearing aids may stop functioning, for
instance if the batteries have expired or if
the tubing is blocked by moisture or ear wax.
Active implants
· The hearing aid has been thoroughly
tested and characterized for human health
according to international standards for
human exposure (Specic Absorption Ratio
– SAR), induced electromagnetic power and
voltages into the human body.
· The exposure values are well below
internationally accepted safety limits for
SAR, induced electromagnetic power and
voltages into the human body dened in the
standards for human health and coexistence
with active medical implants such as
pacemakers and heart debrillators.
· If you have an active brain implant,
please contact the manufacturer of your
implantable device for information about the
risk of disturbance.
· The MultiTool (which has a built-in magnet)
should be kept more than 30 cm away from
the implant, e.g. do not carry it in a breast
pocket.
55
Page 56

General warnings
X-ray, CT, MR, PET scanning and electrotherapy
· Remove your hearing aid before X-ray, CT/
MR/PET scanning electrotherapy, surgery etc.
as your hearing aid may be damaged when
exposed to strong electromagnetic elds.
Heat and chemicals
· The hearing aid must never be exposed to
extreme heat e.g. left inside a parked car in
the sun.
· The hearing aid must not be dried in
microwave ovens or other ovens.
· The chemicals in cosmetics, hairspray,
perfume, aftershave lotion, suntan lotion
and insect repellent can damage the hearing
aid. Always remove your hearing aid before
applying such products and allow time to dry
before use.
Power aid
· Special care should be exercised in selecting,
tting and using a hearing aid where
maximum sound pressure capability exceeds
132 dB SPL (IEC 711), as there may be risk
of impairing the remaining hearing of the
hearing aid user.
For information on whether your hearing aid is
a power aid, ask your hearing care professional.
56
Page 57

Possible side eects
· Hearing aids and earpieces may cause an
accelerated accumulation of ear wax.
· The non-allergenic materials used in hearing
aids may in rare cases cause a skin irritation
or other side eects.
Please seek consultation with a physician if
these conditions occur.
Interference
· The hearing aid has been thoroughly tested
for interference, according to the most
stringent international standards. However,
interference between the hearing aid and
other devices (e.g. some mobile telephones,
citizens band systems and shop alarm
systems and other devices) may occur. If this
occurs, increase the distance between the
hearing aid and the interfering device.
Use on aircraft
· Your hearing aid contains Bluetooth
®
. On
board an aircraft, ight mode must be
activated or the hearing aid needs to be
turned o, unless Bluetooth® is permitted by
the ight personnel.
57
Page 58

General warnings
Connection to external equipment
· The safety of the hearing aid when connected
to external equipment with an auxiliary
input cable and/or directly, is determined by
the external signal source. When connected
to external equipment plugged into a wall
outlet, this equipment must comply with IEC62368 (or IEC-60065, IEC-60950 until June
20, 2019) or equivalent safety standards.
Warning to hearing aid dispensers
A hearing aid dispenser should advise a
prospective hearing aid user to consult
promptly with a licensed physician (preferably
an ear specialist) before dispensing a hearing
aid if the hearing aid dispenser determines
through inquiry, actual observation, or review
of any other available information concerning
the prospective user, that the prospective user
has any of the following conditions:
58
Page 59

(i) Visible congenital or traumatic deformity
of the ear.
(ii) History of active drainage from the ear
within the previous 90 days.
(iii) History of sudden or rapidly progressive
hearing loss within the previous 90 days.
(iv) Acute or chronic dizziness.
(v) Unilateral hearing loss of sudden or
recent onset within the previous 90 days.
(vi) Audiometric air-bone gap equal to or
greater than 15 decibels at 500 hertz (Hz),
1,000 Hz, and 2,000 Hz.
(vii) Visible evidence of signicant cerumen
accumulation or a foreign body in the ear
canal.
(viii) Pain or discomfort in the ear.
Special care should be exercised in selecting
and tting a hearing aid whose maximum
sound pressure level exceeds 132 decibels
because there may be risk of impairing the
remaining hearing of the hearing aid user.
(This provision is required only for those
hearing aids with a maximum sound pressure
capability greater than 132 decibels [dB].)
59
Page 60

General warnings
Important notice for prospective hearing aid
users
Good health practice requires that a person
with a hearing loss has a medical evaluation
by a licensed physician (preferably a physician
who specializes in diseases of the ear) before
purchasing a hearing aid. Licensed physicians
who specialize in diseases of the ear are often
referred to as otolaryngologists, otologists or
otorhinolaryngologists. The purpose of medical
evaluation is to assure that all medically
treatable conditions that may aect hearing
are identied and treated before the hearing
aid is purchased.
Following the medical evaluation, the
physician will give you a written statement
that states that your hearing loss has been
medically evaluated and that you may be
considered a candidate for a hearing aid. The
physician will refer you to an audiologist or
a hearing aid dispenser, as appropriate, for a
hearing aid evaluation.
60
Page 61

The audiologist or hearing aid dispenser will
conduct a hearing aid evaluation to assess
your ability to hear with and without a hearing
aid. The hearing aid evaluation will enable
the audiologist or dispenser to select and t
a hearing aid to your individual needs. If you
have reservations about your ability to adapt
to amplication, you should inquire about the
availability of a trial-rental or purchase-option
program. Many hearing aid dispensers now
oer programs that permit you to wear a
hearing aid for a period of time for a nominal
fee after which you may decide if you want to
purchase the hearing aid.
Federal law restricts this device to sale by or
on the order of a doctor, audiologist or other
hearing care practitioner licensed to dispense
hearing aids in your state-in accordance with
all applicable rules and regulations.
Children with hearing loss
In addition to seeing a physician for medical
evaluation, a child with a hearing loss should
be directed to an audiologist for evaluation
and rehabilitation since hearing loss may
cause problems in language development
and educational and social growth of a child.
An audiologist is qualied by training and
experience to assist in the evaluation and
rehabilitation of a child with a hearing loss.
61
Page 62
Troubleshooting guide
Symptom Possible causes Solutions
Hearing aid is out of power
Dead battery Contact your hearing care professional
No sound
Intermittent or
reduced sound
Squealing noise
Beeping
Clogged earpieces
(dome, Grip Tip, Micro Mold,
or Lite Tip)
Clogged sound outlet
Moisture Gently wipe the hearing aid and let it dry
Hearing aid is out of power
Hearing aid earpiece
inserted incorrectly
Ear wax accumulated
in ear canal
If your hearing aid plays
8 beeps, 4 times
consecut ively, your hearing
aid needs a microphone
service check
62
Page 63
Charge the hearing aid
Clean mold
Replace wax lter, dome, or Grip Tip
Clean mold or replace wax lter, dome, or Grip Tip
Charge the hearing aid
Re-insert the earpiece
Have ear canal examined by your doctor
Contact your hearing care professional
63
Page 64
Symptom Possible causes Solutions
The charger is not switched on
The hearing aid or charger is
either too warm or too cold
Hearing aid LED
remains o when
the hearing aid
is placed in the
charger
Charging is incomplete. The
room temperature exceeds
95°F, which prolongs the
charging time. The charger has
stopped charging to protect
the battery.
The hearing aid is not
correctly inserted into the
charger
The hearing aid
LED blinks red
when the hearing
System error
aid is placed in the
charger
Pairing issue
with Apple device
64
Bluetooth
®
connection failed
Only one hearing aid paired
Page 65
Verify that the charger power supply is connected
correctly
Move the charger and hearing aid to a location with
a temperature between 41°F to 104°F
Reinsert the hearing aid into the charger. This
will complete the charging within approximately
15 minutes.
Check the charger slots for foreign objects
Contact your hearing care professional
1. Unpair your hearing aids
(Settings gGeneral gAccessibility gMFi Hearing
Devices gDevices gForget this device).
2. Turn Bluetooth® o and on again.
3. Turn o and turn back on the hearing aid.
4. Re-pair hearing aids
(see sect ion “Pairing hearing aid with iPhone”).
If none of the above solutions work, consult your hear ing
care professional for assistance.
65
Page 66

Water & dust resistance
Your hearing aid is dust-tight and protected
against ingress of water (IP68), which means
it is designed to be worn in all daily life
situations. Therefore, you do not have to worry
about sweat or getting wet in the rain. Should
your hearing aid come in contact with water
and stop working, gently wipe o any water
and let the hearing aid dry. Before charging
the hearing aid make sure to wipe o any
moisture.
Important notice
Do not wear your hearing aid while showering
or participating in water activities. Do not
immerse your hearing aid in water or other
liquids.
66
Page 67

Conditions of use
Operat ing
conditions
Charging
conditions
Storage and
transportation
conditions
For information about the charger's conditions of
use, see the charger's User Guide.
Temperature: 41 °F to 104 °F
Relative humidity:
5 % to 93 %, non-condensing
Temperature: 41°F to 104°F
Relative humidity:
5 % to 93 %, non-condensing
Temperature and humidit y should
not exceed the following limits for
extended periods during:
Transport
Temperature: –4 °F to 140 °F
Relative humidity:
5 % to 93 %, non-condensing
Storage
Temperature: –4 °F to 86 °F
Relative humidity:
5 % to 93 %, non-condensing
67
Page 68

Mobile phone
Some hearing aid users have reported a
buzzing sound in their hearing aid when they
are using mobile phones, indicating that
the mobile phone and hearing aid may not
be compatible. The ANSI C63.19 standard
determines the prediction of compatibility
between a specic hearing aid and a mobile
phone by adding the numerical value of the
rating for the hearing aid immunity to the
numerical value of the rating for the mobile
phone emissions. A sum of 4 would indicate
that the combination of wireless device and
hearing aid is usable; a combined rating
that equals 5 would provide normal use; a
combined rating of 6 or greater would indicate
excellent performance.
Whereas all hearing aids have acoustic
coupling, only the larger instruments have the
physical space for telecoil (inductive) coupling.
These two types of coupling have dierent
rating scales (M1 – M4 for acoustic coupling
and T1 – T4 for telecoil coupling, respectively)
and both ratings are therefore relevant when
predicting the compatibility of a particular
hearing aid.
For a hearing aid with both acoustic coupling
and telecoil coupling with a rating of M4/
T2 and with a telephone rating of M3/T3, the
68
Page 69

combined rating is 7 (M4 + M3) for the acoustic
coupling and 5 (T2 + T3) for the telecoil
coupling. According to the guideline given
above, both types of coupling will thereby
be acceptable, with the acoustic coupling
indicating excellent performance and the
telecoil coupling indicating normal use.
The above equipment performance
measurements, categories and system
classications are based upon the best
information available, but it cannot be
guaranteed that all users will be satised.
The immunity of this hearing aid is at
least M2/T2. The equipment performance
measurements, categories and system
classications are based upon the best
information available but cannot guarantee
that all users will be satised.
Important notice
The performance of individual hearing aids
may vary with individual mobile phones.
Therefore, please try this hearing aid with your
mobile phone or, if you are purchasing a new
phone, be sure to try it with your hearing aid
prior to purchase. For additional guidance,
please ask your mobile phone provider for the
booklet entitled “Hearing Aid Compatibility
with Digital Wireless Cell Phones”.
69
Page 70

Technical information
The hearing aid contains two radio
technologies, which are described below:
The hearing aid contains a radio transceiver
using short range magnetic induction
technology working at 3.84 MHz. The magnetic
eld strength of the transmitter is very weak
and is always below 15 nW (typically below –40
dBμA/m at 10 meter distance).
The hearing aid also contains a radio
transceiver using Bluetooth® Low Energy (BLE)
and a proprietary short range radio technology
both working at 2.4 GHz. The 2.4 GHz radio
transmitter is weak and is always below 3 mW
equal to 4.8 dBm e.i.r.p. in total radiated power.
The hearing aid complies with international
standards concerning electromagnetic
compatibility and human exposure.
Due to the limited space available on the
hearing aid, relevant approval markings can be
found in this document.
Additional information can be found in the
Specication Guide on
www.hearingsolutions.philips.com.
70
Page 71

USA and Canada
The hearing aid contains a radio module with
the following certication ID numbers:
FCC ID: 2ACAHSBMRTRC
IC: 11936A-SBMRTRC
The device complies with Part 15 of the FCC
Rules and with Industry Canada’s
licenceexempt RSSs.
Operation is subject to the following two
conditions:
1. This device may not cause harmful
interference.
2. This device must accept any interference
received, including interference that may
cause undesired operation.
Changes or modications not expressly
approved by the party responsible for
compliance could void the user’s authority to
operate the equipment.
The manufacturer declares that this hearing
aid is in compliance with the essential
requirements and other relevant provisions
of Directive 2014/53/EU.
71
Page 72
Declaration of Conformity is available from the
manufacturer.
SBO Hearing A/S
Kongebakken 9
DK-2765 Smørum
Denmark
www.hearingsolutions.philips.com
Waste f rom ele ctronic
equipment mu st be
handled according to
local regulations.
72
Page 73
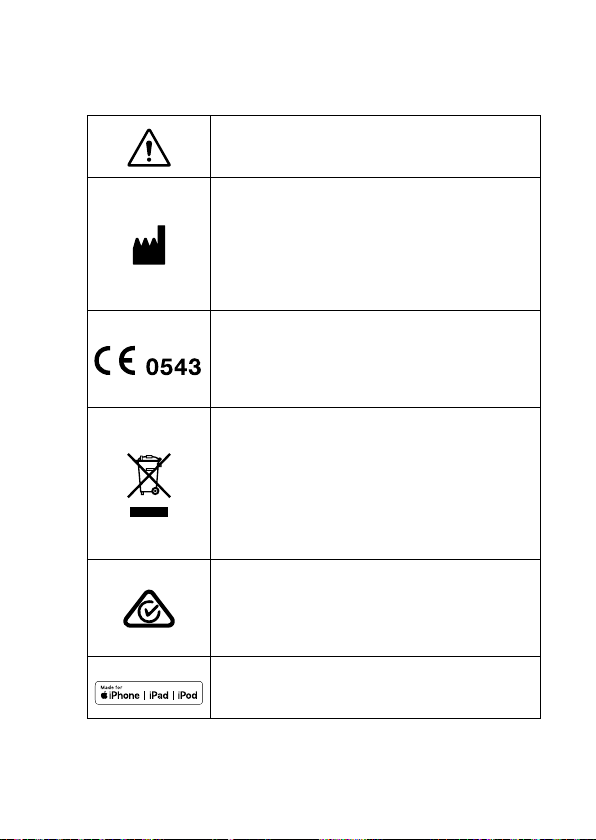
Description of symbols used in this booklet
or on the packaging label
Warnings
Text marked with a marking symbol must
be read before using the product.
Manufacturer
The product is produced by the
manufacturer whose name and address
are stated next to the symbol. Indicates
the medical device manufacturer, as
dened in EU Directives 90/385/EEC,
93/42/EEC and 98/79/EC.
CE mark
The product complies with Medical
Device Directive 93/42/EEC. The four
digits number indicates the identication
of the notied body.
Electronic waste (WEEE)
Recycle your hearing aids, accessories or
batteries according to local regulations
or return them to your hearing care
professional for disposal.
Electronic equipment covered by
Directive 2012/19/EU on waste and
electrical equipment (WEEE).
Regulatory Compliance Mark (RCM)
The product complies with electrical
safety, EMC and radio spectrum
requirements for products supplied to the
Australian or New Zealand market.
Made for iPod, iPhone, and iPad
Indicates that the device is compatible
with iPod, iPhone and iPad.
73
Page 74
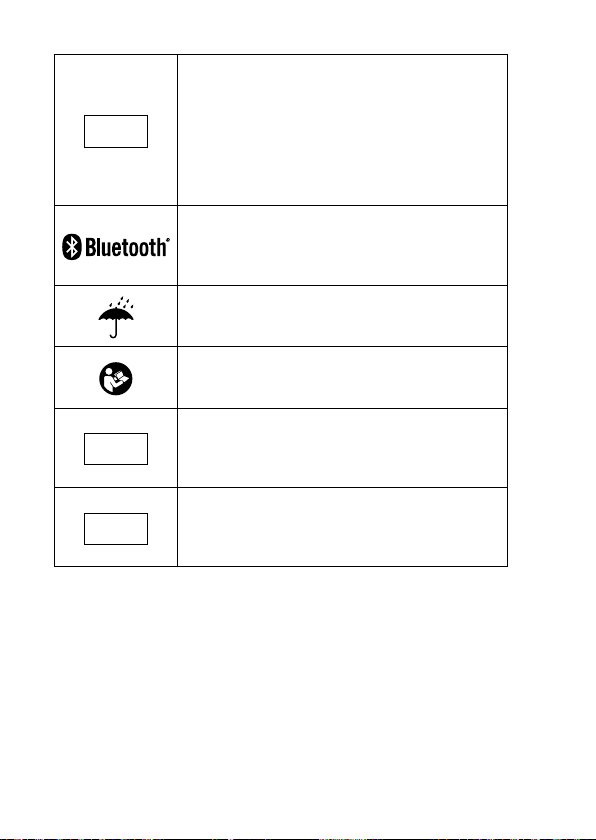
IP code
This symbol indicates the class of
protections against harmful ingress of
IP68
REF
SN
REACH Declaration:
REACH requires Philips Hearing Solutions to provide
chemical content information for Substances of Very
High Concern (SVHC) if they are present above 0.1 % of the
article weight. No substances on the REACH SVHC list
applicable at the time of manufacturing is present in
Product HearLink. More recent information can be found on
the website www.hearingsolutions.philips.com/REACH.
water and particulate matter according to
EN 60529:1991/A1:2002.
IP6X indicates total dust protection.
IPX8 indicates the protection against the
eects of continuous immersion in water.
Bluetooth® logo
Registered trademark of Bluetooth® SIG,
Inc. where any use of such requires a
license.
Keep dry
Indicates a medical device that needs to
be protected from moisture.
Caution symbol
Consult instructions for use (User Guide)
for warnings and cautions.
Catalogue number
Indicates the manufacturer’s catalogue
number so that the medical device can
be identied.
Serial number
Indicates the manufacturer’s serial
number so that a specic medical device
can be identied.
74
Page 75
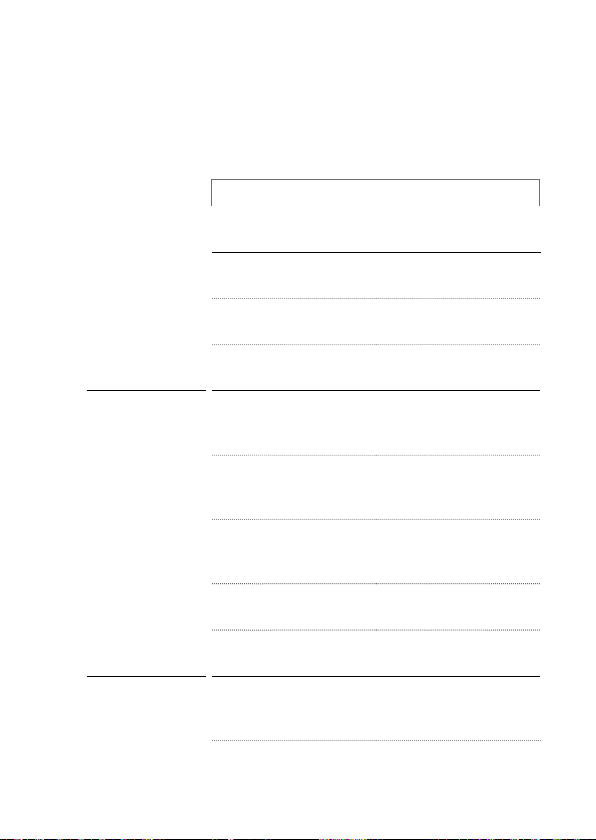
Technical data
Receiver-in-the-ear hearing aids
HearLink miniRITE T R
1)
2CC COUPLER
HL 9010 HL 7010|5010
, 105SPEAKER
OSPL 90, HFA
(dB SPL)
Full-on Gain,
HFA (dB)
Reference Test
Gain (dB)
Frequency
Range
(Hz)
Distortion
500/800/1600
Hz (%)
Equivalent
Input Noise,
dB(A)
Attack Time
(ms)
Release Time
(ms)
Telecoil HFA
SPLITS
(dB SPL)
122 122
57 57
45 45
100– 7700 100–7700
<2/<2/<2 <2/<2/<2
16 16
<5 <5
<70 <7 0
95 95
75
Page 76

Additional information
1)
Technical data measured with expansion, corresponding
to the test box measurement settings.
“2cc” refers to a coupler according to IEC 60318-5:2006.
Applied standard:
ANSI S3.22:2014.
Full-on gain is measured with the gain control of the
hearing aid set to its full-on position minus 20 dB and
with an input SPL of 70 dB. This is to obtain a gain
response equal to the full-on gain response from e.g. IEC
60118-0+A1:1994 but without inuence of feedback.
76
Page 77
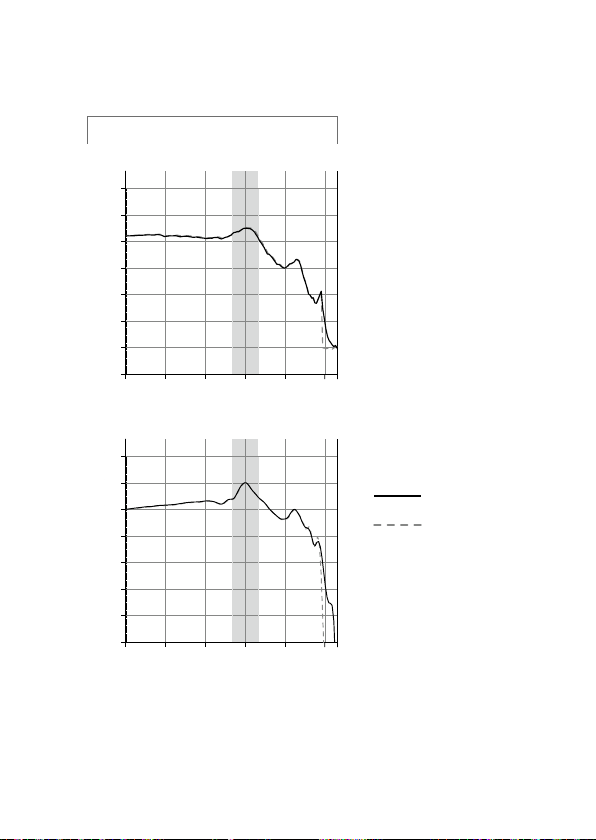
100
110
120
130
140
250 500 1k 1k6 2k 2k5 4k 8k
10k
100
110
120
130
140
250 500 1k 1k6 2k 2k5 4k 8k
10k
100
120
2CC COUPLER
Outpu t OSPL 90
Output/dB SPL
90
80
70
Frequency Response
110
Output/dB SPL
90
80
90
70
80
60
70
50
Freque ncy (Hz)
Freque ncy (Hz)
Measurements with
105-Speaker
HL 9010
HL 7010|5010
77
Page 78
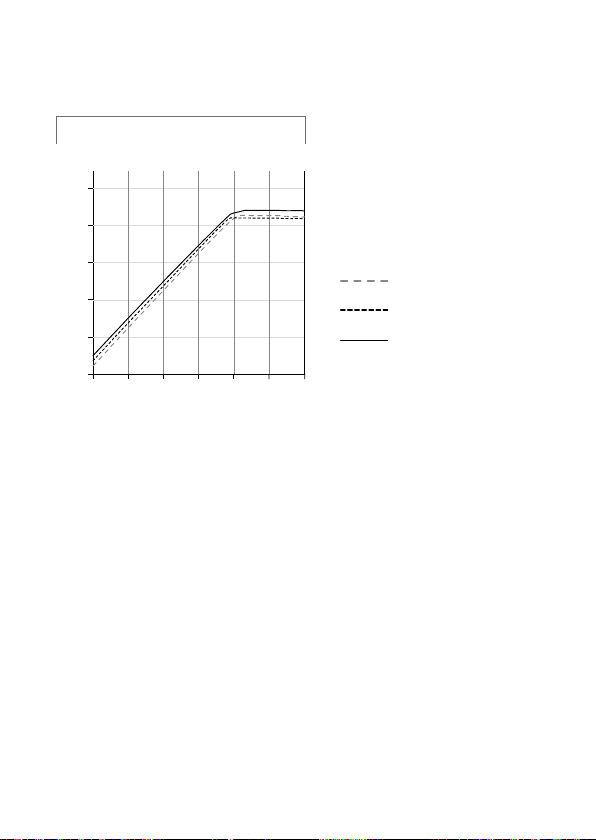
100
110
120
130
40 50 60 70 80 90 100
2CC COUPLER
I/O Cu rve s
HL 9010|7010|5010
Measurements with
105-Speaker
Output/dB SPL
90
80
197526 | US
78
500 Hz
800 Hz
1600 Hz
Input/dB SPL
Page 79
< >
8,15 m m
Placeholder
for FSC lo go
< 19 mm >
< 15 mm >
9.0 mm
< >
79
Page 80
www.hearingsolutions.philips.com
Philips and the Philips Shield Emblem are registered
trademarks of Koninklijke Philips N.V. and are used
under license. This product has been manufactured
by or for and is sold under the responsibility of SBO
Hearing A/S, and SBO Hearing A/S is the warrantor in
relation to this product.
0000197526000001
2018-08-22 | 197526 | US | Firmware 1.x or earlier
 Loading...