

Page 1
1
Connect
2
Set up
Your new Philips Recorder replaces the VCR for your
recording needs. First, unplug all the connections from
your VCR.
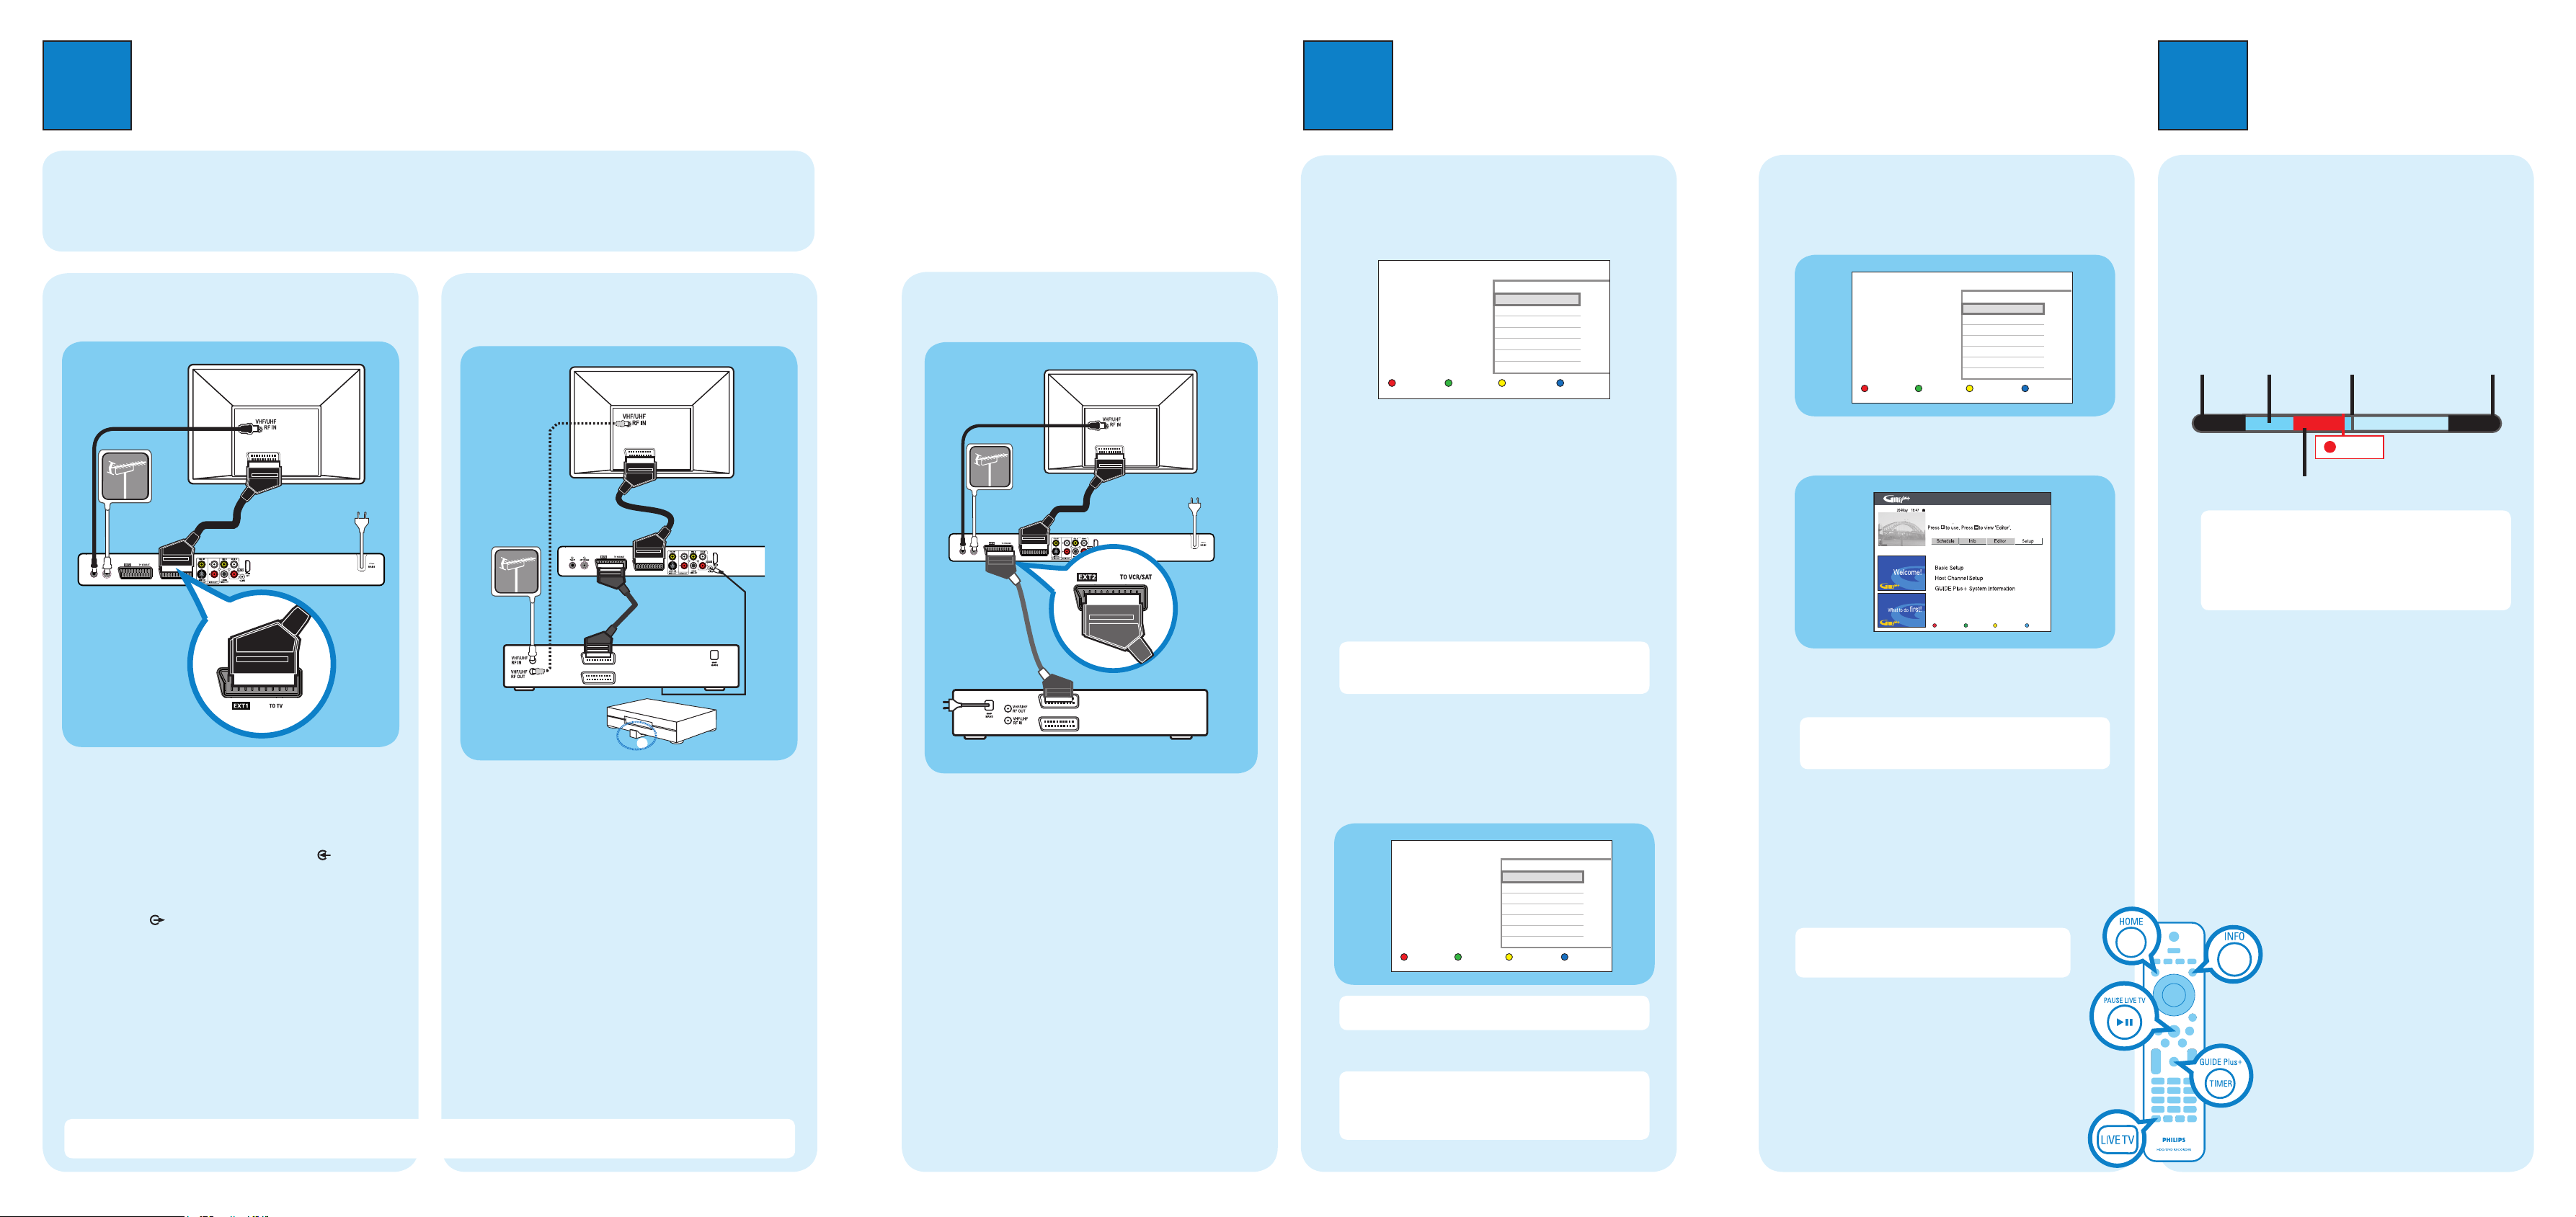
A Follow connection A before you proceed to step 2
below.
B Connect a scart cable (not supplied) from the
EXT2-TO VCR/SAT scart socket on this recorder to
the SCART socket on the VCR.
C Plug in the power cable from the recorder to an AC
power outlet
C
Connecting Recorder with TV
with VCR
A
Finding the viewing channel
A Press
2
on the recorder.
B Turn on the TV. The basic setup screen is displayed.
C In case you don’t see the recorder’s setting menu,
press the Channel Down button on the TVs remote
control repeatedly (or AV, SELECT, ° button) until
you see the menu. This is the correct viewing
channel for the recorder.
B
Start basic setup
Use the recorder’s remote control and follow the onscreen instructions to complete the setup.
A Select the desired menu language and the country
of your residence.
Note Press ST keys to toggle through the options.
Press right X to select an item. Press the Green button
on the remote control to go to the next screen.
B Enter the correct date in the entry field, press the
Green button [ Next ] to continue.
C Enter the correct time in the entry field, press the
Green button [ Next ] to continue.
D Select the eco mode.
Note Select [ Off ] if you want to view the connected
external device during standby.
E Automatic channel search begins.
Note If you have used Option B in ‘Basic
Connections’ press OK to skip channel search and
proceed to the next step. No preset channels will be
stored.
3
Enjoy
About the Time Shift Buffer
(TSB)
Once you turn on the recorder, the selected TV
programme will be stored in a temporary hard disk
storage called Time Shift Buffer ‘TSB’. The ‘TSB’ can
store up to 6 hours of programmes temporarily.
Press INFO to display the Time Shift video bar.
Notes:
- The contents in the time shift video bar will be cleared
when you press 2.
- The blue LED on the recorder will be lit up when the
Time Shift Buffer is active or when you playback a
recording from the hard disk drive.
Watch TV – Pause live TV
Your Philips Recorder allows you to control the TV
programme. You can PAUSE it as if you were in control
of the live broadcast.
A Turn on your recorder to the live TV mode and
press P +/- to select a TV programme.
B Press PAUSE LIVE TV u to suspend it.
C Press PAUSE LIVE TV
u again to continue.
D To return to live broadcast, press LIVE TV.
About the internal
hard disk drive
This recorder’s hard disk drive can be
used as a Media Jukebox, allowing you to
store and playback your TV programmes,
videos, music and photos fi les.
Press HOME on the remote control to
access your contents stored in the
[ Recorded Titles ] and [ Media Jukebox ].
Current point
of playback
Selected clips
for recording
Start time of
the programme
Present time
F Basic setup is complete. To continue with the GUIDE
Plus+ installation, press the Green button.
z
Otherwise, select [ Skip setup ] and press the Green
button to skip.
C
Install the GUIDE Plus+ system
z
Follow the on-screen instructions to select your
language, country and enter the postal code of your
area.
Note If you do not enter any postal code or have
entered the wrong postal code, GUIDE Plus+ (EPG)
service information will not be available.
D
Load the TV listing data
A Press GUIDE Plus+/TIMER
to exit GUIDE Plus+
system.
Leave the recorder in ‘standby’ mode and turn ‘on’ the
set-top box overnight to load the TV listing
data, this may take up to 24 hours.
Note If you tune to your Host Channel before
switching to standby mode, this recorder will start
downloading the TV listings data immediately.
B Check the [ Editor ] screen the next day to
ensure the source and programme numbers
are matching for all channels.
Basic Connections
Before Connecting
Select one of the following basic connections (A , B or C) according to the type of connecting devices you have.
Use this connection if you are connecting the antenna
cable directly from the antenna wall socket or from a
cable TV socket.
A Unplug the antenna cable that is connected to your
TV and plug it into the ANTENNA-IN socket on
this recorder.
B Connect the supplied RF antenna cable from the
TV-OUT socket on the recorder to the Antenna
In socket on the TV.
C Connect a scart cable from the EXT1 TO TV
socket on the recorder to the Scart input socket on
your TV.
D Plug in the power cord from the recorder to an AC
power outlet.
Television (rear)
Note See the accompanying user manual for other possible connections (e.g. Composite Video, Component Video, S-VIDEO or
HDMI).
Use this connection if your current antenna cable is
connected to a cable box with a Scart output socket.
A Keep the existing antenna connection from the cable
box/ satellite receiver to your TV.
B Connect a scart cable from the EXT1 TO TV socket
on the recorder to the Scart input socket on your
TV.
C Connect another scart cable (not supplied) from the
EXT2-TO VCR/SAT socket on the recorder to the
Scart output socket on the Cable Box.
D Connect the G-LINK cable to the G-LINK socket on
this recorder.
E Place the G-LINK transmitter in front of your Cable
Box/Satellite Receiver near to its IR sensor.
TO VCR
TO TV
SCART IN
B
C
D
E
A
Antenna
Television (rear)
Cable Box (rear)
A
Connecting Recorder and TV
with antenna only
B
Connecting Recorder and TV
with Cable TV or Satellite receiver and GLINK cable
Television (rear)
SCART IN
B
C
TO VCR
TO TV
Philips
Recorder
(rear)
Antenna
VCR (rear)
Television (rear)
Philips
Recorder
(rear)
Antenna
Programmes stored
in the
‘TSB’
Philips
Recorder
(rear)
SCART IN
C
B
A
D
Select a menu language.
Next
To view the external
source during standby,
select Eco mode off.
NextPrevious
Menu Language
Deutsch
English
Español
Français
Italiano
Nederlands
ECO Mode
On
Off
GUIDE Plus+ setup
To install interactive TV
program guide, it is
recommended to continue
with the GUIDE Plus+ setup.
P06
Start setup
Skip setup
NextPrevious
‘Setup’ allows you to define your language, country
and postal code and external receiver(s) details.
Home
19:00 22:00
20:20
Page 2
3
Enjoy
Need help?
User Manual
See the user manual that came with your Philips Recorder
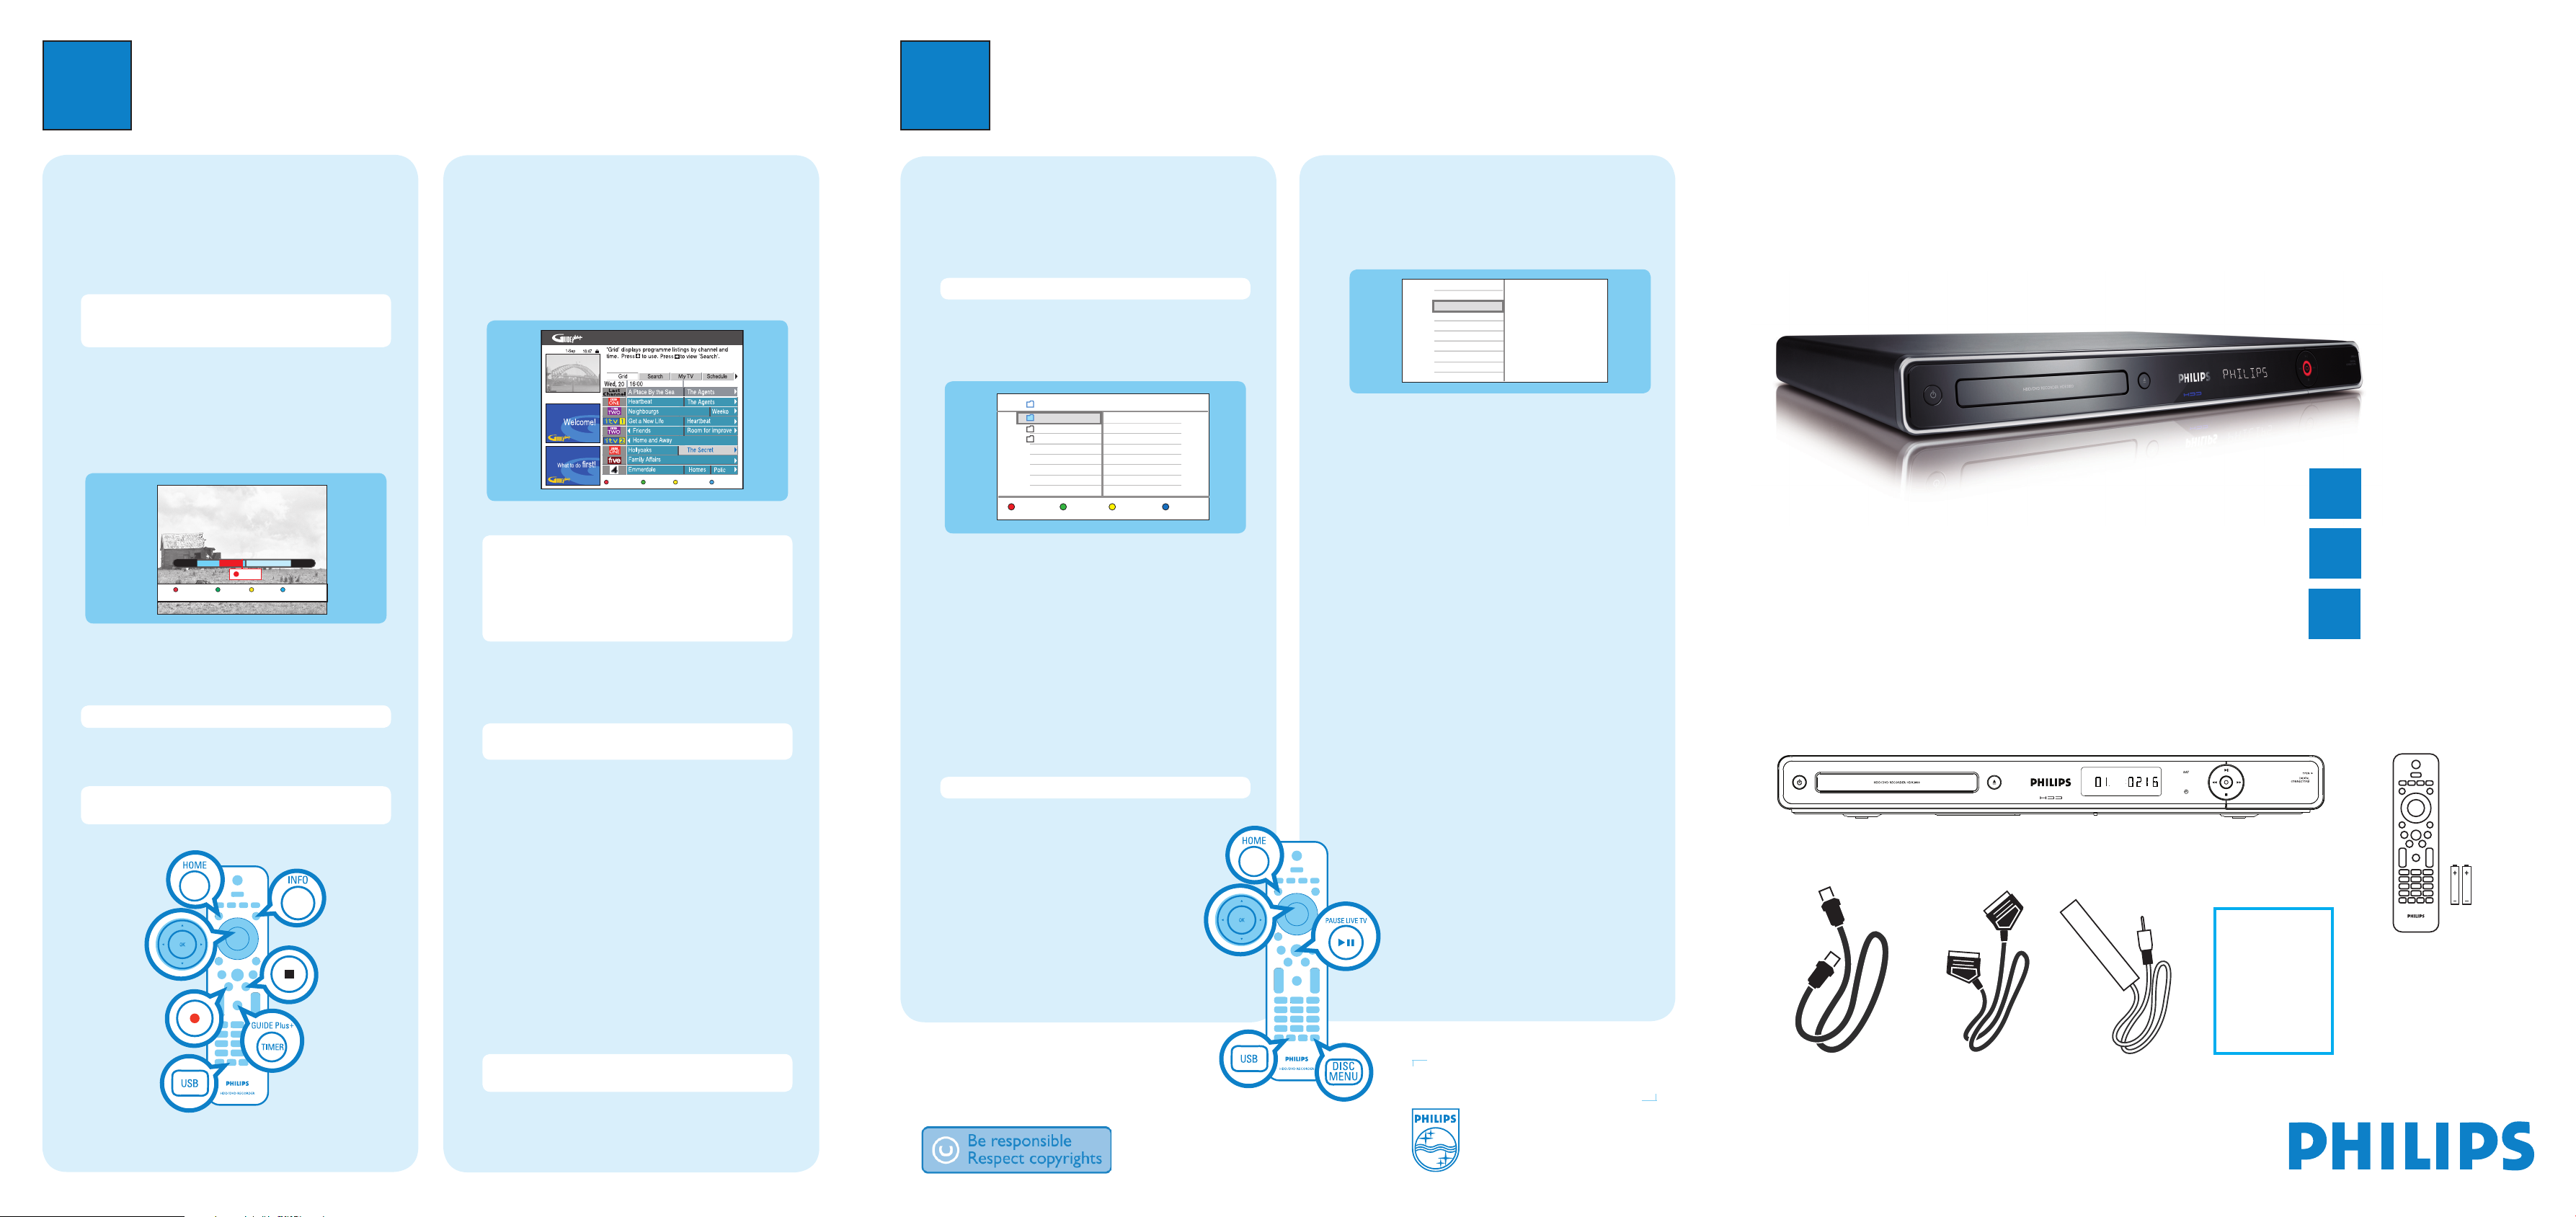
Start playback
A
Playback from hard disk
A Press HOME.
B For HDD titles: select [ Recorded Titles ] and press
OK.
For Media files: select [ Media Jukebox ] and press
OK.
C Use WXST keys to reach the title/file to play and
press u to start play.
B
Playback from disc
A Press ç to eject the disc tray. Load a disc and press
ç to close the disc tray.
B Press DISC MENU to display the contents menu.
C Use WXST keys to select the title/file to play and
press u to start play.
C
Playback from USB device
A Insert the USB device to the USB socket.
B Press USB to display the contents menu.
C Use WXST keys to select a data file
(MP3, WMA,
DivX and JPEG)
and press u to start playback.
2008 © Koninklijke Philips N.V.
All rights reserved.
12 NC 3139 245 29492
www.philips.com
Record to hard disk
A
Record current TV programme
A Press â to start recording. It can record up to 6
hours.
Note To set the recording time length, press â
repeatedly to extend the recording time in 30-minute
increments, up to 6 hours.
B To stop the recording before the scheduled time,
pressÇ.
B
Mark a segment in the Time Shift
Buffer for recording
Clear
19:00 22:00
20:20
A Press W left or X right to search for the scene to
record.
B Press â to start recording from here.
Note Press the Red button to cancel the recording.
C Press X right to search for the scene to end
recording, then press Ç.
Note A new title is created and added to the HDD
titles.
B
Copy fi les from USB
You can only copy the data fi les (MP3, WMA, DivX and
JPEG) from your USB device to the recorder’s hard disk
drive.
Note Only data fi les can be to copied.
A Insert your USB device to the USB socket on the
front panel of the recorder.
B Press USB on the remote control.
C Select the media folder ( Photos, Music or Video ),
press the Yellow button [ Edit ].
D Select [ Copy ], then press OK.
E Use WX keys to reach the file to copy.
F Press OK again to start copying.
C
Copy fi les from Disc
Copy prohibited contents cannot be copied to this
recorder.
Note Only data fi les can be copied.
A Insert a CD/DVD into the recorder.
B Press HOME and select [ Disc ], then press OK.
C Select the media folder ( Photos, Music or
Video), press the Yellow button [ Edit ].
D Select [ Copy ], then press OK.
E Use WX keys to select the file to copy.
F Press OK again to start copying.
C
Using the GUIDE Plus+ system
Make sure that the GUIDE Plus+ TV listing data
download is completed.
A Press GUIDE Plus+/TIMER.
It shows the list of TV programmes that are currently
broadcast and the next 7 days of TV programmes.
B Press T down to select a TV channel.
Notes
– To see an overview of all the available channels, press
the Yellow button on the remote control.
– To go directly to the previous day’s or the next day’s
TV listing, press í/ë.
– To scroll up or down a page, press P +/-.
C Press W left or X right to select a TV programme.
D Press the Red
button on the remote control to set
the highlighted programme for recording.
Note You can store up to 14 programmes for
recording.
Copy TV programmes or les
A
Copy TV programmes from hard
disk
A Insert a recordable DVD into the recorder.
B Press HOME and select [ Recorded Titles ] then
press OK.
C Select the title to copy and press the Green button
[ Copy ].
D A message screen is displayed. Press OK to
continue.
Note It is not possible to copy TV recordings to a USB
device.
Quick Start Guide
Register your product and get support at:
www.philips.com/welcome
HDR3800
HDR3810
Connect
Set up
Enjoy
1
2
3
What’s in the box?
HDD/ DVD Recorder
Remote Control
and 2 batteries
RF antenna cable
User
Manual
Scart cable G-LINK
transmitter cable
3
Enjoy
P06
Home
/ Photo 00:00/00:00
Photo
Music
Video
Playlist EditRepeat Exit
Picture1.jpg
Picture2.jpg
Picture3.jpg
Picture4.jpg
Picture5.jpg
Picture6.jpg
Live TV
Recorded Titles
Media Jukebox
Disc
USB
DV-IN
EXT2
EXT3
Settings
 Loading...