

Page 1
user manual
manuel d’utilisation | manual del usuario
gebruikershandleiding | benutzerhandbuch
manual do usuário
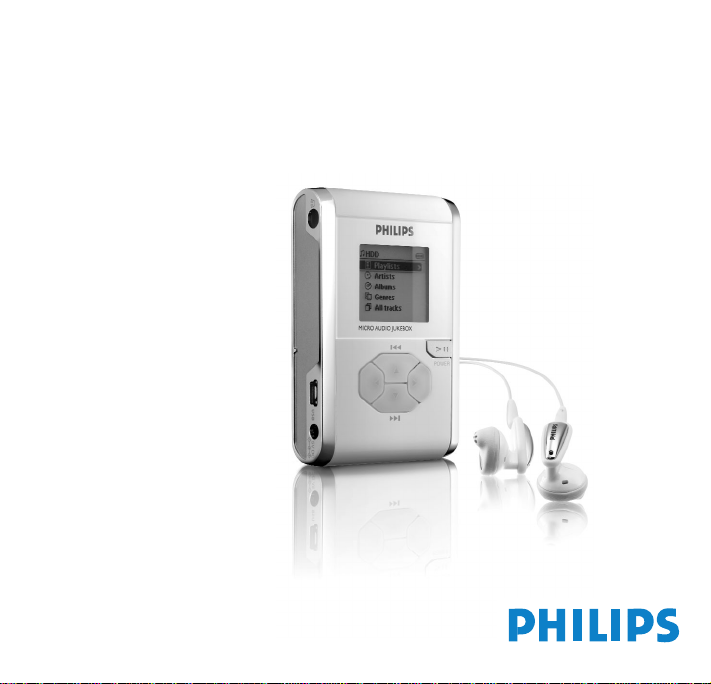
micro audio jukebox
Page 2

We hope you enjoy your hdd.
Please visit:
www.philips.com/support
and enter your product name
(hdd) to view:
• FAQ Frequently Asked Questions
• Latest user manuals and PC software manuals
• Firmware upgrade files for hdd
• Latest PC software downloads
CONTENTS
ENGLISH 1
FRANÇAIS 25
ESPAÑOL 51
NEDERLANDS 77
DEUTSCH 103
PORTUGUÊS 129
1
Page 3
Quick Start
1
Charge the Battery
Connect the supplied multi-voltage adapter/charger to the 5V DC
jack on hdd and the main power supply. Charge 2.5 to 4 hours for
100% battery power. (Battery life may var y according to use .)
2
Install DIGITAL MEDIA MANAGER (DMM)
a. Inser t the supplied CD into your PC's CD-ROM drive.
b. DMM installation will star t automatically for first time users.
c.Follow screen instructions to complete installation.
ATTENTION !
WINDOWS 98 USERS :
To avoid installation problems,DO NOT CONNECT hdd to the PC until
AFTER
installation completes.
3
Connect your hdd and PC
Connect your hdd to your PC using the supplied USB cable,with
hdd powered by supplied adapter.The USB connection screen will
automatically appear.
2
Page 4
Organize and Transfer Music via DMM
4
a. Launch DMM on PC from Windows desktop or Start menu.
b. Use DMM to organize your music.
c.Transfer music files from your PC to your hdd.
Note:
0 DMM cannot r ip MP3 / WMA files from CDs.You will need
additional software to do this.
0 hdd will play MP3 / WMA files only if they are transferred using
DMM.
Safely Disconnect hdd and Enjoy Music on the go
5
a. Exit DMM by clicking the pull-down menu File ➔ Exit.
b. Disconnect hdd safely from your PC by clicking on the task bar
to avoid file error.(WINDOWS 98SE users:there is no icon.
Simply disconnect hdd after file transfer completes.)
c.Press and hold 2; to switch on hdd if the hdd screen doesn’t
automatically appear. Use scroll controls to browse and press 2; to
enjoy music!
ENGLISH
3
Page 5

Left
1
Right
4
5
6
11
2
3
4
10
7
8
9
Page 6
Over view of Connections and Controls
1
p Headphones jack
USB USB cable connector
2
5V DC AC converter jack
3
VOLUME + / – Volume control
4
MENU/HOLD For menu options / key locking
5
SOURCE For music library options
6
7
2; On / Off and Play / Pause
ENGLISH
8
2
9
4 /
2™
10
1
3 /
11
¡1
Right
Next / Fast forward / SuperScroll™
Left
Previous / Rewind / SuperScroll™
5
Page 7

Playback
1
Press SOURCE for music library options.
Press
3
2
3
Tip
to scroll up or 4to scroll down for your option.
Press 2 for next or 1 for previous levels of librar y.
Press 2; to play or pause your selection.
The 2;,3and 4,keys are multi-functional. They wor k according to how you press
them: press halfway down, press down fully, or press and hold.
Understanding hdd Display
hdd has an intuitive display to show various information:
Battery level indicator
Playlist
Genres
All tracks
< Previous menu / librar y level
available
Repeat once
Shuffle
Option available for selection
Keys locked
6
DC power connected
Albums
Artists
Equalizer (EQ)
Next menu / librar y level available
>
Repeat all
Dynamic Bass Boost selected
Option selected
Page 8

Using hdd Controls
Troubleshooting Controls to press
Reset hdd Press and hold 3+ [VOLUME +]
Restore hdd factory settings Press MENU/HOLD; scroll to Restore settings.
Basic Operation Controls to press
Switch hdd on / off Press and hold 2;
Call up library options Press SOURCE
Lock keys / release locks on hdd Press and hold MENU/HOLD
Go to different levels of menu Press 2 for next and 1 for previous
Scrolling and browsing
Play music Highlight selection and press 2;
Pause music Press 2; during playback
Fast forward in a track Press halfway down and hold
Rewind in a track Press halfway down and hold
Change volume Press VOLUME + / –
Play next or previous track Press fully down
SuperScroll™ Press 3or 4fully down and hold
Press 2 to confirm
3,4
, 1, 2 for up, down, left, right
4
for next and 3for previous
4
3
ENGLISH
7
Page 9

Customizing Settings
Press MENU/HOLD for settings options.Press 3to scroll up or 4to scroll down
1
for your option.Press 2 for next or 1 for previous levels of menu.
2
Press 2 to confirm your selection by checking .
3
Press MENU/HOLD or 1 to exit the menu display.Options for each setting are shown on
hdd's display.
Advanced settings and actions
Repeat / Shuffle Play music tracks randomly (Shuffle) and / or repeatedly (Repeat)
DBB Enable or disable Dynamic Bass Boost
Sleep timer Set time to switch off hdd
Equalizer Adjust sound settings
[>] key shortcut
Display Adjust time for display to go dark and contrast level
Auto shutdown Set time for switching off hdd automatically to save battery power
Language Set hdd display language
Information Display hdd information
Restore settings Restore hdd factory settings in case of troubleshooting
8
Adjust 2key actions during playback
Page 10

Using hdd as an External Hard Disk
ENGLISH
hdd can be used as an external hard disk for storage and transfer of any data files. Note that
music files transferred from the PC to hdd via Windows Explorer will not be able to play on
hdd. Please always use DMM for music transfer.
0 During USB connection, we recommend that you always use the supplied power
Tip
adapter to avoid loss of data.
0 Always remove USB connection safely (see Step 5,page 3).
9
Page 11

About PHILIPS Digital Media Manager
PHILIPS Digital Media Manager (DMM) contains all the necessary software
components you need to work properly with hdd.These include:
0 MP3 and WMA transfer for playback on hdd.
0 Paths and supporting links for DMM software and hdd firmware upgrades.
About Digital Rights Management
To protect certain r ights of artists in the music industr y,DMM and hdd are subject
to certain playback restr ictions known as Digital Rights Management. As a result:
0 hdd will play MP3 / WMA files only if they are transferred using DMM.
10
Page 12

Basic Operation
ENGLISH
Launching DMM
Launch DMM on PC from Windows desktop or Start menu.
Managing tracks and playlists
Select desired item(s) by clicking on checkbox(es).
Use drag and drop actions to move selected items between PC Library, My Player
and Playlists.
Erase desired item(s) by clicking on checkbox(es) and press <delete> on your keyboard.
Click the corresponding icons to create playlists.
Managing Media Folders
To add / remove Media Folders, or to set refresh options, click Prefrences ➔ Media
folder. Make sure your tracks in the Media Folders are of MP3 or WMA formats.
Note that autmatic refresh upon DMM start up is not recommended for lar ge
Media Folders.
Customizing DMM view
To resize DMM,click the resizing buttons,or select from theView menu.
IMPORTANT!
0 Connect hdd to your PC via the supplied USB BEFORE star ting DMM on your PC .
0 During USB connection, we recommend that you always use the supplied power adapter
to avoid loss of data.
11
Page 13

The Main Screen: PC Libr ary, My Player and
Status Bar
The DMM main screen comes with PC Library (which displays the contents of your Media
Folders) and My Player (hdd), along with these icons:
Refresh For updating the latest status of the selected window
New For creating a new playlist
Download For transferring tracks and / or playlists from PC to player
Selection Indicates selected items
indicator
New New tracks available for transfer from PC to player
tracks
Preview Indicates the track is being played by DMM upon double-clicking
on a track
Sort List music tracks / playlists in ascending / descending Artist,Album,
In addition, there is a dynamic status bar in My Player that indicates available space on hdd.
12
Genre,All tracks order
Page 14

DMM Actions and Settings (1)
Use menus to customize DMM:
File
Exit For exiting DMM
Edit
User name / player name For changing the names of the user and hdd
View
Small screen view For displaying a smaller DMM window
Large screen view For displaying a larger DMM window
Preferences
Edit user / player name For changing the name of the user and hdd
Select language For selecting a language for DMM
Media folders For adding, deleting or re-arranging your Media Folders
Transfer options For selecting transfer options
Check for player firmware For getting instant access to PHILIPS site
upgrade...
Firmware upgrade tool... For upgrading new hdd firmware
Check for DMM software For getting instant access to PHILIPS site
upgrade...
ENGLISH
13
Page 15

DMM Actions and Settings (2)
Help
DMM Help Supply you with additional help and tips
About DMM For software version information
About Player For hdd information
Connect to support site For getting instant access to PHILIPS site for FAQ,manuals,
14
upgrades, etc. Enter your model name hdd when needed.
Page 16

Transferring your music tracks
1
Highlight one or more music tracks you want to transfer by clicking on their checkboxes.
Press or drag and drop. Then wait for the procedure to complete. It takes 15 to 20
2
minutes to transfer 100 music tracks (4MB each).
Tip
If items selected for transfer already exist on PC Library and / or My Player,
transfer will proceed according to your selected option:
0 Always overwrite (overwrite all tracks that already exist).
0 Always skip (do not transfer any of the tracks).
IMPORTANT:
RETAIN YOUR ORIGINAL FILES!
Please ensure that you retain the original files transferred to hdd. Philips is not responsible
for any loss of content in the case if the product becomes damaged or the hard disk not
readable.
ENGLISH
15
Page 17

Firmware and software upgr ades
For best interaction between your hdd and your PC, check
.philips.com/support for the latest upgrades available.
www
1
You can download the latest upgrade files from www.philips.com/support.You may need
to enter the model number e.g. hdd, to access the upgrade file. Make sure you save the
file(s) in a folder on your PC. Unzip them before you install the upgrade.
2
To upgrade firmware, make sure you connect hdd to your PC and to the main power supply.
Click Preferences ➔Firmware upgrade tool from the DMM main screen. Follow screen
instructions to complete firmware upgrade.
3
To upgrade DMM, unzip the latest upgrade files. Make sure you save the file(s) in a folder
on your PC. Click on the exe file. Follow screen instr uctions to uninstall your existing
DMM. Click on the exe file again.Follow screen instructions to complete DMM upgrade.
16
Page 18

Troubleshooting (1)
ENGLISH
If a fault occurs, first check the points listed in the following pages. For further help and other
troubleshooting tips,please also check out hdd FAQ at www
If you are unable to find a solution by following these hints, consult your dealer or service center.
WARNING:
Do not open the set as there is a risk of electric shock! Under no circumstances should you tr y to repair
the set yourself, as this will invalidate the warranty.
Q.My hdd does not respond.
Press and hold 3+[VOLUME +] to reset.File contents e.g. your songs or downloaded
files on your hdd are not affected when resetting in this way.
Q.I can't play my music tracks.
hdd can only play MP3 / WMA files transferred through DMM.hdd will not be able to
play audio files that are not of these formats.
Q.I can't see new tracks in DMM.
Specify your Media Folders through Preferences ➔ Media folder and click .
Q.I cannot transfer from MY PLAYER to PC LIBRARY.
This is not an error.DMM can only transfer music tracks from PC Librar y to My Player,
subject to Digital Rights Management.
.philips.com/support.
17
Page 19

Troubleshooting (2)
Q.DMM stops responding during file transfer.
Transferring 100 music tracks may take up to 20 minutes.Wait for transfer to
complete.Alternatively,exit DMM using Windows' task manager and restart DMM.
Q.My hdd has short playback time.
Over time, the internal rechargeable battery will become weaker. It is replaceable.
Please contact your nearest Philips Service Center for a batter y replacement.
Q.My hdd shows this [file error] icon.
You have a file error : system files may be missing or there is a format error on
hdd. To remedy, please connect hdd to your PC and to the main power supply
and start DMM.The database will be recreated automatically.
Q.My hdd shows this [disk error] icon.
You have a serious error with your hdd, possibly caused by a faulty hard disk
drive.To remedy,please connect hdd to your PC and to the main power supply
and start DMM.The database will be recreated automatically.
If you continue to encounter problems,please consult your dealer or service
center. For more information visit www
Q.How do I know which firmware version I have?
On your hdd,you can check your firmware version from the menu options.
Scroll for Menu ➔ Settings ➔ Information to display "FW vers:". Otherwise,you
can check this with DMM by clicking Help ➔ About player.
Q.How do I know how much free space I have?
On your hdd,you can check your hdd free space from the menu options.Scroll
for Menu ➔ Settings ➔ Information to display "Free:".Otherwise, you can check
this with DMM from the status bar, where information on free space is provided.
18
.philips.com/support.
Page 20

Safety & Maintenance
ENGLISH
To get the most from your product,please also refer to the Safety &Warranty
booklet supplied with this device for important safety instr uctions.
About Operating and Stor age Temper atures
0 Operate hdd in a place where the temperature is always between 0 and
35º C (32 to 95º F).
0 Store hdd in a place where the temperature is always between -20 and
45º C (-4 to 113º F).
0 Battery life of hdd may shorten in low temperature conditions.
0 Do not expose to excessive heat caused by heating equipment or direct sunlight.
0 When you are using hdd,connecting it to your PC or charging the battery,it is
normal for hdd to become warm.The rear panel case functions as a cooling surface
that transfers heat from inside the unit to the cooler air outside.
0 hdd is not recommended for using during vigorous exercising. hdd is not
shock-proof and may be damaged when subjected to excessive vibrations.
19
Page 21

Avoiding Damage or Malfunction
0 Backup your files.Please ensure that you retain the original files that you have
downloaded to hdd.Philips is not responsible for any loss of content in the case if
the product becomes damaged or the hard disk not readable / legible.
0 Manage (transfer,delete, etc .) your files only through Philips Digital Media Manager
(DMM) to avoid problems!
0 Do not drop hdd or allow objects to fall on hdd.
0 Do not allow hdd to be submersed in water. Do not expose connection jacks to
water as water entering the set may cause major damage.
0 Clean hdd with a slightly damp cloth. Don't use any cleaning agents containing
alcohol, ammonia, benzene or abrasives as these may harm the finishing on hdd.
0 Active mobile phones in the vicinity may cause interference to the device.
Using the Power Adapter /Char ger
0 Use only the AY3192 power adapter that came with hdd.Adapters for other
electronic devices may look similar,but they may damage hdd.
0 The only way to shut off power completely to your power adapter/charger is to
disconnect it from the power source.
0 Always leave space around your power adapter.Do not use this equipment in a
location where airflow around the power adapter is confined,such as a bookcase .
0 When connecting or disconnecting your power adapter,always hold the power
adapter by its sides.Keep fingers away from the metal part of the plug.
0 The power adapter for hdd is a high-voltage component and should not be opened
for any reason,even when hdd is off.
20
Page 22

Using Your Headphones
Hearing safety
Listen at a moderate volume. Using headphones at high volume can impair your
hearing.
Traffic safety
Do not use while driving or cycling as you may cause an accident.
Optimizing playback performance
We recommend to only use PHILIPS headphones for hdd. Music volume and /
or quality is not guaranteed for other non-PHILIPS headphones.
ENGLISH
Using DMM
Avoid the risk of corrupting and losing data with the following precautions when
using DMM:
0 Never disconnect the USB cable while file transfer is in progress. For Windows
2000,XP or ME,always disconnect hdd properly from your PC using the icon.
WINDOWS 98SE users:there is no icon. Simply disconnect hdd after file
transfer completes.
0 Never close DMM while file transfer is in progress.
0 Operate using one file management system only.When transferr ing files, do not attempt
to transfer files via Windows Explorer whilst waiting for transfer to complete on DMM.
0 Do not delete any track via Windows Explorer when file transfer is active in DMM.If
you wish to delete a file, please only do so from either DMM or from Windows Explorer
after file transfer completes.
21
Page 23

Copyright Information
0 Unauthorized duplication and distribution of Internet/CD recordings violate
copyright law and international treaties. You should use hdd and PHILIPS Digital
Media Manager (DMM) software for personal use only.
0 In the U.K and certain countries, the copying of mater ial protected by copyright
may require the permission of the copyright holders.
Notice for the USA
Note:
This equipment has been tested and found to comply with the limits for a Class B digital
device, pursuant to part 15 of the FCC Rules.These limits are designed to provide reasonable protection against
harmful interference in a residential installation.This equipment gener ates, uses, and can radiate radio frequency
energy and, if not installed and used in accordance with the instruction manual, may cause harmful interference
to radio communications.
However,there is no guarantee that interference will not occur in a particular installation. If this equipment does
cause harmful interference to radio or television reception, which can be determined by turning the equipment
off and on, the user is encouraged to try to correct the interference by one or more of the following measures:
0 Relocate the receiving antenna.
0 Increase the separation between the equipment and receiver.
0 Connect the equipment into an outlet on a circuit different from that to which the
receiver is connected.
0 Consult the dealer or an experienced radio/ TV technician for help.
Modifications
Modifications not authorized by the manufacturer may void users authority to operate this
device.
22
Page 24

Technical Specifications (1)
System
Output power 2 x 5mW (16 Ω)
Frequency response 20-20.000 Hz
THD 0.01%- 0.1%
Equalizer 5-band DSP controlled
Display Black / White 128 x 96 pixels
Backlight
Battery Replaceable (by Philips service) 750mAh Li-Ion
Lens hardened optical glass
Encasing Die-cast molded magnesium
Connections Stereo headphone, Mini USB (B-type), DC char ger input
Storage Hard disk 1.0" micro HDD
Supported playback format
MP3 8- 320 Kbps and VBR
WMA 32- 192 Kbps
Sample rates 8, 11.025, 16, 22.050, 32, 44.1, 48
ID3-tag support Yes
PC Connectivity USB
File T ransfer via PHILIPS Digital Media Manager for music playback or
White LED
Capacity 1.5GB
* Actual formatted capacity of hdd will be less
Windows Explorer of data in general (music playback
disabled)
*
ENGLISH
23
Page 25

Technical Specifications (2)
Power supply
Built-in 750 mAh Lithium Ion (Li-Ion) rechargeable battery, replaceable by a Philips Service Center
Multi-voltage AC adapter/charger AY3192
Battery playtime
10 hours using built-in rechargeable batter y (2.5 hours fully charged)
Battery life may vary according to use.
Power Consumption
Shutdown:less than 1.3 mW
Average operational (USB mode): 1.45W
Average operational (play mode): 250mW
* It is not advised to run hdd on batter y power during USB connection
General
Dimensions 54.3 (W) x 84.5 (L) x 18.3 (H) mm
Weight 93g
PHILIPS reserves the right to make design and specification changes for product
improvement without prior notice.
All rights reserved.
All trademarks and registered trademarks are the property of their respective owners.
24
2.2 (W) x 3.4 (L) x 0.7 (H) inch
3.3oz
Page 26

© Koninklijke Philips Electronics N.V. 2003
All rights reserved.
www.philips.com
3104 205 33171
 Loading...