

Page 1

HD9620, HD9621
HD9622, HD9623
HD9627
1ENGLISH
Page 2

2 ENGLISH
TABLE OF CONTENTS
Important 3
Electromagnetic elds (EMF) 5
Introduction 6
General description 6
Before rst use 8
Preparing for use 8
Placing the removable mesh bottom (HD9627,
HD9623, HD9622, HD9621 only) 8
Placing the EasyClick handle 9
Food table 10
Using the appliance 11
Airfrying 11
Making home-made fries 14
Using the double-layer rack
(HD9627, HD9622 only) 15
Using the non-stick grill pan
(HD9627, HD9623 only) 16
Using the splatter-proof lid
(HD9622/45, HD9621/45 only) 16
Cleaning 17
Cleaning table 18
Storage 19
Recycling 19
Guarantee and support 19
Troubleshooting 20
HD9620, HD9621, HD9622, HD9623, HD9627
Page 3

Important
Read this important information carefully before you use the
appliance and save it for future reference.
Danger
- Always put the ingredients to be fried in
the basket, to prevent them from coming
into contact with the heating elements.
- Do not cover the air inlet and the air outlet
openings while the appliance is operating.
- Do not ll the pan with oil as this may
cause a re hazard.
- Never immerse the appliance in water or
any other liquid, nor rinse it under the tap.
Warning
- Check if the voltage indicated on the
appliance corresponds to the local mains
voltage before you connect the appliance.
- Do not use the appliance if the plug,
the power cord or the appliance itself is
damaged.
- If the power cord is damaged, you must
have it replaced by Philips, a service center
authorised by Philips or similarly qualied
persons in order to avoid a hazard.
- This appliance can be used by children
aged from 8 years and above and
persons with reduced physical, sensory or
mental capabilities or lack of experience
and knowledge if they have been given
supervision or instruction concerning use of
the appliance in a safe way and understand
the hazards involved. Children shall not
play with the appliance. Cleaning and user
maintenance shall not be made by children
unless they are older than 8 years and
supervised.
- Keep the appliance and its cord out of
reach of children less than 8 years.
- Keep the power cord away from hot
surfaces.
3ENGLISH
Page 4
4 ENGLISH
- Only connect the appliance to an earthed
wall outlet. Always make sure that the plug
is inserted into the wall outlet properly.
- Always place and use the appliance on a
dry, stable, level and horizontal surface.
- This appliance is not intended to be
operated by means of an external timer or
a separate remote-control system.
- Do not place the appliance against a wall
or against other appliances. Leave at least
10cm free space on the back and sides
and 10cm free space above the appliance.
Do not place anything on top of the
appliance.
- Do not use the appliance for any other
purpose than described in the user
manual.
- During hot airfrying, hot steam is released
through the air outlet openings. Keep
your hands and face at a safe distance
from the steam and from the air outlet
openings. Also be careful of hot steam
and air when you remove the pan from the
appliance.
- The accessible surfaces may become hot
during use.
- The Airfryer accessories become hot when
you use them in the Airfryer. Be careful
when you handle them.
Caution
- This appliance is intended for normal
household use only. It is not intended
for use in environments such as sta
kitchens of shops, oces, farms or other
work environments. Nor is it intended
to be used by clients in hotels, motels,
bed and breakfasts and other residential
environments.
- Always return the appliance to a
service centre authorised by Philips for
Page 5

examination or repair. Do not attempt to
repair the appliance yourself, otherwise
the guarantee becomes invalid.
- Let the basket and non-stick grill pan
(HD9627, HD9623 only) cool down before
you exchange or remove the EasyClick
handle.
- This appliance is designed to be used at
ambient temperatures between 5°C and
40°C.
- Always unplug the appliance after use.
- Let the appliance cool down for approx.
30 minutes before you handle or clean it.
- Do not overll the basket. Only ll the
basket to the MAX indication.
- Make sure the ingredients prepared in this
appliance come out golden-yellow instead
of dark or brown. Remove burnt remnants.
Do not fry fresh potatoes at a temperature
above 180°C (to minimise the production
of acrylamide).
- After having removed the pan with the
basket from the appliance, please put the
pan with the basket on a suitable surface
and let it rest for at least 30 seconds
before removing the basket from the pan.
- Noise level: Lc ≤ 65 dB(A).
5ENGLISH
Electromagnetic elds (EMF)
This Philips appliance complies with all applicable standards
and regulations regarding electromagnetic elds.
Page 6

6 ENGLISH
Introduction
Congratulations on your purchase and welcome to Philips! To
fully benet from the support that Philips oers, register your
product at
Your new Airfryer allows you to prepare your favorite
ingredients and snacks in a healthier way. The Airfryer uses hot
air in combination with high-speed air circulation (TurboStar
rapid air technology) and a top grill to prepare a variety of tasty
dishes in a healthy, fast and easy way. Your ingredients are
heated from all sides at once and there is no need to add oil
to most of the ingredients. For more inspiration, recipes and
information about the Airfryer, visit www.philips.com/kitchen
or download the free Airfryer App for IOS® or Android™.
www.philips.com/welcome.
General description
1 Timer/power-on knob
2 Heating-up light
3 Air inlet
4 Pan
5 Temperature control knob
6 Air outlets
7 Cord storage wrap
8 Power cord
9 Splatter-proof lid (HD9622/45, HD9621/45 only)
10 Double-layer rack (HD9627, HD9622 only)
11 Basket with xed mesh bottom (HD9620 only)
12 MAX indication
13 Basket release button
14 EasyClick handle
15 Basket with removable mesh bottom (HD9627, HD9623,
HD9622, HD9621 only)
16 Removable mesh bottom (HD9627, HD9623, HD9622,
HD9621 only)
17 Non-stick grill pan (HD9627, HD9623 only)
Page 7

7ENGLISH
1
2
3
9
10
4
11
MAX
12
13
5
1
15
14
MAX
6
16
7
17
8
Page 8

8 ENGLISH
1
Before rst use
1 Remove all packing material.
2 Remove any stickers or labels from the appliance.
3 Thoroughly clean the appliance before rst use, as
indicated in the cleaning table.
Preparing for use
Placing the removable mesh bottom (HD9627, HD9623, HD9622, HD9621 only)
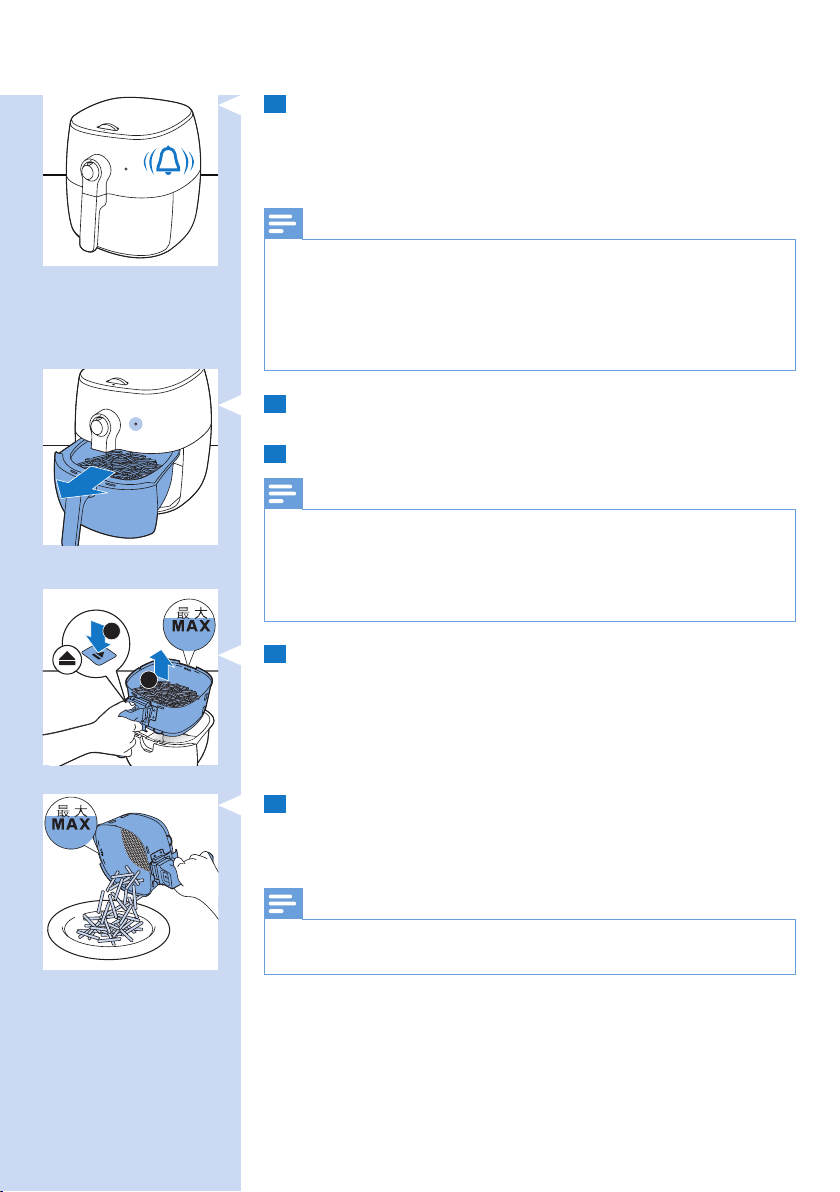
1 Remove the pan from the appliance.
2 Put the pan with the basket on a suitable surface, press
the basket release button and lift the basket out of the
pan.
2
3 Insert the hook of the mesh bottom into the slot on the
right bottom side of the basket. Push the mesh bottom
2
1
down until it locks into position (‘click’ on both sides).
4 Put the basket back into the pan.
Note
• Never use the pan without the basket in it.
Page 9

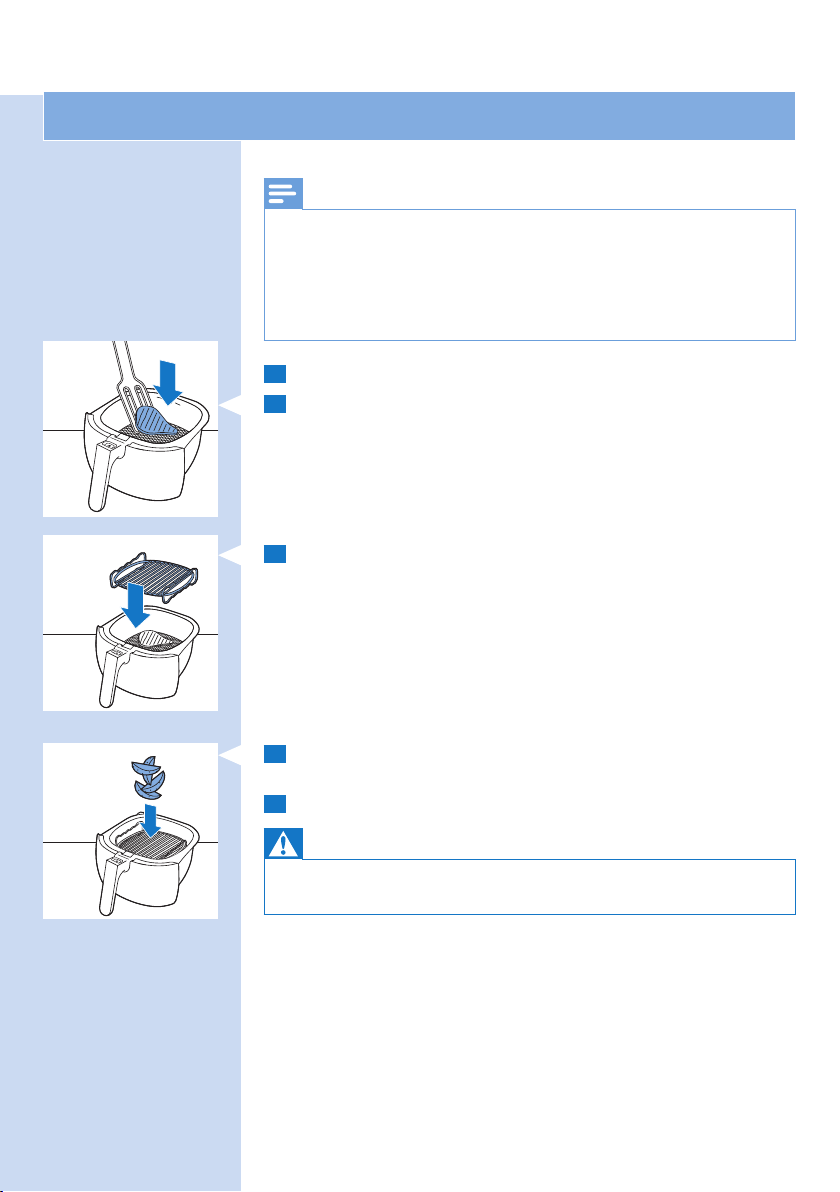
5 Slide the pan back into the appliance.
Placing the EasyClick handle
Warning
• Always make sure the basket and the handle have cooled down
before you attach or detach the EasyClick handle.
Note
• The EasyClick handle also ts to the non-stick grill pan (HD9627/
HD9623 only). It helps you clean and store the appliance in an
easy way.
To attach the EasyClick handle:
1 Hold the basket with one hand and hold the handle with
the other hand.
9ENGLISH
2 Slide the handle into the opening on the basket from
below until it locks into place (‘click’).
To detach the EasyClick handle:
1 Hold the basket with one hand and hold the handle with
the other hand.
2
1
2 Pull gently with your nger on the red release tab while
pulling the handle straight down.
Page 10

10 ENGLISH
Ingredients
Food table
The table below helps you select the basic settings for the
types of food you want to prepare.
• Keep in mind that these settings are suggestions. As ingredients
Min.- max.
amount
(grams)
Note
dier in origin, size, shape as well as brand, we cannot guarantee
the best setting for your ingredients.
Time
(minut es)
Tem per a ture
(°C)
Shake/
Tu rn
Additional
information
Frozen fries 200-800 11-25 180 Shake
halfway
Home-made
fries (1/2cm /
1/4 in thick)
Potato wedges 200-800 15-27 180 Shake
200-800 12-25 180 Shake
halfway
halfway
Soak 30 min. in
water, dry then
add 1/2 tbsp of oil.
Soak 30 min. in
water, dry then
add 1/2 tbsp of oil.
Frozen snacks
(e.g. spring
rolls, chicken
nuggets)
100-400 6-10 200 Turn or
shake
halfway
For the cooking
times, refer to the
instructions on
the packaging of
the snack. Time
compared to oven
should be halved.
Pork chops 100-500 8-14 200
Hamburger 100-500 7-14 160
Sausages 100-500 3-15 160
Drumsticks 100-500 15-22 180
Chicken breast 100-500 10-15 180
Quiche 300 20-25 160 Use a baking tray
or oven dish.
Muns 80-300 8-13 180 Use heat-proof
silicone mun
cups.
Cake 200-400 15-25 160 Use a cake pan.
Mixed veggies 100-500 8-12 180
Pre-baked
50-200 3-6 200
toast/bread
rolls
Fresh bread
100-500 12-25 180
rolls/bread
Page 11

Min.- max.
Ingredients
amount
(grams)
Time
(minut es)
Tem per a ture
(°C)
Shake/
Tu rn
Fish 150-400 10-18 200
Shellsh 100-400 7-15 180
Chicken bread
100-300 8-15 180 Add oil to the
crumbed
Using the appliance
Airfrying
Caution
• This is an Airfryer that works on hot air. Do not ll the pan with
oil or frying fat.
• Do not touch hot surfaces. Use handles or knobs. Only hold the
pan by the basket handle.
• This appliance is for household use only.
• This appliance may produce some smoke when you use it for the
rst time. This is normal.
• Preheating of the appliance is not necessary.
11ENGLISH
Additional
information
breadcrumbs.
1 Place the appliance on a stable, horizontal, level and
heat-resistant surface.
Note
• Do not put anything on top or on the sides of the appliance. This
could disrupt the airow and aect the frying result.
2 Unwind the power cord from the cord storage wrap.
3 Put the plug in the wall outlet.
4 Remove the pan from the appliance.
Page 12

12 ENGLISH
°C
5 Put the ingredients in the basket.
Note
• The Airfryer can prepare a large range of ingredients. Consult the
‘Food table’ for the right quantities and approximate cooking
times.
• Do not exceed the amount indicated in the ‘Food table’ section or
overll the basket beyond the ‘MAX’ indication as this could aect
the quality of the end result.
• If you want to prepare dierent ingredients at the same time,
make sure you check the suggested cooking time required for the
dierent ingredients before you start to cook them simultaneously.
Home-made fries and drumsticks, for example, can be cooked
simultaneously because they require the same settings.
6 If the basket or non-stick grill pan (HD9627, HD9623
only) is placed back into the pan, slide the pan back into
the appliance. Turn the temperature control knob to the
required temperature.
7 Turn the timer knob to the required cooking time to switch
on the appliance.
Note
• The heating-up light goes on. During use the heating-up light
goes on from time to time. This indicates that the appliance is
heating up to the right temperature.
• The timer continues to count down the set cooking time.
• Some ingredients require shaking or turning halfway through the
cooking time (see ‘Food table’). To shake the ingredients, remove
the pan from the appliance and shake it over the sink. Then slide
the pan back into the appliance. To reduce the weight, you can
also remove the basket from the pan.
• Be careful not to press the basket release button while shaking.
Tip
• If you set the timer to half the cooking time, when you hear the
timer bell it is time to shake or turn the ingredients. Be sure to
reset the timer to the remaining cooking time.
Page 13
13ENGLISH
8 When you hear the timer bell, the set cooking time
has elapsed. You can also switch o the appliance
manually. To do this, turn the power-on knob to 0
(counterclockwise); this requires some more force than
turning clockwise.
Note
• Excess oil from the ingredients is collected on the bottom of the
pan.
• If you prepare several batches of fatty ingredients (e.g. drumsticks,
sausages or hamburgers), carefully pour o any excess oil or
rendered fat from the pan after each batch or before shaking or
replacing the basket in the pan.
9 Remove the pan from the appliance and place it on a
heat-resistant surface.
10 Check if the ingredients are ready.
Note
• If the ingredients are not ready yet, simply slide the pan back into
the appliance and set the timer for a few extra minutes.
• After hot airfrying, the pan, basket, accessories, housing and
ingredients are hot. Depending on the type of ingredients in the
basket, steam may escape from the pan.
1
11 Press the basket release button and lift the basket out of
2
the pan.
12 Empty the basket contents into a bowl or onto a plate.
Always remove the basket with ingredients from the pan
to serve as hot oil or rendered fat may be in bottom of the
pan.
Note
• To remove large or fragile ingredients, use a pair of tongs to lift out
ingredients.
Page 14

14 ENGLISH
Making home-made fries
To make great home-made fries in the Airfryer:
- Choose a potato variety suitable for making fries, e.g. fresh,
slightly oury potatoes.
- It is best to air fry the fries in portions of up to 500 grams
for an even result. Larger fries tend to be less crispy than
smaller fries.
- Shake the basket 2-3 times during the airfrying process.
1 Peel the potatoes and cut into sticks (1/2cm / 1/4 in thick).
2 Soak the potato sticks in a bowl of water for at least 30
minutes.
3 Empty the bowl and dry the potato sticks with a dish
towel or paper towel.
4 Pour a half tablespoon of cooking oil in the bowl, put the
sticks in the bowl and mix until the sticks are coated with
oil.
5 Remove the sticks from the bowl with your ngers or a
slotted kitchen utensil so excess oil remains in the bowl.
Note
• Do not tilt the bowl to pour all the sticks in the basket at once to
prevent excess oil from going into the pan.
6 Put the sticks in the basket.
7 Fry the potato sticks and shake the basket halfway
through the airfrying process. Shake 2-3 times if you
prepare more than 400g of fries.
Note
• Consult the chapter “Food table” for the right quantities and
cooking times.
Page 15
Using the double-layer rack (HD9627, HD9622 only)
Use the double-layer rack to maximize your cooking space.
Note
• If cooking dierent ingredients at the same time, make sure that
the cooking temperature and time is the same for each type of
ingredient.
• Always position meats on lower level and vegetables above to
avoid cross contamination of food or unsafe transfer of meat
juices or partially cooked foods.
1 Follow steps 1 to 4 of section ‘Airfrying’.
2 Put one half of the ingredients in the basket.
3 Place the double-layer rack in the basket.
15ENGLISH
4 Put the second half of the ingredients onto the double-
layer rack.
5 Follow steps 6 to 12 of section ‘Airfrying’.
Warning
• The double-layer rack becomes very hot during use. Wear oven
gloves when you remove the double-layer rack from the basket.
Page 16

16 ENGLISH
1
2
Using the non-stick grill pan (HD9627, HD9623 only)
1 Follow steps 1 to 3 of section ‘Airfrying’.
2 Press the basket release button and lift the basket out of
the pan.
3 Attach the EasyClick handle to the non-stick grill pan (see
‘Placing the EasyClick handle’).
4 Place the non-stick grill pan in the pan.
5 Put the ingredients on the non-stick grill pan.
6 Follow steps 6 to 12 of section ‘Airfrying’.
Using the splatter-proof lid (HD9622/45, HD9621/45 only)
Use the splatter-proof lid if you are cooking light-weight
ingredients in order to keep them in the basket, fatty
ingredients or to reduce the speed of browning.
Note
• When using the splatter-proof lid, you may need more time to
reach the same level of browning and doneness.
1 Follow steps 1 to 5 of section ‘Airfrying’.
1
2
2 Hold the lid with the top side facing you. Insert the two
hooks of the lid into the two slots on the front side of the
basket. Push the lid down until it locks into position (‘click’
on both sides).
3 Proceed with step 6 to 9 of section ‘Airfrying’.
4 Carefully remove the splatter-proof lid.
Warning
1
2
• The splatter-proof lid is very hot. Wear oven gloves when you
remove it.
5 Proceed with step 10 to 12 of section ‘Airfrying’.
Page 17

Cleaning
Warning
• Let the basket, pan, accessories and the inside of the appliance
cool down completely before you start cleaning.
• The pan, basket and inside of appliance have a non-stick
coating. Do not use metal kitchen utensils or abrasive cleaning
materials as this may damage the non-stick coating.
Clean the appliance after every use. Remove oil and fat from
the bottom of the pan after every use to prevent smoke.
1 Turn the timer knob to 0, remove the plug from the wall
outlet and let the appliance cool down for 10 minutes.
Tip
• Remove the pan and the basket to let the Airfryer cool down more
quickly.
2 Clean the pan, basket, non-stick gill pan and splatter-
proof lid in a dishwasher. You can also clean them with hot
water, dishwashing liquid and a non-abrasive sponge (see
‘cleaning table’).
17ENGLISH
Tip
• If food residues stuck to the pan, double-layer rack or basket,
you can soak them in hot water and dishwashing liquid for 10-15
minutes. Soaking loosens the food residues and makes it easier to
remove. Make sure you use a dishwashing liquid that can dissolve
oil and grease. If there are grease stains on the pan or basket
and you have not been able to remove them with hot water and
dishwashing liquid, use a liquid degreaser.
• If necessary, food residues stuck to the heating element can be
removed with a soft to medium bristle brush. Do not use a steel
wire brush or a hard bristle brush, as this might damage the
coating on the heating element.
Page 18

18 ENGLISH
3 Clean the inside of the appliance with hot water and a
non-abrasive sponge.
4 Clean the heating element with a cleaning brush to
remove any food residues.
5 Wipe the outside of the appliance with a moist cloth.
6 Clean the inside of the appliance with a moist cloth.
Cleaning table
HD9622/45 , HD9621/45
HD9627, HD9623
HD9622, HD9621
HD9620
HD9627, HD9623
HD9627, HD9622
Page 19

Storage
1 Unplug the appliance and let it cool down.
2 Make sure all parts are clean and dry before storing.
3 Wrap the power cord onto the cord storage wrap.
Note
• Always hold the Airfryer horizontally when you carry it. Make sure
that you also hold the drawer on the front part of the appliance as
it can slide out of the appliance if accidentally tilted downwards.
This can lead to damaging of the drawer.
Recycling
- This symbol means that this product shall not be disposed
of with normal household waste (2012/19/EU).
- Follow your country’s rules for the separate collection of
electrical and electronic products. Correct disposal helps
prevent negative consequences for the environment and
human health.
19ENGLISH
Guarantee and support
If you need information or support, please visit
www.philips.com/support or read the separate worldwide
guarantee leaet.
Page 20

20 ENGLISH
Troubleshooting
This chapter summarizes the most common problems
you could encounter with the appliance. If you are unable
to solve the problem with the information below, visit
www.philips.com/support for a list of frequently asked
questions or contact the Consumer Care Center in your country.
Problem Possible cause Solution
The outside of
the appliance
becomes hot
during use.
My home-made
fries do not turn
out as I expected.
The Airfryer does
not switch on.
The heat inside radiates
to the outside walls.
You did not use the right
potato type.
The amount of
ingredients in the basket
is too big.
Certain types of
ingredients need to be
shaken halfway through
the cooking time.
The appliance is not
plugged in.
You have set the timer
to a time shorter than 5
minutes.
This is normal. All handles and knobs
that you need to touch during use stay
cool enough to touch.
The pan, basket, double-rack layer,
non-stick grill pan and the inside of the
appliance always become hot when the
appliance is switched on to ensure the
food is properly cooked. These parts are
always too hot to touch.
If you leave the appliance switched on
for a longer time, some areas get too hot
to touch. These areas are marked on the
appliance with the following icon:
As long as you are aware of the hot
areas and avoid touching them, the
appliance is completely safe to use.
To get the best results, use fresh, slightly
oury potatoes. If you need to store the
potatoes, do not store them in a cold
environment like in a fridge. Choose
potatoes whose package states that
they are suitable for frying.
Follow the instructions in this user
manual to prepare home-made fries
(see ‘Food table’ or download the free
Airfryer App).
Follow the instructions in this user
manual to prepare home-made fries
(see ‘Food table’ or download the free
Airfryer App).
When you switch on the appliance, you
hear the sound of the working fan. If you
do not hear this sound, check if the plug
is inserted in the wall outlet properly.
Set the timer to a time of 5 minutes or
more.
Page 21

Problem Possible cause Solution
I see some
peeling o spots
inside my Airfryer.
White smoke
comes out of the
appliance.
Several appliances
are connected to one
outlet.
Some small spots can
appear inside the pan
of the Airfryer due to the
incidental touching or
scratching of the coating
(e.g. during cleaning
with harsh cleaning
tools and/or while
inserting the basket).
You are preparing fatty
ingredients.
The pan still contains
greasy residues from
previous use.
Marinade, liquid or meat
juices are splattering
in the rendered fat or
grease.
Try a dierent outlet and check the
fuses. The Airfryer has a power of 1425W.
You can prevent damage by lowering
the basket into the pan properly. If you
insert the basket at an angle, its side
may knock against the wall of the pan,
causing small pieces of coating to chip
o. If this occurs, please be informed
that this is not harmful as all materials
used are food-safe.
The oil or rendered fat in the pan may
cause white smoke and the pan may
get hotter than usual. You can carefully
pour o any excess oil or fat from the
pan and then continue cooking. You can
also place the splatter-proof lid on the
basket.
White smoke is caused by greasy
residues heating up in the pan. Always
clean the pan and basket thoroughly
after every use.
Place the splatter-proof lid on the
basket.
21ENGLISH
Breading or coating did
not adhere properly to
the food.
Tiny pieces of airborne breading
can cause white smoke. Firmly press
breading or coating to food to ensure it
sticks.
Page 22

22 БЪЛГАРСКИ
СЪДЪРЖАНИЕ
Важно 23
Електромагнитни полета (EMF) 25
Въведение 26
Общо описание 26
Преди първата употреба 28
Подготовка за употреба 28
Поставяне на свалящото се мрежесто дъно (само
HD9627, HD9623, HD9622, HD9621) 28
Поставяне на дръжката EasyClick 29
Таблица на храните 30
Използване на уреда 31
Пържене с въздух 31
Приготвяне на домашни пържени картофки 34
Използване на скара за готвене на две нива
(само HD9627, HD9622) 35
Използване на грил-тиган с незалепващо покритие
(само HD9627, HD9623) 36
Използване на предпазващ от пръски капак
(само HD9622/45, HD9621/45) 36
Почистване 37
Таблица за почистване 38
Съхранение 39
Рециклиране 39
Гаранция и поддръжка 39
Отстраняване на неизправности 40
HD9620, HD9621, HD9622, HD9623, HD9627
Page 23

Важно
Преди да използвате уреда, прочетете внимателно тази важна
информация и я запазете за справка в бъдеще.
Опасност
- Винаги слагайте продуктите за пържене
в кошницата, за да не влизат в контакт с
нагревателите.
- Не закривайте отворите за входящ и изходящ
въздух, докато уредът работи.
- Не пълнете кофата с олио, тъй като това може
да създаде опасност от пожар.
- Никога не потапяйте задвижващия блок във
вода или друга течност и не го мийте с течаща
вода.
Предупреждение
- Преди да включите уреда в електрически
контакт, проверете дали посоченото върху
уреда напрежение отговаря на това на
местната електрическа мрежа.
- Не използвайте уреда, ако щепселът,
захранващият кабел или самият уред е
повреден.
- С оглед предотвратяване на опасност, при
повреда в захранващия кабел той трябва да
бъде сменен от Philips, оторизиран от Philips
сервиз или лица с подходяща квалификация.
- Този уред може да се използва от деца на
възраст над 8 години и от хора с намалени
физически възприятия или умствени
недостатъци или без опит и познания, ако са
инструктирани за безопасна употреба на уреда
или са под наблюдение с цел гарантиране на
безопасна употреба и ако са им разяснени
евентуалните опасности. Не позволявайте
на деца да си играят с уреда. Почистване и
поддръжка на уреда може да се извършва от
деца на възраст над 8 години и под родителски
надзор.
- Пазете уреда и захранващия кабел далече от
достъп на деца на възраст под 8 години.
23БЪЛГАРСКИ
Page 24

24 БЪЛГАРСКИ
- Дръжте захранващия кабел далече от горещи
повърхности.
- Включвайте уреда само в заземен електрически
контакт. Винаги проверявайте дали щепселът е
вкаран добре в контакта.
- Винаги поставяйте и използвайте уреда върху
хоризонтална, равна и стабилна повърхност.
- Този уред не е предназначен за използване
с външен таймер или отделна система за
дистанционно управление.
- Не поставяйте уреда до стена или до други
уреди. Оставете поне 10 см свободно място
отзад и отстрани и 10 см свободно място над
уреда. Не поставяйте нищо върху уреда.
- Не използвайте уреда за цели, различни от
указаните в това ръководство за потребителя.
- По време на пържене с горещ въздух през
отворите за изходящ въздух излиза гореща
пара. Пазете ръцете и лицето си на безопасно
разстояние от парата и от отворите за
изходящ въздух. Също така внимавайте за
гореща пара и въздух, когато сваляте кофата от
уреда.
- Външните повърхности може да се нагорещят,
докато уредът работи.
- Аксесоарите на Airfryer се нагорещяват при
употреба в Airfryer. Бъдете внимателни, когато
боравите с тях.
Внимание
- Този уред е предназначен само за домашна
употреба. Не е предназначен за употреба в
помещения като кухни за персонала в магазини,
офиси, ферми и подобни работни помещения.
Освен това не е предназначен за употреба от
клиенти в хотели, мотели, места за нощуване и
закуска и подобни жилищни помещения.
- За проверка или ремонт носете уреда в
упълномощен от Philips сервиз. Не опитвайте
да ремонтирате уреда сами, в противен случай
гаранцията става невалидна.
Page 25

- Оставете кошницата и грил-тигана с
незалепващо покритие (само HD9627, HD9623)
да се охладят, преди да сменяте или сваляте
дръжката EasyClick.
- Този уред е проектиран за използване при
температура на околната среда между 5 ºC и
40 ºC.
- След употреба винаги изключвайте уреда от
контакта.
- Оставете уреда да се охлади за ок. 30 минути,
преди да го премествате или почиствате.
- Не препълвайте кошницата. Напълвайте
кошницата само до индикацията MAX.
- Приготвяйте продуктите в уреда до
златистожълт цвят, а не до тъмен или кафяв.
Отстранявайте изгорелите остатъци. Не
пържете пресни картофи при температура
над 180 °C (за намаляване на отделянето на
акриламид).
- След като сте свалили кофата с кошницата от
уреда, поставете кофата с кошницата на масата
и я оставете за 30 секунди, преди да извадите
кошницата от кофата.
- Внимавайте много при почистване на
горната зона на камерата за готвене: горещ
нагревателен елемент, ръб на метални части.
- Не използвайте уреда за цели, различни от
указаните в ръководството на потребителя, и
използвайте само оригинални аксесоари.
- Ниво на шума: Lc ≤ 65 dB(A).
25БЪЛГАРСКИ
Електромагнитни полета (EMF)
Този уред на Philips е в съответствие с нормативната уредба и всички
действащи стандарти, свързани с електромагнитните излъчвания.
Page 26

26 БЪЛГАРСКИ
Въведение
Поздравления за вашата покупка и добре дошли във Philips! За
да се възползвате изцяло от предлаганата от Philips поддръжка,
регистрирайте продукта си на адрес
Вашият нов фритюрник Airfryer ви позволява да приготвяте любимите
си продукти и аламинути по един по-здравословен начин. Airfryer
използва горещ въздух в комбинация с високоскоростна циркулация
на въздуха (технологията TurboStar Rapid Air) и горно разположен
грил за приготвяне на многообразие от вкусни ястия по здравословен
начин, бързо и лесно. Вашите продукти се нагряват от всички страни
едновременно и няма нужда да добавяте олио към повечето от тях. За
повече вдъхновение, рецепти и информация относно Airfryer посетете
www.philips.com/kitchen или изтеглете безплатното приложение
Airfryer за IOS® или Android™.
www.philips.com/welcome.
Общо описание
1 Таймер/копче за включване
2 Светлинен индикатор за нагряване
3 Входен отвор за въздух
4 Кофа
5 Копче за контрол на температурата
6 Изходи за въздух
7 Място за прибиране на кабела
8 Захранващ кабел
9 Предпазващ от пръски капак (само HD9622/45, HD9621/45)
10 Двойна поставка (само HD9627, HD9622)
11 Кошница с неподвижно мрежесто дъно (само HD9620)
12 Означение MAX
13 Бутон за освобождаване на кошницата
14 Дръжка EasyClick
15 Кошница със свалящо се мрежесто дъно (само HD9627, HD9623,
HD9622, HD9621)
16 Свалящо се мрежесто дъно (само HD9627, HD9623, HD9622,
HD9621)
17 Грил-тиган с незалепващо покритие (само HD9627, HD9623)
Page 27

27БЪЛГАРСКИ
1
2
3
9
10
4
11
MAX
12
13
5
1
15
14
MAX
6
16
7
17
8
Page 28

28 БЪЛГАРСКИ
1
Преди първата употреба
1 Свалете целия опаковъчен материал.
2 Свалете от уреда всички стикери или етикети.
3 Цялостно почистете уреда преди първата употреба, както е
указано в таблицата за почистване.
Подготовка за употреба
Поставяне на свалящото се мрежесто дъно (само HD9627, HD9623, HD9622, HD9621)
1 Свалете кофата от уреда.
2 Поставете кофата с кошницата върху подходяща повърхност,
натиснете бутона за освобождаване на кошницата и повдигнете
кошницата от кофата.
2
3 Вкарайте куката на мрежестото дъно в отвора в дясната долна
страна на кошницата. Натиснете мрежестото дъно надолу,
2
1
докато не се заключи на място ("прищракване" от двете страни).
4 Поставете кошницата обратно в кофата.
Забележка
• Никога не използвайте кофата без кошницата в нея.
Page 29

29БЪЛГАРСКИ
5 Приплъзнете кофата обратно в уреда.
Поставяне на дръжката EasyClick
Предупреждение
• Винаги се уверявайте, че кошницата и дръжката са се охладили, преди
да закрепвате или разкачате дръжката EasyClick.
Забележка
• Дръжката EasyClick също така може да се закрепва и към грил-тигана
с незалепващо покритие (само HD9627 / HD9623). Тя помага за лесно
почистване и съхранение на уреда.
За закрепване на дръжката EasyClick:
1 Задръжте кофата с една ръка, а с другата хванете дръжката.
2 Приплъзнете дръжката в отвора върху кошницата отдолу, докато
не се заключи на място ("прищракване").
За разкачане на дръжката EasyClick:
1 Задръжте кофата с една ръка, а с другата хванете дръжката.
2 Изтеглете внимателно с пръст, поставен върху червения
накрайник за освобождаване, докато теглите дръжката право
2
1
надолу.
Page 30

30 БЪЛГАРСКИ
Таблица на храните
Таблицата по-долу ви помага да изберете основните настройки за
типовете храна, която искате да приготвяте.
Забележка
• Имайте предвид, че тези настройки се дават само като предложения.
Тъй като продуктите се различават по произход, размер, форма и марка,
ние не можем да гарантираме коя е най-добрата настройка за вашите
продукти.
Мин. – макс.
Съставки
Замразени
картофи за
пържене
количество
(грама)
200 – 800 11 – 25 180 Разклащане
Време
(минути)
Температура
(°C)
Разклащане/
обръщане
на
половината
Допълнителна
информация
време
Домашно
приготвени
пържени
картофки (1/2
200 – 800 12 – 25 180 Разклащане
на
половината
време
Накиснете 30 мин
във вода, изсушете
и добавете 1/2 с.л.
олио.
см/1/4 инча
дебелина)
Картофи с
кожичка
Замразени
закуски (напр.
пролетни рулца,
пилешки хапки)
200 – 800 15 – 27 180 Разклащане
на
половината
време
100-400 6-10 200 Обърнете
или
разклатете
на
половината
време
Накиснете 30 мин
във вода, изсушете
и добавете 1/2 с.л.
олио.
За времената на
печене вижте
инструкциите върху
опаковката на
продукта. Времето
трябва да се намали
наполовина в
сравнение с това,
посочено за печене
във фурна.
Свински
100-500 8 – 14 200
котлети
Хамбургери 100-500 7-14 160
Наденици 100-500 3 – 15 160
Пилешки
100-500 15 – 22 180
бутчета
Пилешки гърди 100-500 10-15 180
Киш 300 20 – 25 160 Използвайте тавичка
или форма за печене.
Page 31

Съставки
Мин. – макс.
количество
(грама)
Време
(минути)
Температура
(°C)
Разклащане/
обръщане
31БЪЛГАРСКИ
Допълнителна
информация
Кексчета 80 – 300 8 – 13 180 Използвайте
силиконови
формички за печене
на мъфини.
Кекс 200 – 400 15 – 25 160 Използвайте тава за
кекс.
Смесени
100-500 8-12 180
зеленчуци
Предварително
50-200 3-6 200
препечени
филийки хляб/
питки
Пресни питки/
100-500 12 – 25 180
хляб
Риба 150 – 400 10 – 18 200
Миди 100-400 7 – 15 180
Пиле с галета 100 – 300 8 – 15 180 Добавете олио към
галетата.
Използване на уреда
Пържене с въздух
Внимание
• Този Airfryer работи с горещ въздух. Не пълнете кофата с олио или
мазнина за пържене.
• Не докосвайте горещи повърхности. Използвайте дръжки или
ръкохватки. Дръжте кофата само за дръжката на кошницата.
• Този уред е само за битови цели.
• Когато използвате уреда за пръв път, от него може да се вдигне малко
дим. Това е нормално.
• Предварително нагряване на уреда не е нужно.
1 Поставяйте уреда върху стабилна, хоризонтална, равна и
топлоустойчива повърхност.
Page 32

32 БЪЛГАРСКИ
°C
Забележка
• Не поставяйте нищо върху или отстрани на уреда. Това може да наруши
притока на въздух и да окаже влияние върху резултата от пърженето.
2 Размотайте електрическия кабел от мястото за прибиране на
кабела.
3 Вкарайте щепсела в контакта.
4 Свалете кофата от уреда.
5 Сложете продуктите в кошницата.
Забележка
• Airfryer може да приготвя голям набор от продукти. Консултирайте се
с "Таблица на храните" за правилните количества и приблизителните
времена на готвене.
• Не превишавайте количеството, посочено в раздел "Таблица на храните",
и не препълвайте кошницата над индикацията "МАХ", тъй като това може
да засегне качеството на крайния резултат.
• Ако искате да приготвяте различни продукти по едно и също време,
проверете предлаганото време за готвене, което е нужно за различните
продукти, преди да започнете да ги готвите едновременно. Домашно
приготвените пържени картофки и бутчета например могат да се готвят
едновременно, защото изискват еднакви настройки.
6 Ако кошницата или грил-тиганът с незалепващо покритие (само
HD9627, HD9623) се постави обратно в кофата, приплъзнете
кофата обратно в уреда. Завъртете копчето за контрол на
температурата до желаната температура.
7 Завъртете копчето на таймера до необходимото време за
приготвяне, за да включите уреда.
Page 33

Забележка
• Светва индикаторът за нагряване. По време на използване индикаторът
за нагряване светва от време на време. Това указва, че уредът нагрява до
правилната температура.
• Таймерът продължава обратното броене на зададеното време на
готвене.
• Някои продукти изискват разклащане или обръщане на половината
от времето за готвене (вж. "Таблица на храните"). За да разклатите
продуктите, свалете кофата от уреда и я разклатете над мивката. След
това приплъзнете кофата обратно в уреда. За да намалите теглото,
можете също така да свалите кошницата от кофата.
• Внимавайте да не натиснете бутона за освобождаване на кошницата,
докато разклащате.
Съвет
• Ако настроите таймера на половината време за готвене, когато чуете
таймерът да звъни, това значи, че е време за разклащане или обръщане на
продуктите. Уверете се, че сте настроили отново таймера до оставащото
време за готвене.
8 Когато чуете таймерът да звъни, настроеното време за готвене
е изтекло. Можете да изключите уреда и ръчно. За тази цел
завъртете копчето за включване на 0 (обратно на часовниковата
стрелка); това изисква малко повече сила, отколкото въртенето
по часовниковата стрелка.
33БЪЛГАРСКИ
Забележка
• Излишната мазнина от продуктите се събира на дъното на кофата.
• Ако приготвяте няколко порции продукти с високо съдържание на
мазнини (напр. бутчета, наденици или хамбургери), внимателно изливайте
излишното олио или разтопена мазнина от кофата след всяка порция,
преди разклащане или смяна на кошницата в кофата.
9 Свалете кофата от уреда и я поставете върху топлоустойчива
повърхност.
10 Проверете дали продуктите са готови.
Забележка
• Ако продуктите все още не са готови, просто поставете кофата обратно
в уреда и нагласете таймера на още няколко допълнителни минути.
• След пърженето с горещ въздух кофата, кошницата, аксесоарите, корпусът
1
2
и продуктите са горещи. В зависимост от типа на продуктите в кошницата
от кофата може да излиза пара.
11 Натиснете бутона за освобождаване на кошницата и повдигнете
кошницата от кофата.
Page 34

34 БЪЛГАРСКИ
12 Изпразнете съдържанието на кошницата в купа или в чиния.
Винаги при сервиране изкарвайте кошницата с продуктите от
кофата, тъй като на дъното на кофата може да има горещо олио
или разтопена мазнина.
Забележка
• За изкарване на големи или крехки продукти, използвайте щипки за
повдигане на продуктите.
Приготвяне на домашни пържени картофки
За да приготвите страхотни домашни пържени картофки в Airfryer:
- Изберете подходящ сорт картофи за пържене, напр. пресни, леко
сухи картофи.
- Най-добре е да пържите с въздух картофките на порции, не поголеми от 500 грама, за да постигнете равномерно изпържване.
По-големите картофки са по-малко хрупкави от по-малките.
- Разклатете кошницата 2 – 3 пъти по време на процеса на пържене
с въздух.
1 Обелете картофите и ги нарежете на лентички (1/2 см/1/4 инча
дебели).
2 Накиснете нарязаните картофи в купа с вода за поне 30 минути.
3 Изпразнете купата и изсушете нарязаните картофи с кърпа за
съдове или домакинска хартия.
4 Изсипете половин супена лъжица олио в купата, поставете
картофите и смесете, докато картофите не се покрият с олио.
5 Извадете картофите от купата с пръсти или с решетъчна лъжица,
така че излишното олио да остане в купата.
Забележка
• Не накланяйте купата, за да изсипете всички картофи в кошницата
наведнъж, защото така излишното олио ще отиде в кофата.
6 Сложете картофите в кошницата.
7 Почнете да ги пържите и разклатете кошницата на половината
време от пърженето. Разклатете 2 – 3 пъти, ако приготвяте
повече от 400 г картофки.
Забележка
• Разгледайте "Таблица на храните" за правилните количества и за
времената на готвене.
Page 35

35БЪЛГАРСКИ
Използване на скара за готвене на две нива (само HD9627, HD9622)
Използвайте скарата за готвене на две нива за увеличаване на вашето
място за готвене.
Забележка
• Ако готвите различни продукти едновременно, уверете се, че
температурата на готвене и времето са еднакви за всеки тип продукт.
• Винаги поставяйте месото на по-ниско ниво, а зеленчуците над него, за да
избегнете замърсяване на храната или опасно преминаване на сокове от
месо, както и само частично сготвени храни.
1 Следвайте стъпки 1 до 4 от раздел "Пържене с въздух".
2 Поставете половината продукти в кошницата.
3 Поставете скарата за готвене на две нива в кошницата.
4 Поставете втората половина продукти върху скарата за готвене
на две нива.
5 Следвайте стъпки 6 до 12 от раздел "Пържене с въздух".
Предупреждение
• Скарата за готвене на две нива се нагорещява много при употреба.
Носете ръкохватки при сваляне на скарата за готвене на две нива от
кошницата.
Page 36

36 БЪЛГАРСКИ
1
2
Използване на грил-тиган с незалепващо покритие (само HD9627, HD9623)
1 Следвайте стъпки 1 до 3 от раздел "Пържене с въздух".
2 Натиснете бутона за освобождаване на кошницата и повдигнете
кошницата от кофата.
3 Закрепете дръжката EasyClick към грил-тигана с незалепващо
покритие (вижте "Поставяне на дръжката EasyClick").
4 Поставете грил-тигана с незалепващо покритие в кофата.
5 Поставете продуктите върху грил-тигана с незалепващо
покритие.
6 Следвайте стъпки 6 до 12 от раздел "Пържене с въздух".
Използване на предпазващ от пръски капак (само HD9622/45, HD9621/45)
Използвайте предпазващия от пръски капак, ако готвите леки
продукти, за да ги задържите в кошницата, както и при готвене на
продукти с високо съдържание на мазнини или с цел намаляване на
скоростта на покафеняване.
Забележка
• Когато използвате предпазващ от пръски капак, може да ви е нужно
повече време, за да достигнете същото ниво на запичане и завършеност.
1 Следвайте стъпки 1 до 5 от раздел "Пържене с въздух".
1
2
2 Дръжте капака с горната страна към вас. Вкарайте двете куки на
капака в двата отвора отпред на кошницата. Натиснете капака
надолу докато не се заключи на място ("прищракване" от двете
страни).
3 Следвайте стъпки 6 до 9 от раздел "Пържене с въздух".
4 Внимателно свалете предпазващия от пръски капак.
Предупреждение
1
2
• Предпазващият от пръски капак е много горещ. Носете ръкохватки,
когато го махате.
5 Следвайте стъпки 10 до 12 от раздел "Пържене с въздух".
Page 37

Почистване
Предупреждение
• Оставете кошницата, кофата, аксесоарите и вътрешността на уреда да
се охладят напълно, преди да започнете да почиствате.
• Кофата, кошницата и вътрешността на уреда имат незалепващо
покритие. Не използвайте метални кухненски прибори или абразивни
почистващи материали, тъй като те могат да повредят незалепващото
покритие.
Почиствайте уреда след всяка употреба. Махайте олиото и
мазнината от дъното на кофата след всяка употреба, за да избегнете
образуването на дим.
1 Завъртете копчето на таймера на 0, извадете щепсела от
контакта и оставете уреда да се охлади за 10 минути.
Съвет
• Извадете кофата и кошницата за по-бързо охлаждане на Airfryer.
2 Почистете кофата, кошницата, грил-тигана с незалепващо
покритие и предпазващия от пръски капак в съдомиялна машина.
Можете също така да ги почистите с гореща вода, веро и
неабразивна гъба (вж. "таблица за почистване").
37БЪЛГАРСКИ
Съвет
• Ако остатъци от храната залепнат за кофата, скарата за готвене на две
нива или кошницата, можете да ги накиснете в топла вода и веро за 10
– 15 минути. Накисването размеква остатъците от храна и така те могат
по-лесно да се изчистят. Уверете се, че използвате веро, което може да
разтваря олио и мазнина. Ако има мазни петна по кофата или кошницата
и не можете да ги отстраните с гореща вода и веро, използвайте течен
обезмаслител.
• Ако е необходимо, залепналите към нагревателния елемент хранителни
остатъци могат да се свалят с четка с мек или средно мек косъм. Не
използвайте телена четка или четка с твърд косъм, тъй като това може да
повреди покритието на нагревателния елемент.
Page 38

38 БЪЛГАРСКИ
3 Почистете вътрешността на уреда с гореща вода и мека гъба.
4 Почистете нагревателния елемент с четка за почистване, за да
отстраните остатъците от храна.
5 Избършете уреда отвън с влажна кърпа.
6 Почистете уреда отвътре с влажна кърпа.
Таблица за почистване
HD9622/45 , HD9621/45
HD9627, HD9623
HD9622, HD9621
HD9620
HD9627, HD9623
HD9627, HD9622
Page 39

Съхранение
1 Изключете уреда от захранването и го оставете да изстине.
2 Уверете се, че всички части са чисти и сухи, преди да ги
съхранявате.
3 Намотайте електрическия кабел върху мястото за прибиране на
кабела.
Забележка
• Когато носите Airfryer, винаги го дръжте в хоризонтално положение.
Също така винаги хващайте чекмеджето от предната страна на уреда, тъй
като то може да се изплъзне от уреда, ако случайно се наклони надолу.
Това може да доведе до повреждане на чекмеджето.
• Винаги се уверявайте, че подвижните части на Airfryer като дръжката
EasyClick, сменяемата долна решетка и др. са фиксирани, преди да го
премествате и/или съхранявате.
Рециклиране
- Този символ означава, че продуктът не може да се изхвърля
заедно с обикновените битови отпадъци (2012/19/ЕС).
- Следвайте правилата на държавата си относно разделното
събиране на електрическите и електронните уреди. Правилното
изхвърляне помага за предотвратяването на потенциални
негативни последици за околната среда и човешкото здраве.
39БЪЛГАРСКИ
Гаранция и поддръжка
Ако се нуждаете от информация или поддръжка, посетете
www.philips.bg/support или прочетете листовката за международна
гаранция.
Page 40

40 БЪЛГАРСКИ
Отстраняване на неизправности
В тази глава са обобщени най-често срещаните проблеми, на които
можете да се натъкнете при ползване на уреда. Ако не можете да
разрешите проблема с помощта на информацията по-долу, посетете
www.philips.com/support за списък с често задавани въпроси или се
свържете с центъра за обслужване на потребители във вашата страна.
Проблем Вероятна причина Решение
Външната част на
уреда се нагорещява
при употреба.
Моите домашно
приготвени пържени
картофки не се
получиха така, както
очаквах.
Топлината отвътре се
предава към външните
стени.
Използвали сте
неподходящ сорт картофи.
Количеството продукти
в кошницата е прекалено
голямо.
Някои видове продукти
изискват разклащане на
половината време за
приготвяне.
Това е нормално. Всички дръжки и
ръкохватки, които трябва да докосвате по
време на употреба, остават достатъчно
студени, за да могат да бъдат докосвани.
Кофата, кошницата, скарата за готвене
на две нива, грил-тиганът с незалепващо
покритие и вътрешността на уреда винаги
се нагорещяват, когато уредът се включи,
за да се гарантира правилното сготвяне на
храната. Тези части винаги са твърде горещи,
за да бъдат докосвани.
Ако оставите уреда включен за по-дълго,
някои зони също ще се нагорещят твърде
много, за да бъдат докосвани. Тези зони са
маркирани върху уреда със следната икона:
Уредът е напълно безопасен за употреба,
стига да внимавате за горещите зони и да не
ги докосвате.
За да получите най-добри резултати,
използвайте пресни, леко сухи картофи. Ако
трябва да съхранявате картофите, не ги
слагайте на студено, като напр. в хладилник.
Избирайте картофи, за които на опаковката
пише, че са подходящи за пържене.
Следвайте инструкциите в това ръководство
на потребителя, за да приготвите домашно
приготвените пържени картофки (вж.
"Таблица на храните" или изтеглете
безплатното приложение Airfryer).
Следвайте инструкциите в това ръководство
на потребителя, за да приготвите домашно
приготвените пържени картофки (вж.
"Таблица на храните" или изтеглете
безплатното приложение Airfryer).
Page 41

Проблем Вероятна причина Решение
41БЪЛГАРСКИ
Airfryer не се
включва.
Виждам някакви
петна отвътре на
Airfryer.
От уреда излиза бял
дим.
Уредът не е включен в
контакта.
Настроили сте таймера на
време, което е по-малко от
5 минути.
Няколко уреда са свързани
към един контакт.
Малки петна могат да се
появят от вътрешната
страна на кофата на Airfryer
поради инцидентно
докосване или одраскване
на покритието (напр.
по време на почистване
с груби почистващи
инструменти и/или при
вкарване на кошницата).
Приготвяте мазни
продукти.
По кофата има остатъци
от мазнина от предишното
използване.
Маринатата, течностите
или соковете от месо
пръскат при попадане в
разтопената мазнина или
олиото.
Панировката и галетата
не залепват правилно за
храната.
Когато включите уреда, ще чуете звука на
работещия вентилатор. Ако не чуете този
звук, проверете дали щепселът е вкаран
правилно в контакта.
Настройте таймера на 5 или повече минути.
Опитайте с друг контакт и проверете
предпазителите. Airfryer има мощност от
1425 вата.
За да не допуснете повреждане на уреда,
сваляйте кошницата в кофата правилно. Ако
вкарате кошницата под ъгъл, страничната
й част може да се удари в стената на
кофата, което ще отчупи малки парченца
от покритието. Ако такова нещо се случи,
имайте предвид, че това не е вредно,
тъй като всички използвани материали са
безопасни за храните.
Олиото или разтопената мазнина в тигана
могат да причинят бял дим и тиганът може
да се нагорещи повече от обикновеното.
Можете внимателно да излеете излишното
олио или мазнина от кофата и след това да
продължите готвенето. Можете също така
да поставите предпазващия от пръски капак
върху кофата.
Белият дим се причинява от мазни
остатъчни, които се нагряват в кофата.
Винаги почиствайте кофата и кошницата
добре след употреба.
Поставяйте предпазващия от пръски капак
върху кошницата.
Малки парчета от панировката, които се
носят по въздуха, могат да причинят бял дим.
Притиснете добре панировката и галетата
към храната, за да се уверите, че залепват.
Page 42

42 ČEŠTINA
OBSAH
Důležité 43
Elektromagnetická pole (EMP) 45
Úvod 46
Všeobecný popis 46
Před prvním použitím 48
Příprava k použití 48
Umístění košíku s odnímatelným síťovaným dnem
(pouze modely HD9627, HD9623, HD9622,
HD9621) 48
Umístění rukojeti EasyClick 49
Tabulka pokrmů 50
Použití přístroje 51
Fritování ve fritéze Airfryer 51
Příprava domácích hranolků 54
Dvojitý rošt (pouze modely HD9627, HD9622) 55
Používání grilovací nádoby s nepřilnavým povrchem
(pouze modely HD9627, HD9623) 56
Použití víka odolného proti vystříknutí
(pouze modely HD9622/45, HD9621/45) 56
Čištění 57
Tabulka čištění 58
Uskladnění 59
Recyklace 59
Záruka a podpora 59
Odstraňování problémů 60
HD9620, HD9621, HD9622, HD9623, HD9627
Page 43

Důležité
Před použitím přístroje si pečlivě přečtěte tuto příručku
s důležitými informacemi a uschovejte ji pro budoucí použití.
Nebezpečí
- Přísady, které chcete fritovat, vložte vždy
do košíku, aby nepřišly do styku s topnými
tělesy.
- Pokud je přístroj v provozu, nezakrývejte
vstup vzduchu ani otvory pro výstup
vzduchu.
- Nádobu neplňte olejem, hrozí nebezpečí
požáru.
- Přístroj nikdy neponořujte do vody nebo
jiné kapaliny ani jej neproplachujte pod
tekoucí vodou.
Varování
- Dříve než přístroj připojíte do sítě,
zkontrolujte, zda napětí uvedené na
přístroji souhlasí s napětím v místní
elektrické síti.
- Pokud byste zjistili závadu na zástrčce, na
napájecím kabelu nebo na přístroji, dále jej
nepoužívejte.
- Pokud by byl poškozen napájecí kabel,
musí jeho výměnu provést společnost
Philips, autorizovaný servis společnosti
Philips nebo obdobně kvalikovaní
pracovníci, aby se předešlo možnému
nebezpečí.
- Děti od 8 let věku a osoby s omezenými
fyzickými, smyslovými nebo duševními
schopnostmi nebo nedostatkem
zkušeností a znalostí mohou tento přístroj
používat v případě, že jsou pod dohledem
nebo byly poučeny o bezpečném
používání přístroje a chápou rizika, která
mohou hrozit. Děti si s přístrojem nesmí
hrát. Čištění a údržbu by neměly provádět
děti, které jsou mladší 8 let a jsou bez
dozoru.
43ČEŠTINA
Page 44

44 ČEŠTINA
- Přístroj a jeho kabel udržujte mimo dosah
dětí mladších 8 let.
- Napájecí kabel nenechávejte v blízkosti
horkých povrchů.
- Přístroj připojujte výhradně do řádně
uzemněné zásuvky. Vždy zkontrolujte
řádné zapojení zástrčky do síťové zásuvky.
- Přístroj vždy pokládejte a používejte
na suchém, stabilním, vyrovnaném a
vodorovném povrchu.
- Přístroj není určen k tomu, aby byl
ovládán pomocí externího časovače nebo
samostatného dálkového ovladače.
- Přístroj neumisťujte ke zdi ani k jiným
spotřebičům. Ponechte alespoň 10 cm
volného prostoru za přístrojem, po obou
jeho stranách a 10 cm nad ním. Na přístroj
nic nepokládejte.
- Nepoužívejte přístroj pro jiné účely než
uvedené v této uživatelské příručce.
- Během horkovzdušného fritování se otvory
pro výstup vzduchu uvolňuje horká pára.
Udržujte proto ruce i obličej v bezpečné
vzdálenosti od páry a otvorů pro výstup
vzduchu. Musíte také dávat pozor na
horkou páru a vzduch vystupující po
sejmutí nádoby ze zařízení.
- Přístupné povrchy mohou být během
používání přístroje horké.
- Když používáte horkovzdušnou fritézu
Airfryer, příslušenství Airfryer může být
horké. Při manipulaci dbejte zvláštní
opatrnosti.
Upozornění
- Tento přístroj je určen pouze pro běžné
použití v domácnosti. Není určen pro
používání v prostředích, jako jsou
kuchyňky pro personál obchodů,
kanceláře nebo farmy, nebo v jiných
pracovních prostředích. Přístroj není
Page 45

45ČEŠTINA
určen ani k používání klienty v hotelech,
motelech, zařízeních poskytujících nocleh
se snídaní a jiných ubytovacích zařízeních.
- Kontrolu nebo opravu přístroje svěřte vždy
servisu společnosti Philips. Nepokoušejte
se přístroj sami opravovat, jinak
záruka přestane být platná.
- Košík a nádobu s nepřilnavým povrchem
(pouze modely HD9627, HD9623) nechte
před výměnou nebo sejmutím rukojeti
EasyClick vychladnout.
- Přístroj je navržen pro použití při okolních
teplotách mezi 5 °C a 40 °C.
- Po použití přístroj vždy odpojte z napájení.
- Nechte přístroj přibližně 30 minut
vychladnout, než s ním začnete
manipulovat nebo jej čistit.
- Nepřeplňujte košík. Košík naplňte pouze
k ukazateli MAX.
- Dbejte, aby suroviny připravené v tomto
přístroji byly zlatožluté, a ne tmavé
nebo hnědé. Vyjměte spálené zbytky.
Čerstvé brambory nefritujte při teplotách
nad 180 °C (minimalizujete tak tvorbu
akrylamidů).
- Po odstranění nádoby s košíkem z přístroje
ji položte na vhodný povrch a před
vyjmutím košíku z nádoby nechte alespoň
30 sekund stát.
- Při čištění horní části varné komory buďte
opatrní: rozpálené topné těleso, okraje
kovových částí.
- Nepoužívejte přístroj pro jiné účely než
uvedené v této uživatelské příručce.
Používejte pouze originální příslušenství.
- Hladina hluku: Lc ≤ 65 dB(A).
Elektromagnetická pole (EMP)
Tento přístroj Philips odpovídá všem platným normám a
předpisům týkajícím se elektromagnetických polí.
Page 46

46 ČEŠTINA
Úvod
Společnost Philips Vám gratuluje ke koupi a vítá Vás!
Chcete-li plně využívat výhod, které nabízí společnost
Philips, zaregistrujte svůj výrobek na webových stránkách
www.philips.com/welcome.
Nová fritéza Airfryer vám umožní připravit oblíbené
přísady a svačiny zdravěji. Fritéza Airfryer využívá horký
vzduch v kombinaci s vysokorychlostní cirkulací vzduchu
(rychlovzdušná technologie TurboStar) a horní gril pro zdravou,
rychlou a snadnou přípravu různých chutných jídel. Přísady se
ohřejí najednou ze všech stran a k většině z nich není nutné
přidávat olej. Další inspirativní recepty a informace o fritéze
Airfryer naleznete na adrese www.philips.com/kitchen nebo si
můžete stáhnout bezplatnou aplikaci Airfryer pro systém IOS®
nebo Android™.
Všeobecný popis
1 Knoík časovače / zapnutí
2 Kontrolka ohřevu
3 Vstup vzduchu
4 Nádoba
5 Otočný ovladač teploty
6 Výstupy vzduchu
7 Prostor pro uložení kabelu
8 Napájecí kabel
9 Víko odolné proti vystříknutí (pouze modely HD9622/45,
HD9621/45)
10 Dvojitý rošt (pouze modely HD9627, HD9622)
11 Košík s pevným síťovaným dnem (pouze model HD9620)
12 Indikátor MAX
13 Tlačítko uvolnění košíku
14 Rukojeť EasyClick
15 Košík s odnímatelným síťovaným dnem (pouze modely
HD9627, HD9623, HD9622, HD9621)
16 Odnímatelné síťované dno (pouze modely HD9627,
HD9623, HD9622, HD9621)
17 Grilovací nádoba s nepřilnavým povrchem (pouze modely
HD9627, HD9623)
Page 47

47ČEŠTINA
1
2
3
9
10
4
11
MAX
12
13
5
1
15
14
MAX
6
16
7
17
8
Page 48

48 ČEŠTINA
1
Před prvním použitím
1 Odstraňte veškerý obalový materiál
2 Sejměte všechny případné nálepky nebo štítky z přístroje.
3 Před prvním použitím přístroj důkladně vyčistěte, jak je
uvedeno v tabulce pro čištění.
Příprava k použití
Umístění košíku s odnímatelným síťovaným dnem (pouze modely HD9627, HD9623, HD9622, HD9621)
1 Vyjměte nádobu z přístroje.
2 Položte nádobu s košíkem na vhodný povrch, stiskněte
tlačítko pro uvolnění košíku a zvedněte košík z nádoby.
2
3 Vložte háček síťovaného dna do slotu vpravo na spodní
straně košíku. Zatlačte na síťované dno, dokud nezapadne
2
1
na místo (ozve se klapnutí na obou stranách).
4 Vložte košík do nádoby.
Poznámka
• Nádobu nepoužívejte bez košíku.
Page 49

5 Nádobu zasuňte zpět do přístroje.
Umístění rukojeti EasyClick
Varování
• Než připevníte nebo sejmete rukojeť EasyClick, vždy se ujistěte,
že již košík a rukojeť vychladly.
Poznámka
• Rukojeť EasyClick se také hodí na grilovací nádobu s nepřilnavým
povrchem (pouze modely HD9627/HD9623). Pomůže vám přístroj
snadno vyčistit a uložit.
Připevnění rukojeti EasyClick:
1 Jednou rukou držte košík a ve druhé držte rukojeť.
2 Zasuňte rukojeť zespodu do otvoru na košíku, dokud
nezapadne na místo (ozve se klapnutí).
49ČEŠTINA
Sejmutí rukojeti EasyClick:
1 Jednou rukou držte košík a ve druhé držte rukojeť.
2 Jemně zatáhněte prstem za červený uvolňovací jazýček a
současně zatáhněte za rukojeť rovně dolů.
2
1
Page 50

50 ČEŠTINA
Tabulka pokrmů
S pomocí níže uvedené tabulky můžete vybrat základní
nastavení pro typy pokrmů, které chcete připravit.
Poznámka
• Nezapomeňte, že tato nastavení jsou orientační. Suroviny jsou
různého původu, velikosti, tvaru i značky, proto nejlepší nastavení
pro vaše suroviny nemůžeme zaručit.
Min. –
max.
Ingredience
Mražené
hranolky
množství
(gramy)
200–800 11–25 180 Protřepat
Čas
(minuty) Te plo ta (°C)
Zatřesení/
Oto-čení Další informace
po
uplynutí
poloviny
doby
přípravy
Domácí
hranolky
(1/2 cm /
1/4 palce
silné)
200–800 12–25 180 Protřepat
po
uplynutí
poloviny
doby
přípravy
Americké
brambory
200–800 15–27 180 Protřepat
po
uplynutí
poloviny
doby
přípravy
Mražené
pokrmy (např.
jarní závitky
nebo kuřecí
nugety)
Kousky
100 až 400 6–10 200 V polovině
doby
otočte
nebo
protřeste
100 až 500 8–14 200
vepřového
Hamburger 100 až 500 7–14 160
Klobásy 100 až 500 3–15 160
Drůbeží
100 až 500 15–22 180
stehýnka
Kuřecí prsa 100 až 500 10 - 15 180
Namočte na
30 min do vody,
osušte a přidejte
1/2 lžíce oleje.
Namočte na
30 min do vody,
osušte a přidejte
1/2 lžíce oleje.
Dobu přípravy
najdete na obalu
pokrmu. Dobu
přípravy určenou
pro troubu je
třeba zkrátit na
polovinu.
Page 51

Min. –
max.
Ingredience
množství
(gramy)
Čas
(minuty) Te plo ta (°C)
Zatřesení/
Oto-čení Další informace
Slaný koláč 300 20–25 160 Použijte pečicí
plech nebo
zapékací mísu.
Muny 80–300 8–13 180 Použijte
žáruvzdorné
silikonové košíčky
na muny.
Koláč 200–400 15–25 160 Použijte nádobu
na koláč.
Zeleninová
100 až 500 8–12 180
směs
Předpečené
50 až 200 3-6 200
pečivo
Čerstvé
100 až 500 12–25 180
pečivo
Ryba 150–400 10–18 200
Mořští
100 až 400 7–15 180
měkkýši nebo
korýši
Kuře
obalované ve
100–300 8–15 180 Ke strouhance
přidejte olej.
strouhance
51ČEŠTINA
Použití přístroje
Fritování ve fritéze Airfryer
Upozornění
• Tato fritéza Airfryer pracuje s horkým vzduchem. Nádobu
neplňte olejem ani tukem na smažení.
• Nedotýkejte se horkých povrchů. Používejte rukojeti nebo
knoíky a otočné ovladače. Nádobu držte pouze za rukojeť
košíku.
• Přístroj je určen výhradně k použití v domácnosti.
• Při prvním použití přístroje z něj může unikat slabý kouř. To je
normální jev.
• Předehřívání přístroje není nutné.
1 Přístroj postavte na stabilní, vodorovný a vyrovnaný
povrch.
Page 52

52 ČEŠTINA
°C
Poznámka
• Na přístroj ani těsně vedle něj nepokládejte žádné předměty.
Mohlo by to narušit proud vzduchu a ovlivnit výsledek fritování.
2 Odviňte napájecí kabel z prostoru pro uložení kabelu.
3 Zasuňte zástrčku do síťové zásuvky.
4 Vyjměte nádobu z přístroje.
5 Do košíku vložte suroviny.
Poznámka
• Fritéza Airfryer dokáže připravit celou řadu přísad. Správné
množství přísad a přibližnou dobu vaření naleznete v „Tabulce
pokrmů“.
• Nepřekračujte množství uvedené v části „Tabulka pokrmů“, ani
košík nepřeplňujte nad ukazatel „MAX“, protože by to mohlo
ovlivnit kvalitu konečného výsledku.
• Pokud chcete připravovat různé přísady současně, ujistěte se
ještě před začátkem vaření, že znáte pro tyto různé přísady dobu
přípravy. Například domácí hranolky a drůbeží stehýnka můžete
připravovat dohromady, protože vyžadují stejné nastavení.
6 Pokud se košík nebo grilovací nádoba s nepřilnavým
povrchem (pouze modely HD9627, HD9623) vkládá
zpět do nádoby, vložte nádobu zpět do přístroje. Otočte
ovladač teploty na požadovanou teplotu.
7 Přístroj zapnete otočením knoíku časovače na
požadovanou dobu přípravy.
Page 53

Poznámka
• Kontrolka ohřevu se rozsvítí. Během používání se občas rozsvítí
kontrolka ohřevu. Znamená to, že se přístroj ohřívá na správnou
teplotu.
• Časovač odpočítává nastavenou dobu přípravy.
• Některé suroviny je nutné v polovině doby přípravy protřepat (viz
část „Tabulka pokrmů“). Chcete-li přísady protřepat, vytáhněte
nádobu z přístroje a nad dřezem s ní zatřeste. Poté nádobu
zasuňte zpět do přístroje. Chcete-li snížit hmotnost, můžete také
vyjmout z nádoby košík.
• Během protřepávání dejte pozor, abyste nestiskli tlačítko uvolnění
košíku.
Upozornění
• Nastavíte-li časovač na poloviční dobu vaření, uslyšíte zvonek
časovače, když bude nutné protřepat přísady. Nezapomeňte však
znovu nastavit časovač na zbývající dobu vaření.
8 Až uslyšíte zvonek časovače, nastavená doba přípravy
uplynula. Přístroj můžete také vypnout ručně. Je potřeba
otočit knoíkem pro zapnutí do polohy 0 (proti směru
hodinových ručiček). To vyžaduje o trochu více síly než
otočení po směru hodinových ručiček.
53ČEŠTINA
Poznámka
• Zbytky oleje ze surovin se ukládají na dně nádoby.
• Připravujete-li několik dávek tučných přísad (např. drůbeží
stehýnka, klobásy nebo hamburgery), po každé dávce nebo před
protřesením či opětovným vložením košíku do nádoby opatrně
vylijte veškerý přebytečný olej nebo vzniklý tuk z nádoby.
9 Vyjměte nádobu z přístroje a položte ji na žáruvzdorný
povrch.
10 Zkontrolujte, zda jsou přísady připraveny.
Poznámka
• Pokud ještě připraveny nejsou, zasuňte nádobu zpět do přístroje a
nastavte časovač na dalších několik minut.
• Po fritování ve fritéze Airfryer jsou nádoba, košík, příslušenství,
pouzdro přístroje a přísady horké. Podle typu přísad v košíku může
z nádoby unikat pára.
1
11 Stiskněte tlačítko pro uvolnění košíku a vytáhněte košík
2
z nádoby.
Page 54

54 ČEŠTINA
12 Košík vyprázdněte do mísy nebo na talíř. Košík s přísadami
vždy vyjměte z nádoby, protože na dně nádoby může být
horký olej nebo vzniklý tuk.
Poznámka
• K vyjmutí velkých nebo křehkých přísad použijte kleště, kterými
přísady vytáhnete.
Příprava domácích hranolků
Postup přípravy skvělých domácích hranolků ve fritéze Airfryer:
- Vyberte si druh brambor vhodný pro přípravu hranolků,
například čerstvé, mírně moučné brambory.
- Nejvhodnější je fritovat hranolky v dávkách po
500 gramech, protože tak dosáhnete ještě lepších
výsledků. Větší hranolky bývají méně křupavé než ty menší.
- Během fritování ve fritéze Airfryer košík dvakrát až třikrát
protřeste.
1 Brambory oloupejte a nakrájejte na hranolky (silné
1/2 cm / 1/4 palce).
2 Namočte bramborové hranolky alespoň na 30 minut do
mísy s vodou.
3 Vyprázdněte mísu a osušte bramborové hranolky
ubrouskem nebo papírovou utěrkou.
4 Nalijte do mísy půl lžíce oleje, vložte do ní hranolky a
míchejte, dokud nejsou hranolky pokryté olejem.
5 Vyjměte hranolky z mísy prsty nebo děrovaným
kuchyňským náčiním, aby přebytečný olej zůstal v míse.
Poznámka
• Mísu nenaklánějte, abyste do košíku vložili všechny hranolky
najednou, zabráníte tak stékání přebytečného oleje do nádoby.
6 Vložte hranolky do košíku.
7 Hranolky připravte ve fritéze Aifryer a v půli fritování je
protřeste. Pokud připravujete více než 400 g hranolků,
protřeste je dvakrát až třikrát.
Poznámka
• Správné množství přísad a přibližnou dobu přípravy naleznete
v „Tabulce pokrmů“.
Page 55

55ČEŠTINA
Dvojitý rošt (pouze modely HD9627, HD9622)
Pomocí dvojitého roštu můžete maximálně využít prostor pro
vaření.
Poznámka
• Pokud vaříte současně různé přísady, ujistěte se, že je teplota a
doba vaření pro všechny typy použitých přísad stejná.
• Maso vždy pokládejte níže a zeleninu výše, abyste předešli
vzájemné kontaminaci pokrmů nebo ne zcela bezpečnému
přenosu šťáv z masa či částečně uvařených pokrmů.
1 Postupujte podle kroků 1 až 4 uvedených v části „Fritování
ve fritéze Airfryer“.
2 Vložte do košíku polovinu přísad.
3 Vložte do košíku dvojitý rošt.
4 Na dvojitý rošt vložte druhou polovinu přísad.
5 Postupujte podle kroků 6 až 12 uvedených v části
„Fritování ve fritéze Airfryer“.
Varování
• Dvojitý rošt se během používání velmi zahřívá. Při vyjímání
dvojitého roštu z košíku použijte kuchyňské chňapky.
Page 56

56 ČEŠTINA
1
2
Používání grilovací nádoby s nepřilnavým povrchem (pouze modely HD9627, HD9623)
1 Postupujte podle kroků 1 až 3 uvedených v části „Fritování
ve fritéze Airfryer“.
2 Stiskněte tlačítko pro uvolnění košíku a vytáhněte košík
z nádoby.
3 Rukojeť EasyClick připevněte ke grilovací nádobě
s nepřilnavým povrchem (viz část „Umístění rukojeti
EasyClick“).
4 Grilovací nádobu s nepřilnavým povrchem vložte do
nádoby.
5 Do grilovací nádoby s nepřilnavým povrchem vložte
přísady.
6 Postupujte podle kroků 6 až 12 uvedených v části
„Fritování ve fritéze Airfryer“.
Použití víka odolného proti vystříknutí (pouze modely HD9622/45, HD9621/45)
Víko odolné proti vystříknutí použijte v případě, že připravujete
lehké přísady (udržíte je tak v košíku), tučné přísady nebo
v případě, že chcete zpomalit opékání.
Poznámka
• Při použití víka odolného proti vystříknutí může být k dosažení
stejné úrovně opečení a důkladného zpracování potřeba více
času.
1
2
1 Postupujte podle kroků 1 až 5 uvedených v části „Fritování
ve fritéze Airfryer“.
2 Držte víko tak, aby horní část směřovala k vám. Vložte dva
háčky víka do dvou slotů na přední straně košíku. Zatlačte
na víko, dokud nezapadne na místo (ozve se „klapnutí“ na
obou stranách).
3 Postupujte podle kroků 6 až 9 uvedených v části „Fritování
ve fritéze Airfryer“.
1
2
4 Opatrně sejměte víko odolné proti vystříknutí.
Page 57

Varování
• Víko odolné proti vystříknutí je velmi horké. Až jej budete
snímat, mějte nasazeny kuchyňské chňapky.
5 Postupujte podle kroků 10 až 12 uvedených v části
„Fritování ve fritéze Airfryer“.
Čištění
Varování
• Než začnete s čištěním, nechte košík, nádobu, příslušenství a
vnitřní stranu přístroje úplně vychladnout.
• Nádoba, košík a vnitřní strana přístroje mají nepřilnavý povrch.
Nepoužívejte žádné kovové kuchyňské náčiní ani abrazivní
čisticí materiály, protože by mohly nepřilnavý povrch poškodit.
Po každém použití přístroj vyčistěte. Po každém použití
odstraňte olej a tuk ze dna nádoby, abyste zabránili vzniku
kouře.
1 Otočte knoíkem ovládání časovače do polohy 0,
vytáhněte zástrčku ze síťové zásuvky a nechte přístroj
10 minut vychladnout.
57ČEŠTINA
Upozornění
• Nádobu a košík vyjměte, aby mohl přístroj Airfryer vychladnout
rychleji.
2 Nádobu, košík, grilovací nádobu s nepřilnavým povrchem
a víko odolné proti vystříknutí umyjte v myčce. Můžete je
také umýt horkou vodou, čisticím prostředkem na nádobí a
neabrazivní houbičkou (viz „tabulka čištění“.
Upozornění
• Pokud na nádobě, dvojitém roštu nebo košíku ulpívají zbytky
pokrmu, můžete je na 10–15 minut namočit do horké vody
s čisticím prostředkem na nádobí. Namočením se zbytky pokrmu
uvolní a lze je snáze odstranit. Dbejte, abyste použili takový čisticí
prostředek na nádobí, který dokáže rozpustit olej a tuk. Jsou-li
na nádobě nebo košíku mastné skvrny a nepodařilo se vám je
odstranit horkou vodou s čisticím prostředkem na nádobí, použijte
tekutý odmašťovač.
• Zbytky pokrmu z topného tělesa lze v případě potřeby
odstranit kartáčkem s měkkými nebo středně tvrdými štětinami.
Nepoužívejte kartáček z ocelového drátu ani kartáček s tvrdými
štětinami, protože by mohlo dojít k poškození povrchu topného
tělesa.
Page 58

58 ČEŠTINA
3 Vnitřek přístroje vyčistěte horkou vodou a neabrazivní
houbičkou.
4 Topné těleso vyčistěte čisticím kartáčem, abyste odstranili
všechny zbytky pokrmů.
5 Vnější povrch přístroje čistěte navlhčeným hadříkem.
6 Vnitřní povrch přístroje čistěte navlhčeným hadříkem.
Tabulka čištění
HD9622/45 , HD9621/45
HD9627, HD9623
HD9622, HD9621
HD9620
HD9627, HD9623
HD9627, HD9622
Page 59

Uskladnění
1 Přístroj odpojte od napájení a nechte ho vychladnout.
2 Ujistěte se, že jsou všechny součásti před uložením zcela
suché.
3 Naviňte napájecí kabel do prostoru pro uložení kabelu.
Poznámka
• Při přenášení držte fritézu Airfryer vždy vodorovně. Dbejte také,
abyste drželi zásuvku na přední straně přístroje, protože z něj
může vyklouznout, pokud byste přístroj náhodou naklonili. To by
mohlo zásuvku poškodit.
• Vždy se ujistěte, že jsou odnímatelné části fritézy Airfryer (např.
rukojeť EasyClick, odnímatelné síťové dno atd.) před přenášením
nebo ukládáním zajištěné.
Recyklace
- Tento symbol znamená, že výrobek nelze likvidovat
s běžným komunálním odpadem (2012/19/EU).
- Řiďte se pravidly vaší země pro sběr elektrických a
elektronických výrobků. Správnou likvidací pomůžete
předejít negativním dopadům na životní prostředí a lidské
zdraví
59ČEŠTINA
Záruka a podpora
Více informací a podpory naleznete na adrese
www.philips.com/support nebo samostatném záručním listu
s celosvětovou platností.
Page 60

60 ČEŠTINA
Odstraňování problémů
V této kapitole najdete nejběžnější problémy, s nimiž se
můžete u přístroje setkat. Pokud se vám nepodaří problém
vyřešit podle následujících informací, navštivte webové
stránky www.philips.com/support, kde naleznete seznam
nejčastějších dotazů, nebo se obraťte na středisko péče
o zákazníky společnosti Philips ve své zemi.
Problém Možná příčina Řešení
Vnější povrch
přístroje je při
používání horký.
Moje domácí
hranolky nevyšly
podle očekávání.
Vnitřní teplo vyzařuje do
vnějších stěn.
Nepoužili jste správný
typ brambor.
Množství přísad v košíku
je příliš velké.
Určité typy suroviny je
nutné v polovině doby
vaření protřepat.
To je normální jev. Všechny rukojeti a
knoíky či otočné ovladače, na které
během používání potřebujete sahat,
jsou dostatečně chladné na dotek.
Nádoba, košík, dvojitý rošt, grilovací
nádoba s nepřilnavým povrchem a
vnitřní část přístroje jsou vždy horké,
když se přístroj zapne, aby byl pokrm
správně připravený. Tyto součásti jsou
vždy příliš horké na dotek.
Necháte-li přístroj zapnutý delší dobu,
některé plochy se zahřejí příliš na to,
abyste se jich mohli dotknout. Tyto
plochy jsou na přístroji označeny
následující ikonou:
Pokud si stále uvědomujete, kde jsou
horké plochy, a nedotýkáte se jich, je
používání přístroje zcela bezpečné.
K dosažení nejlepších výsledků použijte
čerstvé, trochu moučné brambory.
Pokud potřebujete brambory skladovat,
neskladujte je v chladném prostředí,
jako je lednice. Vyberte si brambory,
na jejichž obalu je uvedeno, že jsou
vhodné k fritování.
Při přípravě domácích hranolků
postupujte podle pokynů v této
uživatelské příručce (viz část „Tabulka
pokrmů“ nebo si stáhněte bezplatnou
aplikaci Airfryer).
Při přípravě domácích hranolků
postupujte podle pokynů v této
uživatelské příručce (viz část „Tabulka
pokrmů“ nebo si stáhněte bezplatnou
aplikaci Airfryer).
Page 61

Problém Možná příčina Řešení
61ČEŠTINA
Fritéza Airfryer se
nezapne.
Mám ve fritéze
Airfryer místa,
která se odlupují.
Z přístroje vychází
bílý kouř.
Přístroj není připojen do
sítě.
Nastavili jste časovač na
dobu kratší než 5 minut.
K jedné zásuvce je
připojeno více přístrojů.
Uvnitř nádoby v přístroji
Airfryer se mohou
objevit body vzniklé
v důsledku náhodného
poškrábání povrchu
(například během
čištění drsnými nástroji
nebo při vkládání
košíku).
Připravujete tučné
přísady.
Nádoba stále obsahuje
zbytky mastnoty po
předchozím použití.
Marináda, tekutiny nebo
šťáva z masa stříkají
ve vzniklém tuku nebo
mastnotě.
Když přístroj zapnete, ozve se zvuk
točení ventilátoru. Pokud tento zvuk
neslyšíte, zkontrolujte, zda je zástrčka
správně zasunuta v síťové zásuvce.
Nastavte časovač na dobu 5 minut nebo
delší.
Zkuste jinou zásuvku a zkontrolujte
pojistky. Fritéza Airfryer má příkon
1 425 W.
Poškození zabráníte tím, že budete
vkládat košík do nádoby správným
způsobem. Vkládáte-li košík nakloněný,
jeho bok může zavadit o stěnu nádoby
a způsobit odloupnutí malých kousků
povrchové vrstvy. Pokud k tomu dojde,
rádi bychom vás informovali, že to
není škodlivé, protože všechny použité
materiály lze bezpečně používat ve
styku s potravinami.
Olej nebo vzniklý tuk v nádobě může
zapříčinit bílý kouř a nádoba se může
zahřát víc než obvykle. Můžete z pánve
opatrně vylít veškerý přebytečný olej
nebo tuk a poté pokračovat ve vaření.
Můžete také na košík položit víko odolné
proti vystříknutí.
Příčinou bílého kouře jsou zbytky
mastnoty, které se zahřívají v nádobě.
Nádobu a košík po každém použití
důkladně vyčistěte.
Položte na košík víko odolné proti
vystříknutí.
Obal nebo strouhanka
správně nepřilnuly
k pokrmu.
Bílý kouř mohou způsobit malé kousky
strouhanky vířící vzduchem. Strouhanku
nebo obal pevně přitiskněte na pokrm,
aby dobře přilnuly.
Page 62

62 HRVATSKI
SADRŽAJ
Važno! 63
Elektromagnetska polja (EMF) 65
Uvod 66
Opći opis 66
Prije prve uporabe 68
Priprema za uporabu 68
Postavljanje odvojivog mrežastog dna (samo
HD9627, HD9623, HD9622, HD9621) 68
Postavljanje EasyClick drške 69
Tablica hrane 70
Uporaba aparata 71
Prženje zrakom 71
Priprema domaćih krumpirića 74
Uporaba dvoslojne rešetke
(samo HD9627, HD9622) 75
Uporaba tave za grilanje sa slojem koji sprječava
lijepljenje (samo HD9627, HD9623) 76
Uporaba poklopca za sprječavanje prskanja
(samo HD9622/45, HD9621/45) 76
Čišćenje 77
Tablica za čišćenje 78
Spremanje 79
Recikliranje 79
Jamstvo i podrška 79
Rješavanje problema 80
HD9620, HD9621, HD9622, HD9623, HD9627
Page 63

63HRVATSKI
Važno!
Prije uporabe aparata pažljivo pročitajte ove važne informacije
i spremite ih za buduće potrebe.
Opasnost
- Sastojke za prženje obavezno stavite u
košaru kako ne bi došli u dodir s grijaćim
elementima.
- Nemojte pokrivati otvore za ulaz i izlaz
zraka dok aparat radi.
- Nemojte puniti posudu uljem jer to može
uzrokovati požar.
- Aparat nemojte nikada uranjati u vodu
ili neku drugu tekućinu te ispirati pod
mlazom vode.
Upozorenje
- Prije ukopčavanja aparata provjerite
odgovara li mrežni napon naveden na
aparatu naponu lokalne mreže.
- Aparat nemojte koristiti ako je utikač, kabel
za napajanje ili sam aparat oštećen.
- Ako je kabel za napajanje oštećen, mora
ga zamijeniti tvrtka Philips, ovlašteni Philips
servisni centar ili neka druga kvalicirana
osoba kako bi se izbjegle opasne situacije.
- Ovaj aparat mogu koristiti djeca iznad
8 godina starosti i osobe sa smanjenim
zičkim ili mentalnim sposobnostima te
osobe koje nemaju dovoljno iskustva i
znanja, pod uvjetom da su pod nadzorom
ili da su primili upute u vezi rukovanja
aparatom na siguran način te razumiju
moguće opasnosti. Djeca se ne smiju igrati
aparatom. Čišćenje i korisničko održavanje
smiju izvršavati djeca starija od 8 godina
uz nadzor odrasle osobe.
- Aparat i njegov kabel držite izvan dohvata
djece mlađe od 8 godina.
- Kabel za napajanje držite podalje od
vrućih površina.
Page 64

64 HRVATSKI
- Aparat priključujte samo u uzemljenu
zidnu utičnicu. Obavezno provjerite je li
utikač ispravno umetnut u zidnu utičnicu.
- Aparat uvijek koristite i stavite na suhu,
stabilnu, ravnu i vodoravnu površinu.
- Ovaj aparat nije namijenjen korištenju
u kombinaciji s vanjskim timerom
ili zasebnim sustavom za daljinsko
upravljanje.
- Aparat nemojte naslanjati na zid ili na
druge aparate. Ostavite najmanje 10
cm prostora sa stražnje i bočnih strana
aparata te 10 cm iznad njega. Nemojte
ništa stavljati na aparat.
- Aparat upotrebljavajte isključivo u svrhe
opisane u ovom korisničkom priručniku.
- Tijekom prženja kroz otvore za zrak izlazi
vruća para. Pazite da vam ruke i lice budu
na sigurnoj udaljenosti od pare i otvora za
zrak. Na vruću paru i zrak pazite i prilikom
vađenja posude iz aparata.
- Površine aparata koje dodirujete mogu
postati vruće tijekom uporabe.
- Nastavci postaju vrući tijekom uporabe u
aparatu Airfryer. Budite pažljivi prilikom
rukovanja njima.
Pažnja
- Ovaj aparat namijenjen je isključivo
uobičajenoj kućnoj uporabi. Nije
namijenjen uporabi u okruženjima
poput kuhinja za osoblje u trgovinama,
uredima, na farmama ili u drugim radnim
okruženjima. Nije namijenjen niti uporabi
od strane gostiju u hotelima, motelima,
prenoćištima ili drugim vrstama smještaja.
- Aparat uvijek dostavite u ovlašteni Philips
servisni centar na ispitivanje ili popravak.
Ne pokušavajte sami popraviti aparat jer će
u tom slučaju jamstvo prestati vrijediti.
Page 65

65HRVATSKI
- Ostavite košaru i tavu za grilanje sa slojem
koji sprječava lijepljenje (samo HD9627,
HD9623) da se ohlade prije zamjene ili
odvajanja EasyClick drške.
- Aparat je osmišljen za uporabu pri
ambijentalnim temperaturama između 5 °C
i 40 °C.
- Nakon uporabe aparat iskopčajte.
- Ostavite aparat da se hladi približno 30
minuta prije rukovanja njime ili pranja.
- Nemojte previše napuniti košaru. Košaru
punite samo do oznake MAX.
- Pazite da sastojci pripremljeni u ovom
aparatu budu zlatno-žuti, a ne tamni
ili smeđi. Uklonite zagorjele ostatke
sastojaka. Nemojte pržiti svježe krumpire
pri temperaturi većoj od 180 °C (kako bi
se stvaranje akrilamida svelo na najmanju
mjeru).
- Nakon što posudu s košarom izvadite
iz aparata, stavite je na odgovarajuću
površinu i ostavite da stoji najmanje 30
sekundi prije vađenja košare.
- Budite pažljivi prilikom čišćenja gornjeg
dijela komore za kuhanje: vrući grijaći
element, rub metalnih dijelova.
- Aparat upotrebljavajte isključivo u svrhe
opisane u korisničkom priručniku i koristite
isključivo originalnu dodatnu opremu.
- Razina buke: Lc = ≤ 65 dB (A).
Elektromagnetska polja (EMF)
Ovaj aparat tvrtke Philips sukladan je svim primjenjivim
standardima i propisima koji se tiču izloženosti
elektromagnetskim poljima.
Page 66

66 HRVATSKI
Uvod
Čestitamo na kupnji i dobro došli u Philips! Kako biste potpuno
iskoristili podršku koju nudi Philips, registrirajte svoj proizvod na
www.philips.com/welcome.
Vaš novi Airfryer omogućuje vam pripremu omiljenih namirnica
i međuobroka na zdraviji način. Airfryer koristi vrući zrak u
kombinaciji s velikom brzinom kruženja zraka (tehnologija
brzog kruženja zraka TurboStar) i gornjom grijaćom rešetkom
za pripremu raznih ukusnih jela na zdrav, brz i jednostavan
način. Sastojci se u isto vrijeme zagrijavaju sa svih strana
i nema potrebe za dodavanjem ulja većini sastojaka.
Dodatno nadahnuće za recepte i informacije o aparatu
Airfryer potražite na web-stranici www.philips.com/kitchen ili
preuzmite besplatnu aplikaciju Airfryer za IOS® ili Android™.
Opći opis
1 Gumb za kontrolu mjerača vremena / uključivanje
2 Indikator zagrijavanja
3 Ulaz zraka
4 Posuda
5 Regulator temperature
6 Izlazi zraka
7 Jezičac za spremanje kabela
8 Kabel za napajanje
9 Poklopac za sprječavanje prskanja (samo HD9622/45,
HD9621/45)
10 Dvoslojna rešetka (samo HD9627, HD9622)
11 Košara s ksnim mrežastim dnom (samo HD9620)
12 Indikator MAX
13 Gumb za otpuštanje košare
14 EasyClick drška
15 Košara s odvojivim mrežastim dnom (samo HD9627,
HD9623, HD9622, HD9621)
16 Odvojivo mrežasto dno (samo HD9627, HD9623, HD9622,
HD9621)
17 Tava za grilanje sa slojem koji sprječava lijepljenje (samo
HD9627, HD9623)
Page 67

67HRVATSKI
1
2
3
9
10
4
11
MAX
12
13
5
1
15
14
MAX
6
16
7
17
8
Page 68

68 HRVATSKI
1
Prije prve uporabe
1 Uklonite svu ambalažu.
2 Uklonite sve naljepnice i etikete s aparata.
3 Temeljito očistite aparat prije prve uporabe, na način
naznačen u tablici za čišćenje.
Priprema za uporabu
Postavljanje odvojivog mrežastog dna (samo HD9627, HD9623, HD9622, HD9621)
1 Izvadite posudu iz aparata.
2 Posudu s košarom stavite na odgovarajuću površinu,
pritisnite gumb za otpuštanje košare i podignite košaru iz
posude.
2
3 Kuku mrežastog dna umetnite u utor na donjoj desnoj
strani košare. Gurajte mrežasto dno prema dolje dok ne
2
1
sjedne na mjesto ("klik" na obje strane).
4 Vratite košaru u posudu.
Napomena
• Posudu nikada nemojte koristiti bez košare.
Page 69

5 Gurnite posudu natrag u aparat.
Postavljanje EasyClick drške
Upozorenje
• Prije postavljanje ili odvajanja EasyClick drške uvijek provjerite
jesu li se košara i drška ohladile.
Napomena
• EasyClick drška može se postaviti i na tavu za grilanje sa slojem
koji sprječava lijepljenje (samo HD9627/HD9623). Olakšava
čišćenje i spremanje aparata na jednostavan način.
Postavljanje EasyClick drške:
1 Držite košaru jednom rukom, a dršku drugom.
2 Gurajte dršku u otvor na košari s donje strane dok ne
sjedne na mjesto ("klik").
69HRVATSKI
Odvajanje EasyClick drške:
1 Držite košaru jednom rukom, a dršku drugom.
2 Prstom nježno povucite crveni jezičac za otpuštanje
istovremeno povlačeći dršku ravno prema dolje.
2
1
Page 70

70 HRVATSKI
Tablica hrane
Tablica u nastavku pomoći će vam u odabiru osnovnih postavki
za vrste hrane koje želite pripremiti.
Napomena
• Imajte na umu da su te postavke samo prijedlozi. Ne možemo
jamčiti najbolje postavke za vaše sastojke jer se sastojci razlikuju
po porijeklu, veličini, obliku i proizvođaču.
Min. –
maks.
Sastojci
Zamrznuti
krumpirići
količina (u
gramima)
200 – 800 11 – 25 180 Protresti
Vrijeme (u
minutama)
Temperatura
(°C)
Protresti/
okrenuti
nakon
Dodatne
informacije
isteka pola
vremena
Domaći
krumpirići
(debljine 1/2
cm / 1/4 inča)
200 – 800 12 – 25 180 Protresti
nakon
isteka pola
vremena
Namakati 30
min u vodi,
osušiti i dodati
1/2 jušne žlice
ulja.
Kriške
krumpira
200 – 800 15 – 27 180 Protresti
nakon
isteka pola
vremena
Namakati 30
min u vodi,
osušiti i dodati
1/2 jušne žlice
ulja.
Zamrznute
grickalice
(npr. proljetne
rolice, pileći
medaljoni)
100 – 400 6 - 10 200 Okrenuti
ili protresti
nakon
isteka pola
vremena
Vrijeme
pripreme
potražite u
uputama na
pakiranju
grickalica.
Vrijeme treba
biti dvostruko
kraće u odnosu
na pećnicu.
Svinjski
100 – 500 8 – 14 200
odrezak
Hamburger 100 – 500 7 – 14 160
Kobasice 100 – 500 3 – 15 160
Bataci 100 – 500 15 – 22 180
Pileća prsa 100 – 500 10 – 15 180
Pita 300 20 – 25 160 Koristite pladanj
ili posudu za
pečenje.
Page 71

Min. –
maks.
Sastojci
količina (u
gramima)
Vrijeme (u
minutama)
Temperatura
(°C)
Protresti/
okrenuti
Dodatne
informacije
Muni 80 – 300 8 – 13 180 Koristite
silikonske
kalupe za
mune otporne
na toplinu.
Kolač 200 – 400 15 – 25 160 Koristite
posudu za
kolače.
Miješano
100 – 500 8 – 12 180
povrće
Prethodno
50 – 200 3 – 6 200
pečeni tost/
kiice
Svježe kiice/
100 – 500 12 – 25 180
kruh
Riba 150 – 400 10 – 18 200
Školjke 100 – 400 7 – 15 180
Panirana
piletina
100 – 300 8 – 15 180 Dodajte ulje u
krušne mrvice.
71HRVATSKI
Uporaba aparata
Prženje zrakom
Oprez
• Ovo je Airfryer koji prži vrućim zrakom. Posudu nemojte puniti
uljem niti mašću za prženje.
• Nemojte dodirivati vruće površine. Koristite drške i regulatore.
Posudu držite za dršku košare.
• Aparat je namijenjen isključivo kućnoj uporabi.
• Prilikom prve uporabe možda ćete primijetiti malo dima. To je
potpuno normalno.
• Aparat nije potrebno prethodno zagrijavati.
1 Aparat stavite na stabilnu, vodoravnu i ravnu površinu
otpornu na toplinu.
Page 72

72 HRVATSKI
°C
Napomena
• Nemojte ništa stavljati na aparat niti na njegove bočne strane. To
bi moglo omesti kruženje zraka i utjecati na rezultate.
2 Odmotajte kabel za napajanje s jezičca za spremanje.
3 Umetnite utikač u zidnu utičnicu.
4 Izvadite posudu iz aparata.
5 Stavite sastojke u košaru.
Napomena
• U aparatu Airfryer možete pripremati širok raspon namirnica.
Odgovarajuće količine i vremena kuhanja potražite u Tablici hrane.
• Nemojte premašiti količine navedene u odjeljku Tablica hrane
ili napuniti košaru iznad oznake "MAX" jer to može utjecati na
kvalitetu krajnjih rezultata.
• Ako želite istovremeno pripremati različite namirnice, najprije
provjerite predložena vremena kuhanja za različite namirnice. Na
primjer, domaći krumpirići i bataci mogu se kuhati istovremeno jer
zahtijevaju iste postavke.
6 Ako košaru ili tavu za grilanje sa slojem koji sprječava
lijepljenje (samo HD9627, HD9623) vratite u posudu,
gurnite posudu u aparat. Okrenite regulator temperature
na odgovarajuću temperaturu.
7 Gumb mjerača vremena okrenite na potrebno vrijeme
kuhanja kako biste uključili aparat.
Page 73

Napomena
• Uključit će se indikator zagrijavanja. Tijekom uporabe indikator
zagrijavanja povremeno će se uključivati. To naznačuje da se
aparat zagrijava do odgovarajuće temperature.
• Mjerač vremena nastavit će odbrojavati postavljeno vrijeme
kuhanja.
• Neke namirnice moraju se protresti ili okrenuti nakon isteka
pola vremena kuhanja (pogledajte Tablicu hrane). Kako biste
protresli namirnice, izvadite posudu iz aparata i protresite je
iznad sudopera. Zatim gurnite posudu natrag u aparat. Kako biste
smanjili masu, možete i izvaditi košaru iz posude.
• Pazite da tijekom protresanja ne pritisnete gumb za otpuštanje
košare.
Savjet
• Ako mjerač vremena postavite na pola vremena kuhanja, on će
zazvoniti kada bude vrijeme za protresanje ili okretanje namirnica.
Pazite da ponovo postavite mjerač vremena na preostalo vrijeme
kuhanja.
8 Kada čujete zvono mjerača vremena, postavljeno vrijeme
kuhanja isteklo je. Aparat možete i ručno isključiti. Kako
biste to učinili, okrenite regulator za uključivanje na 0 (u
smjeru suprotnom od smjera kazaljke na satu); za to je
potrebna malo veća snaga nego za okretanje u smjeru
kazaljke na satu.
73HRVATSKI
Napomena
• Višak ulja iz sastojaka skuplja se na dnu posude.
• Ako pripremate nekoliko porcija masnih sastojaka (npr. bataci,
kobasice ili hamburgeri), nakon svake porcije ili prije protresanja
ili vraćanja košare u posudu pažljivo izlijte višak ulja ili masti iz
posude.
9 Izvadite posudu iz aparata i stavite je na površinu otpornu
na toplinu.
10 Provjerite jesu li namirnice gotove.
Napomena
• Ako namirnice još nisu gotove, samo vratite posudu u aparat i
postavite mjerač vremena na još nekoliko minuta.
1
2
• Nakon prženja vrućim zrakom, posuda, košara, dodatna oprema,
kućište i namirnice su vrući. Ovisno o vrsti namirnica u košari, iz
posude može izlaziti para.
11 Pritisnite gumb za otpuštanje košare i podignite košaru iz
posude.
Page 74

74 HRVATSKI
12 Sadržaj košare ispraznite u zdjelu ili na tanjur. Košaru
s namirnicama obavezno izvadite iz posude prilikom
posluživanja jer na dnu posude može biti vrućeg ulja ili
masti.
Napomena
• Kako biste izvadili velike ili krhke sastojke, upotrijebite hvataljke.
Priprema domaćih krumpirića
Priprema odličnih domaćih krumpirića u aparatu Airfryer:
- Odaberite vrstu krumpira pogodnu za pržene krumpiriće,
npr. svježe, blago brašnaste krumpire.
- Kako bi se postigli ravnomjerni rezultati, krumpiriće je
najbolje pržiti zrakom u porcijama do 500 grama. Veći
krumpirići obično su manje hrskavi od manjih.
- Tijekom prženja zrakom protresite košaru 2-3 puta.
1 Ogulite krumpire i narežite ih na štapiće (debljine 1/2 cm /
1/4 inča).
2 Namačite štapiće krumpira u zdjeli s vodom najmanje 30
minuta.
3 Ispraznite zdjelu i osušite štapiće krumpirića krpom ili
papirnatim ručnikom.
4 U zdjelu ulijte pola jušne žlice ulja za kuhanje, stavite
štapiće i miješajte dok se štapići ne prekriju uljem.
5 Izvadite štapiće iz zdjele prstima ili kuhinjskim priborom s
prorezima kako bi višak ulja ostao u zdjeli.
Napomena
• Nemojte naginjati zdjelu kako biste sve štapiće odjednom istresli u
košaru jer će višak ulja završiti u posudi.
6 Stavite štapiće u košaru.
7 Ispržite štapiće krumpira i protresite košaru nakon isteka
pola vremena procesa prženja. Protresite 2-3 puta ako
pripremate više od 400 g krumpirića.
Napomena
• Odgovarajuće količine i vremena kuhanja potražite u odjeljku
Tablica hrane.
Page 75

Uporaba dvoslojne rešetke (samo HD9627, HD9622)
Dvoslojnu rešetku koristite kako biste maksimalno povećali
prostor za kuhanje.
Napomena
• Ako istovremeno kuhate različite namirnice, pazite da temperatura
i vrijeme kuhanja budu isti za svaku vrstu namirnice.
• Meso uvijek stavite na donju razinu, a povrće iznad kako ne bi
došlo do uzajamne kontaminacije ili prijenosa sokova iz mesa ili
djelomično kuhane hrane.
1 Slijedite korake 1 od 4 u odjeljku "Prženje zrakom".
2 Stavite pola sastojaka u košaru.
3 Stavite dvoslojnu rešetku u košaru.
75HRVATSKI
4 Stavite drugu polovicu sastojaka na dvoslojnu rešetku.
5 Slijedite korake 6 od 12 u odjeljku "Prženje zrakom".
Upozorenje
• Dvoslojna rešetka jako se zagrijava tijekom uporabe. Prilikom
vađenja dvoslojne rešetke iz košare nosite kuhinjske rukavice.
Page 76

76 HRVATSKI
1
2
Uporaba tave za grilanje sa slojem koji sprječava lijepljenje (samo HD9627, HD9623)
1 Slijedite korake 1 do 3 u odjeljku "Prženje zrakom".
2 Pritisnite gumb za otpuštanje košare i podignite košaru iz
posude.
3 Pričvrstite EasyClick dršku na tavu za grilanje sa slojem
koji sprječava lijepljenje (pogledajte "Postavljanje
EasyClick drške").
4 Stavite tavu za grilanje sa slojem koji sprječava lijepljenje
u posudu.
5 Stavite sastojke na tavu za grilanje sa slojem koji sprječava
lijepljenje.
6 Slijedite korake 6 do 12 u odjeljku "Prženje zrakom".
Uporaba poklopca za sprječavanje prskanja (samo HD9622/45, HD9621/45)
Koristite poklopac za sprječavanje prskanja ako kuhate lagane
sastojke kako biste ih zadržali u košari, ako kuhate masne
namirnice ili kako biste smanjili brzinu prepečenosti.
Napomena
• Kada koristite poklopac za sprječavanje prskanja, možda će trebati
više vremena za postizanje iste razine prepečenosti i završetak
kuhanja.
1
2
1 Slijedite korake 1 od 5 u odjeljku "Prženje zrakom".
2 Držite poklopac tako da gornja strana bude okrenuta
prema vama. Umetnite dvije kuke na poklopcu u dva utora
na prednjoj strani košare. Gurajte poklopac prema dolje
dok ne sjedne na mjesto ("klik" na obje strane).
3 Nastavite s koracima 6 od 9 u odjeljku "Prženje zrakom".
4 Pažljivo uklonite poklopac za sprječavanje prskanja.
Upozorenje
1
2
• Poklopac za sprječavanje prskanja vrlo je vruć. Prilikom
njegovog uklanjanja nosite kuhinjske rukavice.
5 Nastavite s koracima 10 od 12 u odjeljku "Prženje zrakom".
Page 77

77HRVATSKI
Čišćenje
Upozorenje
• Prije čišćenja ostavite košaru, posudu, dodatni pribor i
unutrašnjost aparata da se potpuno ohlade.
• Posuda, košara i unutrašnjost aparata imaju sloj koji sprječava
lijepljenje. Nemojte koristiti metalne ili abrazivne materijale za
čišćenje jer mogu oštetiti sloj koji sprječava lijepljenje.
Očistite aparat nakon svake uporabe. Kako biste spriječili
stvaranje dima, nakon svake uporabe uklonite ulje i mast s dna
posude.
1 Regulator mjerača vremena okrenite na 0, izvadite utikač
iz zidne utičnice i ostavite aparat da se hladi 10 minuta.
Savjet
• Izvadite posudu i košaru iz aparata Airfryer kako bi se brže ohladio.
2 Posudu, košaru, tavu za grilanje sa slojem koji sprječava
lijepljenje i poklopac za sprječavanje prskanja operite
u perilici posuđa. Možete ih oprati i vrućom vodom,
sredstvom za pranje posuđa i neabrazivnom spužvicom
(pogledajte "tablicu za čišćenje").
Savjet
• Ako se ostaci hrane zalijepe za posudu, dvoslojnu rešetku
ili košaru, možete ih namočiti u vrućoj vodi sa sredstvom za
pranje posuđa 10-15 minuta. Namakanjem će se odvojiti ostaci
hrane pa će ih biti lakše ukloniti. Svakako koristite sredstvo za
pranje posuđa koje razgrađuje ulje i masnoću. Ako na posudi
ili košari ima masnih mrlja koje ne možete ukloniti vrućom
vodom i sredstvom za pranje posuđa, upotrijebite tekućinu za
odmašćivanje.
• Prema potrebi, ostatke hrane koji su se zalijepili za grijaći element
možete ukloniti mekom ili srednje tvrdom četkom. Nemojte koristiti
žičanu ili tvrdu četku jer njome biste mogli oštetiti premaz grijaćeg
elementa.
3 Unutrašnjost aparata operite vrućom vodom i
neabrazivnom spužvom.
4 Grijaći element očistite četkom za čišćenje kako biste
uklonili ostatke hrane.
5 Vanjske dijelove aparata obrišite vlažnom krpom.
Page 78

78 HRVATSKI
6 Unutarnje dijelove aparata očistite vlažnom krpom.
Tablica za čišćenje
HD9622/45 , HD9621/45
HD9627, HD9623
HD9622, HD9621
HD9620
HD9627, HD9623
HD9627, HD9622
Page 79

Spremanje
1 Iskopčajte aparat i ostavite ga da se ohladi.
2 Prije spremanja provjerite jesu li svi dijelovi čisti i suhi.
3 Namotajte kabel za napajanje na jezičac za spremanje.
Napomena
• Airfryer uvijek držite vodoravno kada ga nosite. Pazite i da držite
ladicu s prednje strane aparata jer bi mogla skliznuti iz aparata ako
se on slučajno nagne prema dolje. To može dovesti do oštećenja
ladice.
• Prije nošenja i/ili spremanja obavezno provjerite jesu li odvojivi
dijelovi aparata Airfryer, primjerice drška EasyClick, odvojivo
mrežasto dno itd., ksirani.
Recikliranje
- Ovaj simbol naznačuje da se proizvod ne smije odlagati s
uobičajenim otpadom iz kućanstva (2012/19/EU).
- Poštujte propise svoje države o zasebnom prikupljanju
električnih i elektroničkih proizvoda. Ispravno odlaganje
pridonosi sprječavanju negativnih posljedica po okoliš i
ljudsko zdravlje.
79HRVATSKI
Jamstvo i podrška
Ako trebate informacije ili podršku, posjetite
www.philips.com/support ili pročitajte zasebni međunarodni
jamstveni list.
Page 80

80 HRVATSKI
Rješavanje problema
U ovom poglavlju opisani su uobičajeni problemi vezani uz
korištenje aparata. Ako problem ne možete riješiti pomoću
informacija u nastavku, posjetite www.philips.com/support
kako biste pronašli popis čestih pitanja ili se obratite centru za
korisničku podršku u svojoj državi.
Problem Mogući uzrok Rješenje
Vanjska površina
aparata zagrijat
će se tijekom
uporabe.
Vrućina iznutra širi se na
vanjsku površinu.
To je potpuno normalno. Sve ručke
i regulatori koje dodirujete tijekom
uporabe ostat će dovoljno hladni da se
mogu dodirivati.
Posuda, košara, dvoslojna rešetka,
tava za grilanje sa slojem koji sprječava
lijepljenje i unutrašnjost aparata uvijek
će postati vrući kada se aparat uključi
kako bi se osiguralo ispravno kuhanje
hrane. Ti dijelovi uvijek su previše vrući
da se dodiruju.
Ako aparat dugo vremena ostavite
uključen, neka područja zagrijat će se
previše da bi se mogla dodirnuti. Ta
područja na aparatu naznačena su
sljedećom ikonom:
Moji domaći
krumpirići nisu
onakvi kakve sam
očekivala.
Niste koristili
odgovarajuću vrstu
krumpira.
U košari je prevelika
količina sastojaka.
Određene sastojke
treba promiješati nakon
isteka pola vremena
kuhanja.
Sve dok znate za vruća područja i
izbjegavate ih dodirivati, aparat je
potpuno siguran za uporabu.
Kako biste dobili najbolje rezultate,
koristite svježe, blago brašnaste
krumpire. Ako trebate spremiti krumpire,
nemojte ih spremati na hladnom mjestu
kao što je hladnjak. Odaberite krumpire
na čijem je pakiranju naznačeno da su
pogodni za prženje.
Slijedite upute u ovom korisničkom
priručniku kako biste pripremili domaće
krumpiriće (pogledajte "Tablicu hrane" ili
preuzmite besplatnu aplikaciju Airfryer).
Slijedite upute u ovom korisničkom
priručniku kako biste pripremili domaće
krumpiriće (pogledajte "Tablicu hrane" ili
preuzmite besplatnu aplikaciju Airfryer).
Page 81

Problem Mogući uzrok Rješenje
81HRVATSKI
Airfryer se ne
uključuje.
Unutar aparata
Airfryer vidljive su
točke na kojima se
oljuštio.
Iz aparata izlazi
bijeli dim.
Aparat nije uključen u
struju.
Postavili ste mjerač
vremena na vrijeme
kraće od 5 minuta.
Nekoliko aparata
priključeno je na jednu
utičnicu.
Unutar posude aparata
Airfryer mogu se pojaviti
male točke nastale
uslijed slučajnog
dodirivanja ili grebanja
površinskog sloja (npr.
prilikom čišćenja grubim
priborom za čišćenje i/
ili prilikom umetanja
košare).
Pripremate masne
sastojke.
U posudi su još uvijek
ostaci masnoće od
prethodne uporabe.
Marinada, tekućina ili
sokovi od mesa pršću
u masnoći koja se
nakupila.
Kada uključite aparat, čut ćete zvuk
ventilatora. Ako ne čujete taj zvuk,
provjerite je li utikač ispravno umetnut u
zidnu utičnicu.
Postavite mjerač vremena na 5 minuta
ili više.
Pokušajte upotrijebiti drugu utičnicu i
provjerite osigurače. Airfryer ima snagu
od 1425 W.
Oštećenje možete spriječiti ispravnim
spuštanjem košare u posudu. Ako
košaru umetnete pod kutom, njezina
bočna strana može udariti u stjenku
posude, uzrokujući ljuštenje malih
komadića površinskog sloja. Ako se to
dogodi, imajte na umu da nije štetno jer
su svi materijali sigurni za hranu.
Ulje ili masnoća iz hrane koja se nakupi
u posudi može uzrokovati bijeli dim,
a posuda se može zagrijati više nego
što je uobičajeno. Možete pažljivo
izliti višak ulja ili masnoće iz posude i
zatim nastaviti kuhati. Možete i staviti
poklopac za sprječavanje prskanja na
košaru.
Bijeli dim uzrokuju masni ostaci koji se
zagrijavaju u posudi. Posudu i košaru
obavezno temeljito operite nakon svake
uporabe.
Stavite poklopac za sprječavanje
prskanja na košaru.
Krušne mrvice ili smjesa
za paniranje nije se
dobro zalijepila za
hranu.
Sitne čestice smjese za paniranje koje
se prenose zrakom mogu uzrokovati
bijeli dim. Krušne mrvice ili smjesu za
paniranje čvrsto utisnite na hranu kako
bi dobro prionula.
Page 82

82 MAGYAR
TARTALOMJEGYZÉK
Fontos 83
Elektromágneses mezők (EMF) 85
Bevezetés 86
Általános leírás 86
Teendők az első használat előtt 88
Előkészítés a használatra 88
A kivehető, hálós alsó rész felhelyezése (csak
HD9627, HD9623, HD9622, HD9621 esetében) 88
Az EasyClick fogantyú felhelyezése 89
Élelmiszer-táblázat 90
A készülék használata 91
Az Airfryer készülék használata 91
Házi hasábburgonya készítése 94
Kétszintes grillrács használata
(csak HD9627, HD9622 típus esetében) 95
Tapadásmentes grillserpenyő használata
(csak HD9627, HD9623 típus esetében) 96
Cseppálló fedél használata
(csak HD9622/45, HD9621/45 típus esetében) 96
Tisztítás 97
Tisztítási táblázat 98
Tárolás 99
Újrahasznosítás 99
Garancia és terméktámogatás 99
Hibaelhárítás 99
HD9620, HD9621, HD9622, HD9623, HD9627
Page 83

Fontos
A készülék használata előtt gyelmesen olvassa el a fontos
tudnivalókat, és őrizze meg későbbi használatra.
Veszély
- A sütnivaló alapanyagokat mindig a
kosárba tegye, hogy ne érintkezhessenek a
fűtőelemekkel.
- Működés közben tilos a készülék
levegőbemeneti és levegőkimeneti nyílásait
letakarni.
- Ne töltse fel a sütőedényt olajjal, mivel ez
tüzet okozhat.
- Ne merítse a készüléket vízbe vagy más
folyadékba, és ne öblítse le folyóvíz alatt.
Figyelem
- A készülék csatlakoztatása előtt ellenőrizze,
hogy a rajta feltüntetett feszültség
egyezik-e a helyi hálózatéval.
- Ne használja a készüléket, ha a hálózati
csatlakozódugó, a vezeték vagy a készülék
sérült.
- Ha a hálózati vezeték meghibásodott,
a kockázatok elkerülése érdekében
Philips szakszervizben vagy hivatalos
szakszervizben ki kell cserélni.
- A készüléket 8 éven felüli gyermekek, illetve
csökkent zikai, érzékelési vagy szellemi
képességekkel rendelkező, vagy a készülék
működtetésében járatlan személyek is
használhatják, amennyiben ezt felügyelet
mellett teszik, illetve ismerik a készülék
biztonságos működtetésének módját és az
azzal járó veszélyeket. Ne engedje, hogy
gyermekek játsszanak a készülékkel. A
tisztítást és a felhasználó által is végezhető
karbantartást soha ne végezze 8 éven aluli
gyermek, és 8 éven felüli gyermek is csak
felügyelet mellett végezheti el ezeket.
- A készüléket és a vezetéket tartsa távol 8
éven aluli gyermekektől.
- Tartsa a hálózati kábelt távol a forró
felületektől.
83MAGYAR
Page 84

84 MAGYAR
- A készüléket kizárólag földelt fali aljzathoz
csatlakoztassa. Mindig gondoskodjon
arról, hogy a csatlakozódugót megfelelően
helyezze be a fali aljzatba.
- Mindig száraz, stabil és vízszintes felületen
tárolja és használja a készüléket.
- A készüléket ne használja külső időzítővel
illetve külön távvezérlőrendszerrel.
- Ne helyezze a készüléket fal vagy más
készülékek mellé. A készülék hátuljánál, két
oldalánál és fölötte egyaránt legalább 10
cm szabad helynek kell lennie. Ne tegyen
semmit a készülékre.
- Csak a felhasználói kézikönyvben
meghatározott rendeltetés szerint használja
a készüléket.
- Forró levegős sütés közben a
levegőkimeneti nyílásokon át forró gőz
távozik. Kezét és arcát tartsa a gőztől és
a levegőkimeneti nyílásoktól biztonságos
távolságra. Akkor is ügyeljen a forró gőzre
és levegőre, amikor leveszi a sütőedényt a
készülékről.
- Használat közben a készülék hozzáférhető
felületei felforrósodhatnak.
- A tartozékok átforrósodnak az Airfryer
készülékben való használatkor. Óvatosan
kezelje őket!
Vigyázat
- A készüléket kizárólag normál háztartási
használatra tervezték. Nem ajánlott üzletek,
irodák, gazdaságok és egyéb munkahelyek
személyzeti konyhájába. Valamint
hotelekben, motelekben, panziókban és
egyéb vendéglátó-ipari környezetekben
való használatra sem ajánlott.
- A készüléket kizárólag Philips hivatalos
szakszervizbe vigye vizsgálatra, illetve
javításra. Amennyiben nem szakember
próbálja megjavítani a készüléket, a
garancia érvényét veszti.
Page 85

85MAGYAR
- Az EasyClick fogantyú eltávolítása előtt
várjon, amíg a kosár és a tapadásmentes
grillserpenyő (csak HD9627, HD9623 típus
esetében) lehűl.
- A készüléket 5 °C és 40 °C közötti környezeti
hőmérsékleten való használatra tervezték.
- Használat után mindig húzza ki dugót az
aljzatból.
- Hagyja hűlni a készüléket kb. 30 percig,
mielőtt használná vagy megtisztítaná.
- A kosarat ne töltse túl. A kosarat csak a MAX
jelzésig töltse.
- Ügyeljen rá, hogy a hozzávalókból az
elkészített ételt aranysárgán, nem pedig
sötétre vagy sötétbarnára sütve vegye ki.
Távolítsa el a megégett részeket. Ne süssön
friss burgonyát 180 °C feletti hőmérsékleten
(az akrilsav termelődésének minimalizálása
érdekében).
- Miután kivette a készülékből a sütőedényt
a kosárral együtt, tegye azt egy arra
alkalmas felületre, és várjon legalább 30
másodpercet, mielőtt kivenné a kosarat a
sütőedényből.
- Legyen óvatos a főzőkamra felső részének
tisztításakor: ügyeljen a forró fűtőelemre és
a fém részek éleire.
- Csak a felhasználói kézikönyvben
meghatározott rendeltetés szerint használja
a készüléket, és csak eredeti tartozékokat
használjon.
- Zajszint: Lc ≤ 65 dB (A).
Elektromágneses mezők (EMF)
Ez a Philips készülék az elektromágneses terekre érvényes
összes vonatkozó szabványnak és előírásnak megfelel.
Page 86

86 MAGYAR
Bevezetés
Köszönjük, hogy Philips terméket vásárolt, és üdvözöljük
a Philips világában! A Philips által biztosított támogatás
teljes körű igénybevételéhez regisztrálja a terméket a
www.philips.com/welcome oldalon.
Új Airfryer készülékével egészségesebben készítheti el kedvenc
ételeit és harapnivalóit. A forró levegőt, nagy sebességű
légáramot (TurboStar Rapid Air technológia) és a felső grillezést
együttesen alkalmazó Airfryer készülékkel számos ízletes
és egészséges étel készíthető el gyorsan és egyszerűen. Az
alapanyagokat az edény minden oldalról egyszerre melegíti,
ezért a legtöbb ételhez felesleges olajat adni. További
recepteket és ötleteket, illetve az Airfryer készülékről további
információkat a www.philips.com/kitchen oldalon talál, illetve
letöltheti az ingyenes Airfryer alkalmazást IOS® vagy Android™
eszközére.
Általános leírás
1 Időzítő-/bekapcsológomb
2 Melegedést jelző LED
3 Levegőbemeneti nyílás
4 Sütőedény
5 Hőmérséklet-szabályozó gomb
6 Levegőkimeneti nyílások
7 Kábeltartó
8 Hálózati tápkábel
9 Cseppálló fedél (csak HD9622/45, HD9621/45 típus
esetében)
10 Kétszintes grillrács (csak HD9627, HD9622 típus esetében)
11 Kosár rögzített, hálós alsó résszel (csak HD9620 típus
esetében)
12 MAX kijelzés
13 Kosár kioldógombja
14 EasyClick fogantyú
15 Kosár kivehető, hálós alsó résszel (csak HD9627, HD9623,
HD9622, HD9621 esetében)
16 Kivehető, hálós alsó rész (csak HD9627, HD9623, HD9622,
HD9621 esetében)
17 Tapadásmentes grillserpenyő (csak HD9627, HD9623 típus
esetében)
Page 87

87MAGYAR
1
2
3
9
10
4
11
MAX
12
13
5
1
15
14
MAX
6
16
7
17
8
Page 88

88 MAGYAR
1
Teendők az első használat előtt
1 Távolítson el minden csomagolóanyagot.
2 Távolítson el minden matricát és címkét a készülékről.
3 Az első használat előtt alaposan, a tisztítási táblázatnak
megfelelő módon tisztítsa meg a készüléket.
Előkészítés a használatra
A kivehető, hálós alsó rész felhelyezése (csak HD9627, HD9623, HD9622, HD9621 esetében)
1 Vegye ki a készülékből a sütőedényt.
2 Helyezze a sütőedényt a kosárral egy arra alkalmas
felületre, nyomja meg a kosár kioldógombját, majd emelje
ki a kosarat a sütőedényből.
2
3 Illessze a hálós alsó részen található horgot a kosár alján
lévő jobb oldali nyílásba. Nyomja le a hálós alsó részt,
2
amíg a helyére nem záródik (mindkét oldalon kattanás
hallható).
1
4 Helyezze vissza a kosarat a sütőedénybe.
Megjegyzés
• Tilos a sütőedényt a kosár nélkül használni.
Page 89

5 Csúsztassa vissza a sütőedényt a készülékbe.
Az EasyClick fogantyú felhelyezése
Figyelem
• Mindig ellenőrizze, hogy a kosár és a fogantyú lehűlt-e, mielőtt
felhelyezi vagy leválasztja az EasyClick fogantyút.
Megjegyzés
• Az EasyClick fogantyú tapadásmentes grillserpenyőre is
felszerelhető (csak HD9627/HD9623 típus esetén). Segítségével
könnyen megtisztíthatja és tárolhatja a készüléket.
Az EasyClick fogantyú felhelyezése:
1 Az egyik kezében tartsa a kosarat, a másikkal pedig fogja
meg a fogantyút.
89MAGYAR
2 Csúsztassa a fogantyút alul a kosár nyílásába, amíg a
helyére nem záródik (egy kattanással).
Az EasyClick fogantyú leválasztása:
1 Az egyik kezében tartsa a kosarat, a másikkal pedig fogja
meg a fogantyút.
2
1
2 Óvatosan húzza meg az ujjával a piros kioldófület,
miközben a fogantyút egyenesen lefelé nyomja.
Page 90

90 MAGYAR
Hozzávalók
Élelmiszer-táblázat
Az alábbi táblázat segítségével kiválaszthatja az alapvető
beállításokat az elkészíteni kívánt ételtípusokhoz.
• Ne feledje, hogy ezek a beállítások csak tanácsként szolgálnak.
Min.- max.
mennyiség
(gramm)
Megjegyzés
Mivel a hozzávalók származási helyüket, méretüket, alakjukat
és márkájukat tekintve eltérőek, nem garantálhatjuk a legjobb
beállítást a hozzávalóihoz.
Időtartam
(perc)
Hőmérséklet
(°C)
Rázás/
forgatás
További
információ
Fagyasztott
hasábburgonya
Házi készítésű
hasábburgonya
(1/2 cm
vastagságú)
200–800 11–25 180 Félidőben
rázza meg
200–800 12–25 180 Félidőben
rázza meg
Áztassa 30
percig vízbe,
szárítsa meg,
majd adjon
hozzá 1/2
evőkanál olajat.
Burgonyahasábok
200–800 15–27 180 Félidőben
rázza meg
Áztassa 30
percig vízbe,
szárítsa meg,
majd adjon
hozzá 1/2
evőkanál olajat.
Kisebb
fagyasztott
ételek (pl.
tavaszi tekercs,
csirkefalatok)
100–400 6–10 200 Forgassa
meg vagy
rázza meg
félidőben
A főzési időket
lásd az ételek
csomagolásán
lévő
utasításokban. A
sütőre vonatkozó
időket meg kell
felezni.
Sertésborda 100–500 8–14 200
Hamburger 100–500 7–14 160
Kolbász 100–500 3–15 160
Barom
100–500 15–22 180
alsócomb
Csirkemell 100–500 10–15 180
Lepény 300 20–25 160 Használjon
sütőtálcát vagy
sütőedényt.
Page 91

Hozzávalók
Min.- max.
mennyiség
(gramm)
Időtartam
(perc)
Hőmérséklet
(°C)
Rázás/
forgatás
91MAGYAR
További
információ
Mun 80–300 8–13 180 Használjon
hőálló szilikon
munformákat.
Sütemény 200–400 15–25 160 Használjon
tepsit.
Vegyes
100–500 8–12 180
zöldségek
Elősütött
50–200 3–6 200
pirítós/
kenyértekercs
Friss kenyérte-
100–500 12–25 180
kercsek/kenyér
Hal 150–400 10–18 200
Kagyló- és
100–400 7–15 180
rákfélék
Rántott csirke 100–300 8–15 180 Adjon olajat a
kenyérmorzsához.
A készülék használata
Az Airfryer készülék használata
Vigyázat
• Ez egy Airfryer, amely forró levegővel működik. Ne töltse fel a
sütőedényt olajjal vagy zsírral!
• Ne érjen a készülék felforrósodott részeihez! Használja a
fogantyúkat vagy gombokat! Csak a kosárfogantyúnál fogva
tartsa a sütőedényt!
• A készülék kizárólag háztartási használatra készült.
• A készülék első használatakor némi füst keletkezhet. Ez
normális jelenség.
• Nem szükséges a készüléket előmelegíteni.
1 A készüléket stabil, vízszintes, sík és hőálló felületre
helyezze.
Megjegyzés
• Ne helyezzen semmit a készülék tetejére vagy oldalaira. Ellenkező
esetben ez akadályozhatja a légáramlást, illetve befolyásolhatja a
végeredményt.
Page 92

92 MAGYAR
°C
2 Tekerje le a hálózati vezetéket a kábeltárolóról.
3 Csatlakoztassa a hálózati dugót a fali aljzatba.
4 Vegye ki a készülékből a sütőedényt.
5 Tegye az alapanyagokat a kosárba.
Megjegyzés
• Az Airfryer sütővel számos különböző alapanyagú étel készíthető.
Tekintse meg az „Élelmiszer-táblázatot” a megfelelő mennyiségek
és a hozzávetőleges sütési idők érdekében.
• Ne lépje túl az „Élelmiszer-táblázat” fejezetben megadott
mennyiségeket, továbbá ne töltse a kosarat a „MAX” jelzésen túl,
mert az ronthatja a végeredmény minőségét.
• Ha különböző ételeket szeretne készíteni egy időben, ellenőrizze
a különböző hozzávalókhoz javasolt főzési időt, mielőtt egyszerre
kezdené el őket főzni. Például a házi készítésű hasábburgonya
és csirkecombok egyszerre is készíthetők, mivel ugyanazon
beállítások szükségesek hozzájuk.
6 Ha a kosarat vagy a tapadásmentes grillserpenyőt
(csak HD9627, HD9623 típus esetében) visszahelyezi
a sütőedénybe, csúsztassa vissza a sütőedényt a
készülékbe. Fordítsa a hőmérséklet-szabályozó gombot a
kívánt hőmérsékletre.
7 A készülék bekapcsolásához állítsa az időzítőgombot a
megfelelő elkészítési időre.
Page 93

Megjegyzés
• A melegedést jelző fény világítani kezd. Használat közben a
melegedést jelző LED időnként bekapcsol. Ez azt jelzi, hogy a
készülék a megfelelő hőmérsékletre melegszik.
• Az időzítő tovább folytatja a beállított sütési idő visszaszámlálását.
• Egyes alapanyagokat a sütési idő felénél össze kell rázni (lásd
„Élelmiszer-táblázatot”). Az alapanyagok összerázásához távolítsa
el a sütőedényt a készülékből, majd rázza meg a mosogató fölött.
Ezt követően csúsztassa vissza a sütőedényt a készülékbe. A súly
csökkentése érdekében kiveheti a kosarat a sütőedényből.
• Ügyeljen, hogy rázás közben ne nyomja meg a kosár
kioldógombját.
Tipp
• Ha az időzítőt a sütési idő felére állítja be, amikor megszólal az
időzítő, rázza meg vagy forgassa meg a hozzávalókat. Állítsa be az
időzítőn a hátralévő sütési időt.
8 Amikor megszólal az időzítő, a beállított idő letelt. A
készülék manuálisan is kikapcsolható. Ehhez fordítsa el a
bekapcsológombot 0-ra (az óramutató járásával ellenkező
irányba); ez több erőt igényel, mintha az óramutató
járásával megegyező irányba forgatná.
93MAGYAR
Megjegyzés
• Az alapanyagokból származó felesleges zsiradék a sütőedény
alján gyűlik össze.
• Ha több adagnyi zsíros alapanyagot készít (pl. csirkecombokat,
kolbászokat vagy hamburgereket), minden adag után, vagy mielőtt
megrázná vagy visszahelyezné a kosarat a sütőedénybe, óvatosan
öntse ki a sütőedényből a felesleges olajat vagy a sütéshez
használt zsírt.
9 Vegye ki a készülékből a sütőedényt, és helyezze egy
hőálló felületre.
10 Ellenőrizze, hogy elkészültek-e a hozzávalók.
Megjegyzés
• Ha még nem készültek el, csak csúsztassa vissza a sütőedényt a
készülékbe és állítson be az időzítőn még néhány percet.
• Forró levegős sütést követően a sütőedény, a kosár és a
1
2
hozzávalók forrók. A kosárban lévő hozzávalók fajtájától függően a
sütőedényből gőz csaphat ki.
11 Nyomja meg a kosár kioldógombját, majd emelje ki a
kosarat a sütőedényből.
Page 94

94 MAGYAR
12 Ürítse a kosár tartalmát egy tálba vagy egy tálcára.
Tálaláskor mindig távolítsa el a sütőedényből a kosarat
a hozzávalókkal, mivel a sütőedény alján forró olaj vagy
felesleges zsír lehet.
Megjegyzés
• A nagy és törékeny hozzávalók eltávolításához használjon csipeszt
a hozzávalók kiemeléséhez.
Házi hasábburgonya készítése
Az Airfryer készülékben való nagyszerű házi hasábburgonya
készítéséhez:
- Válasszon ki egy megfelelő fajta burgonyát a
hasábburgonya-készítéshez, pl. friss, enyhén lisztes
burgonyákat.
- Az egyenletes eredmény érdekében a legjobb, ha
maximum 500 gramm adagokban süti a hasábburgonyákat
az Airfryer készülékben. A nagyobb hasábburgonyák
általában kevésbé ropogósak, mint a kisebbek.
- Rázza meg a kosarat 2-3-szor az Airfryer készülékben való
sütés közben.
1 Hámozza meg a burgonyákat és vágja őket hasábokra (1/2
cm / 1/4 vastagságúra).
2 Áztassa 30 percen keresztül egy tál vízben a
burgonyahasábokat.
3 Öntse ki a tálból a vizet, és szárítsa meg a
hasábburgonyákat egy konyharuha vagy egy papírkendő
segítségével.
4 Öntsön egy fél evőkanál sütőolajat a tálba, tegye a
burgonyahasábokat a tálba, majd addig keverje, amíg a
burgonyahasábokra rá nem tapad az olaj.
5 Távolítsa el a burgonyahasábokat a tálból az ujjai
vagy egy lyukacsos konyhai eszköz segítségével, így a
felesleges olaj a tálban marad.
Megjegyzés
• Ne döntse meg a tálat annak érdekében, hogy a
burgonyahasábok egyszerre a kosárba essenek, ezáltal
megelőzheti, hogy felesleges olaj kikerüljön a sütőedényből.
6 Tegye a burgonyahasábokat a kosárba.
7 Süsse a hasábburgonyákat, és a sütési idő felénél rázza
meg a kosarat. Rázza meg 2-3-szor, ha több mint 400 g
hasábburgonyát készít.
Page 95

Megjegyzés
• Tekintse meg az „Élelmiszer-táblázat” című fejezetet a megfelelő
mennyiségek és a sütési idők érdekében.
Kétszintes grillrács használata (csak HD9627, HD9622 típus esetében)
A főzési felület maximalizálásához használjon kétszintes
grillrácsot.
Megjegyzés
• Ha különböző ételeket készít egy időben, ellenőrizze, hogy
a sütési hőmérséklet és idő azonos legyen mindegyik fajta
hozzávaló esetében.
• A húst mindig helyezze alacsonyabb szintre, a zöldségeket
pedig felülre, ezáltal elkerülhető, hogy az ételek beszennyezzék
egymást, illetve hogy a húslé vagy a félig megfőtt ételek nem
biztonságos módon átkerüljenek egymásra.
1 Kövesse „Az Airfryer készülék használata” című fejezet
1–4. lépéseit.
2 Tegye az alapanyagok felét a kosárba.
95MAGYAR
3 Helyezze a kétszintes grillrácsot a kosárba.
4 Tegye az alapanyagok második felét a kétszintes
grillrácsra.
5 Kövesse „Az Airfryer készülék használata” című fejezet
6–12. lépéseit.
Figyelem
• A kétszintes grillrács nagyon felforrósodik a használat során.
Viseljen sütőkesztyűt, amikor a kétszintes grillrácsot kiveszi a
kosárból.
Page 96

96 MAGYAR
1
2
Tapadásmentes grillserpenyő használata (csak HD9627, HD9623 típus esetében)
1 Kövesse „Az Airfryer készülék használata” című fejezet
1–3. lépéseit.
2 Nyomja meg a kosár kioldógombját, majd emelje ki a
kosarat a sütőedényből.
3 Helyezze fel az EasyClick fogantyút a tapadásmentes
grillserpenyőre (lásd: „Az EasyClick fogantyú
felhelyezése”).
4 Helyezze a tapadásmentes grillserpenyőt a sütőedénybe.
5 Helyezze a hozzávalókat a tapadásmentes grillserpenyőre.
6 Kövesse „Az Airfryer készülék használata” című fejezet
6–12. lépéseit.
Cseppálló fedél használata (csak HD9622/45, HD9621/45 típus esetében)
Könnyű hozzávalók sütésekor használja a cseppálló fedelet
annak érdekében, hogy a kosárban maradjanak a zsíros
alapanyagok, illetve hogy lecsökkentse a pirulás sebességét.
Megjegyzés
• Ha cseppálló fedelet használ, előfordulhat, hogy ugyanazon
szintű pirítás vagy állapot eléréséhez több idő szükséges.
1 Kövesse „Az Airfryer készülék használata” című fejezet
1
2
1–5. lépéseit.
2 Tartsa a fedelet úgy, hogy a teteje maga felé néz. Illessze
a fedél két horgát a kosár elülső oldalán lévő két nyílásba.
Nyomja le a fedelet, amíg a helyére nem záródik (mindkét
oldalon kattanás hallható).
3 Folytassa „Az Airfryer készülék használata” című fejezet
6–9. lépéseivel.
4 Óvatosan távolítsa el a cseppálló fedelet.
1
2
Figyelem
• A cseppálló fedél nagyon forró. Viseljen sütőkesztyűt, amikor
eltávolítja.
Page 97

97MAGYAR
5 Folytassa „Az Airfryer készülék használata” című fejezet
10–12. lépéseivel.
Tisztítás
Figyelem
• Hagyja, hogy a sütőedény, a kosár és a tartozékok, illetve
a készülék belseje teljesen lehűljön, mielőtt elkezdené
megtisztítani őket.
• A sütőedény, a kosár és a készülék belseje tapadásmentes
bevonattal rendelkezik. Ne használjon fém konyhai eszközöket
vagy karcoló tisztítóanyagokat, mivel ezek kárt tehetnek a
tapadásmentes bevonatban.
Minden használat után tisztítsa meg a készüléket. Minden
használatot követően távolítsa el az olajat és zsírt a sütőedény
aljából, hogy elkerülje a füstöt.
1 Forgassa az időzítőgombot 0-ra, húzza ki a
csatlakozódugót a fali aljzatból, és hagyja lehűlni a
készüléket 10 percig.
Tipp
• Az Airfryer gyorsabban lehűl, ha kiveszi belőle a sütőedényt és a
kosarat.
2 Tisztítsa meg mosogatógépben a sütőedényt, a kosarat,
a tapadásmentes grillserpenyőt és a cseppálló fedelet.
Forró, mosogatószeres meleg vízzel és karcolásmentes
szivaccsal is tisztíthatja őket (lásd „tisztítási táblázatot”).
Tipp
• Ha ételmaradványok ragadnak a sütőedénybe, a kétszintes
grillrácsra vagy kosárba, áztassa őket forró, mosogatószeres
vízbe 10–15 percig. Az áztatásnak köszönhetően fellazulnak az
ételmaradványok, és könnyebbé válik az eltávolításuk. Ellenőrizze,
hogy a mosogatószer oldja-e az olajat és zsírt. Ha zsíros foltok
vannak a sütőedényen vagy a kosáron, és nem tudta őket
eltávolítani forró vízzel és mosogatószerrel, használjon folyékony
zsíroldószert.
• Szükség esetén – pl. ha a fűtőelembe ételmaradvány ragadt
– puha vagy közepes keménységű kefe is használható. Ne
használjon acél drótkefét vagy durva sörtéjű kefét, mivel ezzel kárt
tehet a fűtőelem bevonatában.
3 A készülék belsejét meleg vízzel és karcolásmentes
szivaccsal tisztítsa.
Page 98

98 MAGYAR
4 A fűtőelemet tisztítókefével szabadítsa meg az
ételmaradványoktól.
5 A készülék burkolatát törölje le egy nedves ruhával.
6 A készülék belsejének tisztításához szintén használjon egy
nedves ruhát.
Tisztítási táblázat
HD9622/45 , HD9621/45
HD9627, HD9623
HD9622, HD9621
HD9620
HD9627, HD9623
HD9627, HD9622
Page 99

Tárolás
1 Húzza ki a csatlakozódugót a fali aljzatból, és hagyja
lehűlni a készüléket.
2 Mielőtt eltenné, győződjön meg arról, hogy minden
alkatrész teljesen száraz.
3 Tekerje fel a hálózati vezetéket a kábeltárolóra.
Megjegyzés
• Mindig tartsa vízszintesen az Airfryer készüléket, amikor hordozza
azt. Igyekezzen a készülék elején a ókot is megfogni, mivel az
kicsúszhat a készülékből, és véletlenül leeshet a földre. Ezzel kárt
tehet a ókban.
• Mindig ügyeljen arra, hogy az Airfryer készülék levehető részei
– pl. az EasyClick fogantyú vagy a kivehető, hálós alsó rész stb. –
rögzítve vannak, mielőtt mozgatja és/vagy elteszi a készüléket.
Újrahasznosítás
- Ez a szimbólum azt jelenti, hogy a termék nem kezelhető
normál háztartási hulladékként (2012/19/EU).
- Kövesse az országában érvényes, az elektromos és
elektronikus készülékek hulladékkezelésére vonatkozó
jogszabályokat. A megfelelő hulladékkezelés segítséget
nyújt a környezettel és az emberi egészséggel kapcsolatos
negatív következmények megelőzésében.
99MAGYAR
Garancia és terméktámogatás
Ha információra vagy támogatásra van szüksége, látogasson
el a www.philips.com/support weboldalra, vagy olvassa el a
különálló, világszerte érvényes garancialevelet.
Hibaelhárítás
Ez a fejezet részletesen foglalkozik a készülékkel kapcsolatban
leggyakrabban felmerülő problémákkal. Ha a hibát az alábbi
útmutató segítségével nem tudja elhárítani, látogasson el a
www.philips.com/support weboldalra a gyakran ismétlődő
kérdések listájáért, vagy forduljon az országában illetékes
vevőszolgálathoz.
Page 100

100 MAGYAR
Probléma Lehetséges ok Megoldás
A készülék
a használat
során kívül is
felforrósodik.
A házi készítésű
hasábburgonyáim
nem a vártnak
megfelelőek.
Az Airfryer
készülék nem
kapcsol be.
A hő belülről a külső
falakra sugárzik.
Nem megfelelő fajtájú
burgonyát használt.
Túl nagy mennyiségű
hozzávalót tett a
kosárba.
Bizonyos alapanyagokat
az elkészítési idő felénél
meg kell rázni.
Nem csatlakoztatta a
készüléket.
Ez normális jelenség. Minden fogantyú
és gomb, melyet a használat során meg
kell érintenie, továbbra is kellően hideg
marad.
A sütőedény, a kosár, a kétszintes
grillrács és a készülék belseje mindig
felforrósodik, amikor a készüléket
bekapcsolják annak érdekében, hogy
az étel kellően megsüljön. Ezek az
alkatrészek mindig túl forrók ahhoz,
hogy megérintse őket.
Ha hosszabb ideig bekapcsolva hagyja
a készüléket, néhány része túl forróvá
válik ahhoz, hogy megérintse őket.
Ezen területeket a következő ikon jelzi a
készüléken:
Amennyiben odagyel a forró
területekre és nem érinti meg azokat,
a készülék használata teljesen
biztonságos.
A legjobb eredmény érdekében
használjon friss, enyhén lisztes
burgonyákat. Ha tárolni szeretné a
burgonyát, ne tegye hideg helyre, pl.
a hűtőszekrénybe. Válasszon olyan
burgonyát, amely csomagolásán fel van
tüntetve, hogy alkalmas sütésre.
Kövesse a használati útmutatóban
szereplő, házi készítésű hasábburgonyák
készítésére vonatkozó utasításokat
(tekintse meg az „Élelmiszer-táblázat”
című fejezetet vagy töltse le az ingyenes
Airfryer alkalmazást).
Kövesse a használati útmutatóban
szereplő, házi készítésű hasábburgonyák
készítésére vonatkozó utasításokat
(tekintse meg az „Élelmiszer-táblázat”
című fejezetet vagy töltse le az ingyenes
Airfryer alkalmazást).
A készülék bekapcsolásakor hallható,
amint a ventillátor működik. Ha nem
hallja a hangját, ellenőrizze, hogy a
csatlakozó megfelelően be van-e dugva
a fali aljzatba.
 Loading...