

Page 1

HD926X
User manual 5
Bedienungsanleitung 26
Manuel d'utilisation 52
Gebruiksaanwijzing 76
Page 2

Page 3

ENGLISH
TABLE OF CONTENTS
Important 4
Introduction 8
General description 8
Before rst use 10
Preparing for use 10
Using the appliance 10
Food table 10
Airfrying 13
Healthy re-heating 16
Changing time and temperature during cooking 19
Making home-made fries 20
Cleaning 21
Cleaning table 22
Storage 22
Recycling 23
Guarantee and support 23
Troubleshooting 23
3
Page 4

4
ENGLISH
Important
Read this important information carefully before you use the
appliance and save it for future reference.
Danger
- Always put the ingredients to be fried in
the basket, to prevent them from coming
into contact with the heating elements.
- Do not cover the air inlet and the air outlet
openings while the appliance is operating.
- Do not ll the pan with oil as this may
cause a re hazard.
- Never immerse the appliance in water or
any other liquid, nor rinse it under the tap.
- Do not let any water or other liquid enter
the appliance to prevent electric shock.
- Never put any amount of food that
exceeds the maximum level indicated in
the basket.
- Never touch the inside of the appliance
while it is operating.
Warning
- Check if the voltage indicated on the
appliance corresponds to the local mains
voltage before you connect the appliance.
- Do not use the appliance if the plug,
the mains cord or the appliance itself is
damaged.
- If the mains cord is damaged, you must
have it replaced by Philips, a service centre
authorised by Philips or similarly qualied
persons in order to avoid a hazard.
- This appliance can be used by children
aged from 8 years and above and persons
with reduced physical, sensory or mental
capabilities or lack of experience and
knowledge if they have been given
Page 5

5
ENGLISH
supervision or instruction concerning
use of the appliance in a safe way and
understand the hazards involved. Children
shall not play with the appliance. Cleaning
and user maintenance shall not be made
by children unless they are older than 8
years and supervised.
- Keep the appliance and its cord out of
reach of children less than 8 years.
- Keep the mains cord away from hot
surfaces.
- Only connect the appliance to an earthed
wall socket. Always make sure that the
plug is inserted into the wall socket
properly.
- This appliance is not intended to be
operated by means of an external timer or
a separate remote-control system.
- Do not place the appliance against a wall
or against other appliances. Leave at least
10 cm free space on the back and sides
and 10 cm free space above the appliance.
Do not place anything on top of the
appliance.
- Do not use the appliance for any other
purpose than described in the user
manual.
- During hot air frying, hot steam is released
through the air outlet openings. Keep
your hands and face at a safe distance
from the steam and from the air outlet
openings. Also be careful of hot steam
and air when you remove the pan from the
appliance.
- The accessible surfaces may become hot
during use.
Page 6

6
ENGLISH
- The pan, the basket and accessories inside
the Airfryer become hot during use. Be
careful when you handle them.
- Do not place the appliance on or near a
hot gas stove or all kinds of electric stove
and electric cooking plates, or in a heated
oven.
- Never use light ingredients or baking paper
in the appliance.
- Do not place the appliance on or near
combustible materials such as a tablecloth
or curtain.
- Do not let the appliance operate
unattended.
- Immediately unplug the appliance if
you see dark smoke coming out of the
appliance. Wait for the smoke emission
to stop before you pull the pan out of the
appliance.
- Storage of potatoes: The temperature shall
be appropriate to the potato variety stored
and it shall be above 6°C to minimize
the risk of acrylamide exposure in the
prepared foodstu.
- Do not plug in the appliance or operate
the control panel with wet hands.
Caution
- This appliance is intended for normal
household use only. It is not intended
for use in environments such as sta
kitchens of shops, oces, farms or other
work environments. Nor is it intended
to be used by clients in hotels, motels,
bed and breakfasts and other residential
environments.
Page 7

7
ENGLISH
- Always return the appliance to a
service centre authorised by Philips for
examination or repair. Do not attempt to
repair the appliance yourself, otherwise
the guarantee becomes invalid.
- If the appliance is used improperly or
for professional or semi-professional
purposes or if it is not used according to
the instructions in the user manual, the
guarantee becomes invalid and Philips
refuses any liability for damage caused.
- Always place and use the appliance on a
dry, stable, level and horizontal surface.
- Always unplug the appliance after use.
- Let the appliance cool down for approx. 30
minutes before you handle or clean it.
- Make sure the ingredients prepared in this
appliance come out golden-yellow instead
of dark or brown. Remove burnt remnants.
Do not fry fresh potatoes at a temperature
above 180°C (to minimise the production
of acrylamide).
- Be careful when cleaning the upper area
of the cooking chamber: Hot heating
element, edge of Metal parts.
Electromagnetic elds (EMF)
This Philips appliance complies with all applicable standards
and regulations regarding electromagnetic elds.
Automatic shut-o
This appliance is equipped with an automatic shut-o
function. If you do not press a button within 30 minutes,
the appliance switches o automatically. To switch o the
appliance manually, press the power On/o button.
Page 8

8
ENGLISH
Introduction
Congratulations on your purchase and welcome to Philips!
To fully benet from the support that Philips oers, register
your product at www.philips.com/welcome.
Philips Airfryer is the only Airfryer with unique Rapid Air
technology to fry your favorite foods with little or no added oil
and up to 90% less fat.
Enjoy crispier results with Philips Rapid Air for 7x faster airow.
It cooks food all around as well as our starsh design for
perfect results from your rst bite to your last.
You can now enjoy perfectly cooked fried food—crispy on
the outside tender on the inside—Fry, grill, roast and bake to
prepare a variety of tasty dishes in a healthy, fast and easy way.
For more inspiration, recipes and information about the
Airfryer, visit www.philips.com/kitchen or download the free
NutriU App* for IOS® or Android™.
*The NutriU app may not be available in your country.
In this case please download the Airfryer App.
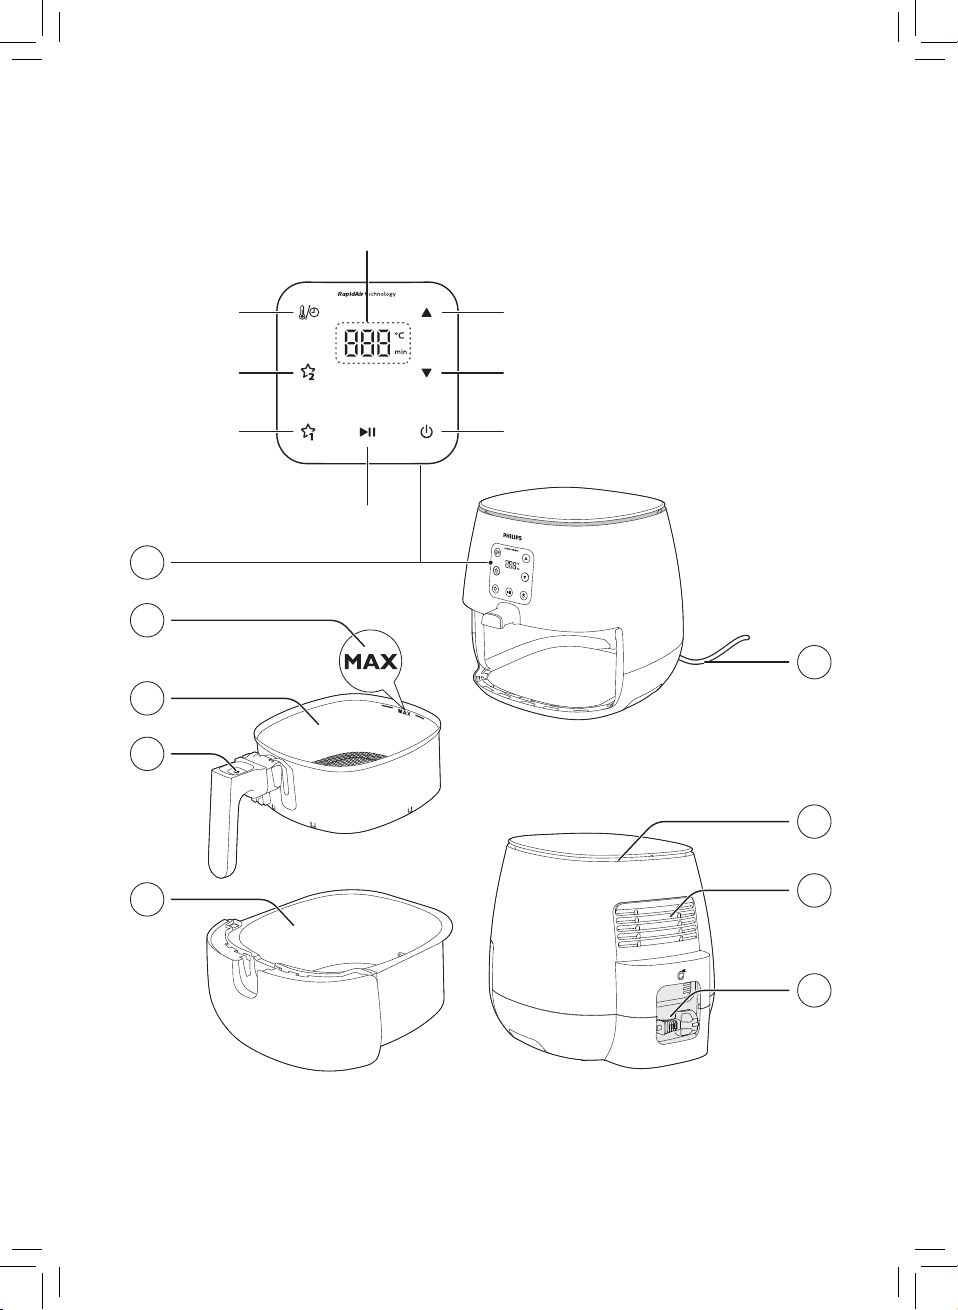
General description
1 Control panel
A Time/temperature indication
B Temperature/time increase button
C Temperature/time decrease button
D Power On/O button
E Start/pause button
F Favorite button 1
G Favorite button 2
H Time/temperature select button
2 MAX indication
3 Basket
4 Basket release button
5 Pan
6 Cord storage compartment
7 Air outlets
8 Air inlet
9 Power cord
Page 9
9
ENGLISH
A
H
G
F
B
C
D
E
1
2
9
3
4
8
5
7
6
Page 10
10
ENGLISH
Before rst use
1 Remove all packing material.
2 Remove any stickers or labels (if available) from the
appliance.
3 Thoroughly clean the appliance before rst use, as
indicated in the cleaning chapter.
Preparing for use
1 Place the appliance on a stable, horizontal, level and
heat-resistant surface.
Note
• Do not put anything on top or on the sides of the appliance. This
could disrupt the airow and aect the frying result.
• Do not place the operating appliance near or underneath objects
that could be damaged by steam, such as walls and cupboard.
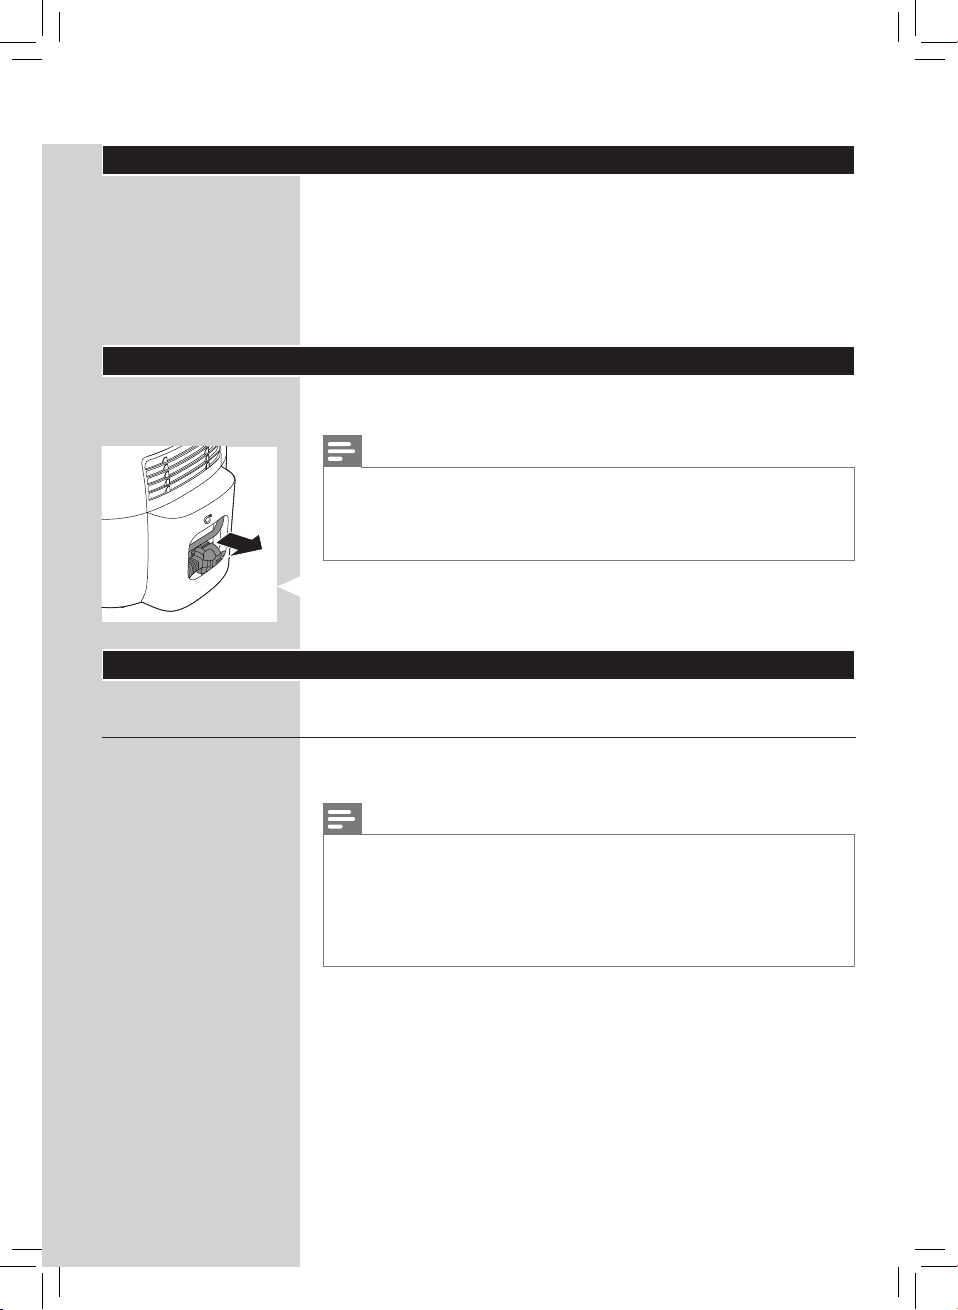
2 Pull the power cord out of the cord storage compartment
at the back of the appliance.
Using the appliance
Food table
The table below helps you select the basic settings for the
types of food you want to prepare.
Note
• Keep in mind that these settings are suggestions. As ingredients
dier in origin, size, shape as well as brand, we cannot guarantee
the best setting for your ingredients.
• When preparing larger amount of food (e.g. fries, prawns,
drumsticks, frozen snacks), shake, turn, or stir the ingredients in
the basket 2 to 3 times in order to achieve a consistent result.
Page 11

11
ENGLISH
Ingredients
Thin frozen fries
(7 x 7 mm/0.3 x 0.3 in)
Thick frozen fries
(10 x 10 mm/0.4 x 0.4 in)
Home-made fries
(12 x 12 mm/0.5 x0.5 in)
Homemade potato
wedges
Frozen snacks
(chicken nuggets)
Frozen snacks
(small spring rolls
around 20 g/0.7 oz)
Whole chicken
Chicken breast
Around 160 g/6 oz
Min.– max.
amount
200-1200 g
7–42 oz
200-1200 g
7–42 oz
200-1200 g
7–42 oz
200-1200 g
7–42 oz
80–1000 g/
3–35 oz
(6–40 pieces)
100–500 g/
3.5–18 oz
(5–30 pieces)
1000–1200 g/
35–42 oz
1–4 pieces 18–22 180°C/350°F
Drumsticks 200-1200 g/
7–42 oz
Chicken ngers bread
crumbed
Chicken wings
Around 100 g/3.5 oz
Meat chops without
bone
Around 150 g/6 oz
Hamburger
Around 150 g/6 oz
(diameter 10 cm/4 in)
3–10 pieces
(1 layer)
2–7 pieces
(1 layer)
1–4 chops 10–13 200°C/400°F
1–4 patties 10–15 200°C/400°F
Time
(min)
13-32
13-33
18–30 180°C/350°F • Soak 30 minutes in cold
20–40 180°C/350°F • Soak 30 minutes in water,
7–18 200°C/400°F • Ready when golden yellow
14–16 200°C/400°F • Ready when golden yellow
50-60 180°C/350°F • Avoid that legs touch the
23-30
10–15 180°C/350°F • Add oil to the
14–18 180°C/350°F • Shake, turn, or stir halfway
Tem per a ture Note
180°C/350°F • Shake, turn, or stir halfway
180°C/350°F • Shake, turn, or stir halfway
180°C/350°F • Shake, turn, or stir halfway
water or 3 minutes in luke
warm water (40°C/100°F),
dry then add 1 tbsp of oil
per 500 g/18 oz.
• Shake, turn, or stir halfway
dry then add 1/4 to 1 tbsp
of oil.
• Shake, turn, or stir halfway
and crispy outside.
• Shake, turn, or stir halfway
and crispy outside.
• Shake, turn, or stir halfway
heating element.
breadcrumbs. Ready when
golden yellow.
Thick sausages
Around 100 g/3.5 oz
(diameter 4 cm/1.6 in)
Thin sausages
Around 70 g/2.5 oz
(diameter 2 cm/0.8 in)
1–5 pieces
(1 layer)
1–6 pieces 9–12 200°C/400°F
12–15 200°C/400°F
Page 12
12
ENGLISH
Ingredients
Pork roast
Whole sh
Around 300-400 g/11–
14 oz
Fish lets
Around 120 g/4.2 oz
Shellsh
Around 25–30 g/0.9–1
oz
Cake 750 g/26 oz 35–40 160°C/325°F • Use a cake pan.
Muns
Around 50 g/1.8 oz
Quiche (diameter
17 cm/6.7 in)
Pre-baked toast / bread
rolls
Home-made bread 550 g/20 oz 25–35 150°C/300°F • The shape should be as
Home-made rolls
Around 80 g/2.8 oz
Chestnuts 200–1500 g/
Mixed vegetable
(roughly chopped)
Min.– max.
amount
500–1000 g/
18–35 oz
1-2 17-20 200°C/400°F • Cut o the tail if it does not
1–3
(1 layer)
200–1500 g/
7–53 oz
1–9 12–14 180°C/350°F • Use heat-proof silicone
500 g/18 oz 20–25 160°C/325°F • Use a baking tray or oven
1–6 6–7 180°C/350°F
1–5 pieces 18–20 160°C/325°F
7–53 oz
300–800 g/
11–28 oz
Time
(min)
50–75 180°C/350°F • Let it rest for 5 minutes
9–12 200°C/400°F • In order to avoid sticking,
15–20 200°C/400°F • Shake, turn, or stir halfway
15–30 200°C/400°F • Shake, turn, or stir halfway
10–20 200°C/400°F • Set the cooking time
Tem per a ture Note
before cutting.
t in the basket/grill pan.
place the skin side to the
bottom and add some oil.
mun cups.
dish.
at as possible to avoid
that the bread touches
the heating element when
rising.
according to your own
taste.
• Shake, turn, or stir halfway
Page 13
13
ENGLISH
Airfrying
Caution
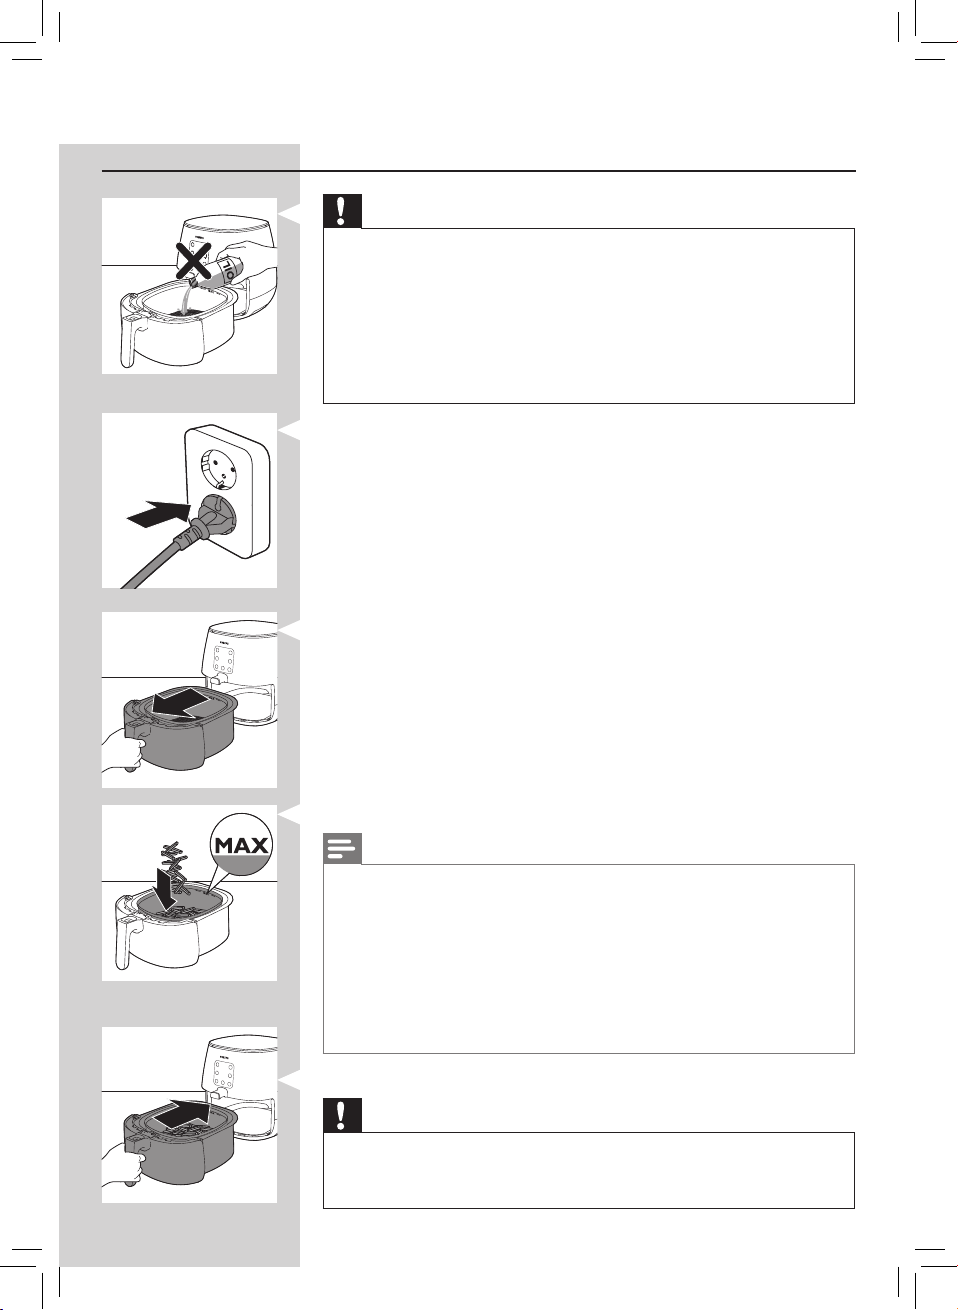
• This is an Airfryer that works on hot air. Do not ll the pan with
oil, frying fat or any other liquid.
• Do not touch hot surfaces. Use handles or knobs. Handle the hot
pan with oven-safe gloves.
• This appliance is for household use only.
• This appliance may produce some smoke when you use it for the
rst time. This is normal.
• Preheating of the appliance is not necessary.
1 Put the plug in the wall outlet.
2 Remove the pan with the basket from the appliance by
pulling the handle.
3 Put the ingredients in the basket.
Note
• The Airfryer can prepare a large range of ingredients. Consult the
‘Food table’ for the right quantities and approximate cooking
times.
• Do not exceed the amount indicated in the ‘Food table’ section or
overll the basket beyond the ‘MAX’ indication as this could aect
the quality of the end result.
• If you want to prepare dierent ingredients at the same time, make
sure you check the suggested cooking time required for the
dierent ingredients before you start to cook them simultaneously.
4 Put the pan with the basket back into the Airfryer.
Caution
• Never use the pan without the basket in it.
• Do not touch the pan or the basket during and for some time
after use, as they get very hot.
Page 14
14
ENGLISH
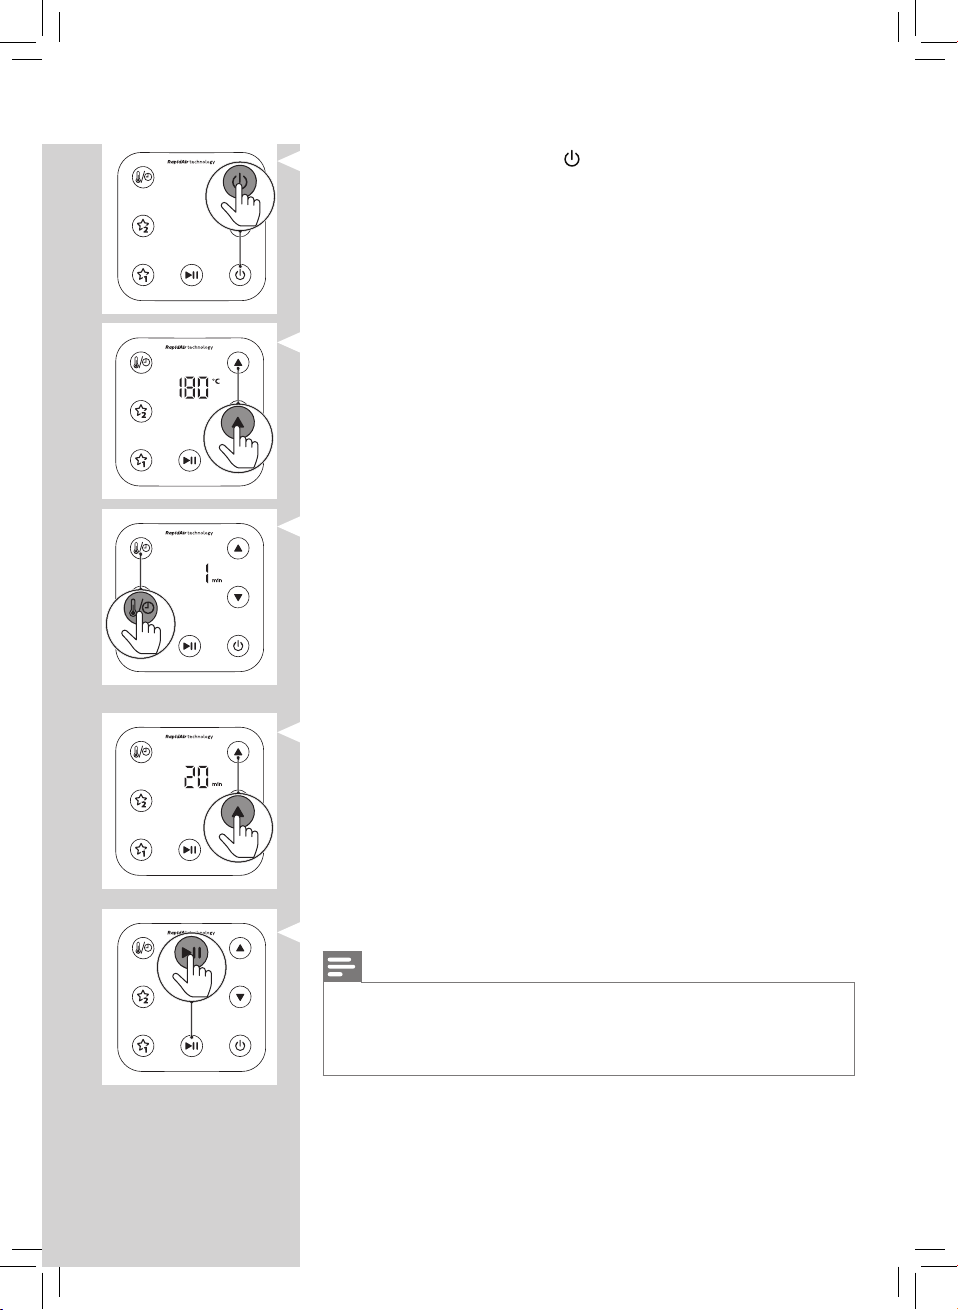
5 Press the power On/O ( ) button to switch on the
appliance.
6 Press the up or down button to choose the needed
temperature.
7 Press the time/temperature select button.
8 Press the up or down button to choose the needed time.
9 Press the start/pause button to start the cooking process.
Note
• During cooking the temperature and time are shown alternately.
• The last cooking minute counts down in seconds.
• Refer to the food table with basic cooking settings for dierent
types of food.
Page 15

15
ENGLISH
Tip
• To pause the cooking process, press the start/pause button. To
resume the cooking process, press the start/pause button again.
• The device is automatically in pause mode when you pull out the
pan and the basket. The cooking process continues when the pan
and the basket are put in the appliance again.
Note
• If you do not set the required cooking time within 30 minutes, the
appliance automatically shuts o for safety reasons.
• If “- -” is selected as the time indication, the appliance goes into
preheating mode. When the set temperature is reached, the
appliance gives a sound feedback.
• Some ingredients require shaking or turning halfway through the
cooking time (see ‘Food table’). To shake the ingredients, pull out
the pan with the basket, place it on a heat resistant work top,
press the basket release button to remove the basket and shake
the basket over the sink. Then put the basket into the pan, and
slide them back into the appliance.
• Put the basket at into the pan so that it lays on the support hook
in the pan. Do not tilt it.
• If you set the timer to the half of the cooking time and you hear
the timer bell it is time to shake or turn the ingredients. Be sure to
reset the timer to the remaining cooking time.
10 When you hear the timer bell, the cooking time has
elapsed.
Note
• You can stop the cooking process manually. To do this, press the
start/pause button.
11 Pull out the pan and check if the ingredients are ready.
Caution
• The Airfryer pan is hot after the cooking process. Always place
it on a heat resistant work top (eg. trivet, etc.) when you remove
the pan from the device.
Note
• If the ingredients are not ready yet, simply slide the pan back into
the Airfryer by the handle and add a few extra minutes to the set
time.
Page 16
16
ENGLISH
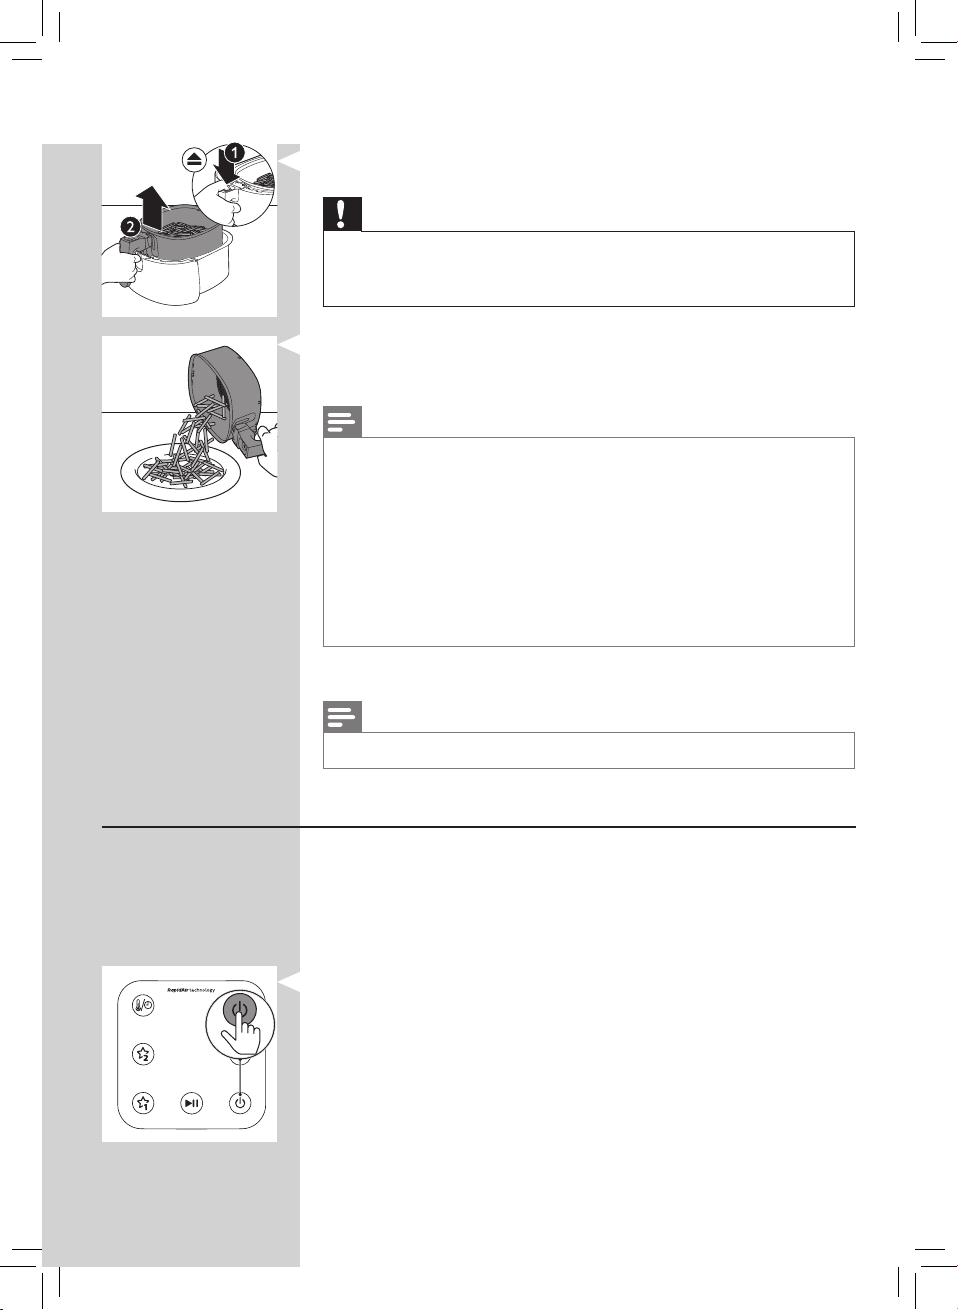
12 To remove small ingredients (e.g. fries), lift the basket out
of the pan by pressing the basket release button.
Caution
• After the cooking process, the pan, the basket, the interior
housing and the ingredients are hot. Depending on the type of
ingredients in the Airfryer, steam may escape from the pan.
13 Empty the basket contents into a bowl or onto a plate.
Always remove the basket from the pan to empty contents
as hot oil may be in the bottom of the pan.
Note
• To remove large or fragile ingredients, use a pair of tongs to lift out
the ingredients.
• Excess oil or rendered fat from the ingredients is collected on the
bottom of the pan.
• Depending on the type of ingredients cooking, you may want to
carefully pour o any excess oil or rendered fat from the pan after
each batch or before shaking or replacing the basket in the pan.
Place the basket on a heat-resistant surface. Wear oven-safe
gloves to pour o excess oil or rendered fat. Return the basket into
the pan.
When a batch of ingredients is ready, the Airfryer is instantly
ready for preparing another batch.
Note
• Repeat steps 4 to 15 if you want to prepare another batch.
Healthy re-heating
Enjoy healthy reheating with the Airfryer.
Refresh your takeaways and leftovers. Your Philips Airfryer can
make your food crispy and juicy again.
It even removes extra fat for healthier meals.
Saving your favorite setting:
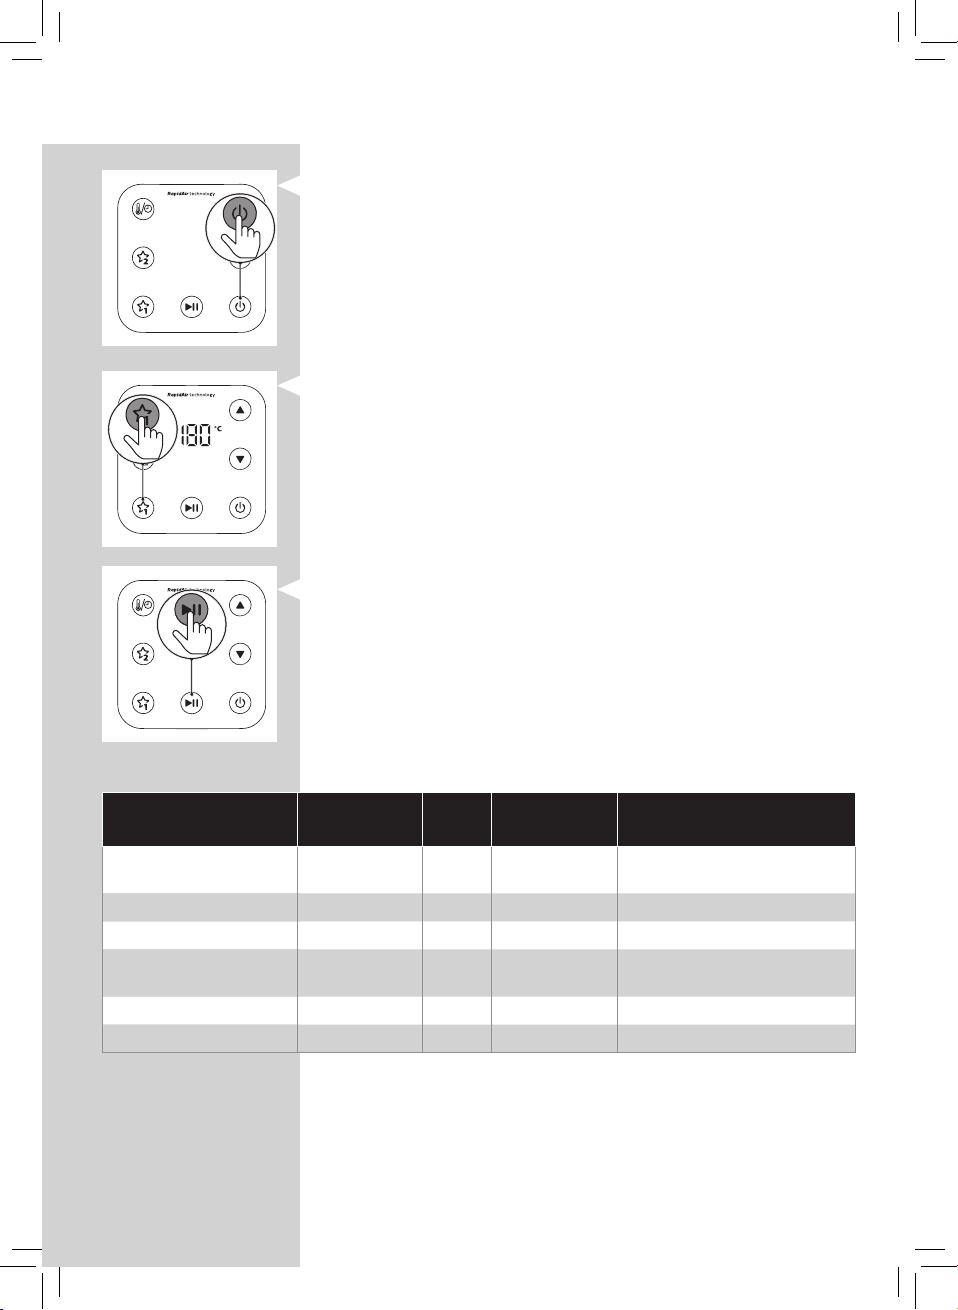
1 Press the power on/o button to switch on the appliance.
Page 17

17
ENGLISH
2 Press one of the favorite buttons.
3 Press the up or down button to choose the needed
temperature.
4 Press the time/temperature select button.
5 Press the up or down button to choose the needed time.
6 Memorize your chosen settings by pressing the same
favorite button again.
» The appliance makes a beep to conrm that the setting
is saved.
Page 18
18
ENGLISH
Starting your favorite setting:
1 Press the power on/o button to switch on the appliance.
2 Press one of the favorite buttons.
» The display shows the saved settings (the temperature
and time is shown alternately).
3 Start the appliance by pressing the start/pause button.
Healthy reheating food table
Ingredients
French fries
(7 x 7 mm/0.3 x 0.3 in)
Meat balls 15–20 6–9 200°C/400°F Fridge temperature.
Chicken drumsticks 1–5 13–16 180°C/350°F Fridge temperature.
Pizza 1 3–5 200°C/400°F Fridge temperature.
Bread rolls 1–6 3–5 180°C/350°F
Mixed vegetables 100–500 g 3–6 200°C/400°F Fridge temperature.
Min.–max.
amount
100–500 g 6–9 180°C/350°F Fridge temperature.
Time
(min)
Tem per a ture Tip
Cut the pizza into pieces.
Page 19

19
ENGLISH
Changing time and temperature during cooking
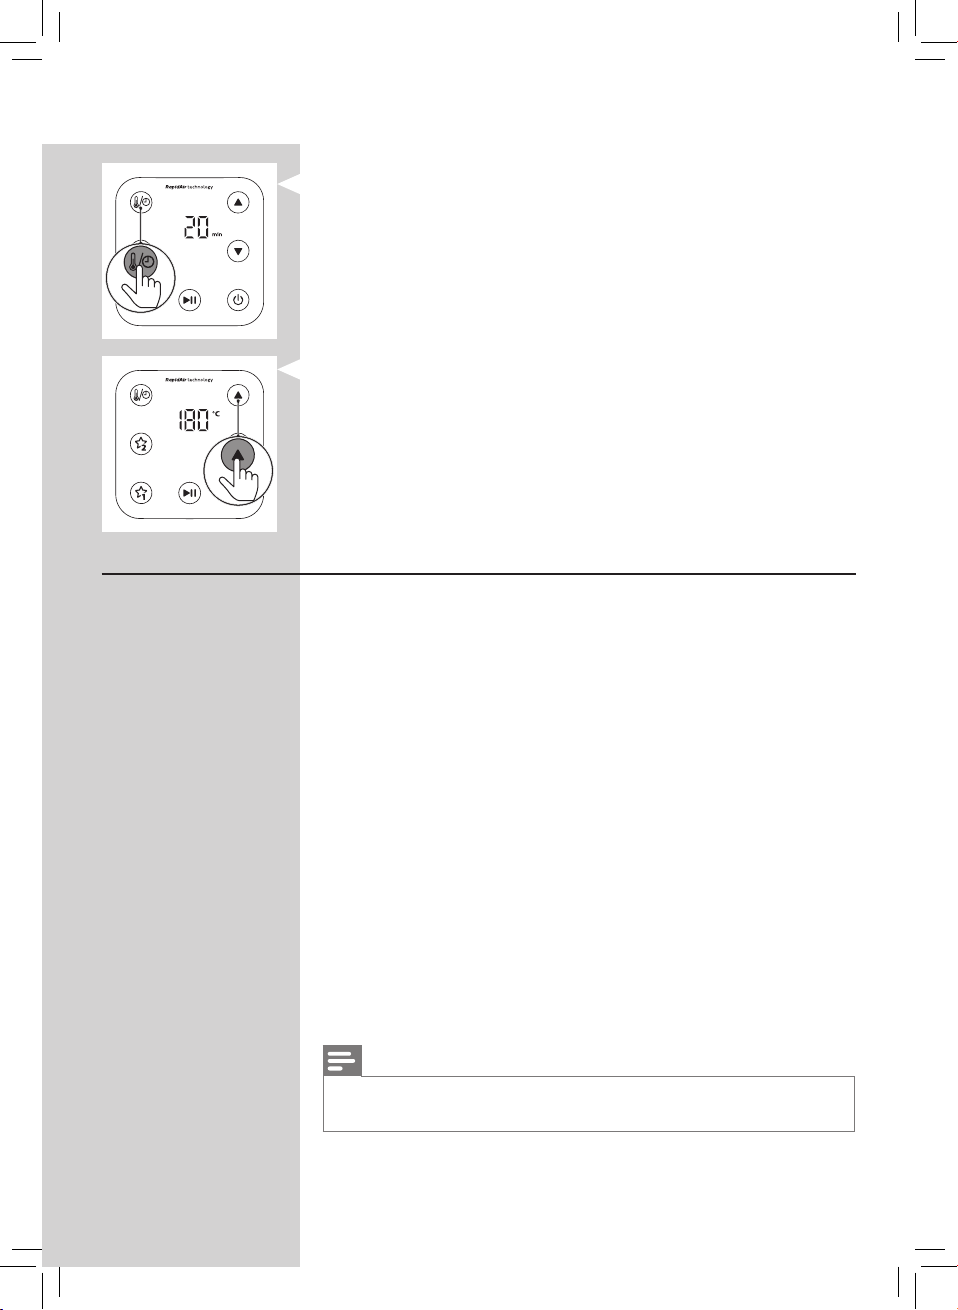
Change the cooking time during cooking
When the appliance shows time on the display:
1 Press the up or down button to set the new cooking time.
» The appliance now works with the new cooking time.
When the appliance shows temperature on the display:
1 Press the time/temperature selection button.
» The cooking time is shown on the display.
2 Press the up or down button to set the new cooking time.
» The appliance now works with the new cooking time.
Change the cooking temperature during cooking
When the appliance shows temperature on the display:
1 Press the up or down button to set the new cooking
temperature.
» The appliance now works with the new cooking
temperature.
Page 20
20
ENGLISH
When the appliance shows time on the display:
1 Press the time/temperature selection button.
» The cooking temperature is shown on the display.
2 Press the up or down button to set the new cooking
temperature.
» The appliance now works with the new cooking
temperature.
Making home-made fries
To make great home-made fries in the Airfryer:
- Choose a potato variety suitable for making fries, e.g. fresh,
(slightly) oury potatoes.
- It is best to air fry the fries in portions of up to 800 g/28 oz
for an even result. Larger fries tend to be less crispy than
smaller fries.
- Shake the basket 2-3 times during the Airfrying process.
1 Peel the potatoes and cut into sticks
(8 x 8 mm/0.3 x 0.3 in thick).
2 Soak the potato sticks in a bowl of water for at least
30 minutes.
3 Empty the bowl and dry the potato sticks with a dish towel
or paper towel.
4 Pour one tablespoon of cooking oil into the bowl, put the
sticks in the bowl and mix until the sticks are coated with
oil.
5 Remove the sticks from the bowl with your ngers or a
slotted kitchen utensil so excess oil remains in the bowl.
Note
• Do not tilt the bowl to pour all the sticks in the basket at once to
prevent excess oil from going into the pan.
6 Put the sticks into the basket.
Page 21

21
ENGLISH
7 Fry the potato sticks and shake the basket halfway
through the Airfrying process. Shake 2-3 times if you
prepare more than 500 g/18 oz of fries.
Cleaning
Warning
• Let the basket, the pan, and the inside of the appliance cool
down completely before you start cleaning.
• The pan, the basket, and the inside of the appliance have a
non-stick coating. Do not use metal kitchen utensils or abrasive
cleaning materials as this may damage the non-stick coating.
Clean the appliance after every use. Remove oil and fat from
the bottom of the pan after every use.
1 Press the power On/O ( ) button to switch o the
appliance, remove the plug from the wall outlet and let the
appliance cool down.
Tip
• Remove the pan and the basket to let the Airfryer cool down more
quickly.
2 Dispose of rendered fat or oil from the bottom of the pan.
3 Clean the pan and the basket in a dishwasher. You can
also clean them with hot water, dishwashing liquid and a
non-abrasive sponge (see ‘Cleaning table’).
Tip
• If food residues stuck to the pan or the basket, you can soak them
in hot water and dishwashing liquid for 10–15 minutes. Soaking
loosens the food residues and makes it easier to remove. Make
sure you use a dishwashing liquid that can dissolve oil and grease.
If there are grease stains on the pan or the basket and you have
not been able to remove them with hot water and dishwashing
liquid, use a liquid degreaser.
• If necessary, food residues stuck to the heating element can be
removed with a soft to medium bristle brush. Do not use a steel
wire brush or a hard bristle brush, as this might damage the
coating on the heating element.
4 Wipe the outside of the appliance with a moist cloth.
Note
• Make sure no moisture remains on the control panel. Dry the
control panel with a cloth after you have cleaned it.
Page 22

22
ENGLISH
5 Clean the heating element with a cleaning brush to
remove any food residues.
6 Clean the inside of the appliance with hot water and a
non-abrasive sponge.
Cleaning table
Storage
1 Unplug the appliance and let it cool down.
2 Make sure all parts are clean and dry before storing.
3 Insert the cord into the cord storage compartment.
Note
• Always hold the Airfryer horizontally when you carry it. Make sure
that you also hold the pan on the front part of the appliance
as the pan with the basket can slide out of the appliance if
accidentally tilted downwards. This can lead to damaging of these
parts.
• Always make sure that the removable parts of the Airfryer are xed
before you carry and/or store it.
Page 23
23
ENGLISH
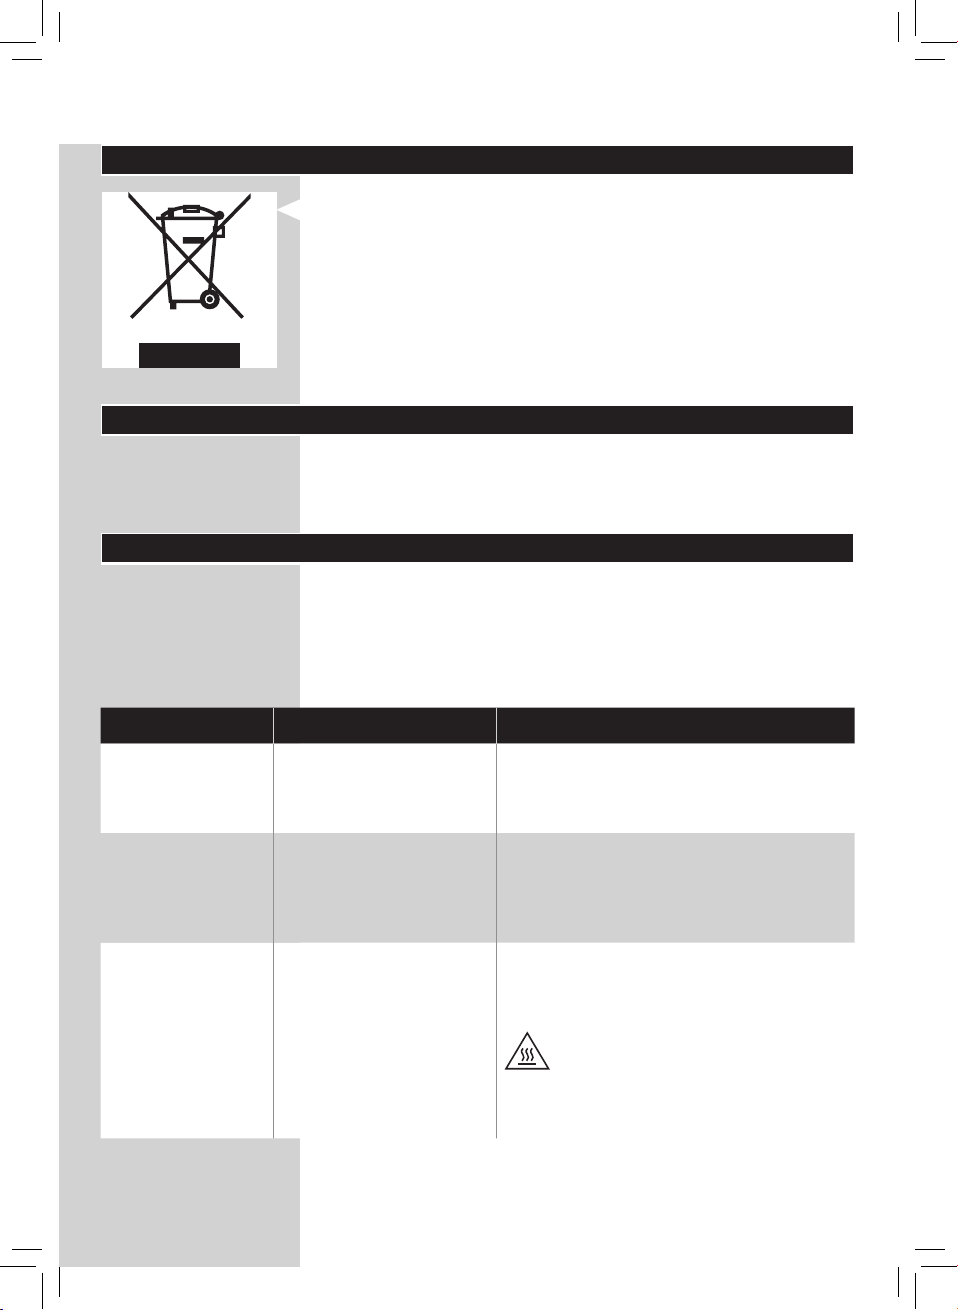
Recycling
- This symbol means that this product shall not be disposed
of with normal household waste (2012/19/EU).
- Follow your country’s rules for the separate collection of
electrical and electronic products. Correct disposal helps
prevent negative consequences for the environment and
human health.
Guarantee and support
If you need information or support, please visit
www.philips.com/support or read the separate worldwide
guarantee leaet.
Troubleshooting
This chapter summarizes the most common problems
you could encounter with the appliance. If you are unable
to solve the problem with the information below, visit
www.philips.com/support for a list of frequently asked
questions or contact the Consumer Care Center in your
country.
Problem Possible cause Solution
The outside of
the appliance
becomes hot
during use.
The heat inside radiates
to the outside walls.
This is normal. All handles and knobs
that you need to touch during use stay
cool enough to touch.
The pan, the basket, and the inside of
the appliance always become hot when
the appliance is switched on to ensure
the food is properly cooked. These parts
are always too hot to touch.
If you leave the appliance switched on
for a longer time, some areas get too
hot to touch. These areas are marked on
the appliance with the following icon:
As long as you are aware of the hot
areas and avoid touching them, the
appliance is completely safe to use.
Page 24

24
ENGLISH
Problem Possible cause Solution
My home-made
fries do not turn
out as I expected.
The Airfryer does
not switch on.
I see some
peeling o spots
inside my Airfryer.
White smoke
comes out of the
appliance.
You did not use the right
potato type.
The amount of
ingredients in the
basket is too big.
Certain types of
ingredients need to be
shaken halfway through
the cooking time.
The appliance is not
plugged in.
Several appliances
are connected to one
outlet.
Some small spots can
appear inside the pan
of the Airfryer due to the
incidental touching or
scratching of the coating
(e.g. during cleaning
with harsh cleaning
tools and/or while
inserting the basket).
You are cooking fatty
ingredients.
To get the best results, use fresh oury
potatoes. If you need to store the
potatoes, do not store them in a cold
environment like in a fridge. Choose
potatoes whose package states that
they are suitable for frying.
Follow the instructions in this user
manual to prepare home-made fries.
Follow the instructions in this user
manual to prepare home-made fries.
Check if the plug is inserted in the wall
outlet properly.
The Airfryer has a high wattage. Try a
dierent outlet and check the fuses.
You can prevent damage by lowering
the basket into the pan properly. If you
insert the basket at an angle, its side
may knock against the wall of the pan,
causing small pieces of coating to chip
o. If this occurs, please be informed
that this is not harmful as all materials
used are food-safe.
Carefully pour o any excess oil or fat
from the pan and then continue cooking.
The pan still contains
greasy residues from
previous use.
Breading or coating did
not adhere properly to
the food.
Marinade, liquid or meat
juices are splattering
in the rendered fat or
grease.
White smoke is caused by greasy
residues heating up in the pan. Always
clean the pan and the basket thoroughly
after every use.
Tiny pieces of airborne breading
can cause white smoke. Firmly press
breading or coating to food to ensure it
sticks.
Pat food dry before placing it in the
basket.
Page 25

25
ENGLISH
Problem Possible cause Solution
My display shows
6 dashes during
cooking.
My display shows
6 dashes after
the appliance has
been unplugged
for one minute.
Safety feature has
been activated due
to overheating of the
appliance.
Safety feature has been
activated.
Unplug the appliance and let it cool
down for 1 minute before plugging in
again.
Call the Philips service hot line or
contact the Consumer Care Center in
your country.
Page 26

26
DEUTSCH
INHALTSVERZEICHNIS
Wichtig! 27
Einführung 32
Allgemeine Beschreibung 32
Vor dem ersten Gebrauch 34
Für den Gebrauch vorbereiten 34
Das Gerät benutzen 34
Grillzeiten-Tabelle 34
Garen mit dem Airfryer 37
Gesundes Aufwärmen 41
Ändern der Zeit und der Temperatur während des
Garvorgangs 44
Zubereiten von hausgemachten Pommes frites 45
Pege 46
Reinigungstabelle 48
Aufbewahrung 48
Recycling 48
Garantie und Support 49
Fehlerbehebung 49
Page 27

27
DEUTSCH
Wichtig!
Lesen Sie diese wichtigen Informationen vor dem Gebrauch
des Geräts aufmerksam durch, und bewahren Sie sie für eine
spätere Verwendung auf.
Achtung!
- Geben Sie die zu bratenden Zutaten
in den Korb, damit sie nicht mit den
Heizelementen in Kontakt kommen.
- Lufteinlass und Luftaustrittsönungen
müssen unbedeckt bleiben, während das
Gerät in Betrieb ist.
- Füllen Sie die Pfanne nicht mit Öl, da sonst
Brandgefahr besteht.
- Tauchen Sie das Gerät niemals in Wasser
oder andere Flüssigkeiten; spülen Sie es
auch nicht unter ießendem Wasser ab.
- Achten Sie darauf, dass kein Wasser
oder andere Flüssigkeiten in das
Gerät gelangen, um das Risiko eines
Stromschlags zu vermeiden.
- Befüllen Sie den Korb nie über den
angegebenen Maximalpegel.
- Berühren Sie nie die Innenseite des Geräts,
während es in Betrieb ist.
Achtung
- Prüfen Sie, bevor Sie das Gerät in Betrieb
nehmen, ob die Spannungsangabe auf
dem Gerät mit der örtlichen Netzspannung
übereinstimmt.
- Verwenden Sie das Gerät nicht, wenn der
Netzstecker, das Netzkabel oder das Gerät
selbst defekt oder beschädigt sind.
Page 28

28
DEUTSCH
- Um Gefährdungen zu vermeiden, darf
ein defektes Netzkabel nur von einem
Philips Service-Center, einer von Philips
autorisierten Werkstatt oder einer ähnlich
qualizierten Person durch ein OriginalErsatzkabel ersetzt werden.
- Dieses Gerät kann von Kindern ab
8 Jahren und Personen mit verringerten
physischen, sensorischen oder
psychischen Fähigkeiten oder Mangel
an Erfahrung und Kenntnis verwendet
werden, wenn sie bei der Verwendung
beaufsichtigt werden oder Anweisung zum
sicheren Gebrauch des Geräts erhalten
und die Gefahren verstanden haben.
Kinder dürfen nicht mit dem Gerät spielen.
Die Reinigung und Wartung darf nicht von
Kindern durchgeführt werden, außer sie
sind älter als 8 Jahre und beaufsichtigt.
- Bewahren Sie das Gerät und das Kabel
außerhalb der Reichweite von Kindern
unter 8 Jahren auf.
- Achten Sie darauf, dass das Netzkabel
nicht in der Nähe heißer Flächen verläuft.
- Schließen Sie das Gerät nur an eine
geerdete Steckdose an. Achten Sie
stets darauf, dass der Stecker fest in der
Steckdose sitzt.
- Dieses Gerät ist nicht dafür geeignet, über
einen externen Timer oder ein separates
Fernbedienungssystem gesteuert zu
werden.
- Stellen Sie das Gerät nicht an einer Wand
oder angelehnt an andere Geräte auf.
Page 29

29
DEUTSCH
Achten Sie darauf, dass hinter dem Gerät
und seitlich davon mindestens 10 cm Platz
ist. Über dem Gerät muss ein Abstand von
mindestens 10 cm eingehalten werden.
Stellen Sie keine Gegenstände auf das
Gerät.
- Verwenden Sie das Gerät nie für andere
als in dieser Bedienungsanleitung
beschriebene Zwecke.
- Während des Heißluftgarens tritt heißer
Dampf aus den Luftaustrittsönungen
aus. Halten Sie Hände und Gesicht in
sicherer Entfernung vom Dampf und den
Luftaustrittsönungen. Achten Sie zudem
auf heißen Dampf und heiße Luft, wenn
Sie die Pfanne aus dem Gerät nehmen.
- Die zugänglichen Oberächen können
während des Betriebs heiß werden.
- Die Pfanne, der Korb und die Zubehörteile
im Inneren des Airfryer werden während
des Gebrauchs heiß. Gehen Sie deshalb
vorsichtig mit diesen Teilen um.
- Stellen Sie das Gerät nicht auf einen
heißen Gas- oder Elektroherd jeglicher
Art, elektrische Kochplatten oder in den
beheizten Ofen.
- Verwenden Sie keine leichten Zutaten und
kein Backpapier im Gerät.
- Stellen Sie das Gerät nicht auf oder in der
Nähe von brennbaren Materialien auf, wie
z. B. Tischdecken oder Vorhängen.
- Lassen Sie das eingeschaltete Gerät nicht
unbeaufsichtigt.
Page 30

30
DEUTSCH
- Ziehen Sie sofort den Stecker, wenn
dunkler Rauch aus dem Gerät austritt.
Warten Sie, bis die Rauchentwicklung
abgeklungen ist, bevor Sie die Pfanne aus
dem Gerät nehmen.
- Lagerung von Kartoeln: Die Temperatur
sollte für die gelagerte Kartoelsorte
passend sein und über 6 °C liegen, um der
Gefahr von Acrylamidaufnahme über die
fertigen Gerichte vorzubeugen.
- Trocknen Sie Ihre Hände sorgfältig ab,
bevor Sie das Gerät anschließen oder das
Bedienfeld betätigen.
Vorsicht
- Dieses Gerät ist ausschließlich für
die Verwendung in gewöhnlichen
Haushalten vorgesehen. Es ist nicht für
die Verwendung in Personalküchen von
Geschäften, Büros, landwirtschaftlichen
Betrieben oder anderen Arbeitsbereichen
vorgesehen. Auch ist es nicht für den
Gebrauch in Hotels, Motels, Pensionen
oder anderen Gastgewerben bestimmt.
- Geben Sie das Gerät zur Überprüfung bzw.
Reparatur stets an ein Philips ServiceCenter. Versuchen Sie nicht, das Gerät
selbst zu reparieren, da andernfalls Ihre
Garantie erlischt.
- Bei unsachgemäßem Gebrauch oder
Verwendung für halbprofessionelle
oder professionelle Zwecke oder bei
Nichtbeachtung der Anweisungen in der
Bedienungsanleitung erlischt die Garantie.
Page 31

31
DEUTSCH
In diesem Fall lehnt Philips jegliche
Haftung für entstandene Schäden ab.
- Verwenden Sie das Gerät immer auf einer
stabilen, ebenen und waagerechten
Unterlage.
- Ziehen Sie nach jedem Gebrauch den
Netzstecker aus der Steckdose.
- Lassen Sie das Gerät abkühlen (ca.
30 Minuten), bevor Sie es anfassen oder
reinigen.
- Vergewissern Sie sich, dass die Zutaten,
die in diesem Gerät zubereitet werden,
goldbraun statt dunkel oder braun sind.
Entfernen Sie verbrannte Reste. Frittieren
Sie frische Kartoeln bei höchstens
180 °C, um der Entwicklung von Acrylamid
vorzubeugen.
- Seien Sie vorsichtig bei der Reinigung des
oberen Bereichs der Zubereitungskammer,
und beachten Sie das heiße Heizelement
und die Kante der Metallteile.
Elektromagnetische Felder
Dieses Philips Gerät erfüllt sämtliche Normen und Regelungen
hinsichtlich möglicher Gefährdung durch elektromagnetische
Felder.
Automatische Abschaltung
Dieses Gerät ist mit einer automatischen Abschaltungsfunktion
ausgestattet. Wenn innerhalb von 30 Minuten keine Taste
gedrückt wird, schaltet sich das Gerät automatisch aus. Um
das Gerät manuell auszuschalten, drücken Sie den Ein-/AusSchalter.
Page 32

32
DEUTSCH
Einführung
Herzlichen Glückwunsch zu Ihrem Kauf und willkommen bei
Philips!
Um das Kundendienstangebot von Philips vollständig
nutzen zu können, sollten Sie Ihr Produkt unter
www.philips.com/welcome registrieren.
Der Philips Airfryer ist der einzige Airfryer mit einzigartiger
Rapid Air-Technologie, mit dem Sie Ihre Lieblingsspeisen mit
wenig Öl und bis zu 90 % weniger Fett frittieren können.
Erzielen Sie knusprigere Ergebnisse mit Philips Rapid Air für
einen 7-mal schnelleren Luftstrom.
Er kocht Speisen gleichmäßig mit unserem Seestern-Design für
perfekte Ergebnisse vom ersten bis zum letzten Bissen.
Sie können nun auf den Punkt gegarte, frittierte Gerichte
genießen – außen knusprig, innen zart. Frittieren, grillen, braten
und backen – bereiten Sie eine Vielfalt an leckeren Gerichten
auf gesunde, schnelle und einfache Art zu.
Rezeptideen und Informationen zum Airfryer nden Sie unter
www.philips.com/kitchen oder in der kostenlosen NutriU App
für iOS® oder Android™.
* Die NutriU App ist in Ihrem Land möglicherweise nicht verfügbar.
Laden Sie in diesem Fall die Airfryer App herunter.
Allgemeine Beschreibung
1 Bedienfeld
A Zeit-/Temperaturanzeige
B Taste zur Erhöhung der Temperatur/Zeit
C Taste zur Reduzierung der Temperatur/Zeit
D Ein-/Aus-Schalter
E Start-/Pausetaste
F Favoritentaste 1
G Favoritentaste 2
H Zeit-/Temperaturwahltaste
2 MAX-Markierung
3 Korb
4 Korbentriegelungstaste
5 Pfanne
6 Fach für Kabelaufbewahrung
7 Luftauslässe
8 Lufteinlass
9 Netzkabel
Page 33

33
DEUTSCH
A
H
G
F
B
C
D
E
1
2
9
3
4
8
5
7
6
Page 34

34
DEUTSCH
Vor dem ersten Gebrauch
1 Entfernen Sie sämtliches Verpackungsmaterial.
2 Entfernen Sie gegebenenfalls sämtliche Aufkleber oder
Etiketten vom Gerät.
3 Reinigen Sie das Gerät vor der ersten Verwendung
gründlich, wie im Reinigungskapitel angegeben.
Für den Gebrauch vorbereiten
1 Stellen Sie das Gerät auf eine stabile, waagerechte, ebene
und hitzebeständige Oberäche.
Hinweis
• Legen Sie keine Gegenstände auf oder neben dem Gerät ab. Dies
kann den Luftstrom stören und das Garergebnis beeinträchtigen.
• Stellen Sie das laufende Gerät nicht in der Nähe von Wänden oder
unter Schränken und anderen Gegenständen auf, die durch den
Dampf beschädigt werden können.
2 Ziehen Sie das Netzkabel aus dem Kabelfach an der
Rückseite des Geräts.
Das Gerät benutzen
Grillzeiten-Tabelle
Die folgende Tabelle hilft Ihnen dabei, die grundlegenden
Einstellungen für die Lebensmittel auszuwählen, die Sie
zubereiten möchten.
Hinweis
• Beachten Sie, dass es sich bei diesen Einstellungen nur um
Empfehlungen handelt. Da Zutaten sich in ihrer Herkunft, Größe,
Form und Marke unterscheiden, kann eine optimale Einstellung
für Ihre Zutaten nicht garantiert werden.
• Bei der Zubereitung größerer Zutatenmengen (z. B. Pommes
frites, Garnelen, Hähnchenschenkel, gefrorene Snacks) schütteln,
wenden oder rühren Sie die Zutaten im Korb 2 bis 3 Mal, um ein
gleichmäßiges Ergebnis zu erzielen.
Page 35

35
DEUTSCH
Inhaltsstoe
Dünne gefrorene
Pommes frites
(7 x 7 mm/
Min./Max.
Menge
200 bis
1200 g
7 bis 42 oz
0,3 x 0,3 in)
Dicke gefrorene
Pommes frites
(10 x 10 mm/
200 bis
1200 g
7 bis 42 oz
0,4 x 0,4 in)
Hausgemachte
Pommes frites
(12 x 12 mm/
0,5 x 0,5 in)
Hausgemachte
Kartoelecken
Gefrorene Snacks
(Chicken Nuggets)
Gefrorene Snacks
(kleine
Frühlingsrollen, je
ca. 20 g/0,7 oz)
Ganzes Hähnchen 1000 bis
Hühnerbrust
ca. 160 g/6 oz
HähnchenUnterschenkel
200 bis
1200 g
7 bis 42 oz
200 bis
1200 g
7 bis 42 oz
80 bis 1000 g/
3 bis 35 oz
(6 bis
40 Stück)
100 bis 500 g/
3,5 bis 18 oz
(5 bis
30 Stück)
1200 g/
35 bis 42 oz
1 bis 4 Stück 18 bis 22 180 °C/350 °F
200 bis
1200 g/
7 bis 42 oz
Panierte
Hähnchensticks
3 bis 10 Stück
(1 Schicht)
Zeit
(Min.)
13 bis 32
13 bis 33
18 bis 30 180 °C/350 °F • 30 Minuten in kaltes
20 bis 40 180 °C/350 °F • Weichen Sie sie
7 bis 18 200 °C/400 °F • Fertig, wenn außen
14 bis 16 200 °C/400 °F • Fertig, wenn außen
50 bis 60 180 °C/350 °F • Vermeiden Sie, dass die
23 bis
Temperatur Hinweis
180 °C/350 °F • Schütteln, wenden oder
180 °C/350 °F • Schütteln, wenden oder
180 °C/350 °F • Schütteln, wenden oder
30
10 bis 15 180 °C/350 °F • Geben Sie Öl zur Panade.
rühren nach der Hälfte der
Zeit
rühren nach der Hälfte der
Zeit
Wasser oder 3 Minuten
in lauwarmes Wasser
(40 °C/100 °F) legen, dann
trocknen und 1 EL Öl pro
500 g/18 oz zugeben.
• Schütteln, wenden oder
rühren nach der Hälfte der
Zeit
30 Minuten in Wasser ein,
trocknen Sie sie, und fügen
Sie dann 1/4 bis 1 EL Öl
hinzu.
• Schütteln, wenden oder
rühren nach der Hälfte der
Zeit
goldgelb und knusprig.
• Schütteln, wenden oder
rühren nach der Hälfte der
Zeit
goldgelb und knusprig.
• Schütteln, wenden oder
rühren nach der Hälfte der
Zeit
Keulen das Heizelement
berühren.
rühren nach der Hälfte der
Zeit
Fertig, wenn goldgelb.
Page 36

36
DEUTSCH
Inhaltsstoe
Hähnchenügel
ca. 100 g/3,5 oz
Fleischkoteletts
ohne Knochen
ca. 150 g/6 oz
Hamburger
ca. 150 g/6 oz
(Durchmesser
10 cm/4 in)
Dicke Würstchen
ca. 100 g/3,5 oz
(Durchmesser
4 cm/1,6 in)
Dünne Würstchen
ca. 70 g/2,5 oz
(Durchmesser
2 cm/0,8 in)
Schweinebraten 500 bis
Ganzer Fisch
ca. 300 bis
400 g/11 bis 14 oz
Fischlets
ca. 120 g/4,2 oz
Schalentiere
ca. 25 bis
30 g/0,9 bis 1 oz
Kuchen 750 g/26 oz 35 bis 40 160 °C/325 °F • Verwenden Sie eine
Muns
ca. 50 g/1,8 oz
Quiche
(Durchmesser
17 cm/6,7 in)
Vorgebackenes
Toastbrot/
Brötchen
Min./Max.
Menge
2 bis 7 Stück
(1 Schicht)
1 bis4 Stück 10 bis 13 200 °C/400 °F
1 bis 4 Stück 10 bis 15 200 °C/400 °F
1 bis 5 Stück
(1 Schicht)
1 bis 6 Stück 9 bis 12 200 °C/400 °F
1000 g/
18 bis 35 oz
1 bis 2 17 bis 20 200 °C/400 °F • Schneiden Sie den
1 bis 3
(1 Schicht)
200 bis
1500 g/
7 bis 53 oz
1 bis 9 12 bis 14 180 °C/350 °F • Verwenden Sie
500 g/18 oz 20 bis 25 160 °C/325 °F • Verwenden Sie ein
1 bis 6 6 bis 7 180 °C/350 °F
Zeit
(Min.)
14 bis 18 180 °C/350 °F • Schütteln, wenden oder
12 bis 15 200 °C/400 °F
50 bis 75 180 °C/350 °F • Lassen Sie das Fleisch vor
9 bis 12 200 °C/400 °F • Um ein Ankleben zu
15 bis 20 200 °C/400 °F • Schütteln, wenden oder
Temperatur Hinweis
rühren nach der Hälfte der
Zeit
dem Schneiden 5 Minuten
ruhen.
Schwanz ab, wenn er
nicht in den Korb/die
Grillpfanne passt.
vermeiden, legen Sie die
Seite mit der Haut nach
unten, und geben Sie
etwas Öl hinzu.
rühren nach der Hälfte der
Zeit
Kuchenform.
hitzebeständige
Munförmchen aus
Silikon.
Backblech oder ofenfestes
Geschirr.
Page 37

37
DEUTSCH
Inhaltsstoe
Hausgemachtes
Brot
Hausgemachte
Brötchen
ca. 80 g/2,8 oz
Kastanien 200 bis
Gemischtes
Gemüse (grob
gehackt)
Min./Max.
Menge
550 g/20 oz 25 bis 35 150 °C/300 °F • Die Form sollte so ach
1 bis 5 Stück 18 bis 20 160 °C/325 °F
1500 g/
7 bis 53 oz
300 bis
800 g/
11 bis 28 oz
Zeit
(Min.)
15 bis 30 200 °C/400 °F • Schütteln, wenden oder
10 bis 20 200 °C/400 °F • Stellen Sie die Garzeit
Temperatur Hinweis
wie möglich sein, um
zu verhindern, dass das
Brot beim Aufgehen das
Heizelement berührt.
rühren nach der Hälfte der
Zeit
ganz nach Ihrem
Geschmack ein.
• Schütteln, wenden oder
rühren nach der Hälfte der
Zeit
Garen mit dem Airfryer
Vorsicht
• Dieser Airfryer funktioniert mit Heißluft. Füllen Sie die Pfanne
nicht mit Öl, Frittierfett oder anderen Flüssigkeiten.
• Berühren Sie die heißen Oberächen nicht. Verwenden Sie
immer die Grie. Berühren Sie die heiße Pfanne nur mit
Ofenhandschuhen.
• Dieses Gerät ist nur für den Gebrauch im Haushalt bestimmt.
• Beim ersten Gebrauch kann das Gerät etwas Rauch entwickeln.
Das ist normal.
• Das Vorheizen des Geräts ist nicht notwendig.
1 Stecken Sie den Stecker in die Steckdose.
Page 38

38
DEUTSCH
2 Nehmen Sie die Pfanne mit dem Korb aus dem Gerät,
indem Sie am Gri ziehen.
3 Geben Sie die Zutaten in den Korb.
Hinweis
• Der Airfryer kann viele verschiedene Zutaten zubereiten. Die
richtigen Mengen und entsprechenden Garzeiten nden Sie in der
Lebensmitteltabelle.
• Überschreiten Sie niemals die in der Lebensmitteltabelle
angegebene Menge, und füllen Sie den Korb nie über die MAXMarkierung hinaus, da dies die Qualität des Endergebnisses
beeinträchtigen kann.
• Wenn Sie unterschiedliche Zutaten gleichzeitig zubereiten
möchten, prüfen Sie die empfohlene Garzeit für die jeweiligen
Lebensmittel, bevor Sie den Garvorgang starten.
4 Setzen Sie den Korb mit der Pfanne wieder in den Airfryer
ein.
Vorsicht
• Verwenden Sie die Pfanne nie ohne den Korb.
• Berühren Sie die Pfanne oder den Korb während und einige Zeit
nach der Verwendung nicht, da sie sehr heiß werden.
5 Drücken Sie den Ein-/Aus-Schalter ( ), um das Gerät
einzuschalten.
6 Drücken Sie die Auf- oder Ab-Taste, um die gewünschte
Temperatur auszuwählen.
Page 39

39
DEUTSCH
7 Drücken Sie die Zeit-/Temperaturwahltaste.
8 Drücken Sie die Auf- oder Ab-Taste, um die gewünschte
Garzeit auszuwählen.
9 Drücken Sie die Start-/Pausetaste, um den Garvorgang zu
starten.
Hinweis
• Während des Garvorgangs werden Temperatur und Zeit
abwechselnd angezeigt.
• Die letzte Minute des Garvorgangs wird in Sekunden
heruntergezählt.
• Weitere Informationen nden Sie in der Tabelle mit grundlegenden
Gareinstellungen für verschiedene Arten von Nahrungsmitteln.
Tipp
• Um den Garvorgang zu pausieren, drücken Sie die Start-/
Pausetaste. Um den Garvorgang fortzusetzen, drücken Sie die
Start-/Pausetaste erneut.
• Das Gerät bendet sich automatisch im Pausenmodus, wenn
Sie die Pfanne und den Korb herausziehen. Der Garvorgang wird
fortgesetzt, wenn die Pfanne und der Korb wieder in das Gerät
eingesetzt werden.
Page 40

40
DEUTSCH
Hinweis
• Wenn Sie die erforderliche Garzeit nicht innerhalb von 30 Minuten
einstellen, schaltet sich das Gerät aus Sicherheitsgründen
automatisch aus.
• Wenn "- -" als Zeitanzeige ausgewählt ist, wechselt das Gerät in
den Vorheizmodus. Wenn die eingestellte Temperatur erreicht ist,
gibt das Gerät ein akustisches Signal ab.
• Einige Zutaten müssen zur Hälfte der Garzeit geschüttelt oder
gewendet werden (siehe Lebensmitteltabelle). Zum Schütteln
der Zutaten, ziehen Sie die Pfanne mit dem Korb heraus, stellen
Sie sie auf eine hitzebeständige Arbeitsäche, drücken Sie die
Korbentriegelungstaste, um den Korb zu entfernen, und schütteln
Sie ihn über dem Spülbecken. Setzen Sie anschließend den Korb
in die Pfanne ein, und schieben Sie beide zurück in das Gerät.
• Setzen Sie den Korb ach in die Pfanne ein, sodass er auf dem
Haken in der Pfanne auiegt. Kippen Sie ihn nicht.
• Falls Sie die Zeitschaltuhr auf die Hälfte der Garzeit gestellt haben,
und das Signal der Zeitschaltuhr ertönt, ist es an der Zeit, die
Zutaten zu schütteln oder zu wenden. Stellen Sie sicher, dass Sie
die Zeitschaltuhr auf die verbliebene Garzeit erneut einstellen.
10 Wenn das Timer-Signal ertönt, ist die Garzeit abgelaufen.
Hinweis
• Sie können den Garvorgang manuell beenden. Drücken Sie dazu
die Start-/Pausetaste.
11 Ziehen Sie die Pfanne heraus, und überprüfen Sie, ob die
Zutaten fertig gegart sind.
Vorsicht
• Die Pfanne des Airfryers ist nach dem Kochen heiß. Stellen Sie
die Pfanne immer auf eine hitzebeständige Oberäche (z. B.
Untersetzer usw.), wenn Sie sie aus dem Gerät nehmen.
Hinweis
• Wenn die Zutaten noch nicht fertig gegart sind, schieben Sie die
Pfanne einfach am Gri zurück in den Airfryer, und stellen Sie die
Zeitschaltuhr auf ein paar zusätzliche Minuten ein.
12 Um kleine Zutaten (z. B. Pommes frites) herauszunehmen,
heben Sie den Korb aus der Pfanne, indem Sie die
Korbentriegelungstaste drücken.
Page 41

41
DEUTSCH
Vorsicht
• Nach dem Garvorgang sind Pfanne, Korb, Innengehäuse und
Zutaten heiß. Je nach Art der Zutaten im Airfryer kann Dampf
aus der Pfanne austreten.
13 Leeren Sie den Inhalt des Korbs in eine Schüssel oder auf
einen Teller. Nehmen Sie den Korb zum Entleeren immer
aus der Pfanne, da sich heißes Öl unten in der Pfanne
ansammeln kann.
Hinweis
• Um große oder zerbrechliche Zutaten herauszunehmen,
verwenden Sie eine Zange, um die Zutaten aus dem Korb zu
heben.
• Überschüssiges Öl oder ausgeschmolzenes Fett von den Speisen
sammelt sich am Boden der Pfanne.
• Je nach Art der gegarten Speisen sollten Sie überschüssiges Öl
oder ausgeschmolzenes Fett nach jeder Portion oder vor dem
Schütteln bzw. Wiedereinsetzen des Korbs in die Pfanne vorsichtig
aus der Pfanne gießen. Legen Sie die Pfanne auf eine
hitzebeständige Oberäche. Tragen Sie Ofenhandschuhe zum
Abgießen von überschüssigem Öl oder ausgeschmolzenem Fett.
Setzen Sie den Korb wieder in die Pfanne ein.
Wenn Ihre Zutaten fertig sind, können Sie sofort weitere
Zutaten im Airfryer zubereiten.
Hinweis
• Wiederholen Sie Schritt 4 bis 15, um weitere Speisen im Airfryer
zuzubereiten.
Gesundes Aufwärmen
Kalte Gerichte mit dem Airfryer gesund wieder aufwärmen.
Wärmen Sie Takeaway-Gerichte und Reste wieder auf. Mit dem
Philips Airfryer werden sie schön knusprig und saftig.
Er entfernt sogar zusätzliches Fett – für gesündere Mahlzeiten.
Speichern Ihrer bevorzugten Einstellung:
1 Drücken Sie den Ein-/Aus-Schalter, um das Gerät
einzuschalten.
Page 42

42
DEUTSCH
2 Drücken Sie eine der Favoritentasten.
3 Drücken Sie die Auf- oder Ab-Taste, um die gewünschte
Temperatur auszuwählen.
4 Drücken Sie die Zeit-/Temperaturwahltaste.
5 Drücken Sie die Auf- oder Ab-Taste, um die gewünschte
Garzeit auszuwählen.
6 Speichern Sie die gewählten Einstellungen, indem Sie die
gleiche Favoritentaste erneut drücken.
» Das Gerät gibt einen Signalton aus, um zu bestätigen,
dass die Einstellung gespeichert wurde.
Page 43

43
DEUTSCH
Starten Ihrer bevorzugten Einstellung:
1 Drücken Sie den Ein-/Aus-Schalter, um das Gerät
einzuschalten.
2 Drücken Sie eine der Favoritentasten.
» Das Display zeigt die gespeicherten Einstellungen an
(Temperatur und Zeit werden abwechselnd angezeigt).
3 Starten Sie das Gerät, indem Sie die Start-/Pausetaste
drücken.
Tabelle – gesundes Aufwärmen von Lebensmitteln
Inhaltsstoe
Pommes frites
(7 x 7 mm/0,3 x 0,3 in)
Fleischbällchen 15 bis 20 6 bis 9 200 °C/400 °F Kühlschranktemperatur.
Hähnchenkeulen 1 bis 5 13 bis 16 180 °C/350 °F Kühlschranktemperatur.
Pizza 1 3 bis 5 200 °C/400 °F Kühlschranktemperatur.
Brötchen 1 bis 6 3 bis 5 180 °C/350 °F
Gemischtes Gemüse 100 bis 500 g 3 bis 6 200 °C/400 °F Kühlschranktemperatur.
Min./Max.
Menge
100 bis 500 g 6 bis 9 180 °C/350 °F Kühlschranktemperatur.
Zeit
(Min.)
Temperatur Tipp
Schneiden Sie die Pizza in
Stücke.
Page 44

44
DEUTSCH
Ändern der Zeit und der Temperatur während des Garvorgangs
Ändern der Garzeit während des Garvorgangs
Wenn das Gerät die Zeit auf dem Display anzeigt:
1 Drücken Sie die Auf- oder Ab-Taste, um die neue Garzeit
einzustellen.
» Das Gerät arbeitet jetzt mit der neuen Garzeit.
Wenn das Gerät die Temperatur auf dem Display anzeigt:
1 Drücken Sie die Zeit-/Temperaturwahltaste.
» Die Garzeit wird auf dem Display angezeigt.
2 Drücken Sie die Auf- oder Ab-Taste, um die neue Garzeit
einzustellen.
» Das Gerät arbeitet jetzt mit der neuen Garzeit.
Ändern der Gartemperatur während des Garvorgangs
Wenn das Gerät die Temperatur auf dem Display anzeigt:
1 Drücken Sie die Auf- oder Ab-Taste, um die neue
Gartemperatur einzustellen.
» Das Gerät arbeitet jetzt mit der neuen Gartemperatur.
Page 45

45
DEUTSCH
Wenn das Gerät die Zeit auf dem Display anzeigt:
1 Drücken Sie die Zeit-/Temperaturwahltaste.
» Die Gartemperatur wird auf dem Display angezeigt.
2 Drücken Sie die Auf- oder Ab-Taste, um die neue
Gartemperatur einzustellen.
» Das Gerät arbeitet jetzt mit der neuen Gartemperatur.
Zubereiten von hausgemachten Pommes frites
So bereiten Sie köstliche hausgemachte Pommes frites im
Airfryer zu:
- Wählen Sie eine Kartoelsorte, die sich zur Herstellung von
Pommes frites eignet, z. B. frische, (leicht) mehlig kochende
Kartoeln.
- Garen Sie die Pommes frites am besten in Portionen von
bis zu 800 g/28 oz, um ein gleichmäßiges Ergebnis zu
erzielen. Größere Pommes frites werden in der Regel nicht
so knusprig wie kleinere.
- Schütteln Sie den Korb während der Zubereitung im Airfryer
2 bis 3 Mal.
1 Schälen Sie die Kartoeln, und schneiden Sie sie in Stifte
(8 x 8 mm/0,3 x 0,3 in dick).
2 Lassen Sie die Kartoelstifte mindestens 30 Minuten in
Wasser ziehen.
3 Gießen Sie das Wasser ab, und tupfen Sie die
Kartoelstifte mit einem Küchen- oder Papiertuch ab.
4 Geben Sie einen Esslöel Speiseöl in eine Schüssel, geben
Sie die Kartoelstifte hinzu, und wenden Sie diese, bis sie
mit Öl bedeckt sind.
5 Nehmen Sie die Stifte mit den Fingern oder einer
Schaumkelle aus der Schüssel, sodass überschüssiges Öl
in der Schüssel zurückbleibt.
Page 46

46
DEUTSCH
Hinweis
• Schütten Sie nicht alle Stifte direkt aus der Schüssel in den Korb,
da so überschüssiges Öl in die Pfanne gelangen kann.
6 Geben Sie die Stifte in den Korb.
7 Garen Sie die Kartoelstifte, und schütteln Sie den Korb
nach der Hälfte der Zeit. Schütteln Sie 2 bis 3 Mal, wenn
Sie mehr als 500 g/18 oz Pommes frites zubereiten.
Pege
Achtung
• Lassen Sie den Korb, die Pfanne und die Innenseite des Geräts
vollständig abkühlen, bevor Sie mit dem Reinigungsvorgang
beginnen.
• Die Pfanne, der Korb und die Innenseite des Geräts sind
antihaftbeschichtet. Verwenden Sie keine Küchenutensilien
aus Metall oder scheuernde Reinigungsmittel, da dies die
Antihaftbeschichtung beschädigen kann.
Reinigen Sie das Gerät nach jedem Gebrauch. Entfernen Sie
nach jeder Verwendung Öl und Fett aus der Pfanne.
1 Drücken Sie den Ein-/Ausschalter ( ), um das Gerät
auszuschalten. Ziehen Sie dann den Stecker aus der
Steckdose, und lassen Sie das Gerät abkühlen.
Tipp
• Nehmen Sie die Pfanne und den Korb heraus, damit der Airfryer
schneller abkühlt.
2 Entsorgen Sie das ausgeschmolzene Fett oder Öl vom
Boden der Pfanne.
3 Reinigen Sie die Pfanne und den Korb in der
Spülmaschine. Sie können sie auch mit einem nicht
kratzenden Schwamm in heißem Spülwasser reinigen
(siehe "Reinigungstabelle").
Page 47

47
DEUTSCH
Tipp
• Wenn an der Pfanne oder am Korb Lebensmittelreste festsitzen,
weichen Sie die Teile 10 bis 15 Minuten in heißem Wasser
mit Spülmittel ein. Durch das Einweichen lösen sich die
Lebensmittelreste und lassen sich leichter entfernen. Stellen
Sie sicher, dass Sie ein Spülmittel verwenden, das Öl und Fett
auösen kann. Wenn sich Fettrückstände an der Pfanne oder dem
Korb benden, die sich nicht mit heißem Wasser und Spülmittel
entfernen lassen, verwenden Sie einen Anti-Fett-Flüssigreiniger.
• Falls erforderlich können Lebensmittelreste, die am Heizelement
festhängen, mit einer Bürste mit weichen bis mittelharten Borsten
entfernt werden. Verwenden Sie keine Stahldrahtbürste oder
harte Bürste, da dadurch die Beschichtung des Heizelements
beschädigt werden könnte.
4 Reinigen Sie die Oberächen des Geräts mit einem
feuchten Tuch.
Hinweis
• Vergewissern Sie sich, dass keine Feuchtigkeit auf dem Bedienfeld
zurückbleibt. Trocknen Sie das Bedienfeld mit einem Tuch,
nachdem Sie es gereinigt haben.
5 Reinigen Sie das Heizelement mit einer Reinigungsbürste,
um etwaige Lebensmittelrückstände zu entfernen.
6 Reinigen Sie die Innenseite des Geräts mit heißem Wasser
und einem nicht kratzenden Schwamm.
Page 48

48
DEUTSCH
Reinigungstabelle
Aufbewahrung
1 Ziehen Sie den Netzstecker, und lassen Sie das Gerät
abkühlen.
2 Stellen Sie sicher, dass alle Teile sauber und trocken sind,
bevor Sie das Gerät verstauen.
3 Verstauen Sie das Kabel im Netzkabelfach.
Hinweis
• Halten Sie den Airfryer beim Tragen immer horizontal. Achten Sie
darauf, die Pfanne an der Vorderseite des Geräts festzuhalten,
da sie mit dem Korb aus dem Gerät rutschen kann, wenn es
versehentlich geneigt wird. Dies kann diese Teile beschädigen.
• Achten Sie immer darauf, dass die abnehmbaren Teile des Airfryer
befestigt sind, bevor Sie ihn tragen und/oder wegräumen.
Recycling
- Dieses Symbol bedeutet, dass das Produkt nicht mit dem
normalen Hausmüll entsorgt werden kann (2012/19/EU).
1 Altgeräte können kostenlos an geeigneten
Rücknahmestellen abgegeben werden.
2 Diese werden dort fachgerecht gesammelt oder zur
Wiederverwendung vorbereitet. Altgeräte können
Schadstoe enthalten, die der Umwelt und der
menschlichen Gesundheit schaden können. Enthaltene
Rohstoe können durch ihre Wiederverwertung einen
Beitrag zum Umweltschutz leisten.
Page 49

49
DEUTSCH
3 Die Löschung personenbezogener Daten auf den
zu entsorgenden Altgeräten muss vom Endnutzer
eigenverantwortlich vorgenommen werden.
4 Hinweise für Verbraucher in Deutschland: Die in Punkt
1 genannte Rückgabe ist gesetzlich vorgeschrieben.
Sammel- und Rücknahmestellen in Deutschland:
https://www.stiftung-ear.de/
Garantie und Support
Für Unterstützung und weitere Informationen besuchen Sie die
Philips Website unter www.philips.com/support, oder lesen
Sie die internationale Garantieschrift.
Fehlerbehebung
In diesem Kapitel sind die häugsten Probleme aufgeführt,
die beim Gebrauch Ihres Geräts auftreten können. Sollten
Sie ein Problem mithilfe der nachstehenden Informationen
nicht beheben können, besuchen Sie unsere Website unter
www.philips.com/support für eine Liste mit häug gestellten
Fragen, oder wenden Sie sich an das Service-Center in Ihrem
Land.
Problem Mögliche Ursache Lösung
Die Außenseite
des Geräts wird
während des
Gebrauchs heiß.
Die Hitze im Inneren
strahlt bis nach außen
zum Gehäuse.
Das ist normal. Alle Grie und Tasten,
die Sie während der Verwendung
betätigen müssen, können gefahrlos
angefasst werden.
Die Pfanne, der Korb und die Innenseite
des Geräts werden immer heiß,
wenn das Gerät eingeschaltet ist, um
sicherzustellen, dass die Speisen gar
werden. Diese Bereiche sind immer zu
heiß zum Anfassen.
Wenn Sie das Gerät über eine längere
Zeit eingeschaltet lassen, werden
einige Bereiche zu heiß, um gefahrlos
angefasst zu werden. Diese Bereiche
sind auf dem Gerät mit folgendem
Symbol markiert:
Solange Sie die heißen Bereiche kennen
und sie nicht berühren, kann das Gerät
gefahrlos verwendet werden.
Page 50

50
DEUTSCH
Problem Mögliche Ursache Lösung
Meine
hausgemachten
Pommes frites
gelingen nicht wie
erwartet.
Der Airfryer
lässt sich nicht
einschalten.
In meinem
Airfryer treten
sich ablösende
Flecken auf.
Es tritt weißer
Rauch aus dem
Gerät aus.
Sie haben die
falsche Kartoelsorte
verwendet.
Die Zutatenmenge im
Korb ist zu groß.
Bestimmte Zutaten
müssen nach der Hälfte
der Garzeit geschüttelt
werden.
Das Gerät ist nicht
an das Stromnetz
angeschlossen.
Es sind mehrere
Geräte an der
gleichen Steckdose
angeschlossen.
Einige kleine Flecken
können in der Pfanne
des Airfryer auftreten,
wenn Sie beispielsweise
die Beschichtung
unbeabsichtigt berührt
oder zerkratzt haben
(z. B. beim Reinigen
mit scheuernden
Reinigungswerkzeugen
und/oder beim
Einsetzen des Korbs).
Sie bereiten fettige
Zutaten zu.
Verwenden Sie für ein optimales
Ergebnis frische, mehlig kochende
Kartoeln. Wenn Sie die Kartoeln
lagern müssen, lagern Sie sie nicht in
einer kalten Umgebung wie z. B. einem
Kühlschrank. Wählen Sie Kartoeln aus,
auf deren Verpackung steht, dass sie
sich zum Frittieren eignen.
Befolgen Sie die Anweisungen in
dieser Bedienungsanleitung, um
hausgemachte Pommes frites
zuzubereiten.
Befolgen Sie die Anweisungen in
dieser Bedienungsanleitung, um
hausgemachte Pommes frites
zuzubereiten.
Überprüfen Sie, ob der Stecker richtig in
die Steckdose eingesteckt wurde.
Der Airfryer verfügt über eine hohe
Wattleistung. Verwenden Sie eine
andere Steckdose, und prüfen Sie die
Sicherungen.
Setzen Sie den Korb ordnungsgemäß in
die Pfanne ein, um Beschädigungen zu
vermeiden. Wenn Sie den Korb in einem
schrägen Winkel einsetzen, können
die Seiten gegen die Pfanne schlagen
und die Beschichtung beschädigen.
Beachten Sie, dass dies nicht schädlich
ist, da alle verwendeten Materialien
lebensmittelecht sind.
Gießen Sie überschüssiges Öl oder Fett
aus der Pfanne, und setzen Sie den
Garvorgang fort.
Die Pfanne enthält noch
Fettrückstände vom
vorherigen Gebrauch.
Weißer Rauch entsteht, wenn
Fettrückstände in der Pfanne erhitzt
werden. Reinigen Sie die Pfanne und
den Korb nach jeder Verwendung
gründlich.
Page 51

51
DEUTSCH
Problem Mögliche Ursache Lösung
Mein Display
zeigt während
des Garvorgangs
6 Bindestriche an.
Mein Display zeigt
6 Bindestriche
an, nachdem das
Gerät eine Minute
lang ausgesteckt
war.
Die Panade haftet nicht
ausreichend an den
Lebensmitteln.
Marinade, Flüssigkeiten
oder Fleischsaft
gelangen in das
ausgetretene Fett.
Aufgrund der
Überhitzung des
Geräts wurde die
Sicherheitsfunktion
aktiviert.
Die Sicherheitsfunktion
wurde aktiviert.
Lose Panadenstücke können weißen
Rauch verursachen. Drücken Sie die
Panade an den Lebensmitteln fest, um
sicherzustellen, dass sie ausreichend
haftet.
Tupfen Sie die Lebensmittel trocken,
bevor Sie sie in den Korb geben.
Ziehen Sie den Stecker aus der
Steckdose, und lassen Sie das Gerät
1 Minute lang abkühlen, bevor Sie es
wieder einstecken.
Rufen Sie die Philips Service-Hotline an
oder wenden Sie sich an das ServiceCenter in Ihrem Land.
Page 52

52
FRANÇAIS
TABLE DES MATIÈRES
Important 53
Introduction 58
Description générale 58
Avant la première utilisation 60
Avant utilisation 60
Utilisation de l'appareil 60
Tableau de cuisson des aliments 60
Cuisson à l'air chaud 63
Réchauage sain 67
Changement du temps de cuisson et de la température
en cours de cuisson 69
Préparation de frites maison 70
Nettoyage 71
Tableau relatif au nettoyage 73
Rangement 73
Recyclage 73
Garantie et assistance 73
Dépannage 74
Page 53

53
FRANÇAIS
Important
Lisez attentivement ces informations importantes avant
d'utiliser l'appareil et conservez-les pour un usage ultérieur.
Danger
- Mettez toujours les aliments à frire dans
le panier an d'éviter qu'ils entrent en
contact avec les résistances.
- Ne couvrez pas les entrées et sorties d'air
pendant que l'appareil fonctionne.
- Ne remplissez pas la cuve d'huile an
d'éviter tout risque d'incendie.
- Ne plongez jamais l'appareil dans l'eau, ni
dans d'autres liquides et ne le rincez pas
sous le robinet.
- Veillez à ne pas faire pénétrer d'eau ou
d'autres liquides dans l'appareil an
d'éviter tout risque d'électrocution.
- Veillez à ce que la quantité de nourriture
utilisée ne dépasse le niveau maximal
indiqué dans le panier.
- Ne touchez jamais l'intérieur de l'appareil
pendant qu'il fonctionne.
Avertissement
- Avant de brancher l'appareil, vériez que la
tension indiquée sur l'appareil correspond
à la tension supportée par le secteur local.
- N'utilisez jamais l'appareil si la prise, le
cordon d'alimentation ou l'appareil luimême est endommagé.
- Si le cordon d'alimentation est
endommagé, il doit être remplacé par
Philips, par un Centre Service Agréé Philips
Page 54

54
FRANÇAIS
ou par un technicien qualié an d'éviter
tout accident.
- Cet appareil peut être utilisé par des
enfants âgés de 8 ans ou plus, des
personnes dont les capacités physiques,
sensorielles ou intellectuelles sont
réduites ou des personnes manquant
d'expérience et de connaissances, à
condition que ces enfants ou personnes
soient sous surveillance ou qu'ils aient
reçu des instructions quant à l'utilisation
sécurisée de l'appareil et qu'ils aient pris
connaissance des dangers encourus.
Les enfants ne doivent pas jouer avec
l'appareil. Le nettoyage et l'entretien ne
doivent pas être réalisés par des enfants
sauf s'ils sont âgés de plus de 8 ans et
sous surveillance.
- Tenez l'appareil et son cordon hors de
portée des enfants de moins de 8 ans.
- Tenez le cordon d'alimentation à l'écart
des surfaces chaudes.
- Branchez l'appareil uniquement sur une
prise murale mise à la terre. Assurez-vous
toujours que la che est correctement
insérée dans la prise murale.
- Cet appareil n'est pas destiné à être utilisé
avec un minuteur externe ou un système
de contrôle séparé.
- Ne placez pas l'appareil contre un mur
ou contre d'autres appareils. Laissez un
espace libre d'au moins 10 cm à l'arrière
et sur les côtés, et de 10 cm au-dessus de
Page 55

55
FRANÇAIS
l'appareil. Ne placez jamais d'objets audessus de l'appareil.
- N'utilisez pas l'appareil à d'autres ns que
celles indiquées dans le mode d'emploi.
- Lors de la cuisson à l'air chaud, de la
vapeur brûlante s'échappe des sorties
d'air. Gardez les mains et le visage à
distance de la vapeur et des sorties
d'air. Faites également attention à la
vapeur chaude et à l'air chaud lorsque
vous retirez la cuve de l'appareil.
- Les surfaces accessibles peuvent chauer
lorsque l'appareil fonctionne.
- La cuve, le panier et les accessoires à
l'intérieur de l'Airfryer deviennent chauds
lors de l'utilisation. Soyez prudent(s)
lorsque vous les manipulez.
- Ne placez pas l'appareil sur ou à proximité
d'une cuisinière chaude à gaz ou de
tout type de cuisinière électrique ou de
plaques de cuisson électriques, ou dans
un four chaud.
- N'utilisez jamais d'aliments légers ou du
papier sulfurisé dans l'appareil.
- Ne placez jamais l'appareil sur des
matériaux combustibles, comme une
nappe ou des rideaux, ou à proximité de
ce type de matériaux.
- Ne laissez jamais l'appareil fonctionner
sans surveillance.
- Débranchez tout de suite l'appareil si vous
voyez de la fumée noire s'en échapper.
Attendez que la fumée cesse pour sortir la
cuve de l'appareil.
Page 56

56
FRANÇAIS
- Conservation des pommes de terre : la
température doit être adaptée à la variété
des pommes de terre entreposées et doit
être supérieure à 6°C pour minimiser le
risque d'exposition à l'acrylamide dans les
aliments préparés.
- Ne branchez pas l'appareil et ne touchez
pas au panneau de commande avec les
mains humides.
Attention
- Cet appareil est destiné uniquement
à un usage domestique normal. Il n'a
pas été conçu pour une utilisation
dans des environnements tels que des
cuisines destinées aux employés dans
les entreprises, magasins et autres
environnements de travail. Il n'est pas non
plus destiné à être utilisé par des clients
dans des hôtels, motels, chambres d'hôtes
et autres environnements résidentiels.
- Conez toujours l'appareil à un
Centre Service Agréé Philips pour
réparation ou vérication. N'essayez jamais
de réparer l'appareil vous-même ; toute
intervention indue entraîne l'annulation de
la garantie.
- S'il est employé de manière inappropriée,
à des ns professionnelles ou semiprofessionnelles, ou en non-conformité
avec les instructions du mode d'emploi,
la garantie devient caduque et Philips
décline toute responsabilité concernant
les dégâts occasionnés.
Page 57

57
FRANÇAIS
- Placez et utilisez toujours l'appareil sur une
surface sèche, stable, plane et horizontale.
- Débranchez toujours l'appareil après
utilisation.
- Laissez l'appareil refroidir pendant
30 minutes environ avant de le manipuler
ou de le nettoyer.
- Assurez-vous que les aliments cuits dans
cet appareil sont dorés et pas bruns ou
noirs. Enlevez les résidus brûlés. Ne faites
pas frire les pommes de terre crues à une
température supérieure à 180 °C (pour
limiter la synthèse d'acrylamide).
- Soyez prudent(e) lorsque vous nettoyez la
zone supérieure de la chambre de cuisson,
l'élément chauant ou le bord des pièces
métalliques.
Champs électromagnétiques (CEM)
Cet appareil Philips est conforme à toutes les normes
et à tous les règlements applicables relatifs aux champs
électromagnétiques.
Arrêt automatique
Cet appareil est équipé d'une fonction d'arrêt automatique.
L'appareil s'arrête automatiquement si vous n'appuyez sur
aucun bouton pendant 30 minutes. Pour éteindre l'appareil
manuellement, appuyez sur le bouton marche/arrêt.
Page 58

58
FRANÇAIS
Introduction
Félicitations pour votre achat et bienvenue chez Philips !
Pour proter pleinement de l'assistance oerte par
Philips, enregistrez votre produit à l'adresse suivante :
www.philips.com/welcome.
L'Airfryer Philips est la seule friteuse saine dotée de la
technologie Rapid Air exclusive permettant de réaliser des
fritures en utilisant jusqu'à 90 % de matières grasses en moins.
Les aliments sont encore plus croustillants grâce à la
technologie Philips Rapid Air produisant une circulation d'air
7 fois plus rapide.
Les aliments sont cuits sur toutes leurs faces, comme avec
notre conception en étoile, pour des résultats parfaits de la
première à la dernière bouchée.
Vous pouvez désormais préparer des fritures parfaites :
croustillantes à l'extérieur et tendres à l'intérieur. Faites
frire, griller, rôtir et cuire vos aliments pour réaliser des plats
délicieux de façon saine, simple et rapide.
Pour obtenir plus d'informations sur l'Airfryer ainsi que des
idées de recettes, visitez le site www.philips.com/kitchen
ou téléchargez l'application gratuite NutriU* pour IOS® ou
Android™.
* L'application NutriU peut ne pas être disponible dans votre pays.
Dans ce cas, téléchargez l'application Airfryer.
Description générale
1 Panneau de commande
A Indicateur de temps de cuisson / température
B Bouton d'augmentation de la température et du temps
de cuisson
C Bouton de diminution de la température et du temps de
cuisson
D Bouton marche/arrêt
E Bouton marche/pause
F Bouton Favori 1
G Bouton Favori 2
H Bouton de sélection de température/temps de cuisson
2 Niveau MAX
3 Panier
4 Bouton de déverrouillage du panier
5 Cuve
6 Rangement du cordon
7 Sorties d'air
8 Entrée d'air
9 Cordon d'alimentation
Page 59

59
FRANÇAIS
A
H
G
F
B
C
D
E
1
2
9
3
4
8
5
7
6
Page 60

60
FRANÇAIS
Avant la première utilisation
1 Retirez tout l'emballage.
2 Le cas échéant, retirez tous les autocollants et étiquettes
de l'appareil.
3 Nettoyez soigneusement l'appareil avant la première
utilisation, comme indiqué dans le chapitre relatif au
nettoyage.
Avant utilisation
1 Placez l'appareil sur une surface horizontale, stable, plane
et résistant à la chaleur.
Remarque
• Ne posez rien sur le dessus ni les côtés de l'appareil. Cela pourrait
entraver la circulation de l'air et aecter le résultat de friture.
• Ne placez jamais l'appareil en marche à proximité ou en dessous
d'objets qui pourraient être endommagés par la vapeur (murs,
placards, etc.).
2 Retirez le cordon d'alimentation du compartiment de
rangement à l'arrière de l'appareil.
Utilisation de l'appareil
Tableau de cuisson des aliments
Le tableau ci-dessous vous aide à choisir les réglages de base
pour certains types d'aliments.
Remarque
• N'oubliez pas que ces réglages sont donnés à titre d'indication.
Étant donné que les aliments n'ont pas tous la même origine,
la même taille ou la même forme et qu'ils sont de marques
diérentes, nous ne pouvons pas garantir le meilleur réglage pour
leur cuisson.
• Lorsque vous préparez de grandes quantités d'aliments (par
exemple des frites, des crevettes, des pilons de poulet ou des encas surgelés), secouez, tournez ou mélangez les ingrédients dans
le panier 2 ou 3 fois pour un résultat homogène.
Page 61

61
FRANÇAIS
Ingrédients
Frites surgelées
nes (7 x 7 mm /
Min.- max.
quantité
200-1 200 g
7–42 oz
0,3 x 0,3 pouce)
Frites surgelées
épaisses (10 x 10 mm
200-1 200 g
7–42 oz
/ 0,4 x 0,4 pouce)
Frites maison
(12 x 12 mm /
0,5 x 0,5 pouce)
Quartiers de pommes
de terre maison
En-cas surgelés
(nuggets de poulet)
En-cas surgelés
(Petits nems d'environ
20 g / 0,7 oz)
Poulet entier
Blancs de poulet
Environ 160 g / 6 oz
200-1 200 g
7–42 oz
200-1 200 g
7–42 oz
80–1 000 g /
3–35 oz
(6-40 pièces)
100–500 g /
3.5–18 oz
(5-30 pièces)
1 000-1 200 g /
35–42 oz
1-4 pièces 18-22 180 °C/350 °F
Pilons de poulet 200-1 200 g /
7-42 oz
Bâtonnets de poulet
panés
Ailes de poulet
Environ 100 g / 3,5 oz
3-10 pièces
(1 couche)
2-7 pièces
(1 couche)
Temps
(min)
13-32
13-33
18-30 180 °C/350 °F • Faites tremper 30 minutes
20-40 180 °C/350 °F • Faites tremper 30 minutes
7-18 200 °C/400 °F • Vos nuggets sont prêts
14-16 200 °C/400 °F • Vos nuggets sont prêts
50-60 180 °C/350 °F • Évitez que les pattes
23-30
10-15 180 °C/350 °F • Ajoutez de l'huile pour la
14-18 180 °C/350 °F • Secouez, tournez, ou
Température Remarque
180 °C/350 °F • Secouez, tournez, ou
180 °C/350 °F • Secouez, tournez, ou
180 °C/350 °F • Secouez, tournez, ou
mélangez à mi-cuisson
mélangez à mi-cuisson
dans de l'eau froide ou
3 minutes dans de l'eau
tiède (40 °C/100 °F),
séchez puis ajoutez
1 cuillère à soupe d'huile
pour 500 g/18 oz.
• Secouez, tournez, ou
mélangez à mi-cuisson
dans l'eau, séchez et
ajoutez 1/4 à 1 cuillère à
soupe d'huile.
• Secouez, tournez, ou
mélangez à mi-cuisson
lorsqu'ils sont dorés et
croustillants à l'extérieur.
• Secouez, tournez, ou
mélangez à mi-cuisson
lorsqu'ils sont dorés et
croustillants à l'extérieur.
• Secouez, tournez, ou
mélangez à mi-cuisson
touchent l'élément
chauant.
mélangez à mi-cuisson
chapelure. Vos bâtonnets
sont prêts lorsqu'ils sont
bien dorés.
mélangez à mi-cuisson
Page 62

62
FRANÇAIS
Ingrédients
Côtelettes désossées
Environ 150 g / 6 oz
Hamburger
Environ 150 g / 6 oz
(diamètre : 10 cm /
4 pouces)
Saucisses épaisses
Environ 100 g/3,5 oz
(diamètre 4 cm/1,6 po)
Saucisses nes
environ 70 g / 2,5 oz
(diamètre : 2 cm /
0,8 pouce)
Rôti de porc
Poisson entier
Environ 300-400 g /
11-14 oz
Filets de poisson
Environ 120 g/4,2 oz
Fruits de mer
Environ 25-30 g/
0,9-1 oz
Gâteau 750 g / 26 oz 35-40 160 °C/325 °F • Utilisez un moule à
Muns
Environ 50 g / 1,8 oz
Quiche (diamètre :
17 cm / 6,7 pouces)
Pain grillé /
petits pains
Pain maison 550 g / 20 oz 25-35 150 °C/300 °F • La forme doit être aussi
Petits pains maison
Environ 80 g / 2,8 oz
Châtaignes 200-1 500 g/
Min.- max.
quantité
1-4 côtelettes 10-13 200 °C/400 °F
1 à 4 grillades 10-15 200 °C/400 °F
1-5 pièces
(1 couche)
1-6 pièces 9-12 200 °C/400 °F
500-1 000 g /
18-35 oz
1-2 17-20 200 °C/400 °F • Coupez la queue si elle ne
1-3
(1 couche)
200-1 500 g/
7-53 oz
1-9 12-14 180 °C/350 °F • Utiliser des moules
500 g/18 oz 20-25 160 °C/325 °F • Utilisez un plat ou une
1-6 6-7 180 °C/350 °F
1-5 pièces 18-20 160 °C/325 °F
7-53 oz
Temps
(min)
12-15 200 °C/400 °F
50-75 180 °C/350 °F • Laissez reposer pendant
9-12 200 °C/400 °F • An d'éviter qu'ils ne
15-20 200 °C/400 °F • Secouez, tournez, ou
15-30 200 °C/400 °F • Secouez, tournez, ou
Température Remarque
5 minutes avant de
découper.
tient pas dans le panier.
collent, placez la peau
vers le bas et ajoutez un
peu d'huile.
mélangez à mi-cuisson
gâteau.
à muns en silicone
résistant à la chaleur.
plaque de cuisson.
plate que possible an
d'éviter que le pain
touche la résistance
lorsqu'il gone.
mélangez à mi-cuisson
Page 63

63
FRANÇAIS
Ingrédients
Mélange de légumes
(hachés grossièrement)
Min.- max.
quantité
300-800 g /
11-28 oz
Temps
(min)
10-20 200 °C/400 °F • Réglez le temps de
Température Remarque
cuisson selon vos
préférences.
• Secouez, tournez, ou
mélangez à mi-cuisson
Cuisson à l'air chaud
Attention
• Cette friteuse Airfryer fonctionne avec de l'air chaud. Ne
remplissez pas la cuve d'huile, de graisse de friture, ni d'aucun
autre liquide.
• Ne touchez pas les surfaces chaudes. Utilisez les poignées ou les
boutons. Manipulez la cuve chaude avec des gants de cuisine.
• Cet appareil est destiné à un usage domestique uniquement.
• Lors de la première utilisation, de la fumée peut se dégager de
cet appareil. Ce phénomène est normal.
• Le préchauage de l'appareil n'est pas nécessaire.
1 Branchez la che sur la prise murale.
2 Retirez la cuve avec le panier de l'appareil en tirant sur la
poignée.
3 Mettez les aliments dans le panier.
Page 64

64
FRANÇAIS
Remarque
• La friteuse Airfryer permet de préparer une grande variété
d'aliments. Consultez le tableau de cuisson des aliments
pour connaître les bonnes quantités et les temps de cuisson
approximatifs.
• Ne dépassez pas la quantité indiquée dans le tableau de cuisson
des aliments et ne remplissez pas le panier au-delà de l'indication
MAX car cela pourrait aecter la qualité du résultat nal.
• Si vous souhaitez faire frire des ingrédients diérents en même
temps, vériez le temps de cuisson suggéré pour les diérents
ingrédients avant de commencer à les faire frire.
4 Remettez la cuve avec le panier dans l'Airfryer.
Attention
• N'utilisez jamais la cuve sans le panier à l'intérieur.
• Ne touchez pas la cuve ou le panier pendant que l'appareil
fonctionne ou refroidit, car ils peuvent devenir très chauds.
5 Appuyez sur le bouton marche/arrêt ( ) pour allumer
l'appareil.
6 Utilisez le bouton de direction haut ou bas pour
sélectionner la température requise.
7 Appuyez sur le bouton de sélection de température/temps
de cuisson.
Page 65

65
FRANÇAIS
8 Utilisez le bouton de direction haut ou bas pour
sélectionner le temps de cuisson requis.
9 Appuyez sur le bouton marche/pause pour lancer la
cuisson.
Remarque
• Pendant la cuisson, la température et le temps de cuisson
s'achent en alternance.
• Les secondes sont décomptées pendant la dernière minute de
cuisson.
• Reportez-vous au tableau des aliments pour connaître les
réglages de cuisson standard des diérents aliments.
Conseil
• Pour interrompre la cuisson, appuyez sur le bouton marche/
pause. Pour reprendre la cuisson, appuyez de nouveau sur le
bouton marche/pause.
• L'appareil passe automatiquement en mode pause lorsque vous
retirez la cuve et le panier. La cuisson reprend lorsque la cuve et le
panier sont remis dans l'appareil.
Remarque
• Si vous ne réglez pas le temps de cuisson requis dans les
30 minutes, l'appareil s'éteint automatiquement pour des raisons
de sécurité.
• Si vous sélectionnez l'indication de temps « - - », l'appareil passe
en mode préchauage. Lorsque la température dénie est
atteinte, l'appareil émet un signal sonore.
• Certains aliments doivent être mélangés ou tournés à mi-cuisson
(voir le tableau de cuisson des aliments). Pour secouer les
ingrédients, retirez la cuve avec le panier, placez-la sur une surface
résistant à la chaleur, appuyez sur le bouton de déverrouillage du
panier an de retirer le panier et secouez ce dernier au-dessus
de l'évier. Remettez le panier dans la cuve et insérez-les dans
l'appareil.
• Placez le panier à plat dans la cuve de manière à ce qu'il repose
sur le crochet de support dans la cuve. Ne l'inclinez pas.
• Si vous réglez le minuteur sur la moitié du temps de cuisson, la
sonnerie du minuteur retentira lorsqu'il sera temps de secouer ou
de retourner les aliments. Veillez à régler le minuteur sur le temps
de cuisson restant.
Page 66

66
FRANÇAIS
10 Lorsque vous entendez la sonnerie du minuteur, cela
signie que le temps de cuisson déni s'est écoulé.
Remarque
• Vous pouvez arrêter la cuisson manuellement. Pour cela, appuyez
sur le bouton marche/pause.
11 Retirez la cuve et vériez que les aliments sont cuits.
Attention
• La cuve de l'Airfryer est chaude après la cuisson. Placez-la
toujours sur un plan de travail résistant à la chaleur (par exemple
sur un dessous de plat) lorsque vous la retirez de l'appareil.
Remarque
• Si les aliments ne sont pas encore cuits, réinsérez la cuve dans
l'Airfryer en tenant la poignée et ajoutez quelques minutes de
temps de cuisson.
12 Pour sortir des aliments de petite taille (frites, par
exemple), retirez le panier de la cuve en appuyant sur le
bouton de déverrouillage du panier.
Attention
• Une fois la cuisson terminée, la cuve, le panier, l'intérieur de
l'appareil et les ingrédients sont chauds. En fonction du type
d'aliments placés dans l'Airfryer, de la vapeur peut s'échapper de
la cuve.
13 Videz le contenu du panier dans un saladier ou un plat.
Retirez toujours le panier de la cuve pour vider son
contenu, car de l'huile chaude peut se trouver au fond de
la cuve.
Remarque
• Pour sortir les aliments volumineux ou fragiles, utilisez des pinces.
• L'excédent d'huile ou la graisse fondue sont recueillis au fond de
la cuve.
• Selon les aliments que vous préparez, videz soigneusement
l'excès d'huile ou de graisse fondue de la cuve après chaque
portion ou avant de secouer ou de replacer le panier dans la cuve.
Placez le panier sur une surface résistant à la chaleur. Portez des
gants de cuisine pour vider l'excédent d'huile ou de graisse
fondue. Replacez le panier dans la cuve.
Page 67

67
FRANÇAIS
Lorsqu'un panier d'aliments est cuit, vous pouvez
immédiatement en faire cuire un autre dans l'Airfryer.
Remarque
• Répétez les étapes 4 à 15 si vous voulez préparer une autre
portion.
Réchauage sain
Réchauez sainement vos plats avec l'Airfryer.
Ravivez vos plats de traiteur et vos restes. Votre Airfryer Philips
peut rendre vos aliments à nouveau croustillants et juteux.
Il élimine même l'excédent de gras de vos aliments, pour des
repas plus sains.
Pour sauvegarder votre réglage Favori :
1 Appuyez sur le bouton marche/arrêt pour allumer
l'appareil.
2 Appuyez sur l'un des boutons Favori.
3 Utilisez le bouton de direction haut ou bas pour
sélectionner la température requise.
Page 68

68
FRANÇAIS
4 Appuyez sur le bouton de sélection de température/temps
de cuisson.
5 Utilisez le bouton de direction haut ou bas pour
sélectionner le temps de cuisson requis.
6 Gardez en mémoire les réglages de votre choix en
appuyant sur le même bouton Favori.
» L'appareil émet un bip pour conrmer que le réglage est
enregistré.
Pour lancer votre réglage Favori :
1 Appuyez sur le bouton marche/arrêt pour allumer
l'appareil.
2 Appuyez sur l'un des boutons Favori.
» L'écran ache les réglages enregistrés (la température
et le temps de cuisson s'achent en alternance).
Page 69

69
FRANÇAIS
3 Démarrez l'appareil en appuyant sur le bouton marche/
pause.
Tableau de réchauage sain des aliments
Ingrédients
Frites nes (7 x 7 mm /
0,3 x 0,3 pouce)
Boulettes de viande 15-20 6-9 200 °C/400 °F Température du réfrigérateur.
Pilons de poulet 1-5 13-16 180 °C/350 °F Température du réfrigérateur.
Pizza 1 3-5 200 °C/400 °F Température du réfrigérateur.
Petits pains 1-6 3-5 180 °C/350 °F
Mélange de légumes 100-500 g 3-6 200 °C/400 °F Température du réfrigérateur.
Min.- max.
quantité
100-500 g 6-9 180 °C/350 °F Température du réfrigérateur.
Temps
(min)
Température Conseil
Coupez la pizza en parts.
Changement du temps de cuisson et de la température en cours de cuisson
Changement du temps de cuisson en cours de cuisson
Lorsque l'appareil ache le temps de cuisson à l'écran :
1 Utilisez le bouton de direction haut ou bas pour dénir le
nouveau temps de cuisson.
» L'appareil fonctionne maintenant avec le nouveau
temps de cuisson.
Lorsque l'appareil ache la température à l'écran :
1 Appuyez sur le bouton de sélection de température/temps
de cuisson.
» Le temps de cuisson déni s'ache à l'écran.
Page 70

70
FRANÇAIS
2 Utilisez le bouton de direction haut ou bas pour dénir le
nouveau temps de cuisson.
» L'appareil fonctionne maintenant avec le nouveau
temps de cuisson.
Changement de la température de cuisson en cours de
cuisson
Lorsque l'appareil ache la température à l'écran :
1 Utilisez le bouton de direction haut ou bas pour dénir le
nouveau temps de cuisson.
» L'appareil fonctionne maintenant avec la nouvelle
température de cuisson.
Lorsque l'appareil ache le temps de cuisson à l'écran :
1 Appuyez sur le bouton de sélection de température/temps
de cuisson.
» La température de cuisson s'ache à l'écran.
2 Appuyez sur le bouton haut ou bas pour dénir la nouvelle
température de cuisson.
» L'appareil fonctionne maintenant avec la nouvelle
température de cuisson.
Préparation de frites maison
Pour préparer de délicieuses frites maison dans l'Airfryer :
- Choisissez une variété de pommes de terre qui convient
à la préparation de frites, par ex. des pommes de terre
fraîches, (légèrement) farineuses.
Page 71

71
FRANÇAIS
- Il est préférable de faire frire les frites par portions de
800 grammes (28 onces) maximum pour un résultat
homogène. Les grosses frites sont généralement moins
croustillantes que les petites.
- Secouez le panier 2 à 3 fois durant la cuisson à l'air chaud.
1 Épluchez les pommes de terre et coupez-les en bâtonnets
(8 x 8 mm / 0,3 x 0,3 pouce d'épaisseur).
2 Faites tremper les bâtonnets de pomme de terre dans un
saladier rempli d'eau pendant au moins 30 minutes.
3 Videz le plat et séchez les bâtonnets de pomme de terre à
l'aide d'un torchon de cuisine ou d'un essuie-tout.
4 Versez une cuillère à soupe d'huile dans un saladier, puis
ajoutez-y les bâtonnets et mélangez jusqu'à ce qu'ils
soient enrobés d'huile.
5 Sortez les bâtonnets du saladier avec les mains ou un
ustensile de cuisine à égoutter pour que l'excédent d'huile
reste dans le saladier.
Remarque
• N'inclinez pas le saladier pour verser directement les pommes
de terre coupées dans le panier an d'éviter qu'une trop grande
quantité d'huile se retrouve dans la cuve.
6 Mettez les bâtonnets dans le panier.
7 Faites frire les bâtonnets de pomme de terre en secouant
le panier à mi-cuisson. Secouez le panier 2 à 3 fois si vous
préparez plus de 500 g (18 oz) de frites.
Nettoyage
Avertissement
• Laissez refroidir entièrement le panier, la cuve et l'intérieur de
l'appareil avant de commencer le nettoyage.
• La cuve, le panier et l'intérieur de l'appareil ont un revêtement
antiadhésif. N'utilisez pas d'ustensiles de cuisine métalliques ou
de produits nettoyants abrasifs an d'éviter d'endommager le
revêtement antiadhésif.
Nettoyez l'appareil après chaque utilisation. Videz l'huile et la
graisse du fond de la cuve après chaque utilisation.
1 Appuyez sur le bouton marche/arrêt ( ) pour éteindre
l'appareil, retirez la che de la prise murale et laissez
l'appareil refroidir.
Page 72

72
FRANÇAIS
Conseil
• Retirez la cuve et le panier pour que la friteuse Airfryer refroidisse
plus rapidement.
2 Jetez la graisse ou l'huile qui se trouve au fond de la cuve.
3 Nettoyez la cuve et le panier au lave-vaisselle. Vous
pouvez aussi les nettoyer avec de l'eau chaude, du liquide
vaisselle et une éponge non abrasive (voir « Tableau relatif
au nettoyage »).
Conseil
• Si des résidus d'aliments adhèrent à la cuve ou au panier, vous
pouvez les laisser tremper dans de l'eau chaude et du liquide
vaisselle pendant 10 à 15 minutes. Les résidus d'aliments se
détacheront et pourront être facilement éliminés. Assurez-vous
que vous utilisez du liquide vaisselle qui peut dissoudre l'huile et
la graisse. Si des taches de graisse persistent dans la cuve ou le
panier et que vous ne parvenez pas à les éliminer avec de l'eau
chaude et du liquide vaisselle, utilisez un produit dégraissant
liquide.
• Si nécessaire, les résidus d'aliments collés à l'élément chauant
peuvent être éliminés avec une brosse à poils souples à
moyennement souples. N'utilisez pas de brosse en ls d'acier
ou de brosse à poils durs car vous risqueriez d'endommager le
revêtement de l'élément chauant.
4 Essuyez l'extérieur de l'appareil à l'aide d'un chion
humide.
Remarque
• Assurez-vous qu'aucune trace d'humidité ne subsiste sur le
panneau de commande. Séchez le panneau de commande avec
un chion après l'avoir nettoyé.
5 Nettoyez l'élément chauant avec une brosse de
nettoyage pour éliminer les résidus de nourriture.
6 Nettoyez l'intérieur de l'appareil avec de l'eau chaude et
une éponge non abrasive.
Page 73

73
FRANÇAIS
Tableau relatif au nettoyage
Rangement
1 Débranchez l'appareil et laissez-le refroidir.
2 Veillez à nettoyer et sécher tous les éléments avant de
ranger l'appareil.
3 Rangez le cordon dans son compartiment.
Remarque
• Tenez toujours la friteuse Airfryer horizontalement lorsque vous
la transportez. Veillez à tenir la cuve à l'avant de l'appareil car
l'ensemble cuve et panier peut glisser hors de l'appareil si celui-ci
est incliné par mégarde. Cela pourrait endommager ces éléments.
• Assurez-vous toujours que les pièces amovibles de l'Airfryer sont
xées avant de transporter et/ou de ranger l'appareil.
Recyclage
- Ce symbole signie que ce produit ne doit pas être mis au
rebut avec les ordures ménagères (2012/19/UE).
- Respectez les règles en vigueur dans votre pays pour la
mise au rebut des produits électriques et électroniques.
Une mise au rebut correcte contribue à préserver
l'environnement et la santé.
Garantie et assistance
Si vous avez besoin d'une assistance ou
d'informations supplémentaires, consultez le site Web
www.philips.com/support ou lisez le dépliant séparé sur la
garantie internationale.
Page 74

74
FRANÇAIS
Problème Cause possible Solution
L'extérieur de
l'appareil devient
chaud en cours
d'utilisation.
Dépannage
Cette rubrique présente les problèmes les plus courants
que vous pouvez rencontrer avec votre appareil. Si vous ne
parvenez pas à résoudre le problème à l'aide des informations
ci-dessous, rendez-vous sur www.philips.com/support pour
consulter les questions fréquemment posées ou contactez le
Service Consommateurs de votre pays.
La chaleur interne
chaue les parois
extérieures.
Ce phénomène est normal. Tous les
boutons et poignées que vous êtes
amené(e) à toucher pendant l'utilisation
resteront susamment froids pour que
vous puissiez les toucher.
Lorsque l'appareil est allumé, la cuve,
le panier et l'intérieur de l'appareil
deviennent toujours chauds, an
d'assurer une cuisson correcte des
aliments. Ces pièces sont toujours trop
chaudes pour que vous puissiez les
toucher.
Si vous laissez l'appareil allumé pendant
longtemps, certaines zones seront très
chaudes au toucher. L'icône suivante
vous permet de reconnaître ces zones :
Mes frites
maison ne sont
pas comme je
l'espérais.
L'Airfryer ne
s'allume pas.
Vous n'avez pas utilisé
la bonne variété de
pommes de terre.
La quantité d'aliments
dans le panier est trop
importante.
Certains types
d'aliments doivent être
mélangés à mi-cuisson.
L'appareil n'est pas
branché.
À partir du moment où vous savez
qu'il y a des zones très chaudes et que
vous évitez de les toucher, l'appareil ne
présente aucun danger.
Pour obtenir les meilleurs résultats,
utilisez des pommes de terre fraîches
farineuses. Si vous avez besoin de
conserver les pommes de terre, ne les
placez pas en milieu froid comme un
réfrigérateur. Choisissez des pommes
de terre pour lesquelles il est indiqué
sur l'emballage qu'elles conviennent à
la friture.
Suivez les instructions de ce manuel
d'utilisation pour préparer des frites
maison.
Suivez les instructions de ce manuel
d'utilisation pour préparer des frites
maison.
Vériez si la che est correctement
insérée dans la prise secteur.
Page 75

75
FRANÇAIS
Problème Cause possible Solution
Je vois des
éraures dans
mon Airfryer.
De la fumée
blanche s'échappe
de l'appareil.
Mon écran ache
6 tirets pendant la
cuisson.
Plusieurs appareils sont
branchés sur une même
prise.
De petites taches
peuvent apparaître
dans la cuve de
l'Airfryer suite à un
contact accidentel
avec le revêtement (par
exemple en nettoyant
avec des outils de
nettoyage durs et/ou en
insérant le panier).
Vous faites cuire des
aliments riches en
matières grasses.
La cuve contient des
résidus de graisse de
l'utilisation précédente.
La chapelure n'adhère
pas correctement aux
aliments.
Il y a des éclaboussures
de marinade, de liquide
ou de jus de viande dans
la graisse fondue ou
l'huile.
La fonction de sécurité
a été activée en raison
de la surchaue de
l'appareil.
L'Airfryer est très puissant. Essayez une
autre prise et vériez les fusibles.
Vous pouvez éviter ces éraures en
abaissant correctement le panier dans
la cuve. Si vous insérez le panier de
travers, le côté peut taper contre la paroi
de la cuve et abîmer le revêtement. Si
cela se produit, sachez que ce n'est pas
nocif car tous les matériaux utilisés sont
sûrs pour les aliments.
Videz avec précaution l'excédent d'huile
ou de graisse de la cuve et poursuivez la
cuisson.
La fumée blanche est causée par la
cuisson de résidus de graisse dans la
cuve. Nettoyez soigneusement la cuve et
le panier après chaque utilisation.
De petits morceaux de chapelure
peuvent provoquer un dégagement
de fumée blanche. Appuyez bien la
chapelure sur aliments an qu'elle
adhère.
Épongez les aliments avant de les placer
dans le panier.
Débranchez l'appareil et laissez-le
refroidir pendant 1 minute avant de le
rebrancher.
Mon écran
ache 6 tirets
une fois l'appareil
débranché depuis
une minute.
Le dispositif de sécurité
a été activé.
Appelez la hot line de la SAV Philips ou
contactez le Service Consommateurs de
votre pays.
Page 76

76
NEDERLANDS
INHOUDSOPGAVE
Belangrijk 77
Introductie 82
Algemene beschrijving 82
Voor het eerste gebruik 84
Klaarmaken voor gebruik 84
Het apparaat gebruiken 84
Tabel voor etenswaren 84
Heteluchtfrituren 87
Gezond opnieuw opwarmen 91
De bereidingstijd en -temperatuur wijzigen tijdens het
koken 93
Zelfgemaakte frites maken 94
Reiniging 95
Schoonmaaktabel 97
Opbergen 97
Recycling 97
Garantie en ondersteuning 97
Problemen oplossen 98
Page 77

77
NEDERLANDS
Belangrijk
Lees deze belangrijke informatie zorgvuldig door voordat u het
apparaat gaat gebruiken. Bewaar het boekje om het indien
nodig later te kunnen raadplegen.
Gevaar
- Doe de etenswaren die u wilt bakken
altijd in de mand om te voorkomen dat ze
met de verwarmingselementen in contact
komen.
- Bedek de luchtinlaat- en
-uitlaatopeningen niet wanneer het
apparaat in gebruik is.
- Vul de pan niet met olie, want dit kan
brandgevaar veroorzaken.
- Dompel het apparaat nooit in water of een
andere vloeistof en spoel het ook niet af
onder de kraan.
- Zorg dat er geen water of een andere
vloeistof in het apparaat terechtkomt om
een elektrische schok te voorkomen.
- Overschrijd nooit het maximumniveau dat
is aangegeven in de mand.
- Raak nooit de binnenkant van het
apparaat aan wanneer het is ingeschakeld.
Waarschuwing
- Controleer of het voltage dat wordt
aangegeven op het apparaat,
overeenkomt met de plaatselijke
netspanning voordat u het apparaat
aansluit.
- Gebruik het apparaat niet indien de
stekker, het netsnoer of het apparaat zelf
beschadigd is.
Page 78

78
NEDERLANDS
- Indien het netsnoer beschadigd is, moet u
het laten vervangen door Philips, een door
Philips geautoriseerd servicecentrum of
personen met vergelijkbare kwalicaties
om gevaar te voorkomen.
- Dit apparaat kan worden gebruikt door
kinderen vanaf 8 jaar en door personen
met verminderde lichamelijke, zintuiglijke
of geestelijke capaciteiten of weinig
ervaring en kennis, mits zij toezicht of
instructie hebben ontvangen aangaande
veilig gebruik van het apparaat, en zij
de gevaren van het gebruik begrijpen.
Kinderen mogen niet met het apparaat
spelen. Reiniging en onderhoud mogen
alleen door kinderen worden uitgevoerd
die ouder zijn dan 8 jaar en alleen onder
toezicht.
- Houd het apparaat en het snoer buiten
bereik van kinderen die jonger zijn dan 8
jaar oud.
- Houd het netsnoer uit de buurt van hete
oppervlakken.
- Sluit het apparaat uitsluitend aan op een
geaard stopcontact. Controleer altijd of de
stekker goed in het stopcontact zit.
- Dit apparaat is niet bedoeld om bediend
te worden met een externe timer of een
afzonderlijk afstandsbedieningssysteem.
- Plaats het apparaat niet tegen een muur
of tegen andere apparaten. Laat minimaal
10 cm vrij achter en aan beide zijden van
het apparaat. Laat boven het apparaat
ook minimaal 10 cm vrij. Plaats geen
voorwerpen op het apparaat.
Page 79

79
NEDERLANDS
- Gebruik het apparaat niet voor andere
doeleinden dan beschreven in de
gebruiksaanwijzing.
- Tijdens het heteluchtfrituren komt hete
stoom uit de luchtuitlaatopeningen.
Houd uw handen en gezicht op veilige
afstand van de stoom en van de
luchtuitlaatopeningen. Pas ook op voor
hete stoom en lucht wanneer u de pan uit
het apparaat haalt.
- De aanraakbare oppervlakken kunnen
tijdens gebruik heet worden.
- De pan, de mand en de accessoires in de
Airfryer worden heet tijdens gebruik. Wees
voorzichtig wanneer u deze aanraakt.
- Plaats het apparaat niet op of in de buurt
van een heet gasfornuis of elektrisch
fornuis, hete elektrische kookplaat of in
een warme oven.
- Doe nooit lichte ingrediënten of bakpapier
in het apparaat.
- Zet het apparaat niet op of in de buurt van
brandbare materialen, zoals een tafelkleed
of gordijnen.
- Laat het apparaat nooit zonder toezicht
werken.
- Haal onmiddellijk de stekker uit het
stopcontact wanneer er donkere rook uit
het apparaat komt. Wacht tot er geen rook
meer uit het apparaat komt voordat u de
pan uit het apparaat haalt.
- Bewaren van aardappels: aardappels
moeten worden bewaard bij
een temperatuur die past bij de
Page 80

80
NEDERLANDS
aardappelsoort en die boven 6°C ligt om
het risico op blootstelling aan acrylamide
te minimaliseren.
- Steek de stekker niet in het stopcontact en
bedien het bedieningspaneel niet als uw
handen nat zijn.
Let op
- Dit apparaat is uitsluitend bedoeld
voor normaal gebruik binnenshuis. Het
apparaat is niet bedoeld voor gebruik
in personeelskeukens van bijvoorbeeld
winkels, kantoren, boerderijen of
vergelijkbare werkomgevingen. Het is ook
niet bedoeld voor gebruik door gasten van
hotels, motels, bed & breakfasts en andere
verblijfsaccommodaties.
- Breng het apparaat altijd naar een door
Philips geautoriseerd servicecentrum
voor onderzoek of reparatie. Probeer het
apparaat niet zelf te repareren, omdat uw
garantie hierdoor komt te vervallen.
- Bij (semi-)professioneel of onjuist gebruik
en bij gebruik dat niet overeenkomt met
de instructies in de gebruiksaanwijzing,
vervalt de garantie en weigert Philips
iedere aansprakelijkheid voor hierdoor
ontstane schade.
- Plaats en gebruik het apparaat altijd op
een droge, stabiele, vlakke en horizontale
ondergrond.
- Haal na gebruik altijd de stekker uit het
stopcontact.
Page 81

81
NEDERLANDS
- Laat het apparaat ongeveer 30 minuten
afkoelen voordat u het vastpakt of
schoonmaakt.
- Zorg ervoor dat de etenswaren die in dit
apparaat zijn bereid, goudgeel zijn en
niet donker of bruin. Verwijder verbrande
resten. Frituur verse aardappelen niet bij
een temperatuur hoger dan 180 °C (om het
ontstaan van acrylamide tot een minimum
te beperken).
- Wees voorzichtig bij het schoonmaken
van het bovenste gedeelte van de
bereidingsruimte: het verwarmingselement
is heet en de randen van metalen
onderdelen zijn scherp.
Elektromagnetische velden (EMV)
Dit Philips-apparaat voldoet aan alle toepasselijke richtlijnen
en voorschriften met betrekking tot elektromagnetische
velden.
Automatische uitschakeling
Dit apparaat heeft een functie voor automatische
uitschakeling. Als u niet binnen 30 minuten op een knop
drukt, wordt het apparaat automatisch uitgeschakeld. Om
het apparaat handmatig uit te schakelen, drukt u op de aanuitknop.
Page 82

82
NEDERLANDS
Introductie
Gefeliciteerd met uw aankoop en welkom bij Philips!
Registreer uw product op www.philips.com/welcome om
optimaal gebruik te kunnen maken van de door Philips
geboden ondersteuning.
De Philips Airfryer is de enige Airfryer met de unieke Rapid Airtechnologie waarmee u uw favoriete gerechten met weinig tot
geen olie en met tot 90% minder vet kunt frituren.
Door de zeven keer snellere airow van de Philips Rapid Air
worden uw gerechten nog krokanter.
In combinatie met het stervormige ontwerp wordt het voedsel
gelijkmatig gaar en kunt u smullen van perfecte resultaten, van
de allereerste hap tot de allerlaatste.
U kunt nu genieten van perfect bereid, gefrituurd voedsel:
krokant vanbuiten en mals vanbinnen. Frituren, grillen,
roosteren en bakken: bereid verschillende smakelijke
gerechten op een gezonde, snelle en gemakkelijke manier.
Ga voor meer inspiratie, recepten en informatie over de Airfryer
naar www.philips.com/kitchen of download de gratis NutriU-
app voor iOS® of Android™.
*De NutriU app is mogelijk niet beschikbaar in uw land.
Download in dat geval de Airfryer-app.
Algemene beschrijving
1 Conguratiescherm
A Tijd-/temperatuurindicatie
B Knop voor verhogen temperatuur-/tijdindicatie
C Knop voor verlagen temperatuur-/tijdindicatie
D Aan-uitknop
E Start-/pauzeknop
F Favorietenknop 1
G Favorietenknop 2
H Selectieknop voor tijd/temperatuur
2 MAX-aanduiding
3 Mand
4 Mandontgrendelknop
5 Pan
6 Snoeropbergruimte
7 Luchtuitlaatopeningen
8 Luchtinlaat
9 Voedingskabel
Page 83

83
NEDERLANDS
A
H
G
F
B
C
D
E
1
2
9
3
4
8
5
7
6
Page 84

84
NEDERLANDS
Voor het eerste gebruik
1 Verwijder al het verpakkingsmateriaal.
2 Verwijder eventuele stickers of labels van het apparaat.
3 Reinig het apparaat grondig vóór het eerste gebruik, zoals
aangegeven in het hoofdstuk 'Reinigen'.
Klaarmaken voor gebruik
1 Plaats het apparaat op een stabiele, horizontale, vlakke en
hittebestendige ondergrond.
Opmerking
• Plaats geen voorwerpen op of op de zijkanten van het apparaat.
Dit zou de luchtstroom kunnen onderbreken en het eindresultaat
kunnen beïnvloeden.
• Plaats het ingeschakelde apparaat niet in de buurt van of onder
voorwerpen die door stoom kunnen worden beschadigd, zoals
muren en kastjes.
2 Trek het netsnoer uit de snoeropbergruimte aan de
achterzijde van het apparaat.
Het apparaat gebruiken
Ingrediënten
Dunne
diepvriesfrites
(7 x 7 mm)
Tabel voor etenswaren
De onderstaande tabel vermeldt de basisstanden voor
veelvoorkomende etenswaren die u wilt bereiden.
Opmerking
• Houd er rekening mee dat deze standen slechts indicaties zijn.
Aangezien etenswaren verschillen in herkomst, grootte, vorm
en merk, kunnen we niet de beste stand voor uw etenswaren
garanderen.
• Als u een grotere hoeveelheid voedsel bereidt (zoals frites,
garnalen, drumsticks, bevroren snacks), schudt, draait of roert u de
etenswaren in de mand 2 of 3 keer voor een consistent resultaat.
Min. - max.
hoeveelheid
200–1200 g
7–42 oz
Bewerkingstijd
(min)
13-32
Temperatuur Opmerking
180 °C/
350 °F
• Halverwege schudden,
draaien of roeren
Page 85

85
NEDERLANDS
Ingrediënten
Dikke
diepvriesfrites
Min. - max.
hoeveelheid
200–1200 g
7–42 oz
(10 x 10 mm/
0.4 x 0.4 in)
Zelfgemaakte
frites (12 x 12 mm/
0.5 x0.5 in)
Zelf gesneden
aardappelpartjes
Bevroren snacks
(kipnuggets)
Bevroren snacks
(kleine loempia's
van ongeveer
20 g/0,7 oz)
Hele kip 1000–
Kiplet
Ongeveer
160 g/6 oz
200–1200 g
7–42 oz
200–1200 g
7–42 oz
80-1000 g/
3–35 oz
(6–40 stuks)
100–500 g/
3,5–18 oz
(5-30 stuks)
1200 g/
35–42 oz
1–4 stuks 18-22 180 °C/
Drumsticks 200–
1200 g/
7–42 oz
Gepaneerde
kipvingers
Kippenvleugeltjes
Ongeveer
100 g/3,5 oz
Koteletten zonder
bot
Ongeveer
150 g/6 oz
3–10 stuks
(1 laag)
2–7 stuks
(1 laag)
1–4 stuks 10-13 200 °C/
Bewerkingstijd
(min)
13-33
18–30 180 °C/
20–40 180 °C/
7-18 200 °C/
14-16 200 °C/
50-60 180 °C/
23–30
10-15 180 °C/
14-18 180 °C/
Temperatuur Opmerking
180 °C/
350 °F
350 °F
350 °F
400 °F
400 °F
350 °F
350 °F
180 °C/
350 °F
350 °F
350 °F
400 °F
• Halverwege schudden,
draaien of roeren
• Laat 30 minuten weken in
koud water of 3 minuten
in lauwwarm water (40
°C/100°F), droog ze en
voeg 1 eetlepel olie toe per
500 g/18 oz.
• Halverwege schudden,
draaien of roeren
• Week 30 minuten in water,
droog af en voeg 1/4 tot 1
eetl. olie toe.
• Halverwege schudden,
draaien of roeren
• Klaar als ze goudbruin
en krokant zijn aan de
buitenkant.
• Halverwege schudden,
draaien of roeren
• Klaar als ze goudbruin
en krokant zijn aan de
buitenkant.
• Halverwege schudden,
draaien of roeren
• Zorg ervoor dat de poten
het verwarmingselement
niet raken.
• Halverwege schudden,
draaien of roeren
• Voeg olie toe aan het
paneermeel. Klaar als ze
goudbruin zijn.
• Halverwege schudden,
draaien of roeren
Page 86

86
NEDERLANDS
Ingrediënten
Hamburger
Ongeveer
Min. - max.
hoeveelheid
Bewerkingstijd
(min)
Temperatuur Opmerking
1-4 stuks 10-15 200 °C/
400°F
150 g/6 oz
(diameter
10 cm/4 in)
Dikke worst
Ongeveer 100
1-5 stuks
(1 laag)
12-15 200 °C/
400°F
g/3,5 oz (diameter
4 cm/1,6 in)
Dunne worst
Ongeveer
1-6 stuks 9-12 200 °C/
400°F
70 g/2.5 oz
(diameter
2 cm/0,8 in)
Varkenslende
Hele vis
Ongeveer 300–
500–1000 g/
18–35 oz
1-2 17–20 200 °C/
50–75 180 °C/
350 °F
400 °F
400 g/11–14 oz
Vislet
Ongeveer
1–3
(1 laag)
9-12 200 °C/
400 °F
120 g/4,2 oz
Schelp-/
schaaldieren
200–1500 g
7-53 oz
15–20 200 °C/
400 °F
Ongeveer
25–30 g/0,9–1 oz
Cake 750 g/26 oz 35–40 160 °C/
325 °F
Muns
Ongeveer
1-9 12-14 180 °C/
350 °F
50 g/1,8 oz
Quiche (diameter
17 cm/6,7 in)
Voorgebakken
geroosterd brood/
500 g/18 oz 20–25 160 °C/
325 °F
1-6 6-7 180 °C/
350 °F
broodjes
Zelfgebakken
brood
550 g/20 oz 25–35 150 °C/
300 °F
• Laat het vlees 5 minuten
rusten voordat u het
aansnijdt.
• Snijd de staart eraf als deze
niet in de mand/grillpan
past.
• Leg de vis met de huidkant
op de bodem en voeg wat
olie toe om aanbakken te
voorkomen.
• Halverwege schudden,
draaien of roeren
• Cakevorm gebruiken.
• Gebruik hittebestendige
siliconen munvormpjes.
• Bakplaat of ovenschaal
gebruiken.
• Het brood moet zo
plat mogelijk zijn om
te voorkomen dat het
tijdens het rijzen tegen het
verwarmingselement komt.
Page 87

87
NEDERLANDS
Ingrediënten
Zelfgemaakte
rolletjes
Ongeveer 80
g/2,8 oz
Kastanjes 200–1500 g
Gemengde
groenten (grof
gehakt)
Min. - max.
hoeveelheid
1-5 stuks 18-20 160 °C/
7-53 oz
300–800 g
11-28 oz
Heteluchtfrituren
Bewerkingstijd
(min)
15-30 200 °C/
10-20 200 °C/
Temperatuur Opmerking
325 °F
400 °F
400 °F
• Halverwege schudden,
draaien of roeren
• Stel de bereidingstijd naar
eigen voorkeur in.
• Halverwege schudden,
draaien of roeren
Let op
• Dit is een Airfryer en dit apparaat werkt met hete lucht. Vul de
pan niet met olie, frituurvet of een andere vloeistof.
• Raak hete oppervlakken niet aan. Gebruik handgrepen of
knoppen. Draag ovenwanten als u de hete pan wilt verplaatsen.
• Dit apparaat is uitsluitend bedoeld voor huishoudelijk gebruik.
• Er kan wat rook uit het apparaat komen wanneer u dit voor het
eerst gebruikt. Dit is normaal.
• Het apparaat hoeft niet te worden voorverwarmd.
1 Steek de stekker in het stopcontact.
2 Verwijder de pan met de mand uit het apparaat door aan
het handvat te trekken.
Page 88

88
NEDERLANDS
3 Doe de etenswaren in de mand.
Opmerking
• Met de Airfryer kunt u een grote verscheidenheid aan etenswaren
bereiden. Raadpleeg de ‘Tabel voor etenswaren’ voor de juiste
hoeveelheden en de kooktijden bij benadering.
• De hoeveelheden uit de ‘Tabel voor etenswaren’ mogen niet
worden overschreden en de mand mag niet tot boven de 'MAX'aanduiding worden gevuld omdat dit een negatief eect op de
kwaliteit van het eindresultaat kan hebben.
• Als u verschillende etenswaren tegelijkertijd wilt bereiden, moet u
de voorgestelde bereidingstijd die nodig is voor de verschillende
etenswaren controleren voordat u met de gelijktijdige bereiding
begint.
4 Zet de pan en de mand terug in de Airfryer.
Let op
• Gebruik de pan nooit zonder mand.
• Raak de pan of mand tijdens en een tijdje na gebruik niet aan,
want deze worden heel heet.
5 Druk op de aan-uitknop ( ) om het apparaat in te
schakelen.
6 Druk op de knop omhoog/omlaag om de gewenste
temperatuur te selecteren.
7 Druk op de selectieknop voor tijd/temperatuur.
Page 89

89
NEDERLANDS
8 Druk op de knop omhoog/omlaag om de gewenste tijd te
selecteren.
9 Druk op de start-/pauzeknop om de bereiding te starten.
Opmerking
• Tijdens de bereiding worden afwisselend de temperatuur en tijd
weergegeven.
• De laatste kookminuut telt af in seconden.
• Raadpleeg de etenswarentabel met
standaardbereidingsinstellingen voor verschillende soorten
voedsel.
Tip
• Druk op de start-/pauzeknop om de bereiding te pauzeren. Druk
opnieuw op de start-/pauzeknop als u het koken wilt hervatten.
• Het apparaat gaat automatisch in de pauzemodus wanneer u de
pan en de mand eruit haalt. De bereiding gaat verder als de pan
en de mand weer terug in het apparaat worden gezet.
Opmerking
• Als u de noodzakelijke bereidingstijd niet binnen 30 minuten
instelt, wordt het apparaat om veiligheidsredenen uitgeschakeld.
• Als '- -' als tijdsaanduiding is geselecteerd, wordt de modus voor
voorverwarmen ingeschakeld. Wanneer de ingestelde temperatuur
is bereikt, maakt het apparaat een geluid.
• Sommige etenswaren moeten halverwege de bereidingstijd
worden geschud of gedraaid (zie 'Tabel voor etenswaren' ). Om
de etenswaren te schudden haalt u de pan met de mand eruit en
plaatst u deze op een hittebestendige ondergrond. Druk op de
ontgrendelknop om de mand te verwijderen en schud deze boven
de gootsteen. Plaats de mand in de pan en schuif ze weer terug in
het apparaat.
• Plaats de mand recht in de pan zodat deze op de steunhaak in de
pan ligt. Kantel de mand niet.
• Als u de timer instelt op de helft van de bereidingstijd, is het bij
het belsignaal tijd om de etenswaren te schudden of draaien.
Vergeet niet om de timer op de resterende bereidingstijd in te
stellen.
Page 90

90
NEDERLANDS
10 Wanneer u het belsignaal hoort, is de bereidingstijd
verstreken.
Opmerking
• U kunt de bereiding handmatig stoppen. Druk hiervoor op de
start-/pauzeknop.
11 Haal de pan eruit en controleer of de etenswaren gaar zijn.
Let op
• De pan van de Airfryer is heet na het koken. Plaats de pan altijd
op een hittebestendige ondergrond (bijv. Trivet, enz.) wanneer u
deze uit het apparaat haalt.
Opmerking
• Als de etenswaren nog niet klaar zijn, schuift u eenvoudigweg de
pan aan het handvat terug in de Airfryer en voegt u wat extra
minuten aan de ingestelde tijd toe.
12 Om kleine etenswaren (bijv. frites) te verwijderen, tilt u de
mand uit de pan door op de ontgrendelknop te drukken.
Let op
• Na het bereidingsproces zijn de pan, de mand, de binnenkant
van de behuizing en de etenswaren erg heet. Afhankelijk van het
type etenswaren in de Airfryer kan er stoom uit de pan komen.
13 Leeg de mand in een schaal of op een bord. Haal altijd de
mand uit de pan om de inhoud eruit te halen aangezien
onder in de pan nog hete olie kan zitten.
Opmerking
• Om grote of kwetsbare etenswaren uit de mand te verwijderen,
kunt u het beste een tang gebruiken.
• Overtollige olie of vet van de etenswaren wordt opgevangen op
de bodem van de pan.
• Afhankelijk van het soort etenswaren dat u bereidt, giet u
voorzichtig na elke portie of voordat u de mand schudt of in de
pan terugzet, overtollige olie of overtollig gesmolten vet uit de
pan. Plaats de mand op een hittebestendig oppervlak. Draag
ovenwanten om overtollige olie of vet weg te gieten. Zet de mand
terug in de pan.
Page 91

91
NEDERLANDS
Zodra er een portie klaar is, kunt u direct een volgende portie
bereiden in de Airfryer.
Opmerking
• Herhaal stap 4 tot en met 15 als u nog een portie wilt bereiden.
Gezond opnieuw opwarmen
Opwarmen wordt gezonder met de Airfryer.
Geef weer smaak aan uw afhaalmaaltijden en restjes. Uw
Philips Airfryer maakt uw gerechten weer sappig en krokant.
De Airfryer verwijdert zelfs extra vet voor gezondere maaltijden.
Uw favoriete instelling opslaan:
1 Druk op de aan-uitknop om het apparaat in te schakelen.
2 Druk op een van de favorietenknoppen.
3 Druk op de knop omhoog/omlaag om de gewenste
temperatuur te selecteren.
4 Druk op de selectieknop voor tijd/temperatuur.
Page 92

92
NEDERLANDS
5 Druk op de knop omhoog/omlaag om de gewenste tijd te
selecteren.
6 Sla de gekozen instellingen op door nogmaals op dezelfde
favorietenknop te drukken.
» Het apparaat piept om te bevestigen dat de instelling is
opgeslagen.
Uw favoriete instelling gebruiken:
1 Druk op de aan-uitknop om het apparaat in te schakelen.
2 Druk op een van de favorietenknoppen.
» Het scherm toont de opgeslagen instellingen (de
temperatuur en tijd worden afwisselend weergegeven).
3 Start het apparaat door op de start-/pauzeknop te
drukken.
Page 93

93
NEDERLANDS
Tabel voor het gezond opwarmen van etenswaren
Ingrediënten
Diepvriesfrites
(7 x 7 mm/0,3 x 0,3 in)
Gehaktballen 15–20 6–9 200 °C/400°F Koelkasttemperatuur.
Kippendrumsticks 1–5 13–16 180 °C/350°F Koelkasttemperatuur.
Pizza 1 3–5 200 °C/400°F Koelkasttemperatuur.
Broodjes 1-6 3–5 180 °C/350°F
Gemengde groenten 100–500 g 3–6 200 °C/400°F Koelkasttemperatuur.
Min. - max.
hoeveelheid
100–500 g 6–9 180 °C/350°F Koelkasttemperatuur.
Bewerkingstijd
(min)
Temperatuur Tip
Snijd de pizza in stukjes.
De bereidingstijd en -temperatuur wijzigen tijdens het koken
De bereidingstijd wijzigen tijdens het koken
Zodra het apparaat op het scherm de tijd weergeeft:
1 Druk op de knop omhoog/omlaag om de nieuwe
bereidingstijd te selecteren.
» Het apparaat houdt nu de nieuwe bereidingstijd aan.
Zodra het apparaat op het scherm de temperatuur weergeeft:
1 Druk op de selectieknop voor tijd/temperatuur.
» De ingestelde tijd verschijnt op het scherm.
2 Druk op de knop omhoog/omlaag om de nieuwe
bereidingstijd te selecteren.
» Het apparaat houdt nu de nieuwe bereidingstijd aan.
Page 94

94
NEDERLANDS
De bereidingstemperatuur wijzigen tijdens het koken
Zodra het apparaat op het scherm de temperatuur weergeeft:
1 Druk op de knop omhoog/omlaag om de nieuwe
bereidingstemperatuur in te stellen.
» Het apparaat houdt nu de nieuwe
bereidingstemperatuur aan.
Zodra het apparaat op het scherm de tijd weergeeft:
1 Druk op de selectieknop voor tijd/temperatuur.
» De bereidingstemperatuur wordt getoond op het
scherm.
2 Druk op de knop omhoog/omlaag om de nieuwe
bereidingstemperatuur in te stellen.
» Het apparaat houdt nu de nieuwe
bereidingstemperatuur aan.
Zelfgemaakte frites maken
Ga als volgt te werk om zelfgemaakte frites in de Airfryer te
bereiden:
- Kies een aardappelsoort die geschikt is voor het maken van
frites, bijvoorbeeld verse, (iets) kruimige aardappelen.
- U kunt de frites het best bakken in porties van maximaal
800 g/28 oz voor een gelijkmatig resultaat. Grotere frites
worden minder krokant dan kleinere frites.
- Schud de mand 2–3 keer tijdens het bereidingsproces.
1 Schil de aardappelen en snijd ze in staafjes
(8 x 8 mm/0,3 x 0,3 in dik).
2 Laat de aardappelstaafjes minimaal 30 minuten weken in
een kom met water.
3 Giet de kom leeg en droog de aardappelstaafjes met een
theedoek of keukenpapier.
Page 95

95
NEDERLANDS
4 Giet een eetlepel olie die geschikt is om te bakken en
frituren in de kom, leg de staafjes in de kom en meng het
geheel totdat de aardappelstaafjes met een laagje olie
bedekt zijn.
5 Verwijder de aardappelstaafjes met de hand of met
keukengerei uit de kom zodat overtollige olie in de kom
achterblijft.
Opmerking
• Kantel de kom niet om alle staafjes in één keer in de mand
te doen. Zo voorkomt u dat overtollige olie onder in de pan
terechtkomt.
6 Leg de aardappelreepjes in de mand.
7 Frituur de aardappelstaafjes en schud de mand
halverwege de bereidingstijd. Schud 2–3 keer als u meer
dan 500 g/18 oz frites bereidt.
Reiniging
Waarschuwing
• Laat de mand, de pan en de binnenkant van het apparaat
volledig afkoelen voordat u begint met reinigen.
• De pan, de mand en de binnenkant van het apparaat hebben een
antiaanbaklaag. Gebruik geen metalen keukengerei of schurende
schoonmaakmaterialen om te voorkomen dat de antiaanbaklaag
beschadigd raakt.
Maak het apparaat na ieder gebruik schoon. Haal na elk
gebruik olie en vet van de bodem van de pan.
1 Druk op de aan-uitknop ( ) om het apparaat uit te
schakelen. Trek vervolgens de stekker uit het stopcontact
en laat het apparaat afkoelen.
Tip
• Verwijder de pan en de mand als u de Airfryer sneller wilt laten
afkoelen.
2 Haal het gesmolten vet of de olie van de bodem van de
pan.
3 Reinig de pan en de mand in een vaatwasmachine. U kunt
ze ook reinigen met warm water, afwasmiddel en een nietschurend sponsje (zie de ‘schoonmaaktabel' ).
Page 96

96
NEDERLANDS
Tip
• Als er voedselresten aan de pan of de mand vastzitten, kunt
u deze 10 tot 15 minuten in heet water met afwasmiddel laten
weken. Het weken maakt de voedselresten los, waarna u deze
gemakkelijk kunt verwijderen. Gebruik een afwasmiddel dat olie
en vet kan oplossen. Als er vetvlekken op de pan of mand zitten
en u deze niet met heet water en afwasmiddel hebt kunnen
verwijderen, gebruikt u een vloeibare ontvetter.
• Indien nodig kunt u voedselresten die vastzitten aan het
verwarmingselement verwijderen met een zachte tot middelharde
borstel. Gebruik geen staalborstel of een harde borstel,
anders kunt u de beschermlaag op het verwarmingselement
beschadigen.
4 Veeg de buitenkant van het apparaat schoon met een
vochtige doek.
Opmerking
• Zorg ervoor dat er geen vocht achterblijft op het
bedieningspaneel. Droog het bedieningspaneel met een doek
nadat u het hebt schoongemaakt.
5 Maak het verwarmingselement schoon met een
schoonmaakborsteltje om etensresten te verwijderen.
6 Maak de binnenkant van het apparaat schoon met warm
water en een niet-schurend sponsje.
Page 97

97
NEDERLANDS
Schoonmaaktabel
Opbergen
1 Haal de stekker uit het stopcontact en laat het apparaat
afkoelen.
2 Controleer of alle onderdelen schoon en droog zijn
voordat u het apparaat opbergt.
3 Duw het snoer in de snoeropbergruimte.
Opmerking
• Houd de Airfryer altijd horizontaal wanneer u deze draagt. Zorg
er ook voor dat u de pan aan de voorzijde van het apparaat
vasthoudt. De pan en mand kunnen uit het apparaat schuiven
als het apparaat per ongeluk naar beneden wordt gekanteld.
Daardoor kunnen de onderdelen beschadigd raken.
• Zorg er altijd voor dat de verwijderbare onderdelen van de Airfryer
vastzitten voordat u het apparaat oppakt en/of opbergt.
Recycling
- Dit symbool betekent dat dit product niet bij het gewone
huishoudelijke afval mag worden weggegooid (2012/19/EU).
- Volg de geldende regels in je land voor de gescheiden
inzameling van elektrische en elektronische producten. Als
u correct verwijdert, voorkomt u negatieve gevolgen voor
het milieu en de volksgezondheid.
Garantie en ondersteuning
Als u informatie of ondersteuning nodig hebt, bezoek dan
www.philips.com/support of lees het 'worldwide guarantee'vouwblad.
Page 98

98
NEDERLANDS
Probleem Mogelijke oorzaak Oplossing
De buitenkant
van het apparaat
wordt heet tijdens
gebruik.
Mijn zelfgemaakte
frites zijn niet
goed gelukt.
De Airfryer kan
niet worden
ingeschakeld.
Problemen oplossen
Dit hoofdstuk behandelt in het kort de problemen die u kunt
tegenkomen tijdens het gebruik van uw apparaat. Als u het
probleem niet met de onderstaande informatie kunt oplossen,
ga dan naar www.philips.com/support voor een lijst met
veelgestelde vragen of neem contact op met het Consumer
Care Center in uw land.
De warmte in het
apparaat straalt uit naar
de buitenwanden.
U hebt de verkeerde
soort aardappelen
gebruikt.
De hoeveelheid
etenswaren in de mand
is te groot.
Bepaalde etenswaren
moeten halverwege de
bereidingstijd worden
geschud.
De stekker van het
apparaat zit niet in het
stopcontact.
Dit is normaal. Alle handgrepen en
knoppen die u tijdens het gebruik moet
aanraken, blijven koel genoeg om aan
te raken.
De pan, de mand en de binnenzijde
van het apparaat worden altijd heet
wanneer het apparaat is ingeschakeld.
Hierdoor wordt het gerecht goed gaar.
Deze onderdelen zijn altijd te heet om
aan te raken.
Als u het apparaat langere tijd
ingeschakeld laat, worden bepaalde
delen te heet om aan te raken. Deze
delen zijn op het apparaat gemarkeerd
met het volgende pictogram:
Zolang u zich bewust bent van de hete
delen en u deze delen niet aanraakt, is
het apparaat volkomen veilig.
Voor het beste resultaat gebruikt u
verse, kruimige aardappelen. Bewaar de
aardappelen niet op een koude plaats
zoals in de koelkast. Kies aardappelen
waarvan op de verpakking staat dat ze
geschikt zijn voor frituren.
Volg de instructies in deze
gebruiksaanwijzing voor de bereiding
van verse frites.
Volg de instructies in deze
gebruiksaanwijzing voor de bereiding
van verse frites.
Controleer of de stekker goed in het
stopcontact is gestoken.
Page 99

99
NEDERLANDS
Probleem Mogelijke oorzaak Oplossing
Ik zie wat
afbladderingen in
mijn Airfryer.
Er komt witte rook
uit het apparaat.
Mijn scherm toont
6 streepjes tijdens
het koken.
Er zijn meerdere
apparaten op
één stopcontact
aangesloten.
In de pan van de Airfryer
kunnen kleine plekjes
ontstaan wanneer u
de coating per ongeluk
hebt aangeraakt of
bekrast, bijvoorbeeld
tijdens het reinigen
met agressieve
schoonmaakmiddelen
en/of bij het plaatsen
van de mand).
U bereidt vette
etenswaren.
Er zitten nog vetresten
in de pan van de vorige
keer.
Een paneerlaag of
omhulling is niet goed
aan de etenswaren vast
blijven zitten.
Marinade, vloeistof of
vleessap spat in de olie
of het gesmolten vet.
De
veiligheidsvoorziening is
ingeschakeld omdat het
apparaat oververhit is
geraakt.
De Airfryer heeft een hoog wattage.
Probeer een ander stopcontact en
controleer de stoppen.
U kunt beschadigingen voorkomen door
de mand correct in de pan te plaatsen.
Als u de mand onder een hoek laat
zakken, kan de zijkant van de mand
tegen de wand van de pan stoten,
waardoor de coating beschadigd kan
raken. Dit is echter niet schadelijk: alle
gebruikte materialen zijn niet gevaarlijk
als ze in uw voedsel terechtkomen.
Giet voorzichtig overtollige olie
of overtollig vet uit de pan en zet
vervolgens de bereiding voort.
Witte rook wordt veroorzaakt door
vetresten die in de pan worden verhit.
Reinig de pan en de mand grondig na
elk gebruik.
Kleine rondzwevende stukjes van een
paneerlaag of omhulling kunnen witte
rook veroorzaken. Druk een paneerlaag
of omhulling stevig op de etenswaren
om er zeker van te zijn dat deze goed
blijft zitten.
Dep voedsel droog voordat u het in de
mand plaatst.
Haal de stekker uit het stopcontact en
laat het apparaat 1 minuut afkoelen
voordat u de stekker weer insteekt.
Mijn scherm
toont 6 streepjes
nadat de stekker
van het apparaat
gedurende één
minuut uit het
stopcontact is
gehaald.
De veiligheidsfunctie is
geactiveerd.
Bel de helpdesk van Philips of neem
contact op met het Consumer Care
Centre in uw land.
Page 100

Specications are subject to change without notice
© 2019 Koninklijke Philips N.V.
All rights reserved
100% recycled paper
100% papier recyclé
3000 040 74261 B
 Loading...