

Page 1
HD8827
HD8827_FRONT-COVER.indd 1 15-01-16 15:17
Page 2
Page 3
2
1
X
X
Aroma plus
Hot water
Steam
Espresso
Memo Memo Memo
Calc
clean
Espresso lungo Coffee
14
15
4
5
6
1 2 3
13
11
12
10
26
24
20
34
33
32
35
28
17
16
27
25
22
7 8 9
2930
31
19 18
23
21
Page 4

Page 5

4
English
Contents
Introduction______________________________________________________________________ 4
Important ________________________________________________________________________ 5
Warning_________________________________________________________________________ 5
Caution__________________________________________________________________________ 6
Electromagnetic fields (EMF)________________________________________________________ 7
Machine overview (Fig. 1)___________________________________________________________ 7
First installation ___________________________________________________________________ 8
Circuit priming____________________________________________________________________ 9
Automatic rinsing cycle_____________________________________________________________ 10
Manual rinsing cycle_______________________________________________________________ 10
Measuring the water hardness_______________________________________________________ 11
Installing the Intenza+ water filter____________________________________________________ 12
Using the machine_________________________________________________________________ 14
Beverage types and lengths_________________________________________________________ 14
Brewing espresso, espresso lungo and coffee__________________________________________ 15
Adjusting the coffee dispensing spout ________________________________________________ 15
Brewing 1 cup of espresso, espresso lungo and coffee___________________________________ 15
Brewing 2 cups of espresso, espresso lungo and coffee__________________________________ 15
Frothing milk_____________________________________________________________________ 15
Hot water________________________________________________________________________ 16
Adjusting quantity and taste ________________________________________________________ 16
Saeco Adapting System____________________________________________________________ 16
Activating the aroma plus function ___________________________________________________ 16
Adjusting coffee length with the MEMO function________________________________________ 17
Adjusting the grinder settings________________________________________________________ 17
Maintenance and care_____________________________________________________________ 17
Cleaning the drip tray and the coffee grounds container _________________________________ 17
Cleaning the brew group____________________________________________________________ 18
Lubrication_______________________________________________________________________ 20
Classic milk frother cleaning (daily) ___________________________________________________ 21
Classic milk frother and steam wand cleaning (weekly) __________________________________ 21
Descaling________________________________________________________________________ 21
Descaling procedure_______________________________________________________________ 21
Interruption of the descaling cycle____________________________________________________ 23
Meaning of light signals_____________________________________________________________ 24
Troubleshooting __________________________________________________________________ 27
Recycling________________________________________________________________________ 30
Guarantee and support ____________________________________________________________ 30
Ordering maintenance products______________________________________________________ 30
Technical specifications____________________________________________________________ 31
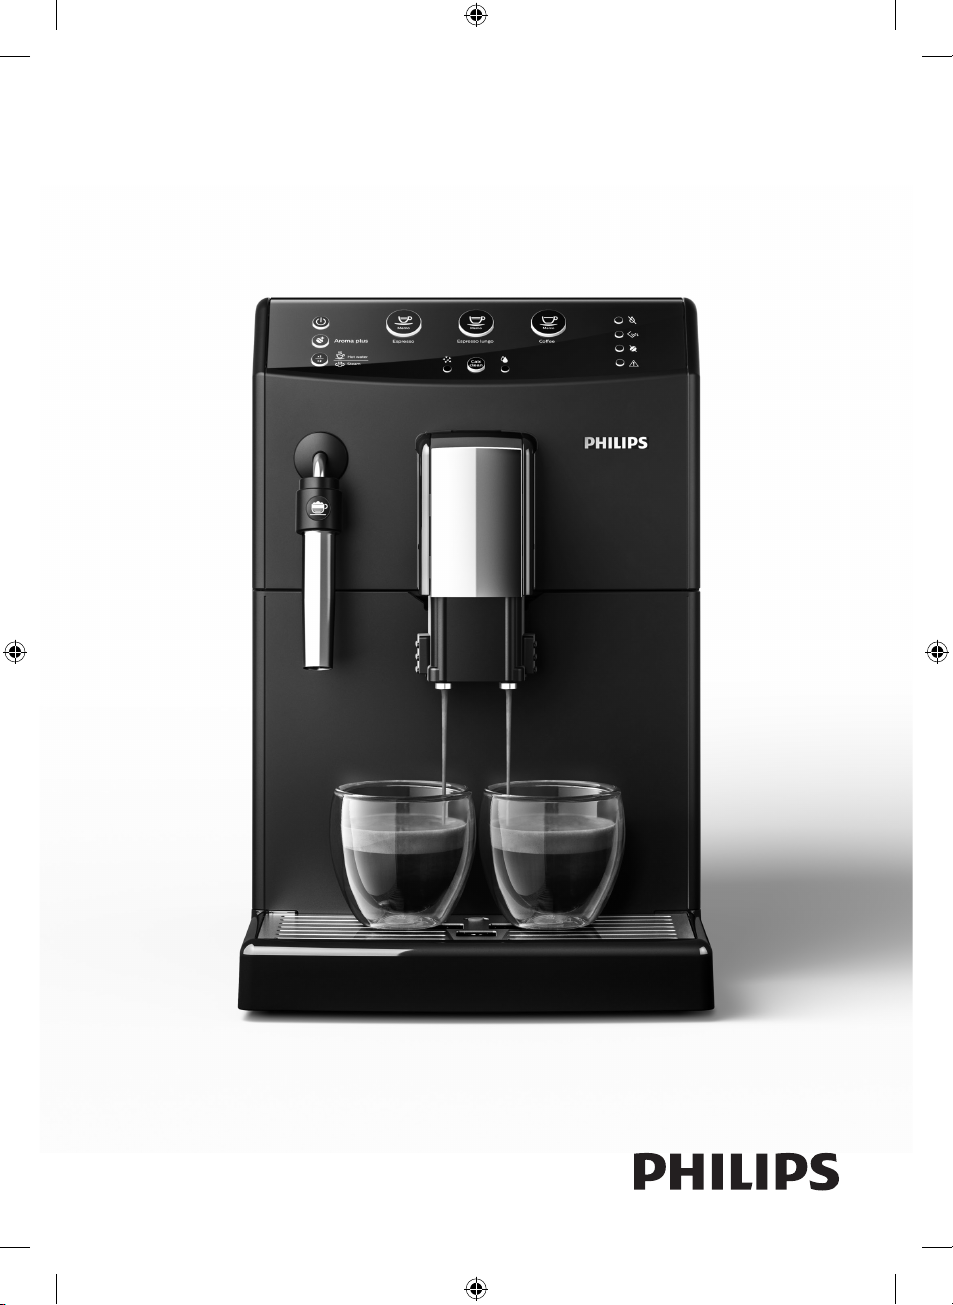
Introduction
Congratulations on your purchase of a Philips fully automatic coffee
machine with Classic Milk Frother! To fully benefit from the support that
Philips offers, please register your product at www.philips.com/welcome.
Page 6

English
The machine is suitable for preparing espresso and coffee using whole
coffee beans, as well as for dispensing steam and hot water. In this user
manual you will find all the information you need to install, use, clean and
descale your machine.
If you experience any future problems with your machine or have other
questions, have a look on our support page at www.philips.com/support.
Here you can find all detailed information on cleaning and maintenance,
frequently asked questions, support movies and the user manuals.
Important
This machine is equipped with safety features. Nevertheless, read and
follow the safety instructions carefully and only use the machine as
described in these instructions, to avoid accidental injury or damage due to
improper use of the machine. Keep this user manual for future reference.
Warning
-
Connect the machine to a wall socket with a voltage matching the
technical specifications of the machine.
-
Connect the machine to an earthed wall socket.
-
Do not let the power cord hang over the edge of a table or
counter, or touch hot surfaces.
-
Never immerse the machine, mains plug or power cord in water
(danger of electrical shock).
-
Do not pour liquids on the power cord connector.
-
Never direct the hot water jet towards body parts: danger of burns.
-
Do not touch hot surfaces. Use handles and knobs.
-
Switch off the machine with the main switch located on the back
and remove the mains plug from the socket:
-
If a malfunction occurs.
-
If the machine will not be used for a long time.
-
Before cleaning the machine.
-
Pull on the plug, not on the power cord.
-
Do not touch the mains plug with wet hands.
-
Do not use the machine if the mains plug, the power cord or the
machine itself is damaged.
-
Do not make any modifications to the machine or its power cord.
5
Page 7

6
English
-
Only have repairs carried out by a service center authorized by
Philips to avoid a hazard
-
The machine should not be used by children younger than 8 years
old.
-
This machine can be used by children aged from 8 years and
above and by persons with reduced physical, sensory or mental
capabilities or lack of experience and knowledge if they have been
given supervision or instruction concerning use of the machine in a
safe way and if they understand the hazards involved.
-
Cleaning and user maintenance shall not be made by children
unless they are older than 8 and supervised.
-
Keep the machine and its cord out of the reach of children aged
less than 8 years.
-
Children should be supervised to ensure that they do not play with
the machine.
-
Never insert fingers or other objects in the coffee grinder.
-
The machine shall not be placed in a cabinet when in use.
Caution
-
This machine is intended for normal household use only. It is not
intended for use in environments such as staff kitchens of shops,
offices, farms or other work environments.
-
Always put the machine on a flat and stable surface. Keep it in
upright position, also during transport.
-
Do not place the machine on a hotplate or directly next to a hot
oven, heater or similar source of heat.
-
Only put roasted coffee beans in the bean hopper. If ground
coffee, instant coffee, raw coffee beans or any other substance is
put in the coffee bean hopper, it may cause damage to the
machine.
-
Let the machine cool down before inserting or removing any parts.
The heating surfaces may retain residual heat after use.
-
Never fill the water tank with warm, hot or sparkling water, as this
may cause damage to the water tank and the machine.
Page 8

English
-
Never use souring pads, abrasive cleaning agents or aggressive
liquids such as petrol or acetone to clean the machine. Simply use
a soft cloth dampened with water.
-
Descale your machine regularly. The machine indicates when
descaling is needed. Not doing this will make your appliance stop
working properly. In this case repair is not covered under your
guarantee.
-
Do not keep the machine at temperatures below 0°C.Water left in
the heating system may freeze and cause damage.
-
Do not leave water in the water tank when the machine is not used
over a long period of time. The water can be contaminated. Use
fresh water every time you use the machine.
Electromagnetic fields (EMF)
This Philips appliance complies with all applicable standards and
regulations regarding exposure to electromagnetic fields.
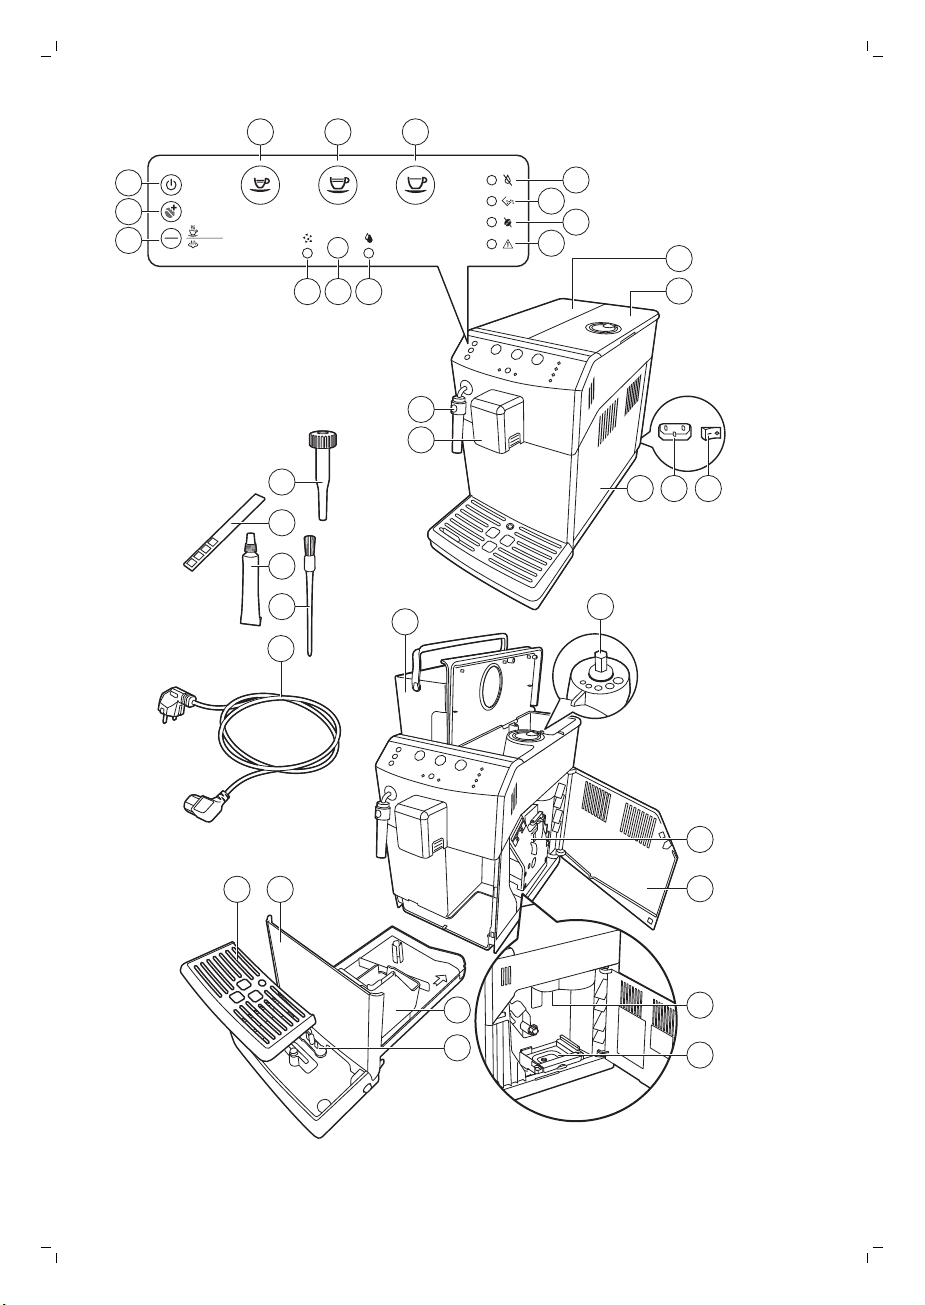
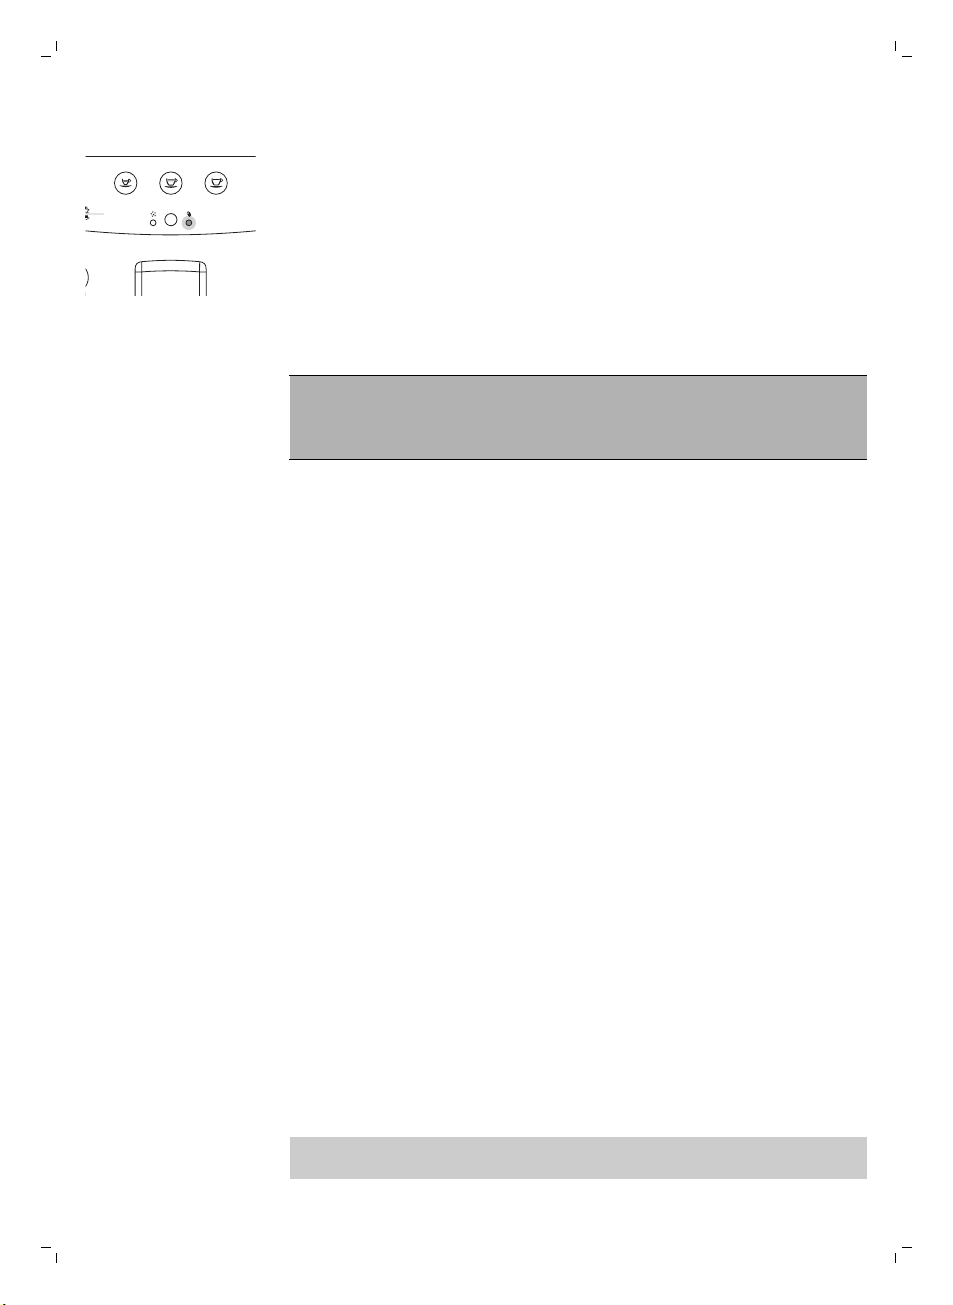
Machine overview (Fig. 1)
1 ESPRESSO button
2 ESPRESSO LUNGO button
3 COFFEE button
4 ON/OFF button
5 AROMA STRENGTH button
6 HOT WATER/ STEAM button
7 Descaling cycle light
8 CALC CLEAN button
9 Rinse cycle light
10 General warning light
11 No coffee light
12 Empty coffee grounds container light
13 No water light
14 Coffee dispensing spout
15 Classic milk frother
16 Lid of the water tank
17 Lid of the bean hopper
18 Main switch
19 Socket for cord
20 Service door
21 Grinder adjustment knob
22 Water tank
23 Brew group
24 Inside of maintenance door with cleaning instructions
25 Coffee exit duct
26 Coffee residues drawer
27 Drip tray full indicator
7
Page 9
15 cm
15 cm
15 cm
15 cm
15 cm
15 cm
15 cm
15 cm
M
AX
CALC
CLEAN
MAX
8
English
28 Coffee grounds container
29 Drip tray
30 Drip tray cover
31 Cord
32 Cleaning brush
33 Grease
34 Water hardness tester
35 Multifunctional tool (grinder adjustment key and coffee duct cleaning
tool)
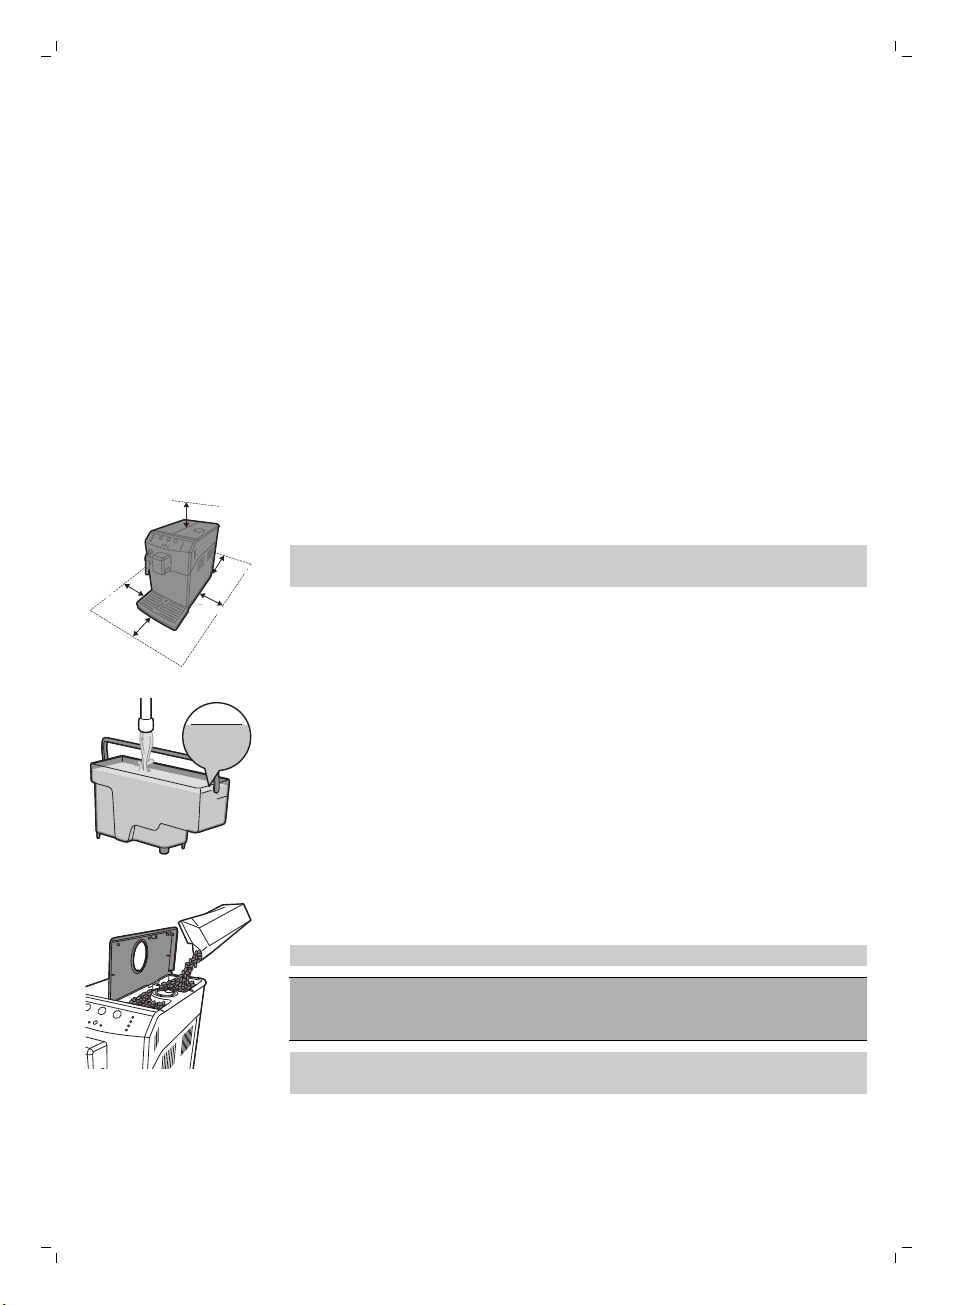
First installation
This machine has been tested with coffee. Although it has been carefully
cleaned, there may be some coffee residues left. We guarantee, however,
that the machine is absolutely new.Like with most full-automatic machines,
you first need to brew some coffees to enable the machine to complete its
self-adjustment and get the best tasting coffee.
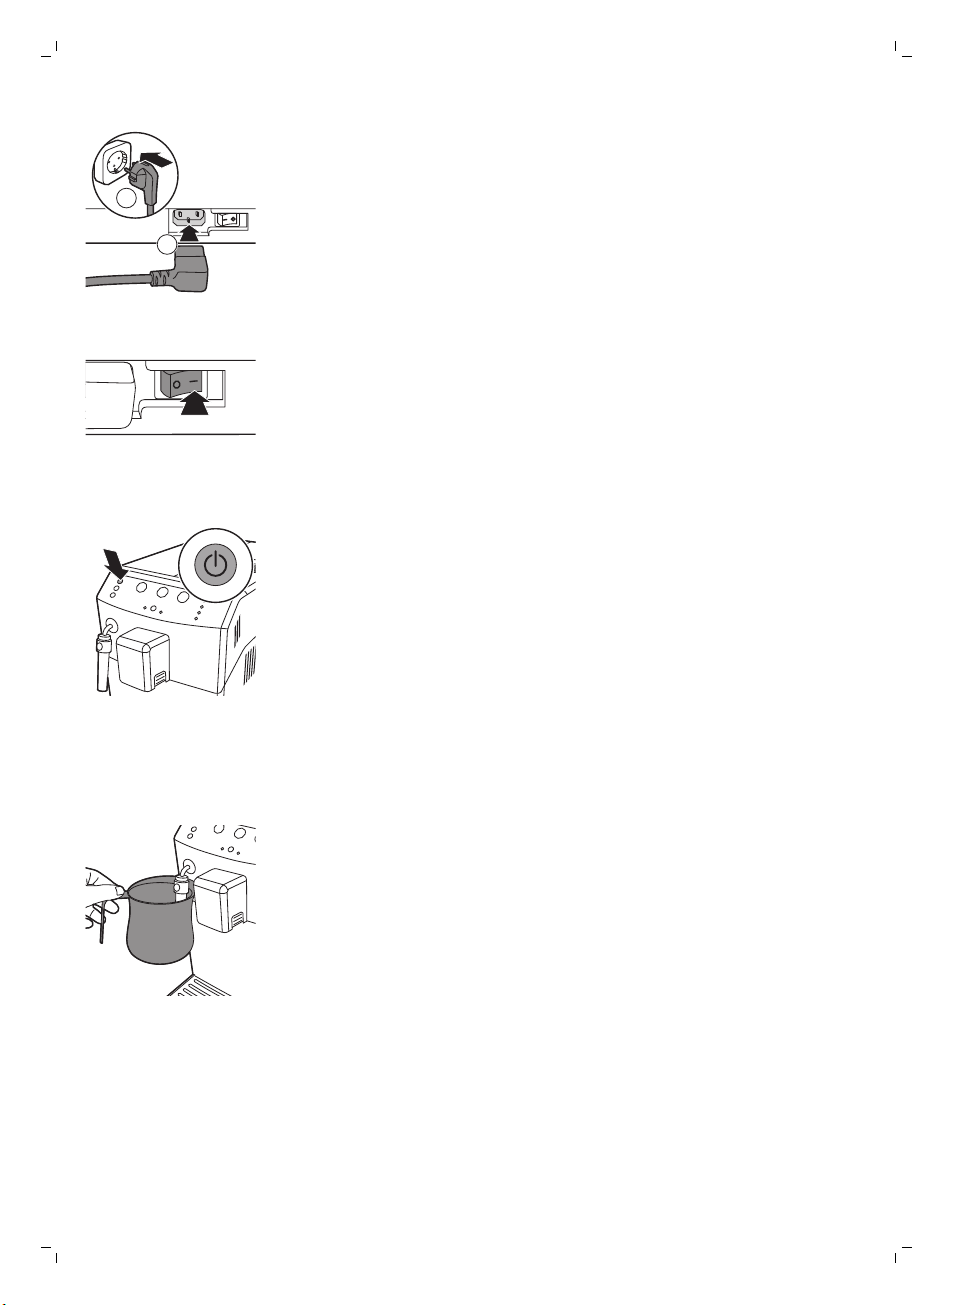
1 Remove all packaging material from the machine.
2 Place the machine on a table or worktop away from the tap, the sink and
heat sources.
Note: Leave at least 15 cm of free space above, behind and on both sides
of the machine.
3 Note: This machine may only be operated by a properly trained person.
Never let the machine operate unattended.
4 Rinse the water tank. Fill the water tank with fresh water to the MAX level
indication.
5 Open the lid of the bean hopper. Fill the bean hopper with coffee beans
and close the lid.
Note: Do not overfill the bean hopper to avoid damage to the grinder.
Caution: Only use espresso beans. Never use ground coffee, unroasted
coffee beans or caramelized coffee beans, as this may cause damage
to the machine.
Note: Do not add pre-ground coffee, water or coffee beans in the exit
duct.
Page 10
2
1
English
6 Insert mains plug into a wall socket (1) and insert the small plug into the
socket located on the back of the machine (2).
7 Set the main switch to the ON position to switch on the machine.
8 Press the ON/OFF button.
9
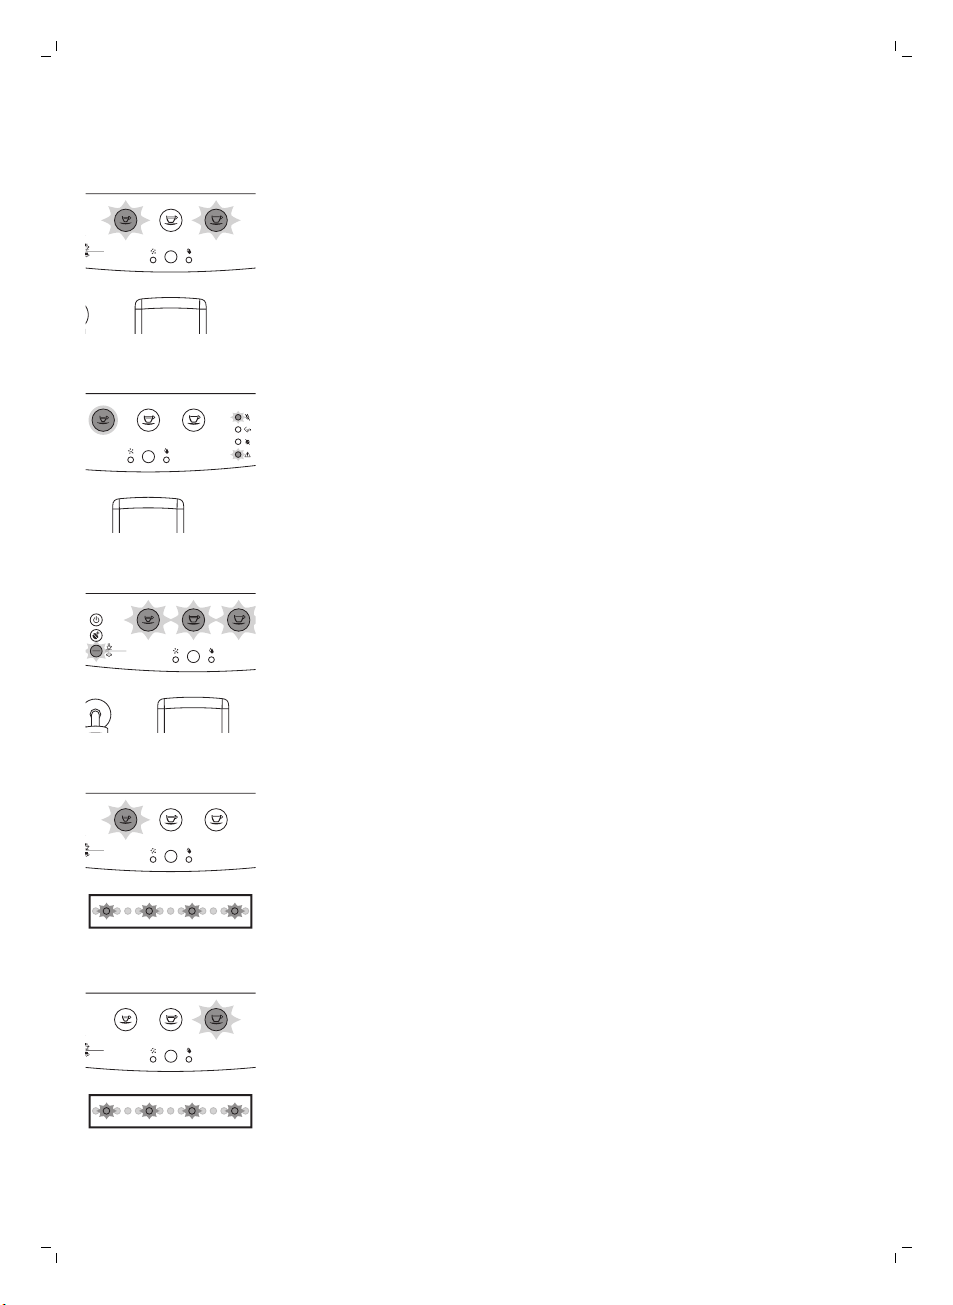
Circuit priming
During the initial heat-up process, fresh water flows through the internal
circuit to heat up the machine. This takes a few seconds.
1 Place a container under the classic milk frother.
Page 11
Espresso
Memo Memo Memo
Calc
clean
Espresso lungo Coee
Hot water
Steam
Espresso
Memo Memo Memo
Calc
clean
Espresso lungo Coee
Espresso
Memo
Hot water
Steam
Espresso
Memo Memo Memo
Calc
clean
Espresso lungo Coee
2
1
X
X
Aroma plus
Hot water
Steam
Espresso
Memo Memo Memo
Calc
clean
Espresso lungo Coee
10
English
2 The no water and general warning lights flash simultaneously.
-
The ESPRESSO button lights up.
3 Press the Espresso button.
-
The machine is heating up and the ESPRESSO, ESPRESSO LUNGO
and COFFEE buttons flash simultaneously.
Automatic rinsing cycle
When the machine has heated up, it performs an automatic rinsing cycle to
clean the internal circuit with fresh water. During the cycle water flows from
the coffee spout.
1 Place a container under the coffee dispensing spout.
-
The ESPRESSO, ESPRESSO LUNGO and COFFEE buttons flash
simultaneously.
-
The cycle ends automatically.
-
Manual rinsing cycle
During the manual rinsing cycle, the machine brews one cup of coffee to
prepare the inner circuit for use.
The ESPRESSO, ESPRESSO LUNGO, COFFEE and HOT
WATER/STEAM buttons light up continuously.
Page 12

2
1
X
X
Aroma plus
Hot water
Steam
Espresso
Memo Memo Memo
Calc
clean
Espresso lungo Coee
Memo
Coee
2
1
X
X
Aroma plus
Hot water
Steam
Espresso
Memo Memo Memo
Calc
clean
Espresso lungo Coee
2
1
X
X
English
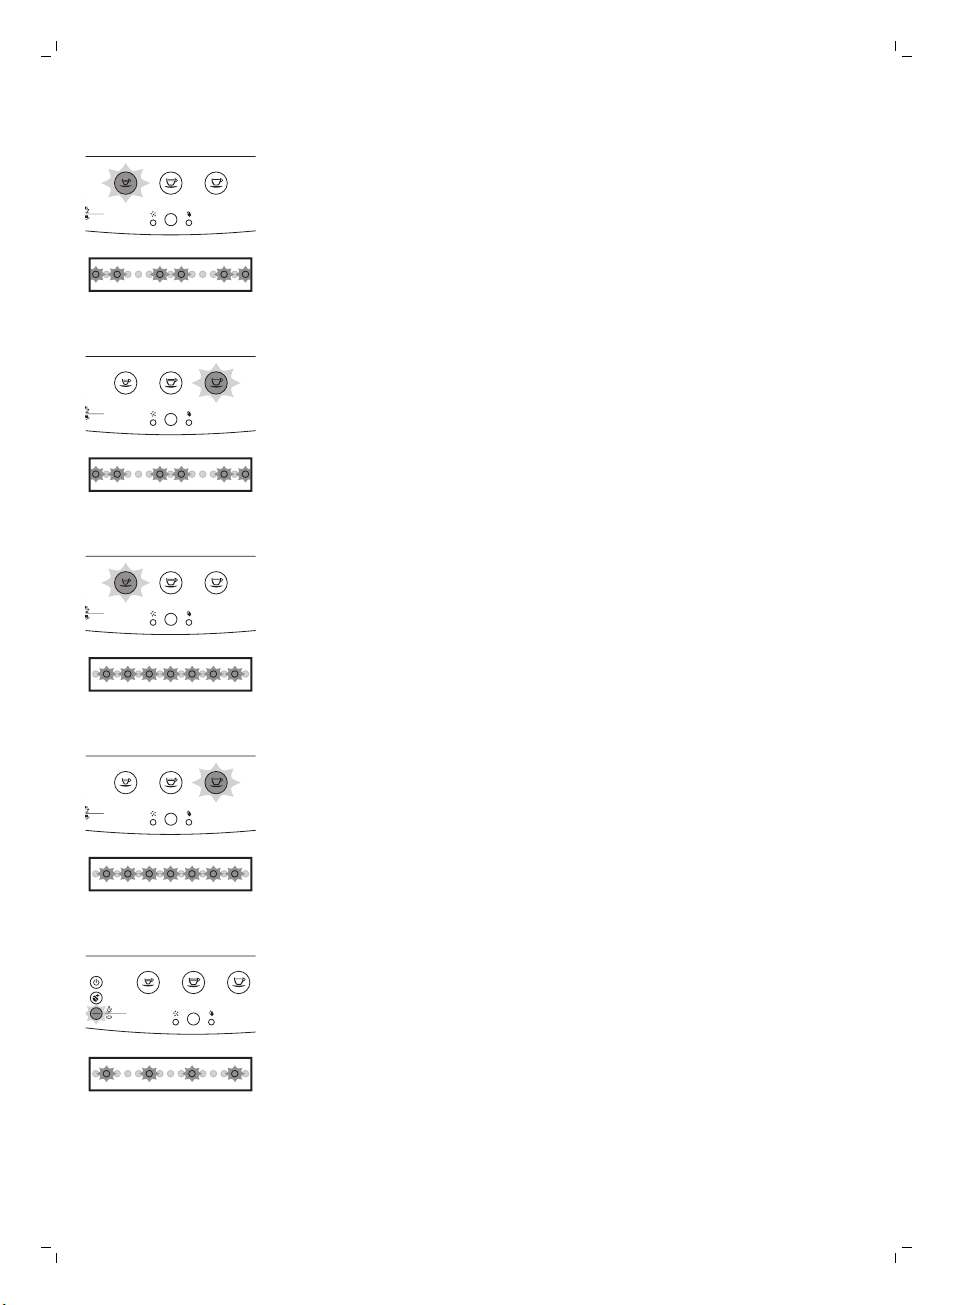
1 Place a container under the coffee dispensing spout.
2 Make sure the ESPRESSO, ESPRESSO LUNGO, COFFEE and HOT
WATER/STEAM buttons light up continuously.
3 Press the COFFEE button.
-
The machine starts to brew a cup of coffee to prepare the inner circuit
for use.This coffee is not drinkable.
4 Empty the container after the brewing cycle is finished.
5 Place the container back under the classic milk frother.
11
6 Press the HOT WATER/STEAM button once. The machine starts
dispensing water.
-
The HOT WATER/STEAM button flashes slowly.
7 Let the machine brew hot water until the no water light lights up
continuously.
Note: If you want to stop the manual rinsing cycle, press the HOT
WATER/STEAM button, to restart the cycle press the HOT
WATER/STEAM button again.
8 Fill the water tank with fresh water up to the MAX level.
Note: The automatic rinsing cycle starts when the machine has been in
stand-by mode, or switched off for more than 30 minutes. When you have
not used the machine for 2 or more weeks, you will need to perform a
manual rinse cycle.
The machine is ready for use.
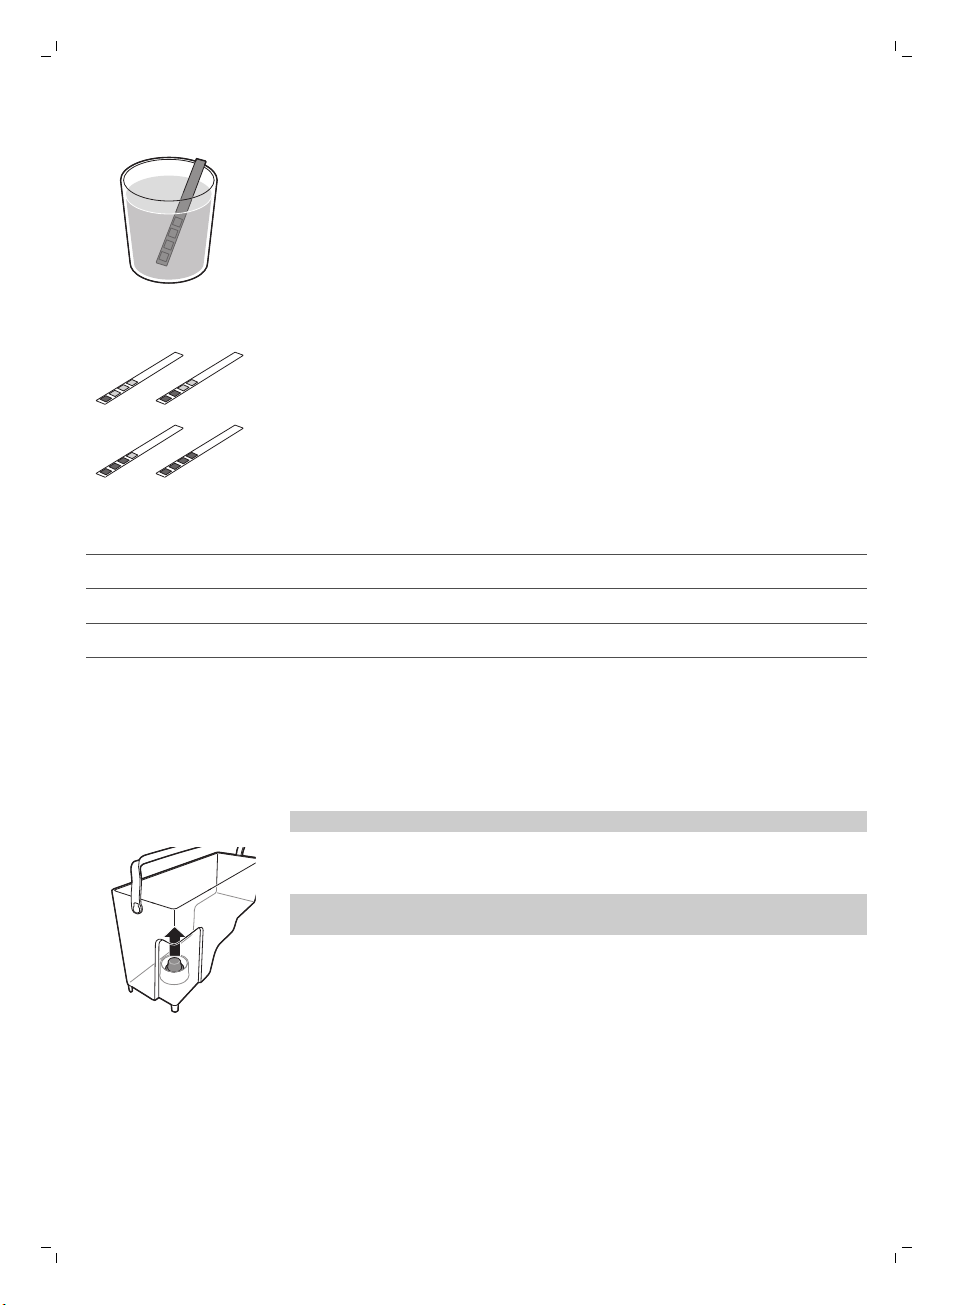
Measuring the water hardness
To be able to adjust the machine settings to the water in your region, please
measure the water hardness with the water hardness strip supplied.
Page 13
1
2
3
4
12
English
1 Immerse the water hardness test strip (supplied with the machine) in
fresh water for 1 second.
2 Remove the water hardness strip and and wait for 1 minute.
3 Check how many squares have changed into the red color and check the
water hardness in below table.
numbers of red squares
1/2 A very soft water/ soft water
3 B hard water
4 C very hard water
value to be set water hardness
Installing the Intenza+ water filter
We advise you to install the Intenza+ water filter as this prevents scale
build-up in your machine. You can buy the Intenza+ water filter separately.
For more details, see chapter ‘Guarantee and support’, section ‘Ordering
maintenance products’.
Note: Replace the INTENZA+ filter after 2 months.
1 Remove the small white filter from the water tank and store it in a dry
place.
Note: Please keep the small white filter for future use. You will need it for
the descaling process.
Page 14

2
1
X
X
Aroma plus
Hot water
Steam
Espresso
Memo Memo Memo
Calc
clean
Espresso lungo Coee
2
1
X
X
Aroma plus
Hot water
Steam
Espresso
Memo Memo Memo
Calc
clean
Espresso lungo Coee
English
13
2 Remove the filter from its packaging and immerse it in cold water with the
opening pointing upwards. Press the sides of the filter gently to let out
the air bubbles.
3 Turn the knob of the filter to the setting that corresponds to the water
hardness of the area you live in.
a Very soft water/ soft water
b Hard water
c Very hard water
Note: You can test the water hardness with a water hardness test strip.
4 Place the filter in the empty water tank. Press it down until it cannot
move any further.
5 Fill the water tank with fresh water up to the MAX indication and slide it
into the machine.
6 Check if the ESPRESSO, ESPRESSO LUNGO, COFFEE and HOT
WATER/STEAM buttons light up continuously.
7 Press the HOT WATER/STEAM button once. The HOT WATER/STEAM
button flashes.
-
Let the machine dispense hot water until the water tank is empty.
-
The no water light lights up continuously.
8 Fill the water tank with fresh water up to the MAX level and place it back
into the machine.
-
The ESPRESSO, ESPRESSO LUNGO, COFFEE and HOT
WATER/STEAM buttons light up continuously.
The machine is ready for use.
Page 15

14
English
Using the machine
Beverage types and lengths
Beverage name
Espresso Coffee with thick crema served in a small cup
Description
Espresso Lungo A longer espresso with thick crema served in a medium-sized
Coffee Regular cup of coffee for a larger cup
Beverage name Standard length Length range
Espresso 40 ml 20 - 230 ml
Espresso Lungo 80 ml 20 - 230 ml
Coffee 120 ml 20 - 230 ml
Hot water 300 ml
Note: The lengths stated above are approximate values.
cup
Page 16

Brewing espresso, espresso lungo and coffee
2x
2
1
X
X
Adjusting the coffee dispensing spout
The machine can be used to dispense different coffee types in cups or
glasses of different sizes. To adjust the height of the coffee dispensing spout
to the size of the cup or glass, slide the spout up or down.
Brewing 1 cup of espresso, espresso lungo and coffee
1 Place a cup under the coffee dispensing spout.
2 Press the ESPRESSO, ESPRESSO LUNGO or COFFEE button once to
brew the selected coffee.
-
The button of the selected beverage flashes slowly.
3 The machine stops brewing when the preset level is reached.
Note: If you want to stop the brewing process before the machine has
finished dispensing the preset coffee volume, press the previously
selected beverage button.
Brewing 2 cups of espresso, espresso lungo and coffee
1 Place two cups under the coffee dispensing spout.
2 Press the ESPRESSO, ESPRESSO LUNGO or COFFEE button twice to
brew the selected coffee.
-
The button of the selected beverage flashes twice quickly.
The machine grinds and doses automatically the correct amount of
coffee. Brewing two cups of a beverage requires two grinding and
brewing cycles the machine carries out automatically.
3 The machine stops brewing when the preset level is reached.
Note: If you want to stop the brewing process before the machine has
finished dispensing the preset coffee volume, press the previously
selected beverage button.
English
15
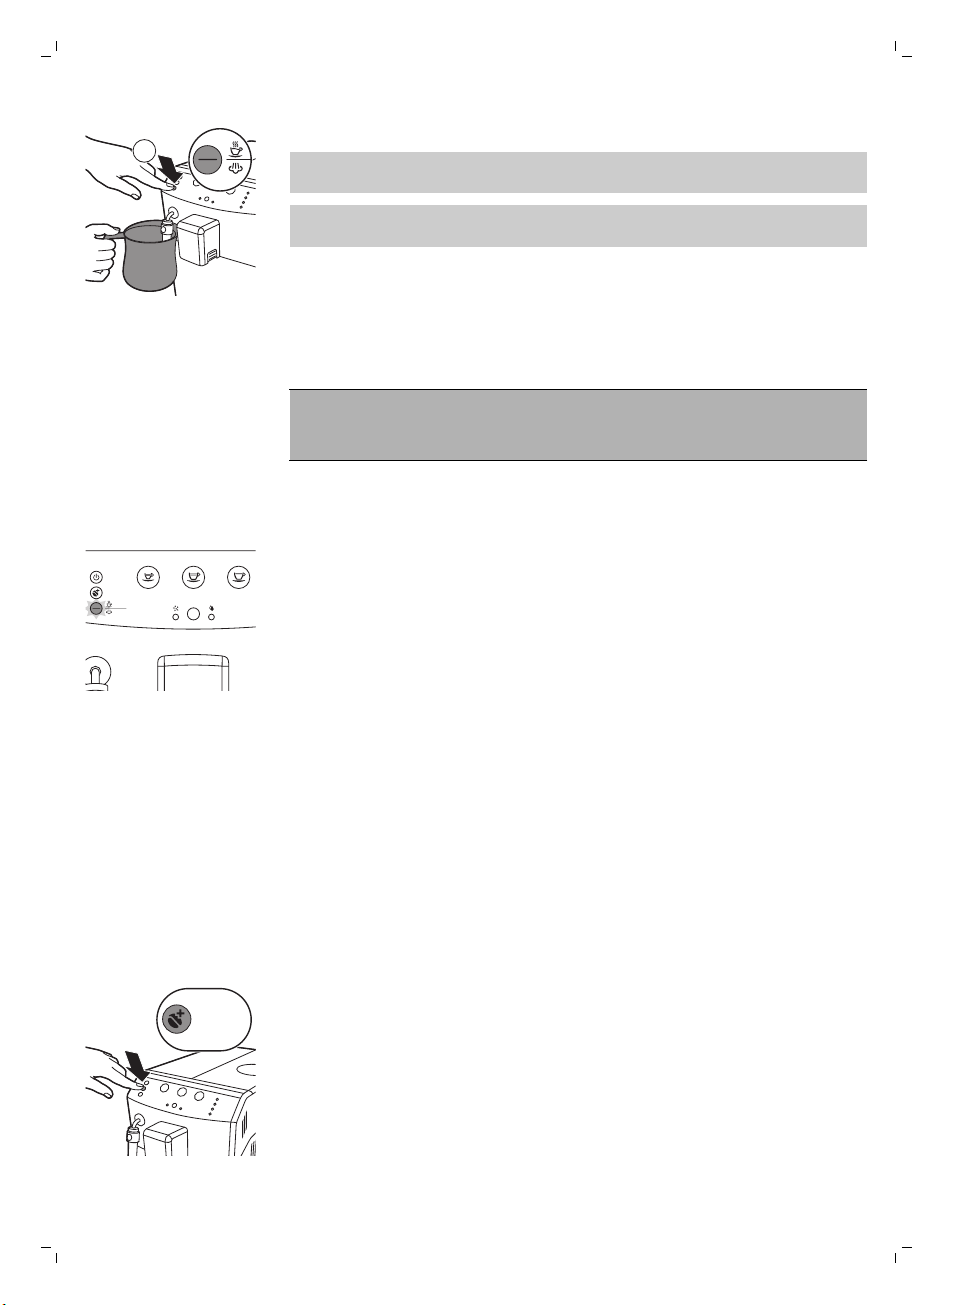
Frothing milk
Warning: Danger of scalding! Dispensing may be preceded by small jets of
hot water. Use the appropriate protective handle only.
Note: Use cold milk (at a temperature of approximately 5°C/41°F) with a
protein content of at least 3% to ensure an optimal frothing result. You can
use whole milk or semi-skimmed milk. It is also possible to use skimmed
milk, soy milk and lactose free milk.
1 Fill 1/3 of a jug with cold milk.
2 Immerse the classic milk frother in the milk. Press the HOT
WATER/STEAM button twice.
-
The HOT WATER/STEAM button flashes twice.
3 Froth the milk by gently swirling the jug and moving it up and down.
Page 17
1x
2
1
X
X
2
1
X
X
Aroma plus
Hot water
Steam
Espresso
Memo Memo Memo
Calc
clean
Espresso lungo Coee
Aroma plus
16
English
Hot water
4 Press the HOT WATER/STEAM CLEAN button once to stop frothing.
Note: After pressing the HOT WATER/STEAM button, it takes a few
seconds before the machine stops frothing.
Note: Frothing stops after 3 minutes, press the HOT WATER/STEAM
button twice if you want to continue frothing.
5 Remove the external part of the classic milk frother and rinse it with
lukewarm tap water. Press the HOT WATER/STEAM button once and
dispense hot water for 5 seconds.
Warning: Danger of scalding. Only grab the steam wand by its
protective handle. Dispensing may be preceded by small jets of
hot water.
1 Place a cup under the classic milk frother.
2 Press the HOT WATER/STEAM button once.
-
The HOT WATER/STEAM button flashes slowly.
-
Hot water dispensing starts automatically.
3 Press the HOT WATER/STEAM button once to stop hot water dispensing.
-
The HOT WATER/STEAM button flashes slowly.
Adjusting quantity and taste
Saeco Adapting System
Coffee is a natural product and its characteristics may vary according to
origin, blend and roasting. The machine is equipped with a self-adjustment
system that allows it to get the best taste out of your favorite coffee beans.
It regulates itself after brewing some coffees.
Activating the aroma plus function
To get a stronger coffee, press the aroma plus button. The aroma plus
button is backlighted when the aroma plus function is active.
Page 18

Adjusting coffee length with the MEMO function
2
1
You can adjust the quantity of beverage brewed according to your taste and
to the size of the cups.
1 Place a cup under the coffee dispensing spout.
2 To adjust the length of espresso, press and hold the ESPRESSO button
until the ESPRESSO button flashes quickly. Release the ESPRESSO
button, the machine is in the programming mode.
-
The machine brews an espresso.
3 Press the ESPRESSO button when the cup contains the desired amount
of espresso.
The ESPRESSO button is programmed: every time it is pressed, the machine
will brew espresso in the amount set. To set the length of espresso lungo or
coffee follow the same procedure: press and hold the button of the
beverage and press the same beverage button when the desired amount is
in the cup.
Adjusting the grinder settings
You can adjust the grinder settings with the grinder adjustment key. At each
setting selected, the ceramic coffee grinder guarantees a perfectly even
grind for every cup of coffee you brew. It preserves the full coffee aroma
and delivers the perfect taste to every cup.
Note: You can only adjust the grinder settings when the machine is grinding
coffee beans.
1 Place a cup under the coffee dispensing spout.
2 Open the lid of the bean hopper.
3 Press the Espresso button.
4 When the grinder starts grinding, place the grinder adjustment key on the
grinder adjustment knob (1). Push and turn to the left or to the right (2).
-
There are 5 different grinder settings you can choose from. The smaller
the dot the stronger the coffee.
English
17
Caution: Do not turn the grinder adjustment knob more than one notch at
a time to prevent damage to the grinder.
Maintenance and care
Maintenance of your machine is important to prolong the life of your
machine and to ensure optimum quality and taste of your coffee.
Cleaning the drip tray and the coffee grounds container
-
The drip tray is full when the drip tray full indicator pops up through the
drip tray. Empty and clean the drip tray every day.
Page 19
2
1
2
1
18
English
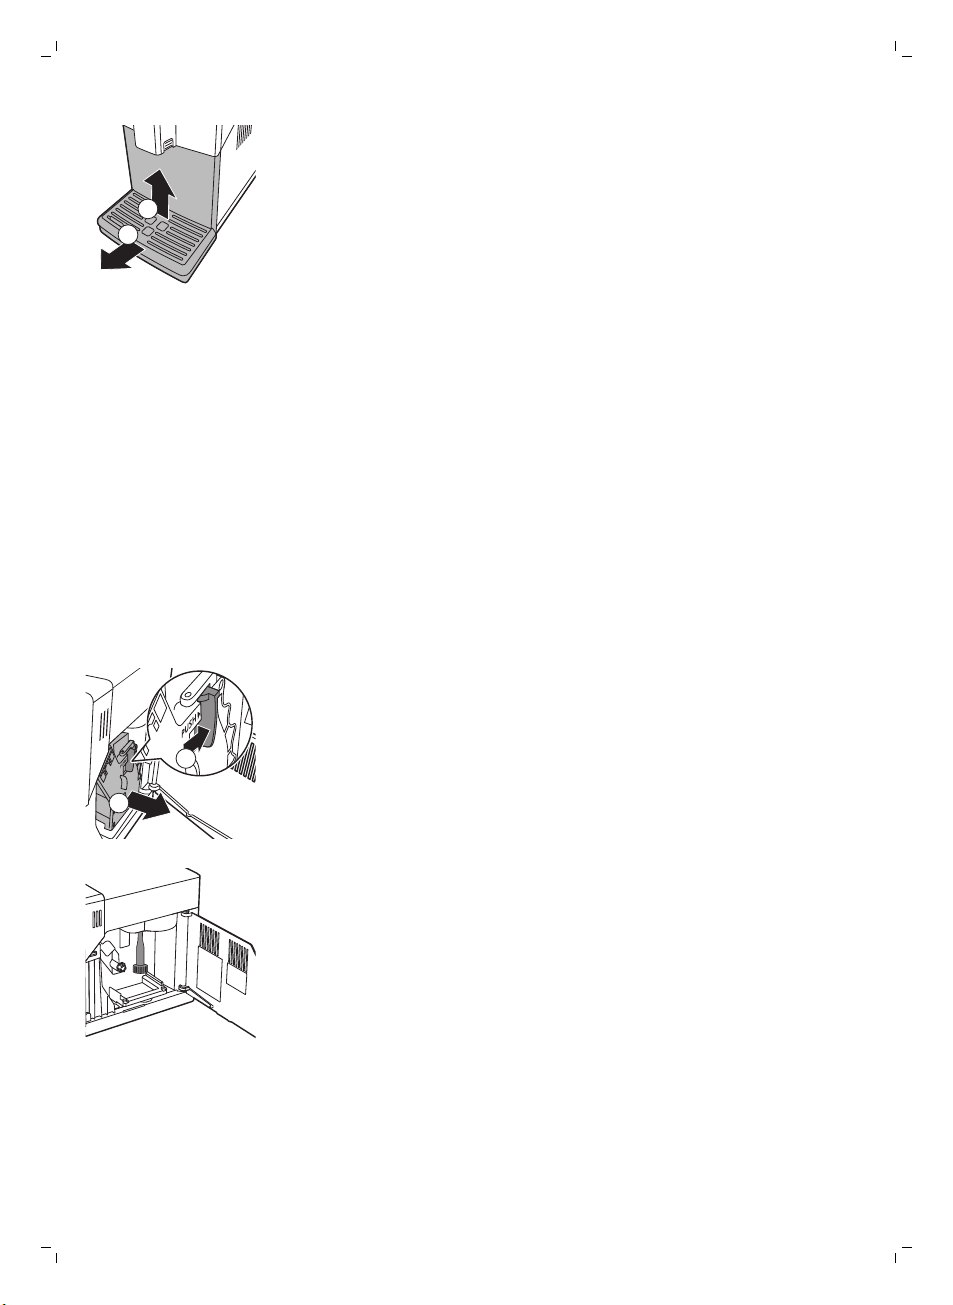
1 Pull the drip tray out of the machine.
2 Remove the coffee grounds container while the machine is switched on.
The counter does not reset if you remove the coffee grounds container
when the machine is switched off.
3 Empty and rinse the drip tray under the tap.
4 Place the coffee grounds container back in the drip tray.
5 Slide the drip tray back into the machine until it locks into position with a
click.
Cleaning the water tank
1 Remove the water tank from the machine and rinse it with fresh water
periodically.
2 Fill the water tank with fresh water up to the MAX level indication and
place it back in the machine.
Cleaning the coffee compartments
-
Clean the bean hopper with a dry cloth once a month.
Cleaning the brew group
Weekly cleaning of the brew group
1 Remove the drip tray with the coffee grounds container.
2 Empty the drip tray and rinse it under the tap.
3 Empty the coffee grounds container and rinse it under a lukewarm tap.
4 Switch off the machine and unplug it.
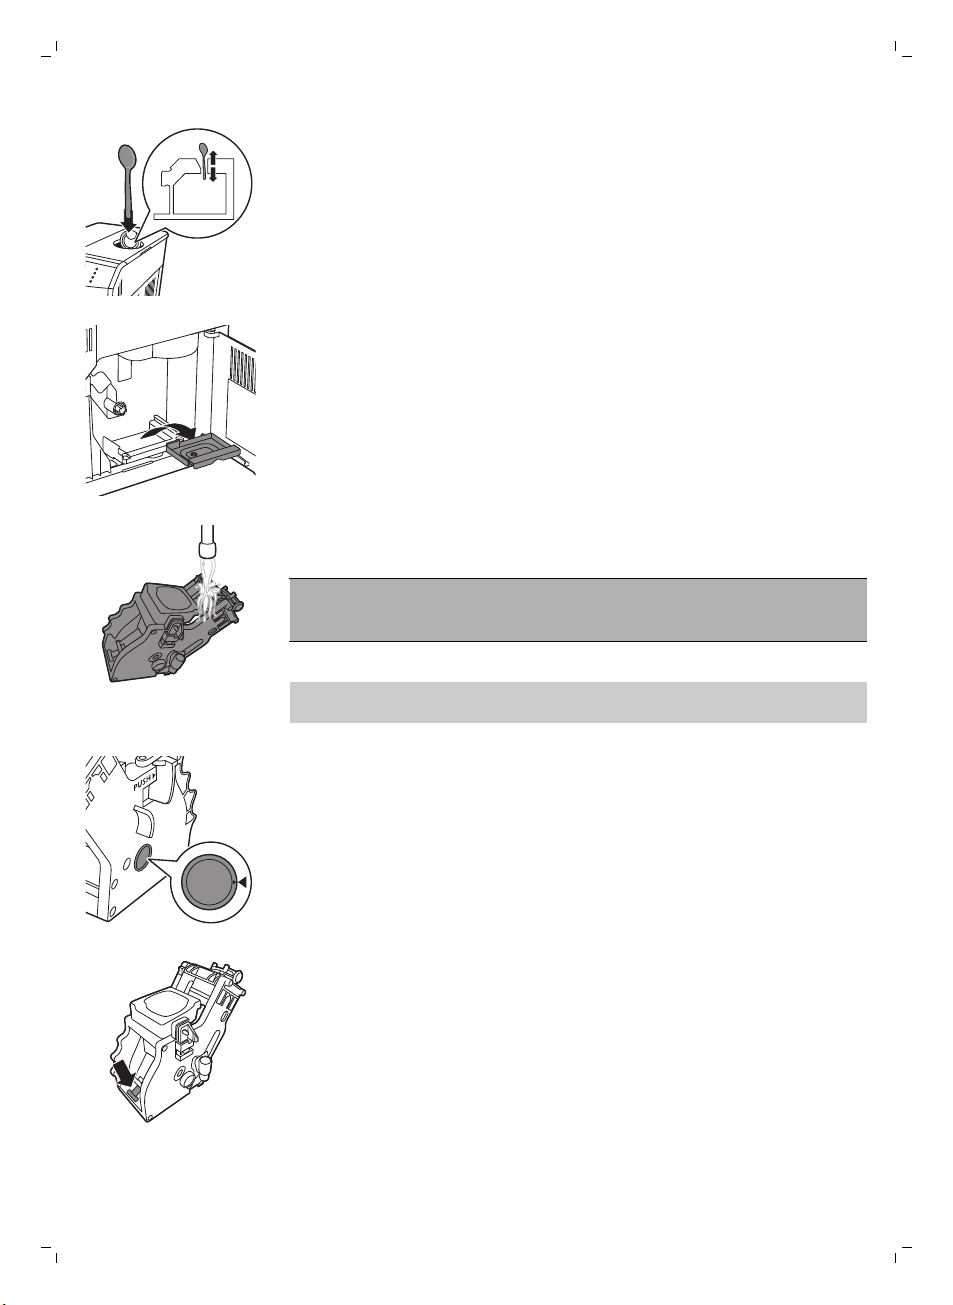
5 Open the service door.
6 Press the PUSH button (1) and pull at the grip of the brew group to
remove it from the machine (2).
7 Clean the coffee exit duct thoroughly with the provided tool. Insert it as
indicated in the figure.
Page 20
English
8 Clean the coffee exit duct thoroughly with a spoon handle. Insert it as
indicated in the figure.
9 Remove the coffee residues container, empty it and rinse it under a
lukewarm tap. Let it dry and then reinsert it.
10 Rinse the brew group thoroughly with lukewarm water. Clean the upper
filter carefully.
Caution: Do not clean the brew group in the dishwasher and do not use
washing-up liquid or a cleaning agent to clean it. This may cause the brew
group to malfunction and may have a negative effect on the coffee taste.
11 Let the brew group air-dry thoroughly.
Note: Do not dry the brew group with a cloth to prevent fibers from
collecting inside the brew group.
12 Clean the inside of the machine with a soft damp cloth.
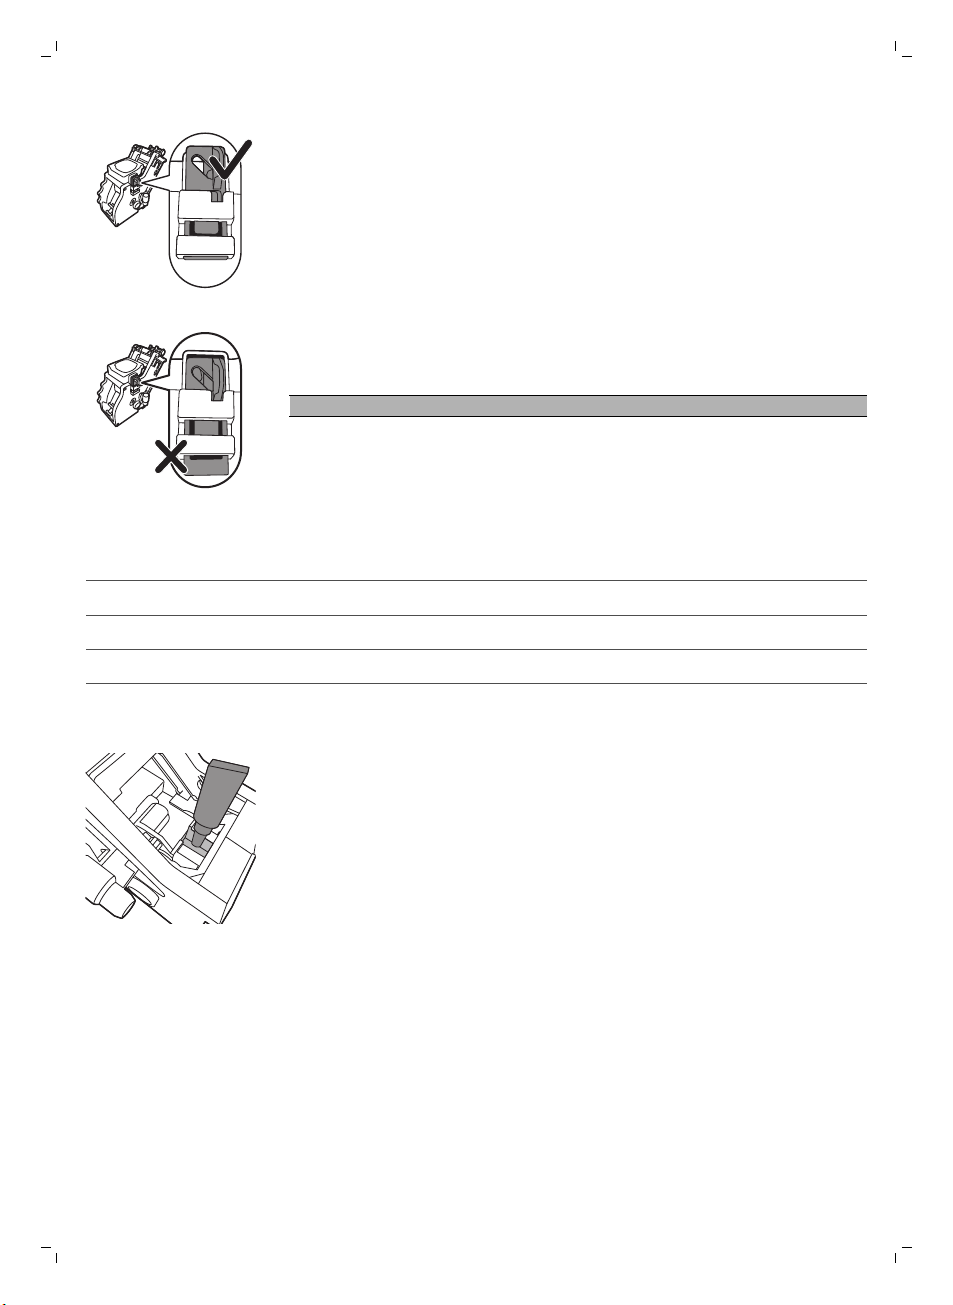
13 Before you slide the brew group back into the machine, make sure the
two reference signs on the side match. If they do not match, perform the
following step:
19
-
Make sure the lever is in contact with the base of the brew group.
14 Make sure that the locking hook of the brew group is in the correct
position.
Page 21
20
English
-
To position the hook correctly, push it upwards until it is in uppermost
position.
-
The hook is not correctly positioned if it is still in bottommost position.
15 Slide the brew group back into the machine along the guiding rails on the
sides until it locks into position with a click.
Caution: Do not press the PUSH button.
16 Close the service door.
Lubrication
For optimal performance of the machine you have to lubricate the brew
group. See table below for the lubrication frequency. For support visit our
website: www.philips.com/support.
Type of usage
Low 1-5 Every 4 months
Normal 6-10 Every 2 months
Heavy >10 Monthly
Nr of daily products Lubrication frequency
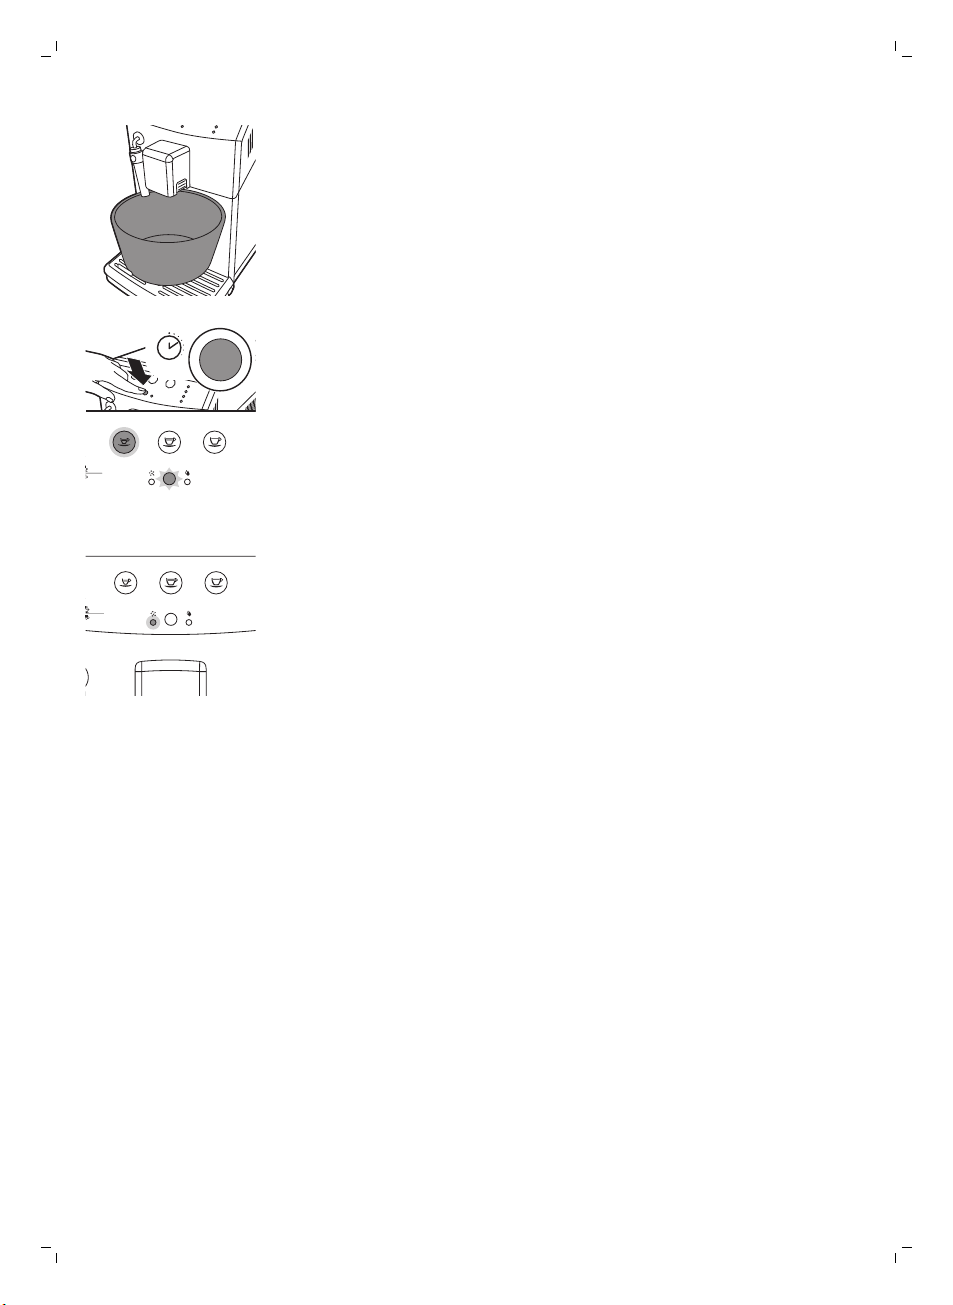
1 Switch off the machine and unplug it.
2 Remove the brew group and rinse it under a lukewarm tap as described
in section 'Weekly cleaning of the brew group'.
3 Apply a thin layer of grease around the shaft in the bottom of the brew
group.
Page 22

Descaling
Hot water
Steam
Espresso
Memo Memo Memo
Calc
clean
Espresso lungo Coee
English
21
4 Apply a thin layer of grease to the rails on both sides (see figure).
5 Insert the brew group as described in section 'Weekly cleaning of the
brew group'.
You can use the grease tube multiple times.
Classic milk frother cleaning (daily)
Remove the external part of the classic milk frother and rinse it with fresh
water.
Classic milk frother and steam wand cleaning (weekly)
1 Remove the external part of the classic milk frother and rinse it with fresh
water.
2 Remove the upper part of the classic milk frother from the steam wand
and rinse it with fresh water.
3 Clean the steam wand with a wet cloth.
4 Put the upper part back into the steam/hot water wand (make sure it is
completely inserted).
5 Reassemble all the classic milk frother parts.
When the CALC CLEAN button lights up continuously, you need to descale
the machine. If you do not descale the machine when this button indicates
this, the machine stops working properly. In that case, repairs are not
covered by the guarantee.
Only use Saeco descaling solution to descale the machine. Saeco descaling
solution is designed to ensure optimal performance of the machine. The use
of other products may damage the machine and leave residues in the water.
You can buy Saeco descaling solution in the online shop at
www.shop.philips.com/service. The descaling procedure lasts 30minutes
and consists of a descaling cycle and a rinsing cycle. You can pause the
descaling or rinsing cycle by pressing the ESPRESSO button. To continue
the descaling or rinsing cycle, press the ESPRESSO button.
Descaling procedure
1 Remove and empty the drip tray and coffee grounds container. Place the
2 Remove the classic milk frother from the hot/water steam wand.
3 Remove the water tank and the “INTENZA+” water filter from the water
4 Pour the descaling solution in the water tank. Fill the water tank with
drip tray and coffee grounds container back into place.
tank (if present), replace it with the small white original one.
fresh water up to the CALC CLEAN level indication. Place the water tank
back in the machine.
Page 23
Hot water
Steam
Espresso
Memo Memo Memo
Calc
clean
Espresso lungo Coee
3 sec.
Calc
clean
Hot water
Steam
Espresso
Memo Memo Memo
Calc
clean
Espresso lungo Coee
22
English
5 Place a large container (1.5 l) under both the hot water/steam wand and
coffee dispensing spout.
6 Press and hold the CALC CLEAN button for 3 seconds to start the
descaling cycle. The ESPRESSO button light lights up continuously and
CALC CLEAN button light flashes throughout the cycle.
7 The descaling cycle light lights up continuously. The machine starts
dispensing the descaling solution at intervals for approximately 20
minutes.
Page 24
Hot water
Steam
Espresso
Memo Memo Memo
Calc
clean
Espresso lungo Coee
English
23
8 Let the machine dispense the descaling solution until the no water light
lights up continuously.
9 Remove the water tank and rinse it. Fill the water tank with fresh water up
to the MAX level indication and place it back in the machine.
10 Empty the drip tray and container and place it back.
11 The rinse cycle light lights up continuously. When the ESPRESSO button
flashes, press it to start the rinsing cycle.
12 When the rinsing cycle is finished the CALC CLEAN button goes out.
13 The machine is heating up and performs an automatic rinsing cycle. The
ESPRESSO and COFFEE buttons flash simultaneously. The descaling
cycle is finished.
Caution: If the no water lights up continuously and the rinse cycle light
does not go out, the water tank was not filled up to the MAX level for the
rinsing cycle.Fill the water tank with fresh water and repeat the process
from step 10.
14 Remove the drip tray, rinse it and place it back. Empty the container.
15 Reinstall the Intenza+ water filter (if present).
16 Remove the water tank and rinse it.
17 Reattach the classic milk frother.
18 Clean the brew group by performing the 'Weekly brew group cleaning'
cycle.
The machine is ready for use.
Interruption of the descaling cycle
Once the descaling procedure has started, complete it until the very end
without switching off the machine. If the machine gets stuck during the
cycle, you can exit the descaling procedure by pressing the ON/OFF button.
If this occurs, or in case of a power failure or accidental disconnection of the
cord, perform the following steps:
1 Remove the water tank rinse it and fill it with fresh water up to the MAX
level.
2 Make sure the main switch is set to the ON position.
3 Press the ON/OFF button to switch on the machine.
4 Wait until the ESPRESSO, COFFEE, HOT WATER/STEAM buttons light up
continuously.
5 Empty the drip tray and place it back.
6 Empty the container and place it back.
7 Press the HOT WATER/STEAM button to dispense water. Press the same
button to stop the water dispensing.
8 Empty the container.
9 Place the container under the coffee dispensing spout.
10 Press the COFFEE button.
11 Repeat steps 9-10.
12 Empty the container.
If the CALC CLEAN button light remains on, you have to perform another
descaling cycle as soon as possible.
The machine is ready for use.
Page 25
Hot water
Steam
Espresso
Memo Memo Memo
Calc
clean
Espresso lungo Coee
Espresso
Memo Memo Memo
Calc
clean
Espresso lungo Coee
2
1
X
X
Aroma plus
Hot water
Steam
Espresso
Memo Memo Memo
Calc
clean
Espresso lungo Coee
Hot water
Steam
Espresso
Memo Memo Memo
Calc
clean
Espresso lungo Coee
Hot water
Steam
Espresso
Memo Memo Memo
Calc
clean
Espresso lungo Coee
24
English
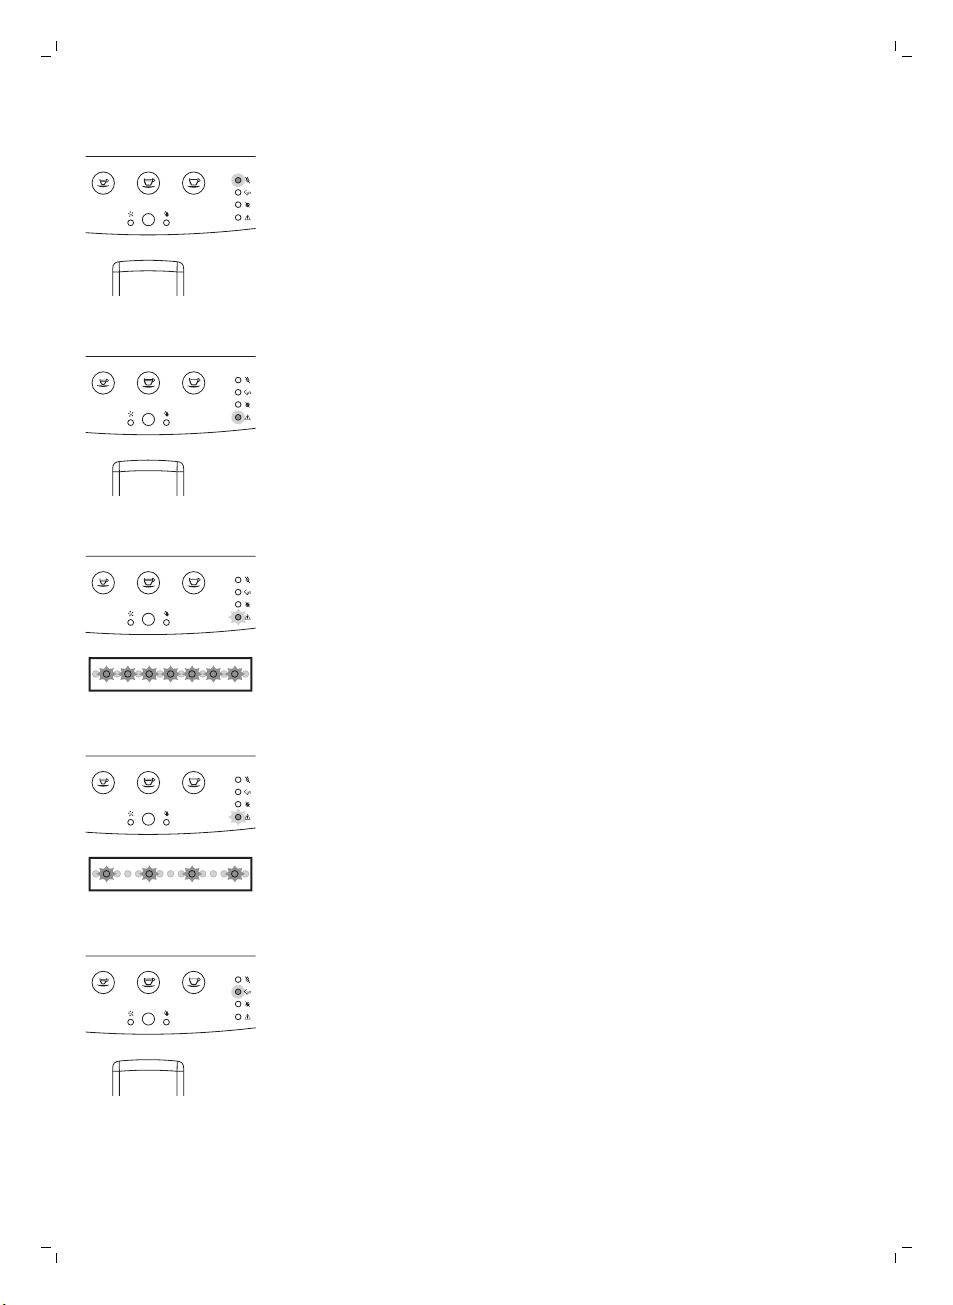
Meaning of light signals
-
The ESPRESSO and COFFEE buttons flash. The machine is warming up
or performing an automatic rinsing cycle.
-
The ESPRESSO button lights up continuously, the no water and general
warning lights flash. You have to prime the circuit, press the ESPRESSO
button and the light of the ESPRESSO button goes out. The no water and
general warning lights flash during the circuit priming, the lights go out
when the circuit priming is completed.
-
The ESPRESSO, ESPRESSO LUNGO, COFFEE and HOT WATER/STEAM
buttons flash. The machine is ready to brew a beverage.
-
The ESPRESSO button flashes slowly. The machine is brewing one cup of
espresso.
-
The COFFEE button flashes slowly. The machine is brewing one cup of
coffee.
Page 26
Hot water
Steam
Espresso
Memo Memo Memo
Calc
clean
Espresso lungo Coee
Hot water
Steam
Espresso
Memo Memo Memo
Calc
clean
Espresso lungo Coee
Hot water
Steam
Espresso
Memo Memo Memo
Calc
clean
Espresso lungo Coee
Hot water
Steam
Espresso
Memo Memo Memo
Calc
clean
Espresso lungo Coee
2
1
X
X
Aroma plus
Hot water
Steam
Espresso
Memo Memo Memo
Calc
clean
Espresso lungo Coee
English
-
The ESPRESSO button flashes twice quickly. The machine is brewing two
cups of espresso.
-
The COFFEE button flashes twice quickly. The machine is brewing two
cups of coffee.
-
The ESPRESSO button flashes quickly. The machine is programming the
amount of espresso to brew.
25
-
The COFFEE button flashes quickly. The machine is programming the
amount of coffee to brew.
-
The HOT WATER/STEAM button flashes slowly. The machine is
dispensing hot water or steam.
Page 27
Espresso
Memo Memo Memo
Calc
clean
Espresso lungo Coee
Espresso
Memo Memo Memo
Calc
clean
Espresso lungo Coee
Espresso
Memo Memo Memo
Calc
clean
Espresso lungo Coee
Espresso
Memo Memo Memo
Calc
clean
Espresso lungo Coee
Espresso
Memo Memo Memo
Calc
clean
Espresso lungo Coee
26
English
-
The no water light lights up continuously. Fill the water tank.
-
The general warning light lights up continuously. Insert the drip tray with
the coffee grounds container into the machine and close the service
door.
-
The general warning light flashes quickly. The brew group is being reset
due to machine reset.
-
The general warning light flashes slowly. Insert the brew group.
-
The empty coffee grounds container light lights up continuously. Empty
the coffee grounds container.
Page 28

Espresso
Memo Memo Memo
Calc
clean
Espresso lungo Coee
Espresso
Memo Memo Memo
Calc
clean
Espresso lungo Coee
Hot water
Steam
Espresso
Memo Memo Memo
Calc
clean
Espresso lungo Coee
Espresso
Memo Memo Memo
Calc
clean
Espresso lungo Coee
English
-
The empty coffee grounds container light flashes. The coffee grounds
container is not inserted into the machine. Wait until the empty coffee
grounds container light goes out and the general warning light lights up
continuously. Insert the coffee grounds container and close the service
door.
-
The no coffee light lights up continuously. Fill the coffee bean hopper
with coffee beans and restart the brewing cycle. The no coffee light goes
out when you press the button of the desired beverage. You can also
dispense steam and hot water when the machine shows this warning
signal.
-
The CALC CLEAN light lights up continuously. You need to descale the
machine, follow the instructions in chapter ‘Descaling'.
27
-
The no water, empty coffee grounds container, no coffee and general
warning lights flash simultaneously. The machine is out of order. Switch
off the machine and switch it back on after 30 seconds. Repeat this
procedure 2 or 3 times. If the machine does not switch back on, contact
the Philips Consumer Care Centre in your country.
Troubleshooting
This chapter summarises the most common problems you could encounter
with the machine. If you are unable to solve the problem with the
information below, visit www.philips.com/support for a list of frequently
asked questions or contact the Philips Consumer Care Centre in your
country.
Page 29

28
English
Problem Cause Solution
There is water under the
machine.
The drip tray is too full and
overflowed.
Empty the drip tray when the drip tray
full indicator pops up through the drip
tray. Always empty the drip tray before
you start descaling the machine.
The machine does not
switch on.
The drip tray is quickly
filled.
The machine does not
dispense hot water after
pressing the HOT WATER
button.
The brew group cannot
be removed.
The machine is not placed on a
horizontal surface.
The machine is disconnected. Check if the power supply cord is
This is normal. The machine uses
water to rinse the internal circuit
and brew group. Some water
flows through the internal system
directly into the drip tray.
The hot water dispensing spout is
not inserted.
The brew group is not positioned
correctly.
The coffee grounds container is
not removed.
The machine is still in the
descaling process.
Place the machine on a horizontal
surface so that the drip tray full
indicator works properly.
inserted correctly.
Empty the drip tray when the 'drip tray
full' full indicator pops up through the
drip tray cover.
Place a cup under the dispensing
spout to collect rinsing water.
Insert the hot water dispensing spout
and press the HOT WATER button
again.
Close the maintenance door. Switch
the machine off and back on again.
Wait for the machine ready screen to
appear and then remove the brew
group.
Remove the coffee grounds container
before removing the brew group.
You cannot remove the brew group
when the descaling process is active.
First complete the descaling process
and then remove the brew group.
The brew group cannot
be inserted.
The brew group is not in the
correct position.
The brew group was not put in rest
position before it was placed back.
Make sure that the lever is in contact
with the base of the brew group and
that the hook of the brew group is in
the correct position.
Reset the machine by switching it on
and off. Place the drip tray and the
coffee grounds container back. Leave
the brew group out. Close the
maintenance door and switch the
machine on and off. Then try to
reinsert the brew group.
Page 30

Problem Cause Solution
The coffee has too little
crema or is watery.
The grinder is set to a coarse
setting.
Adjust the grinder to a finer setting.
English
29
The coffee is not hot
enough.
The machine grinds the
coffee beans, but coffee
does not come out.
The brew group is dirty. Clean the brew group. For thorough
The coffee exit duct is dirty. Clean the coffee exit duct thoroughly
The coffee blend is not the
correct one.
The machine is performing its
self-adjustment.
The cups you use are cold. Preheat the cups by rinsing them with
You added milk. Whether the milk you add is warm or
The grind is set too fine. Adjust the grinder to a coarser setting.
The brew group is dirty. Clean the brew group.
The coffee dispensing spout is
dirty.
The coffee exit duct is blocked. Clean the coffee exit duct with the
cleaning, follow the monthly cleaning
procedure with the degreasing tablet.
with the handle of the multifunctional
tool or a spoon handle.
Try another coffee blend.
Brew a few cups of coffee.
hot water.
cold, it will always decrease the
temperature of the coffee to some
extent.
Clean the coffee dispensing spout and
its holes with a pipe cleaner.
handle of the multifunctional tool or a
spoon handle.
The coffee comes out
slowly.
The milk does not froth. The automatic milk frother is dirty
The grind is ground too finely. Change the grinder to a coarser
The brew group is dirty. Clean the brew group.
The coffee exit duct is blocked. Clean the coffee exit duct with the
The machine circuit is blocked by
limescale.
or not assembled or installed
correctly.
setting.
handle of the multifunctional tool or a
spoon handle.
Descale the machine.
Clean the automatic milk frother and
make sure it is correctly assembled or
installed.
Page 31

30
English
Problem Cause Solution
The type of milk used is not
suitable for frothing.
Different types of milk result in
different amounts of froth and
different froth qualities. Semi-skimmed
or full-fat cow's milk give good results.
The filter does not fit. You need to remove air from the
The coffee grounds
container light lights up
too early.
The empty coffee
grounds container light
lights up continuously
although I emptied the
coffee grounds container.
filter.
There is still water in the water
tank.
Coffee grounds container has
been emptied with while the
machine was switched off and
the counter did not reset.
You emptied the coffee grounds
container while the machine was
switched off, so the machine did
not reset the alarm.
Recycling
-
This symbol means that this product shall not be disposed of with normal
household waste (2012/19/EU).
-
Follow your country's rules for the separate collection of electrical and
electronic products. Correct disposal helps prevent negative
consequences for the environment and human health.
Let air bubbles come out of the filter.
Empty the water tank before you
install the filter.
Empty the coffee grounds container
with the machine switched on.
Remove the coffee grounds container
once more while the machine is
switched on, wait for 5 seconds and
reinsert the coffee grounds container.
Then the empty coffee grounds
container light goes out.
Guarantee and support
If you need information or support, please visit www.saeco.com/support or
read the separate guarantee leaflet.
If you need information or support, please contact the Philips Saeco hotline
in your country. Contacts are included in the warranty booklet supplied
separately or visit www.saeco.com/support.
Manufacturer's address:
Philips Consumer Lifestyle B.V. Tussendiepen, 4-9206 AD Drachten, The
Netherlands.
Ordering maintenance products
-
Intenza+ water filter (CA6702)
-
Lubricant (HD5061)
-
Descaling solution (CA6700)
Page 32

Technical specifications
Nominal voltage - Power
rating - Power supply
Housing material Thermoplastic material
Size (w x h x d) 215 x 330 x 429 mm
Weight 7 kg
Power cord length 800-1200 mm
Control panel Front panel
Cup sizes Up to 152 mm
Water tank 1.8 litres Removable type
See data plate on the inside of the service door
English
31
Coffee bean hopper
capacity
Coffee grounds drawer
capacity
Pump pressure 15 bar
Boiler Stainless steel type
Safety devices Thermal fuse
250 g
15
Page 33

32
Русский
Содержание
Введение________________________________________________________________________ 32
Важная информация ______________________________________________________________ 33
Предупреждение__________________________________________________________________ 33
Внимание!________________________________________________________________________ 34
Электромагнитные поля (ЭМП)______________________________________________________ 35
Обзор кофемашины (рис. 1)_________________________________________________________ 35
Первая установка _________________________________________________________________ 35
Заполнение контуров______________________________________________________________ 37
Цикл автоматической промывки______________________________________________________ 37
Цикл промывки вручную____________________________________________________________ 38
Измерение жесткости воды_________________________________________________________ 39
Установка фильтра для очистки воды Intenza+_________________________________________ 40
Использование кофемашины________________________________________________________ 41
Тип и объем напитка_______________________________________________________________ 41
Приготовление эспрессо, эспрессо лунго и кофе________________________________________ 42
Регулировка носика выхода кофе ____________________________________________________ 42
Приготовление 1 чашки эспрессо, эспрессо лунго и кофе_________________________________ 42
Приготовление 2 чашек эспрессо, эспрессо лунго и кофе_________________________________ 42
Приготовление молочной пенки______________________________________________________ 42
Горячая вода_____________________________________________________________________ 43
Регулировка количества и крепости __________________________________________________ 43
Адаптивная система Saeco_________________________________________________________ 43
Включение функции «аромат плюс» __________________________________________________ 44
Регулировка объема кофе с помощью функции памяти___________________________________ 44
Регулировка параметров кофемолки__________________________________________________ 44
Техническое обслуживание и уход____________________________________________________ 45
Очистка поддона для капель и контейнера для кофейной гущи ____________________________ 45
Очистка варочной группы___________________________________________________________ 45
Смазка __________________________________________________________________________ 47
Очистка классического вспенивателя молока (ежедневная) ______________________________ 48
Очистка классического вспенивателя молока и трубки выхода пара (раз в неделю) ___________ 48
Очистка от накипи_________________________________________________________________ 48
Процесс очистки от накипи__________________________________________________________ 49
Прерывание процесса очистки от накипи.______________________________________________ 50
Значения сигналов индикаторов_____________________________________________________ 51
Поиск и устранение неисправностей __________________________________________________ 55
Утилизация_______________________________________________________________________ 58
Гарантия и поддержка _____________________________________________________________ 58
Заказ продукции для обслуживания___________________________________________________ 58
Технические характеристики________________________________________________________ 58
Введение
Поздравляем с приобретением автоматической кофемашины Philips,
оснащенной классическим вспенивателем молока! Чтобы воспользоваться
всеми преимуществами поддержки Philips, зарегистрируйте продукт на веб-
Page 34

сайте www.philips.com/welcome. Эта кофемашина предназначена для
приготовления эспрессо и кофе с использованием цельных кофейных зерен,
а также для подачи пара или горячей воды. В настоящем руководстве вы
найдете всю необходимую информацию по установке, эксплуатации,
промывке и очистке от накипи своей кофемашины.
При возникновении каких-либо проблем с кофемашиной или появлении
вопросов, связанных с ее работой, посетите веб-страницу поддержки по
адресу www.philips.com/support. Здесь можно найти подробную
информацию по очистке, обслуживанию, получить ответы на часто
задаваемые вопросы, просмотреть видео о порядке обслуживания, а также
ознакомиться с руководствами по эксплуатации.
Важная информация
Кофемашина оснащена функциями безопасности. Тем не менее, во
избежание травм и повреждений из-за неправильного использования
прибора внимательно прочитайте руководство по безопасности и
используйте кофемашину только в соответствии с инструкциями. Сохраните
данное руководство пользователя для дальнейшего использования.
Предупреждение
-
Подключите кофемашину к розетке электросети, напряжение которой
соответствует техническим характеристикам устройства.
-
Подключайте кофемашину к заземленной розетке.
-
Шнур питания не должен свисать с края стола или контактировать с
горячими поверхностями.
-
Не погружайте кофемашину, сетевой шнур или вилку сетевого шнура в
воду. Это может привести к поражению электрическим током.
-
Не допускайте попадания жидкости на штекер шнура питания.
-
Запрещается направлять горячую воду на любые участки тела. Это
может привести к ожогам.
-
Не прикасайтесь к горячим поверхностям. Используйте предусмотренные
на машине ручки.
-
Отключите питание кнопкой, расположенной на задней панели
устройства, и извлеките из розетки вилку сетевого шнура в следующих
случаях:
-
При возникновении сбоя.
-
Если кофемашина не будет использоваться в течение длительного
периода времени.
-
Перед очисткой кофемашины.
-
При отключении держитесь за вилку, а не за сетевой шнур.
-
Не прикасайтесь к вилке питания мокрыми руками.
-
Запрещено пользоваться кофемашиной, если сетевая вилка, шнур
питания или сам прибор повреждены.
-
Запрещается вносить какие-либо изменения в конструкцию кофемашины
или шнура питания.
-
Во избежание рисков ремонт аппарата следует проводить только в
сертифицированном сервисном центре Philips
-
К использованию машины не допускаются дети возрастом до 8 лет.
Русский
33
Page 35

34
Русский
Внимание!
-
Дети старше 8 лет и лица с ограниченными интеллектуальными или
физическими возможностями, а также лица с недостаточным опытом и
знаниями могут пользоваться кофемашиной только под присмотром или
после получения инструкций по безопасному использованию
кофемашины и при условии понимания потенциальных опасностей.
-
Дети старше 8 лет могут осуществлять очистку и уход за прибором
только под присмотром взрослых.
-
Храните прибор и шнур в месте, недоступном для детей младше 8 лет.
-
Не оставляйте детей без присмотра и не позволяйте им играть с
кофемашиной.
-
Запрещается подносить к кофемолке пальцы или вставлять в нее
посторонние предметы.
-
Не устанавливайте прибор в шкафу, если вы собираетесь его
использовать.
-
Кофемашина предназначена только для домашнего использования в
стандартных условиях. Она не предназначена для использования в
качестве кухонного прибора в магазинах, офисах, сельскохозяйственных
помещениях или на других рабочих местах.
-
Устанавливайте кофемашину на ровную устойчивую поверхность.
Прибор должен всегда находиться в вертикальном положении (включая
период транспортировки).
-
Не ставьте кофемашину на плиту, рядом с духовым шкафом, радиатором
или другими источниками тепла.
-
В контейнер можно засыпать только обжаренные кофейные зерна. Не
загружайте в кофемашину молотый и растворимый кофе, необжаренные
зерна или любые другие продукты, так как это может привести к
повреждению кофемашины.
-
Дайте кофемашине остыть перед установкой или извлечением какихлибо деталей. Поверхность нагревательного элемента сохраняет
остаточное тепло после использования.
-
Не заполняйте резервуар для воды теплой, горячей или газированной
водой, так как это может привести к повреждению резервуара и
кофемашины.
-
Запрещается использовать для чистки кофемашины губки с абразивным
покрытием, абразивные чистящие средства или растворители типа
бензина или ацетона. Достаточно использовать мягкую ткань, смоченную
водой.
-
Регулярно выполняйте очистку кофемашины от накипи. Машина
предупреждает о необходимости удаления накипи. Несоблюдение этого
требования приведет к сбоям в работе аппарата. В таком случае
гарантия на ремонт не распространяется.
-
Не храните кофемашину при температуре ниже 0 °C, так как оставшаяся
в системе нагрева вода может замерзнуть и повредить прибор.
-
Если кофемашина не будет использоваться в течение длительного
периода времени, то воду из резервуара необходимо слить. Вода может
испортиться. Всегда используйте только свежую воду.
Page 36

Электромагнитные поля (ЭМП)
Этот прибор Philips соответствует всем применимым стандартам и нормам
по воздействию электромагнитных полей.
Обзор кофемашины (рис. 1)
1 Кнопка ESPRESSO
2 Кнопка ESPRESSO LUNGO
3 Кнопка COFFEE (Кофе)
4 Кнопка включения/выключения
5 Кнопка AROMA STRENGTH
6 Кнопка подачи горячей воды или пара (HOT WATER/ STEAM)
7 Индикатор цикла очистки от накипи
8 Кнопка CALC CLEAN (Очистка от накипи)
9 Индикатор цикла промывки
10 Индикатор общего предупреждения
11 Индикатор отсутствия кофе
12 Индикатор очистки контейнера для кофейной гущи
13 Индикатор отсутствия воды
14 Носик выхода кофе
15 Классический вспениватель молока
16 Крышка резервуара для воды
17 Крышка контейнера для кофейных зерен
18 Переключатель питания
19 Гнездо для шнура питания
20 Эксплуатационная крышка
21 Регулятор помола
22 Резервуар для воды
23 Варочная группа
24 Внутренняя часть сервисной дверцы с инструкциями по очистке
25 Выходное отверстие для кофе
26 Контейнер для частиц кофе
27 Индикатор заполнения поддона для капель
28 Контейнер для кофейной гущи
29 Поддон для капель
30 Крышка поддона для капель
31 Сетевой шнур
32 Щеточка для очистки
33 Смазка
34 Измеритель жесткости воды
35 Многофункциональный инструмент (кнопка регулировки кофемолки и
инструмент для очистки отверстия под кофе)
Русский
35
Первая установка
При тестировании машины мы использовали настоящий кофе. Мы
тщательно очистили машину, однако в ней по-прежнему могут
присутствовать следы кофе. При этом мы гарантируем, что устройство
полностью новое.Как и при использовании большинства автоматических
кофемашин, для проведения автоматической настройки и достижения
оптимального вкуса кофе необходимо сначала выполнить несколько циклов
приготовления напитка.
1 Снимите с кофемашины весь упаковочный материал.
Page 37

15 cm
15 cm
15 cm
15 cm
15 cm
15 cm
15 cm
15 cm
M
AX
CALC
CLEAN
MAX
2
1
36
Русский
2 Установите кофемашину на столе или рабочей поверхности на
достаточном расстоянии от водопроводного крана, раковины и
источников тепла.
Примечание. Над кофемашиной, за ней и по обеим сторонам должно
оставаться не менее 15 см свободного пространства.
3 Примечание. Использовать этот прибор может только тот человек,
который обладает соответствующими навыками. Не оставляйте
включенный прибор без присмотра.
4 Сполосните резервуар. Наполните резервуар чистой водой до отметки
MAX.
5 Откройте крышку контейнера для кофейных зерен. Засыпьте в контейнер
кофейные зерна и закройте крышку.
Примечание. Чтобы не допустить повреждения кофемолки, не засыпайте
в контейнер слишком много зерен.
Внимание! Используйте только зерна для эспрессо. Не используйте
молотый кофе и необжаренные или карамелизированные зерна, так как
это может привести к повреждению кофемашины.
Примечание. Не помещайте в выходное отверстие молотый кофе, воду
или кофейные зерна.
6 Вставьте вилку сетевого шнура в розетку электросети (1), а затем
вставьте маленький штекер в разъем, расположенный на задней панели
кофемашины (2).
7 Установите переключатель питания, расположенный на задней части
устройства, в положение ON.
Page 38

8 Нажмите кнопку включения/выключения.
Espresso
Memo Memo Memo
Calc
clean
Espresso lungo Coee
Hot water
Steam
Espresso
Memo Memo Memo
Calc
clean
Espresso lungo Coee
Espresso
Memo
Заполнение контуров
В процессе нагрева вода течет по внутреннему контуру, нагревая
кофемашину. Этот процесс занимает несколько секунд.
1 Поставьте сосуд под классический вспениватель молока.
2 Одновременно мигают индикатор отсутствия воды и индикатор общего
предупреждения.
-
Включается подсветка кнопки ESPRESSO.
Русский
37
3 Нажмите кнопку Espresso.
-
Кофемашина разогревается, при этом одновременно мигают кнопки
ESPRESSO, ESPRESSO LUNGO и COFFEE.
Цикл автоматической промывки
После нагревания кофемашина запускает автоматический цикл промывки
для очистки внутреннего контура чистой водой. Во время цикла промывки
вода поступает из носика выхода кофе.
1 Поставьте посуду под носик выхода кофе.
Page 39

Hot water
Steam
Espresso
Memo Memo Memo
Calc
clean
Espresso lungo Coee
2
1
X
X
Aroma plus
Hot water
Steam
Espresso
Memo Memo Memo
Calc
clean
Espresso lungo Coee
2
1
X
X
Aroma plus
Hot water
Steam
Espresso
Memo Memo Memo
Calc
clean
Espresso lungo Coee
38
Русский
-
Одновременно мигают кнопки ESPRESSO, ESPRESSO LUNGO и
COFFEE.
-
Цикл промывки завершается автоматически.
-
Кнопки ESPRESSO, ESPRESSO LUNGO, COFFEE и HOT
WATER/STEAM светятся непрерывно.
Цикл промывки вручную
Во время выполнения цикла промывки вручную кофемашина готовит одну
чашку кофе для подготовки внутреннего контура к промывке.
1 Поставьте посуду под носик выхода кофе.
2 Убедитесь, что кнопки ESPRESSO, ESPRESSO LUNGO, COFFEE и HOT
WATER/STEAM светятся непрерывно.
Page 40

Memo
Coee
2
1
X
X
Aroma plus
Hot water
Steam
Espresso
Memo Memo Memo
Calc
clean
Espresso lungo Coee
2
1
X
X
1
2
3
4
Русский
39
3 Нажмите кнопку COFFEE.
-
Кофемашина сварит чашку кофе для подготовки внутреннего контура.
Готовый кофе не предназначен для употребления.
4 Когда цикл приготовления кофе будет завершен, опустошите емкость.
5 Поставьте большую емкость под классический вспениватель молока.
6 Нажмите один раз кнопку HOT WATER/STEAM. Машина начнет подачу
воды.
-
Кнопка HOT WATER/STEAM медленно мигает.
7 Оставьте кофемашину работать в режиме кипячения воды до тех пор,
пока индикатор отсутствия воды не станет светиться непрерывно.
Примечание. Если хотите остановить цикл промывки вручную, нажмите
кнопку HOT WATER/STEAM. Чтобы снова запустить цикл, еще раз
нажмите кнопку HOT WATER/STEAM.
8 Заполните резервуар свежей водой до уровня MAX.
Примечание. Цикл автоматической промывки запускается, если
кофемашина находилась в режиме ожидания или в выключенном состоянии
свыше 30 минут. Если кофемашиной не пользовались больше 2 недель,
следует выполнить цикл промывки вручную.
Кофемашина готова к использованию.
Измерение жесткости воды
Чтобы отрегулировать кофемашину в соответствии с параметрами воды,
актуальными для вашего региона, необходимо с помощью входящих в
комплект тестовых полосок проверить уровень жесткости воды.
1 Поместите тестовую полоску (входит в комплект поставки машины) в
свежую воду на 1 секунду.
2 Извлеките тестовую полоску из воды и подождите 1 минуту.
3 Посмотрите, сколько делений на тестовой полоске поменяли цвет на
красный, и сравните результат с данными в таблице ниже.
Page 41

40
Русский
количество красных
устанавливаемое значение жесткость воды
сегментов
1/2 A мягкая/очень мягкая вода
3 B жесткая вода
4 C очень жесткая вода
Установка фильтра для очистки воды Intenza+
Рекомендуем установить фильтр для очистки воды Intenza+, поскольку он
предотвращает образование минеральных отложений. Фильтр для очистки
воды Intenza+ можно приобрести отдельно. Дополнительные сведения см. в
главе «Гарантия и поддержка», в разделе «Заказ продукции для
обслуживания».
Примечание. Производите замену фильтра INTENZA+ после каждых 2
месяцев эксплуатации.
1 Извлеките из резервуара для воды небольшой белый фильтр и
сохраните его в сухом месте.
Примечание. Сохраните небольшой белый фильтр для дальнейшего
использования. Он понадобится в процессе очистки от накипи.
2 Распакуйте фильтр и погрузите его в холодную воду отверстием вверх.
Осторожно надавите на фильтр с боков, чтобы из него вышел воздух.
3 Установите регулятор фильтра в положение, которое соответствует
уровню жесткости воды в вашем регионе.
a Мягкая/очень мягкая вода
b Жесткая вода
c Очень жесткая вода
Примечание. Жесткость воды можно проверить с помощью тестовой
полоски.
Page 42

2
1
X
X
Aroma plus
Hot water
Steam
Espresso
Memo Memo Memo
Calc
clean
Espresso lungo Coee
2
1
X
X
Aroma plus
Hot water
Steam
Espresso
Memo Memo Memo
Calc
clean
Espresso lungo Coee
Русский
4 Установите фильтр в пустой резервуар для воды. Надавите на него
сверху до упора.
5 Наполните резервуар для воды свежей холодной водой до отметки MAX
и задвиньте его в кофемашину.
6 Проверьте, что кнопки ESPRESSO, ESPRESSO LUNGO, COFFEE и HOT
WATER/STEAM светятся непрерывно.
7 Нажмите один раз кнопку HOT WATER/STEAM. Кнопка HOT
WATER/STEAM мигает.
-
Позвольте кофемашине подавать горячую воду до тех пор, пока
резервуар не будет опустошен.
-
Индикатор отсутствия воды светится непрерывно.
8 Заполните резервуар свежей холодной водой до отметки MAX и
установите его в кофемашину.
-
Кнопки ESPRESSO, ESPRESSO LUNGO, COFFEE и HOT
WATER/STEAM светятся непрерывно.
Кофемашина готова к использованию.
41
Использование кофемашины
Тип и объем напитка
Название напитка
Эспрессо Кофе с густой пеной, подаваемый в небольшой чашке
Эспрессо лунго Эспрессо увеличенного объема с густой пеной, подаваемый в
Кофе Стандартная порция кофе для большой чашки
Название напитка Стандартный объем Диапазон объемов
Эспрессо 40 мл 20–230 мл
Эспрессо лунго 80 мл 20–230 мл
Кофе 120 мл 20–230 мл
Горячая вода 300 мл
Описание
чашке среднего размера
Page 43

42
Русский
Примечание. Указанные выше значения являются приблизительными.
Приготовление эспрессо, эспрессо лунго и кофе
Регулировка носика выхода кофе
Эта кофемашина предназначена для разлива различных видов кофе в
чашки и стаканы разных размеров. Высоту носика выхода кофе в
зависимости от размера чашки или стакана можно настроить, сдвинув его
вверх или вниз.
Приготовление 1 чашки эспрессо, эспрессо лунго и кофе
1 Поставьте чашку под носик выхода кофе.
2 Нажмите кнопку ESPRESSO, ESPRESSO LUNGO или COFFEE один раз,
чтобы приготовить требуемый вид кофе.
-
Кнопка выбранного напитка будет медленно мигать.
3 По достижении предварительно установленного уровня кофемашина
останавливает процесс приготовления напитка.
Примечание. Чтобы остановить процесс приготовления до того, как
машина выдаст заданный объем кофе, нажмите кнопку ранее
выбранного напитка.
Приготовление 2 чашек эспрессо, эспрессо лунго и кофе
1 Поставьте две чашки под носик выхода кофе.
2 Нажмите кнопку ESPRESSO, ESPRESSO LUNGO или COFFEE два раза,
чтобы приготовить требуемый вид кофе.
-
Кнопка выбранного напитка будет мигать в два раза чаще.
Кофемашина автоматически выполняет помол и отмеряет необходимую
дозу кофе. Для приготовления двух чашек напитка требуется два цикла
помола и приготовления, которые кофемашина выполняет в
автоматическом режиме.
3 По достижении предварительно установленного уровня кофемашина
останавливает процесс приготовления напитка.
Примечание. Чтобы остановить процесс приготовления до того, как
машина выдаст заданный объем кофе, нажмите кнопку ранее
выбранного напитка.
Приготовление молочной пенки
Предупреждение! Опасайтесь ожогов! Подаче могут предшествовать тонкие
струи горячей воды. Используйте только одобренную защитную ручку.
Примечание. Для получения идеальной пены необходимо использовать
холодное молоко (прибл. 5 °C) с минимальным содержанием белка 3 %. В
зависимости от ваших предпочтений вы можете использовать как цельное,
так и полуобезжиренное молоко. Кроме того, можно использовать
обезжиренное молоко, соевое молоко и молоко, не содержащее лактозы.
1 Заполните кувшин холодным молоком на 1/3.
Page 44

2x
2
1
X
X
1x
2
1
X
X
Горячая вода
2
1
X
X
Aroma plus
Hot water
Steam
Espresso
Memo Memo Memo
Calc
clean
Espresso lungo Coee
Русский
43
2 Погрузите классический вспениватель молока в молоко. Нажмите два
раза кнопку HOT WATER/STEAM.
-
Кнопка HOT WATER/STEAM мигнет дважды.
3 Вспеньте молоко. Для этого аккуратно вращайте, поднимайте и опускайте
кувшин.
4 Чтобы остановить приготовление пенки, однократно нажмите кнопку HOT
WATER/STEAM CLEAN.
Примечание. После нажатия кнопки HOT WATER/STEAM вспенивание
молока прекратится через несколько секунд.
Примечание. Вспенивание молока прекратится через 3 минуты. Если
требуется продолжить вспенивание, нажмите кнопку HOT
WATER/STEAM дважды.
5 Снимите внешнюю часть классического вспенивателя молока и промойте
ее теплой водопроводной водой. Нажмите кнопку HOT WATER/STEAM
один раз и позвольте кофемашине подавать горячую воду в течение 5
секунд.
Предупреждение! Опасайтесь ожогов! Держите трубку выхода пара
только за защитную ручку. Подаче могут предшествовать тонкие
струи горячей воды.
1 Поставьте чашку под классический вспениватель молока.
2 Нажмите один раз кнопку HOT WATER/STEAM.
-
Кнопка HOT WATER/STEAM медленно мигает.
-
Подача горячей воды начнется автоматически.
3 Для прекращения подачи горячей воды однократно нажмите кнопку HOT
WATER/STEAM.
-
Кнопка HOT WATER/STEAM медленно мигает.
Регулировка количества и крепости
Адаптивная система Saeco
Характеристики кофе зависят от страны его происхождения, состава и
способа обжарки. Кофемашина оснащена системой самостоятельной
регулировки, которая позволяет извлечь максимум вкуса и аромата из
кофейных зерен. После нескольких циклов заварки система настроится
самостоятельно.
Page 45

Aroma plus
44
Русский
Включение функции «аромат плюс»
Для получения более крепкого кофе нажмите кнопку aroma plus. При
включенной функции «аромат плюс» кнопка aroma plus подсвечивается.
Регулировка объема кофе с помощью функции памяти
Размер порции можно регулировать в зависимости от предпочтений и от
объема чашки.
1 Поставьте чашку под носик выхода кофе.
2 Чтобы настроить объем эспрессо, нажмите и удерживайте кнопку
ESPRESSO, пока кнопка ESPRESSO не начнет быстро мигать. Отпустите
кнопку ESPRESSO, кофемашина находится в режиме программирования.
-
Кофеварка готовит эспрессо.
3 Как только чашка будет заполнена нужным количеством эспрессо,
нажмите кнопку ESPRESSO.
Кнопка ESPRESSO запрограммирована: после каждого нажатия кнопки
кофемашина будет готовить заданный объем эспрессо. Выполните
аналогичную процедуру, чтобы настроить объем эспрессо лунго или кофе:
нажмите и удерживайте кнопку требуемого напитка, а затем после того, как
чашка будет заполнена нужным количеством напитка, нажмите кнопку этого
же напитка.
Регулировка параметров кофемолки
Параметры кофемолки можно настроить с помощью кнопки регулировки
помола. Независимо от выбранных параметров кофемолка обеспечивает
идеальный помол зерен для приготовления отменного кофе чашка за
чашкой. Кофемашина сохраняет все богатство аромата и гарантирует
исключительный вкус напитка в каждой чашке.
Примечание. Настраивать кофемолку можно только тогда, когда
кофемашина размалывает кофейные зерна.
1 Поставьте чашку под носик выхода кофе.
2 Откройте крышку контейнера для кофейных зерен.
3 Нажмите кнопку Espresso (Эспрессо).
Page 46

2
1
4 Когда кофемолка начнет размалывать зерна, найдите кнопку регулировки
2
1
помола на регулировочной ручке (1). Нажмите кнопку и поверните ручку
влево или вправо (2).
-
На выбор доступны 5 различных настроек кофемолки. Чем тоньше
помол, тем крепче получается кофе.
Внимание! Не поворачивайте ручку регулировки помола более чем на одну
ступень единовременно во избежание повреждения кофемолки.
Техническое обслуживание и уход
Обслуживание кофемашины продлевает срок ее службы и гарантирует
оптимальное качество и вкус кофе.
Очистка поддона для капель и контейнера для кофейной
гущи
-
Появление индикатора в поддоне для капель свидетельствует о его
заполнении. Ежедневно опустошайте и очищайте поддон для капель.
1 Вытяните поддон для капель из кофемашины.
2 Снимайте контейнер для кофейной гущи только при включенной
кофемашине. Если снимать контейнер для кофейной гущи при
выключенной кофемашине, то счетчик циклов приготовления кофе не
сбрасывается.
3 Очистите поддон для капель и промойте его под струей воды.
4 Установите контейнер для кофейной гущи обратно в поддон для капель.
5 Вставьте поддон для капель обратно в машину и надавите на него до
характерного щелчка.
Русский
45
Очистка резервуара для воды
1 Периодически извлекайте резервуар для воды и споласкивайте его
чистой водой.
2 Наполните резервуар свежей холодной водой до отметки MAX и
установите его в кофемашину.
Очистка отделений для кофе
-
Один раз в месяц протирайте контейнер для кофейных зерен сухой
тканью.
Очистка варочной группы
Еженедельная очистка варочной группы
1 Снимите поддон для капель и контейнер для кофейной гущи.
2 Очистите поддон для капель и промойте его под струей воды.
3 Очистите контейнер для кофейной гущи и промойте его в чуть теплой
воде.
4 Выключите кофемашину и отключите ее от электросети.
5 Откройте эксплуатационную крышку.
Page 47

2
1
46
Русский
6 Нажмите кнопку PUSH (1) и потяните за ручку варочной группы, чтобы
извлечь ее из кофемашины (2).
7 Тщательно очистите выходное отверстие для кофе с помощью
инструмента, входящего в комплект поставки машины. Вставьте, как
показано на рисунке.
8 Очистите выходное отверстие для кофе с помощью ручки ложки.
Вставьте, как показано на рисунке.
9 Снимите контейнер для кофейной гущи, очистите его и промойте в чуть
теплой воде. Дайте контейнеру высохнуть и вставьте его на место.
10 Тщательно промойте варочную группу в чуть теплой воде. Аккуратно
очистите верхний фильтр.
Внимание! Не очищайте варочную группу в посудомоечной машине, а также
не используйте для очистки жидкость для мытья посуды или другие
чистящие средства. Это может привести к выходу варочной группы из строя
и негативно сказаться на вкусовых качествах кофе.
11 Дайте варочной группе просохнуть на воздухе.
Примечание. Не протирайте варочную группу тканью, в противном случае
возможно ее засорение волокнами.
12 Протрите внутреннюю поверхность кофемашины мягкой влажной тканью.
Page 48

Русский
13 Прежде чем установить варочную группу обратно в кофемашину,
убедитесь, что два значка-указателя на боковой панели совпадают. Если
они не совпадают, выполните следующие действия.
-
Убедитесь, что рычаг соприкасается с основанием варочной группы.
14 Убедитесь, что фиксатор варочной группы находится в правильном
положении.
-
Для правильной установки фиксатора поднимайте его до крайнего
верхнего положения.
47
-
Если фиксатор по-прежнему находится внизу, то он расположен
неправильно.
15 Задвиньте варочную группу обратно в кофемашину по направляющим
пазам до щелчка.
Внимание! Не нажимайте кнопку PUSH.
16 Закройте эксплуатационную крышку.
Смазка
Для оптимальной производительности кофемашины необходимо смазывать
варочную группу. Периодичность смазывания указана в таблице ниже. За
поддержкой обращайтесь на наш веб-сайт: www.philips.com/support.
Использование
Редкое 1-5 Каждые 4 месяца
Обычное 6-10 Каждые 2 месяца
Частое >10 Ежемесячно
Количество приготовленных
Периодичность смазывания
порций в день
1 Выключите кофемашину и отключите ее от электросети.
2 Снимите варочную группу и промойте ее чуть теплой водой, как указано в
разделе «Еженедельная очистка варочной группы».
Page 49

Hot water
Steam
Espresso
Memo Memo Memo
Calc
clean
Espresso lungo Coee
48
Русский
3 Нанесите смазку тонким слоем на поверхность вала в нижней части
варочной группы.
4 Обильно нанесите смазку на направляющие с каждой из сторон (см.
рисунок).
5 Вставьте варочную группу, как указано в разделе «Еженедельная очистка
варочной группы».
Смазочную трубку можно использовать несколько раз.
Очистка классического вспенивателя молока (ежедневная)
Снимите внешнюю часть классического вспенивателя молока и промойте ее
свежей водой.
Очистка классического вспенивателя молока и трубки
выхода пара (раз в неделю)
1 Снимите внешнюю часть классического вспенивателя молока и промойте
ее свежей водой.
2 Отсоедините верхнюю часть классического вспенивателя молока от
трубки выхода пара и промойте ее свежей водой.
3 Протрите трубку выхода пара влажной тканью.
4 Установите верхнюю часть обратно в трубку выхода горячей воды/пара
(убедитесь, что она полностью вставлена).
5 Снова соберите вместе все части классического вспенивателя молока.
Очистка от накипи
Если кнопка CALC CLEAN (Очистка от накипи) светится непрерывно,
необходимо очистить кофемашину от накипи. Если не провести очистку от
накипи после того как эта кнопка начнет светиться, кофемашина перестанет
работать надлежащим образом. В таком случае гарантийный ремонт не
предусмотрен.
Для удаления накипи из кофемашины используйте только соответствующие
средства Saeco. Раствор для удаления накипи Saeco гарантирует
оптимальную работу вашей машины. Использование других средств может
привести к повреждению кофемашины. Некоторое количество такого
средства может не раствориться и остаться в воде. Средство для удаления
накипи Saeco можно приобрести в интернет-магазине
www.shop.philips.com/service. Процедура очистки от накипи занимает
30 минут и состоит из цикла очистки от накипи и цикла промывки. Чтобы
приостановить удаление накипи или промывку, нажмите кнопку ESPRESSO.
Для продолжения цикла удаления накипи или цикла промывки нажмите
кнопку ESPRESSO.
Page 50

Процесс очистки от накипи
Hot water
Steam
Espresso
Memo Memo Memo
Calc
clean
Espresso lungo Coee
3 sec.
Calc
clean
Hot water
Steam
Espresso
Memo Memo Memo
Calc
clean
Espresso lungo Coee
1 Извлеките и опорожните поддон для капель и контейнер для кофейной
гущи. Установите поддон для капель и контейнер для кофейной гущи
обратно в кофемашину.
2 Снимите классический вспениватель молока с трубки выхода
пара/горячей воды.
3 Выньте резервуар для воды и извлеките из него фильтр для очистки
воды «INTENZA+» (при наличии), замените извлеченный фильтр
небольшим белым оригинальным фильтром.
4 Налейте раствор для удаления накипи в резервуар для воды. Наполните
резервуар чистой водой до отметки CALC CLEAN. Установите резервуар
для воды обратно в машину.
5 Под трубкой выхода горячей воды/пара и носиком выхода кофе
разместите большую емкость (1,5 л).
6 Нажмите и удерживайте кнопку CALC CLEAN в течение 3 секунд, чтобы
начать цикл очистки от накипи. Во время выполнения цикла очистки от
накипи кнопка ESPRESSO светится непрерывно, а кнопка CALC CLEAN
мигает.
Русский
49
7 Индикатор цикла очистки от накипи светится непрерывно. Кофемашина
начинает подавать раствор для удаления накипи с перерывами в течение
приблизительно 20 минут.
Page 51

Hot water
Steam
Espresso
Memo Memo Memo
Calc
clean
Espresso lungo Coee
50
Русский
8 Оставьте кофемашину работать в режиме подачи раствора для удаления
накипи до тех пор, пока индикатор отсутствия воды не станет светиться
непрерывно.
9 Снимите и промойте резервуар для воды. Наполните резервуар свежей
холодной водой до отметки MAX и установите его в кофемашину.
10 Опорожните поддон для капель и контейнер для кофейной гущи и
установите их обратно на место.
11 Индикатор цикла промывки светится непрерывно. Когда кнопка
ESPRESSO мигает, нажмите ее, чтобы начать цикл промывки.
12 После завершения цикла промывки кнопка CALC CLEAN погаснет.
13 Кофемашина нагревается и выполняет цикл автоматической промывки.
Кнопки ESPRESSO и COFFEE мигают одновременно. Цикл очистки от
накипи завершен.
Внимание! Если индикатор отсутствия воды светится непрерывно, а
индикатор цикла промывки не гаснет, значит, резервуар для воды не был
наполнен до отметки MAX перед началом цикла промывки. Наполните
резервуар чистой водой и повторите цикл промывки, начиная с шага 10.
14 Извлеките поддон для капель, промойте его под струей воды и
установите обратно. Опорожните емкость.
15 Установите обратно фильтр для очистки воды Intenza+ (при наличии).
16 Снимите и промойте резервуар для воды.
17 Снова установите классический вспениватель молока.
18 Очистите варочную группу, выполнив цикл еженедельной очистки
варочной группы.
Кофемашина готова к использованию.
Прерывание процесса очистки от накипи.
После запуска процедуры удаления накипи ее следует довести до конца, не
выключая аппарат. Если при очистке от накипи кофемашина зависает,
нажмите кнопку включения/выключения для прерывания процедуры. В
таком случае или в случае сбоя электропитания или случайного отключения
от сети выполните следующие действия:
1 Снимите резервуар для воды, промойте его и заполните чистой водой до
отметки MAX.
2 Убедитесь, что переключатель питания установлен в положение
«Включено».
3 Нажмите кнопку включения/выключения, чтобы включить кофемашину.
4 Подождите, пока кнопки ESPRESSO, COFFEE и HOT WATER/STEAM не
станут светиться непрерывно.
5 Опорожните поддон для капель и установите обратно.
6 Опорожните контейнер и установите обратно.
7 Нажмите кнопку HOT WATER/STEAM, чтобы запустить подачу воды.
Чтобы прекратить подачу воды, нажмите эту же кнопку.
8 Опорожните емкость.
9 Поставьте контейнер под носик выхода кофе.
10 Нажмите кнопку COFFEE.
11 Повторите шаги 9–10.
Page 52

12 Опорожните емкость.
Hot water
Steam
Espresso
Memo Memo Memo
Calc
clean
Espresso lungo Coee
Espresso
Memo Memo Memo
Calc
clean
Espresso lungo Coee
2
1
X
X
Aroma plus
Hot water
Steam
Espresso
Memo Memo Memo
Calc
clean
Espresso lungo Coee
Hot water
Steam
Espresso
Memo Memo Memo
Calc
clean
Espresso lungo Coee
Если подсветка кнопки CALC CLEAN остается включенной, необходимо
как можно скорее выполнить еще один цикл очистки от накипи.
Кофемашина готова к использованию.
Значения сигналов индикаторов
-
Мигают кнопки ESPRESSO и COFFEE. Кофемашина разогревается или
выполняет цикл автоматической промывки.
-
Непрерывно светится кнопка ESPRESSO, мигают индикаторы отсутствия
воды и общего предупреждения. Необходимо залить жидкость в контур,
установить носик для подачи горячей воды и нажать кнопку ESPRESSO,
индикатор кнопки ESPRESSO погаснет. Во время заправки контура
жидкостью индикаторы отсутствия воды и общего предупреждения
мигают. После завершения заправки контура жидкостью индикаторы
погаснут.
Русский
51
-
Одновременно мигают кнопки ESPRESSO, ESPRESSO LUNGO, COFFEE и
HOT WATER/STEAM. Кофемашина готова к приготовлению напитка.
-
Кнопка ESPRESSO медленно мигает. Кофемашина готовит одну чашку
эспрессо.
Page 53

Hot water
Steam
Espresso
Memo Memo Memo
Calc
clean
Espresso lungo Coee
Hot water
Steam
Espresso
Memo Memo Memo
Calc
clean
Espresso lungo Coee
Hot water
Steam
Espresso
Memo Memo Memo
Calc
clean
Espresso lungo Coee
Hot water
Steam
Espresso
Memo Memo Memo
Calc
clean
Espresso lungo Coee
Hot water
Steam
Espresso
Memo Memo Memo
Calc
clean
Espresso lungo Coee
52
Русский
-
Кнопка COFFEE медленно мигает. Кофемашина готовит одну чашку
кофе.
-
Кнопка ESPRESSO мигает в два раза чаще. Кофемашина готовит 2 чашки
эспрессо.
-
Кнопка COFFEE мигает в два раза чаще. Кофемашина готовит 2 чашки
кофе.
-
Кнопка ESPRESSO быстро мигает. Кофемашина программирует объем
эспрессо для приготовления.
-
Кнопка COFFEE быстро мигает. Кофемашина программирует объем кофе
для приготовления.
Page 54

2
1
X
X
Aroma plus
Hot water
Steam
Espresso
Memo Memo Memo
Calc
clean
Espresso lungo Coee
Espresso
Memo Memo Memo
Calc
clean
Espresso lungo Coee
Espresso
Memo Memo Memo
Calc
clean
Espresso lungo Coee
Espresso
Memo Memo Memo
Calc
clean
Espresso lungo Coee
Espresso
Memo Memo Memo
Calc
clean
Espresso lungo Coee
Русский
-
Кнопка HOT WATER/STEAM медленно мигает. Кофемашина выполняет
подачу горячей воды или пара.
-
Индикатор отсутствия воды светится непрерывно. Наполните резервуар
для воды.
-
Индикатор общего предупреждения светится непрерывно. Вставьте в
кофемашину поддон для капель с контейнером для кофейной гущи и
закройте эксплуатационную крышку.
53
-
Индикатор общего предупреждения быстро мигает. Выполняется сброс
настроек варочной группы во время сброса настроек кофемашины.
-
Индикатор общего предупреждения медленно мигает. Установите
варочную группу.
Page 55

Espresso
Memo Memo Memo
Calc
clean
Espresso lungo Coee
Espresso
Memo Memo Memo
Calc
clean
Espresso lungo Coee
Espresso
Memo Memo Memo
Calc
clean
Espresso lungo Coee
Hot water
Steam
Espresso
Memo Memo Memo
Calc
clean
Espresso lungo Coee
Espresso
Memo Memo Memo
Calc
clean
Espresso lungo Coee
54
Русский
-
Индикатор очистки контейнера для кофейной гущи светится непрерывно.
Опорожните контейнер для кофейной гущи.
-
Индикатор очистки контейнера для кофейной гущи мигает. Контейнер для
кофейной гущи не вставлен в кофемашину. Подождите, пока индикатор
очистки контейнера для кофейной гущи не погаснет, а индикатор общего
предупреждения не станет светиться непрерывно. Вставьте контейнер
для кофейной гущи и закройте эксплуатационную крышку.
-
Индикатор отсутствия кофе светится непрерывно. Засыпьте в контейнер
кофейные зерна и перезапустите цикл приготовления кофе. При нажатии
кнопки требуемого напитка индикатор отсутствия кофе погаснет. Когда на
кофемашине выводится индикация этого предупреждения, можно также
выполнить подачу пара и горячей воды.
-
Индикатор CALC CLEAN светится непрерывно. Необходимо очистить
кофемашину от накипи, следуя инструкциям, описанным в главе
«Очистка от накипи».
-
Индикаторы отсутствия воды, очистки контейнера для кофейной гущи,
отсутствия кофе и общего предупреждения мигают одновременно.
Кофемашина неисправна. Выключите кофемашину и спустя 30 секунд
включите ее снова. Повторите эту процедуру 2 или 3 раза. Если
кофемашина снова не включится, обратитесь в центр поддержки
потребителей Philips в вашей стране.
Page 56

Поиск и устранение неисправностей
Данный раздел посвящен наиболее распространенным проблемам, с
которыми вы можете столкнуться при использовании данного устройства.
Если не удается самостоятельно справиться с возникшими проблемами,
ознакомьтесь с ответами на часто задаваемые вопросы на веб-сайте
www.philips.com/support или обратитесь в центр поддержки потребителей
Philips в вашей стране.
Проблема
Под кофемашиной
собирается вода.
Причина Способы решения
Поддон для капель переполнен. Очистите поддон для капель после
загорания индикатора в поддоне.
Обязательно очищайте поддон для
капель перед началом процедуры
удаления накипи.
Русский
55
Кофемашина не
включается.
Поддон заполнятся
слишком быстро.
Кофемашина не подает
горячую воду после
нажатия кнопки HOT
WATER.
Не удается извлечь
варочную группу.
Кофемашина не установлена на
ровной горизонтальной
поверхности.
Кофемашина не подключена к
электросети.
Это нормально. Для промывки
внутренних контуров и варочной
группы кофемашина использует
воду. Часть этой воды выходит из
внутренних систем и попадает в
поддон для капель.
Не вставлен носик для подачи
горячей воды.
Варочная группа установлена
неправильно.
Контейнер для кофейной гущи не
снят.
Для правильной работы индикатора
заполнения поддона для капель
поместите кофемашину на
горизонтальную поверхность.
Убедитесь в том, что шнур питания
правильно подключен к розетке.
Когда в поддоне для капель
загорается индикатор, то поддон
необходимо очистить.
Поставьте чашку под носик подачи для
сбора воды после промывки.
Вставьте носик для подачи горячей
воды и снова нажмите кнопку HOT
WATER.
Закройте сервисную дверцу.
Выключите кофемашину и включите ее
снова. Дождитесь появления экрана о
готовности кофемашины к работе и
затем снимите варочную группу.
Перед снятием варочной группы
снимите контейнер для кофейной
гущи.
Процедура очистки кофемашины
от накипи не завершена.
Нельзя извлекать варочную группу во
время процедуры очистки от накипи.
Сначала следует завершить
процедуру очистки от накипи и только
затем снимать варочную группу.
Page 57

56
Русский
Проблема Причина Способы решения
Не удается вставить
варочную группу.
Варочная группа расположена
неправильно.
Перед установкой на место варочная
группа не была установлена в
положение ожидания. Убедитесь, что
рычаг соприкасается с основанием
варочной группы. Также убедитесь, что
фиксатор варочной группы находится
в правильном положении.
Выполните сброс настроек
кофемашины, отключив питание и
включив его снова. Установите поддон
для капель и контейнер для кофейной
гущи обратно в кофемашину. Не
устанавливайте варочную группу
обратно в кофемашину. Закройте
сервисную дверцу, а затем включите и
выключите кофемашину. Затем
попробуйте вставить варочную группу
на место.
Слишком мало пены или
слишком жидкий кофе.
Кофе недостаточно
горячий.
Кофемашина измельчает
кофейные зерна, но не
готовит кофе.
Кофемолка настроена на грубый
помол.
Варочная группа загрязнена. Очистите варочную группу. Для
Выходное отверстие для кофе
засорено.
Неправильно подобрана
кофейная смесь.
Кофемашина выполняет
самостоятельную регулировку.
Вы используете холодные чашки. Подогрейте чашки, ополоснув их
Вы добавляете в напиток молоко. При добавлении теплого или
Выбран слишком тонкий помол. Отрегулируйте кофемолку, установив
Варочная группа загрязнена. Очистите варочную группу.
Отрегулируйте кофемолку, установив
более тонкий помол.
тщательной очистки ежемесячно
выполняйте соответствующую
процедуру с использованием таблетки
для удаления жира.
Очистите выходное отверстие для
кофе при помощи ручки ложки или
используя многофункциональный
инструмент.
Используйте другую кофейную смесь.
Приготовьте несколько чашек кофе.
горячей водой.
холодного молока температура кофе в
любом случае снижается.
более грубый помол.
Носик выхода кофе засорен. Очистите носик выхода кофе и его
отверстия, используя ершик.
Page 58

Проблема Причина Способы решения
Выходное отверстие для кофе
засорено.
Очистите выходное отверстие для
кофе при помощи ручки ложки или
используя многофункциональный
инструмент.
Русский
57
Кофе вытекает слишком
медленно.
Не удается получить
молочную пену.
Фильтр не
устанавливается в
машину.
Индикатор очистки
контейнера для кофейной
гущи загорается
преждевременно.
Слишком тонкий помол кофе. Отрегулируйте кофемолку, установив
Варочная группа загрязнена. Очистите варочную группу.
Выходное отверстие для кофе
засорено.
В контурах машины образовалась
накипь.
Автоматический вспениватель
молока загрязнен, неправильно
собран или неправильно
установлен.
Используемое молоко не
пригодно для взбивания.
Из фильтра необходимо удалить
воздух.
В резервуаре по-прежнему
присутствует вода.
Контейнер для кофейной гущи
опорожнен при выключенной
кофемашине и, вследствие этого,
счетчик циклов приготовления
кофе не был сброшен.
более грубый помол.
Очистите выходное отверстие для
кофе при помощи ручки ложки или
используя многофункциональный
инструмент.
Проведите очистку кофемашины от
накипи.
Очистите автоматический
вспениватель молока и убедитесь в
том, что он собран и установлен
правильно.
Объем и качество пены зависят от
типа молока. Коровье молоко средней
жирности и цельное коровье молоко
обеспечивают хороший результат.
Дайте пузырькам воздуха выйти из
фильтра.
Перед установкой фильтра
опорожните резервуар для воды.
Очистите контейнер для кофейной
гущи при включенной кофемашине.
Индикатор очистки
контейнера для кофейной
гущи светится
непрерывно несмотря на
то, что контейнер для
кофейной гущи был
опорожнен.
Контейнер для кофейной гущи
был очищен при выключенной
кофемашине, поэтому
предупреждающий сигнал не был
сброшен.
Еще раз выньте контейнер для
кофейной гущи при включенной
машине, выждите 5 секунд и
установите контейнер для кофейной
гущи обратно на место. После этого
индикатор очистки контейнера для
кофейной гущи погаснет.
Page 59

58
Русский
Утилизация
-
Этот символ означает, что продукт не может быть утилизирован вместе с
бытовыми отходами (2012/19/ЕС).
-
Соблюдайте правила своей страны по раздельному сбору электрических
и электронных изделий. Правильная утилизация поможет предотвратить
негативное воздействие на окружающую среду и здоровье человека.
Гарантия и поддержка
Для получения поддержки или информации посетите веб-сайт
www.saeco.com/support или ознакомьтесь с информацией на гарантийном
талоне.
Для получения поддержки или информации звоните по телефону горячей
линии Philips Saeco в вашей стране. Контактную информацию можно найти
в отдельном гарантийном талоне или на сайте www.saeco.com/support.
Адрес изготовителя:
Philips Consumer Lifestyle B.V. Tussendiepen, 4-9206 AD Drachten,
Нидерланды.
Заказ продукции для обслуживания
-
Фильтр для очистки воды Intenza+ (CA6702)
-
Средство для смазки (HD5061)
-
Средство для очистки от накипи (CA6700)
Технические характеристики
Номинальное
напряжение —
Энергопотребление —
Питание
Материал корпуса Термопластик
Размер (Ш x В x Г) 215 x 330 x 429 мм
Вес 7 кг
Длина сетевого шнура 800–1200 мм
Панель управления Передняя панель
Размеры чашек До 152 мм
Резервуар для воды 1,8 литра, съемного типа
Вместимость контейнера
для кофейных зерен
См. табличку с основными характеристиками на внутренней поверхности
эксплуатационной крышки
250 г
Page 60

Русский
59
Вместимость контейнера
для кофейной гущи
Давление, создаваемое
насосом
Бойлер Из нержавеющей стали
Системы безопасности Плавкий предохранитель
Упаковочные материалы, изготовленные не из пластмассы, содержат бумагу и картон.
Упаковочные материалы из пластмассы содержат полиэтилен низкой плотности (LDPE),
если не указано иное.
15
15 бар
Изготовитель: “Филипс Консьюмер Лайфстайл Б.В.", Туссендиепен 4, 9206
АД, Драхтен, Нидерланды
Для бытовых нужд
Импортер на территорию России и Таможенного Союза: ООО "ФИЛИПС",
Российская Федерация, 123022 г. Москва, ул. Сергея Макеева, д.13, тел. +7
495 961-1111
Импортер на территорию России и Таможенного Союза принимает
претензии потребителей в случаях, предусмотренных Законом РФ «О
защите прав потребителей» 07.02.1992 N 2300-1», в отношении товара,
приобретенного на территории Российской Федерации
HD8425/21, HD8425/19, HD8327/99, HD8325/79, HD8323/99, HD8323/39,
HD8423/19, HD8323/11
Сделано в Китае
Page 61

60
Қазақша
Мазмұны
Кіріспе __________________________________________________________________________ 60
Маңызды ________________________________________________________________________ 61
Абайлаңыз_______________________________________________________________________ 61
Абайлаңыз_______________________________________________________________________ 62
Электромагниттік өрістер (ЭМӨ)_____________________________________________________ 62
Машинаға шолу (1-сурет)___________________________________________________________ 62
Алғашқы орнату __________________________________________________________________ 63
Тізбекті толтыру___________________________________________________________________ 65
Автоматты шаю циклі______________________________________________________________ 65
Қолмен шаю циклі_________________________________________________________________ 66
Су кермектігін өлшеу_______________________________________________________________ 67
Intenza+ су сүзгісін орнату__________________________________________________________ 67
Машинаны пайдалану______________________________________________________________ 69
Сусын түрлері және ұзақтықтар______________________________________________________ 69
Эспрессо, эспрессо лунго мен кофе қайнату____________________________________________ 70
Кофе тамызу шүмегін реттеу ________________________________________________________ 70
1 шыны эспрессо, эспрессо лунго мен кофе қайнату_____________________________________ 70
2 шыны эспрессо, эспрессо лунго мен кофе қайнату_____________________________________ 70
Сүт шайқау_______________________________________________________________________ 70
Ыстық су_________________________________________________________________________ 71
Мөлшерін және дәмін реттеу ________________________________________________________ 71
Saeco бейімдеу жүйесі_____________________________________________________________ 71
Хош иіс қосу функциясын белсендіру _________________________________________________ 72
MEMO (Ескертпе) функциясымен кофе ұзақтығын реттеу_________________________________ 72
Тартқыш параметрлерін реттеу______________________________________________________ 72
Техникалық қызмет және күтім_______________________________________________________ 73
Тамшы науасын және кофе ұнтақтары ыдысын тазалау __________________________________ 73
Қайнату құралын тазалау___________________________________________________________ 73
Майлау__________________________________________________________________________ 75
Классикалық сүт көпірткішті тазалау (күнделікті) ________________________________________ 76
Классикалық сүт көпірткіш пен бу түтікшесін тазалау (апта сайын) _________________________ 76
Қаспақты кетіру___________________________________________________________________ 76
Қақ түсіру процедурасы_____________________________________________________________ 76
Қақ тазалау циклінің кедергісі________________________________________________________ 78
Жарық сигналдарының мағынасы____________________________________________________ 79
Ақаулықтарды жою ________________________________________________________________ 82
Өңдеу __________________________________________________________________________ 85
Техникалық қызмет көрсету өнімдеріне тапсырыс беру___________________________________ 85
Техникалық ерекшеліктер___________________________________________________________ 86
Кіріспе
Классикалық сүт көпірткіштен тұратын Philips толық автоматты кофе
машинасын сатып алғаныңызбен құттықтаймыз! Philips ұсынған қолдау
көрсету қызметін толықтай қолдану үшін, өнімді www.philips.com/welcome
сайтында тіркеңіз. Машина бүтін кофе дәндерімен эспрессо мен кофе
Page 62

Маңызды
Абайлаңыз
Қазақша
дайындауға және бу мен ыстық су тамызуға арналған. Осы пайдаланушы
нұсқаулығында құрылғыны орнату, пайдалану, тазалау және қағын түсіру
бойынша қажетті барлық ақпаратты табуға болады.
Машинамен кейін мәселелер туындаса немесе басқа сұрақтар болса,
www.philips.com/support торабынан қолдау бетін қараңыз. Бұл жерден
тазалау және техникалық қызмет көрсету, жиі қойылатын сұрақтар, қолдау
фильмдері және пайдаланушы нұсқаулықтары туралы барлық толық
ақпаратты таба аласыз.
Құрылғы қауіпсіздік мүмкіндіктерімен жабдықталған. Дегенмен, құрылғыны
дұрыс пайдаланбауға байланысты кездейсоқ жарақаттануды немесе
зақымды болдырмау үшін қауіпсіздік туралы нұсқауларды мұқият оқып,
орындаңыз және құрылғыны тек осы нұсқауларда сипатталғандай
пайдаланыңыз. Осы пайдаланушы нұсқаулығын болашақта қарау үшін
сақтап қойыңыз.
-
Құрылғыны техникалық сипаттамаларға сәйкес кернеулі қабырға
розеткасына қосыңыз.
-
Құрылғыны жерге қосылған розеткаға жалғаңыз.
-
Қуат сымы үстел немесе жұмыс орны жиегінен салбырап тұрмауы тиіс не
ыстық беттерге тимеуі керек.
-
Құрылғыны, электр тығынын немесе қуат сымын суға батырмаңыз (электр
тогының соғу қаупі).
-
Қуат сымы жалғағышына сұйықтықтарды ешқашан құймаңыз.
-
Ыстық су ағынын корпус бөліктеріне тікелей бағыттамаңыз. күйіктер қаупі.
-
Ыстық беттерді ұстамаңыз. Саптарын және тұтқаларын қолданыңыз.
-
Артқы тақтадағы негізгі қосқышпен құрылғыны өшіріп, электр тығынын
розеткадан алып тастаңыз:
-
Егер ақаулық орын алса.
-
Егер құрылғы ұзақ уақыт пайдаланылмаса.
-
Құрылғыны тазалау алдында.
-
Қуат сымынан емес, тығыннан тартыңыз.
-
Электр тығынын ылғалды қолдармен түртпеңіз.
-
Электр тығыны, қуат сымы немесе құрылғының өзі зақымданған болса,
құрылғыны қолданбаңыз..
-
Құрылығыға немесе қуат сымына өзгерістер жасамаңыз.
-
Қауіпті болдырмау үшін жөндеу жұмыстары тек Philips ұйымымен
өкілеттік берілген қызмет орталығымен орындалуы керек.
-
Құрылғыны 8 жастан кіші балалар пайдаланбауы керек.
-
Бақылау астында болса немесе құрылғыны қауіпсіз пайдалану туралы
нұсқаулар алған болса және байланысты қауіптерді түсінсе, бұл
құрылғыны 8 және одан жоғары жастағы балаларға және дене, сезу
немесе ақыл-ой қабілеттері кем немесе тәжірибесі мен білімі жоқ
адамдарға пайдалануға болады.
61
Page 63

62
Қазақша
Абайлаңыз
-
Тазалау мен пайдаланушыға техникалық қызмет көрсету қызметтерін 8
жастан кіші және бақылаусыз балаларға орындауға болмайды.
-
Құрылғыны және оның сымын 8 жасқа толмаған балалардың қолы
жетпейтін жерге қойыңыз.
-
Балалардың құрылғымен ойнамауын қадағалаған жөн.
-
Кофе тартқышқа саусақтар немесе басқа нысандар ешқашан салмаңыз.
-
Құрылғыны пайдаланылатын корпусқа салмау керек.
-
Осы құрылғы тек қалыпты тұрмыстық қолданысқа арналған. Ол
дүкендердің, кеңселердің, фермалардың немесе басқа жұмыс
орталарының қызметкерлердің ас үйлері сияқты орталарда пайдалануға
арналмаған.
-
Құрылғыны әрқашан тегіс және тұрақты бетке қойыңыз. Оны тасымалдау
кезінде де тік күйде ұстаңыз.
-
Құрылғыны плиткаға, не болмаса ыстық духовканың, жылытқыштың
немесе ұқсас жылу көзінің тікелей жанына қоймаңыз.
-
Дән ыдысына тек қуырылған кофе дәндерін салыңыз. Егер ұнтақталған
кофе, тез еритін кофе, өңделмеген кофе дәндері немесе басқа зат кофе
дәні ыдысына салынса, бұл құрылғының зақымына себеп болуы мүмкін.
-
Кез келген бөліктерді салу немесе шығару алдында құрылғыны
суытыңыз. Қыздыру беттерінде пайдаланудан кейін қалдық қызу болады.
-
Су ыдысын жылы, ыстық немесе көпіршіген сумен ешқашан
толтырмаңыз, өйткені бұл су ыдысын және құрылғыны зақымдауы мүмкін.
-
Құрылғыны тазалағанда ешқашан қырғыш шүберек пен тазалағыш
агенттерді немесе жанармай мен ацетон сияқты агрессивті
сұйықтықтарды қолданбаңыз. Сумен суланған жұмсақ матаны
пайдаланыңыз.
-
Құрылғының қағын жүйелі түрде түсіріңіз. Құрылғы қағын түсіру керектігін
көрсетеді. Бұлай істемеу құрылғының дұрыс жұмыс істеуін тоқтатады.
Бұндай жағдайда жөндеу жұмысы кепілдікпен қамтылмайды.
-
Құрылғыны 0 °C-тан төмен температураларда сақтамаңыз. Жылыту
жүйесінде қалған су қатып, зақым тудыруы мүмкін.
-
Құрылғы ұзақ уақыт пайдаланылмаған кезде су ыдысында су
қалдырмаңыз. Су ластануы мүмкін. Құрылғыны пайдаланған сайын таза
су пайдаланыңыз.
Электромагниттік өрістер (ЭМӨ)
Осы Philips құрылғысы электромагниттік өрістерге қатысты барлық
қолданыстағы стандарттар мен ережелерге сәйкес келеді.
Машинаға шолу (1-сурет)
1 ESPRESSO (Эспрессо) түймесі
2 ESPRESSO LUNGO (Эспрессо лунго) түймесі
3 COFFEE (Кофе) түймесі
4 ON/OFF (Қосу/Өшіру) түймесі
5 AROMA STRENGTH (Иіс күші) түймесі
6 HOT WATER/ STEAM (Ыстық су/Бу) түймесі
Page 64

15 cm
15 cm
15 cm
15 cm
15 cm
15 cm
15 cm
15 cm
Қазақша
63
7 «Қақ түсіру циклі» шамы
8 CALC CLEAN (Қақтан тазалау) түймесі
9 «Шаю циклі» шамы
10 «Жалпы ескерту» шамы
11 «Кофе жоқ» шамы
12 «Кофе ұнтақтары ыдысын босату» шамы
13 «Су жоқ» шамы
14 Кофе құю шүмегі
15 Классикалық сүт көпірткіш
16 Су ыдысының қақпағы
17 Дәндер ыдысы қақпағын
18 Негізгі қосқыш
19 Көлік сымына арналған розетка
20 Қызмет есігі
21 Тартқышты реттеу тұтқасы
22 Су ыдысы
23 Қайнату құралы
24 Тазалау нұсқауларына сәйкес есік ішін тазалаңыз
25 Кофені шығару арнасы
26 Кофе қалдықтары тартпасы
27 Drip tray full (Тамшы науасы толы) индикаторы
28 Тартылған кофе ыдысы
29 Тамшы науасы
30 Тамшы науасының қақпағы
31 Қуат сымы
32 Щетка
33 Май
34 Су қаттылығын сынау құралы
35 Бірнеше функциялы құрал (тартқышты реттеу пернесі және кофе арнасын
тазалау құралы)
Алғашқы орнату
Осы құрылғыны кофемен сынауға болады. Дегенмен, бұл мұқият тазаланды,
сол себепті кейбір кофе қалдықтары қалуы мүмкін. Дегенмен, құрылғының
абсолютті жаңа екендігіне кепілдік береміз.Толық автоматты құрылғылар
сияқты, алдымен, жеке реттеуді аяқтауға және дәмді кофені алуға құрылғыда
шамалы кофе қайнату керек.
1 Құрылғыдан бүкіл орама материалын алыңыз.
2 Құрылғыны шүмектен, раковинадан және жылу көздерінен алыс жерге,
үстелдің немесе басқа жұмыс орнының үстіне қойыңыз.
Ескерту: Құрылғының үстінде, артында және екі жағында кемінде 15 см
бос орын қалдырыңыз.
3 Ескерту: Бұл машинаны тек дұрыс маманданған тұлға пайдалана алуы
мүмкін. Машинаны қадағалаусыз қолдануға болмайды.
Page 65

M
AX
CALC
CLEAN
MAX
2
1
64
Қазақша
4 Су ыдысын шайыңыз. Су ыдысын тұщы сумен MAX (Макс) деңгей
көрсеткішіне дейін толтырыңыз.
5 Дәндер ыдысы қақпағын ашыңыз. Дәндер ыдысын кофе дәндерімен
толтырып, қақпақты жабыңыз.
Ескертпе: Ұнтақтау құралына зақым келтірмеу үшін дән ыдысын артық
толтырмаңыз.
Абайлаңыз: Тек эспрессо дәндерін пайдаланыңыз. Тартылған кофені,
қуырылмаған кофе дәндерін немесе карамельденген кофе дәндерін
ешқашан пайдаланбаңыз, өйткені бұл құрылғыны зақымдауы мүмкін.
Ескерту: Шығару арнасына алдын ала ұнтақталған кофені, суды немесе
кофе дәндерін қоспаңыз.
6 Тоқ шанышқысын қабырғадағы розеткаға (1) қосып, шағын ашаны
құрылғының артындағы ұяшыққа (2) қосыңыз.
7 Құрылғыны қосу үшін негізгі қосқышты ON (Қосу) күйіне орнатыңыз.
8 ON/OFF (Қосу/Өшіру) түймесін басыңыз.
Page 66

Тізбекті толтыру
Espresso
Memo Memo Memo
Calc
clean
Espresso lungo Coee
Hot water
Steam
Espresso
Memo Memo Memo
Calc
clean
Espresso lungo Coee
Espresso
Memo
Hot water
Steam
Espresso
Memo Memo Memo
Calc
clean
Espresso lungo Coee
Қазақша
Бастапқы қыздыру барысында таза су ішкі тізбек арқылы ағып, машинаны
қыздырады. Бұл бірнеше секунд алады.
1 Ыдысты классикалық сүт көпірткіш астына қойыңыз.
2 «Су жоқ» шамы және «Жалпы ескерту» шамдары бір уақытта
жыпылықтайды.
-
ESPRESSO (Эспрессо) түймесі жанады.
3 Эспрессо түймесін басыңыз.
-
Машина қызып, ESPRESSO (Эспрессо), ESPRESSO LUNGO (Эспрессо
лунго) және COFFEE (Кофе) түймелері бір уақытта жыпылықтайды.
65
Автоматты шаю циклі
Қызғанда машина ішкі тізбекті таза сумен тазалау үшін автоматты шаю
циклін орындайды. Цикл барысында су кофе шүмегінен ағады.
1 Кофе тамызу шүмегі астына ыдысты қойыңыз.
-
-
ESPRESSO (Эспрессо), ESPRESSO LUNGO (Эспрессо лунго) және
COFFEE (Кофе) түймелері бір уақытта жыпылықтайды.
Цикл автоматты түрде аяқталады.
Page 67

2
1
X
X
Aroma plus
Hot water
Steam
Espresso
Memo Memo Memo
Calc
clean
Espresso lungo Coee
2
1
X
X
Aroma plus
Hot water
Steam
Espresso
Memo Memo Memo
Calc
clean
Espresso lungo Coee
Memo
Coee
66
Қазақша
Қолмен шаю циклі
Қолмен шаю циклі барысында машина ішкі тізбегін пайдалануға дайындау
үшін бір шыныаяқ кофені қайнатады.
1 Кофе тамызу шүмегі астына ыдысты қойыңыз.
2 ESPRESSO (Эспрессо), ESPRESSO LUNGO (Эспрессо лунго), COFFEE
-
ESPRESSO (Эспрессо), ESPRESSO LUNGO (Эспрессо лунго), COFFEE
(Кофе) және HOT WATER/STEAM (Ыстық су/Бу) түймелері үздіксіз
жанады.
(Кофе) және HOT WATER/STEAM (Ыстық су/Бу) түймелері үздіксіз
жанғанын тексеріңіз.
3 COFFEE (Кофе) түймесін басыңыз.
-
Ішкі тізбегін пайдалануға дайындау үшін машина бір шыныаяқ кофені
қайнатуды бастайды. Бұл кофені ішуге болмайды.
4 Қайнату циклі аяқталғаннан кейін контейнерді босатыңыз.
5 Контейнерді классикалық сүт көпірткіш астына кері қойыңыз.
Page 68

2
1
X
X
Aroma plus
Hot water
Steam
Espresso
Memo Memo Memo
Calc
clean
Espresso lungo Coee
2
1
X
X
6 HOT WATER/STEAM (Ыстық су/Бу) түймесін бір рет басыңыз. Машинаны
1
2
3
4
су тамызуды бастайды.
-
7 «Су жоқ» шамы үздіксіз жанғанша машинаның ыстық су қайнатуына
мүмкіндік беріңіз.
Ескерту: Егер қолмен шаю циклін тоқтату керек болса, HOT
WATER/STEAM (Ыстық су/Бу) түймесін басыңыз, циклді қайта бастау
үшін HOT WATER/STEAM (Ыстық су/Бу) түймесін қайта басыңыз.
8 Су ыдысын тұщы сумен MAX (Макс) деңгейіне дейін толтырыңыз.
Ескерту: Машина күту режимінде болғанда немесе 30 минуттан аса уақытқа
өшірілгенде автоматты шаю циклі басталады. Машина 2 немесе одан көп
апта пайдаланылмаса, қолмен шаю циклін орындау керек.
Машина пайдалануға дайын.
Су кермектігін өлшеу
Аудандағы суға машина параметрлерін реттей алу үшін су қаттылығы
жолағымен су қаттылығын өлшеңіз.
1 Су кермектігін сынау жолағын (машинамен бірге қамтамасыз етіледі) таза
суға 1 секундқа батырыңыз.
2 Су қаттылығы жолағын алып, 1 минут күтіңіз.
Қазақша
HOT WATER/STEAM (Ыстық су/Бу) түймесі баяу жыпылықтайды.
67
3 Қызыл түске өзгерген квадраттар санын тексеріп, төмендегі кестеде су
қаттылығын тексеріңіз.
қызыл квадраттар саны
орнатылатын мән су кермектігі
1/2 A өте жұмсақ су/жұмсақ су
3 B кермек су
4 C өте кермек су
Intenza+ су сүзгісін орнату
Intenza+ су сүзгісін орнату ұсынылады, өйткені бұл машинада қақтың
жиналуын болдырмайды. Intenza+ су сүзгісін бөлек сатып алуға болады.
Page 69

68
Қазақша
Қосымша мәліметтерді «Кепілдік және қолдау» тарауының «Техникалық
қызмет көрсету өнімдеріне тапсырыс беру» бөлімінен қараңыз.
Ескерту: INTENZA+ сүзгісін 2 айдан кейін ауыстырыңыз.
1 Су ыдысынан шағын ақ сүзгіні алып, құрғақ жерде сақтаңыз.
Ескерту: Шағын ақ сүзгіні болашақта пайдалану үшін сақтаңыз. Ол қақ
түсіру үшін қажет болады.
2 Сүзгіні орамасынан шығарып, саңылауын жоғары қаратып салқын суға
батырыңыз. Ауа көпіршіктерін шығару үшін сүзгінің шеттерін ақырын
басыңыз.
3 Сүзгі тұтқасын сіз тұратын аумақтың су кермектігіне сай параметрге
бұраңыз.
a Өте жұмсақ су/жұмсақ су
b Қатты су
c Өте кермек су
Ескерту: Су кермектігін су кермектігін тексеру жолағымен тексеруге
болады.
4 Сүзгіні бос су ыдысына салыңыз. Оны әрі қарай қозғалмай қалғанша
төмен басыңыз.
5 Су ыдысын MAX (Макс) көрсеткішіне дейін таза сумен толтырып,
машинаға сырғытып кіргізіңіз.
Page 70

2
1
X
X
Aroma plus
Hot water
Steam
Espresso
Memo Memo Memo
Calc
clean
Espresso lungo Coee
6 ESPRESSO (Эспрессо), ESPRESSO LUNGO (Эспрессо лунго), COFFEE
2
1
X
X
Aroma plus
Hot water
Steam
Espresso
Memo Memo Memo
Calc
clean
Espresso lungo Coee
(Кофе) және HOT WATER/STEAM (Ыстық су/Бу) түймелері үздіксіз
жанатынын тексеріңіз.
7 HOT WATER/STEAM (Ыстық су/Бу) түймесін бір рет басыңыз. HOT
WATER/STEAM (Ыстық су/Бу) түймесі жыпылықтайды.
-
Машинадағы ыстық суды су ыдысы босағанша ағызыңыз.
-
«Су жоқ» шамы үздіксіз жанады.
8 Су ыдысын MAX (Макс) деңгейіне дейін таза сумен толтырып, машинаға
кері салыңыз.
-
ESPRESSO (Эспрессо), ESPRESSO LUNGO (Эспрессо лунго), COFFEE
(Кофе) және HOT WATER/STEAM (Ыстық су/Бу) түймелері үздіксіз
жанады.
Машина пайдалануға дайын.
Машинаны пайдалану
Сусын түрлері және ұзақтықтар
Сусын атауы
Эспрессо Кішкентай шынаяқта берілетін қалың кремді кофе
Сипаттама
Қазақша
69
Эспрессо лунго Орташа өлшемді шынаяқта берілетін қалың кремді үлкен
эспрессо
Кофе Үлкен шыны үшін жүйелі кофе шынысы
Сусын атауы Стандартты ұзындық Ұзындық ауқымы
Эспрессо 40 мл 20-230 мл
Эспрессо лунго 80 мл 20-230 мл
Кофе 120 мл 20-230 мл
Ыстық су 300 мл
Ескерту: Жоғарыда мәлімденген ұзындық көрсеткіштері — шамалас мәндер.
Page 71

70
Қазақша
Эспрессо, эспрессо лунго мен кофе қайнату
Кофе тамызу шүмегін реттеу
Әр түрлі өлшемді шыныларға немесе стакандарға әр түрлі кофе түрлерін
тамызуға құрылғыны пайдалануға болады. Кофе тамызу шүмегі биіктігін
шыны немесе стакан өлшеміне реттеу үшін шүмекті жоғары немесе төмен
жылжытыңыз.
1 шыны эспрессо, эспрессо лунго мен кофе қайнату
1 Кофе тамызу шүмегі астына шыны қойыңыз.
2 Таңдалған кофені қайнату үшін ESPRESSO (Эспрессо), ESPRESSO
LUNGO (Эспрессо лунго) немесе COFFEE (Кофе) түймесін бір рет
басыңыз.
-
Таңдалған сусын түймесі баяу жыпылықтайды.
3 Алдын ала орнатылған деңгейге жеткен кезде машина қайнатуды
тоқтатады.
Ескерту: Егер машинада алдын ала орнатылған кофе көлемін тамызу
аяқталмайынша қайтару процесін тоқтату керек болса, бастапқы
таңдалған сусын түймесін басыңыз.
2 шыны эспрессо, эспрессо лунго мен кофе қайнату
1 Кофе тамызу шүмегі астына екі шыны қойыңыз.
2 Таңдалған кофені қайнату үшін ESPRESSO (Эспрессо), ESPRESSO
LUNGO (Эспрессо лунго) немесе COFFEE (Кофе) түймесін екі рет
басыңыз.
-
Таңдалған сусын түймесі екі рет жылдам жыпылықтайды.
Машина дұрыс кофе мөлшерін автоматты түрде ұнтақтап дайындайды.
Екі шыны сусынды қайнатуға машина автоматты түрде орындайтын екі
ұнтақтау және қайнату циклі талап етіледі.
3 Алдын ала орнатылған деңгейге жеткен кезде машина қайнатуды
тоқтатады.
Ескерту: Егер машинада алдын ала орнатылған кофе көлемін тамызу
аяқталмайынша қайтару процесін тоқтату керек болса, бастапқы
таңдалған сусын түймесін басыңыз.
Сүт шайқау
Абайлаңыз! Күйік қалу қаупі! Тамызу ыстық судың кішкентай тамшыларымен
жүреді. Тек тиісті қорғаныс тұтқасын пайдаланыңыз.
Ескерту: Көпіршіктенудің оңтайлы нәтижесін қамтамасыз ету үшін кемінде
3% ақуыз бар салқын сүтті (шамамен 5°C/41°F температурада)
пайдаланыңыз. Қаймағы алынбаған сүтті немесе майы жартылай алынған
сүтті пайдалануға болады. Майы алынған, соя және лактозасыз сүтті
пайдалануға болады.
1 Құмыраның 1/3 бөлігін салқын сүтке толтырыңыз.
Page 72

2x
2
1
X
X
1x
2
1
X
X
Ыстық су
2
1
X
X
Aroma plus
Hot water
Steam
Espresso
Memo Memo Memo
Calc
clean
Espresso lungo Coee
Қазақша
2 Классикалық сүт көпірткішті сүтке батырыңыз. HOT WATER/STEAM
(Ыстық су/Бу) түймесін екі рет басыңыз.
-
HOT WATER/STEAM (Ыстық су/Бу) түймесі екі рет жыпылықтайды.
3 Құмыраны жаймен айналдыру және оны жоғары-төмен араластыру
арқылы сүтті көбіктендіріңіз.
4 Көпіртуді тоқтату үшін HOT WATER/STEAM CLEAN (Ыстық сумен/бумен
тазалау) түймесін бір рет басыңыз.
Ескерту: HOT WATER/STEAM (Ыстық су/Бу) түймесін басқаннан кейін
машинаның көпіртуді тоқтатқанға бірнеше секунд кетеді.
Ескерту: Көпірту 3 минуттан кейін тоқтайды, көпіртуді жалғастыру керек
болса, HOT WATER/STEAM (Ыстық су/Бу) түймесін екі рет басыңыз.
5 Классикалық сүт көпірткіштің сыртқы бөлігін алып, оны жылы ағын сумен
шайыңыз. HOT WATER/STEAM (Ыстық су/Бу) түймесін бір рет басып,
ыстық суды 5 секунд тамызыңыз.
Абайлаңыз! Күйік қалу қаупі. Бу түтікшесін тек қорғаныс тұтқасымен
ұстаңыз. Тамызу ыстық судың кішкентай тамшыларымен жүреді.
1 Шыныны классикалық сүт көпірткіш астына қойыңыз.
2 HOT WATER/STEAM (Ыстық су/Бу) түймесін бір рет басыңыз.
-
HOT WATER/STEAM (Ыстық су/Бу) түймесі баяу жыпылықтайды.
-
Ыстық су тамызу автоматты түрде басталады.
3 Ыстық су тамызуды тоқтату үшін HOT WATER/STEAM (Ыстық су/Бу)
түймесін бір рет басыңыз.
-
HOT WATER/STEAM (Ыстық су/Бу) түймесі баяу жыпылықтайды.
71
Мөлшерін және дәмін реттеу
Saeco бейімдеу жүйесі
Кофе — табиғи өнім және оның сипаттамалары табиғатына, араласуына
және қуырылуына сәйкес әр түрлі болуы мүмкін. Құрылғы таңдаулы кофе
дәндерінің жақсы дәмін алуға мүмкіндік беретін өздігінен реттелетін жүйемен
жабдықталады. Кофені қайнатқаннан кейін өздігінен реттеледі.
Page 73

Aroma plus
2
1
72
Қазақша
Хош иіс қосу функциясын белсендіру
Күштірек кофе алу үшін хош иіс қосу түймесін басыңыз. Хош иіс қосу
функциясы белсенді болғанда хош иіс қосу түймесі көмескіленеді.
MEMO (Ескертпе) функциясымен кофе ұзақтығын реттеу
Дәміне және шыны өлшеміне сәйкес қайнатылатын сусын мөлшерін реттеуге
болады.
1 Кофе тамызу шүмегі астына шыны қойыңыз.
2 Эспрессо ұзақтығын реттеу үшін ESPRESSO (Эспрессо) түймесі жылдам
жыпылықтағанша ESPRESSO (Эспрессо) түймесін басып тұрыңыз.
ESPRESSO (Эспрессо) түймесін босатсаңыз, машина бағдарламалау
режиміне өтеді.
-
Машина эспрессо қайнатады.
3 Шыныда қажетті эспрессо мөлшері болғанда ESPRESSO (Эспрессо)
түймесін басыңыз.
ESPRESSO (Эспрессо) түймесі бағдарламаланған: түймені басқан сайын
машина эспрессоны орнатылған мөлшерде қайнатады. Эспрессо лунго
немесе кофе уақытын орнату үшін бір процедураны орындаңыз: сусын
түймесін басып тұрып, шыныда қажетті мөлшері болған кезде бірдей сусын
түймесін басыңыз.
Тартқыш параметрлерін реттеу
Тартқышты реттеу пернесінен тұратын тартқыш параметрлерін реттеуге
болады. Әрбір параметрді таңдаған сайын керамикалық кофе тартқыш әрбір
қайнатқан кофе шынаяғы үшін тегіс ұнтақ береді. Бұл толық кофе хош иісін
сақтайды және әрбір шынаяққа керемет дәм жеткізеді.
Ескерту: Құрылғыда кофе дәндерін ұнтақтау кезінде тартқыш параметрлерін
ғана реттеуге болады.
1 Кофе тамызу шүмегі астына шыны қойыңыз.
2 Дәндер ыдысы қақпағын ашыңыз.
3 Эспрессо түймесін басыңыз.
4 Тартқышта ұнтақтауды бастаған кезде тартқышты реттеу пернесін
тартқышты реттеу тұтқасына (1) салыңыз. Сол немесе оң (2) жаққа басып
бұраңыз.
-
Таңдауға болатын 5 түрлі тартқыш параметрі болады. Нүкте кішкентай
болса, кофе күшті болады.
Абайлаңыз: Тартқышты зақымдамау үшін тартқышты реттеу тұтқасын әр
ретте бір ойықтан көбірекке бұрмаңыз.
Page 74

Техникалық қызмет және күтім
2
1
2
1
Құрылғыға техникалық қызмет көрсету қызмет мерзімін ұзартуда және
кофенің оңтайлы сапасы мен дәмін қамтамасыз етуде маңызды.
Тамшы науасын және кофе ұнтақтары ыдысын тазалау
-
Тамшы науасы бойынша тамшы науасының толық индикатор ашылса,
тамшы науасы толық болады. Тамшы науасын күн сайын босатып
тазалаңыз.
1 Машинадан тамшы науасын тартыңыз.
2 Машина қосылған кезде кофе ұнтақтары ыдысын шығарып алыңыз. Егер
машинаны өшіру кезінде кофе ұнтақтары ыдысын шығарып алсаңыз,
есептегіш қайта орнатылмайды.
3 Тамшы науасын ағын сумен босатып шайыңыз.
4 Кофе ұнтақтары ыдысын тамшы науасына кері салыңыз.
5 Бір басумен орнына құлыпталғанша тамшы науасын құрылғыға кері
сырғытыңыз.
Су ыдысын тазалау
1 Құрылғыдан су ыдысын алып, оны таза сумен жүйелі түрде шайыңыз.
2 Су ыдысына MAX (Макс) көрсеткішіне дейін таза су толтырып, құрылғыға
қайта сырғытып кіргізіңіз.
Кофе құрамдастарын тазалау
-
Дән ыдысын құрғақ матамен айына бір рет тазалаңыз.
Қайнату құралын тазалау
Қазақша
73
Қайнату құралын апта сайын тазалау
1 Кофе ұнтақтары ыдысымен тамшы науасын алып тастаңыз.
2 Тамшы науасын босатып, ағын сумен шайыңыз.
3 Кофе ұнтақтары ыдысын босатып, жылы ағын су астында шайыңыз.
4 Машинаны өшіріп, розеткадан ажыратыңыз.
5 Қызмет көрсету есігін ашыңыз.
6 PUSH (Басу) түймесін (1) басып, қайнату құралы тұтқасын тартып,
машинадан (2) алыңыз.
Page 75

74
Қазақша
7 Берілген құралмен кофені шығару арнасын дұрыстап тазалаңыз. Оны
суретте көрсетілгендей салыңыз.
8 Қасық сабымен кофені шығару арнасын дұрыстап тазалаңыз. Оны
суретте көрсетілгендей салыңыз.
9 Кофе қалдықтары ыдысын алып, оны босатып, жылы ағын суда шайыңыз.
Оны құрғатып қайта салыңыз.
10 Қайнату құралын жылы сумен дұрыстап шайыңыз. Жоғарғы сүзгіні
абайлап тазалаңыз.
Абайлаңыз: Қайнату құралын ыдыс жуу машинасында тазаламаңыз және
оны тазалау үшін жуу сұйықтығын немесе тазалағыш зат пайдаланбаңыз.
Бұл қайнату құралының ақаулығына себеп болып, кофе дәміне кері әсер етуі
мүмкін.
11 Қайнату құралын ауада дұрыстап құрғатыңыз.
Ескерту: Талшықтардың қайнату құралында жиналуын болдырмау үшін
қайнату құралын шүберекпен сүртпеңіз.
12 Машина ішін жұмсақ сулы шүберекпен тазалаңыз.
13 Қайнату құралын машинаға қайта сырғыту алдында бүйірдегі екі
анықтамалық белгі сәйкес келетінін тексеріңіз. Егер олар сәйкес келмесе,
мына қадамды орындаңыз:
Page 76

Қазақша
-
Тұтқа қайнату құралының түбіне тиіп тұрғанын тексеріңіз.
14 Қайнату құралының құлыптау ілмегі дұрыс күйде екенін тексеріңіз.
-
Дұрыс орналастыру үшін ілгекті шеткі жоғарғы күйде болғанша жоғары
қарай басыңыз.
-
Әлі шеткі төменгі күйде болса, ілгек дұрыс орналастырылмаған.
15 Қайнату құралын бағыттағыштар бойымен орнына «шырт» етіп түскенше
машинаға сырғытыңыз.
Абайлаңыз: PUSH түймесін баспаңыз.
16 Қызмет көрсету есігін жабыңыз.
75
Майлау
Құрылғының оңтайлы өнімділігі үшін қайнату құралын майлау керек. Майлау
жиілігі үшін төмендегі кестені көріңіз. Қолдау көрсетілімі үшін веб-торапқа
кіріңіз: www.philips.com/support.
Пайдалану түрі
Төмен 1-5 4 ай сайын
Қалыпты 6-10 2 ай сайын
Ауыр >10 Ай сайын
Күнделікті өнімдер саны Майлау жиілігі
1 Құрылғыны өшіріп, розеткадан ажыратыңыз.
2 Қайнату құралын алып, «Қайнату құралын ай сайын тазалау» бөлімінде
сипатталғандай жылы ағын суда шайыңыз.
3 Қайнату құралының төменгі жағындағы білікке майдың жіңішке қабатын
жағыңыз.
Page 77

Hot water
Steam
Espresso
Memo Memo Memo
Calc
clean
Espresso lungo Coee
76
Қазақша
4 Екі жағындағы рельстерге майдың жіңішке қабатын қолданыңыз (суретті
5 «Қайнату құралын ай сайын тазалау» бөлімінде сипатталғандай қайнату
Классикалық сүт көпірткішті тазалау (күнделікті)
Классикалық сүт көпірткіштің сыртқы бөлігін алып, оны таза сумен шайыңыз.
Классикалық сүт көпірткіш пен бу түтікшесін тазалау (апта
сайын)
1 Классикалық сүт көпірткіштің сыртқы бөлігін алып, оны таза сумен
2 Классикалық сүт көпірткіштің үстіңгі бөлігін бу түтікшесінен алып, оны таза
3 Бу түтікшесін ылғалды дымқыл шүберекпен тазалаңыз.
4 Үстіңгі бөлігін бу/ыстық су түтікшесіне кері салыңыз (оның толығымен
5 Барлық классикалық сүт көпірткіш бөліктерін қайта монтаждаңыз.
Қаспақты кетіру
CALC CLEAN (Қақтан тазалау) түймесі үздіксіз жанып тұрса, машина қағын
түсіру керек. Егер осы түйме көрсеткен кезде машина қағын түсірмесеңіз,
машинаның дұрыс жұмысы тоқтайды. Мұндай жағдайда жөндеу жұмысы
кепілдікпен қамтылмайды.
Машина қағын түсіру үшін тек Saeco қағын түсіру ерітіндісін пайдаланыңыз.
Saeco қағын түсіру ерітіндісі машинаның оңтайлы өнімділігін қамтамасыз
етуге арналған. Басқа өнімдерді пайдалану машинаны зақымдауы және суда
қалдықтар қалдыруы мүмкін. Saeco қақ түсіру ерітіндісін
www.shop.philips.com/service торабында онлайн дүкенде сатып алуға
болады. Қақтан тазалау процедурасы 30 минутқа созылады және қақтан
тазалау циклі мен шаю циклінен тұрады. Қақ түсіру немесе шаю циклін
ESPRESSO (Эспрессо) түймесін басумен уақытша тоқтатуға болады. Қақ
түсіру немесе шаю циклін жалғастыру үшін ESPRESSO (Эспрессо) түймесін
басыңыз.
көріңіз).
құралын салыңыз.
Май түтігін бірнеше рет пайдалануға болады.
шайыңыз.
сумен шайыңыз.
салынғанын тексеріңіз).
Қақ түсіру процедурасы
1 Тамшы науасын және кофе ұнтақтары ыдысын алып босатыңыз. Тамшы
науасын және кофе ұнтақтары ыдысын кері орнына салыңыз.
2 Ыстық су/Бу түтікшесінен классикалық сүт көпірткішті алып тастаңыз.
3 Су ыдысын және су ыдысынан «INTENZA+» су сүзгісін (бар болса) алып,
оны кішкентай ақ түпнұсқасымен ауыстырыңыз.
4 Су ыдысына қақ түсіру ерітіндісін құйыңыз. Су ыдысын тұщы сумен CALC
CLEAN (Қақтан тазалау) деңгейі көрсеткішіне дейін толтырыңыз. Су
ыдысын машинаға кері салыңыз.
Page 78

Hot water
Steam
Espresso
Memo Memo Memo
Calc
clean
Espresso lungo Coee
3 sec.
Calc
clean
Hot water
Steam
Espresso
Memo Memo Memo
Calc
clean
Espresso lungo Coee
Қазақша
5 Үлкен ыдысты (1,5 л) ыстық су/бу түтікшесі және кофе тамызу шүмегі
астына қойыңыз.
6 Қақ түсіру циклін бастау үшін CALC CLEAN (Қақтан тазалау) түймесін 3
секунд басып тұрыңыз. ESPRESSO (Эспрессо) түймесінің шамы үздіксіз
жанады және CALC CLEAN (Қақтан тазалау) түймесінің шамы цикл бойы
жыпылықтайды.
7 «Қақ түсіру циклі» шамы үздіксіз жанып тұрады. Машина шамамен 20
минуттық аралықтарда қақ түсіру ерітіндісін тамызуды бастайды.
77
Page 79

Hot water
Steam
Espresso
Memo Memo Memo
Calc
clean
Espresso lungo Coee
78
Қазақша
8 «Су жоқ» шамы үздіксіз жанғанша машинаның қақ түсіру ерітіндісін
тамызуына мүмкіндік беріңіз.
9 Су ыдысын шығарып алып, шайыңыз. Су ыдысына MAX (Макс)
көрсеткішіне дейін таза су толтырып, құрылғыға қайта сырғытып кіргізіңіз.
10 Тамшы науасы мен ыдысты босатып, кері салыңыз.
11 «Шаю циклі» шамы үздіксіз жанып тұрады. ESPRESSO (Эспрессо) түймесі
жыпылықтаған кезде шаю циклін бастау үшін оны басыңыз.
12 Шаю циклі аяқталған кезде CALC CLEAN (Қақтан тазалау) түймесі өшеді.
13 Машина қызуда және автоматты шаю бағдарламасын орындап жатыр.
ESPRESSO (Эспрессо) және COFFEE (Кофе) түймелері бір уақытта
жыпылықтайды. Қақ түсіру циклі аяқталады.
Абайлаңыз: Егер «су жоқ» шамы үздіксіз жанса және «шаю циклі» шамы
өшпесе, су ыдысы шаю циклінің MAX (Макс) деңгейіне дейін толмайды. Су
ыдысын таза сумен толтырып, 10-қадам процесін қайталаңыз.
14 Тамшы науасын алыңыз, шайыңыз және орнына қойыңыз. Ыдысты
босатыңыз.
15 Intenza+ су сүзгісін (бар болса) қайта орнатыңыз.
16 Су ыдысын шығарып алып, шайыңыз.
17 Сүт шайқау шүмегін қайта бекітіңіз.
18 «Апта сайын қайнату құралын тазалау» циклін орындаумен қайнату
құралын тазалаңыз.
Машина пайдалануға дайын.
Қақ тазалау циклінің кедергісі
Қақ түсіру процедурасы басталса, машинаны өшірмей процедураны
толығымен аяқтаңыз. Егер цикл барысында машина ластанса, ON/OFF
(Қосу/Өшіру) түймесін басумен қақ түсіру процедурасынан шығуға болады.
Егер осы орын алса немесе қуат ақаулығы не сымның кездейсоқ
ажыратылуы жағдайында келесі қадамдарды орындаңыз:
1 Су ыдысын алып шайып, таза сумен MAX (Макс) деңгейіне дейін
толтырыңыз.
2 Негізгі қосқыш ON (Қосулы) күйіне орнатылғанын тексеріңіз.
3 Машинаны қосу үшін ON/OFF (Қосу/Өшіру) түймесін басыңыз.
4 ESPRESSO (Эспрессо), COFFEE (Кофе), HOT WATER/STEAM (Ыстық
су/Бу) түймелері үздіксіз жанғанын күтіңіз.
5 Тамшы науасын босатып, орнына қайта қойыңыз.
6 Ыдысты босатып, орнына қайта қойыңыз.
7 Су тамызу үшін HOT WATER/STEAM (Ыстық су/Бу) түймесін басыңыз. Су
тамызуды тоқтату үшін бірдей түймені басыңыз.
8 Ыдысты босатыңыз.
9 Кофе тамызу шүмегі астына ыдысты қойыңыз.
10 COFFEE (Кофе) түймесін басыңыз.
11 9-10 қадамдарын қайталаңыз.
12 Ыдысты босатыңыз.
Егер CALC CLEAN (Қақтан тазалау) түймесінің шамы қосулы қалса, басқа
қақ түсіру циклін бірден орындау керек.
Машина пайдалануға дайын.
Page 80

Жарық сигналдарының мағынасы
Hot water
Steam
Espresso
Memo Memo Memo
Calc
clean
Espresso lungo Coee
Espresso
Memo Memo Memo
Calc
clean
Espresso lungo Coee
2
1
X
X
Aroma plus
Hot water
Steam
Espresso
Memo Memo Memo
Calc
clean
Espresso lungo Coee
Hot water
Steam
Espresso
Memo Memo Memo
Calc
clean
Espresso lungo Coee
Hot water
Steam
Espresso
Memo Memo Memo
Calc
clean
Espresso lungo Coee
-
ESPRESSO (Эспрессо) және COFFEE (Кофе) түймелері жыпылықтайды.
Машина қызуда немесе автоматты шаю бағдарламасын орындап жатыр.
-
ESPRESSO (Эспрессо) түймесі үздіксіз жыпылықтайды, «су жоқ» және
«жалпы ескерту» шамдары жыпылықтайды. Тізбекті толтырып,
ESPRESSO (Эспрессо) түймесін бассаңыз, ESPRESSO (Эспрессо) түймесі
шамы өшеді. Тізбекті толтыру барысында «су жоқ» және «жалпы ескерту»
шамдары жыпылықтайды, тізбек толтыру аяқталғанда шамдар өшеді.
-
ESPRESSO (Эспрессо), ESPRESSO LUNGO (Эспрессо лунго), COFFEE
(Кофе) және HOT WATER/STEAM (Ыстық су/Бу) түймелері
жыпылықтайды. Машина сусын қайнатуға дайын.
Қазақша
79
-
ESPRESSO (Эспрессо) түймесі баяу жыпылықтайды. Машина бір шыны
эспрессо қайнатуда.
-
COFFEE (Кофе) түймесі баяу жыпылықтайды. Машина бір шыны кофе
қайнатуда.
Page 81

Hot water
Steam
Espresso
Memo Memo Memo
Calc
clean
Espresso lungo Coee
Hot water
Steam
Espresso
Memo Memo Memo
Calc
clean
Espresso lungo Coee
Hot water
Steam
Espresso
Memo Memo Memo
Calc
clean
Espresso lungo Coee
Hot water
Steam
Espresso
Memo Memo Memo
Calc
clean
Espresso lungo Coee
2
1
X
X
Aroma plus
Hot water
Steam
Espresso
Memo Memo Memo
Calc
clean
Espresso lungo Coee
80
Қазақша
-
ESPRESSO (Эспрессо) түймесі жылдам екі рет жыпылықтайды. Машина
екі шыны эспрессо қайнатылуда.
-
COFFEE (Кофе) түймесі екі рет жыпылықтайды. Машина екі шыны кофе
қайнатылуда.
-
ESPRESSO (Эспрессо) түймесі жылдам жыпылықтайды. Машина
қайнатылатын эспрессо мөлшерін бағдарламалауда.
-
COFFEE (Кофе) түймесі жылдам жыпылықтайды. Машина демделетін
кофе мөлшерін бағдарламалауда.
-
HOT WATER/STEAM (Ыстық су/Бу) түймесі баяу жыпылықтайды.
Машина ыстық су немесе бу тамызуда.
Page 82

Espresso
Memo Memo Memo
Calc
clean
Espresso lungo Coee
Espresso
Memo Memo Memo
Calc
clean
Espresso lungo Coee
Espresso
Memo Memo Memo
Calc
clean
Espresso lungo Coee
Espresso
Memo Memo Memo
Calc
clean
Espresso lungo Coee
Espresso
Memo Memo Memo
Calc
clean
Espresso lungo Coee
Қазақша
-
«Су жоқ» шамы үздіксіз жанады. Су ыдысына су құйыңыз.
-
«Жалпы ескерту» шамы үздіксіз жанып тұрады. Кофе ұнтақтары ыдысы
мен тамшы науасын машинаға салып, қызмет есігін жабыңыз.
-
«Жалпы ескерту» шамы жылдам жыпылықтайды. Машинаның қайта
орнатылуына байланысты қайнату құралы қайта орнатылуда.
81
-
«Жалпы ескерту» шамы баяу жыпылықтайды. Қайнату құралын салыңыз.
-
«Кофе ұнтақтары ыдысын босату» шамы үздіксіз жыпылықтайды. Кофе
ұнтақтарының ыдысын босатыңыз.
Page 83

Espresso
Memo Memo Memo
Calc
clean
Espresso lungo Coee
Espresso
Memo Memo Memo
Calc
clean
Espresso lungo Coee
Hot water
Steam
Espresso
Memo Memo Memo
Calc
clean
Espresso lungo Coee
Espresso
Memo Memo Memo
Calc
clean
Espresso lungo Coee
82
Қазақша
-
«Кофе ұнтақтары ыдысын босату» шамы жыпылықтайды. Кофе
ұнтақтарының ыдысы машинаға салынбаған. «Кофе ұнтақтары ыдысын
босату» шамы өшіп, «жалпы ескерту» шамы үздіксіз жанғанша күтіңіз.
Кофе ұнтақтары ыдысын салып, қызмет есігін жабыңыз.
-
«Кофе жоқ» шамы үздіксіз жанады. Кофе дәні ыдысын кофе дәндерімен
толтырып, қайнату циклін қайта бастаңыз. Қажетті сусын түймесін басқан
кезде «кофе жоқ» шамы өшеді. Сонымен қатар, машина осы ескерту
сигналын көрсеткен кезде бу мен ыстық су тамыза аласыз.
-
CALC CLEAN (Қақтан тазалау) шамы үздіксіз жанады. Машина қағын
түсіру керек болса, «Қақ түсіру» тарауындағы нұсқауларды орындаңыз.
-
«Су жоқ», «кофе ұнтақтары ыдысын босату», «кофе жоқ» және «жалпы
ескерту» шамдары бір уақытта жыпылықтайды. Машинада ақау бар.
Машинаны өшіріп, 30 секундтан кейін қосыңыз. Осы процедураны 2
немесе 3 рет қайталаңыз. Егер машина кері қосылмаса, елдегі Philips
тұтынушыларды қызмет көрсету орталығына хабарласыңыз.
Ақаулықтарды жою
Бұл тарауда машинада жиі кездесетін мәселелер аталып өтеді. Төмендегі
ақпараттың көмегімен мәселені шеше алмасаңыз, жиі қойылатын сұрақтар
тізімін көру үшін www.philips.com/support торабына кіріңіз немесе еліңіздегі
Philips тұтынушыларға қолдау көрсету орталығына хабарласыңыз.
Page 84

Мәселе Себеп Шешім
Машина астында су
болады.
Тамшы науасы тым көп және
артық толған.
Тамшы науасы бойынша тамшы
науасының толық индикатор ашылса,
тамшы науасын босатыңыз. Машина
қағын түсіруді бастау алдында тамшы
науасын босатыңыз.
Қазақша
83
Машина көлденең бетке
орналастырылмаған.
Машина қосылмайды. Машина ажыратылды. Қуат көзі сымы дұрыс салынғанын
Тамшы науасы жылдам
толтырылады.
HOT WATER (Ыстық су)
түймесін басқаннан кейін
машина ыстық су
тамызбайды.
Қайнату құралын алу
мүмкін емес.
Бұл қалыпты жағдай. Машинада
ішкі тізбекті және қайнату
құралын шаюға су
пайдаланылады. Ішкі жүйе
арқылы тікелей тамшы науасына
су ағады.
Ыстық су тамызу шүмегі
салынбаған.
Қайнату құралы дұрыс
орналастырылмаған.
Кофе ұнтақтары ыдысы
алынбайды.
Машина қақ түсіру процесінде
тұрып қалды.
Тамшы науасының толық индикаторы
дұрыс жұмыс істейтіндей машинаны
көлденең бетке орналастырыңыз.
тексеріңіз.
«Тамшы науасы толық» индикаторы
тамшы науасының қақпағында
ашылған кезде тамшы науасын
босатыңыз.
Шайылған суды жинау үшін тамызу
шүмегіне шынаяқты қойыңыз.
Ыстық су тамызу шүмегін салып, HOT
WATER (Ыстық су) түймесін қайта
басыңыз.
Техникалық қызмет көрсету есігін
жабыңыз. Машинаны өшіріп қайта
қосыңыз. Машинаның дайын экраны
пайда болғанша күтіп, одан кейін
қайнату құралын алыңыз.
Қайнату құралын алу алдында кофе
ұнтақтары ыдысын алыңыз.
Қақ түсіру процесі белсенді кезде
қайнату құралын алу мүмкін емес.
Алдымен, қақ түсіру процесін аяқтап,
қайнату құралын алыңыз.
Қайнату құралын салу
мүмкін емес.
Қайнату құралы дұрыс орында
емес.
Кері салу алдында қайнату құралы
қалған күйіне салынбады. Иінтірек
қайнату құралы негізімен байланыста
екендігін және қайнату құралының
ілмегі дұрыс күйде екендігін тексеріңіз.
Қосып өшірумен машинаны қайта
орнатыңыз. Тамшы науасын және
кофе ұнтақтары ыдысын кері салыңыз.
Қайнату құралын шығарып алыңыз.
Техникалық қызмет есігін жауып,
машинаны қосып өшіріңіз. Одан кейін
қайнату құралын қайта салыңыз.
Page 85

84
Қазақша
Мәселе Себеп Шешім
Кофедегі крем мөлшері
тым аз немесе сулы.
Тартқыш үлкен параметрге
орнатылған.
Тартқышты дәл параметрге реттеңіз.
Кофе жетерліктей ыстық
емес.
Машина кофе дәндерін
ұнтақтайды, бірақ кофе
шықпауы мүмкін.
Қайнату құралы ластанған. Қайнату құралын тазалаңыз. Дұрыстап
Кофені шығару арнасы
ластанған.
Кофе қоспасы дұрыс емес. Басқа кофе қоспасын пайдаланыңыз.
Машинада жеке реттеу
орындалуда.
Пайдаланылатын шынаяқтар
суық.
Сүт қосылды. Қосылатын сүт жылы немесе суық,
Тарту тым кішкентай күйге
орнатылған.
Қайнату құралы ластанған. Қайнату құралын тазалаңыз.
Кофе тамызу шүмегі ластанған. Кофе тамызу шүмегін және
Кофені шығару арнасы
құлыпталған.
тазалау үшін майлау үстелімен ай
сайынғы тазалау процедурасын
орындаңыз.
Бірнеше функциялы құрал тұтқасымен
немесе қасық тұтқасымен кофені
шығару арнасын дұрыстап тазалаңыз.
Бірнеше шынаяқ кофені қайнатыңыз.
Ыстық сумен шаю арқылы
шынаяқтарды алдын ала қыздырыңыз.
кофе температурасын шамалы
төмендетуге болады.
Тартқышты үлкен параметрге реттеңіз.
саңылауларын құбыр тазалау
құралымен тазалаңыз.
Бірнеше функциялы құрал тұтқасымен
немесе қасық тұтқасымен кофені
шығару арнасын тазалаңыз.
Кофе баяу шығады. Дән тым ұсақ болып ұнтақталды. Тартқышты үлкен параметрге
Қайнату құралы ластанған. Қайнату құралын тазалаңыз.
Кофені шығару арнасы
құлыпталған.
Машина тізбегін қақ бітеп
тастаған.
Сүт көбіктелмейді. Автоматты сүт көпірткіш
ластанған немесе дұрыс
бекітілмеген не орнатылмаған.
өзгертіңіз.
Бірнеше функциялы құрал тұтқасымен
немесе қасық тұтқасымен кофені
шығару арнасын тазалаңыз.
Машинаның қағын тазалаңыз.
Автоматты сүт көпірткішті тазалап,
дұрыс бекітілгенін немесе
орнатылғанын тексеріңіз.
Page 86

Мәселе Себеп Шешім
Пайдаланылатын сүт түрі
көбіктендіруге арналмаған.
Әр түрлі сүт түрлері көбіктің әр түрлі
мөлшерлеріне және әр түрлі сүт
сапаларына әкеледі. Жартылай майы
алынған, толығымен майлы сиыр сүті
жақсы нәтижелер береді.
Қазақша
85
Сүзгі бекітілмейді. Сүзгіден ауаны шығару керек. Ауа көпіршіктерінің сүзгіден шығуына
Су ыдысында әлі де су бар. Сүзгіні орнату алдында су ыдысын
«Кофе ұнтақтарының
ыдысы» шамы тым ерте
жанады.
Тіпті, мен кофе
ұнтақтарының ыдысын
босатқан кезде «кофе
ұнтақтарының ыдысын
босату» шамы үздіксіз
жанып тұрады.
Машина өшіріліп, есептегіш қайта
орнатылмаған кезде кофе
ұнтақтарының ыдысы
босатылған.
Кофе ұнтақтары ыдысын өшірулі
машинамен босаттыңыз, сол
себепті машина дабылды қайта
орнатпаған.
мүмкіндік беріңіз.
босатыңыз.
Кофе ұнтақтарының ыдысын қосулы
машинамен босатыңыз.
Кофе ұнтақтары ыдысын машина
қосулы кезде тағы бір рет алып, 5
секунд күтіп, кофе ұнтақтары ыдысын
қайта салыңыз. Одан кейін «кофе
ұнтақтары ыдысын босату» шамы
өшеді.
Өңдеу
-
Бұл таңба осы өнімді қалыпты тұрмыстық қалдықпен бірге тастауға
болмайтынын білдіреді (2012/19/EU).
-
Электрондық және электр өнімдерін бөлек жинау бойынша жергілікті
ережелерді орындаңыз. Дұрыс тастау қоршаған ортаға және адам
денсаулығына кері әсерін тигізбеуге көмектеседі.
Егер сізге ақпарат немесе қолдау қажет болса, www.saeco.com/support
сайтына кіріңіз немесе бөлек кепілдік парақшасын оқыңыз.
Ақпарат немесе қолдау қажет болса, еліңіздегі Philips Saeco анықтама
желісіне хабарласыңыз. Контактілер бөлек қамтамасыз етілетін кепілдік
буклетіне қосылады немесе www.saeco.com/support торабына кіріңіз.
Өндіруші мекенжайы:
Philips Consumer Lifestyle B.V. Tussendiepen, 4-9206 AD Drachten,
Нидерланд.
Техникалық қызмет көрсету өнімдеріне тапсырыс беру
-
Intenza+ су сүзгісі (CA6702)
-
Майлағыш (HD5061)
-
Қақ түсіру ерітіндісі (CA6700)
Page 87

86
Қазақша
Техникалық ерекшеліктер
Номинал кернеу - Қуат
номиналы - Қуат көзі
Корпус материалы Термопластикалық материал
Өлшемі (е x б x д) 215 x 330 x 429 мм
Салмағы 7 кг
Қуат сымы ұзындығы 800 -1200 мм
Басқару тақтасы Алдыңғы панель
Шыны өлшемдері 152 мм дейін
Су ыдысы 1,8 литр, алынбалы түрі
Қызмет есігінің ішіндегі деректер тақтасын көріңіз
Кофе дәндерінің
ыдысының
сыйымдылығы
Тартылған кофе
тартпасының
сыйымдылығы
Сорап қысымы 15 бар
Бойлер Тот баспайтын болат түрі
Қауіпсіздік құрылғылары Ерігіш сақтандырғыш
Пластик бума материалдарында LDPE бар, басқаша көрсетілмеген жағдайда.
250 г
15
Өндіруші: “Филипс Консьюмер Лайфстайл Б.В.", Туссендиепен 4, 9206 АД,
Драхтен, Нидерланды
Тұрмыстық қажеттіліктерге арналған
Ресей және Кедендік Одақ территориясына импорттаушы: "ФИЛИПС" ЖШҚ,
Ресей Федерациясы, 123022 Мәскеу қаласы, Сергей Макеев көшесі, 13-үй,
тел. +7 495 961-1111
Қазақстан Республикасында сатып алынған тауарға қатысты шағымдарды
қабылдайтын заңды тұлға: «Филипс Казахстан» ЖШС Манас көшесі, 32А,
503-кеңсе, 050008, Алматы қаласы, Қазақстан, тел. 8 800 080 0123
Юр. лицо принимающее претензии в отношении товара, приобретенного на
территории Республики Казахстан: ТОО «Филипс Казахстан» ул.Манаса, 32А
офис 503, 050008 Алматы, Казахстан, тел. 8 800 080 0123
HD8425/21, HD8425/19, HD8327/99, HD8325/79, HD8323/99, HD8323/39,
HD8423/19, HD8323/11
Қытайда жасалған
Пластик емес бума материалдарында қағаз немесе картон бар.
Page 88

4219.460.3727.1
07-11-2016
HD8827_4219_460_3727_1_BACK-COVER.indd 1 07-11-16 15:31
 Loading...