

Page 1
Register your product and get support at
中文
한국어
繁體中文
注册您的产品及获取支持服务,请登陆
제품 등록 및 지원:
註冊您的產品及取得支援服務,請登入 :
www.philips.com/welcome
English
中文
Type / 型号 / 모델 / 型號 :HD 8323 / HD 8325 / HD8327
OPERATING INSTRUCTIONS
使用说明书
사용 및 유지관리 설명서
使用說明書
한국어
繁體中文
READ THESE INSTRUCTIONS CAREFULLY BEFORE USING THE MACHINE.
请在使用咖啡机前仔细阅读本说明书。
커피 머신을 사용하기 전에 이 설명서를 주의 깊게 읽으십시오.
請在使用咖啡機前仔細閱讀本說明書。
Page 2
图
圖
2 3
1
7 8 9 10
4 65
11
14
• 2 •
18
19
20
12
15
16
13
17
16 in
40 cm
20 cm
20 cm
8 in
20 cm
8 in
Fig. - 图 - 그림 - 圖 - (A)
20 cm
8 in
8 in
Fig. -
图 -
그림 -
-
(B)
Page 3
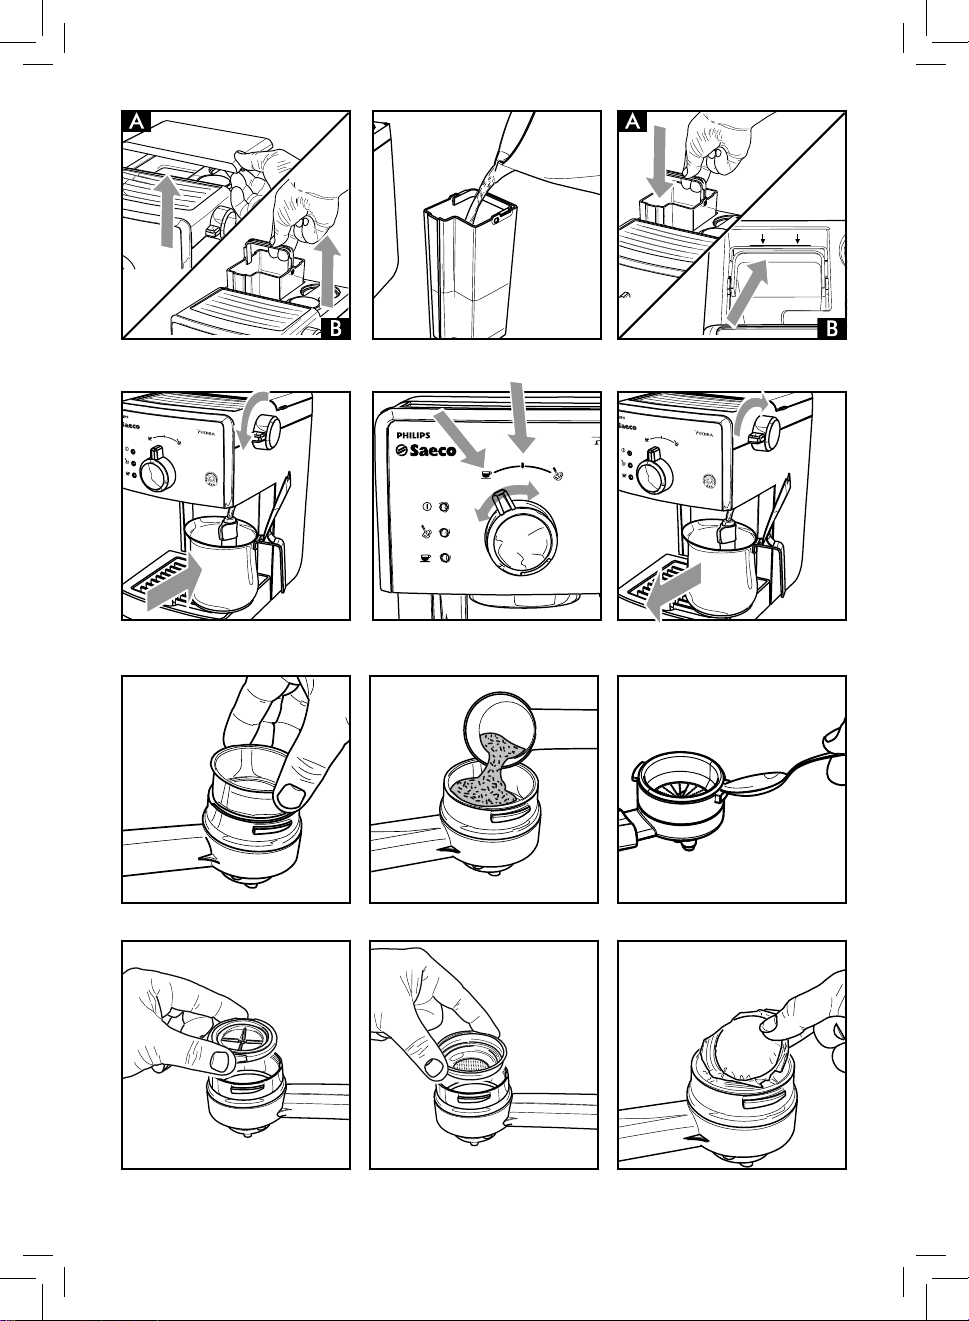
Fig. -
图
圖
图
圖
图
圖
图
圖
图
圖
图
圖
图
圖
图
圖
图
圖
图
圖
图
圖
图
圖
图 - 그림 -
- (1)
Fig. -
图 - 그림 -
- (2)
Fig. -
图 - 그림 -
- (3)
Fig. -
Fig. -
图 - 그림 -
图 - 그림 -
- (4)
- (7)
Fig. -
Fig. -
图 - 그림 -
图 - 그림 -
- (5)
- (8)
Fig. -
Fig. -
图 - 그림 -
图 - 그림 -
- (6)
- (9)
Fig. -
图 - 그림 -
- (10)
Fig. -
图 - 그림 -
- (11)
Fig. -
图 - 그림 -
- (12)
• 3 •
Page 4
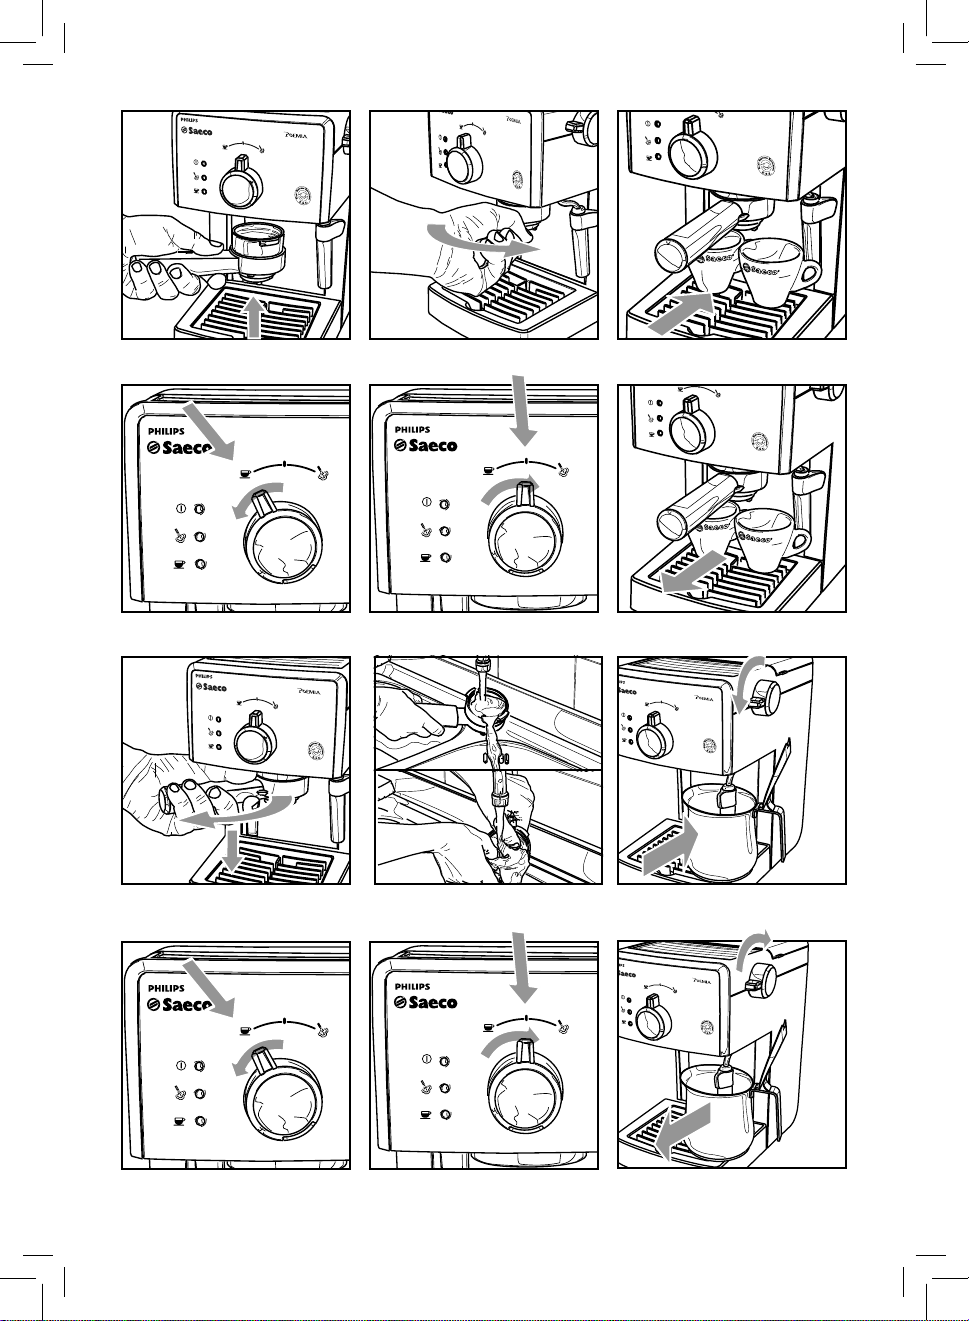
Fig. -
图
圖
图
圖
图
圖
图
圖
图
圖
图
圖
图
圖
图
圖
图
圖
图
圖
图
圖
图
圖
图 - 그림 -
- (13)
Fig. -
图 - 그림 -
- (14)
Fig. -
图 - 그림 -
- (15)
Fig. -
Fig. -
图 - 그림 -
图 - 그림 -
- (16)
- (19)
Fig. -
Fig. -
图 - 그림 -
图 - 그림 -
- (17)
- (20)
Fig. -
Fig. -
图 - 그림 -
图 - 그림 -
- (18)
- (21)
Fig. -
• 4 •
图 - 그림 -
- (22)
Fig. -
图 - 그림 -
- (23)
Fig. -
图 - 그림 -
- (24)
Page 5
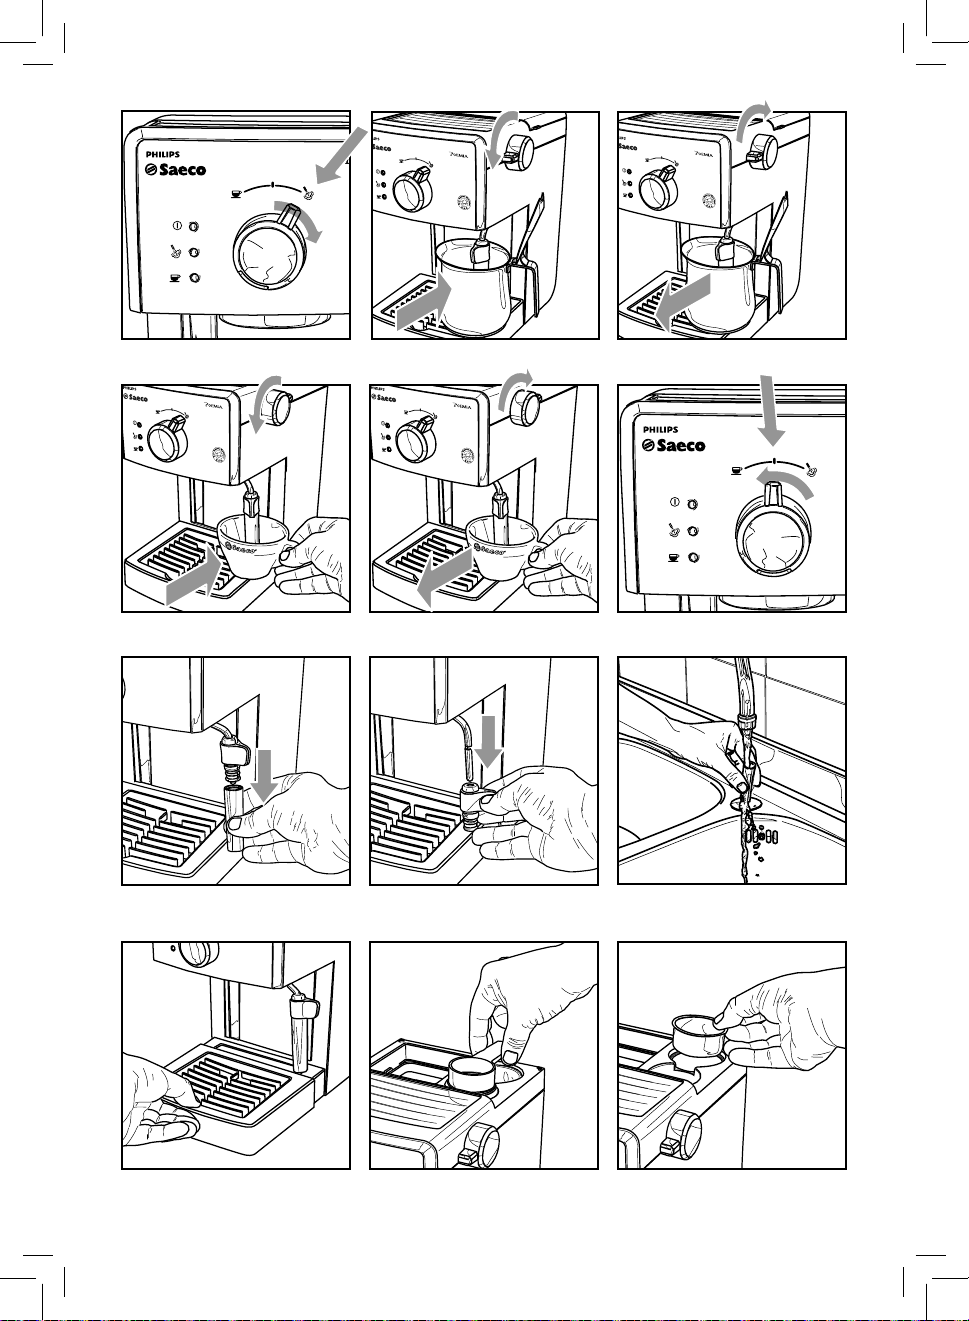
Fig. -
图
圖
图
圖
图
圖
图
圖
图
圖
图
圖
图
圖
图
圖
图
- 圖
图
圖
图
圖
图
圖
图 - 그림 -
- (25)
Fig. -
图 - 그림 -
- (26)
Fig. -
图 - 그림
- (27)
Fig. -
Fig. -
图 - 그림 -
图 - 그림 -
- (28)
- (31)
Fig. -
Fig. -
图 - 그림 -
图 - 그림 -
- (29)
- (32)
Fig. -
Fig. -
图 - 그림 -
图 - 그림 -
- (30)
- (33)
Fig. -
图 - 그림 -
- (34)
Fig. -
图 - 그림 -
- (35)
Fig. -
图 - 그림 -
- (36)
• 5 •
Page 6
1 GENERAL INFORMATION
The co ee machine is suitable for preparing 1 or 2 cups of
espresso co ee and is provided with a swivel steam and hot
water wand. The controls on the front side of the machine are
labelled with easy-to-read symbols.
The machine has been designed for domestic use and is not
suitable for professional, continuous use.
Warning. No liability is held for damage caused
by:
• Incorrect use not in accordance with the intended
purposes;
• Repairs not carried out in authorised service
centres;
• Tampering with the power cord;
• Tampering with any part of the machine;
• Use of non-genuine spare parts and accessories;
• Failure to descale the machine and storage at
temperatures below 0°C.
In these cases, the warr anty is not valid.
1.1 To Simplify Manual Reading
The warning triangle indicates the
instructions that are important for
user’s safe ty. Please carefu lly follow
these instructions to avoid serious injur y!
References to illustrations, parts of the appliance or controls,
etc. are indicated by numbers or letters. Whenever possible,
refer to the illus tration.
2 TECHNICAL SPECIFICATIONS
The manufacturer reserves the right to make changes to the
technical speci cations of the produc t.
Nominal Voltage - Power Rating - Power Supply
See label on the appliance
Housing Material
Plastic
Size (w x h x d) (mm)
210 x 300 x 280
Weight
3.9 kg
Power Cord Length
1.3 m
Control Panel
Front side
Filter Holder
Pressurized type
Pannarello
Special for cappuccinos
Water Tank
1.25 litres – Removable type
Pump Pressure
15bar
Boiler
Stainless steel type
Safety Devices
Thermal fuse
This symbol is used to highlight information
th at i s p ar tic ul ar ly i mp or ta nt t o e nsu re op tim al
use of the machine.
The illust rations corr esponding to th e text can be fou nd
on the rst pages of the manual. Please refer to these
pages while reading the operating instruc tions.
1.2 How to use these Operating
Instructions
Keep these operating instructions in a safe place and make
them available to anyone who may use the co ee machine.
For further information or in case of problems, please refer to
an authorised service centre.
• 6 •
3 SAFETY REGULATIONS
Never allow water to come into contact with any of the
electrical parts of the machine: Danger of shor t circuit!
Overheated steam and hot water may cause scalding!
Do not direct the steam or hot water jet towards body
parts. Handle the steam/hot water spout with care:
Danger of scalding!
Intended Use
The co ee machine is intended for domestic use only. Do
not make any technical changes or use the machine for
unauthorised p urposes since this would create s erious hazards!
The appliance is not to be used by persons (including children)
with reduced physical, mental or sensory abilities or with
scarce exper ience and/or expertise, unless they are supervised
by a person responsible for their safety, or they are instructed
by this person on how to properly use the machine.
Page 7
Power Supply
Only connect the co ee machine to a suitable socket. The
voltage must correspond to that indicated on the machine’s
label.
Power Cord
Never use the co ee machine if the power cord is defective or
damaged. If damaged, the power cord must be replaced by
the manufacturer or an authorised service centre. Do not pass
the power cord around corners, over sharp edges or over hot
object s and keep it away from oil.
Do not use the power cord to carry or pull the co ee machine.
Do not pull out the plug by the power cord or touch it with wet
hands.
Do not let the power cord hang freely from tables or shelves.
For the Safety of Others
Prevent children from play ing with the machine.
Children are not aw are of the risks related to ele ctric household
appliances. Do not leave the machine packaging materials
within the reach of children.
Danger of Burns
Never direc t jets of overheated steam and /or hot water towards
yourself or others. Always use the handles or knobs provided.
Do not disconnec t (remove) the pressurized lter holder during
co ee brewing. Hot water drips may spill out of the brew unit
during the warming phase.
Do not brew co ee when the machine is overheated, namely
when both “
” and “ ” lights are on.
Machine Location
Place the co ee machine in a safe place, where th ere will be no
danger of overturning or injury.
Hot water or overheated steam may spill out of the machine:
Danger of scalding!
Do not keep the machine at a temperature below 0°C. Frost
may damage the machine.
Do not use the co ee machine outdoors.
In order to prevent it s housing from melti ng or being damaged,
do not place the machine on very hot surfaces and close to
open ames.
Cleaning
Bef ore c lean ing th e mach ine, t urn i t o by pr essin g the O N/OFF
button, then pull out the plug from the socket. Wait for the
machine to cool down.
Never immerse the machine in water!
It is strictly forbidden to tamper with the internal parts of the
machine.
Water left in the tank for several days should not be used for
food purposes. Wash the tank and ll it with fresh drinking
water.
Suitable Location for Operation and
Maintenance
To ensure a correct and e cient performance of the co ee
machine, we recommend following the instructions below:
• Choose a level surface.
• Choose a location that is su ciently well-lit, clean and
near an easily reachable socket.
• Allow for a minimum distance from the sides of the
machine as shown in (Fig.A).
Storing the Machine
If the machine is to remain inactive for a long time, turn it
o and unplug it. Store it in a dry place, out of the reach of
children. Keep i t protected from dust and dirt.
Repairs / Maintenance
In case of failure, problems or a suspected fault resulting from
the falling of the machine, immediately remove the plug
from the socket. Never attempt to operate a faulty machine.
Servicing and repairs may only be carried out by Authorised
Service Centres. All liability for damages resulting from work
not carried out by professionals is declined.
Fire Safety Precautions
In case of re, use carbon dioxide (CO2) extinguishers. Do not
use water or dry powder extinguishers.
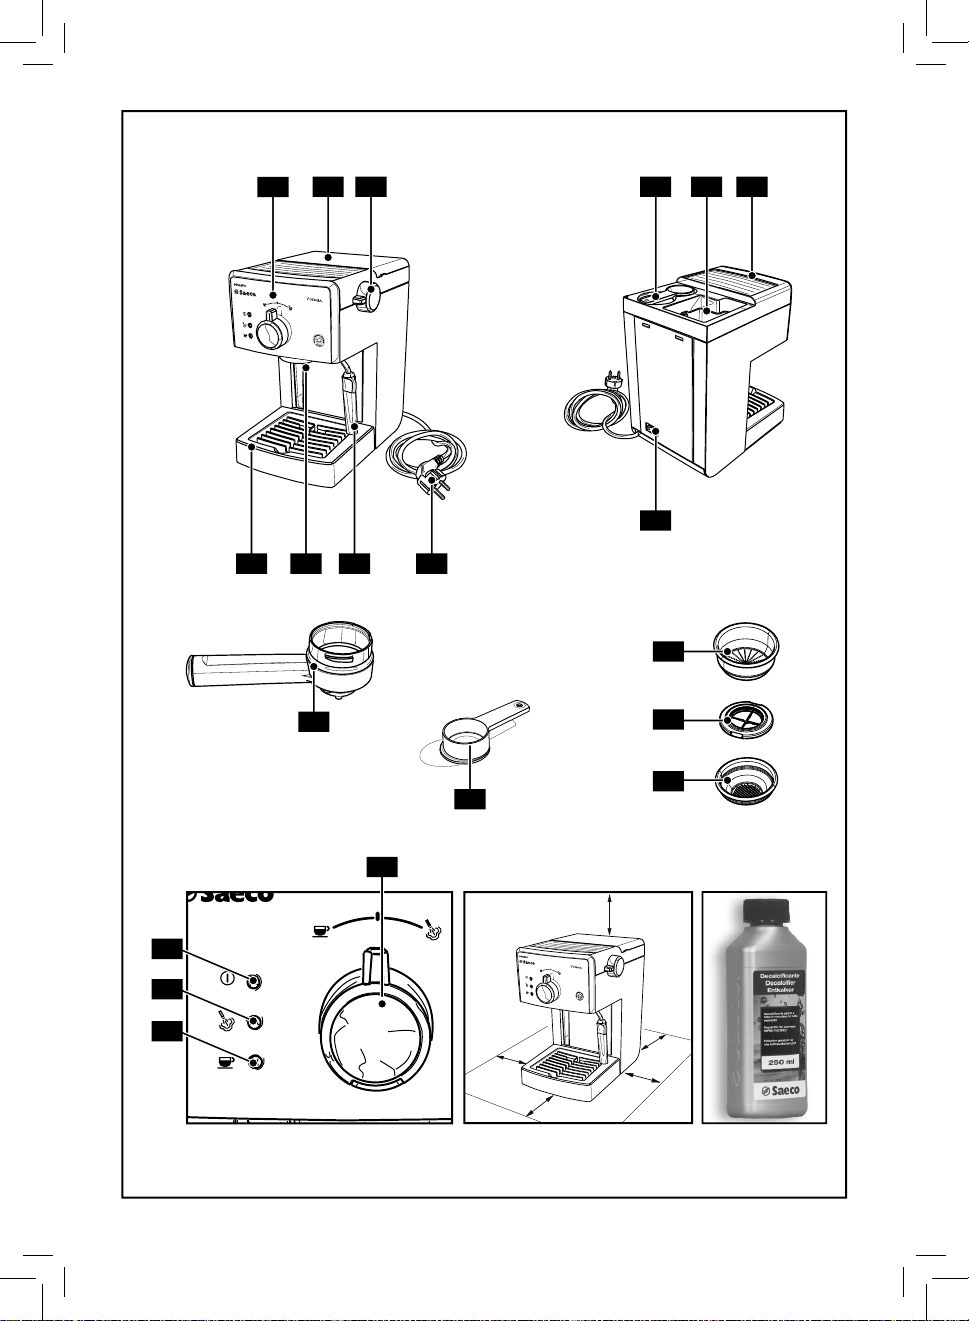
Key to Machine Components (Page 2)
1 Control panel
2 Water tank lid
3 Hot water/steam knob
4 Seat for accessories
5 Water tank
6 Cup holder res t
7 Water recovery tray + grill
8 Brew unit
9 Steam wand (Pannarello)
10 Power cord
11 ON/OFF button
12 Pressurized lter holder
13 Ground co ee measuring scoop
14 Ground co ee lter
(single piece for 1 or 2 co ee(s))
15 Pod lter adapter
16 Co ee pod lter
17 Selection knob
18 "Machine on" light
19 "Steam ready" light
20 Co ee/Water light - "Machine ready"
English
• 7 •
Page 8
4 INSTALLATION
For your own and other people safety, follow the
"Safet y Regulations" indicated in Section 3 carefully.
4.1 Packaging
The original packaging has been designed to protect the
machine during shipping. We recommend keeping the
packaging material for possible future transport.
4.2 Installation Instructions
Before installing the machine, read the following safety
instructions carefully:
• Place the machine in a safe place;
• Make sure children cannot play with the machine;
• Do not place the machine on hot surfaces or near open
a m e s .
The co ee machine is now ready to be connected to the
electrical network.
Note: It is recommended to wash the
components before using them for the rst
time and/or after they have not been used for a certain
period of time.
4.3 Machine Connection
Electric power may be very dangerous! It is
therefore necessary to strictly follow the safety
regulat ions. Do not use faul ty power cords! Fault y cords
and plugs must be replaced immediately in Authorised
Service Centres.
The voltage of the appliance has been pre-set by the
manufacturer. Check that the voltage matches the indication
on the data plate placed at the bottom of the appliance.
• Check that the ON/OFF button (11) is set on “0” before
connecting the machine to the electrical ne twork.
• Insert the plug into a wall socket with suitable power
voltage.
4.4 Water Tank
• (Fig.1A) - Remove the lid f rom the water tank (2) by lifting
it.
• (Fig.1B) - Remove the water tank (5).
• (Fig.2) - Rinse and ll it with fresh drinking water taking
care not to over ll.
Fill the tank only with fresh, non-sparkling,
drinking water. Hot water or any other liquid
may damage the tank. Do not operate the machine if
water is not present: Make sure there is enough water
in the tank.
• (Fig.3A) - Insert the water tank making sure that it has
been properly repositioned in its former seat and then
reposition the lid (2).
After lling the water tank, place it back
into the machine. Make sure that the tank is
correc tly inserted i nto the machine by pus hing it rmly
until its limit stop in order to avoid water leaks from
the botto m - THE REFERENCE MARK INDICATED IN FIG. 3B
SHOULD BE FULLY VISIBLE.
4.5 Circuit Priming
At the beginning, after dispensing steam or when the water
tank is empty, the machine’s water circuit must be primed.
• Press the ON/OFF button (11) and switch it to the "I"
position. The light (18) will turn on to indicate that the
machine is on.
• (Fig.4) - Place a container under the steam wand
(Pannarello).
• Op en the "hot water/steam" knob (3) by turning it counter-
clockwise.
• (Fig.5) - Set the selection knob (17) to the
"
" position.
• Wait until a steady jet of water ows out of the steam
wand (Pannarello).
• (Fig.5) - Set the selection knob (17) to the "
• Close the "hot water/steam" knob (3) by turning it
clockwise. Remove the container.
" position.
4.6 Using the Machine for the First Time
or after a Period of Inactivity
This simple operation ensures optimum brewing and must be
performed:
- At rst start-up;
- When the machine remains inactive for a long time (more
than 2 weeks).
Dispensed water must be emptied into an
ade quat e dra in. It is no t suit abl e for f ood u se. If
the container lls up during the cycle, stop dispensing
water and empty the container before resuming the
operation.
• (Fig.2) - Rinse th e tank and ll it again with fresh drink ing
water.
• 8 •
Page 9
• (Fig.4) - Place a container under the steam wand
(Pannarello). Open the knob (3) by turning it counterclockwise.
(Fig.5) - Set the selection knob (17) to the "
• Dispense the whole water tank content from the steam/
hot water wand (Pannarello). To end the operation, s et the
selection knob (17) to the "
(3) by turning it clockwise.
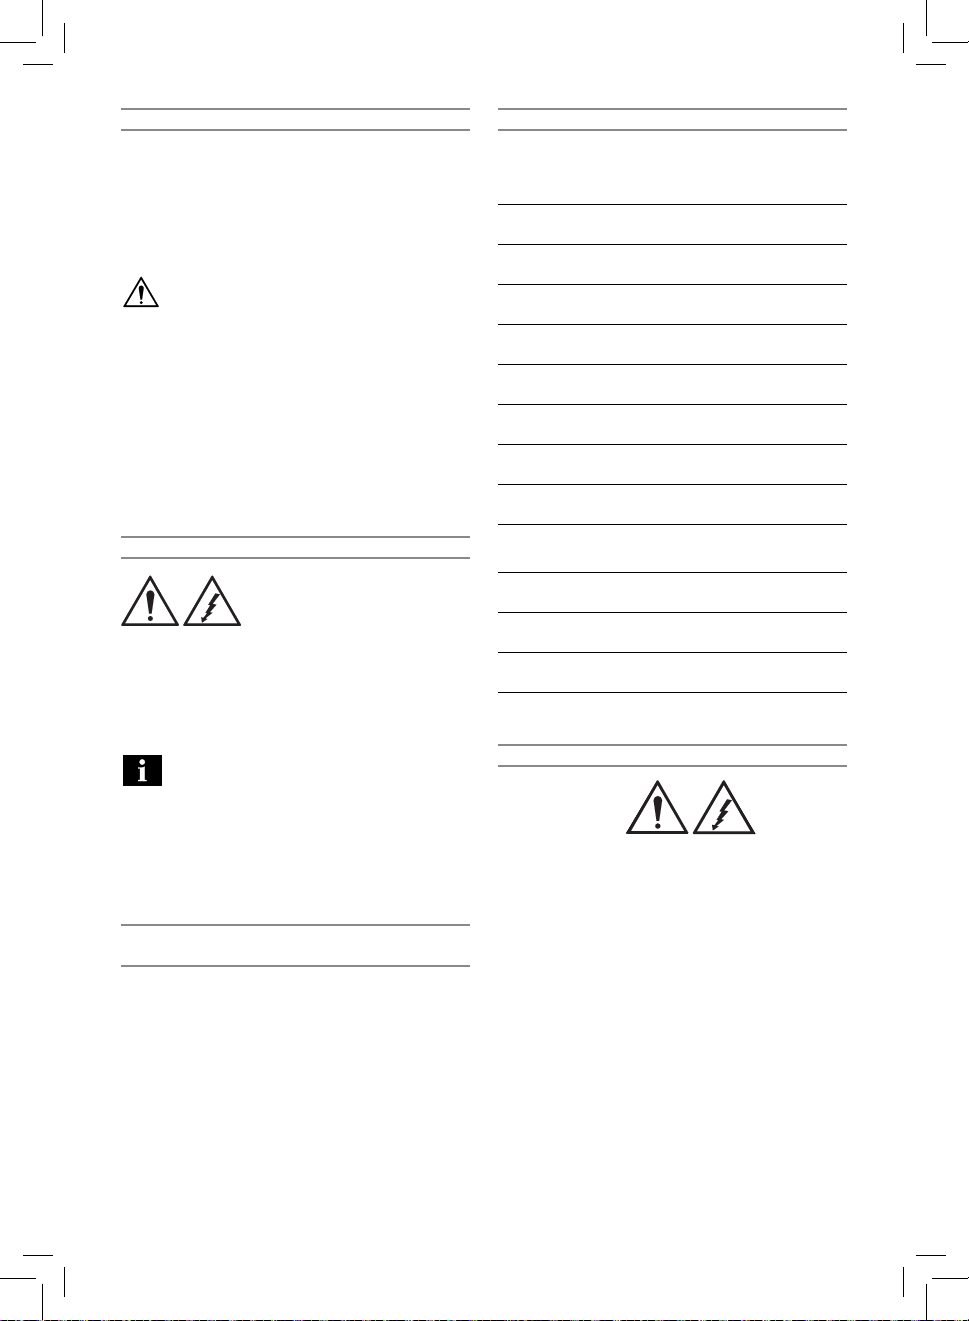
• (Fig.2) - Fill the tank with fresh drinking water.
• (Fig.13-14) - Insert the lter holder into the brew unit (8)
from the bot tom and turn it from left to right until it locks
into place.
• (Fig.15) - Place a suitable container under the lter
holder.
• (Fig.16) - Turn the selection knob (17) to the "
position and dispense all the water in the tank.
(Fig.17) - Once the tank is empty, stop dispensing and
switch the selection knob (17) to the "
• Fill the t ank again and wait until the "machine ready " light
(20) turns on.
• (Fig.19) - Rem ove t he lte r hol der fro m the unit by tu rni ng
it from right to left and rins e it with fresh drinking water.
The machine is now ready; please see related sections for
operating details on how to brew co ee and dispense steam.
" position and close the knob
" position.
" position.
5 COFFEE BREWING
Warning! During the co ee brewing it is
forbidden to remove the pressurized lter
holder by manually turning it clockwise. Danger of
burns.
• During this operation, the "machine ready" light (20) may
ash; this is to be considered as a s tandard and not a faulty
operating mode.
• Before using the machine, make sure that the hot water/
steam knob (3) is closed and that there is enough water in
the tank.
• Press the ON/OFF button (11) and switch it to the "I"
position.
• Wait until the "machine ready" light (20) turns on. The
machine is now ready for co ee brewing.
Accessories for co ee brewing are placed in
a specially designed seat to make operations
easy and immediate.
If the ground co ee measuring scoop and/or the lters
are required, lift the cover (2) and take what you need
(Fig.35 e Fig.36).
5.1 Using Ground Coff ee
• (Fig.7) - Inser t the lter (14) in the pressuri zed lter holder
(12); the lter is already inserted when using the machine
for the rst time.
• (Fig.13) - Insert the lter holder into the bre w unit (8) from
the bottom.
• (Fig.14) - Turn the lter holder from left to right until it
locks into place. Release the pressurized lter holder grip.
The handle will slightly turn to the left. This movement
guarantees proper lter holder performance.
• (Fig.16) - Preheat the pressu rized lte r holder by switching
the selection knob (17) to the "
water spills out of it. This is to be done only for the rst
co ee brewing.
"
• (Fig.17) -When 150cc of water have owed out, set the
selection knob (17) to the "
• (Fig.19) - Remove the lter holder from the machine by
turning it f rom right to left and pour out any water left. As
the machine is tted with the spec ial lter (14), there is no
need to change the lter to make one or two co ees.
• (Fig.35) - Remove the measuring scoop from the
machine.
• (Fig.8) - Add 1-1.5 measuring scoop(s) for single co ee
and 2 measuring scoops for double co ee. Remove any
co ee residues from the rim of the lter holder.
• (Fig.13) - Insert the lter holder (12) into the brew unit (8)
from the bottom.
• (Fig.14) - Turn the lter holder from left to right until it
locks into place.
• (Fig.15) - Take 1 or 2 preheated cups and place them
under the pres surized lter holder. Make sure that they are
correctly placed under the co ee brewing nozzles.
• (Fig.14) - Switch the selection knob (17) to the "
position.
• When the desired quantity of co ee has been obtained,
turn the selection knob (17) to the "
co ee brewing. Wait a few seconds after brewing has
stopped, then remove the cups of co ee (Fig.18).
• (Fig.19) - Remove the pressurized lter holder and empty
out the remaining co ee residues.
Note: If a small quantity of water remains
in the lter holder, this has to be considered
as absolutely normal and is due to the lter holder
features.
Important Note: The lter (14) should be kept
clean to guarantee perfect results. Clean daily
after use.
" position until some
" position to stop brewing.
" position to stop
English
"
• 9 •
Page 10
5.2 Using Coff ee Pods
• (Fig.9) - Use a co ee spoon to remove the lter for ground
co ee (14) from the pressurized lter holder (12).
• (Fig.10) - Insert the co ee pod adapter (15) - with the
convex part f acing down - into the pressurize d lter holder
(12).
• (Fig.11) - Then, insert the pod lter (16) into the pressurized
lter holder (12).
• (Fig.13) - Insert the pressurized lter holder into the brew
unit (8) from the bot tom.
• (Fig.14) - Turn the lter holder from left to right until it
locks into place. Release the grip from the pressurized
lter holder. The handle is automatically slightly turned
leftwards.
This movement guarantees proper pressurized lter holder
performance.
• (Fig.16) - Preheat the pressu rized lte r holder by switching
the selection knob (17) to the "
water spills out of it. This is to be done only for the rst
co ee brewing.
• (Fig.17) -When 150cc of water have owed out, set the
selection knob (17) to the "
• (Fig.19) - Remove the pressurized lter holder from the
machine by turning it from right to left and pour out any
water left.
• (Fig.12) - Insert the pod into the lter holder and make
sure the paper of the pod does not overhang the lter
holder.
• (Fig.13) - Insert the pressurized lter holder into the brew
unit (8) from the bot tom.
• (Fig.14) - Turn the lter holder from left to right until it
locks into place.
• Take 1 prehe ated cup and place it under the lter holder.
Check that it is correctly placed under the co ee brewing
nozzles.
• (Fig.16) - Switch the selection knob (17) to the "
position.
• (Fig.17) - When the desired quantity of co ee has been
obtained, turn the selection knob (17) to the "
to stop co ee brewing, and then remove the co ee cup.
• (Fig.19) - Wait a few seconds after brewing, then remove
the lter holder and dispose of the used pod.
Important Note: The lter (16) and the adapter
(15) should be kept clean to guarantee perfect
results. Clean daily after use.
" position until some
" position to stop brewing.
" position
6 TIPS FOR CHOOSING COFFEE
As a general ru le any type of co ee availabl e on the market can
be used. However, co ee is a natural product and its avour
changes according to i ts origin and blend; it is theref ore a good
idea to try di erent types of co ee in order to nd the most
suited to your personal taste.
For optimal results, we recommend using espresso machine
blends. As a rule, co ee should always come out of the
pressurized lter holder, without dripping.
The co ee brewing speed can b e modi ed by slightly changing
the amount of co ee in the lter and/or using a di erent co ee
grind.
Saeco recommends using ESE single-dose co ee pods for a
tasty co ee and easier cleaning and preparing.
BEFORE PERFORMING ANY OPERATIONS RELATED
TO HOT WATER/STEAM DISPENSING, MAKE SURE
THAT THE STEAM WAND (PANNARELLO) IS DIRECTED OVER
THE WATER RECOVERY TRAY.
7 HOT WATER
Danger of scalding! Dispensing may be preceded
by small jets of hot water. The wand can reach
high temperatures: Do not touch it directly with bare
hands.
• Press the ON/OFF button (11) and switch it to the "I"
"
position.
• Wait until the "machine ready" light (20) turns on. The
machine is now ready.
• (Fig.21) - Place a container or a tea glass under the steam
wand (Pannarello).
• (Fig.21) - Open the knob (3) by turning it counter-
clockwise.
• (Fig.22) - Set the selection knob (17) to the "
position.
• (Fig. 23) - When the desired quantity o f hot water has been
dispensed, set the selection knob (17) to the "
• (Fig.24) - Close the knob (3) by turning it clock wise.
• Remove the hot water container.
"
" position.
• 10 •
Page 11
8 STEAM / CAPPUCCINO
Danger of scalding! Dispensing may be preceded
by small jets of hot water. The wand can reach
high temperatures: Do not touch it directly with bare
hands.
• Press the ON/OFF button (11) and switch it to the "I"
position.
• Wait until the "machine ready" (20) light turns on.
• (Fig. 25) - Set the selectio n knob (17) to the "
The light (20) turns o .
• Wait unt il the light (19) turns on. The mac hine is now ready
for steam dispensing.
• (Fig.26) - Place a container under the steam wand.
• (Fig.26) - Open the knob (3) for a few seconds, so that
remaining water ows out of the s team wand (Pannarello).
In a short time only steam will come out.
• (Fig.27) - Close the knob (3) and remove the container.
• Fill 1/3 of the container you wish to use to prepare
cappuccino with cold milk.
Use cold milk to get a better result.
• (Fig.28) - Immerse the steam wand in the milk and open
the knob (3) by turning it counter-clockwise. Turn the milk
container with slow upward movements so that it warms
up evenly.
A maximum dispensing of 60 seconds is
recommended.
• Once nished, close the knob (3) by turning it clockwise
and remove the cup with frothed milk.
• (Fig.30) - Set the s election knob (17) to the "
If both "
the machine is too high for brewing co ee.
• Prime the circuit as described in Section 4.5 to make the
machine ready for use.
" and " " lights are on, the temperature of
" position.
" position.
9 CLEANING
Maintenance and cleaning can only be carried out when the
machine is cold and disconnected f rom the electrical net work.
• Do not immerse the machine in water or place any of its
parts in a dishwasher.
• Do not use spirit, solvents and/or aggressive chemical
agents.
• We recommend cleaning the water tank and re lling it
with fresh water daily.
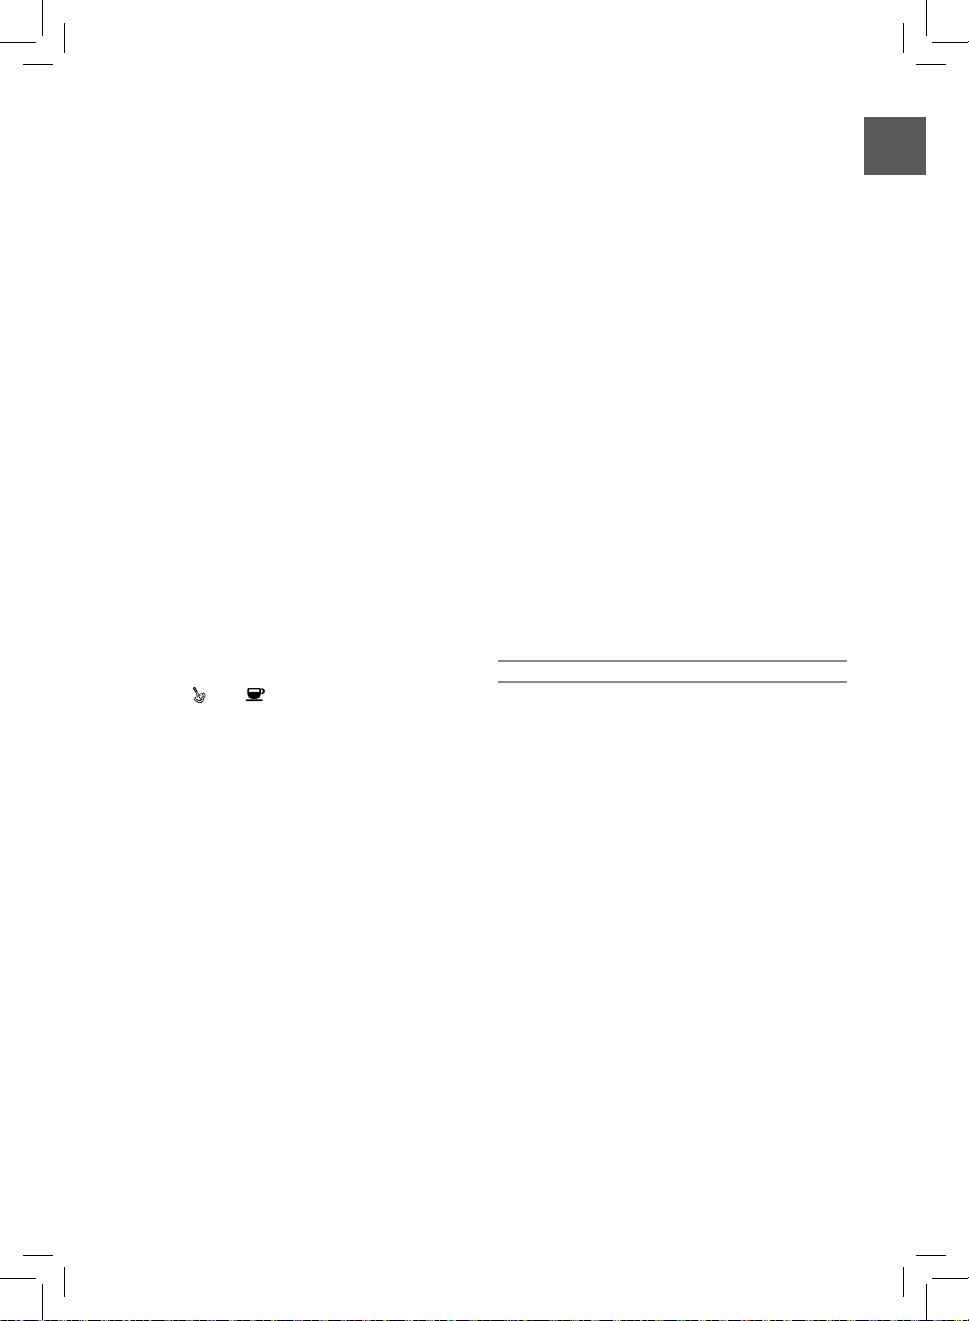
• (Fig.31-33) - Every day, after heating milk, remove the
external part of the Pannarello and wash it with fresh
drinking water.
• (Fig.31-32-33) - Clean the steam wand weekly. To do this,
the following operations have to be per formed:
- Remove the external part of the Pannarello (for standard
cleaning);
- Remove the upper part of the Pannarello from the steam
wand;
- Wash the upper par t of the Pannarello with fr esh drinking
water;
- Wash the steam wand with a wet cloth and remove any
milk residues;
- Reposition the upper part in the steam wand (make sure
it is completely inserted).
Reassemble the e xternal part of the Pannarello.
• (Fig.34) - Empty and clean the drip tray every day.
• Use a sof t, dampened cloth to clean the appliance.
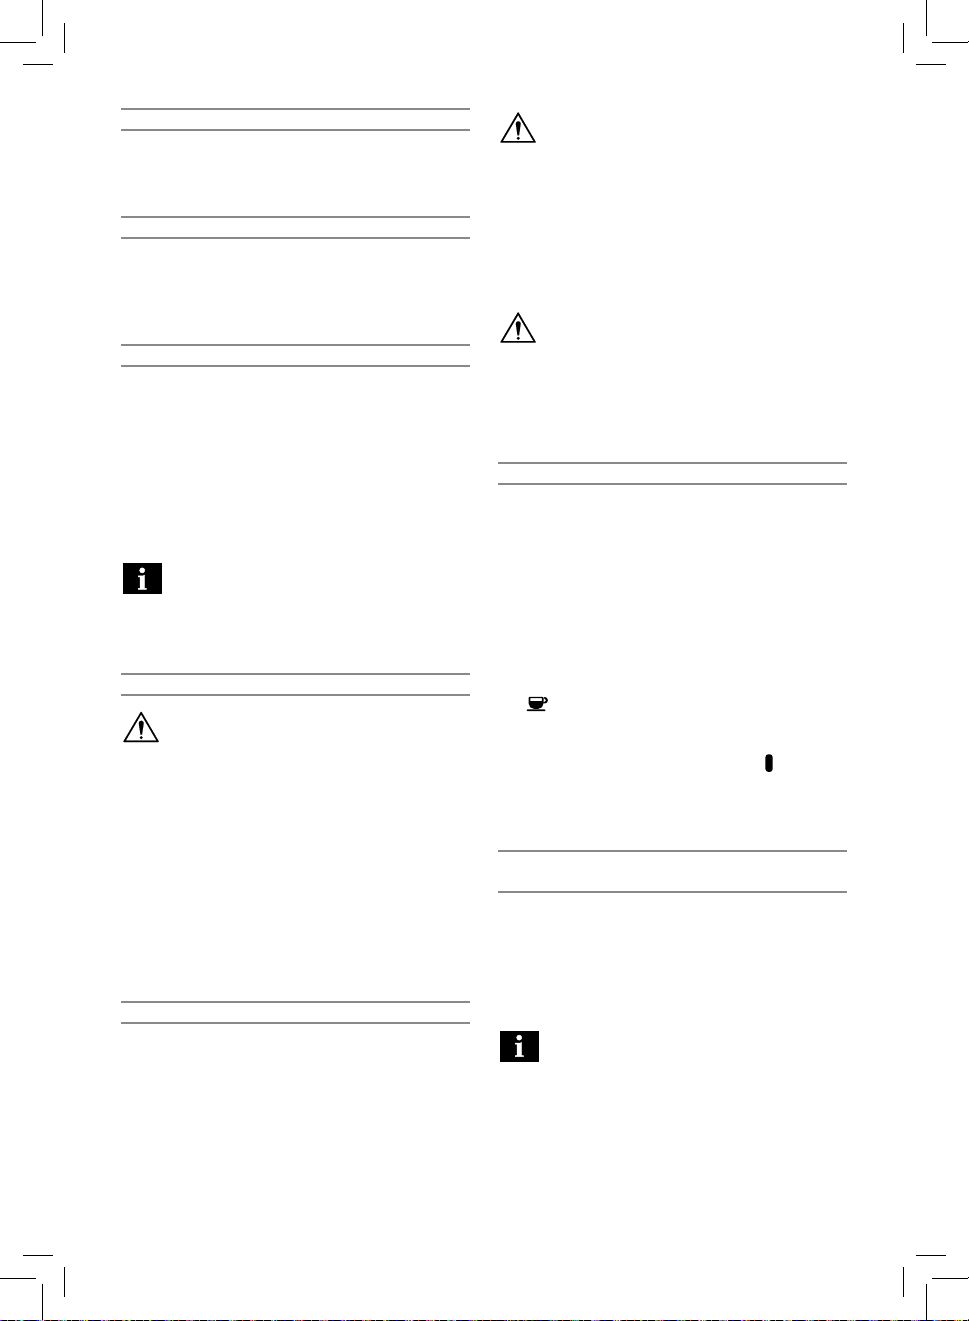
• (Fig.20) - Perform the following operations to clean the
pressurized lter holder:
- (Fig.9) - Remove the lter and wash it thoroughly with
hot water.
- Remove the adapter (if tted) and wash it thoroughly
with hot water.
- Wash the internal part of the pressurized lter holder.
• Do not dry the machine and/or its components using a
microwave and/or standard oven.
• (Fig.35-36) - Clean the seat for accessories with a damp
cloth every we ek to remove any co ee or dust residues.
English
Note: The machine is ready when the "machine
ready" light
Important Note: If it is not possible to brew
cappuccino as described, prime the circuit as
explained in Section 4.5 and then repeat the steps.
The same procedure can be performed to heat
other beverages.
• After this operation, clean the steam wand with a wet
cloth.
is permanently on.
Note: Do not wash the pressurized lter holder
in the dishwasher.
• 11 •
Page 12

10 DESCALING
Limescale bu ilds up with the use of the appliance; t he machine
needs desc aling every 1-2 months and/or whenever a redu ction
in water ow is noticed. Use the Saeco descaling solution only.
In case of con ict, priority must be given
to what is indicated in the operation and
maintenance manual over the instructions provided on
separately sold accessories and materials.
Use the Saeco descaling solution (Fig.B).
Its formula has been designed to ensure
better machine performance and operation for its
whole operating life. If correctly used, it also avoids
alterations in the brewed product. Before starting a
descaling cycle make sure that: THE WATER FILTER (if
used) HAS BEEN REMOVED.
Never drink the descaling solution or any
products dispensed until the cycle has been
carrie d out to the end. Never use vin egar as a descaling
solution.
1 (Fig.13-14) - Insert the lter holder into the brew unit (8)
from the bot tom and turn it from left to right until it locks
into place.
2 (Fig.1B) - Remove and empty the water tank.
3 (Fig.2) - Pour HALF the content of the Saeco concentrated
descaling solution into the water tank, then ll the tank
with fresh drinking water up to the MAX level.
4 Switch on the machine by pressing the ON/OFF but ton (11)
and switch it to the "I" position.
(Fig.21) - Fill up (as described in Section 7 of the manual)
2 cups of water (about 150ml each) from the steam / hot
water wand and turn o the machine by pressing and
switching the ON/OFF button (11) to the "0" position.
5 Let the descaling solution sit for about 15-20 minutes with
the machine o .
6 Switch on the machine by pre ssing the ON/OFF button (11).
(Fig.21) - Fill up (as described in Section 7 of the manual)
two cups of water (about 150 ml each) from the steam /
hot water wand. Then turn the machine o by means of
the ON/OFF but ton (11) and leave it o for 3 minutes.
7 Repeat the operations described in step 6 until the water
tank is completely empty.
8 (Fig.2) - Rinse the tank and ll it completely with fresh
drinking water.
9 Place a container under the lter holder.
10 Switch on the mach ine by pressing the ON/OFF but ton (11);
turn the selection knob (17) to the "
means of the lter holder, dispense the whole content of
the tank. Set the selection knob (17) to the "
stop dispensing.
" position and, by
" position to
11 (Fig.2) - Fill the tank again with f resh water.
(Fig.21) - Place a large enough container under the steam
wand (Pannarello). Open the water dispensing knob (3) by
turning it counter-clockwise.
(Fig.22) - Turn the selection knob (17) to the "
position and dispense the whole content of the tank by
means of the steam / hot water wand.
12 (Fig.23) - After dispensing water, set the selection knob
(17) to the "
" position to stop dispensing.
(Fig.24) - Clos e the water dispensing knob (3) by turning it
clockwise.
13 Repeat the operations f rom point (8) once again for a total
of 4 tanks.
14 (Fig.19) - Remo ve th e lter hold er f rom t he u nit b y tur ning
it from right to left and rins e it with fresh drinking water.
The descaling cycle is now complete.
(Fig.2) - Fill the tank again with fresh water. If necessary,
prime the circuit as described in Sec tion 4.5.
The descaling solution must be disposed of
according to the manufacturer’s instructions
and/or regulations in f orce in the countr y of use.
11 D ISPOSAL
- The packing materials can be rec ycled.
- Appliance: Unplug the appliance and cut the power cord.
- Deliver the appliance and power cord to a service center or
public waste disposal facility.
This produc t complies with eu directive 2002/96/EC.
The symbol
indicates that this product may not be treated as household
waste. Instead it shall be handed over to the applicable
collection point for the recycling of electrical and electronic
equipment.
By ensuring this product is disposed of correctly, you will help
prevent potential negative consequences for the environment
and human health, which could otherwise be caused by
inappropriate waste handling of this product. For more
detailed information about recycling of this product, please
contact your local city o ce, your household waste disposal
service or the shop where you purchased the produc t.
on the product or on its packaging
"
• 12 •
Page 13

Problem Possible Causes Solution
The machine does not turn on.
The pump is ver y noisy. No water in the tank . Re ll with water (Section 4.4).
The co e e is too cold.
The milk does not f roth.
It is not possible to prepare a
cappuccino.
The co ee is brewed too fast,
crema does not form.
Co ee is not brewed or brewed
in drips only.
Co ee ows out of the edges.
The machine is not connected to the
electrical network.
The "machine ready" light (20) was o
while switch ing the selection kn ob (17) to
the "
" position.
The lter holder is not inserted for
preheating (Section 5).
The cups are cold. Preheat the cups with hot water.
Not suitable milk: Powdered milk or lowfat milk has been used.
Dirty Pannarello. Clean the Pannarello as described in Section 9.
No steam left in the boiler.
There is too little co ee in the lter
holder.
The grind is too coarse. Use a di erent blend (Sec tion 6).
Co ee is old or not suitable. Use a di erent blend (Section 6).
Old or not suitable pod. Change the pod.
One component missing in the lter
holder.
No water. Re ll with water (Section 4.4).
The grind is too ne. Use a di erent blend (Section 6).
Co ee pressed in the lter holder. Shake the ground co ee.
There is too much co ee in the lter
holder.
Knob (3) is open. Close knob (3).
The machine has limescale build-up. Descale the machine (Section 10).
The lter in the lter holder is clogged. Clean the lter (Section 9).
Not suitable pod. Change type of pod.
The lter holder is incorrectly inserted in
the brew unit.
The upper edge of the lter holder is
dirty.
The pod is inser ted incorrectly.
There is too much co ee in the lter
holder.
Connect the machine to the elec trical network.
Wait until the "machine ready" light (20) turns
on.
Preheat the lter holder.
Use only cold, whole milk.
Prime the circuit (Section 4.5) and repeat the
steps desc ribed in Section 8.
Add co ee (Section 5).
Make sure that all components are present and
properly installed.
Reduce the quantit y of co ee in the lter holder.
Insert the lter holder correctly (Section 5).
Clean the rim of the lter holder.
Insert the pod correctly. Make sure it does not
come out of the lter holder.
Reduce the quantit y of co ee using the m easuring
scoop.
English
Please contact the customer service for any problems not covered in the above table or when the suggested
solutions do not solve the problem.
• 13 •
Page 14

1 常规信息
1 常规信息
注意。不承担因下列原因引起的赔偿责
任:
• 不正确的使用,不符合标称用途;
• 未在授权服务中心修理;
• 私自改动电源线;
• 私自改动咖啡机的任何零部件;
• 使用非原装零配件;
• 没有按说明进行除垢操作并把咖啡机储存
在 0°C 以下环境中。
如有上述情况,恕不提供质保。
1.1 说明书阅读说明
本使用说明书以警示三角符号
标出和用户安全有关的重要说
明。请小心按照说明进行操作
以避免严重受伤!
该标志用于强调确保咖啡机最佳使用效
果的重要信息。
与正文对应的图示说明列于本说明书前几页。
阅读使用说明时请查阅图示说明。
1.2 如何使用本使用说明书
2 技术规格
3 安全准则
不要让水同咖啡机任何电气部件相接触:有短
路危险!过热蒸汽和热水可能造成灼伤!切勿
将蒸汽或热水指向身体部位。小心操作蒸汽/
热水冲煮口:有灼伤危险!
设计用途
电源
本咖啡机适用于冲煮 1 杯或 2 杯意式浓缩咖
啡,并配备有旋转蒸汽管和热水冲煮管。咖啡
机正面的控制开关标有简单易懂的标记。
本咖啡机仅供家庭使用,不可用于专业用途或
连续作业。
注意。不承担因下列原因引起的赔偿责
任:
• 不正确的使用,不符合标称用途;
• 未在授权服务中心修理;
• 私自改动电源线;
• 私自改动咖啡机的任何零部件;
• 使用非原装零配件;
• 没有按说明进行除垢操作并把咖啡机储存
在 0°C 以下环境中。
如有上述情况,恕不提供质保。
1.1 说明书阅读说明
本使用说明书以警示三角符号
标出和用户安全有关的重要说
明。请小心按照说明进行操作
以避免严重受伤!
图示说明、咖啡机零部件或控制开关以数字或
字母标 记。请尽量查阅图示 说明。
与正文对应的图示说明列于本说明书前几页。
阅读使用说明时请查阅图示 说明。
该标志用于强调确保咖啡机最佳使用效
果的重要信息。
1.2 如何使用本使用说明书
请将使用说明书放在安全的地方,确保任何可
能使用咖啡机的人都能查看本说明书。
如有其他疑问或发现问题,请与授权服务中心
联系。
2 技术规格
制造商有权对本产品的技术规格作出更改。
额定电压 - 额定功率 - 电源供应
外壳材料
尺寸(宽 x 高 x 深)(毫米)
重量
电源线长度
操作面板
滤水器固定架
Pannarello 打奶器
水箱
泵压
热水器
安全装置
参见产品标签
塑料
210 x 300 x 280
3.9 千克
1.3 米
正面
加压式
专用于卡布奇诺
1.25 升 - 摘取式
15 巴
不锈钢式
保险丝
3 安全准则
不要让水同咖啡机任何电气部件相接触:有短
路危险!过热蒸汽和热水可能造成灼伤!切勿
将蒸汽或热水指向身体部位。小心操作蒸汽/
热水冲煮口:有灼伤危险!
设计用途
本咖啡机仅限家庭使用。未经授权禁止改动咖
啡机或用于非设计用途,否则可能导致严重后
果!本产品不打算由肢体不健全、感觉或精神
上有障 碍或缺乏相关 经验和知识的人(包 括儿
童)使用,除非有负责他们安全的人对他们使
用本产品进行监督或指导。应照看好儿童,确
保他们不玩耍本产品。
• 14 •
电源
只可将咖啡 机接在合 适的插座中。电压必须与
咖啡机标签相符。
Page 15

中文
电源线
电源线
为了他人安全
烫伤危险
咖啡机的位置
有灼伤危
险!
清洁
操作和维护的适当位置
(图 A)
咖啡机的储存
修理/维护
防火安全注意事项
主要咖啡机零部件(第 2 页)
1
2
3
4
5
6
7
8
9
10
11
12
13
14
15
16
17
18
19
20
若电源线损坏,不可使用本机。若电源线损坏,
必须由制造商或授权服务中心进行更换。不要
让电源线绕过拐角、经过锋利边沿或位于高温
物体上方,远离油脂。
不要用电源线牵引或拖拽咖啡机。不要通过电
源线拔出插头,或者用潮湿的手触碰插头。
不要让电源线从台面或架面上自由悬挂。
为了他 人 安 全
不要让孩子将咖啡机当作玩具。
儿童并不了解家庭电器风险。不要将产品包装
材料放在儿童可以接触的范围内。
烫伤危险
不要将过热蒸汽和/或水指向自己或他人。请使
用本机自带的手柄或球柄。
冲煮咖啡时,不要断开(取下)加压滤水器固定
架。在预热阶段,可能会从冲煮部件溢出热水
滴。
咖啡机过热时,即“
点亮时,不要冲煮咖啡。
”和“ ”两 盏指 示 灯 均
咖啡机的位置
将咖啡机放在安全的地方,确保没有翻倒咖啡
机或因咖啡机而受伤的危险。
热水和过热蒸汽可能会溢出咖啡机:
险!
不要将咖啡机放在低于 0°C 的环境中。结冰
可能会损坏本机。
不要在室外使用。
为防止其外壳熔化或损坏,不要把咖啡机放在
非常热的表面或靠近明火。
清洁
清洁前,通过按下 ON/OFF(开/关)按钮关闭咖
啡机,然后从插座拔出插头。之后等待咖啡机
冷却。
切勿将咖啡机浸泡在水中!
绝对禁止私自改造咖啡机内部零部件。
存放在水箱中数天的水,不得用来制作食品。
清洗水箱,并注入干净的饮用水。
咖啡机的储存
若咖啡机长时间闲置,将其关闭并拔下插头。
将其存放在干燥且儿童无法触及的地方。防止
灰尘与浮土。
修理/维护
若咖啡机因跌落而导致故障、问题、潜在错误,
请立即拔下插头。不要操作有故障的咖啡机。
服务与修理仅可由授权服务中心执行。因非专
业人士开展工作而导致的损失,恕不承担责
任。
防火安 全 注意事项
发生火情时,请使用二氧化碳(CO2)灭火器。不
要使用水或干粉灭火器。
主要咖啡机零部件(第 2 页)
1 操作面板
2 水箱盖
3 热水/蒸汽旋钮
4 零配件底座
5 水箱
6 咖啡杯固定支架
7 液体回收盘 + 格栅
8 冲煮部件
9 蒸汽冲煮管(Pannarello 打奶器)
有灼伤危
10 电源线
11 ON/OFF(开/关)按钮
12 加压滤水器固定架
13 预磨咖啡粉量匙
14 预磨咖啡粉 滤水器
(一份可冲煮 1 杯或 2 杯咖啡)
15 定量包滤水器接合器
16 咖啡定量包滤水器
17 选择旋钮
18 “咖啡机启动”指示灯
19 “蒸汽准备就绪”指示灯
20 咖啡粉/水指示灯 -“咖啡机准备就绪”
中文
操作和维护的适当位置
为确保咖啡机性能正常和高效,建议遵循下述
说明:
• 选择水平的表面。
• 选择照明充足、干净且靠近插座的位置。
• 确保与咖啡机两侧的最少距离如
示。
(图 A)所
• 15 •
Page 16

4 安装
4 安装
为了自己和他人的安全,请小心遵从第 3 节所
列明的“安全准则”。
4.1 包装
4.2 安装说明
注释:第一次使用前,和/或一段时间没
有使用后,建议清洗零部件。
4.3 咖啡机连接
带电操作非常危险!因此必须严格遵从
安全准则。不要使用有故障的电源线!有
故障的电源线和插头必须立即在授权服务中心
更换。
4.4 水箱
1A)-
(图(图 1B)(图(图 2)-
向水箱内注入干净、无碳酸添加的饮用
水。热水或其他液体可能损坏水箱。无水
时不要操作咖啡机:确保水箱中有足够的水。
(图(图 3A)-
为水箱充水后,请将其放回至咖啡机。
缓缓推动水箱,直至卡入到位,确保水
箱正确插入咖啡机,以避免底部漏水。——图
3B 说明必须完全可见。
4.5 回路上水
(图(图 4)-
5)-
(图(图 5)-
4.6 首次使用时或闲置一段时间后的
咖啡机使用说明
排出的水必须倒空至合适的下水道。不
可用于制作食品。如果器皿在执行程式
期间注满了,停止排水,并清空器皿后再重新开
始操作。
(图(图 2)-
(图(图 4)-
(图(图 5)-
(图(图 2)(图(图 13-14)-
(图(图 15)-
(图(图 16)-
(图(图 17)-
为了自己 和 他 人 的 安 全 ,请小心遵从第 3 节所
列明的“安全准则”。
4.1 包装
原包装能够在 运输期间保护咖啡 机。若将来可
能需要进行运输,建议保存包装材料。
4.2 安装说明
安装咖啡机前,仔细阅读以下安全说明:
• 将咖啡机放在安全的地方;
• 确保孩子不会将咖啡机当作玩具;
• 不要将咖啡机放在高热温表面或明火附
近。
现在咖啡机准备就绪,可进行电气连接。
注释:第一次使用前,和/或一段时间没
有使用后,建议清洗零部件。
4.3 咖啡机连接
带电操作非常危险!因此必须严格遵从
安全准则。不要使用有故障的电源线!有
故障的电源线和插头必须立即在授权服务中心
更换。
咖啡机的电压已由制造商预设。检查电压与咖
啡机底部的参数铭牌上的指示相符。
• 对咖啡机进行电气连接前,确保
开/关)按钮(11)位于 "0" 位。
• 把插头插进电源电压合适的墙上插座。
ON/OFF(
4.4 水箱
• (图(图
1A)- 提起盖子,以从水箱(2)取下。
•
•
时不要 操作咖 啡 机:确保水箱中有足够的水。
•
箱正确插入咖啡机,以避免底部漏水。——图
3B 说明必须完全可见。
1B)- 取下水箱(5)。
2)- 冲洗水箱并注入干净的饮用水,
注意不要满溢。
向水箱内注入干净、无碳酸添加的饮用
水。热水或其他液体可能损坏水箱。无水
3A)- 把水箱正确地放回原位,然后把
盖子(2)放回原位。
为水箱充水后,请将其放回至咖啡机。
缓缓推动水箱,直至卡入到位,确保水
• 16 •
4.5 回路上水
开始时,冲煮蒸汽后或水箱清空时,必须为咖
啡机水线回路上水。
• 按下 ON/OFF(开/关)按钮(11),并将其置
于 "I" 位。指示灯(18)将点亮,表示咖啡
机已启动。
•
• 逆时针方向转动“热水/蒸汽”旋钮(3)以
• (图(图
• 等待直到蒸汽冲煮管(Pannarello 打奶
•
• 顺时针方向转动“热水/蒸汽”旋钮(3)以
4)- 在蒸汽冲煮管下放置一个器皿
(Panna rello)。
将其打开。
5)- 将选择旋钮(17)置于“ ”位置。
器)的水流稳定。
5)- 将选择旋钮(17)置于“ ”位置。
将其关闭。移走器皿。
4.6 首次使用时或闲置一段时间后的
咖啡机使用说明
这项简单的操作确保了最佳冲煮效果,必须执
行:
- 首次启动时;
- 咖啡机长时间闲置时(2 周以上)。
排出的水必须倒空至合适的下水道。不
可用于制作食品。如果器皿在执行程式
期间注满了,停止排水,并清空器皿后再重新开
始操作。
•
•
• 从蒸汽/热水冲煮管排出水箱中的水
•
•
•
•
• 再次向水箱内注水,等待直到“咖啡机准备
2)- 冲洗水箱并再次注入干净的饮用
水。
4)- 在蒸汽冲煮管下放置一个器皿
(Panna rello)。逆时针方向转动旋钮(3)
以将其打开。
5)- 将选择旋钮(17)置于“ ”位
置。
(Panna rello)。将选择旋钮(17)置于“
位置,并顺时针方向转动旋钮(3)以将其关
闭,结束该项操作。
2)- 向水箱内注入干净的饮用水。
13-14)- 把滤水器固定架从底部插入
冲煮部件(8),并从左至右转动,直至将其
锁定到位。
15)- 在滤水器固定架下放 置一个合
适的器皿。
16)- 将选择旋钮(17)置于“ ”位
置,并排出水箱内所有水。
17)- 水箱倒空后即停止排水,并将选
择旋钮(17)置于“
”位置。
”
Page 17

中文
就绪”指示灯(20)点亮。
(图(图 19)-
5 冲煮咖啡
注意!在咖啡冲煮期间,禁止顺时针方向
手动转动加压滤水器固定架,将其取下。
有烫伤危险。
咖啡冲煮的零配件放置于专门设计的底
座中,使操作简易快捷。
如果需要预磨咖啡粉量匙和/或滤水器,提起
盖子(2),取出所需之物(图35 e 图 36)。
5.1 预磨咖啡粉的使用
7)-
(图(图 13)-
(图(图 14)-
(图(图 16)-
(图(图 17)-
(图(图 19)-
(图(图 35)(图(图 8)-
(图(图 13)-
(图(图 14)-
(图(图 15)-
1 或 2 个已预热的杯子
(图(图 14)-
(图(图 18)
(图(图 19)-
注释:如果滤水器固定架中残留少量水,
这是绝对正常的,这是由于滤水器固定
架的特征。
重要提示:应保持滤水器(14)洁净以确
保最佳效果。使用后每日清洁。
5.2 咖啡定量包的使用
9)
(图(图 10)-
(图(图 11)
(图(图 13)
(图(图 14)
(图(图 16)-
(图(图 17)-
(图(图 19)
(图(图 12)
(图(图 13)
•
现在咖啡机已准备就绪;请查阅有关章节以了
解关于冲煮咖啡和蒸汽的操作细节。
19)- 通过从右至左转动滤水器固定
架,将其从部件取下,并用干净的饮用水冲
洗。
5 冲煮咖啡
注意!在咖啡冲煮期间,禁止顺时针方向
手动转动加压滤水器固定架,将其取下。
有烫伤危险。
• 在此操作期间,“咖啡机准备就绪”指示灯
(20) 可能会闪烁;这是标准的操作模式,
而非表示有故障。
• 使用咖啡机前,确认热水/蒸汽旋钮(3)
已关闭,并且 水 箱内有足够 的水。
• 按下 ON/OFF(开/关)按钮(11),并将其置
于 "I" 位。
• 等待直到“咖啡机准备就绪”指示灯(20)
点亮。现在咖啡机准备就绪,可冲煮咖啡。
咖啡冲煮的零配件放置于专门设计的底
座中,使操作简易快捷。
如果需要预磨咖啡粉量匙和/或滤水器,提起
盖子(2),取出所需之物(图35 e 图 36)。
5.1 预磨咖啡粉的使用
• (图(图
•
•
•
•
•
•
•
7)- 将滤水器(14)插入 加压滤 水器
固定架(12);首次使用咖啡 机时,滤水器已
插入。
13)- 把滤水器固定架从底部插入冲
煮部件(8)。
14)- 从左至右转动滤水器固定架,直
至将其锁定到位。松开加压滤水器固定架手
柄。手柄会轻微转向左边。这一 操作确保了
较佳的滤水器固定架性能。
16)- 将选择旋钮(17)置于“ ”位
置,直到溢出一些水,来预热加压滤水器固
定架。仅首次冲煮咖啡时需要进行此操作。
17)- 流出 150 毫升的水后,将选择
旋钮(17)置于“
19)- 通过从右至左转动滤水器固定
架,将其从部件取下,并倒出剩余的水。由
于咖啡机配有专用的滤水器(14),因此无
需更换滤水器来冲煮 1 杯或 2 杯咖啡。
35)- 从咖啡机取出量匙。
8)- 添加 1 至 1.5 量匙来冲煮单 1
杯咖啡,2 量匙冲煮 2 杯咖啡。清除滤水
”位置,停止 冲煮。
器固定架边缘上的咖啡残渣。
•
•
•
•
• 获得所需咖啡量后,将选择旋钮(17)置于“
•
架的特征。
5.2 咖啡定量包的使用
• (图(图
•
•
•
•
这一操作确保了较佳的加压滤水器固定架
•
•
•
•
•
13)- 把滤水器固定架(1 2)从底部插
入冲煮部件(8)。
14)- 从左至右转 动滤水器固定架,直
至将其锁定到位。
15)- 拿出
将其放置于加压滤水器固定架下。确保杯子
正确地放置于咖啡冲煮口下。
14)- 将选择旋钮(17)置于“ ”位
置。
”位置,停止 冲煮。停止 冲煮后等 候 几 秒
钟,然后取出盛有咖啡的杯子
19)- 取下加压滤水器固定架,倒空剩
下的咖啡残渣。
注释:如果滤水器固定架中残留少量水,
这是绝对正常的,这是由于滤水器固定
重要提示:应保持滤水器(14)洁净以确
保最佳效果。使用后每日清洁。
9)- 冲煮预磨咖啡粉(14)时,使用
咖啡匙,从加压滤水器固定架移下滤水器
(12)。
10)- 将咖啡定量包接合器(15)- 突出
部分向下 -插入加压滤水器固定架(1 2)。
11)- 然后将咖啡定量包(16)插入加
压滤水器固定架(1 2)。
13)- 把加压滤水器固定架从底部插
入冲煮部件(8)。
14)- 从左至右转动滤水器固定架,直
至将其锁定到位。从加压滤水器固定架松开
手柄。手柄会自动轻微转向左边。
性能。
16)- 将选择旋钮(17)置于“ ”位
置,直到溢出一些水,来预热加压滤水器固
定架。仅首次冲煮咖啡时需要进行此操作。
17)- 流出 150 毫升的水后,将选择
旋钮(17)置于“
19)- 通过从右至左转动加压滤水器
固定架,将其从部件取下,并倒出剩余的
水。
12)- 把定量包插入滤水器固定架,
确认定量包的纸没有悬垂于滤水器固定架
上。
13)- 把加压滤水器固定架从底部插
入冲煮部件(8)。
1 或 2 个已预热的杯子,
”位置,停止 冲煮。
中文
18)。
• 17 •
Page 18

• (图(图
14)
1 个已预热的杯子
(图(图 16)-
(图(图 17)-
(图(图 19)
重要提示:应保持滤水器(16)和接合器
(15)洁净以确保最佳效果。使用后每日
清洁。
6 挑选咖啡粉的技巧
执行任何有关冲煮热水/蒸汽的操作前,
确认蒸汽冲煮管(
PAN NARELLO
)指向液
体回收盘。
7 热水
有灼伤危险!冲煮之前可能出现热水液
滴飞溅。冲煮管温度可能较高:切勿徒手
直接接触。
21)-
21)-
(图(图 22)-
(图(图 23)-
(图(图 24)-
8 蒸汽/卡布奇诺
有灼伤危险!冲煮之前可能出现热水液
滴飞溅。冲煮管温度可能较高:切勿徒手
直接接触。
(图(图 25)-
(图(图 26)-
26)-
(图
27)-
使用冷鲜奶可获得较好的效果。
(图(图 28)-
• 拿出
•
•
•
清洁。
6 挑选咖啡粉的技巧
一般来说,市场上所有类型的咖啡粉都可使
用。然而,咖啡粉是天然产品,其香味根据其产
地及其混合咖啡豆而改变,因此应该尝试不同
类型的咖啡粉,以找到最适合您的个人口味的
咖啡粉。
为获得最佳效果,建议使用浓缩咖啡机混合
豆。一般来说,咖啡应从加压滤水器固定架流
出,不应滴下。
可通过稍微改变滤水器中咖啡粉的份量,和/
或使用不同的咖啡粉研磨器,来改良咖啡冲煮
的速度。
为制作出美味的咖啡,并使清洁和冲煮更轻
松,Saeco 建议使用 ESE 单份咖啡定量包。
体回收盘。
14)- 从左至右转动滤水器固定架,直
至将其锁定到位。
1 个已预热的杯子,将其放置于滤水
器固定架下。确保杯子正确地放置于咖啡冲
煮口下。
16)- 将选择旋钮(17)置于“ ”位
置。
17)- 获得所需咖啡量后,将选择旋钮
(17)置于“ ”位置,停止冲煮,然后取出咖
啡杯。
19)- 停止冲煮后等候几秒钟,然后取
出滤水器固定架,并丢弃已使用的定量包。
重要提示:应保持滤水器(16)和接合器
(15)洁净以确保最佳效果。使用后每日
执行任何有关冲煮热水/蒸汽的操作前,
确认蒸汽冲煮管(
PANNARELLO
7 热水
直接接触。
• 按下 ON/OFF(开/关)按钮(11),并将其置
• 等待直到“咖啡机准备就绪”指示灯(20)
• (图(图
• (图(图
•
•
•
• 移走热水器皿。
8 蒸汽/卡布奇诺
直接接触。
• 按下 ON/OFF(开/关)按钮(11),并将其置
• 等待直到“咖啡机准备就绪”(20)指示灯
•
• 等待直到指示灯(19)点亮。现在咖啡机准
•
• (图(图
)指 向 液
•
(图
• 将要用于冲煮卡布奇诺的器皿注入 1/3 满
有灼伤危险!冲煮之前可能出现热水液
滴飞溅。冲煮管温度可能较高:切勿徒手
于 "I" 位。
点亮。现在咖啡机准备就绪。
21)- 在蒸汽冲煮管(Pa n narello)
下放置一个器皿或茶杯。
21)- 逆时针方向转动旋钮(3)以将其
打开。
22)- 将选择旋钮(17)置于“ ”位
置。
23)- 冲煮好所需的热水量后,将选择
旋钮(17)置于“
24)- 顺时针方向转动以旋钮(3)以将
其关闭。
有灼伤危险!冲煮之前可能出现热水液
滴飞溅。冲煮管温度可能较高:切勿徒手
于 "I" 位。
点亮。
25)- 将选择旋钮(17)置于“ ”位
置。指示灯(20)熄灭。
备就绪,可冲煮蒸汽。
26)- 在蒸汽冲煮管下放置一个器
皿。
26)- 开启旋钮(3)数秒钟,使残留的
水流出蒸汽冲煮管(Panna rello)。在短时
间内,只会冒出蒸 汽。
27)- 关闭旋钮(3)并取出器皿。
的冷鲜奶。
使用冷鲜奶可获得较好的效果。
”位置。
• 18 •
•
28)-将蒸汽冲煮管浸入鲜奶,逆时针
方向转动旋钮(3)以将其打开。慢慢地向上
转动鲜奶壶,使其均匀预热。
Page 19

中文
建议冲煮最多不超过 60 秒。
建议冲煮最多不超过 60 秒。
(图(图 30)-
注释:当“咖啡机准备就绪”指示灯
恒亮时,咖啡机准备就绪。
重要提示:如果无法按照说明冲煮卡布
奇诺,按照第
4.5
节说明进行回路上水,
然后重复以上步骤。
可执行同样的操作加热其他饮品。
9 清洁
(图(图 31-33)-
(图(图 31-32-33)-
(图(图 34)-
(图(图 20)-
(图(图 9)-
(图(图 35-36)-
注释:不要用洗碗机清洗加压滤水器固
定架。
10 除垢
若操作和维护手册与单独销售的配件和
材料上的说明相抵触,请以操作和维护
手册为准。
使用 Saeco 除垢剂(图 B)。其配方设
计能够保证咖啡机在其寿命期内性能出
众、操作理想。若使用方法正确,还能避免冲
煮饮品口味改变。开始进行除垢程式之前,确
保:已取下滤水器(若使用)。
绝对不要饮用除垢剂,除垢程式运行过
程中冲煮的任何饮品均不可饮用。切勿
将醋用作除垢剂。
11 (图(图 13-14)-
22 (图(图 1B)33 (图(图 2)-
4
(图(图 21)-
5
6
• 完成后,顺时针方向转动旋钮(3)以将其关
闭,并将盛有奶泡的杯子取下。
•
如果“
• 按照第 4.5 节说明进行回路上水,使咖啡
然后重复以上步骤。
• 完成此项操作后,用湿布清洁蒸汽冲煮管。
30)- 将选择旋钮(17)置于“ ”位
置。
咖啡机温度过高,不宜冲煮咖啡。
机准备就绪。
”和“ ”两 盏 灯 均 点 亮 ,这表示
注释:当“ 咖 啡 机 准 备 就 绪 ”指 示 灯
恒亮时,咖啡机准备就绪。
重要提示:如果无法按照说明冲煮卡布
奇诺,按照第
可执行同样的操作加热其他饮品。
4.5
节说明进行回路上 水,
9 清洁
只可在咖啡 机冷却时,并断开电气连接后,方
可维护和清洁咖啡机。
• 不要将咖啡机浸泡在水中或将其任何零部
件放在洗碗机中。
• 不要使用酒精、溶剂和/或腐蚀性化学剂。
• 建议每日用干净的水清洁水箱并重新注
满。
•
•
•
31-33)- 每日加热鲜奶后,取下
Pannarello 的外部零部件,用干净的饮用
水清洗。
31-32-33)- 每周清洁蒸汽冲煮管。必
须执行以下操作来清洁蒸汽冲煮管:
- 取下 Pannarello 的外部零部件(标准 清
洁);
- 从蒸汽冲煮管取下 Pannarello 的上部零
部件;
- 用干净的饮用水清洗 Pannarello 的上部
零部件;
- 用湿布清洗蒸汽冲煮管,并清除残留的鲜
奶;
- 把蒸汽冲煮管放回原位(确认其完全插入)
。
重新组装 Pannarello 的外部零部件。
34)- 每日倒空并清洁滴水盘。
• 用柔软、潮湿的布清洁咖啡机。
•
• 不要在微波炉和/或标准烤箱中烘干本机
•
10 除垢
在咖啡机的使用过程中,水垢日积月累逐渐增
多;每隔 1 至 2 个月或发现水流量显著减小
时需要进行除垢操作。只可使用 Saeco 除垢
剂。
手册为准。
众、操作理想。若使用方法正确,还能避免冲
煮饮品口味改变。开始进行除垢程式之前,确
保:已取下滤水器(若使 用)。
将醋用作除垢剂。
4 按下 ON/OFF(开/关)按钮(11)开启咖啡
5 在关机状态下将除垢剂静置 15 至 20 分
6 按下 ON/OFF(开/关)按钮(11)开启咖啡
20)- 执行以下操作来清洁加压滤水器
固定架:
-
9)- 取下滤水器,并用热水彻底清洗。
- 取下接合器(如有),并用热水彻底清洗。
- 清洗加压滤水器固定架的内部零部件。
和/或其零部件。
35-36)- 每周用湿布清洁零配件底
座,清除残留的咖啡或灰尘。
注释:不要用洗碗机清洗加压滤水器固
定架。
若操作和维护手册与单独销售的配件和
材料上的说明相抵触,请以操作和维护
使用 Saeco 除垢剂(图 B)。其配方设
计能够保证咖啡机在其寿命期内性能出
绝对不要饮用除垢剂,除垢程式运行过
程中冲煮的任何饮品均不可饮用。切勿
13-14)- 将滤水器固定架从底部插入
冲煮部件(8),并从左至右转动,直至将其
锁定到位。
1B)- 取下水箱并清空水箱中的水。
2)- 将 Saeco 浓缩除垢剂的一半一半倒
入水箱中,然后加入干净的饮用水,直到
MAX(最大)刻度线。
机,并将其置于 "I" 位。
21)- 从蒸汽/热水冲煮管注入(参照
手册第 7 节说明)2 杯水(各 150 毫升左
右),然后按下 ON/OFF(开/关)按钮(11)
并将其置于 "0" 位,以关闭咖啡机。
钟。
机。
中文
• 19 •
Page 20

(图(图
21)-
7
步骤 6
。
8
2)-
9
10
11
2)
(图(图 21)
(图(图 22)
12
23)
(图(图 24)
13
第(8)点
14
19)-
(图(图 2 2)
必须根据制造商要求和/或产品使用所
在国的现行法规废弃除垢剂。
11 废弃
21)- 从蒸汽/热水冲煮管注入(参照
手册第 7 节说明) 2 杯水(各 150 毫升
左右)。然后按下 ON/OFF(开/关)按钮(11
)关闭咖啡机,并将其静置 3 分钟。
7 重复
步骤 6的操作,直到水箱清空
8 (图(图
9 在滤水器固定架下放置一个器皿。
2)- 冲洗水箱并用干净的饮用水注满
水箱。
10 按下 ON/OFF(开/关)按钮(11)开启咖啡
机;将选择旋钮(17)置于“
过使用滤水器固定架将水箱中的水全部排
出。将选择旋 钮(17)设至“
排水。
11 (图(图
2)- 再次向水箱内注入干净的水。
21)- 在蒸汽冲煮管(Pa n narello)下
放置一个足够大的器皿。逆时针方向转动以
打开出水旋钮(3)。
22)- 将选择旋钮(17)置于“ ”位
置,并通过蒸汽/热水冲煮管将水箱中的水
全部排出。
12 (图(图
23)- 排水后,将选择旋钮(17)设至“
”位置,以停止排水。
24)- 顺时针方向转动以关闭出水旋钮
(3)。
13 从
第(8)点开始重复上述操作,以完成 4
个水箱的除垢程式。
14 (图(图
19)- 通过从右至左转动滤水器固定
架,将其从部件取下,并用干净的饮用水冲
洗。
”位置,并通
”位置,以停止
11 废弃
- 包装材料可回收。
- 电器:拔掉电源并切断电源线。
- 将电器及电源线送往服务中心或公共废弃物
处置中心。
本产品符合欧洲指令 2002/96/EC。
本产品及其包装上的标志
产品视同家庭垃圾处置。用户必须将本产品送
到专门的电子和电气设备回收点。
若您能正确处置废弃后的产品,便可预防错误
处置本产品对环境和人类健康可能造成的负面
影响。关于产品回收详细信息,请与当地城市规
划办公室、家庭废弃物服务中心或购买本产品
的商店联系。
说明不可将本
除垢程式现已完成。
)- 再 次 向 水 箱 内 注 入干 净 的 水 。如有必
要,按照第 4.5 节说明进行回路上水。
必须根据制造商要求和/或产品使用所
在国的现行法规废弃除垢剂。
• 20 •
Page 21

中文
故障
故障
可能的原因
解决方式
若出现上述表格中没有涉及的问题,或上述解决方法不足以解决问题,请联系客户服务。
咖啡机无法启动。 咖啡机未进行电气连接。 对咖啡机进行电气连接。
水泵噪音大。 水箱中无水。 装满水(第 4.4 节)。
将选择旋钮(17)置于“
置时,“咖啡机准备就绪”指示
咖啡太凉。
无法制作奶泡。
无法冲煮卡布奇诺。
咖啡冲煮过快,未形
成乳脂。
没有冲煮咖啡,或者
只有几滴。
咖啡从边缘流出。
灯(20)熄灭。
未装入滤水器固定架以进行预
热(第 5 节)。
杯子凉。 用热水预热杯子。
不适合的牛奶:使用了奶粉或
低脂牛奶。
Pannarello 很脏。 参照第 9 节的说明清洁 Pannarello。
热水器中无蒸汽。
滤水器固定架中咖啡粉太少。 添加咖啡粉(第 5 节)。
研磨颗粒太大。 使用其他拼配(第 6 节)。
咖啡粉太老或不适合。 使用其他拼配(第 6 节)。
定量包已旧或不适合。 更换定量包。
一个零部件遗落在滤水器固定
架内。
没有水。 装满水(第 4.4 节)。
研磨颗粒太小。 使用其他拼配(第 6 节)。
咖啡在滤水器固定器内冲泡。 摇晃预磨咖啡粉。
滤水器固定架中咖啡粉太多。 减少滤水器固定架中的咖啡粉数量。
旋钮(3)打开。 关闭旋钮(3)。
咖啡机水垢过多。 为咖啡机除垢(第 10 节)。
滤水器固定架中的滤水器堵
塞。
定量包不适合。 更换定量包类型。
滤水器固定架未正确装入冲煮
部件。
滤水器固定架上边缘很脏。 清洁滤水器固定架边缘。
定量包未正确装入。
滤水器固定架中咖啡粉太多。 使用量匙减少咖啡粉数量。
可能的原因
解决方式
”位
等待直到“咖啡机准备就绪”指示灯
(20)点亮。
预热滤水器固定架。
仅适用冷鲜的全脂牛奶。
进行回路上水(第 4.5 节)并重复 第 8
节所述步骤。
确保所有零部件齐全且安装到位。
清洁滤水器(第 9 节)。
正确装入滤水器固定架(第 5 节)。
正确装入定量包。确保其不会显露在滤
水器固定架之外。
中文
若出现上述表格中没有涉及的问题,或上述解决方法不足以解决问题,请联系客户服务。
• 21 •
Page 22

1 일반 정보
1 일반 정보
경고!. 다음으로 인한 커피 머신 손상의
책임은 사용자에게 있습니다.
• 원래 용도에 맞지 않는 부적절한 사용
• 필립스 공식 서비스 센터에서 수행하지 않은
수리
• 전원 코드 개조
• 커피 머신 부품 개조
• 정품이 아닌 부품 및 액세서리 사용
• 커피 머신의 스케일 제거를 못했거나 0°C 이하
기온에서 보관한 경우
위와 같은 경우 보증은 무효가 됩니다.
1.1 설명서 쉽게 알아보기
경고 삼각형은 사용자의 안전에
중요한 지침을 나타냅니다. 이
지침을 반드시 준수하여 심각한
부상을 방지하십시오!
이 기호는 특히 최적의 커피 머신 사용을
보장하는 데 중요한 정보를 강조 표시하는
데 사용됩니다.
텍스트에 해당하는 그림은 사용 설명서의 첫 번째
페이지에서 찾을 수 있습니다. 사용 설명서를 읽을
때에는 해당 페이지를 참조하십시오.
1.2 사용 설명서 사용 방법
2 기술 사양
이 커피 머신은 한두 컵의 에스프레소 커피를
준비하기에 알맞은 머신으로, 회전 스팀 및 뜨거운
물 봉이 함께 제공됩니다. 머신의 전면에 있는
컨트롤에는 알기 쉬운 기호가 있는 라벨이 붙어
있습니다.
이 머신은 가정에서 사용하도록 설계한 제품입니다.
따라서 전문적인 용도나 쉴 틈 없이 사용하기에는
적합하지 않습니다.
경고!. 다음으로 인한 커피 머신 손상의
책임은 사용자에게 있습니다.
• 원래 용도에 맞지 않는 부적절한 사용
• 필립스 공식 서비스 센터에서 수행하지 않은
수리
• 전원 코드 개조
• 커피 머신 부품 개조
• 정품이 아닌 부품 및 액세서리 사용
• 커피 머신의 스케일 제거를 못했거나 0°C 이하
기온에서 보관한 경우
위와 같은 경우 보증은 무효가 됩니다.
1.1 설명서 쉽게 알아보기
경고 삼각형은 사용자의 안전에
중요한 지침을 나타냅니다. 이
지침을 반드시 준수하여 심각한
부상을 방지하십시오!
주변기기나 컨트롤 부품 등에 대한 그림 참조는
번호나 문자로 표시됩니다. 가능하면 그림을
참조하십시오.
2 기술 사양
필립스 세코는 제품의 기술 사양을 변경할 권리를
보유합니다.
정격 전압 – 정격 전력 - 전원 공급장치
제품에 부착된 라벨 참고
외장재
크기(너비 x 높이 x 깊이) (mm)
무게
전원 코드 길이
제어판
필터 홀더
스팀 봉(Pannarello)
물 탱크
펌프 압력
보일러
안전 장치
플라스틱
210 x 300 x 280
3.9 kg
1.3 m
전면
압력 타입
카푸치노 전용
1.25 리터 – 탈착형
15bar
스테인리스 스틸 유형
열 퓨즈
이 기호는 특히 최적의 커피 머신 사용을
보장하는 데 중요한 정보를 강조 표시하는
데 사용됩니다.
텍스트에 해당하는 그림은 사용 설명서의 첫 번째
페이지에서 찾을 수 있습니다. 사용 설명서를 읽을
때에는 해당 페이지를 참조하십시오.
1.2 사용 설명서 사용 방법
이 설명서를 잘 보관하여 커피 머신을 사용할 수
있는 사람은 누구나 읽을 수 있도록 하십시오.
보다 자세한 정보가 필 요하거나 문제가 발생할 경우
필립스 공식 서비스 센터에 문의하시기 바랍니다.
• 22 •
Page 23

한국어
3 안전 규정
3 안전 규정
커피 머신의 전기 부품이 물에 닿게 해서는 안
됩니다. 감전 위험이 있으며 뜨거운 물이나 스팀에
화상을 입을 수 있습니다! 스팀이나 뜨거운 물을
인체 방향으로 분사하지 마십시오. 뜨거운 물이나
스팀은 주의하여 다루십시오. 화상의 위험이
있습니다!
용도
전원 공급장치
전원 코드
타인의 안전을 위해
화상의 위험
머신 위치
화상의 위험이 있습니다!
세척
사용 및 유지관리에 적합한 장소
(그림 A)
기기 보관
수리/유지관리
뜨거운 물이 추출기 밖으로 넘칠 수 있습니다.
만약 커피 머신이 과열되어 있다면, 다시 말해 “
” 및 “ ” 표시등이 켜져 있을 때에는 커피를
추출하지 마십시오.
커피 머신의 전기 부품이 물에 닿게 해서는 안
됩니다. 감전 위험이 있으며 뜨거운 물이나 스팀에
화상을 입을 수 있습니다! 스팀이나 뜨거운 물을
인체 방향으로 분사하지 마십시오. 뜨거운 물이나
스팀은 주의하여 다루십시오. 화상의 위험이
있습니다!
용도
이 커피 머신은 가정용입니다. 커피 머신을
기술적으로 변경하거나 공인되지 않은 용도로
사용하지 마십시오. 심각한 부상을 입을 수
있습니다. 커피 머신은 신체적, 정신적 또는 감각적
능력이 떨어지거나 경험 또는 전문 지식이 부족한
사람(어린이 포함)이 사용해서는 안 되며, 이들이
사용할 때는 안전 책임자의 감독을 받거나 안전
책임자에게 올바른 커피 머신 사용 방법에 대한
지시를 받아야 합니다.
전원 공급장치
커피 머신은 적합한 콘센트에만 연결해야 합니다.
전압은 머신 라벨에 표시되어 있는 전압이어야
합니다.
전원 코드
전원 코드에 결함이 있으면 커피 머신을 사용하지
마십시오. 손상된 전원 코드는 제조업체나 필립스
공식 서비스 센터에서 교체를 받아야 합니다. 전원
코드가 구석 주변, 날카로운 가장자리 또는 뜨거운
물체 위를 지나지 않도록 하며, 항상 오일에 닿지
않도록 하십시오.
전원 코드를 사용하여 커피 머신을 옮기거나
당기지 마십시오. 전원 코드를 잡아당겨 플러그를
뽑거나 전원 코드를 젖은 손으로 만지지 마십시오.
전원 코드가 테이블이나 선반에서 아무렇게 걸려
있지 않도록 하십시오.
타인의 안전을 위해
어린이가 커피 머신을 다루지 않도록 하십시오.
어린이는 가정용 전기 커피 머신과 관련된 위험을
인지하지 못하기 때문입니다. 커피 머신 포장재는
어린이의 손에 닿지 않는 곳에 보관하십시오.
화상의 위험
뜨거운 물 또는 스팀은 사람을 향해 직접
분사해서는 안 됩니다. 항상 제공된 핸들이나
손잡이를 사용하십시오.
커피를 추출하는 동안에는 압력 필터를 분리하지
마십시오. 가열하는 동안 뜨거운 물을 부으면
머신 위치
커피 머신은 뒤집히거나 손상될 염려가 없는
안전한 장소에 놓아야 합니다.
머신에서 뜨거운 물이나 과열된 스팀이 넘칠 수
있습니다.
커피 머신을 온도가 0°C 이하인 장소에 두지
마십시오. 성에로 인해 커피 머신이 손상될 수
있습니다.
커피 머신을 실외에서 사용하지 마십시오.
커피 머신 외장이 녹거나 손상되지 않도록 하려면
커피 머신을 매우 뜨거운 표면에 놓지 말고 화기에
노출되지 않도록 하십시오.
화상의 위험이 있습니다!
세척
커피 머신을 세척하기 전에 ON/OFF 버튼을 눌러
머신을 끈 다음 콘센트에서 플러그를 뽑습니다.
커피 머신이 냉각될 때까지 기다리십시오.
커피 머신을 절대 물에 담그지 마십시오!
커피 머신의 내부 부품을 개조하는 것은 엄격히
금지됩니다.
탱크에 몇 일 동안 들어 있던 물은 식용으로
사용해서는 안 됩니다. 탱크를 씻은 후 깨끗한
식수로 채웁니다.
사용 및 유지관리에 적합한 장소
커피 머신의 성능을 최대화하고 올바르게 사용하기
위해서는 다음과 같은 지침을 준수해야 합니다.
• 평평한 표면 위에 설치합니다.
• 충분하고 효율적인 조명이 가능하고
위생적이며 콘센트가 쉽게 닿을 수 있는
위치를 선택합니다.
•
(그림 A)와 같이 머신의 측면에 최소한의
거리를 확보합니다.
기기 보관
기기를 장시간 사용하지 않을 경우 기기를 끄고
전원 코드를 뽑으십시오. 건조하고 어린이 손이
닿지 않는 곳에 보관하십시오. 먼지나 오물로부터
보호하십시오.
수리/유지관리
커피 머신을 떨어뜨려 고장 또는 문제가 발생하거나
결함이 의심되는 경우에는 즉시 전원 플러그를
뽑으십시오. 절대 고장 난 커피 머신을 작동해서는
안 됩니다. 서비스 및 수리는 필립스 공식 서비스
센터에서만 수행할 수 있습니다. 전문가가 수행하지
않은 작업으로 인해 발생하는 손상에 대한 책임은
일체 지지 않습니다.
한국어
• 23 •
Page 24

화재 안전 주의사항
화재 안전 주의사항
커피 머신의 구성요소 간단 정리
(2페이지)
1
2
3
4
5
6
7
8
9
10
11
12
13
14
15
16
17
18
19
20
4 설치
자신과 타인의 안전을 위해 3절에 있는 "안전 규정"
에서 안내하는 지침을 반드시 따르십시오.
4.1 포장
4.2 설치 시 지침
참고: 커피 머신을 처음으로 사용하거나
오랫동안 사용하지 않은 경우에는
구성요소를 세척하는 것이 좋습니다.
4.3 커피 머신 연결
전원은 매우 위험할 수 있습니다! 따라서
안전 규정을 반드시 준수해야 합니다. 결함이
있는 전원 코드는 절대 사용하지 마십시오! 결함이
있는 코드나 플러그는 공식 서비스 센터에서만
교체해야 합니다.
4.4 물 탱크
(그림 1A) -
(그림 1B) (그림 2) -
화재 발생 시 이산화탄소(CO2) 소화기를
사용하십시오. 물 또는 건식 분말 소화기를
사용하지 마십시오.
커피 머신의 구성요소 간단 정리
(2페이지)
1 제어판
2 물탱크 뚜껑
3 뜨거운 물/스팀 손잡이
4 액세서리 시트
5 물탱크
6 컵 홀더 받침
7 물받이 + 잔 받침대
8 추출기
9 스팀 봉(Pannarello)
10 전원 코드
11 ON/OFF 버튼
12 압력 필터 홀더
13 분쇄 커피용 스푼
14 분쇄용 커피 필터
(1~2잔 커피용 싱글 피스)
15 포드 필터 어댑터
16 커피 포드 필터
17 선택 손잡이
18 "머신 켜짐" 표시등
19 "스팀 준비" 표시등
20 커피/물 표시등- "머신 준비"
4 설치
자신과 타인의 안전을 위해 3절에 있는 "안전 규정"
에서 안내하는 지침을 반드시 따르십시오.
4.1 포장
정식 포장은 커피 머신을 운송 중에 보호할 수
있도록 설계되었습니다. 향후 운송을 위해 포장재를
보관해 두는 것이 좋습니다.
4.2 설치 시 지침
머신을 설치하기 전에 다음 안전 지침을 주의 깊게
읽으십시오.
• 머신을 안전한 장소에 놓습니다.
• 아이들이 머신을 가지고 놀지 않도록
주의하십시오.
• 뜨거운 표면이나 화염 가까이에 머신을
놓지 마십시오.
이제 커피 머신의 전원을 연결할 준비가
되었습니다.
참고: 커피 머신을 처음으로 사용하거나
오랫동안 사용하지 않은 경우에는
구성요소를 세척하는 것이 좋습니다.
4.3 커피 머신 연결
전원은 매우 위험할 수 있습니다! 따라서
안전 규정을 반드시 준수해야 합니다. 결함이
있는 전원 코드는 절대 사용하지 마십시오! 결함이
있는 코드나 플러그는 공식 서비스 센터에서만
교체해야 합니다.
커피 머신의 전압은 제조업체가 사전에 설정합니다.
전압이 머신 하 단의 데이 터 플레이 트에 있는 표시와
일치하는지 확인합니다.
• 머신 전원을 연결하기 전에 ON/OFF
버튼(11)이 "0"으로 설정되어 있는지
확인합니다.
• 플러그를 알맞은 전압의 콘센트에
연결합니다.
• 24 •
4.4 물 탱크
•
(그림 1A) - 물탱크 뚜껑(2)을 들어올려
분리합니다.
•
(그림 1B) - 물탱크(5)를 분리합니다.
•
(그림 2) - 깨끗한 물로 닦아낸 후 물이
넘치지 않도록 채웁니다.
Page 25

한국어
탱크에는 탄산수가 아닌 깨끗한 식수만
탱크에는 탄산수가 아닌 깨끗한 식수만
채워야 합니다. 뜨거운 물 및/또는 기타
액체는 기기에 손상을 줄 수 있습니다. 물이 없으면
커피 머신을 작동시키지 말고, 먼저 탱크에 물을
충분히 채우십시오.
(그림 3A) -
물 탱크에 물을 채운 뒤 다시 기기에
장착합니다. 물이 넘치지 않도록 탱크를
기기에 끝까지 밀어 넣어 올바르게 장착합니다. –
그림 3B번에 나타나 있는 대로 물 탱크를 장착할
때 장착 표시가 잘 보여야 합니다.
4.5 통로 프라이밍
(그림 4) -
(그림 5) -
(그림 5) -
4.6 커피 머신을 처음으로
사용하거나 오랫동안 사용하지
않다가 사용하는 경우
이 과정에서 사용되는 물은 반드시 알맞은
배수구에 따라서 버립니다. 사용된 물은
식용으로는 사용할 수 없습니다. 이 과정 동안
용기가 가득 차면 물 공급을 멈추고 다시 사용하기
전에 용기를 깨끗이 비웁니다.
(그림 2) -
(그림 4) -
(그림 5) -
(그림 2) (그림 13-14) -
(그림 15) -
(그림 16) -
(그림 17) -
(그림 19) -
채워야 합니다. 뜨거운 물 및/또는 기타
액체는 기기에 손상을 줄 수 있습니다. 물이 없으면
커피 머신을 작동시키지 말고, 먼저 탱크에 물을
충분히 채우십시오.
•
(그림 3A) - 물탱크가 알맞은 위치에 제대로
장착되는지 확인하고, 삽입한 후에 뚜껑(2)
을 제자리에 놓습니다.
물 탱크에 물을 채운 뒤 다시 기기에
장착합니다. 물이 넘치지 않도록 탱크를
기기에 끝까지 밀어 넣어 올바르게 장착합니다. –
그림 3B번에 나타나 있는 대로 물 탱크를 장착할
때 장착 표시가 잘 보여야 합니다.
4.5 통로 프라이밍
시작할 때에는 스팀을 다 내보내고 물탱크를 비운
후, 머신의 물 통로를 프라이밍 해야 합니다.
• ON/OFF 버튼(11)을 누른 후 "I" 위치로
돌립니다. 표시등(18)이 켜지고 머신이
켜졌음을 나타냅니다.
•
(그림 4) - 스팀 봉(Pannarello) 아래에
용기를 놓습니다.
• "뜨거운 물/스팀" 손잡이(3)를 시계 반대
방향으로 돌려 엽니다.
•
(그림 5) - 선택 손잡이(17)를
"
" 위치로 돌립니다.
• 스팀 봉(Pannarello)에서 물이 안정적으로
분사될 때까지 기다립니다.
•
(그림 5) - 선택 손잡이(17)를 " " 위치로
돌립니다.
• "뜨거운 물/스팀" 손잡이(3)를 시계
방향으로 돌려 닫습니다. 용기를 치웁니다.
•
(그림 2) - 탱크를 헹구어 낸 후 깨끗한
식수로 다시 채웁니다.
•
(그림 4) - 스팀 봉(Pannarello) 아래에
용기를 놓습니다. 손잡이(3)를 시계 반대
방향으로 돌려 엽니다.
(그림 5) - 선택 손잡이(17)를 " " 위치로
돌립니다.
• 물탱크에 가득 채운 물을 물을 스팀/
뜨거운 물 봉(Pannarello)을 이용하여
내보냅니다. 작업을 완료하기 위해 선택
손잡이(17)를 "
를 시계 방향으로 돌려 닫습니다.
•
(그림 2) - 탱크를 깨끗한 식수로 채웁니다.
•
(그림 13-14) - 하단의 추출기(8)에 필터
홀더를 삽입하고 제 자리에 고정될 때까지
왼쪽에서 오른쪽으로 돌립니다.
•
(그림 15) - 필터 홀더 아래에 알맞은 용기를
놓습니다.
•
(그림 16) - 선택 손잡이(17)를 " " 위치로
놓고 탱크에 있는 모든 물을 내보냅니다.
(그림 17) - 탱크를 비운 후에는 분사를
멈추고 선택 손잡이(17)를 "
전환합니다.
• 탱크를 다시 채운 후 "머신 준비" 표시등
(20)이 켜질 때까지 기다립니다.
•
(그림 19) - 장치에서 필터 홀더를
오른쪽에서 왼쪽으로 돌려 분리한 후
깨끗한 식수로 헹구어 냅니다.
이제 커피 머신을 사용할 준비가 되었습니다. 커피
추출 및 스팀 분사 방법에 대한 설명이 나와 있는
부분을 살펴보십시오.
" 위치로 놓고 손잡이(3)
" 위치로
한국어
4.6 커피 머신을 처음으로
사용하거나 오랫동안 사용하지
않다가 사용하는 경우
다음과 같은 간단한 작업을 수행해야 추출 성능이
최적화될 수 있습니다.
- 최초 시동 시;
- 커피 머신이 오랫동안(2주 이상) 작동되지
않은 경우.
이 과정에서 사용되는 물은 반드시 알맞은
배수구에 따라서 버립니다. 사용된 물은
식용으로는 사용할 수 없습니다. 이 과정 동안
용기가 가득 차면 물 공급을 멈추고 다시 사용하기
전에 용기를 깨끗이 비웁니다.
• 25 •
Page 26

5 커피 추출
5 커피 추출
경고! 커피를 추출하는 동안 압축 필터
홀더를 수동으로 돌려 열거나 분리해서는 안
됩니다. 화상의 위험이 있습니다.
커피를 추출하기 위한 액세서리는 쉽게
사용할 수 있도록 특수 설계된 시트에
있습니다.
분쇄 커피용 스푼 또는 필터가 필요한 경우에는
커버(2)를 들어 올리고 원하는 것을 꺼냅니다(그림
35 및 그림 36).
5.1 분쇄 커피 사용하기
(그림 7) -
(그림 13) -
(그림 14) -
(그림 16) -
(그림 17) -
(그림 19) -
(그림 35) -
(그림 8) -
(그림 13) -
(그림 14) -
(그림 15) - 한두 컵의 예열된 컵을 가져와서
(그림 14) -
(그림 18)
(그림 19) -
참고: 필터 홀더에 물이 조금 남아 있는
경우가 있는데, 이는 매우 정상적인
상황으로 필터 홀더의 특징 때문입니다.
중요 참고: 필터(14)가 깨끗해야 추출한
커피의 맛도 좋습니다. 사용 후에는 항상
닦아주십시오.
5.2 커피 포드 사용하기
(그림 9)
(그림 10) -
(그림 11)
(그림 13)
(그림 14)
(그림 16) -
(그림 17) -
(그림 19)
경고! 커피를 추출하는 동안 압축 필터
홀더를 수동으로 돌려 열거나 분리해서는 안
됩니다. 화상의 위험이 있습니다.
• 이 작업 중에는 "머신 준비" 표시등(20)
이 깜박일 수 있습니다. 이 경우는 결함이
있는 상황이 아니라 일반적인 상황으로
간주하면 됩니다.
• 머신을 사용하기 전에 뜨거운 물/스팀
손잡이(3)가 닫혀 있는지, 탱크에 충분한
물이 있는지 확인합니다.
• ON/OFF 버튼(11)을 누르고 "I" 위치로
돌립니다.
• "머신 준비" 표시등(20)이 켜질 때까지
기다립니다. 이제 커피를 추출할 준비가
되었습니다.
커피를 추출하기 위한 액세서리는 쉽게
사용할 수 있도록 특수 설계된 시트에
있습니다.
분쇄 커피용 스푼 또는 필터가 필요한 경우에는
커버(2)를 들어 올리고 원하는 것을 꺼냅니다(그림
35 및 그림 36).
5.1 분쇄 커피 사용하기
•
(그림 7) - 압력 필터 홀더(12)에 필터(14)
를 삽입합니다. 필터는 머신을 처음으로
사용할 때 이미 삽입되어 있습니다.
•
(그림 13) - 하단의 추출기(8)에 필터 홀더를
삽입합니다.
•
(그림 14) - 필터 홀더가 고정될 때까지
왼쪽에서 오른쪽으로 돌립니다. 압력 필터
홀더 그립에서 손을 뗍니다. 핸들이 약간
왼쪽으로 돌아갑니다. 이로써 필터 홀더의
성능이 최적화됩니다.
•
(그림 16) - 물이 일부 흘러 나올 때까지
선택 손잡이(17)를 "
" 위치로 돌리고
압력 필터 홀더를 예열합니다. 이 작업은
커피를 처음으로 추출할 때만 수행합니다.
•
(그림 17) -150cc 정도의 물이 넘치고 나면
선택 손잡이(17)를 "
" 위치로 돌려 추출을
멈춥니다.
•
(그림 19) - 머신에서 필터 홀더를
오른쪽에서 왼쪽으로 돌려 분리한 후 남아
있는 물을 따라 버립니다. 머신에 특수
필터(14)가 장착되어 있는 경우에는 커피
한두 잔을 만들기 위해 필터를 바꿀 필요가
없습니다.
•
(그림 35) - 머신에서 계량 스푼을
떼어냅니다.
•
(그림 8) - 커피 한 잔에는 1~1.5 계량
• 26 •
스푼을 넣고, 두 잔에는 2 계량 스푼을
넣습니다. 필터 홀더 림에 남아 있는 모든
커피를 제거합니다.
•
(그림 13) - 하단의 추출기(8)에 필터 홀더
(12)를 삽입합니다.
•
(그림 14) - 필터 홀더가 고정될 때까지
왼쪽에서 오른쪽으로 돌립니다.
•
(그림 15) - 한두 컵의 예열된 컵을 가져와서
압력 필터 홀더 아래에 놓습니다. 커피 추출
노즐 아래에 제대로 놓였는지 확인합니다.
•
(그림 14) - 선택 손잡이(17)를 " " 위치로
돌립니다.
• 커피가 원하는 만큼 추출되었으면 선택
손잡이(17)를 "
" 위치로 돌려 추출을
멈춥니다. 추출을 멈추고 몇 초 간 기다린
후 커피잔을 꺼냅니다.
•
(그림 19) - 압력 필터 홀더를 분리하고
남아 있는 커피 찌꺼기를 없앱니다.
(그림 18).
참고: 필터 홀더에 물이 조금 남아 있는
경우가 있는데, 이는 매우 정상적인
상황으로 필터 홀더의 특징 때문입니다.
중요 참고: 필터(14)가 깨끗해야 추출한
커피의 맛도 좋습니다. 사용 후에는 항상
닦아주십시오.
5.2 커피 포드 사용하기
•
(그림 9) - 커피 스푼을 사용하여 압력 필터
홀더(12)에서 분쇄 커피(14)용 필터를
분리합니다.
•
(그림 10) - 커피 포드 어댑터(15) - 볼록한
면이 아래를 향하도록 - 를 압력 필터 홀더
(12)에 삽입합니다.
•
(그림 11) - 그런 다음 포드 필터(16)를 압력
필터 홀더(12)에 삽입합니다.
•
(그림 13) - 하단의 추출기(8)에 압력 필터
홀더를 삽입합니다.
•
(그림 14) - 필터 홀더가 고정될 때까지
왼쪽에서 오른쪽으로 돌립니다. 압력
필터 홀더에서 그립을 떼어냅니다. 핸들이
자동적으로 약간 왼쪽으로 돌아갑니다.
이로써 압력 필터 홀더의 성능이
최적화됩니다.
•
(그림 16) - 물이 일부 흘러 나올 때까지
선택 손잡이(17)를 "
압력 필터 홀더를 예열합니다. 이 작업은
" 위치로 돌리고
커피를 처음으로 추출할 때만 수행합니다.
•
(그림 17) -150cc 정도의 물이 넘치고 나면
선택 손잡이(17)를 "
멈춥니다.
•
(그림 19) - 머신에서 필터 홀더를
" 위치로 돌려 추출을
오른쪽에서 왼쪽으로 돌려 분리한 후 남아
Page 27

한국어
있는 물을 따라 버립니다.
(그림 12)
(그림 13)
(그림 14)
1개의 예열된 컵을 가져와서
(그림 16) -
(그림 17) -
(그림 19)
중요 참고: 필터(16)와 어댑터(15)가
깨끗해야 추출된 커피도 좋습니다. 사용
후에는 항상 닦아주십시오.
6 커피 선택 요령
뜨거운 물/스팀 만들기와 관련된 어떤
작업이든 수행하기 전에 반드시 스팀 봉
(PANNARELLO)이 물받이와 잔 받침대를 향하고
있는지 확인합니다.
7 뜨거운 물
화상의 위험이 있습니다! 물이 나오기 전에
뜨거운 물이 약간 분사될 수 있습니다. 스팀
봉은 높은 온도까지 올라갑니다. 맨손으로 직접
만지지 마세요.
(그림 21) -
(그림 21) -
(그림 22) -
(그림 23) -
(그림 24) -
•
(그림 12) - 필터 홀더에 포드를 삽입하고
포드 종이가 필터 홀더 위에 걸리지
않았는지 확인합니다.
•
(그림 13) - 하단의 추출기(8)에 압력 필터
홀더를 삽입합니다.
•
(그림 14) - 필터 홀더가 고정될 때까지
왼쪽에서 오른쪽으로 돌립니다.
1개의 예열된 컵을 가져와서 필터 홀더
•
아래에 놓습니다. 컵이 커피 추출 노즐
아래에 제대로 놓였는지 확인합니다.
(그림 16) - 선택 손잡이(17)를 " " 위치로
•
돌립니다.
•
(그림 17) - 커피가 원하는 만큼
추출되었으면 선택 손잡이(17)를 "
위치로 돌려 커피 추출을 멈추고 커피 컵을
꺼냅니다.
•
(그림 19) - 추출 후 몇 초간 기다리고 나서
필터 홀더를 분리하고 사용한 포드를
처리합니다.
중요 참고: 필터(16)와 어댑터(15)가
깨끗해야 추출된 커피도 좋습니다. 사용
후에는 항상 닦아주십시오.
6 커피 선택 요령
일반적으로 마켓에서 구매할 수 있는 모든 타입의
커피를 사용할 수 있습니다. 그러나 커피는 천연
생산물이며 원산지와 블렌딩 등에 따라 맛과 향이
바뀔 수 있습니다. 따라서 여러 종류의 커피를
만들어 자신이 원하는 커피를 찾아내는 것도 좋은
방법입니다.
최상의 맛을 위해 에스프레소 머신 블랜드를
사용할 것을 권장합니다. 일반적으로 커피는 항상
드립하지 않고 압력 필터 홀더에서 나와야 합니다.
커피 추출 속도는 필터에 넣는 커피 양을 약간
바꾸거나 커피 원두의 분쇄를 달리하여 조절할 수
있습니다.
Saeco는 맛 좋은 커피와 손쉬운 세척 및 준비를
위해 ESE 일회 분 커피 포드를 사용할 것을
권장합니다.
7 뜨거운 물
"
화상의 위험이 있습니다! 물이 나오기 전에
뜨거운 물이 약간 분사될 수 있습니다. 스팀
봉은 높은 온도까지 올라갑니다. 맨손으로 직접
만지지 마세요.
• ON/OFF 버튼(11)을 누른 후 "I" 위치로
돌립니다.
• "머신 준비" 표시등(20)이 켜질 때까지
기다립니다. 이제 머신을 사용할 준비가
되었습니다.
(그림 21) - 스팀 봉(Pannarello) 아래에
•
용기나 커피잔을 놓습니다.
•
(그림 21) - 손잡이(3)를 시계 반대 방향으로
돌려 엽니다.
•
(그림 22) - 선택 손잡이(17)를 " " 위치로
돌립니다.
•
(그림 23) - 원하는 만큼의 뜨거운 물이
공급되었으면 선택 손잡이(17)를 "
위치로 놓습니다.
•
(그림 24) - 손잡이(3)를 시계 방향으로
돌려 닫습니다.
• 뜨거운 물 용기를 꺼냅니다.
한국어
"
뜨거운 물/스팀 만들기와 관련된 어떤
작업이든 수행하기 전에 반드시 스팀 봉
(PANNARELLO)이 물받이와 잔 받침대를 향하고
있는지 확인합니다.
• 27 •
Page 28

8 스팀/카푸치노
8 스팀/카푸치노
화상의 위험이 있습니다! 물이 나오기 전에
뜨거운 물이 약간 분사될 수 있습니다. 스팀
봉은 높은 온도까지 올라갑니다. 맨손으로 직접
만지지 마세요.
(그림 25) -
(그림 26) -
(그림 26) -
(그림 27) -
차가운 우유를 사용해야 좀 더 좋은 결과를
얻을 수 있습니다.
(그림 28) -
최대 60초 동안만 사용하는 것을
권장합니다.
(그림 30) -
참고: "머신 준비" 표시등
이 깜빡이지
않고 계속 켜져 있을 때에만 머신을 사용할
준비가 된 것입니다.
중요 참고: 이 방법으로 카푸치노를 추출할
수 없는 경우에는 섹션 4.5에서 설명한 대로
통로를 프라이밍 한 뒤 위 과정을 반복합니다.
다른 음료를 데울 때에도 같은 절차를
수행할 수 있습니다.
9 세척
(그림 31-33) -
(그림 31-32-33) -
(그림 34) -
(그림 20) -
(그림 9)
(그림 35-36) -
참고: 압력 필터 홀더를 식기 세척기에서
세척하지 마십시오.
화상의 위험이 있습니다! 물이 나오기 전에
뜨거운 물이 약간 분사될 수 있습니다. 스팀
봉은 높은 온도까지 올라갑니다. 맨손으로 직접
만지지 마세요.
• ON/OFF 버튼(11)을 누른 후 "I" 위치로
돌립니다.
• "머신 준비"(20) 표시등이 켜질 때까지
기다립니다.
(그림 25) - 선택 손잡이(17)를 " " 위치로
•
놓습니다. 표시등(20)이 꺼집니다.
• 표시등(19)이 켜질 때까지 기다립니다.
이제 스팀을 만들 준비가 되었습니다.
•
(그림 26) - 스팀 봉 아래에 용기를
놓습니다.
•
(그림 26) - 스팀 봉(Pannarello)에 남아
있던 물이 흘러 나오도록 손잡이(3)를 몇
초 동안 열어 둡니다. 잠깐만 기다리면
스팀이 나옵니다.
•
(그림 27) - 손잡이(3)를 닫고 용기를
꺼냅니다.
• 카푸치노를 준비하는데 사용하려는 용기의
1/3을 차가운 우유로 채웁니다.
차가운 우유를 사용해야 좀 더 좋은 결과를
얻을 수 있습니다.
•
(그림 28) - 우유 속에 스팀 봉을 담그고
손잡이(3)를 시계 반대 방향으로 돌려
엽니다. 우유 용기를 약간 위쪽으로 천천히
올려 고르게 데워질 수 있도록 만듭니다.
최대 60초 동안만 사용하는 것을
권장합니다.
• 완료되면 손잡이(3)를 시계 방향으로 돌려
닫고 거품을 낸 우유가 담긴 컵을 꺼냅니다.
•
(그림 30) - 선택 손잡이(17)를 " " 위치로
놓습니다.
"
"와 " " 표시등이 모두 켜져 있으면
머신의 온도가 커피를 추출하기에 너무
높은 것입니다.
• 섹션 4.5에서 설명한 것처럼 통로를
프라이밍 하여 머신을 사용할 준비를
합니다.
참고: "머신 준비" 표시등
않고 계속 켜져 있을 때에만 머신을 사용할
준비가 된 것입니다.
중요 참고: 이 방법으로 카푸치노를 추출할
수 없는 경우에는 섹션 4.5에서 설명한 대로
통로를 프라이밍 한 뒤 위 과정을 반복합니다.
이 깜빡이지
• 28 •
다른 음료를 데울 때에도 같은 절차를
수행할 수 있습니다.
• 이 작업 후, 깨끗하고 젖은 천으로 스팀
봉을 닦습니다.
9 세척
기기가 냉각되고 전기 콘센트에서 분리되었을 때만
유지보수 및 세척할 수 있습니다.
• 기기를 물에 담그거나 식기 세척기에
부품을 놓지 마십시오.
• 알코올, 세제 또는 강력한 화학 물질 등을
사용하지 마십시오.
• 물탱크는 매일 세척하고 깨끗한 물을 다시
채워 넣는 것이 좋습니다.
•
(그림 31-33) - 매일 우유를 데운 다음에는
스팀 봉(Pannarello)의 겉을 분리하고
깨끗한 식수로 닦으십시오.
•
(그림 31-32-33) - 스팀 봉은 매주
닦으십시오. 이를 위해서는 다음 작업을
수행해야 합니다.
- 스팀 봉(Pannarello)의 겉을 분리합니다(
표준 세척 시).
- 스팀 봉(Pannarello)의 상단 부분을
봉에서 분리합니다.
- 스팀 봉(Pannarello)의 상단 부분을
깨끗한 식수로 세척합니다.
- 스팀 봉을 젖은 천으로 닦고 남아 있는
우유 잔류물을 없앱니다.
- 스팀 봉에 상단 부분 을 다시 끼워 넣습니다
(제대로 삽입되었는지 확인합니다).
스팀 봉(Pannarello)의 외부 부품을 다시
조립합니다.
•
(그림 34) - 물받이는 매일 비우고 깨끗하게
세척합니다.
• 부드러운 젖은 천으로 커피 머신을
세척합니다.
•
(그림 20) - 다음 순서에 따라 압력 필터
홀더를 세척합니다.
-
(그림 9) - 필터를 분리하고 뜨거운 물로
철저하게 세척합니다.
- 어댑터(장착된 경우)를 분리하고 뜨거운
물로 철저하게 세척합니다.
- 압 력 필 터 홀 더의 내부 부품을 세척합 니다.
• 전자레인지 또는 일반 오븐을 사용하여
커피 머신 또는 구성품을 건조시키지
마십시오.
•
(그림 35-36) - 젖은 천으로 액세서리의
시트를 매주 세척하여 남아 있는 커피나
먼지 등을 없앱니다.
참고: 압력 필터 홀더를 식기 세척기에서
세척하지 마십시오.
Page 29

한국어
10 스케일 제거
10 스케일 제거
매뉴얼 내용이 서로 다른 경우에는
별매 액세서리 및 재료에 대해 제공되는
지침보다는 작업 및 유지관리 매뉴얼에 나와 있는
내용을 우선적으로 따라야 합니다.
세코 스케일 제거 용액을 사용합니다(그림
B). 이 제품은 전체 작동 수명 동안 커피 머신
성능과 작동을 향상시키도록 제조되어 있습니다.
또한 이 제품을 올바르게 사용하는 경우 추출된
음료의 변질도 방지할 수 있습니다. 스케일 제거
과정을 시작하기 전에 다음 사항을 확인하십시오.
물 필터(사용되는 경우)가 제거되어야 합니다.
과정이 끝까지 수행될 때까지 스케일 제거
용액이나 작업에 사용된 물을 절대 마시지
마십시오. 또한 식초를 스케일 제거 용액으로
사용하지 마십시오.
1 (그림 13-14) -
2 (그림 1B) 3 (그림 2) -
절반(HALF)
4
(그림 21) -
5
6
(그림 21) -
7
6 단계
.
8 (그림 2) -
9
10
11 (그림 2)
(그림 21)
(그림 22)
12 (그림 23)
(그림 24)
13
(8)번
14 (그림 19) -
(그림 2)
스케일 제거 용액은 제조업체의 지침 또는
사용 국가에서 적용되는 규정에 따라
사용해야 합니다.
커피 머신을 사용하게 되면 머신 내부에 스케일
등이 생기게 됩니다. 커피 머신은 1~2개월마다 한
번 또는 물이 잘 흐르지 않는 것처럼 보일 때마다
스케일을 제거해주어야 합니다. 필립스 세코 혹은
세코 스케일 제거 용액만 사용하십시오.
매뉴얼 내용이 서로 다른 경우에는
별매 액세서리 및 재료에 대해 제공되는
지침보다는 작업 및 유지관리 매뉴얼에 나와 있는
내용을 우선적으로 따라야 합니다.
세코 스케일 제거 용액을 사용합니다(그림
B). 이 제품은 전체 작동 수명 동안 커피 머신
성능과 작동을 향상시키도록 제조되어 있습니다.
또한 이 제품을 올바르게 사용하는 경우 추출된
음료의 변질도 방지할 수 있습니다. 스케일 제거
과정을 시작하기 전에 다음 사항을 확인하십시오.
물 필터(사용되는 경우)가 제거되어야 합니다.
과정이 끝까지 수행될 때까지 스케일 제거
용액이나 작업에 사용된 물을 절대 마시지
마십시오. 또한 식초를 스케일 제거 용액으로
사용하지 마십시오.
1 (그림 13-14) - 하단의 추출기(8)에 필터
홀더를 삽입하고 고정될 때까지 왼쪽에서
오른쪽으로 돌립니다.
2 (그림 1B) - 물탱크를 분리하고 비웁니다.
3 (그림 2) - 물탱크에 세코 농축 스케일 제거
용액을
절반(HALF) 까지 붓고 깨끗한
식수로 탱크를 MAX 선까지 채웁니다.
4 ON/OFF 버튼(11)을 눌러 "I" 위치로 돌려
머신 스위치를 켭니다.
(그림 21) - 스팀/뜨거운 물 봉에서 두 컵의
물(약 300ml 정도)을 채우고(설명서의
섹션 7에서 설명) ON/OFF 버튼(11)을
눌러 "0" 위치로 돌려 머신을 스위치를
끕니다.
5 머신을 끈 상태에서 약 15~20분 동안
스케일 제거 용액을 나둡니다.
6 ON/OFF 버튼(11)을 눌러 머신 스위치를
켭니다.
(그림 21) - 스팀/뜨거운 물 봉에서 물 두 컵(
약 300ml 정도)을 채웁니다(설명서의 섹션
7에서 설명). 그 다음 ON/OFF 버튼(11)을
사용하여 머신을 끄고 3분 동안 나둡니다.
7 물탱크가 완전히 비워질 때까지
6 단계
에서 설명한 작업을 반복합니다
8 (그림 2) - 탱크를 헹구고 깨끗한 식수로
완전히 채웁니다.
9 필터 홀더 아래에 용기를 놓습니다.
10 ON/OFF 버튼(11)을 눌러 머신 스위치를
켭니다. 선택 손잡이(17)를 "
" 위치로
놓고 필터 홀더를 사용하여 탱크에 있던
모든 물을 배출합니다. 선택 손잡이(17)를
" 위치로 놓고 배출을 멈춥니다.
"
11 (그림 2) - 탱크에 다시 깨끗한 물을
채웁니다.
(그림 21) - 스팀 봉(Pannarello) 아래에
충분히 큰 용기를 놓습니다. 물 배출 손잡이
(3)를 시계 반대 방향으로 돌려 엽니다.
(그림 22) - 선택 손잡이(17)를 " " 위치로
놓고 스팀/뜨거운 물 봉을 사용하여 탱크의
모든 물을 배출합니다.
12 (그림 23) - 물을 내보낸 후 선택 손잡이(17)
를 "
" 위치로 돌려 배출을 멈춥니다.
(그림 24) - 물 배출 손잡이(3)를 시계
방향으로 돌려 닫습니다.
13
(8)번 과정으로 탱크를 4번 채우고
내보내기를 반복합니다.
14 (그림 19) - 필터 홀더를 오른쪽에서
왼쪽으로 돌려 분리한 후 깨끗한 식수로
헹구어냅니다.
이제 스케일 제거 과정이 완료되었습니다.
(그림 2) - 탱크를 다시 깨끗한 물로 채웁니다.
필요한 경우에는 섹션 4.5에서 설명한 것과 같이
통로를 프라이밍 합니다.
스케일 제거 용액은 제조업체의 지침 또는
사용 국가에서 적용되는 규정에 따라
사용해야 합니다.
한국어
• 29 •
Page 30

11 처리
11 처리
- 포장재는 재활용할 수 있습니다.
- 커 피 머 신: 커피 머신의 플러 그를 뽑고 전 원 코 드를
자르십시오.
- 커피 머신과 전원 코드를 필립스 공식 서비스
센터로 보내거나 일반 폐기물 처리 시설에서
처리하십시오.
본 제품은 EU 명령 2002/96/EC를 준수합니다.
제품 또는 포장의
쓰레기로 처리할 수 없음을 나타냅니다. 이 제품은
해당 전기 전자 장비 재활용 수거 처로 보내야
합니다.
본 제품을 올바르게 폐기 처리함으로써 부적절한
처리로 인해 발생할 수 있는 환경과 인체 건강에
대한 잠재적인 피해를 방지할 수 있습니다. 본
제품의 재활용에 대한 자세한 내용은 해당 지역
관공서, 가정용 쓰레기 처리업체 또는 제품
구입처에 문의하십시오.
기호는 본 제품을 가정용
• 30 •
Page 31

한국어
문제점
문제점
가능한 원인
해결 방법
위 표에 나와 있지 않은 문제가 발생하거나 제안된 해결 방법으로 문제가 해결되지 않으면 고객 서비스에
문의하십시오.
커피 머신이 켜지지
않습니다.
펌프에서 소리가 심하게
납니다.
커피가 너무 차갑습니다.
우유에 거품이 생기지
않았습니다.
카푸치노를 준비할 수
없습니다.
커피가 너무 빠르게
추출되어 향이 나지
않습니다.
커피가 추출되지 않거나
조금밖에 추출되지
않습니다.
커피가 가장 자리에서
흘러 나옵니다.
커피 머신이 전원에 연결되지
않았습니다.
탱크에 물이 없습니다. 탱크에 물을 채우십시오(섹션 4.4).
선택 손잡이(17)가 " " 위치에
놓여 있는 동안 "머신 준비" 표시등
(20)이 꺼져 있었습니다.
필터 홀더가 예열을 위해 삽입되지
않았습니다(섹션 5).
컵이 차가운 상태입니다. 뜨거운 물로 컵을 데워 두십시오.
사용할 수 없는 우유: 분유
또는 저지방 우유는 사용할 수
없습니다.
스팀 봉(Pannarello)이
더럽습니다.
보일러에 스팀이 남아 있지
않습니다.
필터 홀더에 커피가 조금밖에
없습니다.
커피가 너무 크게 분쇄되었습니다. 다른 블랜드를 사용하십시오(섹션 6).
커피가 오래되었거나 알맞지
않습니다.
포드가 오래되었거나 적절하지
않습니다.
필터 홀더에 구성요소가 하나
없습니다.
물이 없습니다. 탱크에 물을 채우십시오(섹션 4.4).
커피가 너무 곱게 분쇄됩니다. 다른 블랜드를 사용하십시오(섹션 6).
필터 홀더에 커피가 뭉쳐
있습니다.
필터 홀더에 커피가 너무 많이
있습니다.
손잡이(3)가 열렸습니다. 손잡이(3)를 닫습니다.
머신에 스케일이 생겼습니다.
필터 홀더의 필터가 막혔습니다. 필터를 세척하십시오(섹션 9).
알맞은 포드가 아닙니다. 포드 타입을 바꾸십시오.
필터 홀더가 추출기에 제대로
삽입되지 않았습니다.
필터 홀더의 상단 가장 자리가
더럽습니다.
포드가 잘못 삽입되었습니다.
필터 홀더에 커피가 너무 많이
있습니다.
가능한 원인
해결 방법
커피 머신을 전원에 연결하십시오.
"머신 준비" 표시등(20)이 켜질 때까지
기다립니다.
필터 홀더를 예열하십시오.
차가운 보통 우유(whole milk)만
사용해야 합니다.
섹션 9에 설명한 것과 같이 스팀 봉
(Pannarello)을 세척하십시오.
통로를 프라이밍하고(섹션 4.5) 섹션 8
에서 설명한 과정을 반복합니다.
커피를 추가합니다(섹션 5).
다른 블랜드를 사용하십시오(섹션 6).
포드를 바꾸십시오.
모든 구성요소가 존재하며 제대로
설치되었는지 확인합니다.
분쇄 커피를 흔듭니다.
필터 홀더의 커피 양을 줄입니다.
머신에서 스케일을 제거하십시오(섹션
10).
필터 홀더를 제대로 삽입하십시오(섹션
5).
필터 홀더의 림을 세척하십시오.
포드를 제대로 삽입하십시오. 필터
홀더에서 커피가 나오지 않는지
확인합니다.
계량 스푼으로 커피의 양을 줄이십시오.
한국어
위 표에 나와 있지 않은 문제가 발생하거나 제안된 해결 방법으로 문제가 해결되지 않으면 고객 서비스에
문의하십시오.
• 31 •
Page 32

1 常規信息
1 常規信息
注意。不承擔因下列原因引起的賠償責
任:
• 不正確的使用,不符合標稱用途;
• 未在授權服務中心修理;
• 私自改動電源線;
• 私自改動咖啡機的任何零部件;
• 使用非原裝零件和配件;
• 沒有按照說明對咖啡機進行除鈣作業,或
在 0°C 以下環境中存放咖啡機。
如有上述情況,恕不提供保固。
1.1 手冊閱讀說明
警示 三角符 號表示此 類說明
對用戶的安全至關重要。請謹
遵此類說明,以免嚴重!
此符 號 用於強調相關 資 訊,此 類 資訊
對確保咖啡機的最佳使用狀況尤為重
要。
手冊第一頁上列有與文字對應的圖示。閱讀使
用說明書時,請參閱上述頁面。
1.2 本使用說明書的參閱方式
2 技術規格
本咖啡機適用於沖煮 1 杯或 2 杯義式濃縮咖
啡,亦 配 有 迴 旋 蒸 汽 管 和 熱 水 沖 煮 管。咖 啡 機
正面的控制裝置均以標籤貼注易於閱讀的標
誌。
本咖啡機專為家庭使用而設計,不適合專業連
續性用途。
注 意。不 承 擔 因 下 列 原 因 引 起 的 賠 償 責
任:
• 不正確的使用,不符合標稱用途;
• 未在授權服務中心修理;
• 私自改動電源線;
• 私自改動咖啡機的任何零部件;
• 使用非原裝零件和配件;
• 沒有按照說明對咖啡機進行除鈣作業,或
在 0°C 以下環境中存放咖啡機。
如有上述情況,恕不提供保固。
1.1 手冊閱讀說明
警示三角符號表示此類說明
對用戶的安全至關重要。請謹
遵此類說明,以免嚴重!
圖示、咖啡機零件或控制裝置的參考符號均
以數字或字母標示。請盡可能參閱圖示。
要。
手冊第一頁上列有與文字對應的圖示。閱讀使
用說明書時,請參閱上述頁面。
此符號用於強調相關資訊,此類資訊
對確保咖啡機的最佳使用狀況尤為重
1.2 本使用說明書的參閱方式
請將使用說明書放在安全的地方,確保任何
可能使用咖啡機的人都能查看本說明書。
如有其他疑問或發現問題,請與授權服務中心
聯絡。
2 技術規格
製造商有權對本產品的技術規格作出變更。
額定電壓 - 額定功率 - 電源
外殼材料
尺寸 (寬 x 高 x 深) (毫米)
重量
電源線長度
操作面板
濾水器支架
Pannarello
水箱
泵壓
熱水器
安全裝置
參閱產品標籤
塑膠
210 x 300 x 280
3.9 公斤
1.3 米
正面
加壓式
專用於卡布奇諾
1.25 升 - 摘取式
15 巴
不銹鋼式
保險絲
• 32 •
Page 33

繁體中文
3 安全準則
3 安全準則
不要讓水同咖啡機任何電氣部件相接觸:有
短路危險!過熱的蒸汽和熱水可能造成灼傷!
切勿將蒸汽或熱水指向身體部位。小心操作蒸
汽/熱水沖煮口:有灼傷危險!
設計用途
電源
電源線
為了他人安全
有燙傷危險
咖啡機位置
有灼傷危險!
清潔
操作和保養的適當位置
(圖 A)
存放咖啡機
修理/保養
防火安全注意事項
不要讓水同咖啡機任何電氣部件相接觸:有
短路危險!過熱的蒸汽和熱水可能造成灼傷!
切勿將蒸汽或熱水指向身體部位。小心操作蒸
汽/熱水沖煮口:有灼傷危險!
設計用途
本咖啡機僅限家庭使用。未經授權禁止改動
咖啡機或用於非設計用途,否則可能導致嚴重
後果!身體、精神、感官存在缺陷或經驗不足
者 (包括兒童),除非由可以負責其安全的人監
督,或 接 受 該 人 指 導 ,否 則 均 不 可 使 用 本 機。
電源
只可將咖啡機接在合適的插座中。電壓必須
與咖啡機標籤上標注的電壓相符。
電源線
若電源線損壞,不可使用本機。若電源線損
壞,必須由製造商或授權服務中心進行更換。
不要讓電源線繞過拐角、經過鋒利邊緣或位
於高溫物體上方,遠離油脂。
不要用電源線牽引或拖拽咖啡機。不要拉扯
電源線拔出插頭,或者用潮濕的手觸碰插頭。
不要讓電源線從檯面或架面上自由懸掛。
不要將咖啡機放在低於 0°C 的環境中。結冰可
能會損壞本機。
不要在室外使用咖啡機。
為防止其外殼熔化或損壞,不要把咖啡機放
在非常熱的表面或靠近明火。
清潔
清潔咖啡機前,透過按下 ON/OFF (開/關) 按
鈕關閉咖啡機,然後從插座中拔出插頭。之後
等待咖啡機冷卻。
切勿將咖啡機浸泡在水中!
絕對禁止私自改造咖啡機內部零部件。
存放在水箱中數天的水,不得用來製作飲品。
清洗水箱,並注入乾淨的飲用水。
操作和保養的適當位置
為確保咖啡機準確且高效的性能,建議您遵
循以下說明:
• 選擇平穩的表面。
• 選擇照明充足、乾淨且靠近插座的位置。
• 依據
(圖 A) 所示,在機器兩側留出最小距
離。
存放咖啡機
若咖啡機長期保持閒置,則應將其關閉,並拔
出電源插頭。將其存放在乾 燥且兒童無法觸
及的地方。防止灰塵與浮土。
繁體中文
為了他 人 安 全
不要讓孩子將咖啡機當作玩具。
兒童並不瞭解家庭電器風險。不要將產品包裝
材料放在兒童可以接觸的範圍內。
有燙傷危險
不要將過熱的蒸汽和/或熱水指向自己或他
人。請 使 用 本 機 自 帶 的 手 柄 或 球 柄 。
沖煮咖啡時,不要拆除 (取下) 加壓式濾水器
支架。在預熱階段,熱水液滴可能會從沖煮裝
置中飛濺出來。
咖啡機過熱時,即「
亮起時,請不要沖煮咖啡。
」和「 」指 示 燈 同 時
咖啡機位置
將咖啡機置於不會發生翻倒或損壞的安全之
處。
熱水或過熱的蒸汽可能會從咖啡機中飛濺出
來:
有灼傷危險!
修理/保養
若咖啡機因跌落而導致故障、問題、潛在錯
誤,請 立 即 拔 下 插 頭。不 要 操 作 有 故 障 的 咖 啡
機。服務與修理僅可由授權服務中心執行。因
非專業人士開展工作而導致的損失,恕不承擔
責任。
防火安全注意事項
發生火情時,請使用二氧化碳 (CO2) 滅火器。
不要使用水或乾粉滅火器。
• 33 •
Page 34

咖啡機主要部件 (第 2 頁)
咖啡機主要部件 (第 2 頁)
1
2
3
4
5
6
7
8
9
10
11
12
13
14
15
16
17
18
19
20
4 安裝
為了保證您和他人的安全,請謹遵第 3 章中所
述的「安全準則」。
4.1 包裝
4.2 安裝說明
註釋:建議首次使用前,以及/或閒置一
定時間後,清洗各部件。
4.3 咖啡機連接
電力可能會 造成嚴重危險!因此,務必
嚴格遵照安全準則。不能使用有故障的
電源線!若電源線和插頭發生故障,應立即由
授權服務中心予以更換。
4.4 水箱
(圖 1A) (圖 1B) (圖 2) -
僅向水箱內注入乾淨、無碳酸添加的飲
用水。熱水或任何其他液體均可能損壞
水箱。無水時不要操作咖啡機:確保水箱中有
足夠的水。
(圖 3A) -
為水箱加水後,請將其放回至咖啡機。
緩緩推動 水箱,直至卡入到位,確 保水
箱正確插入咖啡機,以避免從底部漏水。——
圖3B說明必須完全可見。
1 操作面板
2 水箱蓋
3 熱水/蒸汽旋鈕
4 配件支座
5 水箱
6 咖啡杯固定支架
7 液體回收盤 + 格柵
8 沖煮裝置
9 蒸汽沖煮管 (Pannarello)
10 電源線
11 ON/OFF (開/關) 按鈕
12 加壓式濾水器支架
13 预磨咖啡粉量匙
14 预磨咖啡 粉濾水器
(單個適用於 1 杯或 2 杯咖啡)
15 咖啡包濾水器承接件
16 咖啡包濾水器
17 選擇 旋鈕
18 「開機」指示燈
19 「蒸汽準備就緒」指示燈
20 咖啡/水指示燈 -「咖啡機準備就緒」
4 安裝
為了保證您和他人的安全,請謹遵第 3 章中所
述的「安全準則」。
4.1 包裝
原包裝能夠在運輸期間保護咖啡機。若將來
可能需要進行運輸,建議保存包裝材料。
4.2 安裝說明
安裝本機前,請仔細閱讀安全說明:
• 將咖啡機置於安全之處;
• 確保不要讓孩子將咖啡機當作玩具;
• 不要把咖啡機放在高溫表面或靠近明火。
現在便可將咖啡機進行電氣連接。
註釋:建議首次使用前,以及/或閒置一
定時間後,清洗各部件。
4.3 咖啡機連接
電力可能會造成嚴重危險!因此,務必
嚴格遵照安全準則。不能使用有故障的
電源線!若電源線和插頭發生故障,應立即由
授權服務中心予以更換。
產品電壓已由製造商預設。請檢查電壓是否符
合產品底部資料牌上所示的要求。
• 將咖啡機進行電氣連接前,請檢查 ON/OFF
(開/關) 按鈕 (11) 是否已設於「0」位。
• 把插頭插進電源電壓合適的牆上插座。
• 34 •
4.4 水箱
•
(圖 1A) - 提起水箱 (2) 蓋,以將其取下。
•
(圖 1B) - 取出水箱 (5)。
•
(圖 2) - 沖洗水箱,並將其注入乾淨的飲用
水,注 意 不 要 裝 得 過 滿。
僅向水箱內注入乾淨、無碳酸添加的飲
用水。熱水或任何其他液體均可能損壞
水箱。無水時不要操作咖啡機:確保水箱中有
足夠的水。
•
(圖 3A) - 插入水箱,並確保已將其妥善裝回
先前的支座中,然後裝回蓋子 (2)。
為水箱加水後,請將其放回至咖啡機。
緩緩推動水箱,直至卡入到位,確保水
箱正確插入咖啡機,以避免從底部漏水。——
圖3B說明必須完全可見。
Page 35

繁體中文
4.5 迴路上水
4.5 迴路上水
(圖 4) -
(圖 5) -
(圖 5) -
4.6 首次或閒置一段時間後使用咖啡
機
排出的水必須完全倒入合適的下水管。
此類水不宜用於製作飲品。如果執行程
式時器皿已裝滿,則停止排水,並清空器皿,
然後繼續作業。
(圖 2) (圖 4) -
(圖 5) -
(圖 2) (圖(圖 13-14) -
(圖 15) -
(圖 16) -
(圖 17) -
(圖 19) -
5 沖煮咖啡
注意!沖煮咖啡時,嚴禁用手順時針轉
動加壓式濾水器支架來將其取出。有燙
傷危險。
咖啡沖煮配件已置於專用支座中,以便
簡化並加快作業。
如果需要预磨咖啡粉量匙和/或濾水器,請提
起蓋子 (2) 以取出所需配件 (圖 35、圖 36)。
5.1 使用预磨咖啡粉
(圖 7) -
(圖 13) -
(圖 14) -
(圖 16) -
(圖 17) -
(圖 19) -
使用之初,在噴射蒸汽後,或水箱為空時,必
須為咖啡機的水線迴路上水。
• 按 ON/OFF (開/關) 按鈕 (11),並將其切換至
「I」位 置。指 示 燈 ( 1 8 ) 將 亮 起,以 示 咖 啡 機
已開啟。
•
(圖 4) - 在蒸汽沖煮管 (Pannarello) 下方放置
一個器皿。
• 逆時針轉動「熱水/蒸汽」旋鈕 (3),以將其
開啟。
•
(圖 5) - 將選擇旋鈕 (17) 設至 「 」位 置。
• 等待至蒸汽沖煮管 (Pannarello) 中噴射出穩
定的水流。
•
(圖 5) - 將選擇旋鈕 (17) 設至 「 」位 置。
• 順時針轉動「熱水/蒸汽」旋鈕 (3),以將其
關閉。取出器皿。
4.6 首次或閒置一段時間後使用咖啡
此簡單作業可確保最佳的沖煮效果,因此在以
下情況時必須執行:
- 首次啟動時;
- 咖啡機長時間 (超過 2 週) 保持閒置後。
排出的水必須完全倒入合適的下水管。
此類水不宜用於製作飲品。如果執行程
式時器皿已裝滿,則停止排水,並清空器皿,
然後繼續作業。
•
(圖 2) - 沖洗水箱並再次裝滿乾淨的飲用水。
•
(圖 4) - 在蒸汽沖煮管 (Pannarello) 下方放置
一個器皿。逆時針轉動旋鈕 (3),以將其開
啟。
(圖 5) - 將選擇旋鈕 (17) 設至「 」位 置。
• 從蒸汽/熱水沖煮管 (Pannarello) 中排出水箱
中的全部液體。將選擇旋鈕 (17) 設至「
位置,並順時針轉動旋鈕 (3) 將其關閉,以
結束作業。
•
(圖 2) - 向水箱中注入乾淨的飲用水。
•
13-14) - 將濾水器支架從底部插入沖煮裝
置 (8),並從左向右轉動支架,直至其鎖定到
位。
•
(圖 15) - 在濾水器支架下方放置一個合適
的器皿。
•
(圖 16) - 將選擇旋鈕 (17) 轉至「 」位 置,
並排出水箱中的所有水。
(圖 17) - 水箱排空後,即停止排放,並將選
擇旋鈕 (17) 切換至「
• 再次向水箱注水,等到「咖啡機準備就緒」
指示燈 (20) 亮起為止。
」位 置。
•
(圖 19) - 在裝置上從右向左轉動濾水器支
架,以 將 其 取 出,然 後 用 乾 淨 的 飲 用 水 予 以
沖洗。
咖啡機現已準備就緒,請參閱相關章節以瞭
解有關如何沖煮咖啡和噴射蒸汽的操作詳細
情況。
5 沖煮咖啡
」
注意!沖煮咖啡時,嚴禁用手順時針轉
動加壓式濾水器支架來將其取出。有燙
傷危險。
• 執行此作業時,「咖 啡 機 準 備 就 緒」指 示 燈
(20) 會閃爍;這屬於標準作業模式,而非有
故障的作業模式。
• 使用咖啡機前,請確保熱水/蒸汽旋鈕 (3)
已關閉,且水箱中有足夠的水。
• 按 ON/OFF (開/關) 按鈕 (11),並將其切換至
「I」位 置。
• 等到「咖啡機準備就緒」指示燈 (20) 亮起
為止。咖啡機現已準備就緒,可供沖煮咖
啡。
咖啡沖煮配件已置於專用支座中,以便
簡化並加快作業。
如果需要预磨咖啡粉量匙和/或濾水器,請提
起蓋子 (2) 以取出所需配件 (圖 35、圖 36)。
5.1 使用预磨咖啡粉
•
(圖 7) - 將濾水器 (14) 插入加壓式濾水器支
架 (12) 中;首次使用咖啡機時,濾 水器已插
入。
•
(圖 13) - 將濾水器支架從底部插入沖煮裝置
(8)。
•
(圖 14) - 從左向右轉動濾水器支架,直至其
鎖定到位。釋 放 加 壓 式 濾 水 器 支 架 的 把 手。
手柄將略微向左轉動。此移動可確保濾水
器支架的正常運作。
•
(圖 16) - 將選擇旋鈕 (17) 切換至「 」位
置,以 預 熱 加 壓 式 濾 水 器 支 架,直至有水濺
出為止。僅在首次沖煮咖啡時需執行此動
作。
•
(圖 17) - 流出 150 毫升水後,將選擇旋鈕
(17) 切換至「
•
(圖 19) - 在咖啡機上從右向左轉動濾水器
支架以將其取出,然後倒出所有剩餘的水。
由於咖啡機裝有特殊濾水器 (14),因此無
需更換濾水器來製作一杯或兩杯咖啡。
」位 置,以 停 止 沖 煮。
繁體中文
• 35 •
Page 36

•
(圖 35) (圖 8) -
(圖 13) -
(圖 14) -
(圖 15) -
1 個或 2 個經預熱的杯子,
(圖 14) -
(圖 18)
(圖 19) -
註釋:如果濾水器支架中的咖啡殘餘物
較少,這完全屬於正常情況,並且是由
於濾水器支架的特性而形成的。
重要提示:為確保取得理想的效果,應
將濾水器 (14) 保持潔淨。每日用後清潔
濾水器。
5.2 使用咖啡包
(圖 9)
(圖 10) -
(圖 11)
(圖 13)
(圖 14)
(圖 16) -
(圖 17) -
(圖 19)
(圖 12)
(圖 13)
(圖 14)
1 個經預熱的杯子,
(圖 16) -
(圖 17) -
(圖 19)
重要提示:為確保取得理想的效果,應
將濾水器 (16) 和承接件 (15) 保持潔淨。
每日用後清潔濾水器。
6 咖啡選擇技巧
執 行 與 熱 水 / 蒸 汽 噴 射 相 關 的 任 何
作 業 前,請 確 保 已 將 蒸 汽 沖 煮 管
(PANNARELLO) 指向液體回收盤。
(圖 35) - 從咖啡機上取出量匙。
•
(圖 8) - 用量匙添加 1 到 1 匙半以製作一杯
咖啡,也可添加 2 匙以製作兩杯咖啡。清除
濾水器支架邊緣處的所有咖啡殘餘物。
•
(圖 13) - 將濾水器支架 (12) 從底部插入沖
煮裝置 (8)。
•
(圖 14) - 從左向右轉動濾水器支架,直至其
鎖定到位。
•
(圖 15) - 取出
將其置於加壓式濾水器支架下方。確保已
將其正確放置於咖啡沖煮噴嘴下方。
•
(圖 14) - 將選擇旋鈕 (17) 切換至「 」位
置。
• 取得所需份量的咖啡後,將選擇旋鈕 (17)
轉動至「
煮後稍待片刻,然後取出咖啡杯
•
(圖 19) - 取出加壓式濾水器支架,並清空剩
下的咖啡殘餘物。
註釋:如果濾水器支架中的咖啡殘餘物
較少,這完全屬於正常情況,並且是由
於濾水器支架的特性而形成的。
重要提示:為確保取得理想的效果,應
將濾水器 (14) 保持潔淨。每日用後清潔
濾水器。
5.2 使用咖啡包
•
(圖 9) - 用咖啡勺從加壓式濾水器支架 (12)
上取出用於预磨咖啡粉的濾水器 (14)。
•
(圖 10) - 將咖啡包濾水器承接件 (15) 以凸
起部份朝下的方式,插入加壓式濾水器支
架 (12) 中。
•
(圖 11) - 然後將咖啡包濾水器 (16) 插入加
壓式濾水器支架 (12) 中。
•
(圖 13) - 將加壓式濾水器支架從底部插入
沖煮裝置 (8)。
•
(圖 14) - 從左向右轉動濾水器支架,直至其
鎖定到位。釋 放 加 壓 式 濾 水 器 支 架 的 把 手。
手柄將自動略微向左轉動。
此移動可確保加壓式濾水器支架的正常運
作。
•
(圖 16) - 將選擇旋鈕 (17) 切換至「 」位
置,以 預 熱 加 壓 式 濾 水 器 支 架,直至有水濺
出為止。僅在首次沖煮咖啡時需執行此動
作。
•
(圖 17) - 流出 150 毫升水後,將選擇旋鈕
(17) 切換至「
•
(圖 19) - 在咖啡機上從右向左轉動濾水器
支架以將其取出,然後倒出所有剩餘的水。
•
(圖 12) - 將咖啡包插入濾水器支架,並確保
咖啡包紙不會伸出濾水器支架。
1 個或 2 個經預熱的杯子,並
」位 置,以 停 止 沖 煮 咖 啡。停 止 沖
(圖 18)。
」位 置,以 停 止 沖 煮。
• 36 •
•
(圖 13) - 將加壓式濾水器支架從底部插入
沖煮裝置 (8)。
•
(圖 14) - 從左向右轉動濾水器支架,直至其
鎖定到位。
• 取出
•
•
•
每日用後清潔濾水器。
6 咖啡選擇技巧
一般而言,市面上所提供任何類型的咖啡均可
使用。但是,咖啡是一種天然產品,其風味隨
原產地和拼配的不同而變化;因此,最好試用
不同類型的咖啡,以找到最適合您個人口味的
咖啡。
為達到最佳的效果,建議您採用義式濃縮咖
啡機拼配。通常,咖啡應始終從加壓式濾水器
支架中流出,而非滴落下來。
您可透過略微變更濾水器中的咖啡量,以及/
或使用不同的咖啡研磨方式,來改變咖啡沖
煮速度。
Saeco 建議使用單份用量的濃縮咖啡易濾包,
這樣可製作美味的咖啡,且更易於清潔和沖
煮。
(PANNARELLO) 指向液體回收盤。
1 個經預熱的杯子,並將其置於濾水
器支架下方。檢查是否已將其正確放置於
咖啡沖煮噴嘴下方。
(圖 16) - 將選擇旋鈕 (17) 切換至「 」位
置。
(圖 17) - 取得所需份量的咖啡後,將選擇旋
鈕 (17) 轉動至「
然後取出咖啡杯。
(圖 19) - 停止沖煮後稍待片刻,然後取出濾
水器支架,並處置用過的咖啡包。
重要提示:為確保取得理想的效果,應
將濾水器 (16) 和承接件 (15) 保持潔淨。
執行與熱水/蒸汽噴射相關的任何
作業前,請確保已將蒸汽沖煮管
」位 置,以 停 止 沖 煮 咖 啡 ,
Page 37

繁體中文
7 熱水
7 熱水
有灼傷危險!排出熱水前可能會有些許
熱水濺出。沖 煮 管 可能會 達 到 較 高溫
度:不要徒手直接接觸。
(圖 21) -
(圖 21) (圖 22) (圖 23) -
(圖 24) -
8 蒸汽/卡布奇諾
有灼傷危險!排出熱水前可能會有些許
熱水濺出。沖 煮 管 可能會達到較高溫
度:不要徒手直接接觸。
(圖 25) -
(圖 26) (圖 26) -
(圖 27) -
使用冷鮮奶可取得更佳的效果。
(圖 28) -
建議的最長噴射時間為 60 秒。
(圖 30) -
註釋:「咖啡機準備就緒」指示燈
持亮起時,即表示咖啡機已準備就緒。
重要提示:如果無法依所述方式沖煮卡
布奇諾,請依第 4.5 節中的說明為迴路
上水,然後重複上述步驟。
您可執行相同的操作步驟來加熱其他
飲品。
9 清潔
(圖 31-33) -
(圖 31-32-33) -
(圖 34) -
(圖 20) -
(圖 9)
有灼傷危險!排出熱水前可能會有些許
熱水濺出。沖煮管可能會達到較高溫
度:不 要 徒 手 直 接 接 觸。
• 按 ON/OFF (開/關) 按鈕 (11),並將其切換至
「I」位 置。
• 等到「咖啡機準備就緒」指示燈 (20) 亮起
為止。咖啡機現已準備就緒。
•
(圖 21) - 在蒸汽沖煮管 (Pannarello) 下方放
置一個器皿或茶杯。
(圖 21) - 逆時針轉動旋鈕 (3),以將其開啟。
•
•
(圖 22) - 將選擇旋鈕 (17) 設至 「 」位 置。
•
(圖 23) - 排出所需份量的熱水後,將選擇旋
鈕 (17) 切換至「
(圖 24) - 順時針轉動旋鈕 (3),以將其關閉。
•
• 取出熱水器皿。
」位 置。
•
(圖 30) - 將選擇旋鈕 (17) 設至 「 」位 置。
如果「
示咖啡機溫度已過高,不可沖煮咖啡。
• 依第 4.5 節中所述為迴路上水,以 便 能 使 用
咖啡機。
上水,然 後 重 複 上 述 步 驟 。
• 完成此作業后,請用濕布清潔 蒸 汽 沖煮
管。
」和「 」指 示 燈 同 時 亮 起,則 表
註釋:「咖 啡 機 準 備 就 緒」指示 燈 保 保
持亮起時,即表示咖啡機已準備就緒。
重要提示:如果無法依所述方式沖煮卡
布奇諾,請依第 4.5 節中的說明為迴路
您可執行相同的操作步驟來加熱其他
飲品。
繁體中文
8 蒸汽/卡布奇諾
有灼傷危險!排出熱水前可能會有些許
熱水濺出。沖煮管可能會達到較高溫
度:不 要 徒 手 直 接 接 觸。
• 按 ON/OFF (開/關) 按鈕 (11),並將其切換至
「I」位 置。
• 等到「咖啡機準備就緒」指示燈 (20) 亮起
為止。
•
(圖 25) - 將選擇旋鈕 (17) 設至「 」位 置 。
指示燈 (20) 將熄滅。
• 等到指示燈 (19) 亮起為止。咖啡機現已準
備就緒,可噴射蒸汽。
•
(圖 26) - 在蒸汽沖煮管下方放置一個器皿。
(圖 26) - 將旋鈕 (3) 保持開啟幾秒鐘,以便
•
讓剩餘的水流出蒸汽沖煮管 (Pannarello)。片
刻後,便僅會排出蒸汽。
•
(圖 27) - 關閉旋鈕 (3),並取出器皿。
• 在器皿中依需要注入 1/3 的冷鮮奶,以用於
沖煮卡布奇諾。
使用冷鮮奶可取得更佳的效果。
•
(圖 28) - 將蒸汽沖煮管浸入鮮奶中,並逆時
針轉動旋鈕 (3) 以將其開啟。緩慢向上移動
鮮奶器皿,以便將其均勻預熱。
建議的最長噴射時間為 60 秒。
• 完成后,順時針轉動旋鈕 (3) 以將其關閉,
並取出裝盛奶泡的杯子。
9 清潔
只可在咖啡機冷卻時,並 斷開電氣連接後,方
可保養和清潔咖啡 機。
• 不要將咖啡機浸泡在水中,或將其任何零
件置於洗碗機中。
• 不要使用酒精、溶劑和/或侵蝕性化學劑。
• 建議您每天清潔水箱,並裝滿乾淨的水。
•
(圖 31-33) - 每天加熱鮮奶後,取出 Pannarello
的外部零件,並用乾淨的飲用水加以清洗。
•
(圖 31-32-33) - 每週清潔蒸汽沖煮管。為此,
須執行以下作業:
- 取下 Pannarello 的外部零件 (適用於一般
性清潔);
- 從蒸汽沖煮管上取下 Pannarello 的上部零
件;
- 用乾淨的飲用水清洗 Pannarello 的上部零
件;
- 用濕布擦淨蒸汽沖煮管,清除任何鮮奶殘
餘物;
- 裝回蒸汽沖煮管的上部零件 (確保已將其
完全插入)。
重新組裝 Pannarello 的外部零件。
•
(圖 34) - 每日倒空並清潔滴水盤。
• 用沾濕的軟布清潔咖啡機。
•
(圖 20) - 執行以下作業以清潔加壓式濾水
器支架:
-
(圖 9) - 取出濾水器,並用熱水徹底清洗。
- 取出承接件 (如有安裝),並用熱水徹底清
洗。
- 清洗加壓式濾水器支架的內部零件。
• 不要在微波爐和/ 或 標準烤箱中烘乾 本機
和/或其部件。
• 37 •
Page 38

•
(圖 35-36) -
註釋:不要用洗碗機清洗加壓式濾水器
支架。
10 除鈣
若操作和保養手冊與單獨銷售的配件
和材料上的說明相抵觸,請以操作和保
養手冊為准。
使用 Saeco 除鈣劑 (圖 B)。其配方設計
能夠保證咖啡機在其壽命期內性能出
眾、操作理想。若使用方法正確,還能避免沖
煮飲品口味改變。開始除鈣程式之前,必須確
保:已經取下 (如有使用) 濾水器。
絕對不要飲用除鈣劑,除鈣程式運行過
程中沖煮的任何飲品均不可飲用。切勿
將醋用作除鈣劑。
1 (圖 13-14) -
2 (圖 1B) 3 (圖 2) -
4
(圖 21) -
5
6
(圖 21) -
7
步驟 6
。
8 (圖 2) 9
10
11 (圖 2)
(圖 21)
(圖 22)
12 (圖 23)
(圖 24)
13
第 (8) 點
14 (圖 19) -
(圖 2)
必須依據製造商要求和/或產品使用所
在國的現行法規處置除鈣劑。
11 處置
(圖 35-36) - 每週用濕布清潔配件的支座,以
清除任何咖啡和灰塵殘餘物。
註釋:不要用洗碗機清洗加壓式濾水器
支架。
10 除鈣
隨著咖啡機的使用,水垢會逐漸積聚;您需每
隔 1 至 2 個月,以 及 / 或 在 發 現 水 流 減 小 時, 即
執行除鈣作業。僅可使用 Saeco 除鈣劑。
若操作和保養手冊與單獨銷售的配件
和材料上的說明相抵觸,請以操作和保
養手冊為准。
使用 Saeco 除鈣劑 (圖 B)。其配方設計
能夠保證咖啡機在其壽命期內性能出
眾、操 作 理 想。若 使 用 方 法 正 確 ,還 能 避 免 沖
煮飲品口味改變。開始除鈣程式之前,必須確
保:已經取下 (如有使用) 濾水器。
絕對不要飲用除鈣劑,除鈣程式運行過
程中沖煮的任何飲品均不可飲用。切勿
將醋用作除鈣劑。
1 (圖 13-14) - 將濾水器支架從底部插入沖煮
裝置 (8),並從左向右轉動支架,直至其鎖
定到位。
2 (圖 1B) - 取出並清空水箱。
3 (圖 2) - 將半瓶半瓶 Saeco 濃縮除鈣劑倒入水箱
中,然 後 加 入 乾 淨 的 飲 用 水,直至達到 MAX
(最大) 刻度線。
4 按 ON/OFF (開/關) 按鈕 (11),並將其切換至
「I」位置,以開啟咖啡機。
(圖 21) - 從蒸汽/熱水沖煮管接滿 (依手冊第
7 章所述) 2 杯水 (每杯約 150 毫升),然後將
ON/O F F ( 開/ 關) 按鈕 (11 ) 按 下並切 換至「0」
位置,以關閉咖啡機。
5 在咖啡機關閉狀態下,將除鈣劑靜置 15 至
20 分鐘。
6 按 ON/OFF (開/關) 按鈕 (11),以開啟咖啡
機。
(圖 21) - 從蒸汽/熱水沖煮管接滿 (依手冊
第 7 章中所述) 2 杯水 (每杯約 150 毫升)。
隨後使用 ON/OFF (開/關) 按鈕 (11) 關閉咖
啡機,並將其靜置 3 分鐘。
7 重複
步驟 6 中所述的作業,直至水箱完全
清空為止
8 (圖 2) - 沖洗水箱並裝滿乾淨的飲用水。
9 在濾水器支架下方放置一個器皿。
10 按 ON/OFF (開/關) 按鈕 (11),以開啟咖啡
機;將選擇旋鈕 (17) 轉動至「
」位 置,並
• 38 •
使用濾水器支架,排出水箱中的全部液體。
將選擇旋鈕 (17) 設至「
水。
11 (圖 2) - 再次向水箱中注入乾淨的水。
(圖 21) - 在蒸汽沖煮管 (Pannarello) 下方放
置一個足夠大的器皿。逆時針轉動排水旋
鈕 (3),以將其開啟。
(圖 22) - 將選擇旋鈕 (17) 轉動至「 」位
置,並透過蒸汽/熱水沖煮管排出水箱中的
全部液體。
12 (圖 23) - 完成排水後,將選擇旋鈕 (17) 設至
「
」位 置,以 停 止 排 水。
(圖 24) - 順時針轉動排水旋鈕 (3),以將其
關閉。
13 再次重複執行從
箱加滿共 4 次水。
14 (圖 19) - 在裝置上從右向左轉動濾水器支
架,以 將 其 取 出,然 後 用 乾 淨 的 飲 用 水 予 以
沖洗。
除鈣程式現已完成。
(圖 2) - 再次向水箱中注入乾淨的水。如 有 必
要,依第 4.5 節中所述為迴路上水。
必須依據製造商要求和/或產品使用所
在國的現行法規處置除鈣劑。
第 (8) 點起的作業,以對水
」位 置,以 停 止 排
11 處置
- 包裝材料可回收。
- 咖啡機:拔出咖啡機電源插頭並切斷電源
線。
- 將咖啡機及電源線送往服務中心或公共廢棄
物處置中心。
本產品符合歐洲指令 2002/96/EC。
本產品及其包裝上的標誌
本產品視同家庭垃圾處置。用戶必須將本產品
送到專門的電子和電器設備回收點。
若您能確保正確處置廢棄產品,便可幫助預
防錯誤處置本產品對環境和人類健康可能造
成的負面影響。關於產品回收的詳細資訊,請
與當地城市規劃辦公室、家庭廢 棄物服務中心
或購買本產品的商店聯絡。
說明不可將
Page 39

繁體中文
問題
問題
可能的原因
解決方式
若出現上述表格中沒有涉及的問題,或上述解決方法不足以解決問題,請聯絡客戶服務部門。
咖啡機無法開啟。 咖啡機未進行電氣連接。 對咖啡機進行電氣連接。
泵的噪音過大。 水箱中沒有水。 重新裝滿水 (第 4.4 節)。
將選擇旋鈕 (17) 切換至「
位置時,「咖 啡 機 準 備 就 緒」指
咖啡過冷。
奶中未起奶泡。
無法沖煮卡布奇諾。
咖啡沖煮過快,沒有形
成乳脂。
未沖煮咖啡,或僅沖煮
了少 量 咖 啡。
咖啡從邊緣流出。
示燈 (20) 已熄滅。
未插入濾水器支架以預熱 (第
5 章)。
杯子涼。 用熱水預熱杯子。
用奶不適合:所用奶為奶粉或
低脂奶。
Pannarello 不潔淨。 依第 9 節中所述清潔 Pannarello。
熱水器中已不剩任何蒸汽。
濾水器支架中的咖啡過少。 添加咖啡 (第 5 章)。
研磨太過粗糙。 使用不同的拼配方式 (第 6 章)。
咖啡存放過久,或不適用。 使用不同的拼配方式 (第 6 章)。
咖啡包存放過久或不適用。 更換咖啡包。
濾水器支架中缺少某一部件。
沒有水。 重新裝滿水 (第 4.4 節)。
研磨太過精細。 使用不同的拼配方式 (第 6 章)。
濾水器支架中的咖啡受到擠
壓。
濾水器支架中的咖啡過多。 減少濾水器支架中的咖啡份量。
旋鈕 (3) 已開啟。 關閉旋鈕 (3)。
咖啡機中有水垢積聚。 為咖啡機除鈣 (第 10 章)。
濾水器支架中的濾水器堵塞。 清潔濾水器 (第 9 章)。
咖啡包不適用。 更換咖啡包類型。
濾水器支架未正確插入沖煮裝
置。
濾水器支架的上緣不潔淨。 清潔濾水器支架的邊緣。
咖啡包未能正確插入。
濾水器支架中的咖啡過多。 用量匙減少咖啡份量。
可能的原因
解決方式
」
等到「咖啡機準備就緒」指示燈 (20)
亮起為止。
預熱濾水器支架。
僅使用冷的全脂奶。
為迴路上水 (第 4.5 節),然後重複第
8 章中所述的步驟。
確保所有部件均存在,且已妥善安
裝。
搖晃预磨咖啡粉。
正確插入濾水器支架 (第 5 章)。
正確插入咖啡包。確保其不會從濾
水器支架中伸出。
繁體中文
若出現上述表格中沒有涉及的問題,或上述解決方法不足以解決問題,請聯絡客戶服務部門。
• 39 •
Page 40

The manufacturer reserves the right to make changes without prior notice.
制造商有权对本产品做出任何更改,恕不另行通知。
필립스 Saeco는 사전 공지 없이 제품의 특성을 변경할 권리를 갖고 있습니다.
製造商有權對本咖啡機作任何更改,恕不另行通知。
www.philips.com/saeco
Type / 型号 / 모델 / 型號 :HD 8323 / HD 8325 / HD8327 Rev.04 del 15-09-11
 Loading...