

Page 1
www.senseo.com/register
HD8030
HD8010
www.philips.com/senseo-sarista/support
User manual
Page 2
1
Page 3

ENGLISH 4
FRANÇAIS 29
NEDERLANDS 56
HD8030, HD8010
Page 4

4
ENGLISH
Introduction
®
Congratulations on your purchase of a Philips SENSEO
SARISTA bean-
funnel coffeemaker and welcome to Philips! To fully benet from the support
that Philips offers, register your product at www.senseo.com/register.
The Philips SENSEO
Egberts SENSEO
beans, which ensures optimal aroma and taste. Douwe Egberts SENSEO
®
SARISTA bean-funnel coffeemaker uses a Douwe
®
SARISTA bean-funnel to brew coffee from freshly ground
®
SARISTA bean-funnels are available in different varieties to suit different tastes.
This user manual applies to HD8030 and HD8010. HD8030 comes
standard with an insulated jug. For HD8010, you can buy an insulated jug as
an accessory in the online shop at www.shop.philips.com/service.
For more information on the Philips SENSEO
®
SARISTA bean-funnel
coffeemaker and for instruction movies on how to use the coffeemaker
and the bean-funnels, go to www.philips.com/senseo-sarista.
For support and movies on how to clean, maintain and descale the
coffeemaker and how to adjust the grinder, go to
www.philips.com/senseo-sarista/support.
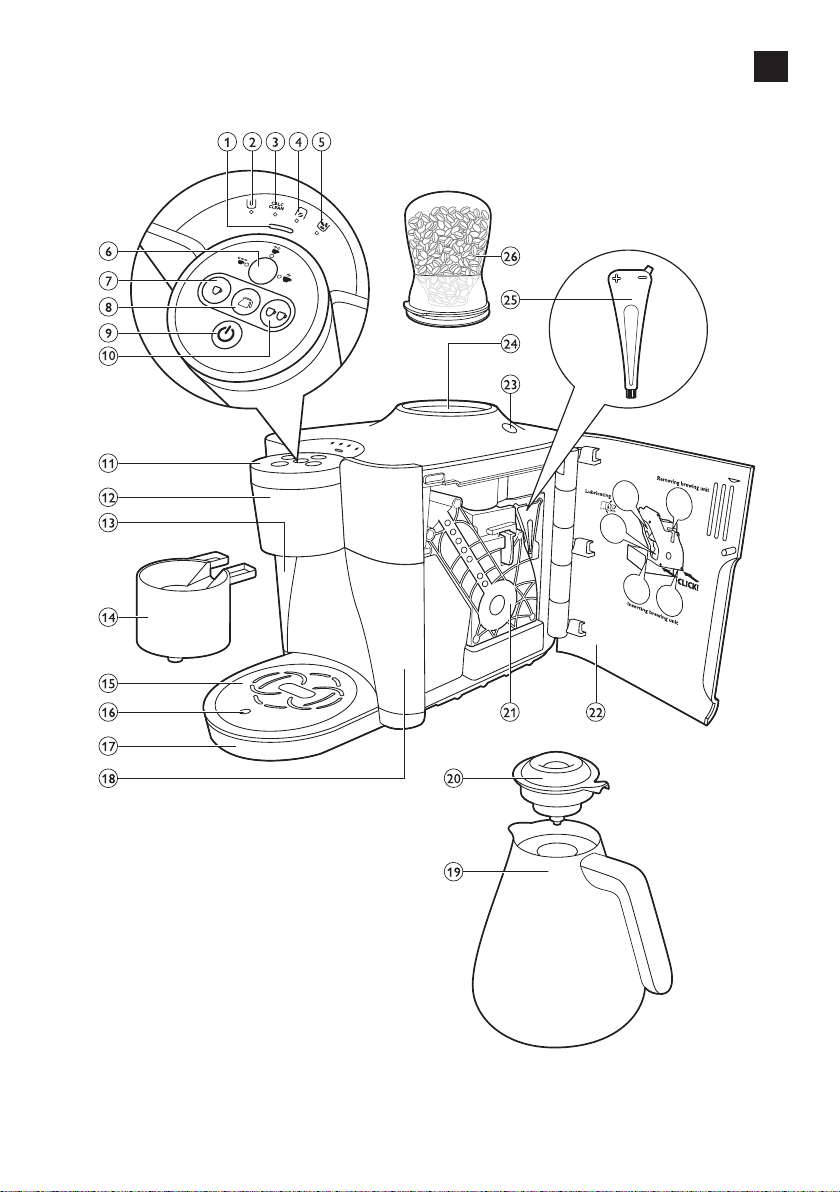
General description (Fig. 1)
1 Activity light
2 ’Water tank empty’ light
3 CALC CLEAN light
4 ’Bean-funnel empty’ light
5 ’Coffee grounds container full’ light
6 Coffee strength button (HD8030 only)
7 1-cup button
8 Jug button
9 On/off button
10 2-cup button
11 Control panel
12 Coffee dispensing head
13 Water tank
14 Detachable coffee spout for 1 or 2 cups
15 Drip tray cover
16 ’Drip tray full’ indicator
17 Drip tray
18 Coffee grounds container
19 Coffee jug (HD8030 only)
20 Lid of coffee jug (HD8030 only)
21 Brewing unit
22 Service door
23 Grinding degree adjustment hole
24 Opening for bean-funnel
25 Grinding degree adjustment tool
26 Bean-funnel
Important
Read this user manual carefully before you use this coffeemaker and
save it for future reference. You can download the user manual and nd
instructions on how to clean, maintain and descale the coffeemaker and
adjust the grinder at www.philips.com/senseo-sarista/support.
Page 5

ENGLISH 5
Danger
- Never immerse the coffeemaker in water or any other liquid, nor rinse
it under the tap.
Warning
- Check if the voltage indicated on the coffeemaker corresponds to the
local mains voltage before you connect the coffeemaker.
- This coffeemaker can be used by children aged from 8 years and above
and by persons with reduced physical, sensory or mental capabilities or
lack of experience and knowledge if they have been given supervision
or instruction concerning use of the appliance in a safe way and if they
understand the hazards involved.
- Cleaning and user maintenance shall not be made by children unless
they are older than 8 and supervised.
- Keep the appliance and its cord out of the reach of children aged less
than 8 years.
- Children should be supervised to ensure that they do not play with the
coffeemaker.
- Keep the packaging materials (plastic bags, cardboard buffers, etc.) out
of the reach of children, as they are not a toy.
- This coffeemaker is designed to grind beans and brew coffee. Use it
correctly and with care to avoid scalding by hot water and steam.
- Do not use the coffeemaker if the plug, the mains cord or the
coffeemaker itself is damaged.
- If the mains cord is damaged, you must have it replaced by Philips, a
service centre authorised by Philips or similarly qualied persons in
order to avoid a hazard.
Caution
- Always place and use the coffeemaker on a stable, level and horizontal
surface.
- Unplug the coffeemaker if problems occur during grinding or brewing
and before you clean it.
- Do not move the coffeemaker while it is operating.
- Do not use the appliance in combination with a transformer, as this
could cause hazardous situations.
- If a problem occurs that you cannot solve by means of this user manual,
contact the Consumer Care Centre in your country. If the problem
cannot be solved, take the coffeemaker to a service centre authorised
by Philips for examination or repair. Do not attempt to repair the
coffeemaker yourself, otherwise your guarantee becomes invalid.
- None of the detachable parts, nor the jug is dishwasher-proof.
- Never use the jug in a microwave oven.
- Never immerse the jug in water or any other liquid, as this could cause
water to enter between the walls of the jug.
- Keep the jug away from heat sources to prevent damage.
- The inside of the jug is breakable. Do not put ice cubes or other solid
objects in the jug.
- Only use the jug to keep coffee hot. Do not use it to keep milk, baby
food or other food hot or cold.
- Do not use aggressive cleaning agents, solvents or chemicals to clean
the jug.
Page 6
ENGLISH6
- Do not overll the jug.
- Always check the inside of the jug before use. If you detect any cracks
or damage, do not use the jug.
- Be careful not to drop the jug. If the jug has fallen while full, do not
pour out the contents to prevent injury. The inner wall of the jug may
be broken due to the fall.
- To prevent scalding, always pour contents into a cup and do not drink
directly from the jug.
- This coffeemaker is intended for normal household use only. It is not
intended for use in environments such as staff kitchens of shops, ofces,
farms or other work environments. Nor is it intended to be used by clients
in hotels, motels, bed and breakfasts and other residential environments.
- Never use accessories or parts made by other manufacturers or that
have not been specically recommended by Philips. Your guarantee will
become invalid if you use such parts or accessories.
- Never ll the water tank with warm, hot or sparkling water, as this may
cause damage to the water tank and the coffeemaker.
Compliance with standards
- This Philips coffeemaker complies with all standards regarding
electromagnetic elds (EMF). If handled properly and according to
the instructions in this user manual, it is safe to use based on scientic
evidence available today.
Before rst use
Installing the coffeemaker
Never install the coffeemaker in environments where the temperature
may drop to 0° or below. If the water inside the coffeemaker freezes, the
coffeemaker will be damaged.
Note: It is normal that there are some traces of coffee and water in the
coffeemaker when you use it for the rst time. This is because the coffeemaker
has been tested in the factory to make sure that it is in perfect working order.
We guarantee that your coffeemaker is brand-new.
1 Remove all packaging material from the coffeemaker.
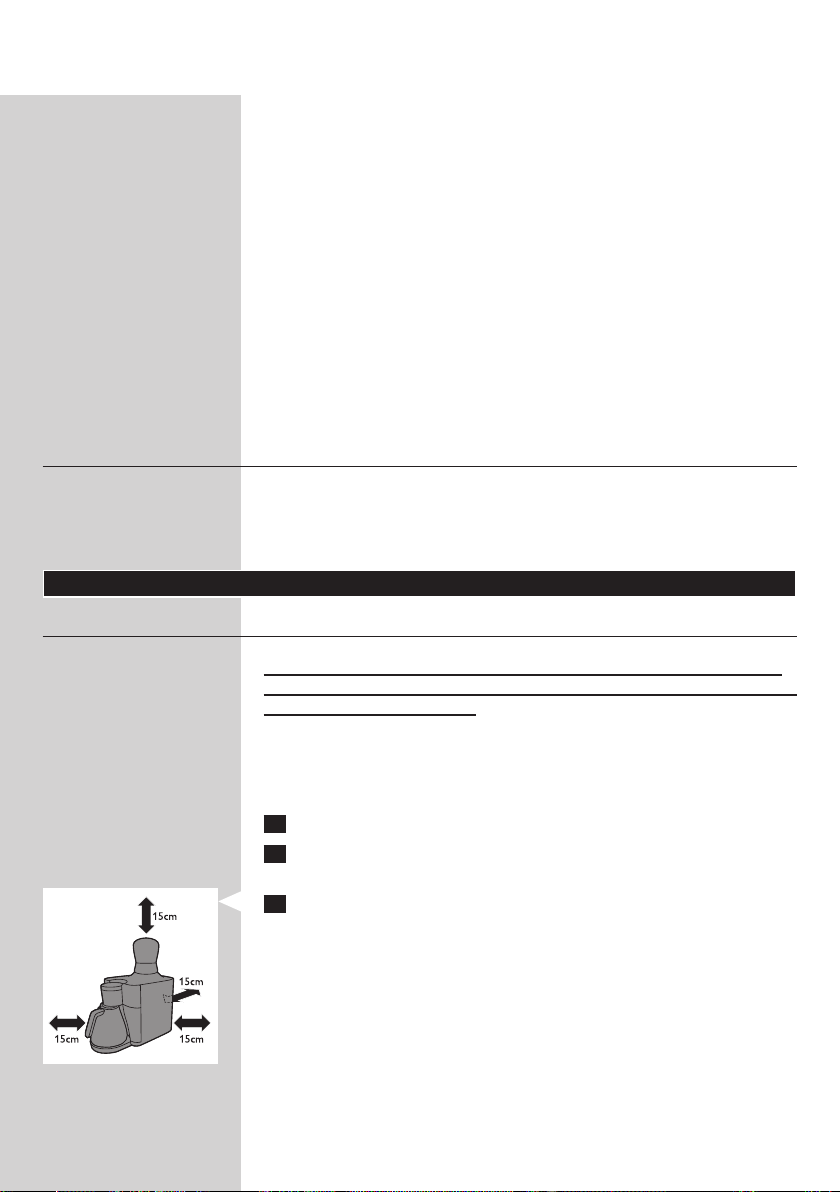
2 Place the coffeemaker on a table or worktop away from the tap, the
sink and heat sources.
3 Leave a free space of at least 15cm above, behind and on both sides
of the coffeemaker.
Page 7
ENGLISH 7
4 Slide the drip tray into the guiding grooves in the front of the
coffeemaker.
Note: Make sure the drip tray is fully inserted.
Never remove the drip tray when the coffeemaker is brewing coffee.
5 Slide the detachable coffee spout into the coffeemaker.
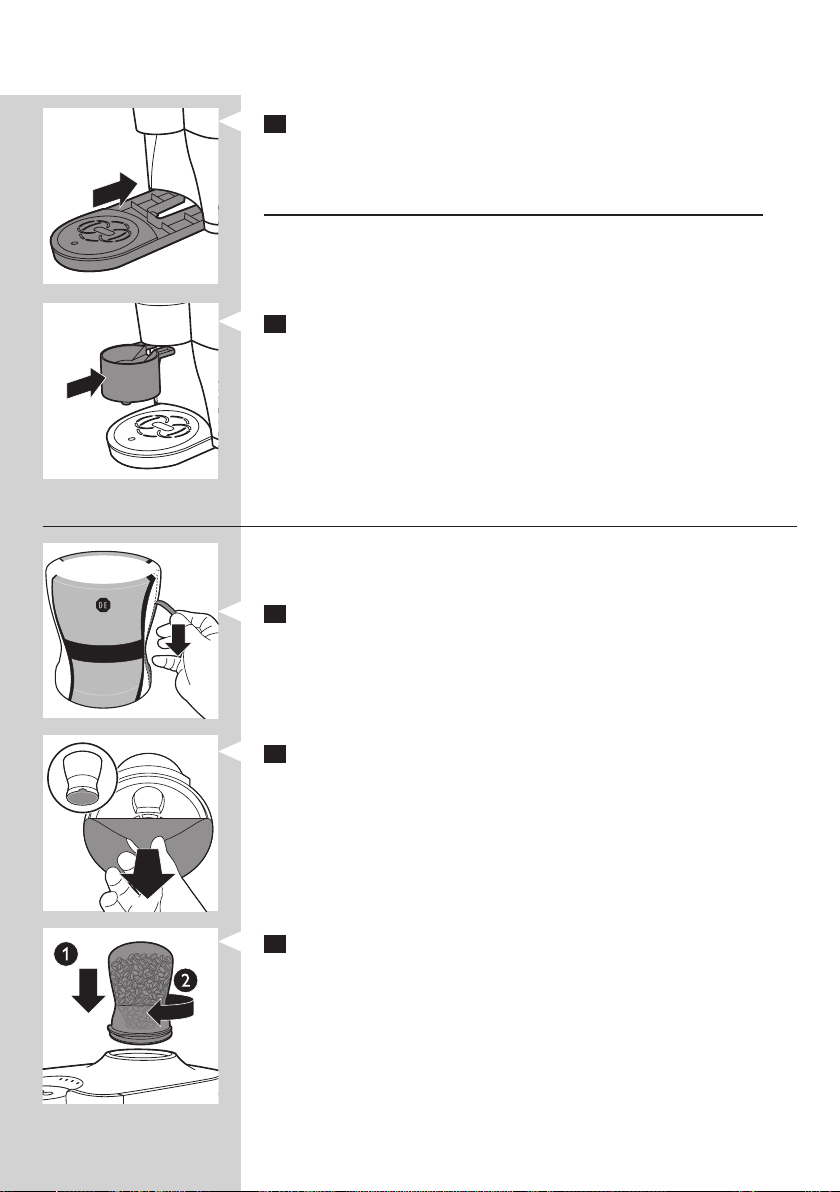
Placing and removing the bean-funnels
For more information on the bean-funnels and movies on how to place them
on the coffeemaker, go to www.philips.com/senseo-sarista/support.
1 Pull the vertical tear strip down to remove the protective sleeve of
the bean-funnel.
2 Pull the round AROMA LOCK
®
seal off the bean-funnel.
3 Insert the screw thread of the bean-funnel properly into the
opening in the top of the coffeemaker (1). Then turn the bean-funnel
clockwise to fasten it (2).
Page 8

ENGLISH8
Preparing for use
Filling the water tank
Fill the water tank with fresh water before each use.
Note: The ‘water tank empty’ light goes on when there is not enough water in
the water tank to brew one cup of coffee.
1 Remove the water tank from the coffeemaker.
2 Rinse the water tank under the tap.
3 Fill the water tank with cold tap water up to the MAX indication.
Never ll the water tank with warm, hot or sparkling water, as this may
cause damage to the water tank and the coffeemaker.
4 Slide the water tank back into the coffeemaker.
Automatic rinsing cycle
To guarantee the perfect cup of coffee the coffeemaker uses water to
rinse the brewing system. This happens during the automatic rinsing cycle
when the coffeemaker has not been used for a longer period of time (20
hours) and before and after brewing each cup. A part of the water ows
through the internal system directly into the drip tray.
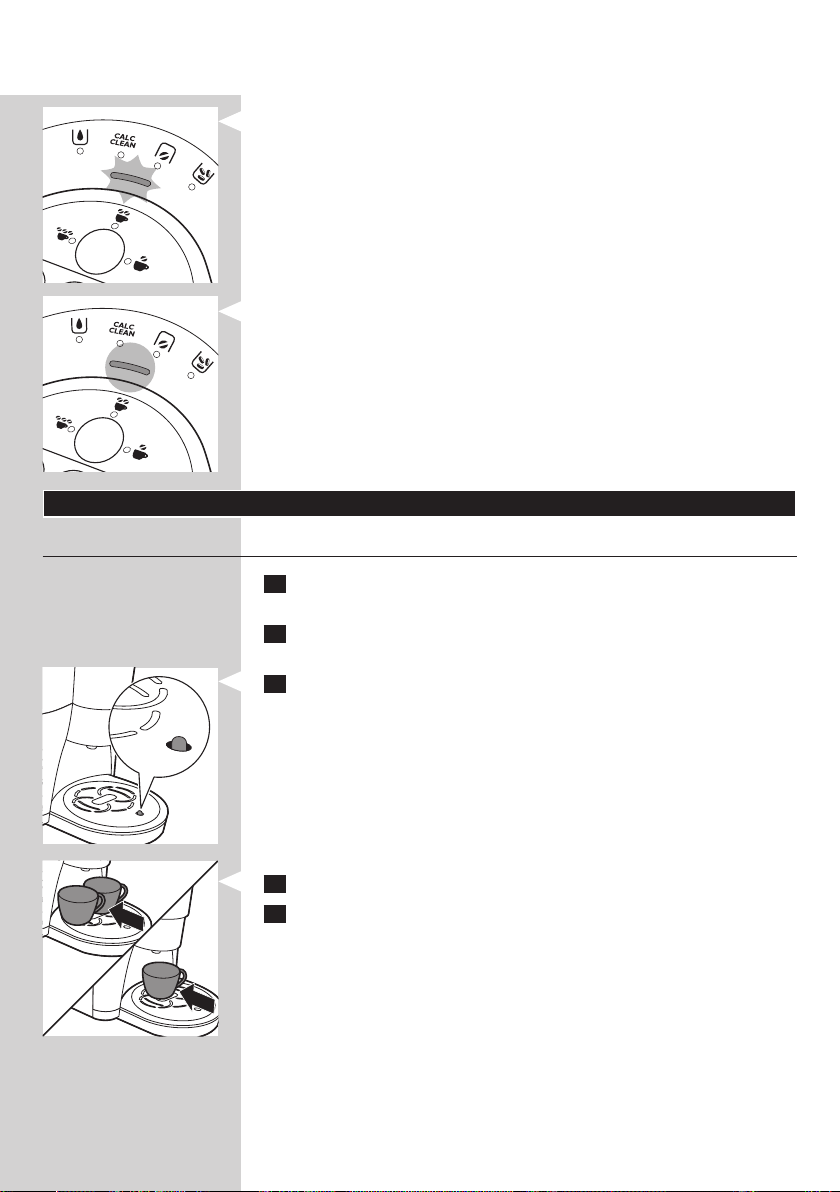
1 Insert the plug into the wall socket.
2 Place a cup on the drip tray cover.
3 Press the on/off button to switch on the coffeemaker.
Page 9
ENGLISH 9
, The activity light starts ashing.
, After a brief heating-up time, water ows into the cup and the drip
tray via the spout and internal circuits. Empty the cup and the drip
tray into the sink.
, When the activity light lights up continuously, the automatic rinsing
cycle is nished and the coffeemaker is ready for use.
Using the coffeemaker
Brewing 1 or 2 cups of coffee
1 Check if there is enough water in the water tank. Fill the water tank
with water, if necessary (see chapter ‘Preparing for use’).
2 Make sure the bean-funnel is attached properly (see chapter ‘Before
rst use’).
3 Empty the drip tray if the ‘drip tray full’ indicator is visible.
Note: If you ignore the ‘drip tray full’ indicator, the drip tray may overow
during brewing and water may end up under the appliance.
4 Place 1 or 2 cups on the drip tray cover.
5 Press the 1-cup or 2-cup button.
Tip: You can interrupt the brewing cycle at any time, which can give you a
stronger coffee. To do this, press the same cup button (1-cup button or 2-cup
button) that you pressed to start brewing coffee.
Note: Each cup of coffee is brewed from freshly ground beans.
Page 10
ENGLISH10
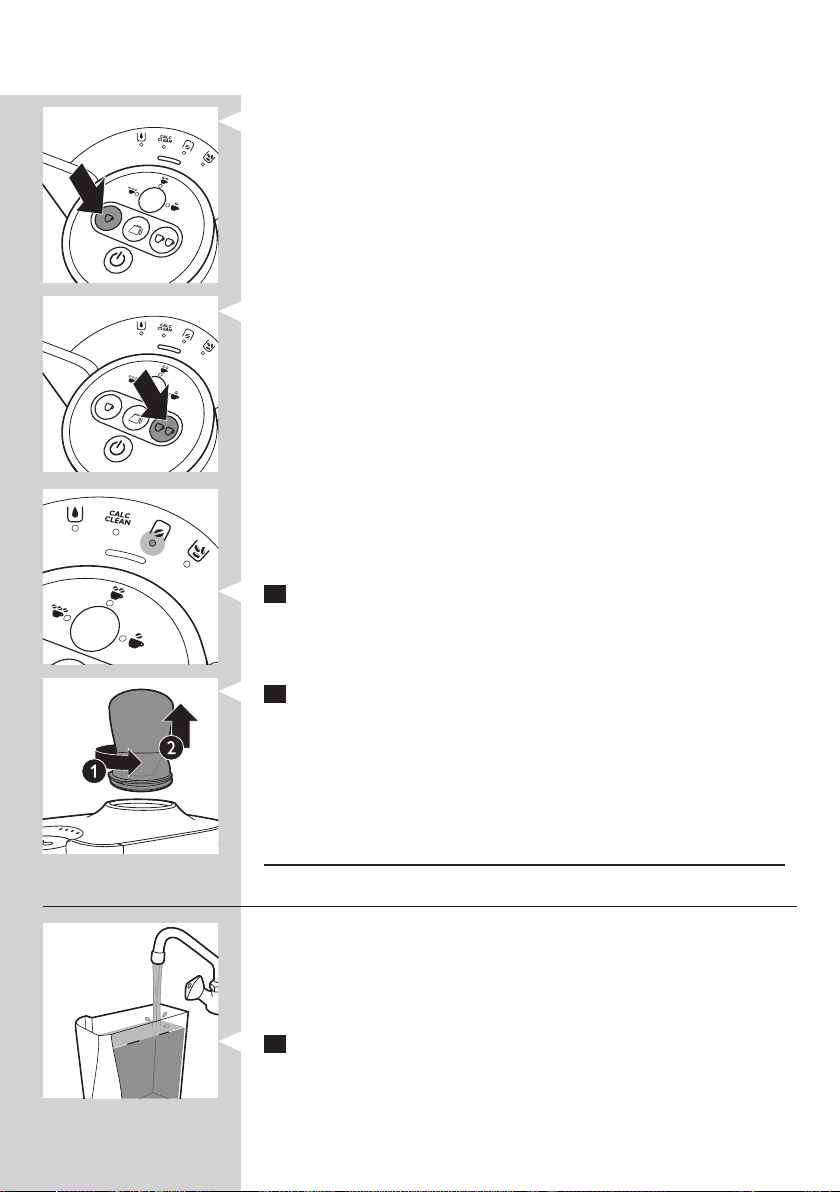
- Press the 1-cup button to brew 1 cup of coffee.
, The coffeemaker grinds the required amount of coffee beans for one
cup and then brews one cup of coffee.
, The activity light ashes once when the beans are ground.
- Press the 2-cup button to brew 2 cups of coffee.
, The coffeemaker grinds the required amount of coffee beans for
one cup and then brews coffee lling both cups half. Then the
coffeemaker again grinds the coffee beans for one cup and brews the
coffee lling both cups fully.
, The activity light ashes once when the beans for the rst half are
ground and twice when the beans for the second half are ground.
Note: If the coffeemaker stops during brewing, the water tank or bean-funnel
may be empty or the coffee grounds container may be full. Fill the water tank,
replace the bean-funnel or empty the coffee grounds container and press
the 2-cup button again to complete the brewing cycle. Make sure the coffee
grounds container is taken out of the appliance for 3 seconds until the beanfunnel empty light stops ashing, then place it back.
6 When the ‘bean-funnel empty’ light goes on, the bean-funnel is empty.
MAX
7 To replace the empty bean-funnel with a full one, turn the bean-
funnel anticlockwise (1) and remove it (2). Then perform step 1 to
place a new full bean-funnel on the coffeemaker.
Note: You can also remove a Douwe Egberts SENSEO
®
SARISTA bean-funnel
that is not yet empty and replace it with another one if you want to switch to
a different coffee blend. Because the bean-funnel is re-closed, you can store the
used bean-funnel for later use.
Never remove the bean-funnel when the coffeemaker is brewing coffee.
Brewing a jug of coffee
When you press the jug button, the coffeemaker brews six cups of coffee
into the jug.
Note: Always clean the jug with warm water and some washing-up liquid before
rst use. If you have not used the jug for a while, rinse it with warm water to
remove any odour.
1 Check if the water tank is lled to the MAX indication. Fill the water
tank with water, if necessary (see chapter ‘Preparing for use’).
Note: If you do not ll the water tank to the MAX indication, the ‘water tank
empty’ light may go on and the coffeemaker may stop during brewing. Fill the
water tank and press the jug button to continue brewing coffee.
Page 11
ENGLISH 11
2 Make sure the bean-funnel is attached properly and contains enough
beans to brew a jug of coffee.
Note: The coffee beans have to be visible above the jug indication of the
bean-funnel. If this is not the case, there are not enough coffee beans in the
bean-funnel to brew six cups of coffee. Replace the bean-funnel with a full one
or one that contains enough coffee beans (see chapter ‘Before rst use’).
Note: If the bean-funnel becomes empty during brewing, the ‘bean-funnel
empty’ light goes on and the coffeemaker stops during brewing. Replace the
bean-funnel with a full one or one that contains enough coffee beans (see
chapter ‘Before rst use’) and press the jug button to continue brewing.
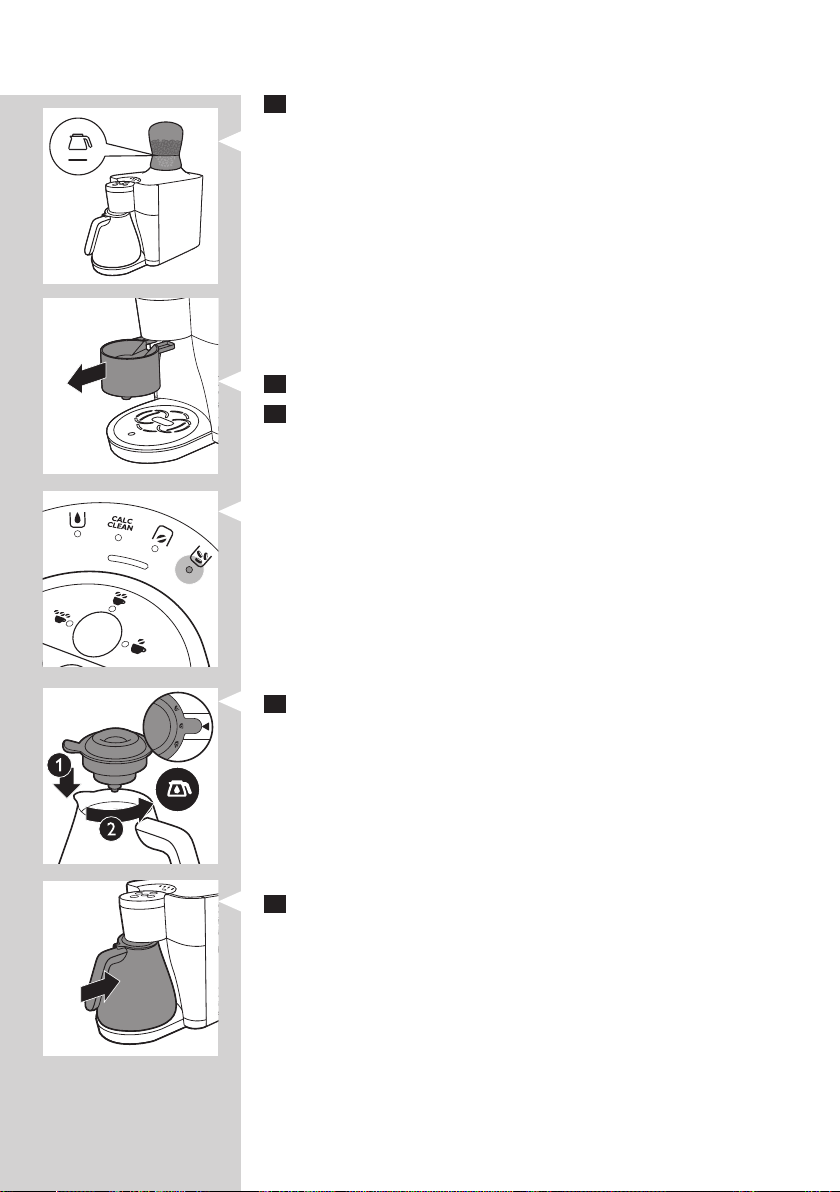
3 Remove the detachable coffee spout, if present.
4 Always empty the coffee grounds container and the drip tray before
you start brewing a jug of coffee.
Note: If you do not empty the drip tray, the drip tray may overow during brewing.
Note: If you do not empty the coffee grounds container, the ‘coffee grounds
container full’ light may go on and the coffeemaker may stop during brewing.
Make sure the appliance is switched on when you empty the coffee grounds
container. Take it out of the appliance for 3 seconds until the bean-funnel
empty light stops ashing before placing it back. Press the jug button to
continue brewing coffee.
5 Turn the lid of the jug by its lever to ‘closed/brewing’ position. In
this position, the arrowhead on the jug handle points to the ‘closed/
brewing’ symbol on the jug lid.
6 Place the jug on the drip tray cover.
Tip: To keep the coffee hot longer, rinse the jug with hot water to preheat it
before you start brewing coffee.
Page 12
ENGLISH12
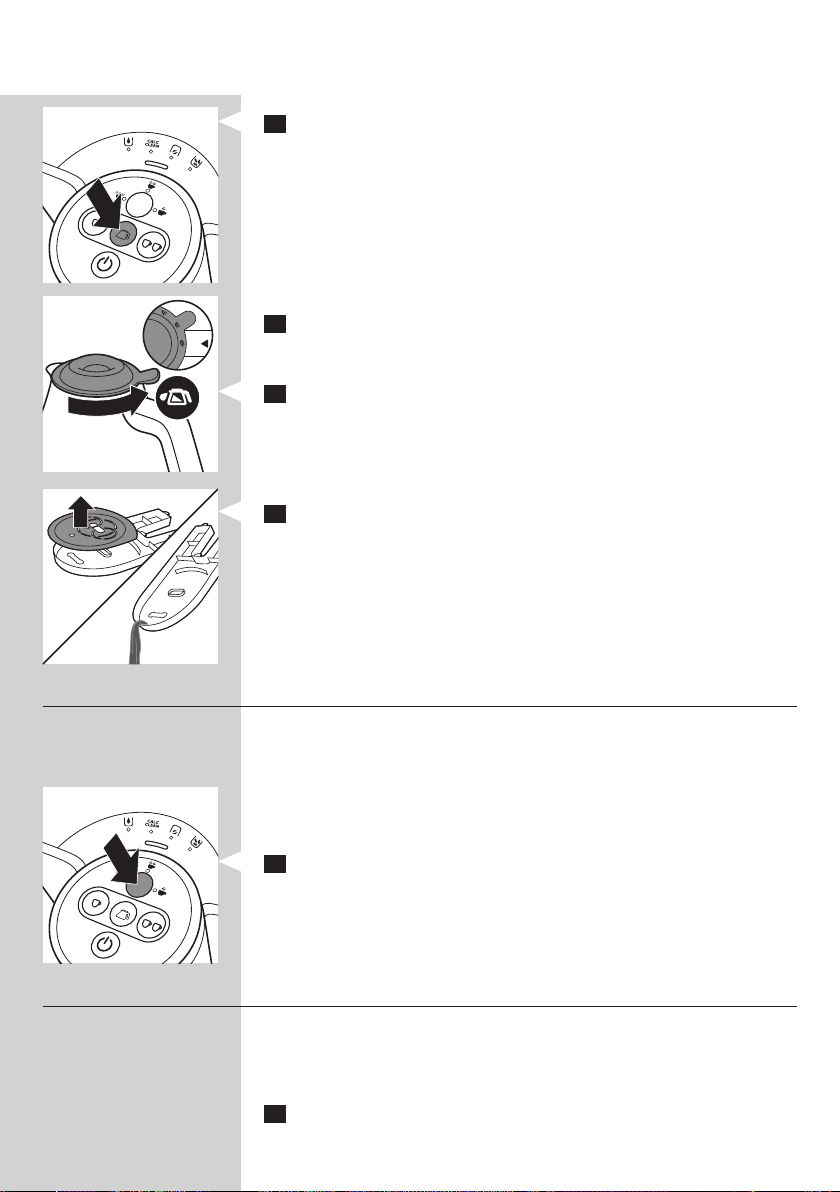
7 Press the jug button.
Note: Each cup of coffee is brewed from freshly ground beans.
, The coffeemaker grinds the required amount of coffee beans for the
rst cup of coffee and then brews coffee into the jug. The coffeemaker
grinds coffee beans and brews coffee ve more times to ll the jug.
, The activity light ashes once when the beans for the rst cup are
ground, twice when the beans for the second cup are ground etc.
, The coffeemaker automatically stops after brewing the sixth cup and
the activity light lights up continuously.
8 When the brewing cycle is nished, take the jug out of the
coffeemaker.
9 To pour out coffee, turn the lid to the ‘pour’ position. In this position,
the arrowhead on the jug handle points to the ‘pour’ symbol on the
jug lid.
Note: To keep the coffee in the jug hot, always turn the lid to the ‘closed/
brewing’ position immediately after pouring out coffee.
10 Empty the drip tray.
Selecting the coffee strength (HD8030 only)
The coffee strength button enables you to select the coffee strength you
prefer for each cup of coffee.
Note: You can only change the coffee strength when you are brewing 1 or
2 cups. The coffee strength button does not work when you are brewing a jug
of coffee. When you brew a jug, you get the standard coffee strength, which is
regular.
1 Press the coffee strength button one or more times to select the
strength you want.
, The corresponding coffee strength light goes on.
- e = strong short coffee
- d = regular coffee
- c= mild long coffee
Manual rinsing cycle
Next to the automatic rinsing cycle, you can also start a manual rinsing
cycle whenever you want. You may perform a manual rinsing cycle when
you switch to another variety. Rinsing enables you to enjoy the full aroma
of the coffee blend you have selected.
1 Ensure water tank is sufciently lled and activity light is on.
Page 13
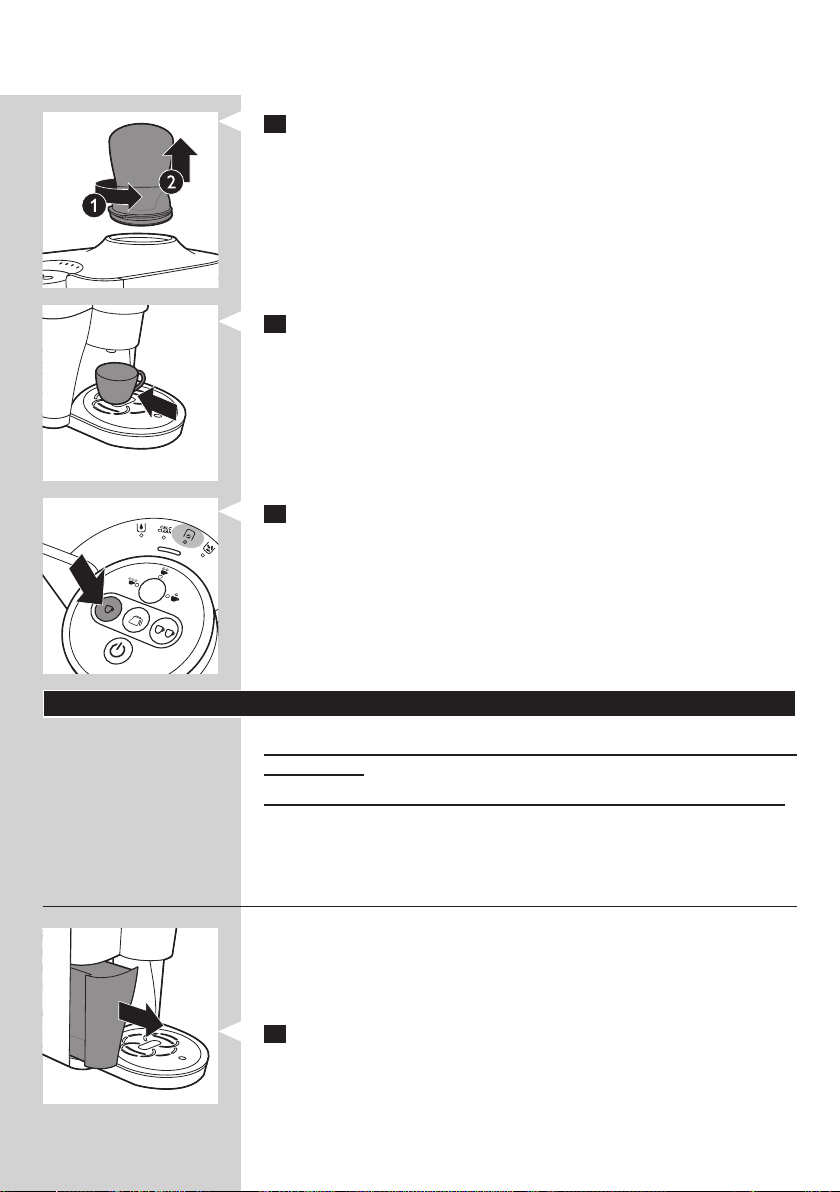
2 Turn the bean-funnel anticlockwise to remove it.
3 Place a cup on the drip tray cover.
4 Press the 1-cup button to start the rinsing cycle.
ENGLISH 13
Cleaning and maintenance
Never immerse the coffeemaker in water or any other liquid, nor rinse it
under the tap.
Always unplug the coffeemaker and let it cool down before you clean it.
Note: None of the detachable parts, nor the brewing unit and the jug are
dishwasher-proof, rinse them under the tap.
Cleaning the water tank, the coffee grounds container and the
drip tray
Empty and clean the water tank, the coffee grounds container and the drip
tray every day. Also empty and clean the water tank and coffee grounds
container when the ‘water tank empty’ light and/or the ‘coffee grounds
container full’ light go on. Empty and rinse the drip tray when the ‘drip tray
full’ indicator indicates the drip tray is full.
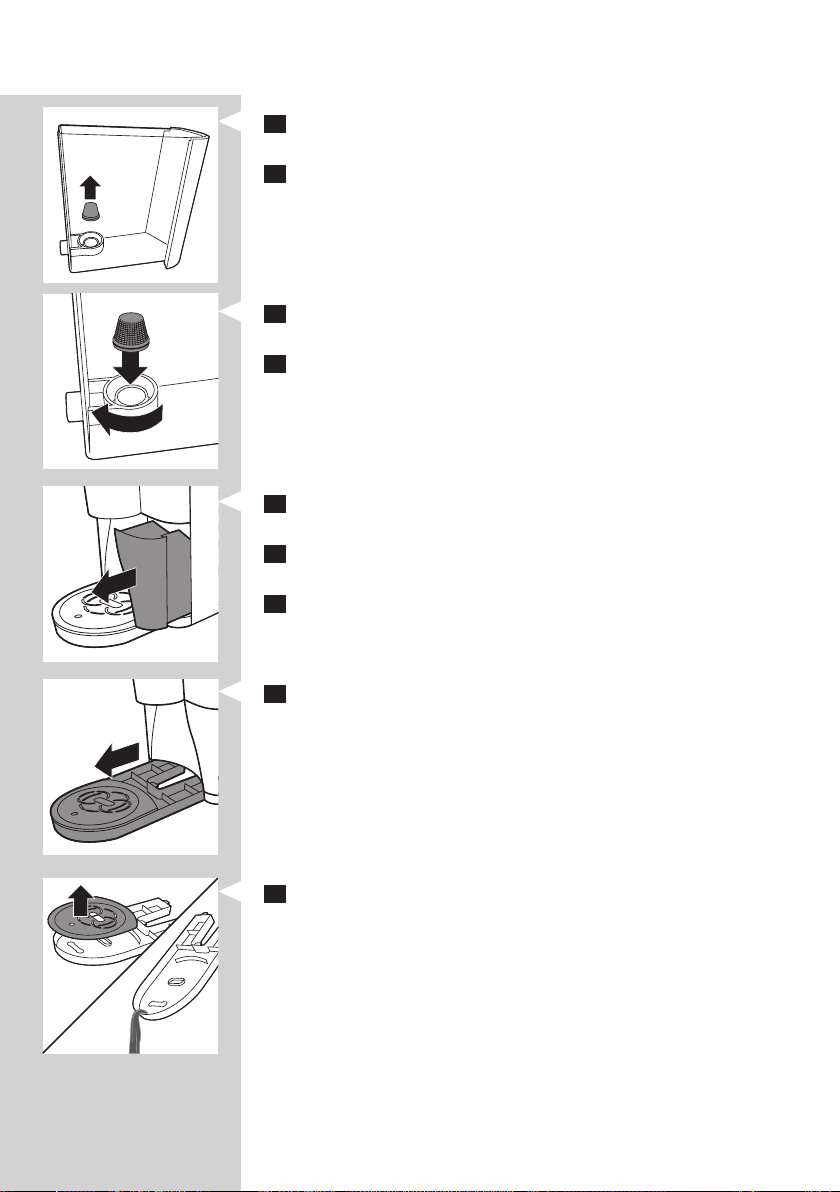
1 Remove the water tank from the coffeemaker.
Page 14
ENGLISH14
2 Remove the lter from its holder in the water tank and rinse it
under the tap.
3 Clean the water tank with hot water and some washing-up liquid.
4 Place the lter back in its holder by turning it a little while pushing it
down gently.
5 Fill the water tank with fresh, cold tap water and slide it back into
the coffeemaker.
6 Remove the coffee grounds container from the coffeemaker and
empty it.
7 Clean the coffee grounds container with hot water and some
washing-up liquid.
8 Slide the coffee grounds container back into the coffeemaker.
9 Pull the drip tray out of the coffeemaker.
10 Remove the drip tray cover and empty the drip tray.
Page 15
ENGLISH 15
11 Clean the drip tray and the drip tray cover with hot water and some
washing-up liquid.
12 Clean the guiding grooves for the drip tray in the bottom of the
coffeemaker with a moist cloth.
Cleaning the detachable coffee spout
1 Remove the detachable coffee spout.
2 Rinse the detachable coffee spout under the tap with some washing-
up liquid.
3 Slide the detachable coffee spout back into the coffeemaker or store it.
Cleaning the jug
Clean the jug after every use.
Do not use aggressive cleaning agents, solvents or chemicals to clean the jug.
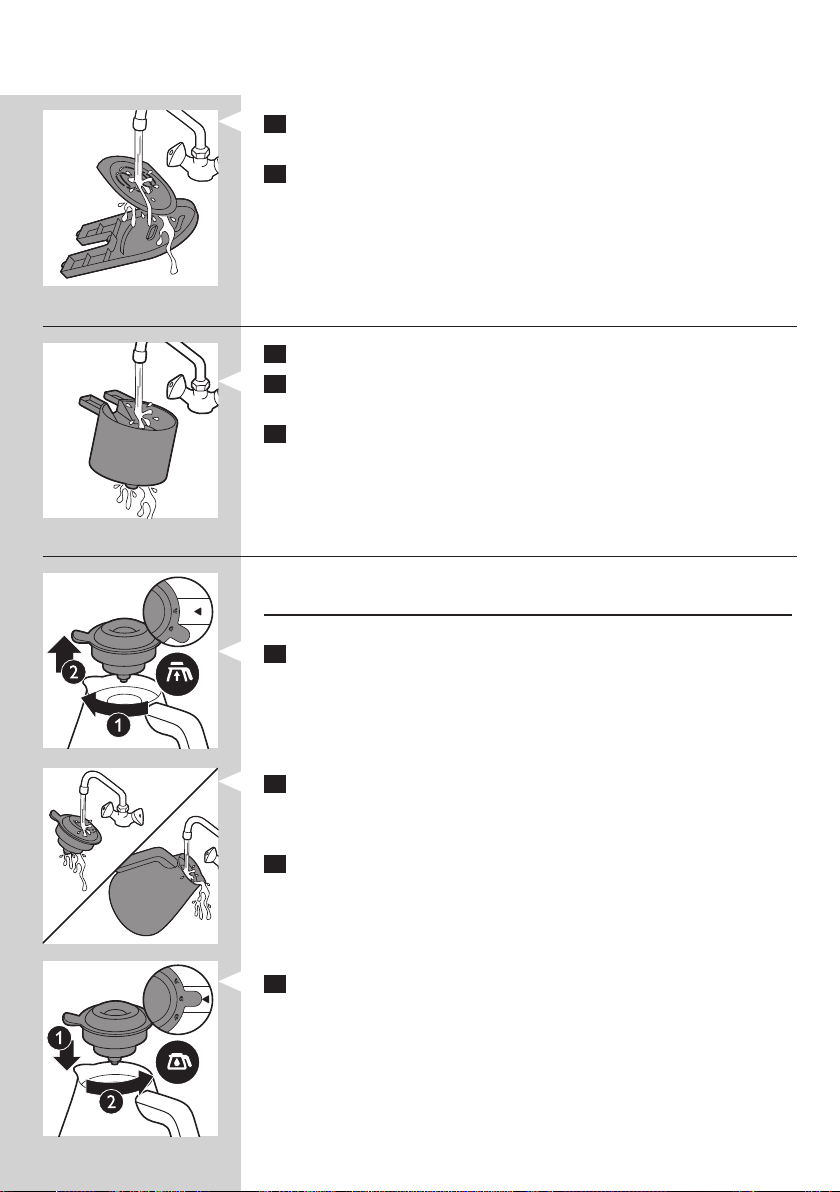
1 Turn the lid by its lever to the ‘remove lid’ symbol to unlock the lid.
Then pull the lid off the jug.
2 Rinse the inside of the jug and the lid with warm water and some
washing-up liquid. Clean the outside of the jug with a damp cloth.
Note: The jug is not dishwasher-proof.
3 Put the jug in upright position without the lid on and let the inside of
the jug dry.
4 When the inside of the jug is dry, place the lid on the jug and turn it
to the ‘closed/brewing’ position
Page 16
ENGLISH16
Cleaning the brewing unit
Do not clean the brewing unit in the dishwasher and do not use soap or
a cleaning agent to clean it.
Clean the brewing unit every time the bean-funnel is empty or at least
once a week. For more information on how to remove, clean and place
back the brewing unit, watch the instruction movies on
www.philips.com/senseo-sarista/support.
1 Switch off the coffeemaker and unplug it.
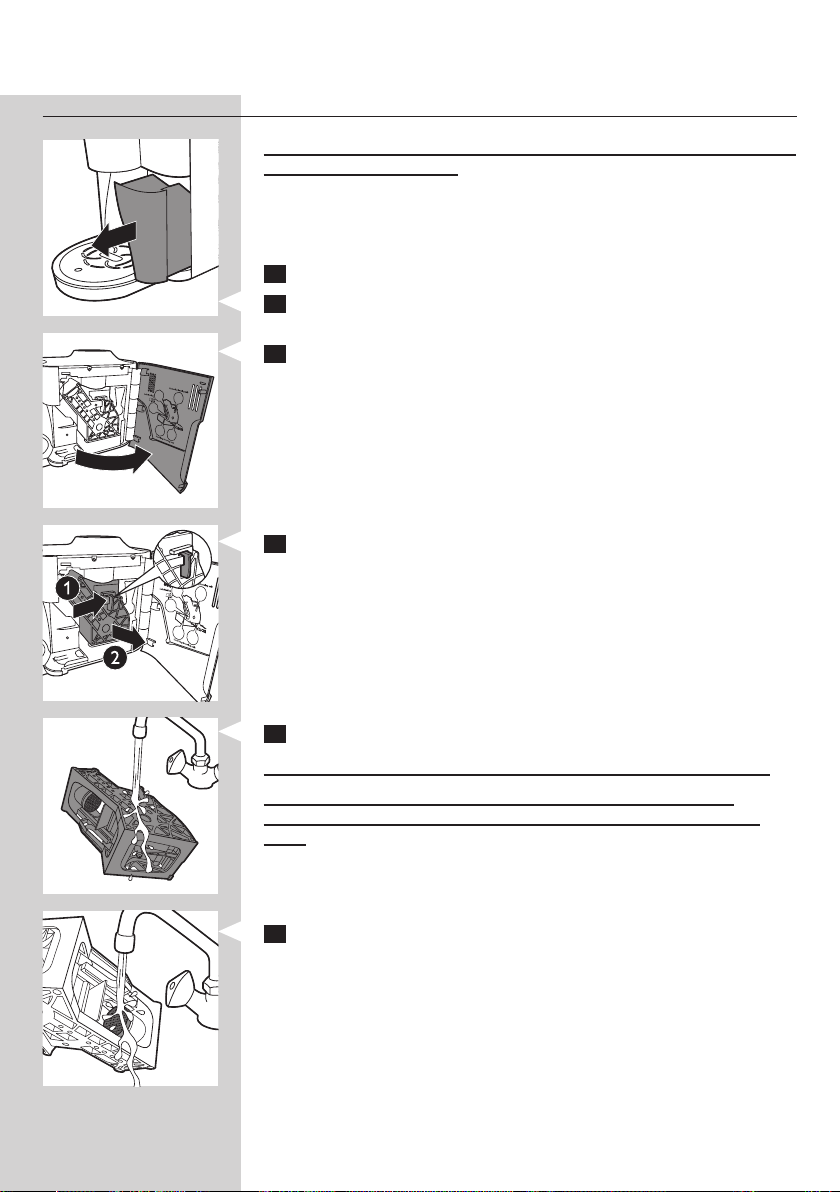
2 Remove the coffee grounds container from the coffeemaker.
3 Open the service door.
4 Press the PUSH button (1) and pull at the grip of the brewing unit
(2) to remove it from the coffeemaker.
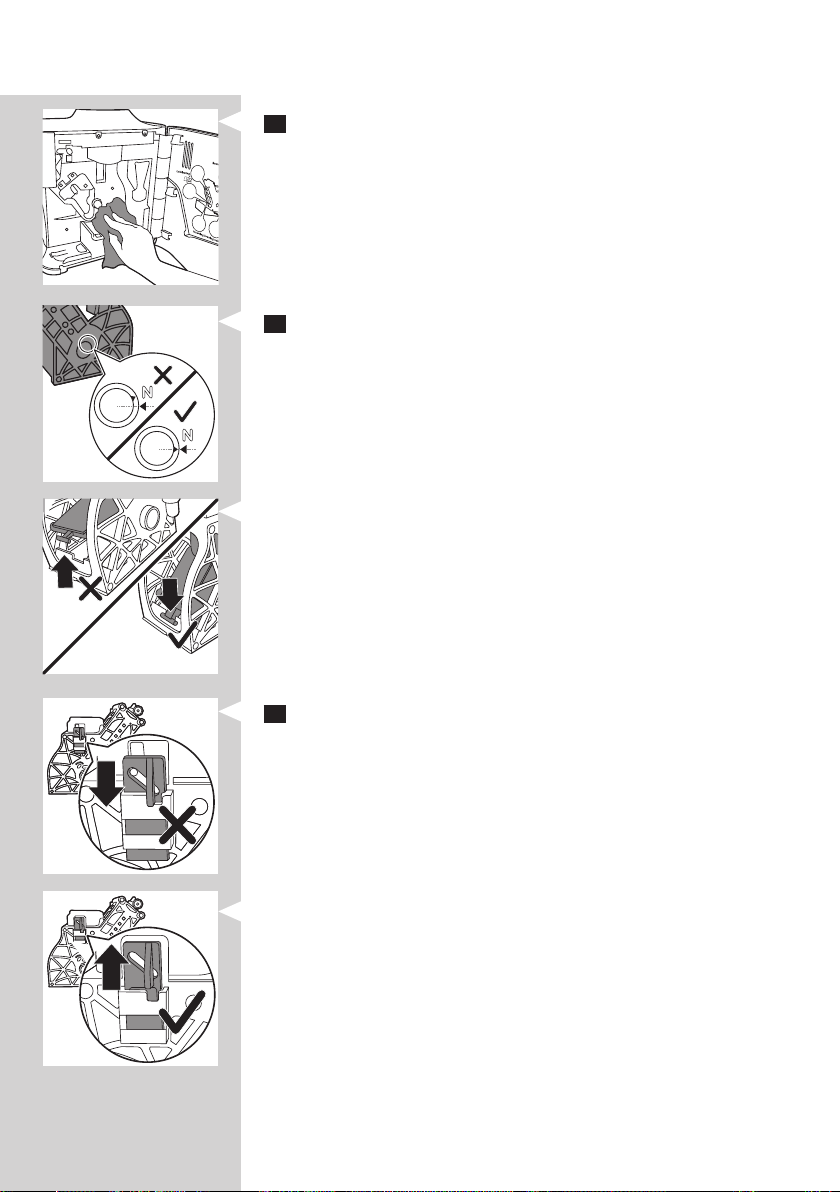
5 Rinse the outside of the brewing unit under a lukewarm tap.
Never use any soap or other cleaning agent to clean the brewing unit.
Do not dry the brewing unit with a cloth to prevent bres from
collecting inside the brewing unit. After rinsing, just shake off excess
water.
6 Carefully rinse the upper lter under a lukewarm tap.
Page 17
ENGLISH 17
7 Thoroughly clean the inside of the coffeemaker with a damp cloth.
8 Before you slide the brewing unit back into the coffeemaker, make
sure the two reference signs on the side match. If they do not match,
perform the following step:
- Make sure that the lever is in contact with the base of the brewing unit.
9 Make sure that the locking hook of the brewing unit is in the
correct position. The hook is not correctly positioned if it is still in
bottommost position.
- To position the hook correctly, push it upwards until it is uppermost
position.
Page 18
ENGLISH18
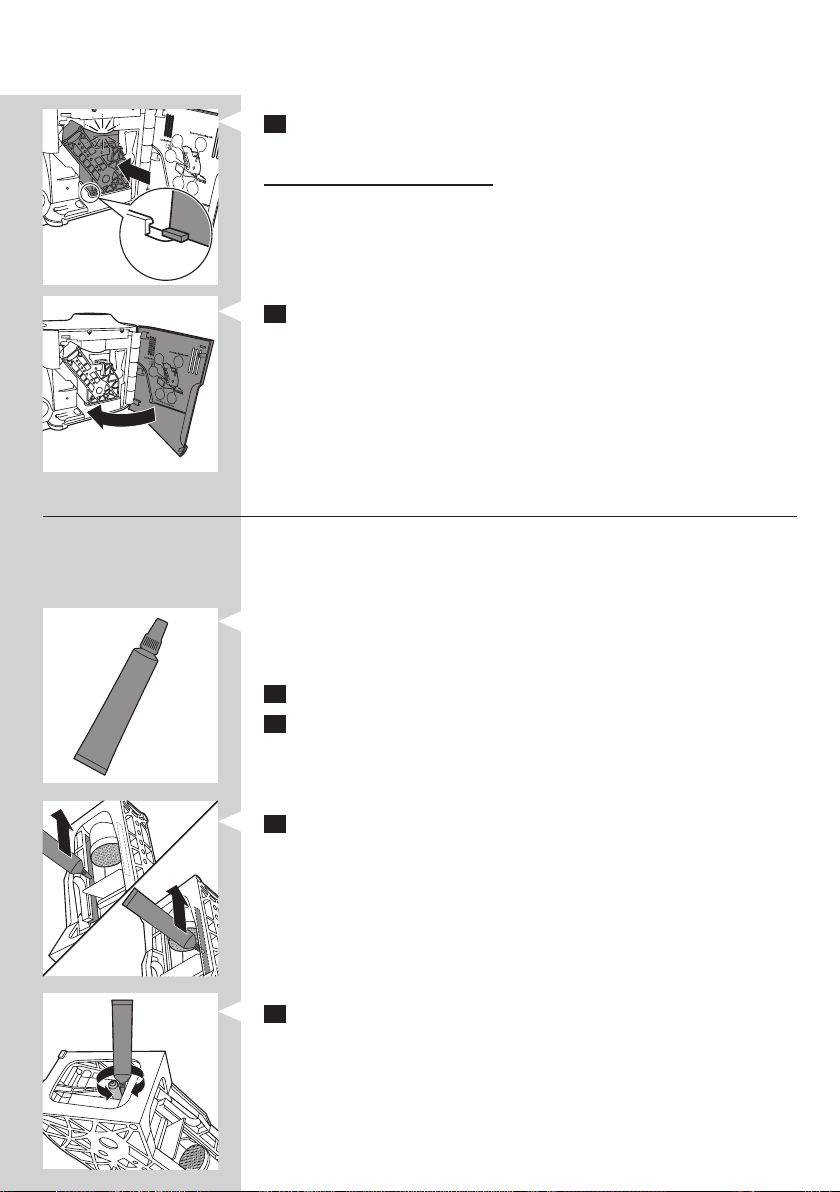
10 Slide the brewing unit back into the coffeemaker using the guiding
rails on the sides until it clicks into position.
Do not press the PUSH button.
11 Close the service door.
Lubrication
For optimal performance of the coffeemaker, lubricate the brewing unit
after 400 cups of coffee or once a month.
- For more information on what and how to lubricate, watch the
instruction movies on www.philips.com/senseo-sarista/support.
- For optimal brewing results, we advise you to use the lubricant by
Philips. You can buy this lubricant in the online shop at
www.shop.philips.com/service.
1 Switch off the coffeemaker and unplug it.
2 Follow steps 2 to 4 of section ‘Cleaning the brewing unit’ to remove
the brewing unit from the coffeemaker.
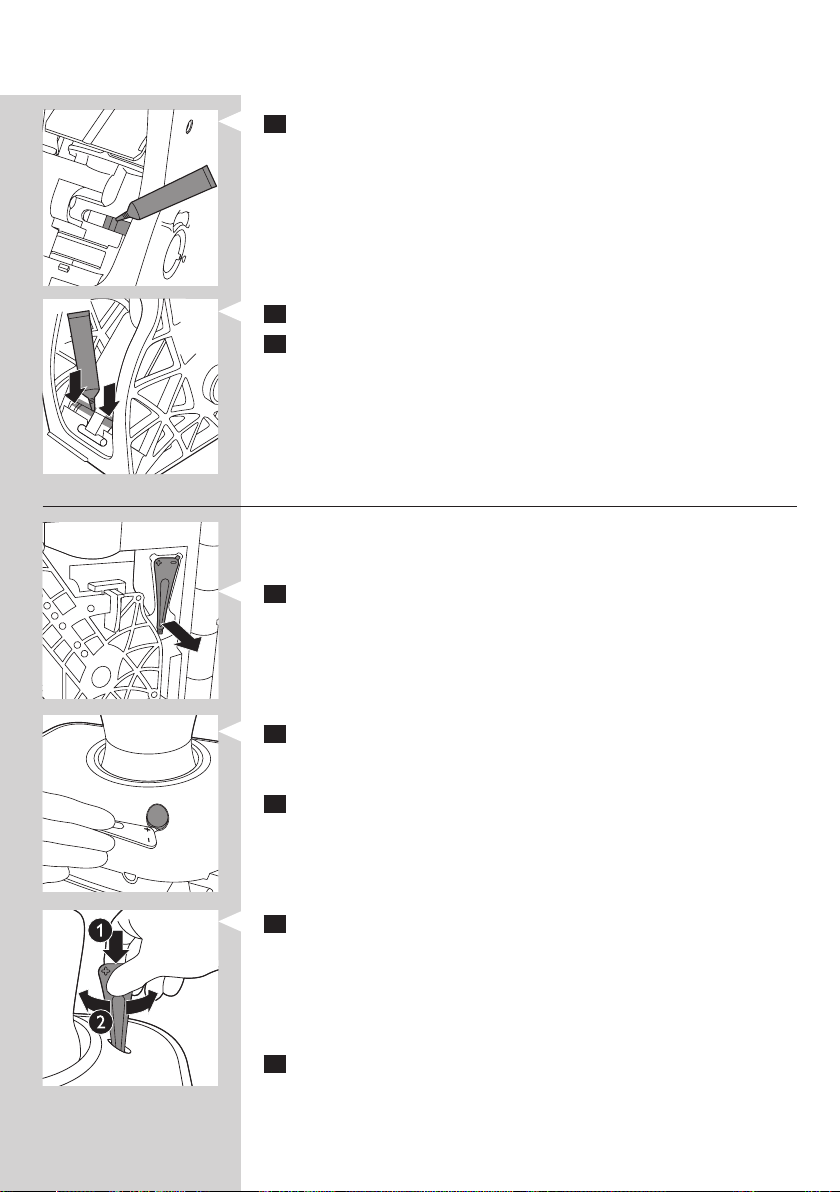
3 Apply some lubricant to the guiding rails inside the brewing unit.
4
Apply some lubricant around the shaft in the bottom of the brewing unit.
Page 19
ENGLISH 19
5 Apply some lubricant to the part shown in the gure.
6 Apply some lubricant on both sides of the lever in the brewing unit.
7 Follow steps 9 to 11 of ‘Cleaning the brewing unit’ to place the brewing
unit and the coffee grounds container back into the coffeemaker.
Adjusting the grinding degree
Over time the grinder may change to a coarser setting. It is recommended
to adjust the grinding degree when you notice this. These adjustments are
not required regularly.
1 Take the grinding degree adjustment tool out of the recess next to
the brewing unit.
2 Insert the lug on the broad end of the grinding degree next to the
cap of the grinding degree adjustment hole and press lightly. This
makes the cap open automatically.
3 Insert the narrow end of the grinding degree adjustment tool into
the grinding degree adjustment hole so that the opening in the tool
ts onto the pin located at the bottom of the hole.
4 For a coarser setting, push down and turn the grinding degree
adjustment tool clockwise. For a ner setting, push down and turn
the grinding degree adjustment tool anticlockwise.
Note: Turn the grinding degree adjustment tool one step clockwise or
anticlockwise at the time. Then brew 2 or 3 cups of coffee to establish if the
grinding degree has been adjusted to your satisfaction.
5 When you are satised with the grinding degree, remove the grinding
degree adjustment tool from the grinding degree adjustment hole,
close the cap and place the grinding degree adjustment tool back
into its recess.
Page 20
ENGLISH20
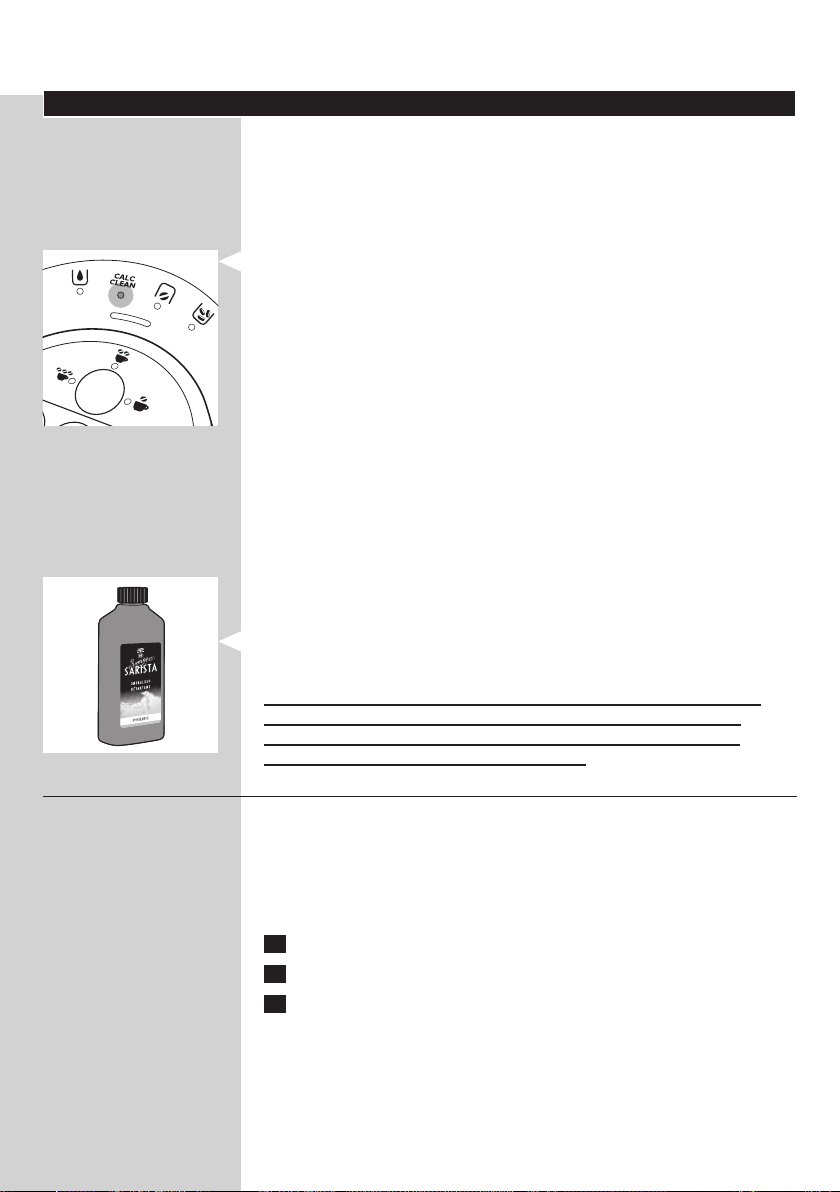
Descaling the coffeemaker
Scale builds up inside the coffeemaker during use. It is essential to descale the
coffeemaker when the CALC CEAN light is lit. Only use the special Philips
SENSEO
For more information on how to descale this coffeemaker, you can watch the
instruction movies on www.philips.com/senseo-sarista/support.
When to descale
Why to descale
Your reasons to descale:
If you do not descale the coffeemaker regularly or do not perform
the descaling procedure correctly, scale residue remains behind in the
coffeemaker. This causes scale to build up more quickly and will ultimately
stop your coffeemaker working properly. If this happens, repair is not
covered by the terms of the guarantee.
Descaling agent
Only use the special Philips SENSEO
(CA6400) to descale the coffeemaker. This solution has been designed to
ensure continued good performance of your coffeemaker throughout its
operating life.
Keep the bottle with descaling solution out of the reach of children.
Never drink the water with descaling mixture that you pour into
the water tank or any water with residues that comes out of the
coffeemaker during the descaling procedure.
Descaling procedure
The descaling procedure lasts 45 minutes and consists of a descaling cycle
and two rinsing cycles. Do not interrupt the descaling cycle and do not
switch off the coffeemaker before you have performed the two rinsing cycles.
Before you start the descaling procedure make sure the activity light lights
up green continuously. To ensure this please make sure the following steps
are taken.
1 Make sure the bean-funnel is attached properly.
2 Empty the coffee grounds container.
3 Make sure the water tank is lled with water.
Note: Once you have started the descaling cycle, you are unable to exit before
the entire descaling procedure is complete. Even when you remove the plug the
machine will stay in the descaling cycle.
®
SARISTA descaling solution (CA6400) to descale the coffeemaker.
- Descale the coffeemaker as described below as soon as
the CALC CLEAN light lights up continuously.
- It prolongs the life of your coffeemaker
- It ensures maximum cup volume
- It ensures maximum coffee temperature
- It prevents malfunctioning
®
SARISTA descaling solution
- You can buy Philips SENSEO
®
SARISTA descaling solution in the online
shop at www.shop.philips.com/service.
Page 21
ENGLISH 21
Descaling cycle
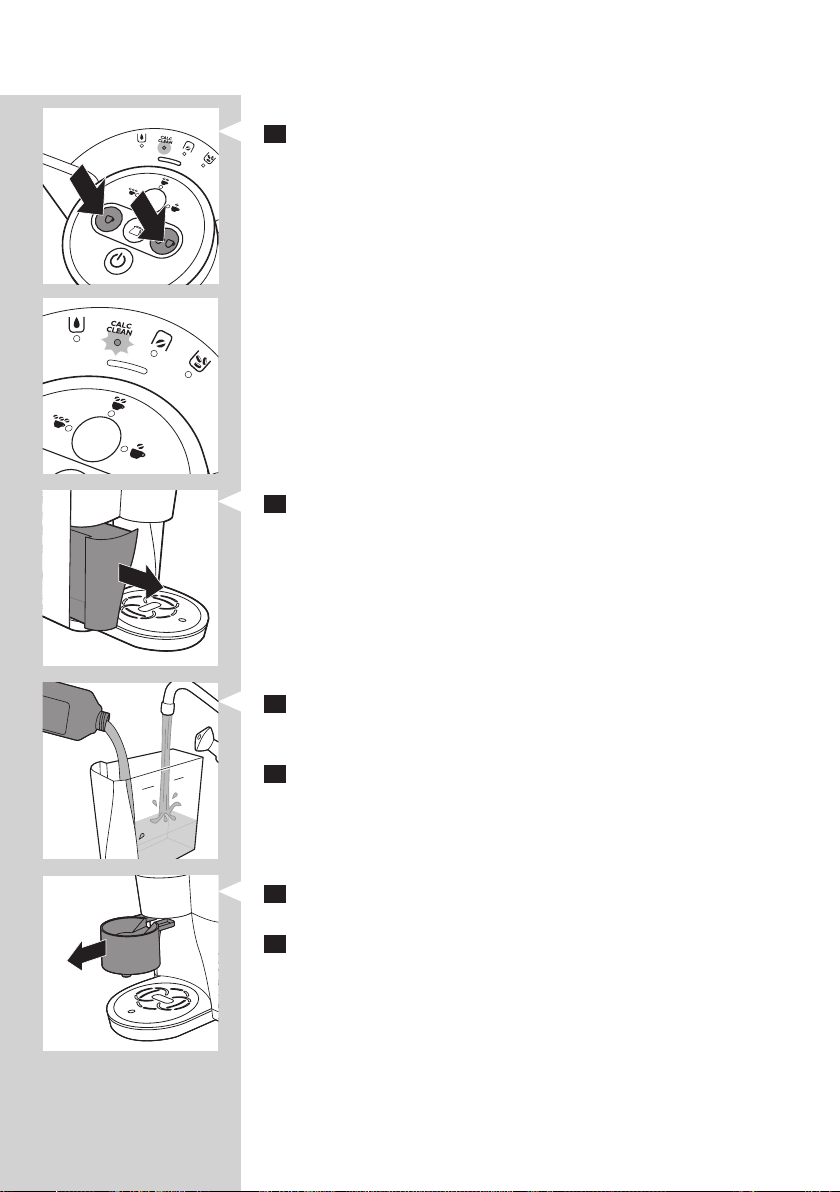
1 Press the 1-cup button and the 2-cup button simultaneously for
3 seconds until the CALC CLEAN light starts to ash. When the
CALC CLEAN light ashes quickly, you can start the descaling cycle.
2 Remove and empty the water tank from the coffeemaker.
MAX
3 Pour the contents of a Philips SENSEO
®
SARISTA descaling solution
bottle (250ml) into the water tank and then add 1 litre of tap water
to ll the water tank to the MAX indication.
4 Slide the water tank back into the coffeemaker.
5 Remove the detachable coffee spout or the coffee jug from the
coffeemaker.
6 Make sure the drip tray is empty.
Page 22

ENGLISH22
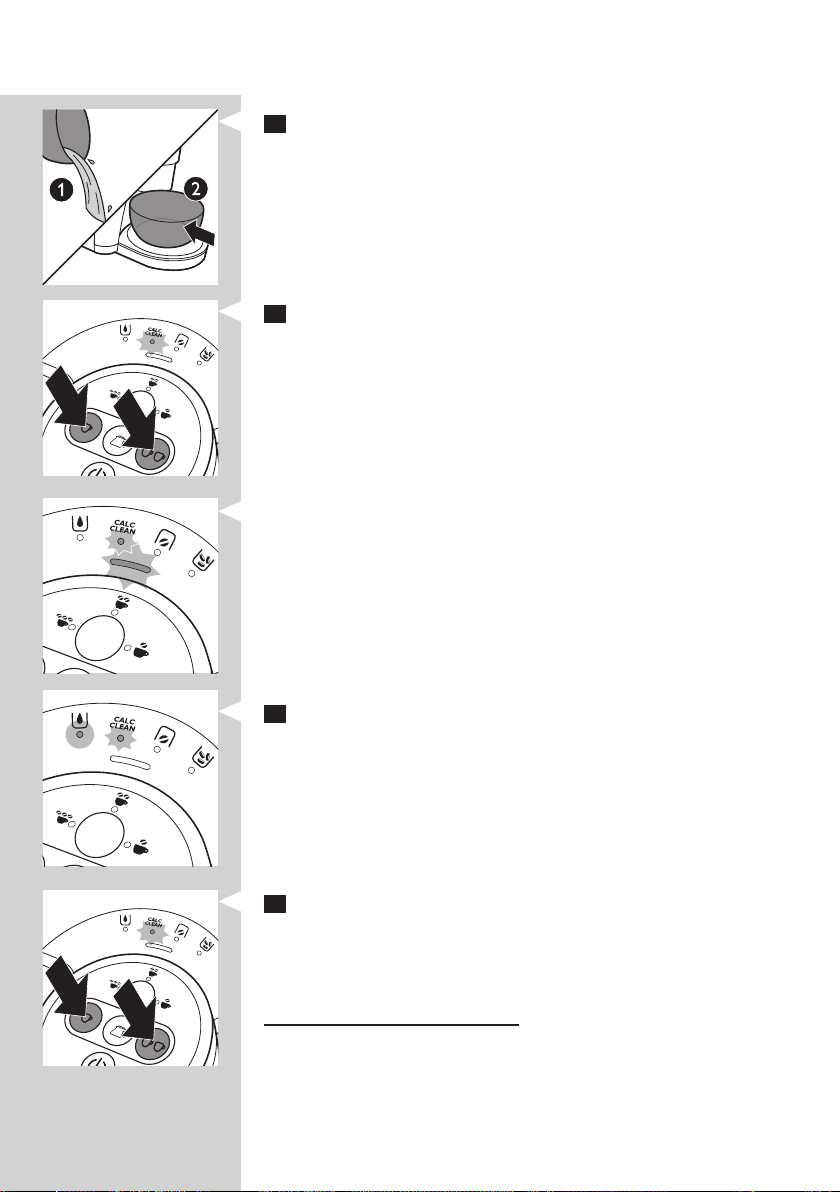
7 Place a bowl with a capacity of 1.5 litres on the drip tray cover.
8 Press the 1-cup button and the 2-cup button simultaneously for
1 second to start the descaling procedure.
, The activity light and the CALC CLEAN light both ash slowly to
indicate that the descaling cycle has started.
, The water-descaling solution mixture comes out at intervals. The
coffeemaker stops descaling a few times to let the descaling solution act.
, When the water tank is empty, the descaling cycle is nished. The
activity light goes out, the CALC CLEAN light starts ashing quickly
and the ‘water tank empty’ light goes on. Continue with the rinsing
cycle.
Do not switch off the coffeemaker or interrupt the descaling cycle.
Note: If you switch off the coffeemaker during the descaling cycle, the CALC
CLEAN light starts ashing quickly when you switch on the coffeemaker. In
that case, you have to complete the whole descaling procedure from the start.
Rinsing cycle
1 Remove the water tank from the coffeemaker.
MAX
2 Rinse the water tank under the tap.
3 Fill the water tank with cold tap water up to the MAX indication and
slide the water tank back into the coffeemaker.
Page 23
ENGLISH 23
4 Empty the bowl (1) and place it back onto the drip tray cover (2).
5 Press the 1-cup button and the 2-cup button simultaneously for
1 second to start the rinsing cycle.
, The activity light and the CALC CLEAN light ash slowly.
, During the ushing cycle, water comes out of the coffeemaker in a
continuous ow.
6 When the activity light goes out, the ‘water tank empty’ light goes on
and the CALC CLEAN light ashes quickly, empty the bowl and rinse
and ll the water tank.
7 Press the 1-cup button and the 2-cup button simultaneously for
1 second to start the second rinsing cycle.
, When all the water in the water tank has been used up, the
complete descaling procedure is nished and the coffeemaker
switches off.
Do not interrupt the rinsing cycles.
Note: If you switch off the coffeemaker before the coffeemaker has completed
two rinsing cycles, the CALC CLEAN light starts ashing quickly when you
switch on the coffeemaker. In that case, you have to perform two rinsing cycles
to make the CALC CLEAN light go out.
Page 24
ENGLISH24
Ordering accessories
To purchase accessories for this coffeemaker, please visit our online shop
at www.shop.philips.com/service. If the online shop is not available
in your country, go to your Philips dealer or a Philips service centre. If you
have any difculties obtaining accessories for your coffeemaker, please
contact the Philips Consumer Care Centre in your country. You nd its
contact details in the worldwide guarantee leaet.
Extra jug for HD8010
You can buy a jug as accessory for HD8010 under number CA6501.
Note: The instructions for the jug included in this user manual also apply
to this jug.
Environment
- Do not throw away this coffeemaker with the normal household waste
at the end of its life, but hand it in at an ofcial collection point for
recycling. By doing this, you help to preserve the environment.
- Douwe Egberts SENSEO
recyclable plastics. Empty bean-funnels can be disposed of in plastics
recycling bins or can be recycled through local waste removal schemes.
Guarantee and service
If you need service or information or if you have a problem, please visit
the Philips website at www.philips.com/senseo-sarista/support or
contact the Philips Consumer Care Centre in your country. You nd its
phone number in the worldwide guarantee leaet. If there is no Consumer
Care Centre in your country, go to your local Philips dealer.
Guarantee restrictions
The guarantee becomes invalid if you do not use the original, unaltered
bean-funnels by D.E Master Blenders.
®
SARISTA bean-funnels are made of 100%
Meaning of light signals
Light signal Meaning Action
’Water tank empty’ light
on continuously.
Not enough water in
water tank.
Water tank not
Fill the water tank (see chapter ‘Preparing for use’).
Insert the water tank into the coffeemaker properly.
properly placed.
’Water tank empty’ light
is on continuously and
activity light ashes.
Not enough water
in water tank to
continue brewing.
Fill the water tank and press the button of the coffee
you were brewing again to continue the brewing
process.
Page 25

Light signal Meaning Action
ENGLISH 25
‘Coffee grounds
container full’ light on
continuously.
‘Coffee grounds
container full’ light is on
continuously and activity
light ashes.
’Bean-funnel empty’ light
on continuously.
’Bean-funnel empty’ light
is on continuously and
activity light ashes.
Activity light ashes
quickly.
Activity light ashes
slowly.
Activity light ashes
during grinding.
CALC CLEAN light on
continuously.
CALC CLEAN light
ashes quickly.
Coffee grounds
container is full.
Coffee grounds
container not
properly placed.
Coffee grounds
container is full and
the coffeemaker
cannot continue
brewing..
Bean-funnel is empty. Replace bean-funnel (see chapter ‘Before rst use’).
Bean-funnel not
properly placed.
Not enough beans
in the bean-funnel to
continue brewing.
Service door open. Close the service door.
Brewing unit not
properly placed.
Brewing unit
clogged up.
Coffeemaker is
heating up or ushing.
This indicates which
cup is being brewed.
You have to descale
the coffeemaker.
This happens
between the different
cycles of descaling.
The coffeemaker
switched of during
the descaling
procedure.
Remove, empty and clean the coffee grounds
container. Make sure the coffee grounds container
is taken out of the appliance for 3 seconds until the
bean-funnel empty light stops ashing, then place it
back. Make sure the coffeemaker remains switched on.
Insert the coffee grounds container into the
coffeemaker properly.
Remove, empty and clean the coffee grounds
container. Make sure the coffee grounds container
is taken out of the appliance for 3 seconds until the
bean-funnel empty light stops ashing, then place it
back. Make sure the coffeemaker remains switched
on. Press the same button again of the coffee you
were brewing to continue the brewing process.
See chapter ‘Before rst use’.
Replace the bean-funnel and press the button of
the coffee you were brewing again to continue the
brewing process.
Place the brewing unit properly (see chapter
‘Cleaning and maintenance’).
Clean brewing unit (see chapter ‘Cleaning and
maintenance’).
Wait until the activity light lights up continuously.
The activity light ashes once or twice when you
brew one or two cups. It ashes 1-6 times when you
brew a jug of coffee: once for the rst cup, twice for
the second cup, three times for the third cup, etc.
Follow the instructions in chapter ‘Descaling the
coffeemaker’.
Follow the instructions in chapter ‘Descaling the
coffeemaker’. Do not interrupt the descaling
procedure!
Restart the descaling procedure (see chapter
‘Descaling the coffeemaker’).
Page 26

ENGLISH26
Light signal Meaning Action
CALC CLEAN light and
activity light ash slowly.
CALC CLEAN light
ashes quickly and ‘water
The coffeemaker is
descaling.
This happens during
the descaling cycle.
tank empty’ light lights up.
This happens during
the rinsing cycle.
Troubleshooting
This chapter summarises the most common problems you could encounter
with your coffeemaker. If you are unable to solve the problem with the
information below, visit www.philips.com/senseo-sarista/support for
a list of frequently asked questions or contact the Consumer Care Centre
in your country. On this site you can also watch instruction movies on how
to use, clean and descale your Philips SENSEO
Problem Possible solution
The coffeemaker seems
to be leaking and or
water ends up in the
drip tray.
This is normal. To guarantee the perfect cup of coffee the coffeemaker uses
water to rinse the brewing system. This happens during the automatic rinsing
cycle when the coffeemaker has not been used for a longer period of time
(20 hours) and before and after brewing each cup. A par t of the water ows
through the internal system directly into the drip tray. Empty the drip tray
regularly and at least before brewing a jug of coffee.
When to descale the
coffeemaker.
You need to descale the coffeemaker when the CALC CLEAN light lights up
continuously. When the CALC CLEAN light lights up depends on the usage
frequency. When you brew coffee very often, you have to descale sooner
than when you brew coffee less often.
The coffeemaker does
Plug in and switch on the coffeemaker.
not work.
Make sure that the voltage indicated on the coffeemaker corresponds to the
local mains voltage.
Fill the water tank with water.
If the activity light ashes quickly, make sure that the brewing unit is inserted
correctly and that the service door is closed properly (see chapter ‘Cleaning
the brewing unit’).
If the CALC CLEAN light ashes quickly, you switched off the coffeemaker
during the descaling procedure (see chapter ‘Descaling the coffeemaker’).
Restart the descaling procedure.
See chapter ‘Descaling the coffeemaker’.
Empty the bowl, rinse and ll the water tank and
continue with the rinsing cycle.
Empty the bowl, rinse and ll the water tank and
continue with the rinsing cycle. Press the 1-cup
button and the 2-cup button simultaneously for
1 second to start the second rinsing cycle.
®
SARISTA coffeemaker.
Page 27

Problem Possible solution
ENGLISH 27
The coffeemaker grinds
the coffee beans but no
coffee comes out.
The coffeemaker stops
brewing before the cup
or cups are lled.
The coffeemaker stops
brewing before the jug
is lled.
I cannot remove the
brewing unit.
I cannot slide the
brewing unit back into
the coffeemaker.
I cannot open the
service door.
I cannot close the
service door.
Coffee leaks out of the
coffee dispensing head.
The brewing unit is dirty. Clean the brewing unit (see chapter ‘Cleaning and
maintenance’).
The detachable coffee spout is dirty. Rinse the detachable spout under the
tap (see chapter ‘Cleaning and maintenance’).
The coffee dispensing head is dirty. Use a moist cloth to clean the bottom of
the coffee dispensing head.
The bean-funnel is not fastened properly. Inser t the screw thread of the
bean-funnel properly into the opening in the top of the coffeemaker. Then
turn the bean-funnel clockwise to fasten it.
Check if the ‘water tank empty’ light, the ‘bean-funnel empty’ light or the
‘coffee grounds container full’ light are on. If the ‘water tank empty’ light is
on, rell the water tank. If the ‘bean-funnel empty’ light is on, replace the
empty bean-funnel with a full one. If the ‘coffee grounds container full’ light is
on, empty the coffee grounds container. Press the same button again of the
coffee you were brewing to continue the brewing process.
Check if the ‘water tank empty’ light, the ‘bean-funnel empty’ light or the ‘coffee
grounds container full’ light are on. If the ‘water tank empty’ light is on, rell the
water tank. If the ‘bean-funnel empty’ light is on, replace the empty bean-funnel
with a full one. If the ‘coffee grounds container full’ light is on, empty the coffee
grounds container. Press the jug button to complete the brewing cycle.
The brewing unit is out of position. Unplug the coffeemaker from the
mains. Close the service door. Slide the coffee grounds container into the
coffeemaker. Insert the plug into the mains. Switch on the coffeemaker. This
will automatically return the brewing unit to its initial position.
Check if the reference signs on the side of the brewing unit match. Make
sure the locking hook of the brewing unit is in the correct position. Slide the
brewing unit back into the coffeemaker using the guiding rails on the sides.
See chapter ‘Cleaning and maintenance’ or watch the instruction movie on
cleaning the brewing unit on www.philips.com/senseo-sarista/support.
Perhaps you try to open the service door to remove the brewing unit while
the coffee grounds container is still in the coffeemaker. First remove the coffee
grounds container and then open the service door and remove the brewing unit.
The brewing unit is out of position. Make sure the locking hook of the
brewing unit is in the correct position. Make sure you hear a click you slide
the brewing unit in the correct position.
You inser ted the coffee grounds container before you tried to close the
service door. Always close the service door properly before you slide the
coffee grounds container back into the coffeemaker.
The coffee dispensing head is dirty. Use a moist cloth to clean the bottom of
the coffee dispensing head.
Page 28

ENGLISH28
Problem Possible solution
The coffee is too weak. Choose a bean-funnel with a stronger coffee blend.
HD8030 only: Use the coffee strength button to set the coffee strength to ‘strong’.
You can increase the strength of the coffee on all models by reducing the
amount of water used for brewing. To stop the brewing process at any
moment, press the same cup button (1-cup button or 2-cup button) that you
pressed to start brewing coffee.
The coffee is not hot
enough.
The ‘water tank empty’
light, ‘coffee grounds
container full’ light,
‘bean-funnel empty’ light
and CALC CLEAN light
ash simultaneously.
The grinding degree
changed to a coarser
setting.
If the temperature has decreased over time, descale the coffeemaker
(see chapter ‘Descaling the coffeemaker’).
Perform a manual rinsing cycle to preheat the inside of the coffeemaker
(see chapter ‘Using the coffeemaker’, section ‘Manual rinsing cycle’).
Rinse the jug with hot water before you start brewing coffee.
Do not use milk that comes directly out of the fridge.
Preheat the cups by rinsing them with hot water. Use thin-walled cups,
because they absorb less heat from the coffee than thick-walled cups.
Try to reset the coffeemaker. To reset the coffeemaker, switch it off and unplug
it. Remove the brewing unit, the bean-funnel, the coffee grounds container and
the water tank. Then put the brewing unit, the bean-funnel, the coffee grounds
container and the water tank back. Plug in the coffeemaker and switch it on. You
may have to repeat this 2-3 times to make all the lights go out. If the problem
persists, go to www.philips.com/senseo-sarista/support or contact the
consumer care centre.
It is recommended to adjust the grinding degree when you notice this. These
adjustments are not required regularly. You can adjust the coffee grinder with
the grinding degree adjustment tool which is placed behind the service door
next to the brewing unit (see chapter ‘Cleaning and maintenance’).
Technical specications
Feature Value / location
Nominal voltage Inside of service door
Power rating Inside of service door
Material Plastic
Cord length 0.8 m
Water tank capacity 1250ml
Coffee grounds container capacity 10 cakes
Capacity of coffee jug 6 cups
Page 29

FRANÇAIS 29
Introduction
®
Félicitations pour votre achat d’une machine à café Philips SENSEO
SARISTA bean-funnel (à entonnoir de café en grain) et bienvenue dans
l’univers Philips ! Pour bénécier pleinement de l’assistance proposée par
Philips, enregistrez votre produit sur www.senseo.com/register.
La machine à café Philips SENSEO
®
SARISTA bean-funnel (à entonnoir
de café en grain) utilise un entonnoir de café en grain SENSEO
de Maison du café pour préparer du café à partir de grains fraîchement
moulus, an d’offrir une boisson au goût et à l’arôme incomparables. Les
entonnoirs de café en grain SENSEO
®
SARISTA de Maison du café sont
disponibles dans différentes variétés pour satisfaire tous les goûts.
Ce manuel d’utilisation s’applique aux modèles HD8030 et HD8010. Le
modèle HD8030 est livré avec une verseuse thermos. Pour le modèle
HD8010, vous pouvez acheter une verseuse thermos dans la rubrique
accessoire de la boutique en ligne sur www.shop.philips.com/service.
Pour en savoir plus sur la machine à café Philips SENSEO
®
SARISTA
bean-funnel (à entonnoir de café en grain) et pour visionner des vidéos
comprenant des instructions sur la façon d’utiliser la machine à café et les
entonnoirs de café en grain, allez sur www.philips.com/senseo-sarista.
Pour obtenir de l’aide ou pour accéder à des vidéos sur le nettoyage,
l’entretien et le détartrage de la machine à café ou le réglage du moulin à
café, accédez à www.philips.com/senseo-sarista/support.
Description générale (g. 1)
1 Voyant de fonctionnement
2 Voyant « Réservoir d’eau vide »
3 Voyant CALC CLEAN
4 Voyant « Entonnoir de café en grain vide »
5 Voyant « Bac à marcs de café plein »
6 Bouton de sélection de l’intensité (HD8030 uniquement)
7 Bouton pour 1 tasse
8 Bouton de la verseuse
9 Bouton marche/arrêt
10 Bouton pour 2 tasses
11 Bloc de commande
12 Unité d’écoulement du café
13 Réservoir d’eau
14 Bec verseur de café amovible, pour une ou deux tasses
15 Grille du plateau égouttoir
16 Voyant « Plateau égouttoir plein »
17 Plateau égouttoir
18 Bac à marcs de café
19 Verseuse (HD8030 uniquement)
20 Couvercle de la verseuse (HD8030 uniquement)
21 Groupe café
22 Porte d’accès au groupe café
23 Zone de réglage du niveau de mouture
24 Ouverture pour entonnoir de café en grain
25 Outil de réglage du niveau de mouture
26 Entonnoir de café en grain
®
SARISTA
Page 30

30
FRANÇAIS
Important
Lisez attentivement ce manuel d’utilisation avant d’utiliser cette machine
à café et conservez-le pour un usage ultérieur. Vous pouvez télécharger le
manuel d’utilisation et rechercher des instructions pour savoir comment
nettoyer, entretenir et détartrer la machine à café et régler le moulin à café
sur www.philips.com/senseo-sarista/support.
Danger
- Ne plongez jamais la machine à café dans de l’eau ou dans un autre
liquide, et ne le rincez pas sous le robinet.
Avertissement
- Avant de brancher la machine à café, vériez que la tension indiquée
sur l’appareil correspond à la tension du secteur.
- Cette machine à café peut être utilisée par des enfants âgés de 8 ans
ou plus, des personnes dont les capacités physiques, sensorielles ou
intellectuelles sont réduites ou des personnes manquant d’expérience et
de connaissances, à condition que ces enfants ou personnes soient sous
surveillance ou qu’ils aient reçu des instructions quant à l’utilisation sécurisée
de l’appareil et qu’ils aient pris connaissance des dangers encourus.
- Le nettoyage et l’entretien ne doivent pas être réalisés par des enfants
sauf s’ils sont âgés de plus de 8 ans et sous surveillance.
- Tenez l’appareil et son cordon hors de portée des enfants de moins de
8 ans.
- Veillez à ce que les enfants ne puissent pas jouer avec la machine à café.
- Les emballages (sacs en plastique, cartons de protection, etc.) ne sont
pas des jouets. Tenez-les hors de portée des enfants.
- Cette machine à café est conçue pour moudre des grains de café et
préparer du café. Respectez les consignes d’utilisation et manipulez l’appareil
avec précaution pour éviter les brûlures dues à l’eau chaude et à la vapeur.
- N’utilisez jamais la machine à café si la prise, le cordon d’alimentation
ou la machine elle-même est endommagée.
- Si le cordon d’alimentation est endommagé, il doit être remplacé
par Philips, par un Centre Service Agréé Philips ou par un technicien
qualié an d’éviter tout accident.
Attention
- Placez et utilisez toujours la machine à café sur une surface stable,
plane et horizontale.
- Débranchez toujours la machine à café en cas de problème lors de
son fonctionnement et avant de la nettoyer.
- Ne déplacez pas la machine à café en cours d’utilisation.
- N’utilisez pas l’appareil avec un transformateur pour éviter tout accident.
- Si vous ne parvenez pas à résoudre un problème à l’aide de ce
manuel d’utilisation, contactez le Service Consommateurs Philips de
votre pays. Si le problème persiste, conez votre machine à café à un
Centre Service Agréé Philips pour vérication ou réparation. N’essayez
jamais de réparer l’appareil vous-même ; toute intervention par des
personnes non qualiées entraîne l’annulation de la garantie.
- Aucune des parties amovibles, ni la verseuse ne passent au lave-vaisselle.
- Ne mettez jamais la verseuse au four à micro-ondes.
Page 31

FRANÇAIS 31
- Ne plongez jamais la verseuse dans l’eau ou dans tout autre liquide an
d’éviter des inltrations d’eau entre les parois de la verseuse.
- Éloignez la verseuse des sources de chaleur pour éviter tout dommage.
- L’intérieur de la verseuse est fragile. Ne mettez pas des glaçons ou
d’autres objets solides dans la verseuse.
- Utilisez uniquement la verseuse pour garder le café au chaud. Ne
l’utilisez pas pour garder du lait, des aliments pour bébé ou de la
nourriture chaude ou froide.
- N’utilisez pas de détergents agressifs, de dissolvants ou de produits
chimiques pour nettoyer la verseuse.
- Ne remplissez pas trop la verseuse.
- Vériez toujours l’intérieur de la verseuse avant l’utilisation. Si vous
remarquez des ssures ou dommages, n’utilisez pas la verseuse.
- Veillez à ne pas faire tomber la verseuse. Si la verseuse tombe alors
qu’elle est pleine, ne versez pas son contenu pour éviter toute blessure
ou tout dommage. La paroi intérieure de la verseuse risque d’être
cassée suite à la chute.
- Pour éviter toute brûlure, versez toujours le contenu dans une tasse et
ne buvez pas directement à la verseuse.
- Cette machine à café est uniquement destinée à un usage domestique
normal. Elle n’est pas destinée à être utilisée dans des environnements tels
que les cuisines des employés dans les entreprises, magasins et autres lieux
de travail. Elle n’est pas non plus destinée à être utilisée par des clients dans
des hôtels, motels, chambres d’hôtes et autres environnements résidentiels.
- N’utilisez jamais d’accessoires, ni de pièces d’autres fabricants qui n’ont
pas été spéciquement recommandés par Philips. Votre garantie n’est
pas valable en cas d’utilisation de tels accessoires/pièces.
- Ne remplissez jamais le réservoir d’eau avec de l’eau chaude, tiède ou
gazeuse, car vous risqueriez de l’endommager ou d’endommager la
machine à café.
Conformité aux normes
- Cette machine à café Philips est conforme à toutes les normes relatives
aux champs électromagnétiques (CEM). Elle répond aux règles de
sécurité établies sur la base des connaissances scientiques actuelles si
elle est manipulée correctement et conformément aux instructions de
ce manuel d’utilisation.
Avant la première utilisation
Installation de la machine à café
N’installez jamais la machine à café dans une pièce où la température
peut être égale ou inférieure à 0 °C. En effet, le gel de l’eau dans la
machine à café risque d’endommager celle-ci.
Remarque : Lors de la première utilisation, vous allez constater la présence
de traces de café et d’eau dans la machine à café. Cela est normal et
signie que la machine à café a été testée en usine an de vérier son bon
fonctionnement. Nous garantissons que votre machine à café est neuve.
1 Retirez la machine à café de l’emballage.
Page 32

FRANÇAIS32
2 Placez la machine à café sur une table ou un plan de travail, à l’écart
des robinets, de l’évier et de toute source de chaleur.
3 Laissez un espace libre d’au moins 15 cm au-dessus, à l’arrière et sur
les côtés de la machine à café.
4 Faites glisser le plateau égouttoir dans les rainures à l’avant de la
machine à café.
Remarque : Assurez-vous que le plateau égouttoir est entièrement inséré.
Ne retirez jamais le plateau égouttoir pendant la préparation du café.
5 Faites glisser le bec verseur amovible dans la machine à café.
Installation et retrait des entonnoirs de café en grain
Pour en savoir plus sur les entonnoirs de café en grain et pour visionner
des vidéos sur la façon de les placer dans la machine à café, rendez vous
sur www.philips.com/senseo-sarista/support.
1 Tirez sur la bande déchirable vers le bas an de retirer la pochette
de protection de l’entonnoir de café en grain.
®
2 Retirez l’anneau AROMA LOCK
de l’entonnoir de café en grain.
Page 33

FRANÇAIS 33
3 Insérez correctement le pas de vis de l’entonnoir de café en grain
dans l’ouverture située dans la partie supérieure de la machine à café
(1). Puis, faites tourner l’entonnoir de café en grain dans le sens des
aiguilles d’une montre pour le xer (2).
Avant utilisation
Remplissage du réservoir
Remplissez le réservoir d’eau fraîche avant chaque utilisation.
Remarque : Le voyant « Réservoir d’eau vide » s’allume lorsqu’il n’y a pas
assez d’eau dans le réservoir pour préparer une tasse de café.
1 Retirez le réservoir d’eau de la machine à café.
2 Rincez le réservoir d’eau sous le robinet.
3 Remplissez le réservoir avec de l’eau froide du robinet, jusqu’au
niveau maximal (MAX).
Ne remplissez jamais le réservoir d’eau avec de l’eau chaude, tiède ou
gazeuse, car vous risqueriez de l’endommager ou d’endommager la
machine à café.
4 Repositionnez correctement le réservoir d’eau dans la machine à café.
Cycle de rinçage automatique
Pour garantir une tasse de café parfaitement dosée, la machine à café
utilise de l’eau pour rincer le système de préparation du café. Ceci se
produit durant le cycle de rinçage automatique lorsque la machine à café
n’a pas été utilisée pendant une période prolongée (20 heures) et avant
et après avoir préparé une tasse. Une partie de l’eau s’écoule par le
système interne directement dans le plateau égouttoir.
1 Insérez la che dans la prise secteur.
Page 34

FRANÇAIS34
2 Placez une tasse sur la grille du plateau égouttoir.
3 Mettez la machine à café en marche en appuyant sur le bouton
marche/arrêt.
, Le voyant de fonctionnement commence à clignoter.
, Après un bref temps de chauffe, l’eau s’écoule dans la tasse et dans
le plateau égouttoir via le bec verseur et les circuits internes. Videz la
tasse et le plateau égouttoir dans l’évier.
, Lorsque le voyant de fonctionnement s’allume de manière continue,
le cycle de rinçage automatique est terminé et la machine à café est
prête à être utilisée.
Utilisation de la machine à café
Préparation d’une ou de deux tasses de café
1 Vériez s’il y a assez d’eau dans le réservoir d’eau. Remplissez le
réservoir d’eau, si nécessaire (voir le chapitre « Avant utilisation »).
2 Assurez-vous que l’entonnoir de café en grain est correctement xé
(voir le chapitre « Avant la première utilisation »).
3 Videz le plateau égouttoir si le voyant « Plateau égouttoir plein »
est allumé.
Page 35

FRANÇAIS 35
Remarque : Si vous ignorez le voyant « Plateau égouttoir plein », le plateau
égouttoir risque de déborder pendant la préparation et de l’eau risque de se
répandre sous l’appareil.
4 Placez une ou deux tasses sur la grille du plateau égouttoir.
5 Appuyez sur le bouton pour 1 tasse ou pour 2 tasses.
Conseil : Vous pouvez interrompre le cycle de préparation du café à tout
moment, ce qui pourra entraîner un café plus fort. Pour ce faire, appuyez sur
le même bouton (bouton pour 1 tasse ou bouton pour 2 tasses) que lors du
lancement de la préparation du café.
Remarque : Chaque tasse de café est préparée à partir de grains de café
fraîchement moulus.
- Appuyez sur le bouton pour 1 tasse pour préparer une tasse de café.
, La machine à café moud la quantité de grains de café requise pour
une tasse puis prépare une tasse de café.
, Le voyant de fonctionnement clignote une fois lorsque les grains
sont moulus.
- Appuyez sur le bouton pour 2 tasses pour préparer deux tasses de café.
, La machine à café moud la quantité de grains de café requise pour
une tasse, puis prépare du café pour remplir les deux tasses à moitié.
Ensuite, la machine à café moud à nouveau des grains de café pour une
tasse et prépare du café pour remplir les deux tasses entièrement.
, Le voyant de fonctionnement clignote une fois lorsque les grains
pour la première moitié sont moulus et deux fois lorsque les grains
pour la deuxième moitié sont moulus.
Remarque : Si la machine à café s’arrête lors de la préparation du café, le
réservoir d’eau ou l’entonnoir de café en grain est probablement vide ou le bac
à marcs de café est plein. Remplissez le réservoir d’eau, remplacez l’entonnoir
de café en grain ou videz le bac à marcs de café et réappuyez sur le bouton
pour 2 tasses pour terminer le cycle de préparation. Veillez à retirer le bac
à marcs de café de l’appareil pendant 3 secondes jusqu’à ce que le voyant
« Entonnoir de café en grain vide » cesse de clignoter, puis remettez-le en place.
6 Lorsque le voyant « Entonnoir de café en grain vide » s’allume,
l’entonnoir est vide.
Page 36

FRANÇAIS36
7 Pour le remplacer par un entonnoir de café en grain plein, faites
tourner l’entonnoir de café en grain dans le sens inverse des aiguilles
d’une montre (1) et retirez-le (2). Ensuite, suivez l’étape 1 pour
placer un nouvel entonnoir de café en grain dans la machine à café.
Remarque : Vous pouvez également retirer un entonnoir de café en grain
®
MAX
SENSEO
par un autre si vous voulez passer à une variété de café différente. L’entonnoir
de café en grain étant refermable, vous pouvez le ranger pour un usage ultérieur.
Ne retirez jamais l’entonnoir de café en grain pendant la préparation du café.
Préparation d’une verseuse entière de café
Lorsque vous appuyez sur le bouton de la verseuse, la machine à café
prépare six tasses de café dans la verseuse.
Remarque : Nettoyez toujours la verseuse à l’eau chaude savonneuse avant
la première utilisation. Si vous n’avez pas utilisé la verseuse depuis un certain
temps, rincez-la avec de l’eau chaude pour enlever les odeurs.
1 Vériez que le réservoir d’eau est rempli jusqu’au niveau MAX.
Remarque : Si vous ne remplissez pas le réservoir d’eau au niveau MAX, le
voyant « Réservoir d’eau vide » risque de s’allumer et la machine à café peut
s’arrêter lors de la préparation. Remplissez le réservoir d’eau et appuyez sur le
bouton de la verseuse pour continuer de préparer le café.
2 Assurez-vous que l’entonnoir de café en grain est correctement xé
Remarque : Les grains de café doivent être visibles au-dessus de l’indication de
verseuse de l’entonnoir de café en grain. Dans le cas contraire, il n’y a pas assez
de grains de café dans l’entonnoir pour préparer six tasses de café. Remplacez
l’entonnoir de café en grain avec un entonnoir plein ou avec un entonnoir
contenant assez de grains de café (voir le chapitre « Avant la première utilisation »).
Remarque : Si l’entonnoir de café en grain se vide intégralement en cours
de préparation, le voyant « Entonnoir de café en grain vide » s’allume et la
machine à café s’arrête pendant la préparation. Remplacez l’entonnoir de café
en grain par un nouvel entonnoir ou un entonnoir contenant assez de grains
de café (voir le chapitre « Avant la première utilisation ») et appuyez sur le
bouton de la verseuse pour continuer la préparation.
3 Enlevez le bec verseur amovible, le cas échéant.
4 Videz toujours le bac à marcs de café et le plateau égouttoir avant de
Remarque : Si vous ne videz pas le plateau égouttoir, ce dernier risque de
déborder pendant la préparation.
SARISTA de Maison du Café qui n’est pas encore vide et le remplacer
Remplissez le réservoir d’eau, si nécessaire (voir le chapitre « Avant
utilisation »).
et contient sufsamment de grains pour préparer une verseuse de café.
démarrer la préparation d’une verseuse entière de café.
Page 37

FRANÇAIS 37
Remarque : Si vous ne videz pas le bac à marcs de café, le voyant « Bac à
marcs de café plein » risque de s’allumer et la machine à café s’arrêtera au
cours de la préparation. Assurez-vous que l’appareil est allumé lorsque vous
videz le bac à marcs de café. Retirez-le de l’appareil pendant 3 secondes
jusqu’à ce que le voyant « Entonnoir de café en grain vide » cesse de clignoter,
puis remettez-le en place. Appuyez sur le bouton de la verseuse pour continuer
de préparer le café.
5 Faites tourner le couvercle de la verseuse par son levier jusqu’à
la position « Fermé/Préparation ». Dans cette position, la èche
située sur la poignée de la verseuse pointe vers le symbole « Fermé/
Préparation » sur le couvercle de la verseuse.
6 Placez la verseuse sur la grille du plateau égouttoir.
Conseil : Pour que le café reste chaud plus longtemps, rincez la verseuse avec
de l’eau chaude pour la préchauffer avant de faire du café.
7 Appuyez sur le bouton de la verseuse.
Remarque : Chaque tasse de café est préparée à partir de grains de café
fraîchement moulus.
, La machine à café moud la quantité de grains de café requise pour
la première tasse de café puis prépare du café dans la verseuse. La
machine à café réitère l’opération cinq fois de plus pour remplir
entièrement la verseuse.
, Le voyant de fonctionnement clignote une fois lorsque les grains
pour la première tasse sont moulus, deux fois lorsque les grains pour
la deuxième tasse sont moulus, etc.
, La machine à café s’arrête automatiquement après avoir préparé la sixième
tasse et le voyant de fonctionnement s’allume de manière continue.
8 Lorsque le cycle de préparation du café est ni, retirez la verseuse de
la machine à café.
9 Pour pouvoir verser le café, faites tourner le couvercle jusqu’à la
position « Verser ». Dans cette position, la èche située sur la poignée
de la verseuse pointe vers le symbole « Verser » sur le couvercle.
Remarque : Pour que le café reste chaud, faites toujours tourner le couvercle
jusqu’à la position « Fermé/Préparation » juste après avoir versé le café.
Page 38

FRANÇAIS38
10 Videz le plateau égouttoir.
Sélection de l’intensité du café (HD8030 uniquement)
Le bouton de sélection de l’intensité du café vous permet de sélectionner
l’intensité du café que vous préférez pour chaque tasse.
Remarque : Vous ne pouvez modier l’intensité du café que lorsque vous
préparez une ou deux tasses. Le bouton de sélection de l’intensité du café
ne fonctionne pas lorsque vous préparez une verseuse de café. Lorsque vous
préparez une verseuse, vous obtenez l’intensité de café standard, c’est-à-dire
un café normal.
1 Appuyez sur le bouton de sélection de l’intensité du café une fois ou
plusieurs fois pour sélectionner l’intensité que vous souhaitez.
, Le voyant d’intensité du café correspondant s’allume.
- e = café court/fort
- d = café normal
- c= café long/doux
Cycle de rinçage manuel
Outre le cycle de rinçage automatique, vous pouvez également lancer un
cycle de rinçage manuel lorsque vous le souhaitez. Vous pouvez réaliser un
cycle de rinçage manuel lorsque vous passez à une autre variété. Le rinçage
vous permet de proter de tout l’arôme de la variété de café sélectionnée.
1 Assurez-vous que le réservoir d’eau est sufsamment rempli et que
le voyant de fonctionnement est allumé.
2 Tournez l’entonnoir de café en grain dans le sens inverse des aiguilles
d’une montre pour l’enlever.
3 Placez une tasse sur la grille du plateau égouttoir.
Page 39

FRANÇAIS 39
4 Appuyez sur le bouton pour une tasse pour démarrer le cycle
de rinçage.
Nettoyage et entretien
Ne plongez jamais la machine à café dans de l’eau ou dans un autre
liquide, et ne le rincez pas sous le robinet.
Débranchez toujours la machine à café et laissez-la refroidir avant de
la nettoyer.
Remarque : Aucune des parties amovibles, ni le groupe café ni la verseuse ne
passent au lave-vaisselle. Rincez-les sous le robinet.
Nettoyage du réservoir d’eau, du bac à marcs de café et du
plateau égouttoir
Videz et nettoyez le réservoir d’eau, le bac à marcs de café et le plateau
égouttoir chaque jour. Videz également le réservoir d’eau et le bac à marcs
de café lorsque le voyant « Réservoir d’eau vide » s’allume et/ou lorsque
le voyant « Bac à marcs de café plein » s’allume. Videz et rincez le plateau
égouttoir lorsque le voyant « Plateau égouttoir plein » s’allume.
1 Retirez le réservoir d’eau de la machine à café.
2 Enlevez le ltre de son support dans le réservoir d’eau et rincez-le
sous le robinet.
3 Nettoyez le réservoir d’eau à l’eau chaude savonneuse.
Page 40

FRANÇAIS40
4 Replacez le ltre dans son support en le tournant un peu et en
l’abaissant doucement.
5 Remplissez le réservoir d’eau avec de l’eau fraîche du robinet, et
faites-le glisser dans la machine à café.
6 Enlevez le bac à marcs de café de la machine à café et videz-le.
7 Nettoyez le bac à marcs de café à l’eau chaude savonneuse.
8 Insérez le bac à marcs de café dans la machine à café.
9 Retirez le plateau égouttoir de la machine à café.
10 Enlevez la grille du plateau égouttoir et videz ce dernier.
11 Nettoyez le plateau égouttoir et la grille du plateau égouttoir à l’eau
chaude savonneuse.
12 Nettoyez les rainures du plateau égouttoir au fond de la machine à
café avec un chiffon humide.
Page 41

FRANÇAIS 41
Nettoyage du bec verseur de café amovible
1 Retirez le bec verseur de café amovible.
2 Rincez le bec verseur de café amovible sous le robinet avec un peu
de liquide vaisselle.
3 Insérez le bec verseur de café amovible dans la machine à café ou
rangez-le.
Nettoyage de la verseuse
Nettoyez la verseuse après chaque utilisation.
N’utilisez pas de détergents agressifs, de dissolvants ou de produits
chimiques pour nettoyer la verseuse.
1 Faites tourner le couvercle par son levier jusqu’au symbole « Ôter le
couvercle ». Ensuite, retirez le couvercle de la verseuse.
2 Rincez l’intérieur de la verseuse et le couvercle à l’eau chaude
savonneuse. Nettoyez l’extérieur de la verseuse avec un chiffon
humide.
Remarque : La verseuse ne peut pas être nettoyée au lave-vaisselle.
3 Mettez la verseuse en position verticale sans le couvercle et laissez
l’intérieur de la verseuse sécher.
4 Lorsque l’intérieur de la verseuse est sec, placez le couvercle sur la
verseuse et tournez-le jusqu’à la position « Fermé/Préparation ».
Nettoyage du groupe café
Ne nettoyez pas le groupe café dans le lave-vaisselle et n’utilisez pas de
savon ou de détergent pour le nettoyer.
Nettoyez le groupe café chaque fois que l’entonnoir de café en grain est
vide ou au moins une fois par semaine. Pour en savoir plus sur le retrait,
le nettoyage et l’insertion du groupe café, regardez les vidéos sur
www.philips.com/senseo-sarista/support.
1 Arrêtez la machine à café et débranchez-la.
Page 42

FRANÇAIS42
2 Enlevez le bac à marcs de café de la machine à café.
3 Ouvrez le portillon de l’appareil.
4 Appuyez sur le bouton PUSH (1) et retirez le groupe café en le
maintenant (2) pour l’enlever de la machine à café.
5 Rincez l’extérieur du groupe café sous l’eau du robinet.
N’utilisez jamais de savon ou tout autre produit de nettoyage pour
nettoyer le groupe café.
Ne séchez pas le groupe café avec un chiffon pour empêcher que des
bres ne tombent dans le groupe café. Après l’avoir rincé, retirez l’excès
d’eau en le secouant.
6 Rincez soigneusement le ltre supérieur à l’eau tiède, sous le robinet.
Page 43

FRANÇAIS 43
7 Nettoyez soigneusement l’intérieur de la machine à café avec un
chiffon humide.
8 Avant d’insérer le groupe café dans la machine à café, assurez-vous
que les deux repères situés sur le côté correspondent. S’ils ne
correspondent pas, procédez comme suit :
- Assurez-vous que le levier est en contact avec la base du groupe café.
9 Assurez-vous que le crochet pour le blocage du groupe café est dans
la bonne position. Le crochet n’est pas correctement positionné s’il
est toujours dans la position la plus basse.
- Pour positionner correctement le crochet, poussez-le vers le haut
jusqu’à ce qu’il soit dans la position la plus haute.
Page 44

FRANÇAIS44
10 Faites glisser le groupe café dans la machine à café à l’aide des
rainures latérales jusqu’à ce qu’il soit enclenché.
N’appuyez pas sur le bouton PUSH.
11 Fermez la porte d’accès au groupe café.
Lubrication
Pour des performances optimales de la machine à café, lubriez le groupe
café après 400 tasses de café ou une fois par mois.
- Pour en savoir plus sur les éléments à lubrier et comment
procéder à la lubrication, visionnez les vidéos sur
www.philips.com/senseo-sarista/support.
- Pour obtenir des résultats de mouture optimaux, nous vous conseillons
d’utiliser le lubriant de Philips. Vous pouvez acheter ce lubriant dans
la Boutique Philips sur www.shop.philips.com/service.
1 Arrêtez la machine à café et débranchez-la.
2 Suivez les étapes 2 à 4 de la section « Nettoyage du groupe café »
pour retirer le groupe café de la machine à café.
3 Appliquez du lubriant dans les rainures à l’intérieur du groupe café.
Page 45

FRANÇAIS 45
4 Appliquez du lubriant autour de l’axe dans la partie inférieure du
groupe café.
5 Appliquez du lubriant sur la partie indiquée dans la gure.
6 Appliquez du lubriant sur les deux côtés du levier dans le groupe café.
7 Suivez les étapes 9 à 11 du chapitre « Nettoyage du groupe café » pour
placer le groupe café et le bac à marcs de café dans la machine à café.
Réglage du niveau de mouture du café
Au l du temps, le moulin peut passer à une mouture plus grossière. Il est
recommandé de régler le niveau de mouture lorsque vous remarquez cela.
Ces réglages ne sont pas requis régulièrement.
1 Prenez l’outil de réglage du niveau de mouture situé dans le
renfoncement à côté du groupe café.
2 Insérez l’extrémité la plus large de l’outil de réglage du niveau de
mouture à côté du capuchon de la zone de réglage de niveau de
mouture et appuyez légèrement. Cette action entraîne l’ouverture
automatique du capuchon.
3 Insérez l’extrémité étroite de l’outil de réglage du niveau de
mouture dans le trou de réglage du niveau de mouture de sorte que
l’extrémité de l’outil s’adapte sur la pointe située au fond du trou.
Page 46

FRANÇAIS46
4 Pour un réglage plus grossier, appuyez vers le bas et tournez l’outil
de réglage du niveau de mouture dans le sens des aiguilles d’une
montre. Pour une mouture plus ne, appuyez vers le bas et tournez
l’outil de réglage du niveau de mouture dans le sens inverse des
aiguilles d’une montre.
Remarque : Tournez l’outil de réglage du niveau de mouture d’un cran à la fois,
dans le sens des aiguilles d’une montre ou dans le sens inverse. Puis, préparez
2 ou 3 tasses de café pour vérier si le niveau de mouture a été réglé à votre
convenance.
5 Lorsque vous êtes satisfait du niveau de mouture, retirez l’outil de
réglage du niveau de mouture du trou de réglage, fermez le capuchon
et replacez l’outil de réglage du niveau de mouture dans son
logement.
Détartrage de la machine à café
Des résidus de calcaire se déposent dans la machine à café pendant
l’utilisation. Il est nécessaire de détartrer la machine à café lorsque le voyant
CALC CLEAN s’allume. Utilisez uniquement la solution de détartrage Philips
SENSEO
sur la procédure de détartrage de cette machine à café, vous pouvez regarder
les vidéos d’instructions sur www.philips.com/senseo-sarista/support.
Fréquence de détartrage
Nécessité du détartrage
En voici les raisons :
Si vous ne détartrez pas régulièrement la machine à café ou si vous ne
réalisez pas correctement les opérations de détartrage, les résidus de
calcaire restent bloqués dans l’appareil. Le calcaire s’accumule et nit par
entraîner le mauvais fonctionnement de votre machine à café. Si cela se
produit, la réparation n’est pas couverte par les termes de la garantie.
Agent de détartrage
Utilisez uniquement la solution de détartrage Philips SENSEO
(CA6400) pour détartrer la machine à café. Cette solution a été conçue
pour assurer des performances optimales tout au long de la durée de vie
de votre machine à café.
Conservez le acon contenant la solution de détartrage hors de la portée
des enfants. Ne buvez jamais l’eau mélangée à la solution de détartrage que
vous avez versée dans le réservoir d’eau ou l’eau contenant des résidus
issus de la machine à café au cours de la procédure de détartrage.
®
SARISTA (CA6400) pour détartrer la machine. Pour en savoir plus
- Détartrez la machine à café comme décrit ci-dessous aussitôt que le
voyant CALC CLEAN s’allume de manière continue.
- Le détartrage prolonge la durée de vie de votre machine à café.
- Il garantit un volume de tasse maximal.
- Il assure une température de café optimale.
- Il prévient les dysfonctionnements.
®
SARISTA
- Vous pouvez acheter la solution de détartrage Philips SENSEO
®
SARISTA dans la Boutique Philips sur www.shop.philips.com/service.
Page 47

FRANÇAIS 47
Procédure de détartrage
La procédure de détartrage dure 45 mn et est constituée d’un cycle de
détartrage et de deux cycles de rinçage. N’interrompez pas le cycle de
détartrage et n’éteignez pas la machine à café avant la n des deux cycles
de rinçage.
Avant de commencer la procédure de détartrage, assurez-vous que le
voyant de fonctionnement s’allume en vert. Pour cela, veillez à suivre les
étapes suivantes.
1 Assurez-vous que l’entonnoir de café en grain est correctement xé.
2 Videz le bac à marcs de café.
3 Assurez-vous que le réservoir d’eau est rempli d’eau.
Remarque : Une fois que vous avez lancé le cycle de détartrage, vous ne
pouvez pas l’arrêter avant qu’il soit entièrement terminé. Même si vous
débranchez la prise, la machine restera en mode de détartrage.
Cycle de détartrage
1 Appuyez sur le bouton pour 1 tasse et sur le bouton pour 2 tasses
simultanément pendant 3 secondes jusqu’à ce que le voyant CALC
CLEAN commence à clignoter. Lorsque le voyant CALC CLEAN
clignote rapidement, vous pouvez commencer le cycle de détartrage.
2 Retirez et videz le réservoir d’eau de la machine à café.
Page 48

FRANÇAIS48
MAX
3 Versez le contenu d’un acon de solution de détartrage Philips
SENSEO
®
SARISTA (250 ml) dans le réservoir d’eau, puis ajoutez
1 litre d’eau du robinet pour remplir le réservoir d’eau jusqu’à
l’indication MAX.
4 Repositionnez correctement le réservoir d’eau dans la machine à café.
5 Retirez le bec verseur de café amovible ou la verseuse de la machine
à café.
6 Assurez-vous que le plateau égouttoir est vide.
7 Placez un bol d’une capacité de 1,5 litre sur la grille du plateau
égouttoir.
8 Appuyez sur le bouton pour 1 tasse et sur le bouton pour 2 tasses
simultanément pendant 1 seconde pour démarrer la procédure de
détartrage.
, Le voyant de fonctionnement et le voyant CALC CLEAN clignotent
tous les deux lentement pour indiquer que le cycle de détartrage
a démarré.
, De l’eau mélangée à la solution de détartrage s’écoulent par
intermittence. La machine à café interrompt le détartrage à plusieurs
reprises pour laisser la solution de détartrage agir.
, Lorsque le réservoir d’eau est vide, le cycle de détartrage est ni.
Le voyant de fonctionnement s’éteint, le voyant CALC CLEAN
commence à clignoter rapidement et le voyant « Réservoir d’eau
vide » s’éteint. Poursuivez le cycle de rinçage.
N’éteignez pas la machine à café et n’interrompez pas le cycle de détartrage.
Page 49

MAX
FRANÇAIS 49
Remarque : Si vous éteignez la machine à café pendant le cycle de détartrage,
le voyant CALC CLEAN commence à clignoter rapidement lorsque vous
allumez la machine. Dans ce cas, vous devez suivre la procédure de détartrage
du début à la n.
Cycle de rinçage
1 Retirez le réservoir d’eau de la machine à café.
2 Rincez le réservoir d’eau sous le robinet.
3 Remplissez le réservoir avec de l’eau du robinet, jusqu’au niveau
maximal (MAX) et insérez le réservoir d’eau dans la machine à café.
4 Videz le bol (1) et placez-le sur la grille du plateau égouttoir (2).
5 Appuyez sur le bouton pour 1 tasse et sur le bouton pour 2 tasses
simultanément pendant 1 seconde pour démarrer le cycle de rinçage.
, Le voyant de fonctionnement et le voyant CALC CLEAN clignotent
lentement.
, Pendant le cycle de rinçage, l’eau sort de la machine à café de façon
continue.
Page 50

FRANÇAIS50
6 Lorsque le voyant de fonctionnement s’éteint, le voyant « Réservoir
d’eau vide » s’allume et le voyant CALC CLEAN clignote rapidement.
Videz le bol et rincez-le, puis remplissez le réservoir d’eau.
7 Appuyez sur le bouton pour 1 tasse et sur le bouton pour 2 tasses
simultanément pendant 1 seconde pour démarrer le second cycle de
rinçage.
, Lorsque toute l’eau du réservoir a été écoulée, toute la procédure
de rinçage est terminée et la machine à café s’éteint.
N’interrompez pas les cycles de rinçage.
Remarque : Si vous éteignez la machine à café avant que les cycles de rinçage
soient terminés, le voyant CALC CLEAN commence à clignoter rapidement
lorsque vous allumez la machine. Dans ce cas, vous devez réaliser deux cycles
de rinçage pour que le voyant CALC CLEAN s’éteigne.
Commande d’accessoires
Pour acheter des accessoires pour cette machine à café, rendez-vous sur
notre boutique en ligne à l’adresse www.shop.philips.com/service. Si
la boutique en ligne n’est pas disponible dans votre pays, contactez votre
revendeur Philips ou un Centre Service Agréé Philips. Si vous rencontrez
des problèmes pour vous procurer des accessoires pour votre machine,
contactez le Service Consommateurs Philips de votre pays. Vous en
trouverez les coordonnées dans le dépliant de garantie internationale.
Verseuse supplémentaire pour HD8010
Vous pouvez acheter une verseuse en tant qu’accessoire pour HD8010
sous la référence CA6501.
Remarque : Les instructions d’utilisation de la verseuse incluses dans ce manuel
d’utilisation s’appliquent également à cette verseuse.
Environnement
- Lorsqu’elle ne fonctionnera plus, ne jetez pas la machine à café avec les
ordures ménagères, mais déposez-la dans un endroit prévu à cet effet,
où elle pourra être recyclée. Vous contribuerez ainsi à la protection
de l’environnement.
- Les entonnoirs de café en grain SENSEO
®
SARISTA de Maison du
Café sont composés de plastiques 100 % recyclables. Les entonnoirs
de café en grain vides peuvent être jetés dans des poubelles de
recyclage de plastiques ou peuvent être recyclés selon des procédures
locales de recyclage des déchets.
Page 51

Garantie et service
Si vous souhaitez obtenir des informations supplémentaires, faire réparer
l’appareil ou si vous rencontrez un problème, rendez-vous sur le site
Web de Philips à l’adresse www.philips.com/support ou contactez le
Service Consommateurs Philips de votre pays. Vous trouverez le numéro
de téléphone correspondant sur le dépliant de garantie internationale.
S’il n’existe pas de Service Consommateurs Philips dans votre pays,
renseignez-vous auprès de votre revendeur Philips local.
Limites de la garantie
La garantie n’est plus valable si vous n’utilisez pas des entonnoirs de café en
grain d’origine et non modiés Master Blenders de Maison du Café.
Signication des voyants
Voyant lumineux Signication Action
FRANÇAIS 51
Le voyant « Réservoir
d’eau vide » reste allumé
de manière continue.
Le voyant « Réservoir
d’eau vide » est
allumé et le voyant de
fonctionnement clignote.
Le voyant « Bac à
marcs de café plein »
reste allumé de manière
continue.
Le voyant « Bac à
marcs de café plein »
est allumé et le voyant
de fonctionnement
clignote.
Le voyant « Entonnoir
de café en grain vide »
reste allumé de manière
continue.
Il n’y a pas assez d’eau
dans le réservoir d’eau.
Le réservoir d’eau n’est
pas correctement inséré.
Il n’y a pas assez d’eau
dans le réservoir d’eau
pour continuer la
préparation.
Le bac à marcs de café
est plein.
Le bac à marcs de café
n’est pas correctement
inséré.
Le bac à marcs de
café est plein et la
machine à café ne
peut pas poursuivre la
préparation.
L’entonnoir de café en
grain est vide.
L’entonnoir de café
en grain n’est pas
correctement inséré.
Remplissez le réservoir d’eau (voir le chapitre
« Avant utilisation »).
Insérez-le correctement dans la machine à café.
Remplissez le réservoir d’eau et réappuyez sur le
bouton du café que vous prépariez pour continuer
le cycle de préparation.
Enlevez, videz et nettoyez le bac à marcs de café. Veillez
à retirer le bac à marcs de café de l’appareil pendant
3 secondes jusqu’à ce que le voyant « Entonnoir de
café en grain » cesse de clignoter, puis remettez-le en
place. Assurez-vous que la machine à café reste allumée.
Insérez-le correctement dans la machine à café.
Enlevez, videz et nettoyez le bac à marcs de café. Veillez
à retirer le bac à marcs de café de l’appareil pendant
3 secondes jusqu’à ce que le voyant « Entonnoir de
café en grain » cesse de clignoter, puis remettez-le
en place. Assurez-vous que la machine à café reste
allumée. Réappuyez sur le bouton du café que vous
prépariez pour continuer le cycle de préparation.
Remplacez l’entonnoir de café en grain (voir le
chapitre « Avant la première utilisation »).
Voir le chapitre « Avant la première utilisation ».
Page 52

FRANÇAIS52
Voyant lumineux Signication Action
Le voyant « Entonnoir de
café en grain vide » est
allumé et le voyant de
fonctionnement clignote.
Le voyant de
fonctionnement clignote
rapidement.
Le voyant de
fonctionnement clignote
lentement.
Le voyant de
fonctionnement clignote
pendant la mouture.
Le voyant CALC
CLEAN reste allumé de
manière continue.
Le voyant CALC
CLEAN clignote
rapidement.
Le voyant CALC
CLEAN et le voyant
de fonctionnement
clignotent lentement.
Le voyant CALC
CLEAN clignote
rapidement et le voyant
« Réservoir d’eau
vide » s’allume.
L’entonnoir de café en
grain ne contient pas
assez de grains pour
continuer la préparation.
La porte d’accès
au groupe café de
l’appareil est ouverte.
Le groupe café n’est pas
correctement inséré.
Le groupe café est
obstrué.
La machine à café est
en train de chauffer ou
en cours de rinçage.
Ceci indique que la
tasse de café en cours
de préparation.
Vous devez détartrer la
machine à café.
Ceci se produit entre
les différents cycles de
détartrage.
La machine à café
s’est éteinte lors
de la procédure de
détartrage.
La machine à café est
en cours de détartrage.
Ceci se produit lors du
cycle de détartrage.
Ceci se produit lors du
cycle de rinçage.
Remplacez l’entonnoir de café en grain et
réappuyez sur le bouton du café que vous
prépariez pour poursuivre le cycle de préparation.
Fermez la porte d’accès au groupe café.
Placez le groupe café correctement (voir le
chapitre « Nettoyage et entretien »).
Nettoyez le groupe café (voir le chapitre
« Nettoyage et entretien »).
Patientez jusqu’à ce que le voyant de
fonctionnement s’allume de manière continue.
Le voyant de fonctionnement clignote une ou deux
fois lorsque vous préparez une ou deux tasses. Il
clignote 1 à 6 fois lorsque vous préparez une verseuse
de café : une fois pour la première tasse, deux fois pour
la deuxième tasse, trois fois pour la troisième tasse, etc.
Suivez les instructions du chapitre « Détartrage de
la machine à café ».
Suivez les instructions du chapitre « Détartrage
de la machine à café ». N’interrompez pas la
procédure de détartrage !
Recommencez la procédure de détartrage (voir le
chapitre « Détartrage de la machine à café »).
Voir le chapitre « Détartrage de la machine à
café ».
Videz le bol, rincez et remplissez le réservoir d’eau
et poursuivez le cycle de rinçage.
Videz le bol, rincez et remplissez le réservoir d’eau
et poursuivez le cycle de rinçage. Appuyez sur le
bouton pour 1 tasse et sur le bouton pour 2 tasses
simultanément pendant 1 seconde pour démarrer
le second cycle de rinçage.
Page 53

Dépannage
Ce chapitre présente les problèmes les plus courants que vous pouvez
rencontrer avec votre machine à café. Si vous ne parvenez pas à résoudre
le problème à l’aide des informations ci-dessous, rendez-vous sur
www.philips.com/senseo-sarista/support pour consulter les
questions les plus fréquemment posées, ou contactez le Service
Consommateurs de votre pays. Sur ce site, vous pouvez également
regarder des vidéos d’instructions sur la façon d’utiliser, de nettoyer et de
détartrer votre machine à café Philips SENSEO
Problème Solution possible
FRANÇAIS 53
®
SARISTA.
La cafetière semble
fuir et/ou de l’eau
s’écoule dans le plateau
égouttoir.
Quand faut-il détartrer
la machine à café ?
La machine à café ne
fonctionne pas.
La machine à café moud
les grains de café mais
aucun café ne s’écoule.
Ce phénomène est normal. Pour garantir une tasse de café parfaitement dosée,
la machine à café utilise de l’eau pour rincer le système de préparation du café.
Ceci se produit durant le cycle de rinçage automatique lorsque la machine à
café n’a pas été utilisée pendant une période prolongée (20 heures) et avant
et après avoir préparé une tasse. Une partie de l’eau s’écoule par le système
interne directement dans le plateau égouttoir. Videz le plateau égouttoir
régulièrement et avant de préparer une verseuse entière de café.
Vous devez détartrer la machine à café lorsque le voyant CALC CLEAN s’allume
de manière continue. Ceci dépend de la fréquence d’utilisation de la machine
à café. Lorsque vous préparez du café très souvent, vous devez détartrer la
machine à café plus tôt que lorsque vous préparez du café moins souvent.
Branchez la machine à café et mettez-la en marche.
Assurez-vous que la tension indiquée sur la machine à café correspond bien à
la tension du secteur.
Remplissez le réservoir d’eau.
Si le voyant de fonctionnement clignote rapidement, assurez-vous que le groupe
café est correctement inséré et que la porte d’accès au groupe café de l’appareil
est correctement fermée (voir le chapitre « Nettoyage du groupe café ».
Si le voyant CALC CLEAN clignote rapidement, c’est que vous avez éteint
la machine à café pendant l’opération de détartrage (voir le chapitre
« Détartrage de la machine à café »). Redémarrez l’opération de détartrage.
Le groupe café est sale. Nettoyez le groupe café (voir le chapitre « Nettoyage
et entretien »).
Le bec verseur de café amovible est sale. Rincez le bec verseur amovible sous
le robinet (voir le chapitre « Nettoyage et entretien »).
L’unité d’écoulement du café est sale. Utilisez un chiffon humide pour
nettoyer le dessous de l’unité d’écoulement du café.
L’entonnoir de café en grain n’est pas correctement xé. Insérez correctement
le pas de vis de l’entonnoir de café en grain dans l’ouverture située dans la
partie supérieure de la machine à café. Ensuite, faites tourner l’entonnoir de
café en grain dans le sens des aiguilles d’une montre pour le xer.
Page 54

FRANÇAIS54
Problème Solution possible
La machine à café cesse
la préparation avant que
la tasse ou les tasses ne
soient remplies.
La machine à café cesse
la préparation avant
que la verseuse ne soit
remplie.
Je ne parviens pas à
enlever le groupe café.
Je ne parviens pas à
faire glisser le groupe
café dans la machine
à café.
Je ne parviens pas à
ouvrir la porte d’accès
au groupe café.
Je ne parviens pas à
fermer la porte d’accès
au groupe café.
Du café fuit de l’unité
d’écoulement du café.
Le café n’est pas assez
fort.
Vériez si le voyant « Réservoir d’eau vide », « Entonnoir de café en grain
vide » ou « Bac à marcs de café plein » est allumé. Si le voyant « Réservoir
d’eau vide » est allumé, remplissez le réservoir d’eau. Si le voyant « Entonnoir
de café en grain vide » est allumé, remplacez l’entonnoir de café en grain
par un nouvel entonnoir plein. Si le voyant « Bac à marcs de café plein » est
allumé, videz le bac à marcs de café. Réappuyez sur le bouton du café que
vous prépariez pour continuer le cycle de préparation.
Vériez si le voyant « Réservoir d’eau vide », « Entonnoir de café en grain
vide » ou « Bac à marcs de café plein » est allumé. Si le voyant « Réservoir
d’eau vide » est allumé, remplissez le réservoir d’eau. Si le voyant « Entonnoir
de café en grain vide » est allumé, remplacez l’entonnoir de café en grain
par un nouvel entonnoir plein. Si le voyant « Bac à marcs de café plein » est
allumé, videz le bac à marcs de café. Appuyez sur le bouton de la verseuse
pour terminer le cycle de préparation du café.
Le groupe café n’est pas correctement inséré. Débranchez la machine à
café de l’alimentation. Fermez la porte d’accès au groupe café. Faites glisser
le bac à marcs de café dans la machine à café. Insérez la che dans la prise
secteur. Allumez la machine à café. Cette action permettra de remettre
automatiquement le groupe café à sa place initiale.
Vériez si les repères sur le côté du groupe café correspondent. Assurez-vous
que le crochet pour le blocage du groupe café est dans la bonne position.
Faites glisser le groupe café dans la machine à café à l’aide des rainures
latérales. Reportez-vous au chapitre « Nettoyage et entretien » ou regardez
les vidéos d’instructions sur le nettoyage du groupe café sur
www.philips.com/senseo-sarista/support.
Peut-être avez-vous tenté d’ouvrir la porte d’accès au groupe café de la
machine à café pour retirer le groupe café alors que le bac à marcs de café
était dans la machine à café. Commencez par retirer le bac à marcs de café,
puis ouvrez la porte d’accès au groupe café et retirez le groupe café.
Le groupe café n’est pas correctement inséré. Assurez-vous que le crochet
pour le blocage du groupe café est dans la bonne position. Assurez-vous
que vous entendez un clic lorsque vous faites glisser le groupe café dans la
position correcte.
Vous avez inséré le bac à marcs de café avant d’essayer de fermer la porte
d’accès au groupe café de la machine. Fermez toujours la porte d’accès au
groupe café de la machine correctement avant de refaire glisser le bac à
marcs de café dans la machine à café.
L’unité d’écoulement du café est sale. Utilisez un chiffon humide pour
nettoyer le dessous de l’unité d’écoulement du café.
Choisissez un entonnoir de café en grain dont la variété est plus forte.
HD8030 uniquement : réglez le bouton de sélection de l’intensité sur
« strong » (fort).
Page 55

Problème Solution possible
Vous pouvez augmenter l’intensité du café sur tous les modèles en réduisant
la quantité d’eau utilisée pour la préparation du café. Pour arrêter le cycle de
préparation du café à tout moment, appuyez sur le même bouton (bouton
pour une tasse ou bouton pour deux tasses) que lors du lancement de la
préparation du café.
Le café n’est pas assez
chaud.
Le voyant « Réservoir
d’eau vide », le voyant
« Bac à marcs de
café plein », le voyant
« Entonnoir de café
en grain vide » et
le voyant CALC
CLEAN clignotent
simultanément.
Le niveau de mouture
est passé à une
mouture plus grossière.
Si la température a diminué progressivement, détartrez la machine à café
(voir le chapitre « Détartrage de la machine à café »).
Réalisez un cycle de rinçage manuel pour préchauffer l’intérieur de la machine
à café (voir le chapitre « Utilisation de la machine à café », section « Cycle de
rinçage manuel »).
Rincez la verseuse à l’eau chaude avant de faire du café.
N’utilisez pas de lait qui vient de sortir du réfrigérateur.
Préchauffez les tasses en les rinçant à l’eau chaude. Utilisez des tasses à parois
nes car celles-ci absorbent moins de chaleur que les tasses à parois épaisses.
Essayez de réinitialiser la machine à café. Pour réinitialiser la machine, éteignez-la
et débranchez-la. Retirez le groupe café, l’entonnoir de café en grain, le bac à
marcs de café et le réservoir d’eau. Ensuite, insérez le groupe café, l’entonnoir
de café en grain, le bac à marcs de café et le réservoir d’eau. Branchez la
machine à café et allumez-la. Vous devrez peut-être renouveler ces opérations
2 ou 3 fois pour que tous les voyants s’éteignent. Si le problème persiste, allez
sur le site www.philips.com/senseo-sarista/support ou contactez le
Service Consommateurs Philips.
Il est recommandé de régler le niveau de mouture lorsque vous remarquez
cela. Ces réglages ne sont pas requis régulièrement. Vous pouvez régler le
moulin avec l’outil de réglage de degré de mouture qui est placé derrière
la porte d’accès au groupe café, à côté du groupe café (voir le chapitre
« Nettoyage et entretien »).
FRANÇAIS 55
Spécicités techniques
Fonction Valeur / emplacement
Tension nominale Intérieur de la porte d’accès au groupe café
Puissance nominale Intérieur de la porte d’accès au groupe café
Matériau Plastique
Longueur du cordon 0,8 m
Capacité du réservoir d’eau 1 250 ml
Capacité du bac à marcs de café 10 galettes
Capacité de la verseuse 6 tasses
Page 56

NEDERLANDS56
Inleiding
®
Gefeliciteerd met uw aankoop van een Philips SENSEO
bean-funnel kofezetter en welkom bij Philips! Registreer uw product
op www.senseo.com/register om optimaal te proteren van de
ondersteuning die Philips te bieden heeft.
De Philips SENSEO
Douwe Egberts SENSEO
versgemalen bonen, waardoor u geniet van optimale aroma en smaak.
Douwe Egberts SENSEO
®
SARISTA bean-funnel kofezetter gebruikt een
®
SARISTA bean-funnel om kofe te zetten van
®
SARISTA bean-funnels zijn verkrijgbaar in
verschillende varianten die beantwoorden aan verschillende smaken.
Deze gebruiksaanwijzing is van toepassing op de HD8030 en HD8010.
De HD8030 wordt standaard geleverd met een thermoskan. Voor de
HD8010 kunt u een thermoskan als accessoire kopen in de Online Shop
op www.shop.philips.com/service.
Voor meer informatie over de Philips SENSEO
®
SARISTA bean-funnel
kofezetter en voor instructielms over het gebruik van de kofezetter en
de bean-funnels, gaat u naar www.philips.com/senseo-sarista.
Voor ondersteuning en lms over het schoonmaken, onderhouden en
ontkalken van de kofezetter en het instellen van de molen, gaat u naar
www.philips.com/senseo-sarista/support.
Algemene beschrijving (g. 1)
1 Activiteitslampje
2 ’Waterreservoir leeg’-lampje
3 CALC CLEAN-lampje
4 ’Bean-funnel leeg’-lampje
5 ’Kofedikbak vol’-lampje
6 Kofesterkteknop (alleen HD8030)
7 1-kops knop
8 Kanknop
9 Aan/uitknop
10 2-kops knop
11 Bedieningspaneel
12 Kofedoseerkop
13 Waterreservoir
14 Afneembare kofetuit voor 1 of 2 koppen
15 Lekplaat
16 ’Lekbak vol’-indicator
17 Lekbak
18 Kofedikbak
19 Kofekan (alleen HD8030)
20 Deksel van kofekan (alleen HD8030)
21 Zetgroep
22 Servicedeur
23 Maalsterkteaanpassingsgat
24 Opening voor bean-funnel
25 Hulpmiddel voor aanpassing maalsterkte
26 Bean-funnel
SARISTA
Page 57

NEDERLANDS
Belangrijk
Lees deze gebruiksaanwijzing zorgvuldig door voordat u deze kofezetter
gebruikt. Bewaar de gebruiksaanwijzing om deze indien nodig te kunnen
raadplegen. U kunt de gebruiksaanwijzing downloaden van
www.philips.com/senseo-sarista/support. Hier vindt u ook instructies
over het schoonmaken, onderhouden en ontkalken van de kofezetter en
het instellen van de molen.
Gevaar
- Dompel de kofezetter nooit in water of een andere vloeistof en spoel
de kofezetter ook niet af onder de kraan.
Waarschuwing
- Controleer of het voltage dat is aangegeven op de kofezetter overeen-
komt met de plaatselijke netspanning voordat u het apparaat aansluit.
- Deze kofezetter kan worden gebruikt door kinderen vanaf 8 jaar en
door personen met verminderde lichamelijke, zintuiglijke of geestelijke
capaciteiten of weinig ervaring en kennis, mits zij toezicht of instructie
hebben ontvangen aangaande veilig gebruik van het apparaat, en zij de
gevaren van het gebruik begrijpen.
- Reiniging en onderhoud mogen alleen door kinderen worden
uitgevoerd die ouder zijn dan 8 en alleen onder toezicht.
- Houd het apparaat en het snoer buiten het bereik van kinderen die
jonger zijn dan 8 jaar oud.
- Houd toezicht op kinderen om te voorkomen dat ze met de
kofezetter gaan spelen.
- Houd de verpakkingsmaterialen (plastic zakken, kartonnen buffers enz.)
buiten het bereik van kinderen. De verpakkingsmaterialen zijn geen
speelgoed.
- Deze kofezetter is ontworpen om bonen te malen en dan kofe
te zetten. Gebruik het apparaat voorzichtig en op de juiste wijze om
verbranding door heet water en stoom te voorkomen.
- Gebruik de kofezetter niet indien de stekker, het netsnoer of de
kofezetter zelf beschadigd is.
- Indien het netsnoer beschadigd is, moet u het laten vervangen door
Philips, een door Philips geautoriseerd servicecentrum of personen met
vergelijkbare kwalicaties om gevaar te voorkomen.
Let op
- Plaats en gebruik de kofezetter altijd op een stabiele, vlakke en
horizontale ondergrond.
- Haal de stekker van de kofezetter uit het stopcontact als er tijdens het
malen van bonen of het kofezetten problemen optreden en voordat
u de kofezetter gaat schoonmaken.
- Verplaats de kofezetter niet wanneer deze in werking is.
- Het apparaat mag niet worden gebruikt in combinatie met een
transformator, aangezien dit tot onveilige situaties kan leiden.
- Als u er niet in slaagt een probleem op te lossen met behulp van de
informatie in deze gebruiksaanwijzing, neem dan contact op met het
Consumer Care Centre in uw land. Als het probleem niet kan worden
opgelost, breng de kofezetter dan naar een door Philips geautoriseerd
servicecentrum voor onderzoek of reparatie. Probeer niet zelf de
kofezetter te repareren, omdat uw garantie hierdoor komt te vervallen.
57
Page 58

NEDERLANDS58
- Geen van de afneembare delen noch de kan is
vaatwasmachinebestendig.
- Gebruik de kan nooit in een magnetron.
- Dompel de kan nooit in water of een andere vloeistof, omdat hierdoor
water tussen de wanden van de thermoskan zou kunnen lopen.
- Houd de kan weg van warmtebronnen om schade te voorkomen.
- De binnenkant van de kan is breekbaar. Doe geen ijsblokjes of andere
harde voorwerpen in de kan.
- Gebruik de kan alleen om kofe warm te houden. Gebruik de kan niet
om melk, babyvoeding of ander voedsel warm of koud te houden.
- Gebruik geen agressieve schoonmaakmiddelen, oplosmiddelen of
chemische stoffen om de kan schoon te maken.
- Doe de kan niet te vol.
- Controleer voor gebruik altijd de binnenkant van de kan. Gebruik de
kan niet als u barsten of beschadigingen ziet.
- Laat de kan niet vallen. Als de kan is gevallen en op dat moment vol
was, giet de inhoud dan niet uit om verwondingen te voorkomen.
Mogelijk is de binnenwand van de kan kapot als gevolg van de val.
- Om verbrandingsgevaar te vermijden, moet u altijd de inhoud in een
kop gieten en niet direct uit de kan drinken.
- Deze kofezetter is uitsluitend bedoeld voor normaal huishoudelijk
gebruik. De kofezetter is niet bedoeld voor gebruik in
personeelskeukens van bijvoorbeeld winkels, kantoren, boerderijen of
vergelijkbare werkomgevingen en ook niet voor gebruik door gasten
van hotels, motels, bed & breakfasts en andere verblijfsaccommodaties.
- Gebruik nooit accessoires of onderdelen van andere fabrikanten of
die niet speciek door Philips worden aangeraden. Uw garantie vervalt
indien gebruik is gemaakt van dergelijke onderdelen of accessoires.
- Vul het waterreservoir nooit met warm of heet water of met
spuitwater, omdat dit schade kan veroorzaken aan het waterreservoir
en de kofezetter.
Naleving van richtlijnen
- Deze Philips-kofezetter voldoet aan alle richtlijnen met betrekking
tot elektromagnetische velden (EMV). Mits de kofezetter op de
juiste wijze en volgens de instructies in deze gebruiksaanwijzing
wordt gebruikt, is deze veilig te gebruiken volgens het nu beschikbare
wetenschappelijke bewijs.
Voor het eerste gebruik
De kofezetter installeren
Plaats de kofezetter niet in een omgeving waar de temperatuur kan
dalen tot 0°C of lager. Als het water in de kofezetter bevriest, leidt dit
tot schade aan de kofezetter.
Opmerking: Het is normaal dat zich enkele sporen van kofe en water in de
kofezetter bevinden wanneer u deze voor het eerst gebruikt. Dit komt omdat
de kofezetter in de fabriek is getest om te controleren of deze naar behoren
werkt. Wij verzekeren u dat uw kofezetter gloednieuw is.
1 Verwijder al het verpakkingsmateriaal van de kofezetter.
Page 59

NEDERLANDS 59
2 Plaats de kofezetter op een tafel of aanrecht, uit de buurt van de
kraan, de gootsteen en warmtebronnen.
3 Laat boven, achter en aan beide zijden van de kofezetter een ruimte
van ten minste 15 cm vrij.
4 Schuif de lekbak in de geleidegroeven aan de voorzijde van de
kofezetter.
Opmerking: Zorg ervoor dat de lekbak volledig is geplaatst.
Verwijder de lekbak nooit wanneer de kofezetter in werking is.
5 Plaats de afneembare kofetuit in de kofezetter.
De bean-funnels plaatsen en verwijderen
Voor meer informatie over de bean-funnels en voor lms over
het plaatsen van bean-funnels in de kofezetter, gaat u naar
www.philips.com/senseo-sarista/support.
1 Trek de verticale strip naar beneden om de beschermende hoes van
de bean-funnel te verwijderen.
2 Trek de ronde AROMA LOCK
®
-afdichting van de bean-funnel.
Page 60

NEDERLANDS60
3 Plaats de schroefdraad van de bean-funnel goed in de opening
aan de bovenkant van de kofezetter (1). Draai de bean-funnel
vervolgens rechtsom om deze te bevestigen (2).
Klaarmaken voor gebruik
Het waterreservoir vullen
Vul het waterreservoir voor elk gebruik met vers water.
Opmerking: Het ‘waterreservoir leeg’-lampje gaat branden wanneer er niet
genoeg water in het waterreservoir zit om een kop kofe te zetten.
1 Neem het waterreservoir van de kofezetter.
2 Spoel het waterreservoir onder de kraan.
3 Vul het waterreservoir tot aan de MAX-aanduiding met koud
kraanwater.
Vul het waterreservoir nooit met warm of heet water of met spuitwater,
omdat dit schade kan veroorzaken aan het waterreservoir en de kofezetter.
4 Schuif het waterreservoir terug in de kofezetter.
Automatische spoelcyclus
Om de perfecte kop kofe te garanderen gebruikt de kofezetter water
om het zetsysteem te spoelen. Dit gebeurt tijdens de automatische
spoelcyclus die wordt geactiveerd wanneer de kofezetter langere tijd
(20 uur) niet is gebruikt en voor en na het zetten van elke kop. Een deel
van het water stroomt door het interne systeem rechtstreeks in de lekbak.
1 Steek de stekker in het stopcontact.
Page 61

NEDERLANDS 61
2 Plaats een kop op de lekplaat.
3 Druk op de aan/uitknop om de kofezetter in te schakelen.
, Het activiteitslampje begint te knipperen.
, Na een korte opwarmtijd stroomt er water via de tuit en de interne
circuits in de kop en de lekbak. Leeg de kop en de lekbak in de gootsteen.
, Wanneer het activiteitslampje ononderbroken brandt, is de automatische
spoelcyclus voltooid en is de kofezetter klaar voor gebruik.
De kofezetter gebruiken
1 of 2 koppen kofe zetten
1 Controleer of er genoeg water in het waterreservoir zit. Vul het
waterreservoir zo nodig met water (zie hoofdstuk ‘Klaarmaken voor
gebruik’).
2 Zorg ervoor dat de bean-funnel goed is bevestigd (zie hoofdstuk
‘Voor het eerste gebruik’).
Page 62

NEDERLANDS62
3 Leeg de lekbak als de ‘lekbak vol’-indicator zichtbaar is.
Opmerking: Als u de ‘lekbak vol’-indicator negeert, kan de lekbak tijdens het
kofezetten overstromen en kan er water onder het apparaat terechtkomen.
4 Plaats 1 of 2 koppen op de lekplaat.
5 Druk op de 1-kops of 2-kops knop.
Tip: U kunt het kofezetten altijd onderbreken om sterkere kofe te krijgen.
Hiervoor drukt u op dezelfde knop (1-kops knop of 2-kops knop) waarop u
hebt gedrukt om het kofezetten te starten.
Opmerking: Elke kop kofe wordt gezet van versgemalen bonen.
- Druk op de 1-kops knop om 1 kop kofe te zetten.
, De kofezetter maalt de benodigde hoeveelheid kofebonen voor
een kop en zet dan één kop kofe.
, Het activiteitslampje knippert één keer wanneer de bonen gemalen zijn.
- Druk op de 2-kops knop om 2 koppen kofe te zetten.
, De kofezetter maalt de noodzakelijke hoeveelheid kofebonen voor
één kop en vult tijdens het kofezetten beide koppen voor de helft.
Dan maalt de kofezetter opnieuw de kofebonen voor één kop en
vult beide koppen ook voor de andere helft.
, Het activiteitslampje knippert één keer wanneer de bonen voor de
eerste helft gemalen zijn en tweemaal wanneer de bonen voor de
tweede helft gemalen zijn.
Opmerking: Als de kofezetter tijdens het kofezetten stopt, is het
waterreservoir of de bean-funnel mogelijk leeg of is de kofedikbak mogelijk
vol. Vul het waterreservoir, vervang de bean-funnel of leeg de kofedikbak en
druk opnieuw op de 2-kops knop om het kofezetten te voltooien. Neem de
kofedikbak 3 seconden uit het apparaat tot het ‘bean-funnel leeg’-lampje
stopt met knipperen en plaats de bak dan terug.
6 Wanneer het ‘bean-funnel leeg’-lampje gaat branden, is de bean-
funnel leeg.
Page 63

MAX
NEDERLANDS 63
7 Om de lege bean-funnel te vervangen met een volle bean-funnel,
draait u de bean-funnel linksom (1) en verwijdert u deze (2). Voer
vervolgens stap 1 uit om een nieuwe volle bean-funnel op de
kofezetter te plaatsen.
Opmerking: U kunt een Douwe Egberts SENSEO
nog niet leeg is, verwijderen en vervangen door een andere bean-funnel als u
naar een andere kofemelange wilt overschakelen. Omdat de bean-funnel kan
worden hersloten, kunt u deze opbergen en later verder gebruiken.
Verwijder de bean-funnel nooit wanneer de kofezetter in werking is.
Een kan kofe zetten
Wanneer u op de kanknop drukt, zet de kofezetter zes koppen kofe
in de kan.
Opmerking: Maak de kan voor het eerste gebruik altijd schoon met warm
water en een beetje afwasmiddel. Als u de kan een tijdje niet hebt gebruikt,
spoel de kan dan met warm water om geuren te verwijderen.
1 Controleer of het waterreservoir tot de MAX-aanduiding is
gevuld. Vul het waterreservoir zo nodig met water (zie hoofdstuk
‘Klaarmaken voor gebruik’).
Opmerking: Als u het waterreservoir niet tot de MAX-aanduiding vult, kan het
‘waterreservoir leeg’-lampje gaan branden en kan de kofezetter tijdens het
kofezetten stoppen. Vul het waterreservoir en druk op de kanknop om verder
te gaan met kofezetten.
2 Zorg ervoor dat de bean-funnel goed is bevestigd en genoeg bonen
bevat om een kan kofe te zetten.
Opmerking: De kofebonen moeten zichtbaar zijn boven de kanmarkering
van de bean-funnel. Als dit niet het geval is, zitten er niet genoeg kofebonen
in de bean-funnel om zes koppen kofe te zetten. Vervang de bean-funnel met
een volle bean-funnel of een bean-funnel die genoeg kofebonen bevat (zie
hoofdstuk ‘Voor het eerste gebruik’).
Opmerking: Als de bean-funnel tijdens het kofezetten leeg raakt, gaat
het ‘bean-funnel leeg’-lampje branden en stopt de kofezetter tijdens het
kofezetten. Vervang de bean-funnel met een volle bean-funnel of een beanfunnel die genoeg kofebonen bevat (zie hoofdstuk ‘Voor het eerste gebruik’)
en druk op de kanknop om verder te gaan met kofezetten.
3 Verwijder de afneembare kofetuit, indien aanwezig.
4 Leeg de kofedikbak en de lekbak altijd voordat u begint met het
zetten van een kan kofe.
Opmerking: Als u de lekbak niet leegt, kan de lekbak tijdens het kofezetten
overstromen.
®
SARISTA-bean-funnel die
Page 64

NEDERLANDS64
Opmerking: Als u de kofedikbak niet leegt, kan het ‘kofedikbak vol’-lampje
gaan branden en kan de kofezetter tijdens het kofezetten stoppen. Zorg
ervoor dat het apparaat ingeschakeld is wanneer u de kofedikbak leegt.
Neem de bak 3 seconden uit het apparaat tot het ‘bean-funnel leeg’-lampje
stopt met knipperen voordat u de bak terugplaatst. Druk op de kanknop om
verder te gaan met kofezetten.
5 Draai het deksel van de kan met de hendel naar de stand ‘gesloten/
kofezetten’. In deze stand wijst de pijl op het handvat van de kan
naar het symbool ‘gesloten/kofezetten’ op het deksel van de kan.
6 Plaats de kan op de lekplaat.
Tip: Als u de kofe langer warm wilt houden, spoel dan de kan met heet water.
Hierdoor wordt de kan voorverwarmd voordat u kofe gaat zetten.
7 Druk op de kanknop.
Opmerking: Elke kop kofe wordt gezet van versgemalen bonen.
, De kofezetter maalt de benodigde hoeveelheid kofebonen voor de
eerste kop kofe en zet dan kofe in de kan. De kofezetter maalt
kofebonen en zet nog vijf keer kofe om de kan te vullen.
, Het activiteitslampje knippert één keer wanneer de bonen voor
de eerste kop gemalen zijn, tweemaal wanneer de bonen voor de
tweede kop gemalen zijn enz.
, De kofezetter stopt automatisch na het zetten van de zesde kop en
het activiteitslampje blijft branden.
8 Neem de kan uit de kofezetter wanneer het kofezetten is voltooid
9 Om kofe in te schenken, draait u het deksel naar de schenkstand.
In deze stand wijst de pijl op het handvat van de kan naar het
schenksymbool op het deksel van de kan.
Opmerking: Om de kofe in de kan warm te houden, draait u het deksel altijd
meteen na het uitschenken van de kofe naar de stand ‘gesloten/kofezetten’.
Page 65

NEDERLANDS 65
10 Leeg de lekbak.
De kofesterkte kiezen (alleen HD8030)
Met de kofesterkteknop kiest u de gewenste kofesterkte voor elke kop kofe.
Opmerking: U kunt de kofesterkte alleen veranderen als u 1 of 2 koppen zet.
De kofesterkteknop werkt niet als u een kan kofe zet. Als u een kan zet,
krijgt u de standaardkofesterkte en dat is normale kofe.
1 Druk een of meerdere keren op de kofesterkteknop om de
gewenste sterkte te kiezen.
, Het bijbehorende kofesterktelampje gaat branden.
- e = kleine kop sterke kofe
- d = normale kofe
- c= grote kop milde kofe
Handmatige spoelcyclus
Naast de automatische spoelcyclus kunt u ook op ieder gewenst moment
een handmatige spoelcyclus uitvoeren. U kunt een handmatige spoelcyclus
uitvoeren wanneer u naar een andere variant overschakelt. Door te spoelen
kunt u van het volledige aroma van de gekozen kofemelange genieten.
1 Controleer of het waterreservoir voldoende is gevuld en of het
activiteitslampje brandt.
2 Draai de bean-funnel linksom om deze te verwijderen.
3 Plaats een kop op de lekplaat.
4 Druk op de 1-kops knop om de spoelcyclus te beginnen.
Page 66

NEDERLANDS66
Schoonmaken en onderhoud
Dompel de kofezetter nooit in water of een andere vloeistof en spoel
de kofezetter ook niet af onder de kraan.
Haal altijd de stekker uit het stopcontact en laat de kofezetter afkoelen
voordat u deze gaat schoonmaken.
Opmerking: Geen van de afneembare delen noch de kofezetunit en de kan
zijn vaatwasmachinebestendig. Spoel ze onder de kraan.
Het waterreservoir, de kofedikbak en de lekbak schoonmaken
Leeg en reinig het waterreservoir, de kofedikbak en de lekbak elke
dag. Leeg en reinig het waterreservoir en de kofedikbak ook wanneer
het ‘waterreservoir leeg’-lampje en/of het ‘kofedikbak vol’-lampje gaat
branden. Leeg en spoel de lekbak wanneer de ‘lekbak vol’-indicator
aangeeft dat de lekbak vol is.
1 Neem het waterreservoir van de kofezetter.
2 Verwijder het lter uit de houder in het waterreservoir en spoel het
lter af onder de kraan.
3 Maak het waterreservoir schoon met warm water en wat
afwasmiddel.
4 Plaats het lter terug in de houder door het een beetje te draaien en
voorzichtig naar beneden te duwen.
5 Vul het waterreservoir met vers, koud kraanwater en schuif het
terug in de kofezetter.
6 Verwijder de kofedikbak uit de kofezetter en leeg deze.
7 Maak de kofedikbak schoon met warm water en een beetje
afwasmiddel.
8 Schuif de kofedikbak terug in de kofezetter.
Page 67

NEDERLANDS 67
9 Trek de lekbak uit de kofezetter.
10 Verwijder de lekplaat en leeg de lekbak.
11 Maak de lekbak en de lekplaat schoon met warm water en een
beetje afwasmiddel.
12 Maak de geleidegroeven voor de lekbak onder in de kofezetter
schoon met een vochtige doek.
De afneembare kofetuit schoonmaken
1 Verwijder de afneembare kofetuit.
2 Spoel de afneembare kofetuit onder de kraan met een beetje
afwasmiddel.
3 Schuif de afneembare kofetuit terug in de kofezetter of berg deze op.
De kan schoonmaken
Maak de kan na elk gebruik schoon.
Gebruik geen agressieve schoonmaakmiddelen, oplosmiddelen of
chemische stoffen om de kan schoon te maken.
1 Ontgrendel het deksel door de hendel naar het verwijdersymbool te
draaien. Trek het deksel vervolgens van de kan.
Page 68

NEDERLANDS68
2 Spoel de binnenkant van de kan en het deksel af met warm water en
een beetje afwasmiddel. Maak de buitenkant van de kan schoon met
een vochtige doek.
Opmerking: De kan is niet vaatwasmachinebestendig.
3 Zet de kan rechtop met het deksel eraf en laat de binnenkant van de
kan drogen.
4 Als de binnenkant van de kan droog is, plaatst u het deksel op de kan
en draait u het naar de stand ‘gesloten/kofezetten’.
De zetgroep schoonmaken
Maak de zetgroep niet schoon in de vaatwasmachine en gebruik geen
zeep of schoonmaakmiddelen om deze schoon te maken.
Reinig de zetgroep elke keer als de bean-funnel leeg is en anders ten
minste één keer per week. Voor meer informatie over het verwijderen,
reinigen en terugplaatsen van de zetgroep bekijkt u de instructielms op
www.philips.com/senseo-sarista/support.
1 Schakel de kofezetter uit en haal de stekker uit het stopcontact.
2 Verwijder de kofedikbak uit de kofezetter.
3 Open de servicedeur.
Page 69

NEDERLANDS 69
4 Druk op de PUSH-knop (1) en trek aan de handgreep van de
zetgroep (2) om deze uit de kofezetter te verwijderen.
5 Spoel de buitenkant van de zetgroep af onder een lauwe kraan.
Gebruik nooit zeep of een ander schoonmaakmiddel om de zetgroep
schoon te maken.
Droog de zetgroep niet met een doek om te voorkomen dat zich vezels
ophopen in de zetgroep. Schud alleen het overtollige water na het
spoelen af.
6 Spoel het bovenste lter voorzichtig af onder een lauwe kraan.
7 Reinig de binnenkant van de kofezetter grondig met een vochtige
doek.
8 Zorg dat de twee referentietekens op de zijkant bij elkaar passen
voordat u de zetgroep terug in de kofezetter schuift. Als ze niet bij
elkaar passen, voert u de volgende stap uit:
Page 70

NEDERLANDS70
- Zorg dat de hendel contact maakt met de voet van de zetgroep.
9 Zorg dat de vergrendelhaak van de zetgroep in de juiste stand staat.
De haak is niet juist geplaatst als deze nog steeds in onderste stand
staat.
- Om de haak in de juiste stand te zetten, drukt u de haak omhoog
totdat deze in de bovenste stand staat.
10 Schuif de zetgroep over de geleiderrails aan de zijkant terug in de
kofezetter tot deze vastklikt.
Druk niet op de PUSH-knop.
11 Sluit de servicedeur.
Page 71

NEDERLANDS 71
Smeren
Voor optimale prestaties van de kofezetter smeert u de zetgroep na 400
koppen kofe of eens per maand.
- Voor meer informatie over wat en hoe te smeren bekijkt u de
instructielms op www.philips.com/senseo-sarista/support.
- Voor optimale resultaten raden wij u aan om het smeermiddel van
Philips te gebruiken. U kunt dit smeermiddel kopen via de Online Shop:
www.shop.philips.com/service.
1 Schakel de kofezetter uit en haal de stekker uit het stopcontact.
2 Volg stap 2 tot en met 4 in ‘De zetgroep schoonmaken’ om de
zetgroep uit de kofezetter te verwijderen.
3 Smeer wat smeermiddel op de geleiderrails in de zetgroep.
4 Smeer wat smeermiddel rond de as in de onderkant van de zetgroep.
5 Smeer wat smeermiddel op het gedeelte dat wordt getoond in
de afbeelding.
6 Smeer wat smeermiddel aan beide zijden van de hendel in
de zetgroep.
7 Volg stap 9 tot en met 11 van ‘De zetgroep schoonmaken’ om de
zetgroep en de kofedikbak terug in de kofezetter te plaatsen.
Page 72

NEDERLANDS72
De maalsterkte instellen
De instelling van de molen kan na verloop van tijd veranderen in een
grovere maling. Het wordt aangeraden de maalsterkte in te stellen wanneer
u dit opmerkt. Deze aanpassingen zijn niet regelmatig vereist.
1 Neem het hulpmiddel voor het aanpassen van de maalsterkte uit de
uitsparing naast de zetgroep.
2 Steek het nokje op het brede uiteinde van het hulpmiddel
voor het aanpassen van de maalsterkte naast de dop van het
maalsterkteaanpassingsgat en druk zachtjes. Hierdoor opent de dop
automatisch.
3 Steek het smalle uiteinde van het hulpmiddel voor het aanpassen van
de maalsterkte in het maaltsterkteaanpassingsgat zodat de opening in
het hulpmiddel op de pin onder in het gat past.
4 Voor een grovere maling duwt u het hulpmiddel voor het aanpassen
van de maalsterkte omlaag en draait u het rechtsom. Voor een jnere
maling duwt u het hulpmiddel voor het aanpassen van de maalsterkte
omlaag en draait u het linksom.
Opmerking: Draai het hulpmiddel voor het aanpassen van de maalsterkte
steeds één stap linksom of rechtsom. Zet dan 2 of 3 koppen kofe om te
controleren of de maalsterkte naar wens is ingesteld.
5 Wanneer u tevreden bent met de maalsterkte, verwijdert u
het hulpmiddel voor het aanpassen van de maalsterkte uit het
maalsterkteaanpassingsgat, sluit u de dop en plaatst u het hulpmiddel
terug in de uitsparing.
De kofezetter ontkalken
Tijdens het gebruik van de kofezetter ontstaat kalk. Het is van groot
belang dat de kofezetter wordt ontkalkt wanneer het CALC CLEAN-
lampje brandt. Gebruik alleen de speciale Philips SENSEO
®
SARISTA-
ontkalkoplossing (CA6400) voor de ontkalking van de kofezetter. Voor
meer informatie over hoe u deze kofezetter kunt ontkalken, bekijkt u de
instructielms op www.philips.com/senseo-sarista/support.
Wanneer ontkalken
- Ontkalk de kofezetter zoals hieronder wordt beschreven zodra het
CALC CLEAN-lampje ononderbroken gaat branden.
Waarom ontkalken
Waarom u de kofemachine zou moeten ontkalken:
- Het verlengt de levensduur van uw kofezetter
- Het zorgt ervoor dat uw kop volledig wordt gevuld
- Het zorgt ervoor dat de kofe zo warm mogelijk is
- Het voorkomt storingen
Page 73

NEDERLANDS 73
Als u de kofezetter niet regelmatig ontkalkt of als u de
ontkalkingsprocedure niet correct uitvoert, blijven kalkresten achter in de
kofezetter. Dit zorgt dat kalk zich sneller ontwikkelt en zal er uiteindelijk
voor zorgen dat uw kofezetter niet meer goed werkt. Als dit gebeurt,
wordt de reparatie niet door de garantie gedekt.
Ontkalker
Gebruik alleen de speciale Philips SENSEO
(CA6400) om de kofezetter te ontkalken. Deze oplossing is ontworpen
om gedurende de levensduur van de kofezetter voortdurend goede
prestaties te garanderen.
- U kunt Philips SENSEO
®
SARISTA-ontkalkoplossing kopen in de Online
Shop: www.shop.philips.com/service.
Houd de es met ontkalkoplossing buiten het bereik van kinderen. Drink
nooit het water met het ontkalkingsmengsel dat u in het waterreservoir
giet of het water met resten dat tijdens de ontkalkingsprocedure uit de
kofezetter stroomt.
Ontkalkingsprocedure
De ontkalkingsprocedure duurt 45 minuten en bestaat uit een
ontkalkingscyclus en twee reinigingscycli. Onderbreek de ontkalkingscyclus
niet en schakel de kofezetter niet uit voordat u de twee reinigingscycli
hebt voltooid.
Zorg er voordat u de ontkalkingsprocedure begint voor dat het
activiteitslampje ononderbroken groen brandt. Hiervoor volgt u de
volgende stappen.
1 Zorg ervoor dat de bean-funnel goed is bevestigd.
2 Leeg de kofedikbak.
3 Zorg ervoor dat het waterreservoir is gevuld met water.
Opmerking: Zodra u de ontkalkingscyclus hebt gestart, kunt u deze niet
afsluiten voor de ontkalkingsprocedure is voltooid. Zelfs wanneer u de stekker
uit het stopcontact neemt, blijft de ontkalkingscyclus in de machine actief.
Ontkalkingscyclus
1 Druk gedurende 3 seconden tegelijkertijd op de 1-kops knop en
de 2-kops knop tot het CALC CLEAN-lampje begint te knipperen.
Wanneer het CALC CLEAN-lampje snel knippert, kunt u de
ontkalkingscyclus beginnen.
®
SARISTA-ontkalkoplossing
Page 74

NEDERLANDS74
2 Verwijder het waterreservoir uit de kofezetter en leeg het.
®
SARISTA-
MAX
3 Giet de inhoud van een esje Philips SENSEO
ontkalkoplossing (250 ml) in het waterreservoir en voeg vervolgens
1 liter kraanwater toe om het waterreservoir te vullen tot de
MAX-aanduiding.
4 Schuif het waterreservoir terug in de kofezetter.
5 Haal de afneembare kofetuit of de kofekan uit de kofezetter.
6 Zorg ervoor de lekbak leeg is.
7 Plaats een kom met een inhoud van 1,5 liter op de lekplaat.
8 Druk gedurende één seconde tegelijkertijd op de 1-kops knop en de
2-kops knop om de ontkalkingsprocedure te beginnen.
Page 75

NEDERLANDS 75
, Het activiteitslampje en het CALC CLEAN-lampje knipperen beide
langzaam om aan te geven dat de ontkalkingscyclus is begonnen.
, De waterontkalkoplossing stroomt met tussenpozen uit de
kofezetter. De kofezetter stopt een paar keer met ontkalken om
de ontkalkoplossing te laten inwerken.
, Wanneer het waterreservoir leeg is, is de ontkalkingscyclus
beëindigd. Het activiteitslampje gaat uit, het CALC CLEAN-lampje
begint snel te knipperen en het ‘waterreservoir leeg’-lampje gaat
branden. Ga door met de spoelcyclus.
Schakel de kofezetter niet uit en onderbreek de ontkalkingscyclus niet.
Opmerking: Als u de kofezetter tijdens de ontkalkingscyclus uitschakelt en u
schakelt deze vervolgens weer in, dan begint het C ALC CLEAN-lampje snel te
knipperen. In dat geval moet u de volledige ontkalkingsprocedure vanaf het
begin uitvoeren.
Spoelcyclus
1 Verwijder het waterreservoir uit de kofezetter.
2 Spoel het waterreservoir onder de kraan.
3 Vul het waterreservoir met koud kraanwater tot de MAX-aanduiding
en schuif het waterreservoir terug in de kofezetter.
MAX
4 Leeg de kom (1) en plaats deze terug op de lekplaat (2).
5 Druk gedurende één seconde tegelijkertijd op de 1-kops knop en de
2-kops knop om de spoelcyclus te beginnen.
Page 76

NEDERLANDS76
, Het activiteitslampje en het CALC CLEAN-lampje knipperen langzaam.
, Tijdens het doorspoelen stroomt ononderbroken water uit de
kofezetter.
6 Wanneer het activiteitslampje uit gaat, het ‘waterreservoir leeg’-
lampje gaat branden en het CALC CLEAN-lampje snel begint te
knipperen, leegt u de kom en spoelt en vult u het waterreservoir.
7 Druk gedurende één seconde tegelijkertijd op de 1-kops knop en de
2-kops knop om de tweede spoelcyclus te beginnen.
, Wanneer al het water in het waterreservoir is opgebruikt, is de
volledige ontkalkingsprocedure voltooid en schakelt de kofezetter uit.
Onderbreek de spoelcycli niet.
Opmerking: Als u de kofezetter uitschakelt voordat deze twee spoelcycli heeft
voltooid en u schakelt deze vervolgens weer in, dan begint het C ALC CLEANlampje snel te knipperen. In dat geval moet u twee spoelcycli uitvoeren om
ervoor te zorgen dat het CALC CLEAN-lampje uitgaat.
Accessoires bestellen
Ga naar onze Online Shop op www.shop.philips.com/service om
accessoires voor deze kofezetter te kopen. Ga naar uw Philips-dealer of
een Philips-servicecentrum als de Online Shop niet beschikbaar is in uw land.
Als u problemen hebt met het vinden van accessoires voor uw kofezetter,
neem dan contact op met het Philips Consumer Care Centre in uw land. U
vindt de contactgegevens in het ‘worldwide guarantee’-vouwblad.
Extra kan voor HD8010
U kunt een kan kopen als accessoire voor HD8010 onder nummer CA6501.
Opmerking: De instructies voor de kan die in deze gebruiksaanwijzing zijn
opgenomen, zijn ook van toepassing op deze kan.
Page 77

NEDERLANDS 77
Milieu
- Gooi deze kofezetter aan het einde van zijn levensduur niet weg met
het normale huisvuil, maar lever de kofezetter in op een door de
overheid aangewezen inzamelpunt om het apparaat te laten recyclen.
Op die manier levert u een bijdrage aan een schonere leefomgeving.
- Douwe Egberts SENSEO
herbruikbaar plastic gemaakt. Lege bean-funnels kunnen worden
weggegooid in recyclebakken voor plastic of kunnen worden
gerecycled via het plaatselijke afvalverwerkingsbedrijf.
Garantie en service
Als u service of informatie nodig hebt of als u een probleem ondervindt,
bezoek dan de ondersteuningspagina op de Philips-website
www.philips.com/senseo-sarista/support of neem contact op met
het Philips Consumer Care Centre in uw land. Het telefoonnummer vindt
u in het ‘worldwide guarantee’-vouwblad. Als er geen Consumer Care
Centre in uw land is, ga dan naar uw plaatselijke Philips-dealer.
Garantiebeperkingen
De garantie vervalt als u iets anders gebruikt dan de originele,
onveranderde bean-funnels van D.E. Master Blenders.
Betekenis van lampjes
®
SARISTA bean-funnels zijn van 100%
Lampjes Betekenis Handeling
Het ‘waterreservoir
leeg’-lampje brandt
Er zit niet genoeg water
in het waterreservoir.
Vul het waterreservoir (zie hoofdstuk ‘Klaarmaken
voor gebruik’).
ononderbroken.
Het waterreservoir is
Plaats het waterreservoir correct in de kofezetter.
niet correct geplaatst.
Het ‘waterreservoir
leeg’-lampje brandt
ononderbroken en
het activiteitslampje
Er zit niet genoeg water
in het waterreservoir
om verder te gaan met
kofezetten.
Vul het waterreservoir en druk opnieuw op de
knop van de kofe die u aan het zetten was om
verder te gaan met het kofezetproces.
knippert.
Het ‘kofedikbak
vol’-lampje brandt
ononderbroken.
De kofedikbak zit vol. Verwijder, leeg en reinig de kofedikbak. Neem
de kofedikbak 3 seconden uit het apparaat tot
het ‘bean-funnel leeg’-lampje stopt met knipperen
en plaats de bak dan terug. Zorg ervoor dat de
kofezetter ingeschakeld blijft.
De kofedikbak is niet
Plaats de kofedikbak correct in de kofezetter.
correct geplaatst.
Page 78

NEDERLANDS78
Lampjes Betekenis Handeling
Het ‘kofedikbak
vol’-lampje brandt
ononderbroken en
het activiteitslampje
knippert.
Het ‘bean-funnel
leeg’-lampje brandt
ononderbroken.
Het ‘bean-funnel
leeg’-lampje brandt
ononderbroken en
het activiteitslampje
knippert.
Het activiteitslampje
knippert snel.
Het activiteitslampje
knippert langzaam.
Het activiteitslampje
knippert tijdens het
malen.
Het CALC CLEANlampje brandt
ononderbroken.
Het CALC CLEANlampje knippert snel.
Het CALC CLEANlampje en het
activiteitslampje
knipperen langzaam.
De kofedikbak is vol
en de kofezetter kan
niet verder gaan met
kofezetten.
De bean-funnel is leeg. Vervang de bean-funnel (zie hoofdstuk ‘Voor het
De bean-funnel is niet
correct geplaatst.
Er zitten niet genoeg
bonen in de beanfunnel om verder te
gaan met kofezetten.
De servicedeur is open. Sluit de servicedeur.
De zetgroep is niet
correct geplaatst.
De zetgroep is verstopt. Reinig de zetgroep (zie hoofdstuk ‘Schoonmaken
De kofezetter is aan
het opwarmen of
doorspoelen.
Dit geeft aan welke kop
wordt gezet.
U moet de kofezetter
ontkalken.
Dit gebeurt tussen
de verschillende
ontkalkingscycli.
De kofezetter
schakelde tijdens de
ontkalkingsprocedure uit.
De kofezetter is bezig
met ontkalken.
Verwijder, leeg en reinig de kofedikbak. Neem
de kofedikbak 3 seconden uit het apparaat tot
het ‘bean-funnel leeg’-lampje stopt met knipperen
en plaats de bak dan terug. Zorg ervoor dat de
kofezetter ingeschakeld blijft. Druk opnieuw op
dezelfde knop van de kofe die u aan het zetten
was om verder te gaan met het kofezetproces.
eerste gebruik’).
Zie hoofdstuk ‘Voor het eerste gebruik’.
Vervang de bean-funnel en druk opnieuw op de
knop van de kofe die u aan het zetten was om
verder te gaan met het kofezetproces.
Plaats de zetgroep op de juiste manier (zie
hoofdstuk ‘Schoonmaken en onderhoud’).
en onderhoud’).
Wacht totdat het activiteitslampje ononderbroken
blijft branden.
Het activiteitslampje knippert eenmaal of tweemaal
wanneer u een of twee koppen zet. Het knippert
1-6 keer wanneer u een kan kofe zet: één keer
voor de eerste kop, twee keer voor de tweede kop,
drie keer voor de derde kop enz.
Volg de instructies in hoofdstuk ‘De kofezetter
ontkalken’.
Volg de instructies in hoofdstuk ‘De kofezetter
ontkalken’. Onderbreek de ontkalkingsprocedure niet!
Start de ontkalkingsprocedure opnieuw (zie
hoofdstuk ‘De kofezetter ontkalken’).
Zie hoofdstuk ‘De kofezetter ontkalken’.
Page 79

Lampjes Betekenis Handeling
NEDERLANDS 79
Het CALC CLEANlampje knippert snel
Dit gebeurt tijdens de
ontkalkingscyclus.
en het ‘waterreservoir
leeg’-lampje brandt.
Dit gebeurt tijdens de
spoelcyclus.
Problemen oplossen
Dit hoofdstuk behandelt de problemen die het vaakst bij uw kofezetter
voorkomen. Als u het probleem niet kunt oplossen met de onderstaande
informatie, gaat u naar www.philips.com/senseo-sarista/support
voor een lijst met veelgestelde vragen of neemt u contact op met het
Consumer Care Centre in uw land. Op deze site kunt u ook instructielms
bekijken over hoe u uw Philips SENSEO
schoonmaakt en ontkalkt.
Probleem Mogelijke oplossing
De kofezetter schijnt te
lekken en/of er zit water
in de lekbak.
Dit is normaal. Om de perfecte kop kofe te garanderen gebruikt de
kofezetter water het zetsysteem te spoelen. Dit gebeurt tijdens de
automatische spoelcyclus die wordt geactiveerd wanneer de kofezetter
langere tijd (20 uur) niet is gebruikt en voor en na het zetten van elke kop.
Een deel van het water stroomt door het interne systeem rechtstreeks in de
lekbak. Leeg de lekbak regelmatig en in ieder geval voor u een kan kofe zet.
Wanneer u de
kofezetter moet
ontkalken.
U moet de kofezetter ontkalken wanneer het CALC CLEAN-lampje
ononderbroken brandt. Wanneer het CALC CLEAN-lampje brandt, hangt
af van de gebruiksfrequentie. Wanneer u zeer vaak kofezet, moet u eerder
ontkalken dan wanneer u minder vaak kofezet.
De kofezetter werkt niet.
Steek de stekker in het stopcontact en schakel de kofezetter in.
Controleer of het voltage dat is aangegeven op de kofezetter overeenkomt
met de plaatselijke netspanning.
Vul het waterreservoir met water.
Als het activiteitslampje snel knippert, controleer dan of de zetgroep correct
is geplaatst en of de servicedeur goed is gesloten (zie hoofdstuk ‘De zetgroep
schoonmaken’).
Als het CALC CLEAN-lampje snel knipper t, hebt u de kofezetter tijdens
de ontkalkingsprocedure uitgeschakeld (zie hoofdstuk ‘De kofezetter
ontkalken’). Start de ontkalkingsprocedure opnieuw.
Leeg de kom, spoel en vul het waterreservoir en ga
verder met de spoelcyclus.
Leeg de kom, spoel en vul het waterreservoir en
ga verder met de spoelcyclus. Druk gedurende één
seconde tegelijkertijd op de 1-kops knop en de
2-kops knop om de tweede spoelcyclus te beginnen.
®
SARISTA-kofezetter gebruikt,
Page 80

NEDERLANDS80
Probleem Mogelijke oplossing
De kofezetter maalt
de kofebonen, maar er
komt geen kofe uit.
De kofezetter stopt
met kofezetten
voordat de kop of
koppen gevuld zijn.
De kofezetter stopt
met kofezetten
voordat de kan is gevuld.
Ik kan de zetgroep niet
verwijderen.
Ik kan de kofezetunit
niet terugschuiven in de
kofezetter.
Ik kan de servicedeur
niet openen.
Ik kan de servicedeur
niet sluiten.
Er lekt kofe uit de
kofedoseerkop.
De zetgroep is vuil. Reinig de zetgroep (zie hoofdstuk ‘Schoonmaken en
onderhoud’).
De afneembare kofetuit is vuil. Spoel de afneembare tuit onder de kraan
(zie hoofdstuk ‘Schoonmaken en onderhoud’).
De kofedoseerkop is vuil. Gebruik een vochtige doek om de onderkant van
de kofedoseerkop schoon te maken.
De bean-funnel is niet goed bevestigd. Plaats de schroefdraad van de bean-
funnel goed in de opening in de bovenkant van de kofezetter. Draai de
bean-funnel vervolgens rechtsom om deze te bevestigen.
Controleer of het ‘waterreservoir leeg’-lampje, het ‘bean-funnel leeg’-lampje of
het ‘kofedikbak vol’-lampje brandt. Als het ‘waterreservoir leeg’-lampje brandt,
vult u het waterreservoir opnieuw. Als het ‘bean-funnel leeg’-lampje brandt,
vervangt u de lege bean-funnel met een volle bean-funnel. Als het ‘kofedikbak
vol’-lampje brandt, leegt u de kofedikbak. Druk opnieuw op dezelfde knop van
de kofe die u aan het zetten was om verder te gaan met het kofezetproces.
Controleer of het ‘waterreservoir leeg’-lampje, het ‘bean-funnel leeg’-lampje
of het ‘kofedikbak vol’-lampje brandt. Als het ‘waterreser voir leeg’-lampje
brandt, vult u het waterreservoir opnieuw. Als het ‘bean-funnel leeg’-lampje
brandt, vervangt u de lege bean-funnel met een volle bean-funnel. Als het
‘kofedikbak vol’-lampje brandt, leegt u de kofedikbak. Druk op de kanknop
om de kofezetcyclus te voltooien.
De zetgroep is uit positie. Haal de stekker van de kofezetter uit het
stopcontact. Sluit de servicedeur. Schuif de kofedikbak in de kofezetter.
Steek de stekker in het stopcontact. Schakel de kofezetter in. De zetgroep
zal nu automatisch naar zijn uitgangspositie terugkeren.
Controleer of de referentietekens op de zijkant van de zetgroep bij elkaar passen.
Zorg dat de vergrendelhaak van de zetgroep in de juiste stand staat. Schuif de
zetgroep over de geleiderrails aan de zijkant terug in de kofezetter. Zie hoofdstuk
‘Schoonmaken en onderhoud’ of bekijk de instructielm over het schoonmaken
van de zetgroep op www.philips.com/senseo-sarista/support.
Misschien probeert u de servicedeur te openen om de zetgroep te
verwijderen terwijl de kofedikbak nog in de kofezetter zit. Verwijder eerst
de kofedikbak, open vervolgens de servicedeur en verwijder daarna de
zetgroep.
De zetgroep is uit positie. Zorg dat de vergrendelhaak van de zetgroep in de
juiste stand staat. U moet een klik horen wanneer u de zetgroep in de juiste
positie schuift.
U hebt de kofedikbak geplaatst voordat u probeerde de servicedeur te
sluiten. Sluit de servicedeur altijd goed voordat u de kofedikbak terugschuift
in de kofezetter.
De kofedoseerkop is vuil. Gebruik een vochtige doek om de onderkant van
de kofedoseerkop schoon te maken.
Page 81

Probleem Mogelijke oplossing
De kofe is te slap. Kies een bean-funnel met een sterkere kofevariant.
Alleen HD8030: gebruik de kofesterkteknop om de kofesterkte op ‘sterk’
te zetten.
U kunt op alle modellen sterkere kofe krijgen door minder water te
gebruiken voor het kofezetten. Druk op dezelfde knop (1-kops knop of
2-kops knop) waarop u hebt gedrukt om het kofezetten te starten om op
ieder gewenst moment het kofezetten te stoppen.
De kofe is niet heet
genoeg.
Het ‘waterreservoir
leeg’-lampje, het
‘kofedikbak vol’-
lampje, het ‘bean-funnel
leeg’-lampje en het
CALC CLEAN-lampje
knipperen gelijktijdig.
De malingen zijn grover
geworden.
Als de temperatuur geleidelijk is afgenomen, moet u de kofezetter ontkalken
(zie hoofdstuk ‘De kofezetter ontkalken’).
Verricht een handmatige spoelcyclus om de binnenkant van de kofezetter
voor te verwarmen (zie ‘Handmatige spoelcyclus’ in hoofdstuk ‘De
kofezetter gebruiken’).
Spoel de kan met heet water voordat u kofe gaat zetten.
Gebruik geen melk die net uit de koelkast komt.
Verwarm de koppen voor door ze met heet water te spoelen. Gebruik
dunwandige koppen; deze absorberen minder warmte van de kofe dan
dikwandige koppen.
Probeer de kofezetter te resetten. Als u de kofezetter wilt resetten, schakel
deze dan uit en haal de stekker uit het stopcontact. Verwijder de zetgroep, de
bean-funnel, de kofedikbak en het waterreservoir. Zet deze vervolgens allemaal
terug. Sluit de kofezetter aan en schakel deze in. Mogelijk moet u deze handeling
2-3 keer herhalen voordat alle lampjes uit gaan. Als het probleem zich blijft
voordoen, gaat u naar www.philips.com/senseo-sarista/support of neemt
u contact op met het Consumer Care Centre.
Het wordt aangeraden de maalsterkte in te stellen wanneer u dit opmerkt. Deze
aanpassingen zijn niet regelmatig vereist. U kunt de kofemolen instellen met het
hulpmiddel voor het aanpassen van de maalsterkte dat zich achter de servicedeur
naast de zetgroep bevindt (zie hoofdstuk ‘Schoonmaken en onderhoud’).
NEDERLANDS 81
Technische specicaties
Functie Waarde/plaats
Nominale spanning Binnenkant servicedeur
Informatie over de voeding Binnenkant servicedeur
Materiaal Plastic
Snoerlengte 0,8 m
Capaciteit waterreservoir 1250 ml
Inhoud van kofedikbak 10 koeken
Inhoud van kofekan 6 koppen
Page 82

Page 83

Page 84

4203.000.7242.2
 Loading...