

Page 1
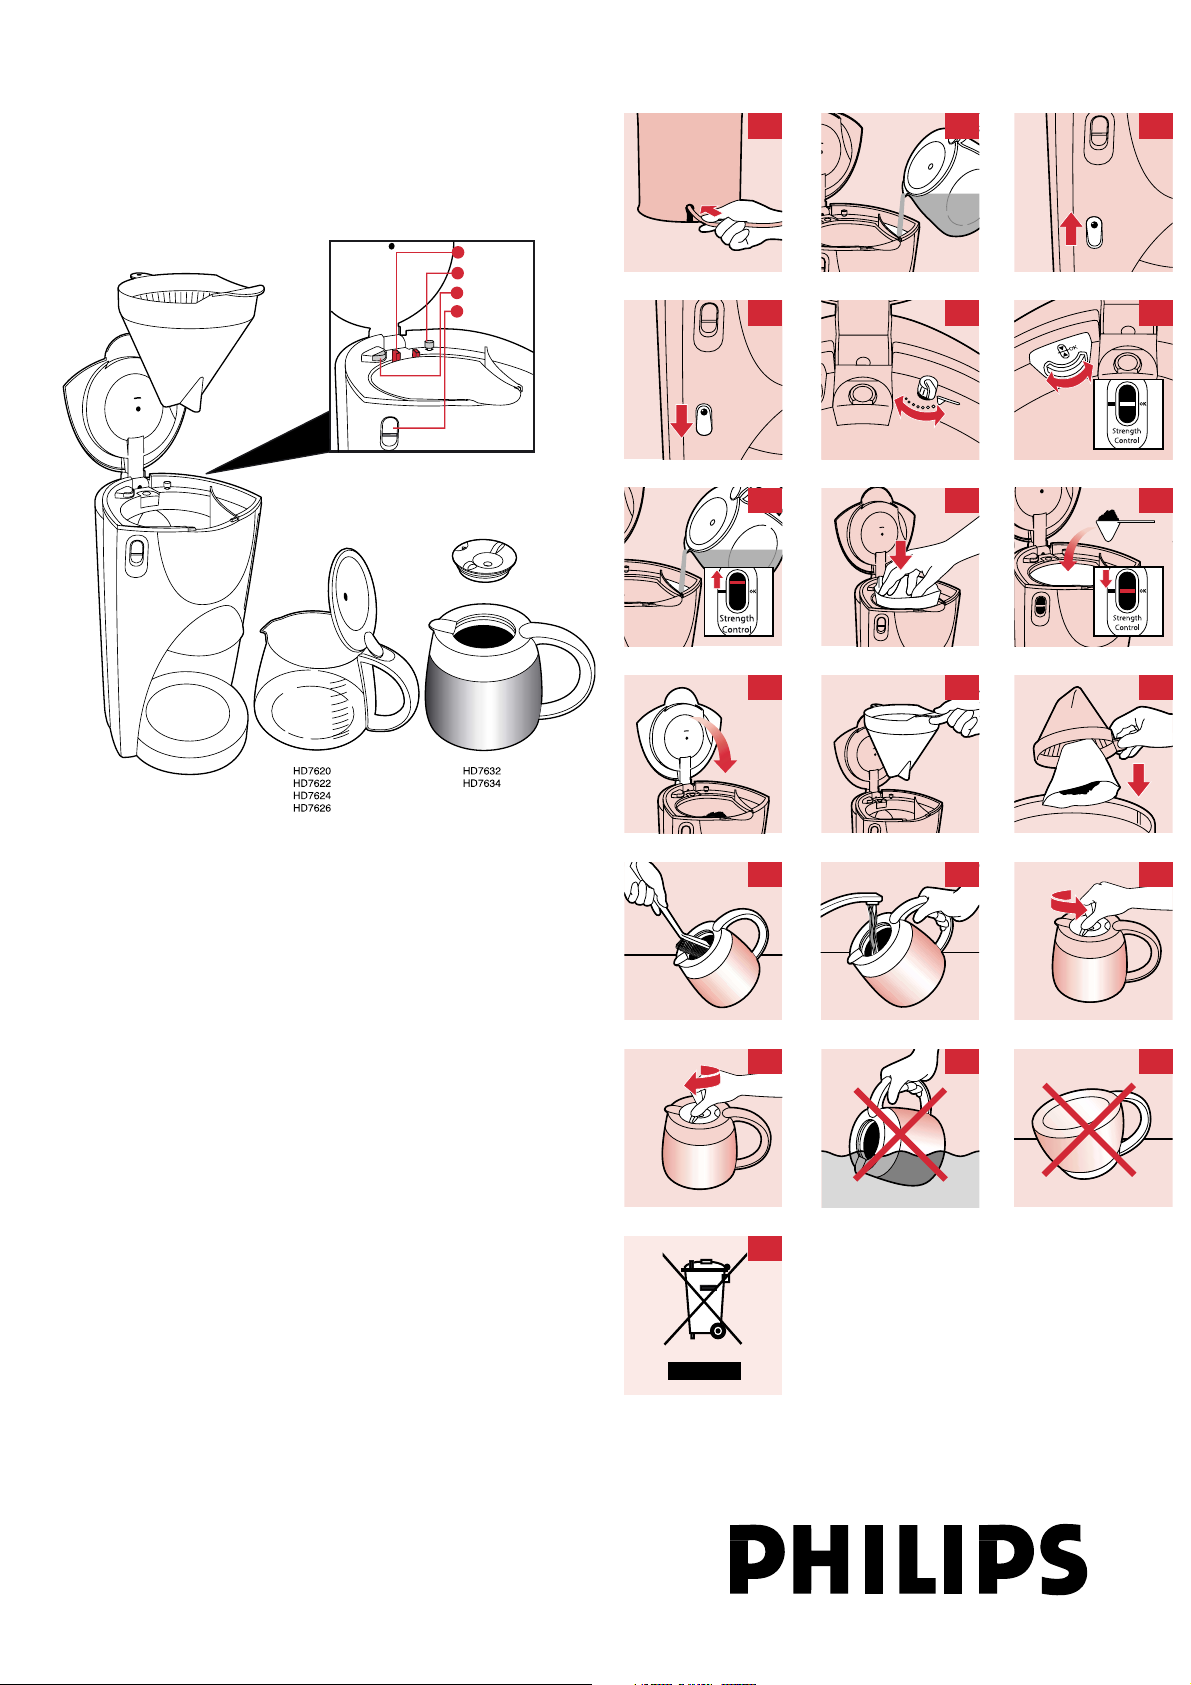
Essence
HD7634, HD7632, HD7626, HD7624, HD7622, HD7620,
1 2 3
4 5 6
7 8 9
10 11 12
13 14 15
16 17 18
19
a
b
c
d
Page 2
ENGLISH
Important
.
◗ Do not use the appliance if the plug, the cord or the appliance itself is damaged.
Thermos jug:
◗ Do not disassemble the thermos jug.
◗ To prevent water from entering the thermos jug, never immerse the jug in
water or any other liquid (fig. 17).
◗ When the jug is filled with coffee, put it in upright position to prevent leakage
(fig. 18).
◗ During brewing, the lower part of the appliance and the bottom of the thermos
jug will become hot.
◗ Tip: preheating the jug with hot water will help to keep the coffee hot after
brewing. Please note that the coffee stays hot longer if you prepare a full jug
than if you prepare a smaller amount
If the coffee maker has a longer brewing time or switches off before the water tank
is empty, you should descale the appliance (see 'Descaling)'.
Before first use
.
1 Check if the voltage indicated on the appliance corresponds to the mains
voltage in your home before you connect the appliance.
2 Put the appliance on a cool, flat and stable surface.
Do not put the appliance on a hot surface
3 Remove the red transportation clip (a) before you start using the appliance
Keep the appliance out of the reach of children and make sure that they are unable
to pull at the cord.
Flushing the appliance
.
1 Put the plug in an earthed wall socket.
2 You can store excess cord at the back of the appliance (fig. 1).
Prevent the cord from coming into contact with hot surfaces.
3 Fill the water tank with water and put the jug in place (fig. 2).
Thermos jug:
When you operate the appliance without ground coffee in the filter, do not fill the
water tank beyond the 9-cup mark, otherwise the jug will overflow.
4 Switch the appliance on by pressing the on/off button (fig. 3).
The pilot light goes on.
Let the appliance run until the water tank is completely empty.
5 Switch the appliance off after use (fig. 4).
Clean the removable parts as described in the section 'Cleaning'.
Brewing coffee
.
Active Balance System
The Active Balance System helps you determine the right balance between ground
coffee and water.
Before using the Active Balance System, please note the following:
Strength selector
Types HD7622, HD7624, HD7626, HD7634, HD7636.
1 Set the strength of your coffee by means of the strength selector knob (b).
If you prefer mild coffee, turn the knob to the left. If you prefer strong coffee, turn the
knob to the right (fig. 5).
Make sure the filter holder is in place when selecting the strength of your coffee.
Reset function
2 Put the system in balance by means of the 'OK' knob (c).
The indicator of the Active Balance System (d) can be put in 'OK' position by turning
the 'OK' knob to the left or to the right (fig. 6).
When putting the system in balance, make sure that:
- the filter holder is in place;
- the appliance does not contain any water and/or ground coffee.
3 First fill the water tank with water. The indicator of the Active Balance System
goes up (fig 7).
- The level indications apply to cups with a content of 120 ml.
- The level indications on the jug apply to an amount of water that is 10% more
than the total amount of coffee after brewing. This extra 10% is needed to
compensate for evaporation.
4 Put a paper filter (type 1x4 or no.4) in the filter holder (fig. 8).
Do not forget to fold the sealed edges of the filter in order to prevent tearing and
folding. Some versions come with a permanent filter. In this case you do not need to
use a paper filter.
5 Then fill the filter holder with coffee (filter-fine grind) until the indicator of the
Active Balance System has reached the 'OK' position (fig. 9) and switch the
appliance on.
6 Close the lid (fig. 10).
Switching the appliance on or off
.
1 Switch the appliance on by pressing the on/off button (fig. 3).
2 Switch the appliance off after use (fig. 4).
- Types HD7624, HD7626: If you have not switched the appliance off, the appliance
will automatically switch itself off after two hours (auto switch-off).
- Types HD7634, HD7636: The appliance will switch itself off automatically (auto
switch-off) after brewing coffee.
3 Remove the paper filter and throw it away (fig. 11-12).
If you have used a permanent filter, you can simply empty it, rinse it and use it again.
Let the appliance cool down for at least 3 minutes before you start brewing coffee
again.
Cleaning
.
1 Unplug the appliance.
2 Clean the appliance with a moist cloth.
Never immerse the appliance in water.
3 Clean the glass jug and the filter holder in hot water with some washing-up
liquid or in the dishwasher.
The thermos jug cannot be cleaned in the dishwasher.
Thermos jug (fig. 13-14):
Clean the inside of the thermos jug with a soft brush, hot water and some washing-up
liquid. The thermos jug is not dishwasher-proof.
After cleaning, rinse the thermos jug with fresh hot water.
Tip: To remove stubborn brown deposits, fill the jug with hot water and add a
spoonful of soda. Leave the soda to do its work for some time.
Then empty the jug and remove the deposits with a soft brush.
Opening, closing or removing the lid of the thermos jug:
Open the lid to pouring position by turning it anti-clockwise half a turn (fig. 15).
Close the lid by turning it clockwise. If properly closed, the insulated jug will keep the
coffee hot and tasty for a long time (fig. 16).
Remove the lid by turning it anti-clockwise until it comes off.
Descaling
.
Regular descaling will prolong the life of your appliance and will guarantee optimal
brewing results.
In case of normal use (two full jugs of coffee every day), descale your coffee maker:
- once every 2 months if you are using hard water (over 18 DH);
- once every 4 months if you are using soft water (up to 18 DH).
Turn to your local water board for information about the water hardness in your area.
1 Fill the water tank with white vinegar. Do not put a paper filter or coffee in the
filter holder.
2 Let the appliance complete two cycles.
See 'Brewing coffee'.
3 Let the appliance complete two more cycles with clean water to rinse away all
vinegar residues.
4 Clean the separate parts.
Replacement
.
Cord
If the mains cord is damaged, it must be replaced by Philips, a service centre authorised
by Philips or similarly qualified persons in order to avoid a hazard.
Jug
You can order a new coffee maker jug from your Philips dealer or Philips service
centre.
- HD7620/22/24 white jug, type HD7965, service no. 882 7965 01000
- HD7626 white jug, type HD7966, service no. 882 7966 01000
- HD7632/34 white jug, type HD7967, service no. 882 7967 01000
- HD7632/34/36 anthracite jug, type HD7967, service no. 882 7967 81000
Permanent filter
A new permanent filter is available under type number HD7971 and service number
882 7971 0000.
Environment
.
1 Do not throw the appliance away with the normal household waste at the end
of its life, but hand it in at an official collection point for recycling. By doing this
you will help to preserve the environment (fig. 19).
Information & service
.
If you need service or information or if you have a problem, please consult the
worldwide guarantee leaflet or visit our Web site: www.philips.com or contact the
Philips Customer Care Centre in your country (you will find its phone number in the
worldwide guarantee leaflet). If there is no Customer Care Centre in your country,
turn to your local Philips dealer or contact the Service Department of Philips Domestic
Appliances and Personal Care BV.
4222 001 94884
2/8
Page 3
EESTI
Tähelepanu!
.
◗ Ärge kasutage seadet, kui selle pistik, toitejuhe või seade on vigastatud.
Termoskann:
◗ Ärge võtke termoskannu lahti.
◗ Et vesi ei satuks termoskannu, ärge kunagi uputage seda vee või mõne muu
vedeliku sisse (jn 17).
◗ Kui kann on kohviga täidetud, siis lekkimise ärahoidmiseks hoidke seda
püstiasendis (jn 18).
◗ Keetmise ajal lähevad termoskannu alumine osa ja põhi kuumaks.
◗ Näpunäide: kannu eelsoojendamine kuuma veega aitab kohvi pärast keetmist
kuumana säilitada. Palun pidage meeles, et terve kannutäie valmistamisel säilib
kohv kauem kuum võrreldes väiksema koguse valmistamisega.
Juhul kui kohvikeetmine võtab tavapärasest pikema aja või seade lülitub
välja enne kui veepaak tühjeneb, siis peab katlakivi eemaldama (vt
„Katlakivi eemaldamine”).
Enne esmakasutust
.
1 Enne seadme elektrivõrku ühendamist kontrollige, kas seadmele märgitud
toitepinge vastab kohaliku elektrivõrgu pingele.
2 Pange seade jahedale, tasasele ja kindlale pinnale.
Ärge pange seadet kuumale pinnale.
3 Enne kui hakkate seadet kasutama, eemaldage punane transpordiklamber (a).
Hoidke seadet väljaspool laste käeulatust ja veenduge selles, et nad toitejuhtmest ei
saaks tõmmata.
Seadme loputamine
.
1 Ühendage pistik maandatud pistikupessa.
2 Liigset juhet võite hoida seadme taga (jn 1).
Vältige toitejuhtme kokkupuudet kuuma pinnaga.
3 Täitke veepaak veega ja pange kann kohale (jn 2).
Termoskann:
Kui kasutate seadet ilma et poleks filtrisse jahvatatud kohvi pannud, siis ärge täitke
veepaaki üle 9-tassilise märgendi, vastasel korral võib kann üle voolata.
4 Lülitage seade sisse, vajutades sisse-välja nuppu (jn 3).
Märgutuli sütib põlema.
Laske seadmel töötada, kuni veenõu on täiesti tühjaks saanud.
5 Pärast kasutamist lülitage seade välja (jn 4).
Puhastage eemaldatavad osad pt „Puhastamine” kirjeldatud viisil.
Kohvi keetmine.
.
Active Balance (aktiivtasakaalu) süsteem
Süsteem „Active Balance” aitab määrata õiget jahvatatud kohvi ja vee vahekorda.
Enne süsteemi „Active Balance” kasutamist pidage silmas järgmist:
Kanguse selektor
Mudelitel HD7622, HD7624, HD7626, HD7634 ja HD7636.
1 Seadistage kohvi kangus kanguse selektori nupuga (b).
Pehme kohvi tegemiseks keerake nuppu vasakule. Kui aga eelistate kanget kohvi,
keerake nuppu paremale (jn 5).
Kohvi kanguse reguleerimisel veenduge, et filtrihoidja oleks omal kohal.
Lähtestamisfunktsioon
2 Seadistage süsteem nupuga „OK” (c) tasakaalu.
Pange süsteemi „Active Balance” näidik (d) asendisse „OK”, keerates nuppu „OK”
vasakule või paremale (jn 6).
Kui olete süsteemi tasakaalustanud, veenduge et:
- filtrihoidja on oma kohal,
- seadmes pole ei vett ega/või jahvatatud kohvi.
3 Kõigepealt täitke paak veega. Süsteemi „Active Balance” näidik nihkub
kõrgemale (jn 7).
- - Tasemenäidud on kohaldatud 120 ml mahuga tasside järgi.
- - Kannul olev tasemenäidud on kohaldatud veekogusele, mis on valmiskeedetud
kohvi omast 10% võrra suurem. See 10% kompenseerib aurustumise.
4 Asetage paberist filter (mudel 1 x 4 või nr 4) filtrihoidjasse (jn 8).
Ärge unustage rebenemise ja kortsumise vältimiseks filtri kinnised ääred voltida. Mõned
mudelid on komplekteeritud püsifiltriga. Sel juhul pole paberfiltrit vaja kasutada.
5 Seejärel täitke filtrihoidja kohviga (filterjahvatus), kuni süsteemi „Active Balance”
näidik nihkub asendisse „OK” (jn 9) ja lülitage seade sisse.
6 Pange kaas kinni (jn 10).
Seadme sisse-välja lülitamine
.
1 Lülitage seade sisse, vajutades sisse-välja nupule (jn 3).
2 Pärast kasutamist lülitage seade välja (jn 4).
- Mudelitel HD7624, HD7626 – kui te seadet välja ei lülitanud, siis seade lülitub kahe
tunni möödudes automaatselt välja (automaatne väljalülitus).
- Mudelitel HD7634, HD7636 – pärast kohvikeetmist lülitub seade automaatselt välja
(automaatne väljalülitus).
3 Eemaldage paberist filter ja visake see minema (jn 11 ja 12).
Püsifiltri kasutamisel lihtsalt tühjendage see, loputage ja kasutage uuesti.
Laske seadmel vähemalt kolm minutit maha jahtuda, enne kui uut kohvi valmistama
hakkate.
Puhastamine
.
1 Eemaldage pistik pistikupesast.
2 Puhastage seade niiske lapiga.
Ärge kunagi kastke seadet vette.
3 Peske klaaskann ja filtrihoidja kuuma vee ning nõudepesuvahendiga või
nõudepesumasinas.
Termoskannu ei tohi nõudepesumasinas pesta.
Termoskann (jn 13 ja 14):
Puhastage termoskannu sisemus pehme harja, kuuma vee ja nõudepesuvedelikuga.
Termoskann ei ole nõudepesumasinas pestav.
Pärast pesemist loputage kann puhta kuuma veega.
Nõuanne: Pruunide lahustumatute sadestuste eemaldamiseks täitke kann kuuma veega
ja lisage lusikatäis soodat. Jätke soodalahus mõneks ajaks kannu toimima.
Seejärel tühjendage kann ja eemaldage sadestused pehme harjaga.
Termoskannu kaane avamine, sulgemine või ära võtmine.
Avage kaas valamisasendini, pöörates seda pool pööret vastupäeva (jn 15).
Sulgege kaas, pöörates seda päripäeva. Korralikult suletud kaas hoiab soojustatud
kannus kohvi pikaajaliselt kuumana ja maitsvana (jn 16).
Kaane eemaldamiseks keerake seda vastupäeva seni, kuni see ära tuleb.
Katlakivi eemaldamine
.
Regulaarne katlakivi eemaldamine pikendab seadme tööiga ja tagab optimaalse
kohvivalmistamise.
Tavakasutuse korral (kaks kannu kohvi iga päev) eemaldage kohvikeetjast katlakivi:
- karedat vett (üle 18 DH) kasutades kord iga kahe kuu tagant;
- pehmet vett kasutades kord iga nelja kuu tagant (kuni 18 DH).
Oma piirkonna vee kareduse kohta küsige infot kohalikust veevõrgust.
1 Täitke veepaak valge äädikaga. Ärge pange seadme filtrihoidjasse filtrit ega kohvi.
2 Laske seadmel kahe tsükli jooksul töötada.
Vt „Kohvi keetmine”.
3 Äädikajääkide täielikuks eemaldamiseks laske seadmel veel kaks tsüklit puhta
veega töötada.
4 Puhastage eraldatavad osad.
Osade vahetus
.
Toitejuhe
Kui toitejuhe on vigastatud, tuleb see uue vastu vahetada Philipsi, Philipsi volitatud
hooldekeskuses või lihtsalt vastavalt kvalifitseeritud isiku poolt, et vältida ohtlikke
olukordi.
Kann
Kohvikeetjale uut kannu on võimalik tellida Philipsi toodete müüjalt või Philipsi
hoolduskeskusest.
- Mudel HD7620/22/24 valge kannuga, mudel HD7965, tellimisnumber 882 7965
01000
- Mudel HD7626 valge kannuga, mudel HD7966, tellimisnumber 882 7966 01000
- Mudel HD7632/34 valge kannuga, mudel HD7967, tellimisnumber 882 7967
01000
- Mudel HD7632/34/36 antratsiidivärvi kannuga, mudel HD7967, tellimisnumber 882
7967 81000
Püsifilter
Uue püsifiltri mudelinumber on HD7971 ja tellimisnumber on 882 7971 0000.
Keskkonnakaitse
.
1 Kasutuskõlbmatut seadet ei tohi olmeprügi hulka visata. Seade tuleb ametlikku
kogumispunkti viia. See on vajalik keskkonna säästmiseks (jn 19).
Teave ja hooldus
.
Hooldamiseks, infopäringuteks ja küsimuste esitamiseks tutvuge rahvusvahelise
garantiitalongiga, külastage Philipsi veebisaiti www.philips.com või pöörduge oma riigi
Philipsi klienditeeninduskeskusesse. Kui teie riigis ei ole klienditeeninduskeskust, siis
pöörduge Philipsi toodete kohaliku müüja poole või võtke ühendust Philips BV
kodumasinate teeninduse ja klienditeeninduse osakonnaga.
4222 001 94884
3/8
Page 4

PУССКИЙ
Внимание
.
◗ Запрещено пользоваться электроприбором, если сетевая вилка, сетевой
шнур или сам прибор повреждены.
Кувшин-термос:
◗ Не разбирайте кувшин-термос.
◗ Во избежание попадания воды во внутренние части кувшина-термоса, не
погружайте его в воду или другие жидкости (рис. 17).
◗ Когда кувшин полон кофе, поставьте его вертикально для предотвращения
протекания (рис. 18).
◗ Во время приготовления кофе нижняя часть прибора и кувшина-термоса
нагреваются.
◗ Совет: предварительный прогрев кувшина горячей водой замедлит
остывание кофе после приготовления. Обратите внимание, что кофе
дольше остается горячим, если приготовить полный кувшин
Если на приготовление кофе уходит больше времени, или кофеварка
отключается до окончания цикла приготовления кофе, следует
очистить прибор от накипи (см. главу "Очистка от накипи").
Перед первым использованием
.
1 Перед подключением прибора убедитесь, что номинальное напряжение,
указанное на приборе, соответствует напряжению местной электросети.
2 Установите прибор на холодную, ровную и устойчивую поверхность.
Не ставьте прибор на горячую поверхность
3 Перед началом использованием прибора снимите с него красный зажим для
транспортировки (a)
Храните кофеварку в месте, недоступном для детей, и убедитесь, что они не
смогут тянуть за сетевой шнур.
Промывка прибора
.
1 Вставьте вилку сетевого шнура в заземленную розетку электросети.
2 Излишек шнура питания можно хранить в задней стороне устройства
(рис. 1).
Не допускайте соприкосновения сетевого шнура с горячими поверхностями.
3 Залейте воду в специальную ёмкость и установите кувшин (рис. 2).
Кувшин-термос:
При использовании прибора без молотого кофе в фильтре, заполняйте ёмкость
для воды не более чем до отметки "9 чашек", в противном случае кувшин
переполнится.
4 Включите прибор, нажав кнопку включения / выключения (рис. 3)
Загорится индикатор.
Не выключайте кофеварку, пока емкость для воды не опустеет.
5 По окончании использования выключите кофеварку (рис. 4).
Вымойте съемные детали, как описано в разделе "Очистка".
Приготовление кофе
.
Система Active Balance
Система Active Balance помогает правильно установить соотношение количества
молотого кофе и воды.
Прежде чем использовать систему Active Balance, обратите внимание на
следующее:
Регулятор крепости
У моделей HD7622, HD7624, HD7626, HD7634, HD7636.
1 Крепость кофе устанавливается с помощью регулятора крепости (b).
Если вы предпочитаете некрепкий кофе, сдвиньте регулятор влево, если крепкий
— вправо (рис. 5).
При установке степени крепости кофе убедитесь, что держатель фильтра
установлен.
Функция сброса
2 Установите систему в равновесное положение при помощи регулятора OK
(c).
Индикатор системы Active Balance (d) можно установить в положение OK,
поворачивая регулятор OK влево или вправо (рис. 6).
При установке системы в равновесное положение необходимо, чтобы:
- был установлен держатель фильтра;
- в приборе не было воды и/или молотого кофе.
3 Заполните ёмкость для воды. Индикатор системы Active Balance займёт
верхнее положение (рис. 7).
- Мерная шкала нанесена из расчета 120 мл воды на чашку.
- Мерная шкала на кувшине соответствует объему воды, на 10%
превышающему объём готового кофе. Дополнительные 10% необходимы для
компенсации испарения.
4 Вставьте в держатель фильтра бумажный фильтр (тип 1x4 или № 4) (рис. 8).
Не забудьте отогнуть склеенные края фильтра, чтобы избежать разрывов и
смятия. Некоторые модели поставляются с постоянным фильтром. В этом случае
бумажный фильтр не нужен.
5 Затем засыпьте кофе в держатель фильтра (кофе мелкого помола), пока
индикатор системы Active Balance не займет положение OK (рис. 9), затем
включите кофеварку.
6 Закройте крышку (рис. 10).
Включение и выключение прибора
.
1 Включите прибор, нажав кнопку включения / выключения (рис. 3)
2 По окончании использования выключите кофеварку (рис. 4).
- Для моделей HD7624, HD7626: если кофеварка не была выключена, через два
часа сработает функция автоматического отключения.
- Для моделей HD7634, HD7636: функция автоматического отключения
сработает после приготовления кофе.
3 Выньте бумажный фильтр и выбросите его (рис. 11-12).
При использовании постоянного фильтра перед повторным использованием
просто выбросите из него гущу и промойте под струёй воды.
Перед приготовлением следующей порции кофе дайте кофеварке остыть в
течение не менее 3 минут.
Очистка прибора
.
1 Отключите прибор от электросети.
2 Чистите прибор влажной тканью.
Запрещается погружать прибор в воду.
3 Мойте кувшин и держатель фильтра в горячей воде с добавлением
жидкого моющего средства или в посудомоечной машине.
Кувшин-термос нельзя мыть в посудомоечной машине.
Кувшин-термос (рис. 13-14):
Внутреннюю поверхность кувшина-термоса следует очищать мягкой щёткой и
горячей водой с добавлением моющего средства. Кувшин-термос не
предназначен для мытья в посудомоечной машине.
После очистки сполосните кувшин-термос чистой горячей водой.
Совет: для снятия стойких загрязнений коричневого цвета залейте кувшин
горячей водой и добавьте столовую ложку соды. Подождите некоторое время,
чтобы сода подействовала.
Затем слейте воду и очистите кувшин с помощью мягкой щетки.
Открывание, закрывание и снятие крышки кувшина-термоса:
Откройте крышку (установите её в положение для залива воды),
повернув на пол оборота против часовой стрелки (рис. 15).
Закройте крышку, повернув её по часовой стрелке. Если крышку закрыть
правильно, термоизолированный кувшин надолго сохранит температуру и вкус
кофе (рис. 16).
Снимите крышку, поворачивая её против часовой стрелки до полного
отсоединения.
Очистка от накипи
.
Регулярная очистка от накипи продлевает срок службы кофеварки и обеспечивает
оптимальные результаты приготовления кофе.
При нормальной интенсивности использования кофеварки (два полных кувшина
кофе в день) накипь следует удалять:
- раз в два месяца при использовании жесткой воды (свыше 18 dH);
- раз в четыре месяца при использовании мягкой воды (не более 18 dH).
Сведения о жесткости воды можно получить в местном отделении организации
водоснабжения.
1 Залейте белый уксус в ёмкость для воды. Не устанавливайте при этом
бумажный фильтр или фильтр с кофе в держатель фильтра.
2 Выполните два полных рабочих цикла.
См. раздел "Приготовление кофе".
3 Выполните ещё два полных рабочих цикла со свежей водой для удаления
остатков уксуса и накипи.
4 Очистите съёмные детали.
4222 001 94884
4/8
Page 5

Замена
.
Сетевой шнур
В случае повреждения сетевого шнура, его необходимо заменить. Чтобы
обеспечить безопасную эксплуатацию прибора, заменяйте шнур только в
торговой организации Philips, в авторизованном сервисном центре Philips или в
сервисном центре с персоналом аналогичной квалификации.
Кувшин
Новый кувшин для кофеварки можно заказать в местной торговой организации
Philips или в сервисном центре Philips.
- Белый кувшин для моделей HD7620/22/24, тип HD7965, номер по каталогу
882 7965 01000
- Белый кувшин для модели HD7626 тип HD7966, номер по каталогу
882 7966 01000
- Белый кувшин для моделей HD7632/34, тип HD7967, номер по каталогу
882 7967 01000
- Угольно-черный кувшин для моделей HD7632/34/36, тип HD7967, номер по
каталогу 882 7967 81000
Постоянный фильтр
Новый постоянный фильтр, тип HD7971, можно заказать под номером по
каталогу 882 7971 0000.
Защита окружающей среды
.
1 После окончания срока службы не выбрасывайте прибор вместе с
бытовыми отходами. Передайте его в специализированный пункт для
дальнейшей утилизации. Этим вы поможете защитить окружающую среду
(рис. 19).
Поддержка и обслуживание
.
Для получения дополнительной информации или в случае возникновения проблем
зайдите на наш веб-сайт www.philips.com или обратитесь в Центр поддержки
покупателей в вашей стране (номер телефона центра указан на гарантийном
талоне). Если подобный центр в вашей стране отсутствует, обратитесь в местную
торговую организацию Philips или в отдел поддержки покупателей компании
Philips Domestic Appliances and Personal Care BV.
4222 001 94884
5/8
Page 6

LIETUVIŠKAI
Svarbu
.
◗ Nenaudokite prietaiso, jei jo kištukas, laidas arba jis pats sugadinti.
Termoso ąsotis:
◗ Neardykite termoso ąsočio.
◗ Kad vanduo nepatektų į termoso ąsotį, nemerkite ąsočio į vandenį ar kitą skystį
(17 pav.).
◗ Kai ąsotis pilnas kavos, laikykite jį vertikaliai, kad kava neišbėgtų (18 pav.).
◗ Verdant kavą apatinė prietaiso dalis ir termoso ąsotis labai įkaista.
◗ Patarimas: iš anksto pašildžius ąsotį karštu vandeniu, išvirta kava ilgiau lieka
karšta. Taip pat nepamirškite, kad kava lieka karšta ilgiau išvirus jos pilną ąsotį,
nei išvirus mažesnį kiekį.
Jei kavos aparatas ilgai gamina kavą arba išsijungia prieš ištuštėjant vandens bakeliui,
reikia pašalinti iš prietaiso kalkių nuosėdas (žr. „Nuosėdų šalinimas“).
Prieš pirmąjį naudojimą
.
1 Prieš įjungdami pirmą kartą patikrinkite, ar įtampa, nurodyta ant prietaiso,
sutampa su įtampa jūsų namuose.
2 Prietaisą statykite ant vėsaus, plokščio ir stabilaus paviršiaus.
Nestatykite prietaiso ant karšto paviršiaus.
3 Prieš pirmąjį prietaiso naudojimą nuimkite raudoną transportavimo spaustuką
(a).
Prietaisą laikykite vaikams nepasiekiamoje vietoje ir užtikrinkite, kad jie negalėtų
patraukti jo už laido.
Prietaiso skalavimas
.
1 Įjunkite kištuką į įžemintą elektros lizdą.
2 Atliekamą laidą laikykite prietaiso nugarėlėje (1 pav.).
Saugokite, kad laidas nesiliestų prie karštų paviršių.
3 Pripildykite vandens bakel∞ vandeniu ir pastatykite àsot∞∞vietà (2 pav.).
Termoso ąsotis:
Jei naudojate prietaisą neįdėję į filtrą maltos kavos, nepilkite vandens į bakelį virš
9 puodelių žymos, antraip vanduo pradės tekėti per ąsočio viršų.
4 Įjunkite prietaisą paspausdami įjungimo/išjungimo mygtuką (3 pav.).
Užsidega lemputė.
Leiskite prietaisui veikti, kol vandens bakelis visiškai ištuštės.
5 Baigę naudoti išjunkite prietaisą (4 pav.).
Išvalykite išimamas dalis, kaip aprašyta skyriuje „Valymas“.
Kavos virimas
.
Aktyvi pusiausvyros sistema
Aktyvi pusiausvyros sistema padeda nustatyti tinkamą maltos kavos ir vandens
proporciją.
Prieš naudodamiesi aktyvia pusiausvyros sistema, atkreipkite dėmesį į šiuos dalykus:
Stiprumo reguliatorius
Tipai HD7622, HD7624, HD7626, HD7634 ir HD7636.
1 Stiprumo reguliavimo rankenėle (b) nustatykite kavos stiprumą.
Jei mėgstate švelnią kavą, sukite rankenėlę į kairę. Jei labiau patinka stipri kava, sukite
rankenėlę į dešinę (5 pav.).
Renkantis kavos stiprumą filtro laikiklis turi būti savo vietoje.
Atstatymo funkcija
2 Nustatykite sistemos pusiausvyrą mygtuku „OK“.
Aktyvios pusiausvyros sistemos indikatorių (d) galima nustatyti į „OK“ sukant rankenėlę
„OK“ į kairę arba į dešinę (6 pav.).
Nustatydami sistemos pusiausvyrą, įsitikinkite, kad:
- filtro laikiklis yra savo vietoje;
- prietaise visai nėra vandens ir/arba maltos kavos.
3 Pirmiausiai pripilkite į vandens bakelį vandens. Užsidegs aktyvios pusiausvyros
sistemos lemputė (7 pav.).
- - Lygis nurodomas 120 ml talpos puodeliais.
- - Lygio žymenys ant ąsočio rodo vandens kiekį, kuris yra 10% didesnis nei visas
išvirtos kavos kiekis. Šių papildomų 10% reikia kompensuoti garavimui.
4 Į filtro laikiklį (8 pav.) įdėkite popierinį filtrą (1 x 4 tipo arba dydis Nr. 4).
Nepamirškite užlenkti suklijuotų filtro kraštų, kad filtras nesuplyštų ir nesusilankstytų.
Tam tikri modeliai pristatomi su nuolatiniu filtru. Tokiu atveju popierinio filtro naudoti
nereikia.
5 Tada pilkite į filtro laikiklį kavos (filtrui tinkamo smulkumo), kol aktyvios
pusiausvyros sistemos indikatorius pasieks padėtį „OK“ (9 pav.), ir įjunkite
prietaisą.
6 Uždarykite dangtį (10 pav.).
Prietaiso įjungimas ir išjungimas
.
1 Įjunkite prietaisą paspausdami įjungimo/išjungimo mygtuką (3 pav.).
2 Baigę naudoti išjunkite prietaisą (4 pav.).
- Tipai HD7624 ir HD7626: jei neišjungsite prietaiso, jis išsijungs automatiškai po dviejų
valandų (automatinis išsijungimas).
- Tipai HD7634 ir HD7636: prietaisas išsijungs automatiškai (automatinis išsijungimas),
kai išvirs kavą.
3 Išimkite ir išmeskite popierinį filtrą (11–12 pav.).
Jei naudojate nuolatinį filtrą, išpilkite iš jo tirščius, išskalaukite ir galėsite naudoti jį vėl.
Prieš vėl gamindami kavą, palaukite bent 3 minutes, kol kavos aparatas atvės.
Valymas
.
1 Išjunkite prietaisą.
2 Prietaisą valykite drėgna šluoste.
Niekada nemerkite prietaiso į vandenį.
2 Stiklinį ąsotį ir filtro laikiklį išplaukite karštu vandeniu su trupučiu plovimo
skysčiu arba indaplovėje.
Termoso ąsočio negalima plauti indaplovėje.
Termoso ąsotis (13–14 pav.):
Termoso ąsočio vidų valykite minkštu šepetėliu, karštu vandeniu ir trupučiu plovimo
skysčio. Termoso ąsočio negalima plauti indaplovėje.
Baigę valyti, išskalaukite termoso ąsotį švariu šiltu vandeniu.
Patarimas: norėdami pašalinti sunkiai išvalomas rudas nuosėdas, įpilkite į ąsotį šilto
vandens ir įberkite valgomąjį šaukštą sodos. Kurį laiką palaukite.
Tada išpilkite vandenį su soda ir pašalinkite nuosėdas minkštu šepečiu.
Termoso ąsočio dangčio atidarymas, uždarymas ar nuėmimas:
Atidarykite dangtį į pylimo padėtį pasukdami jį prieš laikrodžio rodyklę pusę pasukimo
(15 pav.).
Uždarykite dangtį pasukdami jį pagal laikrodžio rodyklę. Tinkamai uždarytas sandarus
dangtis ilgai išlaikys kavą karšta ir skania (16 pav.).
Nuimkite dangtį sukdami jį prieš laikrodžio rodyklę, kol nusiims.
Nuosėdų šalinimas
.
Reguliarus nuosėdų valymas prailgins jūsų prietaiso veikimo laiką ir užtikrins geriausius
naudojimo rezultatus.
Jei kavos aparatas naudojamas įprastai (du pilni kavos ąsočiai kasdien), kalkes šalinkite:
- kartą per du mėnesius, jei jūsų naudojamas vanduo yra kietas (daugiau kaip 18 DH);
- kartą per 4 mėnesius, jei jūsų naudojamas vanduo yra minkštas (iki 18 DH).
Norėdami sužinoti savo rajono vandens kietumą, kreipkitės į vietinę vandens tarnybą.
1 Į vandens bakelį įpilkite baltojo acto. Nedėkite popierinio filtro ar kavos į filtro
laikiklį.
2 Leiskite prietaisui atlikti du ciklus.
Žr. „Kavos virimas“.
3 Leiskite prietaisui atlikti du virimo ciklus su švariu vandeniu, kad būtų išskalauti
visi acto likučiai.
4 Išvalykite atskiras dalis.
Pakeitimas
.
Laidas
Jei pažeistas maitinimo laidas, vengiant rizikos, jį turi pakeisti „Philips“ darbuotojai,
„Philips“ įgaliotasis priežiūros centras arba kiti kvalifikuoti specialistai.
Ąsotis
Naują kavos aparato ąsotį galite užsisakyti kreipęsi į savo „Philips“ atstovą arba „Philips“
aptarnavimo centrą.
- HD7620/22/24 baltas ąsotis, tipas HD7965, aptarnavimo numeris 882 7965 01000
- HD7626 baltas ąsotis, tipas HD7966, aptarnavimo numeris 882 7966 01000
- HD7632/34 baltas ąsotis, tipas HD7967, aptarnavimo numeris 882 7967 01000
- HD7632/34/36 antracito ąsotis, tipas HD7967, aptarnavimo numeris 882 7967
81000
Nuolatinis filtras
Galima įsigyti ir naują nuolatinį filtrą: tipo numeris HD7971, aptarnavimo numeris
882 7971 0000.
Aplinka
.
1 Susidėvėjusio prietaiso nemeskite su įprastomis buitinėmis šiukšlėmis, o
nuneškite į oficialų surinkimo punktą. Taip prisidėsite prie aplinkosaugos
(19 pav.).
Informacija ir aptarnavimas
.
Jei jums reikalingas aptarnavimas ar informacija, jei turite problemų, skaitykite visame
pasaulyje galiojantį garantijos lankstinuką arba apsilankykite „Philips“ tinklalapyje
(www.philips.com), arba kreipkitės į savo šalies „Philips“ klientų aptarnavimo centrą (jo
telefono numerį rasite visame pasaulyje galiojančios garantijos lankstinuke). Jei „Philips“
klientų aptarnavimo centro jūsų šalyje nėra, kreipkitės į vietinį „Philips“ pardavėją arba į
„Philips“ buitinės technikos aptarnavimo skyrių.
4222 001 94884
6/8
Page 7

LATVIEŠU
Svarīgi
.
◗ Neizmantojiet ierīci, ja ir bojāta kontaktdakša, elektrības vads vai pati ierīce.
Termosa krūze
◗ Nemēģiniet izjaukt termosa krūzi.
◗ Lai termosa krūzē nenonāktu ūdens, nekad neiegremdējiet krūzi ūdenī vai kādā
citā šķidrumā (17. att.).
◗ Kad kanna ir pilna ar kafiju, novietojiet to taisni, lai šķidrums neizplūstu (18.
att.).
◗ Kafijas pagatavošanas laikā ierīces apakšējā daļa un termosa krūzes apakša paliek
karsta.
◗ Padoms: krūzes uzsildīšana ar karstu ūdeni palīdzēs saglabāt kafiju karstu pēc tās
pagatavošanas. Lūdzu, ņemiet vērā, ka kafija paliks karsta ilgāk, ja pagatavosit
pilnu krūzi, nevis mazāku kafijas daudzumu.
Ja kafijas automātam ir ilgāks kafijas pagatavošanas laiks vai tas izslēdzas pirms ūdens
tvertnes iztukšošanās, jums no ierīces ir jānotīra katlakmens (skatiet 'Katlakmens
attīrīšana’).
Pirms pirmās lietošanas
.
1 Pirms ierīces ieslēgšanas pārbaudiet, vai uz tās norādītais spriegums atbilst
elektrības tīkla spriegumam jūsu mājā.
2 Novietojiet ierīci uz vēsas, līdzenas un stabilas virsmas.
Nenovietojiet ierīci uz karstas virsmas.
3 Pirms ierīces izmantošanas noņemiet sarkano transportēšanas klipsi (a).
Neļaujiet ierīcei piekļūt bērniem un pārliecinieties, ka bērni nevar izraut tās vadu.
Ierīces izskalošana
.
1 Iespraudiet elektrības vada spraudni iezemētā sienas kontaktligzdā.
2 Jūs varat uzglabāt pāri palikušo vadu ierīces aizmugurē (1. att.).
Neļaujiet elektrības vadam nonākt saskarē ar karstām virsmām.
3 Pielejiet ūdens tvertni ar ūdeni un novietojiet krūzi vietā.
Termosa krūze:
Izmantojot ierīci bez maltas kafijas filtrā, nepiepildiet ūdens tvertni virs 9 krūzīšu
atzīmes pretējā gadījumā krūze pārplūdīs.
4 Ieslēdziet ierīci, piespiežot ieslēgšanas/izslēgšanas pogu (3. att.).
Iedegas lampiņa.
Ļaujiet ierīcei darboties, līdz ūdens trauks ir pilnīgi tukšs.
5 Pēc izmantošanas izslēdziet ierīci (4. att.).
Notīriet izņemamas daļas saskaņā ar sadaļā 'Tīrīšana' rakstīto.
Kafijas gatavošana
.
Active Balance Sistēma
Active Balance Sistēma palīdz jums noteikt pareizo samēru starp maltu kafiju un ūdeni.
Pirms Active Balance Sistēma izmantošanas, lūdzu, ņemiet vērā zemāk redzamo:
Stipruma izvēlne
Modeļiem: HD7622, HD7624, HD7626, HD7634, HD7636.
1 Iestatiet kafijas stiprumu, izmantojot stipruma izvēlni (b).
Ja jums labāk garšo maiga kafija, pagrieziet rokturi pa kreisi. Ja jums labāk garšo stipra
kafija, pagrieziet rokturi pa labi (5. att.).
Pārliecinieties, ka, izvēloties kafijas stiprumu, filtra turētājs ir savā vietā.
Atiestates funkcija
2 Samērojot sistēmu, izmantojiet 'OK' pogu (c).
Active Balance Sistēmas (d) indikatoru var novietot 'OK' pozīcijā, pagriežot 'OK' pogu
pa kreisi vai pa labi (6. att.).
Samērojot sistēmu, pārliecinieties, ka:
- filtra turētājs atrodas savā vietā;
- ierīcē nav ūdens un/vai maltas kafijas.
2 No sākuma piepildiet ūdens tvertni ar ūdeni. Active Balance Sistēmas indikators
paceļas (7. att.).
- Līmeņa norādes piemēro 120 ml tilpuma tasītēm.
- Līmeņa norādes uz krūzes piemēro tādu ūdens daudzumu, kas ir par 10% vairāk
par kopējo kafijas daudzumu pēc tās pagatavošanas. Šos papildu 10% ir
jākompensē uz iztvaikošanās rēķina.
4 Ievietojiet papīra filtru (1x4 vai Nr.4) filtra turētājā (8. att.).
Neaizmirstiet salocīt filtra noblīvētās malas, lai neļautu tam saplīst un salocīties. Daži
modeļi ir komplektā ar daudzreiz lietojamu filtru. Tādā gadījumā jums nav nepieciešami
papīra filtri.
5 Piepildiet filtra turētāju ar kafiju (smalka maluma) līdz Active Balance Sistēmas
rādītājs ir sasniedzis 'OK' pozīciju (9.att.) un tad ieslēdziet ierīci.
6 Aizveriet vāciņu (10. att.).
Ierīces ieslēgšana vai izslēgšana
.
1 Ieslēdziet ierīci, piespiežot ieslēgšanas/izslēgšanas pogu (3. att.).
2 Pēc izmantošanas izslēdziet ierīci (4. att.).
- HD7624, HD7626 modeļiem: Ja neesat izslēdzis ierīci, tā automātiski izslēgsies pēc
divām stundām (automātiska izslēgšanās).
- HD7634, HD7636 modeļiem: Ierīce pati automātiski izslēgsies (automātiska
izslēgšanās) pēc kafijas pagatavošanas.
3 Izņemiet papīra filtru un izmetiet to (11.-12. att.).
Ja esat izmantojis daudzreiz lietojamu filtru, vienkārši iztukšojiet to, izskalojiet un
izmantojiet atkal.
Pirms nākamās kafijas gatavošanas ļaujiet ierīcei atdzist vismaz 3 minūtes.
Tīrīšana
.
1 Atvienojiet ierīci no elektrotīkla.
2 Tīriet ierīci ar mitru drānu.
Nekādā gadījumā neiegremdējiet ierīci ūdenī.
3 Izmazgājiet stikla krūzi un noņemamo filtra turētāju karstā ūdenī, kam pievienots
kāds trauku mazgāšanas līdzeklis, vai arī trauku mazgājamajā mašīnā.
Termosa kannu nevar mazgāt trauku mazgājamajā mašīnā.
Termosa krūze (13.-14. att.)
Iztīriet termosa krūzes iekšpuse ar mīkstu suku, siltu ūdeni un nedaudz mazgāšanas
līdzekļa. Termosa krūzi nevar mazgāt trauku mazgājamajā mašīnā.
Pēc mazgāšanas izskalojiet termosa krūzi ar tīru, karstu ūdeni.
Padoms: Lai noņemtu grūti tīrāmās brūnās nogulsnes, piepildiet krūzi ar karstu ūdeni un
pievienojiet pilnu karoti sodas. Ļaujiet sodai iedarboties kādu laiku.
Tad iztukšojiet krūzi un iztīriet nogulsnes ar mīkstu suku.
Termosa krūzes vāciņa atvēršana, aizvēršana vai noņemšana:
Atveriet krūzi līdz pārliešanas pozīcijai, pagriežot to pretēji pulksteņrādītāja kustības
virzienam (pusi apgrieziena) (15. att.).
Aizveriet vāciņu, pagriežot to pulksteņrādītāja kustības virzienā. Ja tā ir labi aizvērta,
termiskā krūze saglabās kafiju karstu un garšīgu ilgu laiku (16. att.).
Noņemiet vāciņu, pagriežot to pretēji pulksteņrādītāja kustības virzienam līdz tā
noņemas.
Katlakmens attīrīšana
.
Regulāra atbrīvošanās no katlakmens pagarina ierīces darbmūžu un garantē vislabākās
kafijas pagatavošanu.
Parastas lietošanas gadījumā (divas pilnas kannas ik dienas), veiciet katlakmens
noņemšanu:
- reizi 2 mēnešos, ja izmantojat cietu ūdeni (vairāk nekā 18 DH);
- reizi 4 mēnešos, ja lietojat mīkstu ūdeni (līdz 18 DH).
Ūdens cietību var uzzināt vietējā ūdensapgādes dienestā.
1 Ielejiet ūdens traukā balto etiķi. Nelieciet filtra turētājā ne filtru, ne kafiju.
2 Ļaujiet ierīcei veikt divus pilnus darbības ciklus.
Skatiet 'Kafijas pagatavošana'.
3 Lai izskalotu visas etiķa paliekas, ļaujiet ierīcei veikt vēl divus darbības ciklus ar
tīru ūdeni.
4 Tīriet atsevišķas daļas.
Nomaiņa
.
Vads
Ja elektrības vads ir bojāts, tas jānomaina autorizētā Philips servisa centrā, lai izvairītos
no bīstamām situācijām.
Krūze
Varat pasūtīt jaunu kafijas automāta krūzi pie Philips izplatītāja vai Philips servisa centrā.
- HD7620/22/24 balta krūze, modelis HD7965, servisa Nr. 882 7965 01000
- HD7626 balta krūze, modelis HD7966, servisa Nr. 882 7966 01000
- HD7632/34 balta krūze, modelis HD7967, servisa Nr. 882 7967 01000
- HD7632/34/36 antracīta krūze, modelis HD7967, servisa Nr. 882 7967 81000
Daudzreiz lietojams filtrs
Jaunā daudzreiz lietojamā filtra modeļa numurs ir HD7971 un servisa numurs
882 7971 0000.
4222 001 94884
7/8
Page 8

Vides aizsardzība
.
1 Kad ierīce ir beigusi kalpot, neizmetiet to kopā ar sadzīves atkritumiem, bet
nododiet to oficiālā savākšanas punktā pārstrādei. Tādā veidā jūs palīdzēsit
pasargāt vidi (19. att.).
Informācijas un serviss
.
Ja nepieciešama palīdzība vai informācija, vai jums ir problēma, lūdzu, izmantojiet
starptautisko garantijas brošūru vai apmeklējiet Philips tīmekļa vietni www.philips.com
vai sazinieties ar Philips pakalpojumu centru savā valstī (tā telefona numurs atrodams
pasaules garantijas brošūrā). Ja jūsu valstī nav Philips pakalpojumu centra, lūdziet
palīdzību Philips preču izplatītājiem vai Philips Sadzīves un personīgās higiēnas ierīču
nodaļas pakalpojumu dienestam.
4222 001 94884
8/8
 Loading...