

Page 1

Essence
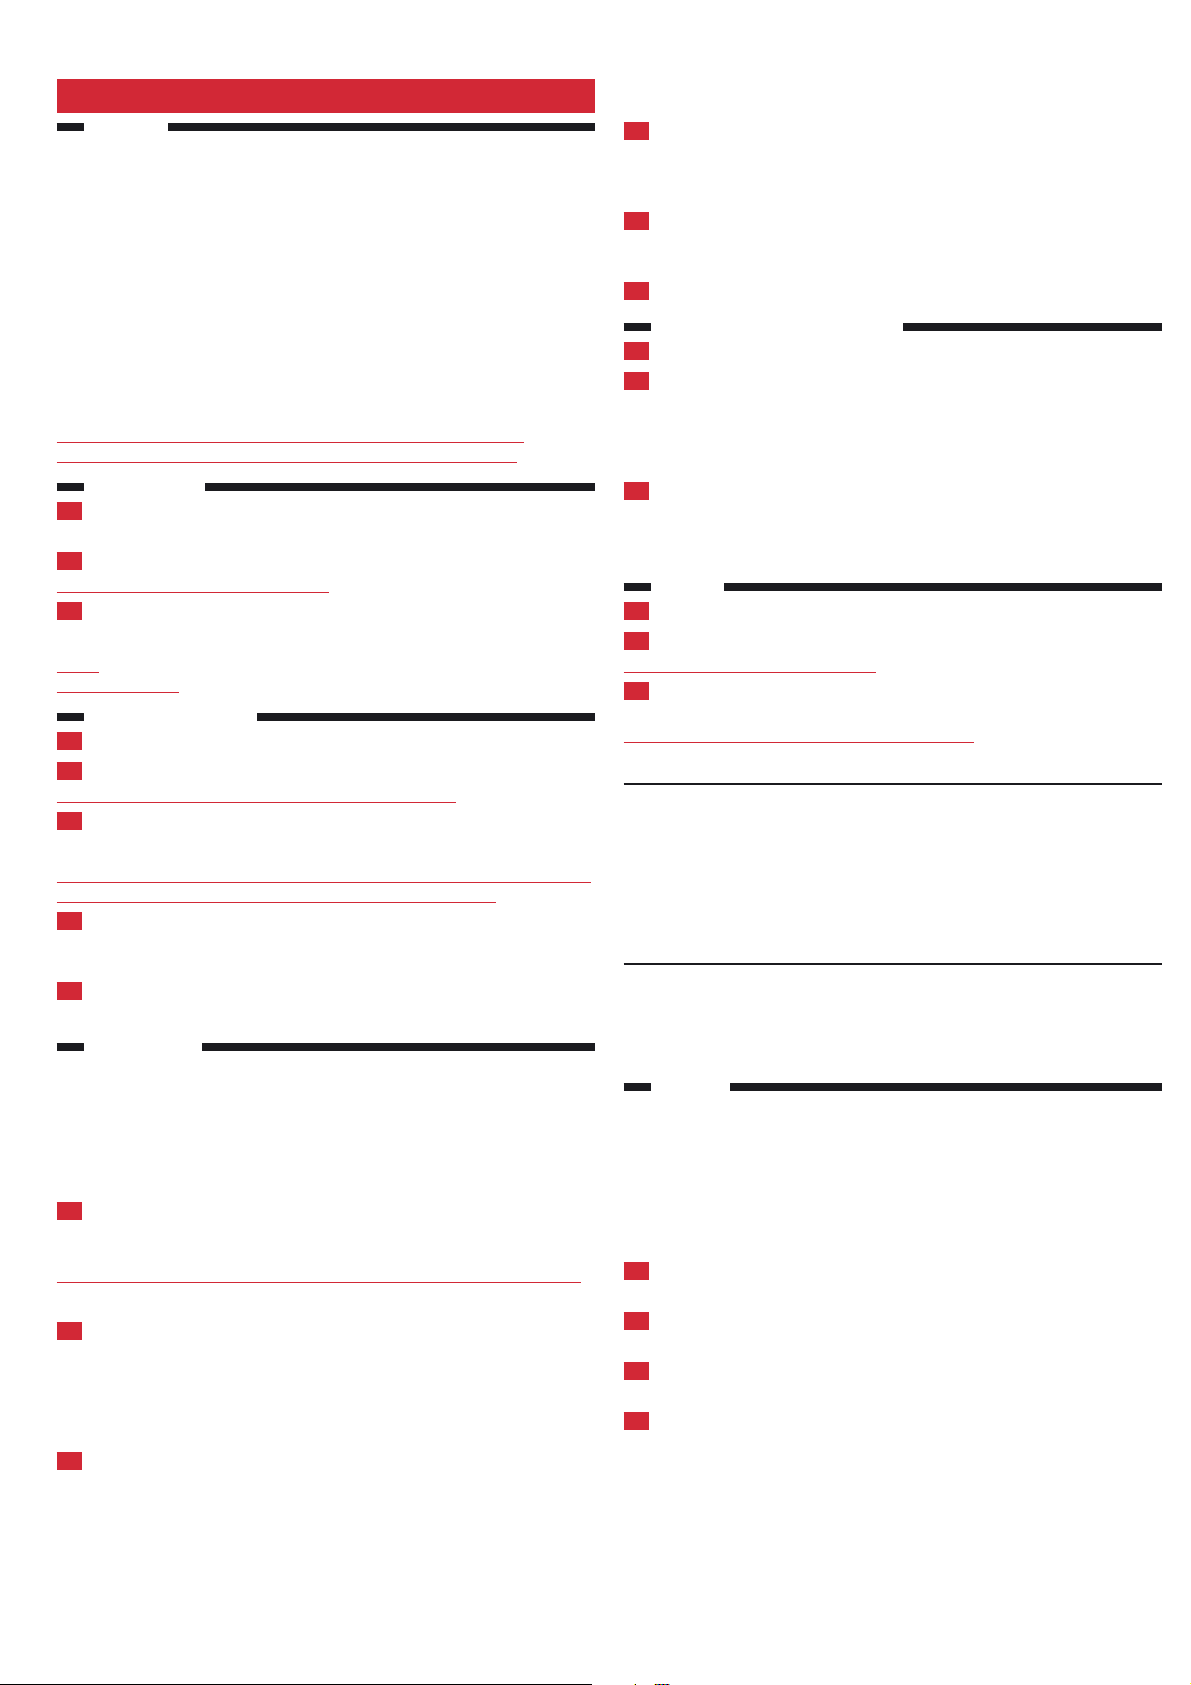
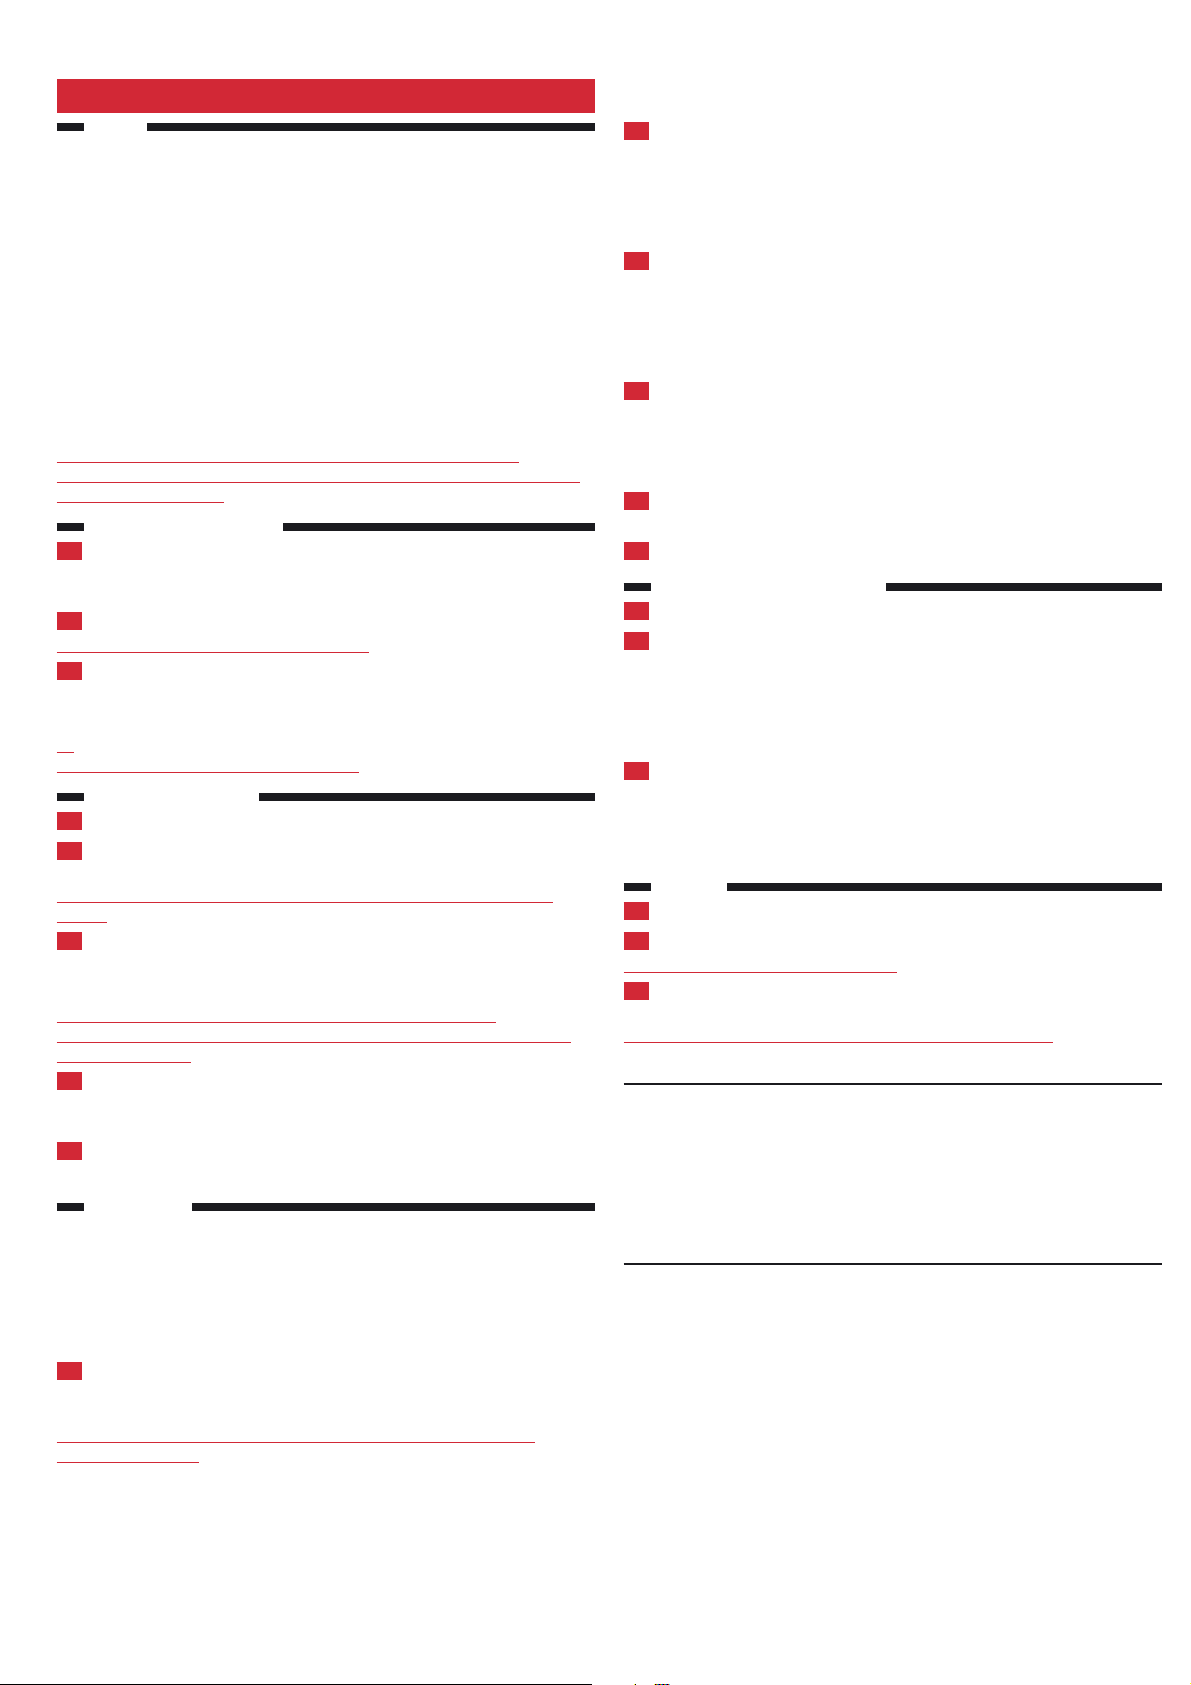
HD7634, HD7632, HD7626, HD7624, HD7622, HD7620,
1 2 3
4 5 6
7 8 9
10 11 12
13 14 15
16 17 18
19
a
b
c
d
Page 2
ENGLISH
Important.
.
◗ Do not use the appliance if the plug, the cord or the appliance itself is
damaged.
Thermos jug:
◗ Do not disassemble the thermos jug.
◗ To prevent water from entering the thermos jug, never immerse the jug in
water or any other liquid (fig. 17).
◗ When the jug is filled with coffee, put it in upright position to prevent leakage
(fig. 18).
◗ During brewing, the lower part of the appliance and the bottom of the
thermos jug will become hot.
◗ Tip: preheating the jug with hot water will help to keep the coffee hot after
brewing. Please note that the coffee stays hot longer if you prepare a full jug
than if you prepare a smaller amount
If the coffee maker has a longer brewing time or switches off before the
water tank is empty, you should descale the appliance (see 'Descaling)'.
Before first use.
.
1 Check if the voltage indicated on the appliance corresponds to the mains
voltage in your home before you connect the appliance.
2 Put the appliance on a cool, flat and stable surface.
Do not put the appliance on a hot surface
3 Remove the red transportation clip (a) before you start using the appliance
Keep the appliance out of the reach of children and make sure that they are
unable
to pull at the cord.
Flushing the appliance.
.
1 Put the plug in an earthed wall socket.
2 You can store excess cord at the back of the appliance (fig. 1).
Prevent the cord from coming into contact with hot surfaces.
3 Fill the water tank with water and put the jug in place (fig. 2).
Thermos jug:
When you operate the appliance without ground coffee in the filter, do not fill the
water tank beyond the 9-cup mark, otherwise the jug will overflow.
4 Switch the appliance on by pressing the on/off button (fig. 3).
The pilot light goes on.
Let the appliance run until the water tank is completely empty.
5 Switch the appliance off after use (fig. 4).
Clean the removable parts as described in the section 'Cleaning'.
Brewing coffee..
Active Balance System
The Active Balance System helps you determine the right balance between ground
coffee and water.
Before using the Active Balance System, please note the following:
Strength selector
Types HD7622, HD7624, HD7626, HD7634, HD7636.
1 Set the strength of your coffee by means of the strength selector knob (b).
If you prefer mild coffee, turn the knob to the left. If you prefer strong coffee, turn
the knob to the right (fig. 5).
Make sure the filter holder is in place when selecting the strength of your coffee.
Reset function
2 Put the system in balance by means of the 'OK' knob (c).
The indicator of the Active Balance System (d) can be put in 'OK' position by turning
the 'OK' knob to the left or to the right (fig. 6).
When putting the system in balance, make sure that:
- the filter holder is in place;
- the appliance does not contain any water and/or ground coffee.
3 First fill the water tank with water. The indicator of the Active Balance System
goes up (fig 7).
- The level indications apply to cups with a content of 120 ml.
- The level indications on the jug apply to an amount of water that is 10% more
than the total amount of coffee after brewing. This extra 10% is needed to
compensate for evaporation.
4 Put a paper filter (type 1x4 or no.4) in the filter holder (fig. 8).
Do not forget to fold the sealed edges of the filter in order to prevent tearing and
folding. Some versions come with a permanent filter. In this case you do not need to
use a paper filter.
5 Then fill the filter holder with coffee (filter-fine grind) until the indicator of the
Active Balance System has reached the 'OK' position (fig. 9) and switch the
appliance on.
6 Close the lid (fig. 10).
Switching the appliance on or off.
.
1 Switch the appliance on by pressing the on/off button (fig. 3).
2 Switch the appliance off after use (fig. 4).
- Types HD7624, HD7626: If you have not switched the appliance off, the
appliance will automatically switch itself off after two hours (auto switch-off).
- Types HD7634, HD7636: The appliance will switch itself off automatically (auto
switch-off) after brewing coffee.
3 Remove the paper filter and throw it away (fig. 11-12).
If you have used a permanent filter, you can simply empty it, rinse it and use it again.
Let the appliance cool down for at least 3 minutes before you start brewing coffee
again.
Cleaning.
.
1 Unplug the appliance.
2 Clean the appliance with a moist cloth.
Never immerse the appliance in water.
3 Clean the glass jug and the filter holder in hot water with some washing-up
liquid or in the dishwasher.
The thermos jug cannot be cleaned in the dishwasher.
Thermos jug (fig. 13-14):
Clean the inside of the thermos jug with a soft brush, hot water and some washingup liquid. The thermos jug is not dishwasher-proof.
After cleaning, rinse the thermos jug with fresh hot water.
Tip: To remove stubborn brown deposits, fill the jug with hot water and add a
spoonful of soda. Leave the soda to do its work for some time.
Then empty the jug and remove the deposits with a soft brush.
Opening, closing or removing the lid of the thermos jug:
Open the lid to pouring position by turning it anti-clockwise half a turn (fig. 15).
Close the lid by turning it clockwise. If properly closed, the insulated jug will keep the
coffee hot and tasty for a long time (fig. 16).
Remove the lid by turning it anti-clockwise until it comes off.
Descaling.
.
Regular descaling will prolong the life of your appliance and will guarantee optimal
brewing results.
In case of normal use (two full jugs of coffee every day), descale your coffee maker:
- once every 2 months if you are using hard water (over 18 DH);
- once every 4 months if you are using soft water (up to 18 DH).
Turn to your local water board for information about the water hardness in your
area.
1 Fill the water tank with white vinegar. Do not put a paper filter or coffee in
the filter holder.
2 Let the appliance complete two cycles.
See 'Brewing coffee'.
3 Let the appliance complete two more cycles with clean water to rinse away all
vinegar residues.
4 Clean the separate parts.
4222 001 94874
2/11
Page 3
Replacement.
.
Cord
If the mains cord is damaged, it must be replaced by Philips, a service centre
authorised by Philips or similarly qualified persons in order to avoid a hazard.
Jug
You can order a new coffee maker jug from your Philips dealer or Philips service
centre.
- HD7620/22/24 white jug, type HD7965, service no. 882 7965 01000
- HD7626 white jug, type HD7966, service no. 882 7966 01000
- HD7632/34 white jug, type HD7967, service no. 882 7967 01000
- HD7632/34/36 anthracite jug, type HD7967, service no. 882 7967 81000
Permanent filter
A new permanent filter is available under type number HD7971 and service number
882 7971 0000.
Environment..
1 Do not throw the appliance away with the normal household waste at the end
of its life, but hand it in at an official collection point for recycling. By doing
this you will help to preserve the environment (fig. 19).
Information & service.
.
If you need service or information or if you have a problem, please consult the
worldwide guarantee leaflet or visit our Web site: www.philips.com or contact the
Philips Customer Care Centre in your country (you will find its phone number in the
worldwide guarantee leaflet). If there is no Customer Care Centre in your country,
turn to your local Philips dealer or contact the Service Department of Philips
Domestic Appliances and Personal Care BV.
4222 001 94874
3/11
Page 4
DEUTSCH
Wichtig
.
◗ Verwenden Sie das Gerät nicht, wenn der Netzstecker, das Netzkabel oder
das Gerät selbst defekt oder beschädigt ist.
Thermoskanne:
◗ Nehmen Sie die Thermoskanne nicht auseinander.
◗ Achten Sie darauf, dass kein Wasser in das Gehäuse der Thermoskanne
eindringt. Tauchen Sie die Thermoskanne niemals in Wasser oder eine andere
Flüssigkeit (Abb. 17).
◗ Halten Sie die gefüllte Thermoskanne in senkrechter Stellung, damit sie nicht
tropft (Abb. 18).
◗ Während der Kaffeezubereitung werden die Basis des Geräts und der Boden
der Thermoskanne heiß.
◗ Hinweis: Wenn Sie die Thermoskanne mit heißem Wasser vorwärmen, hält
sich der Kaffee länger heiß. Auch bleibt eine volle Kanne Kaffee länger heiß als
eine zum Teil gefüllte.
Wenn die Kaffeezubereitung länger dauert als gewöhnlich oder sich die
Kaffeemaschine ausschaltet, bevor der Wasserbehälter leer ist, entkalken Sie das
Gerät (siehe "Entkalken").
Vor dem ersten Gebrauch
.
1 Prüfen Sie, bevor Sie das Gerät zum ersten Mal benutzen, ob die
Spannungsangabe auf dem Gerät mit der örtlichen Netzspannung
übereinstimmt.
2 Stellen Sie das Gerät auf eine kühle, ebene und feste Oberfläche.
Stellen Sie das Gerät nicht auf eine heiße Fläche.
3 Entfernen Sie den roten Transport-Clip (a), bevor Sie das Gerät zum ersten
Mal verwenden.
Halten Sie das Gerät außer Reichweite von Kindern, und achten Sie darauf, dass
sie
nicht am Netzkabel des Geräts ziehen können.
Das Gerät durchspülen
.
1 Stecken Sie den Netzstecker in eine geerdete Steckdose.
2 Überschüssiges Kabel können Sie an der Rückseite des Geräts verstauen
(Abb. 1).
Achten Sie darauf, dass das Netzkabel nicht mit heißen Flächen in Berührung
kommt.
3 Füllen Sie Wasser in den Wasserbehälter, und stellen Sie die Kanne in das
Gerät (Abb. 2).
Thermoskanne:
Wenn Sie das Gerät ohne Kaffeepulver im Filter betreiben, darf der
Wasserbehälter höchstens bis zur Markierung "9 Tassen" gefüllt werden, sonst
läuft die Kanne über.
4 Schalten Sie das Gerät ein, indem Sie den Ein-/Ausschalter drücken (Abb. 3).
Die Kontrollanzeige leuchtet auf.
Lassen Sie das Gerät eingeschaltet, bis der Wasserbehälter leer ist.
5 Schalten Sie das Gerät nach jedem Gebrauch aus (Abb. 4).
Reinigen Sie die abnehmbaren Teile so, wie im Abschnitt "Reinigen" beschrieben.
Kaffee brühen
.
Aktives Dosiersystem
Das aktive Dosiersystem hilft Ihnen dabei, Wasser und Kaffee im richtigen Verhältnis
zu dosieren.
Beachten Sie vor Gebrauch des aktiven Dosiersystems die folgenden Punkte:
Aromawahlfunktion
Typen HD7622, HD7624, HD7626, HD7634 und HD7636:
1 Wählen Sie die Stärke Ihres Kaffees mithilfe des Aromawahlknopfes (b).
Für ein mildes Aroma drehen Sie den Knopf nach links. Wenn Sie starken Kaffee
bevorzugen, drehen Sie den Knopf nach rechts (Abb. 5).
Achten Sie darauf, dass der Filterhalter eingesetzt ist, bevor Sie die Stärke
des Kaffees einstellen.
Reset-Funktion
2 Mit dem "OK"-Knopf (c) stellen Sie die gewünschte Dosierung ein.
Die Dosieranzeige (d) können Sie durch Drehen des "OK"-Knopfes nach links oder
rechts auf die "OK"-Position stellen (Abb. 6).
Beim Einstellen der Dosierung achten Sie bitte darauf, dass
- der Filterhalter richtig eingesetzt ist,
- sich kein Wasser oder Kaffeepulver im Gerät befindet.
3 Befüllen Sie den Wasserbehälter mit Wasser. Das aktive Dosiersystem zeigt
den Wasserstand an (Abb. 7).
- Die Wasserstandsanzeige bezieht sich auf Kaffeetassen mit 120 ml Inhalt.
- Die Wasserstandsanzeige an der Kanne bezieht sich auf eine um 10 % höhere
Wassermenge als Kaffeemenge, da das verdampfte Wasser kompensiert werden
muss.
4 Setzen Sie eine Papierfiltertüte (Typ 1x4 bzw. 4) in den Filterhalter ein
(Abb. 8).
Vergessen Sie nicht, die geprägten Ränder der Filtertüte zu falzen, damit der Filter
nicht reißt. Einige Modelle des Geräts werden mit einem Dauerfilter geliefert; hierfür
werden keine Papierfilter benötigt.
5 Füllen Sie (filterfein) gemahlenen Kaffee in den Filter, bis das aktive
Dosiersystem "OK" anzeigt (Abb. 9). Schalten Sie das Gerät ein.
6 Schließen Sie den Deckel (Abb. 10).
Das Gerät ein- und ausschalten
.
1 Schalten Sie das Gerät ein, indem Sie den Ein-/Ausschalter drücken (Abb. 3).
2 Schalten Sie das Gerät nach Gebrauch aus (Abb. 4).
- Nur Typen HD7624 und HD7626: Wenn Sie vergessen, das Gerät
auszuschalten, wird es nach Ablauf von zwei Stunden automatisch ausgeschaltet
(Abschaltautomatik).
- Nur Typen HD7634 und HD7636: Das Gerät wird nach der Kaffeezubereitung
automatisch ausgeschaltet (Abschaltautomatik).
3 Entnehmen Sie den Papierfilter, und entsorgen Sie ihn (Abb. 11 und 12).
Wenn Sie einen Dauerfilter verwenden, entleeren Sie diesen, spülen ihn aus und
verwenden ihn erneut.
Lassen Sie das Gerät ca. 3 Minuten abkühlen, bevor Sie erneut mit der Zubereitung
von Kaffee beginnen.
Reinigung
.
1 Ziehen Sie den Netzstecker aus der Steckdose.
2 Reinigen Sie das Gerät mit einem feuchten Tuch.
Tauchen Sie das Gerät niemals in Wasser!
3 Reinigen Sie die Kanne und den Filterhalter mit heißem Wasser und etwas
Spülmittel oder in der Spülmaschine.
Die Thermoskanne darf nicht im Geschirrspüler gereinigt werden.
Thermoskanne (Abb. 13 und 14):
Reinigen Sie die Thermoskanne innen mit einer weichen Bürste, heißem Wasser und
etwas Spülmittel. Die Thermoskanne ist nicht spülmaschinenfest.
Spülen Sie die Kanne nach der Reinigung mit heißem Wasser aus.
Hinweis: Hartnäckige Flecken entfernen Sie, indem Sie die Kanne mit heißem Wasser
füllen und einen Löffel Soda hinein geben. Lassen Sie dies eine Weile einwirken.
Leeren Sie die Kanne, und entfernen Sie die Rückstände mit einer weichen Bürste.
Den Deckel der Thermoskanne öffnen, schließen oder abnehmen:
Öffnen Sie den Deckel zum Ausgießen, indem Sie ihn mit einer halben Umdrehung
gegen den Uhrzeigersinn drehen (Abb. 15).
Schließen Sie den Deckel durch Drehen im Uhrzeigersinn. Richtig verschlossen bleibt
der Kaffee in der isolierten Thermoskanne lange Zeit heiß und aromatisch (Abb. 16).
Zum Abnehmen drehen Sie den Deckel solange gegen den Uhrzeigersinn, bis er sich
abheben lässt.
4222 001 94874
4/11
Page 5

Entkalken
.
Regelmäßiges Entkalken verlängert die Nutzungsdauer des Geräts und garantiert
optimale Zubereitung Ihres Kaffees.
Entkalken Sie das Gerät bei normalem Gebrauch von zwei Kannen Kaffee täglich:
- bei Wasserhärte 3 und 4: alle 2 Monate
- bei Wasserhärte 1 und 2: alle 4 Monate
Das für Sie zuständige Wasserwerk kann Ihnen Auskunft über den Härtegrad in Ihrer
Region geben.
1 Füllen Sie den Wasserbehälter mit weißem Haushaltsessig. Geben Sie keine
Filtertüte und keinen gemahlenen Kaffee in den Filterhalter.
2 Lassen Sie das Gerät zweimal komplett durchlaufen.
Siehe Abschnitt "Kaffee brühen".
3 Betreiben Sie das Gerät abschließend zwei Mal mit klarem Wasser, um
Rückstände von Essig zu entfernen.
4 Reinigen Sie danach alle abnehmbaren Teile.
Ersatzteile
.
Netzkabel
Wenn das Netzkabel defekt oder beschädigt ist, darf es nur von einem Philips
Service-Center oder einer von Philips autorisierten Werkstatt durch ein OriginalErsatzkabel ausgetauscht werden, um Gefährdungen zu vermeiden.
Kaffeekanne
Eine neue Kaffeekanne ist über Ihren Philips Händler oder das Philips Service Center
erhältlich.
- Gerätetypen HD7620/22/24: weiße Kanne, Typ HD7965,
Servicenummer. 882 7965 01000
- Gerätetyp HD7626: weiße Kanne, Typ HD7966, Servicenummer 882 7966
01000
- Gerätetypen HD7632/34: weiße Kanne, Typ HD7967, Servicenummer. 882
7967 01000
- Gerätetypen HD7632/34/36: anthrazitfarbene Kanne, Typ HD7967,
Servicenummer 882 7967 81000
Dauerfilter
Einen neuen Dauerfilter erhalten Sie unter der Typennummer HD7971 und der
Servicenummer 882 7971 0000.
Umweltschutz
.
1 Werfen Sie das Gerät am Ende der Lebensdauer nicht in den normalen
Hausmüll. Bringen Sie es zum Recycling zu einer offiziellen Sammelstelle. Auf
diese Weise helfen Sie, die Umwelt zu schonen (Abb. 19).
Informationen und Service
.
Benötigen Sie weitere Informationen oder treten Probleme auf, wenden Sie sich bitte
an Ihren Philips-Händler oder setzen Sie sich mit einem Philips Service-Center in
Ihrem Land in Verbindung (Tel. Nr. 0180/5356767). Besuchen Sie auch die Philips
Website (www.philips.com).
4222 001 94874
5/11
Page 6

FRANÇAIS
Important
.
◗ N'utilisez jamais l'appareil si la fiche, le cordon d'alimentation ou l'appareil lui-
même est endommagé.
Verseuse thermos :
◗ Ne démontez pas la verseuse thermos.
◗ Pour éviter toute infiltration d'eau dans la verseuse thermos, ne la plongez
jamais dans l'eau ou dans tout autre liquide (fig. 17).
◗ Lorsque la verseuse est remplie de café, placez-la en position verticale pour
éviter toute fuite (fig. 18).
◗ Pendant la préparation du café, la partie inférieure de l'appareil et le fond de la
verseuse thermos chauffent.
◗ Conseil : préchauffez la verseuse avec de l'eau chaude pour maintenir le café
chaud une fois prêt. Le café restera chaud plus longtemps si vous préparez
une verseuse pleine.
Si le temps de préparation du café est plus long ou si la cafetière s'éteint avant que le
réservoir d'eau ne soit vide, effectuez un détartrage (voir le chapitre Détartrage).
Avant la première utilisation
.
1 Avant de brancher l'appareil, vérifiez que la tension indiquée sur l'appareil
correspond à la tension secteur locale.
2 Placez l'appareil sur une surface froide, stable et plane.
Ne placez jamais l'appareil sur une surface chaude.
3 Avant d'utiliser l'appareil pour la première fois, retirez le clip de transport
rouge (a).
Tenez l'appareil hors de portée des enfants et veillez à ce qu'ils ne puissent pas
tirer sur le cordon.
Rinçage de l'appareil
.
1 Branchez la fiche sur une prise murale mise à la terre.
2 Vous pouvez ranger le cordon à l'arrière de l'appareil pour en ajuster la
longueur (fig. 1).
Veillez à ce que le cordon d'alimentation ne soit pas en contact avec des surfaces
chaudes.
3 Remplissez le réservoir d'eau et mettez la verseuse en place (fig. 2).
Verseuse thermos :
Pour éviter tout débordement lorsque vous faites fonctionner l'appareil sans café
moulu, ne remplissez pas le réservoir d'eau au delà de l'indication pour 9 tasses.
4 Mettez l'appareil en marche en appuyant sur le bouton marche/arrêt (fig. 3).
Le voyant s'allume.
Laissez l'appareil fonctionner jusqu'à ce que le réservoir soit entièrement vide.
5 Éteignez l'appareil après utilisation (fig. 4).
Nettoyez les pièces amovibles en respectant les instructions du chapitre Nettoyage.
Préparation du café
.
Système d'équilibrage actif
Le système d'équilibrage actif détermine le dosage idéal entre le café moulu et l'eau.
Avant d'utiliser le système d'équilibrage actif, lisez les informations suivantes :
Sélecteur d'intensité
Modèles HD7622, HD7624, HD7626, HD7634 et HD7636.
1 Réglez l'intensité du café à l'aide du sélecteur d'intensité (b).
Si vous préférez un café moins fort, tournez le bouton vers la gauche. Si vous aimez
le café fort, tournez-le vers la droite (fig. 5).
Assurez-vous que le porte-filtre est en place avant de régler l'intensité du café.
Fonction de réinitialisation
2 Le bouton OK (c) permet d'équilibrer le système.
Mettez l'indicateur du système d'équilibrage actif (d) sur la position OK en tournant
le bouton OK vers la droite ou vers la gauche (fig. 6).
Lorsque vous équilibrez le système, assurez-vous que :
- le filtre est en place ;
- l'appareil ne contient pas d'eau et/ou de café moulu.
3 Commencez par remplir le réservoir d'eau. L'indicateur du système
d'équilibrage actif se déplace vers le haut (fig. 7).
- Les indications de niveau correspondent à des tasses de 120 ml.
- Les indications de niveau sur la verseuse correspondent à une quantité d'eau
supérieure de 10 % à la quantité de café obtenue. Cette différence de 10 % est
nécessaire pour compenser l'évaporation.
4 Placez un filtre en papier (type 1x4 ou n° 4) dans le porte-filtre (fig. 8).
N'oubliez pas de rabattre les bords du filtre pour éviter de le déchirer ou de le plier.
Certains modèles sont équipés d'un filtre permanent. Dans ce cas, il n'est pas
nécessaire d'utiliser des filtres en papier.
5 Placez du café moulu (pour filtre) dans le filtre jusqu'à ce que l'indicateur
d'équilibrage actif revienne en position OK (fig. 9), puis allumez l'appareil.
6 Fermez le couvercle (fig. 10).
Mise en marche/arrêt de l'appareil
.
1 Mettez l'appareil en marche en appuyant sur le bouton marche/arrêt (fig. 3).
2 Éteignez l'appareil après utilisation (fig. 4).
- Modèles HD7624, HD7626 : si vous n'avez pas éteint l'appareil, il s'éteint
automatiquement après 2 heures (arrêt automatique).
- Modèles HD7634, HD7636 : l'appareil s'éteint automatiquement après la
préparation du café (arrêt automatique).
3 Retirez le filtre en papier et jetez-le (fig. 11-12).
Si vous utilisez un filtre permanent, videz-le et rincez-le sous le robinet avant de le
réutiliser.
Laissez l'appareil refroidir pendant au moins 3 minutes avant de refaire du café.
Nettoyage
.
1 Débranchez l'appareil.
2 Nettoyez l'appareil avec un chiffon humide.
Ne plongez jamais l'appareil dans l'eau.
3 Nettoyez la verseuse en verre et le porte-filtre à l'eau chaude savonneuse ou
au lave-vaisselle.
La verseuse thermos ne peut pas être nettoyée au lave-vaisselle.
Verseuse thermos (fig. 13-14) :
Nettoyez l'intérieur de la verseuse thermos à l'eau chaude savonneuse à l'aide d'une
brosse douce. Elle ne peut pas être nettoyée au lave-vaisselle.
Une fois le nettoyage terminé, rincez la verseuse thermos à l'eau chaude.
Conseil : pour enlever les dépôts de café, remplissez la verseuse d'eau chaude et
ajoutez une cuillère de soude. Laissez la soude agir quelque temps.
Ensuite, videz la verseuse et éliminez les dépôts à l'aide d'une brosse douce.
Ouverture, fermeture et retrait du couvercle de la verseuse
thermos :
Faites tourner le couvercle d'un demi-tour dans le sens inverse des aiguilles d'une
montre (fig. 15) pour l'ouvrir.
Faites-le tourner dans le sens des aiguilles d'une montre pour le fermer. Si le
couvercle est correctement fermé, la verseuse isotherme maintient le café chaud et
conserve son arôme pendant longtemps (fig. 16).
Pour retirer le couvercle, faites-le tourner dans le sens inverse des aiguilles d'une
montre.
Détartrage
.
Un détartrage régulier prolongera la durée de vie de votre appareil et garantira des
résultats optimaux.
En cas d'utilisation normale (deux verseuses pleines par jour), détartrez votre
cafetière :
- tous les 2 mois si l'eau de votre région est dure (au-delà de 18 °TH) ;
- tous les 4 mois si l'eau de votre région est douce (jusqu'à 18 °TH).
Pour connaître la dureté de l'eau dans votre région, renseignez-vous auprès du
syndicat des eaux de votre commune.
1 Remplissez le réservoir avec du vinaigre blanc. Ne placez pas de filtre en
papier ni de café dans le porte-filtre.
2 Faites passer le vinaigre, puis répétez l'opération.
Reportez-vous au chapitre Préparation du café.
3 Ensuite, faites fonctionner la cafetière deux fois avec de l'eau afin d'éliminer
tous les résidus de vinaigre.
4 Nettoyez les pièces amovibles.
4222 001 94874
6/11
Page 7

Remplacement
.
Cordon d'alimentation
Si le cable d'alimentation est endommagé est endommagé, il ne doit être remplacé
que par le fabricant (Philips), son service après-vente ou une personne de
qualification similaire afin d'éviter un danger.
Verseuse
Vous pouvez vous procurer une nouvelle verseuse auprès de votre revendeur Philips
ou d'un Centre Service Agréé.
- Verseuse blanche HD7620/22/24, modèle HD7965,
code service 882 7965 01000
- Verseuse blanche HD7626, modèle HD7966, code service 882 7966 01000
- Verseuse blanche HD7632/34, modèle HD7967, code service 882 7967 01000
- Verseuse anthracite HD7632/34/36, modèle HD7967,
code service 882 7967 81000
Filtre permanent
Les filtres permanents sont disponibles sous la référence HD7971 et le
code service 882 7971 0000.
Environnement
.
1 Lorsqu'il ne fonctionnera plus, ne jetez pas l'appareil avec les ordures
ménagères mais déposez-le à un endroit assigné à cet effet, où il pourra être
recyclé. Vous contribuerez ainsi à la protection de l'environnement (fig. 19).
Informations et services
.
Si vous souhaitez obtenir des informations supplémentaires, réparer l'appareil ou si
vous rencontrez un problème, consultez le dépliant de garantie internationale, visitez
le site Web de Philips à l'adresse www.philips.com ou contactez le Service
Consommateurs Philips de votre pays (vous trouverez le numéro de téléphone
correspondant sur le dépliant de garantie internationale). S'il n'existe pas de Service
Consommateurs Philips dans votre pays, renseignez-vous auprès de votre revendeur
local ou contactez le Service Department of Philips Domestic Appliances and
Personal Care BV.
4222 001 94874
7/11
Page 8

NEDERLANDS
Belangrijk
.
◗ Gebruik het apparaat niet indien de stekker, het snoer of het apparaat zelf
beschadigd is.
Thermoskan:
◗ Neem de thermoskan niet uit elkaar.
◗ Dompel de thermoskan nooit in water of een andere vloeistof om te
voorkomen dat er vloeistof tussen de wanden loopt (fig. 17).
◗ Plaats de thermoskan altijd rechtop wanneer deze is gevuld met koffie om
lekkage te voorkomen (fig. 18).
◗ Tijdens het koffiezetten worden het onderste deel van het apparaat en de
onderkant van de thermoskan heet.
◗ Tip: de koffie blijft na het zetten langer warm als u de kan voorspoelt met
heet water. Als u een volle kan koffie zet, blijft de koffie langer warm dan
wanneer u een kleinere hoeveelheid koffie zet.
Als het koffiezetten langer duurt of het apparaat uitschakelt voordat het
waterreservoir leeg is, dient u het apparaat te ontkalken (zie 'Ontkalken').
Voor het eerste gebruik
.
1 Controleer of het voltage aangegeven op het apparaat overeenkomt met de
netspanning in uw woning voordat u het apparaat aansluit.
2 Plaats het apparaat op een koele, vlakke en stabiele ondergrond.
Plaats het apparaat nooit op een heet oppervlak.
3 Verwijder de rode transportclip (a) voordat u het apparaat in gebruik neemt
Houd het apparaat buiten het bereik van kinderen en voorkom dat zij aan het
snoer kunnen trekken.
Het apparaat doorspoelen
.
1 Steek de stekker in een geaard stopcontact.
2 Overtollig snoer kunt u aan de achterzijde van het apparaat opbergen (fig. 1).
Voorkom dat het snoer in aanraking komt met hete oppervlakken.
3 Vul het waterreservoir met water en plaats de kan terug op het apparaat
(fig. 2).
Thermoskan:
Vul het waterreservoir niet verder dan de aanduiding voor 9 koppen als u het
apparaat gebruikt zonder gemalen koffie in het filter, anders stroomt de kan over.
4 Schakel het apparaat in door op de aan/uitknop te drukken (fig. 3).
Het indicatielampje gaat branden.
Laat het apparaat werken totdat al het water in de kan is gestroomd.
5 Schakel het apparaat na gebruik uit (fig. 4).
Maak de verwijderbare onderdelen schoon zoals staat beschreven in 'Schoonmaken'.
Koffiezetten
.
Active Balance-systeem
Het Active Balance-systeem helpt u om de juiste balans tussen de hoeveelheid water
en de hoeveelheid gemalen koffie te bepalen.
Voordat u het Active Balance-systeem gaat gebruiken, moet u het volgende goed
lezen:
Koffiesterkteknop
Alleen typen HD7622, HD7624, HD7626, HD7634, HD7636.
1 Stel de sterkte van uw koffie in met de koffiesterkteknop (b).
Indien u de voorkeur geeft aan milde koffie, draai dan de knop naar links. Indien u de
voorkeur geeft aan sterke koffie, draai dan de knop naar rechts (fig. 5).
Zorg ervoor dat de filterhouder op zijn plaats zit wanneer u de koffiesterkte
aanpast.
Resetfunctie
2 Zet het systeem in balans met de 'OK'-knop (c).
U kunt de indicator van het Active Balance-systeem in de 'OK'-stand zetten door de
'OK'-knop naar links of naar rechts te draaien (fig. 6).
Wanneer u het systeem in balans zet, zorg er dan voor dat:
- de filterhouder in het apparaat is geplaatst;
- er geen water en/of gemalen koffie in het apparaat zit.
3 Vul het waterreservoir eerst met water. De indicator van het Active Balance-
systeem gaat omhoog (fig. 7).
- De niveauaanduidingen hebben betrekking op kopjes met een inhoud van 120
ml.
- De niveauaanduidingen op de kan hebben betrekking op een hoeveelheid water
die 10% groter is dan de uiteindelijke hoeveelheid koffie na het zetten. Deze
extra 10% is nodig ter compensatie voor de verdamping van water tijdens het
zetten.
4 Plaats een papieren filterzakje (type 1x4 of nr. 4) in de filterhouder (fig. 8).
Vergeet niet de randen aan de zijkant en de onderzijde van het filterzakje om te
vouwen om scheuren en dubbelklappen van het zakje te voorkomen. Bij sommige
versies wordt een permanent filter geleverd. U hoeft dan geen papieren filterzakjes te
gebruiken.
5 Vul de filterhouder vervolgens met koffie (snelfiltermaling) totdat de indicator
van het Active Balance-systeem de 'OK'-stand heeft bereikt (fig. 9) en schakel
het apparaat in.
6 Sluit het deksel (fig. 10).
Het apparaat in- of uitschakelen
.
1 Schakel het apparaat in door op de aan/uitknop te drukken (fig. 3).
2 Schakel het apparaat na gebruik uit (fig. 4).
- Typen HD7624, HD7626: als u het apparaat niet hebt uitgeschakeld, schakelt het
zichzelf na twee uur automatisch uit (automatische uitschakelfunctie).
- Typen HD7634, HD7636: het apparaat schakelt zichzelf uit (automatische
uitschakelfunctie) na het koffiezetten.
3 Verwijder de filterhouder en gooi het papieren filterzakje weg (fig. 11-12).
Als u een permanent filter gebruikt, kunt u het filter gewoon leeggooien,
schoonspoelen en opnieuw gebruiken.
Laat het apparaat ten minste 3 minuten afkoelen voordat u opnieuw koffie gaat
zetten.
Schoonmaken
.
1 Haal de stekker uit het stopcontact.
2 Maak het apparaat schoon met een vochtige doek.
Dompel het apparaat nooit in water.
3 Maak de glazen kan en de filterhouder schoon in warm water met een beetje
afwasmiddel of in de vaatwasmachine.
De thermoskan mag niet worden schoongemaakt in de vaatwasmachine.
Thermoskan (fig. 13-14):
Maak de binnenkant van de thermoskan schoon met een zachte borstel, heet water
en een beetje afwasmiddel. De thermoskan is niet vaatwasmachinebestendig.
Spoel na het schoonmaken de thermoskan uit met vers, warm water.
Tip: u kunt hardnekkige bruine aanslag verwijderen door de kan met heet water te
vullen en er een lepel soda aan toe te voegen. Laat de soda een tijdje inwerken.
Leeg vervolgens de kan en verwijder de aanslag met een zachte borstel.
Het deksel van de thermoskan openen, sluiten of verwijderen:
Open het deksel naar de schenkstand door het een halve slag linksom te draaien
(fig. 15).
Sluit het deksel door het rechtsom te draaien. Als het deksel goed gesloten is, houdt
de thermoskan de koffie lang warm en lekker (fig. 16).
Verwijder het deksel door het linksom te draaien tot het loslaat.
Ontkalken
.
Door regelmatig te ontkalken verlengt u de levensduur van het apparaat en is een
optimale werking van het apparaat gegarandeerd.
In geval van normaal gebruik (twee volle kannen koffie per dag) dient u het apparaat
volgens het onderstaande schema te ontkalken:
- eens per 2 maanden als u hard water gebruikt (meer dan 18 DH);
- eens per 4 maanden als u zacht water gebruikt (tot 18 DH).
Vraag uw waterleidingbedrijf naar de waterhardheid in uw woongebied.
1 Vul het waterreservoir met blanke azijn. Doe geen papieren filterzakje of
gemalen koffie in de filterhouder.
2 Laat het apparaat twee keer werken.
Zie 'Koffiezetten'.
3 Laat het apparaat nog twee keer met schoon water werken om alle
azijnresten weg te spoelen.
4 Maak de afzonderlijke onderdelen schoon.
4222 001 94874
8/11
Page 9

Vervangen
.
Snoer
Indien het netsnoer beschadigd is, moet het worden vervangen door Philips, een
door Philips geautoriseerd servicecentrum of personen met vergelijkbare kwalificaties
om gevaar te voorkomen.
Kan
U kunt een nieuwe kan voor uw koffiezetter bestellen bij uw Philips-dealer of een
Philips-servicecentrum.
- HD7620/22/24 witte kan, type HD7965, servicenr. 882 7965 01000
- HD7626 witte kan, type HD7966, servicenr. 882 7966 01000
- HD7632/34 witte kan, type HD7967, servicenr. 882 7967 01000
- HD7632/34/36 antracietkleurige kan, type HD7967, servicenr. 882 7967 81000
Permanent filter
Een nieuw permanent filter is verkrijgbaar onder typenummer HD7971 en
servicenummer 882 7971 0000.
Milieu
.
1 Gooi het apparaat aan het einde van zijn levensduur niet weg met het normale
huisvuil, maar lever het in op een door de overheid aangewezen inzamelpunt
om het te laten recyclen. Op die manier levert u een bijdrage aan een
schonere leefomgeving (fig. 19).
Informatie & service
.
Als u informatie nodig hebt of als u een probleem hebt, raadpleeg het 'worldwide
guarantee'-vouwblad of bezoek onze website op www.philips.com. U kunt ook
contact opnemen met het Philips Customer Care Centre in uw land (u vindt het
telefoonnummer in het 'worldwide guarantee'-vouwblad). Als er geen Customer
Care Centre in uw land is, ga dan naar uw Philips-dealer of neem contact op met de
afdeling Service van Philips Domestic Appliances and Personal Care BV.
4222 001 94874
9/11
Page 10

ITALIANO
Importante
.
◗ Non utilizzate l'apparecchio se la spina, il cavo o l'apparecchio stesso sono
danneggiati.
Caraffa thermos:
◗ Non smontate la caraffa thermos
◗ Per evitare che l'acqua possa entrare nella caraffa thermos, non immergete
mai quest'ultima nell'acqua o in altri liquidi (fig. 17).
◗ Quando la caraffa è piena di caffè, mettetela in posizione verticale, per evitare
la fuoriuscita del caffè (fig. 18).
◗ Durante la preparazione del caffè, la parte inferiore dell'apparecchio e il fondo
della caraffa diventeranno molto caldi.
◗ Consiglio: preriscaldate la caraffa con dell'acqua calda per mantenere il caffè
caldo più a lungo. Ricordate inoltre che il caffè rimarrà più caldo se ne
preparerete una caraffa intera invece di una piccola quantità di caffè.
Se l'apparecchio impiega più tempo per preparare il caffè o si spegne prima
che il serbatoio sia vuoto, procedete alla disincrostazione dell'apparecchio
(Consultate "Rimozione del calcare").
Prima di utilizzare l'apparecchio per la prima volta
.
1 Prima di usare l'apparecchio, controllate che la tensione indicata corrisponda a
quella della rete locale.
2 Appoggiate l'apparecchio su una superficie fredda, piatta e stabile.
Non collocate in nessun caso l'apparecchio su una superficie calda.
3 Prima di usare l'apparecchio, togliete la clip rossa (a) usata per il trasporto.
Tenete l'apparecchio lontano dalla portata dei bambini e assicuratevi che non
possano raggiungere e tirare il cavo di alimentazione.
Come lavare l'apparecchio
.
1 Inserite la spina nella presa di corrente dotata di messa a terra.
2 Il cavo in eccesso può essere riposto nell'apposito scomparto nella parte
posteriore dell'apparecchio (fig. 1).
Evitate che il cavo venga a contatto con superficie incandescenti.
3 Riempite d'acqua la caraffa e mettetela in posizione (fig. 2).
Caraffa thermos:
Se usate l'apparecchio senza mettere il caffè macinato nel filtro, non riempite la
caraffa oltre l'indicazione delle 9 tazze, per evitare la fuoriuscita dell'acqua.
4 Accendete l'apparecchio premendo il pulsante on/off (fig. 3).
La spia si accende.
Lasciate l'apparecchio in funzione fino a svuotare completamente il serbatoio d'acqua.
5 Spegnete l'apparecchio dopo l'uso (fig. 4).
Pulite le parti smontabili come indicato nella sezione "Pulizia".
Preparazione del caffè
.
Active Balance System
L'Active Balance System vi aiuta a stabilire l'esatto equilibrio fra acqua e caffè.
Prima di usare l'Active Balance System ricordate quanto segue:
Selettore di forza
Modelli: HD7622, HD7624, HD7626, HD7634, HD7636.
1 Impostate il gusto del caffè che desiderate, più o meno forte, usando il
selettore (b).
Se preferite un caffè meno forte, ruotate la manopola verso sinistra. Se preferite un
caffè più forte, ruotatela verso destra (fig. 5).
Quando selezionate il tipo di caffè, controllate di aver inserito il portafiltro.
Funzione reset
2 Equilibrate il sistema usando la manopola "OK" (c).
L'indicatore dell'Active Balance System (d) può essere messo nella posizione "OK"
ruotando la manopola "OK" verso sinistra o verso destra (fig. 6).
Quando equilibrate il sistema, controllate che:
- il portafiltro sia al suo posto;
- l'apparecchio non contenga acqua o caffè macinato.
3 Riempite prima il serbatoio dell'acqua con acqua. L'indicatore dell'Active
Balance System sale (fig. 7).
- Le indicazioni di livello si riferisce a tazze da 120 ml.
- Le indicazioni di livello sulla caraffa si riferiscono ad una quantità d'acqua che è
del 10% superiore alla quantità di caffè totale ottenibile. Il 10% in più è
necessario per compensare l'evaporazione.
4 Mettete un filtro di carta (modello 1x4 o no. 4) nel portafiltro (fig. 8).
Non dimenticate di piegare i bordi del filtro per evitare che possa rompersi o
piegarsi. Alcuni modelli sono provvisti di un filtro permanente. In questo caso non è
necessario usare il filtro di carta.
5 Riempite il portafiltro con il caffè (filtro macinatura fine), fino a quando
l'indicatore dell'Active Balance System abbia raggiunto la posizione "OK"
(fig. 9), quindi accendete l'apparecchio.
6 Chiudete il coperchio (fig. 10).
Come accendere e spegnere l'apparecchio
.
1 Accendete l'apparecchio premendo il pulsante on/off (fig. 3).
2 Spegnete l'apparecchio dopo l'uso (fig. 4).
- Modelli: HD7624, HD7626. Se non avete provveduto personalmente,
l'apparecchio si spegnerà automaticamente dopo due ore (spegnimento
automatico).
- Modelli: HD7634, HD7636. L'apparecchio si spegnerà automaticamente
(spegnimento automatico) non appena il caffè è pronto.
3 Togliete il filtro di carta e gettatelo via (figg. 11-12).
Se avete usato un filtro permanente, potrete usarlo nuovamente dopo averlo
svuotato e risciacquato.
Lasciate raffreddare l'apparecchio per almeno 3 minuti prima di preparare
nuovamente il caffè.
Pulizia
.
1 Staccate la spina dalla presa di corrente.
2 Pulite l'apparecchio con un panno umido.
Non immergete mai l'apparecchio nell'acqua.
3 Pulite la caraffa di vetro e il portafiltro in acqua calda e detergente liquido o in
lavastoviglie.
La caraffa thermos non può essere lavata in lavastoviglie.
Caraffa thermos (fig. 13-14).
Pulire la caraffa thermos con uno spazzolino morbido, acqua calda e un po' di
detersivo liquido. La caraffa thermos non può essere lavata in lavastoviglie.
Dopo aver pulito la caraffa thermos, sciacquatela con acqua calda corrente.
Consiglio: per eliminare le macchie scure più resistenti, riempite la caraffa con acqua
calda e aggiungete un cucchiaio di bicarbonato e lasciatelo agire per un po' di tempo.
Svuotate la caraffa e togliete le macchie con uno spazzolino morbido.
Come aprire, chiudere o togliere il coperchio della caraffa thermos:
Per aprire il coperchio e poter versare il caffè, ruotatelo di mezzo giro in senso
antiorario (fig. 15).
Chiudete il coperchio ruotandolo in senso orario. Se chiusa correttamente, la caraffa
mantiene il caffè caldo e fragrante a lungo (fig. 16).
Per togliere il coperchio, ruotatelo in senso antiorario fino a quando viene via.
Disincrostazione
.
Una regolare disincrostazione del calcare permette una maggior durata
dell'apparecchio e vi consente di ottenere un caffè più buono.
In caso di normale utilizzo (due caraffe piene al giorno), procedete alla
disincrostazione del calcare come segue:
- una volta ogni 2 mesi nel caso di acqua dura (superiore a 18 DH)
- una volta ogni 4 mesi nel caso di acqua dolce (fino a 18 DH).
Per informazioni sulla durezza dell'acqua della vostra zona, rivolgetevi all'ente di
erogazione.
1 Riempite il serbatoio con aceto bianco, senza mettere né il filtro di carta né il
caffè nel portafiltro.
2 Lasciate che l'apparecchio compia due cicli interi.
Consultate "Come preparare il caffè".
3 Lasciate compiere altri due cicli completi all'apparecchio, usando acqua pulita,
per eliminare le tracce di aceto.
4 Pulire le diverse parti.
4222 001 94874
10/11
Page 11

Sostituzione
.
Cavo
Nel caso in cui il cavo di alimentazione fosse danneggiato, dovrà essere sostituito
presso i centri autorizzati Philips, i rivenditori specializzati oppure da personale
opportunamente qualificato, per evitare situazioni pericolose.
Caraffa
Potete ordinare una nuova caraffa con presso il vostro rivenditore o un Centro
Assistenza Philips.
- HD7620/22/24 caraffa bianca, modello HD7965, no. di codice 882 7965 01000
- HD7626 caraffa bianca, modello HD7966, no. di codice 882 7966 01000
- HD7632/34 caraffa bianca, modello HD7967, no. di codice 882 7967 01000
- HD7632/34/36 caraffa antracite, modello HD7967, no. di codice 882 7967
81000
Filtro permanente
È disponibile un nuovo filtro permanente con numero di modello HD7971 e numero
di codice 882 7971 0000.
Tutela dell'ambiente
.
1 Per contribuire alla tutela dell'ambiente, non smaltite l'apparecchio tra i rifiuti
domestici ma consegnatelo a un centro di raccolta ufficiale (fig. 19).
Garanzia e assistenza
.
Per ulteriori informazioni o in caso di problemi, consultate l'opuscolo della garanzia o
visitate il sito Web: www.philips.com; potete inoltre contattare il Centro Assistenza
Clienti Philips del vostro Paese (troverete il numero di telefono sull'opuscolo della
garanzia). Qualora nel vostro Paese non ci siano Centri Assistenza Clienti, rivolgetevi
a un rivenditore autorizzato Philips oppure contattate il Service Department of Philips
Domestic Appliances and Personal Care BV.
4222 001 94874
11/11
 Loading...