

Page 1
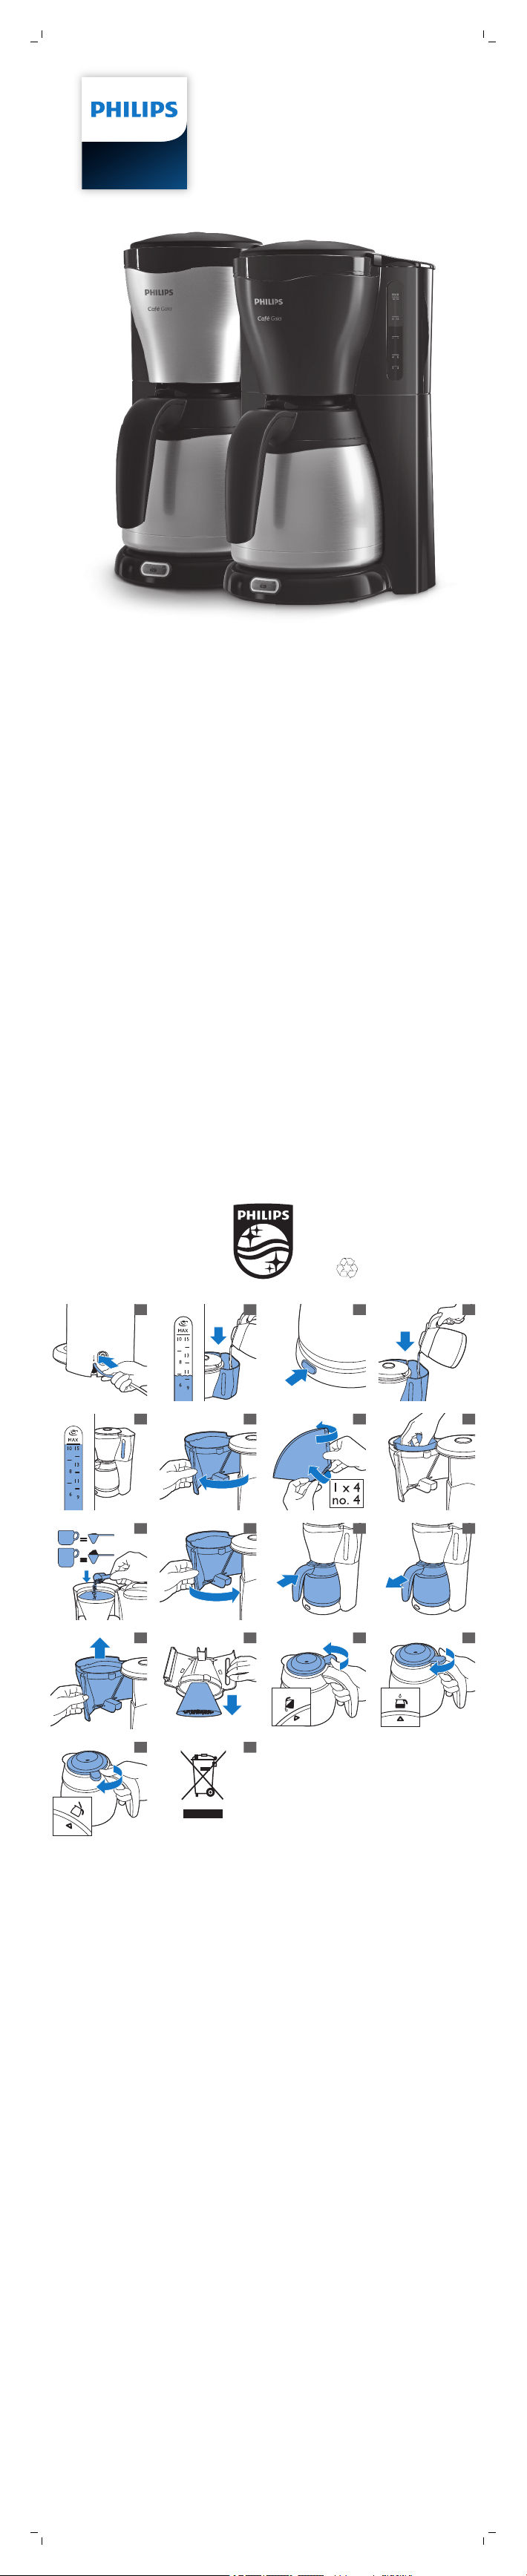
© 2018 Koninklijke Philips N.V.
HD7548 , HD7547,
HD7546 , HD7544
234
5
678
9
101112
13
141516
17
18
19
All rights reserved
4222.200.0658.6 (2/5/2018)
>75% recycled paper
>75% papier recyclé
Page 2
English
9
8
7
6
4
5
3
21
1
Introduction
Congratulations on your purchase and welcome to Philips! To fully benefit
from the support that Philips offers, register your product at
www.philips.com/welcome.
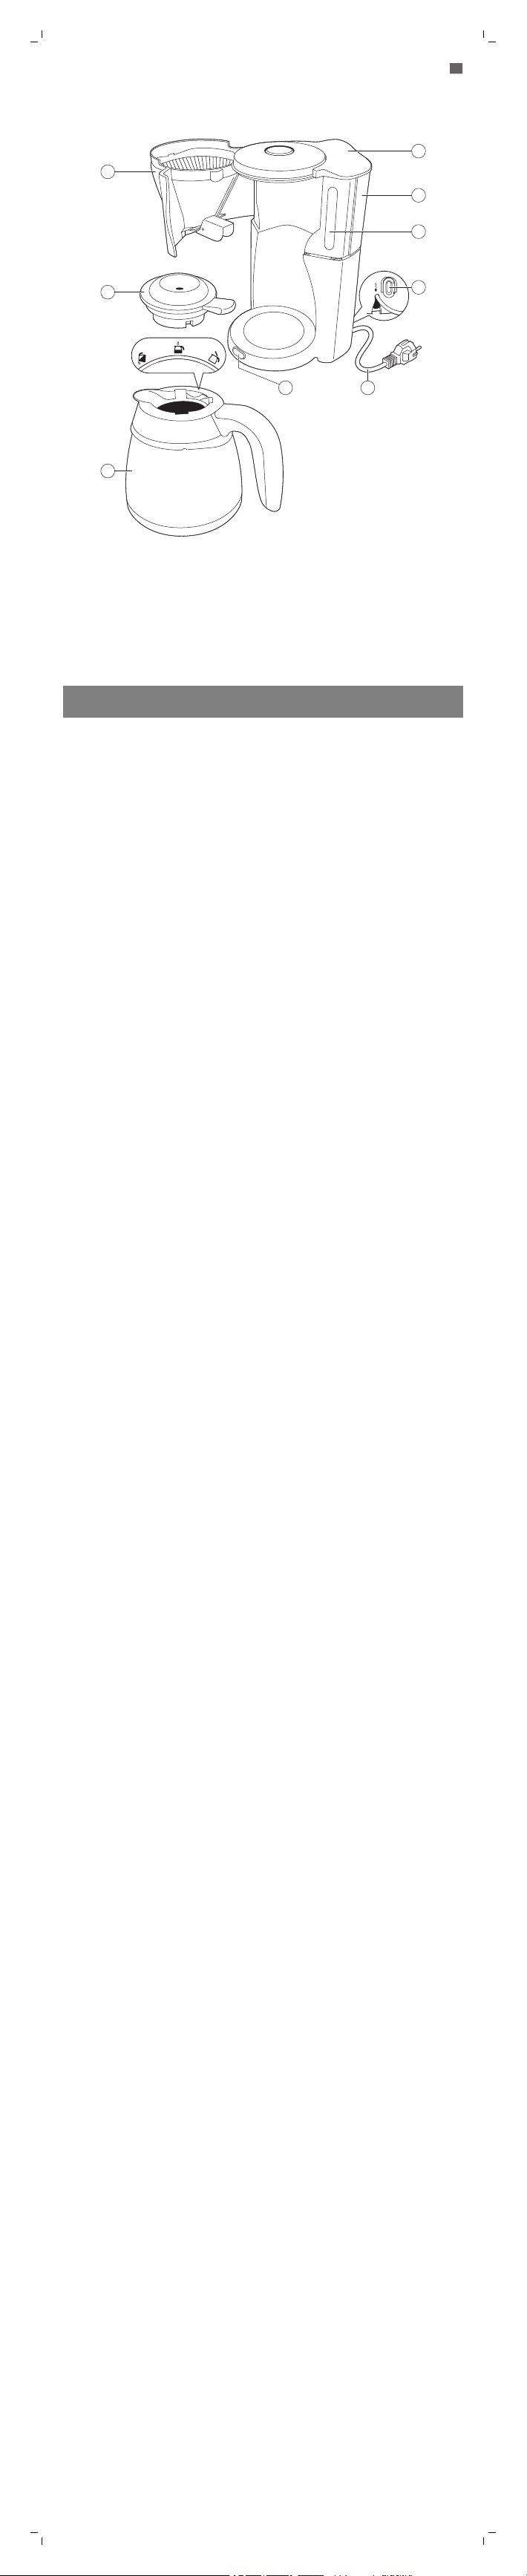
General description (Fig. 1)
1 Start button with light
2 Mains cord with plug
3 On/off switch
4 Water-level indicator
5 Water tank
6 Lid of the water tank
7 Detachable filter holder
8 Lid of the insulated jug
9 Insulated jug
Important safety information
Read this important information carefully before you use the appliance and
save it for future reference.
Danger
- Never immerse the appliance in water or any
other liquid.
Warning
- Do not let the mains cord hang over the edge
of the table or worktop on which the
appliance stands.
- This appliance can be used by children aged
from 8 years and above and by persons with
reduced physical, sensory or mental
capabilities or lack of experience and
knowledge if they have been given
supervision or instruction concerning use of
the appliance in a safe way and if they
understand the hazards involved. Cleaning
and user maintenance shall not be made by
children unless they are older than 8 and
supervised. Keep the appliance and its cord
out of reach of children aged less than 8
years.
- Children shall not play with the appliance.
- If the mains cord is damaged, you must have
it replaced by Philips, a service center
authorized by Philips or similarly qualified
persons in order to avoid a hazard.
- Connect the appliance to an earthed wall
socket.
- Do not use the appliance if the plug, the
mains cord or the appliance itself is
damaged.
- Check if the voltage indicated on the
appliance corresponds to the local mains
voltage before you connect the appliance.
Caution
- Unplug the appliance before you clean it and
if problems occur during brewing.
- Do not place the appliance on a hot surface
and do not let the mains cord come into
contact with hot surfaces.
- Do not place the coffeemaker in a cabinet
when in use.
- Never immerse the insulated jug in water or
any other liquid, as this could cause water to
enter between the walls of the jug.
- Do not disassemble the insulated jug.
- When the jug is filled with coffee, keep it in
upright position to prevent leakage.
- During brewing, the lower part of the
appliance and the bottom of the insulated
jug become hot.
- Do not put the jug on a stove or in a
microwave to reheat coffee.
- This appliance is intended to be used in
household and similar applications such as
farm houses, bed and breakfast type
environments, staff kitchen areas in shops,
offices and other working environments, and
by clients in hotels, motels and other
residential type environments.
- Always return the appliance to a service
center authorized by Philips for examination
or repair. Do not attempt to repair the
appliance yourself, otherwise the warranty
becomes invalid.
Automatic shut-off
For your convenience and extra safety, this appliance switches off
automatically immediately after brewing. The thermal jug keeps your coffee
hot.
Electromagnetic fields (EMF)
This Philips appliance complies with all applicable standards and
regulations regarding exposure to electromagnetic fields.
Page 3

Preparing for use
1 Put the appliance on a flat and stable surface.
2 Put the plug in an earthed wall socket.
3 Set the on/off switch on the back of the appliance to I (On) and push
excess cord into the opening at the back of the appliance (Fig. 2).
Flushing the appliance
1 Fill the water tank halfway with water (Fig. 3) and put the jug in place.
2 Press the start button (Fig. 4). The light goes on.
3 Let the appliance operate until the water tank is completely empty.The
appliance switches off automatically.
Note: Let the appliance cool down for at least 3 minutes before you start
brewing coffee.
Using the appliance
Brewing coffee
1 Fill the water tank with water (Fig. 5).
The graduations on the left are for large cups (120 ml) (Fig. 6).
-
The graduations on the right are for small cups (80 ml).
-
2 Open the filter holder (Fig. 7).
3 Take a paper filter (type 1x4 or no. 4) and fold the sealed edges to
prevent tearing and folding (Fig. 8).
4 Put the filter in the filter holder (Fig. 9).
Note: Some versions come with a permanent filter. In this case you do
not need a paper filter.
5 Put pre-ground coffee (filter-fine grind) in the filter.
For large cups: use one heaped measuring spoon or tablespoon of
-
ground coffee for each cup (Fig. 10).
For small cups: use one level measuring spoon or tablespoon of
-
ground coffee for each cup.
6 Close the filter holder (Fig. 11).
7 Put the jug in the appliance with the handle pointing straight forward
(Fig. 12). Make sure the lid of the jug is set to
8 Press the start button (Fig. 4). The appliance switches off automatically
after brewing.
Note: To switch off the appliance during brewing, set the on/off switch
on the back of the appliance to O. To continue brewing, set the on/off
switch to I again.
9 When all water has passed through the filter, you can remove the jug
from the appliance (Fig. 13).
10 Remove the filter holder (Fig. 14) and throw away the paper filter (Fig. 15).
If you used the permanent filter, empty and rinse it.
Using the insulated jug
The best way to keep the coffee hot is to rinse the jug with hot water before
brewing and to brew a full jug.
- To pour out coffee, turn the lid to the right (Fig. 16) until the arrow on the
lid points to
Note: Always close the lid after pouring coffee to keep the coffee hot.
- To close the lid, turn it to the left (Fig. 17) until the arrow on the lid points
to .
- To remove the lid, turn it to the left (Fig. 18) until the arrow on the lid
points to .
.
.
Cleaning
1 Clean the outside of the coffee maker and the jug with a moist cloth.
2 Detach the filter holder (Fig. 14).
3 Clean the filter holder in hot water with some washing-up liquid.
Note: You can also clean the plastic filter holder (HD7544) in the
dishwasher.The metal filter holder (HD7547, HD7546, HD7548) is not
dishwasher-proof.
4 Clean the inside of the insulated jug with a soft brush, hot water and
some washing-up liquid. Do not clean the insulated jug in the
dishwasher. After cleaning, rinse the insulated jug with fresh hot water.
Note: To remove stubborn brown deposits, fill the jug with hot water and
add a spoonful of soda. Leave the soda in the jug for some time. Then
empty the jug and remove the deposits with a soft brush. Rinse the
insulated jug with fresh hot water.
Descaling
Regular descaling prolongs the lifetime of your coffeemaker and guarantees
optimal brewing results for a long time.
In case of normal use (two full jugs of coffee every day), descale the
appliance:
- 2 or 3 times a year if you use soft water (up to 18dH)
- 4 or 5 times a year if you use hard water (over 18dH)
You can use white vinegar with 4% acetic acid or an appropriate liquid
descaler. If you use a liquid descaler, follow the instructions on the package.
Caution: Never use vinegar with an acetic acid content of 8% or more,
natural vinegar, powder descalers or tablet descalers to descale the
appliance, as this may cause damage.
1 Fill the water tank up to the maximum level with white vinegar (4% acetic
acid).
2 Put a paper filter or the permanent filter in the filter holder to collect
scale particles.
3 Press the start button and let the appliance complete two brewing
cycles. Let the appliance cool down for about 3 minutes between the
brewing cycles.
4 Fill the water tank with fresh cold water and remove the paper filter or
the permanent filter.
5 Let the appliance complete two brewing cycles with fresh cold water to
remove all vinegar or descaler residues. Let the appliance cool down for
about 3 minutes between the brewing cycles.
Note: Do not reuse water that comes out of the appliance for the next
brewing cycle. Always use fresh water.
Note: If necessary, repeat step 5 until the water that comes out of the
appliance no longer tastes or smells of vinegar.
6 Clean the permanent filter (if used), the jug and the filter holder (see
'Cleaning').
Recycling
- This symbol means that this product shall not be disposed of with
normal household waste (2012/19/EU) (Fig. 19).
- Follow your country's rules for the separate collection of electrical and
electronic products. Correct disposal helps prevent negative
consequences for the environment and human health.
Warranty and support
If you need information or support, please visit www.philips.com/support
or read the international warranty leaflet.
Ordering accessories
To buy accessories or spare parts, visit www.shop.philips.com/service or go
to your Philips dealer.
Troubleshooting
This chapter summarizes the most common problems you could encounter
with the appliance. If you are unable to solve the problem with the
information below, visit www.philips.com/support for a list of frequently
asked questions or contact the Consumer Care Center in your country.
Problem
Brewing takes longer
than usual.
The appliances
switches off before
the water tank is
empty.
The coffee is not hot
enough.
The jug cannot be
placed in the
appliance
The filter overflows
when I remove the
jug during brewing.
Solution
Descale the appliance (see 'Descaling').
Descale the appliance (see 'Descaling').
Rinse the jug with hot water before brewing. The
coffee stays warm longer if you brew at least half a
jug.
Make sure that the jug handle points straight
forward.
Do not remove the jug for more than 30 seconds to
prevent this.
Deutsch
Einführung
Herzlichen Glückwunsch zu Ihrem Kauf und willkommen bei Philips! Um die
Unterstützung von Philips optimal nutzen zu können, sollten Sie Ihr Produkt
unter www.philips.com/welcome registrieren.
Allgemeine Beschreibung (Abb. 1)
1 START-Taste mit Kontrollleuchte
2 Netzkabel mit Stecker
3 Ein-/Ausschalter
4 Wasserstandsanzeige
5 Wasserbehälter
6 Deckel des Wasserbehälters
7 Abnehmbarer Filterhalter
8 Deckel der isolierten Thermo-Kanne
9 Isolierte Thermo-Kanne
Wichtige Sicherheitsinformationen
Lesen Sie diese wichtigen Informationen vor dem Gebrauch des Geräts
aufmerksam durch, und bewahren Sie sie für eine spätere Verwendung auf.
Gefahr
- Tauchen Sie das Gerät niemals in Wasser
oder andere Flüssigkeiten.
Warnhinweis
- Lassen Sie das Netzkabel nicht über den
Rand der Arbeitsfläche hängen, auf der das
Gerät steht.
Page 4
- Dieses Gerät kann von Kindern ab 8Jahren
und Personen mit verringerten physischen,
sensorischen oder psychischen Fähigkeiten
oder Mangel an Erfahrung und Kenntnis
verwendet werden, wenn sie bei der
Verwendung beaufsichtigt wurden oder
Anweisungen zum sicheren Gebrauch des
Geräts erhalten und die Gefahren verstanden
haben. Reinigung und Pflege dürfen nicht
von Kindern durchgeführt werden, außer sie
sind älter als 8 Jahre und werden
beaufsichtigt. Bewahren Sie das Gerät und
das Kabel außerhalb der Reichweite von
Kindern unter 8Jahren auf.
- Kinder dürfen nicht mit dem Gerät spielen.
- Um Gefährdungen zu vermeiden, darf ein
defektes Netzkabel nur von einem Philips
Service-Center, einer von Philips
autorisierten Werkstatt oder einer ähnlich
qualifizierten Person durch ein OriginalErsatzkabel ersetzt werden.
- Schließen Sie das Gerät an eine geerdete
Steckdose an.
- Verwenden Sie das Gerät nicht, wenn der
Netzstecker, das Netzkabel oder das Gerät
selbst defekt oder beschädigt sind.
- Prüfen Sie, bevor Sie das Gerät in Betrieb
nehmen, ob die Spannungsangabe auf dem
Gerät mit der örtlichen Netzspannung
übereinstimmt.
Achtung
- Ziehen Sie den Netzstecker aus der
Steckdose, bevor Sie mit dem Reinigen
beginnen oder falls Probleme während des
Brühvorgangs auftreten.
- Stellen Sie das Gerät nicht auf heiße Flächen.
Lassen Sie auch das Netzkabel nicht mit
heißen Oberflächen in Berührung kommen.
- Die Kaffeemaschine beim Betrieb nicht in
einem Schrank aufbewahren.
- Tauchen Sie die isolierte Thermo-Kanne
niemals in Wasser oder eine andere
Flüssigkeit, da dadurch Wasser zwischen die
Wände der Thermo-Kanne gelangen kann.
- Nehmen Sie die isolierte Thermo-Kanne nicht
auseinander.
- Halten Sie die gefüllte Thermo-Kanne
senkrecht, damit sie nicht tropft.
- Während der Kaffeezubereitung werden der
untere Teil des Geräts und der Boden der
isolierten Thermo-Kanne heiß.
- Stellen Sie die Kanne zum Aufwärmen des
Kaffees nicht auf einen Herd oder in eine
Mikrowelle.
- Dieses Gerät ist für die Verwendung im
Haushalt und in Einrichtungen wie
Bauernhöfen, Frühstückspensionen,
Mitarbeiterküchen in Geschäften, Büros und
anderen Arbeitsumgebungen sowie für
Kunden in Hotels, Motels und anderen
Einrichtungen vorgesehen.
- Wenden Sie sich zur Prüfung bzw. Reparatur
des Geräts immer an ein Philips ServiceCenter. Versuchen Sie nicht, das Gerät selbst
zu reparieren, da andernfalls die Garantie
erlischt.
Automatische Abschaltung
Für Ihre Bequemlichkeit und zusätzliche Sicherheit schaltet sich dieses
Gerät nach dem Brühvorgang automatisch aus. In der Thermo-Kanne bleibt
Ihr Kaffee heiß.
Elektromagnetische Felder
Dieses Philips-Gerät erfüllt alle einschlägigen Normen und Vorschriften zur
Exposition gegenüber elektromagnetischen Feldern.
Vorbereiten für den Gebrauch
1 Stellen Sie das Gerät auf eine ebene und feste Oberfläche.
2 Stecken Sie den Netzstecker in eine geerdete Steckdose.
3 Stellen Sie den Ein-/Ausschalter auf der Rückseite des Gerätes auf I (Ein)
und schieben Sie das überschüssige Kabel in das Kabelfach auf der
Rückseite des Geräts (Abb. 2).
Das Gerät durchspülen
1 Füllen Sie den Wasserbehälter zur Hälfte mit Wasser (Abb. 3) und stellen
Sie die Kanne in das Gerät.
2 Drücken Sie die START-Taste (Abb. 4). Die Anzeige leuchtet auf.
3 Lassen Sie das Gerät laufen, bis der Wasserbehälter komplett entleert ist.
Das Gerät schaltet sich automatisch aus.
Hinweis: Lassen Sie das Gerät mindestens 3Minuten abkühlen, bevor Sie
mit der Zubereitung von Kaffee beginnen.
Das Gerät benutzen
Kaffee brühen
1 Füllen Sie den Wasserbehälter mit Wasser (Abb. 5).
Die linke Maßeinteilung bezieht sich auf große Tassen (120 ml) (Abb.
-
6).
Die rechte Maßeinteilung bezieht sich auf kleine Tassen (80ml).
-
2 Öffnen Sie den Filterhalter (Abb. 7).
3 Setzen Sie einen Papierfilter (Typ 1x4 oder Nr. 4) ein und falten Sie die
gestanzten Ränder um, damit der Papierfilter nicht reißt oder einknickt
(Abb. 8).
4 Setzen Sie den Filter in den Filterhalter (Abb. 9) ein.
Hinweis: Einige Gerätetypen sind mit einem Dauerfilter ausgestattet. In
diesem Fall sind keine Papierfilter erforderlich.
5 Füllen Sie (filterfein) gemahlenen Kaffee in den Filter.
Für große Tassen: Nehmen Sie einen gehäuften Messlöffel oder
-
Esslöffel gemahlenen Kaffee pro Tasse (Abb. 10).
Für kleine Tassen: Nehmen Sie einen gestrichenen Messlöffel oder
-
Esslöffel gemahlenen Kaffee pro Tasse.
6 Schließen Sie den Filterhalter (Abb. 11).
7 Stellen Sie die Kanne mit dem Griff nach vorn (Abb. 12) gerichtet in das
Gerät. Achten Sie darauf, dass sich der Deckel der Kanne in der Position
befindet.
8 Drücken Sie die START-Taste (Abb. 4). Das Gerät schaltet sich nach dem
Brühen automatisch aus.
Hinweis: Um das Gerät während des Brühvorgangs auszuschalten,
stellen Sie den Ein-/Ausschalter auf der Rückseite des Geräts auf „O“.
Um den Brühvorgang fortzusetzen, stellen Sie den Ein-/Ausschalter
wieder auf „I“.
9 Wenn das Wasser vollständig durch den Filter gelaufen ist, können Sie
die Kanne vom Gerät (Abb. 13) nehmen.
10 Nehmen Sie den Filterhalter (Abb. 14) heraus und entsorgen Sie die
Filtertüte (Abb. 15). Wenn Ihr Gerät über einen Dauerfilter verfügt, leeren
und spülen Sie ihn aus.
Verwenden der isolierten Thermo-Kanne
Wenn Sie dieThermo-Kanne vorher mit heißem Wasser ausspülen und eine
volle Kanne zubereiten, bleibt der Kaffee länger heiß.
- Um Kaffee auszugießen, drehen Sie den Kannendeckel nach rechts (Abb.
16), bis der Pfeil auf dem Deckel auf das Symbol
Hinweis: Schließen Sie nach dem Ausgießen den Deckel wieder, damit
der Kaffee länger heiß bleibt.
- Zum Schließen drehen Sie den Deckel nach links (Abb. 17), bis der Pfeil
auf dem Deckel auf das Symbol
- Um den Kannendeckel zu entfernen, drehen Sie ihn nach links (Abb. 18),
bis der Pfeil auf dem Deckel auf das Symbol
zeigt.
zeigt.
zeigt.
Page 5

Reinigung
1 Reinigen Sie das Gehäuse der Kaffeemaschine und die Kanne mit einem
feuchten Tuch.
2 Nehmen Sie den Filterhalter (Abb. 14) ab.
3 Reinigen Sie den Filterhalter in heißem Spülwasser.
Hinweis: Der Kunststoff-Filterhalter (HD7544) kann im Geschirrspüler
gereinigt werden. Reinigen Sie den Metall-Filterhalter (HD7547, HD7546,
HD7548) jedoch nicht im Geschirrspüler.
4 Reinigen Sie das Innere der Thermo-Kanne mit einer weichen Bürste,
heißem Wasser und etwas Spülmittel. Reinigen Sie die Thermo-Kanne
nicht im Geschirrspüler. Spülen Sie die isolierte Thermo-Kanne nach der
Reinigung mit heißem Leitungswasser aus.
Hinweis: Hartnäckige Flecken entfernen Sie, indem Sie die Kanne mit
heißem Wasser füllen und einen Löffel Soda hinein geben. Lassen Sie dies
eine Weile einwirken. Leeren Sie die Kanne, und entfernen Sie die
Rückstände mit einer weichen Bürste. Spülen Sie die Thermo-Kanne mit
klarem heißem Wasser aus.
Entkalken
Regelmäßiges Entkalken verlängert die Lebensdauer Ihrer Kaffeemaschine
und garantiert langfristig optimale Ergebnisse bei der Kaffeezubereitung.
Entkalken Sie das Gerät bei normalem Gebrauch von zwei Kannen Kaffee
täglich:
- 2 bis 3 Mal pro Jahr bei weichem Wasser (bis zu 18 dH)
- 4 bis 5 Mal pro Jahr bei hartem Wasser (über 18 dH)
Sie können Haushaltsessig mit 4 % Säuregehalt verwenden oder einen
geeigneten flüssigen Entkalker. Wenn Sie Flüssigentkalker verwenden,
halten Sie sich an die Anweisungen auf der Verpackung.
Achtung: Verwenden Sie zum Entkalken des Geräts auf keinen Fall
Haushaltsessig mit einem Säuregehalt von 8% oder mehr, natürlichen
Essig oder Entkalker in Pulver- oder Tablettenform, da dies zu
Beschädigungen führen kann.
1 Füllen Sie den Wasserbehälter bis zur Maximum-Markierung mit
Haushaltsessig (4 % Säuregehalt).
2 Setzen Sie einen Papierfilter oder einen Dauerfilter in den Filterhalter
ein, um den Kalk darin aufzufangen.
3 Drücken Sie die START-Taste und lassen Sie das Gerät zweimal komplett
durchlaufen. Lassen Sie das Gerät zwischen den Brühvorgängen ca. 3
Minuten lang abkühlen.
4 Füllen Sie den Wasserbehälter mit frischem, kaltem Wasser, und nehmen
Sie den Papierfilter oder Dauerfilter heraus.
5 Lassen Sie dann das Gerät zweimal mit frischem, kaltem Wasser
durchlaufen, um Rückstände von Essig oder Entkalker zu beseitigen.
Lassen Sie das Gerät zwischen den Brühvorgängen ca. 3 Minuten lang
abkühlen.
Hinweis: rwenden Sie das Wasser, das aus dem Gerät herauskommt,
nicht für den nächsten Brühvorgang. Verwenden Sie immer frisches
Wasser.
Hinweis: Wiederholen Sie bei Bedarf Schritt5, bis das Wasser, das aus
dem Gerät herauskommt, nicht mehr nach Essig schmeckt oder riecht.
6 Reinigen Sie den Dauerfilter (wenn dieser verwendet wurde), die Kanne
und den Filterhalter (siehe 'Reinigung').
Recycling
- Dieses Symbol bedeutet, dass das Produkt nicht mit dem normalen
Hausmüll entsorgt werden kann (2012/19/EU) (Abb. 19).
1 Altgeräte können kostenlos an geeigneten Rücknahmestellen
abgegeben werden.
2 Diese werden dort fachgerecht gesammelt oder zur Wiederverwendung
vorbereitet. Altgeräte können Schadstoffe enthalten, die der Umwelt und
der menschlichen Gesundheit schaden können. Enthaltene Rohstoffe
können durch ihre Wiederverwertung einen Beitrag zum Umweltschutz
leisten.
3 Die Löschung personenbezogener Daten auf den zu entsorgenden
Altgeräten muss vom Endnutzer eigenverantwortlich vorgenommen
werden.
4 Hinweise für Verbraucher in Deutschland: Die in Punkt 1 genannte
Rückgabe ist gesetzlich vorgeschrieben. Sammel- und
Rücknahmestellen in Deutschland: https://www.stiftung-ear.de/
Garantie und Support
Für Unterstützung und weitere Informationen besuchen Sie die Philips
Website unter www.philips.com/support, oder lesen Sie die internationale
Garantieschrift.
Bestellen von Zubehör
Um Zubehör oder Ersatzteile zu kaufen, gehen Sie auf
www.shop.philips.com/service, oder suchen Sie Ihren Philips Händler auf.
Fehlerbehebung
In diesem Kapitel sind die häufigsten Probleme aufgeführt, die beim
Gebrauch des Geräts auftreten können. Sollten Sie ein Problem mithilfe der
nachstehenden Informationen nicht beheben können, besuchen Sie unsere
Website unter: www.philips.com/support und ziehen Sie die Liste „Häufig
gestellte Fragen“ hinzu, oder wenden Sie sich an das Philips Consumer
Care-Center in Ihrem Land.
Problem
Der Brühvorgang
dauert
außergewöhnlich
lange.
Das Gerät schaltet
sich aus, bevor der
Wasserbehälter leer
ist.
Der Kaffee ist nicht
heiß genug.
Die Kanne kann
nicht in das Gerät
gestellt werden
Der Filter läuft über,
wenn die Kanne
während des
Brühvorgangs vom
Gerät entfernt wird.
Die Lösung
Entkalken Sie das Gerät (siehe 'Entkalken').
Entkalken Sie das Gerät (siehe 'Entkalken').
Spülen Sie die Kanne vor dem Brühvorgang mit
heißem Wasser aus. Der Kaffee bleibt länger heiß,
wenn Sie zumindest eine halbe Kanne brühen.
Stellen Sie sicher, dass die Kanne mit dem Griff
nach vorne ausgerichtet ist.
Um dies zu vermeiden, nehmen Sie die Kanne
maximal 30 Sekunden vom Gerät.
Español
Introducción
Enhorabuena por la adquisición de este producto, y bienvenido a Philips
Para sacar el mayor partido a la asistencia que Philips le ofrece, registre el
producto en www.philips.com/welcome.
Descripción general (fig. 1)
1 Botón de inicio con piloto
2 Cable de alimentación con clavija
3 Interruptor de encendido/apagado
4 Indicador de nivel de agua
5 Depósito de agua
6 Tapa del depósito de agua
7 Portafiltro desmontable
8 Tapa de la jarra con aislamiento
9 Jarra con aislamiento
Información de seguridad importante
Antes de usar el aparato, lea atentamente esta información importante y
consérvela por si necesitara consultarla en el futuro.
Peligro
- No sumerja nunca el aparato en agua u otros
líquidos.
Advertencia
- No deje que el cable de red cuelgue del
borde de la mesa o encimera donde esté
colocado el aparato.
- Este aparato puede ser usado por niños a
partir de 8 años y por personas con su
capacidad física, psíquica o sensorial
reducida y por quienes no tengan los
conocimientos y la experiencia necesarios, si
han sido supervisados o instruidos acerca del
uso del aparato de forma segura y siempre
que sepan los riesgos que conlleva su uso.
Los niños no deben limpiar el aparato ni
realizar tareas de mantenimiento a menos
que sean mayores de 8 años y cuenten con
supervisión. Mantenga el aparato y el cable
fuera del alcance de los niños menores de
8años.
- No permita que los niños jueguen con el
aparato.
- Si el cable de alimentación está dañado,
debe ser sustituido por Philips o por un
centro de servicio autorizado por Philips con
el fin de evitar situaciones de peligro.
Page 6

- Conecte el aparato a un enchufe de pared
con toma de tierra.
- No utilice el aparato si la clavija, el cable de
alimentación o el propio aparato están
dañados.
- Antes de enchufar el aparato, compruebe si
el voltaje indicado en el mismo se
corresponde con el voltaje de red local.
Precaución
- Desenchufe el aparato antes de limpiarlo y si
surgen problemas durante su uso.
- No coloque el aparato en una superficie
caliente y asegúrese de queel cable de
alimentación noentra en contacto con
superficies calientes.
- No coloque la cafetera en un cuarto de baño
durante el uso.
- No sumerja la jarra con aislamiento en agua
ni en ningún otro líquido, ya que el agua
podría filtrarse entre las paredes de la jarra.
- No desmonte la jarra con aislamiento.
- Cuando la jarra esté llena de café,
manténgala en posición vertical para evitar
que se derrame el café.
- Mientras se prepara el café, la parte inferior
del aparato y de la jarra con aislamiento se
calientan.
- No coloque la jarra en fogones ni microondas
para recalentar el café.
- Este aparato está diseñado para utilizarlo en
entornos domésticos o similares como:
viviendas de granjas, hostales en los que se
ofrecen desayunos, zona de cocina en
tiendas, oficinas y otros entornos laborales, y
por clientes de hoteles, moteles y entornos
residenciales de otro tipo.
- Lleve siempre el aparato a un centro de
servicio autorizado por Philips para su
comprobación y reparación. No intente
repararlo usted mismo; de lo contrario, la
garantíaquedaría anulada.
Desconexión automática
Para su comodidad y una mayor seguridad, este aparato se apaga de forma
automática e inmediata tras preparar el café. La jarra termo mantiene el
café caliente.
Campos electromagnéticos (CEM)
Este Philips cumple los estándares y las normativas aplicables sobre
exposición a campos electromagnéticos.
Preparación para su uso
1 Coloque el aparato sobre una superficie plana y estable.
2 Conecte el aparato a un enchufe con toma de tierra.
3 Ponga el interruptor de encendido/apagado de la parte posterior del
aparato en la posición I (encendido) e introduzca el cable en la abertura
que hay en la parte de atrás del aparato (Fig. 2).
Limpieza del aparato antes de usarlo
1 Llene el depósito hasta la mitad con agua (Fig. 3) y coloque la jarra en su
sitio.
2 Pulse el botón (Fig. 4) de inicio. Se encenderá el piloto.
3 Deje que el aparato funcione hasta que el depósito de agua se vacíe por
completo. El aparato se apagaautomáticamente.
Nota: Deje que el aparato se enfríe durante al menos tres minutos antes
de preparar café.
Uso del aparato
Cómo hacer café
1 Llene el depósito con agua (Fig. 5).
Las graduaciones de la izquierda corresponden a tazas grandes (120
-
ml) (Fig. 6).
Las graduaciones de la derecha corresponden a tazas pequeñas
-
(80ml).
2 Abra el portafiltro (Fig. 7).
3 Coja un filtro de papel (de tipo 1x4 o nº 4) y doble los bordes sellados
para evitar que se rompa o arrugue (Fig. 8).
4 Coloque el filtro en el portafiltro (Fig. 9).
Nota: Algunos modelos incluyen un filtro permanente. En ese caso, no
necesita un filtro de papel.
5 Ponga café molido (molido fino para filtro) en el filtro.
Para tazas grandes: utilice un cacito dosificador o una cucharada
-
colmada de café molido por taza (Fig. 10).
Para tazas pequeñas: utilice un cacito dosificador o una cucharada
-
rasa de café molido por taza.
6 Cierre el portafiltro (Fig. 11).
7 Coloque la jarra en el aparato con el asa de frente (Fig. 12). Asegúrese de
que la tapa de la jarra está
8 Pulse el botón (Fig. 4) de inicio. El aparato se apaga automáticamente
después de preparar el café.
Nota: Para apagar el aparato mientras se prepara el café, ponga el
interruptor de encendido/apagado de la parte posterior del aparato en
la posición O. Para continuar preparando el café, sitúe de nuevo el
interruptor de encendido/apagado en la posición I.
9 Cuando toda el agua haya pasado por el filtro, puede retirar la jarra del
aparato (Fig. 13).
10 Quite el portafiltro (Fig. 14) y tire el filtro de papel (Fig. 15). Si ha utilizado
un filtro permanente, vacíelo y enjuáguelo.
Uso de la jarra con aislamiento
El mejor modo de mantener el café caliente es enjuagar la jarra con agua
caliente antes de preparar el café y preparar una jarra llena.
- Para servir el café, gire la tapa hacia la derecha (Fig. 16) hasta que la
flecha de la tapa señale hacia
Nota: Cierre siempre la tapa después de servir el café para mantenerlo
caliente.
- Para cerrar la tapa, gírela hacia la izquierda (Fig. 17) hasta que la flecha
de la tapa señale hacia .
- Para quitar la tapa, gírela hacia la izquierda (Fig. 18) hasta que la flecha
de la tapa señale hacia .
.
.
Limpieza
1 Limpie el exterior de la cafetera y la jarra con un paño húmedo.
2 Desmonte el portafiltro (Fig. 14).
3 Limpie el portafiltro en agua caliente con algo de detergente líquido.
Nota: El portafiltro de plástico (HD7544) también se puede lavar en el
lavavajillas. El portafiltro de metal (HD7547, HD7546, HD7548) no se
puede en el lavavajillas.
4 Lave el interior de la jarra con aislamiento con un cepillo suave, agua
caliente y un poco de detergente líquido. No lave la jarra con aislamiento
en el lavavajillas. Después de lavarla, aclare la jarra con aislamiento con
agua caliente.
Nota: Para eliminar los restos de café persistentes, llene la jarra de agua
caliente y añada una cucharada de bicarbonato. Déjelo actuar en la jarra un
rato. Después vacíe la jarra y elimine los restos con un cepillo suave. Aclare
la jarra con aislamiento con agua caliente.
Eliminación de los depósitos de cal
Si elimina los depósitos de cal con regularidad, prolongará la vida útil de la
cafetera y garantizará resultados óptimos durante mucho tiempo.
En caso de un uso normal (dos jarras de café llenas al día), elimine los
depósitos de cal del aparato:
- 2 o 3 veces al año si utiliza agua blanda (hasta 18dH)
- 4 o 5 veces al año si utiliza agua dura (más de 18dH)
Puede utilizar vinagre blanco con un 4% de ácido acético o un agente
desincrustante líquido adecuado. Si utiliza un agente desincrustante
líquido, siga las instrucciones del embalaje.
Precaución: No utilice nunca vinagre con un 8% de ácido acético o más,
vinagre natural, desincrustantes en polvo o en tabletas para eliminar la cal
del aparato, ya que podría dañarlo.
1 Llene el depósito de agua hasta el nivel máximo con vinagre blanco (4%
de ácido acético).
2 Coloque un filtro de papel o el filtro permanente en el portafiltro para
recoger las partículas de cal.
3 Pulse el botón de inicio y deje que el aparato complete dos ciclos de
preparación de café. Deje que el aparato se enfríe durante
aproximadamente 3minutos entre cada ciclo.
4 Llene el depósito de agua fría y quite el filtro de papel o el filtro
permanente.
5 Deje que el aparato complete dos ciclos con agua fría limpia para
eliminar todos los restos de vinagre o de cal. Deje que el aparato se
enfríe durante aproximadamente 3minutos entre cada ciclo.
Page 7

Nota: No vuelva a utilizar el agua que sale del aparato para el siguiente
ciclo de preparación de café. Utilice siempre agua limpia.
Nota: Si es necesario, repita el paso 5 hasta que el agua que sale del
aparato no tenga sabor ni olor a vinagre.
6 Limpie el filtro permanente (si lo utiliza), la jarra y el portafiltro (consulte
'Limpieza').
Reciclaje
- Este símbolo significa que este producto no debe desecharse con la
basura normal del hogar (2012/19/UE) (Fig. 19).
- Siga la normativa de su país para la recogida selectiva de productos
eléctricos y electrónicos. El desechado correcto ayuda a evitar
consecuencias negativas para el medio ambiente y la salud humana.
Garantía y asistencia
Si necesita asistencia o información, visite www.philips.com/support o lea
el folleto de garantía internacional.
Solicitud de accesorios
Para comprar accesorios o piezas de repuesto, visite
www.shop.philips.com/service o acuda a su distribuidor de Philips.
Resolución de problemas
En este capítulo se resumen los problemas más comunes que pueden
surgir al usar el aparato. Si no puede resolver el problema con la siguiente
información, visite www.philips.com/support para consultar una lista de
preguntas frecuentes o comuníquese con el servicio de atención al cliente
en su país.
Problema
La preparación del
café tarda más de lo
normal.
El aparato se apaga
antes de que se
vacíe el depósito de
agua.
El café no está lo
suficientemente
caliente.
No se puede colocar
la jarra en el aparato.
El café rebosa por el
filtro cuando se
quita la jarra durante
la preparación del
café.
Solución
Elimine los depósitos de cal del aparato (consulte
'Eliminación de los depósitos de cal').
Elimine los depósitos de cal del aparato (consulte
'Eliminación de los depósitos de cal').
Enjuague la jarra con agua caliente antes de
preparar el café. El café se mantendrá caliente
durante más tiempo si prepara por lo menos media
jarra.
Asegúrese de colocar el asa de la jarra de frente.
No quite la jarra durante más de 30segundos para
evitar que ocurra.
Français
Introduction
Félicitations pour votre achat et bienvenue dans l'univers Philips! Pour
profiter pleinement de l'assistance offerte par Philips, enregistrez votre
produit à l'adresse suivante: www.philips.com/welcome.
Description générale (fig. 1)
1 Bouton marche/arrêt avec voyant
2 Cordon d'alimentation avec fiche secteur
3 Bouton marche/arrêt
4 Indicateur de niveau d'eau
5 Réservoir d’eau
6 Couvercle du réservoir d'eau
7 Porte-filtre amovible
8 Couvercle de la verseuse isotherme
9 Verseuse isotherme
Informations de sécurité importantes
Lisez attentivement ces informations importantes avant d'utiliser l'appareil
et conservez-les pour un usage ultérieur.
Danger
- N'immergez en aucun cas l'appareil, ni dans
l'eau, ni dans tout autre liquide.
Avertissement
- Ne laissez pas le cordon pendre de la table
ou du plan de travail sur lequel l'appareil est
posé.
- Cet appareil peut être utilisé par des enfants
âgés de 8ans ou plus, des personnes dont
les capacités physiques, sensorielles ou
intellectuelles sont réduites ou des
personnes manquant d’expérience et de
connaissances, à condition que ces enfants
ou personnes soient sous surveillance ou
qu’ils aient reçu des instructions quant à
l’utilisation sécurisée de l’appareil et qu’ils
aient pris connaissance des dangers
encourus. Le nettoyage et l'entretien ne
peuvent pas être réalisés par des enfants
sauf s'ils sont âgés de plus de 8ans et sous
surveillance. Tenez l'appareil et son cordon
hors de portée des enfants de moins de
8ans.
- Les enfants ne doivent pas jouer avec
l'appareil.
- Si le cordon d'alimentation est endommagé,
il doit être remplacé par Philips, par un
Centre Service Agréé Philips ou par un
technicien qualifié afin d'éviter tout accident.
- Branchez l'appareil sur une prise murale mise
à la terre.
- N'utilisez jamais l'appareil si la prise, le
cordon d'alimentation ou l'appareil lui-même
est endommagé.
- Avant de brancher l'appareil, vérifiez que la
tension indiquée sur l'appareil correspond à
la tension supportée par le secteur local.
Attention
- Débranchez toujours l'appareil avant de le
nettoyer et en cas de problème lors de la
préparation du café.
- Ne posez jamais l'appareil sur une surface
chaude et veillez à ce que le cordon
d'alimentation ne soit pas en contact avec
des surfaces chaudes.
- Ne placez pas la cafetière dans une armoire
pendant son utilisation.
- Ne plongez jamais la verseuse isotherme
dans l’eau ou dans tout autre liquide afin
d’éviter des infiltrations d’eau entre les parois
de la verseuse.
- Ne démontez pas la verseuse isotherme.
- Lorsque la verseuse est remplie de café,
maintenez-la en position verticale pour éviter
toute fuite.
- La partie inférieure de l'appareil et le fond de
la verseuse isotherme sont très chauds
pendant la préparation du café.
- Ne mettez pas la verseuse sur une cuisinière
ou dans un micro-ondes pour réchauffer du
café.
Page 8

- Cet appareil est destiné à un usage
domestique ou assimilé: utilisation dans des
gîtes, chambres d'hôtes, cuisines destinées
aux employés dans les magasins, les
entreprises et autres environnements de
travail, ou utilisation par les clients d'hôtels,
d'auberges ou d'autres résidences hôtelières.
- Confiez toujours l'appareil à un Centre de
serviceagréé Philips pour réparation ou
vérification. N'essayez jamais de réparer
l'appareil vous-même, toute intervention
entraîne l'annulation de la garantie.
Arrêt automatique
Pour plus de confort et de sécurité, cet appareil s'arrête immédiatement et
automatiquement lorsque le café est prêt. La verseuse isotherme garde
votre café chaud.
Champs électromagnétiques (CEM)
Cet appareil Philips est conforme à toutes les normes et à tous les
règlements applicables relatifs à l'exposition aux champs
électromagnétiques.
Avant utilisation
1 Placez l'appareil sur une surface stable et plane.
2 Branchez la fiche sur une prise murale avec mise à la terre.
3 Réglez l'interrupteur on/off à l'arrière de l'appareil sur I (Marche) et
ajustez la longueur du cordon en le rentrant dans l'orifice situé à l'arrière
de l'appareil (Fig. 2).
Rinçage de l’appareil
1 Remplissez le réservoir d'eau (Fig. 3) à moitié et mettez la verseuse en
place.
2 Appuyez sur le bouton (Fig. 4) marche/arrêt. Le voyant s'allume.
3 Laissez l'appareil fonctionner jusqu'à ce que le réservoir d'eau soit
complètement vide. L'appareil s'éteint automatiquement.
Remarque: Laissez l'appareil refroidir pendant au moins 3minutes avant
de faire du café.
Utilisation de l'appareil
Pour faire du café
1 Remplissez le réservoir d'eau (Fig. 5).
Les indications de niveau à gauche correspondent à des grandes
-
tasses (120ml) (Fig. 6).
Les indications de niveau à droite correspondent à des petites tasses
-
(80ml).
2 Ouvrez le porte (Fig. 7)-filtre.
3 Prenez un filtre en papier (type 1x4 ou n°4) et rabattez les bords du filtre
pour éviter de le déchirer ou de le plier (Fig. 8).
4 Placez le filtre dans le porte (Fig. 9)-filtre.
Remarque: Certaines versions sont livrées avec un filtre permanent.
Dans ce cas, vous n'avez pas besoin d'utiliser un filtre en papier.
5 Placez du café moulu (pour filtre) dans le filtre.
Pour des grandes tasses: comptez une bonne mesure ou une bonne
-
cuillère à soupe par tasse (Fig. 10).
Pour des petites tasses: comptez une cuillère rase ou une cuillère à
-
soupe par tasse.
6 Fermez le porte (Fig. 11)-filtre.
7 Placez la verseuse dans l'appareil. La poignée doit être orientée vers
l'avant (Fig. 12). Assurez-vous que vous avez placé le couvercle de la
verseuse sur
8 Appuyez sur le bouton (Fig. 4) marche/arrêt. L'appareil s'éteint
automatiquement lorsque le café est prêt.
Remarque: Pour éteindre l'appareil pendant la préparation du café,
réglez l'interrupteur on/off à l'arrière de l'appareil sur O. Pour reprendre
la préparation du café, réglez de nouveau l'interrupteur on/off sur I.
9 Lorsque toute l'eau s'est écoulée par le filtre, vous pouvez retirer la
verseuse de l'appareil (Fig. 13).
10 Enlevez le porte (Fig. 14)-filtre et jetez le filtre en papier (Fig. 15). Si vous
avez utilisé le filtre permanent, videz-le et rincez-le.
Utilisation de la verseuse isotherme
Pour garder votre café chaud, il est conseillé de rincer la verseuse à l'eau
chaude avant de l'utiliser et de préparer une verseuse entière.
- Pour verser le café, tournez le couvercle vers la droite (Fig. 16) jusqu'à ce
que la flèche sur le couvercle pointe vers
Remarque: Afin de maintenir le café au chaud, fermez toujours le
couvercle après utilisation.
- Pour fermer le couvercle, tournez-le vers la gauche (Fig. 17) jusqu'à ce
que la flèche sur le couvercle pointe vers .
- Pour enlever le couvercle, tournez-le vers la gauche (Fig. 18) jusqu'à ce
que la flèche sur le couvercle pointe vers .
.
.
Nettoyage
1 Nettoyez l'extérieur de la cafetière et de la verseuse à l'aide d'un chiffon
humide.
2 Retirez le porte (Fig. 14)-filtre.
3 Nettoyez le porte-filtre dans de l'eau chaude savonneuse.
Remarque: Le porte-filtre en plastique (HD7544) peut également être
nettoyé au lave-vaisselle, mais pas le porte-filtre en métal (HD7547,
HD7546, HD7548).
4 Nettoyez l'intérieur de la verseuse isotherme à l'eau chaude légèrement
savonneuse à l'aide d'une brosse douce. Ne placez pas la verseuse
isotherme au lave-vaisselle. Après avoir nettoyé la verseuse isotherme,
rincez-la à l'eau chaude.
Remarque: Pour enlever les dépôts de café tenaces, remplissez la verseuse
d’eau chaude et ajoutez une cuillère de soude. Laissez agir dans la verseuse
quelques instants. Ensuite, videz la verseuse et éliminez les dépôts à l'aide
d'une brosse douce. Rincez la verseuse isotherme à l'eau chaude.
Détartrage
Un détartrage régulier prolonge la durée de vie de votre cafetière et garantit
des résultats optimaux à long terme.
En cas d'utilisation normale (deux verseuses pleines par jour), détartrez
votre cafetière:
- 2 ou 3fois par an si l'eau de votre région est douce (jusqu'à 18TH)
- 4 ou 5fois par an si l'eau de votre région est dure (au-delà de 18TH)
Pour détartrer votre cafetière, vous pouvez utiliser soit du vinaigre blanc
composé à 4% d'acide acétique, soit un détartrant liquide approprié. Si
vous utilisez un détartrant liquide, suivez les instructions sur l'emballage.
Attention: Afin d'éviter tout dommage, n'utilisez jamais de vinaigre blanc
(à teneur en acide acétique supérieure ou égale à 8%), de vinaigre naturel,
de détartrant en poudre ou en tablette pour détartrer l'appareil.
1 Remplissez le réservoir d'eau jusqu'au niveau maximal avec du vinaigre
blanc (4% d'acide acétique).
2 Mettez un filtre en papier ou le filtre permanent dans le porte-filtre pour
recueillir les particules de calcaire.
3 Appuyez sur le bouton marche/arrêt et laissez l'appareil effectuer deux
cycles de préparation complets. Laissez l'appareil refroidir pendant
environ 3minutes entre les cycles de préparation.
4 Remplissez le réservoir avec de l'eau froide et enlevez le filtre en papier
ou le filtre permanent.
5 Ensuite, faites fonctionner la cafetière deux fois avec de l'eau froide afin
d'éliminer tous les résidus de vinaigre ou de détartrant. Laissez l'appareil
refroidir pendant environ 3minutes entre les cycles de préparation.
Remarque: Ne réutilisez pas l'eau s'écoulant de l'appareil pour le cycle
de préparation du café suivant. Utilisez toujours de l'eau fraîche.
Remarque: Si nécessaire, répétez l'étape5 jusqu'à ce que l'eau
s'écoulant de l'appareil n'ait plus le goût ni l'odeur du vinaigre.
6 Nettoyez le filtre permanent (si utilisé), la verseuse et le porte (voir
'Nettoyage')-filtre.
Recyclage
- Ce symbole signifie que ce produit ne doit pas être jeté avec les déchets
ménagers (2012/19/EU) (Fig. 19).
- Respectez les réglementations de votre pays concernant la collecte
séparée des appareils électriques et électroniques. La mise au rebut
appropriée des piles permet de protéger l'environnement et la santé.
Garantie et assistance
Si vous avez besoin d'une assistance ou d'informations supplémentaires,
consultez le site Web www.philips.com/support ou lisez le dépliant sur la
garantie internationale.
Commande d'accessoires
Pour acheter des accessoires ou des pièces de rechange, visitez le site Web
www.shop.philips.com/service ou rendez-vous chez votre revendeur
Philips.
Dépannage
Cette rubrique récapitule les problèmes les plus courants que vous pouvez
rencontrer avec l'appareil. Si vous ne parvenez pas à résoudre le problème
à l'aide des informations ci-dessous, rendez-vous sur le site
www.philips.com/support et consultez la liste de questions fréquemment
posées ou contactez le ServiceConsommateursPhilips de votre pays.
Problème
Le café passe trop
lentement.
L'appareil s'éteint
avant que le
réservoir d'eau soit
vide.
Le café n’est pas
assez chaud.
Solution
Détartrez l'appareil (voir 'Détartrage').
Détartrez l'appareil (voir 'Détartrage').
Rincez la verseuse à l'eau chaude avant de
préparer du café. Le café reste chaud plus
longtemps si vous préparez au moins une demiverseuse de café.
Page 9

La verseuse ne peut
pas être placée dans
l'appareil
Le filtre déborde
lorsque j'enlève la
verseuse pendant la
préparation.
Nederlands
Introductie
Gefeliciteerd met uw aankoop en welkom bij Philips! Registreer uw product
op www.philips.com/welcome om optimaal gebruik te kunnen maken van
de door Philips geboden ondersteuning.
Algemene beschrijving (afb. 1)
1 Startknop met lampje
2 Netsnoer met stekker
3 Aan-uitschakelaar
4 Waterniveau-indicator
5 Waterreservoir
6 Deksel van het waterreservoir
7 Afneembare filterhouder
8 Deksel van de thermoskan
9 Thermoskan
Belangrijke veiligheidsinformatie
Lees deze belangrijke informatie zorgvuldig door voordat u het apparaat
gaat gebruiken en bewaar de informatie om de aanwijzingen later opnieuw
te kunnen raadplegen.
Assurez-vous que la poignée de la verseuse est
orientée vers l'avant.
Pour éviter que le filtre déborde, ne retirez pas la
verseuse pendant plus de 30secondes.
Gevaar
- Dompel het apparaat nooit in water of een
andere vloeistof.
Waarschuwing
- Laat het snoer niet over de rand van de tafel
of het aanrecht hangen waarop het apparaat
staat.
- Dit apparaat kan worden gebruikt door
kinderen vanaf 8 jaar en door personen met
verminderde lichamelijke, zintuiglijke of
geestelijke capaciteiten of weinig ervaring en
kennis, mits dat gebeurt onder toezicht of
nadat zij aanwijzingen hebben gekregen voor
veilig gebruik van het apparaat en mits zij de
gevaren van het gebruik van dit apparaat
begrijpen. Reiniging en onderhoud mogen
alleen door kinderen worden uitgevoerd die
ouder zijn dan 8 en alleen onder toezicht.
Houd het apparaat en het snoer buiten
bereik van kinderen die jonger zijn dan 8 jaar
oud.
- Kinderen mogen niet met het apparaat
spelen.
- Als het netsnoer beschadigd is, moet u het
laten vervangen door Philips, een door
Philips geautoriseerd servicecentrum of door
personen met vergelijkbare kwalificaties om
gevaarlijke situaties te voorkomen.
- Sluit het apparaat uitsluitend aan op een
geaard stopcontact.
- Gebruik het apparaat niet als de stekker, het
netsnoer of het apparaat zelf beschadigd is.
- Controleer of het voltage dat wordt
aangegeven op het apparaat, overeenkomt
met de plaatselijke netspanning voordat u
het apparaat aansluit.
Let op
- Haal de stekker uit het stopcontact voordat u
het apparaat gaat schoonmaken en als er
tijdens het koffiezetten problemen optreden.
- Plaats het apparaat niet op een heet
oppervlak en voorkom dat het netsnoer in
contact komt met hete oppervlakken.
- Plaats het koffiezetapparaat tijdens gebruik
niet in een kast.
- Dompel de thermoskan nooit in water of een
andere vloeistof; hierdoor zou water tussen
de wanden van de thermoskan kunnen
lopen.
- Neem de thermoskan niet uit elkaar.
- Om lekkage te voorkomen dient u de
thermoskan altijd rechtop te houden
wanneer deze gevuld is.
- Tijdens het koffiezetten worden het onderste
deel van het apparaat en de onderkant van
de thermoskan heet.
- Plaats de kan niet op het fornuis of in de
magnetron om de koffie opnieuw op te
warmen.
- Dit apparaat is bedoeld voor huishoudelijk
en soortgelijk gebruik zoals: in boerderijen; in
Bed & Breakfast-achtige omgevingen; in
keukens (voor personeel) in winkels, kantoren
en andere werkomgevingen; door gasten in
hotels, motels en andere
verblijfsaccommodaties.
- Breng het apparaat altijd naar een door
Philips geautoriseerd servicecentrum voor
onderzoek of reparatie. Probeer niet zelf het
apparaat te repareren, aangezien uw
garantie hierdoor komt te vervallen.
Automatische uitschakeling
Voor extra gemak en veiligheid wordt dit apparaat direct na het koffiezetten
automatisch uitgeschakeld. De thermoskan zorgt dat uw koffie warm blijft.
Elektromagnetische velden (EMV)
Dit Philips-apparaat voldoet aan alle toepasselijke richtlijnen en
voorschriften met betrekking tot blootstelling aan elektromagnetische
velden.
Klaarmaken voor gebruik
1 Plaats het apparaat op een vlakke en stabiele ondergrond.
2 Steek de stekker in een geaard stopcontact.
3 Zet de aan-uitschakelaar aan de achterzijde van het apparaat op 'I' (Aan)
en duw overtollig snoer in de opening aan de achterzijde van het
apparaat (Fig. 2).
Het apparaat doorspoelen
1 Vul het waterreservoir voor de helft met water (Fig. 3) en plaats de kan
op het apparaat.
2 Druk op de startknop (Fig. 4). Het lampje gaat branden.
3 Laat het apparaat lopen totdat het waterreservoir helemaal leeg is. Het
apparaat wordt automatisch uitgeschakeld.
Opmerking: Laat het apparaat ten minste 3 minuten afkoelen voordat u
koffie gaat zetten.
Het apparaat gebruiken
Koffiezetten
1 Vul het waterreservoir met water (Fig. 5).
De maatverdeling aan de linkerzijde is voor grote koppen (120 ml)
-
(Fig. 6).
De maatverdeling aan de rechterzijde is voor kleine koppen (80 ml).
-
2 Open de filterhouder (Fig. 7).
Page 10

3 Neem een papieren filterzakje (type 1x4 of nr. 4) en vouw de randen naar
binnen om scheuren en dichtklappen (Fig. 8) te voorkomen.
4 Plaats het filterzakje in de filterhouder (Fig. 9).
Opmerking: Sommige versies zijn voorzien van een permanent filter. In
dat geval hebt u geen filterzakje nodig.
5 Schep gemalen koffie (snelfiltermaling) in het filter.
Voor grote koppen: gebruik een volle, niet-afgestreken maatlepel of
-
eetlepel gemalen koffie per kop (Fig. 10).
Voor kleine koppen: gebruik één afgestreken maatlepel of eetlepel
-
gemalen koffie per kop.
6 Sluit de filterhouder (Fig. 11).
7 Plaats de kan op het apparaat met het handvat naar voren (Fig. 12). Zorg
dat het pijltje op het deksel van de kan naar
8 Druk op de startknop (Fig. 4). Na het koffiezetten schakelt het apparaat
automatisch uit.
Opmerking: Als u het apparaat tijdens het koffiezetten wilt uitschakelen,
zet u de aan-uitschakelaar aan de achterzijde van het apparaat op 'O'.
Als u toch wilt doorgaan met koffiezetten, zet u de schakelaar terug op 'I'.
9 Zodra al het water door het filter is gelopen, kunt u de kan uit het
apparaat (Fig. 13) nemen.
10 Verwijder de filterhouder (Fig. 14) en gooi het papieren filterzakje (Fig. 15)
weg. Het permanente filter kunt u leeggooien en afspoelen.
wijst.
De thermoskan gebruiken
De beste manier om de koffie heet te houden is om de kan vóór het
koffiezetten met heet water om te spoelen en om een volle kan te zetten.
- U kunt koffie uitschenken door het deksel naar rechts (Fig. 16) te draaien
tot de pijl op het deksel naar
Opmerking: Sluit het deksel altijd nadat u koffie hebt geschonken zodat
de koffie warm blijft.
- Sluit het deksel door het naar links (Fig. 17) te draaien tot de pijl op het
deksel naar wijst.
- Verwijder het deksel door het naar links (Fig. 18) te draaien tot de pijl op
het deksel naar wijst.
wijst.
Reinigen
1 Maak de buitenkant van de koffiezetter en de kan schoon met een
vochtige doek.
2 Verwijder de filterhouder (Fig. 14) van het apparaat.
3 Maak de filterhouder schoon in warm water met wat afwasmiddel.
Opmerking: De kunststof filterhouder (HD7544) kan ook in de
vaatwasmachine worden gereinigd. De metalen filterhouder (HD7547,
HD7546, HD7548) is niet vaatwasserbestendig.
4 Maak de binnenkant van de geïsoleerde kan schoon met een zachte
borstel, warm water en een beetje afwasmiddel. Maak de geïsoleerde
kan niet schoon in de vaatwasmachine. Spoel de thermoskan na het
schoonmaken met vers, warm water.
Opmerking: U kunt hardnekkige bruine aanslag verwijderen door de kan met
warm water te vullen en er een lepel soda aan toe te voegen. Laat de soda
een tijdje inwerken in de kan. Leeg vervolgens de kan en verwijder de
aanslag met een zachte borstel. Spoel de thermoskan met vers warm water.
Ontkalken
Regelmatig ontkalken verlengt de levensduur van uw koffiezetapparaat en
garandeert een langdurige, optimale werking van het apparaat.
In geval van normaal gebruik (twee volle kannen koffie per dag) dient u het
apparaat volgens het onderstaande schema te ontkalken:
- 2 of 3 keer per jaar als u zacht water gebruikt (tot 18 dH)
- 4 of 5 keer per jaar als u hard water gebruikt (meer dan 18 dH)
U kunt het koffiezetapparaat ontkalken met blanke azijn met 4% azijnzuur of
een geschikt vloeibare ontkalker. Indien u een vloeibare ontkalker gebruikt,
volg dan de instructies op de verpakking van de ontkalker.
Let op: Gebruik nooit azijn met een azijnzuurpercentage van 8% of hoger,
natuurazijn, een ontkalker op poederbasis of een ontkalker in tabletvorm
om het apparaat te ontkalken, omdat dit schade kan veroorzaken.
1 Vul het waterreservoir tot het maximumniveau met blanke azijn (4%
azijnzuur).
2 Plaats een filterzakje of het permanente filter in de filterhouder om
kalkdeeltjes te verzamelen.
3 Druk op de startknop en laat het apparaat twee keer werken. Laat het
apparaat tussendoor ongeveer 3 minuten afkoelen.
4 Vul het waterreservoir met vers koud water en verwijder het papieren
filterzakje of het permanente filter.
5 Laat het apparaat twee keer met koud vers water werken om alle resten
azijn en ontkalker weg te spoelen. Laat het apparaat tussendoor
ongeveer 3 minuten afkoelen.
Opmerking: Hergebruik het water dat uit het apparaat komt niet voor de
volgende zetcyclus. Gebruik altijd vers water.
Opmerking: Herhaal, indien nodig, stap 5 tot het water dat uit het
apparaat komt niet langer naar azijn smaakt of ruikt.
6 Maak het permanente filter (indien gebruikt), de kan en de filterhouder
(zie 'Reinigen') schoon.
Recyclen
- Dit symbool betekent dat dit product niet samen met het gewone
huishoudelijke afval mag worden weggegooid (2012/19/EU) (Fig. 19).
- Volg de in uw land geldende regels voor de gescheiden inzameling van
elektrische en elektronische producten. Als u oude producten correct
verwijdert, voorkomt u negatieve gevolgen voor het milieu en de
volksgezondheid.
Garantie en ondersteuning
Hebt u informatie of ondersteuning nodig, ga dan naar
www.philips.com/support of lees de internationale garantieverklaring.
Accessoires bestellen
Ga naar www.shop.philips.com/service of naar uw Philips-leverancier om
accessoires of reserveonderdelen aan te schaffen.
Problemen oplossen
In dit hoofdstuk worden in het kort de meest voorkomende problemen
behandeld die zich kunnen voordoen tijdens het gebruik van het apparaat.
Als u het probleem niet kunt oplossen met behulp van de onderstaande
informatie, gaat u naar www.philips.com/support voor een lijst met
veelgestelde vragen of neemt u contact op met het Consumer Care Center
in uw land.
Probleem
Koffiezetten duurt
langer dan normaal.
Het apparaat wordt
uitgeschakeld
voordat het
waterreservoir leeg
is.
De koffie is niet heet
genoeg.
Het lukt niet de kan
in het apparaat te
plaatsen.
Het filter loopt over
als ik de kan
verwijder tijdens het
koffiezetten.
Oplossing
Ontkalk het apparaat (zie 'Ontkalken').
Ontkalk het apparaat (zie 'Ontkalken').
Spoel de kan met heet water voordat u gaat
koffiezetten. De koffie blijft langer warm als u ten
minste een halve kan koffie zet.
Zorg dat het handvat van de kan naar voren wijst.
Verwijder de kan tijdens het koffiezetten niet langer
dan 30 seconden om dit te voorkomen.
 Loading...