

Page 1
HD 7128
Page 2

2
English Page 6
• Keep pages 4 and 5 open when reading these operating instructions.
Français Page 10
• En lisant le mode d'emploi: dépliez les pages 4 et 5.
Deutsch Seite 13
• Schlagen Sie beim Lesen der Gebrauchsanweisung Seiten 4 und 5 auf.
Nederlands Pagina 16
• Sla bij het lezen van de gebruiksaanwijzing de pagina's 4 en 5 op.
Italiano Pagina 19
• Prima di usare l'apparecchio, aprite le pagine 4 e 5 e leggete
attentamente le istruzioni per l'uso.
Español Página 22
• Desplegar las páginas 4 y 5 al leer las instrucciones de manejo.
Português Página 25
• Durante a leitura do modo de emprêgo, desdobre e verifique
as pág. 4 e 5.
Dansk Side 28
• Hold side 4 og 5 opslået mens De læser brugsanvisningen.
Norsk Side 31
• Slå opp påside 4 og 5 før De leser videre.
Svenska Sid 34
• Ha sidan 4 och 5 utvikt när ni läser bruksanvisningen.
Suomi Sivu 37
• Pidä sivut 4 ja 5 auki samalla kun luet käyttöohjetta.
Page 3

3
Page 4
4
1
2 3
MAX
D
B
4
5
H
F
6
A
7
E
A
B
7
C
8
G
D
Page 5
5
9
10 11
12
15
18
13
16
19
14
17
20
Page 6

6
English
Important
• Before connecting the appliance, please check if the voltage
indicated on the appliance corresponds with the local mains
voltage.
• Only have the appliance connected to the mains when there is
water in the heating unit of your Travel Duo.
Always pour water into the heating unit before plugging in.
Be sure never to let the heating unit boil dry: first unplug and
then remove the contents from the heating unit.
• Do not place the appliance on a hot surface. Do not allow the
mains cord to come into contact with hot surfaces or objects.
• Use the appliance out of children's reach. Prevent them from
pulling the mains cord. Do not let the mains cord hang over the
edge of a table or work top.
• Never use the appliance if the mains plug, the mains cord or the
appliance itself is damaged.
• If the mains cord of this appliance is damaged, it must only be
replaced by Philips or their service representative, as special
tools and/or parts are required.
• Extreme caution must be used when moving an appliance
containing hot liquids.
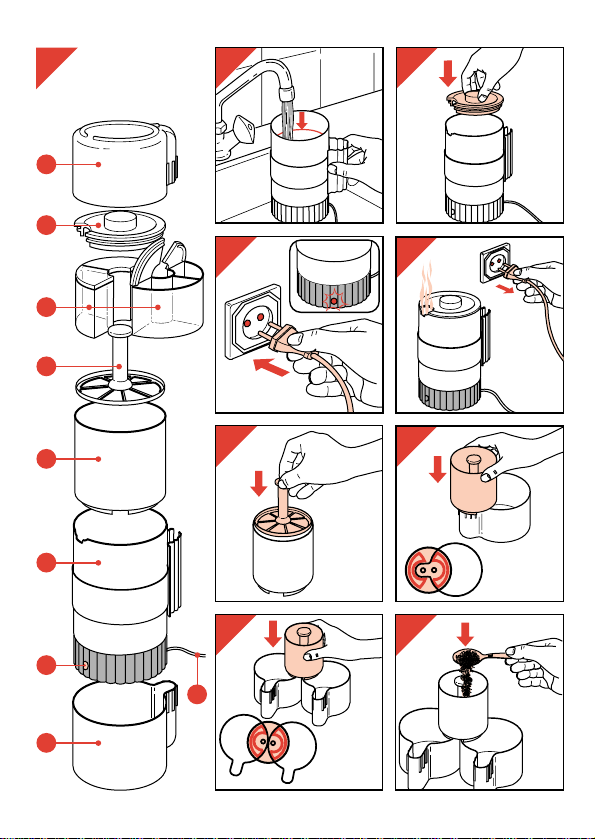
General description (fig. 1)
AHeating unit
BLid
CPilot lamp
DTwo mugs (4.5 dl each)
ECoffee filter holder
FPermanent coffee filter (removable)
GMains cord
HTwo storage canisters
Page 7

Before first use
- Before using for the first time, operate the appliance once using water,
but without filling the filter with ground coffee. (See section "Making
coffee".)
- Next, clean the removable parts as described in section "Cleaning".
Note: During the first few times you may notice an odour and some slight
smoking. This is a normal occurrence and quite harmless.
How to boil water for (beef)tea etc.
- Place the heating unit on a dry, level, heat resistant surface.
- Pour water into the heating unit (maximum filling: 4.5 dl) (fig. 2).
- Place the lid on the heating unit. (fig. 3).
- Insert the mains plug into a wall socket (fig. 4). The pilot light comes on
and warming up begins.
- After approximately 7 minutes the water will be boiling. Unplug the
heating unit (fig. 5).
How to make coffee
- Boil water (see previous section).
- Insert the coffee filter into the coffee filter holder (fig. 6).
- Place the coffee filter holder on a mug as indicated in fig. 7A.
Both coffee outlet openings in the bottom of the holder must be
positioned over the mug.
Note: It is also possible to place the filter holder over two mugs simultaneously (fig. 7B). Each of the two mugs should be positioned under one
outlet opening.
The ridges at the under side of the filter holder provide stable
positioning if the mug(s) has (have) been placed correctly.
- Put ground coffee (fast filter type, quantity according to taste) into the
coffee filter holder (fig. 8). Spread the coffee evenly over the filter.
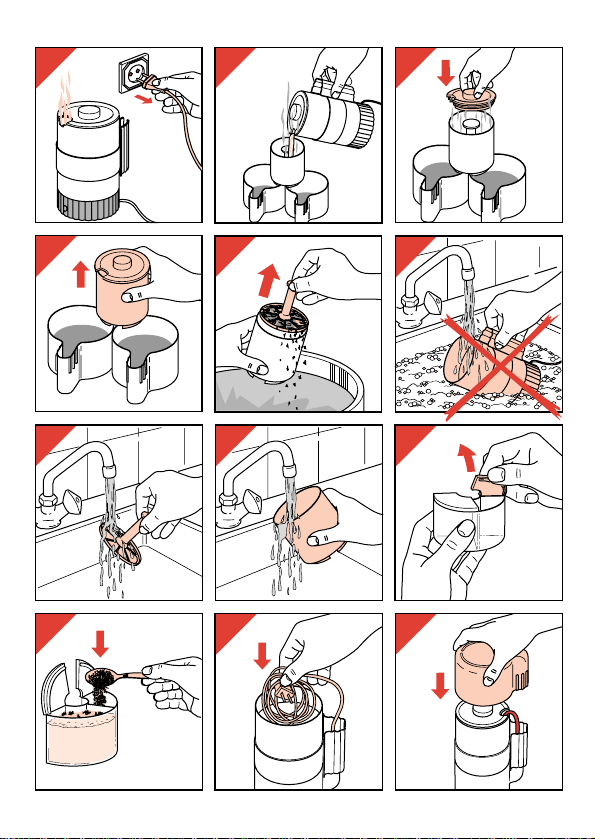
- Unplug the appliance when the water is boiling (fig. 9).
- Pour a small amount of the hot water into the coffee filter holder (fig. 10).
- Then slowly pour out the rest of it. Put the lid on top of the filter holder
to preserve temperature and taste (fig. 11).The hot coffee will drip into
the mug(s).
7
Page 8

8
- After the last coffee has dripped into the mug(s), remove the holder
(fig. 12).
- Discard the coffee grinds (fig. 13).
Cleaning
• Never immerse the heating unit in water (fig. 14).
• Inside walls of heating unit:
The heating element (at the bottom of the heating unit) is aluminium
which may discolour. This will not affect the performance.
To clean the inside, fill with 2 dl of water and 2 dl vinegar. Heat the
mixture (do not boil).
Unplug and let the mixture work in for some time.
Boil one quantity of clean water and throw this away. Rinse thoroughly
and dry.
• Outside walls of heating unit: Wipe clean using a damp cloth.
• The removable items can be washed in hot soapy water (fig. 15, 16).
Rinse with clean hot water and dry.
• Do not use scourers, abrasive cleaning agents, etc.
Making ready for travelling
Filling the storage canisters: fig. 17-18.
Putting together: fig. 1, 19-20.
*
For U.K. only:
This appliance is supplied with a rewirable 13 Amp. plug.
Replacement fuses are available from Electrical Retailers or direct from
Philips, tel. 0181 - 689 - 2166, ext. 8014.
Replacement 3 Amp. fuses must be BSI or ASTA BS 1362 approved.
Important safety information
If the rewirable plug is not suitable for the socket outlets in your home, it
can be removed and replaced by a plug of the correct type.
Please refer to section "Fitting a plug".
Page 9

9
Fitting a plug
Connections - Applicable to U.K. only
Important
WARNING - THIS APPLIANCE MUST BE EARTHED
The wires in this mains lead are coloured in accordance with the
following code:
GREEN AND YELLOW - EARTH
BLUE - NEUTRAL
BROWN - LIVE
As the colours of the wires in the mains lead of this appliance may not
correspond with the markings identifying the terminals in your plug,
proceed as follows:
The wire which is coloured GREEN AND YELLOW must be connected
to the terminal which is marked with the letter "E" or by the earth
symbol E or coloured GREEN or GREEN AND YELLOW.
The wire which is coloured BLUE must be connected to the terminal
which is marked with a letter "N" or coloured BLACK.
The wire which is coloured BROWN must be connected to the terminal
which is marked with the letter "L" or coloured RED.
Note: If the terminals of the plug are unmarked or if you are in any
doubt, consult a qualified electrician.
If a 13 Amp. 3-pin plug is fitted, it must be an "approved" plug,
conforming to BS 1363-1986.
If a (BS 1363) 13 Amp. plug is used, this must be fitted with a 3 Amp.
fuse.
Page 10

10
Français
Important
• Avant de brancher l’appareil, vérifiez que la tension indiquée
sur la plaque signalétique de celui-ci correspond bien avec celle
de votre logement.
• Ne branchez votre Travel Duo qu’après avoir mis de l’eau dans
l’unité chauffante de celle-ci.
• Ne placez pas l’appareil sur une surface chaude. Ne laissez pas
le cordon venir en contact avec des surfaces ou des objets
chauds.
• Utilisez l’appareil hors de portée des enfants. Evitez de tirer sur
le cordon. Ne le laissez pas pendre sur le rebord d’une table ou
planche de travail.
• N’utilisez jamais l’appareil si la prise, le cordon ou l’appareil luimême sont endommagés.
• Si le cordon secteur de votre appareil est endommagé, il doit
impérativement être remplacé par un réparateur indépendant
agréé Philips car des équipements et des composants
spécifiques sont exigés.
• Faites attention quand vous déplacez un appareil contenant les
liquides chauds.
Description générale (fig. 1)
A Unité chauffante
B Couvercle
C Témoin lumineux
D 2 tasses (4,5 dl chacune)
E Support de filtre
F Filtre permanent (amovible)
G Cordon d’alimentation
H Rangement pour 2 boîtes
Page 11

Avant la première utilisation
- Faites fonctionner l’appareil une fois uniquement avec de l’eau et sans
café. (Voir paragraphe “Préparation du café”).
- Ensuite, nettoyez les parties amovibles comme décrit dans le
paragraphe “Nettoyage”.
NOTA : Au cours des premières utilisations, vous percevrez une légère
odeur et un peu de fumée. C’est un phénomène normal et sans aucune
incidence.
Comment chauffer l’eau pour le thé, etc...
- Placez l’unité chauffante sur une surface horizontale, sèche et résistant
à la chaleur.
- Remplissez l’unité chauffante d’eau (remplissage maximum : 4,5 dl)
(fig. 2).
- Mettez le couvercle sur l’unité chauffante (fig. 3).
- Branchez l’appareil (fig. 4). Le témoin lumineux s’allume et l’appareil
commence à chauffer.
- Après environ 7 minutes, l’eau commence à bouillir. Débranchez l’unité
chauffante (fig. 5).
Préparation du café
- Faites bouillir de l’eau (voir paragraphe ci-dessus).
- Mettez le filtre à café dans le support de filtre (fig. 6).
- Placez le support de filtre sur une tasse comme indiqué sur la fig. 7A.
Les ouvertures de sortie de café dans le fond du support doivent être
positionnées sur la tasse.
Nota - Il est également possible de placer le support de filtre sur 2
tasses simultanément (fig. 7 b). Chacune des 2 tasses doit être
positionnée sous une ouverture.
Les bords de la partie inférieure du support de filtre sont en position
stable si les tasses ont été positionnées correctement.
- Mettez du café moulu (filtre rapide, quantité suivant le goût) dans le
support de filtre (fig. 8). Répartissez uniformément le café dans le filtre.
- Débranchez l’appareil quand l’eau bout (fig. 9).
- Versez une petite quantité d’eau chaude dans le support de filtre
(fig. 10).
11
Page 12

12
- Puis versez lentement le restant. Mettez le couvercle sur le support de
filtre pour conserver la température et le goût (fig. 11). Le café chaud
coule dans les tasses.
- Une fois que le café est passé, retirez le support de filtre (fig. 12).
- Jetez la mouture (fig. 13).
Nettoyage
• N’immergez jamais l’unité chauffante dans l’eau (fig. 14).
• Intérieur de l’unité chauffante :
L’unité chauffante (à sa partie inférieure) est en aluminium pouvant se
décolorer. Ceci n’affecte en rien les performances.
Pour nettoyer l’intérieur, remplissez-le de 2 dl d’eau et 2 dl de vinaigre.
Chauffez le mélange (sans faire bouillir).
Débranchez l’appareil et laissez agir le mélange quelque temps.
Faites bouillir ensuite de l’eau claire et jetez-la. Rincez soigneusement et
séchez.
• Extérieur de l’unité chauffante :
Essuyez avec un chiffon humide.
• Les éléments amovibles peuvent être lavés à l’eau chaude
savonneuse (fig. 15, 16).
Rincez à l’eau chaude claire et séchez.
• N’utilisez pas d’agents de nettoyage abrasifs ou récurants.
Préparation de l’appareil pour le voyage
• Remplissez les boîtes du compartiment de rangement (fig. 17-18).
• Assemblez le tout (fig. 1, 19-20).
Page 13

13
Deutsch
Wichtig
• Prüfen Sie vor Inbetriebnahme, ob die Spannungsangabe auf
dem Gerät mit der örtlichen Netzspannung übereinstimmt.
• Stecken Sie den Stecker nur dann in die Steckdose, wenn das
Gerät mit Wasser gefüllt ist. Füllen Sie das Gerät also stets,
bevor Sie den Stecker in die Steckdose stecken.
Achten Sie immer darauf, daß das Wasser in der Heizeinheit
nicht verkocht: Ziehen Sie den Netzstecker, und nehmen Sie
erst dann die anderen Teile vom Gerät.
• Stellen Sie das Gerät niemals auf eine heiße Oberfläche, und
achten Sie darauf, daß das Netzkabel nicht mit heißen
Oberflächen in Berührung kommt.
• Halten Sie Kinder vom Gerät fern. Achten Sie darauf, daß es
nicht am Netzkabel heruntergerissen werden kann. Lassen Sie
das Netzkabel nicht über die Kanten von Arbeitsflächen
herabhängen.
• Verwenden Sie das Gerät niemals, wenn der Stecker, das
Netzkabel oder das Gerät selbst beschädigt ist.
• Wenn das Netzkabel defekt oder beschädigt ist, muß es von
einer durch Philips autorisierten Werkstatt ersetzt werden, da
für die Reparatur Spezial-Werkzeug und/oder spezielle Teile
benötigt werden.
•Äußerste Vorsicht ist geboten, sobald Sie das Gerät bewegen,
wenn es mit heißer Flüssigkeit gefüllt ist.
Allgemeine Beschreibung (Abb. 1)
A Heizeinheit
B Deckel
C Kontrollampe
D Zwei Becher, je 450 ml
E Filterhalter
F Dauerfilter, abnehmbar
G Netzkabel
H Zwei Vorratsbehälter
Page 14

Vor dem ersten Gebrauch
- Betreiben Sie das Gerät zuerst einmal mit Wasser, (s. “Kaffee
zubereiten”) ohne Kaffee im Filter.
- Spülen Sie dann die abnehmbaren Teile ab (s.”Reinigen”).
HINWEIS: Die ersten Male kann das Gerät einen leichten Geruch und
etwas Rauch abgeben. Das ist normal und geht bald vorbei.
Wasser erhitzen zum Aufbrühen von Tee, Bouillon usw.
- Stellen Sie die Heizeinheit auf eine trockene, ebene und hitzebständige
Oberfläche.
- Gießen Sie bis zu 450 ml Wasser in die Heizeinheit (Abb. 2).
- Setzen Sie den Deckel auf die Heizeinheit (Abb. 3).
- Stecken Sie den Stecker in die Steckdose (Abb. 4). Die Kontrollampe
leuchtet auf, und der Heizvorgang beginnt.
- Nach etwa 7 Minuten kocht das Wasser. Ziehen Sie dann den Stecker
aus der Steckdose (Abb. 5).
Kaffee zubereiten
- Kochen Sie Wasser (siehe oben).
- Setzen Sie den Dauerfilter in den Filterhalter ein (Abb. 6).
- Setzen Sie den Filterhalter auf einen Becher (Abb. 7A). Beide Öffnungen
für den Abfluß des Kaffees müssen sich über dem Becher befinden.
HINWEIS: Sie können den Filterhalter auch über zwei Bechern
einsetzen. Unter jede der beiden Öffnungen ist ein Becher aufzustellen
(Abb. 7B).
Ist der Becher/sind die Becher richtig eingesetzt, sorgen die
Führungsleisten an der Unterseite des Filterhalters für einen sicheren
Stand des Filterhalters.
- Füllen Sie den Filterhalter nach Belieben mit gemahlenem Kaffee
(Abb. 8), den Sie gleichmäßig über den Filter verteilen.
- Sobald das Wasser kocht, ziehen Sie den Netzstecker aus der
Steckdose (Abb. 9).
- Gießen Sie ein wenig von dem heißen Wasser in den Filterhalter
(Abb. 10).
- Gießen Sie dann langsam das restliche Wasser nach. Setzen Sie den
Deckel auf den Filterhalter, um Aroma und Temperatur zu bewahren
14
Page 15

15
(Abb. 11). Der heiße Kaffee tropft in den/die Becher.
- Nehmen Sie den Filterhalter ab, sobald das Wasser durchgelaufen ist
(Abb. 12).
- Werfen Sie den Kaffeesatz fort (Abb. 13).
Reinigen
• Tauchen Sie das Gerät niemals in Wasser (Abb. 14).
• Die Innenseite der Heizeinheit:
Die Heizelemente auf dem Boden dieser Einheit bestehen aus
Aluminium, das sich verfärben kann. Das beeinträchtigt nicht die
Leistung.
Füllen Sie die Heizeinheit mit 200 ml Wasser und 200 ml
Haushaltsessig. Heizen Sie diese Mischung auf, aber lassen Sie sie
nicht kochen.
Ziehen Sie den Stecker aus der Steckdose, und lassen Sie das warme
Essigwasser eine Weile einwirken.
Lassen Sie dann eine Füllung klares Wasser aufkochen und wischen Sie
die Innenseite gründlich trocken.
• Die Außenseite des Geräts können Sie mit einem feuchten Tuch
abwischen.
• Die abnehmbaren Teile reinigen Sie in warmem Wasser (Abb. 15
und 16), dem Sie bei Bedarf etwas Spülmittel zufügen.
• Verwenden Sie keine Scheuer- oder Lösungsmittel.
Vorbereitung für die Reise
Füllen der Vorratsbehälter: Abb. 17 und 18.
Verstauen: Abb. 1, 19 und 20.
Page 16

16
Nederlands
Belangrijk
• Controleer, vóórdat u het apparaat aansluit, of de aanduiding
van het voltage op het apparaat overeenkomt met de
plaatselijke netspanning.
• Zorg ervoor dat de stekker alleen in het stopcontact is, wanneer
de waterkoker van uw Travel Duo gevuld is met water.
Doe altijd het water in de waterkoker vóórdat u de stekker in het
stopcontact steekt.
Laat de waterkoker nooit droogkoken: eerst de stekker uit het
stopcontact en daarna pas de inhoud uit de waterkoker gieten.
• Zet het apparaat niet op een heet oppervlak. Zorg ervoor dat het
snoer niet in aanraking kan komen met hete oppervlakken of
voorwerpen.
• Gebruik het apparaat buiten bereik van kinderen. Let erop dat zij
niet aan het snoer kunnen trekken. Laat het snoer niet over de
rand van tafel of aanrechtblad hangen.
• Gebruik het apparaat niet als de stekker, het snoer of het
apparaat zelf beschadigd is.
• Indien het snoer van dit apparaat is beschadigd, dient het
uitsluitend te worden vervangen door een door Philips daartoe
aangewezen reparateur, omdat voor de reparatie speciale
gereedschappen en/of onderdelen vereist zijn.
• Wees uiterst behoedzaam wanneer u een apparaat verplaatst
waarin zich hete vloeistof bevindt.
Algemene beschrijving (fig. 1)
AWaterkoker
BDeksel
CControlelampje
DTwee mokken (4,5 dl per stuk)
EHouder voor koffiefilter
FPermanent koffiefilter (uitneembaar m.b.v. handgreepje)
GSnoer
HTwee opbergdozen (bijv. voor koffie, suiker of creamer)
Page 17

Vóór het eerste gebruik
- Laat het apparaat vóór het eerste gebruik een keer werken zonder
koffie in het filter. (Zie gedeelte "Koffiezetten".)
- Was daarna de losse delen af. (Zie gedeelte "Schoonmaken".)
N.B.: De eerste paar keer kan er een vreemde geur van het apparaat
komen en is het mogelijk dat er wat damp van af komt. Dit is een normaal
en onschuldig verschijnsel, dat vanzelf verdwijnt.
Water koken (voor bouillon, thee e.d.)
- Zet de waterkoker op een droog, horizontaal, hittebestendig oppervlak.
- Giet water in de waterkoker (maximaal 4,5 dl) (fig. 2).
- Doe de deksel op de waterkoker (fig. 3).
- Steek de stekker in het stopcontact (fig. 4). Het controlelampje gaat
branden en het opwarmen begint.
- Na ongeveer 7 minuten kookt het water. Neem de stekker uit het
stopcontact (fig. 5).
Koffiezetten
- Kook water (zie vorig gedeelte).
- Zet het koffiefilter in de filterhouder (fig. 6).
- Zet de filterhouder op een mok. Zorg ervoor dat de gleuven aan de
onderzijde van de houder goed aansluiten op het handvat van de mok
(fig. 7A). De beide uitstroomopeningen in de bodem van de filterhouder
dienen zich boven de mok te bevinden.
Het is ook mogelijk de filterhouder op twee mokken tegelijk te plaatsen
(fig. 7B). Elk van de beide mokken dient dan onder één
uitstroomopening te staan.
De profielranden aan de onderzijde van de filterhouder zorgen voor
stevigheid, mits de filterhouder goed op de mok(ken) geplaatst is.
- Doe koffie (snelfiltermaling, hoeveelheid naar smaak) in de filterhouder
(fig. 8). Verspreid de koffie gelijkmatig over het filter.
- Haal de stekker uit het stopcontact als het water kookt (fig. 9).
- Giet een beetje van het hete water in de filterhouder (fig. 10).
- Giet vervolgens langzaam de rest van het water erin. Zet het dekseltje
op de filterhouder om temperatuur en aroma te behouden (fig. 11). De
hete koffie stroomt uit het koffiefilter in de mok(ken).
17
Page 18

18
- Nadat de laatste koffie in de mok(ken) is gedruppeld, verwijdert u de
filterhouder (fig. 12).
- Gooi het gebruikte koffiemaalsel weg (fig. 13).
Schoonmaken
• Dompel de waterkoker nooit in water (fig. 14).
• Binnenzijde van waterkoker:
Het verwarmingselement (op de bodem van de waterkoker) is van
aluminium. Dit kan verkleuren, wat echter geen invloed heeft op de
werking.
Om de binnenzijde schoon te maken, vult u de waterkoker met 2 dl
water en 2 dl azijn.
Verhit dit mengsel (niet laten koken).
Neem de stekker uit het stopcontact en laat het mengsel enige tijd
inwerken.
Kook één keer schoon water en gooi dit weg. Spoel goed na en droog
af.
• De buitenzijde van de waterkoker kunt u schoonmaken met een
vochtige doek.
• Alle losse delen kunnen worden afgewassen in heet sop (fig. 15, 16).
Spoel ze na en droog ze af.
• Gebruik geen schuurmiddelen of pannesponzen e.d.
Reisklaar maken
Opbergdoosjes vullen: fig. 17-18.
Opbergen: fig. 1, 19-20.
Page 19

Italiano
Importante
• Prima di collegare l’apparecchio verificate che la tensione
indicata sull’apparecchio corrisponda a quella della rete locale.
• Collegate l’apparecchio soltanto quando avete versato l’acqua
nell’unità di riscaldamento.
Riempite l’unità di riscaldamento con acqua prima di collegare
l’apparecchio alla presa di corrente. Assicuratevi che ci sia
sempre acqua nell’unità di riscaldamento: prima togliete la
spina dell’apparecchio dalla presa di corrente e poi togliete
quanto contenuto nell’unità di riscaldamento.
• Non appoggiate l’apparecchio su superfici bollenti. Fate in
modo che il cavo di alimentazione non venga a contatto con
superfici o oggetti bollenti.
• Tenete l’apparecchio lontano dalla portata dei bambini e fate in
modo che non tirino il cavo di alimentazione. Non lasciate che il
cavo di alimentazione penzoli dall’angolo del tavolo e dal piano
di lavoro.
• Non usate l’apparecchio se la spina o il cavo di alimentazione
risultano danneggiati.
• Se il cavo di alimentazione di questo apparecchio si dovesse
rovinare, occorrerà farlo sostituire da un Centro Assistenza
autorizzato Philips perchè occorrono speciali attrezzature e/o
ricambi.
• Prestate molta attenzione quando spostate l’apparecchio che
contiene liquido bollente.
Descrizione generale (fig. 1)
A Unità di riscaldamento
B Coperchio
C Spia luminosa
D Due tazze (ognuna di 4,5 dl)
E Portafiltro del caffè
F Filtro del caffè permanente (asportabile)
G Cavo di alimentazione
H Due contenitori
19
Page 20

Prima dell’uso
- Fate funzionare l’apparecchio solo con acqua, senza riempire il filtro con
il caffè (vedere “Come preparare il caffè”).
- Pulite le parti asportabili come indicato nella sezione “Pulizia”.
Nota: la prima volta che usate l’apparecchio potreste sentire uno strano
odore e vedere un leggero fumo. E’ del tutto normale e non è
assolutamente pericoloso.
Come far bollire l’acqua per il tè, il brodo ristretto ecc.
- Posizionate l’unità di riscaldamento su una superficie termoresistente,
piana e asciutta.
- Versate l’acqua nell’unità di riscaldamento (fino a un massimo di 4,5 dl)
(fig. 2).
- Mettete il coperchio sull’unità di riscaldamento (fig. 3).
- Inserite la spina nella presa di corrente (fig. 4). La spia si accende e ha
inizio la fase di riscaldamento.
- Dopo circa 7 minuti, l’acqua comincia a bollire. Togliete la spina dalla
presa di corrente (fig. 5).
Come preparare il caffè (fate riferimento alle illustrazioni)
- Fate bollire l’acqua (vedere sezione precedente).
- Inserite il filtro del caffè nel portafiltro (fig. 6).
- Mettete il portafiltro su uno dei due contenitori come indicato nella
fig. 7A.
Le due aperture di uscita del caffè poste sul portafiltro in basso devono
essere poste sopra la tazza.
Nota: è anche possibile posizionare il portafiltro contemporaneamente
sopra le due tazze (fig. 7B). Entrambe le tazze dovranno essere messe
sotto una delle due aperture di uscita del caffè.
La zigrinatura posta nella parte inferiore del portafiltro consente un
posizionamento stabile ammesso che la/le tazza/e sia/siano stata/e
collocate correttamente.
- Mettete il caffè (tipo a filtro rapido, quantità a piacere) nel portafiltro (tipo
a filtro rapido, quantità a piacere) nel portafiltro (fig. 8). Distribuite
uniformemente il caffè sopra il filtro.
- Togliete la spina dalla presa di corrente quando l’acqua bolle (fig. 9).
20
Page 21

21
- Versate una piccola quantità di acqua calda nel portafiltro (fig. 10).
- Poi versate lentamente il resto dell’acqua. Mettete il coperchio sopra il
portafiltro per mantenere la temperatura e l’aroma del caffè (fig. 11). Il
caffè bollente colerà nella/e tazza/e.
- Una volta che il caffè è passato nella/e tazza/e, togliete il portafiltro
(fig. 12).
- Eliminate i fondi del caffè (fig. 13).
Pulizia
• Non immergete mai l’unità di riscaldamento in acqua (fig. 14).
• Pulizia delle parti interne dell’unità di riscaldamento:
la resistenza (posta in basso) è in alluminio è può scolorire, senza però
compromettere il funzionamento dell’apparecchio.
Per pulire l’interno, riempite l’unità di riscaldamento con 2 dl d’acqua e
2 dl di aceto. Fate riscaldare la miscela (senza farla bollire).
Togliete la spina dalla presa di corrente e lasciate che la miscela agisca
per un pò di tempo.
Bollite un pò di acqua pulita e poi gettatela via.
Risciacquate abbondantemente e asciugate.
• Pulizia delle parti esterne dell’unità di riscaldamento: pulitele con un
panno umido.
• Le parti asportabili possono essere lavate con acqua calda e
saponata (figg. 15, 16).
Risciacquate con acqua calda e asciugate.
• Non usate detersivi o agenti abrasivi ecc.
Preparazione per il viaggio
Riempite gli appositi contenitori: figg. 17, 18.
Riunite il tutto: figg. 1, 19, 20.
Page 22

22
Español
Importante
• Antes de conectar el aparato, comprueben que la tensión
indicada en él se corresponde con la tensión local.
• Tengan el aparato conectado a la red solo cuando haya agua en
la unidad calefactora de su cafetera de viaje Travel Duo.
Antes de insertar la clavija en la base de enchufe, viertan
siempre agua en la unidad calefactora. Asegúrense de no
permitir nunca que la unidad calefactora hierva en seco.
Quiten primero la clavija de la base de enchufe y, entonces,
quiten los contenidos de la unidad calefactora.
• No coloquen el aparato sobre una superficie caliente. No permitan que el cable de red toque objetos o superficies calientes.
• Usen el aparato fuera del alcance de los niños. Eviten que
puedan estiran del cable de red. No permitan que el cable de red
cuelgue del borde de la mesa o superficie de trabajo.
• No usen nunca el aparato si la clavija, el cable de red o el propio
aparato están deteriorados.
• Si el cable de red de este aparato es dañado, solo puede ser
reemplazado por la Organización Philips o por un taller de
servicio autorizado por ella, ya que se requieren herramientas
y/o piezas especiales.
• Tomen precauciones extremas cuando muevan un aparato que
contenga líquidos calientes.
Descripción general ( fig. 1 )
A Unidad calefactora.
B Tapa.
C Lámpara piloto.
D Dos tazas ( 4’5 dl cada una ).
E Soporte del filtro del café.
F Filtro permanente del café ( desmontable ).
G Cable de red.
H Dos botes para almacenamiento.
Page 23

Antes del primer uso
- Antes de usarlo por vez primera, hagan funcionar el aparato una vez
con agua pero sin llenar el filtro con café molido ( ver la sección “ Cómo
preparar café “ ).
- A continuación, laven las piezas desmontables como se describe en la
sección “ Limpieza “.
Nota : Durante unas pocas primeras veces pueden notar un olor y un
poco de humo. Esto es una cosa normal y completamente inocua.
Cómo hervir agua para caldo, te, etc.
- Coloquen la unidad calefactora sobre una superficie resistente al calor,
plana y seca.
- Viertan agua en la unidad calefactora (llenado máximo : 4’5 dl) ( fig. 2 ).
- Coloquen la tapa sobre la unidad calefactora ( fig. 3 ).
- Inserten la clavija en la base de enchufe ( fig. 4 ). La lámpara piloto se
encenderá y empezará el calentamiento.
- Aproximadamente después de 7 minutos, el agua hervirá.
Quiten la clavija de la unidad calefactora de la base de enchufe ( fig. 5 ).
Cómo preparar café
- Hiervan agua ( ver la sección anterior ).
- Coloquen el filtro del café en su soporte ( fig. 6 ).
- Coloquen el soporte del filtro del café sobre la taza tal como se indica en
la fig. 7A. Las dos aberturas de salida del café del fondo del soporte
deben posicionarse sobre la taza.
Nota : También es posible colocar simultáneamente el soporte del filtro
sobre las dos tazas ( fig. 7B ). Cada una de las tazas deberá colocarse
bajo una de las aberturas de salida.
Los rebordes de la parte inferior del soporte del filtro proporcionan una
posición estable si la(s) taza(s) ha(n) sido correctamente colocada(s).
- Pongan café molido ( del tipo de filtro rápido y una cantidad al gusto ) en
el soporte del filtro del café ( fig. 8 ). Esparzan con suavidad el café
sobre el filtro.
- Quiten la clavija de la base de enchufe cuando el agua hierva ( fig. 9 ).
- Viertan una pequeña cantidad de agua caliente en el soporte del filtro
del café ( fig. 10 ).
23
Page 24

24
- Viertan luego el resto del agua. Pongan la tapa sobre el soporte del filtro
para preservar la temperatura y el sabor ( fig. 11 ). El café caliente
goteará en la(s) taza(s).
- Después que el último café haya pasado a la(s) taza(s), quiten el
soporte ( fig. 12 ).
- Desechen el café usado ( fig. 13 ).
Limpieza
• No sumerjan nunca la unidad calefactora en agua ( fig. 14 ).
• Paredes interiores de la unidad calefactora : El elemento calefactor
(en el fondo de la unidad calefactora) es de aluminio y puede
descolorarse. Ello no afecta al funcionamiento.
Para limpiar el interior, llénenlo con 2 dl de agua y 2 dl de vinagre.
Calienten la mezcla ( sin dejarla hervir ).
Quiten la clavija de la base de enchufe y dejen que la mezcla actúe
durante cierto tiempo.
Hiervan una cantidad de agua limpia y tírenla. Aclaren y sequen
cuidadosamente.
• Paredes exteriores de la unidad calefactora :
Límpienlas frotando con un paño húmedo.
• Las piezas desmontables pueden lavarse con agua jabonosa caliente
( figs. 15, 16 ). Aclárenlas con agua caliente limpia y séquenlas.
• No usen desengrasadores, abrasivos agentes de limpieza, etc.
Preparación para viajar
Llenen los dos botes para almacenamiento : figs. 17, 18.
Armen el aparato : figs. 1, 19, 20.
Page 25

25
Português
IMPORTANTE
• Antes de ligar o aparelho verifique se a voltagem mencionada
no mesmo corresponde à da rede eléctrica da sua área.
• Deixe o aparelho ligado à corrente apenas quando houver água
na unidade de aquecimento da sua máquina “Travel Duo”. Deite
sempre água para dentro da unidade de aquecimento antes de
fazer a ligação à corrente. Certifique-se de que nunca deixa a
unidade de aquecimento a ferver em seco: em primeiro lugar
desligue a ficha e depois esvazie o conteúdo da unidade de
aquecimento.
• Não coloque o aparelho sobre uma superfície quente. Não deixe
o cabo de alimentação entrar em contacto com superfícies ou
objectos quentes.
• Utilize o aparelho fora do alcance das crianças. Evite que elas
possam puxar o cabo de alimentação. Não deixe o cabo de
alimentação suspenso da mesa de trabalho.
• Nunca utilize o aparelho se a ficha de alimentação, o cabo ou o
próprio aparelho estiverem danificados.
• Se o cabo eléctrico deste aparelho estiver danificado, apenas
deverá ser substituído pela Philips ou pelos seus serviços de
assistência, uma vez que serão necessárias ferramentas
especiais e/ou peças.
• Deverá ter o maior cuidado ao deslocar o aparelho contendo
líquidos quentes.
Descrição geral (fig. 1)
A Unidade de aquecimento
B Tampa
C Lâmpada piloto
D Duas canecas
E Suporte do filtro do café
F Filtro permanente do café (removível)
G Cabo de alimentação
H Duas caixas para arrumação
Page 26

ANTES DA PRIMEIRA UTILIZAÇÃO
- Antes da primeira utilização, faça funcionar uma vez a máquina apenas
com água, sem encher o filtro com café moído. (Consulte a secção
“FAZER CAFÉ”).
- Em seguida, limpe as partes removíveis conforme está descrito na
secção “LIMPEZA”.
Nota: Durante as primeiras vezes poderá notar um cheiro e algum fumo.
Isto é uma ocorrência normal e nada prejudicial.
COMO FERVER ÁGUA PARA CHÁ, ETC.
- Coloque a unidade de auqecimento numa superfície seca, nivelada, e
resistente ao calor.
- Deite água para dentro da unidade de aquecimento (máximo: 4,5 dl)
(fig. 2).
- Coloque a tampa na unidade de aquecimento (fig. 3).
- Introduza a ficha na tomada da parede (fig. 4). A lâmpada piloto acendese e o aquecimento começa a processar-se.
- Depois de aproximadamente 7 minutos a água começa a ferver.
Desligue a unidade de auqecimento (fig. 5).
COMO FAZER CAFÉ
- Ferva a água (leia na secção anterior).
- Introduza o filtro do café no suporte respectivo (fig. 6).
- Coloque o suporte do filtro do café numa caneca como se indica na
fig. 7A. Ambas as aberturas de saída do café no fundo do suporte terão
de ficar por cima da caneca. Nota: Pode também colocar o suporte do
filtro do café simultaneamente por cima das duas canecas (fig. 7B).Cada
uma das canecas terá de ficar por baixo de cada uma das aberturas de
saída. As estrias do fundo do suporte do filtro garantirão uma posição
estável no caso de a(s) caneca(s) ter(em) sido colocada(s)
correctamente.
- Deite café moído (do tipo de filtro rápido, a quantidade conforme o seu
gosto), no suporte do filtro (fig. 8). Espalhe o café uniformemente pelo
filtro.
- Desligue o aparelho quando a água estiver a ferver (fig. 9).
26
Page 27

27
- Deite uma pequena porção de água quente no suporte do filtro do café
(fig. 10).
- A seguir deite o resto vagarosamente. Coloque a tampa sobre o suporte
do filtro a fim de conservar a temperatura e o gosto (fig. 11). O café
quente pingará para dentro da(s) caneca(s).
- Depois de o último café ter pingado para dentro da(s) caneca(s), retire o
suporte (fig. 12).
- Deite fora o café moído (fig. 13).
LIMPEZA
• Nunca mergulhe o aparelho dentro de água (fig. 14).
• Paredes interiores da unidade de aquecimento: O elemento de
aquecimento (no fundo da unidade de aquecimento), é de alumínio e
pode mudar de côr. Isto não afectará os resultados. Para limpar o
interior, encha com 2 dl de água e 2 dl de vinagre. Aqueça a mistura
(sem ferver). Desligue a ficha e deixe a mistura actuar durante algum
tempo. Ferva uma porção de água limpa e deite-a fora. Enxague
completamente e seque.
• Paredes exteriores da unidade de aquecimento: Limpe com um pano
húmido.
• As peças removíveis podem ser lavadas numa sabonária de água
quente (fig. 15, 16). Enxague com água quente limpa e seque.
• Não utilize esfregões, produtos abrasivos de limpeza, etc..
ARRUMAÇÃO PARA VIAGEM
Encher as caixas de arrumação: fig. 17-18.
Colocação do conjunto: fig. 1, 19-20.
Page 28

28
Dansk
Vigtigt!
• Før der sluttes strøm til apparatet, kontrolleres det, at
spændingsangivelsen på typeskiltet svarer til den lokale
netspænding.
• Sørg altid for, at der er vand i varmebeholderen inden strømmen
sluttes til.
Hæld altid først vand i varmebeholderen før De sætter stikket i
stikkontakten.
Lad aldrig varmebeholderen koge tør. Træk altid stikket ud af
stikkontakten før De hælder vandet ud af varmebeholderen.
• Anbring aldrig apparatet på varme overflader. Lad aldrig
netledningen komme i kontakt med varme overflader eller varme
ting.
• Lad aldrig børn komme i nærheden af Travel Duo’en og sørg for,
at de ikke kan komme til at trække i netledningen. Lad aldrig
ledningen hænge ud over bordkanter o.lign.
• Brug aldrig Travel Duo’en hvis netstikket, netledningen eller
selve apparatet er beskadiget.
• Hvis netledningen til dette apparat beskadiges, skal den
udskiftes af Philips, da der skal anvendes specialværktøj
og/eller specielle dele i forbindelse med udskiftningen.
• Pas meget på, hvis De flytter rundt med varmebeholderen, mens
der er varmt vand i.
Generel beskrivelse (fig. 1):
A Varmebeholder
B Låg
C Kontrollampe
D To krus (á 41/2 dl)
E Kaffefilterholder
F Permanent kaffefilter (aftageligt)
G Netledning
H To opbevaringsdåser.
Page 29

Før apparatet i brug første gang:
- Lad apparatet arbejde én gang uden at fylde kaffebønner i filteret (se
afsnittet “Sådan laver man kaffe”).
- Derefter rengøres de løse dele som beskrevet i afsnittet “Rengøring”.
Bemærk: De første gange apparatet anvendes, kan der forekomme lidt
ildelugt og en svag røg. Dette er helt normalt og uskadeligt.
Sådan koges vand til te m.m.:
- Anbring varmebeholderen på en tør, jævn og varmebestandig overflade.
- Hæld vand i beholderen (max. 41/2 dl) (fig. 2).
- Sæt låget på varmebeholderen (fig. 3).
- Sæt stikket i stikkontakten og tænd (fig. 4). Kontrollampen lyser, og
vandet begynder at blive varmet op.
- Efter ca. 7 minutter koger vandet. Træk så stikket ud af stikkontakten
(fig. 5).
Sådan laver man kaffe:
- Bring vandet i kog (se foregående afsnit).
- Sæt kaffefilteret i filterholderen (fig. 6).
- Anbring filterholderen på et krus som vist i fig. 7A.
Begge udløbshuller i bunden af filterholderen skal være lige over kruset.
Bemærk: Det er også muligt at anbringe filterholderen over begge krus
samtidigt (fig. 7B). De to krus skal da anbringes under hvert sit
udløbshul.
Indhakkede på undersiden af filterholderen sikrer, at krusene står stabilt,
når de er anbragt korrekt.
- Kom kaffe i filteret (mængde efter smag og behag) (fig. 8). Fordel kaffen
jævnt ud over filteret.
- Træk stikket ud af stikkontakten, når vandet koger (fig. 9).
- Hæld lidt af det kogende vand op i filteret (fig. 10).
- Hæld derefter resten af vandet gradvist i.
Sæt låget på filterholderen så kaffen beholder sin varme og
aroma (fig. 11). Den varme kaffe løber nu ned i kruset/krusene.
- Fjern filterholderen, når den færdige kaffe er løbet ned i kruset/krusene
(fig. 12).
- Smid de brugte kaffebønner ud (fig. 13).
29
Page 30

30
Rengøring:
• Nedsænk aldrig varmebeholderen i vand (fig. 14).
• Rengøring af varmebeholderens inderside:
Varmelegemet (i bunden af beholderen) er af aluminium, som kan blive
lidt misfarvet, når apparatet er taget i brug. Dette er helt normalt og har
ingen indflydelse på Travel Duo’ens effektivitet.
Varmebeholderens inderside rengøres ved at fylde beholderen med en
blanding af 2 dl vand og 2 dl eddikesyre. Varm blandingen op (den må
ikke koge).
Træk stikket ud af stikkontakten og lad den opvarmede blanding stå i
beholderen et stykke tid. Hæld derefter blandingen ud og fyld op med
rent vand, som bringes i kog.
Hæld det kogende vand ud og tør til slut beholderen grundigt af
indvendigt.
• Rengøring af varmebeholderens yderside: Den udvendige side
rengøres med en fugtig klud.
• De løse dele kan vaskes i varmt sæbevand (fig. 15-16). Skyl efter med
rent varmt vand og tør delene af.
• Brug aldrig skuremidler eller andre skrappe rengøringsmidler.
Sådan gøres Travel Duo’en klar til rejsebrug:
Fyld opbevaringsdåserne: Fig. 17-18.
Saml Travel Duo’en: Fig. 1 samt 19-20.
Page 31

31
Norsk
Viktig
• Før apparatet tas i bruk kontroller at spenningen som er angitt
på apparatet stemmer overens med den lokale nettspenningen.
• Koble kun til apparatet når det er vann i oppvarmingsdelen til
Deres Travel Duo.
Hell alltid vann i oppvarmingsdelen før den tilkobles.
Forsikre Dem om at oppvarmingsdelen ikke tørrkoker:
Trekk først ut støpselet og fjern deretter innholdet fra
oppvarmingsdelen.
• Plasser ikke apparatet på en varm overflate.
• La ikke nettledningen komme i kontakt med varme flater eller
gjenstander.
• Bruk apparatet utenfor barns rekkevidde. Hindre barn i å trekke i
nettledningen. La ikke nettledningen henge over kanten til bord
eller benk.
• Bruk aldri apparatet hvis stikkontakten, nettledningen eller
apparatet selv er ødelagt.
• Hvis nettledningen til apparatet er ødelagt, må den bare
erstattes av Philips eller autorisert service-representant, da
spesielle deler og verktøy er nødvendig.
• Vis ekstrem forsiktighet ved flytting av apparat som inneholder
varm væske.
Generell beskrivelse (fig. 1)
A Oppvarmingsdel
B Lokk
C Indikatorlampe
D To krus (4,5 dl hver)
E Filterholder
F Permanent filter (avtagbart)
G Nettledning
H To oppbevaringsbokser
Page 32

Før første gangs bruk
- Bruk apparatet en gang uten å fylle i kaffe (se avsnitt “Trakting av
kaffe”).
- Rengjør deretter de avtagbare delene som beskrevet i avsnitt
“Rengjøring”.
NB! Ved de første gangers bruk kan De merke noe lukt og litt røyk. Dette
er helt normalt og ufarlig.
Hvordan koke vann til te osv.
- Plasser oppvarmingsdelen på en tørr, jevn og varmebestandig overflate.
- Hell vann i oppvarmingsdelen (maksimum påfyllling 4,5 dl) (fig. 2).
- Sett lokket på oppvarmingsdelen (fig. 3).
- Sett støpselet i stikkontakten (fig. 4). Indikatorlampen vil tennes og
oppvarmingen begynner.
- Etter ca. 7 minutter vil vannet koke. Trekk støpselet ut av stikkontakten
(fig. 5).
Trakting av kaffe
- Kok opp vann (se forrige avsnitt).
- Plasser kaffefilteret i filterholderen (fig. 6).
- Plasser filterholderen på et krus som vist i fig. 7 a.
Begge kaffeåpningene i bunnen av holderen må plasseres over kruset.
NB! Det er også mulig å plassere filterholderen over to krus samtidig
(fig. 7 b). Hver av krusene skal plasseres under hver sin åpning.
Kantene på undersiden av filterholderen sørger for stabil plassering av
filterholderen hvis kruset(ene) er plassert riktig.
- Tilsett kaffe (filtermalt, mengde avhengig av smak) opp i filterholderen
(fig. 8). Spre kaffen jevnt utover filteret.
- Trekk ut nettledningen når vannet koker (fig. 9).
- Hell først litt varmt vann i filterholderen (fig. 10). Hell deretter sakte i
resten av vannet. Sett på lokket på toppen av filterholderen for å bevare
temperatur og smak (fig. 11). Den varme kaffen vil dryppe ned i
kruset(ene).
- Etter at siste dråpe kaffe har rent ned i kruset(ene), fjern holderen
(fig. 12).
- Kast kaffegruten (fig. 13).
32
Page 33

33
Rengjøring
• Dypp aldri apparatet i vann (fig. 14).
• Innsiden av oppvarmingsdelen:
Varmeelementet (på bunnen av oppvarmingsenheten) er laget av
aluminium som kan misfarges. Dette vil ikke innvirke på bruken av
trakteren. For å rengjøre innsiden, fyll beholderen med 2 dl vann og 2 dl
eddik. Varm opp blandingen (la det ikke koke).
Trekk ut nettledningen og la blandingen virke en stund.
Kok så opp en porsjon rent vann og hell dette ut. Skyll grundig og tørk.
• Utsiden av oppvarmingsdelen:
Tørkes ren med en fuktig klut.
• De avtagbare delene kan vaskes i varmt såpevann (fig. 15 og 16).
Skyll med rent varmt vann og tørk dem.
• Bruk ikke skurepulver, slipemidler osv.
Klargjøring for reise
Fyll oppbevaringsboksene: fig. 17 og 18.
Sett enhetene sammen: fig. 1, 19 og 20.
Page 34

34
Svenska
Viktigt
• Innan du ansluter kokaren till ett vägguttag kontrollera att den
spänning (Volt), som står på kokarens typskylt, stämmer med
nätspänningen i vägguttaget.
• Anslut aldrig kokaren till ett vägguttag när den är tom. Fyll den
alltid först med vatten. Låt den aldrig koka torr. Drag först ut
stickproppen ur vägguttaget och töm den först därefter.
• Ställ aldrig kokaren eller något av de övriga tillbehören på ett
hett underlag t ex en kokplatta. Låt aldrig nätsladden komma i
beröring med heta ytor.
• Se till att små barn inte drar i sladden eller på annat sätt
kommer åt kokaren så att de får hett vatten över sig. Låt inte
sladden hänga ner över en bordskant eller arbetsbänk.
• Använd inte kokaren om nätsladden eller stickproppen på något
sätt är defekt.
• Om sladden på denna apparat skadas måste den bytas av
Philips eller av deras serviceombud, eftersom specialverktyg
eller särskilda delar krävs.
• Största försiktighet måste iakttas när kokaren skall flyttas om
den innehåller het vätska.
Delarna, fig 1
A Kokare.
B Lock.
C Signallampa.
D Mugg, två stycken på vardera 4,5 dl.
E Filterhållare för filtret (F).
F Filter, permanent .
G Nätsladd.
H Behållare, två st för förvaring av kaffe, te, socker m m.
Läs först hela bruksanvisningen och studera samtidigt illustrationerna!
Spara bruksanvisningen! Spara köpbevis och kvitto!
Page 35

Före första användning
- Förfar som vid bryggning, men utan kaffe eller te. Se avsnittet “Så här
brygger du”.
- Diska alla lösa delar, se avsnittet “Rengöring”.
De första gångerna du använder kokaren kan du förnimma någon lukt
och litet rök. Detta är normalt och ofarligt.
Så här värmer du vatten
- Ställ kokaren (A) på ett torrt plant underlag, som är värmetåligt.
- Fyll i högst 4,5 dl vatten i kokaren, fig 2. Mät med en av muggarna (D).
- Sätt på locket (B), fig 3.
- Sätt stickproppen i vägguttaget, fig 4. Signallampan tänds och
värmningen börjar.
- Efter ca 7 minuter kokar vattnet. Drag då ut stickproppen ur vägguttaget,
fig 5.
Så här brygger du
- Sätt vatten på kokning, se ovan.
- Sätt kaffefiltret (F) i filterhållaren (E), fig 6.
- Sätt filterhålllaren (E) på en mugg (D)som fig 7A visar. Båda
utloppsöppningarna i botten på filterhållaren måste befinna sig ovanför
muggen.
Det är också möjligt att placera filterhållaren över två muggar samtidigt
med en utloppsöppning över vardera muggen som fig 7 visar.
Ryggarna under filterhållaren ger stöd så att den står stadigt på
muggen/muggarna om den placeras på rätt sätt.
- Fyll bryggmalet kaffe, gärna E-brygg, i filterhållaren, fig 8. Sprid det
jämnt över filtret.
- Drag ut stickproppen ur vägguttaget när vattnet kokar, fig 9.
- Häll först en liten mängd vatten i filterhållaren, fig 10. Häll sedan i resten
långsamt.
- Sätt locket (B) på filterhållaren, fig 11, så att kaffet hålls varmt medan det
droppar ner i muggen/muggarna.
- Tag av filterhållaren från muggen/mugarna när allt kaffe droppat ner,
fig 12.
- Kasta kaffesumpen, fig 13.
35
Page 36

36
Rengöring
• Kokaren (A) får aldrig doppas i vatten, fig 14.
• Kokarens insida:
Normalt räcker det med att skölja ur den med vatten.
För rengöring/avkalkning: Fyll 1 dl ättiksprit och 3 dl vatten i kokaren.
Värm blandningen, men låt den inte koka.
Drag ut sickproppen ur vägguttaget och låt kokaren stå någon tid, t ex
över natt, med blandningen i så att den får verka.
Häll bort ättiksblandningen och skölj ur kokaren med rent vatten. Koka
sedan upp och häll bort en omgång vatten.
Värmelementet i botten på kokaren är av aluminium, som kan
missfärgas, vilket dock helt saknar betydelse.
• Kokarens utsida:
Torka ren utsidan med en väl urvriden fuktig trasa.
• De lösa delarna diskas för hand i varmt vatten med diskmedel. Skölj
dem väl och torka dem.
• Använd inte lösningsmedel, skurpulver, skrubbsvamp e dyl.
Inför resan
Fyll behållarna med de ingredienser, kaffe, te, socker m m, som du vill ha
med, fig 17 - 18.
Sätt ihop delarna som fig 1, 19 - 20 visar.
Page 37

37
Suomi
Tärkeää
• Lue käyttöohje kokonaan ja katsele kuvat, ennen kuin alat
käyttää kahvinkeitintä.
• Ennen kuin yhdistät laitteen pistorasiaan, tarkista, että laitteen
arvokilven jännitemerkintä vastaa paikallista verkkojännitettä.
• Yhdistä laite pistorasiaan vain silloin kun keittimen
kuumennusastiassa on vettä.
Kaada kuumennusastiaan vettä, ennen kuin työnnät pistotulpan
pistorasiaan.
Älä päästä keitintä kiehumaan kuiviin; irrota ensin pistotulppa ja
tyhjennä sitten kuumennusastia.
•Älä laita laitetta kuumalle alustalle. Pidä huoli, ettei liitosjohto
kosketa mitään kuumaa pintaa tai esinettä.
• Käytä laitetta poissa lasten ulottuvilta. Varo, etteivät lapset
pääse vetämään liitosjohdosta. Älä jätä liitosjohtoa roikkumaan
pöydän reunan yli.
•Älä käytä laitetta, jos sen pistotulppa, liitosjohto tai itse laite on
vahingoittunut.
• Tarkista liitosjohdon kunto säännöllisesti. Jos tämän laitteen
verkkoliitosjohto vaurioituu, se on korvattava erikoisjohdolla.
Ota yhteys lähimpään Philips-myyjään tai Philips-huoltoon.
• Ole erityisen varovainen liikutellessasi kuumaa nestettä täynnä
olevaa laitetta.
Laitteen osat (kuva 1)
A Kuumennusastia
B Kansi
C Merkkivalo
D Kaksi mukia (4,5 dl kumpikin)
E Suodatinteline
F Kestosuodatin (irrotettava)
G Liitosjohto
H Kaksi säilytysastiaa
Page 38

Käyttöönotto
- Puhdista laite ennen käyttöönottoa suodattamalla siinä kerran pelkkää
puhdasta vettä laittamatta suodattimeen kahvijauhetta. (Katso kohtaa
“Kahvin valmistus”.)
- Puhdista seuraavaksi irrotettavat osat kohdassa “Puhdistus” neuvotulla
tavalla.
Huom. Ensimmäisten minuuttien aikana saatat havaita hajua ja hieman
käryä. Tämä on normaalia ja täysin vaaratonta.
Veden keittäminen teetä yms. varten
- Aseta kuumennusastia kuivalle, tasaiselle, lämmönkestävälle alustalle.
- Kaada kuumennusastiaan vettä enintään 4,5 dl) (kuva 2).
- Laita kansi kuumennusastian päälle (kuva 3).
- Työnnä pistotulppa pistorasiaan (kuva 4). Merkkivalo syttyy ja vesi alkaa
kuumentua.
- Vesi kiehuu noin 7 minuutin kuluttua. Irrota pistotulppa pistorasiasta
(kuva 5).
Kahvin valmistus
- Keitä vesi (katso edellistä kohtaa).
- Aseta suodatin suodatintelineeseen (kuva 6).
- Laita suodatinteline mukin päälle kuvassa 7A näytetyllä tavalla.
Pohjassa olevien molempien kahviaukkojen tulee olla mukin päällä.
Huom. Voit myös laittaa suodatintelineen yhtaikaa kahden mukin päälle
(kuva 7B). Yksi muki kummankin aukon alle.
Suodatintelineen pohjassa olevat reunat pitävät sen tukevasti paikalla,
jos muki(t) on asetettu oikein.
- Mittaa kahvijauhe (suodatinjauhettu kahvi, määrä maun mukaan)
suodatintelineeseen (kuva 8). Levitä kahvijauhe tasaisesti.
- Irrota pistotulppa, kun vesi on kiehunut (kuva 9).
- Kaada ensin hieman kiehuvaa vettä suodatintelineeseen (kuva 10).
- Kaada sitten hitaasti loppu vesi. Laita kansi suodatintelineen päälle, niin
että lämpö ja aromit säilyvät (kuva 11). Kuuma kahvi tippuu mukiin
(mukeihin).
- Kun kahvi on tippunut loppuun, poista suodatinteline (kuva 12).
- Heitä kahvijauhe pois (kuva 13).
38
Page 39

39
Puhdistus
• Älä upota kuumennusastiaa veteen (kuva 14).
• Kuumennusastian sisävaippa:
Lämpöelementti (kuumennusastian pohjassa) on alumiinia ja saattaa
tummua. Tämä ei vaikuta laitteen toimintaan.
Puhdista sisävaippa kuumentamalla astiassa 3 dl vettä ja 1 dl etikkaa.
Kuumenna mutta älä keitä.
Irrota pistotulppa ja anna liuoksen vaikuttaa jonkin aikaa.
Keitä sen jälkeen astiassa täysi määrä pelkkää vettä ja kaada pois.
Huuhtele hyvin ja kuivaa.
• Kuumennusastian ulkovaippa: Pyyhi puhtaaksi kostealla liinalla.
• Irrotettavat osat voi pestä pesuainevedellä (kuvat 15, 16). Huuhtele
lämpimällä vedellä ja kuivaa.
• Älä käytä naarmuttavia tai syövyttäviä puhdistusaineita.
Kokoaminen mukaan matkalle
Säilytysastioiden täyttö: kuvat 17-18.
Kokoaminen: kuvat 1, 19-20.
Page 40

4222 001 73992
;
 Loading...