

Page 1
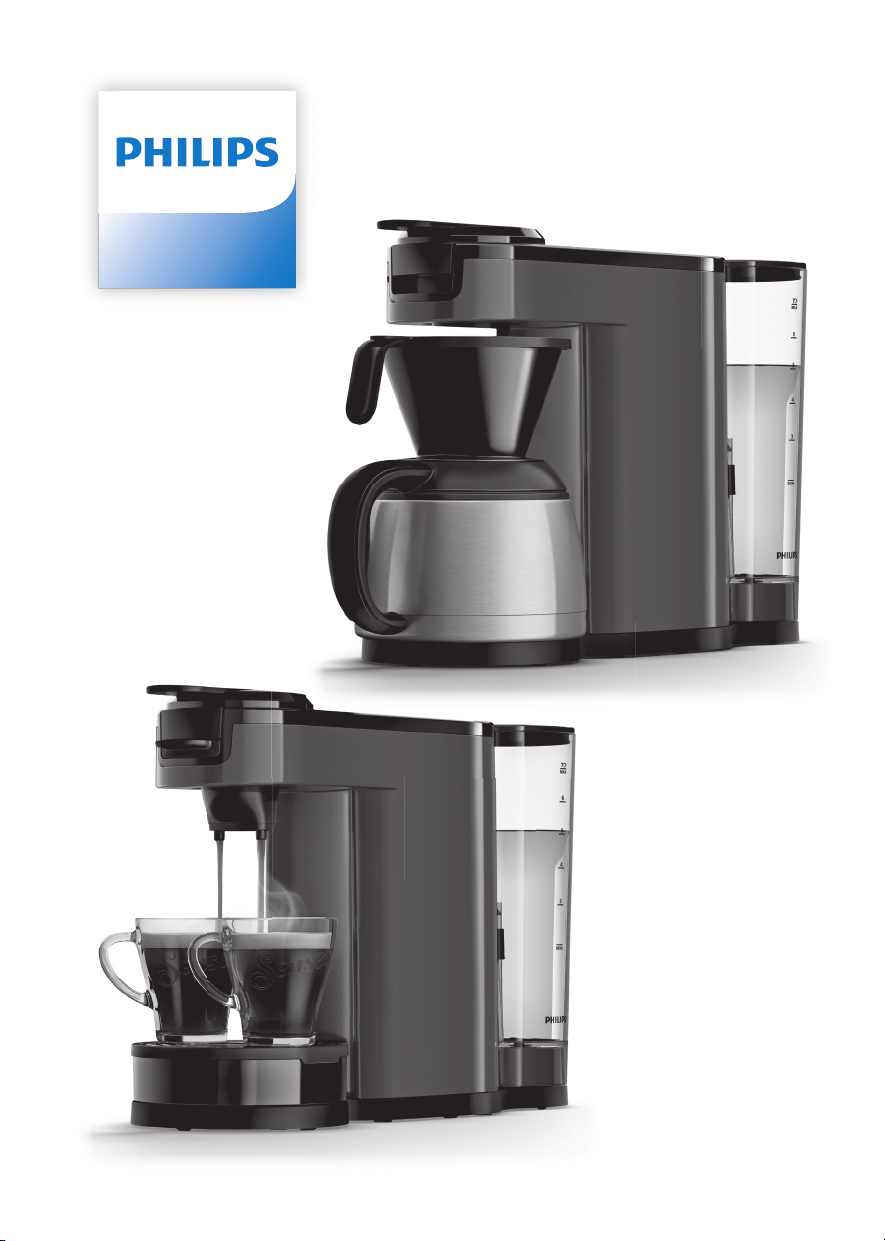
HD6596, HD6592
Page 2

Page 3
1 2
3
4
5
16
6
7
8
9
10
11
12
13
14
15
1
Page 4

Page 5

English 6
Deutsch 18
Français 31
Nederlands 44
Page 6

6
English
Introduction
Congratulations on your purchase and welcome to Philips! To fully benefit from the support that
Philips offers, register your product at www.philips.com/welcome.
Clean cold water
Use clean cold water every day. If you have not used the coffee machine for one day, you have to
flush it with clean cold water before you use it again. To flush the machine, fill the water reservoir with
clean cold water, place a bowl (with a capacity of at least 1500 ml) or 2 cups under the coffee spout
and press the 2-cup button a few times to brew hot water until the water reservoir is empty.
Fresh filter coffee
To brew a jug of delicious coffee use good-quality pre-ground coffee . Always use a paper filter size
102.
You can brew up to 7 cups of coffee in the jug.
Fresh coffee pods
Use good-quality fresh coffee pods in this machine for a full, round taste. To keep the pods fresh
longer, store them in a storage container.
Intensity select
-
For one small cup of strong short coffee, double press the 1-cup button (Fig. 2).
-
For two cups of strong short coffee, double press the 2-cup button (Fig. 3).
Important
Read this user manual carefully before you use the machine and save it for future reference.
Danger
-
Never immerse the machine in water or any other liquid.
Warning
-
Check if the voltage indicated on the bottom of the machine
corresponds to the local mains voltage before you connect the
machine.
-
Connect the machine to an earthed wall socket.
-
If the mains cord is damaged, you must have it replaced by
Philips, a service center authorized by Philips or similarly qualified
persons in order to avoid a hazard.
-
Do not use the machine if the plug, the mains cord or the machine
itself is damaged.
Page 7

English
-
This machine can be used by children aged from 8 years and
above and by persons with reduced physical, sensory or mental
capabilities or lack of experience and knowledge if they have
been given supervision or instruction concerning use of the
machine in a safe way and if they understand the hazards
involved.
-
Cleaning and user maintenance shall not be made by children
unless they are older than 8 and supervised.
-
Keep the machine, its accessories and its cord out of the reach of
children aged less than 8 years.
-
Children shall not play with the machine.
Caution
-
Always return the machine to a service center authorized by
Philips for examination or repair. Do not attempt to repair the
machine yourself, otherwise your warranty becomes invalid.
-
After unpacking the machine, never put your SENSEO® machine
on its side. Always keep it in upright position, also during
transport.
-
Never put normal ground coffee or use torn pods in the machine,
as this causes it to become blocked.
-
Do not use the machine in combination with a transformer, as this
could cause hazardous situations.
-
Do not use the machine in combination with a transformer, as this
could cause hazardous situations.
-
Always put the machine on a flat and stable surface.
-
Do not place the machine on a hotplate or directly next to a hot
oven, heater or similar source of heat.
-
Never let the machine operate unattended.
-
Do not use the machine at altitudes higher than 2200 meters
above sea level.
-
Never pour any other liquid than clean cold water into the water
reservoir.
7
Page 8

8
English
-
Never flush the machine or let it brew coffee when the spout is
not in place.
-
Flush the coffee machine with fresh water before you use it for
the first time. This causes the system to fill with water, which is
essential for the machine to work properly.
-
Do not use the machine in combination with water softeners
based on sodium exchange.
-
Descale your machine regularly. The machine indicates when
descaling is needed. Not doing this will make your machine stop
working properly. In this case, repair is not covered by your
warranty.
-
Never use a descaling agent based on mineral acids such as
sulphuric acid, hydrochloric acid, sulphamic acid and acetic acid
(e.g. vinegar). These descaling agents may damage your coffee
machine.
-
The machine is intended for normal household use only. It is not
intended for use in environments such as staff kitchens of shops,
offices, farms or other work environments, nor is it intended to be
used by clients in hotels, motels, bed and breakfast and other
residential environments.
-
Do not disassemble the insulated jug.
-
Never immerse the insulated jug in water or any other liquid, as
this could cause water to enter between the walls of the jug.
-
When the insulated jug is filled with coffee, keep it in upright
position to prevent leakage.
-
The insulated jug is not dishwasher-proof.
-
During brewing and until the light stops blinking, the filter holder
is filled with hot coffee.
Electromagnetic fields
This Philips machine complies with all applicable standards and regulations regarding exposure to
electromagnetic fields.
Page 9

English
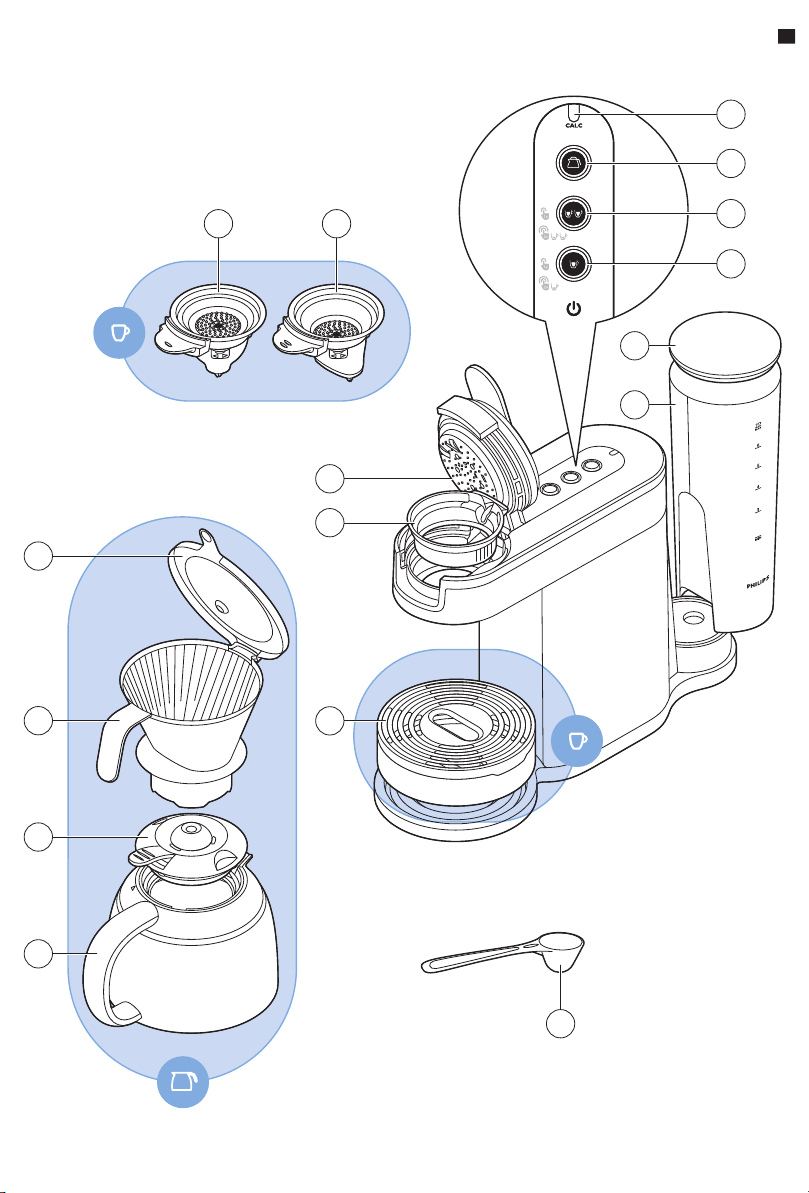
General description
1 1-cup pod holder
2 2-cup pod holder
3 Distribution disk
4 Collector ring
5 Drip tray
6 CALC light
7 Jug button
8 2-cup button
9 1-cup button
10 Water reservoir lid
11 Water reservoir
12 Filter holder lid
13 Filter holder
14 Insulated jug lid
15 Insulated jug
16 Measuring spoon
First use
The machine starts an automatic flushing cycle when you switch it on for the first time, no matter
which button you press.
1 Put the plug in an earthed wall socket.
2 Remove the water reservoir from the machine and remove the lid from the water reservoir (Fig. 4).
3 Clean the water reservoir thoroughly in hot water, if necessary with some washing-up liquid.
4 Fill the water reservoir with clean cold water up to the MAX indication (Fig. 5).
5 Put the lid back onto the water reservoir and put the water reservoir back onto the machine (Fig. 6).
6 Place the 1-cup pod holder in the coffee machine. Close the lid and make sure it is properly locked
(Fig. 7).
7 Remove the drip tray from the platform and put a bowl (with a capacity of at least 1.5 liters) or the
jug under the coffee outflow (Fig. 8).
8 Press one of the buttons on the control panel. The jug button, 2-cup button and 1-cup button flash
in sequence (Fig. 9).
9 The flushing cycle starts. During the flushing cycle the system fills itself with water from the water
reservoir. The machine produces more noise than during a regular brewing cycle.
10 The machine switches off when the water tank is empty (Fig. 10).
11 After the first flushing cycle, clean the collector ring and the pod holders with hot water and some
washing-up liquid or in the dishwasher.
9
Brewing a jug of drip-filter coffee
1 Open the lid of the machine (Fig. 11).
2 Remove the pod holder, if present (Fig. 12).
3 Remove the drip tray, if present.
4 Fill the water reservoir with clean cold water up to the level required for the number of cups of
coffee you wish to brew and put the water reservoir back onto the machine (Fig. 13).
5 Rinse the insulated jug with hot tap water to preheat it .
Tip: To obtain the tastiest and hottest coffee, brew at least half a jug of coffee.
6 Place the filter holder on top of the insulated jug (Fig. 14).
Page 10

10
English
7 Open the lid of the filter holder.
8 Put a paper filter size 102 in the filter holder. Make sure that you fold the sealed edges to ensure
that the paper filter stays upright during brewing (Fig. 15).
9 Use the measuring spoon to put the required amount of pre-ground coffee in the filter (Fig. 16).
Tip: Use one measuring spoon of pre-ground coffee for each cup. Use a heaped measuring spoon
for strong coffee and a level measuring spoon for mild coffee.
10 Close the lid of the filter holder.
11 Slide the insulated jug on the platform of the machine (Fig. 17).
12 Press the jug button to start the brewing process (Fig. 18).
-
The light in the jug button starts flashing and the brewing process starts. (Fig. 19)
Note: If the jug button and the CALC light start flashing alternately during heating up and brewing
(Fig. 20), you need to descale the machine (see 'Descaling the machine').
-
When all the water from the water reservoir has passed through the filter, the light in the jug
button goes out and the machine switches off automatically.
13 You can now remove the insulated jug from the machine (Fig. 21).
14 Remove the filter holder from the insulated jug (Fig. 22).
Tip: You can place the filter holder on the drip tray to prevent coffee from leaking onto your
worktop while you pour out coffee from the jug (Fig. 23).
15 Place the jug lid on the insulated jug and turn it to the keep-warm position (closed lock symbol)
(Fig. 24).
16 Push the lever of the jug lid to pour coffee into one or more cups (Fig. 25).
Brewing pod coffee
Brewing one cup of pod coffee
1 Fill the water reservoir with clean cold water up to the MAX indication and put it back onto the
machine (Fig. 5).
Note: The MIN indication on the water reservoir indicates the minimum amount of water required
for brewing pod coffee. Always fill the water reservoir beyond the MIN level.
2 Put the plug in an earthed wall socket.
3 Open the lid of the machine by moving the lever upwards (Fig. 11).
4 Place the drip tray on the platform of the machine (Fig. 26).
5 Place one pod in the 1-cup pod holder with the convex side pointing downwards (Fig. 27).
Note: Make sure that the pod holder is clean and the sieve in the center is not clogged, e.g. with
loose coffee grounds.
Note: Make sure that the coffee in the pod is distributed evenly and press the pod lightly into the
pod holder.
6 Place the 1-cup pod holder in the machine and close the lid (Fig. 7).
7 Place a cup on the drip tray (Fig. 28).
8 Press the 1-cup button to brew coffee. (Fig. 29)
-
The button starts flashing and the machine starts heating up (Fig. 30).
Note: If the 1-cup button and CALC light start flashing alternately during heating up and brewing
(Fig. 31), you need to descale the machine (see 'Descaling procedure ').
Page 11

English
-
When the heating-up process is finished, the machine starts brewing coffee (Fig. 32). After
brewing, the machine switches off automatically.
Tip: Double press the 1-cup button (Fig. 2) to brew a strong short cup of coffee.
9 Remove the coffee pod after use by lifting the pod holder out of the machine and emptying it (Fig.
33).
Caution: Be careful when you do this, for there may still be some hot water/coffee on the coffee
pod(s).
Caution: Never put normal ground coffee or use torn pods in the machine, as this causes it to
become blocked.
Brewing two cups of pod coffee
1 To brew two cups of pod coffee, place the deeper 2-cup pod holder in the machine. Place two
pods in the 2-cup pod holder (Fig. 34).
2 Press the 2-cup button to brew coffee (Fig. 35).
-
The button starts flashing and the machine starts heating up (Fig. 36).
Note: If the 2-cup button and the CALC light start flashing alternately during heating up and
brewing (Fig. 37), you need to descale the machine (see 'Descaling the machine').
-
When the heating-up process is finished, the machine starts brewing coffee (Fig. 38). After
brewing, the machine switches off automatically.
Tip: Double press the 2-cup button (Fig. 3) for two cups of strong short coffee.
3 Remove the coffee pods after use by lifting the pod holder out of the machine and emptying it (Fig.
33).
11
Brewing special coffees
1 To brew a special coffee, place a cappuccino pod, a hot chocolate pod or another special coffee
pod in the 2-cup pod holder.
2 Place a cup under the coffee spout.
3 Press the 1-cup button to brew your special coffee.
Cleaning the machine
Never immerse the machine in water or any other liquid.
Never clean the machine by flushing it with the lid open.
Cleaning the coffee machine
Warning: Always unplug the machine before you clean it.
1 Clean the outside of the machine with a moist cloth.
2 To prevent clogging, clean the pod holders regularly with hot water, some washing-up liquid and a
washing-up brush. If you have used the 2-cup pod holder to brew cappuccino or hot chocolate,
make sure to clean it thoroughly immediately after use to remove any milk residues.
Note: You can disassemble the pod holders for more thorough cleaning (Fig. 39).
Page 12

12
English
3 Clean the collector ring, the pod holders, the drip tray, the water reservoir and the water reservoir
lid in hot water, if necessary with some washing-up liquid. All detachable parts except for the water
reservoir and the insulated jug can also be cleaned in the dishwasher (Fig. 40).
4 Clean the water distribution disk with a moist cloth. Be careful when you do this. Make sure that the
rubber sealing ring does not get stuck under the edge of the water distribution disk. If it does, the
coffee machine starts to leak.
Cleaning the insulated jug
Warning: Do not immerse the insulated jug in water or any other liquid and do not clean
it in the dishwasher as this will damage the jug.
1 To remove the jug lid, turn the lid anticlockwise to 'open' position and remove it (Fig. 41).
2 Clean the inside of the insulated jug with a soft brush, hot water and some washing-up liquid (Fig.
42).
Tip: To remove stubborn brown deposits, fill the jug with hot water and add a spoonful of baking
soda. Let the baking soda do its work for some time.
3 After cleaning, rinse the insulated jug with fresh, hot water (Fig. 43).
Note: You can clean the jug lid in the dishwasher.
Flushing the coffee machine
If you have not used the coffee machine for one day, flush it with clean cold water before you use it
again. Flush the machine in the following way:
1 Fill the water reservoir with clean cold water up to the MAX indication and put it back onto the
machine.
2 Put the 1-cup pod holder or the 2-cup pod holder in the machine without pod(s).
3 Put a bowl (with a capacity of at least 1.5 liters) or the jug under the coffee spout to collect the
water.
4 Press the 2-cup button, wait until the machine has heated up and brewed an amount of hot water.
Then press the 2-cup button several times until the water reservoir is empty.
Descaling the machine
When to descale
Scale builds up inside the machine during use. It is essential to descale the machine when the CALC
light starts flashing during heating up or brewing (Fig. 31).
Why to descale
Your reasons to descale:
-
It prolongs the life of your coffee machine
-
It ensures maximum cup volume
-
It ensures maximum coffee temperature
-
The machine produces less sound during brewing
-
It prevents malfunctioning
Page 13

English
If the descaling procedure is not performed correctly, scale residue remains behind in the machine.
This causes scale to build up more quickly and may cause permanent and irreparable damage to the
machine.
Use the correct descaler
Only citric acid-based descalers are suitable for descaling the machine. This type of descaler descales
the machine without damaging it. For the correct amount, see under ‘Descaling procedure’ below.
Each descaling mixture can be used only once. Use a new descaling mixture each time. We advise you
to use the special SENSEO® Descaler (HD7012/HD7011). Read the instruction leaflet in the package.
For more information on why it is important to descale, how to descale or which descaler to use, visit
our website at www.philips.com/descale-senseo.
Warning: Never use a descaler based on mineral acids such as sulphuric acid,
hydrochloric acid, sulphamic acid and acetic acid (e.g. vinegar). These descalers may
damage your coffee machine.
Descaling procedure
The descaling procedure consists of two descaling cycles and two flushing cycles. Do not interrupt the
descaling cycles and do not switch off the machine before you have performed the two flushing
cycles.
1 Fill the water reservoir with clean cold water up to the MAX indication and pour the water into a
bowl (Fig. 44).
2 Mix 50 grams of citric acid with the water in the bowl. Stir until the powder has dissolved (Fig. 45).
3 Fill the water reservoir with the descaling mixture and place it back on the machine (Fig. 47).
4 Remove the drip tray. Put a bowl with a capacity of at least 1.5 liters under the spout to collect the
descaling mixture (Fig. 8).
5 Place the 1-cup pod holder with a used coffee pod in it in the coffee machine. Close the lid and
make sure it is properly locked.
Note: Always put a used coffee pod in the pod holder when you descale the machine. This pod
serves as a ‘filter’ to prevent the sieve or hole in the pod holder from getting clogged with scale
residue.
13
Warning: Make sure that the lid is closed properly and the lid lever is locked before
you start descaling the machine.
6 Press the 1-cup button and the 2-cup button simultaneously.
7 During the descaling cycle, the water comes out of the machine at intervals. The CALC light, jug
button, 2-cup button and 1-cup button flash slowly in sequence (Fig. 46).
8 When the water reservoir is empty, the 1-cup button and CALC light start to flash quickly alternately
(Fig. 31).
9 Empty the bowl and place it back. Remove the used pod and the 1-cup pod holder. Place the
2-cup pod holder with one used pod in the machine. Close the lid.
10 Fill the water reservoir with clean cold water up to the MAX indication and pour the water into a
bowl (Fig. 44).
11 Mix 50 grams of citric acid with the water in the bowl. Stir until the powder has dissolved (Fig. 45).
12 Fill the water reservoir with the descaling mixture and place it back on the machine (Fig. 47). Then
press the 1-cup button to start the second descaling cycle.
Page 14

14
English
13 When the 1-cup button and the CALC light start to flash quickly alternately (Fig. 31), remove the
used pod from the 2-cup pod holder. Clean the water reservoir by rinsing it thoroughly with cold
clean tap water a few times (Fig. 48).
14 Fill the water reservoir with clean cold water up to the MAX indication and put it back onto the
machine.
15 Press the 1-cup button. The CALC light, jug button, 2-cup button and 1-cup button flash slowly in
sequence (Fig. 46). During the flushing cycle, the water comes out of the machine at intervals.
16 When all the water in the water reservoir has been used up, the 1-cup button and CALC light start
to flash quickly alternately (Fig. 31).
17 Repeat steps 13 and 14.
-
When all the water in the water reservoir has been used up, the machine switches off and all the
lights go out to indicate that the descaling procedure has ended.
Ordering accessories
To buy accessories or spare parts, visit www.shop.philips.com/service or go to your Philips dealer.
You can also contact the Philips Consumer Care Center in your country (see the international warranty
leaflet for contact details).
Warranty and support
If you need information or support, please visit www.philips.com/support or read the international
warranty leaflet.
Recycling
-
This symbol means that this product shall not be disposed of with normal household waste
(2012/19/EU) (Fig. 49).
-
Follow your country's rules for the separate collection of electrical and electronic products. Correct
disposal helps prevent negative consequences for the environment and human health.
Troubleshooting
This chapter summarizes the most common problems you could encounter with the appliance. If you
are unable to solve the problem with the information below, visit www.philips.com/support for a list
of frequently asked questions or contact the Consumer Care Center in your country.
Problem
My coffee cup overflows
with cold coffee
The light in the button you
pressed flashes slowly.
Possible cause Solution
You did not flush the machine
before first use.
The machine is heating up. If heating up takes longer than two
When you are brewing drip
filter coffee, the light flashes
slowly during brewing.
Flush the machine before first
use.When the machine has emptied a
complete water reservoir, you can start
to make a new coffee.
minutes, contact the Philips Consumer
Care Center in your country.
The brewing cycle last approximately
90 seconds, wait until the brewing
cycle has finished.
Page 15

Problem Possible cause Solution
The light in the button you
pressed flashes quickly.
There is not enough water in
the water reservoir.
Fill the water reservoir.
English
15
The CALC light flashes
when the machine is
heating up or brewing
coffee.
I cannot close the lid
properly.
The coffee machine
produces less pod coffee
than before.
The temperature of the
coffee decreases quickly.
The float in the water reservoir
is stuck.
You need to descale the
machine.
Perhaps a used coffee pod is
sticking to the water
distribution disk.
Perhaps the sieve in the
center of the pod holder is
clogged.
You may have double pressed
the 1-cup or 2-cup button.
You use the wrong type of
cups.
Empty the water reservoir and shake it
a few times to release the float. Clean
the water reservoir with hot water and
some washing-up liquid or in the
dishwasher. If this does not help,
descale the machine (see chapter
‘Descaling’).
Perform the descaling procedure as
described in chapter ‘Descaling’.
If this is the case, remove the used pod.
If the sieve is clogged, use a washingbrush to unclog the sieve. If you cannot
unclog it properly with the washing-up
brush, put the pod holder in the
machine and descale the machine.
Descale the machine (see chapter
‘Descaling’).
If you double press the 1-cup or 2-cup
button within 3 seconds, the machine
brews one or two cups of short strong
coffee.
Use thin-walled cups. Thin-walled cups
absorb less heat from the coffee than
thick-walled cups.
The filter coffee is not hot
enough.
The cups are cold. Rinse the cups with hot water. You can
You have added cold milk to
the coffee.
You have not brewed a full jug. Coffee stays hot longer if you brew a
You have not removed the
pod holder.
You have not preheated the
insulated jug.
preheat the coffee machine and cup by
brewing a cup of hot water first without
placing a coffee pod in the pod holder.
Do not use cold milk straight from the
refrigerator.
full jug of coffee to ensure that that the
coffee has the right temperature.
If you do not remove te pod holder, this
can lead to a longer brewing time.
Rinse the insulated jug with hot tap
water to preheat it .
Page 16

16
English
Problem Possible cause Solution
You have added cold milk to
the coffee.
Do not use cold milk straight from the
refrigerator.
Coffee grounds end up in
the insulated jug.
The coffee is weaker than
expected.
Water leaks from the
coffee machine.
Your paper filter may have
collapsed during brewing.
There may have been some
water in the insulated jug
when you started brewing
filter coffee.
You have not used enough
pre-ground coffee.
You overfilled the water
reservoir.
The sieve in the center of the
pod holder may be clogged.
The sealing ring may be stuck
under the edge of the
distribution disk.
You forgot to place the
collector ring.
To prevent the paper filter from
collapsing, fold the sealed edges.
Always make sure that there is no
water in the jug before you start
brewing coffee.
Use one heaped measuring spoon of
pre-ground coffee per cup for stronger
coffee.
Do not fill the water reservoir beyond
MAX level.
Check the pod holder. If the sieve is
clogged, use a washing-up brush to
unclog the sieve. If you cannot clean it
properly with the washing-up brush,
put the pod holder in the machine and
descale the machine (see chapter
'Descaling').
Check if the sealing ring is stuck under
the edge of the distribution disk. If it is,
pull it out from under the distribution
disk carefully.
If you forget to place the collector ring,
water comes out of the lid of the
machine instead of passing through the
pod.
I cannot open the lid. A vacuum has formed under
It takes longer than before
to brew filter coffee.
There is still water left in
the water tank after
brewing filter coffee.
the lid.
You have to descale the
machine.
You left a pod holder in the
machine.
This is normal. The filter coffee brewing process does
Switch of the coffee machine. Pull up
the lever and wait 24 hours before you
open the lid. You may need to use
some force.
Always make sure the pod holders are
clean and the center of the sieve is not
clogged to prevent a vacuum.
To descale the machine, follow the
instructions in chapter 'Descaling'.
Remove the pod holder.
not use up all the water in the water
tank.This is normal.
Page 17

Problem Possible cause Solution
I do not get a small cup of
stronger coffee after
double pressing the 1-cup
or 2-cup button.
You have double pressed the
button too fast or you have
waited longer than 3 seconds
after pressing the button for
the first time.
You can get a stronger coffee if you
double press the 1-cup or 2-cup button
within 3 seconds. The light in the
button shines less bright when the
selection of stronger coffee is
successful.
English
17
Page 18

18
Deutsch
Einführung
Herzlichen Glückwunsch zu Ihrem Kauf und willkommen bei Philips! Um die Unterstützung von Philips
optimal nutzen zu können, sollten Sie Ihr Produkt unter www.philips.com/welcome registrieren.
Sauberes kaltes Wasser
Verwenden Sie täglich sauberes kaltes Wasser. War die Kaffeemaschine einen Tag lang nicht in
Gebrauch, lassen Sie vor dem nächsten Aufbrühen sauberes kaltes Wasser durchlaufen. Um die
Maschine durchzuspülen, füllen Sie den Wassertank mit sauberem kaltem Wasser, stellen Sie eine
Schüssel (mit einem Volumen von mindestens 1500ml) oder zwei Tassen unter den Kaffeeauslauf,
und drücken Sie mehrmals die 2-Tassen-Taste, damit heißes Wasser durchläuft, bis der Wassertank
leer ist.
Frischer Filterkaffee
Um eine Tasse bekömmlichen Kaffee zu brühen, verwenden Sie gemahlenen Kaffee in guter Qualität.
Verwenden Sie immer Papierfiltertüten der Größe 102.
Sie können in der Kanne bis zu 7Tassen Kaffee brühen.
Frische Kaffeepads
Verwenden Sie frische, hochwertige Kaffeepads in dieser Maschine, um einen vollen, abgerundeten
Geschmack zu erhalten. Damit die Pads länger frisch bleiben, sollten Sie sie in einem entsprechenden
Behälter aufbewahren.
Intensitätsauswahl
-
Für eine kleine Tasse starken Kaffee drücken Sie zweimal auf die 1-Tasse-Taste (Abb. 2).
-
Für zwei Tassen starken Kaffee drücken Sie einmal auf die 2-Tassen-Taste (Abb. 3).
Wichtig
Lesen Sie diese Bedienungsanleitung vor dem Gebrauch der Maschine aufmerksam durch, und
bewahren Sie sie für eine spätere Verwendung auf.
Gefahr
-
Tauchen Sie die Maschine niemals in Wasser oder andere
Flüssigkeiten.
Warnhinweis
-
Prüfen sie, bevor Sie das Gerät anschließen, ob die
Spannungsangabe am Boden des Geräts mit der örtlichen
Netzspannung übereinstimmt.
-
Die Netzsteckdose muss schutzgeerdet sein.
Page 19

Deutsch
-
Um Gefährdungen zu vermeiden, darf ein defektes Netzkabel nur
von einem Philips Service-Center, einer von Philips autorisierten
Werkstatt oder einer ähnlich qualifizierten Person durch ein
Original-Ersatzkabel ersetzt werden.
-
Verwenden Sie die Maschine nicht, wenn der Netzstecker, das
Netzkabel oder die Maschine selbst defekt oder beschädigt ist.
-
Dieses Gerät kann von Kindern ab 8Jahren und Personen mit
eingeschränkten physischen, sensorischen oder geistigen
Fähigkeiten oder ohne Erfahrung und besondere Kenntnisse
verwendet werden, wenn sie beim Gebrauch des Geräts
beaufsichtigt werden oder in den sicheren Gebrauch des Geräts
unterwiesen wurden und die verbundenen Gefahren verstanden
haben.
-
Reinigung und Pflege dürfen nicht von Kindern durchgeführt
werden, außer sie sind älter als 8 Jahre und werden beaufsichtigt.
-
Sorgen Sie dafür, dass Kinder unter 8Jahren keinen Zugang zu
der Maschine, dem Zubehör und zum Kabel der Maschine haben.
-
Kinder dürfen nicht mit der Maschine spielen.
19
Achtung
-
Geben Sie das Gerät zur Überprüfung bzw. Reparatur stets an ein
Philips Service-Center. Versuchen Sie nicht, das Gerät selbst zu
reparieren, da die Garantie sonst verfällt.
-
Legen Sie die SENSEO® Maschine nach dem Auspacken nie auf
der Seite ab. Halten Sie sie stets aufrecht, auch beim Transport.
-
Verwenden Sie keinesfalls normalen gemahlenen Kaffee oder
beschädigte Pads in Ihrer Kaffeepadmaschine, da dies das Gerät
verstopfen würde.
-
Aus Sicherheitsgründen darf das Gerät nicht mit einem
Transformator betrieben werden.
-
Aus Sicherheitsgründen darf das Gerät nicht mit einem
Transformator betrieben werden.
-
Stellen Sie die Maschine auf eine ebene und stabile Fläche.
Page 20

20
Deutsch
-
Stellen Sie die Maschine nicht auf eine Warmhalteplatte, direkt
neben einen heißen Ofen, eine Heizung oder eine ähnliche
Wärmequelle.
-
Lassen Sie das eingeschaltete Gerät niemals unbeaufsichtigt.
-
Benutzen Sie das Gerät nicht in Höhenlagen von über 2200m.
-
Füllen Sie niemals eine andere Flüssigkeit als sauberes kaltes
Wasser in den Wassertank.
-
Spülen Sie die Maschine nicht durch, und bereiten Sie keinen
Kaffee zu, solange der Kaffeeauslauf nicht eingesetzt ist.
-
Spülen Sie die Kaffeemaschine mit frischem Wasser durch, bevor
Sie sie das erste Mal verwenden. Dabei füllt sich das System mit
Wasser. Dies ist für den ordnungsgemäßen Betrieb der Maschine
entscheidend.
-
Verwenden Sie in Verbindung mit Ihrer Kaffeemaschine keine
natriumhaltigen Wasserenthärtungsmittel.
-
Entkalken Sie Ihre Maschine regelmäßig. Die Maschine zeigt an,
wenn sie entkalkt werden muss. Wenn Sie dies ignorieren,
funktioniert die Maschine nicht mehr richtig. In diesem Fall ist die
Reparatur von der Garantie ausgeschlossen.
-
Verwenden Sie keine Entkalker auf Basis von Mineralsäuren,
beispielsweise Schwefel-, Salz-, Sulfamin- oder Essigsäure (z.B.
Essig). Diese Entkalker könnten Ihre Kaffeepadmaschine
beschädigen.
-
Die Maschine ist nur für den normalen Hausgebrauch bestimmt.
Sie ist nicht für die Verwendung in Umgebungen wie z.B.
Personalküchen in Geschäften, Büros, landwirtschaftlichen
Betrieben oder anderen Arbeitsumgebungen vorgesehen.
Weiterhin ist es nicht für den Gebrauch in Hotels, Motels,
Pensionen oder anderen Gastgewerben bestimmt.
-
Nehmen Sie die isolierte Thermo-Kanne nicht auseinander.
-
Tauchen Sie die isolierte Thermo-Kanne niemals in Wasser oder
eine andere Flüssigkeit, da dadurch Wasser zwischen die Wände
der Thermo-Kanne gelangen kann.
Page 21

Deutsch
-
Halten Sie die mit Kaffee gefüllte Thermo-Kanne senkrecht, damit
sie nicht tropft.
-
Die Thermo-Kanne ist nicht spülmaschinenfest.
-
Während des Brühens bis zum Beenden des Blinkens ist der
Filterhalter mit heißem Kaffee gefüllt.
Elektromagnetische Felder
Dieses Philips Gerät erfüllt sämtliche Normen und Vorschriften bezüglich der Exposition in
elektromagnetischen Feldern.
Allgemeine Beschreibung
1 Padhalter für 1Tasse
2 Padhalter für 2Tassen
3 Sprühkopf
4 Sammelring
5 Abtropfschale
6 CALC-Anzeige
7 Kannentaste
8 2-Tassen-Taste
9 1-Tasse-Taste
10 Deckel des Wasserbehälters
11 Wasserbehälter
12 Deckel des Filterhalters
13 Filterhalter
14 Deckel der isolierten Thermo-Kanne
15 Isolierte Thermo-Kanne
16 Messlöffel
21
Erste Anwendung
Die Maschine führt einen automatischen Durchspülvorgang durch, wenn Sie sie zum ersten Mal
einschalten. Dies ist unabhängig von der gedrückten Taste.
1 Stecken Sie den Netzstecker in eine geerdete Steckdose.
2 Entfernen Sie den Wasserbehälter von der Maschine, und nehmen Sie den Deckel des
Wasserbehälters (Abb. 4) ab.
3 Reinigen Sie den Wasserbehälter gründlich in heißem Wasser, dem Sie bei Bedarf etwas Spülmittel
zufügen können.
4 Füllen Sie den Wasserbehälter bis zur Markierung MAX (Abb. 5) mit sauberem kaltem Wasser.
5 Setzen Sie den Deckel zurück auf den Wasserbehälter, und setzen Sie den Wasserbehälter wieder
in die Maschine (Abb. 6) ein.
6 Setzen Sie den 1-Tassen-Padhalter in die Kaffeemaschine ein. Schließen Sie den Deckel, und
stellen Sie sicher, dass er fest verschlossen (Abb. 7) ist.
7 Entfernen Sie die Abtropfschale von der Plattform, und setzen Sie eine Schüssel (mit einem
Fassungsvermögen von mindestens 1,5Liter) oder die Kanne unter den Kaffeeausguss (Abb. 8).
8 Drücken Sie eine der Tasten auf dem Bedienfeld. Die Kannentaste, die 2-Tassen-Taste und die
1-Tasse-Taste blinken nacheinander (Abb. 9).
Page 22

22
Deutsch
9 Der Durchspülvorgang beginnt. Während des Durchspülvorgangs füllt sich das System mit Wasser
aus dem Wasserbehälter. Die Maschine erzeugt lautere Geräusche als während des normalen
Brühvorgangs.
10 Wenn der Wassertank leer (Abb. 10) ist, schaltet sich die Maschine aus.
11 Reinigen Sie nach dem ersten Durchspülen den Sammelring und die Padhalter mit heißem Wasser
und etwas Spülmittel oder im Geschirrspüler.
Eine Kanne Filterkaffee brühen
1 Öffnen Sie den Deckel der Kaffeemaschine (Abb. 11).
2 Entfernen Sie den Padhalter, sofern dieser vorhanden (Abb. 12) ist.
3 Entnehmen Sie die Tropfschale, sofern vorhanden.
4 Füllen Sie den Wasserbehälter mit klarem kaltem Wasser bis zu der Höhe entsprechend der
gewünschten Anzahl Tassen Kaffee, und setzen Sie den Behälter wieder in die Maschine (Abb. 13)
ein.
5 Spülen Sie die Thermo-Kanne zum Vorwärmen mit heißem Leitungswasser aus.
Tipp: Das beste Aroma und den heißesten Kaffee erhalten Sie, wenn Sie mindestens eine halbe
Kanne Kaffee brühen.
6 Setzen Sie den Filterhalter auf die Thermo-Kanne (Abb. 14) auf.
7 Öffnen Sie den Deckel des Filterhalters.
8 Setzen Sie eine Papierfiltertüte der Größe102 in den Filterhalter ein. Falten Sie die geprägten
Ränder um, um sicherzustellen, dass die Filtertüte während des Brühvorgangs (Abb. 15) aufrecht
stehen bleibt.
9 Geben Sie mithilfe des Messlöffels die erforderliche Menge gemahlenen Kaffee in den Filter (Abb.
16).
Tipp: Nehmen Sie einen gestrichenen Messlöffel gemahlenen Kaffee pro Tasse. Nehmen Sie einen
gehäuften Messlöffel für starken Kaffee und einen gestrichenen Messlöffel für milden Kaffee.
10 Schließen Sie den Deckel des Filterhalters.
11 Schieben Sie die Thermo-Kanne auf die Platte der Maschine (Abb. 17).
12 Drücken Sie die Kannentaste, um den Brühvorgang (Abb. 18) zu beginnen.
-
Die Kannentaste beginnt zu blinken, und der Brühvorgang beginnt (Abb. 19).
Hinweis: Wenn die Kannentaste und die CALC-Anzeige beim Aufheizen und Brühen (Abb. 20)
abwechselnd zu blinken beginnen, muss die Maschine (siehe 'Entkalken der Maschine') entkalkt
werden.
-
Wenn sämtliches Wasser aus dem Wasserbehälter den Filter durchlaufen hat, erlischt die
Kannentaste, und die Maschine wird automatisch ausgeschaltet.
13 Sie können die Thermo-Kanne nun von der Maschine (Abb. 21) entfernen.
14 Nehmen Sie den Filterhalter von der Thermo-Kanne (Abb. 22) ab.
Tipp: Sie können den Filterhalter auf die Abtropfschale stellen, damit kein Kaffee auf Ihre
Arbeitsfläche fließt, während Sie Kaffee aus der Kanne (Abb. 23) eingießen.
15 Setzen Sie den Deckel auf die Thermo-Kanne auf, und drehen Sie ihn in die Warmhalteposition
(Symbol des geschlossenen Schlosses) (Abb. 24).
16 Drücken Sie den Hebel des Kannendeckels, um Kaffee in eine oder mehrere Tassen (Abb. 25)
einzugießen.
Page 23

Deutsch
Kaffee mit Kaffeepads brühen
Eine Tasse Kaffee mit einem Pad brühen
1 Füllen Sie den Wasserbehälter bis zur Markierung MAX mit sauberem kaltem Wasser, und setzen
Sie ihn wieder auf das Gerät (Abb. 5).
Hinweis: Die MIN-Anzeige auf dem Wasserbehälter weist auf die Mindestmenge Wasser hin, die für
das Aufbrühen von Kaffee erforderlich ist. Füllen Sie den Wasserbehälter immer bis über die MINAnzeige hinaus.
2 Stecken Sie den Netzstecker in eine geerdete Steckdose.
3 Öffnen Sie den Deckel der Maschine, indem Sie den Hebel aufwärts (Abb. 11) bewegen.
4 Setzen Sie die Abtropfschale auf die Platte der Maschine (Abb. 26).
5 Setzen Sie ein Kaffeepad mit der konvexen Seite nach unten (Abb. 27) in den Padhalter für 1Tasse.
Hinweis: Vergewissern Sie sich, dass der Padhalter sauber und das Sieb in der Mitte nicht verstopft
ist, z.B. durch loses Kaffeepulver.
Hinweis: Achten Sie darauf, dass der Kaffee in den Pads gleichmäßig verteilt ist, und drücken Sie
die Pads im Padhalter leicht an.
6 Setzen Sie den Padhalter für 1Tasse in die Maschine ein, und schließen Sie den Deckel (Abb. 7).
7 Stellen Sie eine Tasse auf die Abtropfschale (Abb. 28).
8 Drücken Sie die 1-Tasse-Taste, um Kaffee (Abb. 29) zu brühen.
-
Die Taste beginnt zu blinken, und die Maschine wird aufgeheizt (Abb. 30).
Hinweis: Wenn die 1-Tassen-Taste und die CALC-Anzeige beim Aufheizen und beim Brühen (Abb.
31) abwechselnd zu blinken beginnen, muss die Maschine (siehe 'Entkalkungsvorgang ') entkalkt
werden.
-
Sobald der Heizvorgang abgeschlossen ist, beginnt die Maschine, Kaffee (Abb. 32) zu brühen.
Nach dem Brühen schaltet sich das Gerät automatisch aus.
Tipp: Drücken Sie die 1-Tasse-Taste (Abb. 2) zweimal, um eine Tasse starken Kaffee zu brühen.
9 Nehmen Sie nach Gebrauch den Padhalter aus dem Gerät, und entsorgen (Abb. 33) Sie das
Kaffeepad.
Achtung: Seien Sie dabei vorsichtig. Es könnte sich noch heißes Wasser oder Kaffee auf den
Kaffeepads befinden.
23
Achtung: Verwenden Sie keinesfalls normalen gemahlenen Kaffee oder beschädigte Pads in Ihrer
Kaffeepadmaschine, da dies das Gerät verstopfen würde.
Zwei Tassen Kaffee mit Kaffeepads brühen
1 Um zwei Tassen Kaffee mit Kaffeepads zu brühen, setzen Sie den tieferen Padhalter für 2 Tassen in
die Maschine ein. Legen Sie zwei Pads in den Padhalter für 2Tassen (Abb. 34).
2 Drücken Sie die 2-Tassen-Taste, um Kaffee zu brühen (Abb. 35).
-
Die Taste beginnt zu blinken, und die Maschine wird aufgeheizt (Abb. 36).
Hinweis: Wenn die 2-Tassen-Taste und die CALC-Anzeige beim Aufheizen und Brühen (Abb. 37)
abwechselnd zu blinken beginnen, muss die Maschine (siehe 'Entkalken der Maschine') entkalkt
werden.
-
Sobald der Heizvorgang abgeschlossen ist, beginnt die Maschine, Kaffee zu brühen (Abb. 38).
Nach dem Brühen schaltet sich das Gerät automatisch aus.
Page 24

24
Deutsch
Tipp: Drücken Sie die 2-Tassen-Taste (Abb. 3) zweimal für zwei Tassen starken Kaffee.
3 Nehmen Sie nach Gebrauch den Padhalter aus dem Gerät, und entsorgen (Abb. 33) Sie die
Kaffeepads.
Kaffeespezialitäten brühen
1 Um eine Kaffeespezialität zu brühen, legen Sie ein Pad für Cappuccino, Kakao oder eine andere
Kaffeespezialität in den Padhalter für 2 Tassen.
2 Stellen Sie eine Tasse unter den Kaffeeauslauf.
3 Drücken Sie die 1-Tasse-Taste, um Ihre Kaffeespezialität zu brühen.
Die Maschine reinigen
Tauchen Sie die Maschine niemals in Wasser oder andere Flüssigkeiten.
Lassen Sie die Kaffeemaschine auf keinen Fall zur Reinigung bei geöffnetem Deckel
durchlaufen.
Die Kaffeepadmaschine reinigen
Warnhinweis: Ziehen Sie vor dem Reinigen des Geräts stets den Netzstecker aus der
Steckdose.
1 Reinigen Sie die Außenwände des Geräts mit einem feuchten Tuch.
2 Um Verstopfungen zu vermeiden, reinigen Sie die Padhalter regelmäßig mit heißem Wasser, etwas
Spülmittel und einer Spülbürste. Wenn Sie den Padhalter für 2Tassen zum Brühen von Cappuccino
oder Kakao verwendet haben, reinigen Sie ihn sofort anschließend, um Milchrückstände zu
beseitigen.
Hinweis: Sie können die Padhalter zur gründlicheren Reinigung (Abb. 39) auch in ihre Einzelteile
zerlegen.
3 Reinigen Sie den Sammelring, die Padhalter, die Abtropfschale, den Wasserbehälter und den
Deckel des Wasserbehälters in heißem Wasser, bei Bedarf mit etwas Spülmittel. Alle abnehmbaren
Teile, mit Ausnahme des Wasserbehälters und der Thermo-Kanne, können auch in der
Spülmaschine (Abb. 40) gereinigt werden.
4 Reinigen Sie den Sprühkopf mit einem feuchten Tuch. Seien Sie dabei vorsichtig. Achten Sie darauf,
den Dichtungsring nicht unter dem Rand des Sprühkopfs einzuklemmen. Falls dies geschieht, tritt
aus der Kaffeemaschine Wasser aus.
Die Thermo-Kanne reinigen
Warnhinweis: Tauchen Sie die Thermo-Kanne nicht in Wasser oder andere Flüssigkeiten,
und reinigen Sie sie nicht in der Spülmaschine, da dies die Kanne beschädigen kann.
1 Um den Deckel der Kanne zu entfernen, drehen Sie ihn gegen den Uhrzeigersinn in die geöffnete
Position, und nehmen Sie ihn ab (Abb. 41).
2 Reinigen Sie das Innere der Thermo-Kanne mit einer weichen Bürste, heißem Wasser und etwas
Spülmittel (Abb. 42).
Tipp: Hartnäckige Rückstände entfernen Sie, indem Sie die Kanne mit heißem Wasser füllen und
einen Löffel Backpulver hineingeben. Lassen Sie das Backpulver eine Weile einwirken.
Page 25

Deutsch
3 Spülen Sie die Thermo-Kanne nach der Reinigung mit klarem heißem Wasser (Abb. 43) aus.
Hinweis: Sie können den Kannendeckel in der Spülmaschine reinigen.
Die Kaffeepadmaschine durchspülen
War die Kaffeemaschine einen Tag lang nicht in Gebrauch, lassen Sie vor dem nächsten Aufbrühen
klares kaltes Wasser durchlaufen. Lassen Sie das Gerät folgendermaßen durchlaufen:
1 Füllen Sie den Wasserbehälter bis zur Markierung MAX mit sauberem kaltem Wasser, und setzen
Sie ihn wieder auf das Gerät.
2 Setzen Sie den Padhalter für 1Tasse oder den Padhalter für 2Tassen ohne Pads in das Gerät ein.
3 Stellen Sie ein Gefäß mit einem Fassungsvermögen von mindestens 1,5l oder die Kanne unter den
Kaffeeauslauf, um das Wasser aufzufangen.
4 Drücken Sie die 2-Tassen-Taste, und warten Sie, bis die Maschine aufgewärmt wurde und eine
gewisse Menge heißes Wasser gebrüht hat. Drücken Sie die 2-Tassen-Taste dann mehrmals, bis
der Wasserbehälter leer ist.
Entkalken der Maschine
Wann entkalken?
Im Laufe der Zeit lagert sich Kalk im Gerät ab. Es ist wichtig, die Maschine zu entkalken, wenn die
CALC-Anzeige beim Aufheizen oder beim Brühen (Abb. 31) zu blinken beginnt.
Warum entkalken?
Die folgenden Gründe sprechen für das Entkalken:
-
Es verlängert die Nutzungsdauer Ihrer Kaffeemaschine.
-
Es stellt die maximale Füllmenge pro Tasse sicher.
-
Es stellt die maximale Kaffeetemperatur sicher.
-
Die Maschine verursacht während des Brühens weniger Geräusche.
-
Es verhindert Fehlfunktionen.
Wird der Entkalkungsvorgang nicht korrekt ausgeführt, bleiben Kalkrückstände im Gerät zurück.
Dadurch kann sich Kalk schneller ablagern und zu dauerhaften und irreparablen Schäden an der
Kaffeemaschine führen.
25
Den richtigen Entkalker verwenden
Zum Entkalken der Maschine dürfen nur Entkalker auf Basis von Zitronensäure verwendet werden.
Diese beschädigen das Gerät nicht. Die richtige Menge finden Sie weiter unten unter
„Entkalkungsvorgang“. Die Entkalkermischung kann jeweils nur einmal verwendet werden. Verwenden
Sie jedes Mal eine neue Entkalkermischung. Wir empfehlen Ihnen die Verwendung des speziellen
SENSEO® Entkalkers (HD7012/HD7011. Lesen Sie die Anweisung in der Verpackung. Weitere
Informationen über die Wichtigkeit des Entkalkens, Anweisungen zum Entkalken oder den richtigen
Entkalker finden Sie auf unserer Website www.philips.com/descale-senseo.
Warnhinweis: Verwenden Sie keine Entkalker auf Basis von Mineralsäuren,
beispielsweise Schwefel-, Salz-, Sulfamin- oder Essigsäure (z. B. Essig). Diese Entkalker
könnten Ihre Kaffeemaschine beschädigen.
Page 26

26
Deutsch
Entkalkungsvorgang
Der Entkalkungsvorgang besteht zwei einem Entkalkungszyklen und zwei Spülzyklen. Unterbrechen
Sie die Entkalkungszyklen nicht, und schalten Sie die Maschine nicht vor Ablauf der zwei Spülzyklen
aus.
1 Füllen Sie den Wasserbehälter bis zur Markierung MAX mit sauberem kaltem Wasser, und gießen
Sie das Wasser in eine Schüssel (Abb. 44).
2 Mischen Sie 50Gramm Zitronensäure mit dem Wasser in der Schüssel. Rühren Sie die Flüssigkeit
um, bis sich das Pulver aufgelöst (Abb. 45) hat.
3 Füllen Sie den Wasserbehälter mit der Entkalkermischung, und setzen Sie ihn wieder in die
Maschine (Abb. 47) ein.
4 Entnehmen Sie die Abtropfschale. Stellen Sie ein Gefäß mit einem Fassungsvermögen von
mindestens 1,5l unter den Kaffeeauslauf, um die Mischung (Abb. 8) aufzufangen.
5 Setzen Sie den Padhalter für 1Tasse mit einem gebrauchten Kaffeepad in die Kaffeemaschine ein.
Schließen Sie den Deckel, und stellen Sie sicher, dass er fest verschlossen ist.
Hinweis: Legen Sie beim Entkalken des Geräts immer ein gebrauchtes Kaffeepad in den Padhalter.
Dieses Pad dient als Filter und verhindert, dass Kalkrückstände das Sieb im Padhalter verstopfen.
Warnhinweis: Vergewissern Sie sich vor dem Entkalken der Maschine, dass der Deckel
richtig geschlossen und der Verschlusshebel des Deckels fest verschlossen ist.
6 Drücken Sie gleichzeitig die 1-Tasse-Taste und die 2-Tassen-Taste.
7 Während des Entkalkungsvorgangs kommt das Wasser in Abständen aus der Maschine. Die CALC-
Anzeige, die Kannentaste, die 2-Tassen-Taste und die 1-Tasse-Taste blinken langsam
nacheinander (Abb. 46).
8 Wenn der Wasserbehälter leer ist, beginnen die 1-Tasse-Taste und die CALC-Anzeige schnell
abwechselnd (Abb. 31) zu blinken.
9 Leeren Sie die Schüssel, und stellen Sie sie wieder zurück. Entnehmen Sie das gebrauchte Pad und
den Padhalter für 1Tasse. Setzen Sie den Padhalter für 2Tasse mit einem gebrauchten Kaffeepad
in die Maschine ein. Schließen Sie den Deckel.
10 Füllen Sie den Wasserbehälter bis zur Markierung MAX mit sauberem kaltem Wasser, und gießen
Sie das Wasser in eine Schüssel (Abb. 44).
11 Mischen Sie 50Gramm Zitronensäure mit dem Wasser in der Schüssel. Rühren Sie die Flüssigkeit
um, bis sich das Pulver aufgelöst (Abb. 45) hat.
12 Füllen Sie den Wasserbehälter mit der Entkalkermischung, und setzen Sie ihn wieder in die
Maschine (Abb. 47) ein. Drücken Sie dann die 1-Tasse-Taste, um den zweiten Entkalkungsvorgang
zu starten.
13 Wenn die 1-Tasse-Taste und die CALC-Anzeige schnell abwechselnd (Abb. 31) zu blinken beginnen,
entfernen Sie das gebrauchte Pad aus dem Padhalter für 2 Tassen. Reinigen Sie den
Wasserbehälter durch gründliches mehrmaliges (Abb. 48) Abspülen mit kaltem Leitungswasser.
14 Füllen Sie den Wasserbehälter bis zur Markierung MAX mit sauberem kaltem Wasser, und setzen
Sie ihn wieder auf das Gerät.
15 Drücken Sie die 1-Tasse-Taste. Die CALC-Anzeige, die Kannentaste, die 2-Tassen-Taste und die
1-Tasse-Taste blinken langsam nacheinander (Abb. 46). Während des Durchspülvorgangs kommt
das Wasser in regelmäßigen Abständen aus der Maschine.
16 Wenn das gesamte Wasser im Wasserbehälter aufgebraucht ist, beginnen die 1-Tasse-Taste und
die CALC-Anzeige abwechselnd schnell zu blinken. (Abb. 31)
17 Wiederholen Sie die Schritte13 und14.
-
Wenn das Wasser im Wasserbehälter vollständig aufgebraucht wurde, schaltet sich die
Maschine aus, und alle Lichter erlöschen, um anzuzeigen, dass der Entkalkungsvorgang
abgeschlossen wurde.
Page 27

Deutsch
Bestellen von Zubehör
Um Zubehör oder Ersatzteile zu kaufen, gehen Sie auf www.shop.philips.com/service, oder suchen
Sie Ihren Philips Händler auf. Sie können sich auch an ein Philips Service-Center in Ihrem Land
wenden. Die Kontaktdaten finden Sie in der internationalen Garantieschrift.
Garantie und Support
Für Unterstützung und weitere Informationen besuchen Sie die Philips Website unter
www.philips.com/support, oder lesen Sie die internationale Garantieschrift.
Recycling
-
Dieses Symbol bedeutet, dass das Produkt nicht mit dem normalen Hausmüll entsorgt werden
kann (2012/19/EU) (Abb. 49).
1 Altgeräte können kostenlos an geeigneten Rücknahmestellen abgegeben werden.
2 Diese werden dort fachgerecht gesammelt oder zur Wiederverwendung vorbereitet. Altgeräte
können Schadstoffe enthalten, die der Umwelt und der menschlichen Gesundheit schaden können.
Enthaltene Rohstoffe können durch ihre Wiederverwertung einen Beitrag zum Umweltschutz
leisten.
3 Die Löschung personenbezogener Daten auf den zu entsorgenden Altgeräten muss vom
Endnutzer eigenverantwortlich vorgenommen werden.
4 Hinweise für Verbraucher in Deutschland: Die in Punkt 1 genannte Rückgabe ist gesetzlich
vorgeschrieben. Sammel- und Rücknahmestellen in Deutschland: https://www.stiftung-ear.de/
27
Fehlerbehebung
In diesem Kapitel sind die häufigsten Probleme aufgeführt, die beim Gebrauch des Geräts auftreten
können. Sollten Sie ein Problem mithilfe der nachstehenden Informationen nicht beheben können,
besuchen Sie unsere Website unter www.philips.com/support, und schauen Sie in der Liste „Häufig
gestellte Fragen“ nach, oder wenden Sie sich an das Philips Service-Center in Ihrem Land.
Problem
Meine Kaffeetasse läuft
mit kaltem Kaffee über.
Die gedrückte Taste blinkt
langsam.
Die gedrückte Taste blinkt
schnell.
Mögliche Ursache Lösung
Sie haben die Maschine vor
dem ersten Gebrauch nicht
durchgespült.
Die Maschine heizt sich auf. Wenn der Aufheizvorgang mehr als
Wenn Sie Filterkaffee brühen,
blinkt die Leuchte
währenddessen langsam.
Es befindet sich nicht genug
Wasser im Wasserbehälter.
Spülen Sie die Maschine vor dem
ersten Gebrauch durch. Wenn die
Maschine den Wasserbehälter
vollständig entleert hat, können Sie
einen frischen Kaffee zubereiten.
zwei Minuten in Anspruch nimmt,
kontaktieren Sie das Philips ServiceCenter in Ihrem Land.
Der Brühzyklus dauert zirka
90Sekunden. Warten Sie, bis der
Brühzyklus abgeschlossen ist.
Befüllen Sie den Wasserbehälter.
Page 28

28
Deutsch
Problem Mögliche Ursache Lösung
Der Schwimmer ist im
Wasserbehälter eingeklemmt.
Entleeren Sie den Wasserbehälter, und
schütteln Sie ihn einige Male, um den
Schwimmer zu lösen. Reinigen Sie den
Wasserbehälter mit heißem Wasser
und etwas Spülmittel oder in der
Spülmaschine. Wenn dies nicht hilft,
entkalken Sie die Maschine (siehe
Kapitel „Entkalken“).
Die CALC-Anzeige blinkt,
wenn die Maschine sich
aufheizt oder Kaffee brüht.
Der Deckel lässt sich nicht
ordnungsgemäß schließen.
Das Gerät produziert
weniger Kaffee aus
Kaffeepads als zuvor.
Die Temperatur des Kaffee
in der Tasse geht schnell
zurück.
Sie müssen die Maschine
entkalken.
Möglicherweise klebt ein
gebrauchtes Kaffeepad am
Sprühkopf.
Das Sieb in der Mitte des
Padhalters ist möglicherweise
verstopft.
Möglicherweise haben Sie die
1-Tasse- oder die 2-TassenTaste zweimal gedrückt.
Sie verwenden eine
ungeeignete Art von Tassen.
Die Tassen sind kalt. Spülen Sie die Tassen mit heißem
Führen Sie den Entkalkungsvorgang
wie im Kapitel „Entkalken“ beschrieben
durch.
Ist dies der Fall, entfernen Sie das Pad.
Wenn das Sieb verstopft ist, reinigen
Sie es mit einer Spülbürste. Wenn Sie
es mit der Spülbürste nicht
ordnungsgemäß reinigen können,
setzen Sie den Padhalter in die
Maschine, und entkalken sie diese.
Entkalken Sie das Gerät (siehe Kapitel
"Entkalken").
Wenn Sie die 1-Tasse- oder die
2-Tassen-Taste innerhalb von
3Sekunden zweimal drücken, bereitet
die Maschine eine oder zwei kleine
Tassen starken Kaffee zu.
Verwenden Sie dünnwandige Tassen.
Diese entziehen dem Kaffee weniger
Wärme als dickwandige Tassen.
Wasser aus. Sie können die
Kaffeemaschine und die Tasse durch
vorheriges Zubereiten einer Tasse
heißen Wassers vorwärmen, ohne ein
Kaffeepad in den Padhalter
einzusetzen.
Der Filterkaffee ist nicht
heiß genug.
Sie haben kalte Milch in den
Kaffee gegeben.
Sie haben keine ganze Kanne
gebrüht.
Sie haben den Padhalter nicht
entfernt.
Verwenden Sie keine kalte Milch direkt
aus dem Kühlschrank.
Kaffee bleibt länger heiß, wenn Sie eine
ganze Kanne Kasse brühen, damit der
Kaffee die richtige Temperatur hat.
Wenn Sie den Padhalter nicht
entfernen, kann die Zubereitungszeit
länger ausfallen.
Page 29

Problem Mögliche Ursache Lösung
Sie haben die Thermo-Kanne
nicht vorgewärmt.
Spülen Sie die Thermo-Kanne zum
Vorwärmen mit heißem Leitungswasser
aus.
Deutsch
29
In der Thermo-Kanne
befindet sich Kaffeesatz.
Der Kaffee ist dünner als
erwartet.
Wasser tropft aus dem
Gerät.
Sie haben kalte Milch in den
Kaffee gegeben.
Möglicherweise ist der
Papierfilter während des
Brühvorgangs
zusammengefallen.
Möglicherweise befand sich
etwas Wasser in der ThermoKanne, als Sie mit dem Brühen
des Filterkaffees begannen.
Sie haben nicht genügend
gemahlenen Kaffee
verwendet.
Sie haben den Wasserbehälter
überfüllt.
Das Sieb in der Mitte des
Padhalters ist möglicherweise
verstopft.
Der Dichtungsring ist
möglicherweise unter dem
Rand des Sprühkopfes
eingeklemmt.
Verwenden Sie keine kalte Milch direkt
aus dem Kühlschrank.
Um ein Zusammenfallen des
Papierfilters zu verhindern, falten Sie
die geprägten Ränder.
Stellen Sie stets sicher, dass sich kein
Wasser in der Kanne befindet, bevor
Sie Kaffee zubereiten.
Nehmen Sie einen gehäuften
Messlöffel gemahlenen Kaffee pro
Tasse für einen stärkeren Kaffee.
Füllen Sie den Wasserbehälter immer
nur bis zur Markierung MAX.
Überprüfen Sie den Padhalter. Wenn
das Sieb verstopft ist, reinigen Sie es
mit einer Spülbürste. Wenn Sie es mit
der Spülbürste nicht ordnungsgemäß
reinigen können, setzen Sie den
Padhalter in die Maschine, und
entkalken sie diese (siehe Kapitel
„Entkalken“).
Überprüfen Sie, ob der Dichtungsring
unter dem Rand des Sprühkopfes
eingeklemmt ist. Ist das der Fall, ziehen
Sie ihn vorsichtig vom Sprühkopf frei.
Ich kann den Deckel nicht
öffnen.
Sie haben vergessen, den
Sammelring einzusetzen.
Unter dem Deckel hat sich ein
Vakuum gebildet.
Wenn Sie den Sammelring nicht
einsetzen, tritt Wasser aus dem Deckel
der Maschine aus, anstatt durch das
Pad zu fließen.
Schalten Sie die Kaffeemaschine aus.
Ziehen Sie den Hebel nach oben, und
warten Sie 24Stunden, bevor Sie den
Deckel öffnen. Möglicherweise müssen
Sie etwas Kraft aufwenden.
Vergewissern Sie sich immer, dass die
Padhalter sauber sind und die Mitte
des Siebs nicht verstopft ist, um ein
Vakuum zu verhindern.
Page 30

30
Deutsch
Problem Mögliche Ursache Lösung
Es dauert länger als bisher,
Filterkaffee zu brühen.
Sie müssen die Maschine
entkalken.
Um das Gerät zu entkalken, befolgen
Sie die Anweisungen in Kapitel
„Entkalken“.
Es befindet sich noch
Wasser im Wassertank,
nachdem Filterkaffee
gebrüht wurde.
Nach zweimaligem
Drücken der 1-Tasse- oder
der 2-Tassen-Taste,
erhalte ich keine kleine
Tasse stärkeren Kaffee.
Sie haben einen Padhalter in
der Maschine gelassen.
Das ist normal. Der Brühvorgang für Filterkaffee
Sie haben die Taste zu schnell
hintereinander gedrückt oder
Sie haben nach dem ersten
Drücken der Taste länger als 3
Sekunden gewartet.
Nehmen Sie den Padhalter heraus.
verbraucht nicht das gesamte Wasser
im Wassertank.Das ist normal.
Sie können einen stärkeren Kaffee
brühen, wenn Sie zweimal innerhalb
von 3 Sekunden die 1-Tasse- oder die
2-Tassen-Taste drücken. Die Lampe in
der Taste leuchtet weniger hell, wenn
die Auswahl der stärkeren Kaffees
erfolgreich ist.
Page 31

Français
Introduction
Félicitations pour votre achat et bienvenue dans l'univers Philips! Pour profiter pleinement de
l'assistance offerte par Philips, enregistrez votre produit à l'adresse suivante:
www.philips.com/welcome.
Eau froide claire
Utilisez chaque jour une eau froide et claire. Si vous n’avez pas utilisé la machine à café depuis
unjour, faites-la fonctionner à l’eau froide claire avant de la réutiliser. Pour rincer la machine à café,
remplissez le réservoir d’eau froide claire, placez un bol (d’une capacité minimale de 1,5l) ou
deuxtasses sous l’unité d’écoulement du café et appuyez sur le bouton pour deuxtasses à plusieurs
reprises pour laisser l’eau chaude s’écouler jusqu’à ce que le réservoir d’eau soit vide.
Café filtre
Pour préparer une verseuse de délicieux café, utilisez un café prémoulu de bonne qualité. Utilisez
toujours un filtre en papier n°102.
Vous pouvez préparer jusqu’à septtasses de café dans la verseuse.
Dosettes
Utilisez des dosettes de café de bonne qualité pour préparer un café tout en goût et en rondeur. Pour
préserver la fraîcheur du café en dosette, disposez les dosettes dans une boîte de conservation.
Sélection de l’intensité
-
Pour une petite tasse de café serré, appuyez deux fois sur le bouton pour unetasse (Fig. 2).
-
Pour deuxtasses de café serré, appuyez sur le bouton pour 2tasses (Fig. 3).
31
Important
Lisez attentivement ce manuel avant d'utiliser l'appareil et conservez-le pour un usage ultérieur.
Danger
-
Ne plongez jamais l’appareil dans l’eau ou dans tout autre liquide.
Avertissement
-
Avant de brancher votre appareil, vérifiez que la tension indiquée
au fond de la machine à café correspond bien à la tension secteur
locale.
-
Branchez la machine sur une prise murale mise à la terre.
-
Si le cordon d'alimentation est endommagé, il doit être remplacé
par Philips, par un Centre Service Agréé Philips ou par un
technicien qualifié afin d'éviter tout accident.
Page 32

32
Français
-
N’utilisez jamais l’appareil si la fiche, le cordon d’alimentation ou
l’appareil lui-même est endommagé.
-
Cette machine peut être utilisée par des enfants âgés de 8ans ou
plus, des personnes dont les capacités physiques, sensorielles ou
intellectuelles sont réduites ou des personnes manquant
d'expérience et de connaissances, à condition que ces enfants ou
personnes soient sous surveillance ou qu'ils aient reçu des
instructions quant à l'utilisation sécurisée de la machine et qu'ils
aient pris connaissance des dangers encourus.
-
Le nettoyage et l'entretien ne peuvent pas être réalisés par des
enfants sauf s'ils sont âgés de plus de 8ans et sous surveillance.
-
Tenez la machine, ses accessoires et son cordon hors de portée
des enfants de moins de 8ans.
-
Les enfants ne doivent pas jouer avec la machine.
Attention
-
Confiez toujours la machine à café à un CentreServiceAgréé
Philips pour réparation ou vérification. N’essayez jamais de
réparer la machine vous-même, toute intervention entraîne
l’annulation de votre garantie.
-
Une fois déballée, ne placez jamais votre machine SENSEO® sur
le côté. Maintenez-la toujours en position verticale, même
pendant le transport.
-
N'utilisez jamais de café moulu ordinaire ou des dosettes
déchirées avec la machine à café: elle risquerait de se boucher.
-
N'utilisez pas la machine à café avec un transformateur pour
éviter tout accident.
-
N'utilisez pas la machine à café avec un transformateur pour
éviter tout accident.
-
Placez toujours l'appareil sur une surface stable et plane.
-
Ne placez pas la machine sur une plaque chauffante ou
directement à côté d'un four chaud, d'un appareil de chauffage
ou d'une source similaire de chaleur.
-
Ne laissez jamais la machine à café fonctionner sans surveillance.
Page 33

Français
-
N'utilisez pas la machine à café à une altitude supérieure à
2200m.
-
Versez uniquement de l’eau froide claire dans le réservoir d’eau.
-
Ne rincez jamais la machine et ne la faites jamais fonctionner
lorsque le bec verseur n’est pas en place.
-
Faites fonctionner la machine à café à l’eau claire avant la
première utilisation. Ainsi, le système se remplit d’eau, ce qui est
absolument nécessaire au bon fonctionnement de la machine.
-
N'utilisez jamais la machine à café avec un adoucisseur d'eau qui
échange les ions de calcium et de magnésium contre les ions de
sodium.
-
Détartrez votre machine régulièrement. La machine indiquera
lorsqu'un détartrage sera nécessaire. Sans détartrage, votre
machine cessera de fonctionner correctement. Dans ce cas, la
réparation n'est pas couverte par la garantie.
-
N'utilisez jamais un agent de détartrage à base d'acides minéraux
tel que l'acide sulfurique, l'acide chlorhydrique, l'acide sulfamique
ou l'acide acétique (le vinaigre, par ex.). Ces détartrants peuvent
endommager votre machine à café.
-
La machine est uniquement destinée à un usage domestique
normal. Elle n'est pas destinée à être utilisée dans des
environnements tels que des cuisines destinées aux employés
dans les entreprises, magasins et autres environnements de
travail. Elle n'est pas non plus destinée à être utilisée par des
clients dans des hôtels, motels, chambres d'hôtes et autres
environnements résidentiels.
-
Ne démontez pas la verseuse isotherme.
-
Ne plongez jamais la verseuse isotherme dans l’eau ou dans tout
autre liquide afin d’éviter des infiltrations d’eau entre les parois de
la verseuse.
-
Lorsque la verseuse isotherme est remplie de café, maintenez-la
en position verticale pour éviter toute fuite.
-
La verseuse isotherme ne peut pas être nettoyée au lavevaisselle.
33
Page 34

34
Français
-
Pendant la préparation du café et tant que le voyant clignote, le
porte-filtre est rempli de café chaud.
Champs électromagnétiques
Cette machine Philips est conforme à toutes les normes et à tous les règlements applicables relatifs à
l’exposition aux champs électromagnétiques.
Description générale
1 Support à dosette pour une tasse
2 Support à dosette pour deux tasses
3 Disque de distribution
4 Bague de récupération
5 Plateau égouttoir
6 Voyant CALC
7 Bouton de la verseuse
8 Bouton pour deuxtasses
9 Bouton pour unetasse
10 Couvercle du réservoir d’eau
11 Réservoir d’eau
12 Couvercle du porte-filtre
13 Porte-filtre
14 Couvercle de la verseuse isotherme
15 Verseuse isotherme
16 Cuillère de mesure
Première utilisation
La machine lance un cycle de rinçage automatique lorsque vous l’allumez pour la première fois, quel
que soit le bouton sur lequel vous appuyez.
1 Branchez la fiche sur une prise murale avec mise à la terre.
2 Retirez le réservoir d’eau de la machine, puis retirez le couvercle du réservoir d’eau (Fig. 4).
3 Nettoyez le réservoir d’eau à l’eau chaude, en ajoutant un peu de produit vaisselle si nécessaire.
4 Remplissez le réservoir avec de l’eau froide et claire jusqu’au niveau maximal (MAX) (Fig. 5).
5 Remettez le couvercle sur le réservoir d’eau, puis replacez le réservoir dans la machine (Fig. 6).
6 Placez le support à dosette pour unetasse dans la machine à café. Fermez le couvercle et assurez-
vous qu’il est correctement verrouillé (Fig. 7).
7 Retirez le plateau égouttoir de son support et mettez la verseuse ou un bol d’une capacité
minimale de 1,5litre sous l’orifice d’écoulement du café (Fig. 8).
8 Appuyez sur un des boutons du bloc de commande. Le bouton de la verseuse, le bouton pour
2tasses et le bouton pour 1tasse clignotent successivement (Fig. 9).
9 Le cycle de rinçage démarre. Pendant le cycle de rinçage, le système se remplit avec de l’eau du
réservoir. La machine est plus bruyante pendant le cycle de rinçage que pendant le cycle de
préparation du café.
10 La machine s’éteint lorsque le réservoir d’eau est vide (Fig. 10).
11 Après le premier cycle de rinçage, nettoyez la bague de récupération et les supports à dosette à
l’eau chaude savonneuse ou au lave-vaisselle.
Page 35

Français
35
Préparation d’une verseuse de café-filtre
1 Ouvrez le couvercle de la machine à café (Fig. 11).
2 Retirez le support à dosette, le cas échéant (Fig. 12).
3 Retirez le plateau égouttoir, le cas échéant.
4 Remplissez le réservoir avec de l’eau froide claire jusqu’à l’indication correspondant au nombre de
tasses que vous souhaitez préparer et replacez le réservoir sur la machine (Fig. 13).
5 Rincez la verseuse isotherme à l’eau chaude du robinet afin de la préchauffer.
Conseil: Pour obtenir un café bien chaud et riche en goût, préparez au moins une demi-verseuse
de café.
6 Placez le porte-filtre au-dessus de la verseuse isotherme (Fig. 14).
7 Ouvrez le couvercle du porte-filtre.
8 Placez un filtre en papier n°102 dans le porte-filtre. Veillez à rabattre les bords du filtre en papier
afin qu’il tienne droit pendant la préparation (Fig. 15).
9 Utilisez la cuillère de mesure pour mettre la quantité nécessaire de café prémoulu dans le filtre (Fig.
16).
Conseil: Comptez l’équivalent d’une cuillère de mesure de café prémoulu par tasse. Comptez une
grosse cuillère par tasse pour préparer du café fort et une cuillère rase pour du café doux.
10 Fermez le couvercle du porte-filtre.
11 Faites glisser la verseuse isotherme sur le support de la machine à café (Fig. 17).
12 Appuyez sur le bouton de la verseuse pour lancer le cycle de préparation (Fig. 18).
-
Le voyant lumineux de la verseuse se met à clignoter et le cycle de préparation commence (Fig.
19).
Remarque: Si le bouton de la verseuse et le voyant CALC commencent à clignoter en alternance
pendant le chauffage et la préparation (Fig. 20), vous devez détartrer la machine (voir 'Détartrage
de l’appareil').
-
Lorsque toute l’eau du réservoir s’est écoulée par le filtre, le voyant lumineux s’éteint et la
machine s’arrête automatiquement.
13 Vous pouvez maintenant retirer la verseuse isotherme de la machine à café (Fig. 21).
14 Retirez le porte-filtre de la verseuse isotherme (Fig. 22).
Conseil: Vous pouvez placer le porte-filtre sur le plateau égouttoir pour empêcher le café de
couler sur le plan de travail pendant que vous versez du café avec la verseuse (Fig. 23).
15 Placez le couvercle sur la verseuse isotherme et tournez-le jusqu’à la position de maintien au
chaud (symbole de verrouillage) (Fig. 24).
16 Poussez le levier du couvercle de la verseuse pour verser du café dans une ou plusieurs tasses (Fig.
25).
Préparation d’un café en dosette
Préparation d’une tasse de café en dosette
1 Remplissez le réservoir jusqu’au niveauMAX avec de l’eau froide claire, puis remettez-le en place
(Fig. 5).
Remarque: Le niveau MIN sur le réservoir d’eau indique la quantité minimale d’eau nécessaire
pour préparer du café en dosette. Vous devez toujours remplir le réservoir au-delà du niveau MIN.
2 Branchez la fiche sur une prise murale avec mise à la terre.
Page 36

36
Français
3 Soulevez le levier pour ouvrir le couvercle de la machine à café (Fig. 11).
4 Placez le plateau égouttoir sur le support de la machine à café (Fig. 26).
5 Placez une dosette dans le support à dosette pour unetasse, avec la partie bombée vers le bas
(Fig. 27).
Remarque: Assurez-vous que le support à dosette est propre et que le tamis au milieu du support
à dosette n’est pas bouché (par du café, par exemple).
Remarque: Assurez-vous que le café est réparti uniformément et appuyez légèrement sur la
dosette pour la caler dans le support à dosette.
6 Placez le support à dosette pour unetasse dans la machine et fermez le couvercle (Fig. 7).
7 Placez une tasse sur le plateau égouttoir (Fig. 28).
8 Appuyez sur le bouton pour unetasse pour préparer le café (Fig. 29).
-
Le bouton se met à clignoter et la machine commence à chauffer (Fig. 30).
Remarque: Si le bouton pour 1tasse et le voyant CALC commencent à clignoter en alternance
pendant le chauffage et la préparation (Fig. 31), vous devez détartrer la machine (voir 'Procédure de
détartrage ').
-
Lorsque l’eau est à température, la préparation du café commence (Fig. 32). La machine s’éteint
automatiquement lorsque le café est prêt.
Conseil: Appuyez deuxfois sur le bouton pour une tasse (Fig. 2) pour préparer une tasse de café
serré.
9 Pour enlever la dosette après utilisation, ôtez le support à dosette de la machine et videz-le (Fig.
33).
Attention : Faites attention car la dosette peut encore contenir un peu de café ou d’eau chaude.
Attention : N’utilisez jamais de café moulu ordinaire ou des dosettes déchirées avec la machine à
café : elle risquerait de se boucher.
Préparation de deux tasses de café en dosette
1 Pour préparer deux tasses de café en dosette, placez le support à dosette pour deux tasses (plus
profond) dans la machine à café. Placez deux dosettes dans le support à dosette pour deuxtasses
(Fig. 34).
2 Appuyez sur le bouton pour deuxtasses pour préparer le café (Fig. 35).
-
Le bouton se met à clignoter et la machine commence à chauffer (Fig. 36).
Remarque: Si le bouton pour 2tasses et le voyant CALC commencent à clignoter en alternance
pendant le chauffage et la préparation (Fig. 37), vous devez détartrer la machine (voir 'Détartrage
de l’appareil').
-
Lorsque l’eau est à température, la préparation du café commence (Fig. 38). La machine s’éteint
automatiquement lorsque le café est prêt.
Conseil: Appuyez deux fois sur le bouton pour 2tasses (Fig. 3) pour obtenir deuxtasses de café
fort.
3 Pour enlever les dosettes après utilisation, ôtez le support à dosette de la machine et videz-le (Fig.
33).
Préparation des cafés spéciaux
1 Pour préparer un café spécial, placez une dosette de cappuccino, une dosette de chocolat chaud
ou une autre dosette de café spécial dans le porte-dosette pour 2tasses.
Page 37

Français
2 Placez une tasse sous l'unité d'écoulement du café.
3 Appuyez sur le bouton pour unetasse pour préparer le café spécial.
Nettoyage de la machine à café
Ne plongez jamais l’appareil dans l’eau ou dans tout autre liquide.
Ne nettoyez jamais l’appareil en le faisant fonctionner à l’eau claire avec le couvercle
ouvert.
Nettoyage de la machine à café
Avertissement : Débranchez toujours l’appareil avant de le nettoyer.
1 Nettoyez l’extérieur de la machine à café à l’aide d’un chiffon humide.
2 Pour empêcher les porte-dosettes de s’obstruer, nettoyez-les à l’eau chaude légèrement
savonneuse avec un goupillon. Si vous avez utilisé le support à dosette pour deuxtasses pour
préparer un cappuccino ou du chocolat chaud, veillez à le nettoyer soigneusement
immédiatement après utilisation pour enlever tout résidu de lait.
Remarque: Vous pouvez démonter les supports à dosette pour un nettoyage en profondeur (Fig.
39).
3 Nettoyez à l’eau chaude la bague de récupération, les supports à dosette, le plateau égouttoir, le
réservoir d’eau et le couvercle du réservoir d’eau. Si nécessaire, utilisez un peu de produit vaisselle.
Toutes les pièces détachables, à l’exception du réservoir d’eau et de la verseuse isotherme,
peuvent aussi être nettoyées au lave-vaisselle (Fig. 40).
4 Nettoyez le disque de distribution d’eau avec un chiffon humide. Soyez prudent lorsque vous le
manipulez. Veillez à ce que la bague d’étanchéité ne se bloque pas sous le disque de distribution
d’eau. Si elle se bloque, la machine à café fuira.
37
Nettoyage de la verseuse isotherme
Avertissement : Ne plongez jamais complètement la verseuse isotherme dans l’eau ou
dans tout autre liquide et ne la lavez pas au lave-vaisselle, car cela pourrait
l’endommager.
1 Pour retirer le couvercle de la verseuse, tournez-le dans le sens inverse des aiguilles d’une montre
jusqu’à la position d’ouverture et retirez-le (Fig. 41).
2 Nettoyez l’intérieur de la verseuse isotherme à l’eau chaude légèrement savonneuse à l’aide d’une
brosse douce (Fig. 42).
Conseil: Pour enlever les dépôts de café tenaces, remplissez la verseuse d’eau chaude et ajoutez
une cuillère de bicarbonate de soude. Laissez agir quelques instants.
3 Après avoir nettoyé la verseuse isotherme, rincez-la à l’eau chaude (Fig. 43).
Remarque: Vous pouvez nettoyer le couvercle de la verseuse au lave-vaisselle.
Rinçage de la machine à café
Si vous n’avez pas utilisé la machine à café depuis unjour, faites-la fonctionner à l’eau froide claire
avant de la réutiliser. Rincez la machine à café de la manière suivante:
Page 38

38
Français
1 Remplissez le réservoir jusqu’au niveauMAX avec de l’eau froide claire, puis remettez-le en place.
2 Placez le support à dosette pour une tasse ou pour deux tasses dans la machine à café sans
dosette.
3 Placez la verseuse ou un bol (d’une capacité minimale de 1,5litre) sous l’unité d’écoulement du
café pour recueillir l’eau.
4 Appuyez sur le bouton pour deuxtasses et attendez que la machine chauffe et prépare une
certaine quantité d’eau chaude. Appuyez ensuite à plusieurs reprises sur le bouton pour
deuxtasses jusqu’à ce que le réservoir soit vide.
Détartrage de l’appareil
Fréquence de détartrage
Des résidus de calcaire se forment lors de l'utilisation de la machine. Il est essentiel de détartrer la
machine lorsque le voyant CALC commence à clignoter pendant la phase de chauffer ou de
préparation (Fig. 31) d'une boisson.
Nécessité du détartrage
En voici les raisons:
-
Il prolonge la durée de vie de votre machine à café.
-
Il garantit un volume de tasse maximal.
-
Il assure une température de café optimale.
-
Il réduit le bruit de la machine lors de la préparation du café.
-
Il prévient les dysfonctionnements.
Si vous ne respectez pas la procédure de détartrage, les résidus de calcaire restent bloqués dans la
machine. Le calcaire se forme alors plus rapidement. À terme, cela peut endommager définitivement
la machine.
Utilisation d’un agent de détartrage approprié
Seuls les détartrants à base d’acide citrique conviennent au détartrage de la machine à café. Ce type
de détartrant agit sur la machine sans l’endommager. Consultez la procédure de détartrage cidessous pour connaître la quantité de détartrant à utiliser. Chaque solution de détartrage ne peut
servir qu’une fois. Utilisez une nouvelle solution de détartrage à chaque reprise. Nous vous
recommandons d’utiliser le détartrant spécial SENSEO® (HD7012/HD7011). Lisez le livret d’instructions
contenu dans l’emballage. Pour plus d’informations sur l’importance du détartrage, sur le procédé de
détartrage et sur le détartrant à utiliser, consultez notre site Web à l’adresse
www.philips.com/descale-senseo.
Avertissement : N’utilisez jamais un agent de détartrage à base d’acides minéraux tel
que l’acide sulfurique, l’acide chlorhydrique, l’acide sulfamique ou l’acide acétique (le
vinaigre, par ex.). Ces détartrants peuvent endommager votre machine à café.
Procédure de détartrage
La procédure de détartrage consiste en deuxcycles de détartrage et deux cycles de rinçage.
N’interrompez pas les cycles de détartrage et n’éteignez pas la machine avant la fin des deuxcycles
de rinçage.
Page 39

Français
1 Remplissez le réservoir d’eau jusqu’au niveauMAX avec de l’eau froide claire, puis versez l’eau
dans un bol (Fig. 44).
2 Mélangez l’eau du bol avec 50grammes d’acide citrique. Remuez jusqu’à dissolution complète de
la poudre (Fig. 45).
3 Remplissez le réservoir avec la solution de détartrage et remettez-le en place dans la machine à
café (Fig. 47).
4 Retirez le plateau égouttoir. Placez un bol d’une capacité minimale de 1,5litre sous l’unité
d’écoulement pour récupérer la solution de détartrage (Fig. 8).
5 Mettez une dosette usagée dans le porte-dosette pour une tasse, puis placez-le dans la machine
à café. Fermez le couvercle et assurez-vous qu’il est correctement verrouillé.
Remarque: Utilisez toujours une dosette usagée lors du détartrage de la machine. Celle-ci filtre les
résidus de calcaire pour éviter que le tamis ou l’orifice du support à dosette ne se bouche.
Avertissement : Avant de commencer à détartrer la machine, assurez-vous que le
couvercle est correctement fermé et le levier correctement verrouillé.
6 Appuyez simultanément sur le bouton pour une tasse et sur le bouton pour deuxtasses.
7 Durant le cycle de détartrage, de l'eau s'écoule de la machine par intermittence. Le voyant CALC, le
bouton de la verseuse, le bouton pour 2tasses et le bouton pour 1tasse clignotent lentement
successivement (Fig. 46).
8 Lorsque le réservoir d'eau est vide, le bouton pour 1tasse et le voyant CALC commencent à
clignoter rapidement en alternance (Fig. 31).
9 Videz le bol et remettez-le en place. Retirez la dosette usagée et le porte-dosette. Mettez une
dosette usagée dans le porte-dosette pour deuxtasses, puis placez-le dans la machine. Fermez le
couvercle.
10 Remplissez le réservoir d’eau jusqu’au niveauMAX avec de l’eau froide claire, puis versez l’eau
dans un bol (Fig. 44).
11 Mélangez l’eau du bol avec 50grammes d’acide citrique. Remuez jusqu’à dissolution complète de
la poudre (Fig. 45).
12 Remplissez le réservoir avec la solution de détartrage et remettez-le en place dans la machine à
café (Fig. 47). Appuyez ensuite sur le bouton pour 1tasse pour démarrer le second cycle de
détartrage.
13 Lorsque le bouton pour 1tasse et le voyant CALC commencent à clignoter alternativement (Fig. 31)
sur un mode rapide, retirez la dosette usagée du porte-dosette pour 2tasses. Pour nettoyer le
réservoir d’eau, rincez-le soigneusement à l’eau du robinet froide plusieurs fois (Fig. 48).
14 Remplissez le réservoir jusqu’au niveauMAX avec de l’eau froide claire, puis remettez-le en place.
15 Appuyez sur le bouton pour 1tasse. Le voyant CALC, le bouton de la verseuse, le bouton pour
2tasses et le bouton pour 1tasse clignotent lentement successivement (Fig. 46). Durant le cycle de
rinçage, de l'eau s'écoule de la machine par intermittence.
16 Lorsque toute l'eau du réservoir s'est écoulée, le bouton pour 1tasse et le voyant CALC
commencent à clignoter alternativement (Fig. 31) sur un mode rapide.
17 Répétez les étapes13 et 14.
-
Lorsque toute l’eau du réservoir s’est écoulée, la machine s’arrête et les voyants lumineux
s’éteignent pour indiquer que le détartrage est terminé.
39
Commande d'accessoires
Pour acheter des accessoires ou des pièces de rechange, consultez le site Web
www.shop.philips.com/service ou rendez-vous chez votre revendeur Philips. Vous pouvez également
Page 40

40
Français
communiquer avec le Service Consommateurs Philips de votre pays (consultez le dépliant de garantie
internationale pour obtenir les coordonnées).
Garantie et assistance
Si vous avez besoin d'une assistance ou d'informations supplémentaires, consultez le site Web
www.philips.com/support ou lisez le dépliant sur la garantie internationale.
Recyclage
-
Ce symbole signifie que ce produit ne doit pas être jeté avec les déchets ménagers (2012/19/EU)
(Fig. 49).
-
Respectez les réglementations de votre pays concernant la collecte séparée des appareils
électriques et électroniques. La mise au rebut appropriée des piles permet de protéger
l'environnement et la santé.
Dépannage
Cette rubrique récapitule les problèmes les plus courants que vous pouvez rencontrer avec l'appareil.
Si vous ne parvenez pas à résoudre un problème à l'aide des renseignements ci-dessous, rendezvous sur le site www.philips.com/support et consultez la liste des questions fréquemment posées ou
contactez le ServiceConsommateursPhilips de votre pays.
Problème
Ma tasse à café déborde
de café froid.
Cause possible Solution
Vous n’avez pas rincé la
machine avant la première
utilisation.
Faites fonctionner la machine à l’eau
claire avant la première utilisation.
Lorsque la machine a vidé un réservoir
d’eau entier, vous pouvez commencer
à préparer un nouveau café.
Le voyant lumineux
entourant le bouton sur
lequel vous avez appuyé
clignote lentement.
Le voyant lumineux
entourant le bouton sur
lequel vous avez appuyé
clignote rapidement.
La machine chauffe. Si ceci prend plus de deuxminutes,
Lorsque vous préparez du café
avec filtre, le voyant clignote
lentement pendant la
préparation.
Il n’y a pas assez d’eau dans le
réservoir d’eau.
Le flotteur dans le réservoir
d’eau est coincé.
contactez le Service Consommateurs
Philips de votre pays.
Le cycle de préparation dure environ
90secondes, attendez que le cycle de
préparation soit terminé.
Remplissez le réservoir d’eau.
Videz le réservoir d’eau, secouez-le à
plusieurs reprises pour décoincer le
flotteur. Nettoyez le réservoir d’eau à
l’eau chaude avec un peu de produit
vaisselle, ou au lave-vaisselle. Si le
problème persiste, détartrez la
machine (voir le chapitre
«Détartrage»).
Page 41

Problème Cause possible Solution
Le voyant CALC clignote
lorsque la machine est en
phase de chauffe ou de
préparation de café.
Vous devez détartrer la
machine.
Effectuez la procédure de détartrage
décrite au chapitre «Détartrage».
Français
41
Je ne parviens pas à
fermer correctement le
couvercle.
La machine à café produit
moins de café en dosette
qu’auparavant.
La température du café
dans la tasse diminue
rapidement.
Une dosette usagée est peutêtre collée au disque de
distribution d’eau.
Le tamis au centre du support
à dosette est peut-être
bouché.
Vous avez peut-être appuyé
deuxfois sur le bouton pour
1tasse ou 2tasses.
Vous n’utilisez pas le bon type
de tasse.
Les tasses sont froides. Rincez les tasses avec de l’eau chaude.
Vous avez ajouté du lait froid
au café.
Si c’est le cas, retirez la dosette usagée.
Si le tamis est obstrué, utilisez un
goupillon pour le dégager. Si vous ne
parvenez pas à le nettoyer
correctement avec le goupillon, placez
le porte-dosette dans la machine à
café et détartrez la machine. Détartrez
l’appareil (voir le chapitre
«Détartrage»).
Si vous appuyez deuxfois sur le
bouton pour une tasse ou 2tasses en
3secondes, la machine prépare une ou
deuxtasses de café serré.
Utilisez des tasses aux parois fines. Les
tasses à parois fines absorbent moins
de chaleur que les tasses à parois
épaisses.
Vous pouvez préchauffer la machine à
café et la tasse en commençant par
préparer une tasse d’eau sans placer
de dosette dans le support à dosette.
N’utilisez pas de lait froid sortant du
réfrigérateur.
Le café filtre n’est pas
suffisamment chaud.
Vous n’avez pas préparé une
verseuse pleine.
Vous n’avez pas retiré le
support à dosette.
Vous n’avez pas préchauffé la
verseuse isotherme.
Vous avez ajouté du lait froid
au café.
Le café reste chaud plus longtemps si
vous préparez une verseuse pleine.
Préparez une verseuse pleine pour
vous assurer que le café est à bonne
température.
Si vous ne retirez pas le support à
dosette, le temps de préparation peut
être plus long.
Rincez la verseuse isotherme à l’eau
chaude du robinet afin de la
préchauffer.
N’utilisez pas de lait froid sortant du
réfrigérateur.
Page 42

42
Français
Problème Cause possible Solution
Du marc de café s’est
introduit dans la verseuse
isotherme.
Le filtre en papier s’est peutêtre replié pendant la
préparation.
Pour empêcher le filtre de se replier,
rabattez ses bords.
Le café est moins fort que
prévu.
L’appareil fuit. Vous avez trop rempli le
Il restait peut-être de l’eau
dans la verseuse isotherme
quand vous avez commencé
la préparation du café filtre.
Vous n’avez pas utilisé assez
de café prémoulu.
réservoir d’eau.
Le tamis au centre du support
à dosette est peut-être
bouché.
La bague d’étanchéité est
peut-être bloquée en dessous
du disque de distribution
d’eau.
Vous avez oublié de mettre la
bague de récupération de café
en place.
Vérifiez toujours qu’il n’y a pas d’eau
dans la verseuse avant de commencer
la préparation du café.
Comptez une grosse cuillère de café
prémoulu par tasse pour obtenir un
café plus fort.
Ne remplissez pas le réservoir d’eau
au-delà de l’indication MAX.
Vérifiez le porte-dosette. Si le tamis est
obstrué, utilisez un goupillon pour le
dégager. Si vous ne parvenez pas à le
nettoyer correctement avec le
goupillon, placez le support à dosette
dans la machine à café et détartrez la
machine (voir le chapitre
«Détartrage»).
Vérifiez si la bague d’étanchéité n’est
pas bloquée sous le disque de
distribution d’eau. Si tel est le cas,
dégagez-la du dessous du disque de
distribution d’eau.
Si vous oubliez de mettre la bague de
récupération de café en place, l’eau
déborde par le couvercle de la machine
à café au lieu de s’écouler par la
dosette.
Je ne parviens pas à ouvrir
le couvercle.
La préparation du café est
plus longue
qu’auparavant.
Un vide s’est formé sous le
couvercle.
Vous devez détartrer la
machine.
Vous avez laissé un support à
dosette dans la machine à
café.
Éteignez la machine à café. Tirez le
levier vers le haut et attendez
24heures avant d’ouvrir le couvercle.
Vous devrez peut-être employer la
force.
Vérifiez toujours que les supports à
dosette sont propres et que le centre
du tamis n’est pas obstrué afin d’éviter
toute vide.
Pour détartrer la machine, suivez les
instructions décrites au chapitre
«Détartrage».
Retirez le support à dosette.
Page 43

Problème Cause possible Solution
Il reste de l'eau dans le
réservoir après la
préparation de café filtre.
Ce phénomène est normal. La procédure de préparation du café
filtre n'utilise pas toute l'eau dans le
réservoir.Ceci est normal.
Français
43
Je n'obtiens pas une petite
tasse de café serré lorsque
j'appuie deuxfois sur le
bouton pour une tasse ou
2tasses.
Vous avez appuyé deux fois
trop rapidement, ou vous avez
attendu plus de 3secondes
après la première pression sur
le bouton.
Vous pouvez obtenir un café plus fort si
vous appuyez deux fois sur le bouton
pour une tasse ou 2tasses en
3secondes. Le voyant du bouton brille
moins fort lorsque vous avez réussi à
sélectionner un café plus fort.
Page 44

44
Nederlands
Introductie
Gefeliciteerd met uw aankoop en welkom bij Philips! Registreer uw product op
www.philips.com/welcome om optimaal gebruik te kunnen maken van de door Philips geboden
ondersteuning.
Schoon, koud water
Gebruik elke dag schoon, koud water. Als u het koffiezetapparaat één dag niet hebt gebruikt, moet u
het apparaat voor gebruik doorspoelen met schoon, koud water. Om het apparaat door te spoelen,
vult u het waterreservoir met schoon, koud water, plaatst u een kom (met een inhoud van ten minste
1500 ml) of 2 koppen onder de koffietuit en drukt u een paar keer op de 2-kops knop om heet water
te laten doorstromen totdat het waterreservoir leeg is.
Verse filterkoffie
Gebruik voor een kan heerlijke koffie voorgemalen koffie van goede kwaliteit. Gebruik altijd een
filterzakje van het formaat 102.
U kunt maximaal 7 koppen koffie zetten in de kan.
Verse koffiepads
Gebruik in dit apparaat verse koffiepads van goede kwaliteit voor een volle, ronde smaak. Bewaar de
pads in een voorraadbus of -doos, zodat ze langer vers blijven.
Intensiteitsselectie
-
Druk voor één kleine kop sterke koffie tweemaal op de 1-kops knop (Fig. 2).
-
Druk voor twee kleine koppen sterke koffie tweemaal op de 2-kops knop (Fig. 3).
Belangrijk
Lees deze gebruiksaanwijzing zorgvuldig door voordat u het apparaat gebruikt. Bewaar de
gebruiksaanwijzing om deze indien nodig later te kunnen raadplegen.
Gevaar
-
Dompel het apparaat nooit onder in water of een andere
vloeistof.
Waarschuwing
-
Controleer of het voltage dat op de onderkant van het apparaat is
aangegeven, overeenkomt met de plaatselijke netspanning
voordat u het apparaat aansluit.
-
Sluit de machine uitsluitend aan op een geaard stopcontact.
Page 45

Nederlands
-
Als het netsnoer beschadigd is, moet u het laten vervangen door
Philips, een door Philips geautoriseerd servicecentrum of door
personen met vergelijkbare kwalificaties om gevaarlijke situaties
te voorkomen.
-
Gebruik het apparaat niet als de stekker, het netsnoer of het
apparaat zelf beschadigd is.
-
Deze machine kan worden gebruikt door kinderen vanaf 8 jaar en
door personen met verminderde lichamelijke, zintuiglijke of
geestelijke capaciteiten of weinig ervaring en kennis, mits zij
onder toezicht staan of instructies hebben ontvangen over veilig
gebruik van de machine en zij de gevaren van het gebruik
begrijpen.
-
Reiniging en onderhoud mogen alleen door kinderen worden
uitgevoerd die ouder zijn dan 8 en alleen onder toezicht.
-
Houd het apparaat, de bijbehorende accessoires en het snoer
buiten het bereik van kinderen jonger dan 8 jaar.
-
Kinderen mogen niet met het apparaat spelen.
45
Let op
-
Breng het apparaat altijd naar een door Philips geautoriseerd
servicecentrum voor onderzoek of reparatie. Probeer niet zelf het
apparaat te repareren, aangezien uw garantie hierdoor komt te
vervallen.
-
Plaats het SENSEO® apparaat nooit op zijn kant nadat u het
apparaat hebt uitgepakt. Houd het apparaat altijd rechtop, ook
tijdens transport
-
Gebruik nooit gewone gemalen koffie of gescheurde pads in de
machine, omdat de machine hierdoor verstopt raakt.
-
Het apparaat mag niet worden gebruikt in combinatie met een
transformator, aangezien dit tot onveilige situaties kan leiden.
-
Het apparaat mag niet worden gebruikt in combinatie met een
transformator, aangezien dit tot onveilige situaties kan leiden.
-
Plaats het apparaat op een vlakke en stabiele ondergrond.
Page 46

46
Nederlands
-
Plaats de machine niet op een warmhoudplaat of naast een hete
oven, verwarmingselement of vergelijkbare warmtebron.
-
Laat het apparaat nooit zonder toezicht werken.
-
Gebruik het apparaat niet op een hoogte boven 2200 meter NAP.
-
Doe nooit andere vloeistoffen dan schoon, koud water in het
waterreservoir.
-
Zorg ervoor dat de tuit goed is geplaatst voordat u het apparaat
doorspoelt of koffie zet.
-
Spoel het koffiezetapparaat vóór het eerste gebruik door met vers
water. Hierdoor wordt het systeem gevuld met water, wat zeer
belangrijk is voor de juiste werking van het apparaat.
-
Gebruik het apparaat niet in combinatie met waterontharders die
natrium aan het water toevoegen.
-
Ontkalk uw apparaat regelmatig. Het apparaat geeft aan wanneer
u dit moet ontkalken. Als u dit niet doet, zal het apparaat na
verloop van tijd niet meer goed werken. In dit geval vallen
reparaties niet onder de garantie.
-
Gebruik nooit een ontkalker op basis van mineraalzuur zoals
zwavelzuur, zoutzuur, sulfaminezuur of azijnzuur (bijv. azijn). Deze
ontkalkers kunnen uw koffiezetapparaat beschadigen.
-
Het apparaat is uitsluitend bedoeld voor normaal huishoudelijk
gebruik. Het apparaat is niet bedoeld voor gebruik in
personeelskeukens van bijvoorbeeld winkels, kantoren,
boerderijen of vergelijkbare werkomgevingen en ook niet voor
gebruik door gasten van hotels, motels, bed and breakfasts en
andere verblijfsaccommodaties.
-
Neem de thermoskan niet uit elkaar.
-
Dompel de thermoskan nooit in water of een andere vloeistof;
hierdoor zou water tussen de wanden van de thermoskan kunnen
lopen.
-
Om lekkage te voorkomen, dient u de geïsoleerde kan altijd
rechtop te houden wanneer deze is gevuld met koffie.
-
De thermoskan is niet vaatwasmachinebestendig.
Page 47

Nederlands
-
Tijdens het koffiezetten en zolang het lampje knippert, is de
filterhouder gevuld met hete koffie.
Elektromagnetische velden
Dit Philips-apparaat voldoet aan alle toepasbare richtlijnen en voorschriften met betrekking tot
blootstelling aan elektromagnetische velden.
Algemene beschrijving
1 1-kops padhouder
2 2-kops padhouder
3 Verdeelschijf
4 Ring opvangbak
5 Lekbak
6 CALC-lampje
7 Kanknop
8 2-kops knop
9 1-kops knop
10 Deksel van waterreservoir
11 Waterreservoir
12 Deksel van filterhouder
13 Filterhouder
14 Deksel van thermoskan
15 Thermoskan
16 Maatlepel
47
Eerste gebruik
Wanneer u het apparaat voor de eerste keer inschakelt, wordt een automatische doorspoelcyclus
gestart, ongeacht welke knop u indrukt.
1 Steek de stekker in een geaard stopcontact.
2 Verwijder het waterreservoir uit het apparaat en verwijder vervolgens het deksel van het
waterreservoir (Fig. 4).
3 Maak het waterreservoir goed schoon in warm water, desgewenst met wat afwasmiddel.
4 Vul het waterreservoir tot aan de MAX-aanduiding (Fig. 5) met schoon, koud water.
5 Plaats het deksel terug op het waterreservoir en plaats het waterreservoir terug op het apparaat
(Fig. 6).
6 Plaats de 1-kops padhouder in het koffiezetapparaat. Sluit het deksel en controleer of het goed
vergrendeld (Fig. 7) is.
7 Verwijder de lekbak van het plateau en plaats een kom (met een inhoud van minstens 1,5 liter) of
de kan onder de koffie-uitloop (Fig. 8).
8 Druk op een van de knoppen op het bedieningspaneel. De kankop, de 2-kops knop en de 1-kops
knop gaan achtereenvolgens (Fig. 9) knipperen.
9 De doorspoelcyclus wordt gestart. Tijdens de doorspoelcyclus wordt het systeem gevuld met water
uit het waterreservoir. Het apparaat maakt daarbij meer geluid dan tijdens het koffiezetten.
10 Wanneer het waterreservoir leeg (Fig. 10) is, wordt het apparaat automatisch uitgeschakeld.
11 Maak na de eerste doorspoelcyclus de collectorring en de padhouders schoon met warm water en
wat afwasmiddel of in de vaatwasmachine.
Page 48

48
Nederlands
Een kan filterkoffie zetten
1 Open het deksel van het apparaat (Fig. 11).
2 Verwijder de padhouder, indien aanwezig (Fig. 12).
3 Verwijder de lekbak, indien aanwezig.
4 Vul het waterreservoir met schoon, koud water tot het juiste niveau voor het aantal kopjes koffie
dat u wilt zetten en plaats het waterreservoir terug op het apparaat (Fig. 13).
5 Spoel de thermoskan met warm kraanwater om deze voor te verwarmen.
Tip: Zet ten minste een halve kan koffie om de lekkerste en warmste koffie te krijgen.
6 Plaats de filterhouder boven op de thermoskan (Fig. 14).
7 Open het deksel van de filterhouder.
8 Plaats een filterzakje (nr. 102) in de filterhouder. Vouw de randen van het filterzakje om zodat het
filter niet naar binnen klapt tijdens het koffiezetten (Fig. 15).
9 Schep met de maatlepel de benodigde hoeveelheid voorgemalen koffie in het filter (Fig. 16).
Tip: Gebruik één maatlepel voorgemalen koffie per kop. Gebruik een volle, onafgestreken
maatlepel voor sterke koffie en een afgestreken maatlepel voor milde koffie.
10 Sluit het deksel van de filterhouder.
11 Schuif de thermoskan op het plateau van het apparaat (Fig. 17).
12 Druk op de kanknop om het koffiezetten (Fig. 18) te starten.
-
Het lampje in de kanknop begint te knipperen en het koffiezetten wordt gestart (Fig. 19).
Opmerking: Als de kanknop en het CALC-lampje tijdens het opwarmen en koffiezetten (Fig. 20)
afwisselend beginnen te knipperen, moet het apparaat (zie 'Het apparaat ontkalken') worden
ontkalkt.
-
Wanneer al het water uit het waterreservoir door het filter is gelopen, gaat het lampje in de
kanknop uit en wordt het apparaat automatisch uitgeschakeld.
13 U kunt nu de thermoskan van het apparaat (Fig. 21) verwijderen.
14 Verwijder de filterhouder van de thermoskan (Fig. 22).
Tip: U kunt de filterhouder op de lekbak plaatsen terwijl u koffie uit de kan (Fig. 23) schenkt. Zo
voorkomt u dat er koffie op uw aanrecht lekt.
15 Plaats het deksel op de thermoskan en draai het naar de warmhoudstand (‘vergrendeld slot’-
symbool) (Fig. 24).
16 Druk op de hendel van het deksel om een of meer koppen (Fig. 25) koffie in te schenken.
Koffiezetten met pads
Eén kop padkoffie zetten
1 Vul het waterreservoir met schoon, koud water tot de MAX-aanduiding en plaats het terug op het
apparaat (Fig. 5).
Opmerking: De MIN-aanduiding op het waterreservoir geeft de minimale hoeveelheid water aan
die nodig is om padkoffie te zetten. Vul het waterreservoir altijd tot boven het MIN-niveau.
2 Steek de stekker in een geaard stopcontact.
3 Open het deksel van het apparaat door de hendel omhoog (Fig. 11) te bewegen.
4 Plaats de lekbak op het plateau van het apparaat (Fig. 26).
5 Plaats één pad in de 1-kops padhouder met de bolle zijde naar beneden (Fig. 27).
Page 49

Nederlands
Opmerking: Zorg dat de padhouder schoon is en dat het zeefje in het midden niet verstopt is,
bijvoorbeeld met koffiedik.
Opmerking: Zorg dat de koffie in de pad gelijkmatig is verdeeld en druk de pad licht aan in de
padhouder.
6 Plaats de 1-kops padhouder in het apparaat en sluit het deksel (Fig. 7).
7 Plaats een kop op de lekbak (Fig. 28).
8 Druk op de 1-kops knop om koffie (Fig. 29) te zetten.
-
De knop begint te knipperen en het apparaat wordt opgewarmd (Fig. 30).
Opmerking: Als de 1-kops knop en het CALC-lampje tijdens het opwarmen en koffiezetten (Fig. 31)
afwisselend beginnen te knipperen, moet het apparaat (zie 'Ontkalkingsprocedure ') worden
ontkalkt.
-
Wanneer de opwarming is voltooid, begint het apparaat met koffiezetten (Fig. 32). Na het
koffiezetten wordt het apparaat automatisch uitgeschakeld.
Tip: Druk tweemaal op de 1-kops knop (Fig. 2) voor één kleine kop sterke koffie.
9 Verwijder na gebruik de koffiepad door de padhouder uit het apparaat te nemen en te legen (Fig.
33).
Let op: Doe dit voorzichtig, aangezien er nog wat heet water/hete koffie op de koffiepad(s) kan
liggen.
Let op: Gebruik nooit gewone gemalen koffie of gescheurde pads in het apparaat, aangezien het
hierdoor verstopt raakt.
Twee koppen padkoffie zetten
1 Als u twee koppen padkoffie wilt zetten, plaatst u de diepere 2-kops padhouder in het apparaat.
Plaats twee pads in de 2-kops padhouder (Fig. 34).
2 Druk op de 2-kops knop om koffie te zetten (Fig. 35).
-
De knop begint te knipperen en het apparaat wordt opgewarmd (Fig. 36).
Opmerking: Als de 2-kops knop en het CALC-lampje tijdens het opwarmen en koffiezetten (Fig. 37)
afwisselend beginnen te knipperen, moet het apparaat (zie 'Het apparaat ontkalken') worden
ontkalkt.
-
Wanneer de opwarming is voltooid, begint het apparaat met koffiezetten (Fig. 38). Na het
koffiezetten wordt het apparaat automatisch uitgeschakeld.
Tip: Druk tweemaal op de 2-kops knop (Fig. 3) voor twee kleine koppen sterke koffie.
3 Verwijder na gebruik de koffiepads door de padhouder uit het apparaat te nemen en te legen (Fig.
33).
49
Speciale koffiesoorten zetten
1 Plaats voor een speciale koffiesoort een cappuccinopad, een pad voor warme chocolademelk of
een andere speciale koffiepad in de 2-kops padhouder.
2 Plaats een kopje onder de koffietuit.
3 Druk op de 1-kops knop om de gewenste koffie te zetten.
Page 50

50
Nederlands
Het apparaat schoonmaken
Dompel het apparaat nooit onder in water of een andere vloeistof.
Maak het koffiezetapparaat nooit schoon door het met geopend deksel door te spoelen.
Het koffiezetapparaat schoonmaken
Waarschuwing: Haal altijd de stekker uit het stopcontact voordat u het apparaat
schoonmaakt.
1 Maak de buitenkant van het apparaat schoon met een vochtige doek.
2 Maak de padhouders regelmatig schoon met warm water, wat afwasmiddel en een afwasborstel
om verstopping te voorkomen. Als u de 2-kops padhouder hebt gebruikt om cappuccino of warme
chocolademelk te bereiden, moet u deze direct na gebruik goed schoonmaken om alle melkresten
te verwijderen.
Opmerking: Voor een zeer grondige reiniging (Fig. 39) kunt u de padhouders uit elkaar halen.
3 Maak de collectorring, de padhouders, de lekbak, het waterreservoir en het deksel van het
waterreservoir schoon in warm water, eventueel met wat afwasmiddel. Alle afneembare
onderdelen, met uitzondering van het waterreservoir en de thermoskan, kunnen ook in de
vaatwasmachine (Fig. 40) worden gereinigd.
4 Maak de waterverdeelschijf schoon met een vochtige doek. Doe dit voorzichtig en let op dat de
rubberen afdichtring niet onder de rand van de waterverdeelschijf vast komt te zitten. Als dat
gebeurt, gaat het koffiezetapparaat lekken.
De thermoskan schoonmaken
Waarschuwing: Dompel de thermoskan niet in water of een andere vloeistof en zet deze
niet in de vaatwasmachine. Hierdoor kan de kan beschadigd raken.
1 Als u het deksel naar links draait, gaat de kan open en kunt u het deksel verwijderen (Fig. 41).
2 Maak de binnenkant van de thermoskan schoon met een zachte borstel, warm water en een beetje
afwasmiddel (Fig. 42).
Tip: U kunt hardnekkige bruine aanslag verwijderen door de kan met warm water te vullen en er
een lepel soda aan toe te voegen. Laat de soda een tijdje inwerken.
3 Spoel de thermoskan na het schoonmaken om met vers, warm water (Fig. 43).
Opmerking: U kunt het deksel van de kan wel in de vaatwasmachine schoonmaken.
Het koffiezetapparaat doorspoelen
Wanneer u het koffiezetapparaat één dag niet hebt gebruikt, spoelt u het vóór gebruik door met
schoon, koud water. Het doorspoelen van het apparaat gaat als volgt:
1 Vul het waterreservoir met schoon, koud water tot de MAX-aanduiding en plaats het terug op het
apparaat.
2 Plaats de 1-kops padhouder of 2-kops padhouder zonder pad(s) in het apparaat.
3 Plaats een kom (met een inhoud van minstens 1,5liter) of de kan onder de koffietuit om het water
op te vangen.
Page 51

Nederlands
4 Druk op de 2-kops knop en wacht tot het apparaat is opgewarmd en een hoeveelheid heet water
heeft afgegeven. Druk vervolgens nog een paar keer op de 2-kops knop, totdat het waterreservoir
leeg is.
Het apparaat ontkalken
Wanneer ontkalken
Tijdens het gebruik hoopt zich kalk op in het apparaat. Het is van groot belang om het apparaat te
ontkalken wanneer het CALC-lampje tijdens het opwarmen of koffiezetten (Fig. 31) begint te
knipperen.
Waarom ontkalken
Waarom u het koffiezetapparaat moet ontkalken:
-
Het verlengt de levensduur van uw koffiezetapparaat.
-
Het zorgt ervoor dat uw kop volledig wordt gevuld.
-
Het zorgt ervoor dat de koffie zo warm mogelijk is.
-
Het apparaat maakt tijdens het koffiezetten minder geluid.
-
Het voorkomt storingen.
Als de ontkalkingsprocedure niet correct wordt uitgevoerd, blijven er kalkresten achter in het
apparaat. Dit leidt tot een snellere ophoping van kalk, waardoor het apparaat permanent en
onherstelbaar beschadigd kan raken.
51
Gebruik de juiste ontkalker
Alleen ontkalkers op basis van citroenzuur zijn geschikt voor het ontkalken van het apparaat. Dit type
ontkalker ontkalkt het apparaat zonder het te beschadigen. Zie ‘Ontkalkingsprocedure’ hieronder voor
de juiste hoeveelheid. Elk ontkalkingsmengsel kan slechts eenmaal worden gebruikt. Gebruik elke keer
een nieuw ontkalkingsmengsel. We raden u aan de speciale SENSEO®-ontkalker (HD7012/HD7011) te
gebruiken. Lees de instructiefolder in de verpakking. Op onze website (www.philips.com/descalesenseo) leest u waarom het belangrijk is om het apparaat te ontkalken, hoe u kunt ontkalken en welke
ontkalker u hiervoor gebruikt.
Waarschuwing: Gebruik nooit een ontkalker op basis van mineraalzuur zoals zwavelzuur,
zoutzuur, sulfaminezuur of azijnzuur (bijv. azijn). Deze ontkalkers kunnen uw
koffiezetapparaat beschadigen.
Ontkalkingsprocedure
De ontkalkingsprocedure bestaat uit twee ontkalkingscycli en twee doorspoelcycli. Onderbreek de
ontkalkingscycli niet en schakel het apparaat niet uit voordat u de twee doorspoelcycli hebt
uitgevoerd.
1 Vul het waterreservoir met schoon, koud water tot de MAX-aanduiding en schenk het water in een
kom (Fig. 44).
2 Meng 50 gram citroenzuur met het water in de kom. Roer het mengsel totdat het poeder is
opgelost (Fig. 45).
3 Vul het waterreservoir met het ontkalkingsmengsel en plaats het reservoir terug op het apparaat
(Fig. 47).
Page 52

52
Nederlands
4 Verwijder de lekbak. Plaats een kom met een inhoud van minstens 1,5 liter onder de tuit om het
ontkalkingsmengsel (Fig. 8) op te vangen.
5 Plaats de 1-kops padhouder met daarin een gebruikte koffiepad in het koffiezetapparaat. Sluit het
deksel en controleer of het goed is vergrendeld.
Opmerking: Plaats altijd een gebruikte koffiepad in de padhouder wanneer u het apparaat
ontkalkt. Deze pad dient als 'filter' om te voorkomen dat de zeef of de opening in de padhouder
tijdens het ontkalken verstopt raakt met kalkresten.
Waarschuwing: Zorg dat het deksel goed is gesloten en dat de hendel van het deksel
is vergrendeld voordat u begint met ontkalken.
6 Druk tegelijkertijd op de 1-kops knop en de 2-kops knop.
7 Tijdens de ontkalkingscyclus komt er met tussenpozen water uit het apparaat. Het CALC-lampje,
de kankop, de 2-kops knop en de 1-kops knop gaan achtereenvolgens (Fig. 46) langzaam
knipperen.
8 Wanneer het waterreservoir leeg is, beginnen de 1-kops knop en het CALC-lampje afwisselend (Fig.
31) snel te knipperen.
9 Leeg de kom en plaats deze weer terug. Verwijder de gebruikte pad en de 1-knops padhouder.
Plaats de 2-kops padhouder met daarin één gebruikte pad in het apparaat. Sluit het deksel.
10 Vul het waterreservoir met schoon, koud water tot de MAX-aanduiding en schenk het water in een
kom (Fig. 44).
11 Meng 50 gram citroenzuur met het water in de kom. Roer het mengsel totdat het poeder is
opgelost (Fig. 45).
12 Vul het waterreservoir met het ontkalkingsmengsel en plaats het reservoir terug op het apparaat
(Fig. 47). Druk vervolgens op de 1-kops knop om de tweede ontkalkingscyclus te starten.
13 Wanneer de 1-kops knop en het CALC-lampje afwisselend (Fig. 31) snel beginnen te knipperen,
verwijdert u de gebruikte pad uit de 2-kops padhouder. Maak het waterreservoir schoon door het
enkele keren (Fig. 48) goed om te spoelen met schoon, koud kraanwater.
14 Vul het waterreservoir met schoon, koud water tot de MAX-aanduiding en plaats het terug op het
apparaat.
15 Druk op de 1-kops knop. Het CALC-lampje, de kankop, de 2-kops knop en de 1-kops knop gaan
achtereenvolgens (Fig. 46) langzaam knipperen. Tijdens de doorspoelcyclus komt er met
tussenpozen water uit het apparaat.
16 Wanneer al het water in het waterreservoir op is, beginnen de 1-kops knop en het CALC-lampje
afwisselend (Fig. 31) snel te knipperen.
17 Herhaal stap 13 en 14.
-
Wanneer het water in het waterreservoir helemaal op is, wordt het apparaat automatisch
uitgeschakeld en gaan alle lampjes uit om aan te geven dat de ontkalkingsprocedure is voltooid.
Accessoires bestellen
Ga naar www.shop.philips.com/service of uw Philips-dealer om accessoires of reserveonderdelen
aan te schaffen. U kunt ook contact opnemen met het Philips Consumer Care Centre in uw land (zie
de meegeleverde wereldwijde garantieverklaring voor contactgegevens).
Garantie en ondersteuning
Hebt u informatie of ondersteuning nodig, ga dan naar www.philips.com/support of lees de
internationale garantieverklaring.
Page 53

Nederlands
Recyclen
-
Dit symbool betekent dat dit product niet samen met het gewone huishoudelijke afval mag worden
weggegooid (2012/19/EU) (Fig. 49).
-
Volg de in uw land geldende regels voor de gescheiden inzameling van elektrische en
elektronische producten. Als u oude producten correct verwijdert, voorkomt u negatieve gevolgen
voor het milieu en de volksgezondheid.
Problemen oplossen
In dit hoofdstuk worden in het kort de meest voorkomende problemen behandeld die zich kunnen
voordoen tijdens het gebruik van het apparaat. Als u het probleem niet kunt oplossen met behulp van
de onderstaande informatie, gaat u naar www.philips.com/support voor een lijst met veelgestelde
vragen of neemt u contact op met het Consumer Care Center in uw land.
Probleem
Mijn kop stroomt over met
koude koffie.
Mogelijke oorzaak Oplossing
U hebt het apparaat niet
doorgespoeld vóór het eerste
gebruik.
Spoel het apparaat vóór het eerste
gebruik door. Wanneer het apparaat
een volledig waterreservoir heeft
geleegd, kunt u nieuwe koffie zetten.
53
Het lampje in de knop die
u hebt ingedrukt, knippert
langzaam.
Het lampje in de knop die
u hebt ingedrukt, knippert
snel.
Het CALC-lampje knippert
terwijl het apparaat
opwarmt of koffiezet.
Ik kan het deksel niet goed
sluiten.
Het apparaat wordt
opgewarmd.
Wanneer u filterkoffie zet,
knippert het lichtje langzaam.
Er zit niet genoeg water in het
waterreservoir.
De vlotter in het waterreservoir
zit vast.
U moet het apparaat
ontkalken.
Mogelijk zit er nog een
gebruikte koffiepad tegen de
waterverdeelschijf aan geplakt.
Als de opwarming langer dan twee
minuten duurt, neemt u contact op met
het Philips Consumer Care Center in uw
land.
Wacht tot het koffiezetten is voltooid.
Dit duurt circa 90 seconden.
Vul het waterreservoir.
Leeg het waterreservoir en schud er
een paar keer mee zodat de vlotter
loskomt. Maak het waterreservoir
schoon met warm water en een beetje
afwasmiddel of reinig het in de
vaatwasmachine. Als dit niet helpt,
ontkalkt u het apparaat (zie het
hoofdstuk 'Ontkalken').
Voer de ontkalkingsprocedure uit zoals
beschreven in het hoofdstuk
'Ontkalken'.
Verwijder in dat geval de gebruikte pad.
Page 54

54
Nederlands
Probleem Mogelijke oorzaak Oplossing
Het koffiezetapparaat zet
minder padkoffie per kop
dan voorheen.
De zeef in het midden van de
padhouder zit mogelijk
verstopt.
Als de zeef verstopt is, kunt u de zeef
ontstoppen met een afwasborstel. Als
u de zeef niet goed kunt ontstoppen
met de afwasborstel, plaatst u de
padhouder in het apparaat en ontkalkt
u het apparaat Ontkalk het apparaat
(zie het hoofdstuk 'Ontkalken').
Mogelijk hebt u tweemaal op
de 1-kops of 2-kops knop
gedrukt.
De koffie wordt snel koud. U gebruikt het verkeerde type
De filterkoffie is niet warm
genoeg.
koppen.
De koppen zijn koud. Spoel de koppen om met warm water.
U hebt koude melk aan de
koffie toegevoegd.
U hebt geen volle kan koffie
gezet.
U hebt de padhouder niet
verwijderd.
U hebt de thermoskan niet
voorverwarmd.
U hebt koude melk aan de
koffie toegevoegd.
Als u binnen 3 seconden tweemaal op
de 1-kops of 2-kops knop drukt, zet het
apparaat één of twee kleine koppen
sterke koffie.
Gebruik dunwandige koppen.
Dunwandige koppen absorberen de
hitte van de koffie minder dan
dikwandige koppen.
U kunt het koffiezetapparaat en de kop
voorverwarmen door eerst een kop
warm water te zetten zonder een
koffiepad in de padhouder te plaatsen.
Gebruik geen koude melk die direct uit
de koelkast komt.
De koffie blijft langer warm wanneer u
een volle kan koffie zet. Zorg dat de
kan vol is als u zeker wilt weten dat de
koffie de juiste temperatuur heeft.
Als u de padhouder niet verwijdert, kan
het koffiezetten langer duren.
Spoel de thermoskan met warm
kraanwater om deze voor te
verwarmen.
Gebruik geen koude melk die direct uit
de koelkast komt.
Er zit koffiedik in de
thermoskan.
De koffie is minder sterk
dan verwacht.
Er lekt water uit het
koffiezetapparaat.
Het filterzakje is mogelijk naar
binnen geklapt tijdens het
koffiezetten.
Mogelijk zat er nog water in de
thermoskan op het moment
dat u filterkoffie ging zetten.
U hebt niet genoeg
voorgemalen koffie gebruikt.
Het waterreservoir is te vol. Vul het waterreservoir nooit tot boven
Om te voorkomen dat het filterzakje
naar binnen klapt, kunt u de randen
omvouwen.
Controleer altijd of de kan leeg is
voordat u koffie gaat zetten.
Gebruik voor sterke koffie één volle,
onafgestreken maatlepel voorgemalen
koffie per kop.
het MAX-niveau.
Page 55

Probleem Mogelijke oorzaak Oplossing
De zeef in het midden van de
padhouder zit mogelijk
verstopt.
Controleer de padhouder. Als de zeef
verstopt is, kunt u de zeef ontstoppen
met een afwasborstel. Als u de zeef
niet goed kunt ontstoppen met de
afwasborstel, plaatst u de padhouder
in het apparaat en ontkalkt u het
apparaat (zie het hoofdstuk
'Ontkalken').
Nederlands
55
Ik kan het deksel niet
openen.
Het duurt langer dan
voorheen om filterkoffie te
zetten.
Er zit nog steeds water in
het waterreservoir nadat u
filterkoffie hebt gezet.
Ik krijg geen kleine kop
sterke koffie wanneer ik
tweemaal op de 1-kops of
2-kops knop druk.
De afdichtring zit mogelijk vast
onder de rand van de
verdeelschijf.
U hebt de collectorring niet
geplaatst.
Er is een vacuüm ontstaan
onder het deksel.
U moet het apparaat
ontkalken.
U hebt de padhouder in het
apparaat laten zitten.
Dit is normaal. Tijdens het zetten van filterkoffie wordt
U hebt de knop te snel achter
elkaar ingedrukt of u hebt
langer dan 3 seconden
gewacht na de eerste druk op
de knop.
Controleer of de afdichtring vastzit
onder de rand van de verdeelschijf. Zo
ja, trek de ring dan voorzichtig onder de
verdeelschijf vandaan.
Als u vergeet de collectorring te
plaatsen, loopt het water niet door de
pad maar uit het deksel van het
apparaat.
Schakel het koffiezetapparaat uit. Trek
de hendel omhoog en wacht 24 uur
voordat u het deksel opent. Mogelijk
moet u hierbij enige kracht gebruiken.
Zorg er altijd voor dat de padhouders
schoon zijn en het midden van de zeef
niet verstopt zit om te voorkomen dat
er een vacuüm ontstaat.
Volg de instructies in het hoofdstuk
'Ontkalken' om het apparaat te
ontkalken.
Verwijder de padhouder.
niet al het water in het waterreservoir
gebruikt.Dit is normaal.
U krijgt sterkere koffie wanneer u
binnen 3 seconden tweemaal op de
1-kops of 2-kops knop drukt. Het
lampje in de knop gaat minder fel
branden wanneer u met succes
sterkere koffie hebt geselecteerd.
Page 56

Page 57

Page 58

2345678
3
4
2
1
910111213
14
2
102
1
15161718192021
22
23
2
1
242526272829303132333435363738
Page 59

2
1
39
40
1
2
4142434445
4
5
3
2
1
464748
49
Page 60

© 2018 Koninklijke Philips N.V.
All rights reserved
4222.200.0731.3 (19/2/2018)
>75% recycled paper
>75% papier recyclé
 Loading...