

Page 1

Register your product and get support at
www.philips.com/welcome
HD4779
EN User manual
Page 2

4x
CUP
10
10
8
8
6
6
3
2
1
2
4
4
2
RICE
SUSHIOATMEAL
Stop
Steam
Main
Soup
Dessert
Breakfast
Compote
& Chutney
Sauce
Rice
Cancel
Stop
Steam
Main
Soup
Dessert
Breakfast
Compote
& Chutney
Sauce
Rice
Cancel
a
b
c
d
e
f
g
h
i
j
k
l
n
o
p
q
r
s
t
u
x
v
w
m
Page 3

Stop
Steam
Main
Soup
Dessert
Breakfast
Compote
& Chutney
Sauce
Rice
Cancel
1
3
Stop
Steam
Main
Soup
Dessert
Breakfast
Compote
& Chutney
Sauce
Rice
Cancel
Language setting
Clock setting
18:00
Stop
Steam
Main
Soup
Dessert
Breakfast
Compote
& Chutney
Sauce
Rice
Cancel
5
18:00
Stop
Steam
Main
Soup
Dessert
Breakfast
Compote
& Chutney
Sauce
Rice
Cancel
17:45
18:00
Stop
Steam
Main
Soup
Dessert
Breakfast
Compote
& Chutney
Sauce
Rice
Cancel
8
18:00
Stop
Steam
Main
Soup
Dessert
Breakfast
Compote
& Chutney
Sauce
Rice
Cancel
Saved!
Stop
Steam
Main
Soup
Dessert
Breakfast
Compote
& Chutney
Sauce
Rice
Cancel
Language setting
Clock setting
10
Stop
Steam
Main
Soup
Dessert
Breakfast
Compote
& Chutney
Sauce
Rice
Cancel
French
Spanish
Italian
Saved!
11
12
Stop
Steam
Main
Soup
Dessert
Breakfast
Compote
& Chutney
Sauce
Rice
Cancel
Cook
OK
Preset
Clock
2 x
2
2
4
6
7
9
Stop
Cancel
Page 4
21
2322
14
15
Stop
Steam
Main
Soup
Dessert
Breakfast
Compote
& Chutney
Sauce
Rice
Cancel
18:00
Stop
Steam
Main
Soup
Dessert
Breakfast
Compote
& Chutney
Sauce
Rice
Cancel
18:00
Stop
Steam
Main
Soup
Dessert
Breakfast
Compote
& Chutney
Sauce
Rice
Cancel
18
18:00
Stop
Steam
Main
Soup
Dessert
Breakfast
Compote
& Chutney
Sauce
Rice
Cancel
16
18:00
Stop
Steam
Main
Soup
Dessert
Breakfast
Compote
& Chutney
Sauce
Rice
Cancel
19
18:00
Stop
Steam
Main
Soup
Dessert
Breakfast
Compote
& Chutney
Sauce
Rice
Cancel
24
13
20
CUP
10
10
8
8
6
6
3
2
1
2
4
4
2
RICE
SUSHI OATMEAL
17
MAIN / SOUP / SAUCE
(MAX)
(MAX)
YOGHURT
TORTILLA / DESSERT /
COMPOTE & CHUTNEY
Page 5

Stop
Steam
Main
Soup
Dessert
Breakfast
Compote
& Chutney
Sauce
Rice
Cancel
Stop
Steam
Main
Soup
Dessert
Breakfast
Compote
& Chutney
Sauce
Rice
Cancel
35
Stop
Steam
Main
Soup
Dessert
Breakfast
Compote
& Chutney
Sauce
Rice
Cancel
18:30
39
33
Preset
36
18:00
Stop
Steam
Main
Soup
Dessert
Breakfast
Compote
& Chutney
Sauce
Rice
Cancel
34
18:00
Stop
Steam
Main
Soup
Dessert
Breakfast
Compote
& Chutney
Sauce
Rice
Cancel
Stop
Steam
Main
Soup
Dessert
Breakfast
Compote
& Chutney
Sauce
Rice
Cancel
Stop
Steam
Main
Soup
Dessert
Breakfast
Compote
& Chutney
Sauce
Rice
Cancel
30
Stop
Steam
Main
Soup
Dessert
Breakfast
Compote
& Chutney
Sauce
Rice
Cancel
18:00
Stop
Steam
Main
Soup
Dessert
Breakfast
Compote
& Chutney
Sauce
Rice
Cancel
25
27
28
CUP
10
10
8
8
6
6
3
2
1
2
4
4
2
RICE
SUSHI OATMEAL
32
31
Reheat
Keep
warm
Reheat
Keep
warm
Preset
Clock
Steam
2 x
26
29
Page 6

1
2
39
40
38
37
Page 7

[Risotto ai funghi]
[Spezzatino di carne]
[Chutney speziato alle mele]
champignons]
--- --- --- ---
[Mushroom Risotto] [Risotto con setas] [Risotto aux
[Paella] [Paella] [Paella] [Paella]
[Beef Bourguignon] [Ternera a la Bourguignon] [Boeuf bourguignon] [Bourguignon di manzo]
[Goulash] [Gulash] [Goulash] [Goulash]
[Ratatouille] [Ratatouille] [Ratatouille] [Ratatouille]
(Ragoût de viande)]
[Poulet Basquaise] [Pollo a la vasca] [Poulet basquaise] [Poulet Basquaise]
[Spezzatino di carne] [Ragú de carne] [Spezzatino di carne
[Tortilla] [Tortilla] [Tor tilla] [Tortilla]
[Stew] [E s tofado] [Ragoût] [Stufato]
aux épices]
[Sweet Fruits Compote] [Compota de frutas dulce] [Compote de fruits] [Marmellata di frutta dolce]
[Spicy Apple Chutney] [Chatni de manzana picante] [Chutney de pommes
[Oatmeal] [Gachas] [Porridge] [Porridge]
[Yoghur t] [Yogur] [Yaourt] [Yogurt]
Menu/Menú/Menu/Menu Submenu Submenú Sous-menu Sottomenu
[Steam] / [Vapor]
[Vapeur] / [Vapore]
[Main]
[Primeros]
[Plat ppal]
[Piatto princip.]
[Compote & Chutney]
[Compotas y conservas]
[Compote et chutney]
[Marmellata/Confettura]
[Breakfast]
[Desayuno]
[Petit-déj.]
[Colazione]
Page 8

Submenu Submenú Sous-menu Sottomenu
Menu/Menú/
Menu/Menu
[Saffron] [Azafrán] [Safran] [Zafferano]
[Basmati] [Basmati] [Basmati] [Basmati]
[Plain] [Normal] [Nature] [Normale]
[Sushi] [Sushi] [Sushi] [Sushi]
[Mushroom & Chicken] [Setas con pollo] [Champignons et poulet] [Funghi e pollo]
[Bolognese] [Boloñesa] [Bolognaise] [Ragù alla bolognese]
[Vegetable Soup] [Sopa de verduras] [Soupe de légumes] [Zuppa di verdure]
[Creme of Mushroom] [Crema de setas] [Crème de champignons] [Crema di funghi]
[Minestrone] [Minestrone] [Minestrone] [Minestrone]
[Seafood Chowder] [Sopa de marisco] [Soupe de fruits de mer] [Chowder ai frutti di mare]
[Cheese Cake] [Tarta de queso] [Cheese cake] [Cheese Cake]
[Chocolate Cake] [Tar ta de chocolate] [Gâteau au chocolat] [Torta al cioccolato]
[Creme Caramel] [Flan] [Crème caramel] [Creme Caramel]
[Soup]
[Dessert]
[Postre]
[Dessert]
[Sopa]
[Dessert]
[Tom Yum Goong] [Tom Yum Goong] [Tom Yum Goong] [Tom Yum Goong]
[Soupe]
[Zuppa]
[Seafood Gumbo] [Gumbo de marisco] [Gumbo aux fruits de mer] [Gumbo di frutti di mare]
[Rice]
[Sauce]
[Salsa]
[Sauce]
[Arroz]
[Salsa]
[Small portion Plain] [Peque. porción Arroz] [Petite portion Nature] [Porz. picc. in bianco]
[R iz]
[Riso]
Page 9

9EN
English
Contents
1 Introduction 10
Product Overview 10
2 Important 10
Danger 10
Warning 10
Caution 11
Electromagnetic elds (EMF) 12
Power failure backup function 12
Environment 12
Guarantee and service 12
3 Preparing for use 13
Before rst use 13
Setting the clock time 13
Setting the display language 13
Control panel and display 14
4 Using the appliance 15
Before Cooking Start 15
Menu Function 15
Other Functions 34
5 After use the appliance 36
Cleaning 36
Storage 36
7 Recipes 39
Mushroom Risotto 39
Paella 40
Beef Bourguignon 41
Goulash 42
Ratatouille 43
Poulet Basquaise 44
Spezzatino di carne 46
Tortilla 46
Stew 47
Sweet Fruits Compote 48
Spicy Apple Chutney 49
Oatmeal 50
Yoghurt 51
Cheese Cake 52
Chocolate Cake 53
Creme Caramel 54
Vegetable Soup 55
Creme of Mushroom Soup 56
Minestrone 57
Seafood Chowder 58
Tom Yum Goong 59
Mushroom and Chicken Sauce 60
Bolognese Sauce 61
Seafood Gumbo 62
Saffron Rice 64
Sushi Rice 64
Steaming 65
6 Troubleshooting 36
Page 10

10 EN
1 Introduction
Congratulations on your purchase, and welcome to Philips! To fully benet from the support that Philips
offers, register your product at www.philips.com/welcome.
Product Overview
a Measuring cup
b Water level indications
c Inner pot with handles
d Detachable inner lid
e Sealing ring
f Heating element
g Temperature sensor
h Touch control panel
i Display with +/- control ring
j Main body
k Mains plug
l Detachable mains cord
m Socket for mains plug
n Lid release button
o Mounting bracket of scoop holder
p Scoop holder
q Outer lid
r Detachable steam vent cap
s Variety Cooker handle
t Steam basket
u Detachable steam tray
v Rice scoop
w Soup ladle
x Resealable cups
2 Important
Read this user manual carefully before you use the appliance and save it for future reference.
Danger
Never immerse the main body of the Variety Cooker in water, nor rinse it under the tap.•
Warning
Check if the voltage indicated on the appliance corresponds to the local mains voltage before •
you connect the appliance.
Only connect the appliance to an earthed wall socket. Always make sure that the plug is •
inser ted rmly into the wall socket.
Page 11

11EN
English
Do not use the appliance if the plug, the mains cord, the inner pot, the sealing ring or the main •
body is damaged.
If the mains cord is damaged, it must be replaced by Philips, a service centre authorised by •
Philips or similarly qualied persons in order to avoid a hazard.
This appliance is not intended for use by persons (including children) with reduced physical, •
sensor y or mental capabilities, or lack of experience and knowledge, unless they have been
given supervision or instruction concerning use of the appliance by a person responsible for
their safety.
Children should be supervised to ensure that they do not play with the appliance. •
Keep the mains cord out of the reach of children. Do not let the mains cord hang over the edge •
of the table or worktop on which the appliance stands.
Make sure the heating element, the temperature sensor and the outside of the inner pot are •
clean and dry before you put the plug in the wall socket.
Do not plug in the appliance or press any of the buttons on the control panel with wet hands.•
Never connect this appliance to an external timer switch in order to avoid a hazardous •
situation.
Caution
Never use any accessories or parts from other manufacturers or that Philips does not •
specically recommend. If you use such accessories or parts, your guarantee becomes invalid.
Do not expose the appliance to high temperatures, nor place it on a working or still hot stove •
or cooker.
Do not expose the appliance to direct sunlight.•
Place the appliance on a stable, horizontal and level surface.•
Always inser t the inner pot before you put the plug in the wall socket and switch on the Variety •
Co oker.
Do not place the inner pot directly over an open re to cook rice.•
Do not use the inner pot if it is deformed.•
Extreme caution must be used when cooking the recipes that require heating the oil or butter •
with the ingredients, as it would reach the high temperature level like a stove or oven.
The accessible surfaces may become hot when the appliance is operating. Only touch the •
control panel.
Beware of hot steam coming out of the steam vent during cooking or out of the Variety Cooker •
when you open the lid. Keep hands and face away from the Variety Cooker to avoid the steam.
Be careful with the inner pot, steam basket and resealable cups when you handle them during •
and after the cooking process, as they may be hot and heavy.
Do not lift and move the Variety Cooker by its handle while it is operating.•
Do not exceed the maximum water level indicated in the inner pot to prevent overows.•
Do not place the cooking utensils inside the pot while cooking, keeping warm or reheating rice.•
Only use the cooking utensils provided. Avoid using sharp utensils.•
Do not use the cooking utensils provided for cooking on open ame.•
To avoid scratches, it is not recommended to cook ingredients with crustaceans and shellsh. •
Remove the hard shells before cooking.
Do not insert metallic objects or alien substances into the steam vent.•
Do not place a magnetic substance on the lid. Do not use the appliance near a magnetic •
substance.
Always let the appliance cool down before you clean or move it.•
Always clean the appliance after use. Do not clean the appliance in the dishwasher.•
Always unplug the appliance if not used for a longer period of time.•
English
EN
Page 12

12 EN
This appliance is intended to be used in household and similar applications such as: •
Staff kitchen areas in shops, ofces and other working environments; »
Farm houses; »
By clients in hotels, motels and other residential type environments; »
Bed and breakfast type environments. »
If the appliance is used improperly or for professional or semi-professional purposes or if it is •
not used according to the instructions in this user manual, the guarantee becomes invalid and
Philips refuses liability for any damage caused.
Electromagnetic elds (EMF)
This appliance complies with all standards regarding electromagnetic elds (EMF). If handled properly
and according to the instructions in this user manual, the appliance is safe to use based on scientic
evidence available today.
Power failure backup function
This appliance has a backup function that remembers the status before a power failure, provided the
power supply is resumed within 2 hours. If the power failure occurs during a cooking process, the
countdown of the cooking time continues where it left off when the power supply resumes.
If the power failure lasts longer than 2 hours and the failure occurs during a cooking process, the
appliance automatically resets to standby mode when the power supply resumes. Open the Variety
Cooker, remove its contents and start all over again.
If you have set the timer and the preset cooking process has not yet started when a power failure
occurs, the process starts when the power supply resumes, provided it resumes within 12 hours.
Environment
Do not throw away the appliance with the normal household waste at the end of its life, but hand it in
at an ofcial collection point for recycling. By doing this, you help to preserve the environment.
Guarantee and service
If you need service or information or if you have a problem, please visit the Philips website at www.
philips.com or contact the Philips Customer Care Centre in your country (you nd its phone number in
the worldwide guarantee leaet). If there is no Consumer Care Centre in your country, go to your local
Philips dealer.
Page 13

13EN
English
3 Preparing for use
Before rst use
Remove the sheet between the inner pot and the heating element.
1
2 Clean the parts of the Variety Cooker thoroughly before you use the appliance for the rst time
(see ‘Cleaning’ section).
3 Dry all parts thoroughly before you start to use the appliance.
4 Attach the scoop holder to the body of the Variety Cooker (Fig. 1).
Setting the clock time
Note: You cannot adjust the clock time during a cooking process or when the appliance is in keep-warm
mode.
1 Put the plug in the wall socket and switch on the mains.
The greeting message appears on the display screen ( » [Good Morning], [Good Afternoon] or
[Good Evening]).
2 Press the [Preset]/[Clock] button twice (Fig. 2).
3 Move your nger up/down on the left/right side of the control ring to select [Clock setting] (Fig. 3).
4 Press the [Cook]/[OK] button (Fig. 4).
The time ashes on the display. Arrows appear on the left and right sides of the display to tell »
you to use the control ring to set the time (Fig. 5).
5 Move your nger up/down on the left/right side of the control ring to set the clock (24-hour time
notation). Press and hold one of the 4 points to move the time forward or backward quickly (Fig. 6).
6 Press the [Cook]/[OK] button to conrm the time (Fig. 4).
Note: If you want to cancel the change, press the [Stop]/[Cancel] button (Fig. 7).
The message » [Saved!] is shown on the display (Fig. 8).
The time stops ashing and the display shows the set clock time. »
Note: The clock time is conrmed automatically if you do not press the [Cook]/[OK] button within
30 seconds.
Note: The display only shows the clock time when the appliance is plugged into the wall socket.
Setting the display language
You can select one of the 4 languages: [English], [French], [Italian] or [Spanish].
1 Press the [Preset]/[Clock] button twice (Fig. 2).
2 Move your nger up/down on the left/right side of the control ring to select [Language setting]
(Fig. 9).
3 Press the[Cook] /[OK] button (Fig. 4).
4 Select the desired language by moving your nger up/down on the left/right side of the control
ring (Fig. 10).
5 Press the [Cook]/[OK] button to conrm the language (Fig. 4).
Note: If you want to cancel the change, press the [Stop]/[Cancel] button (Fig. 7).
The message » [Saved!] is shown on the display (Fig. 8).
Page 14

14 EN
Control panel and display
The appliance is easy to operate with the control panel which consists of 12 touch buttons.
The colored LCD display shows the clock and timer and gives information on the selected process.
White display is indicating the appliance is in standby mode or at the stage of selecting the cooking
programs.
Red display is indicating cooking or reheating mode and the light will goes off after 10 minutes.
Green display is in keep-warm mode and the light will goes off after 10 minutes.
General Buttons
• [Stop]/[Cancel] – To cancel incorrect operation, unnecessar y setting, to stop a cooking
process immediately or to stop a present timer.
• [Preset]/[Clock] – To preset the desired time to star t steaming and rice cooking.
• [Keep warm]/[Reheat] – To allow keeping food warm or to reheat it (Not recommend for
reheating the leftover that come from the fridge).
• [Cook]/[OK] – To conrm the program selection or to star t cooking.
Menu Buttons
Menu Submenu Menu Submenu
[Steam] --- [Dessert] [Cheese Cake]
[Main] [Mushroom Risotto] [Chocolate Cake]
[Compote & Chutney] [Sweet Fruits Compote] [Seafood Gumbo]
[Breakfast] [Oatmeal] [Basmati]
8 Menu buttons (• [Steam], [Main], [Compote & Chutney], [Breakfast], [Dessert], [Soup],
[Sauce] and [Rice]) are located on the control panel.
You can press these buttons to select the cooking function and using the control ring for
the corresponding submenus listed in the table below.
After the selection of submenu, text and animations are shown on the display to guide you •
through the cooking process.
Steam function that does not have the submenu, will have the rst instruction appears on
the display.
A ashing button appears on the control panel indicates that you can press this button to •
go to the next step.
[Paella] [Creme Caramel]
[Beef Bourguignon] [Soup] [Vegetable Soup]
[Goulash] [Creme of Mushroom]
[Ratatouille] [Minestrone]
[Poulet Basquaise] [Seafood Chowder]
[Spezzatino di carne] [Tom Yum Goong]
[Tor tilla] [Sauce] [Mushroom & Chicken]
[Stew] [Bolognese]
[Spicy Apple Chutney] [Rice] [Saffron]
[Yoghurt] [Plain]
[Sushi]
[Small portion Plain]
Page 15

15EN
English
Control Ring
To set the Clock, Timer for delayed cooking, Cooking Time and choose the desired Menu •
and Submenu.
You can move your nger up or down on the left or right side of the control ring to adjust
settings (e.g. the clock, the timer for delayed cooking and the cooking time) or to select the
desired menu.
Press and hold one of the 4 points to move the settings forward or backward quickly (Fig. 6).
A ashing button appears on the control panel indicates that you can press this button to •
go to the next step.
4 Using the appliance
Before Cooking Start
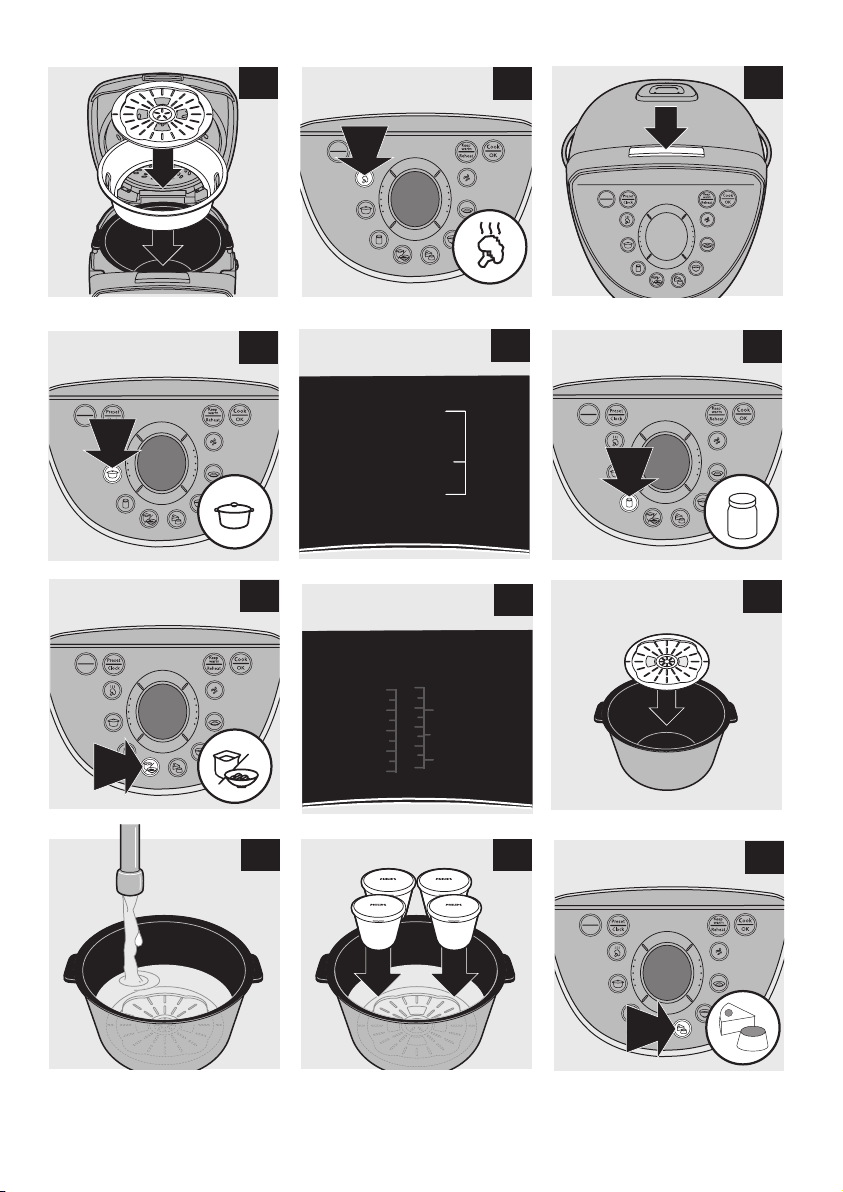
Install the detachable steam vent cap and make sure it is well positioned.
1
2 Press the lid release button to open the lid. Add the required ingredients and/or water to the
inner pot then place pot in Variety Cooker (Fig 11).
Make sure the pot is placed properly and handles of the pot are aligned with the grooves in •
the main body.
Make sure the heating element and outside of inner pot are clean and dry. If the pot is •
returned to cooker when wet or when debris is present it will damage the appliance, causing
it to malfunction.
3 Close the lid of the Variety Cooker and make sure the “click ” sound is heard.
4 Put the plug in wall socket and switch on the mains.
Do not close the lid with force. If the lid does not close properly, check if inner pot is •
placed correctly.
Make sure body plug and power plug are well positioned.•
To prevent breakdown, do not star t cooking program when inner pot is empty.•
Menu Function
Steam Cooking Menu
Preparation
1 Measure 3 cups of water with measuring cup provided and pour them into inner pot.
It takes approx. 8 minutes for 3 cups of water to come to the boil. The table below is a •
steaming guide for reference; cooking time may vary depending on the temperature, quality
and amount of the ingredients.
Note: The amount of water required is determined by the amount of food to be steamed.
Please readjust the water volume accordingly.
2 Put steam tray in steam basket. The line on steam tray has to point to the mark on steam basket.
(Fig. 12)
3 Put the assembled steam basket with steam tray in inner pot (Fig. 13).
4 Put the food for steaming in the steam basket.
Note: To ensure even steaming, spread out the food evenly and do not pile it up.
Page 16

16 EN
5 Follow the “Before Cooking Start” section to handle the inner pot and the Variety Cooker
properly.
Choose Steam
1 Press the [Steam] button to select the Steam function (Fig. 14)
The rst instruction “Fill inner pot with water, put food on steam tray.” appears on the display. »
Set the Cooking Time
1 Press [Cook]/[OK] button to adjust cooking time. It will also automatically display the
adjustable cooking time af ter 30 seconds if you do not press any button.
The default cooking time of 30 minutes appears on the display. »
2 Use control ring to adjust cooking time if necessar y (see “Control panel and display” section).
The timer can be adjusted by unit of 1 minute and the cooking time can be set from 1 to •
60 minutes.
Preset timer is available up to 24 hours. Follow “• Setting the ready time” section to set the
desired start time for steaming.
Not recommend to delay cooking time for more than 1 hour for any food with the exception
of raw vegetables.
Most fresh perishable foods, especially raw poultr y, meat, and sh cannot safely be left at room
temperature and cooking of these foods should never be delayed for more than 1 hour.
Begin Steaming
1 Press the [Cook]/[OK] button to start cooking process.
» [Cook]/[OK] indication is on and the cooking animation appears on the display.
2 The display counts down the cooking time in minutes.
Finish Steaming
1 At the end of the cooking process, the appliance beeps and the message [Done!] appears on
the display.
2 Press lid release button to open the lid (Fig.15). Be caution when opening lid as steam escaping
will be extremely hot.
3 Remove steam basket and check food to ensure it has been thoroughly cooked. Be caution
when removing steam basket, as it will be hot.
4 Press the [Stop]/[Cancel] button to go to standby mode or unplug the Variety Cooker to
switch it off.
Food Steaming Guide
Ingredients Amount Steaming time (min) Suggested herbs/spices for better taste
Asparagus 500g 15 -20 Thyme, basil, lemon
Baby corn 200g 15-20 Chives, chili, paprika
Broccoli 400g 15-20 Garlic, crushed red chili, tarragon
Green beans 500g 15-20 Parsley, lemon, garlic
Carrots 500g 20 -25 Parsley, dry mustard, chives
Cauliower orets 400g 15-20 Rosemar y, basil, tarragon
Courgette 500g 15-20 Dill, sage, rosemary
Potatoes 400g 35-40 Parsley, chives, garlic
Chicken llet 250g 30 -35 Black pepper, lemon, paprika
Eggs 6 pcs 18-25 ---
Page 17

17EN
English
Ingredients Amount Steaming time (min) Suggested herbs/spices for better taste
Prawns 200g 25-30 Saffron, lemon
Salmon 450g 20-25 Dill, parsley, basil
White sh 450g 18 -2 5 Dry mustard, allspice, marjoram
Tips for steaming food
Do not steam food larger than 1½ inch thick. It may hit the inner lid and may not cook well.•
Cut off thick stems from cauliower, broccoli and cabbage.•
Do not thaw frozen vegetables before you steam them.•
Never steam frozen meat, poultry or seafood. Always let frozen meat, poultry or seafood thaw •
completely before you put it in the steamer.
Wash meat properly and pat it dry, so that as little juice as possible drips out.•
Tender pieces of meat with a little fat are most suitable for steaming.•
Wrap sh and meat in aluminum foil to prevent them from sticking to steaming basket. Wrapping •
also provides moister cooking.
Puncture eggs before steaming to prevent shells cracking.•
Always keep the lid closed during the entire steaming process. Opening the lid causes a loss of •
heat and steam, resulting in a slower cooking time.
Make sure the food is well done before you eat it. If the food is not done, set a longer steaming •
time. You may need to put some more water in the inner pot.
Main Cooking Menu
The Main Cooking Menu of this appliance consists of 9 submenus that allow you to cook different
types of nutritious and delicious main dishes. The Stew cooking program is ideal for preparing
delicious homemade meals with your favorite ingredients such as beef, pork, poultry, etc.
Preparation
1 Follow the recipe to prepare the ingredients.
2 Follow the “Before Cooking Start” section to handle the inner pot and the Variety Cooker
properly.
Choose Main
1 Press the [Main] button (Fig. 16). Then select the submenu by moving your nger up/down on
the left/right side of the control ring.
2 Press [Cook]/[OK] button.
The rst instruction appears on the display. »
Make sure to put the ingredients in pot and mix well before starting the cooking program.
Do not exceed the maximum water level of [MAIN] as indicated on the inside of the inner
pot (Fig. 17). Make sure you use the right water level for [TORTILLA].
The step-by-step cooking guidance has been outlined in the table below for your quick »
reference and they will also appear on the display throughout the cooking process.
Set the Cooking Time
1 Press the [Cook]/[OK] button to adjust the cooking time. It will also automatically display the
adjustable cooking time af ter 30 seconds if you do not press the button.
The default cooking time appears on the display. »
Page 18

18 EN
2 Use control ring to adjust cooking time if necessar y (see “Control panel and display” section).
Preset timer is available up to 12 hours for • [Stew] only. Follow “Setting the Ready Time”
section to set the desired star t time for stewing. Not recommend to delay cooking time for
more than 1 hour for any food with the exception of raw vegetables. Most fresh perishable
foods, especially raw poultry, meat and sh cannot safety be left at room temperature and
cooking of these foods should never be delayed for more than 1 hour.
Submenu Default Cooking
Time
[Mushroom
Risotto]
[Paella] 22 minutes Every
[Beef
Bourguignon]
[Goulash] 2 hours 15 minutes Every
[Ratatouille] 25 minutes Ever y
[Poulet
Basquaise]
[Spezzatino di
carne]
[Tor tilla] 38 minutes Every
[Stew] 45 minutes Every
The adjustable cooking time gives exibility to alter the cooking time according to need. •
When scaling a recipe, you will generally have to experiment the correct cooking time for your •
adjusted recipes.
Begin Cooking
25 minutes Every
3 hours Every
1 hour 10 minutes Every
2 hours 25 minutes Ever y
Note: Optimal cooking time is based on the amounts and ingredients listed in the provided
recipes. Each of them are tested to perfection to ensure to achieve culinary success.
Time
Adjustment
1 minute
1 minute
5 minutes
5 minutes
1 minute
5 minutes
5 minutes
1 minute
5 minutes
Adjustable Cooking
Time
20 minutes –
50 minutes
20 minutes –
50 minutes
2 hours – 4 hours
30 minutes
1 hour 30 minutes 4 hours
20 minutes –
40 minutes
45 minutes – 1 hour
45 minutes
1 hour 30 minutes –
3 hours 30 minutes
30 minutes –
55 minutes
30 minutes – 4 hours N/A
Remark
Adjustable cooking time only
affect the 3rd cooking step
Adjustable cooking time only
affect the 3rd cooking step
Adjustable cooking time only
affect the 3rd cooking step
Adjustable cooking time only
affect the 3rd cooking step
Adjustable cooking time only
affect the 3rd cooking step
Adjustable cooking time only
affect the 3rd cooking step
Adjustable cooking time only
affect the 3rd cooking step
Adjustable cooking time only
affect the 1st cooking step
1 Press the [Cook]/[OK] button to start cooking process.
» [Cook]/[OK] indication is on and the cooking animation appears on the display.
2 The display counts down the cooking time in minutes.
Finish Cooking
1 At the end of the cooking process, the appliance beeps and the message [Done!] appears on
the display.
2 The appliance beeps and the [Keep warm]/[Reheat] light goes on to indicate that the appliance
has switched to keep-warm mode. The display counts up the keep-warm time in hours (12 hours
max).
Tip: Auto keep warm function is available for Beef Bourguignon, Poulet Basquaise, Spezzatino di
carne and Stew submenus.
3 Press the [Stop]/[Cancel] button (Fig. 7) to cancel the keep-warm mode.
Page 19

19EN
English
4 Press lid release button to open the lid (Fig. 15). Be caution when opening lid as steam escaping
will be extremely hot.
5 Press the [Stop]/[Cancel] button to go to standby mode or unplug the Variety Cooker to switch
it off.
Submenu Cooking Instruction Action Cooking Time
[Mushroom
Risotto]
[Paella] 1.[Add oil, chorizo,
[Beef
Bourguignon]
1.[Add butter,
shallot, leek, garlic
& mushroom, MIX
WELL .]
2.[Add rice & oil, MIX
WELL .]
3.[Add wine & HOT
stock gradually, MIX
WELL .]
4.[Add cheese,
parsley, trufe oil &
seasonings.]
onion, garlic & bell
pepper, MIX WELL.]
2.[Add paprika, saffron
& rice, MIX WELL.]
3.[Add wine & HOT
stock gradually, MIX
WELL .]
4.[Add remaining
ingredients, MIX
WELL .] (add the
ingredients in the last
10 minutes before the
cooking end)
1.[Add oil & bacon,
MIX WELL.]
2.[Add beef, salt &
pepper, MIX WELL.]
Press [Cook]/[OK] and set the cooking
time or it will auto switch to cooking
time after 30 seconds.
Press [Cook]/[OK] to conrm the total
cooking time and start cooking.
Press / or the process will auto star t
after 30 seconds.
Press [Cook]/[OK] or the process will
auto star t after 30 seconds.
Press [Cook]/[OK] or the instruction
message will disappear after 5 minutes.
Press [Cook]/[OK] and set the cooking
time or it will auto switch to cooking
time after 30 seconds.
Press [Cook]/[OK] to conrm the total
cooking time and start cooking.
Press [Cook]/[OK] or the process will
auto star t after 30 seconds.
Press [Cook]/[OK] or the process will
auto star t after 30 seconds.
Press [Cook]/[OK] or the process will
auto star t after 30 seconds.
Press [Cook]/[OK] and set the cooking
time or it will auto switch to cooking
time after 30 seconds.
Press [Cook]/[OK] to conrm the total
cooking time and start cooking.
Press [Cook]/[OK] or the process will
auto star t after 30 seconds.
5 minutes (xed)
5 minutes (xed)
15 minutes
(adjustable)
---
5 minutes (xed)
2 minutes (xed)
15 minutes
(adjustable)
10 minutes
(xed)
5 minutes (xed)
5 minutes (xed)
Page 20

20 EN
Submenu Cooking Instruction Action Cooking Time
[Beef
Bourguignon]
3.[Add Flour, MIX
WELL. Add wine,
Press [Cook]/[OK] or the process will
auto star t after 30 seconds.
2 hour 20 minutes
(adjus tab le)
HOT stock, tomato
paste & herbs, MIX
WELL .]
4.[Add remaining
ingredients, MIX
Press [Cook]/[OK] or the process will
auto star t after 30 seconds.
30 minutes
(xed)
WELL .]
5.[Remove herbs. Add
butter, seasoning &
Press [Cook]/[OK] or the instruction
message will disappear after 5 minutes.
---
parsley.]
[Goulash] 1.[Add butter & onion,
MIX WELL.]
Press [Cook]/[OK] and set the cooking
time or it will auto switch to cooking
5 minutes (xed)
time after 30 seconds.
Press [Cook]/[OK] to conrm the total
cooking time and start cooking.
2.[Add beef, paprika &
salt, MIX WELL.]
3.[Add bay leaf,
pepper, HOT stock &
wine, MIX WELL.]
4.[Add potato, MIX
WELL .]
[Ratatouille] 1. [Add oil, garlic,
onion & tomato paste,
MIX WELL.]
Press [Cook]/[OK] or the process will
auto star t after 30 seconds.
Press [Cook]/[OK] or the process will
auto star t after 30 seconds.
Press [Cook]/[OK] or the process will
auto star t after 30 seconds.
Press [Cook]/[OK] and set the cooking
time or it will auto switch to cooking
time after 30 seconds.
20 minutes
(xed)
1 hour
30 minutes
(adjustable)
20 minutes
(xed)
5 minutes (xed)
Press [Cook]/[OK] to conrm the total
cooking time and start cooking.
2. [Add HOT stock &
passata, MIX WELL.]
3. [Add remaining
ingredients, MIX
Press [Cook]/[OK] or the process will
auto star t after 30 seconds.
Press [Cook]/[OK] or the process will
auto star t after 30 seconds.
5 minutes (xed)
15 minutes
(adjustable)
WELL .]
[Poulet
Basquaise]
4. [Add basil &
seasoning.]
1.[Add oil, onion,
fennel, garlic & bell
pepper, MIX WELL.]
Press [Cook]/[OK] or the instruction
message will disappear after 5 minutes.
Press [Cook]/[OK] and set the cooking
time or it will auto switch to cooking
time after 30 seconds.
---
5 minutes (xed)
Press [Cook]/[OK] to conrm the total
cooking time and start cooking.
2.[Add chicken, bay
leaf & saffron, MIX
Press [Cook]/[OK] or the process will
auto star t after 30 seconds.
5 minutes (xed)
WELL .]
Page 21

21EN
English
Submenu Cooking Instruction Action Cooking Time
[Poulet
Basquaise]
[Spezzatino
di carne]
[Tor tilla] 1.[Add oil, potato &
[Stew] 1.[Add all ingredients,
3.[Add wine & HOT
stock gradually, MIX
WELL .]
4.[Add tomato &
potato, MIX WELL.]
5.[Garnish with
parsley.]
1.[Add butter, garlic &
beef, MIX WELL.]
2.[Add wine, MIX
WELL .]
3.[Add remaining
ingredients, MIX
WELL .]
onion, MIX WELL.]
2.[Add egg mixture,
MIX WELL.]
3.[Cool in pot 5 min
then ip onto plate.]
MIX WELL.]
Press [Cook]/[OK] or the process will
auto star t after 30 seconds.
Press [Cook]/[OK] or the process will
auto star t after 30 seconds.
Press [Cook]/[OK] or the instruction
message will disappear after 5 minutes.
Press [Cook]/[OK] and set the cooking
time or it will auto switch to cooking
time after 30 seconds.
Press [Cook]/[OK] to conrm the total
cooking time and start cooking.
Press [Cook]/[OK] or the process will
auto star t after 30 seconds.
Press [Cook]/[OK] or the process will
auto star t after 30 seconds.
Press [Cook]/[OK] and set the cooking
time or it will auto switch to cooking
time after 30 seconds.
Press [Cook]/[OK] to conrm the total
cooking time and start cooking.
Press [Cook]/[OK] or the cooking
program will auto stop after 1 hour.
Press [Cook]/[OK] or the instruction
message will disappear after 5 minutes.
Press [Cook]/[OK] and set the cooking
time or it will auto switch to cooking
time after 30 seconds.
Press [Cook]/[OK] to conrm the total
cooking time and start cooking.
45 minutes
(adjustable)
15 minutes
(xed)
---
10 minutes
(xed)
5 minutes (xed)
2 hours 10 minutes (adjustable)
15 minutes
(xed)
23 minutes
(adjustable)
---
45 minutes
(adjustable)
Compote & Chutney Cooking Menu
The Compote & Chutney Cooking Menu of this appliance consists of 2 submenus that allow you to
cook different types of accompaniment for a dessert plate or main dish.
Preparation
1 Follow the recipe to prepare the ingredients.
2 Follow the “Before Cooking Start” section to handle the inner pot and the Variety Cooker
properly.
Choose Compote & Chutney
3 Press the [Compote & Chutney] button (Fig. 18). Then select the submenu by moving your
nger up/down on the left /right side of the control ring.
4 Press [Cook]/[OK] button.
Page 22

22 EN
The rst instruction appears on the display. »
Make sure to put the ingredients in pot and mix well before starting the cooking program.
Do not exceed the maximum water level of [COMPOTE & CHUTNEY] as indicated on the
inside of the inner pot. (Fig. 17)
The step-by-step cooking guidance has been outlined in the table below for your quick »
reference and they will also appear on the display throughout the cooking process.
Set the Cooking Time
1 Press the [Cook]/[OK] button to adjust the cooking time. It will also automatically display the
adjustable cooking time af ter 30 seconds if you do not press the button.
The default cooking time appears on the display. »
2 Use control ring to adjust cooking time if necessar y (see “Control panel and display” section).
Preset timer is unavailable for Compote & Chutney Cooking Menu.•
Submenu Default Cooking
Time
[Sweet Fruits
Compote]
[Spicy Apple
Chutney]
The adjustable cooking time gives exibility to alter the cooking time according to need. •
When scaling a recipe, you will generally have to experiment the correct cooking time for your •
adjusted recipes.
Begin Cooking
25 minutes Ever y 1 minute 15 – 40 minutes N/A
2 hours Every 5 minutes 1 hours 30 minutes –
Note: The default time is the optimal cooking time based on the amounts and ingredients
listed in the provided recipes. Each of them are tested to perfection to ensure to achieve
culinary success.
Time Adjustment Adjustable Cooking
Time
3 hours 30 minutes
Remark
Adjustable cooking
time only affect the
2nd cooking step
1 Press the [Cook]/[OK] button to start cooking process.
» [Cook]/[OK] indication is on and the cooking animation appears on the display.
2 The display counts down the cooking time in minutes.
Finish Cooking
1 At the end of the cooking process, the appliance beeps and the message [Done!] appears on
the display.
2 Press lid release button to open the lid (Fig. 15). Be caution when opening lid as steam
escaping will be extremely hot.
3 Press the [Stop]/[Cancel] button to go to standby mode or unplug the Variety Cooker to
switch it off.
4 Remove the inner pot from the Variety Cooker and allow to cool in room temperature.
Submenu Cooking Instruction Action Cooking Time
[Sweet Fruits
Compote]
1. [Add all ingredients,
MIX WELL.]
Press [Cook]/[OK] and set the cooking
time or it will auto switch to cooking
time after 30 seconds.
Press [Cook]/[OK] to conrm the total
cooking time and start cooking.
25 minutes
(adjustable)
Page 23

23EN
English
Submenu Cooking Instruction Action Cooking Time
[Spicy Apple
Chutney]
1. [Add apple, vinegar
& brandy, MIX WELL .]
2. [Add remaining
ingredients, MIX
WELL .]
Press [Cook]/[OK] and set the cooking
time or it will auto switch to cooking
time after 30 seconds.
Press [Cook]/[OK] to conrm the total
cooking time and start cooking.
Press [Cook]/[OK] or the process will
auto star t after 30 seconds.
30 minutes (xed)
1 hour 30 minutes
(adjustable)
Breakfast Cooking Menu
The Breakfast Cooking Menu of this appliance consists of 2 submenus that allow you to prepare a
well-balanced meal at the start of the day.
Submenu: Oatmeal
Preparation
1 Follow the [Oatmeal] recipe to prepare the ingredients.
2 Follow the “Before Cooking Start” section to handle the inner pot and the Variety Cooker
properly.
Choose Breakfast
1 Press the [Breakfast] button (Fig. 19). Then select the submenu by moving your nger up/down
on the left/right side of the control ring. Choose [Oatmeal].
2 Press [Cook]/[OK] button.
The rst instruction “Add water and oat.” appears on the display. »
Make sure to put the ingredients in pot and mix well before starting the cooking program.
Do not exceed the maximum water level of [OATMEAL] as indicated on the inside of the
inner pot. (Fig. 20)
Set the Cooking Time
1 Press the [Cook]/[OK] button to adjust the cooking time. It will also automatically display the
adjustable cooking time af ter 10 seconds if you do not press the button.
The default cooking time of 20 minutes appears on the display. »
2 Use control ring to adjust cooking time if necessar y (see “Control panel and display” section).
The timer can be adjusted by unit of 1 minute and the cooking time can be set from 10 to •
30 minutes.
Preset timer is unavailable for Oatmeal Cooking Menu.•
Note: The default time is the optimal cooking time based on the ingredients for 3-4 servings.
Begin Cooking
1 Press the [Cook]/[OK] button to start cooking process.
» [Cook]/[OK] indication is on and the cooking animation appears on the display.
2 The display counts down the cooking time in minutes.
Finish Cooking
1 At the end of the cooking process, the appliance beeps and the message [Done!] appears on
the display.
2 Press lid release button to open the lid (Fig. 15). Be caution when opening lid as steam escaping
will be extremely hot.
Page 24

24 EN
3 Press the [Stop]/[Cancel] button to go to standby mode or unplug the Variety Cooker to
switch it off.
Submenu: Yoghurt
Preparation
1 Follow the Yoghurt recipe to prepare the ingredients.
2 Follow the “Before Cooking Start” section to handle the inner pot and the Variety Cooker
properly.
3 Pour warm milk (40°C) and yoghurt mixture into the resealable cups.
4 Put the steam tray in the inner pot (Fig. 21)
5 Fill the inner pot with water (Fig. 22)
Make sure the lled resealable cups and water do not exceed the maximum water level on
the scale for [YOG HURT] indicated on the inside of the inner pot. (Fig. 17)
6 Put the resealable cups on the steam tray (Fig. 23)
Choose Breakfast
1 Press the [Breakfast] button (Fig. 19). Then select the submenu by moving your nger up/down
on the left/right side of the control ring. Choose [Yoghurt].
2 Press [Cook]/[OK] button.
The rst instruction “Pour warm milk (40°C) and yoghurt mixture into resealable cups, ll inner »
pot with water.” appears on the display.
Set the Cooking Time
1 Press the [Cook]/[OK] button to adjust the cooking time. It will also automatically display the
adjustable cooking time af ter 30 seconds if you do not press the button.
The default cooking time of 4 hours appears on the display. »
2 Use control ring to adjust cooking time if necessar y (see “Control panel and display” section).
The timer can be adjusted by unit of 5 minutes and the cooking time can be set from 3 to •
6 hours.
Preset timer is unavailable for Youghurt Cooking Menu.•
Note: The default time is the optimal cooking time for 4 servings of Yoghur t.
Begin Cooking
1 Press the [Cook]/[OK] button to start cooking process.
» [Cook]/[OK] indication is on and the cooking animation appears on the display.
2 The display counts down the cooking time in minutes.
Finish Cooking
1 At the end of the cooking process, the appliance beeps and the message [Done!] appears on
the display.
2 Press lid release button to open the lid (Fig. 15). Be caution when opening lid as steam
escaping will be extremely hot.
3 Remove the resealable cups from the Variety Cooker.
4 Press the [Stop]/[Cancel] button to go to standby mode or unplug the Variety Cooker to
switch it off.
Page 25

25EN
English
Dessert Cooking Menu
The Dessert Cooking Menu of this appliance consists of 3 submenus that allow you to prepare
different delicious desserts to indulge your sweet tooth.
Submenu: Cheese Cake/Chocolate Cake
Preparation
1 Follow the recipe to prepare the ingredients.
2 Follow the “Before Cooking Start” section to handle the inner pot and the Variety Cooker
properly.
Choose Dessert
1 Press the [Dessert] button (Fig. 24). Then select the submenu by moving your nger up/down
on the left/right side of the control ring.
2 Press [Cook]/[OK] button.
The rst instruction appears on the display. »
Make sure to grease the inner pot with margarine or softened butter then pour the cake
batter before starting the cooking program.
Do not exceed the maximum water level of [DESSERT] as indicated on the inside of the
inner pot. (Fig. 17)
The step-by-step cooking guidance has been outlined in the table below for your quick reference »
and they will also appear on the display throughout the cooking process.
Begin Cooking
1 Press the [Cook]/[OK] button to start cooking process. If you do not press this button, the
cooking process starts automatically af ter 10 seconds.
The default cooking time of 1 hour 5 minutes for Cheese Cake or 40 minutes for Chocolate »
Cake appears on the display.
Cooking time is xed and not adjustable.•
Preset timer is unavailable for Cheese Cake and Chocolate Cake Cooking Menu.•
» [Cook]/[OK] indication is on and the cooking animation appears on the display.
Note: The default time is the optimal cooking time based on the amounts and ingredients listed
in the provided recipes. Each of them are tested to perfection to ensure to achieve culinary
success.
Do not scale the recipe or the cake will not cook properly.
2 The display counts down the cooking time in minutes.
Finish Cooking
1 At the end of the cooking process, the appliance beeps and the message [Done!] appears on
the display.
2 Press lid release button to open the lid (Fig. 15). Be caution when opening lid as steam
escaping will be extremely hot.
3 Remove the inner pot from the Variety Cooker.
4 Follow the last cooking instruction to let the cake cool down in pot for 15 minutes. Then turn
the inner pot upside down to ip cake onto a plate.
5 Press the [Stop]/[Cancel] button to go to standby mode or unplug the Variety Cooker to
switch it off.
Page 26

26 EN
Submenu Cooking Instructions Action Cooking Time
[Cheese
Cake]
[Chocolate
Cake]
1. [Put cake batter into
the inner pot.]
2. [Cool in pot 15 min
then ip onto plate.]
1. [Put cake batter into
the inner pot.]
2. [Cool in pot 15 min
then ip onto plate.]
Press [Cook]/[OK] to start the
cooking process or it will auto
start after 10 seconds.
Press [Cook]/[OK] or the
instruction message will
disappear after 5 minutes.
Press [Cook]/[OK] to start the
cooking process or it will auto
start after 10 seconds.
Press [Cook]/[OK] or the
instruction message will
disappear after 5 minutes.
1 hour 5 minutes (xed)
---
40 minutes (xed)
---
Submenu: Creme Caramel
Preparation
1 Follow the [Creme Caramel] recipe to prepare the ingredients.
2 Follow the “Before Cooking Start” section to handle the inner pot and the Variety Cooker
properly.
3 Pour caramel sauce and vanilla custard into the resealable cups.
4 Put the steam tray in the inner pot (Fig. 21)
5 Fill the inner pot with water (Fig. 22)
Make sure the lled resealable cups and water do not exceed the maximum water level on
the scale for [DESSERT] indicated on the inside of the inner pot. (Fig. 17)
Choose Dessert
1 Press the [Dessert] button (Fig. 24). Then select the submenu by moving your nger up/down
on the left/right side of the control ring. Choose [Creme Caramel].
2 Press [Cook]/[OK] button.
The rst instruction appears on the display. »
3 Put steam tray in the inner pot, add water up to the level indication for [DESSERT]. Then put
the resealable cups on the steam tray before star ting the cooking program (Fig. 23).
The step-by-step cooking guidance has been outlined in the table below for your quick »
reference and they will also appear on the display throughout the cooking process.
Set the Cooking Time
1 Press the [Cook]/[OK] button to adjust the cooking time. It will also automatically display the
adjustable cooking time af ter 30 seconds if you do not press the button.
The default cooking time of 25 minutes appears on the display. »
2 Use control ring to adjust cooking time if necessar y (see “Control panel and display” section).
The timer can be adjusted by unit of 1 minutes and the cooking time can be set from 20 to •
45 minutes.
Preset timer is unavailable for Creme Caramel.•
Note: Optimal cooking time based on the amounts and ingredients listed in the provided
recipes. Each of them are tested to perfection to ensure to achieve culinary success.
Do not scale the recipe or change the cooking utensils (resealable cups), the Creme Caramel
will not cook properly.
Page 27

27EN
English
Begin Cooking
1 Press the [Cook]/[OK] button to start cooking process.
» [Cook]/[OK] indication is on and the cooking animation appears on the display.
2 The display counts down the cooking time in minutes.
Finish Cooking
1 At the end of the cooking process, the appliance beeps and the message [Done!] appears on
the display.
2 Press lid release button to open the lid (Fig. 15). Be caution when opening lid as steam
escaping will be extremely hot.
3 Remove the inner pot from the Variety Cooker.
4 Follow the last cooking instruction to let the Creme Caramel cool down in pot for 5 minutes.
Then remove the resealable cups and keep them in the fridge for 3 hours or until rm.
5 Press the [Stop]/[Cancel] button to go to standby mode or unplug the Variety Cooker to
switch it off.
Submenu Cooking Instruction Action Cooking Time
[Creme
Caramel]
1. [Put detachable steam
tray & ll the inner pot
with water. Place covered
cups on top.]
2. [Cool in pot 5 min then
keep cups in fridge >
3 hours]
Press [Cook]/[OK] and set the
cooking time or it will auto switch
to cooking time after 30 seconds.
Press [Cook]/[OK] to conrm
the total cooking time and start
cooking.
Press [Cook]/[OK] or the
instruction message will disappear
after 5 minutes.
25 minutes (adjustable)
---
Soup Cooking Menu
The Soup Cooking Menu of this appliance consists of 5 submenus that allow you to prepare hearty
homemade soup supper. The Vegetable Soup cooking program is ideal for preparing soup with your
favorite ingredients.
Preparation
1 Follow the recipe to prepare the ingredients.
2 Follow the “Before Cooking Start” section to handle the inner pot and the Variety Cooker
properly.
Choose Soup
1 Press the [Soup] button (Fig. 25). Then select the submenu by moving your nger up/down on
the left/right side of the control ring.
2 Press [Cook]/[OK] button. The rst instruction appears on the display. Make sure to put the
ingredients in pot and mix well before star ting the cooking program.
Do not exceed the maximum water level of [SOUP] as indicated on the inside of the inner
pot. (Fig. 17)
The step-by-step cooking guidance has been outlined in the table below for your quick »
reference and they will also appear on the display throughout the cooking process.
Page 28

28 EN
Set the Cooking Time
1 Press the [Cook]/[OK] button to adjust the cooking time. It will also automatically display the
adjustable cooking time af ter 30 seconds if you do not press the button.
The default cooking time appears on the display. »
2 Use control ring to adjust cooking time if necessar y (see “Control panel and display” section).
Adjustable cooking time is unavailable for Tom Yum Goong.•
Preset timer is available up to 12 hours for • [Vegetable Soup] only. Follow “Setting the ready
time” section to set the desired start time for Vegetable Soup. Not recommend to delay
cooking time for more than 1 hours for any food with the exception of raw vegetables. Most
fresh perishable foods, especially raw poultry, meat, and sh cannot safety be left at room
temperature and cooking of these foods should never be delayed for more than 1 hour.
Submenu Default Cooking
Time
[Vegetable
Soup]
[Creme of
Mushroom]
[Minestrone] 25 minutes Every 1 minute 25 - 50 minutes Adjustable cooking
[Seafood
Chowder]
[Tom Yum
Goong]
Note: The default time is the optimal cooking time based on the amounts and ingredients listed in
the provided recipes. Each of them are tested to per fection to ensure to achieve culinar y success.
The adjustable cooking time gives exibility to alter the cooking time according to need. •
When scaling a recipe, you will generally have to experiment the correct cooking time for your •
adjusted recipes.
Begin Cooking
50 minutes Every 5 minutes 30 minutes –
33 minutes Every 1 minute 20 - 40 minutes Adjustable cooking
28 minutes Every 1 minute 20 – 40 minutes Adjustable cooking
30 minutes N/A N/A N/A
Time Adjustment Adjustable
Cooking Time
2 hours
Remark
N/A
time only affect the 4th
cooking step
time only affect the 2nd
cooking step
time only affect the 3rd
cooking step
1 Press the [Cook]/[OK] button to start cooking process.
» [Cook]/[OK] indication is on and the cooking animation appears on the display.
2 The display counts down the cooking time in minutes.
Finish Cooking
1 At the end of the cooking process, the appliance beeps and the message [Done!] appears on
the display.
The appliance beeps and the » [Keep warm]/[Reheat] light goes on to indicate that the
appliance has switched to keep-warm mode.
2 The display counts up the Keep-warm time in hours (12 hours max).
3 Press the [Stop]/[Cancel] button (Fig. 7) to cancel the keep-warm mode.
4 Press lid release button to open the lid (Fig. 15). Be caution when opening lid as steam
escaping will be extremely hot.
5 Unplug the Variety Cooker to switch it off.
Page 29

29EN
English
Submenu Cooking Instruction Action Cooking Time
[Vegetable
Soup]
1. [Add all ingredients,
MIX WELL.]
Press [Cook]/[OK] and set the
cooking time or it will auto switch to
50 minutes
(adjustable)
cooking time after 30 seconds.
Press [Cook]/[OK] to conrm the
total cooking time and star t cooking.
2. [Add seasonings.] Press [Cook]/[OK] or the instruction
---
message will disappear after 5 minutes.
[Creme of
Mushroom]
1. [Add butter & onion,
MIX WELL.]
Press [Cook]/[OK] and set the
cooking time or it will auto switch to
5 minutes (xed)
cooking time after 30 seconds.
Press [Cook]/[OK] to conrm the
total cooking time and star t cooking.
2. [Add mushroom, MIX
WELL .]
3. [Add our, MIX WELL.] Press [Cook]/[OK] or the process
Press [Cook]/[OK] or the process
will auto start after 30 seconds.
5 minutes (xed)
1 minutes (xed)
will auto start after 30 seconds.
4. [Add HOT stock, bay
leaf, salt & pepper, MIX
Press [Cook]/[OK] or the process
will auto start after 30 seconds.
20 minutes
(adjustable)
WELL .]
5. [Add half & half, MIX
WELL .]
[Minestrone] 1. [Add garlic, beans,
vegetables, tomato sauce,
herbs, HOT stock &
water, MIX WELL.]
Press [Cook]/[OK] or the process
will auto start after 30 seconds.
Press [Cook]/[OK] and set the
cooking time or it will auto switch to
cooking time after 30 seconds.
Press [Cook]/[OK] to conrm the
2 minutes (xed)
15 minutes
(xed)
total cooking time and star t cooking.
[Seafood
Chowder]
2. [Add pasta, MIX
WELL .]
1. [Add butter, bacon,
celery & onion, MIX
WELL .]
Press [Cook]/[OK] or the process
will auto start after 30 seconds.
Press [Cook]/[OK] and set the
cooking time or it will auto switch to
cooking time after 30 seconds.
10 minutes
(adjustable)
5 minutes (xed)
Press [Cook]/[OK] to conrm the
total cooking time and star t cooking.
2. [Add Flour, MIX WELL.
Add Wine, MIX WELL.]
3. [Add HOT stock,
water, clam juice &
Press [Cook]/[OK] or the process
will auto start after 30 seconds.
Press [Cook]/[OK] or the process
will auto start after 30 seconds.
1 minute (xed)
15 minutes
(adjustable)
potato, MIX WELL.]
4. [Add herbs & seafood,
MIX WELL.]
5. [Add cream, MIX
WELL .]
6. [Add seasonings, MIX
WELL .]
Press [Cook]/[OK] or the process
will auto start after 30 seconds.
Press [Cook]/[OK] or the process
will auto start after 30 seconds.
Press [Cook]/[OK] or the instruction
message will disappear after 5 minutes.
5 minutes (xed)
2 minutes (xed)
---
Page 30

30 EN
Submenu Cooking Instruction Action Cooking Time
[Tom Yum
Goong]
1. [Add broth, mushroom,
tomato, kafr lime leaves,
galangal, lemongrass &
water.]
2. [Add shrimp/ meat.]
(add the ingredients in the
last 5 minutes before the
cooking end)
3. [Add chili paste & other
seasoning.]
Press [Cook]/[OK] to start the
cooking process or it will auto star t
process after 10 seconds.
Press [Cook]/[OK] or the process
will auto start after 30 seconds.
Press [Cook]/[OK] or the instruction
message will disappear after 5 minutes.
30 minutes
5 minutes (xed)
---
Sauce Cooking Menu
The Sauce Cooking Menu of this appliance consists of 5 submenus that allow you to prepare a
prefect pasta or rice meal.
Preparation
1 Follow the recipe to prepare the ingredients.
2 Follow the “Before Cooking Start” section to handle the inner pot and the Variety Cooker
properly.
Choose Sauce
1 Press the [Sauce] button (Fig. 26). Then select the submenu by moving your nger up/down on
the left/right side of the control ring.
2 Press [Cook]/[OK] button.
The rst instruction appears on the display. »
Make sure to put the ingredients in pot and mix well before starting the cooking program.
Do not exceed the maximum water level of [SAUCE] as indicated on the inside of the inner
pot. (Fig. 17)
The step-by-step cooking guidance has been outlined in the table below for your quick »
reference and they will also appear on the display throughout the cooking process.
Set the Cooking Time
1 Press the [Cook]/[OK] button to adjust the cooking time. It will also automatically display the
adjustable cooking time af ter 30 seconds if you do not press the button.
The default cooking time appears on the display. »
2 Use control ring to adjust cooking time if necessar y (see “Control panel and display” section).
Preset timer is unavailable for Sauce Cooking Menu.•
Submenu Default
Cooking Time
[Mushroom &
Chicken]
[Bolognese] 50 minutes Every 5 minutes 40 minutes –
[Seafood
Gumbo]
30 minutes Every 1 minute 25 - 45 minutes Adjustable cooking time only
51 minutes Every 5 minutes 40 minutes –
Time
Adjustment
Adjustable
Cooking Time
1 hour 45 minutes
2 hour 30 minutes
Remark
affect the 3rd cooking step
Adjustable cooking time only
affect the 5th cooking step
Adjustable cooking time only
affect the 3rd cooking step
Page 31

31EN
English
Note: The default time is the optimal cooking time based on the amounts and ingredients listed in
the provided recipes. Each of them are tested to per fection to ensure to achieve culinar y success.
The adjustable cooking time gives exibility to alter the cooking time according to need. •
When scaling a recipe, you will generally have to experiment the correct cooking time for your •
adjusted recipes.
Begin Cooking
1 Press the [Cook]/[OK] button to start cooking process.
» [Cook]/[OK] indication is on and the cooking animation appears on the display.
2 The display counts down the cooking time in minutes.
Finish Cooking
1 At the end of the cooking process, the appliance beeps and the message [Done!] appears on
the display.
2 The appliance beeps and the [Keep warm]/[Reheat] light goes on to indicate that the appliance
has switched to keep-warm mode. The display counts up the Keep-warm time in hours
(12 hours max).
3 Press the [Stop]/[Cancel] button (Fig. 7) to cancel the keep-warm mode.
4 Press lid release button to open the lid (Fig. 15). Be caution when opening lid as steam
escaping will be extremely hot.
5 Unplug the Variety Cooker to switch it off.
Submenu Cooking Instruction Action Cooking Time
[Mushroom
& Chicken]
1. [Add butter, onion,
bell pepper & bacon,
MIX WELL.]
2. [Add mushroom &
chicken, MIX WELL.]
3. [Add our, MIX
WELL. Add HOT
stock, MIX WELL.]
4. [Add milk & cream,
MIX WELL.]
Press [Cook]/[OK] and set the cooking
time or it will auto switch to cooking
time after 30 seconds.
Press [Cook]/[OK] to conrm the total
cooking time and start cooking.
Press [Cook]/[OK] or the process will
auto star t after 30 seconds.
Press [Cook]/[OK] or the process will
auto star t after 30 seconds.
Press [Cook]/[OK] or the process will
auto star t after 30 seconds.
5 minutes (xed)
10 minutes (xed)
12 minutes
(adjustable)
3 minutes (xed)
[Bolognese] 1. [Add oil, onion,
celery, carrot & garlic,
MIX WELL.]
2. [Add bacon, MIX
WELL .]
3. [Add mince meat,
MIX WELL.]
4. [Add wine, HOT
stock, tomato paste
MIX WELL.]
Press [Cook]/[OK] and set the cooking
time or it will auto switch to cooking
time after 30 seconds.
Press [Cook]/[OK] to conrm the total
cooking time and start cooking.
Press [Cook]/[OK] or the process will
auto star t after 30 seconds.
Press [Cook]/[OK] or the process will
auto star t after 30 seconds.
Press [Cook]/[OK] or the process will
auto star t after 30 seconds.
5 minutes (xed)
5 minutes (xed)
10 minutes (xed)
10 minutes (xed)
Page 32

32 EN
Submenu Cooking Instruction Action Cooking Time
[Bolognese] 5. [Add remaining
ingredients, MIX
WELL .]
[Seafood
Gumbo]
1. [Add oil, onion,
celery, garlic & bell
pepper, MIX WELL.]
2. [Add hot sauce &
herbs, MIX WELL. Add
our, MIX WELL.]
3. [Add tomato sauce
& HOT stock, MIX
WELL .]
4. [Add seafood, salt &
pepper to taste, MIX
WELL .]
Press [Cook]/[OK] or the process will
auto star t after 30 seconds.
Press [Cook]/[OK] and set the cooking
time or it will auto switch to cooking
time after 30 seconds.
Press [Cook]/[OK] to conrm the total
cooking time and start cooking.
Press [Cook]/[OK] or the process will
auto star t after 30 seconds.
Press [Cook]/[OK] or the process will
auto star t after 30 seconds.
Press [Cook]/[OK] or the process will
auto star t after 30 seconds.
20 minutes
(adjustable)
10 minutes (xed)
1 minute (xed)
30 minutes
(adjustable)
10 minutes (xed)
Rice Cooking Menu
The Rice Cooking Menu of this appliance consists of 5 submenus that allow you to cook different
types of rice recipe.
The Variety Cooker automatically makes adjustments to temperature and heating time to cook
perfect rice every time.
Submenu Quantity of rice (cups) Approximate cooking time
[Saffron] 2 - 10 40 – 50 minutes
[Basmati] 2 - 10 40 – 50 minutes
[Plain] 2 - 10 40 – 50 minutes
[Sushi] 2 - 10 40 – 50 minutes
[Small portion Plain]* 2 - 6 30 – 40 minutes
Note: The above table is the approximate cooking time. The actual cooking time may vary, depending
on the voltage, room temperature, humidity and amount of water used.
*[Small portion Plain] requires less cooking time than other submenus and is advised to cook not
more than 6 cups of plain rice for optimal result.
Preparation
1 Measure the rice with the measuring cup provided (Fig. 27)
Each cup of uncooked rice normally gives 2 ser vings of cooked rice. Do not exceed the •
quantities indicated on the inside of the inner pot.
The provided measuring cup is approx. 180mL.•
Tip: The inner pot capacity is 5.0L; maximum capacity for cups of rice is 1.8L.
2 Rinse rice to remove excess bran & starch.
3 Put the pre-washed rice in the inner pot.
Page 33

33EN
English
4 Add water to the level indicated on the scale inside the inner pot that corresponds to the number
of cups and type of rice used. Then smooth the surface of the rice.
Note: If you cook 4 cups of Plain rice, add water up to the 4-cup level for rice indicated on the
scale (Fig. 28).
Saffron rice need to add butter, cinnamon, cardamom pods & peppercorns together with •
the rice and water at this stage.
The level marked inside the inner pot is just an indication; you can always adjust the water •
level for different types of rice and your own preference. However, if you add too much
water (much higher than the appropriate level for the amount of rice used), bubbling water
may come out of the steam vent cap.
Pay attention to water levels indicator on the inner pot. Sushi rice requires slightly more •
water as other rice type. Make sure you use the right water level for Sushi rice.
Small portion Plain can be used to shorten cooking time. The rice may be slightly harder •
than normal.
Do not open the lid while cooking rice. Rice will not cook properly.•
Rice pre-soaked in water may turn out slightly softer.•
5 Follow the “Before Cooking Start” section to handle the inner pot and the Variety Cooker
properly.
Choose Rice
1 Press the [Rice] button (Fig. 29). Then select the rice type by moving your nger up or down on
the left or right side of the control ring.
Preset timer is available up to 24 hours. Follow “• Setting the ready time” section to set the
desired start time for rice cooking.
Begin Cooking
1 Press the [Cook]/[OK] button to start cooking process.
The » [Cook]/[OK] light goes on and the cooking animation appears on the display.
The display counts down in minutes (10, 9, 8 etc.) during the last 10 minutes of the cooking »
process.
Finish Cooking
1 At the end of the cooking process, the appliance beeps and the [Keep warm]/[Reheat]light goes
on to indicate that the appliance has switched to keep-warm mode.
2 The display counts up the Keep-warm time in hours (12 hours max).
Note: The Variety Cooker automatically keep rice at the perfect serving temperature for
maximum 12 hours. Saffron and Basmati will only keep rice warm for maximum 3 hours to
preserve the taste and aroma.
3 Press the [Stop]/[Cancel] button (Fig. 7) to cancel the keep-warm mode.
If you want to continue the keep-warm mode again, press the • [Keep warm]/[Reheat]button
again.
4 Press lid release button to open the lid (Fig. 15). Be caution when opening lid as steam escaping
will be extremely hot.
5 Stir the rice to loosen it.
6 Press the [Stop]/[Cancel] button (Fig. 7) to go to standby mode or unplug the Variety Cooker
to switch it off.
Page 34

34 EN
Other Functions
Reheating
You can use the reheat mode to warm up rice that has cooled down.
Note: Do not use the reheat function when the amount of rice is over “RICE” water level 4 as the
rice may not be warmed adequately.
Do not reheat cooled rice more than once.•
1 Loosen the cooled rice and evenly distribute it in the inner pot.
2 Pour water onto the rice to prevent it from becoming too dr y. The amount of water to be added
depends on the amount of rice being reheated.
Tip: Add ½ cup (with the measuring cup supplied) of water to reheat the amount of rice up to
“RICE” water level 4.
If the rice starts scorching, add more water.•
3 Follow the “Before Cooking Start” section to handle the inner pot and the Variety Cooker
properly.
4 Press the [Keep warm]/[Reheat] button twice to start the reheating process. (Fig. 30)
The » [Keep warm]/[Reheat] light goes on and the reheat animation and the remaining reheat
time appear on the display (Fig. 31).
Note: The default reheat time is 23 minutes.
5 When the reheating process is nished, you hear a beep and the message [Done!] is shown on
the display.
6 Press the lid release button to open the lid (Fig. 15).
7 Press the [Stop]/[Cancel] button (Fig. 7) to go to standby mode or unplug the Variety Cooker
to switch it off.
Keep warm
The keep-warm mode allows you to keep your rice or cooked food warm for a longer period of
time. It is not meant as a cooking function.
Tip: Do not keep your rice or food warm for more than 12 hours to preserve its taste.
1 Press the [Keep warm]/[Reheat] button once to activate the keep-warm mode (Fig. 32).
The » [Keep warm]/[Reheat] light is on continuously.
During the keep-warm process, the display shows the time in hours from 0 to 11 (0HR, 1HR ... »
11HR).
2 After 12 hours, the keep-warm mode automatically ends and the Variety Cooker beeps 10 times.
3 The display switches to clock time.
Timer for Delayed Cooking
Steam and Rice menu allow you to preset timer for delayed cooking from 1 to 24 hours, and 1 to
12 hours for Stew and Vegetable Soup submenus.
Steam menu, Stew and Vegetable Soup submenus can even allow you to set both the timer and the
cooking time.
You can set the timer rst and then the cooking time, vice versa.
Not recommend to delay cooking time for more than 1 hour for any food with the exception of
raw vegetables.
Page 35

35EN
English
Note: Most fresh perishable foods, especially raw poultry, meat, sh and butter or margarine, cannot
safely be left at room temperature and cooking of these foods should never be delayed for more
than 1 hour.
Soaking the rice before cooking produces a softer texture.•
Setting the ready time with the Preset/Clock button
1 Press the [Preset]/[Clock] button (Fig. 33).
The lights of the available menu buttons ( » [Steam] and [Rice]) go on. (Fig. 34)
2 Press the button of the menu you want to use and, if necessary, select the desired submenu
with the control ring. Then press the [Cook]/[OK] button.
Note: Do not use this function to delay cooking time for meat, sh, frozen or fresh perishable
foods.
3 To set the ready time, move your nger up/down on the left /right side of the control ring. Press
and hold one of the 4 points to move the time forward or backward quickly (Fig. 6).
Tip: For example, you can use the [Preset]/[Clock] button to set the ready time at 18:30 (Fig. 35).
4 Press the [Cook]/[OK] button to start the timer.
The message » [Saved!] appears on the display.
The » [Cook]/[OK] light goes on and the text [Saved!] and the preset ready time for the
selected menu appear on the display.
5 When the cooking process star ts, the cooking animation and the remaining cooking time appear
on the display.
• The time difference between the present time and preset ready time must be longer
than the default cooking time.
• If the time difference between the present time and preset ready time is shorter than
the default cooking time, the preset function is not valid.
Setting the ready time with the menu buttons
Do not use this function for preparing meat, sh, frozen or other fresh perishable ingredients.
1 Press the button of the menu (Steam and Rice) you want to use and, if necessary, select the
desired submenu with the control ring. Then press the [Preset]/[Clock] button.
Note: You can also press the preset button in the submenu screen, the rst step-by-step screen
or the cooking time screen.
2 To set the ready time, move your nger up/down on the left/right side of the control ring. Press
and hold one of the 4 points to move the time forward or backward quickly (Fig. 6).
Note: For example, you can use the [Preset]/[Clock] button to set the ready time at 18:30
(Fig. 35).
3 Press the [Cook]/[OK] button to start the timer.
The » [Cook]/[OK] light goes on and the text [Saved!] and the preset ready time for the selected
menu appear on the display.
4 When the cooking process star ts, the cooking animation and the remaining cooking time appear
on the display.
Page 36

36 EN
5 After use the appliance
Cleaning
Warning: Unplug the Variety Cooker before you clean it. Wait until the Variety Cooker has cooled
down sufciently before you clean it.
To protect the non-stick coating of the inner pot, do not:
1 Take the steam basket with tray, resealable cups and the inner pot out of the body of the
2 Detach the inner lid from the outer lid by pressing the lid release tabs and pulling the inner lid
3 Detach the steam vent cap from the outer lid by pulling it upwards (Fig. 37).
4 Clean the inner lid, inner pot, steam basket with tray, resealable cups, cooking utensils and
5 Use only a damp cloth to wipe the inside and outside of the body of the Variety Cooker.
Never immerse the body of the Variety Cooker in water, nor rinse it under the tap.
use the inner pot for washing dishes;•
put vinegar into the pot;•
appliance.
outward and downwards (Fig. 36).
To reattach the inner lid, slot the top end of the inner lid into the outer lid and push the •
release tabs rmly home (‘click’).
To remove the bottom cover of the steam vent cap, press the locking tab to the open •
position and detach the cover from the hinge. (Fig. 38)
To reattach the bottom cover of the steam vent cap, insert the projections of the bottom •
cover into the slots of the cap, push the bottom cover against the cap (1) and push the
locking tab to the closed position (2) (‘click ’). (Fig. 39)
To put the steam vent cap back into the vent hole of the outer lid, insert it into the hole •
and push it down rmly.
steam vent cap with a sponge or a cloth in hot water with some washing-up liquid.
Do not use abrasive cleaning agents, scourers or metal utensils to clean the inner pot as
these damage the non-stick coating.
Storage
You can store all accessories inside the appliance in the following way: (Fig. 40)
1
Put the measuring cup and the resealable cups in the inner pot.•
Put the steam tray in the inner pot.•
2 Store the appliance in a safe, dr y place.
6 Troubleshooting
If your Variety Cooker does not function properly or if the cooking quality is insufcient, consult the
table below. If you are unable to solve the problem, please contact the Philips Consumer Care Centre in
your country.
Page 37

37EN
English
Problem Possible cause Solution
The light in the
[Cook]/[OK] button
does not go on.
There is a connection
problem.
Check if the mains cord is connected to the
Variety Cooker properly and if the plug is
inser ted rmly into the wall socket.
The light is defective. Take the appliance to your Philips dealer or a
service centre authorised by Philips.
The [Keep warm]/
[Reheat]light does
not go on when the
cooking process is
nished.
The light is defective. Take the appliance to your Philips dealer or a
service centre authorised by Philips.
You have been
reheating Mushroom
Risotto, Paella,
Ratatouille, Tortilla, all
Compote & Chutney,
The automatic keep-warm mode only applies
to 5 submenus in Main Cooking Menu (Beef
Bourguignon, Goulash, Poulet Basquaise,
Spezzatino di carne, Stew), all Soup, Sauce and
Rice Cooking Menus.
Breakfast and Dessert
Cooking Menus.
The display does not
function.
The appliance is not
plugged in.
If the appliance is not plugged in, the power
failure backup function does not work and the
display will not function.
The rice is not cooked. Not enough water has
been added.
The cooking process
Add water according to the scale on the inside of
the inner pot (see chapter ‘Using the appliance’).
You did not press the [Cook]/[OK] button.
has not star ted.
The inner pot is not
properly in contact with
Make sure that there is no foreign residue on the
heating element.
the heating element.
The cake is not
properly baked.
The heating element is
damaged.
The inner pot is
deformed.
The quantity of
ingredients was too
large.
You have accidentally
melted the butter that
you was softening for
making Chocolate
Cake.
Take the appliance to your Philips dealer or a
service centre authorised by Philips.
Take the inner pot to your Philips dealer or a
service centre authorised by Philips.
Check the quantities mentioned in the cake
recipe table in the section ‘Baking cake’. Do not
change recipe in propor tion.
Remove the melted butter as it cannot be used
for making Chocolate Cake even if it re-solidies.
To make softened butter, it is either allow the
butter to stand to room temperature or cut
butter into 1-inch chucks and placed between
sheets of wax paper and pound with a rolling pin
once on each side.
Page 38

38 EN
Problem Possible cause Solution
The rice is too hard or
too soft.
The [Preset]/[Clock]
light does not go on
Not enough or too
much water was added.
You selected the
incorrect menu.
Add water according to the scale on the inside of
the inner pot (see chapter ‘Using the appliance’).
Select the required menu (see chapter ‘Using the
appliance’).
The light is defective. Take the appliance to your Philips dealer or a
service centre authorised by Philips.
when I set the timer.
The rice is scorched. You have not rinsed the
Rinse the rice until the water runs clear.
rice properly.
The Variety Cooker
does not switch to
keep-warm mode
automatically.
You have been
reheating Mushroom
Risotto, Paella,
Ratatouille, Tortilla, all
Compote & Chutney,
The automatic keep-warm mode only applies
to 5 submenus in Main Cooking Menu (Beef
Bourguignon, Goulash, Poulet Basquaise,
Spezzatino di carne, Stew), all Soup, Sauce and
Rice Cooking Menus.
Breakfast and Dessert
Cooking Menus.
The yoghurt is not rm
enough or does not
form at all.
The temperature
control is defective.
You have warmed the
milk to over 40°C,
which has destroyed
the bacteria in the
Take the appliance to your Philips dealer or a
service centre authorised by Philips.
Do not warm the milk too long in order to keep
the bacteria alive in the yoghurt culture. For
smoother and rmer yoghur t, you can add 60g
milk powder to the milk and then warm it.
yoghur t culture.
Error message E1, E2,
E3 or E4 appears on
There is a technical
failure.
Take the appliance to your Philips dealer or a
service centre authorised by Philips.
the display.
Error message E5
appears on the display.
There has been a
power failure during
When the power supply resumes, press the
[Stop]/[Cancel] button to reset the appliance.
cooking that lasted
longer than 2 hours.
Page 39

39EN
English
7 Recipes
Mushroom Risotto
Serving size: 4-6 persons
Preparation Time: 15 minutes
Total Cooking Time: 25 minutes
Ingredients Preparation Method
35g Butter --100g Shallots Diced
50g Leeks Trim, discarded tough green leaves
and diced
25g Garlic Finely chopped
200g Mushroom Thinly sliced
400g Arborio Rice --2 Tablespoon Olive Oil --100mL White Wine --650ml(roughly) HOT Mushroom
Stock
150g Mascapone --125g Parmesan Cheese Grated
25g Fresh Parsley Finely chopped
1mL White Trufe Oil --A pinch of Salt ---
---
Cooking Instructions
Note: Follow “Main Cooking Menu” section for details operating procedure of the Variety Cooker.
1 Put butter, shallot, leek, garlic and mushroom in the inner pot, mix well. Press the [Main] button to
select the [Mushroom Risotto] submenu, close the lid and set the cooking time to 25 minutes.
Press the • [Cook]/[OK] button to start the cooking program. Cook for 5 minutes and stir
the ingredients for a few seconds in the middle of the cooking process for even cooking.
2 When the Variety Cooker beeps, put the rice and oil in the inner pot, mix well, close the lid and
cook for 5 minutes. Stir the ingredients for a few seconds in the middle of the cooking process
for even cooking.
3 After the second step and the Variety Cooker beeps, put the wine and hot stock gradually, mix
well, close the lid and cook for 15 minutes.
4 When the Mushroom Risotto cooking process is nished, add the cheese, parsley, trufe oil and
seasonings and then stir well.
Perfect Mushroom Risotto Hints and Tips
Prepare all ingredients in advance of cooking. Put them close to the Variety Cooker before •
you begin.
Page 40

40 EN
Use only Italian shor t-grain rice (e.g. Arborio, Carnaroli, Vialone) for better tasting risotto. •
NEVER wash the rice. Every bit of the rice starch helps make risotto creamy.
It is important to add hot stock, not cold, to the rice during the cooking process for better •
cooking result.
The quantity of liquid suggested in the recipes is always approximate. In actual cooking, you •
should be prepared to use more, or sometimes less, as the risotto itself requires. Use hot
water if the stock has been used up before the rice is fully cooked.
Perfectly cooked risotto should not be hard and stick to the serving spoon, nor should it be •
so liquid that it runs off your plate. The texture should be supple and uid, with a creamy,
slightly soupy consistency, but with body.
Paella
Serving size: 4-6 persons
Preparation Time: 20 minutes
Total Cooking Time: 22 minutes
Ingredients Preparation Method
50mL Olive Oil --80g Chorizo Pampelona Finely diced
75g Onion Finely diced
20g Garlic Minced
150g Red Bell Pepper Trimmed, seeded and diced
5g Smoked Paprika ---
0.05g Saffron thread --400g Spanish medium-
grain rice
100mL White Wine --650ml (roughly) HOT
Chicken Stock
80g Courgette Quarter it lengthwise then slice
75g Pea Defrosted
140g Plum Tomato Cut into quarters and
4 - 6 pieces Mussel Defrosted and de-shelled
8 - 10 pieces Clam Defrosted and de-shelled
4 - 6 pieces Prawn Defrosted, peeled and deveined
---
---
into ¼ segments
de-seeded
Cooking Instructions
Note: Follow “Main Cooking Menu” section for details operating procedure of the Variety Cooker.
1 Put oil, chorizo pampelona, onion, garlic and red bell pepper in the inner pot, mix well. Press
the [Main] button to select the [Paella] submenu, close the lid and set the cooking time for
22 minutes.
Page 41

41EN
English
Press the • [Cook]/[OK] button to start the cooking program. Cook for 5 minutes and stir
the ingredients for a few seconds in the middle of the cooking process for even cooking.
2 When the Variety Cooker beeps, put the paprika, saffron and rice in the inner pot, mix well,
close the lid and cook for 2 minutes.
3 After the second step and the Variety Cooker beeps, add wine and mix well with ingredients.
Immediately add in the hot stock gradually, mix well, close the lid and cook for 15 minutes.
4 10 minutes before the end of the cooking process, add courgette, pea, plum tomato, mussel,
clam and prawn, close the lid and continue to cook.
5 The Variety Cooker beeps to indicate that the cooking process is nished. Ready to serve.
Perfect Paella Hints and Tips
Prepare all ingredients in advance of cooking. Put them close to the Variety Cooker before •
you begin.
Use Arborio rice as a substitute.•
It is important to add hot stock, not cold, to the rice during the cooking process for better •
cooking result.
The quantity of liquid suggested in the recipes is always approximate. In actual cooking, you •
should be prepared to use more, or sometimes less, as the risotto itself requires. Use hot
water if the stock has been used up before the rice is fully cooked.
Use saffron for a nice yellow color as well as a subtle background avor to the rice.•
Perfectly cooked Paella should be al dente, with a tiny white dot in the centre. The rice •
should be dry and separate when done, not creamy like risotto.
Beef Bourguignon
Serving size: 4-6 persons
Preparation Time: 40 minutes
Total Cooking Time: 3 hours
Ingredients Preparation Method
FOR COOKING
1 Tablespoon Olive Oil --50g Smoked Bacon Cut into strips
700g Stew Beef Cut into 2 cm x 2 cm cubes
A pinch of Salt --A pinch of Black Pepper --26g All Purpose Flour --375mL Dry Red Wine --125mL HOT Beef Broth --1 Tablespoon Tomato Paste --1/2 spring Fresh Rosemary Tied together with other herbs in
cheesecloth (Herb Bouquet)
4 spring Fresh thyme Tied together with other herbs in
cheesecloth (Herb Bouquet)
1 Bay leaf Tied together with other herbs in
cheesecloth (Herb Bouquet)
Page 42

42 EN
Ingredients Preparation Method
2 Garlic cloves Peeled and ned chopped
200g Pearl Onion Trimmed and peeled
250g White Mushrooms Stems trimmed, sliced
250g Carrots Peeled and diced
A pinch of Sugar --FOR GARNISH
1 Tablespoon Unsalted
Butter
Few springs Fresh Parsley Chopped the at leaf, seasonings
Cooking Instructions
Note: Follow “Main Cooking Menu” section for details operating procedure of the Variety Cooker.
Allow to come to the room
temperature
to taste
1 Put oil and bacon in the inner pot, mix well. Press the [Main] button to select the [Beef
Bourguignon] submenu, close the lid and set the cooking time to 3 hours.
Press the • [Cook]/[OK] button and star t the cooking program. Cook for 5 minutes and stir
the ingredients for a few seconds in the middle of the cooking process for even cooking.
2 When the Variety Cooker beeps, put the beef, salt and pepper in the inner pot, mix well,
close the lid and cook for 5 minutes. Stir the ingredients for a few seconds in the middle of the
cooking process for even cooking.
3 After the second step and the Variety Cooker beeps, stir in our and continuous mixing until no
lumps. Immediately add in wine, hot stock, tomato paste and herbs, mix well, close the lid and
cook for 2 hour 20 minutes.
4 When the Variety Cooker beeps, put garlic, pearl onion, white mushroom, carrot and sugar,
mix well, close the lid and cook for 30 minutes.
5 When the Beef Bourguignon cooking process is nished, remove the herbs, add butter, seasoning
and parsley then stir well. Ready to serve.
Perfect Beef Bourguignon Hints and Tips
Prepare all ingredients in advance of cooking. Put them close to the Variety Cooker before •
you begin.
Choose well-marbled stewing cut for perfect long slow cooking Beef Bourguignon.•
Pick Point Noir when choosing the Red Wine for perfect result.•
Serve over mashed potatoes to complete the meals.•
Goulash
Serving size: 4-6 persons
Preparation Time: 20 minutes
Total Cooking Time: 2 hour 15 minutes
Ingredients Preparation Method
50g Butter --200g Onion Peeled, cut into trips
700g Stew Beef Cut into 2cm x 2cm cubes
Page 43

43EN
English
Ingredients Preparation Method
10g Hungarian Paprika --10g Salt --2 Bay leaves --8g Ground Black Pepper --650ml HOT Beef Stock --250mL Dry Red Wine --400g Potato Peeled, cut into 2cm x 2cm cubes
Cooking Instructions
Note: Follow “Main Cooking Menu” section for details operating procedure of the Variety Cooker.
1 Put butter and onion in the inner pot, mix well. Press the [Main] button to select the [Goulash]
submenu, close the lid and set the cooking time to 2 hours 15 minutes.
Press the • [Cook]/[OK] button and star t the cooking program. Cook for 5 minutes and stir
the ingredients for a few seconds in the middle of the cooking process for even cooking.
2 When the Variety Cooker beeps, put the beef, paprika and salt in the inner pot, mix well, close
the lid and cook for 20 minutes. Stir the ingredients for a few seconds in the middle of the
cooking process for even cooking.
3 After the second step and the Variety Cooker beeps, add bay leaf, pepper, hot beef stock and
wine, mix well, close the lid and cook for 1 hour 30 minutes.
4 When the Variety Cooker beeps, put potato, mix well, close the lid and cook for 20 minutes.
5 The Variety Cooker beeps to indicate that the cooking process is nished. Ready to serve.
Perfect Goulash Hints and Tips
Prepare all ingredients in advance of cooking. Put them close to the Variety Cooker before •
you begin.
Choose well-marbled stewing cut for perfect Goulash.•
Pick Point Noir when choosing the Red Wine for perfect result.•
Use Sweet Hungarian Paprika to give a rich and delicious classic Hungarian Goulash.•
Serve with sour cream on top or stir in sour cream and serve over rice or eat it as a soup •
and a simple green salad alongside, to complete the meal.
Ratatouille
Serving size: 4-6 persons
Preparation Time: 15 minutes
Total Cooking Time: 25 minutes
Ingredients Preparation Method
FOR COOKING
2 Tablespoon Olive Oil --3 Garlic cloves Finely Chopped
100g Onion Finely Chopped
1/2 Tablespoon Tomato Paste --100mL HOT Vegetable Stock ---
Page 44

44 EN
Ingredients Preparation Method
100ml Pre-packaged Tomato Passata --250g Courgette Quarter it lengthwise then
slice into ¼ segments
250g Aubergine Quarter it lengthwise then
slice into ¼ segments
50g Red Bell Pepper Trimmed, seeded and diced
50g Yellow Bell Pepper Trimmed, seeded and diced
FOR GARNISH
1 Bunch Fresh Basil Chopped, seasonings to taste
Cooking Instructions
Note: Follow “Main Cooking Menu” section for details operating procedure of the Variety Cooker.
1 Put oil, garlic, onion and tomato paste in the inner pot, mix well. Press the [Main] button to
select the [Ratatouille] submenu, close the lid and set the cooking time to 25 minutes.
Press the • [Cook]/[OK] button and star t the cooking program. Cook for 5 minutes and stir
the ingredients for a few seconds in the middle of the cooking process for even cooking.
2 When the Variety Cooker beeps, add hot vegetable stock and passata, mix well, close the lid
and cook for 5 minutes.
3 Add courgette, aubergine and red & yellow bell pepper, mix well, and close the lid. Cook for
15 minutes.
4 When the Ratatouille cooking process is nished, add basil & seasonings and then stir well.
Ready to serve.
Perfect Ratatouille Hints and Tips
Prepare all ingredients in advance of cooking. Put them close to the Variety Cooker before •
you begin.
Use prepackaged tomato passata for perfect Ratatouille.•
Serve over rice or eat it alone as a nutritious super.•
Good serve over pasta, rice, couscous or crusty Italian bread and top with Parmesan to turn •
this into a satisfying meal.
Poulet Basquaise
Serving size: 4-6 persons
Preparation Time: 30 minutes
Total Cooking Time: 1 hour 10 minutes
Ingredients Preparation Method
FOR MARINATE
600g Boneless chicken thigh lets Cut into 2 cm x 2 cm cubes
3g Tablespoon Rock Salt -- 6g Whole Black Peppercorn -- 1 Bay leaf Chopped nely
2 Tablespoon Sugar ---
Page 45

45EN
English
Ingredients Preparation Method
FOR COOKING
3 Teaspoon Olive Oil -- 30g Spanish Onion Peeled, Cut into strips
75g Fennel Diced
10g Garlic Crushed and attened
50g Red Bell Pepper Cut into strips
50g Yellow Bell Pepper Cut into strips
1 Bay leaf ---
0.05g Saffron Thread -- 50mL White Wine -- 500mL HOT Chicken Stock -- 100g Plum Tomato Peeled, seeded and diced
200g New Potato Peeled, cut into 2cm x 2 cm
cubes
FOR GARNISH
50g Fresh Parsley Finely chopped
Marinate Instructions
1 Place the chicken into a dish, mix & cover with the salt, whole black pepper corns, bay leaf and
sugar. Marinate for at least 1 hour.
2 Wash off the excess of salt mixture from the chicken; Keep it on a Kitchen Towel and pat dry.
Cooking Instructions
Note: Follow “Main Cooking Menu” section for details operating procedure of the Variety Cooker.
1 Put oil, onion, fennel, garlic, red and yellow bell pepper in the inner pot, mix well. Press the
[Main] button to select the [Poulet Basquaise] submenu, close the lid and set the cooking time
to 1 hour 10 minutes.
Press the • [Cook]/[OK] button to start the cooking program. Cook for 5 minutes and stir
the ingredients for a few seconds in the middle of the cooking process for even cooking.
2 When the Variety Cooker beeps, put the chicken, bay leaf and saffron, mix well, close the lid
and cook for 5 minutes. Stir the ingredients for a few seconds in the middle of the cooking
process for even cooking.
3 After the second step and the Variety Cooker beeps, add white wine and hot stock, mix well,
close the lid and cook for 45 minutes.
4 When the 3rd cooking step is nished, add tomato and potato mix well, close the lid and cook
for 15 minutes.
5 When the Poulet Basquaise cooking process is nished, garnish with parsley. Ready to serve.
Perfect Poulet Basquaise Hints and Tips
Prepare all ingredients in advance of cooking. Put them close to the Variety Cooker before •
you begin.
Use saffron for a nice yellow color as well as a subtle background avor to this classic dish.•
Serve hot along with a light, red wine and turn this into a satisfying meal.•
Page 46

46 EN
Spezzatino di carne
Serving size: 4-6 persons
Preparation Time: 30 minutes
Total Cooking Time: 2 hour 25 minutes
Ingredients Preparation Method
10g But ter --1 Teaspoon Mashed Garlic --700g Stew Beef Cut into 2cm x 2 cm cubes
½ Cup Dry White Wine --250g Prepackaged Tomato Passata --1 Spring Fresh Basil Finely chopped
120g Celery Trimmed, nely chopped
25g Fresh Parsley Finely chopped
¼ Teaspoon Dried Oregano --1 Spring Fresh Rosemary --A pinch of Salt --A pinch of Ground Black Pepper ---
Cooking Instructions
Note: Follow “Main Cooking Menu” section for details operating procedure of the Variety Cooker.
1 Put butter, garlic and beef in the inner pot, mix well. Press the [Main] button to select the
[Spezzatino di carne] submenu, close the lid and set the cooking time to 2 hours 25 minutes.
Press the • [Cook]/[OK] button and start the cooking program. Cook for 10 minutes and
stir the ingredients for a few seconds in the middle of the cooking process for even cooking.
2 When the Variety Cooker beeps, put wine, mix well, close the lid and cook for 5 minutes. Stir
the ingredients for a few seconds in the middle of the cooking process for even cooking.
3 After the second step and the Variety Cooker beeps, add passata, basil, celery, fresh parsley,
dried oregano, rosemary, salt and black pepper, mix well, close the lid and cook for 2 hours.
4 When the Variety Cooker beeps to indicate that the cooking process is nished. Ready to serve.
Perfect Spezzatino di carne Hints and Tips
Prepare all ingredients in advance of cooking. Put them close to the Variety Cooker before •
you begin.
Arrange Spezzatino di carne on a platter surrounded with potatoes, noodles, or rice, and •
decorate with parsley for great tasting homemade meals.
Tortilla
Serving size: 4-6 persons
Preparation Time: 10 minutes
Total Cooking Time: 38 minutes
Page 47

47EN
English
Ingredients Preparation Method
25mL Olive Oil --400g Potato Peeled and chopped
130g Onion Chopped
A pinch of Salt --A pinch of Ground Black Pepper --6 Large Eggs Beat the eggs with salt and the
pepper with a fork until blended
Cooking Instructions
Note: Follow “Main Cooking Menu” section for details operating procedure of the Variety Cooker.
1 Put oil, potato and onion in the inner pot, mix well. Press the [Main] button to select the
[Tor tilla] submenu, close the lid and set the cooking time to 38 minutes.
Press the • [Cook]/[OK] button to start the cooking program to cook for 15 minutes. Stir
the ingredients for a few seconds in the middle of the cooking process for even cooking.
2 When the Variety Cooker beeps, pour egg mixture to cover the potato, close the lid and cook
for 23 minutes.
3 The Variety Cooker beeps to indicate that the cooking process is nished. Remove the inner
pot from the Variety Cooker. Let the Tortilla cool down in the inner pot for 5 minutes. Then
turn the inner pot upside down to ip the Tortilla onto a plate. Ready to serve.
Perfect Tortilla Hints and Tips
Prepare all ingredients in advance of cooking. Put them close to the Variety Cooker before •
you begin.
Slice a Spanish chorizo sausage and cook with the potato and onion in the inner pot to •
enrich the taste.
Carefully ip the tor tilla onto a plate! To serve as a main course, slice it into 6-8 pieces like •
a pie. Serve sliced French bread on the side.
Stew
Note: Follow “Main Cooking Menu” section for details operating procedure of the Variety Cooker.
Tips & Hints:
Brown/ sear meats in a skillet, prior to adding to Variety Cooker. This will create greater •
depth of avor to any dish as well as melt out fat that can be poured off before stewing.
To ensure the food is safe, as well as tender, it is recommended to use an instant read •
thermometer to ensure food temperature reach well above 74°C (165°F).
Raw beans must be soaked and boiled for at least 10 minutes prior to stewing to avoid •
poisoning; canned beans do not require this.
Recipe Suggestion - Lemongrass Chicken
Serving size: 4-6 persons
Preparation Time: 30 minutes
Total Cooking Time: approximate 50 minutes
Page 48

48 EN
Ingredients Preparation Method
2 Teaspoon Olive Oil --600g Boneless chicken thigh lets Cut into 4 cm x 4 cm cubes
100g Onion Finely chopped
2 Stick Lemongrass Sliced
2 Teaspoon Fish Sauce --2 Tablespoon Dried Ground Cumin --2 Slice Fresh Ginger Finely sliced
½ Cup Water --2 Teaspoon Chili Powder --FOR GARNISH
2 Spring Fresh Spring Onion Finely chopped
4 Teaspoon Lemon juice ---
Cooking Instructions
1 Preheat oil in large sauce-pan, add in chicken and onion and sear for around 5 minutes or until
the outside brown. Transfer the content to the inner pot of the Variety Cooker.
2 Add lemongrass, sh sauce, dried ground cumin, fresh ginger, water, chili powder, mix well.
Press the [Main] button to select the [Stew] submenu, close the lid and set the cooking time
to 45 minutes.
Press the • [Cook]/[OK] button to start the cooking program. Cook for 10 minutes and stir
the ingredients for a few seconds in the middle of the cooking process for even cooking.
3 When the Variety Cooker beeps to indicate that the cooking process is nished. Garnish with
fresh spring onion and lemon juice before ser ving.
Perfect Lemongrass Chicken Hints and Tips
Prepare all ingredients in advance of cooking. Put them close to the Variety Cooker before •
you begin.
Purchase lemongrass with rm stalks (not soft or rubbery, which means it’s too old) for •
perfect result.
You can serve this dish with rice vermicelli, jasmine rice or toasted French bread.•
Sweet Fruits Compote
Serving size: 4-6 persons
Preparation Time: 10 minutes
Total Cooking Time: 25 minutes
Ingredients Preparation Method
5 Gala Apples Peeled, cored and cut into 8 cubes
25g Sugar --1 Vanilla Pod Scrape seeds from vanilla pod
1 Medium size Lemon Squeeze the juice
Page 49

49EN
English
Cooking Instructions
Note: Follow “Compote & Chutney Cooking Menu” section for details operating procedure of the
Variety Cooker.
1 Put gala apple, sugar, vanilla seed and lemon juice in the inner pot, mix well. Press the [Compote
& Chutney] button to select the [Sweet Fruits Compote] submenu, close the lid and set the
cooking time to 25 minutes.
Press the • [Cook]/[OK] button to start the cooking program. Stir the ingredients for a few
seconds in the middle of the cooking process for even cooking.
2 When the Variety Cooker beeps to indicate that the cooking process is nished, serve hot with
poultry and meat as a side dish or let it cool down and por tion into sterilized jars. The compote
should keep sealed, refrigerated and then ser ve cold.
Perfect Sweet Fruits Compote Hints and Tips
Prepare all ingredients in advance of cooking. Put them close to the Variety Cooker before •
you begin.
Variation in this recipe includes using pears to add the taste.•
Ginger, cinnamon goes well with the fruits to enrich the compote.•
Compote can be prepared ahead of time and stored, covered in the refrigerator. Spoon •
over oatmeal, yoghurt or ice-cream for an easy weeknight dessert. This is a delicious way
to add more fruit ser ving to your day.
When potting into jars, make sure there are no air spaces in the compote, as this impairs •
its keeping qualities. Get rid of them by stirring with a spoon. The compote can be kept in
the refrigerator up to 2-3 days.
Spicy Apple Chutney
Serving size: 4-6 persons
Preparation Time: 10 minutes
Total Cooking Time: 2 hours
Ingredients Preparation Method
5 Granny Smith Apple Peeled, cored and cut into 8 cubes
50mL Balsamic Vinegar --100mL Brandy --10g Demerara Sugar --A pinch of Salt --10g Mixed Spice Ground --10g Ground Cinnamon --10g Fresh Ginger Grounded
Cooking Instructions
Note: Follow “Compote & Chutney Cooking Menu” section for details operating procedure of the
Variety Cooker.
1 Put apple, vinegar and brandy, mix well. Press the [Compote & Chutney] button to select the
[Spicy Apple Chutney] submenu, close the lid and set the cooking time to 2 hours.
Press the • [Cook]/[OK] button to start the cooking program. Cook for 30 minutes.
Page 50

50 EN
2 When the Variety Cooker beeps, put demerara sugar, salt, mixed spice, cinnamon and fresh
ginger, mix well, close the lid and cook for 1 hour 30 minutes.
3 When the Variety Cooker beeps to indicate that the cooking process is nished, serve hot with
poultry and meat as a side dish or let it cool down and por tion into sterilized jars. The chutney
should keep sealed, refrigerated and then ser ve cold.
Perfect Spicy Apple Chutney Hints and Tips
Prepare all ingredients in advance of cooking. Put them close to the Variety Cooker before •
you begin.
Pick better quality balsamic vinegar to let the taste of the chutney come through better.•
Replace half of the vinegar by water to lighten the taste of chutney. You can always add •
more vinegar later.
This is a spicy condiment for meat and poultry, this chutney is also tempting serving along •
with sour cream.
Chutney can be prepared ahead of time and stored, covered in the refrigerator. Spoon •
over yoghurt or ice-cream for an easy weeknight dessert. This is a delicious way to add
more fruit serving to your day.
When potting into jars, make sure there are no air spaces in the chutney, as this impairs its •
keeping qualities. Get rid of them by stirring with a spoon. The chutney can be kept in the
refrigerator up to 2-3 days.
Oatmeal
Serving size: 1-6 persons
Preparation Time: 5 minutes
Total Cooking Time: 10-20 minutes
Ingredients Preparation Method
Oatmeal (80g Oatmeal for 1 – 2 persons)
(160g Oatmeal for 3 – 4 persons)
(240g Oatmeal for 5 - 6 persons)
Water ---
Cooking Instructions
Note: Follow “Breakfast Cooking Menu” section for details operating procedure of the Variety Cooker.
1 Put the oatmeal into the inner pot. Add water up to the level indicator for oatmeal according to
the amount of oatmeal you have added. Press the [Breakfast] button to select the [Oatmeal]
submenu, close the lid and set the cooking time according to the following reference.
Oatmeal Cooking Time
80g 10 min
160 g 15 min
240g 20 min
Press the • [Cook]/[OK] button to start the cooking program.
2 When the oatmeal cooking process is nished, add some fruits or honey on top and serve.
Page 51

51EN
English
Perfect Oatmeal Hints and Tips
Prepare all ingredients in advance of cooking. Put them close to the Variety Cooker before •
you begin.
Oatmeal is high in ber and, when made properly, a delicious breakfast choice. It’s best to •
follow the recipe provided above, milk is not recommended to cook in the Variety Cooker.
Add a small handful of dark raisins or currants to the oatmeal when serving. This is a •
delicious way to add more fruit serving to your day.
Be careful when biting into oatmeal, it retains heat very well and remains piping hot for a •
long time.
Yoghurt
Serving size: 4 persons
Preparation Time: 15 minutes
Total Cooking Time: 4 hours
Ingredients Preparation Method
500ml Milk --100ml Plain live yoghur t ---
Cooking Instructions
Note: Follow “Breakfast Cooking Menu” section for details operating procedure of the Variety Cooker.
1 Place the yoghurt in room temperature a few minutes before cooking to warm up the yoghurt
culture. Warm the milk to around 40°C. Mix the yoghurt with the warm milk rapidly in a
separate big pot and pour the mix ture into the resealable cups. Cover the cups with the lids.
Note: It takes only a few seconds to warm the milk to 40°C . If the milk reaches a too high
temperature, it will destroy the bacteria in the yoghur t.
2 Put the stream tray in the inner pot. Add water up to the level indication for yoghur t. Then put
the cups on the steam tray.
Press the • [Breakfast] button to select the [Yoghurt] submenu, close the lid and set the
cooking time to 4 hours.
Press the • [Cook]/[OK] button to start the cooking program.
Tip: If you want a more sour taste, you can set to a longer cooking time.
3 When the yoghurt cooking process is nished, remove the cups from the inner pot, add some
fruits or honey on top of the yoghurt and ser ve warm. Or you can let the yoghurt cool down
and put it into the fridge overnight and then serve cold.
Perfect Yoghurt Hints and Tips
Prepare all ingredients in advance of cooking. Put them close to the Variety Cooker before •
you begin.
For smoother and rmer yoghurt, you can add 60g milk powder to the milk and then warm •
it. Then follow the above steps.
Page 52

52 EN
Cheese Cake
Serving size: 6 persons
Preparation Time: 35 minutes
Total Cooking Time: 1 hour 5 minutes
Ingredients Preparation Method
250g Cream Cheese Cut into 1-inch chucks and allow
to soften at room temperature
60g + 40g Sugar Measure into separate containers
4 Large Eggs Separate egg white and yolk into
different bowl
40g All Purpose Flour --55mL Whipping Cream ---
1.5 Tablespoon Lemon Juice --A dash of Vanilla Essence --25g Butter Melted
Margarine/Softened Butter Grease the inner pot with a soft
brush
Preparing cake batter
1 Allow the cream cheese to soften at the room temperature.
2 In a mixing bowl, beat the cream cheese and sugar (60g) with an Electric Hand Mixer using
medium speed until the sugar dissolved. Scrap the sides of the bowl with spatula to ensure the
ingredients are incorporated during mixing.
3 Add egg yolks one at a time in the batter, then follow by plain our, whipping cream, lemon juice,
vanilla essence and melted butter and mix till combine with Electric Hand Mixer using medium speed.
Scrap the side of the bowl with spatula to ensure the ingredients are incorporated during mixing.
4 Separately in a mixing bowl, beat egg white with Electric Hand Mixer until foaming, gradually
add in sugar (40g) and beat until stiff peaks form.
5 Gently fold in egg white and sugar mixture into the cream cheese mix ture. Do not overmix.
Cooking Instructions
Note: Follow “Dessert Cooking Menu” section for details operating procedure of the Variety Cooker.
1 Grease the inner pot with margarine/softened butter and then pour the cake mixture into it.
Press the • [Dessert] button to select the [Cheese Cake] submenu, close the lid and press
the [Cook]/[OK] button to cook for 1 hour 5 minutes.
2 The Variety Cooker beeps to indicate that the cooking process is nished. Remove the inner
pot from the Variety Cooker. Let the cake cool down in the inner pot for 15 minutes. Then turn
the inner pot upside down to ip the cake onto a plate. Ready to serve. Or you can chill the
cheese cake overnight and then serve cold with fruits, compote.
Perfect Cheese Cake Hints and Tips
Prepare the cake batter in advance of cooking.•
Always bring the ingredients to room temperature before mixing. •
To soften cream cheese in the microwave: place unwrapped cream cheese in a microwavable •
plate and microwave on high for 15 seconds.
Page 53

53EN
English
Garnish the cheese cake with berries sauces, compote, or even place a small amount of sour •
cream of the side to make a rich and delicious indulgent dessert.
Chocolate Cake
Serving size: 6 persons
Preparation Time: 35 minutes
Total Cooking Time: 40 minutes
Ingredients Preparation Method
125g Butter Cut into 1-inch chucks and allow to
soften at room temperature
125g Sugar --100g Plain Flour Sieve well with cocoa powder
25g Cocoa Powder Sieve well with plain our
4 Large Eggs --Margarine/Softened
Butter
Preparing cake batter
Grease the inner pot with a soft brush
1 Allow the butter to soften at room temperature.
2 In a mixing bowl, cream the butter and sugar with an Electric Hand Mixer until light and uffy
(high speed for approximately 5 minutes). Scrap the sides of the bowl with spatula to ensure the
ingredients are incorporated during mixing.
3 Continue high speed, add in our, cocoa powder, and mix till combine. Scrap the sides of the
bowl with spatula to ensure the ingredients are incorporated during mixing.
4 Continue high speed, add eggs (one at a time) through the mixture, and mix only until combined.
Do not overmix. Scraping the side of the bowl to make sure all the ingredients are incorporated.
Cooking Instructions
Note: Follow “Dessert Cooking Menu” section for details operating procedure of the Variety Cooker.
1 Grease the inner pot with margarine/softened butter and then pour the cake mixture into it.
Press the • [Dessert] button to select the [Chocolate Cake] submenu, close the lid and
press the [Cook]/[OK] button to cook for 40 minutes.
2 The Variety Cooker beeps to indicate that the cooking process is nished. Remove the inner
pot from the Variety Cooker. Let the cake cool down in the inner pot for 15 minutes. Then turn
the inner pot upside down to ip the cake onto a plate. Ready to serve. Or you can chill the
chocolate cake overnight and then serve cold with fruits, compote.
Perfect Chocolate Cake Hints and Tips
Prepare the cake batter in advance of cooking.•
Always bring the ingredients to room temperature before mixing.•
To soften the butter quickly: cut butter into 1-inch chucks between 2 large pieces of wax •
paper and smash through with a rolling pin. When the butter is about ⅛ to ¼ inch thick, lif t
out wax paper and peel away the butter (before it gets too soft to peel).
Do not replace butter with margarine, shor tening or part-butter products, or the cake will •
not raise properly.
Page 54

54 EN
Do not replace cocoa power with drinking chocolate powder, or the cake will not raise •
properly and will give sweeter taste and less natural cocoa aroma.
Garnish the chocolate cake with a scoop of vanilla ice cream on the side and top both with •
warm chocolate fudge or caramel sauce and use whipped cream to decorate. Sprinkle with
your favorite toasted nuts and topped with berries.
Create your own Black Forest style dessert by topping this cake with cherry sauce and whip •
cream.
Cake will not raise beautifully if you replace the butter with margarine that need in the recipe.•
Alternative way - Using ready-made cake mix
Ingredients Preparation Method
250g Ready-made Chocolate cake mix --100mL Water or Milk --65g Softened Butter or Margarine --1 Large Egg ---
Preparing cake batter
1 Mix the cake mix, water or milk, butter and egg in a large bowl. Whisk with an electric mixer at
low speed for 1 minute and then at medium speed for another 3 minutes.
Cooking Instructions
Note: Follow “Dessert Cooking Menu” section for details operating procedure of the Variety Cooker.
1 Grease the inner pot with some butter and then pour the cake mixture into it.
Press the • [Dessert] button to select the [Chocolate Cake] submenu, close the lid and
press the [Cook]/[OK] button to cook for 40 minutes.
2 The Variety Cooker beeps to indicate that the cooking process is nished. Remove the inner
pot from the Variety Cooker. Let the cake cool down in the inner pot for 15 minutes. Then turn
the inner pot upside down to ip the cake onto a plate. Ready to serve. Or you can chill the
chocolate cake overnight and then serve cold with fruits, compote.
Creme Caramel
Serving size: 4 persons
Preparation Time: 35 minutes
Total Cooking Time: 25 minutes
Ingredients Preparation Method
FOR CARAMEL SAUCE
¼ cup Sugar -- 25mL Water --FOR VANILLA CUSTARD
400mL Whole Fat Milk -- 1 Vanilla Pod Scrape seeds from vanilla pod
into milk and stir to combine
1 Whole Egg Allow to come to room
temperature
Page 55

55EN
English
Ingredients Preparation Method
5 Egg Yolks Allow to come to room
temperature
60g Sugar ---
Preparing Caramel Sauce
1 Pour sugar, water into a clean saucepan.
2 Bring to a boil over medium-high heat and cook until the sugar starts to color around the edges.
3 Gently swirl the pan to even out the color and continue to cook the mixture until it turns
medium amber.
4 Immediately pour the hot caramel into the bottom of the resealable cup, dividing it evenly among
them.
5 Carefully tilt and turn the cups to coat the sides and bottom with the caramel.
Warning: Caramel, at the saucepan stage, is very, very hot; be extremely careful around it.
When the sugar has begun to caramelize, watch it carefully. Caramel burns quickly, and •
burnt caramel never taste good.
Do not use the cooking utensils provided for cooking on open ame. It may be softened •
and deformed.
Alternative way – use ready-made caramel sauce
Preparing Vanilla Custard
1 Bring the milk and vanilla pod to the boiling point.
2 In a mixing bowl, separately mix egg, egg yolk and sugar.
3 Gently stir in milk over the egg mixture using a wisk and be careful not to produce any foam.
Foam would lead to bubbles in the creme caramel later. »
1 Pour the mixture through a ne sieve to the mark of the resealable cup.
2 Use a tablespoon to skim the sur face to remove any visible air bubbles. Covered the resealable cups.
Cooking Instructions
Note: Follow “Dessert Cooking Menu” section for details operating procedure of the Variety Cooker.
1 Put the steam tray in the inner pot. Add water up to the level indication for desser t. Then
put the resealable cups on the steam tray. Press the [Dessert] button to select the [Creme
Caramel] submenu, close the lid and set the cooking time to 25 minutes.
Press the • [Cook]/[OK] button to start the cooking program.
2 The Variety Cooker beeps to indicate that the cooking process is nished. Let the creme caramel
cool in pot for 5 minutes. Then remove the resealable cups and keep them in the fridge for three
hours or until rm.
Vegetable Soup
Note: Follow “Soup Cooking Menu” section for details operating procedure of the Variety Cooker.
Hints and Tips
This cooking program is unsuitable to cook thick and creamy soup as they are tend to over •
heat easily and spill over, which may damage your Variety Cooker.
Page 56

56 EN
Recipe Suggestion - Pearl Barley Soup
Serving size: 4-6 persons
Preparation Time: 25 minutes
Total Cooking Time: 50 minutes
Ingredients Preparation Method
FOR COOKING
100g Pearl Barley Soak in cold water for few
hours/overnight
2 Tablespoon Olive Oil -- 75g Carrot Roughly chopped
50g Red Onion Peeled and coarsely chopped
50g Celery leaf Coarsely chopped
200g Swiss Chard Shredded leaves and roughly
chopped the stalks
200g Plum Tomato Roughly chopped
1L HOT Chicken Stock or water -- A pinch of Salt -- A pinch of Pepper --FOR GARNISH
25g Parmesan Freshly grated
25g Fresh Parsley Finely chopped
Few spring Fresh Thyme Roughly chopped
1 Tablespoon Olive Oil ---
Cooking Instructions
1 Put all ingredients in the inner pot, mix well. Press the [Soup] button to select the [Vegetable
Soup] submenu, close the lid and set the cooking time to 50 minutes.
Press the • [Cook]/[OK] button to start the cooking program.
2 When the Variety Cooker beeps to indicate that the cooking process is nished, garnish with
parmesan, parsley, thyme and oil before serving.
Perfect Pearl Barley Soup Hints and Tips
Prepare all ingredients in advance of cooking. Put them close to the Variety Cooker before •
you begin.
Creme of Mushroom Soup
Serving size: 4-6 persons
Preparation Time: 20 minutes
Total Cooking Time: 33 minutes
Ingredients Preparation Method
FOR COOKING
2 Tablespoon Butter ---
Page 57

57EN
English
Ingredients Preparation Method
200g Onion Peeled and nely diced
500g Botton Mushroom Thinly sliced
35g All Purpose Flour -- 500ml HOT Mushroom Stock -- 1 Bay leaf Coarsely chopped
A pinch of Salt Shredded leaves and roughly
chopped the stalks
A pinch of Pepper Roughly chopped
FOR FINISHING
800ml Half and Half ---
Cooking Instructions
Note: Follow “Soup Cooking Menu” section for details operating procedure of the Variety Cooker.
1 Put butter and onion in the inner pot, mix well. Press the [Soup] button to select the [Creme
of Mushroom] submenu, close the lid and set the cooking time to 33 minutes.
Press the • [Cook]/[OK] button to start the cooking program. Cook for 5 minutes and stir
the ingredients for a few seconds in the middle of the cooking process for even cooking.
2 When the Variety Cooker beeps, add mushroom, mix well, close the lid. Cook for 5 minutes
and stir the ingredients for a few seconds in the middle of the cooking process for even cooking.
3 After the second step and the Variety Cooker beeps, stir in our and continuous mixing until no
lumps.
4 When the Variety Cooker beeps, immediately add in hot mushroom stock after the Variety
Cooker beeps, then add bay leaf, salt and pepper, mix well, close the lid. Cook for another
20 minutes.
5 When the Variety Cooker beeps, add half and half, mix well, and cook for 2 minutes.
6 The Variety Cooker beeps to indicate that the cooking process is nished. Ready to serve.
Perfect Creme of Mushroom Soup Hints and Tips
Prepare all ingredients in advance of cooking. Put them close to the Variety Cooker before •
you begin.
Replace half & half with 1/3 of whipping cream and 2/3 of Milk if half and half is unavailable.•
Always bring the half & half to room temperature before mixing; it will dissolve beautifully •
with just a little stirring.
Minestrone
Serving size: 4-6 persons
Preparation Time: 20 minutes
Total Cooking Time: 25 minutes
Ingredients Preparation Method
2 Garlic cloves Peeled and minced
430g Canned Kidney beans Drained and rinsed
30g Peas --60g Onion Finely chopped
Page 58

58 EN
Ingredients Preparation Method
60g Celery Finely chopped
70g Carrots Finely chopped
200g Tomato Peeled and diced
60g Cabbage Chopped
125mL Tomato Sauce ---
1.5 teaspoon Dried Parsley --¼ teaspoon Dried Oregano --¼ teaspoon Dried Basil --1L HOT Vegetable Stock --250mL Water --100g Ditalini Pasta ---
Cooking Instructions
Note: Follow “Soup Cooking Menu” section for details operating procedure of the Variety Cooker.
1 Put garlic, kidney beans, peas, onions, celery, carrots, tomato, cabbage, tomato sauce, parsley,
oregano, basil, hot vegetable stock and water in the inner pot, mix well. Press the [Soup] button
to select the [Minestrone] submenu, close the lid and set the cooking time to 25 minutes.
Press the • [Cook]/[OK] button to start the cooking program. Cook for 15 minutes.
2 When the Variety Cooker beeps, add pasta, mix well, close the lid. Cook for 10 minutes.
Perfect Minestrone Hints and Tips
Prepare all ingredients in advance of cooking. Put them close to the Variety Cooker before •
you begin.
Small pasta match with this classic Minestrone, choose the small pasta such as Stelle, tripolini, •
tubetti, conchigliette are the best alternatives for thin pasta soup.
Seafood Chowder
Serving size: 4-6 persons
Preparation Time: 30 minutes
Total Cooking Time: 28 minutes
Ingredients Preparation Method
20g Butter --100g Smoked Bacon Diced
100g Celery Sliced
100g Onion Peeled and diced
40g All Purpose Flour --200ml Dry White Wine --250ml HOT Fish Stock --250ml HOT Water --250ml Clam Juice --200g Potato Peeled and diced
1 teaspoon Thyme ---
Page 59

59EN
English
Ingredients Preparation Method
2 Tablespoon Dried Parsley --100g Shrimp Peeled and deveined
80g Scallops --140g Salmon Diced
140g White sh Diced
300ml Cream --A pinch of salt --A pinch of Pepper ---
Cooking Instructions
Note: Follow “Soup Cooking Menu” section for details operating procedure of the Variety Cooker.
1 Put butter, bacon, celery and onion in the inner pot, mix well.
Press the • [Soup] button to select the [Seafood Chowder] submenu, close the lid and set
the cooking time to 28 minutes.
Press the • [Cook]/[OK] button to start the cooking program. Cook for 5 minutes and stir
the ingredients for a few seconds in the middle of the cooking process for even cooking.
2 When the Variety Cooker beeps, add our and continuous mixing until no lumps. Immediately
add in white wine and stir to mix well, close the lid. Cook for 1 minutes.
3 After the second step, add hot sh stock, water, clam juice and potato, mix well, close the lid
and cook for 15 minutes.
4 Add thyme, parsley, shrimp, scallops, salmon and white sh, mix well, close the lid and cook for
5 minutes.
5 Add cream, mix well, close the lid and cook for 2 minutes.
6 When the Variety Cooker beeps to indicate that the cooking process is nished, add seasoning
and mix well before serving.
Perfect Seafood Chowder Hints and Tips
Prepare all ingredients in advance of cooking. Put them close to the Variety Cooker before •
you begin.
Serve with warm crusty bread and a fresh salad to complete the meal.•
Tom Yum Goong
Serving size: 4-6 persons
Preparation Time: 30 minutes
Total Cooking Time: 30 minutes
Ingredients Preparation Method
FOR COOKING
1200mL HOT Chicken Stock --400g Oyster Mushroom Sliced
1 Tomato Quartered
6 Kafr Lime Leaves --2 Tablespoon Galangal Coarsely chopped
Page 60

60 EN
Ingredients Preparation Method
4 Spring Lemongrass Crushed and cut into smaller
sections
16 Pieces Shrimps Peeled and deveined, leaving
the tail intact
Water --2 Tablespoons “prik pao”
roasted chile in oil
8 Fresh Bird’s Eye Chilies --4 Tablespoon Fresh Lime Juice --4 Tablespoon Fish Sauce --FOR GARNISH
Coriander Leaves ---
Cooking Instructions
Note: Follow “Soup Cooking Menu” section for details operating procedure of the Variety Cooker.
---
1 Put the hot chicken stock, mushroom, tomato, kafr lime leaves, galangal and lemongrass in the
inner pot. Add water according to the level for [Soup] indicated in the inner pot, mix well.
Press the • [Soup] button to select the [Tom Yum Goong] submenu, close the lid and set
the cooking time to 30 minutes.
Press the • [Cook]/[OK] button to start the cooking program.
2 When the Variety Cooker beeps, put the shrimps in the inner pot and cook for 5 minutes.
3 When the Tom Yum Goong soup cooking process is nished, add the chili paste, fresh chilies,
lime juice and sh sauce and then stir well. Garnish with coriander levels before serving.
Perfect Tom Yum Goong Hints and Tips
Prepare all ingredients in advance of cooking. Put them close to the Variety Cooker before •
you begin.
Purchase lemongrass with rm stalks (not soft or rubbery, which means it’s too old) for •
perfect result.
Tom Yum Goong is a hot and sour Thai soup that is great as an appetizer or as a main dish •
when served with rice. Its robust fragrance is sure to tempt your tastebuds.
Mushroom and Chicken Sauce
Serving size: 4-6 persons
Preparation Time: 25 minutes
Total Cooking Time: 30 minutes
Ingredients Preparation Method
40g Butter --100g Onion Finely chopped
100g Red Bell Peppers Finely chopped
100g Green Bell Peppers Finely chopped
100g Smoked Bacon Finely diced
200g Mushroom Finely sliced
Page 61

61EN
English
Ingredients Preparation Method
600g Chicken Breast Diced into 1 cm x 1 cm cube
85g All Purpose Flour --500mL HOT Chicken Stock --100mL Whipping Cream Mix with milk before adding to
the soup
200mL Milk Mix with cream before adding to
the soup
Cooking Instructions
Note: Follow “SauceCooking Menu” section for details operating procedure of the Variety Cooker.
1 Put butter, onion, bell pepper and bacon in the inner pot, mix well.
Press the • [Sauce] button to select the [Mushroom & Chicken] submenu, close the lid and
set the cooking time to 30 minutes.
Press the • [Cook]/[OK] button to start the cooking program. Cook for 5 minutes and stir
the ingredients for a few seconds in the middle of the cooking process for even cooking.
2 When the Variety Cooker beeps, put mushroom and chicken, mix well and close the lid. Cook
for 10 minutes and stir the ingredients for a few seconds in the middle of the cooking process
for even cooking.
3 When the Variety Cooker beeps, stir in our and continuous mixing until no lumps. Immediately
add hot chicken stock and stir to mix well, close the lid. Cook for 12 minutes and stir the ingredients
for a few seconds in the middle of the cooking process for even cooking.
4 When the Variety Cooker beeps, add cream and milk, mix well and close the lid. Cook for
3 minutes.
5 When the Mushroom and Chicken Sauce cooking process is nished, pour over pasta and ready
to serve.
Perfect Mushroom and Chicken Sauce Hints and Tips
Prepare all ingredients in advance of cooking. Put them close to the Variety Cooker before •
you begin.
Serve with rice, pasta for a easy and tasty meal.•
Bolognese Sauce
Serving size: 4-6 persons
Preparation Time: 40 minutes
Total Cooking Time: 50 minutes
Ingredients Preparation Method
2 Tablespoon Olive Oil --150g Onion Finely chopped
150g Celer y ribs Finely chopped
60g Carrots Finely chopped
2 Garlic cloves Peeled and thinly sliced
200g Smoked Bacon Diced
300g Minced Pork ---
Page 62

62 EN
Ingredients Preparation Method
300g Minced Veal --200mL Red Wine --250mL HOT Beef Stock --170g Tomato Paste --400g Prepackaged Tomato Passata --A pinch of Dried Thyme --A pinch of Dried Oregano --A pinch of Salt --A pinch of Pepper ---
Cooking Instructions
Note: Follow “SauceCooking Menu” section for details operating procedure of the Variety Cooker.
1 Put oil, onion, celery, carrot & garlic in the inner pot, mix well.
Press the • [Sauce] button to select the [Bolognese] submenu, close the lid and set the cooking
time to 50 minutes.
Press the • [Cook]/[OK] button to start the cooking program. Cook for 5 minutes and stir
the ingredients for a few seconds in the middle of the cooking process for even cooking.
2 When the Variety Cooker beeps, put bacon, mix well and close the lid. Cook for 5 minutes and
stir the ingredients for a few seconds in the middle of the cooking process for even cooking.
3 When the Variety Cooker beeps, add minced pork and veal and continuous stirring until no
lumps. Close the lid and cook for 10 minutes.
4 Immediately add wine, hot beef stock, tomato paste, stir to mix well, close the lid. Cook for
10 minutes.
5 When the Variety Cooker beeps, add prepackaged tomato passata, thyme, oregano, salt and
pepper, mix well and close the lid. Cook for 20 minutes.
When the cooking process is nished, pour over pasta and ready to ser ve.•
Perfect Bolognese Hints and Tips
Prepare all ingredients in advance of cooking. Put them close to the Variety Cooker before •
you begin.
Use prepackaged tomato passata for perfect result.•
Serve with salad and warm bread for sopping up sauce or plate the Bolognese Sauce over •
fresh pasta and cover with parmesan to enjoy your meal.
Seafood Gumbo
Serving size: 4-6 persons
Preparation Time: 40 minutes
Total Cooking Time: 51 minutes
Ingredients Preparation Method
¼ cup Olive Oil --250g Onion Chopped
280g Celery Chopped
Page 63

63EN
English
Ingredients Preparation Method
1 Garlic cloves Peeled and minced
300g Green Bell Pepper Chopped
2 teaspoons hot pepper sauce --½ teaspoon Ground Dried
Cayene Pepper
½ teaspoon Ground White
Pepper
½ teaspoon Ground Black
Pepper
1.5 teaspoon Paprika Combine all spices and herbs
½ teaspoon Dried Thyme Combine all spices and herbs
½ teaspoon Dried Oregano Combine all spices and herbs
1 Crushed Bay leaf Combine all spices and herbs
35g All Purpose Flour --250g Tomato Sauce --650mL Fish Stock --100g Fresh Salmon Diced
1 cup Crabmeat --250g Small Shrimp Peeled and deveined
100g White Fish Defrosted, diced
1 teaspoon Salt --A pinch of Pepper ---
Combine all spices and herbs
together in a bowl, set aside
Combine all spices and herbs
together in a bowl, set aside
Combine all spices and herbs
together in a bowl, set aside
together in a bowl, set aside
together in a bowl, set aside
together in a bowl, set aside
together in a bowl, set aside
Cooking Instructions
Note: Follow “SauceCooking Menu” section for details operating procedure of the Variety Cooker.
1 Put oil, onion, celery, garlic & bell pepper in the inner pot, mix well.
Press the • [Sauce] button to select the [Seafood Gumbo] submenu, close the lid and set the
cooking time to 51 minutes.
Press the • [Cook]/[OK] button to start the cooking program. Cook for 10 minutes and stir
the ingredients for a few seconds in the middle of the cooking process for even cooking.
2 When the Variety Cooker beeps, put hot sauce and combined herbs, mix well. Immediately stir
in our and continuous mixing until no lumps.
3 When the Variety Cooker beeps, add tomato sauce and hot stock, mix well and close the lid.
Cook for 30 minutes.
4 When the Variety Cooker beeps, add salmon, crabmeat, shrimp, white sh, salt and pepper to
taste, mix well and close the lid. Cook for 10 minutes.
5 When the Seafood Gumbo cooking process is nished, pour over rice and ready to serve.
Page 64

64 EN
Perfect Seafood Gumbo Hints and Tips
Prepare all ingredients in advance of cooking. Put them close to the Variety Cooker before •
you begin.
Serve over rice in soup bowls or with crackers or rolls and salad.•
Saffron Rice
Serving size: 4-6 persons
Preparation Time: 10 minutes
Total Cooking Time: auto sensing by the appliance
Basmati Rice (cup) 2 4 6 8 10
Butter (Tablespoon) 0.5 1 1.5 2 2.5
Cinnamon Stick ¼ ½ ¾ 1 1¼
Whole Black Peppercorn
(pcs)
Saffron Thread (g) 0.025 0.05 0.075 0.1 0.125
Salt: A pinch
Water: According to the water measurement for [RICE]
Cooking Instructions
Note: Follow “Rice Cooking Menu” section for details operating procedure of the Variety Cooker.
1 2 3 4 5
1 Add washed rice and water to the water level indicated for [RICE] on the inner pot. Add
butter, cinnamon stick, whole black peppercorns and saffron thread, mix well, then close the lid.
Press the • [Rice] button to select the [Saffron] submenu.
Press the • [Cook]/[OK] button to start the cooking program.
2 The Variety Cooker beeps to indicate that the cooking process is nished.
Sushi Rice
Serving size: 4-6 persons
Preparation Time: 10 minutes
Total Cooking Time: auto sensing by the appliance
Ingredients Preparation Method
FOR PREPARING RICE
3 cups Sushi Rice --Water (according to the water
measurement for SUSHI)
FOR MAKING SUSHI
½ cup Sushi Vinegar (Japanese Rice
Vinegar)
1 Tablespoon Sugar --A pinch of Salt ---
---
---
Page 65

65EN
English
Cooking Instructions
Note: Follow “RiceCooking Menu” section for details operating procedure of the Variety Cooker.
1 Add washed rice and water to the water level indicated for [SUSHI] on the inner pot. Mix well
then close the lid.
Press the • [Rice] button to select the [Sushi] submenu.
Press the • [Cook]/[OK] button to start the cooking program.
2 When the Variety Cooker beeps to indicate that the cooking process is nished, immediately
add Sushi Vinegar, sugar and salt in the rice and gently mix well and let it cool.
3 Add your favorite ingredients (seaweed, cucumber, crab roe and salmon sashimi) to make
different sushi or rice rolls.
Steaming
Ingredients Amount Steaming time (min) Suggested herbs/spices for better taste
Asparagus 500g 15 -20 Thyme, basil, lemon
Baby corn 200g 15-20 Chives, chili, paprika
Broccoli 400g 15-20 Garlic, crushed red chili, tarragon
Green beans 500g 15-20 Parsley, lemon, garlic
Carrots 500g 20 -25 Parsley, dry mustard, chives
Cauliower orets 400g 15-20 Rosemar y, basil, tarragon
Courgette 500g 15-20 Dill, sage, rosemary
Potatoes 400g 35-40 Parsley, chives, garlic
Chicken llet 250g 30 -35 Black pepper, lemon, paprika
Eggs 6 pcs 18-25 --Prawns 200g 25-30 Saffron, lemon
Salmon 450g 20-25 Dill, parsley, basil
White sh 450g 18 -2 5 Dry mustard, allspice, marjoram
Note: Follow “Steam Cooking Menu” section for details operating procedure of the Variety Cooker.
Tips for steaming food
Do not steam food larger than 1½ inch thick. It may hit the inner lid and may not cook well.•
Cut off thick stems from cauliower, broccoli and cabbage.•
Do not thaw frozen vegetables before you steam them.•
Never steam frozen meat, poultry or seafood. Always let frozen meat, poultry or seafood thaw •
completely before you put it in the steamer.
Wash meat properly and pat it dry, so that as little juice as possible drips out.•
Tender pieces of meat with a little fat are most suitable for steaming.•
Wrap sh and meat in aluminum foil to prevent them from sticking to steaming basket. Wrapping •
also provides moister cooking.
Puncture eggs before steaming to prevent shells cracking.•
Always keep the lid closed during the entire steaming process. Opening the lid causes a loss of •
heat and steam, resulting in a slower cooking time.
Make sure the food is well done before you eat it. If the food is not done, set a longer steaming •
time. You may need to put some more water in the inner pot.
Page 66

© 2010 Koninklijke Philips Electronics N.V.
All rights reserved.
3140 035 22252
 Loading...