

Page 1
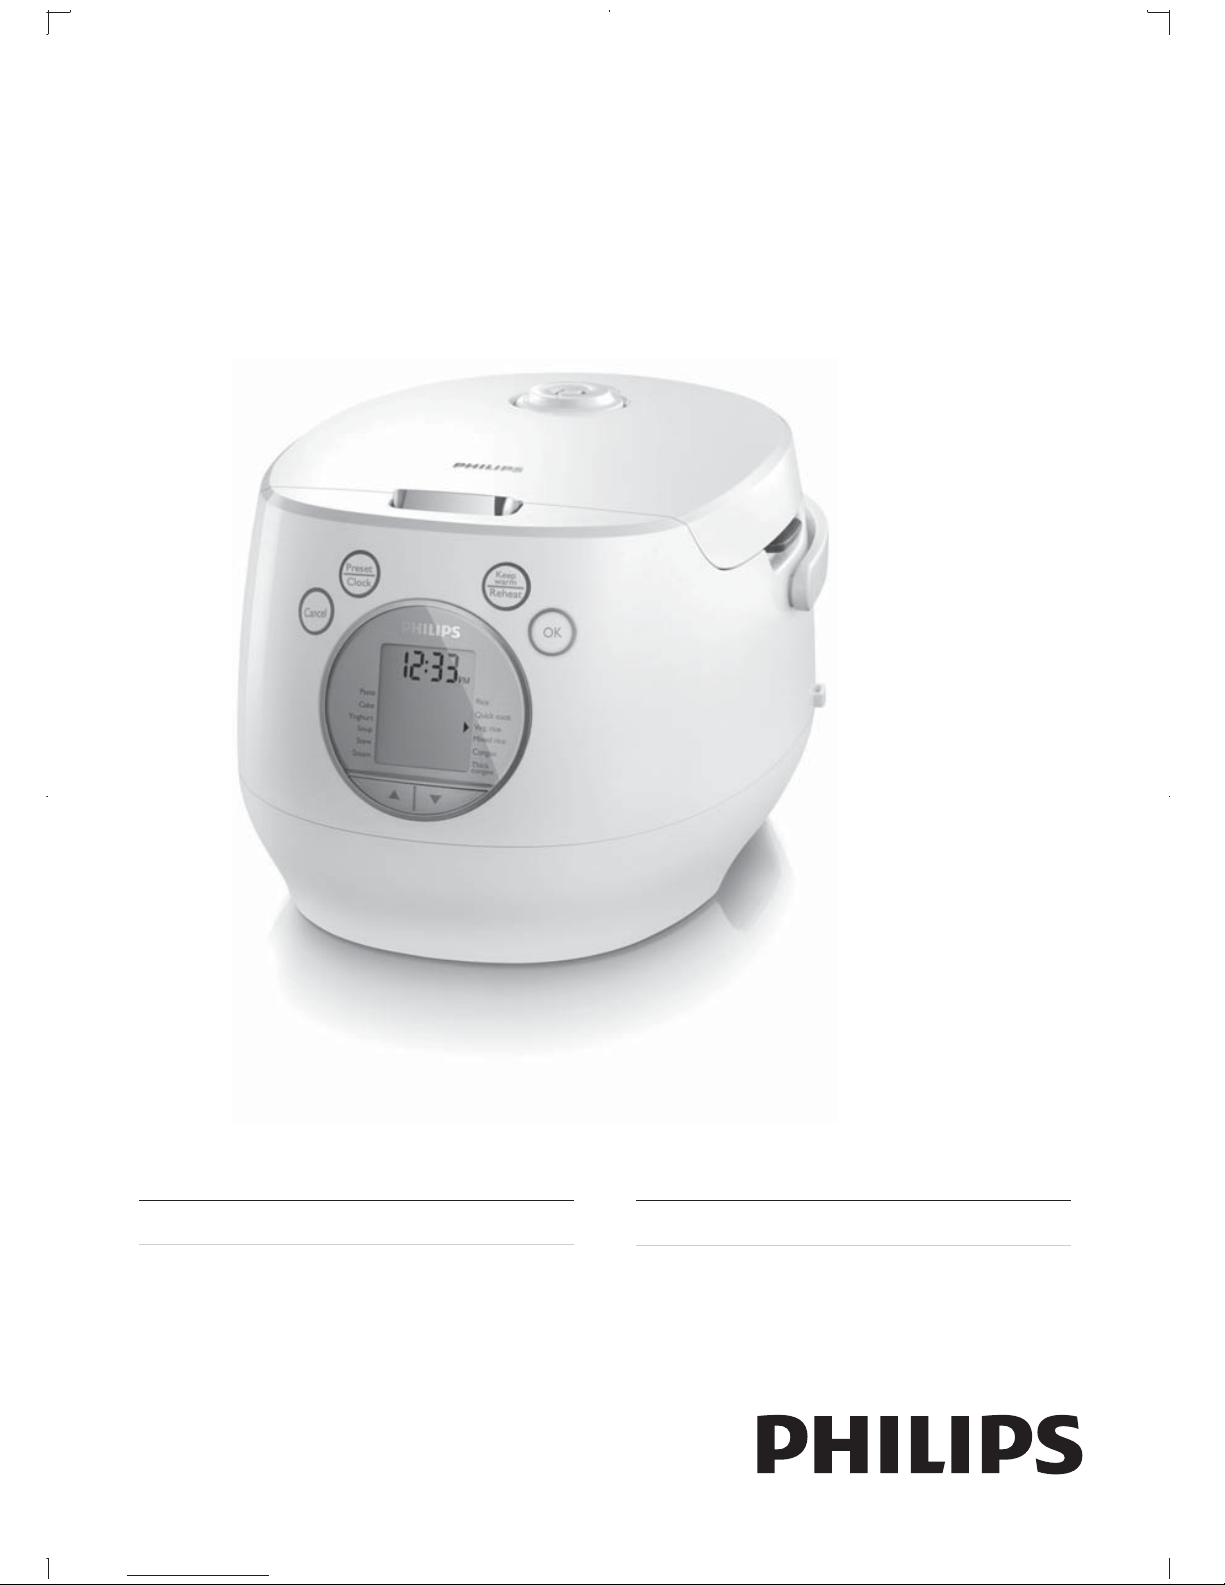
Register your product and get support at
www.philips.com/welcome
HD4765
HD4767
EN User manual 3
ZH-TW Ԛʹ˫ 25
Page 2

Contents
1 Important 4
Danger 4
Warning 4
Caution 4
Electromagnetic elds (EMF) 5
Power failure backup function 5
Environment 5
Guarantee and service 5
2 Product Overview 6
Accessories 7
Control panel 7
3 Clean & Install accessories 8
4 Set the clock
8
5 Rice 9
Cooking time 9
Prepare 9
Start cooking 10
6 Congee 11
Prepare 11
Start cooking 11
10 Yoghurt 15
Ingredients 15
Prepare 15
Start cooking 15
11 Pasta 16
Prepare 16
Start cooking 16
12 Preset time for delayed cooking 17
13 Reheat
18
14 Keep warm 19
15 Cleaning
16 Recipes
Yoghurt 21
Pasta with sauce 21
Cake 21
Braised Beef with Garlic 22
Lotus Root Soup 22
Vegetable Soup 22
20
21
7 Steam 12
8 Soup and Stew
13
9 Cake 14
Prepare 14
Start cooking 14
17 Troubleshooting 23
EN
3
Page 3

1 Important
Read this user manual carefully before you use
the appliance and save it for future reference.
• Do not plug in the appliance or press any
of the buttons on the control panel with
wet hands.
• Never connect this appliance to an
external timer switch in order to avoid a
hazardous situation.
Danger
• Never immerse the main body of the rice
cooker in water, nor rinse it under the tap.
Warning
• Check if the voltage indicated on the
appliance corresponds to the local power
voltage before you connect the appliance.
• Only connect the appliance to an earthed
power outlet. Always make sure that the
plug is inserted rmly into the power outlet.
• Do not use the appliance if the plug, the
power cord, the inner pot, the sealing ring,
or the main body is damaged.
• Make sure that the damaged power cord
is replaced by Philips, a service center
authorized by Philips or similarly quali ed
persons in order to avoid a hazard.
• This appliance is not intended for use by
persons (including children) with reduced
physical,sensory, or mental capabilities, or
lack of experience and knowledge, unless
they have been given supervision or
instruction concerning use of the appliance
by a person responsible for their safety.
• Children should be supervised to make sure
that they do not play with the appliance.
• Keep the power cord out of the reach of
children. Do not let the power cord hang
over the edge of the table or worktop on
which the appliance stands.
• Make sure the heating element, the
temperature sensor, and the outside of the
inner pot are clean and dry before you put
the plug in the power outlet.
Caution
• Never use any accessories or parts from
other manufacturers or that Philips does
not speci cally recommend. If you use
such accessories or parts, your guarantee
becomes invalid.
• Do not expose the appliance to high
temperatures, nor place it on a working or
still hot stove or cooker.
• Do not expose the appliance to direct
sunlight.
• Place the appliance on a stable, horizontal,
and level surface.
• Always put the inner pot in the appliance
before you put the plug in the power
outlet and switch it on.
• Do not place the inner pot directly over an
open re to cook rice.
• Do not use the inner pot if it is deformed.
• The accessible surfaces may become hot
when the appliance is operating. Only
touch the control panel and lid open
button.
• Beware of hot steam coming out of the
steam vent during cooking or out of the
rice cooker when you open the lid. Keep
hands and face away from the rice cooker
to avoid the steam.
• The inner pot, steam basket, and resealable
cups, during and after cooking process, may
be hot and heavy.
• Do not lift and move the rice cooker while
it is operating.
• Do not exceed the maximum water level
indicated in the inner pot to prevent
over ow.
4 EN
Page 4
• Do not place the cooking utensils inside
the pot while cooking, keeping warm or
reheating rice.
• Only use the cooking utensils provided.
Avoid using sharp utensils.
• Do not use the cooking utensils provided
by the rice cooker on open ame.
• To avoid scratches, it is not recommended
to cook ingredients with crustaceans and
shell sh. Remove the hard shells before
cooking.
• Do not insert metallic objects or alien
substances into the steam vent.
• Do not place a magnetic substance on
the lid. Do not use the appliance near a
magnetic substance.
• Always let the appliance cool down before
you clean or move it.
• Always clean the appliance after use. Do
not clean the appliance in the dishwasher.
• Always unplug the appliance if not used for
a longer period.
• This appliance is intended to be used in
household and similar applications such as:
» Staff kitchen areas in shops, of ces, and
other working environments;
» Farm houses;
» By clients in hotels, motels and other
residential type environments;
» Bed and breakfast type environments.
Power failure backup function
This appliance has a backup function that
remembers the status before a power failure,
provided the power supply is resumed within
two hours. If the power failure occurs during a
cooking process, the countdown of the cooking
time continues where it left off when the power
supply resumes.
If the power failure lasts longer than two hours
and the failure occurs during a cooking process,
the appliance automatically resets to standby
mode when the power supply resumes. Open
the rice cooker, remove its contents, and start
all over again.
If you have set the timer and the preset cooking
process has not yet started when a power
failure occurs, the process starts when the
power supply resumes, provided it resumes
within 12 hours.
Environment
Do not throw away the appliance with the
normal household waste at the end of its life,
but hand it in at an of cial collection point for
recycling. By doing this, you help to preserve the
environment.
• If the appliance is used improperly or
for professional or semi-professional
purposes or if it is not used according to
the instructions in this user manual, the
guarantee becomes invalid and Philips
refuses liability for any damage caused.
Electromagnetic elds (EMF)
This appliance complies with all standards
regarding electromagnetic elds (EMF). If handled
properly and according to the instructions in this
user manual, the appliance is safe to use based
on scienti c evidence available today.
Guarantee and service
If you need service or information or if you
have a problem, visit the Philips website
at www.philips.com or contact the Philips
Customer Care Center in your country (you
nd its phone number in the worldwide
guarantee lea et). If there is no Consumer Care
Center in your country, go to your local Philips
dealer.
5EN
Page 5
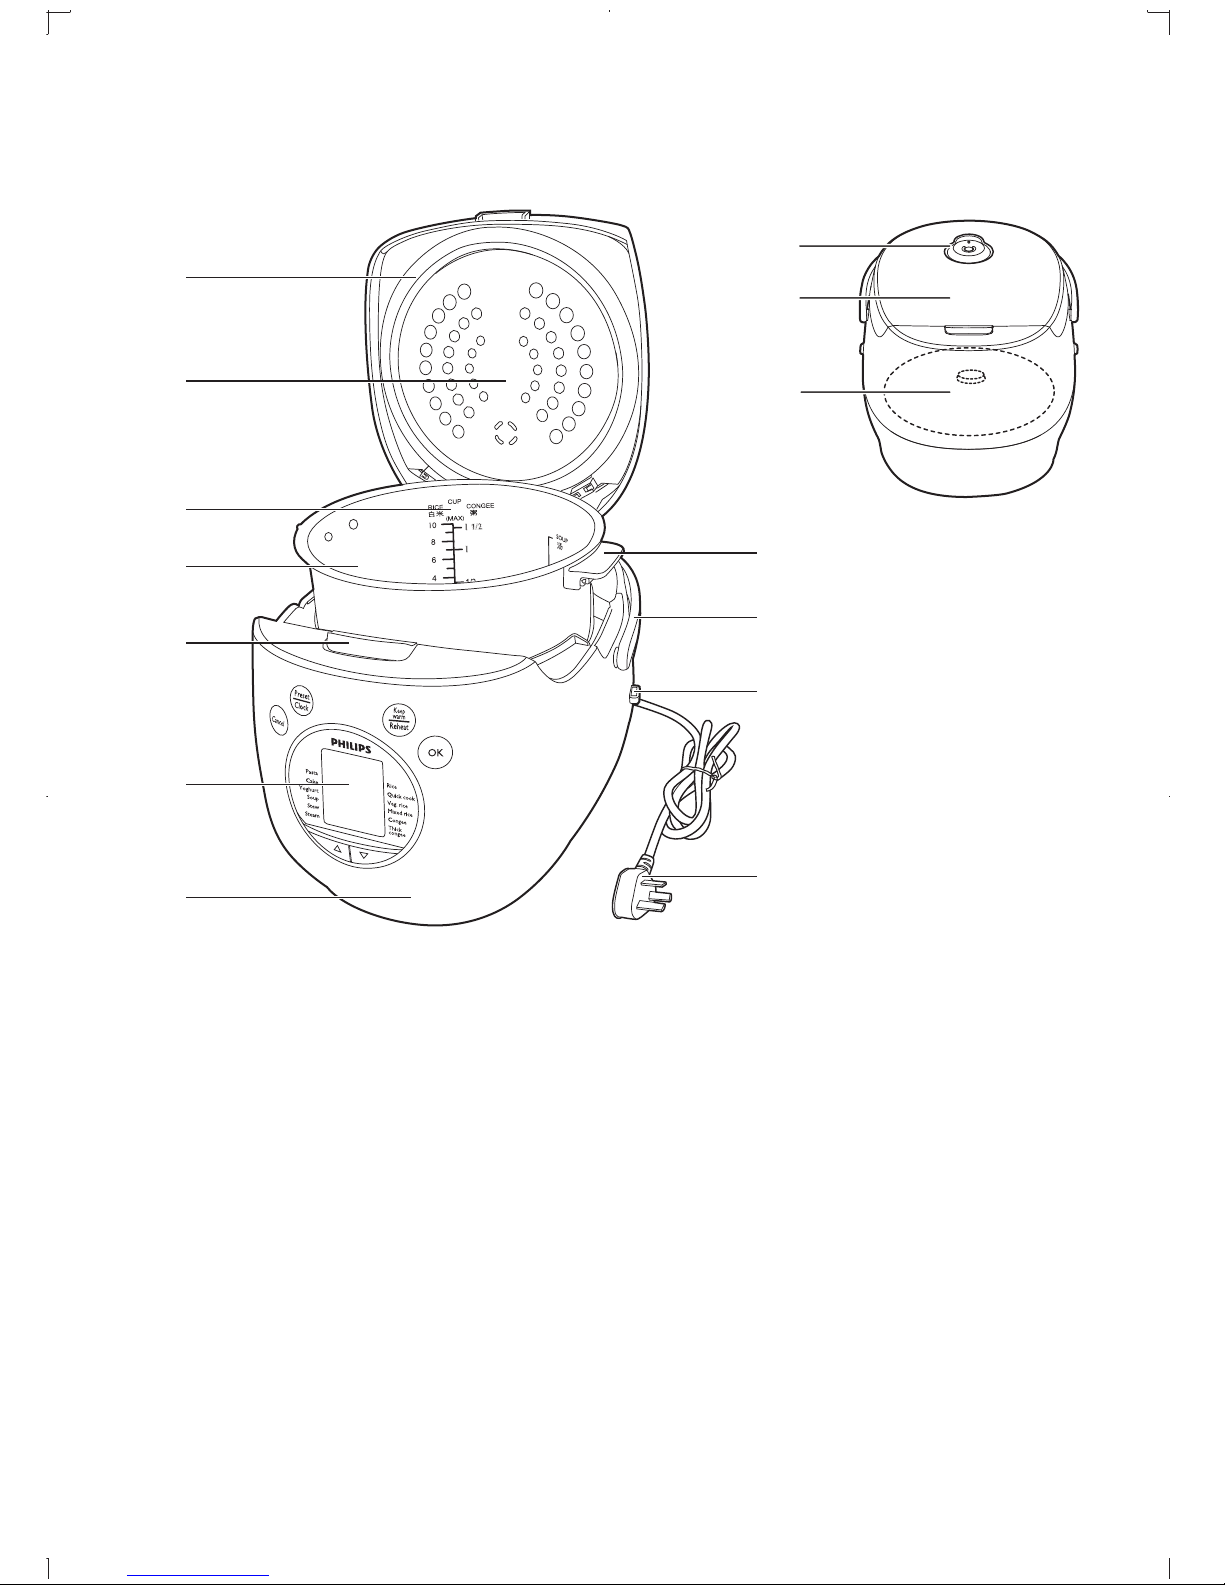
2 Product Overview
a
n
m
b
c
d
e
f
g
l
k
j
i
h
a Sealing ring
b Detachable inner lid
c Water level indications
d Inner pot
e Lid release button
f Control panel
g Main body
6 EN
h Mains plug
i Mounting brackets (left and right)
j Cooker handle
k Pot handle
l Heating element
m Outer lid
n Detachable steam vent cap
Page 6
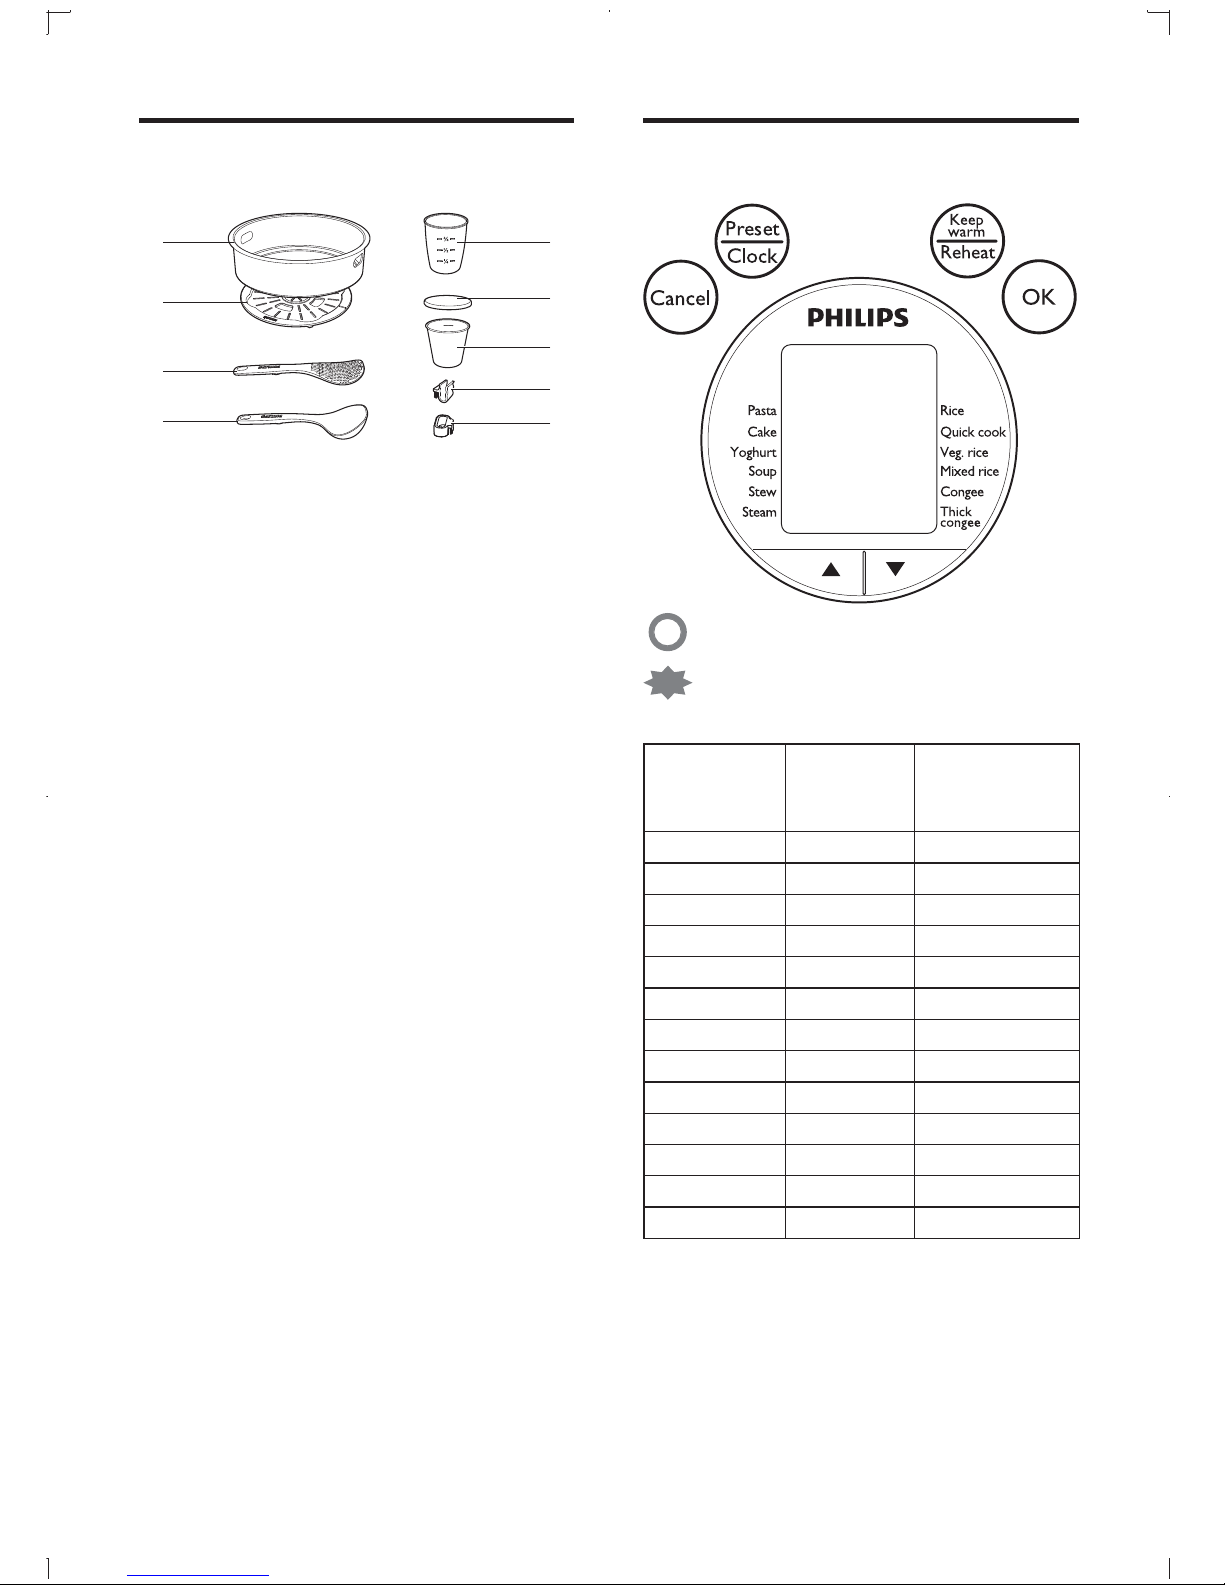
Accessories
Control panel
a
b
c
d
a Steam basket
b Detachable steam tray
c Rice scoop
d Soup ladle
e Scoop holder
f Mains cord holder
g Yoghurt cup
h Lid of yoghurt cup
i Measuring cup
i
h
g
f
e
: This means indication light is on
: This means number or indication light blinks
Menu Default
cooking
time
Rice 35 min None
Quick cook 25 min None
Veg. rice 35 min None
Mixed rice 45 min None
Congee 1 h 30 min - 4 h
Thick congee 1 h 30 min - 2 h
Cake 50 min None
Pasta 35 min 25 min - 35 min
Yoghurt 4 h 3 h - 6 h
Steam 30 min 1 min - 1 h
Soup 2 h 30 min - 4 h
Stew 1 h 45 min - 3 h
Reheat 28 min None
Flexible time
7EN
Page 7
3 Clean & Install
accessories
1 Take out all the accessories from inner pot.
2 Wipe the cooker with soft cloth.
3 Clean the inner pot and inner lid with
STEAM menu.
• Fill half pot of water in the inner pot.
Close the outer lid and connect the
mains plug to power supply.
• Press up/down arrow key to STEAM,
and then press OK .
• "Add ingredients" is prompted. Press
OK to con rm.
• The time suggested for the cooking is
displayed.
• Press OK to con rm. The cooker starts
steaming. The time needed is displayed.
• After the cooker beeps, press
CANCEL button.
• Pour the water out of the pot after it
cools.
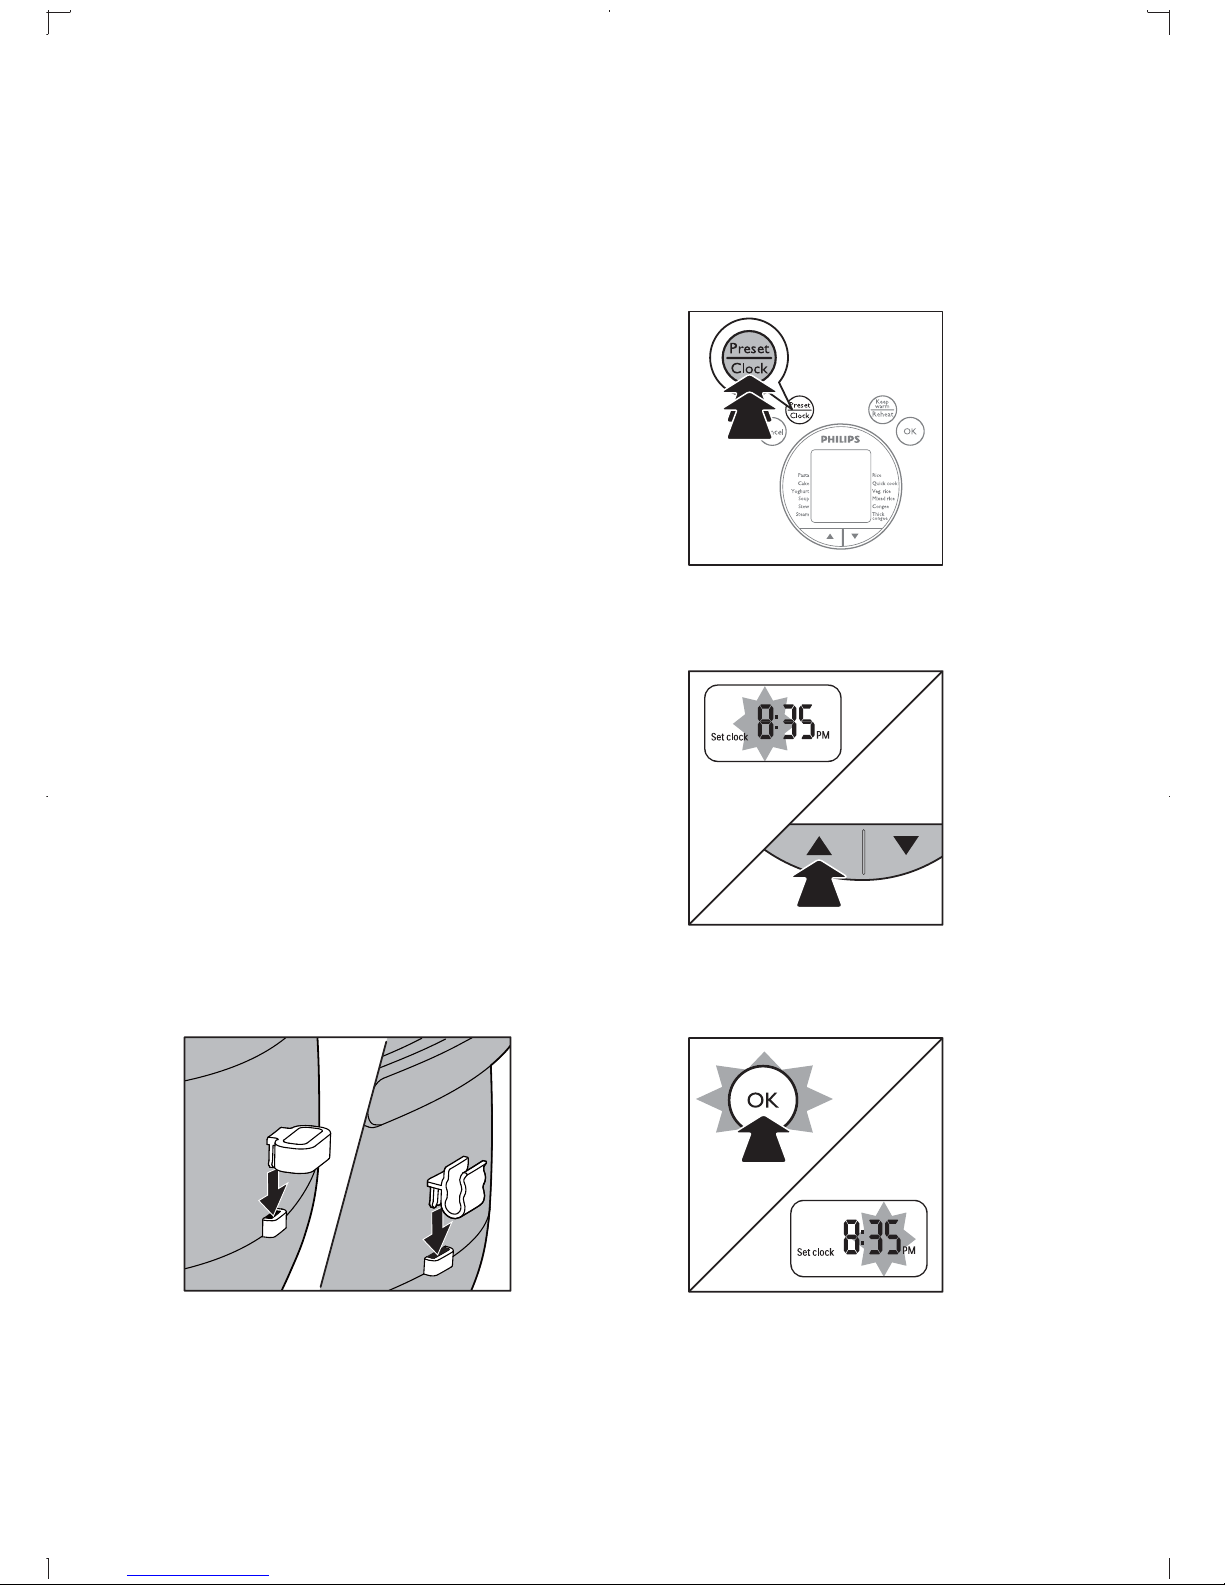
4 Set the clock
1 Press PRESET/CLOCK twice
» Hour time blinks.
2 Press up/down arrow key to set proper
hour time.
4 Wash all the accessories with dish washing
liquid and soft sponge. Then use a soft
cloth to dry inside and outside of the pot
and the accessories.
5 Attach the scoop holder and mains cord
holder to the mounting brackets.
3 Press OK .
» Minute time blinks.
8 EN
Page 8
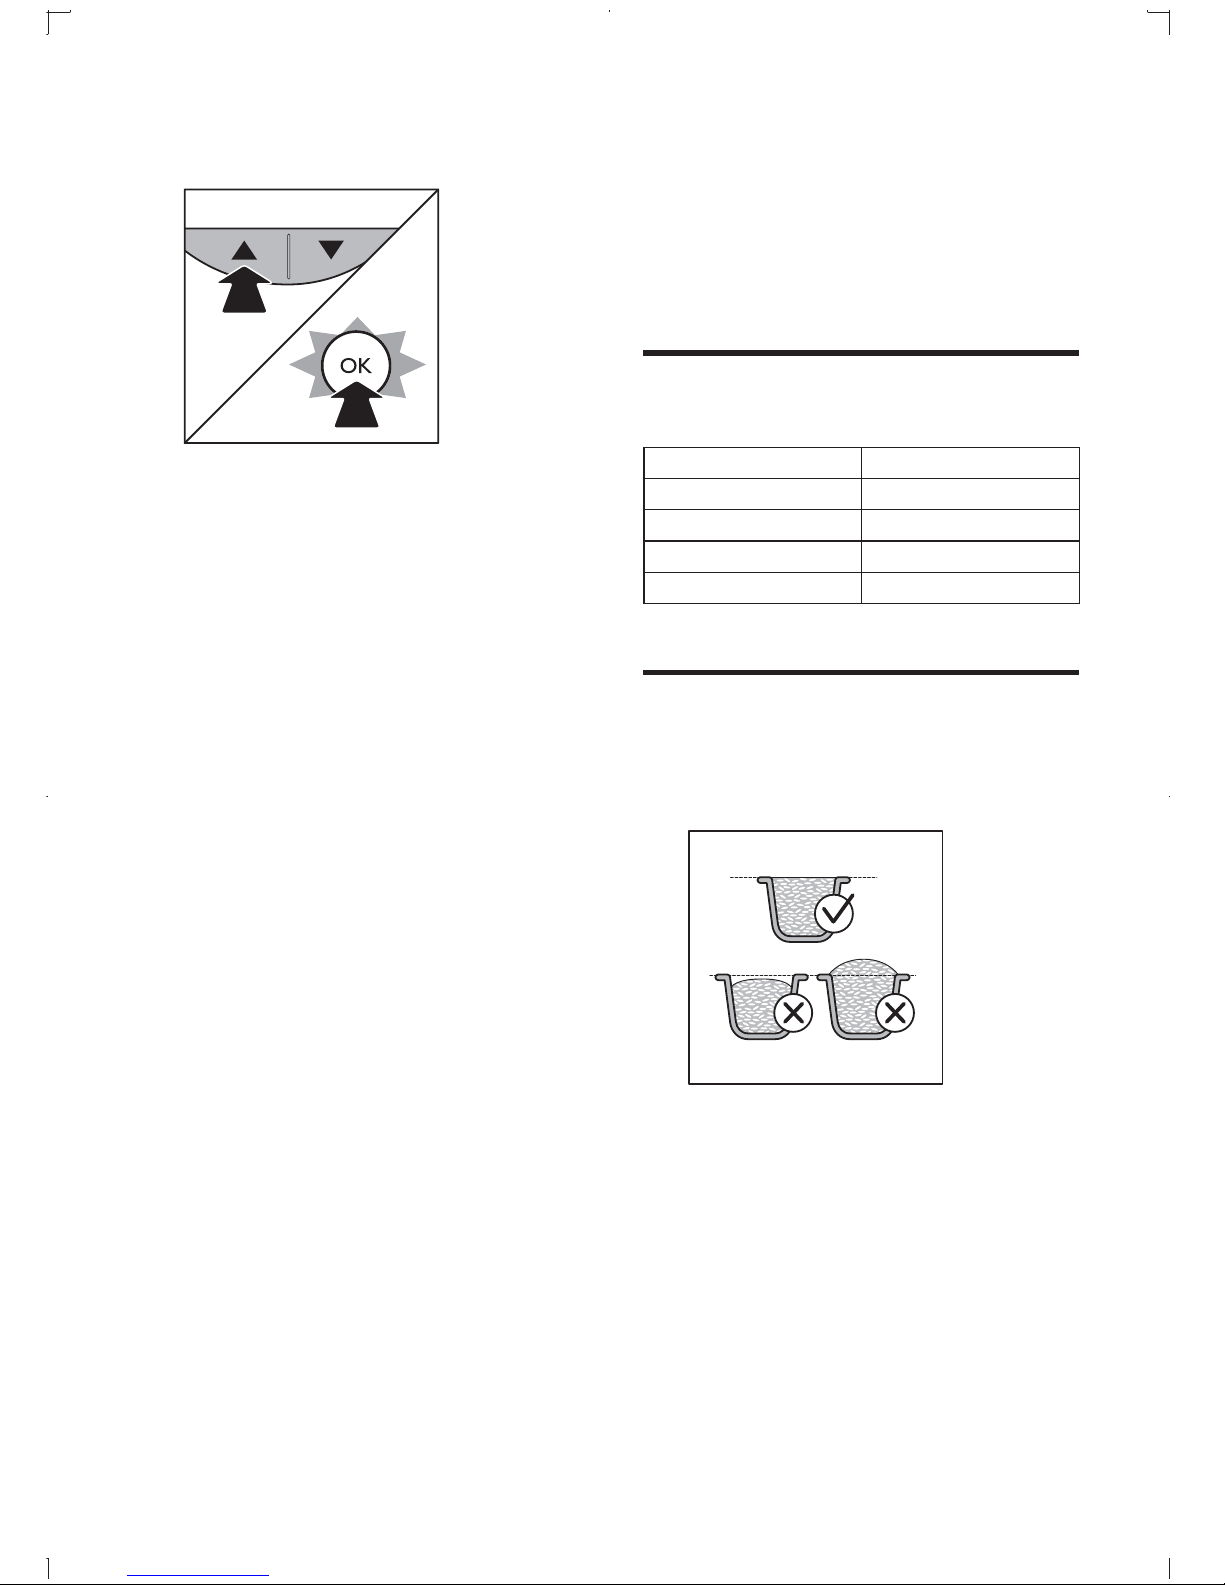
4 Press up/down arrow key to set proper
minute time. Press OK .
5 Rice
There are four types of rice cooking menus:
RICE, QUICK COOK, VEG. RICE, and MIXED
RICE.
Cooking time
Menu Cooking time
Rice 35 min
Quick cook 25 min
Veg. rice 35 min
Mixed rice 45 min
Prepare
Measure the rice with the measuring cup
1
supplied.
• The supplied measuring cup is approx
180ml.
• Using HD4767, y ou can cook 2 to
10 cups of rice each time. While using
HD4765, 2 to 8 cups of rice each time.
• Each cup of uncooked rice normally
gives two servings of cooked rice.
9EN
Page 9
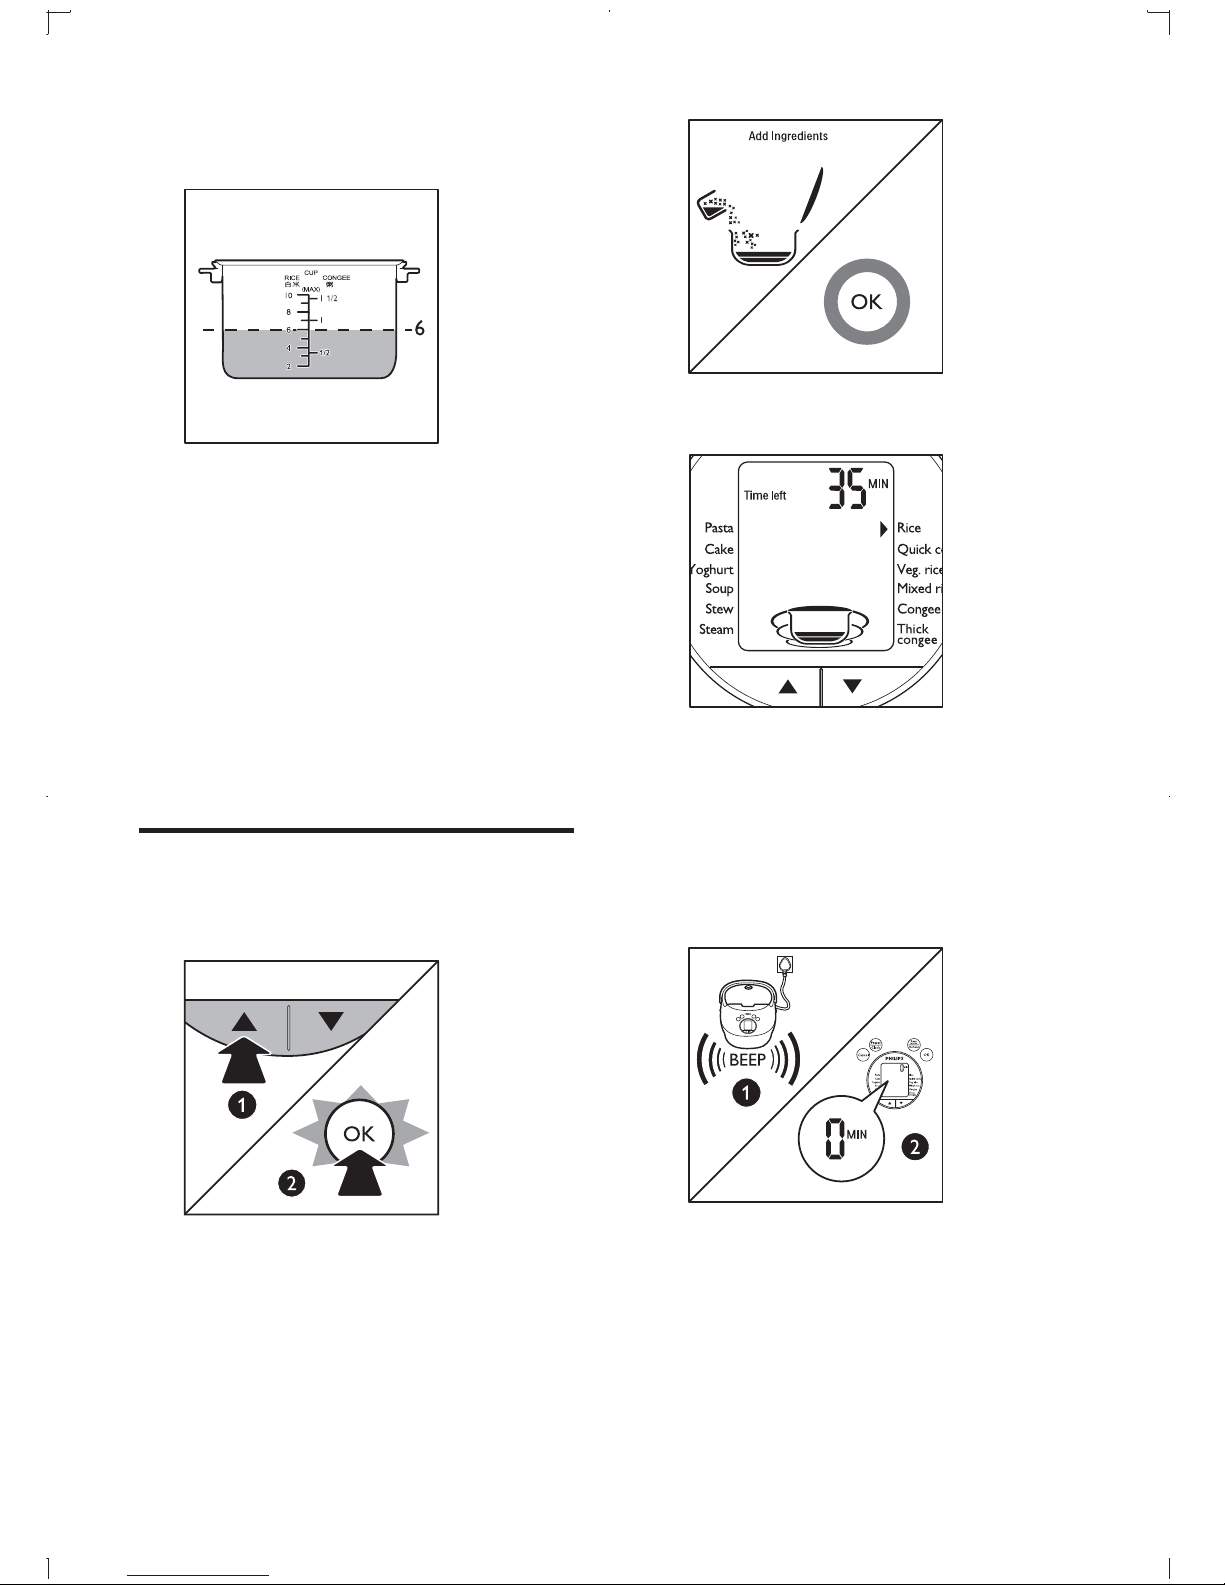
2 Rinse rice, put the washed rice in the inner
pot, and ll in water.
• Do not rinse rice in the inner pot, for
that may scratch off the non-sticky
coating of the inner pot.
• Add water to the level indicated on
the scale inside the inner port that
corresponds to the number of cups
and type of rice used. For example,
if you are cooking 6 cups of rice, add
water to scale 6.
3 Wipe off the water outside of the inner
pot and put it into the main body.
Start cooking
Select the menu you need and con rm.
1
3 The time needed is displayed.
» The rice cooker beeps 10 minutes before
the Veg. rice cooking ends, and "add
ingredients" is prompted.
4 When the cooking is nished, the rice
cooker beeps and turns into warm keeping
automatically.
2 “Add ingredients” prompted, and red
indicator turned on, the cooker star ts
cooking automatically.
10 EN
• The rice cooker remains at warm
keeping for 12 hours, after that it beeps
and cease warm keeping process.
5 Press CANCEL to cease warm keeping,
and unplug the power.
• To cook rice properly, do not open the
lid during cooking process.
Page 10
6 Congee
Prepare
1 Put ingredients for the congee into the
inner pot and add water according to the
scale in the inner pot.
2 Wipe off the water outside of the inner
pot and put it into the main body.
3 Plug the power.
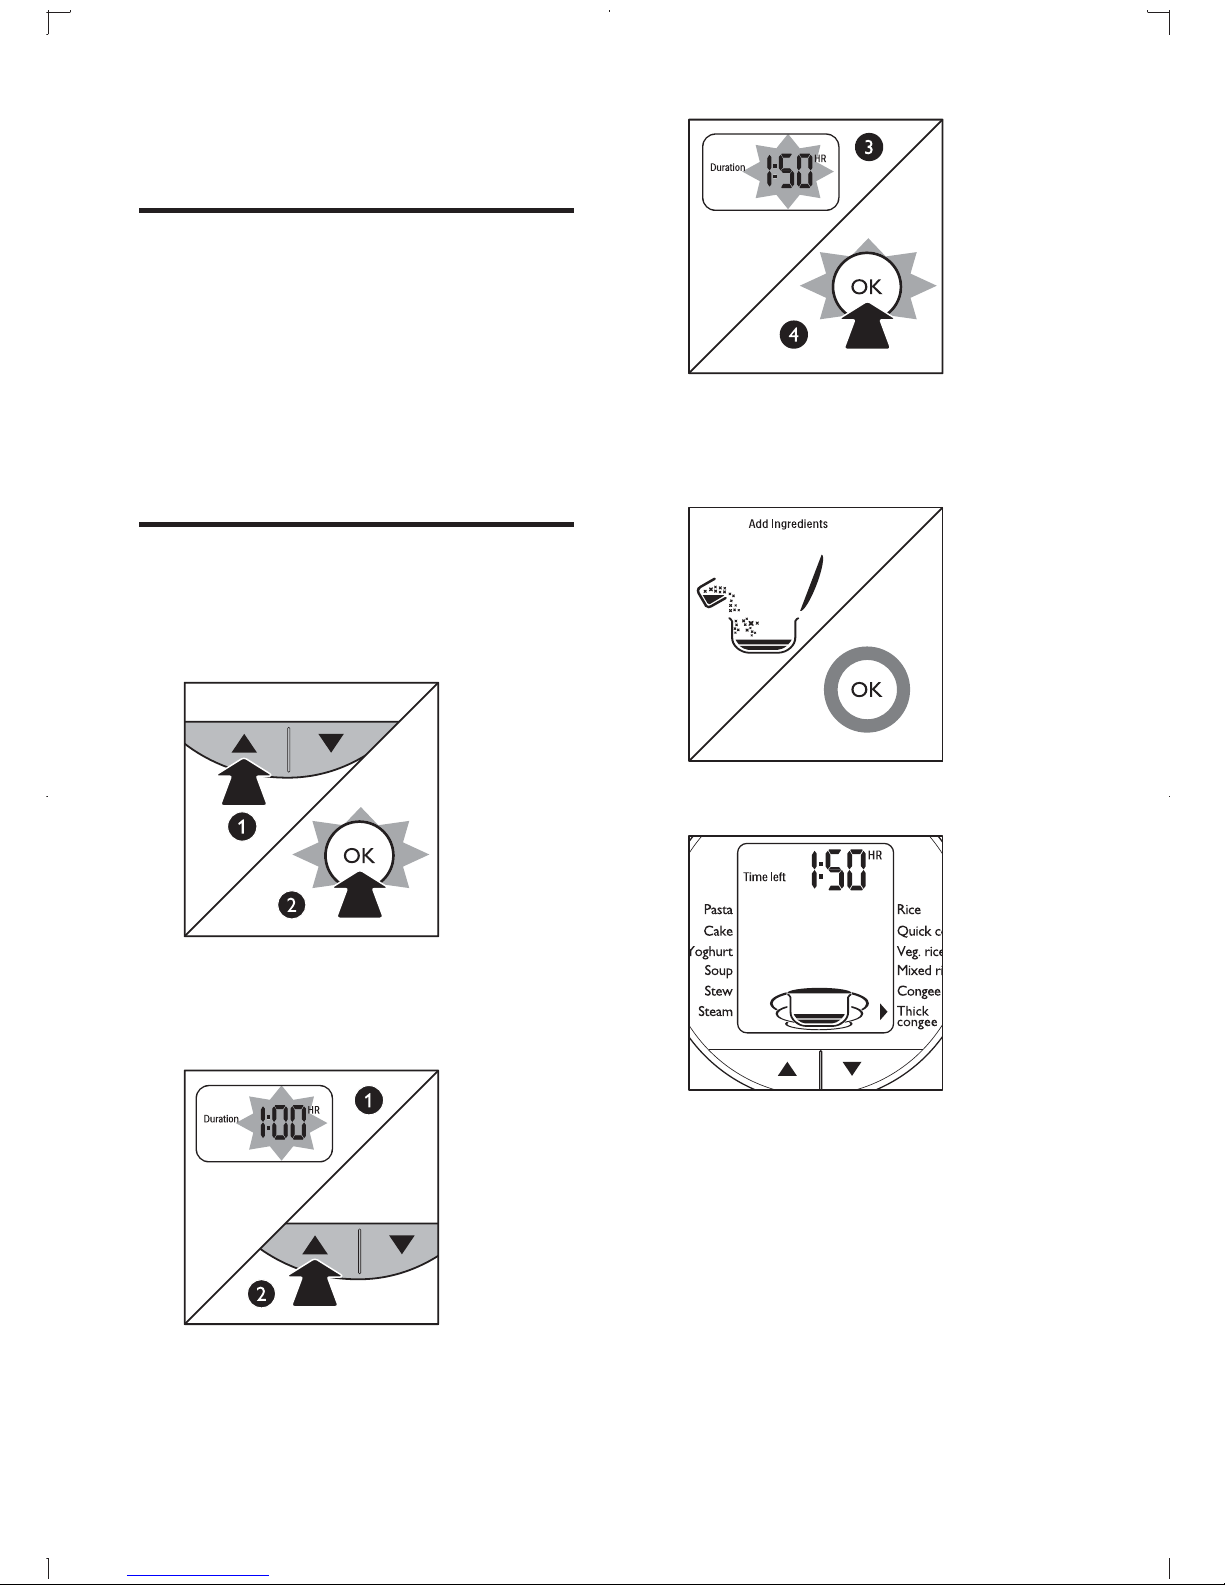
Start cooking
Select the menu you need and press OK
1
to con rm.
3 “Add ingredients” prompted, and red
indicator turned on, the cooker star ts
cooking automatically.
2 The time suggested for the cooking is
displayed. Press up/down arrow key to
adjust time as needed.
4 The time needed is displayed.
» The rice cooker beeps 30 minutes
before the thick congee cooking ends,
and "add ingredients" is prompted. Add
minced beef, sliced chicken or sliced sh.
11EN
Page 11
5 When the cooking is nished, the rice cooker
beeps and turns into warm keeping automatically.
• The rice cooker remains at warm
keeping for 12 hours, after that it beeps
and cease warm keeping process.
6 Press CANCEL to cease warm keeping,
and unplug the power.
7 Steam
1 Put 5 cups of water into the inner pot
(you can adjust water level as needed).
2 Put the steam basket into the inner pot,
p ut the food into the steam basket, and
close the outer lid.
3 Select STEAM and press OK to con rm.
4 The time suggested for the cooking is
displayed. Press up/down arrow key to
adjust time as needed.
12 EN
Page 12
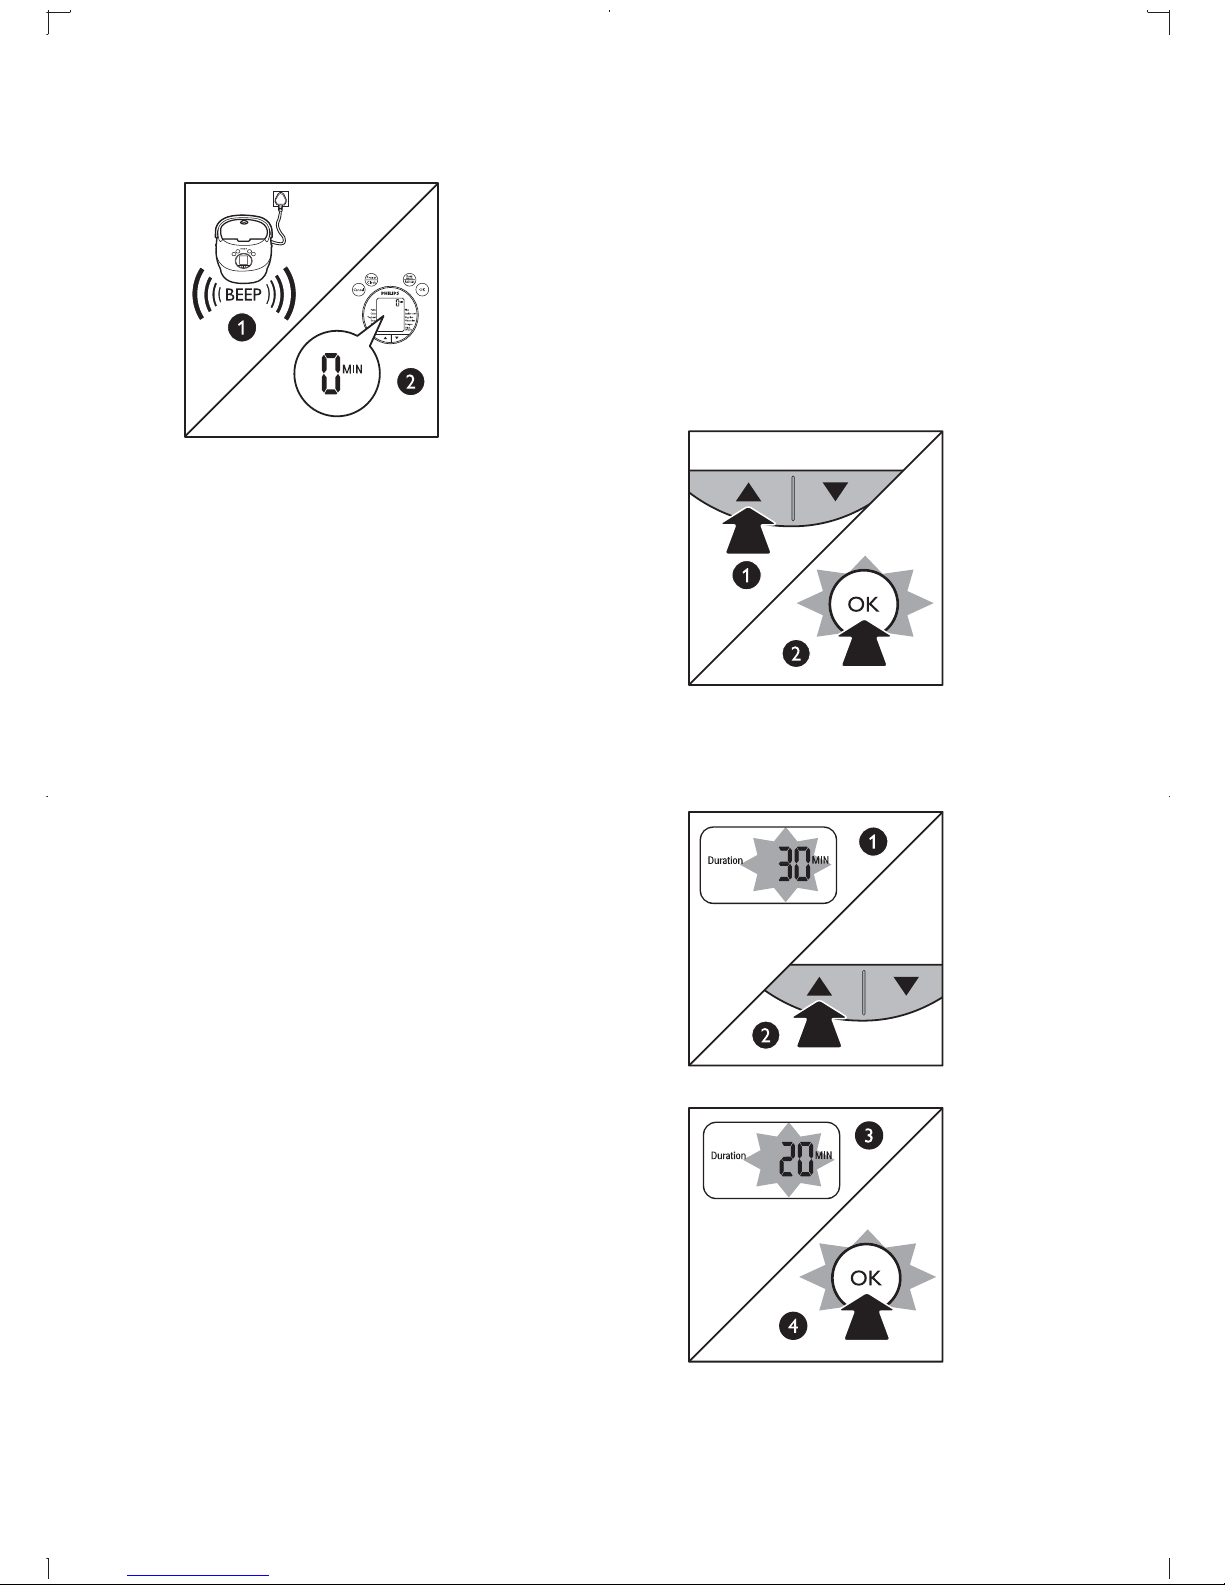
5 “Add ingredients” prompted, and red
indicator turned on, the cooker star ts
cooking automatically.
6 The time needed is displayed.
8 Soup and Stew
1 Wipe off the water outside of the inner
pot and put it into the main body.
2 Put the ingredients prepared into the inner
pot. Add water as required, stir evenly, and
close the lid.
3 Select the menu you need and con rm.
7 When the cooking is nished, the rice
cooker beeps.
8 Unplug the power.
Tip
•
The rice cooker does not turn to warm keeping after
the STEAM process is ended.
4 The time suggested for the cooking is
displayed. Press up/down arrow key to
adjust time as needed.
13EN
Page 13
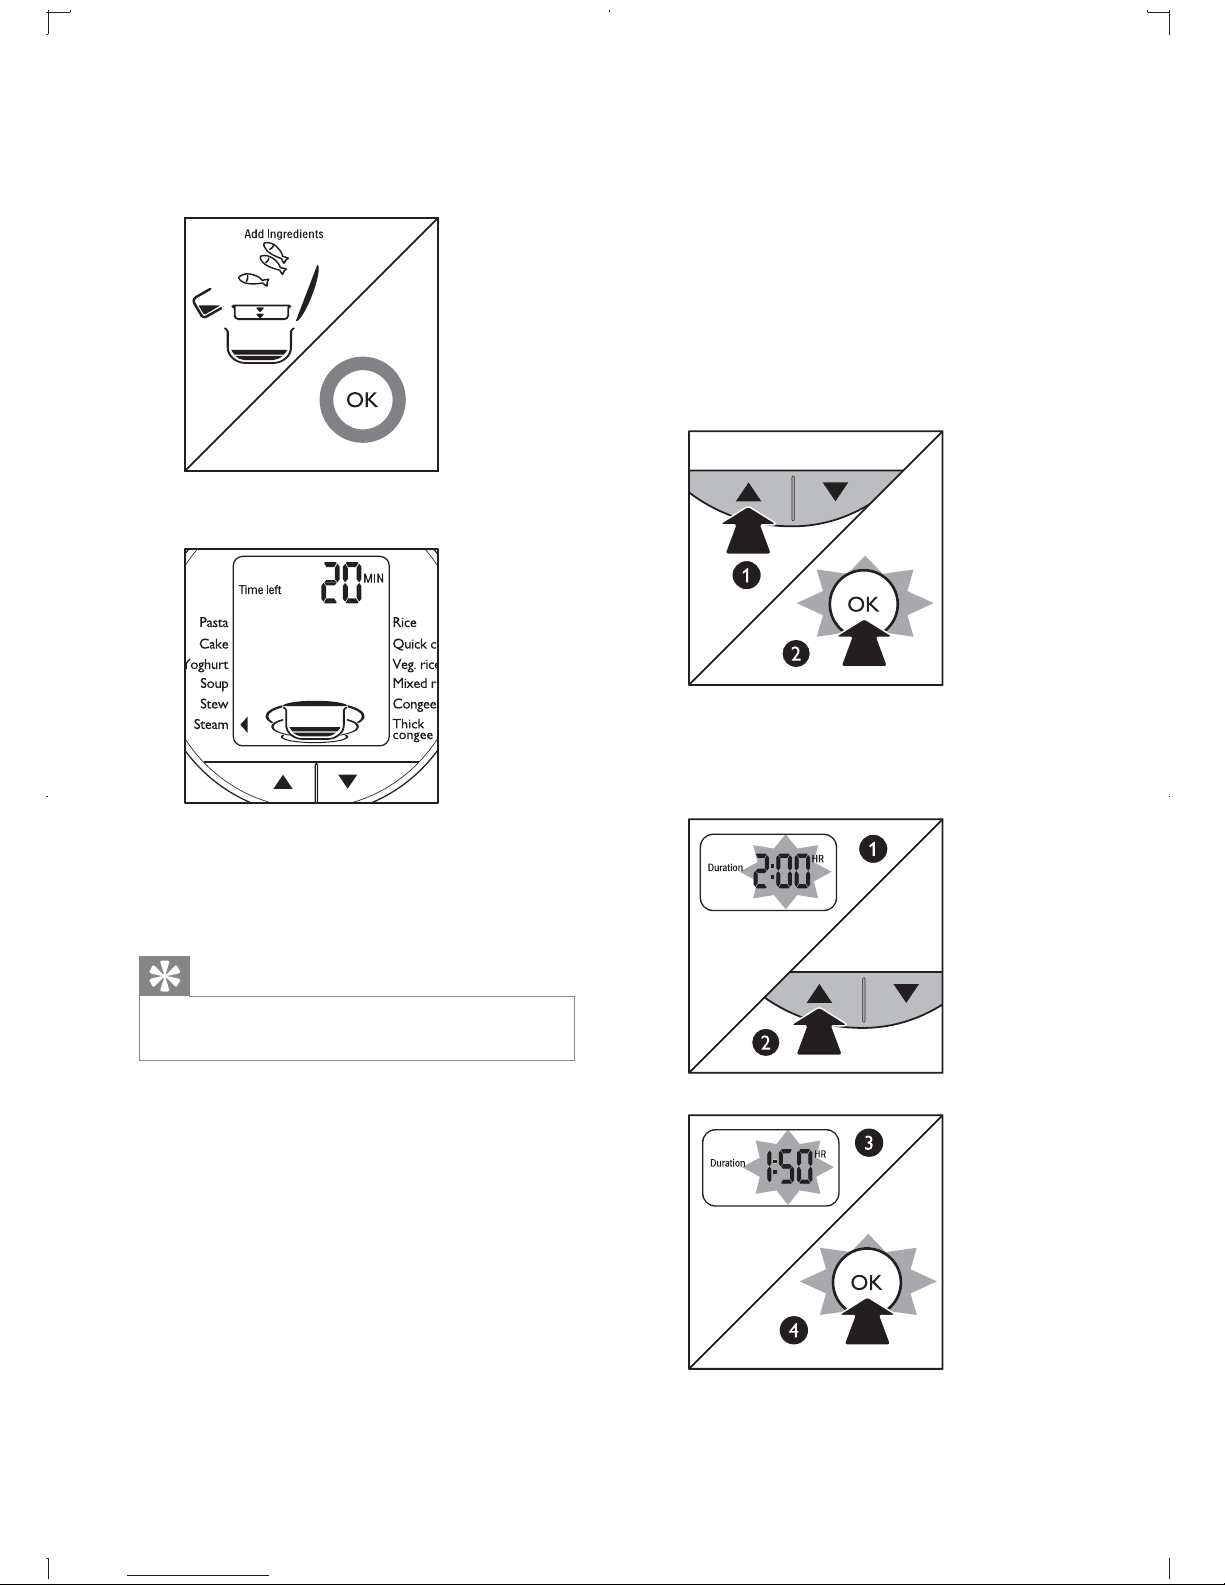
5 “Add ingredients” prompted, and red
indicator turned on, the cooker star ts
cooking automatically.
9 Cake
Prepare
Whisk the ingredients for cake well.
1
2 Coat the inner pot with some butter and
then pour the cake mixture into it.
3 Wipe off water outside of the inner pot
and put it into the main body.
6 The time needed is displayed.
7 When the cooking is nished, the rice cooker
beeps and turns into warm keeping automatically.
4 Plug the power.
Start cooking
1
Select CAKE and con rm.
2 “Add ingredients” prompted, and red
indicator turned on, the cooker star ts
cooking automatically.
• The rice cooker remains at warm
keeping for 12 hours, after that it beeps
and cease warm keeping process.
8 Press CANCEL to cease warm keeping,
and unplug the power.
14 EN
Page 14
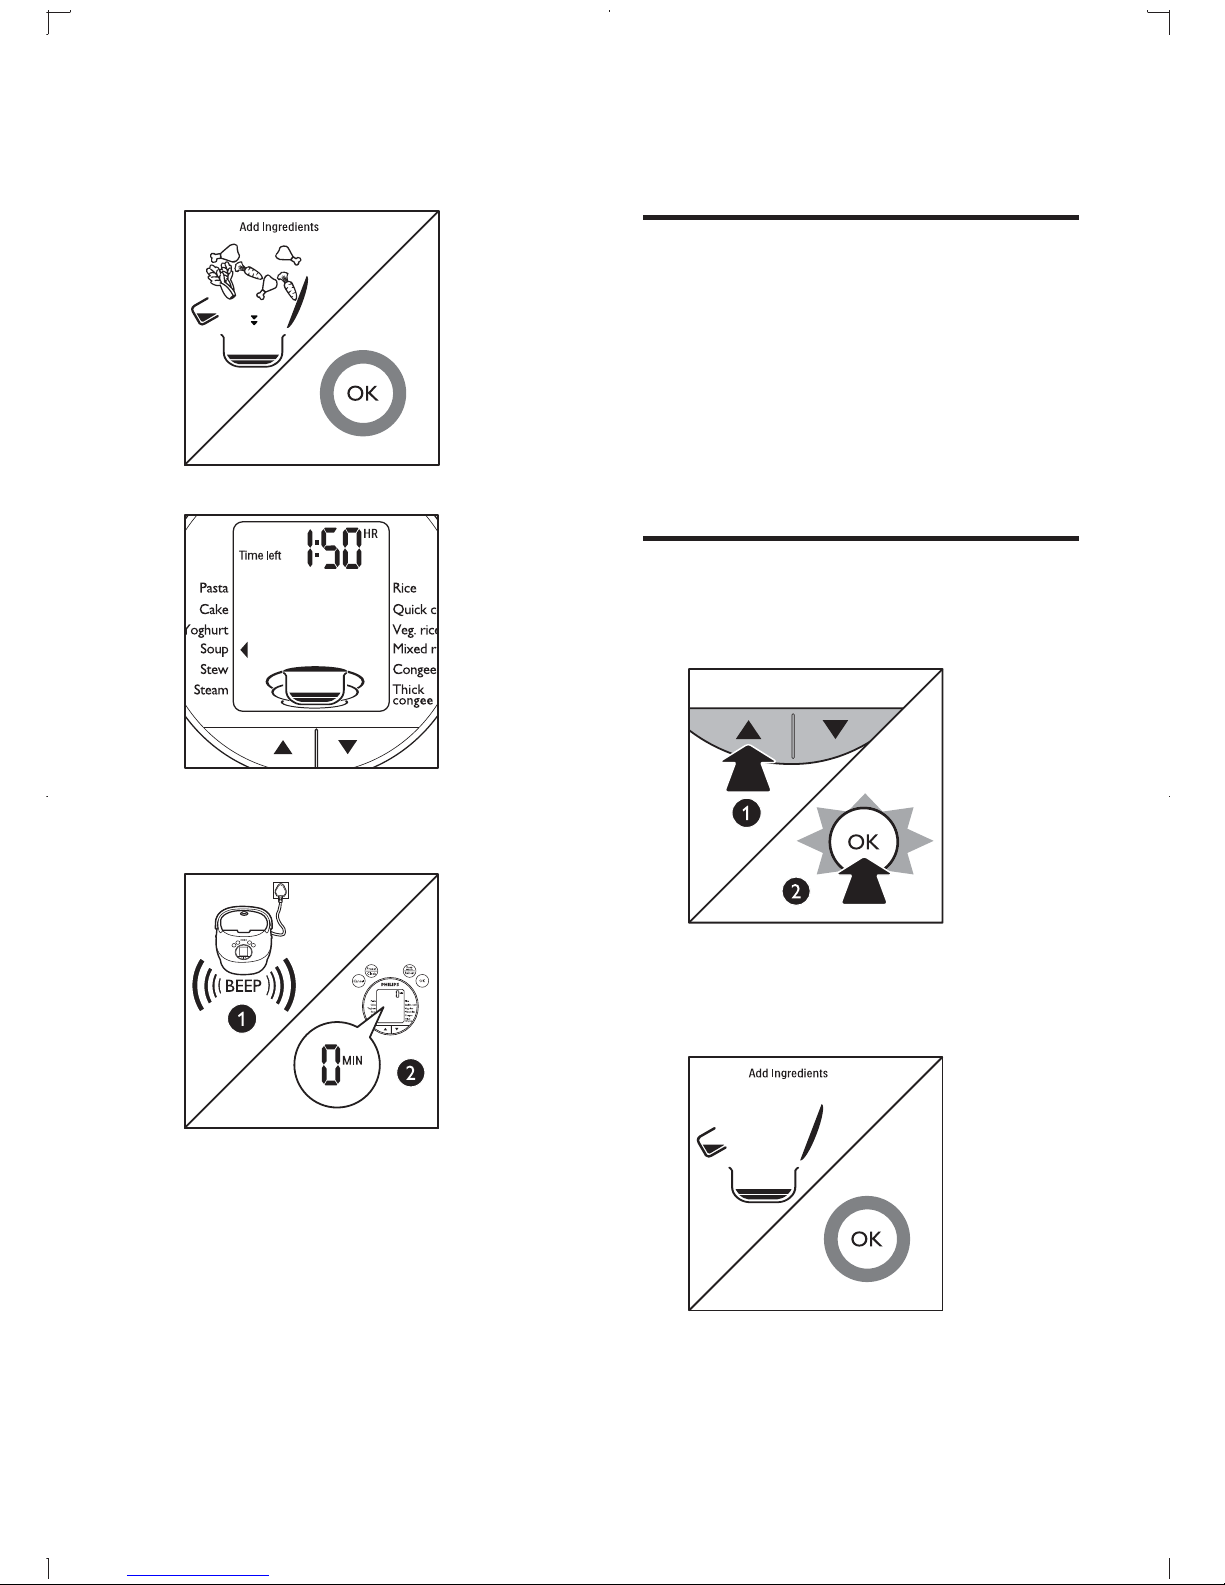
3 The time needed is displayed.
10 Yoghurt
Ingredients
Milk 500 ML
Plain Yoghurt 100 ML
4 When the cooking is nished, the rice
cooker beeps.
5 When the cooking process is nished, let
the cake cool down. Then turn the inner
pot upside down to let the cake slip out of
the inner pot onto a plate.
Prepare
Place the yoghurt in room temperature for a
1
few minutes. Warm the milk to around 40°C.
2 Mix the yoghurt with the warm milk
rapidly and pour the mixture into the
individual yoghurt pots.
3 Cover the pots with the lids.
4 Plug the power.
Start cooking
Put the steam tray in the inner pot. Add
1
water up to level indication of yoghurt. The
put the pots on the steam tray.
2 Select the Yoghurt and press OK to con rm.
15EN
Page 15
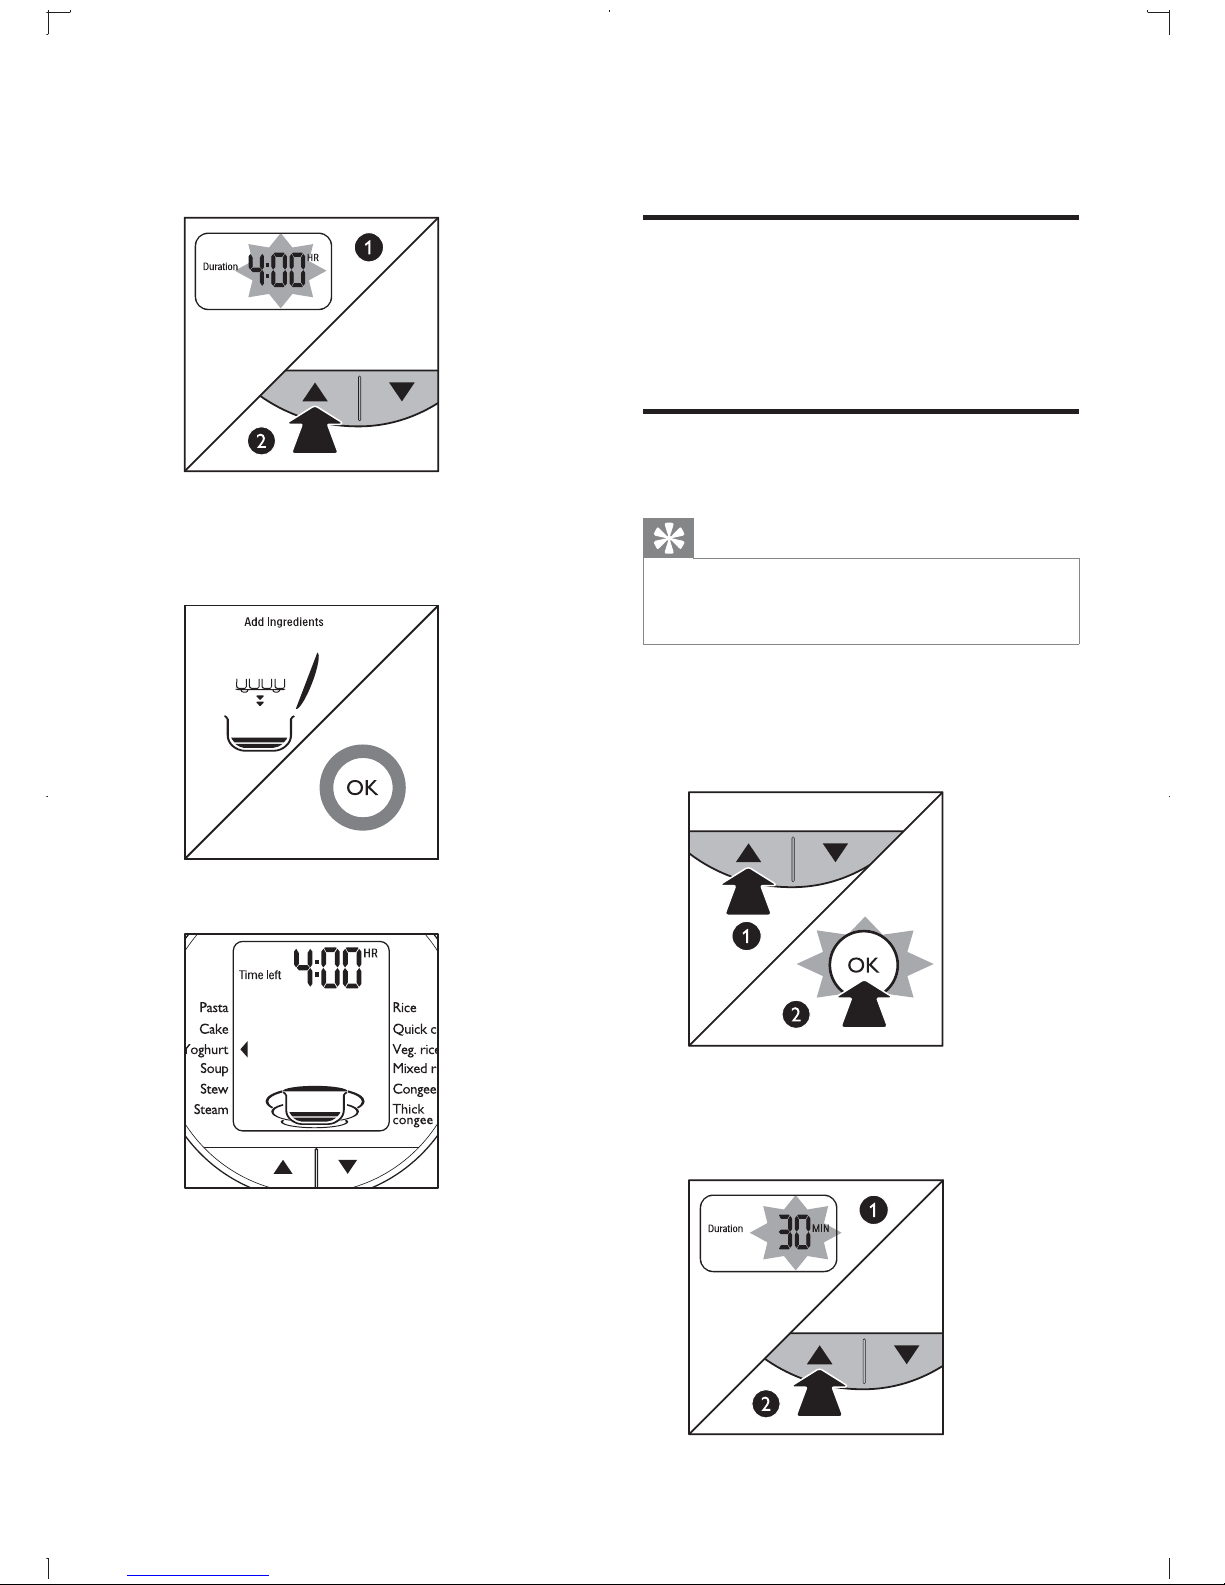
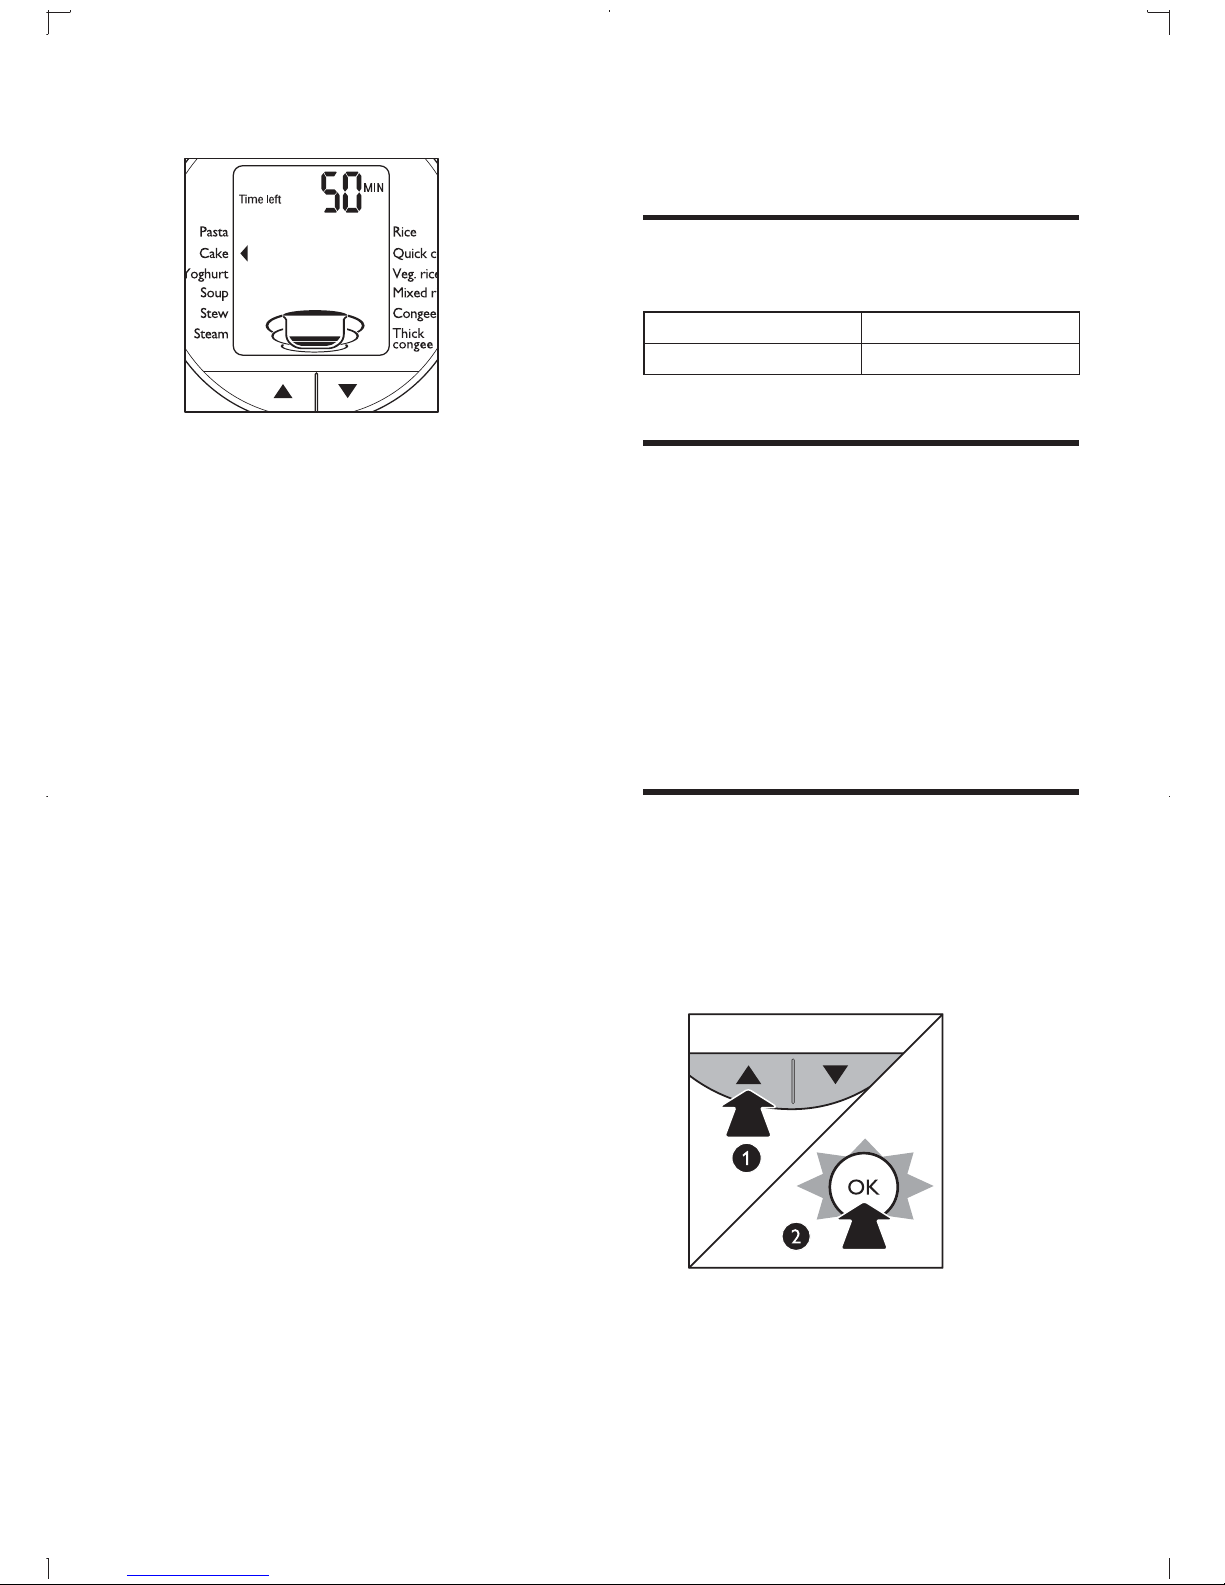
3 The time suggested for the cooking is
displayed. Press up/down arrow key to
adjust time as needed.
4 “Add ingredients” prompted, and red
indicator turned on, the cooker star ts
cooking automatically.
11 Pasta
Prepare
Prepare pasta and ingredients.
1
2 Plug the power.
Start cooking
Tip
•
Please use pasta sauce and do not add liquid more than
the “pasta” water level mark. If water is used, please
add two teaspoons of oil.
1 Put the pasta, sauce and water into the inner
pot, and close the lid.
5 The time needed is displayed.
6 When the cooking is nished, the rice
cooker beeps.
7 Remove yoghurt pots from inner pot
& cool down completely to room
temperature before placing into
refrigerator.
2 Select PASTA and con rm.
3 The time suggested for the cooking is
displayed. Press up/down arrow key to
adjust time as needed.
16 EN
Page 16
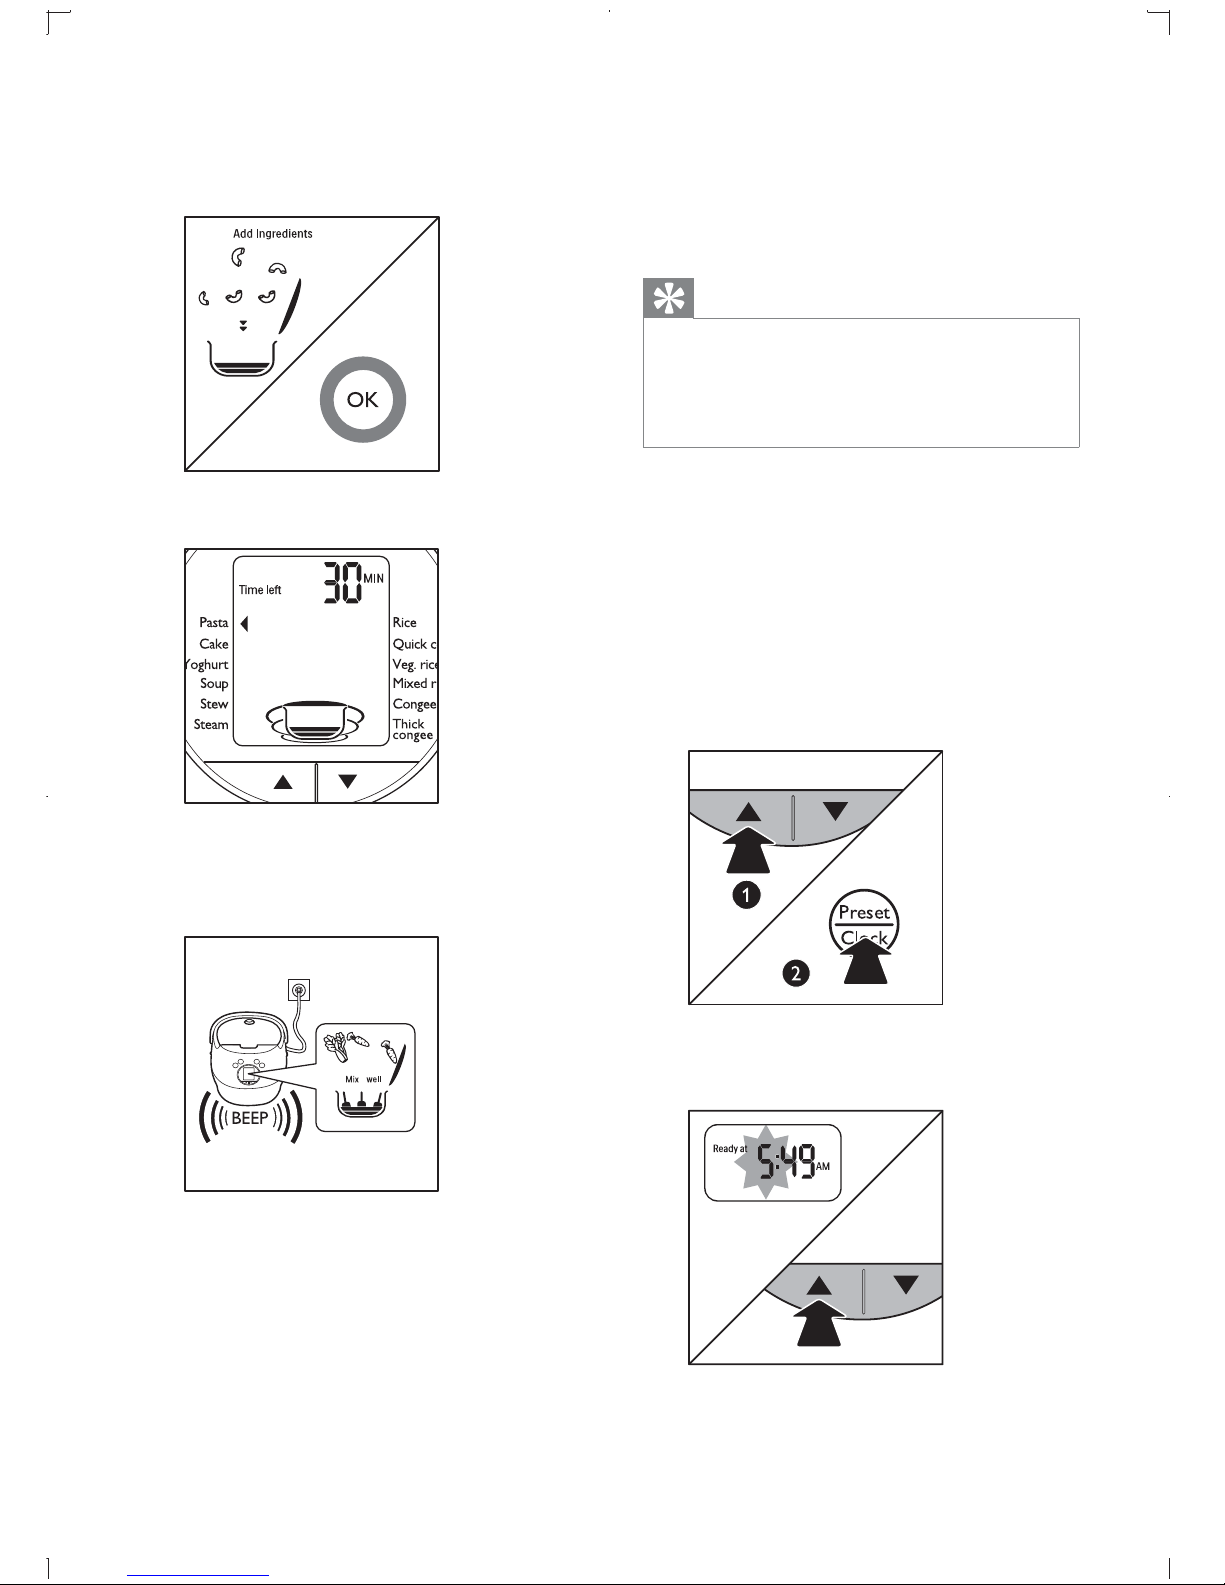
4 “Add ingredients” prompted, and red
indicator turned on, the cooker star ts
cooking automatically.
12 Preset time for
delayed cooking
Tip
•
It is not recommended to do delayed cooking time
for more than 1 hour except for rice, congee and raw
vegetable.
• Preset timer is available up to 24 hours for RICE, SOUP,
STEAM, STEW CONGEE and THICK CONGEE menus.
5 The time needed is displayed.
» The rice cooker beeps 10 minutes
before the cooking ends, and "add
ingredients" is prompted.
1 Put ingredients into the inner pot, add
water to the water marking level for the
speci c program.
2 Wipe the cooker with soft cloth.
3 Plug in the power.
4 Select the menu as needed and press
PRESET . Or press PRESET rst and select
the menu.
5 Hour time blinks. Press up/down arrow key
to set proper hour time. Press OK .
6 Add vegetable.
7 When the cooking is nished, the rice
cooker beeps.
6 Minute time blinks. Press up/down arrow
key to set proper minute time. Press OK .
17EN
Page 17
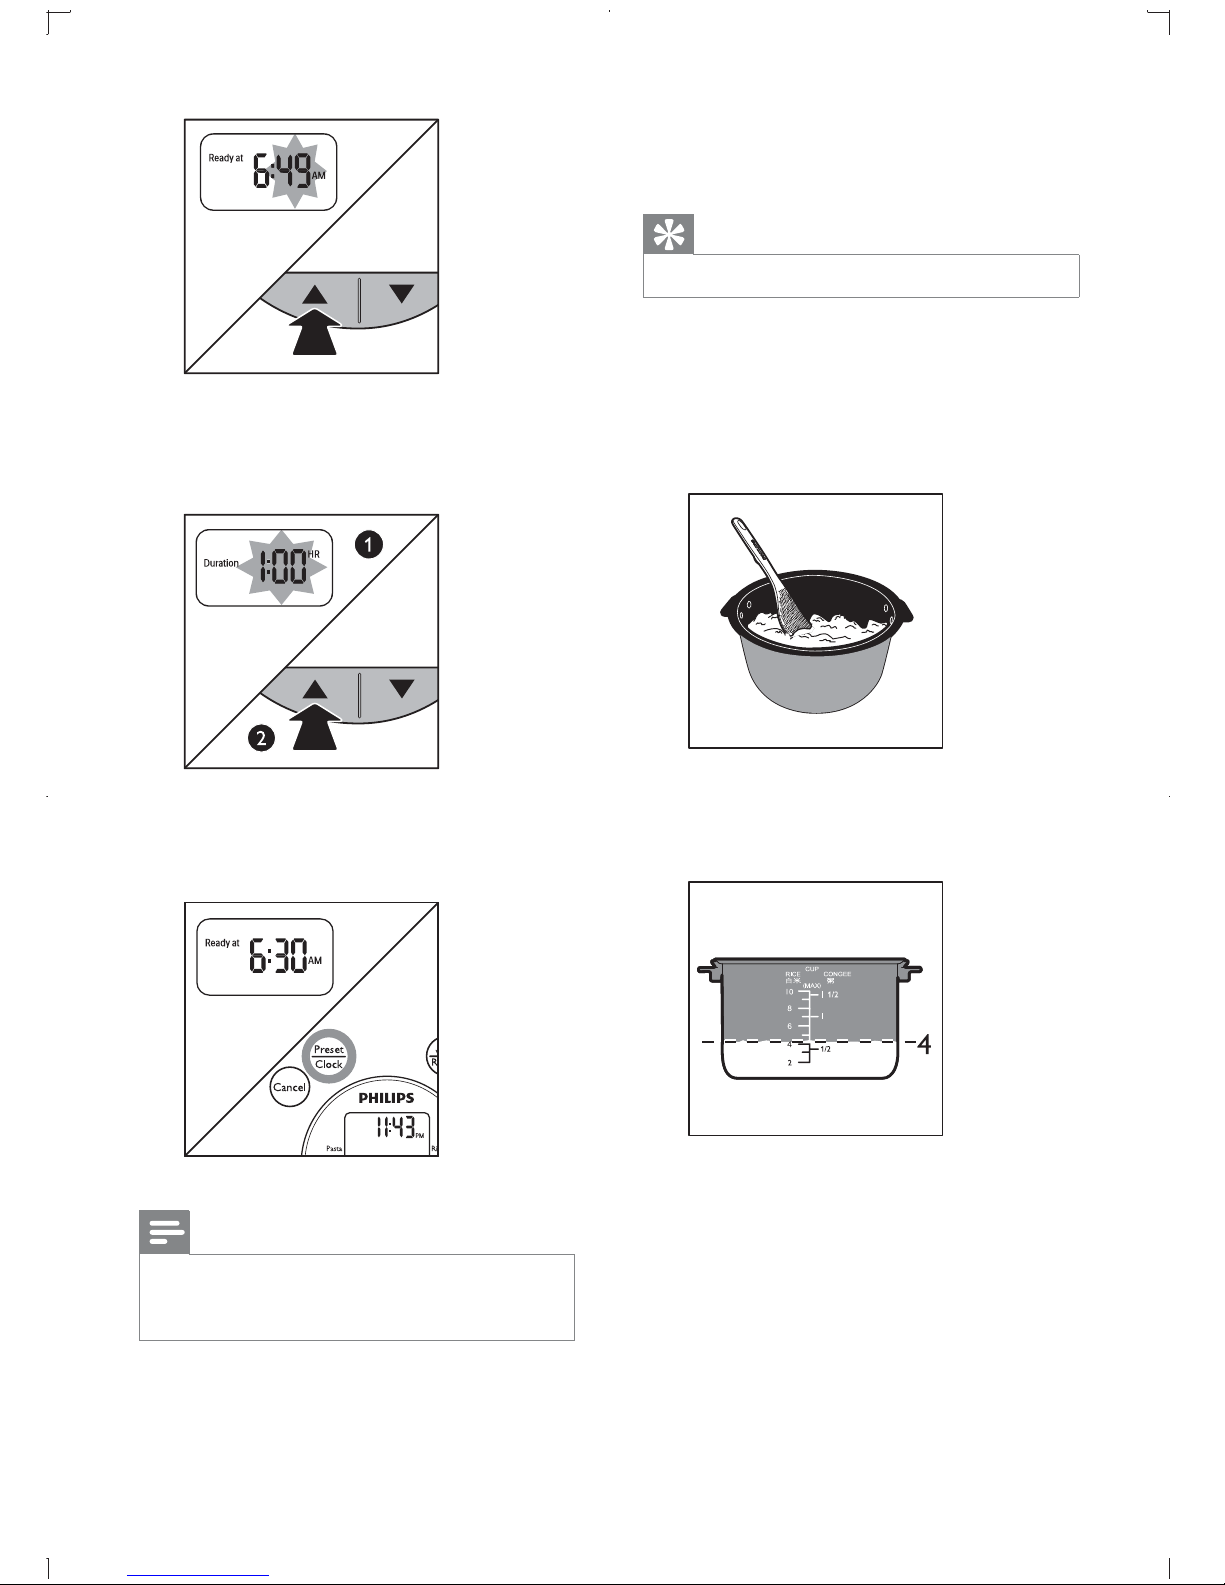
13 Reheat
Tip
•
Reheat needs 28 minutes.
» The proposed cooking time is shown.
7 Press up/down arrow key to set your
desired cooking time. Press OK .
» The preset ready time immediately
disappears. Current clock time is
displayed.
1 Loosen the cooled rice and evenly
distribute it in the inner pot.
• To make sure the rice heat up
thoroughly, put less amount than
"RICE" water level 4.
2 Pour water onto the rice to prevent it
from becoming too dry. The quantity of the
water depends on the amount of rice.
Note
•
The orange light will be on to indicate PRESET is
activated.
• To check the preset ready time, press PRESET again.
8 The cooking starts following the preset
time, and the remaining cooking time is
displayed.
18 EN
• For example: add 1 cup (with the
measuring cup supplied) of water to
reheat the amount of rice up to "RICE"
water level 4.
Page 18
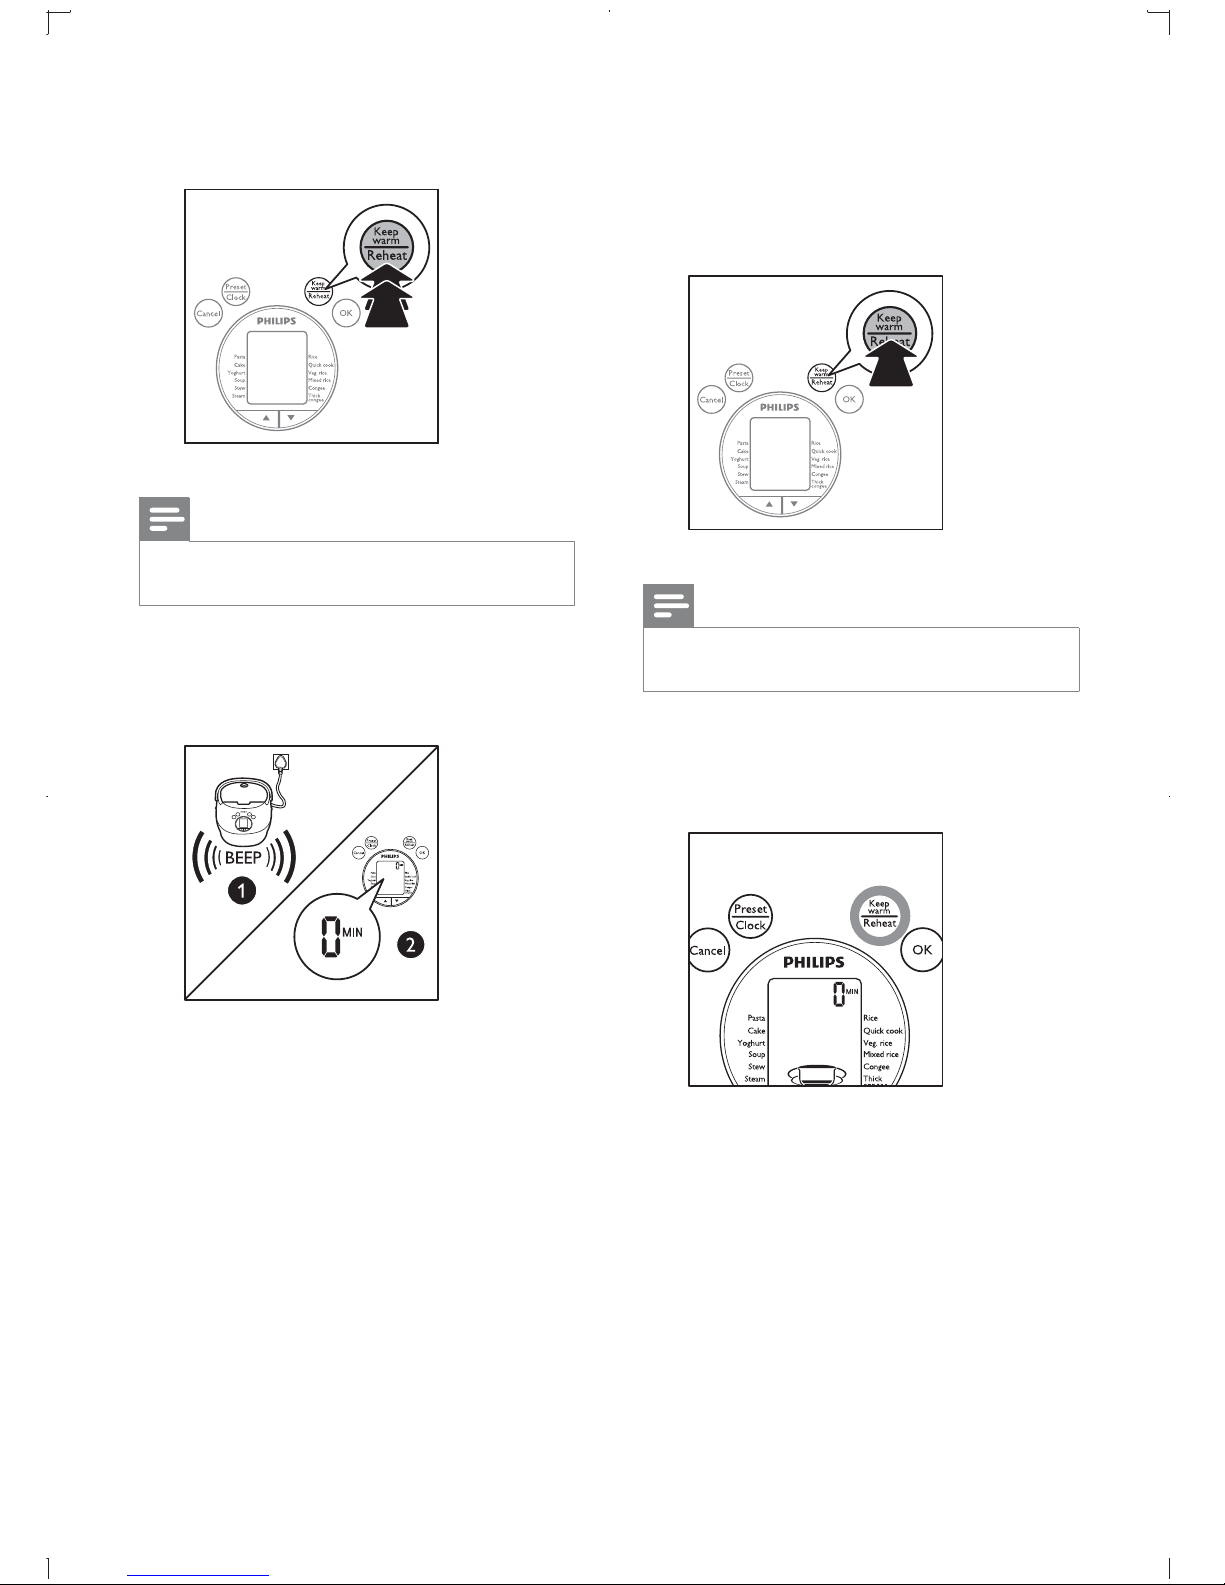
3 Press REHEAT twice to start the reheating
process.
14 Keep warm
1 Press KEEP WARM to start warm keeping.
Note
•
The red light will be on to indicate REHEAT is
activated.
4 When the reheating process complete, the
cooker beeps and turns to warm keeping
automatically.
• The rice cooker remains at warm
keeping for 12 hours, after that it
beeps and cease warm keeping
process.
Note
•
The green light will be on to indicate Keep warm is
activated.
2 The rice cooker remains at warm keeping
for 12 hours, after that it beeps and cease
warm keeping process.
5 Press CANCEL to cease warm keeping,
and unplug the power.
19EN
Page 19
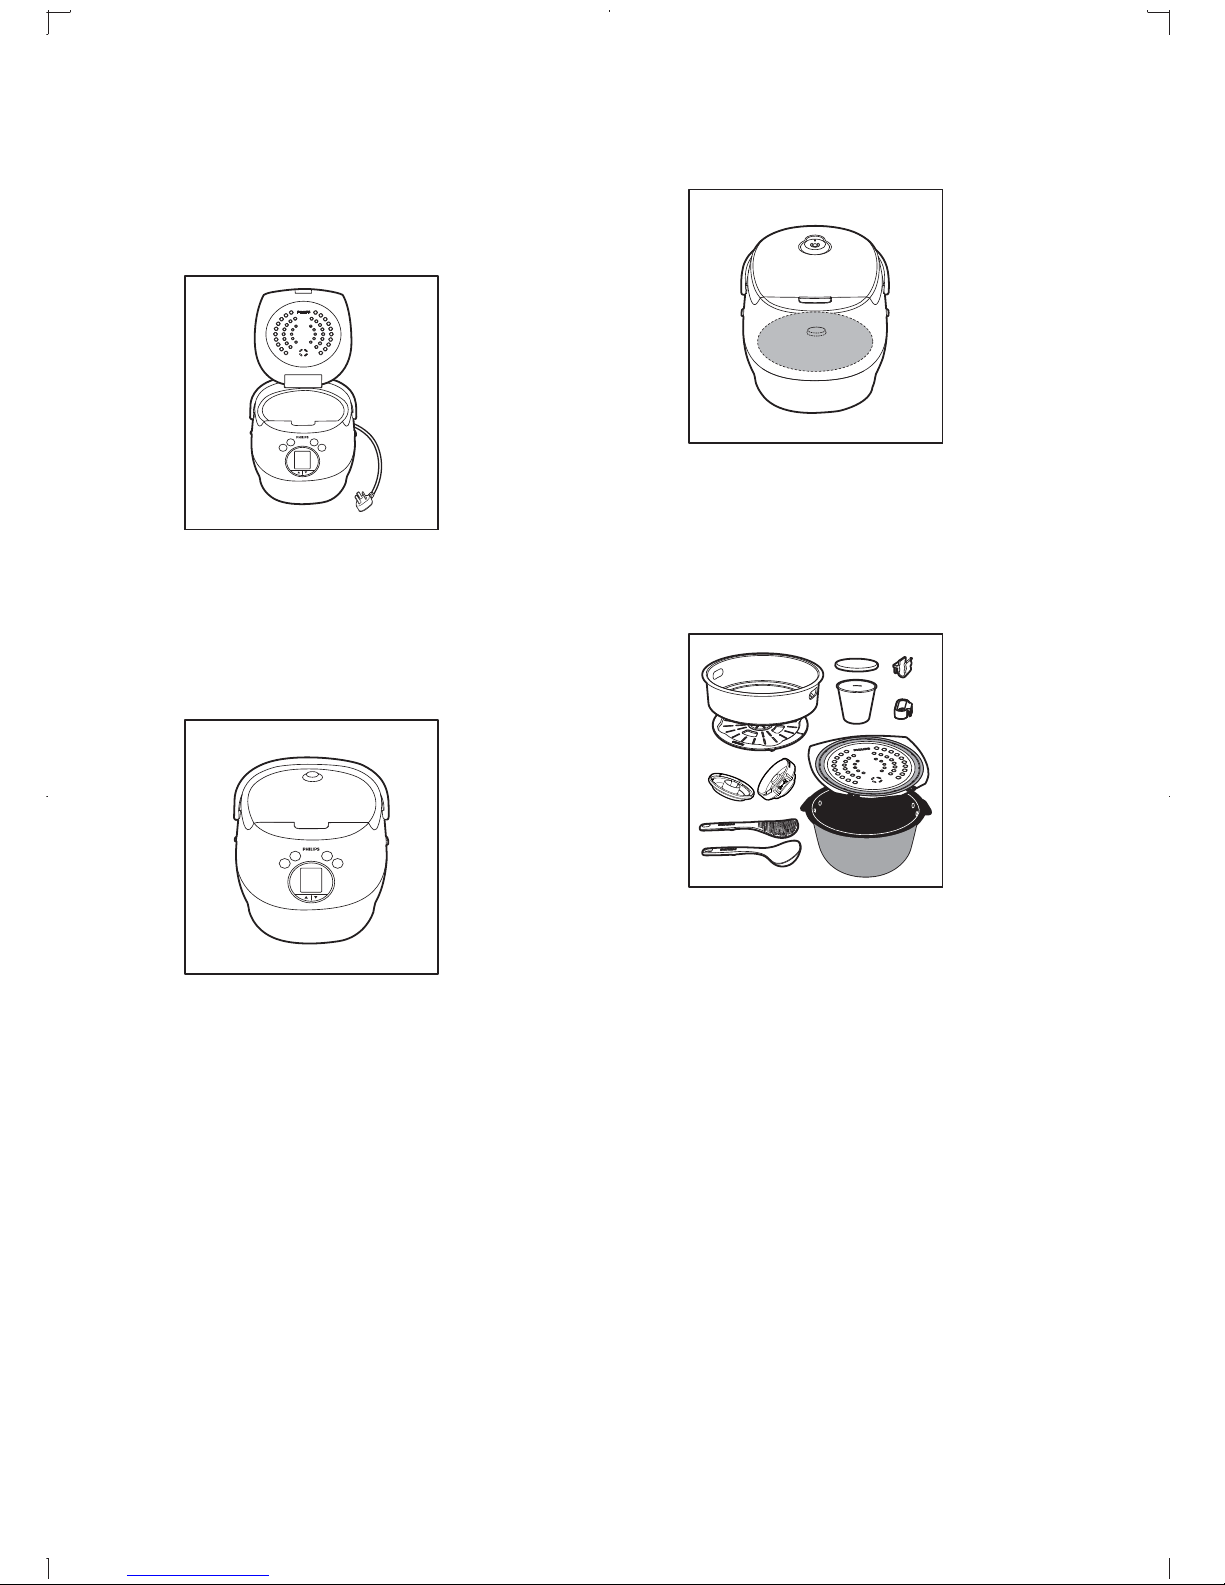
15 Cleaning
1 Inside of the outer lid and the main body
Wipe with wrung out and damp cloth.
Make sure to remove all the food residues
stuck to the rice cooker.
2 Surface of the outer lid and outside of the
main body(including the control panel)
3 Heating element: Wipe with wrung out
and damp cloth.
Remove food residues with wrung out and
damp cloth or toothpicks.
4 Rice scoop, soup ladle, inner pot, mains
cord holder, scoop holder, steam basket,
steam vent cap, and inner lid
Wipe with a cloth damped with soap
water. ONLY use soft and dry cloth to
wipe the control panel. Make sure to
remove all the food residues around the
control buttons.
Soak in hot water and clean with sponge.
20 EN
Page 20
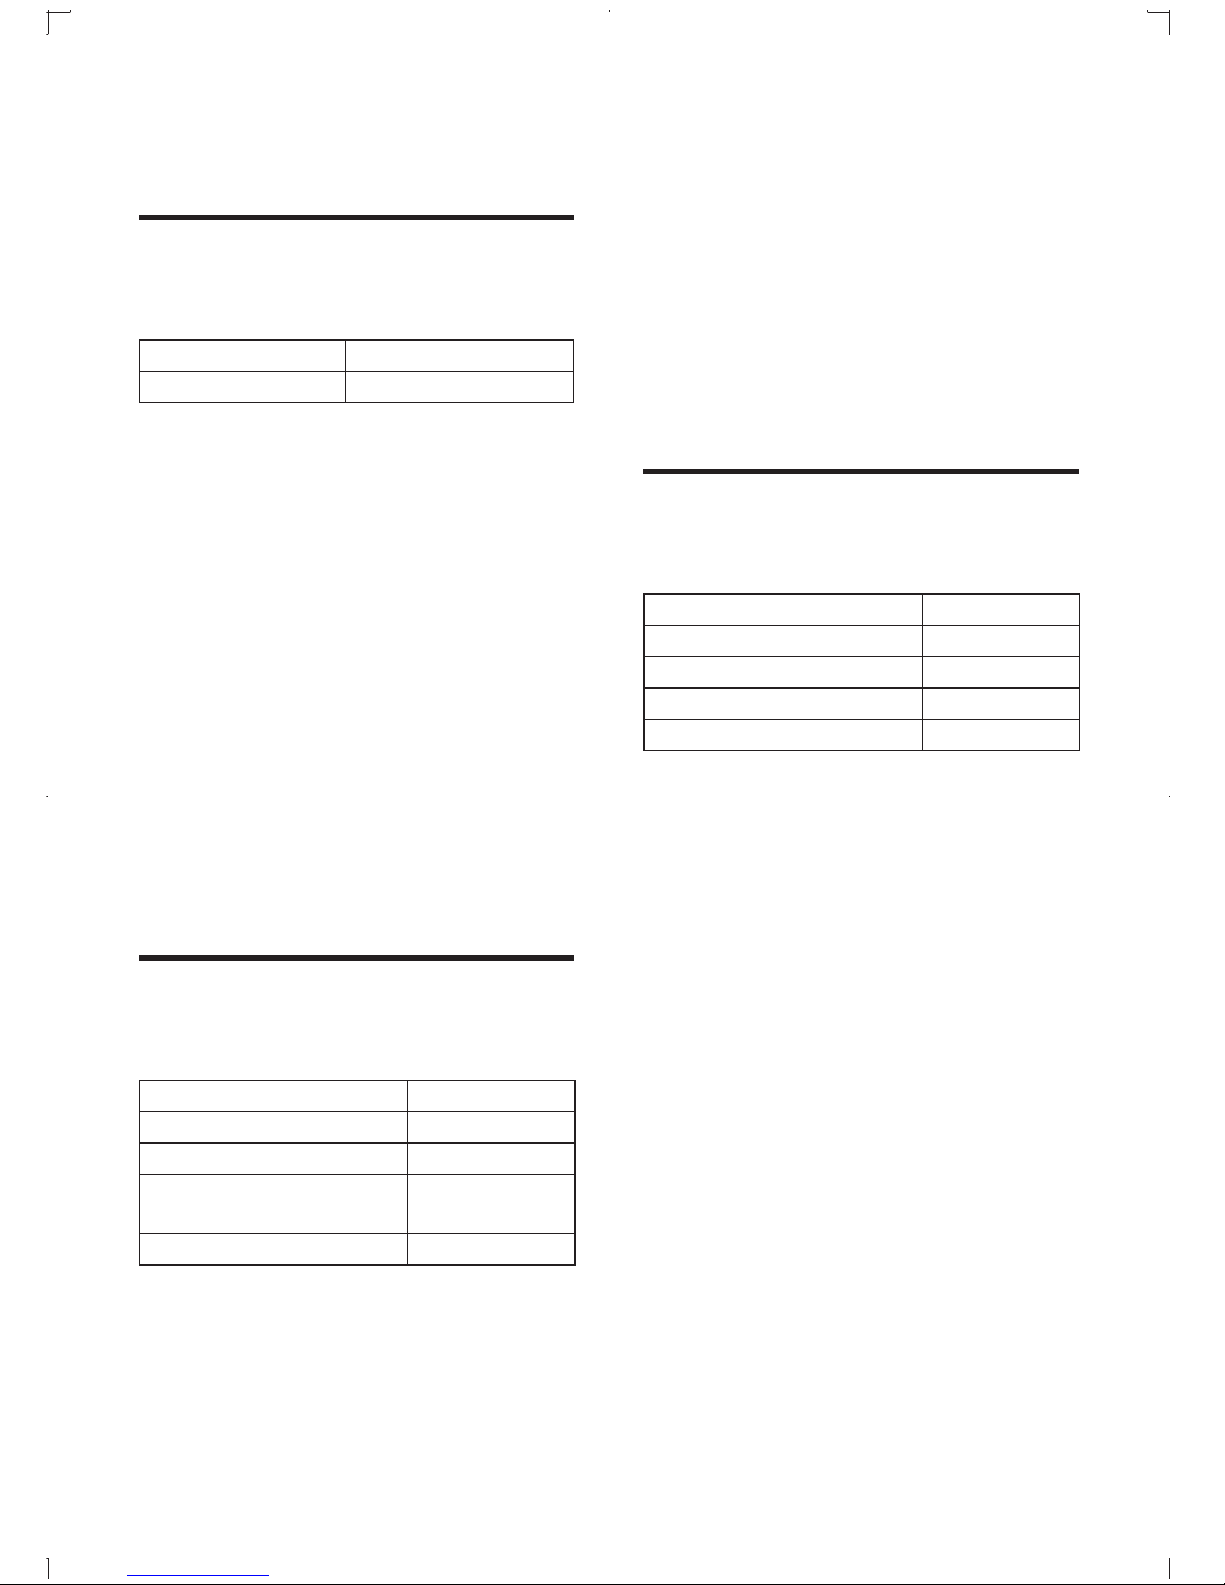
16 Recipes
Yoghurt
Ingredients:
Procedure:
1 Defrosted the frozen vegetables and set
aside.
2 Sliced the ham and set aside.
3 Add pasta, pasta sauce, and water. Close
the lid and cook for 25 minutes (macaroni)
and 35 minutes (penne).
Milk 500mL
Plain Yoghurt 100mL
Procedure:
1 Place the yoghurt in room temperature a
few minutes.
2 Warm the milk to around 40°C. Mix
the yoghurt with the warm milk rapidly
and pour the mixture into the individual
yoghurt pots. Cover the pots with the lids.
3 Put the steam tray in the inner pot. Add
water up to the level indication of yoghurt.
Then put the cups on the steam tray.
4 Start the yoghurt menu. Cook for 3 hours.
5 Remove from inner pot & cool down
completely to room temperature before
placing into refrigerator.
Cooking time:
3 hours.
4 In the last 10 minutes before the cooking
end, add in defrosted vegetables and ham,
mix well and close the lid.
Cake
Ingredients:
Pre-made cake mix our 250g
Butter 65g
Egg 1 big pc
Water/milk 100 ml
Chopped Almond 30g
Procedure:
1 Mix the cake mix our, water or milk,
almond, butter and egg in a large bowl.
2 Whisk with an electric mixer at low speed
for 1 minute and then at medium speed
for another 3 minutes.
Pasta with sauce
Ingredients:
Pasta (Penne or macaroni) 250g
Pasta sauce 550mL
Water 650mL
Frozen Mixed Vegetables
(diced carrots, peas, corns)
Ham 97g
120g
3 Coat the inner pot with some butter and
then pour the cake mixture into it.
4 Start the cake menu.
5 When the cooking process is nished, let
the cake cool down. Then turn the inner
pot upside down to let the cake slip out of
the inner pot onto a plate.
EN
21
Page 21
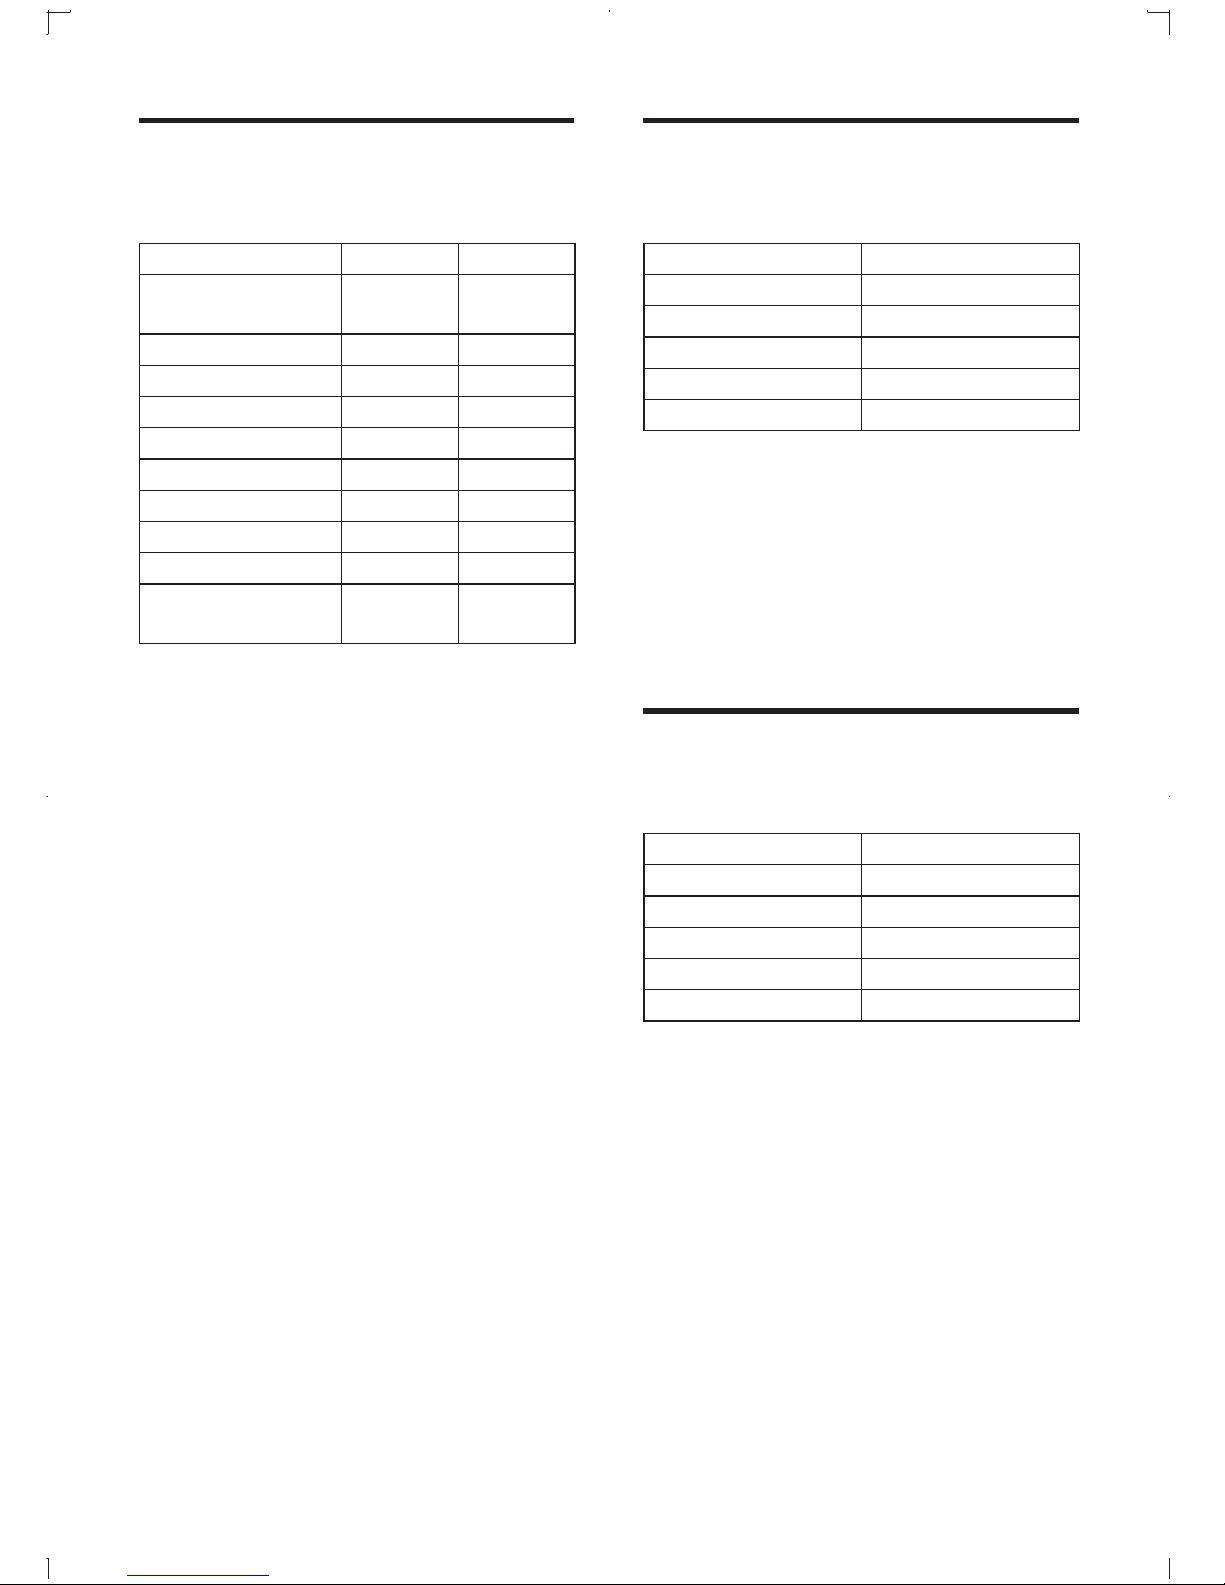
Braised Beef with Garlic
Lotus Root Soup
Ingredients:
HD4765 HD4767
Beef, shin or chuck
steak, trimmed
Shao Shing wine 2 tbsp 2 tbsp
Dark soy sauce 2 tbsp 2 tbsp
Light soy sauce 1 tbsp 1 tbsp
Garlic cloves, peeled 100g 100g
Oil 3 tbsp 3 tbsp
Salt ¼ tsp ¼ tsp
Sugar ½ tsp ½ tsp
Stock 800mL 500mL
Spring onion, cut
into sections
Procedure:
800g 600g
5pcs 5pcs
1 Cut the beef into cubes for about 4-cm.
2 Brown the beef with garlic in a wok for
about 2-3 minutes. Add in the wine and stir
continuously for about 1 minute. Remove
from the heat.
3 Place the ingredients into the inner pot.
Season with salt, sugar, and soy sauce. Pour
in the stock. Cook for 3 hours.
4 When cooking ends, add in the spring
onions.
5 Just before serving, add come dissolved
corn starch to thicken the sauce slightly.
Cooking time:
3 hours.
Ingredients:
Lotus root 300g
Carrot 1-2 pcs
Pork rib 600g
Ginger 2 slices
Salt to taste
Water Soup water line
Procedure:
1 Wash all the ingredients, cut the locus root,
carrot and portk rib.
2 Put all ingredients into inner pot, close the
lid and cook with soup menu.
Cooking time:
3 hours.
Vegetable Soup
Ingredients:
Baby Chinese cabbage 5 stalks (~90g)
Tomato 2
Tofu 1 cake
Pork 300g
Salt to taste
Water Soup water line
Procedure:
1 Wash Chinese cabbage and tomato.
2 Wash and slice the tomato into four parts.
Cut tofu into small pieces.
Place all ingredients into the pot, close the lid
and cook for 30 mins in soup menu.
22
EN
Page 22

17 Troubleshooting
If you encounter problems when using this cooker, check the following points before requesting service.
If you cannot solve the problem, contact the Philips Consumer Care Center in your country.
Problem Possible cause Solution
The light on the
buttons does not
go on.
The display does
not function.
The rice is not
cooked.
There is a connection problem. Check if the power cord is connected to the
cooker properly and if the plug is inserted
rmly into the power outlet.
The light is defective. Take the appliance to your Philips dealer or a
service center authorized by Philips.
The cooker is not connected to
power supply.
The battery that supplies power
to the display is empty.
Not enough water has been
added.
The cooking process has not
started.
The inner pot is not properly in
contact with the heating element.
The heating element is damaged,
or the inner pot is deformed.
If there is no power supply, the power failure
backup function does not work and the
display does not function.
Take the appliance to your Philips dealer or a
service center authorized by Philips to have the
battery replaced.
Add water according to the scale on the
inside of the inner pot.
You did not press OK button.
Make sure that there is no foreign residue on
the heating element and the outside of the
inner pot before switching the rice cooker
on.
Take the cooker to your Philips dealer or a
service center authorized by Philips.
The cooker does
not switch to
keep-warm mode
automatically.
The rice is
scorched.
Water spills out
of the appliance
during cooking.
You are using STEAM or CAKE
menu.
The temperature control is
defective.
You have not rinsed the rice
properly.
You added too much water to
the rice.
The automatic keep-warm mode only applies
to other 5 menus.
Take the appliance to your Philips dealer or a
service center authorized by Philips.
Rinse the rice until the water runs clear.
Make sure that you add water to the level
indicated on the scale inside the inner pot that
corresponds to the number of cups of rice
used.
Make sure the water does not exceed the
next level on the scale, as this may cause the
appliance to over ow during cooking.
23EN
Page 23
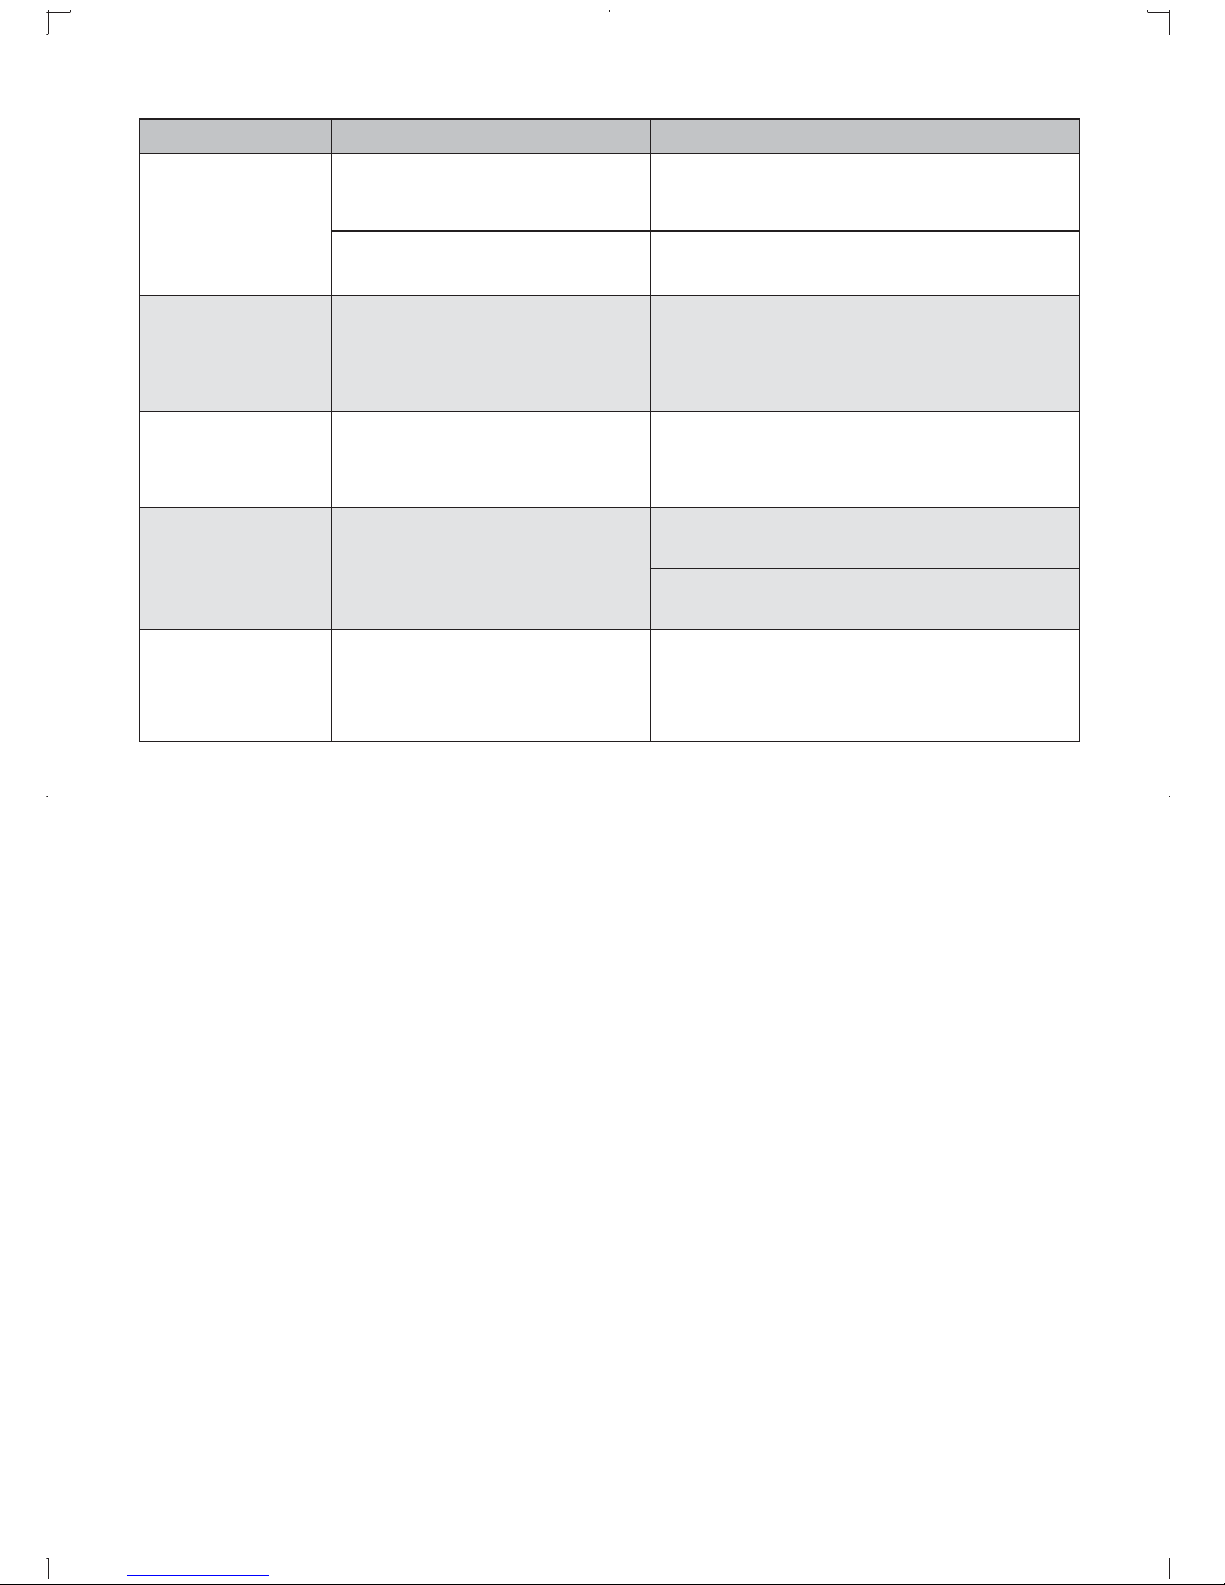
Problem Possible cause Solution
There is over ow
when using the
pasta program.
The cake result is
too hard
Can’t get to the
desired cooking
function
Rice smells bad
after cooking.
Error message E5
appears on the
display.
Too much liquid is added. Only add liquid to the water mark of Pasta
Water instead of pasta sauce is
added.
You didn’t follow the recipe
provided in the user manual and
If only water is added, please add two
teaspoons of oil to prevent over ow.
Please use cake mix and follow the recipe
provided in the user manual.
may have used our instead of
cake mix.
You did not press Menu button Press Menu button repeatedly to select the
desired menu as shown by the LED indicator.
Inner pot is not well cleaned and
leftover from previous cooking
contaminates the rice.
Clean the inner pot with some washing
detergent and warm water.
After cooking, make sure the steam vent cap,
inner lid and inner pot is cleaned thoroughly.
There has been a power
failure during cooking or in the
keep-warm mode that lasted
When the power supply resumes,
press the Stop/Cancel button to
reset the appliance.
longer than 2 hours.
24
EN
Page 24

© 2011 Koninklijke Philips Electronics N.V.
All rights reserved.
HD4765_HD4767_Asean_UM_V1.1
www.philips.com
3140 035 27841
 Loading...