

Philips HD4726 User Manual [ru]
27 2826
Always there to help you
4
1
6
20
8
16
21
17
22
18
23
19
24
8
20
25
21
26
22
27
23
28
8
24
29
25
30
8
27 2826
4
1
6
9
14
8
4
1
6
15
8
4
1
6
11
16
8
4
1
6
17
8
4
1
6
13
18
8
4
1
6
19
8
4
1
6
7
8
4
1
6
98
8
4
1
6
10
8
4
1
6
6
11
8
4
1
6
12
8
4
1
6
13
8
2
4
1
4
1
6
7
8
4
1
6
98
8
4
1
6
10
8
4
1
6
6
11
8
4
1
6
12
8
4
1
6
13
8
4
1
6
9
14
8
4
1
6
15
8
4
1
6
11
16
8
4
1
6
17
8
4
1
6
13
18
8
4
1
6
19
8
4
1
6
20
8
16
21
17
22
18
23
19
24
8
Register your product and get support at
www.philips.com/welcome
Question?
Contact
Philips
EN User manual
KK Пайдаланушы нұсқаулығы
Specifications are subject to change without notice
© 2016 Koninklijke Philips N.V.
All rights reserved.
HD4726_UM_RU_v1.0
RU Руководство пользователя
UK Посібник користувача
English
1 Your multicooker
Congratulations on your purchase, and welcome to Philips!
To fully benet from the support that Philips offers, register your
product at www.philips.com/welcome.
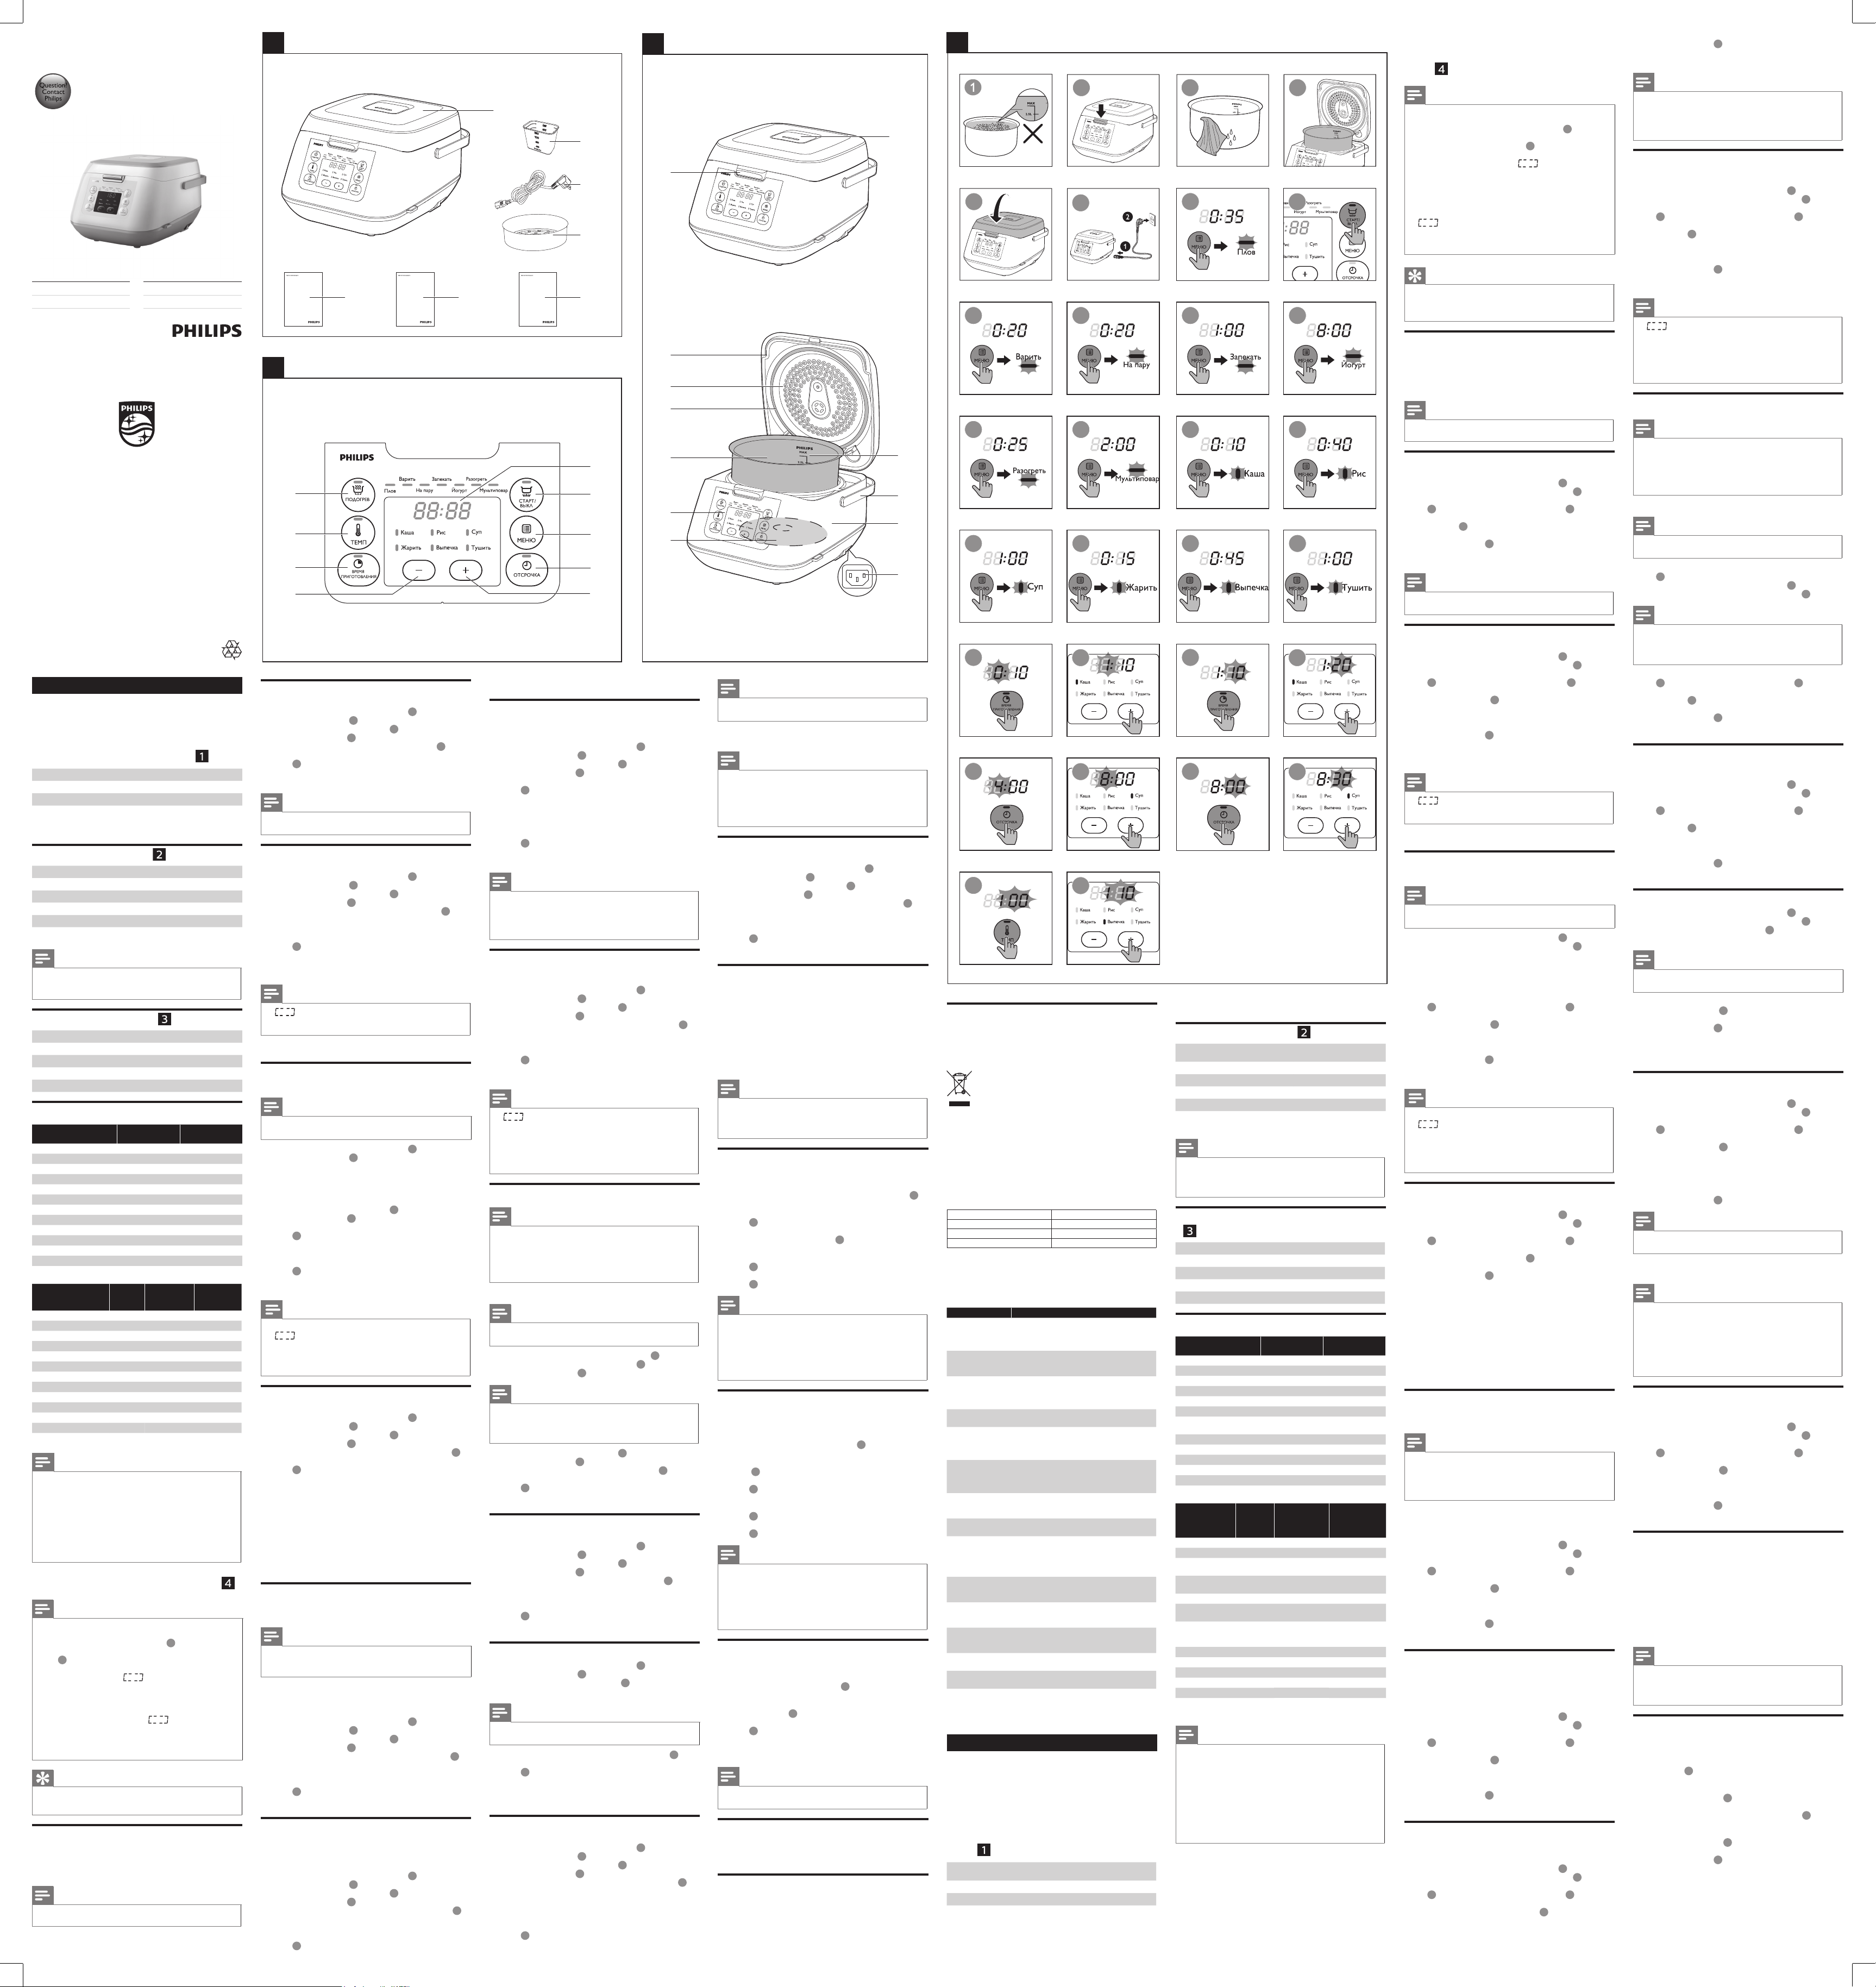
2 What’s in the box (fig. 26)
Multicooker main unit
a
Measuring cup
b
Power cord
c
Steam basket
d
User manual
e
Recipe booklet
f
Warranty card
g
3 Overview
Product overview (g.
Detachable steam vent capgControl panel
a
Lid release button
b
Top lid
c
Detachable inner lid
d
Sealing ring
e
Inner pot
f
Note
• Only use the original inner pot that comes with this appliance. If
the inner pot is damaged, contact the consumer care center in your
country/region to order new inner pots.
Controls overview (g.
Keep-warm button
a
Temperature button
b
Cooking time button
c
Decrease button
d
Increase button
e
Functions overview
Functions
Pilaf (Плов) 35 min /
Boil (Варить) 20 min 5 min - 2 hr
Steam (На пару) 20 min 5 min - 2 hr
Roast (Запекать) 1 hr /
Yogurt (Йогурт) 8 hr 6-12 hr
Reheat (Разогреть) 25 min 5-60 min
Manual (Мультиповар) 2 hr 5 min - 10 hr
Porridge (Каша) 10 min 5 min - 2 hr
Rice (Рис) 40 min /
Soup (Суп) 1 hr 20 min-4 hr
Fry (Жарить) 15 min 5-60 min
Bake (Выпечка) 45 min 20 min - 2 hr
Stew (Тушить) 1 hr 20 min - 10 hr
Functions
Pilaf (Плов) 1 - 24 hr 130 - 140°C /
Boil (Варить) 1 - 24 hr 90 - 100°C /
Steam (На пару) 1 - 24 hr 100°C /
Roast (Запекать) 1 - 24 hr 120 - 130°C /
Yogurt (Йогурт) 1 - 24 hr 40°C /
Reheat (Разогреть) / 85°C /
Manual (Мультиповар) 1 - 24 hr 100°C 30 - 160°C
Porridge (Каша) 1 - 24 hr 90 - 100°C /
Rice (Рис) 1 - 24 hr 130 - 140°C /
Soup (Суп) 1 - 24 hr 90 -100°C /
Fry (Жарить) / 140 - 160°C /
Bake (Выпечка) / 130°C 40 - 160°C
Stew (Тушить) 1 - 24 hr 90°C /
Note
• The cooking time for rice (Рис) and pilaf (Плов) is determined by
the multicooker according to the quantity of ingredients put in the
inner pot.
• You can adjust the cooking temperature for bake (Выпечка) and
manual (Мультиповар). For bake, the temperature is available from
40°C to 160°C; for manual, the temperature is available from 30°C
to 160°C.
• After the cooking process has started, you can press the Start/Off
button (СТАРТ/ВЫКЛ) to deactivate the current cooking process,
and the multicooker will turn into standby mode.
Default cooking
time
Preset
time
)
Heating element
h
Power socket
i
Main unit
j
Cooker handle
k
Water level indications
l
Preset button
f
Menu button
g
Start/Off button
h
Display screen
i
Default
cooking
temperature
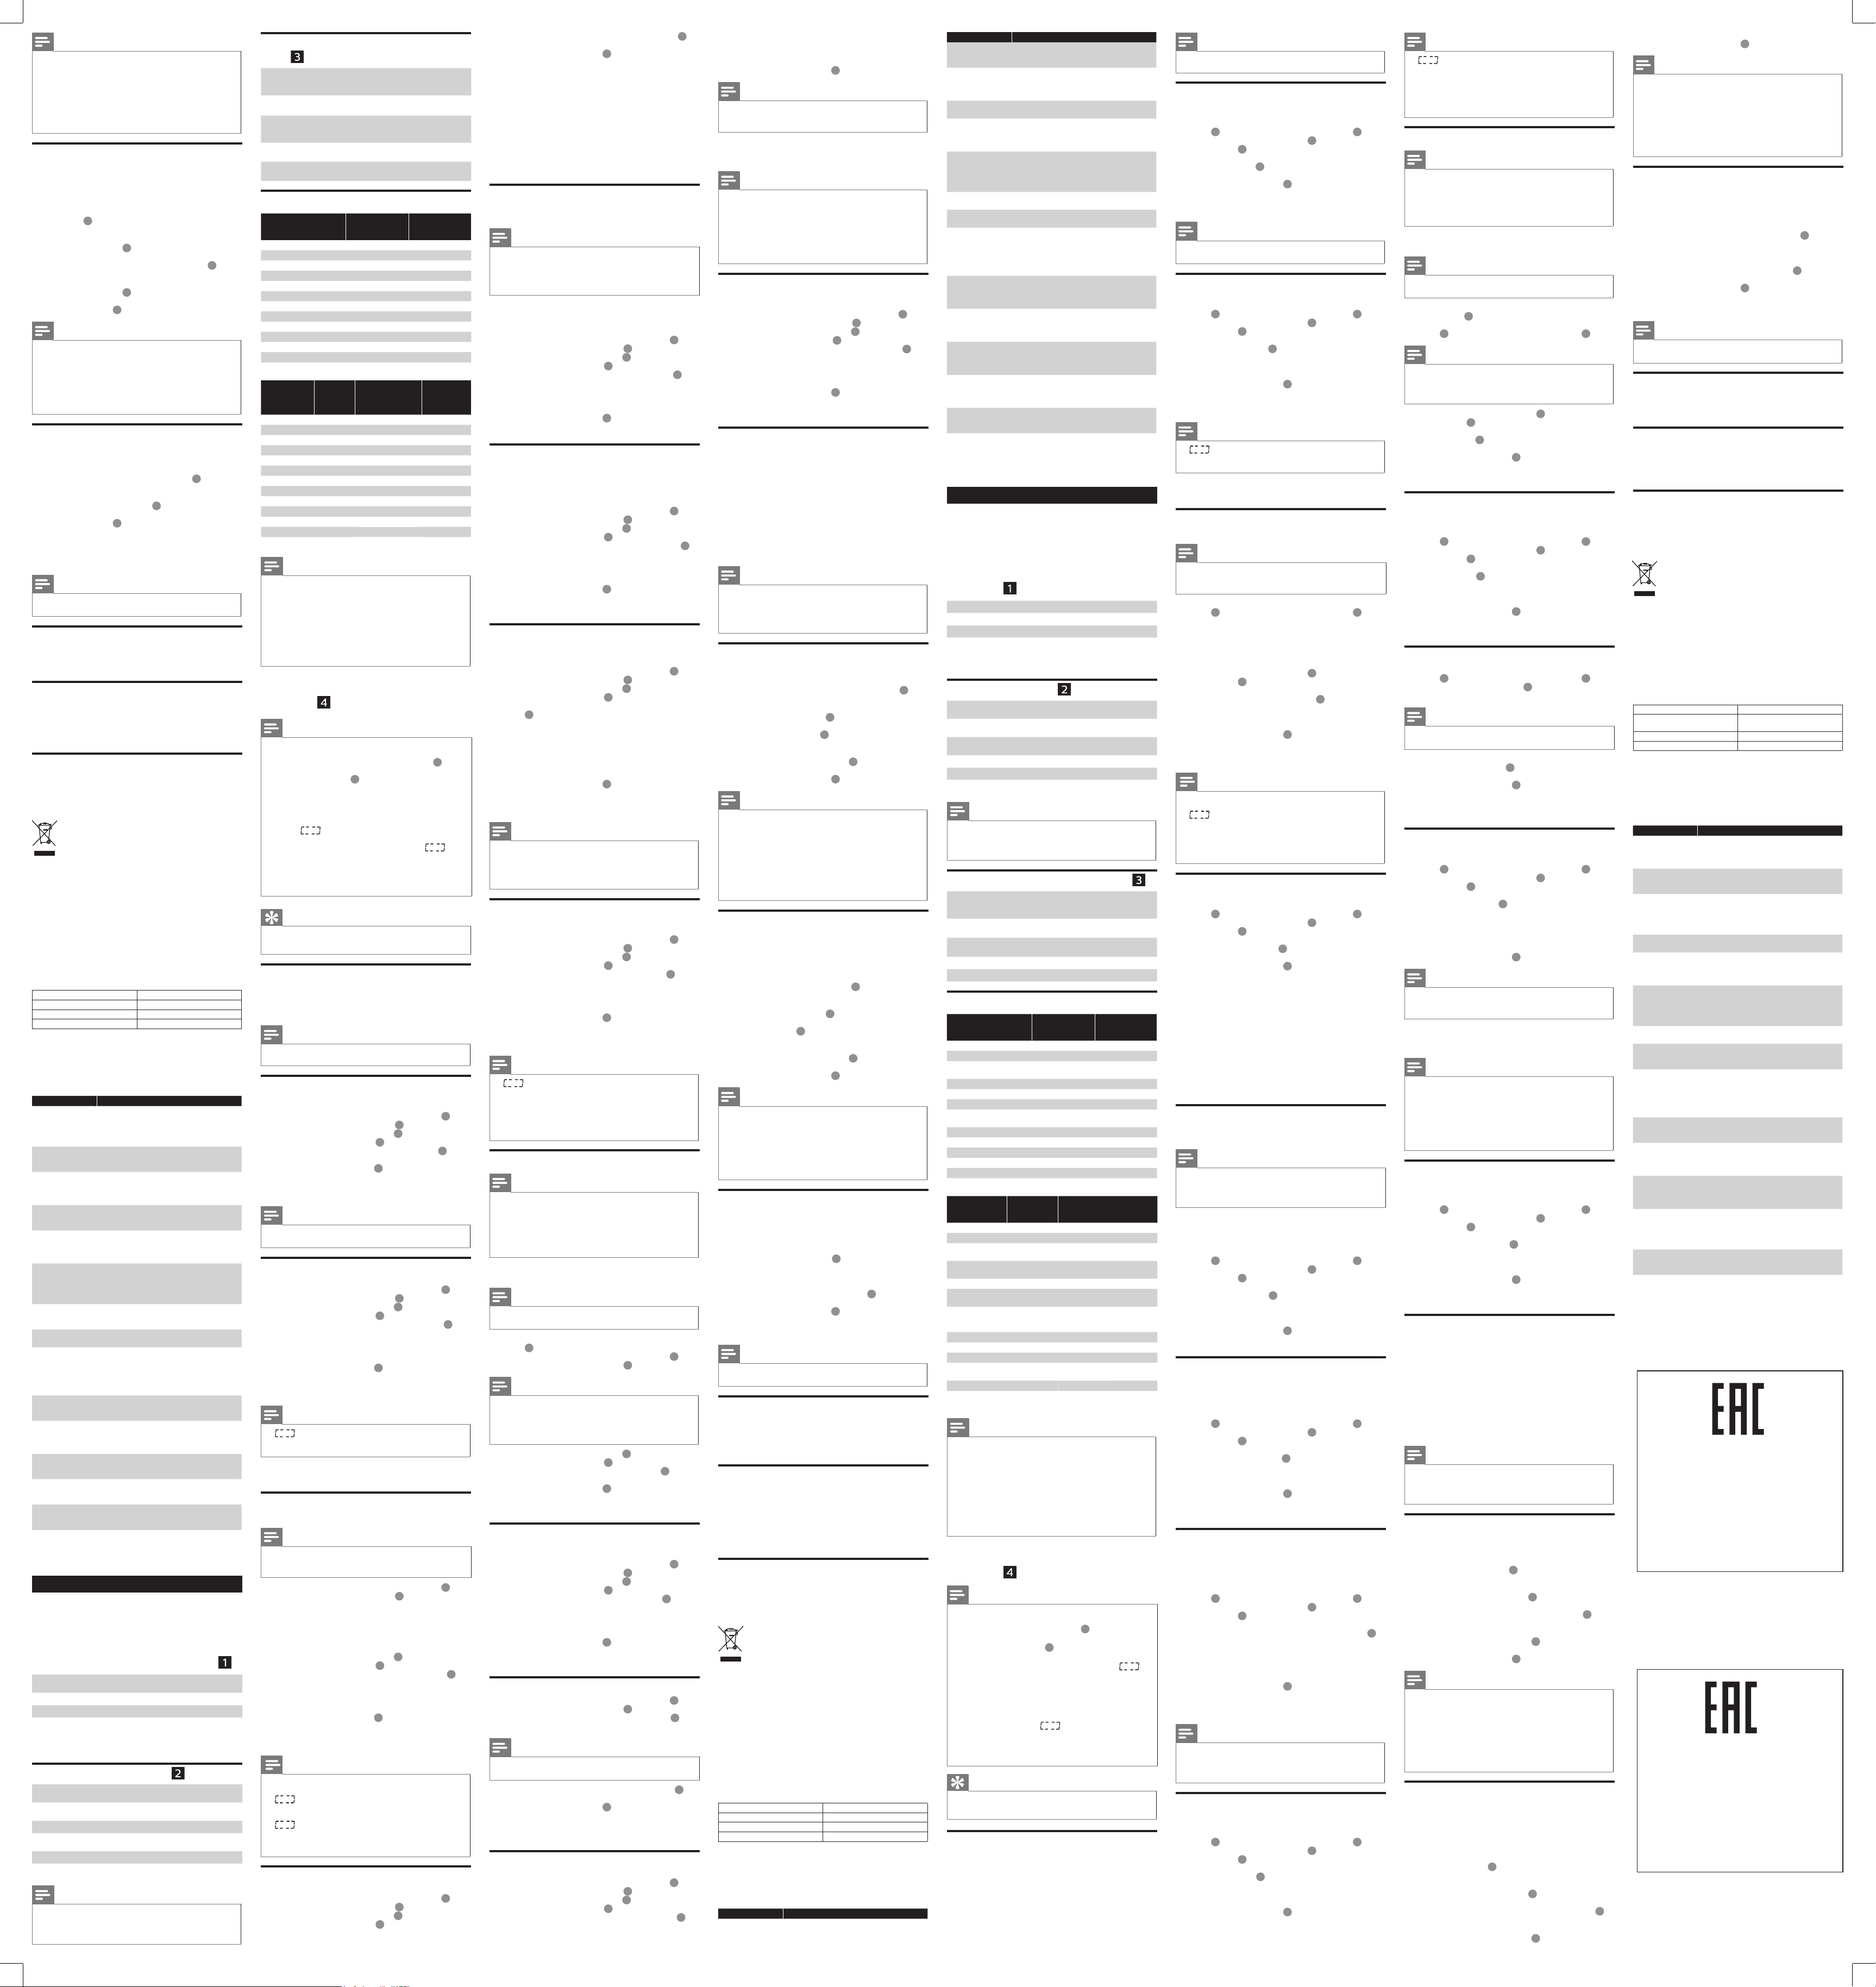
4 Using the multicooker (fig.
Note
• For all functions, do not exceed the MAX indication on the inside of
the inner pot when putting food, liquid or ingredients in it, otherwise
the food may overow during cooking (g. 1).
• To open the top lid of the multicooker, press the lid release button
(g.
).
• The cooking time does not display straight from the beginning for
rice (Рис) and pilaf (Плов). displays on the screen during
most of the cooking time as the multicooker needs to detect the
water/liquid and ingredient volume in the initial preparation stage.
When the multicooker detects the actual cooking time needed, the
remaining cooking time displays on the screen. For porridge (Каша),
steam (На пару), and boil (Варить), displays on the screen
before the water/liquid is brought to boil. When the water/liquid
starts boiling, the set cooking time displays on the screen.
• Refer to the recipe booklet for more details on cooking with each
function.
Tip
• To select a certain function, press "menu" (МЕНЮ) repeatedly. You
can also press "menu" (МЕНЮ) once, and then press increase (+) or
decrease (-) to do so.
Before rst use
1 Take out all the accessories from the inner pot, and remove the
packaging material of the inner pot.
2 Clean all parts of the multicooker thoroughly before using it for
the rst time (see chapter ‘Cleaning and Maintenance’).
Note
• Make sure all parts are completely dry before you start using the
multicooker.
HD4726
Мультиварка
Мультипісіргіш
)
Cooking time
regulating range
Temperature
regulating
range
www.philips.com/welcome
User manual
http://www.philips.com/welcome
3
a
b
c
d
Making pilaf (Плов)
1 Put the ingredients for the pilaf into the inner pot.
2 Wipe the outside of the inner pot dry (g.
in the multicooker (g.
3 Close the lid of the multicooker (g.
the power socket (g.
4 Press “menu” (МЕНЮ) to select “pilaf” (Плов) (g.
5 Press “start” (СТАРТ/ВЫКЛ) to conrm and start cooking
).
(g.
6 When the cooking is nished, the appliance beeps and turns
into warm keeping automatically.
Note
• If the voltage is unstable at the area you live, it is possible that food
in the multicooker overows.
Boiling (Варить)
1 Fill the inner pot with some water.
2 Wipe the outside of the inner pot dry (g.
in the multicooker (g.
3 Close the lid of the multicooker (g.
the power socket (g.
4 Press “menu” (МЕНЮ) to select “boil” (Варить) (g.
» To choose a different cooking time, refer to chapter
“Setting up the cooking time”.
5 Press “start” (СТАРТ/ВЫКЛ) to conrm and start cooking
).
(g.
6 When the water is brought to boil, the multicooker beeps
5 times as a reminder for you to open the lid and put the food
in the inner pot.
Note
• displays on the screen before the water/liquid is brought
to boil. When the water/liquid starts boiling, the set cooking time
displays on the screen.
7 When the cooking is nished, the appliance beeps and turns
into warm keeping automatically.
Steaming (На пару)
1 Pour some water into the inner pot.
Note
• To steam food, pour 0.5L to 2L of water into the inner pot. You can
slightly adjust the amount of water depending on the type of food.
2 Wipe the outside of the inner pot dry (g.
in the multicooker (g.
3 Put the steam basket in the inner pot, put the food in a bowl,
and then put the bowl on the steam basket.
» Make sure that not all the steaming holes on the steam
basket are covered, so that hot steam could ow up from
under the steam basket.
4 Close the lid of the multicooker (g.
the power socket (g.
5 Press “menu” (МЕНЮ) to select “steaming” (На пару)
).
(g.
» To choose a different cooking time, refer to chapter
“Setting up the cooking time”.
6 Press “start” (СТАРТ/ВЫКЛ) to conrm and start cooking
).
(g.
7 When the cooking is nished, the appliance beeps and turns
into warm keeping automatically.
Note
• When steaming food, do not immerse the steam basket in water.
• displays on the screen before the water/liquid is brought
to boil. When the water/liquid starts boiling, the set cooking time
displays on the screen.
• After the steaming is nished, use a kitchen glove or a cloth to
remove the bowl and steam basket, as they could be very hot.
Roasting (Запекать)
1 Put ingredients into the inner pot.
2 Wipe the outside of the inner pot dry (g.
in the multicooker (g.
3 Close the lid of the multicooker (g.
the power socket (g.
4 Press “menu” (МЕНЮ) to select “roast” (Запекать) (g.
5 Press “start” (СТАРТ/ВЫКЛ) to conrm and start cooking
).
(g.
6 There are 2 stages of roasting. When the rst stage (about 35
minutes, 130°C) is over, the multicooker beeps 5 times every
30 seconds as a reminder for you to open the lid, and turn the
food over in the inner pot.
» The remaining cooking time (25 minutes) displays on the
7 Press “menu” (МЕНЮ) to start the second stage (120°C).
screen.
» If menu (МЕНЮ) is not pressed within 5 minutes after
the rst stage is over, the multicooker will turn into warm
keeping.
8 When the cooking is nished, the appliance beeps and turns
into standby mode automatically.
)
Making yogurt (Йогурт)
1 Whisk the ingredients for the yogurt well and put them in
sealed containers.
Note
• Use sealed containers which are made of food-grade plastics or glass
that can bear temperatures higher than 80°C.
• Refer to the recipe book for more details on how to make yogurt.
2 Put the containers in the inner pot. Make sure that the
containers are sealed.
3 Pour some water in the inner pot. Make sure that half of the
containers are immersed in water.
4 Wipe the outside of the inner pot dry (g.
in the multicooker (g.
5 Close the lid of the multicooker (g.
the power socket (g.
6 Press “menu” (МЕНЮ) to select “yogurt” (Йогурт) (g.
» To choose a different cooking time, refer to chapter
7 Press “start” (СТАРТ/ВЫКЛ) to conrm and start cooking
8 When the cooking is nished, the appliance beeps and turns
Reheating (Разогреть)
1 Loosen the food and evenly distribute it in the inner pot.
2 If needed, pour some water onto the food to prevent it from
3 Wipe the outside of the inner pot dry (g.
4 Close the lid of the multicooker (g.
5 Press menu (МЕНЮ) to select “reheat” (Разогреть) (g.
6 Press “start” (СТАРТ/ВЫКЛ) to conrm and start cooking
“Setting up the cooking time”.
).
(g.
into standby mode automatically.
becoming too dry. The quantity of the water depends on the
amount of food.
in the multicooker (g.
the power socket (g.
» To choose a different cooking time, refer to chapter
“Setting up the cooking time”.
).
(g.
).
), and put the plug in
).
).
), and put the plug in
).
).
), and put the plug in
).
).
), and put the plug in
).
).
), and put the plug in
).
).
), and put the plug in
).
Recipe
), and then put it
), and then put it
), and then put it
), and then put it
), and then put it
), and then put it
5 Растап, пісіруді бастау үшін «бастау» (СТАРТ/ВЫКЛ)
түймесін басыңыз (
6 Пісіру аяқталғанда, құрылғы дыбыстық сигнал шығарып,
жылы сақтау режимі автоматты түрде іске қосылады.
сур.).
Есте сақтаңыз
• Егер 80°C-тан төмен температураны таңдасаңыз, пісіру
аяқталғаннан кейін тағам пісіргіш күту режіміне автоматты түрде
ауысады.
• Егер 140°C-тан жоғары температураны таңдасаңыз, онда пісіру
кезінде үстіңгі қақпақ ашық болуы тиіс.
Ботқа пісіру (Каша)
1 Ботқаның ингредиенттерін ішкі кәстрөлге салып, шамалы
араластырыңыз.
2 Ішкі кәстрөлдің сыртын құрғатып сүртіңіз (
кейін көп функциялы тағам пісіргішке салыңыз (
3 Көп функциялы тағам пісіргіштің қақпағын жабыңыз да
сур.), ашаны қуат розеткасына қосыңыз (
(
4 «Мәзір» (МЕНЮ) түймесін басып, «ботқа» (Каша) тармағын
таңдаңыз (
» Басқа пісіру уақытын таңдау үшін «Пісіру уақытын
сур.).
орнату» тарауын қараңыз.
сур.), одан
сур.).
сур.).
a
b
c
d
b
a
4 Көп функциялы тағам
пісіргішті пайдалану
(
-сурет)
2
5
6
3 4
7
Есте сақтаңыз
• Барлық мәзірлер бойынша тағам, сұйықтық не ингредиенттерді
салған кезде, ішкі ыдыс ішіндегі MAX белгісінен асырмаңыз,
болмаса пісіру кезінде тағам тасып кетуі мүмкін ( 1сур).
• Көп функциялы тағам пісіргіштің үстіңгі қақпағын ашу үшін
қақпақты босату түймесін басыңыз (
• Күріш (Рис) және палау (Плов) функциялары үшін пісіру уақыты
ең басынан бастап көрсетілмейді.
көбінде экранда көрсетіледі, себебі көп функциялы тағам пісіргіш
бастапқы дайындау кезеңінде суды/сұйықтық пен құрамдастар
көлемін анықтауға тиіс. Көп функциялы тағам пісіргіш қажетті
8
пісіру уақытын анықтаған кезде, қалған пісіру уақыты экранда
көрсетіледі. Ботқа (Каша), буға пісіру (На пару) және қайнату
(Варить) функцияларында су/сұйықтық қайнағанша экранда
көрсетіледі. Су/сұйықтық қайнай бастағанда орнатылған
пісіру уақыты экранда көрсетіледі.
• Әр мәзірмен пісіру бойынша толық мәліметтерді рецепттер
кітапшасынан қараңыз.
сур).
пісіру уақытының
5 Растап, пісіруді бастау үшін «бастау» (СТАРТ/ВЫКЛ)
www.philips.com/welcome
Warranty
gfe
9 10
11 12
Кеңес
• Белгілі бір функцияны таңдау үшін «мәзір» (МЕНЮ) түймесін
қайталап басыңыз. Сондай-ақ, олай істеу үшін «мәзір» (МЕНЮ)
түймесін бір рет басып, көбейту (+) не азайту (-) түймесін басуға
болады.
Алғашқы рет қолданар алдында
1 Ішкі ыдыстан барлық қосалқы құралдарды алыңыз, одан кейін
ішкі ыдыстың орам материалын алыңыз.
2 Көп функциялы тағам пісіргішті бірінші рет пайдаланбастан
бұрын оның бөліктерін мұқият тазалаңыз («Тазалау және
техникалық қызмет көрсету» тарауын қараңыз).
Есте сақтаңыз
• Көп функциялы тағам пісіргішті пайдаланбастан бұрын барлық
бөліктерінің толық кепкенін тексеріңіз.
Палау (Плов) пісіру
1 Палаудың ингредиенттерін ішкі кәстрөлге салыңыз.
2 Ішкі кәстрөлдің сыртын құрғатып сүртіңіз (
кейін көп функциялы тағам пісіргішке салыңыз (
3 Көп функциялы тағам пісіргіштің қақпағын жабыңыз да
сур.), ашаны қуат розеткасына қосыңыз (
(
4 «Мәзір» (МЕНЮ) түймесін басып, «палау» (Плов) тармағын
таңдаңыз (
5 Растап, пісіруді бастау үшін «бастау» (СТАРТ/ВЫКЛ)
түймесін басыңыз (
6 Пісіру аяқталғанда, құрылғы дыбыстық сигнал шығарып,
жылы сақтау режимі автоматты түрде іске қосылады.
сур.).
сур.).
Есте сақтаңыз
• Тұратын аймағыңыздағы тоқ кернеуі тұрақты болмаса, көп
функциялы тағам пісіргіштегі тағам тасып кетуі мүмкін.
сур.), одан
сур.).
сур.).
i
h
g
f
e
c
d
e
f
g
h
13 14 15 16
l
k
j
17 18 19 20
i
Қайнату (Варить)
1 Ішкі кәстрөлге шамалы су құйыңыз.
21
7 When the cooking is nished, the appliance beeps and turns
into warm keeping automatically.
Manual (Мультиповар)
You may use the manual mode to cook food with more control over
the cooking time and temperature.
).
1 Put ingredients into the inner pot.
2 Wipe the outside of the inner pot dry (g.
in the multicooker (g.
3 Close the lid of the multicooker (g.
the power socket (g.
4 Press “menu” (МЕНЮ) to select “manual” (Мультиповар)
).
(g.
» To choose a different cooking temperature, refer to
chapter “Setting up the cooking temperature”.
» To choose a different cooking time, refer to chapter
“Setting up the cooking time”.
).
).
), and then put it
), and put the plug in
Note
• If the baking temperature is set below 80°C, when the cooking is
nished, the appliance turns into standby mode automatically.
6 When the cooking is nished, the appliance beeps and turns
into warm keeping automatically.
Note
• When baking cake, keep the lid closed during cooking. Baking cake
at 130°C and by 45 minutes usually delivers best cooking result.
• If you bake other food with a temperature above 140°C, keep the
lid open.
• When removing the inner pot from the multicooker after cooking,
use a kitchen glove or a cloth, as the inner pot could be very hot.
25
22
26
23
27
24
28
5 Press “start” (СТАРТ/ВЫКЛ) to conrm and start cooking
).
(g.
6 When the cooking is nished, the appliance beeps and turns
into warm keeping automatically.
Note
• If you select a temperature below 80°C, the multicooker
).
automatically turns into standby mode after the cooking process is
nished.
• If you select a temperature above 140°C, the top lid must be open
during cooking.
Cooking porridge (Каша)
1 Put ingredients for the porridge into the inner pot and stir a
little bit.
2 Wipe the outside of the inner pot dry (g.
in the multicooker (g.
3 Close the lid of the multicooker (g.
the power socket (g.
4 Press “menu” (МЕНЮ) to select “porridge” (Каша) (g.
» To choose a different cooking time, refer to chapter
“Setting up the cooking time”.
).
).
), and then put it
), and put the plug in
5 Press “start” (СТАРТ/ВЫКЛ) to conrm and start cooking
).
(g.
6 When the cooking is nished, the appliance beeps and turns
into warm keeping automatically.
Note
• displays on the screen before the water/liquid is brought
to boil. When the water/liquid starts boiling, the set cooking time
displays on the screen.
• For details about the ratio of ingredients and liquid, refer to the
recipe booklet.
• If the voltage is unstable at the area you live, it is possible that food
in the multicooker overows.
Cooking rice (Рис)
Note
• If the voltage is unstable at the area you live, it is possible that food
in the multicooker overows.
• After the cooking is nished, stir the rice and loosen it immediately
to release excessive moisture for uffy rice.
• Depending on the cooking conditions, the bottom portion of the
rice may become slightly browned.
1 Rinse rice, put the washed rice in the inner pot, and ll in water.
Note
• For details about the ratio of rice and water, refer to the recipe
booklet.
2 Press the lid release button to open the lid (g.
3 Wipe the outside of the inner pot dry (g.
in the multicooker (g.
).
).
), and then put it
Note
• Make sure that the inner pot is in proper contact with the heating
element.
• Make sure that the outside of the inner pot is clean and dry, and
that there is no foreign residue on the heating element.
).
4 Close the lid of the multicooker (g.
the power socket (g.
5 Press “menu” (МЕНЮ) to select “rice” (Рис) (g.
).
), and put the plug in
).
6 Press “start” (СТАРТ/ВЫКЛ) to conrm and start cooking
).
(g.
7 When the cooking is nished, the appliance beeps and turns
into warm keeping automatically.
Making soup (Суп)
1 Put ingredients and water/liquid for the soup into the inner pot.
2 Wipe the outside of the inner pot dry (g.
in the multicooker (g.
3 Close the lid of the multicooker (g.
the power socket (g.
4 Press “menu” (МЕНЮ) to select “soup” (Суп) (g.
» To choose a different cooking time, refer to chapter
“Setting up the cooking time”.
).
).
), and then put it
), and put the plug in
).
5 Press “start” (СТАРТ/ВЫКЛ) to conrm and start cooking
).
(g.
6 When the cooking is nished, the appliance beeps and turns
into warm keeping automatically.
Frying (Жарить)
1 Wipe the outside of the inner pot dry (g.
in the multicooker (g.
2 Put the plug in the power socket (g.
).
3 Pour some cooking oil into the inner pot.
Note
• Refer to the recipe book for more details on using the frying
function.
4 Press “menu” (МЕНЮ) to select “fry” (Жарить) (g.
).
5 Press “start” (СТАРТ/ВЫКЛ) to conrm and start cooking
6 Keep the lid open and stir the ingredients constantly with a
7 When the cooking is nished, the appliance beeps and turns
).
(g.
spatula.
into standby mode automatically.
), and then put it
).
).
Baking (Выпечка)
1 Put the ingredients to bake in the inner pot.
2 Wipe the outside of the inner pot dry (g.
in the multicooker (g.
3 Close the lid of the multicooker (g.
the power socket (g.
4 Press “menu” (МЕНЮ) to select “bake” (Выпечка) (g.
» To choose a different baking temperature, refer to chapter
“Setting up the cooking temperature”.
).
» To choose a different cooking time, refer to chapter
“Setting up the cooking time”.
).
).
5 Press “start” (СТАРТ/ВЫКЛ) to conrm and start cooking
).
(g.
), and then put it
), and put the plug in
Making stew (Тушить)
1 Put the ingredients for the stew or ragout in the inner pot.
2 Wipe the outside of the inner pot dry (g.
in the multicooker (g.
3 Close the lid of the multicooker (g.
the power socket (g.
4 Press “menu” (МЕНЮ) to select “stew” (Тушить) (g.
» To choose a different cooking time, refer to chapter
“Setting up the cooking time”.
).
), and put the plug in
).
5 Press “start” (СТАРТ/ВЫКЛ) to conrm and start cooking
).
(g.
6 When the cooking is nished, the appliance beeps and turns
into warm keeping automatically.
Warm keeping
For cooking functions with warm keeping, you can choose to activate
or deactivate warm keeping after the cooking process is nished.
• Before you start a cooking function with warm keeping, the keep-
warm indicator will be ashing. If you start the cooking function
).
directly, the multicooker will turn into warm keeping automatically
when the cooking process is nished.
• Before you start a cooking function with warm keeping, the keep-
warm indicator will be ashing. If you press the keep-warm button
(ПОДОГРЕВ), the keep-warm indicator will go off. After the
cooking process is nished, the multicooker will turn into standby
mode automatically.
Note
• The maximum warm keeping time is 12 hours.
• The warm keeping mode does not apply to the following cooking
functions: Yogurt, Fry, Manul, and Bake (only when baking at
temperatures below 80°C).
Setting up the cooking time
You can adjust the cooking time for some functions. Refer to chapter
“Functions overview” for the regulating range.
1 Select the cooking function you need.
2 Press “cooking time” (ВРЕМЯ ПРИГОТОВЛЕНИЯ) (g.
» The hour unit starts ashing on the display.
3 Press “increase” (+) or “decrease” (-) to set the hour unit
4 After the hour unit is set, press “cooking time” (ВРЕМЯ
ПРИГОТОВЛЕНИЯ) again (g.
» The minute unit starts ashing on the display.
).
).
(g.
5 Press “increase” (+) or “decrease” (-) to set the minute unit
6 Press “start” (СТАРТ/ВЫКЛ) to conrm and start cooking
(g.
).
).
(g.
Note
• If the multicooker is left idle for 10 seconds after "cooking time"
(ВРЕМЯ ПРИГОТОВЛЕНИЯ) is pressed, it will beep for another
15 seconds, you can still set the cooking time at this point. If no
button is pressed, the multicooker will turn into standby mode.
• For functions with a maximum cooking time of no more
than 1 hour, the rst time you press “cooking time” (ВРЕМЯ
ПРИГОТОВЛЕНИЯ), the minute unit starts ashing on the display.
Preset time for delayed cooking
You can preset the delayed cooking time for some cooking functions.
Refer to chapter “Functions overview” and see the preset time for
different functions.
1 Select the cooking function you need.
2 Press “preset time” (ОТСРОЧКА) (g.
» The hour unit starts ashing on the display.
3 Press “increase” (+) or “decrease” (-) to set the hour unit
4 After the hour unit is set, press “preset” (ОТСРОЧКА) again
).
(g.
» The minute unit starts ashing on the display.
).
(g.
5 Press “increase” (+) or “decrease” (-) to set the minute unit
6 Press “start” (СТАРТ/ВЫКЛ) to conrm and start cooking
(g.
).
).
(g.
Note
• If the multicooker is left idle for 10 seconds after "preset"
(ОТСРОЧКА) is pressed, it will beep for another 15 seconds, you
can still set the preset time at this point. If no button is pressed, the
multicooker will turn into standby mode.
• The cooking process will be nished when the preset time has
elapsed. For example, if you set a preset time of 8 hours, the dishes
will be ready 8 hours later.
Setting up the cooking temperature
You can adjust the cooking temperature for some functions. Refer to
chapter “Functions overview” to see the regulating range.
1 Select the cooking function you need.
2 Press “temperature” (ТЕМП.) (g.
» The default cooking temperature displays on the screen.
).
3 Press “increase” (+) or “decrease” (-) to set the cooking
temperature (g.
4 Press “start” (СТАРТ/ВЫКЛ) to conrm and start cooking
(g.
).
).
5 Cleaning and Maintenance
Note
• Unplug the multicooker and wait until it has cooled down sufciently
before cleaning.
Interior
Inside of the top lid and the main body; the heating element:
• Wipe with a wrung out cloth.
• Make sure to remove all the food residues stuck to the
multicooker.
).
Exterior
Surface of the top lid and outside of the main body:
• Wipe with a cloth damped with soap water.
• Only use soft and dry cloth to wipe the control panel.
• Make sure to remove all the food residues around the control
panel.
), and then put it
).
29
).
Accessories
Detachable inner lid, inner pot, steam basket, and detachable steam
vent cap:
• Soak in hot water and clean with sponge.
6 Recycling
This symbol means that this product shall not be disposed
of with normal household waste (2012/19/EU).
Follow your country’s rules for the separate collection of
electrical and electronic products. Correct disposal helps
prevent negative consequences for the environment and
human health.
7 Guarantee and service
If you need service or information, or if you have a problem, visit the
Philips website at www.philips.com or contact the Philips Customer
Care Center in your country. You can nd its phone number in the
worldwide guarantee leaet. If there is no Customer Care Center in
your country, go to your local Philips dealer.
8 Specifications
).
Model Number HD4726
Rated voltage 220V-240V~, 50-60Hz
Rated power output 790-940W
Rated capacity 4.0L
9 Troubleshooting
If you encounter problems when using this multicooker, check the
following points before requesting service. If you cannot solve the
problem, contact the Philips Consumer Care Center in your country.
Problem Solution
The light on the
button does not
go on.
The display does
not function.
The ingredients
are not cooked.
The rice is too
dry and not well
cooked.
The rice is
scorched.
The multicooker
does not turn into
warm keeping
automatically.
Water spills out
of the multicooker
during cooking.
I cannot get to the
desired cooking
function.
Dishes smell bad
after cooking
Error message
(E1, E2, E3, or E4)
appears on the
display.
There is a connection problem. Check if the
power cord is connected to the multicooker
properly and if the plug is inserted rmly into
the power outlet.
The light is defective. Take the appliance
to your Philips dealer or a service center
authorized by Philips.
The multicooker is not connected to the
power supply. If there is no power supply,
the power failure backup function does not
work and the display does not function.
You did not press "start" (СТАРТ / ВЫКЛ).
Make sure that there is no foreign residue on
the heating element and the outside of the
inner pot before switching the multicooker
on.
The heating element is damaged, or the
inner pot is deformed. Take the multicooker
to your Philips dealer or a service center
authorized by Philips.
Add more water to the rice, and cook for a
bit longer.
You have not rinsed the rice properly. Rinse
the rice until the water runs clear.
You might have pressed “keep-warm”
(ПОДОГРЕВ) before starting the cooking
process. In this case the multicooker will
turn into standby mode after the cooking is
nished.
The temperature control is defective. Take
the appliance to your Philips dealer or a
service center authorized by Philips.
Make sure that the ingredients you put in the
inner pot do not exceed the MAX indication.
Press "menu" (МЕНЮ) repeatedly to select
the desired function.
Clean the inner pot with some washing
detergent and warm water.
After cooking, make sure the steam vent cap,
inner lid and inner pot is cleaned thoroughly.
There has been a power failure during
cooking. Take the appliance to your Philips
dealer or a service center authorized by
Philips.
Қазақша
1 Көп функциялы тағам
пісіргішіңіз
Сатып алғаныңыз құтты болсын және Philips компаниясына қош
келдіңіз!
Philips ұсынатын қолдауды толық пайдалану үшін, өнімді
www.philips.com/welcome торабында тіркеңіз.
2 Қорап ішіндегі заттар
30
3 Жалпы шолу
Өнімге жалпы шолу (
Алынатын бу шығатын
a
тесікше қақпағы
Қақпақты шешу түймесі
b
Жоғарғы қақпақ
c
Алынатын ішкі қақпақ
d
Мөрлейтін сақина
e
Ішкі ыдысы
f
Есте сақтаңыз
• Тек осы құрылғымен берілген түпнұсқа ішкі ыдысты
пайдаланыңыз. Ішкі ыдыс зақымдалса, жаңа ішкі ыдыстарға
тапсырыс беру үшін еліңіздегі/өңіріңіздегі тұтынушыларды қолдау
орталығына хабарласыңыз.
Басқару элементтеріне шолу
(
-сурет)
Жылы сақтау түймесі
a
Температура түймесі
b
Пісіру уақыты түймесі
c
Азайту түймесі
d
Көбейту түймесі
e
Функцияларға шолу
Алдын
ала
орнату
уақыты
Әдепкі пісіру
уақыты
Әдепкі пісіру
температурасы
Функциялар
Палау (Плов) 35 мин. /
Қайнату (Варить) 20 мин. 5 мин. - 2 сағ.
Буға пісіру (На пару) 20 мин. 5 мин. - 2 сағ.
Қақтап пісіру (Запекать) 1 сағ. /
Йогурт (Йогурт) 8 сағ. 6-12 сағ.
Жылыту (Разогреть) 25 мин. 5-60 мин.
Көп функциялы аспаз
(Мультиповар) 2 сағ. 5 мин. - 10 сағ.
Ботқа (Каша) 10 мин. 5 мин. - 2 сағ.
Күріш (Рис) 40 мин. /
Сорпа (Суп) 1 сағ. 20 мин.-4 сағ.
Қуыру (Жарить) 15 мин 5-60 мин.
Пісіру (Выпечка) 45 мин. 20 мин. - 2 сағ.
Бұқтыру (Тушить) 1 сағ. 20 мин. - 10 сағ.
Функциялар
Палау (Плов) 1 - 24 сағ. 130 - 140°C /
Қайнату (Варить) 1 - 24 сағ. 90 - 100°C /
Буға пісіру (На
пару) 1 - 24 сағ. 100°C /
Қақтап пісіру
(Запекать) 1 - 24 сағ. 120 - 130°C /
Йогурт (Йогурт) 1 - 24 сағ. 40°C /
Жылыту
(Разогреть) / 85°C /
Көп функциялы
аспаз
(Мультиповар) 1 - 24 сағ. 100°C 30 - 160°C
Ботқа (Каша) 1 - 24 сағ. 90 - 100°C /
Күріш (Рис) 1 - 24 сағ. 130 - 140°C /
Сорпа (Суп) 1 - 24 сағ. 90 -100°C /
Қуыру (Жарить) / 140 - 160°C /
Пісіру (Выпечка) / 130°C 40 - 160°C
Бұқтыру
(Тушить) 1 - 24 сағ. 90°C /
Есте сақтаңыз
• Күріш (рис)және палау (Плов) үшін пісіру уақытын ішкі ыдысқа
салынған ингредиенттерге қарай көп функциялы тағам пісіргіш
өзі анықтайды.
• Пісіру (Выпечка) және көп функциялы аспаз (Мультиповар)
мәзірлерінде пісіру температурасын реттей аласыз. Пісіру
функциясы үшін температураны 40°C - 160°C арасында, ал
қолмен орындалатын функция үшін температураны 30°C - 160°C
арасында таңдай аласыз.
• Пісіру басталғаннан кейін ағымдағы пісіру процесін тоқтату үшін
Бастау/Өшіру (СТАРТ/ВЫКЛ) түймесін басуыңызға болады,
сонда көп функциялы тағам пісіргіш күту режиміне өтеді.
-сурет)
Басқару панелі
g
Қыздыру элементі
h
Қуат розеткасы
i
Негізгі бөлік
j
Тағам пісіргіштің тұтқасы
k
Су деңгейінің
l
көрсеткіштері
Алдын ала орнату түймесі
f
Меню түймесі
g
Бастау/Өшіру түймесі
h
Дисплей экраны
i
Пісіру уақытын
реттеу ауқымы
Температураны
реттеу ауқымы
( 26-сурет)
Көп функциялы тағам
a
пісіргіштің негізгі бөлігі
Өлшеуіш шыны аяқ
b
Тоқ сымы
c
Бу себеті
d
Пайдаланушы нұсқаулығыъ
e
Рецепт кітапшасы
f
Кепілдік картасы
g
2 Ішкі кәстрөлдің сыртын құрғатып сүртіңіз (
кейін көп функциялы тағам пісіргішке салыңыз (
3 Көп функциялы тағам пісіргіштің қақпағын жабыңыз да
сур.), ашаны қуат розеткасына қосыңыз (.
(
4 «Мәзір» (МЕНЮ) түймесін басып, «қайнату» (Варить)
тармағын таңдаңыз (
» Басқа пісіру уақытын таңдау үшін «Пісіру уақытын
орнату» тарауын қараңыз.
сур.).
5 Растап, пісіруді бастау үшін «бастау» (СТАРТ/ВЫКЛ)
түймесін басыңыз (
6 Су қайнаған кезде, қақпақты ашып, тағамды ішкі кәстрөлге
салу керегін ескерту үшін көп функциялы тағам пісіргіш
дыбыстық сигнал береді.
сур.).
Есте сақтаңыз
• су/сұйықтық қайнардың алдында экранда көрсетіледі. Су/
сұйықтық қайнай бастағанда орнатылған пісіру уақыты экранда
көрсетіледі.
7 Пісіру аяқталғанда, құрылғы дыбыстық сигнал шығарып,
жылы сақтау режимі автоматты түрде іске қосылады.
Буға пісіру (На пару)
1 Ішкі ыдысқа біраз су құйыңыз.
Есте сақтаңыз
• Тағамды буға пісіру үшін ішкі ыдысқа 0,5-2 л су құйыңыз. Тағам
түріне байланысты су мөлшерін аздап реттей аласыз.
2 Ішкі кәстрөлдің сыртын құрғатып сүртіңіз (
кейін көп функциялы тағам пісіргішке салыңыз (
3 Бу себетін ішкі кәстрөлге салып, тағамды шараға салыңыз да,
шараны бу себетінің үстіне қойыңыз.
» Бу себетінен ыстық бу жоғары қарай көтерілуі үшін
ингредиенттер бу себетінің барлық тесіктерін жауып
тастамағанын тексеріңіз.
4 Көп функциялы тағам пісіргіштің қақпағын жабыңыз да
сур.), ашаны қуат розеткасына қосыңыз (
(
5 «Мәзір» (МЕНЮ) түймесін басып, «буға пісіру» (На пару)
тармағын таңдаңыз (
» Басқа пісіру уақытын таңдау үшін «Пісіру уақытын
орнату» тарауын қараңыз.
сур.).
6 Растап, пісіруді бастау үшін «бастау» (СТАРТ/ВЫКЛ)
түймесін басыңыз (
7 Пісіру аяқталғанда, құрылғы дыбыстық сигнал шығарып,
жылы сақтау режимі автоматты түрде іске қосылады.
сур.).
Есте сақтаңыз
• Тағамды буға пісіріп жатқанда, бу себетін суға батырмаңыз.
• су/сұйықтық қайнардың алдында экранда көрсетіледі. Су/
сұйықтық қайнай бастағанда орнатылған пісіру уақыты экранда
көрсетіледі.
• Буға пісіру аяқталғанда, шара мен бу себетін шығарып алу үшін
аспаз қолғабын немесе шүберекті пайдаланыңыз, себебі олар
өте ыстық болуы мүмкін.
Қақтап пісіру (Запекать)
1 Ингредиенттерін ішкі кәстрөлге салыңыз.
2 Ішкі кәстрөлдің сыртын құрғатып сүртіңіз (
кейін көп функциялы тағам пісіргішке салыңыз (
3 Көп функциялы тағам пісіргіштің қақпағын жабыңыз да
сур.), ашаны қуат розеткасына қосыңыз (
(
4 «Мәзір» (МЕНЮ) түймесін басып, «қақтап пісіру»
(Запекать) тармағын таңдаңыз (
5 Растап, пісіруді бастау үшін «бастау» (СТАРТ/ВЫКЛ)
түймесін басыңыз (
6 Қыздырып пісірудің 2 кезеңі бар. Бірінші кезең (шамамен
35 минут, 130°C) аяқталғаннан кейін қақпақты ашып, ішкі
кәстрөлдегі тағамды аударыстыру туралы ескерту үшін тағам
пісіргіш әр 30 секунд сайын 5 рет қысқа дыбыс береді.
» Қалған пісіру уақыты (25 минут) экранда көрсетіледі.
сур.).
7 Екінші кезеңді (120°C) бастау үшін «мәзір» (МЕНЮ)
түймесін басыңыз.
» Бірінші кезең аяқталған соң 5 минут ішінде мәзір
(МЕНЮ) түймесін баспасаңыз, тағам пісіргіш жылы
күйінде ұстау режіміне ауысады.
8 Пісіру аяқталғанда, құрылғы дыбыстық сигнал шығарып, күту
режиміне автоматты түрде ауысады.
Йогурт жасау (Йогурт)
1 Йогуртқа арналған ингредиенттерді жақсылап шайқап,
герметикалық контейнерлерге салыңыз.
Есте сақтаңыз
• 80°C-тан жоғары температураға шыдай алатын тағамдық
пластик не шыныдан жасалған герметикалық контейнерлерді
пайдаланыңыз.
• Йогуртты қалай дайындау туралы толығырақ білу үшін рецепттер
кітабын қараңыз.
2 Контейнерлерді ішкі ыдысқа салыңыз. Контейнерлерге ауа
кірмейтініне көз жеткізіңіз.
3 Ішкі ыдысқа біраз су құйыңыз. Контейнердің жартысы суға
батып тұрғанын тексеріңіз.
4 Ішкі кәстрөлдің сыртын құрғатып сүртіңіз (
кейін көп функциялы тағам пісіргішке салыңыз (
5 Көп функциялы тағам пісіргіштің қақпағын жабыңыз да
сур.), ашаны қуат розеткасына қосыңыз (
(
6 «Мәзір» (МЕНЮ) түймесін басып, «йогурт» (Йогурт)
тармағын таңдаңыз (
» Басқа пісіру уақытын таңдау үшін «Пісіру уақытын
орнату» тарауын қараңыз.
сур.).
7 Растап, пісіруді бастау үшін «бастау» (СТАРТ/ВЫКЛ)
түймесін басыңыз (
8 Пісіру аяқталғанда, құрылғы дыбыстық сигнал шығарып, күту
режиміне автоматты түрде ауысады.
сур.).
Жылыту (Разогреть)
1 Суыған тағамды қопсытып, ішкі кәстрөлге біркелкі етіп
салыңыз.
2 Қатты құрғақ болмауы үшін, қажет болса, тағамға біраз су
құйыңыз. Судың мөлшері тағамның көлеміне байланысты
болады.
3 Ішкі кәстрөлдің сыртын құрғатып сүртіңіз (
кейін көп функциялы тағам пісіргішке салыңыз (
4 Көп функциялы тағам пісіргіштің қақпағын жабыңыз да
сур.), ашаны қуат розеткасына қосыңыз (
(
5 «Мәзір» (МЕНЮ) түймесін басып, «жылыту» (Разогреть)
тармағын таңдаңыз (
» Басқа пісіру уақытын таңдау үшін «Пісіру уақытын
орнату» тарауын қараңыз.
сур.).
6 Растап, пісіруді бастау үшін «бастау» (СТАРТ/ВЫКЛ)
түймесін басыңыз (
7 Пісіру аяқталғанда, құрылғы дыбыстық сигнал шығарып,
жылы сақтау режимі автоматты түрде іске қосылады.
сур.).
Көп функциялы аспаз (Мультиповар)
Пісіру уақыты мен температурасын көбірек бақылап тағам пісіру
үшін қолмен орындау режимін пайдалана аласыз.
1 Ингредиенттерін ішкі кәстрөлге салыңыз.
2 Ішкі кәстрөлдің сыртын құрғатып сүртіңіз (
кейін көп функциялы тағам пісіргішке салыңыз (
3 Көп функциялы тағам пісіргіштің қақпағын жабыңыз да
сур.), ашаны қуат розеткасына қосыңыз (
(
4 «Мәзір» (МЕНЮ) түймесін басып, «көп функциялы аспаз»
(Мультиповар) тармағын таңдаңыз (
» Басқа пісіру температурасын таңдау үшін «Пісіру
температурасын орнату» тарауын қараңыз.
» Басқа пісіру уақытын таңдау үшін «Пісіру уақытын
орнату» тарауын қараңыз.
сур.), одан
сур.).
сур).
сур.), одан
сур.).
сур.).
сур.), одан
сур.).
сур.).
сур.).
сур.), одан
сур.).
сур.).
сур.), одан
сур.).
сур.).
сур.), одан
сур.).
сур.).
сур.).
түймесін басыңыз (
6 Пісіру аяқталғанда, құрылғы дыбыстық сигнал шығарып,
жылы сақтау режимі автоматты түрде іске қосылады.
Есте сақтаңыз
• су/сұйықтық қайнардың алдында экранда көрсетіледі. Су/
сұйықтық қайнай бастағанда орнатылған пісіру уақыты экранда
көрсетіледі.
• Ингредиенттер мен сұйықтықтың арақатынасын рецепттер
кітапшасынан қараңыз.
• Тұратын аймағыңыздағы тоқ кернеуі тұрақты болмаса, көп
функциялы тағам пісіргіштегі тағам тасып кетуі мүмкін.
Күріс пісіру (Рис)
Есте сақтаңыз
• Тұратын аймағыңыздағы тоқ кернеуі тұрақты болмаса, көп
функциялы тағам пісіргіштегі тағам тасып кетуі мүмкін.
• Пісіру аяқталған соң, күріш/жарма жұмсақ болуы үшін әрі артық
ылғалды кетіру үшін оны бірден араластырып, қопсытыңыз.
• Пісіру жағдайларына байланысты күріштің төменгі бөлігі аздап
қоңырлануы мүмкін.
1 Күрішті жуып, ішкі ыдысқа салып, су құйыңыз.
Есте сақтаңыз
• Күріш/жарма мен судың арақатынасын рецепттер кітапшасынан
қараңыз.
2 Қақпақты ашу үшін қақпақты босату түймесін басыңыз
сур.).
(
3 Ішкі кәстрөлдің сыртын құрғатып сүртіңіз (
кейін көп функциялы тағам пісіргішке салыңыз (
Есте сақтаңыз
• Ішкі ыдыстың қыздыру элементіне дұрыс тиіп тұрғанын
тексеріңіз.
• Ішкі кәстрөлдің сырты таза әрі құрғақ екенін және қыздырғыш
элементте бөгде қалдықтың жоқ екенін тексеріңіз.
4 Көп функциялы тағам пісіргіштің қақпағын жабыңыз да
сур.), ашаны қуат розеткасына қосыңыз (
(
5 «Мәзір» (МЕНЮ) түймесін басып, «күріш» (Рис) тармағын
таңдаңыз (
6 Растап, пісіруді бастау үшін «бастау» (СТАРТ/ВЫКЛ)
түймесін басыңыз (
7 Пісіру аяқталғанда, құрылғы дыбыстық сигнал шығарып,
жылы сақтау режимі автоматты түрде іске қосылады.
Сорпа пісіру (Суп)
1 Сорпаның ингредиенттері мен суды/сұйықтықты ішкі
кәстрөлге салыңыз.
2 Ішкі кәстрөлдің сыртын құрғатып сүртіңіз (
кейін көп функциялы тағам пісіргішке салыңыз (
3 Көп функциялы тағам пісіргіштің қақпағын жабыңыз да
сур.), ашаны қуат розеткасына қосыңыз (
(
4 «Мәзір» (МЕНЮ) түймесін басып, «сорпа» (Суп) тармағын
таңдаңыз (
» Басқа пісіру уақытын таңдау үшін «Пісіру уақытын
орнату» тарауын қараңыз.
5 Растап, пісіруді бастау үшін «бастау» (СТАРТ/ВЫКЛ)
түймесін басыңыз (
6 Пісіру аяқталғанда, құрылғы дыбыстық сигнал шығарып,
жылы сақтау режимі автоматты түрде іске қосылады.
Қуыру (Жарить)
1 Ішкі кәстрөлдің сыртын құрғатып сүртіңіз (
кейін көп функциялы тағам пісіргішке салыңыз (
2 Ашаны қуат розеткасына қосыңыз (
3 Ішкі кәстрөлге шамалы сұйық май құйыңыз.
Есте сақтаңыз
• Қуыру функциясын қолдану туралы толығырақ білу үшін
рецепттер кітабын қараңыз.
4 «Мәзір» (МЕНЮ) түймесін басып, «қуыру» (жарить)
тармағын таңдаңыз (
5 Растап, пісіруді бастау үшін «бастау» (СТАРТ/ВЫКЛ)
түймесін басыңыз (
6 Қақпағын ашып қойып, ингредиенттерін қалақшамен үздіксіз
араластырып тұрыңыз.
7 Пісіру аяқталғанда, құрылғы дыбыстық сигнал шығарып, күту
режиміне автоматты түрде ауысады.
Пісіру (Выпечка)
1 Пеште пісірілетін ингредиенттерді ішкі кәстрөлге салыңыз.
2 Ішкі кәстрөлдің сыртын құрғатып сүртіңіз (
кейін көп функциялы тағам пісіргішке салыңыз (
3 Көп функциялы тағам пісіргіштің қақпағын жабыңыз да
сур.), ашаны қуат розеткасына қосыңыз (
(
4 «Мәзір» (МЕНЮ) түймесін басып, «пісіру» (Выпечка)
тармағын таңдаңыз (
» Басқа пісіру температурасын таңдау үшін «Пісіру
температурасын орнату» тарауын қараңыз.
» Басқа пісіру уақытын таңдау үшін «Пісіру уақытын
орнату» тарауын қараңыз.
5 Растап, пісіруді бастау үшін «бастау» (СТАРТ/ВЫКЛ)
түймесін басыңыз (
Есте сақтаңыз
• Егер пісіру температурасы 80°C-тан төмен орнатылса, тағам
піскен кезде құрылғы күту режіміне автоматты түрде ауысады.
6 Пісіру аяқталғанда, құрылғы дыбыстық сигнал шығарып,
жылы сақтау режимі автоматты түрде іске қосылады.
Есте сақтаңыз
• Торт пісірген кезде, пісіру кезінде қақпақты жауып қойыңыз.
Тортты 130°C-та және 45 минут пісіру әдетте жақсы пісіру
нәтижесін береді.
• Егер басқа тағамды 140°C-тан артық температурада пісіретін
болсаңыз, қақпағын ашып қойыңыз.
• Тағамды пісіргеннен кейін тағам пісіргіштен ішкі кәстрөлді алған
кезде аспаз қолғабын немесе шүберекті пайдаланыңыз, себебі
ішкі кәстрөл өте ыстық болуы мүмкін.
Бұқтыру (Тушить)
1 Бұқтырылатын немесе рагуға арналған ингредиенттерді ішкі
кәстрөлге салыңыз.
2 Ішкі кәстрөлдің сыртын құрғатып сүртіңіз (
кейін көп функциялы тағам пісіргішке салыңыз (
3 Көп функциялы тағам пісіргіштің қақпағын жабыңыз да
сур.), ашаны қуат розеткасына қосыңыз (
(
4 «Мәзір» (МЕНЮ) түймесін басып, «бұқтыру» (тушить)
тармағын таңдаңыз (
» Басқа пісіру уақытын таңдау үшін «Пісіру уақытын
орнату» тарауын қараңыз.
5 Растап, пісіруді бастау үшін «бастау» (СТАРТ/ВЫКЛ)
түймесін басыңыз (
6 Пісіру аяқталғанда, құрылғы дыбыстық сигнал шығарып,
жылы сақтау режимі автоматты түрде іске қосылады.
Жылы күйінде ұстау
Жылы күйінде ұстау қолданылатын пісіру мәзірлері үшін тағам
піскен соң жылы ұстау режімін қосуды не өшіруді таңдай аласыз.
• Жылы күйінде ұстау қолданылатын пісіру мәзірін бастар
алдында жылы ұстау көрсеткіші жыпылықтап тұрады. Егер
пісіруді бірден бастасаңыз, пісіру аяқталғаннан кейін тағам
пісіргіш жылы ұстау режіміне автоматты түрде ауысады.
• Жылы күйінде ұстау қолданылатын пісіру мәзірін бастар
алдында жылы ұстау көрсеткіші жыпылықтап тұрады. Егер жылы
ұстау (ПОДОГРЕВ) түймесін бассаңыз, жылы ұстау көрсеткіші
өшеді. Пісіру аяқталғаннан кейін тағам пісіргіш күту режіміне
автоматты түрде ауысады.
Есте сақтаңыз
• Жылы ұстау режімінің ең ұзақ уақыты — 12 сағат.
• Жылы ұстау режімі келесі мәзірлерде қолданылмайды: Йогурт,
Қуыру, Көп функциялы аспаз және Пісіру (тек 80°C-тан төмен
температурада).
Пісіру уақытын орнату
Кейбір функциялар үшін пісіру уақытын өзгерте аласыз. Өзгерту
ауқымын білу үшін «Функцияларға шолу» тарауын қараңыз.
1 Қажет пісіру функциясын таңдаңыз.
2 «Пісіру уақыты» (ВРЕМЯ ПРИГОТОВЛЕНИЯ) түймесін
басыңыз (
» Сағат көрсеткіші дисплейде жыпылықтайды.
3 Сағат көрсеткішін орнату үшін «қосу» (+) немесе «азайту»
(-) түймесін басыңыз (
4 Сағат көрсеткіші орнатылған соң «пісіру уақыты» (ВРЕМЯ
ПРИГОТОВЛЕНИЯ) түймесін қайта басыңыз (
» Минут көрсеткіші дисплейде жыпылықтайды.
5 Минут көрсеткішін орнату үшін «қосу» (+) немесе «азайту»
(-) түймесін басыңыз (
6 Растап, пісіруді бастау үшін «бастау» (СТАРТ/ВЫКЛ)
түймесін басыңыз (
сур.).
сур.), одан
сур.).
сур.).
сур.).
сур.).
сур.), одан
сур.).
сур.).
сур.).
сур.).
сур.), одан
сур).
сур.).
сур.).
сур.).
сур.), одан
сур.).
сур.).
сур.).
сур.).
сур.), одан
сур.).
сур.).
сур.).
сур.).
сур.).
сур.).
сур.).
сур.).
сур.).
Есте сақтаңыз
20
25
21
26
22
27
23
28
8
24
29
25
30
8
27 2826
1
4
1
6
7
8
4
1
6
98
8
4
1
6
10
8
4
1
6
8
4
1
6
20
8
16
21
17
22
18
23
19
24
8
20
25
21
26
22
27
23
28
8
24
29
25
30
8
27 2826
1
6
7
8
1
6
98
8
1
6
10
8
1
6
6
11
8
1
6
12
8
1
6
13
8
1
6
9
14
8
1
6
15
8
6
11
8
4
1
6
12
8
4
1
6
13
8
4
1
6
9
14
8
4
1
6
15
8
4
1
6
11
16
8
4
1
6
17
8
4
1
6
13
18
8
4
1
6
19
1
6
11
16
8
1
6
17
8
1
6
13
18
8
1
6
19
8
1
6
20
8
16
21
17
22
18
23
19
24
8
20
25
21
26
22
27
23
28
8
24
29
25
30
8
• «Пісіру уақыты» (ВРЕМЯ ПРИГОТОВЛЕНИЯ) басылғанан
кейін 10 секундта ешбір түйме басылмаса, келесі 15 секундта
дыбыстық белгі беріледі, бұл кезде әлі де пісіру уақытын
орната аласыз. Егер ешбір түйме басылмаса, тағам пісіргіш күту
режіміне ауысады.
• Ең ұзақ пісіру уақыты 1 сағаттан аспайтын мәзірлер үшін
«пісіру уақыты» (ВРЕМЯ ПРИГОТОВЛЕНИЯ) түймесін бірінші
рет басқан кезде минут көрсеткіші дисплейде жыпылықтай
бастайды.
Кідіртілген пісіру үшін уақытты алдын
ала орнату
Кейбір пісіру мәзірлері үшін кідіртілген пісіру уақытын алдын ала
орната аласыз. Түрлі пісіру мәзірлері үшін алдын ала уақытты
орнатуды «Функцияларға шолу» тарауынан қараңыз.
1 Қажет пісіру функциясын таңдаңыз.
2 «Уақытты алдын ала орнату» (ОТСРОЧКА) түймесін
басыңыз (
» Сағат көрсеткіші дисплейде жыпылықтайды.
сур.).
3 Сағат көрсеткішін орнату үшін «қосу» (+) немесе «азайту»
(-) түймесін басыңыз (
4 Сағат көрсеткіші орнатылғаннан кейін «уақытты алдын ала
орнату» (ОТСРОЧКА) түймесін қайта басыңыз (
» Минут көрсеткіші дисплейде жыпылықтайды.
сур.).
5 Минут көрсеткішін орнату үшін «қосу» (+) немесе «азайту»
(-) түймесін басыңыз (
6 Растап, пісіруді бастау үшін «бастау» (СТАРТ/ВЫКЛ)
түймесін басыңыз (
сур.).
сур.).
Есте сақтаңыз
• «Уақытты алдын ала орнату» (ОТСРОЧКА) басылғанан кейін 10
секундта ешбір түйме басылмаса, келесі 15 секундта дыбыстық
белгі беріледі, бұл кезде әлі де алдын ала уақытты орната аласыз.
Егер ешбір түйме басылмаса, тағам пісіргіш күту режіміне
ауысады.
• Алдын ала орнатылған уақыт өткен кезде, пісіру аяқталады.
Мысалы, алдын ала уақытты 8 сағатқа орнатсаңыз, тағам 8
сағаттан кейін дайын болады.
Пісіру температурасын орнату
Кейбір мәзірлер үшін пісіру температурасын өзгерте аласыз.
Өзгерту ауқымын білу үшін «Функцияларға шолу» тарауын
қараңыз.
1 Қажет пісіру функциясын таңдаңыз.
2 «Температура» (ТЕМП.) түймесін басыңыз (
» Әдепкі пісіру температурасы экранда көрінеді.
3 Пісіру температурасын орнату үшін «көбейту» (+) немесе
«азайту» (-) түймесін басыңыз (
4 Растап, пісіруді бастау үшін «бастау» (СТАРТ/ВЫКЛ)
түймесін басыңыз (
сур.).
сур.).
5 Тазалау және техникалық
қызмет көрсету
Есте сақтаңыз
• Көп функциялы тағам пісіргішті токтан ажыратып, тазалау үшін
әбден суығанша күтіңіз.
Іші
Үстіңгі қақпақтың іші және негізгі корпус; қыздыру элементі:
• Сығылған шүберекпен сүртіңіз.
• Көп функциялы тағам пісіргішке жабысқан барлық тағам
қалдықтарын міндетті түрде кетіріңіз.
Сырты
Үстіңгі қақпақтың беті және негізгі корпустың сырты:
• Сабынды сумен ылғалдандырылған шүберекпен сүртіңіз.
• Басқару панелін сүрту үшін тек жұмсақ және құрғақ
шүберекті пайдаланыңыз.
• Басқару панелінің айналасындағы барлық тағам қалдықтарын
міндетті түрде кетіріңіз.
Қосалқы құралдар
Ішкі алынбалы қақпақ, ішкі ыдыс, бу себеті және бу шығаратын
алынбалы қақпақ:
• Ыстық суға малып, губкамен тазалаңыз.
6 Қалдықтарды қайта өңдеу
Бұл таңба осы өнімді қалыпты тұрмыстық қалдықпен
тастауға болмайтынын білдіреді (2012/19/EU).
Электр және электрондық өнімдердің қалдықтарын
бөлек жинау жөніндегі еліңіздің ережелерін сақтаңыз.
Қоқысқа дұрыс тастау қоршаған ортаға және адам
денсаулығына тиетін зиянды әсерлердің алдын алуға
көмектеседі.
7 Кепілдік және қызмет
көрсету
Қызмет немесе ақпарат қажет болса, я болмаса мәселе болса,
www.philips.com Philips веб-торабына кіріңіз немесе еліңіздегі
Philips тұтынушыларды қолдау орталығына хабарласыңыз. Оның
телефон нөмірін дүние жүзілік кепілдік парақшасында табуға
болады. Егер еліңізде тұтынушыларға қолдау көрсету орталығы
болмаса, онда жергілікті Philips компаниясының дилеріне барыңыз.
8 Техникалық деректер
Үлгі нөмірі HD4726
Нақты кернеулік 220 В-240 В~, 50-60Гц
Номиналды қуат шығысы 790-940 Вт
Номиналды сыйымдылық 4,0 Л
9 Ақауларды жою
Осы көп функциялы тағам пісіргішті пайдалану кезінде
проблемалар туындаса, қызмет көрсетуді сұрамастан бұрын келесі
нәрселерді тексеріңіз. Проблема шешілмесе, еліңіздегі Philips
тұтынушыларды қолдау орталығына хабарласыңыз.
Ақаулық Шешімі
Түймедегі шам
жанбайды.
Дисплей жұмыс
істемейді.
Тағамның
ингредиенттері
піспейді.
Күріш тым құрғақ
және дұрыс
піспеген.
Күріш күйіп
кеткен.
Көп функциялы
тағам пісіргіш
жылы күйінде
ұстау режіміне
автоматты түрде
ауыспайды.
Пісіру кезінде
көп функциялы
тағам пісіргіштен
су ағады.
Қажетті пісіру
функциясына өте
алмаймын.
Пісіргеннен кейін
ыдыстан жаман
иіс шығады.
Дисплейде қате
хабары (E1, E2,
E3 немесе E4)
пайда болады.
Қосылу мәселесі бар. Қуат сымының
көп функциялы тағам пісіргішке
дұрыстап қосылғанын және ашаның
қуат розеткасына мықтап тығылғанын
тексеріңіз.
Жарық сынық. Құрылғыны Philips дилеріне
немесе Philips рұқсат еткен қызмет
көрсету орталығына апарыңыз.
Көп функциялы тағам пісіргіш қуат көзіне
қосылмаған. Қуат көзі жоқ, қуат ақауы
кезінде сақтау функциясы жұмыс істемейді
және дисплей жұмыс істемейді.
Бастау түймесін (СТАРТ / ВЫКЛ)
баспағансыз.
Көп функциялы тағам пісіргішті қоспастан
бұрын, ысыту элементінде және ішкі
ыдыстың сыртында ешқандай бөтен
қалдықтың болмауын тексеріңіз.
Ысыту элементі зақымдалған немесе ішкі
ыдыс бұзылған. Көп функциялы тағам
пісіргішті Philips дилеріне немесе Philips
рұқсат еткен қызмет көрсету орталығына
апарыңыз.
Күрішке көбірек су құйыңыз және ұзақтау
пісіріңіз.
Күрішті дұрыстап жумағансыз. Күрішті су
тазарғанша шайыңыз.
Пісіруді бастардан бұрын «жылы күйінде
ұстау» (ПОДОГРЕВ) түймесін басқан
болуыңыз мүмкін. Бұл жағдайда тағам
пісіргіш пісіру аяқталғаннан кейін күту
режиміне ауысады.
Температура бақылауы сынық. Құрылғыны
Philips дилеріне немесе Philips рұқсат еткен
қызмет көрсету орталығына апарыңыз.
Ішкі кәстрөлге салынған ингредиенттердің
MAX көрсеткішінен аспайтынына көз
жеткізіңіз.
Қалаған функцияны таңдау үшін «мәзір»
(МЕНЮ) түймесін қайталап басыңыз.
Ішкі ыдысты біраз жуу тазартқышымен
және жылы сумен тазалаңыз.
Пісіруден кейін, бу шығатын қақпақты, ішкі
қақпақты және ішкі ыдысты міндетті түрде
мұқият тазалаңыз.
Пісіру кезінде қуат ақауы орын алған.
Құрылғыны Philips дилеріне немесе Philips
рұқсат еткен қызмет көрсету орталығына
апарыңыз.
Русский
1 Мультиварка
Поздравляем с покупкой и приветствуем вас в клубе Philips!
Чтобы воспользоваться всеми преимуществами поддержки Philips,
зарегистрируйте устройство на веб-сайте
www.philips.com/welcome.
2 Комплект поставки (рис. 26)
Мультиварка (основное
a
устройство)
Мерная чашка
b
Шнур питания
c
Корзина для
d
приготовления на пару
Инструкция по
e
эксплуатации
Книга рецептов
f
Гарантийный талон
g
3 Описание
Описание прибора (рис.
Съемная крышка
a
отверстия выхода пара
Кнопка открывания
b
крышки
Верхняя крышка
c
Съемная внутренняя
d
крышка
Уплотнительное кольцо
e
Внутренняя емкость
f
Примечание
• Используйте только оригинальную внутреннюю чаша, которая
входит в комплектацию прибора. Если внутренняя чаша
повреждена, обратитесь в центр поддержки потребителей в
вашей стране/регионе, чтобы заказать новую чашу.
Панель управления
g
Нагревательный элемент
h
Разъем кабеля питания
i
Основное устройство
j
Ручка мультиварки
k
Индикация уровня воды
l
4 Нажмите кнопку МЕНЮ и выберите "Запекать" (рис.
5 Нажмите кнопку СТАРТ/ВЫКЛ, чтобы подтвердить выбор
и начать приготовление (рис.
6 Процесс запекания включает 2 этапа. Когда первый этап
(около 35 минут, 130°C) завершится, мультиварка подаст
5 сигналов с интервалом в 30 секунд, напоминая о том, что
необходимо открыть крышку и поместить ингредиенты во
внутреннюю чашу.
» На экране отображается индикация оставшегося
времени (25 минут).
).
7 Нажмите кнопку МЕНЮ, чтобы перейти ко второму этапу
(120°C).
» Если кнопка МЕНЮ не будет нажата в течение
5 минут после завершения первого этапа, мультиварка
перейдет в режим поддержания температуры.
8 По завершении приготовления прибор подаст сигнал и
автоматически перейдет в режим ожидания.
Программа "Йогурт"
1 Хорошо перемешайте ингредиенты для йогурта и
положите их в герметичный контейнер.
Примечание
• Используйте герметичные контейнеры из пищевого
пластика или стекла, которые могут выдержать температуру,
превышающую 80 °C.
• Подробную информацию о приготовлении йогурта см. в книге
рецептов.
2 Поместите контейнеры во внутреннюю чашу. Убедитесь,
что контейнеры герметично закрыты.
3 Налейте воду во внутреннюю чашу. Контейнеры должны
оказаться наполовину в воде.
4 Насухо вытрите внешнюю поверхность чаши (рис.
поместите чашу в мультиварку (рис.
5 Закройте крышку мультиварки (рис.
сетевую вилку к розетке (рис.
6 Нажмите кнопку МЕНЮ и выберите "Йогурт" (рис.
» Чтобы задать другое время приготовления,
обратитесь к информации в главе "Настройка времени
приготовления".
).
) и подключите
).
7 Нажмите кнопку СТАРТ/ВЫКЛ, чтобы подтвердить выбор
и начать приготовление (рис.
8 По завершении приготовления прибор подаст сигнал и
автоматически перейдет в режим ожидания.
).
Программа "Разогреть"
1 Помешайте блюдо и равномерно распределите его во
внутренней чаше.
2 При необходимости добавьте немного воды, чтобы блюдо
не получилось сухим. Количество воды зависит от нужного
объема порции.
3 Насухо вытрите внешнюю поверхность чаши (рис.
поместите чашу в мультиварку (рис.
4 Закройте крышку мультиварки (рис.
сетевую вилку к розетке (рис.
5 Нажмите кнопку МЕНЮ и выберите "Разогреть" (рис.
» Чтобы задать другое время приготовления,
обратитесь к информации в главе "Настройка времени
приготовления".
).
) и подключите
).
6 Нажмите кнопку СТАРТ/ВЫКЛ, чтобы подтвердить выбор
и начать приготовление (рис.
7 По завершении приготовления прибор подаст сигнал
и автоматически перейдет в режим поддержания
температуры.
).
Программа "Мультиповар"
Данная программа позволит вам готовить блюда с
индивидуальными настройками времени и температуры.
1 Поместите ингредиенты во внутреннюю чашу.
сур.).
сур.).
Описание элементов управления
(рис.
a
b
c
d
e
)
Кнопка режима
поддержания
температуры
Кнопка выбора
температуры
Кнопка выбора времени
приготовления
Кнопка уменьшения
значения
Кнопка увеличения
значения
Кнопка отсрочки старта
f
Кнопка меню
g
Кнопка включения/
h
выключения
Дисплей
i
Обзор программ
Время
Время
отсрочки
старта
приготовления
по умолчанию
Температура
приготовления,
установленная по
умолчанию
Программ
Плов 35 мин /
Варить 20 мин 5 мин – 2 ч
На пару 20 мин 5 мин – 2 ч
Запекать 1 ч /
Йогурт 8 ч 6–12 ч
Разогреть 25 мин 5–60 мин
Мультиповар 2 ч 5 мин – 10 ч
Каша 10 мин 5 мин – 2 ч
Рис 40 мин /
Суп 1 ч 20 мин – 4 ч
Жарить 15 мин 5–60 мин
Выпечка 45 мин 20 мин – 2 ч
Тушить 1 ч 20 мин. – 10 ч
Программ
Плов 1–24 ч. 130–140°C /
Варить 1–24 ч. 90–100°C /
На пару 1–24 ч. 100°C /
Запекать 1–24 ч. 120–130°C /
Йогурт 1–24 ч. 40°C /
Разогреть / 85°C /
Мультиповар 1–24 ч. 100°C 30–160 °C
Каша 1–24 ч. 90–100°C /
Рис 1–24 ч. 130–140°C /
Суп 1–24 ч. 90–100°C /
Жарить / 140–160°C /
Выпечка / 130°C 40–160 °C
Тушить 1–24 ч. 90°C /
Примечание
• Время приготовления в программах "Рис" и "Плов"
определяется мультиваркой автоматически в зависимости от
количества ингредиентов во внутренней чаше.
• Для программ "Выпечка" и "Мультиповар" можно настроить
температуру приготовления. Для режима "Выпечка" можно
выбрать температуру в диапазоне от 40 °C до 160 °C, для
режима "Мультиповар" – от 30 °C до 160 °C.
• После запуска процесса приготовления для отключения
текущей программы коснитесь кнопки СТАРТ/ВЫКЛ.
Мультиварка перейдет в режим ожидания.
Диапазон
времени
приготовления
Диапазон
регулировки
температуры
2 Насухо вытрите внешнюю поверхность чаши (рис.
поместите чашу в мультиварку (рис.
4 Использование мультиварки
(рис.
Примечание
• Во избежание переполнения внутренней чаши в процессе
приготовления во всех программах не превышайте отметку
MAX, помещая ингредиенты и жидкость в чашу (рис.
• Чтобы открыть верхнюю крышку мультиварки, нажмите кнопку
открывания крышки (рис.
• В программах "Рис" и "Плов" время приготовления
отображается не сразу после запуска мультиварки. На
начальном этапе приготовления мультиварка определяет
количество ингредиентов и жидкости, а потому большую часть
времени приготовления на дисплее отображаются бегущие
полоски . Когда мультиварка определит необходимое
время приготовления, на дисплее начнется обратный отсчет.
В режимах "Каша", "На пару" и "Варить" индикация
отображается на экране до закипания воды/жидкости. Когда
вода/жидкость закипит, на дисплее начнется обратный отсчет
установленного времени приготовления.
• Более подробную информацию о каждой программе
приготовления см. в книге рецептов в комплекте.
Совет
• Для выбора программы повторно касайтесь кнопки МЕНЮ.
Вы также можете коснуться кнопки МЕНЮ один раз, а затем
повторно коснитесь кнопки (+) или (-).
Перед первым использованием
1 Выньте все аксессуары из внутренней чаши и снимите
упаковочный материал.
2 Тщательно очистите все детали мультиварки перед первым
использованием (см. главу "Очистка и уход").
Примечание
• Перед использованием мультиварки убедитесь, что все части
абсолютно сухие.
Программа "Плов"
1 Поместите во внутреннюю чашу все ингредиенты для
приготовления плова.
2 Насухо вытрите внешнюю поверхность чаши (рис.
поместите чашу в мультиварку (рис.
3 Закройте крышку мультиварки (рис.
сетевую вилку к розетке (рис.
4 Нажмите кнопку МЕНЮ и выберите "Плов" (рис.
5 Нажмите кнопку СТАРТ/ВЫКЛ, чтобы подтвердить выбор
и начать приготовление (рис.
6 По завершении приготовления прибор подаст сигнал
и автоматически перейдет в режим поддержания
температуры.
Примечание
• Если в вашем регионе наблюдаются перепады напряжения в
сети, чаша мультиварки может переполниться.
Программа "Варить"
1 Налейте воду во внутреннюю чашу.
2 Насухо вытрите внешнюю поверхность чаши (рис.
поместите чашу в мультиварку (рис.
3 Закройте крышку мультиварки (рис.
сетевую вилку к розетке (рис.
4 Нажмите кнопку МЕНЮ и выберите "Варить" (рис.
» Чтобы задать другое время приготовления,
обратитесь к информации в главе "Настройка времени
5 Нажмите кнопку СТАРТ/ВЫКЛ, чтобы подтвердить выбор
6 Когда вода закипит, мультиварка подаст 5 сигналов,
7 По завершении приготовления прибор подаст сигнал
Программа "На пару"
1 Налейте воду во внутреннюю чашу.
2 Насухо вытрите внешнюю поверхность чаши (рис.
3 Положите необходимые ингредиенты в чашу для
4 Закройте крышку мультиварки (рис.
5 Нажмите кнопку МЕНЮ и выберите "На пару" (рис.
6 Нажмите кнопку СТАРТ/ВЫКЛ, чтобы подтвердить выбор
7 По завершении приготовления прибор подаст сигнал
)
приготовления".
и начать приготовление (рис.
напоминая о том, что необходимо открыть крышку и
поместить ингредиенты во внутреннюю чашу.
Примечание
• отображается на дисплее до закипания воды/жидкости.
Когда вода/жидкость закипит, на дисплее начнется обратный
отсчет установленного времени приготовления.
и автоматически перейдет в режим поддержания
температуры.
Примечание
• Для приготовления на пару налейте 0,5–2 л воды во
внутреннюю чашу. Можно немного изменить количество воды в
зависимости от типа продуктов.
поместите чашу в мультиварку (рис.
приготовления на пару и поместите ее во внутреннюю чашу
мультиварки.
» Убедитесь, что не все отверстия для пара в чаше для
приготовления на пару закрыты ингредиентами, чтобы
пар свободно проходил эти отверстия.
сетевую вилку к розетке (рис.
» Чтобы задать другое время приготовления,
обратитесь к информации в главе "Настройка времени
приготовления".
и начать приготовление (рис.
и автоматически перейдет в режим поддержания
температуры.
Примечание
• При приготовлении на пару не погружайте пластиковую чашу
в воду.
• отображается на дисплее до закипания воды/жидкости.
Когда вода/жидкость закипит, на дисплее начнется обратный
отсчет установленного времени приготовления.
• После окончания приготовления на пару используйте
кухонную рукавицу или полотенце для извлечения чаши
мультиварки и чаши для приготовления на пару, так как они
могут быть очень горячими.
)
).
).
) и
).
) и подключите
).
).
).
) и
).
) и подключите
).
).
).
) и
).
) и подключите
).
).
).
3 Закройте крышку мультиварки (рис.
сетевую вилку к розетке (рис.
4 Нажмите кнопку МЕНЮ и выберите "Мультиповар"
).
(рис.
» Чтобы установить нужную температуру приготовления,
обратитесь к информации в главе "Настройка
температуры приготовления".
» Чтобы установить нужное время приготовления,
обратитесь к информации в главе "Настройка времени
приготовления".
5 Нажмите кнопку СТАРТ/ВЫКЛ, чтобы подтвердить выбор
и начать приготовление (рис.
6 По завершении приготовления прибор подаст сигнал
и автоматически перейдет в режим поддержания
температуры.
Примечание
• Если выбрана температура ниже 80 °C, мультиварка
автоматически перейдет в режим ожидания после завершения
процесса приготовления.
• Если выбранная температура выше 140 °C, верхняя крышка
должна быть открыта при приготовлении.
Программа "Каша"
1 Поместите ингредиенты для каши во внутреннюю чашу и
перемешайте их.
2 Насухо вытрите внешнюю поверхность чаши (рис.
поместите чашу в мультиварку (рис.
3 Закройте крышку мультиварки (рис.
сетевую вилку к розетке (рис.
4 Нажмите кнопку МЕНЮ и выберите "Каша" (рис.
» Чтобы задать другое время приготовления,
обратитесь к информации в главе "Настройка времени
приготовления".
5 Нажмите кнопку СТАРТ/ВЫКЛ, чтобы подтвердить выбор
и начать приготовление (рис.
6 По завершении приготовления прибор подаст сигнал
и автоматически перейдет в режим поддержания
температуры.
Примечание
• отображается на дисплее до закипания воды/жидкости.
Когда вода/жидкость закипит, на дисплее начнется обратный
отсчет установленного времени приготовления.
• Подробную информацию о соотношении количества
ингредиентов и воды см. в книге рецептов.
• Если в вашем регионе наблюдаются перепады напряжения в
сети, чаша мультиварки может переполниться.
Приготовление в режиме "Рис"
Примечание
• Если в вашем регионе наблюдаются перепады напряжения в
сети, содержимое чаши мультиварки может выкипеть.
• По окончании приготовления сразу же перемешайте рис, чтобы
разрыхлить его и выпарить лишнюю жидкость. Это позволит
получить более рассыпчатую консистенцию для риса.
• В зависимости от условий приготовления нижний слой риса
может стать золотистым.
1 Отмерьте рис, поместите промытый рис во внутреннюю
чашу и налейте воду.
Примечание
• Подробную информацию о соотношении количества риса и
воды см. в книге рецептов.
2 Откройте крышку, нажав соответствующую кнопку
).
(рис.
3 Насухо вытрите внешнюю поверхность чаши (рис.
поместите чашу в мультиварку (рис.
Примечание
• Убедитесь, что внутренняя чаша касается нагревательного
элемента должным образом.
• Убедитесь, что внешняя поверхность внутренней чаши является
сухой и чистой, а на нагревательном элементе отсутствуют
загрязнения.
4 Закройте крышку мультиварки (рис.
сетевую вилку к розетке (рис.
5 Нажмите кнопку МЕНЮ и выберите "Рис" (рис.
6 Нажмите кнопку СТАРТ/ВЫКЛ, чтобы подтвердить выбор
и начать приготовление (рис.
7 По завершении приготовления прибор подаст сигнал
и автоматически перейдет в режим поддержания
температуры.
Программа "Суп"
1 Поместите ингредиенты и налейте воду/жидкость во
внутреннюю чашу для приготовления супа.
2 Насухо вытрите внешнюю поверхность чаши (рис.
поместите чашу в мультиварку (рис.
3 Закройте крышку мультиварки (рис.
сетевую вилку к розетке (рис.
4 Нажмите кнопку МЕНЮ и выберите "Суп" (рис.
» Чтобы задать другое время приготовления,
обратитесь к информации в главе "Настройка времени
приготовления".
5 Нажмите кнопку СТАРТ/ВЫКЛ, чтобы подтвердить выбор
и начать приготовление (рис.
6 По завершении приготовления прибор подаст сигнал
и автоматически перейдет в режим поддержания
температуры.
Программа "Жарить"
1 Насухо вытрите внешнюю поверхность чаши (рис.
поместите чашу в мультиварку (рис.
2 Подключите сетевую вилку к электророзетке (рис.
3 Налейте небольшое количество масла во внутреннюю чашу.
Примечание
• Подробную информацию об использовании режима жарки см. в
книге рецептов.
4 Нажмите кнопку МЕНЮ и выберите "Жарить" (рис.
5 Нажмите кнопку СТАРТ/ВЫКЛ, чтобы подтвердить выбор
и начать приготовление (рис.
6 Не закрывайте крышку и постоянно помешивайте
ингредиенты лопаткой.
7 По завершении приготовления прибор подаст сигнал и
автоматически перейдет в режим ожидания.
).
) и подключите
).
).
).
) и подключите
).
).
).
) и подключите
).
).
).
) и подключите
).
).
).
).
).
) и
).
) и
).
) и
) и
).
) и
).
) и
).
) и
).
).
Программа "Выпечка"
Программа "Запекать"
1 Поместите ингредиенты во внутреннюю чашу.
2 Насухо вытрите внешнюю поверхность чаши (рис.
поместите чашу в мультиварку (рис.
3 Закройте крышку мультиварки (рис.
сетевую вилку к розетке (рис.
).
) и подключите
).
) и
1 Положите ингредиенты для выпечки во внутреннюю чашу.
2 Насухо вытрите внешнюю поверхность чаши (рис.
поместите чашу в мультиварку (рис.
3 Закройте крышку мультиварки (рис.
сетевую вилку к розетке (рис.
4 Нажмите кнопку МЕНЮ и выберите "Выпечка" (рис.
» Чтобы задать другую температуру выпекания,
обратитесь к информации в главе "Настройка
температуры приготовления".
).
) и подключите
).
) и
).
» Чтобы задать другое время приготовления,
обратитесь к информации в главе "Настройка времени
приготовления".
5 Нажмите кнопку СТАРТ/ВЫКЛ, чтобы подтвердить выбор
и начать приготовление (рис.
).
Примечание
• Если выбрана температура выпекания ниже 80 °C, после
окончания приготовления прибор автоматически перейдет в
режим ожидания.
6 По завершении приготовления прибор подаст сигнал
и автоматически перейдет в режим поддержания
температуры.
Примечание
• При выпечке тортов крышка должна быть закрыта.
Оптимальной для выпечки считается температура 130 °C и
время приготовления 45 минут.
• Если ингредиенты выпекаются при температуре выше 140 °C,
не закрывайте крышку.
• Извлекая внутреннюю чашу из мультиварки после
приготовления, используйте кухонную рукавицу или полотенце,
так как чаша сильно нагревается.
Программа "Тушить"
1 Поместите во внутреннюю чашу ингредиенты для тушения
или приготовления рагу.
2 Насухо вытрите внешнюю поверхность чаши (рис.
поместите чашу в мультиварку (рис.
3 Закройте крышку мультиварки (рис.
сетевую вилку к розетке (рис.
4 Нажмите кнопку МЕНЮ и выберите "Тушить" (рис.
» Чтобы задать другое время приготовления,
обратитесь к информации в главе "Настройка времени
приготовления".
).
) и подключите
).
) и
).
5 Нажмите кнопку СТАРТ/ВЫКЛ, чтобы подтвердить выбор
и начать приготовление (рис.
6 По завершении приготовления прибор подаст сигнал
и автоматически перейдет в режим поддержания
температуры.
).
Поддержание температуры
Для режимов приготовления с поддержанием температуры
можно включить или выключить эту функцию после завершения
приготовления.
• Перед запуском режима приготовления с поддержанием
температуры индикатор режима поддержания температуры
будет мигать. Если вы сразу же запустите режим
приготовления, мультиварка автоматически перейдет в режим
поддержания температуры по окончании приготовления.
• Перед запуском режима приготовления с поддержанием
температуры индикатор режима поддержания температуры
будет мигать. При нажатии кнопки ПОДОГРЕВ индикатор
режима поддержания температуры погаснет. По окончании
приготовления мультиварка автоматически перейдет в режим
ожидания.
Примечание
• Максимальное время поддержания температуры — 12 часов.
• Режим поддержания температуры не используется со
следующими режимами приготовления: "Йогурт", "Жарить",
"Мультиповар" и "Выпечка" (только при температуре выпекания
ниже 80 °C).
Настройка времени приготовления
Вы можете изменить время приготовления для некоторых
программ. Допустимые значения см. в главе "Обзор программ".
1 Выберите нужную программу приготовления.
2 Нажмите кнопку ВРЕМЯ ПРИГОТОВЛЕНИЯ (рис.
» На дисплее начнет мигать значение часа.
).
3 Касайтесь кнопок увеличения (+) или уменьшения (-), чтобы
задать значение часов (рис.
4 Задав количество часов, снова нажмите кнопку ВРЕМЯ
ПРИГОТОВЛЕНИЯ (рис.
» На дисплее начнет мигать значение минут.
).
).
5 Нажимайте кнопку увеличения (+) или уменьшения (-),
чтобы задать значение минут (рис.
6 Нажмите кнопку СТАРТ/ВЫКЛ, чтобы подтвердить выбор
и начать приготовление (рис.
).
).
Примечание
• Если мультиварка не будет использоваться в течение 10 секунд
после нажатия кнопки ВРЕМЯ ПРИГОТОВЛЕНИЯ, прибор
будет издавать звуковой сигнал еще 15 секунд, в течение
которых вы сможете задать время приготовления. Если ни
одна кнопка не будет нажата, мультиварка перейдет в режим
ожидания.
• Для программ, в которых максимальное время приготовления
составляет 1 час, при первом нажатии кнопки ВРЕМЯ
ПРИГОТОВЛЕНИЯ на дисплее сразу начнет мигать индикация
минут.
Функция отсрочки старта для
включения в заданное время
Для некоторых программ приготовления можно включить
функцию отсрочки старта. См. главу "Обзор программ", чтобы
узнать интервалы времени для отсрочки старта в разных
программах приготовления.
1 Выберите нужную программу приготовления.
2 Нажмите кнопку ОТСРОЧКА (рис.
» На дисплее начнет мигать значение часа.
).
3 Касайтесь кнопок увеличения (+) или уменьшения (-), чтобы
задать значение часов (рис.
4 Задав количество часов, снова коснитесь кнопки
ОТСРОЧКА (рис.
» На дисплее начнет мигать значение минут.
).
).
5 Нажимайте кнопку увеличения (+) или уменьшения (-),
чтобы задать значение минут (рис.
6 Нажмите кнопку СТАРТ/ВЫКЛ, чтобы подтвердить выбор
и начать приготовление (рис.
).
).
Примечание
• Если мультиварка не будет использоваться в течение 10 секунд
после нажатия кнопки ОТСРОЧКА, прибор будет издавать
звуковой сигнал еще 15 секунд, в течение которых вы сможете
задать время отсрочки старта. Если ни одна кнопка не будет
нажата, мультиварка перейдет в режим ожидания.
• По истечении установленного времени приготовление будет
завершено. Например, если вы установите отсрочку старта на
8 часов, приготовление блюда начнется через 8 часов.
Настройка температуры
приготовления
Для некоторых программ можно изменять температуру
приготовления. Допустимые значения см. в главе "Обзор
программ".
1 Выберите нужную программу приготовления.
2 Нажмите кнопку ТЕМП. (рис.
» На дисплее отобразится температура приготовления,
установленная по умолчанию.
).
3 Касайтесь кнопок увеличения (+) или уменьшения (-), чтобы
задать температуру приготовления (рис.
4 Нажмите кнопку СТАРТ/ВЫКЛ, чтобы подтвердить выбор
и начать приготовление (рис.
).
).
5 Очистка и уход
Примечание
• Отключите мультиварку от сети и подождите, пока она не
остынет, прежде чем приступать к очистке.
Очистка внутренних поверхностей
мультиварки
Чтобы очистить внутреннюю поверхность крышки и корпуса
мультиварки, а также нагревательный элемент:
• Протрите их слегка влажной тканью.
• Обязательно удалите все приставшие остатки пищи.
Очистка внешней поверхности
мультиварки
Чтобы очистить внешнюю поверхность крышки и корпус
мультиварки:
• Протрите тканью, смоченной мыльной водой.
• Для очистки панели управления используйте только мягкую
сухую ткань.
• Тщательно удаляйте остатки пищи вокруг кнопок
управления.
Аксессуары
Съемная внутренняя крышка, внутренняя емкость, чаша для
приготовления на пару, съемная крышка отверстия выхода пара:
• Замочите в горячей воде и очистите губкой.
6 Утилизация
Этот символ означает, что продукт не может быть
утилизирован вместе с бытовыми отходами (2012/19/
ЕС).
Выполняйте раздельную утилизацию электрических
и электронных изделий в соответствии с правилами,
принятыми в вашей стране. Правильная утилизация
поможет предотвратить негативное воздействие на окружающую
среду и здоровье человека.
7 Гарантия и обслуживание
Если вам требуется обслуживание прибора или дополнительная
информация, а также в случае возникновения проблем посетите
веб-сайт Philips, расположенный по адресу www.philips.com,
или обратитесь в центр поддержки потребителей Philips в вашей
стране. Телефонный номер центра поддержки потребителей
можно найти в гарантийном буклете. Если в вашей стране нет
центра поддержки потребителей Philips, обратитесь по месту
приобретения изделия.
8 Характеристики
Номер модели HD4726
Номинальное напряжение 220–240 В~, 50–60 Гц
Расчетная выходная мощность 790–940 Вт
Номинальная емкость 4 л
9 Устранение неисправностей
При возникновении неполадок в процессе использования
мультиварки перед обращением в сервисную службу проверьте
следующее. Если устранить неполадку не удается, обратитесь в
центр поддержки потребителей Philips в вашей стране.
Проблема Решение
Не загорается
индикатор
кнопки.
Неправильное подключение. Убедитесь,
что сетевой шнур правильно подключен
к мультиварке, а сетевая вилка плотно
вставлена в розетку электросети.
Проблема Решение
Не работает
дисплей.
Ингредиенты не
приготовлены.
Рис пересушен и
недоварен.
Рис пригорел. Рис плохо промыт. Промывайте рис, пока
Мультиварка
не переходит
в режим
поддержания
температуры
автоматически.
Во время
приготовления
из мультиварки
пролилась вода.
Не удается
выбрать нужную
функцию
приготовления.
Приготовленные
блюда имеют
неприятный
запах
На дисплее
появляется
сообщение об
ошибке (E1, E2,
E3 или E4).
Индикатор неисправен. Отнесите
прибор в торговую организацию или
авторизованный сервисный центр Philips.
Мультиварка не подключена к источнику
питания. При отсутствии электропитания
не срабатывает функция возобновления
работы, не работает дисплей.
Не нажата кнопка СТАРТ / ВЫКЛ.
Перед включением мультиварки
убедитесь, что на нагревательном
элементе и внешней поверхности
внутренней чаши нет загрязнений.
Поврежден нагревательный элемент
или деформирована внутренняя
чаша. Отнесите прибор в торговую
организацию или авторизованный
сервисный центр Philips.
Добавьте больше воды, увеличьте время
приготовления.
вода не станет прозрачной.
Возможно, вы нажали кнопку
ПОДОГРЕВ, прежде чем начать процесс
приготовления. В этом случае по
окончании приготовления мультиварка
переходит в режим ожидания.
Неисправен регулятор температуры.
Отнесите прибор в торговую
организацию или авторизованный
сервисный центр Philips.
Убедитесь, что ингредиенты во
внутренней емкости не превышают
отметку MAX.
Несколько раз нажмите кнопку МЕНЮ,
чтобы выбрать нужный режим.
Очистите внутреннюю чашу в теплой
воде с помощью средства для мытья
посуды.
После приготовления тщательно
очистите крышку отверстия выхода пара,
внутреннюю крышку и внутреннюю чашу.
Во время процесса приготовления
произошел сбой подачи питания.
Отнесите прибор в торговую
организацию или авторизованный
сервисный центр Philips.
Українська
1 Мультиварка
Вітаємо Вас із покупкою та ласкаво просимо до клубу Philips!
Щоб у повній мірі користуватися підтримкою, яку пропонує
Philips, зареєструйте свій виріб на веб-сайті
www.philips.com/welcome.
2 Комплектація упаковки
(мал. 26)
Мультиварка
a
Мірна чашка
b
Шнур живлення
c
Кошик для приготування
d
на парі
Посібник користувача
e
Книга з рецептами
f
Гарантійний талон
g
3 Огляд
Огляд виробу (мал.
Знімна кришка парового
a
отвору
Кнопка розблокування
b
кришки
Верхня кришка
c
Знімна внутрішня кришка
d
Ущільнююче кільце
e
Внутрішня каструля
f
Примітка
• Використовуйте лише оригінальну внутрішню каструлю, яка
постачається із цим пристроєм. Якщо внутрішню каструлю
пошкоджено, зверніться до Центру обслуговування клієнтів у
своїй країні/регіоні, щоб замовити нові внутрішні каструлі.
Огляд елементів керування (мал.
Кнопка збереження тепла
a
Кнопка налаштування
b
температури
Кнопка часу
c
приготування
Кнопка зменшення
d
Кнопка збільшення
e
Огляд функцій
Функції
Плов (Плов) 35 хв. /
Варити (Варить) 20 хв. 5 хв. – 2 год.
Готувати на парі (На
пару) 20 хв. 5 хв. – 2 год.
Запікати (Запекать) 1 год. /
Йогурт (Йогурт) 8 год. 6–12 год.
Підігріти (Разогреть) 25 хв. 5–60 хв.
Приготування в ручному
режимі (Мультиповар) 2 год. 5 хв. – 10 год.
Каша (Каша) 10 хв. 5 хв. – 2 год.
Рис (Рис) 40 хв. /
Суп (Суп) 1 год. 20 хв. – 4 год.
Смажити (Жарить) 15 хв. 5–60 хв.
Пекти (Выпечка) 45 хв. 20 хв. – 2 год.
Тушкувати (Тушить) 1 год. 20 хв. – 10 год.
Функції
Плов (Плов) 1–24 год. 130–140°C /
Варити (Варить) 1–24 год. 90–100°C /
Готувати на парі
(На пару) 1–24 год. 100°C /
Запікати
(Запекать) 1–24 год. 120–130°C /
Йогурт (Йогурт) 1–24 год. 40°C /
Підігріти
(Разогреть) / 85°C /
Приготування в
ручному режимі
(Мультиповар) 1–24 год. 100°C 30–160 °C
Каша (Каша) 1–24 год. 90–100°C /
Рис (Рис) 1–24 год. 130–140°C /
Суп (Суп) 1–24 год. 90–100°C /
Смажити
(Жарить) / 140–160°C /
Пекти (Выпечка) / 130°C 40–160 °C
Тушкувати
(Тушить) 1–24 год. 90°C /
Примітка
• Час приготування для функцій приготування рису (Рис) та плову
(Плов) визначається мультиваркою відповідно до кількості
продуктів у внутрішній каструлі.
• Температуру приготування можна налаштувати для функцій
випікання (Выпечка) та приготування в ручному режимі
(Мультиповар). Для функції випікання можна вибрати
температуру від 40 °C до 160 °C, а для функції приготування в
ручному режимі – від 30 °C до 160 °C.
• Після запуску приготування можна натиснути кнопку
запуску/вимкнення (СТАРТ/ВЫКЛ), щоб зупинити поточне
приготування; мультиварка перейде в режим очікування.
Стандартний час
приготування
Попередньо
встановлений
час
)
Панель керування
g
Нагрівальний елемент
h
Роз'єм для кабелю
i
живлення
Головний блок
j
Ручка мультиварки
k
Індикатори рівня води
l
Кнопка попередньо
встановленого
f
налаштування
Кнопка Меню
g
Кнопка запуску/вимкнення
h
Дисплей
i
Діапазон
регулювання часу
приготування
Стандартна
температура
приготування
)
Діапазон
регулювання
температури
4 Використання мультиварки
(мал.
Примітка
• Для усіх функцій: не наповнюйте внутрішню каструлю продуктами,
рідиною чи іншою їжею вище позначки MAX всередині, інакше їжа
може витікати під час приготування (мал. 1).
• Щоб відкрити верхню кришку мультиварки, натисніть кнопку
розблокування кришки (мал.
• Час приготування не відображається безпосередньо з початку
для функцій приготування рису (Рис) та плову (Плов).
відображається на екрані протягом більшості часу приготування,
оскільки мультиварці потрібно визначити кількість води/рідини та
продуктів на початковому етапі приготування. Коли мультиварка
визначить потрібний фактичний час приготування, на екрані
відобразиться час приготування, що залишився. Для функцій
приготування каші (Каша), приготування на парі (На пару) та
варіння (Варить): індикація
закипання води/рідини. Коли вода/рідина починає кипіти, на
екрані відображається встановлений час приготування.
• Детальніше про приготування за допомогою кожної функції
читайте у книзі рецептів.
Порада
• Щоб вибрати певну функцію, кілька разів натисніть кнопку "меню"
(МЕНЮ). Можна також один раз натиснути кнопку "меню"
(МЕНЮ), а потім – кнопку збільшення (+) або зменшення (-).
Перед першим використанням
1 Вийміть усі аксесуари з внутрішньої каструлі та зніміть із неї
пакувальний матеріал.
2 Перед першим використанням добре почистіть усі частини
мультиварки (див. розділ "Чищення та догляд").
)
).
відображається на екрані до
Примітка
• Перед тим як використовувати мультиварку, перевірте, чи всі
частини сухі.
Приготування плову (Плов)
1 Покладіть продукти для приготування плову у внутрішню
каструлю.
2 Витріть зовнішню частину внутрішньої каструлі насухо
3 Закрийте кришку мультиварки (мал.
4 Натисніть кнопку "меню" (МЕНЮ), щоб вибрати функцію
5 Натисніть кнопку запуску (СТАРТ/ВЫКЛ), щоб підтвердити
6 Після завершення приготування пристрій подає звуковий
), після чого вставте її у мультиварку (мал. 4).
(мал.
розетку (мал.
"плов" (Плов) (мал.
і почати приготування (мал.
сигнал та автоматично переходить у режим збереження
тепла.
).
).
) та вставте штекер у
).
Примітка
• Якщо у Вашому регіоні спостерігаються перепади напруги,
можливе переповнення мультиварки їжею.
Варіння (Варить)
1 Налийте воду у внутрішню каструлю.
2 Витріть зовнішню частину внутрішньої каструлі насухо
3 Закрийте кришку мультиварки (мал.
розетку (мал.
4 Натисніть кнопку "меню" (МЕНЮ), щоб вибрати функцію
"варити" (Варить) (мал.
» Як вибрати інший час приготування, читайте у розділі
"Налаштування часу приготування".
).
).
) та вставте штекер у
), після чого вставте її у мультиварку (мал. 4).
(мал.
5 Натисніть кнопку запуску (СТАРТ/ВЫКЛ), щоб підтвердити
і почати приготування (мал.
6 Коли вода закипить, мультиварка подасть звуковий сигнал
5 разів, нагадуючи про те, що потрібно відкрити кришку та
покласти їжу у внутрішню каструлю.
).
Примітка
• відображається на екрані до закипання води/рідини.
Коли вода/рідина починає кипіти, на екрані відображається
встановлений час приготування.
7 Після завершення приготування пристрій подає звуковий
сигнал та автоматично переходить у режим збереження
тепла.
Приготування на парі (На пару)
1 Налийте воду у внутрішню каструлю.
Примітка
• Для приготування їжі на парі налийте від 0,5 л до 2 л води у
внутрішню каструлю. Кількість води можна регулювати залежно
від типу їжі.
2 Витріть зовнішню частину внутрішньої каструлі насухо
), після чого вставте її у мультиварку (мал. 4).
(мал.
3 Поставте кошик для приготування на парі у внутрішню
каструлю, їжу у чашу, а чашу – на кошик для приготування
на парі.
» Продукти не повинні накривати всі отвори для пари
в кошику для приготування на парі, щоб гаряча пара
4 Закрийте кришку мультиварки (мал.
5 Натисніть кнопку "меню" (МЕНЮ), щоб вибрати функцію
виходила з-під кошика для приготування на парі.
розетку (мал.
"приготування на парі" (На пару) (мал.
» Як вибрати інший час приготування, читайте у розділі
"Налаштування часу приготування".
).
) та вставте штекер у
).
6 Натисніть кнопку запуску (СТАРТ/ВЫКЛ), щоб підтвердити
і почати приготування (мал.
7 Після завершення приготування пристрій подає звуковий
сигнал та автоматично переходить у режим збереження
тепла.
).
Примітка
• Готуючи на парі їжу, не занурюйте кошик для приготування на
парі у воду.
• відображається на екрані до закипання води/рідини.
Коли вода/рідина починає кипіти, на екрані відображається
встановлений час приготування.
• Після приготування на парі користуйтеся кухонними рукавицями
або ганчіркою, щоб зняти чашу та кошик для приготування на
парі, оскільки вони можуть бути дуже гарячі.
Запікання (Запекать)
1 Покладіть продукти у внутрішню каструлю.
2 Витріть зовнішню частину внутрішньої каструлі насухо
3 Закрийте кришку мультиварки (мал.
розетку (мал.
4 Натисніть кнопку "меню" (МЕНЮ), щоб вибрати функцію
"запікати" (Запекать) (мал.
5 Натисніть кнопку запуску (СТАРТ/ВЫКЛ), щоб підтвердити
і почати приготування (мал.
6 Існує 2 етапи запікання. Коли закінчиться перший етап
(приблизно 35 хвилин, 130°C), мультиварка подаватиме
звукові сигнали 5 разів кожні 30 секунд, щоб нагадати про
те, що потрібно відкрити кришку та перевернути їжу у
внутрішній каструлі.
» На екрані відобразиться час приготування, що
залишився (25 хвилин).
).
) та вставте штекер у
).
).
), після чого вставте її у мультиварку (мал. 4).
(мал.
7 Натисніть кнопку "меню" (МЕНЮ), щоб почати другий етап
(120°C).
» Якщо кнопку меню (МЕНЮ) не натиснути
протягом 5 хвилин після завершення першого
етапу приготування, мультиварка перейде в режим
збереження тепла.
8 Після завершення приготування пристрій подає звуковий
сигнал та автоматично переходить у режим очікування.
Приготування йогурту (Йогурт)
1 Добре перемішайте продукти для йогурту та покладіть їх у
герметичні ємності.
Примітка
• Використовуйте герметичні ємності, виготовлені з харчової
пластмаси або скла, що може витримувати температуру вище
80 °C.
• Детальніше про приготування йогурту читайте у книзі рецептів.
2 Поставте ємності у внутрішню каструлю. Слідкуйте, щоб
ємності були герметичними.
3 Налийте воду у внутрішню каструлю. Ємності мають бути
занурені у воду наполовину.
4 Витріть зовнішню частину внутрішньої каструлі насухо
5 Закрийте кришку мультиварки (мал.
6 Натисніть кнопку "меню" (МЕНЮ), щоб вибрати функцію
), після чого вставте її у мультиварку (мал. 4).
(мал.
розетку (мал.
"йогурт" (Йогурт) (мал.
» Як вибрати інший час приготування, читайте у розділі
"Налаштування часу приготування".
).
).
) та вставте штекер у
7 Натисніть кнопку запуску (СТАРТ/ВЫКЛ), щоб підтвердити
і почати приготування (мал.
8 Після завершення приготування пристрій подає звуковий
сигнал та автоматично переходить у режим очікування.
).
Підігрівання (Разогреть)
1 Перемішайте страву та рівномірно розподіліть її у
внутрішній каструлі.
2 Щоб їжа не стала надто сухою, за необхідності налийте на
неї трохи води. Кількість води залежить від кількості їжі.
3 Витріть зовнішню частину внутрішньої каструлі насухо
4 Закрийте кришку мультиварки (мал.
5 Натисніть кнопку меню (МЕНЮ), щоб вибрати функцію
), після чого вставте її у мультиварку (мал. 4).
(мал.
розетку (мал.
"підігріти" (Разогреть) (мал.
» Як вибрати інший час приготування, читайте у розділі
"Налаштування часу приготування".
).
) та вставте штекер у
).
6 Натисніть кнопку запуску (СТАРТ/ВЫКЛ), щоб підтвердити
і почати приготування (мал.
7 Після завершення приготування пристрій подає звуковий
сигнал та автоматично переходить у режим збереження
тепла.
).
Приготування в ручному режимі
(Мультиповар)
Для налаштування часу і температури приготування можна
скористатися ручним режимом.
1 Покладіть продукти у внутрішню каструлю.
2 Витріть зовнішню частину внутрішньої каструлі насухо
3 Закрийте кришку мультиварки (мал.
розетку (мал.
4 Натисніть кнопку "меню" (МЕНЮ), щоб вибрати функцію
"приготування в ручному режимі" (Мультиповар) (мал.
» Як вибрати іншу температуру приготування, читайте у
розділі "Налаштування температури приготування".
» Як вибрати інший час приготування, читайте у розділі
"Налаштування часу приготування".
).
) та вставте штекер у
).
), після чого вставте її у мультиварку (мал. 4).
(мал.
5 Натисніть кнопку запуску (СТАРТ/ВЫКЛ), щоб підтвердити
і почати приготування (мал.
6 Після завершення приготування пристрій подає звуковий
сигнал та автоматично переходить у режим збереження
тепла.
).
Примітка
• Якщо вибрати температуру нижче 80 °C, після приготування
мультиварка автоматично переходить у режим очікування.
• У разі вибору температури вище 140 °C верхня кришка має
бути відкрита під час приготування.
Приготування каші (Каша)
1 Покладіть продукти для приготування каші у внутрішню
каструлю та трохи перемішайте.
2 Витріть зовнішню частину внутрішньої каструлі насухо
3 Закрийте кришку мультиварки (мал.
4 Натисніть кнопку "меню" (МЕНЮ), щоб вибрати функцію
5 Натисніть кнопку запуску (СТАРТ/ВЫКЛ), щоб підтвердити
6 Після завершення приготування пристрій подає звуковий
), після чого вставте її у мультиварку (мал. 4).
(мал.
розетку (мал.
"каша" (Каша) (мал.
» Як вибрати інший час приготування, читайте у розділі
"Налаштування часу приготування".
і почати приготування (мал.
сигнал та автоматично переходить у режим збереження
тепла.
).
).
) та вставте штекер у
).
Примітка
• відображається на екрані до закипання води/рідини.
Коли вода/рідина починає кипіти, на екрані відображається
встановлений час приготування.
• Детальну інформацію про співвідношення продуктів та рідини
можна знайти у книзі рецептів.
• Якщо у Вашому регіоні спостерігаються перепади напруги,
можливе переповнення мультиварки їжею.
Приготування рису (Рис)
Примітка
• Якщо у Вашому регіоні спостерігаються перепади напруги,
можливе переповнення мультиварки їжею.
• Після приготування відразу перемішайте та розрихліть рис/
крупу, щоб вийшла зайва волога і рис був розсипчастим.
• Залежно від умов приготування нижній шар рису може злегка
зарум’янитися.
1 Промийте рис, покладіть його у внутрішню каструлю та
налийте воду.
Примітка
• Детальну інформацію про співвідношення рису та води можна
знайти у книзі рецептів.
2 Натисніть кнопку розблокування кришки, щоб відкрити
кришку (мал.
3 Витріть зовнішню частину внутрішньої каструлі насухо
(мал.
).
), після чого вставте її у мультиварку (мал. 4).
Примітка
• Переконайтеся, що внутрішня каструля належно контактує з
нагрівальним елементом.
• Перевірте, чи зовнішня частина внутрішньої каструлі чиста та
суха, а на нагрівальному елементі немає залишків їжі.
4 Закрийте кришку мультиварки (мал.
розетку (мал.
5 Натисніть кнопку "меню" (МЕНЮ), щоб вибрати функцію
"рис" (Рис) (мал.
6 Натисніть кнопку запуску (СТАРТ/ВЫКЛ), щоб підтвердити
і почати приготування (мал.
7 Після завершення приготування пристрій подає звуковий
сигнал та автоматично переходить у режим збереження
тепла.
).
).
) та вставте штекер у
).
Приготування супу (Суп)
1 Покладіть продукти та налийте воду/рідину для
приготування супу у внутрішню каструлю.
2 Витріть зовнішню частину внутрішньої каструлі насухо
3 Закрийте кришку мультиварки (мал.
4 Натисніть кнопку "меню" (МЕНЮ), щоб вибрати функцію
), після чого вставте її у мультиварку (мал. 4).
(мал.
розетку (мал.
"суп" (Суп) (мал.
» Як вибрати інший час приготування, читайте у розділі
"Налаштування часу приготування".
).
).
) та вставте штекер у
5 Натисніть кнопку запуску (СТАРТ/ВЫКЛ), щоб підтвердити
і почати приготування (мал.
6 Після завершення приготування пристрій подає звуковий
сигнал та автоматично переходить у режим збереження
тепла.
).
Смаження (Жарить)
1 Витріть зовнішню частину внутрішньої каструлі насухо
2 Вставте штекер у розетку (мал.
3 Налийте трохи кулінарного жиру у внутрішню каструлю.
• Детальніше про використання функції смаження читайте у книзі
4 Натисніть кнопку "меню" (МЕНЮ), щоб вибрати функцію
5 Натисніть кнопку запуску (СТАРТ/ВЫКЛ), щоб підтвердити
6 Тримайте кришку відкритою та постійно помішуйте
7 Після завершення приготування пристрій подає звуковий
), після чого вставте її у мультиварку (мал. 4).
(мал.
).
Примітка
рецептів.
"смажити" (Жарить) (мал.
і почати приготування (мал.
продукти лопаткою.
сигнал та автоматично переходить у режим очікування.
).
).
Випікання (Выпечка)
1 Покладіть продукти для випікання у внутрішню каструлю.
2 Витріть зовнішню частину внутрішньої каструлі насухо
3 Закрийте кришку мультиварки (мал.
розетку (мал.
4 Натисніть кнопку "меню" (МЕНЮ), щоб вибрати функцію
"пекти" (Выпечка) (мал.
» Як вибрати іншу температуру випікання, читайте у
розділі "Налаштування температури приготування".
» Як вибрати інший час приготування, читайте у розділі
"Налаштування часу приготування".
).
).
) та вставте штекер у
), після чого вставте її у мультиварку (мал. 4).
(мал.
5 Натисніть кнопку запуску (СТАРТ/ВЫКЛ), щоб підтвердити
і почати приготування (мал.
).
Примітка
• Якщо вибрана температура випікання нижче 80 °C, після
завершення приготування пристрій автоматично переходить у
режим очікування.
6 Після завершення приготування пристрій подає звуковий
сигнал та автоматично переходить у режим збереження
тепла.
Примітка
• Під час випікання тортів кришка має бути закрита. Найкращою
для випікання тортів є температура 130 °C і час приготування
45 хвилин.
• У разі випікання іншої їжі за температури вище 140 °C кришка
має бути відкрита.
• Виймаючи внутрішню каструлю з мультиварки після
приготування, користуйтеся кухонними рукавицями або
ганчіркою, оскільки вона може бути дуже гаряча.
Тушкування (Тушить)
1 Покладіть продукти для приготування рагу у внутрішню
каструлю.
2 Витріть зовнішню частину внутрішньої каструлі насухо
3 Закрийте кришку мультиварки (мал.
4 Натисніть кнопку "меню" (МЕНЮ), щоб вибрати функцію
), після чого вставте її у мультиварку (мал. 4).
(мал.
розетку (мал.
"тушкувати" (Тушить) (мал.
» Як вибрати інший час приготування, читайте у розділі
"Налаштування часу приготування".
).
) та вставте штекер у
).
5 Натисніть кнопку запуску (СТАРТ/ВЫКЛ), щоб підтвердити
і почати приготування (мал.
6 Після завершення приготування пристрій подає звуковий
сигнал та автоматично переходить у режим збереження
тепла.
).
Збереження тепла
Для функцій приготування зі збереженням тепла: можна ввімкнути
або вимкнути функцію збереження тепла після приготування.
• Перед увімкненням функції приготування зі збереженням
тепла блиматиме індикатор режиму збереження тепла. У разі
безпосереднього ввімкнення функції приготування мультиварка
автоматично перейде в режим збереження тепла після
приготування.
• Перед увімкненням функції приготування зі збереженням
тепла блиматиме індикатор режиму збереження тепла.
Якщо натиснути кнопку збереження тепла (ПОДОГРЕВ),
індикатор режиму збереження тепла згасне. Після завершення
приготування мультиварка автоматично перейде в режим
очікування.
Примітка
• Максимальний час збереження тепла становить 12 годин.
• Режим збереження тепла не застосовується до таких функцій
приготування: йогурт, смажити, приготування в ручному режимі
та пекти (лише в разі випікання за температури нижче 80 °C).
Налаштування часу приготування
Можна налаштувати час приготування для деяких функцій. Про
діапазон регулювання читайте в розділі "Огляд функцій".
1 Виберіть потрібну функцію приготування.
2 Натисніть кнопку "часу приготування" (ВРЕМЯ
ПРИГОТОВЛЕНИЯ) (мал.
» На дисплеї почне блимати значення годин.
).
3 Натисніть кнопку "збільшення" (+) або "зменшення" (-), щоб
встановити значення годин (мал.
4 Встановивши значення годин, знову натисніть кнопку "часу
приготування" (ВРЕМЯ ПРИГОТОВЛЕНИЯ) (мал.
» На дисплеї почне блимати значення хвилин.
).
).
5 Натисніть кнопку "збільшення" (+) або "зменшення" (-), щоб
встановити значення хвилин (мал.
6 Натисніть кнопку запуску (СТАРТ/ВЫКЛ), щоб підтвердити
і почати приготування (мал.
).
).
Примітка
• Якщо мультиварку залишити у стані бездіяльності на 10 секунд
після натиснення кнопки "часу приготування" (ВРЕМЯ
ПРИГОТОВЛЕНИЯ), вона блиматиме інші 15 секунд, і в цей час
можна встановити час приготування. Якщо не натиснути жодної
кнопки, мультиварка перейде в режим очікування.
• Для функцій із максимальним часом приготування не більше
1 години: у разі натиснення кнопки "часу приготування" (ВРЕМЯ
ПРИГОТОВЛЕНИЯ) вперше на дисплеї починає блимати
значення хвилин.
Попередньо встановлений час для
відкладеного приготування
Можна попередньо встановити час для відкладеного
приготування для деяких функцій приготування. Попередньо
встановлений час для різних функцій можна знайти в розділі
"Огляд функцій".
1 Виберіть потрібну функцію приготування.
2 Натисніть кнопку "попередньо встановленого часу"
(ОТСРОЧКА) (мал.
» На дисплеї почне блимати значення годин.
3 Натисніть кнопку "збільшення" (+) або "зменшення" (-), щоб
встановити значення годин (мал.
4 Після встановлення значення годин знову натисніть кнопку
"попередньо встановленого часу" (ОТСРОЧКА) (мал.
» На дисплеї почне блимати значення хвилин.
5 Натисніть кнопку "збільшення" (+) або "зменшення" (-), щоб
встановити значення хвилин (мал.
).
).
).
6 Натисніть кнопку запуску (СТАРТ/ВЫКЛ), щоб підтвердити
і почати приготування (мал.
).
Примітка
• Якщо мультиварку залишити у стані бездіяльності на 10 секунд
після натиснення кнопки "попередньо встановленого часу"
(ОТСРОЧКА), вона блиматиме інші 15 секунд, і в цей час
можна налаштувати попередньо встановлений час. Якщо не
натиснути жодної кнопки, мультиварка перейде в режим
очікування.
• Приготування буде завершено тоді, коли мине попередньо
встановлений час. Наприклад, якщо налаштувати попередньо
встановлений час 8 годин, страви будуть готові через 8 годин.
Налаштування температури
приготування
Можна налаштувати температуру приготування для деяких
функцій. Про діапазон регулювання читайте в розділі "Огляд
функцій".
1 Виберіть потрібну функцію приготування.
2 Натисніть кнопку "температура" (ТЕМП.) (мал.
» На екрані з’явиться стандартна температура
приготування.
3 Натисніть кнопку "збільшення" (+) або "зменшення" (-), щоб
встановити температуру приготування (мал.
4 Натисніть кнопку запуску (СТАРТ/ВЫКЛ), щоб підтвердити
і почати приготування (мал.
).
5 Чищення та догляд
Примітка
• Перш ніж чистити мультиварку, від’єднайте її від електромережі
та зачекайте, поки вона достатньо охолоне.
Внутрішня частина
Внутрішня частина верхньої кришки та основного корпусу;
нагрівальний елемент:
• витріть викрученою ганчіркою;
• видаліть усі залишки продуктів, які прилипли до мультиварки.
Зовнішня частина
Поверхня верхньої кришки та зовнішня частина основного
корпусу:
• витріть ганчіркою, змоченою у воді з миючим засобом;
• витирайте панель керування лише м’якою і сухою ганчіркою;
• видаліть усі залишки продуктів навколо панелі керування.
Аксесуари
Знімна внутрішня кришка, внутрішня каструля, кошик для
приготування на парі та знімна кришка парового отвору:
• замочіть у гарячій воді та помийте губкою.
6 Утилізація
Цей символ означає, що цей виріб не підлягає утилізації зі
звичайними побутовими відходами (2012/19/EU).
Дотримуйтесь правил розділеного збору електричних та
електронних пристроїв у Вашій країні. Належна утилізація
допоможе запобігти негативному впливу на навколишнє
середовище та здоров’я людей.
7 Гарантія та обслуговування
Якщо Вам необхідне обслуговування чи інформація або ж виникла
проблема, відвідайте веб-сайт компанії Philips www.philips.com
чи зверніться до Центру обслуговування клієнтів компанії Philips
у своїй країні. Номер телефону можна знайти у гарантійному
талоні. Якщо у Вашій країні немає Центру обслуговування клієнтів,
зверніться до місцевого дилера Philips.
8 Технічні характеристики
Номер моделі HD4726
Номінальна напруга 220–240 В змінного струму,
Номінальна вихідна потужність 790–940 Вт
Номінальна ємність 4 л
50–60 Гц
9 Усунення несправностей
Якщо під час використання цієї мультиварки виникають певні
проблеми, перш ніж звертатися до центру обслуговування,
скористайтеся наведеними нижче порадами. Якщо не вдається
вирішити проблему, зверніться до Центру обслуговування клієнтів
Philips у своїй країні.
Проблема Вирішення
Не засвічується
підсвітка кнопки.
Не працює
дисплей.
Продукти не
готові.
Рис надто сухий
та недоварений.
Рис пригорів. Ви не промили рис належним чином.
Мультиварка
не переходить
у режим
збереження
тепла
автоматично.
Під час
приготування
із мультиварки
виливається вода.
Не вдається
вибрати
потрібну функцію
приготування.
Після
приготування
страви
неприємно
пахнуть.
На дисплеї
з’являється
повідомлення
про помилку (E1,
E2, E3 або E4).
Изготовитель:
“Филипс Консьюмер Лайфстайл Б.В.”, Туссендиепен 4,
9206 АД, Драхтен, Нидерланды
Импортер на территорию России и Таможенного Союза:
ООО “ФИЛИПС”, Российская Федерация, 123022 г.
Москва, ул. Сергея Макеева, д.13, тел. +7 495 961-1111
Сделано в Китае
Дата производства указана в серийном номере
устройства. Например, “XP1A1347000001” означает, что
изделие было произведено на 47-ой неделе 2013 года.
Өндіруші:
“Филипс Консьюмер Лайфстайл Б.В.”, Туссендиепен 4, 9206
АД, Драхтен, Нидерланды
Ресей және Кедендік Одақ территориясына импорттаушы:
“ФИЛИПС” ЖШҚ, Ресей Федерациясы, 123022 Мәскеу
қаласы, Сергей Макеев көшесі, 13-үй, тел. +7 495 961-1111
Қытайда жасап шығарылған
Өнімнің сериялық нөмірінен өндірілген күнін табуға
болады. Мысалы, «XP1A1347000001» өнімнің 2013 жылдың
47-ші аптасында шығарылғанын білдіреді.
).
Проблема з підключенням. Перевірте,
чи кабель живлення під’єднано до
мультиварки належним чином, а штекер
надійно зафіксовано в розетці.
Підсвітка несправна. Віднесіть пристрій
до дилера Philips або сервісного центру,
уповноваженого Philips.
Мультиварку не під’єднано до
електромережі. За відсутності
живлення не працює функція
збереження налаштувань у разі збою в
електропостачанні, і не працює дисплей.
Ви не натиснули кнопку запуску
(СТАРТ / ВЫКЛ).
Перед тим як вмикати мультиварку,
перевірте, чи на нагрівальному елементі
та зовнішній частині внутрішньої каструлі
немає залишків їжі.
Пошкоджено нагрівальний елемент
або деформувалася внутрішня каструля.
Віднесіть мультиварку до дилера Philips
або сервісного центру, уповноваженого
Philips.
Налийте до рису більше води та готуйте
його трохи довше.
Промийте рис, поки вода не стане
прозорою.
Можливо, кнопку "збереження тепла"
(ПОДОГРЕВ) було натиснуто до
початку приготування. У такому разі після
завершення приготування мультиварка
перейде в режим очікування.
Несправний регулятор температури.
Віднесіть пристрій до дилера Philips або
сервісного центру, уповноваженого Philips.
Перевірте, чи кількість продуктів у
внутрішній каструлі не перевищує
позначки MAX.
Щоб вибрати потрібну функцію, кілька
разів натисніть кнопку "меню" (МЕНЮ).
Помийте внутрішню каструлю у теплій
воді з миючим засобом.
Після приготування добре почистіть
кришку парового отвору, внутрішню
кришку та внутрішню каструлю.
Під час приготування стався збій в
електропостачанні. Віднесіть пристрій
до дилера Philips або сервісного центру,
уповноваженого Philips.
).
).
 Loading...