

Page 1
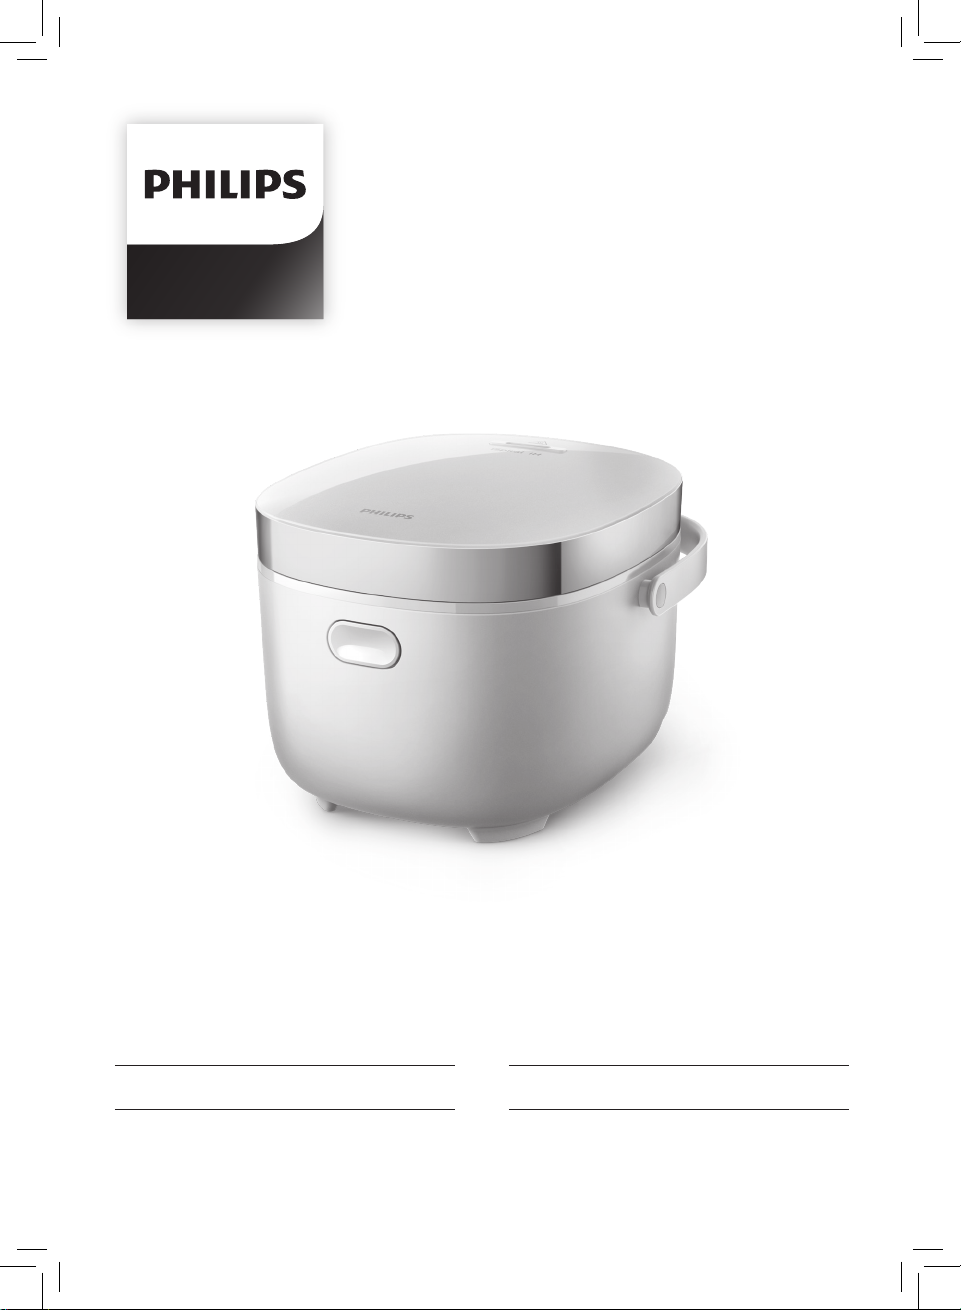
HD3081
EN User manual 1 ZH-S 简体中文 27
Page 2

Page 3

EN
English
Contents
1 Important 4
Safety 4
Power failure backup function 7
Electromagnetic elds (EMF) 7
2 Your Mini Rice Cooker with
Induction Heating 8
What's in the box 8
Product overview 9
Controls overview 10
3 Using your Mini Rice Cooker
with Induction Heating 11
Before rst use 11
Rice 11
Grains and beans 13
Claypot rice 13
Porridge, Soup, Slow cook 14
Steam 14
Noodle 15
Cake 16
Reheat 17
Adjusting the cooking time 17
Preset time for delayed cooking 18
Setting up My Favourite menu 18
5 Recycling 22
6 Guarantee and service 22
7 Specications 22
8 Troubleshooting 23
4 Cleaning and Maintenance 20
Inner lid and steam valve 20
Interior 21
Exterior 21
Accessories and inner pot 21
3
Page 4

EN
1 Important
Please read this safety leaet carefully
before you use the Mini Rice Cooker
with Induction Heating and save it for
future reference.
Safety
Danger
• The appliance must not
be immersed.
Warning
• This appliance shall not be
used by children from
0 year to 8 years.
• This appliance can be
used by children aged
from 8 years and above
if they are continuously
supervised and they have
been given supervision or
instruction concerning use
of the appliance in a safe
way and understand the
hazards involved.
• This appliance is not
intended for use by
persons (including
children) with reduced
physical, sensory or
mental capabilities,
or lack of experience
and knowledge, unless
they have been given
supervision or instruction
concerning use of the
appliance by a person
responsible for their
safety.
• Children should be
supervised to ensure that
they do not play with the
appliance.
• Cleaning and user
maintenance shall not be
made by children unless
they are older than 8 and
supervised.
• Cooking appliances
should be positioned in a
stable situation with the
handles (if any) positioned
to avoid spillage of the
hot liquids.
• This appliance is intended
to be used in household
and similar applications
such as:
• sta kitchen areas in
shops, oces and other
working environments;
• farm houses;
• by clients in hotels,
motels and other
residential type
environments;
• bed and breakfast type
environments.
4
Page 5

EN
English
• If the power cord set
is damaged, it must
be replaced by a cord
set available from the
manufacturer.
• The appliance is not
intended to be operated
by means of an external
timer or a separate
remote-control system.
• Make sure to avoid
spillage on the power
connector to avoid a
potential hazard.
• Always follow the
instructions and use the
appliance properly to
avoid potential injury.
• Check if the voltage
indicated on the
appliance corresponds to
the local power voltage
before you connect it.
• According to the
instructions prescribed in
this user manual, use a
soft damp cloth to clean
the surfaces in contact
with food and make sure
to remove all the food
residues stuck to the
appliance.
• Do not let the power cord
hang over the edge of the
table or worktop on which
the multi-cooker stands.
• Only connect the
appliance to a grounded
power outlet. Always
make sure that the plug
is inserted rmly into the
power outlet.
• Do not use the appliance
if the plug, the mains cord
or the appliance itself
damaged.
• Make sure the heating
element, the temperature
sensor, and the outside
of the inner pot are clean
and dry before you put the
plug in the power outlet.
• Do not plug in the
appliance or press any of
the buttons on the control
panel with wet hands.
• Do not plug in the
appliance or press any of
the buttons on the control
panel with wet hands.
Caution
• CAUTION: Surface of the
heating element is subject
to residual heat after use.
• Never use any accessories
or parts from other
manufacturers or
that Philips does not
5
Page 6

EN
specically recommend. If
you use such accessories
or parts, your guarantee
becomes invalid.
• Do not expose the
appliance to high
temperatures, nor place
it on a working or still hot
stove or cooker.
• Do not expose the
appliance to direct
sunlight.
• Place the appliance on
a stable, horizontal, and
level surface.
• Always put the inner pot
in the appliance before
you put the plug in the
power outlet and switch it
on.
• Do not place the inner pot
directly over an open re
to cook rice.
• Do not use the inner pot if
it is deformed.
• The accessible surfaces
may become hot when
the appliance is operating.
Take extra caution when
touching the appliance.
• Beware of hot steam
coming out of the steam
vent during cooking or out
of the appliance when you
6
open the lid. Keep hands
and face away from the
appliance to avoid the
steam.
• Do not lift and move
the appliance while it is
operating.
• Do not exceed the
maximum water level
indicated in the inner pot
to prevent overow which
might cause potential
hazard.
• Do not place the cooking
utensils inside the pot
while cooking, keeping
warm or reheating rice.
• Only use the cooking
utensils provided. Avoid
using sharp utensils.
• To avoid scratches, it is
not recommended to
cook ingredients with
crustaceans and shellsh.
Remove the hard shells
before cooking.
• Do not insert metallic
objects or alien
substances into the steam
vent.
• Do not place a magnetic
substance on the lid. Do
not use the appliance
near a magnetic
substance.
Page 7

EN
English
• Always let the appliance
cool down before you
clean or move it.
• Always clean the
appliance after use. Do
not clean the appliance in
a dishwasher.
• Always unplug the
appliance if not used for a
longer period.
• If the appliance is
used improperly or
for professional or
semiprofessional
purposes, or if it is not
used according to the
instructions in this user
manual, the guarantee
becomes invalid and
Philips refuses liability for
any damage caused.
Power failure backup
function
This appliance has a backup function
that reserves the status before a power
failure.
• If the power failure occurs during
a cooking process, and the power
supply is resumed within 30 minutes,
the countdown of the cooking time
continues where it is left o.
• If the power failure occurs when the
appliance is at preset mode, and the
power supply is resumed within
30 minutes, the countdown of the
preset time continues where it is left
o.
• If the power supply is not resumed
within 30 minutes, the appliance
might not continue with the previous
working process, but stay in standby
mode.
Electromagnetic elds
(EMF)
This Philips appliance complies with all
applicable standards and regulations
regarding exposure to electromagnetic
elds.
7
Page 8
EN
2 Your Mini Rice Cooker with Induction
Heating
Congratulations on your purchase, and welcome to Philips! To fully benet from the
support that Philips oers, register your product at
www.Philips.com.tw/welcome.
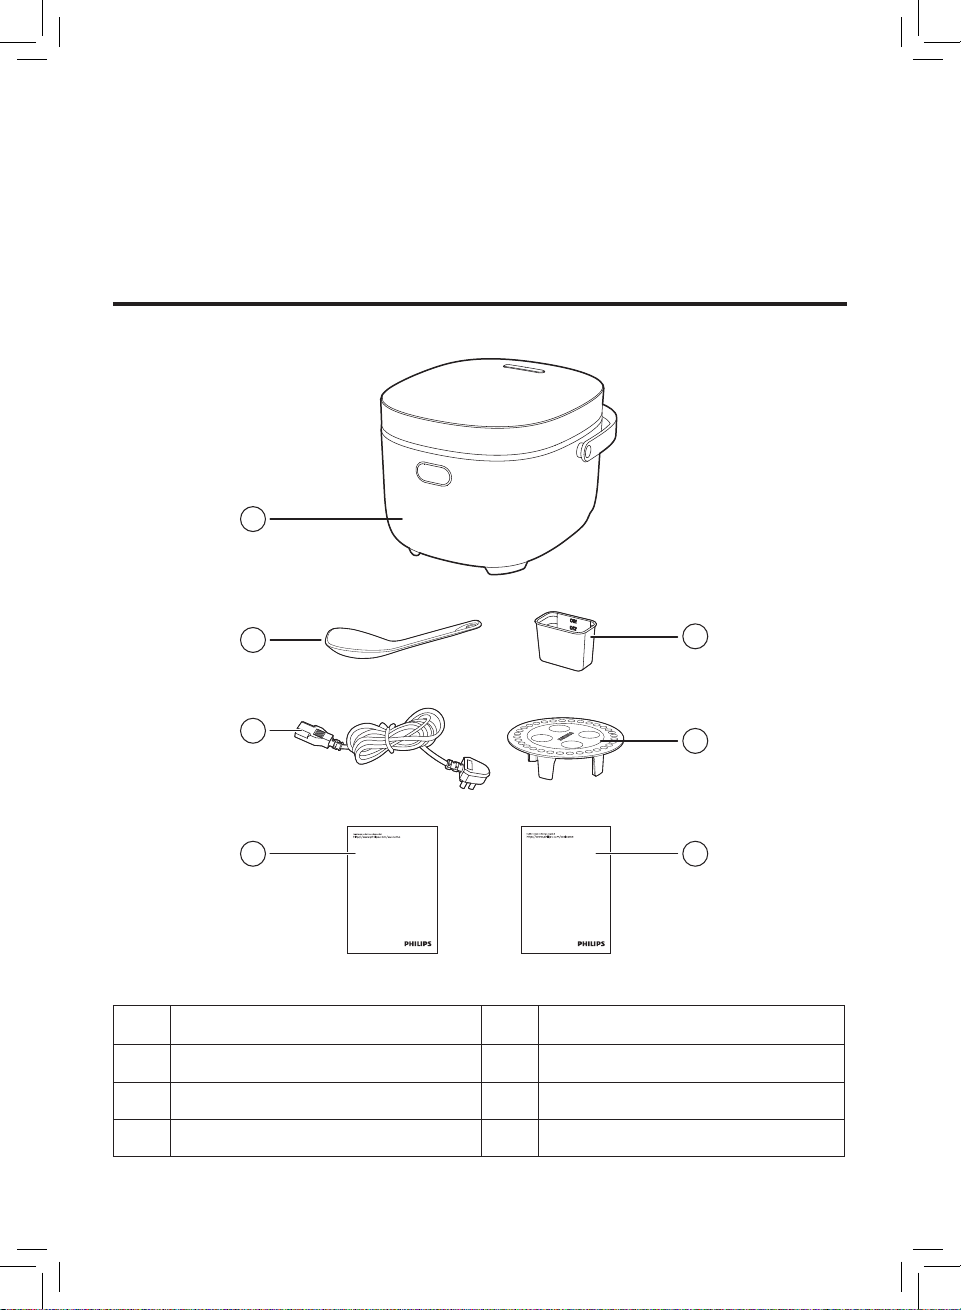
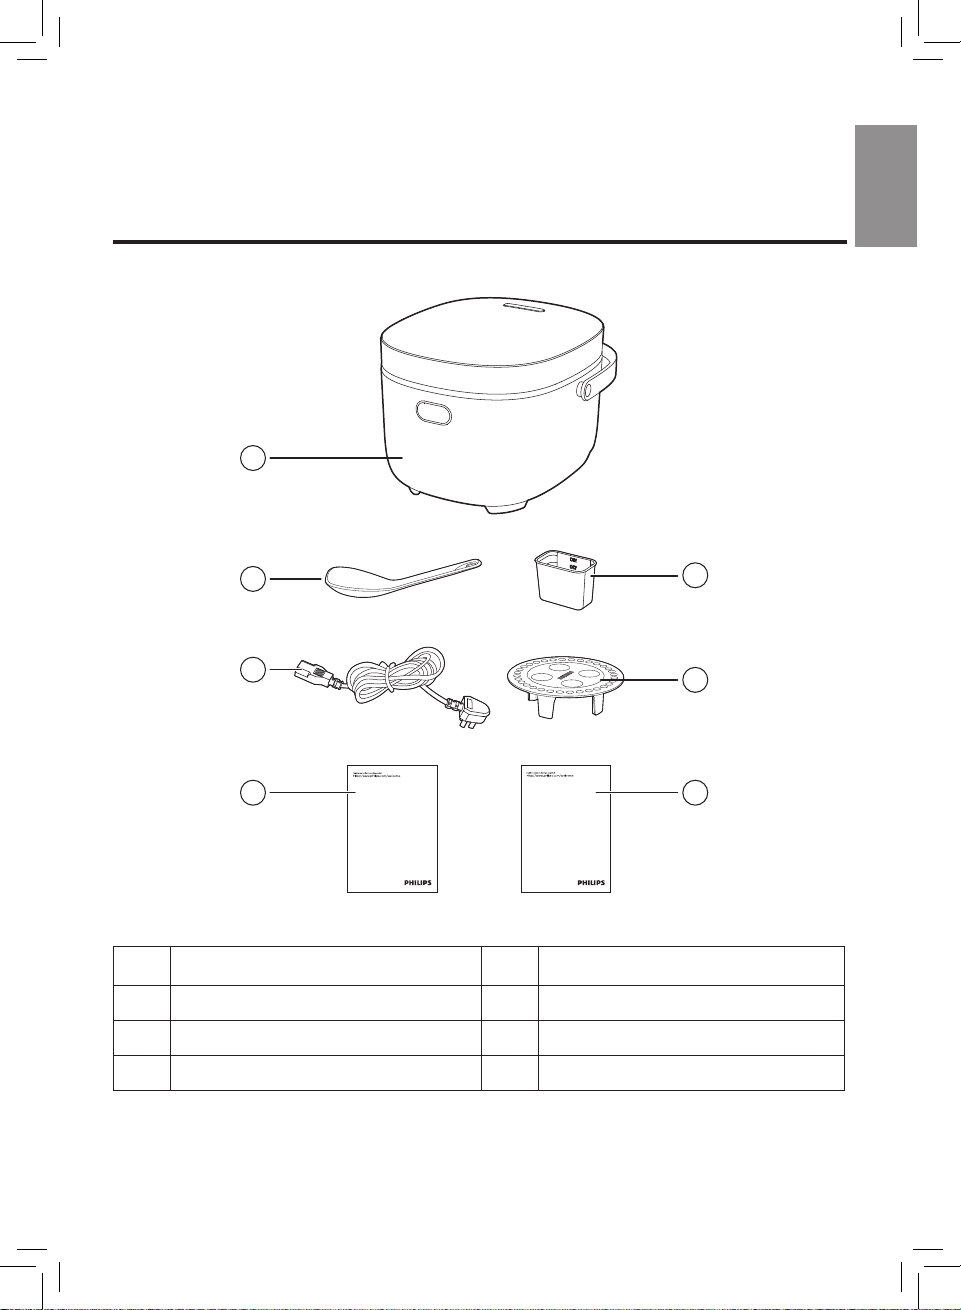
What's in the box
1
2
3
4
Warranty
User manual
Main unit
a
Rice&Soup ladle
b
Power cord
c
Warranty card
d
8
User manual
e
Steaming plate
f
Measuring cup
g
7
6
5
Page 9
EN
English
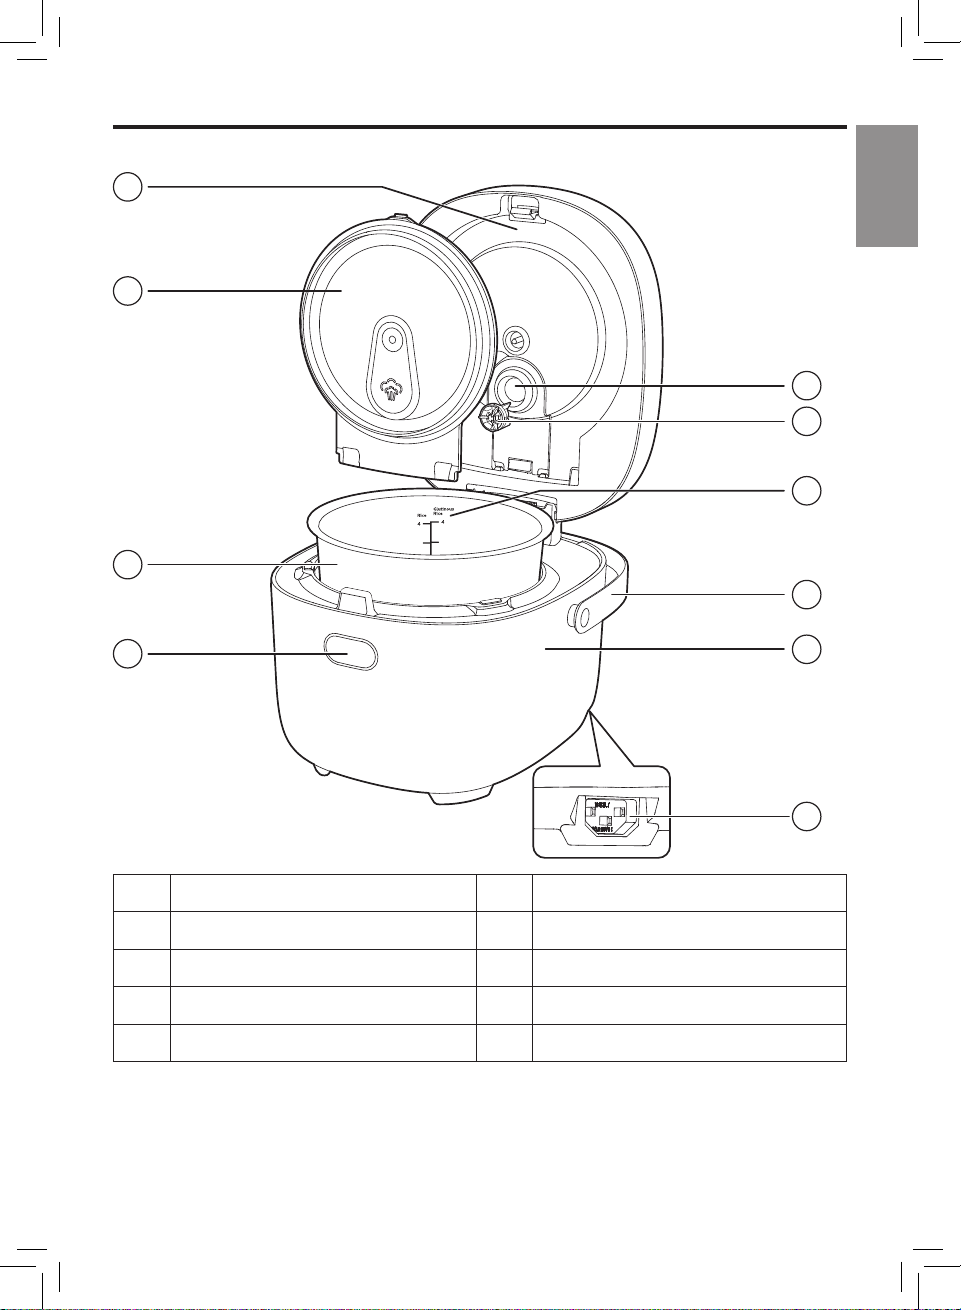
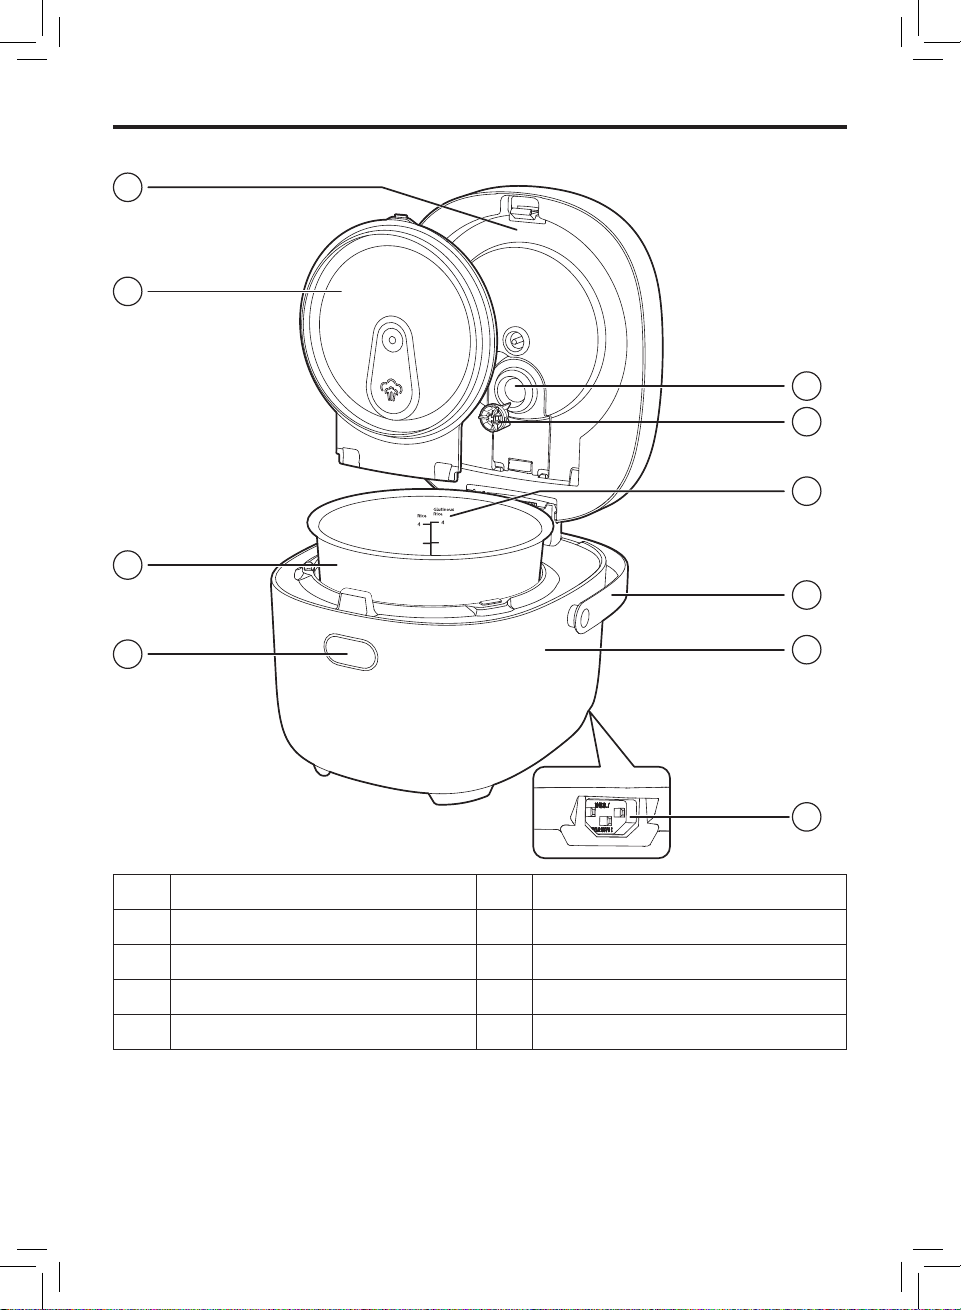
Product overview
1
2
3
10
9
8
7
4
6
5
Top lid
a
Detachable inner lid
b
Inner pot
c
Lid open button
d
Power socket
e
Main unit
f
Handle
g
Water level indication
h
Steam core
i
Steam valve
j
9
Page 10
EN
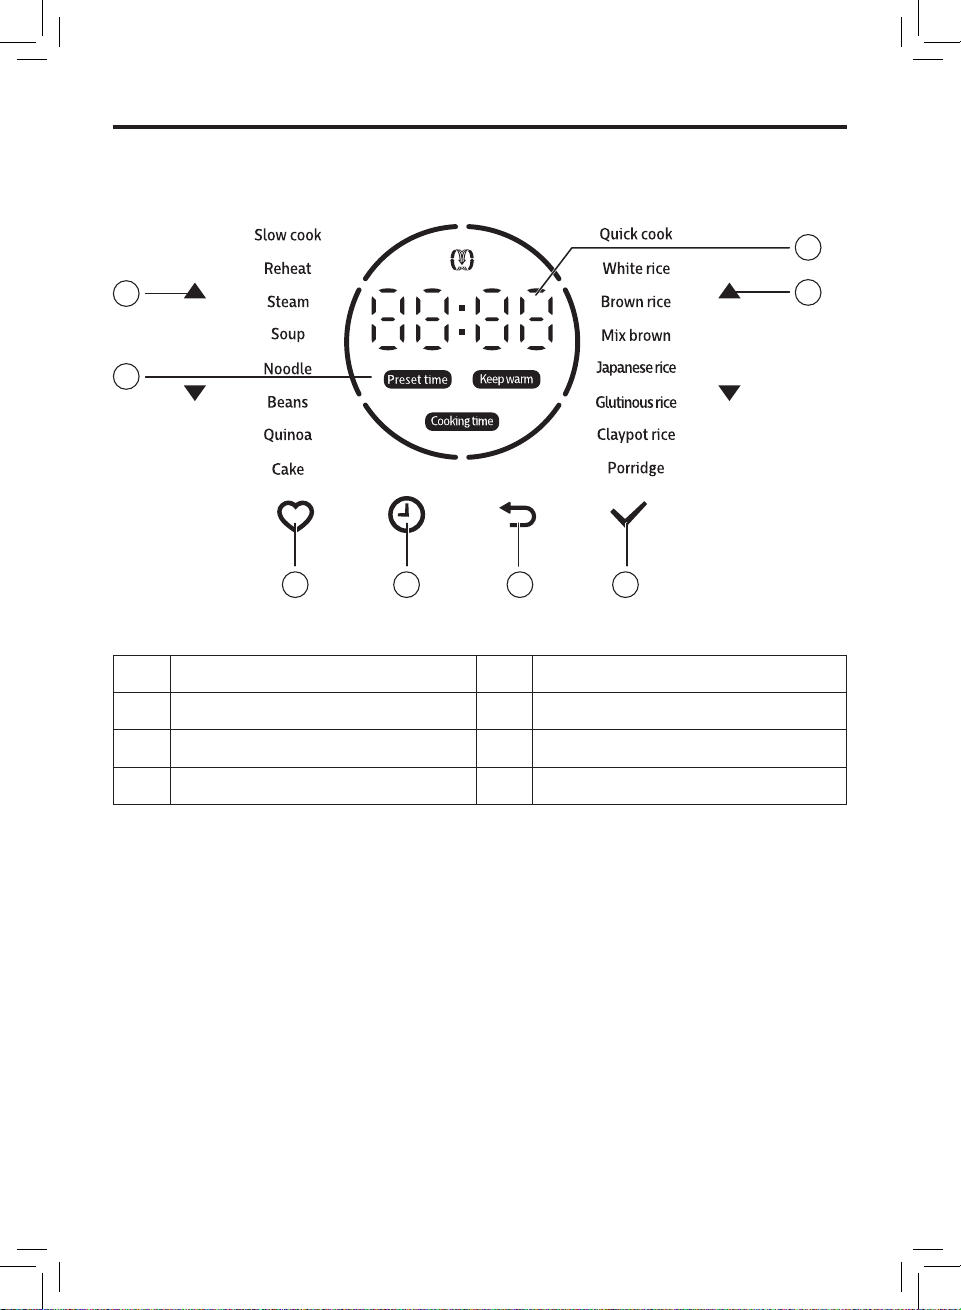
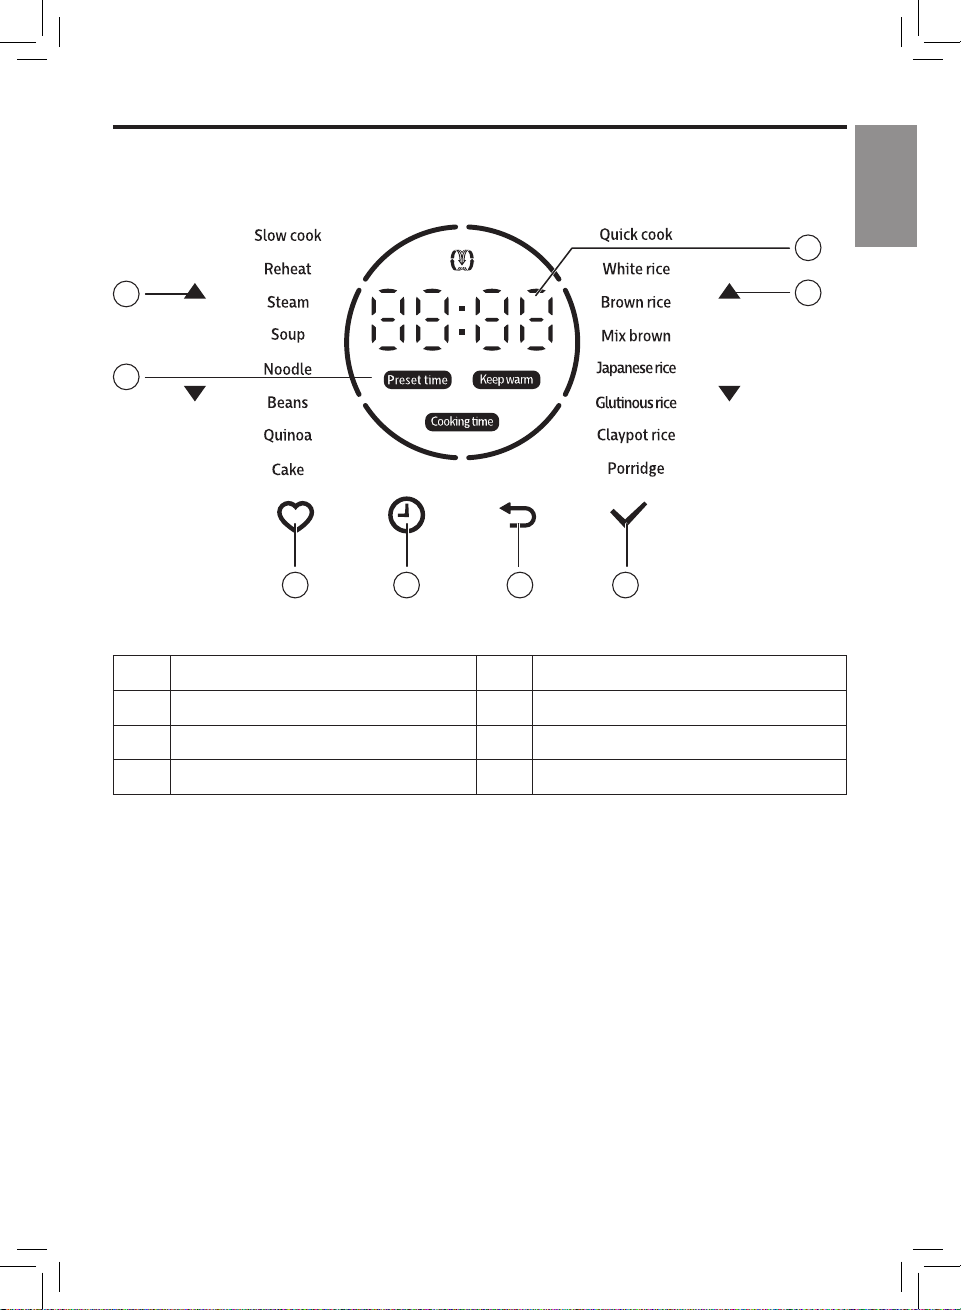
Controls overview
3 4 5
6
8
1
7
2
Menu/Time selection button
a
Control panel
b
My favourite button
c
Cooking time/preset time button
d
Cancel button
e
Conrm/Start button
f
Menu/Time selection button
g
Time display
h
10
Page 11
EN
English
3 Using your Mini
Rice
Rice Cooker
with Induction
Heating
Tip
• After the cooking process is started,
you can press to terminate the
current work, and the appliance
goes to standby mode.
Note
• When opening the lid during
cooking process(especilly with large
amount of water), wait for
1-2 minutes until the steam is
released suciently.
Before rst use
1 Take out all the accessories
from the inner pot. Remove the
packaging material of the inner pot.
2 Use boiled water to clean the
appliance before rst use.
3 Clean the parts of the rice cooker
thoroughly before using the rice
cooker for the rst time (see chapter
"Cleaning and Maintenance").
Note
Default
Menu
Quick cook 25 mins N/A
White rice 45 mins N/A
Japanese
rice
Glutinous
rice
cooking
time
45 mins N/A
45 mins N/A
Adjustable
cooking
time
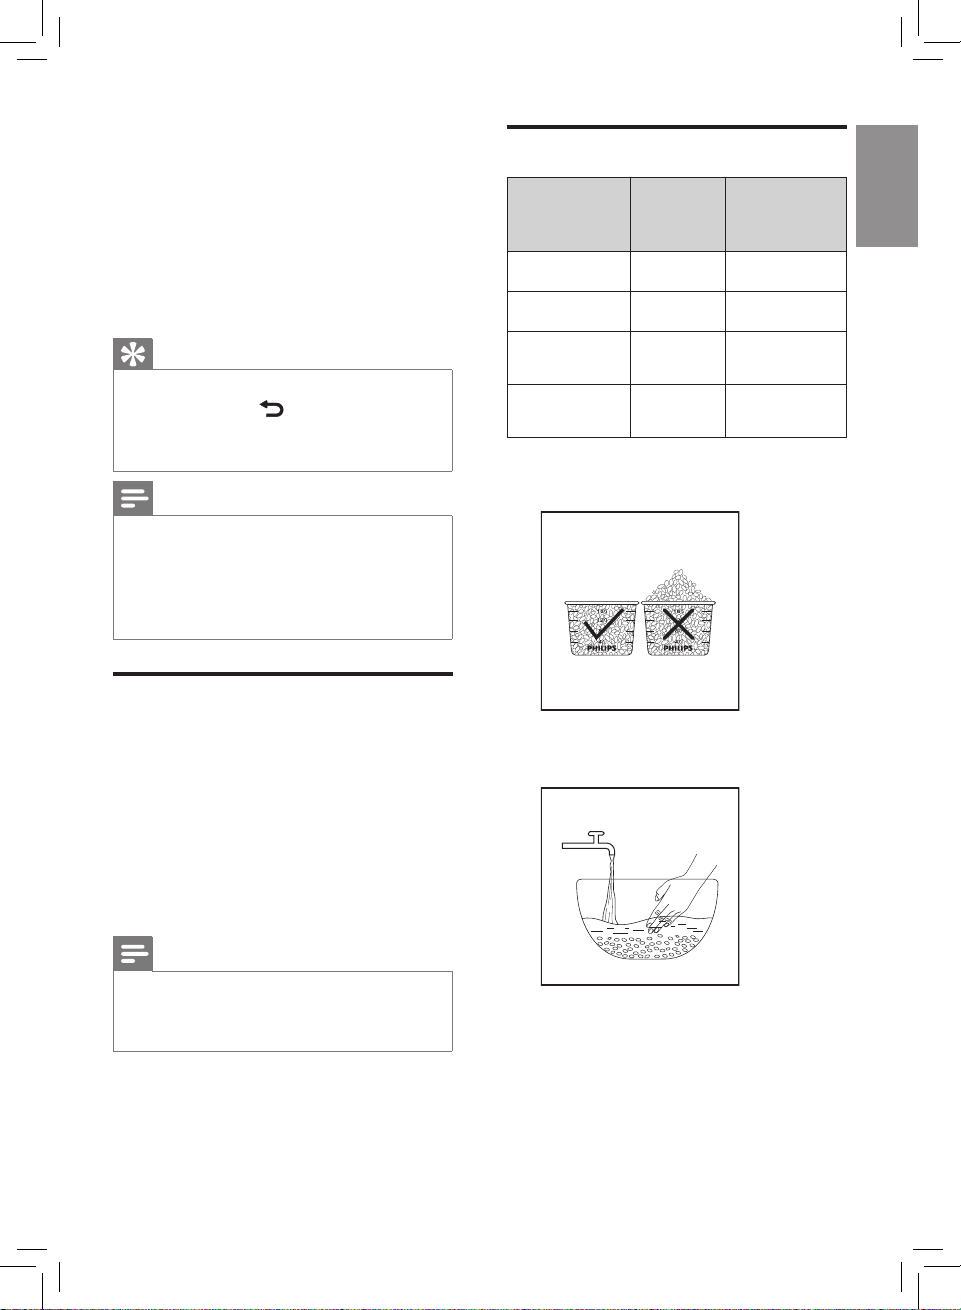
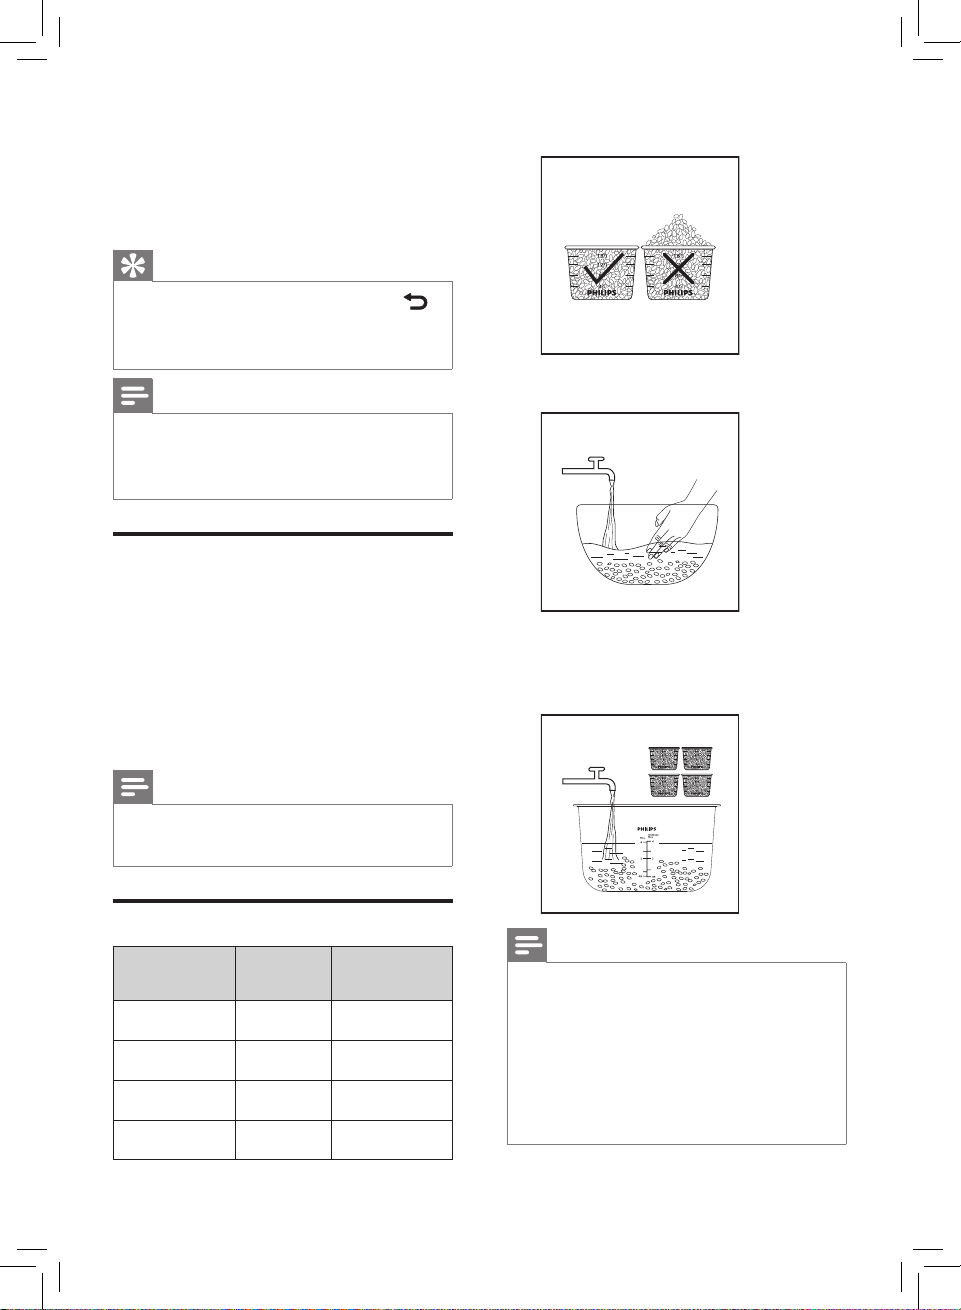
1 Measure the rice using the
measuring cup provided.
2 Wash the rice thoroughly, put the
pre-washed rice in the inner pot.
• Make sure all parts are completely
dry before you start using the rice
cooker.
11
Page 12
EN
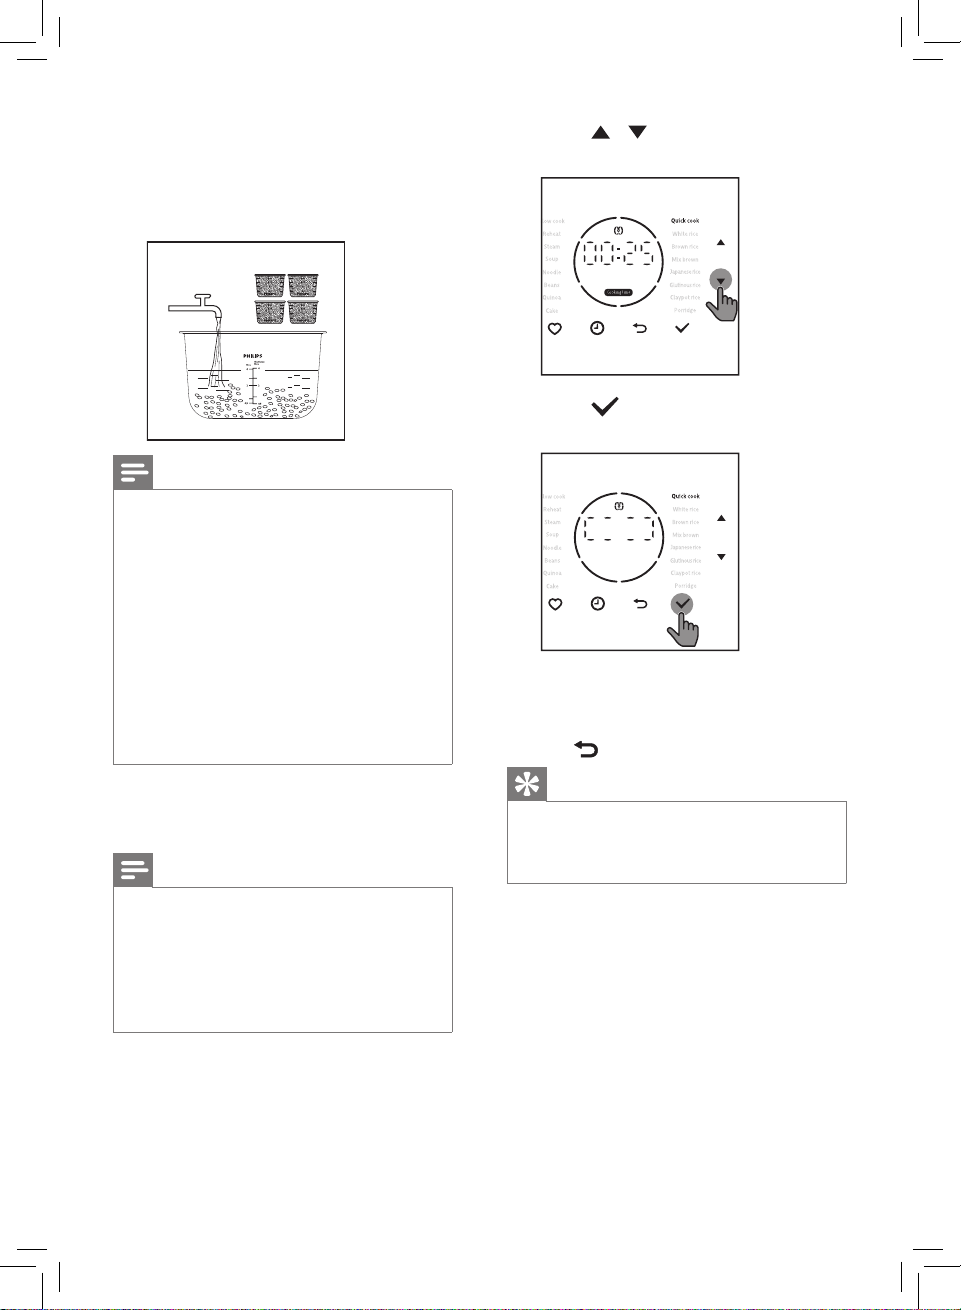
3 Add water to the level indicated on
the scale inside the inner pot that
corresponds to the number of cups
of rice used. Then smooth the rice
surface.
Note
• Do not exceed the volume indicated
nor exceed the maximum water
level indicated in the inner pot, as
this may cause the rice cooker to
overow.
• The level marked inside the inner
pot is just an indication. You can
always adjust the water level for
dierent types of rice and your own
preference. If the voltage is unstable
at the area you live, it is possible
that the rice cooker overows.
4 Wipe the outside of the inner pot
dry, then put the inner pot in the
rice cooker.
Note
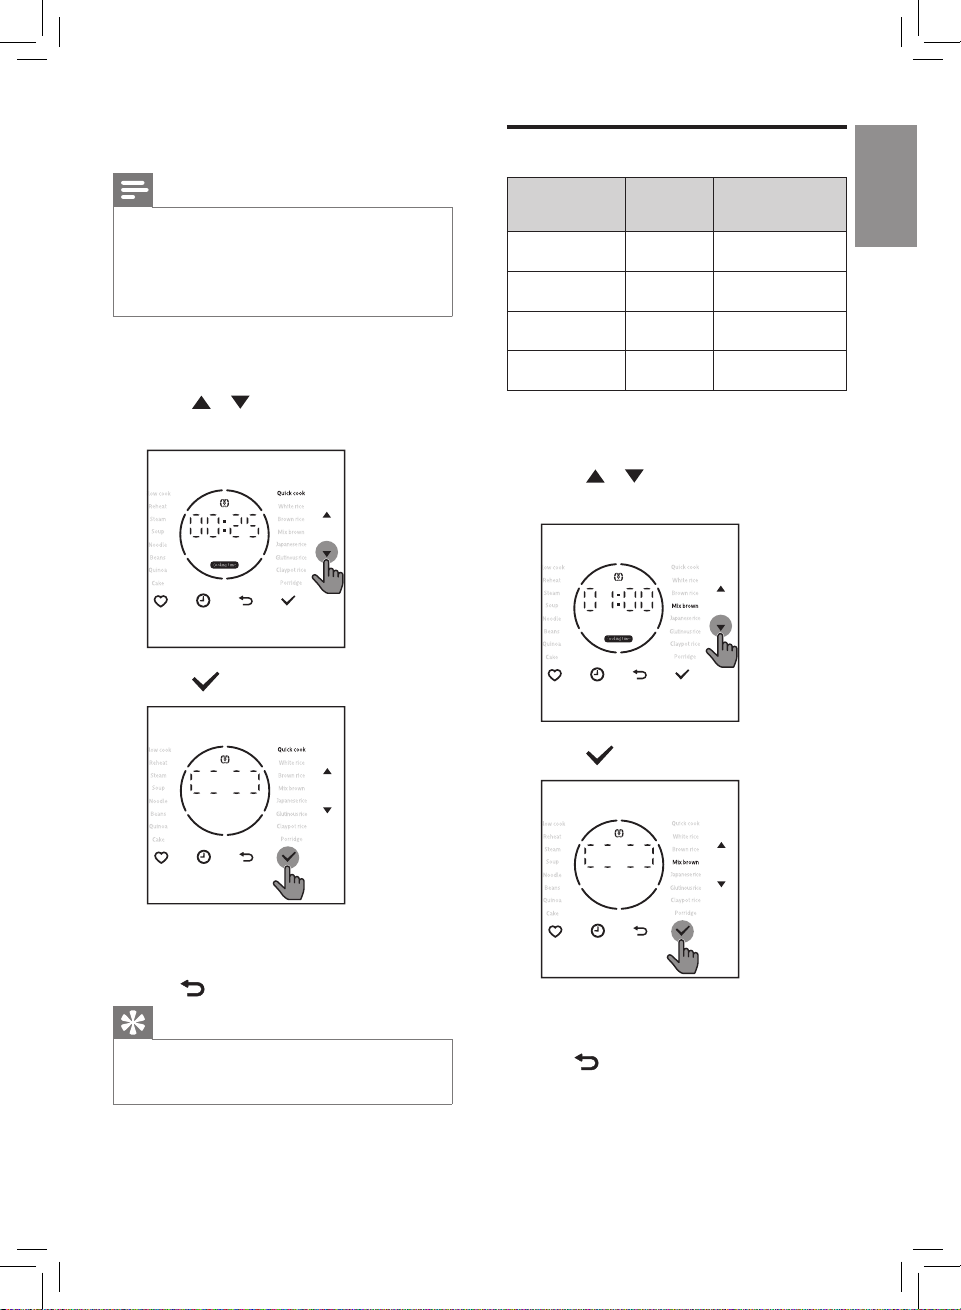
6 Press / button to select the
cooking menu you want.
7 Press button to start the
cooking process.
8 The appliance beeps after cooking
is completed, and automatically
switches to keep warm mode.
» button lights up.
Tip
• After the cooking process is nished,
for better taste, loosen the rice as
soon as possible.
• Make sure the outside of the inner
pot is dry and clean, and that there
is no foreign residue on the heating
element.
• Make sure the inner pot is in proper
contact with the heating element.
5 Close the lid, put the plug in the
power socket.
12
Page 13
EN
English
Grains and beans
Claypot rice
Default
Menu
Brown rice 50 mins N/A
Mix brown 60 mins N/A
Beans 90 mins 40-120mins
Quinoa 30 mins N/A
cooking
time
Adjustable
cooking time
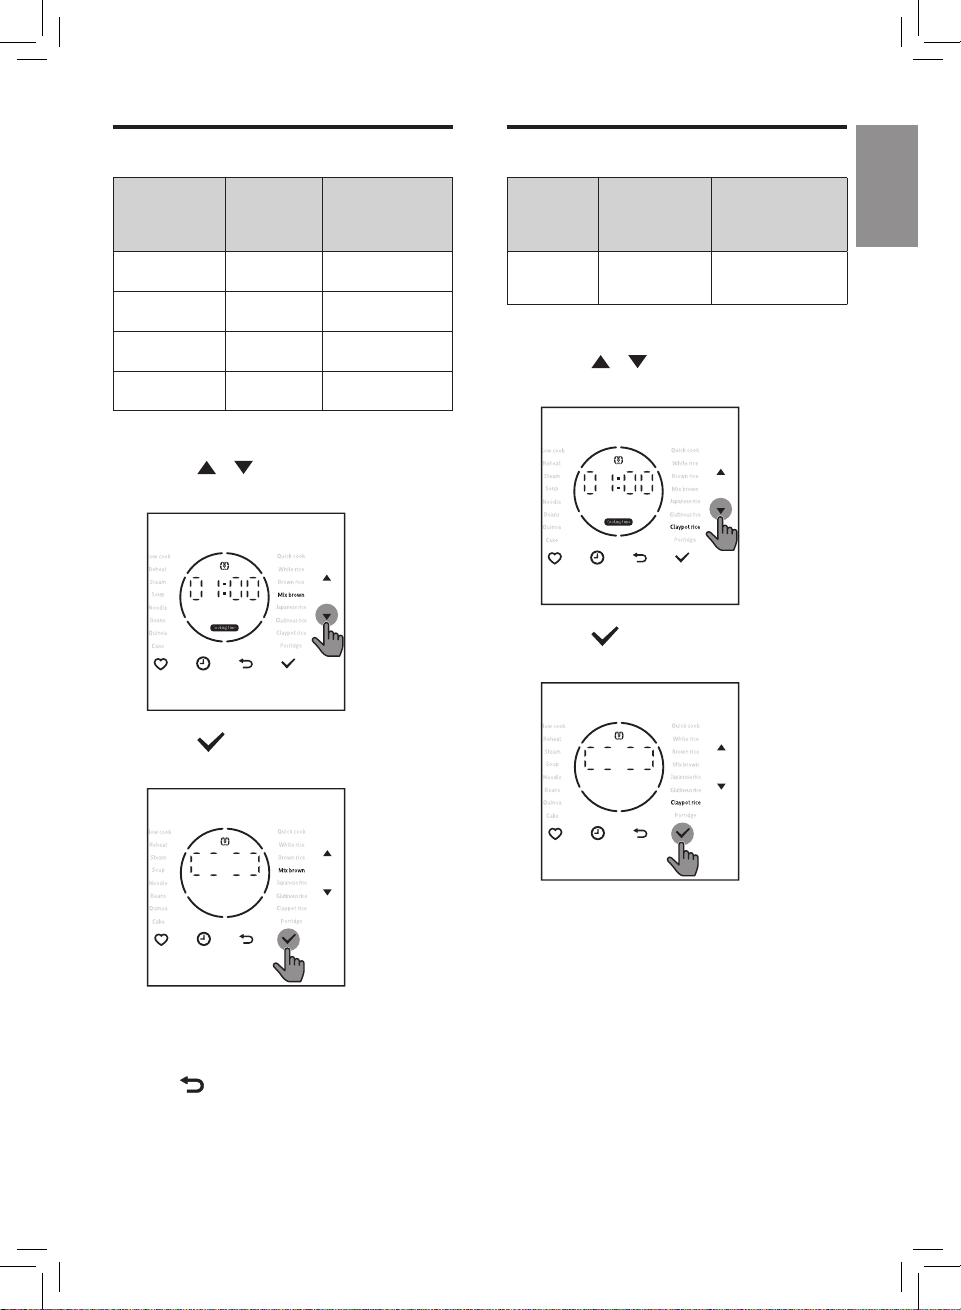
1 Follow the steps 1-5 in "Rice".
2 Press / button to select the
cooking menu you want.
3 Press button to start the
cooking process.
Menu
Claypot
rice
Default
cooking
time
60 mins N/A
Adjustable
cooking time
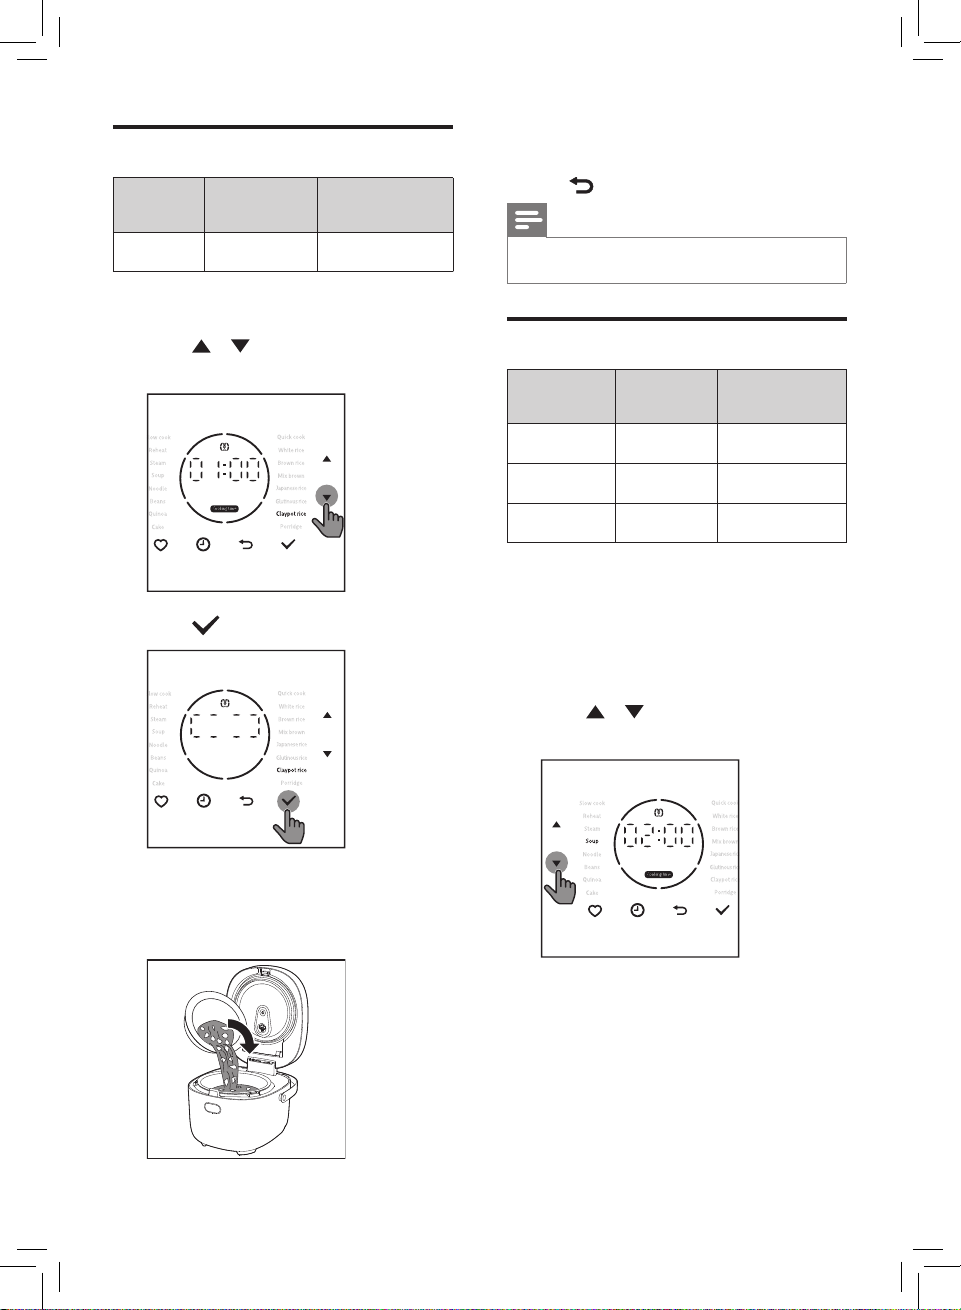
1 Follow the steps 1-5 in "Rice".
2 Press / button to select
Claypot menu.
3 Press button to start the
cooking process.
4 The appliance beeps after cooking
is completed, and automatically
switches to keep warm mode.
» button lights up.
13
Page 14
EN
4 The appliance beeps after rice is
nished cooking process.
5 Put ingredients into the pot, add oil
over the pot edges, close the cover,
the cooking process resumes.
6 The appliance beeps after cooking
is completed, and automatically
switches to keep warm mode.
» button lights up.
Note
• It's normal that there is crispy rice
under the bottom of the pot.
Porridge, Soup, Slow cook
Default
Menu
Slow cook 4 hrs 0.5-8 hrs
Soup 2 hrs 1-4 hrs
Porridge 1 hr 1-4 hrs
cooking
time
Adjustable
cooking time
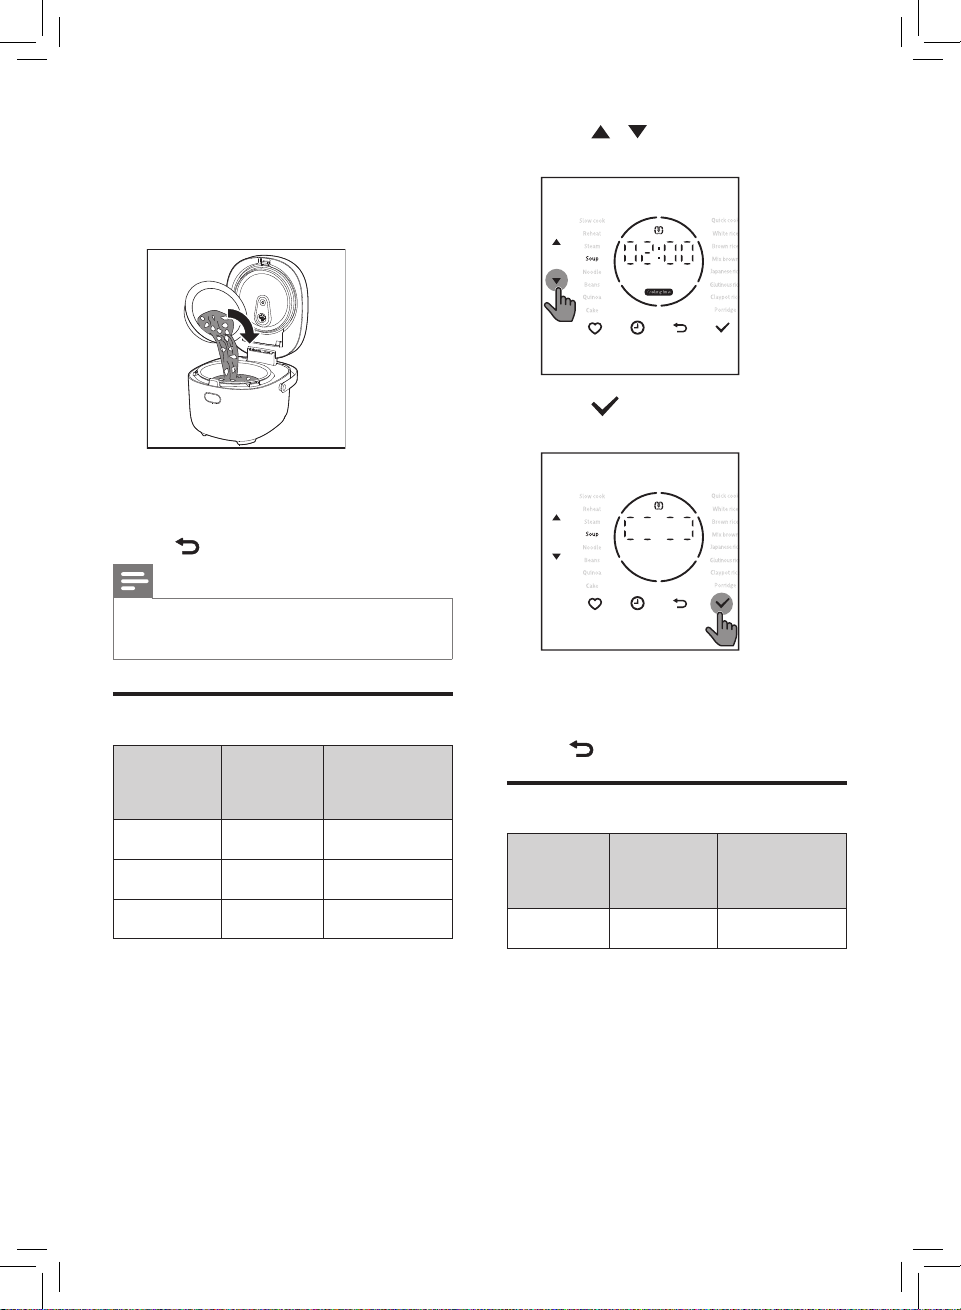
4 Press / button to select Slow
cook, Soup or Porridge function.
5 Press button to start the
cooking process.
6 The appliance beeps after cooking
is completed, and automatically
switches to keep warm mode.
» button lights up.
Steam
Default
Menu
Steam 25 mins 5-59 mins
cooking
time
Adjustable
cooking time
1 Put ingredients and water into the
inner pot.
2 Wipe the outside of the inner pot
dry, then put the inner pot in the
rice cooker.
3 Close the lid, put the plug in the
power socket.
14
1 Pour some water into the inner pot.
2 Put the steam basket into the inner
pot.
3 Put the food on a plate or in the
steam basket.
4 Close the lid, put the plug in the
power socket.
Page 15
EN
English
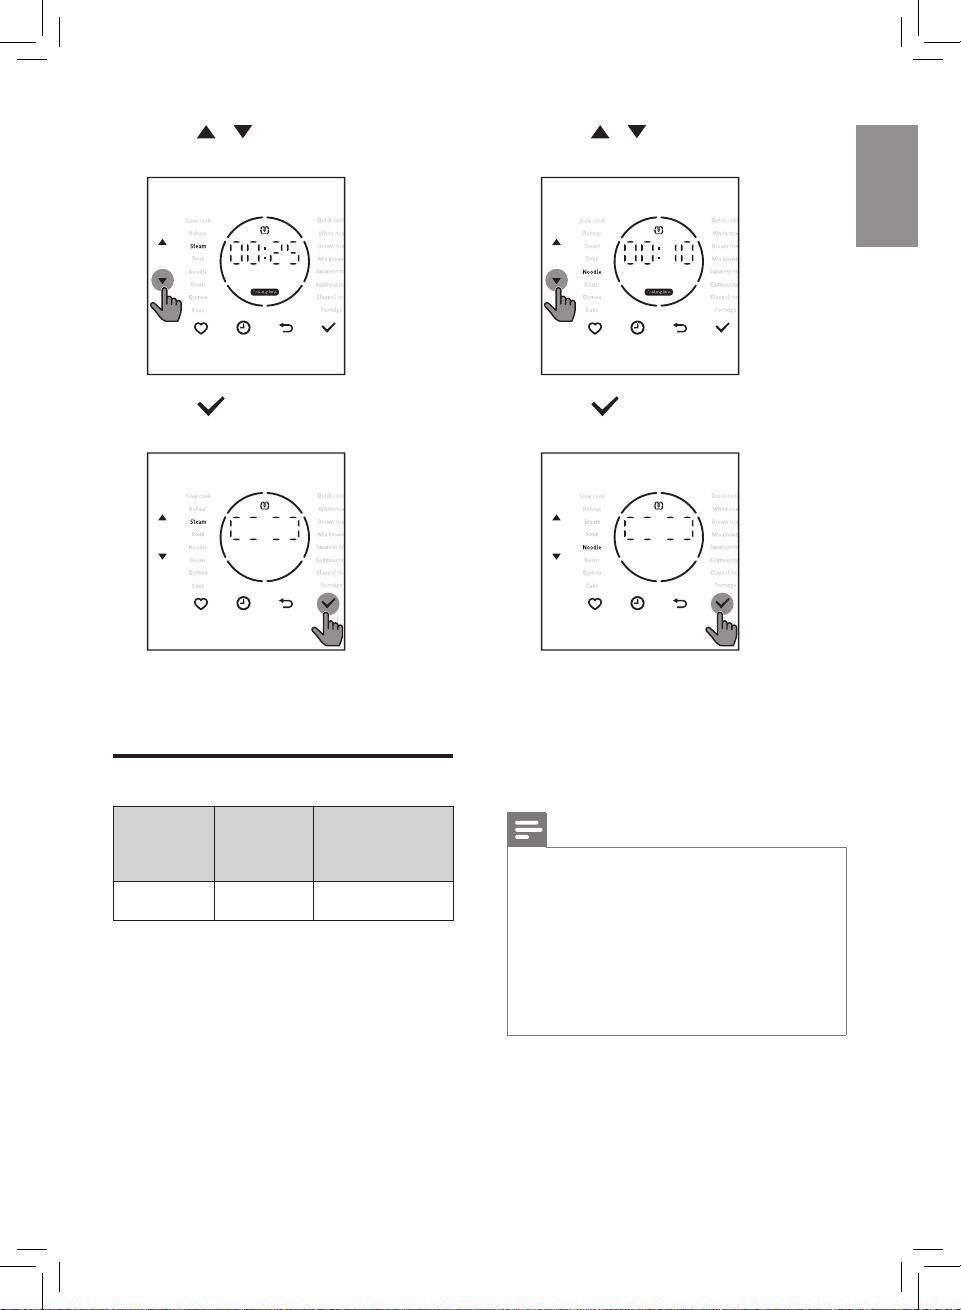
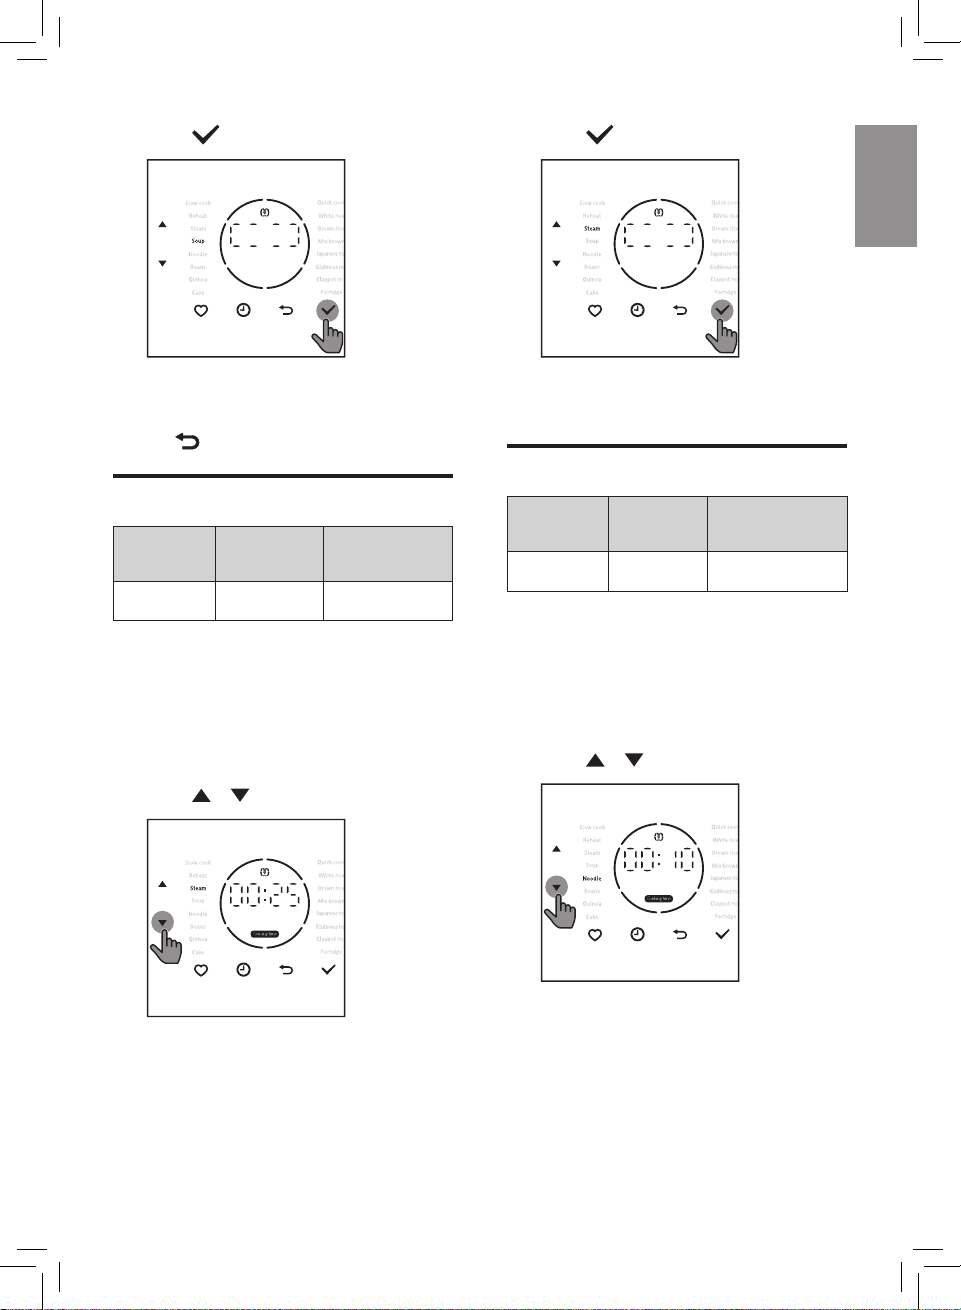
5 Press / button to select Steam
function.
4 Press / button to select
Noodle function.
6 Press button to start the
cooking process.
7 The appliance beeps after cooking
is completed, and automatically
switches to stand by mode.
Noodle
Default
Menu
Noodle 10 mins 5-20 mins
cooking
time
Adjustable
cooking time
1 Pour some water to the inner pot.
2 Wipe outside of the inner pot dry,
then put the inner pot in the Rice
Cooker.
3 Close the lid of the Rice Cooker, put
the plug in the power socket.
5 Press button to start the
cooking process.
6 Countdown will be started after the
water boils, the Rice Cooker beeps
four times.
7 Open the lid, put the noodles into
the inner pot. Keep the lid open
until the cooking process is nished.
Note
• To avoid the water overow or the
noodles sticking together, alway stir
the noodles during cooking.
• The total amount of noodles and
water cannot exceed the maximum
water level indication on the inner
pot, otherwise the Rice Cooker will
have a slightly overow.
8 When the cooking process is
nished, the Rice Cooker beeps
once and then switches to keep-
warm mode automatically.
15
Page 16
EN
Cake
Default
Menu
Cake 45 mins NA
cooking
time
Adjustable
cooking time
1 Whisk the ingredients for cake well.
2 Coat the inner pot with some butter
or cooking oil, and then pour the
cake mixture into it.
3 Close the lid, put the plug in the
power socket.
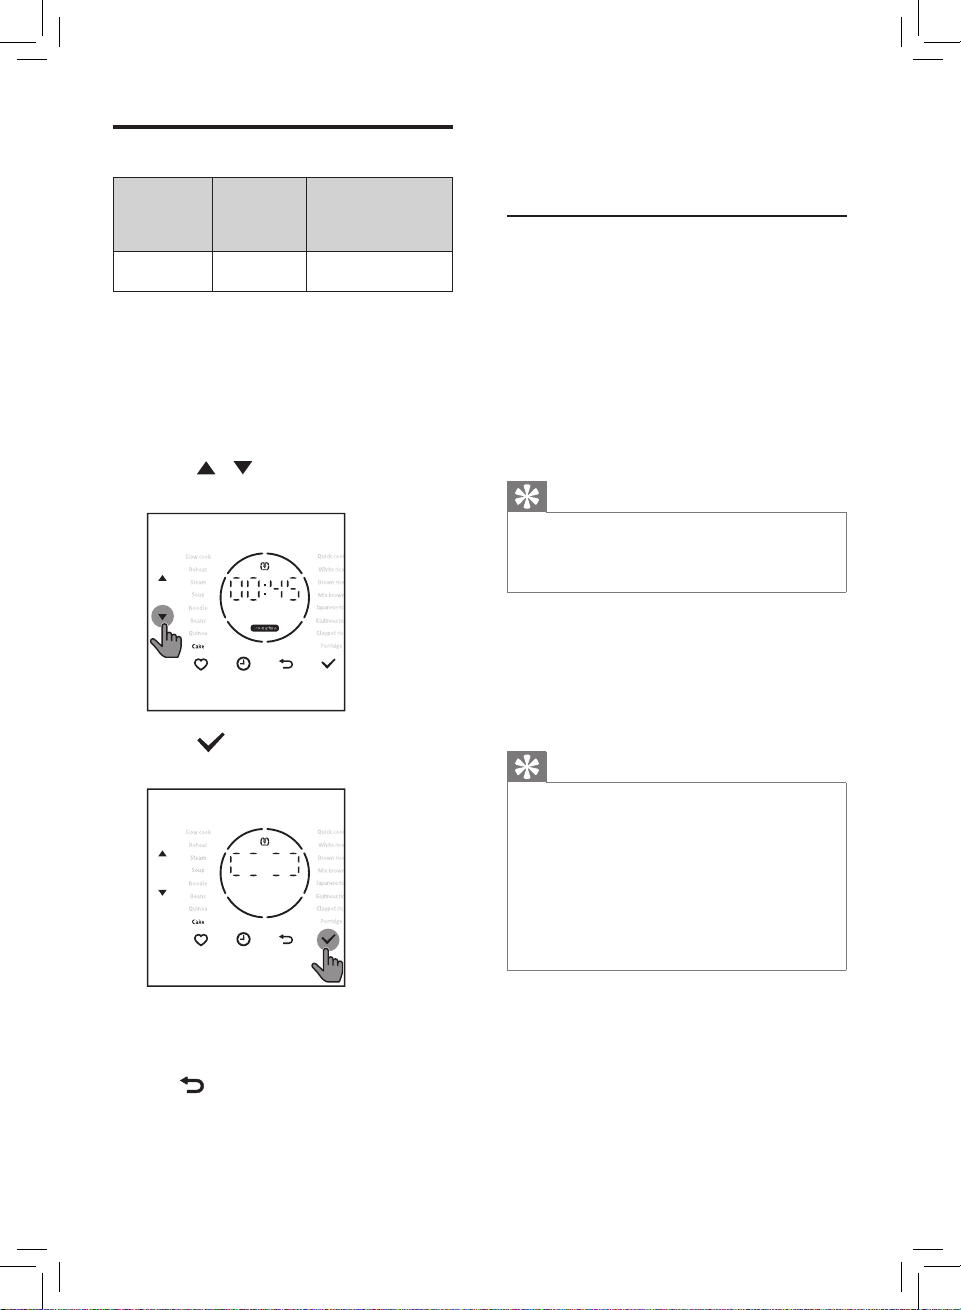
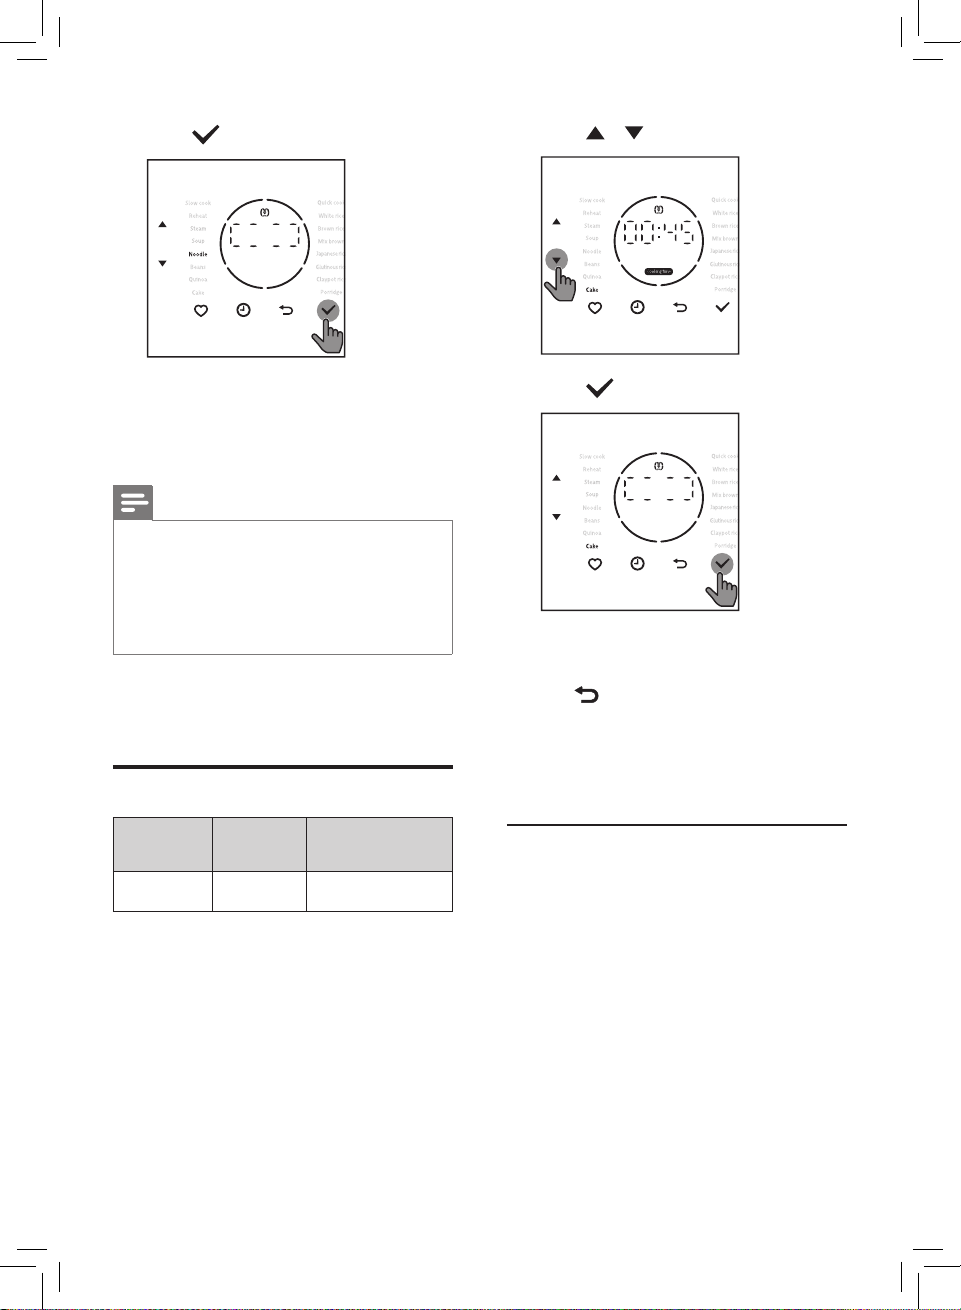
4 Press / button to select Cake
function.
5 Press button to start the
cooking process.
8 After the inner pot has cooled
down, put a plate on top of the pot,
and then ip over to take the cake
out.
Cake recipe
1 Ingredients:
• Small amount
• 3 medium eggs
• 120g castor sugar (about 2/3 cup)
• 100g cake mix our (about 1 cup)
• 50g butter (about 1/3 cup)
• 18g milk (about 1/10 cup)
• Large amount
• 80g butter (about 2/3 cup)
• 36g milk (about 2/5 cup)
Tip
• You can adjust the ratio of the
ingredients according to personal
taste.
2 Separate the egg white and egg
yolk in two containers.
3 Add the castor sugar to the egg
whites and beat till puy and
creamy, then add the egg yolks and
stir.
Tip
• Use 40C water to warm the egg if
it's cold, so that the cake is soft and
uy.
• The container and the egg beater
must be clean and free from grease.
Otherwise, the egg cannot be mikly.
Do not stir in the inner pot to avoid
demaging the non-sticky coating.
6 The appliance beeps after cooking
is completed, and automatically
switches to keep warm mode.
» button lights up.
7 Open the lid and carefully take out
the inner pot to cool down.
16
4 Add the cake mix our and stir well.
5 Add milk and the melted butter
(heat the butter until it melts),
quickly stir the ingredients.
Page 17
EN
English
Reheat
Default
Menu
Reheat 25 mins 25-59 mins
cooking
time
Adjustable
cooking time
1 Loosen the cooled rice and evenly
distribute it in the inner pot.
2 Pour some water onto the rice to
prevent it from becoming too dry.
The quantity of the water depends
on the amount of rice and your own
preference.
3 Complete the steps 4-5 in "Rice".
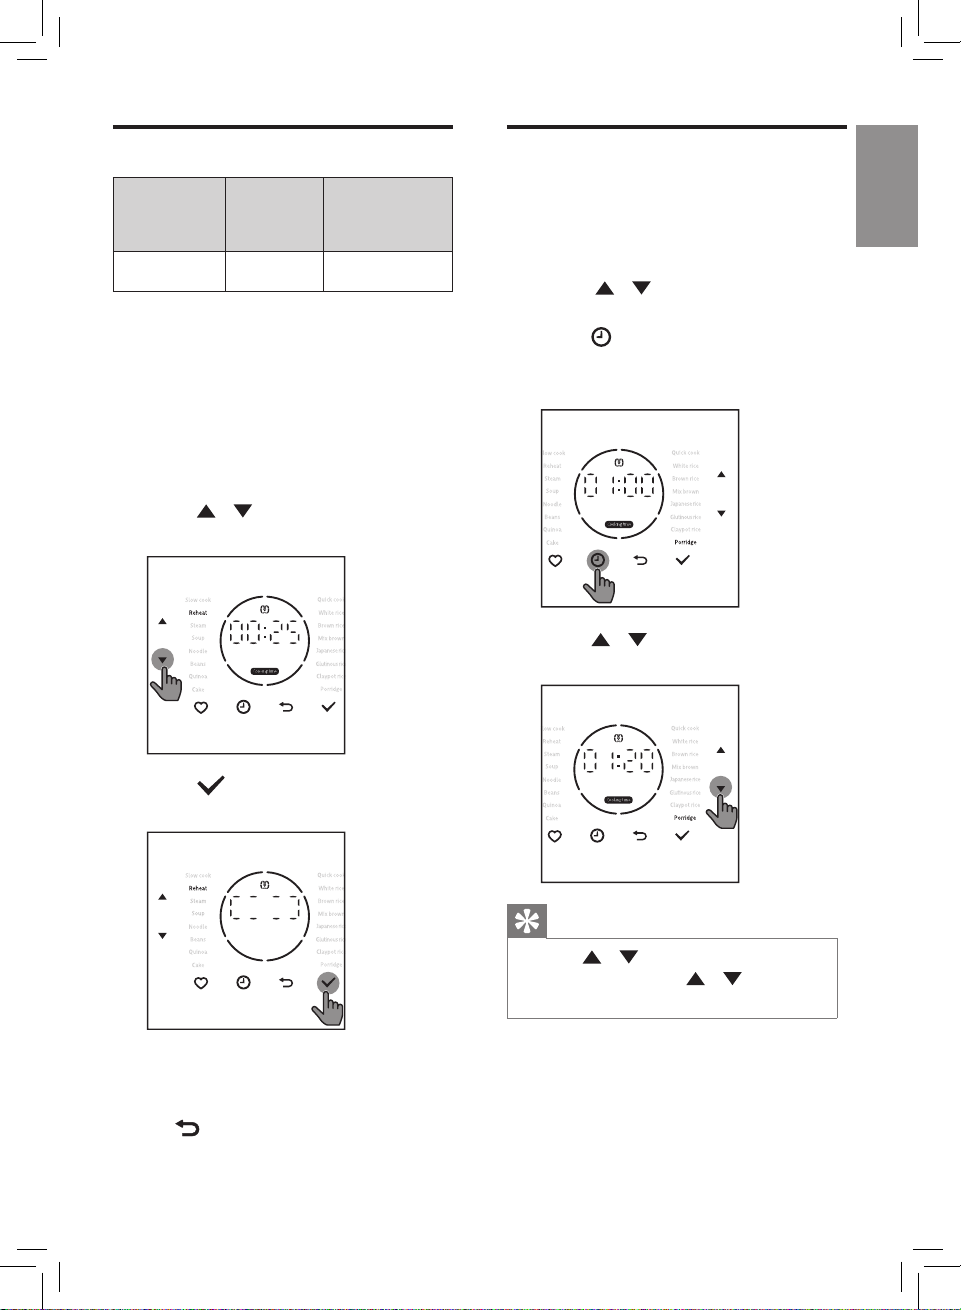
4 Press / button to select
Reheat function.
Adjusting the cooking
time
You can adjust the cooking time for
Porridge, Soup, Steam, Noodle, Slow
cook, Reheat and Beans functions.
1 Press / button
desired cooking function.
to select the
2 Press button.
» Cooking time blinks on the
screen.
3 Press / button to choose the
cooking time.
5 Press button to start the
cooking process.
6 The appliance beeps after cooking
is completed, and automatically
switches to keep warm mode.
» button lights up.
Tip
• Press / button on the left to
adjust hour, press / button
on the right to adjust minute.
17
Page 18
EN
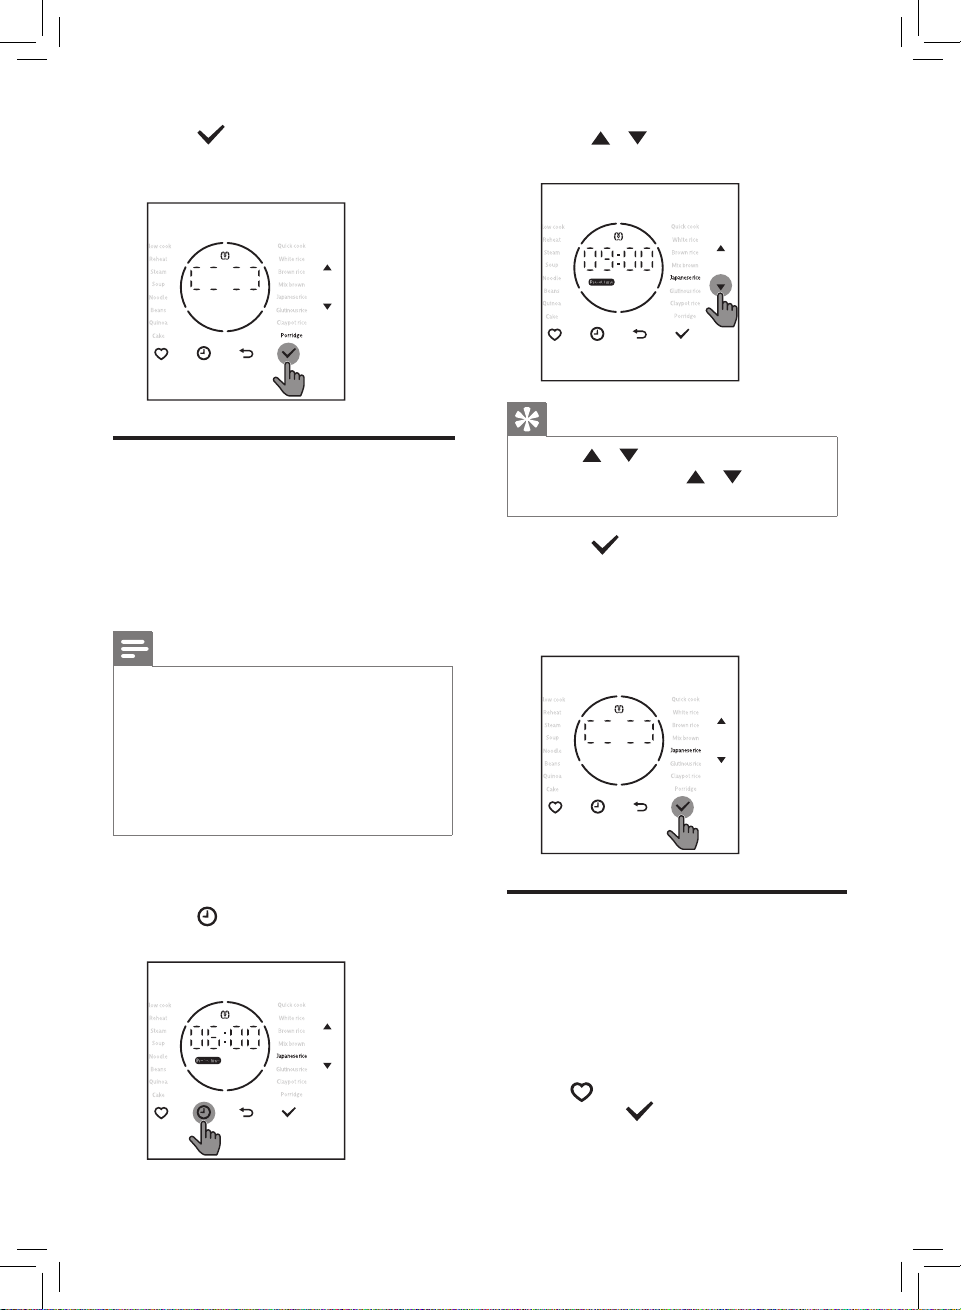
4 Press button to conrm the
cooking time and start the cooking
process.
3 Press / button to choose the
preset time.
Tip
Preset time for delayed
cooking
You can preset the delayed cooking
time in dierent cooking modes except
for Steam, Noodle, Cake and Reheat
functions. The preset timer is available
up to 24 hours.
Note
• For example. The current time is
20:00. If you want to enjoy your
breakfast at 8:00 next morning, the
preset time should be 12:00.
• If the preset time is shorter than
cooking time, cook process starts
immediately.
1 Choose a cooking function you
need.
2 Press button until Preset time
lights up.
• Press / button on the left to
adjust hour, press / button
on the right to adjust minute.
4 Press button to conrm. When
preset time is elapsed, the Mini
Rice Cooker with Induction Heating
starts working in the selected
cooking mode automatically.
Setting up My Favourite
menu
You can set any three menus as "My
Favourite". Before you make any
changes to the setting, the default
menus are White Rice, Brown Rice and
Porridge.
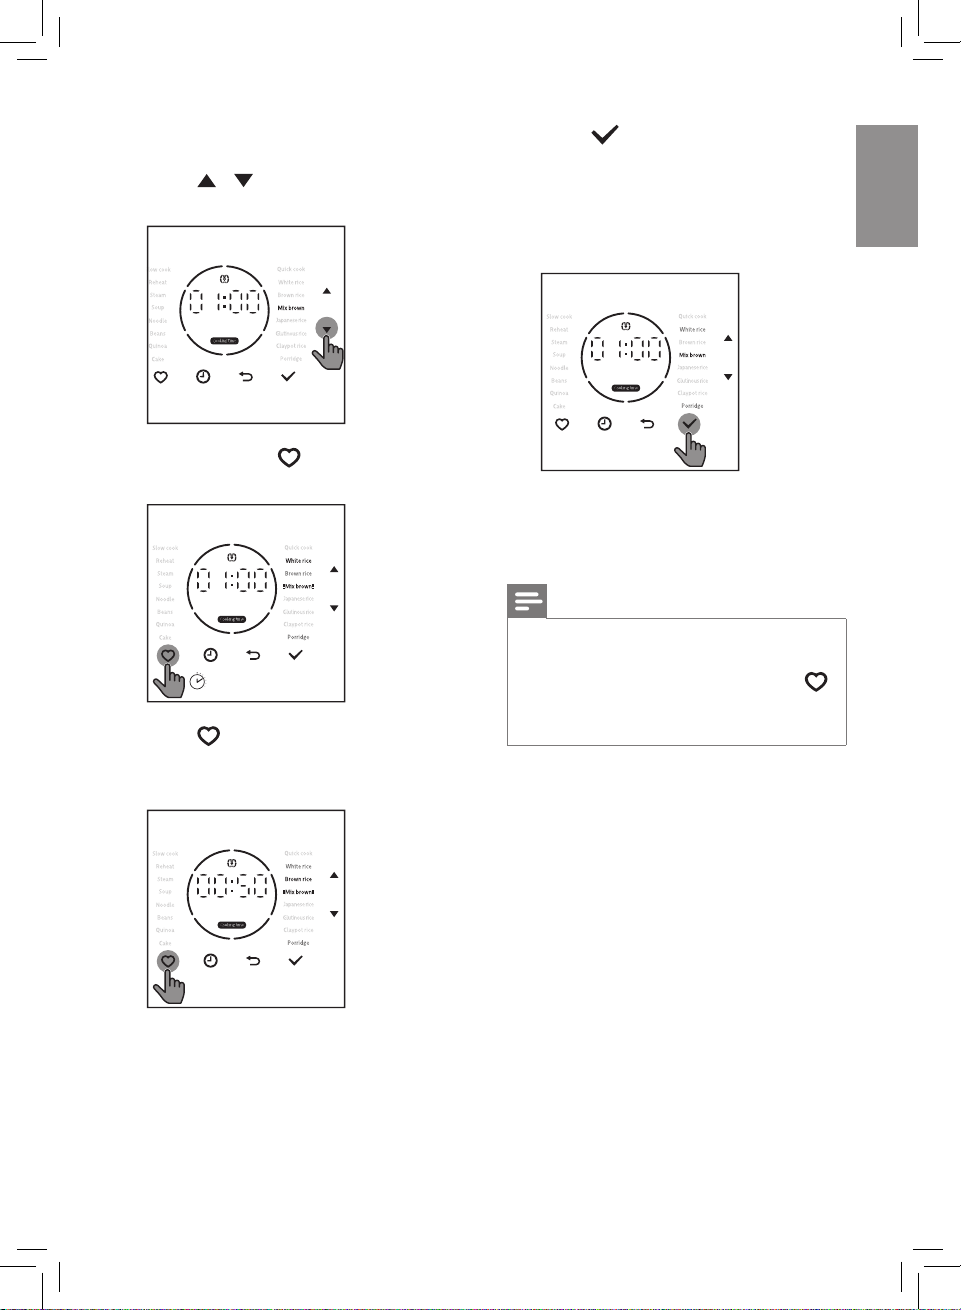
• Tap
then press
favourite menus.
button one or more times,
button to access My
18
Page 19
EN
English
If you need to change the menu, follow
the steps below:
1 Press / button to select the
cooking function you want.
2 Press and hold button for
3 seconds.
3’
3 Press button to choose a menu
you want to replace with.
» The menu lights up.
4 Press button, the current menu
will be saved in My Favourite, the
default menu is replace with this
new one
» The newly saved menu is
displayed on the screen.
5 Follow the above steps, you
can change other menus in My
Favourite to the one you like.
Note
• If there are repeated menus in
My Favourite, the repeated menu
blinks twice when you press the
button, but the cooking time will be
dierent.
19
Page 20
EN
4 Cleaning and
Maintenance
Note
• Unplug the Mini Rice Cooker with
Induction Heating before starting to
clean it.
• Wait until the Mini Rice Cooker with
Induction Heating has cooled down
suciently before cleaning it.
• Clean the innper lid regularly, or
it will discolor and produce an
unpleasant smell.
• Do not use steel wool or other hard
objects to clean the innper pot and
the lid.
• The sealing ring is undetachable.
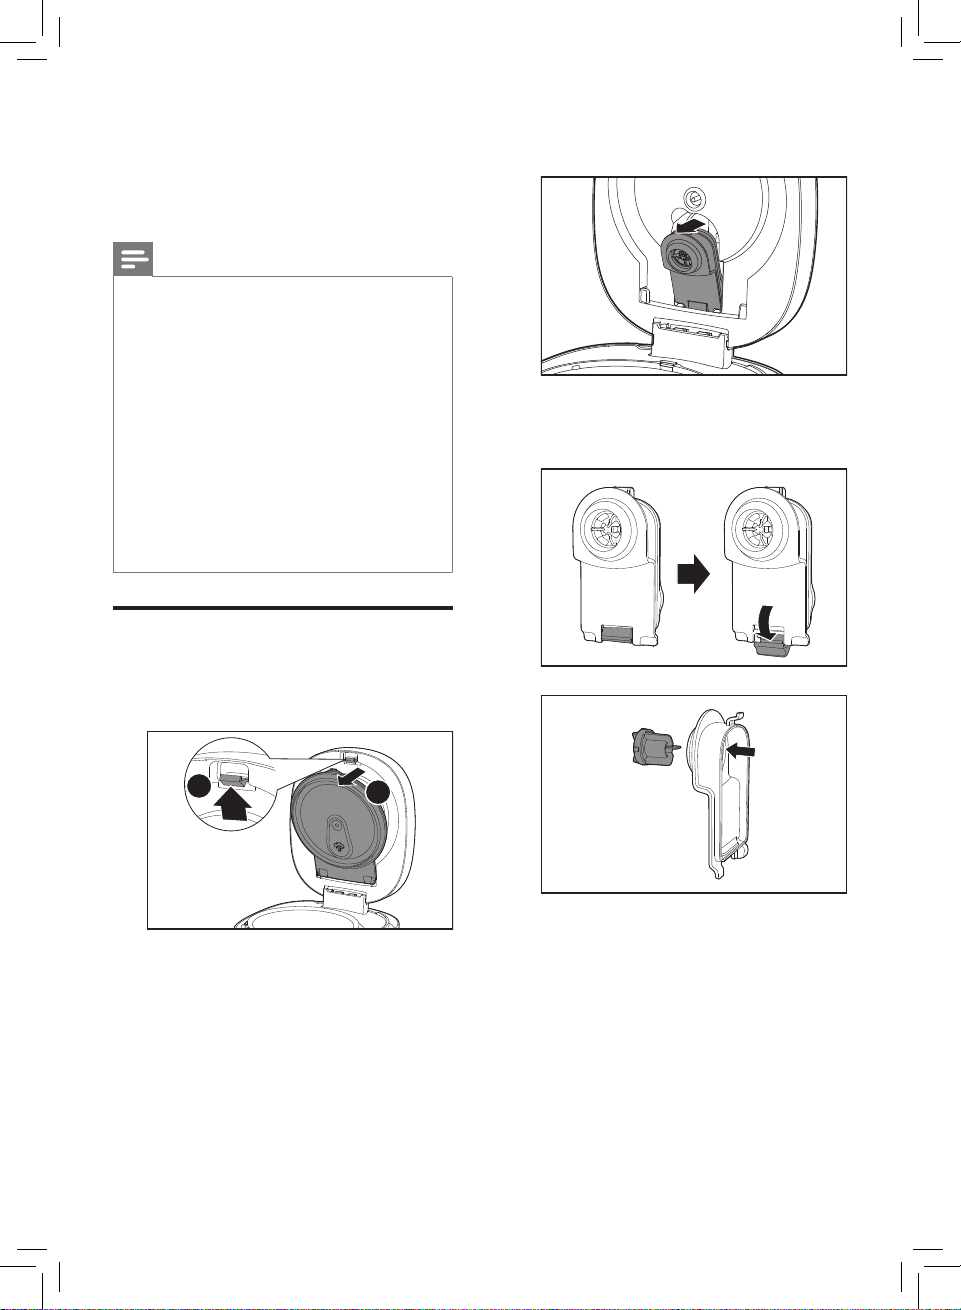
Inner lid and steam valve
• Press the clip of the detachable
inner lid (1) and remove it from the
appliance(2).
• Pull the steam value out from the
appliance.
• Push downwards to remove the lock
of the steam value and take the core
out for clean.
20
1
2
Page 21
EN
English
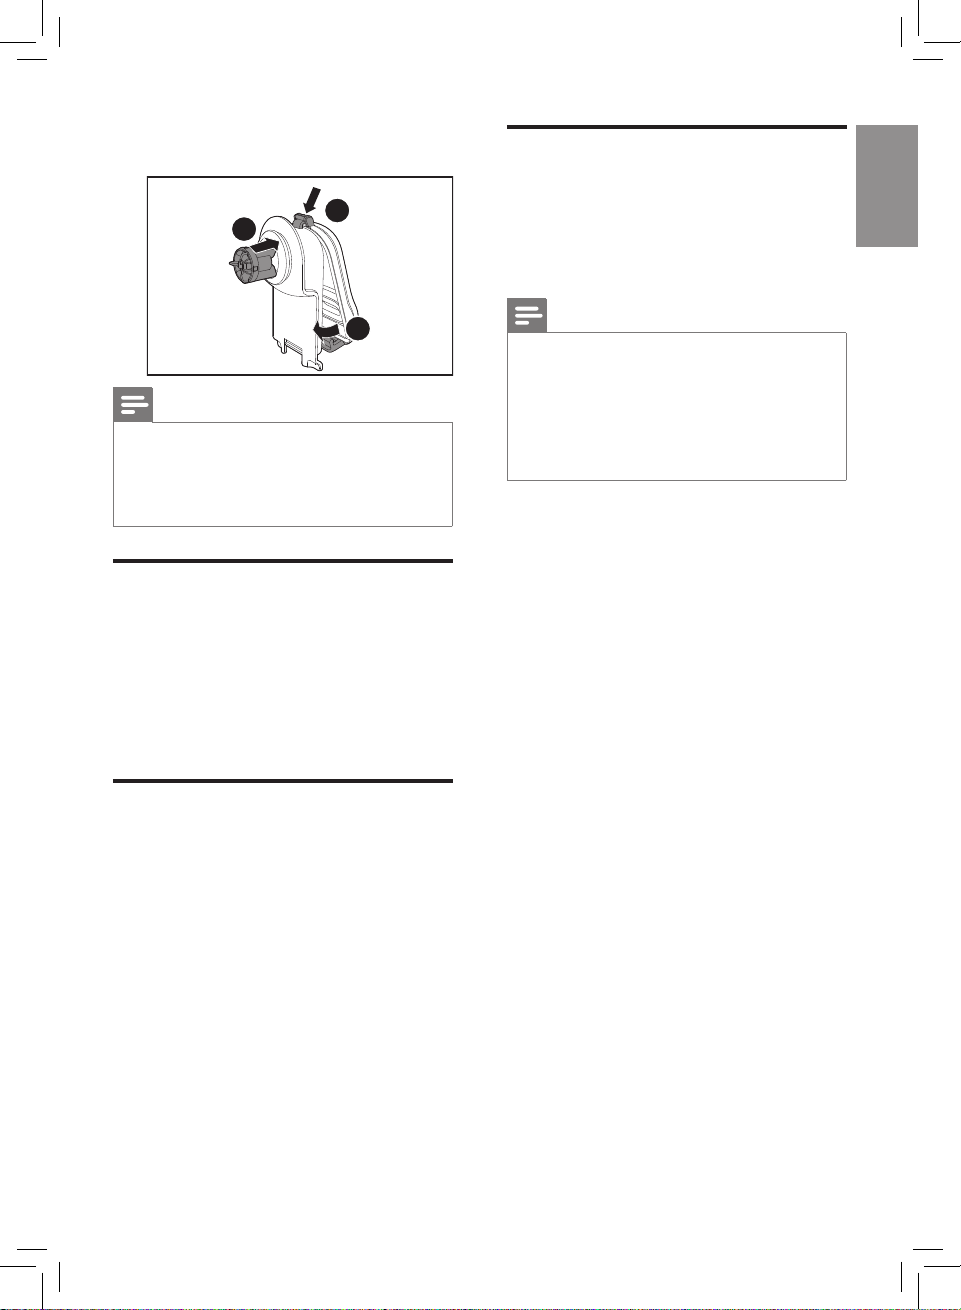
• To install the steam value, follow the
illustration below.
1
3
2
Note
• If the steam value is not properly
installed, the appliance will leak.
Always check the steam value
before using.
Interior
• Soak the detachable inner lid and
steam valve in water, clean with
sponge.
• Clean the interior of the appliance
with damp cloth
• Make sure to remove all the food
residues stuck to the rice cooker.
Accessories and inner
pot
Rice&Soup ladle, inner pot, steam plate
and inner pot.
• Soak in hot water and clean with
sponge.
Note
• Do not put the spoons, bowls or
any other objects in the inner pot to
prevent damage to the non-sticky
coating.
• If condiments have been used in the
inner pot, wash the pot immediately.
Exterior
• Wipe with a cloth damped with
soap water.
• Only use soft and dry cloth to wipe
the control panel.
• Make sure to remove all the
food residues around the control
buttons.
21
Page 22

EN
5 Recycling
7 Specifications
Do not throw away the product with
the normal household waste at the
end of its life, but hand it in at an
ocial collection point for recycling.
By doing this, you help to preserve
the environment.
Follow your country’s rules for the
separate collection of electrical
and electronic products. Correct
disposal helps prevent negative
consequences for the environment
and human health.
6 Guarantee and
service
If you need service or information,
or if you have a problem, visit the
Philips website at www.philips.com
or contact the Philips Customer
Care Center in your country. You
can nd its phone number in the
worldwide guarantee leaet. If there
is no Customer Care Center in your
country, go to your local Philips
dealer.
Model HD3081
Rated power input 950 W
Rated capacity 2.0 L
Inner pot material
(Metal or non-metal)
Metal
22
Page 23

EN
English
8 Troubleshooting
If you encounter problems when using this rice cooker, check the following points
before requesting service. If you cannot solve the problem, contact the Philips
Consumer Care Center in your country.
Problem
The rice is not cooked.
Solution
•
If the appliance is placed on an unstable or inclined
surface, the cooked rice may taste too hard or too soft
because the amount of water will be inconsistent.
•
The taste of rice may vary depending on the brand,
origin and storage time.
•
The taste of rice may dier due to the room
temperature and water temperature.
•
Preset cooking function may soften the rice. This is
normal.
•
If you use the Quick cook function, it's normal that the
rice is hard.
•
Check if the inner pot is deformed.
•
There is not enough water. Add water according to the
scale on the inside of the inner pot.
•
Make sure that there is no foreign residue on the
heating element and the outside of the inner pot
before switching the rice cooker on.
•
Make sure that there is no foreign residue on the inside
and outside of the inner pot. Clean the food residue.
The rice is scorched.
• You have not rinsed the rice properly. Rinse the rice
until water runs clear.
•
Check if the inner pot is deformed.
23
Page 24
EN
Problem
Water spills out of
the rice cooker during
cooking.
I cannot nd the
cooking function I
need.
Rice smells bad after
cooking.
Solution
• Cut o the power immediately. Make sure that you add
water to the level indicated on the scale inside the
inner pot that corresponds to the number of cups of
rice used.
• Make sure the water does not exceed the next level on
the scale, as this may cause the appliance to overow
during cooking.
• Make sure the ratio of foods/rice and water matches
the cooking function.
•
Press / to choose the function you need.
•
Check if the keep warm indicator lights up or not.
Cancel the keep warm function and re-try.
•
Check if the power cord is connected to the appliance,
and the power plug is well pluged to the power socket.
•
Clean the inner pot with some washing detergent and
warm water.
The display panel is
not working.
There is air leakage.
No response after
pressing / button
or other buttons.
24
• The Rice Cooker is not connected to the power. If there
is no power, the display panel will not work.
•
Check if the steam valve is well assembled. If it's not
properly installed, there will be air leakage.
•
Check if there is power supply of your power grid, and
connections amongs the power cord, power plug and
the power socket.
•
Use the rice cooker correctly according to the user
manual.
•
If you cannot handle it yourself, do not disassemble the
appliance, take the appliance to your Philips dealer or
a service center authorized by Philips.
Page 25

EN
English
Problem
The appliace does not
switch to keep warm
mode automatically.
Error message (E5 or
E6) displays on the
screen.
Solution
•
You don't choose the right cooking mode. For example,
you choose the rice function when you want to cook
porridge.
•
Some of the menus don't have keep warm function,
when cooking process is completed, the appliace goes
to standby mode.
•
The temperature control is defective. Take the
appliance to your Philips dealer or a service center
authorized by Philips.
•
Please check with a professional whether the product
is wording under the normal voltage range.
•
Check if too many appliances are using the power
socket at the same time or the extension cable is too
long.
•
If you cannot handle it yourself, do not disassemble the
appliance, take the appliance to your Philips dealer or
a service center authorized by Philips.
•
Check if there are foreign objects on the bottom air
inlet.
Error message (E7)
displays on the screen.
•
Check if ambient temperature is too high.
•
After the error code displays on the screen, the
appliance will automatically shut down. If it can work
normally after cooling down for a while. It means the
appliace displays the error code to protect itself from
overheating.
•
If you cannot handle it yourself, do not disassemble the
appliance, take the appliance to your Philips dealer or
a service center authorized by Philips.
25
Page 26

EN
Problem
Error message (E14)
displays on the screen.
Solution
•
Check if there is no water or less water in the inne pot.
•
Check if the innper pot is overheated.
•
Shut down the appliance, take the inner pot out for
cooling down for a while. The appliance will resume
normal.
•
If you cannot handle it yourself, do not disassemble the
appliance, take the appliance to your Philips dealer or
a service center authorized by Philips.
The appliance stops
heating during use
and other error code
displays.
•
Power malfucntion during use. Take the appliance to
your Philips dealer or a service center authorized by
Philips.
26
Page 27

简体中文
目录
1
重要事项
安全
电源故障备份功能
电磁场
2 IH
包装盒内物品
产品概述
控件概述
3
使用IH电磁加热迷你电饭煲
首次使用之前
米饭
谷物和豆类
煲仔饭
粥、煲汤、慢炖
蒸煮
面条
蛋糕
再加热
调整烹饪时间
延长烹饪的预设时间
设置“我的最爱”菜单
28
28
30
(EMF) 30
电磁加热迷你电饭煲
31
32
33
34
34
35
36
36
37
37
38
39
39
31
34
40
41
5
回收
6
保修与服务
7
规格
8
故障排除
43
43
43
44
4
清洁与保养
内盖和蒸汽阀
43
内部
43
外部
附件和内锅
42
42
43
ZH-S
27
Page 28

1
重要事项
在使用IH电磁加热迷你电饭煲之前,请
仔细阅读本安全手册,并妥善保管以备
日后参考。
安全
危险
• 不得将产品浸入水中。
警告
0 至 8
•
产品。
• 本产品适合由
龄的儿童使用,但前提是有人
对其进行持续照看,并对其使
用本产品进行监督或指导,以
确保他们安全使用,并且让他
们明白相关的危害。
• 本产品不适合由肢体不健
全、感觉或精神上有障碍或
缺乏相关经验和知识的人
(包括儿童)使用,除非有
负责其安全的人对他们使用
本产品进行监督或指导。
• 应照看好儿童,确保他们不
玩耍本产品。
• 不要让儿童进行清洁和保养,
除非儿童已年满
有人监督的情况下操作。
• 应用手柄(如有)将烹饪产
品稳固放置,以避免高温液
体溢漏。
岁的儿童不得使用本
8
岁及以上年
8
周岁且在
• 本产品仅打算用于家用及类
似用途,如:
• 商店、办公场所及其它工
作环境的厨房;
• 农庄;
• 由旅店、旅馆及其它住宿
型环境中的客人使用;
• 提供住宿和早餐的场所。
• 如果电源线组损坏,必须使
用制造商提供的电源线组进
行更换。
• 本产品不能利用外部定时器
或独立的遥控器系统操作。
• 确保防止液体溢漏到电源连
接器上,以免造成潜在危险。
• 务必遵循说明并正确使用产
品,以避免潜在的人身伤害。
• 在产品通电之前,请先检查
本产品上所标的电压与当地
的供电电压是否相符。
• 根据本用户手册中的说明,
使用柔软湿布清洁与食物接
触的表面,并确保清除粘在
产品上的所有食物残渣。
• 请勿将电源线悬挂在放置多
功能电饭煲支架的桌子或工
作台的边缘。
• 本产品只能使用带接地线的
插座。务必确保插头牢固插
到电源插座上。
• 如果插头、电源线或产品本
身受损,请勿使用本产品。
28
ZH-S
Page 29

简体中文
• 将插头接入电源插座之前,
应确保加热元件、温度传
感器和内锅外侧是洁净、
干燥的。
• 请勿用浸湿的手插接产品插
头或按控制面板上的任何
按键。
• 请勿用浸湿的手插接产品插
头或按控制面板上的任何
按键。
警告
• 警告:使用后,加热元件表
面仍有余热。
• 切勿使用由其他制造商生产
或未经飞利浦特别推荐的任
何附件或部件。如果使用此
类附件或部件,您的保修将
失效。
• 切勿将产品暴露在高温之
下,也不要将电饭煲放在正
在工作或仍然发热的炉具或
炊具上。
• 切勿将产品直接曝晒于阳
光下。
• 将本产品放在稳固、水平且
平坦的表面。
• 在将插头插入电源插座并打
开产品之前,请务必先将内
锅放入产品中。
• 不要将内锅直接放在火上
煮饭。
• 如果内锅已变形,请勿使用。
• 产品在使用时,表面会变
得很热。接触产品时,请
注意。
• 小心煮饭期间从蒸汽孔排出
的热蒸汽或在打开盖子时从
产品中冒出的热蒸汽。双手
和脸不要靠近本产品,以免
蒸汽烫伤。
• 运行期间,切勿提起及移动
本产品。
• 请勿超出内锅中标注的最高
水位标示,以免溢水,这可
能造成潜在危险。
• 切勿在煮饭、保温或重新热
饭时将烹饪器具放入锅中。
• 仅使用随附的烹饪器具。不
要使用尖利的器具。
• 为免刮擦,建议您不要烹饪
含虾蟹和贝类的食材。烹饪
前去掉坚壳。
• 切勿将金属物体或异物插入
蒸汽孔。
• 不要将磁性物质放在盖上。
不要在靠近磁性物质的地方
使用本产品。
• 一定要先让产品冷却,才能
进行清洁或移动。
• 每次使用后应清洁产品。请
勿用洗碗机清洗产品。
• 如果长时间不用,务必拔掉
产品插头。
• 对本产品使用不当,或者将
其用于专业、半专业用途,
或者没有根据本用户手册中
的说明进行使用,此类情况
下保修将失效,飞利浦对此
类损坏概不负责。
ZH-S
29
Page 30

电源故障备份功能
本产品具有备份功能,可保留发生电源
故障之前的状态。
• 如果在烹饪过程中发生电源故障,并
30
且在
间倒计时将从中断处继续。
• 如果在产品处于预设模式时发生电源
故障,并且在
则预设时间倒计时将从中断处继续。
• 如果在
品不会继续执行之前的工作过程,而
是保持待机模式。
分钟内恢复供电,则烹饪时
30
分钟内恢复供电,
30
分钟内未恢复供电,则产
电磁场
本飞利浦产品符合所有有关暴露于电磁
场的适用标准和法规。
(EMF)
30
ZH-S
Page 31
简体中文
2 IH
感谢您的惠顾,欢迎光临飞利浦!为了您能充分享受飞利浦提供的支持,请在以下
网站注册您的产品:
电磁加热迷你电饭煲
www.Philips.com.tw/welcome
。
包装盒内物品
1
2
3
4
7
6
5
主体
a
二合一饭汤勺
b
电源线
c
保修卡
d
Warranty
e
f
g
User manual
用户手册
蒸架
量杯
ZH-S
31
Page 32
产品概述
1
2
3
10
9
8
7
32
4
6
5
a
b
c
d
e
ZH-S
上盖
可拆除内盖
内胆
开盖键
电源插孔
f
g
h
i
j
主体
提手
水位指示线
蒸汽阀阀芯
蒸汽阀
Page 33
简体中文
控件概述
3 4 5
6
8
1
7
2
菜单/时间选择键
a
控制面板
b
我的最爱键
c
烹饪时间/预设时间键
d
取消键
e
确认/开始键
f
菜单/时间选择键
g
时间显示屏
h
33
ZH-S
Page 34
3
使用IH电磁加热
迷你电饭煲
提示
1 使用附带的量杯量米。
1 - 2
分
•
烹饪过程开始后,您可以轻触
终止当前工作,产品会进入待机
模式。
注意
•
在烹饪过程中开盖时(尤其是盛
装有大量水时),请等待
钟, 直至蒸汽充分释放。
首次使用之前
1 从内锅中取出所有附件。拆除内锅
的包装材料。
2 首次使用前,请煮沸水彻底清洗
产品。
3 首次使用前,请彻底清洁电饭煲的
部件(请参阅“清洁与保养”一
章)。
注意
•
开始使用之前,确保所有电饭煲部
件均已完全干燥。
2 将米洗净,将淘好的米倒入内锅。
3 根据所倒入米的杯数,依照内锅上
标明的相应水位标记加入适量的
水。然后将米抚平。
米饭
菜单
快煮
白米饭
寿司米
糯米
ZH-S
34
默认烹
饪时间
25
分钟 不适用
45
分钟
45
分钟
45
分钟 不适用
可调节的烹
饪时间
不适用
不适用
注意
•
请勿超过内锅中标注的量,也不要
超过最高水位标示,否则可能导致
电饭煲溢出。
•
内锅的水位标记只是一个参考。您
始终可以根据米的品种及个人喜好
调整水位。如果您居住的区域电压
不稳定,电饭煲可能溢出。
Page 35
简体中文
4 擦干内锅外侧,然后将内锅放入电
饭煲。
注意
•
请确保内胆的外表面洁净且干燥,
并且没有其他杂物黏附在加热元
件上。
•
确保内锅已正确接触加热元件。
5 合上电饭煲的盖子,将插头插入
插座。
6 轻触
7 轻触
/
菜单。
键可选择所需的烹饪
键可开始烹饪过程。
谷物和豆类
菜单
糙米
半糙米饭
豆类
藜麦
默认烹
饪时间
50
60
90
30
可调节的烹
饪时间
不适用
分钟
不适用
分钟
40 - 120
分钟
分钟 不适用
1 按照“煮饭”中的步骤
操作。
2 轻触
菜单。
/
键可选择所需的烹饪
1 - 5
分钟
进行
8 烹饪完成后,产品会发出蜂鸣音,
并自动切换至保温模式。
»
键亮起。
提示
•
烹饪过程结束后,为了获得更佳口
感,请尽快将米饭打散。
3 轻触
键可开始烹饪过程。
4 烹饪完成后,产品会发出蜂鸣音,
并自动切换至保温模式。
»
键亮起。
ZH-S
35
Page 36
煲仔饭
菜单
煲仔饭
默认烹饪
时间
60
分钟 不适用
可调节的烹饪
时间
6 烹饪完成后,产品会发出蜂鸣音,
并自动切换至保温模式。
» 键亮起。
注意
•
锅底下有锅巴是正常现象。
1 按照“煮饭”中的步骤
操作。
2 轻触
3 轻触
/
菜单。
键选择“煲仔饭”
键可开始烹饪过程。
1 - 5
进行
粥、煲汤、慢炖
菜单
慢炖
煲汤
粥
默认烹饪
时间
4
小时
2
小时
1
小时
可调节的烹
饪时间
0.5 - 8
1-4
1-4
小时
小时
小时
1 将原料和水放入内锅。
2 擦干内锅外侧,然后将内锅放入电
饭煲。
3 合上电饭煲的盖子,将插头插入
插座。
4 轻触
或粥功能。
/
键可选择
慢炖、煲汤
4 米饭煮好后,产品会发出蜂鸣音。
5 将原料放入锅中,在锅边加油,盖
上盖子,烹饪过程会继续进行。
ZH-S
36
Page 37
简体中文
5 轻触
键可开始烹饪过程。
6 轻触
键可开始烹饪过程。
6 烹饪完成后,产品会发出蜂鸣音,
并自动切换至保温模式。
» 键亮起。
蒸煮
菜单
蒸煮
默认烹饪
时间
25
分钟
可调节的烹
饪时间
5 - 59
分钟
1 将一些水倒入内锅。
2 将蒸篮放入内锅。
3 将食物放在蒸架上或蒸篮中。
4 合上电饭煲的盖子,将插头插入
插座。
5 轻触
/
键
可选择蒸煮功能。
7 烹饪完成后,产品会发出蜂鸣音,
并自动切换至待机模式。
面条
菜单
面条
默认烹饪
时间
10
分钟
可调节的烹饪
时间
5 - 20
分钟
1 将一些水倒入内锅。
2 擦干内锅外侧,然后将内锅放入电
饭煲。
3 合上电饭煲的盖子,将插头插入
插座。
4 轻触
/
键
可选择面条功能。
ZH-S
37
Page 38
5 轻触
键可开始烹饪过程。
4 轻触
/
键
可选择蛋糕功能。
6 水开后将开始倒计时,电饭煲会发
出四声蜂鸣音。
7 打开锅盖,将面条放入内锅。让锅
盖一直开着,直至烹饪过程完成。
注意
•
为避免水溢出或面条粘在一起,请
在烹饪过程中始终搅拌面条。
•
面条和水的总量不能超过内锅上的
最高水位标示,否则电饭煲会出现
轻微溢出。
8 烹饪过程完成后,电饭煲会发出一
声蜂鸣音,然后自动切换至保温
模式。
蛋糕
菜单
蛋糕
默认烹
饪时间
45
分钟
可调节的烹饪
时间
不适用
1 搅拌好蛋糕原料。
2 用少许黄油涂抹内锅,然后将蛋糕
预拌粉倒入其中。
3 合上电饭煲的盖子,将插头插入
插座。
5 轻触
键可开始烹饪过程。
6 烹饪完成后,产品会发出蜂鸣音,
并自动切换至保温模式。
»
键亮起。
7 打开锅盖,小心地取出内锅以进行
冷却。
8 待内锅冷却后,将盘子放在锅上,
然后翻转过来即可取出蛋糕。
蛋糕食谱
1 原料:
• 少量
3
•
枚中等大小的鸡蛋
120
•
100
•
50
•
18
•
• 大量
80
•
36
•
克细白砂糖(约
克蛋糕预拌粉(约
克黄油(约
克牛奶(约
克黄油(约
克牛奶(约
1/3
1/10
2/3
2/5
2/3
杯)
杯)
杯)
杯)
1
杯)
杯)
38
ZH-S
Page 39
简体中文
提示
4 轻触
/
键
可选择再加热功能。
•
您可以根据个人口味调整原料的
比例。
2 将蛋清和蛋黄分别放入两个容器。
3 将细白砂糖加入蛋清中,打至松软
细腻,然后加入蛋黄并搅拌。
提示
•
如果鸡蛋很凉,请使用
进行加热,这样做出的蛋糕柔软又
蓬松。
•
容器和打蛋器必须清洁且无油脂。
否则,鸡蛋便无法打成乳状。请
勿在内锅中搅拌,以免损坏不粘
涂层。
40
C 水
4 添加蛋糕预拌粉,搅拌均匀。
5 加入牛奶和融化的黄油(将黄油加
热至融化状态),快速搅拌原料。
25
锅中。
默认烹饪
时间
分钟
可调节的烹
饪时间
25 - 59
分钟
再加热
菜单
再加热
1 翻松冷饭并将其均匀地分布在内
2 在饭中倒入一些水以避免饭太干。
4 - 5
。
水量取决于米饭量和您自己的
喜好。
3 完成“煮饭”中的步骤
5 轻触
键可开始烹饪过程。
6 烹饪完成后,产品会发出蜂鸣音,
并自动切换至保温模式。
»
键亮起。
调整烹饪时间
您可以调整粥、煲汤、蒸煮、面条、慢
炖、再加热和豆类功能的烹饪时间。
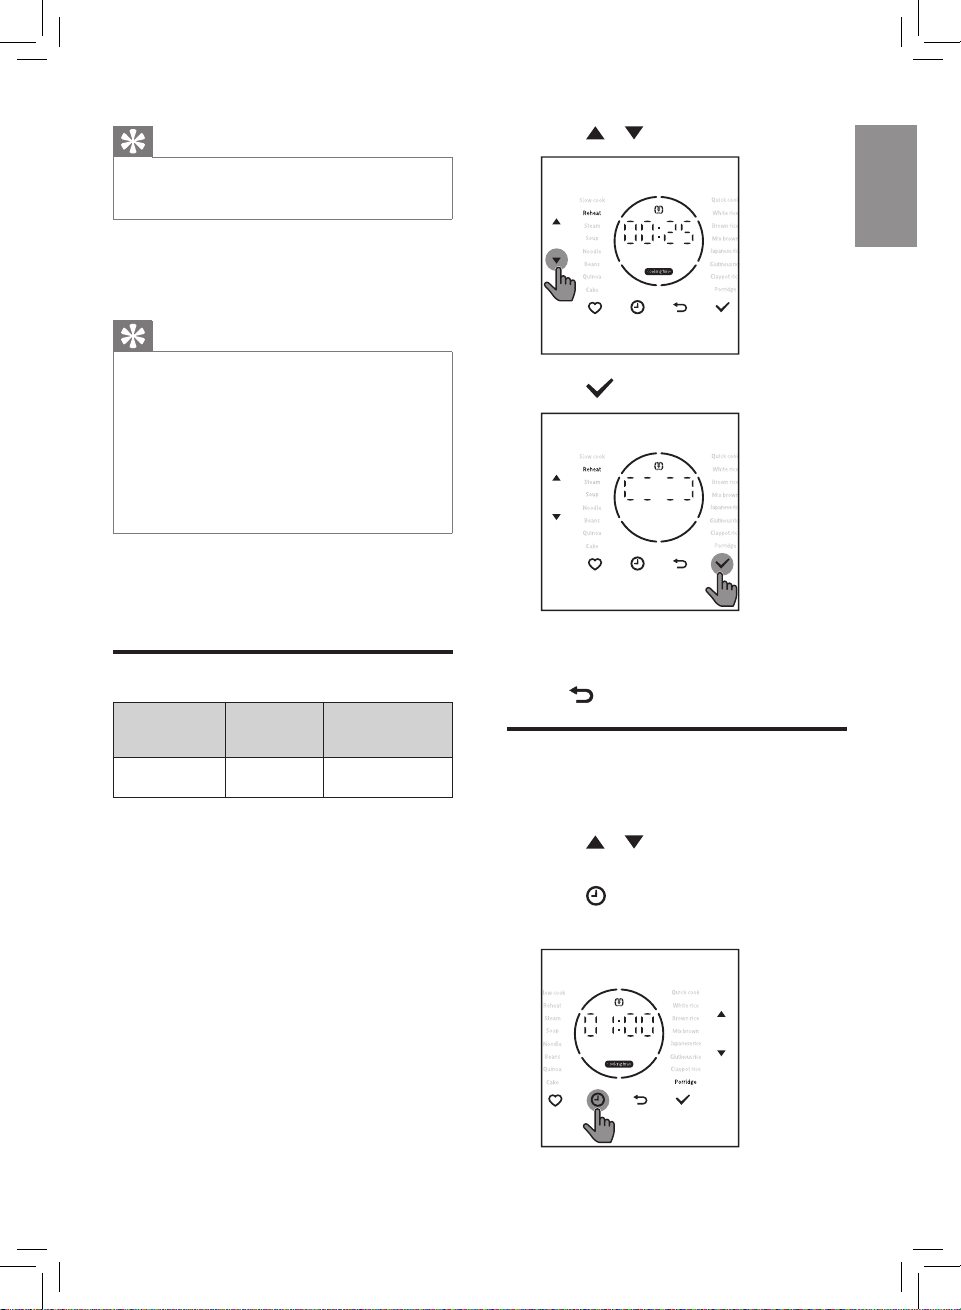
1 轻触
2 轻触
/
功能。
» 烹饪时间会在屏幕上闪烁。
键可选择所需的烹饪
键。
ZH-S
39
Page 40
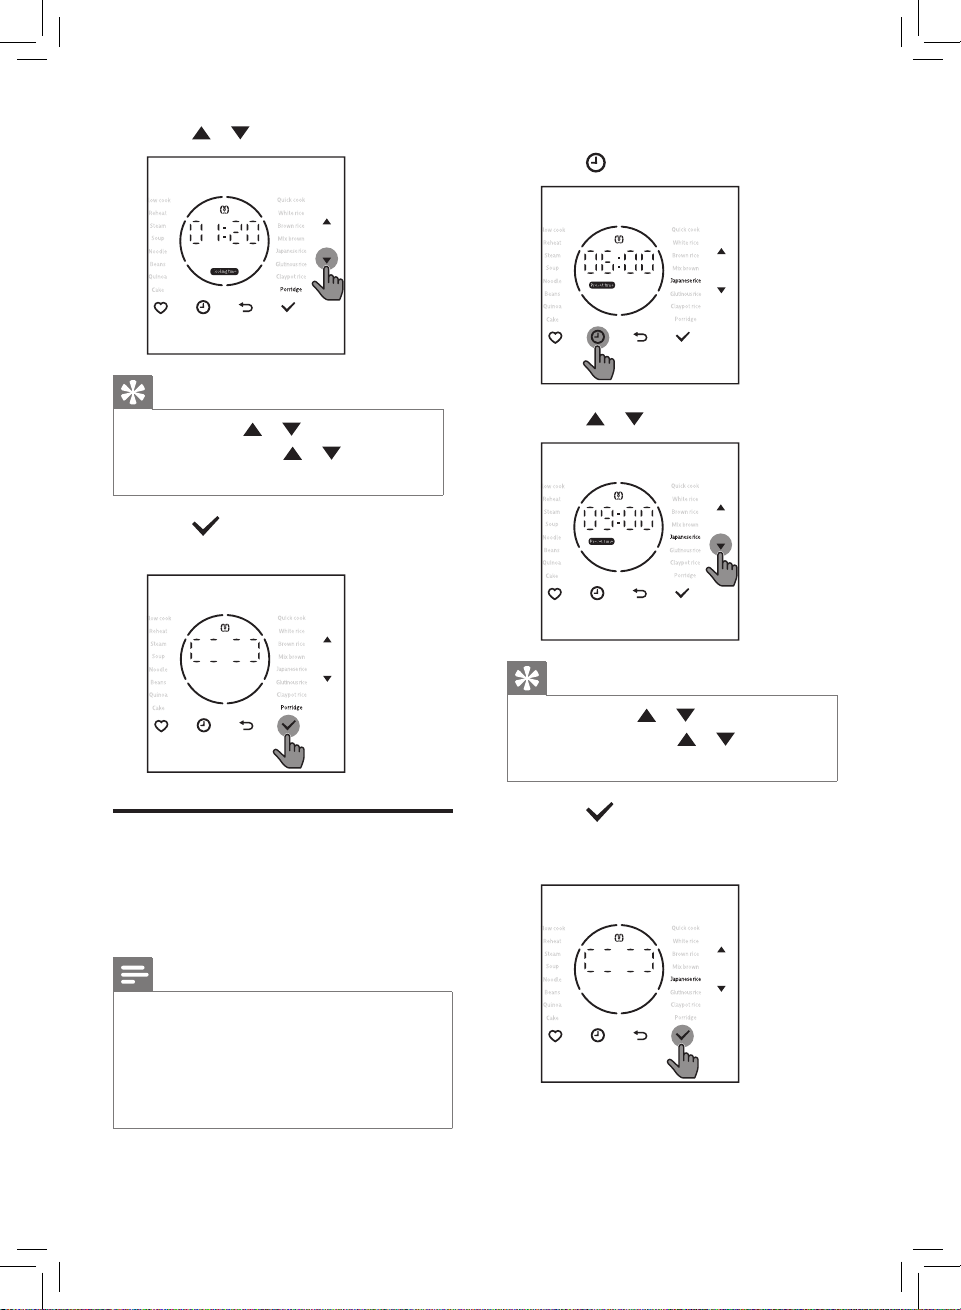
3 轻触
•
轻触左侧的
时,轻触右侧的
分钟。
4 轻触
烹饪过程。
/
提示
键可选择烹饪时间。
/
键可调整小
/
键可调整
键可确认烹饪时间并开始
1 选择所需烹饪功能。
提示
键
,直至预设时间亮起。
/
键可选择预设时间。
2 轻触
3 轻触
延长烹饪的预设时间
您可以在除蒸煮、面条、蛋糕和
再加热功能以外的不同烹饪模式下预设
延迟烹饪时间。预设计时器最长可达
24
小时。
注意
•
例如,当前时间为
您想在第二天早上
则预设时间应为
•
如果预设时间比烹饪时间短,则烹
饪过程会立即开始。
ZH-S
40
20:00
8:00
12:00
。如果
享用早餐,
。
•
轻触左侧的
时,轻触右侧的
分钟。
4 轻触
后,IH电磁加热迷你电饭煲将自动
在选定的烹饪模式下开始工作。
/
键可调整小
/
键可调整
键确认。当预设时间结束
Page 41
简体中文
设置“我的最爱”菜单
您可以将任意三个菜单设置为“我的最
爱”。在对设置进行任何更改之前,默
认菜单为白米饭、糙米饭和粥。
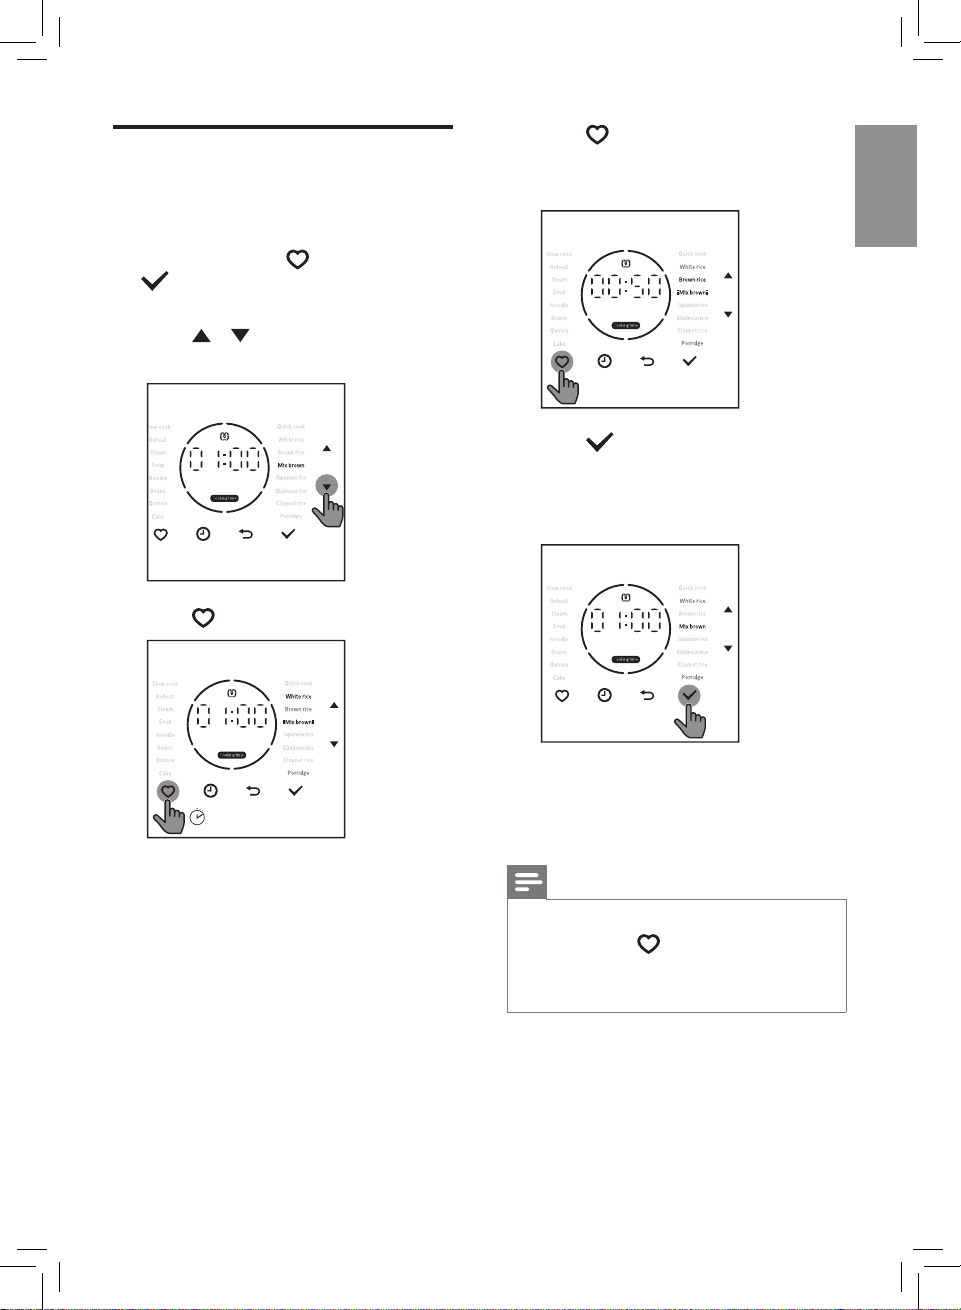
• 一次或多次轻触
键可访问“我的最爱”菜单。
如需更改菜单,请执行以下步骤:
/
键 3
1 轻触
功能。
2 轻触
,然后轻触
键
键可选择所需的烹饪
。
秒
3 轻触
菜单。
4 轻触
“我的最爱”中,默认菜单将被替
换为此新菜单
键可选择要用于替换的
» 该菜单将亮起。
键,当前菜单将保存在
» 新保存的菜单将显示在屏幕上。
5 按照上述步骤操作,您可以将“我
3’
的最爱”中的其他菜单更改为您喜
欢的菜单。
注意
•
如果“我的最爱”中有重复的菜单,
则当您轻触
会闪烁两次,但烹饪时间会有所
不同。
键时,重复的菜单
ZH-S
41
Page 42
4
清洁与保养
注意
•
开始清洁前,请拔下IH电磁加热迷
你电饭煲的插头。
•
清洁前,请等到IH电磁加热迷你电
饭煲充分冷却。
•
定期清洁内盖,否则其会变色并产
生难闻气味。
•
请勿使用钢丝球或其他硬物清洁内
锅和内盖。
•
密封圈不可拆卸。
内盖和蒸汽阀
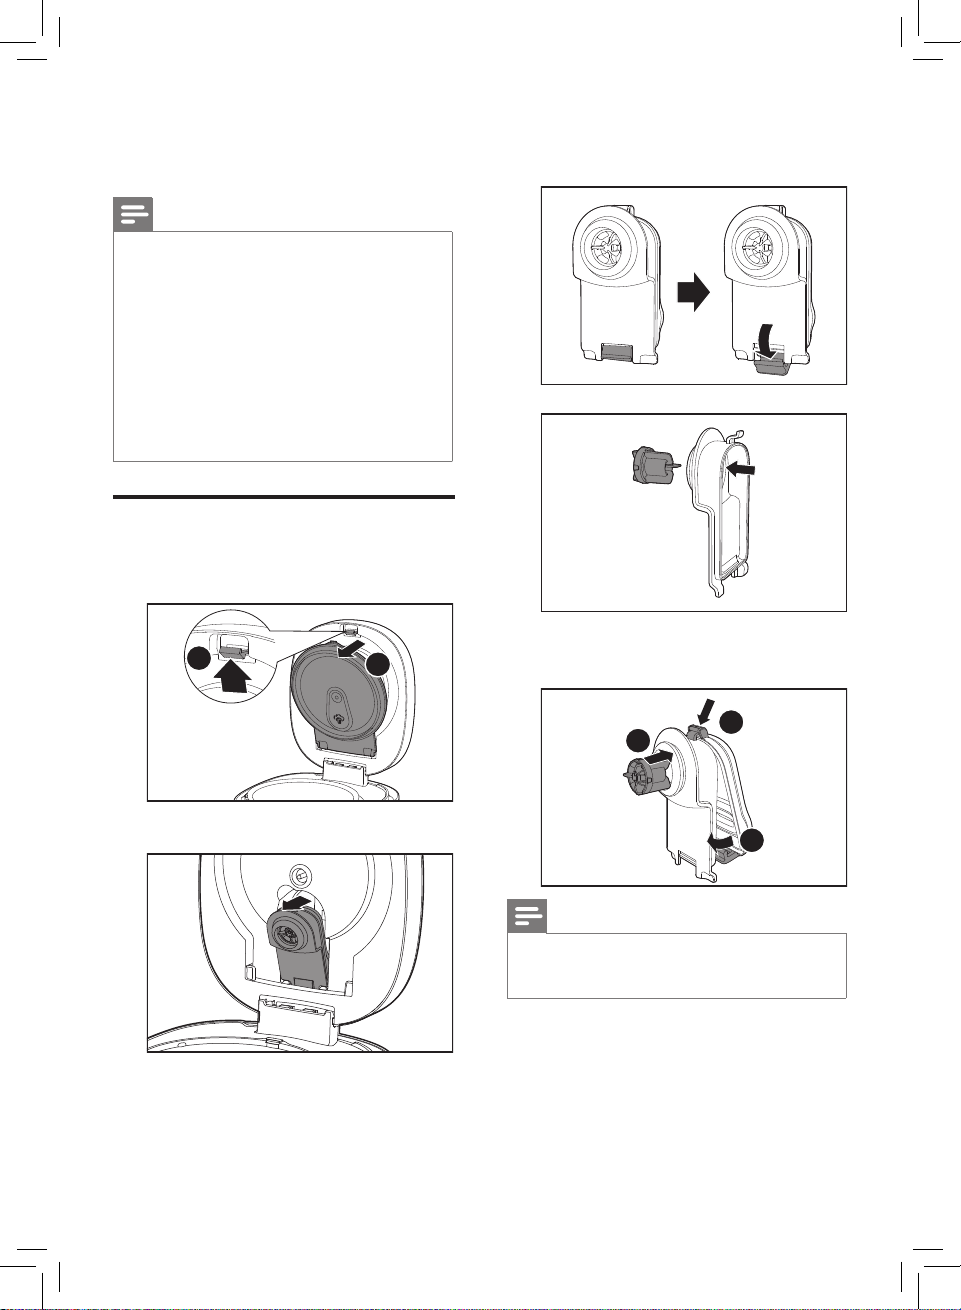
• 向下推以解除蒸汽阀的锁定,然后
取出阀芯进行清洁。
(2)
(1)
。
• 按可拆卸内盖的固定夹
其从产品中取出
1
• 将蒸汽阀从产品中拉出。
,然后将
2
• 要安装蒸汽阀,请按照下图进行
操作。
1
3
2
注意
•
如果蒸汽阀未装好,则产品会发生
泄漏。使用之前,请务必检查蒸汽阀。
42
ZH-S
Page 43
简体中文
内部
• 将可拆卸内盖和蒸汽阀浸泡在水
中,并用海绵进行清洁。
• 用湿布清洁产品内部。
• 确保清理掉黏在电饭煲上的所有食
物残渣。
外部
• 用蘸有肥皂水的布进行擦拭。
• 只能使用柔软的干布擦拭控制
面板。
• 确保清理掉控制按键周围的所有食
物残渣。
附件和内锅
二合一饭汤勺、内锅、蒸架。
• 浸泡到热水中并用海绵清洁。
注意
•
请勿将汤匙、碗或任何其他物体放
入内锅中,以免损坏不沾涂层。
•
如果在内锅中使用过调味品,请立
即清洗。
5
回收
弃置产品时,请不要将它与一般生活垃
圾一同丢弃,应将其交给官方指定的回
收中心。这样做有利于环保。
请遵循您所在国家/地区的电器及电子
产品分类回收规定。正确弃置本产品
有助于避免对环境和人类健康造成负
面影响。
6
保修与服务
如果需要服务或信息,或有任何疑问,
请访问飞利浦网站:
www.philips.com
家/地区的飞利浦客户服务中心。可在
全球保修卡中找到其电话号码。如果您
所在的国家/地区没有飞利浦客户服务
中心,请向当地的飞利浦经销商求助。
7
规格
,或联系您所在国
型号
额定输入功率
额定容量
内锅材质
(金属或者非金属)
HD3081
950
瓦
2.0
升
金属
ZH-S
43
Page 44
8
故障排除
如果在使用本电饭煲时遇到问题,请在申请服务之前检查以下事项。如果无法解决
问题,请联系您所在国家/地区的飞利浦服务中心。
问题
饭没煮好。
饭煮糊了。
烹饪期间,电饭煲中
有水溢出。
解决方法
•
如果将产品置于不稳固或倾斜的表面,则煮熟的米饭
口感可能会因水量不一致而过硬或过软。
•
米饭口感可能会因米的品牌、产地和储存时间而异。
•
米饭口感可能会因室温和水温而异。
•
预设烹饪功能可能会软化米饭。这是正常的。
•
如果您使用快煮功能,则米饭很硬是正常现象。
•
检查内锅是否已变形。
•
水量不足。将水加到内锅的相应水位标示。
•
确保加热元件以及内锅外部没有杂物黏附,再打开电
饭煲。
•
确保内锅内侧和外侧无杂物黏附。清除食物残渣。
• 大米未洗干净。将米洗干净。
•
检查内锅是否已变形。
• 立即切断电源。确保根据所倒入白米的杯数和类型,
依照刻在内锅上的相应水位标记加入适量的水。
• 确保水不超过水位标示上的另一个水位,否则可能导
致产品在烹饪期间溢出。
我找不到所需的烹饪
功能。
ZH-S
44
• 确保食物
•
轻触
•
检查保温指示灯是否亮起。取消保温功能并重试。
•
检查电源线是否已连接至产品,以及电源插头是否已
/
米饭和水的比例与烹饪功能相匹配。
/
可选择所需功能。
完全插入电源插座。
Page 45
简体中文
问题
解决方法
米饭在煮好后味道不
好闻。
显示面板不工作。
出现漏气。
/
轻触
键或其他
按键后无响应。
产品未自动切换至保
温模式。
屏幕上显示错误消息
E5 或 E6
(
)。
•
请用一些清洁剂和温水清洗内锅。
• 电饭煲未连接至电源。如果未接通电源,则显示面板
将无法工作。
•
检查蒸汽阀是否装好。如果未装好,则会漏气。
•
检查电力公司的供电,并检查电源线、电源插头和电
源插座之间的连接。
•
根据用户手册正确使用电饭煲。
•
如果您无法自行处理,请勿拆卸产品,请将产品送至
飞利浦经销商或飞利浦授权的服务中心。
•
您未选择正确的烹饪模式。例如,想煮粥却选择了煮
饭功能。
•
有些菜单没有保温功能,烹饪过程完成后,产品会进
入待机模式。
•
温度控制有故障。请将本产品送往当地的飞利浦经销
商,或经飞利浦授权的客户服务中心。
•
请与专业人员确认产品是否在正常电压范围内工作。
•
检查是否有太多电器在同时使用电源插座或延长线
过长。
•
如果您无法自行处理,请勿拆卸产品,请将产品送至
飞利浦经销商或飞利浦授权的服务中心。
ZH-S
45
Page 46
问题
屏幕上显示错误消息
(E7)
。
屏幕上显示错误消息
(E14)
。
解决方法
•
检查底部进气口是否有异物。
•
检查环境温度是否过高。
•
屏幕上显示错误代码后,产品将自动关闭。如果冷却
一段时间后其可以正常工作;这表示产品显示该错误
代码是防止自身过热。
•
如果您无法自行处理,请勿拆卸产品,请将产品送至
飞利浦经销商或飞利浦授权的服务中心。
•
检查内锅中是否无水或水量过少。
•
检查内锅是否过热。
•
关闭产品,将内锅取出来冷却一段时间。产品将恢复
正常工作。
•
如果您无法自行处理,请勿拆卸产品,请将产品送至
飞利浦经销商或飞利浦授权的服务中心。
产品在使用过程中停
止加热,并显示其他
错误代码。
ZH-S
46
•
使用过程中发生电源故障。请将本产品送往当地的飞
利浦经销商,或经飞利浦授权的客户服务中心。
Page 47

Page 48

© 2021 Philips Domestic Appliances Holding B.V.
All rights reserved
6608 000 07877
 Loading...