

Page 1
Register your product and get support at
COOK
COOK
WARM
COOK
WARM
www.philips.com/welcome
HD3011
HD3012
HD3017
HD3018
HD3027
What’s in the box
Contenido de la caja
Using the rice cooker
Menggunakan penanak nasi
1
Cooking rice
Memasak nasi
Bed and breakfast type
environments.
• If the rice cooker is
used improperly or for
professional or semi-
EN User manual IN Buku Petunjuk Pengguna
a
b
c
d
e
f
www.philips.com/welcome www.philips.com/welcome
HD3011
HD3012
HD3017
HD3018
HD3027
User manual
Warranty
professional purposes, or
if it is not used according
g
to the instructions in this
h
i
j
Steaming
Mengukus
user manual, the guarantee
becomes invalid and Philips
refuses liability for any
damage caused.
k
l
HD3011
HD3012
HD3017
HD3018
HD3027
• Do not place the cooking
utensils inside the pot while
cooking, keeping warm or
reheating rice.
• Only use the cooking
Electromagnetic elds (EMF)
This appliance complies with all standards regarding electromagnetic
elds (EMF). If handled properly and according to the instructions
in this user manual, the appliance is safe to use based on scientic
evidence available today.
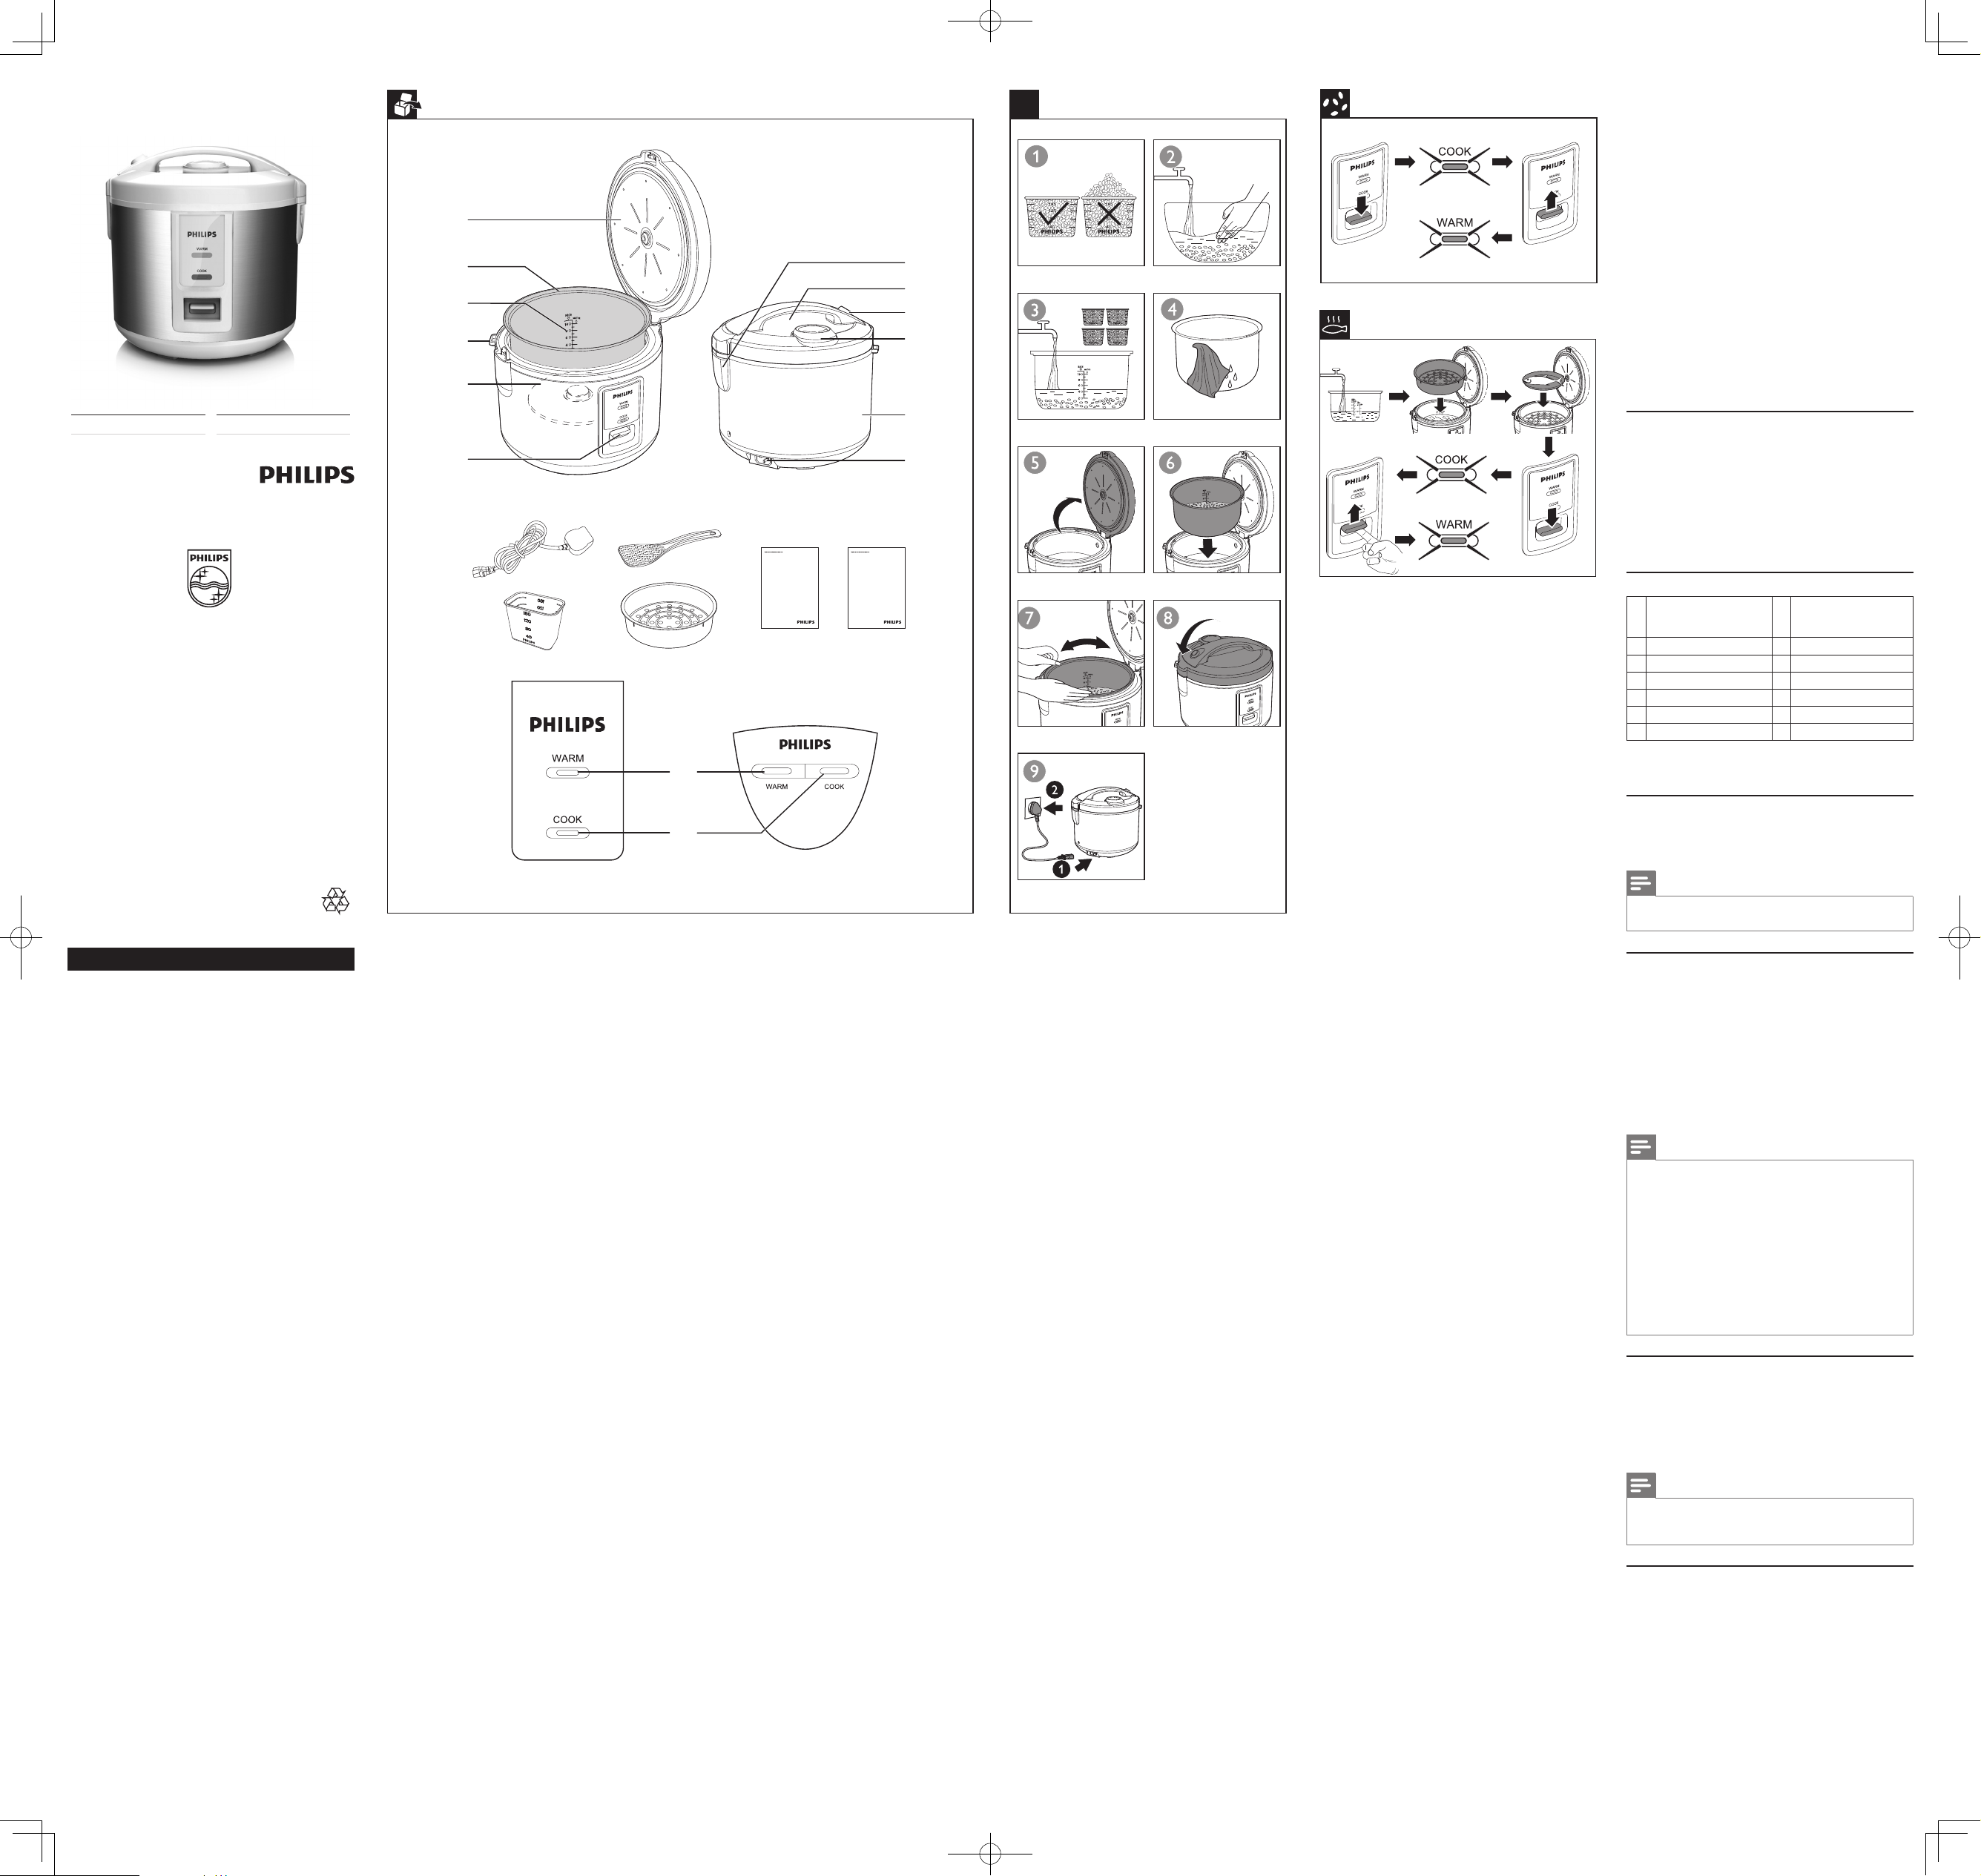
3 What’s in the box
Rice cooker main unit Steam basket
Rice scoop Measuring cup
User manual Warranty card
Power cord
Overview
a
Detachable inner lid
(HD3012, HD3018 and
HD3027 only)
b
Inner pot
c
Water level indications
d
Scoop holder
e
Heating element
f
Control Key
g
Steam water storage
h
Outer lid
i
Lid release button
j
Detachable steam vent cap
k
Main body
l
Power socket
m
Keep warm indicator
n
Cooking indicator
Specifications are subject to change without notice
© 2013 Koninklijke Philips Electronics N.V.
All rights reserved.
HD3011_3012_3017_3018_3027_UM_IN_V3.0
English
1 Your rice cooker
Congratulations on your purchase, and welcome to Philips!
To fully benet from the support that Philips offers, register your
product at www.Philips.com/welcome.
2 Important
Read this user manual carefully before you use the rice cooker and
save it for future reference.
Danger
• Do not immerse the rice
cooker in water, nor rinse it
under the tap.
Warning
• Check if the voltage
indicated on the rice cooker
corresponds to the local
power voltage before you
connect it.
• Only connect the rice
cooker to a grounded
power outlet. Always make
sure that the plug is inserted
rmly into the power outlet.
• Do not use the appliance if
the plug, the power cord,
the inner pot, the sealing
ring, or the main body is
damaged.
• Make sure that the damaged
power cord is replaced
by Philips, a service center
authorized by Philips or
similarly qualied persons in
order to avoid a hazard.
• The appliance is not
intended to be operated
by means of an external
timer or a separate remotecontrol system.
• The appliance is not
intended for use by persons
(including children) with
reduced physical, sensory,
or mental capabilities, or
lack of experience and
knowledge, unless they have
been given supervision or
instruction concerning use
of the appliance by a person
responsible for their safety.
• Children should be
supervised to make sure
that they do not play with
the rice cooker.
• Keep the power cord out
of the reach of children. Do
not let the power cord hang
over the edge of the table
or worktop on which the
rice cooker stands.
• Make sure the heating
element, the temperature
sensor, and the outside of
the inner pot are clean and
m
n
dry before you put the plug
in the power outlet.
• Do not plug in the rice
cooker or press any of the
buttons on the control
panel with wet hands.
• Never connect this rice
cooker to an external timer
switch in order to avoid a
hazardous situation.
Caution
• Never use any accessories
or parts from other
manufacturers or that
Philips does not specically
recommend. If you use such
accessories or parts, your
guarantee becomes invalid.
• Do not expose the
rice cooker to high
temperatures, nor place it
on a working or still hot
stove or cooker.
• Do not expose the rice
cooker to direct sunlight.
• Place the rice cooker on a
stable, horizontal, and level
surface.
• Always put the inner pot in
the rice cooker before you
put the plug in the power
outlet and switch it on.
• Do not place the inner pot
directly over an open re to
cook rice.
• Do not use the inner pot if
it is deformed.
• The accessible surfaces may
become hot when the rice
cooker is operating. Only
touch the control panel and
open lid button.
• Beware of hot steam
coming out of the steam
vent during cooking or out
of the rice cooker when you
open the lid. Keep hands
and face away from the rice
cooker to avoid the steam.
• The inner pot, steam basket,
and resealable cups, during
and after cooking process,
may be hot and heavy.
• Do not lift and move the
rice cooker while it is
operating.
• Do not exceed the
maximum water level
indicated in the inner pot to
prevent overow.
utensils provided. Avoid
using sharp utensils.
• Do not use the cooking
utensils provided by the rice
cooker on open ame.
• To avoid scratches, it is not
recommended to cook
ingredients with crustaceans
and shellsh. Remove the
hard shells before cooking.
• Do not insert metallic
objects or alien substances
into the steam vent.
• Do not place a magnetic
substance on the lid. Do not
use the rice cooker near a
magnetic substance.
• Always let the rice cooker
cool down before you clean
or move it.
• Always clean the rice
cooker after use. Do not
clean the rice cooker in
dishwasher.
• Always unplug the rice
cooker if not used for a
longer period.
• The rice cooker is intended
to be used in household or
similar applications such as:
Staff kitchen areas in shops,
ofces, and other residential
type environments; Farm
houses; By clients in hotels,
motels and other residential
type environments;
4 Using the rice cooker
Before rst use
1 Take out all the accessories from the inner pot. Remove the
packaging material of the inner pot.
2 Clean the parts of the rice cooker thoroughly before using the
rice cooker for the rst time (see chapter ‘Cleaning’).
Note
• Make sure all parts are completely dry before you start using the
rice cooker.
Preparations before use
Before using the rice cooker, you need to follow the preparation:
1 Measure the rice using the measuring cup provided.
2 Wash the rice thoroughly.
3 Put the pre-washed rice in the inner pot.
4 Add water to the level indicated on the scale inside the inner
pot that corresponds to the number of cups of rice used. Then
smooth the rice surface.
5 Press the release lever to open the lid.
6 Put the inner pot in the rice cooker. Check if the inner pot is in
proper contact with the heating element.
7 Close the lid of the rice cooker, put the plug in the power
socket.
Note
• Each cup of uncooked rice normally gives 2 bowls of cooked rice.
Do not exceed the quantities indicated on the inside of the inner
pot.
• The level marked inside the inner pot is just an indication. You can
always adjust the water level for different types of rice and your own
preference. If the voltage is unstable at the area you live, it is possible
that the rice cooker overows.
• Besides following the water level indications, you can also add rice
and water at 1:1-1.2 ratio for rice cooking. Do not exceed the
quantities indicated on the inside of the inner pot.
• Make sure that the outside of the inner pot is dry and clean, and that
there is no foreign residue on the heating element or the magnetic
switch.
Cooking rice
1 Follow the steps in “Preparations before use”.
2 Press down the control key, and the cooking (
indicator lights up.
3 When the cooking is nished, the cooking (
will be off.
4 The rice cooker switches to keep warm mode automatically,
and the keep warm (
Note
• Do not exceed the volume indicated nor exceed the maximum
water level indicated in the inner pot, as this may cause the rice
cooker to overow.
Steaming
1 Measure a few cups of water with the measuring cup.
2 Pour the water into the inner pot.
3 Put the steam basket into the inner pot.
4 Put the food into the steam basket.
5 Close the lid of the rice cooker, and put the plug in the power
socket.
6 Push down the control key, and the cooking (
indicator lights up.
7 When the steaming is nished, pull up the control key.
8 The rice cooker switches to keep warm mode, and the keep
warm (
) indicator lights up.
) indicator lights up.
)
) indicator
)
Page 2
Note
COOK
COOK
WARM
COOK
WARM
• Use a kitchen glove or a cloth, as the plate and steam basket will be
very hot.
• You can cook rice while steaming food. Do not exceed the volume
indicated nor immerse the steam basket in the water, as this may
cause the rice cooker to overow.
• You can adjust the water level as needed.
Specications
Model Number HD3011/
HD3012
Rated power output 400W 400W 400W
Rated capacity 3.0L 5.0L 5.0L
Rice volume (cups) 1L (1-6) 1.8L (1-10) 1.8L (1-10)
HD3017/
HD3018
HD3027
5 Cleaning and Maintenance
Note
• Uplug the rice cooker before starting to clean it.
• Wait until the rice cooker has cooled down sufciently before
cleaning it.
Interior
Inside of the outer lid and the main body:
• Wipe with wrung out and damp cloth.
• Make sure to remove all the food residues stuck to the rice
cooker.
Heating element:
• Wipe with wrung out and damp cloth.
• Remove food residues with wrung out and damp cloth or
toothpicks.
Exterior
Surface of the outer lid and outside of the main body:
• Wipe with a cloth damped with soap water.
• ONLY use soft and dry cloth to wipe the control panel.
• Make sure to remove all the food residues around the control
buttons.
Accessories
Rice scoop, inner pot, steam basket, steam vent cap and detachable
inner lid (HD3012, HD3018 and HD3027 only):
• Soak in hot water and clean with sponge.
6 Environment
Do not throw away the appliance with normal household
waste at the end of its life, but hand it in at an ofcial
collection point for recycling. By doing this, you can help to
preserve the environment.
7 Guarantee and service
If you need service or information, or if you have a problem, visit the
Philips website at www.philips.com or contact the Philips Customer
Care Center in your country. You can nd its phone number in the
worldwide guarantee leaet. If there is no Customer Care Center in
your country, go to your local Philips dealer.
8 Troubleshooting
Problem Solution
The lights on the
buttons does not
go on.
The rice is not
cooked.
The rice is not
well cooked.
The cooker does
not switch to
keep warm mode
automatically in
"Rice Cooking"
mode.
The rice is
scorched.
Water spills out
of the rice cooker
during cooking.
Rice smells bad
after cooking
There is a connection problem. Check if
the power cord is connected to the cooker
properly and if the plug is inserted rmly into
the power outlet.
The light is defective. Take the appliance
to your Philips dealer or a service center
authorized by Philips.
There is not enough water. Add water
according to the scale on the inside of the
inner pot.
You did not press down the control key.
Make sure that there is no foreign residue on
the heating element and the outside of the
inner pot before switching the rice cooker on.
The heating element is damaged, or the inner
pot is deformed. Take the cooker to your
Philips dealer or a service center authorized
by Philips.
Add more water.
The temperature control is defective. Take the
appliance to your Philips dealer or a service
center authorized by Philips.
You have not rinsed the rice properly. Rinse
the rice until water runs clear.
• Make sure that you add water to the level
indicated on the scale inside the inner pot
that corresponds to the number of cups of
rice used.
• Make sure the water does not exceed the
next level on the scale, as this may cause
the appliance to overow during cooking.
Clean the inner pot with some washing
detergent and warm water.
After cooking, make sure the steam vent cap,
inner lid and inner pot is cleaned thoroughly.
Indonesia
1 Penanak nasi Anda
Selamat atas pembelian Anda dan selamat datang di Philips!
Untuk memanfaatkan sepenuhnya dukungan yang ditawarkan Philips,
daftarkan produk Anda di www.Philips.com/welcome.
2 Penting
Baca petunjuk pengguna ini dengan saksama sebelum
menggunakan alat, dan simpanlah sebagai referensi untuk masa
mendatang.
Bahaya
• Jangan merendam penanak
nasi di dalam air atau
membilasnya di bawah
keran.
Peringatan
• Periksa apakah voltase
pada penanak nasi sesuai
dengan voltase listrik di
rumah Anda sebelum
menghubungkannya.
• Hanya hubungkan penanak
nasi ke stopkontak yang
telah dihubungkan ke arde.
Selalu pastikan steker
dipasang dengan benar pada
stopkontak listrik.
• Jangan menggunakan alat
ini jika steker, kabel listrik,
panci bagian dalam, gelang
penyegel, atau badan utama
rusak.
• Pastikan kabel listrik yang
rusak diganti oleh Philips,
pusat servis resmi Philips
atau orang yang mempunyai
keahlian sejenis agar
terhindar dari bahaya.
• Alat ini tidak ditujukan
untuk dioperasikan dengan
menggunakan timer
eksternal atau sistem
remote-control yang
terpisah.
• Alat ini tidak dimaksudkan
untuk digunakan oleh
orang (termasuk anak-
anak) dengan cacat sik,
indera, atau kecakapan
mental yang kurang, atau
kurang pengalaman dan
pengetahuan, kecuali
jika mereka diberikan
pengawasan atau petunjuk
mengenai penggunaan
alat oleh orang yang
bertanggung jawab bagi
keselamatan mereka.
• Anak kecil harus diawasi
untuk memastikan mereka
tidak bermain-main dengan
penanak nasi ini.
• Jauhkan kabel listrik dari
jangkauan anak-anak.
Jangan biarkan kabel listrik
menggantung di tepi meja
atau di tempat penanak nasi
• Pastikan elemen pemanas,
sensor suhu, dan sisi luar
dari panci bagian dalam,
bersih dan kering sebelum
memasang steker ke
stopkontak listrik.
• Jangan menghubungkan
steker pada penanak nasi
atau menekan tombol apa
pun pada panel kontrol saat
tangan basah.
• Jangan sekali-kali
menghubungkan penanak
nasi ini ke sakelar timer
eksternal untuk menghindari
situasi yang membahayakan.
Perhatian
• Jangan sekali-kali
menggunakan aksesori
atau komponen apa
pun dari produsen lain
atau yang tidak secara
khusus direkomendasikan
oleh Philips. Jika Anda
menggunakan aksesori atau
komponen tersebut, garansi
Anda menjadi batal.
• Jangan biarkan penanak nasi
terkena suhu yang tinggi
atau menempatkannya
di atas kompor atau alat
memasak lainnya yang
sedang bekerja atau masih
panas.
• Jangan biarkan penanak
nasi terkena sinar matahari
langsung.
• Tempatkan penanak nasi
pada permukaan yang stabil,
horizontal, dan rata.
• Selalu masukkan panci
bagian dalam penanak
nasi sebelum Anda
menghubungkan ke
stopkontak listrik dan
menghidupkannya.
• Jangan menempatkan
panci bagian dalam secara
langsung di atas nyala api
untuk memasak nasi.
• Jangan menggunakan panci
bagian dalam jika sudah
berubah bentuk.
• Permukaan akan menjadi
panas pada saat penanak
nasi dioperasikan. Sentuh
hanya panel kontrol dan
tombol untuk membuka
tutupnya.
• Hati-hati, ada uap panas
yang keluar dari lubang
uap penanak nasi sewaktu
Anda membuka tutupnya.
Jauhkan tangan dan wajah
Anda dari penanak nasi
untuk menghindari uap.
• Panci bagian dalam,
keranjang kukus, dan gelas
yang dapat disegel kembali,
selama dan setelah proses
memasak, mungkin menjadi
panas dan berat.
• Jangan mengangkat dan
memindahkan penanak nasi
saat masih bekerja.
• Jangan melebihi ukuran air
maksimum yang ditunjukkan
di panci bagian dalam agar
tidak meluap.
• Jangan menaruh perabot
masak di panci bagian
dalam selagi memasak,
menghangatkan atau
memanaskan nasi.
• Gunakan hanya perabot
memasak yang disediakan.
Hindari menggunakan
perabot yang tajam.
• Jangan menggunakan
perabot masak yang tersedia
bersama penanak nasi pada
api terbuka.
• Untuk mencegah tergores,
tidak disarankan memasak
bahan yang bercampur
dengan krustasea (udangudangan) dan kerang.
Singkirkan kulit yang keras
sebelum memasak.
• Jangan memasukkan barang
logam atau benda asing ke
dalam lubang uap.
• Jangan meletakkan benda
bermagnet pada penutup.
Jangan menggunakan
penanak nasi di dekat benda
bermagnet.
• Selalu biarkan penanak
nasi mendingin sebelum
membersihkan atau
memindahkannya.
• Selalu bersihkan penanak
nasi setelah digunakan.
Jangan bersihkan penanak
nasi di dalam mesin cuci
piring.
• Selalu cabut steker penanak
nasi apabila tidak digunakan
dalam waktu yang lama.
• Penanak nasi ditujukan untuk
digunakan di rumah tangga
atau pemakaian yang serupa
seperti: Area dapur staf di
sejenis tempat tinggal
lainnya; Rumah ladang; Oleh
klien di hotel, motel, dan
lingkungan sejenis tempat
tinggal lainnya; Lingkungan
sejenis penginapan.
• Jika penanak nasi ini
digunakan tidak secara
semestinya atau untuk
tujuan profesional atau
semi profesional, atau tidak
digunakan sesuai instruksi
dalam petunjuk penggunaan
ini, garansi menjadi tidak
berlaku dan Philips tidak
bertanggung jawab atas
kerusakan apa pun yang
ditimbulkan.
Medan elektromagnet (EMF)
Alat ini mematuhi semua standar yang berkenaan dengan medan
elektromagnet (EMF). Jika ditangani dengan benar dan sesuai dengan
petunjuk dalam petunjuk pengguna ini, alat tersebut aman digunakan
menurut bukti ilmiah yang kini tersedia.
3 Apa saja isi kemasannya
Unit utama penanak nasi Keranjang kukus
Sendok nasi Gelas takar
Petunjuk Pengguna Kartu garansi
Kabel listrik
Ikhtisar
a
Tutup bagian dalam lepaspasang (hanya HD3012,
HD3018 dan HD3027)
b
Panci bagian dalam
c
Indikator ukuran air
d
Tempat sendok nasi
e
Elemen pemanas
f
Tombol Kontrol
g
Penyimpanan air uap
4 Menggunakan penanak nasi
Sebelum menggunakan alat pertama kali
1 Lepaskan semua aksesori dari panci bagian dalam. Lepaskan
bahan kemasan panci bagian dalam.
2 Bersihkan semua bagian penanak nasi secara saksama sebelum
menggunakan penanak nasi untuk pertama kali (lihat bab
‘Membersihkan’).
Catatan
• Pastikan semua bagian benar-benar kering sebelum Anda mulai
menggunakan penanak nasi.
Persiapan sebelum menggunakan
Sebelum menggunakan penanak nasi, Anda perlu mengikuti persiapan
berikut:
1 Takar nasi dengan menggunakan gelas takar yang sudah
disediakan.
2 Cuci beras sampai bersih.
3 Masukkan beras yang sudah dicuci sebelumnya ke panci bagian
dalam.
4 Tambahkan air sampai ukuran yang ditunjukkan pada skala
di bagian dalam panci sesuai jumlah gelas takar beras yang
digunakan. Lalu ratakan permukaan beras.
5 Tekan tuas pelepas untuk membuka tutupnya.
6 Masukkan panci bagian dalam pada penanak nasi. Pastikan panci
bagian dalam telah bersentuhan dengan elemen pemanas secara
tepat.
7 Tutuplah tutup penanak nasi, lalu pasang steker ke soket daya.
Catatan
• Setiap gelas takar yang berisi beras yang belum dimasak biasanya
dapat menghasilkan 2 mangkuk nasi. Jangan melebihi jumlah yang
ditunjukkan pada panci bagian dalam.
• Ukuran yang ditunjukkan di panci bagian dalam hanya sebagai indikasi
saja. Anda dapat menyesuaikan ketinggian air untuk jenis beras yang
berbeda dan preferensi Anda. Jika voltase tidak stabil di daerah
tempat Anda tinggal, ada kemungkinan penanak nasi akan meluap.
• Selain mengikuti indikasi batas air, Anda juga dapat menambahkan
beras dan air dengan rasio 1:1-1,2 saat memasak nasi. Jangan melebihi
jumlah yang ditunjukkan pada panci bagian dalam.
• Pastikan bagian luar panci bagian dalam sudah kering dan bersih,
dan tidak ada benda apa pun pada elemen pemanas atau sakelar
magnetik.
Memasak nasi
1 Ikuti langkah-langkah di “Persiapan sebelum menggunakan”.
2 Tekan tombol kontrol ke bawah, dan indikator memasak
(
3 Setelah selesai memasak, indikator memasak (
4 Penanak nasi akan beralih ke mode tetap hangat secara
• Jangan melebihi volume yang ditunjukkan atau melebihi ukuran air
maksimum yang ditunjukkan di panci bagian dalam, karena ini dapat
menyebabkan penanak nasi meluap.
) menyala.
padam.
otomatis, dan indikator tetap hangat (
Catatan
h
Tutup luar
i
Tombol pembuka tutup
j
Tutup lubang uap lepaspasang
k
Badan utama
l
Soket daya
m
Indikator tetap hangat
n
Indikator memasak
) akan
) menyala.
Mengukus
1 Takar beberapa gelas air dengan gelas takar.
2 Tuangkan air ke dalam panci bagian dalam.
3 Taruh keranjang kukus di panci bagian dalam.
4 Taruh makanan ke dalam keranjang kukus.
5 Tutup penanak nasi dengan tutupnya, lalu pasang steker ke
soket daya.
6 Tekan tombol kontrol ke bawah, dan indikator memasak
(
7 Ketika pengukusan selesai, tarik tombol kontrol ke atas.
8 Penanak nasi akan beralih ke mode tetap hangat, dan indikator
• Gunakan sarung tangan dapur atau kain, karena piring dan keranjang
kukusan sangat panas.
• Anda dapat memasak nasi sambil mengukus makanan. Jangan
melebihi volume yang ditunjukkan atau merendam keranjang kukus di
dalam air, karena ini dapat menyebabkan penanak nasi meluap.
• Anda dapat menyesuaikan ketinggian air sesuai kebutuhan.
Spesikasi
Nomor Model HD3011/
Keluaran daya terukur 400 W 400 W 400 W
Kapasitas terukur 3,0 L 5,0 L 5,0 L
Jumlah beras (cangkir) 1 L (1-6) 1,8 L (1-10) 1,8 L (1-10)
) menyala.
tetap hangat (
Catatan
) menyala.
HD3012
HD3017/
HD3018
HD3027
5 Membersihkan dan Pemeliharaan
Catatan
• Cabut steker penanak nasi sebelum membersihkannya.
• Tunggu sampai penanak nasi sudah cukup dingin sebelum
membersihkannya.
Bagian dalam
Bagian dalam tutup luar dan badan utama:
• Seka menggunakan kain yang sudah diperas dan lembap.
• Pastikan untuk membersihkan semua sisa makanan yang
menempel pada penanak nasi.
Elemen pemanas:
• Seka menggunakan kain yang sudah diperas dan lembap.
• Bersihkan sisa makanan dengan kain yang sudah diperas dan
lembab atau tusuk gigi.
Bagian luar
Permukaan tutup luar dan bagian luar badan utama:
• Seka dengan kain yang dibasahi air sabun.
• Gunakan HANYA kain lembut dan kering untuk menyeka panel
kontrol.
• Pastikan untuk membersihkan semua sisa makanan di sekeliling
tombol kontrol.
Aksesori
Sendok nasi, panci bagian dalam, keranjang kukusan, tutup lubang uap
dan tutup bagian dalam lepas-pasang (hanya HD3012, HD3018 dan
HD3027):
• Rendam di dalam air panas dan bersihkan dengan spons.
6 Lingkungan
Jangan membuang alat bersama limbah rumah tangga biasa
jika alat sudah tidak bisa dipakai lagi, tetapi serahkan ke tempat
pengumpulan barang bekas yang resmi untuk didaur ulang.
Dengan melakukan hal ini, Anda ikut membantu melestarikan
lingkungan.
7 Garansi dan layanan
Jika Anda memerlukan layanan atau informasi, kunjungi situs web
Philips di www.philips.com atau hubungi Pusat Layanan Pelanggan
Philips di negara Anda. Anda bisa menemukan nomor telepon Philips
di kartu garansi internasional. Jika di negara Anda tidak terdapat Pusat
Layanan Pelanggan, kunjungi dealer Philips setempat.
8 Mengatasi masalah
Masalah Solusi
Lampu pada
tombol tidak
menyala.
Nasi tidak matang. Air tidak mencukupi. Tambahkan air sesuai
Nasi tidak matang. Tambahkan air secukupnya.
Penanak nasi tidak
beralih ke mode
tetap hangat secara
otomatis di mode
"Memasak Nasi".
Nasi gosong. Anda belum mencuci beras dengan benar.
Air tumpah dari
penanak nasi
selama memasak.
Nasi berbau tidak
enak setelah
memasak.
Ada masalah sambungan. Periksa apakah kabel
listrik sudah tersambung dengan benar ke
penanak dan apakah steker sudah dipasang
dengan benar ke stopkontak listrik.
Lampu rusak. Bawalah alat ke dealer Philips
Anda atau ke pusat layanan resmi Philips.
dengan skala pada panci bagian dalam.
Anda tidak menekan tombol kontrol ke
bawah.
Pastikan tidak ada endapan asing pada elemen
pemanas dan di luar panci bagian dalam
sebelum menghidupkan penanak nasi.
Elemen pemanas rusak, atau panci bagian
dalam sudah berubah bentuk. Bawalah
penanak ke dealer Philips Anda atau ke pusat
layanan resmi Philips.
Kontrol suhu rusak. Bawalah alat ke dealer
Philips Anda atau ke pusat layanan resmi
Philips.
Cuci beras hingga air bekas cucian habis.
• Pastikan Anda menambah air hingga ukuran
yang ditunjukkan pada skala di panci bagian
dalam sesuai dengan jumlah gelas takar
beras yang dipakai.
• Pastikan air tidak melebihi ukuran
berikutnya pada skala karena ini akan
menyebabkan luapan selama memasak.
Bersihkan panci bagian dalam menggunakan
deterjen cuci dan air hangat.
Setelah memasak, pastikan tutup lubang uap,
tutup bagian dalam dan panci bagian dalam
dibersihkan sepenuhnya.
berada.
memasak atau sewaktu
toko, kantor, lingkungan
 Loading...