

Page 1
HD2565
1
2 3 4 5
6 7 8 9
10
Page 2
ENGLISH
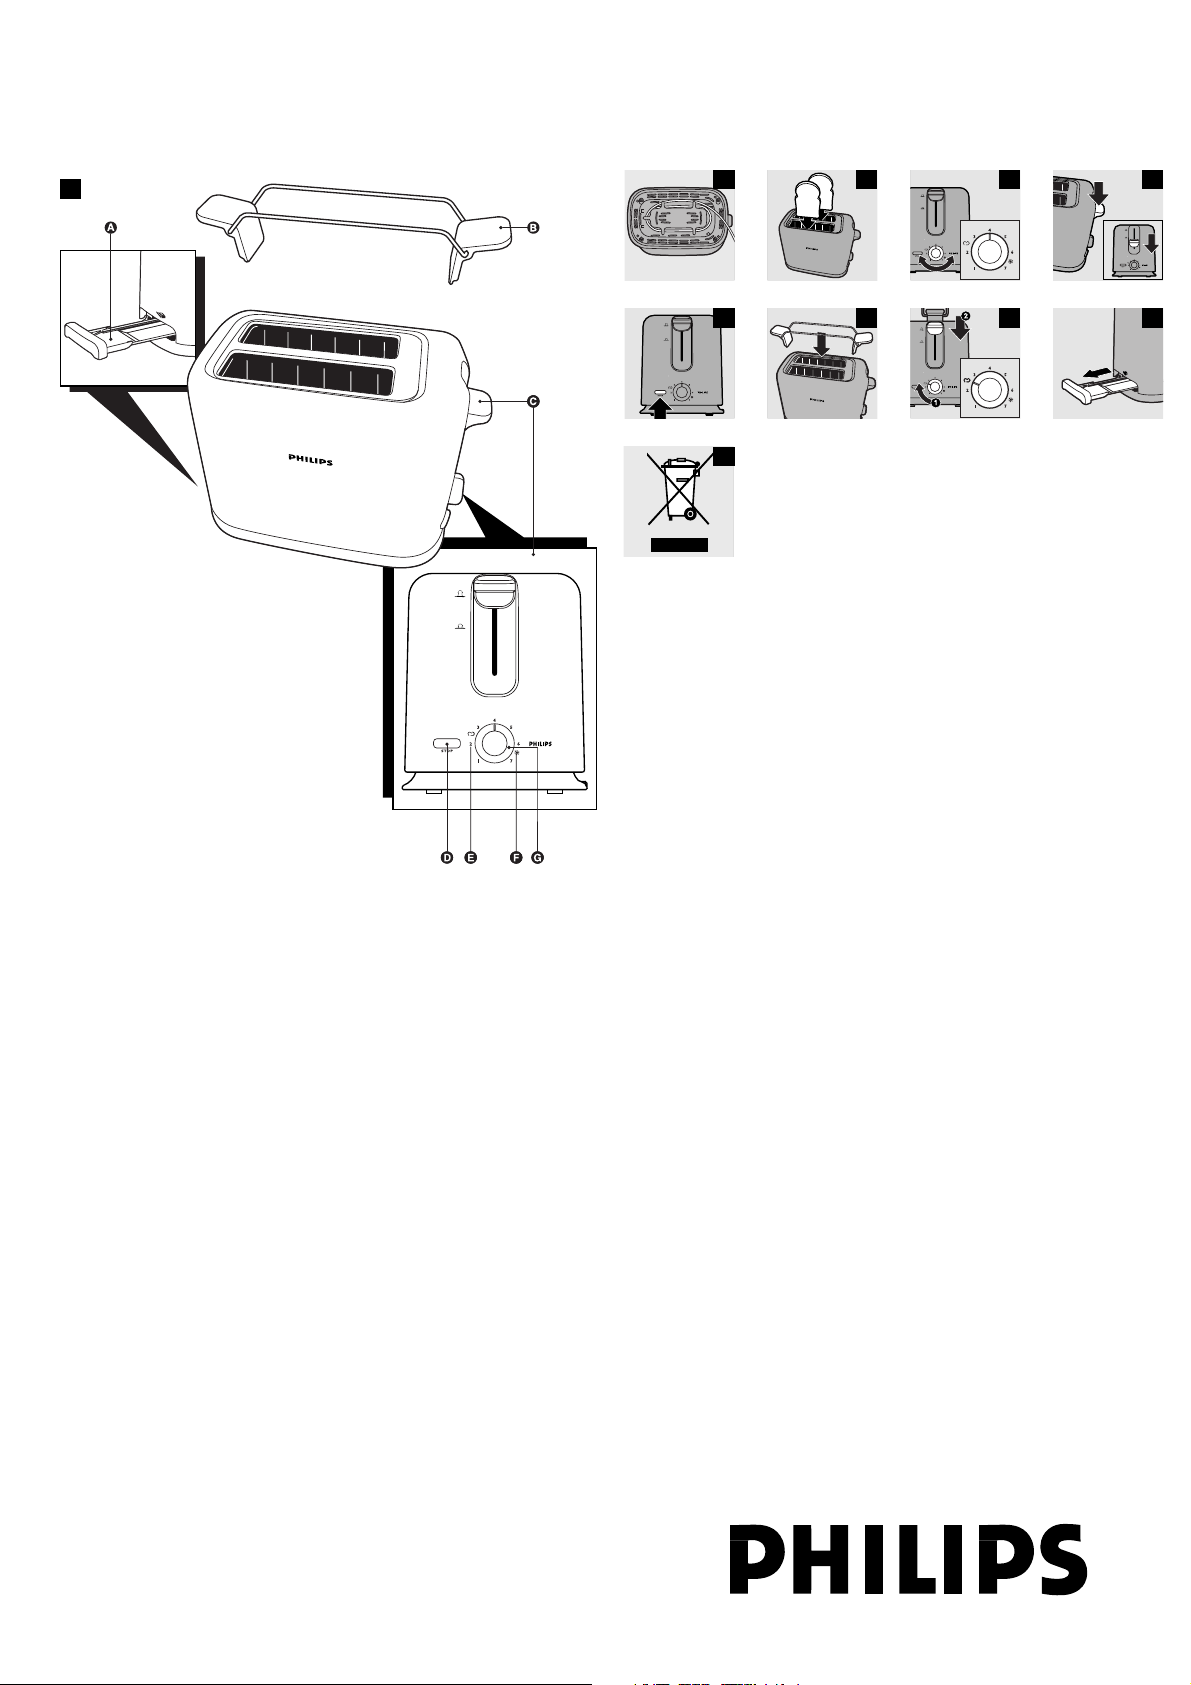
General description (fig. 1)
.
A Crumb tray
B Warming rack
C Toasting lever
D Stop button
E Warming setting
F Defrost function
G Browning control
Important
.
Read these instructions for use carefully before using the appliance and save them for
future reference.
◗ Check if the voltage indicated on the bottom of the appliance corresponds to
the local mains voltage before you connect the appliance.
◗ Only connect the appliance to an earthed wall socket.
◗ If the mains cord is damaged, it must be replaced by Philips, a service centre
authorised by Philips or similarly qualified persons in order to avoid a hazard.
◗ Do not immerse the appliance or the mains cord in water or any other liquid.
◗ Always unplug the appliance after use.
◗ Keep the appliance out of the reach of children.
◗ Do not let the mains cord hang over the edge of the table or worktop on
which the appliance is standing and keep the cord away from hot surfaces.
◗ Do not let the appliance operate unattended. Do not operate it under or near
curtains or other flammable materials or under wall cabinets, as bread may burn.
◗ Avoid touching the metal parts of the toaster as they become very hot during
toasting. Only touch the controls and lift the appliance by its plastic body.
◗ The toaster is intended for household use only and may only be used indoors.
◗ To avoid the risk of fire, frequently remove crumbs from the crumb tray.
Make sure the crumb tray is correctly placed.
◗ Immediately unplug the toaster if fire or smoke is observed.
◗ If a slice of bread gets stuck inside the toaster, unplug the appliance and let it
cool down before trying to remove the bread. Do not use a knife or a sharp
tool, as these may cause damage to the heating elements.
◗ The appliance is only meant for toasting bread. Do not put any other
ingredients in the appliance, as this may lead to a hazardous situation.
◗ Oversized foods and metal foil packages must not be inserted into the toaster,
as this may cause fire or electric shock.
◗ Do not place the toaster on a hot surface.
◗ The warming rack is only intended for warming up rolls or croissants. Do not
put any other ingredients on the warming rack, as this may lead to a
hazardous situation.
Before first use
.
Remove any stickers and wipe the body of the toaster with a damp cloth.
Before using the appliance for the first time, we advise you to let the appliance
complete a few toasting cycles without slices of bread on the highest browning
setting in a properly ventilated room. This will burn off any dust that may have
accumulated on the heating elements and will prevent unpleasant smells when
toasting bread.
Using the appliance
.
1 Put the appliance on a stable and flat surface, away from curtains and other
combustible materials. Put the plug in the wall socket.
◗ You can adjust the length of the cord by winding part of it round the brackets
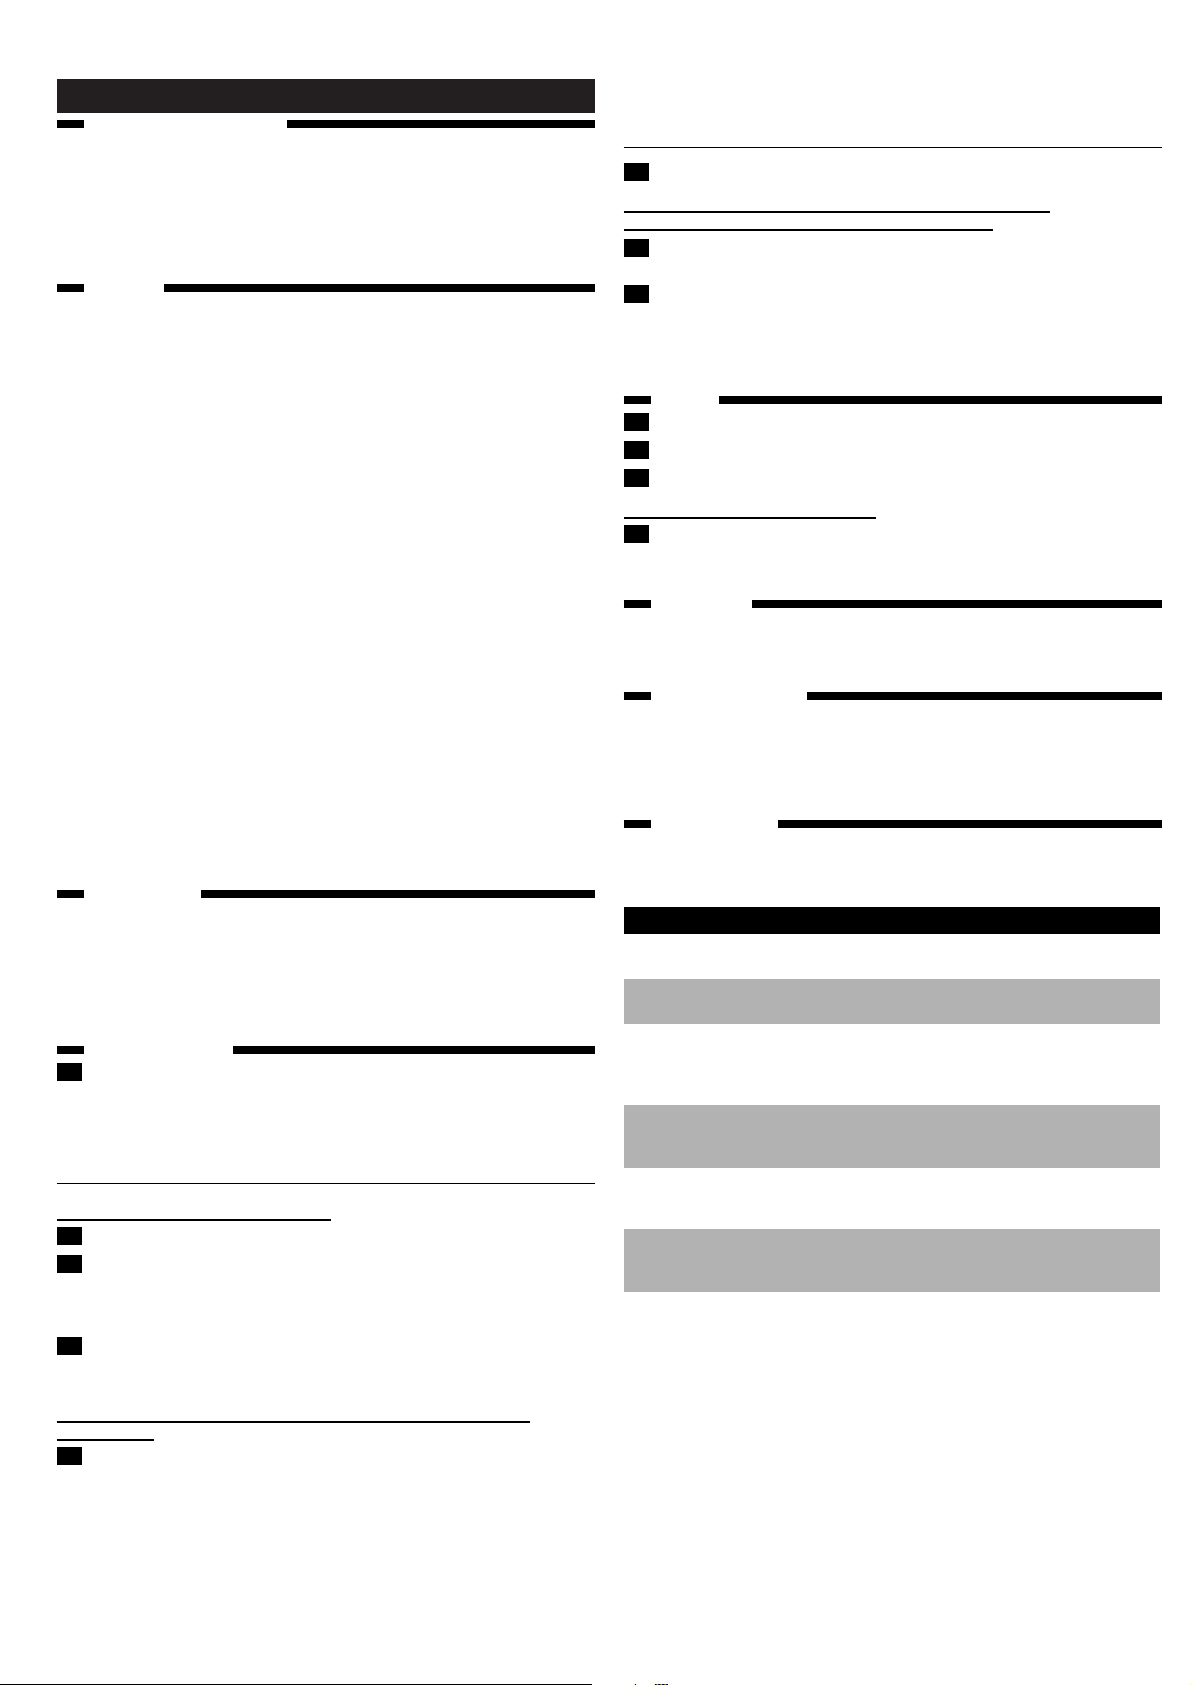
in the base of the appliance (fig. 2).
Toasting bread
Never let the toaster operate unattended.
1 Put one or two slices of bread in the toaster (fig. 3).
2 Select the desired browning setting (fig. 4).
Select a low setting (1-2) for lightly toasted bread and a high setting (5-7) for darkly
toasted bread. Select the defrost function — (settings 6 to 7, depending on the
desired browning degree) for toasting frozen bread.
3 Push the toasting lever down to switch the appliance on (fig. 5).
The toasting lever will only stay down if the appliance has been connected to the
mains.
The metal parts of the toaster will get hot during toasting. Be careful not
to touch them.
4 When the toast is ready, it pops up and the toaster switches off.
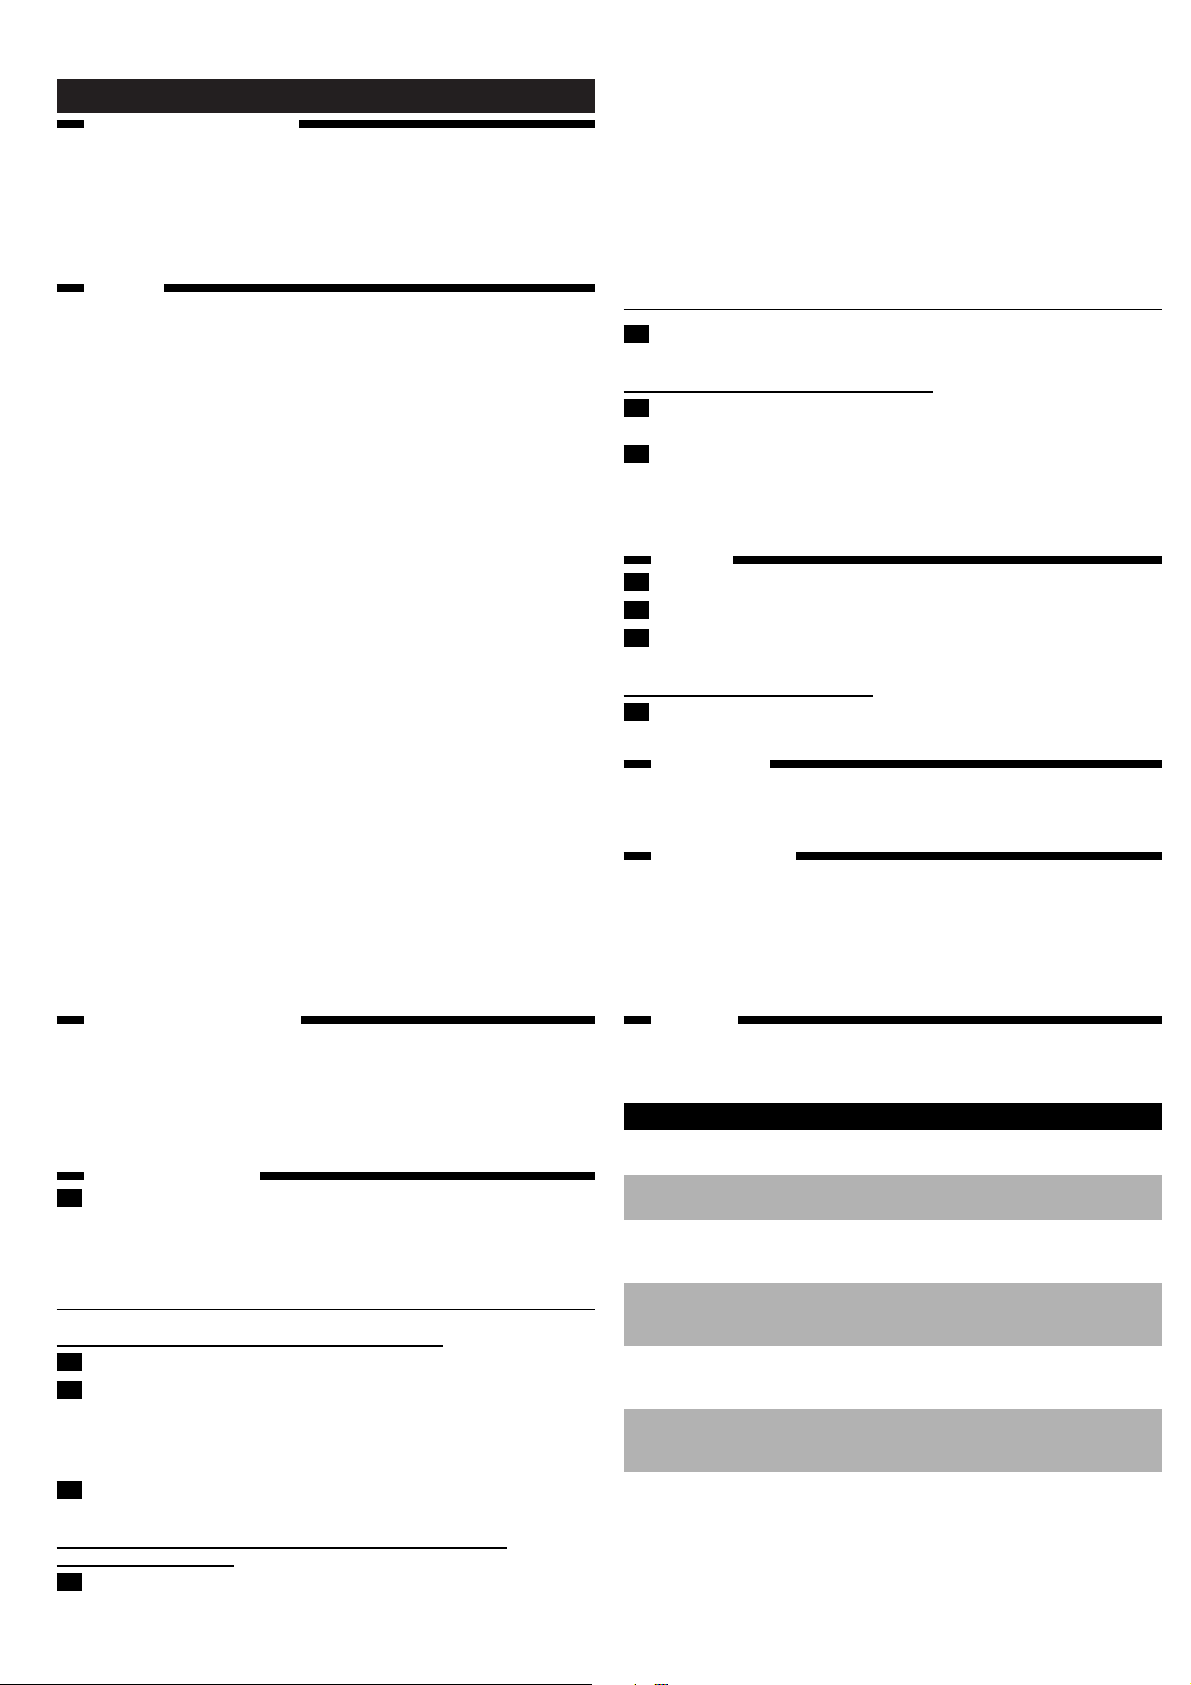
◗ The toaster will switch off automatically. You can stop the toasting process
and pop the bread up at any time by pressing the stop button on the side of
the toaster (fig. 6).
◗ To remove smaller items, you can move the toasting lever upwards a little
further.
◗ If bread gets stuck inside the toaster, remove the plug from the wall socket,
let the appliance cool down completely and carefully remove the bread from
the toaster. Do not use a knife or another sharp metal tool to do this and do
not touch the metal internal parts of the toaster.
Solution
Check if the plug has been properly inserted into the wall
socket.
If the toaster still does not work, take it to a service centre
authorised by Philips for examination.
Unplug the appliance and let it cool down. Carefully remove
the slice or slices from the toaster. Take care not to damage
the heating elements while removing the slice or slices of
bread. Never use a metal object for this purpose.
Check the browning setting selected for toasting. Select a
lower setting next time if your toast is too dark and a higher
setting if your toast is too light.
You have selected a too high setting for the type of bread
inserted. Press the stop button to stop the toasting process.
If the mains cord of this appliance is damaged, it must always
be replaced by Philips, a service centre authorised by Philips
or similarly qualified persons in order to avoid a hazard.
Turn your roll or croissant over and warm it up again. Follow
the instructions in section 'Warming up rolls and croissants'.
Problem
1. The toaster does
not work.
2. Bread gets stuck
in the appliance.
3. The toast is too
dark/too light.
4. Smoke comes
out of the
toaster.
5. The mains cord
is damaged.
6. Only one side of
my roll or
croissant is warm.
Warming up rolls and croissants
1 Place the warming rack on top of the toaster (fig. 7).
Never put the rolls to be heated up directly on top of the toaster
without the warming rack to avoid damaging the toaster.
2 Put the rolls or croissants on top of the warming rack.
Do not warm up more than 2 items at a time.
3 (1)Turn the browning control to the warming setting (¬) and (2) push the
toasting lever down (fig. 8).
If you want to warm the rolls or croissants on both sides, turn them after the toaster
has switched itself off. Leave the browning control on the warming setting (¬) and
switch the toaster on again by pushing the toasting lever down.
Cleaning
.
1 Unplug the appliance.
2 Let the appliance cool down.
3 Clean the appliance with a damp cloth. Do not use abrasive cleaning agents.
Never immerse the appliance in water.
4 Remove crumbs from the appliance by sliding the crumb tray out of the
appliance (fig. 9).
Do not hold the appliance upside down and do not shake it to remove the crumbs.
Environment
.
◗ Do not throw the appliance away with the normal household waste at the end
of its life, but hand it in at an official collection point for recycling. By doing
this you will help to preserve the environment (fig. 10).
Guarantee & service
.
If you need information or if you have a problem, please visit the Philips website at
www.philips.com or contact the Philips Customer Care Centre in your country (you
will find its phone number in the worldwide guarantee leaflet). If there is no
Customer Care Centre in your country, turn to your local Philips dealer or contact
the Service Department of Philips Domestic Appliances and Personal Care BV.
Troubleshooting
.
If problems should arise with your toaster and you are unable to solve them by
means of the information below, contact the Philips Customer Care Centre in your
country.
4222 002 65131
2/8
Page 3
FRANÇAIS
Description générale (fig. 1)
.
A Ramasse-miettes
B Grille de réchauffage
C Manette
D Bouton d'arrêt
E Thermostat
F Fonction de décongélation
G Bouton de réglage
Important
.
Avant d'utiliser l'appareil, lisez les instructions ci-dessous et conservez ce mode
d'emploi pour un usage ultérieur.
◗ Avant de brancher l'appareil, vérifiez que la tension indiquée sur la base
correspond à la tension secteur locale.
◗ Branchez l'appareil uniquement sur une prise murale mise à la terre.
◗ Si le cordon d'alimentation est endommagé, il doit être remplacé par Philips
ou un Centre Service Agréé afin d'éviter tout accident.
◗ Ne plongez jamais l'appareil ou le cordon d'alimentation dans l'eau ou dans
tout autre liquide.
◗ Débranchez toujours l'appareil après utilisation.
◗ Tenez l'appareil hors de portée des enfants.
◗ Ne laissez pas le cordon d'alimentation pendre d'une table ou d'un plan de
travail et tenez-le à l'écart des surfaces chaudes.
◗ Ne laissez jamais l'appareil fonctionner sans surveillance. N'utilisez pas
l'appareil à proximité de matériaux inflammables tels que les rideaux. Ne faites
pas fonctionner l'appareil sous des placards suspendus (le pain risque de
s'enflammer).
◗ Attention: évitez de toucher les parties métalliques du grille-pain car, en cours
de fonctionnement, celle-ci chauffent et atteignent des températures élevées.
Ne touchez que les boutons et lorsque vous manipulez l'appareil, veillez à ne
toucher que les parties en plastique.
◗ Ce grille-pain est destiné à un usage domestique intérieur uniquement.
◗ Pour éviter tout risque d'incendie, retirez fréquemment les miettes qui
s'accumulent dans le ramasse-miettes et veillez à replacer celui-ci
correctement.
◗ Débranchez immédiatement le grille-pain si vous observez de la fumée ou des
flammes.
◗ Si une tranche de pain reste coincée, débranchez le grille-pain et laissez-le
refroidir complètement avant de retirer le pain. N'insérez jamais de couteau
ou d'objet pointu car vous risqueriez d'endommager les résistances.
◗ Afin d'éviter tout risque d'accident, utilisez cet appareil uniquement pour
griller du pain.
◗ N'introduisez pas de tranches de pain trop grandes ou de la nourriture
emballée dans du papier en aluminium car vous risqueriez de provoquer un
incendie ou de vous électrocuter.
◗ Ne placez jamais le grille-pain sur une surface chaude.
◗ Afin d'éviter tout risque d'accident, utilisez la grille de réchauffage uniquement
pour réchauffer des petits pains ou des croissants.
Avant la première utilisation
.
Retirez tous les autocollants et essuyez le grille-pain à l'aide d'un chiffon humide.
Lors de la première utilisation, réglez l'appareil sur le niveau de brunissage maximal et
faites-le fonctionner plusieurs fois sans introduire de tranches de pain, et ce, pour
brûler les particules de poussière qui se sont accumulées sur les éléments chauffants
et éviter qu'une odeur désagréable ne se dégage lorsque vous faites griller votre
tranche de pain.
Utilisation de l'appareil
.
1 Placez l'appareil sur une surface plane et stable, loin de tout matériau
inflammable, tel que des rideaux. Ensuite, branchez-le sur la prise secteur.
◗ Si nécessaire, enroulez le cordon autour des crochets situés en dessous de
l'appareil pour en ajuster la longueur (fig. 2).
Grillage du pain
Ne laissez jamais le grille-pain fonctionner sans surveillance.
1 Insérez une ou deux tranches de pain dans le grille-pain (fig. 3).
2 Sélectionnez le degré de brunissage désiré (fig. 4).
Sélectionnez un faible degré (1-2) si vous souhaitez obtenir un pain légèrement doré.
Pour un brunissage plus prononcé, utilisez un degré élevé (5-7). Sélectionnez la
fonction de décongélation — (réglage 6 à 7, selon le degré de brunissage désiré)
pour faire griller du pain congelé.
3 Abaissez la manette pour mettre l'appareil en marche (fig. 5).
La manette ne restera en position que si l'appareil est branché sur le secteur.
Étant donné que les parties métalliques chauffent pendant l'utilisation,
veillez à ne pas les toucher.
4 Lorsque le pain est prêt, la manette remonte et l'appareil s'éteint
automatiquement.
Solution
Vérifiez si le cordon d'alimentation est correctement inséré
dans la prise secteur.
Si le grille-pain ne fonctionne toujours pas, confiez-le à un
Centre Service Agréé Philips pour vérification.
Débranchez le grille-pain et laissez-le refroidir. Retirez le pain
avec précaution. Veillez à ne pas endommager les résistances.
N'introduisez jamais d'objet métallique dans le grille-pain.
Vérifiez le degré de brunissage choisi. Sélectionnez un degré
inférieur si le pain est trop grillé et un degré supérieur si le
pain n'est pas assez grillé.
Vous avez choisi un réglage trop élevé pour le type de pain
inséré. Appuyez sur le bouton d'arrêt.
Si le cordon d'alimentation est endommagé, il ne peut être
remplacé que par Philips ou un Centre Service Agréé afin
d'éviter tout accident.
Tournez le petit pain ou le croissant et réchauffez-le à
nouveau. Suivez les instructions du chapitre « Réchauffage de
petits pains ou de croissants ».
Problème
1. Le grille-pain ne
fonctionne pas.
2. Une tranche de
pain est restée
coincée.
3. Le pain est trop
grillé/n'est pas
assez grillé.
4. De la fumée se
dégage de
l'appareil.
5. Le cordon
d'alimentation
est endommagé.
6. Une face du petit
pain ou du
croissant n'a pas
été chauffée.
◗ L'appareil s'éteint automatiquement. Vous pouvez suspendre le brunissage et
éjecter le pain à tout moment en appuyant sur le bouton d'arrêt situé sur la
face latérale du grille-pain (fig. 6).
◗ Pour retirer des tranches de pain de petite taille, il suffit de relever la manette
un peu plus haut.
◗ Si une tranche reste coincée, débranchez la fiche d'alimentation de la prise
murale, laissez le grille-pain refroidir et retirez soigneusement la tranche du
grille-pain. N'introduisez jamais de couteau ou autre objet pointu dans le
grille-pain et veillez à ne pas toucher les parties métalliques de l'appareil.
Réchauffage de petits pains ou de croissants
1 Placez la grille de réchauffage sur le grille-pain (fig. 7).
Ne mettez jamais les petits pains à réchauffer directement sur le grille-pain, au
risque de provoquer des dommages à l'appareil.
2 Mettez les petits pains ou les croissants sur la grille de réchauffage.
Ne faites pas chauffer plus de 2 petits pains à la fois.
3 (1) Réglez le brunissage à la température désirée (¬) et (2) abaissez la
manette (fig. 8).
Si vous voulez faire chauffer les petits pains ou les croissants sur les deux faces,
tournez-les une fois que le grille-pain s'est arrêté. Laissez le bouton sur la position de
chauffage (¬) et remettez l'appareil en marche en abaissant la manette.
Nettoyage
.
1 Débranchez l'appareil.
2 Laissez refroidir l'appareil.
3 Nettoyez le grille-pain à l'aide d'un chiffon humide. N'utilisez pas de produits
abrasifs.
Ne plongez jamais l'appareil dans l'eau.
4 Pour retirer les miettes de l'appareil, ouvrez le ramasse-miettes (fig. 9).
Ne retournez pas l'appareil et ne le secouez pas pour enlever les miettes.
Environnement
.
◗ Lorsqu'il ne fonctionnera plus, ne jetez pas l'appareil avec les ordures
ménagères mais déposez-le à un endroit assigné à cet effet, où il pourra être
recyclé. Vous contribuerez ainsi à la protection de l'environnement (fig. 10).
Garantie et service
.
Si vous souhaitez obtenir des informations supplémentaires ou si vous rencontrez un
problème, visitez le site Web de Philips à l'adresse www.philips.com ou contactez le
Service Consommateurs Philips de votre pays (vous trouverez le numéro de
téléphone correspondant sur le dépliant de garantie internationale). S'il n'existe pas
de Service Consommateurs Philips dans votre pays, renseignez-vous auprès de votre
revendeur local ou contactez le « Service Department of Philips Domestic
Appliances and Personal Care BV ».
Dépannage
.
Si vous rencontrez des problèmes avec votre grille-pain et que vous ne pouvez pas
les résoudre à l'aide du tableau ci-dessous, contactez le Service Consommateurs
Philips de votre pays.
4222 002 65131
3/8
Page 4

DEUTSCH
Allgemeine Beschreibung (Abbildung 1)
.
A Krümelschublade
B Brötchenaufsatz
C Schiebeschalter
D Stopptaste
E Aufbackeinstellung
F Auftaufunktion
G Röstgradkontrolle
Wichtig
.
Lesen Sie diese Bedienungsanleitung vor dem ersten Gebrauch des Geräts sorgfältig
durch und bewahren Sie sie zur späteren Einsichtnahme auf.
◗ Prüfen Sie vor dem Anschließen des Gerätes, ob die Spannungsangabe auf der
Unterseite des Gerätes mit der örtlichen Netzspannung übereinstimmt.
◗ Schließen Sie das Gerät nur an eine Schuko-Steckdose an.
◗ Wenn das Netzkabel defekt oder beschädigt ist, darf es nur von einem Philips
Service-Center oder einer von Philips autorisierten Werkstatt durch ein
Original-Ersatzkabel ausgetauscht werden, um Gefährdungen zu vermeiden.
◗ Tauchen Sie das Gerät und das Netzkabel nicht in Wasser oder andere
Flüssigkeiten.
◗ Ziehen Sie nach dem Gebrauch stets den Netzstecker aus der Steckdose.
◗ Halten Sie das Gerät außer Reichweite von Kindern.
◗ Lassen Sie das Netzkabel nicht über den Rand der Tisch- oder Arbeitsplatte
hängen, auf der das Gerät steht, und halten Sie das Kabel fern von heißen
Oberflächen.
◗ Lassen Sie das eingeschaltete Gerät nicht unbeaufsichtigt. Betreiben sie es
nicht unter Wandschränken oder in der Nähe von Gardinen oder anderen
leicht brennbaren Materialien, da Brot in Brand geraten kann.
◗ Vermeiden Sie jede Berührung mit den Metallteilen des Geräts, da diese beim
Toasten sehr heiß werden. Berühren Sie nur die Tasten und Griffe und heben
Sie das Gerät am Kunststoffgehäuse an.
◗ Der Toaster ist ausschließlich für den häuslichen Gebrauch vorgesehen und
darf nur drinnen betrieben werden.
◗ Um das Risiko eines Brandes zu vermeiden, sollten Sie die Brotkrümel
regelmäßig aus der Krümelschublade entfernen. Achten Sie darauf, die
Krümelschublade wieder richtig in das Gerät zu schieben.
◗ Ziehen Sie sofort den Netzstecker aus der Steckdose, wenn Sie Rauch oder
Feuer bemerken.
◗ Wenn eine Scheibe Brot im Toaster klemmt: Ziehen Sie den Netzstecker aus
der Steckdose und lassen Sie das Gerät völlig abkühlen. Entfernen Sie dann das
eingeklemmte Brot aus dem Toaster. Verwenden Sie hierzu keine Teile aus
Metall, weil dies die Heizelemente des Toasters beschädigen könnte.
◗ Verwenden Sie dieses Gerät ausschließlich zum Toasten von Brot. Bei
anderem Toastgut könnte es zu Brand, Stromschlag und anderen Unfällen
kommen.
◗ Übergroße Brotscheiben und Verpackungen aus Metallfolie dürfen nicht in den
Toaster eingeführt werden, da dies zu Bränden und Stromschlägen führen kann.
◗ Stellen Sie den Toaster nicht auf heiße Flächen.
◗ Der Brötchenaufsatz ist nur zum Aufbacken von Brötchen und Croissants
vorgesehen. Legen Sie keine anderen Lebensmittel auf den Brötchenaufsatz, da
dies zu Brand und Geräteschaden führen kann.
Vor dem ersten Gebrauch
.
Ziehen Sie alle Aufkleber ab und reinigen Sie das Gehäuse des Toasters mit einem
feuchten Tuch.
Vor dem ersten Gebrauch des Geräts empfiehlt es sich, den Toaster in einem gut
belüfteten Raum mehrmals ohne Brot auf der höchsten Röststufe zu betreiben.
Dadurch werden Staubpartikel verbrannt, die sich möglicherweise auf den
Heizelementen angesammelt haben und einen unangenehmen Geruch beim Toasten
von Brot verursachen können.
Der Gebrauch des Geräts
.
1 Stellen Sie den Toaster auf eine stabile, ebene Fläche. Achten Sie auf
ausreichende Entfernung zu Gardinen und anderen leicht brennbaren
Materialien. Stecken Sie den Netzstecker in die Steckdose.
◗ Überschüssiges Netzkabel lässt sich um die Vorsprünge an der Unterseite des
Geräts aufwickeln (Abbildung 2).
Brot toasten
Lassen Sie das eingeschaltete Gerät niemals unbeaufsichtigt.
1 Geben Sie eine oder zwei Scheiben Brot in den Toaster (Abbildung 3).
2 Wählen Sie die Einstellung für den gewünschten Röstgrad (Abbildung 4).
Wählen Sie eine niedrige Einstellung (1 - 2) für hellen Toast und eine hohe
Einstellung (5 - 7) für dunkelbraunen Toast. Wählen Sie die Auftaufunktion —
(Einstellung 6 oder 7, je nach gewünschtem Röstgrad) zum Toasten von gefrorenem
Brot.
3 Drücken Sie den Schiebeschalter nach unten, um das Gerät einzuschalten
(Abbildung 5).
Nur wenn das Gerät an das Stromnetz angeschlossen ist, rastet der Schiebeschalter in
der unteren Position ein.
Die Metallteile werden während des Toastens heiß. Vermeiden Sie jede
Berührung.
4 Wenn der Toast fertig ist, wird er ausgeworfen, und der Toaster schaltet sich
aus.
◗ Der Toaster schaltet sich automatisch aus. Sie können den Toastvorgang
jederzeit abbrechen, indem Sie die Stopptaste an der Seite des Toasters
drücken. Das Brot wird sofort ausgeworfen (Abbildung 6).
◗ Zum Entnehmen von kleinem Toastgut können Sie den Schiebeschalter etwas
weiter nach oben heben.
◗ Wenn eine Scheibe Brot im Toaster klemmt, ziehen Sie den Netzstecker aus
der Steckdose und lassen Sie das Gerät völlig abkühlen, bevor Sie das Brot
vorsichtig entfernen. Verwenden Sie hierzu kein Messer oder andere spitze
Gegenstände aus Metall, und vermeiden Sie jede Berührung mit den inneren
Metallteilen des Toasters.
Brötchen und Croissants aufbacken
1 Setzen Sie den Brötchenaufsatz fest auf den Toaster (Abbildung 7).
Legen Sie niemals Brötchen ohne den Brötchenaufsatz auf den Toaster, da
andernfalls das Gerät beschädigt werden kann.
2 Legen Sie die Brötchen/Croissants auf den Brötchenaufsatz.
Wärmen Sie nicht mehr als 2 Brötchen/Croissants gleichzeitig auf.
3 (1) Stellen Sie den Röstgrad auf die Aufbackeinstellung (¬), und (2) drücken
Sie den Schiebeschalter nach unten (Abbildung 8).
Wenn Sie Brötchen oder Croissants von beiden Seiten aufbacken möchten, wenden
Sie sie, nachdem sich der Toaster ausgeschaltet hat. Ändern Sie die
Aufbackeinstellung (¬) nicht, und schalten Sie das Gerät durch Drücken des
Schiebeschalters wieder ein.
Reinigung
.
1 Ziehen Sie den Netzstecker aus der Steckdose.
2 Lassen Sie das Gerät abkühlen.
3 Reinigen Sie das Gerät mit einem feuchten Tuch. Verwenden Sie keine
Scheuermittel.
Tauchen Sie das Gerät niemals in Wasser!
4 Ziehen Sie die Krümelschublade aus dem Gerät, um Brotkrumen aus dem
Gerät zu entfernen (Abbildung 9).
Schütteln Sie die Krümel nicht aus dem umgekehrt gehaltenen Gerät.
Umweltschutz
.
◗ Geben Sie das Gerät am Ende der Lebensdauer nicht in den normalen
Hausmüll. Bringen Sie es zum Recycling zu einer offiziellen Sammelstelle. Auf
diese Weise helfen Sie die Umwelt zu schonen (Abbildung 10).
Garantie und Kundendienst
.
Benötigen Sie weitere Informationen oder treten Probleme auf, wenden Sie sich bitte
an Ihren Philips-Händler oder setzen Sie sich mit einem Philips Service-Center in
Ihrem Land in Verbindung (Tel. Nr. 0180/5356767). Besuchen Sie auch die Philips
Website (www.philips.com).
4222 002 65131
4/8
Page 5

Problembehebung
.
Sollten Sie mit Ihrem Toaster Probleme haben, die sich mithilfe der nachstehenden
Informationen nicht beheben lassen, wenden Sie sich bitte an das Philips ServiceCenter in Ihrem Land.
Lösungsvorschlag
Prüfen Sie, ob der Netzstecker richtig in der Steckdose sitzt.
Wenn der Toaster dann immer noch nicht funktioniert, sollten
Sie ihn von einem Philips Service Center überprüfen lassen.
Ziehen Sie den Stecker aus der Steckdose und lassen Sie das
Gerät abkühlen. Entfernen Sie die Brotscheibe(n) vorsichtig
aus dem Toaster. Achten Sie darauf, die Heizelemente nicht
zu beschädigen. Verwenden Sie zu diesem Zweck keine
Gegenstände aus Metall.
Überprüfen Sie die gewählte Röstgradeinstellung. Wählen Sie
beim nächsten Mal einen niedrigeren Röstgrad, wenn der
Toast zu dunkel ist, bzw. einen höheren Röstgrad, wenn der
Toast zu hell ist.
Sie haben einen zu hohen Röstgrad für die betreffende
Brotsorte gewählt. Drücken Sie die Stopptaste, um den
Toastvorgang abzubrechen.
Ist das Netzkabel defekt, darf es nur von einem Philips ServiceCenter oder einer von Philips autorisierten Werkstatt durch
ein Original-Ersatzkabel ausgetauscht werden, um
Gefährdungen zu vermeiden.
Wenden Sie das Brötchen bzw. Croissant, und backen Sie es
erneut auf. Befolgen Sie die Anleitungen im Abschnitt
"Brötchen und Croissants aufbacken".
Problem
1. Der Toaster
funktioniert nicht.
2. Brot bleibt im
Gerät stecken.
3. Der Toast ist zu
dunkel bzw. zu
hell.
4. Aus dem Toaster
tritt Rauch aus.
5. Das Netzkabel
ist beschädigt.
6. Nur eine Seite
des
Brötchens/Croiss
ants ist warm.
4222 002 65131
5/8
Page 6

NEDERLANDS
Algemene beschrijving (fig. 1)
.
A Kruimellade
B Opwarmrek
C Roosterknop
D Stopknop
E Opwarmstand
F Ontdooifunctie
G Bruiningsknop
Belangrijk
.
Lees deze gebruiksaanwijzing zorgvuldig door voordat u het apparaat gaat gebruiken.
Bewaar de gebruiksaanwijzing om deze indien nodig te kunnen raadplegen.
◗ Controleer of het voltage aangegeven op de onderkant van het apparaat
overeenkomt met de plaatselijke netspanning voordat u het apparaat aansluit.
◗ Sluit het apparaat alleen aan op een geaard stopcontact.
◗ Indien het netsnoer beschadigd is, moet het worden vervangen door Philips,
een door Philips geautoriseerd servicecentrum of personen met vergelijkbare
kwalificaties om gevaar te voorkomen.
◗ Dompel het apparaat en het netsnoer niet in water of een andere vloeistof.
◗ Haal na gebruik altijd de stekker uit het stopcontact.
◗ Houd het apparaat buiten het bereik van kinderen.
◗ Laat het netsnoer niet over de rand van de tafel of het aanrecht hangen waarop
het apparaat staat en houd het netsnoer uit de buurt van hete oppervlakken.
◗ Laat het apparaat nooit zonder toezicht werken. Gebruik het apparaat niet
onder of in de nabijheid van gordijnen of andere brandbare materialen en ook
niet onder hangende keukenkastjes, omdat brood vlam kan vatten.
◗ Raak de metalen delen van de broodrooster niet aan, omdat deze tijdens het
roosteren zeer heet worden. Raak alleen de knoppen aan en til het apparaat
op door de kunststof behuizing vast te pakken.
◗ De broodrooster is uitsluitend bedoeld voor huishoudelijk gebruik en mag
alleen binnenshuis worden gebruikt.
◗ Om brandgevaar te voorkomen moet de kruimellade regelmatig worden
geleegd. Zorg ervoor dat de kruimellade goed in het apparaat zit.
◗ Haal direct de stekker uit het stopcontact indien u vuur of rook waarneemt.
◗ Als een sneetje brood vast komt te zitten in het apparaat, haal dan de stekker
uit het stopcontact en laat het apparaat afkoelen voordat u het brood
verwijdert. Gebruik hiervoor geen mes of ander scherp voorwerp, omdat dit
schade aan de verwarmingselementen kan veroorzaken.
◗ De broodrooster is uitsluitend bedoeld voor het roosteren van brood. Doe
geen andere ingrediënten in het apparaat, aangezien dit tot gevaarlijke situaties
kan leiden.
◗ Grote stukken brood en verpakkingen van aluminiumfolie mogen niet in de
broodrooster worden gestoken, omdat dit brand of elektrische schokken kan
veroorzaken.
◗ Plaats de broodrooster niet op een hete ondergrond.
◗ Het opwarmrek is uitsluitend bedoeld voor het opwarmen van broodjes en
croissants. Leg geen andere producten op het opwarmrek, aangezien dit tot
gevaarlijke situaties kan leiden.
Voor het eerste gebruik
.
Verwijder eventuele stickers van de broodrooster en maak de behuizing schoon met
een vochtige doek.
Voordat u het apparaat voor de eerste keer gebruikt, raden we u aan het apparaat in
een goed geventileerde kamer enkele keren op de hoogste bruiningsstand te laten
werken zonder dat er brood in zit. Hierdoor zal het stof dat zich eventueel op de
verwarmingselementen heeft verzameld, worden weggebrand en wordt het ontstaan
van onaangename geurtjes tijdens het roosteren voorkomen.
Het apparaat gebruiken
.
1 Plaats het apparaat op een stabiele en vlakke ondergrond, uit de buurt van
gordijnen en andere brandbare materialen. Steek de stekker in het
stopcontact.
◗ U kunt de lengte van het snoer aanpassen door een deel van het snoer rond
de haken aan de onderzijde van het apparaat te wikkelen (fig. 2).
Brood roosteren
Laat de broodrooster nooit zonder toezicht werken.
1 Plaats een of twee sneetjes brood in de broodrooster (fig. 3).
2 Stel de gewenste bruiningsstand in (fig. 4).
Kies een lage stand (1-2) voor licht geroosterd brood en een hoge stand (5-7) voor
donker geroosterd brood. Kies de ontdooistand — (standen 6 t/m 7, afhankelijk van
de gewenste bruiningsgraad) voor het roosteren van bevroren brood.
3 Duw de roosterknop naar beneden om het apparaat in te schakelen (fig. 5).
De roosterknop blijft alleen omlaag indien het apparaat op netspanning aangesloten is.
De metalen delen van de broodrooster worden heet tijdens het roosteren.
Raak deze delen niet aan.
4 Als het roosterproces is voltooid, springt de roosterknop omhoog en schakelt
de broodrooster uit.
Oplossing
Controleer of de stekker goed in het stopcontact zit.
Als de broodrooster nu nog steeds niet werkt, breng het
apparaat dan naar een door Philips geautoriseerd
servicecentrum voor onderzoek.
Haal de stekker uit het stopcontact en laat het apparaat
afkoelen. Verwijder het brood voorzichtig uit de broodrooster.
Zorg ervoor dat u de verwarmingselementen niet beschadigt
wanneer u het brood verwijdert. Gebruik nooit een metalen
voorwerp om brood uit de broodrooster te verwijderen.
Controleer de ingestelde bruiningsstand. Stel een lagere stand
in als het geroosterde brood te donker is of een hogere stand
als het te licht is.
U hebt een bruiningsstand ingesteld die te hoog is voor het
type brood dat u aan het roosteren bent. Druk op de
stopknop om het roosterproces te beëindigen.
Indien het netsnoer beschadigd is, moet het altijd worden
vervangen door Philips, een door Philips geautoriseerd
servicecentrum of personen met vergelijkbare kwalificaties om
gevaar te voorkomen.
Draai uw broodje of croissantje om en warm het nog een
keer op. Volg de instructies in 'Broodjes en croissants
opwarmen'.
Probleem
1. De broodrooster
werkt niet.
2. Het brood zit
vast in de
broodrooster.
3. Het geroosterde
brood is te
donker/te licht.
4. Er komt rook uit
de broodrooster.
5. Het netsnoer is
beschadigd.
6. Mijn broodje of
croissant is maar
aan één kant
warm.
◗ De broodrooster schakelt automatisch uit. U kunt het roosterproces op ieder
gewenst moment onderbreken en het brood omhoog laten komen door op
de stopknop aan de zijkant van de broodrooster te drukken (fig. 6).
◗ Om kleinere stukken brood te verwijderen, kunt u de roosterknop iets
verder omhoog duwen.
◗ Als er brood in de broodrooster vast komt te zitten, haal dan de stekker uit het
stopcontact, laat het apparaat volledig afkoelen en verwijder het brood
voorzichting uit de broodrooster. Gebruik hiervoor geen mes of ander scherp
metalen voorwerp en raak de metalen onderdelen in de broodrooster niet aan.
Broodjes en croissants opwarmen
1 Plaats het opwarmrek op de broodrooster (fig. 7).
Plaats de op te warmen broodjes nooit rechtstreeks op de broodrooster
zonder het opwarmrek om schade aan de broodrooster te voorkomen.
2 Plaats de broodjes of croissants boven op het opwarmrek.
Warm niet meer dan 2 broodjes of croissants tegelijk op.
3 (1) Draai de bruiningsknop naar de opwarmstand (¬) en (2) druk de
roosterknop naar beneden (fig. 8).
Als u de broodjes of croissants aan beide zijden wilt opwarmen, draait u ze om nadat
de broodrooster automatisch is uitgeschakeld. Laat de bruiningsknop op de
opwarmstand (¬) staan en schakel de broodrooster opnieuw in door de
roosterknop naar beneden te drukken.
Schoonmaken
.
1 Haal de stekker uit het stopcontact.
2 Laat het apparaat afkoelen.
3 Maak het apparaat schoon met een vochtige doek. Gebruik geen schurende
schoonmaakmiddelen.
Dompel het apparaat nooit in water.
4 Verwijder kruimels door de kruimellade uit het apparaat te trekken (fig. 9).
Houd het apparaat niet ondersteboven en schud het niet om kruimels te
verwijderen.
Milieu
.
◗ Gooi het apparaat aan het einde van zijn levensduur niet weg met het normale
huisvuil, maar lever het in op een door de overheid aangewezen inzamelpunt
om het te laten recyclen. Op die manier levert u een bijdrage aan een
schonere leefomgeving (fig. 10).
Garantie & service
.
Als u informatie nodig hebt of als u een probleem hebt, bezoek dan de Philips-website
(www.philips.com), of neem contact op met het Philips Customer Care Centre in uw
land (u vindt het telefoonnummer in het 'worldwide guarantee'-vouwblad). Als er geen
Customer Care Centre in uw land is, gaat u naar uw Philips-dealer of neemt u contact
op met de afdeling Service van Philips Domestic Appliances and Personal Care BV.
Problemen oplossen
.
Als u een probleem hebt met de broodrooster en u er niet in slaagt dit probleem op
te lossen met behulp van de informatie hieronder, neem dan contact op met het
Philips Customer Care Centre in uw land.
4222 002 65131
6/8
Page 7

ČEŠTINA
Všeobecný popis (obr. 1)
.
A Zásuvka na drobky
B Rozpékací držák
C Páčka topinkovače
D Tlačítko stop
E Nastavení rozpékání
F Funkce rozmrazení
G Regulátor zhnědnutí
Důležité
.
Před použitím přístroje si přečtěte pečlivě tento návod a uschovejte ho pro případné
pozdější nahlédnutí.
◗ Zkontrolujte, zda napětí uvedené na spodní části přístroje odpovídá napětí
sítě. Teprve pak připojte přístroj k napájení.
◗ Přístroj připojujte výhradně do řádně uzemněných zásuvek.
◗ Pokud by byla poškozena síťová šňůra, musí její výměnu provést společnost
Philips, servis autorizovaný společností Philips nebo obdobně kvalifikovaní
pracovníci, abyste předešli možnému nebezpečí.
◗ Přístroj ani síťovou šňůru neponořujte do vody či jiné kapaliny.
◗ Po použití přístroj vždy odpojte ze sítě.
◗ Přístroj neponechávejte v dosahu dětí.
◗ Síťová šňůra nesmí viset přes hranu stolu nebo pracovní plochy, na které je
přístroj umístěn. Chraňte šňůru před horkými plochami.
◗ Přístroj nenechávejte v chodu bez dozoru. Nepoužívejte ho v blízkosti záclon
nebo jiného hořlavého materiálu nebo uvnitř kuchyňských skříněk; pečivo
může vzplanout.
◗ Při provozu přístroje se nedotýkejte jeho kovových částí, protože jsou během
opékání velmi horké. Dotýkejte se vždy pouze prvků, které jsou z plastických
hmot, a zvedejte přístroj pouze za plastovou část.
◗ Topinkovač je určen výhradně pro použití v domácnosti a nesmí se používat
venku.
◗ Abyste se vyhnuli nebezpečí požáru, pravidelně čistěte zásuvku na drobky a
kontrolujte, zda je řádně zasunuta.
◗ Pokud si všimnete kouře nebo plamenů, ihned přístroj vypněte.
◗ Pokud v přístroji uvízne krajíček chleba, odpojte přístroj ze sítě, nechte jej zcela
vychladnout a pak kousky pečiva opatrně vyjměte. K vyjímání nepoužívejte nůž
ani jiný ostrý kovový nástroj, abyste nepoškodili topná tělíska.
◗ Přístroj je určen pouze pro opékání chleba. Aby bylo používání přístroje
bezpečné, nevkládejte do přístroje jiné potraviny.
◗ Do přístroje se nesmí vkládat nadměrně velké potraviny ani potraviny
zabalené v kovové fólii, protože by mohlo dojít k požáru nebo úrazu
elektrickým proudem.
◗ Topinkovač nestavte na horkou podložku.
◗ Rozpékací držák lze použít pouze na rozpečení rohlíků nebo croissantů.
Nepokládejte na něj jiné potraviny, mohlo by to být nebezpečné.
Před prvním použitím
.
Odstraňte z přístroje veškeré nálepky a povrch přístroje otřete navlhčeným hadříkem.
Před prvním použitím přístroje doporučujeme nechat přístroj v dostatečně větrané
místnosti provést několik opékacích cyklů bez vloženého pečiva a s nastavením
maximálního zhnědnutí. Zlikvidují se tak zbytky prachu nashromážděného na topných
tělesech a při opékání chleba nebude vznikat nepříjemný pach.
Použití přístroje
.
1 Přístroj umístěte na pevnou a rovnou podložku v dostatečné vzdálenosti od
záclon a jiných hořlavých materiálů. Zástrčku zapojte do zásuvky.
◗ Délku síťové šňůry můžete upravit ovinutím její části kolem držáků v základně
přístroje (obr. 2).
Opékání pečiva
Nikdy nenechte přístroj v chodu bez dozoru.
1 Do topinkovače vložte jeden nebo dva plátky pečiva (obr. 3).
2 Vyberte požadovaný stupeň zhnědnutí (obr. 4).
Pro mírně opečený chléb zvolte nižší nastavení zhnědnutí (1 – 2) a pro tmavší chléb
vyšší nastavení (5 – 7). Při opékání zmraženého pečiva použijte funkci rozmrazování
— (nastavení 6 až 7 podle požadovaného stupně zhnědnutí).
3 Stlačením páčky topinkovače směrem dolů přístroj zapněte (obr. 5).
Páčka zůstane v dolní poloze pouze v případě, že přístroj připojen k napájení.
Kovové části přístroje jsou během opékání horké. Dejte pozor, abyste se jich
nedotkli.
4 Když je pečivo opečené, vysune se z topinkovače a přístroj se vypne.
◗ Topinkovač se vypíná automaticky. Je však možné jej kdykoli vypnout ručně a
vysunout opékané pečivo stisknutím tlačítka pro přerušení provozu na boční
straně přístroje (obr. 6).
◗ Chcete-li vyjmout menší pečivo, můžete páčku topinkovače posunout výš.
◗ Pokud pečivo uvízne v přístroji, odpojte přístroj ze sítě, nechte jej zcela
vychladnout a pak kousky pečiva opatrně vyjměte. K vyjímání nepoužívejte nůž
ani jiný ostrý kovový nástroj a nedotýkejte se vnitřních kovových částí přístroje.
Řešení
Zkontrolujte, zda byla síťová zástrčka řádně zasunuta do
síťové zásuvky.
Pokud přístroj stále nefunguje, předejte ho k prohlídce do
autorizovaného servisu společnosti Philips.
Odpojte topinkovač od sítě a nechte ho vychladnout. Pak
opatrně vyjměte kousky pečiva z přístroje. Dbejte přitom na
to, abyste nepoškodili topná tělíska. K této práci proto nikdy
nepoužívejte kovové nástroje.
Zkontrolujte nastavení regulátoru zhnědnutí. Pokud jsou
topinky příliš tmavé, nastavte nižší úroveň, pokud jsou topinky
příliš světlé, nastavte vyšší úroveň.
Zřejmě jste zvolili příliš vysoké nastavení pro dané pečivo.
Přerušte opékání stisknutím tlačítka stop.
Pokud by se u přístroje poškodila síťová šňůra, musí být její
výměna svěřena společnosti Philips anebo autorizovanému
servisnímu středisku společnosti Philips anebo jiným příslušně
kvalifikovaným osobám. Zamezíte tak vzniku nebezpečných
situací.
Rohlík nebo croissant obraťte a rozpečte i druhou stranu.
Postupujte podle pokynů v části Rozpékání rohlíků a
croissantů.
Problém
1. Topinkovač
nefunguje.
2. Pečivo uvízlo v
přístroji.
3. Topinky jsou
příliš tmavé nebo
světlé.
4. Z přístroje
vystupuje kouř.
5. Je poškozena
síťová šňůra.
6. Pouze jedna
strana rohlíku
nebo croissantu
je horká.
Rozpékání rohlíků a croissantů
1 Nasaďte rozpékací držák na přístroj (obr. 7).
Nikdy nepokládejte pečivo určené k rozpečení přímo na horní stranu topinkovače
bez použití rozpékacího držáku. Mohlo by dojít k poškození přístroje.
2 Položte rohlíky nebo croissanty na rozpékací držák.
Nerozpékejte více než 2 kusy pečiva současně.
3 (1)Otočte regulátor zhnědnutí do polohy pro rozpékání (¬) a (2) stlačte
páčku topinkovače dolů (obr. 8).
Jestliže chcete rozpéct rohlíky nebo croissanty po obou stranách, vyčkejte, až se
opékač automaticky vypne a pak pečivo obraťte. Ponechte regulátor zhnědnutí v
poloze pro rozpékání (¬) a znovu zapněte přístroj stisknutím páčky topinkovače
směrem dolů.
Čištění
.
1 Odpojte přístroj od sítě.
2 Nechte přístroj vychladnout.
3 Přístroj čistěte pouze navlhčeným hadříkem. Nepoužívejte žádné abrazivní
přípravky.
Přístroj neponořujte do vody.
4 Vysuňte zásuvku z přístroje a vysypte drobky, které se v zásuvce nahromadily
(obr. 9).
Neobracejte přístroj vzhůru nohama a nevysypávejte drobky tímto způsobem.
Ochrana životního prostředí
.
◗ Až přístroj doslouží, nevyhazujte jej do běžného komunálního odpadu, ale
odevzdejte jej do sběrny určené pro recyklaci. Chráníte tím životní prostředí
(obr. 10).
Záruka a servis
.
Pokud byste měli jakýkoliv problém nebo byste potřebovali nějakou informaci,
navštivte webovou stránku www.philips.com, nebo kontaktujte Informační středisko
firmy Philips. Adresu, telefonní čísla a další spojení na Informační servis najdete v
letáčku s celosvětovou zárukou. Pokud není Informační středisko ve vaší zemi, můžete
kontaktovat místního dodavatele výrobků Philips nebo oddělení Service Department
of Philips Domestic Appliances and Personal Care BV.
Řešení problémů
.
Pokud by se u topinkovače vyskytl problém, který byste nedovedli vyřešit podle
následujících pokynů, kontaktujte Středisko péče o zákazníky společnosti Philips ve své
zemi.
4222 002 65131
7/8
Page 8

SLOVENSKY
Opis zariadenia (obr. 1)
.
A Podnos na odrobinky
B Rošt na ohrievanie
C Páka hriankovača
D Tlačidlo STOP
E Poloha ohrievania
F Funkcia rozmrazovania
G Nastavenie intenzity zhnednutia
Dôležité
.
Pred použitím zariadenia si pozorne prečítajte tieto pokyny na použitie a uschovajte
ich pre referenciu do budúcnosti.
◗ Pred zapojením zariadenia skontrolujte, či napätie uvedené na spodnej časti
zariadenia súhlasí s napätím v sieti vo vašej domácnosti.
◗ Zariadenie pripojte jedine do uzemnenej zásuvky.
◗ Ak je poškodený sieťový kábel, smie ho vymeniť jedine personál spoločnosti
Philips, servisného centra autorizovaného spoločnosťou Philips alebo iná
kvalifikovaná osoba, aby sa predišlo nebezpečným situáciám.
◗ Zariadenie ani kábel neponárajte do vody ani do žiadnej inej kvapaliny.
◗ Po použití vždy odpojte zariadenie zo siete.
◗ Zariadenie odkladajte mimo dosahu detí.
◗ Kábel nenechajte prevísať cez hranu stola alebo kuchynskej linky, na ktorej
zariadenie stojí. Kábel sa nesmie dotýkať horúcich povrchov.
◗ Keď je zariadenie zapnuté, nenechávajte ho bez dozoru. Hriankovač
nepoužívajte pod alebo v blízkosti záclon ani iných horľavých materiálov, ani
pod zavesenými skrinkami, pretože chlieb môže začať horieť.
◗ Nedotýkajte sa kovových častí hriankovača, lebo sa počas jeho činnosti
zohrejú na vysokú teplotu. Dotknúť sa môžete len jeho ovládacích prvkov a
zdvíhajte ho tak, že uchopíte jeho plastové telo.
◗ Hriankovač je určený len na použitie v domácnosti a môže sa používať len v
interiéri.
◗ Aby ste predišli riziku požiaru, pravidelne vyprázdňujte podnos na odrobinky.
Postarajte sa, aby ste podnos riadne zasunuli na miesto.
◗ Ak zbadáte oheň alebo dym, hriankovač okamžite odpojte zo siete.
◗ Ak sa v hriankovači vzprieči chlieb, zariadenie odpojte zo siete a nechajte ho
vychladnúť. Až potom sa pokúste odstrániť vzpriečený chlieb. Nepoužívajte na
to nôž ani iné ostré predmety, pretože by ste mohli poškodiť ohrevné telesá
hriankovača.
◗ Zariadenie je určenie len na hriankovanie chleba. Nevkladajte do neho iné
suroviny, pretože by mohla nastať nebezpečná situácia.
◗ Do zariadenia nevkladajte väčšie kusy chleba ani alobal, pretože by ste mohli
spôsobiť požiar alebo úraz elektrickým prúdom.
◗ Hriankovač nesmiete položiť na horúci povrch.
◗ Rošt na ohrievanie je určený len na ohrievanie rožkov a croissantov.
Neukladajte naň iné suroviny, pretože by mohla vzniknúť nebezpečná situácia.
Pred prvým použitím
.
Odstráňte všetky nálepky a otrite telo hriankovača navlhčenou tkaninou.
Pred prvým použitím hriankovača vám odporúčame v dobre vetranej miestnosti
nechať zariadenie niekoľkokrát zohriať pri najvyššom nastavení intenzity zhnednutia
bez toho, aby ste doňho vložili chlieb. Vypáli sa tak prach nahromadený na ohrevných
telesách, ktorý by spôsobil nepríjemný zápach pri hriankovaní chleba.
Použitie zariadenia
.
1 Zariadenie postavte na stabilný rovný povrch preč od záclon a iných horľavých
materiálov. Pripojte ho do siete.
◗ Môžete nastaviť aj dĺžku napájacieho kábla tak, že jeho prebytočnú časť
naviniete na cievku v spodnej časti zariadenia (obr. 2).
Hriankovanie chleba
Zariadenie nenechávajte nikdy bez dozoru.
1 Do hriankovača vložte jeden alebo dva krajce chleba (obr. 3).
2 Zvoľte intenzitu zhnednutia (obr. 4).
Zvoľte nízke nastavenie (1-2) na prípravu jemne opečeného chleba a vysoké
nastavenie (5-7) na prípravu silno opečeného chlieb. Pri hriankovaní zamrznutého
chleba zvoľte funkciu rozmrazovania — (nastavenie 6 až 7 v závislosti od
požadovaného stupňa zhnednutia).
3 Zatlačte páku hriankovača nadol, aby ste zariadenie zapli (obr. 5).
Páka hriankovača zostane v spodnej polohe len vtedy, ak ste zariadenie pripojili do
siete.
Počas hriankovania sa kovové súčiastky zohrejú na vysokú teplotu.
Nedotýkajte sa ich.
4 Keď je hrianka hotová, vyskočí z hriankovača a zariadenie sa vypne.
Riešenie
Skontrolujte, či je zástrčka riadne pripojená do sieťovej
zásuvky.
Ak hriankovač stále nefunguje, zaneste ho na kontrolu do
servisného centra autorizovaného spoločnosťou Philips.
Hriankovač odpojte zo siete a nechajte vychladnúť. Pozorne
vyberte krajec, alebo krajce z hriankovača. Pri vyberaní krajca
alebo krajcov chleba dajte pozor, aby ste nepoškodili ohrevné
telesá. Nikdy na tento účel nepoužívajte kovové predmety.
Skontrolujte nastavenie intenzity zhnednutia. Ak chcete, aby
nasledujúca hrianka bola svetlejšia, nastavte nižšiu intenzitu.
Ak je hrianka priveľmi svetlá, nastavte vyššiu intenzitu.
Zvolili ste príliš vysoké nastavenie intenzity zhnednutia pre
daný druh chleba. Stlačte tlačidlo STOP a prerušte
hriankovanie.
Ak je poškodený kábel, smie ho vymeniť jedine personál
spoločnosti Philips, servisného centra autorizovaného
spoločnosťou Philips alebo iná podobne kvalifikovaná osoba,
aby sa predišlo nebezpečnej situácii.
Rožok alebo croissant otočte na druhú stranu a zohrejte ho.
Postupujte podľa pokynov v časti „Ohrievanie rožkov a
croissantov".
Problém
1. Prístroj
nefunguje.
2. V zariadení sa
zasekol chlieb.
3. Hrianka je
priveľmi
tmavá/svetlá.
4. Z hriankovača
vychádza dym.
5. Sieťový kábel je
poškodený.
6. Zohriala sa len
jedna strana
rožka alebo
croissantu.
◗ Hriankovač sa vypne automaticky. Hriankovanie môžete prerušiť a hrianku
vybrať tak, že stlačíte tlačidlo STOP na vrchnej časti zariadenia (obr. 6).
◗ Ak potrebujete vybrať z hriankovača menšie kúsky chleba, potiahnite páku
ešte trochu viac nahor.
◗ Ak sa v hriankovači chlieb vzprieči, zariadenie odpojte zo siete a nechajte ho
úplne vychladnúť a pozorne odstráňte vzpriečený chlieb. Nepoužívajte na to
nôž ani iné ostré predmety a nedotýkajte sa vnútorných kovových častí
hriankovača.
Ohrievanie rožkov a croissantov
1 Na hriankovač položte rošt na ohrievanie (obr. 7).
Ohrievané rožky nikdy neukladajte priamo na povrch hriankovača bez roštu na
ohrievanie. Predídete tak poškodeniu zariadenia.
2 Rožky alebo croissanty položte na rošt na ohrievanie.
Neohrievajte viac ako dva kusy naraz.
3 (1) Nastavenie intenzity zhnednutia prepnite do polohy ohrievania (¬) a (2)
páku hriankovača zatlačte nadol (obr. 8).
Ak chcete rožky alebo croissanty ohriať z oboch strán, otočte ich, keď sa hriankovač
vypne. Nastavenie intenzity zhnednutia nechajte v polohe ohrievania (¬) a potom
hriankovač znovu zapnite zatlačením páky hriankovača.
Čistenie
.
1 Zariadenie odpojte zo siete.
2 Zariadenie nechajte vychladnúť.
3 Zariadenie očistite navlhčenou tkaninou. Nepoužívajte drsné čistiace
prostriedky.
Zariadenie nikdy neponárajte do vody.
4 Odrobinky zo zariadenia odstránite tak, že vytiahnete podnos na odrobinky
(obr. 9).
Zariadenie neotáčajte hore nohami ani z neho odrobinky nevytriasajte.
Životné prostredie
.
◗ Zariadenie na konci životnosti neodhadzujte spolu s bežným komunálnym
odpadom, ale kvôli recyklácii ho odovzdajte na mieste oficiálneho zberu.
Pomôžete tak chrániť životné prostredie (obr. 10).
Záruka a servis
.
Ak potrebujete informácie alebo máte problém, prosíme Vás, aby ste navštívili
webovú stránku spoločnosti Philips - www.philips.com alebo sa obrátili na Centrum
služieb zákazníkom spoločnosti Philips vo Vašej krajine (telefónne číslo Centra nájdete
v priloženom celosvetovo platnom záručnom liste). Ak sa vo Vašej krajine toto
Centrum nenachádza, obráťte sa na miestneho predajcu výrobkov Philips alebo
kontaktujte Oddelenie služieb Philips - divízia domáce spotrebiče a osobná
starostlivosť.
Riešenie problémov
.
Ak sa vyskytnú problémy s hriankovačom a neviete ich vyriešiť pomocou nižšie
uvedených informácii, kontaktujte Centrum starostlivosti o zákazníka spoločnosti
Philips vo Vašej krajine.
4222 002 65131
8/8
 Loading...