

Page 1
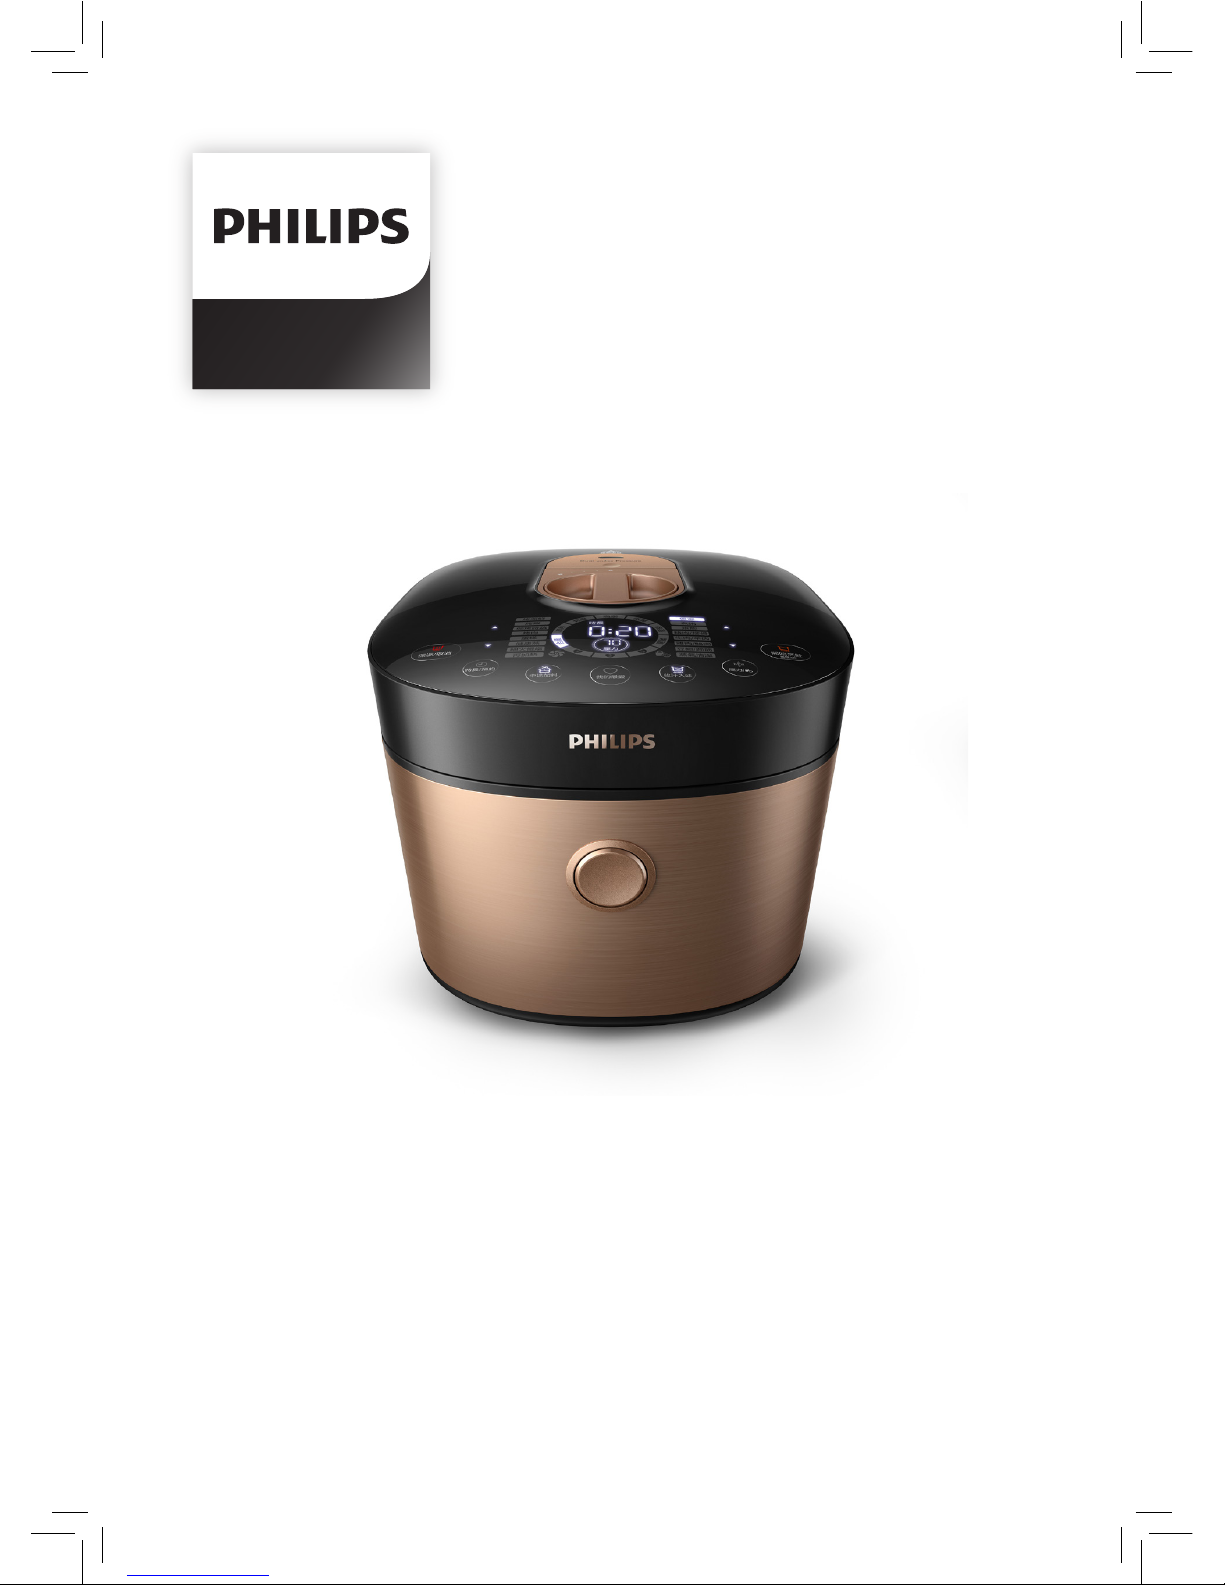
User manual
HD2195
Page 2

Page 3

3
EN
Contents
1 Important 4
Power failure backup
function 7
Electromagnetic elds
(EMF) 7
2 Your All-in-One cooker 8
What’s in the box 8
Product overview 9
Controls overview 10
Function overview 11
3 Using the All-in-One
cooker 13
Before rst use 13
Preparations before
cooking 13
Pressure cooking 14
Waterless cooking 16
Reheat 18
Slow cook 18
Adding ingredient 19
Sauce thickening 20
Preset time for delayed
cooking 20
Setting up child lock 21
Steam clean 22
Setting up My Favourite
menu 22
4 Cleaning and
Maintenance 23
Cleaning the detachable
inner lid 23
Cleaning the steam valve 24
Cleaning the oating valve 24
Interior 25
Exterior 25
Accessories and inner pot 25
5 Recycling 25
6 Guarantee and service 25
7 Specications 25
8 Troubleshooting 26
Page 4

4
EN
1 Important
Read this safety leaet carefully before
you use the appliance and save it for
future reference.
Danger
•
The appliance must not
be immersed.
Warning
•
This appliance is
intended to be used in
household and similar
applications such as:
•
sta kitchen areas
in shops, oces
and other working
environments;
•
farm houses;
•
by clients in hotels,
motels and other
residential type
environments;
•
This appliance is not
intended for use by
persons (including
children) with reduced
physical, sensory or
mental capabilities,
or lack of experience
and knowledge, unless
they have been given
supervision or instruction
concerning use of the
appliance by a person
responsible for their
safety.
•
Children should be
supervised to ensure that
they do not play with the
appliance. The children
should not contact with
the appliance or power
cord. Do not let the power
cord hang over the edge
of the table or worktop
on which the appliance
stands.
•
If the supply cord is
damaged, it must
be replaced by the
manufacturer, its service
agent or similarly
qualied persons in order
to avoid a hazard.
•
Make sure to avoid
spillage on the power
connector to avoid a
potential hazard.
•
Always follow the
instructions and use the
appliance properly to
avoid potential injury.
•
CAUTION: The surface of
the heating element is
subject to residual heat
after use.
Page 5

5
EN
•
The appliance is not
intended to be operated
by means of an external
timer or a separate
remote-control system.
•
The ducts in the pressure
regulator allowing the
escape of steam should
be checked regularly to
ensure that they are not
blocked.
•
The container must not be
opened until the pressure
has decreased suciently.
•
Do not spill on the power
connector to avoid a
potential hazard.
•
Only connect the
appliance to a grounded
power outlet. Always
make sure that the plug
is inserted rmly into the
power outlet.
•
Do not use the appliance
if the plug, the power cord,
the inner pot, the sealing
ring, or the main body is
damaged.
•
Make sure the heating
element, the temperature
sensor, and the outside of
the inner pot are clean and
dry before you put the plug
in the power outlet.
•
Do not plug in the
appliance or turn the
control knob with wet
hands.
•
Do not use the appliance
if too much air or steam
is leaking from under the
top lid.
Caution
•
Never use any
accessories or parts from
other manufacturers or
that Philips does not
specically recommend. If
you use such accessories
or parts, your guarantee
becomes invalid.
•
Do not expose the
appliance to high
temperatures, nor place
it on a working or still hot
stove or cooker.
•
Do not expose the
appliance to direct
sunlight.
•
Place the appliance on
a stable, horizontal, and
level surface.
•
Always put the inner pot
in the appliance before
you put the plug in the
power outlet and switch
it on.
Page 6

6
EN
•
Only use the cooking
utensils provided. Avoid
using sharp utensils.
•
To avoid scratches, it is
not recommended to
cook ingredients with
crustaceans, shellsh and
meats with protruding
bones. Remove the hard
shells or excessive bone
before cooking.
•
Do not place a magnetic
substance on the lid. Do
not use the appliance
near a magnetic
substance.
•
Always let the appliance
cool down to room
temperature before you
clean or move it.
•
Always clean the
appliance after use. Do
not put the appliance
into the dishwasher
(accessories included).
•
Always unplug the
appliance if not used for a
longer period.
•
If the appliance is
used improperly or for
professional or semiprofessional purposes, or
if it is not used according
to the instructions in
•
Do not place the inner
pot directly over an open
re to cook food.
•
Do not use the inner pot
if it is deformed.
•
Make sure that the
sealing ring is clean and
in good condition.
•
The accessible surfaces
may become hot
when the appliance is
operating. Take extra
caution when touching
the surfaces.
•
Beware of hot steam
coming out of the oating
valve and pressure
regulator valve during
cooking or when you
open the lid. Keep hands
and face away from the
appliance to avoid the
steam.
•
Do not lift and move
the appliance while it is
operating.
•
Do not exceed the
maximum water level
indicated in the inner pot
to prevent overow.
•
Do not place the cooking
utensils inside the pot
while cooking.
Page 7

7
EN
Electromagnetic elds
(EMF)
This Philips appliance complies with all
applicable standards and regulations
regarding exposure to electromagnetic
elds.
this safety leaet, the
guarantee becomes
invalid and Philips refuses
liability for any damage
caused.
•
Visit www.philips.com/
support to download the
user manual.
Power failure backup
function
This appliance has a backup function
that reserves the status before a power
failure.
•
If the power failure occurs during
a cooking process, and the power
supply is resumed within 30 minutes,
the countdown of the cooking time
continues where it is left o.
•
If the power failure occurs when the
appliance is at preset mode, and the
power supply is resumed within 30
minutes, the countdown of the preset
time continues where it is left o.
•
If the power supply is not resumed
within 30 minutes, the appliance
might not continue with the previous
working process, but stay in standby
mode.
•
If the power failure occurs during
pressure release process, and the
power supply is resumed within
30 minutes. If there is still pressure
inside the pot, the pressure release
indicator blinks, the appliance beeps
and then starts to release pressure
automatically.
Page 8
8
EN
2 Your All-in-One cooker
Congratulations on your purchase, and welcome to Philips!
To fully benet from the support that Philips oers, register your product at
www.Philips.com/welcome.
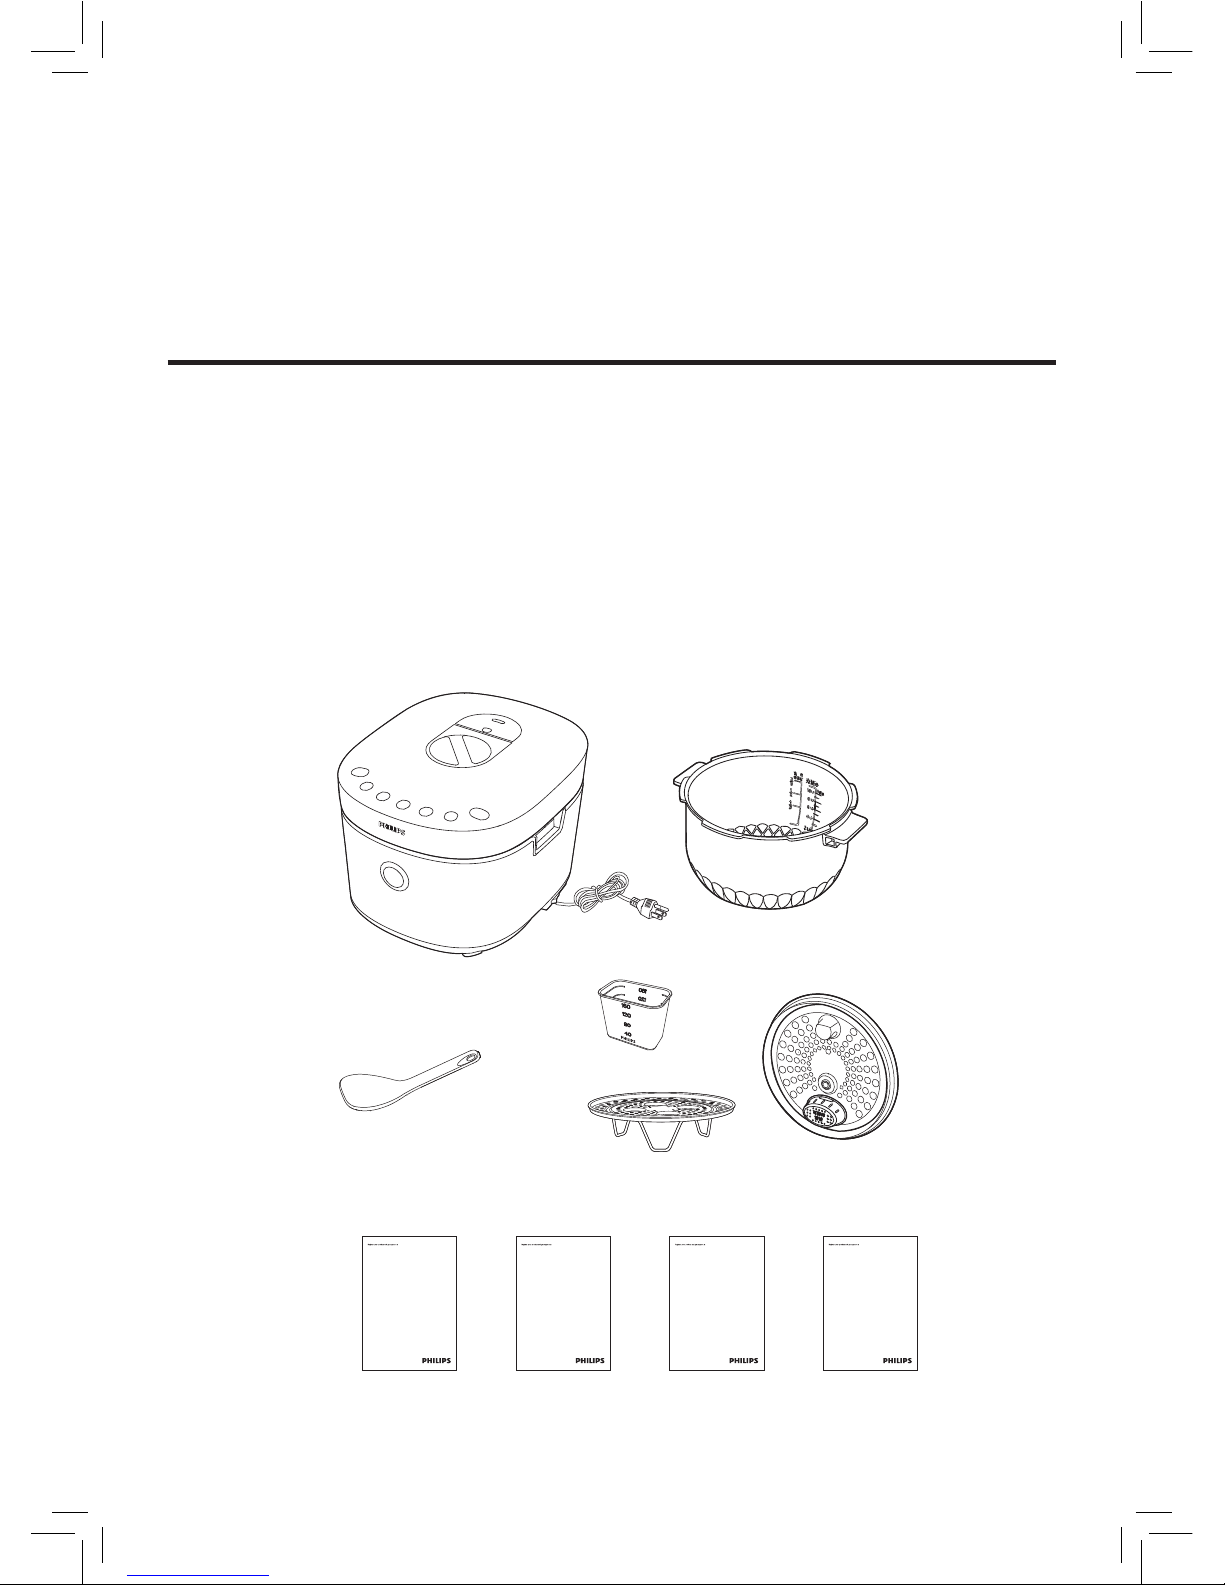
What’s in the box
Main unit Rice&Soup ladle
Inner Pot Measuring cup
Power cord Recipe book
Steaming rack Direct response card
User manual Warranty card
Detachable inner lid and the sealing ring
www.philips.com/welcome
User manual
www.philips.com/welcome
Direct reponse card
www.philips.com/welcome
Warranty card
www.philips.com/welcome
Recipe book
Page 9
9
EN
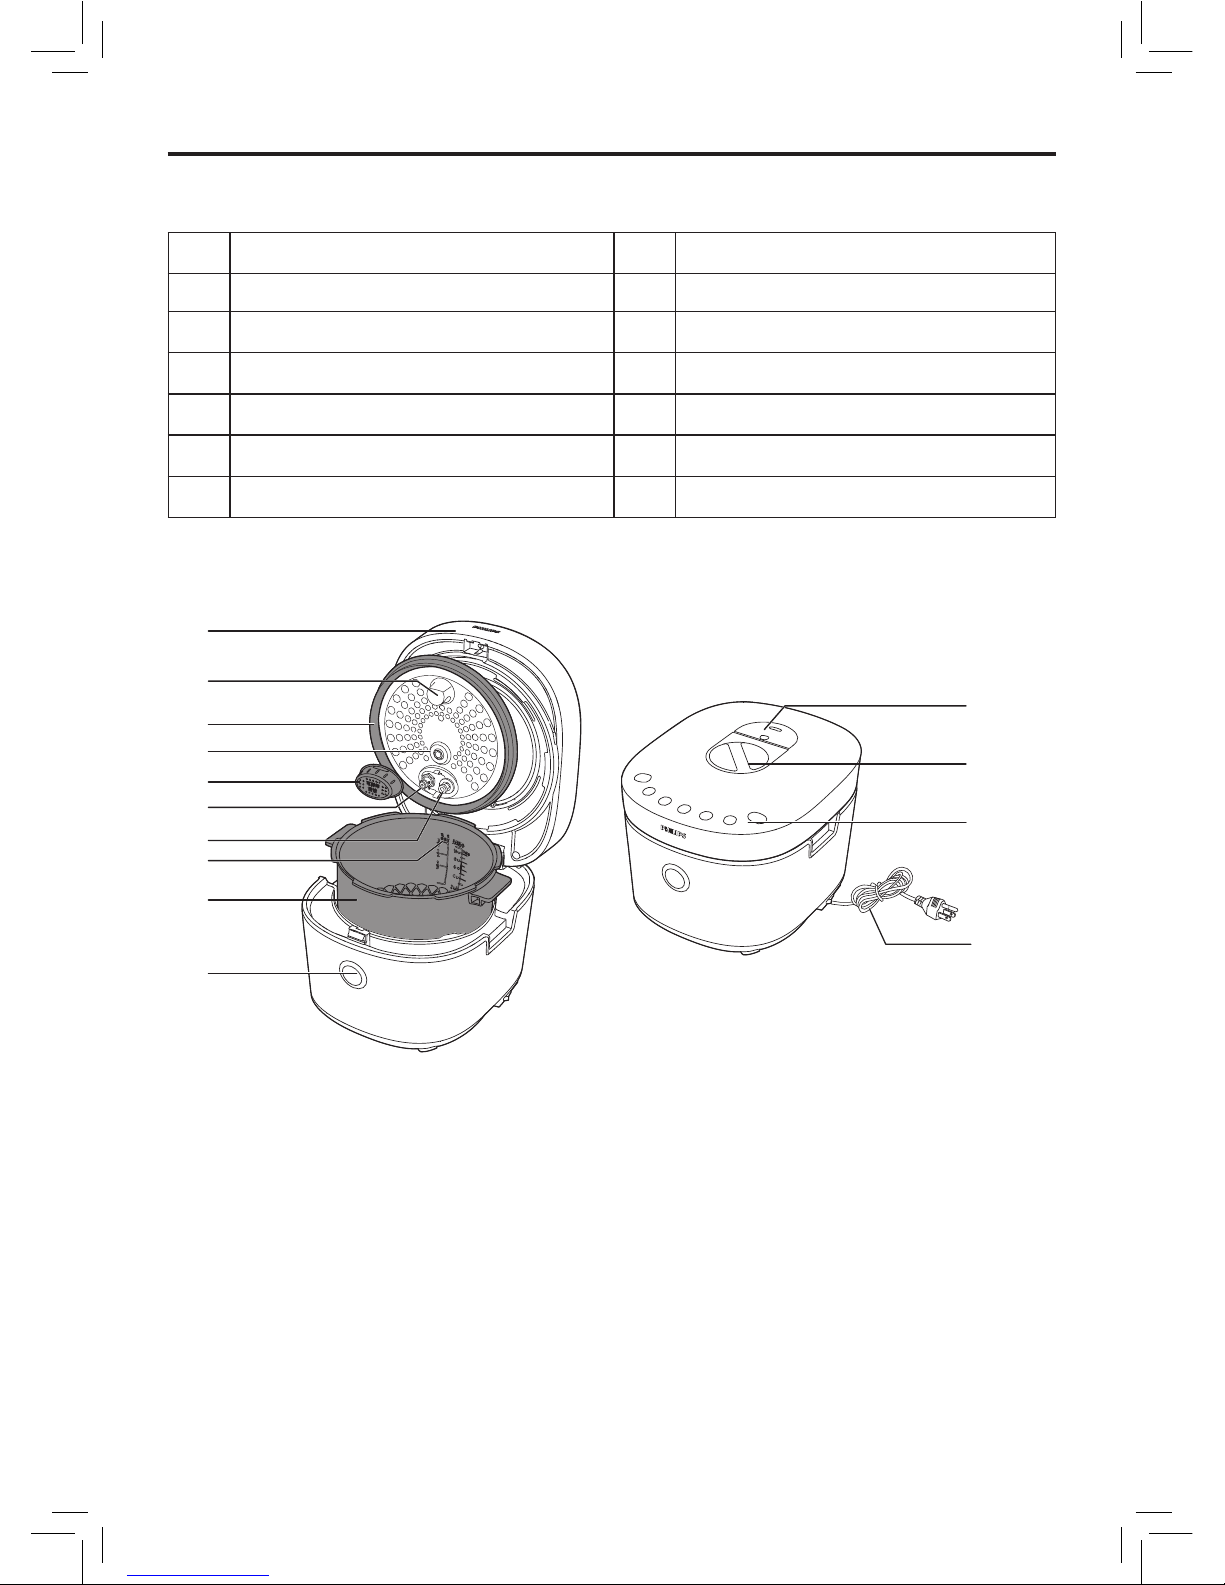
Product overview
a
Top lid
h
Water level indication
b
Detachable inner lid
i
Inner pot
c
sealing ring
j
Lid open button
d
Temperature controller
k
Power cord
e
Anti-block cap
l
Control panel
f
Safety valve
m
Lid lock/unlock handle
g
Floating valve
n
Steam valve
i
h
f
g
a
k
l
n
m
e
c
d
b
j
Page 10
10
EN
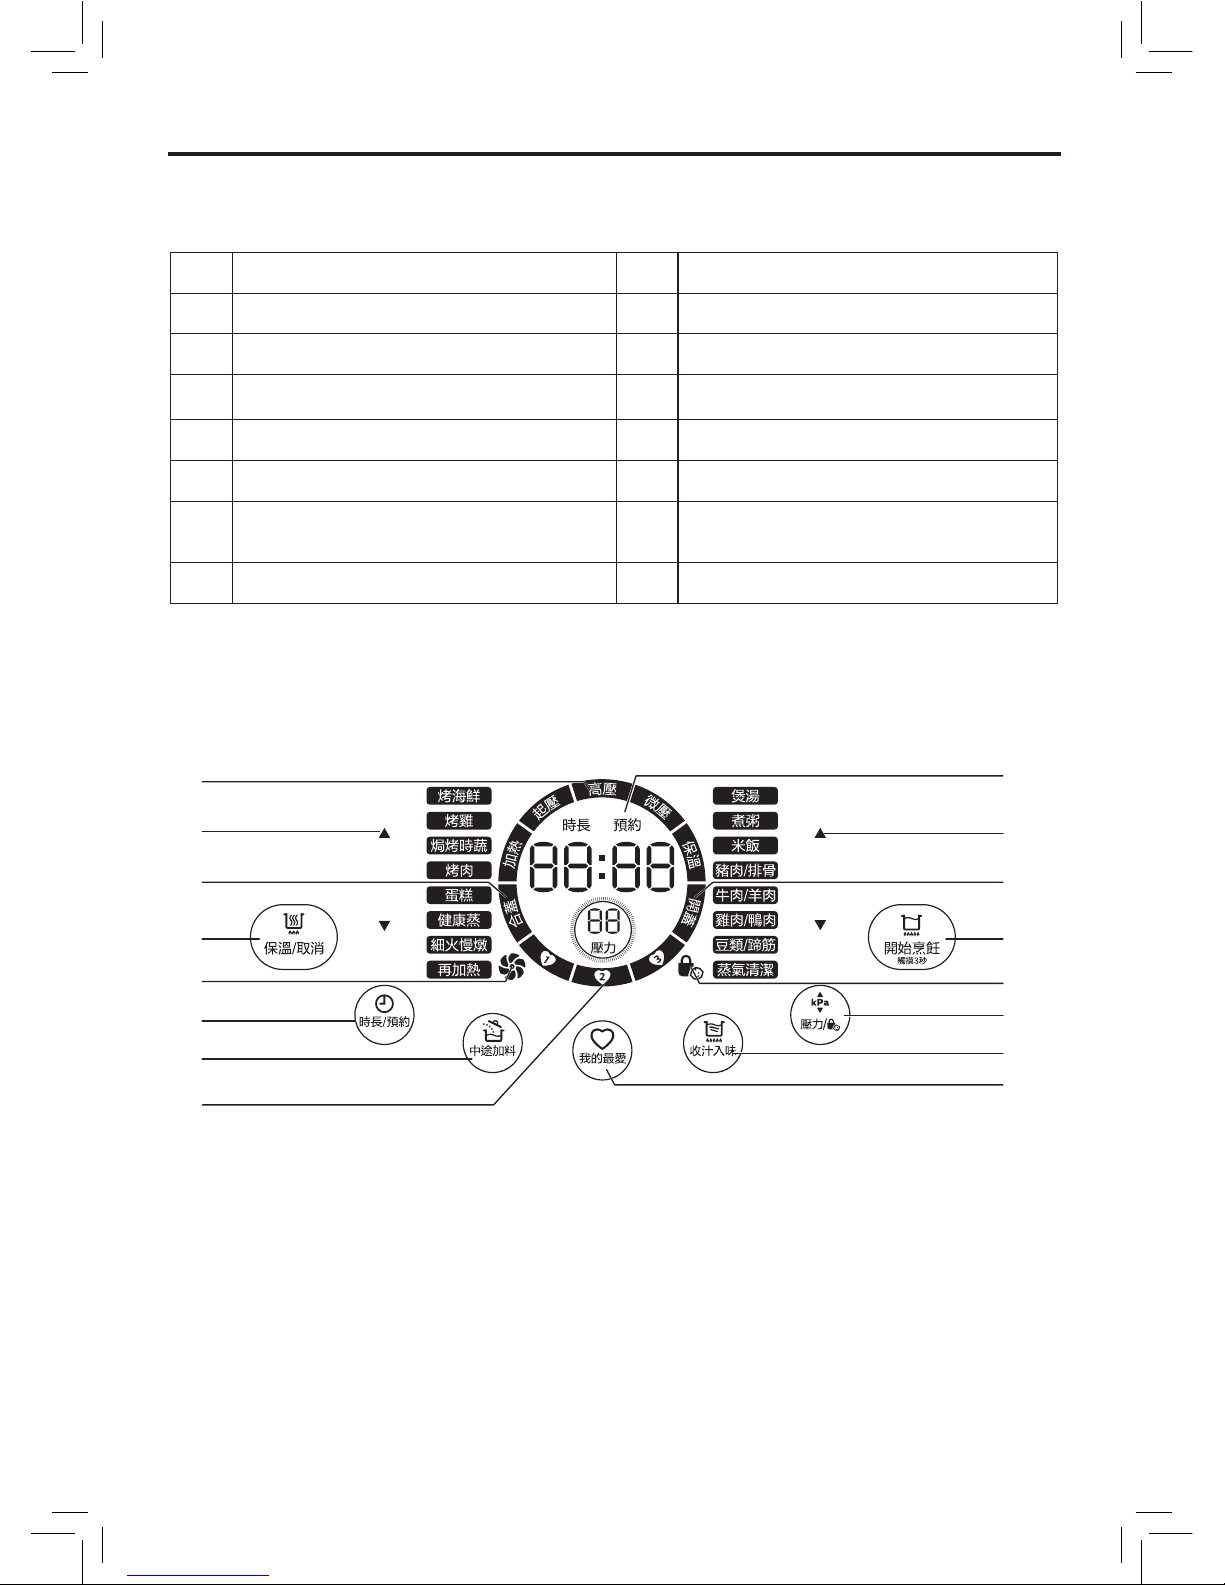
Controls overview
o
Cooking process indicator
w
我的最愛 button
p
Menu/Time selection button
x
收汁入味 button
q
Lid close indicator
y
壓力選擇/安全鎖 button
r
保溫/取消 button
z
Child lock indicator
s
Pressure release indicator
{
開始烹飪 button
t
時長/預約 button
|
Lid open indicator
u
中途加料 button
}
Selection button for pressure
cooking
v
My favourite indicator
~
Time indication area
r
p
q
o
t
s
u
v
{
y
z
}
|
x
w
~
Page 11

11
EN
Function overview
Waterless cooking
( You can open lid only when the time starts to count down.)
Cooking
function
Preset time
(minute)
Adjustable
cooking
time(minute)
Default
pressure
(kPa)
Pressure
regulation
range
(kPa)
烤海鮮
23 20-59
/ /
烤雞
18 15-59
/ /
焗烤時蔬
5 3-30
/ /
烤肉
15 10-59
/ /
蛋糕
45 40-59
/
/
Other functions
Cooking
function
Preset time
(minute)
Adjustable
cooking
time(minute)
Default
pressure
(kPa)
Pressure
regulation
range
(kPa)
細火慢燉
2 hrs 2-6 hrs
/
/
再加熱
10 10-40
/ /
Page 12

12
EN
Pressure cooking
( When you adjust the cooking time by yourself, it means the total time of high pressure
and the micro pressure, which are called pressure kepping time.)
Cooking
function
Preset time
(minute)
Adjustable
cooking
time(minute)
Default
pressure
(kPa)
Pressure
regulation
range
(kPa)
煲湯
30 25-59
70 20-70
煮粥
20 15-59
40 20-70
米飯
14 /
30 /
豬肉/排骨
30 30-59
50 20-70
牛肉/羊肉
40 30-59
60 20-70
雞肉/鴨肉
25 25-59
50 20-70
豆類/蹄筋
40
40-90
50 20-50
蒸氣清潔
15
5-59
20 /
健康蒸
8
3-20
20 /
Page 13
13
EN
Note
•
Do not ll the inner pot with less than
1/3 or more than water level indication .
•
For food that expands during cooking,
do not ll the inner pot with more than
1/2 full of food and liquid.
•
For rice cooking, follow the water level
indications on the inside of the inner
pot. Water level indication for rice, refer
to cup provided with the product. You
can adjust the water level for dierent
types of rice and your own preference.
Do not exceed the maximum water
level indication.
•
After the cooking process is started, you
can press 保溫/取消 to terminate the
current work, and the appliance goes to
standby mode.
Before using the All-in-One cooker to
cook food, you need to follow below
preparations:
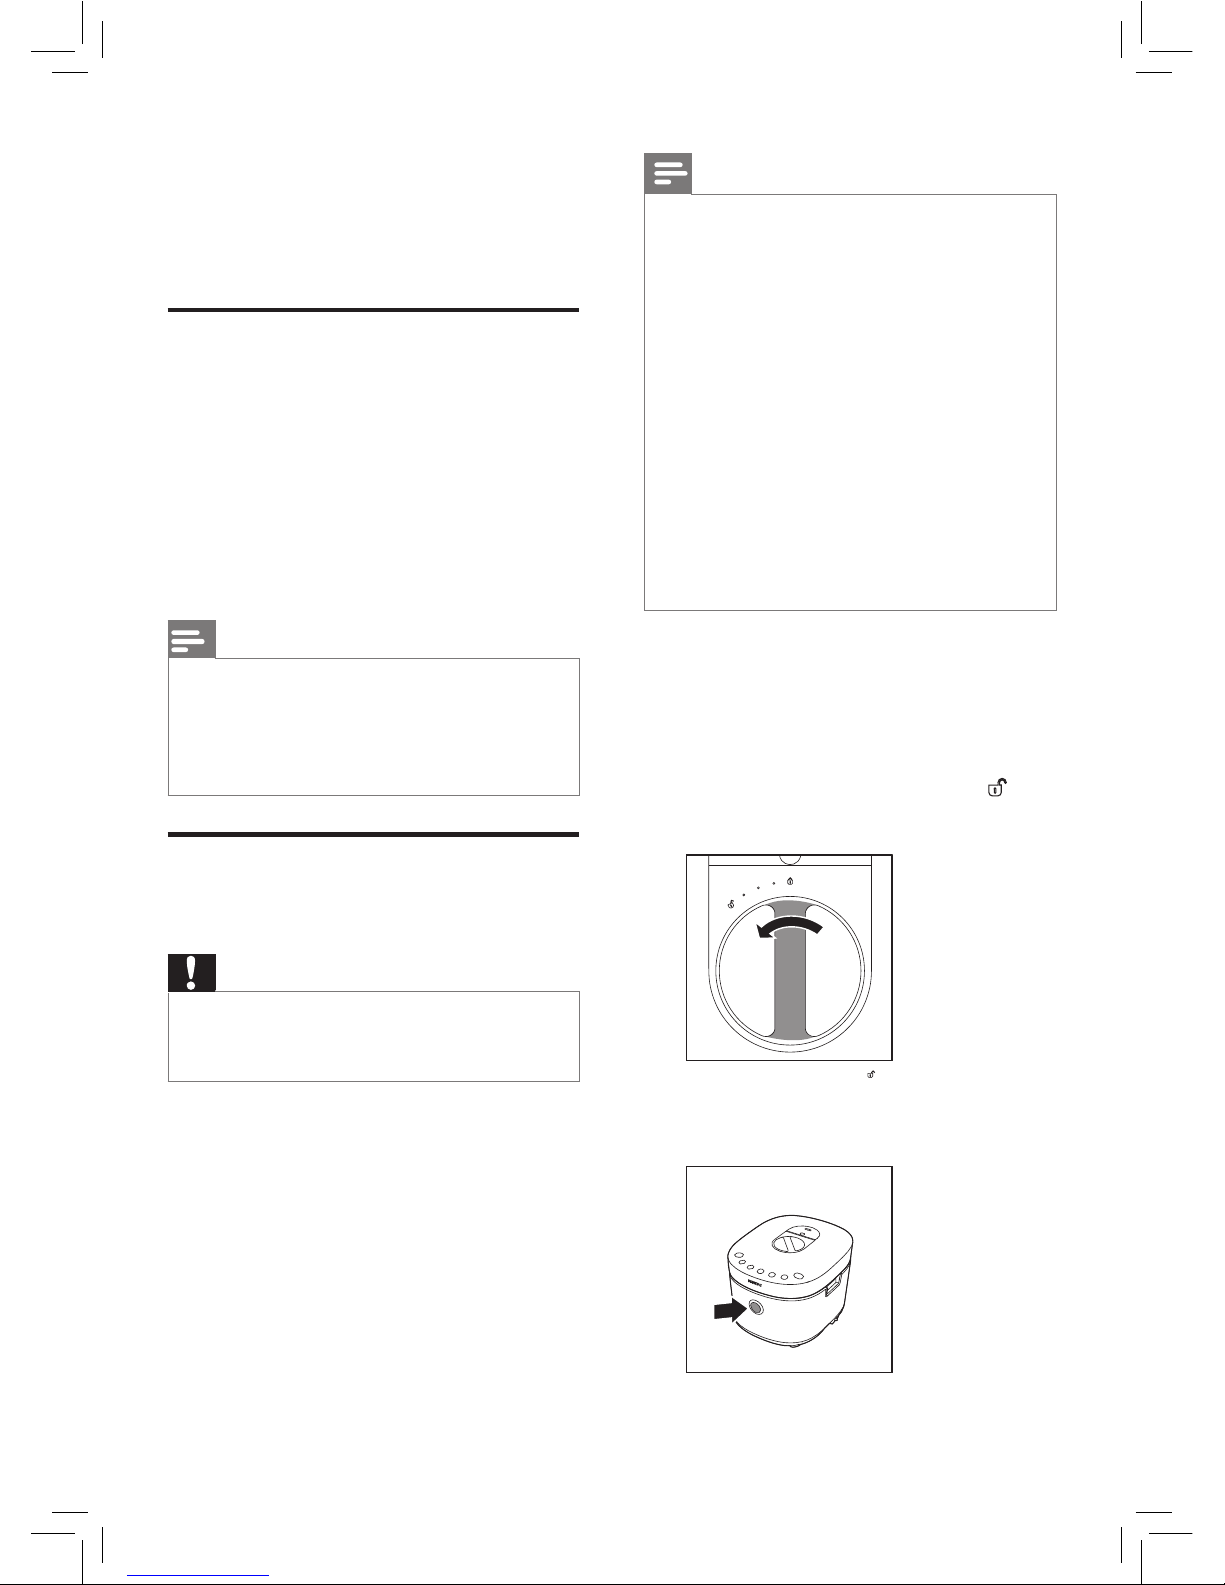
1
Turn the lid lock/unlock handle
counter clockwise to unlock ( )
position.
2
Press the lid open button to open
the top lid.
3 Using the All-
in-One cooker
Before rst use
1
Remove all packaging materials
from the appliance.
2
Take out all the accessories from
the inner pot.
3
Clean the parts of the All-in-One
cooker thoroughly before using
it for the rst time (see chapter
‘Cleaning’).
Note
•
Make sure all parts are completely dry
before you start using the All-in-One
cooker.
•
Make sure the inner pot is well connected
with the heating element.
Preparations before
cooking
Warning
•
Make sure the steam valve is not
blocked, the detachable inner lid is
properly installed.
Page 14
14
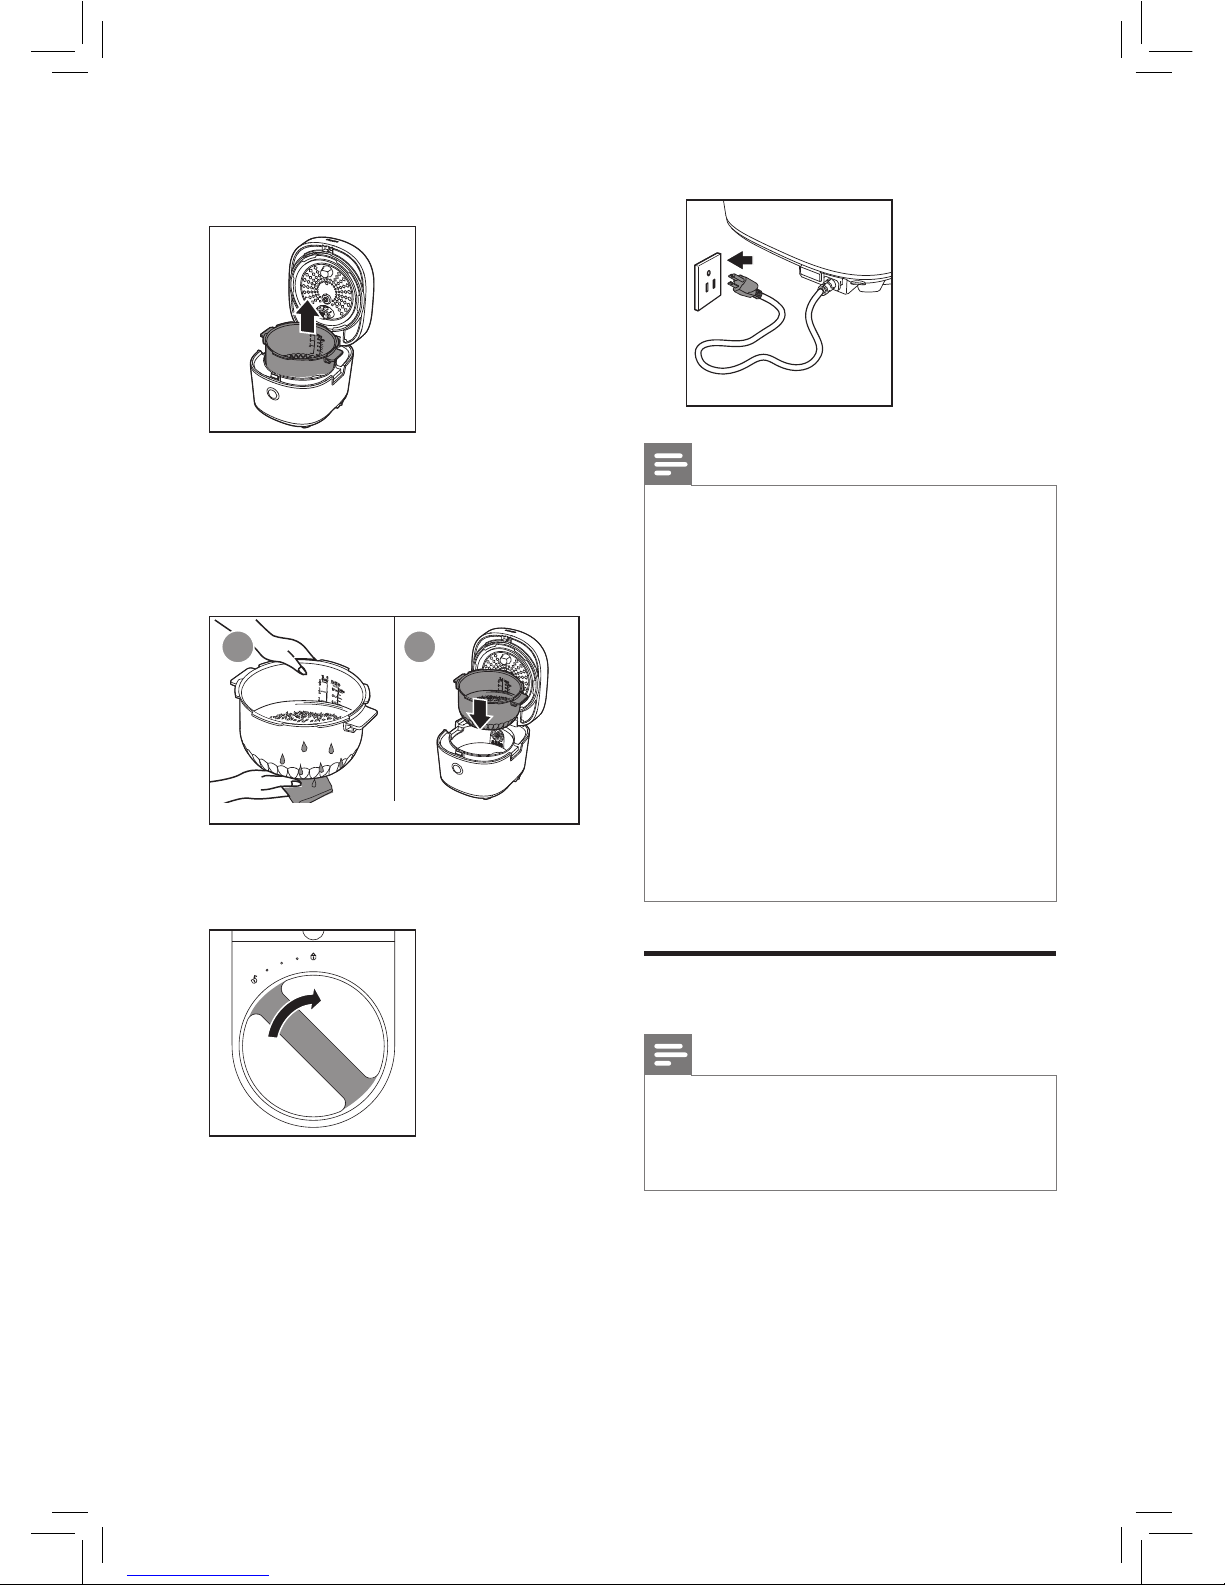
EN
6
Put the plug into the power socket.
Note
•
Make sure the sealing ring is properly
assembled around the inside of the top
lid.
•
Make sure the detachable inner
lid is properly installed, for details,
please refer to Chapter ‘‘Cleaning and
Maintenance’’.
•
Make sure the outside of the inner pot
is dry and clean, and that there is no
foreign residue on the heating element.
•
Make sure the inner pot is in proper
contact with the heating element.
•
The All-in-One cooker uses dual pulse
technology, it has high pressure stage
and micro pressure stage. 加熱, 起壓,
高壓
and 微壓 are the four stages of
pressure cooking.
Pressure cooking
Note
•
The pressure shown on the illustrations
in this chapter is for reference only, the
actual pressure for cooking is based on
the value displayed on the screen.
煲湯, 煮粥, 米飯, 豬肉/排骨, 牛肉/羊肉, 健
康蒸 (pressure unadjustable), 雞肉/鴨
肉 and 豆類/蹄筋
are pressure cooking
functions.
About the information of the
pressure cooking time and pressure
3
Take out the inner pot from the Allin-One cooker.
4
Put the pre-washed food in the
inner pot, wipe the outside and
bottom of the inner pot dry (g 1)
with soft cloth, then put it back into
the All-in-One cooker (g 2).
1 2
5
Turn the handle clockwise to lock
the top lid.
Page 15
15
EN
regulating range, refer to Chapter
‘Functions Overview‘.
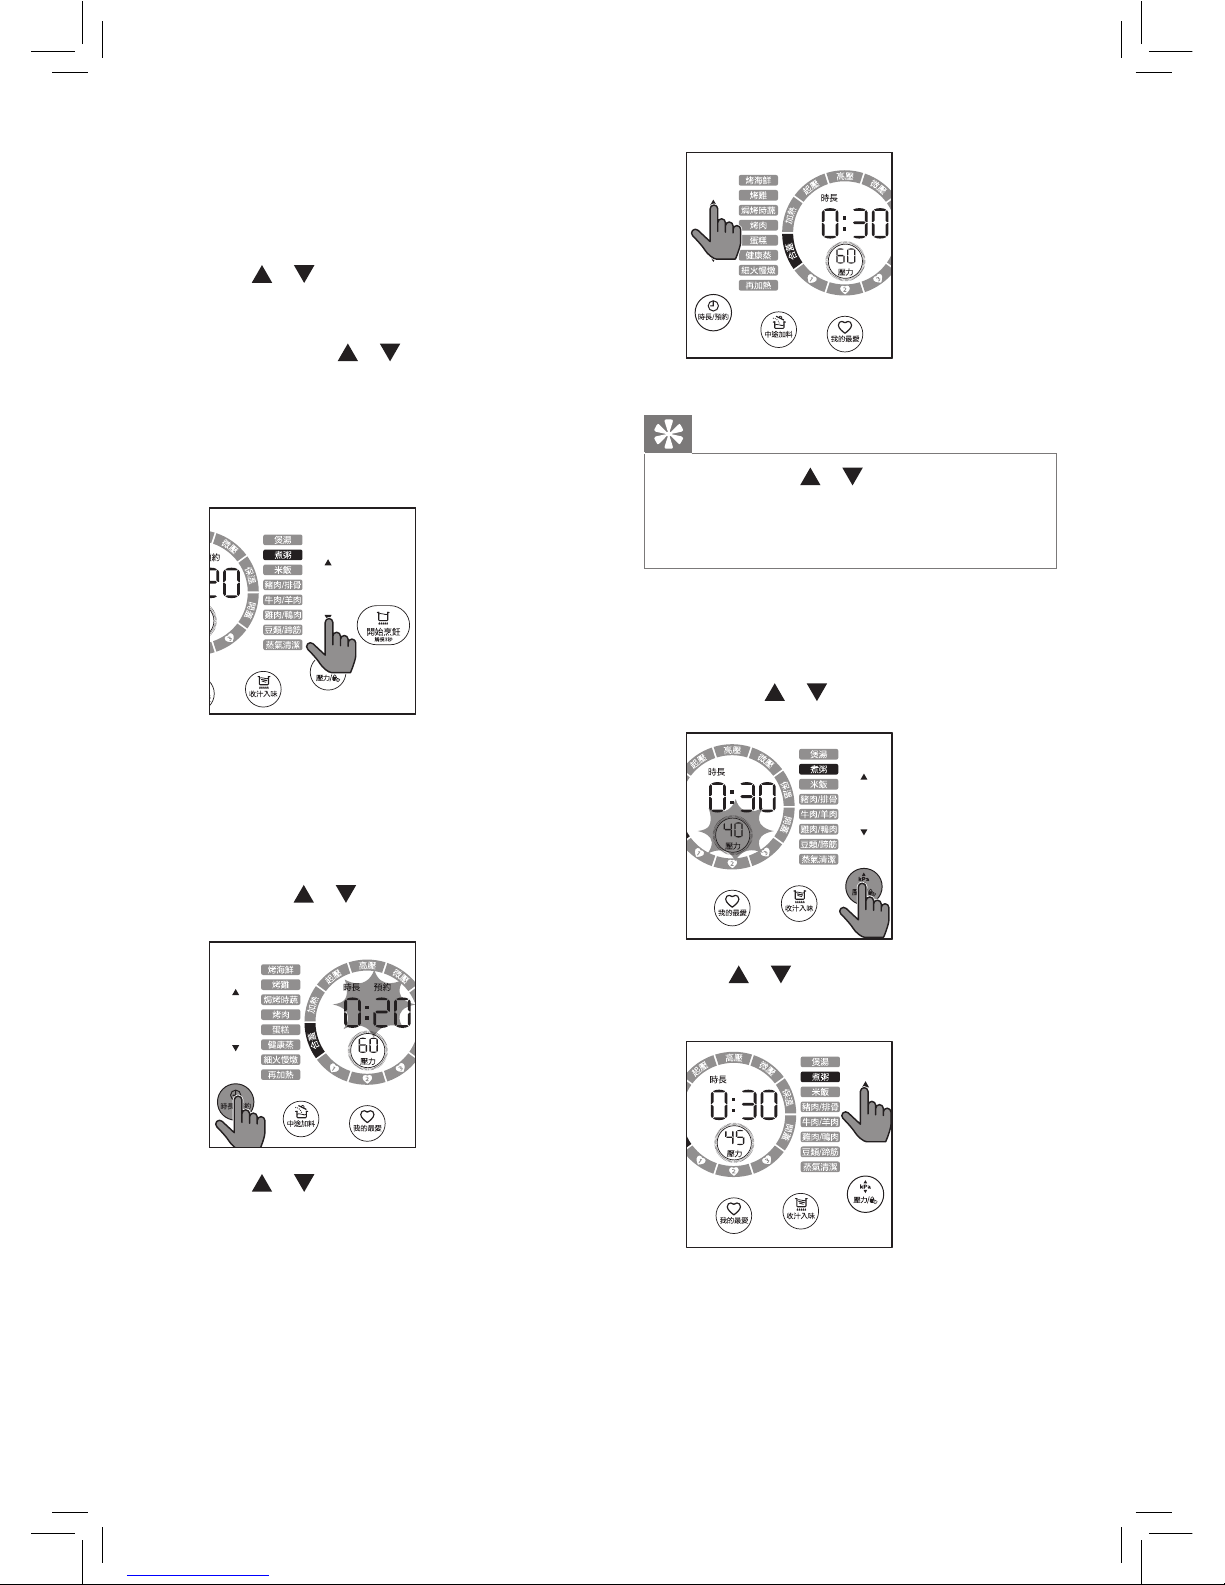
1
Follow the steps in “Preparations
before cooking”.
2
Tap / on the right to choose
one of the pressure cooking
functions ( if you want to choose
’ 健康蒸’, tap / on the left).
» The chosen cooking function
lights up, the default pressure
keeping time and pressure are
displayed on the screen.
3
To set a dierent pressure keeping
time, tap 時長/預約, Cooking time
lights up.
» The pressure keeping time
blinks.
» The / on the left is on.
4
Tap / on the left to set the
cooking time. For the cooking time
adjustable range, refer to Chapter
‘Functions Overview’.
Tip
•
Tap and hold / to fast forward or
fast backward time.
•
The cooking time is not adjustable for
米飯.
5
To set a dierent cooking pressure,
tap 壓力 button.
» The pressure blinks on the screen.
» The / on the right is on.
6
Tap / to choose the pressure
you need.
Page 16
16
EN
10
The All-in-One cooker
automatically switches to keep
warm mode after pressure is
released completely.
» The 保溫 indicator on the status
ring is on.
Note
•
After the cooking process is nished,
unplug the All-in-One cooker from the
electrical outlet.
•
If canceling the cooking process in the
pressure up stage, the pressure release
indicator lights up, the All-in-One
cooker beeps and then starts to release
pressure. You can open the lid after the
pressure is released suciently.
Waterless cooking
Note
•
The pressure is not adjustable for
waterless cooking functions.
You can cook foods without adding
water into the inner pot when using
waterless cooking functions. However,
if the ingredients contain more water
inside, there may still have pressure.
Wait until the countdown starts, then
you can open the lid.
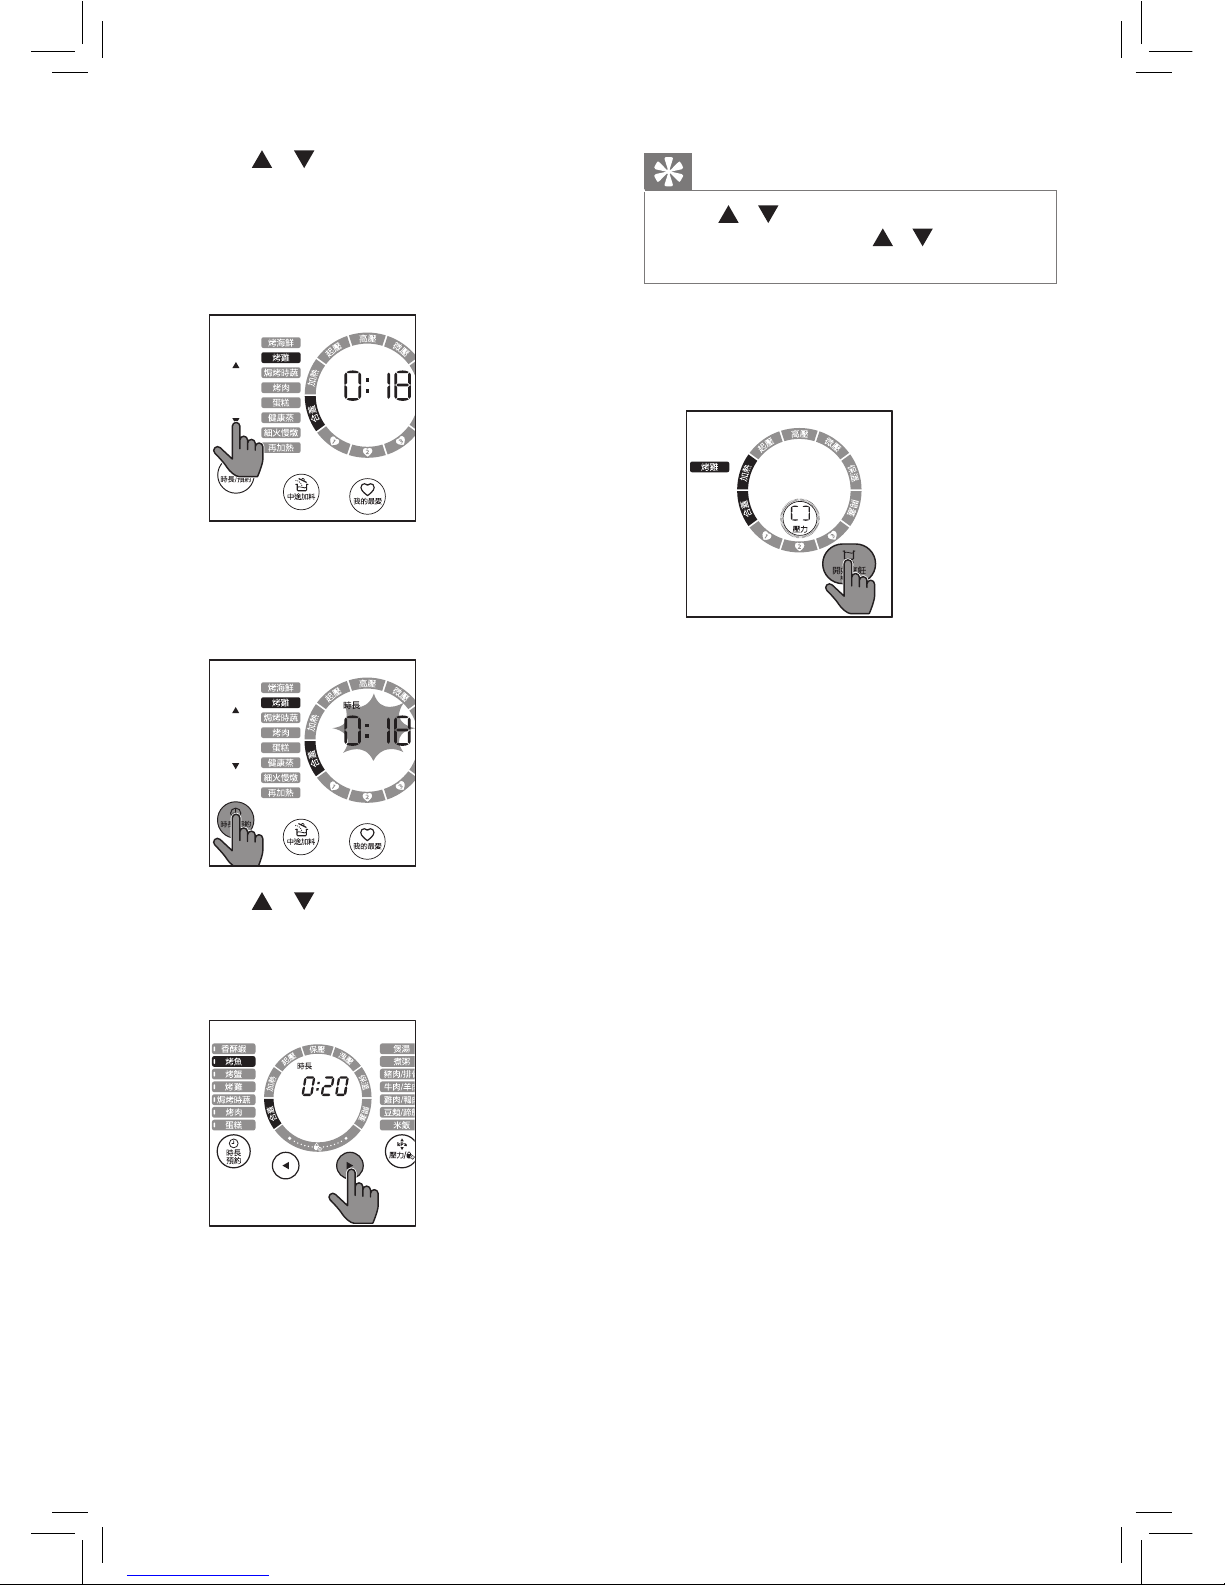
烤海鮮, 烤雞, 焗烤時蔬, 蛋糕 and 烤肉 are
waterless cooking functions.
1
Follow the steps in “Preparations
before cooking”.
Note
•
Only the pressure level for the following
functions are adjustable: 煲湯, 煮粥
,
豬肉/排骨, 牛肉/羊肉, 雞肉/鴨肉 and
豆類/蹄筋.
•
The pressure level for 健康蒸 fucntion is
not adjustable.
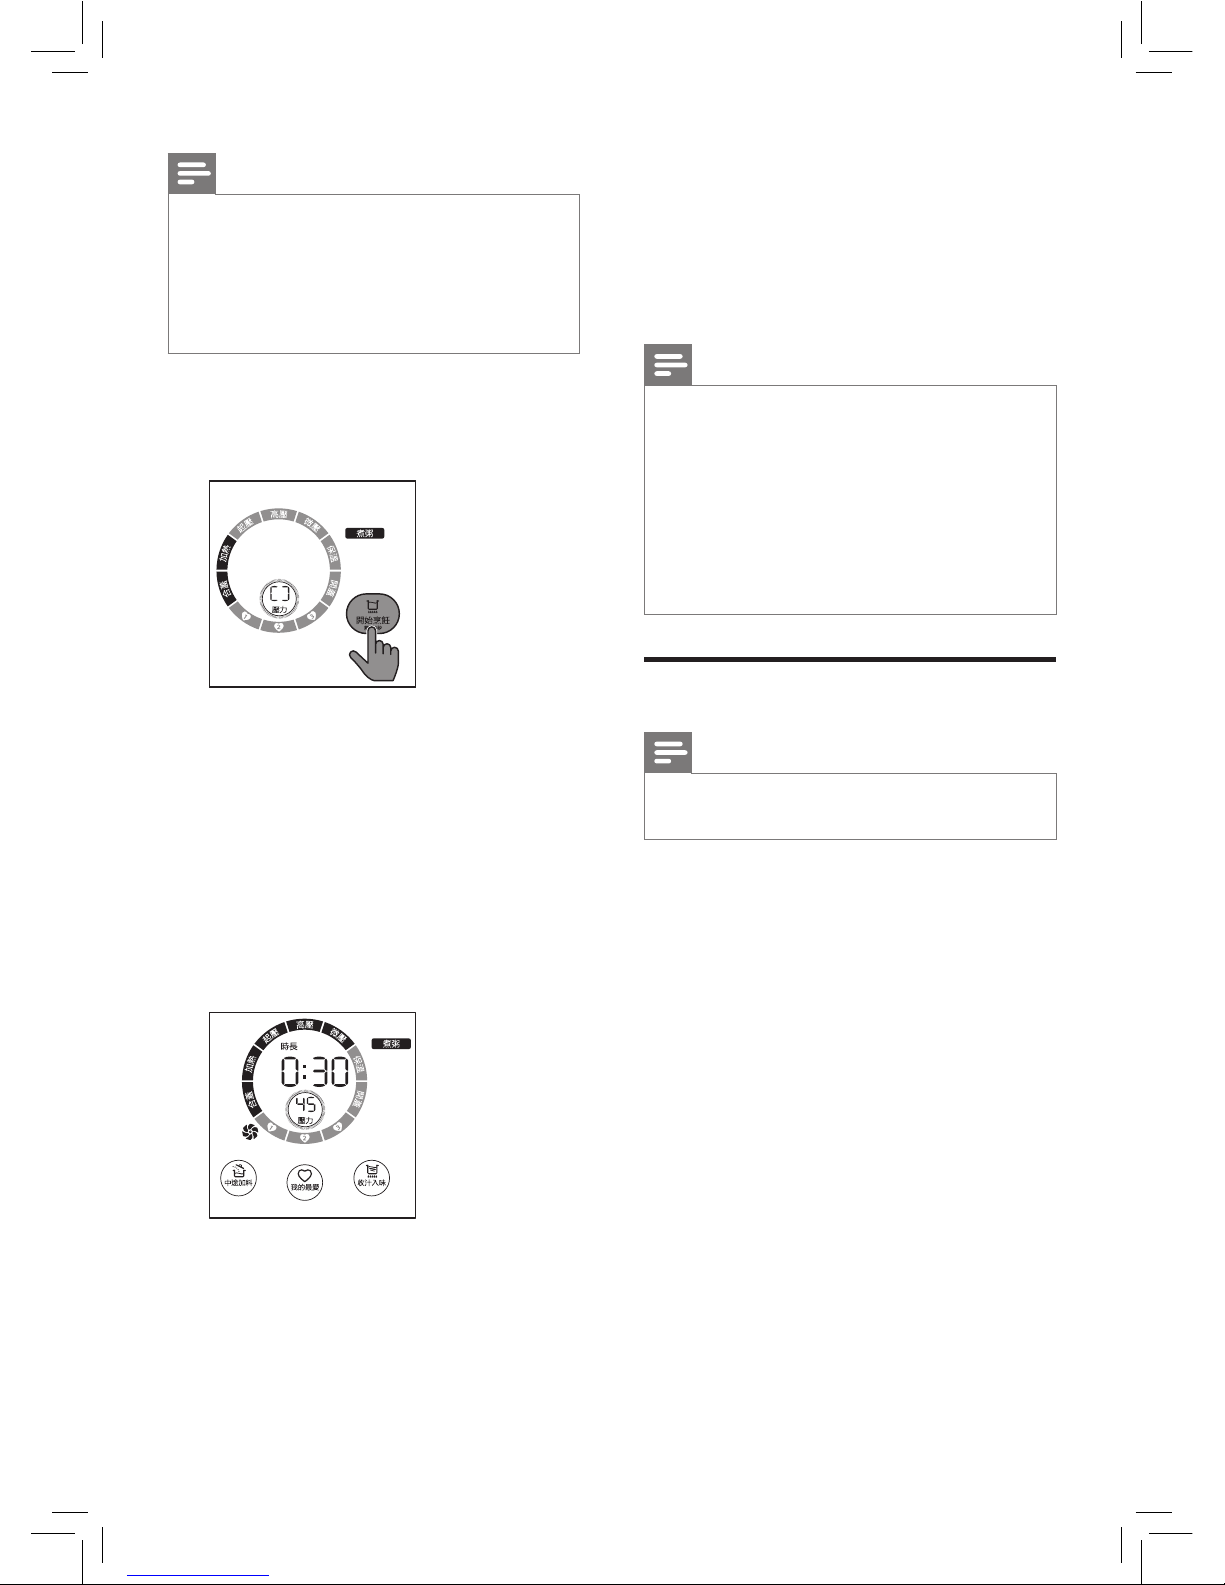
7
Tap and hold 開始烹飪 for
3 seconds, the All-in-One cooker
starts working in the selected mode.
8
When the All-in-One cooker
reaches the cooking pressure,
the pressure keeping time starts
countdown.
9
When the pressure keeping time
has elapsed, The All-in-One cooker
beeps for three times, and then
starts to release pressure.
» The 洩壓 indicator on the status
ring is on.
Page 17
17
EN
Tip
•
Tap / to adjust time by one
minute. Tap and hold / to fast
forward or fast backward time.
5
Tap and hold 開始烹飪 for 3
seconds, the All-in-One cooker
starts working in the selected mode.
6
The All-in-One cooker reaches the
preset temperature, the countdown
starts. Put the ingredients into the
inner pot.
7
DO lock the lid if you want to close
it. If the ingredients has more
moisture, the All-in-One cooker will
release pressure automatically. You
can open the lid after the pressure
is released suciently.
8
When the cooking process is
nished, the All-in-One cooker
automatically switches to keep
warm mode.
» The 保溫 indicator on the status
ring is on.
2
Tap / on the left to choose a
function you need.
» The chosen cooking function
lights up, the default cooking
time is displayed on the screen.
3
To set a dierent pressure keeping
time, tap 時長/預約, 時長 lights up.
» The cooking time blinks.
4
Tap / on the left to set the
cooking time. For the cooking time
adjustable range, refer to Chapter
‘Functions Overview‘.
Page 18
18
EN
6
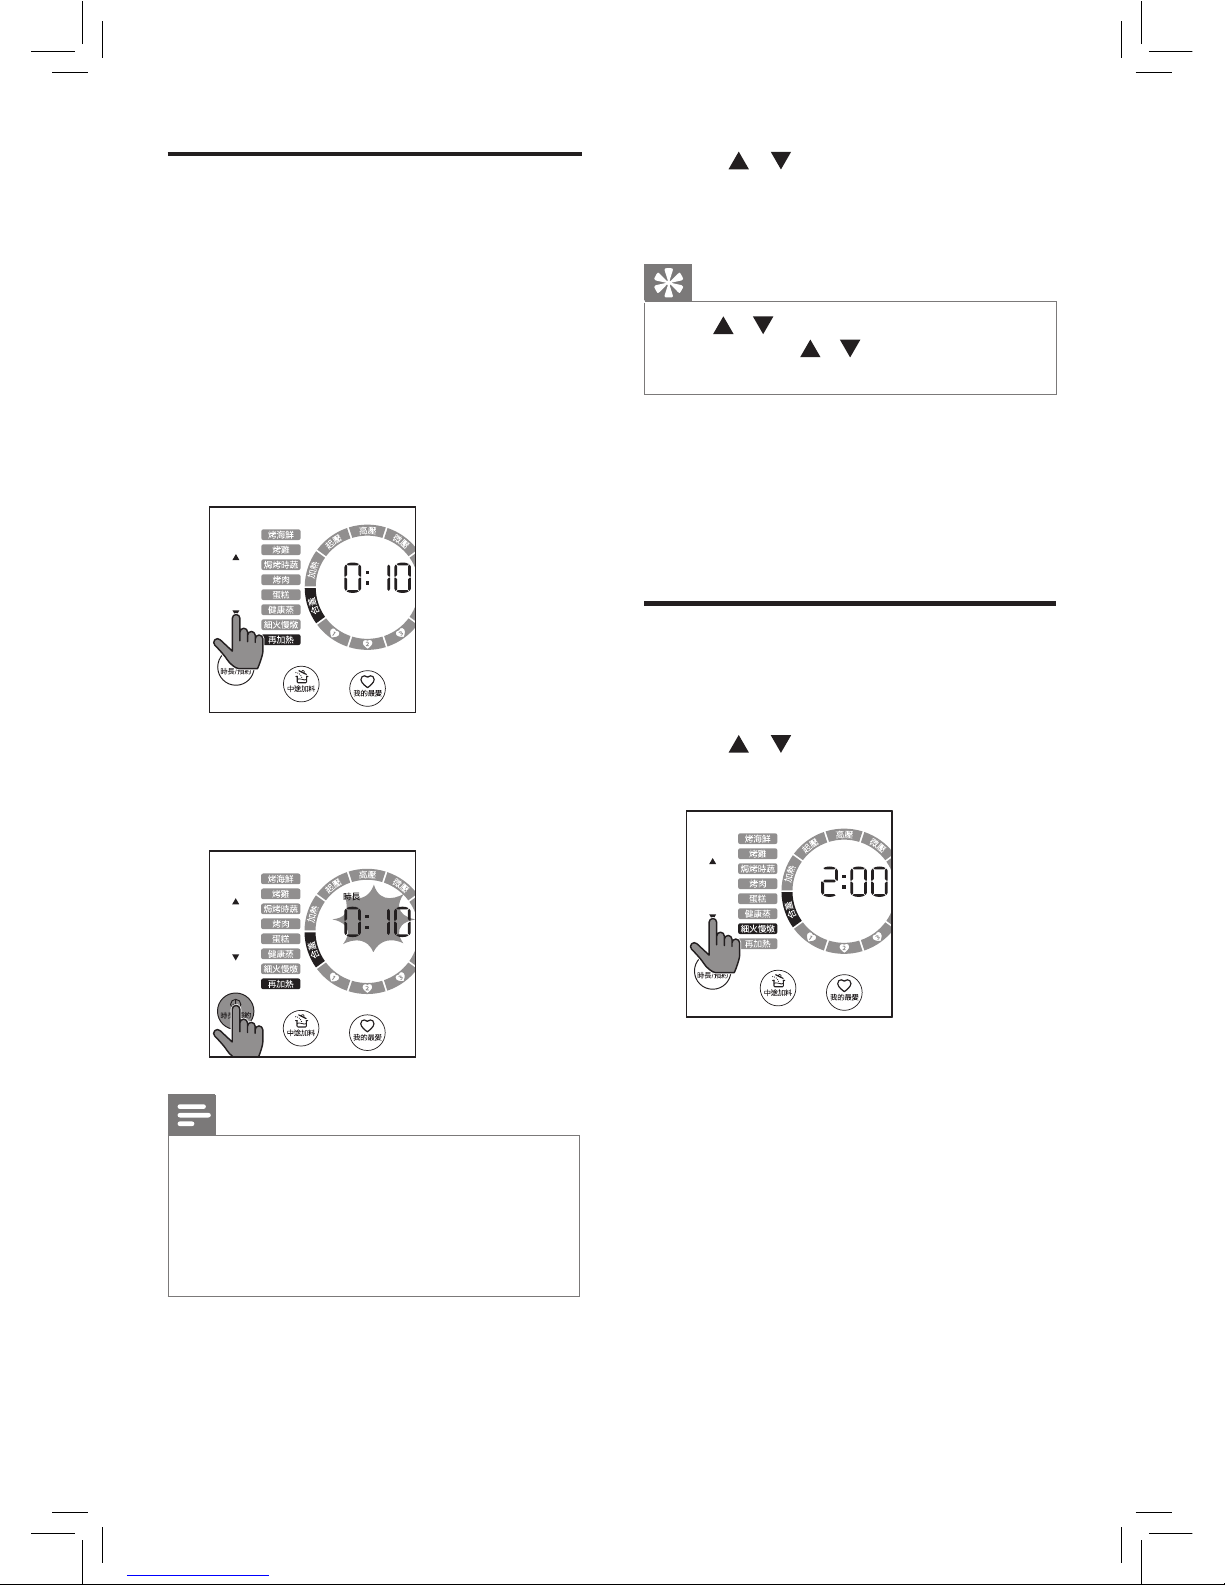
Tap / to set the time. For the
cooking time adjustable range, refer
to Chapter ‘Functions Overview‘.
Tip
•
Tap / to adjust time by one minute.
Tap and hold / to fast forward or
fast backward time.
7
Tap and hold 開始烹飪 for 3
seconds, the All-in-One cooker
starts working in the selected mode.
8
When the reheat process is nished,
the All-in-One cooker automatically
switches to keep warm mode.
Slow cook
1
Put the ingredients into the inner
pot, and close the lid.
2
Tap / on the left to choose
細火慢燉 function.
3
Tap and hold 開始烹飪 for 3
seconds, the All-in-One cooker
starts working in the selected mode.
4
When the temperature of the inner
pot reaches 90 oC, the screen starts
to count down.
Reheat
1
Follow the steps in “Preparations
before cooking”.
2
Loosen the food and evenly
distribute it in the inner pot.
3
Pour some water onto the food to
prevent it from becoming too dry.
The quantity of the water depends
on the amount of food.
4
Tap 再加熱.
5
To set a dierent reheating time, Tap
時長/預約, 時長 lights up.
» The reheat cooking time blinks.
Note
•
The pressure shown on the illustrations
in this chapter is for reference only, the
actual pressure for cooking is based on
the value displayed on the screen.
•
Close and lock the lid when using the
reheat function.
Page 19
19
EN
5
When the cooking time has 10
minute left, the 加熱 indicator is o,
微壓 indicator lights up. The All-inOne cooker release a little steam to
decrease the pressure.
6
After 10 minutes, when the pressure
is fully released, the All-in-One
cooker automatically switches to
keep warm mode.
Note
•
When using the slow cook function, you
can open the lid and stir the ingredients,
DO close and lock the lid after that. If the
lid is not locked in the last 10 minutes
of the cooking process, the All-in-One
cooker beeps, the cooking time expands
to 20 minutes automatically.
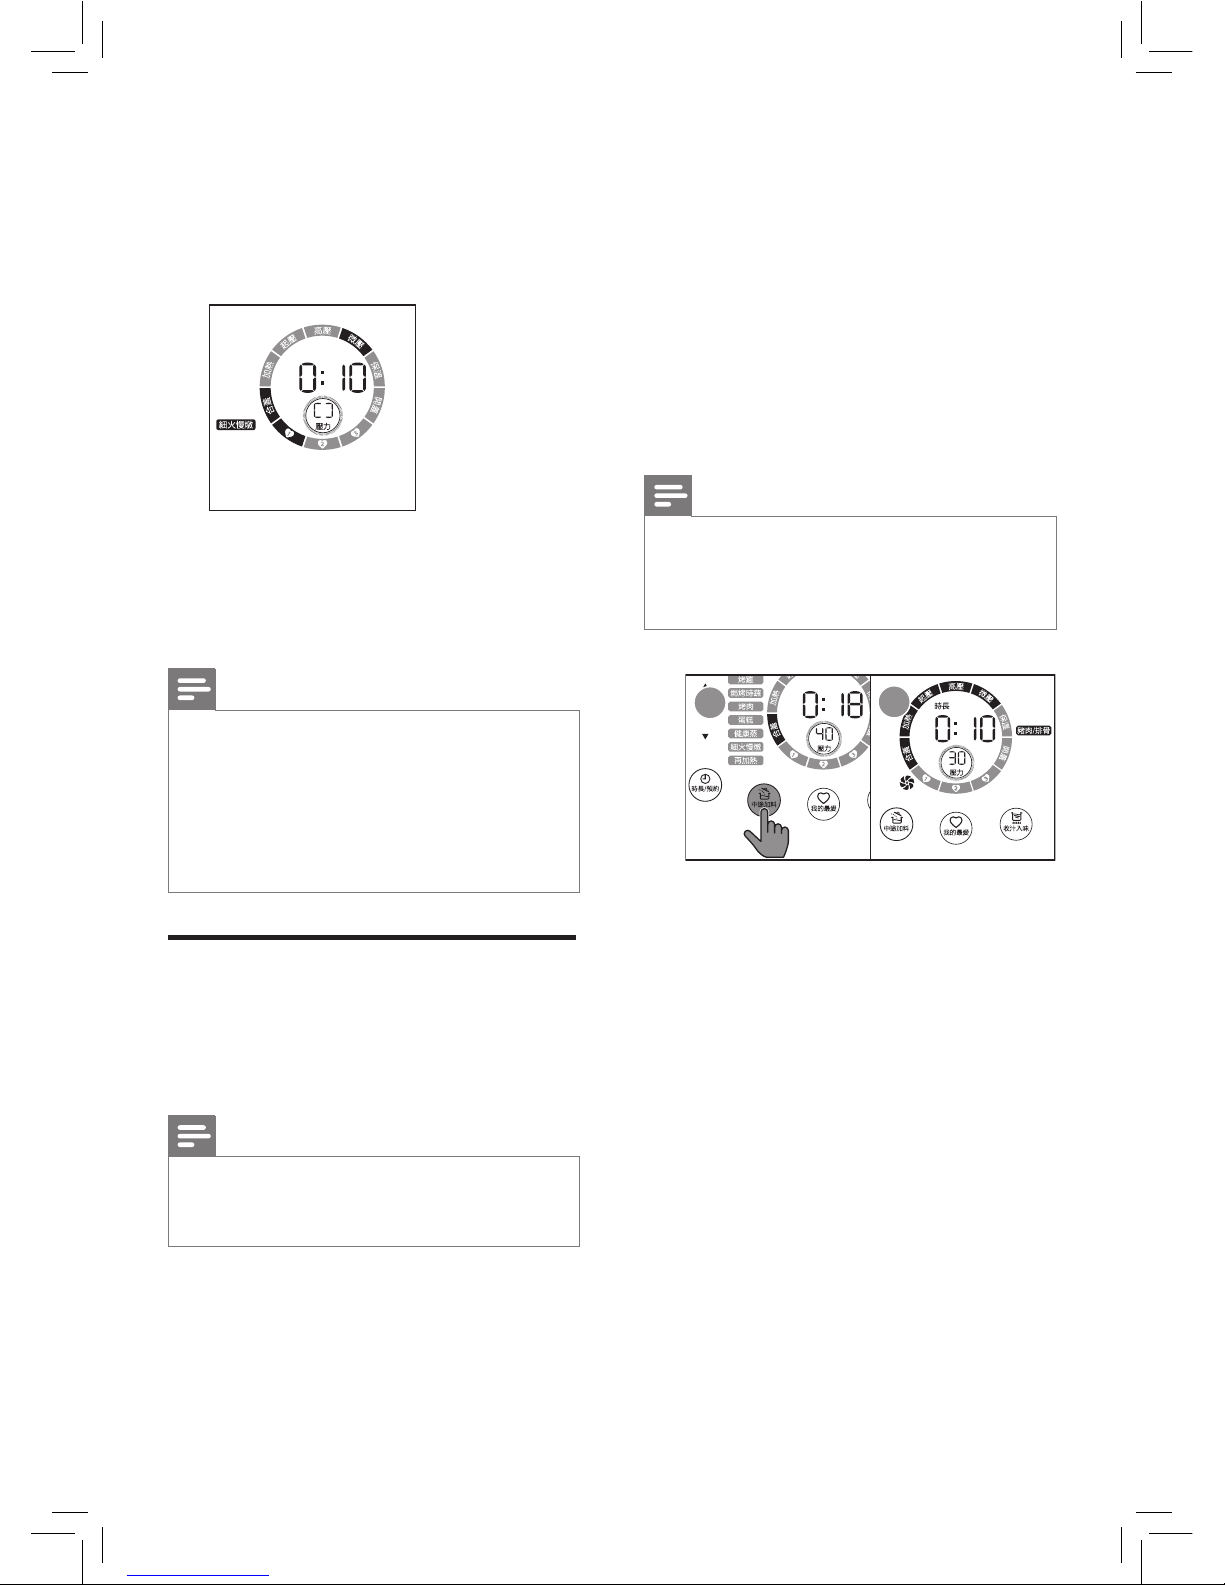
Adding ingredient
With this function, you can open the lid
during pressure cooking process and
add more ingredients.
Note
•
The
Add ingredient
function is not
available for the 煮粥, 煮飯, 蒸氣清潔 and
蛋糕 functions.
1
In standby mode, choose the
function you need, and then tap
中途加料.
» Tap and hold 開始烹飪 for
3 seconds to start the cooking
process. When the remaining
cooking time is 8 minutes left,
the current cooking process
pauses, the All-in-One cooker
beeps three times and starts to
release pressure.
Note
•
The 健康蒸 function can’t add
ingredient, you can tap 中途加料 in the
pressure maintain stage, open the lid
and add more ingredients.
1
2
2
If not tapping the 中途加料 in
advance, you can still tap it in
the pressure maintain stage to
release pressure rst, then add the
indredients you want.
» Tap 中途加料 in the pressure
maintain stage, the current
cooking process pauses, the Allin-One cooker beeps for three
times, and then starts to release
pressure.
3
When pressure is released
completely, the 開蓋 indicator on
status ring blinks and the All-in-One
cooker beeps. You can open the
top lid to add more ingredients you
want.
Page 20
20
EN
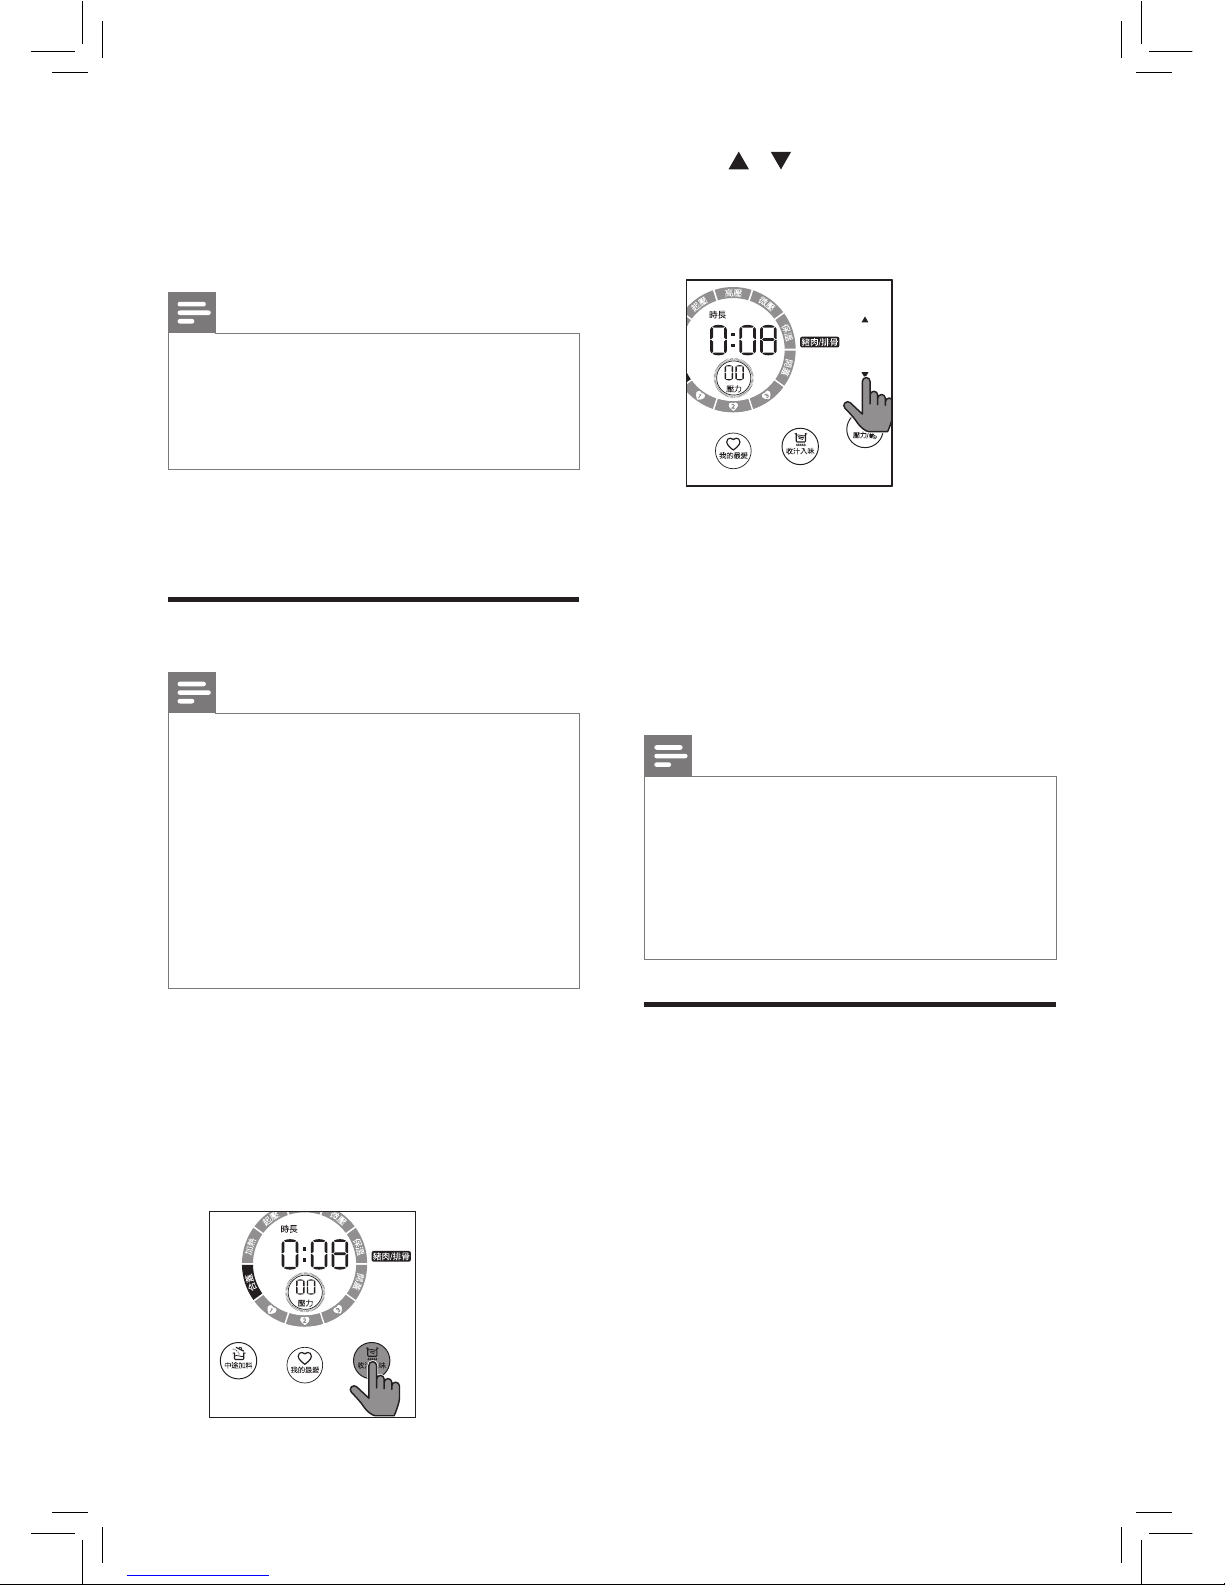
2
Tap / to set time, and then tap
and hold 開始烹飪 for 3 seconds,
the function starts immediately after
the pressure is released.
Non reservation mode
•
After the cooking process is
nished, you can tap 收汁入味 in
warm-keep mode, tap and hold
開始烹飪 for 3 seconds, the function
starts immediately.
Note
•
To get a better result, it’s suggested
to open the lid when using the sauce
thickening function. If you want to close
the lid, DO lock the lid, otherwise the
All-in-One cooker beeps. If the lid is still
not locked, the All-in-One cooker will
stop heating.
Preset time for delayed
cooking
You can preset the delayed cooking
time for dierent cooking functions. The
preset timer is from 10 munites to 24
hours.
4
Turn the handle clockwise to lock
the top lid.
» The All-in-One cooker resumes
to the previous cooking process.
Note
•
If the top lid is not easy to close, it’s
because that the inner pot still has
steam left. Wait for a while until the
steam is released and the oater drops,
you can close the top lid.
5
If you don’t add the ingredients in
two minutes, it will resume to the
previous cooking process.
Sauce thickening
Note
•
The Sauce thickening function applies
to the following functions: 豬肉/排骨, 牛
肉/羊肉, 雞肉/鴨肉, 豆類/蹄筋, 煲湯, 烤海
鮮, 烤雞, 焗烤時蔬 and 烤肉. You can use
this function in a cooking process, keep
warm mode, or standby mode.
•
The default time is 8 minutes, you can
set the time from 5 to 15 minutes.
•
When the Sauce thickening function
is working, tap Keep warm/Cancel to
cancel.
Reservation mode
1
In warm-keeping or standby mode
mode, tap 收汁入味
.
» The displays shows the default
cooking time.
Page 21
21
EN
4
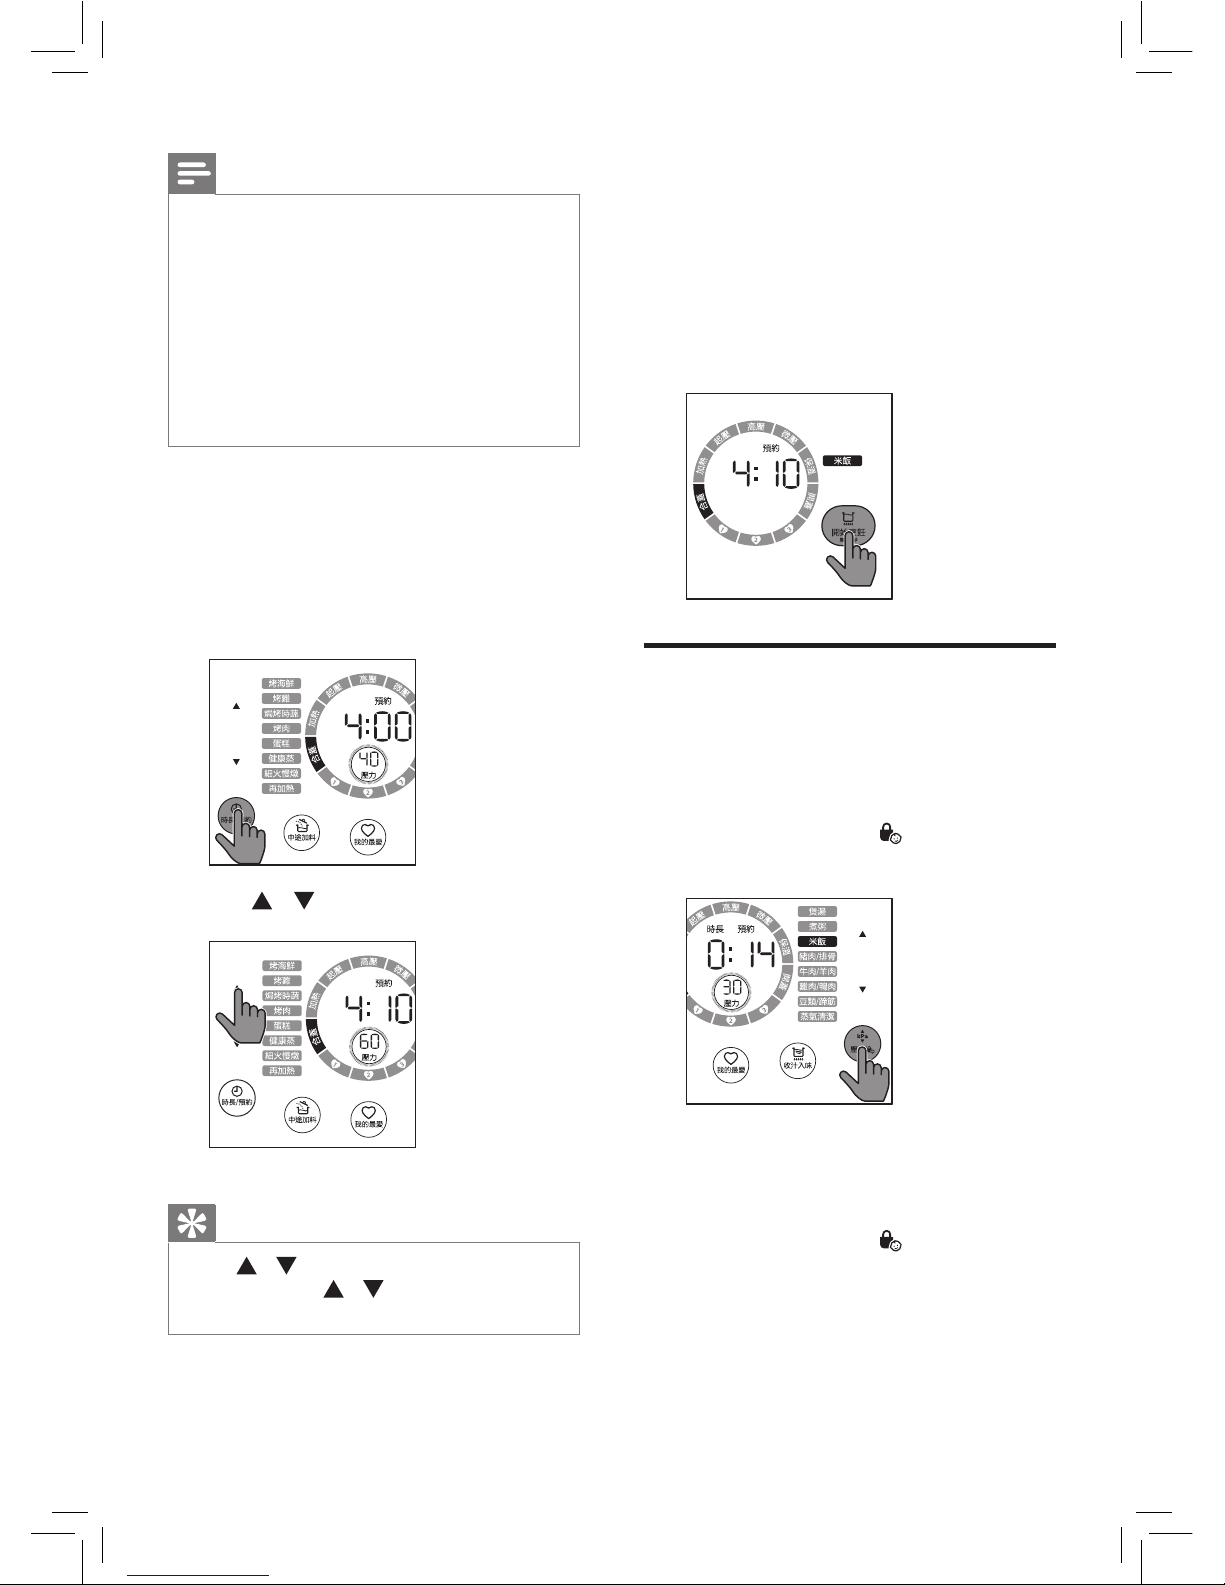
Tap 開始烹飪 for 3 seconds to
conrm the preset time.
» The screen shows the remaining
time for cooking. When preset
time is elapsed, the All-inOne cooker starts working in
the selected cooking mode
automatically.
Setting up child lock
To protect your child from using the
appliance, or to avoid unexpected
operations during cooking, you can set
up the child lock function.
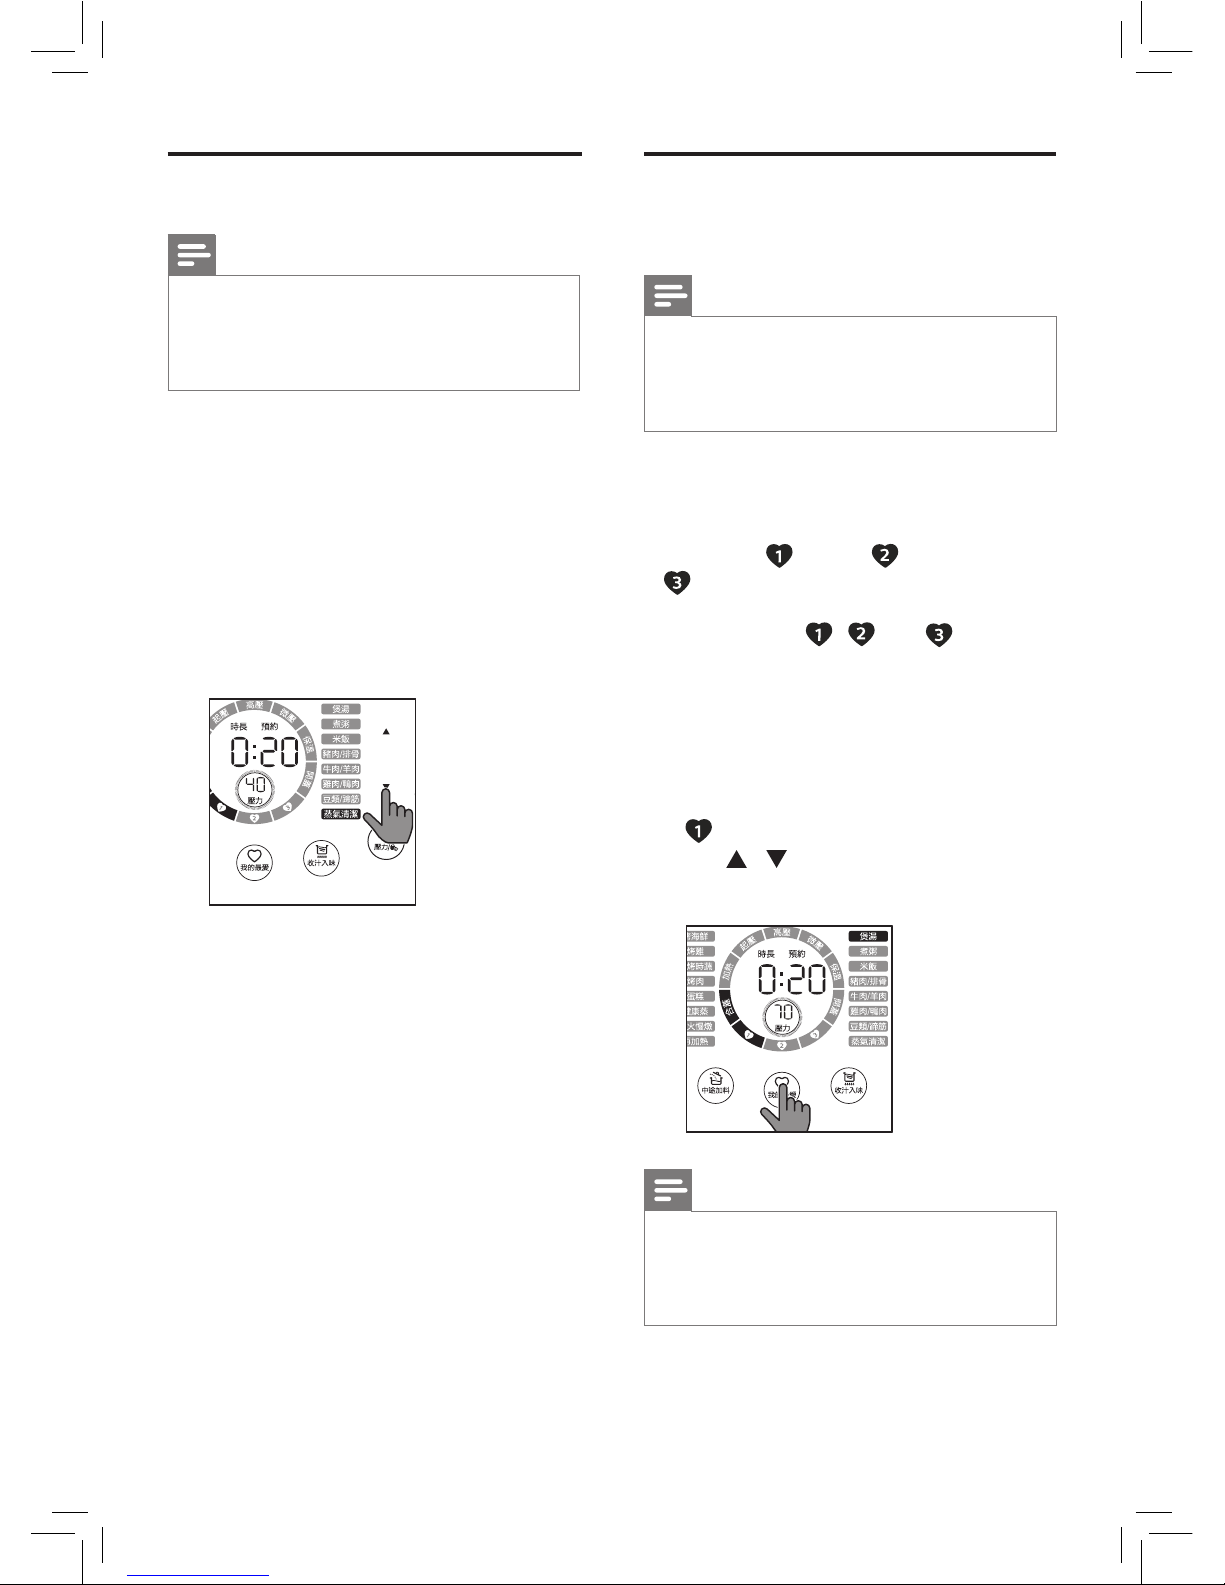
1
Tap and hold 壓力/ to activate
child lock.
3S
» Child lock indicator lights up.
» The other buttons are not
responsive.
2
Tap and hold 壓力/ for 3 seconds
again to deactivate child lock.
» Child lock indicator goes o.
Note
•
The preset timer is not available only in
蛋糕
and
蒸氣清潔 function.
•
You can use preset timer and sauce
thickening for the following functions:
豬肉/排骨, 牛肉/羊肉, 雞肉/鴨肉, 豆類/蹄
筋,煲湯, 烤海鮮, 烤雞, 焗烤時蔬 and 烤肉.
•
The pressure shown on the illustrations
in this chapter is for reference only, the
actual pressure for cooking is based on
the value displayed on the screen.
1
Follow the steps of pressure
cooking or waterless cooking,
choose the cooking function you
need.
2
Tap 時長/預約 twice, the 預約
indicator lights up.
3
Tap / to set time.
Tip
•
Tap / to adjust time by 10 minutes.
Tap and hold / to fast forward or
fast backward time.
Page 22
22
EN
Setting up My Favourite
menu
Note
•
The pressure shown on the illustrations
in this chapter is for reference only, the
actual pressure for cooking is based on
the value displayed on the screen.
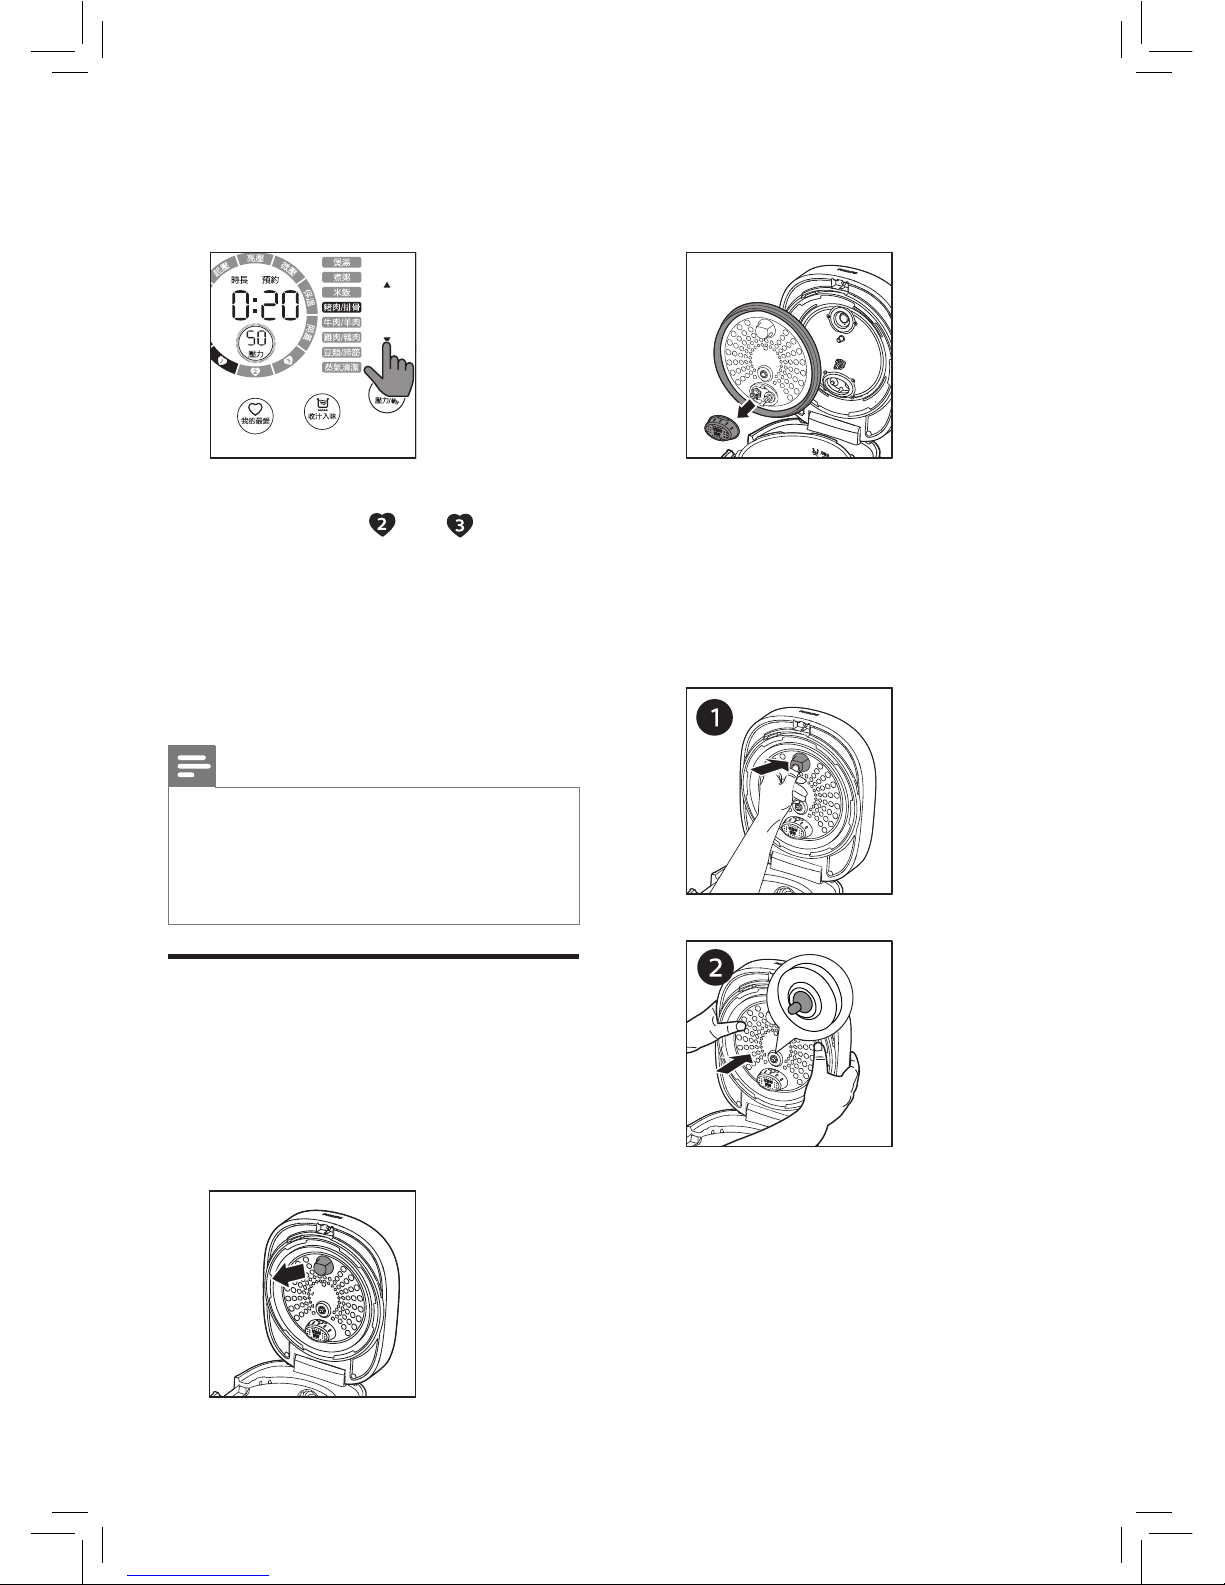
You can set any three menus as “My
Favourite”. Before you make any
changes to the setting, the default
menus are “-米飯”, “
-
煲湯” and
“
-
煮粥”.
•
In standby mode, tap 我的最愛
repeatedly,
,
and
lights up
in sequence, tap and hold 開始烹飪
3 seconds to use 我的最愛 menu.
If you need to change the menu in
我的最愛, for instance to change 煲湯
to 豬肉/排骨, follow the steps below:
1
Tap 我的最愛 repeatedly to choose
.
2
Tap / on the right to choose 豬
肉/排骨.
Note
•
If you need to set the dierent cooking
time, please refer to steps in each
function. The revised cooking time will
be stored in 我的最愛 menu.
Steam clean
Note
•
The pressure shown on the illustrations
in this chapter is for reference only, the
actual pressure for cooking is based on
the value displayed on the screen.
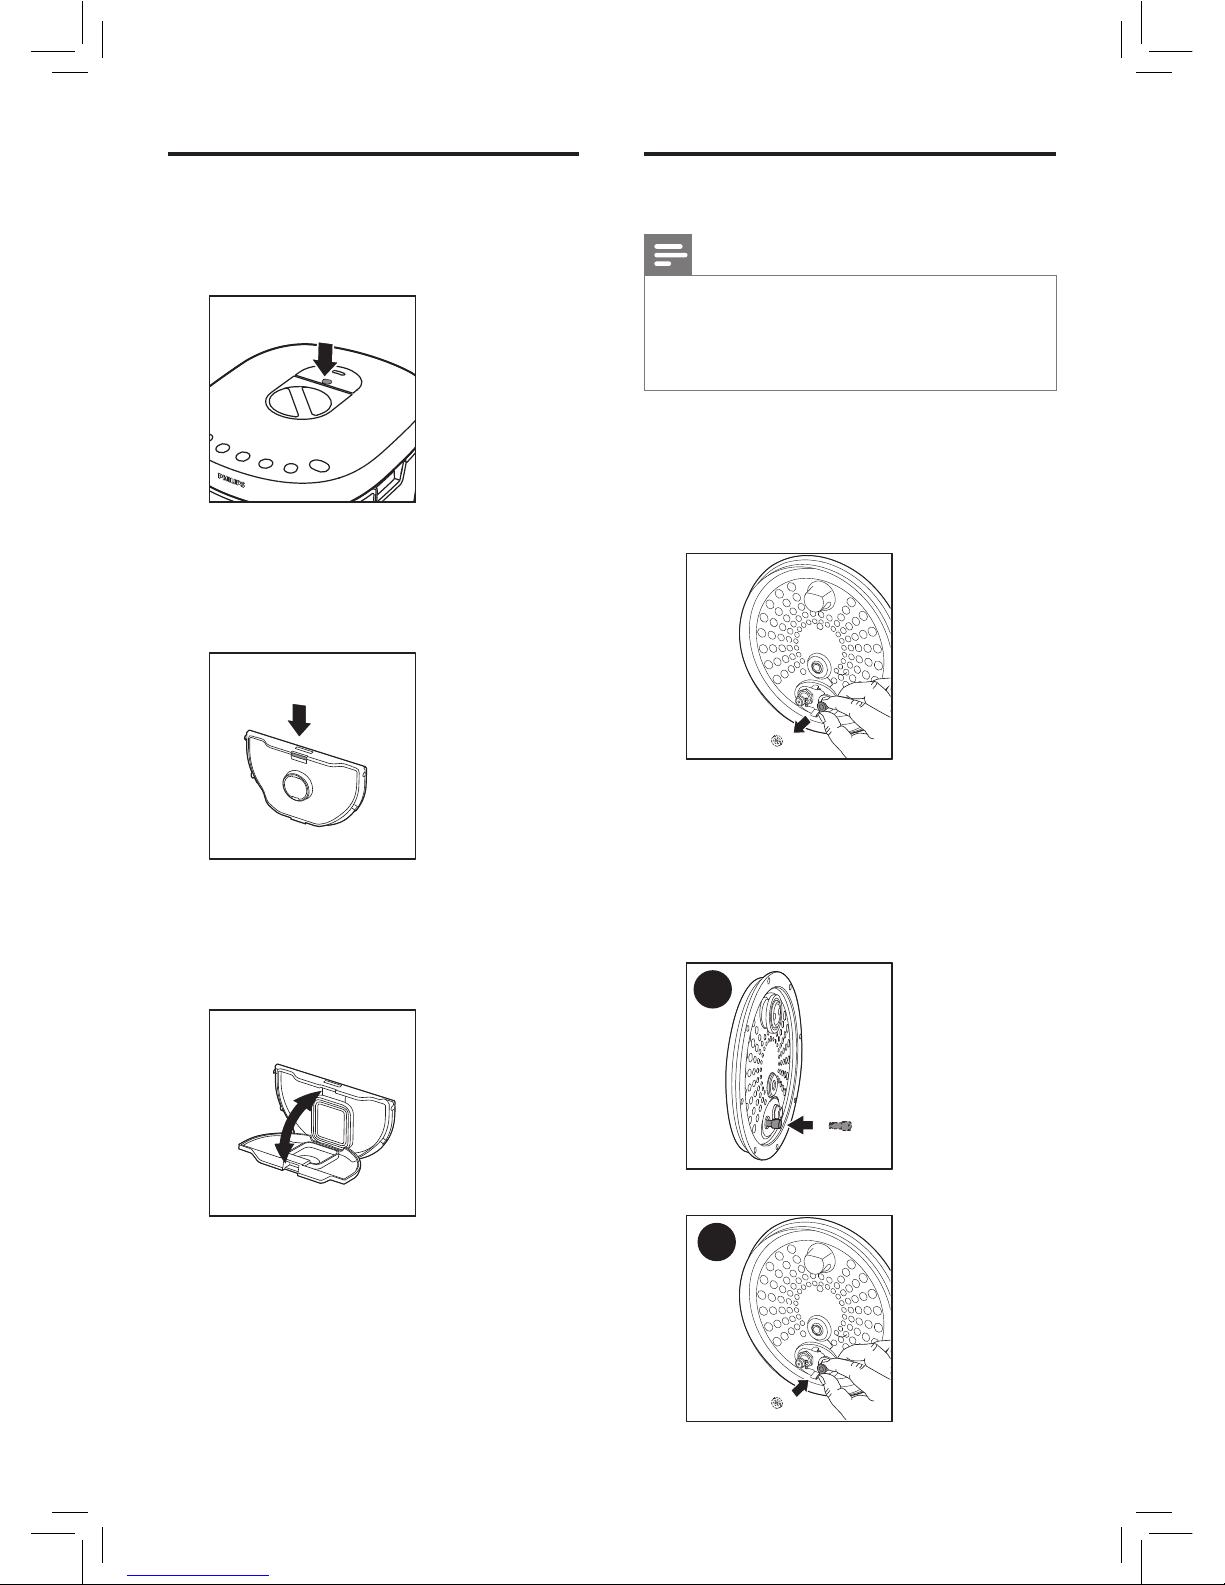
1
Pour more than two cups of water
into the inner pot.
2
Wipe the outside and bottom of
the inner pot dry with soft cloth,
then put it back into the All-in-One
cooker.
3
Close the top lid, put the plug into
the power socket.
4
Tap 蒸氣清潔 function.
5
Tap and hold 開始烹飪 for 3
seconds, the All-in-One cooker
starts the steam clean function.
6
The All-in-One cooker beeps and
switches to standby mode after the
cleaning process is nished.
7
Wait until the All-in-One cooker
cools down before cleaning
(refer to Chapter 4 Cleaning and
Maintenance).
Page 23
23
EN
4 Cleaning and
Maintenance
Note
•
Unplug the All-in-One cooker before
starting to clean it.
•
Wait until the All-in-One cooker
has cooled down suciently before
cleaning it.
Cleaning the detachable
inner lid
•
To disassemble the detachable
inner lid, hold the handle and pull it
outwards to remove it from the top
lid for cleaning.
3
Tap and hold 我的最愛 for 3
seconds, the 煲湯 function will be
replaced by 豬肉/排骨.
4
Follow steps 1-3 to change My
favourite menu and .
•
Hold the anti-block cap, pull it
outwards to disassemble it for
cleaning.
•
To assemble the detachable inner
lid, fully attach the handle to the top
lid (1), aim the hole of the inner lid
to the temperature controller, hold
both sides of the inner lid with your
hands and push it hard until you
hear a click(2).
Page 24
24
EN
Cleaning the oating valve
Note
•
If you have cooked ne or sticky foods,
the oating valve may be blocked.
Follow the below steps to disassemble
and clean the oating valve.
•
Grab the rubber ring around the
oating valve with your hands, gently
pull upwards to remove it from the
oating valve. Clean them with water
to remove food residues.
•
To assemble the oating valve, aim
the thinner end of the oating valve
to the hole and pass it through
the back of the inner lid (1), and
assemble the rubber ring around the
oating valve (2).
1
2
Cleaning the steam valve
•
Press the recession of the steam
valve to remove it from the top lid.
•
Press the hooks on the top of the
steam valve to disassemble it.
Soak in warm water and clean with
sponge.
•
To assemble the steam valve, fully
secure the bottom hooks rst, and
then press the top hooks until you
hear a click.
Page 25
25
EN
Interior
Inside of the outer lid and the main
body and the heating element:
•
Wipe with damp cloth.
•
Make sure to remove all the food
residues stuck to the All-in-One
cooker.
Exterior
Surface of the outer lid and outside of
the main body:
•
Wipe with a cloth damped with
soap water.
•
Only use soft and dry cloth to
wipe the control panel.
•
Make sure to remove all the food
residues around the steam valve
and oating valve.
Accessories and inner
pot
Soup ladle and inner pot.
•
Soak in hot water and clean with
sponge.
5 Recycling
Do not throw away the product with
the normal household waste at the
end of its life, but hand it in at an
ocial collection point for recycling.
By doing this, you help to preserve the
environment.
Follow your country’s rules for the
separate collection of electrical and
electronic products. Correct disposal
helps prevent negative consequences
for the environment and human health.
6 Guarantee and
service
If you need service or information, or
if you have a problem, visit the Philips
website at www.philips.com or contact
the Philips Customer Care Center in
your country. You can nd its phone
number in the worldwide guarantee
leaet. If there is no Customer Care
Center in your country, go to your local
Philips dealer.
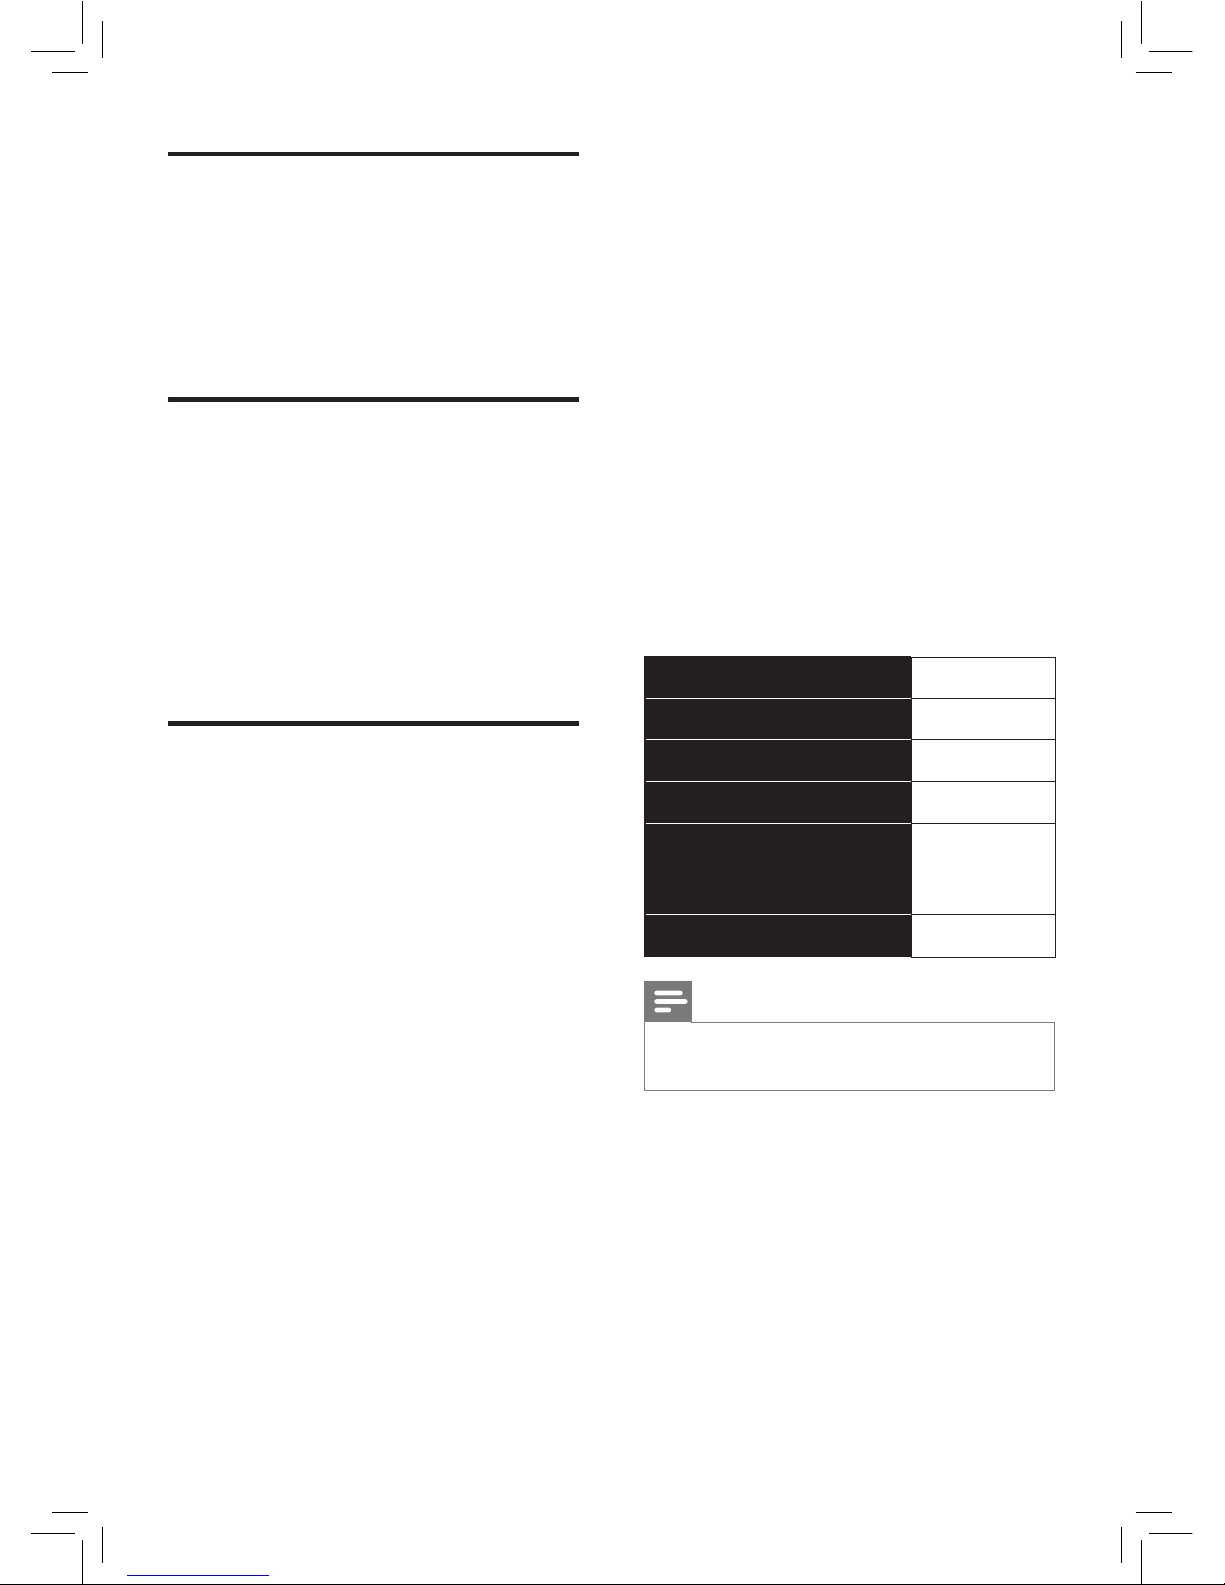
7 Specifications
Model
HD2195
Rated power output
1250 W
Rated capacity
5.0 L
Diamter of inner pot
22 cm
Dimension (WxHxD)
355mmx
285mmx
260mm
Net weight
8.3 kg
Note
•
Unplug the All-in-One cooker if not
used for a long time.
Page 26
26
EN
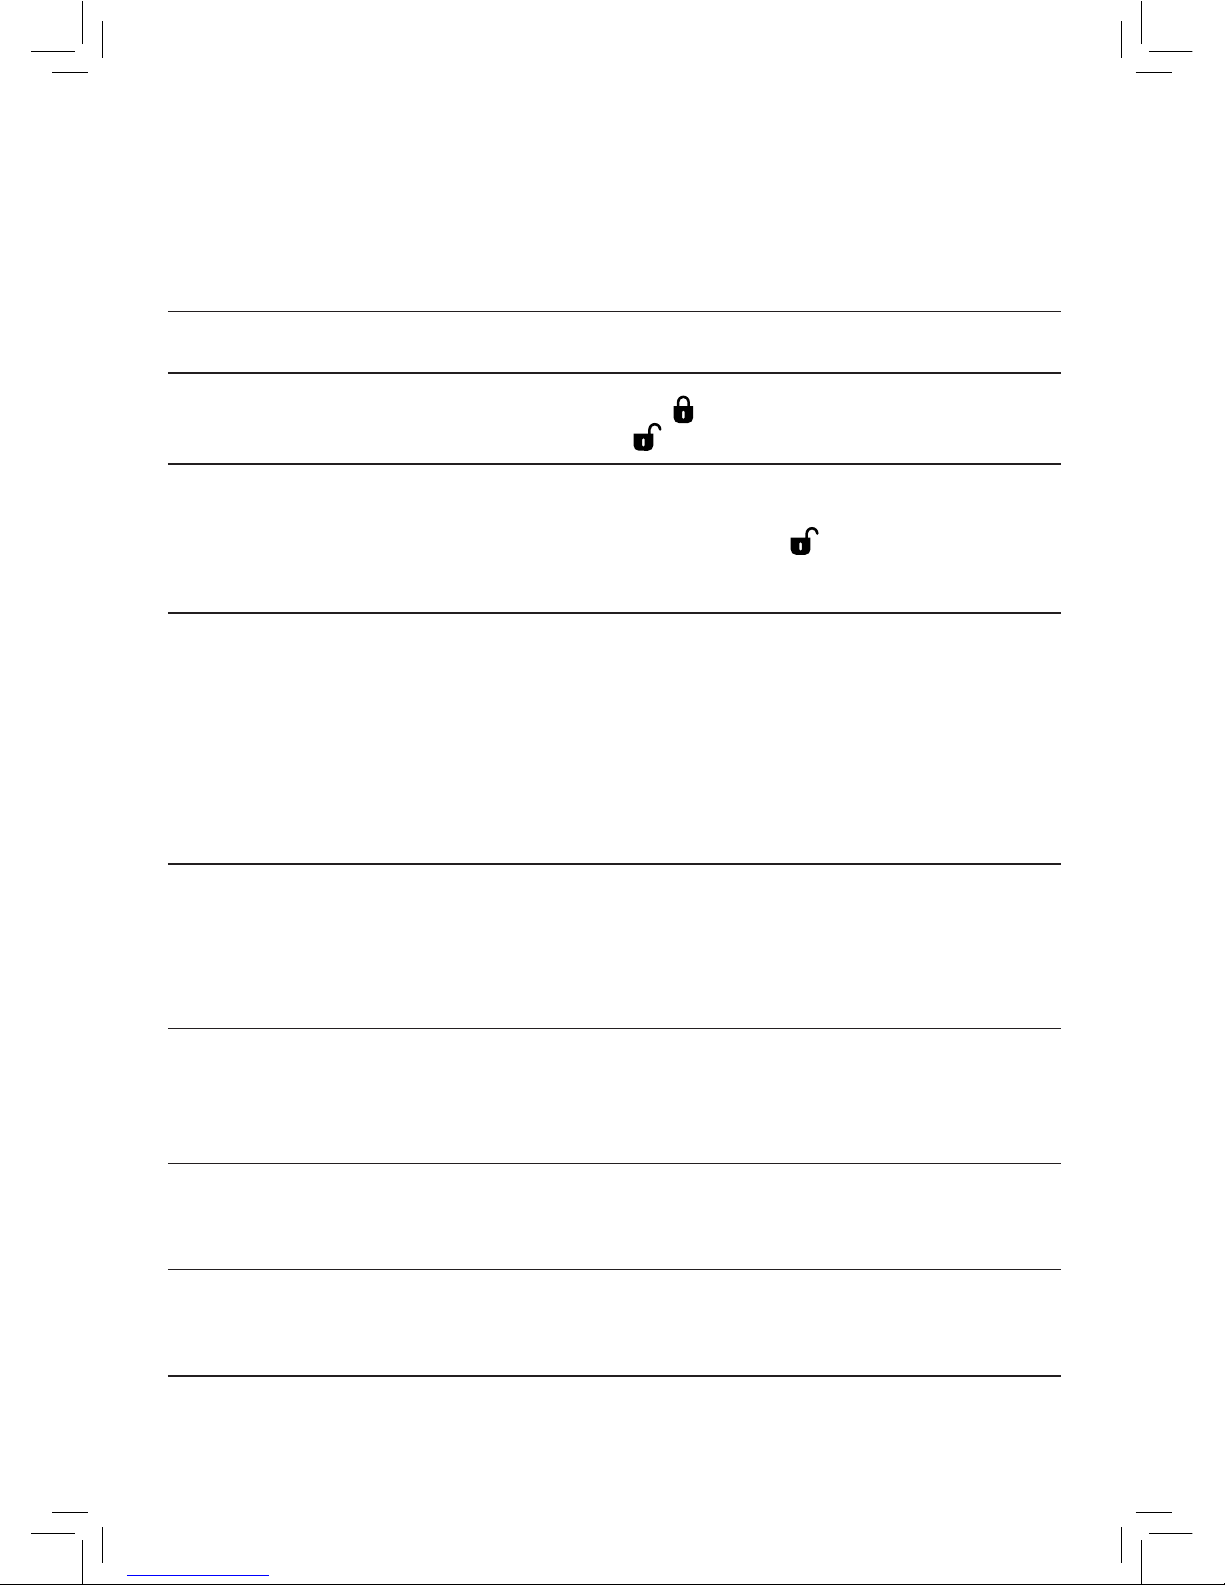
8 Troubleshooting
If you encounter problems when using this appliance, check the following points before
requesting service. If you cannot solve the problem, contact the Philips Consumer Care
Center in your country.
Problem Solution
I have diculties
closing the top lid.
•The handle is in position. Turn it counter
clockwise to position.
I have diculties
opening the top lid
after the pressure is
released.
•Make sure the handle is in position.
The food is not
cooked.
•Make sure that there is no foreign residue on the
heating element and the outside of the inner pot
before switching the All-in-One cooker on.
•The heating element is damaged, or the inner
pot is deformed. Take the cooker to your Philips
dealer or a service center authorized by Philips.
•Incorrect function or time was selected, increase
cooking time or change cooking method.
Air or steam leaks
from under the lid.
•The sealing ring is not well assembled. Make sure
the sealing ring is well assembled around the
inside of the top lid.
•There is food residue in the sealing ring. Make
sure the sealing ring is clean.
Air or steam leaks
from the oating
valve.
•There is food residue on the oating valve. Clean
the oating valve.
•There is food residue in the pressure regulator.
Clean the pressure regulator.
E5 displays on the
screen.
•The voltage in your home is too high. Wait until
the voltage is stable or check the voltage before
use the All-in-One cooker.
E5 displays on the
screen.
•The voltage in your home is too low. Wait until the
voltage is stable or check the voltage before use
the All-in-One cooker.
Page 27

27
EN
Problem Solution
E14 displays on the
screen.
•The temperature in the inner pot is high or the
All-in-One cooker is in dry burning. Wait until the
temperature drops, or check if the inner pot is
lack of water.
E18 displays on the
screen.
•The oating value is stuck to the inner lid, cannot
fall o. Clean the food residues before use.
E1, E2, E4, E7, E8,
E9, E10, E11, E12, E13,
E15, E16, E17 , E19 or
E20 displays on the
screen.
•The All-in-One cooker has malfunction. Take the
appliance to a Philips dealer or a service center
authorised by Philips.
Page 28

© 2018 Koninklijke Philips N.V.
All rights reserved.
HD2195_UM_TW_v3.0
 Loading...