

Page 1
User Manual
HD2151
Page 2

Page 3

EN
Contents
1 Important 4
Power failure backup function 6
Electromagnetic elds (EMF) 6
2 YourAll-in-Onecooker 7
What’s in the box 7
Product overview 8
Control panel overview 9
3 Using your All-in-One
cooker 10
Before rst use 10
Cooking program 11
Preparations before cooking 13
Pressure cooking 14
Slow cooking 15
Steam cooking 16
Special recipes 16
Sauté 18
Reheat 18
Adjust the cooking time,
pressure and delay start 19
Adding ingredient 20
Sauce thickening 20
Setting up child lock 21
Setting up My Favourite menu 21
5 Recycling 25
6 Guaranteeandservice 25
7 Specications 25
8 Troubleshooting 26
4 Cleaningand
Maintenance 22
Inner lid 22
Steam box 22
Floater 23
Pressure regulator 23
Sealing ring 23
Interior 24
Exterior 24
Accessories and inner pot 24
3
Page 4

EN
1 Important
Read this safety leaet carefully before you use
the appliance and save it for future reference.
Danger
• The appliance must not be immersed.
Warning
• This appliance is intended to be used in
household and similar applications such as:
• sta kitchen areas in shops, oces and
other working environments;
• farm houses;
• by clients in hotels, motels and other
residential type environments;
• bed and breakfast type environments.
• This appliance is not intended for use by
persons (including children) with reduced
physical, sensory or mental capabilities,
or lack of experience and knowledge,
unless they have been given supervision
or instruction concerning use of the
appliance by a person responsible for their
safety.
• Children should be supervised to ensure
that they do not play with the appliance.
• If the power cord set is damaged, it must
be replaced by a cord set available from
the manufacturer.
• The appliance is not intended to be
operated by means of an external timer or
a separate remote-control system.
• The ducts in the pressure regulator
allowing the escape of steam should be
checked regularly to ensure that they are
not blocked.
• The container must not be opened until
the pressure has decreased suciently.
• WARNING: Make sure to avoid spillage on
the power connector to avoid a potential
hazard.
• Always follow the instructions and use
the appliance properly to avoid potential
injury.
• Use a clean and soft cloth to clean the
surfaces in contact with food.
• Only connect the appliance to a grounded
power outlet. Always make sure that the
plug is inserted rmly into the power
outlet.
• Do not use the appliance if the plug, the
power cord, the inner pot, the sealing ring,
or the main body is damaged.
• Do not let the power cord hang over the
edge of the table or worktop on which the
appliance stands.
• Make sure the heating element, the
temperature sensor, and the outside of the
inner pot are clean and dry before you put
the plug in the power outlet.
• Do not plug in the appliance or turn the
control knob with wet hands.
• Make sure the power socket is clean and
dry before you plug in the appliance.
• Do not use the appliance if too much air or
steam is leaking from under the top lid.
• When cooking soup or viscous liquid,
do not release pressure by turning the
pressure regulator to the steam vent
position, otherwise liquid might spurt from
the pressure regulator valve. Wait until
the pressure is naturally released and the
oater has dropped to open the top lid.
Caution
• CAUTION: the surface of the heating
element is subject to residual heat after
use.
• Never use any accessories or parts from
other manufacturers or that Philips does
not specically recommend. If you use
such accessories or parts, your guarantee
becomes invalid.
• Do not expose the appliance to high
temperatures, nor place it on a working or
still hot stove or cooker.
• Do not expose the appliance to direct
sunlight.
• Place the appliance on a stable, horizontal,
and level surface.
• Do not use the handle on the top lid to
move the appliance, use the side handles
instead.
• When pressure is being released from the
pressure regulator valve, hot steam or
liquid will be ejected. Keep hands and face
away from the steam vent.
• Always put the inner pot in the appliance
before you put the plug in the power
outlet and switch it on.
• Do not place the inner pot directly over an
open re to cook food.
• Do not use the inner pot if it is deformed.
4
Page 5

EN
• Make sure that the sealing ring is clean
and in good condition.
• The accessible surfaces may become hot
when the appliance is operating. Take
extra caution when touching the surfaces.
• Beware of hot steam coming out of the
oating valve and pressure regulator valve
during cooking or when you open the
lid. Keep hands and face away from the
appliance to avoid the steam.
• Do not lift and move the appliance while it
is operating.
• Do not exceed the maximum water level
indicated in the inner pot to prevent
overow.
• Do not place the cooking utensils inside
the pot while cooking.
• Only use the cooking utensils provided.
Avoid using sharp utensils.
• To avoid scratches, it is not recommended
to cook ingredients with crustaceans and
shellsh. Remove the hard shells before
cooking.
• Do not place a magnetic substance on
the lid. Do not use the appliance near a
magnetic substance.
• Always let the appliance cool down to
room temperature before you clean or
move it.
• Always clean the appliance after use. Do
not clean the appliance in dishwasher.
• Always unplug the appliance if not used
for a longer period.
• If the appliance is used improperly or for
professional or if it is not used according
to the instructions in this safety leaet,
the guarantee becomes invalid and Philips
refuses liability for any damage caused.
• Do not let children near the All-in-One
cooker when in use.
• Do not put the All-in-One cooker into a
heated oven.
• Move the All-in-One cooker under
pressure with the greatest care. Do not
touch hot surfaces. Use the handles and
knobs. If necessary, use protection.
• Do not use the All-in-One cooker for a
purpose other than the one for which it is
intended.
• This appliance cooks under pressure.
Scalds may result from inappropriate
use of the All-in-One cooker. Make sure
that the cooker is properly closed before
applying heat.
• Never force open the All-in-One cooker.
Do not open before making sure that its
internal pressure has completely dropped.
• Never use your All-in-One cooker without
adding water, this would seriously damage
it.
• Do not ll the cooker beyond 2/3 of its
capacity. When cooking foodstus which
expand during cooking, such as rice or
dehydrated vegetables, do not ll the
cooker to more than half of its capacity.
• Use the appropriate heat source(s)
according to the instructions for use.
• After cooking meat with a skin (e.g. ox
tongue) which may swell under the eect
of pressure, do not prick the meat while
the skin is swollen; you might be scalded.
• When cooking doughy food, gently shake
the cooker before opening the lid to avoid
food ejection.
• Before each use, check that the valves are
not obstructed. See the Instructions for
use.
• Never use the All-in-One cooker in its
pressurized mode for deep or shallow
frying of food.
• Do not tamper with any of the safety
systems beyond the maintenance
instructions specied in the instructions
for use.
• Only use manufacturer’s spare parts in
accordance with the relevant model. In
particular, use a body and a lid from the
same manufacturer indicated as being
compatible.
• Repairs have to be made by authorized
personnel only.
• The All-in-One cooker should be put in a
dry place when storage.
• Visit www.philips.com/support to
download the user manual.
5
Page 6

EN
Power failure backup
function
This appliance has a backup function that
reserves the status before a power failure.
• If the power failure occurs during a cooking
process, and the power supply is resumed
within 30 minutes, the countdown of the
cooking time continues where it is left o.
• If the power failure occurs when the
appliance is at preset mode, and the power
supply is resumed within 30 minutes, the
countdown of the preset time continues
where it is left o.
• If the power supply is not resumed within
30 minutes, the appliance might not
continue with the previous working process,
but stay in standby mode.
Electromagneticelds(EMF)
This Philips appliance complies with all
applicable standards and regulations regarding
exposure to electromagnetic elds.
6
Page 7
EN
2 Your All-in-One cooker
Congratulations on your purchase, and welcome to Philips!
To fully benet from the support that Philips oers, register your product at
www.Philips.com/welcome.
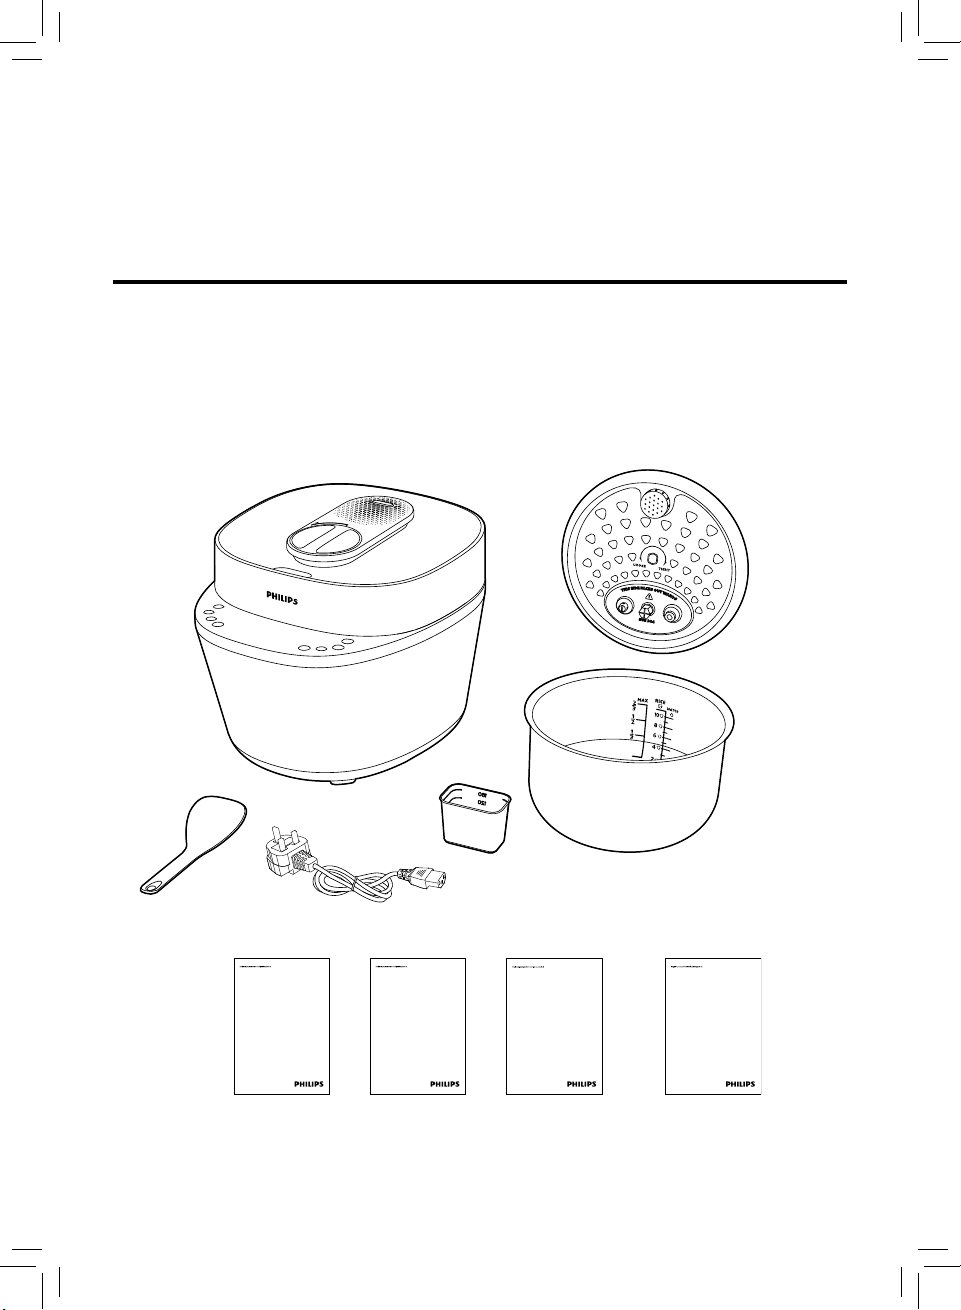
What’s in the box
Main unit Inner Pot
Rice&Soup ladle Measuring cup
Power cord Detachable inner lid
User manual Recipe book
Quick start guide for demonstration
Warranty card
www.philips.com/welcome
User Manual
www.philips.com/welcome
Quick start guide
for demonstration
www.philips.com/welcome
Recipe Book
www.philips.com/welcome
Warranty
7
Page 8
EN
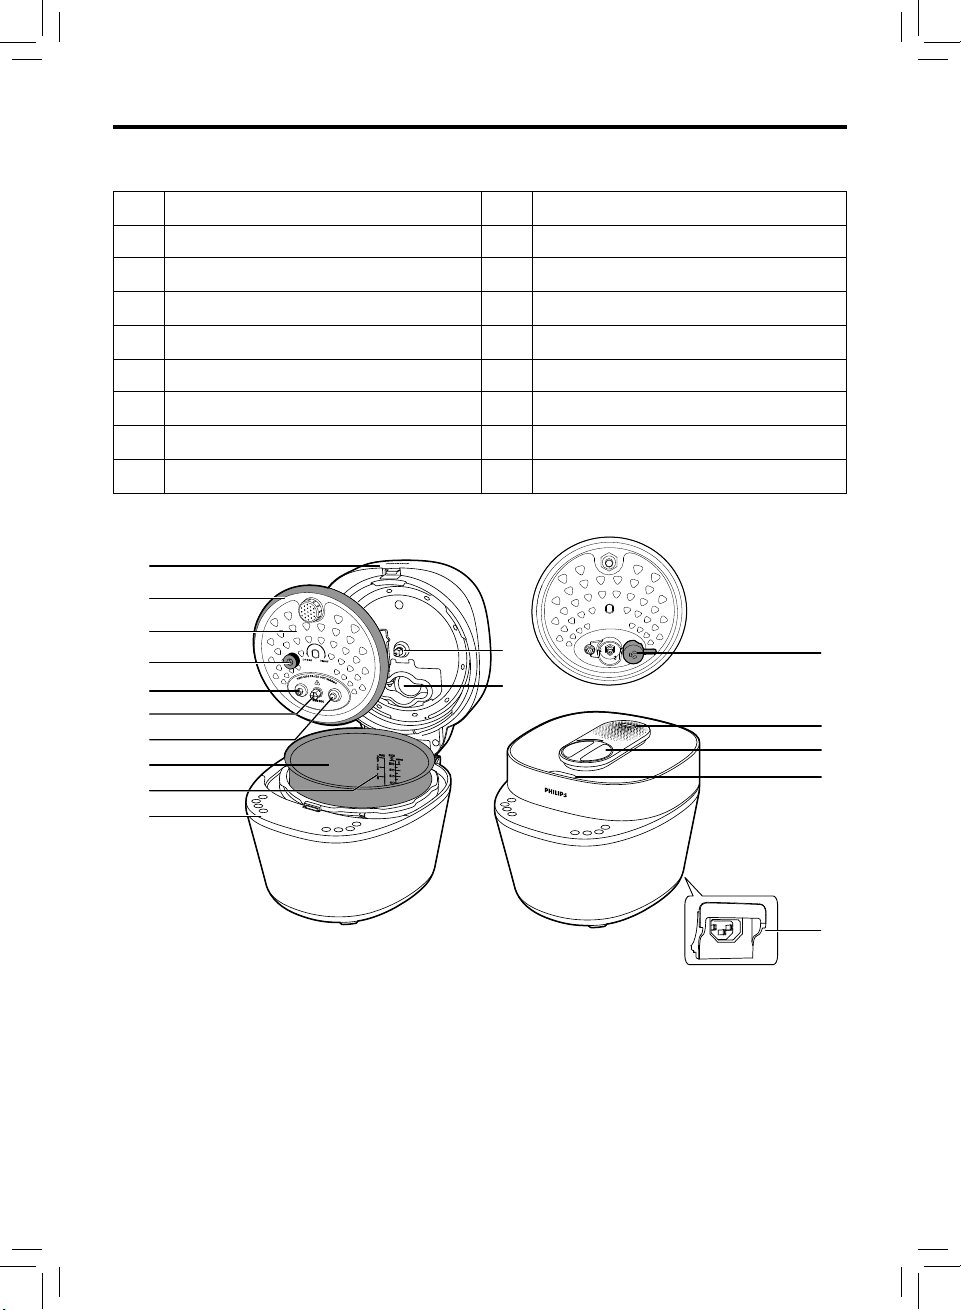
Productoverview
m
n
q
p
o
i
j
g
h
f
a
d
e
b
c
Top lid
a
Sealing ring
b
Detachable inner lid
c
Cap nuts
d
Safety valve
e
Fixing nut
f
Floating valve
g
Inner pot
h
Water level indication
i
Control panel
j
Temperature controller
k
Steam box
l
Power socket
m
Lid open button
n
Lid lock/unlock handle
o
Steam valve
p
Pressure regulator
q
k
l
8
Page 9
EN
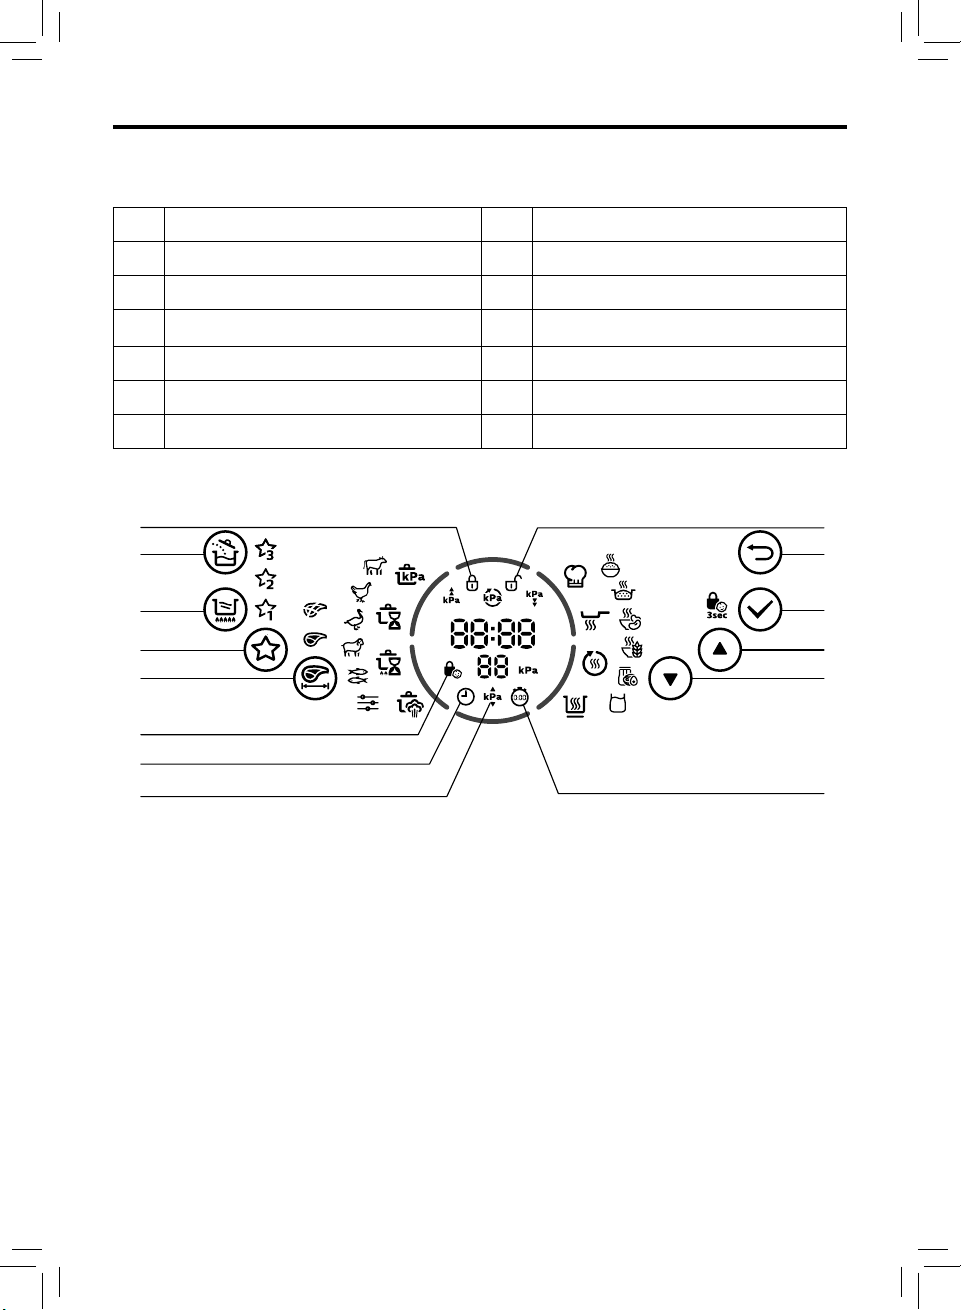
Controlpaneloverview
r
t
s
u
w
x
v
y
}
~
|
{
z
r
Lid locked indicator
s
Add ingredient button
t
Sauce thickening button
u
My favourite button
v
Meat cubes’ size selection button
w
Child lock indicator
x
Timer selection indicator
y
Pressure selection indicator
z
Delay start indicator
{
Menu selection button
|
Menu selection button
}
Conrm/Child lock button
~
Cancel button
Lid unlocked indicator
9
Page 10

EN
3 Using your All-in-
One cooker
Beforerstuse
1 Remove all packaging materials from the
appliance.
2 Take out all the accessories from the inner
pot.
3 Clean the parts of the All-in-One cooker
thoroughly before using it for the rst time
(see chapter “Cleaning and Maintenance”).
Note
• Make sure all parts are completely dry
before you start using the All-in-One
cooker.
• Make sure the inner pot is in proper
contact with the heating element.
10
Page 11
EN
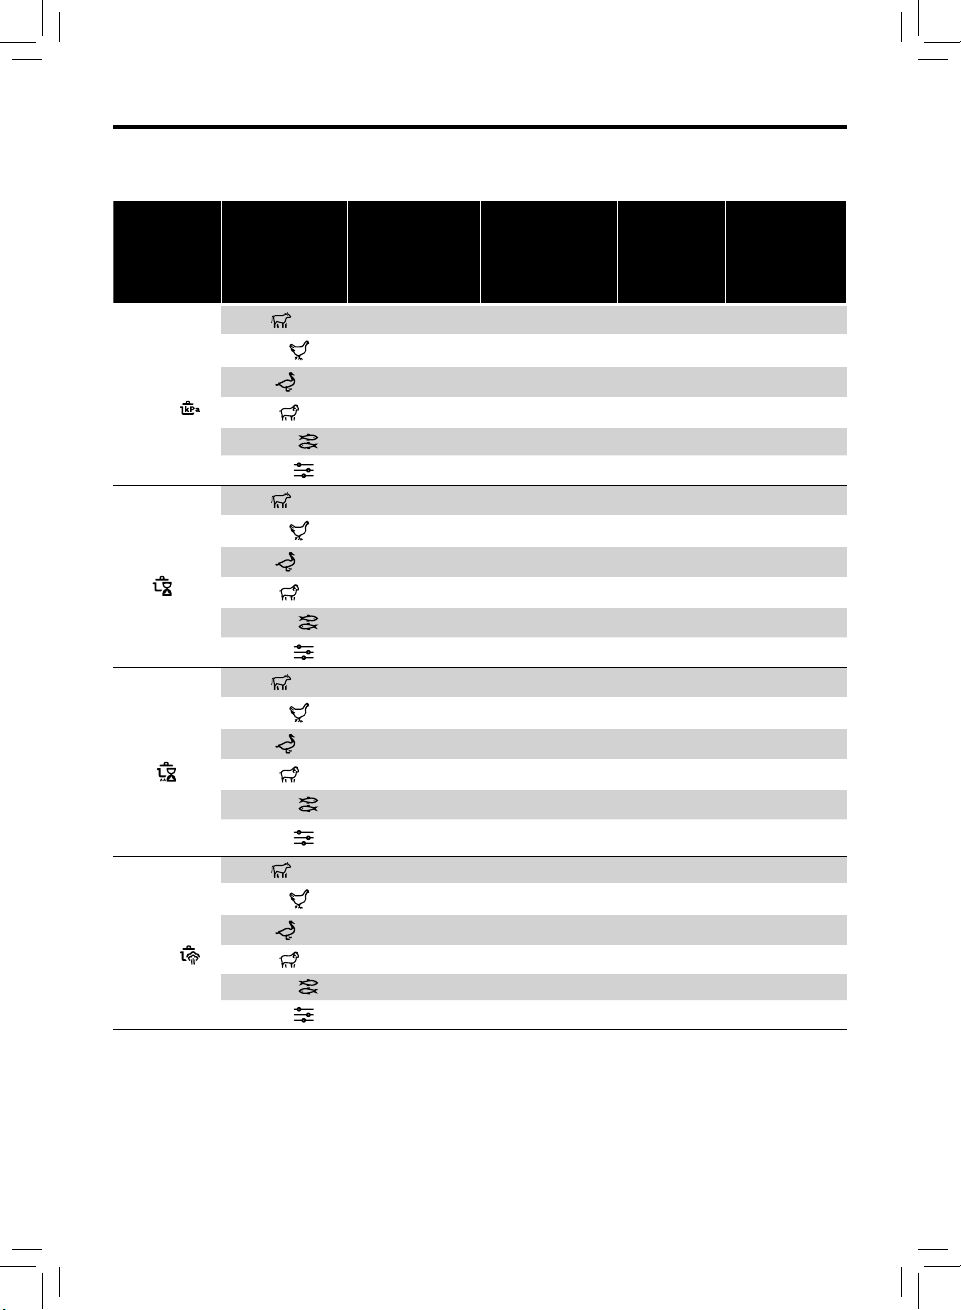
Cooking program
Cooking
function
Pressure
cooking
Slow cook
Low
Slow cook
High
Steam
cooking
Subcooking
function
Beef ( )
Poultry ( )
Duck ( )
Lamb ( )
Seafood ( )
Manual ( )
Beef ( )
Poultry ( )
Duck ( )
Lamb ( )
Seafood ( )
Manual ( )
Beef ( )
Poultry ( )
Duck ( )
Lamb ( )
Seafood ( )
Manual ( )
Beef ( )
Poultry ( )
Duck ( )
Lamb ( )
Seafood ( )
Manual ( )
Default
cooking time
30 minutes 3-59 minutes 70 20-70
15 minutes 2-59 minutes 60 20-70
15 minutes 12-59 minutes 50 20 -70
20 minutes 3-59 minutes 70 20-70
3 minutes 1-59 minutes 40 20-70
5 minutes 2-59 minutes 20 20-70
12 hours 2-12 hours NA NA
10 hours 2-12 hours NA NA
8 hours 2-12 hours NA NA
10 hours 2-12 hours NA NA
8 hours 2-12 hours NA NA
2 hours 2-12 hours NA NA
6 hours 2-12 hours NA NA
4 hours 2-12 hours NA NA
3 hours 2-12 hours NA NA
4 hours 2-12 hours NA NA
2 hours 2-12 hours NA NA
2 hours 2-12 hours NA NA
30 minutes 3-30 minutes 10 NA
30 minutes 3-30 minutes 10 NA
20 minutes 3-30 minutes 10 NA
30 minutes 3-30 minutes 10 NA
8 minutes 3-30 minutes 10 NA
10 minutes 3-30 minutes 10 NA
Adjustable
cooking time
Default
pressure
(kPa)
Adjustable
pressure
regulating
range(kPa)
11
Page 12
EN
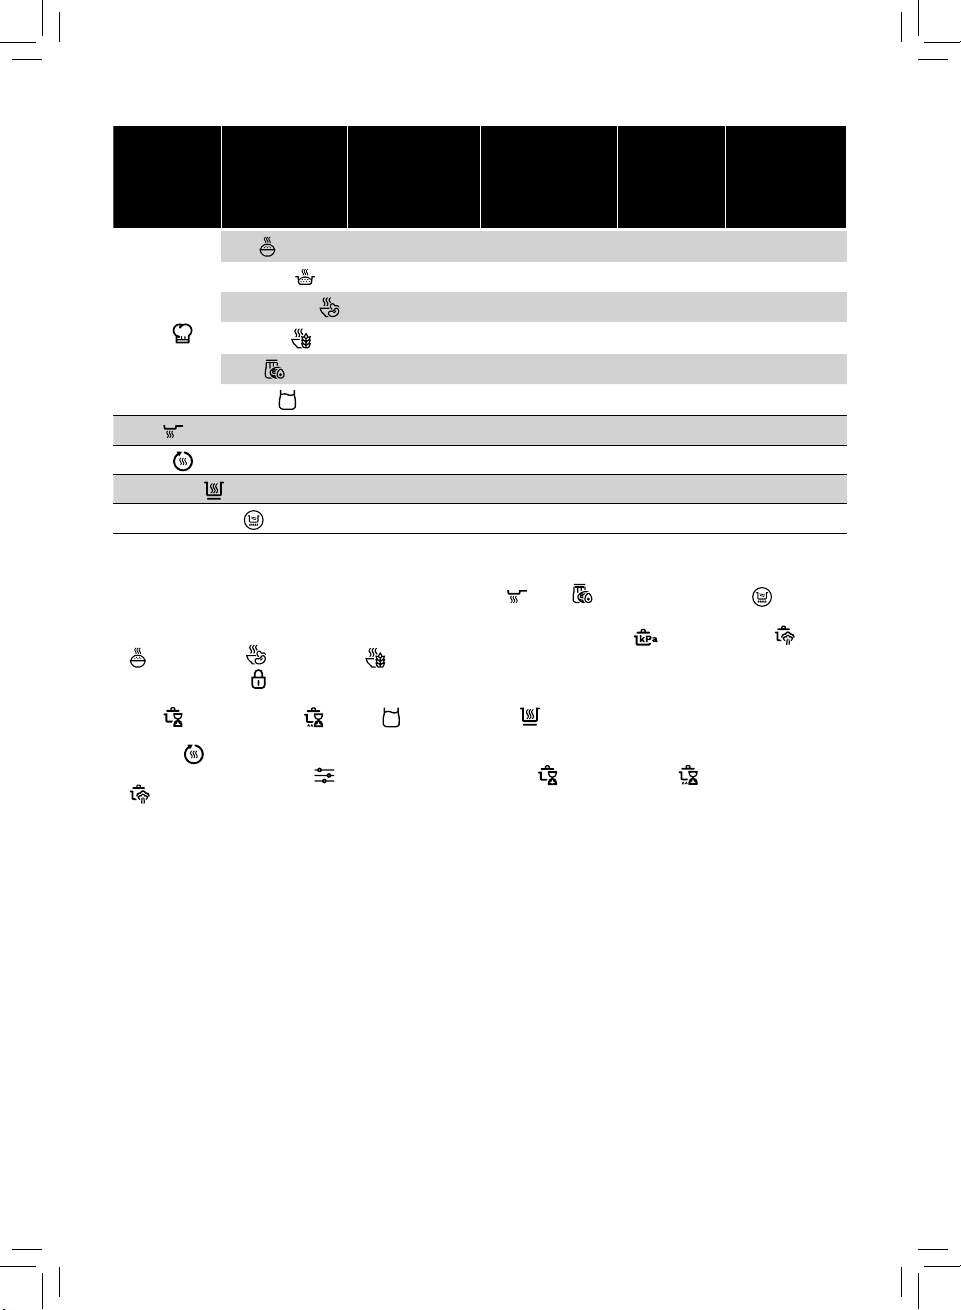
Cooking
function
Subcooking
function
Default
cooking time
Adjustable
cooking time
Default
pressure
(kPa)
Adjustable
pressure
regulating
range(kPa)
Rice
Fried rice
Special
recipes
Sauté
Reheat
Keep warm
Sauce thickening
Notes
• Keep the lid open when using these functions: Sauté , Kaya and Sauce thickening .
Otherwise the All-in-One cooker beeps to remind you to open the lid.
• Do close and lock the lid when using these functions: Pressure cooking , Steam cooking , Rice
, Lentil/beans and Porridge . If the you unlock the lid, the All-in-One cooker will stop the
cooking process, indicator lights up and beeps.
• You can start the cooking process, either with the lid open or closed. This is applicable for Slow cook
Low , Slow cook High , Yogurt and Keep warm .
• You can start the cooking process, either with the lid open or closed&locked. This is applicable for
Reheat .
• When using the Manual ( ) function in Slow cook Low , Slow cook High or Steam cooking
, you need to set the cooking time, cooking pressure and preset time manually before starting the
cooking process.
• Steam will be released intermittently from the steam vent during cooking. This is to have optimal
airow and to ensure cooking result.
• When pressure starts to build up, the All-in-One cooker will automatically release cold air from the
inner pot through the steam vent. This is to make sure sensor can accurately sense and control the
temperature and pressure inside.
• Cooking pressure can be adjusted to reach your preferred texture. You may increase the cooking
pressure to have an even more tender result, or decrease the cooking pressure if you nd the texture
to be too soft.
Lentil/beans
Porridge
Kaya
Yogurt
14 minutes NA 30 NA
11 minutes NA 30 NA
20 minutes 20-59 minutes 70 20 -70
15 minutes 15-59 minutes 40 20 -70
14 minutes 10-59 minutes NA NA
8 hours 6-12 hours NA NA
10 minutes 10-59 minutes NA NA
15 minutes 15-59 minutes NA NA
12 hours NA NA NA
8 minutes 5-15 minutes NA NA
12
Page 13
EN
Preparations before cooking
Warning
• Make sure that the detachable inner lid is
properly installed.
Note
•
Do not ll the inner pot with food and
liquid less than the minimum of the
water level indications, or more than the
maximum of the water level indications.
•
For food that expands (such as beans or
dried foods) during cooking, do not ll the
inner pot with more than 1/2 full of food
and liquid.
•
For rice cooking, follow the water level
indications on the inside of the inner pot.
You can adjust the water level for dierent
types of rice and according to your own
preference. Do not exceed the maximum
quantities indicated on the inside of the
inner pot.
•
After the cooking process is started, you
can press to terminate the current
work, and the appliance goes to menu
selection mode.
• After the cooking process is started and
the pressure already exists in the inner pot,
you must press and hold for 3 seconds
to cancel the current cooking process
(single click the button does not work).
• ONLY button lighting up on the screen
means the All-in-One cooker is in standby
mode.
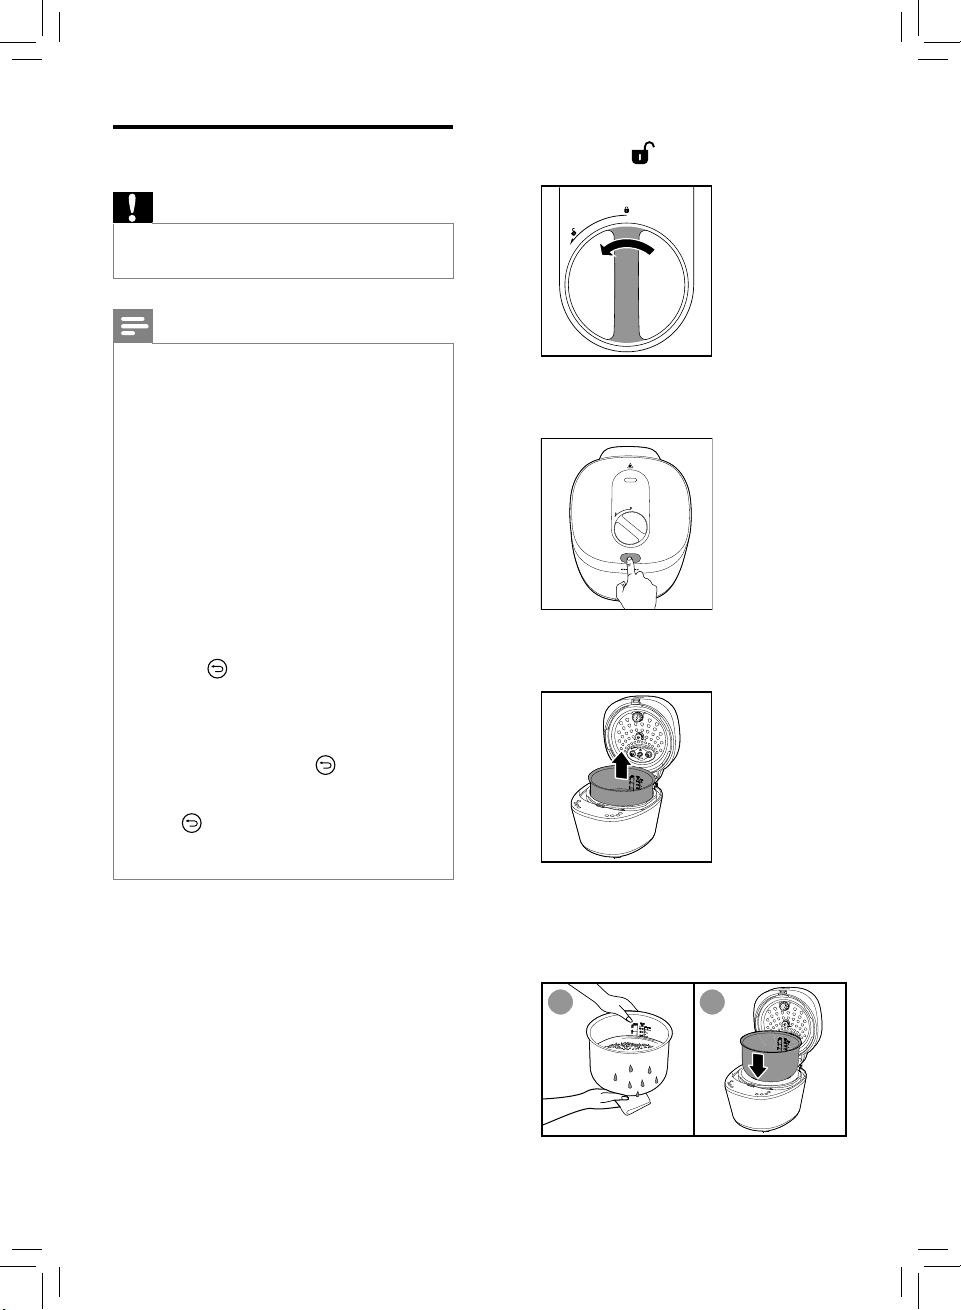
Perform the following preparations before
cooking with the All-in-One cooker:
1 Turn the lid lock/unlock handle counter
clockwise to position.
2 Press the lid open button to open the top
lid.
3 Take out the inner pot from the All-in-One
cooker.
4 Put the pre-washed food in the inner pot,
wipe the outside and bottom of the inner
pot dry (g 1) with soft cloth, then put it
back into the All-in-One cooker (g 2).
1 2
13
Page 14
EN
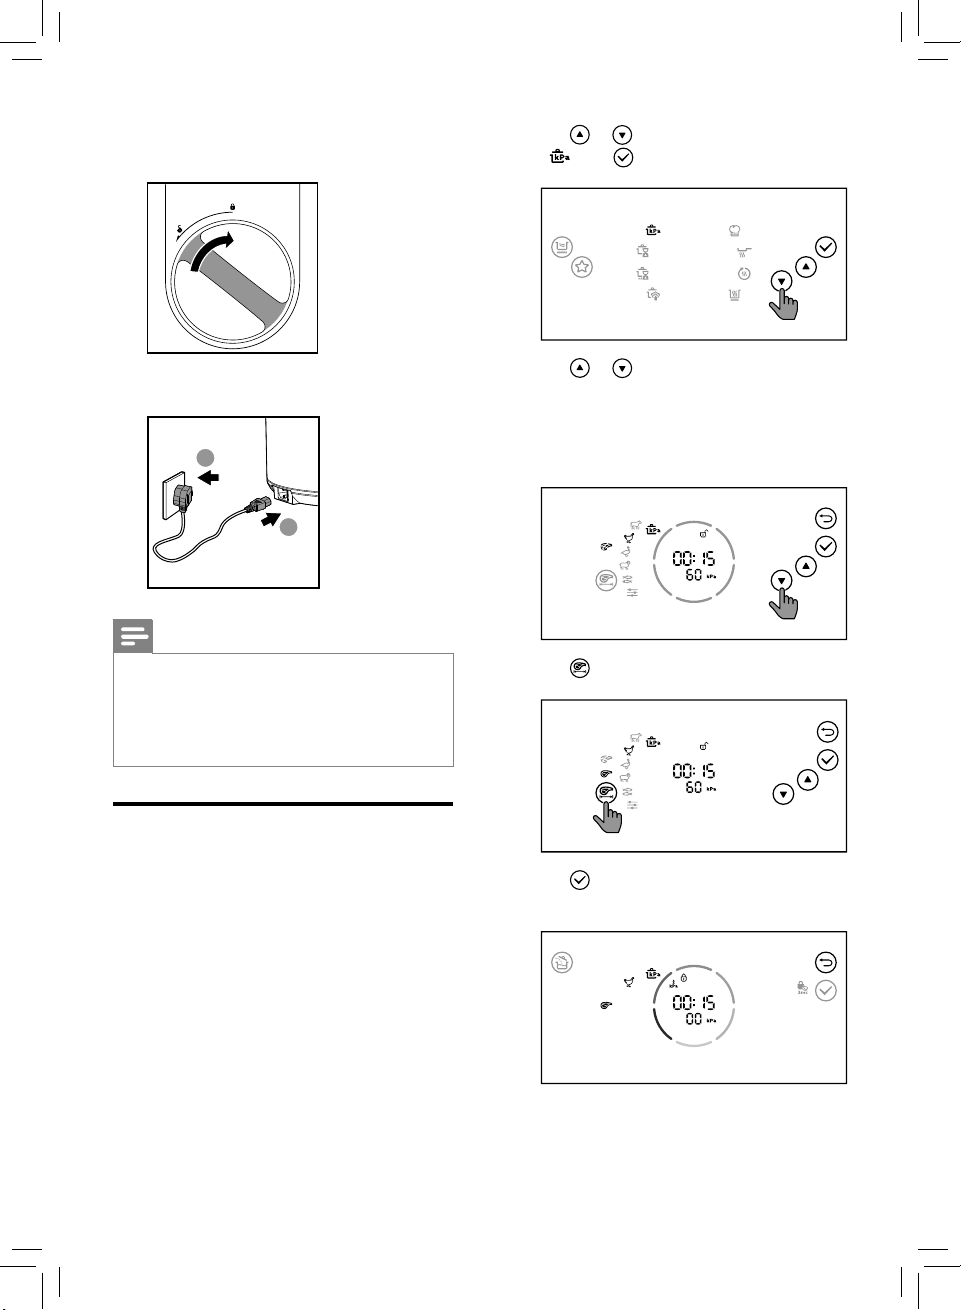
5 Turn the handle clockwise to lock the top
lid.
2 Tap or to select pressure cooking
( ), tap conrm.
6 Put the plug into the power socket.
2
1
Note
• Make sure the outside of the inner pot is
dry and clean, and that there is no foreign
residue on the heating element.
• Make sure the inner pot is in proper
contact with the heating element.
Pressure cooking
There are 6 sub menus available. For pressure
cooking time and pressure regulating range,
refer to Chapter “Functions Overview”.
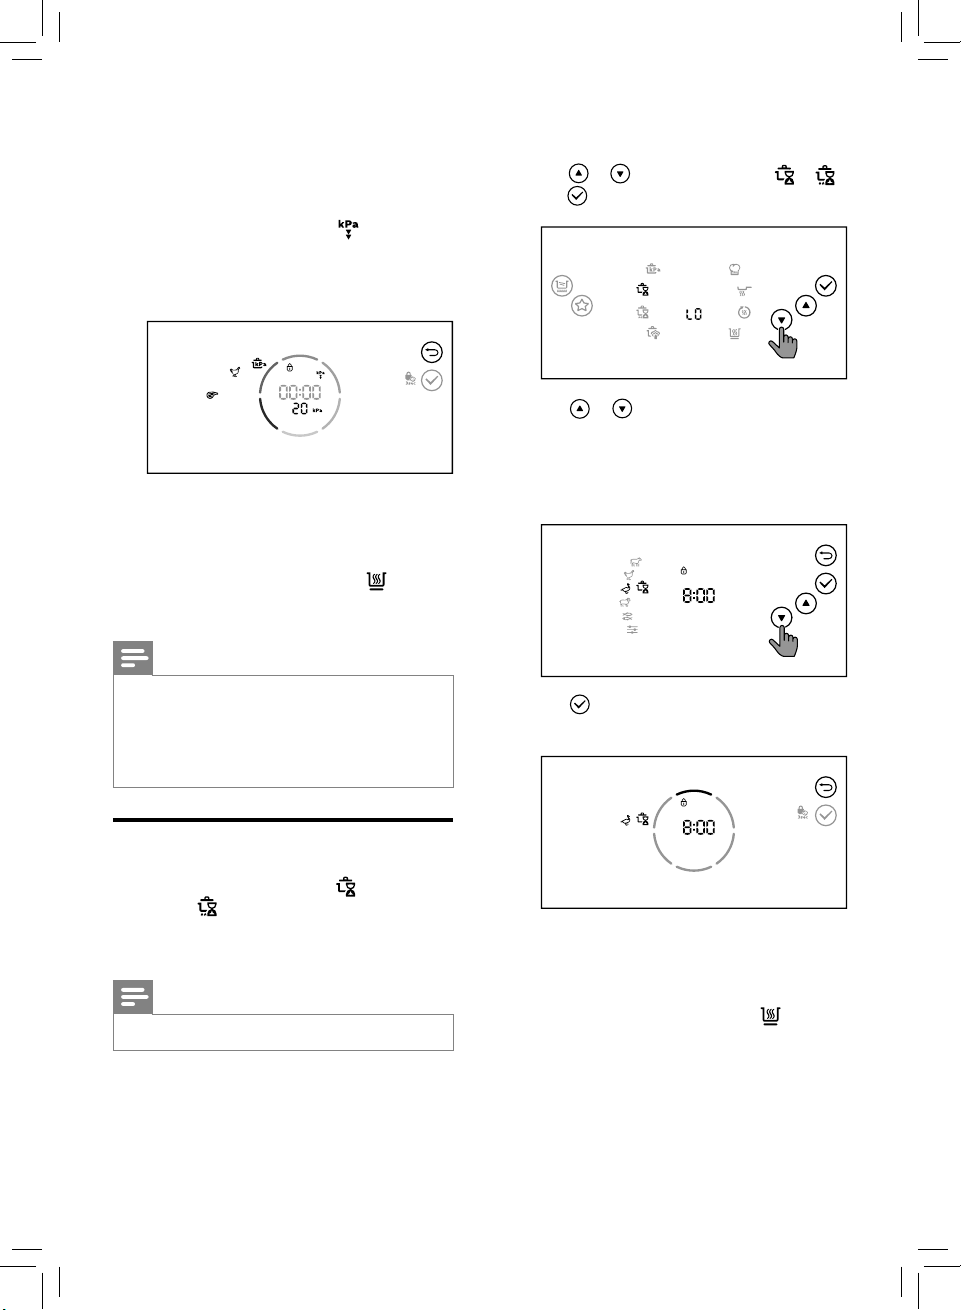
1 Follow the steps in “Preparations before
cooking”.
3 Tap or to select one of the sub
menus.
» The chosen cooking function lights up,
the default pressure keeping time and
pressure are displayed on the screen.
4 Tap to select the size of the meat cubes.
5 Tap to conrm, the All-in-One cooker
starts working in the selected mode.
14
Page 15
EN
6 When the All-in-One cooker reaches the
cooking pressure, the pressure keeping
time starts countdown.
7 When the pressure keeping time has
elapsed, The All-in-One cooker steps into
pressure release stage, the indicator
lights up, the All-in-One cooker starts to
release pressure at intervals. Do not touch
the steam vent.
8 The All-in-One cooker automatically
switches to keep warm mode after
pressure is released completely. You can
unlock and open the top lid.
» The keep-warm indicator ( ) lights
up.
Note
1 Follow the steps in “Preparations before
cooking”.
2 Tap or select slow cooking ( or ),
tap conrm.
3 Tap or to select one of the sub
menus.
» The chosen cooking function lights up,
the default cooking time are displayed
on the screen.
• Wait until the All-in-One cooker cools
down naturally to open the lid.
•
After the cooking process is nished,
unplug the All-in-One cooker from the
electrical outlet.
Slowcooking
You can select Slow cook Low ( ) or Slow
cook High ( ), each function has 6 sub
menus. For cooking time and time regulating
range, refer to Chapter ‘Functions Overview‘.
Note
• This is non-pressure cooking menu.
4 Tap to conrm, the All-in-One cooker
starts working in the selected mode.
5 The All-in-One cooker automatically
switches to keep warm mode after the
cooking process is nished. You can unlock
and open the top lid.
» The keep-warm indicator ( ) lights
up.
15
Page 16
EN
Steamcooking
For cooking time and regulating range of
each sub menu, refer to Chapter “Functions
Overview”.
Note
• The default cooking pressure is 10kPa, and
it cannot be adjusted.
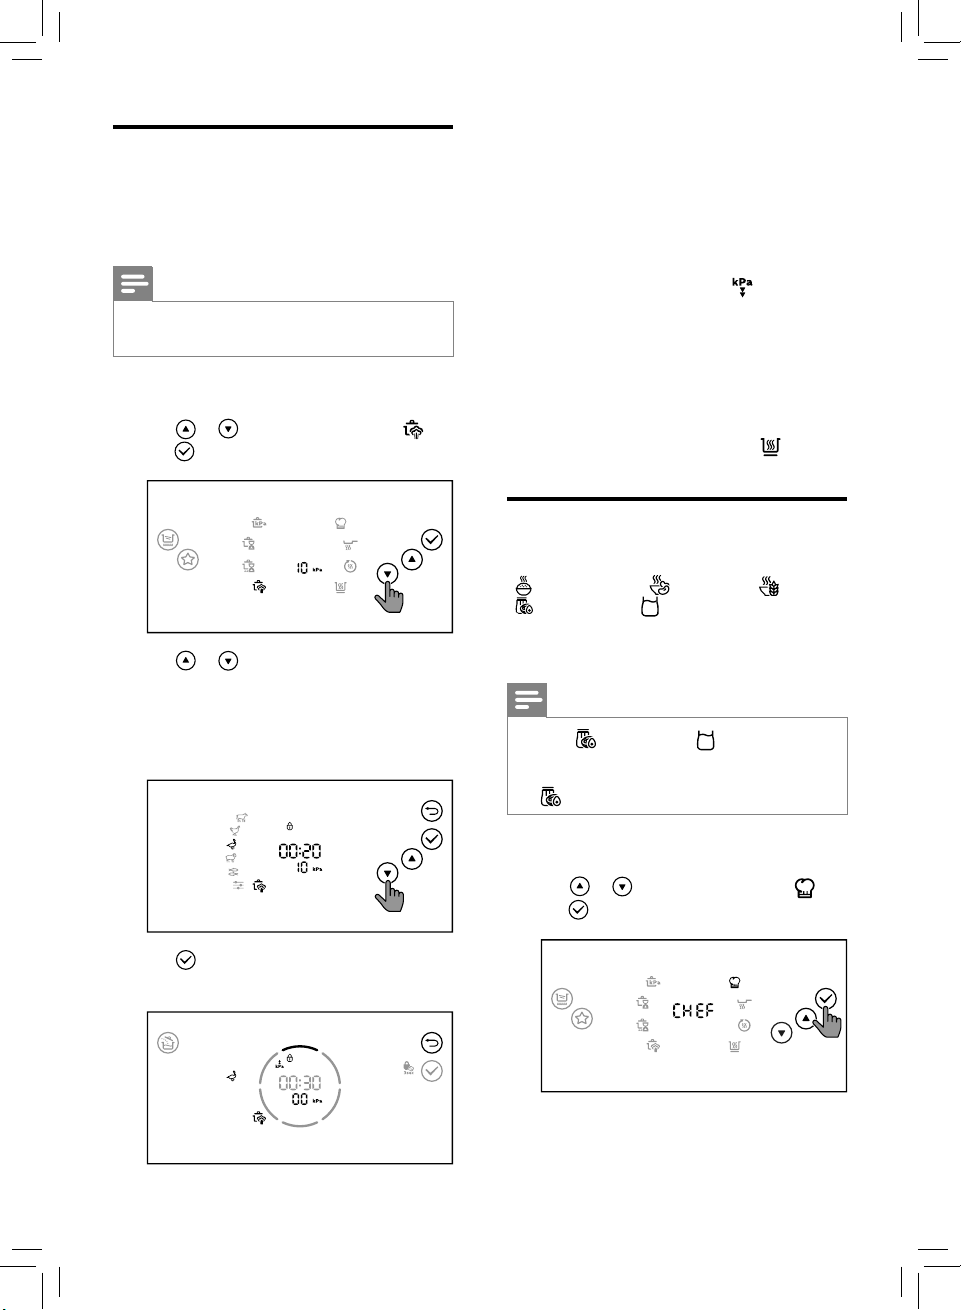
1 Follow the steps in “Preparations before
cooking”.
2 Tap or select steam cooking ( ),
tap conrm.
3 Tap or to select one of the sub
menus.
» The chosen cooking function lights up,
the default cooking time and pressure
are displayed on the screen.
5 When the All-in-One cooker reaches the
cooking pressure, the pressure keeping
time starts countdown. The All-in-One
cooker is heating while exhausting steam.
During the cooking process, do not touch
the steam vent to avoid burning.
6 When the pressure keeping time has
elapsed, the All-in-One cooker steps into
pressure release stage, the indicator
lights up, the All-in-One cooker starts to
release pressure at intervals. Do not touch
the steam vent.
7 The All-in-One cooker automatically
switches to keep warm mode after
pressure is released completely. You can
unlock and open the top lid.
» The keep-warm indicator ( ) lights
up.
Specialrecipes
There are 6 menus in this cooking function: Rice
( ), Lentil/beans ( ), Porridge ( ), Kaya
( ), and Yogurt ( ).
For cooking time and regulating range, refer to
Chapter “Functions Overview”.
Note
• Kaya ( ), and Yogurt ( ) are non-pressure
cooking programs.
• Keep the lid open when using the Kaya
( ) function.
4 Tap to conrm, the All-in-One cooker
starts working in the selected mode.
16
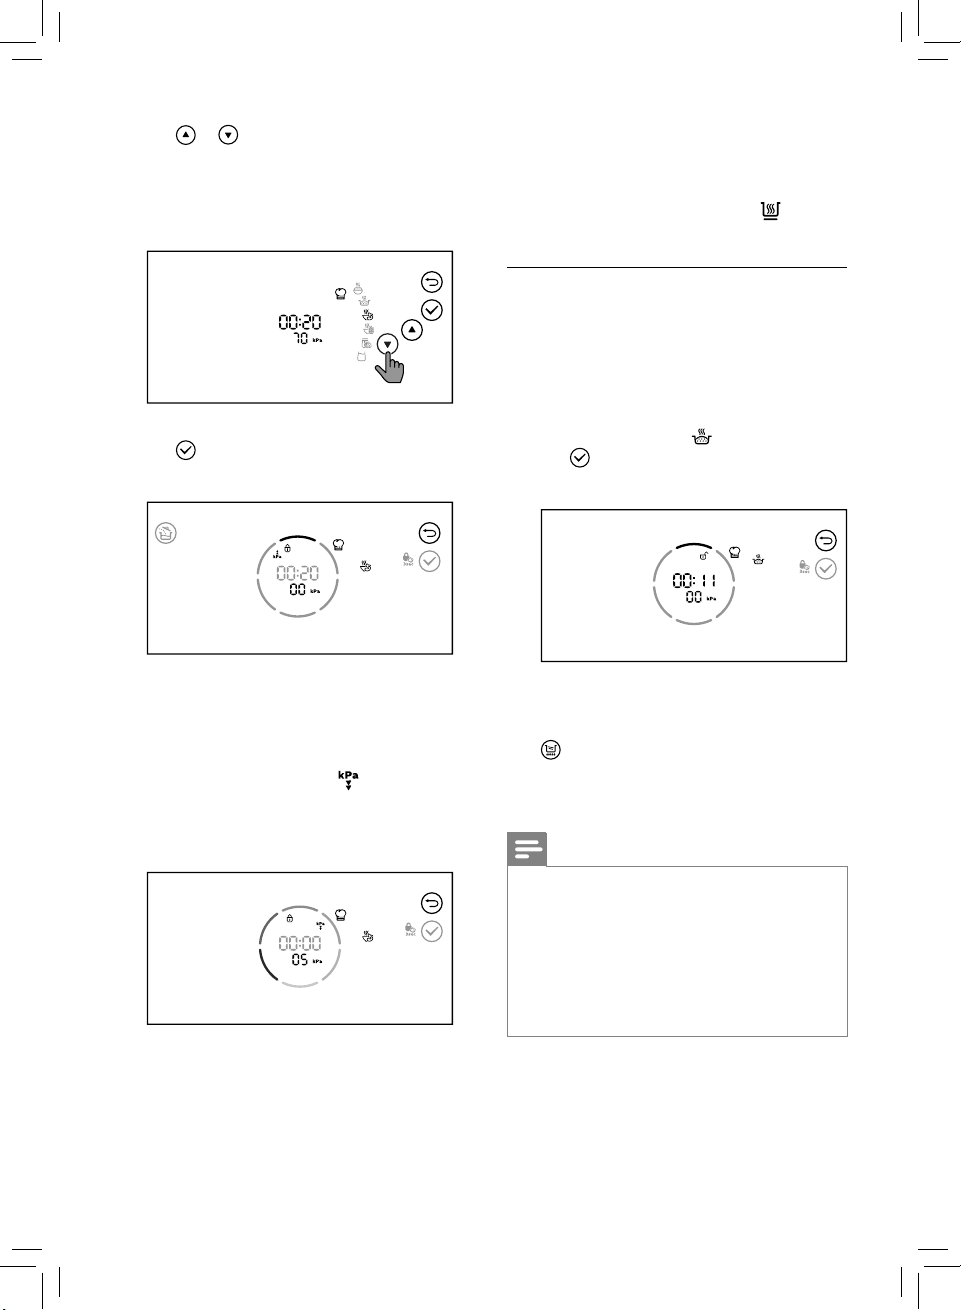
1 Follow the steps in “Preparations before
cooking”.
2 Tap or select special recipes ( ),
tap conrm.
Page 17
EN
3 Tap or to select one of the sub
menus.
» The chosen cooking function lights up,
the default cooking time and pressure
are displayed on the screen.
4 Tap to conrm, the All-in-One cooker
starts working in the selected mode.
7 The All-in-One cooker automatically
switches to keep warm mode after
pressure is released completely. You can
unlock and open the top lid.
» The keep-warm indicator ( ) lights
up.
Friedrice
1 Open the lid, pour some oil, add
ingredients for fried rice into the inner
pot. Stir and fry the mixed ingredients for
a while.
2 Add rinsed rice and water (ratio 1:1), close
and lock the lid.
3 Select the Fried rice ( ) function.
4 Tap to conrm, the All-in-One cooker
starts working in the selected mode.
5 When the All-in-One cooker reaches the
cooking pressure, the pressure keeping
time starts countdown.
6 When the pressure keeping time has
elapsed, the All-in-One cooker steps into
pressure release stage, the indicator
lights up, the All-in-One cooker starts to
release pressure at intervals. Do not touch
the steam vent.
5 The All-in-One cooker automatically
switches to keep warm mode after the
cooking process is nished. You can tap
button to start the sauce thickening
function. You can stir and fry the rice again
according to you own preference.
Note
• Use the silicone spatula when using this
function to avoid damaging the coating of
the inner pot.
• Keep the lid open before the cooking
process starts and add ingredients
according to you own preference.
• During cooking process, keep the lid closed
and locked.
17
Page 18
EN
Sauté
Note
• Keep the lid open when using the Sauté
function, or the All-in-One cooker will
beep.
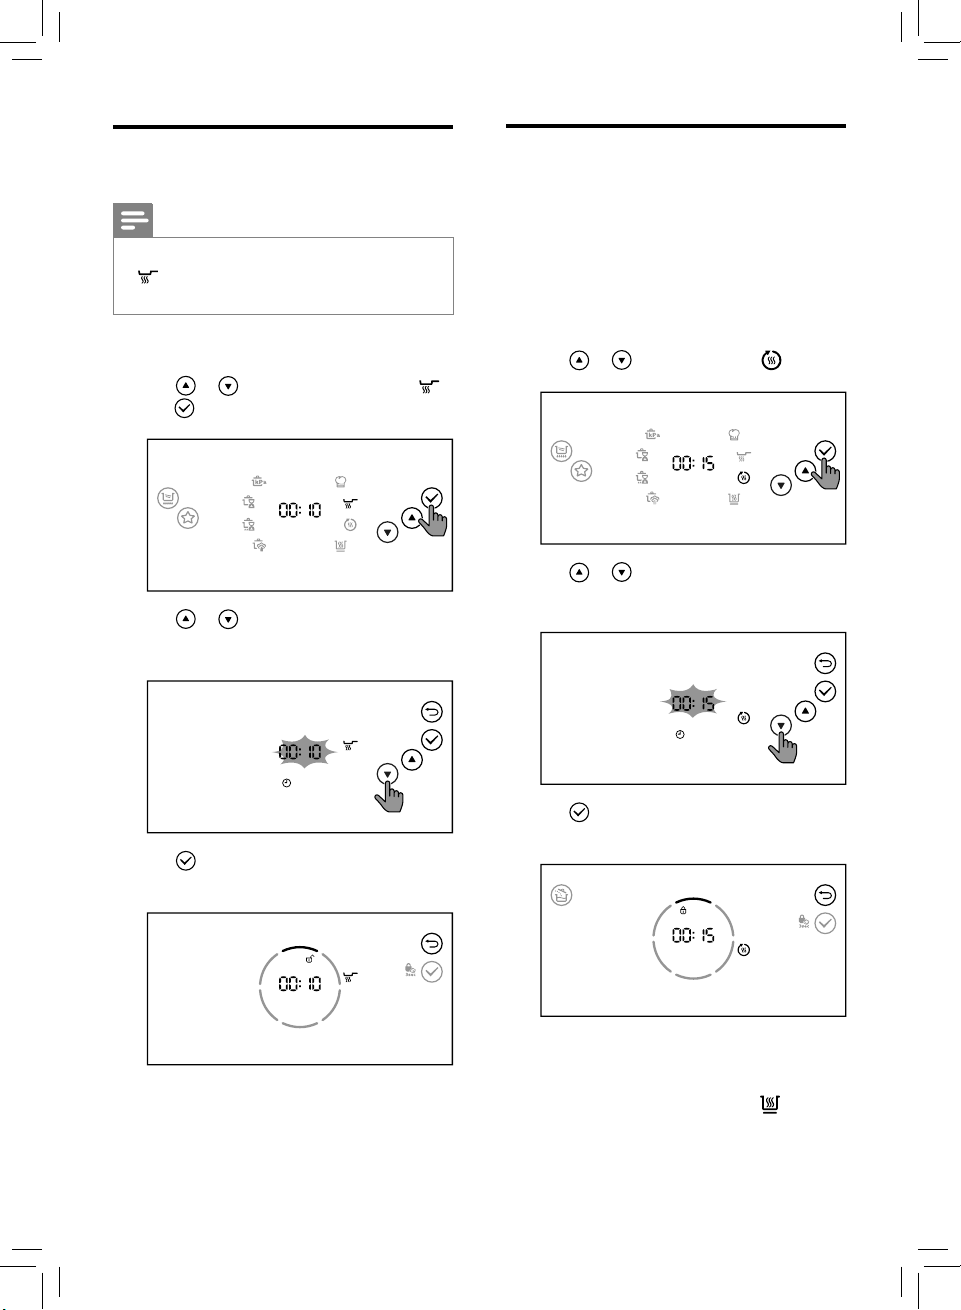
1 Follow the steps in “Preparations before
cooking”.
2 Tap or to select Sauté cooking ( ),
tap conrm.
3 Tap or to select cooking time.
» The cooking time blinks on the screen.
Reheat
1 Loosen the cooled food and evenly
distribute it in the inner pot.
2 Pour some water onto the food to prevent
it from becoming too dry. The quantity of
the water depends on the amount of food.
3 Close the lid, and put the plug in
the power socket, and switch on the
appliance.
4 Tap or to select Reheat ( ) .
5 Tap or to select cooking time.
» The cooking time blinks on the screen.
4 Tap to conrm, the All-in-One cooker
starts working in the selected mode.
5 The All-in-One cooker automatically
switches to standby mode after the
cooking process completely.
18
6 Tap to conrm, the All-in-One cooker
starts working in the selected mode.
7 The All-in-One cooker automatically
switches to keep warm mode after the
cooking process completely.
» The keep-warm indicator ( ) lights
up.
Page 19
EN
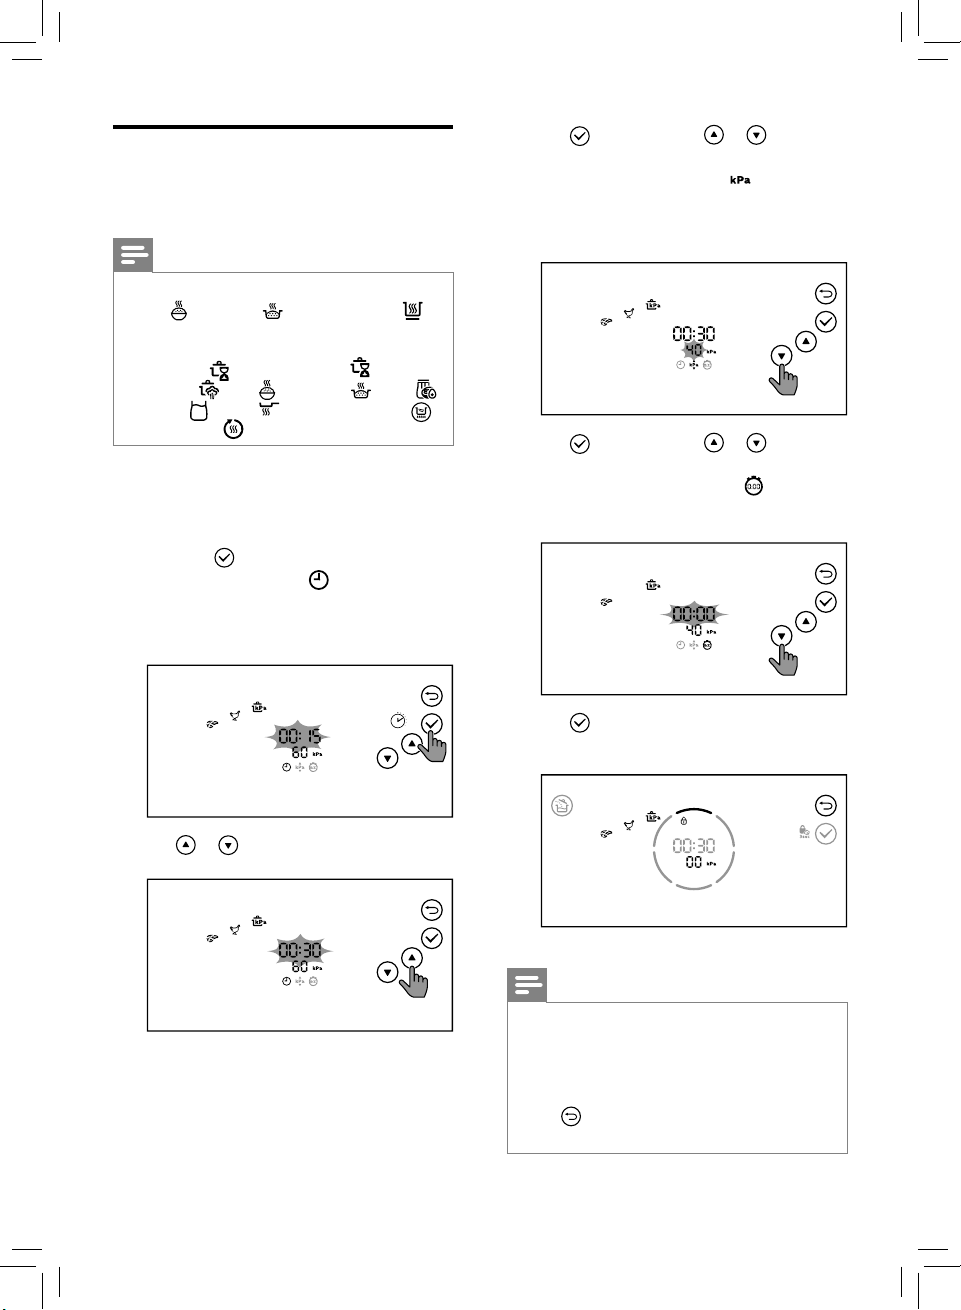
Adjustthecookingtime,
pressureanddelaystart
Note
• You cannot adjust the cooking time for
Rice , Fried rice and Keep warm
function.
• Pressure level is not adjustable for: Slow
cook Low , Slow cook High , Steam
cooking , Rice , Fried rice , Kaya ,
Yogurt , Sauté , Sauce thickening
and Reheat .
You can adjust the cooking time, default
pressure and delay start during the menu
selection.
1 After you choose a desired function, tap
and hold to adjust the cooking time.
» The time indicator displays on the
screen.
» The cooking time blinks.
3 Tap to conrm. Tap or to set the
pressure.
» The pressure indicator displays on
the screen.
» The cooking pressure blinks.
4 Tap to conrm. Tap or to set the
delay start time.
» The delay start indicator displays on
the screen.
2 Tap or to set the time.
3s
5 Tap to conrm, the All-in-One cooker
starts working in the selected mode.
Note
• You may increase the cooking pressure
to achieve an even more tender result
according to your preference, while
decrease the cooking pressure if you nd
the texture to be too soft.
• Tap to cancel the cooking time/
pressure/delay start setting.
19
Page 20
EN
Addingingredient
With this function, you can open the lid during
pressure cooking process and add more
ingredients.
Note
• The Add ingredient function is available
for all pressure cooking functions.
1 After the cooking process starts, the
button will light up if the selected function
is supported adding ingredient.
2 You can tap anytime during pressure
maintain process.
» The current cooking process pauses,
the All-in-One cooker beeps and starts
to release pressure.
3 When pressure is released completely, the
lid unlocked indicator blinks and the
All-in-One cooker beeps. You can open the
top lid to add more ingredients you want.
Saucethickening
Note
• In standby mode, the Sauce thickening
function applies to all cooking functions.
• In keep warm mode, the Sauce thickening
function doesn’t apply to these
functions: Reheat , Kaya , Rice ,
Porridge and Yogurt .
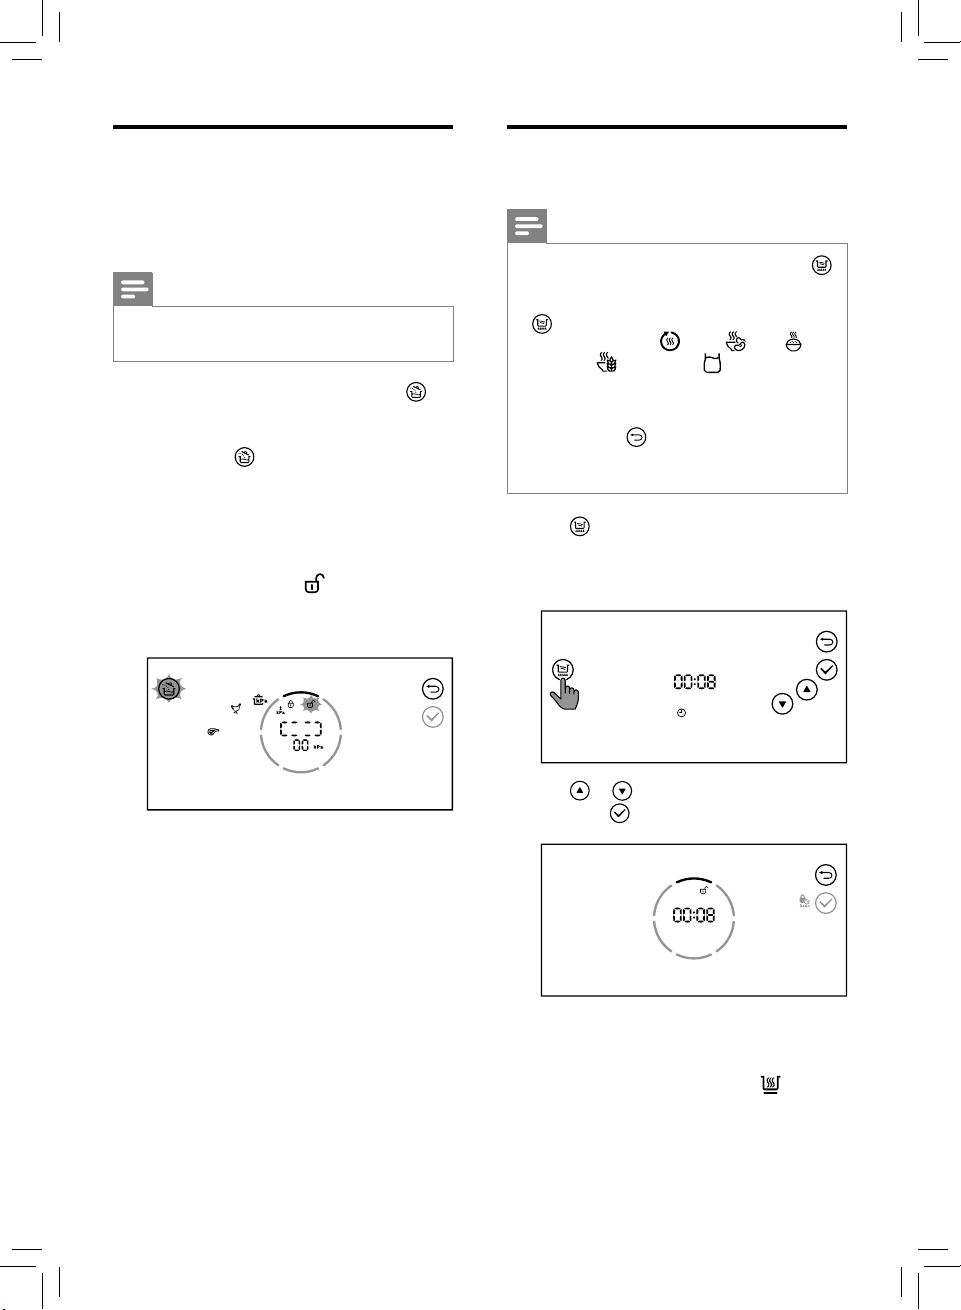
• The default time is 8 minutes, you can set
the time from 5 to 15 minutes.
• When the Sauce thickening function is
working, tap to cancel.
• When using this function, keep the lid
open.
1 Tap button in standby mode or in keep
warm mode.
» The default cooking time is displayed.
4 Turn the handle clockwise to lock the top
lid.
5 If you don’t add the ingredients in two
minutes, the All-in-One cooker will resume
to the previous cooking process.
20
2 Tap or to set the desired cooking
time. Tap to conrm.
3 The All-in-One cooker automatically
switches to keep warm mode after
cooking time has elapsed.
» The keep-warm indicator ( ) lights
up.
Page 21
EN
Settingupchildlock
To protect your child from using the appliance,
or to avoid unexpected operations during
cooking, you can set up the child lock function.
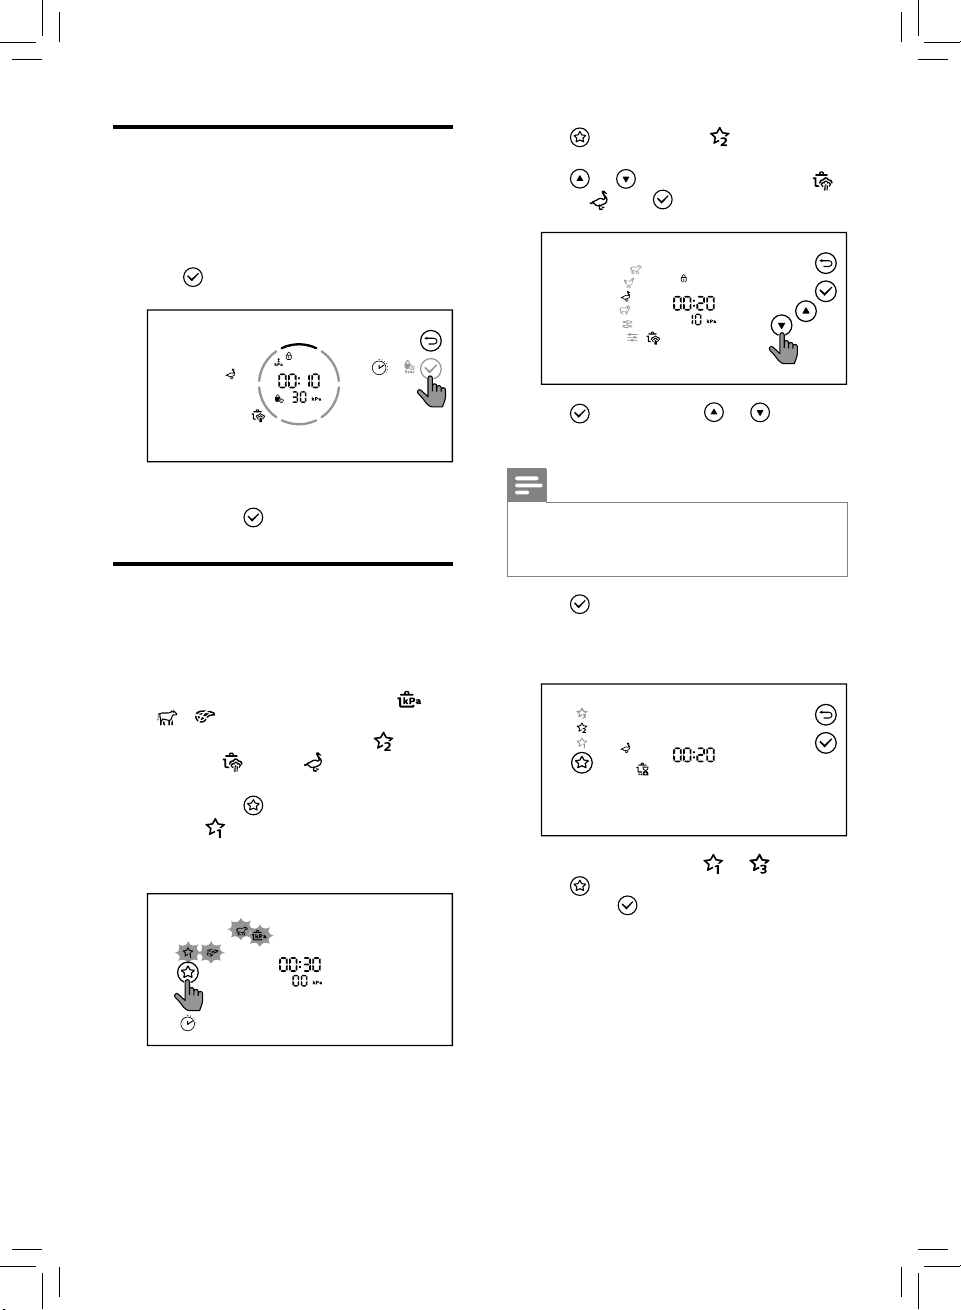
1 After the cooking process starts, tap and
hold for 3 seconds activate child lock.
3s
2 Tap repeatedly until blinks on the
display screen.
3 Tap or to select Steam cooking -
Duck ( ). Tap to conrm.
4 Tap to conrm. Tap or to set
cooking time.
» The other buttons are not responsive.
2 Tap and hold for 3 seconds again to
deactivate child lock.
SettingupMyFavourite
menu
You can set any three menus as “My Favourite”.
Before you make any changes to the setting,
the default menus are Pressure cooking Beef ( )- .
If you need to change My Favourite- to
Steam cooking - Duck ( ), follow the steps
below:
1 Tap and hold for 3 seconds.
» The blinks.
» The icons of the default menu blink.
3s
Note
• For pressure cooking function, you need
to set the pressure before saving new
favourite menu .
5 Tap to conrm.
» The old menu is replaced by the new
one successfully.
6 Follow steps 1-5 to set or .
7 Tap repeatedly to access my favourite
menu, tap to start the cooking process.
21
Page 22
EN
1
4 Cleaningand
Maintenance
Note
• Unplug the All-in-One cooker before
starting to clean it.
• Wait until the All-in-One cooker has cooled
down suciently before cleaning it.
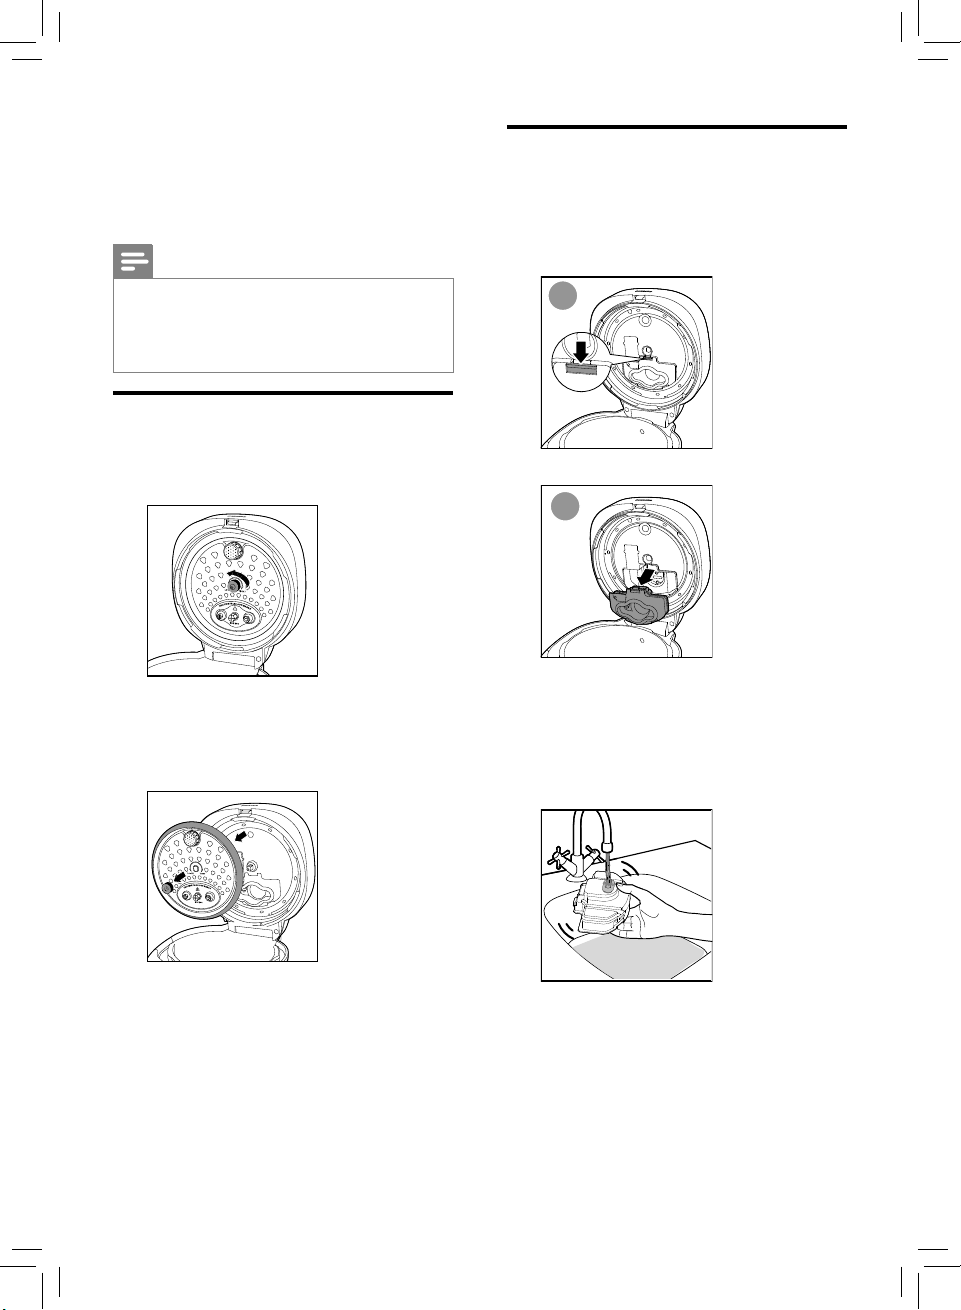
Innerlid
• Unscrew the screw around the temperature
controller counter clockwise.
• Hold the detachable inner lid and pull it
outwards to remove it from the top lid for
cleaning.
• Soak in hot water and clean with sponge.
Steambox
• Follow the above steps to disassemble the
inner lid.
• Disassemble the stem box from the inner
lid as below:
2
• Direct the tap water to the hole on the
back side of the steam box, ll it with water
and shake to clean it thoroughly to make
sure no food residue is left. Reassemble the
steam box to the inner lid after cleaning is
completed.
• To assemble the detachable inner lid, fully
attach it to the top lid, and then screw the
nut around the temperature controller
clockwise.
22
Page 23
EN
Floater
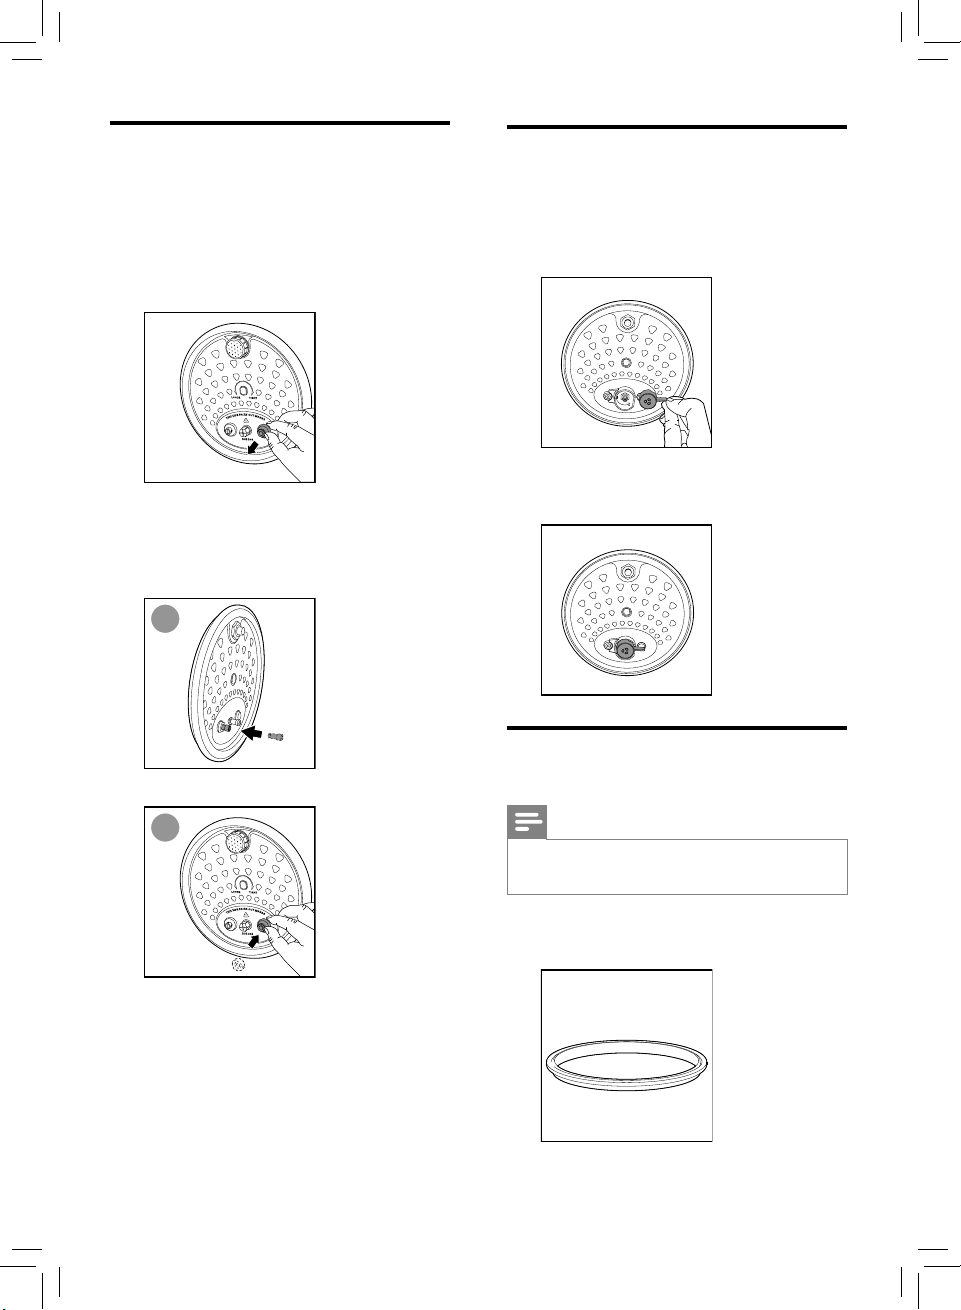
• Hold the rubber ting around the oater,
and pull outwards to remove it from
the top lid. Clean it regularly with water
and make sure there’s no food residue
sticking to it, otherwise you may encounter
diculty to open the lid.
• To assemble the oater, put the thin end of
the oater into the hole on the lid (g.1),
and assemble the rubber ring around the
oater (g.2).
1
Pressure regulator
• Hold the handle of pressure regulator and
pull it out gently. Rinse it under tap water
to remove food residues inside, or use a
toothpick.
• Hold the right handle of pressure regulator
and assemble it back to the inner lid.
2
• You can also add water to the pot and
start the steam function to help with the
cleaning.
Sealingring
Note
• Do not remove the sealing ring by force, it
will leak if not fully assembled.
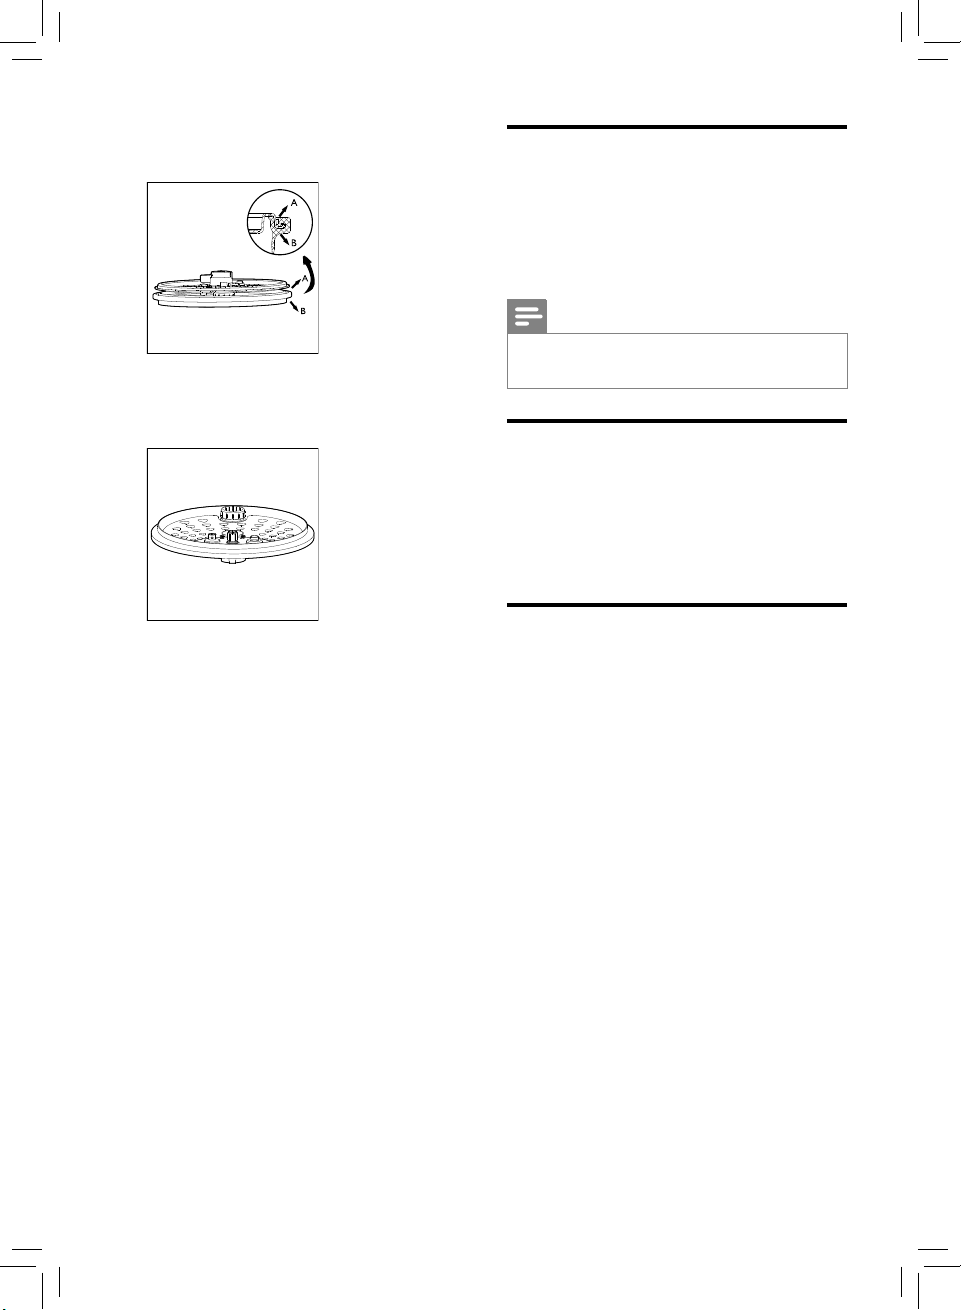
• Put the sealing ring with the groove facing
upwards in a at surface.
23
Page 24
EN
• Place the reverse side of the detachable
inner lid on the sealing ring.
• Embed the outer edge of the inner lid in
the groove, make sure that the sealing ring
ts the lid well.
Interior
Inside of the outer lid and the main body and
the heating element:
• Wipe with damp cloth.
• Make sure to remove all the food
residues stuck to the All-in-One cooker.
Note
• Do not remove the sealing ring by force, it
will leak if not fully assembled.
Exterior
Surface of the outer lid and outside of the main
body:
• Wipe with a cloth damped with soap
water.
• Only use soft and dry cloth to wipe the
control panel.
Accessoriesandinnerpot
Soup ladle and inner pot.
• Soak in hot water and clean with
sponge.
24
Page 25
EN
5 Recycling
Do not throw away the product with the normal household waste at the end of its life, but hand it in at
an ocial collection point for recycling. By doing this, you help to preserve the environment.
Follow your country’s rules for the separate collection of electrical and electronic products. Correct
disposal helps prevent negative consequences for the environment and human health.
6 Guaranteeandservice
If you need service or information, or if you have a problem, visit the Philips website at
www.philips.com or contact the Philips Customer Care Center in your country. You can nd its phone
number in the worldwide guarantee leaet. If there is no Customer Care Center in your country, go to
your local Philips dealer.
7 Specifications
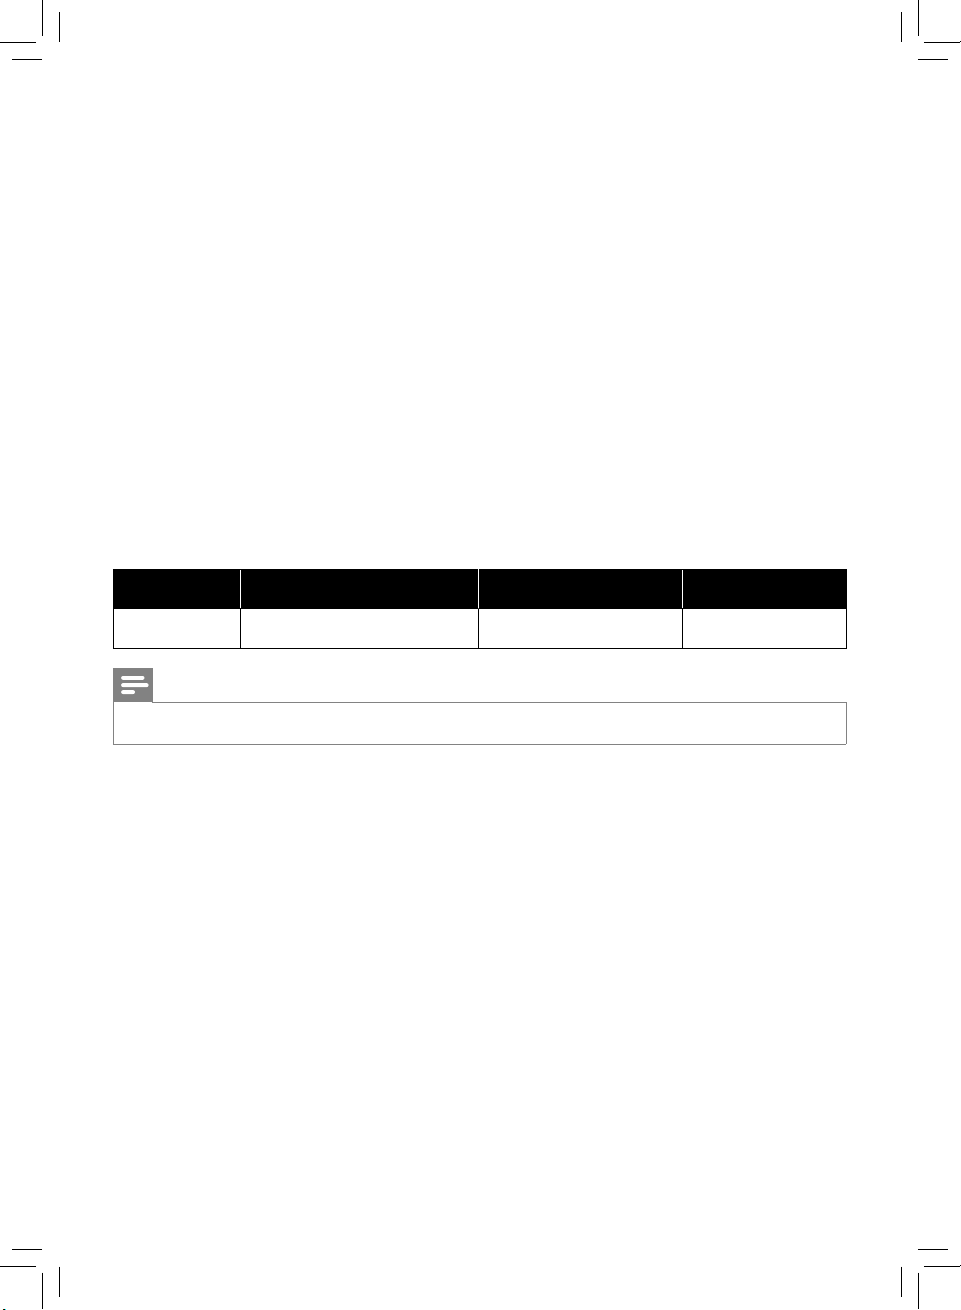
Model
HD2151
Note
• Unplug the All-in-One cooker if not used for a long time.
Ratedpoweroutput Ratedcapacity Diameter
910 - 1090W 5.0 L 22cm
25
Page 26
EN
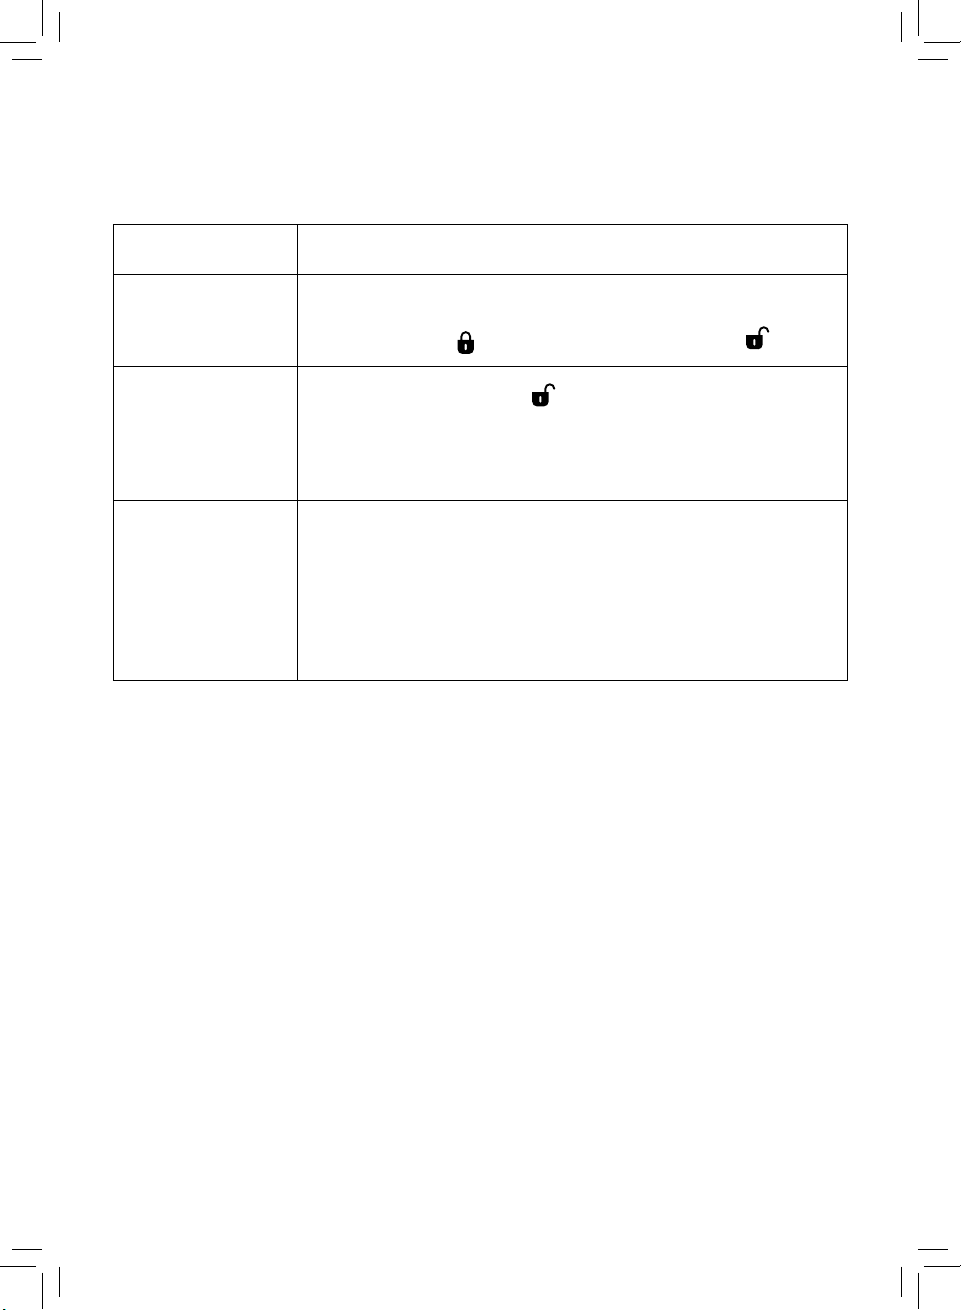
8 Troubleshooting
If you encounter problems when using this appliance, check the following points before requesting
service. If you cannot solve the problem, contact the Philips Consumer Care Center in your country.
Problem
I have diculties
closing the top lid.
I have diculties
opening the top lid
after the pressure is
released.
The food is not
cooked.
Solution
• The inner lid is not well assembled. Make sure the inner lid is well
assembled around the inside of the top lid.
• The handle is in position. Turn it counter clockwise to position.
• Make sure the handle is in position.
•There could be food residue on the bottom of the oating valve. Do
not force to open it which may cause burn. Wait for the appliance to
cool down (around 30 minutes) then repeatedly turn the handle back
and forth.
•Incorrect function or time was selected, increase cooking time or
change cooking method.
•Make sure that there is no foreign residue on the heating element
and the outside of the inner pot before switching the All-in-One
cooker on.
•The heating element is damaged, or the inner pot is deformed. Take
the cooker to your Philips dealer or a service center authorized by
Philips.
26
Page 27

EN
Problem
Air or steam leaks
from the lid or the
steam vent.
Solution
•The cap nut around the temperature controller is loose. Fasten the
cap nut tightly with the appropriate tools.
•The sealing ring is not well assembled. Make sure the it is well
assembled around the detachable inner lid.
•There is food residue in the sealing ring. Make sure the sealing ring is
clean.
•There is food residue on the oating valve. Clean the oating valve.
•There is food residue in the pressure regulator. Clean the pressure
regulator.
•The pressure regulator is not well assembled. Make sure it’s well
assembled.
•The lid is not completely closed and locked. Make sure that the lid is
completely fastened and locked in the right position.
E1, E2, E3, E8, E10,
E11, or E16 displays
on the screen.
The above problems
still exist.
• The All-in-One cooker has malfunction. Take the appliance to a Philips
dealer or a service center authorised by Philips.
• The All-in-One cooker has encountered a malfunction. If this is the
case, please:
(1) Do-it-yourself service. Contact Consumer Care Center and we
may be able to give instructions and help you solve the problem with
video.
(2) Carry-in service. Carry your product into the Philips Service care.
(3) Onsite service. Contact us and we’ll help you arrange a Philipsauthorized repair for your product, at no additional charge.
27
Page 28

©2021PhilipsDomesticAppliancesHoldingB.V.
Allrightsreserved.
660.8000.0800.8(12/11/2021)
 Loading...