

Page 1

Register your product and get support at
www.philips.com/welcome
HD2060
User manual
Page 2

Page 3

Contents
1 Important 4
Electromagnetic Fields (EMF) 6
Conformity with national standards 6
2 Introduction 7
3 What’s in the box 7
4 Overview 8
5 Cleaning before rst use 9
6 Use the appliance 9
Make soymilk 9
Make ve-grain soymilk 11
Make rice paste 12
Make juice 14
Keep warm 15
7 Cleaning 16
Easy clean 16
8 Product information 17
9 Recycling 18
10 Guarantee and service 18
11 Troubleshooting 19
12 Recipes 22
Soymilk 22
Five grain soymilk 22
Rice paste 24
Juice 26
3EN
Page 4

1 Important
Read this user manual carefully
before you use the appliance, and
save the user manual for future
reference.
Before processing:
• Before you insert the plug into
the power outlet, make sure
that the appliance is assembled
correctly.
• Make sure that your hands are
dry before you insert the plug
into the power outlet.
• Before you connect the
appliance to the power, make
sure that the voltage indicated
on the bottom of the appliance
corresponds to the local power
voltage.
• This appliance can only be used
with a grounded plug. Make
sure that the plug is rmly
inserted into the power outlet.
• Never connect this appliance
to a timer switch, to avoid a
hazardous situation.
• Make sure that you clean the
appliance before use (see the
“Cleaning before rst use”
section on Page 9).
• Do not use this appliance to
heat up soymilk or other liquid
foods.
• Never use the appliance for dry
heating.
• Never add contents (including
water) above ഌට໎ (the
maximum level indication) or
below ༳ට໎(the minimum
level indication).
• If the power cord, the plug, or
other parts are damaged, do
not use the appliance.
• If the power cord is damaged,
you must have it replaced
by Philips, a service centre
authorised by Philips or similarly
quali ed persons to avoid a
hazard.
• Do not replace parts of the
appliance yourself.
• This appliance is not intended
for use by persons (including
children) with reduced physical,
sensory or mental capabilities,
or lack of experience and
knowledge, unless they have
been given supervision or
instructions concerning use
of the appliance by a person
responsible for their safety.
• For their safety, do not allow
children to play with the
appliance.
• Make sure that the water you
add into the soymilk maker is no
hotter than 70°C.
• This appliance is intended for
household use only.
4 EN
Page 5

During processing:
• Do not use this appliance on an
unstable or uneven surface.
• Keep the appliance and its
power cord out of the reach of
children.
• Never let the appliance run
unattended.
• Do not touch the steam or the
metal parts of the appliance, to
avoid burns or scalding.
• Do not disconnect the power
cord or remove the head unit
before processing is complete.
• If you have to stop processing,
disconnect the power cord
before you perform other
operations.
• If there is a power outage
during processing and this
lasts up to three minutes, do
not immediately restart the
soymilk maker. Empty the
contents in the soymilk maker,
and then put in new contents
before restarting. Otherwise,
the contents will stick to the
chamber or over ow, or the
appliance will set off a long
alarm.
After processing:
• Disconnect the power before
you continue other operations.
• Disconnect the power and
remove the power cord before
cleaning or disassembling this
appliance.
• To prevent steam scalding,
keep a certain distance from
the soymilk maker before you
lift the head unit.
• Install, remove, and clean the
perforated ow cup with care.
The blade on the head unit
is sharp. Be careful not to cut
yourself or others.
• To prevent a short circuit or an
electric shock,
• do not use water to rinse
the outside of the chamber
unit or head unit (including
the head unit handle,
control panel, upper plug,
upper plug connector, and
the power cord connector)
and keep them away from
drip or splash;
• do not place the head unit
in water; and
• do not place the base of the
soymilk maker in water.
• Use a microwave to heat up
cold soymilk. Do not use this
appliance to heat it, as the
contents will stick to the inner
side of the chamber.
5EN
Page 6

• Store the power cord in a cool
and dry place.
• To prevent an electric shock,
use the power cord to connect
other appliances.
• Food coloring can discolor
components. This is normal and
has no impact on use.
Electromagnetic Fields (EMF)
This Philips soymilk maker
complies with all standards
regarding electromagnetic elds
(EMF). If handled properly and
according to the instructions in
this user manual, the appliance
is safe to use based on scienti c
evidence available today.
Conformity with national
standards
• GB4706. 1-2005, “Safety of
household and similar electrical
appliances”, Part 1 General
requirements
• GB4706. 19-2008, “Safety
of household and similar
electrical appliances”, Particular
requirements for appliances for
heating liquids
• GB4706. 30-2008, “Safety
of household and similar
electrical appliances”, Particular
requirements for kitchen
machines
6 EN
Page 7
2 Introduction
Congratulations on your purchase
and welcome to Philips! To fully bene t
from the suppor t that Philips offers,
register your product at
www.philips.com/welcome .
• Philips soymilk maker HD2060 can
be used to make beverages and food
such as soymilk, ve-grain soymilk,
rice paste, and juice. It comes with
keep warm and easy clean functions,
and it equips with anti-over ow and
anti-splash protective device. It is
fully automated, easy to use, healthy,
attractive, and durable .
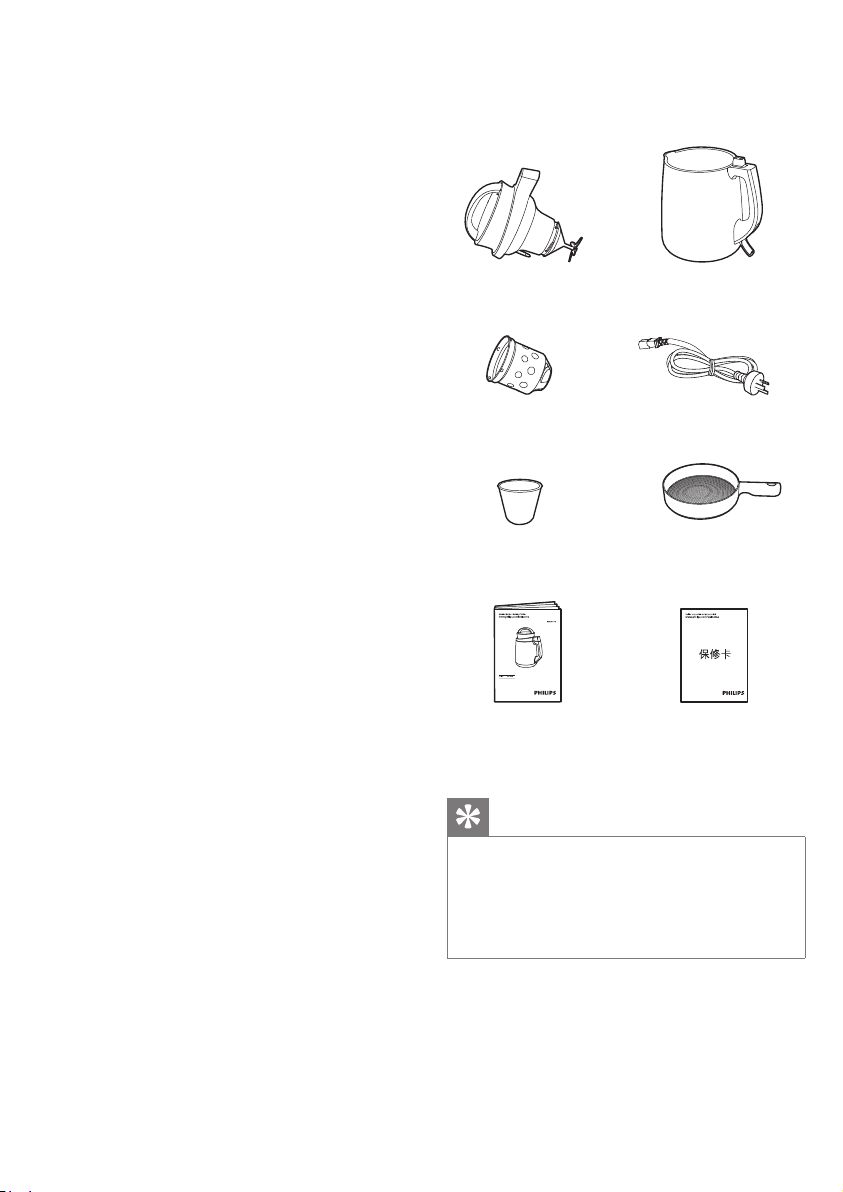
3 What’s in the box
Head unit
Perforated
ow cup
Measuring cup
Chamber unit
Power cord
Filter
User manual
Tip
• Do not change the lter direction.
The convex lter is a special design
from Philips, which makes ltering
much more ef cient.
Warranty card
7EN
Page 8

4 Overview
a
b
c
d
f
e
g
m
a Handle of the head unit
b Control panel
• Function buttons:
࿎ᄸ (Select)
గײ (Start)
ၢ౦༥ (Easy clean)
• Indicators:
ۈࢁ (Soymilk)
ܥࢁ (Five-grain soymilk)
႓ဥૠ (Rice paste)
ݘൺႆ (Juice)
܁ቘᇓ (Working)
А໕ (Keep warm)
ၢ౦༥ (Easy clean)
c Over ow sensor
• Monitor soymilk and prevent
over owing
d Blade
h
i
8 EN
l
k
j
e Lower part of the head unit
f Upper plug
g Perforated ow cup
• Increase the ow rate and make
soymilk well balanced
h Chamber unit
i Base
j Protective cover of the power cord
connector
k Power cord connector
l Chamber handle
m Upper plug connector
Page 9
5 Cleaning before
6 Use the
first use
Method 1:
1 Pour boiling water into the chamber,
put the head unit into the chamber,
and soak for 10 minutes.
2 Clean the appliance (see the
"Cleaning" section on Page 16).
Method 2:
1 Make soymilk following the
instructions in the “Make soymilk”
section.
2 After soymilk is made, pour it away
and then clean the appliance (see the
“Cleaning” section on Page 16).
appliance
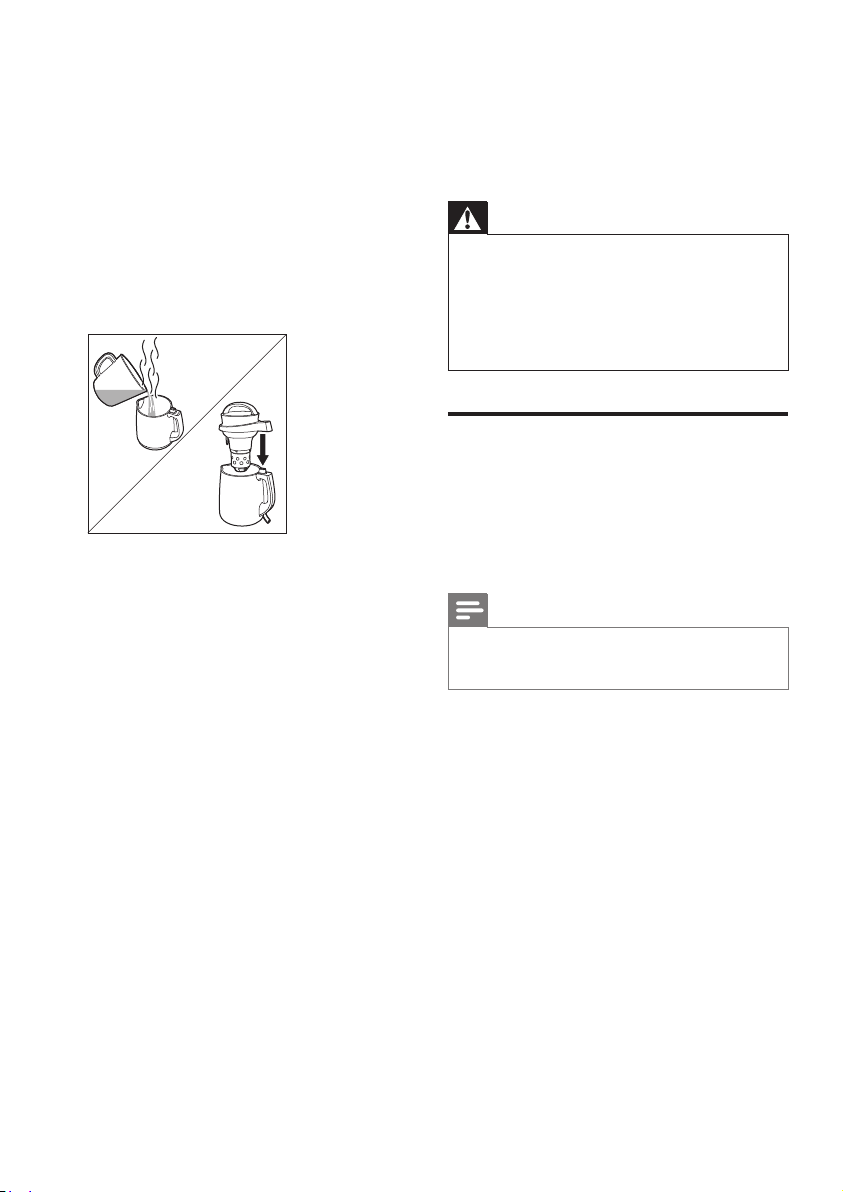
Warning
• If you wish to cancel a function once
it is selected, do not lift the head unit
to prevent the facial scalding. You can
unplug the power cord, re-plug it, and
then select another function.
Make soymilk
• Measure ingredients as instructed.
You can adjust the quantity a bit as
per your personal taste.
• For 2-4 people.
Note
• Make sure that the perforated ow
cup is installed correctly before use.
1 Take a cup of dry soybeans with the
supplied measuring cup and wash
them clean.
• To increase the life of the blade,
soak the soybeans (8-9 hours
in fall and spring, 6-7 hours in
summer, and 9-10 hours in
winter) and wash them clean
before processing.
9EN
Page 10

2 Install the perforated ow cup and
ഌට໎
༳ට໎
rotate it to the correct position, as
shown in the illustration.
» Make sure that it cannot be pulled
off.
3 Put the soybeans evenly at the
bottom of the chamber to prevent
them from touching the perforated
ow cup.
4 Pour water into the chamber.
Make sure that the water level is
between ഌට໎ (the maximum
level indication) and ༳ට໎ (the
minimum level indication).
6 Open the protective cover, insert the
power cord, and connect the power.
» The indicators ash in a circle,
indicating that the power is
connected.
7 Press ࿎ᄸ (Select) to select ۈ
ࢁ (Soymilk).
» The ۈࢁ (Soymilk)
indicator lights up.
ഌට໎
ഌට໎
༳ට໎
༳ට໎
5 Put the head unit into the chamber.
Make sure that the upper plug is
correctly inserted into the connector.
10 EN
8 Press గײ (Start).
» The ܁ቘᇓ (Working) indicator
ashes and 1 beep occurs,
indicating that processing starts.
After about 24 minutes, 6 beeps
occur and the А໕ (Keep warm)
indicator lights up, indicating
that soymilk is ready. If no other
operations are performed,
the appliance starts the keep
warm function. The keep warm
function lasts for 1 hour, and then
automatically stops (see the "Keep
warm" section on Page 15).
Page 11

ഌට໎
༳ට໎
9 After processing, disconnect the
power. Hold the handle of the
chamber tightly with one hand and
lift the head unit with the other hand.
winter) and wash them clean
before processing.
2 Install the perforated ow cup and
rotate it to the correct position, as
shown in the illustration.
» Make sure that it cannot be
pulled off.
10 Filtrate soymilk with the lter, and it
is ready to serve. You can add some
sugar before serving.
• Soymilk can also be served
without being ltrated.
Make ve-grain soymilk
• Measure ingredients as instructed.
You can adjust the quantity a bit as
per your personal taste.
• Example recipe: rice and soy bean
milk, for 2-4 people.
Note
• Make sure that the perforated ow
cup is installed correctly before use.
1 Take 30 g of soybeans (around
1/2 cup) and 50 g of rice (around
1/2 cup) with the supplied measuring
cup and wash them clean.
• To increase the life of the blade,
soak the soybeans (8-9 hours
in fall and spring, 6-7 hours in
summer, and 9-10 hours in
3 Put rice and the soybeans evenly
at the bottom of the chamber to
prevent them from touching the
perforated ow cup.
4 Pour water into the chamber.
Make sure that the water level is
between ഌට໎ (the maximum
level indication) and ༳ට໎ (the
minimum level indication).
• To shorten the processing time,
you can add warm water no hotter
than 70§.
ഌට໎
ഌට໎
༳ට໎
༳ට໎
5 Put the head unit into the chamber.
Make sure that the upper plug is
correctly inserted into the connector.
11EN
Page 12

6 Open the protective cover, insert the
power cord, and connect the power.
» The indicators ash in a circle,
indicating that the power is
connected.
7 Press ࿎ᄸ (Select) to select ܥ
ࢁ (Five-grain soymilk).
» The ܥࢁ (Five-grain
soymilk) indicator lights up.
8 Press గײ (Start).
» The ܁ቘᇓ (Working) indicator
ashes and 1 beep occurs,
indicating that processing starts.
After about 25 minutes, 6 beeps
occur and the А໕ (Keep warm)
indicator lights up, indicating
that soymilk is ready. If no other
operations are performed,
the appliance starts the keep
warm function. The keep warm
function lasts for 1 hour, and then
automatically stops (see the “Keep
warm” section on Page 15).
9 After processing, disconnect the
power. Hold the handle of the
chamber tightly with one hand and
lift the head unit with the other hand.
10 Pour ve-grain soymilk into the
soymilk cup, and it is ready to serve.
You can also add some sugar before
serving.
Make rice paste
• Measure ingredients as instructed.
You can adjust the quantity a bit as
per your personal taste.
• Example recipe: lily bulb and
Job’s-tears rice paste, for 2-4 people.
Note
• Make sure that the perforated ow
cup is installed correctly before use.
1 Take 35 g of Job’s-tears and 35 g of
rice (around 2/5 cup each) with the
supplied measuring cup, take 20 g of
fresh lily bulbs (around 7-8 pieces),
and wash them clean.
12 EN
Page 13

2 Install the perforated ow cup and
ഌට໎
༳ට໎
rotate it to the correct position, as
shown in the illustration.
» Make sure that it cannot be
pulled off.
3 Put the lily bulbs, Job’s-tears, and rice
evenly at the bottom of the chamber
to prevent them from touching the
perforated ow cup.
4 Pour water into the chamber.
Make sure that the water level is
between ഌට໎ (the maximum
level indication) and ༳ට໎ (the
minimum level indication).
• To shorten the processing time,
you can add warm water no hotter
than 70§.
ഌට໎
ഌට໎
༳ට໎
༳ට໎
5 Put the head unit into the chamber.
Make sure that the upper plug is
correctly inserted into the connector.
6 Open the protective cover, insert the
power cord, and connect the power.
» The indicators ash in a circle,
indicating that the power is
connected.
7 Press ࿎ᄸ (Select) to select
႓ဥૠ (Rice paste).
» The ႓ဥૠ (Rice paste)
indicator lights up.
8 Press గײ (Start).
» The ܁ቘᇓ (Working) indicator
ashes and 1 beep occurs,
indicating that processing starts.
After about 25 minutes, 6 beeps
occur and the А໕ (Keep warm)
indicator lights up, indicating
that soymilk is ready. If no other
operations are performed,
the appliance starts the keep
warm function. The keep warm
function lasts for 1 hour, and then
automatically stops (see the “Keep
warm” section on Page 15).
13EN
Page 14

ഌට໎
༳ට໎
9 After processing, disconnect the
power. Hold the handle of the
chamber tightly with one hand and
lift the head unit with the other hand.
10 Pour rice paste into the soymilk cup,
and it is ready to serve. You can add
some sugar before serving.
Make juice
• Measure ingredients as instructed.
You can adjust the quantity a bit as
per your personal taste.
• Example recipe: banana juice, for 2-4
people.
3 Put the banana cubes evenly at the
bottom of the chamber to prevent
them from touching the perforated
ow cup.
4 Pour 200 ml of milk and some water
into the chamber. Make sure that the
water level is between ഌට໎ (the
maximum level indication) and ༳ට
໎ (the minimum level indication).
ഌට໎
ഌට໎
༳ට໎
༳ට໎
5 Put the head unit into the chamber.
Make sure that the upper plug is
correctly inserted into the connector.
Note
• Make sure that the perforated ow
cup is installed correctly before use.
1 Cut 3 bananas (about 400 g) into
1.3-mm cubes.
2 Install the perforated ow cup and
rotate it to the correct position, as
shown in the illustration.
» Make sure that it cannot be
pulled off.
14 EN
6 Open the protective cover, insert the
power cord, and connect the power.
Page 15

» The indicators ash in a circle,
indicating that the power is
connected.
7 Press ࿎ᄸ (Select) to select
ݘൺႆ (Juice).
» The ݘൺႆ (Juice) indicator
lights up.
8 Press గײ (Start).
» The ܁ቘᇓ (Working) indicator
ashes and 1 beep occurs,
indicating that processing starts.
After about 4 minutes, 6 beeps
occur, indicating that juice is
ready.
9 After processing, disconnect the
power. Hold the handle of the
chamber tightly with one hand and
lift the head unit with the other hand.
Tip
• After banana juice is ready, serve at
once to avoid oxidization.
• If you want to make juice multiple
times, wait about 10 minutes until
the appliance cools down before
the next use. This makes the
appliance more durable.
Keep warm
After soymilk, rice paste, puree, or corn
juice is made, 6 beeps occur and the
А໕ (Keep warm) indicator lights up. If
no other operations are performed, the
appliance starts the keep warm function.
The keep warm function lasts for 1 hour,
and then automatically stops.
Tip
• If you lift the head unit as soon as
processing is complete, the appliance
does not start the keep warm
function.
• The appliance does not star t the
keep warm function at the
completion of juice making.
10 Pour banana juice into the soymilk
cup, and it is ready to serve. You can
add some sugar before serving.
15EN
Page 16

7 Cleaning
Note
• Disconnect the power and remove
the power cord before cleaning or
disassembling this appliance.
• Do not put the head unit in water.
• To prevent scalding, do not touch the
head unit, perforated ow cup, or the
inner side of the chamber before they
cool down.
1 After disconnecting the power, lift
the head unit, rinse the lower part of
the head unit, over ow sensor, blade,
perforated ow cup, and inner side of
the chamber.
3 Use a cleaning pad to remove the
residue from the lower part of the
head unit, over ow sensor, and the
blade.
4 Use a dry cloth to clean the head
unit handle, control panel, upper
plug, upper plug connector, base, and
power cord connector.
2 After the head unit cools down,
remove the perforated ow cup.
Rotate the perforated ow cup and
remove it, as shown in the illustration.
Take care of the sharp blade.
16 EN
5 The outside of the chamber can be
cleaned with a damp cloth.
Easy clean
• After processing is complete, if you
cannot promptly clean the residue on
the appliance, the residue will dry up
and stick on the appliance, dif cult to
remove. As this happens, you can use
the easy clean function to heat and
soak the inner side of the chamber
and clean the appliance easier.
Page 17

• To prevent the residue from smelling,
clean the appliance within 10 hours
after use.
1 Make sure that the perforated ow
cup is correctly installed before use.
8 Product
information
2 Pour water into the chamber.
Make sure that the water level is
between ഌට໎ (the maximum
level indication) and ༳ට໎ (the
minimum level indication).
3 Put the head unit into the chamber.
Make sure that the upper plug is
correctly inserted into the connector.
4 Open the protective cover, insert the
power cord, and connect the power.
» The indicators ash in a circle,
indicating that the power is
connected.
5 Press ၢ౦༥ (Easy clean).
» The ၢ౦༥ (Easy clean) indicator
lights up and 1 beep occurs,
indicating that the easy clean
function starts. After about 8
minutes, beeps occur and the ܁
ቘᇓ (Working) indicator lights
up, indicating that the eay clean
function is complete.
Note
• Product information is subject to
change without prior notice.
• Rated voltage: 220 V-
• Rated frequency: 50 Hz
• Motor power: 180 W
• Heating power: 900 W
• Dimensions (L x W x H)
• Soymilk maker:
231.5 x 180.0 x 314.2 mm
• Packaging: 230 x 230 x 345 mm
• Weight
• Net weight: 2.45 kg
• Gross weight: 3.07 kg
• Capacity: 1000-1200 ml (for 2-4 people)
6 Clean the appliance as instructed in
the “Cleaning” section.
17EN
Page 18

9 Recycling
Do not throw away the appliance
with the normal household waste
at the end of its life, but hand it in
at an of cial collection point for recycling.
By doing this, you help to preserve the
environment.
10 Guarantee and
service
If you have a problem, need service or
need information, see
www.philips.com/support or contact the
Philips Consumer Care Centre in your
country. The phone number is
4008 800 008.
18 EN
Page 19

11 Troubleshooting
This chapter summarizes the most common problems you could encounter with the
appliance. If you are unable to solve the problem with the information below, contact the
Philips Consumer Care Centre in your country.
Problem Possible cause Solution
The indicators do
not light up.
The indicators light
up but the appliance
does not work.
Processing will not
stop.
The buttons do not
work.
The beans or rice is
not ground well.
The upper plug is not plugged
correctly.
Too much ingredient is added. Put proper quantity of ingredient
There is water in the head unit
or the indicators are broken.
You do not press గײ (Star t). Press గײ (Start).
The power is disconnected
during processing.
The appliance is broken. Contact the Philips Consumer
The appliance is broken. Contact the Philips Consumer
The appliance is broken. Contact the Philips Consumer
The voltage is too low. Use a household power
Too many beans are added. Put proper quantity of ingredient
Insuf cient water is added. Make sure that the water level is
The machine is broken. Contact the Philips Consumer
Make sure that the head unit is
put into the chamber correctly.
evenly at the bottom of the
chamber as instructed.
Contact the Philips Consumer
Care Centre.
Follow the instructions in this
user manual.
Care Centre.
Care Centre.
Care Centre.
regulator.
as instructed in the "Use the
appliance" section.
between ഌට໎ (the maximum
level indication) and ༳ට໎
(the minimum level indication).
Care Centre.
19EN
Page 20

Problem Possible cause Solution
Over ow. A wrong function was selected. Select a correct function.
Installation was incorrect or the
perforated ow cup was not
Make sure that the perforated
ow cup is correctly installed.
installed into place.
Soymilk is too diluted or too
many beans are added.
Put proper quantity of ingredient
as instructed in the “Use the
appliance” section.
The water level is above
ഌට໎ (the maximum level
indication) or below ༳ට໎
(the minimum level indication).
Make sure that the water level is
between ഌට໎ (the maximum
level indication) and ༳ට໎
(the minimum level indication).
The appliance is broken. Contact the Philips Consumer
Care Centre.
The over ow sensor is not
Clean the over ow sensor.
cleaned.
The time taken to
process soymilk
is longer than
instructed, but other
The voltage is too low. Use a household power
regulator.
The water temperature is
too low.
Add warm water no hotter
than 70§.
functions work well.
Food is burnt. A wrong function is selected. Select a correct function.
The inner side of the chamber
was not cleaned.
Clean the inner side of the
chamber.
Insuf cient water is added. Make sure that the water level is
between ഌට໎ (the maximum
level indication) and ༳ට໎
(the minimum level indication).
Too much ingredient is added. Put proper quantity of ingredient
as instructed in the “Use the
appliance” section.
20 EN
Page 21

Problem Possible cause Solution
The beeps occur
before soymilk is
ready.
Too much ingredient is added. Make sure that the water level is
between ഌට໎ (the maximum
level indication) and ༳ට໎
(the minimum level indication).
The appliance is broken. Contact the Philips Consumer
Care Centre.
The sea level of your region is
too high.
This appliance can only be used
in regions no more than 2000 m
above mean sea level.
The appliance begins
stirring once you
The appliance is broken. Contact the Philips Consumer
Care Centre.
press any button.
21EN
Page 22

12 Recipes
Five grain soymilk
For more recipes, you can visit
Philips MyKitchen website
www.philips.com/kitchen.
Soymilk
Tip
• For details on cooking, see the
"Make Soymilk" section.
Soymilk
• Ingredients:
• 75 g of dry soybeans (a full cup)
• Bene ts:
• Soybean: Nourishing. G.ood
for digestion. Helpful to reduce
phlegm and control blood
pressure.
Black soyean milk
• Ingredients:
• 85 g black soybeans (a full cup)
• Bene ts:
• Black soybean: Good for the
kidneys, lungs, and hair. Known
for their detoxing properties.
Tip
• For details on cooking, see the
“Make ve-grain soymilk” section.
Classic ve-grain soymilk
• Ingredients:
• 15 g of soybeans (around 1/5 cup)
• 20 g of rice (around 1/5 cup)
• 20 g of millet (around 1/5 cup)
• 15 g of oats (around 1/5 cup)
• 10 g of wheat
• Cooking: Wash the ingredients and
soak for 6 hours. For details, see the
“Make ve-grain soymilk” section.
• Bene ts:
• Millet: Rich in female hormones.
Good for skin and longevity.
• Oat: Helpful to reduce cholesterol
and control blood sugar.
Black rice and soybean milk
• Ingredients:
• 50 g of black rice (around 1/2 cup)
• 30 g of soybeans (around 1/2 cup)
• some black sesame seeds
• some sugar
• Cooking: Wash the black rice and
soybeans and soak for 6 hours. For
details, see the “Make ve-grain
soymilk” section.
• Bene ts:
• Black rice: Good for the blood
and complexion.
22 EN
Page 23

• Soybean: Good for digestion.
Helpful to reduce phlegm and
control blood pressure.
Rice and soybean milk
• Ingredients:
• 30 g of soybeans (around
1/2 cup)
• 50 g of rice (around 1/2 cup)
• some sugar
• Cooking: Wash the red beans and
millet and soak for 6 hours. For details,
see the “Make ve-grain soymilk”
section.
• Bene ts:
• Rice: Good for the spleen,
stomach, and lungs.
• Soybean: Good for digestion.
Helpful to reduce phlegm and
control blood pressure.
Pumpkin soybean milk
• Ingredients:
• 35 g of soybeans (around 1/2 cup)
• 35 g of pumpkin (around 1/2 cup)
• Cooking: Wash the soybeans and
soak for 6 hours. Remove the pumpkin
skin and cut the pumpkin into 1.3-mm
cubes. For details, see the “Make
ve-grain soymilk” section.
• Bene ts:
• Soybean: Good for digestion.
Helpful to reduce phlegm and
control blood pressure.
• Pumpkin: Detox. Helpful to
control sugar levels and quench
thirst.
Sweet potato and soybean milk
• Ingredients:
• 40 g of sweet potato (around
1/2 cup)
• 35 g of soybeans (around 1/2 cup)
• Cooking: Wash the soybeans and
soak for 6 hours. Remove the sweet
potato skin and cut the sweet potato
into 1.3-mm cubes. For details, see
the “Make ve-grain soymilk” section.
• Bene ts:
• Soybean: Good for digestion.
Helpful to reduce phlegm and
control blood pressure.
• Sweet potato: Rich in nutrients.
Helpful to increase appetite and
strengthen the kidneys.
Foxnut and walnut paste
• Ingredients:
• 50 g of foxnut (around 1/2 cup)
• esh of 10-15 walnuts
• 5-10 Chinese dates (with stones
removed)
• some sugar
• Cooking: Wash the Chinese dates
and foxnuts and soak for 6 hours.
Chop Chinese dates and walnut esh
into small pieces. For details, see the
“Make ve-grain soymilk” section.
• Bene ts:
• Foxnut: Good for the kidneys.
Helpful to relieve the nerves.
• Walnut esh: Good for the
kidneys, brain, lungs, and other
respiratory organics.
• Chinese date: Good for the
spleen, stomach, and respiratory
organics. Helpful to enrich blood.
23EN
Page 24

Mung bean and Job’s-tears paste
• Ingredients:
• 35 g of Job’s-tears (around 2/5 cup)
• 35 g of mung beans (around 2/5 cup)
• 20 g of rice (around (1/5 cup)
• 10 g of oats (around 1/5 cup)
• some sugar
• Cooking: Wash and the ingredients
and soak the Job’s-tears, mung beans,
and rice for 6 hours. For details, see
the “Make ve-grain soymilk” section.
• Bene ts:
• Mung bean: Diuretic. Good for
eyes. Helpful to control blood
pressure and prevent oedema.
• Job’s-tear: Helpful to reduce
vascular disease, reduce
cholesterol, and improve
complexion.
• Bene ts
• Walnut esh: Good for the
kidneys, brain, lungs, and other
respiratory organics.
• Cashew: Good for the blood,
brain, kidney, and spleen.
• Chinese date: Good for the
spleen, stomach, and respiratory
organics. Helpful to enrich blood.
• Longan: Good for the blood,
heart, brain, and spleen.
Rice paste
Tip
• For details on cooking, see the
“Make rice paste” section.
Walnut and cashew paste
• Ingredients:
• 35 g of rice (around 2/5 cup)
• 35 g of millet (around 2/5 cup)
• esh of 5 cashews
• esh of 5 walnuts
• 5-10 Chinease dates (with stones
removed)
• 5-10 longans (with stones
removed)
• some sugar
• Cooking: Wash rice and millet and
soak for 6 hours. Chop walnut esh,
Chinese dates, and longans into small
pieces. For details, see the Make
ve-grain soymilk” section.
24 EN
Complete nutritious rice paste
• Ingredients:
• 35 g of rice (around 1/2 cup)
• 15 g of millet (around 1/5 cup)
• 10 g of black sesame seeds
• 10 peanuts (with shells removed)
• esh of 5 walnuts
• 5 Chinese dates (with stones
removed)
• Cooking: Wash rice and millet and
soak for 6 hours. Chop walnut esh
into small pieces. For details, see the
“Make rice paste” section.
• Bene ts
• Millet: Rich in female hormones.
Good for the skin and longevity.
• Black sesame seed: Good for the
kidneys, liver, lungs, and blood.
Page 25

• Peanut: Good for the spleen and
stomach.
• Walnut esh: Good for the
kidneys, brain, lungs, and other
respiratory organics.
• Chinese date: Good for the
spleen, stomach, and respiratory
organics. Helpful to enrich blood.
• Bene ts:
• Yam: Good for the spleen and
stomach. Helpful to end diarrhea.
• Chinese date: Good for the
spleen, stomach, respiratory
system, and blood.
Sweet potato and pumpkin rice paste
Job’s-tears and lily rice paste
• Ingredients:
• 35 g of Job’s-tears (around 2/5 cup)
• 35 g of rice (around 2/5 cup)
• 20 g of fresh lily bulbs
• some sugar
• Cooking: Wash the Job’s-tears and
rice and soak for 6 hours. Wash and
chop fresh lily bulbs into small pieces.
For details, see the “Make rice paste”
section.
• Bene ts:
• Job’s-tear: Helpful to make the
skin beautiful and fair.
• Lily bulb: Helpful to make the skin
beautiful and fair.
Yam and Chinese date rice paste
• Ingredients:
• 50 g of rice (around 1/2 cup)
• 30 g of yam
• 5-10 Chinese dates (with stones
removed)
• some crystal sugar
• Cooking: Wash the Chinese dates
and rice and soak for 6 hours.
Remove the skin of the yam and cut
the yam into 1.3-cm cubes. For details,
see the “Make rice paste” section.
• Ingredients:
• 30 g of sweet potato (around
1/2 cup)
• 20 g of pumpkin (around 1/3 cup)
• 35 g of rice (around 1/3 cup)
• 35 g of millet (around 1/3 cup)
• Cooking: Wash millet and rice and
soak for 6 hours. Remove the skin of
sweet potato and pumpkin and cut
them into 1.3-cm cubes. For details,
see the “Make rice paste” section.
• Bene ts:
• Sweet potato: Rich in nutrients.
Helpful to increase positive
energy, improve appetite, and
strengthen the kidneys.
• Pumpkin: Helpful to increase
positive energy, relieve pain,
decrease toxicity, control sugar
levels, and quench thirst.
• Millet: Rich in female hormones.
Good for skin and longevity.
Almond rice paste
• Ingredients:
• 50 g of rice (around 1/2 cup)
• 40 g of almonds
• some crystal sugar
• Cooking: Wash rice and soak for 6
hours. For details, see the “Make rice
paste” section.
25EN
Page 26

• Bene ts:
• Almond: Good for skin and
complexion. Helpful to eliminate
blemishes, freckles, and dark
spots.
Juice
Tip
• For details on cooking, see the
“Make juice” section.
Banana milkshake
• Ingredients:
• 400 g of banana
• 300 ml of milk
• Cooking: Remove the skin of the
bananas and cut them into 1.3-cm
cubes. For details, see the “Make
juice” section.
Cucumber juice
• Ingredients:
• One cucumber (around 200 g)
• Cooking: Cut the cucumber into
1.3-cm cubes. For details, see the
“Make juice” section.
26 EN
Page 27

Page 28

©2011 Koninklijke Philips Electronics N.V.
All rights reserved.
HD2060_EN_UM_V1.0
 Loading...